

Page 1
Video Recording Manager
MVM-BVRM
en Software Manual
Page 2

Page 3

Video Recording Manager Table of Contents | en 3
Table of contents
1
2
2.1 iSCSI storage pools 6
2.2 VRM Functions 6
2.3 VRM Server 7
2.4 Configuration Manager 7
2.5 VRM Monitor 7
2.6 Video Streaming Gateway 7
3
3.1 Installing 8
3.1.1 Installing Video Streaming Gateway 8
3.2 Configuring a Firewall 8
3.3 Verifying installation 9
3.4 Uninstalling 9
4
4.1 Licensing the software 10
5
6
6.1 Starting VRM Monitor 13
6.2 Starting Configuration Manager 13
6.3 Enabling the Cameras tab 13
7
7.1 Adding a VRM to the system 14
7.2 Managing iSCSI Systems 14
7.2.1 Adding a storage pool 14
7.2.2 Adding an iSCSI system 15
7.2.3 Removing an iSCSI System 15
7.2.4 Adding LUNs 15
7.2.5 Formatting LUNs 16
7.2.6 Configuring the LUN type 16
7.3 Allocating detected devices 16
7.4 Authorizing an encoder permanently 16
7.5 Clearing device allocations 16
7.6 Creating groups of allocated devices 17
7.7 Allocating a device manually 17
7.8 Managing recording 17
7.8.1 Configuring local storage (firmware version 4.0 or later) 18
7.8.2 Configuring alarm tracks (firmware up to 3.5x) 18
7.9 Configuring failover recording mode 18
7.10 Configuring automatic recording mode 19
7.11 Configuring logs 19
7.12 Activating a transcoding device 19
8
8.1 Adding a VSG to the system 20
8.2 Adding a Bosch camera to a VSG 20
8.3 Adding an ONVIF camera to a VSG 21
8.4 Adding a 3rd party camera to a VSG 21
Introduction 5
System overview 6
Installation 8
Licensing 10
Used icons 11
Getting started 13
Configuring a VRM system 14
Configuring Video Streaming Gateway 20
Bosch Sicherheitssysteme GmbH 2013.01 | v1 | DOC
Page 4

4 en | Table of Contents Video Recording Manager
8.5 Configuring multicast 22
8.6 Switching on recording 22
9
10
Configuring a failover server 23
Managing user groups and permissions 24
10.1 Configuring users and user groups 24
10.2 Configuring camera permissions 25
11
User interface 26
11.1 Device Allocator dialog box 26
11.2 Device Editor dialog box 26
11.3 Pool tab 26
11.3.1 iSCSI System Access tab 27
11.3.2 Basic Configuration tab 27
11.3.3 Load Balancing tab 29
11.4 Failover VRM Server information 29
11.5 VRM Settings tab 30
11.6 User Management tab 30
11.6.1 User dialog box 31
11.6.2 Group dialog box 31
11.7 Target Settings tab 31
11.7.1 LUN Assignment dialog box 32
11.8 Recording Management tab (only firmware version 4.0 or later) 32
11.9 Storage Medium tab (only firmware version up to 3.5) 33
11.10 Recording Preferences tab 34
11.11 Retention time tab 34
11.12 Privileges tab 34
11.13 Advanced tab 35
11.14 License tab 35
11.15 Assignment tab (Video Streaming Gateway) 35
11.16 Add/Edit dialog box (Video Streaming Gateway) 36
11.17 Recording profiles tab (Video Streaming Gateway) 38
11.18 Multicast tabs (Video Streaming Gateway) 38
11.19 Advanced tab (Video Streaming Gateway) 39
Index 40
2013.01 | v1 | DOC Bosch Sicherheitssysteme GmbH
Page 5

Video Recording Manager Introduction | en 5
1
Introduction
This manual is intended for persons responsible for setting up, using Configuration Manager to
configure the VRM Video Recording Manager.
For detailed help and step-by-step instructions read the Operator’s Manual or use the Online
Help. You find the manual as PDF file on your Setup CD.
Bosch Sicherheitssysteme GmbH 2013.01 | v1 | DOC
Page 6

6 en | System overview Video Recording Manager
2
2.1
System overview
You use VRM Video Recording Manager to organize video recordings in a CCTV system. This
involves recording video sequences that are provided in the system by an IP camera or an
encoder (for example a Dinion IP camera or VIP X1600) on iSCSI RAID arrays. Recordings
managed by the VRM system can be played back, exported and, if necessary, burnt to CD or
DVD using Bosch Video Management System or Bosch Video Client.
Video Streaming Gateway provides the integration of 3rd party cameras and NVR-like recording,
e.g. in low-bandwidth networks.
Caution!
For each device that you want to record, e.g. in low-bandwidth networks, via Video Streaming
Gateway ensure that the I-Frame distance has the maximum value 60.
Otherwise recording is not possible. For non-Bosch devices see the manual of the respective
camera how to perform this task.
iSCSI storage pools
As of VRM v.3.0, iSCSI storage pools are introduced. A storage pool is a container for one or
more iSCSI storage systems that share the same load balancing properties. The encoders / IP
cameras that are assigned to a storage pool, are recorded with these common load balancing
settings.
A storage pool can be used to have a logical mapping of the network topology to the VRM, for
example if you have two buildings, both containing storage and devices, you want to avoid
routing the network traffic from one building to the other.
Storage pools can also be used to group cameras and storage systems by an important aspect
of view. For example a system contains of some very important cameras and a lot of less
important ones. In this case it is possible to group them into two storage pools, one with a lot
of redundancy features and one with less redundancy.
You can configure the following load balancing properties for a storage pool:
– Recording preferences (Automatic or Failover)
– Secondary target usage
Secondary target is used in case of Failover mode if the assigned primary target fails. If
this option is turned off, the recording stops on all devices assigned to this failed primary
target.
In case of Automatic mode: if one target fails, VRM Server performs an automatic
reassign of the related devices to other storages. If VRM Server is down while a target
fails, the recording is stopped on the devices currently recording on the failed target.
– Block reservation for downtime
– Sanity check period
2.2
2013.01 | v1 | DOC Bosch Sicherheitssysteme GmbH
VRM Functions
The application comprises the following modules:
– VRM Server
– VRM Monitor
– Configuration Manager
– Video Streaming Gateway
Page 7
Video Recording Manager System overview | en 7
2.3
2.4
2.5
VRM Server
VRM Server manages the recordings of the devices. Further, it monitors the system health
status, i.e. cameras, storage online / offline, and problems of the system.
Configuration Manager
Use Configuration Manager to configure the VRM system. The program can be installed on one
or more Windows PCs that provide network access to the computer on which VRM Server has
been started.
Using this program, you specify which IP cameras and encoders have their recordings
managed using the VRM system, as well as the iSCSI storage systems on which the recordings
are stored.
Configuration Manager allows you to create users who may belong to various user groups with
different rights. Only users who are set up here can access the system settings and the
recordings managed in the VRM system.
Access to the VRM system is only permitted for users who log on using a valid user ID.
Different types of access privilege may be granted.
VRM Monitor
The VRM Monitor module is provided to monitor the VRM system. The module is automatically
installed together with VRM Server. This is where information about the connected BVIP
devices (Bosch Video over IP) and storage systems, as well as about the recordings, is
displayed.
VRM Monitor provides limited options for replaying the recordings. You cannot configure VRM
with VRM Monitor.
2.6
Notice!
You need Microsoft Internet Explorer 8.0 or later for the correct display.
Check the Windows Firewall settings. Default settings can possibly prohibit the display of live
images.
Video Streaming Gateway
For integration of 3rd party cameras Video Streaming Gateway provides an ONVIF interface.
Additionally you can integrate 3rd party cameras via RTSP (Real Time Streaming Protocol) or
JPEG.
Video Streaming Gateway (via HTTP) provides NVR-like recording for Bosch cameras. This is
especially useful within low bandwidth networks. This is achieved by providing a continuous
live video stream which is written to the storage. Therefore, the quality of the recorded data is
identical to the quality of the live video. The bandwidth requirement of this live video stream is
low because the data packets of this stream do not contain any iSCSI header information. If
you have a bandwidth-reduced part in your network, ensure that the live stream is sent
through this part. If a connection loss occurs in this part of the network, the connection
between Video Streaming Gateway and iSCSI target is not affected. No new block is reserved
on the iSCSI target when the connection is reestablished. Hence, the VRM system is more
robust against connection loss.
Video Streaming Gateway supports name resolution. This allows for using (Dyn-)DNS to
connect devices. You do not need to configure IP addresses in Video Streaming Gateway.Video
Streaming Gateway itself and the VRM Server must work with fixed IP addresses.
Bosch Sicherheitssysteme GmbH 2013.01 | v1 | DOC
Page 8

8 en | Installation Video Recording Manager
3
Installation
For system requirements and recommended Bosch server hardware see the data sheet for
Video Recording Manager in the Online Product Catalog on http://www.boschsecurity.com
(Video > Video Software > Video Management Systems > VRM - Video Recording Manager. The
navigation path is subject to change).
VRM Server
The VRM Server service is installed on a Windows platform.
Ensure that a possibly installed web server does not interfere with VRM's HTTP and HTTPS
ports.
Do not install any of the following applications from VIDOS Pro Suite on the computer where
you install VRM:
– VIDOS Server
– VIDOS-NVR
– VIDOS Monitor Wall
It is advisable to install VRM Server on a dedicated platform.
Note: For installing VRM Server you need Windows administrator rights.
VRM Monitor
VRM Monitor is an HTML-based interface for monitoring the VRM system. The module is
automatically installed together with VRM Server.
Configuration Manager
Configuration Manager is installed along with VRM Server. The program can also be installed
on other PCs with network access to the computer on which VRM Server has been started and
to the devices that are to be managed.
3.1
3.1.1
3.2
Installing
1. Close all other applications before beginning the installation.
2. Download the software package from the Online Product Catalog and extract the zip file
locally.
3. Select the extraction directory and double-click index.htm.
4. Select the required language for the user interface.
5. Under Installation, click VRM Video Recording Manager.
The setup wizard opens and guides you through the installation.
When selecting components, a description for each one is displayed when you hover the
mouse cursor over them.
Installing Video Streaming Gateway
When you have selected Video Streaming Gateway as a VRM component, in the displayed
Wizard dialog box you can configure the following values:
– Number of instances that you install on this computer
You can later change this number by reinstalling Video Streaming Gateway.
– Starting RCP+ port number, further port numbers are subsequently numbered
– Starting HTTP port number, further port numbers are subsequently numbered
– Starting HTTPS port number, further port numbers are subsequently numbered
Configuring a Firewall
If you use VRM Video Recording Manager and Video Streaming Gateway behind a Firewall,
ensure that the following programs are not blocked by the Firewall:
rms.exe
–
2013.01 | v1 | DOC Bosch Sicherheitssysteme GmbH
Page 9

Video Recording Manager Installation | en 9
vsg_connector.exe
–
vsg_worker.exe
–
3.3
Verifying installation
The Video Recording Manager service is started automatically after installation and every time
the computer is started up.
Follow the steps below to check that VRM Server has been installed correctly:
1. Click Start > Control Panel.
2. Select Administrative Tools.
3. Select Component Services.
4. Select Services (Local).
5. Search for the Bosch Video Recording Manager entry in the list of all installed services.
The following details must appear here:
– Status: Started
– Startup Type: Automatic
If you installed Video Streaming Gateway: Search for one Bosch Video Streaming Gateway
entry and for as many Bosch VSG Worker Instance entries as you have installed.
If you stop the Bosch Video Streaming Gateway service, all Bosch VSG Worker Instance
services are also stopped. If you start the Bosch Video Streaming Gateway service, all
Bosch VSG Worker Instance services are also started. If you stop a single Bosch VSG
Worker Instance, this has no impact o the other Bosch VSG Worker Instance services nor
on the Bosch Video Streaming Gateway service.
The following details must appear at each service:
– Status: Started
– Startup Type: Automatic
3.4
Uninstalling
If you no longer wish to use one of the programs on a computer, you can uninstall the program
at any time.
Caution!
The license for any program requiring one applies to the computer hardware and cannot be
used on another computer. Please contact your sales partner if you want to use a license on
another computer.
Notice!
When you uninstall a licensed program and then install an update on the same PC, your
license is unaffected.
Bosch Sicherheitssysteme GmbH 2013.01 | v1 | DOC
Page 10

!
10 en | Licensing Video Recording Manager
4
4.1
Licensing
When you purchase VRM Video Recording Manager, you are provided with an authorization
number. This number can be found in an envelope that is included with the scope of delivery
or you receive it via e-mail.
Using this number and the installation code that you can access via the Configuration Manager
program, go to the Bosch Software Licensing Manager Internet platform and generate the
activation keys.
These keys are then entered using Configuration Manager. Once this process is complete, you
can use VRM Video Recording Manager permanently in line with terms of the acquired license.
You can test VRM for 30 days after installation.
Licensing the software
Main window > Devices tab > > Service > License tab
1. Make a note of the Installation code entry — the copy-and-paste function is supported.
2. On a computer with Internet access, enter the following URL into your browser:
https://activation.boschsecurity.com
If you do not have an account to access the Bosch License Activation Center, either
create a new account (recommended) or click the link to activate a new license without
logging on. If you create an account and log on before activating, the License Manager
keeps track of your activations. You can then review this at any time.
Follow the instructions to obtain the License Activation Keys.
3. Return to Configuration Manager > License tab.
4. Under Activation key, enter the first activation key (Activation Key 1) — the copy-andpaste function is supported.
5.
Click to save the first activation key.
6. Under Activation key, enter the second activation key (Activation Key 2).
7.
Click to save the second activation key.
8. Restart the VRM Server service for which you have entered the license.
Video Recording Manager is now available as a full version.
Relevant information about the license is displayed on the License tab in Configuration
Manager.
Caution!
The license applies to the computer on which VRM Server is installed. If you have uninstalled
VRM Server and wish to reinstall it on a different computer, you must request new activation
keys.
Video Streaming Gateway does not need a license.
2013.01 | v1 | DOC Bosch Sicherheitssysteme GmbH
Page 11
Video Recording Manager Used icons | en 11
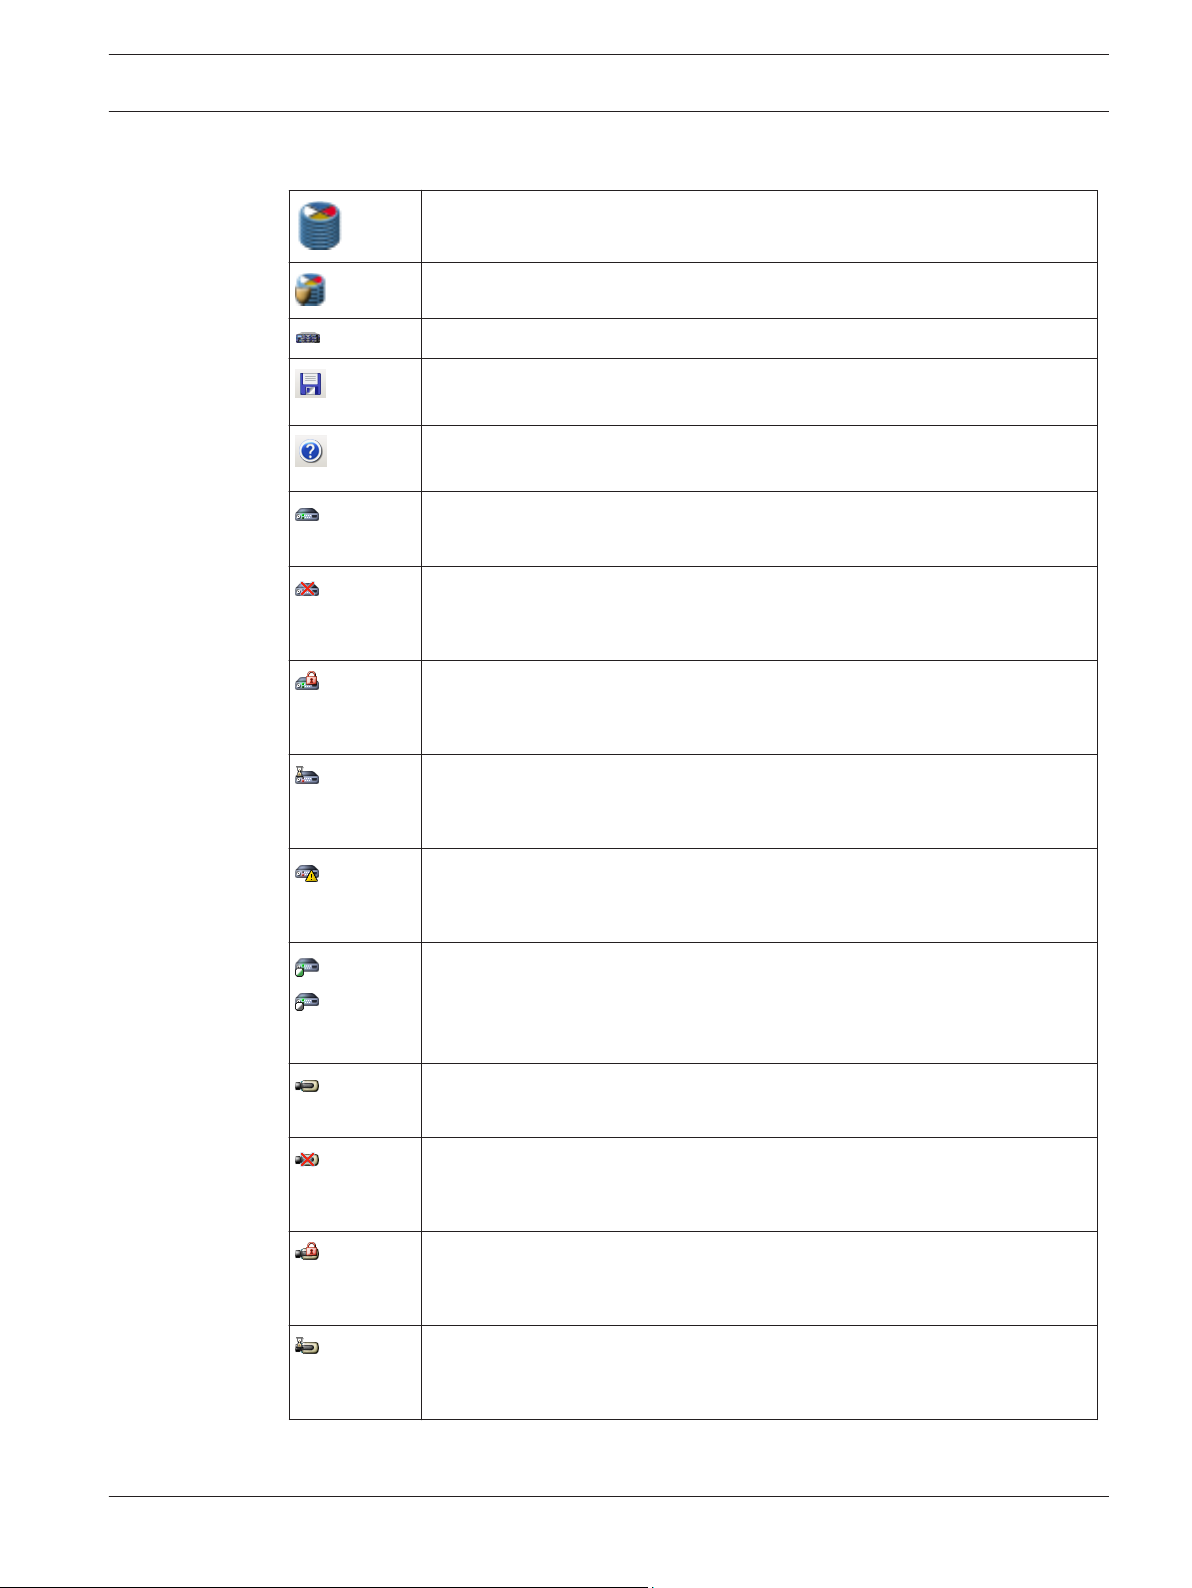
5
Used icons
VRM Server
Failover VRM Server
iSCSI storage device
Save
Click to apply and save your changes.
Online Help...
Click to display the Online Help.
Device is available.
Device cannot be accessed.
Devices that cannot be accessed, for example because the network
connection has been interrupted, are indicated by a red cross.
Device is password-protected.
Devices that are protected by a password are indicated by a padlock until
you have authenticated yourself for the device.
Device is busy.
Devices for which actions are being carried out are indicated by an egg
timer until they become available again.
Device has an error.
Devices for which an error has been identified are indicated by a yellow
triangle containing an exclamation mark.
Device is in ANR mode.
Devices in ANR mode are indicated by a half-filled square with rounded
corners. While a network connection exists, the filling is green; otherwise, it
is gray.
Camera is available.
Camera cannot be accessed.
Cameras that cannot be accessed, for example because the network
connection has been interrupted, are indicated by a red cross.
Camera is password-protected.
Cameras that are protected by a password are indicated by a padlock until
you have authenticated yourself for the camera.
Camera is busy.
Cameras for which actions are being carried out are indicated by an egg
timer until they become available again.
Bosch Sicherheitssysteme GmbH 2013.01 | v1 | DOC
Page 12

12 en | Used icons Video Recording Manager
Camera has an error.
Cameras for which an error has been identified are indicated by a yellow
triangle containing an exclamation mark.
Camera is in ANR mode.
Cameras in ANR mode are indicated by a half-filled square. While a network
connection exists, the filling is green; otherwise, it is gray.
2013.01 | v1 | DOC Bosch Sicherheitssysteme GmbH
Page 13

Video Recording Manager Getting started | en 13
6
6.1
Getting started
The Configuration Manager program is used to set and adjust the VRM system. The program
can be installed on any PC with network access to the computer on which VRM Server has
been started and to the devices that are to be managed.
Starting VRM Monitor
1. Start Internet Explorer on a PC that has network access to the VRM Server computer.
2. In the address bar, enter the IP address of the VRM Server computer and press <ENTER>.
If you are starting VRM Monitor on the VRM Server computer, enter the IP address for the
localhost followed by the port number if the port number is not 80: http://127.0.0.1:<port
number>/
3. Access to VRM Monitor is only possible for authorized persons. For this reason you will
now be prompted to log on using your user ID. If you do not have the appropriate rights,
you cannot view any recordings.
Caution!
Treat your logon details as confidential.
Ensure that the password is not saved in the browser.
The functions described in the following sections are now available.
On the left-hand side, you will see the navigation bar. Click the appropriate entry. The
information is displayed on the right-hand side.
6.2
6.3
Starting Configuration Manager
To start the program:
4
Click Start, point to Programs, point to Bosch Configuration Manager, and then click
Configuration Manager.
Caution!
If a computer on which VRM Server is started is simultaneously accessed by multiple
Configuration Manager programs, this can result in an inconsistent VRM configuration. Ensure
that different people do not make changes to the configuration at the same time.
Enabling the Cameras tab
Main window > System tab
Enable the Cameras tab, when it is not displayed.
1. Expand the Applications folder.
2. Click Configuration Manager.
3. Click the Appearance tab.
4. Click to check the Show 'Cameras' tab check box.
5. Restart Configuration Manager.
Bosch Sicherheitssysteme GmbH 2013.01 | v1 | DOC
Page 14

14 en | Configuring a VRM system Video Recording Manager
7
7.1
Configuring a VRM system
To configure a VRM system perform the following tasks:
– Adding a VRM to the system, page 14
– Managing iSCSI Systems, page 14
– Allocating detected devices, page 16
– Clearing device allocations, page 16
– Creating groups of allocated devices, page 17
– Allocating a device manually, page 17
– Managing recording, page 17
– Configuring failover recording mode, page 18
– Configuring automatic recording mode, page 19
– Configuring logs, page 19
Adding a VRM to the system
Main window > Network tab
You add a VRM to the system to enable assigning storage devices and encoders to this VRM.
1. Right-click the desired VRM and click Add to System....
The Add Device to System dialog box is displayed.
2. In the Group list, select Configuration Manager.
The VRM is added to the system and is displayed on the Devices page.
Required configuration changes are performed automatically.
You can add a secondary VRM if already two VRM instances are running on a computer and/or
no broadcast scan is possible on your system.
To add a secondary VRM without scan:
1. Start Configuration Manager.
2. Click the Devices tab, right-click the desired group and click New Device....
The Device Editor dialog box is displayed.
3. In the URL field, type in the IP address and port number of the desired secondary VRM
instance.
Example: 172.22.5.6:1754
4. Click OK.
7.2
7.2.1
2013.01 | v1 | DOC Bosch Sicherheitssysteme GmbH
Managing iSCSI Systems
To configure a working iSCSI storage, you must add a storage pool, an iSCSI system and add
LUNs.
Adding a storage pool
Main window > Devices tab > Right-click > Click New Pool… > Pool Editor dialog box
To add a pool:
4
Type in a name for the storage pool or retain the default name.
The default name is automatically numbered.
A new folder is added.
To configure a pool:
1.
Click Pool n.
2. On the Pool page, perform the required changes.
Page 15

Video Recording Manager Configuring a VRM system | en 15
Related Topics
– Pool tab, page 26
See also
– Pool tab, page 26
7.2.2
7.2.3
7.2.4
Adding an iSCSI system
Main window > Devices tab > Expand > Expand Pool n > Right-click Storage
Systems > Add iSCSI System... command > Add iSCSI System dialog box
1. Enter the IP address of the iSCSI storage system.
2. Select the type.
Configure the available device types (for example Bosch DLA and DSA (NetApp) storage
systems). Configure other types directly via the management software of the relevant
storage system.
3. Enter the iSCSI storage system configuration password and confirm it.
The VRM system attempts to establish a connection with the device.
The device is added to the system and displayed in the tree structure.
Removing an iSCSI System
Main window Devices tab > Expand > Expand Pool n > Expand Storage
Systems > Right-click desired > Delete command
Adding LUNs
Main window > Devices tab > Expand > Expand Pool n > Expand Storage
Systems >
Add individual LUNs to the system and configure them.
You can add a backup LUN that has been used in another VRM system. If the backup LUN was
formatted with VRM 2.10 or later, it is automatically detected as a backup LUN.
The type of a LUN (standard/read-only/backup) is stored on the LUN itself, so if configuration
is lost, the LUN can be added without risk of data loss. The correct type of the LUN is read out
and is set correctly.
1. Right-click an iSCSI system
Assignment dialog box appears.
The left pane displays the LUNs that are available for this target and have not yet been
added to the system. The right pane displays the LUNs that have already been added to
the system.
2. Drag a LUN from the left to the right pane to add it.
3. Activate the Restore database option if you want to retain data when the LUN is added.
4. Click OK.
The LUNs are added to the VRM system. The LUN Assignment dialog box is closed.
and click LUN Assignment... to add new LUNs. The LUN
Removing Luns
To remove LUNs from the system, open the LUN Assignment dialog box and drag the LUNs in
question from the right to the left pane.
For the LUNs added to the system, make further settings if necessary.
Bosch Sicherheitssysteme GmbH 2013.01 | v1 | DOC
Page 16

16 en | Configuring a VRM system Video Recording Manager
7.2.5
7.2.6
7.3
Formatting LUNs
Main window > Devices tab > Expand
Systems > Expand > > Target Settings
You can format each added LUN. Formatting deletes all data on this LUN.
1. In the Format column, select the corresponding check box for each LUN that you want to
format.
2. Click Set to start formatting.
> Expand Pool n > Expand Storage
Configuring the LUN type
Main window > Devices tab > Expand > Expand Pool n > Expand Storage Systems >
Expand > > Target Settings
You can configure the type of each added LUN. Some types require formatting of the LUN.
1. In the Type list, select the corresponding item for each LUN that you want to configure.
2. Click Set to start configuration.
Allocating detected devices
Main window > Tools menu > Device Allocator... command > Device Allocator dialog box
You allocate devices to a pool of a VRM. On devices allocated during recording the
configuration changes are not performed as long as recording is active. Perform the
configuration changes after recording has stopped.
Note: When adding an encoder to the VRM, recording of this device stops automatically.
1. Drag devices from the left pane on the VRM item on the right pane.
The encoder is now a child item of the VRM item.
2. Click OK.
The encoders are allocated to the VRM system and are recorded.
Required configuration changes are performed automatically.
7.4
7.5
2013.01 | v1 | DOC Bosch Sicherheitssysteme GmbH
Authorizing an encoder permanently
Main window > Devices tab > Expand > Expand Pool n > Expand Devices >
> General > Unit Access tab
Enter the access data for an encoder so that you do not have to repeat authorizing after each
restart of Configuration Manager. For VRM it is mandatory to select the user called service and
the corresponding password.
To authenticate permanently:
1. In the Device access pane, enter the user name and password.
2.
Click .
Clearing device allocations
Main window > Tools menu > Device Allocator... command > Device Allocator dialog box
You can remove devices from the VRM system at any time by clearing the allocation. The
devices will then no longer be listed in the tree structure.
Page 17

!
Video Recording Manager Configuring a VRM system | en 17
Caution!
If you clear the allocation for a device or a group, all associated stored video data is retained.
To delete these data, use the unmanagedcameras.htm debug page. For details refer to the
VRM Troubleshooting Guide.
1. Drag a device from the right to the left pane.
2. Click OK.
The storage media type is automatically set to Off — no more recordings are made for this
device until it is manually reconfigured for this.
Groups can also be deleted in the same way. If you delete a group, you also clear the
allocation of all devices that you have allocated to that group.
7.6
7.7
Creating groups of allocated devices
Main window > Tools menu > Device Allocator... command > Device Allocator dialog box
The context menu in the Device Allocator dialog box enables you to group the devices in the
list.
1. In the Allocated devices area, right-click Select Group.
2. Enter a name for the new group.
3. Click OK.
The group is displayed in the list.
You can rename the group later by using the context menu.
4. Drag a device from the list to the group name.
The device is added to the group.
5. Click OK.
You can also create sub-groups by dragging a group to the name of another group in the
Device Allocator dialog box.
Allocating a device manually
Main window > Tools menu > Device Allocator... command > Device Allocator dialog box
Allocate devices to the VRM system that were not detected during the network scan, for
example if they belong to a different subnet or have not yet been switched on.
1. Select the New Device... command from the context menu of the desired device in the
desired storage pool.
The Device Editor dialog box appears.
2. Enter the IP address for the device. If required you add a valid port number to the IP
address.
Example: 172.22.5.6:1754
3. Select the device type from the list of supported devices.
4. Click OK.
The device is listed on the right-hand side of the window and is allocated to the VRM.
Notice!
Only supported devices can be allocated.
In the tree structure, these devices are marked with a red cross until they can be reached in
the network.
7.8
Bosch Sicherheitssysteme GmbH 2013.01 | v1 | DOC
Managing recording
As soon as an encoder is added to the system, all necessary changes for management by the
VRM system are usually carried out automatically.
Page 18

18 en | Configuring a VRM system Video Recording Manager
The following sections describe the settings for VRM storage management. A distinction is
made between devices with firmware version 4.0 or later and devices with firmware versions
up to 3.5x.
7.8.1
7.8.2
Configuring local storage (firmware version 4.0 or later)
Main window > Devices tab > Expand
> Recording Management
Before you make any changes, you must stop any active recordings. Active recordings are
indicated by an icon:
If you hover the pointer over the icon, detailed information about the active recordings are
displayed.
4
To stop the recordings, click the Recording Scheduler tab and click Stop Recording.
To configure local storage:
1. In the Local Media tab, select the storage medium on which local recording should take
place. Depending on the device type, different media will be available.
2. Click Add to add the selected medium to the disk space in use.
3. Ensure that the Rec. 2 option is activated for a medium in the list.
Click to ckeck Overwrite older recordings – Recording 2.
Related Topics
– Recording Management tab (only firmware version 4.0 or later), page 32
Pool n > Expand Devices > > Recording
Configuring alarm tracks (firmware up to 3.5x)
Main window > Devices tab > Expand Devices > > Recording > Storage Medium
To configure alarm tracks:
1. Select an entry in the Partition window.
2. Click Edit....
The Partition Settings dialog box appears.
3. Select the required number under Number of alarm tracks. One alarm event can be
recorded in each alarm track. The number of alarms entered can be recorded and
archived.
4. Select the required profile for pre-alarm recording under Pre-alarm profile.
5. Select the required time for pre-alarm recording under Pre-alarm time.
6. Select the required profile for post-alarm recording under Post-alarm profile.
7. Select the required time for post-alarm recording under Post-alarm time.
8. Click OK.
The appropriate number of alarm tracks has now been reserved for the camera. You can now
activate alarm track recording on the Recording Profiles tab and make the appropriate
settings.
7.9
2013.01 | v1 | DOC Bosch Sicherheitssysteme GmbH
Configuring failover recording mode
Main window > Devices tab > Expand > Expand Pool n > Expand Devices >
> Recording > Recording Preferences
Prerequisite: In the Pool tab, in the Recording preferences mode list, select Failover. If
Automatic is selected, the settings are performed automatically and cannot be configured.
Page 19

Video Recording Manager Configuring a VRM system | en 19
To configure the recording mode:
1. Under Primary target, select the entry for the required target. All storage systems
entered under Storage Systems will be shown in the list.
2. Under Secondary target, select the entry for the required target. All storage systems
entered under Storage Systems are displayed in the list.
3.
Click
See also
– Pool tab, page 26
– Recording Preferences tab, page 34
.
7.10
7.11
7.12
Configuring automatic recording mode
Main window > Devices tab > Expand > Click Pool n
Note: If you have configured a failover recording mode earlier, this configuration is
overwritten.
To configure the recording mode:
1. In the Recording preferences mode list, select Automatic.
2.
Click
See also
– Pool tab, page 26
.
Configuring logs
Main window > > Service tab > Advanced tab
1. Select all logging options with files that you want to be logged.
2.
Click
You can export zip files with the logs from within VRM Monitor.
.
Activating a transcoding device
Main window > > General > User Management tab
You can activate a transcoding device for a user group. This transcoding device is connected
to the VRM Server computer. You can use the VJT XTC XF as a transcoding device.
To activate:
1. Add the transcoding device to a pool in your VRM System.
Transcoding is now possible for all encoders/IP cameras assigned to this VRM,
independent from their pool assignment.
2. Select the desired user group.
3. In the VRM Rights tab, enable Use transcoder.
Related Topics
– User Management tab, page 30
See also
– User Management tab, page 30
Bosch Sicherheitssysteme GmbH 2013.01 | v1 | DOC
Page 20
20 en | Configuring Video Streaming Gateway Video Recording Manager
8
Configuring Video Streaming Gateway
This chapter contains descriptions of the tasks that you can perform to configure Video
Streaming Gateway.
Not all tasks might be required for your system.
Notice!
If you assign one camera to a Video Streaming Gateway repeatedly or assign this camera to
multiple Video Streaming Gateway instances, the camera can be overloaded. Configure
multicast to avoid.
Caution!
For each device that you want to record, e.g. in low-bandwidth networks, via Video Streaming
Gateway ensure that the I-Frame distance has the maximum value 60.
Otherwise recording is not possible. For non-Bosch devices see the manual of the respective
camera how to perform this task.
See also
– Adding a VSG to the system, page 20
– Adding a Bosch camera to a VSG, page 20
– Adding an ONVIF camera to a VSG, page 21
– Adding a 3rd party camera to a VSG, page 21
– Configuring multicast, page 22
8.1
8.2
Adding a VSG to the system
Main window > Network tab
You add a VSG to the system to enable assigning and configuring cameras to this VSG.
To add:
1. Select the desired VSG devices. On the Tools menu, click Device Allocator....
The Device Allocator dialog box is displayed.
2. In the Installed devices list, select the desired Video Streaming Gateway devices and
drag them to the desired VRM.
The Video Streaming Gateway devices are automatically added to the Devices folder.
The video of the cameras that are assigned to this VSG is recorded.
Adding a Bosch camera to a VSG
Main window > Devices tab > Expand > Expand Devices > Video Streaming
Gateway device > Assignment tab
To add a camera:
1.
Select the desired cameras and click to add them to the VSG cameras list.
The Add/Edit dialog box is displayed.
Note: Select cameras of the same type, for example only Bosch cameras. Otherwise the
button is disabled.
2013.01 | v1 | DOC Bosch Sicherheitssysteme GmbH
Page 21
Video Recording Manager Configuring Video Streaming Gateway | en 21
2. Type in user name and password and click Connect.
If the connection to the encoder is established successfully, the configuration settings in
the Protocol settings group are active.
If you do not want to wait until the connection is established, click Skip.
3. In the Type list, select Bosch RCP+.
4. In the Video input and Stream and Protocol lists make the required settings.
5. If required, type a name for the camera in the VSG Camera Name column.
6. Click OK.
7.
Click
See also
– Assignment tab (Video Streaming Gateway), page 35
– Add/Edit dialog box (Video Streaming Gateway), page 36
.
8.3
Adding an ONVIF camera to a VSG
Main window > Devices tab > Expand > Expand Devices > Video Streaming
Gateway device > Assignment tab
To add a camera:
1.
Select the desired cameras and click
The Add/Edit dialog box is displayed.
Note: Select cameras of the same type, for example only Bosch cameras. Otherwise the
button is disabled.
2. Type in user name and password and click Connect.
If the connection to the encoder is established successfully, the configuration settings in
the Protocol settings group are active.
If you do not want to wait until the connection is established, click Skip.
3. In the Type list, select ONVIF.
4. In the Stream and Token lists make the required settings.
5. If required, type a name for the camera in the VSG Camera Name column.
6. Click OK.
7.
Click
.
to add them to the VSG cameras list.
See also
– Add/Edit dialog box (Video Streaming Gateway), page 36
8.4
Bosch Sicherheitssysteme GmbH 2013.01 | v1 | DOC
Adding a 3rd party camera to a VSG
Main window > Devices tab > Expand > Expand Devices > Video Streaming
Gateway device > Assignment tab
You can add 3rd party cameras that support RTSP (Real Time Streaming Protocol) or JPEG.
You need the URL of each camera that you want to add.
To add a camera:
1. Click Add....
The Add/Edit dialog box is displayed.
2. In the URL field, type in the URL.
Page 22

22 en | Configuring Video Streaming Gateway Video Recording Manager
3. For a camera supporting RTSP:
In the Type list, select RTSP.
For a camera supporting JPEG:
In the Type list, select JPEG.
4. For JPEG: Select the desired image rate.
5. If required, type a name for the camera in the VSG Camera Name column.
6. Click OK.
7.
Click
See also
– Add/Edit dialog box (Video Streaming Gateway), page 36
.
8.5
Configuring multicast
Main window > Devices tab > Expand > Expand Devices > Video Streaming
Gateway device > Network tab
For each camera assigned to a Video Streaming Gateway device you can configure a multicast
address with port.
Notice!
If you assign one camera to a Video Streaming Gateway repeatedly or assign this camera to
multiple Video Streaming Gateway instances, the camera can be overloaded. Configure
multicast to avoid.
To configure multicast:
1. Click to enable multicast.
2. Type in a valid multicast address and a port number.
3. If required, configure continuous multicast streaming.
4.
Click
See also
– Multicast tabs (Video Streaming Gateway), page 38
.
8.6
2013.01 | v1 | DOC Bosch Sicherheitssysteme GmbH
Switching on recording
Main window > Devices tab > Expand > Expand Devices > Video Streaming
Gateway device > Recording tab
To switch on:
1. Click the Recording Profiles tab.
2. Select the line of the camera, for which you want to switch on recording.
3. In the Recording list, select On.
4.
Click
Recording for this camera starts.
See also
– Recording profiles tab (Video Streaming Gateway), page 38
.
Page 23

Video Recording Manager Configuring a failover server | en 23
9
Configuring a failover server
Main window > Devices tab > > General > VRM Settings tab
VRM service is running on the master and on the failover server.
Both master and failover server must have the same VRM version.
Proceed as follows to configure a master and a failover server:
1. On the master server, create a failover group and a failover user with corresponding
password. The name of each the group and the user must be backup. The group should
not have any rights.
2. Select the failover server and click the VRM Settings tab.
3. Click to check Use as failover server.
4. In the Master server IP address field, type the IP address of the master server.
Click the green arrow to display a list of available VRM Servers. You can select an entry.
5. In the Password field, type the password for the failover user.
6.
Click .
In normal operation, the failover server is passive.
Notice!
To check the connection between master and failover server, connect to the master server
using VRM Monitor and check whether the Failover server connected to master server. entry
is listed in the log.
See also
– VRM Settings tab, page 30
Bosch Sicherheitssysteme GmbH 2013.01 | v1 | DOC
Page 24

24 en | Managing user groups and permissions Video Recording Manager
10
10.1
Managing user groups and permissions
You create users and groups for configuring VRM and access to live video and recordings.
Configuring users and user groups
Main window > Devices tab > > General > User Management tab
Creating a user group
To create a user group:
1. Click the Groups list.
2. Click Add....
The Group dialog box is displayed.
3. Enter a name for the group.
4. Click OK.
5. Click the VRM Rights tab and assign the desired rights to the group.
Editing a user group
To configure an existing user group:
1. Select the desired user group the Groups list.
2. Click Edit....
The Group dialog box is displayed.
3. Change the name of the group as desired.
4. Click OK.
5. Click the VRM Rights tab and assign the desired rights to the group.
Creating a user
To create a user:
1. Click the Users list.
2. Click Add....
The User dialog box is displayed.
3. Enter a name and a password for the user.
Confirm the password.
4. Select the desired group for the new user.
5. Click OK.
Editing a user
To configure an existing user:
1. Select the desired user in Users list.
2. Change the password or the group assignment as desired.
You can drag a user to another group.
Deleting user group or user
1. Select an entry.
2. Click Remove.
3. In the displayed dialog box, click OK.
Default user groups cannot be deleted.
Default user groups
The rights of the admin group are unlimited and cannot be changed.
This group cannot be deleted. It must have at least one member. This ensures that access to
the system remains guaranteed.
Only members of the admin group have write access to all device settings in Configuration
Manager. This ensures that only these users create new users or set rights.
2013.01 | v1 | DOC Bosch Sicherheitssysteme GmbH
Page 25

Video Recording Manager Managing user groups and permissions | en 25
The observer group is used for the dual authorization.
Dual authorization (Security logon)
VRM offers the option to create users who can only log on together according to the principle
of dual authorization.
To configure dual authorization:
1. Create a user group for which the Dual authorization option is activated.
2. Create a user with password in this user group.
3. Create a user with password in the observer user group.
No rights are set in the observer user group. Effectively, the observer takes on the rights
of the main user logging on with him.
To logon with dual authorization enabled:
1. The main user logging on enters his user name followed by a colon.
2. The main user then enters his password followed by a colon.
3. The observer enters his user name directly after the colon following the main user's user
name (for example: username_user:username_observer).
4. The observer enters his password directly after the colon following the main user's
password (for example: password_user:password_observer).
5. Click OK.
10.2
Configuring camera permissions
Main window > Devices tab > Service
Follow the steps below to prohibit members of a user group from having access to certain
cameras:
1. Select one or more cameras in the tree structure.
2. Click the Privileges tab.
The tab displays a table with all created VRM user groups and connected cameras.
Meaning
Green Users have access
Red Users do not have access
M In the case of multiple selection:
different settings
1. Right-click
– a box to change a single entry
– a user group to change all entries for this group
– a camera name to change this entry for all groups.
2. Select Access on or Access off from the context menu.
3.
Click .
Bosch Sicherheitssysteme GmbH 2013.01 | v1 | DOC
Page 26

26 en | User interface Video Recording Manager
11
11.1
User interface
This chapter contains information on all VRM related pages available in
Configuration Manager.
Notice!
Detailed information about the configuration options for a device can be found in the relevant
device documentation and the online Help in the relevant Web browser view.
Notice!
Some settings (for example in the Date/Time tab) can only be changed if the device is not
currently recording.
If necessary, stop any recordings before making changes.
Device Allocator dialog box
Main window > Tools menu > Device Allocator... command > Device Allocator dialog box
Installed devices / Allocated devices
All IP cameras and encoders detected in the network are displayed on the left pane, while
those allocated to the VRM system appear on the right pane. You can sort the list entries by
clicking the relevant table header.
Recordings managed by VRM
Click to clear if you want the recordings of this device not be managed by VRM. This is for
example the case when you want to configure ANR for this device.
11.2
11.3
Click to get step-by-step instructions:
– Allocating detected devices
– Adding a VSG to the system, page 20
Device Editor dialog box
Main window > Devices tab > Expand > Expand Pool n > Right-click Devices >
Click New Device...
The Device Editor dialog box allows you to add devices manually that cannot be found by the
device scan.
URL
Type in URL or IP address. For devices in another network add the port number. Example:
172.22.5.6:1754
Type
Select the <Auto detect> entry. If the device type cannot be found, select the required entry
manually.
Pool tab
Main window > Devices tab > Expand > Click Pool n
Allows you to configure recording settings valid for all devices that are collected in this
storage pool.
Name
Type in a name for the storage pool.
2013.01 | v1 | DOC Bosch Sicherheitssysteme GmbH
Page 27

Video Recording Manager User interface | en 27
Recording preferences mode
– Failover
Recordings are saved only to primary target. If it is not possible to save to this target, the
recording will be saved to the target entered under secondary target.
A failure situation is reached if the primary target does not provide storage blocks due to
whatever reason: system down, network error, no capacity left.
You can leave the second list empty. In this case no failover is possible but the number of
required iSCSI sessions is reduced and no disk space on secondary target is allocated.
This reduces system overhead and extends the system retention time.
– Automatic
Load balancing is configured automatically. Each encoder is automatically assigned
2 iSCSI targets and blocks on these 2 iSCSI targets are assigned to the encoder.
– Recording Preferences tab, page 34
Sanity check period (days)
Move the slider to configure the required time period. After this time period the iSCSI target is
checked and blocks are reassigned if needed.
Secondary target usage
Enable or disable the use of a secondary target.
11.3.1
Block reservation for downtime
Enter the number of days that the assigned encoders will be recorded although the
VRM Server is down.
For example, if you set 4, the encoders will be recorded during approximately 4 days of
VRM Server downtime.
If your system has encoders with low bit rate, you can significantly reduce the pre-allocated
disk space. This ensures a proper distribution of storage capacity and extends the retention
time.
Check Now
Click to reassign the devices of this storage pool to their iSCSI storage systems. This is only
being performed on storage pools with Automatic recording mode.
Click to get step-by-step instructions:
– Adding a storage pool, page 14
iSCSI System Access tab
Main window > Devices tab > Expand
Systems > Desired iSCSI device: > iSCSI System Access tab
Configuration password
Enter the password that enables the VRM system to access the iSCSI storage system for
configuration purposes.
> Expand Pool n > Expand Storage
SNMP IP address
If the RAID system has its own port for SNMP requests, enter the relevant SNMP IP address
here.
11.3.2
Bosch Sicherheitssysteme GmbH 2013.01 | v1 | DOC
Basic Configuration tab
Main window > Devices tab > Expand > Expand Pool n > Expand Storage
Systems > > Basic Configuration tab
Page 28

!
28 en | User interface Video Recording Manager
Only displayed if the device is an iSCSI storage system supported by Bosch, for example DSA
or DLA 1x00.
The displayed options differ depending on the used type of iSCSI storage system.
Notice!
After the basic configuration of an E-Series the system needs many hours (or even days) to
initialize. In this phase the full performance is not available and in phase 1.5 formatting can
fail.
Physical capacity [GB]
Information on the total capacity of the storage system.
Number of LUNs
You can change the number of LUNs.
Caution!
If you change the number of LUNs, the entire iSCSI system is reorganized and any sequences
saved on the system are lost.
Therefore, before making changes, check the recordings and back up any important
sequences.
Capacity for new LUNs [GB]
This option is only displayed for E-Series.
As 256 is the maximum number of LUNs of a storage array, the LUN size should not be set to a
too small value (otherwise no more LUNs can be created in the future, if an additional shelf is
installed).
Target spare disks
Number of spare disks the user wants the system to have.
Actual spare disks
Number of spare disks which are currently in the system. This number can differ from the
number above, e.g. if the storage system is reconfigured manually or if disks are broken.
Initialization status (%)
Additional information is displayed during initialization. When initialization is complete
(100%), you will also have the opportunity to delete all LUNs again.
Note: On FAS storage systems, it can take several hours before LUNs are fully deleted. During
that time, the total capacity of newly created LUNs can be reduced. You can only create new
LUNs with full capacity after the old LUNs have been completely deleted.
RAID-DP (reliability focused)
Activate this option if you do not wish to use the specified RAID type RAID-4, but would prefer
to use the more reliable RAID type RAID DP.
RAID 6 (reliability focused)
Activate this option if you do not wish to use the specified RAID type RAID-5, but would prefer
to use the more reliable RAID type RAID 6.
Clear
Clears the configuration, i.e. deleting all LUNs.
2013.01 | v1 | DOC Bosch Sicherheitssysteme GmbH
Page 29

Video Recording Manager User interface | en 29
Defaults
Sets the storage system back to its factory default. Additionally to clear the storage system
name and all iSCSI IP addresses are deleted. Only management addresses and the
configuration password are retained.
Serial number
The serial number needed for support cases. It is only correct if the controller is not moved to
a different shelf.
Delete all LUNs
As already stated above the user should wait some hours before he creates new LUNs.
Additional information
Additional information is displayed here, for example information that the storage system is
not configured correctly and that therefore no setup is possible.
11.3.3
Load Balancing tab
Main window > Devices tab > Expand > Expand Pool n > Expand Storage
Systems > Desired iSCSI device: > Load Balancing tab
Set the upper limits for the permitted bit rate and the number of simultaneous iSCSI
connections for each iSCSI system. If these limits are exceeded, data is no longer being
written to the iSCSI system and is lost.
For supported systems (for example Bosch RAID, DSA, DLA), use the default values. For
another device see the documentation of this device. Start testing with small values.
Prerequisite: Configure the Automatic recording mode.
Hard limit
These values represent a security margin in relation to the soft limit values. If the write
accesses are in this range, internal allocation of addressed blocks must be reorganized. This
does not affect the current recording.
If this value is also exceeded, the recording is interrupted for a few seconds and the internal
allocation of addressed blocks is reorganized.
If the system as a whole does not provide sufficient bandwidth or iSCSI connections for the
allocated devices, this can result in recordings being impossible on a regular basis. If this is
the case, increase the available overall bandwidth and/or the number of possible iSCSI
connections by adding further storage systems, or reduce the number of cameras recording on
the iSCSI system.
11.4
Bosch Sicherheitssysteme GmbH 2013.01 | v1 | DOC
Failover VRM Server information
Main window > Devices tab > > General > Unit Access tab
Failover VRM Server information
IP address failover server
For Archive Player only: Type the IP address of the failover VRM that you have configured on
the VRM Settings tab. This ensures that Archive Player has access to the recordings of the
failover VRM.
See also
– Configuring a failover server, page 23
Page 30

30 en | User interface Video Recording Manager
11.5
VRM Settings tab
Main window > Devices tab > > General > VRM Settings tab
VRM Server name
Type a name that is displayed in the device tree of Bosch Video Client.
Server initiator name
Displays the iSCSI initiator name of VRM Server.
System-wide CHAP password
Enter the password that you have configured in the iSCSI storage device. The CHAP password
is valid for the VRM and is sent to all devices automatically. Replay clients do not need
additional configuration. You must configure the iSCSI systems manually with the CHAP
password. If you are using a CHAP password, all storage systems have to be configured to use
the CHAP password. Only one system wide CHAP password is supported by the VRM system.
Use as failover server / Master server IP address / Password
You can set up a computer as the master server, provided that VRM Server is started on it, and
set up another computer as a failover server. The configuration settings of the master server
are then synchronized on the failover server. If the master server fails, the failover server
automatically takes over the management of the VRM system.
Recording Preferences tab, page 34
Check Now
Click to reassign the devices of all storage pools to their iSCSI storage systems. This is only
being performed on storage pools with Automatic recording mode.
11.6
Click to get step-by-step instructions:
– Configuring a failover server, page 23
See also
– Adding a storage pool, page 14
User Management tab
Main window > Devices tab > > General > User Management tab
Allows you to configure user groups and users used for configuring VRM Server.
Add...
Click to display the User or Group dialog box.
Edit...
Click to display the User or Group dialog box.
Remove
Click to display the Remove User or Remove Group dialog box.
VRM Rights tab
Click to configure rights for a selected user group.
Password
Type in a password for the selected user.
Confirm
Confirm the password.
2013.01 | v1 | DOC Bosch Sicherheitssysteme GmbH
Page 31

Video Recording Manager User interface | en 31
Click to get step-by-step instructions:
– Configuring users and user groups, page 24
11.6.1
11.6.2
User dialog box
Main window > Devices tab >
or
Main window > Devices tab > > General > User Management tab > Edit... button
Name
Type in a name for the user.
Password
Type in a password for the user.
Confirm password
Confirm the password.
Group
Select a group to assign this user to the selected group.
Click to get step-by-step instructions:
– Configuring users and user groups, page 24
> General > User Management tab > Add... button
Group dialog box
Main window > Devices tab > > General > User Management tab > Add... button
or
Main window > Devices tab > > General > User Management tab > Edit... button
Name
Type in a name for the user group.
PTZ control priority (for VIDOS only)
Enter a number to configure the priority for the PTZ control for each user of this user group.
1 means lowest priority, 100 means highest priority. 0 means no access.
Click to get step-by-step instructions:
– Configuring users and user groups, page 24
11.7
Bosch Sicherheitssysteme GmbH 2013.01 | v1 | DOC
Target Settings tab
Main window > Devices tab > Expand > Expand Pool n > Expand Storage
Systems > Expand iSCSI System Access > > Target Settings tab
Format
Activate this option for each LUN that you wish to reformat. You can also use the Select All
and Deselect All buttons.
Type
Define the LUN type:
– Standard
Standard VRM LUN for saving and replaying recordings.
– Read only
Recordings can be replayed from the LUN, but no new data will be written to the LUN.
Page 32

32 en | User interface Video Recording Manager
If (format) is displayed after the selected type, the LUN is automatically formatted when this
type is selected.
There is another LUN type, which cannot be defined on this tab. This type is automatically
allocated to each LUN for which the recordings are not managed by the VRM system:
– Backup
LUN is used for backups with Archive Player.
Not supported for Bosch Video Client < V.1.2.
Backup LUNs are deprecated, i.e. you should not add a new backup LUN, but if one exists
(e.g. from a previous VRM version), it is still there and provides the backed up video.
Status
Shows the current process. Ready means that the LUNs are available.
Set
All changes are saved and the necessary processes (type changes, formatting) are started.
Progress information is displayed in the Status column.
11.7.1
11.8
LUN Assignment dialog box
Main window > Devices tab > Expand > Expand Pool n > Expand Storage
Systems > Expand iSCSI System Access > > Target Settings > LUN Assignment...
Add individual LUNs to the system and configure them.
You can add a backup LUN that has been used in another VRM system. If the LUN was
formatted with VRM 2.10 or later, it is automatically detected as a backup LUN.
The type of a LUN types (standard/read-only/backup) is stored on the LUN itself, so if
configuration is lost, the LUN can be added without risk of data loss. The correct type of the
LUN is read out and is set correctly.
Source
Lists the LUNs that are available for this target and have not yet been added to the system.
VRM System
Lists the LUNs that have already been added to the system.
Restore database
Activate this option if you want to retain any existing data, for example recordings from
another VRM system, when the LUN is added. This data is evaluated and any cameras
referenced in it are added to the current VRM system, if necessary.
Recording Management tab (only firmware version 4.0 or later)
Main window > Devices tab > Expand Pool n > Expand Devices > > Recording >
Recording Management
Before you make any changes, you must stop any active recordings. Active recordings are
indicated by an icon:
If you hover the pointer over the icon, detailed information about the active recordings are
displayed.
4
To stop the recordings, click the Recording Scheduler tab and click Stop Recording.
Recordings manually managed
The recordings are managed locally on this encoder. All relevant settings must be carried out
manually. The encoder / IP camera acts as a live only device. It is not be removed from VRM
automatically.
2013.01 | v1 | DOC Bosch Sicherheitssysteme GmbH
Page 33

!
Video Recording Manager User interface | en 33
Recording 1 managed by VRM
The recordings of this encoder are managed by the VRM system.
Dual VRM
Recording 2 of this encoder is managed by a secondary VRM.
iSCSI Media tab
Only available if you click Recordings manually managed. Click to display the available iSCSI
storage connected to this encoder.
Local Media tab
Only available if you click Recordings manually managed. Click to display the available local
storage on this encoder.
Add
Only available if you click Recordings manually managed. Click to add a storage device to the
list of managed storage media.
Remove
Only available if you click Recordings manually managed. Click to remove a storage device
from the list of managed storage media.
Overwrite older recordings
If activated, the oldest recordings are deleted as soon as the medium is full. A loop recording
process occurs.
If not activated, nothing more is recorded on the disk once it is full.
11.9
Click to get step-by-step instructions:
– Configuring local storage (firmware version 4.0 or later), page 18
Storage Medium tab (only firmware version up to 3.5)
Main window > Devices tab > Expand Devices > > Recording > Storage Medium
The Storage Medium tab is displayed for encoders with firmware 3.5 and older. Once you
have allocated an encoder to the VRM system, the storage medium type is automatically set to
VRM if iSCSI storage systems have already been allocated and the encoder is not actively
recording on another medium (for example a CompactFlash card).
Partitioning is performed and managed by the VRM system. For this reason, under Partition
only a sequential number and specified name are shown for each camera that is connected to
the device, as well as a fixed partition size of approx. 1 GB. This partition size represents the
smallest unit that the VRM system can manage. The currently available disk space for
recordings of the sender depends on how much total storage you have included in the system
under Storage Systems and whether this has been restricted for the sender under Recording
Preferences.
You must call up the Storage Medium tab if you want to make alarm recordings with the VRM
system.
Caution!
Alarm tracks must be set up in the partition for alarm recording.
Bosch Sicherheitssysteme GmbH 2013.01 | v1 | DOC
The encoder uses a special recording mode during alarm recording for optimal usage of
storage capacity: as soon as a time gap for alarm recording begins, a recording is continuously
made on one segment, which is the size of a complete alarm sequence (pre- and post-alarm
time).
Page 34

34 en | User interface Video Recording Manager
This segment in the partition works like a ring buffer and is overwritten until an alarm is
actually triggered. Recording occurs on the segment only for the duration of the preset postalarm time and a new segment subsequently used in the same way.
Click to get step-by-step instructions:
– Configuring alarm tracks (firmware up to 3.5x), page 18
11.10
11.11
Recording Preferences tab
Main window > Devices tab > Expand > Expand Pool n > Expand Devices >
> Recording > Recording Preferences tab
The Recording preferences page is displayed for each encoder. This page only appears if a
device is assigned to a VRM system.
Pool tab, page 26
Primary target
Only visible if the Recording preferences mode list on the Pool page is set to Failover.
Select the entry for the required target.
Secondary target
Only visible if the Recording preferences mode list on the Pool page is set to Failover.
Select the entry for the required target for configuring failover mode.
Retention time tab
Main window > Cameras tab > Select a camera > Recording > Recording Profiles tab
Note: If the Cameras tab is not displayed, enable it:
Enabling the Cameras tab, page 13
You can specify the retention time for recordings for each camera.
11.12
Maximum retention time (days)
Recordings are automatically deleted as soon as this value and the minimum retention time
are exceeded.
The maximum retention time is valid also for already existing recordings.
The value O means infinite. In this case VRM Server tries to keep the recordings according to
the minimum retention time, for example 10 days. But if enough storage is available, older
recordings can exist, for example 20 or more days.
VRM Server checks all 60 minutes, whether recordings are available that has exceeded the
maximum and the minimum retention time. This data is deleted.
Minimum retention time (days)
Recordings cannot be deleted until this value is exceeded.
This value is stored when the data is written to the disk. It cannot be changed afterwards. If
changed, only new recordings are affected.
Note: If you configure a minimum retention time that needs more disk space than available,
recording stops until the configured minimum retention time is exceeded.
Lock
Activate this option to avoid accidental changing of the retention time values.
Privileges tab
Main window > Cameras tab > Service
The Privileges tab is displayed for each camera. This is where access privileges are granted
for the camera in line with the VRM user groups.
2013.01 | v1 | DOC Bosch Sicherheitssysteme GmbH
Page 35
Video Recording Manager User interface | en 35
This is where you can revoke access privileges to this camera for members of a user group.
These users will then no longer see the camera in question in the camera lists in VRM Monitor
and Bosch Video Client. They do not have access to the camera itself or to the associated
recordings.
In the default setting, all user groups have access privileges to all cameras.
11.13
Advanced tab
Main window > Devices tab > > Service > Advanced tab
Activate the different logs for VRM Server and Configuration Manager, and specify the
retention time for log files in days. We recommend that you configure a logging retention time
not less than the longest minimum retention time of the cameras.
The log files for VRM Server are stored on the computer on which VRM Server has been
started, and can be viewed or downloaded with VRM Monitor.
The log files for Configuration Manager are stored locally in the following directory:
C:\Documents and Settings\<User>\My Documents\Bosch\Video Recording Manager\Log
Complete memory dump file
Only activate this option if necessary, for example if the Technical Customer Service team
requests a complete summary of the main memory.
Telnet support
Activate this option if access with the Telnet protocol is to be supported. Only activate if
necessary.
Caution!
Extensive logging requires considerable CPU power and HDD capacity.
Do not use extensive logging in continuous operation.
11.14
11.15
See also
– Configuring logs, page 19
License tab
Main window > Devices tab > > Service > License tab
Provides information on your license.
Assignment tab (Video Streaming Gateway)
Main window > Devices tab > Expand > Expand Pool n > Expand Devices >
Video Streaming Gateway device > Assignment tab
Allows you to assign cameras to the selected VSG device and to configure the VSG cameras.
Network scan
In the list, select the camera type that you want to display.
Click to assign or de-assign selected cameras to or from VSG.
Bosch Sicherheitssysteme GmbH 2013.01 | v1 | DOC
Page 36

36 en | User interface Video Recording Manager
Note: When you select multiple cameras in the Network scan list, select only cameras of the
same type, for example only Bosch cameras or only ONVIF cameras. Otherwise the
button is disabled.
Refresh
Click to update the list of scanned cameras.
VSG cameras
Displays the cameras that are assigned to a Video Streaming Gateway device and the lines
that are available for assigning a camera.
Add...
Click to display the Add/Edit dialog box for assigning a camera to your Video Streaming
Gateway device. Allows you to configure properties like IP address or protocol settings.
Note: When you add multiple ONVIF cameras in the Network scan list, in the Token list only
the common tokens are displayed.
Edit... (only available if you select an entry in the VSG cameras list)
Click to display a dialog box for editing the properties of a VSG camera.
See also
– Adding a Bosch camera to a VSG, page 20
11.16
Add/Edit dialog box (Video Streaming Gateway)
Main window > Devices tab > Expand > Expand Pool n > Expand Devices >
Video Streaming Gateway device > Assignment tab > Add... button
or
Main window > Devices tab > Expand
Video Streaming Gateway device > Assignment tab > Select cameras in the Network scan list
> > Add... button
or
Main window > Devices tab > Expand
Video Streaming Gateway device > Assignment tab > Select cameras in the VSG cameras list >
Edit... button
URL
In the list, select the IP address or the URL of the desired VSG device.
Bosch device: IP address or DNS name
ONVIF, RTSP, JPEG: URL (starts with http)
User name
Type in the user name for logon to the device, usually service.
> Expand Pool n > Expand Devices >
> Expand Pool n > Expand Devices >
Password
Type in the password for logon to the device.
Connect
Click to connect to the device and to assign it to VSG.
When logon is successful, configure the protocol settings if required.
2013.01 | v1 | DOC Bosch Sicherheitssysteme GmbH
Page 37

Video Recording Manager User interface | en 37
Skip
Click to activate the configuration settings in the Protocol settings group.
This button does not appear, if you configure a camera that was detected by network scan and
added by clicking . The button appears, if you select a line in the VSG cameras list and
click the Add... or the Edit... button.
Protocol settings
Make the desired protocol settings. Note that the available configuration settings change with
the selected entry in the Type list.
Type
Note: The available configuration settings change with the selected entry.
Entry in the Type list
Available configuration settings
Bosch RCP+ Video input
Select the number of the desired camera if you configure
a multichannel device.
Stream
Select the number of the stream of the selected camera.
Protocol
TCP
Used for transmission in the Internet and / or for lossless
data transmission. Ensures that no data packet gets lost.
Bandwidth requirement can be high.
Use if the device is located behind a Firewall. Does not
support multicast.
UDP
Used for connectionless and lightweight data
transmission in private networks. Data packets can get
lost. Bandwidth requirement can be low.
Supports multicast.
ONVIF
Stream
ONVIF Media Profile
Contains advanced settings including a specific camera
including amongst others the encoding settings.
Video source
Contains basic video settings including a specific
camera.
Corresponds to a physical video input.
Token
Select a profile number. If you selected Video source,
usually only one entry is available.
Name
Displays the display name of the profile if ONVIF Media
Profile is selected. If multiple names are available,
<multiple> is displayed.
Bosch Sicherheitssysteme GmbH 2013.01 | v1 | DOC
Page 38

38 en | User interface Video Recording Manager
Entry in the Type list Available configuration settings
RTSP Select for adding a 3rd party camera that supports the
Real Time Streaming Protocol.
JPEG Select for adding a 3rd party camera that can send JPEG
images (usually every CCTV camera).
In the Rate [ips] list, select the desired value.
Table 11.1: Protocol settings
VSG Camera Name
Change the camera name if required. This name is used for VRM and for Bosch Video Client.
See also
– Adding a Bosch camera to a VSG, page 20
– Adding an ONVIF camera to a VSG, page 21
– Adding a 3rd party camera to a VSG, page 21
11.17
11.18
Recording profiles tab (Video Streaming Gateway)
Main window > Devices tab > Expand > Expand Pool n > Expand Devices >
Video Streaming Gateway device > Recording tab > Recording Profiles tab
Allows you to switch recording on or off for each VSG camera.
Recording
In the list, select the desired entry.
See also
– Switching on recording, page 22
Multicast tabs (Video Streaming Gateway)
Main window > Devices tab > Video Streaming Gateway device > Network tab >
Multicast tab
Allows you to configure multicast for the assigned cameras.
Enable
Click to enable multicast for this camera.
Multicast Address
Insert a valid multicast address (in the range 224.0.0.0 - 239.255.255.255).
Type in 1.0.0.0. A unique multicast address is automatically inserted based on the MAC
address of the device.
Port
When a firewall is used, enter a port value that is configured as non-blocked port in the
firewall.
Streaming
Click to enable continuous multicast streaming to the switch. This means that the multicast
connection is not preceded by a RCP+ registration. The encoder streams always all data to the
switch. The switch in return (if no IGMP multicast filtering is supported or configured) sends
this data to all ports, with the result that the switch will flood.
2013.01 | v1 | DOC Bosch Sicherheitssysteme GmbH
Page 39

Video Recording Manager User interface | en 39
You need streaming when using a non-Bosch device for receiving a multicast stream.
See also
– Configuring multicast, page 22
11.19
Advanced tab (Video Streaming Gateway)
Main window > Devices tab > Expand > Expand Pool n > Expand Devices >
Video Streaming Gateway device > Service tab
Allows you to activate logging for Video Streaming Gateway.
See Advanced tab, page 35 for Configuration Manager.
Bosch Sicherheitssysteme GmbH 2013.01 | v1 | DOC
Page 40

40 en | Index Video Recording Manager
Index
Numerics
3rd party camera, 21
A
Activation key, 10
add 3rd party camera, 21
add Bosch camera, 20
add ONVIF camera, 21
add VSG, 20
add:secondary VRM, 14
admin, 24
application windows, 26
authentication, 16
Authorization number, 10
authorize, 16
automatic recording mode, 27, 34
C
Camera
ANR mode, 12
available, 11
busy, 11
faulty, 12
offline, 11
protected, 11
CHAP password, 30
Clearing allocations, 16
Configurator
installation, 8
D
Device
ANR mode, 11
available, 11
busy, 11
faulty, 11
offline, 11
protected, 11
Device allocator, 16, 17, 26
E
Egg timer, 11
F
failover recording mode, 27
Firewall, 8, 37
I
Installation code, 10
iSCSI password, 30
iSCSI storage pool, 6
iSCSI storage system, 6
iSCSI system
adding, 15, 23
configuring, 15, 23
removing, 15
L
Licensing, 10
Logging, 35
logon, 16
LUN
adding, 32
allocating, 15, 32
backup, 32
removing, 15
M
manual recording mode, 34
manually add secondary VRM, 14
Master server, 30
multicast, 37
O
ONVIF, 21
stream, 37
token, 37
P
Padlock, 11
Partitioning, 33
permanent authentication, 16
pooling, 6
Program start, 13
R
recording mode
automatic, 27, 34
failover, 27
manual, 34
Recording preferences, 34
Rights, 34
2013.01 | v1 | DOC Bosch Sicherheitssysteme GmbH
Page 41

Video Recording Manager Index | en 41
S
Saving (settings), 11
secondary VRM
manually add, 14
secondary VRM:add, 14
Server
installation, 8
Server initiator name, 30
Server name, 30
Setting up alarm tracks, 18
Storage management, 33
T
TCP, 20
token, 37
transcoder, 19
U
UDP, 20
Users, 24
V
Video Streaming Gateway, 20
multicast, 22
recording, 22
VJT XTC XF, 19
VRM Monitor, 7
VRM storage pool, 6
Bosch Sicherheitssysteme GmbH 2013.01 | v1 | DOC
Page 42

Page 43

Page 44

Bosch Sicherheitssysteme GmbH
Robert-Bosch-Ring 5
85630 Grasbrunn
Germany
www.boschsecurity.com
© Bosch Sicherheitssysteme GmbH, 2013
 Loading...