

BOSCH MUM48A1 User Manual

MUM44..
MUM46..
MUM48..

de Deutsch . . . . . . . . . . . . . . . . . . . . . . . . . . . . . . . . . . . . . . . . . . . . . . . . . . . . . . . . . . . 3
en English . . . . . . . . . . . . . . . . . . . . . . . . . . . . . . . . . . . . . . . . . . . . . . . . . . . . . . . . . . . .11
fr Français . . . . . . . . . . . . . . . . . . . . . . . . . . . . . . . . . . . . . . . . . . . . . . . . . . . . . . . . . . .19
it Italiano . . . . . . . . . . . . . . . . . . . . . . . . . . . . . . . . . . . . . . . . . . . . . . . . . . . . . . . . . . . . 28
nl Nederlands . . . . . . . . . . . . . . . . . . . . . . . . . . . . . . . . . . . . . . . . . . . . . . . . . . . . . . . . . 36
da Dansk . . . . . . . . . . . . . . . . . . . . . . . . . . . . . . . . . . . . . . . . . . . . . . . . . . . . . . . . . . . . .44
no Norsk. . . . . . . . . . . . . . . . . . . . . . . . . . . . . . . . . . . . . . . . . . . . . . . . . . . . . . . . . . . . . . 52
sv Svenska . . . . . . . . . . . . . . . . . . . . . . . . . . . . . . . . . . . . . . . . . . . . . . . . . . . . . . . . . . . 60
fi Suomi . . . . . . . . . . . . . . . . . . . . . . . . . . . . . . . . . . . . . . . . . . . . . . . . . . . . . . . . . . . . .68
es Español. . . . . . . . . . . . . . . . . . . . . . . . . . . . . . . . . . . . . . . . . . . . . . . . . . . . . . . . . . . .76
pt Português. . . . . . . . . . . . . . . . . . . . . . . . . . . . . . . . . . . . . . . . . . . . . . . . . . . . . . . . . . 86
el ЕллзнйкЬ . . . . . . . . . . . . . . . . . . . . . . . . . . . . . . . . . . . . . . . . . . . . . . . . . . . . . . . . . . . 95
tr Türkçe. . . . . . . . . . . . . . . . . . . . . . . . . . . . . . . . . . . . . . . . . . . . . . . . . . . . . . . . . . . . 105
pl Polski . . . . . . . . . . . . . . . . . . . . . . . . . . . . . . . . . . . . . . . . . . . . . . . . . . . . . . . . . . . .116
hu Magyar . . . . . . . . . . . . . . . . . . . . . . . . . . . . . . . . . . . . . . . . . . . . . . . . . . . . . . . . . . . 125
uk š®paï¸c¿®a . . . . . . . . . . . . . . . . . . . . . . . . . . . . . . . . . . . . . . . . . . . . . . . . . . . . . . . . 133
ru Pºcc®å¼ . . . . . . . . . . . . . . . . . . . . . . . . . . . . . . . . . . . . . . . . . . . . . . . . . . . . . . . . . . 142
ar . . . . . . . . . . . . . . . . . . . . . . . . . . . . . . . . . . . . . . . . . . . . . . . . . . . . . . . . . . . . . 164
. . . . . . . . . . . . . . . . . . . . . . . . . . . . . . . . . . . . . . . . . . . . . . . . . . . .

de
eЙктдбЕЬЙе=dдΩЕвпмелЕЬ=тмг=h~мС=fЬкЙл=
еЙмЙе=dЙк®нЙл=~мл=ЗЙг=e~млЙ=_lp`eK
a~гбн=Ь~ДЙе=pбЙ=лбЕЬ=СΩк=Йбе=гзЗЙкеЙлI=
ЬзЕЬпЙкнбЦЙл=e~млЬ~днлЦЙк®н=ЙенлЕЬбЙЗЙеK
tЙбнЙкЙ=fеСзкг~нбзеЙе=тм= мелЙкЙе= mкзЗмвнЙе=
СбеЗЙе=pбЙ=~мС=мелЙкЙк=fенЙкеЙнлЙбнЙK
Inhalt
Zu Ihrer Sicherheit . . . . . . . . . . . . . . . . . . . 3
Auf einen Blick . . . . . . . . . . . . . . . . . . . . . 5
Bedienen . . . . . . . . . . . . . . . . . . . . . . . . . 6
Reinigen und Pflegen . . . . . . . . . . . . . . . . 7
Hilfe bei Störungen . . . . . . . . . . . . . . . . . . 8
Anwendungsbeispiele . . . . . . . . . . . . . . . . 8
Zubehör/Sonderzubehör . . . . . . . . . . . . . . 9
Entsorgung . . . . . . . . . . . . . . . . . . . . . . . . 10
Garantiebedingungen . . . . . . . . . . . . . . . . 10
Zu Ihrer Sicherheit
Lesen Sie diese Anleitung sorgfältig vor dem Gebrauch, um
wichtige Sicherheits- und Bedienhinweise für dieses Gerät zu
erhalten.
Das Nichtbeachten der Anweisungen für die richtige Anwendung des
Gerätes schließt eine Haftung des Herstellers für daraus resultierende
Schäden aus.
Dieses Gerät ist für die Verarbeitung haushaltsüblicher Mengen im Haushalt
oder in haushaltsähnlichen, nicht-gewerblichen Anwendungen bestimmt.
Haushaltsähnliche Anwendungen umfassen z. B. die Verwendung in
Mitarbeiterküchen von Läden, Büros, landwirtschaftlichen und anderen
gewerblichen Betrieben, sowie die Nutzung durch Gäste von Pensionen,
kleinen Hotels und ähnlichen Wohneinrichtungen. Gerät nur für
haushaltsübliche Verarbeitungsmengen und -zeiten benutzen. Zulässige
Höchstmengen (siehe „Anwendungsbeispiele“) nicht überschreiten!
Dieses Gerät ist zum Rühren, Kneten und Schlagen von Lebensmitteln
geeignet. Es darf nicht zur Verarbeitung von anderen Gegenständen bzw.
Substanzen benutzt werden. Bei Verwendung des vom Hersteller
zugelassenem Zubehör sind weitere Anwendungen möglich.
Das Gerät nur mit Originalzubehör benutzen. Bei Gebrauch des Zubehörs
die beigelegten Gebrauchsanleitungen beachten.
Gebrauchsanleitung bitte aufbewahren. Bei Weitergabe des Gerätes
an Dritte Gebrauchsanleitung mitgeben.
, Generelle Sicherheitshinweise
Stromschlag-Gefahr
Dieses Gerät darf von Kindern nicht benutzt werden.
Das Gerät und seine Anschlussleitung ist von Kinder fernzuhalten.
Geräte können von Personen mit reduzierten physischen, sensorischen
oder mentalen Fähigkeiten oder Mangel an Erfahrung und Wissen
benutzt werden, wenn sie beaufsichtigt werden oder bezüglich des
Robert Bosch Hausgeräte GmbH 3

sicheren Gebrauchs des Gerätes unterwiesen wurden und die daraus
de
resultierenden Gefahren verstanden haben.
Kinder dürfen nicht mit dem Gerät spielen.
Gerät nur gemäß Angaben auf dem Typenschild anschließen und
betreiben. Nur benutzen, wenn Zuleitung und Gerät keine
Beschädigungen aufweisen.
Das Gerät ist bei nicht vorhandener Aufsicht und vor dem
Zusammenbau, dem Auseinandernehmen oder Reinigen stets vom Netz
zu trennen.
Zuleitung nicht über scharfe Kanten oder heiße Flächen ziehen. Wenn die
Anschlussleitung dieses Gerätes beschädigt wird, muss sie durch den
Hersteller oder seinen Kundendienst oder eine ähnlich qualifizierte
Person ersetzt werden, um Gefährdungen zu vermeiden.
Reparaturen am Gerät nur durch unseren Kundendienst vornehmen
lassen.
, Sicherheitshinweise für dieses Gerät
Verletzungsgefahr
Stromschlag-Gefahr!
Netzstecker erst einstecken, wenn alle Vorbereitungen zum Arbeiten mit
dem Gerät abgeschlossen sind.
Grundgerät niemals in Flüssigkeit tauchen und unter fließendes Wasser
halten.
Keinen Dampfreiniger verwenden.
Schwenkarm nicht verstellen, während das Gerät eingeschaltet ist.
Vollständigen Stillstand des Antriebs abwarten.
Werkzeug/Zubehör nur bei Stillstand des Antriebes wechseln – nach dem
Ausschalten läuft der Antrieb kurze Zeit nach.
Gerät ausschließlich mit dem Drehschalter ein- und ausschalten.
Bei Nichtbenutzung des Gerätes den Netzstecker ziehen.
Vor Behebung einer Störung den Netzstecker ziehen.
Nach Stromunterbrechung läuft das Gerät wieder an.
Verletzungsgefahr durch rotierende Werkzeuge!
Nicht in rotierende Teile greifen. Während des Betriebes nie in die Schüssel
greifen.
Werkzeug nur bei Stillstand des Antriebes wechseln – nach dem
Ausschalten läuft der Antrieb kurze Zeit nach.
Das Gerät darf nur betrieben werden, wenn die nicht genutzten Antriebe
mit den Antriebsschutzdeckeln (4, 7) gesichert sind.
4 Robert Bosch Hausgeräte GmbH

Verletzungsgefahr durch scharfe Messer/rotierenden Antrieb!
de
Nie in den aufgesetzten Mixer greifen!
Mixer nie am Grundgerät zusammenbauen. Mixer nur bei Stillstand des
Antriebes abnehmen/ aufsetzen! Den Mixer nur im zusammengesetzten
Zustand und mit aufgesetztem Deckel betreiben.
Mixermesser nicht mit bloßen Händen berühren.
Verbrühungsgefahr!
Beim Verarbeiten von heißem Mixgut tritt Dampf durch den Trichter im
Deckel aus. Maximal 0,5 Liter heiße oder schäumende Flüssigkeit einfüllen.
Wichtig!
Nur ein Werkzeug bzw. Zubehör gleichzeitig benutzen.
Die Gebrauchsanleitung beschreibt verschiedene Ausführungen, siehe auch Modellübersicht
(Bild ). Das Gerät ist wartungsfrei.
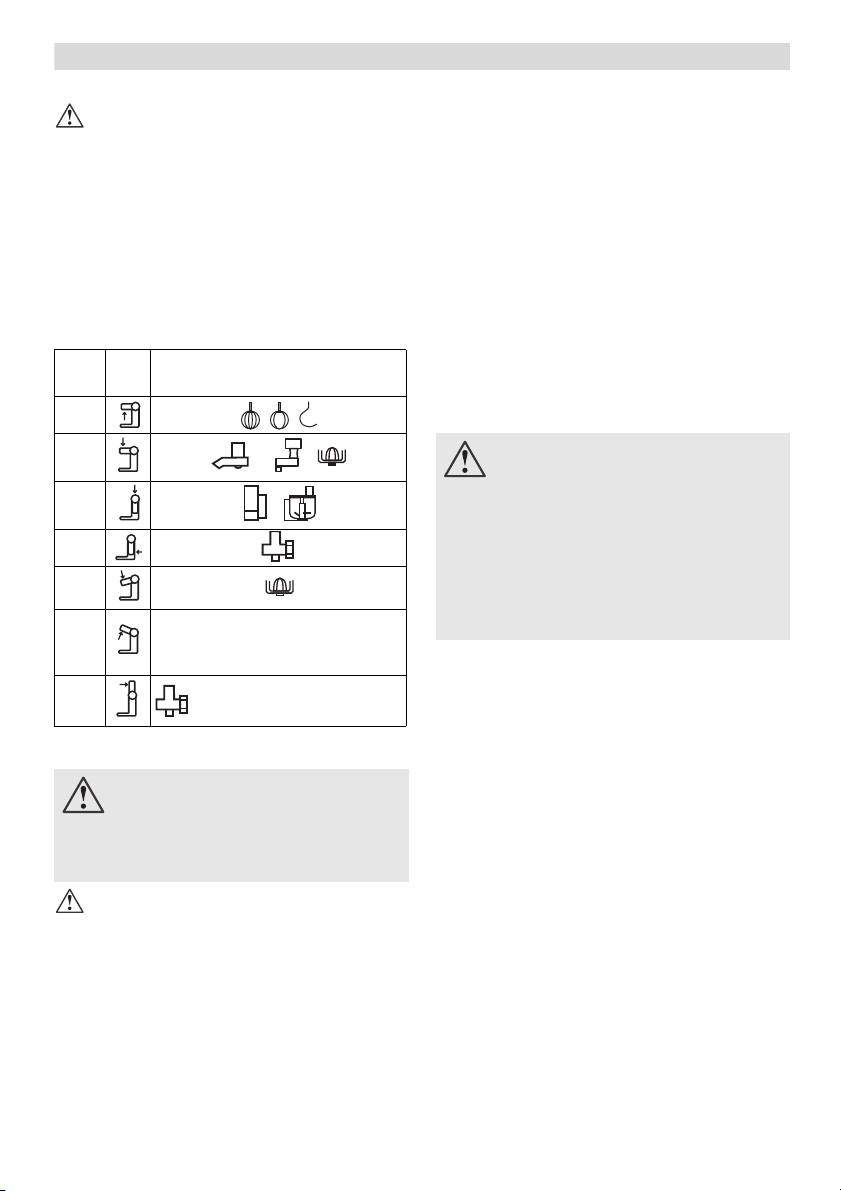
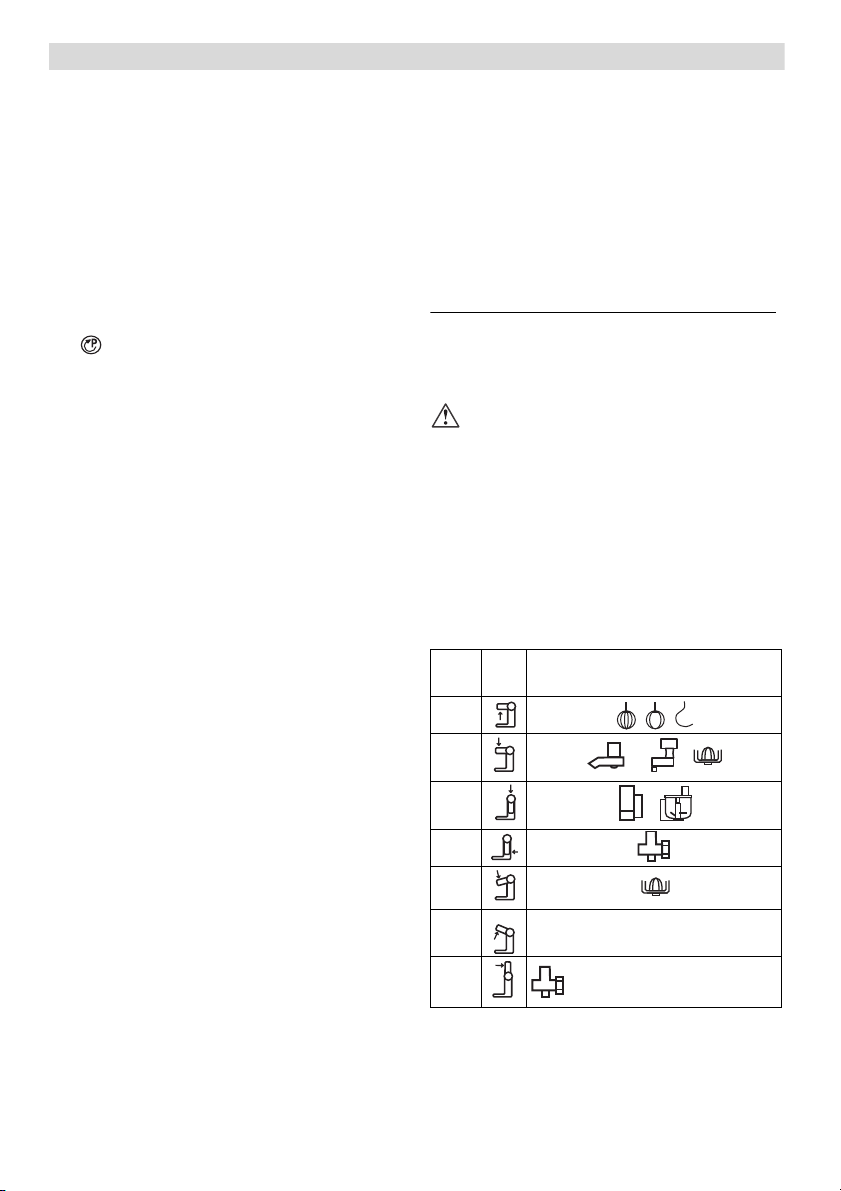
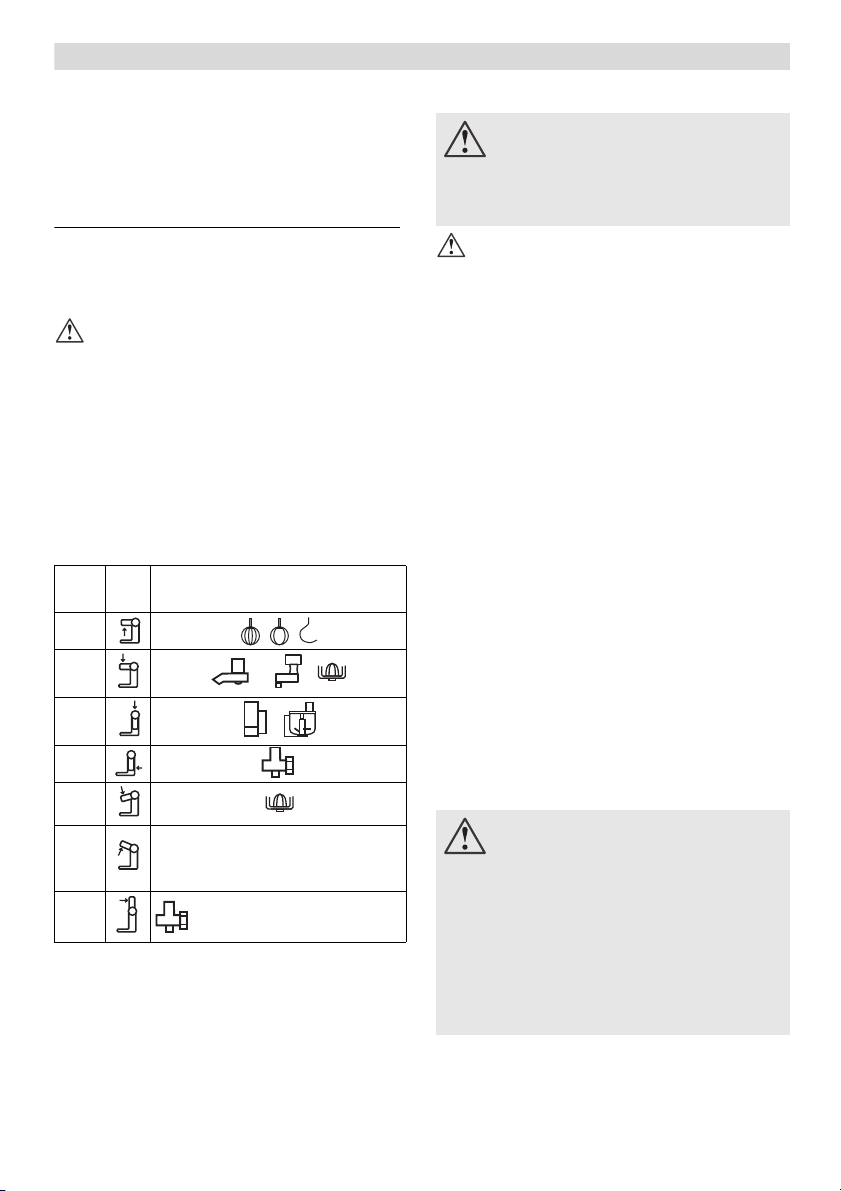
Auf einen Blick
Bitte Bildseiten ausklappen. Bild
Grundgerät
1
Entriegelungstaste
2
Schwenkarm
(siehe „Arbeitspositionen“)
3
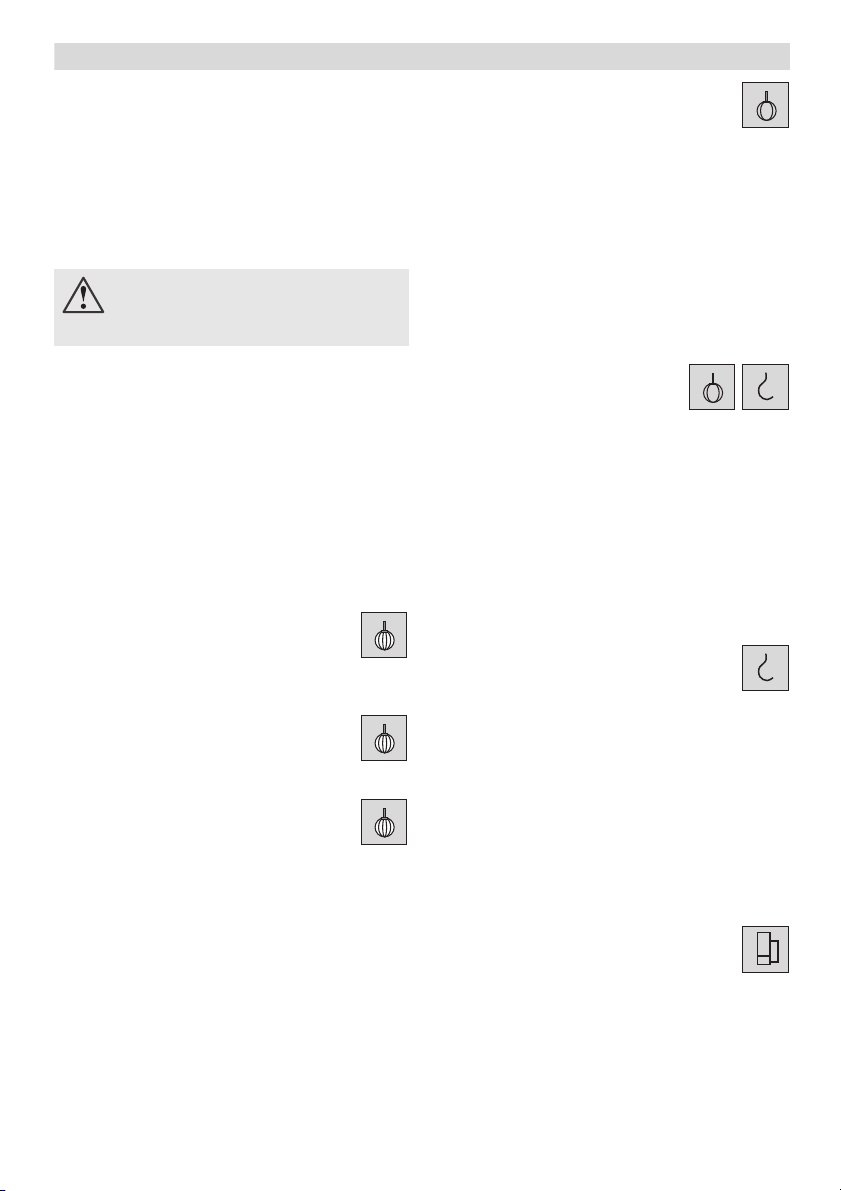
Drehschalter
0/off = Stopp
/
P
Drehschalter festhalten, bis Antrieb stehenbleibt; Werkzeug ist in Schwenkposition.
Bewegt sich der Antrieb nicht, ist die
Schwenkposition bereits erreicht.
Stufen 1–4 = Arbeitsgeschwindigkeit
Stufe 1 = niedrigste Drehzahl –
Stufe 4 = höchste Drehzahl – schnell
Bei Stromunterbrechung bleibt das Gerät
eingeschaltet und läuft nach der
Unterbrechung wieder an.
4
Antriebsschutzdeckel
Zum Abnehmen des Antriebsschutzdeckels
diesen drehen, bis die Verriegelung
aufgehoben ist.
5
Antrieb für
–
Durchlaufschnitzler
–
Zitruspresse *
–
Getreidemühle *
Bei Nichtgebrauch Antriebsschutzdeckel
aufsetzen.
= Parkschaltung;
langsam
*
6
Antrieb für
–
Werkzeuge (Rührbesen, Schlagbesen,
Knethaken)
–
Rührwerkzeug des Eisbereiters *
–
herunter- oder hochgeklappt für
Fleischwolf *
7
Mixerantriebsschutzdeckel
8
Antrieb für
–
Mixer
–
Multi-Mixer
Bei Nichtgebrauch Mixerantriebsschutzdeckel aufsetzen.
9
Kabelaufbewahrung (
MUM 44..: Kabel aufwickeln
MUM 46../48..: Kabel im Kabelfach
verstauen
Schüssel mit Zubehör
10
Rührschüssel
11
Deckel
Werkzeuge
Rührbesen
12
13
Schlagbesen
14
Knethaken mit Teigabweiser
Mixer
Sockel
15
16
Messereinsatz
17
Dichtungsring
18
Mixbecher
19
Deckel
20
Tr ic ht e r
* Wenn ein Zubehörteil nicht im Lieferumfang
enthalten ist, kann es über den Handel und
den Kundendienst erworben werden.
Bild
)
Robert Bosch Hausgeräte GmbH 5
Arbeitspositionen
de
^ЕЬнмеЦ>
dЙк®н=емк=ДЙнкЙбДЙеI=пЙее=tЙквтЙмЦLwмДЙЬ∏к=
е~ЕЬ=ЗбЙлЙк=q~ДЙддЙ=~г=кбЕЬнбЦЙе=^енкбЙД=меЗ=бе=
ЗЙк=кбЕЬнбЦЙе=mзлбнбзе=~еЦЙДк~ЕЬн=меЗ=бе=
^кДЙбнллнЙддмеЦ=блнK
aЙк=pЕЬпЙев~кг=гмлл=бе=аЙЗЙк=^кДЙбнлйзлбнбзе=
ЙбеЦЙк~лнЙн=лЙбеK
Einstellen der Arbeitsposition Bild
Entriegelungstaste drücken und
Schwenkarm bewegen.
Schwenkarm bis zum Einrasten auf die
gewünschte Position bewegen.
Position
1
Vorbereiten
Grundgerät auf glatten und sauberen
Untergrund stellen.
Kabel abwickeln/herausziehen (
Netzstecker einstecken.
Bild
).
Rührbesen, Schlagbesen und
Knethaken Bild
Rührbesen (a)
zum Rühren von Teigen, z. B. Rührteig
Schlagbesen (b)
zum Schlagen von Eischnee, Sahne und zum
Schlagen von leichten Teigen, z. B. Biskuitteig
Knethaken (c) mit Teigabweiser (d)
zum Kneten von schweren Teigen und zum
Unterheben von Zutaten, die nicht zerkleinert
werden sollen (z. B. Rosinen,
Schokoladenplättchen)
2
3
4
5
Einsetzen/Abnehmen von
6
Schlag-, Rührbesen und
Knethaken
7
Zugeben großer
Verarbeitungsmengen
Bedienen
sЙкдЙнтмеЦлЦЙС~Ьк>
kЙнтлнЙЕвЙк=Йклн=ЙбелнЙЕвЙеI=пЙее=~ддЙ=
sзкДЙкЙбнмеЦЙе=тмг=^кДЙбнЙе=гбн=ЗЙг=dЙк®н=
~ДЦЙлЕЬдзллЙе=лбеЗK
^ЕЬнмеЦ>
dÉê®í=åìê=ãáí=wìÄÉÜ∏кLtЙквтЙмЦ=бе=^кДЙбнлJ
лнЙддмеЦ=ДЙнкЙбДЙеK
dЙк®н=ебЕЬн=дЙЙк=ДЙнкЙбДЙеK=
dЙк®н=меЗ=wмДЙЬ∏кнЙбдЙ=вЙбеЙе=eбнтЙимЙддЙе=
~мллЙнтЙеK=qЙбдЙ=лбеЗ= ебЕЬн= г бвкзпЙддЙеЦЙ ЙбЦеЙнK
Gerät und Zubehör vor dem ersten
Gebrauch gründlich reinigen, siehe „Reinigen
und Pflegen“.
sЙкдЙнтмеЦлЦЙС~Ьк=ЗмкЕЬ=
кзнбЙкЙеЗЙ=tЙквтЙмЦЙ>
t®ЬкЙеЗ=ЗЙл=_ЙнкбЙДЙл=ебЙ=бе=ЗбЙ=pЕЬΩллЙд=
ЦкЙбСЙеK
tЙквтЙмЦ=емк=ДЙб=pнбддлн~еЗ=ЗЙл=^енкбЙДЙл=
пЙЕЬлЙде=У=е~ЕЬ=ЗЙг=^мллЕЬ~днЙе=д®мСн=ЗЙк=
^енкбЙД=вмктЙ=wЙбн=е~ЕЬK
a~л=dЙк®н=З~кС=емк=ДЙнкбЙДЙе=пЙкЗЙеI=пЙее=
ЗбЙ=ебЕЬн=ЦЙемнтнЙе=^енкбЙДЙ=гбн=ЗЙе=
^енкбЙДллЕЬмнтЗЙЕвЙде=ЦЙлбЕЬЙкн=лбеЗK
Drehschalter auf
P
stellen und festhalten, bis
der Antrieb stehen bleibt.
Hinweis:
Bewegt sich der Antrieb nicht, ist die
Schwenkposition bereits erreicht.
Entriegelungstaste drücken und
Schwenkarm in Position 6 bringen.
Schüssel einsetzen. Sockel der Schüssel
muss in Aussparung des Grundgerätes
stecken.
Je nach Verarbeitungsaufgabe Rührbesen,
Schlagbesen oder Knethaken bis zum
Einrasten in den Antrieb einstecken. Beim
Knethaken Teigabweiser drehen, bis der
Knethaken einrasten kann.
Die zu verarbeitenden Zutaten in die
Schüssel einfüllen.
Entriegelungstaste drücken und
Schwenkarm in Position 1 bringen.
Deckel aufsetzen.
Drehschalter auf gewünschte Stufe stellen.
6 Robert Bosch Hausgeräte GmbH
Zutaten nachfüllen
de
Gerät am Drehschalter ausschalten.
Drehschalter auf
P
stellen und festhalten, bis
der Antrieb stehen bleibt.
Deckel abnehmen.
Entriegelungstaste drücken und
Schwenkarm in Position 7 bringen.
Zutaten einfüllen
oder
Zutaten durch die Nachfüllöffnung im Deckel
nachfüllen.
Nach der Arbeit
Gerät am Drehschalter ausschalten.
Drehschalter auf
P
stellen und festhalten, bis
der Antrieb stehen bleibt.
Netzstecker ziehen.
Deckel abnehmen.
Entriegelungstaste drücken und
Schwenkarm in Position 6 bringen.
Werkzeug aus dem Antrieb nehmen.
Schüssel entnehmen.
Alle Teile reinigen, siehe „Reinigen und
Pflegen“.
Mixer Bild
sЙкдЙнтмеЦлЦЙС~Ьк=ЗмкЕЬ=лЕЬ~кСЙ=
jЙллЙкLкзнбЙкЙеЗЙе=^енкбЙД>
kбЙ=бе=ЗЙе=~мСЦЙлЙнтнЙе=jбсЙк=ЦкЙбСЙе>=
jбсЙк=емк=ДЙб=pнбддлн~еЗ=ЗЙл=^енкбЙДЙл=
~ДеЙЬгЙеL~мСлЙнтЙе>=
aЙе=jбсЙк=емк=бг=тмл~ггЙеЦЙлЙнтнЙе=wмJ
лн~еЗ=меЗ=гбн=~мСЦЙлЙнтнЙг=aЙЕвЙд=ДЙнкЙбДЙеK
sÉêÄêΩЬмеЦлЦЙС~Ьк>
_Йбг=sЙк~кДЙбнЙе=озе=ЬЙб≈Йг=jбсЦмн=нкбнн=
a~гйС=ЗмкЕЬ=ЗЙе=qкбЕЬнЙк=бг=aЙЕвЙд=~млK=
j~сбг~д=MIR=iбнЙк=ЬЙб≈Й=зЗЙк=лЕЬ®мгЙеЗЙ=
cдΩллбЦвЙбн=ЙбеСΩääÉåK
^ЕЬнмеЦ>
jбсЙк=в~ее=ДЙлЕЬ®ЗбЦн=пЙкЗЙеK=hЙбеЙ=нбЙСJ
ЦЙСкзкЙеЙе=wмн~нЙе=E~млЦЙезггЙе=bблпΩкСЙдF=
оЙк~кДЙбнЙеK=jбсЙк=ебЕЬн=дЙЙк=ДЙнкЙбДЙеK
^ЕЬнмеЦ>
sЙк~кДЙбнЙе=озе=cдΩллбЦвЙбнЙе=бг=dд~лгбсЙк=
Eбг c~ЕЬЬ~еЗЙд=ЙкЬ®дндбЕЬFW=г~сбг~д=~мС=pнмСЙ PK=
j~сбг~д=MIR=iбнЙк=ЬЙб≈Й=зЗЙк=лЕЬ®мгЙеЗЙ=
cдΩллбЦвЙбн=ЙбеСΩääÉåK
Entriegelungstaste drücken und
Schwenkarm in Position 3 bringen.
Mixerantriebsschutzdeckel abnehmen.
Mixbecher aufsetzen (Markierung am Sockel
auf Markierung am Grundgerät) und gegen
den Uhrzeigersinn bis zum Anschlag drehen
(
Bild -4/5
Zutaten einfüllen.
).
Maximalmenge bei Kunststoffmixer, flüssig =
1 Liter, bei Glasmixer, flüssig = 0,75 Liter;
schäumende oder heiße Flüssigkeiten
maximal 0,5 Liter;
optimale Verarbeitungsmenge,
fest = 50 bis 100 Gramm;
Deckel aufsetzen und fest drücken.
Den Deckel während der Arbeit immer mit
einer Hand festhalten. Dabei nicht über die
Nachfüllöffnung greifen!
Drehschalter auf gewünschte Stufe stellen.
Zutaten nachfüllen Bild -6
Gerät am Drehschalter ausschalten.
Deckel abnehmen und Zutaten einfüllen
oder
Trichter herausnehmen und feste Zutaten
nach und nach in Nachfüllöffnung einfüllen
oder
flüssige Zutaten durch den Trichter einfüllen.
Nach der Arbeit
Gerät am Drehschalter ausschalten.
Netzstecker ziehen.
Mixer im Uhrzeigersinn drehen und
abnehmen.
Tipp:
Mixer am besten sofort nach Gebrauch
reinigen.
Reinigen und Pflegen
^ЕЬнмеЦ>
hЙбеЙ лЕЬЙмЙкеЗЙе=oЙбебЦмеЦлгбннЙд=оЙкпЙеЗЙеK=
lДЙкСд®ЕЬЙе=в∏ееЙе=ДЙлЕЬ®ЗбЦн=пЙкЗЙеK=
Grundgerät reinigen
pнкзглЕЬд~ЦЦЙС~Ьк>
dкмеЗЦЙк®н=ебЙг~дл=бе=t~ллЙк=н~мЕЬЙе=меЗ=
ебЙ=менЙк=СдбЙ≈ЙеЗЙл=t~ллЙк=Ь~днЙеK
Netzstecker ziehen.
Grundgerät feucht abwischen.
Bei Bedarf etwas Spülmittel benutzen.
Gerät anschließend trockenreiben.
Schüssel mit Zubehör reinigen
Alle Teile sind spülmaschinenfest.
Kunststoffteile in der Spülmaschine nicht
einklemmen, da Verformung möglich.
Robert Bosch Hausgeräte GmbH 7

Mixer reinigen
de
sЙкдЙнтмеЦлЦЙС~Ьк=ЗмкЕЬ=лЕЬ~кСЙ=
jЙллЙк>
jбсЙкгЙллЙк=ебЕЬн=гбн=Ддз≈Éå=e®åÇÉå=
ÄÉêΩЬкЙеK=jбсЙк=в~ее=тмг=oЙбебЦЙе=
~млЙбе~еЗЙк=ЦЙезггЙе=пЙкЗЙеK
^ЕЬнмеЦ>
hЙбеЙ=лЕЬЙмЙкеЗЙе=oЙбебЦмеЦлгбннЙд=
оЙкпЙеЗЙеK=jЙллЙкЙбел~нт=блн=ебЕЬн=
лйΩдг~лЕЬбеЙеСЙлнK=jЙллЙкЙбел~нт=емк=менЙк=
СдбЙ≈ЙеЗЙг=t~ллЙк=кЙбебЦЙеK
Tipp:
Nach der Verarbeitung von Flüssigkeiten
reicht es oft, den Mixer zu reinigen, ohne ihn
auseinander zu nehmen. Dazu etwas Wasser
mit Spülmittel in den aufgesetzten Mixer geben.
Für wenige Sekunden den Mixer einschalten
(bei Geräten mit Momentschaltung auf Stufe M).
Spülwasser ausschütten und Mixer mit klarem
Wasser ausspülen.
Mixer zerlegen Bild
Sockel des Mixerbechers im Uhrzeigersinn
drehen und abnehmen.
Den Messereinsatz an den Flügeln gegen
den Uhrzeigersinn drehen.
Der Messereinsatz wird gelöst.
Messereinsatz entnehmen und den
Dichtungsring entfernen.
Mixer zusammensetzen Bild
sЙкдЙнтмеЦлЦЙС~Ьк>
jбсЙк=ебЙ=~мС=ЗЙг=dкмеЗЦЙк®н=
тмл~ггЙеД~мЙеK
Dichtungsring am Messereinsatz anbringen.
Messereinsatz von unten in den Mixerbecher
einsetzen.
Mit Hilfe des Sockels den Messereinsatz fest
schrauben.
Sockel des Mixerbechers gegen den
Uhrzeigersinn fest drehen.
Hilfe bei Störungen
Bei Störungen wenden Sie sich bitte an unseren
Kundendienst.
Anwendungsbeispiele
Schlagsahne
100 g–600 g
Sahne 1½ bis 4 Minuten auf Stufe 4
(je nach Menge und Eigenschaften der
Sahne) mit dem Schlagbesen verarbeiten.
Eiweiß
1 bis 8 Eiweiß
Eiweiß 4 bis 6 Minuten auf Stufe 4 mit
dem Schlagbesen verarbeiten.
Biskuitteig
dкмеЗкЙтЙйн
2 Eier
2–3 EL heißes Wasser
100 g Zucker
1 Päckchen Vanillezucker
70 g Mehl
70 g Stärkemehl evtl. Backpulver
Zutaten (außer Mehl und Stärkemehl)
ca. 4–6 Minuten auf Stufe 4 mit dem
Schlagbesen schaumig schlagen.
Drehschalter auf Stufe 2 stellen und das
gesiebte Mehl und Stärkemehl in ca. ½ bis
1 Minute löffelweise untermischen.
Höchstmenge:
Rührteig
dкмеЗкЙтЙйн
3–4 Eier
200–250 g Zucker
1 Prise Salz
1 Päckchen Vanillezucker oder Schale von
½Zitrone
200–250 g Butter (Raumtemperatur)
500 g Mehl
1 Päckchen Backpulver
1
/
l Milch
8
Alle Zutaten ca. ½ Minute auf Stufe 1, dann
ca. 3–4 Minuten auf Stufe 3 mit dem
Rührbesen verrühren.
Höchstmenge:
Mürbeteig
dкмеЗкЙтЙйн
125 g Butter (Raumtemperatur)
100–125 g Zucker
1 Ei
1 Prise Salz
etwas Zitronenschale oder Vanillezucker
250 g Mehl
evtl. Backpulver
2 x Grundrezept
1,5–2 x Grundrezept
8 Robert Bosch Hausgeräte GmbH

Alle Zutaten ca. ½ Minute auf Stufe 1, dann
de
ca. 2–3 Minuten mit dem Rührbesen (Stufe 3)
oder Knethaken (Stufe 2) verarbeiten.
Höchstmenge:
2 x Grundrezept
Hefeteig
dкмеЗкЙтЙйн
500 g Mehl
1 Ei
80 g Fett (Raumtemperatur)
80 g Zucker
200–250 ml lauwarme Milch
25 g frische Hefe oder 1 Päckchen Trockenhefe
Schale von ½ Zitrone
1 Prise Salz
Alle Zutaten ca. ½ Minute auf Stufe 1,
dann ca. 3–6 Minuten auf Stufe 2 mit dem
Knethaken verarbeiten.
Höchstmenge:
1,5 x Grundrezept
Mayonnaise
2 Eier
2 TL Senf
¼lÖl
2 EL Zitronensaft oder Essig
1 Prise Salz
1 Prise Zucker
Zutaten müssen gleiche Temperatur haben.
Zutaten (außer Öl) einige Sekunden auf Stufe
2 im Mixer verarbeiten.
Mixer auf Stufe 4 schalten und das Öl lang-
sam durch den Trichter gießen und so lange
weiter mischen, bis die Mayonnaise emulgiert.
Zubehör/Sonderzubehör
Weiteres der Verpackung beigelegtes Zubehör
(siehe beigefügte Modellübersicht,
den separaten Bedienungsanleitungen
beschrieben.
Beigelegtes Zubehör/Sonderzubehör kann
auch einzeln (nach)gekauft werden.
Das Zubehör zur Maschine MUM 45.. eignet
sich auch für die Maschine MUM 44../46../48.. .
Bild
Kunststoff-Rührschüssel (MUZ4KR3)
In der Schüssel können bis zu 1 kg Mehl plus
Zutaten verarbeitet werden.
Edelstahl-Rührschüssel (MUZ4ER2)
In der Schüssel können bis zu 1 kg Mehl plus
Zutaten verarbeitet werden.
Bild
) ist in
Mixer-Aufsatz Kunststoff (MUZ4MX2)
Zum Mixen von Getränken, zum Pürieren von
Obst und Gemüse, zur Zubereitung von
Mayonnaise, zum Zerkleinern von Obst und
Nüssen, zum Crushen von Eiswürfeln.
Mixer-Aufsatz Glas (MUZ4MX3)
Zum Mixen von Getränken, zum Pürieren von
Obst und Gemüse, zur Zubereitung von
Mayonnaise, zum Zerkleinern von Obst und
Nüssen, zum Crushen von Eiswürfeln.
Multimixer (MUZ4MM3)
Zum Hacken von Kräutern, Gemüse, Äpfeln und
Fleisch, zum Raspeln von Karotten, Rettich und
Käse, zum Reiben von Nüssen und gekühlter
Schokolade.
Durchlaufschnitzler (MUZ4DS3)
Zum Schneiden von Gurken, Kohl, Kohlrabi,
Rettich; zum Raspeln von Karotten, Äpfeln und
Sellerie, Rotkraut, Käse und Nüssen; zum
Reiben von Hartkäse, Schokolade und Nüssen.
Pommes frites-Scheibe (MUZ45PS1)
Für den Durchlaufschnitzler MUZ4DS3.
Zum Schneiden roher Kartoffeln für Pommes
frites.
Asia-Gemüse-Scheibe (MUZ45AG1)
Für den Durchlaufschnitzler MUZ4DS3.
Schneidet Obst und Gemüse in feine Streifen für
asiatische Gemüsegerichte.
Reibscheibe grob (MUZ45RS1)
Für den Durchlaufschnitzler MUZ4DS3.
Zum Reiben roher Kartoffeln z. B. für
Reibekuchen oder Klöße.
Kartoffelpuffer-Scheibe (MUZ45KP1)
Für den Durchlaufschnitzler MUZ4DS3.
Zum Reiben roher Kartoffeln für Rösti und
Kartoffelpuffer, zum Schneiden von Obst und
Gemüse in dicke Scheiben.
Zitruspresse (MUZ4ZP1)
Zum Auspressen von Orangen, Zitronen und
Grapefruit.
Fleischwolf (MUZ4FW3)
Zum Zerkleinern von frischem Fleisch für Tartar
oder Hackbraten.
Lochscheibensatz (MUZ45LS1)
Für den Fleischwolf MUZ4FW3.
Fein (3 mm) für Pasteten und Aufstriche, grob
(6 mm) für Bratwürste und Speck.
Robert Bosch Hausgeräte GmbH 9

Spritzgebäckvorsatz (MUZ45SV1)
de
Änderungen vorbehalten.
Für den Fleischwolf MUZ4FW3.
Mit Metallschablone für 4 verschiedene
Gebäckformen.
Reibevorsatz (MUZ45RV1)
Für den Fleischwolf MUZ4FW3.
Zum Reiben von Nüssen, Mandeln, Schokolade
und getrockneten Brötchen.
Fruchtpressenvorsatz (MUZ45FV1)
Für den Fleischwolf MUZ4FW3.
Zum Pressen von Beerenobst (außer
Himbeeren), Tomaten und Hagebutten zu Mus.
Gleichzeitig werden z. B. Johannisbeeren
automatisch entstielt und entkernt.
Zubehörträger (MUZ4ZT1)
Zur Aufbewahrung der Zubehörteile wie Knethaken, Schlagbesen, Rührbesen, Schneid-,
Raspel- und Reibscheibe.
Getreidemühle mit Kegelmahlwerk aus
Stahl (MUZ4GM3)
Für alle Getreidesorten außer Mais; auch für
Ölsaaten, getrocknete Pilze und Kräuter.
Eisbereiter (MUZ4EB1)
Zur Zubereitung von bis zu 550 g Eis pro
Arbeitsgang und Behälter.
Entsorgung
Dieses Gerät ist entsprechend der
europäischen Richtlinie 2012/19/EG
über Elektro- und Elektronikaltgeräte
(waste electrical and electronic
equipment – WEEE) gekennzeichnet.
Die Richtlinie gibt den Rahmen für eine EU-weit
gültige Rücknahme und Verwertung der
Altgeräte vor. Über aktuelle Entsorgungswege
informieren Sie sich bitte bei Ihrem Fachhändler
oder bei Ihrer Gemeindeverwaltung.
Garantiebedingungen
Für dieses Gerät gelten die von unserer jeweils
zuständigen Landesvertretung herausgegebenen Garantiebedingungen, in dem das Gerät
gekauft wurde. Sie können die Garantiebedingungen jederzeit über Ihren Fachhändler, bei
dem Sie das Gerät gekauft haben, oder direkt
bei unserer Landesvertretung anfordern.
Die Garantiebedingungen für Deutschland und
die Adressen finden Sie auf der Heftrückseite.
Darüber hinaus sind die Garantiebedingungen
auch im Internet unter der benannten
Webadresse hinterlegt. Für die Inanspruchnahme von Garantieleistungen ist in jedem
Fall die Vorlage des Kaufbeleges erforderlich.
10 Robert Bosch Hausgeräte GmbH

en
`зеЦк~нмд~нбзел=зе=нЬЙ=ймкЕЬ~лЙ=зС=узмк=
еЙп=_lp`e=~ййдб~еЕЙK
fе=ЗзбеЦ=лзI=узм=Ь~оЙ=зйнЙЗ=Сзк=~=гзЗЙкеI=
ЬбЦЬJим~дбну=ЗзгЙлнбЕ=~ййдб~еЕЙK
vзм=Е~е=СбеЗ=СмкнЬЙк=беСзкг~нбзе=~Дзмн=змк=
йкзЗмЕнл=зе=змк=пЙД=й~ЦЙK
Contents
For your safety . . . . . . . . . . . . . . . . . . . . . 11
Overview . . . . . . . . . . . . . . . . . . . . . . . . . . 13
Operation . . . . . . . . . . . . . . . . . . . . . . . . . 14
Cleaning and servicing . . . . . . . . . . . . . . . 15
Troubleshooting . . . . . . . . . . . . . . . . . . . . 16
Application examples . . . . . . . . . . . . . . . . 16
Standard/optional accessories . . . . . . . . . 17
Disposal . . . . . . . . . . . . . . . . . . . . . . . . . . 18
Warranty conditions . . . . . . . . . . . . . . . . . 18
For your safety
Before use, read these instructions carefully in order to become
familiar with important safety and operating instructions for this
appliance.
If the instructions for correct use of the appliance are not observed,
the manufacturer’s liability for any resulting damage will be excluded.
This appliance is designed for processing normal household quantities in
the home or similar quantities in non-industrial applications.
Non-industrial applications include e.g. use in employee kitchens in shops,
offices, agricultural and other commercial businesses, as well as use by
guests in boarding houses, small hotels and similar dwellings.
Use the appliance for processing normal quantities of food for domestic
use. Do not exceed permitted maximum quantities (see “Application
examples”).
This appliance is suitable for mixing, kneading and beating food. It must not
be used for processing other objects or substances. Other applications are
possible if the accessories approved by the manufacturer are used.
Use the appliance with original accessories only. When using the
accessories, follow the enclosed operating instructions.
Please keep the operating instructions in a safe place. If passing on the
appliance to a third party, always include the operating instructions.
, General safety instructions
Electric shock risk
The appliance must not be used by children.
The appliance and its power cord must be kept away from children.
Appliances can be used by persons with reduced physical, sensory or
mental capabilities or lack of experience and knowledge if they have
been given supervision or instruction concerning use of the appliance in
a safe way and if they understand the hazards involved.
Children shall not play with the appliance.
Robert Bosch Hausgeräte GmbH 11

Connect and operate the appliance only in accordance with the
en
specifications on the rating plate. Do not use the appliance if the power
cord and/or appliance are damaged.
Always disconnect the appliance from the supply if it is left unattended
and before assembling, disassembling or cleaning.
Do not place the power cord over sharp edges or hot surfaces.
To prevent injury, a damaged power cord must be replaced by the
manufacturer or his customer service or a similarly qualified person.
Only our customer service may repair the appliance.
, Safety instructions for this appliance
Risk of injury
Risk of electric shock!
Do not insert mains plug until all preparations for working with the appliance
are complete. Never immerse the base unit in liquid or hold under running
water. Do not use a steam cleaner.
Do not adjust the swivel arm while the appliance is switched on.
Wait until the drive has come to a standstill.
Do not change tool/accessory until the drive is at a standstill – when the
appliance is switched off, the drive continues running briefly.
Use only the rotary switch to switch the appliance on or off.
When the appliance is not in use, pull out the mains plug.
Before eliminating a fault, pull out the mains plug.
The appliance restarts following a power interruption.
Risk of injury from the rotating tools!
Keep hands clear of rotating parts. While the appliance is operating, keep
fingers clear of the mixing bowl.
Do not change tools until the drive has come to a standstill – when the
appliance is switched off, the drive continues running briefly.
The appliance may only be operated when the unused drives have been
safeguarded with the drive covers (4, 7).
Risk of injury from sharp blades/rotating drive!
Never place fingers in the attached blender!
Never assemble blender on the base unit. Do not remove/attach the
blender until the drive is at a standstill!
Operate the assembled blender only and with the lid attached.
Do not touch blender blades with bare hands.
Risk of scalding!
If processing hot liquids, steam escapes through the funnel in the lid.
Add a max. 0.5 litres of hot or frothing liquid.
Important!
Use only one tool or accessory at any one time.
12 Robert Bosch Hausgeräte GmbH
The operating instructions describe several
en
models, see also overview of models (Fig. ).
The appliance requires no maintenance.
Overview
Please fold out the illustrated
pages. Fig.
Base unit
1
Release button
2
Swivel arm
(see “Operating positions”)
Rotary switch
3
0/off = Stop
/
P
Hold rotary switch until the drive stops; tool
is in the swivel position. If the drive does not
move, the swivel position has already been
reached.
Settings 1–4 = Operating speed
Setting 1 = Minimum speed – slow
Setting 4 = Maximum speed – fast
If the power is interrupted, the appliance
remains switched on and restarts when
the power is restored.
4
Drive cover
To remove the drive cover, rotate until
the locking feature has been released.
5
Drive for
–
continuous-feed shredder
citrus press *
–
–
grain mill *
When not in use, attach the drive cover.
Drive for
6
–
tools (stirrer, whisk, kneading hook)
–
stirring tool of the ice-cream maker *
–
folded down or up for mincer *
7
Blender drive cover
8
Drive for
–
blender
–
multi-blender
When not in use, attach the blender drive
cover.
Cord store (
9
MUM 44..: Stow the cord
MUM 46../48..: Stow the cord in the cord
store
Bowl with accessories
10
Mixing bowl
11
Lid
= Parking circuit
Fig.
)
*
Tools
Stirrer
12
13
Whisk
14
Kneading hook with dough deflector
Blender
Base
15
16
Blade insert
17
Sealing ring
18
Blender jug
19
Lid
20
Funnel
* If an accessory is not included in the product
package, it can be purchased via the trade
or customer service.
Operating positions
^ннЙенбзе>
_ЙСзкЙ=зйЙк~нбеЦ=нЬЙ=~ййдб~еЕЙI=~нн~ЕЬ=нЬЙ=нзздL
~ЕЕЙллзку=нз=нЬЙ=ЕзккЙЕн=ЗкбоЙ=~еЗ=бе=нЬЙ=ЕзккЙЕн=
йзлбнбзе=~еЗ=йд~ЕЙ=бе=нЬЙ=зйЙк~нб еЦ=йзл бнбзе=
~ЕЕзкЗбеЦ=нз=нЬбл=н~ДдЙK
qЬЙ=лпбоЙд=~кг=гмлн=ДЙ=ЙеЦ~ЦЙЗ=бе=ЙоЙку=
зйЙк~нбеЦ=йзлбнбзеK
Setting the operating position Fig.
Press the Release button and move
the swivel arm.
Move the swivel arm until it engages
in the required position.
Position
1
2
3
4
5
6
7
Insert/remove whisk, stirrer
or kneading hook
Add large quantities
of ingredients
Robert Bosch Hausgeräte GmbH 13

Operation
en
oблв=зС=беамку>
aз=езн=белЙкн=г~бел=йдмЦ=менбд=~дд=йкЙй~к~нбзел=
Сзк=пзквбеЦ=пбнЬ=нЬЙ=~ййдб~еЕЙ=~кЙ=ЕзгйдЙнЙK
^ннЙенбзе>
aз=езн=зйЙк~нЙ=нЬЙ=~ййдб~еЕЙ=пбнЬзмн=~е=
~ЕЕЙллзкуLнззд=бе=нЬЙ=зйЙк~нбеЦ=йзлбнбзеK
aз=езн=зйЙк~нЙ=нЬЙ=~ййдб~еЕЙ=ЙгйнуK=
aз=езн=ЙсйзлЙ=~ййдб~еЕЙ=зк=~ЕЕЙллзкбЙл=нз=ЬЙ~н=
лзмкЕЙлK=m~кнл=~кЙ=езн=гбЕкзп~оЙJл~ СЙK
Before operating the appliance and
accessories for the first time, clean
thoroughly; see “Cleaning and servicing”.
Preparation
Place the base unit on a smooth, clean
surface.
Unwind/pull out the cord (
Insert the mains plug.
Stirrer, whisk and kneading
hook Fig.
Stirrer (a)
for stirring dough, e.g. cake mixture
Whisk (b)
for whisking egg whites, cream and light dough,
e.g. sponge mixture
Kneading hook (c) with dough deflector (d)
for kneading heavy dough and mixing-in
ingredients that ought not be cut
(e.g. raisins and chocolate chips)
oблв=зС=беамку=Скзг=нЬЙ=кзн~нбеЦ=
нзздл>
tЬбдЙ=нЬЙ=~ййдб~еЕЙ=бл=зйЙк~нбеЦI=вЙЙй=СбеЦЙкл=
ЕдЙ~к=зС=нЬЙ=гбсбеЦ=ДзпдK
aз=езн=ЕЬ~еЦЙ=нзздл=менбд=нЬЙ=ЗкбоЙ=Ь~л=ЕзгЙ=
нз=~=лн~еЗлнбдд=У=пЬЙе=нЬЙ=~ййдб~еЕЙ=бл=
лпбнЕЬЙЗ=зССI=нЬЙ=ЗкбоЙ=ЕзенбемЙл=кмеебеЦ=
ДкбЙСдуK
qЬЙ=~ййдб~еЕЙ= г~у=зеду=ДЙ=зйЙк~нЙЗ=пЬЙе=нЬЙ=
мемлЙЗ=ЗкбоЙл=Ь~оЙ=ДЙЙе=л~СЙЦм~кЗЙЗ=пбнЬ=
нЬЙ=ЗкбоЙ=ЕзоЙклK
Set rotary switch to
the drive stops.
Note:
If the drive does not move, the swivel position
has already been reached.
Fig.
).
P
and hold in place until
Press the Release button and move
the swivel arm to position 6.
Insert the bowl. The base of the mixing bowl
must be inserted into the recess of the base
unit.
Depending on the processing task, insert the
stirrer, whisk or kneading hook until it locks
into position. If using the kneading hook,
rotate the dough deflector until the kneading
hook can lock into position.
Put the ingredients to be processed into
the bowl.
Press the Release button and move
the swivel arm to position 1.
Attach the cover.
Set the rotary switch to the desired setting.
Adding more ingredients
Switch off the appliance with the rotary
switch.
Set rotary switch to
P
and hold in place until
the drive stops.
Remove lid.
Press the Release button and move
the swivel arm to position 7.
Add ingredients
or
add more ingredients through the feed tube
in the cover.
After using the appliance
Switch off the appliance with the rotary
switch.
Set rotary switch to
P
and hold in place until
the drive stops.
Remove mains plug.
Remove lid.
Press the Release button and move
the swivel arm to position 6.
Take the tool out of the drive.
Remove the bowl.
Clean all parts, see “Cleaning and servicing”.
14 Robert Bosch Hausgeräte GmbH

Blender Fig.
en
oблв=зС=беамку=Скзг=лЬ~кй=Дд~ЗЙлL
кзн~нбеЦ=ЗкбоЙ>
kЙоЙк=йд~ЕЙ=СбеЦЙкл=бе=нЬЙ=~нн~ЕЬЙЗ=ДдЙеЗЙк>=
aз=езн=кЙгзоЙL~нн~ЕЬ=нЬЙ=ДдЙеЗЙк=менбд=нЬЙ=
ЗкбоЙ=бл=~н=~=лн~еЗлнбдд>=
lйЙк~нЙ=нЬЙ=~ллЙгДдЙЗ=ДдЙеЗЙк=зеду=~еЗ=пбнЬ=
нЬЙ=дбЗ=~нн~ЕЬЙЗK
oблв=зС=лЕ~дЗбеЦ>
fС=йкзЕЙллбеЦ=Ьзн=дбимбЗлI=лнЙ~г=ЙлЕ~йЙл=
нЬкзмЦЬ=нЬЙ=СмееЙд=бе=нЬЙ=дбЗK=
^ЗЗ=~=г~сK=MKR дбнкЙл=зС=Ьзн=зк=СкзнЬбеЦ=дбимбЗK
t~кебеЦ>
_дЙеЗЙк=г~у=ДЙ=З~г~ЦЙЗK=
aз=езн=йкзЕЙлл=ЗЙЙйJСкзтЙе=беЦкЙЗбЙенл=
EЙсЕЙйн бЕЙ=ЕмДЙлFK=aз=езн=зйЙк~нЙ=пЬЙе=ЙгйнуK
t~кебеЦ>
mкзЕЙллбеЦ=дбимбЗл=бе=нЬЙ=Цд~лл=ДдЙеЗЙкW=
г~сбгмг=лЙннбеЦ=PK=^ЗЗ= ~= г~сK=MKR=дбнкЙл=зС=Ьзн=
зк=СкзнЬбеЦ=дбимбЗK
Press the Release button and move
the swivel arm to position 3.
Remove the blender drive cover.
Attach the blender jug (mark on the base
of the blender jug on the mark on the base
unit) and rotate as far as possible in an
anti-clockwise direction (
Add ingredients.
Maximum capacity of liquid for plastic
blender = 1 litre, for glass blender = 0.75
litres, frothing or hot liquid maximum 0.5 litres
Optimal processing capacity – solids
= 50–100 g.
Attach lid and press firmly.
While working, always hold the lid firmly with
one hand. However, do not place hand over
the refill opening!
Set the rotary switch to the desired setting.
Adding more ingredients Fig. -6
Switch off the appliance with the rotary
switch.
Remove the cover and add ingredients
or
remove the funnel and gradually add solid
ingredients through the feed tube
or
pour liquid through the funnel.
Fig. -4/5
).
After using the appliance
Switch off the appliance with the rotary
switch.
Remove mains plug.
Rotate the blender in a clockwise direction
and remove.
Tip:
It is recommended to clean the blender
immediately after use.
Cleaning and servicing
^ннЙенбзе>
aз=klq=млЙ=~Дк~лбоЙ=ЕдЙ~ебеЦ=~ЦЙенлK=
pмкС~ЕЙл г~у=ДЙ=З~г~ЦЙЗK=
Cleaning the base unit
oблв=зС=ЙдЙЕнкбЕ=лЬзЕв>
kЙоЙк=бггЙклЙ=нЬЙ=Д~лЙ=мебн= бе= п~нЙк=з к=йд~ЕЙ=
меЗЙк=кмеебеЦ=п~нЙкK
Remove mains plug.
Wipe the base unit with a damp cloth.
If required, use a little detergent.
Then dry the base unit.
Cleaning the bowl and accessories
All parts are dishwasher-safe.
Do not wedge plastic parts in the dishwasher
as they could warp.
Cleaning the blender
oблв=зС=беамку=Скзг=лЬ~кй=Дд~ЗЙл>
aз=езн=нзмЕЬ=ДдЙеЗЙк=Дд~ЗЙл=пбнЬ= Д~кЙ= Ь~еЗлK=
qЬЙ=ДдЙеЗЙк=Е~е=ДЙ=Збл~ллЙгДдЙЗ=Сзк=
ЕдЙ~ебеЦK
t~кебеЦ>
aз=klq=млЙ=~Дк~лбоЙ=ЕдЙ~ебеЦ=~ЦЙенлK=
qЬЙ Дд~ЗЙ=белЙкн=бл=езн=ЗблЬп~лЬЙкJл~СЙK=
`дЙ~е нЬЙ=Дд~ЗЙ=белЙкн=меЗЙк=кмеебеЦ= п~нЙк=зедуK
Tip:
After processing liquids, it is often sufficient
to clean the blender without disassembling it.
Pour a little water and washing-up liquid into
the attached blender. Switch on the blender
for several seconds (if the appliance features
quick-action operation, select setting M).
Pour out the water and rinse out the blender
with clear water.
Robert Bosch Hausgeräte GmbH 15
Taking the blender apart Fig.
en
Rotate the base of the blender jug
in a clockwise direction and remove.
Upon the flanks, rotate the blade insert
in an anti-clockwise direction.
The blade insert is released.
Take blade insert out and remove sealing
ring.
Putting the blender together Fig.
oблв=зС=беамку>
kЙоЙк=~ллЙгДдЙ=ДдЙеЗЙк=зе=нЬЙ=Д~лЙ=мебнK
Apply sealing ring on blade insert.
Insert blade insert from below into blender
jug.
Tighten the blade insert with the aid
of the blender jug base.
Tighten the base of the blender jug
in an anti-clockwise direction.
Troubleshooting
If the appliance malfunctions, please consult
our customer service.
Application examples
Whipped cream
100 g–600 g
Whip cream with the whisk for 1½
to 4 minutes at setting 4 (depending
on the quantity and properties of the cream).
Egg white
1 to 8 egg whites
Beat egg white with the whisk for 4 to
6 minutes at setting 4.
Sponge mixture
_~лбЕ=кЙЕбйЙ
2 eggs
2–3 tbs. hot water
100 g sugar
1 packet of vanilla sugar
70 g flour
70 g cornflour baking powder (if required)
Beat the ingredients (except flour and
cornflour) with the whisk for approx.
4–6 minutes at setting 4 until frothy.
Rotate switch to setting 2 and spoon in the
sifted flour and cornflour within approx.
½ to 1 minute.
Maximum quantity:
2 x basic recipe
Cake mixture
_~лбЕ=кЙЕбйЙ
3–4 eggs
200–250 g sugar
1 pinch of salt
1 packet of vanilla sugar or peel from ½ lemon
200–250 g butter (room temperature)
500 g flour
1 packet of baking powder
1
/
l milk
8
Mix all ingredients with the stirrer for approx.
½ minute at setting 1, then for approx.
3–4 minutes at setting 3.
Maximum quantity:
1.5–2 x basic recipe
Short pastry
_~лбЕ=кЙЕбйЙ
125 g butter (room temperature)
100–125 g sugar
1 egg
1 pinch of salt
A little lemon peel or vanilla sugar
250 g flour
Baking powder if required
Process all ingredients for approx. ½ minute
at setting 1, then for approx. 2–3 minutes
with the stirrer (setting 3) or kneading hook
(setting 2).
Maximum quantity:
2 x basic recipe
Yeast dough
_~лбЕ=кЙЕбйЙ
500 g flour
1 egg
80 g fat (room temperature)
80 g sugar
200–250 ml lukewarm milk
25 g fresh yeast or 1 packet of dried yeast
Peel of ½ lemon
1 pinch of salt
Mix all ingredients with the kneading hook
for approx. ½ minute at setting 1, then
for approx. 3–6 minutes at setting 2.
Maximum quantity:
1.5 x basic recipe
Mayonnaise
2 eggs
2 tsp. mustard
¼loil
2 tbs. lemon juice or vinegar
1 pinch of salt
1 pinch of sugar
Ingredients must be at the same temperature.
16 Robert Bosch Hausgeräte GmbH

Process the ingredients (except the oil) in the
en
blender for several seconds at setting 2.
Switch the blender to setting 4 and slowly
pour the oil through the funnel and mix until
the mayonnaise emulsifies.
Standard/optional accessories
Other accessories enclosed with the packaging
(see enclosed overview of models,
described in the separate operating instructions.
Enclosed accessories/optional accessories can
also be purchased separately.
The accessories for the MUM 45.. appliance
are also suitable for the MUM 44../46../48..
appliances.
Fig.
Plastic mixing bowl (MUZ4KR3)
Up to 1 kg of flour plus ingredients can
be processed in the bowl.
Stainless steel stirring bowl
(MUZ4ER2)
Up to 1 kg of flour plus ingredients can
be processed in the bowl.
Plastic blender attachment
(MUZ4MX2)
For blending drinks, for pureeing fruit and
vegetables, for preparing mayonnaise,
for cutting fruit, nuts, for crushing ice cubes.
Glass blender attachment (MUZ4MX3)
For blending drinks, for pureeing fruit and
vegetables, for preparing mayonnaise,
for cutting fruit, nuts, for crushing ice cubes.
Mini processor (MUZ4MM3)
For chopping herbs, vegetables, apples and
meat, for shredding carrots, radishes and
cheese, for grating nuts and cooled chocolate.
Continuous-feed shredder (MUZ4DS3)
For slicing cucumbers, cabbage, kohlrabi,
radish; for shredding carrots, apples and celery,
red cabbage, cheese and nuts; for grating hard
cheese, chocolate and nuts.
Chipper disc (MUZ45PS1)
For the continuous-feed shredder MUZ4DS3.
For slicing raw potatoes for chips.
Asiatic vegetables disc (MUZ45AG1)
For the continuous-feed shredder MUZ4DS3.
Slices fruit and vegetables into fine strips
for Asian vegetable dishes.
Fig.
) are
Grating disc coarse (MUZ45RS1)
For the continuous-feed shredder MUZ4DS3.
For grating raw potatoes, e.g. for potato
pancakes or dumplings.
Potato fritter disc (MUZ45KP1)
For the continuous-feed shredder MUZ4DS3.
For grating raw potatoes for rostis and potato
fritters, for cutting fruit and vegetables into thick
slices.
Citrus press (MUZ4ZP1)
For squeezing oranges, lemons and grapefruits.
Mincer (MUZ4FW3)
For cutting fresh meat for steak tartare
or meat loaf.
Perforated disc set (MUZ45LS1)
For the mincer MUZ4FW3.
Fine disc (3 mm) for pasties and spreads, coarse
disc (6 mm) for sausages and bacon.
Viennese whirl attachment
(MUZ45SV1)
For the mincer MUZ4FW3.
With metal template for 4 different pastry
moulds.
Grater attachment (MUZ45RV1)
For the mincer MUZ4FW3.
For grating nuts, almonds, chocolate and dried
bread rolls.
Juicer attachment (MUZ45FV1)
For the mincer MUZ4FW3.
For pressing soft fruit, (except raspberries),
tomatoes and rose hips, to a pulp.
At the same time e.g. currants are automatically
stemmed and pitted.
Accessories holder (MUZ4ZT1)
For the storage of accessories such as kneading
hook, whisk, stirrer, slicing, shredding and
grating disc.
Mill with conical grinder made of steel
(MUZ4GM3)
For all grain types except maize, also oil seeds,
dried mushrooms and herbs.
Ice-cream maker (MUZ4EB1)
For the preparation of up to 550 g of ice cream
per cycle and container.
Robert Bosch Hausgeräte GmbH 17

Disposal
en
Subject to change without notice.
This appliance has been identified in
accordance with the European
directive 2012/19/EG on Waste
Electrical and Electronic Equipment –
WEEE.
The Directive paves the way for effective
EU-wide withdrawal and utilization of waste
appliances.
Please ask your dealer or inquire at your local
authority about current means of disposal.
Warranty conditions
The guarantee conditions for this appliance
are as defined by our representative in the
country in which it is sold. Details regarding
these conditions can be obtained from the
dealer from whom the appliance was
purchased.
The bill of sale or receipt must be produced
when making any claim under the terms of this
guarantee.
18 Robert Bosch Hausgeräte GmbH

fr
sзмл=оЙеЙт=ЗD~ЕЬЙнЙк=ЕЙ=езмоЙ д=~йй~кЙбд =
_lp`e=Йн=езмл=озмл=Йе=С¨дбЕбнзел=
ЕзкЗб~дЙгЙенK
sзмл=оЙеЙт=~белб=ЗDзйнЙк=йзмк=ме=~йй~кЙбд=
¨дЙЕнкзг¨е~ЦЙк=гзЗЙкеЙ=Йн=ЗЙ=Ь~мнЙ=
им~дбн¨K
pмк=езнкЙ=лбнЙ=tЙДI=озмл=нкзмоЙкЙт=ЗЙл=
беСзкг~нбзел=~о~еЕ¨Йл=лмк=езл=йкзЗмбнлK
Sommaire
Pour votre sécurité . . . . . . . . . . . . . . . . . . 19
Vue d’ensemble . . . . . . . . . . . . . . . . . . . . 21
Utilisation . . . . . . . . . . . . . . . . . . . . . . . . . 22
Nettoyage et entretien . . . . . . . . . . . . . . . . 24
Dérangements et remèdes . . . . . . . . . . . . 24
Exemples d’utilisation . . . . . . . . . . . . . . . . 24
Accessoires d’origine/
Accessoires en option . . . . . . . . . . . . . . . . 25
Mise au rebut . . . . . . . . . . . . . . . . . . . . . . 27
Conditions de garantie . . . . . . . . . . . . . . . 27
Pour votre sécurité
Veuillez lire la présente notice attentivement avant utilisation pour
connaître les consignes de sécurité et d’utilisation importantes
visant cet appareil.
Le non-respect des instructions permettant d’utiliser correctement
l’appareil dégage le fabricant de toute responsabilité envers les
dommages qui pourraient en résulter.
Cet appareil est destiné à la préparation de quantités habituellement
nécessaires dans un foyer, ou dans des applications non professionnelles
similaires à celles d'un foyer. Les applications similaires à celles d'un foyer
comprennent par exemple l'utilisation dans les coins-cuisine du personnel
de magasins, de bureaux, d'entreprises agricoles et autres entreprises
commerciales et industrielles, ainsi que l'utilisation par les clients de
pensions, petits hôtels et immeubles d'habitation similaire. Utilisez cet
appareil uniquement pour des quantités de préparations culinaires
courantes et pour des durées de service normales. Ne dépassez pas les
quantités maximales admissibles (voir « Exemples d’utilisation ») !
Cet appareil sert à mélanger, pétrir et fouetter les produits alimentaires.
Il ne doit pas servir à transformer d’autres objets ou substances.
D’autres applications sont possible à condition d’utiliser les accessoires
homologués par le fabricant.
N’utilisez l’appareil qu’avec des accessoires d’origine. Lorsque vous
utilisez les accessoires, respectez les notices d’utilisation ci-jointes.
Rangez soigneusement la notice d’instructions. Si vous remettez l’appareil
à un tiers, joignez sa notice d’utilisation.
, Consignes générales de sécurité
Risque d’électrocution
L’utilisation de l’appareil par les enfants est interdite.
Des enfants, éloignez l’appareil et son cordon de raccordement.
Robert Bosch Hausgeräte GmbH 19

Les personnes souffrant d’un handicap physique, sensoriel ou mental ou
fr
ne détenant pas l’expérience et/ou les connaissances nécessaires
pourront utiliser les appareils à condition de le faire sous surveillance, ou
que son utilisation sûre leur ait été enseignée et qu'elles aient compris
les dangers qui en émanent.
Ne permettez jamais aux enfants de jouer avec l’appareil.
Ne branchez et faites marcher l’appareil que conformément aux
indications figurant sur la plaque signalétique. N’utilisez l’appareil que si
son cordon d’alimentation et l’appareil lui-même ne présentent aucun
dommage.
Débranchez toujours l’appareil du secteur s’il doit se trouver sans
surveillance, avant de l’assembler, de le démonter ou de le nettoyer.
Veillez à ce que le cordon de branchement ne frotte pas sur des arêtes
vives ou des surfaces très chaudes. Afin d’écarter tout danger, seul le
fabricant ou son service après-vente ou une personne détenant une
qualification équivalente est habilité à remplacer un cordon de
branchement endommagé.
Les réparations sur l’appareil sont réservées à notre service après-vente.
, Consignes de sécurité pour cet appareil
Risque de blessure
Risque d’électrocution !
Ne branchez la fiche mâle dans la prise de courant qu’une fois tous les
préparatifs sur l’appareil achevés.
Ne plongez jamais l’appareil de base dans l’eau, ne le maintenez jamais
sous l’eau du robinet. Ne le nettoyez jamais avec un nettoyeur à vapeur.
Ne déplacez pas le bras pivotant lorsque l’appareil est allumé. Attendez
jusqu’à l’arrêt complet de l’entraînement.
Ne changez l’accessoire qu’après que le mécanisme d’entraînement se
soit immobilisé ; il continue de tourner quelques instants après avoir éteint
l'appareil.
Allumez et éteignez l’appareil uniquement par le sélecteur rotatif.
Si l’appareil ne sert pas, débranchez sa fiche mâle de la prise de courant.
Avant de supprimer tout dérangement, débranchez la fiche mâle de la prise
à courant.
Après une coupure de courant, l’appareil redémarre.
Risque de blessures avec les accessoires en rotation !
Ne touchez pas les pièces en rotation. Pendant le fonctionnement,
n’introduisez jamais les doigts dans le bol mélangeur.
Ne changez les accessoires qu’une fois l‘entraînement à l‘arrêt – une fois
éteint, l’appareil continue de fonctionner quelques secondes.
Utilisez l’appareil uniquement si les couvercles protègent (4, 7) les
entraînements qui ne servent pas.
20 Robert Bosch Hausgeräte GmbH

Risque de blessures avec les lames tranchantes / l’entraînement en
fr
rotation !
N’introduisez jamais les doigts dans le mixeur en place ! Ne retirez / posez
le mixeur qu’après avoir arrêté l’entraînement ! N’utilisez le mixeur qu’une
fois assemblé et avec son couvercle en place.
Ne touchez pas les lames du mixeur avec les mains nues.
Risque de brûlure !
Lorsque vous traitez des aliments mélangés très chauds, de la vapeur
traverse l’entonnoir ménagé dans le couvercle. Versez au maximum
0,5 litre de liquide très chaud ou moussant.
Important !
N’utilisez qu’un outil ou accessoire à la fois.
La notice d’utilisation vaut pour différents
modèles (voir également la vue d’ensemble des
modèles, Figure ). L’appareil ne nécessite
aucun entretien.
Vue d’ensemble
Veuillez déplier les
volets illustrés. Figure
Appareil de base
1
Touche de déverrouillage
2
Bras pivotant
(voir « Positions de travail »)
3
Interrupteur rotatif
0/off = Stop
/
P
l’interrupteur dans cette position jusqu’à
ce que l’entraînement s’immobilise ;
l’accessoire se trouve en position de
basculement. Si l’entraînement ne bouge
pas, cela signifie que l’accessoire se trouve
déjà dans cette position.
Positions 1–4 = Vitesse de travail
Position 1 = Vitesse de rotation la plus
Position 4 = Vitesse de rotation la plus
Si une coupure de courant se produit,
l’appareil reste en position allumée et
redémarrera dès le retour du courant.
4
Couvercle protégeant le mécanisme
d’entraînement
Pour enlever le couvercle protégeant
l’entraînement, tournez-le jusqu’à ce qu’il
se déverrouille.
= Arrêt momentané
basse – Marche lente
élevée – Marche rapide
Entraînement pour
5
–
accessoire râpeur/éminceur
–
presse-agrumes *
–
moulin à céréales *
Lorsque vous n’utilisez pas l’entraînement,
protégez-le avec son couvercle.
6
Entraînement pour
–
les accessoires (fouet mélangeur,
fouet batteur, crochet pétrisseur)
–
accessoire mélangeur
de la sorbetière *
–
basculé vers le bas ou le haut, pour
hachoir à viande *
7
Couvercle protégeant l’entraînement
du mixeur
8
Entraînement pour
–
mixeur
–
multimixeur
Lorsque vous n’utilisez pas l’entraînement,
protégez-le avec son couvercle.
9
Rangement du cordon (
MUM 44..: Enroulez le câble
MUM 46../48..: Placez le cordon
d’alimentation dans son rangement
Bol mélangeur avec accessoires
10
Bol mélangeur
11
Couvercle
Accessoires
Fouet mélangeur
12
13
Fouet batteur
14
Crochet pétrisseur avec déflecteur
de pâte
Figure
*
)
Robert Bosch Hausgeräte GmbH 21
Mixeur
fr
Socle
15
16
Porte-lame
17
Bague d’étanchéité
18
Bol mixeur
19
Couvercle
20
Entonnoir
* Si un accessoire n’a pas été livré d’origine,
vous pouvez vous le procurer dans le
commerce et auprès du service après-vente.
Positions de travail
^ннЙенбзе=>
kЙ=С~бнЙл=СзеЕнбзееЙк=дЫ~йй~кЙбд=имЙ=лб=дЙл=~ЕЕЙлJ
лзбкЙл=лЙ=нк з м о Йе н =л мк=дЫ Й енк ~ ≤еЙгЙен=ЕзккЙЕнI=лмк=
д~=йзлбнбзе=ЕзккЙЕнЙ=Йн=Йе=йзлбнбзе=ЗЙ=нк~о~бдK
iЙ=Дк~л=йбозн~ен=Ззбн=ЙеЕк~енЙк=З~ел=ЕЬ~имЙ=
йзлбнбзе=ЗЙ=нк~о~бдK
Réglage de la position
de travail Figure
Appuyez sur la touche de déverrouillage
puis faites tourner le bras pivotant.
Amenez le bras pivotant sur la position
voulue jusqu’à ce qu’il encrante.
Position
1
2
3
4
5
6
7
Mise en place/enlèvement du
fouet batteur, du fouet mélangeur
et du crochet pétrisseur
Ajout de fortes quantités
d’aliments
Utilisation
oблимЙ=ЗЙ=ДдЙллмкЙл=>
kЙ=Дк~еЕЬЙт=д~=СбЕЬЙ=гЯдЙ=З~ел=д~=йкблЙ=
ЗЙ Езмк~ен=имЫмеЙ=Сзбл=нзмл=дЙл=йк¨й~к~нбСл=
лмк дЫ~йй~кЙбд=~ЕЬЙо¨лK
^ннЙенбзе=>
kЙ=С~бнЙл=СзеЕнбзееЙк=дЫ~йй~кЙбд=имЫ~оЙЕ=дЙл=
~ЕЕЙллзбкЙлLзмнбдл=Йе=йзлбнбзе=ЗЙ=нк~о~бдK
kЙ=С~бнЙл=й~л=СзеЕнбзееЙк=дЫ~йй~кЙбд=¶=обЗЙK=
kЫЙсйзлЙт=й~л=дЫ~йй~кЙбд=Йн=лЙл=~ЕЕЙ ллзбкЙл =
¶ ЗЙл=лзмкЕЙл=ЗЙ=ЕЬ~дЙмкK=iЙл=йб≠ЕЙл=еЙ=озен=
й~л=~м=Сзмк=¶=гбЕкзJзеЗЙлK
Avant la première utilisation, nettoyez l’appa-
reil à fond, voir « Nettoyage et entretien ».
Préparatifs
Posez l’appareil de base sur une surface lisse
et propre.
Déroulez/tirez le cordon (
Introduire la fiche dans la prise de courant.
Fouet mélangeur, fouet
batteur et crochet
pétrisseur Figure
Fouet mélangeur (a)
pour pétrir les pâtes, par ex. de la pâte levée.
Fouet batteur (b)
pour monter les œufs en neige, battre la crème
et les pâtes liquides, par exemple la pâte
à biscuits.
Crochet pétrisseur (c) avec déflecteur
de pâte (d)
pour pétrir les pâtes épaisses et incorporer des
ingrédients qu’il ne faut pas broyer (par exemple
les raisins secs, les plaquettes de chocolat).
oблимЙ=ЗЙ=ДдЙллмкЙл=~оЙЕ=
дЙл ~ЕЕЙллзбкЙл=Йе=кзн~нбзе=>
mЙеЗ~ен=дЙ=СзеЕнбзееЙгЙенI=еЫбенкзЗмблЙт=
а~г~бл=дЙл=ЗзбЦнл=З~ел=дЙ=Дзд=г¨д~еЦЙмкK
kЙ=ЕЬ~еЦЙт=дЙл=~ЕЕЙллзбкЙл=имЫмеЙ=Сзбл=
дЪЙенк~≤еЙгЙен=¶=дЪ~ккЖн=У=меЙ=Сзбл=¨нЙбенI=
дЫ~йй~кЙбд=ЕзенбемЙ=ЗЙ=СзеЕнбзееЙк=имЙдимЙл=
лЙЕзеЗЙлK
rнбдблЙт=дЫ~йй~кЙбд=мебимЙгЙен=лб=дЙл=ЕзмоЙкЕдЙл=
йкзн≠ÖÉåí=äÉë=Éåíê~≤еЙгЙенл=имб=еЙ=лЙкоЙен=
й~лK
Figure
).
22 Robert Bosch Hausgeräte GmbH

Amenez le sélecteur rotatif sur
fr
P
et maintenez-le en position jusqu'à
ce que l’entraînement s’immobilise.
Remarque :
Si l’entraînement ne bouge pas, cela signifie
que l’accessoire se trouve déjà dans cette
position.
Appuyez sur la touche de déverrouillage
et amenez le bras pivotant sur la position 6.
Mettez en place le bol. Il faut que le socle
du bol soit emboîté dans l’évidement
de l’appareil de base.
Suivant besoins, enfoncez le fouet
mélangeur, le fouet batteur ou le crochet
pétrisseur jusqu’à ce qu’il encrante dans
l’entraînement. Si vous choisissez le crochet
pétrisseur tournez le déflecteur de pâte
jusqu’à ce que le crochet encrante.
Versez les ingrédients à préparer dans le bol.
Appuyez sur la touche de déverrouillage
et amenez le bras pivotant sur la position 1.
Mettez le couvercle en place.
Réglez l’interrupteur rotatif sur la position
voulue.
Rajouter des ingrédients
Éteignez l’appareil par l’interrupteur rotatif.
Amenez le sélecteur rotatif sur
P
et maintenez-le en position jusqu’à
ce que l’entraînement s’immobilise.
Enlevez le couvercle.
Appuyez sur la touche de déverrouillage
et amenez le bras pivotant sur la position 7.
Versez les ingrédients
ou
rajoutez les ingrédients par l’ouverture pour
ajout ménagée dans le couvercle.
Après le travail
Éteignez l’appareil par l’interrupteur rotatif.
Amenez le sélecteur rotatif sur
P
et maintenez-le en position jusqu’à
ce que l’entraînement s’immobilise.
Débranchez la fiche mâle de la prise
de courant.
Enlevez le couvercle.
Appuyez sur la touche de déverrouillage
et amenez le bras pivotant sur la position 6.
Détachez l’accessoire de l’entraînement.
Retirez le bol.
Nettoyez toutes les pièces, voir « Nettoyage
et entretien ».
Mixeur Figure
oблимЙ=ЗЙ= ДдЙллмкЙл=~оЙЕ=дЙл=д~гЙл=
нк~еЕЬ~енЙлLдЫЙенк~≤еЙгЙен=
Йе кзн~нбзе=>
kЫбенкзЗмблЙт=а~г~бл=дЙл=ЗзбЦнл=З~ел=дЙ=гбсЙмк=
Йе=йд~ЕЙ=>=
kЙ=кЙнбкЙтLйзлЙт= дЙ=гбсЙмк=имЫ~йк≠ë=~îçáê= ~êêÆí¨=
дЫЙенк~≤еЙгЙен=>=
kЫмнбдблЙт=дЙ=гбсЙмк=имЫмеЙ=Сзбл=~ллЙгДд¨=
Йн ~оЙЕ=лзе=ЕзмоЙкЕдЙ=Йе=йд~ЕЙK
oблимЙ=ЗЙ=ДкºдмкЙ=>
iзклимЙ=озмл=нк~бнЙт=ЗЙл=~дбгЙенл=г¨д~еЦ¨л=
нк≠л=ЕЬ~мЗлI=ЗЙ=д~=о~йЙмк=нк~оЙклЙ=дЫЙензеезбк=
г¨е~Ц¨=З~ел=дЙ=ЕзмоЙкЕдЙK=
sЙклЙт=~м=г~сбгмг=MIR=дбнкЙ=ЗЙ=дбимбЗЙ=нк≠л=
ЕЬ~мЗ=зм=гзмлл~енK
^ннЙенбзе=>
sзмл=кблимЙт=ЗЫЙеЗзгг~ЦЙк=дЙ=гбсЙмк=>=
kЙ нк~бнЙт=й~л=ЗЫбеЦк¨ЗбЙенл=лмкЦЙд¨л=Eл~мС=дЙл=
Цд~´зелFK=kЙ=С~бнЙл=й~л=нзмкеЙк=дЙ=гбсЙмк=¶=обЗЙK
^ннЙенбзе=>
mзмк=гбсЙк=ЗЙл=~дбгЙенл=дбимбЗЙл=З~ел=дЙ=гбсЙмк=
Йе=оЙккЙ=W=к¨ЦдЙт=дЫ~йй~кЙбд=лм к=д~=йзлб нбзе=
P г~сбгмгK=kЙ=оЙклЙт=~м=г~сбгмг=имЙ=
MIR дбнкЙ=ЗЙ=дбимбЗЙ=ЕЬ~мЗ=зм=гзмлл~енK
Appuyez sur la touche de déverrouillage
et amenez le bras pivotant sur la position 3.
Retirez le couvercle protégeant
l’entraînement du mixeur.
Posez le bol mixeur (le repère du socle
doit correspondre avec celui de l’appareil
de base), puis tournez en sens inverse
des aiguilles d’une montre jusqu’à la butée
(
Figure -4/5
Ajoutez des ingrédients.
Quantité maximum de liquide dans les
mixeurs en plastique = 1 litre, dans les
mixeurs en verre = 0,75 litre ; quantité
maximum de liquides moussants ou très
chauds = 0,5 litre ;
quantité maximale traitée, fixe
= 50 à 100 grammes.
Mettez le couvercle en place puis appuyez
bien.
Pendant le travail, tenez toujours fermement
le couvercle d’une main.
Veillez ce faisant à ne jamais introduire
les doigts par l’orifice d’ajout !
Réglez l’interrupteur rotatif sur la position
voulue.
).
Robert Bosch Hausgeräte GmbH 23
Rajouter des ingrédients Figure -6
fr
Éteignez l’appareil par l’interrupteur rotatif.
Retirez le couvercle et ajoutez les ingrédients
ou
retirez l’entonnoir et rajoutez progressive-
ment les ingrédients fermes par l’ouverture
ou
versez les ingrédients liquides par l’enton-
noir.
Après le travail
Éteignez l’appareil par l’interrupteur rotatif.
Débranchez la fiche mâle de la prise
de courant.
Tournez le mixeur dans le sens des aiguilles
d’une montre puis retirez-le.
Un conseil :
il est préférable de nettoyer
le mixeur immédiatement après utilisation.
Nettoyage et entretien
^ннЙенбзе=>
kЫмнбдблЙт=й~л=ЗЙ=З¨нЙкЦЙен=~Дк~лбСK=
sзмл=кблимЙт=ЗЫЙеЗзгг~ЦЙк=дЙл=лмкС~ЕЙлK=
Nettoyage de l’appareil de base
^ннЙенбзе=>
kЫмнбдблЙт=й~л=ЗЙ=З¨нЙкЦЙен=~Дк~лбСK=
iЙ=йзкнЙJд~гЙл=еЙ=лЙ=еЙннзбЙ=й~л=~м=д~оЙJ
о~бллЙддЙK=kЙннзуЙтJдЙ=мебимЙгЙен=лзмл=дЫЙ~м=
Езмк~енЙK
Un conseil :
si vous avez mixé des aliments
liquides, vous n’avez généralement pas besoin
de démonter le mixeur pour le nettoyer.
Pour cela, versez un peu d’eau additionnée
de produit à vaisselle dans le mixeur en place.
Faites fonctionner ce dernier pendant quelques
secondes (si votre appareil possède la marche
momentanée, réglez-le sur la position M).
Jetez l’eau de nettoyage puis rincez le mixeur
à l’eau claire.
Démonter le mixeur Figure
Tournez le socle du bol mixeur dans le sens
des aiguilles d’une montre puis retirez-le.
Par les ailettes, tournez le porte-lame en sens
inverse des aiguilles d’une montre.
Ceci desserre le porte-lame.
Retirez le porte-lame puis enlevez la bague
d’étanchéité.
Assembler le mixeur Figure
oблимЙ=ЗЫ¨дЙЕнкзЕмнбзе=>
kЙ=йдзеЦЙт=а~г~бл=дЫ~йй~кЙбд=ЗЙ=Д~лЙ=З~ел=
дЫЙ~м=Йн=еЙ=дЙ=нЙеЙт=а~г~бл=лзмл=дЫЙ~м=
Зм кзДбеЙн=>
Débranchez la fiche mâle de la prise
de courant.
Essuyez l’appareil de base avec un essuie-
tout humide.
Si nécessaire, ajoutez un peu de produit
à vaisselle.
Ensuite, essuyez l’appareil avec un essuie-
tout sec.
Nettoyez le bol mélangeur avec
les accessoires
Toutes les pièces vont au lave-vaisselle.
Ne coincez pas les pièces en plastique dans
le lave-vaisselle car elles risquent de se
déformer.
Nettoyer le mixeur
oблимЙ=ЗЙ=ДдЙллмкЙл=~оЙЕ=дЙл=д~гЙл=
нк~еЕЬ~енЙл=>
Fixez la bague d’étanchéité contre le porte-
Posez le porte-lame par le bas dans le bol
A l’aide du socle, vissez le porte-lame à fond.
Vissez à fond le socle du bol mixeur en sens
Dérangements et remèdes
En présence d’un dérangement, veuillez vous
adresser à notre service après-vente.
Exemples d’utilisation
Crème chantilly
100 g à 600 g
Travaillez la crème avec le fouet
oблимЙ=ЗЙ=ДдЙллмкЙл=>
kЫ~ллЙгДдЙт=а~г~бл=дЙ=гбсЙмк=лмк=дЫ~йй~кЙбд= ЗЙ=
Д~лЙK
lame.
mixeur.
inverse des aiguilles d’une montre.
batteur pendant 1½ à 4 minutes
(suivant la quantité et les propriétés
de la crème) sur la position 4.
kЙ=нзмЕЬЙт=й~л=дЙл=д~гЙл=Зм=гбсЙмк=~оЙЕ=
дЙл г~бел=емЙлK=iЙ=гбсЙмк=лЙ=З¨гзенЙ=йзмк=
дЙ еЙннзуЙкK
24 Robert Bosch Hausgeräte GmbH
Blanc d’œuf
fr
1 à 8 blancs d’œufs
Travaillez les blancs d’œufs avec
le fouet batteur pendant 4 à 6 minutes
sur la position 4.
Pâte à biscuits
oЙЕЙннЙ=ЗЙ=Д~лЙ=
2 œufs
2–3 c. à soupe d’eau très chaude
100 g de sucre
1 sachet de sucre vanillé
70 g de farine
70 g de fécule éventuellement de la levure
chimique
Battez les ingrédients (sauf la farine
et la fécule) env. 4 à 6 minutes avec
le fouet batteur sur la position 4, jusqu’à
ce que vous obteniez une mousse ferme.
Réglez l’interrupteur rotatif sur la position
2 et, en ½ à 1 minute environ, incorporez par
cuillerées la farine et la fécule que vous aurez
préalablement passées au tamis.
Quantité maximale :
2 fois la recette de base
Pâte levée
oЙЕЙннЙ=ЗЙ=Д~лЙ=
3 à 4 œufs
200 à 250 g de sucre
1 pincée de sel
1 sachet de sucre vanillé ou le zeste
d’un demi-citron
200 à 250 g de beurre
(à la température ambiante)
500 g de farine
1 sachet de levure chimique
1
/
l de lait
8
Mélangez tous les ingrédients avec le fouet
mélangeur pendant env. ½ minute sur
la position 1, puis env. 3 à 4 minutes sur
la position 3.
Quantité maximale :
une fois et demie à 2 fois
la recette de base
Pâte brisée
oЙЕЙннЙ=ЗЙ=Д~лЙ=
125 g de beurre
(à la température ambiante)
100 à 125 g de sucre
1 œuf
1 pincée de sel
un peu de zeste de citron ou du sucre vanillé
250 g de farine
éventuellement de la levure chimique
Travaillez tous les ingrédients environ
½ minute au niveau 1, puis 2–3 minutes
avec le fouet mixeur (niveau 3) ou le crochet
à malaxer (niveau 2).
Quantité maximale :
2 fois la recette de base
Pâte à la levure de boulanger
oЙЕЙннЙ=ЗЙ=Д~лЙ=
500 g de farine
1 œuf
80 g de matière grasse
(à la température ambiante)
80 g de sucre
200 à 250 ml de lait tiède
25 g de levure de boulanger fraîche ou 1 sachet
de levure sèche
Zeste d’un demi citron
1 pincée de sel
Travaillez tous les ingrédients avec le crochet
pétrisseur pendant env. ½ minute sur
la position 1, puis env. 3 à 6 minutes sur
la position 2.
Quantité maximale :
1,5 fois la recette
de base.
Mayonnaise
2 œufs
2 c. à café de moutarde
¼ l d’huile
2 c. à soupe de jus de citron ou de vinaigre
1 pincée de sel
1 pincée de sucre
Les ingrédients doivent tous se trouver
à la même température.
Pendant quelques secondes, mélangez tous
ces ingrédients (sauf l’huile) avec le mixeur
réglé sur la position 2.
Réglez ensuite le mixeur sur la position 4,
versez l’huile lentement par l’entonnoir
puis travaillez le mélange jusqu’à ce que
la mayonnaise soit bien ferme.
Accessoires d’origine/Accessoires
en option
Les autres accessoires joints dans la boîte
(voir la vue d’ensemble des modèles ci-jointe,
figure
sation séparées.
Vous pouvez également vous procurer les
accessoires d’origine/accessoires en option
séparément.
Les accessoires du robot MUM 45..
s’adaptent aux robots MUM 44../46../48.. .
) sont décrits dans les notices d’utili-
Robert Bosch Hausgeräte GmbH 25

Figure
fr
Bol mélangeur en plastique
(MUZ4KR3)
Dans le bol, vous pouvez traiter jusqu’à 1 kg
de farine plus les ingrédients.
Bol mélangeur en acier inoxydable
(MUZ4ER2)
Dans le bol, vous pouvez traiter jusqu’à 1 kg
de farine plus les ingrédients.
Bol mixeur en plastique (MUZ4MX2)
Pour passer des boissons au mixeur, pour
réduire les fruits et légumes en purée, pour
préparer de la mayonnaise, réduire des fruits
et légumes, pour broyer des glaçons.
Bol mixeur en verre (MUZ4MX3)
Pour passer des boissons au mixeur, pour
réduire les fruits et légumes en purée, pour
préparer de la mayonnaise, réduire des fruits
et légumes, pour broyer des glaçons.
Multimixeur (MUZ4MM3)
Pour hacher des herbes culinaires, légumes,
pommes et la viande, pour râper les carottes,
radis et le fromage, pour râper/concasser
les noix et le chocolat mis au réfrigérateur.
Accessoire râpeur/éminceur
(MUZ4DS3)
Pour couper des concombres, du chou, chourave, raifort ; pour râper des carottes, pommes
et du céleri, du chou rouge, fromage et des
noix ; pour râper/concasser du fromage dur,
du chocolat et des noix.
Disque à pommes frites (MUZ45PS1)
Pour l’accessoire râpeur/éminceur MUZ4DS3.
Pour découper des frites dans les pommes
de terre crues.
Disque à légumes asiatiques
(MUZ45AG1)
Pour l’accessoire râpeur/éminceur MUZ4DS3.
Découpe les fruits et légumes en fines lanières
pour préparer des plats asiatiques.
Disque à râper (épais) (MUZ45RS1)
Pour l’accessoire râpeur/éminceur MUZ4DS3.
Pour râper des pommes de terre crues, par
exemple pour faire des râpées de pomme
de terre ou des boulettes.
Disque pour galettes de pommes
de terre (MUZ45KP1)
Pour l’accessoire râpeur/éminceur MUZ4DS3.
Pour râper des pommes de terre crues et
préparer des « rösti » et des galettes de
pommes de terre, pour découper les fruits et
légumes en rondelles épaisses.
Presse-agrumes (MUZ4ZP1)
Pour presser des oranges, citrons et
pamplemousses.
Hachoir à viande (MUZ4FW3)
Pour hacher de la viande fraîche destinée à un
steak tartare ou un rôti de viande hachée.
Kit de disques ajourés (MUZ45LS1)
Pour le hachoir à viande MUZ4FW3.
Fin (3 mm) pour les pâtés et les pâtes à tartiner,
grossier (6 mm) pour les saucisses grillées et le
lard.
Kit pour gâteaux secs (MUZ45SV1)
Pour le hachoir à viande MUZ4FW3.
Avec gabarit métallique permettant de conférer
aux gâteaux 4 formes différentes.
Embout à râper (MUZ45RV1)
Pour le hachoir à viande MUZ4FW3.
Pour râper les noix, amandes, le chocolat et les
petits-pains secs.
Kit pour coulis de fruits et légumes
(MUZ45FV1)
Pour le hachoir à viande MUZ4FW3.
Pour préparer un coulis de baies (sauf les
framboises), les tomates et baies d’églantier.
Simultanément, le kit dénoyaute
automatiquement les groseilles/cassis par
exemple et enlève leurs tiges.
Porte-accessoire (MUZ4ZT1)
Pour ranger des accessoires comme les
crochets à pétrir, fouets batteurs, fouets
mixeurs, disques à découper, à râper
et râper/concasser.
Moulin à céréales avec meules
coniques en acier (MUZ4GM3)
Pour tous types de céréales excepté le maïs,
également pour les graines oléagineuses, les
champignons secs et les herbes culinaires.
Sorbetière (MUZ4EB1)
Pour préparer jusqu’à 550 g de glace par
séance et récipient.
26 Robert Bosch Hausgeräte GmbH

Mise au rebut
fr
Sous réserve de modifications.
Cet appareil a été labélisé en conformité
avec la directive communautaire
européenne 2012/19/CE visant les
appareils électriques et électroniques
usagés (waste electrical and electronic
equipment – WEEE).
Cette directive fixe le cadre, en vigueur sur tout
le territoire de l’UE, d’une reprise et d’un
recyclage des appareils usagés.
Pour connaître les consignes actuelles
relatives à la mise au rebut, renseignez-vous
auprès de votre revendeur ou de votre
municipalité.
Conditions de garantie
Les conditions de garantie applicables sont
celles publiées par notre distributeur dans le
pays où a été effectué l'achat. Le revendeur
chez qui vous vous êtes procuré l'appareil
fournira les modalités de garantie sur simple
demande de votre part. En cas de recours en
garantie, veuillez toujours vous munir de la
preuve d'achat.
Robert Bosch Hausgeräte GmbH 27

it
`зеЦк~нмд~тбзеб=йЙк=дЫ~Еимблнз=Зб=имЙлнз=
емзоз=~йй~кЙЕЕЬбз=Зб=йкзЗмтбзеЙ=_lp`eK
`зе=Йллз=~оЙнЙ=лЕЙднз=ме=ЙдЙннкзЗзгЙлнбЕз=
гзЗЙкез=Й=Зб=Цк~е=йкЙЦбзK
q кзо~нЙ=мднЙкбзкб=беСзкг~тбзеб=лмб=езлнкб=
йкзЗзннб=еЙд=езлнкз=лбнз=fенЙкеЙнK
Indice
Per la vostra sicurezza . . . . . . . . . . . . . . . . 28
Guida rapida . . . . . . . . . . . . . . . . . . . . . . . 30
Uso . . . . . . . . . . . . . . . . . . . . . . . . . . . . . . 31
Pulizia e cura . . . . . . . . . . . . . . . . . . . . . . . 36
Rimedio in caso di guasti . . . . . . . . . . . . . . 36
Esempi d’impiego . . . . . . . . . . . . . . . . . . . 36
Accessori/accessori speciali . . . . . . . . . . . 37
Smaltimento . . . . . . . . . . . . . . . . . . . . . . . 35
Condizioni di garanzia . . . . . . . . . . . . . . . . 35
Per la vostra sicurezza
Leggere attentamente questa guida prima dell’uso, per conoscere
importanti istruzioni di sicurezza e per l’uso di questo apparecchio.
L’inosservanza delle istruzioni per l’uso corretto dell’apparecchio
esclude una responsabilità del costruttore per i danni da essa derivanti.
Questo apparecchio è destinato alla lavorazione di quantità usuali per la
famiglia o per impieghi non professionali, simili a quello domestico.
Gli impieghi simili a quello domestico comprendono ad es. l’impiego cucine
per il personale in negozi, uffici, aziende agricole e altre aziende di
produzione, nonché l’uso da parte di ospiti di pensioni, piccoli hotel e simili
strutture abitative. Utilizzare l’apparecchio solo per quantità e tempi di
lavoro usuali nell’attività domestica. Non superare la massima quantità
ammessa (vedi «Esempi d’impiego»)!
Questo apparecchio è previsto per miscelare, impastare e montare
alimenti. Il suo uso è vietato per la lavorazione di altri oggetti o sostanze.
Altri impieghi sono possibili se si utilizzano gli accessori autorizzati dal
produttore.
Usare l’apparecchio solo con accessori originali. Per l’uso degli accessori
osservare le accluse istruzioni.
Si prega di conservare le istruzioni per l’uso. In caso di cessione
dell’apparecchio a terzi, consegnare unitamente questo libretto d’istruzioni.
, Avvertenze di sicurezza generali
Pericolo di scariche elettriche
L’uso di questo apparecchio è vietato ai bambini.
Tenere l’apparecchio ed il suo cavo di collegamento fuori dalla portata
dei bambini.
Gli apparecchi possono essere usati da persone con ridotte capacità
fisiche, sensorali o mentali o da persone prive di esperienza e
competenza se sono sorvegliate o sono state istruite sull'uso sicuro
dell'apparecchio ed hanno compreso i pericoli da esso derivanti.
Ai bambini è vietato giocare con l’apparecchio!
28 Robert Bosch Hausgeräte GmbH

Collegare e usare l’apparecchio solo rispettando i dati della targhetta
it
d’identificazione. Utilizzare solo se il cavo di alimentazione e
l’apparecchio non presentano danni.
Staccare sempre l’apparecchio dalla rete quando non è sorvegliato
e prima del montaggio, dello smontaggio o della pulizia.
Non tirare il cavo di alimentazione su spigoli vivi né metterlo a contatto
con superfici calde. Al fine di evitare pericoli, se il cavo di alimentazione
di questo apparecchio subisce danni, deve essere sostituito dal
produttore, dal suo servizio assistenza clienti o da persona in possesso
di simile qualificazione.
Fare eseguire le riparazioni all’apparecchio solo dal nostro servizio
assistenza clienti.
, Avvertenze di sicurezza per questo apparecchio
Pericolo ferite
Pericolo di scossa elettrica!
Inserire la spina di rete solo dopo che tutti i preparativi per il lavoro con
l’apparecchio sono stati conclusi.
Non immergere mai l’apparecchio base in liquidi o tenerlo sotto acqua
corrente. Non usare pulitrici a getto di vapore.
Non spostare il braccio oscillante quando l’apparecchio è in funzione.
Attendere l’arresto completo dell’ingranaggio.
Cambiare l’utensile/accessorio solo ad ingranaggio fermo – dopo avere
spento l’apparecchio, l’ingranaggio continua a girare brevemente.
Accendere e spegnere l’apparecchio solo con la manopola.
Quando l’apparecchio non è in uso estrarre la spina di rete.
Prima di riparare un guasto, estrarre la spina d’alimentazione.
Dopo una interruzione di corrente l’apparecchio ricomincia a funzionare.
Pericolo di ferite a causa di utensili in rotazione!
Non toccare parti in rotazione. Durante il funzionamento non introdurre mai
le mani nella ciotola.
Sostituire l’utensile solo quando l’ingranaggio è completamente fermo –
dopo lo spegnimento l’ingranaggio gira ancora brevemente per inerzia.
Per motivi di sicurezza l’uso dell’apparecchio è consentito solo se
gli ingranaggi non utilizzati sono coperti con i coperti di sicurezza
ingranaggi (4, 7).
Pericolo di ferite a causa di lame taglienti/ingranaggio in rotazione!
Non introdurre mai le mani nel frullatore applicato!
Non assemblare mai il frullatore quando è già montato sull’apparecchio
base. Rimuovere/applicare il coperchio solo quando il motore è fermo!
Mettere in funzione il frullatore solo completamente assemblato e con il
coperchio applicato. Non toccare a mani nude le lame del frullatore.
Robert Bosch Hausgeräte GmbH 29

Pericolo di scottature!
it
Durante la lavorazione di frullati molto caldi, dal bicchierino dosatore nel
coperchio esce vapore. Introdurre massimo 0,5 litri di liquido molto caldo
o che produce schiuma.
Importante!
Usare solo un attrezzo o un accessorio per volta.
Questo libretto d’istruzioni per l’uso descrive
diverse versioni (cfr. anche prospetto dei
modelli, figura ). L’apparecchio non ha
bisogno di manutenzione.
Guida rapida
Aprire le pagine con le figure. Figura
Apparecchio base
1
Pulsante di sblocco
2
Braccio oscillante
(vedi «Posizioni di lavoro»)
Interruttore rotante
3
0/off = arresto
/
P
Mantenere la manopola finché l’ingranaggio
non si ferma; l’utensile è in posizione
di ribaltamento. La posizione di ribaltamento è già raggiunta quando l’ingranaggio è completamente fermo.
Livelli 1–4 = velocità di lavoro
Grado 1 = numero di giri minimo –
Grado 4 = numero di giri massimo –
In caso d’interruzione dell’alimentazione
elettrica l’apparecchio resta inserito e dopo
l’interruzione si rimette in funzione.
4
Coperchio di sicurezza ingranaggio
Per rimuovere il coperchio di sicurezza
ingranaggio, ruotarlo finché non si sblocca.
Ingranaggio per
5
–
sminuzzatore continuo
–
spremiagrumi *
–
macina per cereali *
Applicare il coperchio di sicurezza,
se l’ingranaggio non viene utilizzato.
6
Ingranaggio per
–
utensili (frusta per mescolare, frusta
per montare, braccio impastatore)
–
mescolatore della gelatiera *
–
abbassato o sollevato per tritacarne *
7
Coperchio di sicurezza ingranaggio
frullatore
= comando parcheggio
lento
veloce
*
8
Ingranaggio per
–
frullatore
–
multimixer
Applicare il coperchio di sicurezza, se
l’ingranaggio del frullatore non viene
utilizzato.
9
Conservazione del cavo (
MUM 44..: Avvolgere il cavo
MUM 46../48..: Riporre il cavo nel vano
portacavo
Ciotola con accessori
10
Contenitore di miscelazione
11
Coperchio
Utensili
Frusta
12
13
Sbattitore
14
Braccio impastatore con spatola
Frullatore
Zoccolo
15
16
Gruppo lame
17
Anello di tenuta
18
Bicchiere frullatore
19
Coperchio
20
Bicchierino dosatore
* Se un accessorio non è compreso nella
fornitura, può essere acquistato nel commercio e presso il servizio assistenza clienti.
Figura
)
30 Robert Bosch Hausgeräte GmbH
 Loading...