

Page 1
Register your new Bosch now:
www.bosch-home.com/welcome
MUC 2...RU
MUC 4...RU
en Instruction manual
ru Инструкция по эксплуатации
uk Інструкція з експлуатації
MUC_2-4_RU_8001013355.indb 1 10.08.2015 12:44:35
Page 2
en English 2
B
C
c
g
a
b d e
f
h
i
ru Pycckий 23
uk Українська 50
A
3
2
7
84 5 9
61
10*
11
12 13
14
15* 16 17 18
Register your new Bosch now:
www.bosch-home.com/welcome
MUC_2-4_RU_8001013355.indb 2 10.08.2015 12:44:46
Page 3
B
a
C
b d e
c
i
h
f
g
MUC_2-4_RU_8001013355.indb 3 10.08.2015 12:44:49
Page 4

en
Congratulations on the purchase of your
new Bosch appliance.
In doing so, you have opted for a modern,
high-quality domestic appliance. On the
following pages of these operating instruc-
tions, you will nd useful information for
safe use of this appliance.
We request that you read these instructions
carefully and observe all instructions. This
ensures that you will be able to enjoy this
appliance for a long time and the results of
your work will be an endorsement of your
decision to purchase this appliance.
Retain these operating instructions for
subsequent use or for the next owner.
You can nd further information about our
products on our website.
Table of contents
Intended use
Safety instructions �����������������������������������4
Overview
Control panel
Controls
Indicators
Before using for the rst
Operation
Function selection mode
Selecting and starting a preparation
programme ...............................................10
Selecting a pre-congured
preparation time........................................12
Setting a start time delay
Prematurely terminating the current
preparation step........................................12
Using the deep frying basket
Using the steamer insert
Child lock
Preparation
General recommendations
Customised setting options
Setting the preparation time
Setting the preparation temperature
мой ре
епт 1 / рецепт 2 (recipe 1 / recipe 2) –
рец
saving personal preparation programmes
Care and daily cleaning
Cleaning the basic appliance
Disassembling the steam outlet................17
Cleaning the lid insert and
the steam outlet
Cleaning the pan and accessories
Disposal�
Guarantee ������������������������������������������������18
List of preparation programmes
Model overview and technical data
Special accessories
roubleshooting �������������������������������������21
T
���������������������������������������������3
�
���������������������������������������������������5
��������������������������������������������6
......................................................6
....................................................
time �����������������8
�������������������������������������������������10
...........................10
..........................12
.................... 13
...........................13
..................................................14
����������������������������������������������14
.......................14
������������������15
.....................
......... 15
жим – my mode ............................
�������������������������17
....................17
........................................
...........
��������������������������������������������������18
�����������19
������20
�������������������������������21
15
15
16
18
18
7
2
MUC_2-4_RU_8001013355.indb 2 10.08.2015 12:44:49
Page 5

3
en
Intended use
Intended use
Please read and follow the operating instructions carefully and
keep them for later reference. Enclose these instructions when
you give this appliance to someone else.
If the instructions for correct use of the appliance are not observed,
the manufacturer’s liability for any resulting damage will be
excluded.
This appliance is designed for the preparation of normal household
quantities in the home, or in household-like, non-commercial
environments. Household-like environments include staff kitchens
in shops, ofces, agricultural and other small businesses or for use
by guests at bed-and-breakfast establishments, small hotels and
similar residential facilities.
The appliance is suitable for cooking, baking, roasting, braising,
steam-cooking, frying, pasteurising and heating up food, as well
as keeping food warm. It must not be used for processing other
substances or objects.
All ingredients must be hygienically faultless. During handling, the
rules of kitchen hygiene must be observed.
Use the appliance with original accessories only. Only use the pan
and the accessories with the basic appliance.
Only use the appliance indoors at room temperature and up to
2000
m above sea level. When installing the appliance, ensure that
there are no sensitive surfaces and appliances above and behind
the appliance that may be damaged by the temperature development
and the escaping steam.
This appliance can be used by persons with reduced physical,
sensory or mental capabilities or lack of experience and knowledge
if they have been given supervision or instruction concerning use
of the appliance in a safe way and if they understand the hazards
involved. Keep children away from the appliance and connecting
cable and do not allow them to use the appliance. Children shall not
play with the appliance. Cleaning and user maintenance shall not be
made by children.
MUC_2-4_RU_8001013355.indb 3 10.08.2015 12:44:50
Page 6

en
Safety instructions
Safety instructions
A Warning
Danger of electric shock and re!
The appliance may only be connected to a power supply with
alternating current via a correctly installed socket with earthing.
Ensure that the protective conductor system of the domestic supply
has been correctly installed.
Connect and operate the appliance only according to the type
plate specications. Use only if power cord and appliance show no
signs of damage. To avoid potential hazards, repairs must only be
carried out by our customer service personnel. If the supply cord
is damaged, it must be replaced by a special cord or assembly
available from the manufacturer or its service agent.
Do not connect the appliance to or operate it by means of a time
switch or remote control socket. Never leave the appliance
unattended while it is switched on! Should a fault occur, pull the
plug or disconnect from the mains immediately. The mains cable
must not come into contact with hot parts or be pulled across sharp
edges.
Never immerse the appliance or mains cable in water or place it in
the dishwasher! Unplug the appliance before cleaning it.
A W
arning
Risk of burns!
During operation, the appliance must never be used without the pan
inserted. The housing, pan and metallic components heat up while
the appliance is in use! The pan and the accessories may only be
removed using the tools provided. Use oven gloves. Hot steam is
generated in the appliance. Do not lean over the appliance. Open
the lid with care. Only transport or clean the appliance once it has
fully cooled down!
A W
arning
Risk of suffocation!
Do not allow children to play with packaging material.
4
MUC_2-4_RU_8001013355.indb 4 10.08.2015 12:44:50
Page 7

5
en
Overview
Overview
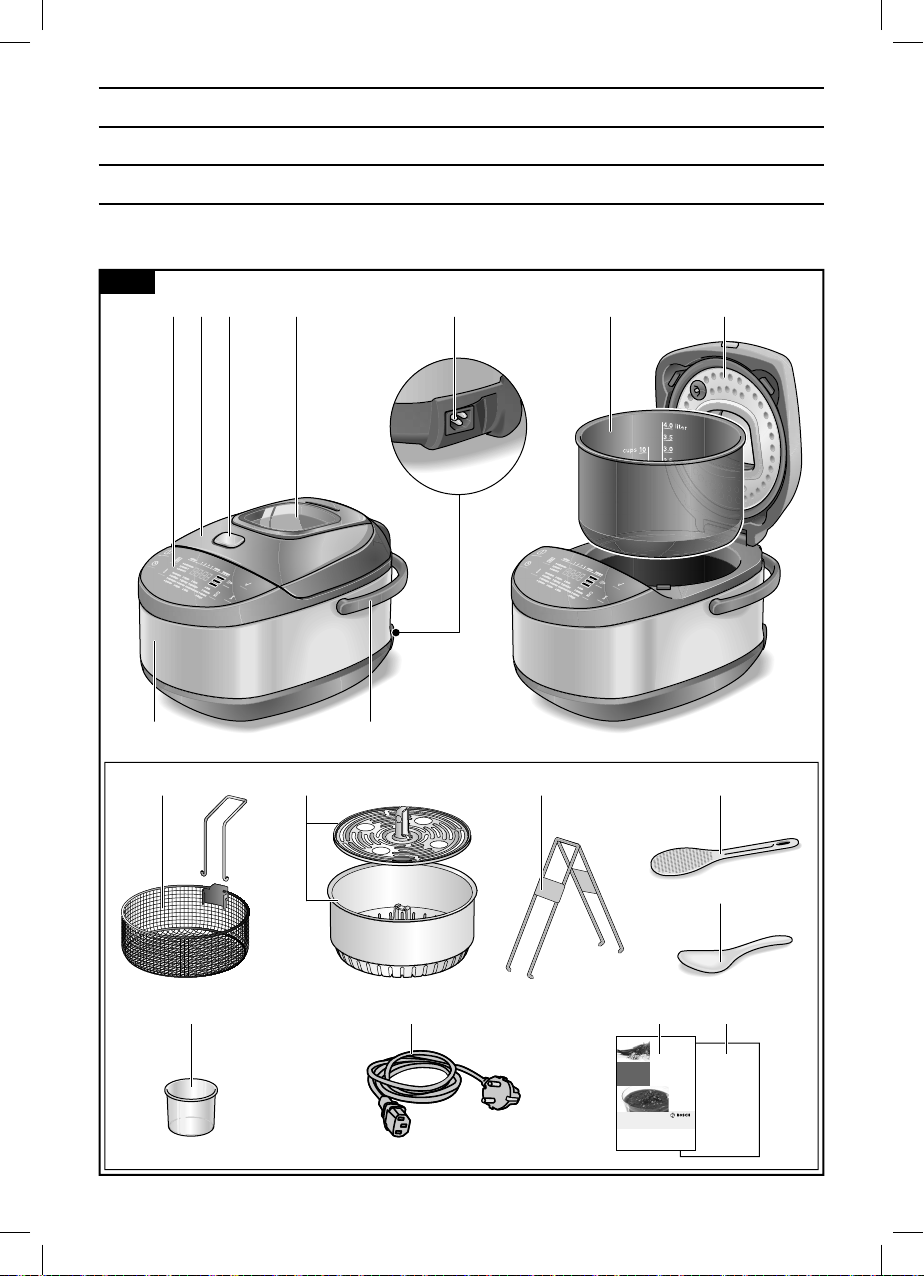
(Figure A at the start of the operating instructions)
1
Multi cooker (basic appliance)
Control panel
2
Lid
3
Opening button for the lid
4
5
Removable steam outlet (with window*), 2-part
Carrying handle
6
7
Mains connection
Pan with non-stick coating
8
Removable lid insert
9
10
Deep frying basket with removable handle *
Steamer insert, 2-part
11
12
Pan tongs
Spatula
13
Ladle
14
15
Measuring beaker*
Mains cable
16
17
Instruction manual
Recipe book
18
* Depending on the model
The operating instructions refer to dif
overview and technical data” (page
different models.
ferent models of the appliance. In the section “Model
20), you will nd an overview of the features of the
MUC_2-4_RU_8001013355.indb 5 10.08.2015 12:44:50
Page 8

en
Control panel
Control panel
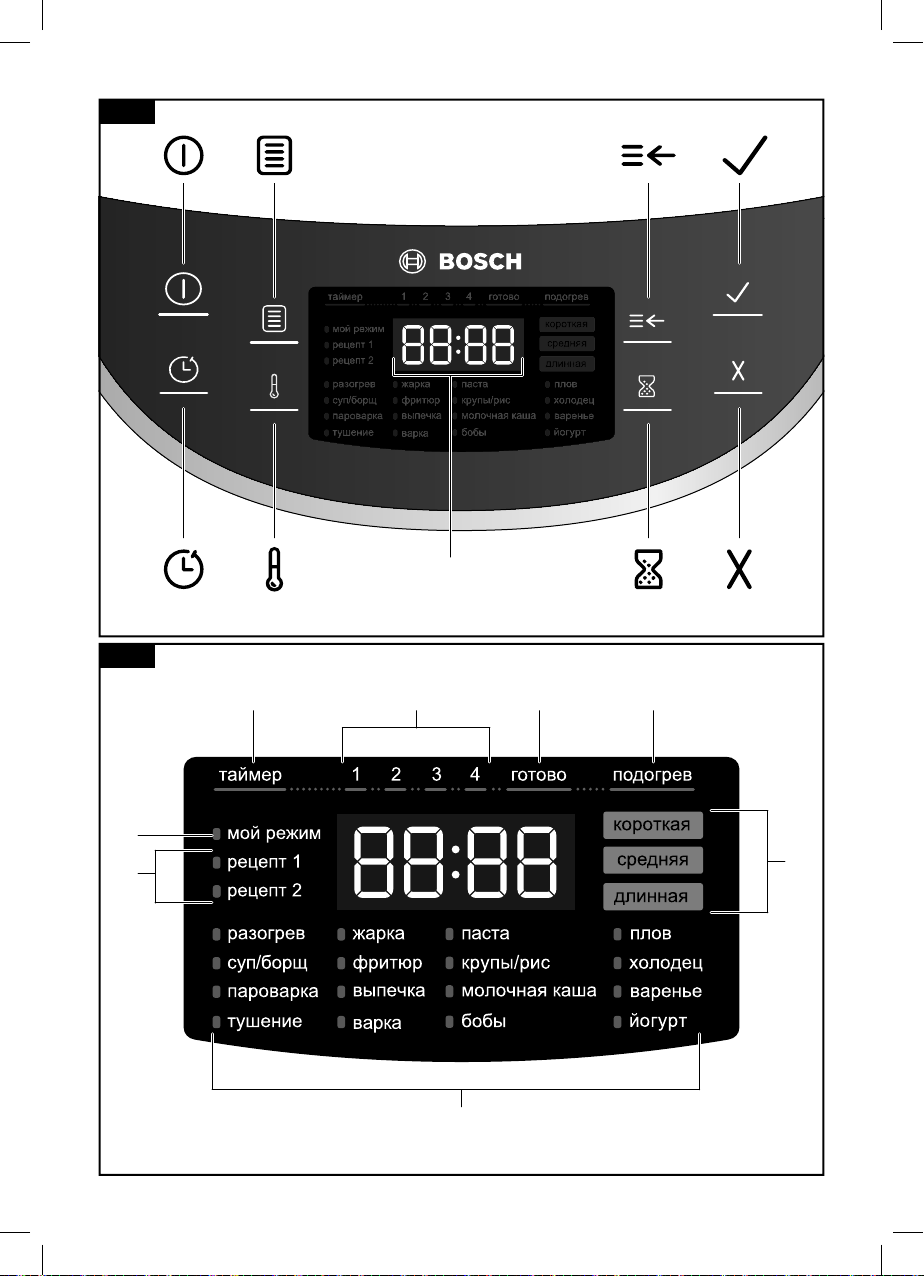
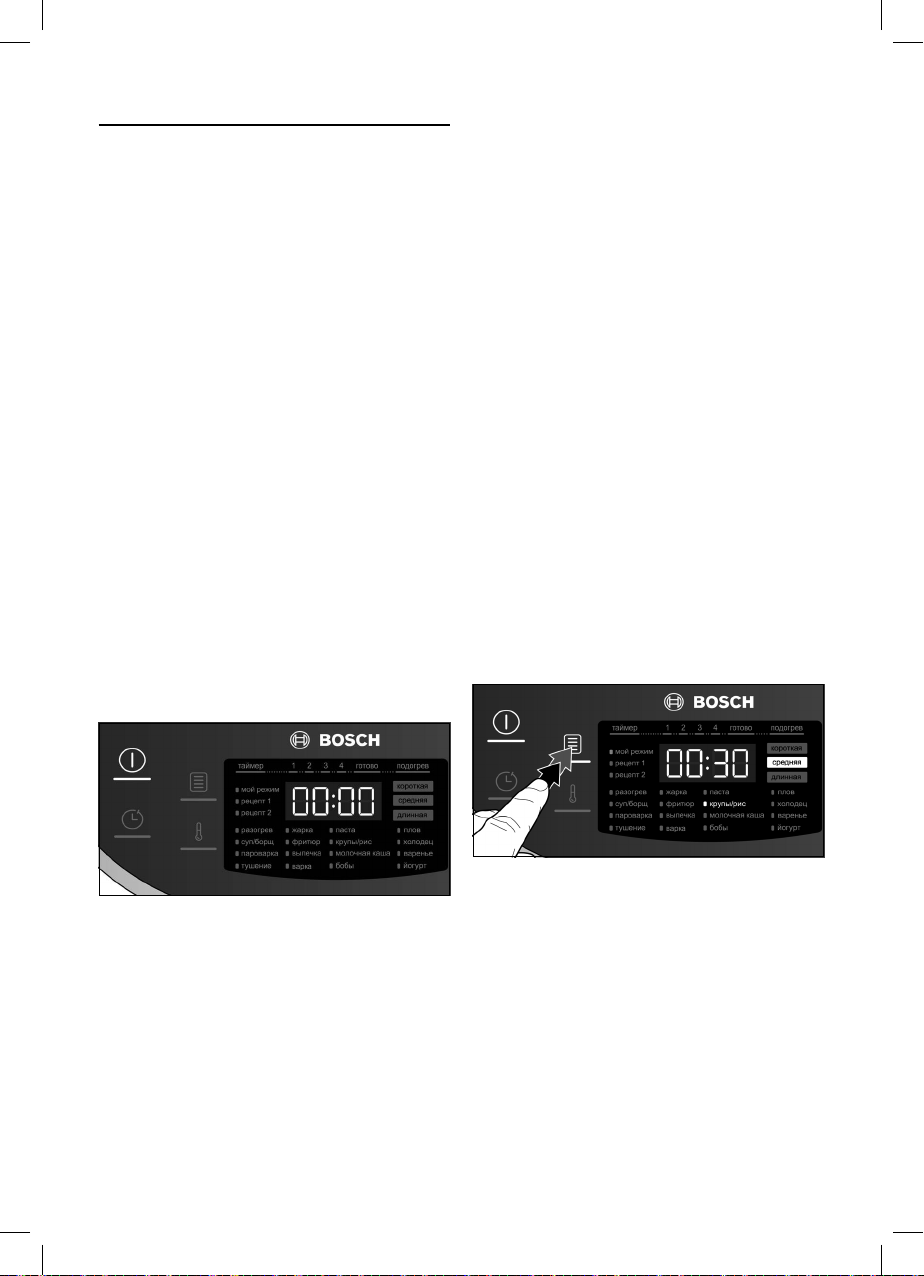
The control panel consists of controls (buttons) and indicators (LEDs). The buttons can
be used to select the individual preparation programmes and adopt the different setting
options (e.g. preparation temperature and time). The settings are indicated via the illuminated LEDs and/or the display.
Controls
(Figure B at the start of the operating instructions)
Standby
B
Switches the appliance standby mode on or off.
Set start time delay
A
The start time delay can be set for the selected preparation programme.
Select a preparation programme from the list (g)
D
The individual preparation programmes are displayed one after another by repeatedly pressing button D. The corresponding LED lights up in the control panel.
Set a customised preparation temperature
C
For customised adjustment of the preparation temperature.
Adjust the preparation time
E
The pre-congured preparation time [
programme can be shortened [
sponding indicator (f) lights up. The corresponding pre-congured preparation duration is shown in the display (a).
Set a customised preparation time
F
For customised adjustment of the preparation time.
Conrm the programme
G
Pressing button G starts the selected preparation programme.
Delete a setting or abort the programme
H
Pressing button H deletes the settings or stops a programme that was previously
started.
короткая ] or lengthened [ длинная ]. The corre-
сре
дняя
] (medium) for a preparation
6
MUC_2-4_RU_8001013355.indb 6 10.08.2015 12:44:50
Page 9

en
Control panel
Indicators
(Figure C at the start of the operating instructions)
a
Display
Display of the remaining time or the temperature.
b таймер (timer)
Indicates that the start time delay is enabled.
start of the selected preparation programme.
Preparation steps / programme progress
c
Display of the individual preparation steps and the programme progress. In the
case of multiple preparation steps (e.g. the ingredients are added after heating the
deep frying oil), these are visually indicated by the illumination of LEDs 1, 2, 3 or 4.
An audible signal also sounds if a subsequent preparation step is required.
d
г
This indicates that the meal is ready. The display (a) ashes and shows “00:00”. An
audible signal also sounds.
e подогрев (keep warm)
Indicates that the keep warm function is switched on at the end of a preparation
programme. A rectangle lights up in the display (dotted line).
f Display of the pre-congured preparation time
The pre-congured preparation time [
programme can be shortened [
The corresponding indicator lights up.
List of preparation programmes
g
There are 16 pre-congured preparation programmes available. The individual
preparation programmes are displayed one after another by repeatedly pressing
button D. The corresponding LED lights up in the control panel.
h рецепт 1&2 – recipe 1&2 (depending on model)
Memory locations for preparation programmes with customised time and
temperature.
i мой режим – my mode
Quick setting mode for customising the preparation time and temperature setting for
a cooking process.
отово (ready)
The display (a) shows the time until the
средняя ] (medium) for a preparation
к
ороткая
] or lengthened [ длинная ] using button
E.
7
MUC_2-4_RU_8001013355.indb 7 10.08.2015 12:44:50
Page 10

en
Before using for the rst time
Before using for the
rst time
Before the new appliance can be used,
this must be fully unpacked, cleaned and
connected to the power outlet. To do this,
perform the following steps:
Remove the appliance and all accessory
1�
parts from the packaging.
2
Use the carrying handle to lift up the
�
appliance. Swing the carrying handle
upwards accordingly
Caution!
You must use only the carrying handle.
This also applies for safe transport of the
appliance.
3� Place the appliance on a stable, level
and smooth work surface.
Caution!
There must be no sensitive surfaces and
appliances above and behind the appliance
that may be damaged by the temperature
development and the escaping steam.
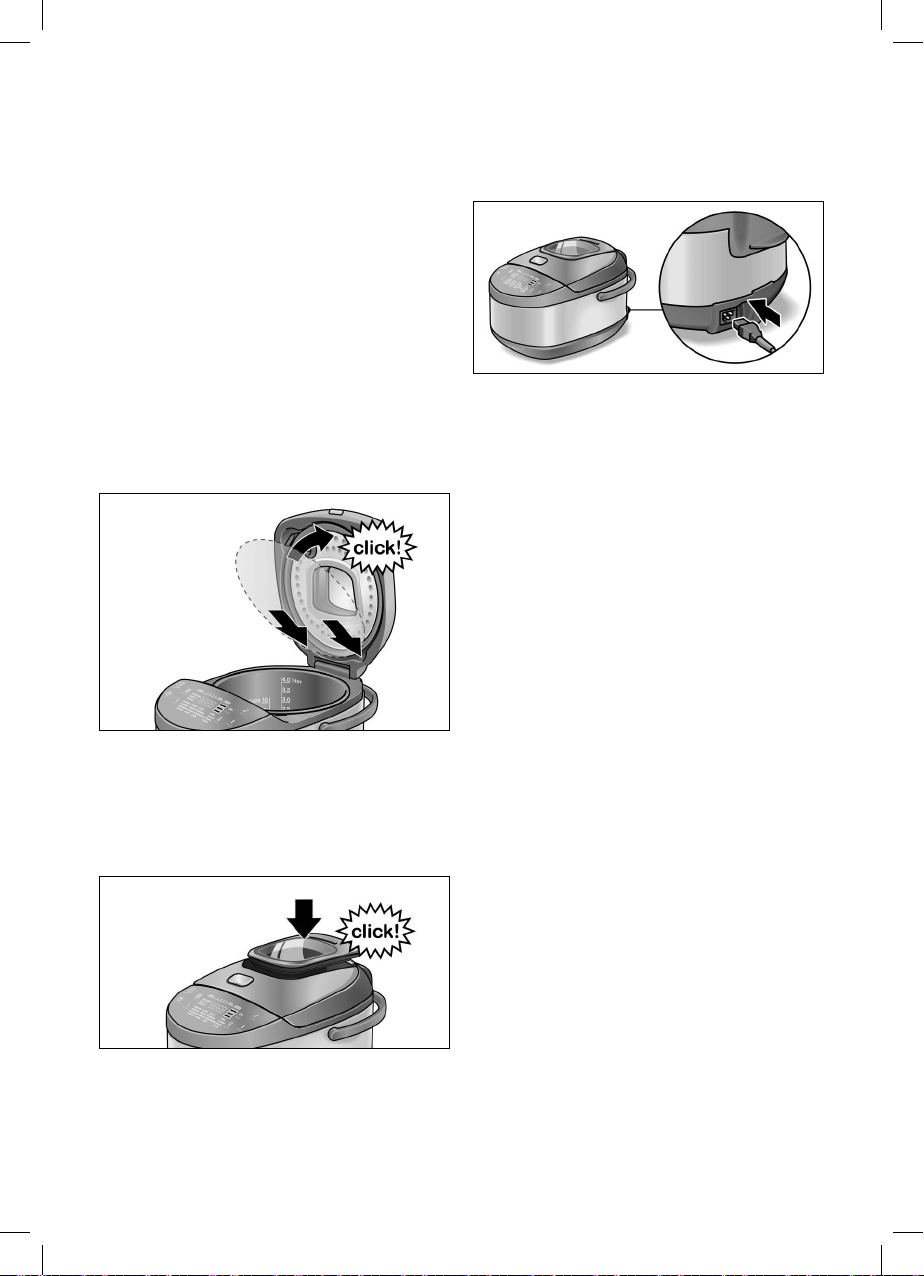
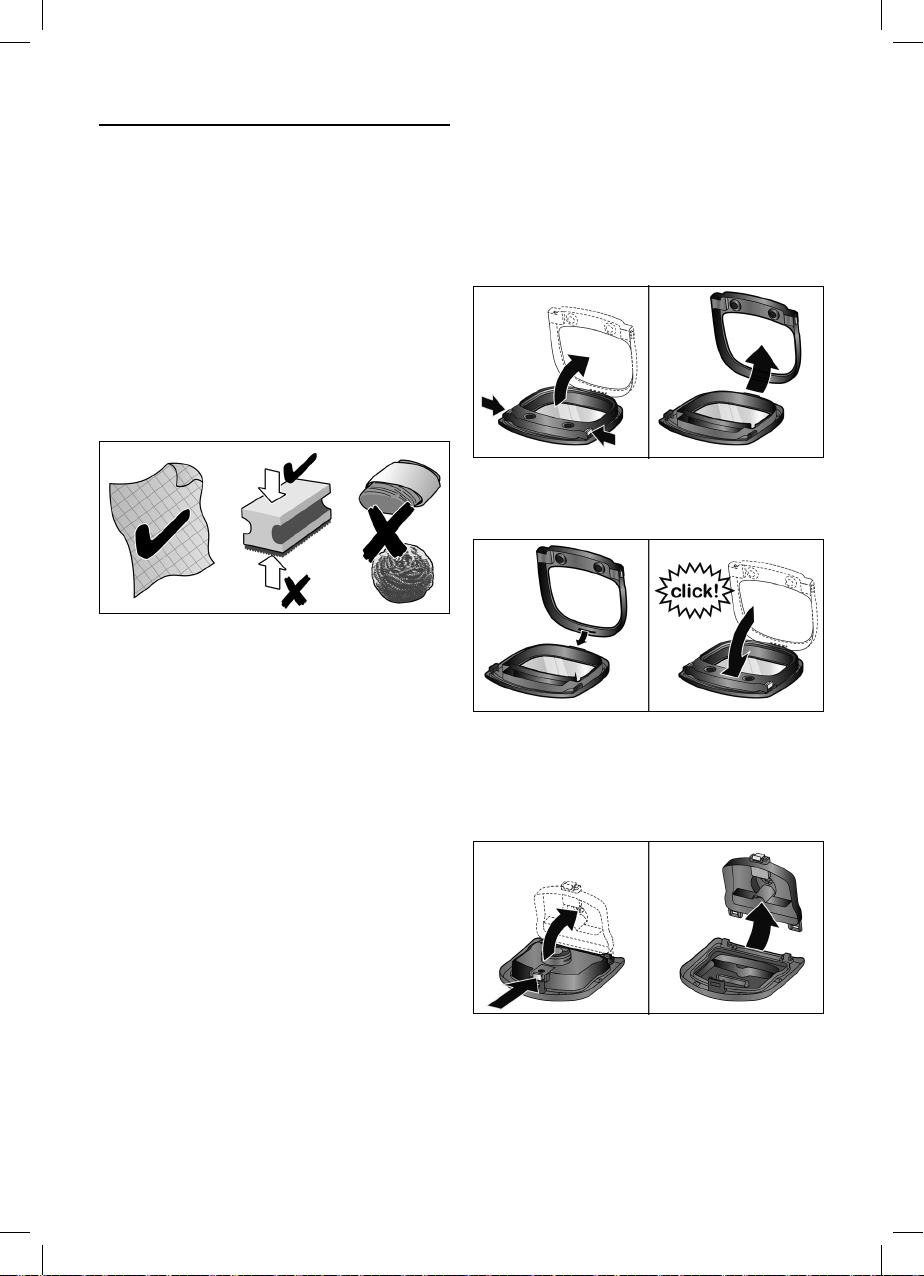
Remove the steam outlet
4�
Grip the steam outlet at the rear and pull
up and off.
.
5� Open the lid of the appliance
Press the opening button on the lid.
6� Remove the lid insert
Grip both anges on the left and right of
the lid insert, then pull out and remove
the lid insert.
7� Lift the pan out of the appliance interior.
8� Remove the packaging material that
is on the appliance and the accessory
parts.
9� Check all parts for completeness.
X Figure A
8
MUC_2-4_RU_8001013355.indb 8 10.08.2015 12:44:51
Page 11
en
Before using for the rst time
10�
Check the appliance and the accessory
parts for visible damage.
Caution!
16� Connect the supplied mains cable to
the appliance rst, then connect it to the
socket.
Never operate a damaged appliance!
1� Thoroughly clean and dry all parts
1
before using for the rst time. X “Care
and daily cleaning” see page 17
12�
After cleaning, insert the pan back into
the appliance interior
.
Caution!
Before inserting the pan, check that the
appliance interior is dry and clean.
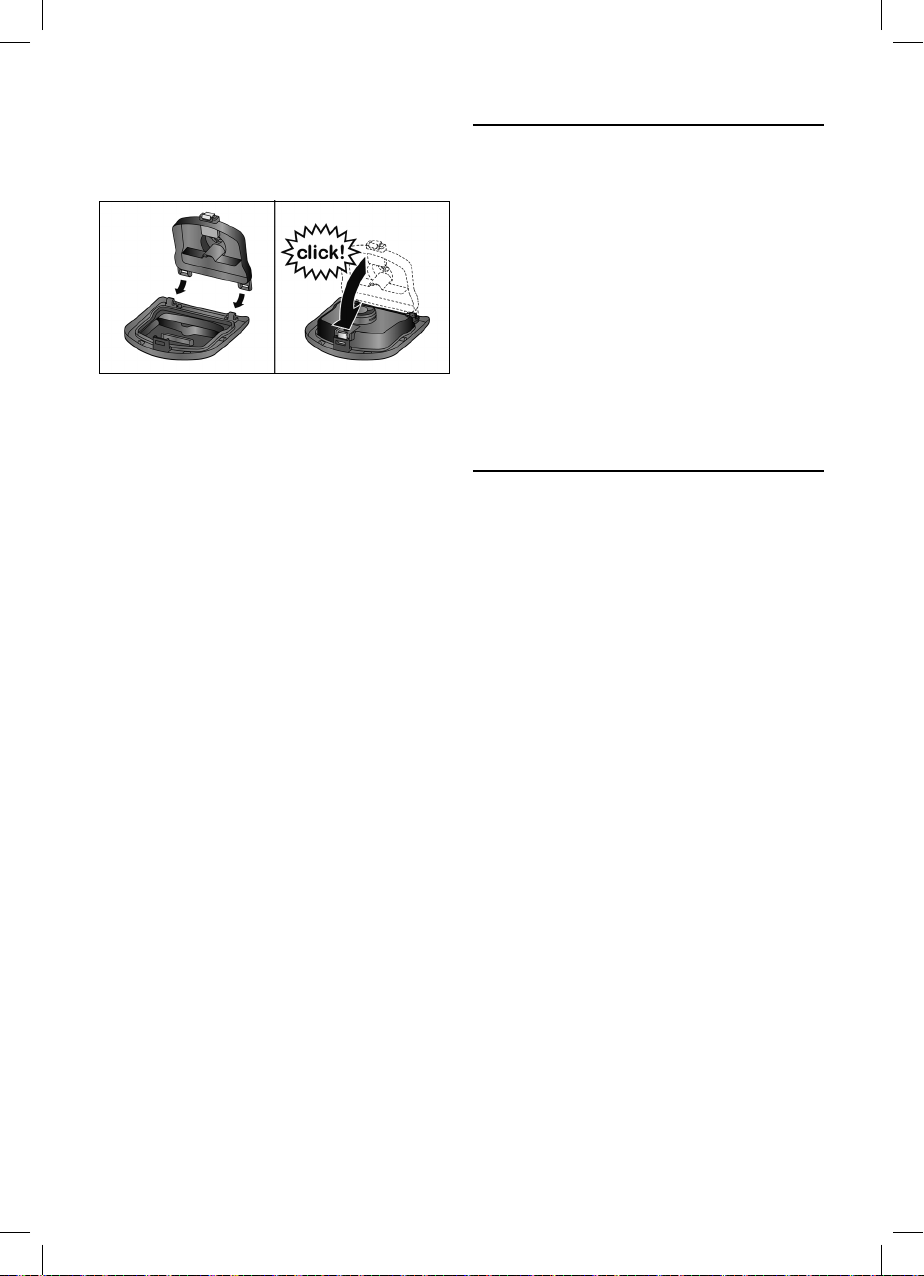
13� Insert the lid insert
Insert the lid insert into the 2 ducts at
the bottom and press into the lid at the
top.
Caution!
Use only the supplied mains cable.
On the control panel, buttons B and G
and all LEDs briey light up once and a ve-
level audible signal sounds. Button B then
ashes. The appliance is in standby mode
and is ready for operation.
14� Close the lid
Press the lid down until it clicks into
place.
15� Insert the steam outlet
Place the steam outlet onto the lid from
above and press down rmly.
9
MUC_2-4_RU_8001013355.indb 9 10.08.2015 12:44:51
Page 12
en
Operation
Operation
Function selection mode
In function selection mode, all preparation
programmes are selected and all settings
are made on the appliance. To do this,
perform the following steps:
arning
W W
Risk of burns!
During operation, the appliance must never
be used without the pan and the steam
outlet inserted.
Caution!
Each time prior to operation, check the
appliance for damage, completeness,
cleanliness and proper installation.
X “Before using for the rst time” see
page 8
1�
The appliance is ready to use. Press
B in order to access function
button
selection mode.
In function selection mode, button B and
the indicator [
permanently lit. Button G ashes. “00:00”
is shown in the display.
мой
режим
] (my mode) are
Selecting and starting a
preparation programme
There are 16 pre-congured preparation
programmes available to choose from.
X “List of preparation programmes” see
page 19
1�
Fill the appliance with the desired
ingredients.
pour the ingredients into the pan. The
measuring scale on the inside of the pan
can also be used to read the quantity.
Caution!
■ Do not ll the pan beyond the marking
liter]!
[
4.0
■ Use only the spatula provided for stirring
(do not use metal cutlery).
�
2
Close the lid and press button B
access function selection mode.
Note: certain preparation programmes
or steps are carried out with the lid open.
X See recipe book provided
3�
Keep pressing button D
desired preparation programme is
selected.
To do this, open the lid and
to
until the
The corresponding LED lights up in the
control panel and the pre-congured prepa-
Note: If no input is made on the control
panel within 5 minutes, the appliance automatically switches to standby mode.
10
MUC_2-4_RU_8001013355.indb 10 10.08.2015 12:44:52
ration time for the selected preparation
programme ashes.
Page 13
en
Operation
4�
Press button
programme.
G to start the preparation
To increase the temperature, press and
hold the C button. The current temperature
will briefly be shown on the display and will
then increase in 1°C increments until the
maximum value is reached (+10°C). Press
and hold the button until the temperature is
at the increased level desired.
To reduce the temperature, press and hold
the C button. The current temperature will
briefly be shown on the display and will
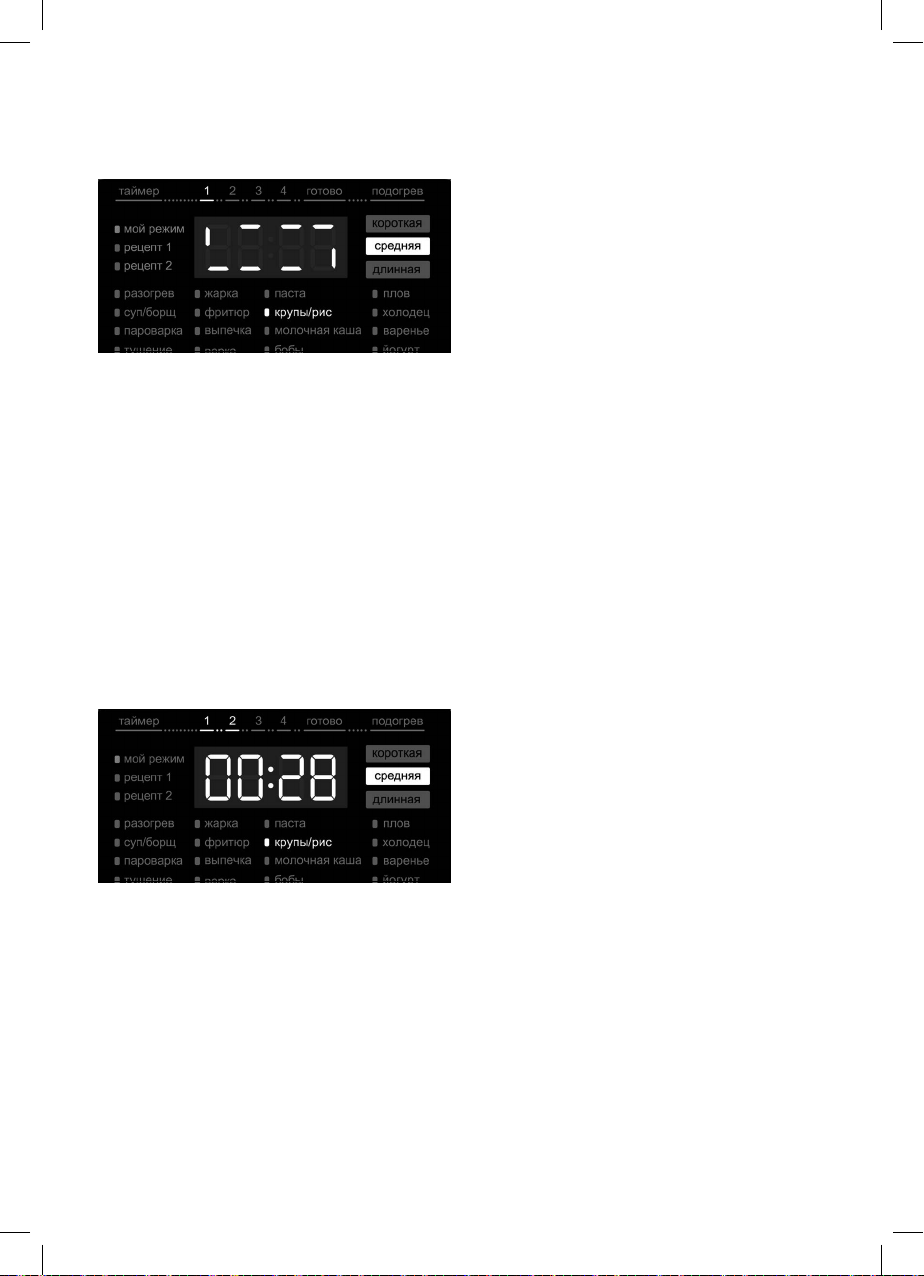
The appliance heats up the pan until the
target temperature is reached. During the
heating phase, lines that light up in a clockwise direction appear in the display.
Once the target temperature is reached,
the lines go out and the preparation time
is shown in the display. The preparation
process starts automatically.
Note: when the programme [
or [
фритюр ] ( deep frying) is selected, a
паста ] (pasta)
repeating audible signal is emitted, the
display and button G ash until the food
has been added and button G has been
pressed.
The preparation time counts down.
initially increase in 1°C increments until the
maximum value is reached (+10°C). Once
the maximum value has been reached, the
display will jump back to the minimum value
(20°C lower).
Press and hold the button until the temperature is at the reduced level desired.
To continue with the preparation
programme,.press the G button.
Note: If the G button is not pressed, the
preparation programme will continue with
the temperature that was previously set.
When the preparation programme ends,
an audible signal sounds and the indicator
готово
[
] (ready) and button
G light up. The
display ashes and shows “00:00”.
5� Open the lid of the appliance and serve
the meal that has been prepared.
W Warning
Risk of burns!
■ During preparation, large amounts of
steam may accumulate in the appliance.
Open the lid with care. Do not lean over
the lid of the appliance.
Steam that is formed when preparing the
meals exits the multi cooker via the steam
outlet, thereby preventing the formation of
excess pressure. Depending on the model,
the steam outlet is tted with a viewing
window.
Increasing or reducing the temperature
If the current temperature was set too high
or too low during the preparation, this can
be increased (by +10°C max.) or decreased
(by -10°C max.) accordingly during the
cooking process.
■ The pan and any inserts that are used
may be very hot. Always use pan tongs,
corresponding handles or oven gloves.
Notes:
■ The preparation programme can be
stopped at any time using button H.
The appliance subsequently switches to
function selection mode.
■ If the preparation programme features
the keep warm function, this is switched
on automatically once the meal is ready
and keeps the meal warm for up to
10 hours at 40°C. [ готово ] (ready) and
11
MUC_2-4_RU_8001013355.indb 11 10.08.2015 12:44:52
Page 14

en
Operation
догрев
[ по
rectangle lights up in the display (dotted
lines). The keep warm function can be
ended using button H. The appliance
subsequently switches to function
selection mode.
If the selected preparation programme
consists of multiple preparation steps, an
audible signal sounds once the next step
needs to take place. In the control panel,
LEDs 1, 2, 3 or 4 are shown accordingly
and button G ashes. Perform the
following steps:
�
Open the lid of the appliance.
1
2� Add additional ingredients.
3
� Close the lid of the appliance.
� Start the next preparation step using
4
button G.
The appliance heats up the appliance
interior until the target temperature of the
next preparation step is reached. During
the heating phase, lines that light up in a
clockwise direction appear in the display.
Once the target temperature is reached, the
lines go out and the next preparation time
is shown in the display. The preparation
process starts automatically. The preparation time counts down.
] (keep warm) light up.
A
Selecting a pre-congured
preparation time
The pre-congured preparation time of
the level [ средняя ] (medium) is shown
on the control panel for each preparation
programme.
The preparation time can be shortened
[ короткая ] or lengthened [ длинная ].
1� Keep pressing button E until the
desired indicator is lit. The display
changes from [ средняя ] (medium)
to [ длинная ] (longer) and then to
[ короткая ] (shorter) before returning to
[ средняя ] (medium).
The corresponding pre-congured values
for the preparation time are shown in the
display.
Press button
2�
programme.
“Selecting and starting a preparation
X
programme” see page 10
G to start the preparation
Setting a start time delay
The start time delay can be set for the
selected preparation programme so you
can enjoy a freshly prepared meal at a
specic time.
Note: the start time delay can only be
set for certain preparation programmes.
The pre-congured start time delay varies
among these preparation programmes.
Select the preparation programme.
1�
2
� Press button A. Button G ashes.
“00:10” ashes in the display.
Press button A repeatedly to increase the
displayed time. A brief press increases the
time by 5 minutes. A slightly longer press
increases the time by 10 minutes. Pressing
and holding button A for around 2 seconds
increases the time by 30 minutes.
Press button
3�
time delay is displayed.
The desired start time delay is shown in the
display. [
display
The time until the start counts down. Once
this time has elapsed, the preparation
process starts automatically.
Notes:
таймер
.
■ The start time delay can be switched
off at any time by pressing button G.
The preparation programme then starts
immediately.
■ If “00:10” does not ash in the display
start time display cannot be set for the
selected preparation programme.
G when the desired start
] (timer) lights up in the
, a
Prematurely terminating the
current preparation step
If the ingredients are cooked ahead of time
during one of the preparation steps, the
step can also be terminated manually.
12
MUC_2-4_RU_8001013355.indb 12 10.08.2015 12:44:52
Page 15
en
Operation
1� To do this, press the G button for at
least 2 seconds.
This will terminate the current preparation
step. An audible signal will then sound as
usual once the next step can be carried out.
In the control panel, LEDs 1, 2, 3 or 4 are
shown accordingly and button G ashes.
2�
Perform the next preparation step.
The oil is heated. Once the target temperature is reached, an audible signal sounds
and button G ashes.
6
Fill the deep frying basket with food for
�
deep frying.
7
Open the lid of the appliance.
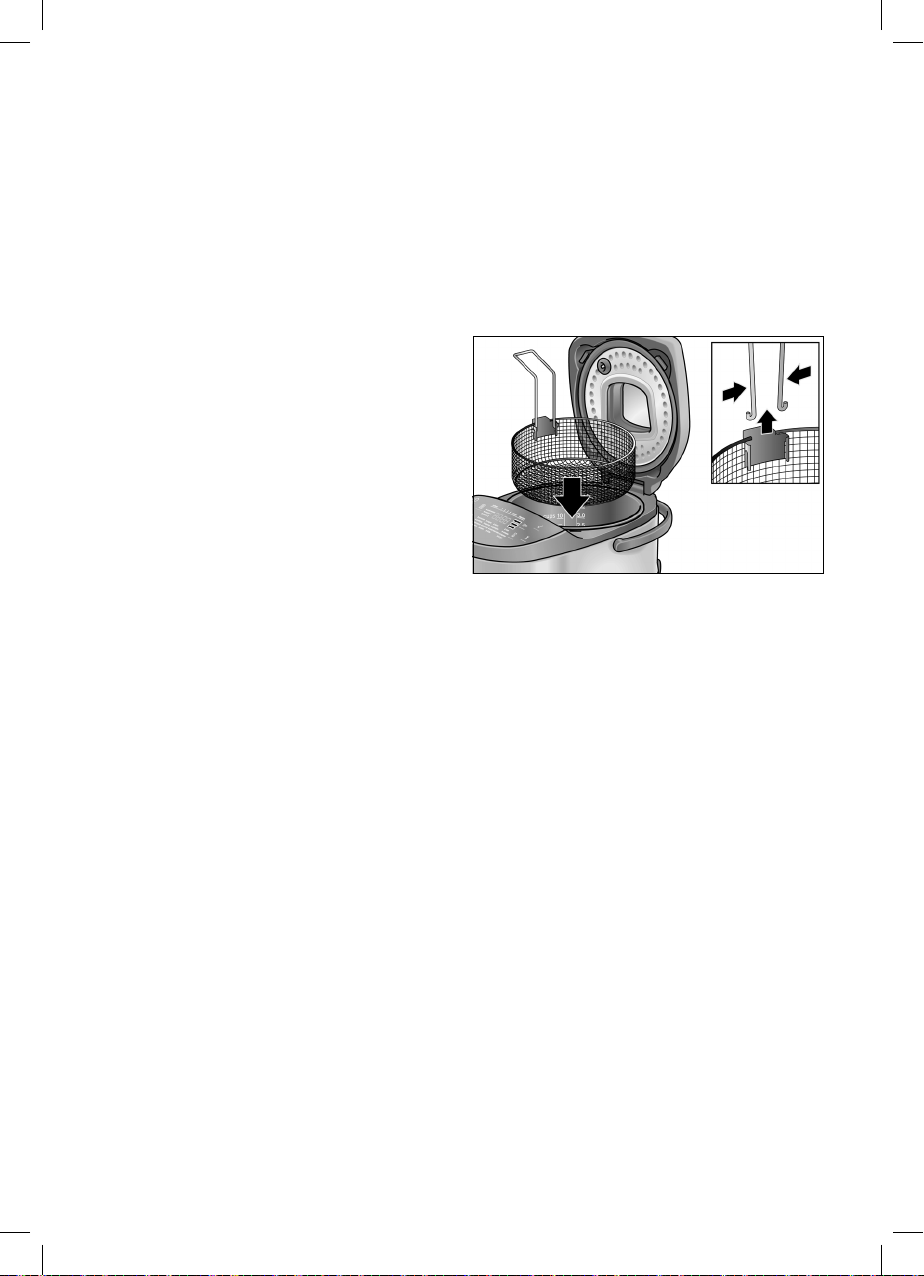
�
8
� Place the deep frying basket in the pan
using the handle supplied and remove
the handle.
Using the deep frying basket
It is necessary to use the deep frying
basket (depending on the model) in order to
prepare meat, sh, chips, etc. in hot oil.
Note: For the best and tastiest results, we
recommend using the suggestions in our
recipe book.
Observe the following when using the deep
frying basket:
W Warning
Risk of burns!
■ Fill with oil or deep-frying fat up to the
1.0
mark [
■ Do not use more than 200 g of frozen
food or 300 g of non-frozen food for
deep frying.
■ During preparation, large amounts of
steam may accumulate in the appliance.
Open the lid with care. Do not lean over
the lid of the appliance.
■ The pan and any inserts that are used
may be very hot. Always use pan tongs,
corresponding handles or oven gloves.
Open the lid of the appliance.
1�
2� Fill the pan with a maximum of 1 litre of
oil. The measuring scale on the inside
of the pan can also be used to read the
quantity.
3� Close the lid.
4� In function selection mode, select the
preparation programme [ фритюр ]
(deep frying) X
programmes” see page 19
� Press button G to start the preparation
5
programme.
] at maximum.
I
“List of preparation
9� Close the lid of the appliance.
Note: certain preparation programmes
or steps are carried out with the lid open.
X See recipe book provided
Press button
10�
programme.
Once the preparation programme ends, an
audible signal sounds.
11� Open the lid of the appliance.
12
� To drain the deep-fried food, lift up the
deep frying basket using the handle and
hang on the edge of the pan using the
ange.
G to start the preparation
Using the steamer insert
It is necessary to use the steamer insert for
the purpose of steam-cooking vegetables,
meat and sh. The 2-part steamer insert
enables different ingredients to be steamed
separately at the same time (e.g. vegetables in the bottom part and sh in the top
part).
Note: For the best and tastiest results, we
recommend using the suggestions in our
recipe book.
13
MUC_2-4_RU_8001013355.indb 13 10.08.2015 12:44:52
Page 16
en
Preparation
Observe the following when using the
steamer insert:
W W
arning
Risk of burns!
■ Fill with water up to the mark [ 0.5
maximum.
■ During preparation, large amounts of
steam may accumulate in the appliance.
Open the lid with care. Do not lean over
the lid of the appliance.
■ The pan and any inserts that are used
may be very hot. Always use pan tongs,
corresponding handles or oven gloves.
1� Open the lid of the appliance.
2�
Fill the pan with a maximum of 0.5
of water. The measuring scale on the
inside of the pan can also be used to
read the quantity.
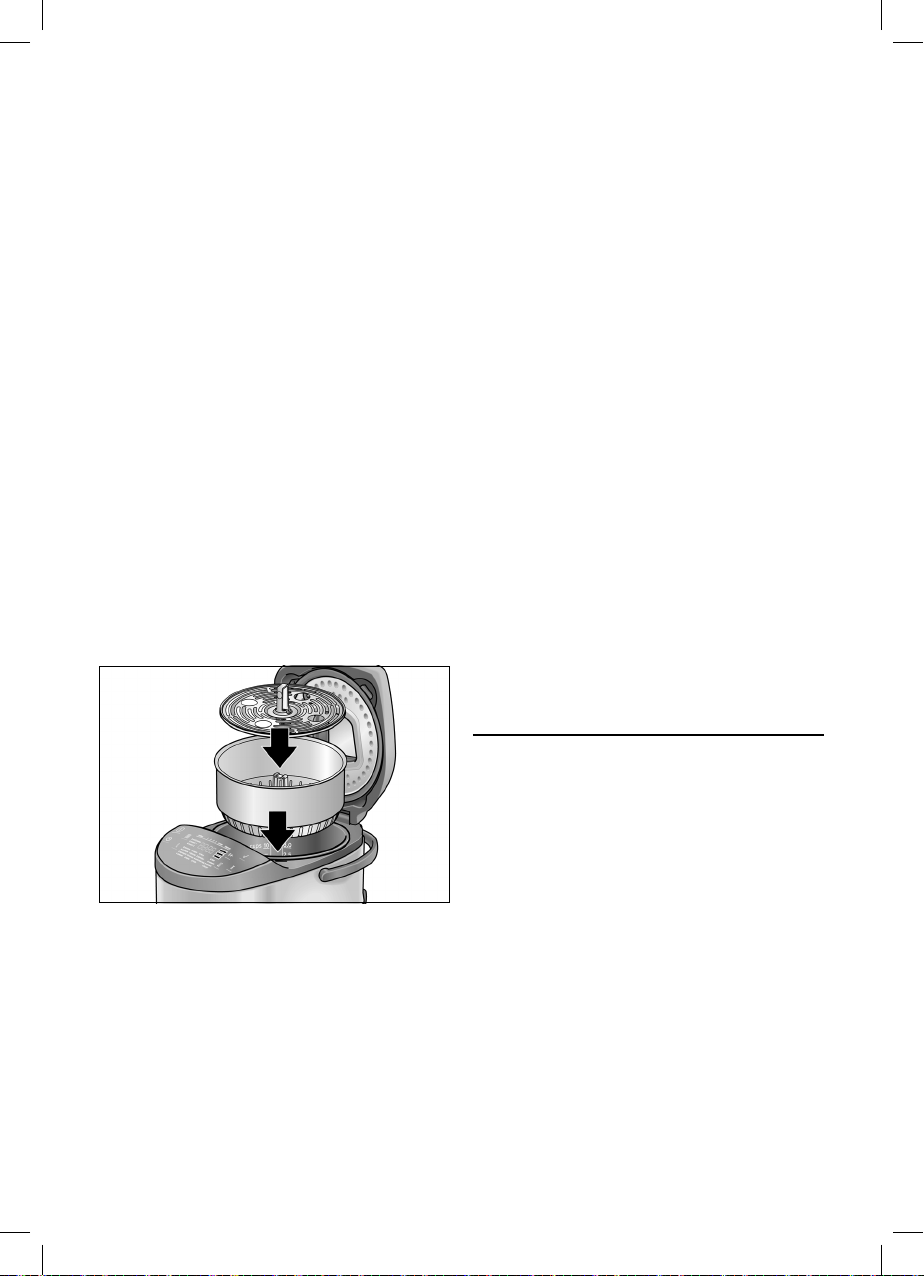
3� Hang the bottom part of the steamer
insert in the pan.
4� For steam-cooking different ingredients,
ll the bottom part up to the lower edge.
5
� Position the top part and add additional
ingredients.
J
litres
10� After steam-cooking, lift the top part and
the bottom part of the steamer insert out
of the pan.
Child lock
] at
The child lock can be activated and deactivated during a preparation process. If the
child lock has been activated, all buttons on
the appliance are locked and settings can
no longer be made on the appliance.
arning
W W
When the child lock is active, the preparation processes cannot be changed or
aborted. The child lock must be deactivated
rst.
Press the following button combination:
1�
Activate
Press and hold buttons C
simultaneously for 3 seconds. A short
audible signal sounds. The child lock is
activated.
�
2
Deactivate
Press and hold buttons C
taneously for 3 seconds once again. A
short audible signal sounds. The child
lock is switched off.
and F
and F simul-
Preparation
General recommendations
For the best and tastiest results, we recommend using the suggestions in our recipe
book, which was specially developed for
use with the multi cooker.
6� Close the lid.
7� In function selection mode, select the
preparation programme [ пароварка ]
(steam) X “List of preparation
programmes” see page 19
8� Press button G to start the preparation
programme.
Once the preparation programme ends,
an audible signal sounds and button G
ashes.
9� Open the lid of the appliance.
14
MUC_2-4_RU_8001013355.indb 14 10.08.2015 12:44:53
The recipe book features detailed information on the required quantities of ingredients, recommendations for the preparation
time and the preparation temperature,
and smart combinations of the preparation
programmes.
Use these recipe recommendations in
order to gain initial experience. Once you
appreciate the benets and the variety of
the usage options, you will enjoy experimenting with new recipes. To do this, use
Page 17

en
Customised setting options
the customised setting options that are
explained on the following pages.
To provide you with an overview of all
preparation programmes, we have compiled
this information in a clearly arranged table.
X “List of preparation programmes” see
page 19
Customised setting
options
The pre-congured values for the preparation time and the preparation temperature
can be adapted to individual needs and the
recipe guidelines.
Setting the preparation time
1� In function selection mode, keep
pressing button D until the desired
preparation programme is selected.
The corresponding LED lights up in the
control panel and the pre-congured prepa-
ration time for this preparation programme
is shown.
2� Press button F once.
The pre-congured preparation duration
ashes in the display.
Keep pressing button F
3�
preparation time is displayed.
When button F is briey pressed, the
preparation time is increased by 1 minute.
The time increases up to the pre-congured
maximum value and then returns to the
pre-congured minimum value. When
button F is pressed for a longer period,
the preparation time is increased by
10 minutes.
4� Once the desired preparation time is
displayed, press button G
If the time needs to be adjusted individually
for all preparation steps in a selected
programme, then repeat points 2 to 4 prior
to starting the respective preparation step.
until the desired
.
Note: these settings are not saved. If this
preparation programme is selected again,
the pre-congured preparation time will be
shown in the display once more.
Setting the preparation
temperature
1� In function selection mode, keep
pressing button D until the desired
preparation programme is selected.
The corresponding LED lights up in the
control panel and the pre-congured prepa-
ration time for this preparation programme
is shown.
2� Press button C once.
The pre-congured preparation temperature
ashes in the display.
Keep pressing button C
3�
preparation temperature is displayed.
When button C is briey pressed, the
preparation temperature is increased by
5°C. The temperature increases up to the
pre-congured maximum value and then
returns to the pre-congured minimum
value. When button C is pressed for a
slightly longer period, the temperature is
increased by 10°C.
Once the desired preparation tempera-
4�
ture is displayed, press button G
If the temperature needs to be adjusted
individually for all preparation steps in a
selected programme, then repeat points 2
to 4 prior to starting the respective preparation step.
Note: these settings are not saved. If this
preparation programme is selected again,
the pre-congured preparation time will be
shown in the display once more.
until the desired
.
мой режим – my mode
Quick setting mode for customising the
preparation time and temperature setting for
a cooking process.
15
MUC_2-4_RU_8001013355.indb 15 10.08.2015 12:44:53
Page 18

en
Customised setting options
In function selection mode, button B
the indicator [ мой режим ] (my mode) are
permanently lit. Button G ashes. “00:00”
is shown in the display.
Press button
1�
“00:00” ashes in the display.
Keep pressing button F
2�
preparation time is displayed.
3� Press button C once.
“0000” ashes in the display.
Keep pressing button C
4�
preparation temperature is displayed.
Press button
5�
selected settings.
The appliance heats up the pan until the
target temperature is reached.
Once the target temperature is reached,
the lines go out and the preparation time
is shown in the display. The preparation
process starts automatically.
F once.
until the desired
until the desired
G to start with the
рецепт 1 / рецепт 2 (recipe 1 /
recipe 2) – saving personal
preparation programmes
Depending on the model X “Model overview and technical data” see page 20
Personal preparation programmes with
customised time and temperature can
be saved under the memory locations
[ рецепт 1 ] (recipe 1) and [ рецепт 2 ]
(recipe 2).
1� In function selection mode, press
button D once.
The LED [
The pre-congured preparation time is
shown in the display
Note: if you have not previously saved any
personal preparation programmes, “00:00”
is shown in the display.
2�
The display ashes. LED 1 (preparation
step 1) lights up in the control panel.
�
3
16
рец
Press button
Keep pressing button F
preparation time is displayed.
] (recipe 1) lights up.
епт 1
.
F once.
until the desired
and
When button F is briey pressed, the preparation time is increased by 1 minute. When
button F is pressed for a longer period, the
preparation time is increased by 10 minutes.
The time increases up to the pre-congured
maximum value and then returns to the
pre-congured minimum value.
Press button
4
�
The pre-congured preparation temperature
is shown in the display.
Note: if you have not previously saved any
personal preparation programmes, “0000” is
shown in the display.
Keep pressing button C
�
5
preparation temperature is displayed.
Press and hold button G
6�
to save the set values.
In order to program other preparation steps,
repeat points 2 to 6. Up to 3 preparation
steps can be programmed.
The saved preparation programme
[ рецепт 1 ] (recipe 1) can be selected as
usual via function selection mode (see the
sections on selecting and starting a prepa-
ration programme).
Note: to save a second personal prepa-
ration programme under [
(recipe
2), use the same process as
described above for [
T
o delete a personal preparation
programme, perform the following steps:
In function selection mode, press
1�
button
The LED [
The saved preparation time is shown in the
display
.
Press button
2�
The display ashes. LED 1 (preparation
step 1) lights up in the control panel.
� Press and hold button H (>2 seconds).
3
The settings for [
deleted.
Note: to delete the second personal prepa-
ration programme [
use the same process as described above
рец
for [
епт 1
C once.
D once.
рец
епт 1
F once.
] (recipe 1).
until the desired
(>2 seconds)
рец
епт 2
рец
] (recipe 1) lights up.
рец
епт 1
рец
епт 2
епт 1
] (recipe
] (recipe
] (recipe 1).
]
1) are
2),
MUC_2-4_RU_8001013355.indb 16 10.08.2015 12:44:53
Page 19
en
Care and daily cleaning
Care and daily cleaning
W Warning!
Risk of electric shock
■ Never immerse the appliance in water
■ Do not steam-clean the appliance.
■ Unplug the appliance before cleaning it.
Caution!
■ Do not use any cleaning agents
containing alcohol or spirits.
■ Do not use any sharp, pointed or metal
objects.
■ Do not use abrasive cloths or cleaning
agents.
The appliance must be thoroughly cleaned
after each use.
1� Let the appliance cool down completely.
2�
Open the lid.
� Remove the pan, lid insert, steam outlet
3
and accessories. X “Before using for
the rst time” see page 8
Cleaning the basic appliance
1� Wipe the outside of the appliance with a
soft, damp cloth and dry off.
2� Wipe the interior of the appliance with a
soft, damp cloth and dry off.
3� Clean the control panel using a dry
micro-bre cloth.
Disassembling the steam outlet
Steam outlet with window:
1�
Press together the white catches on the
.
left and right on the underside of the
steam outlet and remove the bottom
part.
2� To assemble, use the slot to hang the
bottom part on the top part and press
down until the catches click into place.
Steam outlet without window:
1� Press the white catches on the
underside of the steam outlet, pull off
the bottom part and remove from both
ducts.
17
MUC_2-4_RU_8001013355.indb 17 10.08.2015 12:44:54
Page 20
en
J
Dispose of packaging in an environ-
electronic appliances (waste electrical
The guarantee conditions for this appliance
are as de ned by our representative in the
country in which it is sold. Details regarding
these conditions can be obtained from
the dealer from whom the appliance was
purchased. The bill of sale or receipt must
be produced when making any claim under
the terms of this guarantee.
Changes reserved.
Disposal
o assemble, use both ducts to hang
2� T
the bottom part and press down until the
catch clicks into place.
Cleaning the lid insert and
the steam outlet
1� Clean the individual parts with a deter-
gent solution and a soft cloth or sponge.
2� Rinse with clean water and dry off.
3� Re-assemble the dry individual parts
and attach to the basic appliance.
Cleaning the pan and
accessories
1� Clean the individual parts with a deter-
gent solution and a soft cloth or sponge.
2� Rinse with clean water and dry off.
Note: the pan, deep frying basket with
handle, steamer inserts, basket tongs,
spatula, ladle and measuring beaker can
also be placed in the dishwasher.
Caution!
Before inserting the pan, check that the
appliance interior is dry and clean and that
there are no objects present in the appliance interior.
Disposal
mentally-friendly manner. This
appliance is labelled in accordance
with European Directive 2012/19/EU
concerning used electrical and
and electronic equipment – WEEE).
The guideline determines the framework for the return and recycling
of used appliances as applicable
throughout the EU. Please ask your
specialist retailer about current
disposal facilities.
Guarantee
18
MUC_2-4_RU_8001013355.indb 18 10.08.2015 12:44:54
Page 21

en
List of preparation programmes
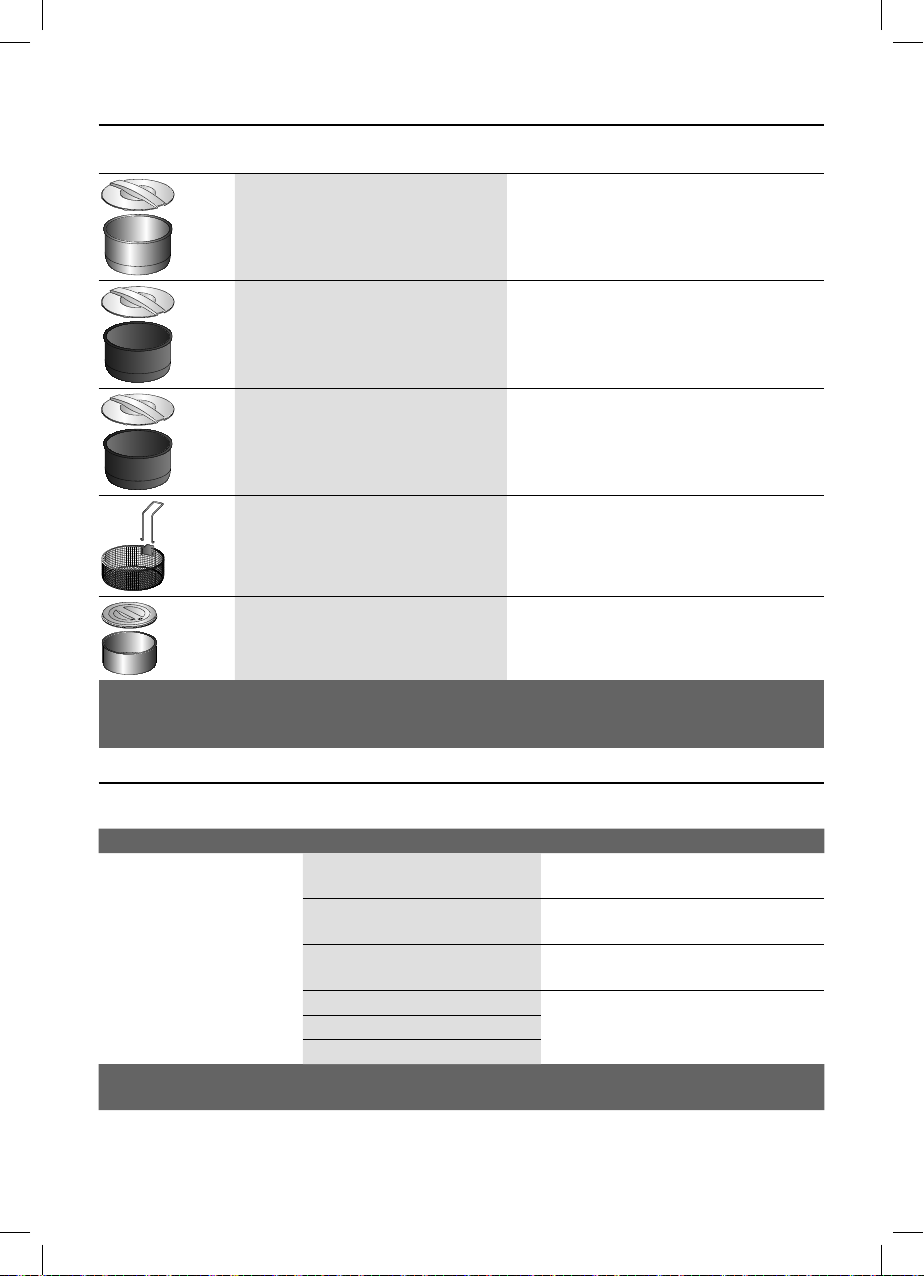
List of preparation programmes
The following table contains the most important data for the various preparation
programmes.
Programme Number of
preparation
steps
мой режим – my mode
Customised setting for the desired temperature and
preparation time
рецепт 1&2 – recipe 1&2
2 memory locations for personal recipes
(depending on model)
разогрев – warm up
Warming up cold (pre-cooked) meals
суп/борщ – soup/borsch
Preparing soups and stews
пароварка – steam
Steam-cooking vegetables, meat and sh (steamer insert
required)
тушение – stew
Braising vegetables, meat and sh
жарка – fry
Frying vegetables, meat and sh
фритюр – deep frying
Deep frying meat, sh, chips, etc. (deep frying basket
required)
выпечка – baking
Baking cakes or bread
варка – boiling
Boiling food
паста – pasta
Cooking pasta dishes, eggs or sausages
крупы/рис – rice and krupy
Cooking krupy or rice
молочная каша – milk porridge
Preparing dairy foods
бобы – beans
Cooking beans and other vegetables
* Depending on recipe/preparation step
Please see the recipe book provided for notes on correct use of the programmes and for information on
ingredients, quantities and cooking times.
1 — Open / closed *
1-3 — Open / closed *
1
Short: 1
Medium: 2
Long: 3
1
1
1
1 — Open / closed *
1 — Closed
1
1 — Open / closed *
1 — Closed
1
Short: 1
Medium: 2
Long: 2
Keep warm
function
available
G
G
G
G
G
G
G
G
Lid
Closed
Open / closed *
Closed
Closed
Open
Closed
Closed
Closed
19
MUC_2-4_RU_8001013355.indb 19 10.08.2015 12:44:54
Page 22
en Model overview and technical data
Programme Number of
preparation
steps
плов – pilaf
Cooking rice dishes
холодец – aspic
Preparing aspic and similar dishes
варенье – jam
Preserving fruits as jams
йогурт – yogurt
Preparing yogurt
* Depending on recipe/preparation step
Please see the recipe book provided for notes on correct use of the programmes and for information on
ingredients, quantities and cooking times.
Short: 2
Medium: 3
Long: 4
1 — Closed
1 — Open
1 — Closed
Keep warm
function
available
G
Open / closed *
Model overview and technical data
MUC
22...RU
G G G G
—
MUC
24...RU
G G G
MUC
28...RU
MUC
48...RU
Lid
Individual memory locations — 2 2 2
Max. volume capacity (litres) 4 4 4 4
Steam outlet with viewing window
Pan coating Te on Ceramic Ceramic Te on
Housing material Plastic Plastic Metal Metal
Temperature range 40-160°C 40-160°C 40-160°C 40-160°C
Electrical connection (voltage – frequency) 220-240 V~
Heater wattage 900 W 900 W 900 W 1200 W
Induction
Length of power cord 1.5 m 1.5 m 1.5 m 1.5 m
Weight, empty 3.7 kg 4.1 kg 4.1 kg 5.4 kg
20
MUC_2-4_RU_8001013355.indb 20 10.08.2015 12:44:55
—
50/60 Hz
— — —
G G G
220-240 V~
50/60 Hz
220-240 V~
50/60 Hz
220-240 V~
50/60 Hz
G
Page 23
en
Special accessories
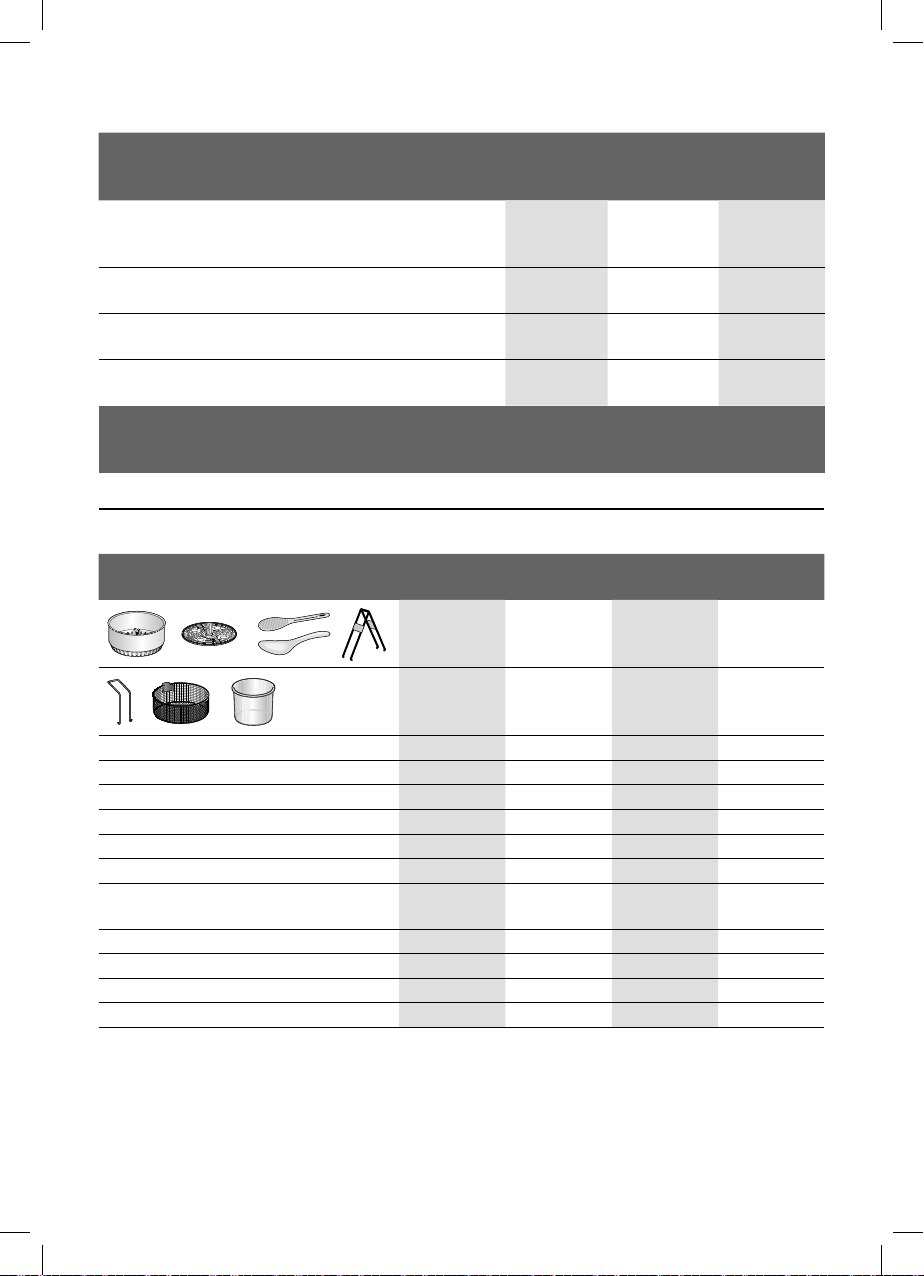
Special accessories
MAZ4BI
Stainless steel pan, with a non-stick
coating and storage lid*; suitable for the
induction multi-cooker MUC48
MAZ2BC
Pan with ceramic non-stick coating and
storage lid*; suitable for the multi-cooker
MUC24/28
MAZ2BT
Pan with Teon non-stick coating and
storage lid*; suitable for the multi-cooker
MUC22
MAZ0FB
Deep frying basket
MAZ0YG
Yoghurt container
*The storage lid is not supplied as standard with the appliance. This is only supplied with pans as a special
accessory. If an accessory is not included in the product package, it can be purchased via trade stockists or
customer services.
5-litre pan; dishwasher safe; very robust pan;
2.5 mm thick; stainless steel polished exterior;
non-stick coating; lid* for the practical storage
of food in the pan, e.g. in the refrigerator
5-litre pan; dishwasher safe; ceramic non-stick
coating; lid* for the practical storage of food in
the pan, e.g. in the refrigerator
5-litre pan; dishwasher safe; Teon non-stick
coating; lid* for the practical storage of food in
the pan, e.g. in the refrigerator
Stainless steel basket with removable handle
for easy handling; dishwasher safe
Large volume for the preparation of large quantities: can feasibly hold 1 litre; container made
of metal; lid made of plastic
Troubleshooting
Problem Cause Remedy
The prepared meal is
half-raw.
If you are unable to solve the problem, always call the hotline!
You will nd the telephone numbers at the back of these instructions.
21
MUC_2-4_RU_8001013355.indb 21 10.08.2015 12:44:56
Filled beyond capacity. Do not ll the pan beyond the marking
[ 4.0 liter ]!
The ratio of the amount of water
and the ingredients is incorrect.
Foreign objects in the appliance
interior.
The pan is deformed. Contact customer service.
Fault in the appliance.
Fault in the sensor.
Adjust the ratio of the amount of water
and the ingredients.
Remove all foreign objects. Do not use
any water for this purpose!
Page 24
en
Troubleshooting
Problem Cause Remedy
The prepared meal is burnt. There is dirt underneath the pan. Thoroughly clean the pan and the appli-
ance interior.
The pan is deformed. Contact customer service.
Fault in the appliance.
Fault in the sensor.
The appliance boils over. Filled beyond capacity. Adjust the amount.
The temperature is too high. Reduce the temperature.
The selected preparation
Open the lid of the appliance.
programme requires the meal to
be cooked with the lid open.
LED does not light up. The appliance is switched off. Switch on the appliance.
Fault in the power cord. Contact customer service.
The hotplate does not
function.
Water is owing out of the
appliance.
Fault in the appliance. Contact customer service.
The hotplate is damaged.
The appliance features overow
protection.
Remove the water. Remove the pan and
use a cloth to rub the appliance interior
dry. Ensure that no water enters the
appliance interior.
Display screen
E1~E6
Fault in the appliance. Abort the preparation programme.
Disconnect the appliance from the power
supply. Switch the appliance on again. If
the problem persists, contact customer
service.
Display screen
E0
Fault in the appliance. If the display persists for more than
seconds, disconnect the appliance
20
from the power supply and contact
customer service.
Display screen
E1
Display screen
E2, E5, E6 or E7
Incorrect pan inserted or pan not
recognised.
Disconnect the appliance from the power
supply and contact customer service.
The appliance has overheated. Disconnect the appliance from the power
supply and allow to cool down. Restart
the appliance once it has cooled down.
Short-circuit in the appliance. Disconnect the appliance from the power
supply and contact customer service.
Display screen
E3
Display screen
Mains voltage too high. Contact electricity provider or grid oper-
ator. Have the power supply checked by
Mains voltage too low.
an expert.
E4
Display screen
E8
Communication failure. Restart the appliance once it has cooled
down.
If you are unable to solve the problem, always call the hotline!
You will nd the telephone numbers at the back of these instructions.
22
MUC_2-4_RU_8001013355.indb 22 10.08.2015 12:44:56
Page 25

ru
От всего сердца поздравляем Вас с
покупкой нового прибора фирмы Bosch.
Вы приобрели современный и высококачественный бытовой прибор. На
следующих страницах данной инструкции
по эксплуатации Вы найдете ценные
указания по безопасному пользованию
этим прибором.
Мы просим Вас полностью ознакомиться
с данной инструкцией и следовать всем
указаниям. Тогда этот прибор будет
служить Вам долгое время, и результаты
его работы подтвердят, что при покупке
Вы приняли правильное решение.
Сохраните эту инструкцию для дальнейшего использования или для передачи ее
следующему владельцу.
Дополнительную информацию о нашей
продукции Вы найдете на нашей странице
в Интернете.
Содержание
Использование по назначению ������������ 24
Указания по безопасности ���������������������� 25
Обзор ����������������������������������������������������������� 26
Панель управления ���������������������������������� 27
Элементы индикации .................................
Перед первым испо
Управление
ежим выбора функций .............................
Р
Выбор и зап
приготовления
Выбор п
времени приготовления
Настройк
ждевременное окончание текущего
Пре
этапа приготовления
ользование контейнера
Исп
для фритюра ...............................................
ользование вставного
Исп
контейнера для пароварки
Блокировка от детей
отовление
Приг
Общие рек
Индивид
настройки
Настройка времени приготовления
Настройк
ой режим ...................................................
м
епт 1 / рецепт 2 – сохранение
рец
в памяти собственных программ
приготовления ............................................. 38
ход и ежедневная очистка
У
Очистк
азборка клапана для выпуска пара .......
Р
Очистка вставного элемента крышки и
клапана для выпуска пара.........................40
Очистк
Утилиз
Условия гарантийного обслуживания �40
Список программ приготовления ��������� 41
Перечень моделей и технические
данные
Специальные принадл
мощь при устранении
По
неисправностей ���������������������������������������� 44
������������������������������������������������ 31
уск программы
редварительной настройки
а отсрочки времени запуска ......
омендации ................................
уальные возможности
��������������������������������������������������� 37
а температуры приготовления
а основного прибора ......................
а чаши и принадлежностей ...........
ация ������������������������������������������������� 40
�������������������������������������������������������� 42
льзованием �����������29
............................................. 31
............................. 33
.................................. 34
........................
................................... 36
������������������������������������������ 36
�������������������� 39
ежности
28
31
34
34
35
36
.......... 37
.. 37
37
39
39
40
������������ 43
23
MUC_2-4_RU_8001013355.indb 23 10.08.2015 12:44:56
Page 26

ru
Использование по назначению
Использование по назначению
Внимательно прочтите инструкцию по эксплуатации,
соблюдайте ее указания и тщательно храните ее!
Передавая прибор другому человеку, дайте ему эту
инструкцию. Производитель не несет ответственности за
повреждения, возникшие в результате несоблюдения указаний
по правильному применению прибора.
Данный прибор предназначен для домашнего использования,
или для использования в некоммерческой, бытовой среде.
Прибор предназначен для варки, выпекания, жарения, тушения,
приготовления на пару, жарения во фритюре, пастеризации и
подогрева продуктов питания. Его запрещено использовать для
переработки других предметов или веществ.
Все ингредиенты должны быть безупречного с точки зрения
гигиены качества. При переработке соблюдайте правила
кухонной гигиены.
Прибор можно использовать только с оригинальными
принадлежностями. Кастрюлю и принадлежности можно
использовать только с основным прибором.
Используйте прибор только внутри помещений при комнатной
температуре на высоте не выше 2000 м над уровнем моря. При
установке прибора следите за тем, чтобы над и под прибором
не находились чувствительные к нагреву поверхности
и приборы, которые под воздействием температуры и
выделяющегося пара могут быть повреждены.
Этот прибор могут использовать лица с ограниченными
физическими, сенсорными или умственными способностями
или не имеющими достаточного опыта или знаний, если они
находятся под присмотром или прошли соответствующий
инструктаж относительно безопасного пользования прибором
и уяснили для себя, какую опасность несет в себе прибор.
Детей нельзя подпускать к прибору и шнуру питания, им нельзя
пользоваться прибором. Детям нельзя играть с прибором.
Производить очистку и техобслуживание детям не разрешается.
24
MUC_2-4_RU_8001013355.indb 24 10.08.2015 12:44:56
Page 27

Указания по безопасности
ru
Указания по безопасности
W Предупреждение
Опасность поражения током и возгорания!
Прибор можно подключать только к электросети переменного
тока через установленную согласно предписаниям розетку с
заземлением. Убедитесь, что система заземления в домашней
электропроводке установлена согласно предписаниям.
При подключении прибора и его эксплуатации соблюдайте
данные, приведенные на заводской табличке.
Пользоваться прибором допускается только при отсутствии
повреждений кабеля и прибора.
Ремонт прибора разрешается производить из соображений
безопасности только нашей сервисной службе.
Если сетевой кабель прибора повреждён, он должен быть
заменён только на сетевой кабель, приобретенный в нашей
сервисной службе. Ни в коем случае не разрешается
подключать прибор к таймеру или дистанционно управляемой
штепсельной розетке и включать его через них.
Всегда следите за прибором во время эксплуатации! В случае
неисправности сразу же вынуть штекер из розетки или
выключить сетевое напряжение.
Сетевой кабель не должен соприкасаться с горячими частями
или проходить через острые грани.
Прибор или шнур питания не разрешается погружать в воду
или помещать в посудомоечную машину. Перед чисткой выньте
вилку сетевого провода из розетки.
W Пред
Опасность ожогов!
Запрещается использовать в работе прибор без установленной
кастрюли. При использовании прибора корпус, кастрюля
и металлические части прибора нагреваются! Снимайте
кастрюлю и принадлежности только с применением
имеющихся в комплекте подсобных средств. Пользуйтесь
кухонными рукавицами. В приборе образуется горячий
пар. Не наклоняйтесь над прибором. Открывайте крышку с
осторожностью. Переносите и очищайте прибор только после
того, как он полностью остыл!
W Пред
Опасность удушения!
Не разрешайте детям играть с упаковочным материалом.
упреждение
упреждение
25
MUC_2-4_RU_8001013355.indb 25 10.08.2015 12:44:56
Page 28

ru
Обзор
Обзор
(Рис. A в начале инструкции по эксплуатации)
1 Мультиварка (основной прибор)
2 Панель управления
Крышка
3
Кнопка о
4
5 Съемный клапан для выпуска пара (с окном*), из двух частей
Ручка для перено
6
7 Подключение к электросети
Чаша
8
Съе
9
10 Контейнер для фритюра со съемной ручкой *
Вставной к
11
12 Щипцы для извлечения чаши
Лопатка
13
14
Ложка
Мерный стакан *
15
Се
16
17 Инструкция по эксплуатации
Книг
18
* в зависимости от модели
В данной инструкции описаны различные исполнения прибора. В разделе «Использование по назначению» (см. стр.
моделей.
ткрывания крышки
ски
с антипригарным покрытием
мный вставной элемент крышки, из двух частей
онтейнер для пароварки, из двух частей
тевой кабель
а рецептов
24) приведен перечень оборудования различных
26
MUC_2-4_RU_8001013355.indb 26 10.08.2015 12:44:56
Page 29

Панель управления
ru
Панель управления
Панель управления состоит из элементов управления (кнопок) и элементов индикации
(светодиодов). Посредством кнопок выбирают отдельные программы приготовления и
выполняют различные настройки (например, температуры и времени приготовления).
Настройки отображаются посредством светодиодов и на дисплее.
Элементы управления
(Рис. В в начале инструкции по эксплуатации)
Режим ожидания
B
Включает и выключает режим ожидания прибора.
Настройка отсрочки времени запуска
A
Время до запуска выбранной программы приготовления можно регулировать.
Выбор программы приготовления из списка (g)
D
Многократным нажатием кнопки D поочередно вызываются отдельные
программы приготовления. На панели управления загорается соответствующий
светодиод.
Настройка индивидуальной температуры приготовления
C
Для индивидуальной настройки температуры приготовления.
Настройка времени приготовления
E
Предварительную настройку времени приготовления [
приготовления можно сократить [ короткая ] или удлинить [ длинная ]. Загорается
соответствующий элемент индикации (f). Предварительная настройка времени
приготовления отображается на дисплее (a).
Настройка индивидуального времени приготовления
F
Для индивидуальной настройки времени приготовления.
Подтверждение программы
G
Нажатием кнопки G запускается выбранная программа приготовления.
Удаление настройки или прерывание программы
H
Нажатием кнопки H настройки или прекращается выполнение уже запущенной
программы.
сре
дняя
] в п
рограмме
27
MUC_2-4_RU_8001013355.indb 27 10.08.2015 12:44:56
Page 30

ru
Панель управления
Элементы индикации
(Рис. С в начале инструкции по эксплуатации)
a
b таймер
c
d готово
e
Индикация предварительной настройки времени приготовления
f
g
h
i мой режим
ей
Диспл
Индикация оставшегося времени или температуры.
Показывает, что включена отсрочка времени запуска. Дисплей (a) показывает
время до запуска выбранной программы приготовления.
Этапы приг
отовления / ход программы
Индикация отдельных этапов приготовления или хода программы. При
наличии нескольких этапов приготовления (например, после разогревания
фритюрного масла происходит загрузка ингредиентов) эти этапы отображаются
загорающимися светодиодами 1, 2, 3 или 4. Дополнительно, если требуется
следующий этап приготовления, раздается звуковой сигнал.
Показывает, что блюдо готово. Дисплей (a) мигает и показывает «00:00».
Дополнительно раздается звуковой сигнал.
догрев
по
Показывает, что по окончании программы приготовления включена функция
подогрева. На дисплее горит прямоугольник (штриховая линия).
Предварительную настройку времени приготовления [
приготовления можно сократить [
короткая
ли удлинить [
] и
сре
дняя
длинная ] к
Загорается соответствующий элемент индикации.
Список прог
рамм приготовления
В распоряжении имеются 16 предварительно настроенных программ
приготовления. Многократным нажатием кнопки D поочередно вызываются
отдельные программы приготовления. На панели управления загорается
соответствующий светодиод.
рецепт 1&2 (в з
ависимости от модели)
Ячейки памяти для программ приготовления с индивидуальным выбором
времени и температуры.
Режим быстрой настройки, чтобы индивидуальным образом установить для
процесса варки время и температуру приготовления.
] в п
рограмме
нопкой E.
28
MUC_2-4_RU_8001013355.indb 28 10.08.2015 12:44:56
Page 31

ru
Перед первым
использованием
Перед использованием нового прибора
его необходимо полностью распаковать,
очистить и подключить к сети электропитания. Для этого нужно выполнить
следующее:
Вынь
1�
2� Чтобы поднять прибор, воспользуй-
Внимание!
Для надежной транспортировки прибора
также пользуйтесь только ручкой для
переноски.
3�
Внимание!
Над и под прибором не должны находиться чувствительные к нагреву поверхности и приборы, которые под воздействием температуры и выделяющегося пара
могут быть повреждены.
4� Снимите клапан для выпуска пара
те прибор и все принадлежности
из упаковки.
тесь ручкой для переноски. Поверните
ручку для переноски соответствующим
образом вверх.
У
становите прибор на прочную,
горизонтальную и ровную рабочую
поверхность.
Возмитесь снизу за клапан для
выпуска пара и поднимите его вверх.
Перед первым использованием
5� Откройте крышку прибора
Нажмите открывающую кнопку на
крышке.
6� Выньте вставной элемент крышки
Возьмите вставной элемент крышки
за оба выступа слева и справа вверху,
отсоедините и выньте его.
7� Выньте чашу из внутреннего
п
ространства прибора.
8� Снимите с прибора и с принадлеж-
ностей имеющийся упаковочный
материал.
29
MUC_2-4_RU_8001013355.indb 29 10.08.2015 12:44:57
Page 32

ru
Перед первым использованием
9� Проверьте комплектность всех частей.
10�
X
Пров
A
Рис.
ерьте прибор и принадлежности
на внешние повреждения.
Внимание!
Вводить в действие поврежденный
прибор категорически запрещено!
11�
д первым использованием
Пере
тщательно очистите и высушите
все детали. X «Уход и ежедневная
очистка» см. стр. 39
12� После очистки установите чашу
обратно во внутреннее пространство
прибора.
Внимание!
Перед тем, как вставить чашу, удостоверьтесь в том, что внутреннее пространство
прибора сухое и чистое.
� Установите вставной элемент
13
крышки
Установите вставной элемент крышки
в обе направляющие и, прижав,
вставьте сверху в крышку.
15
�
Вставь
те клапан для выпуска пара
Установите клапан для выпуска пара
сверху на крышку и плотно прижмите.
16� Подсоедините имеющийся в
комплекте сетевой кабель сначала к
прибору, а затем к розетке.
Внимание!
Используйте только имеющийся в
комплекте сетевой кабель.
На панели управления светятся обе
кнопки B, G кратковременно загораются
все светодиоды и раздается пятиступенчатый звуковой сигнал. Затем мигает
подсветка кнопки B. Прибор находится в
режиме ожидания и готов к работе.
14� Закройте крышку
Прижмите книзу крышку с фиксацией
до щелчка.
30
MUC_2-4_RU_8001013355.indb 30 10.08.2015 12:44:58
Page 33

ru
Управление
Режим выбора функций
В режиме выбора функций можно
выбрать все программы приготовления и
выполнить все настройки прибора. Для
этого нужно выполнить следующее:
упреждение
W Пред
Опасность ожога!
Запрещается использовать в работе
прибор без установленной кастрюли и
вставленного клапана для выпуска пара.
Внимание!
Перед каждым вводом в действие
проверьте прибор на отсутствие повреждений, комплектность, чистоту и надлежащую установку. X
использованием» см. стр. 29
1�
Прибор г
кнопку B для входа в режим выбора
функций.
В режиме выбора функций постоянно
светится кнопка B и элемент индикации
ой режим
[
м
дисплее отображается «00:00».
отов к работе. Нажмите
нопка G мигает. На
]. К
«Пере
д первым
Управление
Выбор и запуск программы
приготовления
Имеются на выбор 16 предварительно
настроенных программ приготовления.
X
«Список программ
см. стр. 41
1�
Внимание!
2�
Указание: Некоторые программы или
этапы приготовления выполняются при
открытой крышке. X
книге рецептов
3�
олните прибор нужными ингреди-
Нап
ентами. Для этого откройте крышку и
загрузите ингредиенты в кастрюлю.
Для считывания количества служит
дополнительно мерная шкала с
внутренней стороны кастрюли.
олняйте кастрюлю максимум до
■ Нап
отметки [
■ Для
только имеющуюся в комплекте
прибора лопатку (ни в коем случае не
металлические столовые приборы).
Зак
для входа в режим выбора функций.
Нажи
выбрана нужная программа приготовления.
4.0
перемешивания используйте
ройте крышку и нажмите кнопку B
майте кнопку D, пока не будет
приготовления»
liter
]!
. в прилагаемой
см
Указание: Если в течение 5 минут не
будет выполнен ввод на панели управления, прибор автоматически переключится в режим ожидания.
MUC_2-4_RU_8001013355.indb 31 10.08.2015 12:44:58
На панели управления загорается
соответствующий светодиод и мигает
предварительная настройка времени для
выбранной программы приготовления.
31
Page 34

ru
Управление
4� Нажмите кнопку G для запуска
программы приготовления.
Прибор нагревает кастрюлю до заданной
температуры. В процессе нагрева на
дисплее появляются линии, загорающиеся по часовой стрелке.
После достижения заданной температуры
линии гаснут, и на дисплее отображается
время приготовления. Процесс приготовления запускается автоматически.
Указание: При выборе программы [
п
(паста) или [ фритюр ] (фритюр) раздается повторяющийся звуковой сигнал, а
также мигают дисплей и кнопка G, пока
не будут загружены продукты и нажата
кнопка G.
Идет обратный отсчет времени приготовления.
Через клапан для выпуска пара из
мультиварки выходит водяной пар,
образующийся при приготовлении пищи,
предотвращая тем самым чрезмерное
давление. В зависимости от модели
клапан для выпуска пара снабжен
смотровым окном.
аста ]
Повышение или снижение
температуры
Если при приготовлении установлена
слишком высокая или слишком низкая
текущая температура, ее можно уже
в процессе варки соответствующим
образом повысить (макс. на +10°C) или
понизить (макс. на -10°C).
Чтобы повысить температуру, нажмите
кнопку C и удерживайте ее нажатой. На
дисплее кратковременно отобразится
текущая температура, после чего она
будет повышаться шагами в 1°C до максимального значения (+10°C). Удерживайте
кнопку нажатой, пока не будет достигнута
нужная повышенная температура.
Чтобы понизить температуру, нажмите
кнопку C и удерживайте ее нажатой. На
дисплее кратковременно отобразится
текущая температура, после чего она
вначале будет повышаться шагами в
1°C до максимального значения (+10°C).
После достижения максимального
значения, индикация возвратится к
минимальному значению (на 20°C).
Удерживайте кнопку нажатой, пока не
будет достигнута нужная пониженная
температура.
Чтобы продолжить программу приготовления, нажмите кнопку G.
Указание: Если кнопка не будет
нажата G, программа приготовления
продолжится с ранее установленной
температурой.
По окончании программы приготовления раздается звуковой сигнал,
загорается элемент индикации [
готово ] и
клавиша G. Дисплей мигает и показывает
«00:00».
5� Откройте крышку прибора и подайте к
столу готовое блюдо.
32
MUC_2-4_RU_8001013355.indb 32 10.08.2015 12:44:59
Page 35

ru
W Предупреждение
Опасность ожога!
роцессе приготовления внутри
■ В п
прибора может скопиться очень много
пара. Открывайте крышку с осторожностью. Не наклоняйтесь над крышкой
прибора.
аша и вставные элементы, если
■ Ч
таковые используются, могут быть
очень горячими. Обязательно используйте щипцы для вынимания чаши,
соответствующие ручки или кухонные
рукавицы.
Указания:
■ Программу приготовления можно в
любой момент остановить кнопкой H.
После этого прибор переключается в
режим выбора функций.
■ Если в программу приготовления
входит функция подогрева, то эта
функция автоматически включается
после приготовления блюда и до
10 часов поддерживает температуру блюда на уровне 40 °C. Горят
индикаторы [
На дисплее горит прямоугольник
(штриховые линии). Работу функции
подогрева можно завершить кнопкой
H. После этого прибор переключается
в режим выбора функций.
Если выбранная программа приготовления состоит из нескольких этапов, то
перед тем, как должен начаться следующий этап, раздается звуковой сигнал. На
панели управления отображаются соответствующие светодиоды 1, 2, 3 или 4, и
мигает кнопка G. Выполните следующее:
�
ройте крышку прибора.
1
Отк
2�
обавьте следующие ингредиенты.
Д
3�
ройте крышку прибора.
Зак
4�
нопкой G запустите следующий этап
К
приготовления.
готово ] и [ подогрев ].
Управление
Прибор нагревает внутреннее пространство прибора до заданной температуры
следующего этапа приготовления. В
процессе нагрева на дисплее появляются
линии, загорающиеся по часовой стрелке.
После достижения заданной температуры
линии гаснут, и на дисплее отображается следующее время приготовления.
Процесс приготовления запускается
автоматически. Идет обратный отсчет
времени приготовления.
Выбор предварительной
настройки времени
приготовления
Для каждой программы приготовления на
панели управления отображается предварительная настройка времени приготовления на ступени [
дварительную настройку времени
Пре
приготовления можно сократить
[ короткая
�
1
Нажи
рится нужный элемент индикации.
Индикация меняется в последовательности [
и затем опять [ средняя ].
На дисплее отображаются соответствующие значения предварительной
настройки времени приготовления.
2�
Нажм
программы приготовления.
X
приготовления» см. стр. 31
ли удлинить [
] и
майте кнопку E, пока не заго-
дняя
сре
ите кнопку G для запуска
ор и запуск программы
«Выб
дняя
сре
], [ длинная ], [ к
].
длинная ].
ороткая ]
33
MUC_2-4_RU_8001013355.indb 33 10.08.2015 12:44:59
Page 36

ru
Управление
Настройка отсрочки времени
запуска
Чтобы к определенному моменту подать к
столу свежеприготовленное блюдо, время
до запуска выбранной программы приготовления можно регулировать.
Указание: Настройка задержки времени
запуска возможна только для определенных программ приготовления.
Задержка времени запуска для этих
программ приготовления предварительно
настроена на разные значения.
1�
2�
Многократным нажатием кнопки A
показанное на дисплее время увеличивается. При каждом коротком нажатии
кнопки время увеличивается на 5 минут.
При каждом более длительном нажатии
кнопки время увеличивается на 10 минут.
Если кнопку A удерживать нажатой
примерно 2 секунды, время увеличивается каждый раз на 30 минут.
3�
Выбранная задержка времени запуска
отображается на дисплее. Ha диcплee
горит [
Иде
запуска. Затем процесс приготовления
запускается автоматически.
Указания:
ерите программу приготовления.
Выб
ите кнопку A. Кнопка G мигает.
Нажм
На дисплее мигает «00:10».
ите кнопку G после того, как на
Нажм
дисплее отобразится нужное значение
задержки времени запуска.
таймер
т обратный отсчет времени до
■ Нажа
момент выключить задержку времени
запуска. В этом случае программа
приготовления запускается сразу.
сли на дисплее не мигает «00:10»,
■ Е
настройка задержки времени запуска
для выбранной программы приготовления невозможна.
].
тием кнопки G можно в любой
Преждевременное окончание
текущего этапа приготовления
Если ингредиенты на этапе приготовления
готовы раньше времени, этот этап можно
закончить также вручную.
1�
Текущий этап приготовления будет
закончен. Затем, как обычно, перед тем,
как может быть начат следующий этап,
раздастся звуковой сигнал. На панели
управления отображаются соответствующие светодиоды 1, 2, 3 или 4, и мигает
кнопка G.
2�
этого нажимайте на кнопку G в
Для
течение не менее 2 секунд.
олните следующий этап
Вып
приготовления.
Использование контейнера
для фритюра
Для приготовления мяса, рыбы, картофеля фри и проч. в горячем масле необходимо использовать корзину фритюрницы (в зависимости от модели).
Указание: Чтобы приготовить вкусные и
качественные блюда, мы рекомендуем
использовать рецепты, предлагаемые в
нашей книге рецептов.
При использовании контейнера
для фритюра примите во внимание
следующее:
упреждение
W Пред
Опасность ожога!
■ Наполните емкость маслом или
фритюрным жиром максимум до
отметки [
оличество приготавливаемого во
■ К
фритюре продукта не должно превышать 200
незамороженном состоянии.
роцессе приготовления внутри
■ В п
прибора может скопиться очень много
пара. Открывайте крышку с осторожностью. Не наклоняйтесь над крышкой
прибора.
] .
1.0 I
г в замороженном или 300 г в
34
MUC_2-4_RU_8001013355.indb 34 10.08.2015 12:44:59
Page 37

ru
■ Чаша и вставные элементы, если
таковые используются, могут быть
очень горячими. Обязательно используйте щипцы для вынимания чаши,
соответствующие ручки или кухонные
рукавицы.
ройте крышку прибора.
1�
Отк
2�
3� Закройте крышку.
4�
�
5
Масло разогревается. После достижения заданной температуры раздается
звуковой сигнал, и мигает подсветка
кнопки G.
6
�
�
7
8�
9� Закройте крышку прибора.
Указание: Некоторые программы или
этапы приготовления выполняются при
открытой крышке. X см. в прилагаемом
сборнике рецептов
10� Кнопкой G запустите программу
е в кастрюлю максимум 1 литр
Залейт
масла. Для считывания количества
служит дополнительно мерная шкала
с внутренней стороны чаши.
жиме выбора функций выберите
В ре
программу приготовления [
X «Список программ приготов-
ления» см. стр. 41
ите кнопку G для запуска
Нажм
программы приготовления.
узите в контейнер для фритюра
Загр
приготавливаемый во фритюре
продукт.
ройте крышку прибора.
Отк
авьте контейнер для фритюра,
Вст
используя имеющуюся в комплекте
ручку, в чашу и снимите ручку.
приготовления.
Фритюр ]
Управление
По окончании программы приготовления
раздается звуковой сигнал.
ройте крышку прибора.
11�
Отк
12� Для стекания капель с приготовлен-
ного во фритюре продукта поднимите
контейнер для фритюра за ручку и
установите его, пользуясь навесной
планкой, на край кастрюли.
Использование вставного
контейнера для пароварки
Для приготовления на пару овощей, мяса
и рыбы необходим вставной контейнер
для пароварки. Состоящий из двух частей
вставной контейнер для пароварки позволяет готовить одновременно различные
ингредиенты независимо друг от друга
(например, в нижней части - овощи, в
верхней части - мясо).
Указание: Чтобы приготовить вкусные и
качественные блюда, мы рекомендуем
использовать рецепты, предлагаемые в
нашей книге рецептов.
При использовании вставного контейнера
для пароварки примите во внимание
следующее:
W Предупреждение
Опасность ожога!
■ Залейте воду максимум до отметки
[ 0.5 J ] .
роцессе приготовления внутри
■ В п
прибора может скопиться очень много
пара. Открывайте крышку с осторожностью. Не наклоняйтесь над крышкой
прибора.
аша и вставные элементы, если
■ Ч
таковые используются, могут быть
очень горячими. Обязательно используйте щипцы для вынимания чаши,
соответствующие ручки или кухонные
рукавицы.
1
� Откройте крышку прибора.
2� Залейте в чашу максимум 0,5 литра
воды. Для считывания количества
служит дополнительно мерная шкала
с внутренней стороны кастрюли.
35
MUC_2-4_RU_8001013355.indb 35 10.08.2015 12:44:59
Page 38

ru
Приготовление
3� Установите нижнюю часть вставного
контейнера для пароварки в чашу.
4�
5�
6� Закройте крышку.
7�
8� Нажмите кнопку G для запуска
По окончании программы приготовления
раздается звуковой сигнал, и мигает
подсветка кнопки G.
9� Откройте крышку прибора.
10� По окончании приготовления на пару
приготовления на пару различных
Для
ингредиентов наполните нижнюю
часть до нижней кромки.
становите верхнюю часть и добавьте
У
прочие ингредиенты.
В ре
жиме выбора функций выберите
программу приготовления [ пароварка ]
X «Список программ приготов-
ления» см. стр. 41
программы приготовления.
выньте верхнюю и нижнюю часть
вставного контейнера для пароварки
из чаши.
Блокировка от детей
Блокировку от детей можно включить или
выключить в процессе приготовления.
Если включена блокировка от детей, все
кнопки прибора блокированы, и выполнение настроек на приборе невозможно.
W Предупреждение
При включенной блокировке от детей
внести изменения в процессы приготовления или прервать их невозможно.
Вначале нужно выключить блокировку от
детей.
Нажмите следующую комбинацию
клавиш:
1� Включение
Удерживайте одновременно нажатыми
кнопки C и F в течение 3 секунд.
Раздается короткий звуковой сигнал.
Блокировка от детей включена.
2�
лючение
Вык
Снова удерживайте одновременно
нажатыми кнопки C и F в течение
3 секунд. Раздается короткий
звуковой сигнал. Блокировка от детей
выключена.
Приготовление
Общие рекомендации
Чтобы приготовить вкусные и качественные блюда, мы рекомендуем использовать рецепты, предлагаемые в нашей
книге рецептов, специально разрабо
танные для приготовления в мультиварке.
В книге рецептов содержатся подробные
сведения с необходимым количеством
ингредиентов, рекомендации по времени
и температуре приготовления, а также
предпочтительные комбинации программ
приготовления.
Используйте рекомендуемые нами
рецепты, чтобы накопить собственный
опыт. Если Вы цените преимущества и
разнообразие вариантов применения,
Вы с удовольствием опробуете новые
рецепты. Используйте для этого индивидуальные возможности настройки,
описанные на следующих страницах.
В качестве обзорной информации о всех
программах приготовления мы составили
общую таблицу. X «Список программ
приготовления» см. стр.
41
36
MUC_2-4_RU_8001013355.indb 36 10.08.2015 12:44:59
Page 39

Индивидуальные возможности настройки
ru
Индивидуальные
возможности настройки
Предварительно настроенные значения
времени и температуры приготовления
могут быть согласованы с индивидуальными потребностями и данными
рецептов.
Настройка времени
приготовления
1� В режиме выбора функций нажимайте
кнопку D, пока не будет выбрана
нужная программа приготовления.
На панели управления горит соответствующий светодиод и отображается предварительная настройка времени для данной
программы приготовления.
2� Коротко нажмите 1 раз кнопку F.
На дисплее мигает предварительная
настройка времени приготовления.
3�
Коротким нажатием кнопки F время
приготовления увеличивается на 1 минуту.
Время увеличивается до предварительно
настроенного максимального значения
и затем возвращается к предварительно
настроенному минимальному значению.
Если кнопку F дольше удерживать
нажатой, время увеличивается каждый
раз на 10 минут.
4�
Если требуется индивидуальная
настройка времени на всех этапах
приготовления, повторите пункты 2 - 4
перед запуском соответствующего этапа
приготовления.
Указание: Эти настройки не сохраняются
в памяти. При повторном выборе этой
программы приготовления на дисплее
снова отображается предварительная
настройка времени приготовления.
майте кнопку F до тех пор, пока
Нажи
на дисплее не появится нужное время
приготовления.
огда дисплее появится нужное время
К
приготовления, нажмите кнопку G.
Настройка температуры
приготовления
1� В режиме выбора функций нажимайте
кнопку D, пока не будет выбрана
нужная программа приготовления.
На панели управления горит соответствующий светодиод и отображается предварительная настройка времени для данной
программы приготовления.
2� Коротко нажмите 1 раз кнопку C.
На дисплее мигает предварительная
настройка температуры приготовления.
3�
Коротким нажатием C температура
приготовления повышается на 5 градусов.
Температура увеличивается до предварительно настроенного максимального
значения и затем возвращается к предварительно настроенному минимальному
значению. Если кнопку C удерживать
нажатой немного дольше, температура
увеличивается каждый раз на 10
4�
Если требуется индивидуальная
настройка температуры на всех этапах
приготовления, повторите пункты 2 - 4
перед запуском соответствующего этапа
приготовления.
Указание: Эти настройки не сохраняются
в памяти. При повторном выборе этой
программы приготовления на дисплее
снова отображается предварительная
настройка времени приготовления.
майте кнопку C до тех пор, пока
Нажи
на дисплее не появится нужная темпе-
ратура приготовления.
сов.
граду
огда на дисплее появится нужная
К
температура приготовления, нажмите
кнопку G.
мой режим
Режим быстрой настройки, чтобы индивидуальным образом установить для
процесса варки время и температуру
приготовления.
37
MUC_2-4_RU_8001013355.indb 37 10.08.2015 12:44:59
Page 40

ru
Индивидуальные возможности настройки
В режиме выбора функций постоянно
светится кнопка B и элемент индикации
[ мой режим
дисплее отображается «00:00».
оротко нажмите 1 раз кнопку F.
1�
К
На дисплее мигает «00:00».
2�
Нажи
на дисплее не появится нужное время
приготовления.
3�
оротко нажмите 1 раз кнопку C.
К
На дисплее мигает «0000».
4�
Нажи
на дисплее не появится нужная температура приготовления.
5�
Нажм
выбранных настроек.
Прибор нагревает кастрюлю до заданной
температуры.
После достижения заданной температуры
линии гаснут, и на дисплее отображается
время приготовления. Процесс приготовления запускается автоматически.
нопка G мигает. На
]. К
майте кнопку F до тех пор, пока
майте кнопку C до тех пор, пока
ите кнопку G для запуска
рецепт 1 / рецепт 2 – сохранение
в памяти собственных
программ приготовления
В зависимости от модели X «Перечень
моделей и технические данные» см.
стр. 42
В ячейках памяти [ рецепт 1 ] и [ рецепт 2 ]
могут быть сохранены программы приготовления с индивидуальным выбором
времени и температуры.
1� В режиме выбора функций нажмите
1 раз кнопку D.
Загорается светодиод [ рецепт 1 ]. Дисплей
показывает предварительную настройку
времени приготовления.
Указание: Если до этого собственная
программа приготовления не была сохранена, дисплей показывает «00:00».
2� Коротко нажмите 1 раз кнопку F.
Дисплей мигает. На панели управления
загорается светодиод 1 (этап приготовления 1).
�
3
Коротким нажатием кнопки F время
приготовления увеличивается на 1 минуту.
Если кнопку F дольше удерживать
нажатой, время увеличивается каждый
раз на 10 минут. Время увеличивается до
предварительно настроенного максимального значения и затем возвращается к
предварительно настроенному минимальному значению.
4�
На дисплее отображается предварительная настройка температуры
приготовления.
Указание: Если до этого собственная
программа приготовления не была сохранена, дисплей показывает «0000».
5�
6�
Для программирования последующих
этапов приготовления повторите пункты
2 - 6. Могут быть запрограммированы
максимум 3 этапа приготовления.
Сохраненную в памяти программу приготовления [ рецепт 1 ] можно, как обычно,
выбрать в режиме выбора функций
X «Выбор и запуск программы
приготовления» см. стр. 31
Указание: Чтобы сохранить вторую
программу приготовления в ячейке
памяти [ рецепт 2 ], выполните действия,
описанные для [ рецепт 1 ].
Чтобы удалить собственную программу
приготовления, выполните следующее:
1� В режиме выбора функций нажмите
Загорается светодиод [ рецепт 1 ]. Дисплей
показывает сохраненное в памяти время
приготовления.
2� Коротко нажмите 1 раз кнопку F.
айте кнопку F до тех пор, пока
Нажим
на дисплее не появится нужное время
приготовления.
К
оротко нажмите 1 раз кнопку C.
майте кнопку C до тех пор, пока
Нажи
на дисплее не появится нужная температура приготовления.
ельно нажмите кнопку G
Длит
(>2 секунд), чтобы сохранить настроенные значения.
раз кнопку D.
1
38
MUC_2-4_RU_8001013355.indb 38 10.08.2015 12:44:59
Page 41

ru
Дисплей мигает. На панели управления
загорается светодиод 1 (этап приготовления 1).
3�
Настройки [
Указание: Чтобы удалить вторую собственную программу приготовления из
ячейки памяти [
действия, описанные для [
ельно нажмите кнопку H
Длит
(>2 секунд).
епт 1
рец
рец
] у
епт 2
далены.
], вып
рец
олните
епт 1
].
Уход и ежедневная
очистка
W Предупреждение!
Опасность поражения током
■ Запрещается погружать прибор в воду.
■ Не используйте паровые очистители.
д очисткой отсоедините сетевой
■ Пере
кабель от сети.
Внимание!
■ Не исп
■ Не исп
■ Не п
ользуйте моющие средства,
содержащие алкоголь или спирт.
ользуйте металлические и
остроконечные предметы, а также
предметы с острыми кромками.
рименяйте грубую ткань или абра-
зивные чистящие средства.
Уход и ежедневная очистка
Очистка основного прибора
1� Протрите корпус мягкой влажной
тканью и высушите его.
2�
3�
трите внутреннее пространство
Про
мягкой влажной тканью и высушите
его.
Очистит
микрофибровой салфеткой.
е панель управления сухой
Разборка клапана для выпуска
пара
Клапан для выпуска пара с окном:
1� Сожмите белые защелки слева и
справа с нижней стороны клапана
для выпуска пара и снимите нижнюю
часть.
2� Для сборки вставьте нижнюю часть
прорезью в верхнюю часть и прижмите
вниз до фиксации защелок.
После каждого применения прибор
должен быть тщательно очищен.
1� Дайте прибору полностью остыть.
2� Откройте крышку.
3� Выньте кастрюлю, вставной элемент
крышки, клапан для выпуска пара и
принадлежности. X «Перед первым
использованием» см. стр. 29
39
MUC_2-4_RU_8001013355.indb 39 10.08.2015 12:45:00
Page 42

ru
J
Утилизируйте упаковку с использо-
вила возврата и утилизации старых
Получить исчерпывающую информацию
об условиях гарантийного обслуживания Вы можете в Вашем ближайшем
авторизованном сервисном центре, или
в сервисном центре от производителя
ООО «БСХ Бытовая техника», или
в сопроводительной документации.
Мы оставляем за собой право на
внесение изменений.
Утилизация
Клапан для выпуска пара без окна:
1�
2� Для сборки вставьте нижнюю часть в
ите на белую защелку с нижней
Нажм
стороны клапана для выпуска пара,
снимите нижнюю часть и выньте из
обеих направляющих.
обе направляющие и прижмите вниз
до фиксации защелки.
Внимание!
Перед тем, как вставить чашу, удостоверьтесь в том, что внутреннее пространство
прибора сухое и чистое, и в нем отсутствуют предметы.
Утилизация
ванием экологически безопасных
методов. Данный прибор имеет
отметку о соответствии европейским нормам 2012/19/EU утилизации электрических и электронных приборов (waste electrical and
electronic equipment – WEEE). Данные нормы определяют действующие на территории Евросоюза пра-
приборов. Информацию об актуальных возможностях утилизации
Вы можете получить в магазине,
в котором Вы приобрели прибор.
Очистка вставного элемента
крышки и клапана для выпуска
пара
1� Очистите детали мыльным раствором
и мягкой тканью или губкой.
Пром
2�
3� Снова соберите высохшие детали и
ойте чистой водой и высушите.
установите в основной прибор.
Очистка чаши и
принадлежностей
1� Очистите детали мыльным раствором
и мягкой тканью или губкой.
2� Промойте чистой водой и высушите.
Указание: Чашу, контейнер для фритюра,
вставной контейнер для пароварки,
щипцы для вынимания чаши, лопатку,
ложку и мерный стакан можно мыть также
в посудомоечной машине.
40
MUC_2-4_RU_8001013355.indb 40 10.08.2015 12:45:00
Условия гарантийного
обслуживания
Page 43

Список программ приготовления
ru
Список программ приготовления
В таблице ниже приведены основные данные различных программ приготовления.
Программа Количество
этапов
приготовления
мой режим
Индивидуальная настройка нужной температуры и
времени приготовления
рецепт 1&2
2 ячейки памяти для собственных рецептов
(в зависимости от модели)
разогрев
Разогрев холодных (предварительно сваренных)
блюд
суп/борщ
Приготовление супов и рагу
пароварка
Приготовление на пару овощей, мяса и рыбы
(необходим вставной контейнер для пароварки)
тушение
Тушение овощей, мяса и рыбы.
жарка
Жарка овощей, мяса и рыбы.
фритюр
Жарение во фритюре мяса, рыбы, картофеля фри
и проч. (необходим контейнер для фритюра)
выпечка
Выпекание пирогов или хлеба
варка
Варка продуктов питания
паста
Варка макаронных изделий, яиц или сосисок.
крупы/рис
Варка круп или риса
молочная каша
Приготовление молочных блюд
бобы
Варка бобов и других овощей.
* В зависимости от рецепта / этапа приготовления
Указания по правильному применению программ, а также сведения об ингредиентах, количествах и
времени варки содержатся в прилагаемой книге рецептов
1 —
1-3 —
1
короткий: 1
средний: 2
длинный: 3
1
1
1
1 —
1 — закрыта
1
1 —
1 — закрыта
1
короткий: 1
средний: 2
длинный: 2
Доступна
функция
поддержания
в горячем
состоянии
G
G
G
G
G
G
G
G
Крышка
открыта /
закрыта *
открыта /
закрыта *
закрыта
открыта /
закрыта *
закрыта
закрыта
открыта
открыта /
закрыта *
закрыта
открыта /
закрыта *
закрыта
закрыта
41
MUC_2-4_RU_8001013355.indb 41 10.08.2015 12:45:00
Page 44

Перечень моделей и технические данныеru
Программа Количество
этапов
приготовления
плов
Варка блюд из риса
холодец
Приготовление холодца и других подобных блюд
варенье
Консервирование фруктов для варки варенья
йогурт
Приготовление йогурта
* В зависимости от рецепта / этапа приготовления
Указания по правильному применению программ, а также сведения об ингредиентах, количествах и
времени варки содержатся в прилагаемой книге рецептов
короткий: 2
средний: 3
длинный: 4
1 — закрыта
1 — открыта
1 — закрыта
Доступна
функция
поддержания
в горячем
состоянии
G
Крышка
открыта /
закрыта *
Перечень моделей и технические данные
MUC
22...RU
G G G G
MUC
24...RU
MUC
28...RU
MUC
48...RU
—
Индивидуальные ячейки памяти — 2 2 2
Макс. вмecтимocть (литров) 4 4 4 4
Паровыпуск с контрольным окном
Покрытие чаши Тефлон Керамика Керамика Тефлон
Материал корпуса Пластмасса Пластмасса Металл Металл
Диапазон температур 40-160 °C 40-160 °C 40-160 °C 40-160 °C
Электропитание (напряжение / частота) 220-240 В~
Мощность нагрева 900 Вт 900 Вт 900 Вт 1200 Вт
Индукция
Длина сетевого кабеля 1,5 м 1,5 м 1,5 м 1,5 м
Вес, порожний 3,7 кг 4,1 кг 4,1 кг 5,4 кг
42
MUC_2-4_RU_8001013355.indb 42 10.08.2015 12:45:02
—
50/60 Гц
— — —
G G G
G G G
220-240 В~
50/60 Гц
220-240 В~
50/60 Гц
220-240 В~
50/60 Гц
G
Page 45

Специальные принадлежности
ru
Специальные принадлежности
MAZ4BI
Кастрюля из нержавеющей стали,
полированная, с антипригарным
покрытием и крышкой для хранения*;
годится для индукционной мультиварки MUC48…
MAZ2BT
Кастрюля с тефлоновым антипригарным покрытием и крышкой для
хранения*; годится для мультиварки
MUC22
MAZ2BC
Кастрюля с керамическим антипригарным покрытием и крышкой для
хранения*; годится для мультиварки
MUC24/28
MAZ0FB
Контейнер для фритюра
MAZ0YG
Контейнер для йогурта
*Крышка для хранения не входит в стандартный комплект поставки прибора. Она поставляется только с
кастрюлями из ассортимента специальных принадлежностей.
Принадлежности, которые не входят в комплект поставки, можно приобрести в торговле и в сервисной
службе.
Кастрюля 5 л; годится для мойки в
посудомоечной машине; чаша высокой
прочность; толщина 2,5 мм; полированная
снаружи нержавеющая сталь; антипригарное покрытие; крышка* для практичного
хранения продуктов в кастрюле, например, в
холодильнике
Кастрюля 5 л; годится для мойки в посудомоечной машине; тефлоновое антипригарное
покрытие; крышка* для практичного
хранения продуктов в кастрюле, например, в
холодильнике
Кастрюля 5 л; годится для мойки в посудомоечной машине; керамическое антипригарное
покрытие; крышка* для практичного
хранения продуктов в кастрюле, например, в
холодильнике
Контейнер для фритюра со съемной ручкой
для простого обращения; годится для мытья
в посудомоечной машине
Большой объем для приготовления больших
количеств: полезный объем 1 л; металлический контейнер; пластмассовая крышка
43
MUC_2-4_RU_8001013355.indb 43 10.08.2015 12:45:03
Page 46

ru
Помощь при устранении неисправностей
Помощь при устранении неисправностей
Проблема Причина Уcтpaнeниe
Приготовленное блюдо
полусырое.
Приготовленное блюдо
подгорело.
Содержимое прибора при
варке выкипает.
Светодиод не горит. Прибор выключен. Включите прибор.
Нагревательная панель не
работает.
Из прибора выливается вода. Прибор оборудован защитой от
Индикация на дисплее
E1~E6
Если невозможно устранить неполадку, обязательно свяжитесь с «горячей линией»!
Номера телефонов указаны на последних страницах инструкции.
Загружено слишком большое
количество.
Неправ
ильное соотношение
количества воды и
ингредиентов.
Посторонние предметы во
внутреннем пространстве
прибора.
Чаша деформирована. Обратитесь в сервисную службу.
Неисправность прибора.
Неисправность датчика.
Загрязнение под чашей. Тщательно очистите чашу и
Кастрюля деформирована. Обратитесь в сервисную службу.
Неисправность прибора.
Неисправность датчика.
Загружено слишком большое
количество.
Слишком высокая температура. Уменьшите температуру.
Для выбранной программы
приготовления требуется варка
с открытой крышкой.
Кабель электропитания
неисправен.
Неисправность прибора. Обратитесь в сервисную службу.
Нагревательная панель
повреждена.
перелива.
Неисправность прибора. Прервите программу приготовления.
Наполняйте чашу максимум до
отметки [
Скорректируйте соотношение
количества воды и ингредиентов.
Удалите все посторонние предметы.
Не используйте для этого воду!
внутреннее пространство прибора.
Загрузите надлежащее количество.
Откройте крышку прибора.
Обратитесь в сервисную службу.
Удалите воду. Выньте чашу и
насухо протрите тканью внутреннее
пространство прибора. Следите за
тем, чтобы во внутреннее пространство прибора не попадала вода.
Отсоедините прибор от сети
электропитания. Cнoвa включите
прибор. Если проблема сохранится,
обратитесь в сервисную службу.
4.0
liter
]!
44
MUC_2-4_RU_8001013355.indb 44 10.08.2015 12:45:03
Page 47

Помощь при устранении неисправностей
ru
Проблема Причина Уcтpaнeниe
Индикация на дисплее
E0
Неисправность прибора. Если индикация на дисплее
сохраняется дольше 20 секунд,
отсоедините прибор от сети
электропитания и обратитесь в
сервисную службу.
Индикация на дисплее
E1
Вставлена неподходящая чаша,
или чаша не идентифицируется.
Отсоедините прибор от сети
электропитания и обратитесь в
сервисную службу.
Индикация на дисплее
E2, E5, E6 или E7
Перегрев прибора. Отсоедините прибор от сети
электропитания и дайте ему остыть.
После того, как прибор остынет, снова
включите его.
Короткое замыкание в приборе. Отсоедините прибор от сети
электропитания и обратитесь в
сервисную службу.
Индикация на дисплее
E3
Индикация на дисплее
E4
Индикация на дисплее
E8
Слишком высокое сетевое
напряжение.
Слишком низкое сетевое
напряжение.
Обратитесь в организацию
энергоснабжения или к оператору
сети. Поручите специалисту
проверить электропитание.
Ошибка связи После того, как прибор остынет, снова
включите его.
Если невозможно устранить неполадку, обязательно свяжитесь с «горячей линией»!
Номера телефонов указаны на последних страницах инструкции.
45
MUC_2-4_RU_8001013355.indb 45 10.08.2015 12:45:03
Page 48

Адреса сервисных центров по обслуживанию бытовой техники http://www.bosch-home.com/ru/
B31C045B1-1M23 02/2015Внимание! Список сервисных центров постоянно обновляется.
РОССИЯ
АБАКАН, ИП Кобылянский Роман Сергеевич, 655010, Торосова ул., д.15,
тел: (3902) 26-65-64, факс: (3902) 22-65-64
АЛЬМЕТЬЕВСК, ИП Валиуллин Марат Рафгатович, 423450, К.Цеткин ул., д.18а,
тел: (8553) 37-17-89, 32-22-11, факс: (8553) 37-17-89
АЛЬМЕТЬЕВСК, ООО «Альметьевский Сервисный Центр», 423450,
Нефтяников ул., д.37, тел: (8553) 38-43-43, 22-17-00, факс: (8553) 38-43-43
АНАПА, ИП Коваленко Сергей Иванович, 353440, Астраханская ул., д.98,
тел: (86133) 6-09-84, 8-918-215-5775
АПАТИТЫ, ИП Корепанов Антон Юрьевич, 184209, ул. Зиновьева, д.22А,
тел: (81555) 6-61-06, факс: (81555) 6-61-06
АРЗАМАС, ИП Абросимов Дмитрий Александрович, 607224, 9-е Мая ул., д.4,
тел: (83147) 7-07-40, 7-73-82, факс: (83147) 7-73-82
АРМАВИР, ИП Филин Сергей Иванович, 352900, Комсомольская ул., д.115,
тел: (86137) 3-80-00
АРХАНГЕЛЬСК, ООО «Двина-Сервис Центр», 163000, Садовая ул., д.21,
тел: (8182) 65-79-95, факс: (8182) 20-23-30
АРХАНГЕЛЬСК, ООО «Сервисный Центр «Мир», 163045, Гагарина ул., д.1,
тел: (8182) 27-60-66, 27-55-10, факс: (8182) 27-60-66
АСТРАХАНЬ, ИП Кузнецов Александр Федорович, 414041, Яблочкова ул.,
д.1В, тел: (8512) 36-84-10, 37-06-91, факс: (8512) 37-06-01
АЧИНСК, ИП Кудрин Сергей Юрьевич, 662150, мкр.2, д.6, тел: (39151) 4-42-22,
7-24-21, факс: (39151) 7-24-22
БАЛАКОВО, ИП Барышников Евгений Владимирович, 413853, Чапаева ул.,
д.159А, тел: (8453) 44-75-31, 927-148-97-70, факс: (8453) 44-75-31
БАЛАШОВ, ИП Рыженькина Наталия Сергеевна, 412309, Луначарского ул.,
д.102, тел: (9172) 13-17-78
БАРНАУЛ, ООО «Диод», 656043, Пролетарская ул., д.113, тел: (3852) 63-94-02,
факс: (3852) 63-59-88
БАРНАУЛ, ООО «Р.С.Ц.», 656044, Попова ул., д.55, тел: (3852) 48-50-67,
факс: (3852) 48-40-67
БЕЛГОРОД, ООО «Выбор-Сервис», 308000, Гражданский пр-т, д.32,
тел:
(4722) 32-65-92, 22-92-90, 22-95-16, факс: (4722) 22-92-90
БЕЛОРЕЦК, ООО «Электроника», 453501, Ф.Алексеева ул., д.45,
тел: (3479) 25-35-26, 24-07-28, факс: (3479) 25-35-26
БЕЛОРЕЧЕНСК, ООО «Дело техники», 352630, Мира ул., д.63/1,
тел: (8615) 53-11-00
БЕРЕЗНИКИ, ООО «Рембытторгтехника-Сервис», 618419, Льва Толстого ул.,
д.76А, оф.7, тел: (3424) 23-72-28, 23-72-23, факс: (3424) 23-71-61
БИЙСК, ООО «Парус плюс», 659325, Кирова пер., д.8, тел: (3854) 35-69-70,
33-65-65
БЛАГОВЕЩЕНСК
, ООО «Амурский сервисный центр», 675000,
Октябрьская ул., д.162, тел: (4162) 33-36-38
БОГУЧАНЫ, ООО «Сервис центр №3», 663430, Ленина ул., д.119,
тел: (39162) 2-14-73, 2-16-35
БРАТСК, ИП Рудакова Елизавета Викторовна, 665700, Курчатова ул., д.30А,
тел: (3953) 26-80-60
БРЯНСК, ИП Карпов Владимир Иванович, 241038, Сталелитейная ул., д.1,
тел: (4832) 52-21-09, 952-9622209
БУГУРУСЛАН, ИП Покручина Валентина Ивановна, 461630, Транспортная ул.,
д.2, тел: (35352) 9-10-99
ВЕЛИКИЙ НОВГОРОД, ООО «ТКТ», 173025, Кочетова ул., д.23А,
тел: (8162) 61-12-00, 33-59-18, факс: (8162) 61-12-00
ВЛАДИВОСТОК
, ИП Юзефович Вячеслав Григорьевич, 690014, Народный
пр-т, д.11, тел: (4232) 96-62-27
ВЛАДИКАВКАЗ, ООО «Арктика-Сервис», 362015, Коста пр-т, д.15,
тел: (8672) 25-01-07, факс: (8672) 25-01-07
ВЛАДИМИР, ООО «Владимир-Сервис», 600014, Строителей пр-т, д.36,
тел: (4922) 36-45-18, 36-99-36, факс: (4922) 36-45-19
ВОЛГОГРАД, ООО «Толиман», 400082, 50-ти лет Октября ул., д.17,
тел: (8442) 62-93-74, факс: (8442) 62-93-74
ВОЛГОГРАД, ООО «Толиман», 400117, 8-й воздушной армии ул., д.35,
тел: (8442) 78-91-41, факс: (8442) 78-91-41
ВОЛГОГРАД, ООО «Толиман», 400050, Кузнецова ул., д.49,
тел:
(8442) 27-05-06, факс: (8442) 27-05-07
ВОЛГОДОНСК, ИП Ибрагимов Марат Асгатович, 347387, К. Маркса ул., д.30,
тел: (8639) 25-29-29, факс: (8639) 25-29-29
ВОЛЖСКИЙ, ООО «Толиман», 404109, Труда пл., д.10, тел: (8443) 21-53-57
ВОЛОГДА
, ИП Коновалов С.А., 160022, Пошехонское ш., д.6А,
тел: (8172) 71-59-69, 71-81-29, факс: (8172) 71-59-69
ВОЛОГДА, ООО «Авторизованный Центр «Пионер Сервис», 160024,
Северная ул., д.34, тел: (8172) 27-24-13, 27-24-14, факс: (8172) 27-24-14
ВОРКУТА, ООО «Мега», 169907, Тиманская ул., д. 8А, тел: (82151) 6-60-06,
6-63-42, факс: (82151) 6-60-06
ВОРОНЕЖ, ИП Михайлов Андрей Игоревич, 394043, Ленина ул., д.73,
тел: (473) 210-00-12
ГРОЗНЫЙ, ООО «Техноплюс», 364029, Ханкальская ул., д.75,
тел: 8-928-024-56-66, 8-962-024-56-66
ДЕРБЕНТ
, ИП Джабраилов Руслан Расулович, 368608, 345 Стрелковой
дивизии ул., д.19, тел: (963) 374-97-78, (989) 669-48-99
ДИВНОГОРСК, ИП Митяев Дмитрий Николаевич, 663090, Школьная ул., д.31А,
тел: (39144) 3-52-65
ДИМИТРОВГРАД, ИП Федотов Сергей Алексеевич, 433505, Октябрьская ул.,
д.63, тел: (8423) 52-86-59, 59-14-64, факс: (8423) 52-86-59
ЕЙСК, ИП Лаврович Константин Анатольевич, 353688, Маяковского ул., д.55,
тел: (8613) 25-05-00, факс: (8613) 25-05-00
ЕКАТЕРИНБУРГ, ООО «Евротехника-Сервис», 620146, Бардина ул., д.28,
тел: (343) 240-98-26, 243-26-11, факс: (343) 243-42-22
ЕКАТЕРИНБУРГ, ООО «Норд-Сервис», 620057, Донская ул., д.31,
тел: (343) 310-00-91, факс: (343) 310-00-91
ЕЛЕЦ, ИП Шульгин Александр Иванович, 399776, 220-й Стрелковой
дивизии ул., д.1А, тел: (47467) 3-72-62, 905-684-66-73, факс: (47467) 6-75-83
ЖЕЛЕЗНОГОРСК
, ИП Гречанников Алексей Владимирович, 662978,
Ленинградский пр-т, д.21, кв.24, тел: (39197) 7-00
-28, 8-908-223-4028,
факс:
(39197) 7-00-28
ИВАНОВО, ООО «Центр ремонтных услуг», 153037, Шереметевский пр., д.117,
тел: (4932) 37-22-34, 37-45-82, факс: (4932) 37-22-34
ИЖЕВСК, ООО «ДС», 426000, К. Маркса ул., д.393, тел: (3412) 43-16-62,
43-50-64, факс: (3412) 43-16-62
ИЖЕВСК, ООО «Элгуд», 426057, В. Сивкова ул., д.152, тел: (3412) 77-10-10,
факс: (3412) 24-95-13
ИНТА, ИП Нестерович Ярослав Николаевич, 169830, Кирова ул., д.29,
тел: (82145) 6-38-19, факс: (82145) 6-38-19
ЙОШКАР-ОЛА
, ИП Бешкарева Светлана Владимировна, 424000,
Советская ул., д.173, тел: (8362) 45-73-68, 41-77-43, факс: (8362) 45-73-68
ИРКУТСК, ООО «Комту-Сервис Центр», 664047, Партизанская ул., д.46А,
тел: (3952) 20-89-02, 22-27-32, 29-10-48, факс: (3952) 29-10-48
КАЗАНЬ
, ООО «Городской сервисный центр «АТремонтируем всё»,
420032, Краснококшайская ул., д.92, тел: (843) 555-49-92, (987) 421-55-11,
факс: (843) 555-49-92
КАЗАНЬ, ООО «Луазо», 420080, Декабристов ул., д.106Б, тел: (843) 260-04-12,
562-46-45, 562-47-07, факс: (843) 562-47-07
КАЗАНЬ, ООО «Элнет», 420095, Восстания ул., д.100, корп. 45,
тел: (843) 240-64-94, факс: (843) 240-64-94
КАЛИНИНГРАД, ООО «РемТехСервис», 236011, Судостроительная ул., д.75,
тел: (4012) 30-38-00, факс: (4012) 30-38-30
КАЛУГА, ИП Спирин Сергей Леонидович, 248000, Баумана ул., д.48,
тел: (4842) 75-01-24, 77-47-18, факс: (4842) 77-47-18
КАЛУГА, ООО «Рестарт», 248016, М. Горького ул., д.6а, тел: (4842) 56-18-21,
56-18-22, факс: (4842) 56-18-22
КАМЕНСК-УРАЛЬСКИЙ
, ИП Шайдуров Сергей Анатольевич, 623409,
Ленина ул., д.95, тел: (3439) 37-02-03, 8-950-547-1015, факс: (3439) 37-02-03
КАНАШ, ИП Дмитриев Юрий Сергеевич, 429330, Полевая ул., д.20,
тел: (8353) 34-16-19, факс: (8353) 34-13-67
КА
НСК, ООО «Электроника плюс интернешнл», 663614, Яковенко ул., д.74,
тел: (39161) 2-33-52, 3-87-90, факс: (39161) 3-87-90
КАРАБУЛАК, ИП Хамхоев Иса Магомедович, 386230, Джабагиева ул., д.157,
тел: (8928) 743-23-91
КЕМЕРОВО, ООО «Кузбасс-Импорт-Сервис», 650060, Ленина пр-т, д.137/3,
тел: (3842) 51-05-33, 33-04-28, факс: (3842) 51-05-33
КИНЕШМА, ООО «Рембыттехника», 155800, Правды ул., д.7Б,
тел: (49331) 2-16-39, 2-16-02, факс: (49331) 2-16-39
КИРОВ, ООО «Квадрат Сервис», 610027, К. Маркса ул., д.99,
тел: (8332) 75-45-55, 75-45-50, факс: (8332) 75-45-55
КИРОВ, ООО «ТВКОМ», 610001, Октябрьский пр-т, д.116А, тел: (8332) 54-40-42,
факс: (8332) 54-40-42
КИРОВ, ООО «ЦПС-Киров», 610000, Московская ул., д.9, тел: (8332) 35-55-13,
35-19-43, факс: (8332) 38-20-60
КОЛОМНА, ООО «Росинка-2», 140411, Кирова пр-т, д.15, тел: (4966) 14-14-86,
14-63-64, факс: (4966) 14-14-86
КОМСОМОЛЬСК-НА-АМУРЕ, ООО «Гамбит», 681018, Советская ул., д.9,
тел: (4217) 59-56-51, факс: (4217) 20-10-90
КОПЬЕВО, ИП Шалапутов Сергей Николаевич, 655250, Новобольничная ул.,
д.4, тел: (39036) 2-24-79, 8-906-192-7118
КОСТРОМА, ООО «Антэк», 156019, Станкостроительная ул., д.5 б,
тел: (4942) 41-02-02, факс: (4942) 41-02-02
КОТЛАС, ООО «Консультант Сервис», 165300, Кузнецова ул., д.17А,
тел: (81837) 3-25-10, факс: (81837) 2-75-55
КРАСНОДАР
, ИП Краснощеков Юрий Николаевич, 350002,
Промышленная ул., д.23, тел: (861) 292-77-90, 8-918-060-69-18,
факс: (861) 253-50-20
КРАСНОТУРЬИНСК
, ИП Седельников Василий Викторович, 624449,
Карпинского ул., д.15, тел: (83438) 43-60-26, факс: (83438) 43-60-26
КРАСНОЯРСК, ИП Близницов Игорь Леонидович, 660020, Дудинская ул.,
д.12А, тел: (391) 229-65-95, 201-92-28, 201-89-22, факс: (391) 229-65-95
КРО
ПОТКИН, ООО «Нэвис», 352380, 1-й Микрорайон ул., д.2,
тел: 8-928-407-9993, факс: (86146) 4-27-68
КУРГАН, ООО «Товарищество предпринимателей», 640020, Красина ул., д.41,
тел: (3522) 45-87-54, факс: (3522) 45-76-38
КУРСК, ИП Сунцов Александр Геннадьевич, 305044, Станционная ул., д.4А,
тел: (4712) 39-37-47, факс: (4712) 39-38-00
ЛЕСОСИБИРСК
, ИП Головинов Евгений Геннадьевич, 662544,
60 лет ВЛКСМ ул., д.11, кв.33, тел: (39145) 6-37-61, 8-904-892-9300
ЛИВНЫ, ООО «Эл-сервис», 303850, Максима Горького ул., д.43, литер Б,
тел: (4867) 72-10-07, 920-818-7260, факс: (4867) 72-10-07
ЛИПЕЦК, ООО «Владон», 398032, Космонавтов ул., д.66, тел: (4742) 33-82-48,
33-45-65, факс: (4742) 33-45-65
ЛИПЕЦК, ООО «Сервисный центр «Фолиум», 398016, Космонавтов ул., д.8,
тел: (4742) 345534, 34-07-13, 34-09-34, факс: (4742) 35-37-57
МАГАДАН, ИП Терехин Валентин Яковлевич, 685030, Гагарина ул., д.28/2,
маг.»XXI век», тел: (4132) 65-13-65, факс: (4132) 65-47-47
МАГНИТОГОРСК, ООО «Техника-Сервис», 455037, Грязнова ул., д.44/2,
тел: (3519) 31-09-01, факс: (3519) 31-09-01
МАЙКОП, ООО «Электрон-Сервис», 385018, Димитрова ул., д.25,
тел: (8772) 55-62-38, факс: (8772) 55-62-38
МАХАЧКАЛА
, ИП Шамилов Исламутдин Джамалутдинович, 367027,
Акушинского пр., 14 линия, д.21, тел: (8722) 64-71-33, 8-988-293-5515,
факс: (8722) 64-28-95
МАХАЧКАЛА, ИП Эмирбеков Алимирза Абдугашумович, 367000, Ленина ул.,
д.113А, тел: (8722) 67-95-87, факс: (8722) 67-95-87
МИЧУРИНСК, ООО «Техно-Сервис», 393773, Липецкое ш., д.68, корп.1,
тел: (47545) 2-84-21, факс: (47545) 2-84-21
МОСКВА, ООО «ВнешРемТорг», 127473, Селезневская ул., д.30, к.Б-В,
тел: (495) 518-64-32, 518-69-41, 518-69-47, факс: (495) 518-64-32
МОС
КВА, ООО «ДС-Сервис», 109518, Волжский б-р, д.5, кор.1,
тел: (495) 971-75-32, 971-03-43
МОСКВА
, ООО «Кумино», 109369, Новочеркасский бул., д.47,
тел: (495) 348-65-30, факс: (495) 348-65-30
МОСКВА, ООО «Пульсар», 121096, Олеко Дундича ул., д.21, к.2,
тел: (495) 987-10-43, 987-13-19, факс: (495) 987-10-43
МУРМАНСК
, ООО «Авторизованный Центр «Пионер Сервис»,
183038, Свердлова ул., д.19А, тел: (8152) 31-49-64, (911) 300-39-30,
факс: (8152) 31-49-64
МУРМАНСК, ООО «Лидер-Сервис», 183038, Книповича ул., д.46,
тел: (8152) 40-00-83, 44-47-49, факс: (8152) 40-00-83
МУРОМ, ИП Серкова Татьяна Андреевна, 602252, Чкалова ул., д.2, к.В,
тел: (4923) 43-35-54, факс: (4923) 43-35-54
НАБЕРЕЖНЫЕ ЧЕЛНЫ, ИП Волоснова Марина Сергеевна, 423819, Мира пр-т,
д.46, кв.112, тел: (8552) 38-24-96, факс: (8552) 38-24-96
НАЛЬЧИК, ООО «Альфа-Сервис», 360000, Ленина пр-т, д.24,
тел: (8662) 42-04-30, 77-28-78, 42-12-21, факс: (8662) 42-04-30
НАХОДКА, ИП Кураков Сергей Феликсович, 692900, Пограничная ул., д.40,
тел: (4236) 63-03-62, факс: (4236) 62-99-54
НЕФТЕКАМСК, ИП Гильфанов Эдуард Замирович, 452688, Победы ул., д.10А,
тел: (3478) 33-43-44, факс: (3478) 33-43-44
НЕФТЕЮГАНСК
, ИП Кожухин Алексей Юрьевич, 628311, 16А мкр., д.85,
пом.55/2, тел: (3463) 25-19-90, факс: (3463) 25-19-90
НИЖНЕВАРТОВСК
, ИП Шахматов Николай Геннадьевич, 628600, Мусы
Джалиля ул., д.63, оф.11, тел: (3466) 53-03-60, 56-68-13, факс: (3466) 53-03-60
НИЖНИЙ НОВГОРОД, ООО «Бытовая автоматика-сервис», 603152,
Ларина ул., д.18А, тел: (831) 461-88-48, факс: (831) 461-88-48
НИЖНИЙ НОВГОРОД, ООО «Симона-СЦ», 603074, Сормовское ш., д.15А,
тел: (831) 241-47-20, 241-38-85, 241-19-
20, 275-44-57, факс: (831) 241-47-20
НО
ВОКУЗНЕЦК, ООО «Альфа», 654010, Музейная ул., д.5, оф.102,
тел: (3843) 33-29-12, 8-923-633-4000, факс: (3846) 62-62-64
НОВОМОСКОВСК
, ИП Сапожников Александр Федорович, 301650,
Московская ул., д.21/27, тел: (48762) 6-46-46, факс: (48762) 6-46-46
НОВОМОСКОВСК, ООО «ЕСКО», 301650, Московская ул., д.21,
тел: (48762) 6-46-46, факс: (48762) 6-46-46
НОВОРОССИЙСК, ООО «Аргон-Сервис», 353905, Серова ул., д.14,
тел: (8617) 63-11-15, 63-03-95, факс: (8617) 63-03-95
НОВОСИБИРСК, ООО «Бирюса», 630030, Первомайская ул., д.220,
тел: (383) 337-36-96, 337-16-16, факс: (383) 337-36-26
НОВОСИБИРСК, ООО «К-техника», 630015, Королёва ул., д.17А,
тел: (383) 274-99-33, факс: (383) 274-99-41
НОВЫЙ УРЕНГОЙ, ООО «Сервис маркет», 629300, 26 Съезда КПСС ул., д.10Б,
тел: (3494) 94-61-45, 94-54-87, 22-16-85, факс: (3494) 94-61-45
НОГИНСК
, ИП Запышный Александр Иванович, 142407,
3-го Интернационала ул., д.175, тел: (496) 519-32-02, 519-32-77,
факс: (496) 519-32-02
ОБНИНСК, ООО «Радиотехника», 249030, Курчатова ул., д.46,
тел: (48439) 5-31-31, 6-44-14, 5-63-50, факс: (48439) 6-44-14
ОМСК, ЗАО «Евротех-Сервис», 644024, Маршала Жукова ул., д.91,
тел: (3812) 53-08-81, 58-06-87, факс: (3812) 58-06-87
ОРЕЛ, ИП Гусева Ольга Викторовна, 302043, Комсомольская ул., д.241,
тел: (4862) 72-16-95, 8 (919) 201-09-30, факс: (4862) 72-16-95
ОРЕЛ
, ИП Кожухова Вероника Петровна, 302000, Мира пл., д.3,
тел: (4862) 43-67-65
ОРЕНБУРГ, ООО «Ликос-Сервис плюс», 460006, Невельская ул., д.8А,
тел: (3532) 57-24-91, 57-24-94, 57-26-68, 79-23-68, факс: (3532) 57-24-91
О
РСК, ИП Бердников Виталий Владимирович, 462421, Батумская ул., д.25,
тел: (3537) 33-34-83, 35-13-18, факс: (3537) 27-91-83
ОРСК, ООО «Аста - Сервис», 462431, Краматорская ул., д.50,
тел: (3537) 21-36-66, 25-98-03, факс: (3537) 28-28-78
ПЕНЗА, ООО «Евростиль-Пенза», 440047, Минская ул., д.2,
тел: (8412) 54-43-01, 52-33-33, факс: (8412) 52-33-33
ПЕРВОУРАЛЬСК, ООО «Оптима-сервис», 623104, Ватутина ул., д.23,
тел: (3439) 25-74-13, 64-91-90, факс: (3439) 25-03-70
ПЕРМЬ, ИП Юдин Сергей Владиславович, 614068, Крисанова ул., д.29,
тел: (342) 236-30-33, факс: (342) 238-33-80
ПЕРМЬ, ООО «Импорт-Сервис», 614107, Инженерная ул., д.10,
тел: (342) 265-00-07, 266-12-60, факс: (342) 260-14-41
ПЕРМЬ, ООО «Сатурн-Сервис», 614107, Инженерная ул., д.14,
тел: (8342) 259-66-59, факс: (8342) 259-66-59
ПЕТРОЗАВОДСК, ООО «Фирма «Акант - Сервис», 185002, Суоярвская ул., д.8,
тел: (8142) 72-20-56, 72-20-34, факс: (8142) 72-20-56
ПЕТРОПАВЛОВСК-КАМЧАТСКИЙ
, ИП Тихомирова Елена Александровна,
683024, Лукашевского ул., д.23, тел: (4152) 26-32-00
ПЕЧОРА, ООО «Карст-сервис», 169601, ул. Лесокомбинатовская, д. 17 А.,
тел: (82142) 7-74-85
ПРОКОПЬЕВСК, ООО «Альфа», 653045, Шишкина ул., д.39А,
тел: (3846) 62-62-64, факс: (3846) 62-62-64
ПСКОВ, ООО «МиниМакс», 180016, Рижский пр-т., д.70А, тел: (8112) 72-13-90,
факс: (8112) 72-13-90
ПЯТИГОРСК, ИП Чернявский Евгений Витальевич, 357551, 1-я
Набережная ул., д.32, к.4, тел: (8793) 33-17-29, 39-48-40, факс: (8793) 33-17-29
РОСТОВ-НА-ДОНУ, ООО «Абрис-Плюс», 344012, Буденновский пр-т, д.103А,
тел: (863) 244-35-90, 270-46-72, 270-46-78
РЫБ
ИНСК
, ИП Удальцов Владимир Николаевич, 152935,
Моторостроителей ул., д.21, тел: (4855 ) 24-31-21, 25-14-88
РЯЗАНЬ, ООО «Арктика - Сервис», 390046, Яхонтова ул., д.19,
тел: (4912) 21-13-97, 21-57-20, 25-40-96, факс: (4912) 21-05-70
САМАРА, ООО «Видео-Сервис», 443074, Мориса Тореза ул.137,
тел: (846) 262-62-62, факс: (846) 262-62-62
САМАРА, ООО «Фирма «Сервис-Центр», 443096, Мичурина ул., д.15, оф.307,
тел: (846) 263-74-74, 263-75-75, факс: (846) 263-74-74
САМАРА, ООО «Энон-Сервис», 443090, Советской Армии ул., д.148,
тел: (846) 224-43-61, 224-07-40, факс: (846) 224-43-61
САНКТ-ПЕТЕРБУРГ, ООО «Альбатрос-Сервис», 194295, Ивана Фомина ул., д.
6, лит. Б, тел: (812) 517-92-02, 517-66-37, факс: (812) 517-66-37
САНКТ-ПЕТЕРБУРГ, ООО «Альбатрос-Сервис», 192148, Седова ул., д.37, лит.
А, тел: (812) 336-40-13, 336-40-12, 560-24-66, 568-09-58, факс: (812) 336-40-13
САНКТ-ПЕТЕРБУРГ
, ООО «Орбис», 193079, Октябрьская наб., д.60,
тел: (812) 379-62-70, факс: (812) 446-61-71
САНКТ-ПЕТЕРБУРГ, ООО «Энергоквартал», 196105, Свеаборгская ул., д.10,
литер А, тел: (812) 368-22-05, факс: (812) 368-22-05
САРАНСК, ООО «Верона», 430000, Пролетарская ул., д.36,
тел: (8342) 47-10-47, факс: (8342) 47-10-47
САРАТОВ, ООО «Сар-сервис», 410004, 4-й Вакуровский пр-д, д.4,
тел: (8452) 51-00-99, 20-03-85, факс: (8452) 51-00-99
САСОВО
, ИП Гусев Владимир Анатольевич, 391434, Мкр. Южный, д.59,
тел: (49133) 2-07-40, факс: (49133) 2-07-40
СЛАВЯНСК-НА-КУБАНИ, ООО «Нэвис», 353561, Ленина ул., д.114а,
тел: (86146) 4-27-68, 8-928-407-9992
СМОЛЕНСК, ООО «Техносат-Сервис», 214004, Николаева ул., д.11,
тел:
(4812) 61-16-29, 61-16-45, факс: (4812) 61-16-29
СОЧИ, ООО «Союз-Сервис», 354000, Горького ул., д.89, тел: (862) 264-33-22,
261-30-05, факс: (862) 261-19-64
СОЧИ, ООО «Техинсервис», 354068, Донская ул., д.3/3, тел: (8622) 62-02-95,
факс: (8622) 62-02-95
СТАВРОПОЛЬ, ООО «Техно-Сервис», 355035, 7-я Промышленная ул., д.6,
тел: (8652) 39-30-30
СТАРЫЙ ОСКОЛ, ЗАО «Авантаж-Информ», 309509, Лебединец мкр., д.1А,
тел: (4725) 24-62-27, факс: (4725) 24-73-49
СТЕРЛИТАМАК, ООО «Сервис-Технос», 453118, Худайбердина ул., д.158,
тел: (3473) 20-12-13, факс: (3473) 20-27-70
СУРГУТ, ИП Полукаров Евгений Викторович, 628400, Республики ул., д.78 А,
тел: (3462) 66-70-79, 68-33-50
СЫЗРАНЬ, ОАО «Радуга», 446001, Победы ул., д.16, тел: (8464) 33-17-62,
98-40-92, факс: (8464) 33-23-64
СЫКТЫВКАР, ООО «Домотехника», 167000, Первомайская ул., д.78, оф. 37,
тел: (8212) 57-10-12, 57-10-23, факс: (8212) 20-37-20
ТАГАНРОГ
, ООО «БЕСТ Сервис», 347900, Смирновский пер., д.45,
тел: (8634) 37-90-66, факс: (8634) 37-99-85
ТАМБОВ, ООО ТТЦ «Атлант-Сервис», 392000, Московская ул., д.23А,
тел: (4752) 72-63-46, 72-66-56, факс: (4752) 71-91-19
ТВЕРЬ, ООО «Стэко-Сервис», 170034, Чайковского пр-т, д.6, к.1,
тел: (4822) 32-00-23, 35-40-81, факс: (4822) 35-40-81
ТВЕРЬ, ООО СЦ «Веста-Сервис», 170008, 15 лет Октября ул., д.12,
тел: (4822) 32-41-07, факс: (4822) 32-41-07
ТИМАШЕВСК, ООО «Нэвис», 352700, 50 лет Октября ул., д.186а/1,
тел: (86130) 4-40-18, 8-928-407-9991
ТОБОЛЬСК, ИП Петелина Алла Владимировна, 626150, 4 мкр., стр.85,
тел: (3456) 25-33-99, факс: (3456) 25-33-99
ТОЛЬЯТТИ, ИП Симонов Виктор Александрович, 445039, Дзержинского ул.,
д.25А, тел:
(8482) 51-17-77, факс: (8482) 51-17-77
ТОМСК, ИП Бабин Алексей Павлович, 634021, Герцена ул., д.72,
тел: (3822) 52-32-25, 52-33-42, факс: (3822) 52-33-42
ТОМСК, ИП Еремина Светлана Вадимовна, 634063, С. Лазо ул., д.15,
тел: (3822) 67-35-73, 67-33-55, 72-72-70, факс: (3822) 66-49-79
ТУАПСЕ, ООО «Планар», 352800, Кронштадтская ул., д.2, тел: (86167) 233-88,
243-81
ТУЛА, ИП Баньков Андрей Андреевич, 300041, Жуковского ул., д.13,
тел: (4872) 36-30-66, 36-30-31, факс: (4872) 36-30-66
ТЮМЕНЬ, ООО «Евросервис», 625035, Геологоразведчиков пр-д, д.33,
тел: (3452) 97-82-52, факс: (3452) 26-06-06
УЛАН-УДЭ, ИП Коркина Ольга Юрьевна, 670047, Сахъяновой ул., д.9В,
тел: (3012) 45-59-12
УЛЬЯНОВСК, ООО «Мастер-Сервис», 432012, Инзенская ул., д.41,
тел: (8422) 32-07-33, 36-43-31, 36-43-35, факс: (8422) 32-07-33
УРАЙ, ООО «ПиП», 628284, Аэропорт, д.29, тел: (3467) 63-15-15,
факс: (3467) 63-15-15
УССУРИЙСК, ООО «Техносервис», 692525, Советская ул., д.96,
тел: (4234) 33-53-05, 33-51-80, факс: (4234) 33-51-80
УФА, ИП Салынов Андрей Владимирович, 450104, Российская ул., д.45/1,
тел: (347) 235-27-55, факс: (347) 233-72-46
УФА, ООО «Сервис-центр «Техно-Плюс», 450022, Менделеева ул., д.153,
тел: (347) 279-90-70, факс: (347) 241-62-02
УХТА, ООО «АВВА», 169310, Семяшкина ул., д.8а, тел: (8216) 74-18-88,
факс: (8216) 76-36-13
ХАБАРОВСК, ООО «Сервисный центр «ЭНКА техника», 680007,
Волочаевская ул., д.8, тел: (4212) 23-33-33, 21-60-39, факс: (4212) 21-60-39
ХАНТЫ-МАНСИЙСК, ИП Климин Алексей Анатольевич, 628011, Обская ул.,
д.29, тел: (3467) 30-00-05, факс: (3467) 30-00-01
ЧЕБОКСАРЫ, ООО «ВТИ-Сервис», 428029, И. Яковлева пр-т, д.4/2,
тел: (8352) 63-72-98, факс: (8352) 63-73-24
Ч
ЕБОКСАРЫ, ООО «ВТИ-Сервис», 428009, М. Горького пр-т, д.32/25,
тел: (8352) 41-70-24, 43-15-32, факс: (8352) 41-70-24
ЧЕБОКСАРЫ, ООО «ЗИП-Сервис», 428003, Петрова, ул., д.6,
тел: (8352) 38-63-92, 22-57-75, факс: (8352) 38-63-92
ЧЕЛЯБИНСК, ООО «Логос-Сервис», 454026, Победы пр-т, д.292,
тел: (351) 741-34-03, факс: (351) 793-61-49
ЧЕЛЯБИНСК, ООО ТТЦ «Рембыттехника», 454008, Производственная ул., д.8 б,
тел: 800-333-55-56, (351) 239-39-39, факс: (351) 239-39-90
ЧЕРЕПОВЕЦ, ИП Остромский Григорий Витальевич, 162622, Ленина ул., д.11,
тел: (8202) 54-31-88
ЧЕРЕПОВЕЦ, ООО «Авторизованный Центр «Пионер Сервис», 162602,
Данилова ул., д.23 А, тел: (8202) 20-53-91, 20-53-94, факс: (8202) 20-53-94
ЧЕРКЕССК, ИП Батов Рустам Хезирович, 369002, Ленина пр-т, д.340В,
тел: (8782) 27-70-77
ЧИТА, ООО «Архимед», 672010, Анохина ул., д.10, тел: (3022) 36-47-01
ЭЛИСТА, ИП Долинский Владимир Николаевич, 358009, 3-й мкр., д.21А,
тел: (84722) 9-52-07, факс: (84722) 9-52-07
ЮЖНО-САХАЛИНСК, ООО «ВЛ Сервис», 693013, Комсомольская ул., д.298,
лит.В, тел: (4242) 73-38-05, факс: (4242) 73-38-05
ЯКУТСК, ООО «Сервисный центр «Физтех-Сервис», 677000, Октябрьская ул.,
д.1/1, тел: (4112) 33-69-44, 39-00-80, 39-00-81, факс: (4112) 33-69-44
ЯРОСЛАВЛЬ, ООО «Сервисный центр «ВИРТ», 150003, Республиканская ул.,
д.3, тел: (4852) 58-22-11, факс: (4852) 58-22-11
БЕЛАРУСЬ
БРЕСТ, ОДО «Золак», 224028, Орловская ул., д.10, тел: (162) 42-63-94,
факс: (162) 42-63-94
ВИТЕБСК, УЧРП «Р-Плюс», 210015, Чкалова ул., д.3, тел: (212) 21-78-35,
факс: (212) 21-78-35
ГОМЕЛЬ, ЧПТУП «Техносити», 246050, Гагарина ул., д.20, тел: (232) 74-90-71,
74
-90-44, факс: (232) 74-90-44
ГРОДНО, ЧТСУП «Салби-Плюс», 230029, Горького ул., д.72, кв.207,
тел: (152) 41-79-99, факс: (152) 41-41-47
МОГИЛЕВ, ЧПУП «Система Сервис», 212030, Ленинская ул., д.29А,
тел: (22) 231-05-98, факс: (22) 231-05-98
МИНСК, ОДО «ЦБТ Сервис», 220113, Якуба Коласа ул., д.52,
тел: (172) 62-66-71, 62-95-50, факс: (172) 62-66-71, 62-95-50
МИНСК, ООО «ЛайдерСервис», 220077, Ташкентская ул., д.7, ком.6,
тел. (173) 45-45-88
(495) 737-2961
(812) 449-3161
☎
☎
Прием заявок на ремонт (круглосуточно)
в г. Москве:
в г. Санкт-Петербурге:
Адреса и телефоны авторизованных сервисных центров приведены на обороте, а также в
интернете: http://www.bosch-home.com/ru/ в разделе Сервис.
Рекомендуем Вам пользоваться услугами только авторизованных сервисных центров.
Оригинальные аксессуары и средства по уходу для бытовой техники Bosch Вы можете при-
обрести в нашем фирменном интернет-магазине: www.bosch-home.com/ru/store. С условиями
Пункты 1-2 заполняются только в
случае, если эти данные не содер-
жатся в документах о покупке изде-
лия (кассовый чек и/или товарный
чек, товарная накладная).
Внимание! Важная информация для потребителей
заказа, оплаты и доставки Вы можете ознакомиться на сайте.
Данный прибор предназначен для использования исключительно для личных, семейных, домашних
и иных нужд, не связанных с осуществлением предпринимательской деятельности либо удовлет-
ворением бытовых потребностей в офисе предприятия, учреждения или организации. Использо-
вание прибора в целях, отличных от вышеуказанных, является нарушением правил надлежащей
эксплуатации прибора.
Наличие фирменной заводской типовой таблички на приборе обязательно! Пожалуйста, убедитесь
в ее наличии и сохраните ее на приборе в течение всего срока службы прибора. Удаление таблички
8.
ведет к обезличению прибора и к возможным нарушениям правил его эксплуатации.
Изготовитель не несет ответственность за недостатки в приборе, если сервисной службой будет
доказано, что они возникли после передачи прибора потребителю вследствие нарушения им правил
пользования, транспортировки, хранения, действий тре тьих лиц, непреодолимой силы (пожара,
природной катастрофы и т.п.), попадания бытовых насекомых и грызунов, воздействия иных
посторонних факторов, а также вследствие существенных нарушений технических требований,
оговоренных в инструкции по эксплуатации, в том числе нестабильности параметров элект росети,
установленных ГОСТ 32144-2013.
Для подтверждения даты покупки прибора при гарантийном ремон те или предъявлении иных
предусмотренных законом требований убедительно просим Вас сохранять документы о покупке
(чек, квитанцию, иные документы, подтверждающие дату и место покупки).
Соблюдение рекомендаций и указаний, содержащихся в инструк ции по эксплуатации (правилах
Информация о сервисе
пользования), поможет избежать проблем в эксплуатации прибора и его обслуживании.
Неисправные узлы приборов в гарантийный период бесплатно ремонтируются или заменяются
новыми. Решение вопроса о целесообразности их замены или ремонта остается за службами
сервиса.
9.
В период и после истечения гарантийного срока наша Служба Сервиса, а также мастерские наших
партнеров всегда готовы предложить Вам свои услуги. Список адресов уполномоченных изготови-
телем пунктов авторизованного сервисного обслуживания находится на обороте.
Срок службы малых бытовых приборов (кроме кухонных комбайнов и пылесосов) составляет 2 года.
Срок службы кухонных комбайнов и пылесосов составляет 5 лет. Срок службы изделия исчисляется
с даты его покупки, либо при невозможности ее определения, с даты изготовления изделия, нане-
сенной на типовую табличку изделия. В соответствии со стандартом изготовителя дата изготовления
маркируется FD ГГММ, где ГГ – год изготовления минус 1920, а ММ – месяц изготовления. Для
определения года изготовления прибора необходимо к 1920 прибавить число ГГ.
4. Уважаемые дамы и господа, сообщаем Вам, что подтверждение соответствия нашей
продукции обязательным требованиям в соответствии с законодательством осуществля-
ется в форме обязательной сертификации.
Информацию по сертификации наших приборов, а также данные о номере сертификата
соответствия и сроке его дейст вия Вы можете получить в ООО «БСХ Бытовая техника».
1. Изделие __________________________________________________
Информация изготовителя
о гарантийном и сервисном обслуживании
2. Модель __________________________________________________
Наша продукция производится под контролем транснациональной корпорации «БСХ Хаусгерете
ГмбХ», адрес штаб-квартиры: 81739 Мюнхен, Карл-Вери Штрассе 34, Германия (BSH Hausgeräte
GmbH, Carl-Wery-Str. 34, 81739 München, Germany).
Организацией, выполняющей функции иностранного изготовителя, уполномоченной изготовите-
лем на основании договора с ним, является ООО «БСХ Бытовая техника», адрес: Москва, 119071,
3. Данная информация распространяется на малые бытовые приборы товарного знака Bosch: кофе-
варки, кофемашины, кофемолки, весы, кухонные комбайны, миксеры, пылесосы, резки, тостеры,
утюги, фены, распрямители для волос, электрочайники, соковыжималки, измельчители, блендеры,
гладильные доски, ванночки, напольные весы и аналогичные им изделия.
ул. Малая Калужская, д.15; тел.: (495) 737-2777, факс: (495) 737-2798.
Аксессуары и средства по уходу
5. Обязательные сведения о технических характеристиках прибора приведены на типовой табличке
прибора или на его этикетке и/или в сопроводительной документации.
6.
Для безупречного функционирования Вашей техники и ухода за ней производитель рекомендует
использовать только оригинальные аксессуары и средства по уходу. Оригинальные аксессуары
разработаны производителем, они идеально подходят именно для Вашего прибора. Оригинальные
аксессуары и средства по уходу соответствуют самым высоким требованиям качества товарного зна-
Гарантия изготовителя
Фирма изготовитель предоставляет на приобретенный Вами в Российской Федерации бытовой при-
бор гарантию в соответствии с действующим законодательством РФ сроком 1 год. На приобретенный
в Республике Беларусь бытовой прибор, к которому при покупке был выдан гарантийный талон,
ка Bosch, они проходят заводские испытания для обеспечения максимальной надежности в работе.
По всем вопросам, связанным с аксессуарами и средствами по уходу для Вашей бытовой техники,
Вы можете обратиться в авторизованные сервисные центры, перечисленные на обороте.
действуют гарантийные условия, не противоречащие законодательству Республики Беларусь.
7.
MUC_2-4_RU_8001013355.indb 46 10.08.2015 12:45:04
Page 49

B31C045B1-1M23 02/2015Внимание! Список сервисных центров постоянно обновляется.
, ООО «БЕСТ Сервис», 347900, Смирновский пер., д.45,
СОЧИ, ООО «Союз-Сервис», 354000, Горького ул., д.89, тел: (862) 264-33-22,
261-30-05, факс: (862) 261-19-64
СОЧИ, ООО «Техинсервис», 354068, Донская ул., д.3/3, тел: (8622) 62-02-95,
факс: (8622) 62-02-95
СТАВРОПОЛЬ, ООО «Техно-Сервис», 355035, 7-я Промышленная ул., д.6,
тел: (8652) 39-30-30
СТАРЫЙ ОСКОЛ, ЗАО «Авантаж-Информ», 309509, Лебединец мкр., д.1А,
тел: (4725) 24-62-27, факс: (4725) 24-73-49
СТЕРЛИТАМАК, ООО «Сервис-Технос», 453118, Худайбердина ул., д.158,
тел: (3473) 20-12-13, факс: (3473) 20-27-70
СУРГУТ, ИП Полукаров Евгений Викторович, 628400, Республики ул., д.78 А,
тел: (3462) 66-70-79, 68-33-50
СЫЗРАНЬ, ОАО «Радуга», 446001, Победы ул., д.16, тел: (8464) 33-17-62,
98-40-92, факс: (8464) 33-23-64
СЫКТЫВКАР, ООО «Домотехника», 167000, Первомайская ул., д.78, оф. 37,
тел: (8212) 57-10-12, 57-10-23, факс: (8212) 20-37-20
ТАГАНРОГ
тел: (8634) 37-90-66, факс: (8634) 37-99-85
ТАМБОВ, ООО ТТЦ «Атлант-Сервис», 392000, Московская ул., д.23А,
тел: (4752) 72-63-46, 72-66-56, факс: (4752) 71-91-19
ТВЕРЬ, ООО «Стэко-Сервис», 170034, Чайковского пр-т, д.6, к.1,
20, 275-44-57, факс: (831) 241-47-20
, ИП Шахматов Николай Геннадьевич, 628600, Мусы
, ИП Кожухин Алексей Юрьевич, 628311, 16А мкр., д.85,
НАБЕРЕЖНЫЕ ЧЕЛНЫ, ИП Волоснова Марина Сергеевна, 423819, Мира пр-т,
д.46, кв.112, тел: (8552) 38-24-96, факс: (8552) 38-24-96
НАЛЬЧИК, ООО «Альфа-Сервис», 360000, Ленина пр-т, д.24,
тел: (8662) 42-04-30, 77-28-78, 42-12-21, факс: (8662) 42-04-30
НАХОДКА, ИП Кураков Сергей Феликсович, 692900, Пограничная ул., д.40,
тел: (4236) 63-03-62, факс: (4236) 62-99-54
НЕФТЕКАМСК, ИП Гильфанов Эдуард Замирович, 452688, Победы ул., д.10А,
тел: (3478) 33-43-44, факс: (3478) 33-43-44
НЕФТЕЮГАНСК
пом.55/2, тел: (3463) 25-19-90, факс: (3463) 25-19-90
, ИП Бешкарева Светлана Владимировна, 424000,
, ООО «Городской сервисный центр «АТремонтируем всё»,
ИЖЕВСК, ООО «Элгуд», 426057, В. Сивкова ул., д.152, тел: (3412) 77-10-10,
факс: (3412) 24-95-13
ИНТА, ИП Нестерович Ярослав Николаевич, 169830, Кирова ул., д.29,
тел: (82145) 6-38-19, факс: (82145) 6-38-19
ЙОШКАР-ОЛА
Советская ул., д.173, тел: (8362) 45-73-68, 41-77-43, факс: (8362) 45-73-68
ИРКУТСК, ООО «Комту-Сервис Центр», 664047, Партизанская ул., д.46А,
тел: (3952) 20-89-02, 22-27-32, 29-10-48, факс: (3952) 29-10-48
КАЗАНЬ
420032, Краснококшайская ул., д.92, тел: (843) 555-49-92, (987) 421-55-11,
, ИП Сапожников Александр Федорович, 301650,
ВОКУЗНЕЦК, ООО «Альфа», 654010, Музейная ул., д.5, оф.102,
НИЖНЕВАРТОВСК
Джалиля ул., д.63, оф.11, тел: (3466) 53-03-60, 56-68-13, факс: (3466) 53-03-60
НИЖНИЙ НОВГОРОД, ООО «Бытовая автоматика-сервис», 603152,
Ларина ул., д.18А, тел: (831) 461-88-48, факс: (831) 461-88-48
НИЖНИЙ НОВГОРОД, ООО «Симона-СЦ», 603074, Сормовское ш., д.15А,
тел: (831) 241-47-20, 241-38-85, 241-19-
НО
тел: (3843) 33-29-12, 8-923-633-4000, факс: (3846) 62-62-64
НОВОМОСКОВСК
Московская ул., д.21/27, тел: (48762) 6-46-46, факс: (48762) 6-46-46
НОВОМОСКОВСК, ООО «ЕСКО», 301650, Московская ул., д.21,
факс: (843) 555-49-92
КАЗАНЬ, ООО «Луазо», 420080, Декабристов ул., д.106Б, тел: (843) 260-04-12,
562-46-45, 562-47-07, факс: (843) 562-47-07
КАЗАНЬ, ООО «Элнет», 420095, Восстания ул., д.100, корп. 45,
тел: (843) 240-64-94, факс: (843) 240-64-94
КАЛИНИНГРАД, ООО «РемТехСервис», 236011, Судостроительная ул., д.75,
тел: (4012) 30-38-00, факс: (4012) 30-38-30
КАЛУГА, ИП Спирин Сергей Леонидович, 248000, Баумана ул., д.48,
тел: (4842) 75-01-24, 77-47-18, факс: (4842) 77-47-18
КАЛУГА, ООО «Рестарт», 248016, М. Горького ул., д.6а, тел: (4842) 56-18-21,
56-18-22, факс: (4842) 56-18-22
(8482) 51-17-77, факс: (8482) 51-17-77
тел: (4822) 32-00-23, 35-40-81, факс: (4822) 35-40-81
ТВЕРЬ, ООО СЦ «Веста-Сервис», 170008, 15 лет Октября ул., д.12,
тел: (4822) 32-41-07, факс: (4822) 32-41-07
ТИМАШЕВСК, ООО «Нэвис», 352700, 50 лет Октября ул., д.186а/1,
тел: (86130) 4-40-18, 8-928-407-9991
ТОБОЛЬСК, ИП Петелина Алла Владимировна, 626150, 4 мкр., стр.85,
тел: (3456) 25-33-99, факс: (3456) 25-33-99
ТОЛЬЯТТИ, ИП Симонов Виктор Александрович, 445039, Дзержинского ул.,
д.25А, тел:
ТОМСК, ИП Бабин Алексей Павлович, 634021, Герцена ул., д.72,
, ИП Запышный Александр Иванович, 142407,
тел: (48762) 6-46-46, факс: (48762) 6-46-46
НОВОРОССИЙСК, ООО «Аргон-Сервис», 353905, Серова ул., д.14,
тел: (8617) 63-11-15, 63-03-95, факс: (8617) 63-03-95
НОВОСИБИРСК, ООО «Бирюса», 630030, Первомайская ул., д.220,
тел: (383) 337-36-96, 337-16-16, факс: (383) 337-36-26
НОВОСИБИРСК, ООО «К-техника», 630015, Королёва ул., д.17А,
тел: (383) 274-99-33, факс: (383) 274-99-41
НОВЫЙ УРЕНГОЙ, ООО «Сервис маркет», 629300, 26 Съезда КПСС ул., д.10Б,
тел: (3494) 94-61-45, 94-54-87, 22-16-85, факс: (3494) 94-61-45
НОГИНСК
, ИП Шайдуров Сергей Анатольевич, 623409,
НСК, ООО «Электроника плюс интернешнл», 663614, Яковенко ул., д.74,
КАМЕНСК-УРАЛЬСКИЙ
Ленина ул., д.95, тел: (3439) 37-02-03, 8-950-547-1015, факс: (3439) 37-02-03
КАНАШ, ИП Дмитриев Юрий Сергеевич, 429330, Полевая ул., д.20,
тел: (8353) 34-16-19, факс: (8353) 34-13-67
КА
тел: (39161) 2-33-52, 3-87-90, факс: (39161) 3-87-90
КАРАБУЛАК, ИП Хамхоев Иса Магомедович, 386230, Джабагиева ул., д.157,
тел: (8928) 743-23-91
КЕМЕРОВО, ООО «Кузбасс-Импорт-Сервис», 650060, Ленина пр-т, д.137/3,
тел: (3842) 51-05-33, 33-04-28, факс: (3842) 51-05-33
тел: (3822) 52-32-25, 52-33-42, факс: (3822) 52-33-42
ТОМСК, ИП Еремина Светлана Вадимовна, 634063, С. Лазо ул., д.15,
тел: (3822) 67-35-73, 67-33-55, 72-72-70, факс: (3822) 66-49-79
ТУАПСЕ, ООО «Планар», 352800, Кронштадтская ул., д.2, тел: (86167) 233-88,
243-81
ТУЛА, ИП Баньков Андрей Андреевич, 300041, Жуковского ул., д.13,
тел: (4872) 36-30-66, 36-30-31, факс: (4872) 36-30-66
ТЮМЕНЬ, ООО «Евросервис», 625035, Геологоразведчиков пр-д, д.33,
тел: (3452) 97-82-52, факс: (3452) 26-06-06
УЛАН-УДЭ, ИП Коркина Ольга Юрьевна, 670047, Сахъяновой ул., д.9В,
тел: (3012) 45-59-12
УЛЬЯНОВСК, ООО «Мастер-Сервис», 432012, Инзенская ул., д.41,
тел: (8422) 32-07-33, 36-43-31, 36-43-35, факс: (8422) 32-07-33
УРАЙ, ООО «ПиП», 628284, Аэропорт, д.29, тел: (3467) 63-15-15,
факс: (3467) 63-15-15
УССУРИЙСК, ООО «Техносервис», 692525, Советская ул., д.96,
тел: (4234) 33-53-05, 33-51-80, факс: (4234) 33-51-80
УФА, ИП Салынов Андрей Владимирович, 450104, Российская ул., д.45/1,
тел: (347) 235-27-55, факс: (347) 233-72-46
УФА, ООО «Сервис-центр «Техно-Плюс», 450022, Менделеева ул., д.153,
тел: (347) 279-90-70, факс: (347) 241-62-02
УХТА, ООО «АВВА», 169310, Семяшкина ул., д.8а, тел: (8216) 74-18-88,
факс: (8216) 76-36-13
ХАБАРОВСК, ООО «Сервисный центр «ЭНКА техника», 680007,
Волочаевская ул., д.8, тел: (4212) 23-33-33, 21-60-39, факс: (4212) 21-60-39
ХАНТЫ-МАНСИЙСК, ИП Климин Алексей Анатольевич, 628011, Обская ул.,
д.29, тел: (3467) 30-00-05, факс: (3467) 30-00-01
ЧЕБОКСАРЫ, ООО «ВТИ-Сервис», 428029, И. Яковлева пр-т, д.4/2,
, ИП Кожухова Вероника Петровна, 302000, Мира пл., д.3,
РСК, ИП Бердников Виталий Владимирович, 462421, Батумская ул., д.25,
тел: (3537) 33-34-83, 35-13-18, факс: (3537) 27-91-83
ОРСК, ООО «Аста - Сервис», 462431, Краматорская ул., д.50,
тел: (3537) 21-36-66, 25-98-03, факс: (3537) 28-28-78
ПЕНЗА, ООО «Евростиль-Пенза», 440047, Минская ул., д.2,
тел: (8412) 54-43-01, 52-33-33, факс: (8412) 52-33-33
ПЕРВОУРАЛЬСК, ООО «Оптима-сервис», 623104, Ватутина ул., д.23,
тел: (3439) 25-74-13, 64-91-90, факс: (3439) 25-03-70
ПЕРМЬ, ИП Юдин Сергей Владиславович, 614068, Крисанова ул., д.29,
тел: (342) 236-30-33, факс: (342) 238-33-80
ПЕРМЬ, ООО «Импорт-Сервис», 614107, Инженерная ул., д.10,
тел: (342) 265-00-07, 266-12-60, факс: (342) 260-14-41
ПЕРМЬ, ООО «Сатурн-Сервис», 614107, Инженерная ул., д.14,
тел: (8342) 259-66-59, факс: (8342) 259-66-59
ПЕТРОЗАВОДСК, ООО «Фирма «Акант - Сервис», 185002, Суоярвская ул., д.8,
3-го Интернационала ул., д.175, тел: (496) 519-32-02, 519-32-77,
факс: (496) 519-32-02
ОБНИНСК, ООО «Радиотехника», 249030, Курчатова ул., д.46,
тел: (48439) 5-31-31, 6-44-14, 5-63-50, факс: (48439) 6-44-14
ОМСК, ЗАО «Евротех-Сервис», 644024, Маршала Жукова ул., д.91,
тел: (3812) 53-08-81, 58-06-87, факс: (3812) 58-06-87
ОРЕЛ, ИП Гусева Ольга Викторовна, 302043, Комсомольская ул., д.241,
тел: (4862) 72-16-95, 8 (919) 201-09-30, факс: (4862) 72-16-95
ОРЕЛ
тел: (4862) 43-67-65
ОРЕНБУРГ, ООО «Ликос-Сервис плюс», 460006, Невельская ул., д.8А,
тел: (3532) 57-24-91, 57-24-94, 57-26-68, 79-23-68, факс: (3532) 57-24-91
О
, ИП Краснощеков Юрий Николаевич, 350002,
КИНЕШМА, ООО «Рембыттехника», 155800, Правды ул., д.7Б,
тел: (49331) 2-16-39, 2-16-02, факс: (49331) 2-16-39
КИРОВ, ООО «Квадрат Сервис», 610027, К. Маркса ул., д.99,
тел: (8332) 75-45-55, 75-45-50, факс: (8332) 75-45-55
КИРОВ, ООО «ТВКОМ», 610001, Октябрьский пр-т, д.116А, тел: (8332) 54-40-42,
факс: (8332) 54-40-42
КИРОВ, ООО «ЦПС-Киров», 610000, Московская ул., д.9, тел: (8332) 35-55-13,
35-19-43, факс: (8332) 38-20-60
КОЛОМНА, ООО «Росинка-2», 140411, Кирова пр-т, д.15, тел: (4966) 14-14-86,
14-63-64, факс: (4966) 14-14-86
КОМСОМОЛЬСК-НА-АМУРЕ, ООО «Гамбит», 681018, Советская ул., д.9,
тел: (4217) 59-56-51, факс: (4217) 20-10-90
КОПЬЕВО, ИП Шалапутов Сергей Николаевич, 655250, Новобольничная ул.,
д.4, тел: (39036) 2-24-79, 8-906-192-7118
КОСТРОМА, ООО «Антэк», 156019, Станкостроительная ул., д.5 б,
тел: (4942) 41-02-02, факс: (4942) 41-02-02
КОТЛАС, ООО «Консультант Сервис», 165300, Кузнецова ул., д.17А,
тел: (81837) 3-25-10, факс: (81837) 2-75-55
КРАСНОДАР
тел: (8142) 72-20-56, 72-20-34, факс: (8142) 72-20-56
, ИП Седельников Василий Викторович, 624449,
ПОТКИН, ООО «Нэвис», 352380, 1-й Микрорайон ул., д.2,
тел: 8-928-407-9993, факс: (86146) 4-27-68
Промышленная ул., д.23, тел: (861) 292-77-90, 8-918-060-69-18,
факс: (861) 253-50-20
КРАСНОТУРЬИНСК
Карпинского ул., д.15, тел: (83438) 43-60-26, факс: (83438) 43-60-26
КРАСНОЯРСК, ИП Близницов Игорь Леонидович, 660020, Дудинская ул.,
д.12А, тел: (391) 229-65-95, 201-92-28, 201-89-22, факс: (391) 229-65-95
КРО
ЕБОКСАРЫ, ООО «ВТИ-Сервис», 428009, М. Горького пр-т, д.32/25,
тел: (8352) 63-72-98, факс: (8352) 63-73-24
Ч
тел: (8352) 41-70-24, 43-15-32, факс: (8352) 41-70-24
ЧЕБОКСАРЫ, ООО «ЗИП-Сервис», 428003, Петрова, ул., д.6,
тел: (8352) 38-63-92, 22-57-75, факс: (8352) 38-63-92
ЧЕЛЯБИНСК, ООО «Логос-Сервис», 454026, Победы пр-т, д.292,
тел: (351) 741-34-03, факс: (351) 793-61-49
ЧЕЛЯБИНСК, ООО ТТЦ «Рембыттехника», 454008, Производственная ул., д.8 б,
тел: 800-333-55-56, (351) 239-39-39, факс: (351) 239-39-90
ЧЕРЕПОВЕЦ, ИП Остромский Григорий Витальевич, 162622, Ленина ул., д.11,
тел: (8202) 54-31-88
ЧЕРЕПОВЕЦ, ООО «Авторизованный Центр «Пионер Сервис», 162602,
Данилова ул., д.23 А, тел: (8202) 20-53-91, 20-53-94, факс: (8202) 20-53-94
ЧЕРКЕССК, ИП Батов Рустам Хезирович, 369002, Ленина пр-т, д.340В,
тел: (8782) 27-70-77
ЧИТА, ООО «Архимед», 672010, Анохина ул., д.10, тел: (3022) 36-47-01
ЭЛИСТА, ИП Долинский Владимир Николаевич, 358009, 3-й мкр., д.21А,
, ИП Тихомирова Елена Александровна,
, ИП Удальцов Владимир Николаевич, 152935,
ПЕТРОПАВЛОВСК-КАМЧАТСКИЙ
683024, Лукашевского ул., д.23, тел: (4152) 26-32-00
ПЕЧОРА, ООО «Карст-сервис», 169601, ул. Лесокомбинатовская, д. 17 А.,
тел: (82142) 7-74-85
КУРГАН, ООО «Товарищество предпринимателей», 640020, Красина ул., д.41,
тел: (3522) 45-87-54, факс: (3522) 45-76-38
КУРСК, ИП Сунцов Александр Геннадьевич, 305044, Станционная ул., д.4А,
тел: (4712) 39-37-47, факс: (4712) 39-38-00
ИНСК
ПРОКОПЬЕВСК, ООО «Альфа», 653045, Шишкина ул., д.39А,
тел: (3846) 62-62-64, факс: (3846) 62-62-64
ПСКОВ, ООО «МиниМакс», 180016, Рижский пр-т., д.70А, тел: (8112) 72-13-90,
факс: (8112) 72-13-90
ПЯТИГОРСК, ИП Чернявский Евгений Витальевич, 357551, 1-я
Набережная ул., д.32, к.4, тел: (8793) 33-17-29, 39-48-40, факс: (8793) 33-17-29
РОСТОВ-НА-ДОНУ, ООО «Абрис-Плюс», 344012, Буденновский пр-т, д.103А,
тел: (863) 244-35-90, 270-46-72, 270-46-78
РЫБ
Моторостроителей ул., д.21, тел: (4855 ) 24-31-21, 25-14-88
РЯЗАНЬ, ООО «Арктика - Сервис», 390046, Яхонтова ул., д.19,
тел: (4912) 21-13-97, 21-57-20, 25-40-96, факс: (4912) 21-05-70
САМАРА, ООО «Видео-Сервис», 443074, Мориса Тореза ул.137,
, ИП Головинов Евгений Геннадьевич, 662544,
ЛЕСОСИБИРСК
60 лет ВЛКСМ ул., д.11, кв.33, тел: (39145) 6-37-61, 8-904-892-9300
ЛИВНЫ, ООО «Эл-сервис», 303850, Максима Горького ул., д.43, литер Б,
тел: (4867) 72-10-07, 920-818-7260, факс: (4867) 72-10-07
ЛИПЕЦК, ООО «Владон», 398032, Космонавтов ул., д.66, тел: (4742) 33-82-48,
33-45-65, факс: (4742) 33-45-65
ЛИПЕЦК, ООО «Сервисный центр «Фолиум», 398016, Космонавтов ул., д.8,
тел: (4742) 345534, 34-07-13, 34-09-34, факс: (4742) 35-37-57
МАГАДАН, ИП Терехин Валентин Яковлевич, 685030, Гагарина ул., д.28/2,
маг.»XXI век», тел: (4132) 65-13-65, факс: (4132) 65-47-47
МАГНИТОГОРСК, ООО «Техника-Сервис», 455037, Грязнова ул., д.44/2,
тел: (3519) 31-09-01, факс: (3519) 31-09-01
МАЙКОП, ООО «Электрон-Сервис», 385018, Димитрова ул., д.25,
БЕЛАРУСЬ
БРЕСТ, ОДО «Золак», 224028, Орловская ул., д.10, тел: (162) 42-63-94,
факс: (162) 42-63-94
ВИТЕБСК, УЧРП «Р-Плюс», 210015, Чкалова ул., д.3, тел: (212) 21-78-35,
тел: (84722) 9-52-07, факс: (84722) 9-52-07
ЮЖНО-САХАЛИНСК, ООО «ВЛ Сервис», 693013, Комсомольская ул., д.298,
лит.В, тел: (4242) 73-38-05, факс: (4242) 73-38-05
ЯКУТСК, ООО «Сервисный центр «Физтех-Сервис», 677000, Октябрьская ул.,
тел: (846) 262-62-62, факс: (846) 262-62-62
САМАРА, ООО «Фирма «Сервис-Центр», 443096, Мичурина ул., д.15, оф.307,
тел: (846) 263-74-74, 263-75-75, факс: (846) 263-74-74
САМАРА, ООО «Энон-Сервис», 443090, Советской Армии ул., д.148,
, ИП Шамилов Исламутдин Джамалутдинович, 367027,
тел: (8772) 55-62-38, факс: (8772) 55-62-38
МАХАЧКАЛА
Акушинского пр., 14 линия, д.21, тел: (8722) 64-71-33, 8-988-293-5515,
факс: (8722) 64-28-95
факс: (212) 21-78-35
д.1/1, тел: (4112) 33-69-44, 39-00-80, 39-00-81, факс: (4112) 33-69-44
ЯРОСЛАВЛЬ, ООО «Сервисный центр «ВИРТ», 150003, Республиканская ул.,
д.3, тел: (4852) 58-22-11, факс: (4852) 58-22-11
, ООО «Орбис», 193079, Октябрьская наб., д.60,
тел: (846) 224-43-61, 224-07-40, факс: (846) 224-43-61
САНКТ-ПЕТЕРБУРГ, ООО «Альбатрос-Сервис», 194295, Ивана Фомина ул., д.
6, лит. Б, тел: (812) 517-92-02, 517-66-37, факс: (812) 517-66-37
САНКТ-ПЕТЕРБУРГ, ООО «Альбатрос-Сервис», 192148, Седова ул., д.37, лит.
А, тел: (812) 336-40-13, 336-40-12, 560-24-66, 568-09-58, факс: (812) 336-40-13
САНКТ-ПЕТЕРБУРГ
тел: (812) 379-62-70, факс: (812) 446-61-71
САНКТ-ПЕТЕРБУРГ, ООО «Энергоквартал», 196105, Свеаборгская ул., д.10,
литер А, тел: (812) 368-22-05, факс: (812) 368-22-05
, ООО «Кумино», 109369, Новочеркасский бул., д.47,
КВА, ООО «ДС-Сервис», 109518, Волжский б-р, д.5, кор.1,
МАХАЧКАЛА, ИП Эмирбеков Алимирза Абдугашумович, 367000, Ленина ул.,
д.113А, тел: (8722) 67-95-87, факс: (8722) 67-95-87
МИЧУРИНСК, ООО «Техно-Сервис», 393773, Липецкое ш., д.68, корп.1,
тел: (47545) 2-84-21, факс: (47545) 2-84-21
МОСКВА, ООО «ВнешРемТорг», 127473, Селезневская ул., д.30, к.Б-В,
тел: (495) 518-64-32, 518-69-41, 518-69-47, факс: (495) 518-64-32
МОС
тел: (495) 971-75-32, 971-03-43
МОСКВА
-90-44, факс: (232) 74-90-44
ГОМЕЛЬ, ЧПТУП «Техносити», 246050, Гагарина ул., д.20, тел: (232) 74-90-71,
74
ГРОДНО, ЧТСУП «Салби-Плюс», 230029, Горького ул., д.72, кв.207,
тел: (152) 41-79-99, факс: (152) 41-41-47
МОГИЛЕВ, ЧПУП «Система Сервис», 212030, Ленинская ул., д.29А,
тел: (22) 231-05-98, факс: (22) 231-05-98
МИНСК, ОДО «ЦБТ Сервис», 220113, Якуба Коласа ул., д.52,
тел: (172) 62-66-71, 62-95-50, факс: (172) 62-66-71, 62-95-50
МИНСК, ООО «ЛайдерСервис», 220077, Ташкентская ул., д.7, ком.6,
тел. (173) 45-45-88
, ИП Гусев Владимир Анатольевич, 391434, Мкр. Южный, д.59,
САРАНСК, ООО «Верона», 430000, Пролетарская ул., д.36,
тел: (495) 348-65-30, факс: (495) 348-65-30
(4812) 61-16-29, 61-16-45, факс: (4812) 61-16-29
тел: (8342) 47-10-47, факс: (8342) 47-10-47
САРАТОВ, ООО «Сар-сервис», 410004, 4-й Вакуровский пр-д, д.4,
тел: (8452) 51-00-99, 20-03-85, факс: (8452) 51-00-99
САСОВО
тел: (49133) 2-07-40, факс: (49133) 2-07-40
СЛАВЯНСК-НА-КУБАНИ, ООО «Нэвис», 353561, Ленина ул., д.114а,
тел: (86146) 4-27-68, 8-928-407-9992
СМОЛЕНСК, ООО «Техносат-Сервис», 214004, Николаева ул., д.11,
тел:
, ООО «Авторизованный Центр «Пионер Сервис»,
МОСКВА, ООО «Пульсар», 121096, Олеко Дундича ул., д.21, к.2,
тел: (495) 987-10-43, 987-13-19, факс: (495) 987-10-43
МУРМАНСК
183038, Свердлова ул., д.19А, тел: (8152) 31-49-64, (911) 300-39-30,
факс: (8152) 31-49-64
МУРМАНСК, ООО «Лидер-Сервис», 183038, Книповича ул., д.46,
тел: (8152) 40-00-83, 44-47-49, факс: (8152) 40-00-83
МУРОМ, ИП Серкова Татьяна Андреевна, 602252, Чкалова ул., д.2, к.В,
тел: (4923) 43-35-54, факс: (4923) 43-35-54
-28, 8-908-223-4028,
Адреса сервисных центров по обслуживанию бытовой техники http://www.bosch-home.com/ru/
РОССИЯ
АБАКАН, ИП Кобылянский Роман Сергеевич, 655010, Торосова ул., д.15,
тел: (3902) 26-65-64, факс: (3902) 22-65-64
АЛЬМЕТЬЕВСК, ИП Валиуллин Марат Рафгатович, 423450, К.Цеткин ул., д.18а,
тел: (8553) 37-17-89, 32-22-11, факс: (8553) 37-17-89
АЛЬМЕТЬЕВСК, ООО «Альметьевский Сервисный Центр», 423450,
Нефтяников ул., д.37, тел: (8553) 38-43-43, 22-17-00, факс: (8553) 38-43-43
АНАПА, ИП Коваленко Сергей Иванович, 353440, Астраханская ул., д.98,
тел: (86133) 6-09-84, 8-918-215-5775
АПАТИТЫ, ИП Корепанов Антон Юрьевич, 184209, ул. Зиновьева, д.22А,
тел: (81555) 6-61-06, факс: (81555) 6-61-06
АРЗАМАС, ИП Абросимов Дмитрий Александрович, 607224, 9-е Мая ул., д.4,
тел: (83147) 7-07-40, 7-73-82, факс: (83147) 7-73-82
АРМАВИР, ИП Филин Сергей Иванович, 352900, Комсомольская ул., д.115,
тел: (86137) 3-80-00
АРХАНГЕЛЬСК, ООО «Двина-Сервис Центр», 163000, Садовая ул., д.21,
тел: (8182) 65-79-95, факс: (8182) 20-23-30
АРХАНГЕЛЬСК, ООО «Сервисный Центр «Мир», 163045, Гагарина ул., д.1,
тел: (8182) 27-60-66, 27-55-10, факс: (8182) 27-60-66
АСТРАХАНЬ, ИП Кузнецов Александр Федорович, 414041, Яблочкова ул.,
д.1В, тел: (8512) 36-84-10, 37-06-91, факс: (8512) 37-06-01
, ООО «Амурский сервисный центр», 675000,
АЧИНСК, ИП Кудрин Сергей Юрьевич, 662150, мкр.2, д.6, тел: (39151) 4-42-22,
7-24-21, факс: (39151) 7-24-22
БАЛАКОВО, ИП Барышников Евгений Владимирович, 413853, Чапаева ул.,
(4722) 32-65-92, 22-92-90, 22-95-16, факс: (4722) 22-92-90
д.159А, тел: (8453) 44-75-31, 927-148-97-70, факс: (8453) 44-75-31
БАЛАШОВ, ИП Рыженькина Наталия Сергеевна, 412309, Луначарского ул.,
д.102, тел: (9172) 13-17-78
БАРНАУЛ, ООО «Диод», 656043, Пролетарская ул., д.113, тел: (3852) 63-94-02,
факс: (3852) 63-59-88
БАРНАУЛ, ООО «Р.С.Ц.», 656044, Попова ул., д.55, тел: (3852) 48-50-67,
факс: (3852) 48-40-67
БЕЛГОРОД, ООО «Выбор-Сервис», 308000, Гражданский пр-т, д.32,
тел:
БЕЛОРЕЦК, ООО «Электроника», 453501, Ф.Алексеева ул., д.45,
тел: (3479) 25-35-26, 24-07-28, факс: (3479) 25-35-26
БЕЛОРЕЧЕНСК, ООО «Дело техники», 352630, Мира ул., д.63/1,
тел: (8615) 53-11-00
БЕРЕЗНИКИ, ООО «Рембытторгтехника-Сервис», 618419, Льва Толстого ул.,
д.76А, оф.7, тел: (3424) 23-72-28, 23-72-23, факс: (3424) 23-71-61
БИЙСК, ООО «Парус плюс», 659325, Кирова пер., д.8, тел: (3854) 35-69-70,
33-65-65
БЛАГОВЕЩЕНСК
Октябрьская ул., д.162, тел: (4162) 33-36-38
БОГУЧАНЫ, ООО «Сервис центр №3», 663430, Ленина ул., д.119,
тел: (39162) 2-14-73, 2-16-35
БРАТСК, ИП Рудакова Елизавета Викторовна, 665700, Курчатова ул., д.30А,
тел: (3953) 26-80-60
БРЯНСК, ИП Карпов Владимир Иванович, 241038, Сталелитейная ул., д.1,
тел: (4832) 52-21-09, 952-9622209
БУГУРУСЛАН, ИП Покручина Валентина Ивановна, 461630, Транспортная ул.,
д.2, тел: (35352) 9-10-99
ВЕЛИКИЙ НОВГОРОД, ООО «ТКТ», 173025, Кочетова ул., д.23А,
, ИП Юзефович Вячеслав Григорьевич, 690014, Народный
, ИП Коновалов С.А., 160022, Пошехонское ш., д.6А,
(8442) 27-05-06, факс: (8442) 27-05-07
ВОЛГОДОНСК, ИП Ибрагимов Марат Асгатович, 347387, К. Маркса ул., д.30,
тел: (8639) 25-29-29, факс: (8639) 25-29-29
ВОЛЖСКИЙ, ООО «Толиман», 404109, Труда пл., д.10, тел: (8443) 21-53-57
ВОЛОГДА
тел: (8172) 71-59-69, 71-81-29, факс: (8172) 71-59-69
ВОЛОГДА, ООО «Авторизованный Центр «Пионер Сервис», 160024,
Северная ул., д.34, тел: (8172) 27-24-13, 27-24-14, факс: (8172) 27-24-14
ВОРКУТА, ООО «Мега», 169907, Тиманская ул., д. 8А, тел: (82151) 6-60-06,
6-63-42, факс: (82151) 6-60-06
ВОРОНЕЖ, ИП Михайлов Андрей Игоревич, 394043, Ленина ул., д.73,
тел: (473) 210-00-12
тел: (8162) 61-12-00, 33-59-18, факс: (8162) 61-12-00
ВЛАДИВОСТОК
пр-т, д.11, тел: (4232) 96-62-27
ВЛАДИКАВКАЗ, ООО «Арктика-Сервис», 362015, Коста пр-т, д.15,
тел: (8672) 25-01-07, факс: (8672) 25-01-07
ВЛАДИМИР, ООО «Владимир-Сервис», 600014, Строителей пр-т, д.36,
тел: (4922) 36-45-18, 36-99-36, факс: (4922) 36-45-19
ВОЛГОГРАД, ООО «Толиман», 400082, 50-ти лет Октября ул., д.17,
тел: (8442) 62-93-74, факс: (8442) 62-93-74
ВОЛГОГРАД, ООО «Толиман», 400117, 8-й воздушной армии ул., д.35,
тел: (8442) 78-91-41, факс: (8442) 78-91-41
ВОЛГОГРАД, ООО «Толиман», 400050, Кузнецова ул., д.49,
тел:
ГРОЗНЫЙ, ООО «Техноплюс», 364029, Ханкальская ул., д.75,
, ИП Джабраилов Руслан Расулович, 368608, 345 Стрелковой
тел: 8-928-024-56-66, 8-962-024-56-66
ДЕРБЕНТ
дивизии ул., д.19, тел: (963) 374-97-78, (989) 669-48-99
ДИВНОГОРСК, ИП Митяев Дмитрий Николаевич, 663090, Школьная ул., д.31А,
тел: (39144) 3-52-65
ДИМИТРОВГРАД, ИП Федотов Сергей Алексеевич, 433505, Октябрьская ул.,
д.63, тел: (8423) 52-86-59, 59-14-64, факс: (8423) 52-86-59
, ИП Гречанников Алексей Владимирович, 662978,
ЕЙСК, ИП Лаврович Константин Анатольевич, 353688, Маяковского ул., д.55,
тел: (8613) 25-05-00, факс: (8613) 25-05-00
(39197) 7-00-28
ЕКАТЕРИНБУРГ, ООО «Евротехника-Сервис», 620146, Бардина ул., д.28,
тел: (343) 240-98-26, 243-26-11, факс: (343) 243-42-22
ЕКАТЕРИНБУРГ, ООО «Норд-Сервис», 620057, Донская ул., д.31,
тел: (343) 310-00-91, факс: (343) 310-00-91
ЕЛЕЦ, ИП Шульгин Александр Иванович, 399776, 220-й Стрелковой
дивизии ул., д.1А, тел: (47467) 3-72-62, 905-684-66-73, факс: (47467) 6-75-83
ЖЕЛЕЗНОГОРСК
Ленинградский пр-т, д.21, кв.24, тел: (39197) 7-00
факс:
ИВАНОВО, ООО «Центр ремонтных услуг», 153037, Шереметевский пр., д.117,
тел: (4932) 37-22-34, 37-45-82, факс: (4932) 37-22-34
ИЖЕВСК, ООО «ДС», 426000, К. Маркса ул., д.393, тел: (3412) 43-16-62,
43-50-64, факс: (3412) 43-16-62
MUC_2-4_RU_8001013355.indb 47 10.08.2015 12:45:05
Page 50

FB5030 02/2015
Модель
Апробационный
тип
Сертификат соответствия
Страна-
изготовитель
Регистрационный номер Дата выдачи Действует до
Миксеры, блендеры, измельчители
MFQ4080 CNHR22 C-DE.АЯ46.B.63982 11.06.14 10.06.19 Словения
MFQ36480 CNHR27 C-DE.АЯ46.B.63982 11.06.14 10.06.19 Словения
MFQ36440 CNHR27 C-DE.АЯ46.B.63982 11.06.14 10.06.19 Словения
MFQ36460 CNHR27 C-DE.АЯ46.B.63982 11.06.14 10.06.19 Словения
MFQ36GOLD CNHR27 C-DE.АЯ46.B.63982 11.06.14 10.06.19 Словения
MMB1001 CNSM03ST C-DE.АЯ46.B.66627 21.11.14 20.11.19 Турция
MMB2001 CNSM03EV C-DE.АЯ46.B.66627 21.11.14 20.11.19 Турция
MMR1501 CNCM13ST2 C-DE.АЯ46.B.61496 17.01.14 16.01.19 Словения
MMR08A1 CNCM13ST1 C-DE.АЯ46.B.61496 17.01.14 16.01.19 Словения
MMR15A1 CNCM13ST2 C-DE.АЯ46.B.61496 17.01.14 16.01.19 Словения
MSM6B100 CNHR11 C-DE.АЯ46.B.62888 21.03.14 20.03.19 Словения
MSM6B150 CNHR11 C-DE.АЯ46.B.62888 21.03.14 20.03.19 Словения
MSM6B300 CNHR12 C-DE.АЯ46.B.62888 21.03.14 20.03.19 Словения
MSM6B700 CNHR12 C-DE.АЯ46.B.62888 21.03.14 20.03.19 Словения
MSM67PE CNHR13 C-DE.АЯ46.B.65723 18.09.14 17.09.19 Словения
MSM6700 CNHR9EV C-DE.АЯ46.B.65723 18.09.14 17.09.19 Словения
MSM6B500 CNHR12 C-DE.АЯ46.B.62888 21.03.14 20.03.19 Словения
MSM6B250 CNHR11 C-DE.АЯ46.B.62888 21.03.14 20.03.19 Словения
MSM66050RU CNHR25 C-DE.АЯ46.B.62888 21.03.14 20.03.19 Словения
MSM66150RU CNHR25 C-DE.АЯ46.B.62888 21.03.14 20.03.19 Словения
MSM67140RU CNHR26 C-DE.АЯ46.B.62888 21.03.14 20.03.19 Словения
MSM67160RU CNHR26 C-DE.АЯ46.B.62888 21.03.14 20.03.19 Словения
MSM66130 CNHR25 C-DE.АЯ46.B.62888 21.03.14 20.03.19 Словения
MSM67170 CNHR26 C-DE.АЯ46.B.62888 21.03.14 20.03.19 Словения
MSM67SPORT CNHR26 C-DE.АЯ46.B.62888 21.03.14 20.03.19 Словения
MSM66155 CNHR25 C-DE.АЯ46.B.62888 21.03.14 20.03.19 Словения
MSM87160 CNHR28 C-DE.АЯ46.B.59536 20.08.13 19.08.18 Словения
MSM87165 CNHR28 C-DE.АЯ46.B.59536 20.08.13 19.08.18 Словения
MSM87180 CNHR28 C-DE.АЯ46.B.59536 20.08.13 19.08.18 Словения
MSM88190 CNHR29 C-DE.АЯ46.B.59536 20.08.13 19.08.18 Словения
MSM64035 CNHR24 C-DE.АЯ46.B.62888 21.03.14 20.03.19 Словения
MSM66020 CNHR25 C-DE.АЯ46.B.62888 21.03.14 20.03.19 Словения
MSM66110 CNHR25 C-DE.АЯ46.B.62888 21.03.14 20.03.19 Словения
MSM87130 CNHR28 C-DE.АЯ46.B.59536 20.08.13 19.08.18 Словения
MSM87140 CNHR28 C-DE.АЯ46.B.59536 20.08.13 19.08.18 Словения
MSM64155RU CNHR24 C-DE.АЯ46.B.62888 21.03.14 20.03.19 Словения
MSM67165RU CNHR26 C-DE.АЯ46.B.62888 21.03.14 20.03.19 Словения
MSM67190 CNHR26FP C-DE.АЯ46.B.65723 18.09.14 17.09.19 Сл овения
MSM67150RU CNHR26 C-DE.АЯ46.B.62888 21.03.14 20.03.19 Словения
MSM64120 CNHR24 C-DE.АЯ46.B.62888 21.03.14 20.03.19 Словения
MSM671X0 CNHR26FP C-DE.АЯ46.B.65723 18.09.14 17.09.19 Словения
MSM671X1 CNHR26FP C-DE.АЯ46.B.65723 18.09.14 17.09.19 Словения
MSM881X1 CNHR29 C-DE.АЯ46.B.59536 20.08.13 19.08.18 Словения
MSM881X2 CNHR29 C-DE.АЯ46.B.59536 20.08.13 19.08.18 Словения
MSM6B400 CNHR12 C-DE.АЯ46.B.62888 21.03.14 20.03.19 Словения
Кухонные комбайны
MCM2050 CNCM11ST C-DE.АЯ46.B.60779 26.11.13 25.11.18 Словения
MCM2150 CNCM11ST1 C-DE.АЯ46.B.60779 26.11.13 25.11.18 Словения
MCM4000 CNCM20 C-DE.АЯ46.B.60779 26.11.13 25.11.18 Словения
MCM4100 CNCM20 C-DE.АЯ46.B.60779 26.11.13 25.11.18 Словения
MCM4200 CNCM21 C-DE.АЯ46.B.60779 26.11.13 25.11.18 Словения
MCM4250 CNCM21 C-DE.АЯ46.B.60779 26.11.13 25.11.18 Словения
MCM62020 CNCM30 C-DE.АЯ46.B.60779 26.11.13 25.11.18 Словения
MCM64051 CNCM30 C-DE.АЯ46.B.60779 26.11.13 25.11.18 Словения
MCM64085 CNCM30 C-DE.АЯ46.B.60779 26.11.13 25.11.18 Словения
MCM68840 CNCM30 C-DE.АЯ46.B.60779 26.11.13 25.11.18 Словения
MCM68885 CNCM30 C-DE.АЯ46.B.60779 26.11.13 25.11.18 Словения
MUM4406 CNUM5ST C-DE.АЯ46.B.60779 26.11.13 25.11.18 Словения
MUM4427 CNUM5ST C-DE.АЯ46.B.60779 26.11.13 25.11.18 Словения
MUM4657 CNUM5ST C-DE.АЯ46.B.60779 26.11.13 25.11.18 Словения
MUM4855 CNUM5ST C-DE.АЯ46.B.60779 26.11.13 25.11.18 Словения
MUM4856EU CNUM5ST C-DE.АЯ46.B.60779 26.11.13 25.11.18 Сл овения
MUM4880 CNUM5ST C-DE.АЯ46.B.60779 26.11.13 25.11.18 Словения
MUM52131 CNUM50 C-DE.АЯ46.B.60779 26.11.13 25.11.18 Словения
MUM54240 CNUM51 C-DE.АЯ46.B.60779 26.11.13 25.11.18 Словения
MUM54251 CNUM51
C-DE.АЯ46.B.60779 26.1
1.13 25.11.18 Словения
MUM56S40 CNUM51 C-DE.АЯ46.B.60779 26.11.13 25.11.18 Сл овения
MUM57830 CNUM51 C-DE.АЯ46.B.60779 26.11.13 25.11.18 Словения
MUM57860 CNUM51 C-DE.АЯ46.B.60779 26.11.13 25.11.18 Словения
MUMXL20C CNUM70 C-DE.АЯ46.B.60779 26.11.13 25.11.18 Словения
MUMXL40G CNUM70 C-DE.АЯ46.B.60779 26.11.13 25.11.18 Словения
Кофемолки
MKM6003 KM13 C-DE.АЯ46.B.62081 14.02.14 13.02.19 Сл овения
MKM6000 KM13 C-DE.АЯ46.B.62081 14.02.14 13.02.19 Сл овения
Мясорубки
MFW1501 SFW1 C-DE.АЯ46.B.61421 13.01.14 12.01.19 Сл овения
MFW1545 CNFW2 C-DE.АЯ46.B.61421 13.01.14 12.01.19 Словения
MFW1550 CNFW2 C-DE.АЯ46.B.61421 13.01.14 12.01.19 Словения
MFW45020 CNFW5 C-DE.АЯ46.B.59504 16.08.13 15.08.18 Китай
MFW45120 CNFW5 C-DE.АЯ46.B.59504 16.08.13 15.08.18 Китай
MFW66020 CNFW6 C-DE.АЯ46.B.59504 16.08.13 15.08.18 Китай
MFW67440 CNFW7 C-DE.АЯ46.B.59504 16.08.13 15.08.18 Китай
MFW67600 CNFW7 C-DE.АЯ46.B.59504 16.08.13 15.08.18 Китай
MFW68640 CNFW8 C-DE.АЯ46.B.59504 16.08.13 15.08.18 Китай
MFW68660 CNFW8 C-DE.АЯ46.B.59504 16.08.13 15.08.18 Китай
MFW68680 CNFW8 C-DE.АЯ46.B.59504 16.08.13 15.08.18 Китай
Информация о бытовой технике, произведенной* под контролем концерна
БСХ Хаусгерете ГмбХ, Карл-Вери-Штр. 34, 81739 Мюнхен, Германия
в соответствии с требованиями Федерального Закона РФ от 23 ноября 2009 г.
и законодательства о защите прав потребителей Российской Федерации
Продукция: cоковыжималки, миксеры, блендеры, резки,
кухонные комбайны, кофемолки, мясорубки, измельчители
ВНИМАНИЕ! Асс ортимент продукции постоянно обновляется. Технические характеристики продукции, в том числе энергоэффективности, постоянно совершенствуются. Продукция регулярно проходит обязательную процедуру подтверждения соответствия согласно действующему законодательству. Информацию о
реквизитах актуальных сертификатов соответствия и сроках их действия, актуальную информацию о классе и характеристиках энергоэффективности продукции, информацию об актуальном ассортименте продукции можно получить у организации, выполняющей функции иностранного изготовителя на территории
Российской Федерации ООО «БСХ Бытовая техника», Москва, 119071, ул. Малая Калужская, д.15, телефон (495) 737-2777, факс (495) 737-2798.
Компания ООО «БСХ Бытовая техника», 119071, Москва, ул. Малая Калужская, д.15 осуществляет свою деятельность по подтверждению соответствия продукции от имени производителя на единой таможенной территории Таможенного союза в соответствии с действующими Техническими регламентами, в качестве
уполномоченного Изготовителем лица, а также выполняет требования, предусмотренные Законом РФ №184-ФЗ «О техническом регулировании» для лица,
выполняющего функции иностранного изготовителя на территории Российской Федерации.
Импортером в Российскую Федерацию продукции, сертифицированной в качестве серийно производимой органом по сертификации «Ростест-Москва», аттестат аккредитации РОСС RU.0001.10.АЯ46, Москва, 117418, Нахимовский просп., 31, телефон (499) 129-2600, является ООО «БСХ Бытовая техника», Москва,
119071, ул. Малая Калужская, д.15, телефон (495) 737-2777.
Организацией, указываемой на продукции в целях идентификации продукции и осуществляющей первичное размещение продукции на рынке Европейского
союза, является Роберт Бош Хаусгерете ГмбХ Карл-Вери-Штр. 34, 81739 Мюнхен, Германия (Robert Bosch Hausgeräte GmbH, Carl-Wery-Str. 34, 81739 München,
Germany).
Юридическим лицом (изготовителем), осуществляющим от своего имени изготовление продукции и ответственным за ее соответствие требованиям применимых
технических регламентов Таможенного союза, является БСХ Хаусгерете ГмбХ, Карл-Вери-Штр. 34, 81739 Мюнхен, Германия (BSH Hausgeräte GmbH, Carl-WeryStr. 34, 81739 München, Germany).
При перевозке, погрузке, разгрузке и хранении продукции следует руководствоваться, помимо изложенных в инструкции по эксплуатации, следующими требованиями:
• Запрещается подвергать продукцию существенным механическим нагрузкам, которые могут привести к повреждению продукции и/или нарушению ее упаковки.
• Необходимо избегать попадания на упаковку продукции воды и других жидкостей.
Перед перевозкой или передачей на хранение бывшей в эксплуатации продукции при отрицательной температуре необходимо убедиться в отсутствии в продукции воды.
Продукция предназначена к использованию в условиях температуры выше 0°С и относительной влажности, не превышающей 93%.
Перед началом эксплуатации продукции, длительное время находившейся под воздействием отрицательной температуры, необходимо выдержать ее в условиях комнатной температуры несколько часов.
Правила реализации продукции определяются предприятиями розничной торговли в соответствии с требованиями действующего законодательства.
Указания по утилизации продукции содержатся в инструкции по эксплуатации и могут быть уточнены у муниципальных органов исполнительной власти.
Для продукции, реализованной изготовителем в течение срока действия сертификата соответствия, этот сертификат действителен при ее поставке, продаже и
использовании (применении) в течение срока службы, установленного в соответствии со статьей 18 Закона РФ о защите прав потребителей. Срок службы на
продукцию указан производителем в листовке «Информация изготовителя о гарантийном и сервисном обслуживании».
Продукция может быть идентифицирована по модельному обозначению (поле «E-Nr.»), апробационному типу (поле «Type») и товарному знаку Bosch, нанесенным на продукцию, упаковку и (или) содержащихся в сопроводительной документации.
В состав эксплуатационных документов, предусмотренных изготовителем для продукции, могут входить настоящая информация, инструкция (руководство) по
эксплуатации, информация об условиях гарантийного и сервисного обслуживания.
Маркирование продукции осуществляется изготовителем на типовой табличке прибора, на упаковочной этикетке, непосредственно на упаковке прибора, а также
может производиться иными способами, обеспечивающими доступное и наглядное представление информации о приборе в местах продаж.
Эксплуатационные документы на продукцию выполняются на русском языке. Эксплуатационные документы на государственных языках государств – членов
Таможенного союза, отличных от русского, при наличии соответствующих требований в законодательстве можно безвозмездно получить у торгующей организации-резидента соответствующего государства – члена Таможенного союза.
Информация о комплектации продукции представлена в торговых залах, может быть запрошена по телефону бесплатной «горячей линии» (800) 200-2961, а
также доступна в интернете на сайте производителя http://www.bosch-bt.ru.
* 09.02.2015 БСХ Бош унд Сименс Хаусгерете ГмбХ, Карл-Вери-Штр. 34, 81739 Мюнхен, Германия, переименована в компанию БСХ Хаусгерете ГмбХ, Карл-Вери-Штр. 34, 81739 Мюнхен, Германия.
Модель
Соковыжималки
MCP3000 CNZP3 C-DE.АЯ46.B.01025 12.11.12 11.11.17 Словения
MES25A0 CNCJ03 C-DE.АЯ46.B.62431 27.02.14 26.02.19 Китай
MES25C0 CNCJ03 C-DE.АЯ46.B.62431 27.02.14 26.02.19 Китай
MES25G0 CNCJ03 C-DE.АЯ46.B.62431 27.02.14 26.02.19 Китай
MES3500 CNCJ03 C-DE.АЯ46.B.62431 27.02.14 26.02.19 Китай
MES4000 CNCJ04 C-DE.АЯ46.B.62431 27.02.14 26.02.19 Китай
MES4010 CNCJ05 C-DE.АЯ46.B.62431 27.02.14 26.02.19 Китай
Резки
MAS4201N CNAS11ST1 C-DE.АЯ46.B.63040 31.03.14 30.03.19 Турция
MAS4601N CNAS11EV1 C-DE.АЯ46.B.63040 31.03.14 30.03.19 Турция
MAS6200N CNAS12 C-DE.АЯ46.B.63040 31.03.14 30.03.19 Турция
MAS9101N AS9ST C-DE.АЯ46.B.63040 31.03.14 30.03.19 Турция
Миксеры, блендеры, измельчители
MFQ3010 CNHR19 C-DE.АЯ46.B.63982 11.06.14 10.06.19 Словения
MFQ3020 CNHR19 C-DE.АЯ46.B.63982 11.06.14 10.06.19 Словения
MFQ3520 CNHR17 C-DE.АЯ46.B.63982 11.06.14 10.06.19 Словения
MFQ3030 CNHR19 C-DE.АЯ46.B.63982 11.06.14 10.06.19 Словения
MFQ3555 CNHR18 C-DE.АЯ46.B.63982 11.06.14 10.06.19 Словения
MFQ4070 CNHR22 C-DE.АЯ46.B.63982 11.06.14 10.06.19 Словения
MFQ4020 CNHR22 C-DE.АЯ46.B.63982 11.06.14 10.06.19 Словения
№ 261-ФЗ, законодательства о техническом регулировании
Продукция, которая прошла процедуру подтверждения соответствия согласно требованиям Технических Регламентов Таможенного Союза,
маркируется единым знаком обращения продукции на рынке государств – членов Таможенного союза.
Продукция, которая была выпущена уполномоченными таможенными органами в свободное обращение на территории Таможенного союза
до 15.03.2015 и соответствие которой обязательным требованиям подтверждено российскими сертификатами в системе ГОСТ Р, либо едиными
документами Таможенного союза, может быть маркирована знаком соответствия.
Апробационный
тип
Регистрационный номер Дата выдачи Действует до
MUC_2-4_RU_8001013355.indb 48 10.08.2015 12:45:05
Сертификат соответствия
Товарный знак:
Bosch
Страна-
изготовитель
Page 51

Модель
Миксеры, блендеры, измельчители
MFQ4080 CNHR22 C-DE.АЯ46.B.63982 11.06.14 10.06.19 Словения
MFQ36480 CNHR27 C-DE.АЯ46.B.63982 11.06.14 10.06.19 Словения
MFQ36440 CNHR27 C-DE.АЯ46.B.63982 11.06.14 10.06.19 Словения
MFQ36460 CNHR27 C-DE.АЯ46.B.63982 11.06.14 10.06.19 Словения
MFQ36GOLD CNHR27 C-DE.АЯ46.B.63982 11.06.14 10.06.19 Словения
MMB1001 CNSM03ST C-DE.АЯ46.B.66627 21.11.14 20.11.19 Турция
MMB2001 CNSM03EV C-DE.АЯ46.B.66627 21.11.14 20.11.19 Турция
MMR1501 CNCM13ST2 C-DE.АЯ46.B.61496 17.01.14 16.01.19 Словения
MMR08A1 CNCM13ST1 C-DE.АЯ46.B.61496 17.01.14 16.01.19 Словения
MMR15A1 CNCM13ST2 C-DE.АЯ46.B.61496 17.01.14 16.01.19 Словения
MSM6B100 CNHR11 C-DE.АЯ46.B.62888 21.03.14 20.03.19 Словения
MSM6B150 CNHR11 C-DE.АЯ46.B.62888 21.03.14 20.03.19 Словения
MSM6B300 CNHR12 C-DE.АЯ46.B.62888 21.03.14 20.03.19 Словения
MSM6B700 CNHR12 C-DE.АЯ46.B.62888 21.03.14 20.03.19 Словения
MSM67PE CNHR13 C-DE.АЯ46.B.65723 18.09.14 17.09.19 Словения
MSM6700 CNHR9EV C-DE.АЯ46.B.65723 18.09.14 17.09.19 Словения
MSM6B500 CNHR12 C-DE.АЯ46.B.62888 21.03.14 20.03.19 Словения
MSM6B250 CNHR11 C-DE.АЯ46.B.62888 21.03.14 20.03.19 Словения
MSM66050RU CNHR25 C-DE.АЯ46.B.62888 21.03.14 20.03.19 Словения
MSM66150RU CNHR25 C-DE.АЯ46.B.62888 21.03.14 20.03.19 Словения
MSM67140RU CNHR26 C-DE.АЯ46.B.62888 21.03.14 20.03.19 Словения
MSM67160RU CNHR26 C-DE.АЯ46.B.62888 21.03.14 20.03.19 Словения
MSM66130 CNHR25 C-DE.АЯ46.B.62888 21.03.14 20.03.19 Словения
MSM67170 CNHR26 C-DE.АЯ46.B.62888 21.03.14 20.03.19 Словения
MSM67SPORT CNHR26 C-DE.АЯ46.B.62888 21.03.14 20.03.19 Словения
MSM66155 CNHR25 C-DE.АЯ46.B.62888 21.03.14 20.03.19 Словения
MSM87160 CNHR28 C-DE.АЯ46.B.59536 20.08.13 19.08.18 Словения
MSM87165 CNHR28 C-DE.АЯ46.B.59536 20.08.13 19.08.18 Словения
MSM87180 CNHR28 C-DE.АЯ46.B.59536 20.08.13 19.08.18 Словения
MSM88190 CNHR29 C-DE.АЯ46.B.59536 20.08.13 19.08.18 Словения
MSM64035 CNHR24 C-DE.АЯ46.B.62888 21.03.14 20.03.19 Словения
MSM66020 CNHR25 C-DE.АЯ46.B.62888 21.03.14 20.03.19 Словения
MSM66110 CNHR25 C-DE.АЯ46.B.62888 21.03.14 20.03.19 Словения
MSM87130 CNHR28 C-DE.АЯ46.B.59536 20.08.13 19.08.18 Словения
MSM87140 CNHR28 C-DE.АЯ46.B.59536 20.08.13 19.08.18 Словения
MSM64155RU CNHR24 C-DE.АЯ46.B.62888 21.03.14 20.03.19 Словения
MSM67165RU CNHR26 C-DE.АЯ46.B.62888 21.03.14 20.03.19 Словения
MSM67190 CNHR26FP C-DE.АЯ46.B.65723 18.09.14 17.09.19 Сл овения
MSM67150RU CNHR26 C-DE.АЯ46.B.62888 21.03.14 20.03.19 Словения
MSM64120 CNHR24 C-DE.АЯ46.B.62888 21.03.14 20.03.19 Словения
MSM671X0 CNHR26FP C-DE.АЯ46.B.65723 18.09.14 17.09.19 Словения
MSM671X1 CNHR26FP C-DE.АЯ46.B.65723 18.09.14 17.09.19 Словения
MSM881X1 CNHR29 C-DE.АЯ46.B.59536 20.08.13 19.08.18 Словения
MSM881X2 CNHR29 C-DE.АЯ46.B.59536 20.08.13 19.08.18 Словения
MSM6B400 CNHR12 C-DE.АЯ46.B.62888 21.03.14 20.03.19 Словения
Кухонные комбайны
MCM2050 CNCM11ST C-DE.АЯ46.B.60779 26.11.13 25.11.18 Словения
MCM2150 CNCM11ST1 C-DE.АЯ46.B.60779 26.11.13 25.11.18 Словения
MCM4000 CNCM20 C-DE.АЯ46.B.60779 26.11.13 25.11.18 Словения
MCM4100 CNCM20 C-DE.АЯ46.B.60779 26.11.13 25.11.18 Словения
MCM4200 CNCM21 C-DE.АЯ46.B.60779 26.11.13 25.11.18 Словения
MCM4250 CNCM21 C-DE.АЯ46.B.60779 26.11.13 25.11.18 Словения
MCM62020 CNCM30 C-DE.АЯ46.B.60779 26.11.13 25.11.18 Словения
MCM64051 CNCM30 C-DE.АЯ46.B.60779 26.11.13 25.11.18 Словения
MCM64085 CNCM30 C-DE.АЯ46.B.60779 26.11.13 25.11.18 Словения
MCM68840 CNCM30 C-DE.АЯ46.B.60779 26.11.13 25.11.18 Словения
MCM68885 CNCM30 C-DE.АЯ46.B.60779 26.11.13 25.11.18 Словения
MUM4406 CNUM5ST C-DE.АЯ46.B.60779 26.11.13 25.11.18 Словения
MUM4427 CNUM5ST C-DE.АЯ46.B.60779 26.11.13 25.11.18 Словения
MUM4657 CNUM5ST C-DE.АЯ46.B.60779 26.11.13 25.11.18 Словения
MUM4855 CNUM5ST C-DE.АЯ46.B.60779 26.11.13 25.11.18 Словения
MUM4856EU CNUM5ST C-DE.АЯ46.B.60779 26.11.13 25.11.18 Сл овения
MUM4880 CNUM5ST C-DE.АЯ46.B.60779 26.11.13 25.11.18 Словения
MUM52131 CNUM50 C-DE.АЯ46.B.60779 26.11.13 25.11.18 Словения
MUM54240 CNUM51 C-DE.АЯ46.B.60779 26.11.13 25.11.18 Словения
MUM54251 CNUM51 C-DE.АЯ46.B.60779
MUM56S40 CNUM51 C-DE.АЯ46.B.60779 26.11.13 25.11.18 Сл овения
MUM57830 CNUM51 C-DE.АЯ46.B.60779 26.11.13 25.11.18 Словения
MUM57860 CNUM51 C-DE.АЯ46.B.60779 26.11.13 25.11.18 Словения
MUMXL20C CNUM70 C-DE.АЯ46.B.60779 26.11.13 25.11.18 Словения
MUMXL40G CNUM70 C-DE.АЯ46.B.60779 26.11.13 25.11.18 Словения
Кофемолки
MKM6003 KM13 C-DE.АЯ46.B.62081 14.02.14 13.02.19 Сл овения
MKM6000 KM13 C-DE.АЯ46.B.62081 14.02.14 13.02.19 Сл овения
Мясорубки
MFW1501 SFW1 C-DE.АЯ46.B.61421 13.01.14 12.01.19 Сл овения
MFW1545 CNFW2 C-DE.АЯ46.B.61421 13.01.14 12.01.19 Словения
MFW1550 CNFW2 C-DE.АЯ46.B.61421 13.01.14 12.01.19 Словения
MFW45020 CNFW5 C-DE.АЯ46.B.59504 16.08.13 15.08.18 Китай
MFW45120 CNFW5 C-DE.АЯ46.B.59504 16.08.13 15.08.18 Китай
MFW66020 CNFW6 C-DE.АЯ46.B.59504 16.08.13 15.08.18 Китай
MFW67440 CNFW7 C-DE.АЯ46.B.59504 16.08.13 15.08.18 Китай
MFW67600 CNFW7 C-DE.АЯ46.B.59504 16.08.13 15.08.18 Китай
MFW68640 CNFW8 C-DE.АЯ46.B.59504 16.08.13 15.08.18 Китай
MFW68660 CNFW8 C-DE.АЯ46.B.59504 16.08.13 15.08.18 Китай
MFW68680 CNFW8 C-DE.АЯ46.B.59504 16.08.13 15.08.18 Китай
Апробационный
тип
Регистрационный номер Дата выдачи Действует до
Сертификат соответствия
26.11.13 25.1
1.18 Словения
Страна-
изготовитель
FB5030 02/2015
MUC_2-4_RU_8001013355.indb 49 10.08.2015 12:45:05
Page 52

uk
Щиро вітаємо Вас з покупкою нового
приладу фірми Bosch.
Ви придбали сучасний, високоякісний
побутовий прилад. На наступних сторінках
даної інструкції з експлуатації Ви знайдете
цінні вказівки стосовно безпечного використання даного приладу.
Ми просимо Вас уважно прочитати дану
інструкцію та дотримуватися всіх вказівок.
Таким чином, Ви зможете довго насолоджуватися цим приладом, а результати
його роботи стануть доказом того, що при
покупці Ви зробили правильний вибір.
Зберігайте інструкцію з експлуатації для
пізнішого користування або для наступного власника приладу.
Додаткову інформацію про нашу
продукцію Ви знайдете на нашій сторінці в
Інтернеті.
Зміст
Використання за призначенням
зівки з техніки безпеки ������������������� 52
Вка
Стислий огляд ���������������������������������������� 53
Панель управління �������������������������������� 54
Індикатори ....................................................
Перед першим вик
Обслуговування ������������������������������������� 58
Режим вибору функцій ...............................
а запуск програми приготування... 58
Вибір т
Вибір попередньо налаштованої
тривалості приготування
Налашт
Д
приготування
Використання корзини для
смаження
Вик
для готування на пару ................................
Б
Приготування ������������������������������������������ 63
Загальні рекомендації
Мо
налаштування
Налашт
Налаштування температури
приготування
м
рец
власних програм приготування
Д
Очищ
Дем
Очищ
кришки і випуску пару .................................
Очищ
Утиліз
Умови гарантії ����������������������������������������� 67
Список програм приготування ������������ 68
Огляд моделей та технічні дані
Спеціальне приладдя
Допомога при неполадках
ування відтермінування запуску .
очасне завершення поточного кроку
у фритюрі ...................................
ористання вставного компонента
локування від доступу дітей ....................
жливості індивідуального
ування тривалості приготування .
ой режим – мій режим
епт 1 / рецепт 2 – зберігання
огляд і щоденне очищення
ення основного блоку .......................
онтаж випуску пару ..............................
ення вставного елементу
ення каструлі і приладдя
ація ������������������������������������������������� 67
ористанням ����������� 56
............................
...............................................
................................
����������������������������������������� 63
...............................................
.............................. 64
���������������������������� 70
���������� 51
55
58
60
60
61
61
62
63
63
63
64
.................
���������������� 65
.................. 67
�������������������� 71
65
66
66
67
����������� 69
50
MUC_2-4_RU_8001013355.indb 50 10.08.2015 12:45:05
Page 53

Використання за призначенням
uk
Використання за призначенням
Уважно прочитайте інструкцію з експлуатації, дотримуйтеся
її вказівок, не викидайте і зберігайте її надалі! При передачі
приладу в користування іншим людям додавайте до нього
також і цю інструкцію.
У разі недотримання вказівок щодо правильного використання
приладу виробник не несе відповідальності за збитки, які
виниклі внаслідок цього.
Цей пристрій призначений для приготування кави в домашніх
умовах або для непромислового використання в умовах,
подібних до домашніх. Застосування в побутових умовах
включає, напр.: використання на кухнях для співробітників
магазинів, офісів, сільськогосподарських і інших промислових
підприємств, а також користування гостями пансіонів, невеликих
готелів і подібних закладів.
Даний пристрій передбачений для варіння, випікання,
смаження, тушкування, приготування на пару, смаження у
фритюрі, розігрівання, підігрівання продуктів харчування. Не
використовуйте для обробки інших предметів чи речовин.
Усі інгредієнти повинні відповідати усім гігієнічним вимогам. При
переробці дотримуйтеся правил гігієни на кухні.
Прилад можна використовувати лише з оригінальним
приладдям. Каструлю та приладдя використовуйте тільки з
основним блоком.
Використовуйте прилад лише всередині приміщень при
кімнатній температурі на висоті не вище 2000
моря. При встановленні приладу слідкуйте за тим, щоб за ним і
над ним не було чутливих поверхонь чи приладів, які би могли
зазнати пошкоджень внаслідок впливу температур та виходу
пару.
Особи з фізичними, сенсорними або ментальними вадами, або
особи, яким бракує знань та досвіду, можуть користуватися
приладом лише під наглядом, або якщо вони пройшли
підготовку з користування приладом та розуміють можливу
небезпеку. Тримайте прилад і шнур живлення подалі від
дітей, їм не дозволяється користуватися приладом. Не
дозволяйте дітям гратися з приладом. Очищення та технічне
обслуговування забороняється виконувати дітям.
м над рівнем
51
MUC_2-4_RU_8001013355.indb 51 10.08.2015 12:45:05
Page 54

uk
Вказівки з техніки безпеки
Вказівки з техніки безпеки
W Попередження
Небезпека враження електричним струмом та небезпека
виникнення пожежі!
Прилад можна підключати до електромережі змінного струму
тільки через розетку з заземленням, яка інстальована
згідно з нормами. Пepeкoнaйтecя, щo cиcтeмa зaзeмлeння
eлeктpoпpoвoдки в бyдинкy встановлена згiднo з дiючими
нормами. Прилад дозволяється вмикати в розетку й
експлуатувати лише відповідно до даних, зазначених на
заводській табличці. Не користуйтеся приладом, якщо шнур
живлення і прилад мають будь-які пошкодження. Щоб уникнути
небезпеки, ремонт приладу дозволяється виконувати лише
в нашій сервісній майстерні. У разі пошкодження кабелю
живлення цього приладу його необхідно замінити відповідним
кабелем, який можна замовити у нашій сервісній службі.
Ніколи не підключайте пристрій до вимикачів з годинниковим
механізмом чи розеток з дистанційним керуванням. Ніколи не
залишайте ввімкнений прилад без нагляду! У разі несправності
негайно витягніть штепсель із розетки або вимкніть напругу в
електромережі.
Кабель живлення не повинен торкатися до гарячих частин або
гострих країв. Прилад чи кабель живлення ні в якому разі не
занурювати в воду і не мити в посудомийній машині. Перед
очищенням приладу витягуйте штепсель з розетки.
W П
опередження
Небезпека обпікання!
Під час експлуатації ніколи не використовуйте пристрій без
вставленої каструлі. Під час використання приладу розігрійте
корпус, каструлю і металеві компоненти! Каструлю та приладдя
виймате тільки за допомогою допоміжних засобів, що додаються
до комплекту поставки. Використовуйте спеціальні рукавиці
для виймання каструлі. У пристрої утворюється гаряча пара.
Не нахиляйтеся над приладом. Обережно відкривайте кришку.
Переносьте та чистіть прилад тільки після його повного
охолодження!
W П
опередження
Існує небезпека задухи!
Не дозволяйте дітям гратися з пакувальним матеріалом.
52
MUC_2-4_RU_8001013355.indb 52 10.08.2015 12:45:06
Page 55

Стислий огляд
uk
Стислий огляд
(Малюнок A на початку інструкції з експлуатації)
1 Мультиварка (основний блок)
2 Панель управління
Кришка
3
Кнопка для відкрив
4
5 Знімний випуск пару (з віконцем*), з двох частин
Ручка
6
7
Підключення до мережі
К
аструля з антипригарним покриттям
8
Знімний в
9
10 Корзина для смаження у фритюрі зі знімною ручкою *
Вставний к
11
12 Затискач для каструлі
Лопатка
13
Черпак
14
15
Мірна ск
Кабель живлення
16
17 Інструкція з експлуатації
Книг
18
* залежно від моделі
У цій інструкції з експлуатації описано різні варіанти виконання. У пункті «Огляд
моделей та технічні дані» (див. стор.
моделей.
ставний елемент кришки
омпонент для готування на пару, з двох частин
лянка
а рецептів
ання кришки
69) Ви знайдете огляд оснащення різних
53
MUC_2-4_RU_8001013355.indb 53 10.08.2015 12:45:06
Page 56

uk
Панель управління
Панель управління
Панель управління складається з елементів системи управління (кнопок) та індикаторів
(світлодіодів). Використовуючи кнопки, можна вибирати різноманітні програми приготування, а також задавати різні налаштування (наприклад, температуру чи тривалість
приготування). Індикація налаштувань здійснюється за допомогою світлодіодів або
дисплея.
Елементи системи управління
(Малюнок B на початку інструкції з експлуатації)
Режим очікування
B
Вмикає чи вимикає режим очікування приладу.
Налаштування відтермінування запуску
A
Дозволяє налаштувати час до запуску вибраної програми приготування.
Вибір програми приготування зі списку (g)
D
Кількаразовим натисканням кнопки D можна викликати одну за одною різні
програми приготування. На панелі управління засвічується відповідний світлодіодний індикатор.
Налаштування індивідуальних температур приготування
C
Для індивідуального регулювання температури приготування.
Налаштування тривалості приготування
E
Попередньо налаштовану тривалість для відповідної програми приготування
[ средняя ] (середня) можна зменшити [ короткая ] (коротка) чи збільшити
[ длинная ] (довга). Засвічується відповідний індикатор (f). На дисплеї (a) виводиться відповідна, попередньо налаштована тривалість приготування.
Налаштування індивідуальної тривалості приготування
F
Для індивідуального регулювання тривалості приготування.
Підтвердження програми
G
Натисканням на кнопку G запускається вибрана програма приготування�
Видалення налаштування або відміна програми
H
Натисканням на кнопку H видаляються налаштування або зупиняється виконання запущеної програми.
54
MUC_2-4_RU_8001013355.indb 54 10.08.2015 12:45:06
Page 57

Панель управління
uk
Індикатори
(Малюнок C на початку інструкції з експлуатації)
a
b таймер
c
d готово
e
f
g Список програм приготування
h
i мой режим – мій режим
ей
Диспл
Індикація залишкового часу чи температури.
азує на те, що ввімкнене відтермінування запуску. На дисплеї (a) відобража-
Вк
ється час до запуску вибраної програми приготування.
Кроки приг
отування/
хід прог
рами
Індикація окремих кроків приготування або ходу програми. У випадку кількох
кроків приготування (напр., після розігрівання олії для фритюрниці в корзину
додають інгредієнти) вони відображаються візуально за допомогою засвічування
світлодіодних індикаторів 1, 2, 3 чи 4. Крім того, лунає звуковий сигнал, якщо
потрібен наступний крок приготування.
Вказує на те, що блюдо готове. Дисплей мигає (a) і показує «00:00». Крім того,
лунає звуковий сигнал.
догрев (підігрівання)
по
Показує, що функція підтримування страви в теплому стані увімкнена після закінчення програми приготування. На дисплеї засвічується прямокутник (штрихова
лінія).
Індикація попередньо налашт
ованої тривалості приготування
Попередньо налаштовану тривалість для відповідної програми приготування
[ средняя ] (середня) кнопкою E можна зменшити [ короткая ] (коротка) чи збільшити [ длинная ] (довга). Засвічується відповідний індикатор.
У Вашому розпорядженні 16
попередньо налаштованих програм приготування.
Кількаразовим натисканням кнопки D можна викликати одну за одною різні
програми приготування. На панелі управління засвічується відповідний світлодіодний індикатор.
рецепт 1&2 (з
алежно від моделі)
Комірки пам'яті для програм приготування з індивідуальним вибором часу та
температури.
Режим швидкого налаштування – для індивідуального налаштування тривалості і
температури приготування для відповідного процесу варіння.
55
MUC_2-4_RU_8001013355.indb 55 10.08.2015 12:45:06
Page 58

uk
Перед першим використанням
Перед першим
використанням
Перед початком експлуатації нового
приладу його потрібно повністю розпакувати, очистити та підключити до мережі
живлення. Для цього потрібно виконати
наступні кроки:
Вийм
1�
2�
Увага!
Також для надійного перенесення
приладу використовуйте виключно ручку
3�
Увага!
За приладом і над ним не повинно бути
чутливих поверхонь чи приладів, які би
могли зазнати пошкоджень внаслідок
впливу температур та виходу пару.
4� Виймання випуску пару
іть прилад та всі приладдя з
упаковки.
Для
піднімання приладу використовуйте ручку. Ручку відкиньте відповідно
вверх.
ановіть прилад на стабільну, гори-
Вст
зонтальну і рівну поверхню.
Схопіть випуск пару ззаду та тягніть
вверх.
5� Відкривання кришки приладу
Натисніть на кнопку відкривання на
кришці.
6� Виймання вставного елемента
кришки
Схопіть вставний елемент кришки за
обидва захвати зліва і справа, витягніть його та вийміть з приладу.
7� Підніміть каструлю зсередини приладу.
8� Зніміть наявний пакувальний матеріал
з приладу і приладдя.
9� Перевірте всі деталі на комплектність.
X Малюнок А
56
MUC_2-4_RU_8001013355.indb 56 10.08.2015 12:45:07
Page 59

uk
10� Перевірте прилад та приладдя на
візуальні пошкодження.
Увага!
Ніколи не вводіть в експлуатацію пошкоджений прилад!
етельно очистіть та висушіть всі
11�
Р
деталі перед першим використанням.
X
ляд і щоденне очищення» див.
«Дог
стор. 65
12� Після очищення вставте каструлю
всередину приладу.
Увага!
Перед вставленням каструлі перевірте, чи
внутрішня частина приладу перебуває в
чистому та сухому стані.
13�
Встанов
лення вставного елемента
кришки
Вставний елемент кришки встановіть
в обидві напрямні та вверху втисніть в
кришку.
Перед першим використанням
16� Кабель живлення, що доданий до
комплекту поставки, спочатку вставте
в прилад, а потім в розетку.
Увага!
Використовуйте тільки кабель живлення,
що доданий до комплекту поставки.
На панелі управління на короткий період
часу засвічуються обидві кнопки B, G та
всі світлодіоди, після чого лунає звуковий
сигнал з п'яти нот. Тепер мигає кнопка B.
Прилад перебуває в режимі очікування,
він готовий до експлуатації.
14� Закривання кришки
Притисніть кришку, щоб вона не
зафіксувалася.
15� Встановлення випуску пару
Випуск пару встановіть зверху на
кришку і затисніть.
57
MUC_2-4_RU_8001013355.indb 57 10.08.2015 12:45:07
Page 60

uk
Обслуговування
Обслуговування
Режим вибору функцій
У режимі вибору функцій можна вибрати
всі програми приготування і виконати
всі налаштування приладу. Для цього
потрібно виконати наступні кроки:
W Попередж
Небезпека обпікання!
Під час експлуатації ніколи не використовуйте пристрій без вставленої каструлі та
без випуску пару.
Увага!
Перед кожним використанням перевіряйте
пристрій на пошкодження, комплектність,
чистоту та належне встановлення.
X
«Пере
стор. 56
1�
Прилад г
Натисніть на кнопку B, щоб перейти в
режим вибору функцій.
У режимі вибору функцій постійно
світиться кнопка B, а також індикатор
ой режим
[
м
блимає. На дисплеї відображається
«00:00».
ення
д першим використанням» див.
отовий до експлуатації.
ій режим). Клавіша G
] (м
Вибір та запуск програми
приготування
На Ваш вибір пропонуються 16 попередньо налаштованих програм приготування. X
вання» див. стор. 68
1�
Засип
Для цього відкрийте кришку і додайте в
каструлю інгредієнти. Для зчитування
кількості додатково служить вимірювальна шкала на внутрішній частині
каструлі.
Увага!
■ Зап
вання [
■ Для
виключно лопатку, що додається до
комплекту поставки (а не металевий
прибор).
2�
Зак
кнопку B, щоб перейти в режим
вибору функцій.
Вказівка: певні програми приготування чи
кроки виконуються при відкритій кришці.
див. книгу рецептів, що додається до
X
комплекту поставки
3�
На
пір, поки не буде вибрана бажана
програма приготування.
«Список програм приг
те в прилад бажані інгредієнти.
овнюйте каструлю макс. до марку-
liter
4.0
]!
перемішування використовуйте
рийте кришку та натисніть на
тискайте на кнопку D до тих
оту-
Вказівка: якщо протягом 5 хвилин не
виконується жодних дій на панелі управління, то прилад автоматично переходить
в режим очікування.
58
MUC_2-4_RU_8001013355.indb 58 10.08.2015 12:45:08
На панелі управління засвічується відповідний світлодіодний індикатор і блимає
попередньо налаштована тривалість
приготування для вибраної програми.
Page 61

uk
4� Натисніть на кнопку G, щоб запустити
програму приготування.
Прилад підігріває каструлю, поки не буде
досягнута бажана температура. Під час
фази нагрівання на дисплеї з'являються
риски, що засвічуються за годинниковою
стрілкою.
Відразу ж після досягнення бажаної
температури згасають риски, і на дисплеї
відображається тривалість приготування.
Процес приготування запускається
автоматично.
п
Примітка: у разі вибору програми [
аста ]
або [ фритюр ] лунає періодичний звуковий
сигнал, а дисплей і кнопка G блимають,
доки користувач не завантажить продукт і
не натисне кнопку G.
Час тривалості приготування відраховується у зворотному порядку.
Через випуск пару з мультиварки виходить
водяна пара, що виникає під час приготування страв, що запобігає утворенню
надлишкового тиску. Залежно від моделі
випуск пару може бути оснащеним оглядовим віконцем.
Збільшення чи зменшення температури
Якщо від час приготування поточну температуру становлено на занадто високе або
занадто низьке значення, то його можна
Обслуговування
збільшити (макс. на +10 °C) або зменшити
(макс. на -10
°C) під час процесу варіння.
Для збільшення температури натисніть
та утримуйте кнопку C. На дисплеї на
короткий період часу буде відображена
поточна температура, після чого вона
збільшуватиметься щоразу на 1
максимального значення (+10
°C до
°C). Натискайте кнопку, поки не буде встановлено
бажану вищу температуру.
Для зменшення температури натисніть
та утримуйте кнопку C. На дисплеї на
короткий період часу буде відображена
поточна температура, після чого вона
збільшуватиметься щоразу на 1
максимального значення (+10
°C до
°C). Якщо
досягнуто максимального значення, то
індикація повертається назад на мінімальне значення (на 20 °C). Натискайте
кнопку, поки не буде встановлено бажану
нижчу температуру.
Натисніть на кнопку G, щоб продовжити
програму приготування.
Вказівка: якщо кнопка G не натиснута,
то продовжується програма приготування з попередньо налаштованою
температурою.
У випадку завершення програми приготування лунає звуковий сигнал, засвічуються індикатор [ готово ] і кнопка G.
Дисплей мигає і показує «00:00».
5� Тепер можна відкрити кришку
пристрою та подавати страву.
W Попередження
Небезпека обпікання!
■ Під час готування в приладі може
накопичуватися великий об'єм пару.
Обережно відкривайте кришку. Не
нахиляйтеся над кришкою пристрою.
■ Каструля і вставні компоненти можуть
бути дуже гарячими. Завжди використовуйте затискачі для каструлі,
відповідні ручки та кухонні рукавиці.
59
MUC_2-4_RU_8001013355.indb 59 10.08.2015 12:45:08
Page 62

uk
Обслуговування
Вказівки
■ Програм
який час перервати кнопкою H. Після
цього прилад переходить в режим
вибору функцій.
■ Як
функцію підігрівання, то вона вмикається автоматично після приготування
блюда та підтримує страву протягом
10 годин у теплому стані при температурі 40
[
п
засвічується прямокутник (штрихові
лінії). Функцію підігрівання можна
завершувати кнопкою H. Після цього
прилад переходить в режим вибору
функцій.
Якщо вибрана програма приготування
складається з декількох кроків приготування, то лунає звуковий сигнал, як тільки
повинен виконуватися наступний крок. На
панелі управління виводяться відповідно
світлодіодні індикатори 1, 2, 3 чи 4, а
кнопка G блимає. Потрібно виконати
наступні кроки:
�
1
Відк
2�
одайте подальші інгредієнти.
Д
�
3
Зак
4�
нопкою G можна запустити
К
наступний крок приготування.
Прилад підігріває внутрішню частину
приладу, поки не буде досягнута бажана
температура наступного кроку приготування. Під час фази нагрівання на дисплеї
з'являються риски, що засвічуються
за годинниковою стрілкою. Відразу ж
після досягнення бажаної температури
згасають риски, і на дисплеї відображається наструпна тривалість приготування.
Процес приготування запускається автоматично. Час тривалості приготування
відраховується у зворотному порядку.
у приготування можна у будь-
що програма приготування містить
°C. Засвічується
одогрев
рийте кришку приладу.
рийте кришку приладу.
ідігрівання). На дисплеї
] (п
[ готово
Вибір попередньо налаштованої
тривалості приготування
Для кожної програми приготування на
панелі управління відображається попередньо налаштована тривалість рівня
дняя
[
сре
Тривалість приготування можна зменшити [
[
] і
1�
На дисплеї виводяться відповідні попередньо налаштовані значення для тривалості приготування.
2�
ороткая
к
длинная ] (довг
тискайте на кнопку E до тих пір,
На
поки не засвітиться бажаний індикатор.
Індикація змінюється з [
(середня) на [
цього на [
знову на [
тисніть на кнопку G, щоб запустити
На
програму приготування.
X
«Виб
тування» див. стор. 58
дня).
] (сере
оротка) чи збільшити
] (к
а).
дняя ]
сре
длинная ] (довг
ороткая
к
сре
ір та запуск програми приго-
дняя
] (к
] (сере
а), а після
оротка), а далі
дня).
Налаштування відтермінування
запуску
Щоб мати можливість спробувати
свіжоприготовану страву у відповідний
момент, можна налаштувати час до
запуску вибраної програми приготування.
Вказівка: відтермінування запуску можна
налаштовувати тільки для певних програм
приготування. Відтермінування запуску
для цих програм приготування має різні
попередні налаштування.
1� Виберіть програму приготування.
2� Натисніть кнопку A. Клавіша G
блимає. На дисплеї блимає «00:10».
Кількаразовим натисканням кнопки A
збільшується тривалість, що виводиться
на індикації У результаті кожного короткого натискання тривалість збільшується
на 5 хвилин. У результаті кожного дещо
довшого натискання тривалість збільшується на 10 хвилин. Якщо кнопку
A тримати в натиснутому стані понад
60
MUC_2-4_RU_8001013355.indb 60 10.08.2015 12:45:08
Page 63

uk
2 секунди, то тривалість щоразу збільшується на 30 хвилин.
3� Натисніть на кнопку G, якщо на інди-
кації з'явиться бажане відтермінування
запуску.
Вибране відтермінування запуску відображається на дисплеї. На полі індикації
засвічується [
ас до запуску відраховується у зворот-
Ч
ному порядку. Після цього процес приготування запускається автоматично.
Вказівки
тисканням кнопки G можна в будь-
■ На
який час вимкнути відтермінування
запуску. Тоді відразу ж запускається
програма приготування.
що на дисплеї не блимає індикація
■ Як
«00:10», то для вибраної програми
приготування неможливо налаштувати
відтермінування запуску.
аймер
т
].
Дочасне завершення поточного
кроку приготування
Якщо усі інгредієнти дочасно готові під час
відповідного кроку приготування, то його
можна також завершити вручну.
Для
1�
Поточний крок приготування завершено.
Після цього, як правило, лунає звуковий
сигнал, як тільки можна виконувати
наступний крок. На панелі управління
виводяться відповідно світлодіодні індикатори 1, 2, 3 чи 4, а кнопка G блимає.
2� Виконайте наступний крок
цього утримуйте кнопку G натис-
нутою протягом мін. 2 секунд.
приготування.
Обслуговування
Використання корзини для
смаження у фритюрі
Для приготування м'яса, риби, картоплі
фрі, тощо в гарячій олії необхідно використовувати корзину для смаження у
фритюрі (залежно від моделі).
Вказівка: для досягнення найкращих
результатів та смаку ми рекомендуємо
користуватися порадами з нашої книги
рецептів.
При використанні корзини для смаження у
фритюрі слід враховувати наступне:
W Попередж
Небезпека обпікання!
■ Залив
до позначки макс. [
■ Не вик
рожених або 300 г незаморожених
продуктів для фритюру.
■ Під час г
накопичуватися великий об'єм пару.
Обережно відкривайте кришку. Не
нахиляйтеся над кришкою пристрою.
аструля і вставні компоненти можуть
■ К
бути дуже гарячими. Завжди використовуйте затискачі для каструлі,
відповідні ручки та кухонні рукавиці.
1
�
Відк
2� У каструлю залийте макс. 1 літр олії.
Для зчитування кількості додатково
служить вимірювальна шкала на
внутрішній частині каструлі.
3�
Зак
4� У режимі вибору функцій виберіть
програму приготування [
(фритюр) X
тування» див. стор. 68
5�
тисніть на кнопку G, щоб запустити
На
програму приготування.
Олія нагрівається. У випадку досягнення
бажаної температури лунає звуковий
сигнал і блимає кнопка G.
�
6
Зап
фритюрі відповідними продуктами
харчування.
7
�
Відк
ення
айте олію чи жир для фритюру
] .
1.0 I
ористовуйте понад 200 г замо-
отування в приладі може
рийте кришку приладу.
рийте кришку.
фритюр ]
«Список програм приг
овніть корзину для смаження у
рийте кришку приладу.
о-
61
MUC_2-4_RU_8001013355.indb 61 10.08.2015 12:45:08
Page 64

uk
Обслуговування
8� Вставте корзину для смаження у
фритюрі з ручкою в каструлю та
зніміть ручку.
9� Закрийте кришку приладу.
Вказівка: певні програми приготування чи
кроки виконуються при відкритій кришці.
X див. книгу рецептів, що додається до
комплекту поставки
К
10�
нопкою G запустіть програму
приготування.
У випадку завершення програми приготування лунає звуковий сигнал.
11� Відкрийте кришку приладу.
12�
стікання жиру з продуктів для
Для
фритюру слід підняти корзину для
смаження у фритюрі і зачепити на
краю каструлі.
При використанні вставного компонента
для готування на пару слід враховувати
наступне:
W Попередж
Небезпека обпікання!
■ Залийт
[ 0.5 J ] .
■ Під час г
накопичуватися великий об'єм пару.
Обережно відкривайте кришку. Не
нахиляйтеся над кришкою пристрою.
аструля і вставні компоненти можуть
■ К
бути дуже гарячими. Завжди використовуйте затискачі для каструлі,
відповідні ручки та кухонні рукавиці.
1�
Відк
2� У каструлю залийте макс. 0,5 літра
води. Для зчитування кількості додатково служить вимірювальна шкала на
внутрішній частині каструлі.
3� Зачепіть нижню частину вставного
компонента для готування в пару на
каструлю.
4� Для готування на пару різних інгреді-
єнтів нижню частину слід заповнювати
до нижнього краю.
5� Встановіть верхню частину та додайте
інгредієнтів.
ення
е воду до позначки макс.
отування в приладі може
рийте кришку приладу.
Використання вставного
компонента для готування
на пару
Для приготування овочів, м'яса та
риби потрібне застосування вставного
компонента для готування на пару. За
допомогою вставного компонента для
готування на пару, що складається з
двох частин, можна одночасно, але
окремо один від одного готувати різні
продукти (напр., у нижній частині овочі,
а у верхній – рибу).
Вказівка: для досягнення найкращих
результатів та смаку ми рекомендуємо
користуватися порадами з нашої книги
рецептів.
62
MUC_2-4_RU_8001013355.indb 62 10.08.2015 12:45:09
6� Закрийте кришку.
7� У режимі вибору функцій виберіть
програму приготування [ пароварка ]
(пароварка) X «Список програм
приготування» див. стор. 68
8� Натисніть на кнопку G, щоб запустити
програму приготування.
Page 65

uk
У випадку завершення програми приготування лунає звуковий сигнал і блимає
кнопка G.
9�
10�
рийте кришку приладу.
Відк
іть з каструлі верхню і нижню
Піднім
частину вставного компонента для
готування на пару.
Блокування від доступу дітей
Блокування від доступу дітей можна активувати чи деактивувати під час процесу
приготування. Якщо блокування від
доступу дітей активоване, то всі кнопки на
приладі заблоковано, і на ньому більше
неможливо виконувати налаштування.
W Попередження
При активованому блокуванні від доступу
дітей немає можливості змінювати
процеси приготування чи переривати їх.
Спочатку слід деактивувати блокування
від доступу дітей.
Натисніть на наступну комбінацію кнопок:
Актив
1�
2�
ація
Тримайте в натиснутому стані одночасно кнопки C і F протягом 3 секунд.
Лунає короткий звуковий сигнал. Функція
блокування від доступу дітей увімкнена.
Д
еактивація
Повторно тримайте в натиснутому
стані одночасно кнопки C і F протягом
секунд. Лунає короткий звуковий
3
сигнал. Функція блокування від
доступу дітей вимикається.
Приготування
Загальні рекомендації
Для досягнення найкращих результатів
та смаку ми рекомендуємо користуватися
порадами з нашої книги рецептів, розроблену спеціально для використання з
мультиваркою.
Приготування
У книзі рецептів Ви знайдете дані про
необхідну кількість кожного з інгредієнтів,
рекомендації з тривалості і температури
приготування, а також корисні комбінації
програм приготування.
Для отримання початкового досвіду
користуйтеся даними рекомендаціями
рецептів. Якщо Ви ознайомитеся з перевагами і різноманітністю можливостей
застосування, то з радістю зможете
експериментувати з новими рецептами.
Для цього користуйтеся можливостями
індивідуального налаштування, які буде
роз'яснено на наступних сторінках.
Для загального огляду всіх програм приготування ми створили для Вас наглядну
таблицю. X
вання» див. стор. 68
«Список програм приг
оту-
Можливості
індивідуального
налаштування
Попередньо налаштовані значення тривалості та температури приготування можна
узгодити відповідно до індивідуальних
потреб та даних рецепта.
Налаштування тривалості
приготування
1� У режимі вибору функцій натискайте
на кнопку D до тих пір, поки не
буде вибрана бажана програма
приготування.
На панелі управління засвічується відповідний світлодіодний індикатор, і відображається попередньо налаштована тривалість приготування для цієї програми.
2� Натисніть на кнопку F 1 раз.
На дисплеї блимає попередньо налаштована тривалість приготування.
3� Натискайте на кнопку F, поки на інди-
кації не з'явиться бажана тривалість
приготування.
63
MUC_2-4_RU_8001013355.indb 63 10.08.2015 12:45:09
Page 66

uk
Можливості індивідуального налаштування
У результаті короткого натискання
на кнопку F тривалість приготування
продовжується на 1 хвилину. Тривалість
збільшується до попередньо налаштованого максимального значення і перескакує
назад до попередньо налаштованого
мінімального значення. Якщо на кнопку F
натискати довше, то тривалість збільшується на 10 хвилин.
4� Якщо на індикації з'явиться бажана
тривалість приготування, натисніть на
кнопку G.
Якщо необхідно індивідуально регулювати
тривалість на всіх кроках приготування
вибраної програми, то перед запуском
відповідного кроку приготування слід
повторювати пункти 2 – 4.
Вказівка: дані налаштування не зберігаються. При повторному виборі даної
програми на дисплеї знову виводиться
попередньо налаштована тривалість
приготування.
Налаштування температури
приготування
1� У режимі вибору функцій натискайте
на кнопку D до тих пір, поки не
буде вибрана бажана програма
приготування.
На панелі управління засвічується відповідний світлодіодний індикатор, і відображається попередньо налаштована тривалість приготування для цієї програми.
2� Натисніть на кнопку C 1 раз.
На дисплеї блимає попередньо налаштована температура приготування.
3� Натискайте на кнопку C, поки на інди-
кації не з'явиться бажана температура
приготування.
У результаті короткого натискання на
кнопку C температура приготування
збільшується на 5 градусів. Температура
збільшується до попередньо налаштованого максимального значення і перескакує
назад до попередньо налаштованого
мінімального значення. Якщо на кнопку C
натискати дещо довше, то температура
щоразу збільшується на 10
Як
що на індикації з'явиться бажана
4�
температура приготування, натисніть
на кнопку G.
Якщо необхідно індивідуально регулювати
температуру на всіх кроках приготування
вибраної програми, то перед запуском
відповідного кроку приготування слід
повторювати пункти 2 – 4.
Вказівка: дані налаштування не зберігаються. При повторному виборі даної
програми на дисплеї знову виводиться
попередньо налаштована тривалість
приготування.
градусів.
мой режим – мій режим
Режим швидкого налаштування – для
індивідуального налаштування тривалості
і температури приготування для відповідного процесу варіння.
У режимі вибору функцій постійно
світиться кнопка B, а також індикатор
м
ой режим
[
блимає. На дисплеї відображається
«00:00».
1� Натисніть на кнопку F 1 раз.
На дисплеї блимає «00:00».
На
2�
кації не з'явиться бажана тривалість
приготування.
На
3�
На дисплеї блимає «0000».
� Натискайте на кнопку C, поки на інди-
4
кації не з'явиться бажана температура
приготування.
5� Натисніть на кнопку G, щоб запустити
вибрані налаштування.
Прилад підігріває каструлю, поки не буде
досягнута бажана температура.
Відразу ж після досягнення бажаної
температури згасають риски, і на дисплеї
відображається тривалість приготування.
Процес приготування запускається
автоматично.
] (м
ій режим). Клавіша G
тискайте на кнопку F, поки на інди-
тисніть на кнопку C 1 раз.
64
MUC_2-4_RU_8001013355.indb 64 10.08.2015 12:45:09
Page 67

uk
рецепт 1 / рецепт 2 – зберігання
власних програм приготування
Залежно від моделі X «Огляд моделей
та технічні дані» див. стор. 69
У комірках пам'яті [
можна зберігати власні програми приготування з індивідуальним вибором часу та
температури.
1�
Засвічується світлодіод [
дисплеї виводиться індикація попередньо
налаштованої тривалості приготування.
Вказівка: якщо раніше Ви не зберігали
власну програму приготування, то на
дисплеї з'явиться «00:00».
2�
Дисплей приладу блимає. На панелі
управління засвічується світлодіод 1 (крок
приготування
3�
У результаті короткого натискання
на кнопку F тривалість приготування
продовжується на 1 хвилину. Якщо на
кнопку F натискати довше, то тривалість
збільшується на 10
збільшується до попередньо налаштованого максимального значення і перескакує
назад до попередньо налаштованого
мінімального значення.
4
На дисплеї виводиться індикація попередньо налаштованої температури
приготування.
Вказівка: якщо раніше Ви не зберігали
власну програму приготування, то на
дисплеї з'явиться «0000».
5
6
жимі вибору функцій натисніть на
У ре
кнопку D 1 раз.
тисніть на кнопку F 1 раз.
На
1).
тискайте на кнопку F, поки на інди-
На
кації не з'явиться бажана тривалість
приготування.
� Натисніть на кнопку C 1 раз.
� Натискайте на кнопку C, поки на інди-
кації не з'явиться бажана температура
приготування.
� Довго натискайте на кнопку G
(>2 секунд) для зберігання налаштованих значень.
епт 1
рец
рец
хвилин. Тривалість
] і [ рец
епт 1
епт 2 ]
]. На
Догляд і щоденне очищення
Для програмування подальших кроків
приготування повторіть кроки 2 – 6. Можна
запрограмувати до 3 кроків приготування.
Збережену програму приготування
епт 1
[
рец
через режим функції вибору X
та запуск програми приготування» див.
стор. 58
Вказівка: для збереження другої власної
програми приготування [
аналогічно до опису для [
видалення власної програми приготу-
Для
вання потрібно виконати наступні кроки:
1�
У ре
кнопку D 1
Засвічується світлодіод [
дисплеї виводиться індикація збереженої
тривалості приготування.
� Натисніть на кнопку F 1 раз.
2
Дисплей приладу блимає. На панелі
управління засвічується світлодіод
приготування
3
� Довго натискайте на кнопку H
(>2
Налаштування [
Вказівка: для видалення другої власної
програми приготування [
аналогічно до опису для [
ожна вибрати, як звичайно,
] м
епт 2
рец
епт 1
рец
жимі вибору функцій натисніть на
раз.
епт 1
рец
1).
секунд).
епт 1
рец
] видалені.
епт 2
рец
епт 1
рец
«Виб
] дійт
].
] . На
1 (крок
] дійт
].
ір
е
е
Догляд і щоденне
очищення
W Попередження!
Існує небезпека ураження електричним
струмом
■ У жодному разі не занурюйте прилад
у воду.
■ Не використовуйте паровий очищувач.
■ Перед очищенням приладу витягуйте
штепсель з розетки.
Увага!
■ Не використовуйте засоби для
очищення, що містять спирт.
■ Не використовуйте гострі, кінчасті чи
металеві предмети.
65
MUC_2-4_RU_8001013355.indb 65 10.08.2015 12:45:09
Page 68

uk
Догляд і щоденне очищення
■ Не використовуйте жорсткі ганчірки
або засоби для очищення.
Прилад необхідно ґрунтовно чистити після
кожного використання.
1� Залиште прилад повністю охолонути.
2�
3� Вийміть каструлю, вставний елемент
рийте кришку.
Відк
кришки, випуск пару і приладдя.
X
див. стор. 56
д першим використанням»
«Пере
Очищення основного блоку
1� Протріть корпус приладу вологою
м’якою ганчіркою та залиште сохнути.
2� Протріть внутрішню частину приладу
вологою м’якою ганчіркою та залиште
сохнути.
3� Очистьте панель керування сухою
серветкою з мікроволокна.
Демонтаж випуску пару
Випуск пару з віконцем:
1� Стисніть білі фіксатори зліва та справа
на нижній частині випуску пару і зніміть
нижню частину.
2� Для складання нижню частину
прорізом зачепіть за верхню частину,
після чого втисніть вниз, щоб фіксатори зайшли в заглиблення.
Випуск пару без віконця:
1� Натисніть на білий фіксатор на нижній
частині випуску пару, зніміть нижню
частину і вийміть з обох напрямних.
2� Для складання нижню частину зачепіть
за обидві напрямні і втисніть вниз, щоб
фіксатор зайшов у заглиблення.
66
MUC_2-4_RU_8001013355.indb 66 10.08.2015 12:45:10
Page 69

uk
Очищення вставного елементу
J
Цей прилад маркіровано згідно
Стосовно цього приладу діють умови
гарантії, щоб були опубліковані нашим
компетентним представництвом в країні,
в якій Ви придбали прилад. Ви можете
в будь-який час одержати умови гарантії
у спеціалізованому магазині, в якому Ви
придбали прилад, або безпосередньо
в нашому представництві у Вас в країні.
Умови гарантії для Німеччини та адреси
Ви знайдете на останніх чотирьох
сторінках цієї брошури. Крім того, умови
гарантії розміщені також і в Інтернеті за
зазначеною адресою. Для користування
гарантійними послугами необхідно в
будь-якому випадку показати квитанцію
про оплату.
Можливі зміни.
кришки і випуску пару
1� Очистьте окремі деталі м’якою
ганчіркою або мочалкою, зволоженою
в лужному мийному розчині.
2�
3�
ийте деталі чистою водою та
Пром
висушіть їх.
ремі частини знову складіть та
Сухі ок
встановіть в головний прилад.
Очищення каструлі і приладдя
1� Очистьте окремі деталі м’якою
ганчіркою або мочалкою, зволоженою
в лужному мийному розчині.
2� Промийте деталі чистою водою та
висушіть їх.
Вказівка: каструлю, корзину для
смаження у фритюрі з ручкою, вставний
компонент для готування на пару,
затискний пристрій для корзини, лопатку,
черпак і мірну склянку можна мити в посудомийній машині.
Увага!
Перед вставленням каструлі перевірте,
чи внутрішня частина приладу перебуває
в чистому та сухому стані та чи немає у
ньому сторонніх предметів.
Утилізація
Утилізація
положень європейської Директиви
2012/19/EU стосовно електронних
та електроприладів, що були у
використанні (waste electrical and
electronic equipment – WEEE).
Директивою визначаються можливості, які є дійсними у межах
Європейського союзу, щодо
прийняття назад та утилізації
бувших у використанні приладів.
Про актуальні можливості для
видалення можна дізнатися
в спеціалізованому магазині.
Умови гарантії
MUC_2-4_RU_8001013355.indb 67 10.08.2015 12:45:10
67
Page 70

uk
Список програм приготування
Список програм приготування
У наступній таблиці Ви знайдете найважливіші дані для різних програм приготування.
Програма Кількість
кроків
приготування
мой режим – мій режим
Індивідуальне налаштування бажаної температури і часу
приготування
рецепт 1&2
2 комірки пам'яті для власних рецептів
(залежно від моделі)
разогрев – розігрів
Розігрівання холодних (попередньо зварених) страв
суп/борщ – суп/борщ
Приготування супів, у тому числі густих
пароварка
Приготування овочів, м'яса та риби на пару (потрібен
вставний компонент для готування на пару)
тушение – тушкування
Тушкування овочів, м'яса та риби.
жарка – смаження
Смаження овочів, м'яса та риби.
фритюр
Приготування у фритюрі м'яса, риби, картоплі фрі
(потрібна корзина для смаження у фритюрі)
выпечка – випікання
Випікання пирогів
варка – варіння
Варіння продуктів харчування
паста
Приготування макаронних виробів
крупы/рис – крупи/рис
Приготування круп або рису
молочная каша – молочна каша
Приготування молочних страв
бобы – бобові
Варіння бобових
плов
Приготування плову
* Залежно від рецепту/крок приготування
Вказівки стосовно належного використання програм, а також дані щодо інгредієнтів, їх кількості та часу
приготування Ви знайдете в книзі рецептів, що додається до комплекту поставки.
1 —
1-3 —
1
коротка: 1
середня: 2
довга: 3
1
1
1
1 —
1 — закрита
1
1 —
1 — закрита
1
коротка: 1
середня: 2
довга: 2
коротка: 2
середня: 3
довга:4
Доступна
функція
підігрівання
G
G
G
G
G
G
G
G
G
Кришка
відкрита/
закрита*
відкрита/
закрита*
закрита
відкрита/
закрита*
закрита
закрита
відкрита
відкрита/
закрита*
закрита
відкрита/
закрита*
закрита
закрита
відкрита/
закрита*
68
MUC_2-4_RU_8001013355.indb 68 10.08.2015 12:45:10
Page 71

Огляд моделей та технічні дані uk
Програма Кількість
кроків
приготування
холодец – холодець
Приготування холодця та подібних страв
варенье – варення
Приготування варення з фруктів
йогурт
Приготування йогурту
* Залежно від рецепту/крок приготування
Вказівки стосовно належного використання програм, а також дані щодо інгредієнтів, їх кількості та часу
приготування Ви знайдете в книзі рецептів, що додається до комплекту поставки.
1 — закрита
1 — відкрита
1 — закрита
Доступна
функція
підігрівання
Кришка
Огляд моделей та технічні дані
MUC
22...RU
G G G G
—
Індивідуальні комірки пам'яті — 2 2 2
Макс. об'єм (л) 4 4 4 4
Випуск пару з віконцем
Покриття каструлі Тефлон Кераміка Кераміка Тефлон
Матеріал корпусу Пластмаса Пластмаса Метал Метал
Діапазон температур 40-160 °C 40-160 °C 40-160 °C 40-160 °C
Електричне живлення (напруга – частота) 220-240 В~
Потужність нагрівання 900 Вт 900 Вт 900 Вт 1200 Вт
Індукція
Довжина кабелю живлення 1,5 м 1,5 м 1,5 м 1,5 м
Маса в порожньому стані 3,7 кг 4,1 кг 4,1 кг 5,4 кг
—
50/60 Гц
— — —
MUC
24...RU
G G G
G G G
220-240 В~
50/60 Гц
MUC
28...RU
220-240 В~
50/60 Гц
MUC
48...RU
220-240 В~
50/60 Гц
G
69
MUC_2-4_RU_8001013355.indb 69 10.08.2015 12:45:11
Page 72

uk
Спеціальне приладдя
Спеціальне приладдя
MAZ4BI
Каструля з нержавіючої сталі, полірована, з антипригарним покриттям і з
кришкою для зберігання*; призначена
для індукційних мультиварок MUC48…
MAZ2BT
Тефлонова каструля з антипригарним
покриттям і з кришкою для зберігання*;
призначена для індукційних мультиварок з функцією парового готування
під тиском MUC22
MAZ2BC
Каструля з керамічним антипригарним
покриттям і з кришкою для зберігання*;
призначена для індукційних мультиварок з функцією парового готування
під тиском MUC24/28
MAZ0FB
Корзина для смаження у фритюрі
MAZ0YG
Ємність для йогурту
5 л каструля; придатна для миття в посудомийній машині; дуже міцна каструля; товщина
2,5 мм; полірована нержавіюча сталь; антипригарне покриття; кришка* для практичного
зберігання продуктів харчування в каструлі,
напр., в холодильнику
5 л каструля; придатна для миття в посудомийній машині; тефлонове антипригарне
покриття; кришка* для практичного зберігання
продуктів харчування в каструлі, напр., в
холодильнику
5 л каструля; придатна для миття в посудомийній машині; керамічне антипригарне
покриття; кришка* для практичного зберігання
продуктів харчування в каструлі, напр., в
холодильнику
Корзина з нержавіючої сталі зі знімною
ручкою для простого застосування, придатна
для миття в посудомийній машині
Великий об'єм для приготування великих
кількостей: 1 л корисної місткості, металева
ємність, пластмасова кришка
*Кришка для зберігання не входить в стандартний комплект поставки приладу. Вона поставляється тільки
з каструлями із спеціального приладдя.
Деталі, які не входять до комплекту поставки, можна замовити у магазинах або службі сервісу.
70
MUC_2-4_RU_8001013355.indb 70 10.08.2015 12:45:12
Page 73

Допомога при неполадках
uk
Допомога при неполадках
Проблема Причина Усунення
Приготовлена страва
напівсира.
Приготовлена страва
пригоріла.
Страва збігає з приладу. Кількість заповнення занадто
Світлодіодний індикатор не
горить.
Нагрівальна зона не працює. Прилад несправний. Звертіться в сервісну службу.
З приладу витікає вода. Прилад оснащений захистом від
Індикація на дисплеї
E1~E6
Індикація на дисплеї
E0
Якщо проблему не вдається усунути самостійно, обов’язково зверніться до служби підтримки!
Номери телефонів зазначені на останніх сторінках інструкції.
Кількість заповнення занадто
велика.
Неналежне співв
кількості води та інгредієнтів.
Сторонні предмети у внутрішній
частині приладу.
Каструля деформована. Звертіться в сервісну службу.
Прилад несправний.
Датчик несправний.
Під каструлею є бруд. Ретельно очистіть каструлю і
Каструля деформована. Звертіться в сервісну службу.
Прилад несправний.
Датчик несправний.
велика.
Занадто висока температура. Зменште температуру.
Для вибраної програми приго-
тування необхідно, щоб приготування страви виконувалося з
відкритою кришкою.
Прилад вимкнутий. Увімкніть прилад.
Помилка в системі подачі
струму.
Нагрівальна зона пошкоджена.
переливання.
Прилад несправний. Зупиніть програму приготування.
Прилад несправний. Якщо індикація залишається протягом
ідношення
Заповнюйте каструлю макс. до марку-
4.0
]!
вання [
Відкорегуйте співвідношення кількості
води та інгредієнтів.
Приберіть всі сторонні предмети. Для
цього не використовуйте воду!
внутрішню частину приладу.
Відкорегуйте кількість заповнення.
Відкрийте кришку приладу.
Звертіться в сервісну службу.
Видаліть воду. Вийміть каструлю і
витріть насухо внутрішню частину
приладу. Слідкуйте за тим, щоб вода
не попадала у внутрішню частину
приладу.
Від'єднайте прилад від системи подачі
струму. Повторно увімкніть прилад.
Якщо проблему не вирішено, звертіться в сервісну службу.
понад 20
від системи подачі струму і зверніться
в сервісну службу.
liter
секунд, від'єднайте прилад
71
MUC_2-4_RU_8001013355.indb 71 10.08.2015 12:45:12
Page 74

uk
Допомога при неполадках
Проблема Причина Усунення
Індикація на дисплеї
E1
Встановлено неналежну
каструлю або каструлю не
Від'єднайте прилад від системи подачі
струму і зверніться в сервісну службу.
розпізнано.
Індикація на дисплеї
E2, E5, E6 або E7
Прилад перегрівся. Від'єднайте прилад від системи подачі
струму і дайте охолонути. Повторно
запустіть пристрій, як тільки він
охолоне.
Коротке замикання в приладі. Від'єднайте прилад від системи подачі
струму і зверніться в сервісну службу.
Індикація на дисплеї
E3
Індикація на дисплеї
E4
Індикація на дисплеї
E8
Занадто висока напруга
електромережі.
Занадто низька напруга
Зверніться до оператора електромереж. Перевірте подачу напруги,
скориставшись послугами фахівця.
електромережі.
пошкодження зв'язку Повторно запустіть пристрій, як тільки
він охолоне.
Якщо проблему не вдається усунути самостійно, обов’язково зверніться до служби підтримки!
Номери телефонів зазначені на останніх сторінках інструкції.
72
MUC_2-4_RU_8001013355.indb 72 10.08.2015 12:45:12
Page 75

y
A
A
A
Kundendienst – Customer Service
DE Deutschland, German
BSH Hausgeräte Service GmbH
Zentralwerkstatt für kleine
Hausgeräte
Trautskirchener Strasse 6-8
90431 Nürnberg
Online Auftragsstatus, FilterbeutelKonfigurator und viele weitere
Infos unter:
www.bosch-home.com
Reparaturservice, Ersatzteile &
Zubehör, Produkt-Informationen:
Tel.: 0911 70 440 040
mailto:cp-servicecenter@
bshg.com
Wir sind an 365 Tagen rund um die Uhr
erreichbar.
AE United Arab Emirates,
BSH Home Appliances FZE
Round About 13,
Plot Nr MO-0532A
Jebel Ali Free Zone – Dubai
Tel.: 04 881 4401
mailto:service.uae@bshg.com
www.bosch-home.com/ae
AL Republika e Shqiperise,
Albania
ERTECH SH.P.K.
Rruga Qemal Stafa
Pallati i ri perball Prokuroris se
Pergjithshme
Hyrja C Kati 10
Tirana
Tel.: 066 206 47 94
mailto:g.volina@aertech.al
AT Österreich, Austria
BSH Hausgeräte
Gesellschaft mbH
Werkskundendienst
für Hausgeräte
Quellenstrasse 2
1100 Wien
Tel.: 0810 550 511*
Fax: 01 605 75 51 212
mailto:vie-stoerungsannahme@
bshg.com
Hotline für Espresso-Geräte:
Tel.: 0810 700 400*
www.bosch-home.at
*innerhalb Österreichs zum Regionaltarif
AU Australia
BSH Home Appliances Pty. Ltd.
7-9 Arco Lane
HEA
THERTON, Victoria 3202
Tel.: 1300 368 339
mailto:bshau-as@bshg.com
www.bosch-home.com.au
Bosna i Hercegovina,
B
Bosnia-Herzegovina
"HIGH" d.o.o.
Gradačačka 29b
71000 Sarajevo
Info-Line: 061 100 905
Fax: 033 213 513
mailto:delicnanda@hotmail.com
BE Belgique, België, Belgium
BSH Home Appliances S.A.
venue du Laerbeek 74
Laarbeeklaan 74
1090 Bruxelles – Brussel
Tel.: 070 222 141
Fax: 024 757 291
mailto:bru-repairs@bshg.com
www.bosch-home.be
BG Bulgaria
BSH Domakinski Uredi
Bulgaria EOOD
115К Tsarigradsko Chausse Blvd.
European Trade Center Building,
5th floor
1784 Sofia
Tеl.: 02 892 90 47
Fax: 02 878 79 72
mailto:informacia.servis-bg@
bshg.com
www.bosch.home.bg
BH Bahrain,
Khalaifat Est.
P.O. Box 5111
Manama
Tel.: 01 7400 553
mailto:service@khalaifat.com
BY Belarus, Беларусь
OOO "БСХ Бытовая техника"
тел.: 495 737 2961
mailto:mok-kdhl@bshg.com
CH Schweiz, Suisse,
Svizzera, Switzerland
BSH Hausgeräte AG
Werkskundendie
Hausgeräte
Fahrweidstrasse 80
8954 Geroldswil
mailto:ch-info.hausgeraete@
nst für
bshg.com
Service Tel.: 0848 840 040
Service Fax: 0848 840 041
mailto:ch-reparatur@bshg.com
Ersatzteile Tel.: 0848 880 080
Ersatzteile Fax: 0848 880 081
mailto:ch-ersatzteil@bshg.com
www.bosch-home.com
CY Cyprus, Κύπρος
BSH Ikiakes Syskeves-Service
39, Arh. Makaariou III Str.
2407 Egomi/Nikosia (Lefkosia)
Tel.: 7777 8007
Fax: 022 658 128
mailto:bsh.service.cyprus@
cytanet.com.cy
CZ Česká Republika,
Czech Republic
BSH domácí spo
Firemní servis domácích
spotřebičů
Pekařská 10b
155 00 Praha 5
Tel.: 0251 095 546
Fax: 0251 095 549
www.bosch-home.com/cz
DK Danmark, Denmark
BSH Hvidevarer A/S
Telegrafvej 4
2750 Ballerup
Tel.: 44 89 89 85
Fax: 44 89 89 86
mailto:BSH-Service.dk@
BSHG.com
www.bosch-home.dk
EE Eesti, Estonia
SIMSON OÜ
Raua 55
10152 Tallinn
Tel.: 0627 8730
Fax: 0627 8733
mailto:teenindus@simson.ee
ES España, Spain
BSH Electrodomésticos
España S.A.
Servicio Oficial del Fabricante
Parque Empresarial PLAZA,
C/ Manfredonia, 6
197 Zaragoza
50
Tel.: 902 245 255 o 976 305 713
Fax: 976 578 425
mailto:CAU-Bosch@bshg.com
www.bosch-home.es
FI Suomi, Finland
BSH Kodinkoneet Oy
Itälahdenkatu 18 A, PL 123
00201 Helsinki
Tel.: 0207 510 700
Fax: 0207 510 780
mailto:Bosch-ServiceFI@bshg.com
www.bosch-home.fi
Lankapuhelimesta 8,28 snt/puhelu
+ 7 snt/min (alv 24%)
Matkapuhelimesta 8,28 snt/puhelu
+ 17 snt/min (alv 24%)
třebiče s.r.o.
06/15
MUC_2-4_RU_8001013355.indb 73 10.08.2015 12:45:12
Page 76

06/15
MV Raajjeyge Jumhooriyyaa,
Maledives
Lintel Investments
Ma. Maadheli, Majeedhee Magu
Malé
Tel.: 0331 0742
mailto:mohamed.zuhuree@
lintel.com.mv
NL Nederland, Netherlands
BSH Huishoudapparaten B.V.
Taurusavenue 36
2132 LS Hoofddorp
Storingsmelding:
Tel.: 088 424 4010
Fax: 088 424 4845
mailto:bosch-contactcenter@
bshg.com
Onderdelenverkoop:
Tel.: 088 424 4010
Fax: 088 424 4801
mailto:bosch-onderdelen@bshg.com
www.bosch-home.nl
NO Norge, Norway
BSH Husholdningsapparater A/S
Grensesvingen 9
0661 Oslo
Tel.: 22 66 06 00
Fax: 22 66 05 50
mailto:Bosch-Ser
vice-NO@
bshg.com
www.bosch-home.no
NZ New Zealand
BSH Home Appliances Ltd.
Unit F 2, 4 Orbit Drive
Mairangi Bay
A
uckland 0632
Tel.: 09 477 0492
Fax: 09 477 2647
mailto:bshnz-cs@bshg.com
www.bosch-home.co.nz
PL Polska, Poland
BSH Sprzęt Gospodarstwa
Domowego sp. z o.o.
A
l. Jerozolimskie 183
02-222 Warszawa
Centrala Serwisu
Tel.: 801 191 534
Fax: 022 572 7709
mailto:Serwis.Fabryczny@bshg.com
www.bosch-home.pl
PT Portugal
BSHP Electrodomésticos Lda.
Rua Alto do Montijo, nº 15
2790-012 Carnaxide
Tel.: 214 250 730
Fax: 214 250 701
mailto:bosch.electrodomesticos.pt@
bshg.com
www.bosch-home.pt
RO România, Romania
BSH Electrocasnice srl.
Sos. Bucuresti-Ploiesti,
nr. 19-21, sect.1
13682 Bucuresti
Tel.: 021 203 9748
Fax: 021 203 9733
mailto:service.romania@bshg.com
www.bosch-home.ro
RU Russia, Россия
OOO "БСХ Бытовая техника"
Сер
вис от производителя
Малая Калужская 19/1
119071 Москва
тел.: 495 737 2961
mailto:mok-kdhl@bshg.com
www.bosch-home.com
SE Sverige, Sweden
BSH Hushållsapparater AB
Landsvägen 32
169 29 Solna
Tel.: 0771 11 22 77
local rate
mailto:Bosch-Service-SE@
bshg.com
www.bosch-home.se
SG Singapore, 新
加坡
BSH Home Appliances Pte. Ltd.
TECHPLACE I and
Mo Kio Avenue 10
Block 4012 #01-01
569628 Singapore
Tel.: 6751 5000
Fax: 6751 5005
mailto:bshsgp.service@bshg.com
www.bosch-home.com.sg
SI Slovenija, Slovenia
BSH Hišni aparati d.o.o.
Litostrojska 48
1000 Ljubljana
Tel.: 01 583 07 01
Fax: 01 583 08 89
mailto:informacije.servis@
bshg.com
www.bosch-home.com/si
SK Slovensko, Slovakia
BSH domáci spotřebiče s.r.o.
Organizačná zložka Bratislava
Galvaniho 17/C
821 04 Bratislava
Tel.: 02 44 45 20 41
mailto:opravy@bshg.com
www.bosch-home.com/sk
TR Türkiye, Turke
y
BSH Ev Aletleri Sanayi
ve Ticaret A.S.
Fatih Sultan Mehmet Mahallesi
Balkan Caddesi No: 51
34771 Ümraniye, Istanbul
Tel.: 0 216 444 6333*
Fax: 0 216 528 9188
mailto:careline.turkey@bshg.com
www.bosch-home.com/tr
*Çağrı merkezini sabit hatlardan aramanın
bedeli şehir içi ücretlendirme, Cep
telefonlarından ise kullanılan tarifeye gore
değişkenlik göstermektedir
SA Kingdom Saudi Arabia,
Abdul Latif Jameel Electronics
and Airconditioning Co. Ltd.
BOSCH Service centre,
Kilo 5 Old Makkah Road
(Next to Toyota), Jamiah Dist.
P.O.Box 7997
Jeddah 21472
Tel.: 800 244 0043
mailto:kunnumalsp@alj.com
www.aljelectronics.com.sa
TW Taiwan, 台台湾湾
BSH Home Appliances Private Limited
台北市內湖區洲子街80號11樓
11F., No.80, Zhouzi St., Neihu Dist.
Taipei City 11493
Tel.: 0800 368 888
Fax: 02 2627 9788
UA Ukraine, Україна
ТОВ "БСХ Побутова Техніка"
тел.: 044 490 2095
mailto:bsh-service.ua@bshg.com
www.bosch-home.com.ua
XK Kosovo
NTP GAMA
Rruga Mag Prishtine-Ferizaj
70000 Ferizaj
Tel.: 0290 321 434
mailto:a_service@
gama-electronics.com
XS Srbija, Serbia
BSH Kućni aparati d.o.o.
Milutina Milankovića 11ª
11070 Novi Beograd
Tel.: 011 205 23 97
Fax: 011 205 23 89
mailto:informacije.servis-sr@
bshg.com
www.bosch-home.rs
ZA South Africa
BSH Home Appliances (Pty) Ltd.
15th Road Randjespark
Private Bag X36, Randjespark
16
85 Midrand – Johannesburg
Tel.: 086 002 6724
Fax: 086 617 1780
mailto:applianceserviceza@
bshg.com
www.bosch-home.com/za
mailto:bshtzn-service@bshg.com
我們期盼您不斷的鼓勵與指導,
任何咨詢或服務需求,
歡迎洽詢客服專線
www.bosch-home.com.tw
FR France
A
y
A
ﻟ
v
BSH Electroménager S.A.S.
50 rue Ardoin – BP 47
93401 SAINT-OUEN cedex
Service interventions à domicile:
01 40 10 11 00
Service Consommateurs:
0 892 698 010
mailto:soa-bosch-conso@bshg.com
Service Pièces Détachées et
ccessoires:
0 892 698 009
www.bosch-home.fr
GB Great Britain
BSH Home Appliances Ltd.
Grand Union House
Old Wolverton Road
Wolverton
Milton Keynes MK12 5PT
To arrange an engineer visit, to
order spare parts and accessories
or for product advice please visit
www.bosch-home.co.uk
or call
Tel.: 0344 892 8979*
*Calls are charged at the basic rate, please
check with your telephone service provider
for exact charges
GR Greece, Ελλάς
BSH Ikiakes Siskeves A.B.E.
Central Branch Service
17 km E.O. Athinon-Lamias &
Potamou 20
14564 Kifisia
Πανελλήνιο τηλέφωνο: 181 82
(Αστική χρέωση)
www.bosch-home.gr
HK Hong Kong, 香
BSH Home Appliances Limited
Unit 1 & 2, 3rd Floor
North Block, Skyway House
3 Sham Mong Road
Tai Kok Tsui, Kowloon
Hong Kong
Tel.: 2565 6151
Fax: 2565 6681
mailto:bosch.hk.service@bshg.com
www.bosch-home.cn
HR Hrvatska, Croatia
BSH kućni uređaji d.o.o.
Kneza Branimira 22
10000 Zagreb
Tel:. 01 640 36 09
Fax: 01 640 36 03
mailto:informacije.servis-hr@
bshg.com
www.bosch-home.com/hr
06/15
MUC_2-4_RU_8001013355.indb 74 10.08.2015 12:45:13
(0,34 € TTC/mn)
(0,34 € TTC/mn)
港
HU Magyarország, Hungar
BSH Háztartási Készülék
Kereskedelmi Kft.
Háztartási gépek márkaszervize
Királyhágó tér 8-9
1126 Budapest
Hibabejelentés
Tel.: +361 489 5461
Fax: +361 201 8786
mailto:hibabejelentes@bsh.hu
lkatrészrendelés
Tel.: +361 489 5463
Fax: +361 201 8786
mailto:alkatreszrendeles@bsh.hu
www.bosch-home.com/hu
IE Republic of Ireland
BSH Home Appliances Ltd.
Unit F4, Ballymount Drive
Ballymount Industrial Estate
Walkinstown
Dublin 12
Service Requests,
Spares and Accessories
Tel.: 01450 2655*
Fax: 01450 2520
www.bosch-home.co.uk
*0.03 € per minute at peak.
Off peak 0.0088 € per minute
IL Israel,
C/S/B/ Home Appliance Ltd.
1, Hamasger St.
North Industrial Park
Lod, 7129801
Tel.: 08 9777 222
Fax: 08 9777 245
mailto:csb-serv@csb-ltd.co.il
www.bosch-home.co.il
IN India, Bhārat,
BSH Household Appliances
Mfg. Pvt. Ltd.
Arena House, 2nd Floor, Main Bldg,
Plot No. 103, Road No. 12, MIDC,
Andheri East
Mumbai 400 093
Toll Free 1800 266 1880
www.bosch-home.com/in
IS Iceland
Smith & Norland hf.
Noatuni 4
105 Reykjavik
Tel.: 0520 3000
Fax: 0520 3011
www.sminor.is
IT Italia, Italy
BSH Elettrodomestici S.p.A.
Via. M.
20147 Milano (MI)
Numero verde 800 829 120
mailto:info@bosch-elettrodomestici.it
www.bosch-home.com/it
Nizzoli 1
KZ Kazakhstan, Қазақстан
IP Turebekov Yerzhan
Nurmanovich
Jangeldina str. 15
Shimkent 160018
Tel.: 0252 31 00 06
mailto:evrika_kz@mail.ru
LB Lebanon,
Teheni, Hana & Co.
Boulevard Dora 4043 Beyrouth
P.O. Box 90449
Jdeideh 1202 2040
Tel.: 01 255 211
mailto:Info@Teheni-Hana.com
LT Lietuva, Lithuania
Senuku prekybos centras UAB
Jonavos g. 62
44192 Kaunas
Tel.: 0372 12146
Fax: 0372 12165
www.senukai.lt
LU Luxembourg
BSH électroménagers S.A.
13-15 Zl Breedeweues
1259 Senningerberg
Tel.: 26349 300
Fax: 26349 315
mailto:lux-service.electromenager@
bshg.com
www.bosch-home.com/lu
LV Latvija, Latvia
General Serviss Limited
Bullu street 70c
1067 Riga
Tel.: 07 42 41 37
mailto:bt@olimpe
Elkor Serviss
Brivibas gatve 201
1039 Riga
Tel.: 067 0705 20; -36
mailto:domoservice@elkor.lv
www.servisacentrs.l
MD Moldova
S.R.L. "Rialto-Studio"
ул. Щусева 98
2012 Кишинев
тел./факс: 022 23 81 80
mailto:bosch-md@mail.ru
ME Crna Gora, Montenegro
Elektronika komerc
Ul. Slobode 17
84000 Bijelo Polje
Tel./Fax: 050 432 575
Mobil: 069 324 812
mailto:ekobosch.servis@
t-com.me
MK Macedonia, Македонија
GORENEC
Jane Sandanski 69 lok.3
1000 Skopje
Tel.: 022 454 600
Mobil: 070 697 463
mailto:gorenec@yahoo.com
MT Malta
Oxford House Ltd.
Notabile Road
Mriehel BKR 14
Tel.: 021 442 334
Fax: 021 488 656
www.oxfordhouse.com.mt
ﻥﺎﻨﺒ
ks.lv
Page 77

MV Raajjeyge Jumhooriyyaa,
A
A
y
Lintel Investments
Ma. Maadheli, Majeedhee Magu
Malé
Tel.: 0331 0742
mailto:mohamed.zuhuree@
lintel.com.mv
NL Nederland, Netherlands
BSH Huishoudapparaten B.V.
Taurusavenue 36
2132 LS Hoofddorp
Storingsmelding:
Tel.: 088 424 4010
Fax: 088 424 4845
mailto:bosch-contactcenter@
bshg.com
Onderdelenverkoop:
Tel.: 088 424 4010
Fax: 088 424 4801
mailto:bosch-onderdelen@bshg.com
www.bosch-home.nl
NO Norge, Norway
BSH Husholdningsapparater A/S
Grensesvingen 9
0661 Oslo
Tel.: 22 66 06 00
Fax: 22 66 05 50
mailto:Bosch-Ser
bshg.com
www.bosch-home.no
NZ New Zealand
BSH Home Appliances Ltd.
Unit F 2, 4 Orbit Drive
Mairangi Bay
Tel.: 09 477 0492
Fax: 09 477 2647
mailto:bshnz-cs@bshg.com
www.bosch-home.co.nz
PL Polska, Poland
BSH Sprzęt Gospodarstwa
Domowego sp. z o.o.
02-222 Warszawa
Centrala Serwisu
Tel.: 801 191 534
Fax: 022 572 7709
mailto:Serwis.Fabryczny@bshg.com
www.bosch-home.pl
PT Portugal
BSHP Electrodomésticos Lda.
Rua Alto do Montijo, nº 15
2790-012 Carnaxide
Tel.: 214 250 730
Fax: 214 250 701
mailto:bosch.electrodomesticos.pt@
bshg.com
www.bosch-home.pt
06/15
MUC_2-4_RU_8001013355.indb 75 10.08.2015 12:45:14
Maledives
vice-NO@
uckland 0632
l. Jerozolimskie 183
RO România, Romania
BSH Electrocasnice srl.
Sos. Bucuresti-Ploiesti,
nr. 19-21, sect.1
13682 Bucuresti
Tel.: 021 203 9748
Fax: 021 203 9733
mailto:service.romania@bshg.com
www.bosch-home.ro
RU Russia, Россия
OOO "БСХ Бытовая техника"
вис от производителя
Сер
Малая Калужская 19/1
119071 Москва
тел.: 495 737 2961
mailto:mok-kdhl@bshg.com
www.bosch-home.com
SA Kingdom Saudi Arabia,
Abdul Latif Jameel Electronics
and Airconditioning Co. Ltd.
BOSCH Service centre,
Kilo 5 Old Makkah Road
(Next to Toyota), Jamiah Dist.
P.O.Box 7997
Jeddah 21472
Tel.: 800 244 0043
mailto:kunnumalsp@alj.com
www.aljelectronics.com.sa
SE Sverige, Sweden
BSH Hushållsapparater AB
Landsvägen 32
169 29 Solna
Tel.: 0771 11 22 77
mailto:Bosch-Service-SE@
bshg.com
www.bosch-home.se
SG Singapore, 新
BSH Home Appliances Pte. Ltd.
TECHPLACE I and
Mo Kio Avenue 10
Block 4012 #01-01
569628 Singapore
Tel.: 6751 5000
Fax: 6751 5005
mailto:bshsgp.service@bshg.com
local rate
加坡
www.bosch-home.com.sg
SI Slovenija, Slovenia
BSH Hišni aparati d.o.o.
Litostrojska 48
1000 Ljubljana
Tel.: 01 583 07 01
Fax: 01 583 08 89
mailto:informacije.servis@
bshg.com
www.bosch-home.com/si
SK Slovensko, Slovakia
BSH domáci spotřebiče s.r.o.
Organizačná zložka Bratislava
Galvaniho 17/C
821 04 Bratislava
Tel.: 02 44 45 20 41
mailto:opravy@bshg.com
www.bosch-home.com/sk
TR Türkiye, Turke
BSH Ev Aletleri Sanayi
ve Ticaret A.S.
Fatih Sultan Mehmet Mahallesi
Balkan Caddesi No: 51
34771 Ümraniye, Istanbul
Tel.: 0 216 444 6333*
Fax: 0 216 528 9188
mailto:careline.turkey@bshg.com
www.bosch-home.com/tr
*Çağrı merkezini sabit hatlardan aramanın
bedeli şehir içi ücretlendirme, Cep
telefonlarından ise kullanılan tarifeye gore
değişkenlik göstermektedir
TW Taiwan, 台台湾湾
BSH Home Appliances Private Limited
台北市內湖區洲子街80號11樓
11F., No.80, Zhouzi St., Neihu Dist.
Taipei City 11493
Tel.: 0800 368 888
Fax: 02 2627 9788
mailto:bshtzn-service@bshg.com
我們期盼您不斷的鼓勵與指導,
任何咨詢或服務需求,
歡迎洽詢客服專線
www.bosch-home.com.tw
UA Ukraine, Україна
ТОВ "БСХ Побутова Техніка"
тел.: 044 490 2095
mailto:bsh-service.ua@bshg.com
www.bosch-home.com.ua
XK Kosovo
NTP GAMA
Rruga Mag Prishtine-Ferizaj
70000 Ferizaj
Tel.: 0290 321 434
mailto:a_service@
gama-electronics.com
XS Srbija, Serbia
BSH Kućni aparati d.o.o.
Milutina Milankovića 11ª
11070 Novi Beograd
Tel.: 011 205 23 97
Fax: 011 205 23 89
mailto:informacije.servis-sr@
bshg.com
www.bosch-home.rs
ZA South Africa
BSH Home Appliances (Pty) Ltd.
15th Road Randjespark
Private Bag X36, Randjespark
85 Midrand – Johannesburg
16
Tel.: 086 002 6724
Fax: 086 617 1780
mailto:applianceserviceza@
bshg.com
www.bosch-home.com/za
Page 78

Beratung und Reparaturauftrag bei Störungen
✆
D 0 911 70 44 0 040
A 0810 550 511
CH 0 848 8 40 0 40
Die Konta ktdaten aller L änder fi nden Sie im beiliegenden Kundendienst-Ver zeichnis.
Robert Bosch Hausgeräte GmbH
Carl-Wery-Straße 34
81739 München, GERMANY
www.bosch-home.com
8001013355
MUC_2-4_RU_8001013355.indb 76 10.08.2015 12:45:14
950810
 Loading...