

Page 1

MIC Series Replacement Wiper
MIC-xxx-RWAy
Page 2

enInstallation Guide
Page 3

MIC Series Replacement
Wiper
Table of contents
Table of Contents | en 3
1
2
2.1 Replacing the Wiper-arm assembly (MIC550 and
2.2 Replacing the Wiper-Arm assembly (MIC612,
2.3 Replacing the Wiper-Arm assembly (MIC400) 12
3
MIC Series Cameras - Wiper Replacement 4
Replacing Wiper Assemblies 6
MIC500)
10
MIC440, and MIC412)
Replacing wiper blade (MIC400 Only) 15
6
Bosch Security Systems, Inc. Installation Guide 2013.06 | 1.0 | F.01U.286.905
Page 4

4 en | MIC Series Cameras - Wiper Replacement
MIC Series Replacement
Wiper
1
MIC Series Cameras - Wiper Replacement
Replacement wiper-arm assemblies are available for MIC series
cameras. All replacement wiper-arm assemblies ship with
replacement washers, spacers and O-rings as required for the
specific unit. These components should always be replaced
when replacing the wiper-arm assembly.
The Replacement Wiper-arm kit (MIC-RWA) is available in
the following finishes for the
MIC400, MIC412, MIC440, MIC500, MIC550, and MIC612
MIC-500-RWAB Replacement wiper-arm assembly for
MIC550 and MIC500
– Black anodized
MIC-412 RWAB Replacement wiper-arm assembly for
MIC412 and MIC612 – Black anodized
MIC-412-RWAC Replacement wiper-arm assembly for
MIC412 and MIC612 - Clear anodized
MIC-400-RWAB Replacement wiper-arm assembly for
MIC400 – Black anodized
MIC-400-RWAC Replacement wiper-arm assembly for
MIC400 – Clear anodized
MIC-400 RWAS Replacement wiper-arm assembly for
MIC400 – Stainless Steel
MIC-RWB Replacement wiper blade for MIC400
2013.06 | 1.0 | F.01U.286.905 Installation Guide Bosch Security Systems, Inc.
Page 5
MIC Series Replacement
Wiper
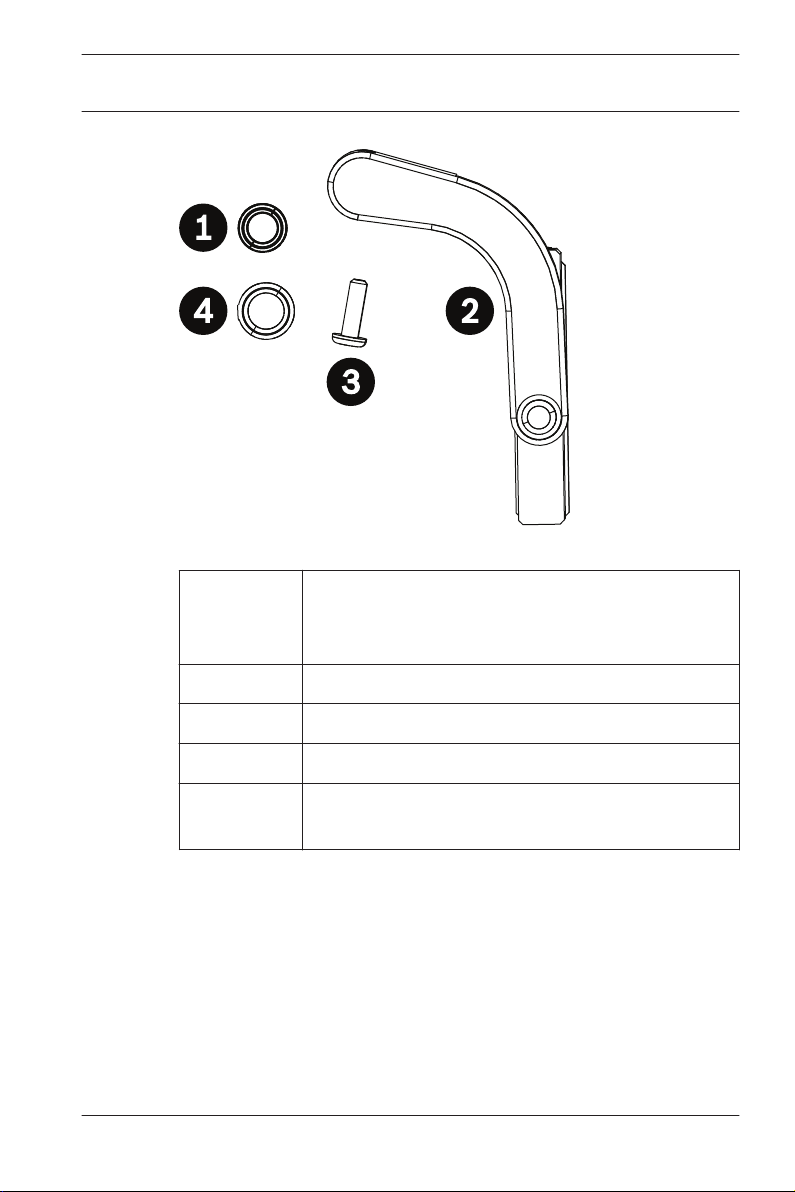
Figure 1.1: Wiper Components
MIC Series Cameras - Wiper Replacement | en 5
Component
The MIC Replacement Wiper Arm (RWA)
may include any or all of the following
components:
1 One O-ring (MIC550 and MIC500 only)
2 One replacement wiper-arm with integral blade
3 One wiper-arm retaining screw
4 One or more wiper arm washers
(for MIC550, MIC500, and MIC400 only)
Bosch Security Systems, Inc. Installation Guide 2013.06 | 1.0 | F.01U.286.905
Page 6
6 en | Replacing Wiper Assemblies
MIC Series Replacement
Wiper
2
2.1
Replacing Wiper Assemblies
Replacing the Wiper-arm assembly (MIC550 and MIC500)
Tools Required
– One T-10 torx
– One 1 mm x 3 mm Phillips screwdriver
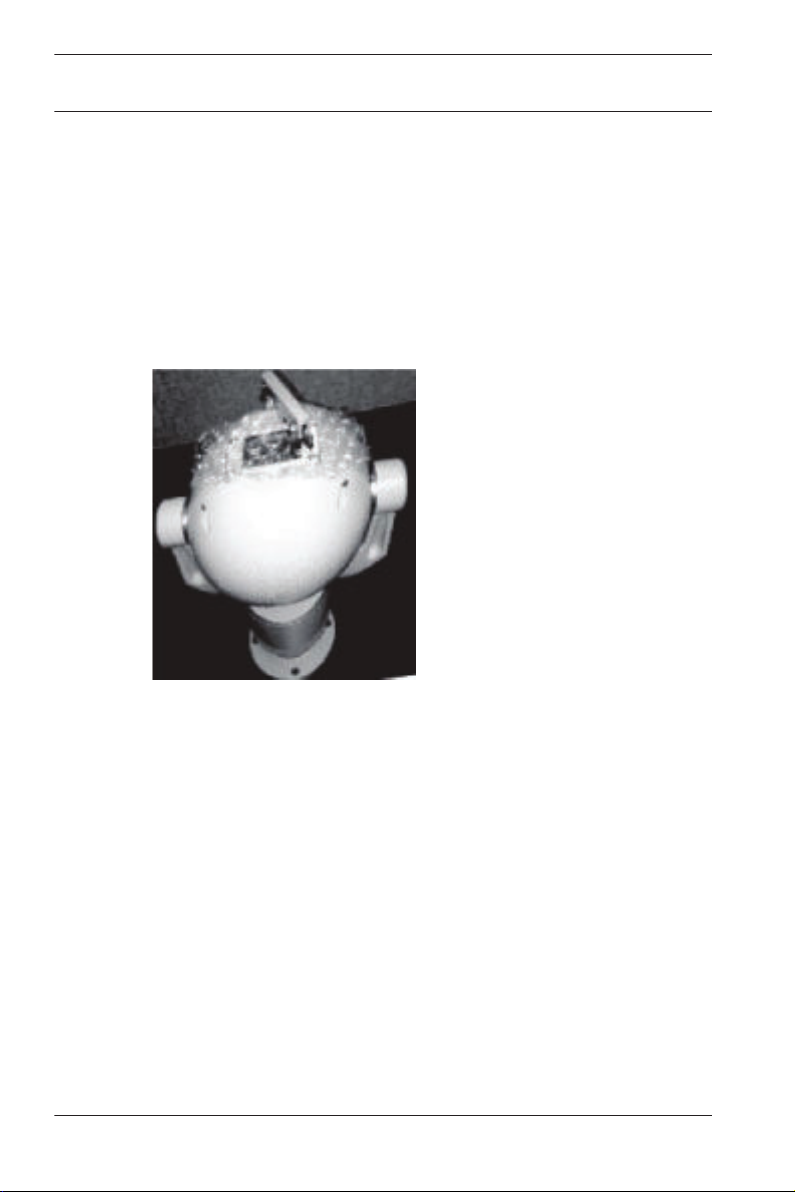
Figure 2.1: Preparing for Installation
1. Use the control unit to tilt the camera upward to a 45
degree angle (Figure 2.1).
2. Place a piece of protective material over the window glass
to prevent accidental damage (Figure 2.1).
2013.06 | 1.0 | F.01U.286.905 Installation Guide Bosch Security Systems, Inc.
Page 7

MIC Series Replacement
Wiper
Remove Sun Shield
Figure 2.2: Sun Shield
1. Remove four Phillips screws (Figure 2.2 Item 3) from the
sun shield (Figure 2.2, Item 1).
2. Remove sun shield (Figure 2.2, Item 1) from faceplate
(Figure 2.2. Item 2) and set aside.
Replacing Wiper Assemblies | en 7
Bosch Security Systems, Inc. Installation Guide 2013.06 | 1.0 | F.01U.286.905
Page 8

8 en | Replacing Wiper Assemblies
Replace Wiper-Arm Assembly
MIC Series Replacement
Wiper
Figure 2.3: Remove and Install Wiper Assembly
Notice!
It is important to replace the O-ring and washer when
replacing the wiper-arm.
1. Remove the set-screw (Figure 2.3, Item 5) from the wiperarm (Figure 2.3, Item 4).
2. Remove the wiper-arm (Figure 2.3, Item 4) from the wiper
shaft (Figure 2.3, Item 1).
3. Remove the washer (Figure 2.3, Item 3) and O-ring (Figure
2.3, Item 2) from the wiper shaft (Figure 2.3, Item 1) and
discard.
4. Install the replacement O-ring (Figure 2.3, Item 2) and
replacement washer (Figure 2.3, Item 3) onto the wiper
shaft (Figure 2.3, Item 1).
2013.06 | 1.0 | F.01U.286.905 Installation Guide Bosch Security Systems, Inc.
Page 9

MIC Series Replacement
Wiper
5. Install the replacement wiper-arm (Figure 2.3, Item 4) onto
the wiper shaft (Figure 2.3, Item 1).
6. Align the holes on the wiper-arm (Figure 2.3, Item 4) with
the holes on the wiper shaft (Figure 2.3, Item 1).
7. Install the set-screw (Figure 2.3, Item 5) into the wiper-arm
(Figure 2.3, Item 4) and secure it to the wiper shaft (Figure
2.3, Item 1).
8. Install four Phillips screws (Figure 2.2, Item 3) into the
matching holes on the sun shield (Figure 2.2 Item 1) and
secure the sun shield to the face plate.
Replacing Wiper Assemblies | en 9
Bosch Security Systems, Inc. Installation Guide 2013.06 | 1.0 | F.01U.286.905
Page 10

10 en | Replacing Wiper Assemblies
MIC Series Replacement
Wiper
2.2
Replacing the Wiper-Arm assembly (MIC612, MIC440, and MIC412)
Tools Required
– One 1 mm x 3 mm Phillips screwdriver
Use the following procedures to replace the wiper-arm on the
MIC612, MIC440, and MIC412.
Getting Started
Figure 2.4: Wiper-Arm in Off Position
1. Place a piece of protective material over the window glass
to prevent accidental damage.
2. Ensure that the wiper-arm (Figure 2.3, Item 4) is parked in
the “Off” position (Figure 2.4).
2013.06 | 1.0 | F.01U.286.905 Installation Guide Bosch Security Systems, Inc.
Page 11

MIC Series Replacement
Wiper
Replacement Procedures
Figure 2.5: Remove Set Screw
1. Remove the wiper-arm set screw from the rear of the wiperarm (Figure 2.5).
2. Remove the wiper-arm from the wiper shaft (Figure 2.6).
Replacing Wiper Assemblies | en 11
Figure 2.6: Remove Wiper Arm from wiper shaft
3. Align the hole in the replacement wiper-arm with the hole in
the wiper shaft (Figure 2.6).
4. Install the replacement wiper arm (Figure 2.6) onto the
wiper shaft (Figure 2.6).
5. Insert the wiper retaining screw through the holes in the
wiper arm assembly and wiper shaft and secure (Figure
2.5).
Bosch Security Systems, Inc. Installation Guide 2013.06 | 1.0 | F.01U.286.905
Page 12

12 en | Replacing Wiper Assemblies
MIC Series Replacement
Wiper
2.3
Replacing the Wiper-Arm assembly (MIC400)
Tools required:
– One 1 mm x 3 mm hex key
– One 1 mm x 3 mm Phillips screwdriver
– One pair of long tweezers
– One 1 x 100g tube of Dow Corning DC4 electrical
compound
Notice!
Because the MIC400 wiper shaft has no internal
restraint, it is possible for the wiper shaft to fall into
the MIC lid/housing. Use a small hex key, screwdriver,
or other tool to hold the shaft in place as illustrated in
the following procedures. If the shaft falls into the
MIC lid/housing, the upper shell must be removed to
retrieve the shaft. Care must be taken when removing
and replacing the upper shell to prevent moisture
from entering the unit. Use the following procedures
to replace the wiper-arm assembly on the MIC400.
Getting Started
Figure 2.7: Preparing for Installation
1. Place a piece of protective material over the window glass
to prevent accidental damage (Figure 2.7).
2013.06 | 1.0 | F.01U.286.905 Installation Guide Bosch Security Systems, Inc.
Page 13

MIC Series Replacement
Wiper
2. Ensure that the wiper-arm is parked in the “Off” position
(Figure 2.7).
Replacement Procedures
Figure 2.8: Remove Retaining Screw
1. Remove the wiper-arm retaining screw at the back of the
wiper-arm (Figure 2.8).
Replacing Wiper Assemblies | en 13
Figure 2.9: Remove wiper-arm from wiper shaft
2. Remove the wiper- from the wiper shaft (Figure 2.9).
Figure 2.10: Replace 3 washers on shaft
Bosch Security Systems, Inc. Installation Guide 2013.06 | 1.0 | F.01U.286.905
Page 14

en | Replacing Wiper Assemblies
14
3. Remove the three washers (Figure 2.10) from the wiper
shaft (Figure 2.10) and discard.
4. Install the three replacement washers (Figure 2.10) onto
the wiper shaft (Figure 2.10) using a small hex key or
screwdriver (Figure 2.10) to prevent the wiper shaft from
sliding inside the lid/housing.
5. Apply a small amount of electrical compound onto the end
of the wiper shaft.
Figure 2.11: Replace Wiper Arm
6. Install the replacement wiper arm (Figure 2.11) onto the
wiper shaft (Figure 2.11) while keeping the wiper shaft fully
extended (Figure 2.11), using tweezers (Figure 2.11) as
necessary for this step.
7. Ensure proper alignment between the holes in the wiperarm (Figure 2.11) and the wiper shaft (Figure 2.11) by
using the hex key (Figure 2.10) and/or tweezers (Figure
2.11).
8. Install the wiper-arm retaining screw (Figure 2.8) through
the holes in the wiper-arm and the wiper shaft (Figure
2.10). Tighten securely.
9. Test the wiper-arm assembly operation to ensure that the
wiper cleans correctly.
MIC Series Replacement
Wiper
2013.06 | 1.0 | F.01U.286.905 Installation Guide Bosch Security Systems, Inc.
Page 15

MIC Series Replacement
Wiper
Replacing wiper blade (MIC400 Only) | en 15
3
Replacing wiper blade (MIC400 Only)
It is possible to replace only the wiper blade on the MIC400.
Tools required:
– One 5 mm nut driver
– One 1 mm x 3 mm Phillips screwdriver
Getting Started
Follow the steps below to replace the wiper blade:
Figure 3.1: Getting Started
1. Place a piece of protective material (Figure 3.1) over the
window glass to prevent accidental damage.
2. Ensure that the wiper-arm is parked in the “Off” position
(Figure 3.1).
Replacing Wiper Blade
Figure 3.2: Replace Wiper Blade
1. Use the nut driver and Phillips screwdriver to remove the
retaining nut (Figure 3.2) from the retaining screw (Figure
3.2).
2. Remove and discard old wiper blade (Figure 3.2)
Bosch Security Systems, Inc. Installation Guide 2013.06 | 1.0 | F.01U.286.905
Page 16

16 en | Replacing wiper blade (MIC400 Only)
3. Line up the hole in the replacement wiper blade with the
holes in the wiper arm.
4. Reinsert the long screw, fit the nut, and then tighten the
screw until it is fully secure.
5. Test the wiper-arm assembly operation to ensure that the
wiper cleans correctly.
MIC Series Replacement
Wiper
2013.06 | 1.0 | F.01U.286.905 Installation Guide Bosch Security Systems, Inc.
Page 17

Page 18

Page 19

 Loading...