

Bosch MD-200 User Manual
MD-200
Scan Tool User Manual
MD-200 User Manual
en User Manual
581624 | REV. B | 06.2017 | APDMD032018

Technical Support
1-800-533-6127
For technical questions on your product, contact (800) 533-6127, and select
the option for technical support.
For assistance with internet or wireless connectivity, contact (800) 533-6127,
and select the option for connectivity.
or email tech@otctools.com.
Copyright © 2018 Bosch Automotive Service Solutions Inc., All rights reserved.
The information, specifications, and illustrations in this guide are based on the latest information available
at the time of printing. Bosch Automotive Service Solutions reserves the right to make changes at any time,
without notice.

User Manual | Mitchell Diagnostics | Scan Tool | 1 | en
Table of Contents
Safety Definitions .............................................................2
General Information ........................................................4
Introduction .............................................................................4
Handset .....................................................................................4
Handset Ports ...........................................................................5
Software Descriptions ...........................................................6
Battery Charging ....................................................................6
Using the Handset ..................................................................6
Registration .......................................................................7
30 Day Trial ...............................................................................9
Demo ..........................................................................................9
Provide Power to Scan Tool .............................................. 10
Test Startup and Vehicle Connection ............................. 11
Settings ............................................................................ 11
Application Settings ........................................................... 11
Software Information ........................................................ 12
Software Update.................................................................. 12
Printer setup.......................................................................... 12
Subscription .......................................................................... 12
User Details ............................................................................ 13
Language ............................................................................... 13
Read DTCs Select Systems ............................................ 28
Ford/Lincoln/Mercury ........................................................ 30
Data Stream .................................................................... 32
Special Tests .................................................................... 36
Diagnostic Information ................................................ 38
Automated System Test ............................................... 42
Maintenance Tests ......................................................... 46
Enhanced OBDII ............................................................. 47
Saved Diagnostic Data .................................................. 47
Browser ........................................................................... 48
Settings ............................................................................ 48
Customer Support ......................................................... 49
Selecting Vehicle ............................................................ 14
AutoID..................................................................................... 14
Manual Entry ........................................................................ 14
Recent ..................................................................................... 16
Search by VIN ........................................................................ 17
OBDII ................................................................................ 18
Overview ................................................................................ 18
Diagnostic Functions .......................................................... 18
Data Stream ........................................................................... 18
DTCs Modes ........................................................................... 20
Oxygen (O2) Sensors ........................................................... 21
Non-Continuous Tests ........................................................ 22
Special Tests ........................................................................... 22
Vehicle Info ............................................................................ 23
Saved Diagnostic Data .................................................. 24
Browser ........................................................................... 25
Heavy Duty ..................................................................... 26
Read DTCs All Systems .................................................. 27
©Mitchell International, Inc. 581624 | REV. B | 06.2017 | APDMD032018

User Manual | Mitchell Diagnostics | Scan Tool | 2 | en
Safety Definitions
Follow all DANGER, WARNING, andIMPORTANT
messages. These safety messages are defined as
follows:
DANGER or WARNING: Risk of bodily harm
and/or possible loss of life.
IMPORTANT: The information demands special
attention or risks damage to the vehicle or tool.
The safety messages cover situations of
which Bosch Automotive Service Solutions is
aware. Bosch Automotive Service Solutions
cannot know, evaluate, or advise as to all of
the possible hazards. You must be certain
that any conditions or service procedures
encountered do not jeopardize personal
safety.
Safety Precautions
DANGER:When an engine is operating, keep
the service area well ventilated or attach
a building exhaust removal system to the
engine exhaust system. Engines produce
carbon monoxide, an odorless, poisonous gas
that causes slower reaction time and can lead
to serious personal injury or loss of life.
WARNING: When working with hydraulic
or fuel lines, be careful that liquids under
pressure do not escape and create a
dangerous condition. Use adequate
ventilation and make sure there are no sparks
or possibility of sparks that may ignite any
vapor.
Wear an American National Standards
Institute (ANSI) approved eye shield when
testing or repairing vehicles.
Objects propelled by whirling engine
components or pressurized liquids escaping
may cause personal injury.
Do not drive the vehicle and operate the
software at the same time.
Maintain adequate clearance around moving
components or belts during testing.
Moving components and belts can catch
loose clothing, body parts, or test equipment
and cause serious damage or personal injury.
Automotive batteries contain sulfuric acid
and produce explosive gases that can result
in serious injury ignition of gases, keep lit
cigarettes, sparks, flames, and other ignition
sources away from the battery at all times.
Refer to the service manual for the vehicle
being serviced. Adhere to all diagnostic
procedures and precautions Failure to do so
could result in personal injury or otherwise
unneeded repairs.
Use only specially designed replacement
parts (brake hoses and lines) for ABS
equipped vehicles.
After bleeding the brake system, check
the brake pedal for excessive travel or a
spongy feel. Bleed again if either condition is
present.
When installing transmitting devices (Citizen
Band radio, telephone, etc) on ABS-equipped
vehicles, do not locate the antenna near the
ABS control unit or any other control unit.
This equipment has been tested and found
to comply with the limits for a Class B digital
device, pursuant to Part 15 of the FCC
Rules. These limits are designed to provide
reasonable protection against harmful
interference in a residential installation. This
equipment generates and radiates radio
frequency energy and, if not installed and
used in accordance with the instructions,
may cause harmful interference to radio
communications.
Set the parking brake and block the wheels
before testing or repairing a vehicle. It is
especially important to block the wheels
on front-wheel drive vehicles because the
parking brake does not hold the drive
wheels.
©Mitchell International, Inc. 581624 | REV. B | 06.2017 | APDMD032018
To reduce risk of injury, charge only Bosch
Automotive Service Solutions rechargeable
batteries for the handset product with the
supplied charger. Other types of batteries
may burst causing injury to persons and
peoperty damage.

User Manual | Mitchell Diagnostics | Scan Tool | 3 | en
Use of an attachment not recommended or
sold by the battery charger manufacturer
may result in fire, electric shock, or personal
injury.
Do not operate the tool with a damaged
cord or connector. Replace damaged cords
and connectors immediately.
Do not operate the charger if it has received
a sharp blow, been dropped, or otherwise
damaged in any way. Take the charger to a
qualified service person.
Do not disassemble the charger. Take the
charger to a qualified service person if service
or repair is necessary. Incorrect reassembly
may result in electric shock or fire. Unplug
charger before attempting any maintenance
or cleaning. Turning o controls will not
reduce this risk.
To prevent possible hearing damage, avoid
using the tool at high volume levels for long
periods.
Do not expose tool or charger to rain,
moisture, or snow.
Keep the battery away from children.
Do not store or leave your tool or battery
near a heat source such as a radiator,
fireplace, stove, electric heater, or other heatgenerating appliance or otherwise expose it
to temperatures in excess of 140 ºF (60ºC).
When heated to excessive temperatures,
battery cells could explode or vent, posing a
risk of fire.
Do not dispose of your tool’s battery in a fire
or with normal household waste. Battery
cells may explode. Discard a used battery
according to the manufacturer’s instructions
or contact your local waste disposal agency
for disposal instructions. Dispose of a spent
or damaged battery promptly.
IMPORTANT: To avoid damage or generation
of false data, make sure the vehicle battery
is fully charged and the connection to the
vehicle Data Link Connector (DLC) is clean
and secure.
Do not place the tool on the distributor of a
vehicle. Strong electromagnetic interference
can damage the tool.
Verify that cords are located where they will
not be stepped on, tripped over, or otherwise
become a safety hazard or subjected to
damage or stress.
Use only batteries that are approved for
use with this tool. Use of other types may
increase the risk of fire or explosion.
Do not carry a battery in your pocket, purse,
or other container where metal objects (such
as car keys or paper clips) could short-circuit
the battery terminals. The resulting excessive
current flow can cause extremely high
temperatures and may result in damage to
the battery pack or cause fire or burns.
The battery poses a burn hazard if you
handle it improperly. Do not disassemble it.
Handle a damaged or leaking battery with
extreme care. If the battery is damaged,
electrolyte may leak from the cells and may
cause personal injury.
Never disconnect or reconnect any
electrical connector while the ignition is on.
Powertrain Control Module (PCM) damage
may result.
©Mitchell International, Inc. 581624 | REV. B | 06.2017 | APDMD032018
User Manual | Mitchell Diagnostics | Scan Tool | 4 | en
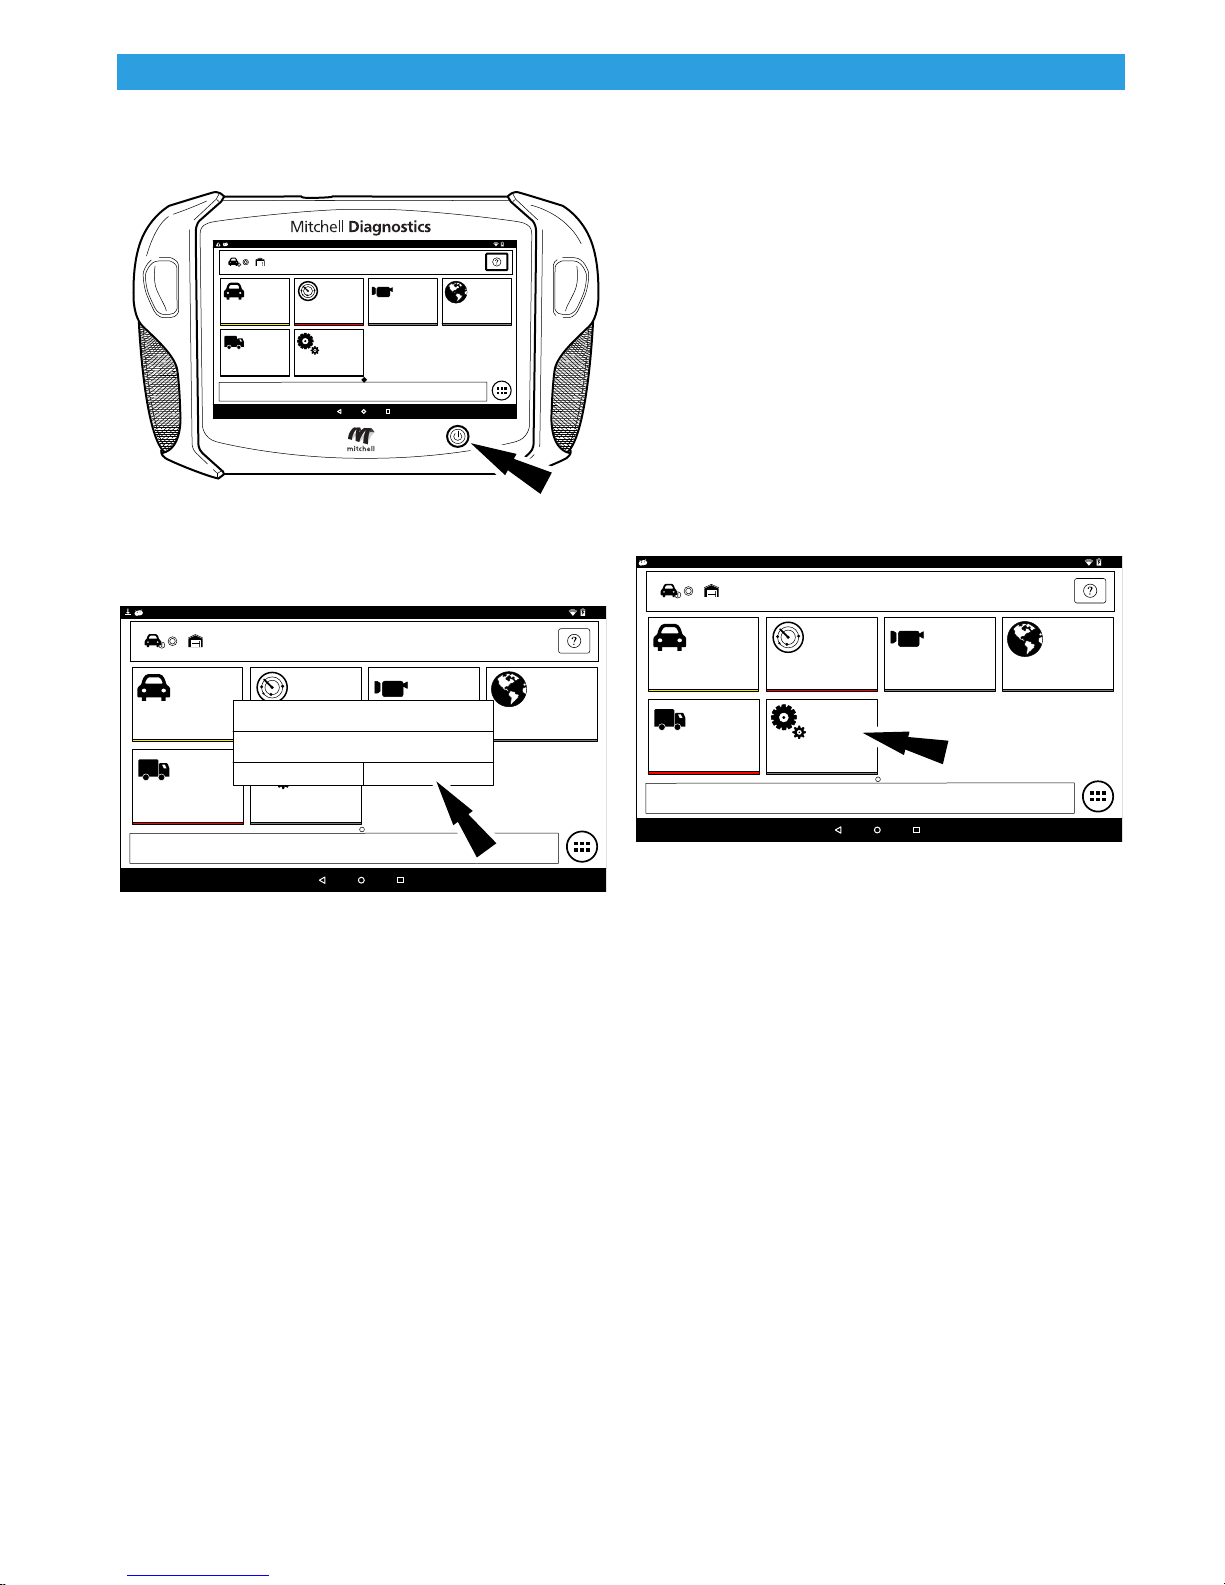
General Information
Introduction
ss01711
1
2
MAIN MENU - Tap Below To Begin Your Diagnostic Experience
Heavy Duty
MD-200
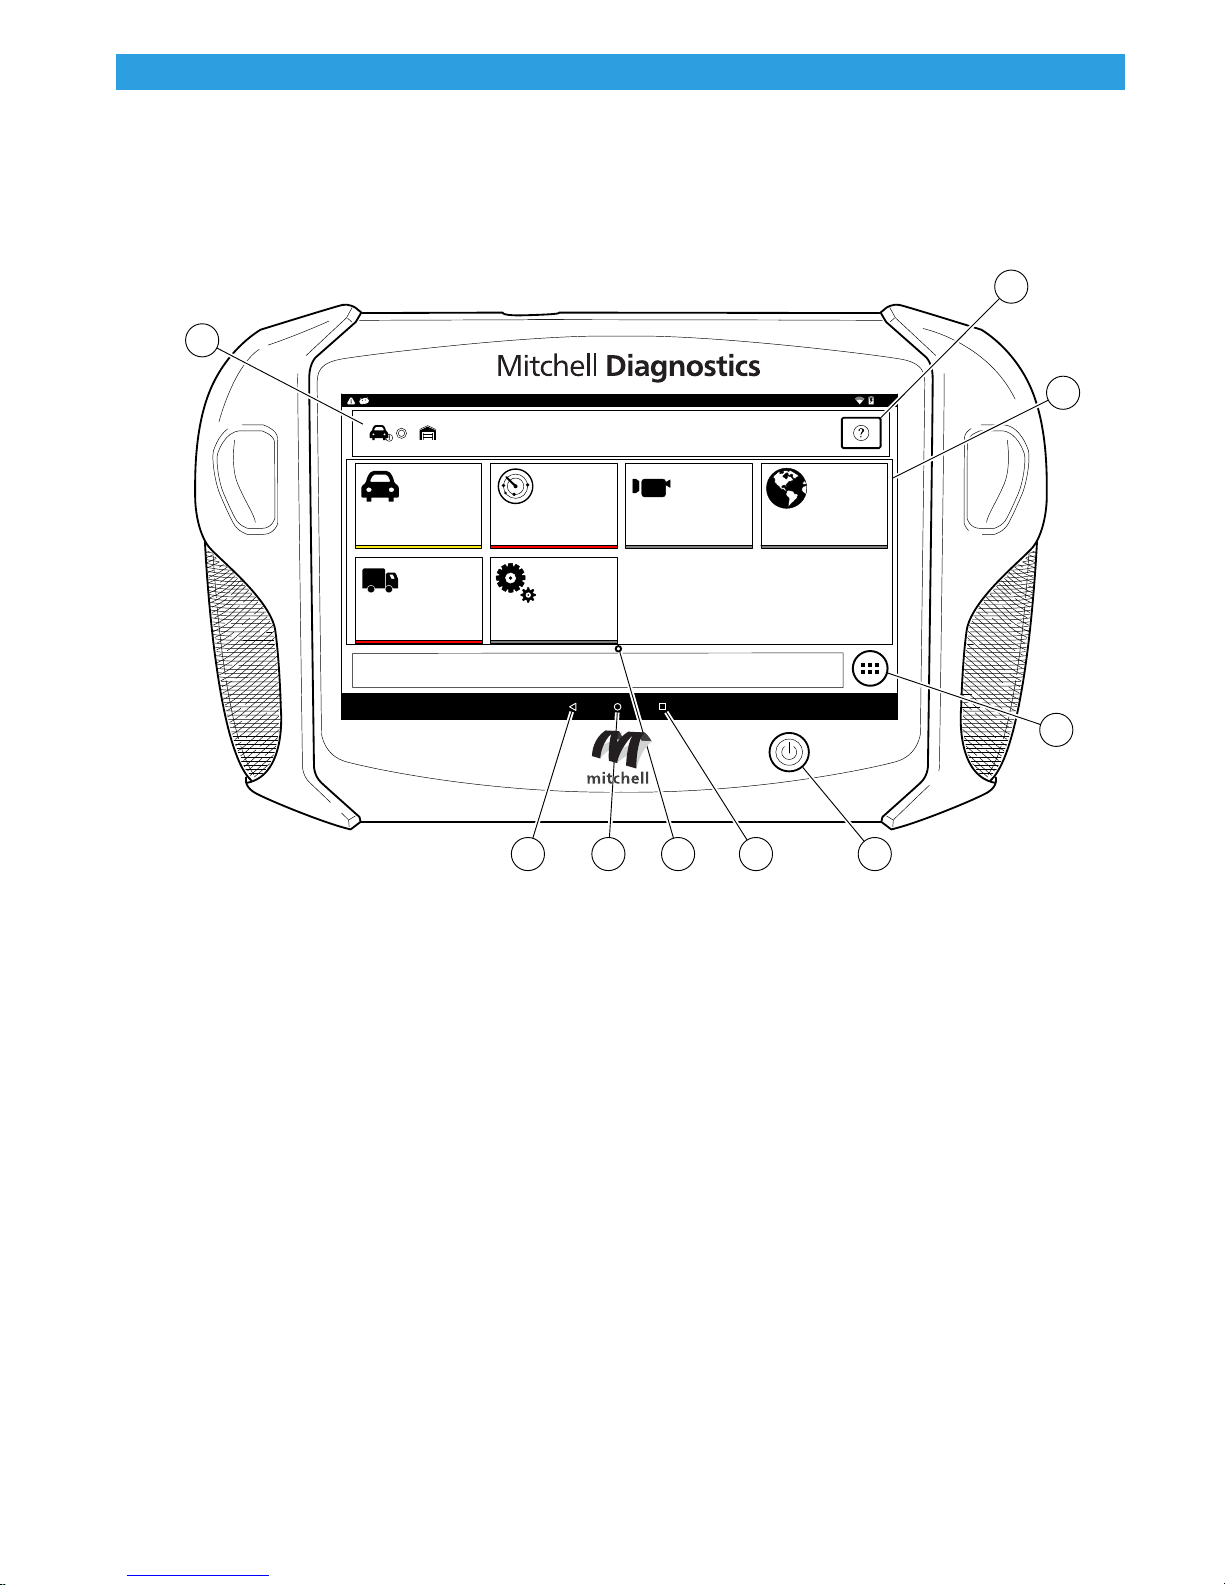
Handset Front
1. Vehicle Identification Window
• Where vehicle information is displayed.
OBDII
Settings
Today is Thu, 04 Jan 2018.
Saved Diagnostic Data BrowserSelect Vehicle
9 8 567
4. Android Applications Button
• Displays the Apps screen.
9:40
3
4
2. Navigation Help button
3. Main Menu Functions
• Select Vehicle allows you to manually choose
the vehicle, AutoID to automatically identify
the vehicle or enter the VIN.
• OBDII (also referred to as Generic OBDII)
Provides limited engine control and monitors
the diagnostic control network of the vehicle.
• Saved Diagnostic Data allows the user to view
previously run and saved DTC reads, All System
DTC scan, and Automated System Test scans
and data stream recordings.
• Browser Fast Touch™ sites and internet.
• Heavy Duty allows the user to read Heavy Duty
• Diagnostic information.
• Settings change settings of the tool.
©Mitchell International, Inc. 581624 | REV. B | 06.2017 | APDMD032018
5. Power Button
• Press to power ON handset or if running press
to access menu to: Power Down.
6. Recent apps button
• Opens a list of thumbnail images of currently
running apps.
7. Page indicator
• Displays the page currently being displayed.
8. Home Button
• Displays the Main Menu screen.
9. Back Button
• Returns to the previous screen or option.
User Manual | Mitchell Diagnostics | Scan Tool | 5 | en
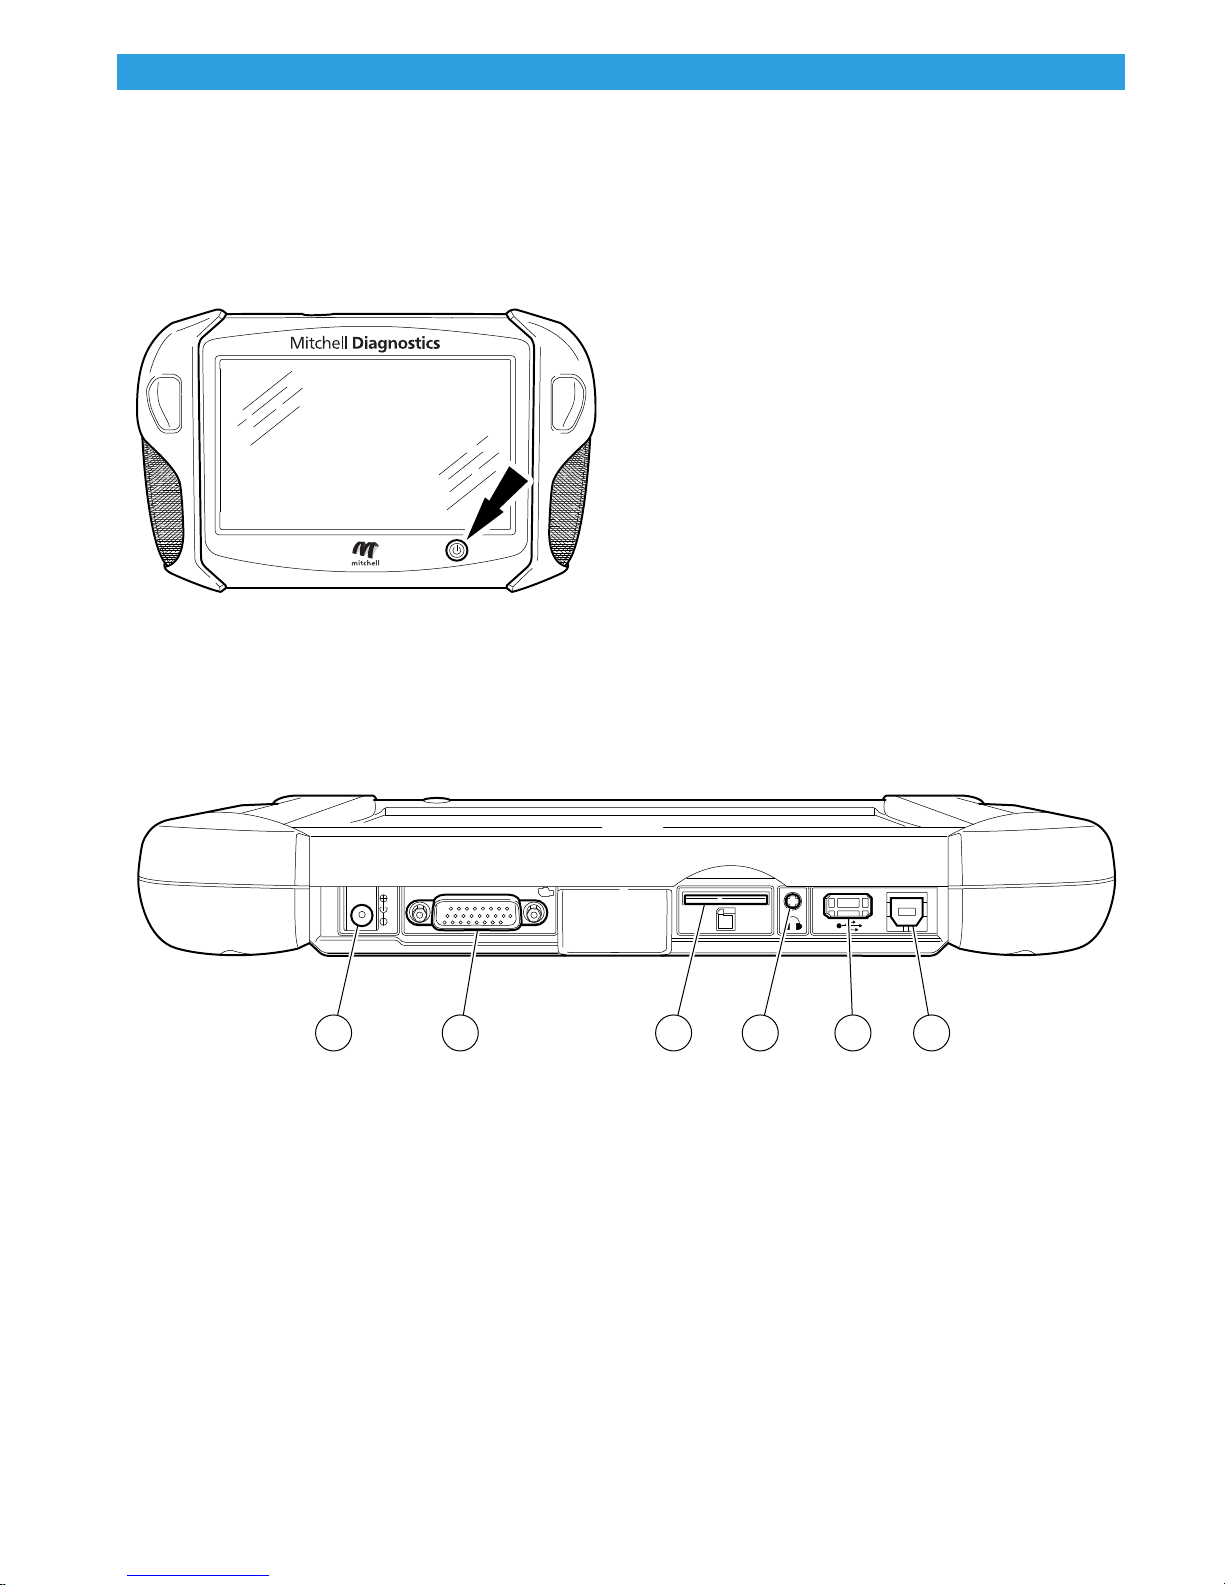
Handset
The handset is a ruggedized touchscreen tablet
equipped with the Android operating system. The
power button is located on the lower center front of
the Handset.
ss01715
MD-200
Handset Power Button
Handset Ports
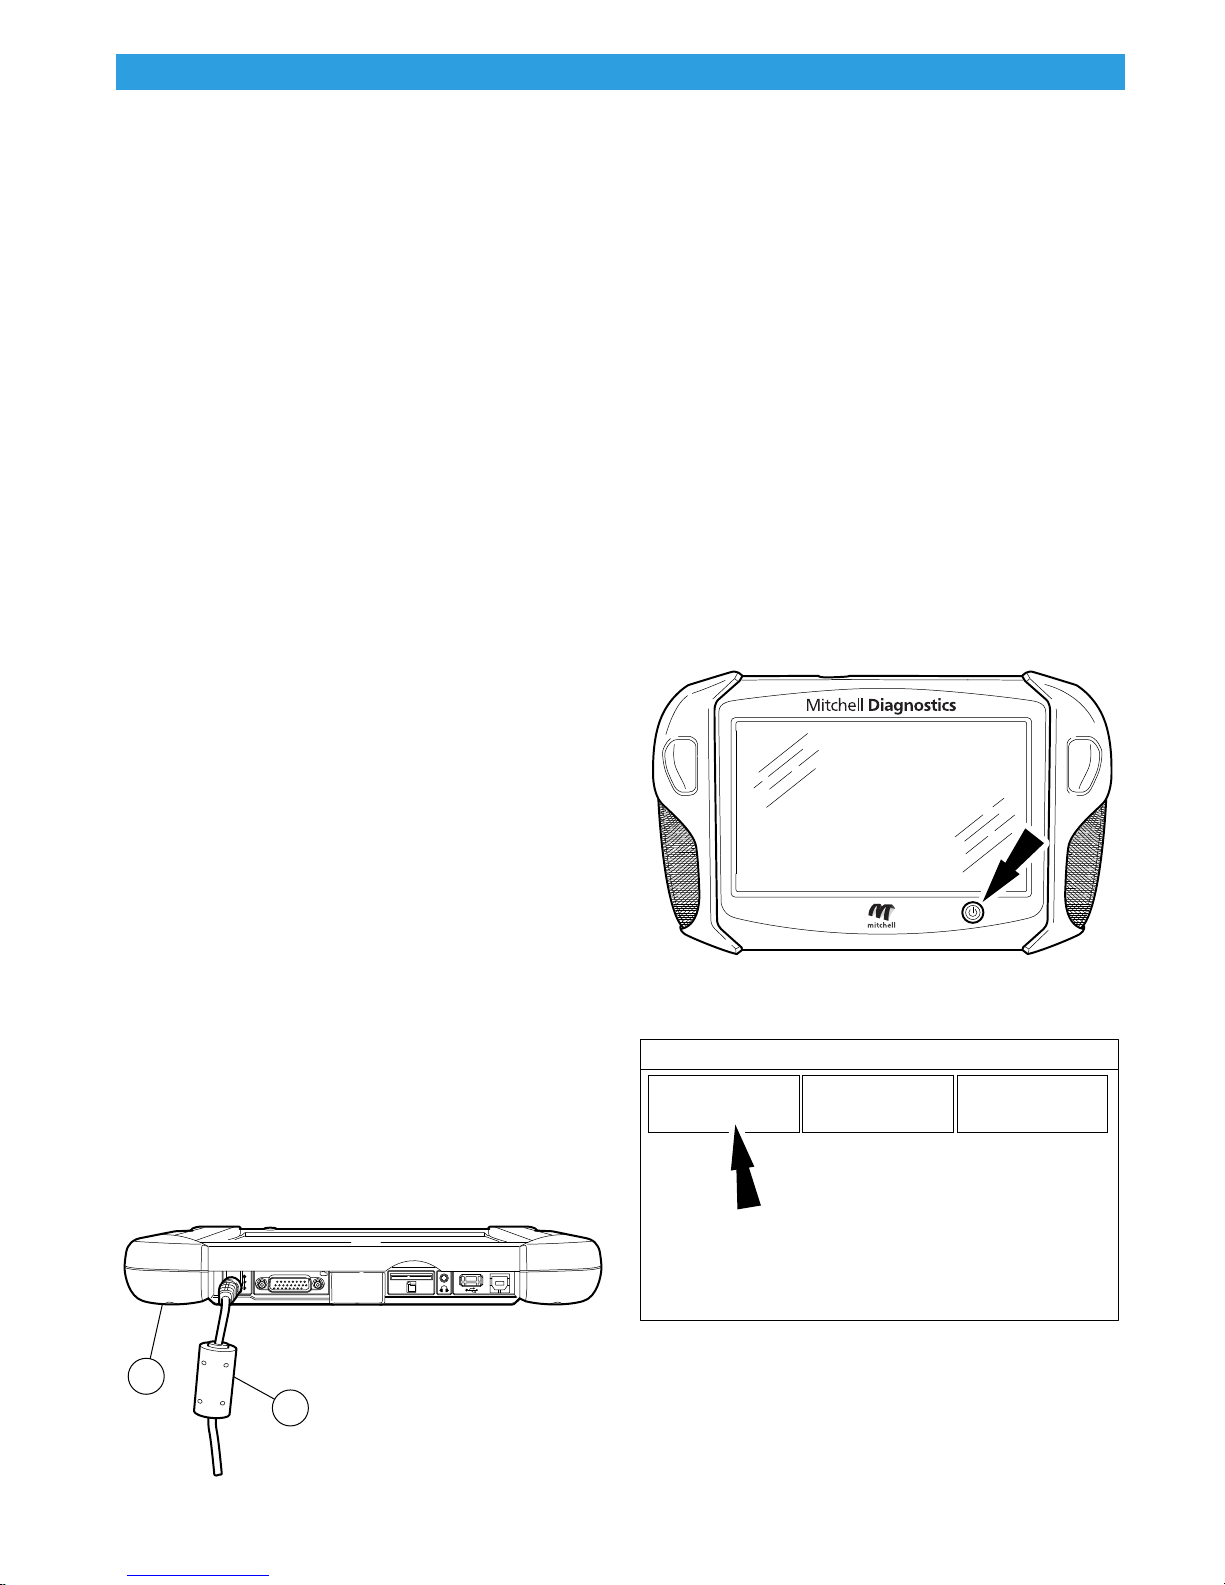
Power Button Functions
The power button has four functions
a. ON: Press the power button to turn the
handset on.
b. OFF: Press and release the power button. A
pop up window will appear to shut down the
handset.
c. ON: If the screen times out or is in standby
mode, press and release the power button to
wake up the handset. Turn ON: With tool o,
press to turn ON
d. OFF: Press the power button and hold for 5
seconds to turn the handset o completely
(not recommended).
ss01712
1 2 3 4 5 6
1. Power port
2. DLC cable Port
3. SD card slot
4. Audio out port (3.5mm)
5. USB Type “A” port
• Print to or store data as needed
• Connect add-on hardware
• USB Drive (optional) USB Type “A” port
Handset Ports
6. USB Type “B” port
©Mitchell International, Inc. 581624 | REV. B | 06.2017 | APDMD032018
User Manual | Mitchell Diagnostics | Scan Tool | 6 | en
Software Descriptions
Handset Software
The handset comes with the diagnostic software
pre-loaded.
The first time the handset is powered up, the user
needs to accept the license agreement. Then, the
user will have three choices:
• Register Now: Unlocks all functions of handset.
• Trial mode: Unlocks all functions for 30 days.
• Demo Mode: Displays what functions may look
like.
Periodically, updates will become available and the user
will be notified by an icon on the screen. To update the
handset, there must be Wi-Fi connection available.
Software Applications
Overview
The handset allows users to diagnose problems on
a wide variety of vehicles (from electric to heavy
duty vehicles). Users are able to perform common
service procedures, maintenance tests, and special
tests to find deficiencies with vehicle systems or
components.
Power Port
1. Handset
2. AC Power cord
When the handset is turned on, the level of battery charge
is indicated in the upper right corner of the screen.
NOTE: The tool can be used while charging. The battery can also be
charged using the 15 volt power supply provided with the kit.
Using the handset
There are three options for use.
• Register Now: It is recommended to register
for full functionality of tool and tech support.
• Trial Mode: This allows use of the handset for
30 days before it must be registered. If the 30
day trial period is over before it is registered,
the handset functions will be locked out. At
that time, register now or demo mode will
need to be entered.
• Demo Mode: This mode demonstrates the
functions by displaying random data.
ss01715
The handset will display DTCs from OBDI or OBDII
systems. Real-time sensor data can be viewed in data
stream mode. The user can also obtain diagnostic
information regarding repairs.
Browser mode allows the user to connect to the
internet to find websites that may help with the
repair of the vehicle. The handset comes with
wireless communication for ease of use and onscreen help when desired.
Battery Charging
Connect the handset to AC power and fully charge
the battery.
ss01714
1
2
MD-200
1. Press the power button to turn on the handset.
ss01719
You’ve got the right tool!
English
Espanol
¸
Francais
~
2. Select a language.
©Mitchell International, Inc. 581624 | REV. B | 06.2017 | APDMD032018
User Manual | Mitchell Diagnostics | Scan Tool | 7 | en
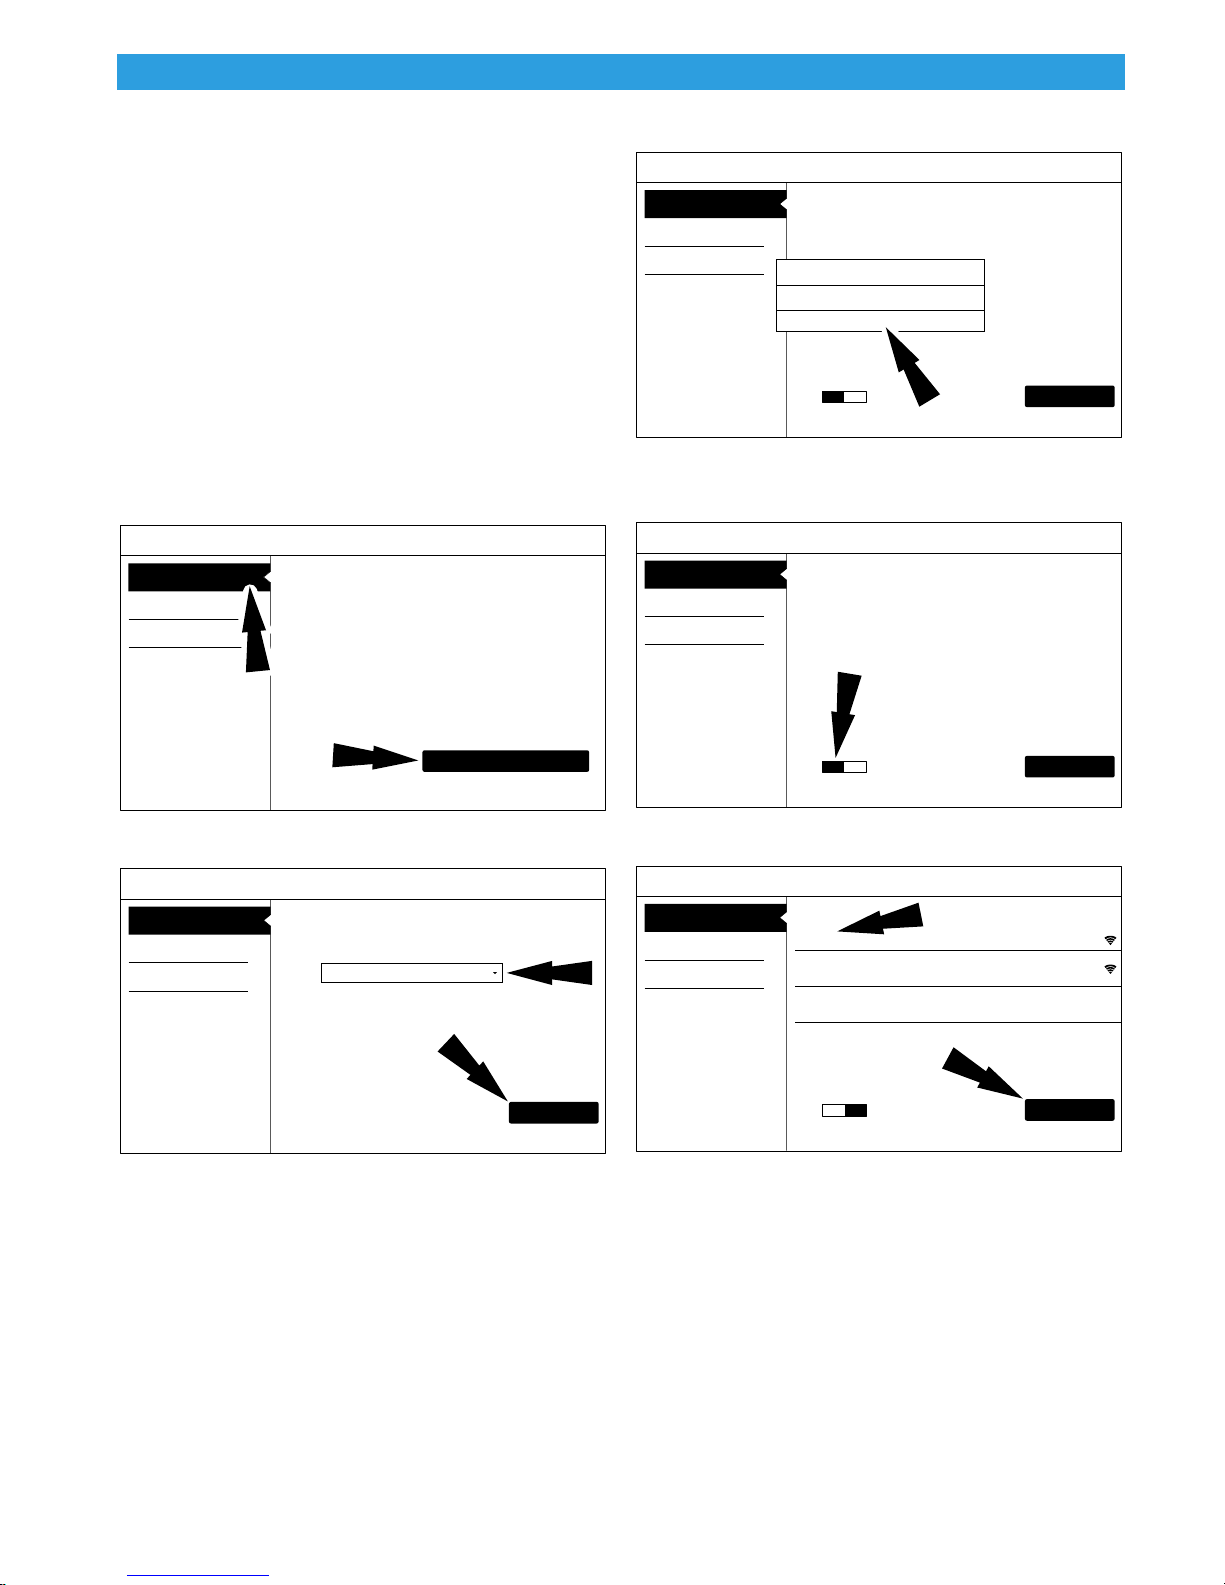
Registration
It is important to register the handset right away. To
register, it will need a Wi-Fi internet connection. To
connect to Wi-Fi, refer to steps 2 through 6. Register
now enables the unit. Register later causes the
device to go into a 30-day trial mode. Demo Mode
is for training and demonstration purposes only, it
cannot communicate with a vehicle. Demo Mode will
use sample data.
1. Select Register my Device Now.
2. Read and accept the user agreement.
ss01720
You’ve got the right tool!
Register my Device Now
Register my Device Later
Demo Mode
Quick Setup
1) Read & agree to the EULA.
2) Setup Wi-Fi.
3) Activate your warranty.
End User License Agreement
Software Product License Agreement
Copyright (c) 2014-2017, Bosch Automotive
Service Solutions Inc. All Rights Reserved
SOFTWARE PRODUCT LICENSE AGREEMENT
IMPORTANT: Do not continue until you have
read this Software Product License Agreement
(”Agreement”).
By clicking the I Agree button (or authorizing
any other person to do so), you accept this
Agreement and are bound bv its terms. If you
I Agree
ss02665
You’ve got the right tool!
Register my Device Now
Register my Device Later
Demo Mode
Note: Wi-Fi Must be ON. If Wi-Fi is OFF slide the Wi-Fi switch to the
ON position and follow the prompts on the screen.
ss02666
Setup Wi-Fi
Add Wi-Fi Network
This is needed for networks that do not broadcast their SSID
Wi-Fi is not enabled
Please enable Wi-Fi
OK
Wi-Fi
OFF
Next: Your Name
You’ve got the right tool!
Register my Device Now
Register my Device Later
Demo Mode
Setup Wi-Fi
Add Wi-Fi Network
This is needed for networks that do not broadcast their SSID
Wi-Fi
OFF
Next: Your Name
3. Select the correct Time Zone.
ss02825
You’ve got the right tool!
Register my Device Now
Register my Device Later
Demo Mode
Set Time Zone
GMT-05:00 Eastern Standard Time
4. Enable Wi-Fi and select Next
Next: Setup Wi-Fi
5. Select a network and select Next
ss01721
You’ve got the right tool!
Register my Device Now
Register my Device Later
Demo Mode
Setup Wi-Fi
Shop
Secured with WPA2
Office
Secured with WPA
Add WiFi Network
This is needed for networks that do not broadcast their SSID
Wi-Fi
ON
Next: Your Name
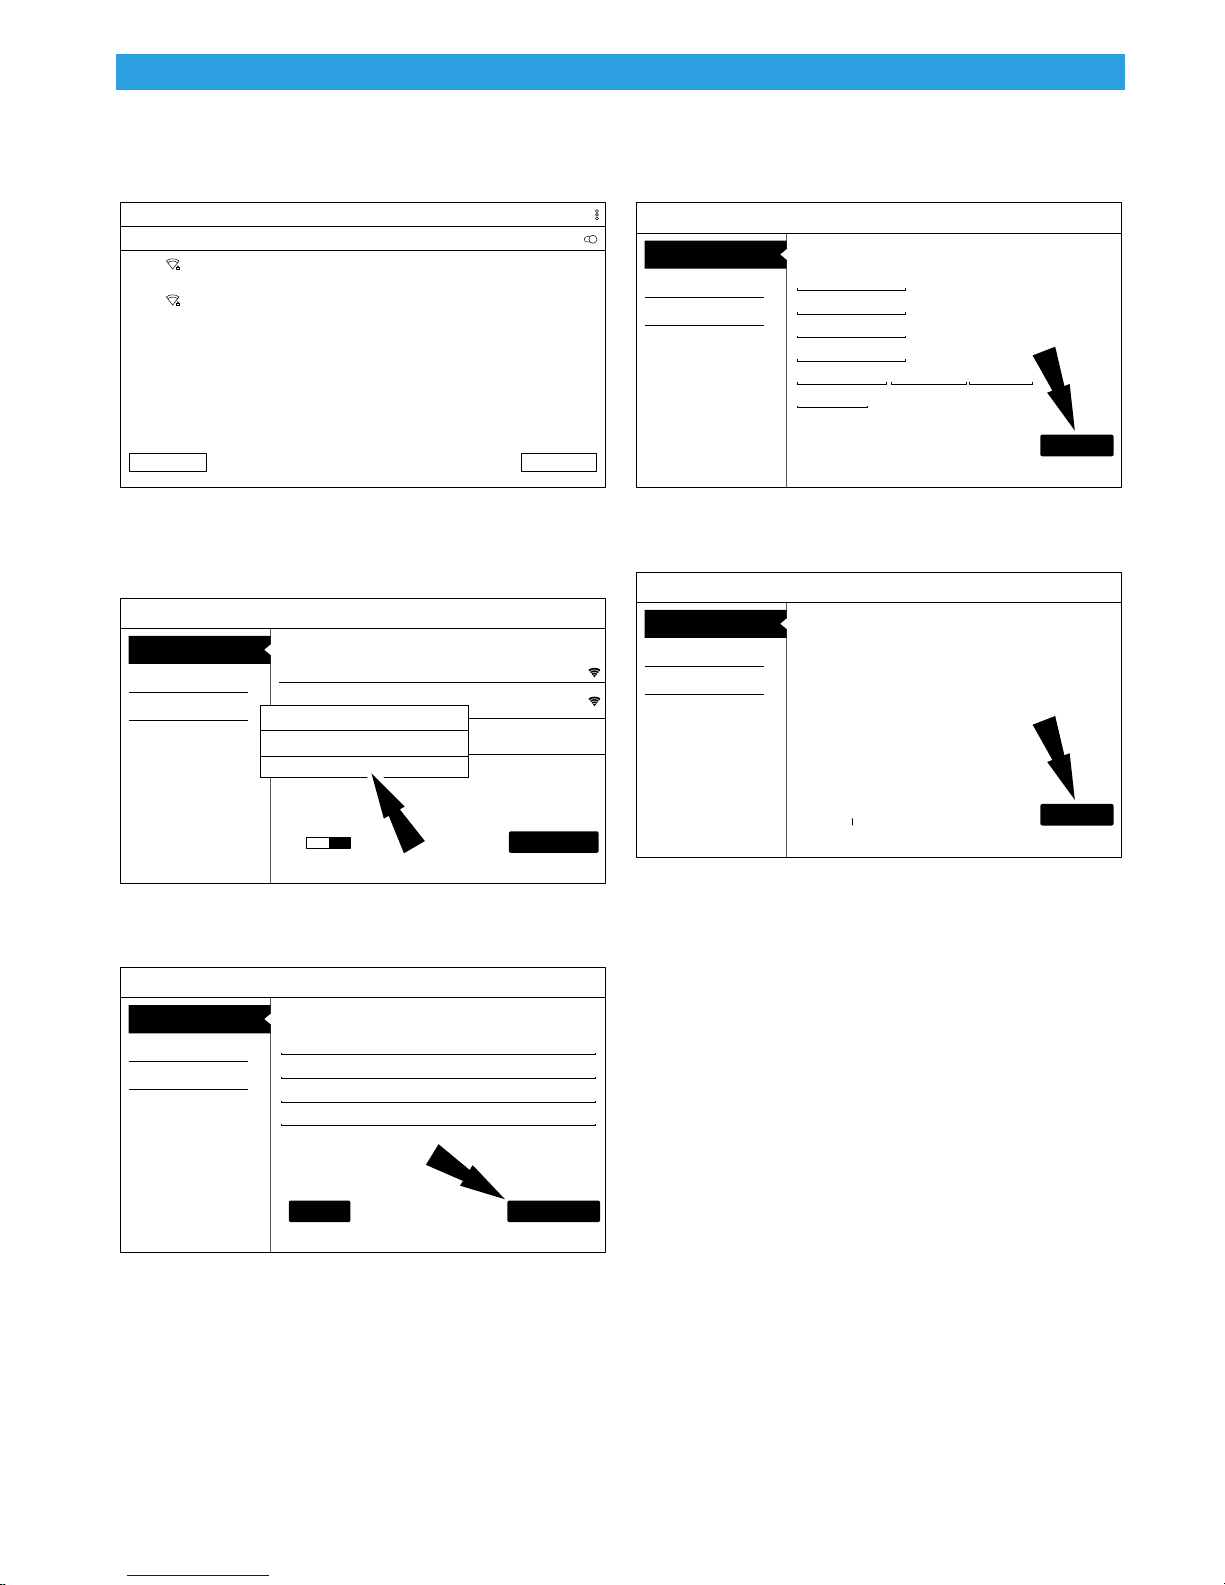
6. If a Network password is required the Android
©Mitchell International, Inc. 581624 | REV. B | 06.2017 | APDMD032018
User Manual | Mitchell Diagnostics | Scan Tool | 8 | en
Wi-Fi screen will be displayed. Follow the
prompts on the screen.
ss01722
Select Wi-Fi
On
Shop
Connected
Office
Saved
Back Next
7. If an internet connection could not be
established, follow the prompts on the
screen and try again.
ss02667
You’ve got the right tool!
Register my Device Now
Register my Device Later
Demo Mode
Setup Wi-Fi
Shop
Secured with WPA2
Office
Secured with WPA
Internet Sync Required
Add WiFi Network
Could not establish connection. please ensure connection to
Internet is stable and try again!
This is needed for networks that do not broadcast their SSID
Wi-Fi
OK
ON
Next: Your Name
9. Enter contact information. Follow the prompts
on the screen.
ss01726
You’ve got the right tool!
Register my Device Now
Register my Device Later
Demo Mode
Activate Warranty
cityshop@gmail.com
3135551212
1234 Main St
Address 2 (optional)
Detroit
United States
MI 48123
Confirm Info
10. Confirm information. Follow the prompts on
the screen and activate warranty.
ss01727
You’ve got the right tool!
Register my Device Now
Register my Device Later
Demo Mode
Activate Warranty
John
Doe
Garage
Ford
10/10/2013
2695551212
123 Main St
Detroit, MI 48481
USA
Privacy Policy Warranty FAQs
Activate Now
8. Enter your Name. Follow the prompts on the
screen to activate warranty.
ss01724
You’ve got the right tool!
Register my Device Now
Register my Device Later
Demo Mode
Activate Warranty
John
Smith
City Service Center
City Service Center
Set Clock
Next: Contact Info
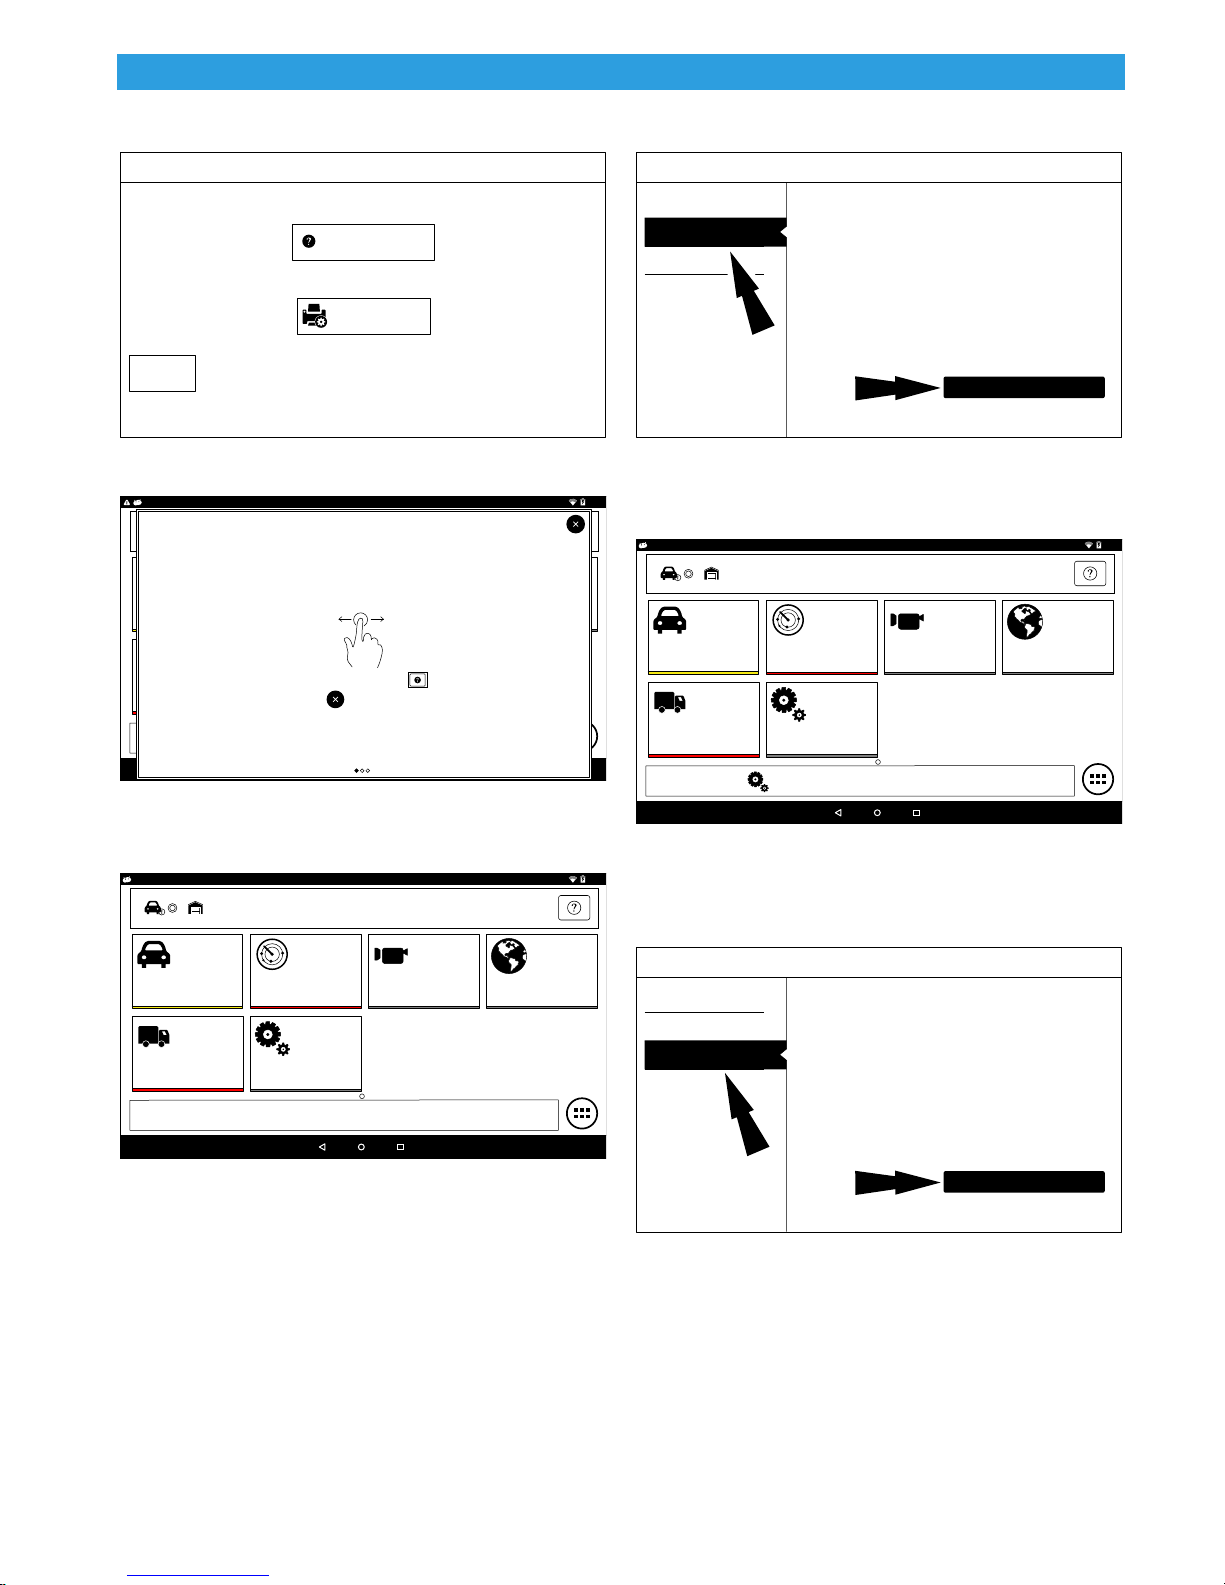
11. Setup Printer. This can be completed later by
going to Settings
©Mitchell International, Inc. 581624 | REV. B | 06.2017 | APDMD032018
User Manual | Mitchell Diagnostics | Scan Tool | 9 | en
ss02663
You’ve got the right tool!
Printer Setup
Printer setup help
Print test page
Skip
If skipped, you may setup a printer later from settings.
12. Follow the prompts on the screen.
ss02664
MAIN MENU - Tap Below To Begin Your Diagnostic Experience
We have some exciting new updates...
Swipe to see what’s new
Saved Diagnostic Data BrowserSelect Vehicle
OBDII
TIP: You can bring up this Overview at anytime by selecting the
Select the icon to close this Overview
Heavy Duty
Settings
icon at the top of the Main Menu.
ss01823
You’ve got the right tool!
Register my Device Now
Register my Device Later
Demo Mode
1. MD-200 is ready to use.
9:40
ss01824
MAIN MENU - Tap Below To Begin Your Diagnostic Experience
Start a 30 Day Use
1) Read & agree to the EULA.
2) Setup Wi-Fi.
Enabling 30 day use allows
time to register. The tool can
be used live on-car. At the
end of the 30 days, only
Demo Mode will be available
until the tool is registered.
Saved Diagnostic Data BrowserSelect Vehicle
OBDII
End User License Agreement
Software Product License
Agreement
Copyright (c) 2014-2017, Bosch Automotive
Service Solutions Inc. All Rights Reserved
SOFTWARE PRODUCT LICENSE AGGREEMENT
IMPORTANT: Do not continue until you have
read this Software Product license Agreement
(”AGreement”).
By clicking the I Agree button (or authorizing
any other person to do so) you accept this
I Agree
9:40
Today is Thu, 04 Jan 2018.
13. MD-200 is ready to use.
ss01728
MAIN MENU - Tap Below To Begin Your Diagnostic Experience
Saved Diagnostic Data BrowserSelect Vehicle
OBDII
Heavy Duty
Settings
Today is Thu, 04 Jan 2018.
30 Day Trial
1. Select Register my Device Later for 30 days of full
use of the tool before registration is required. If
the handset is not registered within the 30 day
trial period, after 30 days it will only function in
Demo Mode.
Heavy Duty
Demo
9:40
1. Select Demo mode
ss01825
You’ve got the right tool!
Register my Device Now
Register my Device Later
Demo Mode
2. MD-200 is ready to use.
Settings
Trial Mode: Click here to register
Enter Demo Mode
1) Read & agree to the EULA.
Demo Mode can be used for
training and tool
familiarization. Yo can
select various vehicles and
review the tool’s features
and functions. Demo Mode
does not allow
communication to a car.
End User License Agreement
Software Product License
Agreement
Copyright (c) 2014-2017, Bosch Automotive
Service Solutions Inc. All Rights Reserved
SOFTWARE PRODUCT LICENSE AGGREEMENT
IMPORTANT: Do not continue until you have
read this Software Product license Agreement
(”AGreement”).
By clicking the I Agree button (or authorizing
any other person to do so) you accept this
I Agree
©Mitchell International, Inc. 581624 | REV. B | 06.2017 | APDMD032018
User Manual | Mitchell Diagnostics | Scan Tool | 10 | en
ss01826
DEMO
MAIN MENU - Tap Below To Begin Your Diagnostic Experience
Saved Diagnostic Data BrowserSelect Vehicle
OBDII
Heavy Duty
Today is Thu, 04 Jan 2018.
Settings
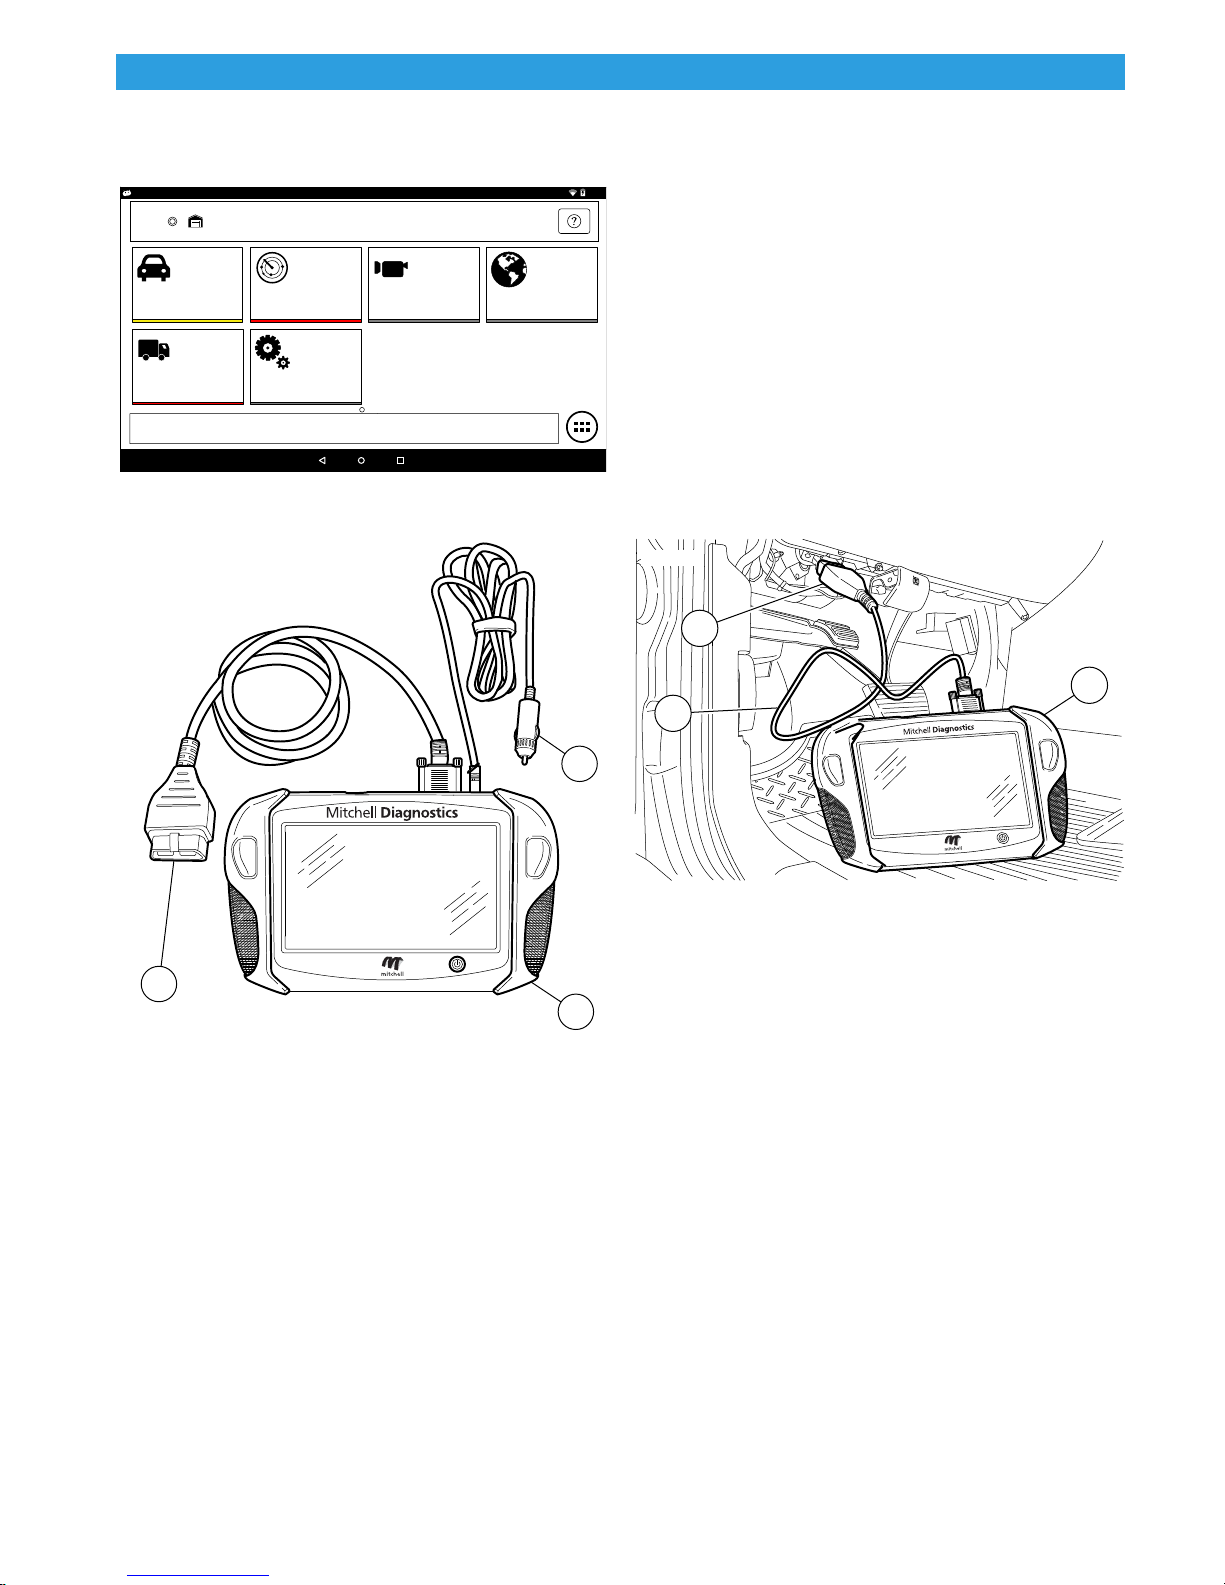
Provide Power to Scan ToolI
ss01716
3. Turn ignition ON.
Non-powered vehicle DLC setup
9:40
Some vehicles do not supply power through DLC. In
this case use the following procedure.
1. Connect OBD II / DLC cable to scan tool.
2. Connect OBD II / DLC cable to DLC on vehicle.
Typically located on the driver’s side under the
dash.
3. Connect the 12 volt power cable to the scan tool
power port.
4. Connect the 12 volt power connector to the
vehicle power outlet
5. Turn ignition ON.
ss01717
2
1
3
2
MD-200
1
3
Scan Tool Cable Connections
1. OBD II / DLC cable
2. 12 volt power cable (Use with vehicles that do
not supply power through DLC)
3. Scan tool
Power via vehicle DLC
1. Connect the OBD II / DLC cable to the scan tool.
2. Connect the OBD II / DLC cable to the DLC on
vehicle. Located within 18 inches (45.7 cm) of
steering wheel. Typically located on the driver’s
side, under dash.
MD-200
Scan Tool Connected to Vehicle
1. OBDII/DLC Cable
2. DLC
3. Scan Tool
©Mitchell International, Inc. 581624 | REV. B | 06.2017 | APDMD032018
User Manual | Mitchell Diagnostics | Scan Tool | 11 | en
Turning o handset:
ss01713
MAIN MENU - Tap Below To Begin Your Diagnostic Experience
Saved Diagnostic Data BrowserSelect Vehicle
OBDII
Heavy Duty
MD-200
Settings
Today is Thu, 04 Jan 2018.
1. Press and release the power button.
ss02856
MAIN MENU - Tap Below To Begin Your Diagnostic Experience
Heavy Duty
Power off
MRST will shut down.
Cancel OK
Settings
OBDII
Saved Diagnostic Data BrowserSelect Vehicle
Settings
Settings allow the user to make adjustments to the
following:
9:40
9:40
• Applications
• Software information
• Software update
• Printer Setup
• Subscriptions
• User Detail
• Language
• Direct-Hit
• Service
• Report Options
ss02852
MAIN MENU - Tap Below To Begin Your Diagnostic Experience
Heavy Duty
Today is Thu, 04 Jan 2018.
OBDII
Settings
9:40
Saved Diagnostic Data BrowserSelect Vehicle
Today is Thu, 04 Jan 2018.
2. Select OK. The tool will now shutdown.
Test Startup and Vehicle Connection
1. Turn ON the handset.
2. Connect the OBDII/DLC cable to the scan tool.
3. Connect the OBDII/DLC cable to the DLC on the
vehicle.
4. Turn the ignition ON, but keep the engine OFF
(KOEO).
5. Select vehicle from the Main Menu screen.
6. Enter the vehicle information one of two ways:
• AutoID
• Manual entry
7. From the Vehicle selected screen, select any
diagnostic function.
1. Select Settings from the Main Menu.
Application Settings
From the Settings screen select Application Settings.
Follow the prompts on the screen to make changes
to the following:
• Demo Mode
• Turn Demo mode ON or OFF
• Units of measure
• Switch between Standard or Metric
• Use TPR
• Enable TRP
• Data Steam Scroll Options
• Select scrolling options
©Mitchell International, Inc. 581624 | REV. B | 06.2017 | APDMD032018
User Manual | Mitchell Diagnostics | Scan Tool | 12 | en
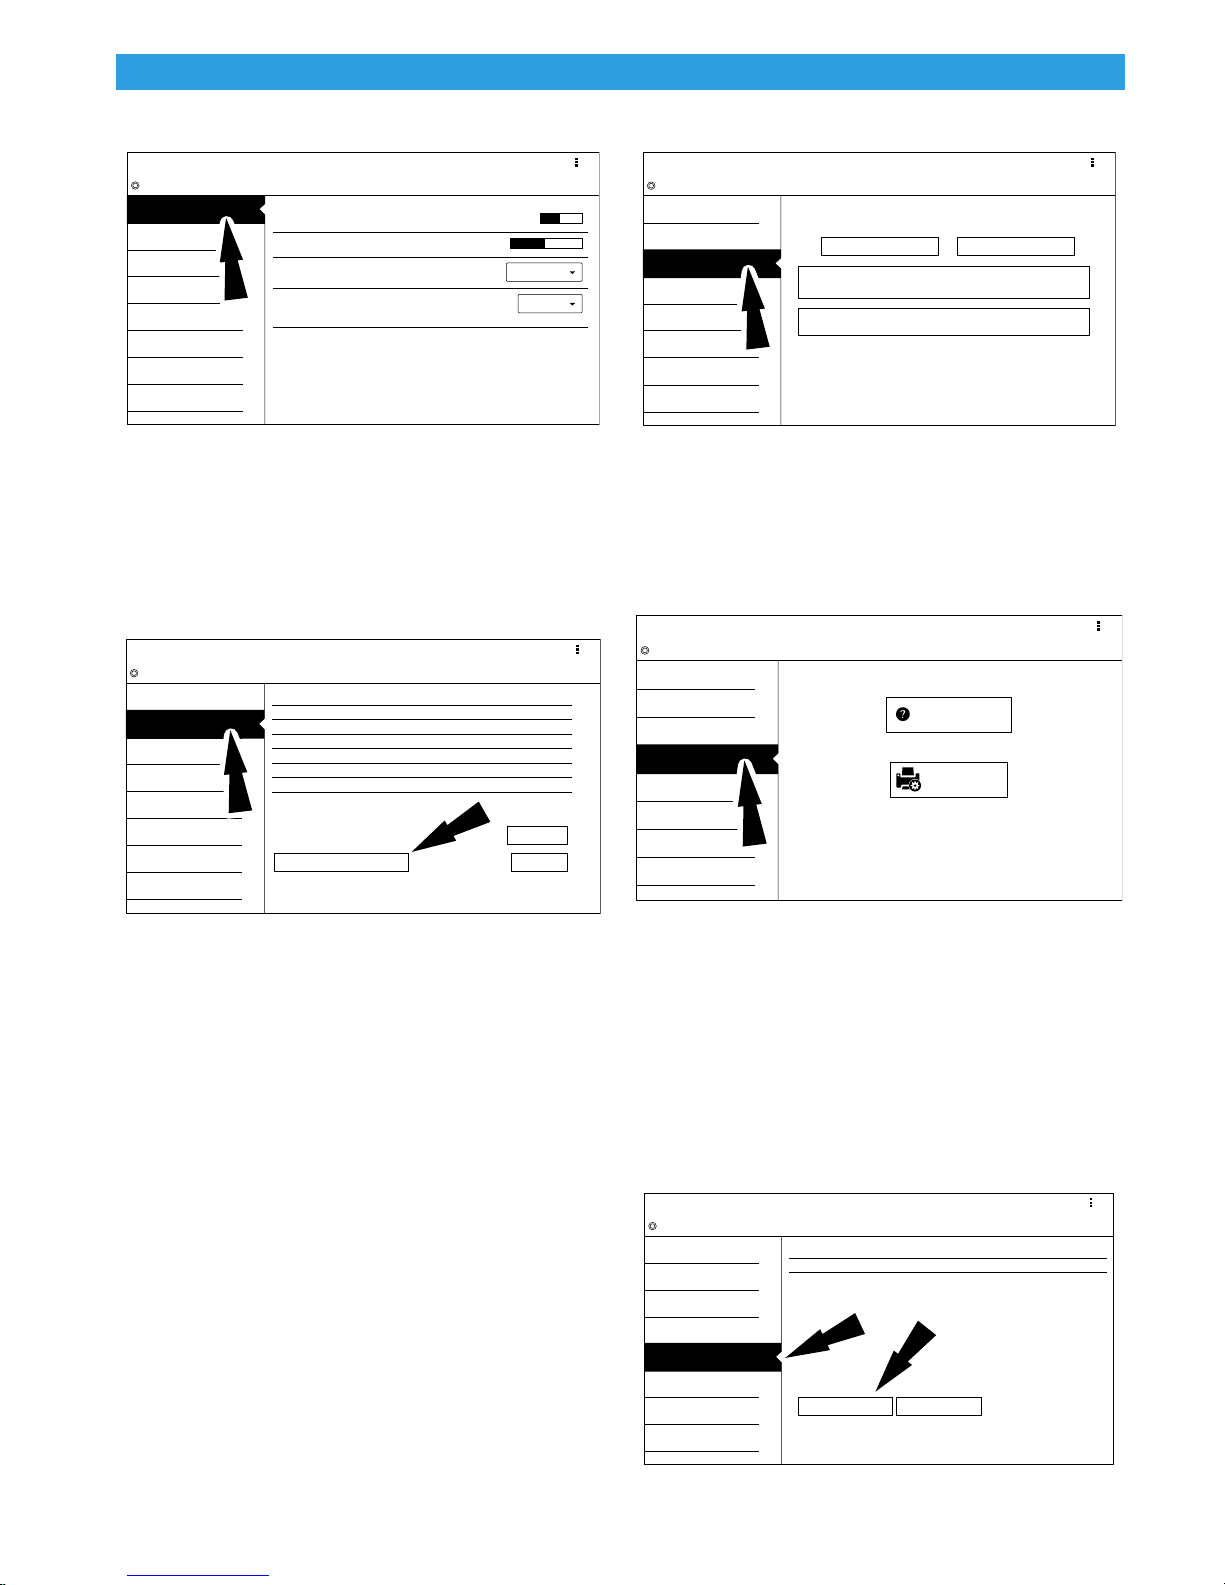
Software Information
Settings
Application Settings
Demo Mode
Units of Measure
Use TPR
Data Stream Scroll Options
Software Update
Subscriptions
Printer Setup
User Details
Contact Us
Language
Always Ask
Ask during test
Menu
OFF
Standard
ss02670
Settings
Application Settings
CoreManager 3.0.0.2
Windows DBCoordinatorAPI 3.0.0.2
DBCoordinatorCore 3.0.0.2
Database Schema 65
Database Publication Date 2017-12-05
Diagnostic API WSI 3.0.5
Launcher Version 3.0.0.122
Serial Number D1HGOW1415005484ET
Release Version: 3.0.0.11
View Open Source Software Details
Software Update
Subscriptions
Printer Setup
User Details
Contact Us
Language
Menu
Software Information
Release Notes
View License
ss02671
Settings
Application Settings
Software Update
Subscriptions
Printer Setup
Please ensure the tool is connected to the internet
Check for Updates
User Details
Contact Us
Language
Menu
Software Information
Install Update
No Updates Available
Updates Ready to Install
Current Revision: 3.0.0.11
ss02672
Settings
Application Settings
Software Update
Subscriptions
Printer Setup
User Details
Contact Us
Language
Menu
Software Information
Heavy Duty
Enter Subscription Code
All Coverage Subscription: Expires 5/21/2017
Reload Subscriptions
ss02674
Software Information
From the Settings screen select Software
Information. The current software versions will
be displayed.
Select View Open Source Software Details to view
more in-depth information.
Software Update
From the Settings screen select Software Update.
• Manually check for updates.
• Automatic download.
NOTE: Active internet connection is required for this function.
If an update is available follow the prompts on the
screen to update the handset.
Downloading the software will occur in the
background and varies with Wi-Fi connection speed
and quality. Installing the software can take up to
45 minutes. Please be sure to have your handset
fully charged and allow sucient time for the
installation.
Printer setup
1. Ensure device is connected to internet and
that network has unrestricted access to Google
services.
2. Follow the prompts on the screen.
ss02673
Settings
Application Settings
Software Information
Software Update
Printer Setup
Subscriptions
User Details
Contact Us
Language
Printer Setup
Printer setup help
Print test page
Subscription
The tool must be registered to see this tab.
1. From the Settings screen select Subscription.
• Heavy duty vehicle function is locked and must
be unlocked.
• Need to obtain subscription code.
• After one year, the user will be required to
renew the subscriptions to receive product
updates.
Menu
©Mitchell International, Inc. 581624 | REV. B | 06.2017 | APDMD032018
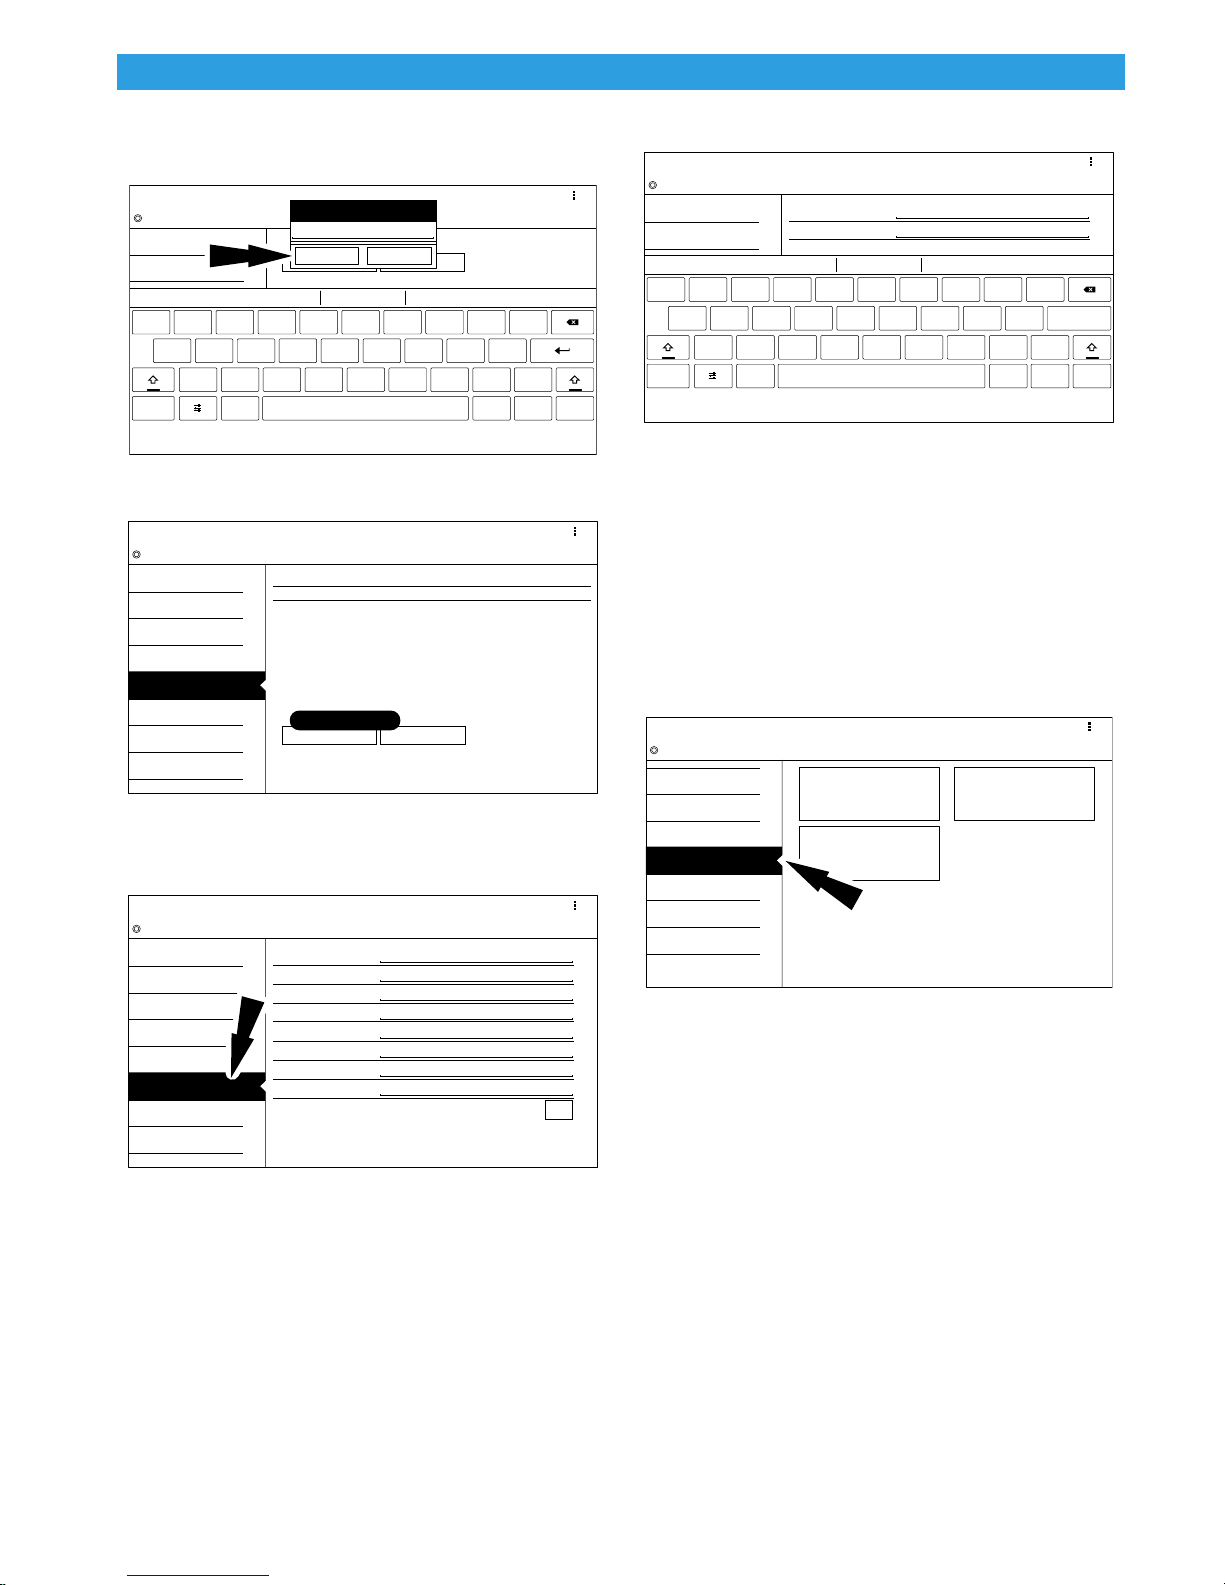
2. Select Enter Subscription Code.
Settings
Application Settings
Menu
Software Information
q
Heavy Duty
Enter Subscription Code Reload Subscriptions
w e r t y u i o
a s d f g h j k
z x c v b n m ,!.
?
‘
“
-
:-)
_
/
?123
@
l
p
OK Cancel
Enter Subscription Code
ss02675
Settings
Application Settings
Software Update
Subscriptions
Printer Setup
User Details
Contact Us
Language
Menu
Software Information
Heavy Duty
Enter Subscription Code
All Coverage Subscription: Expires 5/21/2017
Reload Subscriptions
Subscription Successfully Activated
ss02676
Settings
Application Settings
Software Update
Subscriptions
Printer Setup
User Details
Contact Us
Language
Menu
Software Information
Owner’s First Name
Owner’s Last Name
Distribution Name
Email
Phone
Address 1
Address 2 (optional)
City
Detroit
Save
123 Main Street
3195551234
JohnDoe@cityservice.com
City Service
Technician
John Doe
ss02677
Settings
Application Settings
Menu
Software Information
Owner’s First Name
Owner’s Last Name
Distribution Name
City Service
Technician
John Doe
q w e r t y u i o
a s d f g h j k
z x c v b n m ,!.
?
‘
“
-
:-)
_
/
?123
@
l
Next
p
ss02678
Settings
User Details
Contact Us
Language
Service
Direct-Hit
®
Report Options
Menu
Subscriptions
Espanol
~
¸
Francais
English
ss02679
3. Enter Subscription Code and select OK.
User Manual | Mitchell Diagnostics | Scan Tool | 13 | en
Note: The information saved in User Details will also update registration information.
Language
1. From the Settings screen select Language
2. Follow the prompts on the screen
3. English
4. Spanish
User Details
1. From the Settings screen select User Details.
2. Select field to modify.
5. French
©Mitchell International, Inc. 581624 | REV. B | 06.2017 | APDMD032018
User Manual | Mitchell Diagnostics | Scan Tool | 14 | en
VIN Match Results (4)
1FTPW14V28FC54321
2008 Ford
F-150
FORD
King Ranch
5.4, FLEX, -, Naturally Aspirated, SOHC
FORD
2008 Ford
F-150
XLT
5.4, FLEX, -, Naturally Aspirated, SOHC
ss02710
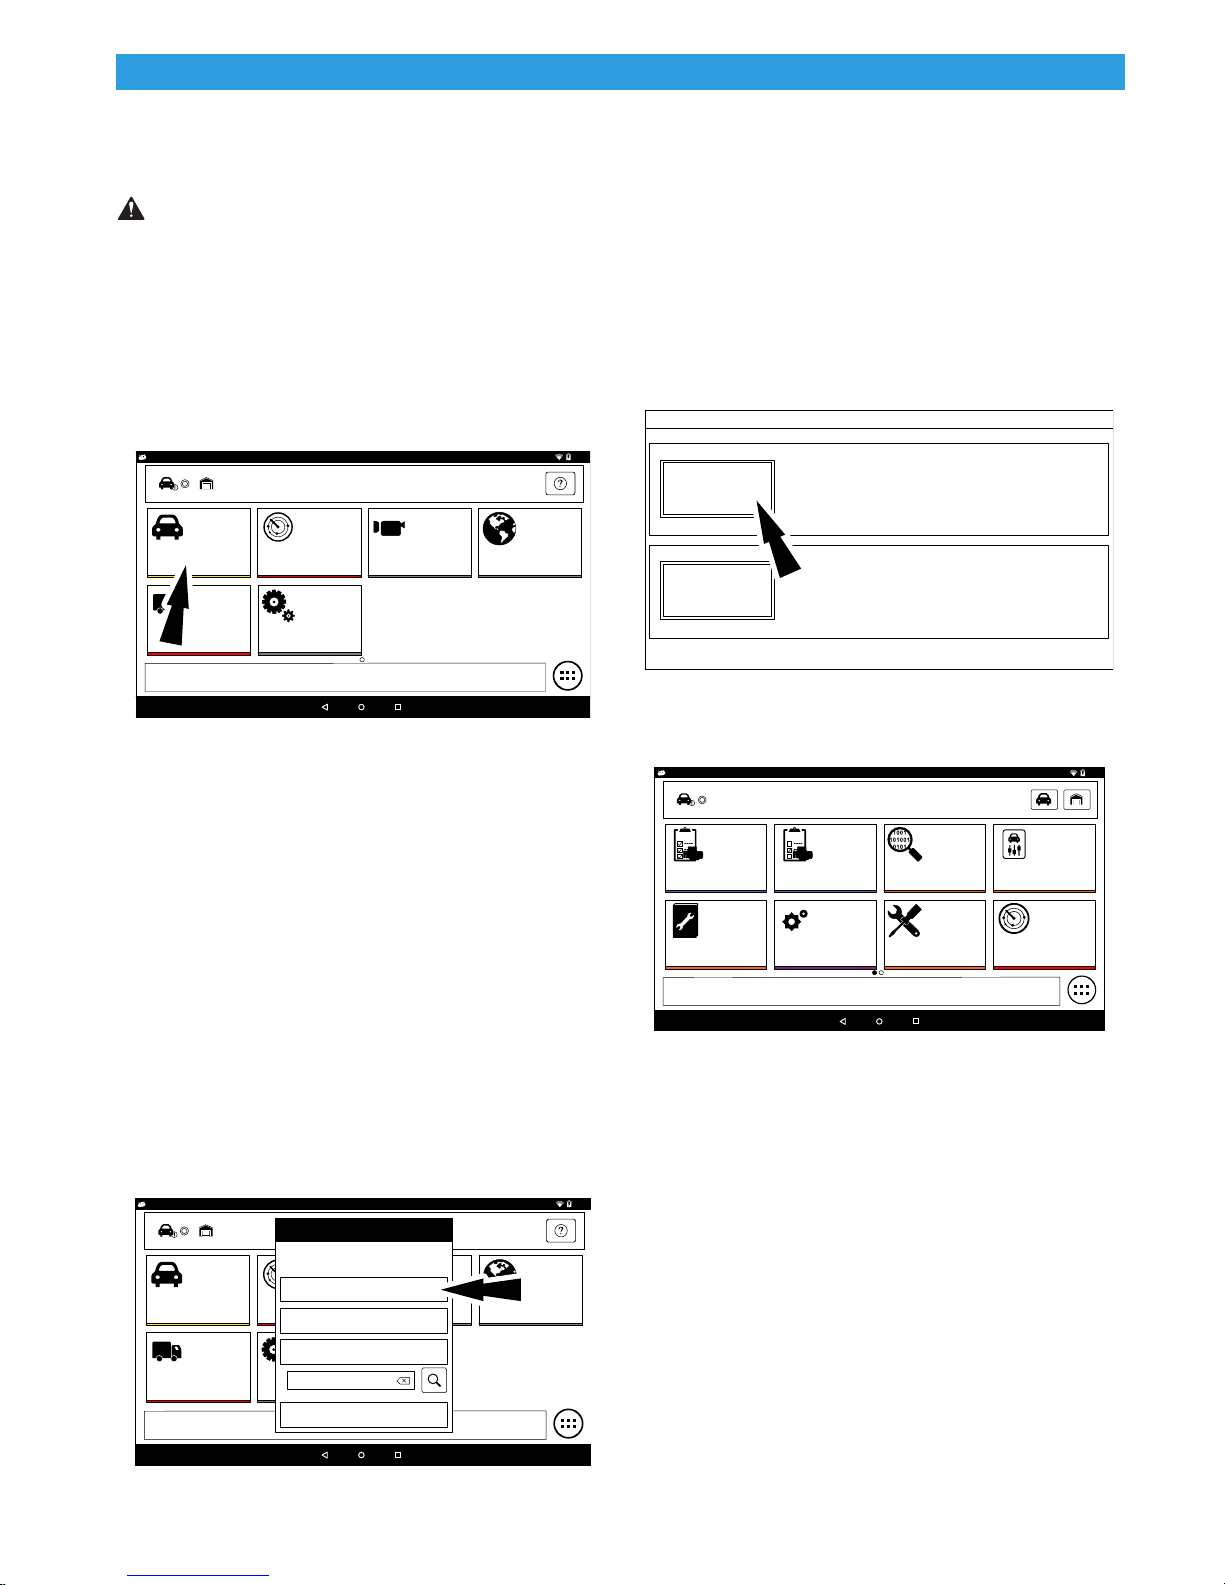
Selecting Vehicle
WARNING: Before performing any diagnostic
functions, refer to the Safety Precautions
and Warnings provided by the vehicle
manufacturer. In addition, follow any
warnings and instructions provided on the
handset.
.
ss02826
MAIN MENU - Tap Below To Begin Your Diagnostic Experience
Saved Diagnostic Data BrowserSelect Vehicle
OBDII
Heavy Duty
Settings
Today is Thu, 04 Jan 2018.
communicating with the vehicle.
4. The vehicle must have the key on, engine o
(KOEO).
5. Once the VIN is retrieved it is compared to the
vehicle database.
6. If a match is found the vehicle selection
information will be displayed on the screen.
7. Wait for AutoID to finish.
9:40
8. Select the desired vehicle from the list.
1. Select Vehicle from the Main Menu screen
to manually choose the vehicle, AutoID to
automatically identify the vehicle or enter the
VIN.
2. Select the vehicle specification options on each
screen until the complete vehicle information is
entered.
AutoID
AutoID uses the vehicle’s Mode 9 VIN information,
when available. Most vehicles from 2004 and newer
support AutoID, but some other older vehicles may
support Mode 9 too.
AutoID Operation:
1. Handset must be on and connected to the vehicle.
ss02689
9:40
MAIN MENU - Tap Below To Begin Your Diagnostic Experience
Heavy Duty
Select Vehicle
Choose vehicle selection method:
Make sure the key is ON and Engine is OFF
AutoID
Saved Diagnostic Data BrowserSelect Vehicle
OBDII
Manual Selection
Recent Vehicles
SEARCH BY VIN
Settings
Cancel
ss02835
2008 Ford F-150 King Ranch 5.4L
DTC
CHECK
Read DTCs
All Systems
Diagnostic information
DTC
CHECK
Read DTCs
Select Systems
Automated System Test
Today is Tue, 09 Jan 2018.
Data Stream
Maintenance Tests
Special Tests
Enhanced OBDII
9. At this point vehicle entry will disappear and
the user will be able to begin using diagnostic
functions on the vehicle.
4:09
2. Select AutoID.
3. Once selected the handset will begin
©Mitchell International, Inc. 581624 | REV. B | 06.2017 | APDMD032018
 Loading...