

Bosch MAP Quick Operation Manual
Safety
Danger!
Electricity
Injuries due to electricity are possible if
the system is not operated correctly or
if the system is opened or modified.
– Never open or modify the system.
– Please contact your installer if you want to
get your system modified.
!
Caution!
Sensitive components
Damage of sensitive components is
possible if the system is not handled
carefully or if the system is opened or
modified.
– Always handle the system carefully.
– Never open or modify the system.
– Please contact your installer if you want to
get your system modified.
Old electrical and electronic appliances
Electrical or electronic devices that are no
longer serviceable must be collected separately
and sent for environmentally compatible recycling (in accordance with the European Waste
Electrical and Electronic Equipment Directive).
To dispose of old electrical or electronic
devices, you should use the return and collection systems put in place in the country concerned.
Short information
This manual describes the most important operations of the MAP 5000 system. It does not replace the MAP 5000 Operation Manual.
For detailed information and instructions on operation, refer to the MAP 5000 Operation
Manual.
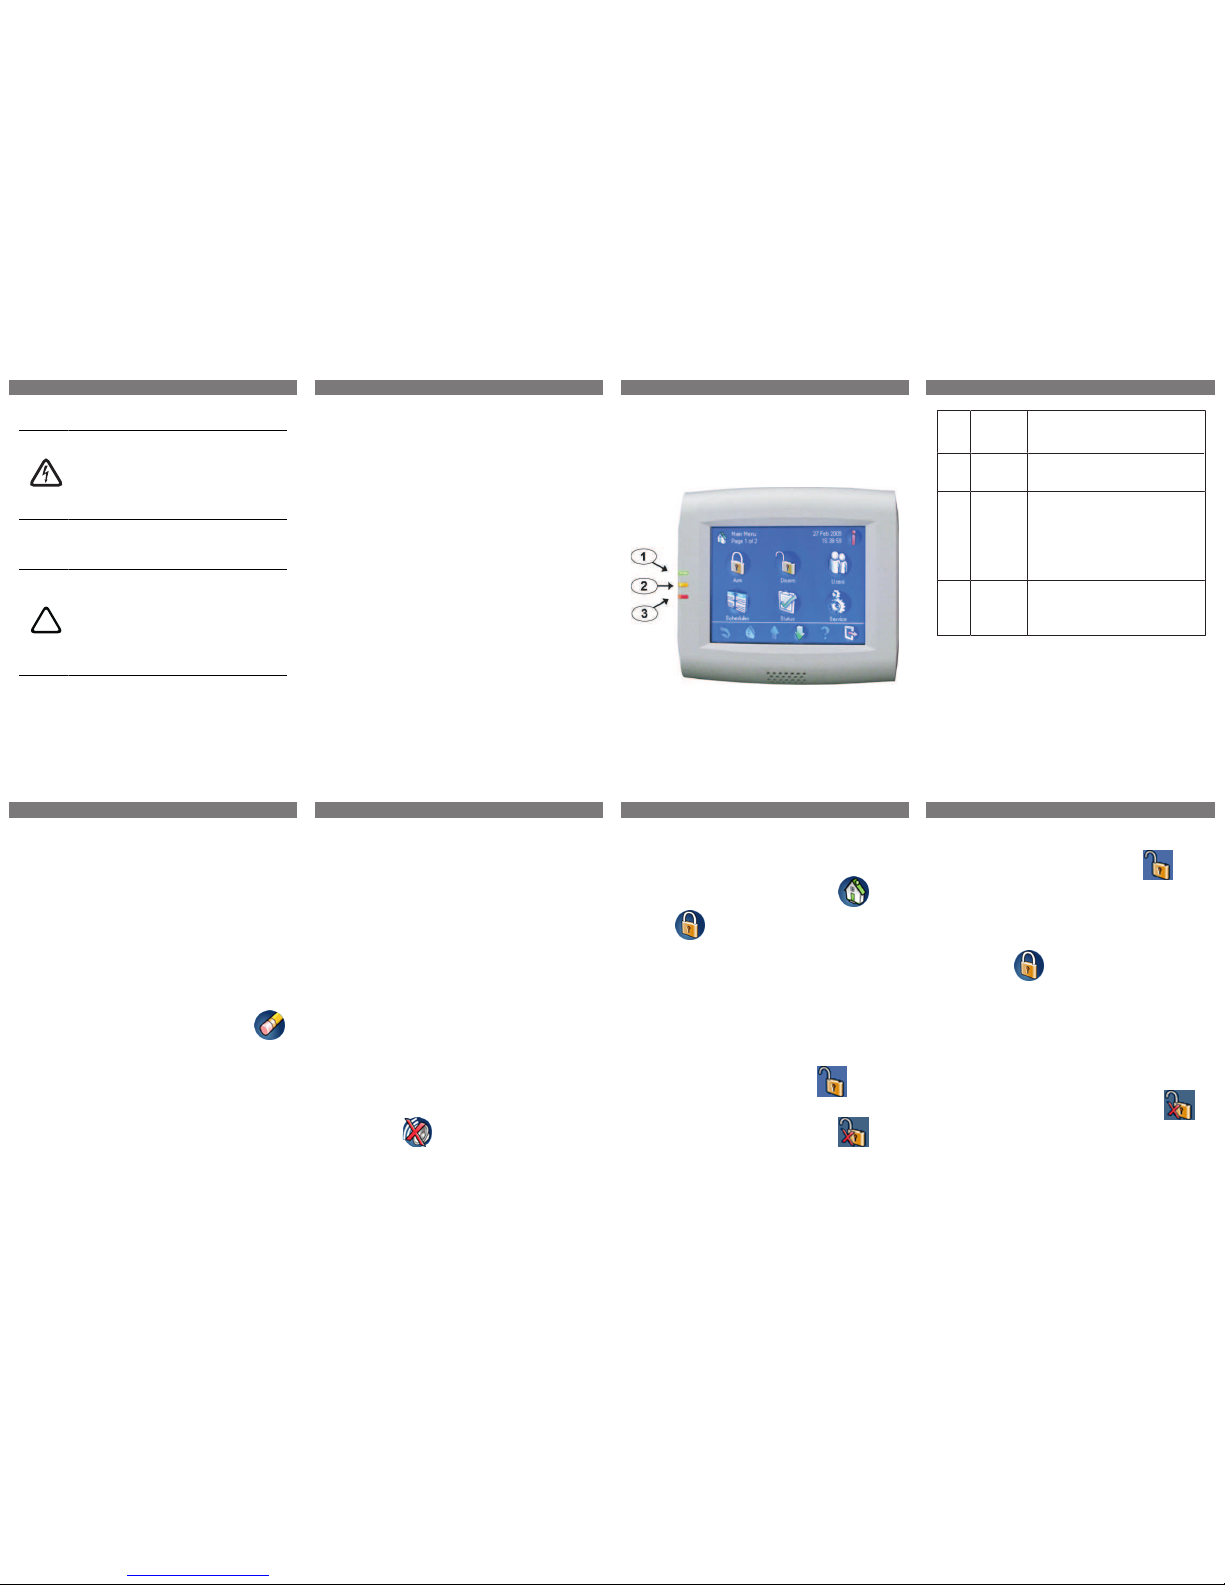
System overview
Three light-emitting diodes (LEDs) are located
on the left edge of the MAP control center housing:
Ele-
ment
Compon-
ent
Description
1 Green
LED
Indicates that the control center is in normal condition.
2 Yellow
LED
Indicates that there is a trouble
condition, that devices are
covered, or that devices of the
system are bypassed or disabled.
3 Red LED The default behavior indicates
that an alarm condition exists
in the security system.
Operation
Logging in
How to log in
1. To view the login screen, tap the screen.
2. In the passcode field, enter your
passcode.
The user passcode is a combination of
the 3-digit user ID and a 6-digit password
(e.g. 004123456).
ð If the passcode is correct, the Main
Menu is displayed.
Invalid passcode
If the passcode is not correct, an error message
is displayed.
1. To empty the passcode field, press
.
When an incorrect passcode has been entered
ten times, the control center is locked for two
minutes per default. These values can be configured by the installer.
Silencing alarms
How to silence the acoustic alarm of the local
control center
1. Touch the screen of the local control
center.
ð The login screen is displayed and the
acoustic alarm on the local control center is silenced.
How to silence all acoustic alarms of remote
devices
1. Log in to display all acoustic alarms.
Refer to How to log in, 1.
ð The first and last alarms are dis-
played immediately.
2. To silence the alarms of all remote
acoustic devices and control centers,
press .
ð The alarms of all remote acoustic devices
and control centers are silenced.
Arming areas
How to open the Arm menu
1. To open the Arm menu, press and
.
ð The Arm menu with three menu options
is displayed.
How to arm
1. Select one of the three menu options to
proceed.
ð The area and their current arming
possibility are displayed.
– An area is ready to arm, if the icon is
displayed.
– An area is not ready to arm, if the icon
is displayed.
How to arm, if area is ready to arm
ü An area is ready to arm, if the icon
is displayed. All devices in this area are
in normal state.
1. To arm an area that is ready to arm,
press the desired option or area.
2. Press .
ð A countdown starts, indicating the
remaining time to exit the location.
3. Exit the area within the remaining time of
the countdown.
ð The area is armed.
How to make an area ready to arm
ü An area is not ready to arm, if the
icon is displayed. There are active or faulted devices in the area.
1. To arm an area that is not ready to arm,
press the desired option or area.
1 | 2 | 3 | 4 |
5 | 6 | 7 | 8 |

2. Press .
ð All active or faulted devices, that
either can be bypassed or cannot be
bypassed, are displayed.
3. Resolve the issues of the listed devices
to make this area ready to arm.
How to force arm
1. If you want to arm the area without the
devices listed and if the preconditions
are fulfilled, press Force Arm.
Disarming areas
How to open the Disarm menu
1. To open the Disarm menu, press
and .
ð The Disarm menu with three menu op-
tions is displayed.
How to disarm
1. Select one of the three menu options to
proceed.
ð The area and their current arming
status are displayed. An area is
armed and can be disarmed if the
icon is displayed.
2. To disarm an area, press the desired option or area.
3. Press .
ð The area is disarmed.
Viewing area status
How to open the Status menu
1. To open the Status menu, press
and .
2. The Status menu with four menu options
is displayed.
How to view the area status
1. Press View Area Status.
ð A list with all areas and their status
is displayed. The symbol indicates that there is detailed information to be displayed for an area.
You can also search for areas by
name or filter areas according to
their arming or disarming status.
2. To view details on the area status, press
the symbol.
ð Details on the area status are displayed.
Bypassing
How to open the Status menu
1. To open the Status menu, press
and .
2. The Status menu with four menu options
is displayed.
How to bypass or unbypass a device
1. Press Bypass/Unbypass Device.
ð A list with all devices that can be by-
passed or unbypassed are displayed.
You can also search for devices by
name or filter devices according to
their fault and bypass status.
2. To change the status of a device, press
the button of the device.
ð The icon indicates that the device is
unbypassed. The icon and the yellow
LED on the control panel indicate that
the device is bypassed.
Logging off
How to log off
1. To log off, press .
Troubleshooting
Please contact your installer in case of problems
or any unexpected behavior of the system.
For detailed information and instructions on operation, refer to the MAP 5000 Operation
Manual.
9 | 10 | 11 |
12 | 13 | 14 |
MAP Control Center
en Quick Operation Guide
| 2016.10 | 01 | F.01U.330.487
 Loading...