


Bosch KFN91 Operating And Installation Manual

KFN91..
en Operating and installation instructions

2
en Table of Contents
Safety and warning information 3. . . . . . . . . . . . . . . . . . . . . . . . . . . . . . . . . . . . . . . . . . . . . . . . . . . . . . . . . . .
Directions for disposal 4. . . . . . . . . . . . . . . . . . . . . . . . . . . . . . . . . . . . . . . . . . . . . . . . . . . . . . . . . . . . . . . . . . .
Scope of delivery 4. . . . . . . . . . . . . . . . . . . . . . . . . . . . . . . . . . . . . . . . . . . . . . . . . . . . . . . . . . . . . . . . . . . . . . .
Installation notes 4. . . . . . . . . . . . . . . . . . . . . . . . . . . . . . . . . . . . . . . . . . . . . . . . . . . . . . . . . . . . . . . . . . . . . . . .
Note the ambient temperature and ventilation 5. . . . . . . . . . . . . . . . . . . . . . . . . . . . . . . . . . . . . . . . . . . . . . .
Installing and connecting up the appliance 5. . . . . . . . . . . . . . . . . . . . . . . . . . . . . . . . . . . . . . . . . . . . . . . . . .
Appliance and installation dimensions 9. . . . . . . . . . . . . . . . . . . . . . . . . . . . . . . . . . . . . . . . . . . . . . . . . . . . . .
Getting to know the appliance 10. . . . . . . . . . . . . . . . . . . . . . . . . . . . . . . . . . . . . . . . . . . . . . . . . . . . . . . . . . . .
Control elements 11. . . . . . . . . . . . . . . . . . . . . . . . . . . . . . . . . . . . . . . . . . . . . . . . . . . . . . . . . . . . . . . . . . . . . . .
Notes on using the appliance 12. . . . . . . . . . . . . . . . . . . . . . . . . . . . . . . . . . . . . . . . . . . . . . . . . . . . . . . . . . . . .
Switching on the appliance 12. . . . . . . . . . . . . . . . . . . . . . . . . . . . . . . . . . . . . . . . . . . . . . . . . . . . . . . . . . . . . . .
Setting the temperatures 12. . . . . . . . . . . . . . . . . . . . . . . . . . . . . . . . . . . . . . . . . . . . . . . . . . . . . . . . . . . . . . . . .
Alarm function 12. . . . . . . . . . . . . . . . . . . . . . . . . . . . . . . . . . . . . . . . . . . . . . . . . . . . . . . . . . . . . . . . . . . . . . . . . .
Childproof lock 13. . . . . . . . . . . . . . . . . . . . . . . . . . . . . . . . . . . . . . . . . . . . . . . . . . . . . . . . . . . . . . . . . . . . . . . . .
Supercool function 13. . . . . . . . . . . . . . . . . . . . . . . . . . . . . . . . . . . . . . . . . . . . . . . . . . . . . . . . . . . . . . . . . . . . . .
Superfreeze function 13. . . . . . . . . . . . . . . . . . . . . . . . . . . . . . . . . . . . . . . . . . . . . . . . . . . . . . . . . . . . . . . . . . . .
quick ice 13. . . . . . . . . . . . . . . . . . . . . . . . . . . . . . . . . . . . . . . . . . . . . . . . . . . . . . . . . . . . . . . . . . . . . . . . . . . . . .
Water filter symbol 13. . . . . . . . . . . . . . . . . . . . . . . . . . . . . . . . . . . . . . . . . . . . . . . . . . . . . . . . . . . . . . . . . . . . . .
Unit of temperature 14. . . . . . . . . . . . . . . . . . . . . . . . . . . . . . . . . . . . . . . . . . . . . . . . . . . . . . . . . . . . . . . . . . . . .
Fridge compartment 14. . . . . . . . . . . . . . . . . . . . . . . . . . . . . . . . . . . . . . . . . . . . . . . . . . . . . . . . . . . . . . . . . . . .
HydroFresh drawers 14. . . . . . . . . . . . . . . . . . . . . . . . . . . . . . . . . . . . . . . . . . . . . . . . . . . . . . . . . . . . . . . . . . . . .
Delicatessen drawer 14. . . . . . . . . . . . . . . . . . . . . . . . . . . . . . . . . . . . . . . . . . . . . . . . . . . . . . . . . . . . . . . . . . . . .
Variable layout of inside 15. . . . . . . . . . . . . . . . . . . . . . . . . . . . . . . . . . . . . . . . . . . . . . . . . . . . . . . . . . . . . . . . . .
Freezer compartment 16. . . . . . . . . . . . . . . . . . . . . . . . . . . . . . . . . . . . . . . . . . . . . . . . . . . . . . . . . . . . . . . . . . . .
Freezing foods 16. . . . . . . . . . . . . . . . . . . . . . . . . . . . . . . . . . . . . . . . . . . . . . . . . . . . . . . . . . . . . . . . . . . . . . . . .
Buying and storing deep−frozen foods 16. . . . . . . . . . . . . . . . . . . . . . . . . . . . . . . . . . . . . . . . . . . . . . . . . . . . . .
Thawing out frozen food 16. . . . . . . . . . . . . . . . . . . . . . . . . . . . . . . . . . . . . . . . . . . . . . . . . . . . . . . . . . . . . . . . .
Features of the freezer compartment 17. . . . . . . . . . . . . . . . . . . . . . . . . . . . . . . . . . . . . . . . . . . . . . . . . . . . . . .
Ice and water dispenser 17. . . . . . . . . . . . . . . . . . . . . . . . . . . . . . . . . . . . . . . . . . . . . . . . . . . . . . . . . . . . . . . . .
Water filter 19. . . . . . . . . . . . . . . . . . . . . . . . . . . . . . . . . . . . . . . . . . . . . . . . . . . . . . . . . . . . . . . . . . . . . . . . . . . . .
Specification and performance data sheet 20. . . . . . . . . . . . . . . . . . . . . . . . . . . . . . . . . . . . . . . . . . . . . . . . . .
Saving energy 21. . . . . . . . . . . . . . . . . . . . . . . . . . . . . . . . . . . . . . . . . . . . . . . . . . . . . . . . . . . . . . . . . . . . . . . . . .
Operating noises 21. . . . . . . . . . . . . . . . . . . . . . . . . . . . . . . . . . . . . . . . . . . . . . . . . . . . . . . . . . . . . . . . . . . . . . .
Defrosting 21. . . . . . . . . . . . . . . . . . . . . . . . . . . . . . . . . . . . . . . . . . . . . . . . . . . . . . . . . . . . . . . . . . . . . . . . . . . . .
Switching the appliance off and placing it out of operation 21. . . . . . . . . . . . . . . . . . . . . . . . . . . . . . . . . . . .
Cleaning 21. . . . . . . . . . . . . . . . . . . . . . . . . . . . . . . . . . . . . . . . . . . . . . . . . . . . . . . . . . . . . . . . . . . . . . . . . . . . . .
Lighting (LED) 22. . . . . . . . . . . . . . . . . . . . . . . . . . . . . . . . . . . . . . . . . . . . . . . . . . . . . . . . . . . . . . . . . . . . . . . . . .
Repairing minor malfunctions yourself 23. . . . . . . . . . . . . . . . . . . . . . . . . . . . . . . . . . . . . . . . . . . . . . . . . . . . . .
Customer services 25. . . . . . . . . . . . . . . . . . . . . . . . . . . . . . . . . . . . . . . . . . . . . . . . . . . . . . . . . . . . . . . . . . . . . .

3
Safety and warning
information
Before operating the
appliance
Read the instruction and installation
manual carefully.
They contain important information on
setting up, using, and maintaining the
appliance.
Retain all documents for later use or
for subsequent owners.
Safety
The appliance contains a small
amount of the refrigerant R600a, which
is environmentally friendly but
flammable. Make sure that the
refrigerant circuit pipes are not
damaged during transport or fitting. If
refrigerant sprays out, it can cause eye
injuries or ignite.
In the event of damage:
n Keep open flames or sources of
ignition away from the appliance,
n Ventilate the room well for a few
minutes,
n Switch off the appliance and
unplug it from the mains,
n Inform customer service.
The more refrigerant the appliance
contains, the greater the space
requirements for the room where it is
installed. If the room is too small, a
flammable gas/air mixture may
accumulate if there is a leak.
The room must be at least 1m
3
large
per 8g of refrigerant. The quantity of
refrigerant in the appliance is stated on
the nameplate inside the appliance.
If the appliance’s mains cable is
damaged, it must be replaced by the
manufacturer, customer services, or a
similarly qualified person. Improper
installation and repair jobs can place
the user in considerable danger.
Repairs may only be carried out by the
manufacturer, customer services, or a
similarly qualified person.
Only original parts of the manufacturer
may be used. The manufacturer only
guarantees that the safety
requirements are met if these parts are
used.
A mains cable extension lead may only
be procured via customer services.
During operation
n Never use electrical appliances
inside the appliance (e.g.heaters,
electric ice makers).
Risk of explosion!
n Never defrost or clean the
appliance with a steam cleaner.
Steam can come into contact with
electrical parts and cause a short
circuit or an electric shock.
Risk of electric shock!
n Do not use pointed or sharp
objects to remove layers of ice and
frost! Doing so can damage the
refrigerant pipes. If refrigerant
sprays out, it can ignite or cause
eye injuries.
n Do not store products with
flammable propellant gases
(e.g.spray cans) or explosive
substances inside the appliance.
Risk of explosion!
n Do not use base, drawers, doors,
etc. as steps or supports.
n When defrosting and cleaning the
appliance, disconnect the mains
plug or switch off the circuit
breaker. Tug on the mains plug, not
on the cable.
n Store high percentage alcohol only
in tightly closed containers and
upright.
n Do not soil plastic parts and the
door seal with oil or grease. If you
do so, the plastic parts and door
seal will become porous.
n Never cover or block ventilation
openings on the appliance.
n Children and people with impaired
physical, sensory, or mental abilities
or who lack knowledge of the
appliance must only use it if they
are supervised by a person who will
take responsibility for their safety or
who have learned how to use the
appliance by reading this manual.
n Do not store liquids in bottles or
cans in the freezer compartment (in
particular carbonated beverages).
Bottles and cans may burst.
n Never eat frozen foods immediately
after they have been taken out of
the freezer compartment.
Risk of freezer burn!
n Avoid prolonged contact of your
hands with frozen foods, ice, and
the evaporator tubes etc.
Risk of freezer burn!
Children in the household
n Do not give packaging or
packaging parts to children.
Danger of suffocation from
cardboard boxes and films!
n This appliance is not a toy!
n For appliances with a door lock:
Keep the key out of the reach of
children!
General requirements
The appliance is suitable for the
following tasks:
n Chilling and freezing food,
n Making ice cubes,
n Dispensing drinking water.
This appliance is intended for domestic
use in private households and for a
domestic environment.
The appliance is fitted with interference
suppression in accordance with
EUDirective 2004/108/EC.
The refrigerant circuit has been tested
for leaks.
This appliance corresponds to the
relevant safety requirements for
electrical appliances (EN60335/2/24).
deen
4
Directions for
disposal
x Disposal of packaging
The packaging protects your appliance
against damage during transp ort. All
materials used are environmentally
compatible and reusable. Please help:
dispose of the packaging in an
environmentally friendly manner.
For current methods of disposal,
please contact your dealer or the local
authorities.
x Disposal of old
appliances
Old appliances are not valueless
waste.
Valuable raw materials can be
recovered through environmentally
responsible disposal.
This appliance is in accordance
with European Directive
2002/96/EC on old electrical and
electronic appliances (Waste
Electrical and Electronic
Equipment − WEEE). The
guideline provides a valid
framework for recovering and
utilising old appliances
throughout the EU.
! War ning!
Handle worn out appliances as
follows:
1. Unplug the mains plug.
2. Cut the power cord and remove
along with the mains plug.
3. Do not remove the shelves and
containers. Leaving them intact
makes it more difficult for children
to climb in!
4. Never let children play with a worn
out appliance.
Risk of asphyxiation!
Refrigerators contain refrigerants and
the insulation contains gases.
Refrigerants and gases must be
disposed of properly. Do not damage
refrigerant tubing until such time when
it can be disposed of properly.
Scope of delivery
After unpacking the appliance, check
all parts for transport damage.
If you wish to make a complaint,
please contact the dealer from whom
you purchased the appliance or
customer services.
The scope of delivery includes the
following parts:
n Refrigerator and freezer unit,
n Features (vary depending on the
model),
n Water connection hose,
n Usage and assembly instructions,
n Guarantee slip,
n Information on energy consumption
and noises,
n Bag of assembly materials.
Installation notes
Transport and installation
This appliance is heavy and must be
secured during transport and fitting.
! War ning!
This appliance is very heavy. If the
appliance falls over during transport
and installation work, it can cause
serious injuries. At least two people are
required to install the appliance safely.
Keep the doors of the appliance shut
until the appliance is positioned and
level at its installation location.
Installation location
The appliance should be placed in a
dry room that can be ventilated. The
installation location should not be
directly exposed to the sun and should
not be near a heat source such as a
stove or radiator. If installation next to a
heat source is unavoidable, use a
suitable insulating plate or maintain the
following minimum distances from the
heat source:
n 3cm from an electric or gas
cooker,
n 30cm from oil or solid fuel cookers.
If the appliance is being installed next
to another refrigerator or freezer,
maintain a minimum distance between
the sides of the two appliances of
25mm. This prevents the formation of
condensation.
If there is a cover or cupboard above
the appliance, there must be a gap of
10mm to enable the appliance to be
pulled out if necessary.
The heated air must be able to escape
unimpeded from the rear of the
appliance.
If the appliance is being installed in the
corner of a room or in a niche, the
minimum required gaps (see section
"Device and installation dimensions")
at the sides of the appliance must be
observed so that the doors can be
opened all the way.
If adjacent kitchen units are deeper
than 75 cm, the minimum required
gaps at the side must be observed in
order to enable the entire door opening
angle to be used (see section "Door
opening angle").
Floor surface
Information!
The appliance is very heavy.
The floor at the installation location
must not sag. If necessary, reinforce it.
Empty weight:
Basic model 147kg
deen
5
Note the ambient
temperature and
ventilation
The climate class is stated on the
nameplate. It specifies the room
temperatures suitable for using the
appliance. The nameplate is on the
right of the appliance.
Climate class
Permissible ambient
temperature
SN +10 °C to 32 °C
N +16 °C to 32 °C
ST +16 °C to 38 °C
T +16 °C to 43 °C
Ventilation
The air from the base panel at the front
and cover plate at the rear heats up.
The heated air must be able to escape
unimpeded. Otherwise, the
refrigerating unit has to work harder,
which increases the appliance’s power
consumption. You must therefore
never cover or block the ventilation
openings.
Installing and
connecting up the
appliance
n The appliance must be installed
and connected up by a specialist in
accordance with these assembly
instructions.
n Once the appliance has been
positioned, wait at least 8hours
before plugging in the mains cable.
The oil in the compressor can shift
to the refrigeration system during
transport.
n Before starting the appliance up for
the first time, clean its interior (see
section Cleaning the appliance").
n The water line must be connected
up before the electrical
connections.
n In addition to the statutory national
regulations, the connection
requirements of the local electricity
and water supply companies are to
be observed.
n Only remove the transport locks on
the trays and racks once the
appliance has been installed.
n If the appliance doors need to be
removed in order for the appliance
to fit through the doors of the
house or flat, the doors must be
removed by customer services only.
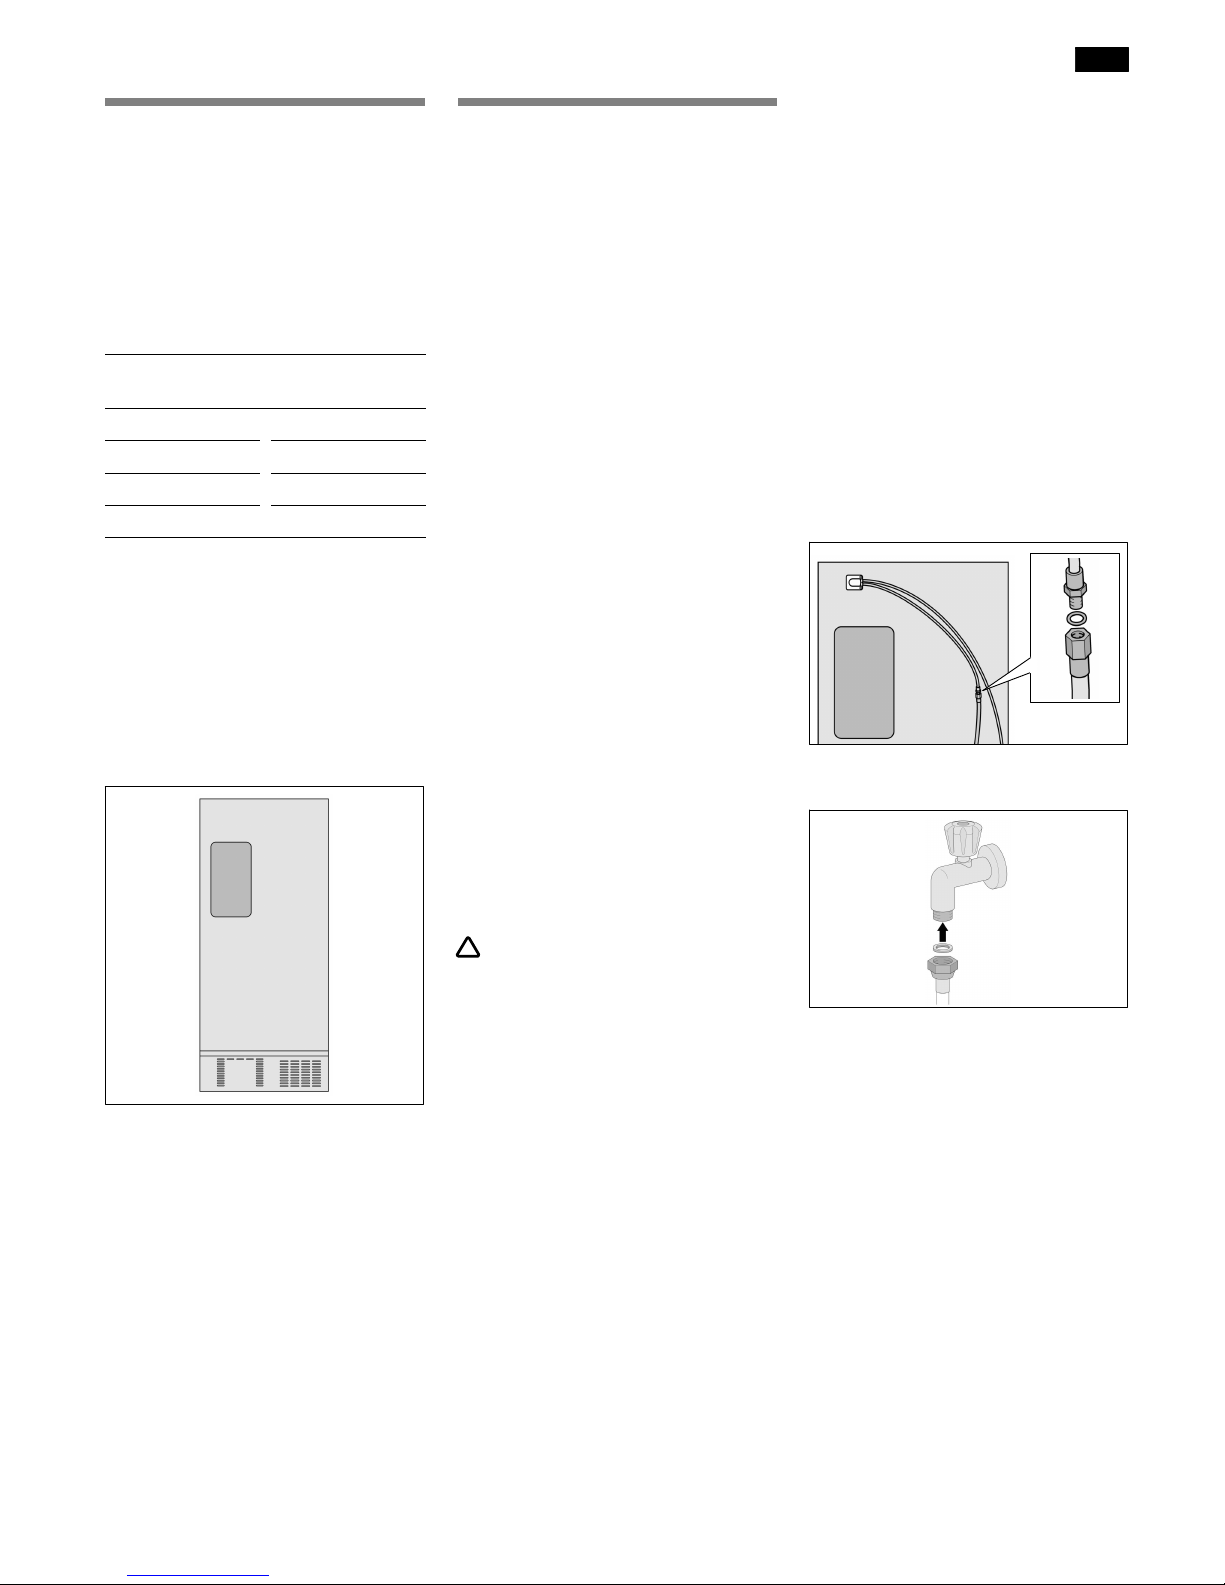
Water connection
! War ning!
Risk of electric shock and of damage
to property!
Disconnect the appliance from the
electricity mains before carrying out
any work on the water connection.
The water connection must only be
installed by a qualified plumber in
accordance with the regulations
governing the plumbing trade and the
local waterworks.
Connect the appliance to a drinking
water pipeline.
n Minimum pressure: 1.0bar
n Maximum pressure: 8.2bar
If the water pressure is more than
8.2bar, a pressure reducing valve
must be integrated. If the water
pressure is less than 1.0 bar, the ice
maker will not work.
The 3/4" tap for connecting the
enclosed connection line must be
easily accessible.
The connection line has a
3/4"connector.
The taste and smell of the water can
be improved by installing the enclosed
filter cartridge. If the filter cartridge is
used, pay attention to the different
connection conditions (see section
"Water filter").
Connecting up the appliance
1. Connect the connection line to the
appliance.
2. Connect the connection line to the
water tap.
3. Loop or wind the connection line so
that the appliance can be moved
away from the wall.
deen
6
Electrical connection
Following the installation of the
appliance, wait at least 8 hours before
starting it up. The oil in the compressor
can shift to the refrigeration system
during transport.
Clean the inside of the appliance
before it is first used (see section
"Cleaning").
The socket must be near to the
appliance and easily accessible, even
after the appliance has been moved
into place.
Connect the appliance to a
220−240V/50 Hz alternating current
via a properly installed socket with an
earth wire. The socket must have a
10A − 16 A fuse.
In the case of appliances operated
outside Europe, check whether the
voltage and type of current specified
on the nameplate conform to the
values of your electricity grid. This
information is located on the
nameplate.
! War ning!
In no circumstances may the
appliance be connected up to an
electronic energy saving socket.
Sine− and line−commutated inverters
can be used with our appliances. In
the case of isolated installations in
holiday homes or on boats, for
example, you must use a
sine−commutated inverter.
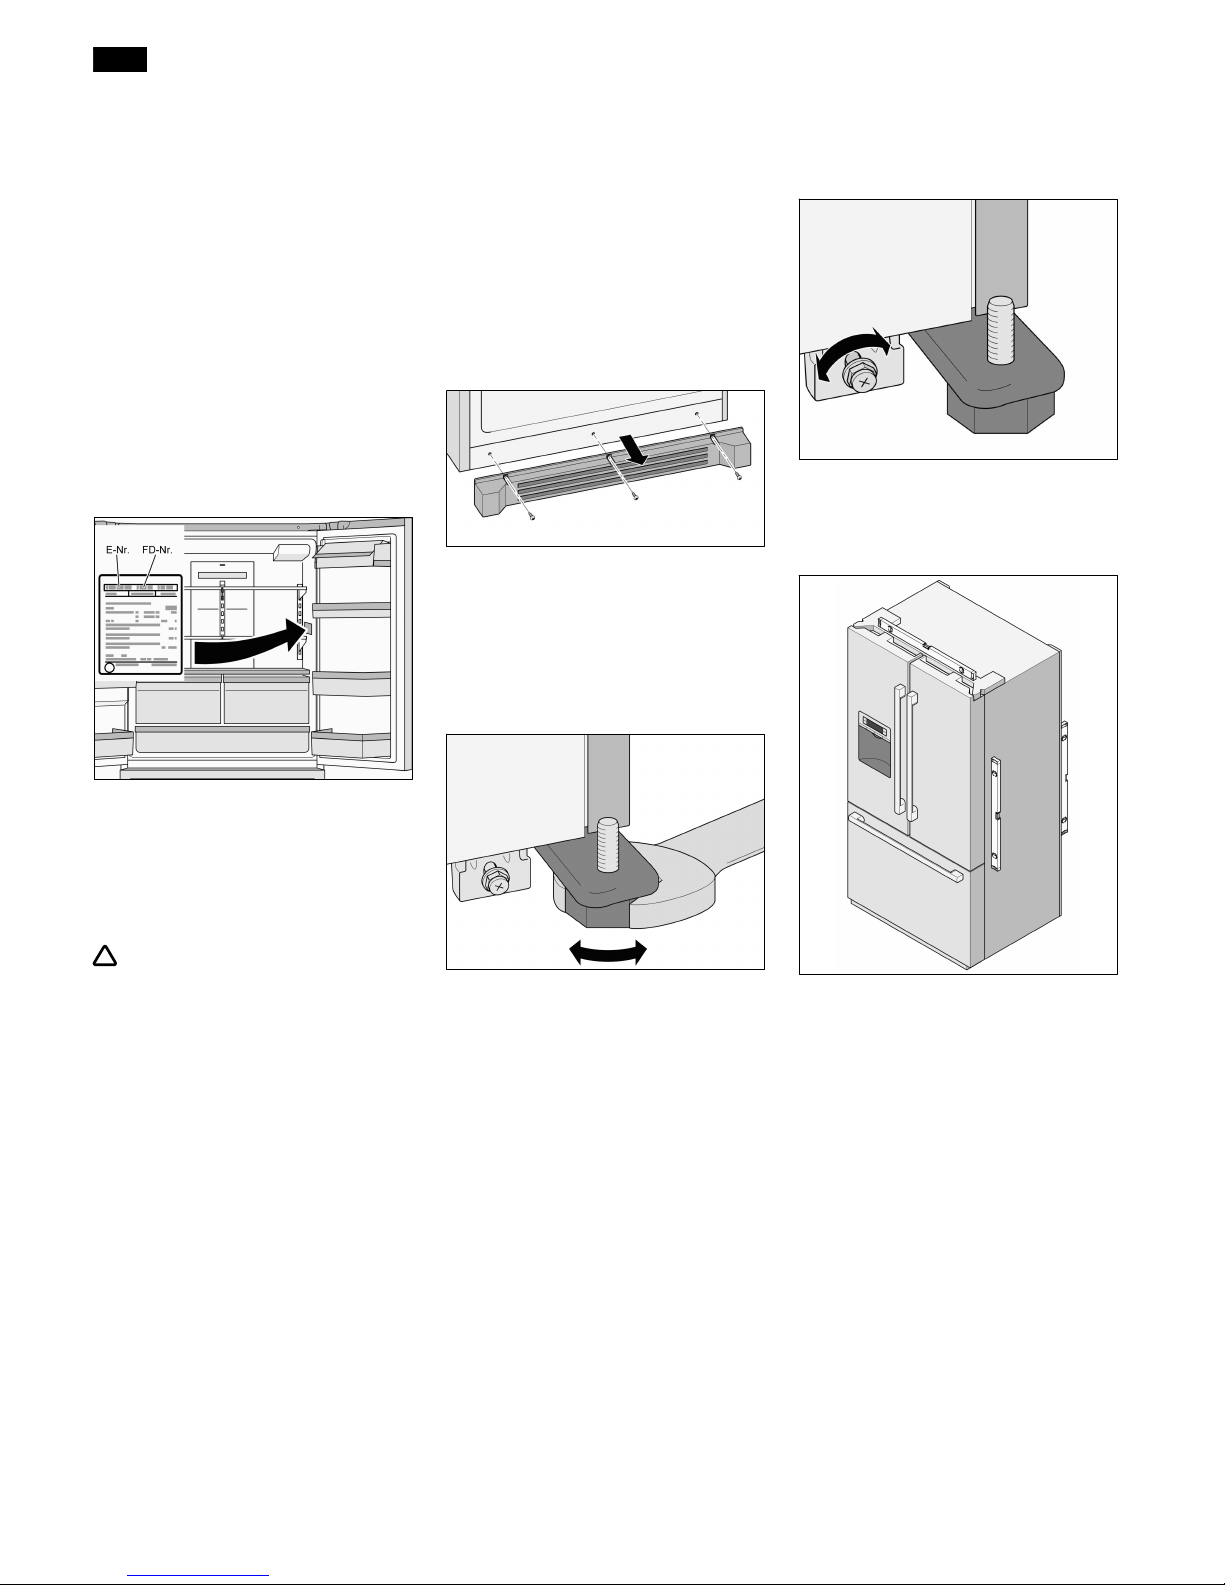
Aligning the appliance
Information!
So that it functions properly, the
appliance must be set level using a
spirit level.
An improperly aligned appliance can
result in water running out of the ice
maker, ice cubes of different sizes
being made, or the doors not closing
properly.
1. Place appliance at the intended
location.
2. Unscrew the three screws on the
base panel.
3. Remove the base panel.
4. Use an Allen key to screw the two
front feet out until they stand firmly
on the ground and align the
appliance at the front.
5. Use an Allen key to turn the screws
and align the appliance at the rear.
Raise the appliance at the rear:
Tur n the screw clockwise.
Lower the appliance at the rear:
Tur n the screw anticlockwise.
6. Check for horizontal alignment of
the appliance using a spirit level.
Information!
The front feet must stand firmly on the
ground so that the appliance does not
roll away.
7. If the fridge compartment doors or
freezer drawer have an uneven
height or are on a slant once the
appliance has been aligned, align
them as described below.
deen
7
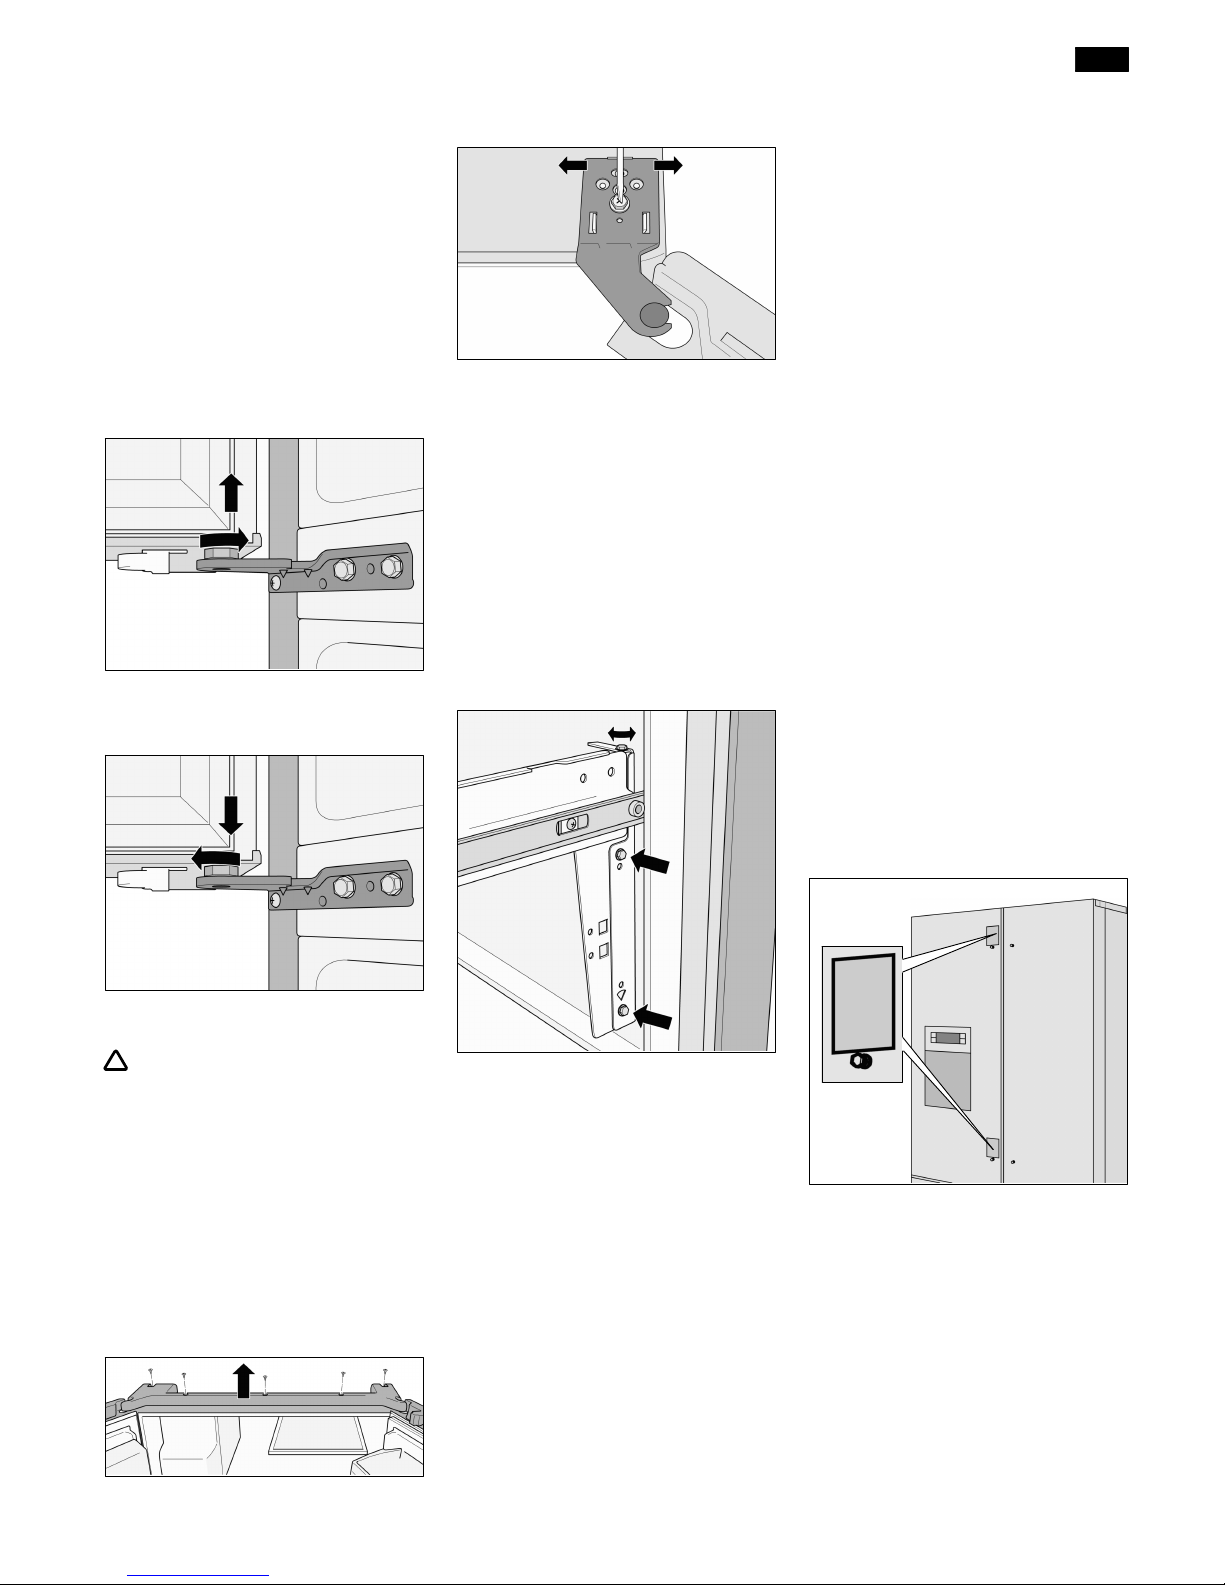
Aligning the fridge
compartment door
If the top and bottom edges of the
two fridge compartment doors are
not at the same level, proceed as
follows:
1. Determine which fridge
compartment door needs to be
raised.
2. Use the nut on the lower mount to
align the fridge compartment door.
To raise the fridge compartment
door:
Tur n the screw anticlockwise.
To lower the fridge compartment
door:
Tur n the screw clockwise.
If the fridge compartment doors are
on a slant, proceed as follows:
! War ning!
Risk of electric shock!
Before removing the top panel:
interrupt the supply of water to the
appliance. Pull out the mains plug or
disable the fuse.
1. Determine which fridge
compartment door needs to be
adjusted.
2. Unscrew the five screws on the top
panel.
3. Raise the panel.
4. Loosen the screws.
Do not take the screws out!
5. Align the fridge compartment door
by moving the mount to the side.
6. Tighten the screw.
7. Position the panel.
8. Position and tighten the five
screws.
Aligning the freezer
drawer
1. Determine which side needs to be
adjusted.
2. Loosen the two screws.
Do not take the screws out!
3. Align the freezer drawer using the
top screw.
4. Tighten the two screws.
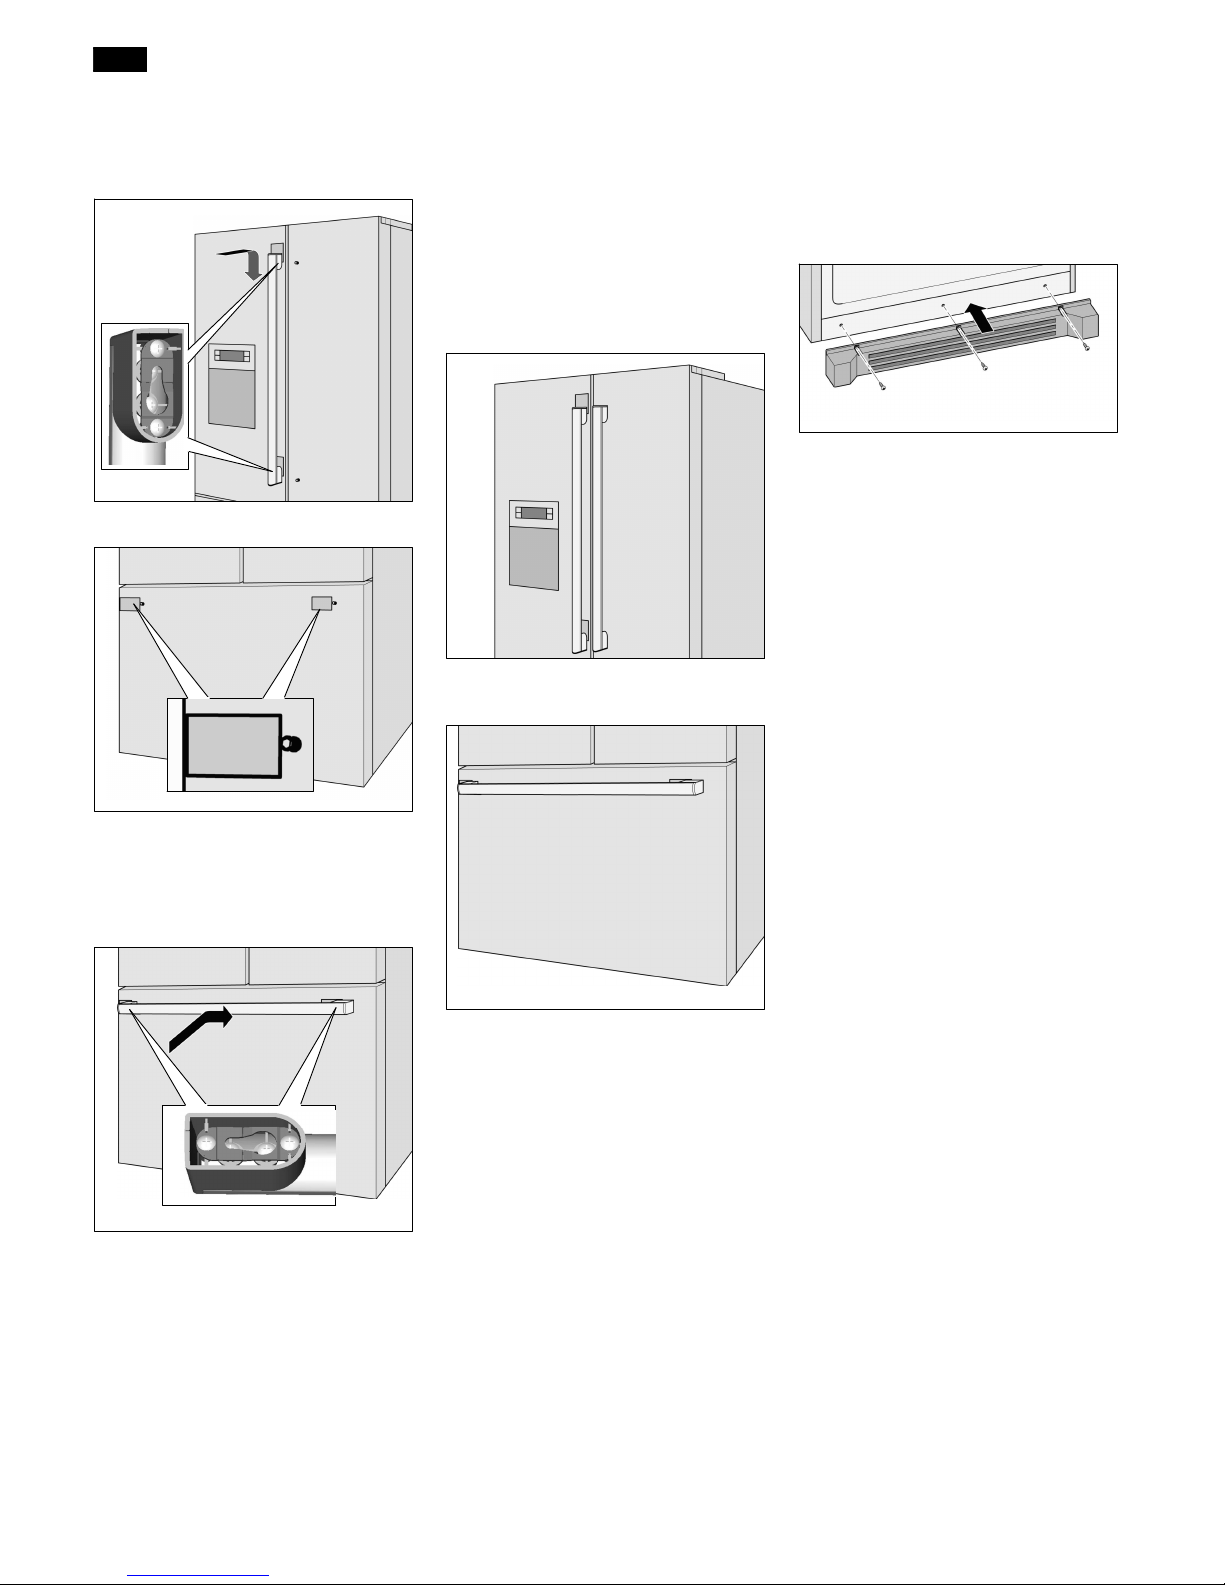
Attaching the handles
Only attach the handles once the
appliance has been positioned in its
installation location and has been
aligned so that it is level.
All of the handles are the same.
There are two protective sheets
enclosed with the appliance for
attaching and removing the handles.
These sheets can be reused.
The protective sheets protect the
surfaces during the attachment and
removal of the handles.
Information!
If the handles are incorrectly
positioned, they cannot be pushed in
the specified direction.
Position the handles properly as
follows:
It must be possible to push the
handles for the fridge compartment
doors downwards.
It must be possible to push the handle
for the freezer compartment drawer to
the right.
If the handles are hard to push,
carefully tap them with a rubber
hammer.
1. Remove the protective sheets from
the fridge compartment doors and
the freezer compartment drawer.
2. Attach the protective sheets.
deen
8
3. Position the handles for the fridge
compartment doors on the guides.
4. Slide the handles downwards until
they snap into place.
5. Attach the protective sheets.
6. Place the handle for the freezer
compartment drawer onto the
guides.
7. Slide the handle to the right until it
snaps into place.
8. Remove the protective sheets and
keep them for reuse.
Removing the handles
Information!
To avoid scratching the surface, attach
the protective sheet a little below the
handle so that it is not pushed to the
side by the handle.
1. Attach the protective sheets as
follows:
n To the fridge compartment doors
above the guides.
n To the freezer compartment
drawer to the left of the guides.
2. Push the handles for the fridge
compartment doors upwards and
remove them.
3. Push the handle for the freezer
compartment drawer to the left and
remove it.
4. Remove the protective sheets and
keep them for reuse.
Fitting the base panel
1. Unscrew the three screws on the
device.
2. Position the base panel.
3. Position and tighten the three
screws.
deen
 Loading...