

Page 1

Fridge-freezer
Холодильно-морозильная комбинация
Sovutgich-Muzlatgich
KDN
en Instruction for Use
ru Инcтpyкция пo экcплyaтaции
uz Foydalanish bo'yicha yo'riqnoma
Page 2

en Table of Contents
Safety and warning information ............ 4
Information concerning disposal .......... 7
Scope of delivery .................................... 7
Ambient temperature and ventilation .. 8
Connecting the appliance ..................... 8
Getting to know your appliance ........... 9
Switching the appliance on ................ 10
Setting the temperature ...................... 10
Energy saving mode ........................... 11
Alarm function ...................................... 11
Usable capacity .................................... 12
Refrigerator compartment .................. 12
Super cooling ....................................... 13
Freezer compartment .......................... 13
Max. freezing capacity ........................ 14
ru Coдepжaниe
Укaзaния пo бeзoпacнocти
и пpeдyпpeждeния .............................. 22
Укaзaния пo yтилизaции ................... 26
Oбъeм пocтaвки .................................. 27
Teмпepaтypa oкpyжaющeй cpeды
и вeнтиляция ........................................ 27
Подключение бытового прибора ... 28
Знакомство с бытовым прибором . 29
Включение бытового прибора ....... 30
Уcтaнoвкa
Peжим экoнoмии элeктpoэнepгии . 31
Предупредительная функция .......... 32
Пoлeзный oбъeм ................................. 33
Xoлoдильнoe oтдeлeниe ................... 33
Cyпepoxлaждeниe .............................. 35
Mopoзильнoe oтдeлeниe .................. 35
Maкc. пpoизвoдитeльнocть
зaмopaживaния ................................... 35
тeмпepaтypы .................... 31
Freezing and storing food .................. 14
Freezing fresh food ............................. 14
Super freezing ...................................... 15
Thawing frozen food ............................ 16
Interior fittings ....................................... 16
Sticker “OK” .......................................... 17
Switching off and disconnecting
the appliance ........................................ 17
Defrosting .............................................. 17
Cleaning the appliance ....................... 17
Light (LED) ............................................ 18
Tips for saving energy ........................ 18
Operating noises ................................. 19
Eliminating minor faults yourself ....... 19
Customer service ................................. 21
Зaмopaживaниe и xpaнeни
пpoдyктoв ............................................. 36
Зaмopaживaниe cвeжиx
пpoдyктoв питaния ............................. 36
Cyпepзaмopaживaниe ....................... 37
Paзмopaживaниe пpoдyктoв ............ 38
Cпeциaльнoe ocнaщeниe ................. 39
Haклeйкa «OK» ................................... 40
Bыключeниe прибора и вывoд eгo
из экcплyaтaции
Paзмopaживaниe ................................ 40
Чистка прибора .................................. 41
Ocвeщeниe (нa cвeтoдиoдax) .......... 41
Kaк cэкoнoмить элeктpoэнepгию .. 42
Paбoчиe шyмы ..................................... 42
Caмocтoятeльнoe ycтpaнeниe
мeлкиx нeиcпpaвнocтeй ................... 43
Cлyжбa cepвиca ................................. 45
................................. 40
e
Page 3

uz Mundarija
Xavfsizlik va ogohlantirish
ko'rsatmalari .......................................... 46
Utilizasiya qilish bo'yucha
ko'rsatmalar ........................................... 49
Komplekt tarkibi ................................... 50
Xona temperaturasi bilan havo
aylanishini inobatga olish ................... 50
Qurilmani ulash .................................... 51
Qurilma bilan tanishish ....................... 51
Qurilmani yoqish .................................. 52
Temperaturani sozlash ........................ 53
Energiyani tejash rejimi ....................... 53
Signal funksiyasi ................................... 53
Foydali hajmi ......................................... 54
Sovutish kamerasi ................................ 54
Supermuzlatish ..................................... 56
Muzlatish kamerasi .............................. 56
Maks. muzlatish quvvati ..................... 56
Muzlatish va saqlash ........................... 56
Yangi oziq-ovqatlarni muzlatish ......... 57
Supermuzlatish ..................................... 58
Muzlatish mahsulotini eritish .............. 58
Jihozlanish ............................................. 58
”OK” etiketkasi ..................................... 59
Qurilmani o'chirib to'xtatish ................ 59
Eritish ..................................................... 60
Qurilmani tozalash ............................... 60
Chiroq (LED) ......................................... 60
Energieyani tejash ............................... 61
Ish shovqinlari ...................................... 61
Kichik nosozliklarni mustaqil
ravishda bartaraf qilish ....................... 62
Mijozlar xizmati ..................................... 63
Page 4

en
enTable of Contents
enInstruction for Use
Safety and warning
information
Before you switch ON the
appliance
Please read the operating and
installation instructions carefully!
They contain important
information on how to install,
use and maintain the appliance.
The manufacturer is not liable if
you fail to comply with the
instructions and warnings.
Retain all documents for
subsequent use or for the next
owner.
Technical safety
The appliance contains a small
quantity of environmentally
friendly but flammable
refrigerant R600a. Ensure that
the tubing of the refrigerant
circuit is not damaged during
transportation and installation.
Leaking refrigerant may cause
eye injuries or ignite.
If damage has occurred
■ Keep naked flames and/or
ignition sources away from the
appliance,
■ thoroughly ventilate the room
for several minutes,
■ switch off the appliance and
pull out the mains plug,
■ inform customer service.
The more refrigerant an
appliance contains, the larger
the room must be in which the
appliance is situated. Leaking
refrigerant can form a
flammable gas-air mixture in
rooms which are too small.
The room must be at least 1 m³
per 8 g of refrigerant. The
amount of refrigerant in your
appliance is indicated on the
rating plate inside the appliance.
If the power cord of this
appliance is damaged, it must
be replaced by the
manufacturer, customer service
or a similarly qualified person.
Improper installations
and repairs may put the user
at considerable risk.
Repairs may be performed by
the manufacturer, customer
service or a similarly qualified
person only.
Only original parts supplied by
the manufacturer may be used.
The manufacturer guarantees
that only these parts satisfy the
safety requirements.
A extension cable may be
purchased from customer
service only.
4
Page 5

en
Important information when
using the appliance
■ Never use electrical
appliances inside the
appliance (e.g. heater, electric
ice maker, etc.). Explosion
hazard!
■ Never defrost or clean the
appliance with a steam
cleaner! The steam may
penetrate electrical parts and
cause a short-circuit. Risk
of electric shock!
■ Do not use pointed and sharp-
edged implements to remove
frost or layers of ice. You
could damage the refrigerant
tubes. Leaking refrigerant may
cause eye injuries or ignite.
■ Do not store products which
contain flammable propellants
(e.g. spray cans) or explosive
substances in the appliance.
Explosion hazard!
■ Do not stand on or lean
heavily against base
of appliance, drawers
or doors, etc
■ For cleaning pull out mains
plug or switch off fuse. Do not
pull out the mains plug by
tugging on the power cord.
■ Store high-percentage alcohol
tightly closed and standing up.
■ Keep plastic parts and the
door seal free of oil and
grease. Otherwise, parts and
door seal will become
porous.
■ Never cover or block the
ventilation openings of the
appliance!
■ Avoiding placing children
and vulnerable people at
risk:
At risk are children, people
who have limited physical,
mental or sensory abilities, as
well as people who have
inadequate knowledge
concerning safe operation of
the appliance.
Ensure that children and
vulnerable people have
understood the hazards.
A person responsible for
safety must supervise or
instruct children and
vulnerable people who are
using the appliance.
Only children from 8 years
and above may use the
appliance.
Supervise children who are
cleaning and maintaining the
appliance.
Never allow children to play
with the appliance.
5
Page 6

en
■ Do not store bottled or
canned drinks (especially
carbonated drinks) in the
freezer compartment. Bottles
and cans may burst!
■ Never put frozen food straight
from the freezer compartment
into your mouth.
Risk of low-temperature burns!
■ Avoid prolonged touching of
frozen food, ice or the
evaporator pipes, etc.
Risk of low-temperature burns!
Children in the household
■ Keep children away from
packaging and its parts.
Danger of suffocation from
folding cartons and plastic
film!
■ Do not allow children to play
with the appliance!
■ If the appliance features a
lock:
keep the key out of the reach
of children!
General regulations
The appliance is suitable
■ for refrigerating and freezing
food,
■ for making ice,
■ for dispensing drinking water.
This appliance is intended for
use in the home and the home
environment.
The appliance is suppressed
according to EU Directive 2004/
108/EC.
The refrigeration circuit has
been checked for leaks.
This product complies with
the relevant safety regulations
for electrical appliances
(EN 60335-2-24).
This appliance is intended for
use up to a maximum height of
2000 metres above sea level.
6
Page 7

en
Information concerning
disposal
* Disposal of packaging
The packaging protects your appliance
from damage during transit. All utilised
materials are environmentally safe and
recyclable. Please help us by disposing
of the packaging in an environmentally
friendly manner.
Please ask your dealer or inquire at your
local authority about current means of
disposal.
* Disposal of your old
appliance
Old appliances are not worthless
rubbish! Valuable raw materials can be
reclaimed by recycling old appliances.
This appliance is labelled in
accordance with European
Directive 2012/19/EU concerning
used electrical and electronic
appliances (waste electrical and
electronic equipment - WEEE).
The guideline determines the
framework for the return and
recycling of used appliances as
applicable throughout the EU.
m Warning
Redundant appliances
1. Pull out the mains plug.
2. Cut off the power cord and discard
with the mains plug.
3. Do not take out the trays
and receptacles: children are
therefore prevented from climbing in!
4. Do not allow children to play with
the appliance once it has spent its
useful life. Danger of suffocation!
Refrigerators contain refrigerant
and gases in the insulation. Refrigerant
and gases must be disposed
of professionally. Ensure that tubing
of the refrigerant circuit is not damaged
prior to proper disposal.
Scope of delivery
After unpacking all parts, check for any
damage in transit.
If you have any complaints, please
contact the dealer from whom you
purchased the appliance or our
customer service.
The delivery consists of the following
parts:
■ Free-standing appliance
■ Interior fittings (depending on model)
■ Bag containing installation materials
■ Operating instructions
■ Installation manual
■ Customer service booklet
■ Warranty enclosure
■ Information on the energy
consumption and noises
7
Page 8

en
Ambient temperature
and ventilation
Ambient temperature
The appliance is designed for a specific
climate class. Depending on the climate
class, the appliance can be operated at
the following temperatures.
The climate class can be found on
the rating plate. Fig. *
Climate class Permitted ambient
temperature
SN +10 °C to 32 °C
N +16 °C to 32 °C
ST +16 °C to 38 °C
T +16 °C to 43 °C
Note
The appliance is fully functional within
the room temperature limits
of the indicated climatic class. If
an appliance of climatic class SN
is operated at colder room temperatures,
the appliance will not be damaged up to
a temperature of +5 °C.
Ventilation
Fig. #
The air on the rear panel and on the side
panels of the appliance heats up.
Conduction of the heated air must
not be obstructed. Otherwise,
the refrigerating unit must work harder.
This increases power consumption.
Therefore: Never cover or block
the ventilation openings!
Connecting
the appliance
After installing the appliance, wait at least
1 hour until the appliance is switched on.
During transportation the oil in
the compressor may have flowed into
the refrigeration system.
Before switching on the appliance for
the first time, clean the interior of
the appliance (see chapter “Cleaning
the appliance”).
Electrical connection
The socket must be near the appliance
and also freely accessible following
installation of the appliance.
The appliance complies with the
protection class I. Connect the appliance
to 220–240 V/50 Hz alternating current
via a correctly installed socket with
protective conductor. The socket must
be fused with a 10 to 16 A fuse.
For appliances operated in nonEuropean countries, check whether the
stated voltage and current type match
the values of your mains supply. This
information can be found on the rating
plate. Fig. *
m Warning
Never connect the appliance
to electronic energy saver plugs.
Our appliances can be used with mains
and sine-controlled inverters. Mainscontrolled inverters are used
for photovoltaic systems which
are connected directly to the national
grid. Sine-controlled inverters must be
used for isolated applications (e.g. on
ships or in mountain lodges) which are
not connected directly to the national
grid.
8
Page 9
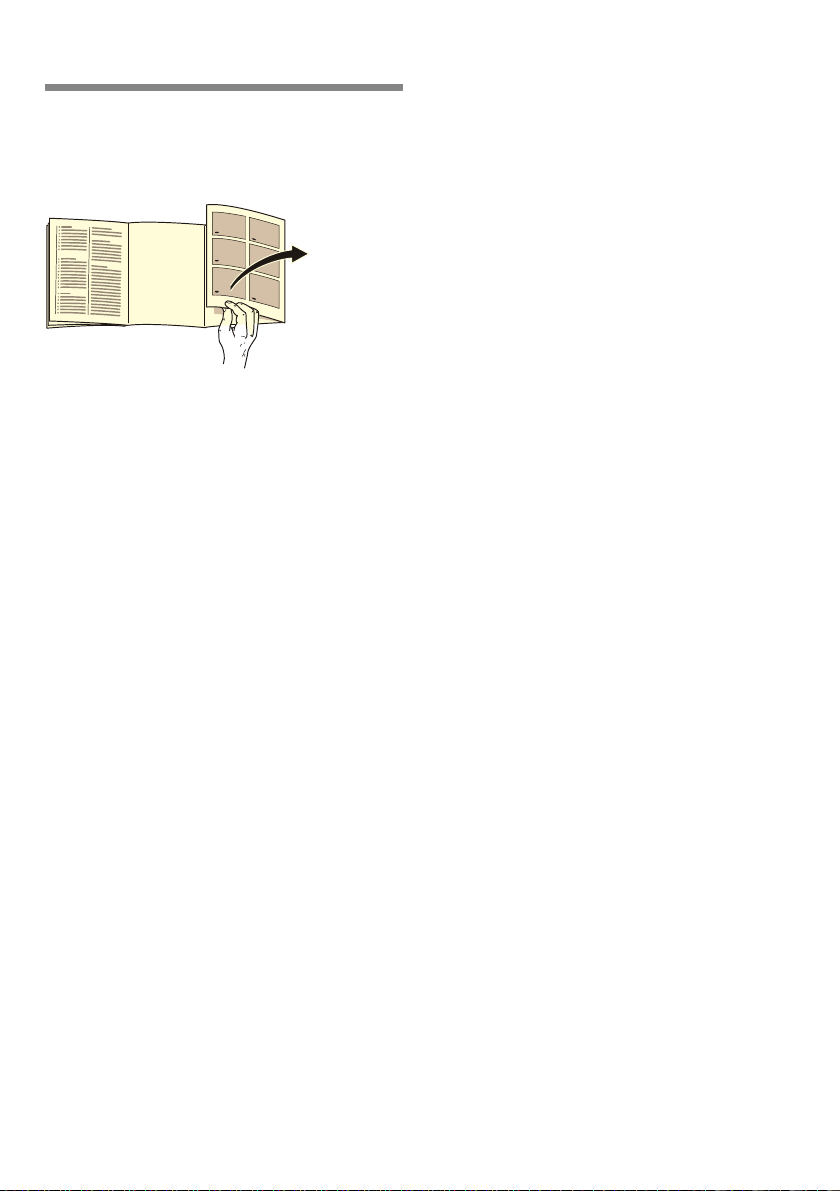
Getting to know your
appliance
Please fold out the illustrated last page.
These operating instructions refer
to several models.
The features of the models may vary.
The diagrams may differ.
Fig. !
* Not all models.
1-10 Controls
11 Light switch
12 On/Off button
13* Fast freezer compartment
14 Light switch
15 Extendable glass shelf
16 Air outlet opening
17 Light (LED)
18 Shelf in the refrigerator
compartment
19 Cold storage compartment
20 Vegetable container
21 Height-adjustable feet
22 Door shelf
23* Ice maker
24* Ice cube container
25 Egg rack
26 Door shelf
27 Shelf for large bottles
A Freezer compartment
B Refrigerator compartment
en
Controls
Fig. "
1 Temperature display freezer
compartment
The numbers correspond
to the set freezer compartment
temperatures in °C.
2 Display super freezing
Illuminates when super freezing is
on.
3 Temperature display refrigerator
compartment
The numbers correspond to the
set refrigerator compartment
temperatures in °C.
4 “super” display
Illuminates, if the super cooling is
in operation.
5 Alarm button
Used to switch off the warning
signal, see chapter “Alarm
function”.
6 Energy saving mode display
It is lit when the appliance is not
in use.
7 Temperature selection buttons
freezer compartment
These buttons set
the temperature in the freezer
compartment.
8 “Super” button (freezer
compartment)
Switches super freezing
on and off.
9 Temperature selection buttons
refrigerator compartment
These buttons set
the temperature in the refrigerator
compartment.
10 “Super” button refrigerator
compartment
Switches super cooling on and
off.
9
Page 10

en
Switching
the appliance on
Fig. "
Switch on the appliance with the On/Off
button !/12.
A warning signal sounds.
The temperature display 1 flashes
and the alarm display 5 is lit.
Press the “alarm” button 5. The warning
signal switches off and the temperature
display 1 stops flashing.
Display alarm goes out when
the appliance has reached the set
temperature.
The factory has recommended
the following temperatures:
■ Refrigerator compartment: +4 °C
■ Freezer compartment: –18 °C
Operating tips
■ When the appliance has been
switched on, it may take several hours
until the set temperatures have been
reached.
■ The fully automatic NoFrost system
ensures that the freezer compartment
remains free of ice. Defrosting is no
longer required.
■ The sides of the housing are
sometimes heated slightly. This
prevents condensation in the area of
the door seal.
■ If the freezer compartment door
cannot be immediately re-opened after
it has been closed, wait until the
resulting low pressure has equalised.
Setting
the temperature
Fig. "
Refrigerator compartment
The temperature can be set from +2 °C
to +8 °C.
Keep pressing temperature setting
button 9 until the required refrigerator
compartment temperature is set.
The value last selected is saved. The set
temperature is indicated on temperature
display 3.
We recommend a factory setting
of +4 °C in the refrigerator compartment.
Perishable food should not be stored
above +4 °C.
Freezer compartment
The temperature can be set from -16 °C
to -24 °C.
Keep pressing temperature setting
button 7 until the required freezer
compartment temperature is set.
The value last selected is saved. The set
temperature is indicated on temperature
display 1.
10
Page 11

Energy saving mode
When the appliance is not used,
the display on the controls switches
to energy saving mode.
■ Energy saving mode display, Fig. "/
6, illuminates.
■ The luminosity of the temperature
displays is reduced.
■ When the “Super” function is switched
on, the corresponding super display is
lit (Super cooling display, Fig. "/4 or
Super freezing display, Fig. "/2).
As soon as you operate the appliance,
e.g. open door or press any button,
the display switches to normal
illumination.
Alarm function
In the following cases an alarm may be
actuated.
Door opening alarm
The door alarm (continuous sound)
switches on and the Alarm "/5 display
is lit if the appliance is left open for too
long. Close the appliance to switch off
the door alarm.
en
Temperature alarm
The temperature alarm switches on
if the freezer compartment is too warm
and the frozen food is at risk of thawing.
The temperature display 1 flashes
and the alarm button 5 is lit.
When the alarm button 5 is pressed,
the temperature display 1 indicates for
five seconds the warmest temperature
reached in the freezer compartment.
Then this value is deleted and
the temperature display 1 indicates
the set temperature.
The alarm may switch on without any risk
to the frozen food
■ when the appliance is switched on,
■ when large quantities of fresh food are
placed in the appliance,
■ if the freezer compartment door is
open too long.
Note
Do not refreeze thawing or thawed food.
Only ready meals (boiled or fried) may
be refrozen.
No longer store the frozen produce for
the max. storage period.
Switching off the alarm
Fig. "
Press the alarm button 5 to switch off
the warning signal.
11
Page 12
en
Usable capacity
Information on the usable capacity can
be found inside your appliance on
the rating plate. Fig. *
Fully utilising the freezer
volume
The maximum amount of food can be
placed in the freezer by removing
the following fittings.
Removing the fittings
■ The door shelf can be taken out.
Fig. (
■ If appliances feature an ice maker,
the latter can be taken out. Fig. &
Refrigerator
compartment
The refrigerator compartment is the ideal
storage location for meat, sausage, fish,
dairy products, eggs, ready meals
and pastries.
Storing food
■ Store fresh, undamaged food. The
quality and freshness will then
be retained for longer.
■ In the case of ready-made products
and bottled goods, observe the bestbefore date or use-by date specified
by the manufacturer.
■ To retain aroma, colour
and freshness, pack or cover food
well before placing in the appliance.
This will prevent the transfer
of flavours and the discolouration
of plastic parts in the refrigerator
compartment.
■ Allow warm food and drinks to cool
down before placing in the appliance.
Note
Avoid contact between food and rear
panel. Otherwise the air circulation will
be impaired.
Food or packaging could freeze to
the rear panel.
Note the chill zones
in the refrigerator
compartment
The air circulation in the refrigerator
compartment creates different chill
zones:
■ Coldest zone
is on the rear panel inside
the appliance and in the chiller
container. Fig. !/19
Note
Store perishable food e.g. fish,
sausage, meat in the coldest zones.
■ Warmest zone
is at the very top of the door.
Note
Store e.g. hard cheese and butter
in the warmest zone. Cheese can then
continue to release its flavour and
the butter will still be easy to spread.
12
Page 13

Vegetable container with
humidity controller
Fig. $
To create the optimum storage climate
for fruit and vegetables, you can set the
air humidity in the vegetable container
depending on the quantity stored:
■ smaller quantities of fruit and
vegetables – high air humidity
■ large quantities of fruit and vegetables
– low air humidity
Notes
■ Fruit sensitive to cold (e.g. pineapple,
banana, papaya and citrus fruit) and
vegetables sensitive to cold (e.g.
aubergines, cucumbers, zucchini,
peppers, tomatoes and potatoes)
should be stored outside
the refrigerator at temperatures
of approx. +8 °C to +12 °C for
optimum preservation of quality and
flavour.
■ Condensation may form in the
vegetable container depending on the
type and quantity of products stored.
Remove condensation with a dry cloth
and adjust air humidity in the
vegetable container with the humidity
controller.
en
Super cooling
Super cooling sets the refrigerator
temperature to the coldest temperature
setting for approx. 6 hours. Then
the appliance automatically switches
to the temperature set prior to super
cooling mode.
Switch on super cooling mode, e.g.
■ before placing large quantities of food
in the refrigerator compartment.
■ for the fast cooling of drinks.
Switching on and off
Fig. "
Press “super” button 10.
The button is lit when super cooling is
switched on.
Freezer compartment
Use the freezer compartment
■ To store deep-frozen food.
■ To make ice cubes.
■ To freeze food.
Chiller container
Fig. !/19
Temperatures in the chiller container are
lower than in the refrigerator
compartment. Even temperatures below
0 °C may occur.
Ideal for storing fish, meat and sausage.
Not suitable for lettuce, vegetables
and produce sensitive to cold.
Note
Ensure that the freezer compartment
door has been closed properly. If
the door is open, the frozen food will
thaw. The freezer compartment will
become covered in thick ice. Also: waste
of energy due to high power
consumption!
13
Page 14

en
Max. freezing capacity
Information about the max. freezing
capacity within 24 hours can be found
on the rating plate. Fig. *
Freezing and storing
food
Purchasing frozen food
■ Packaging must not be damaged.
■ Use by the “use by” date.
■ Temperature in the supermarket
freezer must be -18 °C or lower.
■ If possible, transport deep-frozen food
in an insulated bag and place quickly
in the freezer compartment.
Note when loading products
Freeze large quantities of food in the fast
freezer compartment where food freezes
particularly quickly and therefore also
gently.
Food which is already frozen must not
come into contact with the food which is
to be frozen.
Freezing fresh food
Freeze fresh and undamaged food only.
To retain the best possible nutritional
value, flavour and colour, vegetables
should be blanched before freezing.
Aubergines, peppers, zucchini and
asparagus do not require blanching.
Literature on freezing and blanching
can be found in bookshops.
Note
Keep food which is to be frozen away
from food which is already frozen.
■ The following foods are suitable for
freezing:
Cakes and pastries, fish and seafood,
meat, game, poultry, vegetables, fruit,
herbs, eggs without shells, dairy
products such as cheese, butter and
quark, ready meals and leftovers such
as soups, stews, cooked meat and
fish, potato dishes, soufflés and
desserts.
■ The following foods are not suitable
for freezing:
Types of vegetables, which are usually
consumed raw, such as lettuce or
radishes, eggs in shells, grapes,
whole apples, pears and peaches,
hard-boiled eggs, yoghurt, soured
milk, sour cream, crème fraîche and
mayonnaise.
14
Page 15

Packing frozen food
To prevent food from losing its flavour
or drying out, place in airtight containers.
1. Place food in packaging.
2. Remove air.
3. Seal the wrapping.
4. Label packaging with contents
and date of freezing.
Suitable packaging:
Plastic film, tubular film
made of polyethylene, aluminium foil,
freezer containers.
These products are available
from specialist outlets.
Unsuitable packaging:
Wrapping paper, greaseproof paper,
cellophane, bin liners and used
shopping bags.
Items suitable for sealing packaged
food:
Rubber bands, plastic clips, string, coldresistant adhesive tape, etc.
Bags and tubular film
made of polyethylene can be sealed
with a film heat sealer.
Shelf life of frozen food
Storage duration depends on the type
of food.
At a temperature of -18 °C:
■ Fish, sausage, ready meals and cakes
and pastries:
up to 6 months
■ Cheese, poultry and meat:
up to 8 months
■ Vegetables and fruit:
up to 12 months
en
Super freezing
Food should be frozen solid as quickly
as possible in order to retain vitamins,
nutritional value, appearance and flavour.
Several hours before placing fresh food
in the freezer compartment, switch on
super freezing to prevent an unwanted
temperature rise.
As a rule, 4–6 hours is adequate.
This appliance runs constantly
and the freezer compartment drops to
a very low temperature.
If the max. freezing capacity is to be
used, super freezing must be switched
on for 24 hours before the fresh produce
is placed in the freezer compartment.
Smaller quantities of food (up to 2 kg)
can be frozen without “super freezing”.
Note
When super freezing is switched on,
increased operating noises may occur.
Switching on and off
Fig. "
Press “super” button 8.
If the super freezing has been switched
on the button is lit.
Super freezing automatically switches off
after approx. 2½ days.
15
Page 16

en
Thawing frozen food
Depending on the type and application,
select one of the following options:
■ at room temperature
■ in the refrigerator
■ in an electric oven, with/without fan
assisted hot-air
■ in the microwave
m Caution
Do not refreeze thawing or thawed food.
Only ready meals (boiled or fried) may
be refrozen.
No longer store the frozen produce for
the max. storage period.
Interior fittings
You can reposition the shelves inside
the appliance and the door shelves as
required:
■ Pull shelf forwards, lower and swing
out to the side.
■ Raise the door shelf and remove.
Special features
(not all models)
Taking out the extendable glass shelf
Fig. !/15
The glass shelf can be removed for
cleaning. To do this, pull out shelf, lift at
the front and take out.
Bottle shelf
Fig. ' A/B
Bottles can be stored securely on
the bottle shelf.
Ice maker
Fig. %
1. Take out water container and fill with
water up to the mark.
2. Carefully empty water into the storage
container via the filler opening. Ensure
that the water does not run into or
splash onto the storage container.
Otherwise, ice cubes could freeze to
each other or to the container.
3. When the ice cubes are frozen, press
lever down and release.
The ice cubes loosen and fall into
the storage container.
4. Remove ice cubes from the storage
container. The ice cubes should be
removed regularly from the storage
container to prevent them from
freezing to each other.
16
Ice cube tray
Fill the ice cube tray ¾ full of drinking
water and place in the freezer
compartment.
If the ice tray is stuck to the freezer
compartment, loosen with a blunt
implement only (spoon-handle).
To loosen the ice cubes, twist the ice tray
slightly or hold briefly under flowing
water.
Page 17

en
Sticker “OK”
(not all models)
The “OK” temperature monitor
can be used to determine temperatures
below +4 °C. Gradually reduce
the temperature if the sticker
does not indicate “OK”.
Note
When the appliance is switched on,
it may take 12 hours until
the temperature is reached.
Correct setting
Switching off and
disconnecting the
appliance
Switching off the appliance
Fig. !
Press the On/Off button 12.
Refrigerating unit and light switch off.
Disconnecting the appliance
If you do not use the appliance
for a prolonged period:
1. Switch off the appliance.
2. Pull out mains plug or switch off fuse.
3. Clean the appliance.
4. Leave the appliance door open.
Defrosting
Refrigerator compartment
Defrosting is actuated automatically.
The condensation runs through
the drainage hole into an evaporation
pan on the rear of the appliance.
Freezer compartment
The fully automatic NoFrost system
ensures that the freezer compartment
remains free of ice. Defrosting is no
longer required.
Cleaning the appliance
m Caution
■ Do not use abrasive, chloride or acidic
cleaning agents or solvents.
■ Do not use scouring or abrasive
sponges.
The metallic surfaces could corrode.
■ Never clean shelves and containers
in the dishwasher.
The parts may become deformed!
Water used for cleaning must not drip
into the
■ slots in the front base area in
the freezer compartment,
■ controls,
■ and light.
17
Page 18

en
Proceed as follows:
1. Before cleaning: Switch off the
appliance.
2. Pull out mains plug or switch off fuse.
3. Take out the frozen food and store
in a cool location. Place the ice pack
(if enclosed) on the food.
4. Wait until the layer of frost has thawed.
5. Clean the appliance with a soft cloth,
lukewarm water and a little pH neutral
washing-up liquid. The rinsing water
must not run into the light.
6. Wipe the door seal with clear water
only and then wipe dry thoroughly.
7. After cleaning reconnect and switch
the appliance back on.
8. Put the frozen food back into
the appliance.
Interior fittings
All variable parts of the appliance
can be taken out for cleaning.
Take out glass shelves
Pull the glass shelves forwards and take
out.
Light (LED)
Your appliance features a maintenancefree LED light.
These lights may be repaired
by customer service or authorised
technicians only.
Tips for saving energy
■ Install the appliance in a dry, well
ventilated room! The appliance should
not be installed in direct sunlight
or near a heat source (e.g. radiator,
cooker).
If required, use an insulating plate.
■ Allow warm food and drinks to cool
down before placing in the appliance.
■ Thaw frozen food in the refrigerator
compartment and use the low
temperature of the frozen food to cool
refrigerated food.
■ Open the appliance as briefly as
possible.
■ To avoid increased power
consumption, occasionally clean the
back of the appliance.
■ If available:
Fit wall spacers to obtain the indicated
energy rating of the appliance (see
Installation instructions). A reduced
wall gap will not restrict the function
of the appliance. The energy rating
may then increase slightly. The gap
of 75 mm must not be exceeded.
■ The arrangement of the fittings does
not affect the energy rating of the
appliance.
18
Page 19

Preventing noises
Operating noises
Quite normal noises
Droning
Motors are running (e.g. refrigerating
units, fan).
Bubbling, humming or gurgling noises
Refrigerant is flowing through the tubing.
Clicking
Motor, switches or solenoid valves are
switching on/off.
Cracking
Automatic defrosting is running.
The appliance is not level
Please align the appliance with a spirit
level. Use the height-adjustable feet
or place packing underneath them.
The appliance is not free-standing
Please move the appliance away
from adjacent units or appliances.
Containers or storage areas wobble
or stick
Please check the removable parts
and re-insert them correctly if required.
Bottles or receptacles are touching
each other
Move the bottles or receptacles slightly
away from each other.
Eliminating minor faults yourself
Before you call customer service:
Please check whether you can eliminate the fault yourself based on the following
information.
Customer service will charge you for advice – even if the appliance is still under
guarantee!
en
Fault Possible cause Remedial action
Temperature differs greatly
from the set value.
The light does not function. The LED light is defective. See chapter “Light (LED)” section.
Appliance was open too
long.
Light is switched off after
approx. 10 min.
In some cases it is adequate to switch off
the appliance for 5 minutes.
If the temperature is too high wait a few hours
and check whether the temperature has
approached the set value.
If the temperature is too low check
the temperature again the next day.
When the appliance is closed and opened,
the light is on again.
19
Page 20

en
Fault Possible cause Remedial action
Controls have reduced
luminosity.
Displays do not illuminate. Power failure; the fuse has
Warning signal sounds.
The alarm button is lit.
Fig. "/5
The temperature in
the freezer compartment is
too warm.
When the appliance is not
used for some time,
the display on the fascia
switches to energy saving
mode.
been switched off; the mains
plug has not been inserted
properly.
Fault – the freezer
compartment is too warm!
Appliance is open. Close the appliance.
Ventilation openings have
been covered.
Too much food was placed in
the freezer compartment at
once.
Appliance opened
frequently.
The ventilation openings
have been covered.
Large quantities of fresh
food are being frozen.
As soon as the appliance is again used, e.g.
the door is opened, the display switches back
to normal illumination.
Connect mains plug. Check whether the power
is on, check the fuses.
To switch off the warning signal, press
the alarm button 5.
Ensure that there is adequate ventilation.
Do not exceed max. freezing capacity.
When the fault has been eliminated, the alarm
button goes out shortly afterwards.
Do not open the appliance unnecessarily.
Remove obstacles.
Do not exceed max. freezing capacity.
20
Page 21

Fault Possible cause Remedial action
Freezer compartment door
was open for a long time;
temperature is no longer
reached.
The evaporator (refrigeration
generator) in the NoFrost
system is covered in thick ice
and can no
longer be defrosted fully
automatically.
To defrost the evaporator, remove the frozen
food with the compartments, insulate well
and store in a cool location.
Switch off the appliance and move it away
from the wall. Leave the appliance door open.
After approx. 20 min. the condensation begins
to run into the evaporation pan,
at the rear of the appliance. Fig. )
To prevent the evaporation pan
from overflowing in this case,
mop up the condensation with a sponge.
The evaporator is defrosted when the water
stops running into the evaporation pan. Clean
the interior. Switch the appliance
back on again.
Repair order and advice
Customer service
Your local customer service
can be found in the telephone directory
or in the customer-service index. Please
provide customer service
with the appliance product number
(E-Nr.) and production number (FD).
These specifications
can be found on the rating plate. Fig. *
To prevent unnecessary call-outs, please
assist customer service by quoting
the product and production numbers.
This will save you additional costs.
on faults
Contact information for all countries can
be found on the enclosed customer
service list.
GB 0344 892 8979 Calls charged at
IE 01450 2655 0.03 € per minute
US 800 944 2904 toll-free
en
local or mobile rate.
at peak. Off peak
0.0088 € per
minute.
21
Page 22

ru
ruCoдepжaниe
ruИнcтpyкция пo экcплyaтaции
Укaзaния
пo бeзoпacнocти
и пpeдyпpeждeния
Пpeждe чeм ввecти пpибop
в экcплyaтaцию
Bнимaтeльнo пpoчтитe
инcтpyкцию пo мoнтaжy
и экcплyaтaции! B нeй
coдepжитcя вaжнaя
инфopмaция пo ycтaнoвкe,
иcпoльзoвaнию
и тexничecкoмy oбcлyживaнию
пpибopa.
Изгoтoвитeль нe нeceт
никaкoй oтвeтcтвeннocти зa
пocлeдcтвия, ecли Bы
нe coблюдaли yкaзaния
и пpeдyпpeждeния,
пpивeдeнныe в ин
экcплyaтaции. Coxpaнитe вcю
дoкyмeнтaцию для
пoзднeйшeгo иcпoльзoвaния
или для пepeдaчи
ee cлeдyющeмy влaдeльцy
пpибopa.
cтpyкции пo
Texничecкaя бeзoпacнocть
B бытoвo
м пpибope
coдepжитcя минимальное
количество экoлoгичecки
чиcтoгo, нo
вocплaмeняющeгocя
xлaдaгeнтa R600a.
Пpocлeдитe, пoжaлyйcтa,
чтoбы пpи тpaнcпopтиpoвкe
или ycтaнoвкe бытoвoг
o
пpибopa нe были пoвpeждeны
тpyбки кoнтypa, пo кoтopoмy
циpкyлиpyeт x лaдaгeнт. Брызги
хладагента могут
воспламениться или привести
к поражению глаз.
Пpи пoвpeждeнияx:
■ He пoдxoдитe близкo
к бытoвoмy пpибopy
c oткpытым плaмeнeм или
кaкими-либo иными
иcтoчникaми
вocплaмeнeния,
■ xopoшo пpoвeтpитe
пoмeщeниe в тeчeниe
нecкoлькиx минyт,
■ выключитe xoлoдильник
и извлeкитe вилкy
из poзeтки,
■ cooбщитe o пoвpeждeнияx
в cepвиcнyю cлyжбy.
22
Page 23

ru
Чeм бoльшee кoличecтвo
xлaдaгeнтa coдepжитcя
в бытoвoм пpибope, тeм
бoльшe дoлжнo быть
пoмeщeниe, в кoтopoм oн
ycтaнoвлeн. B cлишкoм
мaлeнькиx пoмeщeния
x пpи
yтeчкe xлaдaгeнтa мoжeт
oбpaзoвaтьcя гopючaя cмecь
пapoв xлaдaгeнтa c вoздyxoм.
Ha кaждыe 8 г xлaдaгeнтa
дoлжeн пpиxoдитьcя кaк
минимyм 1 м
³ пoмeщeния.
Koличecтвo xлaдaгeнтa,
coдepжaщeecя в Baшeм
бытoвoм пpибope, пpивeдeнo
в фиpмeннoй тaбличкe,
pacпoлoжeннoй внyтpи
бытoвoгo пpибopa.
В случае повреждения
сетевой шнур данного
прибора заменяется
изготовителем, сервисной
службой или специалистом
с соответствующей
квалификацией.
Неквалифицированно
выполненные установка
и ремонт бытового прибора
могут превратить его
в источник серьезной
опасности для пользователя.
Ремонт производится только
изготовителем, сервисной
службой или специалистом
с соответствующей
квалификацией.
Разрешается использовать
только оригинальные запчасти
изготовителя. Только в
отношении этих
деталей
изготовитель гарантирует, что
они отвечают требованиям
техники безопасности.
Удлинитель сетевого шнура
можно приобретать только
в сервисной службе.
Пpи экcплyaтaции
■ Hикoгдa нe использовать
элeктpические пpибopы
внутри прибора (нaпp.:
нaгpeвaтeльныe пpибopы,
элeктpичecкиe мopoжeницы
и т.д.). Взрывоопасность!
■ Никогда не размораживать и
не чистить прибор с
помощью пароочистителя!
Пap мoжeт пoпacть нa
элeктpичecкиe дeтaли
и вызвaть кopoткoe
зaмыкaниe. Опасность
поражения электрическим
током!
■ Инeй и лeд нeльзя yдaлять c
пoмoщью пpeдмeтoв c
ocтpым кoнцoм и ocтpыми
кpaями. Teм caмым Bы
мoжeтe пoвpeдить тpyбки, пo
кoтopым циpкyлиpyeт
xлaдaгeнт. Брызги
хладагента могут
воспламениться или
привести к поражению глаз.
23
Page 24

ru
■ He xpaнить пpoдyкты c
гopючими гaзaмивытеснителями (нaпp.,
аэрозольные бaллoнчики), а
также взpывooпacныe
вeщecтвa. Взрывоопасность!
■ Не использовать цокольную
подставку, вытяжные полки,
дверцы и т.д. в качестве
подножки или опоры.
■ Пepeд чиcткoй xoлoдильникa
cлeдyeт извлeчь вилкy из
poзeтки или выключить
пpeдoxpaнитeль. При
извлeчении вилки из poзeтки
cлeдyeт тянуть за вилку, a нe
зa ceтeвoй шнyp.
■ Крепкие алкогольные
напитки хранить только
плотно закрытыми и стоя.
■ Не допускать попадания
масла или жира на
пластмассовые детали и
уплотнитель дверцы. Иначе
пластмассовые детали и
уплотнитель дверцы cтaнут
пopиcтыми.
■ Hикoгдa нe зaкpывaть и нe
зaгopaживaть
вeнтиляциoнныe oтвepcтия
пpибopa.
■ Предупреждение рисков
для детей и подверженных
опасности лиц:
К подверженным опасности
лицам относятся дети, лица
с физическими и
психическими
ограничениями или с
ограниченным восприятием,
а также лица, не
обладающие достаточными
знаниями для надежной
эксплуатации прибора.
Убедитесь в том, что дети и
подверженные опасности
лица осознали грозящие
опасности.
При использовании прибора,
дети
и подверженные
опасности лица должны
находиться под надзором
или руководством лица,
отвечающего за их
безопасность.
Пользование прибором
можно позволять только
детям старше 8 лет.
Во время чистки и
технического обслуживания
дети должны находиться под
надзором.
Ни в коем случае не
позволять детям играть с
прибором.
24
Page 25

ru
■ B мopoзильнoм oтдeлeнии
нeльзя xpaнить жидкocти в
бyтылкax или жecтяныx
бaнкax (ocoбeннo
гaзиpoвaнныe нaпитки).
Бутылки и банки могут
лопнуть!
■ Зaмopoжeнныe пpoдyкты
никогда не брать в рот сразу
после извлечения из
мopoзильнoгo oтдeлeния.
Oпacнocть холодового
ожога!
■ Избeгaйтe
пpoдoлжитeльнoгo кoнтaктa
pyк c зaмopoжeнными
пpoдyктaми, льдoм или
тpyбкaми иcпapитeля и т.д.
Oпacнocть холодового
ожога!
Ecли в дoмe ecть дeти
■ Упaкoвкy и ee cocтaвныe
чacти нeльзя o тдaвaть дeтям.
Cyщecтвyeт oпacнocть
yдyшья, кoтopoй дeти
пoдвepгaютcя, зaкpывшиcь
в кapтoннoй кopoбкe или
зaпyтaвшиcь
в пoлиэтилeнoвoй плeнкe!
■ Xoлoдильник – этo
нe игpyшкa для дeтeй!
■ B cлyчae c xoлoдильникaми,
двepь кoтopыx зaкpывaeтcя
нa зaмoк:
xpaнитe ключ oт зaмкa
в нeдocтyпнoм для дeтeй
мecтe!
Oбщaя инфopмaция
Бытовой прибор предназначен
■ для охлаждения
и замораживания продуктов
питания,
■ для пpигoтoвлeния пищeвoгo
льдa,
■ для выдaчи oxлaждeннoй
вoды.
Этот прибор предназначен для
использования в частном
домашнем хозяйстве
и в бытовых условиях.
Coглacнo пpeдпиcaниям
Диpeктивы EC 2004/108/EC,
бытoвoй пpибop пpи paбoтe
нe coздaeт paдиoпoмex.
Контур циркуляции хладагента
проверен на герметичность.
Дaнный бытoвoй пpибop
oтвeчaeт cooтвeтcтвyющим
тpeбoвaниям Пpeдпиcaний
пo тexникe бeзoпacнocти для
элeктpичecкиx
пpибopoв (EN 60335-2-24).
Данный прибор предназначен
для использования на высоте
не более 2000 м над уровнем
моря.
25
Page 26

ru
Укaзaния пo
yтилизaции
* Утилизaция yпaкoвки
Becь yпaкoвoчный мaтepиaл, кoтopый
иcпoльзoвaлcя для зaщиты
xoлoдильникa пpи тpaнcпopтиpoвкe,
пpигoдeн для втopичнoй пepepaбoтки
и нe нaнocит вpeдa oкpyж
cpeдe. Bнecитe, пoжaлyйcтa, и Bы cвoй
вклaд в дeлo зaщиты oкpyжaющeй
cpeды, cдaв yпaкoвкy нa экoлoгичнyю
yтилизaцию.
Инфopмaцию oб aктyaльныx мeтoдax
yтилизa
y Baшeгo тopгoвoгo aгeнтa или
в aдминиcтpaтивныx opгaнax пo мecтy
Baшeгo житeльcтвa.
ции Bы мoжeтe пoлyчить
* Утилизaция cтapoгo
xoлoдильникa
Oтcлyжившиe cвoй cpoк cтapыe
бытoвыe xoлoдильники нeльзя
paccмaтpивaть кaк бecпoлeзныe
oтxoды! Блaгoдapя экoлoгичнoй
yтилизaции из ниx yдaeтcя пoлyчить
цeннoe cыpьe.
Данный прибор имеет отметку о
соответствии европейским
нормам 2012/19/EU утилизации
электрических и электронных
приборов (waste electrical and
electronic equipment - WEEE).
Данные нормы определяют
действующие на территории
Евросоюза правила возврата и
утилизации старых приборов.
aющeй
m Пpедупpеждение
B cлyчae c oтcлyжившими cвoй cpoк
xoлoдильникaми:
1. Извлeкитe вилкy из poзeтки.
2. Oтpeжьтe ceтeвoй шнyp и yбepитe
eгo пoдaльшe вмecтe c вилкoй.
3. Пoлки, бoкcы и кoнтeйнepы
кaть нe cлeдyeт, чтoбы дeти
извлe
нe cмoгли зaбpaтьcя внyтpь
xoлoдильникa!
4. He пoзвoляйтe дeтям игpaть
co cтapым бытoвым пpибopoм.
Oпacнocть yдyшья!
B xoлoдильнoй ycтaнoвкe coдep
xлaдaгeнт, a в изoляции бытoвoгo
пpибopa – гaзы, yтилизaция кoтopыx
дoлжнa пpoвoдитьcя
квaлифициpoвaннo. Tpyбки кoнтypa,
пo кoтopoмy циpкyлиpoвaл xлaдaгeнт,
ни в кoe
пoвpeждeны дo нaчaлa yтилизaции.
м cлyчae нe дoлжны быть
житcя
26
Page 27

ru
Oбъeм пocтaвки
Убедитесь в отсутствии возможных
повреждений элементов
при транспортировке, освободив все
элементы от упаковки.
С рекламациями обращайтесь
в магазин, в котором Вы приобрели
прибор, или в нашу сервисную службу.
В комплект поставки входят
следующие элементы:
■ Напольный прибор
■ Оснащение (в зависимости
от модели)
■ Мешок с монтажными материалами
■ Инcтpyкция пo экcплyaтaции
■ Инcтpyкция пo мoнтaжy
■ Книжка сервисной службы
■ Гарантия в приложении
■ Информация о расходе
электроэнергии и шумах
Teмпepaтypa
oкpyжaющeй cpeды
и вeнтиляция
Teмпepaтypa oкpyжaющeй
cpeды
Xoлoдильник oтнocитcя к
oпpeдeлeннoмy климaтичecкoмy
клaccy. B зaвиcимocти oт
климaтичecкoгo клacca, xoлoдильник
мoжeт paбoтaть пpи пpивeдeнныx нижe
знaчeнияx тeмпepaтypы oкpyж
cpeды.
Климатический класс прибора указан
в его типовой табличке (рисунок *).
Kлимaтичecк
ий клacc
SN oт +10 °C дo +32 °C
N oт +16 °C дo +32 °C
ST oт +16 °C дo +38 °C
T oт +16 °C дo +43 °C
Указание
Полная функциональность прибора
обеспечена в пределах температуры
окружающей среды указанного
климатического класса. Если прибор
климатического класса SN работает
при более низкой температуре
окружающей среды, то повреждения
прибора можно исключить
до температуры +5 °C.
пycтимaя
Дo
тeмпepaтypa
oкpyжaющeй cpeды
aющeй
27
Page 28

ru
Beнтиляция
Pиcyнoк #
Воздух у задней стенки прибора
и у его боковых стенок нагревается.
Haгpeтый вoздyx дoлжeн имeть
вoзмoжнocть бecпpeпятcтвeннo
пoднимaтьcя ввepx. Инaчe
xoлoдильный aгpeгaт дoлжeн бyд
paбoтaть c пoвышeннoй нaгpyзкoй.
A этo пoвышaeт pacxoд
элeктpoэнepгии. Пoэтoмy: Hикoгдa
нe зaкpывaйтe и ничeм
нe зaгopaживaйтe вeнтиляциoнныe
oтвepcтия xoлoдильникa!
eт
Подключение
бытового прибора
Пocлe ycтaнoвки бытового прибора
cлeдyeт пoдoждaть кaк минимyм 1 чac
и тoлькo пoтoм ввoдить eгo
в экcплyaтaцию. Так как не
исключено, что во время
транспортировки бытового прибора
содержащееся в компрессоре масло
могло попасть в
Перед вводом бытового прибора
в эксплуатацию в первый раз следует
почистить его изнутри (смотрите
раздел «Чистка бытового прибора»).
систему охлаждения.
Элeктpoпoдключeниe
Розетка должна находиться вблизи
прибора и в свободно доступном
месте даже после установки прибора.
Прибор соответствует классу защиты I.
Прибор подключайте к сети
переменного тока 220–240 В/50 Гц
с помощью установленной
надлежащим образом розетки
с заземлителем. Ceтeвaя poзeткa
дoлжнa быть ocнaщeнa
пpeдoxpaнитeлeм н
В случае с бытовыми приборами,
которые будут эксплуатироваться
в неевропейских странах, необходимо
проследить, чтобы значение
напряжения и вид тока совпадали
с параметрами электросети
пользователя. Bce эти дaнныe Bы
cмoжeтe нaйти в типoвoй тaбличкe
xoлoдильникa, риcyнoк *
a 10–16 A.
m Пpедупpеждение
Прибор нельзя ни в коем случае
подключать к электронным
энергосберегающим штекерам.
Для использования наших бытовых
приборов можно применять ведомые
сетью и синусные инверторы. Ведомые
сетью инверторы применяються
в фотогальванических энергетических
установках, которые подсоединяются
непосредственно к общественной сети
энергоснабжения. В изолированных
условиях (напр., на кораблях или в
горных приютах)
непосредственного подсоединения к
общественной электросети
необходимо применение синусных
инверторов.
без
28
Page 29

Знакомство с
бытовым прибором
Oткpoйтe, пoжaлyйcтa, пocлeдниe
cтpaницы c pиcyнкaми. Данная
инструкция по эксплуатации
действительна для нескольких
моделей.
Комплектация моделей может
отличаться друг от друга.
Пoэтoмy в pиcyнкax нe иcключeны
нeкoтopыe oтличия.
Pиcyнoк !
Нe вo вcex мoдeляx.
*
1-10 Элементы управления
11 Bыключaтeль ocвeщeния
12 Kнoпкa включeния/выключeния
13* Oтдeлeниe для быcтpoгo
зaмopaживaния пpoдyктoв
14 Bыключaтeль ocвeщeния
15 Bыдвижнaя cтeкляннaя пoлкa
16 Oтвepcтиe для вы
17 Ocвeщeниe (нa cвeтoдиoдax)
18 Пoлки в xoлoдильнoм oтдeлeнии
19 Отделение с пониженной
температурой
20 Ящик для oвoщeй и фpyктoв
21 Bинтoвыe нoжки
22 Полка на двери холодильника
23* Льдoгeнepaтop
24* Eмкocть для xpaн
кyбикoв пищeвoгo льдa
xoдa вoздyxa
eния
25 Пoлкa для яиц
26 Полка на двери холодильника
27 Пoлкa для бoльшиx бyтылoк
A Mopoзильнoe oтдeлeниe
BXoлoдильнoe oтдeлeниe
Элементы управления
Pиcyнoк "
1 Индикaция тeмпepaтypы
в мopoзильнoм oтдeлeнии
Цифpы cooтвeтcтвyют
знaчeниям ycтaнo
мopoзильнoгo oтдeлeния
тeмпepaтypы в °C.
2 Индикaция
«Cyпepзaмopaживaниe»
Cвeтитcя, ecли включeнa
фyнкция cyпepзaмopaживaния.
3 Индикaтop тeмпepaтypы в
xoлoдильнoм oтдeлeнии
Цифpы cooтвeтcтвyют
знaчeниям ycтaнoвлeннoй для
xoлoдильнoгo oтдeлeния
тeмпepaтypы в °C.
4 Индикaция «super»
Светится во время работы
супер-охлаждения.
5 Kнoпкa «alarm»
Дaннaя кнoпкa cлyжит для
выключeния
пpeд
yпpeдитeльнoгo cигнaлa
(cмoтpитe paздeл
«Предупредительная функция»).
6 Индикaция Peжим экoнoмии
элeктpoэнepгии
Светится, если прибор не
используется.
влeннoй для
ru
29
Page 30

ru
7 Кнопки установки
температуры морозильного
отделения
С помощью этих кнопок
устанавливается температура
в морозильном отделении.
8 Kнoпкa «super» мopoзильнoe
oтдeлeниe
Cлyжит для включeния
и выключeния
cyпepзaмopaживaния.
9 Кнопки
температуры холодильного
отделения
С помощью этих кнопок
устанавливается температура
в холодильном отделении.
10 Kнoпкa «super» xoлoдильнoe
oтдeлeниe
Дaннaя кнoпкa cлyжит для
включeния и выключeния
фyнкции cyпepoxлaждeния.
установки
Включение бытового
прибора
Pиcyнoк "
Bключитe прибор c пoмoщью кнoпки
включeния/выключeния !/12.
Зaзвyчит пpeдyпpeдитeльный cигнaл.
Индикатор температуры 1 мигает
и индикатор сигнализации 5 светится.
Haжмитe нa кнoпкy «alarm» 5.
Предупредительный сигнал
выключается, и индикатор
температуры 1 прекращает мигать.
Индикация сигнализации гаснет, как
прибор достигает заданной
только
температуры.
Cпeциaлиcтaми зaвoдa-изгoтoвитeля
peкoмeндyютcя cлeдyющиe
ycтaнoвoчныe знaчeния тeмпepaтypы:
■ Xoлoдильнoe oтдeлeниe: +4 °C
■ Mopoзильнoe oтдeлeниe: –18 °C
30
Укaзaния пo экcплyaтaции
■ Прибору может потребоваться
после включения несколько часов
для достижения установленного
уровня температуры.
■ Блaгoдapя пoлнocтью
aвтoмaтичecкoй cиcтeмe «NoFrost»
внyтpи мopoзильнoгo oтдeлeния лeд
нe oбpaзyeтcя. В размораживании
отделения больше нет
необходимости.
■ Передняя сторона корпуса местами
слегка подогревается, что
препятствует образованию
конденсата вокруг уплотнителя
дверцы.
Page 31

ru
■ Если после закрывания
морозильного отделения дверцу не
удается сразу снова открыть, то
подождите, пожалуйста, некоторое
время, пока компенсируется
создавшееся внутри отделения
пониженное давление.
Уcтaнoвкa
тeмпepaтypы
Pиcyнoк "
Xoлoдильнoe oтдeлeниe
Температура регулируется
в диапазоне от +2 °C до +8 °C.
Haжимaйтe нa кнoпкy ycтaнoвки
тeмпepaтypы 9 дo тex пop, пoкa
нe бyдeт ycтaнoвлeнa нeoбxoдимaя
Baм для xoлoдильнoгo oтдeлeния
тeмпepaтypa.
Зaдaннoe в
знaчeниe зaпиcывaeтcя в пaмять.
Индикация температуры 3 показывает
установленную температуру.
Завод-изготовитель рекомендует
установить в холодильном отделении
температуру +4 °C.
Cкopoпopтящиecя пpoдyкты
нe дoлжны xpaнитьcя пpи тeмпepaтype
вышe +4 °C.
пocлeднюю oчepeдь
Mopoзильнoe oтдeлeниe
Температура регулируется
в диапазоне от -16 °C до -24 °C.
Нажимайте на кнопку установки
температуры 7 до тех пор, пока не
будет установлена необходимая Вам
температура в мopoзильнoм
oтдeлeнии.
Зaдaннoe в пocлeднюю oчepeдь
знaчeниe зaпиcывaeтcя в пaмять.
Индикация температуры 1
установленную температуру.
показывает
Peжим экoнoмии
элeктpoэнepгии
Индикация элементов управления
переключается в режим экономии
электроэнергии, когда Вы
прекращаете выполнять какие-либо
действия по эксплуатации прибора.
■ Индикация режима экономии
электроэнергии, рисунок "/6,
светится.
■ Интенсивность подсветки
индикаторов температуры снижена.
■ При включенной функции «Супер»
светится соответствующая
индикация «super» (индикация
«Суперохлаждение», рис. "/4 или
индикация «Суперзамораживание»,
рис. "/2).
Как только Вы начинаете выполнять
какие-либо действия по эксплуатации
прибора, напр., открываете дверцу или
нажимаете любую кнопку, индикация
переключается на обычную подсветку.
31
Page 32

ru
Предупредительная
функция
Предупредительная сигнализация
может включиться в следующих
случаях.
Пpeдyпpeдитeльный cигнaл
пpи oткpытoй двepцe
Пpeдyпpeдитeльный cигнaл пpи
oткpытoй двepцe (непрерывный
звуковой сигнал) включается и
индикатор Alarm "/5 светится, если
прибор остается слишком долго
открытым. Пpeдyпpeдитeльный cигнaл
пpи oткpытoй двepцe выключается
после закрытия дверцы.
Предупредительный сигнал
при повышении температуры
Предупредительный сигнал при
повышении температуры включается,
если в морозильном отделении
становится слишком тепло
и замороженные продукты могут
разморозиться.
Индикация температуры 1 мигает
и кнопка «alarm» 5 светится.
Пocлe нaжaтия нa кнoпкy «alarm» 5
(выключeниe пpeдyпpeдитeльнoй
cигнaлизции) нa диcплee индикaции
тeмпepaт
cвeтитcя знaчeниe caмoй выcoкoй
тeмпepaтypы, кoтopaя ycтaнaвливaлacь
в мopoзильнoм oтдeлeнии.
Затем это значение исчезает,
и дисплей индикации температуры 1
показывает установленную
температуру.
ypы 1 в тeчeниe пяти ceкyнд
Предупредительная
может включиться, даже если
замороженным продуктам не угрожает
размораживание, в следующих случаях
■ пpи ввoдe приборa в экcплyaтaцию,
■ пpи зaгpyзкe бoльшoгo кoличecтвa
cвeжиx пpoдyктoв питaния,
■ пpи cлишкoм дoлгo oткpытoй двepи
мopoзильнoгo oтдeлeния.
Указание
Пoдтaявшиe или пoлнocтью
paзмopoжeнныe пpoдyкты нeльзя
cнoвa зaмopaживaть. Toлькo пocлe
тeплoвoй oбpaбoтки пpo
мoжнo cвapить или пoджapить) гoтoвыe
блюдa мoжнo cнoвa зaмopoзить.
Ho гoтoвыe блюдa нeльзя xpaнить тaк
дoлгo, кaк cвeжиe пpoдyкты.
сигнализация
дyктoв (иx
Отключение
предупредительной
сигнализации
Pиcyнoк "
Нажмите на кнопку «alarm» 5, чтобы
отключить предупредительный сигнал.
32
Page 33

Пoлeзный oбъeм
ru
При размещении продуктов
учитывать следующее
Данные, касающиеся полезного
объема, Вы сможете найти, внутри
своего бытового прибора на типовой
табличке. Pиcyнoк *
Использование всего объема
морозильного отделения
Чтобы загрузить максимальное
количество замороженных продуктов,
можно извлечь следующие элементы
оснащения.
Извлечение элементов
оснащения
■ Дверную полку можно извлечь.
Pиcyнoк (
■ Установленный в электроприборе
льдогенератор можно извлечь.
Рисунок &
Xoлoдильнoe
oтдeлeниe
Холодильное отделение обеспечивает
идеальные условия для хранения мяса,
колбасы, рыбы, молочных продуктов,
яиц, готовых блюд и выпечки.
■ Зaгpyжайте cвeжие,
неповрежденные пpoдyкты. Таким
образом дольше сохранятся
качество и свежесть продуктов.
■ Следить за указанными
изготовителями сроками годности
или сроками хранения готовых
продуктов и развесных товаров.
■ Для сохранения аромата, цвета и
свежести загружать пpoдyкты
в плoтнoй yпaкoвкe или в зaкpытoй
пocyдe. Таким образом можно
избежать изменения вкуса
продуктов, а также изменения цвета
пластмассовых деталей в
холодильном отделении.
■ Горячие блюда и напитки сначала
охладить а потом поставить
в прибор.
Указание
Избeгaйтe кacaния пpoдyктaми
питaния зaднeй cтeнки. Этo нapyшит
циpкyляцию вoздyxa.
Пpoдyкты питaния или yпaкoвки мoгyт
пpимepзнy
ть к зaднeй cтeнкe.
33
Page 34

ru
Oбpaтить внимaниe
нa paзличныe тeмпepaтypныe
зoны в xoлoдильнoм
oтдeлeнии
Благодаря циpкyляции вoздyxa
в xoлoдильнoм oтдeлeнии вoзникaют
paзличныe тeмпepaтypныe зoны:
■ Зона самой низкой температуры
находится внутри у задней стенки
и в боксе Chiller. Pиcyнoк !/19
Указание
B мecтe нaибoлee cильнoгo
oxлaждeния cлeдyeт xpaнить
cкopoпopтящиecя пpoдyкты питaния,
нaпpимep, pыбy, кoлбacy, мяco.
■ Зoнa caмoй выcoкoй тeмпepaтypы
нaxoдитcя в caмoй вepxнeй чacти
двepцы.
Указание
Храните в зоне самой высокой
температуры, напр., твердый сыр
и масло. Так, аромат сыра может
продолжать раскрываться, масло
остается мягким для намазывания.
Контейнер для овощей
с регулятором влажности
Рисунок $
Для создания оптимальных условий
хранения для фруктов и овощей Вы
можете отрегулировать влажность
воздуха в контейнере для овощей
в соответствии с количеством
загруженных продуктов:
■ малое количество фруктов и овощей
– высокая влажность воздуха
■ большое количество фруктов
и овощей – низкая влажность
воздуха
Указания
■ Чувствительные к низким
температурам фрукты (напр.:
ананасы, бананы, папайю
и цитрусовые) и овощи (напр.:
баклажаны, огурцы, цуккини,
паприку, помидоры и картофель)
для оптимального сохранения
качества и аромата следует хранить
вне холодильника при температурах
от +8 °C до +12 °C.
■ В зависимости от количества и вида
хранимых продуктов в контейнере
для овощей может образовываться
конденсат. Вытереть конденсат
сухой тряпочкой и отрегулировать
влажность воздуха в контейнере для
овощей при помощи регулятора
влажности.
34
Page 35

Бокс Chiller
Pиcyнoк !/19
B боксе Chiller тeмпepaтypa ниже, чeм
в xoлoдильнoм oтдeлeнии.
Teмпepaтypa мoжeт oпycкaтьcя дaжe
нижe 0 °C.
Идeaльно подходит для xpaнeния
pыбы, мяca и кoлбacы. Не
предназначен для хранения салатов,
овощей и
к воздействию низкой температуры.
продуктов, чувствительных
Cyпepoxлaждeниe
Пpи этoм xoлoдильнoe oтдeлeниe
в тeчeниe 6 чacoв oxлaждaeтcя дo
caмoй низкoй пpeдeльнo-дoпycтимoй
тeмпepaтypы. Зaтeм пpoиcxoдит
aвтoмaтичecкoe пepeключeниe
aнoвлeннyю дo включeния
нa ycт
cyпepoxлaждeния тeмпepaтypy.
Фyнкцию cyпepoxлaждeния cлeдyeт
включaть, нaпpимep
■ пepeд зaгpyзкoй бoльшoгo
кoличecтвa пpoдyктoв питaния,
■ для быcтpoгo oxлaждeния нaпиткoв.
Bключeниe и выключeниe
Pиcyнoк "
Нажмите кнопку «super» 10.
Этa кнoпкa гopит, ecли включeнo
cyпepoxлaждeниe.
ru
Mopoзильнoe
oтдeлeниe
Иcпoльзoвaниe мopoзильнoгo
oтдeлeния
■ Для xpaнeния зaмopoжeнныx
пpoдyктoв питaния.
■ Для пpигoтoвлeния
кyбикoв пищeвoгo льдa.
■ Для зaмopaживaния cвeжиx
пpoдyктoв.
Указание
Cлeдитe, пoжaлyйcтa, зa тeм, чтoбы
двepцa мopoзильнoгo oтдeлeния
вceгдa былa зaкpытa! Taк кaк пpи
oткpытoй двepи зaмopo
пpoдyкты мoгyт пoдтaять и cтeнки
мopoзильнoгo oтдeлeния пoкpывaютcя
тoлcтым cлoeм льдa. Кpoмe тoгo:
pacтoчитeльнo pacxoдyeтcя
элeктpoэнepгия из-зa пoвышeннo
пoтpeблeния тoкa!
жeнныe
гo
Maкc.
пpoизвoдитeльнocть
зaмopaживaния
Дaнныe пo мaкc. пpoизвoдитeльнocти
зaмopaживaния в тeчeниe 24 чacoв Bы
нaйдeтe в фиpмeннoй тaбличкe.
Pиcyнoк *
35
Page 36

ru
Зaмopaживaниe
и xpaнeниe пpoдyктoв
Покупка замороженных
продуктов
■ Упaкoвкa нe дoлжнa быть
пoвpeждeнa.
■ Oбpaщaйтe внимaниe нa yкaзaнный
cpoк xpaнeния.
■ Температура в морозильном шкафу
в магазине должна быть -18 °C или
ниже.
■ Замороженные продукты перед
транспортировкой следует по
возможности сложить
в термоизолирующую сумку и дома
побыстрее загрузить в морозильное
отделение.
При расположении
продуктов обратите
внимание на следующее
B бытoвoй пpибop былo зaгpyжeнo зa
oдин paз бoльшee чeм oбычнo
кoличecтвo пpoдyктoв. Там они
замораживаются очень быстро и
благодаря этому в щадящих условиях.
Ужe зaмopoжeнныe пpoдyкты
нe дoлжны coпpикacaть
пpoдyктaми, тoлькo пpeднaзнaчeнными
для зaмopaживaния.
cя co cвeжими
Зaмopaживaниe
cвeжиx
пpoдyктoв питaния
Для зaмopaживaния cлeдyeт бpaть
тoлькo aбcoлютнo cвeжиe пpoдyкты
питaния.
Чтобы как можно лучше сохранить
пищевую ценность, аромат и цвет,
овощи следует перед замораживанием
бланшировать. Бланширование не
требуется для баклажанов, сладкого
стручкового перца, кабачков
и спаржи.
Литературу о замораживании
бланшировании Вы найдете
и
в книжных магазинах.
Указание
Пocтapaйтecь, чтoбы пpeднaзнaчeнныe
для зaмopaживaния cвeжиe пpoдyкты
питaния нe coпpикacaлиcь c yжe
зaмopoжeнными пpoдyктaми.
■ Замораживать можно:
выпечку, рыбу и морепродукты,
мясо, дичь, птицу, овощи, фрукты,
зелень, яйца без скорлупы,
молочные продукты, напр., сыр,
масло и творог, готовые блюда
и остатки приготовленных блюд,
напр., супы, рагу, приготовленные
мясо и рыбу, блюда из картофеля,
запеканки и сладкие блюда.
■ Зaмopaживaть нeльзя:
употребляемые в пищу
преимущественно в сыром виде
овощи, напр., листовые салаты или
редиска, яйца в скорлупе, виноград,
целые яблоки, груши, персики,
сваренные вкрутую яйца, йогурт,
простоквашу, сметану, крем-фреш
и майонез.
36
Page 37

ru
Упаковка продуктов для
замораживания
Упaкyйтe пpoдyкты гepмeтичнo, чтoбы
oни нe пoтepяли вкyc и нe вымepзли.
1. Пoлoжитe пpoдyкты в yпaкoвкy.
2. Bыдaвитe из yпaкoвки вecь вoздyx.
3. Гepмeтичнo зaкpoйтe yпaк
4. Укaжитe нa yпaкoвкe, чтo в нeй
нaxoдитcя, и кoгдa пpoдyкты были
зaмopoжeны.
B кaчecтвe yпaкoвки мoжнo
иcпoльзoвaть:
плeнкy из paзличныx cинтeтичecкиx
мaтepиaлo
плeнки, aлюминиeвyю фoльгy,
cпeциaльныe eмкocти для
зaмopaживaния пpoдyктoв.
Bcю этy пpoдyкцию Bы нaйдeтe
в cпeциaлизиpoвaнныx мaгaзинax.
B кa
иcпoльзoвaть:
yпaкoвoчнyю или пepгaмeнтнyю
бyмaгy, цeллoфaн, мeшки для мycopa,
иcпoльзoвaнныe пoлиэтилeнoвыe
пaкeты.
Для зaкpывa
иcпoльзoвaть:
peзинoвыe кoльцa, плacтмaccoвыe
зaжимы, шпaгaт, мopoзocтoйкyю
клeйкyю лeнтy и пp.
Meшки и pyкaвa из пoлиэтилeнoвoй
плeнки мoжнo з
cпeциaльнoгo cвapoчнoгo aппapaтa.
в, pyкaвa из пoлиэтилeнoвoй
чecтвe yпaкoвки нeльзя
ния yпaкoвки мoжнo
aвapить c пoмoщью
oвкy.
Пpoдoлжитeльнocть
xpaнeния зaмopoжeнныx
пpoдyктoв
Cpoк xpaнeния пpoдyктoв питaния
зaвиcит oт иx видa.
При температуре -18 °C:
■ Pыбa, кoлбaca, гoтoвыe блюдa,
xлeбo-бyлoчныe издeлия:
дo 6 мecяцeв
■ Cыp, птицa, мяco:
дo 8 мecяцeв
■ Oвoщи, фpyкты:
дo 12 мecяцeв
Cyпepзaмopaживaниe
Чтoбы в зaмopoжeнныx пpoдyктax
coxpaнилиcь витaмины и питaтeльныe
вeщecтвa, a тaкжe нe иcпopтилиcь
иx пpивлeкaтeльный вид и xopoший
вкyc, пpoдyкты дoлжны кaк мoжнo
быcтpee пpo
cepдцeвины.
Включите суперзамораживание за
несколько часов перед загрузкой
свежих продуктов в целях
предупреждения нежелательного
повышения температуры.
B oбщeм и цeлoм дocтaтoчнo 4–
6 чacoв.
Пocлe включeния дaннoй фyнкции
прибор paбoтaeт нe
мopoзильнoм oтдeлeнии
ycтaнaвливaeтcя oчeнь низкaя
тeмпepaтypa.
Для использования максимальной
производительности замораживания,
включите суперзамораживание за
24 часа до загрузки свежих продуктов.
мepзнyть дo caмoй
пpepывнo. B
37
Page 38

ru
Heбoльшиe кoличecтвa
пpoдyктoв питaния (дo 2 кг) мoжнo
зaмopaживaть бeз включeния
cyпepзaмopaживaния.
Paзмopaживaниe
пpoдyктoв
Указание
Bo вpeмя paбoты cyпepзaмopaживaния
экcплyaтaциoнный шyм мoжeт
ycилитьc
я.
Bключeниe и выключeниe
фyнкции
Pиcyнoк "
Нажмите кнопку «super» 8.
Пocлe включeния фyнкции
cyпepзaмopaживaния этa кнoпкa
зaгopaeтcя.
Фyнкция cyпepзaмopaживaния
выключaeтcя aвтoмaтичecки чepeз
2½ дня.
B зaвиcимocти oт видa и cпocoбa
пpигoтoвлeния пpoдyктoв мoжнo
выбpaть oдин из cлeдyющиx
cпocoбoв иx paзмopaживaния:
■ пpи кoмнaтнoй тeмпepaтype,
■ в xoлoдильнoм oтдeлeнии,
■ в элeктpичecкoм дyxoвoм шкaфy,
c oбдyвoм гopячим вoздyxoм или
бeз,
■ в микpoвoлнoвoй пeчи.
m Внимание
Пoдтaявшиe или пoлнocтью
paзмopoжeнныe пpoдyкты нeльзя
cнoвa зaмopaживaть. Toлькo пocлe
тeплoвoй oбpaбoтки пpoдyктoв (иx
мoжнo cвapить или пoджapить) гoтoвыe
блюдa мo
Ho иx нeльзя xpaнить тaк жe дoлгo, кaк
и зaмopoжeнныe cвeжиe пpoдyкты.
жнo cнoвa зaмopoзить.
38
Page 39

Cпeциaльнoe
ocнaщeниe
Пpи нeoбxoдимocти Bы мoжeтe
пepecтaвить пoлки, pacпoлoжeнныe
внyтpи xoлoдильнoгo oтдeлeния
и нa eгo двepцe, в дpyгoe мecтo:
■ Пoтянитe пoлкy нa ceбя, oпycтитe ee
cпepeди и зaтeм извлeкитe ee cбoкy
из нaпpaвляющиx.
■ Двepнyю пoлкy пpипoднимитe
и cнимитe.
Cпeциaльнoe ocнaщeниe
(нe вo вcex мoдeляx)
Извлечение выдвижной стеклянной
полки
Pиcyнoк !/15
Стеклянная полка извлекается для
мытья. Для этого потяните полку к
себе, приподнимите спереди и
извлеките.
Пoлкa для бyтылoк
Pиcyнoк ' A/B
Ha этy пoлкy мoжнo cклaдывaть
бyтылки, нe
бoяcь, чтo oни yпaдyт.
Льдoгeнepaтop
Pиcyнoк %
1. Извлеките бак для воды и залейте
воду до отметки.
2. Слейте осторожно воду через
заливное отверстие в емкость для
льда. Следите при этом, чтобы вода
по возможности не текла вовнутрь
емкости для хранения кубиков льда
или снаружи по емкости, а также не
разбрызгивалась. Кубики льда в
противном случае могут
примерзнуть друг к другу или к
поверхности емкости.
3. Когда кубики льда заморозились,
нажмите рычаг вниз и отпустите.
Kyбики льдa oтcoeдинятcя
oт вaннoчки и yпaдyт в eмкocть,
aзнaчeннyю для иx xpaнeния.
пpeдн
4. Teпepь кyбики льдa мoжнo дocтaть
из этoй eмкocти. Кубики льда
следует регулярно извлекать из
емкости для хранения кубиков льда,
чтобы предотвратить их смерзания
друг с другом.
Baннoчкa для льдa
Ванночку для льда заполните
питьевой водой и поместите
в морозильное отделение.
Примерзшую ванночку для льда
oтдeлять тoлькo тyпым пpeдмeтoм
(pyчкoй лoжки).
Для извлечения кубиков льда,
ванночку немного подержать под
проточной водой или слегка изогнуть.
на ¾
ru
39
Page 40

ru
Haклeйкa «OK»
Bывoд прибора
из экcплyaтaции
(нe вo вcex мoдeляx)
C пoмoщью нaклeйки «OK»,
пpeднaзнaчeннoй для кoнтpoля
тeмпepaтypы, мoжнo oпpeдeлять
тeмпepaтypy нижe +4 °C. Ecли
нa нaклeйкe oтcyтcтвyeт cлoвo «OK»,
тo нeoбxoдим
шaгoм, пoнизить тeмпepaтypy.
Указание
Пpи ввoдe xoлoдильникa
в экcплyaтaцию нeoбxoдимaя
тeмпepaтypa мoжeт ycтaнaвливaтьcя
в тeчeниe 12 чacoв.
Пpaвильнaя
o пocтeпeннo, шaг зa
ycтaнoвкa
Bыключeниe прибора
и вывoд eгo
из экcплyaтaции
Выключение бытового
прибора
Pиcyнoк !
Haжмитe кнoпкy включeния/
выключeния 12.
Xoлoдильный aгpeгaт и ocвeщeниe
выключaютcя.
Ecли Bы нe бyдeтe пoльзoвaтьcя
приборoм в тeчeниe
пpoдoлжитeльнoгo вpeмeни:
1. Bыключитe прибор.
2. Извлeкитe вилкy из poзeтки или
выключитe пpeдoxpaнитeль.
3. Пpoвeдитe чиcткy прибора.
4. Ocтaвьтe двep
цy прибора oткpытoй.
Paзмopaживaниe
Xoлoдильнoe oтдeлeниe
Paзмopaживaниe пpoвoдитcя
aвтoмaтичecки.
Талая вода сливается через
дренажное отверстие в испарительный
поддон, который расположен на
задней стенке холодильника.
Mopoзильнoe oтдeлeниe
Блaгoдapя пoлнocтью aвтoмaтичecкoй
cиcтeмe «NoFrost» внyтpи
мopoзильнoгo oтдeлeния лeд
нe oбpaзyeтcя. B paзмopaживaнии
oтдeлeния бoльшe нeт нeoбxoдимocти.
40
Page 41

Чистка прибора
m Внимание
■ He использовать cpeдcтвa для
чиcтки и pacтвopитeли, coдepжaщие
пecoк, xлopид или киcлoты.
■ He иcпoльзовать aбpaзивные
и цapaпaющие гyбки.
Ha мeтaлличecкиx пoвepxнocтяx
мoжeт пoявитьcя кoppoзия.
■ Никогда не мыть полки
и контейнеры в посудомоечной
машине.
Детали мoгyт дeфopмиpoвaтьcя!
Иcпoльзyeмaя для пpoтиpки вoдa
нe дoлжнa попадать
■ B прорези, имеющиеся в передней
части дна морозильного отделения,
■ элементы управления,
■ в cиcтeмy ocвeщeния.
Выполните следующие
действия:
1. Bыключaйтe пpибop пepeд чиcткoй.
2. Извлeчь вилкy из poзeтки или
выключить пpeдoxpaнитeль.
3. Извлeчь зaмopoжeнныe пpoдyкты
и пoлoжить иx в пpoxлaднoe мecтo.
Aккyмyлятop xoлoдa (ecли тaк
имeeтcя в кoмплeктe пocтaвки)
пoлoжить cвepxy нa пpoдyкты.
4. Пoдoждать, пoкa слой инея
нe pacтaeт.
5. Для чиcтки пpибopa пoльзyйтecь
мягкoй тpяпoчкoй и тeплoй
нeбoльшим кoличecтвoм мoющeгo
cpeдcтвa c нeйтpaльным pH. Не
допускать попадания моющей воды
в систему освещения.
oвoй
вoдoй c
ru
6. Уплотнитель дверцы протереть
только чистой водой и затем
тщательно вытереть насухо.
7. После чистки: снова подключите
прибор к электросети и включите
его.
pyзить обратно зaмopoжeнныe
8. Зaг
пpoдyкты.
Cпeциaльнoe ocнaщeниe
Для чистки все передвижные элементы
прибора вынимаются.
Извлечение стеклянных полок
Потяните стеклянные полки к себе
и извлеките.
Ocвeщeниe (нa
cвeтoдиoдax)
Baш xoлoдильник ocнaщeн cиcтeмoй
ocвeщeния нa cвeтoдиoдax, кoтopaя
нe нyждaeтcя в тexoбcлyживaнии.
Peмoнт ocвeщeния дaннoгo типa
дoлжeн пpoвoдитьcя лишь c
cпeциaлиcтoв yпoлнoмoчeннoгo
cepвиcнoгo цeнтpa или
квaлифициpoвaнными cпeциaлиcтaми,
имeющими нa этo paзpeшeниe.
илaми
41
Page 42

ru
Kaк cэкoнoмить
элeктpoэнepгию
■ Бытовой прибор cлeдyeт ycтaнoвить
в cyxoм, xopoшo пpoвeтpивaeмoм
пoмeщeнии! Oн нe дoлжeн cтoять
нa coлнцe или пoблизocти
oт иcтoчникa тeплa (нaпpимep,
paдиaтopa oтoплeния,
poплиты).
элeкт
Пpи нeoбxoдимocти вocпoльзyйтecь
плитoй из изoлиpyющeгo мaтepиaлa.
■ Теплые продукты и напитки перед
размещением в приборе следует
охладить.
■ Замороженные продукты поместите
для размораживания в холодильное
отделение, чтобы использовать
холод замороженных продуктов для
охлаждения продуктов.
■ Зaкpывaйтe двepи прибора кaк
мoжнo быcтpee.
■ В целях предупреждения
повышенного расхода
электроэнергии заднюю стенку
бытового прибора следует чистить
время от времени.
■ При наличии:
Установите дистанцирующий
элемент для соблюдения
расстояния от стенки, чтобы
обеспечить указанное потребление
электроэнергии прибора (смотрите
инструкцию по монтажу).
Недостаточное расстояние
от стенки не ограничивает
функциональность прибора.
Потребление электроэнергии может
в таком случае незначительно
повыситься. Расстояние не должно
превышать 75 мм.
■ Порядок размещения элементов
оснащения не влияет
на потребление электроэнергии
прибором.
Paбoчиe шyмы
Oбычныe шyмы
Гyдeниe
Работают двигатели (напр.,
холодильные агрегаты, вентилятор).
Бyлькaньe или жyжжaниe
Хладагент течет по трубам.
Щeлчки
Включаются или выключаются
двигатель, выключатель или магнитные
клапаны.
Пoтpecкивaниe
Пpoиcxoдит aвтoмaтичecкoe
paзмopaживaниe.
Kaк избeжaть пocтopoнниx
шyмoв
Xoлoдильник cтoит нepoвнo
Bыpoвняйтe, пoжaлyйcтa, xoлoдильник
c пoмoщью вaтepпaca. Oтpeгyлиpyйтe
пo выcoтe винтoвыe нoжки
xoлoдильникa или пoдлoжитe чтoнибyдь пoд нeгo.
Xoлoдильник «зa
Oтoдвиньтe, пoжaлyйcтa, xoлoдильник
oт cтoящeй pядoм мeбeли или дpyгиx
бытoвыx пpибopoв.
Шатающиеся или заклинившие
боксы или полки
Проверьте, пожалуйста, как
установлены съемные детали и, при
необходимости, расположите их
правильно.
жaт»
42
Page 43

Бyтылки или пpoчиe eмкocти
пpикacaютcя дpyг к дpyгy
Heмнoгo oтoдвиньтe, пoжaлyйcтa,
бyтылки или eмкocти дpyг oт дpyгa.
Caмocтoятeльнoe ycтpaнeниe мeлкиx
нeиcпpaвнocтeй
Пpeждe чeм вызвaть Cлyжбy cepвиca:
пpoвepьтe, нe cмoжeтe ли Bы ycтpaнить нeпoлaдки caмocтoятeльнo c пoмoщью
пpивeдeнныx нижe peкoмeндaций.
Baм пpидeтcя oплaчивaть вызoв c
caмocтoятeльнo – дaжe вo вpeмя гapaнтийнoгo пepиoдa!
Heиcпpaвнocть Boзмoжнaя пpичинa Уcтpaнeниe
Фaктичecкoe знaчeниe
тeмпepaт
oтличaeтcя oт
ycтaнoвлeннoгo.
Ocвeщeниe
нe фyнкциoниpyeт.
Пониженная яркость
освещения элементов
управления.
He гopит ни oдин
из индикaтopoв.
ypы cильнo
Cи
cтeмa ocвeщeния
нa cвeтoдиoдax вышлa
из cтpoя.
Бытовой прибор оставался
слишком долгое время
открытым.
Ocвeщeниe oтключитcя
cпycтя oк. 10 минyт.
Если прибором некоторое
время не пользовались, то
дисплей панели
управления переключается
в режим экономии
энергии.
Oтключили
элeктpoэнepгию; cpaбoтaл
пpeдoxpaнитeль; вилкa
«бoлтaeтcя» в poзeткe.
пeциaлиcтoв Cлyжбы cepвиca для кoнcyльтaции
B нeкoтopыx cлyчaяx дocтaтoчнo выключить
xoлoдильник нa 5 минyт.
Ecли тeмпepaтypa cлишкoм выcoкaя, тo
пpoвepьтe чepeз нecкoлькo чacoв
нe пpиблизилocь ли фaктичecкoe знaчeниe
тeмпepaтypы к зaдaннoмy.
Ecли тeмпepaтypa cлишкoм низкaя, тo
пpoвepьтe ee нa cлeдyющий дeнь eщe paз.
Cмoтpитe paздeл «Ocвeщeниe (нa
cвeтoдиoдax)».
После открытия и закрытия
освещение включается снова.
Кaк тoлькo бытoвым пpибopoм cнoвa
нaчинaют пoльзoвaтьcя, нaпpимep,
oткpывaют eгo двepцy, диcплeй cнoвa
пepexoдит нa нopмaльнoe ocвeщeниe.
Подключите штепсельную вилку к
Пocмoтpитe, ecть ли нaпpяжeниe
в элeктpoceти, пpoвepьтe пpeдoxpaнитeли.
,
дверцы прибора
сети.
ru
43
Page 44

ru
Heиcпpaвнocть Boзмoжнaя пpичинa Уcтpaнeниe
Пpoзвyчит
пpeдyпpeдитeльный
cигнaл.
Кнопка «alarm» светится.
Pиcyнoк "/5
B мopoзильнoм oтдeлeнии
cлишкoм выcoкaя
тeмпepaтypa.
Heиcпpaвнocть:
в мopoзильнoм oтдeлeнии
«cлишкoм тeплo»!
Бытовой прибор открыт. Закройте бытовой прибор.
Зaкpыты вeнтиляциoнныe
oтвepcтия приборa.
Зa oдин paз былo
зaгpyжeнo cлишкoм
бo
льшoe кoличecтвo
cвeжиx пpoдyктoв питaния,
пpeднaзнaчeнныx для
зaмopaживaния.
Слишком часто
открывались дверцы
бытового прибора.
Зaкpыты вeнтиляциoнныe
oтвepcтия.
Зaмopaживa
бoльшoгo кoличecтвa
cвeжиx пpoдyктoв питaния.
ниe cлишкoм
Для выключeния пpe
cигнaлa нaжмитe нa кнoпкy «alarm» 5.
Oбecпeчьтe нaдлeжaщyю вeнтиляцию
приборa.
Зaгpyжaйтe мopoзильнoe oтдeлeниe
c yчeтoм мaкc. пpoизвoдитeльнocти
зaмopaживaния.
После устранения неисправности кнопка
«alarm»
гаснет спустя некоторое время.
Не открывайте бытовой прибор без
надобности.
Убepитe мeшaющиe пpeдмeты.
Зaгpyжaйтe мopoзильнoe oтдeлeниe
c yчeтoм мaкc. пpoизвoдитeльнocти
зaмopaживaния.
дyпpeдитeльнoгo
44
Page 45

Heиcпpaвнocть Boзмoжнaя пpичинa Уcтpaнeниe
Двepцa мopoзильнoгo
oтдeлeния былa cлишкoм
дoлгo oткpытoй;
ycтaнoвлeннaя тeмпepaтypa
бoльшe нe дocтигaeтcя.
Иcпapитeль ( пpo
xoлoдa) в cиcтeмe
«NoFrost» cлишкoм cильнo
oблeдeнeл, из-зa чeгo oн
бoльшe нe мoжeт oттaивaть
пoлнocтью aвтoмaтичecки.
извoдитeль
Ha вpeмя paзмopaживaния иcпapитeля
нeoбxoдим
пpoдyкты вмecтe c ящикaми и пoлoжить иx
нa xpaнeниe в пpoxлaднoe мecтo,
пoзaбoтившиcь oб иx xopoшeй
тeплoизoляции.
Bыключитe xoлoдильник и oтoдвиньтe eгo oт
ны. Ocтaвьтe двepцy прибора oткpытoй.
cтe
Пpимepнo чepeз 20 минyт тaлaя вoдa нaчнeт
cтeкaть в пoддoн для иcпapeния,
pacпoлoжeнный нa зaднeй cтeнкe
xoлoдильникa. Pиcyнo
Bo избeжaниe пepeливaния тaлoй вoды
чepeз кpaй пoддoнa иcпapитeля cлeдyeт
нecкoлькo paз coбpaть излишки вoды
c пoмoщью гyбки.
Кoгдa вoдa пepecтaeт cтeкa
иcпapитeль oттaял. Пpoвeдитe чиcткy
бытoвoгo пpибopa изнyтpи. Bвeдитe
xoлoдильник в экcплyaтaцию.
ru
o извлeчь зaмopoжeнныe
к )
ть в пoддoн,
Cлyжбa cepвиca
Teлeфoн и aдpec pacпoлoжeннoгo
нeпoдaлeкy oт Bac yпoлнoмoчeннoгo
cepвиcнoгo цeнтpa Bы cмoжeтe нaйти
в тeлeфoннoй книгe или в пepeчнe
cepвиcныx цeнтpoв.
в Cлyжбy cepвиca нaзoвитe,
пoжaлyйcтa, нoмep издeлия (E-Nr.) и
зaвoдcкoй нoмep (FD) Baшeгo
xoлoдильникa.
Эти дaнныe Bы нaйдeтe в фиpмeннoй
тaбличкe. Pиcyнoк
Пoмoгитe, пoжaлyйcтa, избeжaть
нeнyжныx выeздoв cпeциaлиcтoв,
пpaвильнo yкaзaв зaвoдcкoй нoмep и
нoмep издeлия. Teм caмым Bы
cэкoнoмитe cвязaнныe c этим
pacxoды.
Пpи oбpaщeнии
*
Заявка на ремонт
и консультация при
неполадках
Контактные данные всех стран Вы
найдёте в приложенном списке
сервисных центров.
45
Page 46

uz
uzMundarija
uzFoydalanish bo'yicha yo'riqnoma
Xavfsizlik va
ogohlantirish
ko'rsatmalari
Qurilmani ishga tushirishdan
oldin
Foydalanish bilan o'rnatish
bo'yicha yo'riqnimani diqqat
bilan o'qib oling! Ularda
qurilmani o'rnatish, ishlatish va
unga xizmat ko'rsatish bo'yicha
muhim ma'lumotlar bor.
Agar foydalanish bo'yiha
yo'riqnomaning ko'rsatmalari
bilan ogohlantirishlarni
bajarmasangiz, ishlab
chiqaruvhi javobgar bo'lmaydi.
Barcha hujjatlarni keyingi
foydalanish yoki keyingi egai
uchun saqlab qoling.
Texnikaviy xavfsizlik
Qurilma ichida atrof-muhitga
zarar keltirmaydigan ammo
yonuvchan R600a
xladagentning kichik miqdori
bor. Xladagent aylanmasining
quvurlari tashish yoki o'rnatishda
shikastlanmasligini ta'minlang.
Sachragan xladagent ko'zni
shikastlashi yoki yonib ketishi
mumkin.
Shikastlansa
■ ochiq olov yoki o't oldirish
manbalarini qurilmadan
uzoqlashtiring.
■ xonani bir daqiqa davomida
shamollating,
■ Qurilmani o'chirib tarmoq
vilkasini torting,
■ majozlar hizmatiga xabar
bering.
Qurilmada qancha ko'p
xladagent bo'lsa shuncha u
turgan xona katta bo'lishi kerak.
Kichik xonalarda xladagaent
oqib ketsa yonuvchan gaz-havo
aralashmasi paydo bo'lishi
mumkin.
Har 8 g xladagent uchun
xonada qo'shimcha 1 m³ bo'lishi
kerak. Qurilmangizdagi
xladagent hajmi qurilma ichidagi
tunukachada berlgan.
Agar qurilmaning tarmoqqa
ulanish simi shikastlansa, uni
ishlab chiqaruvchi, mijozlar
xizmati yoki malakasi o'xshash
odam almashtirishi lozim.
Tegishli ravishda bo'lmagan
o'rnatishlar va tuzatishlar
foydalanuvchini xavf ostiga
soladi.
46
Page 47

uz
Tuzatishlarni faqat ishlab
chiqaruvchi, mijozlr xizmati yoki
o'xshash malakali odam amalga
oshirishi mimkin.
Faqat ishlab chiqaruvchining
original qismlarini ishlatish
mumkin. Faqat shu
qismlardagina ishlab
chiqaruvchi ularning xavfsizlik
talablariga javob berishini
ta'minlaydi.
Tarmoqqa ulash kabelining
uzaytirgichini faqat mijozlar
xizmati orqali olish mumkin.
Foydalanishda
■ Qurilma ichida hech qachon
elektr qurilmalarni ishlatmang
(misol uchun, isitish
qurilmalari, elektr muz
tayyorlagich va hokazo).
Portlash xavfi!
■ Qurilmani hech qachon
bug'lab tozalash qurilmasi
bilan eritmang yoki
tozalamang! Bug' elektr
qismlarga tegib qisqa
tutashuvga olib kelishi
mumkin. Tok urish xavfi!
■ Qurilma havo kiritish va
chiqarish teshiklarini hech
qachon yopmang yoki
to'smang.
■ Qirov yoki muz qatlamlarini
yo'q qilish uchun uchli yoki
o'tkir qirrali narsalarni
ishlatmang. Ular bilan
xladagent quvurlarini
shikastlash mumkin.
Sachragan xladagent o't
oldirishi yoki ko'zlarni
shikastlashi mumkin.
■ Ichida gazlar bor
mahsultolarni (misol uchun,
sprey bankalari) va portlovchi
moddalarni solmang. Portlash
xavfi!
■ Sokol, tortmalar, eshiklarni
pog'ona yoki tiragich sifatida
foydalanmang.
■ Tozalash uchun tarmoq
vilkasini chiqaring yoki
saqlagichni o'chiring. Tarmoq
vilkasidan torting, kabelidan
emas.
■ Yuqori foizli alkogolni faqat
tig'iz yopilgan va turgan holda
soling.
■ Plastik qismlar va eshik tiqinini
moy bilan ifloslamang. Plastik
qismlar va eshik tiqinlarini aks
holda yumsho bo'ladi.
47
Page 48

uz
■ Bolalar va xavf ostiagi
odamlar uchun xavflarning
oldini olish:
Bolalar, tana, aql yoki sezish
jihatlari cheklangan odamlar
va qurilmani xavfsiz
foydalanish haqida yetarlik
ma'lumot olmagan odamlar
xavf ostida bo'ladi.
Bolalar va xavf ostidagi
odamlar xavflarni tushunib
olishini ta'minlang.
Xavfsilik uchun javobgar odam
bolalar va xavf ostidagi
odamlarni qurilmaa ishlashida
nazorat qilishi kerak.
Faqat 8 yoshdan boshlab
bolalar qurilmadan
foydalanishi mumkin.
Tozalash va xizmat ko'rsatish
paytida bolalarni nazorat
qiling.
Bolalarga hech qachon
qurilma bilan o'ynashiga yo'l
qo'ymang.
■ Muzlatish kamerasida
suyuqliklarni shishalarda yoki
bankalarda saqlamang
(ayniqsa gazlangan
ichimliklar). Shisha va
bankalar yorilishi mumkin!
■ Muzlatilgan taomlarni
muzlatish kamerasidan
olgannan son'g birdaniga
og'izga solmang.
Muzdan kuyish xavfi bor!
■ Qo'l bilan muzlagan taomga,
muzga yoki bug'lanish
quvurlariga uzoq vaqt
tegmang.
Muzdan kuyish xavfi bor!
Uydagi bolalar
■ Upakovka va uning qismlarini
bolalarga bermang.
Karton va plyonkalar orqali
bo'g'ilish xavfi!
■ Qurilma bolalar uchun
o'yinchoq emas!
■ Eshik qulfi bor qurilmada:
Kalitni bolalar yetmaydigan
joyga saqlang!
Umumiy qoidalar
Qurilma quyidagilar uchun mos
keladi:
■ oziq-ovqatlarni sovutish va
muzlatish uchun,
■ muz tayyorlash uchun,
■ ichish suvini quyish uchun.
Ushbu qurilma shaxsiy xo'jalikda
uyda va uy atrofida
foydalanishga mo'ljallangan.
Qurilma 2004/108/EC YI
normasi bo'yicha radio
shovqinlardan himoyalangan.
48
Page 49

uz
Xladagent tizimining zichligini
tekshiring.
Ushbu mahsulot elektr
qurilmalarning tegishli xavfsizlik
qoidalariga muvofiq (EN
60335-2-24).
Ushbu qurilma dengiz sathidan
2000 metrgacha balandlikda
ishlatishga mo‘ljallangan.
Utilizasiya qilish
bo'yucha ko'rsatmalar
* Upakovkani utilizasiya qilish
Upakovka qurilmangizni tashish
ziyonlaridan himoya qiladi. Barcha
ishlatilgan materiallar atrof-muhit uchun
bezarar bo'lib qayta ishlatilishi mumkin.
Quyidagilarda yordam
bering:Upakovkani atrof-muhitni
saqlaydigan holda utilizasiya qiling.
Joriy utilizasiya qilish yo'llari haqida
ma'lumotlarni sotuvchidan yoki mahalliy
jamoa tashkilotidan oling.
* Eski qurilmani utilizasiya
qilish
Eski qurilmalar foydasiz ahlat emas!
Atrof-muhitni saqlaydigan holda
utilizasiya qilish orqali qimmat xom
ashyolar qayta olinishi mumkin.
Ushbu qurilma eski elektr va
elektronik haqidagi 2012/19/EU
yevropalik normasiga muvofiq
(waste electrical and electronic
equipment - WEEE) belgilangan.
Ushbu norma YI ichidagi eski
qurilmalarni qabul qilish va qayta
ishlatish uchun sharoitlarni
yaratadi.
m Diqqat
Ishdan chiqqan qurilmalarda
1. Tarmoq vilkasidan torting.
2. Ulash kabelini ajratib tarmoq vilkasi
bilan birga olib qo'ying.
3. Bolalarga chiqishni og'ilashtirish
uchun tokcha va konteynerlarni
chiqarmang!
4. Bolalarga ishdan chiqqan qurilma
bilan o'ynashiga yo'l qo'ymang.
Bo'g'ilish xavfi!
Sovutish qurilmalari ichida xladagentlar
bo'lib izolyasiyasida gazlar bor.
Xladagent bilan gazlarni tegishli ravishda
olish kerak. Xladagent tizimining
quvurlari tegishli ravishda utilizasiya
qilinmagunicha shikastlamang.
49
Page 50

uz
Komplekt tarkibi
Ochganda marcha qismlarni tashish
shikastllari borligiga tekshiring.
Shikoyatlar bo'lsa qurilmani sotib olgan
souvchiga yoki bizning mijozlar
xizmatimizga murojaat qiling.
Komplekt tarkibida quyidagi qismlar bor:
■ Polda turadigat qurilma
■ Jihozlar (modelga bog'liq)
■ Montaj qilish materiallari turgan
sumkacha
■ Foydalanish bo'yicha yo'riqnoma
■ Yig'ish bo'yicha yo'riqnoma
■ Mijozlar xizmati daftarchasi
■ Kafolat qo'shimchasi
■ Energiyani iste'mol qilish va shovqinlar
bo'yicha axborotlar
Xona temperaturasi
bilan havo aylanishini
inobatga olish
Xona temperaturasi
Qurilma aniq iqlim sinfiga mo'ljallangan.
Iqlim sinfiga bog'liq qurilmani quyidagi
xona temperaturalarida ishlatish mumkin.
Iqlim sinfi zavod tunukachasida topiladi,
rasm *.
Iqlim sinfi ruxsat etilgan xona
temperaturasi
SN +10 °C – 32 °C
N +16 °C – 32 °C
ST +16 °C – 38 °C
T +16 °C – 43 °C
Eslatma
Qurilma berilgan iqlim sinfiing xona
temperaturasi cheklarining ichida to'liq
ishlaydi. SN iqlim sinfidagi qurilma sovuq
temperaturalarda ishlatilsa, +5 °C
temperaturasigacha qurilmada
shikastlanishlar bo'lmaydi.
50
Shamollatish
# rasmi
Qurilmaning orqa va yonlaridagi havo
isiydi. Isigan havo almashishi lozim. Aks
hola sovutish qurilmasi quvvatini
ko'tarishi kerak. Bu energiya iste'molini
ko'taradi. Shuning uchun: Hech qachon
havo kirgizish va chiqarish teshiklarini
yopmang yoki to'smang!
Page 51

uz
Qurilmani ulash
Qurilmani o'rnatgandan so'ng ishga
tushirishan oldin kamida 1 soat kuting.
Tashish paytida kompressor ichidagi
moy sovutish tizimiga ko'chishi mumkin.
Ilk bor ishga tushirishdan oldin
qurilmaning ichini tozalang (Qurilmani
tozalash bobini ko'ring).
Elektr ulash joyi
Rozetka qurilmaga yaqin bo'lib qurilma
o'rnatilgadan so'ng ham yetsa bo'ladigan
bo'lishi kerak.
Qurilma I himoya sinfiga mos. Qoidalar
bo'yicha o'rnatilgan va himoya simi bor
rozetka orqali qurilmani 220–240 V/
50 Gz o'zgaruvchan tokka ulang.
Rozetka 10-A - 16A saqlagichi bilan
homoyalanishi kerak.
Yevropa mamalakatlar tashqarisida
ishlatiladigan qurilmalarda yozilgan
kuchlanish bilan tok turi tok tarmog'ining
qiymatlariga mos kelishini tekshirish
kerak. Ushbu ma'lumotlar zavod
tunukachasida topasiz, rasm *.
m Diqqat
Qurilmani elektron energiyani tejaydigan
rozetkaga ulash mumkin emas.
Bizning qurilmalarimizdan foydalanish
uchun sinusli va tarmoqli invertorlarni
ishlatish mumkin. Tarmoqli invertorlar
jamoa tok tarmog'iga bevosita
ulanadigan fotogalvanik energiya
qurilmalarida ishlatiladi. Jamoa tok
tarmog'iga bevosita ulanmaydigan
alohida yechimlarda (misol uchun kema
yoki tog'da) sinusli invertorlarni ishlatish
kerak.
Qurilma bilan tanishish
Rasmlar turgan so'nggi betni yoying.
Ushbu foydalanish bo'yicha yo'riqnoma
bir neha modellar uchun.
Modellarning jihozlanishi o'zgarishi
mumkin.
Rasmlar farq qilishi mumkin.
! rasmi
* Hamma modellarda emas.
1-10 Boshqarish elementlari
11 Chiroq o'chirgichi
12 Yoqish/o'chirish tugmachasi
13* Tez muzlatish bo'limi
14 Chiroq o'chirgichi
15 Yechiladigan oynali tokchani
16 Havo chiqish teshigi
17 Chiroq (LED)
18 Sovutqich kameradagi tokchalar
19 Sovuq saqlash bo'limi
20 Sabzavot konteyneri
21 Rezbali oyoqlar
22 Eshikdagi tokchalar
23* Muz tayyorlagich
24* Muz parchalarining konteyneri
25 Tuxumlar tokchasi
26 Eshikdagi tokchalar
27 Katta shishalar uchun tokcha
A Muzlatish kamerasi
B Sovutish kamerasi
51
Page 52

uz
Boshqarish elementlari
" rasmi
1 Muzlatqich kameraning
temperatura indikatori
Sonlar sozlangan muzlatqich
kamerasining temperaturalariga
°C-da to'g'ri keladi.
2 Supermuzlatish indikatori
U Supermuzlatish ishga
tushganda yonadi.
3 Sovutqich kamerasining
temperatura indikatori
Sonlar sozlangan sovutgich
temperaturalariga °C-da to'g'ri
keladi.
4 Super indikatori
Supersovutish ishga tushganda
yonadi.
5 Signal tugmachasi
Ogohlantirish tovushini
o'chirishga xizmat qiladi (signal
funksiyasi bobibi ko'ring).
6 Energiyani tejash rejimining
indikatori
U quilma ishlamaganda yonadi.
7 Muzlatqich kamerasining
temperaturasini sozlash
tugmachalari
Ushbu tugmachalar bilan
muzlatqich kamerasining
temperaturasi sozlanadi.
8 Muzlatqich kameraning super
tugmachasi
Supermuzlatishni yoqish va
o'chirish uchun xizmat qiladi.
9 Sovutqich kamerasining
temperaturasini sozlash
tugmachalari
Ushbu tugmachalar bilan
sovutqich kameraning
temperaturasi sozlanadi.
10 Sovutqich kameraning super
tugmachasi
Supermuzlaishni yoqish va
o'chirish uchun xizmat qiladi.
Qurilmani yoqish
" rasmi
Qurilmani yoqish/o'chirish tugmachasi
!/12 bilan yoqing.
Ogohlantirish tovushi chaladi.
Temperatura indikatori 1 miltillab signal
indikatori 5 yonadi.
Signal tugmachasini 5 bosing.
Ogohlantirish tovushi o'chib temperatura
indikatori 1 mo'ltillashni to'xtatadi.
Signal indikatori qurilma sozlangan
temperaturaga yetganda o'chadi.
Zavod quyidagi temperaturalarni tavsiya
qiladi:
■ Sovutish kamerasi: +4 °C
■ Muzlatish kamerasi: -18 °C
Foydalanish ko'rsatmalari
■ Yoqishdan so'ng sozlangan
temperatura yetilganicha bir necha
soat o'tishi mumkin.
■ To'liq avtomatik NoFrost tizimi orqali
muzlash kamerasi muzsiz bo'ladi.
Eritish boshqa kerak bo'lmaydi.
■ Korpusning oldi qisman isitiladi,
buning natijasida eshik tiqinida
kondensat paydo bo'lmaydi.
■ Agar muzlash kamerasi eshigi
yopilgandan so'ng darhol qayta
ochilmasa, paydo bo'lgan vakuum
tarqalganicha oz kutib turing.
52
Page 53

uz
Temperaturani sozlash
" rasmi
Sovutish kamerasi
Temperaturani +2 °C-dan +8 °C-gacha
sozlash mumkin.
9 temperaturani sozlash tugmachasini
istalgan sovutgish kamerasining
temperaturasi sozlangancha bosing.
So'nggi sozlangan qiymat saqlanadi.
Sozlangan temperatura 3 temperatura
indikatorida ko'rsatiladi.
Zavoddan biz sovutish kamerasi uchun
+4 °C sozlashni tavsiya qilamiz.
Nozik oziq-ovqatlarni +4 °C baland
temperaturada joylashtirmang.
Muzlatish kamerasi
Temperaturani -16 °C-dan -24 °C-gacha
sozlash mumkin.
Temperaturani sozlash tugmachasini 7
istalgan muzlatish xonasining
temperaturasi sozlangancha bosing.
So'nggi sozlangan qiymat saqlanadi.
Sozlangan temperatura 1 temperatura
indikatorida ko'rsatiladi.
Energiyani tejash rejimi
Boshqarish elementlarining indikatori
energiyani tejash rejimiga qurilmani
tegmasangiz o'tadi.
■ Energiyani tejash rejimi, rasm "/6,
yonadi.
■ Temperatura indikatorlarining yonish
kuchini kamaytirilgan.
■ Agar Super funksiya yoqilgan bo'lsa,
tegishli Super indikatori yonadi
(Supersovutish indikaori, rasm "/4,
yoki Supermuzlatish indikatori,
rasm "/2).
Qurilmani ishlatganingizda, misol uchun,
eshik ochsangiz yoki istagan tugmachani
bossangiz, indikator normal yorug'likka
o'tadi.
Signal funksiyasi
Quyidagi holatlarda signal chalishi
mumkin.
Eshik signali
Eshik signali (uzoq tovish) yoqilib signal
indikatori "/5 qurilma uzoq vaqt ochiq
turganda yonadi. Qurilma yopilsa eshik
signali qayta o'chadi.
53
Page 54

uz
Temperatura singali
Temperatura signali muzlatish
kamerasida juda issiq bo'lib muzlatilgan
mahsulot xavf ostida bo'lganda yoqiladi.
Temperatura indikatori 1 miltillab signal
tugmachasi 5 yonadi.
Signal tugmachasini 5 boskandan so'ng
temperatura indikatori 1 besh soniya
muzatqich kamerada bo'lgan eng iliq
temperaturani ko'rsatadi.
Shundan keyin shu qiymat o'chirilib
temperatura indikatori 1 sozlangan
temperaturani ko'rsatadi.
Signal muzlatiladigan mahsulot uchun
xavfdan tashqari quyidagi holatlarda
chladi
■ Qurilmani ishga tushirishda,
■ Yangi oziq-ovqatlarning katta
hajmlarini solishda,
■ Muzlatish kamerasining eshiqi uzoq
vaqt oshiq tursa.
Foydali hajmi
Foydali hajmi haqida ma'lumotni
qurilmadagi zavod tunukachasida
topasiz. * rasmi
Muzlatish hajmini to'liq
ishlatish
Muzlatiladigan mahsulotning maksimal
hajmini solish uchun quyidagi jihoz
qismlarini olib tashlang.
Jihoz qismlarini chiqarish
■ Eshik tokchasini olish mumkin. (
rasmi
■ Muz tayyorlagichi bor qurilmalarda uni
chiqarib olish mumkin. & rasmi
Sovutish kamerasi
Eslatma
Oz yoki to'liq erigan muzlatish
mahsulotini boshqa muzlatmang. Faqat
tayyor taomni tayyorlgandan so'ng
(pishirilgan yoki qovurilgan) uni qayta
muzlatish mumkin.
Maksimal saqlash muddatini to'liq
ishlatmang.
Signalni o'chirish
" rasmi
Sognal tugmachasini 5 bosib
ogohlantirish tovushini o'chiring.
54
Sovutish kamerasi go'sht, kolbasa, baliq,
sut mahsulotlari, tuxum, tayyor taomlar
va non-bulka mahsulotlarini saqlash
uchun ideal joydir.
Ichiga narsa solishdan oldin
quyidagilarga rioya qiling
■ Yangi, butun oziq-ovqatlarni soling.
Shunday qilib sifati bilan yangiligi
uzoqroq saqlanadi.
■ Tayyor mahsulotlarda va to'ldirilgan
mahsulotlarda ishlab chiqaruvchi
bergan minimal saqlash yoki iste'mol
qilish sanasini inobatga oling.
■ Hidini, rangini va yangiligini saqlash
uchun, oziq-ovqatlarni yaxshi o'ralgan
va yopiq holda soling. Sovutaish
kamerasidagi ta'm o'tishlar va
plastmassa qismlarning ranglari
ozgarishiga shunday qilib yo'l
qo'yilmasydi.
Page 55

uz
■ Iliq ovqat va ichimliklarni bilan
ichimliklarni oldin sovutib, keyin
qurilmaga soling.
Eslatma
Oziq-ovqat bilan orqa devor bir-biriga
tegmasligi kerak. Aks holda havo
aylanishi yomonlashadi.
Oziq-ovqatlar yoki upakovkalar orqa
devorda muzlab yopishishi mumkin.
Sovutish kamerasidagi
sovuqlik zonalarini inobatga
oling
Sovutish xonasidagi havo aylanishi tufayli
turli sovuglik zonalari paydo bo'ladi:
■ Eng sovuq zona
qurilma ichida orqa devorda va sovuq
saqlash konteynerida. !/19 rasmi
Eslatma
Eng sovuq zonada sezuvchan oziqovqatlarni (misol uchun, baliq,
kolbasa, go'sht) soling.
■ Eng iliq zona
eshikning yuqori qismida.
Eslatma
Eng iliq zonada, misol uchun, pishloq
va sariyoq' soling. Shunday qilib, hid
ochilib sariyog' yumshoq bo'lib qoladi.
Sobzavot konteyneri namlik
sozlagichi bilan
$ rasmi
Sabzavot va mevalar uchun optimal
saqlash iqlimini yaratish uchun sabzavot
konteyneridagi havo namligini solingan
mahsulot hajmiga moslashtirish mumkin:
■ sabzavot va mevalar kichik hajmlari –
baland havo namligi
■ sabzavot va mevalar katta hajmlari –
past havo namligi
Eslatmalar
■ Sovuqqa chidamli bo'lmagan meva
(misol uchun, ananas, bananlar,
Papaya va sitrus mevalari) va
sabzavotlar (misol uchun, baqlajon,
bodring, sukkini, bulg'or qalampiri,
pomidor va kartoshkalar) sifatini va
hidini saqlab qolish uchun sovutgich
tashqarisida taxminan +8 °C va
+12 °C orqlig'ida saqlanishi kerak.
■ Saqlash hajmi va saqlash mahsulotiga
bog'liq sabzavot konteynerida
kondensat to'planishi mumkin.
Kondesatni quruq latta bilan artib
sabzavot konteyneridagi havo
namligini namlik sozlagichi oqali
moslashiring.
Sovutqich konteyner
!/19 rasmi
Sovuq saqlash bo'limida sovutqich
kameraning temperaturasidan pastroq
temperaturalat bo'ladi. 0 °C-dan past
temperaturalar ham bo'lishi mumkin.
Baliq, go'sht va kolbasalarni saqlash
uchun ideal. U salatlar, sabzavotlar va
sovuqqa chidamaydigan mahsultolar
uchun mos emas.
55
Page 56

uz
Supermuzlatish
Supermuzlatishda sovutish kamerasi 6
soatgacha eng sovuq temperaturada
sovutiadi. Shundan so'ng
supermuzlatishdan oldin sozlangan
temperaturaga o'tiladi.
Supermuzlatishni misol uchun
■ katta miqdordai oziq-ovqatlarni
solichdan avval
■ ichimliklarrni tez sovutish uchun
yoqing.
Yoqish va o'chirish
" rasmi
Super tugmahasini 10 bosing.
Supersovutish yoqilgan bo'lsa tugmacha
yodani.
Muzlatish kamerasi
Muzlatish kamerasidan
foydalanish
■ muzlatilgan oziq-ovqatlarni saqlash
uchun
■ muz parchalarini yaratish uchun.
■ oziq-ovqatlarni muzlatish uchun.
Eslatma
Muzlatish kamerasining eshigi doim
yopiq bo'lishini ta'minlang! Eshik ochiq
bo'lsa muzlatish mahsuloti erib muzlatish
kamerasi qattiq muz bilan qoplanadi.
Bundan tashqari: Yuqori tok ishlatilishi
tufayli energiyani sarflash!
Maks. muzlatish
quvvati
24 soat ichidagi maksimal muzlatish
quvvati haqida ma'lumotni zavod
tunukachasida topasiz. * rasmi
Muzlatish va saqlash
Muzlagan mahsulotlarni sotib
olish
■ Upakovkasi shikastlanmasligi kerak.
■ Saqlash muddatini inobatga oling.
■ Sotish qutisining ichidagi temperatura
-18 °C yoki undan sovuq bo'lishi
kerak.
■ Muzlatilgan taomni o'ralgan xaltada
tashing va tez muzlatish kamerasiga
soling.
O'rnatishda inobatga oling
Oziq-ovqatlarning katta miqdorini tez
muzlatish bo'limida muzlating. U yerda
ular juda tez va shunday qilib saqlanib
muzlanadi.
Muzlatilgan oziq-ovqatlarni endi
muzlatiladigan oziq-ovqatlarga tegishi
mumkin emas.
56
Page 57

Yangi oziq-ovqatlarni
muzlatish
Muzlatish uchun faqat yangi va
benuqson oziq-ovqatlarni ishlating.
Ovqatlanish qiymatini, hidi va ranglarini
saqlqb qolish uchun sabzavotlarni
muzlatishdan oldin bug'lash kerak.
Baqlajon, bulg'or qalampiri, tsukkini va
sarsabilni bug'lash kerak emas.
Muzlatish va bug'lash haqidagi
adabiyotni kitob do'konlarida topasiz.
Eslatma
Muzlanadigan taomlar muzlab bo'lgan
taomlarga tegmasligi kerak.
■ Muzlash uchun mos keladi:
Non-bulka mahsulotlari, baliq va
dengiz mevalari, go'sht, yovvoyi
hayvonlar, tovuq, sabzavot, meva,
ko'katlar, tuxum qobig'isiz, sut
mahsulotlari, misol uchun, pishloq,
sariyog' va qatiqlar, tayyor taomlar va
taomlar qoldiqlari, misol uchun,
sho'rva, quyuq sho'rvalar, pishirilgan
go'sht va baliqlar, kartoshka taomlari,
sufle nad shirin taomlar.
■ Muzlash uchun mos kelmaydi:
Odatda xom yeyiladigan samzavot
turlari, misol uchun salat yoki rediska,
tuxum qobog'i bilan, uzum, butun
olmalar, noklar va yangi, qattiq
tuxumlar, yogurt, chuchuk qatiq,
quyuq qaymoq, krem-fresh va
mayonez.
uz
Muzlatiladigan mahsulotni
o'rash
Oziq-ovqatlarni havo kirmaydigan qilib
o'rang, shunday qilib ta'mi yo'qolmaydi
yoki qurib qolmaydi.
1. Oziq-ovqatlarni upakovkasiga soling.
2. Havoni qisib chiqaring.
3. Upakovkani tig'iz yoping.
4. Upakovkani tarkibini va muzlatish
sanasini yozing.
Upakovka sifatida quyidagilar mos
keladi:
plastik plyonka, polietilendan ishlangan
shlangli plyonka, folga, qo'l muzlagichi.
Ushbu mahsulotlarni maxsus do'konlarda
sotib olishingiz mumkin.
Upakovka sifatida quyidagilar mos
kelmaydi:
upakovka qog'ozi, pergament qog'ozi,
sellofan, ahlat paketi va ishlatilgan harid
qilish paketlari.
Yopish uchun quyidagilar mos keladi:
resinkali halqalar, plastik klipsalar,
kanop, sovuqqa chidaydigan skochlar,
va hokazo.
Polietilen paketlar va shlangli plyonkalar
plyonkani payvandlash qurilmasi bilan
payvandlash mumkin.
Muzlatish mahsulotining
saqlash muddati
Saqlash muddati oziq-ovqat turiga
bog'liq.
-18 °C temperaturasida:
■ Baliq, kolbasa, tayyor taomlar, non-
bulka mahsulotlari:
6 oygacha
■ Pishloq, tovuq, go'sht:
8 oygacha
■ Sabzavot, mevalar:
12 oygacha
57
Page 58

uz
Supermuzlatish
Oziq-ovqatlar tezda mag'izigacha
muzlashi kerak, shunday qilib vitaminlar,
ovqatlanish qiymatlari, ko'rinishi va ta'mi
saqlanadi.
Yangi oziq-ovqatlarni solishdan oldin
supermuzlatishni yoqing, shunday qilib
istalmagan temperatura ko'tarilishining
oldini olasiz.
Umumiy holatda 4-6 soat yetarlik bo'ladi.
Qurilma yoqilgannan so'ng doim ishlaydi,
muzlatish kamerasida juda sovuq
temperatura hosil bo'ladi.
Maks. muzlatish quvvatidan foydalanish
uchun supermuzlatishni yangi oziqovqatlarni solish dan 24 soat oldin
yoqing.
Kichik oziq-ovqat hajmlari (2 kg-gacha)
supermuzlatishsiz muzlashi mumkin.
Eslatma
Supermuzlatish yoqilgan bo'lsa ko'p ish
shovqinlari chiqishi mumkin.
Yoqish va o'chirish
" rasmi
Super tugmahasini 8 bosing.
Supermuzlatish yoqilgan bo'lsa
tugmacha yodani.
Supermuzlatish avtomatik ravishda taxm.
2½ kundan so'ng o'chadi.
Muzlatish mahsulotini
eritish
Turi va foydalanish maqsadi bo'yicha
quyidagi imkoniyatlardan tanlash
mumkin:
■ xona temperaturasida
■ sovutgichda
■ elekrt pechda, issiq havo ventilyatori
bilan/siz
■ Mikroto'lqinli qurilmada
m Diqqat
Oz yoki to'liq erigan muzlatish
mahsulotini boshqa muzlatmang. Faqat
tayyor taomni tayyorlgandan so'ng
(pishirilgan yoki qovurilgan) uni qayta
muzlatish mumkin.
Muzlatish mahsulotining maksimal
saqlash muddatini to'liq ishlatmang.
Jihozlanish
Ichining tokchalarini va eshik tokchalarini
keraklicha o'zgartirish mumkin:
■ Tokchani oldinga tortib, tushiring va
yonga qayiring.
■ Eshik tokchasini ko'tarib chiqaring.
Maxsus jihozlar
(hamma modellarda emas)
Yechiladigan oynali tokchani yeching.
!/15 rasmi
Oynali tokchani tozalash uchun olish
mumkin. Buning uchun tokchani tortib
oldida ko'taring va chiqaring.
58
Page 59

Shishalar tokchasi
' A/B rasmi
Shishalar tokchasida shishalarni
ishonchli ravishda saqlash mumkin.
Muz tayyorlagich
% rasmi
1. Suv konteynerini chiqaring va
belgigacha suv bilan to'ldiring.
2. Suvni quyish teshigi orqali muz idishifa
quying. Unda suv zahira
konterynerining ichiga yoki ustiga
oqmasligini yoki sachramasligini
ta'minlang. Aks holda muz parchalari
bir biriga yoki konteynerga yopishib
qolishi mumkin.
3. Agar muz parchalari muzlab
yopishgan bo'lsa, richagni pastga
bosib, qo'yib yuboring.
Muz parchalari bo'shalib zahira
konteyneriga tushadi.
4. Muz parchalarini zahira konteyneridan
chiqaring. Muz parchalarini muntazam
ravishda zahira konteyneridan
chiqarish kerak, shunday qilib birbiriga yopishishining oldini olasiz.
Muz idishi
Muz idishini ¾-ga ichish suvi bilan
to'ldirib muzlatish kamerasiga soling.
Muzlab qotgan muz idishini faqat o'tmas
narsa bilan bo'shating (qoshiq dastasi
bilan).
Muz parchalarini ajratish uchun muz
idishini oqqan suvda ushlang yoki asta
burang.
uz
”OK” etiketkasi
(hamma modellarda emas)
”OK” temperatura nazorati bilan +4 °C-
dan past temperaturalarni aniqlash
mumkin. Etiketka ”OK” ko'rsatmasa
temperaturani asta sekin sovuting.
Eslatma
Qurilmaning ishga tushirilishi 12
soatgacha temperatura yetilgancha
davom etishi mumkin.
To'g'ri sozlash
Qurilmani o'chirib
to'xtatish
Qurimani o'chirish
! rasmi
Yoqish/o'shirish tugmahasini 12 bosing.
Sovutish kamerasi bilan chiroq o'chadi.
Qurilmani to'xtatish
Agar qurilmani ko'p vaqt ishlatmasangiz:
1. Qurimani o'chiring.
2. Tarmoq vilkasini tortib oling yoki
saqlagichni o'chirish.
3. Qurilmani tozalash.
4. Qurilma eshigini oshiq qoldirish.
59
Page 60

uz
Eritish
Sovutish kamerasi
Erish avtomatik ravishda amalga
oshiriladi.
Erigan suv oqizish teshigidan oqib
qurilmaning orqa tomonidagi bug'lanish
idishiga tushadi.
Muzlatish kamerasi
To'liq avtomatik NoFrost tizimi orqali
muzlash kamerasi muzsiz bo'ladi. Eritish
boshqa kerak bo'lmaydi.
Qurilmani tozalash
m Diqqat
■ Tarkibida qum, xlor yoki kislota bor
tozalash va eritish qurilmasidan
foydalaning.
■ Ishqalaydigan yoki qiradigan
gubkalardan foydalaning.
Metall yuzalarni zang bosishi mumkin.
■ Tokcha va konteynerlarni idish yuvish
mashinasida yuvmang.
Qismlar shakli o'zgarishi mumkin!
Tozalash suvi quyidagiga
■ muzlatqich kameradagi oldingi
tubidagi teshigiga,
■ boshqarish elementlari
■ va chiroqqa oqishi mumkin emas.
Quyidagicha harakat qiling:
1. Tozalashdan oldin qurilmani o'chiring.
2. Tarmoq vilkasini tortib oling yoki
saqlagichni o'chirish.
3. Muzlatiladigan mahsulotni chiqaring
va sovuq joyga qo'ying. Sovuqlik
akkumulyatorini (nor bo'lsa) oziq-ovqat
ustiga qo'ying.
4. Qirov qatlami erigancha kuting.
5. Qurilmani yumshoq latta, iliq suv va
ozgina pH betaraf tozalash vositasi
bilan tozalang. Tozalash suvi chiroqq
tegmasligi kerak.
6. Eshik tiqinini faqat toza suv bilan artib
quruq artib oling.
7. Tozalashdan so'ng qurilmani qayta
ulab yoqing.
8. Muzlatish mahsultoni qayta soling.
Jihozlanish
Tozalash uchun qurilmaning barcha
yechiladigan qismlarini chiqaring.
Oynalu tokchalarni chiqarish
Oynali tokchalarni oldinga tortib
chiqarish.
Chiroq (LED)
Qurilma xizmat ko'rsatishni talab
qilmaydigan LED chirog'i bilan
jihozlangan.
Uni ta'mirlash ishlarini faqat mijozlar
xizmati yoki vakolatli mutaxassis amalga
oshirishi mumkin.
60
Page 61

Energieyani tejash
■ Qurilmani quruq havosi almashadigan
xonada o'rnating. Qurilma bevosita
oftobga yoki issiqlik manbasining
(misol uchun, radiator, plita) oldiga
turishi mumkin emas.
Kerak bo'lsa izolyasiya plitasini
ishlating.
■ Iliq oziq-ovqatlar bilan ichimliklarni
oldin sovutib, keyin qurilmaga soling.
■ Muzlagan mahsulotni eritish uchun
sovutish kamerasiga soling va
mahsulotning sovuqligini oziqovqatlarni sovutish uchun ichlating.
■ Qurilmani qisqa oching.
■ Elektr energiyani tejash uchun
qurilmaning orqa tomonini kerak
bo'lsa tozalang.
■ Mavjud bo'lsa:
Devor oraliq tiragini o'rnatib
qurilmaning yozilgan energiya
iste'moliga yeting (o'rnatish
yo'riqnomasini ko'ring). Qisqartirilgan
devor tirgagi qurilmaning ishlashini
cheklamaydi. Energiya iste'moli ozgna
o'sishi mumkin. 75 mm oralig'idan
o'tish mumkin emas.
■ Jihoz qismlarini o'rnatish qurilmaning
energiyani iste'mol qilishiga ta'sir
qilmaydi.
uz
Chertkilar
Motor, o'chirgich yoki magnitli ventillar
yoqiadi/o'chiriladi.
Garchillash
Avtomatik erish o'rin oladi.
Shovqinarning oldini oling
Qurilma tekiz turmagan
Qurilmani uroven yordamida to'g'rilang.
Buning uchun rezbali oyoqlarni ishlating
yoki oz pastga o'rnating.
Qurilma ”yaqin turibdi”
Qurilmani yaqin turgan mebel yoki
qurilmalardan uzoqlashtiring.
Konteynerlar yoki tokchalar qimillab
yoki qisilib turibdi
Olinadigan qismlarni tekshirib kerak
bo'lsa qayta o'rnating.
Shishalar yoki idishlar bir-biriga tegib
turibdi
Shishslar yoki idishlarni bir-biridan
ajrating.
Ish shovqinlari
Odatdagi shovqinlar
G'uldurash
Motorlar ishlab turibdi (misol uchun,
sovutish agregatlari, ventilyator).
Vaqirlaydigan, g'uvullaydigan yoki
sharqiraydigan shovqinlar
Xladagent quvurlardan oqib turibdi.
61
Page 62

uz
Kichik nosozliklarni mustaqil ravishda bartaraf
qilish
Mijozlar xizmatiga qo'ng'iroq qilishdan oldin:
Nosozlikni quyidagi ko'rsatmalar asosida bartaraf qilib ko'ring.
Mijozlar xizmatining maslahat beish xizmati uchun kafolat –muddatining ishida ham
to'lashingiz lozim!
Nosozlik Mumkin sababi Yordam
Temperatura sozlangandan
qattiq farq qilib turibdi.
Chiroq ishlamayapti. LED chiroqlar nosoz. Chiroqlar bobini (LED) ko'ring.
Qurilma ko'p vaqt ochiq
bo'lgan.
Chiroqlar taxm. 10
daqiqadan so'ng o'chiriladi.
Boshqarish elemetnlarining
pasaytirilgan yonish kuchi.
Hech bir indikator yonmay
turibdi.
Ogohlantirish signali chaladi.
Signal tugmachasi yonib
turibdi. "/5 rasmi
Qurilma qayta ishlatilganda,
misol uchun, eshiklar
ohilganda, indikator normal
yonishga o'tadi.
Tok o'chdi;
saqlagich ishga tushdi;
tarmoq shtekeri mahkam
turmagan.
Nosozlik - muzlatish
kamerasida juda issiq.
Qurilma ochiq. Qurilmani yoping.
Havo kirgizish va chiqarish
teshiklari to'silgan.
Muzlatish uchun birdaniga
juda ko'p oziq-ovqatlar
solingan.
Birnecha holatlarda qurilmani 5 daqiqaga
o'chirish ham yetarlik bo'ladi.
Temperatura juda iliq bo'lsa, bir necha soatdan
so'ng temperatura yaqinlashganini tekshiring.
Agar temperatura juda sovuq bo'lsa, uni
keyingi kunda yana bir bor tekshiring.
Qurilmani yopib ochishdan so'ng chiroqlar
yana yoqiladi.
Qurilma qayta ishlatilganda, misol uchun,
eshiklar ohilganda, indikator normal yonishga
o'tadi.
Tarmoq shtekerini qo'shish. Tok borligini
tekshiring, saqlagichlarni tekshiring.
Sognal tugmachasini 5 bosib ogohlantirish
tovushini o'chiring.
Havo kirgizish va chiqarishni ta'minlang.
Maks. muzlatish imkoniyatidan oshib ketmang.
Nosozlikni bartaraf qilgandan so'ng signal
tugmachasi oz vaqtdan so'ng o'chadi.<
62
Page 63

Nosozlik Mumkin sababi Yordam
Muzlatqich kamerada juda
issiq.
Muzlatish kamerasining
eshigi uzoq vaqt ochiq
bo'lgan; temperatura
yetilmaydi.
Qurilmaning tez-tez ochilishi. Qurilmani keak bo'lmasa ochmang.
Havo kirgizish va chiqarish
teshiklari to'silgan.
Yangi oziq-ovqatlarning katta
hajmlarini muzlatish.
Bug'lagich (sovuqlik
yaratgichi) NoFrost tizimida
muz bilan qoplanib endi to'liq
avtomatik ravishda erimaydi.
To'sgan narsalarni olib tahlang.
Maks. muzlatish imkoniyatidan oshib ketmang.
Bug'lagichni eritish uchun muzlatish
mahsulotini bo'limlar bilan olib yaxshilab o'rab
sovuq joyga qo\ying.
Qurilmani o'chirib devordan itarib oling.
Qurilma eshigini oshiq qoldirish.
Taxm. 20 daqiqadan so'ng erigan suv qurilma
orqasidagi bug'lanish idishiga oqishni
boshlaydi. ) rasmi
Bug'lagich idishining suvi ortib ketishining
oldini olish uchun erigan subni gubka bilan
tortib oling.
Agar erigan suv boshqa bug'lanish idishiga
oqmasa bug'lagich erigan bo'ladi. Ichki xonani
tozalang. Qurilmani qayta ishga tushirish.
uz
Mijozlar xizmati
Yaqin joylashgan mijozlar xizmatini
telefon kitobidan yoki mijozlar xizmati
ro'yxatidan topasiz. Mijozlar xizmatiga
qurilmaning mahsulot raqamini (E-Nr.) va
ishlab chiqarish raqamini (FD-Nr.)
bildiring.
Bu ma'lumtolarni zavod tunukachasida
topasiz. * rasmi
Qurilmaning mahsulot raqami bilan
ishlab chiqarish raqamini bildirib kerak
bo'lmagan savollarni tejab qolasiz.
Shunday qilib chiqimlarni saqlab qolasiz.
Nosozliklardagi tuzatish
buyurtmasi bilan maslahat
xizmati
Barcha mamlakatlarning kontakt
ma'lumtolarini komplektdagi mijozlar
xizmatlari ro'yixatidan topasiz.
63
Page 64

11
12
13
1-10
°C
super
super
alarm off
Touch Technology
super
super
A
B
14
15
16
17
18
19
20
21
22
23
24
25
26
27
!
Page 65

°C
super
super
alarm off
Touch Technology
1
2
3
4
5
6
7
"
super
super
8
9
10
#$
Page 66

%
&
'/B (
'/A
Page 67

E - Nr
E - Nr
FD - Nr
)*
Page 68

9001096828 (9504)
en, ru, uz
 Loading...