

Page 1

Built-in oven
Εντοιχιζόμενος φούρνος
Horno empotrado
Four encastrable
HVA331BS0
[en] Instruction manual .................................... 3
[el] Οδηγíες χρήσεως ..................................... 15
[fr] Notice d’utilisation ..................................28
[es] Instrucciones de uso ............................... 41
Page 2

Page 3

Ú Table of contents
[en]Instruction manual
Important safety information..................................................... 3
Causes of damage .............................................................................4
Your new appliance....................................................................5
Function selector.................................................................................5
Temperature selector .........................................................................5
The electronic clock ...........................................................................5
Accessories .........................................................................................6
Before using the oven for the first time....................................6
Setting the clock .................................................................................6
Baking out the oven ...........................................................................6
Cleaning the accessories..................................................................6
How to operate your oven..........................................................7
Switching on the oven........................................................................7
Operating the electronic clock .........................................................7
Setting the automatic timer...............................................................7
Displaying and changing set values ...............................................8
Care and cleaning ......................................................................8
Cleaning agents ..................................................................................8
Removing and installing the door panels ......................................9
Removing and fitting the appliance door.......................................9
Removing and inserting the hook-in racks ................................. 10
Troubleshooting .......................................................................10
Replacing the oven light bulb........................................................ 10
After-sales service ...................................................................11
E number and FD number ............................................................. 11
Energy and environment tips..................................................11
Saving energy................................................................................... 11
Environmentally-friendly disposal.................................................. 11
Acrylamide in foodstuffs .........................................................12
Tips for using your appliance .................................................12
Baking................................................................................................ 12
Roasting and grilling ....................................................................... 13
Tested for you in our cooking studio........................................... 14
Produktinfo
Additional information on products, accessories, replacement
parts and services can be found at www.bosch-home.com and
in the online shop www.bosch-eshop.com
: Important safety information
Read these instructions carefully. Only then will you be able to operate your appliance safely and correctly. Retain the instruction manual and installation instructions for future use or for subsequent owners.
This appliance is only intended to be fully fitted in a kitchen. Observe the special installation instructions.
Check the appliance for damage after unpacking it. Do not connect the appliance if it has been damaged in transport.
Only a licensed professional may connect appliances without plugs. Damage caused by incorrect connection is not covered under warranty.
This appliance is intended for domestic use only. The appliance must only be used for the preparation of food and drink. The appliance must be supervised during operation. Only use this appliance indoors.
This appliance is intended for use up to a maximum height of 2000 metres above sea level.
This appliance may be used by children
over the age of 8 years old and by persons
with reduced physical, sensory or mental
capabilities or by persons with a lack of
experience or knowledge if they are
supervised or are instructed by a person
responsible for their safety how to use the
appliance safely and have understood the
associated hazards.
Children must not play with, on, or around the appliance. Children must not clean the appliance or carry out general maintenance unless they are at least 8 years old and are being supervised.
Keep children below the age of 8 years old at a safe distance from the appliance and power cable.
Always slide accessories into the cooking compartment correctly. See "Description of accessories in the instruction manual.
Risk of fire!
■
Combustible items stored in the cooking
compartment may catch fire. Never store
combustible items in the cooking
compartment. Never open the appliance
door if there is smoke inside. Switch off
the appliance and unplug it from the
mains or switch off the circuit breaker in
the fuse box.
Risk of fire!
3
Page 4

■
A draught is created when the appliance
door is opened. Greaseproof paper may
come into contact with the heating
element and catch fire. Do not place
greaseproof paper loosely over
accessories during preheating. Always
weight down the greaseproof paper with a
dish or a baking tin. Only cover the
surface required with greaseproof paper.
Greaseproof paper must not protrude over
the accessories.
Risk of burns!
■
The appliance becomes very hot. Never
touch the interior surfaces of the cooking
compartment or the heating elements.
Always allow the appliance to cool down.
Keep children at a safe distance.
Risk of serious burns!
■
Accessories and ovenware become very
hot. Always use oven gloves to remove
accessories or ovenware from the cooking
compartment.
Risk of burns!
■
Alcoholic vapours may catch fire in the hot
cooking compartment. Never prepare food
containing large quantities of drinks with a
high alcohol content. Only use small
quantities of drinks with a high alcohol
content. Open the appliance door with
care.
Risk of scalding!
■
The accessible parts become hot during
operation. Never touch the hot parts. Keep
children at a safe distance.
Risk of scalding!
■
When you open the appliance door, hot
steam may escape. Open the appliance
door with care. Keep children at a safe
distance.
Risk of scalding!
■
Water in a hot cooking compartment may
create hot steam. Never pour water into
the hot cooking compartment.
Risk of injury!
Scratched glass in the appliance door may develop into a crack. Do not use a glass scraper, sharp or abrasive cleaning aids or detergents.
Risk of electric shock!
■
Incorrect repairs are dangerous. Repairs
may only be carried out by one of our
trained after-sales engineers. If the
appliance is faulty, unplug the mains plug
or switch off the fuse in the fuse box.
Contact the after-sales service.
Risk of electric shock and serious injury!
■
The cable insulation on electrical
appliances may melt when touching hot
parts of the appliance. Never bring
electrical appliance cables into contact
with hot parts of the appliance.
Risk of electric shock!
■
Do not use any high-pressure cleaners or
steam cleaners, which can result in an
electric shock.
Risk of electric shock!
■
When replacing the cooking compartment
bulb, the bulb socket contacts are live.
Before replacing the bulb, unplug the
appliance from the mains or switch off the
circuit breaker in the fuse box.
Risk of electric shock!
■
A defective appliance may cause electric
shock. Never switch on a defective
appliance. Unplug the appliance from the
mains or switch off the circuit breaker in
the fuse box. Contact the after-sales
service.
Causes of damage
Caution!
■ Accessories, foil, greaseproof paper or ovenware on the
cooking compartment floor: do not place accessories on the
cooking compartment floor. Do not cover the cooking
compartment floor with any sort of foil or greaseproof paper.
Do not place ovenware on the cooking compartment floor if a
temperature of over 50 ºC has been set. This will cause heat
to accumulate. The baking and roasting times will no longer
be correct and the enamel will be damaged.
■ Water in a hot cooking compartment: do not pour water into
the cooking compartment when it is hot. This will cause
steam. The temperature change can cause damage to the
enamel.
■ Moist food: do not store moist food in the cooking
compartment when it is closed for prolonged periods This will
damage the enamel.
■ Fruit juice: when baking particularly juicy fruit pies, do not
pack the baking tray too generously. Fruit juice dripping from
the baking tray leaves stains that cannot be removed. If
possible, use the deeper universal pan.
■ Cooling with the appliance door open: only allow the cooking
compartment to cool when it is closed. Even if the appliance
door is only open a little, front panels of adjacent units could
be damaged over time.
■ Very dirty door seal: If the door seal is very dirty, the
appliance door will no longer close properly when the
appliance is in use. The fronts of adjacent units could be
damaged.Always keep the door seal clean.
■ Appliance door as a seat, shelf or worktop: Do not sit on the
appliance door, or place or hang anything on it. Do not place
any cookware or accessories on the appliance door.
■ Inserting accessories: depending on the appliance model,
accessories can scratch the door panel when closing the
appliance door. Always insert the accessories into the
cooking compartment as far as they will go.
■ Carrying the appliance: do not carry or hold the appliance by
the door handle. The door handle cannot support the weight
of the appliance and could break.
4
Page 5
Your new appliance
Get to know your appliance. You will find information on the
control panel, the oven, types of heating and accessories.
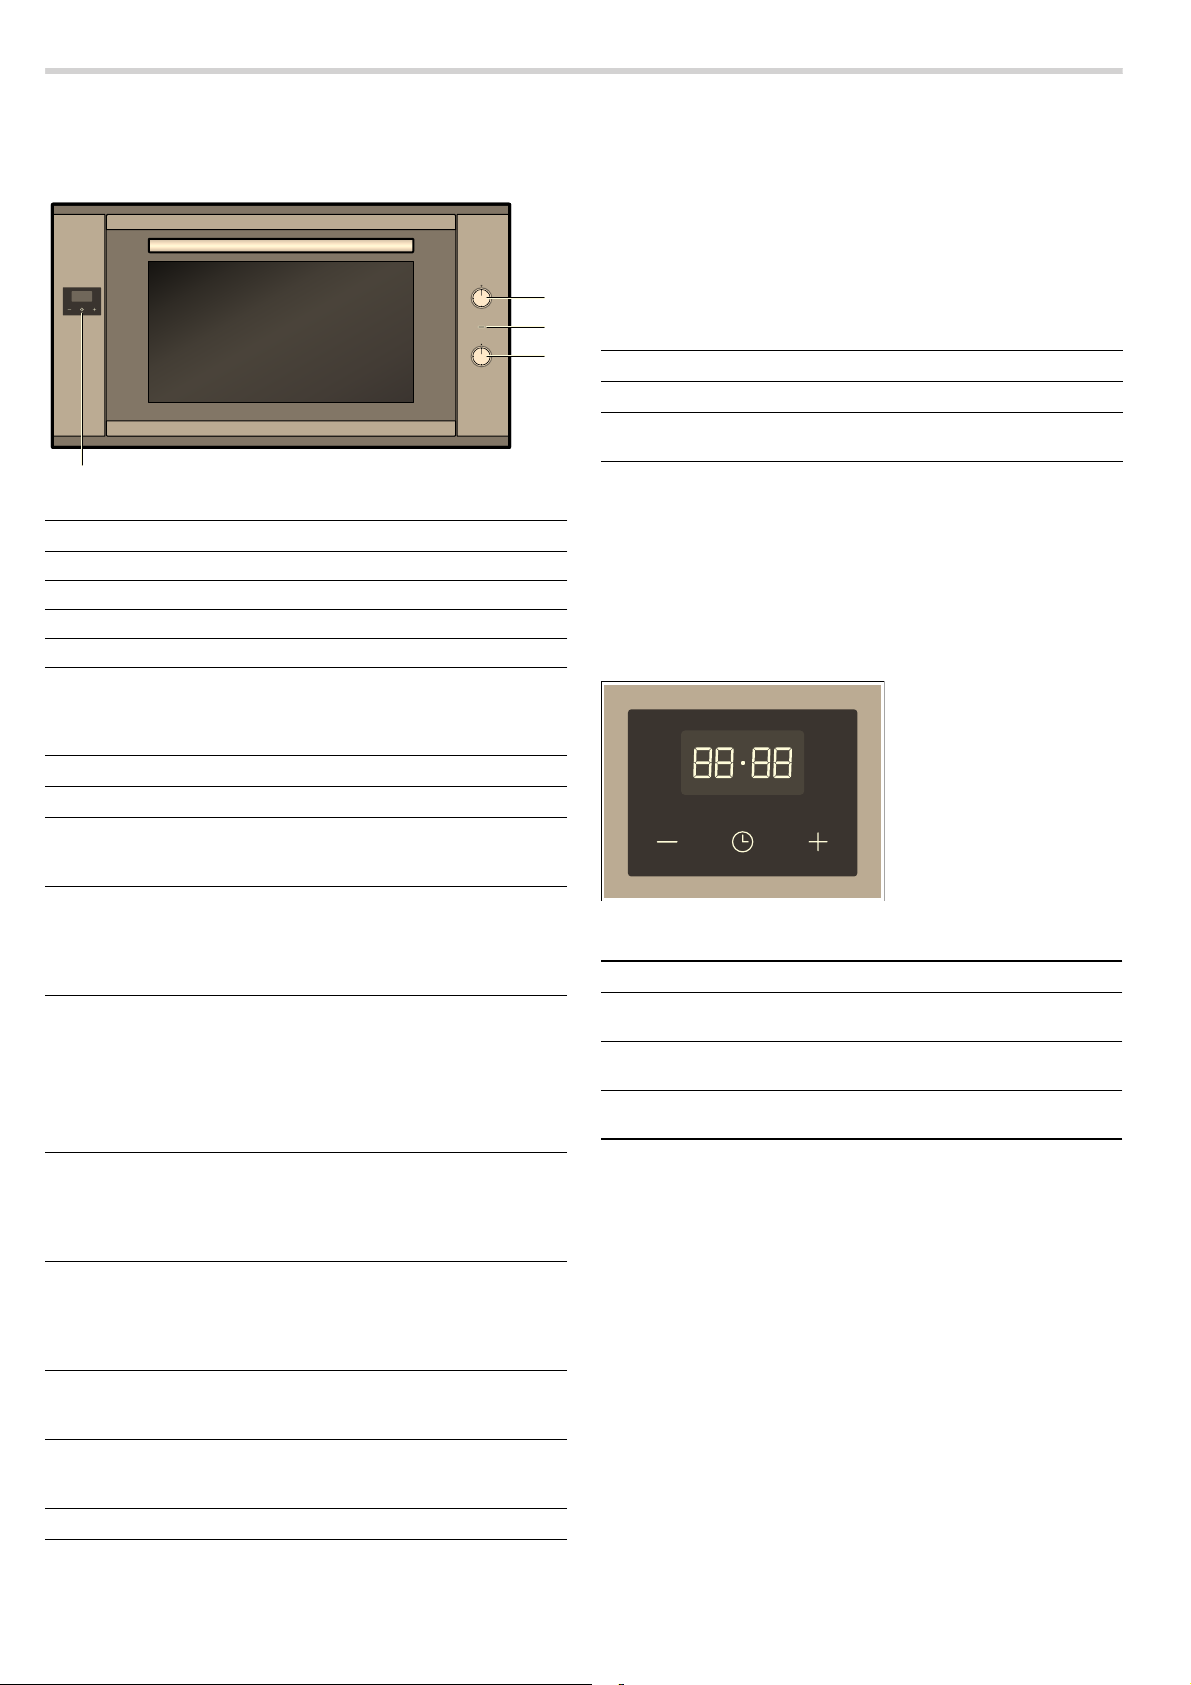
Explanation
1 Electronic clock
2 Function selector
3 Indicator light
4 Temperature selector
Function selector
Use the function selector to set the heating function.
Note: When you set the heating function, the oven light in the
cooking compartment switches on.
Note: With the "Hot air eco" heating function, the oven lighting
remains switched off.
Temperature selector
Set the temperature or grill setting using the temperature
selector.
Setting Meaning
Ú
50-250 Temperature
The indicator light is lit when the oven is heating up. It goes out
during pauses in heating.
Off position The oven does not heat up.
range
The temperature in the cooking
compartment in °C.
The electronic clock
You can use the electronic clock to control your oven. You can
therefore preselect, for example, the time at which the oven is
to switch on or at which time the automatic timer is to end the
baking or cooking process. The electronic clock can also be
used as a timer.
Setting Use
Off position The oven is switched off.
Û
Top/bottom heating For cakes, bakes and lean joints.
%
Hot air For cakes and pastries on one or
<
Hot air eco* For cakes and pastries on one or
’
Air recirculation For cakes, pastries and fresh pizza
N
Pizza setting Quick preparation of frozen products
;
Hot air grill For baking or roasting meat, poultry
7
Full-surface grill For grilling steaks, sausages, toast
(
Lighting The oven lighting is switched on.
^
* Heating function used to determine the energy efficiency
class in accordance with EN 60350-1.
Heat is emitted evenly from the top
and bottom.
two levels. The fan distributes the
heat from the ring heating element in
the back panel evenly around the
cooking compartment.
two levels. The fan distributes the
heat from the ring heating element in
the back panel evenly around the
cooking compartment.
With this heating function, the oven
lighting remains switched off.
on one or two levels. The fan distributes heat from the heating elements
evenly around the cooking compartment.
without preheating, e.g. pizza, chips
or strudel. The bottom heating element and the ring heating element in
the back panel heat up.
and whole fish. The fan causes the
hot air to circulate around the dish.
and pieces of fish. The whole area
below the grill element becomes hot.
Function buttons for the electronic clock
Symbol Meaning Use
0
- Minus Reduces the cooking time
+ Plus Increases the cooking time
Electronic clock Sets the cooking time or
the time
or the time
or the time
5
Page 6
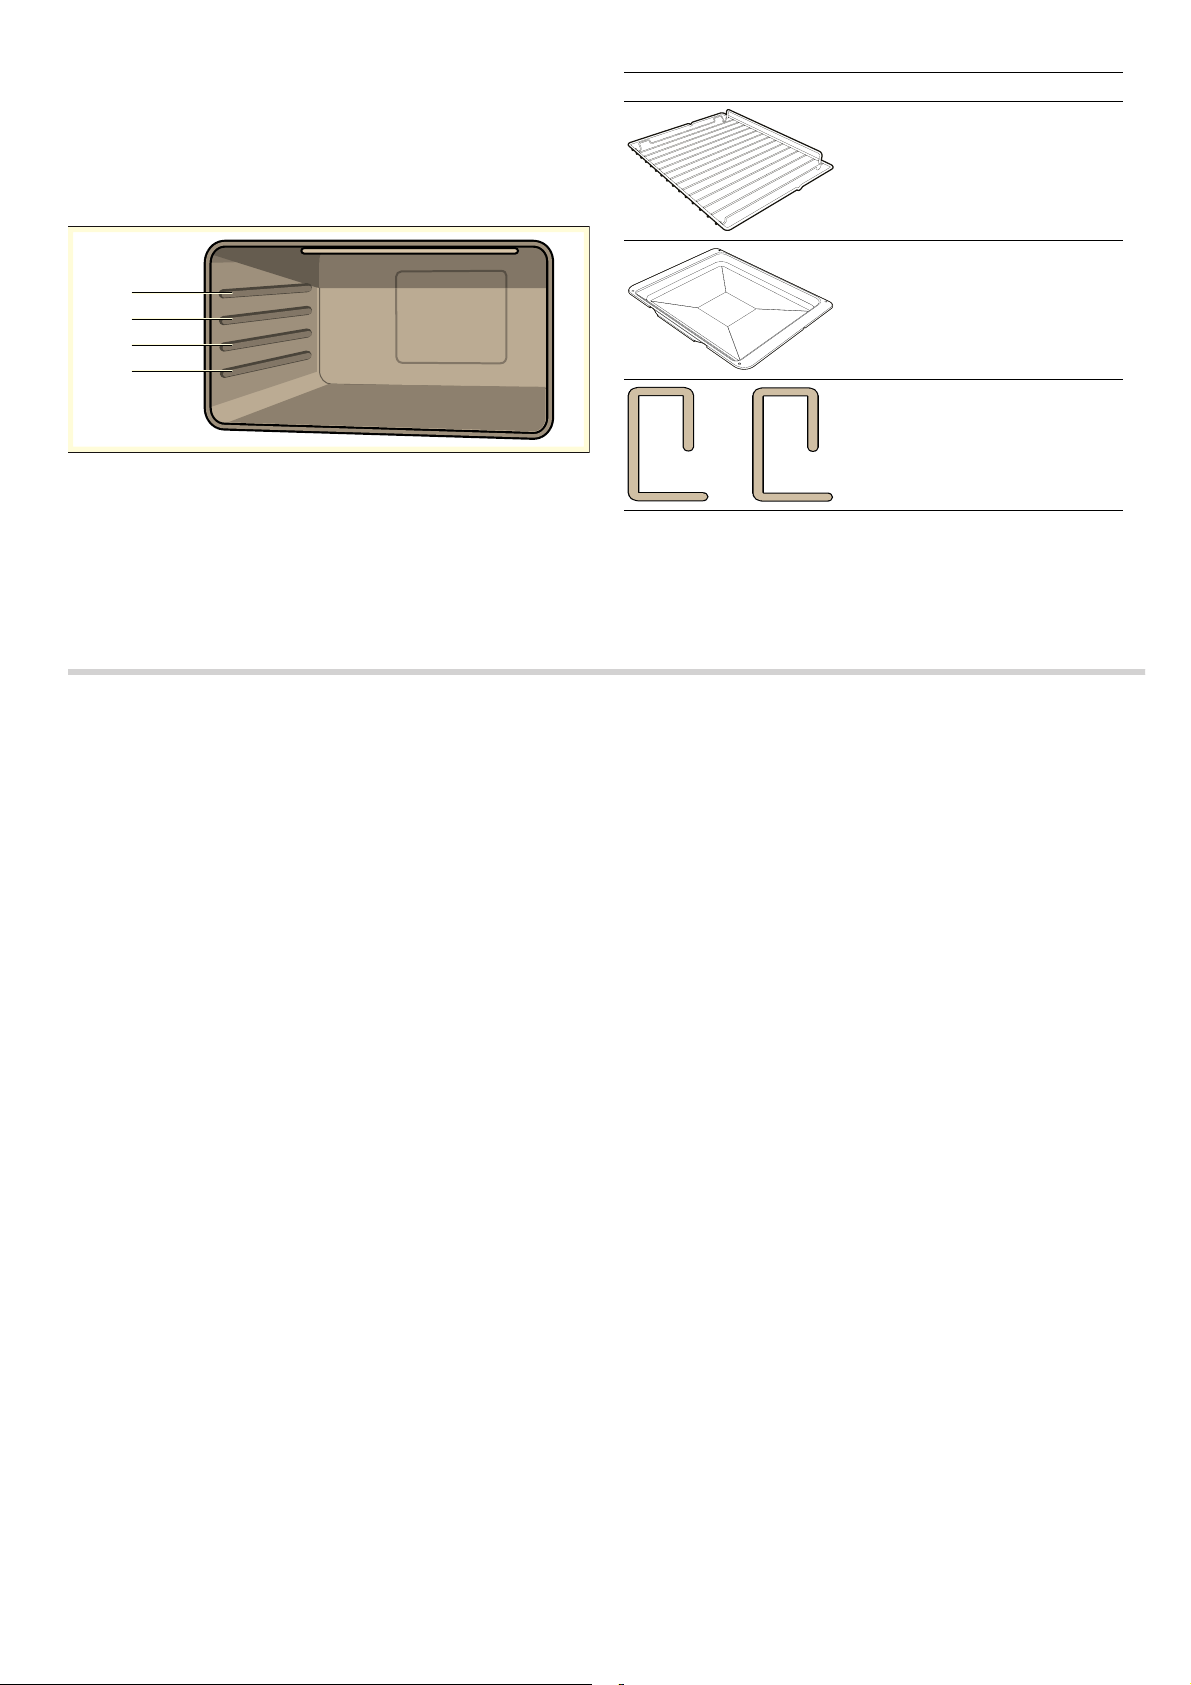
Accessories
The accessories can be inserted into the cooking compartment
at 4 different levels. Always insert them as far as they will go so
that the accessories do not touch the door panel. Ensure that
the accessories have always been inserted into the cooking
compartment correctly.
You can pull out the accessories two thirds of the way without
them tipping. This allows dishes to be removed easily.
The accessories may become deformed when they become
hot. As soon as they have cooled down, the deformation
disappears with no effect on the function.
You can buy accessories from the after-sales service, from
specialist retailers or online.
Accessories Description
Baking and roasting shelf
For ovenware, cake tins, joints,
grilled items, frozen meals.
Enamel baking tray
For moist cakes, pastries, frozen
meals and large roasts. Can also
be used as a drip tray to collect
run-off fat.
Locking pins
For locking the hinges.
--------
Before using the oven for the first time
In this section, you can find out what you must do before using
your appliance to prepare food for the first time. Read the
Safety information section beforehand.
Remove the appliance packaging and dispose of it
appropriately.
Setting the clock
After the appliance has been connected to the mains or after a
power cut, three zeros and the "A" symbol flash on the display.
1. Press the 0 button until the dot flashes on the display.
2. Set the current time with the "+" and "-" buttons.
After seven seconds, the time that has been set is adopted.
Note: To change the set time, press the "+" and "-" buttons until
the dot flashes on the display. Then set the current time with the
"+" and "-" buttons.
Baking out the oven
Precleaning the oven
1. Remove the accessories and the hook-in racks from the
cooking compartment.
2. Completely remove any leftover packaging, e.g. small pieces
of polystyrene, from the cooking compartment.
3. Some parts are covered with a protective film. Remove this
scratch protection film.
4. Clean the outside of the appliance with a soft, damp cloth.
5. Clean the cooking compartment with hot soapy water.
Heating up the oven
To remove the new cooker smell, heat up the oven when it is
empty and closed.
1. Turn the function selector to the Top/bottom heating
operating mode.
2. Turn the temperature selector to the maximum temperature.
3. Switch the oven off after 40 minutes.
Note: When the appliance is heating up for the first time, you
may hear crackling noises coming from the oven.
Recleaning the oven
1. Clean the cooking compartment with hot soapy water.
2. Refit the hook-in racks.
Cleaning the accessories
Before using the accessories, clean them thoroughly using a
cloth and warm soapy water.
6
Page 7

How to operate your oven
Pop-out operating controls
The function selector and the temperature selector can be
popped out. Press the operating control in question to pop it in
or out.
Switching on the oven
1. Use the function selector to set the heating function.
2. Use the temperature selector to set the temperature.
The oven begins to heat up.
Switching off the oven
Turn the function selector and temperature selector to the off
position.
Changing settings
The heating function and temperature or grill setting can be
changed at any time using their respective selectors.
Heating up
To heat up the cooking compartment as quickly as possible,
use the "Circulated air" heating function. If the set temperature
has been reached (indicator light has gone out), set the
required heating function.
Operating the electronic clock
In addition to the clock time and remaining time, the following
symbols may appear on the display:
Symbol Meaning
û
V
A Automatic mode
Û
Setting the time on the clock
After the appliance has been connected to the mains or after a
power cut, three zeros and the "A" symbol flash on the display.
1. Press the 0 button until the dot flashes on the display.
2. Set the current time with the "+" and "-" buttons.
After seven seconds, the time that has been set is adopted.
Note: To change the set time, press the "+" and "-" buttons until
the dot flashes on the display. Then set the current time with the
"+" and "-" buttons.
Setting the timer
The timer has no influence on the functions of the oven. The
duration of the timer can be set to between 1 minute and 23
hours and 59 minutes.
1. Press the 0 button until the V symbol flashes on the display
and three zeros are displayed.
2. Set the required cooking time with the "+" and "-" buttons.
An audible signal sounds once the time has elapsed.
Dot between the displayed hours and minutes.
Flashes when it is possible to set the clock time.
Timer
Displays the operating statuses for the timer.
Displays the operating statuses for Automatic
mode.
Operating readiness
If this symbol is displayed, the oven is ready to
use.
Notes
■ To change the remaining time, press the 0 button until the
V symbol flashes on the display. Then change the remaining
time with the "+" and "-" buttons.
■ To cancel the setting, press the 0 button until the symbol
flashes on the display. Then press the "+" and "-" buttons at
the same time.
Switching off the acoustic signal
Press the "
After seven minutes, the signal switches off automatically.
Changing the audible signal
Three different audible signals are available.
1. Press the "+" and "-" buttons simultaneously.
2. Press the 0 button.
The current audible signal is shown in the display panel, e.g.
"Tone 1".
3. Press the "-" button to select a different audible signal.
0" button until the V symbol disappears.
Setting the automatic timer
The electronic clock can be used to switch the oven on or off
automatically.
Automatic switch-off
1. Press the 0 button until the V symbol flashes on the display
and three zeros are displayed.
2. Press the 0 function button again until "dur" and "0.00" flash
alternately on the display panel and the "A" symbol flashes.
3. Set the cooking time with the "+" and "-" buttons.
The cooking time can be set to between 1 minute and 10
hours.
4. Set the required heating function and temperature.
The oven starts and the A symbol and the current clock time
appear on the display panel.
The cooking time has elapsed
An audible signal sounds, the
display panel and the A symbol flashes.
1. Switch off the temperature selector and function selector.
2. Press the 0 button until the Û symbol appears.
The oven switches back to manual mode.
Automatic switch-on and switch-off
Baking or roasting starts for the set duration at a later time
which you chose.
1. Press the 0 button until the V symbol flashes on the display
and three zeros are displayed.
2. Press the 0 function button again until "dur" and "0.00" flash
alternately on the display panel and the "A" symbol flashes.
The current time may be 17:30, for example.
3. Set the cooking time (e.g. 1 hour) with the "+" and "-" buttons.
The cooking time can be set to between 1 minute and 10
hours.
4. Press the 0 function button again until "End" and the switch-
off time "18:30" (i.e. the current time plus the set cooking
time) flash alternately on the display panel.
5. Set the switch-off time (e.g. 19:30) using the "+" and "-"
buttons.
The switch-off time can be set to up to 23 hours and 59
minutes.
Û symbol disappears from the
7
Page 8

6. Set the required heating function and temperature.
The
Û symbol disappears from the display panel.
In this example, the oven starts at 18:30 and switches off
again at 19:30.
The cooking time has elapsed
An audible signal sounds, the
display panel and the A symbol flashes.
1. Switch off the temperature selector and function selector.
2. Press the 0 button until the Û symbol appears.
The oven switches back to manual mode.
Û symbol disappears from the
Displaying and changing set values
The set values and the remaining time for the various operating
modes of the electronic clock can be viewed and changed on
the display panel at any time.
Care and cleaning
Displaying the remaining time for the timer
Press the
The remaining time appears on the display and can be
changed with the "+" and "-" buttons.
Displaying and changing the cooking time and switch-off
time.
1. Press the 0 button until the V symbol flashes on the display
panel.
2. Press the 0 button again until "dur" and the remaining
cooking time flash alternately on the display panel and the A
symbol flashes.
The cooking time can be changed with the "+" and "-"
buttons. Press the "+" and "-" buttons at the same time to
switch off the automatic timer.
3. Press the 0 button again until "End" and the set switch-off
time flash alternately on the display panel.
The switch-off time can be changed with the "+" and "-"
buttons. Press the "+" and "-" buttons at the same time to
switch off the automatic timer.
0 button until the V symbol flashes on the display.
With good care and cleaning, your oven will remain clean and
fully-functioning for a long time to come. Here we will explain
how to maintain and clean your oven correctly.
Notes
■ Slight differences in the colours on the front of the oven are
caused by the use of different materials, such as glass,
plastic and metal.
■ Shadows on the door panel which look like streaks, are
caused by reflections made by the oven light.
■ Enamel is baked on at very high temperatures. This can
cause some slight colour variations. This is normal and does
not affect their function. The edges of thin trays cannot be
completely enamelled. As a result, these edges can be
rough. This will not impair the anti-corrosion protection.
: Risk of electric shock!
Do not use any high-pressure cleaners or steam cleaners,
which can result in an electric shock.
: Risk of burns!
The appliance becomes very hot. Never touch the interior
surfaces of the cooking compartment or the heating elements.
Always allow the appliance to cool down. Keep children at a
safe distance.
Cleaning agents
Damage to the various different surfaces caused by using the
wrong cleaning agent can be avoided by observing the
following instructions.
Do not use
■ harsh or abrasive cleaning agents
■ cleaning agents with high concentrations of alcohol
■ hard scouring pads and sponges
■ high-pressure cleaners or steam cleaners.
Wash new sponge cloths thoroughly before use.
Area Cleaning agent
Appliance exterior Hot soapy water:
Stainless steel Hot soapy water:
Aluminium and
plastic
Enamel surfaces
(smooth surfaces)
Door panels Glass cleaner:
Glass cover for the
oven light
Seal
Do not remove.
Rails Hot soapy water:
Accessories Hot soapy water:
Clean with a dish cloth and dry with a
soft cloth. Do not use glass cleaner or a
glass scraper.
Clean with a dish cloth and dry with a
soft cloth. Remove flecks of limescale,
grease, starch and albumin (e.g. egg
white) immediately. Corrosion can form
under such flecks.
Special stainless steel cleaning products suitable for hot surfaces are available from our after-sales service or from
specialist retailers. Apply a very thin layer
of the cleaning product with a soft cloth.
Glass cleaner:
Clean with a soft cloth.
To facilitate cleaning, you can switch on
the interior lighting and, if necessary,
detach the appliance door. Apply commercially available washing-up liquid or a
vinegar solution with a soft, damp cloth
or chamois; dry with a soft cloth. Soften
any burnt-on food residues with a damp
cloth and washing-up liquid. For stubborn dirt, we recommend using oven
cleaning gel. This can be applied directly
to the affected area. Leave the cooking
compartment open to dry after cleaning.
Clean with a soft cloth. Do not use a
glass scraper.
Hot soapy water:
Clean with a dish cloth.
Hot soapy water:
Clean with a dish cloth. Do not scour.
Soak and clean with a dish cloth or
brush.
Soak and clean with a dish cloth or
brush.
8
Page 9
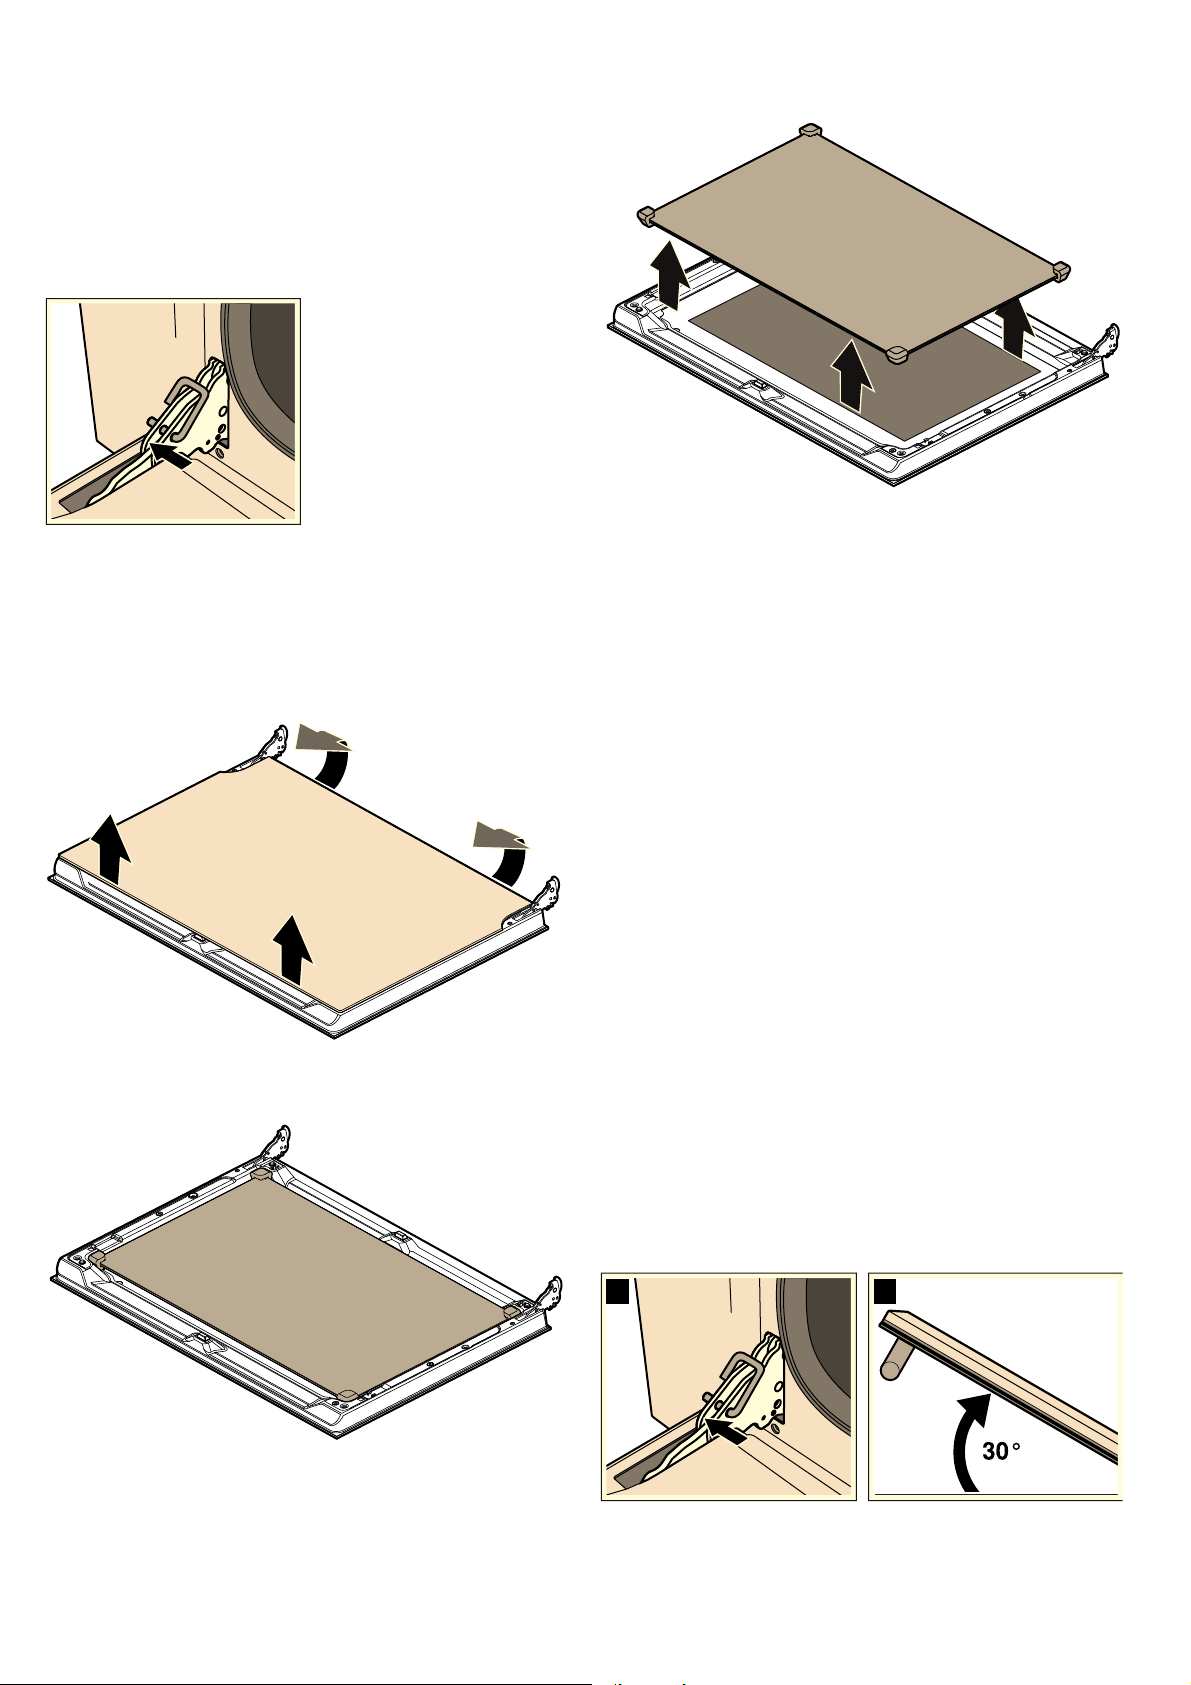
Removing and installing the door panels
To facilitate cleaning, you can remove the glass panels from the
oven door.
Removing the door panels
1. Open the oven door fully.
2. Lock both hinges on the left and right using the locking pin.
Note: The locking pins must be fully inserted into the holes in
the hinges.
3. Lift the bottom of the inner panel slightly until the fastening
pins come out of the holder (1).
4. Carefully lift the top of the inner panel until the fastening pins
come out of the holder (2).
Caution!
When lifting the inner panel, the middle panel may stick to the
inner panel. Make sure that the middle panel does not fall.
Note: The middle panel is kept in place with rubber bushings
rather than retaining pins.
Clean the panels with glass cleaner and a soft cloth.
: Risk of injury!
Scratched glass in the appliance door may develop into a
crack. Do not use a glass scraper, sharp or abrasive cleaning
aids or detergents.
Fitting the door panels
1. Reinsert the middle panel.
Notes
■ If the Low-E symbol can be read, the middle panel is
inserted correctly.
■ Make sure that the panel is seated correctly. All rubber
mounts must lay flat against the outer panel.
2. Reinsert the inner panel.
Note: All four fastening pins must engage in the holders
provided for them.
3. Remove the locking pins and close the oven door.
5. Remove the inner panel.
6. Remove the middle panel.
Removing and fitting the appliance door
If the oven is very heavily soiled, the oven door can be removed
for easier cleaning. Normally, however, this is not necessary.
Removing the appliance door
1. Open the oven door fully.
2. Lock both hinges on the left and right using the locking pin
(a).
Note: The locking pins must be fully inserted into the holes in
the hinges.
3. Grip the oven door on either side with both hands and close
the oven door by approx. 30° (b).
DE
4. Raise the oven door slightly and pull it out.
Note: Do not fully close the oven door. The hinges could
become bent and the enamel could be damaged.
9
Page 10

Fitting the appliance door
1. Grip the oven door on either side with both hands.
2. Slide the hinges into the slots in the oven (a).
Note: The notch below the hinges must engage into the
frame of the oven (b).
ED
Removing and inserting the hook-in racks
You can remove the hook-in racks for easier cleaning.
Removing the hook-in racks
The hook-in racks are each fixed to the side panels of the
cooking compartment at three points.
1. Grip the front of the hook-in rack and pull it to the middle of
the cooking compartment.
The front hook of the hook-in rack will release from the hole.
2. Fold out the hook-in rack further and pull it from the rear
holes of the side panel.
3. Hold the catalytic cooking compartment panel in place.
4. Remove the hook-in rack from the cooking compartment.
3. Lower the door downwards.
4. Remove the locking pins.
: Risk of injury!
Do not reach into the hinge if the oven door falls out
unintentionally or a hinge snaps closed. Call after-sales service.
Troubleshooting
Malfunctions often have simple explanations. Please read the
following notes before calling the aftersales service.
Problem Possible cause Notes/remedy
The appliance
does not work.
The oven cannot be switched
off.
The clock display flashes.
The oven does
not heat up.
The door glass
is broken.
Fruit juice or
albumen stains
on enamelled
surfaces.
Circuit breaker
faulty.
Power cut Check whether the kitchen
The electronics
are faulty.
Power cut Reset the clock.
Circuit breaker
faulty.
The function
selector has not
been set.
Moist cake or
meat juices.
Look in the fuse box and
check that the circuit
breaker for the cooker is in
working order.
light works.
Switch off the circuit
breaker. Contact the aftersales service.
Check the circuit breaker
and replace if necessary.
Set the function selector.
Switch off the appliance.
Contact the after-sales service.
Harmless change in the
enamel, cannot be
removed.
D
Inserting the hook-in rack
1. Hold the catalytic cooking compartment panel in place.
2. Insert the hooks of the hook-in rack into the rear holes in the
side panel.
3. Press the front hook of the hook-in rack into the hole.
E
: Risk of electric shock!
Incorrect repairs are dangerous. Repairs may only be carried
out by one of our trained after-sales engineers.
Incorrect repairs may result in significant risk to the user.
Replacing the oven light bulb
If the oven light bulb fails, it must be replaced. Replacement
heat-resistant bulbs can be obtained from the after-sales
service or from specialist retailers. Please specify the E number
and FD number of your appliance. Do not use any other type of
bulb.
10
Page 11

: Risk of electric shock!
When replacing the cooking compartment bulb, the bulb socket
contacts are live. Before replacing the bulb, unplug the
appliance from the mains or switch off the circuit breaker in the
fuse box.
1. Allow the cooking compartment to cool down.
2. Open the appliance door.
3. Place a tea towel in the cooking compartment to prevent
damage.
4. Remove the hook-in racks.
5. Remove the glass cover. To do this, open the glass cover at
the front with your hand. Should you experience difficulties
removing the glass cover, use a spoon to help.
6. Remove the oven light bulb.
7. Replace the oven light bulb with a bulb of the same type:
Voltage: 230 V;
Power: 40 W;
Fitting: G9;
Temperature resistance: 300 °C
8. Refit the glass cover for the oven light bulb.
9. Refit the hook-in racks.
10.Remove the tea towel.
11.Switch the circuit breaker back on.
12.Check that the oven lighting is working again.
After-sales service
Our after-sales service is there for you if your appliance needs
to be repaired. We will always find the right solution in order to
avoid unnecessary visits from a service technician.
E number and FD number
When calling us, please give the product number (E no.) and
the production number (FD no.) so that we can provide you with
the correct advice. To find the identification plate with the
numbers, open the oven door and look at the front of the
bottom of the cooking compartment. To save time, you can
make a note of the number of your appliance and the
telephone number of the after-sales service in the space below,
should it be required.
E no. FD no.
After-sales service
O
Energy and environment tips
Please note that there will be a fee for a visit by a service
technician in the event of a malfunction, even during the
warranty period.
You can find the contact information for your nearest after-sales
service in all countries here or in the attached after-sales
service directory.
Repair order and advice if faults occur
A 0810 240 260
D 01801 22 33 55
(€0.039/min. from a landline,
max. €0.42/min. from a mobile phone)
CH 0848 840 040
Put your trust in the expertise of the manufacturer. You can then
be sure that the repair work is carried out by trained service
technicians who can supply original spare parts for your
household appliance.
Here you can find tips on how to save energy when baking and
roasting and how to dispose of your appliance properly.
Saving energy
■ Only preheat the oven when it is specified in the recipe that
you should do so.
■ Use dark, black lacquered or enamelled baking tins. They
absorb the heat particularly well.
■ Open the oven door as infrequently as possible while you are
cooking, baking or roasting.
■ It is best to bake several cakes one after the other. The oven
is still warm. This reduces the baking time for the second
cake. You can also place two loaf tins next to each other.
■ For longer cooking times, you can switch the oven off
10 minutes before the end of the cooking time and use the
residual heat to finish cooking.
Environmentally-friendly disposal
Dispose of packaging in an environmentally-friendly manner.
This appliance is labelled in accordance with
European Directive 2012/19/EU concerning used
electrical and electronic appliances (waste electrical
and electronic equipment - WEEE). The guideline
determines the framework for the return and recycling
of used appliances as applicable throughout the EU.
11
Page 12

Acrylamide in foodstuffs
Acrylamide is mainly produced in grain and potato products
prepared at high temperatures, such as potato crisps, chips,
Tips for keeping acrylamide to a minimum when preparing food
General
Baking With Top/bottom heating max. 200 °C.
Biscuits With Top/bottom heating max. 190 °C.
Oven chips Spread out a single layer evenly on the baking tray. Cook at least 400 g at once on a
■ Keep cooking times to a minimum.
■ Cook meals until they are golden brown, but not too dark.
■ Large, thick pieces of food contain less acrylamide.
With 3D hot air or hot air max.180 °C.
With 3D hot air or hot air max. 170 °C.
Egg or egg yolk reduces the production of acrylamide.
baking tray so that the chips do not dry out.
toast, bread rolls, bread or fine baked goods (biscuits,
gingerbread, cookies).
Tips for using your appliance
Here you will find a selection of tips on ovenware and
preparation methods.
Notes
■ Use the accessories provided. Additional accessories may
be obtained as special accessories from specialist retailers
or from the after-sales service.
Before using the oven, remove any unnecessary accessories
and ovenware from the cooking compartment.
■ Always use an oven cloth or oven gloves when taking
accessories or cookware out of the cooking compartment.
Baking
Baking tins
■ Use light-coloured baking tins and trays wherever possible.
■ Always place the baking tins on the middle of the baking and
roasting wire rack.
Baking tips
How to establish whether sponge cake
is baked through.
The cake collapses. Use less fluid next time or set the oven temperature 10 degrees lower. Note the stirring
The cake has risen high in the middle
and less around the edges.
The cake is too dark on the top. Place it lower in the oven, select a lower temperature and bake the cake for a little
The cake is too dry. When it is done, make small holes in the cake using a cocktail stick. Then drizzle fruit
The bread or cake (e.g. cheesecake)
looks good but is sticky on the inside
(soggy with wet streaks).
The pastries are not evenly browned. Select a slightly lower temperature to ensure that the cake is baked more evenly. Excess
The bottom of a fruit flan is too light. Place the cake one level lower the next time.
The fruit juice overflows. Next time, use the deeper universal pan, if you have one.
Small baked items made out of yeast
dough stick to one another during baking.
Condensation forms when you bake
moist cakes.
Approx. 10 minutes before the end of the baking time stated in the recipe, insert a cocktail stick into the cake at its deepest point. If no cake mixture sticks to the wood, the cake
is ready.
times indicated in the recipe.
Do not grease the sides of the springform cake tin. After baking, carefully loosen the
cake using a knife.
longer.
juice or an alcoholic drink over it. Next time, set the temperature 10 degrees higher and
reduce the baking time.
Next time, use less liquid and bake at a lower temperature for slightly longer. For cakes
with a moist topping, bake the base first. Sprinkle it with almonds or bread crumbs and
then place the topping on top. Take care to follow recipes and baking times.
greaseproof paper can affect the air circulation. Always cut the greaseproof paper to suit
the size of the baking tray.
There should be a gap of approx. 2 cm around each item. This gives enough space for
the baked items to expand and turn brown on all sides.
Baking may create water vapour, which escapes above the door. The steam may settle
and form water droplets on the control panel or on the fronts of adjacent units. This is a
natural process.
12
Page 13

Roasting and grilling
Ovenware
You may use any heatresistant ovenware. Always place the
ovenware in the middle of the wire rack. The enamelled baking
tray is also suitable for large roasts.
Roasting tips
■ A a lower temperature produces more even browning.
■ Depending on the size of the joint, add 2 or 3 tablespoons of
liquid to lean meat and 8 to 10 tablespoons of liquid to pot
roasts.
■ When cooking duck or goose, pierce the skin on the
underside of the wings to allow the fat to run out.
■ Poultry will turn out particularly crispy and brown if you baste
it towards the end of the roasting time with butter, salted
water or orange juice.
■ Turn pieces of meat halfway through the cooking time.
■ When the roast is ready, turn off the oven and allow it to rest
for an additional 10 minutes. This will allow the meat juices to
distribute themselves better inside the roast.
Roasting tips
■ When roasting large pieces of meat, you may find that the
amount of steam and condensation on the oven door is more
than usual. This is a normal occurrence which has no effect
on the oven's performance. Once roasting is complete, dry
the oven door and window with a cloth.
■ If you are roasting on the wire rack, insert the enamelled
baking tray into shelf position 1 to collect the drips of fat.
Grilling tips
■ If possible, grill items should be of equal thickness. They
should be at least 2 to 3 cm thick. This ensures that they
brown evenly while also remaining succulent.
■ Place the food to be grilled in the centre of the wire rack.
Pour a little water into the enamelled baking tray and insert
this into the shelf position underneath the grill to collect the
drips of fat. Never place it on the cooking compartment floor.
■ Drizzle some oil over the food to be grilled before you place it
on the wire rack under the grill.
■ If the food to be grilled is thin, turn it over halfway through
grilling; if it is thick, turn it over several times during grilling.
Use tongs when turning the food to avoid piercing it and, in
the case of meat, to keep the meat juices inside the meat.
■ Dark meats such as lamb and beef brown better and more
quickly than light meats such as pork and veal.
How can you tell when the roast is
ready?
The roast is too dark and the crackling
is burnt in places.
The roast looks good but the juices are
burnt.
The roast looks good, but the juices are
too clear and watery.
Use a meat thermometer (available from specialist retailers) or carry out a "spoon test".
Press down on the roast with a spoon. If it feels firm, it is ready. If the spoon can be
pressed in, it needs to be cooked for a little longer.
Check the shelf position and temperature.
Next time, use a smaller roasting dish and add more liquid.
Next time, use a larger roasting dish and add less liquid.
13
Page 14

Tested for you in our cooking studio.
Here, you can find a selection of dishes and the ideal settings
for them. We will show you which type of heating, temperature
and shelf position are best suited for your dish.
Notes
■ The times specified in the tables are only guidelines. They will
depend on the quality and composition of the food.
■ Use the accessories provided. Additional accessories may
be obtained as optional accessories from specialist retailers
or from the after-sales service.
Before using the oven, remove any unnecessary accessories
and ovenware from the cooking compartment.
■ Always use an oven cloth or oven gloves when taking hot
accessories or cookware out of the cooking compartment.
All values refer to a preheated oven.
Dish Weight (kg) Shelf posi-
tion
Lasagne 3-4 1
Pasta bake 2 1
Joint of veal 1.5 2
Pork loin 1 2
Joint of hare 1.5 2
Grilled chicken 1 2
Grilled chicken 2 2
Sausage 1 3
Pork chop 2 4
Fresh fish 1.5 2
Fresh pizza 2 1
Bread 2 2
Sponge cake 1 2
Jam tarts 1 2
Brioche 1 2
Muffins x 15, 30 g each 2
Type of
heating
%
%
N
N
’
N
N
7
(
;
N
<
<
%
’
N
Temperature in °C Cooking time in minutes
200-230 50-60
220-230 40-45
180-190 70-80
180-190 50-60
180-190 70-80
180-190 50-60
180-190 80-90
max. 7-9 first side
5-6 second side
max. 12-15 first side
5-7 second side
160-170 50-60
max. 9-11
190-200 40-50
150-160 50-60
160-170 40-50
160-170 25-30
170 25
14
Page 15

Ù Πίνακας περιεχομένων
[el]Οδηγíες χρήσεως
Σημαντικές υποδείξεις ασφαλείας ............................................. 15
Αιτίες των ζημιών .................................................................................... 17
Η καινούργια σας συσκευή.......................................................... 17
Διακόπτης επιλογής λειτουργίας.......................................................... 17
Διακόπτης επιλογής θερμοκρασίας..................................................... 18
Το ηλεκτρονικό ρολόι............................................................................. 18
Εξαρτήματα ............................................................................................. 18
Πριν την πρώτη χρήση.................................................................. 19
Ρύθμιση της ώρας .................................................................................. 19
Ζέσταμα του φούρνου........................................................................... 19
Καθαρισμός των εξαρτημάτων............................................................. 19
Έτσι χειρίζεστε το φούρνο σας ................................................... 19
Ενεργοποίηση του φούρνου ................................................................. 19
Χειρισμός του ηλεκτρονικού ρολογιού ............................................... 19
Ρύθμιση του αυτόματου συστήματος επιλογής χρόνου
Ένδειξη και αλλαγή των ρυθμισμένων τιμών...................................... 20
Φροντίδα και καθαρισμός............................................................ 21
Υλικά καθαρισμού .................................................................................. 21
Αφαίρεση και τοποθέτηση των τζαμιών της πόρτας ........................ 22
Αφαίρεση και ανάρτηση της πόρτας της συσκευής ........................ 23
.................. 20
Αφαίρεση και τοποθέτηση της σχάρας ανάρτησης..........................23
Τι πρέπει να κάνετε σε περίπτωση βλάβης ............................... 24
Αλλαγή της λάμπας του φούρνου ........................................................24
Υπηρεσία τεχνικής εξυπηρέτησης πελατών.............................. 25
Αριθμός E και αριθμός FD:...................................................................25
Συμβουλές για την ενέργεια και το περιβάλλον ....................... 25
Εξοικονόμηση ενέργειας........................................................................25
Απόσυρση σύμφωνα με τους κανόνες προστασίας του
περιβάλλοντος..........................................................................................25
Ακρυλαμίδη σε τρόφιμα ............................................................... 25
Συμβουλές χρήσης ........................................................................ 26
Ψήσιμο.......................................................................................................26
Ψήσιμο στο φούρνο και στο γκριλ .......................................................26
Δοκιμάστηκαν για εσάς, στο δικό μας εργαστήριο μαγειρικής. .....27
Produktinfo
Περαιτέρω πληροφορίες για τα προϊόντα, τα εξαρτήματα, τα
ανταλλακτικά και το σέρβις θα βρείτε στο διαδίκτυο (Internet):
www.bosch-home.com και στο online-shop: www.boscheshop.com
: Σημαντικές υποδείξεις ασφαλείας
Διαβάστε προσεκτικά αυτές τις οδηγίες. Μόνο
τότε μπορείτε να χειριστείτε τη συσκευή
σίγουρα και σωστά. Φυλάξτε τις οδηγίες
χρήσης και συναρμολόγησης για μια
αργότερη χρήση ή για τον επόμενο ιδιοκτήτη.
Αυτή η συσκευή προορίζεται μόνο για την τοποθέτηση. Προσέξτε τις ειδικές οδηγίες συναρμολόγησης.
Μετά την αφαίρεση από τη συσκευασία, ελέγξτε τη συσκευή. Σε περίπτωση ζημιάς κατά τη μεταφορά μην την συνδέσετε.
Μόνο ένας αδειούχος εγκαταστάτης
επιτρέπεται να συνδέσει τις συσκευές χωρίς
φις. Σε περίπτωση ζημιών που οφείλονται σε
λάθος σύνδεση, δεν έχετε κανένα δικαίωμα
εγγύησης.
Αυτή η συσκευή προορίζεται μόνο για την
οικιακή χρήση και το οικιακό περιβάλλον.
Χρησιμοποιείτε τη συσκευή μόνο για την
παρασκευή φαγητών και ποτών. Κατά τη
διάρκεια της λειτουργίας επιτηρείτε τη
συσκευή. Χρησιμοποιείτε τη συσκευή μόνο σε
κλειστούς χώρους.
Αυτή η συσκευή προορίζεται για χρήση μέχρι ένα μέγιστο ύψος 2.000 μέτρων πάνω από την επιφάνεια της θάλασσας.
Αυτή η συσκευή επιτρέπεται να
χρησιμοποιηθεί από παιδιά άνω των 8 ετών
και από άτομα με μειωμένες φυσικές,
αισθητήριες ή πνευματικές ικανότητες ή με
ανεπαρκή εμπειρία ή γνώση, όταν
επιτηρούνται ή εάν έχουν λάβει σχετικές
οδηγίες για την ασφαλή χρήση της συσκευής
από ένα άτομο που είναι υπεύθυνο για την
ασφάλειά τους και έχουν κατανοήσει τους
κινδύνους που μπορούν να προκύψουν.
Τα παιδιά δεν επιτρέπεται να παίζουν με τη
συσκευή. Ο καθαρισμός και η συντήρηση από
το χρήστη δεν επιτρέπεται να
πραγματοποιηθούν από παιδιά, εκτός εάν
είναι 8 ετών και άνω και επιτηρούνται.
Κρατάτε τα παιδιά που είναι κάτω των 8 ετών μακριά από τη συσκευή και το καλώδιο σύνδεσης.
Τοποθετείτε τα εξαρτήματα πάντοτε σωστά μέσα στο χώρο μαγειρέματος. Βλέπε Περιγραφή εξαρτημάτων στις οδηγίες χρήσης.
Κίνδυνος πυρκαγιάς!
■
Τα αποθηκευμένα στο χώρο μαγειρέματος
εύφλεκτα αντικείμενα μπορούν να
αναφλεγούν. Μην τοποθετείτε ποτέ
εύφλεκτα αντικείμενα μέσα στο χώρο
μαγειρέματος. Μην ανοίγετε ποτέ την πόρτα
της συσκευής, όταν δημιουργείται καπνός
μέσα στη συσκευή. Απενεργοποιήστε τη
συσκευή και τραβήξτε το ρευματολήπτη
(φις) από την πρίζα ή κατεβάστε/ξεβιδώστε
την ασφάλεια στο κιβώτιο των ασφαλειών.
Κίνδυνος πυρκαγιάς!
15
Page 16

■
Κατά το άνοιγμα της πόρτας της συσκευής
δημιουργείται ένα ρεύμα αέρος. Το
λαδόχαρτο μπορεί να έρθει σε επαφή με τα
θερμαντικά στοιχεία και να πιάσει φωτιά.
Κατά την προθέρμανση μην τοποθετείτε
ποτέ το λαδόχαρτο χαλαρό πάνω στα
εξαρτήματα. Τοποθετείτε πάντοτε πάνω στο
λαδόχαρτο ένα μαγειρικό σκεύος ή μια
φόρμα ψησίματος. Καλύπτετε με λαδόχαρτο
μόνο την απαραίτητη επιφάνεια. Το
λαδόχαρτο δεν επιτρέπεται να προεξέχει
από τα εξαρτήματα.
Κίνδυνος εγκαύματος!
■
Η συσκευή ζεσταίνεται πολύ. Μην
ακουμπάτε ποτέ τις ζεστές εσωτερικές
επιφάνειες του χώρου μαγειρέματος ή τα
θερμαντικά στοιχεία. Αφήνετε τη συσκευή
πάντοτε να κρυώσει. Κρατάτε τα παιδιά
μακριά.
Κίνδυνος εγκαύματος!
■
Τα εξαρτήματα ή τα σκεύη ζεσταίνονται
πάρα πολύ. Απομακρύνετε τα καυτά σκεύη
ή εξαρτήματα από το χώρο μαγειρέματος
πάντοτε με μια πιάστρα.
Κίνδυνος εγκαύματος!
■
Οι ατμοί του οινοπνεύματος μπορούν να
αναφλεγούν μέσα στον καυτό χώρο
μαγειρέματος. Μην παρασκευάζετε φαγητά
με μεγάλες ποσότητες δυνατών
οινοπνευματώδη ποτών. Χρησιμοποιείτε
μόνο μικρές ποσότητες από δυνατά
οινοπνευματώδη ποτά. Ανοίγετε προσεκτικά
την πόρτα της συσκευής.
Κίνδυνος ζεματίσματος!
■
Τα προσιτά μέρη/εξαρτήματα ζεσταίνονται
πολύ κατά τη λειτουργία. Μην ακουμπάτε
ποτέ τα καυτά μέρη/εξαρτήματα. Κρατάτε
τα παιδιά μακριά.
Κίνδυνος ζεματίσματος!
■
Κατά το άνοιγμα της πόρτας της συσκευής
μπορεί να εξέλθει καυτός ατμός. Ανοίγετε
προσεκτικά την πόρτα της συσκευής.
Κρατάτε τα παιδιά μακριά.
Κίνδυνος ζεματίσματος!
■
Με το νερό στον καυτό χώρο μαγειρέματος
μπορεί να δημιουργηθεί καυτός υδρατμός.
Μη χύνετε ποτέ νερό μέσα στον καυτό χώρο
μαγειρέματος.
Κίνδυνος ηλεκτροπληξίας!
■
Οι ακατάλληλες επισκευές είναι
επικίνδυνες.Οι επισκευές επιτρέπεται να
γίνονται μόνο από έναν τεχνικό του
τμήματος εξυπηρέτησης πελατών,
εκπαιδευμένο από εμάς.Εάν η συσκευή έχει
βλάβη, τραβήξτε το ρευματολήπτη (φις) από
την πρίζα ή κατεβάστε/ξεβιδώστε την
ασφάλεια στο κιβώτιο των ασφαλειών.
Καλέστε την υπηρεσία τεχνικής
εξυπηρέτησης πελατών.
Κίνδυνος ηλεκτροπληξίας!
■
Στα καυτά μέρη της συσκευής μπορεί να
λιώσει η μόνωση των καλωδίων των
ηλεκτρικών συσκευών. Τα καλώδια
σύνδεσης των ηλεκτρικών συσκευών δεν
επιτρέπεται να έρθουν ποτέ σε επαφή με τα
καυτά μέρη της συσκευής.
Κίνδυνος ηλεκτροπληξίας!
■
Μια εισχώρηση υγρασίας μπορεί να
προκαλέσει μια ηλεκτροπληξία. Μη
χρησιμοποιείτε συσκευές καθαρισμού
υψηλής πίεσης ή συσκευές εκτόξευσης
ατμού.
Κίνδυνος ηλεκτροπληξίας!
■
Κατά την αντικατάσταση της λάμπας του
χώρου μαγειρέματος οι επαφές στο ντουί
της λάμπας βρίσκονται υπό τάση. Πριν την
αντικατάσταση τραβήξτε το ρευματολήπτη
(φις) από την πρίζα ή κατεβάστε/ξεβιδώστε
την ασφάλεια στο κιβώτιο των ασφαλειών.
Κίνδυνος ηλεκτροπληξίας!
■
Μια ελαττωματική συσκευή μπορεί να
προκαλέσει μια ηλεκτροπληξία. Μην
ενεργοποιείτε ποτέ μια χαλασμένη συσκευή.
Τραβήξτε το ρευματολήπτη (φις) από την
πρίζα ή κατεβάστε/ξεβιδώστε την ασφάλεια
στο κιβώτιο των ασφαλειών. Καλέστε την
υπηρεσία τεχνικής εξυπηρέτησης πελατών.
Κίνδυνος τραυματισμού!
Το γρατσουνισμένο γυαλί της πόρτας της συσκευής μπορεί να ραγίσει. Μη χρησιμοποιείτε ξύστρες γυαλιού, δυνατά ή τραχιά υλικά καθαρισμού.
16
Page 17
Αιτίες των ζημιών
Προσοχή!
■ Εξαρτήματα, αλουμινόχαρτο, λαδόχαρτο ή μαγειρικό σκεύος
στον πάτο του χώρου μαγειρέματος: Μην τοποθετείτε κανένα
εξάρτημα πάνω στον πάτο του χώρου μαγειρέματος. Μην
καλύπτετε τον πάτο του χώρου μαγειρέματος με αλουμινόχαρτο ή
λαδόχαρτο. Μην τοποθετείτε κανένα μαγειρικό σκεύος πάνω
στον πάτο του χώρου μαγειρέματος, όταν είναι ρυθμισμένη μια
θερμοκρασία πάνω από 50 °C. Διαφορετικά
συσσώρευση θερμότητας. Οι χρόνοι ψησίματος δεν ισχύουν
πλέον και το εμαγιέ καταστρέφεται.
■ Νερό στο ζεστό χώρο μαγειρέματος: Μη χύνετε ποτέ νερό μέσα
στο ζεστό χώρο μαγειρέματος. Διαφορετικά δημιουργούνται
υδρατμοί. Λόγω της αλλαγής της θερμοκρασίας μπορούν να
προκύψουν ζημιές στο εμαγιέ.
■ Υγρά τρόφιμα: Μην αποθηκεύετε υγρά τρόφιμα για μεγάλη
χρονική διάρκεια στον κλειστό χώρο μαγειρέματος. Το εμαγιέ
καταστρέφεται.
■ Χυμός φρούτων: Σε περίπτωση που φτιάχνετε πολύ ζουμερά
γλυκά φρούτων μη γεμίζετε πάρα πολύ το ταψί. Ο χυμός των
φρούτων που στάζει από το ταψί, αφήνει λεκέδες που δεν
μπορείτε πλέον να τους απομακρύνετε. Εάν είναι δυνατό,
χρησιμοποιείτε το βαθύτερο ταψί γενικής χρήσης.
δημιουργείται μια
Η καινούργια σας συσκευή
■ Κρύωμα με ανοιχτή πόρτα συσκευής: Αφήνετε το χώρο
μαγειρέματος να κρυώνει μόνο, όταν είναι κλειστός. Ακόμα και
όταν η πόρτα της συσκευής είναι ανοιχτή, έστω και λίγο, μπορούν
να χαλάσουν με το πέρασμα του χρόνου οι γειτονικές προσόψεις
των ντουλαπιών.
■ Πολύ λερωμένη τσιμούχα στεγανοποίησης της πόρτας: Εάν η
τσιμούχα στεγανοποίησης της πόρτας είναι πολύ λερωμένη, δεν
κλείνει πλέον σωστά η πόρτα της συσκευής κατά τη λειτουργία.
Οι γειτονικές προσόψεις των ντουλαπιών μπορούν να
χαλάσουν.Διατηρείτε την τσιμούχα στεγανοποίησης της πόρτας
πάντοτε καθαρή.
■ Η πόρτα της συσκευής ως κάθισμα ή ως επιφάνεια εναπόθεσης:
Μην ανεβαίνετε, μην κάθεστε ή μην κρατιέστε από την πόρτα της
συσκευής. Μην τοποθετείτε κανένα σκεύος ή εξάρτημα πάνω
στην πόρτα της συσκευής.
■ Τοποθέτηση των εξαρτημάτων: Ανάλογα με τον τύπο της
συσκευής μπορεί να γρατσουνίσουν τα εξαρτήματα το τζάμι κατά
το κλείσιμο της πόρτας της συσκευής. Σπρώχνετε τα εξαρτήματα
πάντοτε μέχρι το τέρμα μέσα στο χώρο μαγειρέματος.
■ Μεταφορά της συσκευής: Μη μεταφέρετε ή μην κρατάτε τη
συσκευή από τη λαβή της πόρτας. Η λαβή της πόρτας δεν
αντέχει το βάρος της συσκευής και μπορεί να σπάσει.
Εδώ γνωρίζετε την καινούργια σας συσκευή. Θα πάρετε
πληροφορίες για την κονσόλα χειρισμού, το φούρνο, τους τρόπους
ψησίματος και τα εξαρτήματα.
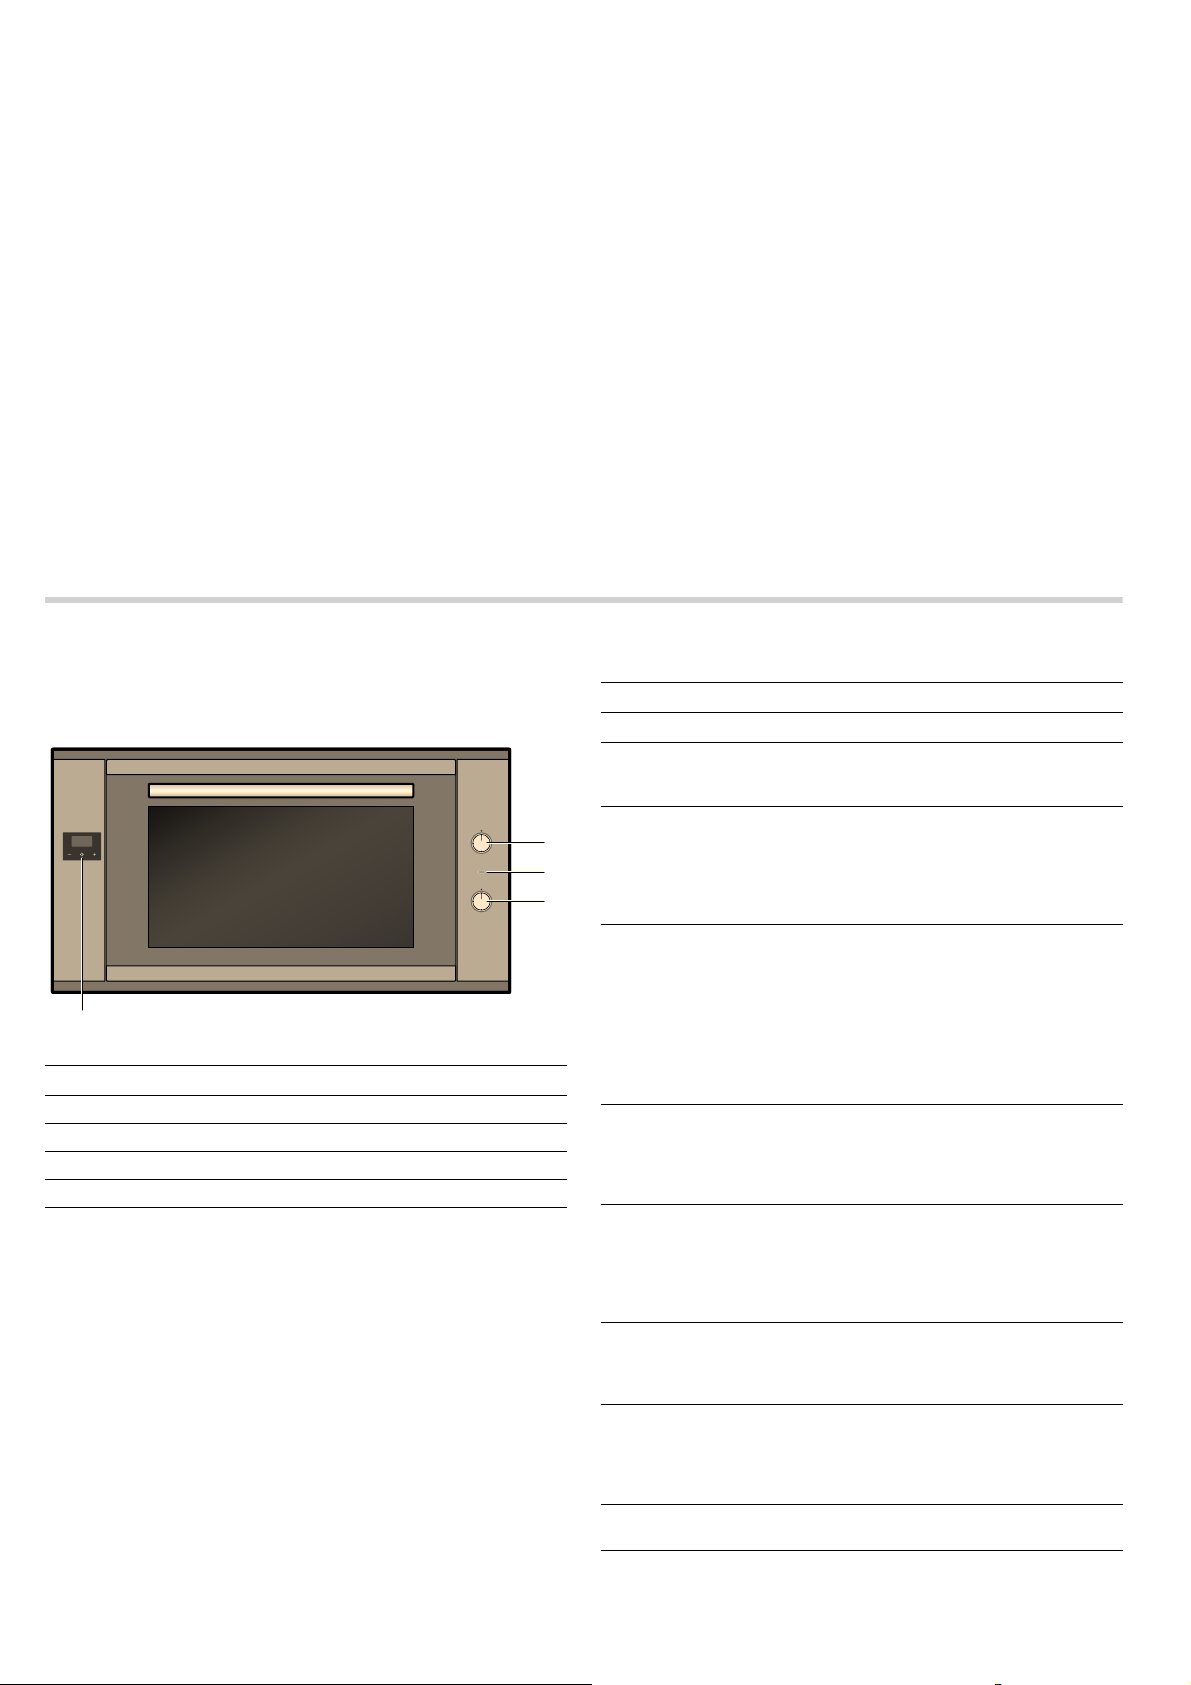
Επεξήγηση
1 Ηλεκτρονικό ρολόι
2 Διακόπτης επιλογής λειτουργίας
3 Ενδεικτική λυχνία
4 Διακόπτης επιλογής θερμοκρασίας
Διακόπτης επιλογής λειτουργίας
Με το διακόπτη επιλογής λειτουργίας ρυθμίζετε τον τρόπο
ψησίματος.
Θέση Χρήση
Θέση μηδέν Ο φούρνος είναι απενεργοποιημένος.
Û
Επάνω/Κάτω θέρ-
%
μανση
Θερμός αέρας Για γλυκά και παρασκευάσματα σε ένα
<
Θερμός αέρας eco* Για γλυκά και παρασκευάσματα σε ένα
’
Ανακυκλοφορία
N
αέρα
Βαθμίδα πίτσας Γρήγορη παρασκευή κατεψυγμένων
;
Συνδυασμός θερ-
7
μού αέρα/γκριλ
Μεγάλο γκριλ Ψήσιμο στο γκριλ από μπριζόλες, λου-
(
Φωτισμός Ο φωτισμός του φούρνου είναι ενεργο-
^
* Τρόπος ψησίματος, με τον οποίο καθορίστηκε η κατηγορία απο-
τελεσματικότητας της ενέργειας κατά το πρότυπο EN 60350-1.
Για γλυκά, σουφλέ και άπαχα κομμάτια
κρέας. Η θερμότητα έρχεται ομοιόμορφα από επάνω και κάτω.
έως δύο επίπεδα. Ο ανεμιστήρας μοιράζει τη θερμότητα του δακτυλιοειδούς θερμαντικού σώματος στο πίσω
τοίχωμα ομοιόμορφα μέσα στο χώρο
μαγειρέματος.
έως δύο επίπεδα. Ο ανεμιστήρας μοιράζει τη θερμότητα του δακτυλιοειδούς θερμαντικού σώματος στο πίσω
τοίχωμα ομοιόμορφα μέσα στο χώρο
μαγειρέματος.
Σε αυτό τον τρόπο ψησίματος παραμένει ο φωτισμός του φούρνου απενεργοποιημένος.
Για γλυκά, παρασκευάσματα και φρέσκια πίτσα σε ένα έως δύο επίπεδα. Ο
ανεμιστήρας μοιράζει τη θερμότητα
των θερμαντικών στοιχείων ομοιόμορφα στο χώρο μαγειρέματος.
προϊόντων χωρίς προθέρμανση, π.χ.
πίτσα, τηγανητές πατάτες ή στρούντελ.
Το κάτω θερμαντικό σώμα και το
δακτυλιοειδές θερμαντικό σώμα στο
πίσω τοίχωμα θερμαίνουν.
Ψήσιμο κρέατος, πουλερικώ και ολόκληρου ψαριού. Ο ανεμιστήρας στροβιλίζει τον καυτό αέρα γύρω από το
φαγητό.
κάνικα, τοστ και κομμάτια ψαριού.
Θερμαίνεται ολόκληρη η επιφάνεια
κάτω από το θερμαντικό σώμα του
γκριλ.
ποιημένος.
17
Page 18

Υπόδειξη: Όταν ρυθμίζετε τον τρόπο ψησίματος, ανάβει η λάμπα του φούρνου στο χώρο μαγειρέματος.
Υπόδειξη: Στον τρόπο ψησίματος "Θερμός αέρας Eco" παραμένει ο φωτισμός του φούρνου απενεργοποιημένος.
Διακόπτης επιλογής θερμοκρασίας
Με το διακόπτη επιλογής θερμοκρασίας ρυθμίζετε τη θερμοκρασία
ή τη βαθμίδα ψησίματος στο γκριλ.
Εξαρτήματα
Τα εξαρτήματα μπορούν να τοποθετηθούν μέσα στο χώρο
μαγειρέματος σε 4 διαφορετικά ύψη. Τοποθετείτε τα εξαρτήματα
πάντοτε μέχρι το τέρμα, για να μην ακουμπάνε το τζάμι της πόρτας.
Προσέχετε, να τοποθετείτε τα εξαρτήματα πάντοτε σωστά μέσα στο
χώρο μαγειρέματος.
Θέση Σημασία
Ú
50-250 Περιοχή θερμο-
Όταν ο φούρνος θερμαίνει, ανάβει η ενδεικτική λυχνία. Στα
διαλείμματα θέρμανσης σβήνει.
Θέση μηδέν Ο φούρνος δε θερμαίνει.
κρασίας
Η θερμοκρασία στο χώρο μαγειρέματος σε °C.
Το ηλεκτρονικό ρολόι
Με το ηλεκτρονικό ρολόι μπορείτε να ελέγξετε το φούρνο σας. Έτσι
μπορείτε π.χ. να προεπιλέξετε τη χρονική στιγμή, στην οποία πρέπει
να ενεργοποιηθεί ο φούρνος ή το αυτόματο σύστημα επιλογής
χρόνου να τερματίσει τη διαδικασία ψησίματος ή μαγειρέματος. Το
ηλεκτρονικό ρολόι μπορεί να επίσης να χρησιμοποιηθεί ως ρολόι
συναγερμού σύντομου
Πλήκτρα λειτουργιών ηλεκτρονικού ρολογιού
Σύμβολο Σημασία Χρήση
0
- Πλην Μείωση της διάρκειας ή του
+ Συν Αύξηση της διάρκειας ή του
χρόνου.
Ηλεκτρονικό ρολόι Ρύθμιση της διάρκειας ή του
χρόνου
χρόνου
χρόνου
Μπορείτε να τραβήξετε έξω τα εξαρτήματα κατά τα δύο τρίτα,
χωρίς να ανατραπούν
φαγητά.
Όταν τα εξαρτήματα ζεσταθούν πάρα πολύ, μπορούν να
παραμορφωθούν. Μόλις κρυώσουν ξανά, εξαφανίζεται η
παραμόρφωση, η οποία δεν έχει καμία επιρροή πάνω στη
λειτουργία.
Τα εξαρτήματα μπορείτε να τα αγοράσετε στην υπηρεσία τεχνικής
εξυπηρέτησης πελατών, στα ειδικά καταστήματα ή στο διαδίκτυο
(Internet).
Εξαρτήματα Περιγραφή
. Έτσι μπορούν να αφαιρεθούν εύκολα τα
Σχάρα ψησίματος
Για μαγειρικά σκεύη, φόρμες γλυκών, ψητά, κομμάτια κρέατος για
γκριλ και κατεψυγμένα φαγητά.
Εμαγιέ ταψί
Για ζουμερά γλυκά, παρασκευάσματα, κατεψυγμένα φαγητά και
μεγάλα ψητά. Μπορεί να χρησιμοποιηθεί επίσης ως δοχείο συλλογής
του λίπους.
Πείροι ασφαλείας
Για το κλείδωμα των μεντεσέδων.
18
--------
Page 19

Πριν την πρώτη χρήση
Εδώ θα πληροφορηθείτε, τι πρέπει να κάνετε, προτού
παρασκευάσετε για πρώτη φορά ένα φαγητό με τη συσκευή σας.
Διαβάστε πρώτα το κεφάλαιο Υποδείξεις ασφαλείας.
Απομακρύνετε τη συσκευασία της συσκευής και αποσύρτε την
σύμφωνα με τους κανονισμούς.
Ρύθμιση της ώρας
Μετά την ηλεκτρική σύνδεση της συσκευής ή μετά από μια διακοπή
ρεύματος αναβοσβήνουν στην ένδειξη τρία μηδενικά και το
σύμβολο "A".
1. Πατήστε το πλήκτρο
κουκκίδα.
2. Με τα πλήκτρα "+" και "-" ρυθμίστε την τρέχουσα ώρα. Μετά από 7 δευτερόλεπτα εισάγεται στη μνήμη της συσκευής ο
ρυθμισμένος χρόνος.
Υπόδειξη: Για να αλλάξετε τη ρυθμισμένη ώρα πατήστε τα πλήκτρα "+" και "-", μέχρι να αναβοσβήνει στην ένδειξη η κουκκίδα. Μετά ρυθμίστε με τα πλήκτρα "+"
0, μέχρι να αναβοσβήνει στην ένδειξη η
και "-" την τρέχουσα ώρα.
Ζέσταμα του φούρνου
Προκαθαρισμός του φούρνου
1. Αφαιρέστε το εξαρτήματα και τις σχάρες ανάρτησης από το
χώρο μαγειρέματος.
2. Απομακρύνετε εντελώς τα υπολείμματα της συσκευασίας, π.χ.
μικρά κομμάτια στυροπόρ, από του χώρο μαγειρέματος.
3. Μερικά μέρη είναι καλυμμένα με μια μεμβράνη προστασίας από
τις γρατσοιυνιές. Απομακρύνετε αυτή τη μεμβράνη προστασίας
από τις γρατσοιυνιές.
4. Καθαρίζετε
5. Καθαρίστε το χώρο μαγειρέματος με ζεστό διάλυμα
απορρυπαντικού πιάτων.
Ζέσταμα του φούρνου
Για να απομακρύνετε τη μυρωδιά της νέας συσκευής, θερμάνετε
τον άδειο και κλειστό φούρνο.
1. Γυρίστε το διακόπτη επιλογής λειτουργίας στον τρόπο
λειτουργίας Επάνω/Κάτω θέρμανση.
2. Γυρίστε το διακόπτη επιλογής θερμοκρασίας
θερμοκρασία.
3. Απενεργοποιήστε μετά από 40 λεπτά το φούρνο. Υπόδειξη: Κατά τη διάρκεια της πρώτης θέρμανσης μπορεί να
ακούγονται θόρυβοι τριξίματος από το φούρνο.
Ολοκλήρωση του καθαρισμού του φούρνου
1. Καθαρίστε το χώρο μαγειρέματος με ζεστό διάλυμα
απορρυπαντικού πιάτων.
2. Συναρμολογήστε τις σχάρες ανάρτησης.
τη συσκευή εξωτερικά μ’ ένα μαλακό, υγρό πανί.
στη μέγιστη
Έτσι χειρίζεστε το φούρνο σας
Βυθιζόμενα στοιχεία χειρισμού
Ο διακόπτης επιλογής λειτουργίας και ο διακόπτης επιλογής
θερμοκρασίας είναι βυθιζόμενοι. Για ασφάλιση και απασφάλιση
πατήστε το εκάστοτε στοιχείο χειρισμού.
Ενεργοποίηση του φούρνου
1. Με το διακόπτη επιλογής λειτουργίας ρυθμίστε τον τρόπο
ψησίματος.
2. Με το διακόπτη επιλογής θερμοκρασίας ρυθμίστε τη
θερμοκρασία.
Ο φούρνος αρχίζει να θερμαίνει.
Απενεργοποίηση του φούρνου
Γυρίστε το διακόπτη επιλογής λειτουργίας και το διακόπτη επιλογής
θερμοκρασίας στη θέση μηδέν.
Αλλαγή ρυθμίσεων
Μπορείτε να αλλάξετε οποτεδήποτε τον τρόπο ψησίματος και τη
θερμοκρασία ή
διακόπτη επιλογής.
Θέρμανση
Για να θερμάνετε το χώρο μαγειρέματος όσο το δυνατό πιο
γρήγορα, χρησιμοποιήστε τον τρόπο ψησίματος "Ανακυκλοφορία
αέρα". Όταν επιτευχθεί η ρυθμισμένη θερμοκρασία (η ενδεικτική
λυχνία είναι σβηστή), ρυθμίστε τον επιθυμητό τρόπο ψησίματος.
τη βαθμίδα ψησίματος στο γκριλ με τον εκάστοτε
Καθαρισμός των εξαρτημάτων
Πριν χρησιμοποιήσετε τα εξαρτήματα, καθαρίστε τα καλά με ζεστό
διάλυμα απορρυπαντικού πιάτων και ένα πανί καθαρισμού.
Χειρισμός του ηλεκτρονικού ρολογιού
Στην ένδειξη μπορούν να εμφανιστούν εκτός της ώρας και του
υπόλοιπου χρόνου τα ακόλουθα σύμβολα:
Σύμβολο Σημασία
û
V
A Αυτόματος τρόπος λειτουργίας
Û
Κουκκίδα μεταξύ ένδειξης ωρών και λεπτών.
Αναβοσβήνει, όταν η ώρα μπορεί να ρυθμιστεί.
Ρολόι συναγερμού σύντομου χρόνου
Δείχνει τις καταστάσεις λειτουργίας του ρολογιού
συναγερμού σύντομου χρόνου.
Δείχνει τις καταστάσεις λειτουργίας της αυτόματου
τρόπου λειτουργίας.
Ετοιμότητα λειτουργίας
Όταν εμφανίζεται αυτό το σύμβολο, τότε ο φούρ-
νος βρίσκεται σε ετοιμότητα λειτουργίας.
19
Page 20

Ρύθμιση της ώρας
Μετά την ηλεκτρική σύνδεση της συσκευής ή μετά από μια διακοπή
ρεύματος αναβοσβήνουν στην ένδειξη τρία μηδενικά και το
σύμβολο "A".
1. Πατήστε το πλήκτρο
κουκκίδα.
2. Με τα πλήκτρα "+" και "-" ρυθμίστε την τρέχουσα ώρα. Μετά από 7 δευτερόλεπτα εισάγεται στη μνήμη της συσκευής ο
ρυθμισμένος χρόνος.
Υπόδειξη: Για να αλλάξετε τη ρυθμισμένη ώρα πατήστε τα πλήκτρα "+" και "-", μέχρι να αναβοσβήνει στην ένδειξη η κουκκίδα. Μετά ρυθμίστε με τα πλήκτρα "+"
Ρύθμιση του ρολογιού συναγερμού σύντομου χρόνου
Το ρολόι συναγερμού σύντομου χρόνου δεν έχει καμία επιρροή στις
λειτουργίες του φούρνου. Η διάρκεια του ρολογιού συναγερμού
σύντομου χρόνου μπορεί να ρυθμιστεί από 1 λεπτό μέχρι και 23
ώρες και 59 λεπτά.
1. Πατήστε το πλήκτρο
σύμβολο
2. Με τα πλήκτρα "+" και "-" ρυθμίστε την επιθυμητή διάρκεια.
Μετά τη λήξη του χρόνου ηχεί ένα ηχητικό σήμα.
Υποδείξεις
■ Για την αλλαγή του υπολειπόμενου χρόνου λειτουργίας πατήστε
το πλήκτρο
V και να εμφανιστούν 3 μηδενικά.
0, μέχρι να αναβοσβήνει στην ένδειξη το σύμβολο
0, μέχρι να αναβοσβήνει στην ένδειξη η
και "-" την τρέχουσα ώρα.
0, μέχρι να αναβοσβήνει στην ένδειξη το
V. Μετά αλλάξτε με τα πλήκτρα "+" και "-" τον υπολειπόμενο
χρόνο λειτουργίας.
■ Για τη διαγραφή της ρύθμισης πατήστε το πλήκτρο 0, μέχρι να
αναβοσβήνει στην ένδειξη το σύμβολο. Μετά πατήστε
ταυτόχρονα τα πλήκτρα "+" και "-".
Απενεργοποίηση του ηχητικού σήματος
Πατήστε το πλήκτρο "
Μετά από εφτά λεπτά απενεργοποιείται αυτόματα το σήμα.
Αλλαγή του ηχητικού σήματος
Στη διάθεσή σας έχετε 3 διαφορετικά ηχητικά σήματα.
1. Πατήστε ταυτόχρονα τα πλήκτρα "+" και "-".
2. Πατήστε το πλήκτρο
Στο πεδίο ενδείξεων εμφανίζεται το τρέχον ηχητικό σήμα, π.χ.
"ήχος.1".
3. Πατήστε το πλήκτρο "-" για να επιλέξετε ένα άλλο ηχητικό σήμα.
0", μέχρι να εξαφανιστεί το σύμβολο V.
0.
Ρύθμιση του αυτόματου συστήματος επιλογής χρόνου
Με το ηλεκτρονικό ρολόι μπορείτε να ενεργοποιήσετε και να
απενεργοποιήσετε αυτόματα το φούρνο.
Αυτόματη απενεργοποίηση
1. Πατήστε το πλήκτρο
σύμβολο
2. Πατήστε τα πλήκτρα λειτουργιών
αναβοσβήνουν εναλλάξ στο πεδίο ενδείξεων "dur" και "0.00" και
να αναβοσβήνει το σύμβολο "A".
3. Με τα πλήκτρα "+" και "-" ρυθμίστε την διάρκεια του χρόνου λειτουργίας.
Η διάρκεια του χρόνου λειτουργίας μπορεί να ρυθμιστεί από 1
λεπτό μέχρι και 10 ώρες.
4. Ρυθμίστε τον επιθυμητό τρόπο ψησίματος και τη
Ο φούρνος ξεκινά και στο πεδίο ενδείξεων εμφανίζεται το
σύμβολο A και η τρέχουσα ώρα.
Η διάρκεια του χρόνου λειτουργίας έληξε
Ένα ηχητικό σήμα ηχεί, στο πεδίο ενδείξεων εξαφανίζεται το
σύμβολο
1. Κλείστε το διακόπτη επιλογής θερμοκρασίας και το διακόπτη επιλογής λειτουργίας.
V και να εμφανιστούν 3 μηδενικά.
Û και το σύμβολο A αναβοσβήνει.
0, μέχρι να αναβοσβήνει στην ένδειξη το
0 ακόμα μια φορά, μέχρι να
θερμοκρασία.
2. Πατήστε το πλήκτρο
Ο φούρνος περνά ξανά στη χειροκίνητη λειτουργία.
Αυτόματη ενεργοποίηση και απενεργοποίηση
Το ψήσιμο ή το μαγείρεμα για τη ρυθμισμένη διάρκεια αρχίζει σε
μια επιλεγμένη από σας αργότερη χρονική στιγμή.
1. Πατήστε το πλήκτρο
σύμβολο
2. Πατήστε τα πλήκτρα λειτουργιών
αναβοσβήνουν εναλλάξ στο πεδίο ενδείξεων "dur" και "0.00" και
να αναβοσβήνει το σύμβολο "A".
Η τρέχουσα ώρα είναι π.χ. 17:30.
3. Ρυθμίστε με τα πλήκτρα "+" και "-" τη διάρκεια του χρόνου λειτουργίας (π.χ. 1 ώρα).
Η διάρκεια του χρόνου λειτουργίας μπορεί να ρυθμιστεί από 1
λεπτό μέχρι και
4. Πατήστε το πλήκτρο λειτουργιών
αναβοσβήνει εναλλάξ στο πεδίο ενδείξεων "End" και ο χρόνος
απενεργοποίησης "18:30" (τρέχουσα ώρα συν τη ρυθμισμένη
διάρκεια του χρόνου λειτουργίας).
5. Ρυθμίστε με τα πλήκτρα "+" και "-" το χρόνο απενεργοποίησης (π.χ. 19:30).
Ο χρόνος απενεργοποίησης μπορεί να ρυθμιστεί μέχρι και 23
ώρες και 59 λεπτά.
6. Ρυθμίστε τον επιθυμητό
Στο πεδίο ενδείξεων εξαφανίζεται το σύμβολο
Ο φούρνος ξεκινά σε αυτό το παράδειγμα στις 18:30 και
απενεργοποιείται ξανά στις 19:30.
Η διάρκεια του χρόνου λειτουργίας έληξε
Ένα ηχητικό σήμα ηχεί, στο πεδίο ενδείξεων εξαφανίζεται το
σύμβολο
1. Κλείστε το διακόπτη επιλογής θερμοκρασίας και το διακόπτη επιλογής λειτουργίας.
2. Πατήστε το πλήκτρο
Ο φούρνος περνά ξανά στη χειροκίνητη λειτουργία.
V και να εμφανιστούν 3 μηδενικά.
Û και το σύμβολο A αναβοσβήνει.
0 , μέχρι να εμφανιστεί το σύμβολο Û.
0, μέχρι να αναβοσβήνει στην ένδειξη το
0 ακόμα μια φορά, μέχρι να
10 ώρες.
0 ακόμα μια φορά, μέχρι να
τρόπο ψησίματος και τη θερμοκρασία.
Û.
0 , μέχρι να εμφανιστεί το σύμβολο Û.
Ένδειξη και αλλαγή των ρυθμισμένων τιμών
Οι ρυθμισμένες τιμές και ο υπολειπόμενος χρόνος των διάφορων
τρόπων λειτουργίας του ηλεκτρονικού ρολογιού μπορούν να
εμφανιστούν οποτεδήποτε στο πεδίο ενδείξεων και να αλλαχτούν.
Ένδειξη υπολειπόμενου χρόνου λειτουργίας του ρολογιού
συναγερμού σύντομου χρόνου
Πατήστε το πλήκτρο
σύμβολο
Στην ένδειξη εμφανίζεται ο υπολειπόμενος χρόνος λειτουργίας και
μπορεί να αλλαχτεί με τα πλήκτρα "+" και "-".
Ένδειξη και αλλαγή της διάρκειας του χρόνου λειτουργίας και
του χρόνου απενεργοποίησης.
1. Πατήστε το πλήκτρο
2. Πατήστε το πλήκτρο
3. Πατήστε
V.
ενδείξεων το σύμβολο
εναλλάξ στο πεδίο ενδείξεων "dur" και η υπόλοιπη διάρκεια του
χρόνου λειτουργίας και να αναβοσβήνει το σύμβολο A.
Η διάρκεια του χρόνου λειτουργίας μπορεί να αλλαχτεί με τα
πλήκτρα "+" και "-". Με το ταυτόχρονο πάτημα των πλήκτρων "+"
και "-" απενεργοποιείται το αυτόματο σύστημα επιλογής χρόνου.
το πλήκτρο 0 ακόμα μια φορά, μέχρι να αναβοσβήνουν
εναλλάξ στο πεδίο ενδείξεων "End" και ο ρυθμισμένος χρόνος
απενεργοποίησης.
Ο χρόνος απενεργοποίησης μπορεί να αλλαχτεί με τα πλήκτρα "+"
και "-". Με το ταυτόχρονο πάτημα των πλήκτρων "+" και "-"
απενεργοποιείται το αυτόματο σύστημα επιλογής χρόνου.
0, μέχρι να αναβοσβήνει στην ένδειξη το
0, μέχρι να αναβοσβήνει στο πεδίο
V.
0 ακόμα μια φορά, μέχρι να αναβοσβήνουν
20
Page 21

Φροντίδα και καθαρισμός
Με καλή φροντίδα και προσεκτικό καθαρισμό, διατηρεί ο φούρνος
σας για πολύ χρόνο την ωραία του εμφάνιση και τη λειτουργικότητά
του. Εδώ σας εξηγούμε με ποιο τρόπο πρέπει να φροντίζετε και να
καθαρίζετε σωστά το φούρνο σας.
Υποδείξεις
■ Μικρές διαφορές στην απόχρωση στην μπροστινή πλευρά του
φούρνου δημιουργούνται από τα διάφορα υλικά, όπως γυαλί,
πλαστικό ή μέταλλο.
■ Οι σκιές στο τζάμι της πόρτας, που μοιάζουν με ανταύγειες/νερά,
είναι αντανακλάσεις του φωτός της λάμπας του φούρνου.
■ Το εμαγιέ ψήνεται σε πολύ υψηλές θερμοκρασίες. Έτσι μπορούν
να δημιουργηθούν μικρές χρωματικές διαφορές. Αυτό είναι κάτι
το κανονικό και δεν έχει καμία επιρροή πάνω στη λειτουργία. Οι
γωνίες στις λεπτές λαμαρίνες δε γίνονται τελείως εμαγιέ. Για αυτό
μπορεί να είναι τραχιές. Η προστασία από διάβρωση δεν
επηρεάζεται από αυτό.
: Κίνδυνος ηλεκτροπληξίας!
Μια εισχώρηση υγρασίας μπορεί να προκαλέσει μια ηλεκτροπληξία.
Μη χρησιμοποιείτε συσκευές καθαρισμού υψηλής πίεσης ή
συσκευές εκτόξευσης ατμού.
: Κίνδυνος εγκαύματος!
Η συσκευή ζεσταίνεται πολύ. Μην ακουμπάτε ποτέ τις ζεστές
εσωτερικές επιφάνειες του χώρου μαγειρέματος ή τα θερμαντικά
στοιχεία. Αφήνετε τη συσκευή πάντοτε να κρυώσει. Κρατάτε τα
παιδιά μακριά.
Υλικά καθαρισμού
Για να μην υποστούν ζημιές οι διάφορες επιφάνειες από λάθος
υγρό καθαρισμού, προσέξτε τα ακόλουθα στοιχεία.
Μη χρησιμοποιείτε
■ ισχυρά καθαριστικά ή υλικά τριψίματος
■ ισχυρά αλκοολούχα καθαριστικά
■ σκληρά σύρματα τριψίματος ή σφουγγάρια καθαρισμού
■ συσκευές καθαρισμού υψηλής πίεσης ή συσκευές εκτόξευσης
ατμού.
Πριν τη χρήση πλύνετε καλά τα καινούργια σφουγγαρόπανα.
Περιοχή Υλικά καθαρισμού
Συσκευή, εξωτερικά
Ανοξείδωτος χάλυβας
Αλουμίνιο και συνθετικό υλικό
Εμαγιέ επιφάνειες
(λεία επιφάνεια)
Τζάμια πόρτας
Γυάλινο κάλυμμα της
λάμπας του φούρνου
Τσιμούχα στεγανοποίησης
Μην αφαιρέσετε τη
στεγανοποίηση!
Υποδοχές
Εξαρτήματα
Ζεστό διάλυμα απορρυπαντικού πιάτων:
Καθαρίστε μ’ ένα πανί καθαρισμού και στεγνώστε μ’ ένα μαλακό πανί. Μη χρησιμοποιήσετε κανένα υγρό καθαρισμού τζαμιών ή
ξύστρα γυαλιού.
Ζεστό διάλυμα απορρυπαντικού πιάτων:
Καθαρίστε μ’ ένα πανί καθαρισμού και στεγνώστε μ’ ένα μαλακό πανί. Απομακρύνετε
αμέσως τους λεκέδες από άλατα ασβεστίου, λίπος, κορν φλάουρ και ασπράδι
αυγού. Κάτω απ’ αυτούς τους λεκέδες μπορεί να δημιουργηθεί διάβρωση.
Στην υπηρεσία τεχνικής εξυπηρέτησης
πελατών ή στα ειδικά καταστήματα μπορείτε να προμηθευτείτε ειδικά υλικά
ρησης ανοξείδωτου χάλυβα, τα οποία είναι
κατάλληλα για ζεστές επιφάνειες. Απλώστε
πολύ λεπτά το υλικό συντήρησης μ’ ένα
μαλακό πανί.
Υγρό καθαρισμού τζαμιών:
Καθαρίστε με ένα μαλακό πανί.
Για τον ευκολότερο καθαρισμό μπορείτε να
ανάψετε το φωτισμό του χώρου μαγειρέματος και ενδεχομένως να αφαιρέσετε την
πόρτα της συσκευής. Απλώστε στην επιφάνεια ένα συνηθισμένο υγρό καθαρισμού
πιάτων ή ξιδόνερο με ένα μαλακό, υγρό
πανί ή δέρμα καθαρισμού των
γνώστε με ένα μαλακό πανί. Μουλιάστε τα
καμένα υπολείμματα φαγητού μ’ ένα υγρό
πανί και με υγρό καθαρισμού των πιάτων.
Σε περίπτωση μεγάλης ρύπανσης συνιστούμε απορρυπαντικό φούρνου σε μορφή
ζελέ. Αυτό μπορεί να χρησιμοποιηθεί στα
συγκεκριμένα σημεία. Μετά τον καθαρισμό
αφήστε το χώρο μαγειρέματος ανοιχτό, για
να στεγνώσει
Υγρό καθαρισμού τζαμιών:
Καθαρίστε με ένα μαλακό πανί. Μη χρησιμοποιείτε ξύστρες γυαλιού.
Ζεστό διάλυμα απορρυπαντικού πιάτων:
Καθαρίστε μ’ ένα πανί καθαρισμού.
Ζεστό διάλυμα απορρυπαντικού πιάτων:
Καθαρίστε μ’ ένα πανί καθαρισμού. Μην
τρίβετε.
Ζεστό διάλυμα απορρυπαντικού πιάτων:
Μουλιάστε και καθαρίστε μ’ ένα πανί καθαρισμού ή με μια βούρτσα.
Ζεστό διάλυμα απορρυπαντικού πιάτων:
Μουλιάστε και καθαρίστε μ’ ένα πανί καθαρισμού ή με μια βούρτσα.
.
συντή-
τζαμιών, στε-
21
Page 22

Αφαίρεση και τοποθέτηση των τζαμιών της πόρτας
Για καλύτερο καθαρισμό μπορείτε να αφαιρέσετε τα τζάμια της
πόρτας του φούρνου.
Αφαίρεση των τζαμιών της πόρτας
1. Ανοίξτε εντελώς την πόρτα του φούρνου.
2. Κλειδώστε τους δύο μεντεσέδες αριστερά και δεξιά με τον πείρο
ασφαλείας. Υπόδειξη: Οι πείροι ασφαλείας πρέπει να βρίσκονται εντελώς
μέσα στις οπές των μεντεσέδων.
3. Ανασηκώστε ελαφρά το
μέχρι να ελευθερωθούν οι πείροι στερέωσης από το στήριγμα (1).
4. Ανασηκώστε προσεκτικά το επάνω μέρος του εσωτερικού τζαμιού, μέχρι να ελευθερωθούν οι πείροι στερέωσης από το στήριγμα (2).
Προσοχή!
Κατά το σήκωμα του εσωτερικού τζαμιού μπορεί το μεσαίο τζάμι
να παραμείνει "κολλημένο" στο εσωτερικό τζάμι
μην πέσει κάτω το μεσαίο τζάμι.
κάτω μέρος του εσωτερικού τζαμιού,
. Φροντίστε, να
Υπόδειξη: Το μεσαίο τζάμι δεν είναι στερεωμένο με πείρους συγκράτησης αλλά συγκρατείται στη θέση του με λαστιχένια έδρανα.
Καθαρίστε τα τζάμια με υγρό καθαρισμού τζαμιών και ένα μαλακό
πανί.
: Κίνδυνος τραυματισμού!
Το γρατσουνισμένο γυαλί της πόρτας της συσκευής μπορεί να
ραγίσει. Μη χρησιμοποιείτε ξύστρες γυαλιού, δυνατά ή τραχιά υλικά
καθαρισμού.
Τοποθέτηση των τζαμιών της πόρτας
1. Τοποθετήστε ξανά το μεσαίο τζάμι.
Υποδείξεις
■ Το μεσαίο τζάμι είναι σωστά τοποθετημένο, όταν το σύμβολο
Low-E μπορεί να διαβαστεί.
■ Προσέξτε την ακριβή θέση του τζαμιού. Όλα τα λαστιχένια
έδρανα πρέπει να ακουμπούν επίπεδα πάνω στο εξωτερικό
τζάμι.
2. Τοποθετήστε ξανά το εσωτερικό τζάμι. Υπόδειξη: Και οι τέσσερις πείροι στερέωσης πρέπει να
ασφαλίζονται στα προβλεπόμενα γι’ αυτό στηρίγματα.
3. Απομακρύνετε τους πείρους ασφαλείας και κλείστε την πόρτα του φούρνου.
5. Αφαιρέστε το εσωτερικό τζάμι.
6. Αφαιρέστε το μεσαίο τζάμι.
22
Page 23

Αφαίρεση και ανάρτηση της πόρτας της συσκευής
Σε περίπτωση μεγάλης ρύπανσης μπορεί να αφαιρεθεί η πόρτα του
φούρνου για καλύτερο καθαρισμό. Για τη συνηθισμένη ρύπανση
αυτό όμως δεν είναι απαρα'ίτητο.
Αφαίρεση της πόρτας της συσκευής
1. Ανοίξτε εντελώς την πόρτα του φούρνου.
2. Κλειδώστε τους δύο μεντεσέδες αριστερά και δεξιά με τον πείρο ασφαλείας (a).
Υπόδειξη: Οι πείροι μέσα στις οπές των μεντεσέδων.
3. Πιάστε την πόρτα του φούρνου στα πλάγια και με τα δύο χέρια και κλείστε την πόρτα του φούρνου περίπου κατά 30° (b).
ασφαλείας πρέπει να βρίσκονται εντελώς
DE
Αφαίρεση και τοποθέτηση της σχάρας ανάρτησης
Για καλύτερο καθαρισμό μπορείτε να αφαιρέσετε τις σχάρες
ανάρτησης.
Αφαίρεση της σχάρας ανάρτησης
Οι σχάρες ανάρτησης είναι στερεωμένες κάθε φορά σε τρία σημεία
στα πλευρικά τοιχώματα του χώρου μαγειρέματος.
1. Πιάστε τη σχάρα ανάρτησης στην μπροστινή πλευρά και
τραβήξτε την προς τη μέση του χώρου μαγειρέματος.
Το μπροστινό άγκιστρο της σχάρας ανάρτησης
από την οπή.
2. Σηκώστε ακόμα τη σχάρα ανάρτησης και τραβήξτε την από τις
πίσω οπές του πλευρικού τοιχώματος.
3. Κρατήστε καλά την καταλυτική επένδυση του χώρου
μαγειρέματος.
4. Αφαιρέστε τη σχάρα ανάρτησης από το χώρο μαγειρέματος.
ελευθερώνεται
4. Ανασηκώστε ελαφρά την πόρτα του φούρνου και τραβήξτε την έξω.
Υπόδειξη: Μην κλείσετε εντελώς την πόρτα του φούρνου. Οι μεντεσέδες μπορεί να λυγίσουν και να προκύψουν ζημιές στο εμαγιέ.
Ανάρτηση της πόρτας της συσκευής
1. Πιάστε την πόρτα του φούρνου στα πλάγια και με τα δύο χέρια.
2. Σπρώξτε τους μεντεσέδες στις εγκοπές του φούρνου (a).
Υπόδειξη: Η εγκοπή κάτω στους μεντεσέδες πρέπει να ασφαλίσει στο πλαίσιο του φούρνου (b).
ED
D
Τοποθέτηση της σχάρας ανάρτησης
1. Κρατήστε καλά την καταλυτική επένδυση του χώρου
μαγειρέματος.
2. Τοποθετήστε
του πλευρικού τοιχώματος.
3. Πιέστε το μπροστινό άγκιστρο της σχάρας ανάρτησης μέσα στην
οπή.
τα άγκιστρα της σχάρας ανάρτησης στις πίσω οπές
E
3. Κατεβάστε
4. Αφαιρέστε τους πείρους ασφαλείας.
την πόρτα προς τα κάτω.
: Κίνδυνος τραυματισμού!
Εάν πέσει αθέλητα η πόρτα του φούρνου ή κλείσει ένας μεντεσές,
μην πιάσετε στο μεντεσέ. Καλέστε την υπηρεσία τεχνικής
εξυπηρέτησης πελατών.
23
Page 24

Τι πρέπει να κάνετε σε περίπτωση βλάβης
Εάν παρουσιαστεί κάποια βλάβη, δε σημαίνει πως είναι κάτι το
σοβαρό, συχνά η αιτία είναι ασήμαντη. Πριν καλέσετε την υπηρεσία
τεχνικής εξυπηρέτησης πελατών, προσέξτε παρακαλώ τις
ακόλουθες υποδείξεις.
Βλάβη Πιθανή αιτία Υποδείξεις/Αντιμετώπιση
Η συσκευή δε
λειτουργεί.
Η απενεργοποίηση του φούρνου δεν είναι
δυνατή.
Η ένδειξη της
ώρας αναβοσβήνει.
Ο φούρνος δε
θερμαίνει.
Το γυαλί της
πόρτας έσπασε.
Χυμός φρούτων
ή λεκέδες από
ασπράδι αυγού
πάνω σε εμαγιέ
επιφάνειες.
Η ασφάλεια είναι
χαλασμένη.
Διακοπή ρεύματος.
Το ηλεκτρονικό
σύστημα είναι
ελαττωματικό.
Διακοπή ρεύματος
Η ασφάλεια είναι
χαλασμένη.
Ο διακόπτης επιλογής λειτουργίας
δεν είναι
ρυθμισμένος.
Ζουμερά γλυκά ή
χυμός κρέατος.
Κοιτάξτε στο κιβώτιο των
ασφαλειών, εάν είναι εντάξει
η ασφάλεια για την ηλεκτρική
κουζίνα.
Ελέγξτε, αν ανάβει η λάμπα
του δωματίου.
Κατεβάστε/ξεβιδώστε την
ασφάλεια. Καλέστε την υπηρεσία τεχνικής εξυπηρέτησης
πελατών.
Ρυθμίστε την ώρα από την
αρχή.
Ελέγξτε ή αντικαταστήστε την
ασφάλεια.
Ρυθμίστε το διακόπτη επιλογής λειτουργίας.
Απενεργοποιήστε τη συσκευή.
Καλέστε την υπηρεσία τεχνικής εξυπηρέτησης πελατών.
Ακίνδυνη αλλοίωση του χρώματος του εμαγιέ, δεν αποκαθίσταται.
Αλλαγή της λάμπας του φούρνου
Όταν καεί μια λάμπα του φούρνου, πρέπει να αλλαχτεί.
Ανταλλακτικές λάμπες, ανθεκτικές στη θερμοκρασία, μπορείτε να
προμηθευτείτε στην υπηρεσία τεχνικής εξυπηρέτησης πελατών ή
στα ειδικά καταστήματα. Δώστε παρακαλώ τον αριθμό Ε και τον
αριθμό FD της συσκευής σας. Μη χρησιμοποιήσετε καμία άλλη
λάμπα.
: Κίνδυνος ηλεκτροπληξίας!
Κατά την αντικατάσταση της λάμπας του χώρου μαγειρέματος οι
επαφές στο ντουί της λάμπας βρίσκονται υπό τάση. Πριν την
αντικατάσταση τραβήξτε το ρευματολήπτη (φις) από την πρίζα ή
κατεβάστε/ξεβιδώστε την ασφάλεια στο κιβώτιο των ασφαλειών.
1. Αφήστε το χώρο μαγειρέματος να κρυώσει.
2. Ανοίξτε την πόρτα της συσκευής.
3.
Τοποθετήστε μια πετσέτα κουζίνας μέσα στο χώρο μαγειρέματος, για ν’ αποφύγετε τυχόν ζημιές.
4. Αφαιρέστε τη σχάρα ανάρτησης.
5. Αφαιρέστε το γυάλινο κάλυμμα.Ανοίξτε γι’ αυτό με το χέρι το
γυάλινο καπάκι από μπροστά. Σε περίπτωση που το γυάλινο
καπάκι μπορεί να αφαιρεθεί μόνο με δυσκολία, χρησιμοποιήστε
για βοήθεια ένα κουτάλι.
6.
Τραβήξτε έξω τη λάμπα του φούρνου.
: Κίνδυνος ηλεκτροπληξίας!
Οι ακατάλληλες επισκευές είναι επικίνδυνες. Οι επισκευές
επιτρέπεται να γίνονται μόνο από έναν τεχνικό του τμήματος
εξυπηρέτησης πελατών, εκπαιδευμένο από εμάς.
Εάν η συσκευή σας δεν επισκευαστεί σωστά, μπορεί να προκύψουν
σοβαροί κίνδυνοι για εσάς.
7. Αντικαταστήστε τη λάμπα του φούρνου με μια άλλη λάμπα ίδιου
τύπου:
Τάση: 230 V,
Ισχύς: 40 W,
Ντουί: G9,
Αντοχή στη θερμοκρασία: 300 °C
8. Τοποθετήστε ξανά το γυάλινο κάλυμμα της λάμπας του φούρνου.
9. Συναρμολογήστε τη σχάρα ανάρτησης.
10.Αφαιρέστε ξανά την πετσέτα της κουζίνας.
11.Ενεργοποιήστε ξανά την ασφάλεια.
12.Ελέγξτε, εάν λειτουργεί ξανά ο φωτισμός του φούρνου.
24
Page 25

Υπηρεσία τεχνικής εξυπηρέτησης πελατών
Εάν η συσκευή σας πρέπει να επισκευαστεί, βρίσκεται στη διάθεσή
σας η υπηρεσία τεχνικής εξυπηρέτησης των πελατών της εταιρείας
μας. Εμείς βρίσκουμε πάντοτε μια κατάλληλη λύση, επίσης και για
την αποφυγή των περιττών επισκέψεων του τεχνικού.
Αριθμός E και αριθμός FD:
Αναφέρετε στο τηλεφώνημα τον αριθμό προϊόντος (Αριθ. E) και τον
αριθμό κατασκευής ( Αριθ. FD), για να μπορούμε να σας
βοηθήσουμε σωστά. Την πινακίδα τύπου με τους αριθμούς θα την
βρείτε με ανοιχτή την πόρτα του φούρνου μπροστά από την κάτω
μεριάς του χώρου μαγειρέματος. Για να μη χρειαστεί να ψάχνετε
πολύ, σε περίπτωση
στοιχεία της συσκευής σας και τον αριθμό τηλεφώνου της
υπηρεσίας τεχνικής εξυπηρέτησης πελατών.
E-Nr. Αριθ. FD
Τμήμα εξυπηρέτησης πελατών
που χρειάζεται, μπορείτε να γράψετε εδώ τα
Προσέξτε, ότι η επίσκεψη του τεχνικού του τμήματος εξυπηρέτησης
πελατών στη περίπτωση ενός εσφαλμένου χειρισμού δεν είναι
δωρεάν, ακόμα και κατά τη διάρκεια του χρόνου της εγγύησης.
Τα στοιχεία επαφής
τεχνικής εξυπηρέτησης πελατών θα τα βρείτε εδώ ή στο συνημμένο
κατάλογο υπηρεσιών τεχνικής εξυπηρέτησης πελατών.
Εντολή επισκευών και συμβουλές σε περίπτωση βλάβης
A 0810 240 260
D 01801 22 33 55
(0,039 €/λεπτό από το σταθερό,
κινητό μέγ. 0,42 €/λεπτό)
CH 0848 840 040
Εμπιστευτείτε την εμπειρία του κατασκευαστή. Έτσι εξασφαλίζετε,
ότι η επισκευή γίνεται από εκπαιδευμένους τεχνικούς του σέρβις,
που είναι εξοπλισμένοι με τα γνήσια
οικιακή συσκευή.
όλων των χωρών για την πλησιέστερη υπηρεσία
O
Συμβουλές για την ενέργεια και το περιβάλλον
Εδώ θα βρείτε συμβουλές, πως μπορείτε να εξοικονομήσετε
ενέργεια κατά το ψήσιμο στο φούρνο και πως πρέπει να αποσύρετε
σωστά τη συσκευή σας.
Εξοικονόμηση ενέργειας
■ Προθερμαίνετε το φούρνο μόνο τότε, όταν αναφέρεται στη
συνταγή.
■ Χρησιμοποιείτε σκούρες, βαμμένες μαύρες ή εμαγιέ φόρμες
ψησίματος. Αυτές απορροφούν τη θερμότητα ιδιαίτερα καλά.
■ Ανοίγετε όσο γίνεται λιγότερο την πόρτα του φούρνου κατά τη
διάρκεια του μαγειρέματος, ή του ψησίματος.
■ Περισσότερα γλυκά τα ψήνετε καλύτερα το ένα μετά το άλλο. Ο
φούρνος είναι ακόμα ζεστός. Έτσι μικραίνει ο χρόνος ψησίματος
για το δεύτερο γλυκό. Μπορείτε να τοποθετήσετε επίσης και 2
μακρόστενες φόρμες τη μία δίπλα στην άλλη.
■ Σε μεγάλους χρόνους μαγειρέματος μπορείτε να
απενεργοποιήσετε το φούρνο 10 λεπτά πριν τη λήξη του χρόνου
ψησίματος και να εκμεταλλευτείτε έτσι την υπόλοιπη θερμότητα
για την ολοκλήρωση του ψησίματος.
Απόσυρση σύμφωνα με τους κανόνες προστασίας του περιβάλλοντος
Αποσύρετε τη συσκευασία σύμφωνα με τους κανόνες προστασίας
του περιβάλλοντος.
Αυτή η συσκευή χαρακτηρίζεται σύμφωνα με την
ευρωπαϊκή οδηγία 2012/19/ΕE περί ηλεκτρικών και
ηλεκτρονικών συσκευών (waste electrical and electronic
equipment - WEEE).
Η οδηγία προκαθορίζει τα πλαίσια για μια απόσυρση και
αξιοποίηση των παλιών συσκευών με ισχύ σ’ όλη την ΕΕ.
ανταλλακτικά για τη δική σας
Ακρυλαμίδη σε τρόφιμα
Η ακρυλαμίδη δημιουργείται πριν απ’ όλα στα προϊόντα
δημητριακών και πατάτας, που παρασκευάζονται με πολύ υψηλές
θερμοκρασίες, όπως π.χ. πατατάκια, τηγανητές πατάτες, τοστ,
Συμβουλές για την παρασκευή φαγητών με ελάχιστη ακρυλαμίδη
Γενικά
Ψήσιμο Με Επάνω/Κάτω θέρμανση το πολύ 200 °C.
Μπισκοτάκια Με Επάνω/Κάτω θέρμανση το πολύ 190 °C.
Τηγανητές πατάτες
φούρνου Μοιράστε τις πατάτες ομοιόμορφα και σε μια στρώση πάνω στο ταψί. Ψήνετε το λιγότερο
■ Ο χρόνος μαγειρέματος πρέπει να είναι όσο το δυνατόν συντομότερος.
■ Ροδοκοκκινίζετε τα φαγητά μέχρι να αποκτήσουν ένα χρυσαφί χρώμα, μην τα παραψήνετε.
■ Ένα μεγάλο, χοντρό κομμάτι φαγητού περιέχει λιγότερη ακρυλαμίδη.
Με Θερμό αέρα 3D ή Θερμό αέρα το πολύ 180 °C.
Με Θερμό αέρα 3D ή Θερμό αέρα το πολύ 170 °C.
Το αυγό ή ο κρόκος του αυγού μειώνει την παραγωγή της ακρυλαμίδης.
400 γρ. σε κάθε ταψί, για να μη στεγνώσουν οι τηγανητές πατάτες.
ψωμάκια, ψωμί ή λεπτά αρτοσκευάσματα (μπισκότα, λέμπκουχεν,
μπισκότα κανέλας).
25
Page 26

Συμβουλές χρήσης
Εδώ θα βρείτε μια επιλογή από συμβουλές για τα μαγειρικά σκεύη
και την προετοιμασία.
Υποδείξεις
■ Χρησιμοποιήστε τα συμπαραδιδόμενα εξαρτήματα. Πρόσθετα
εξαρτήματα μπορείτε να τα προμηθευτείτε ως ειδικά εξαρτήματα
στα ειδικά καταστήματα ή στην υπηρεσία τεχνικής εξυπηρέτησης
πελατών.
Ψήσιμο
Φόρμες ψησίματος
■ Χρησιμοποιείτε κυρίως ανοιχτόχρωμες φόρμες ψησίματος και
ταψιά.
■ Τοποθετείτε τις φόρμες ψησίματος πάντοτε στη μέση της σχάρας
ψησίματος.
Πριν τη χρήση απομακρύνετε τα εξαρτήματα και τα μαγειρικά
σκεύη, τα οποία δε χρειάζεστε, από το χώρο μαγειρέματος.
■ Χρησιμοποιείτε πάντοτε πιάστρες, όταν θέλετε να βγάλετε καυτά
εξαρτήματα ή μαγειρικά σκεύη από το χώρο μαγειρέματος.
Συμβουλές για το ψήσιμο γλυκών
Έτσι θα διαπιστώσετε, εάν το κέικ έχει
ψηθεί.
Τρυπήστε περίπου 10 λεπτά πριν τη λήξη του χρόνου ψησίματος που αναφέρεται στη συνταγή,
με μια οδοντογλυφίδα στο υψηλότερο σημείο του γλυκού. Όταν δεν κολλά πλέον
ζύμη πάνω
στην οδοντογλυφίδα, είναι το γλυκό έτοιμο.
Το γλυκό κάθεται. Χρησιμοποιήστε την επόμενη φορά λιγότερο υγρό ή ρυθμίστε τη θερμοκρασία του φούρνου
κατά 10 βαθμούς χαμηλότερα. Προσέξτε τους χρόνους ανάδευσης που δίνονται στη συνταγή.
Το γλυκό φούσκωσε στη μέση περισσότερο
απ’ ό,τι στις άκρες.
Μην αλείφετε με βούτυρο τον
γλυκό προσεκτικά μ’ ένα μαχαίρι.
γύρο της φόρμας με σούστα. Μετά το ψήσιμο ξεκολλήστε το
Το γλυκό παραψήθηκε από πάνω. Τοποθετήστε το σε χαμηλότερο ύψος μέσα στον φούρνο, επιλέξτε μια χαμηλότερη θερμοκρα-
σία και ψήστε το γλυκό λίγο παραπάνω.
Το γλυκό είναι πολύ στεγνό. Κάνετε στο έτοιμο γλυκό μικρές τρύπες με
μια οδοντογλυφίδα. Ραντίστε το στη συνέχεια με
χυμό φρούτων ή με οινοπνευματώδες ποτό. Επιλέξτε την επόμενη φορά τη θερμοκρασία κατά
10 βαθμούς ψηλότερα και μειώστε το χρόνο ψησίματος.
Το ψωμί ή το γλυκό (π.χ. γλυκό μυζήθρας)
έχει ωραία εμφάνιση, αλλά στο εσωτερικό
του είναι λασπωμένο (με λωρίδες νερού).
Χρησιμοποιήστε την
επόμενη φορά λιγότερο υγρό και ψήστε λίγο παραπάνω σε χαμηλότερη
θερμοκρασία. Στα γλυκά με ζουμερή επίστρωση, ψήστε πρώτα λίγο τον πάτο. Πασπαλίστε τον
με αμύγδαλα ή με τριμμένη φρυγανιά και τοποθετήστε μετά από πάνω την επίστρωση. Προσέχετε παρακαλώ τις συνταγές και τους χρόνους ψησίματος.
Τα παρασκευάσματα έχουν ροδοκοκκινίσει
ανομοιόμορφα.
Επιλέξτε τη θερμοκρασία λίγο χαμηλότερη, τότε γίνονται τα παρασκευάσματα πιο ομοιόμορφα.
Το λαδόχαρτο που προεξέχει μπορεί να επηρεάσει την κυκλοφορία του αέρα. Κόβετε το λαδόχαρτο πάντοτε ανάλογα με το ταψί.
Το γλυκό των φρούτων δεν έχει πάρει πολύ
Τοποθετήστε την επόμενη φορά το γλυκό ένα επίπεδο πιο
κάτω.
χρώμα από κάτω.
Ο χυμός των φρούτων ξεχειλίζει. Χρησιμοποιήστε την επόμενη φορά, εάν υπάρχει, το βαθύτερο ταψί γενικής χρήσης.
Τα μικρά παρασκευάσματα από ζύμη
μαγιάς κολλάνε μεταξύ τους κατά το
ψήσιμο.
Κατά το ψήσιμο ζουμερών γλυκών εμφανίζεται υγρασία.
Γύρω από κάθε κομμάτι πρέπει να υπάρχει μια απόσταση από 2 cm περίπου. Έτσι υπάρχει
αρκετός χώρος, ώστε να φουσκώσουν όμορφα τα παρασκευάσματα
και να ροδοκοκκινίσουν
απ’ όλες τις πλευρές.
Κατά το ψήσιμο μπορεί να δημιουργηθεί υδρατμός. Αυτός ο υδρατμός διαφεύγει από την
πόρτα. Ο υδρατμός μπορεί να συμπυκνωθεί στο πεδίο χειρισμού ή στις επιφάνειες των γειτονικών ντουλαπιών και να δημιουργήσει υγρασία. Αυτό οφείλεται σε
φυσικούς λόγους.
Ψήσιμο στο φούρνο και στο γκριλ
Μαγειρικό σκεύος
Μπορείτε να χρησιμοποιήσετε κάθε ανθεκτικό στη θερμότητα
μαγειρικό σκεύος. Τοποθετείτε το μαγειρικό σκεύος πάντοτε στη
μέση της σχάρας. Για τα μεγάλα ψητά είναι επίσης κατάλληλο και
το εμαγιέ ταψί.
Συμβουλές για το ψήσιμο στο φούρνο
■ Μια χαμηλότερη θερμοκρασία δίνει ένα ομοιόμορφο ρόδισμα.
■ Προσθέστε στο άπαχο κρέας 2 έως 3 κουταλιές της σούπας
υγρό, στον ψητό καπαμά 8 έως 10 κουταλιές της σούπας,
ανάλογα με το μέγεθος.
■ Όταν ψήνετε πάπια ή χήνα, τρυπάτε την πέτσα κάτω από τις
φτερούγες, γιατί τότε μπορεί να τρέξει το λίπος.
■ Τα πουλερικά ροδοψήνονται πολύ ωραία, όταν κατά το τέλος του
ψησίματος τα αλείψετε με βούτυρο, αλατόνερο ή με χυμό
πορτοκαλιού.
■ Γυρίστε τα κομμάτια του κρέατος μετά το μισό χρόνο.
■ Όταν το ψητό είναι έτοιμο, θα πρέπει να μείνει ακόμα 10 λεπτά
μέσα στον απενεργοποιημένο, κλειστό φούρνο. Έτσι κατανέμεται
ο χυμός του ψητού καλύτερα.
26
■ Κατά το ψήσιμο μεγάλων κομματιών κρέατος μπορεί να
εμφανιστεί μεγαλύτερη δημιουργία ατμού και υγρασία στην
πόρτα φούρνου. Αυτό είναι ένα κανονικό φαινόμενο, που δεν
επηρεάζει καθόλου την ικανότητα λειτουργίας της συσκευής.
Μετά το ψήσιμο στεγνώστε με ένα πανί την πόρτα φούρνου και
το τζάμι.
■ Όταν ψήνετε πάνω στη σχάρα, τοποθετείτε για τη συλλογή του
λίπους πρόσθετα το εμαγιέ ταψί στο ύψος τοποθέτησης 1.
Page 27

Συμβουλές για το ψήσιμο στο γκριλ
■ Ψήνετε κατά το δυνατόν κομμάτια φαγητού του ίδιου πάχους. Τα
κομμάτια πρέπει να έχουν το λιγότερο 2 ως 3 cm πάχος. Αυτά
ροδίζουν έτσι ομοιόμορφα και δε στεγνώνουν.
■ Τοποθετείτε το ψητό για γκριλ στη μέση της σχάρας. Βάλτε λίγο
νερό στο εμαγιέ ταψί και τοποθετήστε το για τη συλλογή του
λίπους στο αμέσως από κάτω ύψος τοποθέτησης. Μην το
τοποθετήσετε ποτέ πάνω στον πάτο του χώρου μαγειρέματος.
Συμβουλές για το ψήσιμο στο φούρνο
■ Προσθέστε στο ψητό με λίγο λάδι, προτού το τοποθετήσετε πάνω
στη σχάρα κάτω από το γκριλ.
■ Γυρίστε το λεπτό ψητό μετά την παρέλευση του μισού χρόνου
ψησίματος και το χοντρότερο ψητό αρκετές φορές κατά τη
διάρκεια του ψησίματος στο γκριλ. Χρησιμοποιήστε γι’ αυτό μια
τσιμπίδα του γκριλ, έτσι δεν τρυπιέται το ψητό και ο ζωμός του
κρέατος παραμένει π.χ. στο ψητό.
■ Τα σκούρα είδη κρέατος, όπως το αρνίσιο και το βοδινό κρέας,
ροδοκοκκινίζουν γρηγορότερα και καλύτερα από τα
ανοιχτόχρωμο χοιρινό και μοσχαρίσιο κρέας.
Πώς μπορείτε να διαπιστώσετε, αν είναι
έτοιμο το ψητό.
Το ψητό έγινε πολύ σκούρο και η κρούστα
κάηκε σε μερικά σημεία.
Το ψητό έχει ωραία εμφάνιση, αλλά η σάλτσα κάηκε.
Το ψητό έχει ωραία εμφάνιση, αλλά η σάλτσα του είναι ανοιχτόχρωμη και δεν έπηξε.
Χρησιμοποιήστε το θερμόμετρο κρέατος (πωλείται στα ειδικά καταστήματα) ή κάντε τη "δοκιμή
με το κουτάλι". Πιέστε με το
χωρεί, χρειάζεται ακόμα λίγο χρόνο.
Ελέγξτε το ύψος τοποθέτησης και τη θερμοκρασία.
Επιλέξτε την επόμενη φορά
υγρό.
Επιλέξτε την επόμενη φορά ένα μεγαλύτερο μαγειρικό σκεύος και χρησιμοποιήστε λιγότερο
υγρό.
Δοκιμάστηκαν για εσάς, στο δικό μας εργαστήριο μαγειρικής.
Εδώ θα βρείτε μια επιλογή από φαγητά και τις αντίστοιχες ιδανικές
ρυθμίσεις. Σας δείχνουμε, ποιος τρόπος ψησίματος, ποια
θερμοκρασία και ποιο ύψος τοποθέτησης ενδείκνυται περισσότερο
για το φαγητό σας.
Υποδείξεις
■ Οι τιμές του χρόνου στους πίνακες είναι ενδεικτικές τιμές. Αυτές
εξαρτώνται από την ποιότητα και τη σύσταση των τροφίμων.
Φαγητό Βάρος (κιλά) Ύψος τοπο-
Λαζάνια 3-4 1
Παστίτσιο 21
Μοσχαράκι ψητό 1,5 2
Χοιρινό μπούτι 12
Λαγός ψητός 1,5 2
Ψητό κοτόπουλο 12
Ψητό κοτόπουλο 22
Ψητό λουκάνικο 13
Χοιρινή κοτολέτα 24
Φρέσκο ψάρι 1,5 2
Φρέσκια πίτσα 21
Ψωμί 22
Γλυκό από παντεσπάνι 12
Ταρτάκια με μαρμελάδα 12
Μπριός (Brioche) 1 2
Μάφινς 15 κομμάτια από
30 γρ.
θέτησης
2
Τρόπος
ψησίματος
%
%
N
N
’
N
N
7
(
;
N
<
<
%
’
N
κουτάλι το ψητό. Αν αυτό δεν υποχωρεί, τότε είναι έτοιμο. Αν υπο-
ένα μικρότερο μαγειρικό σκεύος και προσθέστε περισσότερο
■ Χρησιμοποιήστε τα συμπαραδιδόμενα εξαρτήματα. Πρόσθετα
εξαρτήματα μπορείτε να τα προμηθευτείτε ως ειδικά εξαρτήματα
στα ειδικά καταστήματα ή στην υπηρεσία τεχνικής εξυπηρέτησης
πελατών.
Πριν τη χρήση απομακρύνετε τα εξαρτήματα και τα μαγειρικά
σκεύη, τα οποία δε χρειάζεστε, από το χώρο μαγειρέματος.
■ Χρησιμοποιείτε πάντοτε πιάστρες, όταν θέλετε να βγάλετε καυτά
εξαρτήματα ή μαγειρικά σκεύη από το χώρο μαγειρέματος.
Όλα τα στοιχεία αναφέρονται σε έναν προθερμασμένο φούρνο.
Θερμοκρασία σε °C Διάρκεια σε λεπτά
200-230 50-60
220-230 40-45
180-190 70-80
180-190 50-60
180-190 70-80
180-190 50-60
180-190 80-90
max 7-9 πρώτη πλευρά
5-6 δεύτερη πλευρά
max 12-15 πρώτη πλευρά
5-7 δεύτερη πλευρά
160-170 50-60
max 9-11
190-200 40-50
150-160 50-60
160-170 40-50
160-170 25-30
170 25
27
Page 28

Þ Table des matières
[fr]Notice d’utilisation
Précautions de sécurité importantes..................................... 28
Causes de dommages ................................................................... 30
Votre nouvel appareil............................................................... 30
Sélecteur des fonctions .................................................................. 30
Thermostat ........................................................................................ 31
L'horloge électronique ....................................................................31
Accessoire.........................................................................................31
Avant la première utilisation................................................... 32
Réglage de l'heure .......................................................................... 32
Chauffe à vide du four .................................................................... 32
Nettoyer les accessoires ................................................................ 32
Voici comment utiliser le four................................................. 32
Allumer le four ..................................................................................32
Utiliser l'horloge électronique ........................................................ 32
Réglage de la minuterie automatique.......................................... 33
Afficher les valeurs réglées et les modifier................................. 33
Entretien et nettoyage ............................................................. 34
Nettoyants .........................................................................................34
Dépose et pose des vitres de la porte........................................ 35
Décrocher et accrocher la porte de l'appareil ........................... 35
Retrait et montage des grilles supports ...................................... 36
Pannes et dépannage.............................................................. 36
Changer la lampe du four.............................................................. 37
Service après-vente................................................................. 37
Numéro E et numéro FD ................................................................ 37
Conseils concernant l'énergie et l'environnement ............... 38
Economie d'énergie......................................................................... 38
Elimination écologique.................................................................... 38
L'acrylamide dans certains aliments ..................................... 38
Conseils pour l'utilisation ....................................................... 39
Cuisson de pain et de pâtisseries................................................ 39
Rôtissage et grillade .......................................................................39
Testés pour vous dans notre laboratoire. ................................... 40
Produktinfo
Vous trouverez des informations supplementaires concernant
les produits, accessoires, pièces de rechange et services sur
Internet sous : www.bosch-home.com et la boutique en ligne :
www.bosch-eshop.com
: Précautions de sécurité importantes
Lire attentivement ce manuel. Ce n'est qu'alors que vous pourrez utiliser votre appareil correctement et en toute sécurité. Conserver la notice d'utilisation et de montage pour un usage ultérieur ou pour le propriétaire suivant.
Cet appareil est conçu pour être encastré uniquement. Respecter la notice spéciale de montage.
Contrôler l'état de l'appareil après l'avoir déballé. Ne pas le raccorder s'il présente des avaries de transport.
Seul un expert agréé peut raccorder l'appareil sans fiche. La garantie ne couvre pas les dommages résultant d'un mauvais raccordement.
Cet appareil est conçu uniquement pour un
usage ménager privé et un environnement
domestique. Utiliser l'appareil uniquement
pour préparer des aliments et des
boissons. Surveiller l'appareil lorsqu'il
fonctionne. Utiliser l'appareil uniquement
dans des pièces fermées.
disposant de connaissances ou
d’expérience insuffisantes, sous la
surveillance d'un tiers responsable de leur
sécurité ou bien lorsqu'ils ont reçu des
instructions liées à l'utilisation de l'appareil
en toute sécurité et qu'ils ont intégré les
risques qui en résultent.
Les enfants ne doivent pas jouer avec l'appareil. Le nettoyage et l'entretien effectué par l'utilisateur ne doivent pas être accomplis par des enfants, sauf s'ils sont âgés de 8 ans et plus et qu'un adulte les surveille.
Les enfants de moins de 8 ans doivent être tenus à distance de l'appareil et du cordon d'alimentation.
Toujours insérer les accessoires à l'endroit dans le four. Voir la description des accessoires dans la notice d'utilisation.
Cet appareil est conçu pour une utilisation jusqu'à une altitude maximale de 2 000 m.
Cet appareil peut être utilisé par des
enfants de 8 ans ou plus et par des
personnes dotées de capacités physiques,
sensorielles ou mentales réduites ou
28
Page 29

Risque d'incendie !
■
Tout objet inflammable entreposé dans le
compartiment de cuisson peut
s'enflammer. Ne jamais entreposer
d'objets inflammables dans le
compartiment de cuisson. Ne jamais
ouvrir la porte de l'appareil lorsqu'il s'en
dégage de la fumée. Éteindre l'appareil et
débrancher la fiche secteur ou enlever le
fusible dans le boîtier à fusibles.
Risque d'incendie !
■
Il se produit un courant d'air lors de
l'ouverture de la porte de l'appareil. Le
papier sulfurisé peut toucher les
résistances chauffantes et s'enflammer.
Ne jamais poser de papier sulfurisé non
attaché sur un accessoire lors du
préchauffage. Toujours déposer un plat ou
un moule de cuisson sur le papier
sulfurisé pour le lester. Recouvrir
uniquement la surface nécessaire de
papier sulfurisé. Le papier sulfurisé ne doit
pas dépasser des accessoires.
Risque de brûlure !
■
L'appareil devient très chaud. Ne jamais
toucher les surfaces intérieures chaudes
du compartiment de cuisson ni les
résistances chauffantes. Toujours laisser
l'appareil refroidir. Tenir les enfants
éloignés
Cet appareil et ses parties accessible
deviennent chauds pendant leur
utilisation. Il convient de veiller à ne pas
toucher les éléments chauffants. Il
convient de maintenir à distance les
enfants de moins de 8 ans à moins qu’ils
ne soient sous une surveillance continue.
Risque de brûlure !
■
Les récipients ou les accessoires
deviennent très chaud. Toujours utiliser
des maniques pour retirer le récipient ou
les accessoires du compartiment de
cuisson.
Risque de brûlure !
■
Les vapeurs d'alcool peuvent s'enflammer
dans un compartiment de cuisson chaud.
Ne jamais préparer de plats contenant de
grandes quantités de boissons fortement
alcoolisées. Utiliser uniquement de petites
quantités de boissons fortement
alcoolisées. Ouvrir la porte de l'appareil
avec précaution.
Risque de brûlures !
■
Les éléments accessibles deviennent
chauds pendant le fonctionnement. Ne
jamais toucher les éléments chauds.
Eloigner les enfants.
Risque de brûlure !
■
De la vapeur chaude peut s'échapper lors
de l'ouverture de la porte de l'appareil.
Ouvrir la porte de l'appareil avec
précaution. Tenir les enfants éloignés
Risque de brûlure !
■
La présence d'eau dans un compartiment
de cuisson chaud peut générer de la
vapeur d'eau chaude. Ne jamais verser
d'eau dans le compartiment de cuisson
chaud.
Risque de blessure !
Un verre de porte d'appareil rayé peut se fendre. Ne pas utiliser de racloir à verre, ni de produit de nettoyage agressif ou abrasif.
Risque de choc électrique !
■
Les réparations inexpertes sont
dangereuses.Seul un technicien du
service après-vente formé par nos soins
est habilité à effectuer des réparations.Si
l'appareil est défectueux, retirer la fiche
secteur ou enlever le fusible dans le
boîtier à fusibles. Appeler le service
aprèsvente.
Risque de choc électrique !
■
L'isolation des câbles des appareils
électroménagers peut fondre au contact
des pièces chaudes de l'appareil. Ne
jamais mettre le câble de raccordement
des appareils électroménagers en contact
avec des pièces chaudes de l'appareil.
Risque de choc électrique !
■
De l'humidité qui pénètre peut
occasionner un choc électrique. Ne pas
utiliser de nettoyeur haute pression ou de
nettoyer à vapeur.
Risque de choc électrique !
■
Lors du remplacement de l'ampoule du
compartiment de cuisson, les contacts du
culot de l'ampoule sont sous tension.
Retirer la fiche secteur ou couper le
fusible dans le boîtier à fusibles avant de
procéder au remplacement.
Risque de choc électrique !
■
Un appareil défectueux peut provoquer un
choc électrique. Ne jamais mettre en
service un appareil défectueux.
Débrancher la fiche secteur ou enlever le
fusible dans le boîtier à fusibles. Appeler
le service après-vente.
29
Page 30

Causes de dommages
Attention !
■ Accessoires, feuille, papier cuisson ou récipient sur le fond
du compartiment de cuisson : Ne posez pas d'accessoires
sur le fond du compartiment de cuisson. Ne recouvrez pas le
fond du compartiment de cuisson d'une feuille, quel que soit
le type, ni de papier cuisson. Ne placez pas de récipient sur
le fond du compartiment de cuisson si vous avez réglé une
température supérieure à 50 °C. Cela crée une accumulation
de chaleur. Les temps de cuisson ne correspondent plus et
l'émail sera endommagé.
■ Eau dans le compartiment de cuisson chaud : Ne versez
jamais d'eau dans le compartiment de cuisson chaud. Cela
produit de la vapeur d'eau. Le changement de température
peut occasionner des dommages sur l'émail.
■ Aliments humides : Ne conservez pas d'aliments humides
dans le compartiment de cuisson pendant une longue durée.
Cela endommage l'émail.
■ Jus de fruits : Ne garnissez pas trop la plaque à pâtisserie en
cas de gâteaux aux fruits très juteux. Le jus de fruits qui
goutte de la plaque laisse des taches définitives. Utilisez de
préférence la lèchefrite à bords hauts.
Votre nouvel appareil
■ Refroidissement la porte de l'appareil ouverte : Laissez
refroidir le compartiment de cuisson uniquement la porte
fermée. Même si la porte de l'appareil n'est qu'entrouverte,
les façades des meubles voisins risquent d'être
endommagées au fil du temps.
■ Joint de porte très encrassé : si le joint de la porte est très
encrassé, la porte de l'appareil ne fermera plus correctement
lors du fonctionnement. La façade des meubles voisins peut
être endommagée.Veillez à ce que le joint de l'appareil soit
toujours propre.
■ Porte de l'appareil utilisée comme surface d'assise ou
support : il est interdit de grimper, de s'asseoir et de
s'accrocher à la porte de l'appareil. Ne pas déposer de
récipients ou des accessoires sur la porte de l'appareil.
■ Introduire l'accessoire : Selon le modèle d'appareil, les
accessoires peuvent rayer la vitre en fermant la porte.
Introduire les accessoires toujours jusqu'en butée dans le
compartiment de cuisson.
■ Transporter l'appareil : Ne transportez ou ne portez pas
l'appareil par la poignée de la porte. La poignée ne
supportera pas le poids de l'appareil et risque de se casser.
Les informations qui suivent vont vous permettre de vous
familiariser avec votre nouvel appareil. Vous obtenez des
informations sur le bandeau de commande, le four, les modes
de cuisson et les accessoires.
Explication
1 Horloge électronique
2 Sélecteur des fonctions
3 Voyant lumineux
4 Thermostat
Sélecteur des fonctions
Le sélecteur des fonctions permet de régler le mode de
cuisson.
Position Utilisation
Position zéro Le four est éteint.
Û
Convection natu-
%
relle
* Mode de cuisson ayant été utilisé pour déterminer la classe
d'efficacité énergétique selon EN 60350-1.
Pour des gâteaux, soufflés et pièces
de rôti maigre. La chaleur est diffusée uniformément par la voûte et la
sole.
Position Utilisation
Chaleur tournante Pour des gâteaux et pâtisseries cuits
<
sur un à deux niveaux. La chaleur du
collier chauffant situé dans la paroi
arrière est répartie uniformément
dans le compartiment de cuisson
par le ventilateur.
Chaleur tournante
’
Eco*
Pour des gâteaux et pâtisseries cuits
sur un à deux niveaux. La chaleur du
collier chauffant situé dans la paroi
arrière est répartie uniformément
dans le compartiment de cuisson
par le ventilateur.
Lors de ce mode de cuisson l'éclairage du four reste éteint.
Air pulsé Pour des gâteaux, pâtisseries et piz-
N
zas fraîches cuits sur un ou deux
niveaux. La chaleur des éléments
chauffants est répartie uniformément
dans le compartiment de cuisson.
Position pizza Préparation rapide de produits sur-
;
gelés sans préchauffage, par ex.
pizza, frites ou strudel. La résistance
de chauffe inférieure et le collier
chauffant dans la paroi arrière chauffent.
Gril air pulsé Rôtissage de viande, de volaille et
7
de poisson entier. Le ventilateur
répartit l'air chaud autour du mets.
Gril grande surface Faire griller des steaks, des saucis-
(
ses, des toasts et des morceaux de
poisson. Toute la surface située
sous la résistance du gril est chauffée.
Éclairage L'éclairage du four est allumé.
^
* Mode de cuisson ayant été utilisé pour déterminer la classe
d'efficacité énergétique selon EN 60350-1.
30
Page 31

Remarque : Lorsque vous réglez le mode de cuisson, la lampe
du four dans le compartiment de cuisson s'allume.
Remarque : Lors du mode de cuisson "Chaleur tournante Eco"
l'éclairage du four reste éteint.
Thermostat
Le thermostat permet de régler la température ou la position
gril.
Accessoire
Les accessoires peuvent être enfournés à 4 niveaux différents.
Introduisez-le toujours jusqu'en butée, afin que l'accessoire ne
touche pas la vitre de la porte. Assurez-vous d'insérer les
accessoires toujours dans le bon sens dans le compartiment
de cuisson.
Position Signification
Ú
50-250 Plage de tempé-
Le voyant lumineux est allumé lorsque le four chauffe. Il s'éteint
pendant les coupures de chauffe.
Position zéro Le four ne chauffe pas.
rature
La température dans le compartiment de cuisson en °C.
L'horloge électronique
Vous pouvez pilotez votre four au moyen de l'horloge
électronique. Ainsi, vous pouvez présélectionner par ex. le
moment auquel le four doit se mettre en marche ou bien
auquel la minuterie automatique doit terminer le processus de
cuisson. L'horloge électronique peut aussi être utilisée comme
minuteur.
Touches de fonction Horloge électronique
Symbole Signification Emploi
0
- Moins Réduire la durée ou l'heure
+ Plus Augmenter la durée ou
Horloge électronique
Réglage d'une durée ou du
temps
l'heure
Vous pouvez sortir l'accessoire aux deux tiers sans qu'il ne
bascule. Il est ainsi plus facile de retirer les plats du four.
Lorsque l'accessoire devient chaud il peut se déformer. Cela
n'a aucune influence sur le fonctionnement, il reprend sa forme
dès qu'il est refroidi.
Vous pouvez acheter des accessoires auprès du service aprèsvente, dans le commerce spécialisé ou sur Internet.
Accessoires Description
Grille à pâtisserie/de rôtissage
Pour de la vaisselle, des moules
à gâteau, rôtis, grillades, plats
surgelés.
Plaque à pâtisserie émaillée
Pour des gâteaux fondants, pâtisseries, plats surgelés et gros
rôtis. Egalement utilisable
comme collecteur de graisse.
Tiges de sécurité
Pour bloquer les charnières.
--------
31
Page 32

Avant la première utilisation
Vous apprendrez ici ce que vous devez faire avant d'utiliser
votre appareil pour la première fois pour préparer des mets.
Avant de commencer, lisez le chapitre Consignes de sécurité.
Retirez l'emballage de l'appareil et éliminez-le conformément
aux réglementations en la matière.
Réglage de l'heure
Après le raccordement électrique de l'appareil ou après une
panne de courant, trois zéros et le symbole "A" clignotent dans
l'affichage.
1. Appuyer sur la touche 0, jusqu'à ce que le point clignote
dans l'affichage.
2. Régler l'heure actuelle à l'aide des touches "+" et "-".
Le temps réglé est validé au bout de 7 secondes.
Remarque : Pour modifier l'heure réglée, appuyer sur les
touches "+" et "-", jusqu'à ce que le point clignote dans
l'affichage. Régler ensuite l'heure actuelle à l'aide des touches
"+" et "-".
Chauffe à vide du four
Premier nettoyage du four
1. Retirez les accessoires et les grilles supports du
compartiment de cuisson.
2. Enlevez tous les éléments de l'emballage, par ex. pièces de
polystyrène, du compartiment de cuisson.
3. Certaines parties sont recouvertes d'un film protecteur.
Retirez le film protecteur.
4. Nettoyez l'extérieur de l'appareil avec un chiffon doux
humide.
5. Nettoyez le compartiment de cuisson à l'eau chaude
additionnée de produit à vaisselle.
Chauffer le four
Pour éliminer l'odeur du neuf, laissez chauffer le four à vide, la
porte fermée.
1. Réglez le sélecteur des fonctions sur le mode de
fonctionnement Convection naturelle.
2. Réglez le thermostat sur la température maximale.
3. Eteignez le four au bout de 40 minutes.
Remarque : Pendant la première chauffe, il est possible que
des bruits de froissement proviennent du four.
Nettoyage ultérieur du four
1. Nettoyez le compartiment de cuisson à l'eau chaude
additionnée de produit à vaisselle.
2. Remettez les grilles en place.
Nettoyer les accessoires
Avant d'utiliser les accessoires, nettoyez-les soigneusement
avec de l'eau additionnée de produit à vaisselle et une lavette.
Voici comment utiliser le four
Éléments de commande escamotables
Le sélecteur des fonctions et le thermostat sont escamotables.
Appuyez sur l'élément de commande respectif pour
l'enclencher et le désenclencher.
Allumer le four
1. Régler le mode de cuisson à l'aide du sélecteur des
fonctions.
2. Régler la température au moyen du thermostat.
Le four commence à chauffer.
Éteindre le four
Régler le sélecteur des fonctions et le thermostat sur la position
zéro.
Modifier les réglages
Vous pouvez modifier à tout moment le mode de cuisson et la
température ou la position gril au moyen du sélecteur
correspondant.
Chauffe
Pour chauffer rapidement le compartiment de cuisson, utiliser
le mode de cuisson "Air pulsé". Lorsque la température réglée
est atteinte (le voyant lumineux s'est éteint), régler le mode de
cuisson désiré.
Utiliser l'horloge électronique
Outre l'heure et le temps résiduel, les symboles suivants
peuvent être affichés dans l'affichage :
Symbole Signification
û
V
A Mode Automatique
Û
Régler l’heure
Après le raccordement électrique de l'appareil ou après une
panne de courant, trois zéros et le symbole "A" clignotent dans
l'affichage.
1. Appuyer sur la touche 0, jusqu'à ce que le point clignote
dans l'affichage.
2. Régler l'heure actuelle à l'aide des touches "+" et "-".
Le temps réglé est validé au bout de 7 secondes.
Remarque : Pour modifier l'heure réglée, appuyer sur les
touches "+" et "-", jusqu'à ce que le point clignote dans
l'affichage. Régler ensuite l'heure actuelle à l'aide des touches
"+" et "-".
Point entre l'affichage de l'heure et des minutes.
Clignote quand l'heure peut être réglée.
Minuteur
Indique les états de service du minuteur.
Indique les états de service du mode automatique.
Disponibilité au service
Lorsque ce symbole est affiché, le four est opé-
rationnel.
32
Page 33

Réglage du minuteur
Le minuteur n'a pas d'influence sur les fonctions du four. La
durée du minuteur peut être réglée de 1 minute à 23 heures et
59 minutes.
1. Appuyer sur la touche 0, jusqu'à ce que le symbole V
clignote dans l'affichage et 3 zéros s'affichent.
2. Régler la durée désirée à l'aide des touches "+" et "-".
Une fois la durée écoulée, un signal sonore retentit.
Remarques
■ Pour modifier le temps de marche résiduel, appuyer sur la
touche
0 jusqu'à ce que le symbole V clignote dans
l'affichage. Modifier ensuite le temps de marche résiduel à
l'aide des touches "+" et "-".
■ Pour effacer le réglage, appuyer sur la touche 0 jusqu'à ce
que le symbole clignote dans l'affichage. Appuyez ensuite
simultanément sur les touches "+" et "-".
Arrêter le signal sonore
Appuyer sur la touche "
0" jusqu'à ce que le symbole V
disparaisse.
Le signal s'arrête automatiquement au bout de sept minutes.
Modifier le signal sonore
3 signaux sonores différents sont disponibles.
1. Appuyer simultanément sur les touches "+" et "-".
2. Appuyer sur la touche 0.
Le signal sonore actuel, par ex. "ton. 1" apparaît dans la zone
d'affichage.
3. Appuyez sur la touche "-" pour sélectionner un autre signal
sonore.
Réglage de la minuterie automatique
Au moyen de l'horloge électronique, vous pouvez programmer
l'arrêt ou la mise en marche et l'arrêt automatiques du four.
Arrêt automatique
1. Appuyer sur la touche 0, jusqu'à ce que le symbole V
clignote dans l'affichage et 3 zéros s'affichent.
2. Réappuyer sur la touche de fonction 0, jusqu'à ce que "dur"
et "0.00" apparaissent en alternance dans le bandeau
d'affichage et que le symbole "A" y clignote.
3. Régler la durée du temps de service à l'aide des touches + et
-.
La durée du temps de service peut être réglée de 1 minute à
10 heures.
4. Régler le mode de cuisson et la température désirés.
Le four se met en marche et le symbole A et l'heure actuelle
apparaissent dans la zone d'affichage.
La durée du temps de service est écoulée
Un signal sonore retentit, le symbole
bandeau d'affichage et le symbole A clignote.
1. Éteindre le thermostat et le sélecteur des fonctions.
2. Appuyer sur la touche 0 , jusqu'à l'apparition du symbole
Û.
Le four repasse au mode manuel.
Û disparaît dans le
Mise en marche et arrêt automatiques
La cuisson ou le rôtissage pour la durée réglée commence à
un moment ultérieur que vous avez sélectionné.
1. Appuyer sur la touche 0, jusqu'à ce que le symbole V
clignote dans l'affichage et 3 zéros s'affichent.
2. Réappuyer sur la touche de fonction 0, jusqu'à ce que "dur"
et "0.00" apparaissent en alternance dans le bandeau
d'affichage et que le symbole "A" y clignote.
L'heure actuelle est par ex. 17:30 h.
3. Régler la durée du temps de service (par ex. 1 heure) à l'aide
des touches + et -.
La durée du temps de service peut être réglée de 1 minute à
10 heures.
4. Réappuyer sur la touche de fonction 0, jusqu'à ce que "End"
et l'heure d'arrêt "18:30" (heure actuelle plus la durée du
temps de service réglée) clignotent en alternance dans le
bandeau d'affichage.
5. Régler l'heure d'arrêt (par ex. 19:30 h) à l'aide des touches +
et -.
L'heure d'arrêt peut être différée de max. 23 heures et 59
minutes.
6. Régler le mode de cuisson et la température désirés.
Le symbole
Û disparaît dans le bandeau d'affichage.
Le four se met en marche, dans cet exemple, à 18:30 h et
s'éteint à 19:30 h.
La durée du temps de service est écoulée
Un signal sonore retentit, le symbole
Û disparaît dans le
bandeau d'affichage et le symbole A clignote.
1. Éteindre le thermostat et le sélecteur des fonctions.
2. Appuyer sur la touche 0 , jusqu'à l'apparition du symbole
Û.
Le four repasse au mode manuel.
Afficher les valeurs réglées et les modifier
Les valeurs réglées et le temps de marche restant des
différents modes de fonctionnement de l'horloge électronique
peuvent être visualisés à tout moment dans le bandeau
d'affichage et être modifiés.
Afficher le temps de marche résiduel du minuteur
Appuyer sur la touche
clignote dans l'affichage.
Le temps de marche résiduel apparaît dans l'affichage et peut
être modifié à l'aide des touches "+" et "-".
Afficher et modifier la durée du temps de fonctionnement et
l'heure d'arrêt.
1. Appuyer sur la touche 0, jusqu'à ce que le symbole V
clignote dans le bandeau d'affichage.
2. Réappuyer sur la touche 0, jusqu'à ce que "dur" et la durée
restante du temps de fonctionnement apparaissent en
alternance dans le bandeau d'affichage et que le symbole A
y clignote.
La durée du temps de fonctionnement peut être modifiée à
l'aide des touches "+" et "-". La minuterie automatique est
désactivée en appuyant simultanément sur les touches "+" et
"-".
3. Réappuyer sur la touche 0, jusqu'à ce que "End" et l'heure
d'arrêt réglée clignotent en alternance dans le bandeau
d'affichage.
L'heure d'arrêt peut être modifiée à l'aide des touches "+" et "". La minuterie automatique est désactivée en appuyant
simultanément sur les touches "+" et "-".
0, jusqu'à ce que le symbole V
33
Page 34

Entretien et nettoyage
Si vous entretenez et nettoyez soigneusement votre four il
gardera longtemps l'aspect du neuf et restera opérationnel.
Nous vous expliquons ici comment entretenir et nettoyer
correctement votre four.
Remarques
■ Les légères variations de couleur apparaissant sur la façade
du four sont dues aux différents matériaux tels que le verre,
le plastique et le métal.
■ Des ombres sur la vitre de la porte, qui ressemblent à des
stries, sont des reflets de lumière de la lampe du four.
■ L'émail est cuit à des températures très élevées. Ceci peut
engendrer des différences de teintes. Ce phénomène est
normal et n'a aucune incidence sur le fonctionnement du
four. Les bords de plaques minces ne peuvent pas être
émaillés complètement. Ils peuvent donc présenter des
aspérités. La protection contre la corrosion n'en est pas
compromise.
: Risque de choc électrique !
De l'humidité qui pénètre peut occasionner un choc électrique.
Ne pas utiliser de nettoyeur haute pression ou de nettoyer à
vapeur.
: Risque de brûlure !
L'appareil devient très chaud. Ne jamais toucher les surfaces
intérieures chaudes du compartiment de cuisson ni les
résistances chauffantes. Toujours laisser l'appareil refroidir.
Tenir les enfants éloignés
Cet appareil et ses parties accessible deviennent chauds
pendant leur utilisation. Il convient de veiller à ne pas toucher
les éléments chauffants. Il convient de maintenir à distance les
enfants de moins de 8 ans à moins qu’ils ne soient sous une
surveillance continue.
Nettoyants
Afin de ne pas endommager les différentes surfaces par des
nettoyants inappropriés, veuillez respecter les indications
suivantes.
N'utilisez pas
■ de produits agressifs ou récurants
■ de nettoyants fortement alcoolisés
■ de tampons en paille métallique ni des éponges à dos
récurant
■ de nettoyeurs haute pression ni de nettoyeurs à vapeur.
Avant d'utiliser des lavettes éponges neuves, rincez-les
soigneusement.
Niveau Nettoyants
Extérieur de l'appareil
Inox Eau chaude additionnée de produit à
Aluminium et plastique
Surfaces émaillées
(surface lisse)
Vitres de la porte Nettoyant pour vitres :
Couvercle en verre
de la lampe du four
Joint
Ne pas l'enlever !
Supports Eau chaude additionnée de produit à
Accessoires Eau chaude additionnée de produit à
Eau chaude additionnée de produit à
vaisselle :
Nettoyer avec une lavette et sécher avec
un chiffon doux. Ne pas utiliser de nettoyant pour vitres ni de racloirs à verre.
vaisselle :
Nettoyer avec une lavette et sécher avec
un chiffon doux. Eliminer immédiatement
les dépôts calcaires, de graisse, de
fécule et de blanc d'oeuf. De la corrosion
peut se former sous ces salissures.
Des produits d'entretien spéciaux pour
inox qui sont appropriés pour des surfaces chaudes sont en vente auprès du
service après-vente ou dans le commerce spécialisé. Appliquer avec un chiffon doux une pellicule mince de produit
d'entretien.
Nettoyant pour vitres :
Nettoyer avec un chiffon doux.
Pour faciliter le nettoyage vous pouvez
allumer l'éclairage du compartiment de
cuisson et décrocher la porte de l'appareil, le cas échéant. Appliquer un produit
à vaisselle usuel du commerce ou de
l'eau au vinaigre avec un chiffon doux,
humide ou une peau de chamois ;
sécher avec un chiffon doux. Ramollissez les résidus d'aliment incrustés avec
un chiffon humide et du produit à vaisselle. En cas d'encrassement important,
nous recommandons d'utiliser un produit
de nettoyage pour four en gel. Il peut
être appliqué avec précision. Après le
nettoyage, laisser le compartiment de
cuisson ouvert, afin qu'il sèche.
Nettoyer avec un chiffon doux. Ne pas
utiliser de racloir à verre.
Eau chaude additionnée de produit à
vaisselle :
Nettoyer avec une lavette.
Eau chaude additionnée de produit à
vaisselle :
Nettoyer avec une lavette. Ne pas récurer.
vaisselle :
Mettre à tremper et nettoyer avec une
lavette ou une brosse.
vaisselle :
Mettre à tremper et nettoyer avec une
lavette ou une brosse.
34
Page 35

Dépose et pose des vitres de la porte
Pour faciliter le nettoyage, vous pouvez déposer les vitres de la
porte du four.
Dépose des vitres de la porte
1. Ouvrir complètement la porte du four.
2. Bloquer les deux charnières à gauche et à droite à l'aide de
la tige de sécurité.
Remarque : Les tiges de sécurité doivent être complètement
introduites dans les trous des charnières.
3. Lever légèrement la partie inférieure de la vitre intérieure,
jusqu'à ce que les tiges de fixation sortent de la fixation (1).
4. Lever délicatement la partie supérieure de la vitre intérieure,
jusqu'à ce que les tiges de fixation sortent de la fixation (2).
Attention !
En levant la vitre intérieure, il se peut que la vitre du milieu
reste collée à la vitre intérieure. Veiller à ce que la vitre du
milieu ne tombe pas.
Remarque : La vitre du milieu n'est pas fixée avec des tiges
de fixation mais est maintenue en position par des supports
en caoutchouc.
Nettoyez les vitres avec un nettoyant pour vitres et un chiffon
doux.
: Risque de blessure !
Un verre de porte d'appareil rayé peut se fendre. Ne pas utiliser
de racloir à verre, ni de produit de nettoyage agressif ou
abrasif.
Pose des vitres de la porte
1. Remettre la vitre du milieu.
Remarques
■ La vitre du milieu est correctement placée lorsque le
symbole Low-E est lisible.
■ Veiller à ce que la vitre soit correctement en place. Tous
les supports en caoutchouc doivent reposer à plat sur la
vitre extérieure.
2. Remettez la vitre intérieure en place.
Remarque : Les quatre tiges de fixation doivent s'enclencher
dans les fixations prévues à cet effet.
3. Enlever les tiges de sécurité et fermer la porte du four.
5. Enlever la vitre intérieure.
6. Enlever la vitre du milieu.
Décrocher et accrocher la porte de l'appareil
En cas d'encrassement très important, la porte du four peur
être décrochée pour faciliter le nettoyage. Cependant, cela
n'est pas nécessaire en cas d'encrassement normal.
Décrocher la porte de l'appareil
1. Ouvrir complètement la porte du four.
2. Bloquer les deux charnières à gauche et à droite au moyen
de la tige de sécurité (a).
Remarque : Les tiges de sécurité doivent être complètement
introduites dans les trous des charnières.
3. Saisir la porte du four des deux mains sur les côtés et la
fermer d'env 30° (b).
DE
35
Page 36

4. Soulever légèrement la porte du four et la retirer.
Remarque : Ne pas fermer la porte du four complètement.
Cela risque de tordre les charnières et d'endommager
l'émail.
Accrocher la porte de l'appareil
1. Saisir la porte du four des deux mains sur les côtés.
2. Pousser les charnières dans les évidements du four (a).
Remarque : L'encoche en bas aux charnières doit
s'encranter dans le cadre du four (b).
ED
Retrait et montage des grilles supports
Pour pouvez décrocher les grilles supports pour faciliter le
nettoyage.
Retrait des grilles supports
Les grilles porte-accessoires sont fixées respectivement à trois
points aux parois latérales dans le compartiment de cuisson.
1. Saisir les grilles porte-accessoires sur le devant et les tirer
vers le milieu du compartiment de cuisson.
Le crochet avant de la grille porte-accessoires se détache du
trou.
2. Ouvrir davantage les grilles porte-accessoires et les retirer
des trous arrière de la paroi latérale.
3. Retenir les revêtements catalytiques du compartiment de
cuisson.
4. Enlever les grilles porte-accessoires du compartiment de
cuisson.
3. Abaisser la porte.
4. Retirer les tiges de sécurité.
: Risque de blessure !
Si la porte du four tombe par inadvertance ou une charnière se
ferme, ne pas mettre la main dans la charnière. Appeler le
service après-vente.
Pannes et dépannage
Il se peut qu'une petite panne gêne le bon fonctionnement de
votre appareil. Avant d'appeler le service après-vente, tenez
compte des indications suivantes.
D
Mise en place de la grille support
1. Retenir les revêtements catalytiques du compartiment de
cuisson.
2. Engager les crochets des grilles supports dans les trous
arrière de la paroi latérale.
3. Pousser le crochet avant des grilles supports dans le trou.
Panne Cause possible Remarques/Remèdes
L'appareil ne
fonctionne pas.
Le four ne peut
pas être éteint.
L'affichage de
l'heure clignote.
Le four ne
chauffe pas.
Le verre de la
porte est cassé.
Jus de fruit ou
taches de blanc
d'œuf sur les
surfaces émaillées.
Fusible grillé. Vérifiez dans le boîtier à
Panne de courant.
La commande
électronique est
défectueuse.
Panne de courant
Fusible grillé. Vérifier le fusible ou le rem-
Le sélecteur
des fonctions
n'est pas réglé.
Jus de gâteaux
fondants ou jus
de viande.
E
fusibles si celui de la cuisinière est en état de marche.
Vérifiez si la lumière dans la
cuisine s'allume.
Couper le fusible. Appeler
le service aprèsvente.
Régler l'heure à nouveau.
placer.
Régler le sélecteur des
fonctions .
Mettre l'appareil hors service. Appeler le service
aprèsvente.
Modification sans gravité de
l'émail, irrémédiable.
36
Page 37

: Risque de choc électrique !
Les réparations inexpertes sont dangereuses. Seul un
technicien du service après-vente formé par nos soins est
habilité à effectuer des réparations.
Des réparations incorrectes peuvent engendrer des risques
considérables pour l'utilisateur.
Changer la lampe du four
Si la lampe du four ne fonctionne pas, vous devez la changer.
Des ampoules de rechange résistantes aux températures
élevées sont en vente au service après-vente ou dans le
commerce spécialisé. Veuillez indiquer les numéros E et FD de
votre appareil. N'utilisez pas d'autres ampoules.
: Risque de choc électrique !
Lors du remplacement de l'ampoule du compartiment de
cuisson, les contacts du culot de l'ampoule sont sous tension.
Retirer la fiche secteur ou couper le fusible dans le boîtier à
fusibles avant de procéder au remplacement.
1. Laisser refroidir le compartiment de cuisson.
2. Ouvrir la porte de l’appareil.
3. Étaler un torchon dans le compartiment de cuisson afin
d'éviter des endommagements.
4. Enlever les grilles porte-accessoires.
5. Retirer le couvercle en verre. Pour ce faire, ouvrir le
couvercle en verre avec la main de face. Si le couvercle en
verre s'enlève difficilement, utiliser une cuillère comme aide.
6. Retirer l'ampoule du four.
7. Remplacer l'ampoule du four par une ampoule de type
identique :
Voltage : 230 V ;
Puissance : 40W ;
Culot : G9 ;
Résistance à la température : 300°C
8. Remettre en place le couvercle en verre de la lampe du four.
9. Monter les grilles porte-accessoires.
10.Retirer le torchon à vaisselle.
11.Réarmer le fusible.
12.Vérifier que l'éclairage du four refonctionne.
Service après-vente
Si votre appareil a besoin d'être réparé, notre service aprèsvente se tient à votre disposition. Nous trouvons toujours une
solution appropriée pour éviter des visites inutiles d'un
technicien.
Numéro E et numéro FD
Lors de votre appel, veuillez indiquer le numéro de produit
(E-Nr.) et le numéro de fabrication (FD-Nr.), afin de nous
permettre de mieux vous aider. Vous trouverez la plaque
signalétique comportant ces numéros devant la face inférieure
du compartiment de cuisson, la porte du four ouverte. Pour
éviter d'avoir à les rechercher en cas de besoin, vous pouvez
inscrire ici les données de votre appareil et le numéro de
téléphone du service après-vente.
E-Nr. FD-Nr.
Service après-vente
Veuillez noter que la visite d'un technicien du SAV n'est pas
gratuite en cas de manipulation incorrecte, même pendant la
période de garantie.
Vous trouverez ici, ou bien dans le répertoire de SAV joint, les
données de contact de tous les pays pour le service aprèsvente le plus proche.
O
Demande de réparation et conseil en cas de dérangements
A 0810 240 260
D 01801 22 33 55
(0,039 €/min. depuis un poste fixe,
téléphone portable max. 0,42 €/min.)
CH 0848 840 040
Faites confiance à la compétence du fabricant. Vous
garantissez ainsi que la réparation sera effectuée par des
techniciens formés qui possèdent les pièces de rechange
d'origine pour votre appareil.
37
Page 38

Conseils concernant l'énergie et l'environnement
Vous trouverez ici des conseils comment vous pouvez
économiser de l'énergie lors de la cuisson et comment
correctement éliminer votre appareil.
Economie d'énergie
■ Préchauffez le four uniquement si cela est indiqué dans la
recette.
■ Utilisez des moules de couleur foncée, laqués noirs ou
émaillés. Ces types de moules absorbent bien la chaleur.
■ Pendant la cuisson ou le rôtissage, ouvrez la porte du four le
moins souvent possible.
■ Si vous voulez faire cuire plusieurs gâteaux, faitesles cuire
les uns après les autres. Le four étant encore chaud. Le
temps de cuisson diminue au deuxième gâteau. Vous pouvez
également enfourner 2 moules à cake l'un à côté de l'autre.
■ Si les temps de cuisson sont assez longs, vous pouvez
éteindre le four 10 minutes avant la fin de la durée impartie
puis terminez la cuisson avec la chaleur résiduelle.
Elimination écologique
Eliminez l'emballage en respectant l'environnement.
Cet appareil est marqué selon la directive
européenne 2012/19/UE relative aux appareils
électriques et électroniques usagés (waste electrical
and electronic equipment - WEEE).
La directive définit le cadre pour une reprise et une
récupération des appareils usagés applicables dans
les pays de la CE.
L'acrylamide dans certains aliments
L'acrylamide se forme avant tout en cas de produits céréaliers
et de pommes de terre cuits à haute température, tels que
Conseils pour la préparation de plats avec une faible formation d'acrylamide
De manière générale
Cuisson de pâtisseries En mode Convection naturelle, max. 200 °C.
Petits gâteaux secs En mode Convection naturelle, max. 190 °C.
Frites au four Les répartir uniformément et en une seule couche sur la plaque. Faites cuire au moins
■ Les temps de cuisson doivent être aussi courts que possible.
■ Faites uniquement dorer les aliments, sans trop les faire dorer.
■ Un aliment gros et épais contient moins d'acrylamide.
En mode Chaleur tournante 3D ou Chaleur tournante, max. 180 °C.
En mode Chaleur tournante 3D ou Chaleur tournante, max. 170 °C.
Des œufs ou des jaunes d'œuf réduisent la formation d'acrylamide.
400 g par plaque, afin que les frites ne se dessèchent pas
chips, frites, toast, petits pains, pain ou pâtisseries fines
(biscuits, pain d'épices, speculoos).
38
Page 39

Conseils pour l'utilisation
Vous trouverez ici des conseils concernant les récipients et la
préparation.
Cuisson de pain et de pâtisseries
Moules
Remarques
■ Utilisez les accessoires livrés avec l'appareil. Des
accessoires supplémentaires sont en vente dans le
commerce spécialisé ou auprès du service après-vente
■ Utilisez avant tout des moules ou plaques à pâtisserie de
couleur claire.
■ Placez toujours les moules à gâteaux au centre de la grille.
comme accessoires optionnels.
Avant l'utilisation, retirez du compartiment de cuisson tous les
accessoires et récipients qui ne sont pas nécessaires.
■ Utilisez toujours des maniques pour retirer des accessoires
ou récipients chauds du compartiment de cuisson.
Conseils pour la pâtisserie
Vérifiez si votre cake est complètement
cuit.
A l'aide d'un bâtonnet en bois, piquez le sommet du gâteau environ 10 minutes avant la
fin du temps de cuisson indiqué dans la recette. Le gâteau est cuit si la pâte n'adhère
plus au bâtonnet.
Le gâteau s'affaisse. La fois suivante, veillez à ce que la pâte soit moins liquide ou bien réduisez la tempéra-
ture du four de 10 degrés. Respectez les temps de malaxage indiqués dans la recette.
Le gâteau a levé davantage au centre
que sur les bords.
Ne graissez pas le tour du moule démontable. Après la cuisson, détachez soigneusement le gâteau à l'aide d'un couteau.
Le dessus du gâteau est trop cuit. Enfournezle jusqu'au fond, choisissez une température plus basse et faites cuire le
gâteau un peu plus longtemps.
Le gâteau est trop sec. A l'aide d'un curedent, percez plusieurs petits trous dans le gâteau cuit. Arrosez de jus
de fruit ou de liquide légèrement alcoolisé. La prochaine fois, augmentez la température
de 10 degrés et réduisez les temps de cuisson.
Le pain ou le gâteau (p.ex. gâteau au
fromage blanc) a un bel aspect mais
l'intérieur est pâteux (filets d'eau à l'intérieur)
Les pâtisseries ne sont pas uniformément dorées.
Pour le gâteau suivant, veillez à ce que la pâte soit moins liquide. Augmentez le temps
de cuisson et réduisez la température. En cas de gâteau avec une garniture fondante,
faites d'abord précuire le fond. Saupoudrez-le de poudre d'amandes ou de chapelure et
mettez ensuite la garniture. Suivez la recette et respectez les temps de cuisson.
Baissez la température, la cuisson sera plus uniforme. Le papier cuisson dépassant de
la plaque peut gêner la circulation de l'air. Découpez toujours le papier aux dimensions
de la plaque.
Le dessous de la tarte aux fruits est trop
La fois suivante, enfournez le gâteau un niveau plus bas.
clair.
Le jus des fruits a coulé. La fois suivante, utilisez la lèchefrite à bords hauts (s'il y en a).
Les petites pâtisseries en pâte levée
collent ensemble pendant la cuisson.
Disposez les pièces de pâtisserie sur la plaque en respectant un espace d'env. 2 cm
autour de chaque pièce. Il y aura ainsi suffisamment de place pour que les pièces de
pâtisserie puissent gonfler et dorer tout autour.
La cuisson de gâteaux aux fruits juteux
produit de la condensation.
La cuisson peut générer de la vapeur d'eau. Elle s'échappe au-dessus de la porte. Cette
vapeur peut se condenser sur le bandeau de commande ou sur les façades des
meubles situés à proximité et se mettre à goutter. C'est là une propriété physique normale.
Rôtissage et grillade
Récipients
Vous pouvez utiliser tout récipient résistant à la chaleur. Placez
toujours le plat au centre de la grille. La plaque à pâtisserie
émaillée est également appropriée pour des gros rôtis.
Conseils pour les rôtis
■ Une température plus basse permet d'obtenir des mets plus
uniformément dorés.
■ Versez 2 à 3 cuillerées à soupe de liquide sur la viande
maigre et 8 à 10 cuillerées à soupe sur les rôtis à braiser,
selon leur taille.
■ Pour les canards ou les oies, piquez la peau sous les ailes
afin que la graisse puisse s'écouler.
■ Pour obtenir une peau de volaille dorée et croustillante,
enduisez la peau de beurre ou versez de l'eau salée ou du
jus d'orange sur la peau vers la fin de la cuisson.
■ Retournez les pièces de viande à micuisson.
■ Une fois le rôti cuit, laissez-le reposer 10 minutes de plus
dans le four éteint et fermé. Cela permet au jus de rôti de
mieux se répartir.
■ Lors du rôtissage de gros morceaux de viande une plus forte
formation de vapeur peut se produire et se condenser sur la
porte du four. C'est un phénomène normal qui n'a aucune
influence sur le bon fonctionnement. Après la cuisson,
essuyez la porte du four et la vitre avec un chiffon.
■ Si vous faites des grillades sur la grille, enfournez en plus la
plaque à pâtisserie émaillée au niveau 1 pour récupérer la
graisse.
39
Page 40

Conseils pour les grillades
■ Prenez si possible des pièces à griller de la même épaisseur.
Elles doivent faire au moins 2 à 3 cm d'épaisseur. Elles
seront alors uniformément dorées et bien juteuses.
■ Placez les pièces à griller au centre de la grille. Versez un
peu d'eau sur la plaque à pâtisserie émaillée et enfournez-la
en plus sous la grille, afin de récupérer la graisse. Ne la
placez jamais sur la sole du compartiment de cuisson.
Conseils pour le rôtissage
■ Badigeonnez les pièces à griller d'un peu d'huile, avant de
les placer sur la grille sous le gril.
■ Retournez à mi-cuisson les pièces peu épaisses, retournez
les pièces épaisses plusieurs fois pendant le temps de
cuisson. Utilisez pour cela une pince à grillade, les pièces à
griller ne seront ainsi pas transpercées et le jus de viande
restera p.ex. dans le rôti.
■ Des types de viande rouge telle que de l'agneau et du bœuf
brunissent davantage et plus rapidement que de la viande
blanche telle que du porc et du veau.
Comment savoir si le rôti est cuit? Utilisez un thermomètre pour viande (en vente dans le commerce) ou faites le "test de la
cuillère". Appuyez sur le rôti avec la cuillère. Si vous sentez une résistance, le rôti est
cuit. Si la cuillère s'enfonce, allongez le temps de cuisson.
Le rôti est trop cuit et l'extérieur est
Vérifiez le niveau d'enfournement ainsi que la température.
brûlé par endroits.
Le rôti a un bel aspect mais la sauce est
La fois suivante, choisissez un plat à rôtir plus petit et ajoutez plus de liquide.
brûlée.
Le rôti a un bel aspect, mais la sauce
La fois suivante, choisissez un plat à rôtir plus grand et ajoutez moins de liquide.
est trop claire et insipide.
Testés pour vous dans notre laboratoire.
Vous trouverez ici un choix de plats et les réglages optimaux
correspondants. Nous vous montrons le mode de cuisson, la
température et le niveau d'enfournement les plus appropriés
pour votre plat.
Remarques
■ Les durées indiquées dans les tableaux sont indicatives.
■ Utilisez les accessoires livrés avec l'appareil. Des
accessoires supplémentaires sont en vente dans le
commerce spécialisé ou auprès du service après-vente
comme accessoires optionnels.
Avant l'utilisation, retirez du compartiment de cuisson tous les
accessoires et récipients dont vous n'avez pas besoin.
■ Utilisez toujours des maniques pour retirer des accessoires
ou récipients chauds du compartiment de cuisson.
Elles dépendent de la qualité et de la nature des aliments.
Toutes les indications se rapportent à un four préchauffé.
Plat Poids (kg) Enfourne-
ment
Lasagnes 3-4 1
Gratin de pâtes 2 1
Rôti de veau 1,5 2
Filet de porc 1 2
Rôti de lièvre 1,5 2
Poulet rôti 1 2
Poulet rôti 2 2
Saucisse 1 3
Mode de
cuisson
%
%
N
N
’
N
N
7
Température en °C Durée en minutes
200-230 50-60
220-230 40-45
180-190 70-80
180-190 50-60
180-190 70-80
180-190 50-60
180-190 80-90
max 7-9 première face
5-6 deuxième face
Côte de porc 2 4
(
max 12-15 première face
5-7 deuxième face
Poisson entier 1,5 2
Pizza fraîche 2 1
Pain 2 2
Tarte génoise 1 2
Tartelettes à la confiture 1 2
Brioche 1 2
Muffins 15 pièces de
;
N
<
<
%
’
2
N
160-170 50-60
max 9-11
190-200 40-50
150-160 50-60
160-170 40-50
160-170 25-30
170 25
30 g
40
Page 41

Û Índice
[es]Instrucciones de uso
Indicaciones de seguridad importantes.................................41
Causas de daños............................................................................. 43
Su nuevo aparato .....................................................................43
Selector de funciones ..................................................................... 43
Selector de temperatura................................................................. 44
El reloj electrónico........................................................................... 44
Accesorios ........................................................................................44
Antes del primer uso................................................................45
Ajustar la hora .................................................................................. 45
Limpiar el horno con calor............................................................. 45
Limpiar los accesorios.................................................................... 45
Cómo utilizar el horno .............................................................45
Conectar el horno............................................................................ 45
Utilizar el reloj electrónico.............................................................. 45
Ajustar el temporizador automático ............................................. 46
Indicación y cambio de los valores ajustados........................... 46
Cuidados y limpieza.................................................................47
Productos de limpieza .................................................................... 47
Montaje y desmontaje del cristal de la puerta........................... 48
Desmontar y montar la puerta del aparato................................. 49
Desmontar y montar las guías laterales...................................... 49
¿Qué hacer en caso de avería?...............................................50
Cambiar la bombilla del horno .....................................................50
Servicio de Asistencia Técnica...............................................51
Número de producto (E) y número de fabricación (FD).......... 51
Consejos sobre energía y medio ambiente ...........................51
Ahorrar energía ................................................................................ 51
Eliminación de residuos respetuosa con el medio ambiente. 51
Presencia de acrilamida en alimentos ...................................52
Consejos de aplicación ...........................................................52
Hornear.............................................................................................. 52
Asar y asar al grill............................................................................ 53
Platos probados en nuestro estudio de cocina......................... 54
Produktinfo
Encontrará más información sobre productos, accesorios,
piezas de repuesto y servicios en internet:
www.bosch-home.com y también en la tienda online:
www.bosch-eshop.com
: Indicaciones de seguridad importantes
Leer con atención las siguientes instrucciones. Solo así se puede manejar el aparato de forma correcta y segura. Conservar las instrucciones de uso y montaje para utilizarlas más adelante o para posibles futuros compradores.
Este aparato ha sido diseñado exclusivamente para su montaje empotrado. Prestar atención a las instrucciones de montaje especiales.
Comprobar el aparato al sacarlo de su embalaje. El aparato no debe conectarse en caso de haber sufrido daños durante el transporte.
Los aparatos sin enchufe deben ser conectados exclusivamente por técnicos especialistas autorizados. Los daños provocados por una conexión incorrecta no están cubiertos por la garantía.
Este aparato ha sido diseñado para uso doméstico. Utilizar el aparato exclusivamente para preparar alimentos y bebidas.Vigilarlo mientras está funcionando y emplearlo exclusivamente en espacios cerrados.
Este aparato puede ser utilizado por niños
a partir de 8 años y por personas con
limitaciones físicas, sensoriales o psíquicas,
o que carezcan de experiencia y
conocimientos, siempre y cuando sea bajo
la supervisión de una persona responsable
de su seguridad o que le haya instruido en
el uso correcto del aparato siendo
consciente de los daños que se pudieran
ocasionar.
No dejar que los niños jueguen con el aparato. La limpieza y el mantenimiento rutinario no deben encomendarse a los niños a menos que sean mayores de 8 años y lo hagan bajo supervisión.
Mantener los niños menores de 8 años alejados del aparato y del cable de conexión.
Introducir los accesorios correctamente en el compartimento de cocción. Véase la descripción de los accesorios en las instrucciones de uso.
Este aparato está previsto para ser utilizado a una altura máxima de 2.000 metros sobre el nivel del mar.
41
Page 42

¡Peligro de incendio!
■
Los objetos inflamables que pueda haber
en el compartimento de cocción se
pueden incendiar. No introducir objetos
inflamables en el compartimento de
cocción. No abrir la puerta en caso de
que salga humo del aparato. Desconectar
y desenchufar el aparato de la red o
desconectar el fusible de la caja de
fusibles.
¡Peligro de incendio!
■
Cuando se abre la puerta del aparato se
producirá una corriente de aire. El papel
para hornear puede entrar en contacto
con los elementos calefactores e
incendiarse. Fijar bien el papel de hornear
a los accesorios al precalentar el aparato.
Colocar siempre una vajilla o un molde
para hornear encima del papel de hornear
para sujetarlo. Cubrir solo la superficie
necesaria con papel de hornear. El papel
de hornear no debe sobresalir del
accesorio.
¡Peligro de quemaduras!
■
El aparato se calienta mucho. No tocar la
superficie interior del compartimento de
cocción cuando está caliente ni los
elementos calefactores. Dejar siempre
que el aparato se enfríe. No dejar que los
niños se acerquen.
¡Peligro de quemaduras!
■
Los accesorios y la vajilla se calientan
mucho. Utilizar siempre agarradores para
sacar los accesorios y la vajilla del
compartimento de cocción.
¡Peligro de quemaduras!
■
Los vapores de alcohol pueden inflamarse
cuando el compartimento de cocción está
caliente. No preparar comidas utilizando
grandes cantidades de bebidas
alcohólicas de alta graduación. Si se
utilizan bebidas alcohólicas de alta
graduación, hacerlo en pequeñas
cantidades. Abrir la puerta del aparato
con precaución.
¡Peligro de lesiones!
Si el cristal de la puerta del aparato está dañado, puede romperse.No utilizar rascadores para vidrio o productos de limpieza abrasivos o corrosivos.
¡Peligro de descarga eléctrica!
■
Las reparaciones inadecuadas son
peligrosas.Las reparaciones solo pueden
ser efectuadas por personal del Servicio
de Asistencia Técnica debidamente
instruido.Si el aparato está defectuoso,
extraer el enchufe o desconectar el fusible
en la caja de fusibles. Avisar al Servicio
de Asistencia Técnica.
¡Peligro de descarga eléctrica!
■
El aislamiento del cable de un aparato
eléctrico puede derretirse al entrar en
contacto con componentes calientes. No
dejar que el cable de conexión de un
aparato eléctrico entre en contacto con
los componentes calientes.
¡Peligro de descarga eléctrica!
■
La humedad interior puede provocar una
descarga eléctrica. No utilizar ni
limpiadores de alta presión ni por chorro
de vapor.
¡Peligro de descarga eléctrica!
■
Al sustituir la lámpara del compartimento
de cocción los contactos del
portalámparas están bajo corriente. Antes
de sustituirla, desenchufar el aparato de la
red o desconectar el fusible de la caja de
fusibles.
¡Peligro de descarga eléctrica!
■
Un aparato defectuoso puede ocasionar
una descarga eléctrica. No conectar
nunca un aparato defectuoso.
Desenchufar el aparato de la red o
desconectar el fusible de la caja de
fusibles. Avisar al Servicio de Asistencia
Técnica.
¡Peligro de quemaduras!
■
Las partes accesibles se calientan
durante el funcionamiento.No tocar nunca
las partes calientes. No dejar que los
niños se acerquen.
¡Peligro de quemaduras!
■
Al abrir la puerta del aparato puede salir
vapor caliente. Abrir la puerta del aparato
con precaución. No dejar que los niños se
acerquen.
¡Peligro de quemaduras!
■
Si se introduce agua al compartimento de
cocción puede generarse vapor de agua
caliente. No derramar agua en el
compartimento de cocción caliente.
42
Page 43

Causas de daños
¡Atención!
■ Accesorios, film, papel de hornear o recipientes en la base
del compartimento de cocción: No colocar ningún accesorio
en la base del compartimento de cocción. No cubrir la base
del compartimento de cocción con ninguna clase de film o
con papel de hornear. No colocar ningún recipiente en la
base del compartimento de cocción si la temperatura está
ajustada a más de 50 ºC. Se calentará demasiado. Los
tiempos de cocción y asado dejan de coincidir y el esmalte
se estropea.
■ Agua en el compartimento de cocción caliente: No derramar
agua en el compartimento de cocción caliente. Se formará
vapor de agua. La oscilación térmica puede provocar daños
en el esmalte.
■ Alimentos húmedos: No conservar alimentos húmedos
durante un período prolongado en el compartimento de
cocción cerrado. Se dañaría el esmalte.
■ Jugo de fruta: No sobrecargar la bandeja con pastel de
frutas muy jugoso. El jugo que gotea de la bandeja de horno
produce manchas difíciles de eliminar. Utilizar la bandeja
universal más profunda cuando sea posible.
Su nuevo aparato
■ Enfriar el compartimento de cocción: Dejar enfriar el
compartimento de cocción únicamente con la puerta
cerrada. Los frontales de los muebles contiguos pueden
dañarse con el tiempo aun cuando la puerta del horno sólo
se encuentre ligeramente abierta.
■ Junta de la puerta sucia: cuando la junta de la puerta está
muy sucia, la puerta del horno no queda bien cerrada
durante el funcionamiento. Los frontales de los muebles
contiguos pueden deteriorarse. Mantener siempre limpia la
junta de la puerta.
■ Puerta del aparato como superficie de apoyo: no apoyarse,
sentarse ni colgarse sobre ella. No colocar recipientes ni
accesorios sobre la puerta del aparato.
■ Introducción de los accesorios: en función del tipo de
aparato, al cerrar la puerta del mismo, los accesorios pueden
rayar el cristal de la puerta. Introducir siempre los accesorios
en el compartimento de cocción hasta el tope.
■ Transportar el aparato: No transportar ni sujetar el aparato
por el tirador de la puerta. El asa de la puerta no aguanta el
peso del aparato y puede romperse.
Instrucciones sobre el manejo del nuevo aparato. Encontrará
información relativa a la pantalla de mando, el horno, los tipos
de calentamiento y los accesorios.
Explicación
1 Reloj electrónico
2 Selector de funciones
3 Lámpara indicadora
4 Selector de temperatura
Selector de funciones
El selector de funciones sirve para seleccionar el tipo de
calentamiento.
Posición Uso
Posición cero El horno está apagado.
Û
Calor superior/infe-
%
rior
* Tipo de calentamiento con el que se determina la clase de
eficiencia energética según EN 60350-1.
Para pasteles, gratinados y asados
de carne magra. El calor proviene
de forma homogénea de las resistencias inferior y superior.
Posición Uso
aire caliente Para pasteles y repostería en uno o
<
dos niveles. El ventilador reparte de
manera uniforme el calor de la resistencia circular situada en la placa
posterior del interior del aparato.
Aire caliente eco* Para pasteles y repostería en uno o
’
dos niveles. El ventilador reparte de
manera uniforme el calor de la resistencia circular situada en la placa
posterior del interior del aparato.
En este tipo de calentamiento, la iluminación del horno permanece desconectada.
Recirculación de
N
aire
Para pasteles, repostería y pizza
fresca en uno o dos niveles. El ventilador reparte de manera uniforme el
calor de los elementos calefactores
en el interior del aparato.
Posición de pizza Preparación rápida de productos
;
congelados sin precalentamiento, p.
ej., pizzas, patatas fritas o pasteles
de hojaldre. El calor proviene de la
resistencia inferior y de la resistencia circular situada en la placa posterior.
Turbogrill Asar piezas de carne, ave y pes-
7
cado. El ventilador hace circular el
aire caliente en torno a los alimentos.
Grill de amplia
(
superficie
Asar al grill filetes, salchichas, tostadas y pescado. Se calienta toda la
superficie por debajo de la resistencia del grill.
Iluminación La iluminación del horno está conec-
^
tada.
* Tipo de calentamiento con el que se determina la clase de
eficiencia energética según EN 60350-1.
43
Page 44

Nota: Cuando se ajusta el tipo de calentamiento, se enciende
la luz situada en el interior horno.
Nota: En el tipo de calentamiento "Aire caliente eco" la
iluminación del horno permanece desconectada.
Selector de temperatura
Con el selector de temperatura se ajusta la temperatura o el
nivel de la parrilla.
Accesorios
Los accesorios pueden colocarse en el interior del horno en 4
alturas diferentes. Introducir los accesorios siempre hasta el
tope, para que no golpeen en el cristal de la puerta.
Asegurarse de introducir siempre los accesorios en la posición
correcta en el interior del horno.
Posición Significado
Ú
50-250 Margen de tem-
La lámpara indicadora se ilumina cuando se calienta el horno.
Esta se apaga durante las pausas en las que el horno no
calienta.
Posición cero El horno no calienta.
peratura
La temperatura del interior del
horno en °C.
El reloj electrónico
Con el reloj electrónico se puede controlar el horno. De este
modo se puede, por ejemplo, preseleccionar la hora a la que
debe encenderse el horno o a la que el temporizador
automático debe finalizar el proceso de horneado o de
cocción. El reloj electrónico se puede usar como avisador.
Teclas y funciones del reloj electrónico
Símbolo Significado Aplicación
0
- Menos Disminuir la duración o el
+ Más Aumentar la duración o el
Reloj electrónico Ajustar la duración o el
tiempo
tiempo
tiempo
Se pueden extraer hasta 2/3 partes de los accesorios sin que
vuelquen. De esta manera, los platos pueden retirarse con
facilidad.
Si los accesorios se calientan pueden deformarse. Una vez que
se hayan enfriado, desaparece la deformación y no repercute
sobre el funcionamiento.
Los accesorios pueden adquirirse en el Servicio de Asistencia
Técnica, en comercios especializados o en Internet.
Accesorios Descripción
Parrilla para hornear y asar
Para recipientes, moldes para
pasteles, asados, parrilladas y
platos congelados.
Bandeja de horno esmaltada
Para pasteles jugosos, pastas,
platos congelados y asados
grandes. También se puede utilizar como bandeja para recoger
la grasa.
Varillas de seguridad
Para bloquear las bisagras.
--------
44
Page 45

Antes del primer uso
A continuación se indican los pasos que deben seguirse antes
de utilizar el aparato por primera vez. Leer antes el capítulo
Consejos y advertencias de seguridad.
Retirar el embalaje del aparato y desecharlo de forma
adecuada.
Ajustar la hora
Tras la conexión eléctrica del aparato o tras un corte de la
corriente, en la pantalla parpadean tres ceros y el símbolo “A”.
1. Pulsar la tecla 0 hasta que el punto parpadee en la pantalla.
2. Ajustar la hora actual con las teclas "+" y "-".
El tiempo programado se aplica transcurridos 7 segundos.
Nota: Para modificar la hora ajustada, pulsar las teclas “+” y “-”
hasta que el punto parpadee en la pantalla. A continuación,
ajustar la hora actual con las teclas "+" y "-".
Limpiar el horno con calor
Limpiar el horno previamente
1. Extraer los accesorios y las rejillas de soporte del interior del
horno.
2. Retirar por completo los restos de embalaje del interior del
horno, p. ej. partículas de poliestireno.
3. Algunas piezas están recubiertas con un plástico protector.
Retirar el plástico protector.
4. Limpiar el aparato por fuera con un paño suave y húmedo.
5. Limpiar el interior del horno con agua caliente con jabón.
Calentar el horno
Para eliminar el olor a nuevo, calentar el horno vacío y cerrado.
1. Girar el mando de funciones hasta el modo de
funcionamiento Calor superior/inferior.
2. Girar el mando de temperatura a la temperatura máxima.
3. Desconectar el horno transcurridos 40 minutos.
Nota: Es posible que se escuchen chisporroteos procedentes
del interior la primera vez que se calienta el horno.
Limpiar el horno posteriormente
1. Limpiar el interior del horno con agua caliente con jabón.
2. Montar las rejillas de soporte.
Limpiar los accesorios
Antes de utilizar los accesorios, limpiarlos a fondo con agua
caliente con jabón y un paño de limpieza.
Cómo utilizar el horno
Mandos escamoteables
El selector de funciones y el de temperatura son
escamoteables. Pulsar el mando para encajar y desencajar.
Conectar el horno
1. Ajustar el tipo de calentamiento con el selector de funciones.
2. Ajustar la temperatura con el selector de temperatura.
El horno empieza a calentarse.
Desconectar el horno
Girar el selector de funciones y el de temperatura a la posición
cero.
Modificar los ajustes
El tipo de calentamiento y la temperatura o el nivel de grill
pueden modificarse en cualquier momento con el
correspondiente selector.
Calentamiento
Para calentar el horno lo más rápido posible, cambiar el tipo
de calentamiento a "Aire circulante". Si se alcanza la
temperatura ajustada (se apaga la lámpara indicadora), ajustar
el tipo de calentamiento deseado.
Utilizar el reloj electrónico
En la pantalla también pueden mostrarse los siguientes
símbolos para la hora y el tiempo restante:
Símbolo Significado
û
V
A Modo automático
Û
Ajustar la hora
Tras la conexión eléctrica del aparato o tras un corte de la
corriente, en la pantalla parpadean tres ceros y el símbolo “A”.
1. Pulsar la tecla 0 hasta que el punto parpadee en la pantalla.
2. Ajustar la hora actual con las teclas "+" y "-".
El tiempo programado se aplica transcurridos 7 segundos.
Nota: Para modificar la hora ajustada, pulsar las teclas “+” y “-”
hasta que el punto parpadee en la pantalla. A continuación,
ajustar la hora actual con las teclas "+" y "-".
Punto entre la indicación de horas y minutos.
Parpadea cuando puede ajustarse la hora.
Reloj avisador
Muestra los estados de funcionamiento del reloj
avisador.
Muestra los estados de funcionamiento del
modo automático.
Disponibilidad para el funcionamiento
Si se muestra este símbolo, el horno está pre-
parado para el funcionamiento.
45
Page 46

Programar el reloj avisador
El reloj avisador no afecta a las funciones del horno. La
duración del reloj avisador se puede ajustar desde 1 minuto
hasta 23 horas y 59 minutos.
1. Pulsar la tecla 0 hasta que parpadee en la pantalla el
símbolo
2. Ajustar la duración deseada con las teclas "+" y "-".
V y se muestren 3 ceros.
Una vez transcurrido el tiempo suena una señal acústica.
Notas
■ Para cambiar el tiempo restante, pulsar la tecla 0 hasta que
parpadee el símbolo
V en la pantalla. A continuación,
cambiar el tiempo restante con las teclas "`+" y "-".
■ Para cancelar el ajuste, pulsar la tecla 0 hasta que
parpadee el símbolo en la pantalla. A continuación, pulsar
simultáneamente las teclas "+" y "-".
Desactivar el tono de aviso
Pulsar la tecla “
0” hasta que desaparezca el símbolo V.
La señal se apaga siete minutos después.
Cambiar el tono de aviso
Hay 3 tonos de aviso.
1. Pulsar simultáneamente las teclas "+" y "-".
2. Pulsar la tecla 0.
En el panel indicador se muestra el tono de aviso actual, por
ejemplo, "tono 1".
3. Pulsar la tecla "-" para seleccionar otro tono de aviso.
Ajustar el temporizador automático
Con el reloj electrónico se puede hacer que el horno se
desconecte o bien que se conecte y desconecte de forma
automática.
Conexión y desconexión automática
El horneado o asado con la duración ajustada se inicia más
tarde de la hora seleccionada.
1. Pulsar la tecla 0 hasta que parpadee en la pantalla el
símbolo
2. Pulsar de nuevo la tecla de función 0 hasta que en
V y se muestren 3 ceros.
parpadee en la pantalla “dur” y “0.00” de forma alterna y el
símbolo “A”.
La hora actual es, p. ej., las 17:30 horas.
3. Ajustar la duración del tiempo de funcionamiento con las
teclas "+" y "-" (p. ej. 1 hora).
La duración del tiempo de funcionamiento se puede ajustar
desde 1 minuto hasta 10 horas.
4. Pulsar de nuevo la tecla de función 0 hasta que en la
pantalla parpadee de forma alterna “End” y la hora de
desconexión “18:30” (hora actual más el tiempo de
funcionamiento ajustado).
5. Ajustar la hora de desconexión con las teclas "+" y "-" (p. ej.
las 19:30 horas).
La hora de desconexión se puede ajustar hasta 23 horas y
59 minutos.
6. Ajustar el tipo de calentamiento y temperatura deseados.
El símbolo
Û desaparece en la pantalla.
En ese ejemplo, el horno comienza a funcionar a las 18:30
horas y se desconecta de nuevo a las 19:30 horas.
Ha concluido la duración del tiempo de funcionamiento
Suena una señal acústica; en la pantalla desaparece el
símbolo
1. Desconectar el selector de temperatura y el de funciones.
2. Pulsar la tecla 0 hasta que aparezca el símbolo Û.
Û y el símbolo A parpadea.
El horno cambia de nuevo al modo manual.
Desconexión automática
1. Pulsar la tecla 0 hasta que parpadee en la pantalla el
símbolo
2. Pulsar de nuevo la tecla de función 0 hasta que en
V y se muestren 3 ceros.
parpadee en la pantalla “dur” y “0.00” de forma alterna y el
símbolo “A”.
3. Ajustar la duración del tiempo de funcionamiento con las
teclas "+" y "-".
La duración del tiempo de funcionamiento se puede ajustar
desde 1 minuto hasta 10 horas.
4. Ajustar el tipo de calentamiento y temperatura deseados.
El horno comienza a funcionar y en la pantalla aparece el
símbolo A y la hora actual.
Ha concluido la duración del tiempo de funcionamiento
Suena una señal acústica; en la pantalla desaparece el
símbolo
1. Desconectar el selector de temperatura y el de funciones.
2. Pulsar la tecla 0 hasta que aparezca el símbolo Û.
Û y el símbolo A parpadea.
El horno cambia de nuevo al modo manual.
Indicación y cambio de los valores ajustados
Los valores ajustados y el tiempo restante de los distintos
modos de funcionamiento del reloj electrónico pueden verse y
modificarse en la pantalla en cualquier momento.
Mostrar el tiempo restante del reloj avisador
Pulsar la tecla
pantalla.
En la pantalla se muestra el tiempo restante, que puede
modificarse con las teclas "+" y "-".
Mostrar y cambiar la duración del tiempo de funcionamiento
y la hora de desconexión.
1. Pulsar la tecla 0 hasta que el símbolo V parpadee en la
pantalla.
2. Pulsar de nuevo la tecla 0 hasta que en la pantalla
parpadee de forma alterna “dur”, la duración del tiempo de
funcionamiento restante y el símbolo A.
La duración del tiempo de funcionamiento puede cambiarse
con las teclas "+" y "-". Al presionar simultáneamente las
teclas "+" y "-", se desconecta el interruptor temporizador
automático.
3. Pulsar de nuevo la tecla 0 hasta que en la pantalla
parpadee de forma alterna “End” y el tiempo de desconexión
ajustado.
El tiempo de desconexión puede cambiarse con las teclas
"+" y "-". Al presionar simultáneamente las teclas "+" y "-", se
desconecta el interruptor temporizador automático.
0 hasta que el símbolo V parpadee en la
46
Page 47

Cuidados y limpieza
El horno mantendrá durante mucho tiempo su aspecto
reluciente y su capacidad funcional siempre y cuando se lleven
a cabo la limpieza y los cuidados pertinentes. A continuación
se describe cómo efectuar el cuidado y la limpieza del horno.
Notas
■ Es posible que aparezcan diferentes tonalidades en el frontal
del horno debido a los diferentes materiales como vidrio,
plástico o metal.
■ Las sombras apreciables en el cristal de la puerta, que
parecen suciedad, son reflejos de luz de la lámpara de
iluminación del horno.
■ El esmalte se quema cuando se alcanza una temperatura
muy elevada. Esto puede provocar ligeras decoloraciones.
Este fenómeno es normal y no afecta al funcionamiento del
horno. Los bordes de las bandejas finas no pueden
esmaltarse por completo. Por este motivo pueden resultar
ásperos al tacto, aunque no afecta a la protección
anticorrosiva.
: ¡Peligro de descarga eléctrica!
La humedad interior puede provocar una descarga eléctrica.
No utilizar ni limpiadores de alta presión ni por chorro de
vapor.
: ¡Peligro de quemaduras!
El aparato se calienta mucho. No tocar la superficie interior del
compartimento de cocción cuando está caliente ni los
elementos calefactores. Dejar siempre que el aparato se enfríe.
No dejar que los niños se acerquen.
Productos de limpieza
Observar las siguientes indicaciones con el fin de no dañar las
distintas superficies del horno por emplear un producto de
limpieza inadecuado.
No utilizar
■ productos de limpieza abrasivos o corrosivos
■ productos con un alto contenido de alcohol
■ esponjas o estropajos duros
■ limpiadores de alta presión o por chorro de vapor.
Lavar a fondo las bayetas nuevas antes de usarlas.
Zona Productos de limpieza
Parte exterior del
aparato
Acero inoxidable Agua caliente con jabón:
Aluminio y plástico Limpiacristales:
Superficies esmaltadas (superficie lisa)
Cristales de la
puerta
Cristal protector de
la bombilla del
horno
Junta
No retirar.
Rejillas Agua caliente con jabón:
Accesorios Agua caliente con jabón:
Agua caliente con jabón:
Limpiar con una bayeta y secar con un
paño suave. No utilizar limpiacristales ni
rascadores para cristal.
Limpiar con una bayeta y secar con un
paño suave. Limpiar inmediatamente las
manchas de cal, grasa, maicena y clara
de huevo. Debajo de estas manchas
puede formarse corrosión.
En el Servicio de Asistencia Técnica o en
comercios especializados pueden adquirirse los productos de limpieza especiales para el acero inoxidable, apropiados
para superficies calientes. Aplicar una
capa muy fina del producto de limpieza
con un paño suave.
Limpiar con un paño suave.
Para una limpieza más cómoda, se reco-
mienda conectar la iluminación del interior del horno y, si procede, descolgar la
puerta del aparato. Limpiar con detergente convencional o vinagre diluido en
agua usando un trapo suave y humedecido o una gamuza; secar con un paño
suave. Limpiar los residuos de comida
quemados con un paño húmedo y un
producto de limpieza. Si la suciedad es
intensa es recomendable utilizar un producto de limpieza específico para hornos en forma de gel. Este puede
aplicarse de forma directa. Dejar el interior del horno abierto tras la limpieza
para que se seque.
Limpiacristales:
Limpiar con un paño suave. No utilizar
rascadores para cristal.
Agua caliente con jabón:
Limpiar con una bayeta.
Agua caliente con jabón:
Limpiar con una bayeta. No frotar.
Poner en remojo y limpiar con una
bayeta o un cepillo.
Poner en remojo y limpiar con una
bayeta o un cepillo.
47
Page 48

Montaje y desmontaje del cristal de la puerta
El cristal de la puerta del horno puede extraerse para facilitar
su limpieza.
Extraer los cristales de las puertas
1. Abrir por completo la puerta del horno.
2. Bloquear las bisagras a izquierda y derecha con la varilla de
seguridad.
Nota: Las varillas de seguridad deben estar completamente
insertadas en los orificios de las bisagras.
3. Levantar suavemente la parte inferior del cristal interior hasta
que se suelten del soporte los pasadores de sujeción (1).
4. Levantar con cuidado la parte superior del cristal hasta que
se suelten del soporte los pasadores de sujeción (2).
¡Atención!
El cristal intermedio puede quedarse unido al cristal interior
al levantar este último. Asegurarse de que el cristal
intermedio no se cae.
Nota: El cristal intermedio no está sujeto con pasadores de
sujeción, sino que se mantiene en su posición mediante
soportes de goma.
Limpiar los cristales con limpiacristales y un paño suave.
: ¡Peligro de lesiones!
Si el cristal de la puerta del aparato está dañado, puede
romperse.No utilizar rascadores para vidrio o productos de
limpieza abrasivos o corrosivos.
Montar los cristales de la puerta
1. Colocar de nuevo el cristal intermedio.
Notas
■ El cristal intermedio está colocado correctamente cuando
el símbolo Low-E es legible.
■ Asegúrese de que el cristal esté colocado en la posición
correcta. Todos los soportes de goma deben colocarse
planos sobre el cristal exterior.
2. Colocar de nuevo el cristal interior.
Nota: Se deben encajar los cuatro pasadores de sujeción en
los soportes correspondientes.
3. Retirar las varillas de seguridad y cerrar la puerta del horno.
5. Extraer el cristal interior.
6. Extraer el cristal intermedio.
48
Page 49

Desmontar y montar la puerta del aparato
En caso de una suciedad especialmente resistente, la puerta
del horno se puede desmontar para una mejor limpieza. Sin
embargo, habitualmente esto no es necesario.
Desmontar la puerta del aparato
1. Abrir por completo la puerta del horno.
2. Bloquear las bisagras a izquierda y derecha con la varilla de
seguridad (a).
Nota: Las varillas de seguridad deben estar completamente
insertadas en los orificios de las bisagras.
3. Sujetar la puerta del horno por los laterales con las dos
manos y cerrarla unos 30° (b).
DE
4. Levantar ligeramente la puerta del horno y extraerla.
Nota: No cerrar la puerta del horno por completo. Podrían
doblarse las bisagras y producirse daños en el esmalte.
Montar la puerta
1. Sujetar la puerta del horno por los laterales con las dos
manos.
2. Insertar las bisagras en las escotaduras del horno (a).
Nota: La muesca en la parte inferior de las bisagras debe
encajar en el marco del horno (b).
Desmontar y montar las guías laterales
Las guías laterales pueden extraerse para facilitar su limpieza.
Desmontar las guías laterales
Las guías laterales están fijadas en tres puntos a las paredes
laterales del interior del horno.
1. Sujetar la guía lateral por la parte delantera y tirar de ella
hacia el centro.
El gancho delantero de la guía lateral se desprende del
orificio.
2. Seguir abriendo la guía lateral y extraerla de los orificios
traseros de la pared lateral.
3. Retener el revestimiento catalítico del interior del horno.
4. Extraer las guías laterales del interior del horno.
D
Montar las guías laterales
1. Retener el revestimiento catalítico del interior del horno.
2. Insertar los ganchos de la guía lateral en los orificios traseros
de la pared lateral.
3. Introducir el gancho delantero de la guía lateral en el orificio.
E
ED
3. Empujar la puerta hacia abajo.
4. Retirar las varillas de seguridad.
: ¡Peligro de lesiones!
No tocar la bisagra en caso de que la puerta caiga
involuntariamente o de que una bisagra se cierre de golpe.
Llamar al Servicio de Atención al Cliente.
49
Page 50

¿Qué hacer en caso de avería?
Con frecuencia, cuando se produce una avería, suele tratarse
de una pequeña anomalía fácil de subsanar. Antes de llamar el
Servicio de Asistencia Técnica, deben tenerse en cuenta las
siguientes indicaciones.
Avería Posible causa Consejos/solución
El aparato no
funciona.
No es posible
desconectar el
horno.
La pantalla del
reloj parpadea.
El horno no
calienta.
El cristal de la
puerta está
roto.
Jugo de fruta o
manchas de
clara de huevo
sobre las superficies esmaltadas.
El fusible está
defectuoso.
Corte en el
suministro eléctrico.
El sistema electrónico está
defectuoso.
Corte en el
suministro eléctrico
El fusible está
defectuoso.
El mando de
funciones no
está ajustado.
Jugo de pasteles o carne.
Comprobar en la caja de
fusibles que el estado del
fusible de la cocina es
correcto.
Comprobar si funciona la
lámpara de cocina.
Desconectar el fusible. Avisar al Servicio de Asistencia Técnica.
Volver a programar el reloj.
Comprobar el fusible o sustituirlo.
Ajustar el mando de funciones.
Apagar el aparato. Avisar al
Servicio de Asistencia Técnica.
Cambio inofensivo del
esmalte que no se puede
eliminar.
Cambiar la bombilla del horno
Si la bombilla del horno está deteriorada, hay que cambiarla.
Las bombillas de recambio resistentes a la temperatura se
pueden obtener en un comercio especializado o poniéndose
en contacto con el Servicio de Asistencia Técnica. Indicar el
número de producto (E) y el número de fabricación (FD) del
aparato. No utilizar ninguna otra bombilla.
: ¡Peligro de descarga eléctrica!
Al sustituir la lámpara del compartimento de cocción los
contactos del portalámparas están bajo corriente. Antes de
sustituirla, desenchufar el aparato de la red o desconectar el
fusible de la caja de fusibles.
1. Dejar enfriar el interior del horno.
2. Abrir la puerta del aparato.
3. Poner un paño de cocina en el interior del aparato para evitar
daños.
4. Extraer las guías laterales.
5. Retirar el cristal protector.Para ello, abrir el cristal protector
con la mano desde delante. En caso de que resultase difícil
retirar el cristal protector, utilizar una cuchara como ayuda.
6. Extraer la bombilla del horno.
: ¡Peligro de descarga eléctrica!
Las reparaciones inadecuadas son peligrosas. Las
reparaciones solo pueden ser efectuadas por personal del
Servicio de Asistencia Técnica debidamente instruido.
La reparación inadecuada del aparato puede implicar serios
riesgos para el usuario.
7. Sustituir la bombilla del horno por otra del mismo tipo:
Tensión: 230 V
Potencia: 40 W
Portabombillas: G9
Resistencia de temperatura: 300 °C
8. Volver a colocar el cristal protector de la bombilla del horno.
9. Montar las guías laterales.
10.Retirar de nuevo el paño de cocina.
11.Volver a conectar el fusible.
12.Comprobar que la iluminación del horno funciona
correctamente.
50
Page 51

Servicio de Asistencia Técnica
Nuestro Servicio de Asistencia Técnica se encuentra a su
disposición siempre que necesite la reparación de su aparato.
Encontraremos la solución correcta; también a fin de evitar la
visita innecesaria de un técnico de servicio.
Número de producto (E) y número de fabricación (FD)
Indicar el número de producto (E) y el de fabricación (FD) para
obtener un asesoramiento cualificado. La placa de
características con los números se encuentra en la parte
inferior del interior del horno al abrir la puerta del horno. A fin
de evitarse molestias llegado el momento, le recomendamos
anotar los datos de su aparato, así como el número de teléfono
del Servicio de Asistencia Técnica en el siguiente apartado.
N.º de producto (E)
Servicio de Asistencia Técnica
O
N.° de fabricación (FD)
En caso de manejo incorrecto, la asistencia de un técnico de
servicio no es gratuita, incluso aunque todavía esté dentro del
período de garantía.
Los datos de contacto del Servicio de Asistencia Técnica más
cercano para todos los países se encuentran aquí y en el
índice de puntos de Servicio de Asistencia Técnica
suministrado.
Solicitud de reparación y asesoramiento en caso de averías
A 0810 240 260
D 01801 22 33 55
(0,039 €/min. desde teléfono fijo;
desde teléfono móvil, máx. 0,42 €/min.)
CH 0848 840 040
Confíe en la competencia del fabricante. De esa forma se
asegura de que la reparación se lleva a cabo por personal
técnico debidamente instruido, equipado con las piezas
originales y de repuesto necesarias para su aparato.
Consejos sobre energía y medio ambiente
Aquí encontrará algunos consejos sobre cómo ahorrar energía
horneando y sobre cómo cuidar su aparato de la manera
adecuada.
Ahorrar energía
■ Precalentar el horno solo cuando esté indicado
explícitamente en la receta.
■ Utilizar moldes para hornear oscuros, lacados o esmaltados
en negro. Estos absorben especialmente bien el calor.
■ Abrir la puerta del horno lo menos posible mientras dure la
cocción, horneado o asado.
■ Si se hornean varios pasteles, hacerlo preferiblemente uno
detrás de otro. El horno estará todavía caliente. De esta
manera, se reducirá el tiempo de cocción del segundo
pastel. También se pueden colocar 2 moldes rectangulares a
la vez, uno al lado del otro.
■ En los tiempos de cocción largos, se puede apagar el horno
10 minutos antes del final del tiempo y aprovechar el calor
residual para terminar de cocer.
Eliminación de residuos respetuosa con el medio ambiente
Eliminar el embalaje de forma ecológica.
Este aparato está marcado con el símbolo de
cumplimiento con la Directiva Europea 2012/19/UE
relativa a los aparatos eléctricos y electrónicos
usados (Residuos de aparatos eléctricos y
electrónicos RAEE).
La directiva proporciona el marco general válido en
todo el ámbito de la Unión Europea para la retirada y
la reutilización de los residuos de los aparatos
eléctricos y electrónicos.
51
Page 52

Presencia de acrilamida en alimentos
La acrilamida se produce especialmente en productos de
cereales y patata preparados a temperaturas elevadas, p. ej.,
Consejos para reducir la formación de acrilamida al cocinar alimentos
General
Hornear Con "Calor superior/inferior" máx. 200 °C
Galletas Con "Calor superior/inferior" máx. 190 °C.
Patatas fritas al horno Untar una capa sobre la bandeja de forma uniforme. Hornear un mínimo de 400 g por
■ Mantener el tiempo de cocción lo más reducido posible.
■ Hornear los alimentos hasta dorarlos, sin que queden demasiado oscuros.
■ Los alimentos de gran tamaño y grosor contienen una cantidad de acrilamida más
reducida.
Con "Aire caliente 3D" o a"Aire caliente" máx. 180 °C.
Con "Aire caliente 3D" o "Aire caliente" máx. 170 °C.
El huevo o la yema de huevo reducen la formación de acrilamida.
bandeja para evitar que las patatas se sequen
patatas fritas, tostadas, panecillos, pan y repostería fina
(galletas, pastas especiadas, galletas navideñas).
Consejos de aplicación
Aquí encontrará consejos acerca de los recipientes y de la
preparación de platos.
Notas
■ Utilizar los accesorios suministrados. Los accesorios
adicionales están disponibles como accesorios especiales
en los comercios especializados o a través del Servicio de
Asistencia Técnica.
Antes de su utilización, retirar del interior del horno los
accesorios y recipientes que no sean necesarios.
■ Utilizar siempre un paño apropiado para retirar los
accesorios o los recipientes calientes del interior del horno.
Hornear
Moldes para hornear
■ Utilizar principalmente moldes para hornear y bandejas de
color claro.
■ Colocar los moldes para hornear siempre en el centro de la
parrilla para hornear y asar.
Sugerencias para hornear
Cómo comprobar si el pastel de masa
de bizcocho está en su punto.
El pastel se desmorona. La próxima vez, utilizar menos líquido o ajustar la temperatura del horno 10 grados
El pastel ha subido bien en el centro,
pero en los bordes tiene menos altura.
El pastel se está quedando demasiado
oscuro por arriba.
El pastel está demasiado seco. Hacer pequeños agujeros en el pastel con un palillo cuando esté terminado. A continua-
El pan o el pastel (p. ej., tarta de queso)
tiene buen aspecto, pero está crudo por
dentro (con partes líquidas)
Las pastas se han dorado de forma irregular.
El pastel de frutas está demasiado claro
por la parte de abajo.
El jugo de fruta se sale. La próxima vez utilizar la bandeja universal más profunda, si está disponible.
Las pastas pequeñas hechas con leva-
dura se pegan unas a otras durante el
horneado.
Al hornear pasteles jugosos se forma
agua condensada.
Unos 10 minutos antes de finalizar el tiempo de cocción indicado en la receta, pinchar
con un palillo la parte más alta del pastel. El pastel estará en su punto cuando la masa
no se adhiera al palillo.
menos. Tener en cuenta los tiempos de mezclado que se indican en la receta.
No engrasar las paredes del molde desarmable. Después del horneado, desprender el
pastel con cuidado con la ayuda de un cuchillo.
Colocar el pastel a una altura inferior, seleccionar una temperatura más baja y dejar que
se hornee durante más tiempo.
ción, verter en los agujeros unas gotas de zumo de fruta o de alguna bebida alcohólica.
Aumentar la próxima vez la temperatura 10 grados y reducir el tiempo de horneado.
Emplear la próxima vez menos líquido y hornear el producto a una temperatura más
baja durante más tiempo. Para pasteles con una capa jugosa, hornear primero la base.
Cubrir la base con almendras o pan rallado y añadir la capa. Tener en cuenta las recetas y los tiempos de cocción.
Reducir un poco la temperatura para que las pastas se doren de forma homogénea. Si
el papel de hornear sobresale, puede influir en la circulación del aire. Recortar siempre
el papel de hornear de forma que coincida con los bordes de la bandeja.
La próxima vez colocar el pastel a una altura inferior.
Procurar dejar una separación de unos 2 cm entre unas y otras. Así tendrán el espacio
suficiente para crecer y dorarse por todos los lados.
Al hornear puede originarse vapor de agua que se escapa por encima de la puerta. El
vapor de agua puede condensarse en el panel de mando o en los frontales de los muebles contiguos y escurrirse en forma de agua condensada. Esto se debe simplemente a
las leyes de la física.
52
Page 53

Asar y asar al grill
Recipiente
Se puede usar cualquier vajilla resistente al calor. Colocar el
recipiente siempre en el centro de la parrilla. La bandeja de
horno esmaltada también se puede usar para asados grandes.
Sugerencias para asar
■ Con una temperatura más baja se consigue un dorado más
uniforme.
■ Añadir de 2 a 3 cucharadas soperas de líquido a las carnes
magras, y de 8 a 10 cucharadas a los estofados, según el
tamaño.
■ Al asar pato o ganso, pinchar la piel por debajo de las alas
para que se desprenda la grasa.
■ Las aves quedan muy doradas y crujientes si, más o menos
al final del tiempo de cocción, se untan con mantequilla,
agua con sal o zumo de naranja.
■ Dar la vuelta a la carne cuando haya transcurrido la mitad del
tiempo.
■ Cuando el asado esté listo, deberá reposar unos 10 minutos
en el horno cerrado y desconectado. De este modo, el jugo
del asado se reparte mejor.
■ Al asar trozos de carne más grandes pueden generarse
fuertes vapores y vaho en la puerta del horno. Esto es algo
normal que no influye en el correcto funcionamiento. Tras el
proceso de horneado, secar con un paño la puerta del horno
y la ventana.
■ Para asar directamente sobre la parrilla, colocar la bandeja
de horno esmaltada en la altura de inserción 1 para recoger
la grasa.
Sugerencias para asar al grill
■ En la medida de lo posible, utilizar piezas del mismo grosor.
Deberían tener un grosor mínimo de entre 2 y 3 cm. Así se
doran de forma homogénea y se conservan jugosas.
■ Colocar los alimentos en el centro de la parrilla. Llenar con
un poco de agua la bandeja de horno esmaltada e
introducirla en la altura de inserción inmediatamente inferior
para que pueda recoger la grasa. No colocar la bandeja en
ningún caso sobre la base del interior del horno.
■ Aplicar una pequeña capa de aceite al alimento antes de
colocarlo sobre la parrilla bajo el grill.
■ Si el alimento no es muy grueso, dar la vuelta una vez
transcurrida la mitad del tiempo; si el alimento es grueso, dar
varias vueltas durante el tiempo de asado. Utilizar para ello
unas pinzas para evitar atravesar el producto y para que el
jugo de la carne permanezca en el asado.
■ Las carnes oscuras como el cordero y el vacuno se tuestan
más rápidamente y mejor que las carnes más claras como el
cerdo o la ternera.
Sugerencias para asar
Cómo comprobar si el asado está en su
punto.
El asado está demasiado oscuro y la
corteza quemada por algunas partes.
El asado tiene buen aspecto, pero la
salsa se ha quemado.
El asado tiene buen aspecto, pero la
salsa es demasiado clara y líquida.
Utilizar un termómetro para carnes (disponible en comercios especializados) o hacer la
"prueba de la cuchara". Presionar el asado con la cuchara. Si está firme, significa que
está listo. Si está blando, necesita aún algo de tiempo.
Comprobar la altura en la que se ha colocado y la temperatura.
Utilizar en la próxima ocasión una cacerola más pequeña y añadir más líquido.
Utilizar en la próxima ocasión una cacerola más grande y añadir menos líquido.
53
Page 54

Platos probados en nuestro estudio de cocina
En este apartado figuran una selección de platos y los ajustes
óptimos correspondientes. Se detalla el tipo de calentamiento,
la temperatura y la altura de inserción más apropiados para
cada plato.
Notas
■ Los valores relativos al tiempo que figuran en las tablas son
valores orientativos. Vienen determinados por la calidad y la
composición de los alimentos.
■ Utilizar los accesorios suministrados. Los accesorios
adicionales están disponibles como accesorios especiales
en los comercios especializados o en el Servicio de
Asistencia Técnica.
Antes de su utilización, retirar del interior del horno los
accesorios y recipientes que no sean necesarios.
■ Utilizar siempre un agarrador para retirar los accesorios o los
recipientes calientes del interior del horno.
Todos los datos hacen referencia a un horno precalentado.
Plato Peso (kg) Altura de
Lasaña 3-4 1
Gratinado de pasta 2 1
Asado de ternera 1,5 2
Lomo de cerdo 1 2
Liebre asada 1,5 2
Pollo a la parrilla 1 2
Pollo a la parrilla 2 2
Salchicha bratwurst 1 3
Chuleta de cerdo 2 4
Pescado fresco 1,5 2
Pizza fresca 2 1
Pan 2 2
Bizcocho 1 2
Tartaleta de mermelada 1 2
Brioche 1 2
Magdalenas 15 unidades de
30 g cada una
inserción
2
Tipo calentam.
%
%
N
N
’
N
N
7
(
;
N
<
<
%
’
N
Temperatura en °C Duración en minutos
200-230 50-60
220-230 40-45
180-190 70-80
180-190 50-60
180-190 70-80
180-190 50-60
180-190 80-90
máx. 7-9 un lado
5-6 otro lado
máx. 12-15 un lado
5-7 otro lado
160-170 50-60
máx. 9-11
190-200 40-50
150-160 50-60
160-170 40-50
160-170 25-30
170 25
54
Page 55

Page 56

Robert Bosch Hausgeräte GmbH
Carl-Wery-Straße 34
81739 München
Germany
www.bosch-home.com
*9000971542*
9000971542
960701
 Loading...