

Page 1

3FHJTUFS
OFXEFWJDFPO
.Z#PTDIOPXBOE
HFUGSFFCFOFGJUT
CPTDIIPNFDPN
XFMDPNF
ZPVS
Free standing cooker
HL.59E0.0U
[en] Instruction manual Free standing cooker
Page 2

Page 3

Table of contents
[en]I n st r u ct i on manual Fr ee s t andi ng cooker
8 Intended use . . . . . . . . . . . . . . . . . . . . . . . . . . . . . 4
( Important safety information . . . . . . . . . . . . . . . 5
Halogen lamp. . . . . . . . . . . . . . . . . . . . . . . . . . . . . . . . 6
Meat thermometer . . . . . . . . . . . . . . . . . . . . . . . . . . . . 6
] Causes of damage . . . . . . . . . . . . . . . . . . . . . . . . 7
Hob . . . . . . . . . . . . . . . . . . . . . . . . . . . . . . . . . . . . . . 7
Damage to the oven. . . . . . . . . . . . . . . . . . . . . . . . . . . 7
Damage to the plinth drawer . . . . . . . . . . . . . . . . . . . . 7
7 Environmental protection . . . . . . . . . . . . . . . . . . 8
Saving energy . . . . . . . . . . . . . . . . . . . . . . . . . . . . . . . 8
Energy-saving advice . . . . . . . . . . . . . . . . . . . . . . . . . . 8
Environmentally-friendly disposal . . . . . . . . . . . . . . . . . 9
f Induction cooking . . . . . . . . . . . . . . . . . . . . . . . . 9
Advantages of induction cooking . . . . . . . . . . . . . . . . . 9
Cookware. . . . . . . . . . . . . . . . . . . . . . . . . . . . . . . . . . . 9
5 Installation and connection. . . . . . . . . . . . . . . . 10
Electrical connection . . . . . . . . . . . . . . . . . . . . . . . . . 10
Removing the appliance . . . . . . . . . . . . . . . . . . . . . . 11
Adjacent units . . . . . . . . . . . . . . . . . . . . . . . . . . . . . . 11
Wall fixing. . . . . . . . . . . . . . . . . . . . . . . . . . . . . . . . . . 11
Door lock . . . . . . . . . . . . . . . . . . . . . . . . . . . . . . . . . . 11
Measures to be noted during transport . . . . . . . . . . . 11
en
v PowerBoost function . . . . . . . . . . . . . . . . . . . . . 22
Activation . . . . . . . . . . . . . . . . . . . . . . . . . . . . . . . . . .22
Deactivation . . . . . . . . . . . . . . . . . . . . . . . . . . . . . . . .22
A Childproof lock. . . . . . . . . . . . . . . . . . . . . . . . . . 22
Activating and deactivating the childproof lock . . . . .22
Childproof lock . . . . . . . . . . . . . . . . . . . . . . . . . . . . . .22
b Automatic safety cut-out . . . . . . . . . . . . . . . . . . 23
Q Basic settings. . . . . . . . . . . . . . . . . . . . . . . . . . . 23
To access the basic settings: . . . . . . . . . . . . . . . . . . .24
t Cookware check. . . . . . . . . . . . . . . . . . . . . . . . . 25
h Power manager . . . . . . . . . . . . . . . . . . . . . . . . . 25
1 Operating the appliance . . . . . . . . . . . . . . . . . . 26
Switching the appliance on and off . . . . . . . . . . . . . .26
Setting the heating function and temperature . . . . . . .26
Rapid heating . . . . . . . . . . . . . . . . . . . . . . . . . . . . . . .26
O Time-setting options . . . . . . . . . . . . . . . . . . . . . 27
Setting the cooking time. . . . . . . . . . . . . . . . . . . . . . .27
Setting the end time . . . . . . . . . . . . . . . . . . . . . . . . . .27
Setting the timer . . . . . . . . . . . . . . . . . . . . . . . . . . . . .28
Setting the time. . . . . . . . . . . . . . . . . . . . . . . . . . . . . .29
* Getting to know your appliance . . . . . . . . . . . . 12
General information . . . . . . . . . . . . . . . . . . . . . . . . . . 12
Cooking area . . . . . . . . . . . . . . . . . . . . . . . . . . . . . . .12
Control panel . . . . . . . . . . . . . . . . . . . . . . . . . . . . . . .13
Cooking compartment . . . . . . . . . . . . . . . . . . . . . . . . 15
_ Accessories . . . . . . . . . . . . . . . . . . . . . . . . . . . . 16
Accessories included . . . . . . . . . . . . . . . . . . . . . . . . . 16
Inserting accessories . . . . . . . . . . . . . . . . . . . . . . . . . 16
Optional accessories . . . . . . . . . . . . . . . . . . . . . . . . . 16
K Before using for the first time. . . . . . . . . . . . . . 17
Initial use . . . . . . . . . . . . . . . . . . . . . . . . . . . . . . . . . . 17
Cleaning the cooking compartment and accessories 17
1 Operating the appliance . . . . . . . . . . . . . . . . . . 18
Switching the hob on and off . . . . . . . . . . . . . . . . . . . 18
Setting a hotplate . . . . . . . . . . . . . . . . . . . . . . . . . . . . 18
Chef's recommendations . . . . . . . . . . . . . . . . . . . . . .18
O Time-setting options . . . . . . . . . . . . . . . . . . . . . 21
Programming the cooking time . . . . . . . . . . . . . . . . . 21
The kitchen timer . . . . . . . . . . . . . . . . . . . . . . . . . . . . 21
@ Meat thermometer . . . . . . . . . . . . . . . . . . . . . . . 29
Types of heating . . . . . . . . . . . . . . . . . . . . . . . . . . . . .29
Inserting the meat probe into the food . . . . . . . . . . . .29
Setting the core temperature . . . . . . . . . . . . . . . . . . .30
Core temperatures of different foods . . . . . . . . . . . . .30
A Childproof lock. . . . . . . . . . . . . . . . . . . . . . . . . . 31
Activating and deactivating. . . . . . . . . . . . . . . . . . . . .31
Q Basic settings. . . . . . . . . . . . . . . . . . . . . . . . . . . 31
List of basic settings. . . . . . . . . . . . . . . . . . . . . . . . . .31
Changing the basic settings . . . . . . . . . . . . . . . . . . . .32
D Cleaning . . . . . . . . . . . . . . . . . . . . . . . . . . . . . . . 32
Cleaning agents . . . . . . . . . . . . . . . . . . . . . . . . . . . . .32
Surfaces in the cooking compartment . . . . . . . . . . . .34
Keeping the appliance clean . . . . . . . . . . . . . . . . . . .35
Cleaning aid . . . . . . . . . . . . . . . . . . . . . . . . . . . . . . . . . 35
Setting the cleaning aid . . . . . . . . . . . . . . . . . . . . . . .35
Cleaning the cooking compartment after use. . . . . . .36
p Rails. . . . . . . . . . . . . . . . . . . . . . . . . . . . . . . . . . . 36
Detaching and refitting the rails . . . . . . . . . . . . . . . . .36
3
Page 4

en Intended use
q Appliance door. . . . . . . . . . . . . . . . . . . . . . . . . . 37
Detaching and attaching the oven door . . . . . . . . . . . 37
Removing and installing the door panels . . . . . . . . . .37
Additional door safety . . . . . . . . . . . . . . . . . . . . . . . . 38
{ Frequently Asked Questions (FAQ) . . . . . . . . . 38
3 Trouble shooting . . . . . . . . . . . . . . . . . . . . . . . . 39
Rectifying faults yourself. . . . . . . . . . . . . . . . . . . . . . . 40
Replacing the bulb in the top of the cooking
compartment . . . . . . . . . . . . . . . . . . . . . . . . . . . . . . . 41
4 Customer service. . . . . . . . . . . . . . . . . . . . . . . . 41
E number and FD number . . . . . . . . . . . . . . . . . . . . .41
P Programmes . . . . . . . . . . . . . . . . . . . . . . . . . . . . 42
Cookware. . . . . . . . . . . . . . . . . . . . . . . . . . . . . . . . . . 42
Preparing food . . . . . . . . . . . . . . . . . . . . . . . . . . . . . . 42
Programmes. . . . . . . . . . . . . . . . . . . . . . . . . . . . . . . . 42
Setting a programme . . . . . . . . . . . . . . . . . . . . . . . . .43
J Tested for you in our cooking studio. . . . . . . . 44
General information . . . . . . . . . . . . . . . . . . . . . . . . . . 44
Cakes and pastries . . . . . . . . . . . . . . . . . . . . . . . . . . 45
Bakes and gratins . . . . . . . . . . . . . . . . . . . . . . . . . . .48
Poultry, meat and fish. . . . . . . . . . . . . . . . . . . . . . . . . 48
Vegetables and side dishes . . . . . . . . . . . . . . . . . . . .51
Yoghurt. . . . . . . . . . . . . . . . . . . . . . . . . . . . . . . . . . . . 51
Acrylamide in foodstuffs . . . . . . . . . . . . . . . . . . . . . . . 52
Drying. . . . . . . . . . . . . . . . . . . . . . . . . . . . . . . . . . . . . 52
Preserving . . . . . . . . . . . . . . . . . . . . . . . . . . . . . . . . .52
Prove dough. . . . . . . . . . . . . . . . . . . . . . . . . . . . . . . . 53
Defrosting. . . . . . . . . . . . . . . . . . . . . . . . . . . . . . . . . . 54
Test dishes. . . . . . . . . . . . . . . . . . . . . . . . . . . . . . . . . 54
Produktinfo
Additional information on products, accessories,
replacement parts and services can be found at
www.bosch-home.com and in the online shop
www.bosch-eshop.com
8Intended use
Intended use
Read these instructions carefully. Only then
will you be able to operate your appliance
safely and correctly. Retain the instruction
manual and installation instructions for future
use or for subsequent owners.
The images shown in these instructions are for
guidance only.
Check the appliance for damage after
unpacking it. Do not connect the appliance if it
has been damaged in transport.
Only a licensed professional may connect
appliances without plugs. Damage caused by
incorrect connection is not covered under
warranty.
This appliance is intended for private domestic
use and the household environment only. The
appliance must only be used for the
preparation of food and beverages. The
cooking process must be supervised. A short
cooking process must be supervised without
interruption. Only use the appliance in
enclosed spaces.
This appliance is intended for use up to a
maximum height of 4000 metres above sea
level.
This appliance is not designed for operation
with an external timer or by remote control.
Do not use inappropriate child safety shields
or hob guards. These can cause accidents.
This appliance may be used by children over
the age of 8 years old and by persons with
reduced physical, sensory or mental
capabilities or by persons with a lack of
experience or knowledge if they are
supervised or are instructed by a person
responsible for their safety how to use the
appliance safely and have understood the
associated hazards.
Children must not play with, on, or around the
appliance. Children must not clean the
appliance or carry out general maintenance
unless they are at least 15 years old and are
being supervised.
Keep children below the age of 8 years old at
a safe distance from the appliance and power
cable.
We advise that you exercise caution using or
standing near an induction hob while it is in
operation, if you wear a pacemaker or a
similar medical device. Consult your doctor or
4
Page 5

Important safety information en
the device manufacturer concerning its
conformity or any possible incompatibilities,
Always slide accessories into the cooking
compartment the right way round.
~ "Accessories" on page 16
(Important safety
information
Impor t ant safety informat i on
:Warning – Risk of fire!
■ Combustible items stored in the cooking
compartment may catch fire. Never store
combustible items in the cooking
compartment. Never open the appliance
door if there is smoke inside. Switch off the
appliance and unplug it from the mains or
switch off the circuit breaker in the fuse box.
Risk of fire!
■ A draught is created when the appliance
door is opened. Greaseproof paper may
come into contact with the heating element
and catch fire. Do not place greaseproof
paper loosely over accessories during
preheating. Always weight down the
greaseproof paper with a dish or a baking
tin. Only cover the surface required with
greaseproof paper. Greaseproof paper
must not protrude over the accessories.
Risk of fire!
■ Hot oil and fat can ignite very quickly. Never
leave hot fat or oil unattended. Never use
water to put out burning oil or fat. Switch off
the hotplate. Extinguish flames carefully
using a lid, fire blanket or something similar.
Risk of fire!
■ The hotplates become very hot. Never
place combustible items on the hob. Never
place objects on the hob.
Risk of fire!
■ The appliance becomes very hot, and
flammable materials can easily catch fire.
Do not store or use any flammable objects
(e.g. aerosol cans, cleaning agents) under
or in the vicinity of the oven. Do not store
any flammable objects inside or on top of
the oven.
Risk of fire!
■ The surfaces of the plinth drawer may
become very hot. Only store oven
accessories in the drawer. Flammable and
combustible objects must not be stored in
the plinth drawer.
Risk of fire!
■ The hob switches off automatically and can
no longer be operated. It may switch on
unintentionally at a later point. Switch off the
circuit breaker in the fuse box. Contact the
after-sales service.
:Warning – Risk of burns!
■ The appliance becomes very hot. Never
touch the interior surfaces of the cooking
compartment or the heating elements.
Always allow the appliance to cool down.
Keep children at a safe distance.
Risk of serious burns!
■ Accessories and ovenware become very
hot. Always use oven gloves to remove
accessories or ovenware from the cooking
compartment.
Risk of burns!
■ Alcoholic vapours may catch fire in the hot
cooking compartment. Never prepare food
containing large quantities of drinks with a
high alcohol content. Only use small
quantities of drinks with a high alcohol
content. Open the appliance door with care.
Risk of burns!
■ The hotplates and surrounding area
(particularly the hob surround, if fitted)
become very hot. Never touch the hot
surfaces. Keep children at a safe distance.
Risk of burns!
■ During operation, the surfaces of the
appliance become hot. Do not touch the
surfaces when they are hot. Keep children
away from the appliance.
Risk of burns!
■ The hotplate heats up but the display does
not work. Switch off the circuit breaker in
the fuse box. Contact the after-sales
service.
Risk of burns!
■ The appliance becomes hot during
operation. Allow the appliance to cool down
before cleaning.
Risk of burns!
■ Metal objects on the hob quickly become
very hot. Never place metal objects (such
as knives, forks, spoons and lids) on the
hob.
Risk of fire!!
■ After each use, always turn off the hob at
the main switch. Do not wait until the hob
turns off automatically after the pan is
removed.
:Warning – Risk of scalding!
■ The accessible parts become hot during
operation. Never touch the hot parts. Keep
children at a safe distance.
Risk of scalding!
■ When you open the appliance door, hot
steam can escape. Steam may not be
visible, depending on its temperature. When
opening, do not stand too close to the
appliance. Open the appliance door
carefully. Keep children away.
Risk of scalding!
■ Water in a hot cooking compartment may
create hot steam. Never pour water into the
cooking compartment when the cooking
compartment is hot.
5
Page 6

en Important safety information
:Warning – Risk of injury!
■ Scratched glass in the appliance door may
develop into a crack. Do not use a glass
scraper, sharp or abrasive cleaning aids or
detergents.
Risk of injury!
■ When cooking in a bain marie, the hob and
cooking container could shatter due to
overheating. The cooking container in the
bain marie must not directly touch the
bottom of the water-filled pot. Only use heatresistant cookware.
Risk of injury!
■ Saucepans may suddenly jump due to
liquid between the pan base and the
hotplate. Always keep the hotplate and
saucepan bases dry.
Risk of injury!
■ If the appliance is placed on a base and is
not secured, it may slide off the base. The
appliance must be fixed to the base.
Risk of injury!
■ If you leave the appliance door open,
people may bump into it, resulting in injury.
The appliance door must be kept closed
both while the appliance is in operation and
when it has finished.
:Warning – Risk of tipping!
■ Do not use any high-pressure cleaners or
steam cleaners, which can result in an
electric shock.
Risk of electric shock!
■ A defective appliance may cause electric
shock. Never switch on a defective
appliance. Unplug the appliance from the
mains or switch off the circuit breaker in the
fuse box. Contact the after-sales service.
Risk of electric shock!
■ Cracks or fractures in the glass ceramic
may cause electric shocks. Switch off the
circuit breaker in the fuse box. Contact the
after-sales service.
Risk of electric shock !
■ When disconnecting the appliance from the
mains, the connections may cause residual
voltages. Only allow a professional to
connect the appliance.
Halogen lamp
:Warning – Risk of burns!
The bulbs in the cooking compartment
become very hot. There is still a risk of burning
your skin for some time after they have been
switched off. Do not touch the glass cover.
Avoid contact with your skin when cleaning.
Warning: In order to prevent tipping of the
appliance, this stabilizing means must be
installed. Refer to the instructions for
installation.
:Warning – Risk of electric shock!
■ Incorrect repairs are dangerous. Repairs
may only be carried out and damaged
power cables replaced by one of our
trained after-sales technicians. If the
appliance is defective, unplug the appliance
from the mains or switch off the circuit
breaker in the fuse box. Contact the aftersales service.
Risk of electric shock and serious injury!
■ The cable insulation on electrical
appliances may melt when touching hot
parts of the appliance. Never bring
electrical appliance cables into contact with
hot parts of the appliance.
Risk of electric shock!
:Warning – Risk of electric shock!
When replacing the cooking compartment
bulb, the bulb socket contacts are live. Before
replacing the bulb, unplug the appliance from
the mains or switch off the circuit breaker in
the fuse box.
Meat thermometer
:Warning – Risk of electric shock!
The insulation of an incompatible meat
thermometer may be damaged. Only use the
meat thermometer which is recommended for
this appliance.
6
Page 7

Causes of damage en
]Causes of damage
Causes of damage
Hob
■ Hard or pointed objects dropped on the hob may
damage it.
■ Aluminium foil and plastic containers will melt if
placed on the hotplate while it is hot. The use of
laminated sheeting is not recommended on the hob.
Caution!
■ Rough pan bases may scratch the hob.
■ Avoid leaving empty pots and pans on the hotplate.
Doing so may cause damage.
■ Do not place hot pans on the control panel, the
Overview
You will find the most frequently caused damage in the
following table:
indicator area, or the hob frame. Doing so may
cause damage.
Damage Cause Measure
Stains Boiled over food. Remove boiled over food immediately with a glass scraper.
Unsuitable cleaning agent. Only use cleaning agents that are suitable for this type of hob.
Scratches Salt, sugar and sand. Do not use the hob as a work surface or storage space.
Cookware with rough bases scratch the hob. Check the cookware.
Discolouration Unsuitable cleaning agent. Only use cleaning agents that are suitable for this type of hob.
Pan abrasion. Lift pots and pans when moving them.
Chips Sugar, food with a high sugar content. Remove boiled over food immediately with a glass scraper.
Damage to the oven
■ Fruit juice: when baking particularly juicy fruit pies,
do not pack the baking tray too generously. Fruit
Caution!
■ Accessories, foil, greaseproof paper or ovenware on
the cooking compartment floor: do not place
accessories on the cooking compartment floor. Do
not cover the cooking compartment floor with any
sort of foil or greaseproof paper. Do not place
ovenware on the cooking compartment floor if a
temperature of over 50 ºC has been set. This will
cause heat to accumulate. The baking and roasting
times will no longer be correct and the enamel will
be damaged.
■ Aluminium foil: Aluminium foil in the cooking
compartment must not come into contact with the
door glass. This could cause permanent
discolouration of the door glass.
■ Water in a hot cooking compartment: do not pour
water into the cooking compartment when it is hot.
This will cause steam. The temperature change can
cause damage to the enamel.
■ Moisture in the cooking compartment: Over an
extended period of time, moisture in the cooking
compartment may lead to corrosion. Allow the
cooking compartment to dry after use. Do not keep
moist food in the closed cooking compartment for
extended periods of time. Do not store food in the
cooking compartment.
■ Cooling with the appliance door open: Following
juice dripping from the baking tray leaves stains that
cannot be removed. If possible, use the deeper
universal pan.
■ Extremely dirty seal: If the seal is very dirty, the
appliance door will no longer close properly during
operation. The fronts of adjacent units could be
damaged. Always keep the seal clean. Never
operate the appliance if the seal is damaged or
missing. ~ "Cleaning" on page 32
■ Appliance door as a seat, shelf or worktop: Do not
sit on the appliance door, or place or hang anything
on it. Do not place any cookware or accessories on
the appliance door.
■ Inserting accessories: depending on the appliance
model, accessories can scratch the door panel
when closing the appliance door. Always insert the
accessories into the cooking compartment as far as
they will go.
■ Carrying the appliance: do not carry or hold the
appliance by the door handle. The door handle
cannot support the weight of the appliance and
could break.
■ Grilling: do not insert the baking tray or universal pan
higher than level 3 when grilling. The high heat
distorts it and the enamel may be damaged when it
is removed. At level 4 and 5, only grill directly on the
wire rack.
operation at high temperatures, only allow the
cooking compartment to cool down with the door
closed. Do not trap anything in the appliance door.
Even if the door is only left open a crack, the front of
nearby furniture may become damaged over time.
Only leave the cooking compartment to dry with the
door open if a lot of moisture was produced whilst
Damage to the plinth drawer
Caution!
Do not place hot objects in the plinth drawer. It could be
damaged.
the oven was operating.
7
Page 8
en Environmental protection
7Environmental protection
Envi r onment al pr ot ec t i on
Your new appliance is particularly energy-efficient.
Here you can find tips on how to save even more
energy when using the appliance, and how to dispose
of your appliance properly.
Saving energy
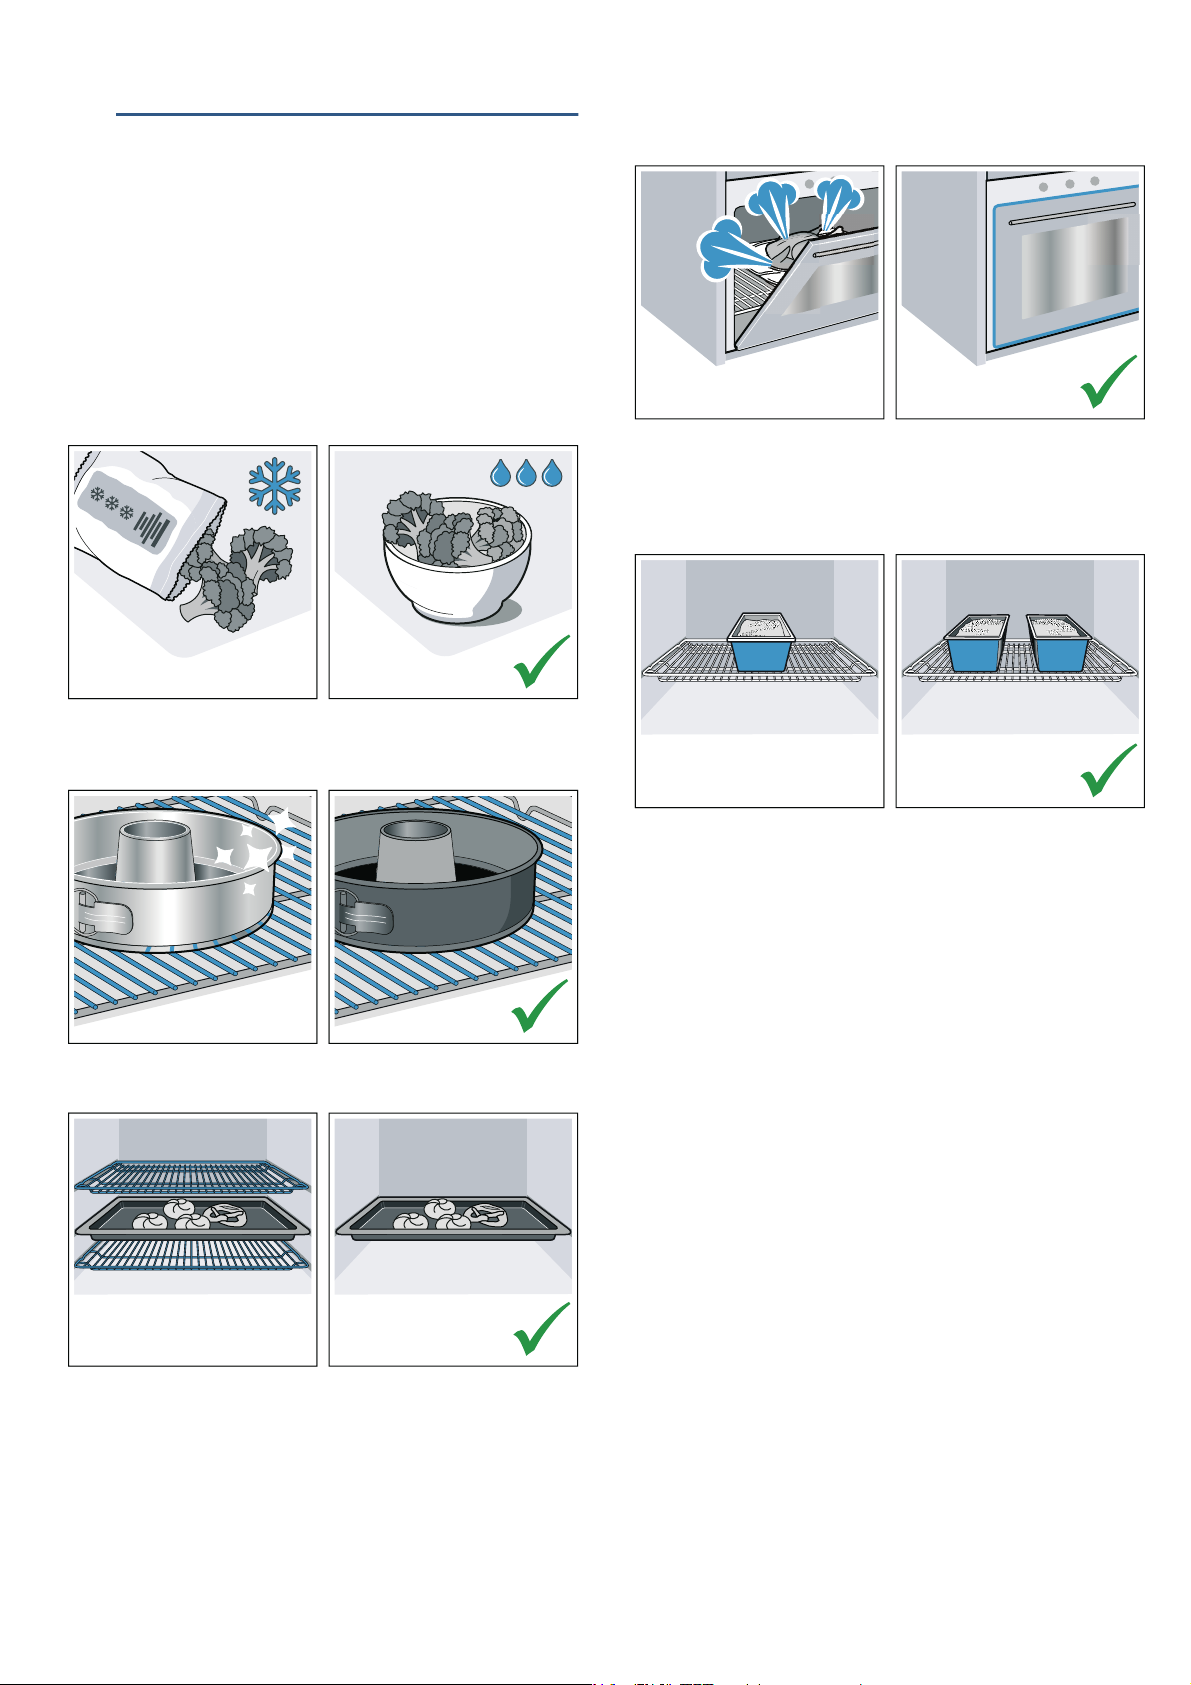
■ Only preheat the appliance if this is specified in the
recipe or in the tables in the operating instructions.
■ Leave frozen food to defrost before placing it in the
cooking compartment.
■ Open the appliance door as infrequently as possible
when the appliance is in use.
■ It is best to bake several cakes one after the other.
The cooking compartment stays warm. This reduces
the baking time for the second cake. You can place
two cake tins next to each other in the cooking
compartment.
■ Use baking tins that are dark-coloured, painted black
or have an enamel coating. These absorb the heat
particularly well.
■ Remove any unnecessary accessories from the
cooking compartment.
■ For longer cooking times, you can switch the
appliance off 10 minutes before the end of the
cooking time and use the residual heat to finish
cooking.
Energy-saving advice
■ Always use the correct lid for each pan. Cooking
without a lid uses a lot more energy. Use a glass lid
to provide visibility and avoid having to lift the lid.
■ Use pans with flat bases. Bases that are not flat use
a lot more energy.
■ The diameter of the pan base must match the size of
the hotplate. Please note: pan manufacturers usually
provide the diameter for the top of the pan, which is
usually larger than the diameter of the pan base.
■ Use a small pan for small amounts of food. A large
pan which is not full uses a lot of energy.
■ Use little water when cooking. This saves energy and
preserves all the vitamins and minerals in
vegetables.
■ Select the lowest power level to maintain cooking. If
the power level is too high, energy is wasted.
8
Page 9
Induction cooking en
Environmentally-friendly disposal
Dispose of packaging in an environmentally-friendly
manner.
This appliance is labelled in accordance with
European Directive 2012/19/EU concerning
used electrical and electronic appliances
(waste electrical and electronic equipment WEEE). The guideline determines the
framework for the return and recycling of used
appliances as applicable throughout the EU.
fInduction cooking
Induction cooki ng
Advantages of induction cooking
Induction cooking is very different from traditional
cooking methods, as heat builds up directly in the item
of cookware. This offers numerous advantages:
■ Saves time when boiling and frying.
■ Saves energy.
■ Easier to care for and clean. Spilled food does not
burn on as quickly.
■ Heat control and safety – the hob increases or
decreases the heat supply as soon as the user
changes the setting. The induction hotplate stops the
heat supply as soon as the cookware is removed
from the hotplate, without having to switch it off first.
Cookware
Only use ferromagnetic cookware for induction cooking,
such as:
■ Cookware made from enamelled steel
■ Cookware made from cast iron
■ Special induction-compatible cookware made from
stainless steel.
To check whether your cookware is suitable for
induction cooking, refer to the section on
~ "Cookware check".
To achieve a good cooking result, the ferromagnetic
area on the base of the pan should match the size of
the hotplate. If a hotplate does not detect an item of
cookware, try placing it on another hotplate with a
smaller diameter.
FP
FP
FP
Some induction cookware does not have a fully
ferromagnetic base:
■ If the base of the cookware is only partially
ferromagnetic, only the area that is ferromagnetic will
heat up. This may mean that heat will not be
distributed evenly. The non-ferromagnetic area may
not heat up to a sufficient temperature for cooking.
■ The ferromagnetic area will also be reduced if the
material from which the base of the cookware is
made contains aluminium, for example. This may
mean that the cookware will not become sufficiently
hot or even that it will not be detected.
9
Page 10
en Installation and connection
5Installation and connection
Install ati on and connect i on
Do not install the appliance behind a decorative door
or the door of a kitchen unit, as this may cause the
appliance to overheat.
Unsuitable pans
Never use diffuser hobs or pans made from:
■ common thin steel
■ glass
■ earthenware
■ copper
■ aluminium
Properties of the base of the cookware
The material(s) from which the base of the cookware is
made can affect the cooking result. Using pots and
pans made from materials that distribute heat evenly
through them, such as stainless-steel pans with a threelayer base, saves time and energy.
Use cookware with a flat base; if the base of the
cookware is uneven, this may impair the heat supply.
Absence of pan or unsuitable size
If no pan is placed on the selected hotplate, or if it is
made of unsuitable material or is not the correct size,
the power level displayed on the hotplate indicator will
flash. Place a suitable pan on the hotplate to stop the
flashing. If this takes more than 90 seconds, the
hotplate will switch off automatically.
Electrical connection
Only licensed specialists may connect the appliance.It
is important that you comply with the requirements of
your electricity supplier.
Any damage arising from the appliance being
connected incorrectly will invalidate the warranty.
Caution!
Your appliance comes with the enclosed cable for
permanently connecting it to the mains electricity
supply.
Except in the event of damage, never remove the cable
from the appliance or replace it with another cable (with
or without plug).
Caution!
If the supply cord is damaged, it must be replaced by
the manufacturer, its service agent or similarly qualified
persons in order to avoid a hazard.
:Warning – Danger of death!
There is a risk of electric shock if you touch live
components.
■ Always make sure your hands are dry when you
touch or hold the mains plug.
■ Only pull out the mains cable by taking hold of the
plug and removing the plug; never pull it out by the
mains cable itself, as this could damage it.
■ Never unplug the mains plug when the appliance is
in operation.
Please note the following information and ensure that:
Empty pans or those with a thin base
Do not heat empty pans, nor use pans with a thin base.
The hob is equipped with an internal safety system.
However, an empty pan may heat up so quickly that the
"automatic switch off" function may not have time to
react and the pan may reach very high temperatures.
The base of the pan could melt and damage the glass
on the hob. In this case, do not touch the pan and
switch the hotplate off. If it fails to work after it has
cooled down, please contact the Technical Assistance
Service.
Pan detection
Each hotplate has a lower limit for pan detection. This
depends on the diameter of the ferromagnetic area of
the cookware and the material from which its base is
made. For this reason, you should always use the
hotplate that best matches the diameter of the base of
the pan.
Notes
■ The mains plug fits the socket.
■ The cable cross section is adequate.
■ The earthing system is properly installed.
■ The mains cable is only replaced by a qualified
electrician (if this is necessary).Spare mains cables
can be ordered from our after-sales service.
■ No power strips/multi-way connectors or extension
cables are used.
■ If using a residual current device, only use one that
bears the mark z.
The presence of this mark is the only way to be sure
that it fulfils all the applicable regulations.
■ The mains plug can be accessed at all times.
■ The mains cable is not kinked, crushed, modified or
severed.
■ The mains cable does not come into contact with
heat sources.
10
Page 11
Installation and connection en
For the installer
■ An all-pole isolating switch with a contact gap of at
least 3 mm must be present in the installation circuit.
This is not necessary if the appliance is connected
by a plug that is accessible to the user.
■ Electrical safety: The cooker corresponds to safety
class I and may only be used in conjunction with a
safety earth terminal.
■ A type H 05 VV-F or equally rated lead must be used
to connect the appliance.
Removing the appliance
Disconnect the appliance from the mains power supply.
:Warning – Risk of electric shock !
When disconnecting the appliance from the mains, the
connections may cause residual voltages. Only allow a
professional to connect the appliance.
Adjacent units
Any adjacent units must not be made of flammable
materials. The fronts of any adjacent units must be heatresistant up to at least 90 °C.
Wall fixing
To prevent the cooker from tipping over, you must fix it
to the wall using the enclosed bracket. Please observe
the installation instructions for fixing the oven to the
wall.
Removing the door lock
If the door safety lock is no longer needed or if it is
soiled:
1. Opening the oven door
2. Unscrew the screw and remove the door lock
(picture B).
3. Close the oven door.
Measures to be noted during transport
Secure all mobile parts in and on the appliance using
an adhesive tape that can be removed without leaving
any traces. Push all accessories (e.g. baking tray) into
the corresponding slots with cardboard at the edges, in
order to avoid damaging the appliance. Place
cardboard or similar between the front and rear side to
prevent knocks against the inside of the glass door.
Secure the door and, if available, the top cover to the
appliance sides using adhesive tape.
Keep the original appliance packaging. Only transport
the appliance in the original packaging. Observe the
transport arrows on the packaging.
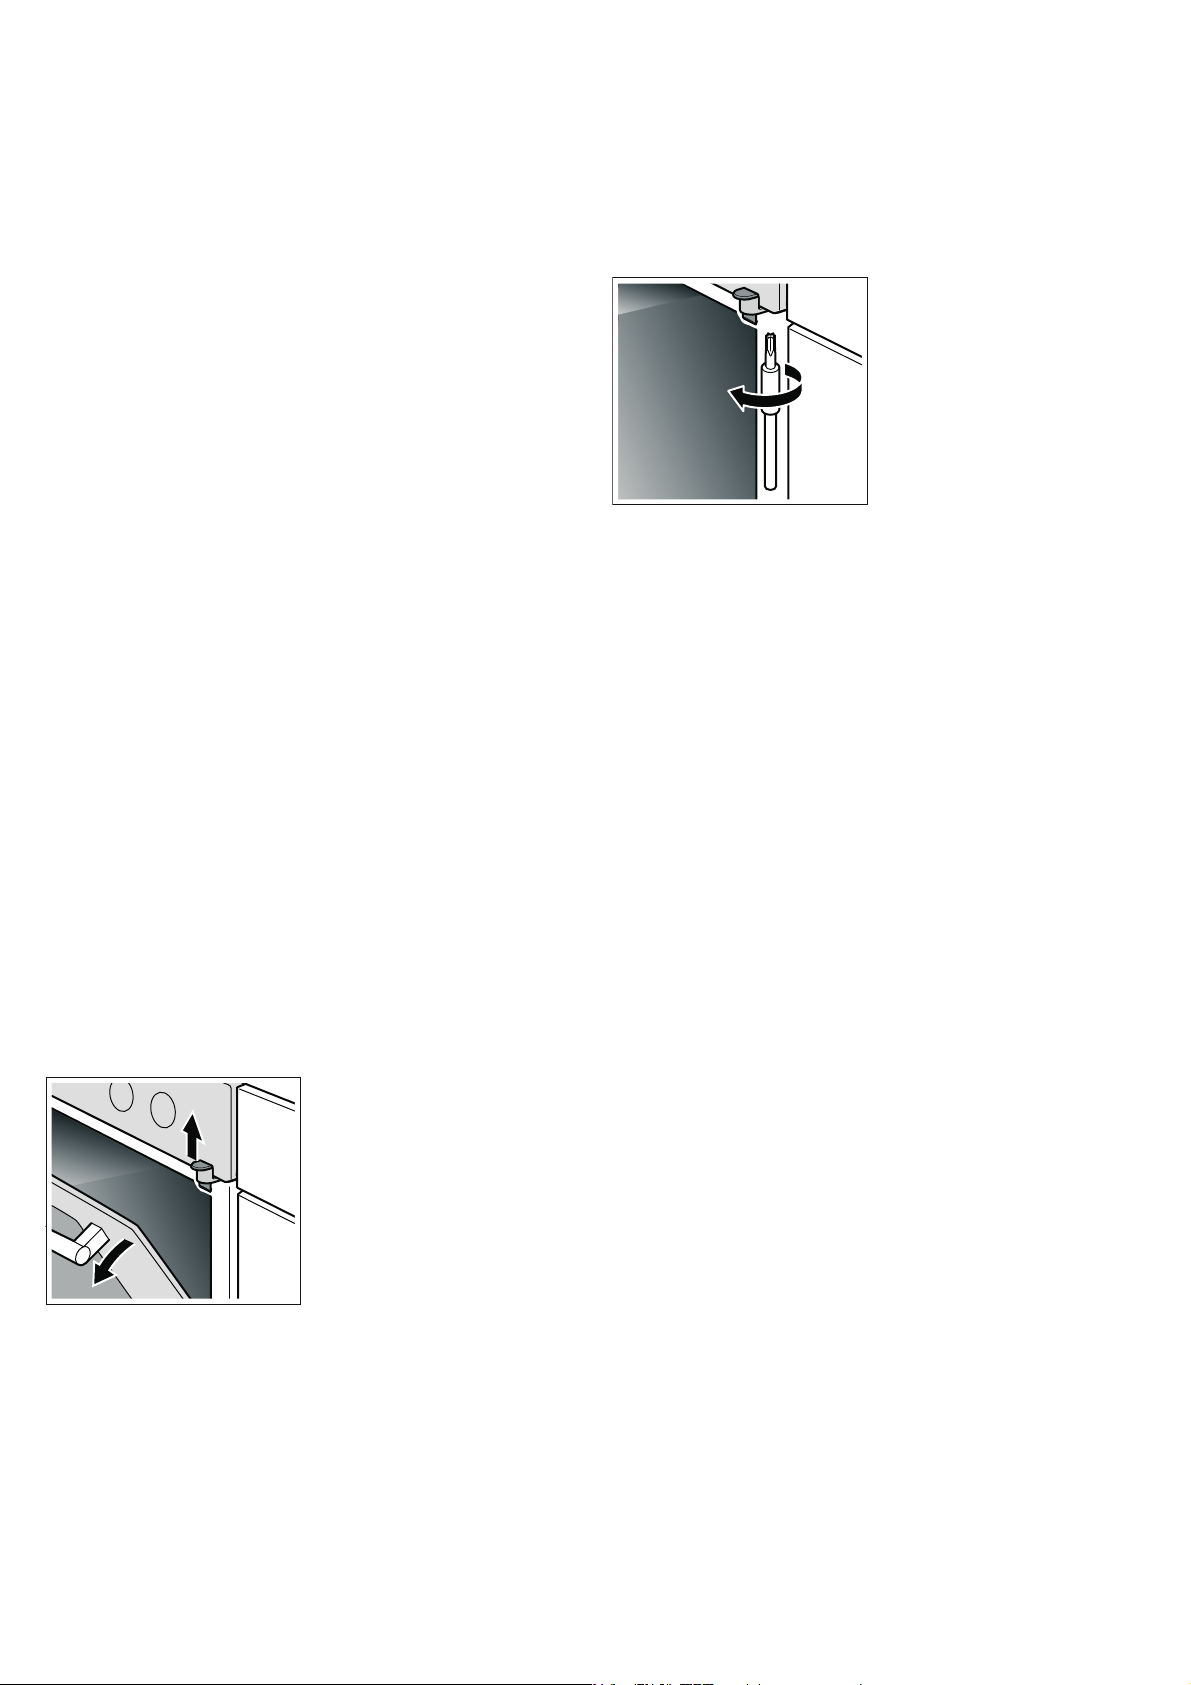
Door lock
To prevent children reaching into the oven when it is
hot, the oven door is equipped with a lock. It is located
at the top of the oven door.
Opening the oven door
Press the lock upwards (picture A).
If the original packaging is no longer available
pack the appliance in protective packaging to
guarantee sufficient protection against any transport
damage.
Transport the appliance in an upright position. Do not
hold the appliance by the door handle or the
connections on the rear, as these could be damaged.
Do not place any heavy objects on the appliance.
11
Page 12
en Getting to know your appliance
*Getting to know your
appliance
Gett i ng to know your appl i ance
In this section, we will explain the indicators and
controls. You will also find out about the various
functions of your appliance.
General information
The design depends on the respective appliance
model.
Note: Depending on the appliance model, individual
details and colours may differ.
Cooking area
Here is an overview of the control panel. The design
depends on the respective appliance model.
Explanations
1 Hob**
2 Control panel**
3* Cooling fan
4 Oven door**
5* Plinth drawer**
* Optional (available for some appliances)
** Details may vary depending on the appliance
model.
,(&
: :
: :
: :
12
Page 13
The control panel
Getting to know your appliance en
Controls
#
ø
A/@
à
0
D
Main switch
Selecting a hotplate
Adjustment fields
PowerBoost function
Timer function
Childproof lock
Indicators
›
‹‹
Touch controls
Touching a symbol activates the associated function.
Notes
■ Always keep the control panel clean and dry.
Moisture reduces its effectiveness.
Indicators
‹
‚-Š
•/œ
Operating status
Heat settings
Residual heat
■ Do not place any cookware near the indicators or
sensors. The electronics could overheat.
The hotplates
Hotplates
$
Simple hotplate Use cookware that is a suitable size
Only use cookware that is suitable for induction cooking; see section ~ "Induction cooking"
Residual heat indicator
The hob has a residual heat indicator for each hotplate.
This indicates that a hotplate is still hot. Do not touch a
hotplate while the residual heat indicator is lit up.
The following indicators are shown depending on the
amount of residual heat:
■ Display •: High temperature
■ Display œ: Low temperature
If you remove the cookware from the hotplate during
cooking, the residual heat indicator and the selected
heat setting will flash alternately.
When the hotplate is switched off, the residual heat
indicator will light up. Even after the hob has been
switched off, the residual heat indicator will stay lit for as
long as the hotplate is still warm.
PowerBoost function
Timer
Control panel
Details may vary depending on the appliance model.
Control knobs
The control knobs can be pushed in and remain
pressed down when they are in the "out" position. Press
down on the control knob again to release it back up.
Buttons and display
You can use the buttons to set various additional
functions on your appliance. You will be able to see the
values for these on the display.
Symbol Meaning
Time-setting options Tap the symbol repeatedly to select
v
the time v, timer t, duration y
and end time {.
Minus
A
Plus
@
Weight Select a weight for the programmes.
h
Childproof lock Lock and unlock the oven functions
D
Reduce setting values.
Increase setting values.
on the control panel.
--------
13
Page 14

en Getting to know your appliance
Display
The value that can be set at the present time or that is
elapsing will be shown in large digits on the display.
Types of heating and functions
Use the function selector to set the types of heating and
other functions.
Type of heating Use
<
6
$
$
(
7
%
--------
3D hot air For baking and roasting on one or more levels.
The fan distributes the heat from the ring heating element in the back panel evenly around
the cooking compartment.
Gentle hot air For gently cooking selected types of food on one level without preheating.
The fan distributes the heat from the ring-shaped heating element in the back panel
around the cooking compartment.
This heating function is used to measure both the energy consumption in air recirculation
mode and the energy efficiency class.
Pizza setting For cooking pizza and dishes that require a lot of heat from underneath.
The bottom heating element and the ring heating element in the back panel heat up.
Bottom heating For cooking in a bain marie and for baking food for extra time.
Heat is emitted from below.
Grill, large area For grilling flat items, such as steaks or sausages, for making toast, and for browning
food.
The whole area below the grill element becomes hot.
Circulated air grilling For roasting poultry, whole fish and larger pieces of meat.
The grill element and the fan switch on and off alternately. The fan circulates the hot air
around the food.
Top/bottom heating For traditional baking and roasting on one level. Especially suitable for cakes with moist
toppings.
Heat is emitted evenly from above and below.
This heating function is used to measure the energy consumption in the conventional
mode.
To use the individual time-setting options, tap the
v button several times.If there is a red bar above or
below a symbol, this means that the value being shown
in large digits on the display refers to the function that
this symbol represents.
To make sure you always use the right type of heating
to cook your food, we have explained the differences
and applications below.
Other functions
Your new oven has yet more functions; see below for a
brief description of these.
Function Use
Rapid heating Preheats the cooking compartment rapidly without accessories.
F
^
%
--------
Interior lighting Switches on the interior lighting; all other functions remain off.
Makes it easier to clean the cooking compartment, for example.
Programmes For many dishes, the appliance has preprogrammed setting values that you can use.
~ "Programmes" on page 42
14
Page 15

Getting to know your appliance en
Temperature
Use the temperature selector to set the temperature in
the cooking compartment. You can also use it to select
the settings for other functions.
For temperature settings above 250 °C, the appliance
reduces the temperature to approx. 240 °C after
approx. 10 minutes. If your appliance has the top/
bottom heating or bottom heating types, this reduction
does not take place.
Position Meaning
Ú
"Off" position The appliance is not heating.
50-275 Temperature range The temperature that can be set
in the cooking compartment in °C.
1, 2, 3
or
I, II, III
Grill settings The configurable settings for the
grill, large area ( and small
area * (depending on the appliance model).
Setting 1 = low
Setting 2 = medium
Setting 3 = high
%
Programmes The setting for the programme
function.
--------
Temperature indicator
The line at the bottom of the display turns red in three
increments, from left to right, as the cooking
compartment heats up.
When you are preheating the appliance, the optimal
time to place your food in the cooking compartment is
as soon as all three sections of the line have turned red.
When the appliance is in operation, one of the red
sections of the line will go out during the heating
phases.
By turning the function selector to the interior lighting
setting, you can switch on the lighting without heating
the oven. This makes it easier to clean your appliance,
for example.
Cooling fan
The cooling fan switches on and off as required. The
hot air escapes above the door.
Caution!
Do not cover the ventilation slots. Otherwise, the
appliance may overheat.
So that the cooking compartment cools down more
quickly after operation, the cooling fan continues to run
for a certain period afterwards.
Note: Due to thermal inertia, the temperature displayed
may be slightly different to the actual temperature inside
the oven.
Cooking compartment
Various functions in the cooking compartment make
your appliance easier to use. For example, the cooking
compartment is well lit and a cooling fan prevents the
appliance from overheating.
Opening the appliance door
If you open the appliance door when the appliance is in
operation, the appliance will continue to operate as
before.
Interior lighting
With most heating functions and other functions, the
interior lighting in the cooking compartment will remain
lit while the oven is in operation. When the function
selector is turned to bring operation to an end, the
lighting will go out.
15
Page 16
en Accessories
_Accessories
Accessori es
Your appliance is accompanied by a range of
accessories. Here, you can find an overview of the
accessories included and information on how to use
them correctly.
Accessories included
Your appliance is equipped with the following
accessories:
Wire rack
For ovenware, cake tins and ovenproof
dishes.
For roasts, grilled items and frozen
meals.
Baking tray
For tray bakes and small baked products.
Universal pan
For moist cakes, pastries, frozen meals
and large roasts.
It can be used to catch dripping fat when
you are grilling directly on the wire rack.
Meat probe
Enables precision roasting to your exact
requirements.
The relevant section describes how to
use it. ~ "Meat thermometer"
--------
Only use original accessories. They are specially
adapted for your appliance.
You can buy accessories from the after-sales service,
from specialist retailers or online.
Note: The accessories may deform when they become
hot. This does not affect their function. Once they have
cooled down again, they regain their original shape.
on page 29
Inserting accessories
The cooking compartment has five shelf positions. The
shelf positions are counted from the bottom up.
In some appliances, the highest shelf position is
marked on the cooking compartment by the grill
symbol.
Always insert accessories between the two guide rods
for the shelf position.
Accessories can be pulled out approximately halfway
without tipping.
When sliding accessories into the cooking
compartment, ensure that the kink in the side rail is at
the back. Only then will they lock in place.
Notes
■ Hold the baking tray securely at the sides with both
hands and slide it into the shelf supports, keeping it
parallel. Do not move the baking tray from side to
side as you slide it in, otherwise it will not go in easily
and the enamelled surfaces may be damaged.
■ Make sure that you always insert the accessories
into the cooking compartment the right way round.
■ Always insert the accessories fully into the cooking
compartment so that they do not touch the appliance
door.
■ Take any accessories that you will not be using out
of the cooking compartment.
Optional accessories
You can buy optional accessories from our after-sales
service, from specialist retailers or online. You will find a
comprehensive range of products for your appliance in
our brochures and online.
Their availability and whether it is possible to order
them online varies from country to country. See your
sales brochures for more details.
Note: Not all optional accessories are suitable for every
appliance. When purchasing, always quote the exact
product number (E no.) of your appliance.
~ "Customer service" on page 41
Optional accessories
Wire rack
For cookware, cake tins and ovenproof dishes, and for roasts and
grilled food.
Baking tray
For tray bakes and small baked items.
Universal pan
For moist cakes, baked items, frozen food and large roasts.
It can be used to catch dripping fat when you are grilling directly on
the wire rack.
Wire insert
For meat, poultry and fish.
For inserting into the universal pan to catch dripping fat and meat
juices.
16
Page 17

Before using for the first time en
Professional pan
For preparing large quantities of food. Also ideal for moussaka, for
example.
Lid for the professional pan
The lid turns the professional pan into a professional roasting dish.
Pizza tray
For pizzas and large round cakes.
Grill tray
Use for grilling in place of the wire rack or as a splatter guard. Use in
the universal pan only.
Baking stone
For home-made bread, bread rolls and pizzas that you wish to have a
crispy base.
The baking stone must be preheated to the recommended temperature.
Glass roasting dish
For stews and bakes.
Glass pan
For bakes, vegetable dishes and baked items.
Pull-out system, one level
Fitting pull-out rails at position 2 will allow you to pull accessories out
further without them tipping.
Pull-out system, two levels
Fitting pull-out rails at positions 2 and 3 will allow you to pull accesso-
ries out further without them tipping.
Pull-out system, three levels
Fitting pull-out rails at positions 1, 2 and 3 will allow you to pull acces-
sories out further without them tipping.
--------
KBefore using for the first
time
Bef or e usi ng for the first time
Before you can use your new appliance, you must
make some settings. You must also clean the cooking
compartment and accessories.
Initial use
The time will appear on the display once the appliance
is connected to the power supply. Set the current time.
Setting the time
Make sure that the function selector is set to the "Off"
position.
The time starts at "12:00".
1. Use the A or @ button to set the time.
2. Touch the v button to confirm.
The current time will be shown on the display.
Cleaning the cooking compartment and
accessories
Before using the appliance to prepare food for the first
time, you must clean the cooking compartment and
accessories.
Cleaning the cooking compartment
To eliminate the new-appliance smell, heat up the
cooking compartment when it is empty and with the
oven door closed.
Make sure that there is no leftover packaging, such as
polystyrene pellets, in the cooking compartment and
remove the adhesive tape that is in or on the appliance.
Before heating the appliance, wipe the smooth surfaces
in the cooking compartment with a soft, damp cloth.
Keep the kitchen ventilated while the appliance is
heating.
Apply the settings indicated below. You can find out
how to set the heating function and the temperature in
the next section. ~ "Operating the appliance"
on page 18
Settings
Heating function
Temperature maximum
Time 1 hour
Switch off the appliance after the time indicated.
Once the cooking compartment has cooled down,
clean the smooth surfaces with soapy water and a dish
cloth.
Cleaning the accessories
Clean the accessories thoroughly using soapy water
and a dish cloth or soft brush.
3D Hotair :
17
Page 18

en Operating the appliance
1Operating the appliance
Operat i ng the appl i ance
This chapter explains how to set a hotplate. The table
shows heat settings and cooking times for various
meals.
Switching the hob on and off
The main switch is used to switch the hob on and off.
To switch on: Touch the # symbol. An audible signal
sounds. The indicator next to the main switch and the
hotplate indicators ‹ light up. The hob is ready to use.
To switch off: Touch the # symbol until the indicator
goes out. All hotplates are switched off. The residual
heat indicator remains lit until the hotplates have cooled
down sufficiently.
Notes
■ The hob will automatically switch itself off if all
hotplates have been switched off for more than
20 seconds.
■ The settings are stored for 4 seconds after the hob
has been switched off. If you switch the hob back on
during this time, the hob will operate using the
stored settings.
■ The maximum output of the hob depends on the
type of mains connection used. In order not to
exceed the maximum output limit, the hob
automatically distributes the power available
between the hotplates that are switched on.
The output of a hotplate can be temporarily
decreased to below the setpoint while the Power
Management function is active.
Setting a hotplate
The heat setting is set.
Changing the heat setting
Select the hotplate and touch the @ or A symbol until
the required heat setting appears.
Switching off the hotplate
Select the hotplate and then touch the @ or A symbol
until ‹ appears.
The hotplate switches itself off and the residual heat
indicator appears.
Notes
■ If no pan has been placed on the hotplate, the
selected power level flashes. After a certain time has
elapsed, the hotplate switches off.
■ If a pan has been placed on the hotplate before
switching on the hob, it will be detected within
20 seconds of pressing the main switch and the
hotplate will be selected automatically. Once
detected, select the power level within the next
20 seconds or the hotplate will switch off.
If more than one pan is placed on the hob, only one
will be detected when switching it on.
Use the @ and A symbols to select the required heat
setting.
Heat setting ‚ = lowest setting.
Heat setting Š = highest setting.
Every heat setting has an intermediate setting. This is
marked with a dot.
Notes
■ To protect the fragile parts of your appliance from
overheating and electrical overloading, the hob may
temporarily reduce the power.
■ In order to prevent the appliance from producing
excess noise, the hob may temporarily reduce the
power.
Selecting a hotplate and heat setting
The hob must be switched on.
1. Select the hotplate using the ø symbol.
2. Touch the @ or A symbol within 10 seconds. The
following basic setting appears:
@ symbol: Š heat setting
A symbol: … heat setting
Chef's recommendations
Recommendations
■ When heating up puree, cream soups and thick
sauces, stir occasionally.
■ Set heat setting 8 to 9 for preheating.
■ When cooking with the lid on, turn the heat setting
down as soon as steam escapes between the lid
and the cookware. Steam does not need to escape
for a good cooking result.
■ After cooking, keep the lid on the cookware until you
serve the food.
■ To cook with the pressure cooker, observe the
manufacturer's instructions.
■ Do not cook food for too long, otherwise the
nutrients will be lost. The kitchen clock can be used
to set the optimum cooking time.
■ For a more healthy cooking result, smoking oil
should be avoided.
■ To brown food, fry small portions in succession.
■ Cookware may reach high temperatures while the
food is cooking. We recommend that you use oven
gloves.
■ You can find recommendations for energy-efficient
cooking in section ~ "Environmental protection"
18
Page 19

Operating the appliance en
Cooking table
The table shows which heat setting is suitable for each
type of food. The cooking time may vary depending on
the type, weight, thickness and quality of the food.
Heat setting Cooking time
(mins)
Melting
Chocolate coating 1 - 1. -
Butter, honey, gelatine 1 - 2 -
Heating and keeping warm
Stew, e.g. lentil stew 1. - 2 -
Milk* 1. - 2. -
Heating sausages in water* 3 - 4 -
Defrosting and heating
Spinach, frozen 3 - 4 15 - 25
Goulash, frozen 3 - 4 35 - 55
Poaching, simmering
Potato dumplings* 4. - 5. 20 - 30
Fish* 4 - 5 10 - 15
White sauces, e.g. Béchamel sauce 1 - 2 3 - 6
Whisked sauces, e.g. sauce béarnaise, hollandaise 3 - 4 8 - 12
Boiling, steaming, braising
Rice (with double the volume of water) 2. - 3. 15 - 30
Rice pudding*** 2 - 3 30 - 40
Unpeeled boiled potatoes 4. - 5. 25 - 35
Boiled potatoes 4. - 5. 15 - 30
Pasta, noodles* 6 - 7 6 - 10
Stew 3. - 4. 120 - 180
Soups 3. - 4. 15 - 60
Vegetables 2. - 3. 10 - 20
Vegetables, frozen 3. - 4. 7 - 20
Cooking in a pressure cooker 4. - 5. -
Braising
Roulades 4 - 5 50 - 65
Pot roast 4 - 5 60 - 100
Goulash*** 3 - 4 50 - 60
* Without lid
** Turn several times
*** Preheat to heat setting 8 - 8.
19
Page 20

en Operating the appliance
Heat setting Cooking time
(mins)
Roasting/frying with little oil*
Escalope, plain or breaded 6 - 7 6 - 10
Escalope, frozen 6 - 7 6 - 12
Chop, plain or breaded** 6 - 7 8 - 12
Steak (3 cm thick) 7 - 8 8 - 12
Poultry breast (2 cm thick)** 5 - 6 10 - 20
Poultry breast, frozen** 5 - 6 10 - 30
Rissoles (3 cm thick)** 4. - 5. 20 - 30
Hamburgers (2 cm thick)** 6 - 7 10 - 20
Fish and fish fillet, plain 5 - 6 8 - 20
Fish and fish fillet, breaded 6 - 7 8 - 20
Fish, breaded and frozen, e.g. fish fingers 6 - 7 8 - 15
Scampi, prawns 7 - 8 4 - 10
Sautéeing fresh vegetables and mushrooms 7 - 8 10 - 20
Stir-fry, vegetables, meat cut in Asian-style strips 7 - 8 15 - 20
Frozen dishes, e.g. roasted dishes 6 - 7 6 - 10
Pancakes (baked in succession) 6. - 7. -
Omelette (cooked in succession) 3. - 4. 3 - 10
Fried eggs 5 - 6 3 - 6
Deep-fat frying* (150-200 g per portion in 1-2 l oil, deep-fat fried in portions)
Frozen products, e.g. chips, chicken nuggets 8 - 9 -
Croquettes, frozen 7 - 8 -
Meat, e.g. chicken portions 6 - 7 -
Fish, breaded or in beer batter 6 - 7 -
Vegetables, mushrooms, breaded or battered, tempura 6 - 7 -
Small baked items, e.g. doughnuts, fruit in batter 4 - 5 -
* Without lid
** Turn several times
*** Preheat to heat setting 8 - 8.
20
Page 21

Time-setting options en
OTime-setting options
Ti me-s et t i ng opt i ons
Your hob has two timer functions:
■ Programming the cooking time
■ Kitchen timer
Programming the cooking time
The hotplate automatically switches off after the time
that is set has elapsed.
Setting procedure:
1. Select the hotplate and the required heat setting.
2. Touch the 0 symbol. Ú lights up in the display for
the hotplate. ‹‹ appears in the timer display.
3. Touch the @ or A symbol. The basic setting
appears:
@ symbol: 30 minutes.
A symbol: 10 minutes.
The kitchen timer
You can use the kitchen timer to set a time of up to 99
minutes.
This functions independently from the hotplates and
from other settings. This function does not automatically
switch off a hotplate.
Setting procedure:
1. The kitchen timer can be set in two different ways:
– If a hotplate has been selected, touch the
0 symbol twice.
– If no hotplate is selected, touch the 0 symbol.
The Ú display beside the U symbol lights up. ‹‹
appears in the timer display.
2. Touch the @ or A symbol. The basic setting
appears.
@ symbol: 10 minutes.
A symbol: 05 minutes.
3. Use the @ or A symbol to set the required time.
After a few seconds, the time begins to elapse.
Changing or deleting the time
Touch the symbol 0 repeatedly until the display Ú
lights up beside the symbol U. Change the time or use
the symbols @ or A to set the time to ‹‹.
4. Use the @ or A symbol to select the required
cooking time.
After a few seconds, the time begins to elapse.
Note: The same cooking time can be set automatically
for all hotplates. The set time for each of the hotplates
counts down independently.
You can find information on automatically programming
the cooking time in section ~ "Basic settings"
Changing or deleting the time
Select a hotplate. Touch the 0 symbol and use the
@ or A symbols to change the cooking time, or set the
time to ‹‹.
Once the time has elapsed
The hotplate switches off. A beep sounds and in the
time program function display ‹‹ appears for
10 seconds. The Ú indicator on the hotplate lights up.
Pressing the 0 symbol turns off the indicators and
stops the beeping.
Once the time has elapsed
A warning signal sounds. ‹‹ is displayed on the time
program function display. After 10 seconds the
indicators turn off.
Pressing the 0 symbol turns off the indicators and
stops the beeping.
Notes
■ If a cooking time was programmed for several
hotplates, the time information for the selected
hotplate is shown in the timer display.
■ You can set a cooking time of up to 99 minutes.
21
Page 22

en PowerBoost function
vPowerBoost function
PowerBoost f unc t i on
The PowerBoost function enables you to heat up large
quantities of water faster than when using heat
setting Š.
The function can be used by any hotplate provided that
no other hotplates are switched on. Otherwise › and Š
will flash in the heat setting display.
Activation
1. Select a hotplate.
2. Touch the boostG symbol.
› lights up on the display.
The function is activated.
Note: If a hotplate is switched on while the PowerBoost
function is active,
display; heat setting Š will then be applied
automatically. The PowerBoost function will now be
deactivated.
Deactivation
1. Select the hotplate.
2. Touch the boostG symbol.
› goes out on the display and the hotplate switches
back to the Š heat setting.
The function is deactivated.
› and Š will flash on the heat setting
AChildproof lock
Chi l d p r oo f lock
You can use the childproof lock to prevent children
from switching on the hob.
Activating and deactivating the childproof
lock
The hob should be turned off.
To activate: press the symbol D for approximately
4 seconds. The indicator next to the symbol D lights
up for 10 seconds. The hob is locked.
To deactivate: press the symbol D for approximately
4 seconds. The lock is now deactivated.
Childproof lock
With this function, the childproof lock automatically
activates when a hob is switched off.
Switching on and off
You can find out how to switch the automatic childproof
lock on in the ~ "Basic settings" section
Note: In certain circumstances, the PowerBoost
function can switch itself off automatically in order to
protect the electronic elements inside the hob.
22
Page 23

Automatic safety cut-out en
bAutomatic safety cut-out
Aut omati c safet y cut - out
If a hotplate operates for an extended period and no
settings are changed, the automatic safety shut-off is
activated.
The hotplate stops heating. ”, ‰ and the residual heat
indicator œ or • flash alternately in the hotplate display.
When you touch any symbol, the display switches off.
The hotplate can now be set again.
Indicator/
symbol
™‚
™ƒ
Function
Childproof lock
‹ Manual*.
‚ Automatic.
ƒ Function deactivated.
Signal tones
‹ Confirmation and fault signals are switched off.
‚ Only the fault signal is switched on.
ƒ Only the confirmation signal is switched on.
„ All signal tones are switched on.*
The point at which the safety shut-off becomes active
depends on which heat setting has been set (after 1 to
10 hours).
QBasic settings
Bas i c set t i ngs
The appliance has various basic settings. These basic
™†
™‡
™ˆ
Automatically programming the cooking time
‹‹ Switched off.*
‹‚-ŠŠ Time until automatic switch-off.
Audible signal duration for the timer function
‚ 10 seconds.*
ƒ 30 seconds.
„ 1 minute.
Power management function. Limiting the total power of the hob
The available settings depend on the maximum power of the hob.
‹ Deactivated. Maximum power of the hob. *
‚ 1000 W minimum power.
‚. 1500 W
...
„ 3000 W recommended for 13 A.
„. 3500 W recommended for 16 A.
… 4000 W
…. 4500 W recommended for 20 A.
...
Š or Š. Maximum power of the hob.
™Š
™‚ƒ
Time for selecting the cooking zone
‹ Unlimited: The hotplate that was last set remains selected.*
‚ Limited: The cooking zone only remains selected for a few seconds.
Check the cookware and the cooking results
‹ Not suitable
‚ Not perfect
ƒ Suitable
23
Page 24

en Basic settings
™ƒ„
Automatic management with power limitation
‹ Deactivated: Shows the power limitation according to the power management function.*
‚ Activated: Does not show the power limitation of the power management function.
™‹
Restore to standard settings
‹ Individual settings.*
‚ Restore factory settings.
*Factory setting
--------
To access the basic settings:
The hob must be off.
1. Switch on the hob.
2. Within ten seconds, touch and hold the D symbol
for approximately four seconds.
The first four displays provide product information.
Touch the @ or A symbol to view the individual
displays.
Product information Display screen
After-sales service index (ASSI)
Production number
Production number 1
Production number 2
‹‚
”š
Š†.
‹.†
Leaving the basic settings
Turn off the hob with the main switch.
3. Touching the D symbol again takes you to the
basic settings.
™ and ‚ flash alternately on the displays and ‹
appears as a presetting.
4. Touch the D symbol repeatedly until the required
function is displayed.
5. Then use the @ and A symbols to select the
required setting.
6. Touch the D symbol for at least four seconds.
The settings have been saved.
24
Page 25

Cookware check en
tCookware check
Cookware check
This function can be used to check the speed and
quality of the cooking process depending on the
cookware.
The result is a reference value and depends on the
properties of the cookware and the hotplate being used.
1. Place a cold saucepan containing approx. 200 ml of
water in the centre of the hotplate the diameter of
which matches the base of the pan most closely.
2. Go to the basic settings and select the ™‚ ƒ setting.
3. Touch the @ or A symbol. A will flash on the hotplate
display.
The function has now been enabled.
After 20 seconds, the quality and speed of the cooking
process will appear in the hotplate display.
hPower manager
Power manager
You can use the power manager to set the total power
of the hob.
The hob is preset at the factory. You can use the power
manager to change the value in accordance with the
requirements for the relevant electrical installation.
In order not to exceed this set value, the hob
automatically distributes the power available between
the cooking zones that are switched on.
As long as the power manager function is activated, the
output of a cooking zone may temporarily fall below the
nominal value. If a cooking zone is switched on and the
power limit is reached, ¬ appears in the heat setting
display for a short time. The appliance automatically
regulates and selects the highest possible power level.
For more information about how the total power of the
hob is changed, see section ~ "Basic settings"
Check the result using the following table:
Result
The cookware is not suitable for the hotplate and will therefore
‹
not heat up.*
The cookware is taking longer to heat up than expected and the
‚
cooking process is not going as well as it should.*
The cookware is heating up correctly and the cooking process
ƒ
is going well.
* If there is a smaller hotplate available, test the cookware again on the
smaller hotplate.
To activate the function again, select the @ or A symbol.
Notes
■ If the diameter of the hotplate used is much smaller
than the diameter of the cookware, only the middle
of the cookware can be expected to heat up. This
may result in the cooking results not being as good
as expected or being less than satisfactory.
■ You can find information on this function in the
section on ~ "Basic settings".
■ You can find information on the type, size and
positioning of the cookware in the section on
~ "Induction cooking".
25
Page 26

en Operating the appliance
1Operating the appliance
Operat i ng the appl i ance
You have already learnt about the controls and how
they work. Now we will explain how to apply settings on
your appliance.
Switching the appliance on and off
Use the function selector to switch the appliance on or
off. Turning the function selector to any position other
than the "Off" position switches on the appliance. To
switch off the appliance, always turn the function
selector to the "Off" position.
Setting the heating function and temperature
The function selector and temperature selector make it
very easy to apply the settings you require to your
appliance. To find out which heating function is best for
which type of food, please refer to the beginning of the
instruction manual. ~ "Getting to know your
appliance" on page 12
Example in the picture: Top/bottom heating % at
190 °C.
1. Use the function selector to set the heating function.
Rapid heating
With Rapid heating, you can shorten the heat-up time.
Then, for best results, use:
■ < 3D hot air
■ % Top/bottom heating
Only use Rapid heating when a temperature of over
100 °C has been selected.
To achieve an even cooking result, do not place your
food into the cooking compartment until Rapid heating
is complete.
1. Set the function selector to F.
2. Use the temperature selector to set the temperature.
The oven will start heating after a few seconds.
Once Rapid heating is complete, an audible signal will
sound. Place your food in the cooking compartment.
2. Use the temperature selector to set the temperature
or grill setting.
The appliance will start heating after a few seconds.
Once your food is cooked, turn the function selector to
the "Off" position to switch the appliance off.
&
Note: You can set both a cooking time and an end time
on the appliance. ~ "Time-setting options" on page 21
Changing
The heating function and temperature can be changed
at any time using the relevant selector.
26
Page 27

Time-setting options en
OTime-setting options
Ti me-s et t i ng opt i ons
Your appliance has different time-setting options.
Time-setting option Use
Cooking time Once the set cooking time has elapsed, the
y
appliance will automatically stop heating.
End time Enter a cooking time and the required end
{
time. The appliance will start up automatically
so that it finishes cooking at the required time.
Timer The timer functions like an egg timer. It runs
t
independently of the appliance when it is
heating and of other time-setting options and
does not affect the appliance.
Time When no other function is running in the fore-
v
ground, the appliance will show you the time
of day on the display.
Before you can call up the cooking time using the
v button, you will need to set a heating function.Once
you have set a cooking time, the end time can be called
up. The timer can be set at any time.
An audible signal will sound once the cooking time or
timer duration has elapsed. You can cancel the audible
signal early by touching the v button.
Note: You can change how long the audible signal
sounds for in the basic settings. ~ "Basic settings"
on page 23
Setting the cooking time
You can set the cooking time for your food on the
appliance. This prevents the food from accidentally
being cooked for too long, and means that you do not
have to stop what you are doing to switch off the oven.
The maximum time that can be set is 23 hours and 59
minutes. The cooking time can be set in 1-minute
increments up to one hour, and then in 5-minute
increments.
The cooking time will start at a different default value
depending on which button you touch first:
10 minutes if you touch the A button and 30 minutes if
you touch the @ button.
Example in the picture: Cooking time of 45 minutes.
1. Set the type of heating and temperature or setting.
2. Touch the v button twice.
The cooking time y will be highlighted on the
display.
3. Use the A or @ button to set the cooking time.
The appliance will start heating after a few seconds. The
remaining time will count down on the display.
On some appliances, the time counts down in the
background. You can use the v button to check how
much time is left.
The cooking time has elapsed
An audible signal will sound. The appliance will stop
heating. The cooking time will be zero on the display.
Once the signal stops, you can touch the @ button to
set a new cooking time.
Once your food is cooked, turn the function selector to
the "Off" position to switch the appliance off.
Changing and cancelling
You can use the A or @ button to change the cooking
time at any time.After a few seconds, the change will be
applied.
To cancel, use the A button to reset the cooking time all
the way to zero. The appliance will continue heating
without a cooking time.
Checking time-setting options
If time-setting options have been set, the corresponding
symbols are lit up on the display. The symbol for which
the time is currently being displayed will be indicated.
To check the values for the different time-setting
options, touch the v button repeatedly until the
required symbol is indicated.
Setting the end time
You can delay the time at which cooking is due to
finish. You can, for example, put your food in the
cooking compartment in the morning and set the
cooking time so that it is ready at lunch time.
Notes
■ Make sure that food is not left in the cooking
compartment for too long as it may spoil.
■ Do not adjust the end time once the appliance is
already in operation. Otherwise the cooking result
may no longer be satisfactory.
■ The end time cannot be set for types of heating with
grill function.
The end of the cooking time can be delayed by up to
[
23 hours and 59 minutes.
27
Page 28

en Time-setting options
Example in the picture: The time is 10.30 a.m., a
cooking time of 45 minutes has been set and you want
the food to be ready at 12.30 p.m.
1. Set the type of heating and temperature or setting.
2. Touch the v button twice and use the A or @ button
to set the cooking time.
3. Touch the v button again.
The end time { will be highlighted on the display.
4. Use the @ or A button to delay the end time.
Checking time-setting options
If time-setting options have been set, the corresponding
symbols are lit up on the display. The symbol for which
the time is currently being displayed will be indicated.
To check the values for the different time-setting
options, touch the v button repeatedly until the
required symbol is indicated.
Setting the timer
The timer runs alongside other settings. You can set it
at any time, even if the appliance has been switched off.
It has its own audible signal so that you can tell whether
it is the timer or a cooking time that has elapsed.
The maximum time that can be set is 23 hours and 59
minutes. Up to 10 minutes, the timer duration can be
set in 30-second increments.Above 10 minutes, the
time increments become longer the higher the value.
The timer duration will start at a different default value,
depending on which button you touch first:
5 minutes if you touch the A button and 10 minutes if
you touch the @ button.
1. Touch the v button until the timer symbol t is
underlined.
2. Use the A or @ button to set the timer duration.
After a few seconds, the timer duration will start to
count down.
The appliance will apply the settings after a few
seconds. The end time will be shown on the display.
Once the appliance starts, the time will begin counting
down.
On some appliances, the time counts down in the
background. You can use the v button to check how
much time is left.
The cooking time has elapsed
An audible signal will sound. The appliance will stop
heating. The cooking time will be zero on the display.
Once the signal stops, you can touch the @ button to
set a new cooking time.
Once your food is cooked, turn the function selector to
the "Off" position to switch the appliance off.
Changing and cancelling
You can use the A or @ button to change the end time.
After a few seconds, the change will be applied. The
end time cannot be changed once the cooking time has
already started to count down. Otherwise the cooking
result would no longer be satisfactory.
To cancel, use the A button to set the end time all the
way back to the current time plus the cooking time. The
appliance will start to heat and the cooking time will
start to count down.
Tip: If the set timer duration is the duration for which
you wish to cook your food, use the cooking time. The
appliance will then switch off automatically when it has
finished cooking.
The timer duration has elapsed
An audible signal will sound. The timer duration will be
zero on the display.
Touch any button to switch off the timer.
Changing and cancelling
You can use the A or @ button to change the timer
duration at any time. After a few seconds, the change
will be applied.
To cancel, use the A button to reset the timer duration
all the way to zero. The timer is now switched off.
Checking time-setting options
If time-setting options have been set, the corresponding
symbols are lit up on the display. The symbol for which
the time is currently being displayed will be indicated.
To check the values for the different time-setting
options, touch the v button repeatedly until the
required symbol is indicated.
28
Page 29

Meat thermometer en
Setting the time
Once the appliance has been connected to the mains
or following a power failure, the clock will flash on the
display. Set the time.
The function selector must be set to the "Off" position.
1. Use the A or @ button to set the time.
The time will stop flashing.
2. Confirm by pressing the v button.
The appliance will apply the time you have set.
Note: You can go to the basic settings to specify
whether or not the time should be shown on the display.
~ "Basic settings" on page 23
Changing the time
You can change the time again when you need to, e.g.
from summer to winter time.
To do this, when the appliance is switched off, touch the
v button until the symbol for the time is underlined,
and use the A or @ button to change the time.
@Meat thermometer
Meat thermomet er
The meat thermometer makes precise cooking
possible. It measures the temperature inside the food.
Once the set temperature has been reached, the
appliance automatically switches itself off.
Types of heating
Not all types of heating are suitable for operation with
the meat probe.
Suitable heating functions include:
■ < 3D hot air
■ 6 Hot air gentle
■ $ Pizza setting
■ 7 Convection grilling
■ % Top/bottom heating
Note: If the meat probe is being used and you select an
unsuitable type of heating, a signal will sound.
Temperature
The meat probe measures the internal temperature of
the food between 30 °C and 99 °C. You can set the
core temperature you require on the display.
You can set the temperature of the cooking
compartment as normal using the temperature selector.
To avoid damaging the meat thermometer, do not set
temperatures higher than 250 °C.
The cooking compartment temperature set must be at
least 10 °C higher than the core temperature set.
Inserting the meat probe into the food
Insert the meat probe into the food before placing your
dish in the cooking compartment.
Use only the meat probe supplied. You can purchase
one as a spare part from our after-sales service.
:Warning – Risk of electric shock!
The insulation of an incompatible meat thermometer
may be damaged. Only use the meat thermometer
which is recommended for this appliance.
Engaging
Insert the meat probe into the thickest part of the meat.
Make sure that the end of the probe is roughly in the
centre of the meat. It must not be touching the fat, the
dish or any bones.
Place the meat (preferably in an item of cookware) in
the centre of the wire shelf.
29
Page 30

en Meat thermometer
Caution!
Ensure that the meat probe's cable does not become
trapped.
To prevent the meat probe from being damaged by
excessive heat, there must be a gap of a few
centimetres between the grill element and the meat
probe. The meat may expand during the cooking
process.
Turning the food
If you want to turn the food, do not remove the meat
probe. Once you have turned the food, check that the
meat probe is correctly positioned in the food.
If you remove the meat probe while the food is cooking,
all the settings will be reset and you will have to
configure them again.
Setting the core temperature
If you have placed your dish with the meat probe in the
cooking compartment, you can set the core
temperature.
The core temperature indicator on the display is divided
into two parts. The current core temperature of the meat
is shown on the left, while the set core temperature is
shown on the right, e.g. 15°C|75°C. The current
temperature will not be displayed until it reaches at
least 10 °C.
1. Insert the meat probe into the socket on the left-hand
side of the cooking compartment and close the
door.
Ensure that the cable is not pinched or crushed.
2. Use the function selector to set an appropriate type
of heating.
The @ symbol will be highlighted on the display and
the core temperature indicator will appear.
3. Use the A or @ button to set the core temperature.
The recommended setting when using either button
is 60 °C.
4. Use the temperature selector to set the temperature
of the cooking compartment.
Do not set the temperature higher than 250 °C.
The appliance will start heating after a few seconds.
If you want to cancel the process, remove the meat
probe from the socket and the food. The appliance will
continue heating without a core temperature setting.
The type of heating and the temperature of the cooking
compartment can be changed at any time using the
relevant selector. The core temperature setting will be
retained.
Core temperatures of different foods
Do not use frozen food. The figures in the table are
given as a guide. They will depend on the quality and
composition of the food.
You can find detailed information on types of heating
and temperatures at the end of this instruction manual.
~ "Tested for you in our cooking studio" on page 44
Food Core temperature in
°C
Pork
Shoulder of pork 85-90
Fillet of pork, medium rare 62-70
Pork loin, well done 72-80
Beef
Tenderloin or sirloin, rare 45-52
Tenderloin or sirloin, medium rare 55-62
Tenderloin or sirloin, well done 65-75
Veal
Joint of veal or hock, lean 75-80
Joint of veal, shoulder 75-80
Knuckle of veal 85-90
Lamb
Leg of lamb, medium rare 60-65
Leg of lamb, well done 70-80
Saddle of lamb, medium rare 55-60
Once the food reaches the core temperature that has
been set, a signal will sound. The appliance will stop
heating. The current core temperature on the display is
the same as the set temperature, e.g. 75°C|75°C.
Switch the appliance off by turning the function selector
to the "Off" position. Pull the meat probe out of the
socket in the cooking compartment.
:Warning – Risk of burns!
The cooking compartment, accessories and meat
thermometer become very hot. Always use oven gloves
to remove hot accessories and the meat thermometer
from the cooking compartment.
Changing and cancelling
You can use the A or @ button to change the core
temperature at any time. The change will be applied
after a few seconds.
30
Page 31

Childproof lock en
AChildproof lock
Childproof lock
Your appliance is equipped with a childproof lock so
that children cannot switch it on accidentally or change
any settings.
Notes
■ You can go to the basic settings to specify whether
you want the option to set the childproof lock.
~ "Basic settings" on page 23
■ If a hob is connected, it will not be affected by the
childproof lock on the oven.
■ After a power cut, the childproof lock will no longer
be active.
Activating and deactivating
To activate the childproof lock, the function selector
must be set to the "Off" position.
Press and hold the D button for approx. 4 seconds.
The symbol for this function will appear on the display.
The childproof lock is now activated.
Note: If a timer duration t has been set, this will
continue to count down. While the childproof lock is
active, the timer duration cannot be changed.
To deactivate the childproof lock, press and hold the
D button again for approx. 4 seconds until the symbol
goes out on the display.
QBasic settings
Bas i c set t i ngs
There are various settings available to you in order to
help use your appliance effectively and simply. You can
change these settings as required.
List of basic settings
Depending on the features of your appliance, not all
basic settings will be available.
Basic setting Options
Display the time
™‚
Audible signal duration
™ƒ
upon completion of a cooking time or timer duration
Button tone that sounds
™„
when a button is touched
Cooling fan run-on time
™…
Amount of time until a set-
™†
ting is applied
Enable childproof lock acti-
™‡
vation
Water hardness**
™ˆ
* Factory setting (factory settings may vary depending on the appli-
ance model)
** Not available for all appliance types.
--------
‹ = Hide the time
‚ = Display the time*
‚ = Approx. 10 seconds
ƒ = Approx. 30 seconds*
„ = Approx. 2 minutes
‹ = off
‚ = on*
‚ = Short
ƒ = Medium
„ = Long*
… = Extra long
‚ = Approx. 3 seconds*
ƒ = Approx. 6 seconds
„ = Approx. 10 seconds
‹ = No
‚ = Yes*
‹ = softened
‚ = soft (up to 1.3 mmol/l)
ƒ = medium (1.3 - 2.5 mmol/l)
„ = hard (2.5 - 3.8 mmol/l)
… = very hard* (above 3.8 mmol/
l)
31
Page 32

en Cleaning
Changing the basic settings
The function selector must be set to the "Off" position.
1. Press and hold the v button for approx. 4 seconds.
The first basic setting will appear on the display,
e.g. ™‚ ‚.
2. Use the A or @ button to change the setting if
necessary.
3. Press the v button to confirm.
The next basic setting will appear on the display.
4. Using the v button, continue going through all the
basic settings as described above, changing the
settings if necessary using the A or @ button.
5. When you have finished, press and hold the
v button again for approx. 4 seconds to confirm the
settings.
All basic settings have now been applied.
You can change the basic settings again at any time.
Note: Following a power failure, the basic factory
settings will be restored.
DCleaning
Cl ea n i ng
With good care and cleaning, your appliance will retain
its appearance and remain fully functioning for a long
time to come. We will explain here how you should
correctly care for and clean your appliance.
Cleaning agents
Damage to the various different surfaces caused by
using the wrong cleaning agent can be avoided by
observing the following instructions.
When cleaning the hob do not use
■ undiluted washing-up liquid or dishwasher detergent,
■ scouring pads,
■ abrasive cleaning agents such as oven cleaner or
stain remover,
■ high-pressure cleaners or steam jets.
■ Do not clean individual parts in the dishwasher.
When cleaning the oven do not use
■ sharp or abrasive cleaning agents,
■ cleaning agent with a high alcohol content,
■ scouring pads,
■ high-pressure cleaners or steam jets.
■ Do not clean individual parts in the dishwasher.
Wash new sponges thoroughly before first use.
:Warning – Risk of burns!
The appliance becomes very hot. Never touch the
interior surfaces of the cooking compartment or the
heating elements. Always allow the appliance to cool
down. Keep children at a safe distance.
Zone Cleaning agent
Stainless steel surfaces*
(depending on appliance model)
Enamel, painted, plastic and screen-printed
surfaces*
(depending on appliance model)
Control panel Hot soapy water:
* Optional (available for some appliances, depending on the appliance
model)
Hot soapy water:
Clean with a dish cloth and dry with a soft
cloth. On stainless steel surfaces, always wipe
parallel to the natural grain. Otherwise, you
may scratch the surface. Remove patches and
splashes of limescale, grease, starch and albumin (e.g. egg white) immediately. Corrosion
can form under such patches and splashes.
Special care products suitable for hot stainless
steel surfaces are available from our aftersales service and from specialist retailers.
Apply a thin layer of care product with a soft
cloth.
Hot soapy water:
Clean with a dish cloth and dry with a soft
cloth. Do not use glass cleaner or glass scrapers for cleaning.
Clean with a dish cloth and dry with a soft
cloth. Do not use glass cleaner or glass scrapers for cleaning.
32
Page 33

Cleaning en
Zone Cleaning agent
Upper glass cover*
(depending on appli-
ance model)
Rotary knobs
Do not remove.
Hob surround Hot soapy water:
Gas hob and pan supports*
(depending on appliance model)
Gas burners*
(depending on appli-
ance model)
Electric hotplate*
(depending on appli-
ance model)
Hotplate ring*
(depending on appli-
ance model)
Ceramic hob*
(depending on appli-
ance model)
Glass cleaner:
Clean with a soft cloth.
You can remove the upper glass cover for
cleaning. To find out how to do this, please
refer to the section Upper glass cover.
Hot soapy water:
Clean with a dish cloth and dry with a soft
cloth.
Do not clean with a glass scraper, lemon juice
or vinegar.
Hot soapy water.
Use very little water. Water must not be
allowed to enter the appliance through the
base of the burners.
Clean off boiled-over liquids and spilt food
immediately.
You can remove the pan supports.
Cast iron pan supports*:
Do not clean in the dishwasher.
Remove the burner head and cap and clean
with hot soapy water.
Do not clean in the dishwasher.
The gas outlet openings must remain unobstructed at all times.
Ignition plugs: Small, soft brush.
The gas burners only work properly when the
ignition plugs are dry. Dry all parts thoroughly.
Ensure that they are refitted correctly.
The burner caps are coated in black enamel.
The colour may change over time. This does
not impair their performance.
Abrasive materials or sponges:
Briefly heat up the hotplate afterwards, so that
it dries. Hotplates can rust over time if they
remain wet. Apply care product to finish.
Clean off boiled-over liquids and spilt food
immediately.
Remove yellow to blue iridescent discolouration from the hotplate ring with a steel care
product.
Do not use any abrasive materials that may
scratch surfaces.
Care: Protective/care products for ceramics
Cleaning: Cleaning agents suitable for ceramics.
Follow the cleaning instructions on the packaging.
:Glass scraper for stubborn dirt:
Remove the protective cover and clean using
the blade only. Caution: The blade is very
sharp. Risk of injury.
Cover the blade again after cleaning. Replace
damaged blades immediately.
* Optional (available for some appliances, depending on the appliance
model)
Zone Cleaning agent
Glass hob*
(depending on appli-
ance model)
Care: Protective/care products for glass
Cleaning: Cleaning agents for glass.
Follow the cleaning instructions on the packaging.
:Glass scraper for stubborn dirt:
Remove the protective cover and clean using
the blade only. Caution: The blade is very
sharp. Risk of injury.
Cover the blade again after cleaning. Replace
damaged blades immediately.
Glass panel Glass cleaner:
Clean with a soft cloth.
Do not use the glass scraper.
The door can be removed to facilitate cleaning.
To find out how to do this, please refer to the
section Removing and refitting the
oven door.
Childproof lock*
(depending on appli-
ance model)
Seal
Do not remove.
Cooking zone Hot soapy water or a vinegar solution:
Hot soapy water:
Clean with a dish cloth.
If a childproof lock has been fitted to the oven
door, it must be removed before cleaning.
If it is very dirty, the childproof lock will not
work properly.
Hot soapy water:
Clean with a dish cloth. Do not scour.
Clean with a dish cloth.
For stubborn dirt, use a stainless steel scour-
ing pad or oven cleaner.
Only use when the cooking compartment is
cold.
:Please use the self-cleaning function to
clean self-cleaning surfaces. To find out how to
do this, please refer to the section Self-
cleaning.
Caution! Never use oven cleaner on self-cleaning surfaces.
Glass cover for the
oven light
Shelf Hot soapy water:
* Optional (available for some appliances, depending on the appliance
model)
Hot soapy water:
Clean with a dish cloth.
Clean with a dish cloth or a brush.
You can remove the shelves for cleaning. To
find out how to do this, please refer to the section Removing and refitting shelves.
Telescoping extension rails*
(depending on appliance model)
Hot soapy water:
Clean with a dish cloth or a brush.
Do not remove the lubricant from the extension
rails. It is best to clean them when they are
pushed in. Do not soak, clean in the dishwasher, or clean in the oven as part of the selfcleaning programme. This may damage the
shelves and they may no longer work properly
as a result.
33
Page 34

en Cleaning
Zone Cleaning agent
Accessories Hot soapy water:
Soak and then clean with a dish cloth or a
brush.
Enamelled accessories are dishwasher-suitable.
Aluminium baking tray*:
(depending on appliance model)
Dry with a soft cloth.
Do not clean in the dishwasher.
Never use oven cleaner.
To prevent scratches, never touch the metal
surfaces with a knife or a similar sharp object.
Harsh cleaning products, scratchy sponges
and rough cleaning cloths are not suitable.
Otherwise, you may scratch the surface.
Rotary spit*
(depending on appliance model)
Hot soapy water:
Clean with a dish cloth or a brush. Do not clean
in the dishwasher.
Meat thermometer*
(depending on appliance model)
Hot soapy water:
Clean with a dish cloth or a brush. Do not clean
in the dishwasher.
Plinth drawer*
(depending on appli-
Hot soapy water:
Clean with a dish cloth.
ance model)
* Optional (available for some appliances, depending on the appliance
model)
Notes
■ Slight differences in colour on the front of the
appliance are caused by the use of different
materials, such as glass, plastic and metal.
■ Shadows on the door panels, which look like
streaks, are caused by reflections made by the
interior lighting.
■ Enamel is baked on at very high temperatures.This
can cause some slight colour variation. This is
normal and does not affect operation.
The edges of thin trays cannot be completely
enamelled. As a result, these edges can be rough.
This does not impair the anti-corrosion protection.
Surfaces in the cooking compartment
The back wall in the cooking compartment is selfcleaning.You can tell this from the rough surface.
The base, ceiling and side panel are enamelled and
have smooth surfaces.
Cleaning enamel surfaces
Clean the smooth enamel surfaces with a dish cloth
and hot soapy water or a vinegar solution. Then dry
them with a soft cloth.
Soften baked-on food remnants with a damp cloth and
soapy water. Use stainless steel wire wool or oven
cleaner to remove stubborn dirt.
Caution!
Never use oven cleaner in the cooking compartment
when it is still warm. This may damage the enamel.
Remove all food remnants from the cooking
compartment and the appliance door before you next
heat up the appliance.
Leave the cooking compartment open to dry after
cleaning it.
Note: Food residues can cause white deposits to form.
These are harmless and do not affect how the
appliance works. You can remove these residues using
lemon juice if required.
Cleaning self-cleaning surfaces
The self-cleaning surfaces are coated with a porous,
matte ceramic layer. This coating absorbs and dispels
splashes from baking and roasting while the appliance
is in operation.
If the self-cleaning surfaces no longer clean themselves
sufficiently and dark stains appear, they can be cleaned
using targeted heating.
Making settings
Remove the rails, pull-out shelves, accessories and
ovenware from the cooking compartment beforehand.
Thoroughly clean the smooth enamel surfaces in the
cooking compartment, the inside of the appliance door
and the glass cover on the interior lighting.
1. Set the 3D hot air type of heating.
2. Set the maximum temperature.
3. Start the mode and leave it to run for at least one
hour.
The ceramic coating is regenerated.
34
When the cooking compartment has cooled down,
remove the brown or white residue with water and a soft
sponge.
Note: During operation, reddish spots form on the
surfaces. This is not rust, but residues from food. These
spots are not harmful and do not restrict the cleaning
ability of the self-cleaning surfaces.
Caution!
Do not use oven cleaner on the self-cleaning surfaces.
This will damage the surfaces.If oven cleaner does get
onto these surfaces, dab it off immediately using water
and a sponge cloth. Do not rub the surface and do not
use abrasive cleaning aids.
Page 35

Cleaning en
Keeping the appliance clean
Always keep the appliance clean and remove dirt
immediately so that stubborn deposits of dirt do not
build up.
:Warning – Risk of fire!
Loose food remnants, fat and meat juices may catch
fire. Before using the appliance, remove the worst of the
food remnants from the cooking compartment, heating
elements and accessories.
Tips
■ Clean the cooking compartment after each use. This
will ensure that dirt cannot be baked on.
■ Always remove flecks of limescale, grease, starch
and albumin (e.g. egg white) immediately.
■ Use the universal pan for baking very moist cakes.
■ Use suitable ovenware for roasting, e.g. a roasting
dish.
Cleaning aid
The cleaning aid is a quick alternative for occasionally
cleaning the cooking compartment. The cleaning aid
softens dirt by vaporising the soapy water. It can then
be removed more easily.
Setting the cleaning aid
Prerequisite: The cooking compartment has cooled
down completely.
:Warning – Risk of scalding!
Water in a hot cooking compartment may create hot
steam. Never pour water into the cooking compartment
when the cooking compartment is hot.
1. Remove any accessories from the cooking
compartment.
2. Mix 0.4 litres water with a drop of washing-up liquid
and pour into the centre of the cooking compartment
floor.
Do not use distilled water.
3. Use the function selector to set the Bottom
heating $ type of heating.
4. Use the temperature selector to set 80 °C.
5. Press the v button repeatedly until y is highlighted
in the display.
6. Use the A or @ button to set the duration to 4 .
After a few seconds, the appliance starts heating
and the time counts down.
Once the time has elapsed, an audible signal
sounds and the display shows the time as zero.
7. Switch off the appliance and leave it to cool down for
approx. 20 minutes.
35
Page 36

en Rails
Cleaning the cooking compartment after use
Caution!
The prolonged presence of moisture in the cooking
compartment leads to corrosion.
After using the cleaning aid, wipe the cooking
compartment clean and allow it to cool down
completely.
Prerequisite: The cooking compartment has cooled
down.
1. Open the appliance door and remove the remaining
water with an absorbent sponge cloth.
2. Clean the smooth surfaces in the cooking
compartment with a dish cloth or a soft brush.
Remove stubborn food remnants using a stainless
steel scouring pad.
3. Remove limescale with a cloth soaked in vinegar.
Then wipe with clean water and rub dry with a soft
cloth (including under the door seal).
4. Once the cooking compartment is cleaned
sufficiently:
– To allow the cooking compartment to dry, open
the appliance door halfway (approx. 30°) and
leave it open for approx. one hour.
– To dry the cooking compartment quickly, use 3D
hot air < to heat up the appliance for approx.
five minutes at 50 °C while the door is open.
pRails
Rai l s
With good care and cleaning, your appliance will retain
its appearance and remain fully functional for a long
time to come. This will tell you how to remove the
shelves and clean them.
Detaching and refitting the rails
The rails can be removed for cleaning. The oven must
have cooled down.
Detaching the rails
1. Lift up the front of the rail
2. and unhook it (figure A).
3. Then pull the whole rail forward
4. and remove it (Fig. B).
$
%
Clean the rails with cleaning agent and a sponge. For
stubborn deposits of dirt, use a brush.
Refitting the rails
1. First insert the rail into the rear socket, press it to the
back slightly (figure A),
2. and then hook it into the front socket (figure B).
$
%
The rails fit both the left and right sides. Ensure that, as
shown in figure B, levels 1 and 2 are below and levels
3, 4 and 5 are above.
36
Page 37

Appliance door en
qAppliance door
Appliance door
With good care and cleaning, your appliance will retain
its appearance and remain fully functional for a long
time to come. This will tell you how to remove the
appliance door and clean it.
Detaching and attaching the oven door
For cleaning purposes and to remove the door panels,
you can detach the oven door.
The oven door hinges each have a locking lever. When
the locking levers are closed (figure A), the oven door
is secured in place. It cannot be detached. When the
locking levers are open in order to detach the oven
door (Fig. B), the hinges are locked. They cannot snap
shut.
%$
$
3. Fold back both locking
levers (figure C). Close the oven door.
%
&
:Warning – Risk of injury!
If the oven door falls out accidentally or a hinge snaps
shut, do not reach into the hinge. Call the aftersales
service.
:Warning – Risk of injury!
Whenever the hinges are not locked, they snap shut
with great force. Ensure that the locking levers are
always fully closed or, when detaching the oven door,
fully open.
Detaching the door
1. Open the oven door fully.
2. Fold up the two locking levers on the left and right
(figure A).
3. Close the oven door as far as the limit stop. With
both hands, grip the door on the left and right-hand
sides. Close the door a little further and pull it out
(figure B).
%$
Attaching the door
Reattach the oven door in the reverse sequence to
removal.
Removing and installing the door panels
To facilitate cleaning, you can remove the glass panels
from the oven door.
Removal
1. Detach the oven door and lay it on a cloth with the
handle facing down.
2. Pull off the cover at the top of the oven door. Press
in the tabs on the left and right using your fingers
(fig. A).
3. Lift the top panel up and pull it out (fig. B).
%$
4. Lift the panel up and pull it out (fig. C).
&
1. When attaching the oven door, ensure that both
hinges are inserted straight into the opening
(figure A).
2. The notch on the hinge must engage on both sides
(figure B).
37
Page 38

en Frequently Asked Questions (FAQ)
Clean the panels with glass cleaner and a soft cloth.
:Warning – Risk of injury!
Scratched glass in the appliance door may develop into
a crack. Do not use a glass scraper, sharp or abrasive
cleaning aids or detergents.
Installation
During installation, make sure that the lettering "top
right" is upside down at the bottom left.
1. Insert the panel at an angle towards the back
(fig. A).
2. Insert the top panel at an angle towards the back
into the brackets. The smooth surface must face
outwards. (fig. B).
$
%
3. Put the cover back in place and press on it.
4. Attach the oven door.
Do not use the oven again until the panels have been
correctly installed.
Additional door safety
When preparing meals with long cooking times, the
oven door can reach very high temperatures.
Supervise small children and keep them away from the
oven when the oven is in operation.
Additional safety devices have been fitted to prevent
contact with the oven door. Always attach these safety
devices when children could come near the oven.
You can purchase this optional accessory (11023590)
from the after-sales service.
{Frequently Asked
Questions (FAQ)
Using the appliance
Why can't I switch on the hob and why is the childproof lock symbol lit?
The childproof lock is activated.
You can find information on this function in the section on ~ "Childproof lock"
Why are the displays flashing and why can I hear an audible signal?
Remove any liquid or food remains from the control panel. Remove any objects from the control panel.
You can find instructions on how to deactivate the audible signal in the section on ~ "Basic settings"
Noises
Why I can hear noises while I'm cooking?
Noises may be generated while using the hob depending on the characteristics of the base of the cookware. These noises are a normal
part of induction technology. They do not indicate a defect.
Possible noises:
A low humming noise like the one a transformer makes:
Occurs when cooking at a high heat setting. The noise disappears or becomes quieter when the heat setting is reduced.
Low whistling noise:
Occurs when the cookware is empty. The noise disappears when water or food is added to the cookware.
Crackling:
Occurs when using cookware made from layers of different material or when using cookware of different sizes and different materials at
the same time.The volume of the noise may vary depending on the quantity of food being cooked and the cooking method.
38
High-pitched whistling noises:
May occur if two hotplates are used at the highest heat setting at the same time. The whistling noises disappear or become quieter when
the heat setting is reduced.
Fan noise:
The hob is equipped with a fan that automatically switches on at high temperatures. The fan may continue to run even after you have
switched off the hob if the temperature detected is still too high.
Page 39

Trouble shooting en
Noises
Rhythmical tones like the ticking of a clock:
This noise only occurs when three or more hotplates are on. The noise disappears or becomes quieter when one of the hotplates is
switched off.
Cookware
Which types of cookware can be used with an induction hob?
You can find information on which types of cookware can be used with an induction hob in the section on ~ "Induction cooking"
Why is the hotplate not heating up and why is the heat setting flashing?
The hotplate on which the cookware is standing is not switched on.
Check that you have switched on the correct hotplate.
The cookware is too small for the hotplate that is switched on or it is not suitable for induction cooking.
You can find information on the type, size and positioning of the cookware in the section on ~ "Induction cooking"
Why is it taking so long for the cookware to heat up or why is it not heating up sufficiently despite being on a high heat setting?
The cookware is too small for the hotplate that is switched on or it is not suitable for induction cooking.
You can find information on the type, size and positioning of the cookware in the section on ~ "Induction cooking"
Cleaning
How do I clean the hob?
Using a special glass-ceramic cleaning agent produces the best results. We advise against using harsh or abrasive cleaning agents, dishwater detergent (concentrated) or scouring pads.
You can find more information on cleaning and caring for your hob in the section on ~ "Cleaning"
3Trouble shooting
Troubl e shoot i ng
If a fault occurs, there is often a simple explanation.
Before calling the after-sales service, please refer to the
fault table and attempt to correct the fault yourself.
Display Possible cause Solution
None The power supply has been disconnected. Use other electrical devices to check whether a short-circuit has
occurred in the power supply.
The device has not been connected in accordance with the circuit diagram.
Electronics fault. If the fault cannot be eliminated, inform the technical after-sales
The displays flash The control panel is damp or an object is cover-
ing it.
The Ù indicator flashes in the
hotplate displays
”ƒ
”…
Ӡ + heat setting and acous-
tic signal
Do not place hot pans on the control panel.
A fault has occurred in the electronics. To acknowledge the fault, cover the control panel with your hand.
The electronics have overheated and have
switched off the corresponding hotplate.
The electronics have overheated and have
switched off all hotplates.
There is a hot pan in the area of the control
panel. There is a risk that the electronics will
overheat.
Ensure that the device has been connected in accordance with
the circuit diagram.
service.
Dry the control panel or remove the object.
Wait until the electronics have cooled down sufficiently. Then
touch any symbol on the hob.
Remove the pan. The fault display goes out shortly afterwards.
You can continue to cook.
39
Page 40

en Trouble shooting
Display Possible cause Solution
Ӡ and acoustic signal
There is a hot pan in the area of the control
panel. To protect the electronics, the hotplate
Remove the pan. Wait for a few seconds. Touch any control. If the
fault display goes out, you can continue to cook.
has been switched off.
”‚/”‡
”‰
“Š‹‹‹
“Š‹‚‹
—…‹‹
The hotplate has overheated and switched itself
off to protect the work surface.
The hotplate was operating for an extended
period without interruption.
The supply voltage is faulty; outside of the normal operating range.
The hob is not connected properly Disconnect the hob from the power supply. Ensure that it has
Wait until the electronics have cooled down sufficiently and
switch the hotplate on again.
The automatic safety switch-off function has been activated. See
section
Contact your electricity provider.
been connected in accordance with the circuit diagram.
Do not place hot pans on the control panel.
Notes
■ If “ appears on the display, press and hold the
button for the relevant cooking zone in order to read
the fault code.
■ If the fault code is not listed in the table, disconnect
the hob from the mains power supply and wait
30 seconds before reconnecting it. If this code is
displayed again, contact the technical after-sales
service and specify which fault code has appeared.
■ If a fault occurs, the appliance will not switch to
standby mode.
Rectifying faults yourself
You can often easily rectify technical faults with the
appliance yourself.
If a dish does not turn out exactly as you wanted, you
can find useful cooking tips and instructions at the end
of this instruction manual. ~ "Tested for you in our
cooking studio" on page 44
Fault Possible
Notes/remedy
cause
The appliance is
not working.
Defective circuit breaker.
Check the circuit breaker in the
fuse box.
Power failure Check whether the kitchen light
or other kitchen appliances are
working.
The time is flash-
Power failure. Reset the time.
ing on the display.
The settings on
the appliance
cannot be configured. A key sym-
The childproof lock is
activated.
Deactivate the childproof lock by
pressing and holding the button
with the key symbol for approx. 4
seconds.
bol has lit up on
the display or
†‘”“.
--------
:Warning – Risk of injury!
Incorrect repairs are dangerous. Do not attempt to
repair the appliance yourself. Repairs must only be
carried out by one of our trained after-sales engineers. If
the appliance is defective, call the after-sales service.
one of our trained after-sales technicians. If the
appliance is defective, unplug the appliance from the
mains or switch off the circuit breaker in the fuse box.
Contact the after-sales service.
Error messages on the display
If an error message with "“" appears on the display,
e.g. “‹†-„ƒ, touch the v button. This will reset the
error message. Reset the time, if necessary.
If the fault was a one-off, you can continue to use your
appliance as normal. If the error message appears
again, call our after-sales service and quote the exact
error message and the E no. of your appliance.
~ "Customer service" on page 41
:Warning – Risk of electric shock!
Incorrect repairs are dangerous. Repairs may only be
carried out and damaged power cables replaced by
40
Page 41

Customer service en
Replacing the bulb in the top of the cooking
compartment
If the cooking compartment light bulb fails, it must be
replaced. Heat-resistant, 25 watt, 230 V halogen bulbs
are available from the after-sales service or specialist
retailers.
When handling the halogen bulb, use a dry cloth. This
will increase the service life of the bulb. Only use these
bulbs.
:Warning – Risk of electric shock!
When replacing the cooking compartment bulb, the
bulb socket contacts are live. Before replacing the bulb,
unplug the appliance from the mains or switch off the
circuit breaker in the fuse box.
:Warning – Risk of burns!
The appliance becomes very hot. Never touch the
interior surfaces of the cooking compartment or the
heating elements. Always allow the appliance to cool
down. Keep children at a safe distance.
1. Place a tea towel in the cold cooking compartment
to prevent damage.
2. Turn the glass cover anti-clockwise to remove it
(figure !).
3. Pull out the bulb – do not turn it (figure ").
Insert the new bulb, making sure that the pins are in
the correct position. Push the bulb in firmly.
1
2
4Customer service
Cus t o mer servi ce
Our after-sales service is there for you if your appliance
needs to be repaired. We will always find an
appropriate solution, also in order to avoid after-sales
personnel having to make unnecessary visits.
E number and FD number
When calling us, please give the product number (E
no.) and the production number (FD no.) so that we can
provide you with the correct advice. The rating plate
containing these numbers is found on the side of the
oven door. To save time, you can make a note of the
number of your appliance and the telephone number of
the after-sales service in the space below, should it be
required.
E no.
After-sales service O
Please note that there will be a fee for a visit by a
service technician in the event of a malfunction, even
during the warranty period.
Please find the contact data of all countries in the
enclosed customer service list.
To book an engineer visit and product advice
GB 0344 892 8979
Calls charged at local or mobile rate.
IE 01450 2655
0.03 € per minute at peak. Off peak 0.0088 €
per minute.
FD no.
4. Screw the glass cover back on.
Depending on the appliance model, the glass cover
may have a sealing ring. If the glass cover has a
sealing ring, put it back in place before screwing the
cover back on.
5. Remove the tea towel and switch on the circuit
breaker.
Rely on the professionalism of the manufacturer. You
can therefore be sure that the repair is carried out by
trained service technicians who carry original spare
parts for your appliances.
41
Page 42

en Programmes
PProgrammes
Pr o g r ammes
You can prepare food very easily using the various
programmes. Simply select a programme and the
appliance will apply the optimal settings for you.
To achieve good results, the cooking compartment
must not be too hot. Allow the cooking compartment to
cool before starting the programme.
Cookware
Follow the instructions provided by the cookware
manufacturer.
Suitable cookware:
Use cookware that is heat-resistant up to 300 °C.
Glass or glass ceramic cookware is best. The grill can
heat through the glass lid and the roast will become
nice and crispy on the outside.
Roasting dishes made from stainless steel are not
ideal.Their shiny surface reflects a high proportion of
the radiated heat.The food will brown less readily and
the meat will be less well done. If you are using a
stainless steel roasting dish, remove the lid once the
programme has come to an end. Grill the meat at grill
setting 3 for an additional 8 to 10 minutes.
The food will brown more quickly from below if you use
a roasting dish made of enamelled steel, cast iron or
die-cast aluminium.Add a little more liquid.
Tip: If the gravy is too light or too dark, add less or
more liquid next time.
Unsuitable cookware:
Cookware made of bright, shiny aluminium, unglazed
clay or plastic, and cookware with plastic handles, is
not suitable.
Size of the cookware:
The roast should cover around two thirds of the
cookware base.This will ensure that you get good meat
juices.
The distance between the meat and the lid should be at
least 3 cm. The meat may expand as it roasts.
Preparing food
Use fresh food, ideally at fridge temperature.
Tip: Very lean meat will remain more succulent if it is
covered with rashers of bacon.
Weigh your food. You need the weight in order to set
the programme. Always round up to the nearest weight.
Place the cookware onto the wire rack. Always place
the ovenware into the cooking compartment without
preheating it.
Programmes
When the roast is ready, it can be left to rest for an
additional 10 minutes in the cooking compartment with
the appliance switched off and the door closed. This
allows for better distribution of the meat juices.
The weight can be set to between 0.5 kg and 2.5 kg.
Note: The weight range is deliberately limited.For very
large items of food, there is often no suitable cookware
available, meaning that the cooking result would not be
what was expected.
Programme Food Cookware Add liquid Shelf posi-
tion
01 Chicken, not stuffed Ready to cook,
seasoned
02 Turkey breast Whole, seasoned Roasting
03 Stew, with vegetables Vegetarian Deep roast-
04 Goulash Diced beef or
pork with vegetables
05 Meat loaf, fresh Minced beef, pork
or lamb
06 Pot-roasted beef E.g. forerib, shoul-
der, rump or marinated beef roast
Roasting
dish with
glass lid
dish with
glass lid
ing dish with
lid
Deep roasting dish with
lid
Roaster with
lid
Roaster with
lid
No 2 Chicken
Cover the bottom of the
roasting dish, and add
up to 250 g vegetables
if you wish
As per recipe 2 Total weight Cut vegetables that take
As per recipe 2 Total weight Place the meat at the bot-
No 2 Roast weight -
Meat almost covered
with liquid
2 Turkey breast
2 Meat weight Do not sear the meat
Set weight Information
Place in the cookware
weight
weight
with the breast at the top
Do not sear the meat
beforehand
longer to cook (e.g. carrots) into smaller pieces
than vegetables that take
less time to cook (e.g.
tomatoes)
tom and cover with vegetables.
Do not sear the meat
beforehand.
beforehand
42
Page 43

Programmes en
Programme Food Cookware Add liquid Shelf posi-
tion
07 Beef olives Stuffed with vege-
tables or meat
Roaster with
lid
Add stock, water or
another liquid to the
2 Total weight
dish until the beef olives
are almost covered
08 Leg of lamb, well done Boned, seasoned Roaster with
lid
Cover the bottom of the
roasting dish, and add
2 Meat weight Do not sear the meat
up to 250 g vegetables
if you wish
09 Joint of veal, lean E.g. tenderloin or
eye
Roaster with
lid
Cover the bottom of the
roasting dish, and add
2 Meat weight Do not sear the meat
up to 250 g vegetables
if you wish
10 Pork neck joint Boned, seasoned Roasting
dish with
glass lid
Cover the bottom of the
roasting dish, and add
up to 250 g vegetables
2 Meat weight Do not sear the meat
if you wish
Setting a programme
If the food has been cooked to your liking, switch the
appliance off by turning the function selector to the "Off"
The appliance chooses the optimal heating function and
position.
the time and temperature setting. All you need to do is
set the weight.
The weight can only be set within defined limits.
1. Set the function selector and the temperature
selector to Programmes %.
2. Use the @ or A button to set the required
programme.
3. Touch the h button.
4. Use the @ or A button to set the weight of your food.
Once the weight setting has been applied, the
calculated cooking time will appear on the display.
You can use the h button to return to the
programme if you need to.
The programme will start after a few seconds.The
cooking time will count down on the display.
Once the programme has ended, an audible signal will
Setting a later end time
With some programmes, you can set a later end time.
Before starting, touch the v button until the "End"
symbol is highlighted on the display. Use the @ button
to delay the end time.
The appliance switches to standby after it is started.
Changing and cancelling
Once the appliance is started, the programme number
and the weight cannot be changed.
The end time can be changed while the appliance is on
standby.
If you would like to cancel the programme, switch the
appliance off by turning the function selector to the "Off"
position.
sound. The cooking time will be zero on the display.
If the food has been cooked to your liking, switch the
appliance off by turning the function selector to the "Off"
position.
Set weight Information
Do not sear the meat
of all the
beforehand
stuffed beef
olives
beforehand
beforehand
beforehand
Programme duration
Your appliance will automatically calculate how long the
programme you have set is going to take. The
programme duration will be displayed once you have
set the weight for your chosen programme.
You cannot change the duration of a programme.
Extending the cooking time
Once the programme and the audible signal stop, you
can touch the @ button to set a new cooking time. The
appliance will resume heating using the programme
settings.
Note: You can extend the cooking time as many times
as required.
43
Page 44

en Tested for you in our cooking studio
JTested for you in our
cooking studio
Test ed for you in our cooki ng st udio
Here, you can find a selection of dishes and the ideal
settings for them. We will show you which type of
heating and temperature are best suited to your dish.
You will get information on suitable cooking
accessories and the height at which they should be
placed in the oven. You will also get tips about
cookware and preparation methods.
Note: A lot of steam can build up in the cooking
compartment when cooking food.
Your appliance is very energy-efficient and radiates very
little heat to its surroundings during operation. Due to
the significant differences in temperature between the
appliance interior and the external parts of the
appliance, condensation may build up on the door, the
control panel or the front panels of adjacent kitchen
cabinets. This is a normal physical phenomenon.
Condensation can be reduced by preheating the oven
or opening the door carefully.
General information
method of preparation and the type of food, it is
possible to save energy. If you open the appliance door
before the food has finished cooking or if you preheat
the appliance, you may not be able to achieve this
result.
Only use genuine accessories for your appliance.
These have been tailored to the cooking compartment
and the heating functions of your appliance. Remove
any accessories that are not being used from the
cooking compartment.
Place the food into the empty cooking compartment
before the oven is heated up. Select a temperature of
between 120 °C and 230 °C.Always keep the
appliance door closed when cooking. Only cook on one
level when using this function.
The Gentle hot air heating function is used to measure
both the energy consumption in air recirculation mode
and the energy efficiency class.
Baking on one level
When baking on one level, use the following shelf
positions:
■ Position 2 – tall baked items and tins/dishes on the
wire rack
■ Position 3 – shallow baked items and baking trays
Recommended setting values
The table lists the optimal heating function for various
types of food. The temperature and cooking time
depend on the amount of food and the recipe.For this
reason, the table specifies setting ranges. Try using the
lower value to start with. A lower temperature will result
in more even browning. You can increase the
temperature next time if necessary.
Note: Cooking times cannot be reduced by using
higher temperatures. The food would only be cooked
on the outside, but would not be fully cooked in the
middle.
The setting values apply to food placed in the cooking
compartment while the cooking compartment is still
cold. This will save energy.If you preheat the oven, you
can reduce the indicated baking times by several
minutes.
Preheating is necessary for selected types of food –
this is indicated in the table. Do not place your food and
accessory into the cooking compartment until it has
finished preheating.
If you wish to follow one of your own recipes, you
should use the settings listed in the table for similar
food as reference. Additional information can be found
in the baking tips listed after the settings tables.
Remove any accessories that are not being used from
the cooking compartment. This will allow you to achieve
optimal cooking results while saving energy.
Gentle hot air heating function
Gentle hot air is an intelligent heating function that
allows you to gently cook meat, fish and baked items.
The appliance optimally controls the supply of energy to
the cooking compartment. The food is cooked in
phases using residual heat. This means that it remains
more succulent and browns less. Depending on the
Baking on two or more levels
Use the hot air heating function. Items that are placed in
the oven on baking trays or in baking tins/dishes at the
same time will not necessarily be ready at the same
time.
Baking on two levels:
■ Universal pan, position 3
Baking tray, position 1
■ Baking tins/dishes on the wire rack
First wire rack, position 3
Second wire rack, position 1
Baking on three levels:
■ Baking tray, position 5
Universal pan, position 3
Baking tray, position 1
You can cut energy use by cooking different items at
the same time. Position baking tins/dishes either next to
one another or offset on different shelves so that they
are not directly one above the other in the cooking
compartment.
Accessories
Only use original accessories supplied with your
appliance. These have been tailored to the cooking
44
Page 45

Tested for you in our cooking studio en
compartment and the operating modes of your
appliance.
Ensure that you always use suitable accessories and
that they are placed in the oven the right way around.
~ "Accessories" on page 16
Greaseproof paper
Only use greaseproof paper that is suitable for the
selected temperature. Always cut greaseproof paper to
size.
Cakes and pastries
Your appliance offers you a range of heating types for
the preparation of cakes and small baked items. You
can find the ideal settings for many dishes in the
settings tables.
Also refer to the notes in the section on allowing dough
to rise.
Baking tins
For optimal cooking results, we recommend using darkcoloured metal baking tins.
Tinplate baking tins, ceramic dishes and glass dishes
extend baking time and mean that the baked item will
not brown evenly.
If you are using silicone moulds, follow the
manufacturer's instructions and recipes. Silicone
moulds are often smaller than normal baking tins.
Quantity and recipe specifications may vary.
Frozen products
Do not use frozen products that are heavily frosted.
Remove any ice on the food.
Some frozen products may be unevenly pre-baked.
Uneven browning may remain even after baking.
Bread and rolls
Caution!
Never pour water into the hot cooking compartment or
place cookware containing water onto the bottom of the
cooking compartment. The change in temperature can
cause damage to the enamel.
Some food turns out better if it is baked in several
stages. These dishes are indicated in the table.
The setting values for bread dough apply to both dough
placed on a baking tray and dough placed in a loaf tin.
Cakes in tins
Dish Accessories/cookware Shelf posi-
tion
Sponge cake, simple Vienna ring tin/loaf tin 2
Sponge cake, simple, 2 levels Vienna ring tin/loaf tin 3+1
Sponge cake, delicate Vienna ring tin/loaf tin 2
Sponge flan base Flan tin 3
Fruit tart or cheesecake with shortcrust pastry
base
Tart Tart dish or tin 1
Yeast cake 28 cm springform cake tin 2
Bundt cake Bundt cake tin 2
3-egg fatless sponge cake 26 cm springform cake tin 2
6-egg fatless sponge cake 28 cm springform cake tin 2
Cakes on trays
Dish Accessories/cookware Shelf posi-
Sponge cake with topping Universal pan 3
Small yeast cakes, 2 levels Universal pan + baking tray 3+1
Shortcrust tart with dry topping Universal pan 2
Shortcrust tart with dry topping, 2 levels Universal pan + baking tray 3+1
Shortcrust tart with moist topping Universal pan 2
Yeast cake with dry topping Universal pan 3
Yeast cake with dry topping, 2 levels Universal pan + baking tray 3+1
* Preheat for 10 minutes
26 cm springform cake tin 2
tion
Heating
function
6
<
%
%
%
%
<
%
6
6
Heating
function
%
<
%
<
%
%
<
Temperature in °C
160-180 50-60
140-160 60-80
150-170 60-80
160-180 30-40
160-180 70-90
200-240 25-50
150-160 25-35
150-170 60-80
160-170 30-40
160-170 35-45
Temperature
in °C
160-180 20-45
140-160 30-55
170-190 25-35
160-170 35-45
160-180 60-90
170-180 25-35
150-170 20-30
Cooking
time in
mins
Cooking
time in
mins
45
Page 46

en Tested for you in our cooking studio
Dish Accessories/cookware Shelf posi-
tion
Yeast cake with moist topping Universal pan 3
Yeast cake with moist topping, 2 levels Universal pan + baking tray 3+1
Plaited loaf, savarin Universal pan 2
Swiss roll Universal pan 2
Strudel, sweet Universal pan 2
Strudel, frozen Universal pan 3
* Preheat for 10 minutes
Small baked items
Dish Accessories/cookware Shelf posi-
tion
Muffins Muffin tray 2
Muffins, 2 levels Muffin trays 3+1
Small yeast cakes Universal pan 3
Small yeast cakes, 2 levels Universal pan + baking tray 3+1
Puff pastry Universal pan 3
Puff pastry, 2 levels Universal pan + baking tray 3+1
Puff pastry, 3 levels Baking trays + universal pan 5+3+1
Choux pastry Universal pan 3
Choux pastry, 2 levels Universal pan + baking tray 3+1
Heating
function
%
<
%
%
%
$
Heating
function
%
<
6
<
<
<
<
%
<
Temperature
in °C
160-180 30-50
150-170 40-65
160-170 35-40
170-190* 15-20
190-210 55-65
180-200 35-45
Temperature
in °C
170-190 20-40
160-170 30-40
150-170 25-35
150-170 25-40
180-200 20-30
180-200 25-35
170-190 30-45
190-210 35-50
190-210 35-45
Cooking
time in
mins
Cooking
time in
mins
Biscuits
Dish Accessories/cookware Shelf position Heating
function
Viennese whirls Universal pan 3
Viennese whirls, 2 levels Universal pan + baking tray 3+1
Viennese whirls, 3 levels Baking trays + universal pan 5+3+1
Biscuits Universal pan 3
Biscuits, 2 levels Universal pan + baking tray 3+1
Biscuits, 3 levels Baking trays + universal pan 5+3+1
Meringue Universal pan 3
Meringue, 2 levels Universal pan + baking tray 3+1
Macaroons Universal pan 2
Macaroons, 2 levels Universal pan + baking tray 3+1
Macaroons, 3 levels Baking trays + universal pan 5+3+1
* Preheat
Bread and rolls
Dish Accessories/cookware Shelf posi-
tion
Bread, 750 g (in a loaf tin or free-form) Universal pan or loaf tin 2
Bread, 1000 g (in a loaf tin or free-form) Universal pan or loaf tin 2
* Preheat
Heating
function
6
6
%
<
<
%
<
<
<
<
%
<
<
Step Temperature in °CCooking
- 180-200 50-60
- 200-220 35-50
Temperature in °CCooking
time in
mins
140-150* 30-40
140-150* 30-45
130-140* 40-55
140-160 20-30
130-150 25-35
130-150 30-40
80-100 100-150
90-100* 100-150
100-120 30-40
100-120 35-45
100-120 40-50
time in
mins
46
Page 47

Tested for you in our cooking studio en
Dish Accessories/cookware Shelf posi-
tion
Bread, 1500 g (in a loaf tin or free-form) Universal pan or loaf tin 2
Flatbread Universal pan 3
Bread rolls, sweet, fresh Universal pan 3
Bread rolls, sweet, fresh, 2 levels Universal pan + baking tray 3+1
Bread rolls, fresh Universal pan 3
Toast with topping, 4 slices Wire rack 3
Toast with topping, 12 slices Wire rack 3
* Preheat
Pizza, quiche and savoury cakes
Dish Accessories/cookware Shelf posi-
Pizza, fresh Universal pan 3
Pizza, fresh, 2 levels Universal pan + baking tray 3+1
Pizza, fresh, thin-crust Universal pan 2
Pizza, chilled Universal pan 1
Pizza, frozen, thin-crust, x 1 Wire rack 2
Pizza, frozen, thin-crust, x 2 Universal pan + wire rack 3+1
Pizza, frozen, deep-pan, x 1 Wire rack 3
Pizza, frozen, deep-pan, x 2 Universal pan + wire rack 3+1
Mini pizzas Universal pan 3
Savoury cakes in a tin 28 cm springform cake tin 2
Quiche Tart dish or tin 2
Tart Ovenproof dish 2
Empanadas Universal pan 3
Börek Universal pan 2
* Preheat
Heating
function
6
<
%
<
%
%
%
tion
Step Temperature in °CCooking
time in
mins
- 180-200 60-70
- 240-250 25-30
- 170-180* 20-30
- 160-180* 15-25
- 200-220 20-30
- 200-220 15-20
- 220-240 15-25
Heating
function
$
<
%
$
$
<
$
<
$
$
$
<
<
%
Temperature
in °C
170-190 20-30
160-180 35-45
250-270* 20-30
180-200* 10-15
190-210 15-20
190-210 20-25
180-200 20-25
170-190 20-30
190-210 10-20
170-190 40-50
190-210 35-45
170-190 55-65
180-190 35-45
220-240 30-40
Cooking
time in
mins
Baking tips
You want to find out whether the
baked item is completely cooked in
the middle.
The baked item collapses. Next time, use less liquid. Alternatively, set the temperature 10 °C lower and extend the baking time. Adhere
The baked item has risen in the middle but is lower around the edge.
The fruit juice overflows. Next time, use the universal pan.
Small baked items stick to one
another during baking.
The baked item is too dry. Set the temperature 10 °C higher and shorten the baking time.
The baked item is too light in colour
overall.
The baked item is too light on top, and
too dark underneath.
The baked item is too dark on top,
and too light underneath.
Push a cocktail stick into the highest point on the baked item. If the cocktail stick comes out clean with no
dough residue, the baked item is ready.
to the specified ingredients and preparation instructions in the recipe.
Only grease the base of the springform cake tin. After baking, loosen the baked item carefully with a knife.
There should be a gap of approx. 2 cm around each item. This gives enough space for the baked items to
expand well and brown on all sides.
If the shelf position and the accessories are correct, then you should increase the temperature if necessary or
extend the baking time.
Bake the cake one level higher in the oven the next time.
Bake the cake one level lower in the oven the next time. Select a lower temperature and extend the baking
time.
47
Page 48

en Tested for you in our cooking studio
The baked item is too dark in a tin or
loaf tin.
The baked item is too dark in colour
overall.
The baked item is unevenly browned. Select a slightly lower temperature.
You were baking on several levels.
The items on the top baking tray are
darker than those on the lower baking
tray.
The baked item looks good, but is not
cooked properly in the middle.
The baked item cannot be turned out
of the dish when it is turned upside
down.
Place the baking tray in the middle of the accessory, not directly against the back wall.
Select a lower temperature next time and extend the baking time if necessary.
Protruding greaseproof paper can affect the air circulation. Always cut greaseproof paper to size.
Ensure that the baking tin does not stand directly in front of the openings in the cooking compartment back
wall.
When baking small items, you should use similar sizes and thicknesses wherever possible.
Always select hot air when baking on several levels. Baked items that are placed into the oven on trays or in
baking tins at the same time will not necessarily be ready at the same time.
Use a lower temperature and bake slightly longer; if necessary, add slightly less liquid. For baked items with a
moist topping, bake the base first. Sprinkle it with almonds or breadcrumbs and then place the topping on top.
Allow the baked item to cool down for 5 to 10 minutes after baking. If it still sticks, carefully loosen it around
the edges again using a knife. Turn the baked item upside down again and cover it several times with a cold,
wet cloth. Next time, grease the baking tin and sprinkle with breadcrumbs.
Bakes and gratins
Your appliance offers a range of heating functions for
cooking bakes. The settings tables list the optimal
settings for a wide range of dishes.
How well cooked a bake is will depend on the size of
the cookware and the shelf position of the bake.
Use wide, shallow cookware for bakes and gratins.
Food takes longer to cook in deep, narrow cookware
and it browns more on top.
Always use the shelf positions indicated.
You can cook food on one level in baking tins/dishes or
in the universal pan.
■ Baking tins/dishes on the wire rack: Position 2
■ Universal pan, position 3
You can cut energy use by cooking different items at
the same time. Position baking tins/dishes next to one
another in the cooking compartment.
Dish Accessories/cookware Shelf posi-
tion
Bake, savoury, cooked ingredients Ovenproof dish 2
Bake, sweet Ovenproof dish 2
Potato gratin, raw ingredients, 4 cm deep Ovenproof dish 2
Potato gratin, raw ingredients, 4 cm deep, 2 levels Ovenproof dish 3+1
Poultry, meat and fish
Your appliance offers you a range of heating types for
preparing poultry, meat and fish. You can find the ideal
settings for certain dishes in the settings tables.
Roasting on the wire rack
Roasting on the wire rack works particularly well for
large poultry or for multiple pieces at the same time.
Place the food to be grilled directly onto the wire rack. If
you are grilling a single piece, place it in the centre of
the wire rack for best results.
The universal pan should also be inserted at position 1.
This will catch the meat juices that drip down and keeps
the cooking compartment clean.
Add up to ^ litre of water to the universal pan,
depending on the size and type of joint. This will catch
the liquid that drips down. You can make a sauce from
these juices. This will also result in less smoke being
produced and keep the cooking compartment clean.
Roasting in cookware
:Warning – Risk of injury caused by shattering
glass!
Place hot glass cookware on a dry mat after cooking. If
the surface is damp or cold, the glass may crack.
:Warning – Risk of scalding!
Very hot steam may escape when opening the lid after
cooking. Lift the lid at the rear, so that the hot steam
can escape away from you.
Only use cookware which is suitable for use in an oven.
Glass cookware is best. Check whether the cookware
fits in the cooking compartment.
Shiny roasting dishes made from stainless steel or
aluminium reflect heat like a mirror and are therefore
not particularly suitable. The poultry, meat and fish
cooks slower and does not brown so well. Use a higher
temperature and/or a longer cooking time.
Observe the manufacturer's instructions for your
roasting cookware.
Heating
function
%
%
<
<
Temperature in °CCooking time
in mins
200-220 30-60
180-200 50-60
150-170 60-80
150-160 70-80
48
Page 49

Tested for you in our cooking studio en
Uncovered cookware
To cook poultry, meat and fish, it is best to use a deep
roasting tin. Place the tin onto the wire rack. If you do
not have any suitable cookware, use the universal pan.
Covered cookware
When cooking with covered cookware, the cooking
compartment remains considerably cleaner. Ensure that
the lid fits well and closes properly. Place the cookware
onto the wire rack.
Poultry, meat and fish can also become crispy in a
covered roasting dish. Simply use a roasting dish with a
glass lid and set a higher temperature.
Grilling
Keep the appliance door closed when using the grill.
Never grill with the appliance door open.
Place the food to be grilled on the wire rack. In addition,
slide the universal pan in at least one shelf position
lower, with the slanted edge facing the appliance door.
Any dripping fat will be caught.
When grilling, try wherever possible to use pieces of
food which are of a similar thickness and weight. This
will allow them to brown evenly and remain succulent
and juicy. Place the food to be grilled directly onto the
wire rack.
Use tongs to turn the pieces of food you are grilling. If
you pierce the meat with a fork, the juices will run out
and it will become dry.
Do not add salt to the meat until it has been grilled. Salt
draws water from the meat.
Notes
■ The grill element switches itself on and off
repeatedly; this is normal. The grill setting
determines how frequently this occurs.
■ Smoke may be produced when grilling.
■ When you are using the grill, do not insert the baking
tray or universal pan into the cooking compartment
any higher than shelf position 3. The high
temperatures at the top of the cooking compartment
can warp accessories, which may damage the
cooking compartment when removed.
Meat thermometer
Depending on your appliance's features, you may have
a meat thermometer. You can cook accurately using a
meat thermometer. Read important notes on using the
meat thermometer in the corresponding chapter. There,
you can find notes on inserting the meat thermometer,
the possible heating types and additional information.
~ "Meat thermometer" on page 29
Recommended setting values
The setting values are based on the assumption that
unstuffed, chilled, ready-to-roast poultry, meat or fish is
placed into a cold cooking compartment.
In the table, you can find specifications for poultry, meat
and fish with default values for the weight. If you wish to
prepare heavier poultry, meat or fish, always use the
lower temperature. If roasting several joints, use the
weight of the heaviest piece as a basis for determining
the cooking time. The individual pieces should be
approximately equal in size.
The larger the poultry, meat or fish is, the lower the
cooking temperature and the longer the cooking time.
Turn the poultry, meat and fish after approx. ^ to Z of
the indicated time.
Poultry
When cooking duck or goose, pierce the skin on the
underside of the wings. This allows the fat to run out.
If using duck breast, score the skin. Do not turn duck
breasts.
Add some liquid to the poultry in the dish. Cover the
base of the ovenware with approx. 1-2 cm of liquid.
When you turn poultry, ensure that the breast side or
the skin side is underneath at first.
Poultry will turn out particularly crispy and brown if you
baste it towards the end of the roasting time with butter,
salted water or orange juice.
Meat
Baste lean meat with fat as required or cover it with
strips of bacon.
When roasting, add a little liquid if the meat is lean. A
covering of approx. ^ cm depth should be applied to
the base of any glass cookware.
Score the rind crosswise. If you turn the joint when
cooking, ensure that the rind is underneath at first.
When the joint is ready, turn off the oven and allow it to
rest for another 10 minutes in the cooking
compartment. This allows the meat juices to be better
distributed. Wrap the joint in aluminium foil if necessary.
The recommended resting time is not included in the
cooking time indicated.
It is more convenient to roast and braise meat in
cookware. You can take the joint out of the cooking
compartment more easily in the cookware, and prepare
the sauce in the cookware itself.
The quantity of liquid is dependent on the type of meat,
the cookware material and also on whether or not a lid
is used. If preparing meat in an enamelled or dark metal
roasting dish, it will need a little more liquid than if
cooked in glass cookware.
The steam evaporates in the cookware when roasting.
Carefully pour in more liquid if required.
The distance between the meat and the lid should be at
least 3 cm. The meat may rise.
If necessary, braise the meat first by searing it. Add
water, wine, vinegar or a similar liquid to the braising
liquid. A covering approx. 1-2 cm deep should be
applied to the base of the cookware.
Fish
Fish cooked whole does not have to be turned. Place
the whole fish into the cooking compartment in
swimming position with the dorsal fin facing upwards.
Placing half a potato or a small oven-proof container in
the stomach cavity of the fish will provide stability.
You can tell when the fish is cooked because the dorsal
fin can be removed easily.
When stewing, add two to three tablespoons of liquid
and a little lemon juice or vinegar into the cookware.
49
Page 50

en Tested for you in our cooking studio
Poultry
Dish Accessories/cookware Shelf position Heating
function
Chicken, 1.3 kg Wire rack 2
Small chicken portions, 250 g each Wire rack 3
Chicken goujons, nuggets, frozen Universal pan 3
Duck, 2 kg Wire rack 2
Duck breast, medium, 300 g each Wire rack 3
Goose, 3 kg Wire rack 2
Goose legs, 350 g each Wire rack 3
Small turkey, 2.5 kg Wire rack 2
Turkey breast, boned, 1 kg Cookware, covered 2
Turkey thigh, bone in, 1 kg Wire rack 2
Meat
Dish Accessories/cookware Shelf posi-
tion
Joint of pork without rind, e.g. neck, 1.5 kg Cookware, uncovered 1
Joint of pork with rind, e.g. shoulder, 2 kg Cookware, uncovered 1
Pork tenderloin steak, 1.5 kg Cookware, uncovered 2
Pork steaks, 2 cm thick Wire rack 4
Fillet of beef, medium, 1 kg Cookware, uncovered 3
Pot-roasted beef, 1.5 kg Cookware, uncovered 2
Sirloin, medium, 1.5 kg Cookware, uncovered 2
Burger, 3-4 cm thick Wire rack 4
Joint of veal, 1.5 kg Cookware, uncovered 2
Knuckle of veal, 1.5 kg Cookware, uncovered 2
Leg of lamb, boned, medium, 1.5 kg Cookware, uncovered 2
Saddle of lamb on the bone, medium, 1.5 kg Wire rack 2
Grilling sausages Wire rack 3
Meat loaf, 1 kg Cookware, uncovered 2
* Do not turn
** Slide the universal pan in at shelf position 1
7
7
%
7
7
7
7
7
%
7
Heating
function
7
7
%
(
%
6
7
(
%
%
7
7
(
7
Temperature in °CCooking time
in mins
200-220 60-70
220-230 30-35
190-210 20-25
190-210 100-110
240-260 30-40
170-190 120-140
220-240 40-50
180-200 80-100
240-260 80-100
180-200 90-100
Step Tempera-
ture in °C
- 180-200 140-160
- 170-190 190-200
- 190-210 130-140
- 3 20-25**
- 210-220 45-55
- 200-220 100-120
- 200-220 60-70
- 3 25-30**
- 180-200 120-140
- 210-230 130-150
- 170-190 70-80*
- 180-190 45-55*/**
- 3 20-25**
- 170-180 70-80
Cooking
time in
mins
Fish
Fish Weight Accessories
and cookware
Fish, whole Approx. 300 g each Wire rack 2
1.0 kg Wire rack 2
1.5 kg Wire rack 2
Fish steak, 3 cm thick Wire rack 3
50
Position Heating
function
(
7
7
(
Temperature in
°C, grill setting
2 20-25
180-200 45-50
170-190 50-60
2 20-25
Cooking time
in minutes
Page 51

Tips on roasting and braising
Tested for you in our cooking studio en
The cooking compartment becomes
very dirty.
The roast is too dark and the crackling is burned in places, and/or the
roast is too dry.
The crackling is too thin. Increase the temperature or switch on the grill briefly at the end of the roasting time.
The roast looks good but the juices
are burnt.
The roast looks good but the juices
are too clear and watery.
The meat gets burned during braising.
Vegetables and side dishes
Here, you can find information for preparing grilled
vegetables, potatoes and frozen potato products.
Dish Accessories/cookware Shelf posi-
Grilled vegetables Universal pan 5
Baked potatoes, halved Universal pan 3
Potato products, frozen, e.g. chips, croquettes,
potato pockets, rösti
Chips, 2 levels Universal pan + baking tray 3+1
Prepare your food in an enclosed roasting dish with higher temperature or use the grill tray. You will achieve
the best roasting results if you use the grill tray. The grill tray can be bought later as a special accessory.
Check the shelf position and temperature. Select a lower temperature the next time and reduce the roasting
time if necessary.
Next time, use a smaller roasting dish and add more liquid if necessary.
Next time, use a larger roasting dish and add less liquid if necessary.
The roasting dish and lid must fit together well and close properly.
Reduce the temperature and add more liquid when braising if necessary.
Adhere to the specifications in the table.
Universal pan 3
tion
Heating
function
(
<
%
<
Temperature in °C
3 10-20
160-180 45-60
200-220 25-35
190-210 30-40
Cooking
time in mins
Yoghurt
You can use your appliance to make your own yoghurt.
Remove accessories and shelf supports from the
cooking compartment. The cooking compartment must
be empty.
1. Heat 1 litre of milk (3.5% fat) to 90 °C on the hob
and then leave it to cool down to 40 °C.
Dish Accessories/cookware Shelf position Heating
Yoghurt Cup/jar Cooking compart-
It is sufficient to heat UHT milk to 40 °C.
2. Stir in 30 g (approx. 1 tbsp) (chilled) yoghurt.
3. Pour into cups or small jars with lids and cover.
4. Place the cups or jars onto the cooking
compartment floor and use the settings indicated in
the table.
5. After making the yoghurt, leave it to cool in the
refrigerator.
function
^
ment floor
Temperature in °C
- 4-5h
Cooking time
51
Page 52

en Tested for you in our cooking studio
Acrylamide in foodstuffs
crisps, chips, sliced bread, bread rolls, bread or fine
baked goods (biscuits, gingerbread, spiced biscuit).
Acrylamide is mainly produced in grain and potato
products prepared at high temperatures, such as potato
Tips for keeping acrylamide to a minimum
General ■ Keep cooking times as short as possible.
■ Cook food until it is golden brown, but not too dark.
■ Large, thick pieces of food contain less acrylamide.
Baking With top/bottom heating at max. 200 °C.
With hot air at max. 180 °C.
Biscuits With top/bottom heating at max. 190 °C.
With hot air at max. 170 °C.
Egg or egg yolk reduces the production of acrylamide.
Oven chips Spread out a single layer evenly on the baking tray. Cook approx. 400-600 g at once on a baking tray so
that the chips do not dry out and become crunchy.
Drying
You can achieve outstanding drying results with hot air.
Use the following shelf positions for drying:
■ 1 wire rack: Position 3
■ 2 wire racks: Positions 3 + 1
With this type of preserving, flavours are concentrated
as a result of the dehydration.
Only use unblemished, fresh fruit, vegetables and herbs
and wash them thoroughly. Line the wire rack with
greaseproof paper or parchment paper. Drain the
excess water from the fruit and then dry the fruit
thoroughly.
If necessary, cut it into pieces of equal size or slice it
thinly. Place unpeeled fruit onto the dish with the sliced
surfaces facing upwards. Ensure that neither fruit nor
mushrooms overlap on the wire rack.
Grate vegetables and then blanch them. Drain the
excess water from the blanched vegetables and spread
them evenly on the wire rack.
Turn very juicy fruit and vegetables several times. After
drying, remove the dried food from the paper
immediately.
In the table, you will find settings for drying various
foodstuffs. The temperature and drying time are
dependent on the type, moisture, ripeness and
thickness of the food. The longer you leave the food to
be dried, the better it will be preserved. The more thinly
you slice the food, the more quickly it will dry and the
more flavour it will retain.For this reason, the table
specifies setting ranges.
If you wish to dry food that is not listed in the table, you
should use the settings listed in the table for similar
food as reference.
Dry herbs on the stem. Spread the herbs out evenly and
slightly heaped on the wire rack.
Fruit, vegetables and herbs Accessories Heating
function
Pomes (apple rings, 3 mm thick, 200 g per wire rack) 1-2 wire racks
Root vegetables (carrots), grated, blanched 1-2 wire racks
Sliced mushrooms 1-2 wire racks
Herbs, washed 1-2 wire racks
Preserving
cooking mode, check whether the contents of the jars
<
<
<
<
are bubbling as they should.
For preserving, the jars and rubber seals must be clean
and intact. If possible, use jars of the same size. The
Preparation
information in the table is for round, one-litre jars.
Caution!
Do not use jars that are larger or taller than this. The
lids could crack.
Only use fruit and vegetables in good condition. Wash
them thoroughly.
The times given in the tables are a guide only. The time
will depend on the room temperature, number of jars,
and the quantity and temperature of the contents.
Before you switch off the appliance or change the
1. Fill the jars, but not to the top.
2. Wipe the rims of the jars, as they must be clean.
3. Place a damp rubber seal and a lid on each jar.
4. Seal the jars with the clips.
Place no more than six jars in the cooking
compartment.
Settings
1. Insert the universal pan at level 2. Arrange the
preserving jars so that they do not touch each other.
Temperature in °CCooking time in
hours
80 4-8
80 4-7
80 5-8
60 2-5
52
Page 53

Tested for you in our cooking studio en
2. Pour ½ litre of water (approx. 80 °C) into the
universal pan.
3. Close the oven door.
4. Set Bottom heat$.
5. Set the temperature to 170 - 180 °C.
Fruit in one-litre jars When it starts to bubble Residual heat
Apples, redcurrants, strawberries Switch off approx. 25 minutes
Cherries, apricots, peaches, gooseberries Switch off approx. 30 minutes
Apple purée, pears, plums Switch off approx. 35 minutes
Vegetables
As soon as bubbles begin to form in the jars, set the
temperature back to between 120 and 140 °C.
Vegetables with cold cooking water in one-litre jars When it starts to bubble Residual heat
Gherkins - approx. 35 minutes
Beetroot approx. 35 minutes approx. 30 minutes
Brussels sprouts approx. 45 minutes approx. 30 minutes
Beans, kohlrabi, red cabbage approx. 60 minutes approx. 30 minutes
Peas approx. 70 minutes approx. 30 minutes
Preserving
Fruit
After approx. 40 to 50 minutes, small bubbles begin to
form at short intervals. Switch off the oven.
After 25 to 35 minutes of residual heat, remove the
preserving jars from the cooking compartment. If they
are allowed to cool for longer in the cooking
compartment, germs could multiply, promoting
acidification of the preserved fruit.
Depending on the type of vegetable, heat for approx. 35
to 70 minutes. Switch off the oven after this time and
use the residual heat.
Taking out the jars
After preserving, remove the jars from the cooking
compartment.
Caution!
Do not place the hot jars on a cold or wet surface. They
could suddenly burst.
Prove dough
Your yeast dough will prove considerably more quickly
using this heating function than at room temperature
and will not dry out. Do not start the appliance if the
cooking compartment is not completely cool.
Always allow yeast dough to prove twice.Use the
settings indicated in the settings tables for the first and
second proving stages (dough fermentation stage and
final fermentation stage).
Dough fermentation
Place the dough into a heat-resistant bowl and place
Dish Accessories/cookware Shelf posi-
Yeast dough, light Bowl 2
Universal pan or loaf tin 2
Yeast dough, heavy and rich Bowl 2
Universal pan or loaf tin 2
* Heat up up to 50 °C with %
this onto the wire rack. Use the settings indicated in the
table.
Do not open the appliance door while the dough is
proving, otherwise moisture will escape. Do not cover
the dough.
Condensation builds up during the proving process,
which steams up the door panel. Wipe out the cooking
compartment after dough proving.Remove any
limescale with a little vinegar and wipe with clean water.
Final fermentation
Place your dough into the oven at the shelf position
indicated in the table.
If you want to preheat the oven, the final fermentation
stage takes place outside the appliance in a warm
place.
The temperature and proving time are dependent on
the type and quantity of the ingredients. For this reason,
the values indicated in the settings table are intended
as a guide only.
tion
Heating
function
^
^
^
^
Step Temperature
in °C
1. -* 25-30
2. -* 10-20
1. -* 60-75
2. -* 45-60
Cooking
time in
mins
53
Page 54

en Tested for you in our cooking studio
Defrosting
Remove frozen food from its packaging and place it
onto the wire rack in suitable cookware.
For defrosting frozen fruit, vegetables and baked items.
Poultry, meat and fish should ideally be defrosted in the
refrigerator. Not suitable for cream cakes or cream
gateaux.
Use the following shelf positions when defrosting:
■ 1 wire rack: Position 2
■ 2 wire racks: Positions 3 + 1
Tip: Food that has been frozen flat or in portions
Redistribute the food or turn it once or twice as it
defrosts. Large pieces of food should be turned several
times.As the food defrosts, break up any clumps and
remove items that have already defrosted from the
appliance.
To allow the temperature to equalise, leave the
defrosted food to rest for another 10 to 30 minutes in
the appliance after switching it off.
defrosts more quickly than food items frozen in a block.
Frozen food Accessories Position Heating
function
For example cream gateaux, buttercream cakes, gateaux with chocolate
Wire rack 2
<
or sugar icing, fruit, chicken, sausage and meat, bread and bread rolls,
cakes and other baked items
Test dishes
1
These tables have been produced for test institutes to
facilitate appliance testing.
As per EN 60350-1.
Baking
Items that are placed in the oven on baking trays or in
baking tins/dishes at the same time will not necessarily
be ready at the same time.
Temperature
The temperature selector must
remain in the "Off" position
2
Shelf positions for baking on two levels:
■ Universal pan, position 3
Baking tray, position 1
■ Baking tins/dishes on the wire rack
First wire rack, position 3
Second wire rack, position 1
Shelf positions for baking on three levels:
■ Baking tray, position 5
■ Universal pan, position 3
■ Baking tray: Position 1
Baking with two springform tins:
■ On one level (figure !)
■ On two levels (figure ")
Notes
■ The setting values apply to dishes placed into a cold
cooking compartment.
■ Please note the information in the tables about
preheating. The setting values are valid without rapid
heating-up.
■ For baking, use the lower of the indicated
temperatures first.
Grilling
Also slide in the universal pan. The liquid will be caught
and the cooking compartment stays cleaner.
Baking
Meal Accessories/cookware Shelf posi-
tions
Viennese whirls Universal pan 3
Viennese whirls Universal pan 3
Viennese whirls, 2 levels Universal pan + baking tray 3+1
Viennese whirls, 3 levels Baking trays + universal pan 5+3+1
Small cakes Universal pan 3
Small cakes Universal pan 3
Small cakes, 2 levels Universal pan + baking tray 3+1
Small cakes, 3 levels Baking trays + universal pan 5+3+1
** Preheat for 5 mins; do not use rapid heat-up function.
** Preheat; do not use rapid heat-up function.
Type of
heating
%
<
<
<
%
<
<
<
Temperature in °CCooking
time in
mins
140-150* 20-30
140-150* 20-30
140-150* 20-35
130-140* 25-40
150* 25-35
150* 25-35
150* 25-35
140* 35-45
54
Page 55

Tested for you in our cooking studio en
Meal Accessories/cookware Shelf posi-
tions
Sponge cake 26 cm springform cake tin 2
Sponge cake 26 cm springform cake tin 2
Sponge cake, 2 levels 2 x 26 cm springform cake tins 3+1
Double-crusted apple pie 2 x 20 cm black cake tins 2
Double-crusted apple pie 2 x 20 cm black cake tins 3
Double-crusted apple pie, 2 levels 2 x 20 cm black cake tins 3+1
** Preheat for 5 mins; do not use rapid heat-up function.
** Preheat; do not use rapid heat-up function.
Grilling
Dish Accessories Shelf position Heating
Toasting bread
Preheat for 10 min
Beefburgers, x 12
* Do not preheat
* Turn after 2/3 of the total time
Wire rack 5
Wire rack 4
Type of
heating
%
6
<
%
<
<
function
(
(
Temperature in °CCooking
time in
mins
160-170** 30-40
170 30-40
150-160** 30-45
180-200 60-80
160-180 75-85
170-190 70-90
Temperature in °CCooking time
in mins
3 0,2-1,5
3 25-30*
55
Page 56

5IBOLZPVGPSCVZJOHB
#PTDI)PNF"QQMJBODF
3FHJTUFSZPVSOFXEFWJDFPO.Z#PTDIOPXBOEQSPGJUEJSFDUMZGSPN
t&YQFSUUJQTUSJDLTGPSZPVSBQQMJBODF
t8BSSBOUZFYUFOTJPOPQUJPOT
t%JTDPVOUTGPSBDDFTTPSJFTTQBSFQBSUT
t%JHJUBMNBOVBMBOEBMMBQQMJBODFEBUBBUIBOE
t&BTZBDDFTTUP#PTDI)PNF"QQMJBODFT4FSWJDF
'SFFBOEFBTZSFHJTUSBUJPOoBMTPPONPCJMFQIPOFT
XXXCPTDIIPNFDPNXFMDPNF
-PPLJOHGPSIFMQ
:PV}MMGJOEJUIFSF
&YQFSUBEWJDFGPSZPVS#PTDIIPNFBQQMJBODFTOFFEIFMQXJUIQSPCMFNT
PSBSFQBJSGSPN#PTDIFYQFSUT
'JOEPVUFWFSZUIJOHBCPVUUIFNBOZXBZT#PTDIDBOTVQQPSUZPV
XXXCPTDIIPNFDPNTFSWJDF
$POUBDUEBUBPGBMMDPVOUSJFTBSFMJTUFEJOUIFBUUBDIFETFSWJDFEJSFDUPSZ
3PCFSU#PTDI)BVTHFSÉUF(NC)
$BSM8FSZ4USBF
.ßODIFO
(FSNBOZ
XXXCPTDIIPNFDPN
*9001376249*
9001376249
001012(F)
 Loading...