

Page 1
Built-in oven
Use and Care Manual
HBE5452UC
Page 2

Page 3

Table of Contents
Use and care manual
9 Safety Definitions ..................................................... 4
IMPORTANT SAFETY INSTRUCTIONS ........................ 5
Proper Installation and Maintenance ................................ 5
Fire Safety .............................................................................. 5
Burn Prevention .................................................................... 6
Child Safety ........................................................................... 6
Cleaning Safety ..................................................................... 6
Cookware Safety .................................................................. 6
Proposition 65Warning ...................................................... 7
Causes of Damage ........................................................ 8
Protecting the environment .......................................... 8
Saving energy ....................................................................... 8
Getting to know the appliance ..................................... 9
Parts ........................................................................................ 9
Control panel ...................................................................... 10
Operating controls ............................................................ 10
Display ................................................................................. 11
Operating modes .............................................................. 11
Heating modes .................................................................. 12
Further information ............................................................ 12
Cooking compartment functions .................................... 13
Accessories ........................................................................ 13
Before using the appliance for the first time ............ 14
Initial use ............................................................................. 14
Cleaning the cooking compartment and accessories 14
Operation ...................................................................... 15
Switching the appliance on and off ............................... 15
Starting the operation ....................................................... 15
Setting an operating mode .............................................. 15
Setting the heating mode and temperature ................. 15
Fast preheat ....................................................................... 16
Time-setting options ................................................... 16
Setting the cooking time .................................................. 16
Setting the end time .......................................................... 17
Setting the timer ................................................................ 18
Child lock ..................................................................... 18
Activating and deactivating ............................................. 18
Basic Settings .............................................................. 18
Changing the basic settings ........................................... 18
List of basic settings ......................................................... 19
Power failure ....................................................................... 19
Changing the time ............................................................. 19
Sabbath mode .............................................................. 20
Starting Sabbath mode .................................................... 20
Home Connect ............................................................. 21
Setting Up ........................................................................... 21
Remote Start ...................................................................... 22
Home Connect Settings ................................................... 23
Information on Data Protection ....................................... 24
Declaration of Conformity ................................................ 24
®
Module ................................................................... 24
Wi-Fi
Cleaning and maintenance ......................................... 25
Suitable cleaning agents ................................................. 25
Surfaces in the cooking compartment .......................... 26
Keeping the appliance clean .......................................... 26
Cleaning function .............................................................. 26
Rails ..................................................................................... 27
Appliance door .................................................................. 28
Troubleshooting .......................................................... 30
Eliminating faults yourself ................................................ 30
Maximum operating time ................................................. 31
Replacing the cooking compartment bulb on
the ceiling ........................................................................... 32
Glass cover ........................................................................ 32
Customer Service ........................................................ 33
Before Calling Service ..................................................... 33
Data Plate ........................................................................... 33
Service ................................................................................ 33
Parts and Accessories ..................................................... 33
STATEMENT OF LIMITED PRODUCT WARRANTY .. 34
What this Warranty Covers & Who it Applies to ......... 34
How Long the Warranty Lasts ........................................ 34
Repair/Replace as Your Exclusive Remedy ................ 34
Out of Warranty Product .................................................. 34
Warranty Exclusions ......................................................... 34
Dishes .......................................................................... 35
Information on the settings .............................................. 35
Selecting a dish ................................................................. 35
Applying settings for dishes ............................................ 36
Tested for You in Our Cooking Studio ...................... 37
Cakes and Small Baked Items ....................................... 37
Bread and Rolls ................................................................ 40
Pizza, Quiche, and Savoury Pastries ............................. 42
Casseroles and Soufflés .................................................. 44
Poultry ................................................................................. 44
Meat ..................................................................................... 46
Fish ...................................................................................... 48
Vegetables and Side Dishes .......................................... 49
Slow Cooking ..................................................................... 50
Drying .................................................................................. 51
Proofing Dough ................................................................. 52
Defrosting ........................................................................... 52
Keeping Food Warm ........................................................ 53
Pr odukt i nf o.
Additional information on products, accessories,
replacement parts and services can be found at
www.bosch-home.com and in the online shop
www.bosch-home.com/us/store
3
Page 4

9 Safety Definitions
9 WARNING
Safety Definitions
This indicates that death or serious injuries may
occur as a result of non-observance of this warning.
9 CAUTION
This indicates that minor or moderate injuries may
occur as a result of non-observance of this warning.
NOTICE: This indicates that damage to the appliance or property may occur as a result of non-compliance with this advisory.
Note: This alerts you to important information and/or tips.
4
Page 5

9 IMPORTANT SAFETY INSTRUCTIONS
READ AND SAVE THESE INSTRUCTIONS
IMPORTANT SAFETY I NS TRU CTI ONSRE AD AND SAVE THESE INSTRUCTIONS
WARNING
When properly cared for, your new appliance has been
designed to be safe and reliable. Read all instructions
carefully before use. These precautions will reduce the
risk of burns, electric shock, fire, and injury to persons.
When using kitchen appliances, basic safety precautions
must be followed, including those in the following pages.
This appliance is intended for use at an elevation of no
more than 2000 meters above sea level.
Proper Installation and Maintenance
Have the installer show you the location of the circuit
breaker or fuse. Mark it for easy reference.
This appliance must be properly installed and grounded
by a qualified technician. Connect only to properly
grounded outlet. Refer to Installation Instructions for
details.
This appliance is intended for normal family household
use only. It is not approved for outdoor use. See the
Statement of Limited Product Warranty. If you have any
questions, contact the manufacturer.
Do not store or use corrosive chemicals, vapors,
flammables or nonfood products in or near this
appliance. It is specifically designed for use when
heating or cooking food. The use of corrosive chemicals
in heating or cleaning will damage the appliance and
could result in injury.
Do not operate this appliance if it is not working properly,
or if it has been damaged. Contact an authorized
servicer.
Do not obstruct oven vents.
Do not repair or replace any part of the appliance unless
specifically recommended in this manual. Refer all
servicing to an authorized servicer.
In the event of an error the display flashes and beeps
continuously. Disconnect appliance from the power
supply and call an authorized servicer.
WARNING
When removing the door make sure oven is cool and
power to the oven has been turned off before removing
the door. Failure to do so could result in burns.
WARNING
To avoid injury from hinge bracket snapping closed, be
sure that both levers are securely in place before
removing door. Also, do not force door open or closed the hinge could be damaged and injury could result.
WARNING
Make sure the appliance and lights are cool and power
to the appliance has been turned off before replacing the
light bulb(s). Failure to do so could result in electrical
shock or burns. The lenses (if equipped) must be in
place when using the appliance. The lenses (if equipped)
serve to protect the light bulb from breaking. The lenses
(if equipped) are made of glass. Handle carefully to
avoid breaking. Broken glass can cause an injury.
WARNING
Light socket is live when door is open if main power
supply is not turned off.
Fire Safety
WARNING
NEVER cover any slots, holes or passages in the oven
bottom or cover an entire rack with materials such as
aluminum foil. Doing so blocks air flow through the oven.
Aluminum foil linings may also trap heat, causing a fire
hazard.
If materials inside an oven or warming drawer should
ignite, keep door closed. Turn off the appliance and
disconnect the circuit at the circuit breaker box.
WARNING
Use this appliance only for its intended use as described
in this manual. NEVER use this appliance as a space
heater to heat or warm the room. Doing so may result in
overheating the appliance. Never use the appliance for
storage.
The oven door is heavy and fragile. Use both hands to
remove the oven door. The door front is glass. Handle
carefully to avoid breaking.
Grasp only the sides of the oven door. Do not grasp the
handle as it may swing in your hand and cause injury or
damage.
Failure to grasp the oven door firmly and properly could
result in personal injury or product damage.
Lay the door on a flat smooth surface so that the door
cannot fall over. Failure to do so may result in personal
injury or damage to the appliance.
Always have a working smoke detector near the kitchen.
In the event that personal clothing or hair catches fire,
drop and roll immediately to extinguish flames.
Have an appropriate fire extinguisher available, nearby,
highly visible and easily accessible near the appliance.
Smother flames from food fires other than grease fires
with baking soda. Never use water on cooking fires.
5
Page 6

9 IMPORTANT SAFETY INSTRUCTIONS
READ AND SAVE THESE INSTRUCTIONS
WARNING
TO REDUCE THE RISK OF INJURY TO PERSONS IN THE EVENT OF A GREASE FIRE, OBSERVE THE FOLLOWING:
a.
SMOTHER FLAMES with a close-fitting lid, cookie
sheet, or metal tray, then turn off the burner. BE
CAREFUL TO PREVENT BURNS. If the flames do not
go out immediately, EVACUATE AND CALL THE FIRE
DEPARTMENT.
b.
NEVER PICK UP A FLAMING PAN – You may be
burned.
c.
DO NOT USE WATER, including wet dishcloths or
towels – a violent steam explosion will result.
d.
Use an extinguisher ONLY if:
- You know you have a Class ABC extinguisher, and
you already know how to operate it.
- The fire is small and contained in the area where it
started.
- The fire department is being called.
- You can fight the fire with your back to an exit.
Burn Prevention
DO NOT TOUCH HEATING ELEMENTS OR INTERIOR
SURFACES OF OVEN - Heating elements may be hot
even though they are dark in color. Interior surfaces of an
oven become hot enough to cause burns. During and
after use, do not touch, or let clothing, potholders, or
other flammable materials contact heating elements or
interior surfaces of oven until they have had sufficient
time to cool. Other surfaces of the appliance may
become hot enough to cause burns. Among these
surfaces are oven vent openings, surfaces near these
openings and oven doors.
Exercise caution when opening the appliance. Standing
to the side, open the door (or drawer) slowly and slightly
to let hot air and/or steam escape. Keep your face clear
of the opening and make sure there are no children or
pets near the unit. After the release of hot air and/or
steam, proceed with your cooking. Keep doors shut
unless necessary for cooking or cleaning purposes. Do
not leave open doors unattended.
Do not heat or warm unopened food containers. Build-up
of pressure may cause the container to burst and cause
injury.
Use caution when cooking foods with high alcohol
content (e.g. rum, brandy, bourbon) in the oven. Alcohol
evaporates at high temperatures. There is a risk of
burning as the alcohol vapors may catch fire in the oven.
Use only small quantities of alcohol in foods, and open
the oven door carefully.
Always place oven racks in desired location while oven is
cool. Always use oven mitts, when the oven is warm. If a
rack must be moved while oven is hot, do not let
potholder contact the heating elements.
CAUTION
To avoid possible injury or damage to the appliance,
ensure rack is installed exactly per installation
instructions and not backwards or upside down.
Always use dry potholders. Moist or damp potholders on
hot surfaces may result in burns from steam. Do not let
potholder touch hot heating elements. Do not use a towel
or other bulky cloth.
Secure all loose garments, etc. before beginning. Tie
long hair so that it does not hang loose, and do not wear
loose fitting clothing or hanging garments, such as ties,
scarves, jewelry, or dangling sleeves.
Child Safety
When children become old enough to use the appliance,
it is the responsibility of the parents or legal guardians to
ensure that they are instructed in safe practices by
qualified persons.
Do not allow anyone to climb, stand, lean, sit, or hang on
any part of an appliance, especially a door, warming
drawer, or storage drawer. This can damage the
appliance, and the unit may tip over, potentially causing
severe injury.
Do not allow children to use this appliance unless closely
supervised by an adult. Children and pets should not be
left alone or unattended in the area where the appliance
is in use. They should never be allowed to play in its
vicinity, whether or not the appliance is in use.
CAUTION
Items of interest to children should not be stored in an
appliance, in cabinets above an appliance or on the
backsplash. Children climbing on an appliance to reach
items could be seriously injured.
Cleaning Safety
Keep oven free from grease build up.
WARNING
RISK OF BURNS
; The appliance will become very hot on the outside
during the cleaning function. Never touch the appliance
door. Allow the appliance to cool down. Keep children
away from the appliance.
Cookware Safety
NOTICE: Do not place food directly on oven bottom. Follow the manufacturer’s directions when using cooking
or roasting bags.
6
Page 7

9 IMPORTANT SAFETY INSTRUCTIONS
READ AND SAVE THESE INSTRUCTIONS
Proposition 65Warning:
This product may contain a chemical known to the State
of California, which can cause cancer or reproductive
harm. Therefore, the packaging of your product may
bear the following label as required by California:
67$7(2)&$/,)251,$352326,7,21:$51,1*
:$51,1*
&DQFHUDQG5HSURGXFWLYH+DUPZZZ3:DUQLQJVFDJRY
Note: IMPORTANT SAFETY NOTICE: The California Safe Drinking and Toxic Enforcement Act requires the Governor of California to publish a list of substance known to the state to cause cancer, birth defect or other reproductive harm, and requires businesses to warn customers of potential exposure to such substances. The burning of gas cooking fuel and the elimination of soil during self-cleaning can generate small amounts of carbon monoxide. The fiberglass insulation in Self Clean ovens gives off very small amounts of formaldehyde during the first several cleaning cycles. California lists formaldehyde as a potential cause of cancer. Carbon monoxide is a potential cause of reproductive toxicity. Exposure to these substances can be minimized by:
1.
Providing good ventilation when cooking with gas.
2.
Providing good ventilation during and immediately after self-cleaning the oven.
3.
Operating the unit according to the instructions in this manual.
7
Page 8

Causes of Damage
NOTICES
▯ Accessories, foil, greaseproof paper or ovenware on
the cooking compartment floor:
▯ Do not place accessories on the cooking
compartment floor.
▯ Do not cover the cooking compartment floor with
any sort of foil or greaseproof paper.
▯ Do not place ovenware on the cooking
compartment floor if a temperature of over 122° F
(50°C) has been set.
This will cause heat to accumulate. The baking and
roasting times will no longer be correct and the
enamel will be damaged.
▯ Aluminum foil: Aluminum foil in the cooking
compartment must not come into contact with the door
glass. This could cause permanent discoloration of the
door glass.
▯ Water in a hot cooking compartment: do not pour
water into the cooking compartment when it is hot.
This will cause steam. The change in temperature can
cause damage to the enamel.
▯ Moisture in the cooking compartment: Over an
extended period of time, moisture in the cooking
compartment may lead to corrosion. Allow the cooking
compartment to dry after use. Do not keep moist food
in the closed cooking compartment for extended
periods of time. Do not store food in the cooking
compartment.
▯ Cooling with the appliance door open: Following
operation at high temperatures, only allow the cooking
compartment to cool down with the door closed. Do
not trap anything in the appliance door. Even if the
door is only left open a crack, the front of nearby
furniture may become damaged over time.
Only leave the cooking compartment to dry with the
door open if a lot of moisture was produced during
operation.
▯ Fruit juice: when baking particularly juicy fruit pies, do
not pack the baking tray too generously. Fruit juice
dripping from the baking tray leaves stains that cannot
be removed. If possible, place on a baking sheet lined
with aluminum foil.
▯ Dirty seal: If the seal is very dirty, the appliance door
will no longer close properly during operation. The
fronts of adjacent cabinets could be damaged. Always
keep the seal clean.
▯ Appliance door as a seat, shelf or worktop: Do not sit
on the appliance door, or place or hang anything on it.
Do not place any cookware or accessories on the
appliance door.
▯ Inserting accessories: depending on the appliance
type, accessories can scratch the door glass when
closing the door. Always slide accessories into the
cooking compartment as far as they will go.
▯ Transporting the appliance: Do not carry or hold the
appliance by the door handle. The door handle cannot
support the weight of the appliance and could break.
Protecting the environment
Your new appliance is energy-efficient. Here you can find
tips on how to save even more energy when using the
appliance, and how to dispose of your appliance
properly.
Unpack the appliance and dispose of the packaging in
an environmentally friendly manner.
Saving energy
▯ Only preheat the appliance if this is specified in the
recipe or in the tables in the operating instructions.
▯ Use baking tins that are dark-colored, painted black or
have an enamel coating. They absorb the heat
particularly well.
▯ Open the appliance door as infrequently as possible
when the appliance is in use.
▯ It is best to bake several cakes one after the other.
The cooking compartment is still warm. This reduces
the baking time for the second cake. You can place
two cake tins next to each other in the cooking
compartment.
▯ For longer cooking times, you can switch the
appliance off 10 minutes before the end of the
cooking time and use the residual heat to finish
cooking.
8
Page 9
Getting to know the appliance
L
L
L
L
L
L
In this section, we will explain the indicators and controls.
You will also find information on the various functions of
your appliance.
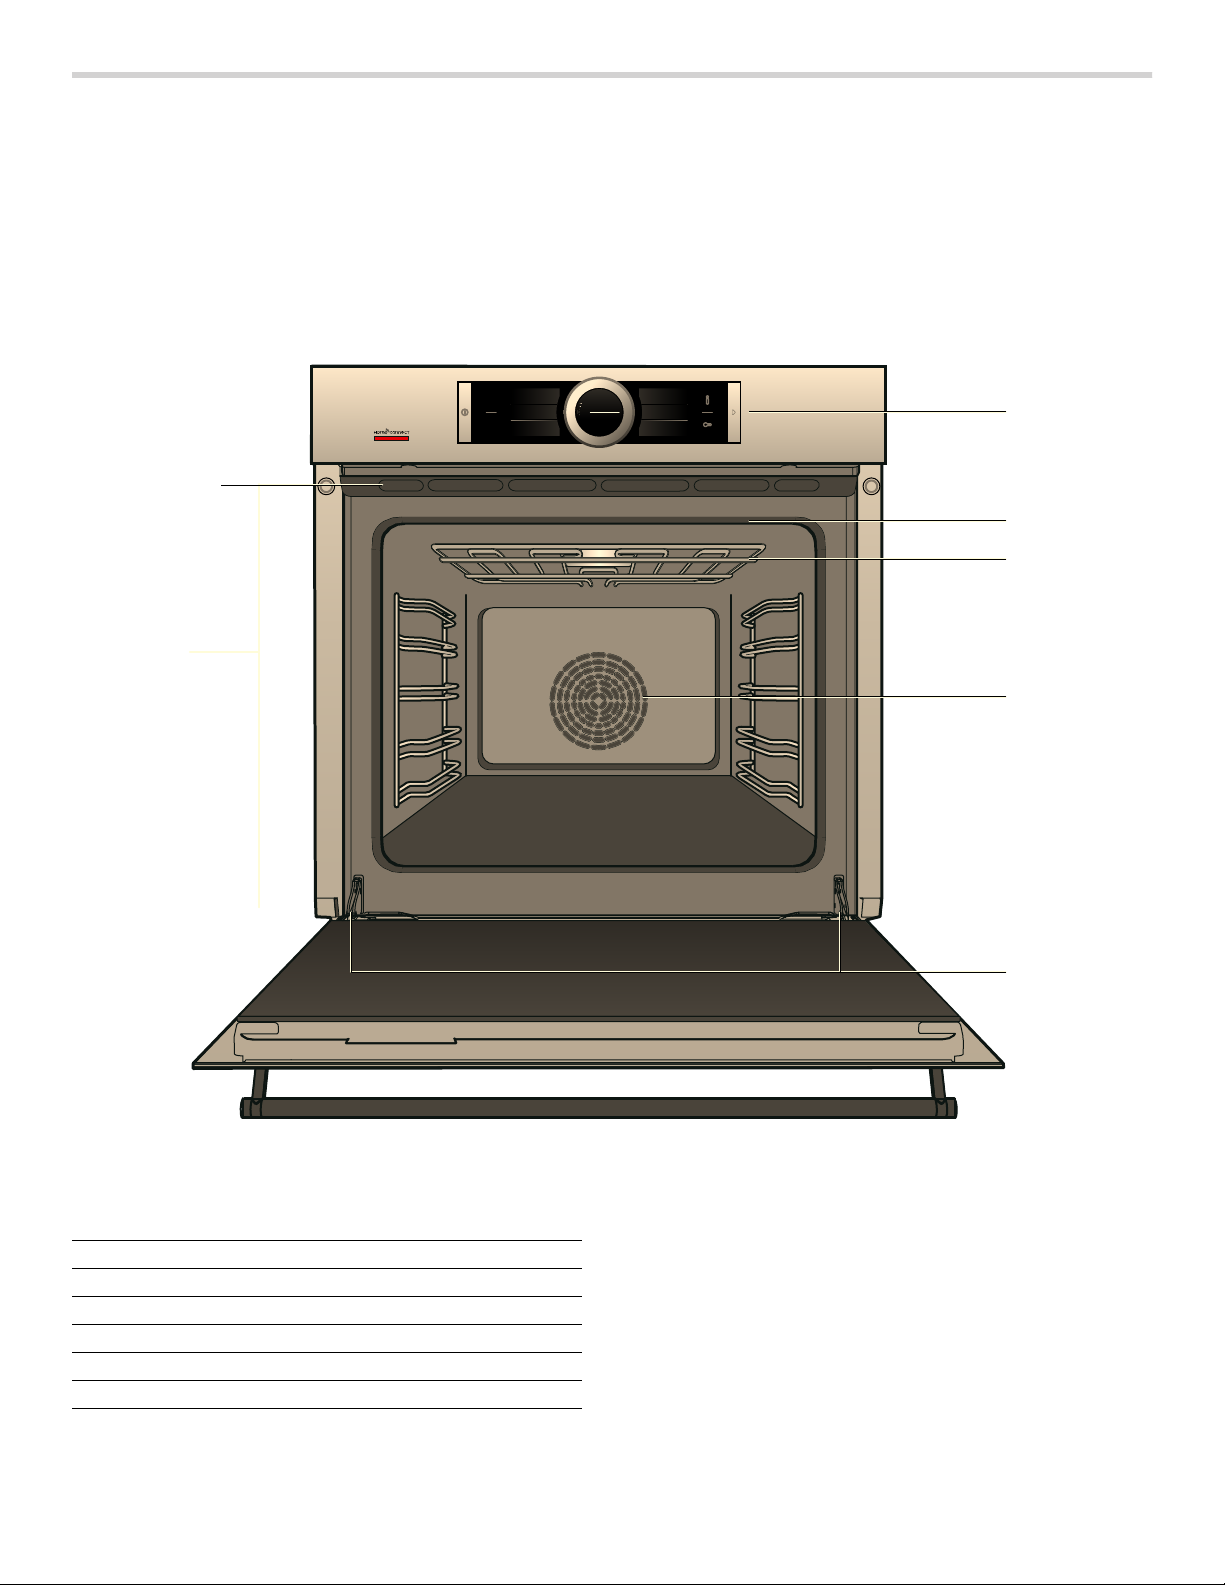
Parts
+HL]DUW
+HDWLQJPRGHV
PHQX
2EHU8QWHUKLW]H
RQ
+HL]DUW
$VVLVW
2EHU8QWHUKLW]H
RII
+HL]DUW
(FR&OHDQ
_
2EHU8QWHUKLW]H
Note: Depending on the appliance model, individual details and colors may differ.
+RPH&RQQHFW
*UXQGHLQVWHOOXQJHQ
0DLQPHQX
6HOHFW
PV
&
$VVLVWDQW
8POXIWJULOOHQ
VHWWLQJV
6FKQHOOYRUKHL]HQ
*ULOOJURH)OlFKH
VWDUW
%DVLF
(QGH
VWRS
DXV
1 Control panel
2 Door seal
3 Broil element
4 Convection fan
5 Door hinges
6 Oven vents
NOTICE: Do not place food directly on oven bottom. Do not obstruct oven vents.
9
Page 10
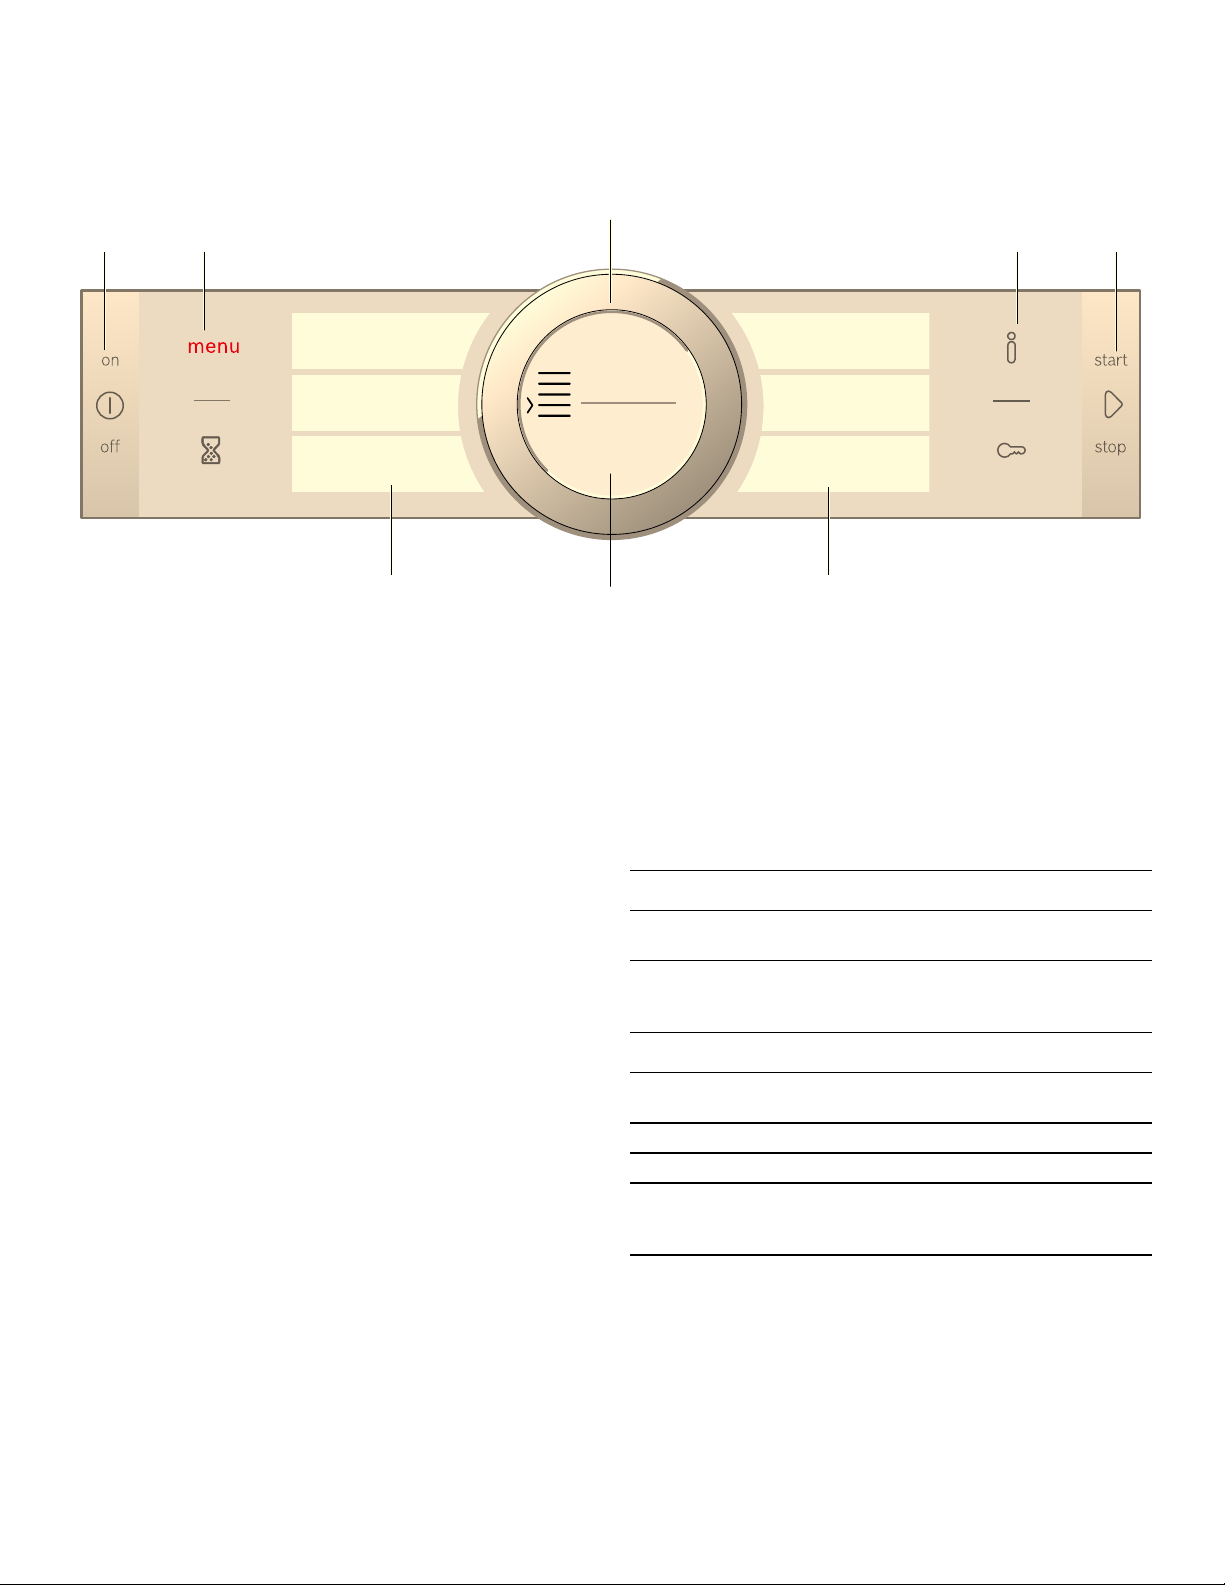
Control panel
In the control panel, you can use the various buttons,
touch fields, touch-screen displays and the rotary
selector to set the different appliance functions. The
current settings are shown on the display.
The overview shows the control panel when the
appliance is switched on with the menu display.
+HDWLQJPRGHV
$VVLVW
(FR&OHDQ
+ +
Buttons
(
The buttons on the left- and right-hand side of the
control panel have a pressure point. Press these
buttons to activate them.
For appliances that do not have a stainless steel
front, these two button touch fields do not have a
pressure point.
Touch fields
0
There are sensors under the touch fields. Simply
touch the respective symbol to select the function.
Rotary selector
8
The rotary selector is fitted so that you can turn it
indefinitely to the left or right. Press it lightly and
move it in the direction required using your finger.
Display
@
You can see the current adjustment values,
options or notes in the display.
Touch-screen displays
H
You can see the current selection options in the
touch-screen displays. You can select these here
directly by touching the appropriate text field. The
text fields change depending on the selection.
+RPH&RQQHFW
$VVLVWDQW
0DLQPHQX
6HOHFW
#
%DVLF
VHWWLQJV
Operating controls
The individual controls are adapted for the various
functions of your appliance. You can set your appliance
simply and directly.
Buttons and touch fields
Here you can find a short explanation of the various
buttons and touch fields.
Symbol Meaning
Buttons
ÿ
l
Touch fields
menu Menu Opens the "Operating modes"
|
°
D
--------
on/off Switching the appliance on and
off
start/stop Starting, pausing or cancelling
(hold down for approx. 3secs)
an operation
menu
Timer Selects the timer
Information Displays information
Child lock Activating and deactivating
(hold down for approx. 4secs)
the childproof lock
10
Rotary selector
You can use the rotary selector to change the setting
values shown on the display.
You can also use the rotary selector to scroll through the
selection lists on the touch-screen displays.
In most selection lists, you have to turn the rotary
selector in the opposite direction once you reach the
beginning or the end of the list.
Page 11
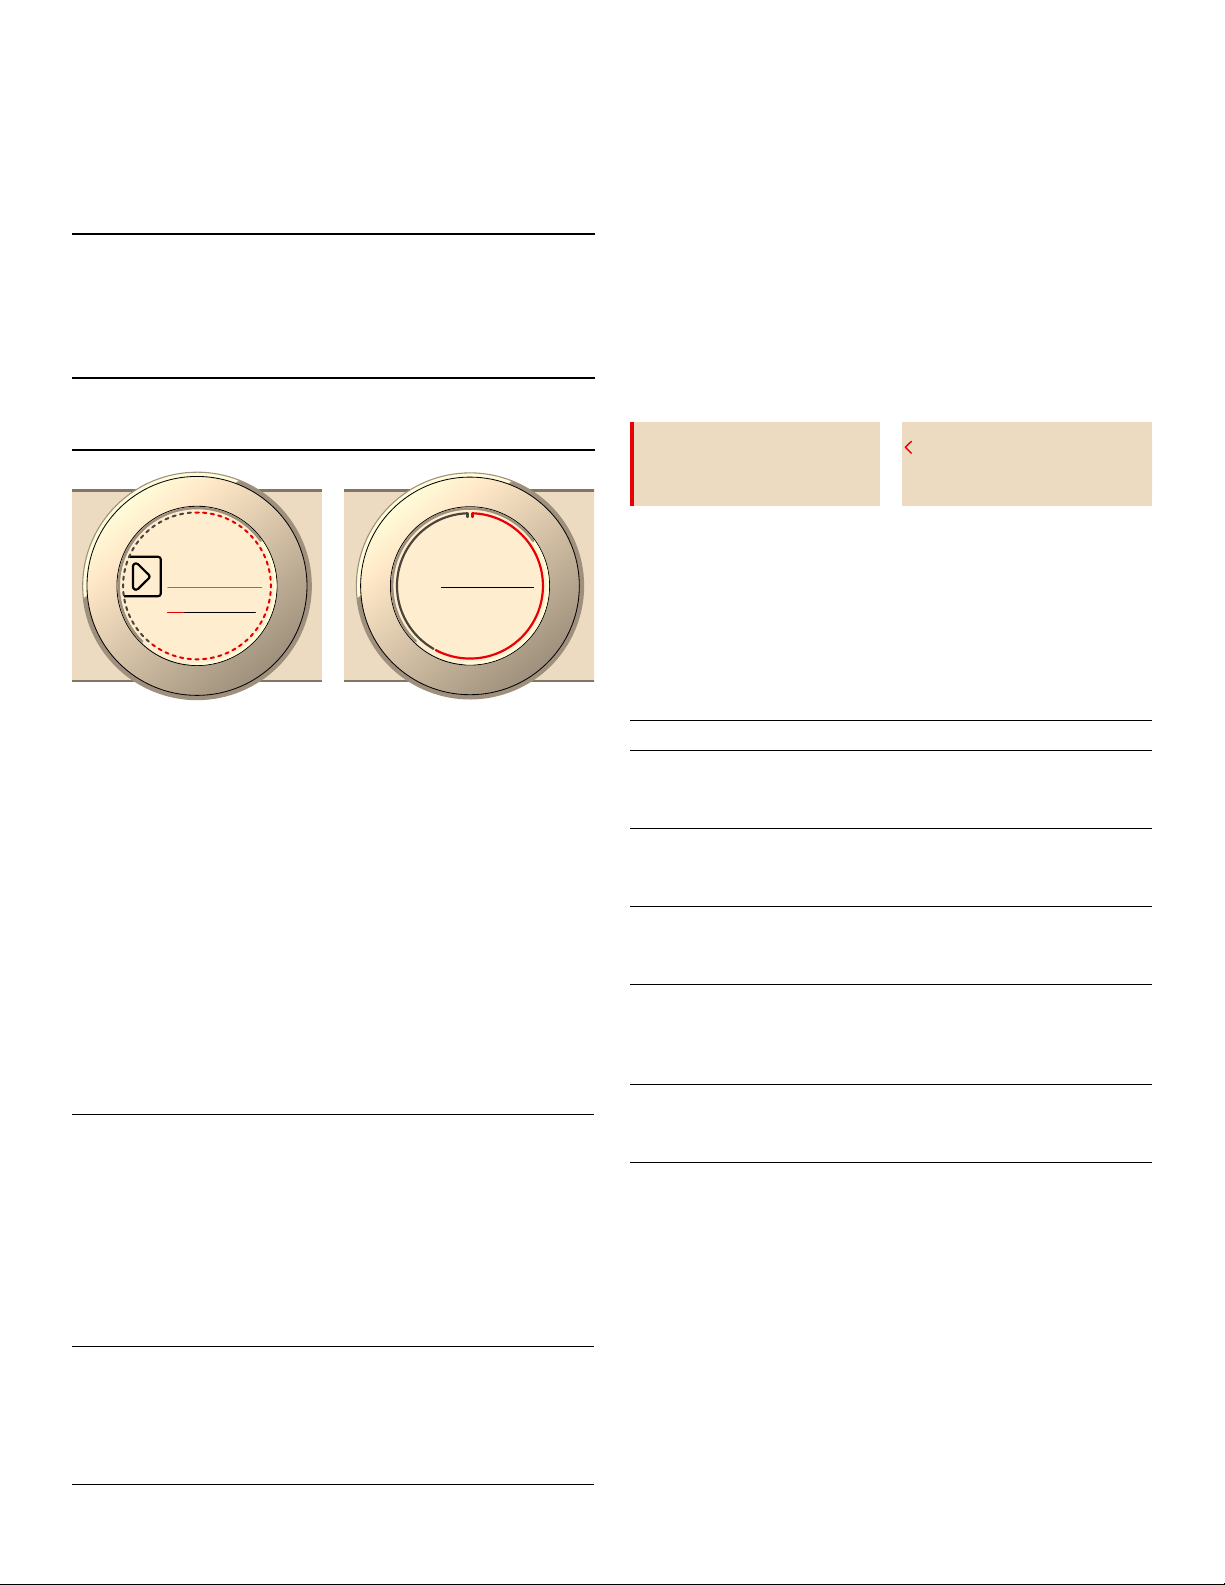
Display
The display is structured so that the information can be
read at a glance in any situation.
The value that you can currently set is highlighted in
white text in the display. The value in the background is
displayed in gray text.
Focus The highlighted value can be changed
immediately without first being selected.
After starting an operation, either the
temperature or level remains highlighted. The white line also serves as the
heating line and gradually turns red.
Enlargement As long as you use the rotary selector to
change the highlighted value, only this
value will be displayed larger.
P
a
V
7HPSH
UDWXUH
Note: Due to thermal inertia, the temperature displayed may be slightly different to the actual temperature inside the oven.
Touch-screen displays
The touch-screen displays are both a display medium
and control element at the same time. They show the
options that you can select for a function and the current
setting. To select a function, simply touch the text field
directly.
The function currently selected is identified by a red
vertical bar next to it. Its corresponding value is
highlighted in white on the display.
The small red arrow next to the text field shows the
functions to which you can scroll forwards or backwards.
+HDWLQJPRGH
7HPSHUDWXUH
&RQY0XOWL5DFN
Operating modes
Your appliance has various operating modes that make
your appliance easier to use.
You can find more precise descriptions of these in the
corresponding sections.
You can open the "Operating modes" menu by pressing
the menu field.
Display ring
The display ring can be found around the outside of the
display.
If you change a value, the display ring shows you where
you are in the selection list. Depending on the settings
area and length of the selection list, the display ring may
be continuous or divided into segments.
During operation, the display ring turns red at secondlong intervals. After every full minute, the segments turn
red again from the beginning. As the cooking time
counts down, one segment disappears every second.
Temperature display
After the operation has started, the current cooking
compartment temperature is displayed graphically on the
display.
Heating line The white line under the temperature
turns red from left to right as the cooking
compartment heats up. When you are
preheating the appliance, the optimal time
to place the food in the cooking compartment is when the line has completely
turned red, and a beep indicates that preheating is complete.
For set levels, e.g. the broil setting, the
heating line turns red immediately.
Residual
heat
indicator
When the appliance is switched off, the
display ring shows the residual heat in the
cooking compartment. As the residual
heat cools down, the display ring
becomes darker and disappears completely at some point.
Operating mode Use
Heating modes
~ "Operation"
on page 15
Assist
~ "Dishes"
on page 35
EcoClean
~ "Cleaning function"
on page 26
Home Connect Assistant
~ "Home Connect"
on page 21
Basic settings
~ "Basic Settings"
on page 18
--------
There are various finely tuned
heating types for the optimal
preparation of your food.
For many dishes, there are
preprogrammed setting values.
The cleaning function cleans
the cooking compartment
almost by itself.
This function allows you to
connect your oven with a
mobile device.
You can change your appliance's basic settings to suit
your needs.
11
Page 12

Heating modes
To enable you to find the correct type of heating for your
dish, we have explained the differences and scopes of
application here.
Type of heating Temperature Use
%
(
&
<
7
$
.
$
O
P
B
--------
Bake 150-550° F
(65-285)
Broil Broil settings:
1= low
2= medium
3= high
Roast 150-550° F
(65-285)
Convection MultiRack
Convection Broil 450-550° F
Pizza setting 150-525° F
Slow Cook 100-250° F
Proof 80-110° F
Warming 140-220° F
Plate warming 100-150° F
Defrost 100-140° F
150-525° F
(65-275°C)
(230-285°C)
(65-275°C)
(35-120°C)
(25-45°C)
(60-105°C)
(35-65°C)
(35-60°C)
For traditional baking and roasting on one level. Especially suitable for cakes with moist toppings.
Heat is emitted evenly from the top and bottom.
For broiling flat items, such as steaks or sausages, for making
toast, and for browning food.
The whole area below the broiler element becomes hot.
For less tender cuts of meat and poultry.
The heat is emitted from above and more intensively from below.
For baking and roasting on one or more levels.
The fan distributes the heat from the ring heating element in the
back panel evenly around the cooking compartment.
For roasting poultry, whole fish and larger pieces of meat.
The grill heating element and the fan switch on and off alternately.
The fan circulates the hot air around the food.
For preparing pizza and dishes that require a lot of heat from
underneath.
The bottom heating element and the ring heating element in the
back panel heat up.
For gentle and slow cooking of seared, tender pieces of meat in
ovenware without a lid.
The heat is emitted evenly from the top and bottom at low temperatures.
For the rising of dough or yeast.
Heat is emitted from below.
For keeping cooked food warm.
For preheating plates.
For gently defrosting frozen food.
The symbols for each type of heating help you to
remember them.
When cooking at very high temperatures, the appliance
lowers the temperature slightly after an extended period.
Default values
For each type of heating, the appliance specifies a
default temperature or level. You can accept this value or
change it in the appropriate area.
Further information
In most cases, the appliance provides notes and further
information on the action just carried out.
Touch the ° field. The note is shown in the display for a
few seconds. Use the rotary selector to scroll to the end
of longer notes.
Some notes are displayed automatically, for example as
confirmation, or to provide an instruction or warning.
12
Page 13
Cooking compartment functions
The functions in the cooking compartment make your
appliance easier to use. These functions include, for
example, that the cooking compartment is well lit and
that a cooling fan prevents the appliance from
overheating.
9 CAUTION
Do not place anything on the cooking compartment
floor. Do not cover it with aluminium foil. A build-up
of heat could damage the appliance or cause injury.
Opening the appliance door
If you open the appliance door during an operation, the
operation is paused. The operation continues to run
when you close the door.
Interior lighting
When you open the appliance door, the interior lighting
switches on. If the door remains open for longer than
15 minutes, the lighting switches off again.
For most operating modes, the interior lighting switches
on as soon as the operation is started. When the
operation has finished, the lighting switches off.
Note: You can set the interior lighting not to come on during the operation in the basic settings. ~ "Basic
Settings" on page 18
Cooling fan
The cooling fan switches on and off as required. The hot
air escapes above the door.
9 CAUTION
Do not cover the ventilation slots. Otherwise, the
appliance may overheat.
Accessories
Your appliance is accompanied with a variety of
accessories. Here, you can find an overview of the
accessories included and information on how to use
them correctly.
9 CAUTION
Do not slide any accessories between the rack
positions, or they may tip.
Accessories Included
Your appliance is equipped with the following
accessories:
Wire rack (3x)
For ovenware, cake tins and
ovenproof dishes, roasts, grilled
items and frozen meals.
--------
Only use original accessories. They are specially
designed for your appliance.
You can buy accessories from customer service or
online.
Note: The accessories may slightly flex when they become hot. This does not affect the function of the accessory. Once they have cooled down, they will regain their original shape.
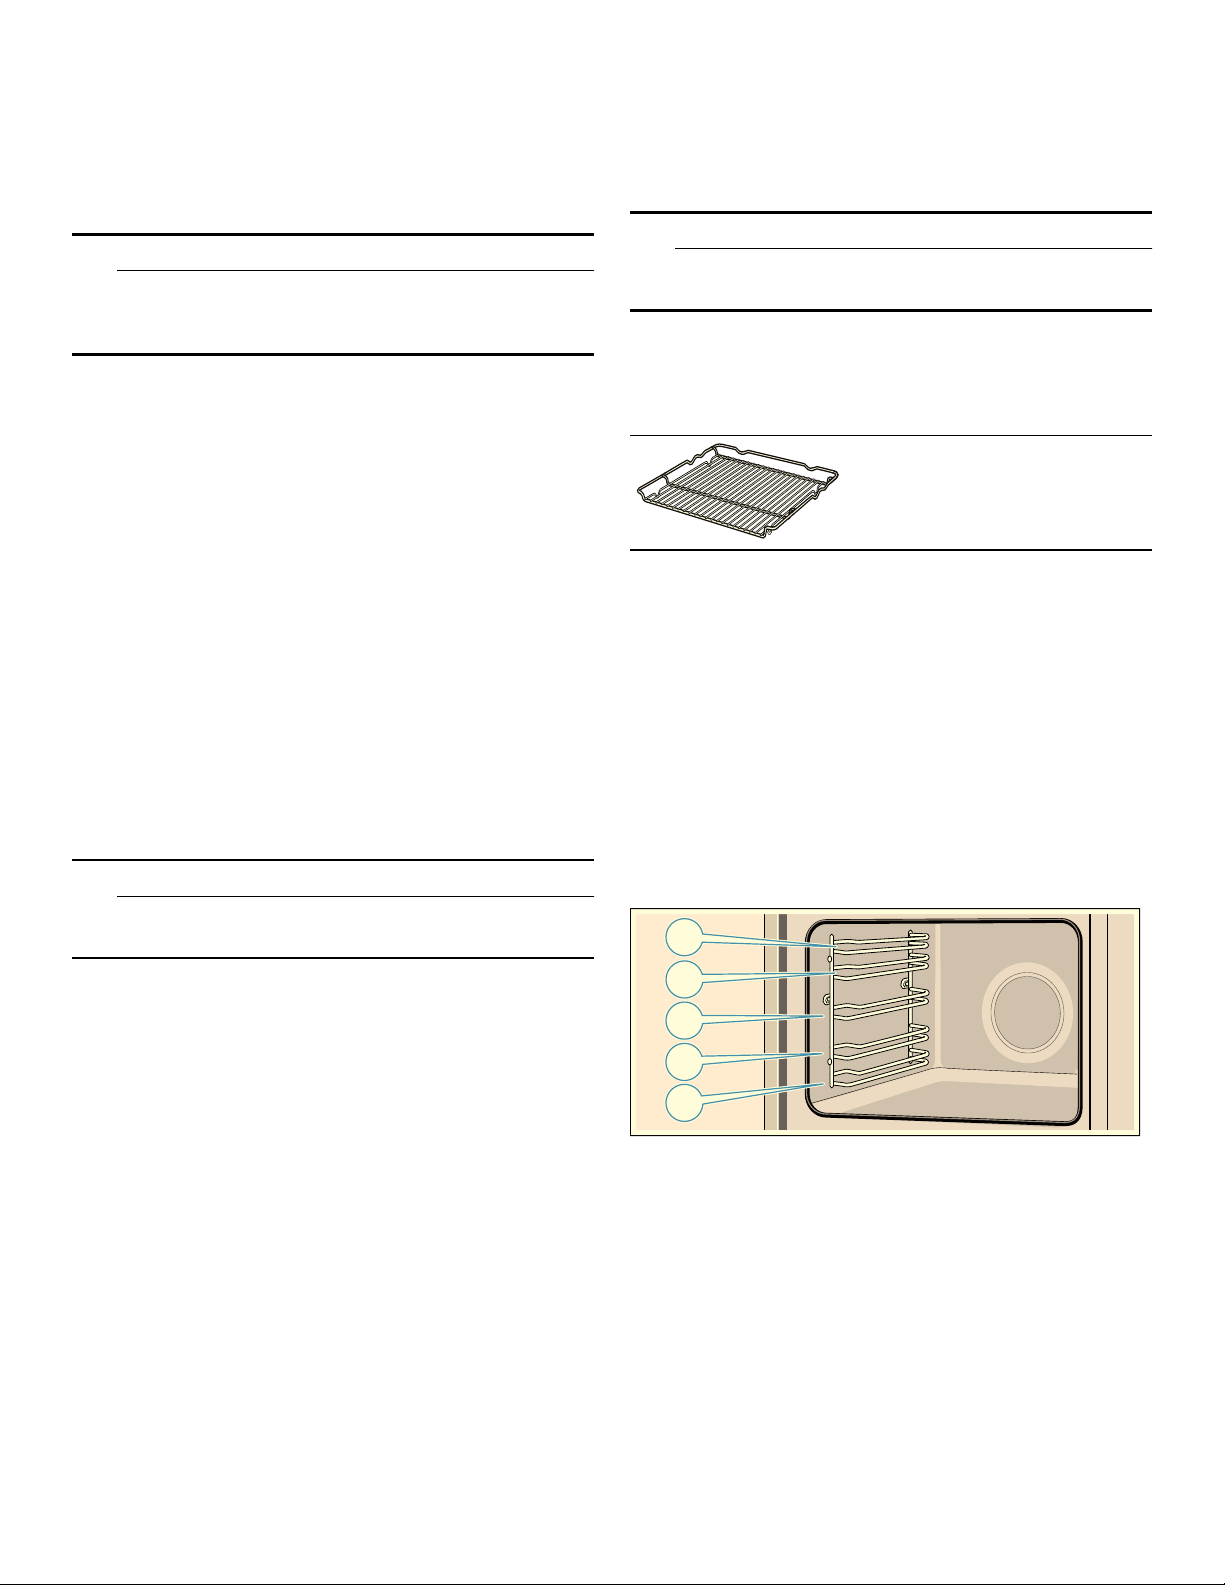
Inserting accessories
The cooking compartment has five rack positions. The
rack positions are counted from the bottom up.
In some appliances, the highest rack position is marked
on the cooking compartment with the grill symbol.
So that the cooking compartment cools down more
quickly after the operation, the cooling fan continues to
run for a certain period afterwards.
Note: You can change how long the cooling fan continues to run in the basic settings. ~ "Basic
Settings" on page 18
Always insert the accessory between the two guide rods
for a rack position.
The accessories can be pulled out approximately halfway
without tipping.
Notes
▯ Ensure that you always insert the accessories into the
cooking compartment facing the correct way.
▯ Always insert the accessories fully into the cooking
compartment so that they do not touch the appliance
door.
13
Page 14
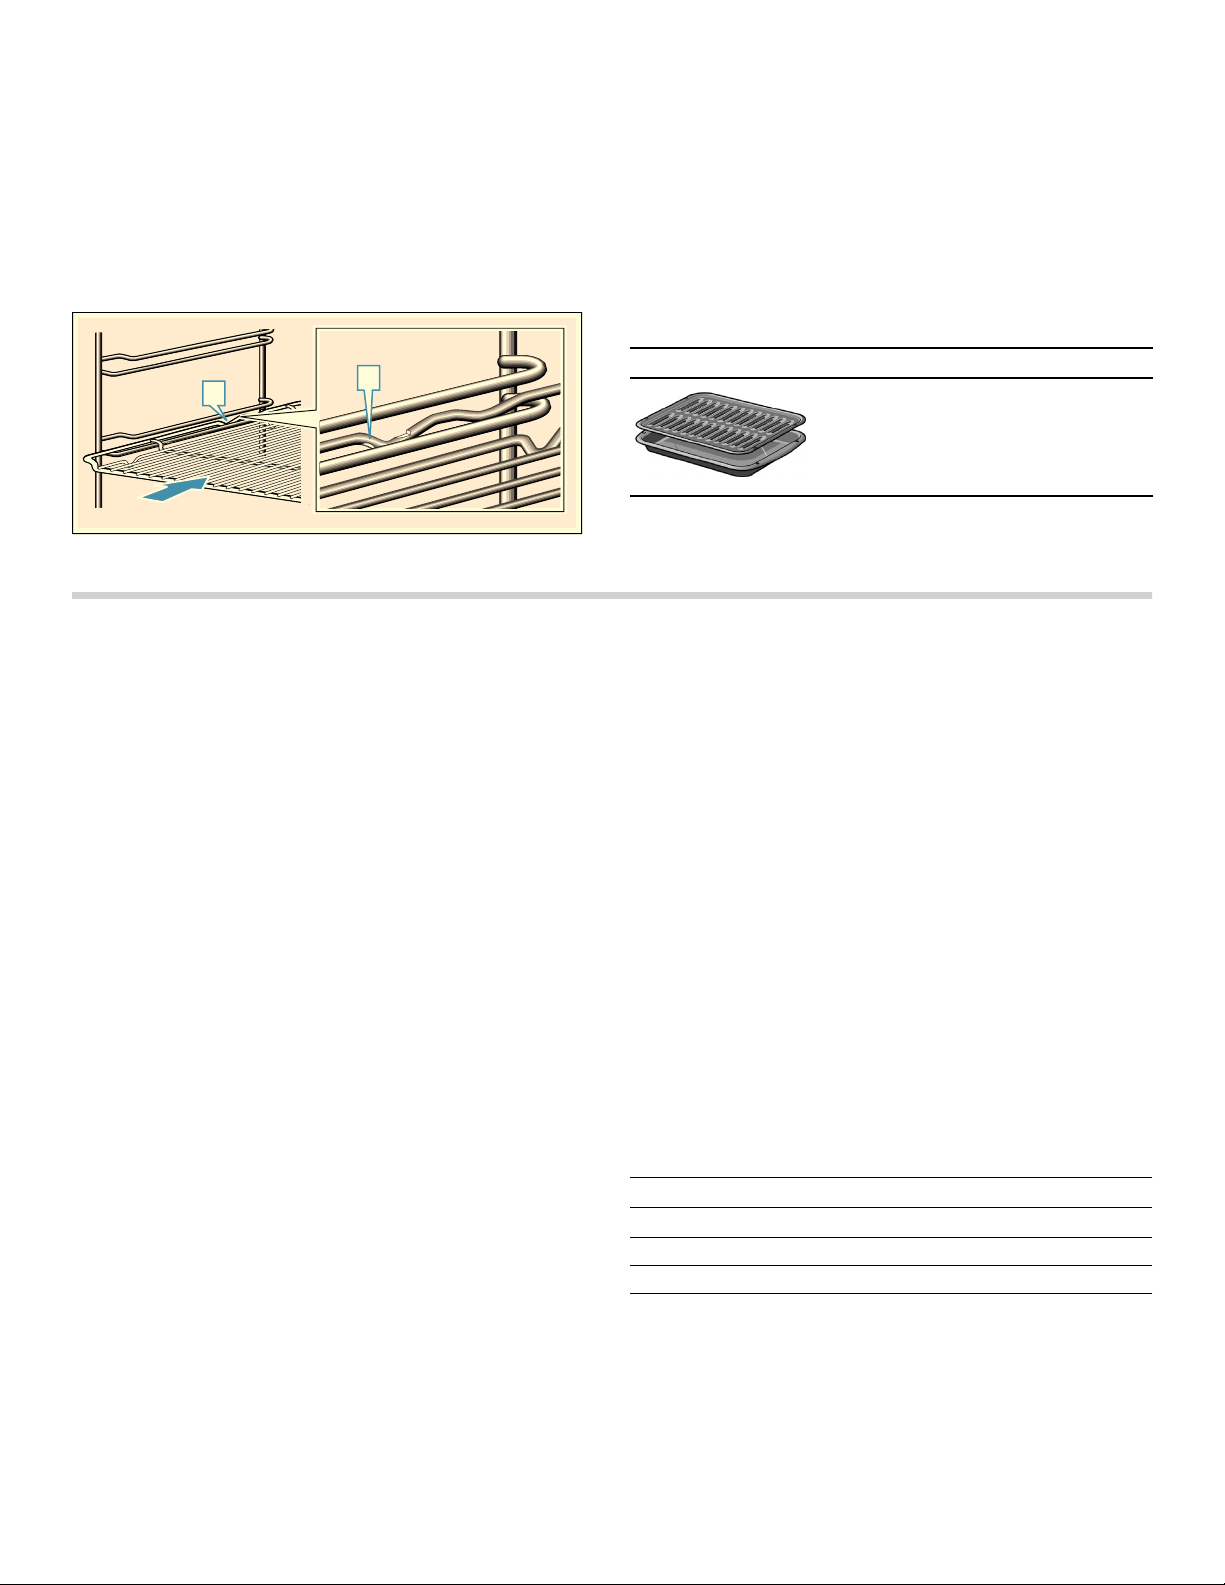
Locking function
The accessories can be pulled out approximately halfway
until they lock in place. The locking function prevents the
accessories from tilting when they are pulled out. The
accessories must be inserted into the oven cavity
correctly for the tilt protection to work properly.
When inserting the wire rack, ensure that the locking
‚ is at the rear and is facing downwards. The open
catch
side must be facing towards the appliance door and the
curvature must be facing downwards
¾.
Special accessories
You can buy optional accessories from customer service
or online. *You will find a list of products for your
appliance in our brochures and online.
Availability of products differ by country and whether
available for order online. Please see your sales
brochures for more details.
Note: Not all optional accessories are suitable for every appliance. When purchasing, please always use the exact identification number (E-no.) of your appliance.
~ "Customer Service" on page 33
D
D
Special accessories
Before using the appliance for the first time
Before you can use your new appliance, you must enter
certain settings. You must also clean the cooking
compartment and accessories.
Initial use
After connecting the appliance to the power or following
a power failure, the settings for initial use are shown in
the display. It may take a few seconds for the instruction
to appear.
Note: You can change these settings again at any time in the basic settings. ~ "Basic Settings" on page 18
With HomeConnect
You can apply the initial settings on the appliance or with
Home Connect on your mobile device.
1.
Touch the "With Home Connect" text field.
2.
Follow the instructions in the "Home Connect" section.
On the appliance
Make the following initial settings on your appliance:
A note appears in the display confirming that the initial
use has been completed.
Cleaning the cooking compartment and accessories
Before using the appliance to prepare food for the first
time, you must clean the cooking compartment and
accessories.
Cleaning the cooking compartment
To eliminate the new-appliance smell, heat up the
cooking compartment when it is empty and with the oven
door closed.
Make sure that there is no leftover packaging, such as
polystyrene pellets, in the cooking compartment. Before
heating the appliance, wipe the smooth surfaces in the
cooking compartment with a soft, damp cloth. Keep the
kitchen ventilated while the appliance is heating.
Apply the settings indicated below. You can find out how
to set the heating function and the temperature in the
next section. ~ "Operation" on page 15
Broiling Pan
(available via eShop)
Pan: #00449757
Grill(top): #00449756
Setting the language
The language is the first setting displayed. "English" is
the preset language.
1.
Turn the rotary selector to set the required language.
2.
Touch the next text field to confirm.
The next setting appears.
Setting the time
The time starts at "12:00."
1.
Touch the "Clock" text field.
2.
Set the time using the rotary selector.
3.
Touch the "Finish settings" text field to confirm.
14
Settings
Heating mode
Temperature maximum
Cooking time 1 hour
Switch off the appliance after the indicated cooking time
using the ÿ On/Off button.
Once the cooking compartment has cooled down, clean
the smooth surfaces with soapy water and a dish cloth.
Cleaning the accessories
Clean the accessories thoroughly using soapy water and
a dish cloth or soft brush.
Convection Multi-Rack <
Page 15
Operation
You have already learned about the controls and how
they work. Now we will explain how to apply settings on
your appliance. You will learn about what happens when
you switch the appliance on and off, and how to select
the operating mode.
Switching the appliance on and off
Before you are able to set the appliance, you must switch
it on.
Note: The childproof lock and the timer can also be set when the appliance is switched off. Certain displays and notes, such as those relating to the residual heat in the cooking compartment, remain visible on the display after the appliance has been switched off.
Switch off your appliance when you do not need to use it.
If no settings are applied for a long time, the appliance
switches itself off automatically.
Switching on the appliance
Press the ÿ On/Off button to switch on the appliance.
The Bosch logo appears on the display, followed by the
selection list for the heating modes.
Note: In the basic settings, you can specify which operating mode should appear after the appliance is switched on.
Switching off the appliance
Press the ÿ On/Off button to switch off the appliance.
Any functions that may be running are cancelled.
The time, or if applicable, the residual heat indicator,
appears on the display.
Note: You can set whether or not the time should be displayed when the appliance is switched off in the basic settings.
Starting the operation
You must press the l Start/Stop button to start each
operation.
After starting the appliance, the time display is shown on
the display along with the settings. The display ring and
the heating line also appear.
Pausing the operation
You can also interrupt and then continue an operation
using the l Start/Stop button.
If you press and hold the l Start/Stop button for approx.
3seconds, the operation is cancelled and all settings are
reset.
Note: The fan may continue to run after an operation has been paused or cancelled.
Setting an operating mode
Once the appliance is switched on, the default operating
mode is displayed.
If you would like to select a different operating mode, you
can do so using the menu. You can find detailed
descriptions of the individual operating modes in the
corresponding sections.
The following always applies:
1.
Touch the appropriate text field.
The function is highlighted.
2.
Turn the rotary selector to change the highlighted selection.
3.
If necessary, apply other settings.
To do this, touch the appropriate text field and change
the value using the rotary selector.
4.
Press the Start/Stop button l to start.
The appliance starts the operation.
Setting the heating mode and temperature
If the "Heating modes" operating mode has not been
selected, touch the "Heating modes" text field in the
menu. The selection list for the heating modes appears
on the touch-screen displays.
Example in the picture: Bake % at 350° F (195 °C).
1.
Touch the text field with the required heating mode. If necessary, scroll though the selection list using the rotary selector.
%DNH
+HDWLQJ
%URLO
,QWHQVLYHKHDW
PRGHV
6HOHFW
The temperature is highlighted white.
2.
Turn the rotary selector to set the temperature.
+HDWLQJPRGH
%DNH
)
7HPSHUDWXUH
7HPSH
UDWXUH
&RQYHFWLRQ
0XOWL5DFN
&RQYHFWLRQ
%URLO
3L]]D
&RRNWLPH
PV
(QG
15
Page 16

3.
Press the Start/Stop button l to start.
The time in the display shows how long the operation
has already been running.
&RRNWLPH
PV
PV
a
)
(QG
The appliance begins to heat up.
When your dish is ready, use the ÿ On/Off button to
switch off the appliance.
Note: You can also set the cooking time and an end time for the operation on the appliance.
Changing
After starting the appliance, the temperature remains
highlighted. When you move the rotary selector, the
temperature is changed and applied immediately.
To change the type of heating, first use the l Start/Stop
button to interrupt the operation and then touch the "Type
of heating" text field. The selection list is displayed.
Touch the required type of heating. The corresponding
default temperature appears on the display.
Note: When you change the type of heating, the other settings are also reset.
Fast preheat
With Fast preheat, you can shorten the heat-up time for
some heating types.
The heating types suitable for Fast preheat are:
▯ < Convection Multi-Rack
▯ % Bake
To achieve an even cooking result, do not place your
food or accessories into the cooking compartment until
"Fast preheat" is complete.
Setting
Ensure you have selected a suitable type of heating and
set a temperature of at least 200° F (95°C). Otherwise,
rapid heating cannot be activated.
1.
Set the type of heating and temperature.
2.
Touch the "Rapid heating" text field.
"On" is displayed in the text field. A confirmation
message appears on the display.
When rapid heating comes to an end, an audible signal
sounds and a message appears on the display. "Off" is
displayed in the text field.Place your food in the cooking
compartment.
Note: The "Cooking time" time-setting option starts at the same time as rapid heating. Therefore, only set a cooking time when rapid heating has come to an end.
Cancelling
To cancel the fast preheat, touch the "Fast preheat" text
field again. "Off" is displayed in the text field.
Time-setting options
Your appliance has different time-setting options.
Time-setting
option
Cooking
q
time
End Enter a cooking time and the
r
Timer The timer functions like an egg timer.
t
You can call up the cooking time and the end time after
setting an operation using the touch-screen displays. The
timer has a separate field | and can be adjusted at any
time.
An audible signal will sound once the cooking time or
timer duration has elapsed. You can cancel the audible
signal early by touching a field or touch-screen display.
Use
Once the set cooking time has
elapsed, the appliance will automatically stop heating.
required end time. The appliance will
start up automatically so that it finishes cooking at the required time.
It runs independently of the operation
and the other time-setting options.
After the set time has elapsed, the
appliance does not switch on or off
automatically.
Note: You can change how long the audible signal sounds for in the basic settings.
Setting the cooking time
You can set the cooking time for your food on the
appliance. This prevents the food from accidentally being
cooked for too long, and means that you do not have to
stop what you are doing to switch off the oven.
Setting
Depending on which direction you turn the rotary selector
first, the cooking time starts at a particular default value:
Left = 10minutes, right = 30minutes.
The cooking time can be set in one-minute increments
up to one hour, and then in five-minute increments.
The maximum time that can be set is 23hours and
59minutes.
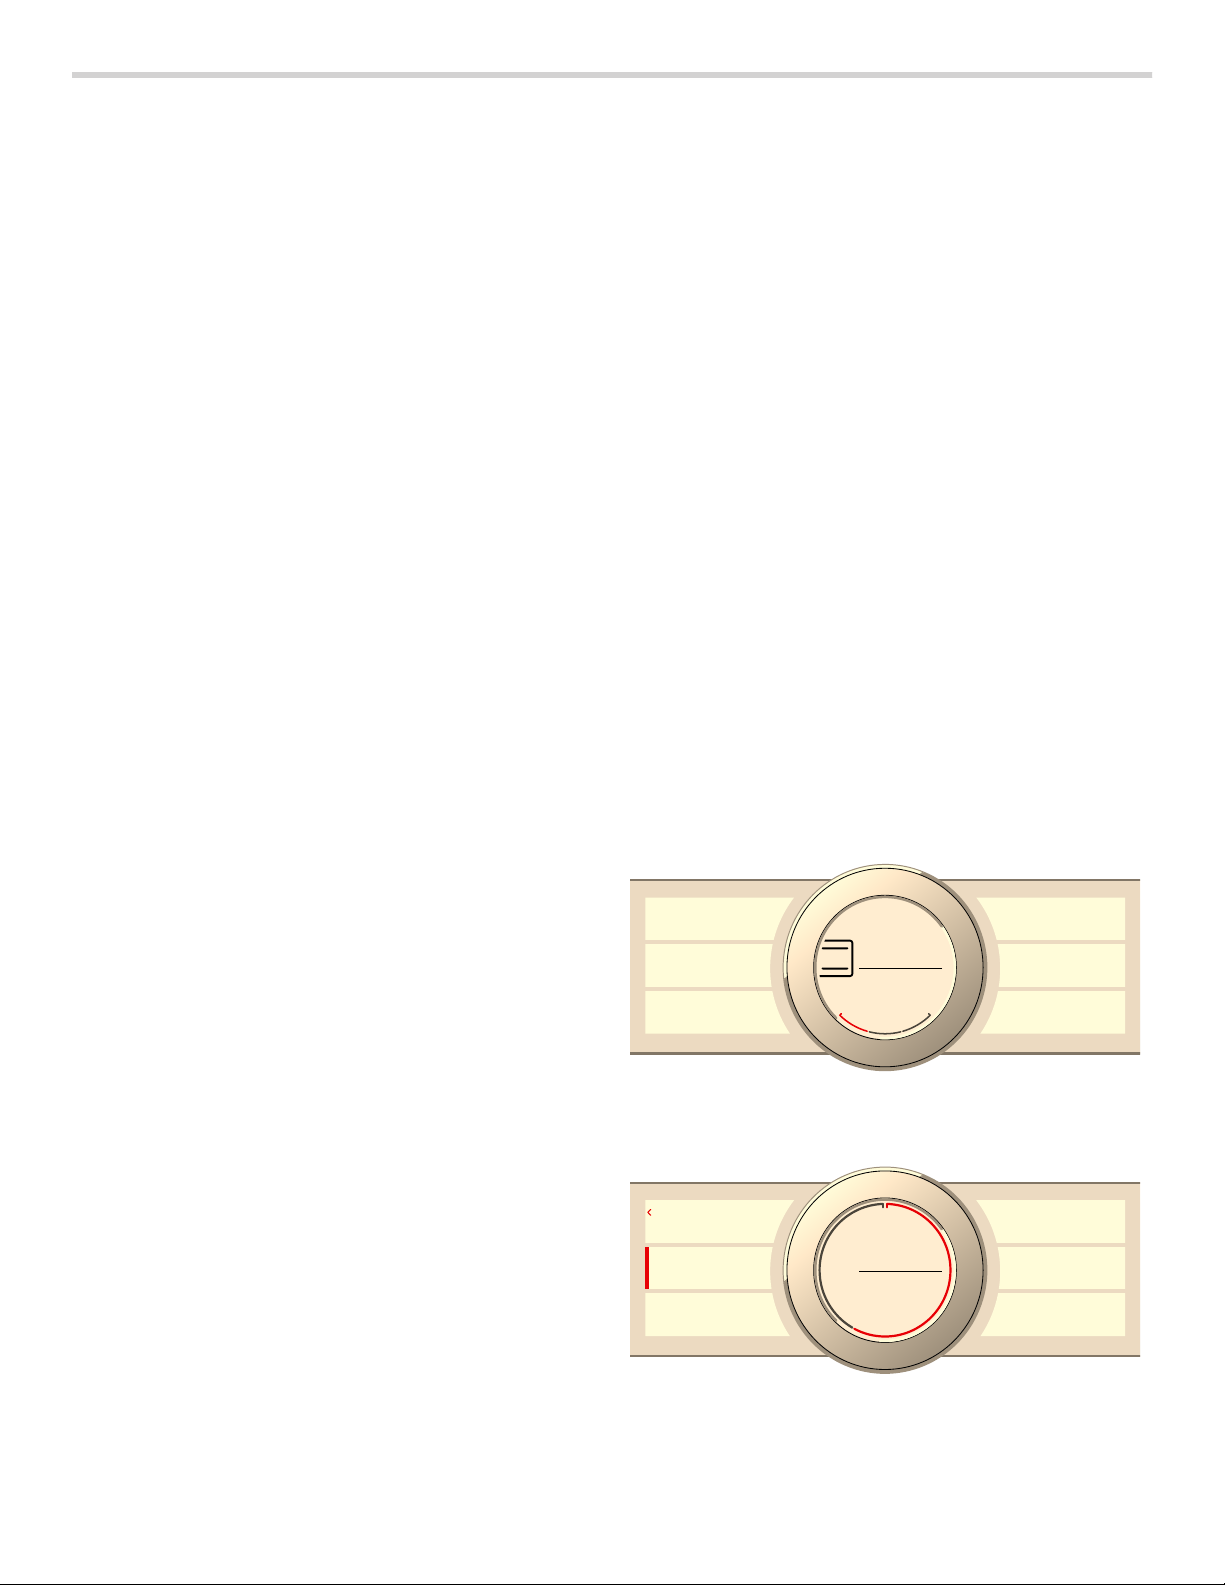
Example in the picture: It is 10:00, cooking time of
45minutes.
1.
Set the operating mode and temperature or level.
2.
Before starting the operation, touch the "Cooking time" text field.
The cooking time is highlighted in white in the display.
16
Page 17
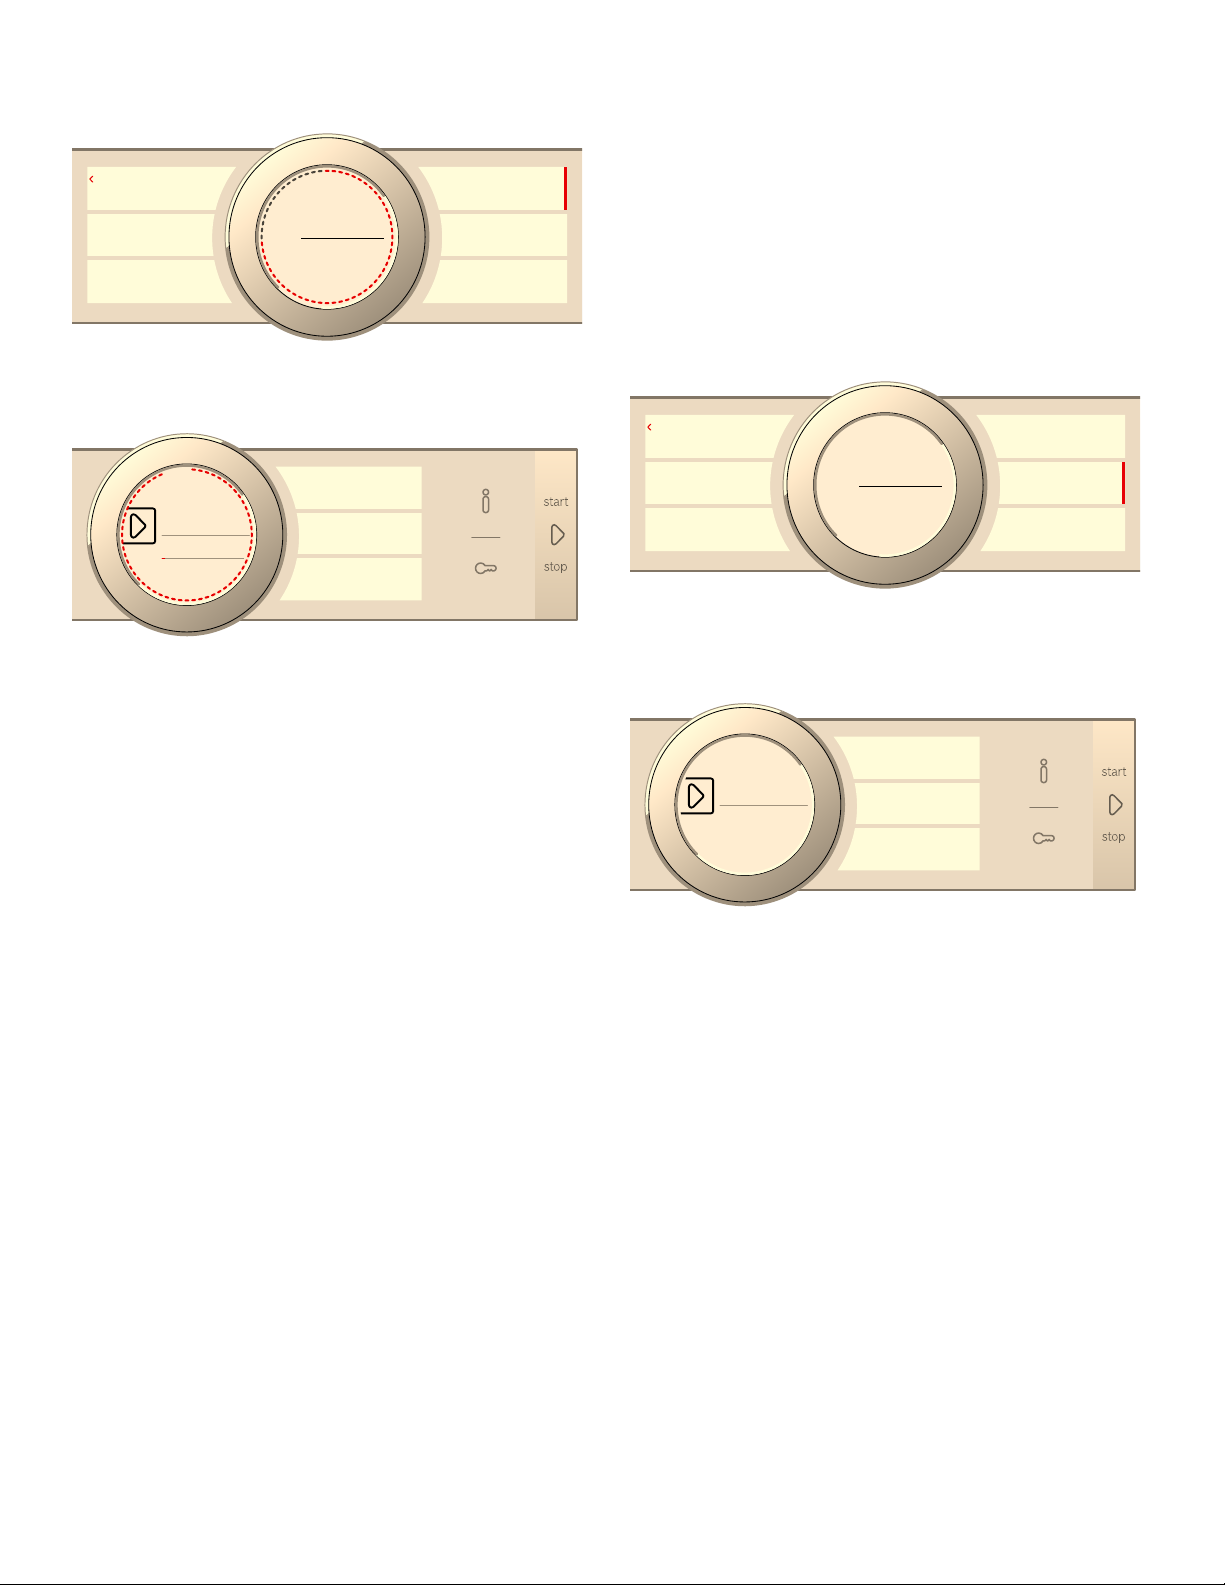
3.
Turn the rotary selector to set the cooking time.
The end time is calculated automatically.
+HDWLQJPRGH
%DNH
7HPSHUDWXUH
)
4.
Press the Start/Stop button l to start.
P
&RRNWLPH
V
&RRNWLPH
(QG
The cooking time counts down.
&RRNWLPH
PV
PV
a
)
(QG
The appliance begins to heat up.
Once the cooking time has elapsed, an audible signal
sounds. The appliance stops heating up. The cooking
time 00m 00s is shown in the display.
You can reset the cooking time using the "Cooking time"
text field or you can press the l Start/Stop button to
continue the operation without a cooking time.
When your dish is ready, use the ÿ On/Off button to
switch off the appliance.
Setting
The end of the cooking time can be delayed by up to
23hours and 59minutes.
Example in the picture: It is 10:00, the set cooking time is
45minutes and the dish should be ready at 12:00.
1.
Set the operating mode and temperature or level.
2.
Set the cooking time.
3.
Before starting the operation, touch the "End" text field.
The projected end time is highlighted white in the
display.
4.
Turn the rotary selector to set a later end time.
+HDWLQJPRGH
%DNH
7HPSHUDWXUH
)
5.
Press the Start/Stop button l to start.
(QG
&RRNWLPH
PV
(QG
The time at which the appliance will start is shown in
the display.
&RRNWLPH
PV
6WDUW
(QG
Changing and cancelling
To change the cooking time, touch the "Cooking time"
text field. The cooking time is highlighted, and can be
changed using the rotary selector. The change is applied
immediately.
If you want to cancel the cooking time, reset the cooking
time to zero. After the change has been adopted,
operating continues without a cooking time.
Setting the end time
You can delay the time at which cooking is due to finish.
You can, for example, put your food in the cooking
compartment in the morning and set the cooking time so
that it is ready at lunch time.
Notes
▯ Ensure that food is not left in the cooking compartment
for too long, as it may spoil. PLEASE OBSERVE ALL
SAFE FOOD HANDLING PRACTICES TO ENSURE
FOOD SAFETY.
▯ Do not adjust the end time once the operation has
started. The cooking result would no longer be correct.
The appliance is in standby mode. When the appliance
starts, the cooking time counts down in the display.
Once the cooking time has elapsed, an audible signal
sounds. The appliance stops heating up. The cooking
time 00m 00s is shown in the display.
You can reset the cooking time using the "Cooking time"
text field or you can press the l Start/Stop button to
continue the operation without a cooking time.
When your dish is ready, use the ÿ On/Off button to
switch off the appliance.
Changing and cancelling
After starting the appliance, the end time can no longer
be changed.
If you want to cancel the cooking time and end time,
interrupt the operation by pressing the l Start/Stop
button. You can continue the operation without a cooking
time or end time.
17
Page 18

Setting the timer
The timer runs alongside other settings. You can set it at
any time, even if the appliance has been switched off. It
has its own audible signal so that you can tell whether it
is the timer duration or a cooking time that has elapsed.
Setting
The timer duration always starts at zero minutes.
The higher the value, the greater the time steps when
setting the timer.
The maximum setting is 24hours.
1.
Touch the | field.
The symbol lights up red. On the display, the timer
duration is shown in white and in focus.
2.
Set the timer duration using the rotary selector.
3.
Press the | field to start.
Note: After a few seconds, the timer will also start automatically.
The timer duration counts down.
Child lock
The timer remains visible in the display if the appliance is
switched off. When an operation is running, the settings
for this operation are shown in the foreground. When you
touch the | field, the timer duration is displayed for a
few seconds.
When the timer duration comes to an end, an audible
signal sounds and a note appears on the display. The
symbol is no longer lit up.
Tip: If the set timer duration is the duration for which you wish to cook your food, use the cooking time. The time is visible in the foreground and the appliance switches off automatically.
Changing and cancelling
To change the timer duration, touch the
timer duration is displayed in white and in focus, and can
be changed by using the rotary selector.
If you want to cancel the timer, reset the duration on the
timer to zero. Once the change has been applied, the
symbol is no longer lit up.
| field. The
Your appliance is equipped with a childproof lock so that
children cannot switch it on accidentally or change any
settings.
The control panel is locked and no settings can be
made. The appliance can only be switched off using the
ÿ On/Off button.
Basic Settings
There are various settings available to you in order to
help use your appliance effectively and simply. You can
change these settings as required.
Changing the basic settings
The appliance must be switched on.
1.
Touch the menu field.
The list of operating modes is displayed.
2.
Touch the "Basic settings" text field.
The settings appear on the touch-screen displays.
3.
Touch the text field with the required setting.
The red bar next to the text field identifies the setting
that is currently selected.
Its corresponding value is shown on the display.
4.
Turn the rotary selector to change the value as required.
Activating and deactivating
You can activate and deactivate the childproof lock when
the appliance is switched on or off.
In each case, press the D field for approx. 4seconds.
A confirmation note appears on the display.
The D field lights up red when the appliance is switched
on. The D field does not light up when the appliance is
switched off.
5.
Touch the text field for the next setting.
Its value is shown on the display and can be changed
using the rotary selector.
6.
Work through the settings and use the rotary selector to make changes as required.
To scroll through the settings, touch the "Further
settings" text field.
7.
Touch the menu field to confirm.
A query is displayed asking whether the changes
should be saved.
8.
Touch the "Save" text field.
A message is shown on the display to confirm that the
settings have been saved.
Cancelling
If you do not want to save the settings, touch the
menu field and then touch the "Do not save" text field. A
message is shown on the display to confirm that the
settings have not been saved. Switch off the appliance
using the ÿ On/Off button if you do not need to use it.
18
Page 19

List of basic settings
Depending on the features of your appliance, not all
basic settings will be available.
Setting Options
Language Additional languages are avail-
able
Time Clock in 12-hour format
Home Connect Switches Wi-Fi on or off
Factory settings Reset
Do not restore*
Beeping sound Short cooking time (30sec.)
Medium cooking time (1min)*
Long cooking time ( 5min.)
Volume Scale with 5levels
Button tone Switched on
Switched off* (tone remains for
ÿ On/Off)
Display brightness Five levels
Clock display Off
Digital*
Analog
Lighting Off when in operation
On during operation*
Operation after
switch-on
Night-time dimming Switched off*
Brand logo Display*
Fan run-on time Recommended*
Pull-out system Not retrofitted* (for rails and sin-
Sabbath mode Switched on
* Factory setting (factory settings may vary depending
on the appliance model)
--------
Main menu
Heating modes*
Assist
Switched on
Do not display
Minimum
gle pull-out system)
Retrofitted (for double and triple
pull-out systems)
Switched off*
Changing the time
If you want to change the time, for example from summer
to winter time, you must change the basic setting.
The appliance must be switched on.
1.
Touch the menu field.
The list of operating modes is displayed.
2.
Touch the "Basic settings" text field.
The settings appear on the touch-screen displays.
3.
Touch the "Clock" text field.
The time appears on the display.
4.
Turn the rotary selector to change the time.
5.
Touch the menu field to confirm.
A query is displayed asking whether the changes
should be saved.
6.
Touch the "Save" text field.
A message is shown on the display to confirm that the
settings have been saved.
Power failure
The changes you make to the settings are retained even
after a power failure.
You only have to reset the settings for the initial use
following a long-term power failure. The appliance can
bridge a short-term power failure.
19
Page 20

Sabbath mode
With the Sabbath mode, a cooking time of up to
74hours can be set. You can keep the food in the
cooking compartment warm without having to switch the
oven on or off.
Starting Sabbath mode
Before you are able to use the Sabbath mode, you must
activate it in the basic settings. ~ "Basic Settings"
on page 18
When the basic setting has been changed accordingly,
Sabbath mode is listed with the heating modes as the
last type of heating.
The appliance heats up with Bake. You can set a
temperature between 150° F and 300° F (85 °C and
140 °C).
The "Heating modes" operating mode must be selected.
The selection list for the heating modes appears on the
touch-screen displays.
1.
Touch the "Sabbath" text field.
The default temperature is highlighted white in the
display.
2.
Set the required temperature using the rotary selector.
3.
Before starting the operation, touch the "Cooking time" text field.
The default cooking time is highlighted white in the
display.
4.
Set the required cooking time using the rotary selector.
Note: The end time is calculated automatically but cannot be changed.
5.
Press the Start/Stop button l to start.
The cooking time will count down on the display.
The appliance begins to heat up.
When the cooking time for Sabbath mode has ended, an
audible signal sounds. The appliance stops heating up.
The cooking time 00m 00s is shown in the display.
Press the ÿ On/Off button to switch off the appliance.
Note: The operation is not interrupted if you open the appliance door.
Changing and cancelling
After starting the appliance, the settings can no longer be
changed.
If you would like to cancel Sabbath mode, switch the
appliance off using the ÿ On/Off button. You can no
longer pause the operation using the l Start/Stop
button.
20
Page 21

Home Connect
This appliance is Wi-Fi-capable and can be remotely
controlled using a mobile device.
If the appliance is not connected to the home network,
the appliance functions in the same way as an oven with
no network connection and can still be operated via the
display.
The availability of the Home Connect function depends
on the availability of Home Connect services in your
country. Home Connect services are not available in
every country. You can find more information on this at
www.home-connect.com.
Notes
▯ Ensure that you follow the safety instructions in this
instruction manual and that you comply with these
even when you are away from home and are operating
the appliance via the Home Connect app. You must
also follow the instructions in the Home Connect app.
▯ Operating the appliance directly from the appliance
always has priority. During this time, it is not possible
to operate the appliance using the Home Connect
app.
Setting Up
To implement settings via Home Connect, you must have
installed and set up the Home Connect app on your
mobile device.
Refer to the supplied Home Connect documents for
more information.
Follow the steps specified by the app to implement the
settings.
The app must be open in order to perform the setup
process.
3.
Press the WPS button on the router.
Wait until "Network connection - Successful" is shown
in the display.
1HWZRUN
FRQQHFWLRQ
6XFFHVV
IXO
4.
Touch "Connect with app".
1HWZRUN
'LVFRQQHFW
IURPQHWZRUN
FRQQHFWLRQ
6XFFHVV
IXO
&RQQHFW
ZLWKDSS
(QG
DVVLVWDQW
The appliance is ready to connect to the app.
5.
Start the app on the mobile device and follow the instructions for automatic network registration.
The process for registering is completed once "Connect
to app - Successful" is shown on the display.
Automatic Registration in the Home Network
Notes
▯ A router that has WPS functionality is required.
▯ You can start the Home Connect Assistant during
initial start-up or using the main menu.
1.
Touch the menu field.
2.
Touch the "Home Connect Assistant" text field.
The appliance is ready to connect to the network
automatically.
PV
3UHVVWKH:36
EXWWRQRQWKH
URXWHU
0DQXDOO\
FRQQHFW
1HWZRUN
FRQQHFWLRQ
$XWRPDWLF
&DQFHO
DVVLVWDQW
&RQQHFW
WRDSS
6XFFHVV
IXO
Manual Registration in the Home Network
Note: You can start the Home Connect Assistant during
initial start-up or using the menu.
1.
Touch the menu field.
2.
Touch the "Home Connect Assistant" text field.
21
Page 22

3.
Touch the "Manually connect" text field.
PV
3UHVVWKH:36
EXWWRQRQWKH
URXWHU
0DQXDOO\
FRQQHFW
1HWZRUN
FRQQHFWLRQ
$XWRPDWLF
&DQFHO
DVVLVWDQW
5.
Touch "Connect with app".
'LVFRQQHFW
IURPQHWZRUN
1HWZRUN
FRQQHFWLRQ
6XFFHVV
IXO
&RQQHFW
ZLWKDSS
(QG
DVVLVWDQW
The appliance is ready to connect to the network
manually.
The SSID and the key for the oven network are shown
on the display.
PV
66,'
+RPH&RQQHFW
&RQQHFW
DXWRPDWLFDOO\
4.
Use the "Home Connect" SSID and the "Home
1HWZRUN
FRQQHFWLRQ
0DQXDO
+RPH&RQQHFW
.H\
&DQFHO
DVVLVWDQW
Connect" key to register the mobile device on the oven
network.
The appliance is ready to connect to the app.
6.
Start the app on the mobile device and follow the instructions for manual network registration.
The process for registering is completed once "Connect
to app - Success" is shown on the display.
&RQQHFW
WRDSS
6XFFHVV
IXO
Remote Start
If you want to start an oven operation using your mobile
device, you must activate remote start.
Notes
▯ The "Remote start" text field is only visible if the Home
Connect Assistant has been successfully completed.
▯ Note that some operating modes can only be started
on the oven itself.
1.
Touch the menu field.
2.
Touch the "Remote Start" text field.
C appears in the display
Wait until "Network connection - Successful" is shown
in the display.
1HWZRUN
FRQQHFWLRQ
6XFFHVV
IXO
22
&
0DLQPHQX
L
6HOHFW
Remote start is automatically deactivated in the following situations:
▯ The oven door is opened 15minutes after remote start
is activated.
▯ The oven door is opened 15minutes after the oven
operation ends.
▯ 24hours after remote start is activated.
Page 23

When you start the oven operation on the appliance,
remote start is automatically activated. You can therefore
make changes on your mobile device or start a new
program.
Home Connect Settings
You can adjust Home Connect to suit your requirements
at any time.
Note: In the Home Connect settings, press the display network and device information.
Wi-Fi
If WiFi is activated, you can use the Home Connect
functions.
Note: In the networked standby mode, your appliance requires a maximum of 3W.
1.
Touch the Menu field.
2.
Touch the "Basic settings" text field.
3.
Touch the "Home Connect" text field.
4.
Touch "WiFi" text field to switch the wireless module on or off.
%DFN
6HWWLQJV
:L)L
2Q
'
+RPH
&RQQHFW
Disconnecting from the Network
You can disconnect your oven from the network at any
time.
Note: If your oven is disconnected from the network, it is not possible to operate the oven using Home Connect.
1.
Touch the menu field.
2.
Touch the "Basic settings" text field.
3.
Touch the "Home Connect" text field.
4.
Touch the "Disconnect from network" text field.
%DFN
6HWWLQJV
:L)L
2Q
'
+RPH
&RQQHFW
° field to
'LVFRQQHFW
IURPQHWZRUN
&RQQHFW
ZLWKDSS
5HPRWHFRQWURO
2Q
'LVFRQQHFW
IURPQHWZRUN
&RQQHFW
ZLWKDSS
5HPRWHFRQWURO
2Q
5.
Touch the "Assist" text field.
"Connect manually" or
"Connect automatically".
6.
Follow the instructions in the section entitled
"Manual registration in the home network" or
"Automatic registration in the home network".
Connect to App
If the Home Connect app is installed on your mobile
device, you can connect it to your oven.
Note: The appliance must be connected to the network.
1.
Touch the menu field.
2.
Touch the "Basic settings" text field.
3.
Touch the "Home Connect" text field.
4.
Touch the "Connect with app" text field.
%DFN
6HWWLQJV
:L)L
2Q
+RPH
&RQQHFW
'
'LVFRQQHFW
IURPQHWZRUN
&RQQHFW
ZLWKDSS
5HPRWHFRQWURO
2Q
Remote control
You can use the Home Connect app to easily access the
functions of your oven.
Notes
▯ Operating the appliance directly from the appliance
always has priority. During this time, it is not possible
to operate the appliance using the Home Connect
app.
▯ The remote control is already activated when the
appliance is delivered.
▯ If the remote control has been deactivated, only the
oven's operating statuses will be displayed in the
Home Connect app.
▯ The remote control is automatically activated when the
remote start is activated.
1.
Touch the menu field.
2.
Touch the "Basic settings" text field.
3.
Touch the "Home Connect" text field.
4.
Touch the "Remote control" text field to switch operation via the Home Connect app on or off.
Connecting to the network
1.
Touch the menu field.
2.
Touch the "Basic settings" text field.
3.
Touch the "Home Connect" text field.
4.
Touch the "Connect to network" text field.
Connecting to the network
%DFN
6HWWLQJV
:L)L
2Q
'
+RPH
&RQQHFW
'LVFRQQHFW
IURPQHWZRUN
&RQQHFW
ZLWKDSS
5HPRWHFRQWURO
2Q
23
Page 24

Information on Data Protection
When your appliance is connected to a WLAN network
that is connected to the Internet for the first time, your
appliance transmits the following categories of data to
the Home Connect server (initial registration):
▯ Unique appliance identification (consisting of
appliance codes as well as the MAC address of the
installed Wi-Fi communication module).
▯ Security certificate of the Wi-Fi communication module
(to ensure a secure data connection).
▯ The current software and hardware version of your
appliance.
▯ Status of any previous resetting to factory settings.
This initial registration prepares the Home Connect
functions for use and is only required when you want to
use these Home Connect functions for the first time.
Note: Ensure that the Home Connect functions can be used only in conjunction with the Home Connect app. Information on data protection can be accessed in the Home Connect app.
Declaration of Conformity
Robert Bosch Hausgeräte GmbH hereby declares that
the appliance with Home Connect functionality meets the
basic requirements and other relevant provisions of
Directive 2014/53/EU.
A detailed RED Declaration of Conformity can be found
online at
www.bosch-home.com
among the additional documents on the product page
for your appliance.
FCC COMPLIANCE STATEMENT
9 CAUTION
Changes or modifications not expressly approved
could void your authority to use this equipment.
This device complies with Part 15of the FCC Rules.
Operation to the following two conditions:
1.
This device may not cause harmful interference, and
2.
This device must accept any interference received, including interference that may cause undesired operation.
INDUSTRY CANADA STATEMENT
This device complies with Industry Canada licenseexempt RSS standard(s).
Operation is subject to the following two conditions:
1.
This device may not cause interference, and
2.
This device must accept any interference, including interference that may cause undesired operation of the device.
Operation in the band 5150-5250MHz is only for indoor
use to reduce the potential for harmful interference to cochannel mobile satellite systems.
Wi-Fi® Module
FCC/IC Statements
Model: COM2
FCC ID: 2AHES-COM2
IC: 21152-COM2
The Home Connect module is a communication device
designed to provide communication between appliances
and smart devices.
This module is integrated at the factory, under direct
control of BSH Home Appliances Corporation, and is not
user servicable or upgradable. At least 77/8 inch (20 cm)
separation distance should be maintained from device to
user.
24
Page 25

Cleaning and maintenance
With good care and cleaning, your appliance will retain
its appearance and remain fully functioning for a long
time to come. We will explain here how you should
correctly care for and clean your appliance.
9 WARNING
Do not clean the appliance while it is still hot. Some
cleaners produce noxious fumes when applied to a
hot surface. Wet clothes and sponges can cause
burns from steam.
9 WARNING
RISK OF BURNS
The appliance becomes very hot. Never touch the
hot inside surfaces of the oven interior or heating
elements. Always allow the appliance to cool down.
Keep children away.
9 WARNING
RISK OF ELECTRICAL SHOCK
Moisture entering the appliance can cause an
electrical shock. Don't use a high-pressure cleaner
or steam cleaner.
9 WARNING
RISK OF INJURY
Scratched glass in the appliance door can burst. Do
not use any glass scrapers or strong or abrasive
cleaning agents.
Suitable cleaning agents
To ensure that the different surfaces are not damaged by
using the wrong cleaning agent, follow the information in
the following table. Depending on the appliance model,
not all of the areas listed may be on/in your appliance.
9 CAUTION
SURFACE DAMAGE!
Do not use any
▯ Harsh or abrasive cleaning agents,
▯ Cleaning agents with a high alcohol content,
▯ Hard scouring pads or cleaning sponges,
▯ High-pressure cleaners or steam cleaners,
▯ Special cleaners for cleaning the appliance while
it is hot.
Tip: Recommended cleaning and care products can be purchased through customer service. Observe the respective manufacturer's instructions.
9 WARNING
RISK OF BURNS
The appliance becomes very hot. Never touch the
hot inside surfaces of the oven interior or heating
elements. Always allow the appliance to cool down.
Keep children away.
Area Cleaning
Appliance exterior
Stainless
steel front
Hot soapy water:
Clean with a dishcloth and then dry with
a soft cloth.
Remove flecks of lime scale, grease,
starch and albumin (e.g. egg white)
immediately. Corrosion can form under
such flecks.
Special stainless steel cleaning products suitable for hot surfaces are available for purchase from customer
service or from specialist retailers. Apply
a very thin layer of the cleaning product
with a soft cloth.
Plastic Hot soapy water:
Clean with a dishcloth and then dry with
a soft cloth.
Do not use glass cleaner or a glass
scraper.
Painted surfaces
Hot soapy water:
Clean with a dishcloth and then dry with
a soft cloth.
Control panel Hot soapy water:
Clean with a dishcloth and then dry with
a soft cloth.
Do not use glass cleaner or a glass
scraper.
Door panels Hot soapy water:
Clean with a dishcloth and then dry with
a soft cloth.
Do not use a glass scraper or a stainless steel scouring pad.
Door handle Hot soapy water:
Clean with a dishcloth and then dry with
a soft cloth.
If descaler comes into contact with the
door handle, wipe it off immediately.
Otherwise, any stains will not be able to
be removed.
Wash new sponge cloths thoroughly before use.
25
Page 26

Appliance interior
Enamel surfaces and
self-cleaning
Observe the instructions for the surfaces
of the cooking compartment that follow
the table.
surfaces
Glass cover
for the interior lighting
Hot soapy water:
Clean with a dishcloth and then dry with
a soft cloth.
If the cooking compartment is heavily
soiled, use oven cleaner.
Door seal
Do not
remove.
Stainless
steel door
cover
Hot soapy water:
Clean with a dish cloth.
Do not scour.
Stainless steel cleaner:
Observe the manufacturer's instructions.
Do not use stainless steel care prod-
ucts.
Remove the door cover for cleaning.
Rails Hot soapy water:
Soak and clean with a dish cloth or
brush.
Accessories Hot soapy water:
Soak and clean with a dish cloth or
brush.
If there are heavy deposits of dirt, use a
--------
stainless steel scouring pad.
Notes
▯ Slight differences in color on the front of the appliance
are caused by the use of different materials, such as
glass, plastic and metal.
▯ Shadows on the door panels, which look like streaks,
are caused by reflections made by the interior lighting.
▯ Enamel is baked on at very high temperatures. This
can cause some slight color variation. This is normal
and does not affect operation.
The edges of thin trays cannot be completely
enameled. As a result, these edges can be rough. This
does not impair the anti-corrosion protection.
Surfaces in the cooking compartment
The slightly textured surface of the back wall, ceiling and
sides in the cooking compartment are self-cleaning.
The cooking compartment floor is enameled and has a
smooth surface.
Cleaning Enamel Surfaces
Clean the smooth enamel surfaces with a dish cloth and
hot soapy water or a vinegar solution. Dry with a soft
cloth.
Soften baked-on food residues with a damp cloth and
soapy water. If there are heavy deposits of dirt, use a
stainless steel scouring pad or oven cleaner.
NOTICE: Never use oven cleaner in the oven cavity when it is still warm. This may damage the enamel. Remove all food remnants from the oven cavity and the appliance door before you next heat up the appliance.
Leave the oven cavity open to dry after cleaning.
Note: Food residues can leave a white coating behind.These are harmless and do not affect performance. You can remove these residues using lemon juice if required.
Cleaning self-cleaning surfaces
The self-cleaning surfaces are coated with a porous,
matte ceramic layer. This coating absorbs and dispels
splashes from baking and roasting while the appliance is
in operation.
If the self-cleaning surfaces no longer clean themselves
sufficiently and dark stains appear, they can be cleaned
using the cleaning function. To do this, refer to the
information in the relevant section. ~ "Cleaning
function" on page 26
9 CAUTION
Do not use oven cleaner on the self-cleaning
surfaces. These will damage the surfaces. If oven
cleaner does get onto these surfaces, dab it off
immediately using water and a sponge cloth. Do not
rub the surface and do not use abrasive cleaning
aids.
Keeping the appliance clean
Always keep the appliance clean and remove dirt
immediately so that stubborn deposits of dirt do not build
up.
Tips
Clean the cooking compartment after each use. This will
ensure that dirt cannot be baked on.
Always remove flecks of limescale, grease, starch and
albumin (e.g. egg white) immediately.
Use suitable ovenware for roasting, e.g. a roasting dish.
Cleaning function
The self-cleaning surfaces in the cooking compartment
are cleaned with the "EcoClean" cleaning function.
The self-cleaning surfaces (back panel, ceiling panel and
side panels) are coated with a porous, matt ceramic
material. This coating absorbs and breaks down
splashes from baking, roasting and grilling while the
oven is in operation. If the surfaces no longer clean
themselves adequately and dark patches appear, the
surfaces can be cleaned by the cleaning function.
Note: The appliance records the number of times it is used. The appliance indicates when it has reached a point in time after which cleaning is recommended. The recommendation is displayed until the cleaning function has finished. If you do not act on this recommendation, the selfcleaning surfaces may become damaged.
If your appliance becomes prematurely dirty or if you
notice dark patches on the back panel, do not wait until
your appliance recommends cleaning to do so. The more
often the appliance is cleaned, the longer the selfcleaning surfaces will retain their cleaning capability. You
can clean your appliance at any time needed using the
cleaning function.
26
Page 27

Before running the cleaning function
Remove racks, rails, accessories and ovenware from the
cooking compartment.
Cleaning the cooking compartment floor and the inside of the appliance door
Remove the worst dirt from the cooking compartment
floor, the inside of the appliance door and the interior
lighting. Otherwise, patches will appear that cannot be
removed.
9 CAUTION
Do not use oven cleaner on the self-cleaning
surfaces. These will damage the surfaces. If oven
cleaner does get onto these surfaces, dab it off
immediately using water and a sponge cloth. Do not
rub the surface and do not use abrasive cleaning
aids.
Note: The operating hour counter is not reset. The instruction for the cleaning function is still shown on the display.
Once the cleaning function has ended
Once the cooking compartment has cooled down, wipe
down the cooking compartment with a damp cloth if
necessary.
Note: During operation and while the cleaning function is active, reddish patches may form on the surfaces. This is not rust, but food residues. These patches are not hazardous to your health and do not limit the cleaning capacity of the self-cleaning surfaces.
Rails
With good care and cleaning, your appliance will retain
its appearance and remain fully functioning for a long
time to come. This will tell you how to remove the shelves
and clean them.
9 WARNING
RISK OF BURNS
; The appliance will become very hot on the
outside during the cleaning function. Never touch
the appliance door. Allow the appliance to cool
down. Keep children away from the appliance.
Setting the cleaning function
Before setting the cleaning function, ensure that you
have followed all instructions for preparation.
The duration of the cleaning function is preset to 1 hour.
It cannot be changed.
1.
Touch the menu field.
The list of operating modes is displayed.
2.
Touch the "EcoClean" text field.
3.
Press the Start/Stop button l to start.
The cooking time will count down on the display. The
heating line does not appear for the cleaning function.
The cleaning function starts.
Ventilate the kitchen when the cleaning function is
running.
When the cleaning function has ended, an audible signal
sounds. The cooking time 00m 00s is shown in the
display. Press the ÿ On/Off button to switch off the
appliance.
Setting a later end time
You can set a later end time. Before starting the
appliance, touch the "End" text field and set a later end
time using the rotary selector.
The appliance switches to standby after it is started. The
end time can no longer be changed.
Cancelling
If you would like to cancel the cleaning function, switch
the appliance off using the ÿ On/Off button. You can no
longer pause the operation using the l Start/Stop
button.
Detaching and refitting the rails
9 WARNING
RISK OF BURNS
The rails become very hot. Never touch the hot rails.
Always allow the appliance to cool down. Keep
children away from the appliance.
Detaching the rails
1.
Lift the rail slightly at the front ‚ and detach it ƒ (figure !).
2.
Then pull the whole rail to the front and remove it (figure ").
21
D
E
Clean the rails with cleaning agent and a sponge. For
stubborn dirt deposits, use a brush.
27
Page 28

Attaching the rails
The rails only fit on the right or the left side. For both rails,
ensure that the curved rods are at the front.
1.
First, insert the rail in the middle into the rear socket ‚,
until the rail rests against the cooking compartment
wall, and push it back slightly
2.
Then insert the rail into the front socket „, until the rail
ƒ (figure !).
also rests against the cooking compartment wall here
and press it downwards
1
… (figure ").
2
Removing and fitting the appliance door
To clean and remove the door panels, you can detach
the appliance door.
The oven door hinges each have a locking lever.
When the locking levers are closed (figure A
!), the
oven door is secured in place. It cannot be detached.
When the locking levers are open in order to detach the
oven door (figure "), the hinges are locked. They cannot
snap shut.
21
D
E
F
G
Appliance door
With good care and cleaning, your appliance will retain
its appearance and remain fully functioning for a long
time to come. This will tell you how to remove the
appliance door and clean it.
9 CAUTION
WHEN REMOVING THE OVEN DOOR:
▯ Make sure oven is cool and power to the oven
has been turned off before removing the door.
Failure to do so could result in electrical shock or
burns.
▯ The oven door is heavy and parts of it are fragile.
Use both hands to remove the oven door. The
door front includes glass components. Handle
carefully to avoid breakage.
▯ Grasp only the sides of the oven door. Do not
grasp the handle as it may swing in your hand
and cause damage or injury.
▯ Failure to grasp the oven door firmly and properly
could result in personal injury or product damage.
▯ To avoid injury from hinge bracket snapping
closed, be sure that both locking levers are
securely in place before removing the door. Also,
do not force the oven door open or closed - the
hinge could be damaged and injury could result.
▯ Do not lay the removed door on sharp or pointed
objects as this could break the glass. Lay the
door on a flat, smooth surface, positioned so that
the door cannot fall over.
9 WARNING
RISK OF INJURY
▯ Whenever the hinges are not locked, they can
snap shut with great force. Ensure that the
locking levers are always fully closed or, when
detaching the appliance door, fully open.
9 WARNING
Risk of injury
▯ The hinges on the appliance door move when
opening and closing the door, and you may be
pinched. Keep your hands away from the hinges.
Removing the appliance door
1.
Open the appliance door fully and push it in the direction of the appliance.
2.
Open the two locking levers on the left and right (figure !).
3.
Close the appliance door as far as it goes ‚. With both hands, grip the door on the left- and right-hand side ƒ and pull it up and out (figure ").
1I
2
E
D
E
28
Page 29

Refitting the appliance door
Follow the instructions in the reverse order to refit the
appliance door.
1.
When fitting the appliance door, ensure that both
hinges are inserted straight into the opening
(figure
Place both hinges at the bottom on the outer panel
and use this as a guide.
Ensure that the hinges are inserted into the correct
opening. You must be able to insert them easily and
without resistance. If you can feel any resistance,
check that the hinges are inserted into the correct
opening.
!).
1
2.
Open the appliance door fully.Close the two locking levers (figure ").
2I
Note: Clean the stainless steel insert in the cover with stainless steel cleanser. Clean the rest of the door cover with dishwashing detergent and a soft cloth.
4.
Open the appliance door a little again. Put the cover
back in place and press on it until it clicks audibly into
place (figure
#).
5.
Close the appliance door.
Removing and installing the door panels
For better cleaning, you can remove the glass panels
from the appliance door.
Removing door panels from the appliance
1.
Open the appliance door a little.
2.
Press on the left and right of the cover (figure !).
3.
Remove the cover (figure ").
21
3.
Close the cooking compartment door.
Removing the door cover
The stainless steel insert in the door cover can discolor.
To carry out thorough cleaning, you can remove the
cover.
1.
Open the appliance door a little.
2.
Press on the left and right of the cover (figure !).
3.
Remove the cover (figure "). Close the appliance door carefully.
1
2
4.
Undo and remove the screws on the left and right of the appliance door (fig. #).
5.
Fold a dish towel several times and place it between the appliance and the door before shutting the door on the dish towel (figure $).
Pull out the front panel upwards and lay it on a flat
surface with the door handle facing downwards.
29
Page 30

Clean the panels with glass cleaner and a soft cloth.
9 WARNING
RISK OF INJURY
▯ Scratched glass in the appliance door can burst.
Do not use any glass scrapers or strong or
abrasive cleaning agents.
3.
Push the front panel in at the bottom until you hear it
click into place (figure
4.
Open the appliance door a little and remove the dish
#).
towel.
5.
Screw both screws back in on the left and right.
6.
Put the cover back in place and press on it until it
clicks audibly into place (figure
$).
9 WARNING
Risk of injury
▯ The hinges on the appliance door move when
opening and closing the door, and you may be
pinched. Keep your hands away from the hinges.
Refitting door panels on the appliance
1.
Insert the front panel downwards into the retainers (figure !).
2.
Close the front panel until the two upper hooks are opposite the opening (figure ").
21
7.
Close the appliance door.
9 CAUTION
Do not use the cooking compartment again until the
panels have been correctly fitted.
Troubleshooting
Faults often have simple explanations. Before calling
customer service, please refer to the table below and
attempt to correct the fault yourself.
9 CAUTION
Repairs should only be done by an authorized
servicer.
Improper repair of your appliance may result in risk
of severe physical injury or death.
Fault Possible cause Notes/remedy
The appliance does not work. Faulty fuse. Check the circuit breaker in the fuse box.
Power failure Check whether the kitchen light or other kitchen appliances
“Language English”
Power failure Reset the language and the time.
appears on the display.
The time does not appear
when the appliance is
Basic setting is
changed.
switched off.
Eliminating faults yourself
You can often easily eliminate technical faults on the
appliance yourself.
If a dish does not turn out exactly as you wanted, you can
find many tips and instructions for preparation at the end
of the operating manual. ~ "Tested for You in Our
Cooking Studio" on page 37
are working.
Change the basic setting for the clock display.
30
Page 31

The appliance does not heat
up; the
on the display.
The appliance will not start
and "Cooking compartment
too hot" appears on the display
The rotary selector has fallen
out of the support in the control panel.
The rotary selector can no
longer be turned easily.
HomeConnect does not work
correctly.
m symbol lights up
Demo mode is acti-
vated in the basic set-
tings.
The cooking compart-
ment is too hot for the
selected dish or type of
heating
The rotary selector has
been accidentally dis-
engaged.
There is dirt under the
rotary selector.
Briefly disconnect the appliance from the mains (switch off
the circuit breaker in the fuse box) and then deactivate demo
mode in the basic settings within 3minutes.
Allow the cooking compartment to cool down and start again
The rotary selector can be removed. Simply place the rotary
selector back in its support in the control panel and push it in
so that it engages and can be turned as usual.
The rotary selector can be removed. To disengage the rotary
selector, simply remove it from the support. Alternatively,
press on the outer edge of the rotary selector so that it tips
and can be picked up easily.
Carefully clean the rotary selector and its support on the
appliance using a cloth and soapy water. Dry with a soft
cloth. Do not use any sharp or abrasive materials. Do not
soak or clean in the dishwasher.
Do not remove the rotary selector too often so that the support remains stable.
Go to www.home-connect.com
9 WARNING
RISK OF ELECTRIC SHOCK
Improper repairs are dangerous. Only an authorized
servicer may perform repairs and may replace
damaged plug and connections. Remove the power
plug or turn off the circuit breaker or fuse in the fuse
box if the appliance is damaged or not working. Call
Customer Service.
Error messages on the display
When an error message appears on the display with "D"
or "E", e.g. D0111or E0111, switch the appliance off
and on again using the ÿ On/Off button.
If it was a one-time error, the display goes out. If the error
message appears again, call customer service and
quote the exact error message.
Maximum operating time
If you do not change the settings on your appliance for
several hours, the appliance stops heating up
automatically. This prevents unwanted continuous
operation.
The respective settings for the operating mode govern
when the maximum operating time is reached.
Maximum operating time reached
A note appears on the display confirming that the
maximum operating time has been reached.
To continue operation, touch any field or turn the rotary
selector.
Switch the appliance off using the ÿ On/Off button if you
do not need to use it.
Tip: Set a cooking time so that the appliance does not switch off when you do not want it to, e.g. with an extremely long preparation time. The appliance heats up until the set cooking time has elapsed.
31
Page 32

Replacing the cooking compartment bulb on the ceiling
If the cooking compartment light bulb burns out, it must
be replaced. Heat-resistant, 40watt, 230V halogen
bulbs are available from customer service or specialist
retailers.
When handling the halogen bulb, use a dry cloth. This
will increase the service life of the bulb. Only use these
bulbs.
9 WARNING
Light socket is live when door is open if main power
supply is not turned off.
9 WARNING
1.
Place a dish towel in the cold cooking compartment to prevent damage.
2.
Turn the glass cover counter-clockwise to remove it
(figure
3.
Pull out the bulb – do not turn it (figure "). Insert the new bulb, making sure that the pins are in the correct position. Push the bulb in firmly.
1
!).
2
Make sure the appliance and lights are cool and
power to the appliance has been turned off before
replacing the light bulb(s). Failure to do so could
result in electrical shock or burns. The lenses (if
equipped) must be in place when using the
appliance. The lenses (if equipped) serve to protect
the light bulb from breaking. The lenses (if
equipped) are made of glass. Handle carefully to
avoid breaking. Broken glass can cause an injury.
9 WARNING
RISK OF ELECTRIC SHOCK
When you replace the oven interior lamp, the
contacts of the lamp holder are live. Before
replacing the lamp, remove the power plug or
deactivate the circuit breaker or fuse in the fuse box.
9 WARNING
RISK OF BURNS
The appliance becomes very hot. Never touch the
hot inside surfaces of the oven interior or heating
elements. Always allow the appliance to cool down.
Keep children away.
4.
Screw the glass cover back on. Depending on the appliance model, the glass cover may have a sealing ring. If the glass cover has a sealing ring, put it back in place before screwing the cover back on.
5.
Remove the dish towel and switch on the circuit breaker.
Glass cover
If the glass cover of the halogen bulb is damaged, it
must be replaced. You can obtain a new glass cover
from customer service. Please specify the E number and
FD number of your appliance.
32
Page 33

Customer Service
Before Calling Service
See the Use and Care Manual for troubleshooting
information. Refer to the “Statement of Limited Product
Warranty” in the Use and Care Manual.
To reach a service representative, see the contact
information at the front of the manual or in the following
section. Please be prepared with the information printed
on your product data plate prior to calling.
Data Plate
The data plate shows the model and serial number. Refer
to the data plate on the appliance when requesting
service.
The data plate can be found at the left side of the oven
cavity.
To avoid having to search for each piece of information
when calling, you can enter the four items needed in the
spaces provided below.
Service
We realize that you have made a considerable
investment in your kitchen. We are dedicated to
supporting you and your appliance so that you have
many years of creative cooking.
Please don’t hesitate to contact our Customer Support
Department if you have any questions or in the unlikely
event that your Bosch® appliance needs service. Our
service team is ready to assist you.
USA
800-944-2904
www.bosch-home.com/us/support
Canada
800-944-2904
www.bosch-home.ca/en/support
Parts and Accessories
Parts, filters, descalers, stainless steel cleaners and more
can be purchased in the Bosch® eShop or by phone.
USA
www.bosch-home.com/us/store
Canada
Marcone 800-482-6022
or
Reliable Parts 800-941-9217
Model No.
FD-No.
Date of Purchase
Customer Service O
Keep your invoice or escrow papers for warranty
validation if service is needed.
33
Page 34

STATEMENT OF LIMITED PRODUCT WARRANTY
What this Warranty Covers & Who it Applies to
The limited warranty provided by BSH Home Appliances
Corporation (“BSH“) in this Statement of Limited Product
Warranty applies only to the Bosch appliance (“Product“)
sold to you, the first using purchaser, provided that the
Product was purchased:
▯ For your normal, household (non-commercial) use,
and has in fact at all times only been used for normal
household purposes.
▯ New at retail (not a display, "as is", or previously
returned model), and not for resale, or commercial
use.
▯ Within the United States or Canada, and has at all
times remained within the country of original purchase.
The warranties stated herein apply only to the first
purchaser of the Product and are not transferable.
Please make sure to return your registration card; while
not necessary to effectuate warranty coverage, it is the
best way for BSH to notify you in the unlikely event of a
safety notice or product recall.
How Long the Warranty Lasts
BSH warrants that the Product is free from defects in
materials and workmanship for a period of three hundred
sixty-five (365) days from the date of purchase. The
foregoing timeline begins to run upon the date of
purchase, and shall not be stalled, tolled, extended, or
suspended, for any reason whatsoever.
This Product is also warranted to be free from cosmetic
defects in material and workmanship (such as scratches
of stainless steel, paint/porcelain blemishes, chip, dents,
or other damage to the finish of the Product), for a period
of thirty (30) days from the date of purchase or closing
date for new construction. This cosmetic warranty
excludes slight color variations due to inherent
differences in painted and porcelain parts, as well as
differences caused by kitchen lighting, product location,
or other similar factors. This cosmetic warranty
specifically excludes any display, floor, “As Is”, or “B”
stock appliances.
Repair/Replace as Your Exclusive Remedy
During this warranty period, BSH or one of its authorized
service providers will repair your Product without charge
to you (subject to certain limitations stated herein) if your
Product proves to have been manufactured with a defect
in materials or workmanship. If reasonable attempts to
repair the Product have been made without success,
then BSH will replace your Product (upgraded models
may be available to you, in BSH’s sole discretion, for an
additional charge). All removed parts and components
shall become the property of BSH at its sole option. All
replaced and/or repaired parts shall assume the identity
of the original part for purposes of this warranty and this
warranty shall not be extended with respect to such
parts. BSH's sole liability and responsibility hereunder is
to repair manufacturer-defective Product only, using a
BSH-authorized service provider during normal business
hours. For safety and property damage concerns, BSH
highly recommends that you do not attempt to repair the
Product yourself, or use an un-authorized servicer; BSH
will have no responsibility or liability for repairs or work
performed by a non-authorized servicer. If you choose to
have someone other than an authorized service provider
work on your Product, THIS WARRANTY WILL
AUTOMATICALLY BECOME NULL AND VOID. Authorized
service providers are those persons or companies that
have been specially trained on BSH products, and who
possess, in BSH's opinion, a superior reputation for
customer service and technical ability (note that they are
independent entities and are not agents, partners,
affiliates or representatives of BSH). Notwithstanding the
foregoing, BSH will not incur any liability, or have
responsibility, for the Product if it is located in a remote
area (more than 100miles from an authorized service
provider) or is reasonably inaccessible, hazardous,
threatening, or treacherous locale, surroundings, or
environment; in any such event, if you request, BSH
would still pay for labor and parts and ship the parts to
the nearest authorized service provider, but you would
still be fully liable and responsible for any travel time or
other special charges by the service company, assuming
they agree to make the service call.
Out of Warranty Product
BSH is under no obligation, at law or otherwise, to
provide you with any concessions, including repairs, prorates, or Product replacement, once this warranty has
expired.
Warranty Exclusions
The warranty coverage described herein excludes all
defects or damage that are not the direct fault of BSH,
including without limitation, one or more of the following:
▯ Use of the Product in anything other than its normal,
customary and intended manner (including without
limitation, any form of commercial use, use or storage
of an indoor product outdoors, use of the Product in
conjunction with air or water-going vessels).
▯ Any party's willful misconduct, negligence, misuse,
abuse, accidents, neglect, improper operation, failure
to maintain, improper or negligent installation,
tampering, failure to follow operating instructions,
mishandling, unauthorized service (including selfperformed "fixing" or exploration of the appliance's
internal workings).
▯ Adjustment, alteration or modification of any kind.
▯ A failure to comply with any applicable state, local,
city, or county electrical, plumbing and/or building
codes, regulations, or laws, including failure to install
the product in strict conformity with local fire and
building codes and regulations.
▯ Ordinary wear and tear, spills of food, liquid, grease
accumulations, or other substances that accumulate
on, in, or around the Product.
34
Page 35

▯ Any external, elemental and/or environmental forces
and factors, including without limitation, rain, wind,
sand, floods, fires, mud slides, freezing temperatures,
excessive moisture or extended exposure to humidity,
lightning, power surges, structural failures surrounding
the appliance, and acts of God.
In no event shall BSH have any liability or responsibility
whatsoever for damage to surrounding property,
including cabinetry, floors, ceilings, and other structures
or objects around the Product. Also excluded from this
warranty are Products on which the serial numbers have
been altered, defaced, or removed; service visits to teach
you how to use the Product, or visits where there is
nothing wrong with the Product; correction of installation
problems (you are solely responsible for any structure
and setting for the Product, including all electrical,
plumbing or other connecting facilities, for proper
foundation/flooring, and for any alterations including
without limitation cabinetry, walls, floors, shelving, etc.);
and resetting of breakers or fuses.
TO THE EXTENT ALLOWED BY LAW, THIS WARRANTY
SETS OUT YOUR EXCLUSIVE REMEDIES WITH
RESPECT TO PRODUCT, WHETHER THE CLAIM ARISES
IN CONTRACT OR TORT (INCLUDING STRICT LIABILITY,
OR NEGLIGENCE) OR OTHERWISE. THIS WARRANTY
IS IN LIEU OF ALL OTHER WARRANTIES, WHETHER
EXPRESS OR IMPLIED. ANY WARRANTY IMPLIED BY
LAW, WHETHER FOR MERCHANTABILITY OR FITNESS
FOR A PARTICULAR PURPOSE, OR OTHERWISE,
SHALL BE EFFECTIVE ONLY FOR THE PERIOD THAT
THIS EXPRESS LIMITED WARRANTY IS EFFECTIVE. IN
NO EVENT WILL THE MANUFACTURER BE LIABLE FOR
CONSEQUENTIAL, SPECIAL, INCIDENTAL, INDIRECT,
"BUSINESS LOSS", AND/OR PUNITIVE DAMAGES,
LOSSES, OR EXPENSES, INCLUDING WITHOUT
LIMITATION TIME AWAY FROM WORK, HOTELS AND/
OR RESTAURANT MEALS, REMODELLING EXPENSES
IN EXCESS OF DIRECT DAMAGES WHICH ARE
DEFINITIVELY CAUSED EXCLUSIVELY BY BSH, OR
OTHERWISE. SOME STATES DO NOT ALLOW THE
EXCLUSION OR LIMITATION OF INCIDENTAL OR
CONSEQUENTIAL DAMAGES, AND SOME STATES DO
NOT ALLOW LIMITATIONS ON HOW LONG AN IMPLIED
WARRANTY LASTS, SO THE ABOVE LIMITATIONS MAY
NOT APPLY TO YOU. THIS WARRANTY GIVES YOU
SPECIFIC LEGAL RIGHTS, AND YOU MAY ALSO HAVE
OTHER RIGHTS WHICH VARY FROM STATE TO STATE.
No attempt to alter, modify or amend this warranty shall
be effective unless authorized in writing by an officer of
BSH.
Dishes
You can use the "Assist" operating mode to prepare a
wide variety of food. The appliance selects the optimal
settings for you.
To achieve good results, the cooking compartment must
not be too hot for the type of food you have selected. If it
is, a message will appear on the display. Allow the
cooking compartment to cool down and start again.
Information on the settings
▯ The cooking result depends on the quality of the food
and the size and type of cookware. For an optimal
cooking result, use food that is in good condition and
chilled meat only. For frozen food, use food straight
out of the freezer only.
▯ For some food, a temperature, heating mode and
cooking time is suggested. The temperature and the
cooking time can be changed according to your
requirements.
▯ When roasting dishes for which the appliance will
apply the temperature selection for you, temperatures
of up to 570° F (300 °C) can be saved. Therefore,
make sure that you use cookware that is sufficiently
heat resistant.
▯ Information is provided, e.g. on cookware, rack
position or the addition of liquid when cooking meat.
Some food requires turning or stirring, etc. during
cooking. This is shown in the display shortly after
operation starts. An audible signal will remind you at
the right time.
▯ Information on the right kind of cookware to use and
tips and tricks for the preparation can be found at the
end of the instruction manual. ~ "Tested for You in
Our Cooking Studio" on page 37
Selecting a dish
The dishes are arranged in a uniform structure:
▯ Category
▯ Food
▯ Dish
The following table lists the categories with the
corresponding food. One or more dishes are listed
beside each food.
Categories Food
Cakes in tins
Cake
Bread/bread rolls
Pizza, savory
cakes
Cakes on baking trays
Small baked items
Cookies
Bread
Bread rolls
Pizza
Savory cakes, quiche
35
Page 36

Categories Food
Casserole, savory, fresh, cooked
ingredients
Lasagna, fresh
Bakes, soufflés
Frozen products
Poultry
Meat
Fish Fish
Vegetables Vegetables au gratin
Potatoes au gratin
Casserole, sweet
Soufflé in individual molds
Fruit crisp
Pizza
Bread rolls
Casseroles
Potato products
Poultry, fish
Chicken
Duck, goose
Turkey
Pork
Beef
Lamb
Meat dishes
Baked potatoes, halved
Whole baked potatoes
Continue cooking
After the cooking time has ended, you can leave some
dishes to continue cooking if you are not satisfied with
the cooking result.
A query appears on the display, which asks if you want
to continue cooking. If you want to continue cooking,
touch the "Extend cooking time" text field. A cooking time
is suggested, which can be changed. Press the
Stop button to start.
Note: You can extend the cooking time as often as required.
If you are satisfied with the cooking result, touch the
"Finish" text field.
Press the ÿ On/Off button to switch off the appliance.
Setting a later end time
You can set a later end time for some dishes. Before
starting the appliance, touch the "End" text field and set a
later end time using the rotary selector.
The appliance switches to standby after it is started. The
end time can no longer be changed.
Changing and cancelling
After starting the appliance, the settings can no longer be
changed.
If you would like to cancel the operation, switch the
appliance off using the
longer pause the operation using the l Start/Stop
button.
ÿ On/Off button. You can no
l Start/
Applying settings for dishes
You will be guided through the entire setting process for
your chosen food.
Use the rotary selector to scroll through the individual
levels.
1.
Touch the menu field.
The list of operating modes is displayed.
2.
Touch the "Assist" text field.
The categories are displayed.
3.
Touch the required category.
The foods in this category are displayed.
4.
Touch the required food.
The individual dishes are displayed.
5.
Touch the required dish.
The settings for this dish appear on the display. For
many dishes, you can change the settings to suit your
needs.
Tip:The "Tip" text field provides you with information
about accessories and rack height.
6.
Press the Start/Stop button l to start.
The cooking time will count down on the display.
The appliance begins to heat up.
Once the cooking time has elapsed, an audible signal
sounds. The appliance stops heating up.
When your dish is ready, use the ÿ On/Off button to
switch off the appliance.
36
Page 37

Tested for You in Our Cooking Studio
Here, you can find a selection of dishes and the ideal
settings for them. We will show you which heating
method and temperature are best suited to your dish.
You will be provided with information on suitable cooking
accessories and the height at which they should be
placed in the oven. You will also be provided with tips
about cookware and preparation methods.
Note: A lot of steam can build up in the cooking compartment when cooking food.
Your appliance is very energy-efficient and radiates very
little heat to its surroundings during operation. Due to the
high difference in temperature between the appliance
interior and the external parts of the appliance,
condensation may build up on the door, control panel, or
adjacent kitchen cabinet panels. This is a normal
physical phenomenon. Condensation can be reduced by
preheating the oven or opening the door carefully.
Cakes and Small Baked Items
Your appliance offers you a range of heating types for
the preparation of cakes and small baked items. You can
find the ideal settings for many dishes in the settings
tables.
Also refer to the notes in the section on allowing dough
to rise.
Only use original accessories supplied with your
appliance. These have been tailored to the cooking
compartment and the operating modes of your
appliance.
Rack positions
Use the indicated rack positions.
Baking on one rack
When baking on one rack, use the following rack
positions:
▯ Tall baked items: rack position 2
▯ Flat baked items: rack position 3
If you are using Convection Multi-Rack as the heating
mode, you can choose between rack positions 1, 2,
3and 4.
Baking on several racks
Use Convection Multi-Rack. Baked items that are placed
into the oven on two racks at the same time will not
necessarily be ready at the same time.
Baking on two racks:
▯ First wire rack: rack position 3
▯ Second wire rack: rack position 1
Baking on three racks:
▯ First wire rack: rack position 5
▯ Second wire rack: rack position 3
▯ Third wire rack: rack position 1
Position baking tins/dishes next to one another or offset
and vertically stacked in the cooking compartment.
Accessories
Ensure that you always use suitable accessories and that
they are placed in the oven the right way around.
Wire Rack
Insert the wire rack with the open side facing the
appliance door and the curved lip pointing downwards.
Always place cookware, tins, and dishes on the wire
rack.
Baking pans
Shiny aluminum baking pans are most suitable.
Tinplate baking pans, ceramic dishes and glass dishes
extend baking time and mean that the baked item will not
brown evenly. If you wish to bake using these baking
pans/dishes and using top/bottom heating, slide in the
pan/dish at rack position 1.
Parchment Paper
Only use parchment paper that is suitable for the
selected temperature. Always cut parchment paper to
size.
Recommended setting values
The table lists the optimal heating modes for various
baked items. The temperature and baking time depend
on the amount and consistency of the dough/mixture.
For this reason, the table specifies setting ranges. Try
using the lower values to start with. A lower temperature
will result in more even browning. You can use a higher
setting next time if necessary.
Note: Baking times cannot be reduced by using higher temperatures. Cakes or small baked items would only be cooked on the outside, and would not be fully baked in the middle.
If you wish to follow one of your own recipes when
baking, you should use the setting values listed for
similar baked items in the table as reference. Additional
information can be found in the baking tips listed after
the settings table.
Remove unused accessories from the cooking
compartment. This will ensure that you achieve the best
possible cooking results.
Heating methods used:
▯ < Convection Multi-Rack
▯ % Bake
▯ $ Pizza
37
Page 38

Dish Accessories / cookware Rack
position
Cakes in pans
Sponge cake, simple Cake pan/cake tin 3
Sponge cake, simple, 2 racks Cake pan/cake tin 3+1
Sponge cake, delicate Cake pan/cake tin 2
Sponge flan base Flan base tin 3
Fruit tart or cheesecake with shortcrust pastry base
Swiss flan Pizza tray 3
Tart Flan-base cake tin, black 3
Bundt yeast cake Bundt cake pan 2
Yeast cake Springform cake pan, Ø11"
Sponge base, 2 eggs Flan base tin 3
Sponge flan, 3 eggs
Sponge flan, 6 eggs Springform cake pan, Ø11"
Springform cake pan, Ø10
(26 cm)
(28 cm)
Springform cake pan, Ø101/4"
(26 cm)
(28 cm)
1
/4"
2
2
2
2
Heating
mode
%
<
%
%
%
%
$
%
%
%
<
<
Temperature
in °F (°C)
300-340
(150-170)
285-320
(140-160)
300-340
(150-170)
320-355
(160-180)
340-375
(170-190)
430-465
(220-240)
375410(190-
210)
300-340
(150-170)
320-340
(160-170)
300-340
(150-170)
320-340
(160-170)
300-340
(150-170)
Cooking
time in
mins.
50-70
25-35
60-80
20-30
60-80
35-45
30-45
50-70
20-30
20-30
25-35
30-50
Cakes on baking sheets
Sponge cake with topping Baking sheet 3
Sponge cake, 2 racks Baking sheets 1+3
Shortcrust tart with dry topping Baking sheet 3
Shortcrust tart with dry topping,
2 racks
Shortcrust tart with moist topping Baking sheet 3
Swiss flan Baking sheet 3
Yeast cake with dry topping Baking sheet 3
Yeast cake with dry topping, 2 racks Baking sheets 1+3
Yeast cake with moist topping Baking sheet 3
Yeast cake with moist topping,
2 racks
Braided loaf, savarin Baking sheet 2
Swiss roll Baking sheet 3
Baking sheets 1+3
Baking sheets 1+3
%
<
<
<
%
%
%
<
%
<
%
<
320-355
(160-180)
285-320
(140-160)
340-375
(170-190)
320-340
(160-170)
320-355
(160-180)
390-410
(200-210)
320-355
(160-180)
300-340
(150-170)
355-390
(180-200)
300-340
(150-170)
320-340
(160-170)
355-390
(180-200)
20-40
30-50
20-30
35-45
55-65
40-50
15-20
20-30
30-40
45-60
25-35
8-15
38
Page 39

Dish Accessories / cookware Rack
position
Strudel, sweet Baking sheet 2
Strudel, frozen Baking sheet 3
Small baked items
Cupcakes Muffin tray 3
Cupcakes Muffin tray 3
Cupcakes, 2 racks Muffin trays 1+3
Cupcakes, 3 racks Muffin trays 5+3+1
Muffins Muffin tray 3
Muffins, 2 racks Muffin trays 3+1
Puff pastry Baking sheet 3
Puff pastry, 2 racks Baking sheets 3+1
Puff pastry, 3 racks Baking sheets 5+3+1
Puff pastry, flat, 4 racks Baking sheets 5+3+2+1
Danish pastry Baking sheet 3
Heating
mode
%
<
%
<
<
<
%
<
<
<
<
<
<
Temperature
in °F (°C)
375410(190-
210)
390-430
(200-220)
320(160) 25-35
300(150) 25-35
300(150) 30-40
285(140) 35-45
340-375
(170-190)
320-355
(160-180)
340-375
(170-190)
340-375
(170-190)
340-375
(170-190)
355-390
(180-200)
320-355
(160-180)
Cooking
time in
mins.
55-65
35-45
15-20
15-40
20-35
20-45
20-45
20-35
20-30
Cookies
Shortbread Baking sheet 3
Shortbread Baking sheet 3
Shortbread, 2 racks Baking sheets 3+1
Shortbread, 3 racks Baking sheets 5+3+1
Cookies Baking sheet 3
Cookies, 2 racks Baking sheets 3+1
Cookies, 3 racks Baking sheets 5+3+1
Macaroons Baking sheet 3
Macaroons, 2 racks Baking sheets 3+1
Macaroons, 3 racks Baking sheets 5+3+1
%
<
<
<
<
<
<
<
<
<
285-300
(140-150)
285-300
(140-150)
285-300
(140-150)
265-285
(130-140)
285-320
(140-160)
285-320
(140-160)
285-320
(140-160)
195-230
(90-110)
195-230
(90-110)
195-230
(90-110)
25-40
25-40
30-40
35-55
15-30
15-30
15-30
20-40
25-45
30-45
39
Page 40

Tips on baking
You want to find out whether
the cake is completely
Push a toothpick into the highest point on the cake. If the toothpick comes out clean
with no dough residue, the cake is ready.
cooked in the middle.
The cake collapses. Next time, use less liquid. Alternatively, set the temperature to be 50° F (10°C) lower
and extend the baking time. Adhere to the specified ingredients and preparation
instructions in the recipe.
The cake has risen in the
middle but is lower around
Only grease the base of the springform cake pan. After baking, loosen the cake carefully with a knife.
the edge.
The fruit juice overflows. Next time, line the baking sheet with aluminum foil.
Small baked items stick to
one another during baking.
There should be a gap of approx. 1 inch (2 cm) around each item. This gives enough
space for the baked items to expand well and brown on all sides.
The cake is too dry. Set the temperature 50° F (10°C) higher and shorten the baking time.
The cake is generally too light
in color.
The cake is too light on top,
If the rack position and the cookware are correct, then you should increase the tem-
perature if necessary or extend the baking time.
Bake the cake one rack level higher in the oven the next time.
and too dark underneath.
The cake is too dark on top,
and too light underneath.
Cakes baked in a tray or tin
are too brown at the back.
Bake the cake one rack level lower in the oven the next time. Select a lower tempera-
ture and extend the baking time.
Place the baking tray in the middle of the accessories, not directly against the back
wall.
The whole cake is too dark. Select a lower temperature next time and extend the baking time if necessary.
The cake is unevenly
browned.
Select a slightly lower temperature.
Protruding greaseproof paper can affect the air circulation. Always cut greaseproof
paper to size.
Ensure that the baking tin does not stand directly in front of the openings in the cook-
ing compartment back wall.
When baking small items, you should use similar sizes and thicknesses wherever pos-
sible.
You were baking on several
levels. The items on the top
rack are darker than those on
Always select Convection Multi-Rack when baking on several levels. Baked items that
are placed into the oven on trays or in baking tins/dishes at the same time will not
necessarily be ready at the same time.
the lower rack.
The cake looks good, but is
not cooked properly in the
middle.
The cake cannot be turned
out of the dish when it is
turned upside down.
Use a lower temperature and bake slightly longer; if necessary, add slightly less liquid.
For cakes with a moist topping, bake the base first. Sprinkle it with almonds or flour
and then place the topping on top.
Allow the cake to cool down for 5to 10minutes after baking. If it still sticks, carefully
loosen the cake around the edges again using a knife. Turn the cake pan upside
down again and cover it several times with a cold, wet cloth. Next time, grease the
baking tin/dish and sprinkle with flour.
Bread and Rolls
Your appliance offers you a range of heating methods for
baking bread and rolls. You can find the ideal settings for
many dishes in the settings tables.
Also refer to the notes in the section on allowing dough
to rise.
Only use original accessories supplied with your
appliance. These have been tailored to the cooking
compartment and operating modes of your appliance.
Rack positions
Use the indicated rack positions.
Baking on one rack
When baking on one rack, use the following rack
positions:
▯ Tall baked items: rack position 2
40
▯ Flat baked items: rack position 3
If you are using Convection Multi-Rack as the heating
mode, you can choose between rack positions 1, 2,
3and 4.
Baking on two racks
Use Convection Multi-Rack. Baked items that are placed
into the oven on two racks at the same time will not
necessarily be ready at the same time.
Baking tins/dishes on the wire rack:
▯ First wire rack: rack position 3
▯ Second wire rack: rack position 1
Position baking tins/dishes next to one another or offset
and vertically stacked in the cooking compartment.
Page 41

Accessories
Ensure that you always use suitable accessories and that
they are placed in the oven the right way around.
Wire Rack
Insert the wire rack with the open side facing the
appliance door and the curved lip pointing downwards.
Always place cookware, tins, and dishes on the wire
rack.
Baking pans
Shiny aluminum baking pans are most suitable.
Tinplate baking pans, ceramic dishes and glass dishes
extend baking time and mean that the baked item will not
brown evenly. If you wish to bake using these baking
pans/dishes and using top/bottom heating, slide in the
pan/dish at rack position 1.
Parchment Paper
Only use parchment paper that is suitable for the
selected temperature. Always cut parchment paper to
size.
Note: Baking times cannot be reduced by using higher temperatures. The bread or rolls would only be cooked on the outside, but would not be fully baked in the middle.
The setting values apply to food that is placed into the
cold cooking compartment. If you preheat the oven, you
can reduce the indicated baking times by several
minutes.
Preheating is necessary for selected food, and this is
indicated in the table. Do not place your food or
accessories into the cooking compartment until it has
finished preheating. Some food turns out best if it is
baked in several stages. These foods are indicated in the
table.
The setting values for bread dough apply to both dough
placed on a baking tray and dough placed in a loaf tin.
If you wish to follow one of your own recipes when
baking, you should use similar baked goods in the table
as a reference.
Frozen Products
Do not use frozen products that are heavily frosted.
Remove any ice on the food.
Some frozen products may be unevenly pre-baked.
Uneven browning may remain even after baking.
Recommended Setting Values
The table lists the optimal heating method for various
types of breads and rolls. The temperature and baking
time depend on the amount and consistency of the
dough/mixture. For this reason, setting ranges are
indicated. Try using the lower values to start with. A lower
temperature results in more even browning. You can
increase the temperature next time if necessary.
Dish Accessories Rack
position
Bread
White bread, 1.5 lb (750 g) Loaf pan 2
Multigrain bread, 3 lb (1.5 kg) Loaf pan 2
Multigrain bread, 3 lb (1.5 kg) Baking sheet 2
Wholemeal bread, 2.5 lb (1 kg) Baking sheet 2
Flatbread Baking sheet 3
9 CAUTION
Never pour water into the hot cooking compartment
or place cookware containing water onto the bottom
of the cooking compartment. The change in
temperature can cause damage to the enamel.
Heating methods used:
▯ < Convection Multi-Rack
▯ % Bake
▯ 7 Convection Broil
▯ ( Broil
▯ $ Pizza
Heating
mode
<
Temperature
in °F (°C)
355-390
Broil
setting
Cooking time
in mins.
- 25-40
(180-200)
<
390(200) - 10
355(180) - 20-30
%
390-410
- 40-50
(200-210)
%
390-410
- 40-50
(200-210)
%
480-520
- 20-25
(250-270)
Bread rolls
Part-cooked rolls or baguette,
Baking sheet 3
pre-baked
Bread rolls, sweet, fresh Baking sheet 3
Bread rolls, sweet, fresh,
Baking sheets 3+1
2 racks
Bread rolls, fresh Baking sheet 3
$
%
<
%
355-390
(180-200)
340-375
(170-190)
300-340
(150-170)
355-390
(180-200)
- 10-15
- 15-20
- 20-30
- 20-30
41
Page 42

Dish Accessories Rack
position
Baguette, pre-baked, chilled Baking sheet 3
Bread rolls, frozen
Part-cooked rolls or baguette,
Baking sheet 3
pre-baked
Croissant, pieces of dough Baking sheet 3
Toast
Toast with topping, 4 slices Wire rack 3
Toast with topping, 12 slices Wire rack 3
Toasting bread
Wire rack 5
(do not preheat)
Heating
mode
$
$
<
7
7
(
Temperature
in °F (°C)
355-390
Broil
setting
Cooking time
in mins.
- 20-30
(180-200)
355-390
- 10-15
(180-200)
340-375
- 30-35
(170-190)
375-410
- 10-15
(190-210)
445-480
- 10-15
(230-250)
- 3 4-6
Pizza, Quiche, and Savoury Pastries
Your appliance offers you a range of heating methods for
preparing pizza, quiche, and savoury pastries. You can
find the ideal settings for many dishes in the settings
tables.
Also refer to the notes in the section on allowing dough
to rise.
Only use original accessories supplied with your
appliance. These have been tailored to the cooking
compartment and operating modes of your appliance.
Rack positions
Use the indicated rack positions.
Baking on one rack
When baking on one rack, use the following rack
positions:
▯ Tall baked items: rack position 2
▯ Flat baked items: rack position 3
If you are using Convection Multi-Rack as the heating
mode, you can choose between rack positions 1, 2,
3and 4.
Baking on several racks
Use Convection Multi-Rack. Baked items that are placed
into the oven on two racks at the same time will not
necessarily be ready at the same time.
Baking on two racks:
▯ First rack with greaseproof paper: rack position 3
▯ Second rack with greaseproof paper: rack position 1
Baking on four racks:
▯ First rack with greaseproof paper: rack position 5
▯ Second rack with greaseproof paper: rack position 3
▯ Third rack with greaseproof paper: rack position 2
▯ Fourth rack with greaseproof paper: rack position 1
Position baking tins/dishes next to one another or offset
and vertically stacked in the cooking compartment.
Accessories
Ensure that you always use suitable accessories and that
they are placed in the oven the right way around.
Wire Rack
Insert the wire rack with the open side facing the
appliance door and the curved lip pointing downwards.
Always place cookware, tins, and dishes on the wire
rack.
Baking pans
Shiny aluminum baking pans are most suitable.
Tinplate baking pans, ceramic dishes and glass dishes
extend baking time and mean that the baked item will not
brown evenly. If you wish to bake using these baking
pans/dishes and using top/bottom heating, slide in the
pan/dish at rack position 1.
Parchment Paper
Only use parchment paper that is suitable for the
selected temperature. Always cut parchment paper to
size.
Frozen Products
Do not use frozen products that are heavily frosted.
Remove any ice on the food.
Some frozen products may be unevenly pre-baked.
Uneven browning may remain even after baking.
Recommended Setting Values
The table lists the optimal heating method for various
types of food. The temperature and baking time depend
on the amount and consistency of the dough/mixture.
For this reason, setting ranges are indicated. Try using
the lower values to start with. A lower temperature results
in more even browning. You can increase the
temperature next time if necessary.
Note: Baking times cannot be reduced by using higher temperatures. The food would only be cooked on the outside, but would not be fully cooked in the middle.
The setting values apply to food that is placed into the
cold cooking compartment. If you preheat the oven, you
can reduce the indicated baking times by several
minutes.
42
Page 43

Preheating is necessary for selected food, and this is
indicated in the table. Do not place your food or
accessories into the cooking compartment until it has
finished preheating.
If you wish to follow one of your own recipes when
baking, you should use similar baked goods in the table
as a reference.
Remove unused accessories from the cooking
compartment. This will ensure that you achieve the best
possible cooking results.
Heating methods used:
▯ < Convection Multi-Rack
▯ % Bake
▯ $ Pizza
Dish Accessories Rack
position
Pizza
Pizza, fresh Perforated pizza pan 3
Pizza, fresh Perforated pizza pan 3
Pizza, fresh, 2 racks Perforated pizza pan 3+1
Pizza, fresh, thin base Perforated pizza pan 2
Pizza, chilled Wire rack 3
Pizza, frozen
Pizza with thin base x 1 Wire rack 3
Pizza with thin base x 2 Wire rack 3+1
Pizza, deep-pan, x 1 Wire rack 3
Pizza, deep-pan, x 2 Wire rack 3+1
Pizza baguette Wire rack 3
Mini pizzas Wire rack 3
Mini pizzas, Ø2.5" (7 cm),
4 racks
4 wire racks 5+3+2+1
Heating
mode
%
$
<
$
$
$
<
$
<
$
$
<
Temperature
in °F (°C)
390-430
(200-220)
390-430
(200-220)
355-390
(180-200)
430-445
(220-230)
375-410
(190-210)
375-410
(190-210)
375-410
(190-210)
355-390
(180-200)
375-410
(190-210)
390-430
(200-220)
355-390
(180-200)
355-390
(180-200)
Cooking
time in
mins.
25-35
25-35
35-45
20-30
10-15
15-20
20-25
20-25
20-30
15-20
15-20
20-30
Savoury cakes & quiches
Savoury cakes in a tin Springform cake pan Ø11"
(28 cm)
Quiche Tart pan 3
Tarte flambée Baking sheet 3
Pierogi Ovenproof dish 2
2
%
$
%
<
340-375
(170-190)
375-410
(190-210)
500-535
(260-280)
340-375
(170-190)
65-75
35-45
10-15
50-70
43
Page 44

Casseroles and Soufflés
Your appliance offers a range of heating methods for
preparing casseroles and soufflés. You can find the ideal
settings for many dishes in the settings tables.
Only use original accessories supplied with your
appliance. These have been tailored to the cooking
compartment and operating modes of your appliance.
Rack positions
Always use the indicated rack position.
Baking tins/dishes on the wire rack: Rack position 2
Position baking tins/dishes next to one another in the
cooking compartment.
Accessories
Ensure that you always use suitable accessories and that
they are placed in the oven the right way around.
Wire Rack
Insert the wire rack with the open side facing the
appliance door and the curved lip pointing downwards.
Always place cookware, tins, and dishes on the wire
rack.
Cookware
Use wide, shallow cookware for casseroles and gratins.
Food takes longer to cook in narrow, deep cookware and
browns more on top.
Recommended Setting Values
The table lists the optimal heating method for various
types of casseroles and soufflés. Temperature and
cooking time depend on the quantity of food and the
recipe. How well cooked a casserole is will depend on
the size of the cookware and the thickness of the
casserole. For this reason, setting ranges are indicated.
Try using the lower values to start with. A lower
temperature results in more even browning. You can
increase the temperature next time if necessary.
Note: Cooking times cannot be reduced by using higher temperatures. Casseroles or soufflés would only be cooked on the outside, but would be raw in the middle.
The setting values apply to food that is placed into the
cold cooking compartment. If you preheat the oven, you
can reduce the indicated cooking times by several
minutes.
If you wish to follow one of your own recipes, you should
use similar dishes in the table as a reference.
Remove unused accessories from the cooking
compartment. This will ensure that you achieve the best
possible cooking results.
Heating methods used:
▯ < Convection Multi-Rack
▯ % Bake
Bakes & soufflés Accessories / cookware Rack
position
Casserole, savoury, cooked
ingredients
Casserole, sweet Ovenproof dish 2
Lasagna, fresh, 2.5 lb (1 kg) Ovenproof dish 2
Lasagna, frozen, 1 lb (400 g) Wire rack 2
Potato gratin, raw ingredients,
1.5" (4 cm) deep
Potato gratin, raw ingredients,
1.5" (4 cm) deep, 2 racks
Soufflé Ovenproof dish 2
Soufflé Individual molds 3
Poultry
Your appliance offers you a range of heating methods for
preparing poultry. You can find the ideal settings for
certain dishes in the settings tables.
Roasting in Cookware
Only use cookware that is suitable for use in an oven.
Check that the cookware fits in the cooking
compartment.
Glass cookware is the most suitable. Place hot glass
cookware onto a dry mat after cooking. The glass could
crack if placed on a cold or wet surface.
Shiny roasting dishes made from stainless steel or
aluminum reflect heat like a mirror and are therefore not
Ovenproof dish 2
Ovenproof dish 2
Ovenproof dish 3+1
particularly suitable. Poultry cooks slower and does not
brown so well. Use a higher temperature and/or a longer
cooking time.
Observe the manufacturer's instructions for your roasting
cookware.
Uncovered Cookware
It is best to use a deep roasting pan/dish for roasting
poultry. Place the pan/dish onto the wire rack.
Heating
mode
%
%
<
<
<
<
<
<
Temperature
in °F (°C)
390-430
(200-220)
340-375
(170-190)
320-355
(160-180)
375-410
(190-210)
320-375
(160-190)
300-340
(150-170)
340-375
(170-190)
375-410
(190-210)
Cooking time
in mins.
30-50
40-60
50-60
30-35
50-70
60-80
35-45
25-30
44
Page 45

Covered Cookware
When preparing food with covered cookware, the
cooking compartment remains considerably cleaner.
Ensure that the lid fits well and closes properly. Place the
cookware onto the wire rack.
Very hot steam may escape when opening the lid after
cooking. Lift the lid in the back, so that the hot steam can
escape away from you.
Poultry can also become crispy in a covered roasting
dish. To do so, use a roasting dish with a glass lid and
set a higher temperature.
Recommended Setting Values
You can find the ideal heating method for the kind of
poultry you are cooking in the table. Temperature and
cooking time depend on the quantity, consistency, and
temperature of the food. For this reason, setting ranges
are indicated. Try using the lower values to start with. You
can increase the temperature next time if necessary.
The setting values are based on the assumption that
unstuffed, chilled, ready-to-roast poultry is placed into a
cold cooking compartment. If you preheat the oven, you
can reduce the indicated cooking times by several
minutes.
In the table, you can find specifications for poultry with
default values for the weight. If you wish to cook heavier
poultry, use the lower temperature in every case. If
cooking multiple pieces, use the weight of the heaviest
piece as a reference for determining the cooking time.
The individual pieces should be approximately equal in
size.
A general rule: the larger the poultry, the lower the
cooking temperature and the longer the cooking time.
Turn the poultry after approx. ^ to Z of the indicated
time.
Note: Only use parchment paper that is suitable for the selected temperature. Always cut parchment paper to size.
Tips
When cooking duck or goose, pierce the skin
underneath the wings. This allows the fat to run out.
When cooking duck breast, score the skin. Do not turn
duck breasts.
If you turn poultry when cooking, ensure that the breast
side or the skin side is underneath at first.
Poultry will turn out particularly crispy and brown if you
baste it towards the end of the roasting time with butter,
salted water, or orange juice.
Remove unused accessories from the cooking
compartment. This will ensure that you achieve the best
possible cooking results.
Heating methods used:
▯ % Bake
▯ 7 Convection Broil
▯ ( Broil
Dish Accessories / cookware Rack
position
Chicken
Chicken, 2.5 lb (1 kg) Broil pan 2
Chicken breast fillet,
Broil pan 4
0.5 lb (150 g) each (broiling)
Small chicken portions,
Broil pan 3
0.5 lb (250 g) each
Chicken nuggets, frozen Broil pan 3
Whole chicken,
Broil pan 2
3.5 lb (1.5 kg)
Turkey
Small turkey,
Broil pan 2
5.5 lb (2.5 kg)
Turkey breast, boned,
Cookware, covered 2
2.5 lb (1 kg)
Turkey thigh, with bones,
Broil pan 2
2.5 lb (1 kg)
Heating
mode
7
(
7
%
7
7
%
7
Temperature
in °F (°C)
Broil
setting
Cooking
time in
mins.
390-430
- 60-70
(200-220)
- 3 15-20
390-445
- 30-35
(220-230)
375-410
- 20-25
(190-210)
390-430
- 70-90
(200-220)
355-390
- 70-90
(180-200)
465-500
- 80-100
(240-260)
355-390
- 80-100
(180-200)
45
Page 46

Meat
Your appliance offers a range of heating methods for
preparing meat. You can find the ideal settings for many
dishes in the settings tables.
Roasting and Braising
Baste lean meat with fat as required or cover it with strips
of bacon.
Score the rind crosswise. If you turn the roast when
cooking, ensure that the rind is underneath at first.
When the roast is ready, turn off the oven and allow it to
rest for another 10minutes in the cooking compartment.
This allows the meat juices to be better distributed. Wrap
the roast in aluminum foil if necessary. The
recommended resting time is not included in the
indicated cooking time.
Roasting and Braising in Cookware
It is more convenient to roast and braise meat in
cookware. You can take the roast out of the cooking
compartment more easily in the cookware, and prepare
the sauce in the cookware itself.
Only use cookware that is suitable for use in an oven.
Check that the cookware fits in the cooking
compartment.
Glass cookware is the most suitable. Place hot glass
cookware onto a dry mat after cooking. The glass could
crack if placed on a cold or wet surface.
When roasting, add in a little liquid if the meat is lean.
Wtih glass cookware, the bottom of the cookware should
be covered with approx.
The quantity of liquid is dependent on the type of meat,
the cookware material, and also on whether or not a lid is
used. When preparing meat in an enamelled or dark
metal roasting dish, it will need a little more liquid than
when cooked in glass cookware.
During roasting, the liquid in the cookware will evaporate.
Carefully pour in more liquid if required.
Shiny roasting dishes made from stainless steel or
aluminum reflect heat like a mirror and are therefore not
particularly suitable. The meat cooks more slowly and will
not brown so much. Use a higher temperature and/or a
longer cooking time.
Observe the manufacturer's instructions for your roasting
cookware.
Uncovered Cookware
It is best to use a deep roasting pan/dish for roasting
meat. Place the pan/dish onto the wire rack.
Covered Cookware
When preparing food with covered cookware, the
cooking compartment remains considerably cleaner.
Ensure that the lid fits well and closes properly. Place the
cookware onto the wire rack.
The distance between the meat and the lid should be at
least 3cm. The meat may rise.
Very hot steam may escape when opening the lid after
cooking. Lift the lid in the back, so that the hot steam can
escape away from you.
If necessary, braise the meat first by searing it. Add
water, wine, vinegar, or a similar liquid for the braising
liquid. Cover the bottom of the cookware with approx. 1–
2cm of liquid.
^ inch (2cm) of liquid.
During roasting, the liquid in the cookware will evaporate.
Carefully pour in more liquid if required.
Meat can also become crispy in a covered roasting dish.
To do so, use a roasting dish with a glass lid and set a
higher temperature.
Broiling
Keep the appliance door closed when using the broil
mode. Never broil with the appliance door open.
When broiling, try wherever possible to use pieces of
food which are of a similar thickness and weight. This will
allow them to brown evenly and remain succulent and
juicy.
Use tongs to turn the pieces of food you are broiling. If
you pierce the meat with a fork, the juices will run out and
it will become dry.
Do not add salt until after the meat has been broiled. Salt
draws water from the meat.
Notes
▯ The grill element switches itself on and off
continuously; this is normal. The grill setting
determines how frequently this occurs.
▯ Smoke may be produced when grilling.
Recommended Setting Values
You can find the ideal heating method for many meat
dishes in the table. Temperature and cooking time
depend on the quantity, consistency, and temperature of
the food. For this reason, setting ranges are indicated.
Try using the lower values to start with. You can increase
the temperature next time if necessary.
The setting values apply to chilled meat placed into the
cold cooking compartment. If you preheat the oven, you
can reduce the indicated cooking times by several
minutes.
You can find information on roasts and default values for
weights in the table. If you wish to roast a heavy piece of
meat, you should definitely use a lower temperature. If
cooking multiple pieces, use the weight of the heaviest
piece as a reference for determining the cooking time.
The individual pieces should be approximately equal in
size.
A general rule: the larger the roast, the lower the cooking
temperature and the longer the cooking time.
Turn roasts and grilled items after approx. ^ to Z of the
indicated time.
If you wish to follow one of your own recipes, you should
use similar dishes as a reference. Additional information
can be found in the tips on roasting, braising, and grilling
listed after the settings table.
Remove unused accessories from the cooking
compartment. This will ensure that you achieve the best
possible cooking results.
Heating methods used:
▯ % Bake
▯ 7 Convection Broil
▯ ( Broil
46
Page 47

Dish Accessories / cookware Rack
position
Pork
Joint of pork without rind,
e.g. neck, 3.5 lb (1.5 kg)
Joint of pork with rind,
e.g. shoulder, 4.5 lb (2 kg)
Pork tenderloin steak, 3.5 lb
(1.5 kg)
Pork fillet, 0.8 lb (400 g) Wire rack 3
Smoked pork on the bone, 2.2 lb
(1 kg) (with a little added water)
Pork steak, 1 inch (2 cm) thick Wire rack 5
Pork medaillons, 1.2 inch (3 cm)
thick
Beef
Fillet of beef, medium, 2.5 lb
(1 kg)
Pot-roasted beef, 3.5 lb (1.5 kg) Cookware, covered 2
Sirloin, medium, 3.5 lb (1.5 kg) Wire rack 2
Steak, 1 inch (3 cm) thick,
medium
Burger, 1 inch (3 cm) deep Wire rack 4
Cookware, uncovered 2
Wire rack 2
Cookware, uncovered 2
Cookware, covered 2
Wire rack 5
Wire rack 2
Wire rack 3
Heating
mode
7
7
7
7
7
(
(
7
7
7
(
(
Temperature
in °F (°C)
355-375
(180-190)
375-390
(190-200)
430-445
(220-230)
430-445
(220-230)
410-445
(210-230)
- 2 16-20
- 3 8-12
410-430
(210-220)
390-430
(200-220)
430-445
(220-230)
- 3 15-20
- 3 25-30
Broil
setting
- 110-130
- 130-140
- 70-80
- 20-25
- 70-90
- 40-50
- 130-160
- 60-70
Cooking
time in
mins.
Lamb
Leg of lamb, boned, medium Cookware, uncovered 2
Saddle of lamb on the bone
(remove sinews, cut lengthwise
from the bone without turning)
Lamb cutlet Wire rack 3
Sausages
Grilled sausages Wire rack 4
Meat dishes
Meat loaf, 2.5 lb (1 kg) Cookware, uncovered 2
Tips for Roasting and Braising
The cooking compartment is
very dirty.
The roast is too dark and the
crackling is burned in places,
and/or the roast is too dry.
The crackling is too thin. Increase the temperature or switch on the grill briefly at the end of the roasting time.
The roast looks good but the
juices are burnt.
Wire rack 2
Prepare your food in an enclosed roaster at higher temperatures or use the grill tray.
You will achieve the best roasting results if you use the grill tray. You can buy the grill
tray later as a special accessory.
Check the shelf position and temperature. Select a lower temperature the next time
and reduce the roasting time if necessary.
Next time, use a smaller roasting dish and add more liquid if necessary.
7
7
(
(
7
340-375
(170-190)
355-375
(180-190)
- 3 12-16
- 3 10-15
340-355
(170-180)
- 50-80
- 40-50
- 60-70
47
Page 48

The roast looks good but the
juices are too clear and
watery.
The meat is burned slightly
during braising.
Next time, use a larger roasting dish and add less liquid if necessary.
The roasting dish and lid must fit together well and close properly.
Reduce the temperature and add more liquid when braising if necessary.
Fish
Your appliance offers you a range of heating methods for
preparing fish. You can find the ideal settings for many
dishes in the settings tables.
Whole fish does not have to be turned. Place the whole
fish into the cooking compartment in swimming position
with the dorsal fin facing upwards. Placing half a potato
or a small oven-proof container in the stomach cavity of
the fish will provide stability.
You can tell when the fish is cooked because the dorsal
fin can be removed easily.
Roasting and Steaming in Cookware
Only use cookware that is suitable for use in an oven.
Check that the cookware fits in the cooking
compartment.
Glass cookware is the most suitable. Place hot glass
cookware onto a dry mat after cooking. The glass could
crack if placed on a cold or wet surface.
Shiny roasting dishes made from stainless steel or
aluminum reflect heat like a mirror and are therefore not
particularly suitable. Fish cooks slower and does not
brown so well. Use a higher temperature and/or a longer
cooking time.
Observe the manufacturer's instructions for your roasting
cookware.
Uncovered Cookware
It is best to use a deep roasting tin/dish for cooking
whole fish. Place the tin/dish onto the wire rack.
Covered Cookware
When preparing food with covered cookware, the
cooking compartment remains considerably cleaner.
Ensure that the lid fits well and closes properly. Place the
cookware onto the wire rack.
When steaming, add two to three tablespoons of liquid
and a little lemon juice or vinegar into the cookware.
Very hot steam may escape when opening the lid after
cooking. Lift the lid in the back, so that the hot steam can
escape away from you.
Fish can also become crispy in a covered roasting dish.
To do so, use a roasting dish with a glass lid and set a
higher temperature.
Recommended Setting Values
You can find the ideal heating method for your fish
dishes in the table. Temperature and cooking time
depend on the quantity, consistency, and temperature of
the food. For this reason, setting ranges are indicated.
Try using the lower values to start with. You can increase
the temperature next time if necessary.
The setting values apply to chilled fish placed into the
cold cooking compartment. If you preheat the oven, you
can reduce the indicated cooking times by several
minutes.
In the table, you can find specifications for fish with
default values for the weight. If you wish to cook heavier
fish, use the lower temperature in every case. If cooking
several fish, use the weight of the heaviest fish as a
reference for determining the cooking time. The
individual fish should be approximately equal in size.
A general rule: the larger the fish, the lower the cooking
temperature and the longer the cooking time.
Turn fish that are not in swimming position after approx.
^ to Z of the indicated time.
Note: Only use parchment paper that is suitable for the selected temperature. Always cut parchment paper to size.
Remove unused accessories from the cooking
compartment. This will ensure that you achieve the best
possible cooking results.
Heating methods used:
▯ % Bake
▯ 7 Convection Broil
▯ ( Broil
Dish Accessories /
cookware
Fish
Fish, grilled, whole 1/2 inch
Broil pan 2
(300 g), e.g. trout
Fish, grilled, whole 3.5 inch
Broil pan 2
(1.5 kg), e.g. salmon
Fish fillets
Fish fillet, plain, broiled Broil pan 4
Fish steaks
Fish steak, 1 inch (3 cm) thick Broil pan 4
48
Rack
position
Heating
mode
7
7
(
(
Temperature
in °F (°C)
340-375
Broil
setting
Cooking time in
mins.
- 20-30
(170-190)
340-375
- 30-40
(170-190)
- 1 15-25
- 3 10-20
Page 49

Dish Accessories /
cookware
Fish, frozen
Fish fillet, plain Cookware, cov-
ered
Fish sticks (turn during cooking) Baking sheet 3
Rack
position
2
Heating
mode
%
%
Temperature
in °F (°C)
410-445
(210-230)
390-430
(200-220)
Broil
setting
Cooking time in
mins.
- 20-30
- 20-30
Vegetables and Side Dishes
Here, you can find information for preparing grilled
vegetables, potatoes, and frozen potato products.
Remove unused accessories from the cooking
compartment. This will allow you to achieve optimum
cooking results and save energy.
Rack positions
Use the indicated rack positions.
Cooking on one rack
Adhere to the specifications in the table.
Cooking on two racks
Use Convection Multi-Rack. Food on different racks
placed in the oven at the same time will not necessarily
be ready at the same time.
▯ First wire rack: rack position 3
▯ Second wire rack: rack position 1
Accessories
Ensure that you always use suitable accessories and that
they are placed in the oven the right way around.
Wire Rack
Insert the wire rack with the open side facing the
appliance door and the curved lip pointing downwards.
Always place cookware, tins, and dishes on the wire
rack.
Parchment Paper
Only use parchment paper that is suitable for the
selected temperature. Always cut parchment paper to
size.
Recommended Setting Values
The table lists the optimal heating method for various
types of food. Temperature and cooking time depend on
the amount and consistency of the food. For this reason,
setting ranges are indicated. Try using the lower values
to start with. A lower temperature results in more even
browning. You can increase the temperature next time if
necessary.
The setting values apply to food that is placed into the
cold cooking compartment. If you preheat the oven, you
can reduce the indicated cooking times by several
minutes.
If you wish to follow one of your own recipes, you should
use similar dishes in the table as a reference.
Heating methods used:
▯ < Convection Multi-Rack
▯ % Bake
Dish Accessories Rack
position
Vegetable dishes
Grilled vegetables Baking sheet 5
Potatoes
Baked potatoes, halved Baking sheet 3
Potato products, frozen
Hash browns Baking sheet 3
French fries Baking sheet 3
French fries, 2racks Baking sheete 3+1
Heating
mode
(
<
<
<
<
Temperature
in °F (°C)
Broil
setting
Cooking
time in
mins.
- 3 10-15
320-355
- 45-60
(160-180)
390-430
- 25-35
(200-220)
375-410
- 25-35
(190-210)
375-410
- 30-40
(190-210)
49
Page 50

Slow Cooking
Slow cooking is a technique for cooking food over a long
period at low temperatures. For this reason, it is also
called "low-temperature cooking".
Slow cooking is ideal for all prime cuts (e.g., tender
portions of beef, veal, pork, lamb, or poultry) that are to
be cooked medium/medium rare or "à point." The meat
will remain moist and tender.
The benefit of this cooking method is that you have
plenty of leeway for menu planning because slow-cooked
meat is easy to keep warm. You do not have to turn the
meat when cooking. Keep the appliance door closed in
order to maintain an even cooking climate.
Only use fresh, good-quality meat without bones.
Carefully remove sinews and fat from around the edge.
Fat develops a strong, distinct flavor during slow
cooking. You can also use seasoned or marinated meat.
Do not use defrosted meat.
Meat can be carved immediately following slow cooking.
No resting time is required. As a result of the special
cooking method, the meat looks pink, but it is not raw or
undercooked.
Note: A delayed-start operation with an end time is not possible for the slow cooking heating method.
Cookware
Use shallow cookware, e.g., a porcelain or glass serving
dish. Place the cookware into the cooking compartment
to preheat.
Always place the uncovered cookware onto the wire rack
at rack position 2.
Additional information can be found in the tips on slow
cooking listed after the settings table.
Your appliance features the heating method "Slow Cook."
Only start operation when the cooking compartment has
fully cooled down. Allow the cooking compartment to
warm up for approx. 15minutes with the cookware
inside.
Sear the meat on the hotplate at a very high heat and for
a sufficiently long time on all sides, even on the ends.
Place food onto/into the preheated cookware
immediately. Put the cookware containing the meat back
into the cooking compartment and slow cook.
Recommended Setting Values
The slow cooking temperature and cooking time are
dependent on the size, thickness, and quality of the
meat. For this reason, setting ranges are indicated.
Heating methods used:
. Slow Cook
Dish Cookware Rack
position
Poultry
Duck breast, 1 lb (400 g) Cookware, uncovered 2
Chicken breast fillet,
1/2 lb (200 g) each
Turkey breast, boned,
2.5 lb (1 kg)
Pork
Pork tenderloin steak,
2 in (5-6 cm) thick,
3.5 lb (1.5 kg)
Pork fillet, whole Cookware, uncovered 2
Pork medallions,
1.5 in (4 cm) dick
Beef
Joint of beef (rump),
3 in (6-7 cm) thick,
3.5 lb (1.5 kg)
Beef tenderloin, whole,
2.5 lb (1 kg)
Sirloin, 2.5 in (5-6 cm) thick Cookware, uncovered 2
Beef medallions/rump steak,
1.5 in (4 cm) thick
* preheat
Cookware, uncovered 2
Cookware, uncovered 2
Cookware, uncovered 2
Cookware, uncovered 2
Cookware, uncovered 2
Cookware, uncovered 2
Cookware, uncovered 2
Heating
mode
.
.
.
.
.
.
.
.
.
.
Searing time
in mins.
6-8 175(80)* 60-120
5-7 195(90)* 60-90
8-10 195(90)* 150-210
8-10 175(80)* 180-210
6-8 175(80)* 60-120
5-7 175(80)* 90-120
8-10 175(80)* 180-240
4-6 175(80)* 180-240
6-8 175(80)* 210-270
5-7 175(80)* 30-60
Temperature
in ° F (°C)
Cooking
time in
mins.
50
Page 51

Dish Cookware Rack
position
Lamb
Saddles of lamb, boneless,
1/2 in (200 g) each
Leg of lamb, boned, medium,
2.5 in (1 kg) tied
* preheat
Slow Cooking Tips
Slow cook duck breast. Place the cold duck breast into a pan and sear the skin side first. After slow cooking,
Slow-cooked meat is not as
hot as conventionally roasted
meat.
Cookware, uncovered 2
Cookware, uncovered 2
grill for 3to 5minutes until crispy.
Warm the plates and serve the gravy very hot so that the roasted meat does not cool
as quickly.
Heating
mode
.
.
Searing time
in mins.
5-7 175(80)* 120-180
6-8 175(80)* 150-210
Temperature
in ° F (°C)
Cooking
time in
mins.
Drying
With Convection Multi-Rack, you can dry foods with
outstanding results. With this type of preserving,
flavorings are concentrated by the dehydration.
Only use fruit, vegetables, and herbs that are in good
condition, and wash them thoroughly. Line the wire rack
with baking or parchment paper. Drain the excess water
from the fruit, then dry it.
Cut it into equal chunks or thin slices, if necessary. Place
unpeeled fruit onto the tray with the sliced surfaces
facing upwards. Ensure that neither fruit nor mushrooms
overlap on the wire rack.
Grate vegetables and then blanch them. Allow the
blanched vegetables to drain and distribute them evenly
on the wire rack.
Dry herbs on the stem. Position the herbs evenly and
slightly heaped on the wire rack.
Use the following shelf positions for drying:
▯ 1Wire rack: rack position 3
▯ 2Wire racks: rack positions 3+1
Turn very juicy fruit and vegetables several times. After
drying, remove the dried fruit and vegetables from the
paper immediately.
Recommended Setting Values
In the table, you can find settings for drying various food
items. Temperature and cooking time are dependent on
the type, moisture, ripeness, and thickness of the food to
be dried. The longer you leave the food to be dried, the
better it will be preserved. The thinner the slices are, the
quicker the drying process will be and the more aromatic
the dried food will remain. For this reason, setting ranges
are indicated.
If you wish to dry additional food items, you should use
similar food items in the table as a reference.
Heating methods used:
< Convection Multi-Rack
Fruit, vegetables and herbs Accessories Heating
mode
Apples (apple rings, 0.1 in (3 mm) thick,
per wire rack 0.5 lb (200 g))
Stone fruit (plums) 1-2wire racks
Root vegetables (carrots), grated, blanched 1-2wire racks
Sliced mushrooms 1-2wire racks
Herbs, washed 1-2wire racks
1-2wire racks
<
<
<
<
<
Temperature in
°F (°C)
175(80) 5-9
175(80) 8-10
175(80) 5-8
175(80) 6-9
175(80) 2-6
Cooking
time in
hours
51
Page 52

Proofing Dough
You can proof yeast dough in your appliance more
quickly than at room temperature. Use the Bake mode.
Only start operation when the cooking compartment has
fully cooled down.
Always allow yeast dough to proof twice. Observe the
specifications in the settings tables for the 1st and 2nd
proofing processes (dough fermentation and final
fermentation).
Dough Fermentation
Use the settings indicated in the table and heat up the
appliance. Place the dough bowl on the wire rack.
Do not open the appliance door during the proofing
process, as moisture will escape. Cover the dough with a
damp cloth.
Final Fermentation
Place your pastry into the oven at the shelf position
indicated in the table.
If you want to preheat the oven, the final fermentation
takes place outside the appliance in a warm place.
Recommended Setting Values
Temperature and proving time are dependent on the type
and quantity of the ingredients. Therefore, the values in
the table are meant to be guide values only.
Heating methods used:
% Bake
Dish Accessories /
cookware
Yeast dough, light Bowl 2
Baking tray 2
Yeast dough, heavy and rich Bowl 2
Baking tray 2
Rack
position
Defrosting
The "Defrost" heating method is suitable for defrosting
frozen fruit, vegetables, and baked items. Poultry, meat,
and fish should ideally be defrosted in the refrigerator.
Use the following shelf positions when defrosting:
▯ 1Wire rack: rack position 2
▯ 2Wire racks: rack positions 3+1
9 WARNING
HEALTH RISK
Liquid will be produced when defrosting meat or
poultry. Drain off this liquid when turning meat and
poultry, and under no circumstances, use it for other
purposes, or allow it to come into contact with other
foods.
Heating
mode
%
%
%
%
Recommended Setting Values
The times specified in the table are intended as a guide.
They are dependent on the quality, freezing temperature
(0°F / -18° C), and composition of the food. Time ranges
are indicated. Set the shortest time first and then extend
the time if necessary.
Tip: Items which were frozen flat or portioned defrost faster than those frozen in a block.
Remove frozen food from the packaging and place it
onto the wire rack in suitable cookware.
Turn or stir the food once or twice during the defrosting
time. Large pieces of food should be turned several
times. Occasionally break up the food or remove items
which have already defrosted from the cooking
compartment.
Leave the defrosted food to rest for another 10to
30 minutes in the appliance while it is switched off to
compensate for the temperature difference.
Heating methods used:
Step Temperature in
°F (°C)
Dough fermentation
Final fermentation
Dough fermentation
Final fermentation
95-105
(35-40)
95-105
(35-40)
95-105
(35-40)
95-105
(35-40)
Cooking
time in
mins.
25-30
10-20
20-40
15-25
B Defrost
Dish Accessories Rack position Heating
mode
Bread, bread rolls
Bread & bread rolls general Baking tray 2
Cake
Cake, moist Baking tray 2
Cake, dry Baking tray 2
52
B
B
B
Temperature in °F
(°C)
120(50) 40-70
120(50) 70-90
140(60) 60-75
Cooking time
in mins.
Page 53

Keeping Food Warm
You can keep cooked dishes warm using the "Keep
Warm" heating method. This will prevent condensation
from developing, meaning you will not have to wipe out
the cooking compartment.
Do not keep cooked dishes warm for longer than two
hours. Be aware that some dishes may continue cooking
while being kept warm. Cover the food if necessary.
53
Page 54

Page 55

Page 56

*9001379484*
9001379484
981122
1901 Main Street, Suite 600 • Irvine, CA 92614 • 800-944-2904
www.bosch-home.com • © 2018 BSH Home Appliances
 Loading...