

Page 1
Combination steam oven HBC36D7.4.
[en] Instruction manual
Page 2

Page 3

Ú Table of contents
[en]Instruction manual
Safety precautions ..................................................................... 4
Safety notes .........................................................................................4
Causes of damage .............................................................................4
Your new appliance.................................................................... 5
Control panel ....................................................................................... 5
Types of heating..................................................................................5
Cooking compartment .......................................................................6
Accessories .........................................................................................6
Automatic calibration .........................................................................6
Before using the appliance for the first time ........................... 7
Setting the clock and language .......................................................7
Setting the water hardness range ...................................................7
Before first use ....................................................................................7
Cleaning the accessories before use .............................................7
Fitting the grease filter in place........................................................ 7
Operating the appliance ............................................................ 8
Filling the water tank ..........................................................................8
Switching on the appliance...............................................................8
Switching off the appliance...............................................................9
After each use ..................................................................................... 9
Recommended settings ....................................................................9
Time-setting options ................................................................ 10
Set the timer...................................................................................... 10
Setting the cooking time................................................................. 10
Setting a later end time .................................................................. 10
Setting the clock .............................................................................. 11
Automatic programmes ........................................................... 11
Setting a programme ...................................................................... 11
Notes about the programmes ....................................................... 12
Programme tables ........................................................................... 12
Memory...................................................................................... 16
Saving to the Memory function ..................................................... 16
Starting the memory function ........................................................ 16
Childproof lock ......................................................................... 17
Activating the childproof lock ........................................................ 17
Deactivating the childproof lock ................................................... 17
Basic settings ........................................................................... 17
Automatic switch-off................................................................ 17
Care and cleaning .................................................................... 18
Cleaning agents ............................................................................... 18
Cleaning aid...................................................................................... 19
Descaling........................................................................................... 19
Removing and fitting the appliance door.................................... 20
Cleaning the door panels............................................................... 21
Cleaning the rails ............................................................................. 21
Troubleshooting .......................................................................22
Replacing the cooking compartment bulb ................................. 23
Changing the door seal.................................................................. 23
After-sales service ................................................................... 24
E number and FD number ............................................................. 24
Environmental protection ........................................................24
Environmental protection................................................................ 24
Tips for saving energy .................................................................... 24
Tables and tips ......................................................................... 24
Steam ................................................................................................. 24
Hot air ................................................................................................ 25
Combination ..................................................................................... 25
Vegetables ........................................................................................ 25
Side dishes and pulses .................................................................. 25
Poultry and meat.............................................................................. 26
Fish ..................................................................................................... 28
Slow cooking meat.......................................................................... 28
Bakes, soup ingredients, etc......................................................... 28
Dessert, compote ............................................................................ 28
Cakes and pastries ......................................................................... 29
Reheating food................................................................................. 30
Defrosting .......................................................................................... 31
Proving dough .................................................................................. 31
Juicing................................................................................................ 31
Preserving ......................................................................................... 32
Frozen products ............................................................................... 32
Test dishes................................................................................ 33
Produktinfo
Additional information on products, accessories, replacement
parts and services can be found at www.bosch-home.com and
in the online shop www.bosch-eshop.com
3
Page 4

ã=Safety precautions
Read these instructions for use carefully. Please keep the instructions for use and installation instructions in a safe place. If the appliance changes owners, the instructions should always be included.
Safety notes
This appliance is intended for domestic use only. This
appliance must only be used for food preparation.
Adults and children must not operate the appliance without
supervision,
■ if they are physically or mentally incapable of doing so or
■ if they have insufficient knowledge or experience.
Never let children play with the appliance.
Risk of scalding!
Hot steam may escape when the appliance door is opened.
Open the appliance door carefully during or after cooking.
When opening the door, do not lean over it. Ensure that,
depending on the temperature, steam is not visible.
Risk of burns!
Never touch the interior surfaces of the cooking compartment
or the heating elements when they are hot. Small children must
be kept at a safe distance from the appliance.
Risk of fire!
Never store combustible items in the cooking compartment.
Risk of fire!
When preheating, never place greaseproof paper unsecured on
the accessories. Draughts are created when the appliance door
is opened. Greaseproof paper may ignite when in contact with
very hot surfaces. Always use a plate or a baking tin to hold the
greaseproof paper down. Only cover the required surface with
greaseproof paper. The greaseproof paper must not extend
over the edge of accessories.
Risk of scalding!
Never pour water into the cooking compartment when it is hot.
This will create hot steam.
Risk of short circuit!
Never trap connecting cables of electrical appliances in the hot
appliance door. The cable insulation could melt.
Risk of burning!
Never prepare food containing large quantities of drinks with a
high alcohol content. Alcoholic vapours can catch fire in the
cooking compartment. Only use small quantities of drinks with
a high alcohol content and take care when opening the
appliance door.
Risk of scalding!
Do not clean the appliance immediately after switching it off.
The water in the evaporator dish is still hot. Wait until the
appliance has cooled down.
Risk of electric shock!
Incorrect repairs are dangerous. Repairs may only be carried
out by one of our trained aftersales engineers. If the appliance
is defective, pull out the mains plug or switch off the appliance
at the circuit breaker in the fuse box. Call the aftersales
service.
Causes of damage
Caution!
■ Do not place anything on the cooking compartment floor. Do
not cover it with aluminium foil. A build-up of heat could
damage the appliance.
The cooking compartment floor and the evaporator dish must
always be kept clear. Always place ovenware in a perforated
cooking container or on a wire rack.
■ Aluminium foil in the cooking compartment must not come
into contact with the door panel. This could cause permanent
discolouration of the door panel.
■ Ovenware must be heat and steam resistant. Silicone baking
tins are not suitable for combined operation with steam.
■ Do not use ovenware that shows signs of rust. Even the
smallest spots of rust can lead to corrosion in the cooking
compartment.
■ When steaming with a perforated cooking container, always
insert the baking tray or the solid cooking container
underneath. Dripping liquid is caught.
■ Do not store moist food in the closed cooking compartment
for long periods. It can lead to corrosion in the cooking
compartment.
■ Fruit juice may leave stains in the cooking compartment.
Always remove fruit juice immediately and wipe the cooking
compartment with a moist and dry cloth.
■ If the door seal is very dirty, the appliance door will no longer
close properly during operation. The fronts of adjacent units
could be damaged. Always keep the door seal clean and
replace when necessary.
■ Do not place anything on the open appliance door. The
appliance could be damaged.
■ Do not carry or hold the appliance by the door handle. The
door handle cannot support the weight of the appliance, and
could break.
■ The cooking compartment in your appliance is made of high
grade stainless steel. Improper care can lead to corrosion in
the cooking compartment. Refer to the care and cleaning
instructions in the instruction manual. Remove food residues
from the cooking compartment as soon as the appliance has
cooled.
Risk of burning!
Never remove hot accessories or ovenware from the cooking
compartment without oven gloves.
4
Page 5
Your new appliance
7\SHVRIKHDWLQJ
3URJUDPPHV
&OHDQLQJV\VWHP
0DLQVZLWFK
1DYLJDWLRQEXWWRQV
0HQXEXWWRQV 'LVSOD\ 5RWDU\VHOHFWRU )XQFWLRQEXWWRQV 6WDUW3DXVHEXWWRQ
In this section, you will find information on
■ the control panel
■ the types of heating
■ the cooking compartment
■ accessories
■ automatic calibration
Control panel
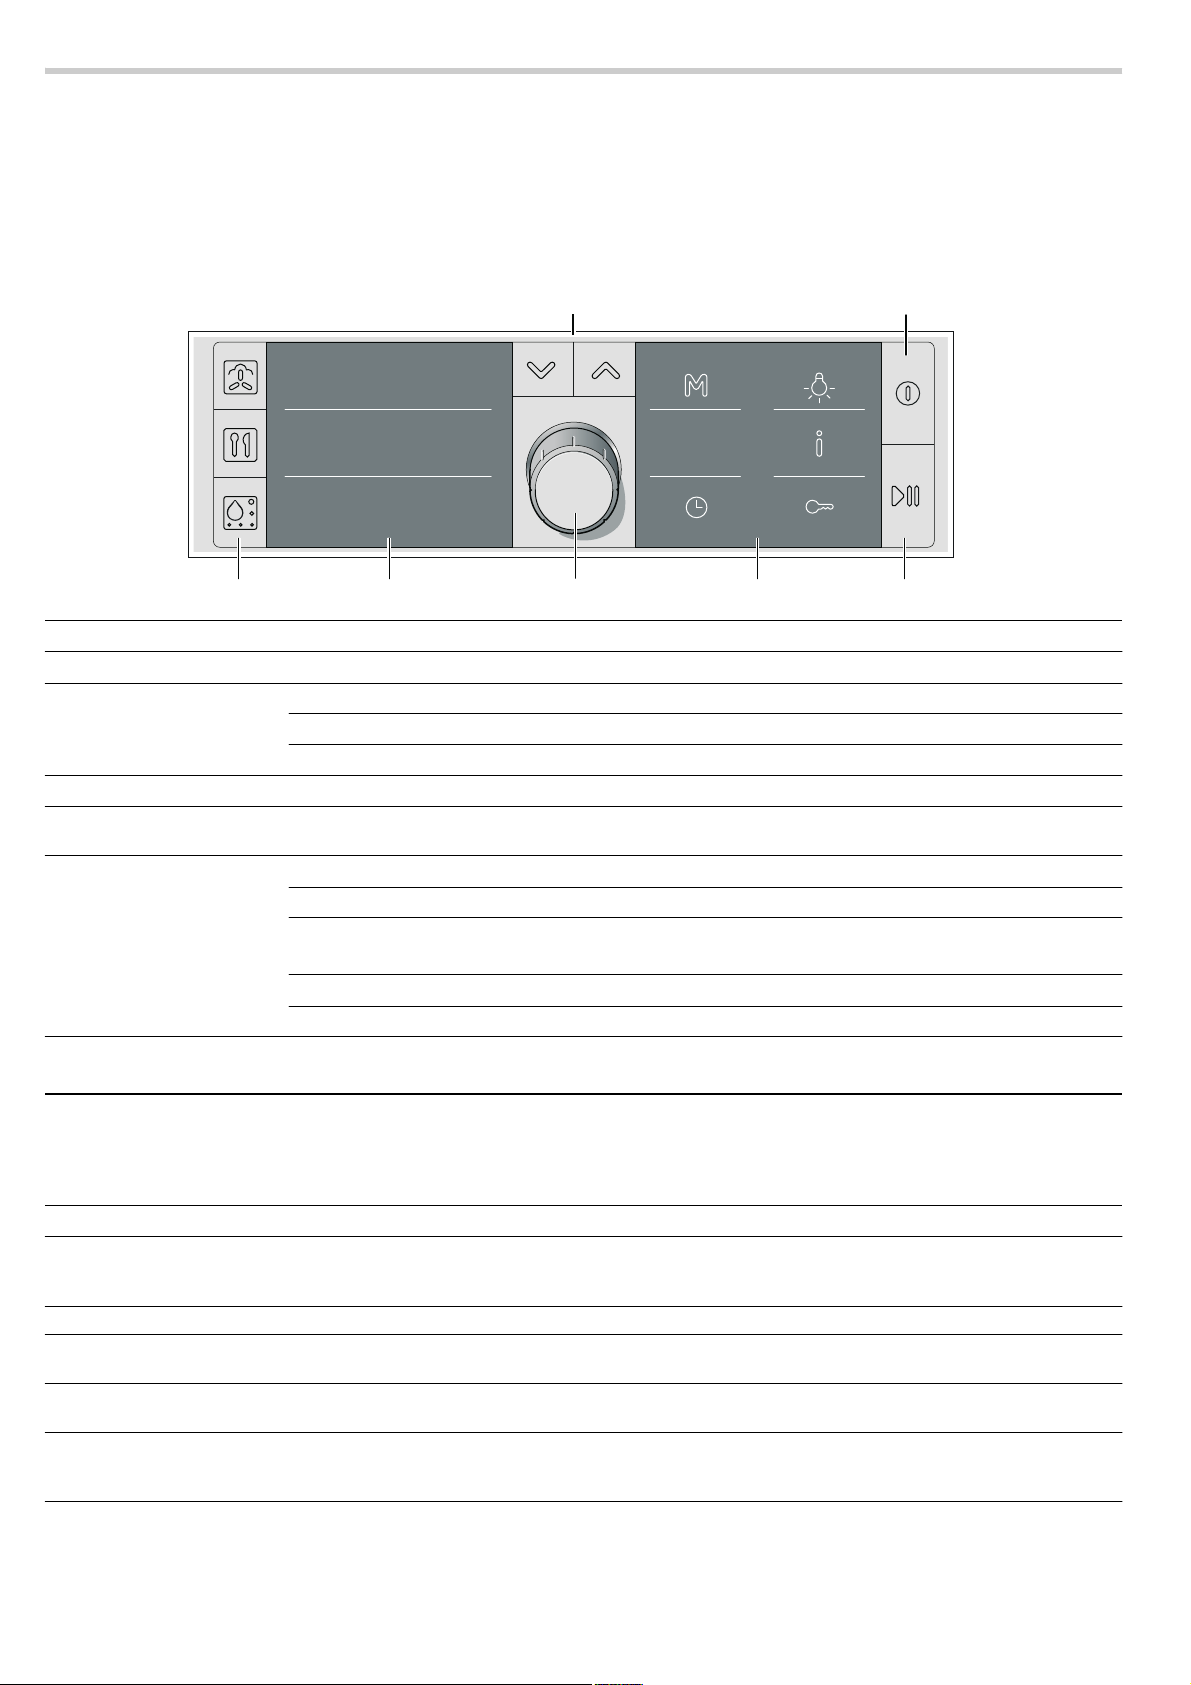
Control element Use
Main switch
Menu buttons
%
å
`
r
Navigation buttons
Rotary selector: Changes values for the clock, cooking time, weight etc.
Function buttons
XY
f
B
°
0
D
Start/Pause button
n
Switching the appliance on and off
Selecting the type of heating
Selects a programme (see section: Automatic programmes)
Selects the cleaning aid and descaling function (see section: Care and cleaning)
Changes between the rows in the display. Modifications are saved
Press the rotary selector to lock and unlock
Saves and calls up the memory function (see section: Memory)
Switches the lighting on and off
If the appliance is switched on: calls up current information
If the appliance is switched off: selects basic settings (see section: Basic settings)
Selects time-setting options (see section: Time-setting options)
Switches the childproof lock on and off (see section: Childproof lock)
Short press: starts and stops cooking (pause)
Press and hold: ends cooking
Types of heating
You can use the 8 button to set your appliance for various
applications.
Type of heating Used for
Hot air 30 - 230 °C for moist cakes, sponge, pot roasts.
A fan in the back wall of the oven distributes the heat evenly inside the cooking compart-
ment.
Steam 35 - 100 °C For vegetables, fish, side dishes, for juicing fruit and for blanching.
Combination 120 - 230 °C for meat, bakes and baked goods.
Reheat 100 - 180 °C for plated meals and baked items.
Prove 35 - 50 °C for yeast dough and sourdough.
Defrosting 35 - 60 °C for vegetables, meat, fish and fruit.
Hot air and steam are combined.
Cooked food is gently reheated. The steam ensures that the food does not dry out.
Dough will prove considerably more quickly than at room temperature. Hot air and steam
are combined so that the surface of the dough does not dry out
Hot air and steam are combined. The moisture gently transfers the heat to the food. The
food does not dry out or lose shape.
5
Page 6
Type of heating Used for
(YDSRUDWRUGLVK
5DLOVIRU
WKHDFFHVVRULHV
:DWHUWDQN
*UHDVHILOWHU
Slow cook 60 - 120 °C for sirloin, leg of lamb.
Tender pieces of meat stay particularly juicy.
Plate warming 30 - 70 °C for porcelain tableware.
Keep warm 60 - 100 °C for keeping food warm for up to two hours
Food does not cool down so quickly on preheated plates and dishes. Drinks also remain
warm for longer.
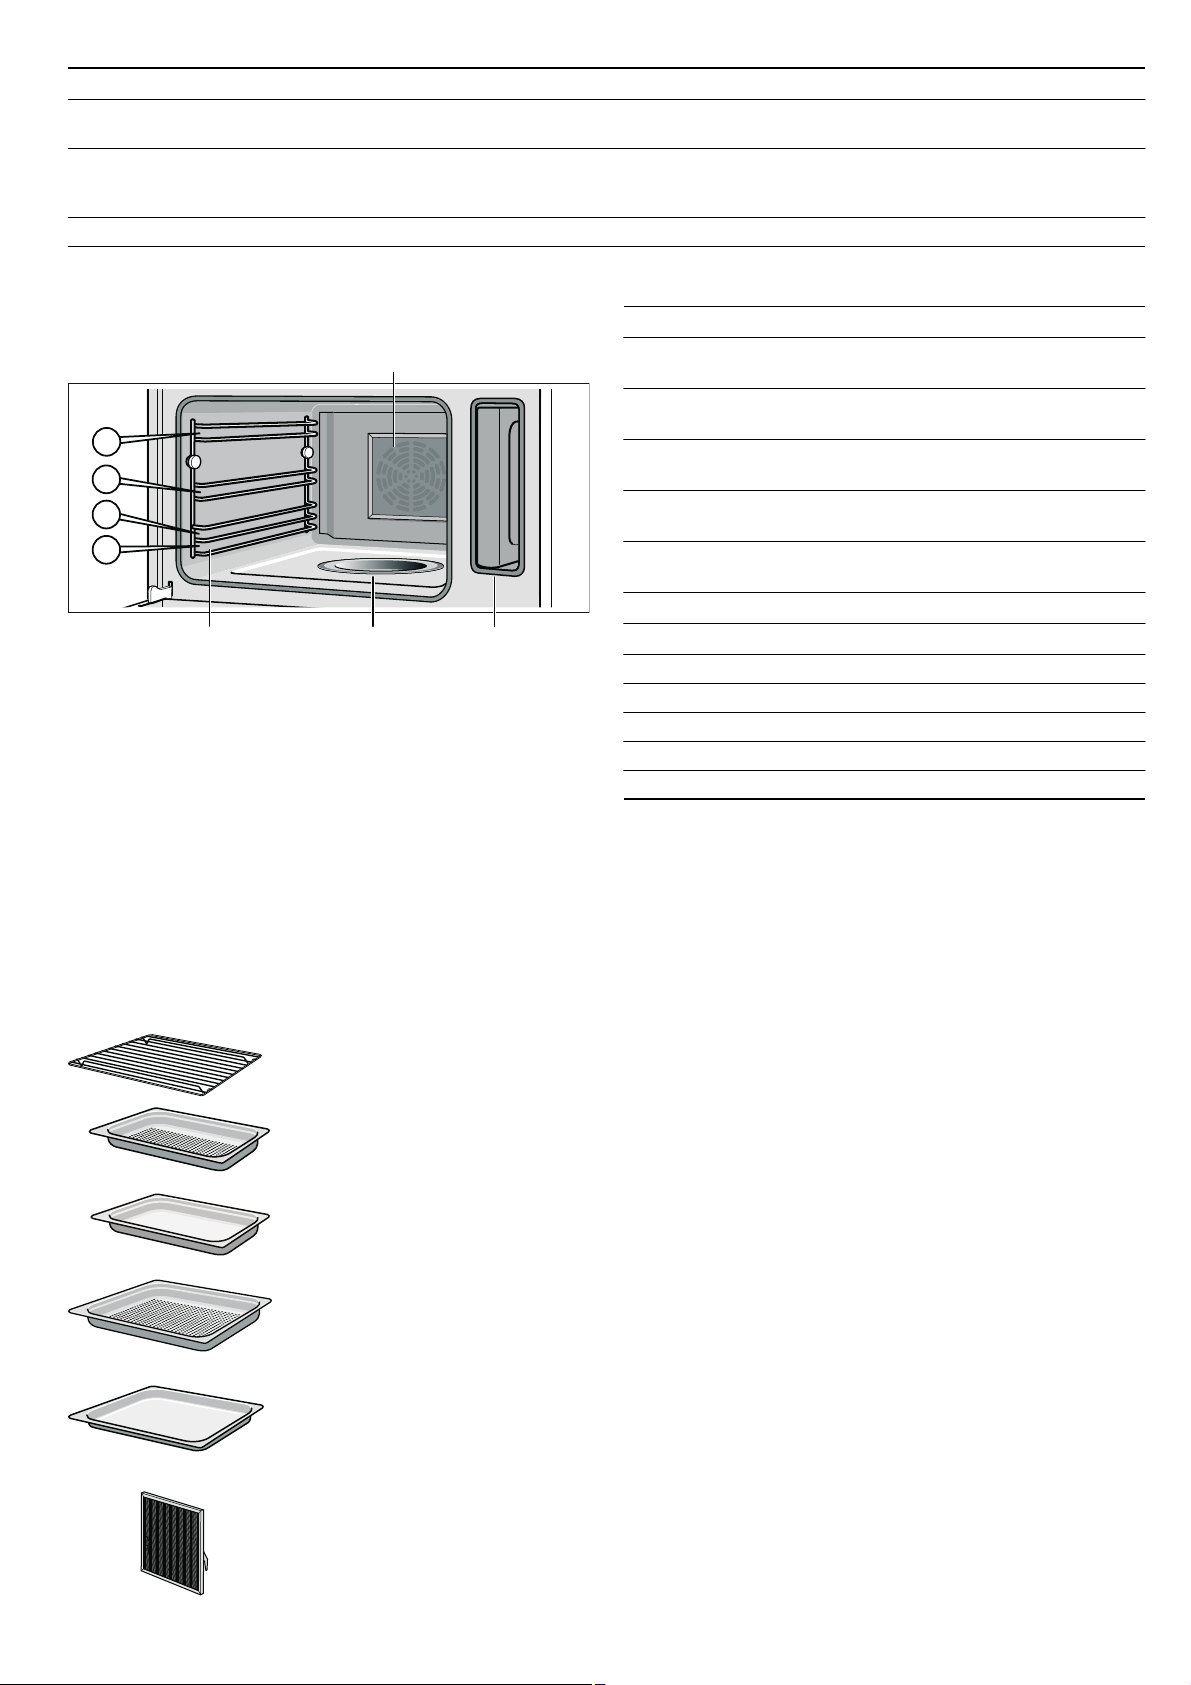
Cooking compartment
The cooking compartment has four shelf positions. The shelf
positions are counted from the bottom up.
Caution!
■ Do not place anything on the cooking compartment floor. Do
not cover it with aluminium foil. A build-up of heat could
damage the appliance.
The cooking compartment floor and the evaporator dish must
always be kept clear. Always place ovenware in a perforated
cooking container or on a wire rack.
■ Do not slide any accessories between the shelf positions, or
they may tip.
Accessories
Use only the accessories supplied with the product or available
from the after-sales service. They are specially designed for
your appliance.
Your appliance is equipped with the following accessories:
wire rack
For ovenware, cakes and casserole
dishes, and for roasting
Cooking container, perforated,
GN
Y, 40 mm deep
For steaming vegetables, juicing
berries and defrosting
Cooking container, solid, GN
40 mm deep
For cooking rice, pulses and
cereals
Cooking container, perforated,
GN
Z, 40 mm deep
for the steaming of whole fish or
large quantities of vegetables, for
juicing berries, etc.
Cooking container, solid, GN
28 mm deep (baking tray)
For baking tray bakes and for
catching dripping liquid during
steaming
Grease filter
protects the fan of the back panel
of the cooking compartment from
becoming dirty (e.g. from
spattering)
Y,
Z,
You can obtain further accessories from specialist retailers:
Accessories Ordering no.
Z
Y
HEZ36D353
HEZ36D353G
HEZ36D352
HEZ36D153
HEZ36D153G
HEZ36D353P
HEZ36D153P
Cooking container, solid, GN Z, 40 mm
deep
Cooking container, perforated, GN
40 mm deep
Cooking container, solid, GN
deep (baking tray)
Cooking container, solid, GN
deep
Cooking container, perforated, GN
40 mm deep
Porcelain cooking container, solid, GN
Porcelain cooking container, solid, GN
Wire rack HEZ36DR
Roasting set HEZ36DB
Cleaning sponge 643 254
Descaler 311 138
Honeycomb microfibre cloth 460 770
Cooking containers may warp during cooking. This is caused
by the considerable temperature differences acting on the
accessories. It may occur if only a part of the accessory is
covered or if you place frozen items, such as pizza, on the
accessory.
Z,
Z, 28 mm
Y, 40 mm
Y,
Automatic calibration
The boiling temperature of water depends on the air pressure.
During calibration, the appliance is adapted to the pressure
conditions in the location where it is installed. This happens
automatically when you first use the appliance (see section:
First use). More steam develops than usual.
It is important that the appliance steams without interruption for
20 minutes at 100 °C. Do not open the appliance door during
this time.
If the appliance was not able to calibrate itself automatically (for
example, because the appliance door was opened), the
calibration process is carried out again during the next cooking
operation.
After moving house
So that the appliance automatically adjusts itself to its new
location, you must reset the appliance to the factory settings
(see section: Basic settings) and repeat the initial start-up
process (see section: First use).
After a power cut
The appliance saves the calibration settings even in the event
of a power cut or disconnection from the mains. Recalibration
is not necessary.
6
Page 7
Before using the appliance for the first time
2EHU8QWHUKLW]H
&
8KU]HLWHLQVWHOOHQ
8KU]HLW
PLWVFKOLHHQ
In this section you will find out which steps are required before
using the appliance for the first time:
■ Setting the clock and language
■ Setting the water hardness range
■ Starting the appliance for the first time
■ Cleaning the accessories before use
■ Fitting the grease filter
Setting the clock and language
When your new appliance is connected, "Uhrzeit einstellen" (set
clock) appears in the display. Set the clock and the language
for the display, if required.
1. Press the X button to switch to the default time.
2. Set the current time using the rotary selector.
3. Press the Y button to switch back to "Uhrzeit" (clock).
4. Turn the rotary selector to switch to "Sprache auswählen"
(select language).
5. Press the X button to switch to "deutsch".
6. Set the required language using the rotary selector.
30 different languages are available.
7. Press the 0 button.
The time and language are applied. The current time is
displayed.
Setting the water hardness range
Descale your appliance regularly. This is the only way to
prevent damage.
Your appliance automatically displays when it needs descaling.
It has been preset to water hardness range "medium". Change
the value if your water is softer or harder.
You can check the water hardness with the test strips supplied
or ask your water supplier.
If your water is very hard, we recommend that you use softened
water.
You can only dispense with descaling completely if you
exclusively use softened water. If this is the case, change the
water hardness to "softened".
You can change the water hardness range in the basic settings
when the appliance is switched off.
1. If required, press the % button to switch off the appliance.
2. Press and hold the ° button until "Select language" appears in
the display.
3. Turn the rotary selector until "Water hardness range" appears.
4. Press the X button.
"2-medium" is highlighted in the display.
5. Change the water hardness range using the rotary selector.
Possible values:
softened 1-soft I
2-medium II
3-hard III
4very hard IV
6. Press the ° button to exit the basic settings.
The change is saved.
Before first use
Before first use, heat the empty appliance for 20 minutes at
100 °C with the Steam type of heating. Do not open the
appliance door during this time. The appliance is automatically
calibrated (see section: Automatic calibration).
1. Press the % button to switch on the appliance.
The "Hot air" type of heating appears after approx.
4seconds.
2. Fill the water tank and insert it (see section: Filling the
water tank).
Before using for the first time, moisten the tank cover seal
with a little water.
3. Turn the rotary selector until "Steam" appears.
4. Press the n button.
The appliance heats up to 100 °C. The cooking time (20 minutes) does not start to count down until the set temperature has been reached. Do not open the appliance door during this time.
The cooking operation automatically ends and a signal
sounds.
5. Press the % button to switch off the appliance.
Leave the appliance door ajar until the appliance has cooled
down.
Cleaning the accessories before use
Using soapy water and a soft cloth, clean the accessories
thoroughly before first use.
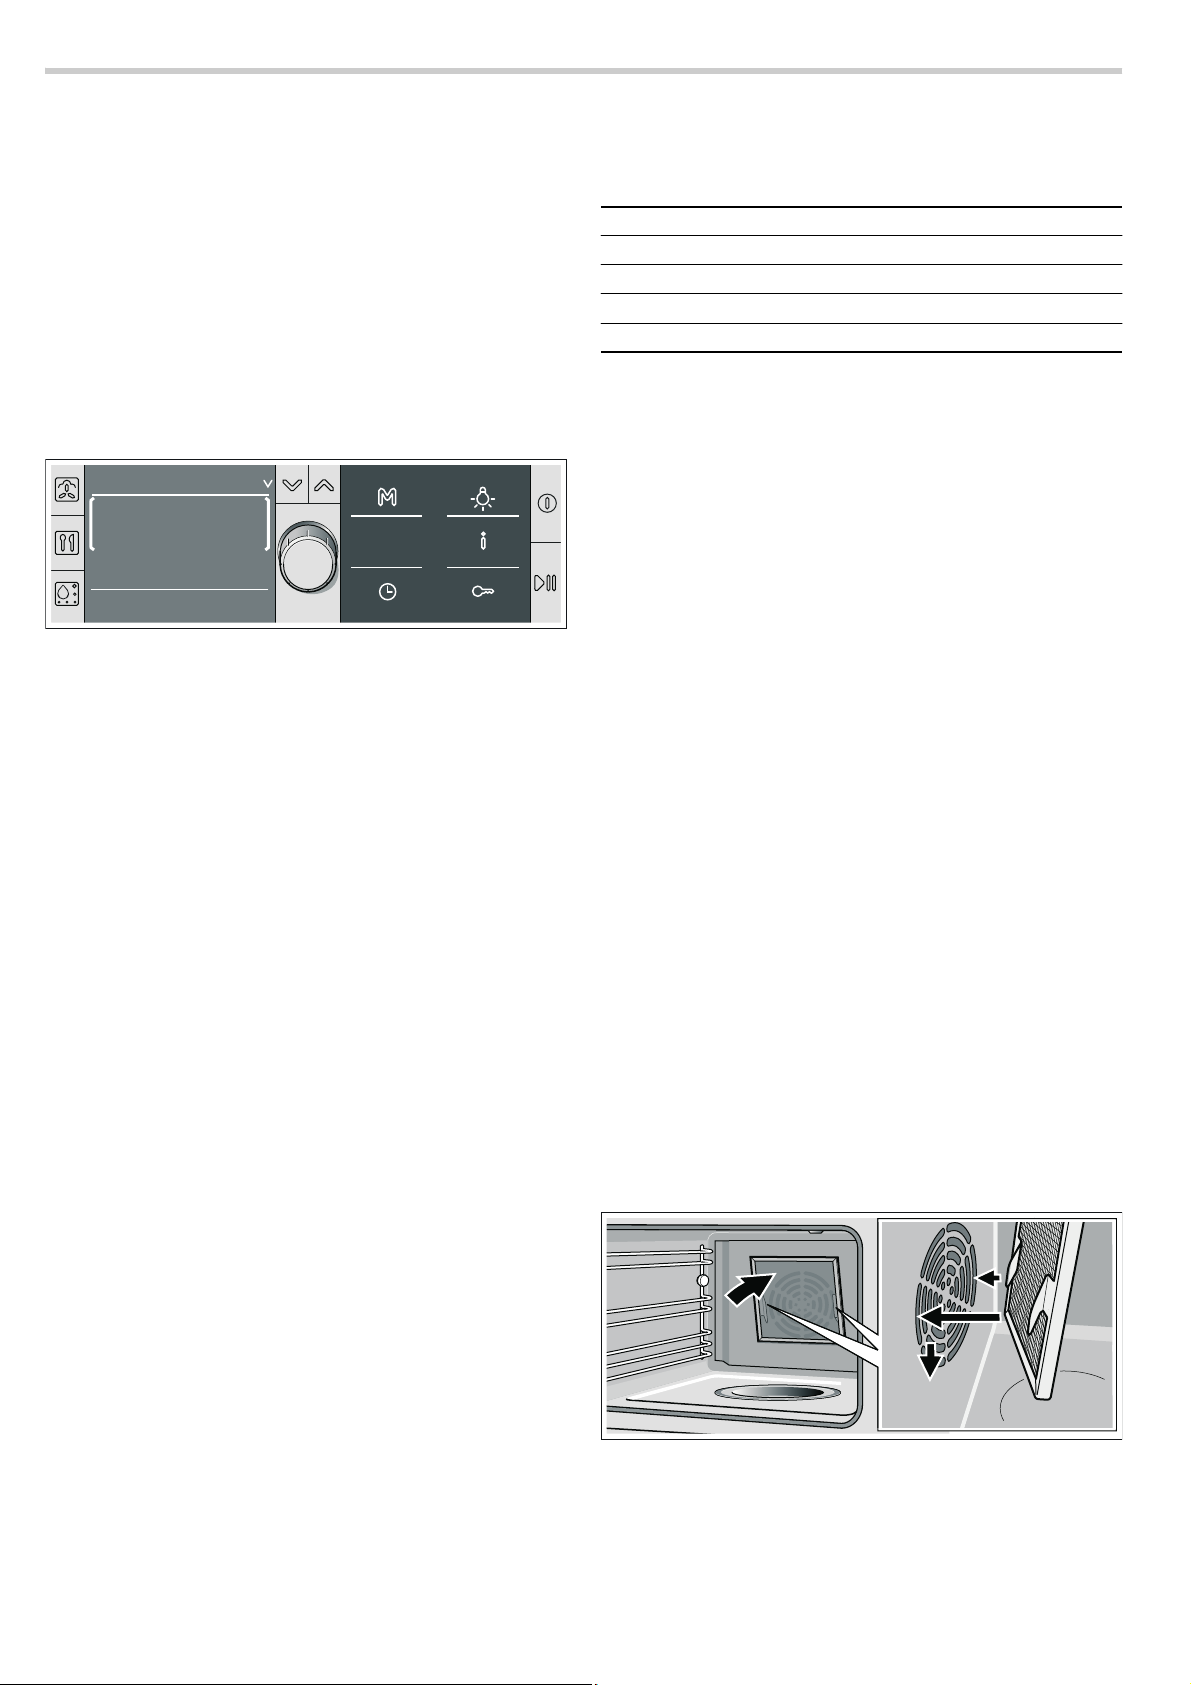
Fitting the grease filter in place
Hook the enclosed grease filter onto the hot air grille in the
back wall of the cooking compartment.
Leave the grease filter in the cooking compartment for all
applications.
ã=Risk of injury!
You could hurt yourself on the grease filter hooks. Always clean
the grease filter with care. Always place the grease filter in the
dishwater so that the hooks for fixing it in place are facing
downwards.
7
Page 8
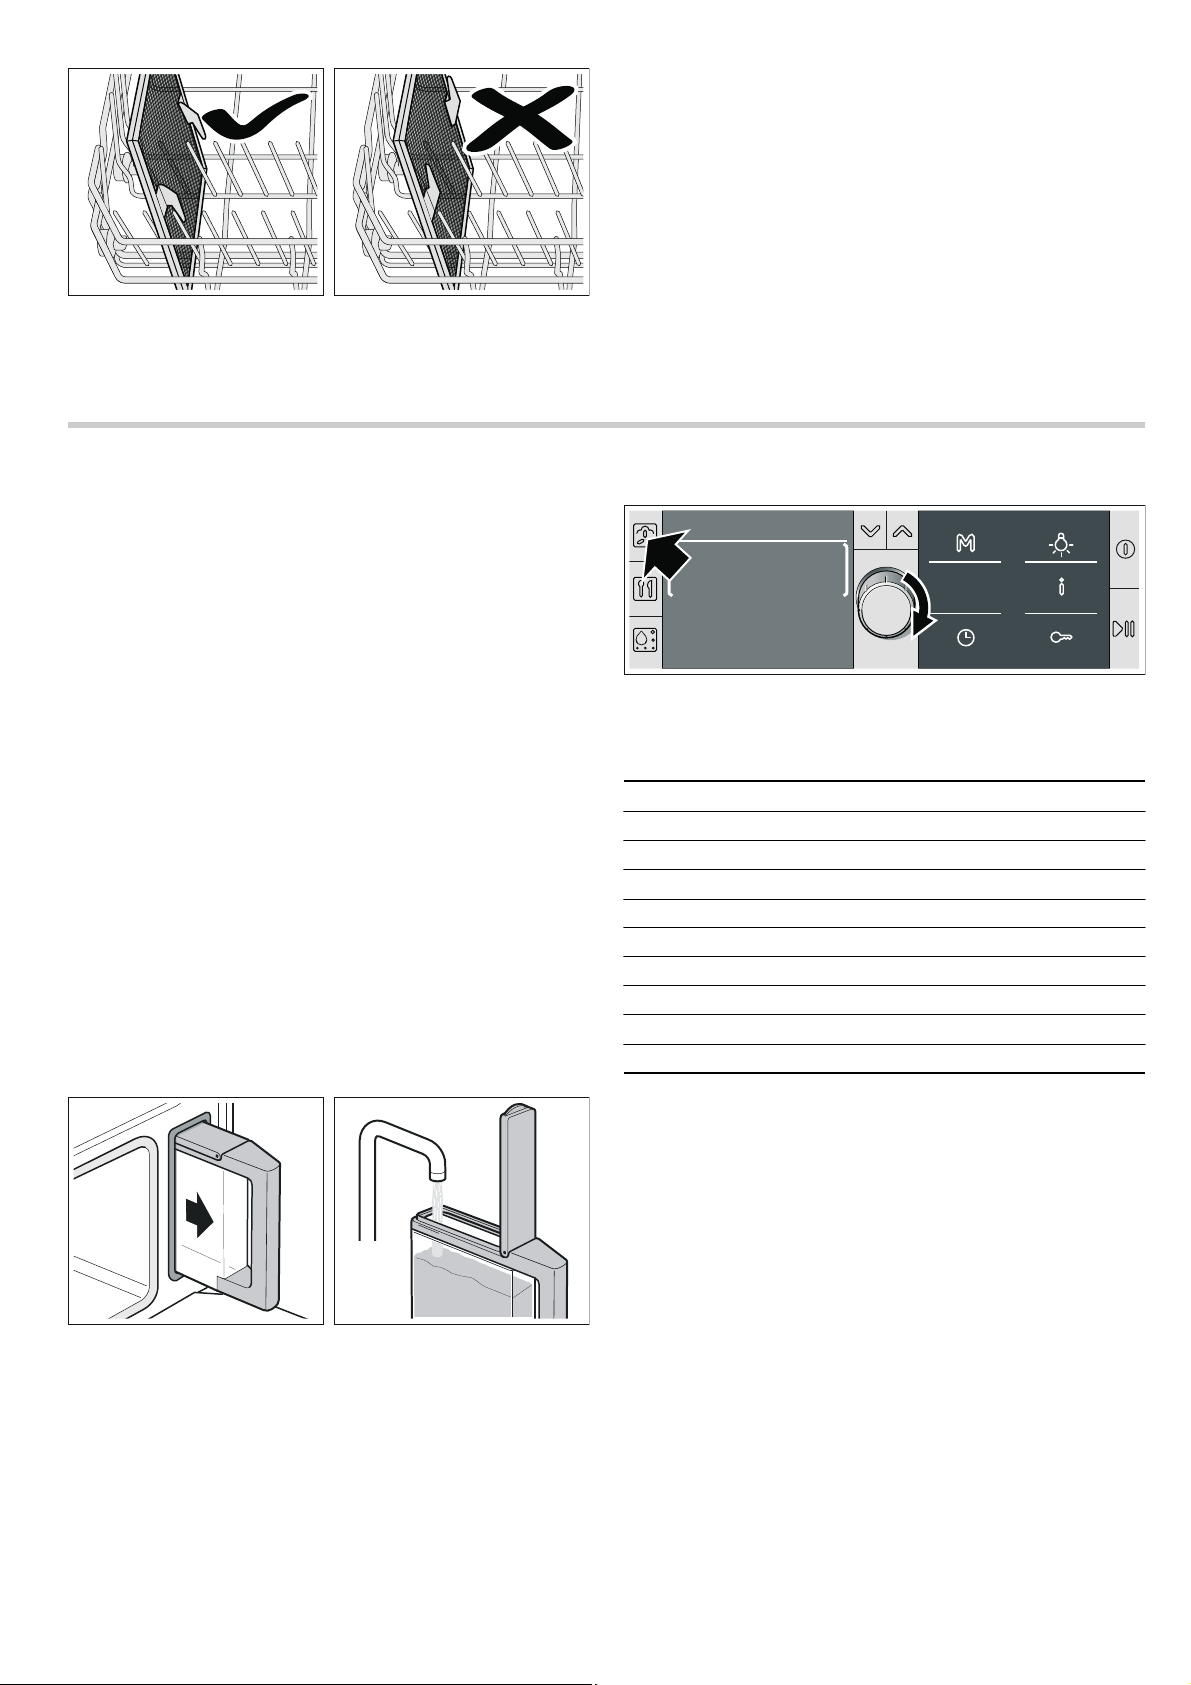
Clean the grease filter with hot soapy water or in the
PD[
7RSERWWRPKHDWLQJ
&
7\SHVRIKHDWLQJ
+RWDLU
&
dishwasher every time heavy dirt deposits have been left
behind after cooking.
Operating the appliance
In this section, you can read about
■ how to fill the water tank
■ how to switch the appliance on and off
■ what to note after each use
■ how you can use the recommended settings
Filling the water tank
When you open the appliance door, you will see the water tank
on the right-hand side.
Caution!
Use of unsuitable liquids may damage the appliance
■ Only use fresh tap water, softened water or uncarbonated
mineral water.
■ If your tap water is very hard, we recommend that you use
softened water.
■ Do not use distilled water, highly chlorinated tap water
(> 40 mg/l) or other liquids.
You can obtain information about your tap water from your
water supplier. The water hardness can be checked with the
test strips enclosed.
Fill the water tank before each use:
1.Open the appliance door and take out the water tank.
2.Fill the water tank with cold water up to the "max" mark.
3.Close the tank cover until you feel it engage.
4.Slide in the water tank until it engages.
Switching on the appliance
1.Press the % button to switch on the appliance.
The button description appears in the display for approx. 4 seconds. The display then changes automatically to the "Types of heating" menu.
Or press the
menu.
2.Turn the rotary selector to set the desired type of heating.
8
å button to go directly to the "Types of heating"
3.Press the X button.
The recommended temperature is highlighted.
4.Turn the rotary selector to set the desired temperature.
Type of heating Temperature range
Hot air 30 - 230 °C
Steam 35 - 100 °C
Combination 120 - 230 °C
Reheat 100 - 180 °C
Prove 35 - 50 °C
Defrosting 35 - 60 °C
Slow cook 60 - 120 °C
Plate warming 30 - 70 °C
Keep warm 60 - 100 °C
For types of heating involving steam, you must now set a
cooking time (see also section: Time-setting options).
5.Press the 0 button.
6.Switch to cooking time using the rotary selector.
7.Press the X button.
The default duration is highlighted.
8.Turn the rotary selector to set the required cooking time.
9.Press the n button to start cooking.
The appliance heats up.
For the Steam type of heating, the cooking time starts
counting down after the heating-up time.
"Fill water tank?" message
This message appears if you set a type of heating and the
water tank is only half full.
If you think that the water in the water tank is sufficient for the
cooking procedure, you can start the appliance. If not, fill the
water tank to the "max" mark, slide it back in and start the
appliance.
Page 9

Current temperature
Press the
The current temperature is displayed for 3 seconds.
Changing the temperature
You can change the temperature at any time.
1. Press the X or Y button until the temperature is
highlighted.
2. Change the temperature using the rotary selector.
The change is adopted automatically.
Pause
Briefly press the
cooling fan may continue to run. Press the
If you open the appliance door during cooking, operation is
interrupted. Close the appliance door and press the
to restart.
If you have set the basic setting "Continue operation after
closing door" to "automatic", restarting is not required (see
section: Basic settings).
"Fill water tank" message
If the water tank is empty, a signal sounds. "Fill water tank"
appears in the display. Cooking is paused.
1. Open the appliance door carefully.
Hot steam will escape.
2. Take out the water tank, fill to the "max" mark and reinsert.
3. Press the n button.
° button.
n button to interrupt cooking (pause). The
n button to start.
n button
Switching off the appliance
ã=Risk of scalding!
Hot steam may escape when the appliance door is opened.
Open the appliance door carefully during or after cooking.
When opening the door, do not lean over it. Ensure that,
depending on the temperature, steam is not visible.
Press and hold the
cooking time, cooking is ended automatically. A signal sounds.
Press the
The cooling fan may continue running when you open the
appliance door.
% button to switch off the appliance.
After each use
Emptying the water tank.
1. Open the appliance door carefully.
Hot steam will escape.
2. Remove and clean the water tank.
3. Thoroughly dry the seal in the tank cover and the tank recess
in the appliance.
Caution!
Do not dry the water tank in the hot cooking compartment. This
will damage the water tank.
n button to end cooking. If you have set a
Drying the cooking compartment
ã=Risk of scalding!
The water in the evaporator dish may still be hot. Allow it to cool
before wiping.
1. Leave the appliance door ajar until the appliance has cooled
down.
2. Once it has cooled down, wipe out the cooking compartment
and the evaporator dish with the enclosed cleaning sponge
and dry well with a soft cloth.
3. Remove food residues from the cooking compartment as
soon as the appliance has cooled. Burnt-on remains will be
much harder to remove later.
4. Wipe kitchen units or handles if condensation has formed on
them.
Recommended settings
If you choose a dish from the recommended settings, the ideal
setting values are already specified.
You can choose from many different categories. Our
recommended settings include a large number of dishes from
cakes, bread, poultry, meat, fish and game to bakes and
convenience products.
The dishes can be found via several selection levels. Try it out.
see for yourself the variety of dishes.
1. Press the 8 button.
"Hot air 160 °C" appears in the display.
2. Turn the rotary selector anti-clockwise to "Recommended
settings".
The first food category appears in the display.
3. Press the X button to switch to the food category and select
the required category by turning the rotary selector.
(Use the
selector to make your next selection).
The setting for the selected dish then appears. You can
change the temperature and cooking time, but not the type of
heating.
4. Press the n button.
Cooking starts. The cooking time appears in the display and
starts to count down.
The cooking time has elapsed
A signal sounds. The appliance stops heating. 00:00:00 is
shown in the display.
Press the
Changing the temperature
You can change the temperature at any time using the rotary
selector.
Changing the cooking time
Press the
selector. Press the
change the cooking time. Exit the time-setting options with the
0 button.
Checking information
Press the
For more information, press the
X button to move to the next level. Use the rotary
0 button to stop the signal.
0 button. Switch to cooking time using the rotary
X button and turn the rotary selector to
° button.
° button again.
9
Page 10
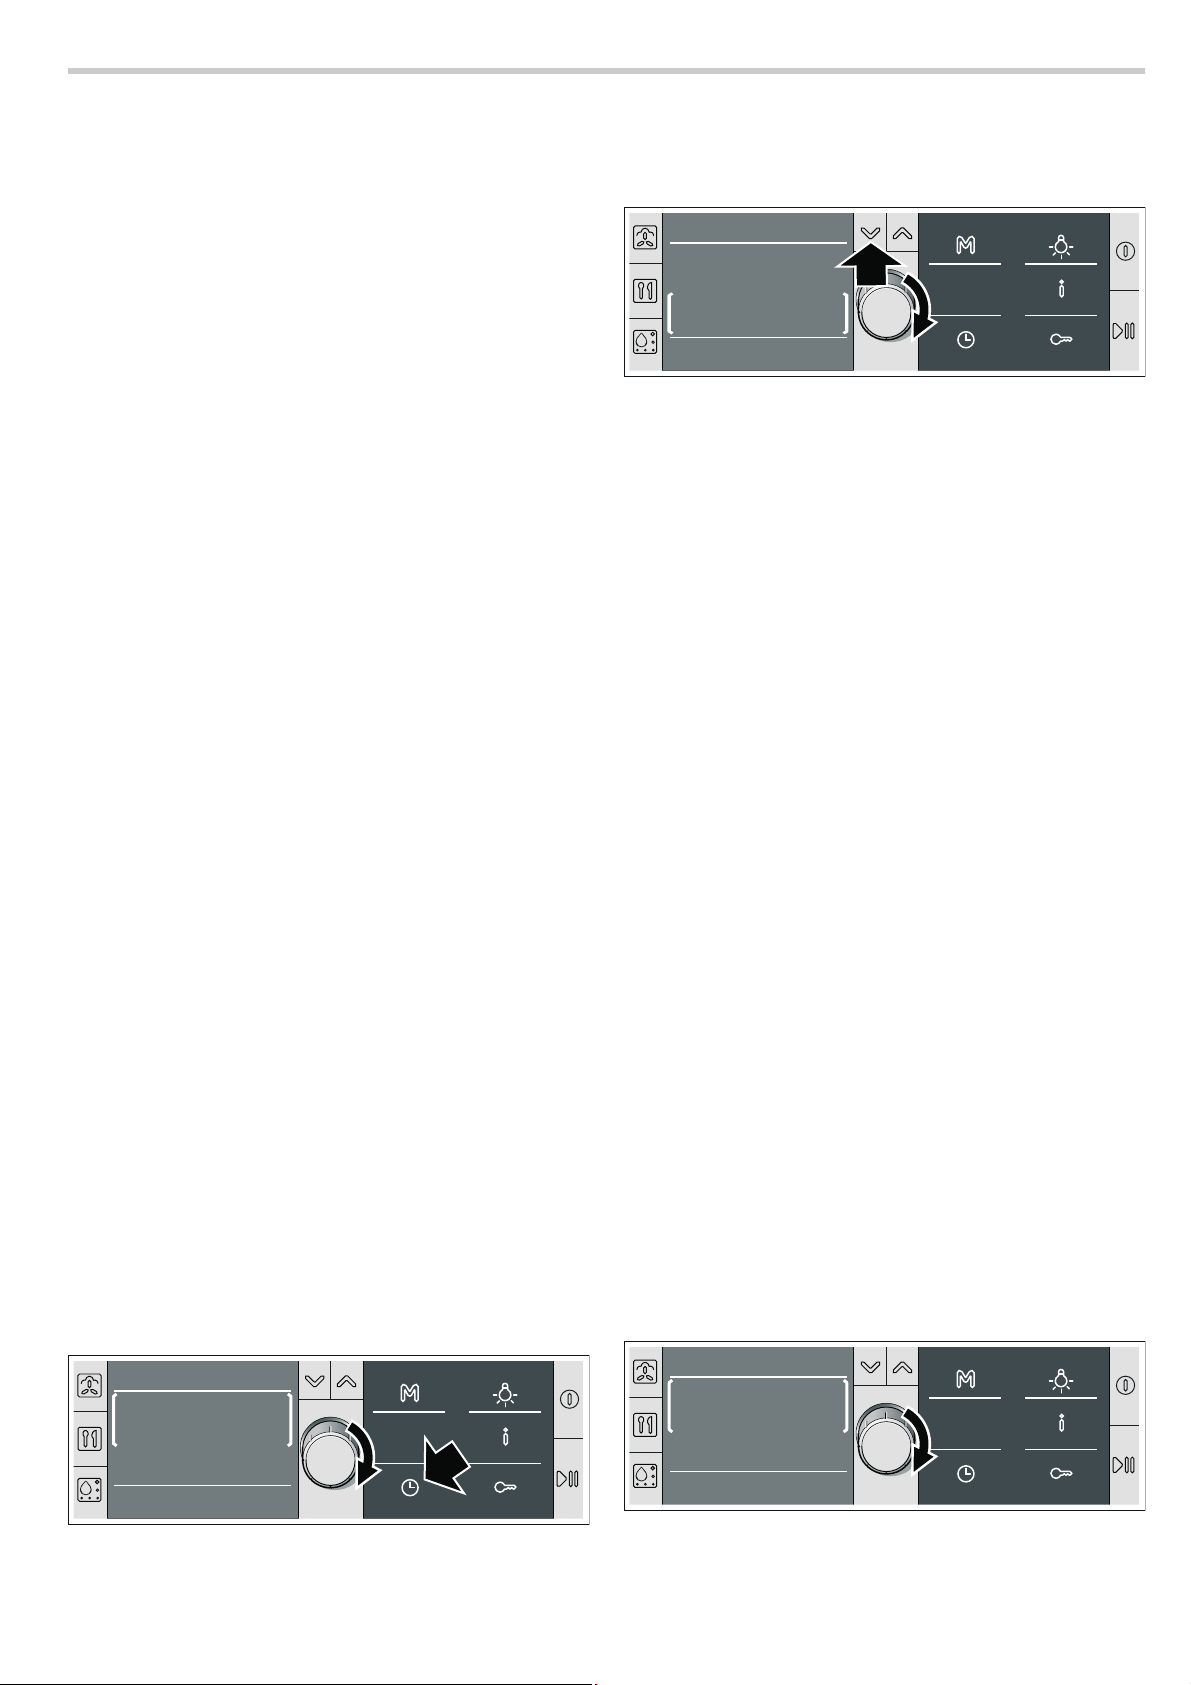
Time-setting options
7RSERWWRPKHDWLQJ
&
7LPHVHWWLQJRSWLRQV
&RRNLQJWLPH
ZLWKFORVH
KPLQ
7RSERWWRPKHDWLQJ
&
7LPHVHWWLQJRSWLRQV
&RRNLQJWLPH
ZLWKFORVH
KPLQ
7RSERWWRPKHDWLQJ
&
7LPHVHWWLQJRSWLRQV
(QG
ZLWKFORVH
The time-setting options are called up with the 0 button. The
following functions are available:
When the appliance is switched off:
■ Setting the timer
■ Setting the clock
When the appliance is switched on:
■ Setting the timer
■ Setting the cooking time
■ Setting a later end time
Setting time-setting options - in brief
1.Press the 0 button.
2.Select the desired time-setting option with the rotary selector.
3.Press the X button to change line and turn the rotary
selector to set the time or cooking time.
4.Exit the time-setting options with the 0 button.
Set the timer
The timer runs independently of the cooking mode. You can
use it like a kitchen timer and set it at any time.
1.Press the 0 button.
2.Press the X button and use the rotary selector to set the
timer time.
3.Exit the time-setting options with the 0 button.
The display switches to its previous state. The
the timer appears, and the time can be seen counting down.
Changing the timer duration
Press the
time within the next few seconds using the rotary selector. Exit
the time-setting options with the
Once the timer duration has elapsed
A signal sounds.
0 button. Press the X button and change the timer
0 button.
Q "00:00" is shown in the display. Press the
Q symbol for
0 button to stop the signal.
Cancelling the timer duration
Press the
time down to "00:00" using the rotary selector. Exit the timesetting options with the
0 button. Press the X button and turn the timer
0 button.
Setting the cooking time
If you set the cooking time for your dish, the cooking operation
will end automatically after this time. The appliance stops
heating.
For types of heating involving steam, you must always set a
cooking time.
Example in the picture: set a cooking time of 45 minutes.
Requirement: The type of heating and temperature have been
set.
1.Press the 0 button.
2.Switch to cooking time using the rotary selector.
3.Use the X button to switch the line.
4.Set the cooking time using the rotary selector.
5.Close the Time-setting options with the 0 button.
6.If operation has not yet started, press the n button.
The cooking time counts down on the display.
For the Steam type of heating, the cooking time starts
counting down after the heating-up time.
Changing the cooking time
Press the
selector. Press the
using the rotary selector. Close the Time-setting options with
the
The cooking time has elapsed
A signal sounds. The appliance stops heating. “00:00:00” is
shown in the display. Press the
Cancelling the cooking time
Press the
selector. Press the
“00:00” using the rotary selector. Close the Time-setting
options with the
0 button. Switch to cooking time using the rotary
X button and change the cooking time
0 button.
0 button to stop the signal.
0 button. Switch to cooking time using the rotary
X button and set the cooking time to
0 button.
Setting a later end time
You can delay the time at which you wish your dish to be ready.
The appliance starts automatically and is ready at the desired
time. You can, for example, put your dish in the compartment in
the morning and set the cooking time so that it is ready at
lunchtime.
Ensure that food is not left in the cooking compartment for too
long as it may spoil.
For some programmes it is not possible to change the end
time.
For the Steam type of heating, the cooking time starts counting
down after the heating-up time. The selected end time is
delayed by the length of the heating-up time.
Example in the picture:
It is 9:30 and the dish will take 45 minutes to cook, but is not
due to be ready until 12:45.
Prerequisites:
The selected cooking operation has not begun yet. A cooking
time is set. The
1.Switch to "End" by turning the rotary selector.
The time at which the cooking operation will finish is shown in the display.
0 Time-setting options are open.
10
Page 11
2. Press the X button.
7RSERWWRPKHDWLQJ
&
7LPHVHWWLQJRSWLRQV
(QG
ZLWKFORVH
7RSERWWRPKHDWLQJ
&
3URJUDPPHV
9HJHWDEOHV
&DXOLIORZHU
VWHDP
7RSERWWRPKHDWLQJ
&
3URJUDPPHV
3RXOWU\
&KLFNHQIUHVK
7RSERWWRPKHDWLQJ
&
3URJUDPPHV
&KLFNHQEUHDVW
âJ
IUHVKâVWHDPHG
3. Use the rotary selector to set a later end time.
4. Exit the Time-setting options with the 0 button.
5. Confirm by pressing the n button.
The setting is applied. The appliance is in standby
end time is shown on the display. Cooking starts at the right
time. The cooking time counts down in the display.
Changing the end time
The end time can be changed provided the appliance is in
standby. Press the
rotary selector. Press the
to change the cooking time. Exit the Time-setting options with
the
0 button.
The cooking time has elapsed
A signal sounds. The appliance stops heating. The cooking
time "00:00:00" appears in the display. Press the
stop the signal.
0 button. Switch to end time using the
X button and turn the rotary selector
0... . The
0 button to
Cancelling the end time
The End time can be cancelled provided the appliance is in
standby. Press the
rotary selector. Press the
to turn back the end time until the display goes out. Exit the
Time-setting options with the
time starts counting down straight away.
0 button. Switch to end time using the
X button and turn the rotary selector
0 button. The selected cooking
Setting the clock
So that you can set the clock, you must switch off the
appliance.
Example: changing from summer to winter time.
1. If required, press the % button to switch off the appliance.
2. Press the 0 button.
3. Switch to Clock using the rotary selector.
4. Press the X button and turn the rotary selector to change
the time.
5. Exit the time-setting options with the 0 button.
After a power cut
After a power cut "Clock" appears in the display. Press the
X button and turn the rotary selector to set the current time.
Exit the time-setting options with the
adopted.
Hiding the clock
When the appliance is switched off, the current time appears on
the display. You can hide the clock (see section: Basic
settings).
0 button. The time is
Automatic programmes
The automatic programmes enable you to prepare food very
easily. There are 16 programme groups containing a total of
70 programmes.
In this section, you will find out
■ how to set one of the automatic programmes
■ hints and tips on the programmes
■ Which programmes you can set (programme tables)
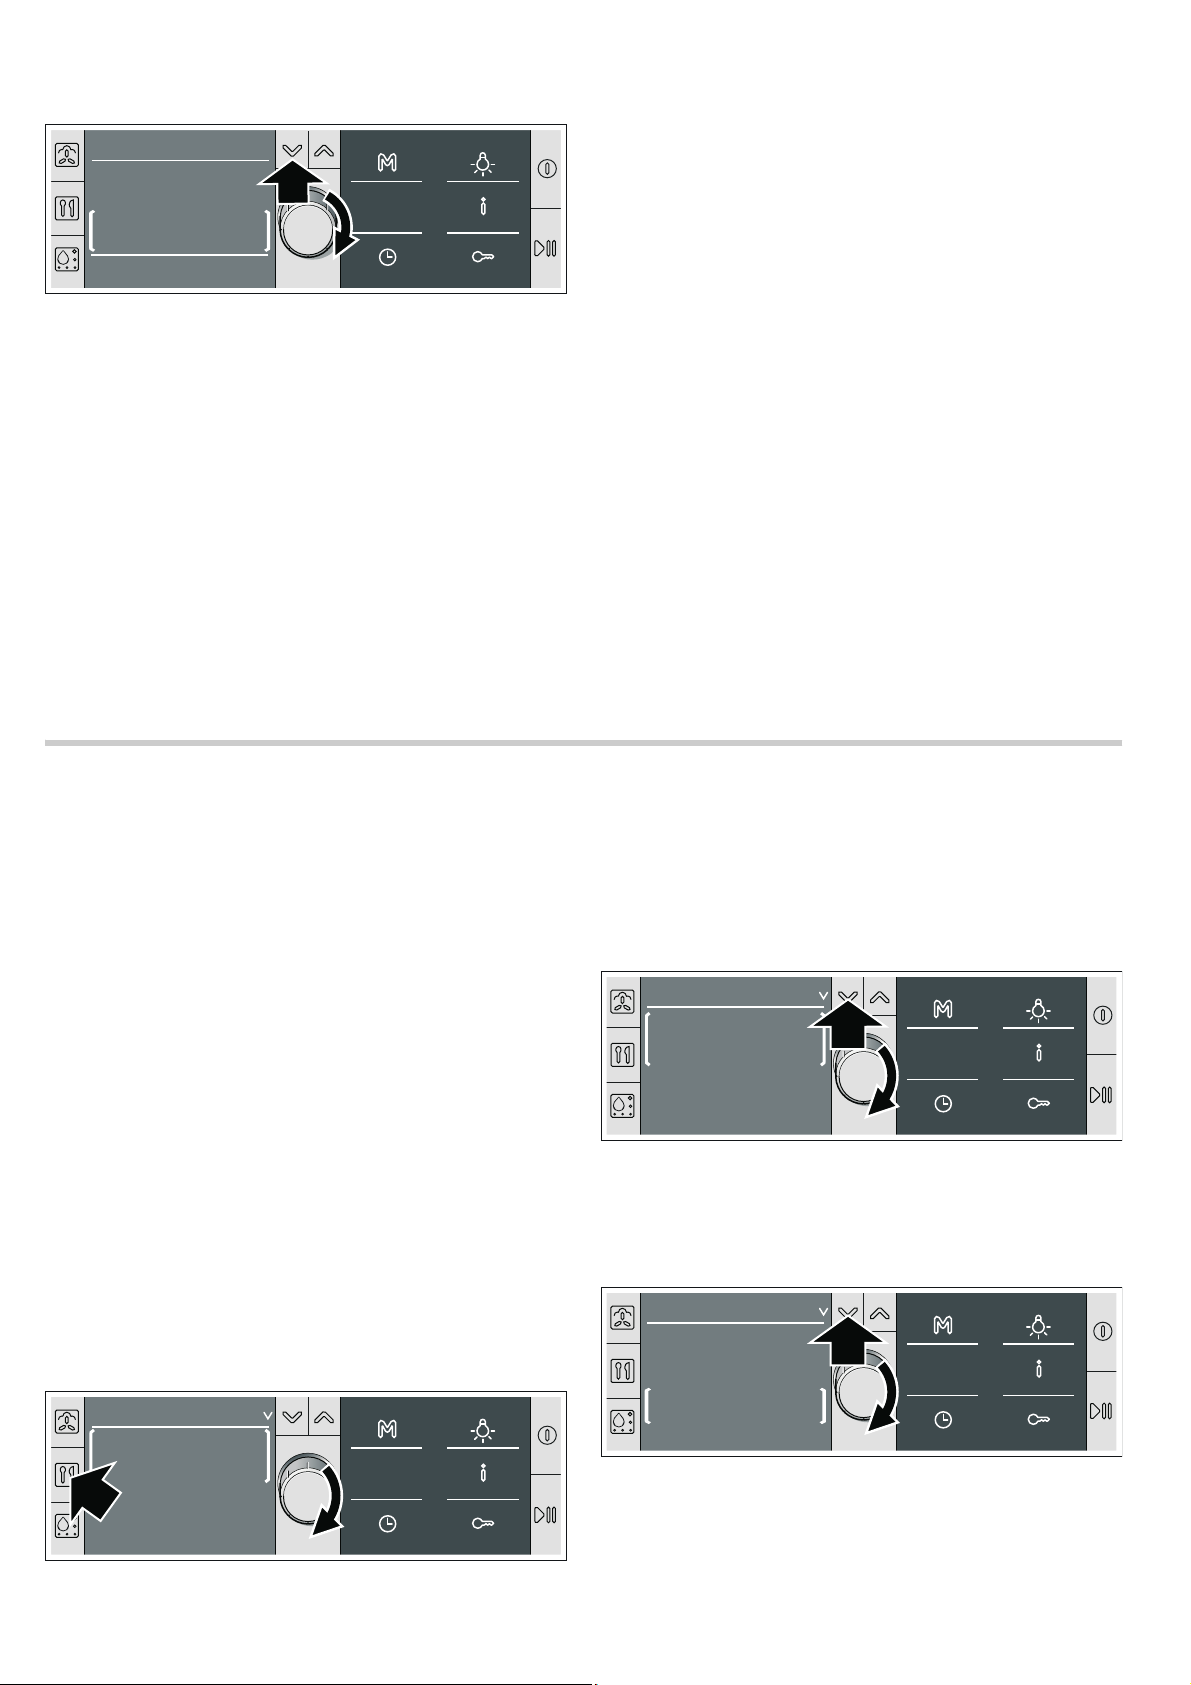
Setting a programme
Select a suitable programme from the programme table. Follow
the instructions for the programmes.
Example in the picture: you want to steam 500 g fresh chicken
breast.
■ Programme group “Poultry“
■ Programme "Chicken breast, fresh, steamed"
Selecting a programme group
1. Press the % button to switch on the appliance.
2. Press the ` button.
"Programmes" appears in the display and the first
programme group "Vegetables" is highlighted.
3. Turn the rotary selector until the required programme group
appears.
Selecting the programme
4. Press the X button.
The first programme of the selected programme group is
highlighted.
5. Turn the rotary selector until the required programme
appears.
Enter the weight
6. Press the X button.
The recommended weight is highlighted.
7. Turn the rotary selector to set the weight of the items to be
cooked.
Adjusting the cooking result to suit individual tastes
8. Press the X button.
The individual adjustment is highlighted "-
ЫЫЫЪЫЫЫ+".
11
Page 12

9.Turn the rotary selector to adjust the cooking result.
■ Anti-clockwise: set a less intensive cooking result
■ Clockwise: set a more intensive cooking result
You can also modify the cooking result permanently for all
programmes at the same time (see section: Basic settings).
10.Press the n button to start the programme.
The programme cooking time counts down in the display.
Set a later end time
You can delay the end time for some programmes. The
programme will be started later and finish at the desired time
(see section: Time-setting options).
Cancelling the programme
Press the
appliance.
End of the programme
A signal sounds. Cooking has finished. Press the
switch off the appliance.
% button to cancel the programme and switch off the
# button to
ã=Risk of scalding!
Hot steam may escape when the appliance door is opened.
Open the appliance door carefully during or after cooking.
Programme tables
Follow the instructions for the programmes.
When opening the door, do not lean over it. Ensure that,
depending on the temperature, steam is not visible.
Notes about the programmes
All programmes are designed for cooking on one level.
The cooking result can vary according to the size and quality of
the food.
Ovenware
Use the suggested ovenware. All meals have been tested using
this ovenware. The cooking result may change if you use
different ovenware.
When cooking in the perforated cooking container, always
insert the baking tray at level 1. Dripping liquid is caught.
Amount/weight
Do not fill the food more than 4 cm deep in the accessories.
The automatic programmes require the weight of the food. With
individual pieces, always enter the weight of the largest. The
total weight must be within the specified weight range.
Cooking time
After the programme is started the cooking time is displayed. It
may change during the first 10 minutes, as the heating-up time
depends, among other things, on the temperature of the food
and the water.
Vegetables
Do not season vegetables until after cooking.
Programme Note Accessories Level
Steam cauliflower/In florets* florets of equal size Perforated cooking container
+
Baking tray
Steam broccoli florets* florets of equal size Perforated cooking container
+
Baking tray
Steam green beans* - Perforated cooking container
+
Baking tray
Sliced carrots, steam* slices, approx. 3 mm thick Perforated cooking container
+
Baking tray
Sliced kohlrabi, steam* slices, approx. 3 mm thick Perforated cooking container
+
Baking tray
Steam Brussels sprouts* - Perforated cooking container
+
Baking tray
Steam asparagus/White asparagus* - Perforated cooking container
+
Baking tray
Steam asparagus/Green asparagus* - Perforated cooking container
+
Baking tray
Mixed vegetables frozen, steam - Perforated cooking container
+
Baking tray
* You can delay the end time for this programme
3
1
3
1
3
1
3
1
3
1
3
1
3
1
3
1
3
1
12
Page 13

Potatoes
Do not season potatoes until after cooking.
Programme Note Accessories Level
Boiled potatoes* medium-sized, quartered,
30 - 40 g each
Perforated cooking container
+
3
1
Baking tray
Unpeeled boiled potatoes* medium-sized, dia. 4 - 5 cm Perforated cooking container
+
3
1
Baking tray
* You can delay the end time for this programme
Cereal products
Weigh the food and add the correct ratio of water:
■ Rice 1:1.5
■ Couscous 1:1
■ Millet 1:3
■ Lentils 1:2
Stir cereal products after cooking. The remaining water is then
quickly absorbed.
Making risotto
Add water to the risotto in the ratio of 1:2. Enter the total weight
including water. The message “Stir” appears after approx.
15 minutes. Stir the risotto and, if required, press the Start
button.
Enter the weight excluding liquid.
Programme Note Accessories Level
Rice/Long grain rice max. 0.75 kg solid cooking container 2
Rice/Basmati rice max. 0.75 kg solid cooking container 2
Rice/Brown rice max. 0.75 kg solid cooking container 2
Couscous max. 0.75 kg solid cooking container 2
Millet max. 0.55 kg solid cooking container 2
Risotto max. 2 kg solid cooking container 2
Lentils max. 0.55 kg solid cooking container 2
Bakes
Programme Note Accessories Level
Bake, savoury, cooked ingredients* max. 4 cm deep Wire rack + ovenproof dish 2
Bake, sweet* max. 4 cm deep Wire rack + ovenproof dish 2
* You can delay the end time for this programme
Poultry
Do not place chicken breasts or chicken portions on top of
each other in the ovenware. The chicken portions can be
marinated beforehand.
Programme Notes Accessories Level
Chicken, fresh total weight 0.7 - 1.5 kg wire rack + baking tray 2
Chicken portions, fresh 0.04 - 0.35 kg each wire rack + baking tray 2
Duck, fresh total weight 1-2kg wire rack + baking tray 2
Chicken breast, fresh, steamed total weight 0.2 - 1.5 kg Perforated cooking container
+ baking tray
3
1
Beef
With sirloin, it is recommended that you use a thick piece.
Programme Note Accessories Level
Pot roast, fresh* 1 - 1.5 kg Baking tray 2
Sirloin, fresh, slow cook/
total weight 1-2kg Baking tray 2
Sirloin, medium**
Sirloin, fresh, slow cook/
total weight 1-2kg Baking tray 2
Sirloin, rare**
* You can delay the end time for this programme
** Sear the meat well beforehand
13
Page 14

Veal
Programme Note Accessories Level
Joint, fresh/Lean joint* 1 - 2 kg Wire rack + baking tray 2
Joint, fresh/Marbled joint* 1 - 2 kg Wire rack + baking tray 2
Breast, stuffed* 1-2kg Wire rack + baking tray 2
* You can delay the end time for this programme
Pork
Before cooking, score the rind from the middle outwards. For a joint with a crust, it is best to use a piece of shoulder.
Programme Note Accessories Level
Boned neck joint, fresh* 1 - 2 kg Wire rack + baking tray 2
Joint with crust, fresh* 0.8 - 2 kg Wire rack + baking tray 2
Boiled sausages* - Perforated cooking container
* You can delay the end time for this programme
Lamb
Programme Note Accessories Level
Leg, fresh/Boned, well done 1-2kg Wire rack + baking tray 2
Leg, fresh/
Boned, medium, slow cook*
* Ensure that the meat is well sealed beforehand
1-2kg Baking tray 2
+
Baking tray
3
1
Meat loaf
Programme Notes Accessories Level
Made from fresh minced meat total weight 0.5 - 2 kg baking tray 2
Fish
When preparing fish, grease the perforated cooking container. Do not place whole fish, fish fillets or fish fingers on top of each
other. Enter the weight of the heaviest fish and choose pieces
as similar in size as possible.
Programme Note Accessories Level
Steam whole, fresh fish 0.3 - 2 kg Perforated cooking container
+
Baking tray
Steam fish fillet/Fish fillet, fresh max. 2.5 cm thick Perforated cooking container
+
Baking tray
Steam fish fillet/Fish, frozen max. 2.5 cm thick Perforated cooking container
+
Baking tray
Blue mussels - Perforated cooking container
+
Baking tray
Breaded squid rings, frozen 0.5 - 1.25 kg Baking tray + greaseproof
paper
Fish fingers 0.5 - 1 kg Baking tray + greaseproof
paper
3
1
3
1
3
1
3
1
2
2
Pastries, dessert
Baking plaited loaf
Leave the yeast dough to prove in the combination steam oven
for half an hour at 40 °C.
Making fruit compote
The programme is only suitable for fruits with stones and pips.
Weigh the fruit and add approximately
and add sugar and spices according to taste.
Making rice pudding
Weigh the rice and add 2.5 times the amount of milk. Ensure
14
Y the amount in water,
the level of rice and milk in the accessory is no higher than
2.5 cm. Stir after cooking. The remaining milk is quickly
absorbed.
Making yoghurt
Heat the milk to 90 °C on the hob. Then leave to cool to 40 °C.
If you are using UHT milk, you do not need to heat it.
Stir in one to two teaspoons of natural yoghurt per 100 ml milk,
or the corresponding amount of yoghurt culture into the milk.
Pour the mixture into clean jars and seal them.
Page 15

After preparation, leave the glasses to cool in the refrigerator.
Programme Note Accessories Level
Plaited loaf 0.6 - 1.8 kg Baking tray + greaseproof
paper
Sponge cake 0.8 - 2 kg Greased springform cake tin
Fruit compote* - Baking tray 2
Rice pudding - Baking tray 2
Yoghurt in glass jars - Glass jars + perforated cooking
* You can delay the end time for this programme
Bread/bread rolls
Baking bread
The programmes are for bread baked without a tin. The dough
should not be too soft. Cut into the dough several times with a
sharp knife to a depth of approx. 1 cm before baking.
Programme Notes Accessories Level
Multigrain bread / Bake* 0,6 - 2 kg baking tray + greaseproof paper 2
Multigrain bread / prove and bake Note the message baking tray + greaseproof paper 2
Rye bread / Bake* 0,6 - 2 kg baking tray + greaseproof paper 2
Rye bread / prove and bake Note the message baking tray + greaseproof paper 2
White bread / Bake* 0,4 - 2 kg baking tray + greaseproof paper 2
White bread / Prove and bake Note the message baking tray + greaseproof paper 2
Bread rolls / Bake fresh bread rolls* Weight per piece 0,05 - 0,1 kg baking tray + greaseproof paper 2
Bread rolls / Bake frozen bread rolls Total weight 0,2 - 1 kg baking tray + greaseproof paper 2
* You can delay the end time for this programme
Proving and baking dough
The message "Cut into the bread" appears after approx.
20 minutes. Cut into the dough and press the Start button.
Baking fresh bread rolls
The bread rolls should all be the same weight. Enter the weight
of an individual bread roll.
with fluted ring base, dia. 26 cm
+ wire rack
container
2
2
2
Reheat
Programme Note Accessories Level
1 portion* - Wire rack 2
2 portions* - Wire rack 2
Side dishes, cooked* - Baking tray 2
Cooked vegetables* - Baking tray 2
Pizza, cooked/Pizza, thin base* - Wire rack + baking tray 3
Pizza, cooked/Pizza, deep-pan* - Wire rack + baking tray 3
* You can delay the end time for this programme
Defrosting
When freezing, lay the food as flat as possible and in portionsized pieces at -18 °C. Do not freeze excessively large
quantities. Once defrosted, food will not keep for as long and
spoils more quickly than fresh food.
Leave the food to defrost in the freezer bag, on a plate or in the
perforated cooking container. Always insert the baking tray
underneath. The food is then not left lying in the defrost water
and the cooking compartment remains clean.
All defrost programmes apply to raw food.
If necessary, the meal can occasionally be split apart or pieces
which have already defrosted can be removed from the
appliance.
After defrosting, allow the food to stand for a further 5 -
15 minutes to allow the temperatures to even out.
ã=Health risk!
When defrosting food from animal sources, you must remove
the liquid that escapes during defrosting. It must never come
into contact with other food. Bacteria could be transferred.
After defrosting, operate the combination steam oven for
15 minutes using Hot air at 180 °C.
Defrosting fish fillet
Do not place the fish fillets on top of each other.
Defrosting whole poultry
Remove the packaging before defrosting. Leave the poultry to
stand after defrosting. With large poultry (e.g. small turkeys),
you can remove the giblets after approximately 30 minutes
standing time.
Defrost meat
With this programme you can defrost individual joints of meat.
Only thaw fruit (not defrost)
If you only wish to thaw the fruit slightly, you can make an
individual adjustment to the cooking result.
15
Page 16

Programme Note Accessories Level
Fish/whole fish max. 3 cm thick Perforated cooking container
Fish/Fish fillet max. 2.5 cm thick Perforated cooking container
Whole poultry max. 1.5 kg Perforated cooking container
Meat max. weight per piece 1.5 kg Perforated cooking container
Berries - Perforated cooking container
Special
Sterilising bottles
Always clean the bottles with a bottle brush immediately after
drinking. Then clean them in the dishwasher.
Place the bottles in the perforated cooking container so that
they do not touch one another.
Dry the bottles with a clean cloth after sterilising. The process
corresponds to normal sterilisation by boiling.
Preserving
This programme is suitable for fruits with a stone and core and
for vegetables (except beans).
Blanch pumpkin before preserving.
The programme is designed for 1 litre jars. For larger or smaller
jars, you must adjust the cooking result individually.
After the end of the programme, open the appliance door to
prevent overcooking in the remaining heat. Leave the jars to
cool down for a few minutes in the cooking compartment.
The programme is designed for firm fruit. If the fruit being used
is no longer firm, adjust the cooking results individually.
Cooking eggs
Pierce the eggs before cooking. Do not place eggs on top of
each other. Size M corresponds to a unit weight of approx.
50 g.
+
Baking tray
+
Baking tray
+
Baking tray
+
Baking tray
+
Baking tray
3
1
3
1
3
1
3
1
3
1
Programme Note Accessories Level
Sterilising bottles* - Perforated cooking container 2
Preserving in 1 litre glass jars Perforated container +
Baking tray
Eggs/hard-boiled eggs* Eggs, size M, Max. 1.8 kg Perforated container +
Baking tray
Eggs/soft-boiled eggs* Eggs, size M, max. 1 kg Perforated container +
Baking tray
* You can delay the end time for this programme
3
1
3
1
3
1
Memory
The memory function allows you to save a programme of your
own and access it again at the touch of a button. The memory
function is useful for dishes you prepare particularly frequently.
Saving to the Memory function
1.Set the heating type, temperature and, if required, a cooking
time. Do not start operation.
2.Press and hold the f button until "Memory saved" is
displayed.
The memory setting is saved.
If you save another setting using the
overwritten.
f button, the old setting is
Starting the memory function
The saved setting can be started at any time.
1.Press the f button briefly.
2.Press the n button.
The memory setting is started.
The setting can be changed at any time. When you start the
memory the next time, the original saved setting appears again.
16
Page 17

Childproof lock
The appliance has a childproof lock to prevent children
switching it on accidentally or changing a setting.
Even with the childproof lock activated, you can switch the
appliance off, set the timer and switch off the audible signal
using the
% button or pressing and holding the n button.
Activating the childproof lock
Press and hold the D button for approx. 4 seconds until the
D symbol appears.
The control panel is locked.
Deactivating the childproof lock
Press and hold the D button until the symbol goes out. You
can make settings again.
Basic settings
Your appliance has various basic settings, which are preset at
the factory. You can change the basic settings as you require.
If you want to cancel all the changes, you can restore the
factory settings.
The appliance must be switched off.
1. If required, press the % button to switch off the appliance.
2. Press the ° button.
“Basic settings” and “Select language” appear in the display.
Basic setting Function Possible settings
Select language Changes the display language 30 different languages
Signal duration Sets the length of the audible signal at the end of an opera-
Button tone Switches on/off the audible signal that sounds when you
Display brightness Changes display brightness day / medium / night
Contrast Changes display contrast
Clock display Display the clock when the appliance is off off / on
Continue operation after the door
is closed.
Adjust individually Set programme cooking results to be generally higher or
Water hardness Sets the water hardness range for the descaling indicator softened / 1soft / 2medium /
Steam cooking heat signal Audible signal at the end of the heating up phase during
Display button description Switches the button description display on or off when the
Restore factory settings Restore the appliance to the factory settings:
tion
press a button
The operation does not go back to the beginning when the
appliance door is opened
lower
steaming
appliance is switched on
■ all changes to the basic settings are deleted
■ Memory is cleared
■ Automatic calibration is carried out again
3. Turn the rotary selector until the required basic setting
appears.
4. Press the X button to switch to the bottom line.
5. Turn the rotary selector to change the setting.
6. Press the ° button to exit Basic settings.
The change is saved.
You can change the following basic settings:
short / medium / long
off / on
7 levels -
off / automatic
7 levels -
3hard / 4very hard
off / on
shown / hidden
do not restore / restore
ЫЫЫЪЫЫЫ +
ЫЫЫЪЫЫЫ +
Automatic switch-off
If you do not change the settings on your appliance for several
hours, the automatic switch-off function will be activated.
"Automatic switch-off" appears in the display.
Press any button to deactivate the automatic switch-off. You
can now make new settings.
17
Page 18

Care and cleaning
In this section, you will find information on
■ care and cleaning of your appliance
■ the cleaning aid
■ descaling
ã=Risk of short circuit!
Do not use high-pressure cleaners or steam jet cleaners to
clean your appliance.
Caution!
Risk of surface damage: Do not use
■ harsh or abrasive cleaning agents
■ oven cleaners
■ corrosive or aggressive cleaners, or those containing
chlorine
■ cleaning agents with a high alcohol content
If such an agent comes into contact with the front of the
appliance, wash it off immediately with water.
Caution!
Risk of surface damage: If descaler or the oven and grill
cleaning gel comes into contact with the front of the appliance
or other sensitive surfaces, wash it off immediately with water.
Remove food residues from the cooking compartment as soon
as the appliance has cooled. Burnt-on remains will be much
harder to remove later.
For heavy soiling use the cleaning aid (see section: Cleaning
aid).
Salts are very corrosive and can cause rust. Remove remains
of acidic sauces (ketchup, mustard) or salted food from the
cooking compartment immediately after cooling.
Do not use hard scouring pads or cleaning sponges.
Cleaning agents
Appliance exterior (with aluminium front) Use soapy water and dry with a soft cloth.
Appliance exterior (with stainless steel
front)
Cooking compartment interior with evaporator dish
Grease filter Remove the grease filter on the back wall of the cooking compartment by lifting it off
Mild window cleaning agent - wipe the aluminium front horizontally and without applying pressure using a soft window cloth or a lint-free microfibre cloth.
Use soapy water and dry with a soft cloth.
Always remove flecks of limescale, grease, starch and albumin (e.g. egg white) immediately. Special stainless steel cleaning agents can be obtained from the after-sales
service or from specialist retailers.
Hot, soapy water or a vinegar solution use the enclosed cleaning sponge or a soft
washing-up brush.
Caution!
The cooking compartment could rust.: Do not use steel pads or scourers.
If the cooking compartment contains heavy deposits of dirt, use only the oven and grill
cleaning gel recommended by the after-sales service (ordering no. 463 582, also
available online in the eShop). Follow the manufacturer's instructions. Other oven
cleaners could damage the appliance.
The cooking compartment light and the seals around the door, light and evaporator
dish must not come into contact with the gel. Allow the gel to act for at least 12 hours
and do not switch on the appliance during this time. Then rinse out the cooking compartment thoroughly with water (e.g. with a spray bottle) to remove all gel residues.
upwards and clean it with hot soapy water or in the dishwasher. Clean the grease filter
every time heavy dirt deposits have been left behind after cooking
ã=Risk of injury!
You could hurt yourself on the grease filter hooks. Always clean the grease filter with
care. Always place the grease filter in the dishwater so that the hooks for fixing it in place
are facing downwards.
Water tank Soapy water - do not clean in the dishwasher.
Water tank recess Rub dry after every use
Seal in the water tank lid Thoroughly dry after every use
Rails See section: Cleaning the rails
Door panels See section: Cleaning the door panels
Caution!
Surface damage: After cleaning, wipe the door panels with glass cleaner, then dry. Oth-
erwise, stains will appear which it will not be possible to remove.
Door seal Hot soapy water
Accessories Soak in hot soapy water. Clean with a washing-up brush or sponge or in the dish-
washer.
Clean stains caused by starchy food (e.g.rice) with a vinegar solution
18
Page 19

Cleaning sponge
The enclosed cleaning sponge is very absorbent. Use the
cleaning sponge only for cleaning the cooking compartment
and for removing residual water from the evaporator dish.
Wash the cleaning sponge thoroughly before using for the first
time. You can wash the cleaning sponge in the washing
machine (hot wash).
Microfibre cloth
The honeycomb microfibre cloth is particularly suitable for
cleaning sensitive surfaces such as glass, glass ceramic,
stainless steel or aluminium (product no. 460 770, also
available from our online eShop). It removes liquid and greasy
deposits in one go.
Roasting set
If possible, use the roasting set when roasting (ordering
no. HEZ36DB, also available online in the eShop). This
considerably reduces the amount of spatter from the roast and
therefore the amount of soiling in the cooking compartment.
Cleaning aid
The cleaning aid loosens dirt in the cooking compartment using
steam. It can then be removed easily.
The cleaning process consists of:
■ Cleaning (approx. 30 minutes), then empty the evaporator
dish and wipe out the appliance
■ 1st rinse (20 seconds), then empty the evaporator dish
■ 2nd rinse (20 seconds), then remove the remaining water
All three steps must be completed in full. The appliance is
ready for operation again only after the 2nd rinse.
Preparation
Allow the cooking compartment to cool down and remove the
accessories. Clean the evaporator dish with the enclosed
cleaning sponge.
Put a drop of washing-up liquid into the evaporator dish on the
cooking compartment floor.
Starting the cleaning aid
1. Press the % button to switch on the appliance.
2. Press the r button.
"Clean" appears in the display.
3. Fill the water tank with water up to the "max" mark and slide it
in.
4. Press the n button.
The cleaning aid starts running. The light in the cooking
compartment remains switched off.
Emptying the evaporator dish and wiping out the appliance
A signal sounds after approx. 30 minutes. "Empty dish and
wipe out appliance" and "00:00:40" appear in the display.
1. Open the appliance door.
"Appliance ready to rinse" appears in the display.
2. Take the rails out of the cooking compartment and clean
them (see section: Cleaning the rails).
3. Wipe out all loosened food residues from the cooking
compartment and the evaporator dish using a soft washingup brush and the cleaning sponge.
4. If required, fill the water tank with water and reinsert it.
5. Close the appliance door.
"Continue operation with
1st rinse
Press the
n button.
The appliance starts rinsing. "1st rinse" appears in the display.
n" appears in the display.
Empty evaporator dish
After 20 seconds, "Empty dish" and "00:00:20" appear in the
display.
1. Open the appliance door.
"Appliance ready to rinse" appears in the display.
2. Thoroughly rinse out the cleaning sponge.
3. Remove the remaining water from the evaporator dish using
the cleaning sponge.
4. Close the appliance door.
"Continue operation with
n" appears in the display.
2nd rinse
Press the
n button.
The appliance starts rinsing. "2nd rinse" appears in the display.
Removing the remaining water
After 20 seconds, "Empty dish" and "00:00:00" appear in the
display.
1. Open the appliance door.
2. Remove the remaining water from the evaporator dish using
the cleaning sponge.
3. Wipe out the cooking compartment using the cleaning
sponge and then dry with a soft cloth.
4. Press the % button to switch off the appliance.
The cleaning aid is complete.
Cancelling the cleaning aid
Note: After cancelling the cleaning aid, the appliance must be
rinsed twice. The appliance is locked against other applications
until the second rinsing operation is complete.
1. Press and hold the n button in order to cancel the cleaning
aid.
“Continue
n operation” and “Clean” appear in the display.
To ensure that no washing-up liquid remains in the appliance,
it must be rinsed twice after a cancellation.
2. Press the n button.
“Empty dish and wipe out appliance” appears in the display.
3. If required, fill the water tank with water, reinsert it and press
the
n button.
Now proceed as described in the section “Emptying the
evaporator dish and wiping out the appliance”.
Descaling
The appliance must be descaled at regular intervals in order for
it to continue operating correctly. "Descale the appliance"
reminds you of this.
You can only dispense with descaling completely if you
exclusively use softened water.
The descaling consists of:
■ Descale (approx. 30 minutes), then empty the evaporator
dish and refill the water tank
■ 1st rinse (20 seconds), then empty the evaporator dish
■ 2nd rinse (20 seconds), then remove the remaining water
All three steps must be completed in full. The appliance is
ready for operation again only after the 2nd rinse.
Descaler
Only use the liquid descaler recommended by the after-sales
service for descaling (product no. 311 138, also available
online from the eShop). Other descalers may damage the
appliance.
1. Prepare a descaling solution by mixing 300 ml water and
60 ml liquid descaler.
2. Empty the water tank and fill with descaling solution.
19
Page 20
Caution!
$
%
Risk of surface damage: If descaler comes into contact with the
front of the appliance or any other sensitive surfaces, wash it off
immediately with water.
Starting descaling
The cooking compartment must have cooled down completely.
1.Press the % button to switch on the appliance.
2.Press the r button.
"Clean" appears in the display.
3.Turn the rotary selector until "Descale" appears.
4.Slide in the water tank containing the descaling solution and
close the appliance door.
5.Press the n button.
The descaling process starts. The light in the cooking
compartment remains switched off.
Emptying the evaporator dish and refilling the water tank
A signal sounds after approx. 30 minutes. "Empty dish and refill
water tank" and "00:00:40" appear in the display.
1.Open the appliance door.
2.Remove the descaling solution from the evaporator dish
using the cleaning sponge supplied.
3.Rinse the water tank thoroughly, fill with water and reinsert.
"Appliance ready to rinse" appears in the display.
4.Close the appliance door.
"Continue operation with
1st rinse
Press the
The appliance starts rinsing. "1st rinse" appears in the display.
Empty evaporator dish
After 20 seconds, "Empty dish" and "00:00:20" appear in the
display.
1.Open the appliance door.
"Appliance ready to rinse" appears in the display.
2.Thoroughly rinse out the cleaning sponge.
3.Remove the remaining water from the evaporator dish using
the cleaning sponge.
4.Close the appliance door.
"Continue operation with
2nd rinse
Press the
The appliance starts rinsing. "2nd rinse" appears in the display.
Removing the remaining water
After 20 seconds, "Empty dish" and "00:00:00" appear in the
display.
1.Open the appliance door.
2.Remove the remaining water from the evaporator dish using
the cleaning sponge.
3.Wipe out the cooking compartment using the cleaning
sponge and then dry with a soft cloth.
4.Press the % button to switch off the appliance.
Descaling is complete.
n button.
n button.
n" appears in the display.
n" appears in the display.
Cancelling the descaling
Note: After cancelling the descaling, you must rinse the
appliance twice. The appliance is locked against other
applications until the second rinsing operation is complete.
1.Press and hold the n button to cancel the descaling
process.
"Cleaning system", "Continue operation with
"Descale" appear in the display.
To ensure that no descaling solution remains in the
appliance, it must be rinsed twice after a cancellation.
2.Press the n button.
"Empty dish and refill water tank" appears in the display.
Now proceed as described in the "Emptying the evaporator
dish and refilling the water tank" section.
Descaling the evaporator dish only
You can also use "Descale" if you do not wish to descale the
whole appliance, but only the evaporator dish in the cooking
compartment.
The only difference is as follows:
1.Prepare a descaling solution by mixing 100 ml water and
20 ml liquid descaler.
2.Completely fill the evaporator dish with descaling solution.
3.Fill the water tank with water only.
4.Start "Descale" as described.
You can also descale the evaporator dish manually.
n" and
Removing and fitting the appliance door
You can remove the appliance door to clean it more
thoroughly.
ã=Risk of injury!
The hinges of the appliance door may snap shut with great
force. Always open the hinge locking lever fully when removing
the appliance door and close it fully after refitting. Do not reach
into the hinge.
ã=Risk of injury!
If the appliance door has only been unhinged on one side, do
not reach into the hinge. The hinge can snap back with great
force. Call the aftersales service.
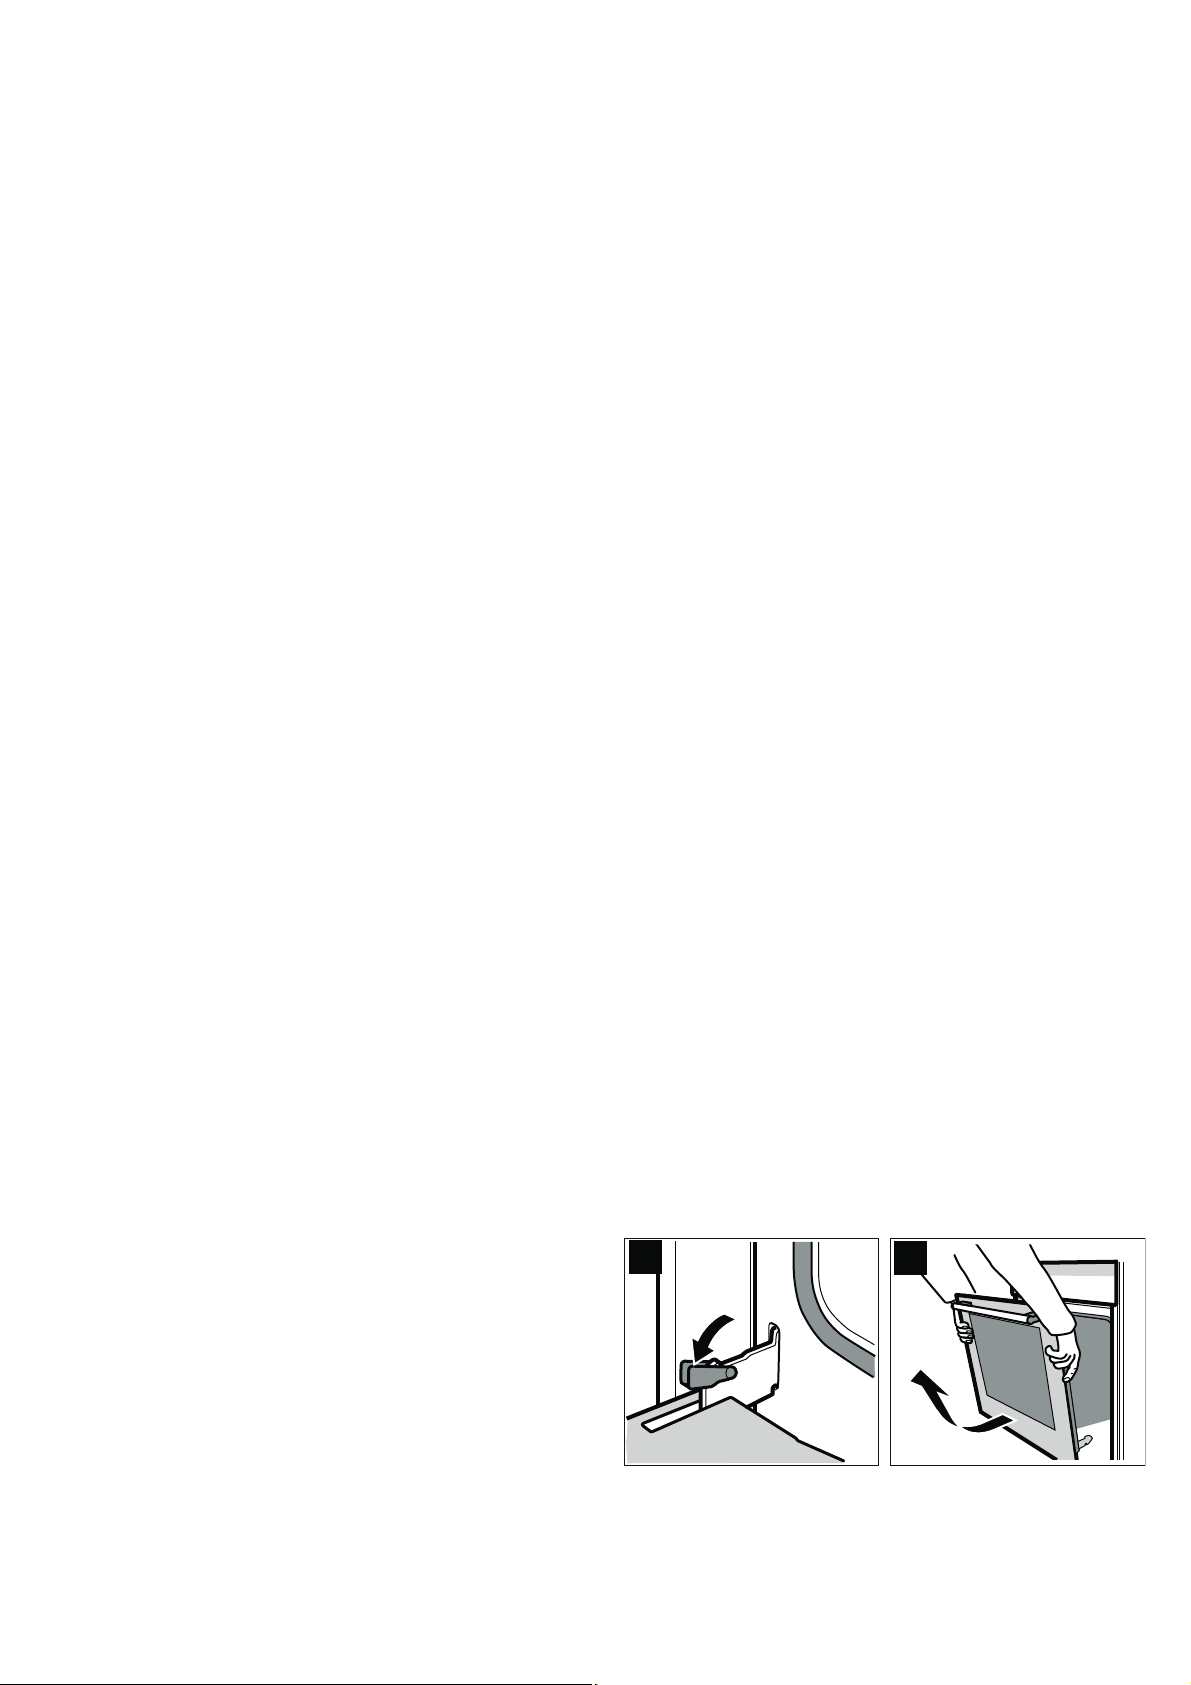
Removing the appliance door
1.Open the appliance door fully.
2.Fold out the locking levers on the left and right fully (figure A).
The hinges are secured and cannot snap closed.
3.Close the appliance door until you feel some resistance.
4.With both hands, grip the door on the left and right-hand side,
close the door a little more and pull it out (Fig. B).
20
Page 21
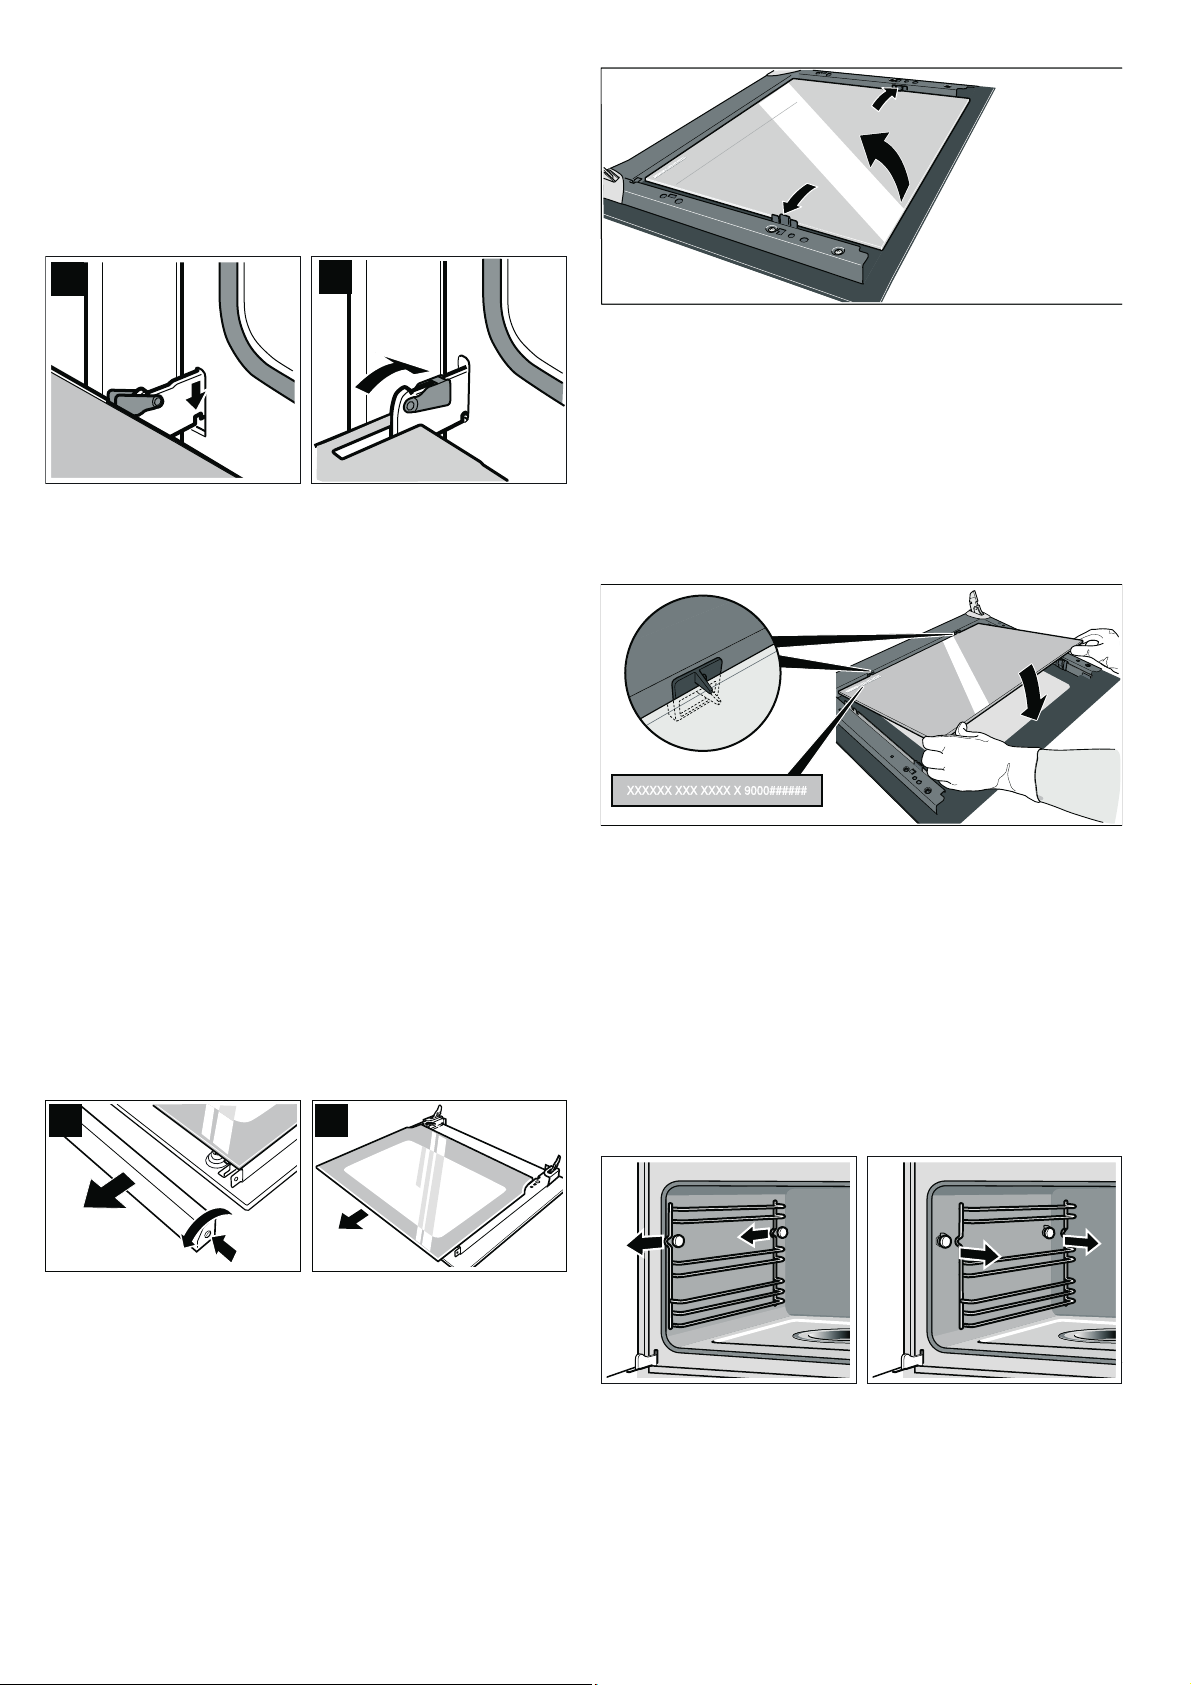
Fitting the appliance door
&
'
$
%
Refit the appliance door after cleaning.
1. Insert the hinges in the left and right-hand bracket (figure C).
The notch on both hinges must engage.
2. Open the appliance door fully.
3. Close the locking levers on the left and right-hand side fully
(figure D).
The appliance door is secured and can no longer be
removed.
4. Close the appliance door.
Cleaning the door panels
To facilitate cleaning, you can remove the door panels from the
appliance door.
Cleaning
Clean the door panels with glass cleaner and a soft cloth.
Caution!
Do not use any sharp or abrasive medium or a glass scraper.
The glass could be damaged.
Fitting the intermediate panel
1. Insert the intermediate panel on the left and right into the
supports.
2. Push the intermediate panel downwards in the retainers.
ã=Risk of injury!
The components inside the appliance door may have sharp
edges. Take care not to cut yourself. Wear protective gloves.
ã=Risk of injury!
The appliance must not be used again until the door panels
and appliance door have been correctly fitted.
Removing the door panel
Note: Before removing, make a note of the orientation in which
the door panel is fitted, so that it is not refitted the wrong way
round.
1. Unhook the appliance door and lay it on a soft, clean surface
with the front side facing downwards (see section: Removing
and installing the appliance door).
2. Unscrew the cover at the top left and right of the appliance
door and detach it (figure A).
3. Lift the door panel and remove it (figure B).
Fitting the door panel
1. Slide in the door panel all the way.
2. Put the cover back in place and screw it in.
3. Refit the appliance door.
Cleaning the rails
The rails can be removed for cleaning.
ã=Risk of burning due to hot components in the cooking
compartment!
Wait until the cooking compartment has cooled down.
1. Pull the rails forwards and unhook them to the side.
Removing the intermediate panel
Before removing, make a note of the position in which the
intermediate panel is fitted, so that you do not refit it the wrong
way round later.
1. Press the left and right-hand holders outwards.
2. Lift the intermediate panel slightly and take it out.
2. Clean the rails with washing-up liquid and a sponge/brush
or
Clean the rails in the dishwasher.
3. Hook the rails in at the back and front and slide them back
until they engage.
Each set of rails only fits on one side.
21
Page 22

Troubleshooting
Malfunctions often have simple explanations. Please read the
following instructions before calling the after-sales service.
Repairs may only be carried out by fully trained after-sales
service technicians. Incorrect repairs to your appliance may
present considerable risks for the user.
Problem Possible cause Notes/remedy
The appliance does not work The plug is not plugged into the mains. Connect the appliance to the electricity
Power cut Check whether other kitchen appliances
Fuse defective Check in the fuse box to make sure that
Faulty operation Switch the appliance off using the fuse in
The appliance cannot be started The appliance door is not fully closed Close the appliance door.
The appliance cannot be started, the dis-
play shows
"Cleaning system"
"Continue operation with
"Descale"
The appliance cannot be started, the display shows
"Cleaning system"
"Continue operation with
"Clean"
"Clock" appears in the display Power cut Reset the clock
The appliance is not in operation. A cooking time is shown in the display.
"Automatic switch-off" appears in the display
"Fill water tank" appears even though the
water tank is full
"Fill water tank" appears even though the
water tank is not yet empty, or "Fill water
tank" does not appear even though the
water tank is empty
The water tank empties for no discernible
reason. The evaporator dish is overflowing
Liquid in the evaporator dish has fully
evaporated, even though the water tank is
full.
"Empty tank/clean?" appears in the display The appliance has not been used for at
There is a "pop" noise during cooking Cold/warm effect with frozen food, caused
When you cook with steam, a lot of steam
is created
n"
n"
Descaling has been cancelled
The cleaning aid has been cancelled
The rotary selector was accidentally operated
n button was not pressed after mak-
The
ing the setting
The Automatic switch-off is active. Press any button.
The water tank has not been pushed in
properly
The detection system is not working Call the after-sales service
The water tank is dirty. The mobile water
level indicators are jammed
The water tank was not closed properly Close the lid until you feel it engage
The tank lid seal is dirty Clean the seal
The seal in the tank cover is defective Obtain a new water tank from the after-
The water tank has not been pushed in
properly
The feed line is blocked Descale the appliance. Check whether the
least two days and the water tank is full
by the steam.
The appliance is being automatically cali-
brated
ã=Risk of electric shock!
■ Work on the appliance electronics may only be performed by
a specialist.
■ Always disconnect the appliance from the power supply
when work is carried out on the electronics. Switch off the
circuit breaker or remove the fuse from your household fuse
box.
supply
are working
the fuse for the appliance is OK
the fuse box. Wait approximately 10 seconds and then switch it back on.
Press the
ance twice (see section: Descaling. Proceed as described under "Emptying the
evaporator dish and refilling the water
tank")
Press the
ance twice (see section: Cleaning aid. Proceed as described under "Emptying the
evaporator dish and wiping out the appliance")
(see section: Time-setting options)
Press the
Press the n button or delete the setting
with the
Slide in the water tank until it engages
Shake and clean the water tank. If the
parts cannot be released, obtain a new
water tank from the after-sales service
sales service
Slide in the water tank until it engages
water hardness range is set correctly
Empty and clean the water tank. Always
empty the water tank after cooking
This is normal
This is normal
n button. Then rinse the appli-
n button. Then rinse the appli-
% button
% button
22
Page 23
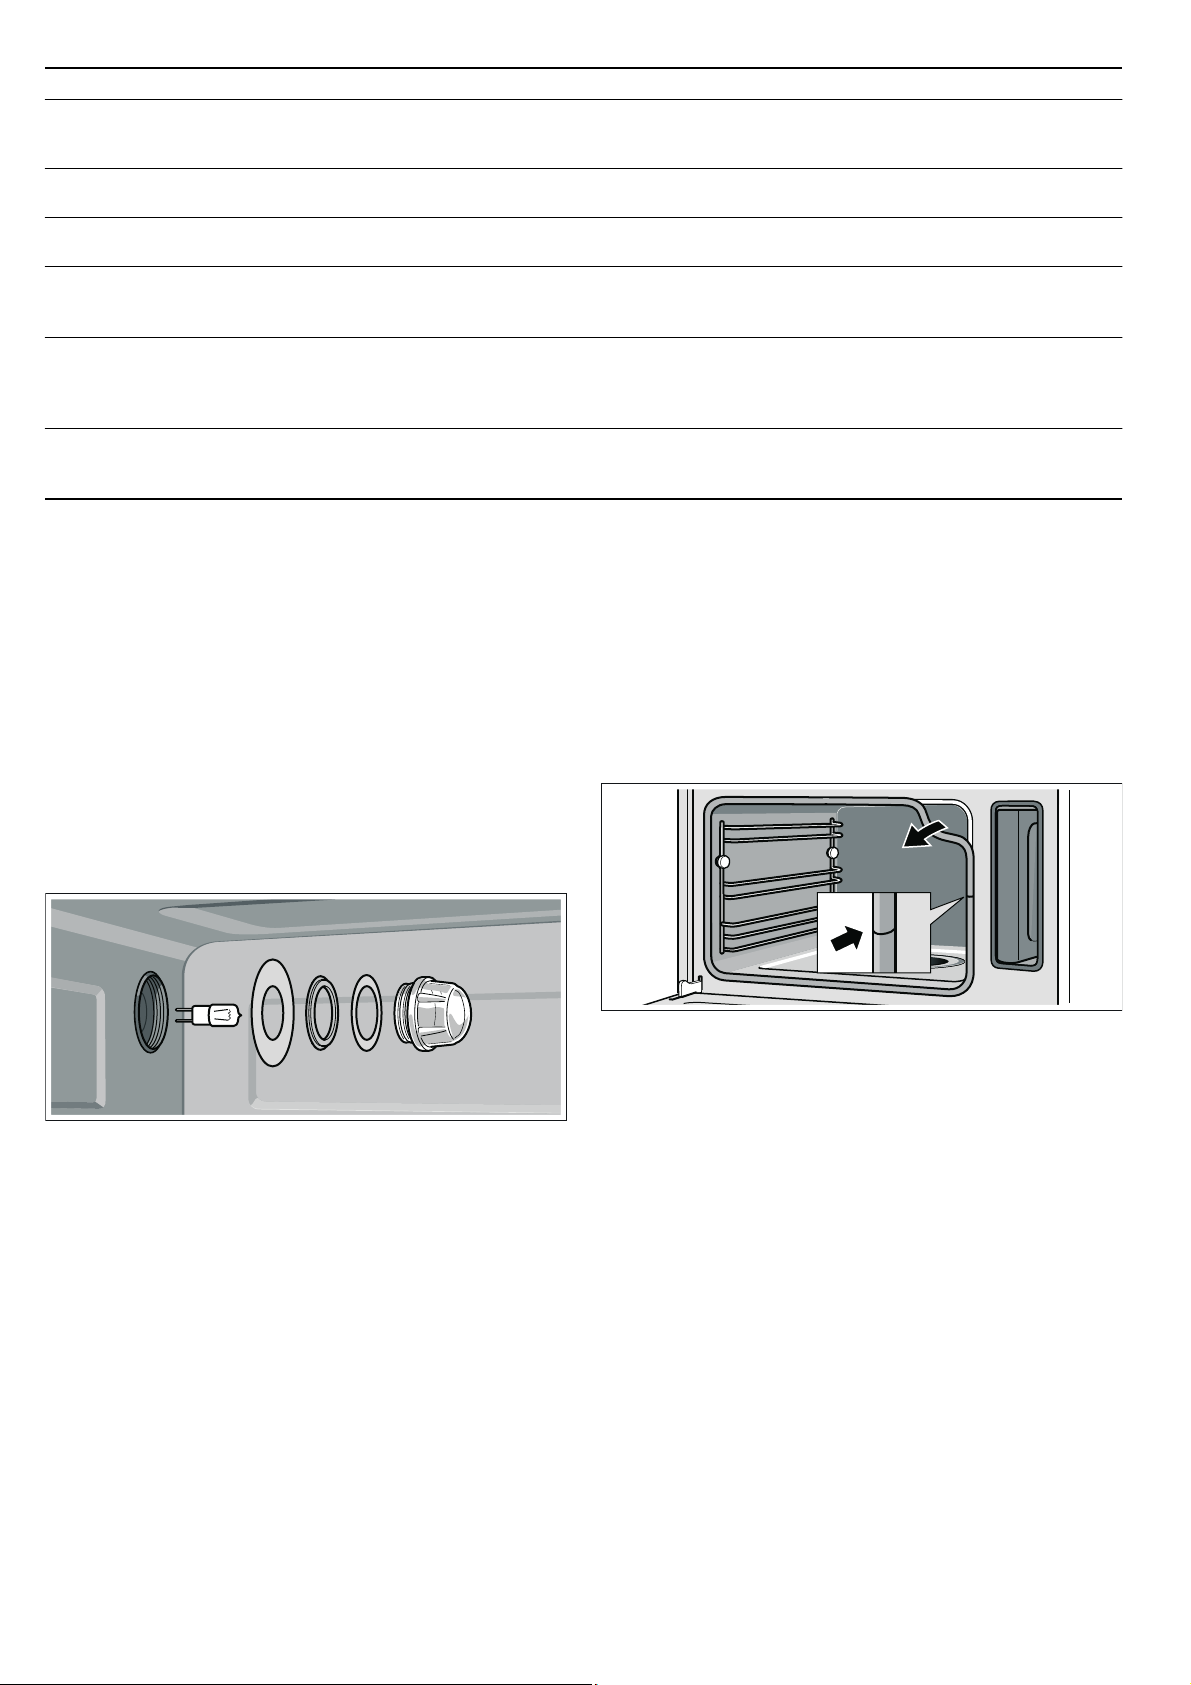
Problem Possible cause Notes/remedy
When cooking with steam, a lot of steam is
produced repeatedly
Steam escapes from the ventilation slots
during cooking
The appliance is not producing steam
properly
Error message "E011" appears in the display
An error message "E..." appears in the display
The appliance is not heating. "Demo" is
shown in the display
The appliance is unable to calibrate itself
automatically if cooking times are too
short
Limescale has formed in the appliance Start the descaling programme.
A button was pressed for too long or is
jammed
Technical fault.
A button combination was actuated Disconnect the power supply and recon-
Restore the appliance to the factory setting (see section: Basic settings). Then
start steaming at 100 °C for 20 minutes
This is normal
Press the
message Press all of the buttons individually and check whether they are clean
Press the 0 button to delete the error
message. Reset the clock if required.
If the error message appears again, call
the after-sales service
nect after 10 seconds. Within 2 minutes,
press the
0 button to delete the error
D button for 4 seconds
Replacing the cooking compartment bulb
Heat-resistant 230 V/25 W halogen bulbs with seals are
available from the after-sales service. Please specify the E
number and FD number of your appliance.
ã=Risk of burns!
Allow the cooking compartment and cooking compartment light
to cool before changing the bulb.
Always use a dry cloth to remove a new halogen bulb from the
packaging, otherwise it will not last as long.
1. Switch off the fuse in the fuse box or unplug at the mains.
2. Turn the cover anti-clockwise to remove.
3. Remove the bulb and replace with a bulb of the same type.
4. Slide the new seals and the clamping ring onto the glass
cover in the right order.
Changing the door seal
If the seal around the outside of the cooking compartment is
faulty, it must be replaced. Replacement seals for your
appliance can be obtained from the after-sales service. Please
specify the E number and FD number of your appliance.
1. Open the appliance door.
2. Pull off the old seal.
3. Push in the new door seal at one point and pull it in all the
way round. The joint must be at the side.
4. Check again that the seal is correctly fitted in the corners.
5. Screw the glass cover with the seals back on again.
6. Connect the appliance to the mains and reset the clock.
Never operate the appliance without the glass cover and seals.
Replacing the glass cover or seals
Any damaged glass cover or seals must be replaced. Please
provide the after-sales service with the E number and FD
number of your appliance.
23
Page 24
After-sales service
Our after-sales service is there for you if your appliance needs
to be repaired. We will always find the right solution in order to
avoid unnecessary visits from a service technician.
E number and FD number
When calling us, please give the product number (E no.) and
the production number (FD no.) so that we can provide you with
the correct advice. The rating plate bearing these numbers can
be found on the lower left-hand side when you open the
appliance door.
You can make a note of the numbers of your appliance and the
telephone number of the after-sales service in the space below
to save time should it be required.
E no.
FD no.
Environmental protection
Unpack the appliance and dispose of the packaging in an
environmentally-responsible manner.
Environmental protection
This appliance is labelled in accordance with the
European Directive 2002/96/EU concerning used
electrical and electronic appliances (WEEE –
waste electrical and electronic equipment). The
guideline determines the framework for the return
and recycling of used appliances as applicable.
Tips for saving energy
■ Only preheat the appliance if this is specified in the recipe or
in the operating instructions table.
After-sales service O
Please note that there will be a fee for a visit by a service
technician in the event of a malfunction, even during the
warranty period.
Please find the contact data of all countries in the enclosed
customer service list.
To book an engineer visit and product advice
GB 0844 8928979
Calls from a BT landline will be charged at up to 3
pence per minute. A call set-up fee of up to 6 pence may
apply.
IE 01450 2655
Trust the expertise of the manufacturer, and rest assured that
the repair will be carried out by trained service technicians
using original spare parts for your domestic appliance.
■ Open the appliance door as infrequently as possible while
the food is cooking.
■ Use dark, black lacquered or enamelled baking tins for
baking. They absorb the heat particularly well.
■ It is best to bake several cakes one after the other. The
combination steam oven will still be hot. This reduces the
baking time for the second cake. You can also place two loaf
tins next to each other.
■ If the cooking time is relatively long, you can switch off the
combination steam oven 10 minutes before the end of the
cooking time and use the oven's residual heat to complete
the cooking process.
■ When steaming, you can cook on several levels at the same
time. When preparing foods with different cooking times,
those with the longest cooking time should be placed in the
oven first.
Tables and tips
The tables contain a selection of dishes which are particularly
suitable for your combination steam oven. You can find out
which operating mode, accessories and cooking time to select.
Unless otherwise stated, the information given applies to
inserting accessories when the appliance is cold.
Accessories
Use the accessories provided.
When steaming in the perforated cooking container, always
insert the baking tray underneath. Dripping liquid is caught.
Ovenware
When using ovenware, always place it in the middle of the wire
rack.
Ovenware must be heat and steam resistant. Cooking times are
increased if thick-sided ovenware is used.
Food which would normally be prepared in a bain-marie should
always be covered with foil (e.g.when melting chocolate).
Grease filter
Leave the grease filter in the cooking compartment for all
applications.
24
Steam
Steaming is a particularly gentle way of cooking food. The
steam surrounds the dish thereby preventing a loss of nutrients
from the food. Cooking takes place without excess pressure.
As a result, the shape, colour and typical aroma of the dishes
are retained.
Cooking times and quantities
The cooking times when steaming depend on the item size, but
do not depend on the total quantity. The appliance can steam
food to a maximum of 2 kg.
Follow the unit sizes given in the tables. The cooking time is
reduced for smaller pieces and increased for larger ones.
Cooking time is also influenced by the quality and ripeness of
the food. The values quoted can therefore only serve as a
guideline.
Distributing food evenly
Always distribute the food evenly in the ovenware. It will not
cook evenly if the layers are of different depths.
Page 25

Pressure-sensitive food
When layering delicate foods in the cooking container, do not
pile them too high. It is better to use two containers.
Cooking a menu
With steam, you can cook a whole menu at once, without the
different flavours mixing. Place the food with the longest
cooking time in the appliance first and delay the rest until the
appropriate time. This means that all the food will be ready at
the same time.
The overall cooking time is extended with menu cooking, as a
little steam escapes each time the appliance door is opened
and has to be reheated.
Hot air
The Hot Air operating mode is ideal for sweet and savoury
baking, pot roasts and various cakes.
Combination
Because combination cooking combines the use of hot air and
steam, it is particularly suitable for preparing roasted joints,
chicken and baked goods such as yeast-risen pastry and
bread.
Roasts and chicken are nice and crisp on the outside and juicy
inside. What is more, meat loses less of its weight.
Baked items, such as yeast-risen pastry and bread, take on a
particularly attractive surface shine and they do not dry out.
Vegetables
Place the vegetables in the perforated cooking container and
insert at level 3. Insert the baking tray underneath at level 1.
Dripping liquid is caught.
Food Size Accessories Operating
Artichokes whole perforated + baking tray Steam 100 30 - 35
Cauliflower whole perforated + baking tray Steam 100 30 - 40
Cauliflower florets perforated + baking tray Steam 100 10 - 15
Broccoli florets perforated + baking tray Steam 100 8 - 10
Peas - perforated + baking tray Steam 100 5 - 10
Fennel slices perforated + baking tray Steam 100 10 - 14
Stuffed vegetables
(courgettes, aubergines, peppers)
Vegetable flan - 1.5 l bain-marie + wire
Green beans - perforated + baking tray Steam 100 15 - 20
Carrots slices perforated + baking tray Steam 100 10 - 20
Kohlrabi slices perforated + baking tray Steam 100 15 - 20
Leeks slices perforated + baking tray Steam 100 4 - 6
Sweetcorn whole perforated + baking tray Steam 100 25 35
Swiss chard* shredded perforated + baking tray Steam 100 8 - 10
Green asparagus* whole perforated + baking tray Steam 100 7 - 12
White asparagus* whole perforated + baking tray Steam 100 10 - 15
Spinach* - perforated + baking tray Steam 100 2 - 3
Romanesco florets perforated + baking tray Steam 100 8 - 10
Brussels sprouts sprouts perforated + baking tray Steam 100 20 30
Beetroot whole perforated + baking tray Steam 100 40 50
Red cabbage shredded perforated + baking tray Steam 100 30 - 35
White cabbage shredded perforated + baking tray Steam 100 25 35
Courgettes slices perforated + baking tray Steam 100 2 - 3
Mangetout - perforated + baking tray Steam 100 8 - 12
* Preheat the appliance
Do not precook vegetables
baking tray at level 2 Combination 160 - 180 15 - 30
rack at level 2
mode
Steam 100 50 - 70
Temperature
in°C
Cooking time
in min.
Side dishes and pulses
Add water or liquid in the proportion specified.
Example: 1:1.5 = add 150 ml liquid for every 100 g rice.
Food Ratio Accessories Level Mode of opera-
Unpeeled boiled potatoes
(Medium size)
Boiled potatoes
(Quartered)
Potato gratin - Baking tray 2 Heißluft 170 - 180 35 - 45
Brown rice 1:1,5 Solid - Steam 100 30 - 40
-Perforated +
baking tray
-Perforated +
baking tray
You may select any shelf position you wish for the solid
cooking container.
Temperature in °C Duration in
3
1
3
1
tion
Steam 100 35 - 45
Steam 100 20 - 25
min.
25
Page 26

Food Ratio Accessories Level Mode of opera-
tion
Long grain rice 1:1,5 Solid - Steam 100 20 - 30
Basmati rice 1:1,5 Solid - Steam 100 20 - 30
Parboiled rice 1:1,5 Solid - Steam 100 15 - 20
Risotto 1:2 Solid - Steam 100 30 - 35
Lentils 1:2 Solid - Steam 100 30 - 45
Canellini beans, pre-
softened
Couscous 1:1 Solid - Steam 100 6 - 10
Unripe spelt grain,
coarse ground
Millet, whole 1:2,5 Solid - Steam 100 25 - 35
Wheat, whole 1:1 Solid - Steam 100 60 - 70
Dumplings - Perforated +
1:2 Solid - Steam 100 65 - 75
1:2,5 Solid - Steam 100 15 - 20
baking tray
3
1
Steam 95 20 - 25
Temperature in °C Duration in
min.
Poultry and meat
Insert the wire rack and baking tray together at the same level.
When the roast is cooked, switch off the combination steam
oven and leave it to rest for a further 10 minutes with the door
closed. This will keep the meat juicy.
Cooking with the Combination mode leaves the meat
particularly juicy on the inside and crispy on the outside.
Poultry
Food Amount Accessories Level Operating
mode
Chicken, whole 1.2 kg wire rack + baking tray 2 Combination 180 190 50 - 60
Chicken, halved per 0.4 kg wire rack + baking tray 2 Combination 180 190 35 45
Chicken breast 0.15 kg each perforated +
baking tray
Chicken portions 0.12 kg each wire rack + baking tray 2 Combination 180 200 20 35
Duck, whole 2 kg wire rack + baking tray 2 Combination 170 60 80
Duck breast* 0.35 kg each wire rack + baking tray 2 Combination 170 180 10 - 15
Rolled turkey joint 1.5 kg wire rack + baking tray 2 Combination 150 160 70 90
Turkey breast 1 kg wire rack + baking tray 2 Combination 150 160 60 80
* Sear first
Beef
Food Amount Accessories Level Operating
Pot-roasted beef* 1.5 kg wire rack + baking tray 2 Reheat 140 - 150 100 - 140
Fillet of beef, medium* 1 kg wire rack + baking tray 2 Reheat 170 180 20 - 28
Thin slice of sirloin,
medium*
Thin slice of sirloin,
rare*
Thick piece of sirloin,
medium*
Thick piece of sirloin,
rare*
* Sear first
1 kg wire rack + baking tray 2 Hot air 170 180 40 - 55
1 kg wire rack + baking tray 2 Hot air 170 180 30 45
1 kg wire rack + baking tray 2 Hot air 170 180 45 60
1 kg wire rack + baking tray 2 Hot air 170 180 35 50
3
1
Steam 100 15 25
Hot air 210 15 - 20
mode
Temperature in°C Cooking time
in min.
Temperature in°C Cooking time
in min.
26
Page 27

Veal
Food Amount Accessories Level Operating
mode
Joint of veal, marbled 1 kg wire rack + baking tray 2 Combination 160 170 60 70
Joint of veal, lean 1 kg wire rack + baking tray 2 Combination 160 170 50 - 60
Veal back* 1 kg wire rack + baking tray 2 Combination 160 - 180 15 25
Breast of veal, stuffed 1.5 kg wire rack + baking tray 2 Combination 140 - 160 75 - 120
* Sear first
Pork
Food Amount Accessories Level Operating
mode
Joint without rind (e.g.
neck)
Joint with rind (crackling)
Fillet of pork* 0.5 kg wire rack + baking tray 2 Combination 160 - 180 20 30
Fillet in puff pastry 1 kg baking tray 2 Combination 180 200 40 60
Smoked pork on the
bone
Smoked pork ribs sliced baking tray 2 Steam 100 15 - 20
Rolled roasting joint 1.5 kg wire rack + baking tray 2 Combination 170 180 70 80
* Sear first
1.5 kg wire rack + baking tray 2 Combination 170 180 70 80
1.5 kg wire rack + baking tray 2 Steam 100 20 25
Combination 140 - 160 40 50
Hot air 210 - 220 20
1 kg wire rack + baking tray 2 Combination 120 140 60 70
Temperature in°C Cooking time
in min.
Temperature in°C Cooking time
in min.
Miscellaneous
Food Amount Accessories Level Operating mode Temperature in°C Cooking time
Meat loaf made from
0.5 kg minced
meat
Saddle of venison on
the bone*
Boned leg of lamb 1.5 kg wire rack + baking tray 2 Combination 170 180 60 80
Saddle of lamb on the
bone*
Rabbit portions 1.5 kg wire rack + baking tray 2 Combination 150 160 40 60
Wiener sausages - perforated +
Bavarian veal sausages
* Sear first
Roasting tips
Using the roasting set Using the roasting set will give optimum results and the cooking compartment will stay
When is the roast ready? Use a meat thermometer (available from specialist retailers) or carry out the "spoon test":
The roast is too dark and the outside is
burnt in places.
The roast looks good but the juices are
burnt.
The roast looks good, but the juices are
too clear and watery.
0.6 - 0.8 kg wire rack + baking tray 2 Combination 150 - 170 15 - 30
1.5 kg wire rack + baking tray 2 Combination 160 170 15 25
-perforated +
baking tray 2 Combination 140 - 150 45 60
3 1Steam 80 - 85 12 - 18
baking tray
3 1Steam 80 - 85 15 - 20
baking tray
as clean as possible. You can purchase the roasting set as an accessory from specialist
retailers (see section: Accessories)
press down on the roast with a spoon. If it feels firm, it is ready. If the spoon can be
pressed in, it needs to be cooked for a little longer.
Check the shelf height and temperature.
Next time, choose a smaller roasting dish or add more liquid.
Next time, choose a larger roasting dish or add less liquid.
in min.
27
Page 28

Fish
Food Amount Accessories Level Type of heating Temperature in °C Cooking time
in min.
Sea bream, whole per 0.3 kg perforated +
baking tray
Sea bream fillet per 0.15 kg perforated +
baking tray
Fish terrine Bain marie 1.5 l wire rack 2 Steam 70 80 40 - 80
Trout, whole per 0.2 kg perforated +
baking tray
Cod fillet per 0.15 kg perforated +
baking tray
Salmon fillet per 0.15 kg perforated +
baking tray
Mussels 1.5 kg baking tray 2 Steam 100 10 - 15
Ocean perch fillet per 0.15 kg perforated +
baking tray
Sole rolls, stuffed - perforated +
baking tray
3
1
3
1
3
1
3
1
3
1
3
1
3
1
Steam 80 90 15 25
Steam 80 90 10 - 20
Steam 80 90 12 - 15
Steam 80 90 10 - 14
Steam 100 8 - 10
Steam 80 90 10 - 20
Steam 80 90 10 - 20
Slow cooking meat
Slow cooking is the ideal cooking method for all tender pieces
of meat which are to be cooked medium rare or à point. The
meat remains very juicy and turns out as soft as butter.
Slide the baking tray into the combination steam oven and
preheat with the Slow cook operating mode.
Sear the meat on the hob on all sides.
Place in the preheated steam oven and continue to cook gently.
When cooked, arrange on preheated plates and serve with a
hot sauce or gravy.
Food Amount Accessories Level Temperature in°C Cooking time
in min.
Boned leg of lamb 1 - 1.5 kg baking tray 2 80 140 - 160
Sirloin 1.5 - 2.5 kg baking tray 2 80 150 180
Fillet of pork - baking tray 2 80 90 50 - 70
Pork medallions - baking tray 2 80 60 80
Beef steaks approx. 3 cm thick baking tray 2 80 40 60
Duck breast - baking tray 2 80 35 - 55
Bakes, soup ingredients, etc.
Food Accessories Level Operating
Savoury bake made from cooked
ingredients
Sweet bake ovenproof dish + wire rack 2 Combination 150 - 170 30 - 45
Lasagne baking tray 2 Combination 160 170 35 45
Soufflé mould + wire rack 2 Combination 180 200 15 25
Royale solid 2 Steam 90 15 - 20
Semolina dumplings perforated +
Hard-boiled eggs
(size M, max. 1.8 kg)
Soft-boiled eggs
(size M, max. 1 kg)
ovenproof dish + wire rack 2 Combination 150 - 170 30 - 40
baking tray
perforated +
baking tray
perforated +
baking tray
3
1
3
1
3
1
mode
Steam 90 - 95 7 - 10
Steam 100 10 - 12
Steam 100 6 - 8
Temperature in °C Cooking time
in min.
Dessert, compote
Compote:
Weigh the fruit and add approximately
then add sugar and spices to taste.
28
Y the amount of water,
Rice pudding
Weigh the rice and add 2.5 times the amount of milk. Ensure
the level of rice and milk in the accessory is no higher than
2.5 cm. Stir after cooking. The remaining milk is quickly
absorbed.
Page 29

Yoghurt
Heat the milk to 90 °C on the hob. Then leave to cool to 40 °C.
If you are using UHT milk, you do not need to heat it.
Stir in one to two teaspoons of natural yoghurt per 100 ml milk,
or the corresponding amount of yoghurt culture into the milk.
Pour the mixture into clean jars and seal them.
After preparation, leave the glass jars to cool in the refrigerator.
Food Accessories Operating
mode
Yeast dumplings baking tray Steam 100 20 25
Crème caramel mould + wire rack Steam 90 - 95 15 - 20
Sweet bake (e.g. semolina pudding) ovenproof dish + wire rack Combination 160 170 50 - 60
Rice pudding* baking tray Steam 100 25 35
Yoghurt* portion-sized glasses + wire rack Steam 40 300 - 360
Apple compote baking tray Steam 100 10 - 15
Pear compote baking tray Steam 100 10 - 15
Cherry compote baking tray Steam 100 10 - 15
Rhubarb compote baking tray Steam 100 10 - 15
Plum compote baking tray Steam 100 15 - 20
* You can also use the appropriate programme (see section: Automatic programmes)
Temperature
in°C
Cooking time
in min.
Cakes and pastries
It is best to use dark-coloured metal baking tins.
The temperature and cooking time depend on the quantity and
composition of the dough. That is why ranges of temperatures
are given in the tables.
Cakes in tins
Food Accessories Level Operating
Sponge cake Ring/loaf tin 2 Hot air 150 160 60 70
Sponge flan base flan tin 2 Hot air 150 160 30 45
Delicate fruit flan, sponge Springform cake tin 2 Hot air 150 160 45 - 55
Sponge base (2 eggs) flan tin 2 Hot air 180 190 12 - 16
Sponge flan (6 eggs) Springform cake tin 2 Hot air 150 160 25 35
Shortcrust pastry base with crust Springform cake tin 2 Hot air 150 160 40 50
Swiss flan Springform cake tin 2 Hot air 180 190 35 - 60
Ring cake ring cake tin 2 Combination 150 160 35 45
Savoury cakes (e.g. quiche) quiche dish 2 Hot air 180 190 35 - 60
Apple tart flan-base cake tin 2 Hot air 170 190 35 50
First set the lower temperature. This will brown the dish more
evenly. A higher temperature can be selected next time, if
required.
Do not overpack the wire rack or baking tray with food.
Temperature in°C Cooking time
mode
in min.
Cakes on trays
Food Accessories Level Operating
Yeast cake with dry topping baking tray 2 Combination 150 160 35 45
Yeast cake with moist topping (fruit) baking tray 2 Hot air 150 160 35 45
Swiss roll baking tray 2 Hot air 180 200 10 - 15
Plaited loaf (500 g flour) baking tray + greaseproof
paper
Strudel, sweet baking tray 2 Combination 160 - 180 40 60
Onion tart baking tray 2 Combination 170 180 30 - 40
Bread, bread rolls
Food Accessories Level Operating
White bread (750 g flour) baking tray + greaseproof paper 2 Combination 200 210 15 - 20
Sourdough bread (750 g flour) baking tray + greaseproof paper 2 Combination 200 220 15 25
2 Combination 150 160 25 35
mode
mode
Hot air 160 170 20 25
Hot air 150 160 40 60
Temperature in°C Cooking time
Temperature
in°C
in min.
Cooking time
in min.
29
Page 30

Food Accessories Level Operating
mode
Multigrain bread (750 g flour) baking tray + greaseproof paper 2 Combination 200 220 15 - 20
Hot air 160 170 25 40
Wholemeal bread (750 g flour) baking tray + greaseproof paper 2 Combination 200 220 20 30
Hot air 140 - 150 40 60
Rye bread (750 g flour) baking tray + greaseproof paper 2 Combination 200 220 20 30
Hot air 150 160 50 - 60
Bread rolls (70 g each, unbaked) baking tray + greaseproof paper 2 Combination 190 200 25 - 30
Rolls made with sweet yeast dough
(70 g each, unbaked)
Small baked items
baking tray + greaseproof paper 2 Combination 170 180 20 30
Temperature
in°C
Cooking time
in min.
Food Accessories Level Operating
mode
Meringue baking tray 2 Hot air 80 90 120 - 180
Macaroons baking tray 2 Hot air 140 - 160 15 25
Puff pastry baking tray 2 Combination 170 190 10 - 20
Muffins bun tray 2 Hot air 170 180 20 30
Choux pastry baking tray 2 Hot air 170 190 27 - 35
Biscuits baking tray 2 Hot air 150 160 12 - 17
Leavened cake baking tray 2 Hot air 150 160 15 - 20
Baking tips
You want to bake according to your own
recipe
How to tell whether sponge cake is
baked through
The cake collapses Next time, use less liquid or set the baking temperature 10 °C lower. Note the stirring
The cake has risen in the middle but is
lower around the edge
Cakes baked in a tray or tin are overbrowned at the back
The cake is too dry Make tiny holes in the finished cake using a cocktail stick. Then drizzle fruit juice or an
The bread or cake looks good but it is
soggy inside (overmoist with watery
streaks)
The cake or pastry is unevenly browned Next time, set the temperature a little lower
Use similar items in the baking tables as a guide
Approx. 10 minutes before the end of the baking time stated in the recipe, insert a cocktail stick into the cake at its deepest point. If the cocktail stick comes out clean, the cake
is ready.
times indicated in the recipe.
Do not grease the edge of the springform cake tin. After baking, carefully loosen the
cake using a knife
Place the baking tray in the middle of the accessories, not directly against the back wall
alcoholic drink over it. Next time, set the temperature 10 °C higher and shorten the baking times or use the Combination operating mode
Next time, use less liquid. Bake at a lower temperature for a little longer. For cakes with a
moist topping, bake the base first. Cover the base with almonds or bread crumbs first
and then apply the topping. Observe the baking time in the recipe
Temperature in°C Cooking time
in min.
Reheating food
Using Reheat, dishes can be gently reheated. They taste and
look like they have been freshly prepared. Even baked items
from the day before can be recrisped.
Food Accessories Level Operating
mode
Meals on plates wire rack 2 Reheat 120 12 - 18
Vegetables baking tray 3 Reheat 100 12 - 15
Pasta, potatoes, rice baking tray 3 Reheat 100 5 - 10
Bread rolls* wire rack 2 Combination 170 180 6 - 8
Baguette* wire rack 2 Combination 170 180 5 - 10
Bread* wire rack 2 Combination 170 180 8 - 12
Pizza wire rack + baking tray 3 Reheat 170 180 12 - 15
* Preheat for 5 minutes
30
Temperature in°C Cooking time
in min.
Page 31

Defrosting
When freezing, lay the food as flat as possible and in portionsized pieces at -18 °C. Do not freeze excessively large
quantities. Once defrosted, food will not keep for as long and
spoils more quickly than fresh food.
Leave the food to defrost in the freezer bag, on a plate or in the
perforated cooking container. Always insert the baking tray
underneath. The food is then not left lying in the defrost water
and the cooking compartment remains clean.
Use the Defrost operating mode.
If necessary, the food can occasionally be split apart or pieces
which have already defrosted can be removed from the
appliance.
After defrosting, allow the food to stand for a further 5 -
15 minutes to allow the temperatures to even out.
Food Amount Accessories Level Temperature in°C Cooking time in
Chicken 1 kg perforated +
Chicken drumsticks 0.4 kg perforated +
Vegetables frozen in blocks
(e.g. spinach)
Berries 0.3 kg perforated +
Fish fillet 0.4 kg perforated +
Whole fish 1 kg perforated +
Goulash - perforated +
Joint of beef - perforated +
0.4 kg perforated +
baking tray
baking tray
baking tray
baking tray
baking tray
baking tray
baking tray
baking tray
ã=Health risk!
When defrosting food from animal sources, you must remove
the liquid that escapes during defrosting. It must never come
into contact with other food. Bacteria could be transferred.
After defrosting, operate the combination steam oven for
15 minutes using Hot air at 180 °C.
Defrost meat
Allow pieces of meat which are to be breadcrumbed to defrost
to the point where seasoning and breadcrumbs adhere to the
meat.
Defrosting poultry
Remove from packaging before defrosting. You must tip the
defrost liquid away.
min.
3
1
3
1
3
1
3
1
3
1
3
1
3
1
3
1
45 - 50 60 70
45 - 50 30 - 35
45 - 50 20 30
45 - 50 5 - 8
45 - 50 15 - 20
45 - 50 40 50
45 - 50 40 50
45 - 50 70 80
Proving dough
When the Prove operating mode is used, dough will prove
considerably more quickly than at room temperature.
You may select any shelf position you wish for the wire rack or
place the wire rack carefully on the cooking compartment floor.
Caution: do not scratch the cooking compartment floor.
Food Amount Accessories Temperature in°C Cooking time
Yeast dough 1 kg bowl + wire rack 40 20 30
Sourdough 1 kg bowl + wire rack 40 20 30
Stand the dough bowl on the wire rack. Do not cover the
dough.
in min.
Juicing
Before juicing, place the berries in a bowl and sprinkle with
sugar. Leave to stand for at least one hour to draw out the
juice.
Food Accessories Level Mode of operation Temperature in °C Duration in min
Raspberries Perforated cooking container
+ baking tray
Red currants Perforated cooking container
+ baking tray
Pour the berries into the perforated cooking container and
insert at level 3. Insert the baking tray at level 1 to catch the
juice.
Finally, place the berries in a cloth and squeeze out the rest of
the juice.
3 1Steam 100 30 - 45
3 1Steam 100 40 - 50
31
Page 32

Preserving
Preserve food which is as fresh as possible. When foods are
stored for a relatively long period, their vitamin content is
reduced and they ferment and spoil more easily.
Only use fruit and vegetables which are in perfect condition.
The following foods cannot be preserved with your appliance:
Contents of tins, meat, fish or pastry dough.
Check preserving jars, rubber rings, clips and springs.
Clean rubber rings and jars thoroughly with hot water. The
"Sterilise bottles" programme is also suitable for cleaning
glasses.
Place the jars in the perforated cooking container. They must
not be in contact with each other.
After the specified cooking time, open the appliance door.
Do not remove the preserving jars from the appliance until they
have completely cooled down.
Food Accessories Position Type of heating Temperature in °C Cooking time
Vegetables 1-litre preserving jars 2 Steam 100 30 - 120
Stone fruits 1-litre preserving jars 2 Steam 100 25 - 30
Pip fruits 1-litre preserving jars 2 Steam 100 25 - 30
in min.
Frozen products
Observe the instructions on the packaging. The cooking times indicated apply to dishes placed in a cold
Food Accessories Level Operating
Chips baking tray + greaseproof paper 2 Hot air 170 190 25 35
Croquettes baking tray + greaseproof paper 2 Hot air 180 200 18 - 22
Rösti baking tray + greaseproof paper 2 Hot air 180 200 25 - 30
Pasta, fresh, refrigerated* baking tray 2 Steam 100 5 - 10
Lasagne, frozen baking tray + wire rack 2 Combination 190 210 35 - 55
Pizza, thin base baking tray + wire rack 2 Hot air 180 200 15 - 23
Pizza, deep-pan baking tray + wire rack 2 Hot air 180 200 18 - 25
Pizza baguette baking tray + wire rack 2 Hot air 180 200 18 - 22
Pizza, chilled baking tray 2 Hot air 170 180 12 - 17
Herb butter baguette, refrigerated baking tray 2 Hot air 180 200 15 - 20
Bread rolls, baguette, frozen baking tray + wire rack 2 Hot air 180 200 18 - 22
Pretzels, frozen baking tray + greaseproof paper 2 Hot air 180 200 18 - 22
Croissant, frozen baking tray + greaseproof paper 2 Combination 180 200 20 25
Part-cooked rolls or baguette, pre-
baked
Strudel, frozen baking tray + greaseproof paper 2 Combination 160 - 180 45 60
Fish fingers baking tray + greaseproof paper 2 Hot air 195 - 205 20 - 24
Trout perforated +
Frozen fish fillet with topping baking tray + wire rack 2 Combination 180 200 35 50
Salmon fillet Perforated cooking container +
Squid rings baking tray + greaseproof paper 2 Hot air 190 210 25 - 30
Broccoli Perforated cooking container +
Cauliflower Perforated cooking container +
Beans Perforated cooking container +
Peas Perforated cooking container +
Carrots Perforated cooking container +
Mixed vegetables Perforated cooking container +
Brussels sprouts Perforated cooking container +
* Add a little liquid
baking tray + greaseproof paper 2 Hot air 150 - 170 12 - 15
baking tray
baking tray
baking tray
baking tray
baking tray
baking tray
baking tray
baking tray
baking tray
cooking compartment.
mode
3
1
3
1
3
1
3
1
3
1
3
1
3
1
3
1
3
1
Steam 80 100 20 25
Steam 80 100 20 25
Steam 100 4 - 6
Steam 100 5 - 8
Steam 100 4 - 6
Steam 100 4 - 6
Steam 100 3 - 5
Steam 100 4 - 8
Steam 100 5 - 10
Temperature
in°C
Cooking
time in min.
32
Page 33

Test dishes
In accordance with EN 50304/EN 60350 (2009), and IEC
60350.
Food Accessories Level Operating
Piped cookies baking tray 2 Hot air 160 170 17 - 20
Small cakes baking tray 2 Hot air 160 170 25 - 33
Hot water sponge cake 26 cm springform cake tin 2 Hot air 150 160 35 - 40
German apple pie 20 cm springform cake tin 2 Hot air 160 170 60 70
The values in the table apply to dishes placed in a cold cooking
compartment.
mode
Temperature in°C Cooking time
in min.
33
Page 34

Page 35

Page 36

Robert Bosch Hausgeräte GmbH
Carl-Wery-Straße 34
81739 München
Germany
www.bosch-home.com
*9000698080*
9000698080
910816
 Loading...