

Page 1
ΕΎϤϴϠόΗϞϴϐθΘϟΔϴϠλϷ
OBJ_BUCH-424-004.book Page 1 Tuesday, March 15, 2011 3:22 PM
Robert Bosch GmbH
Power Tools Division
70745 Leinfelden-Echterdingen
Germany
www.bosch-pt.com
1 609 929 Y19 (2011.03) T / 180 UNI
GEX Professional
125 A | 125 AC | 150 AC
de Originalbetriebsanleitung
en Original instructions
fr Notice originale
es Manual original
pt Manual original
it Istruzioni originali
nl Oorspronkelijke
gebruiksaanwijzing
da Original brugsanvisning
sv Bruksanvisning i original
no Original driftsinstruks
fi Alkuperäiset ohjeet
el Рсщфьфхрп пдзгйюн чсЮузт
tr Orijinal işletme talimat
pl Instrukcja oryginalna
cs Původní návod k používání
sk Pôvodný návod na použitie
hu Eredeti használati utasítás
ru Оригинальное руководство по
эксплуатации
uk Ориг³нальна ³нструкц³я з
експлуатац³¿
ro Instrucţiuni originale
bg Оригинална инструкция
sr Originalno uputstvo za rad
sl Izvirna navodila
hr Originalne upute za rad
et Algupärane kasutusjuhend
lv Instrukcijas oriģinālvalodā
lt Originali instrukcija
ar
fa
Ϡλ έΎ ίήσ ΎϤϨϫέ
Page 2
OBJ_BUCH-424-004.book Page 4 Tuesday, March 15, 2011 3:24 PM
4 |
3
5
4
10
2
1
9
1
8
6
7
GEX 125 AC
GEX 150 AC
Professional
BA
8
11
8
1 609 929 Y19 | (15.3.11) Bosch Power Tools
Page 3
OBJ_BUCH-424-004.book Page 5 Tuesday, March 15, 2011 3:24 PM
5 |
12
13
14
6
C2C1
15
1
6
2
C4C3
16
ED
1817
14
14 19
1 609 929 Y19 | (15.3.11) Bosch Power Tools
13
Page 4

OBJ_BUCH-424-004.book Page 12 Tuesday, March 15, 2011 3:24 PM
12 | English
f Prevent unintentional starting. Ensure the switch is in
English
Safety Notes
General Power Tool Safety Warnings
WARNING
and instructions may result in electric shock, fire and/or serious injury.
Save all warnings and instructions for future reference.
The term “power tool” in the warnings refers to your mainsoperated (corded) power tool or battery-operated (cordless)
power tool.
Work area safety
f Keep work area clean and well lit. Cluttered or dark areas
invite accidents.
f Do not operate power tools in explosive atmospheres,
such as in the presence of flammable liquids, gases or
dust. Power tools create sparks which may ignite the dust
or fumes.
f Keep children and bystanders away while operating a
power tool. Distractions can cause you to lose control.
Electrical safety
f Power tool plugs must match the outlet. Never modify
the plug in any way. Do not use any adapter plugs with
earthed (grounded) power tools. Unmodified plugs and
matching outlets will reduce risk of electric shock.
f Avoid body contact with earthed or grounded surfaces,
such as pipes, radiators, ranges and refrigerators.
There is an increased risk of electric shock if your body is
earthed or grounded.
f Do not expose power tools to rain or wet conditions.
Water entering a power tool will increase the risk of electric
shock.
f Do not abuse the cord. Never use the cord for carrying,
pulling or unplugging the power tool. Keep cord away
from heat, oil, sharp edges and moving parts. Damaged
or entangled cords increase the risk of electric shock.
f When operating a power tool outdoors, use an exten-
sion cord suitable for outdoor use. Use of a cord suitable
for outdoor use reduces the risk of electric shock.
f If operating a power tool in a damp location is unavoid-
able, use a residual current device (RCD) protected
supply. Use of an RCD reduces the risk of electric shock.
Personal safety
f Stay alert, watch what you are doing and use common
sense when operating a power tool. Do not use a power
tool while you are tired or under the influence of drugs,
alcohol or medication. A moment of inattention while op-
erating power tools may result in serious personal injury.
f Use personal protective equipment. Always wear eye
protection. Protective equipment such as dust mask,
non-skid safety shoes, hard hat, or hearing protection used
for appropriate conditions will reduce personal injuries.
1 609 929 Y19 | (15.3.11) Bosch Power Tools
Read all safety warnings and all instructions. Failure to follow the warnings
the off-position before connecting to power source
and/or battery pack, picking up or carrying the tool.
Carrying power tools with your finger on the switch or
energising power tools that have the switch on invites accidents.
f Remove any adjusting key or wrench before turning
the power tool on. A wrench or a key left attached to a ro-
tating part of the power tool may result in personal injury.
f Do not overreach. Keep proper footing and balance at
all times. This enables better control of the power tool in
unexpected situations.
f Dress properly. Do not wear loose clothing or jewel-
lery. Keep your hair, clothing and gloves away from
moving parts. Loose clothes, jewellery or long hair can be
caught in moving parts.
f If devices are provided for the connection of dust
extraction and collection facilities, ensure these are
connected and properly used. Use of dust collection can
reduce dust-related hazards.
Power tool use and care
f Do not force the power tool. Use the correct power tool
for your application. The correct power tool will do the
job better and safer at the rate for which it was designed.
f Do not use the power tool if the switch does not turn it
on and off. Any power tool that cannot be controlled with
the switch is dangerous and must be repaired.
f Disconnect the plug from the power source and/or the
battery pack from the power tool before making any
adjustments, changing accessories, or storing power
tools. Such preventive safety measures reduce the risk of
starting the power tool accidentally.
f Store idle power tools out of the reach of children and
do not allow persons unfamiliar with the power tool or
these instructions to operate the power tool. Power
tools are dangerous in the hands of untrained users.
f Maintain power tools. Check for misalignment or bind-
ing of moving parts, breakage of parts and any other
condition that may affect the power tool’s operation. If
damaged, have the power tool repaired before use.
Many accidents are caused by poorly maintained power
tools.
f Keep cutting tools sharp and clean. Properly maintained
cutting tools with sharp cutting edges are less likely to bind
and are easier to control.
f Use the power tool, accessories and tool bits etc. in ac-
cordance with these instructions, taking into account
the working conditions and the work to be performed.
Use of the power tool for operations different from those
intended could result in a hazardous situation.
Service
f Have your power tool serviced by a qualified repair per-
son using only identical replacement parts. This will
ensure that the safety of the power tool is maintained.
Page 5

OBJ_BUCH-424-004.book Page 13 Tuesday, March 15, 2011 3:24 PM
Safety Warnings for Sander
f Use the machine only for dry sanding. Penetration of wa-
ter into the machine increases the risk of an electric shock.
f Pay attention that no persons are put at risk through
sparking. Remove any combustible materials in the
vicinity. Sparking occurs when sanding metal materials.
f Caution, fire hazard! Avoid overheating the object
being sanded as well as the sander. Always empty the
dust collector before taking breaks. In unfavourable
conditions, e.g., when sparks emit from sanding metals,
sanding debris in the dust bag, micro filter or paper sack
(or in the filter sack or filter of the vacuum cleaner) can
self-ignite. Particularly when mixed with remainders of varnish, polyurethane or other chemical materials and when
the sanding debris is hot after long periods of working.
f When working with the machine, always hold it firmly
with both hands and provide for a secure stance. The
power tool is guided more secure with both hands.
f Secure the workpiece. A workpiece clamped with clamp-
ing devices or in a vice is held more secure than by hand.
f Products sold in GB only: Your product is fitted with a
BS 1363/A approved electric plug with internal fuse
(ASTA approved to BS 1362).
If the plug is not suitable for your socket outlets, it should
be cut off and an appropriate plug fitted in its place by an
authorised customer service agent. The replacement plug
should have the same fuse rating as the original plug.
The severed plug must be disposed of to avoid a possible
shock hazard and should never be inserted into a mains
socket elsewhere.
Products sold in AUS and NZ only: Use a residual current
device (RCD) with a rated residual current of 30 mA or less.
Product Description and
Specifications
While reading the operating instructions, unfold the graphics
page for the machine and leave it open.
Intended Use
The machine is intended for dry sanding of wood, plastic,
metal, filler as well as coated surfaces.
Machines with electronic control are also suitable for polishing.
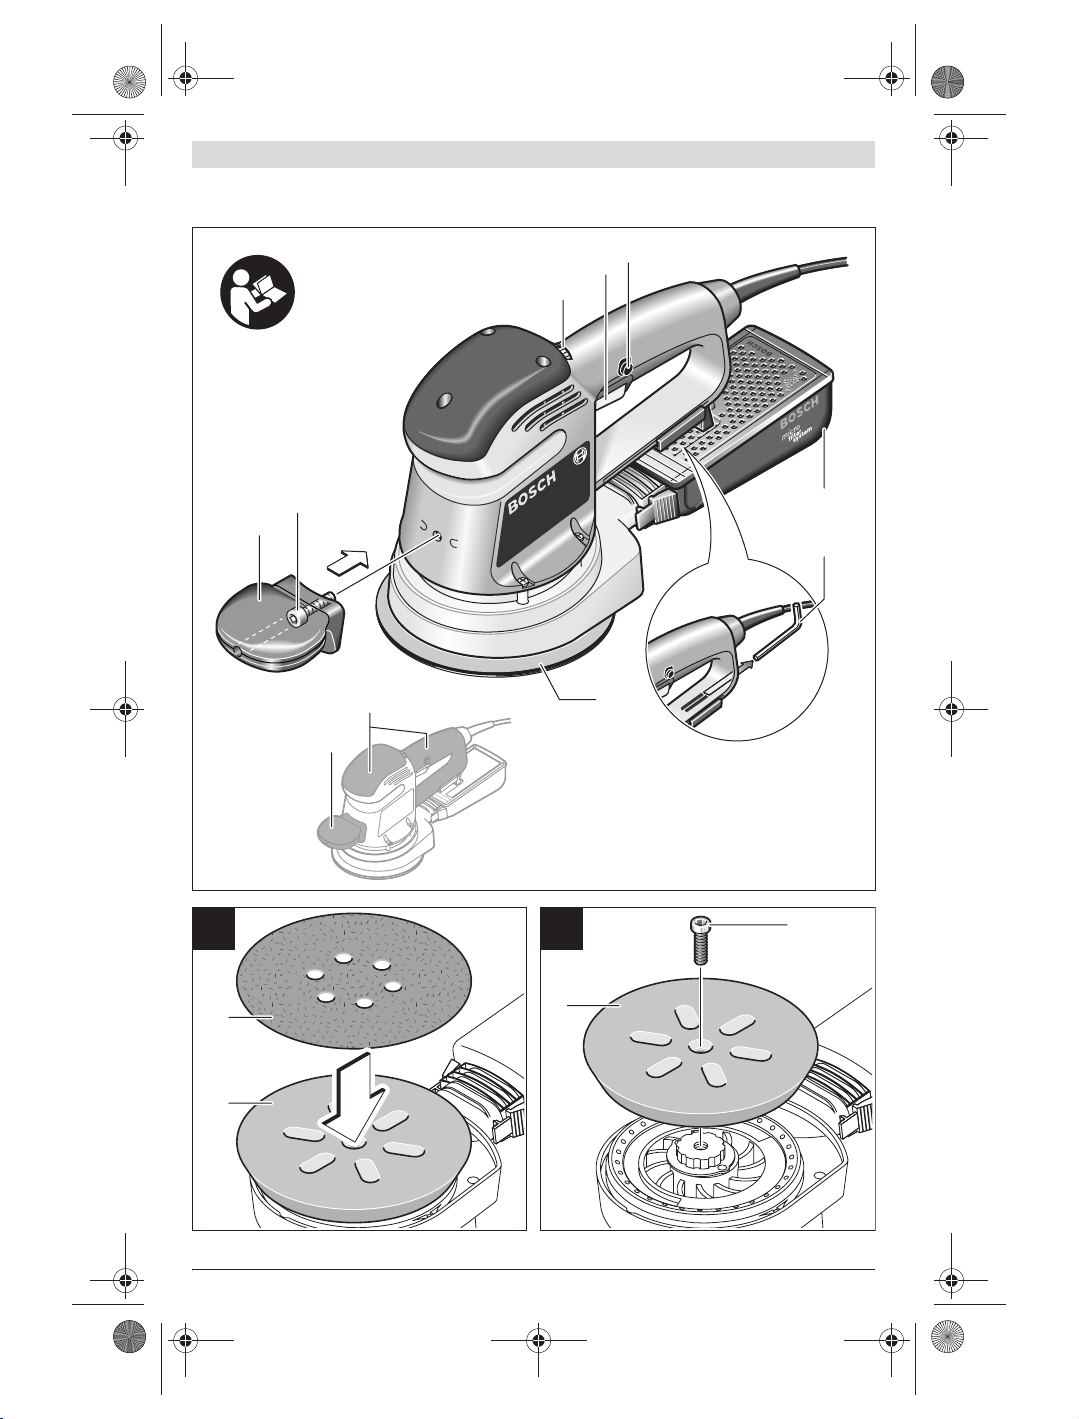
Product Features
The numbering of the product features refers to the illustration of the machine on the graphics page.
10 Sanding sheet*
11 Screw for fastening the sanding plate
12 Holder for dust box*
13 Plastic slider
14 Extraction outlet
15 Latching lever for dust box*
16 Filter element (Microfilter System)*
17 Extraction adapter*
18 Vacuum hose*
19 Dust bag*
*Accessories shown or described are not part of the standard delivery scope of the product. A complete overview of accessories
can be found in our accessories program.
English | 13
Read all safety warnings and all instructions. Failure to follow the warnings and in-
structions may result in electric shock, fire
and/or serious injury.
1 Auxiliary handle (insulated gripping surface)*
2 Screw for auxiliary handle*
3 Thumbwheel for orbit frequency preselection
(GEX 125 AC/GEX 150 AC)
4 On/Off switch
5 Lock-on button for On/Off switch
6 Dust box, complete (Microfilter System)*
7 Allen key
8 Sanding plate
9 Handle (insulated gripping surface)
Bosch Power Tools 1 609 929 Y19 | (15.3.11)
Page 6

OBJ_BUCH-424-004.book Page 14 Tuesday, March 15, 2011 3:24 PM
14 | English
Technical Data
Random Orbital Sander
GEX ... Professional
Article number
0 601 ... 372 0.. 372 4.. 372 5.. 372 6.. 372 7..
Dust box included in delivery scope
Preselection of orbital stroke rate
Rated power input
No-load speed
No-load orbital stroke rate
Orbit diameter
Sanding plate diameter
Weight according to
EPTA-Procedure 01/2003 kg 1.9 2.0 2.0 2.1 2.1
Protection class
The values given are valid for a nominal voltage [U] of 230 V. For different voltages and models for specific countries, these values can vary.
Please observe the article number on the type plate of your machine. The trade names of the individual machines may vary.
Noise/Vibration Information
Measured sound values determined according to EN 60745.
Typically the A-weighted sound pressure level of the product
is 75 dB(A). Uncertainty K= 3 dB.
The noise level when working can exceed 80 dB(A).
Wear hearing protection!
Vibration total values (triax vector sum) determined according to EN 60745:
Vibration emission value a
K=1.5m/s
2
.
The vibration emission level given in this information sheet
has been measured in accordance with a standardised test
given in EN 60745 and may be used to compare one tool with
another. It may be used for a preliminary assessment of exposure.
The declared vibration emission level represents the main
applications of the tool. However if the tool is used for different applications, with different accessories or poorly maintained, the vibration emission may differ. This may significantly increase the exposure level over the total working
period.
An estimation of the level of exposure to vibration should also
take into account the times when the tool is switched off or
when it is running but not actually doing the job. This may significantly reduce the exposure level over the total working
period.
Identify additional safety measures to protect the operator
from the effects of vibration such as: maintain the tool and the
accessories, keep the hands warm, organisation of work patterns.
=4.0m/s2, Uncertainty
h
125 A 125 AC 125 AC 150 AC 150 AC
– z – z –
– zzzz
W340 340 340 340 340
min-112000 4500–12000 4500–12000 4500–12000 4500–12000
min-124000 9000–24000 9000–24000 9000–24000 9000–24000
mm 5.0 5.0 5.0 4.0 4.0
mm 125 125 125 150 150
/II /II /II /II /II
Declaration of Conformity
We declare under our sole responsibility that the product described under “Technical Data” is in conformity with the following standards or standardization documents: EN 60745
according to the provisions of the directives 2004/108/EC,
2006/42/EC.
Technical file at:
Robert Bosch GmbH, PT/ESC,
D-70745 Leinfelden-Echterdingen
Dr. Egbert Schneider
Senior Vice President
Engineering
Robert Bosch GmbH, Power Tools Division
D-70745 Leinfelden-Echterdingen
Leinfelden, 15.12.2010
Dr. Eckerhard Strötgen
Head of Product
Certification
Assembly
f Before any work on the machine itself, pull the mains
plug.
Replacing the Sanding Sheet (see figure A)
When attaching a new sanding sheet, remove any dust or
debris from the sanding plate 8, e.g., with a brush.
The surface of the sanding plate 8 is fitted with Velcro backing
for quick and easy fastening of sanding sheets with Velcro adhesion.
Press the sanding sheet 10 firmly against the bottom side of
the sanding plate 8.
To ensure optimum dust extraction, pay attention that the
punched holes in the sanding sheet match with the holes in
the sanding plate.
1 609 929 Y19 | (15.3.11) Bosch Power Tools
Page 7

OBJ_BUCH-424-004.book Page 15 Tuesday, March 15, 2011 3:24 PM
English | 15
Selecting the Sanding Sheet
Depending on the material to be worked and the required rate of material removal, different sanding sheets are available:
Material Application Grain size
–Paint
– Varnish
– Filling compound
–Filler
Expert for Wood
– All wooden materials (e.g.,
hardwood, softwood, chip-
board, building board)
Best for Wood
–Hardwood
– Particle Board
– Building board
– Metal materials
For sanding off paint coarse 40
For sanding primer (e.g., for removing brush dashes,
drops of paint and paint run)
For final sanding of primers before coating fine 180
For coarse-sanding, e.g. of rough, unplaned beams and
boards
For face sanding and planing small irregularities medium 80
For finish and fine sanding of wood fine 180
medium 80
coarse 40
60
100
120
240
320
400
60
100
120
240
320
400
– Automotive paint
– Masonry, stone
–Marble
–Granite
–Ceramic
–Glass
– Plexiglas
– Glass-fibre plastics
For pre-sanding coarse 80
For shaping and braking edges medium 100
For final sanding and forming fine 180
For polish-sanding and rounding off edges very fine 600
Selection of the Sanding Plate
Depending on the application, the machine can be equipped
with sanding plates of different hardness:
– Soft sanding plate: Suitable for polishing and sensitive
sanding (also for curved surfaces).
– Medium sanding plate: Suitable for all sanding applications
and general-purpose use.
– Hard sanding plate: Suitable for high sanding capacity on
flat surfaces.
Replacing the Sanding Plate (see figure B)
Note: Replace a damaged sanding plate 8 immediately.
Pull off the sanding sheet or polishing tool. Completely unscrew the screw 11 and take off the sanding plate 8. Attach
the new sanding plate 8 and tighten the screw again.
Note: When attaching the sanding plate, pay attention that
the toothing of the drive element engage into the openings of
the sanding plate.
120
240
320
400
1200
Dust/Chip Extraction
f Dusts from materials such as lead-containing coatings,
some wood types, minerals and metal can be harmful to
one’s health. Touching or breathing-in the dusts can cause
allergic reactions and/or lead to respiratory infections of
the user or bystanders.
Certain dusts, such as oak or beech dust, are considered
as carcinogenic, especially in connection with wood-treatment additives (chromate, wood preservative). Materials
containing asbestos may only be worked by specialists.
– As far as possible, use a dust extraction system suitable
for the material.
– Provide for good ventilation of the working place.
– It is recommended to wear a P2 filter-class respirator.
Observe the relevant regulations in your country for the
materials to be worked.
f Prevent dust accumulation at the workplace. Dusts can
easily ignite.
Bosch Power Tools 1 609 929 Y19 | (15.3.11)
Page 8

OBJ_BUCH-424-004.book Page 16 Tuesday, March 15, 2011 3:24 PM
16 | English
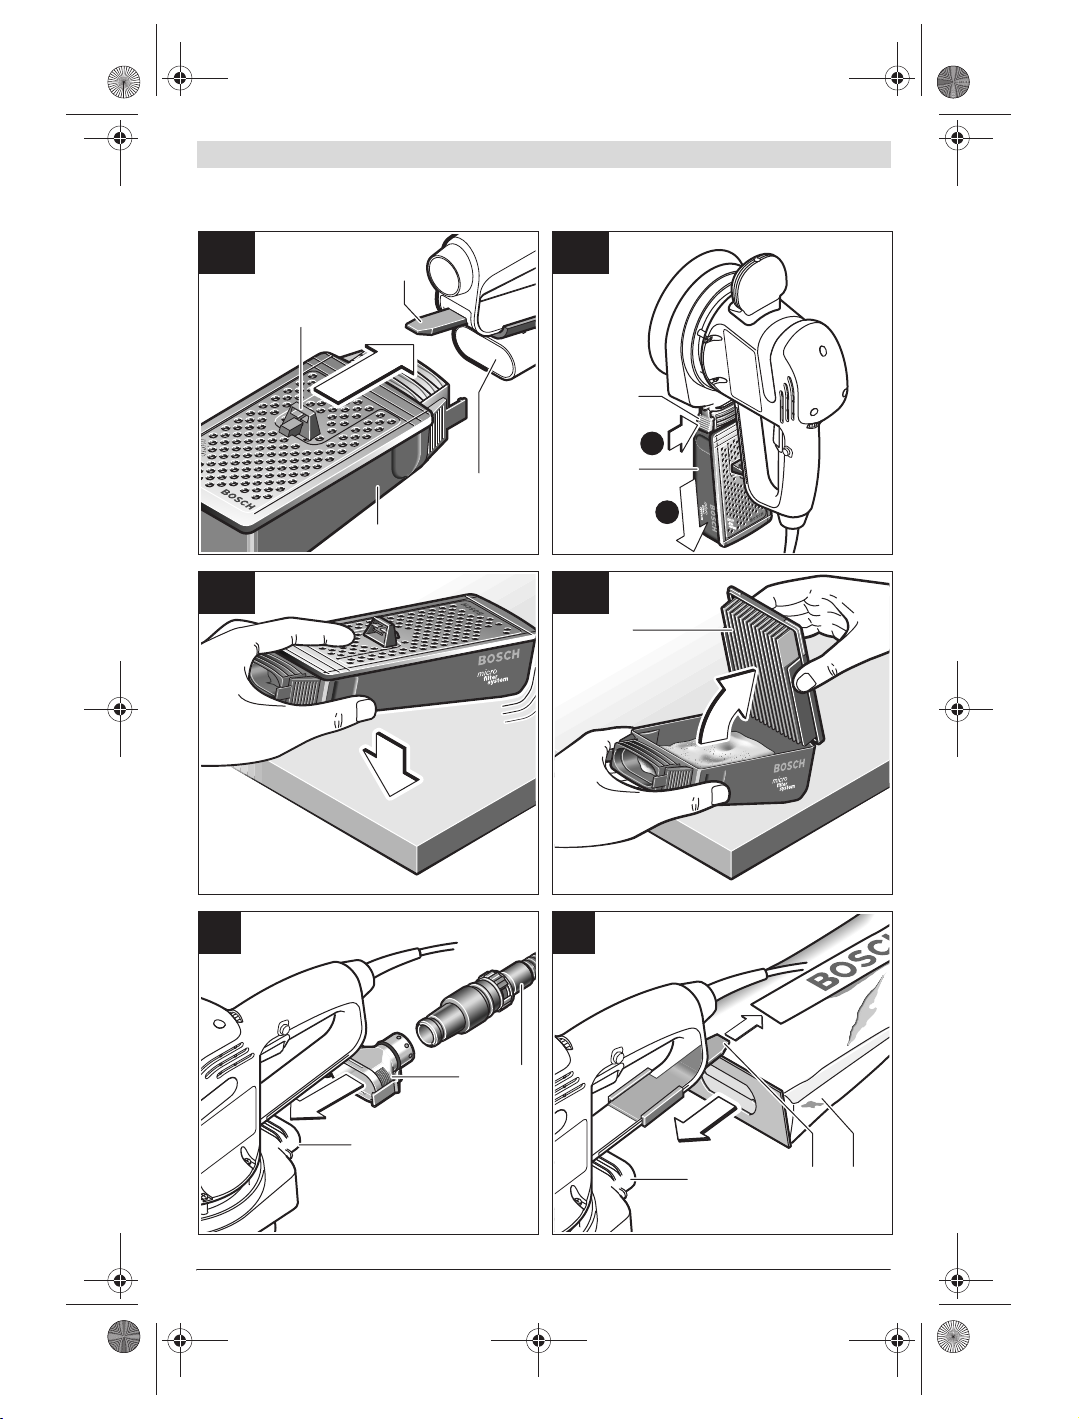
Integrated Dust Extraction with Dust Box
(see figures C1– C4)
Before assembling the dust box 6, pull out the plastic slider
13. Place the dust box 6 onto the extraction outlet 14 and al-
low it to engage. Make sure that the plastic slider 13 engages
in the holder 12.
To empty the dust box 6, press the latching levers 15 on the
side of the dust box (n). Pull off the dust box toward the bottom (o).
Before opening the dust box 6, it is recommended to loosen
the dust from the filter element by gently striking it against a
firm support (as shown in the figure).
Grasp the dust box 6 by the recessed grip, fold the filter element 16 upward and empty the dust box. Clean the thin
plates of the filter element 16 with a soft brush.
External Dust Extraction (see figure D)
Slide the extraction adapter 17 onto the outlet piece 14. Ensure that the latching levers of the extraction adapter engage.
The extraction adapter 17 accepts a vacuum hose with a diameter of 19 mm.
For removal of the extraction adapter 17, press the latching
levers together at the rear and pull the extraction adapter off.
The vacuum cleaner must be suitable for the material being
worked.
When vacuuming dry dust that is especially detrimental to
health or carcinogenic, use a special vacuum cleaner.
Internal Dust Extraction with Dust Bag (see figure E)
For small sanding jobs, a dust bag (accessory) 19 can be connected.
Before mounting the dust bag 19, pull out the plastic slider
13. Slide the dust-bag sleeve firmly over the extraction outlet
14. Pay attention that the plastic slider 13 engages in the
holder intended for it on the dust bag 19.
To maintain optimum dust collection, empty the dust bag 19
in good time.
Auxiliary Handle
The auxiliary handle 1 enables convenient handling and optimal distribution of power, especially at high removal rates.
Fasten the auxiliary handle 1 with screw 2 to the casing.
Operation
Starting Operation
f Observe correct mains voltage! The voltage of the pow-
er source must agree with the voltage specified on the
nameplate of the machine. Power tools marked with
230 V can also be operated with 220 V.
Switching On and Off
To start the machine, press the On/Off switch 4 and keep it
pressed.
To lock the pressed On/Off switch 4, press the lock-on button 5.
To switch off the machine, release the On/Off switch 4 or
when it is locked with the lock-on button 5, briefly press the
On/Off switch 4 and then release it.
1 609 929 Y19 | (15.3.11) Bosch Power Tools
Preselecting the Orbital Stroke Rate
(GEX 125 AC/GEX 150 AC)
With the thumbwheel for preselection of the orbital stroke
rate 3, you can preselect the required orbital stroke rate, even
during operation.
1– 2 Low stroke rate
3– 4 Medium stroke rate
5– 6 High stroke rate
The required stroke rate depends on the material and the
working conditions and can be determined through practical
testing.
The constant electronic control keeps the stroke rate almost
constant under no-load or load conditions and ensures a uniform working performance.
After longer periods of working at low stroke rate, allow the
machine to cool down by running it for approx. 3 minutes at
maximum stroke rate with no load.
Sanding Plate Brake
An integrated sanding plate brake reduces the stroke rate
when running at no-load so that scoring is prevented when
placing the machine onto the workpiece.
If the no-load stroke rate continuously increases over the
course of time, then the sanding plate is damaged and must
be replaced or the sanding plate brake is worn. A worn sanding plate brake must be replaced by an authorised after-sales
service agent for Bosch power tools.
Working Advice
f Before any work on the machine itself, pull the mains
plug.
f Wait until the machine has come to a standstill before
placing it down.
Sanding Surfaces
Switch the machine on, place it with the complete sanding
surface on the surface to be worked and move the machine
with moderate pressure over the workpiece.
The removal capacity and the sanding pattern are mainly determined by the selection of the sanding sheet, the preselected orbital stroke rate (GEX 125 AC/GEX 150 AC) and the applied pressure.
Only flawless sanding sheets achieve good sanding capacity
and extend the service life of the machine.
Pay attention to apply uniform sanding pressure; this increases the working life of the sanding sheets.
Intensifiying the sanding pressure does not lead to an increase of the sanding capacity, but to increased wear of the
machine and the sanding sheet.
A sanding sheet that has been used for metal should not be
used for other materials.
Use only original Bosch sanding accessories.
Rough Sanding
Attach a sanding sheet with coarse grain.
Apply only light pressure to the machine so that it runs at a
higher stroke rate and high material removal is achieved.
Page 9

OBJ_BUCH-424-004.book Page 17 Tuesday, March 15, 2011 3:24 PM
Fine Sanding
Attach a sanding sheet with fine grain.
By lightly varying the application pressure or changing the or-
bital stroke rate (GEX 125 AC/GEX 150 AC), the sanding
plate stroke rate can be reduced whereby the orbital action is
maintained.
With moderate pressure, move the machine in a circular pattern or alternately in lengthwise and crosswise directions
over the workpiece. Do not tilt the machine to avoid sanding
through the workpiece (e. g. when sanding veneer).
After finishing the working procedure, switch the power tool
off.
Polishing (GEX 125 AC/GEX 150 AC)
For the polishing of weathered paint or buffing out scratches
(e.g., acrylic glass), the machine can be equipped with appropriate polishing accessories such as lamb’s wool bonnet, polishing felt or sponge (accessories).
Select a low stroke rate (setting 1 –2) for polishing in order to
avoid excessive heating of the surface.
Apply the polish onto a somewhat smaller surface than you intend to polish. Work the polishing agent in with a suitable polishing tool applying it crosswise or with circular motion and
moderate pressure.
Do not allow the polishing agent to dry out on the surface, otherwise the surface can become damaged. Do not subject the
surface to be polished to direct sunlight.
Clean the polishing accessories regularly to ensure good polishing results. Wash out polishing accessories with a mild detergent and warm water; do not use paint thinner.
Maintenance and Service
Maintenance and Cleaning
f Before any work on the machine itself, pull the mains
plug.
f For safe and proper working, always keep the machine
and ventilation slots clean.
If the machine should fail despite the care taken in manufacturing and testing procedures, repair should be carried out by
an after-sales service centre for Bosch power tools.
In all correspondence and spare parts order, please always include the 10-digit article number given on the type plate of
the machine.
After-sales Service and Customer Assistance
Our after-sales service responds to your questions concerning maintenance and repair of your product as well as spare
parts. Exploded views and information on spare parts can also be found under:
www.bosch-pt.com
Our customer service representatives can answer your questions concerning possible applications and adjustment of
products and accessories.
Great Britain
Robert Bosch Ltd. (B.S.C.)
P.O. Box 98
Broadwater Park
North Orbital Road
Denham
Uxbridge
UB 9 5HJ
Tel. Service: +44 (0844) 736 0109
Fax: +44 (0844) 736 0146
E-Mail: boschservicecentre@bosch.com
Ireland
Origo Ltd.
Unit 23 Magna Drive
Magna Business Park
City West
Dublin 24
Tel. Service: +353 (01) 4 66 67 00
Fax: +353 (01) 4 66 68 88
Australia, New Zealand and Pacific Islands
Robert Bosch Australia Pty. Ltd.
Power Tools
Locked Bag 66
Clayton South VIC 3169
Customer Contact Center
Inside Australia:
Phone: +61 (01300) 307 044
Fax: +61 (01300) 307 045
Inside New Zealand:
Phone: +64 (0800) 543 353
Fax: +64 (0800) 428 570
Outside AU and NZ:
Phone: +61 (03) 9541 5555
www.bosch.com.au
Republic of South Africa
Customer service
Hotline: +27 (011) 6 51 96 00
Gauteng – BSC Service Centre
35 Roper Street, New Centre
Johannesburg
Tel.: +27 (011) 4 93 93 75
Fax: +27 (011) 4 93 01 26
E-Mail: bsctools@icon.co.za
KZN – BSC Service Centre
Unit E, Almar Centre
143 Crompton Street
Pinetown
Tel.: +27 (031) 7 01 21 20
Fax: +27 (031) 7 01 24 46
E-Mail: bsc.dur@za.bosch.com
Western Cape – BSC Service Centre
Democracy Way, Prosperity Park
Milnerton
Tel.: +27 (021) 5 51 25 77
Fax: +27 (021) 5 51 32 23
E-Mail: bsc@zsd.co.za
English | 17
Bosch Power Tools 1 609 929 Y19 | (15.3.11)
Page 10

OBJ_BUCH-424-004.book Page 18 Tuesday, March 15, 2011 3:24 PM
18 | English
Bosch Headquarters
Midrand, Gauteng
Tel.: +27 (011) 6 51 96 00
Fax: +27 (011) 6 51 98 80
E-Mail: rbsa-hq.pts@za.bosch.com
People’s Republic of China
China Mainland
Bosch Power Tools (China) Co., Ltd.
567, Bin Kang Road
Bin Jiang District 310052
Hangzhou, P.R. China
Service Hotline: 400 826 8484
Fax: +86 571 8777 4502
E-Mail: contact.ptcn@cn.bosch.com
www.bosch-pt.com.cn
HK and Macau Special Administrative Regions
Robert Bosch Hong Kong Co. Ltd.
21st Floor, 625 King’s Road
North Point, Hong Kong
Customer Service Hotline: +852 (21) 02 02 35
Fax: +852 (25) 90 97 62
E-Mail: info@hk.bosch.com
www.bosch-pt.com.hk
Indonesia
PT. Multi Tehaka
Kawasan Industri Pulogadung
Jalan Rawa Gelam III No. 2
Jakarta 13930
Indonesia
Tel.: +62 (21) 46 83 25 22
Fax: +62 (21) 46 82 86 45/ 68 23
E-Mail: sales@multitehaka.co.id
www.multitehaka.co.id
Philippines
Robert Bosch, Inc.
28th Floor Fort Legend Towers,
3rd Avenue corner 31st Street,
Fort Bonifacio Global City,
1634 Taguig City, Philippines
Tel.: +63 (2) 870 3871
Fax: +63 (2) 870 3870
matheus.contiero@ph.bosch.com
www.bosch-pt.com.ph
Bosch Service Center:
9725-27 Kamagong Street
San Antonio Village
Makati City, Philippines
Tel.: +63 (2) 899 9091
Fax: +63 (2) 897 6432
cheehoe.on@my.bosch.com
Toll-Free: 1800 880 188
www.bosch-pt.com.my
Thailand
Robert Bosch Ltd.
Liberty Square Building
No. 287, 11 Floor
Silom Road, Bangrak
Bangkok 10500
Tel.: +66 (2) 6 31 18 79 – 18 88 (10 lines)
Fax: +66 (2) 2 38 47 83
Robert Bosch Ltd., P. O. Box 2054
Bangkok 10501, Thailand
Bosch Service – Training Centre
2869-2869/1 Soi Ban Kluay
Rama IV Road (near old Paknam Railway)
Prakanong District
10110 Bangkok
Thailand
Tel.: +66 (2) 6 71 78 00 – 4
Fax: +66 (2) 2 49 42 96
Fax: +66 (2) 2 49 52 99
Singapore
Robert Bosch (SEA) Pte. Ltd.
11 Bishan Street 21
Singapore 573943
Tel.: +65 6571 2772
Fax: +65 6350 5315
leongheng.leow@sg.bosch.com
Toll-Free: 1800 333 8333
www.bosch-pt.com.sg
Vietnam
Robert Bosch Vietnam Co. Ltd
10/F, 194 Golden Building
473 Dien Bien Phu Street
Ward 25, Binh Thanh District
84 Ho Chi Minh City
Vietnam
Tel.: +84 (8) 6258 3690 ext. 413
Fax: +84 (8) 6258 3692
hieu.lagia@vn.bosch.com
www.bosch-pt.com
Disposal
The machine, accessories and packaging should be sorted for
environmental-friendly recycling.
Do not dispose of power tools into household waste!
Only for EC countries:
rosalie.dagdagan@ph.bosch.com
Malaysia
Robert Bosch (S.E.A.) Pte. Ltd.
No. 8A, Jalan 13/6
G.P.O. Box 10818
46200 Petaling Jaya
Selangor, Malaysia
Tel.: +60 (3) 7966 3194
Fax: +60 (3) 7958 3838
Subject to change without notice.
According to the European Guideline
2002/96/EC for Waste Electrical and Electronic Equipment and its implementation
into national right, power tools that are no
longer usable must be collected separately
and disposed of in an environmentally correct manner.
1 609 929 Y19 | (15.3.11) Bosch Power Tools
 Loading...