

Bosch Power Tools FNA250-15 User Manual

BM 2610957377 02-09:BM FNA250 06-09 6/17/09 8:00 AM Page 1
IMPORTANT: IMPORTANT : IMPORTANTE:
Read Before Using Lire avant usage Leer antes de usar
Operating/Safety Instructions
Consignes de fonctionnement/sécurité
Instrucciones de funcionamiento y seguridad
FNA-250-15
Call Toll Free for
Consumer Information
& Service Locations
Pour obtenir des informations et
les adresses de nos centres de
service après-vente,
appelez ce numéro gratuit
Llame gratis para
obtener información
para el consumidor y
ubicaciones de servicio
1-877-BOSCH99 (1-877-267-2499) www.boschtools.com
For English Version Version française Versión en español
See page 2 Voir page 15 Ver la página 28
BM 2610957377 02-09:BM FNA250 06-09 6/17/09 8:00 AM Page 2
General Pneumatic Tool Safety Rules
!
WARNING
may result in electric shock, fire, serious personal injury or death.
ALL USERS AND EMPLOYERS/OWNERS MUST READ AND UNDERSTAND ALL INSTRUCTIONS IN THIS
MANUAL BEFORE OPERATING OR MAINTAINING THIS TOOL. Failure to follow all instructions listed below
SAVE THESE INSTRUCTIONS
Work Area
Keep your work area clean and well lit. Cluttered
benches and dark areas increase the risks of accidents,
electric shock, fire, and injury to persons.
Do not operate pneumatic tools in explosive
atmospheres, such as in the presence of flammable
liquids, gases, or dust. The tool is able to create sparks
which may ignite the dust or fumes. Never use the tool in
sites containing lacquer, paint, benzine, thinner, gasoline,
gases, adhesive agents, and other materials which are
combustible or explosive.
Keep bystanders, children, and visitors away while
operating a pneumatic tool. Distractions may cause loss
of control of the tool. Fragments of fasteners may cause
injury to bystanders.
Never engage in horseplay with the tool. Respect the
tool as a working implement.
Personal Safety
Do not remove, tamper with, or otherwise cause the tool
operating controls to become disabled or inoperable.
This will cause the tool to work irregularly and may result in
the risk of injury.
Dress properly. Do not wear loose clothing or jewelry.
Contain long hair. Keep your hair, clothing, and gloves
away from moving parts. Loose clothes, jewelry, or long
hair can be caught in moving parts and increases the risk of
injury.
Always wear eye and ear protection when using this
tool. Use additional personal protective equipment as
appropriate when operating this tool. Operators and
others in work area must wear safety glasses with side
shields and make sure all other personnel in the work area
wear safety glasses. Safety glasses must conform to the
requirements of American National Standards Institute,
ANSI Z87.1 and provide protection against flying particles
both from the front and side. Prolonged exposure to high
intensity noise is able to cause hearing loss. Dust mask,
non-skid safety shoes, hard hat and other personal
protective equipment, must be used for appropriate
conditions.
Keep handles dry, clean and free from oil and grease.
Slippery hands cannot safely control the tool.
Avoid directing exhaust air from the tool into your or a
bystander face and eyes. Exhaust air from a tool can
contain water, oil, metal particles or contaminants from the
compressor, which can be blown into the eyes or cause
serious injury. Use adjustable air vent to direct exhaust to
blow exhaust air away from user.
Stay alert. Watch what you are doing, and use common
sense when operating a pneumatic tool. Do not use the
tool while tired or under the influence of drugs, alcohol,
or medication. A moment of inattention while operating the
tool may result in serious personal injury.
Avoid unintentional operation. While connecting air
supply do not depress trigger. Do not carry the tool with
your finger on the trigger or connect the tool to the air
supply with the switch “on.”
Do not overreach. Keep proper footing and balance at
all times. Proper footing and balance enable better control
of the tool in unexpected situations.
Make sure air hose is free of snags and obstructions.
Do not attach an air hose or tool to your body.
Entangled or snarled hoses can cause a loss of balance or
footing in addition to unintentional tool operation. Attach the
hose to the structure to reduce the risk of loss of balance if
the hose shifts.
Tool Use and Care
Use this tool and accessories in accordance with the
instructions. Tools and accessories must be used for the
purpose for which they are designed. Use of the pneumatic
tool for operations different from what's described in this
manual can result in a hazardous situation.
Use only accessories that are recommended by BOSCH
for your particular model. Accessories that may be
recommended for a particular model tool may not be
suitable on other model tools and may result in personal
injury.
Before each use, inspect the tool. Do not operate if any
portion of the tool is loose, missing, damaged,
malfunctioning, disconnected or altered. If the tool
appears to be operating unusually and/or making strange
noises, stop using it immediately and contact your local
service center. There is a risk of bursting if the tool is
damaged.
Do not force tool. Use the correct tool for your
application. The correct tool will do the job better and safer
at the rate for which it is designed.
Do not operate the tool with any power source other
than that specified in the tool operating/safety
instructions. Use of alternative power sources may result
in malfunctions of the tool and the power source which may
lead to serious injury of you or others in your surroundings.
Disconnect tool from air supply when not in use.
Leaving the tool unattended with the air supply connected
can result in unintentional operation of the tool by users
unfamiliar with tool.
2.

BM 2610957377 02-09:BM FNA250 06-09 6/17/09 8:00 AM Page 3
Disconnect the tool from the air source before making
adjustments, clearing jams, unloading fasteners,
leaving the work area, performing tool maintenance or
storing the tool. Such precautionary safety measures
reduce the risk or unintentional tool operation.
Never carry the tool by the hose. The tool, air fittings and
the air hose may become damaged.
Use clamps or another practical way to secure and
support the work piece to a stable platform. Holding
work by hand or against your body is unstable and may lead
to loss of control or personal injury.
The correct pressure is the lowest pressure that will do
the job. Always follow recommendations for the particular
tool.
Maintain tools with care. Properly maintained tools are
less likely to break and cause injury. Any alteration or
modification is a misuse and may result in a dangerous
condition.
Service
Maintenance performed by unauthorized personnel may
result in misplacing of the internal components which
could cause serious hazard. We recommend that all tool
service be performed by a BOSCH factory service center or
authorized BOSCH service station.
Develop a periodic maintenance schedule for your tool.
When cleaning a tool be careful not to disassemble any
portion of the tool since internal components may be
misplaced or safety components may be improperly
mounted. Certain cleaning agents such as gasoline, carbon
tetrachloride, ammonia, etc. may damage plastic parts and
o-rings.
When servicing the tool, use only recommended
BOSCH replacement parts. Follow instructions in the
Maintenance section of this manual. Use of unauthorized
parts or failure to follow Maintenance Instructions can cause
a risk of injury.
Use only the air tool lubricants supplied with the tool or
specified by BOSCH. Do not use other lubricants as they
may damage the tool. See the "Lubrication" section for a list
of recommended air tool lubricants.
Replace missing or damaged warning labels. Refer to
tool schematic for correct placement and part number.
Keep the tool clean and lubricated. Clean the tool at least
daily and lubricate as required. Never operate a dirty or
malfunctioning tool.
When not in use, store the tool out of reach of children
and other personnel unfamiliar with tool operation.
When not in use, the tool should be disconnected and
stored in a dry place. Keep out of reach of children. Lock
the storage area. Tools are dangerous in the hands of users
unfamiliar with the tool.
Air Source
Never use oxygen or other bottled gases as a power
source. Explosion may occur. Combustible gases and other
bottled gases are dangerous and may cause the tool to
explode.
Use only clean, dry, regulated, compressed air within
the rated pressure range marked on the tool. Do not
exceed maximum recommended air pressure marked
on the tool. Verify prior to using the tool that the air source
has been adjusted within the rated air-pressure range. Be
sure the air pressure gauge is operating properly and check
it at least twice a day. Tools operated in excess of their
maximum pressure rating may operate abnormally or burst,
resulting in personal injury.
Never connect the tool to an air source that is capable
of producing air pressure exceeding 200 PSI. Excessive
pressure can cause abnormal operation or cause the tool to
burst, resulting in personal injury.
Do not abuse the air hose. Protect all hoses from kinks,
restrictions, solvents or sharp objects. Keep air hose
away from heat, oil, sharp edges or moving parts.
Replace damaged hoses immediately. Damaged hoses can
burst or whip around.
Check all fittings, hoses, pipes, connections and
compressor before each use of this tool. Repair or
replace damaged or leaking hoses and connections
immediately. Damage to a hose or connection can cause a
pressure hose to break and whip around the work area, and
can lead to injury.
Safety Rules for Pneumatic Nailer Tools
Always assume the tool contains nails. Check the
magazine for nails that may be left in the tool, even if you
think the tool is empty or disconnected.
Never point the tool at yourself or others in the work
area. Always assume the tool contains nails. If nails are
accidentally fired, it may result in injury. The tool is not a toy
and should not be used like one.
Remove finger from the trigger when not driving nails.
Always carry the tool by the handle only. Removing your
finger from the trigger when not operating the tool reduces
the risk of unintentionally firing a nail and injuring yourself or
someone else.
Do not disable or remove the work contact element.
This tool is equipped with a safety mechanism, the work
contact element, to reduce the risk of accidental firing.
Disabling this component can result in unintentional firing.
Do not use the tool unless the work contact element is
working properly. If the work contacting element is not
functioning correctly, the tool can fire unexpectedly.
Never use non relieving couplers and/or female quick
disconnect couplings on the tool. Non relieving couplings
and female couplings will trap high pressure air in the tool
when the air line is disconnected. This will leave the tool
charged with enough air after it has been disconnected to
drive a nail. Only MALE pneumatic type air connectors
should be fitted to the tool, so that high pressure air in the
tool is vented to atmosphere as soon as the air line is
disconnected.
3.

BM 2610957377 02-09:BM FNA250 06-09 6/17/09 8:00 AM Page 4
Follow all recommendations for sizes of hoses, fittings
and other compressed air accessories. Improperly sized
or fitting components may result in the risk of injury or
property damage.
Check air supply lines for restrictions before adjusting
the tool. Air volume is as important as air pressure.
Restricted air flow will prevent the tool from operating as
designed, resulting in slow operation, nail misfeeding or
reduced driving power.
Always load nails into the tool's magazine before the air
supply is connected. Connecting the air supply after
loading nails reduces the risk of unintentionally driving a nail
and injuring yourself or someone else.
When loading nails ensure that nails are parallel with
nose of tool. If nails are not parallel with nose the tool will
misfire and nails can be deflected, cause the tool to react in
an unexpected manner, and damage the tool.
When loading the tool's magazine, check that the nail
follower slides smoothly by pulling with finger. If not
smooth, nails can be driven at irregular angle.
Use only the nails meeting the criteria listed in the
“Specification” section of this manual. Nails not
identified for use with this tool can cause the tool to
malfunction and result in the risk of injury and/or tool
damage.
Do not connect the air supply when the trigger or work
contact element is depressed. Keep the tool pointed
downward, away from yourself and bystanders when
connecting the hose to reduce the risk of accidental nail
firing.
Keep hands and feet away from work contact element
of the tool during use. Never place your hands or feet
closer than 8 inches (200 mm) to the work contact element
of the tool. Nails can be deflected by the work piece or
driven away from the point of entry.
Choice of triggering methods is important; understand
the operating characteristics of each option. There are
two possible firing modes; “sequential firing” and “bump
firing.” Read and understand section titled “Actuation
Systems” for details of each mode.
Do not use a frozen tool. Allow tool to thaw before using.
Moisture frozen in the tool may impede internal components
resulting in the risk of injury and/or tool damage.
Operate the tool only when properly positioned on the
work piece. If the tool is not held properly on the work
piece the nail can be deflected or the tool can react in an
unexpected manner.
Use sufficient grip to maintain control of the tool while
allowing tool to recoil away from work surface as nail is
driven. Do not attempt to prevent the recoil by holding
the tool with excessive force against the work piece.
The tool will recoil as the nail is driven. This is normal
function for the tool. Restriction to the recoil can result in
second nail being driven when the tool is in “bump firing”
mode.
Use caution when operating the tool in confined areas.
If the work contact element is allowed to re-contact the work
surface before trigger is released, an unwanted nail will be
fired if the tool is set in “bump firing” mode.
In order to avoid undesirable double fire, take the
following actions when the tool is in the following firing
modes:
Sequential firing:
. Ensure trigger is in sequential fire mode.
1
2. Pull the trigger firmly and release.
Bump firing:
1.Do not press the tool against the wood with
excessive force.
2.Allow the tool to separate from the wood as it
recoils after nailing.
Never drive nails near flammable materials. Some types
of nails can spark out of the nose during driving operation.
Know what is behind your work piece. Do not fire nails
into walls or floors without assuring the area on the
opposite side is clear. A nail could travel through the work
piece, striking someone.
Do not drive a nail on top of another nail. This could
cause the nail to be deflected or the tool to react in an
unexpected manner.
Do not attempt to drive nails at a steep angle. This could
cause the nail to be deflected or the tool to react in an
unexpected manner.
Use care when nailing thin material or when working
near the edges and corners of the work piece. Nails may
drive through or away from the work piece and injure
yourself or someone else. Be aware that the nail may follow
the grain of the wood causing it to protrude unexpectedly
from the side of the work material. Drive the nails
perpendicular to the grain.
Do not drive nails into walls, floors or other work areas
without knowing what may be damaged by the driven
nails. Nails driven into live electrical wires, plumbing, gas
piping, or other types of obstructions can result in
electrocution, explosion, personal injury and/or property
damage.
Make sure the pressure of the compressor is adjusted
so that nails are driven flush into the work piece and
not pushed completely through. The correct pressure is
the lowest pressure that will do the job.
Keep face and body parts away from back of the top
cap when working in restricted areas. Sudden recoil can
result in impact to the body especially when nailing into hard
or dense material.
Handle tool carefully. Because of high air pressure in the
tool, do not drop the tool or strike the tool against hard
surfaces; and do not scratch, stamp, nor engrave signs on
the tool. The tool may burst.
Always disconnect tool from air supply and remove
nails from magazine before leaving the area or passing
tool to another operator. This avoids the risk of
unintentional operation.
Do not disconnect air hose from the tool with finger on
trigger or the work contact element depressed. The tool
can fire when reconnected to air supply.
4.
BM 2610957377 02-09:BM FNA250 06-09 6/17/09 8:00 AM Page 5
Functional Description and Specifications
!
WARNING
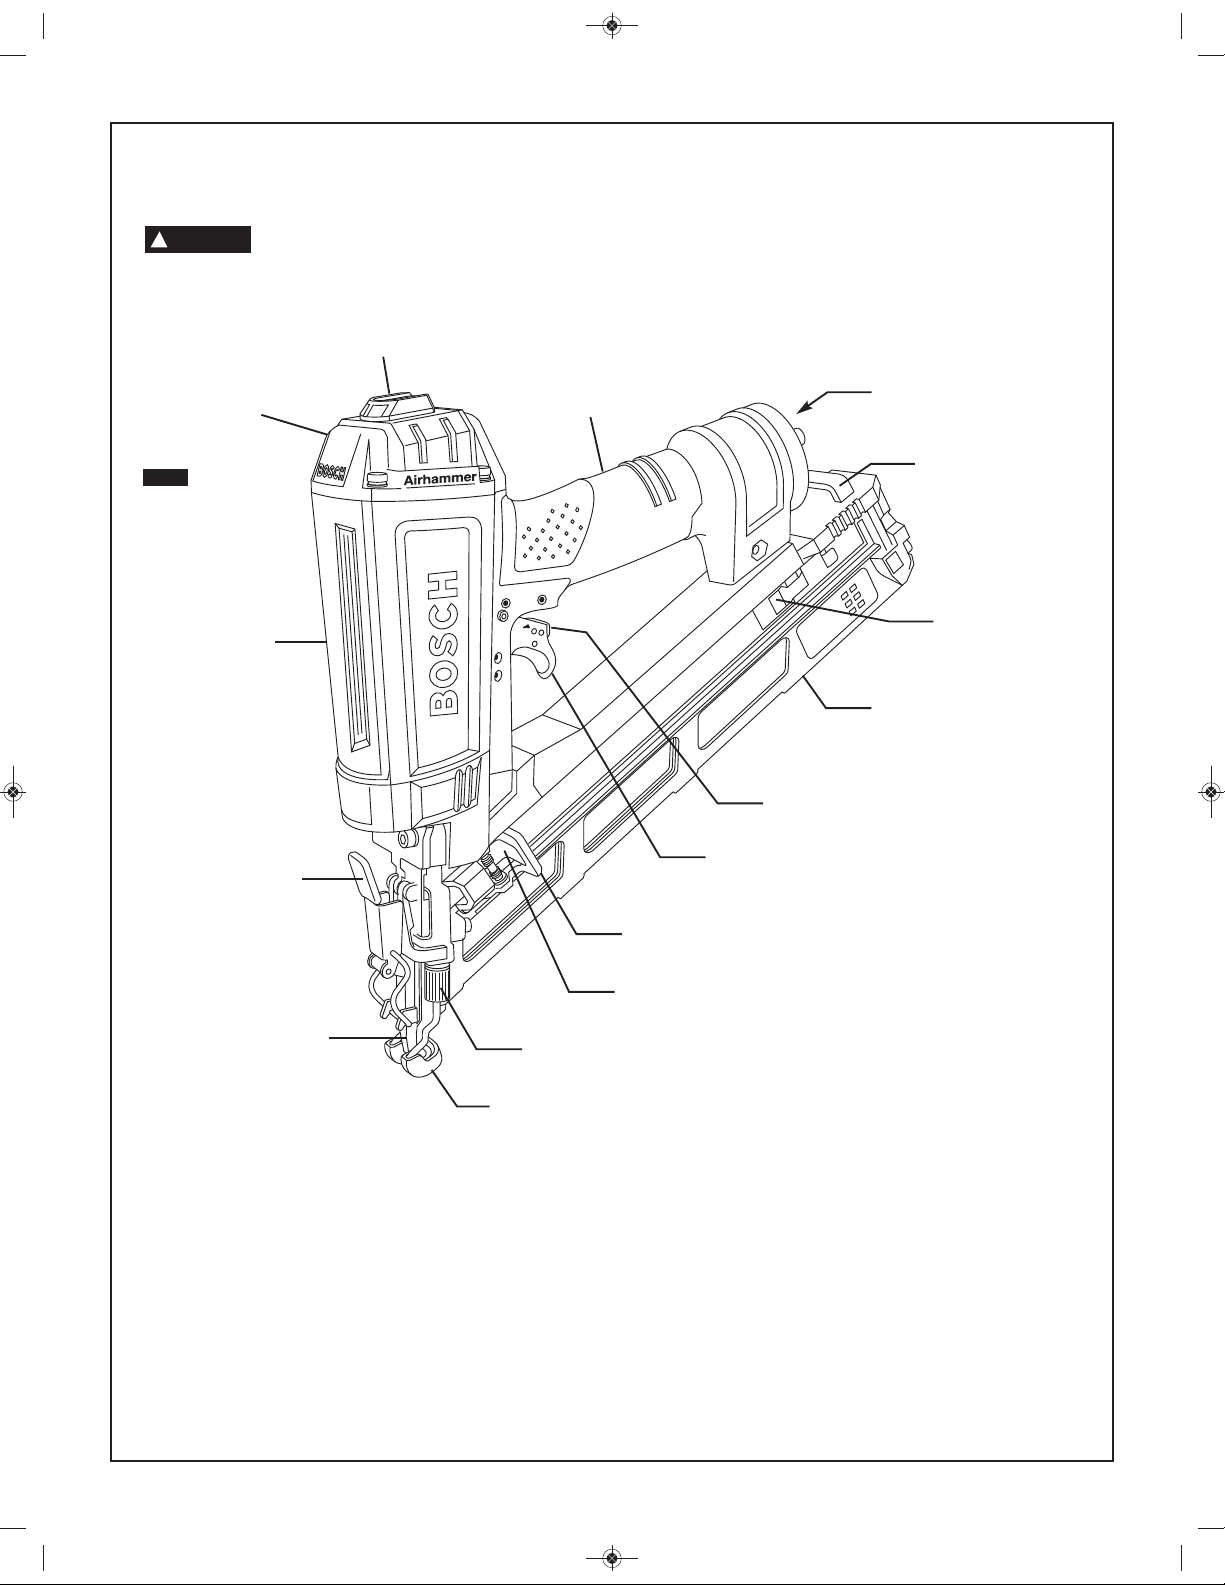
FIG. 1
Top Cap
Housing
Disconnect the tool from the air source before making any adjustments, changing accessories or
storing the tool. Such precautionary safety measures reduce the risk or unintentional tool operation.
Adjustable Exhaust
Deflector
Handle
Air Fitting
(Not Included)
No Mar Tip
Storage
Nail Hold
Back Spring
Magazine
Selectable Firing Mode Switch
Quick
Release
Lever
Work Contact
Element
Depth of Drive Adjustment
No-Mar Tip
Specifications
Product Size:
Height - 12.1 in.
Width - 3.1 in.
Weight: 4.1 lbs.
Normal Operating Pressure: 60 to 120 PSI
Magazine Capacity: 100 Nails
Maintenance: Oiling
Firing Modes: Bump Fire or Sequential Fire
Air Consumption, one shot per second @ 100 psi: 3.1 CFM
Trigger
Nail Follower
Bypass Lever
Maximum Capacities
Nails: Diameter 15 gage
Length (Range): 1-1/4 in. to 2-1/2 in.
Nail Loading & Change Out: Back
Additional Features
Tool-Less No-Mar Tip
5.
BM 2610957377 02-09:BM FNA250 06-09 6/17/09 8:01 AM Page 6
Assembly / Installation
Follow the instructions below to prepare your tool for
operation.
1. All tool operators and their immediate supervisors must
become familiar with the operator safety instructions
before operating the tool. The instructions begin on page
3 of this manual.
2.Included with each tool are one copy of these
Operating/Safety Instructions and one copy of the Tool
Schematic. Keep these publications for future reference.
3. Install a filter, regulator, lubricator unit and moisture trap
on your air delivery system per the manufacturer's
instructions for these devices. Additionally, install a
pressure gauge as close as practical to the tool,
preferably within ten feet.
4. Select hoses with a minimum inner diameter of 3/8 inches
and a maximum length of 100 feet.
!
WARNING
least 200 PSI.
5. Select fittings that are appropriately sized for the selected
hoses. The tool and air hose must have a hose coupling
such that all pressure is removed from the tool when the
coupling joint is disconnected.
To reduce the risk of injury from a hose
bursting, select hoses that are rated at
!
WARNING
couplings on the tool. Non relieving couplings and
female couplings will trap high pressure air in the tool
when the air line is disconnected. This will leave the tool
charged with enough air after it has been disconnected to
drive a nail. Only MALE pneumatic type air connectors
should be fitted to the tool, so that high pressure air in the
tool is vented to atmosphere as soon as the air line is
disconnected.
6. Set the regulator at the air delivery system to a PSI that
falls within the tool's operating range of 60 to 120 PSI.
The correct pressure is the lowest pressure that will do
the job.
7.If the operator is working at a bench or table, it is
recommended to run the air line underneath the bench. A
small tray under the bench top can hold the nail supply
and the tool when not in use.
Never use non relieving couplers
and/or female quick disconnect
Operation
Actuation System
Your tool is equipped with two devices that require actuation
before the tool will fire, the work contact element and the
finger trigger. There are two selectable modes, built into the
trigger, that determine how the tool fires nails.
“Sequential” Firing Mode: In “sequential” firing mode,
there is a predetermined sequence required to fire a nail.
The work contact element must first be depressed against
the work piece. A nail will then fire when the trigger is
depressed. To fire another faster, the work contact element
must be removed from the work piece, the trigger must be
released. The sequence can then be repeated.
“Bump” Firing Mode: In “Bump” firing mode, nails can be
fired each time the work contact element is depressed with
the trigger depressed. With the trigger continuously
depressed, a nail will fire each time the work contact
element is depressed against the work piece. This allows
for nails to be fired at a faster rate.
Each mode is described in detail in the “Firing Modes”
section of this manual.
!
WARNING
tool in an inappropriate mode may cause tool to react in an
unexpected manner and may result in personal injury.
!
WARNING
before verifying the actuation mode may cause tool to react
in an unexpected manner and may result in personal injury.
Understand the differences between
actuation modes for this tool. Using the
Verify the setting of the Selectable trigger
switch before using the tool. Using the tool
6.
BM 2610957377 02-09:BM FNA250 06-09 6/17/09 8:01 AM Page 7
Operation
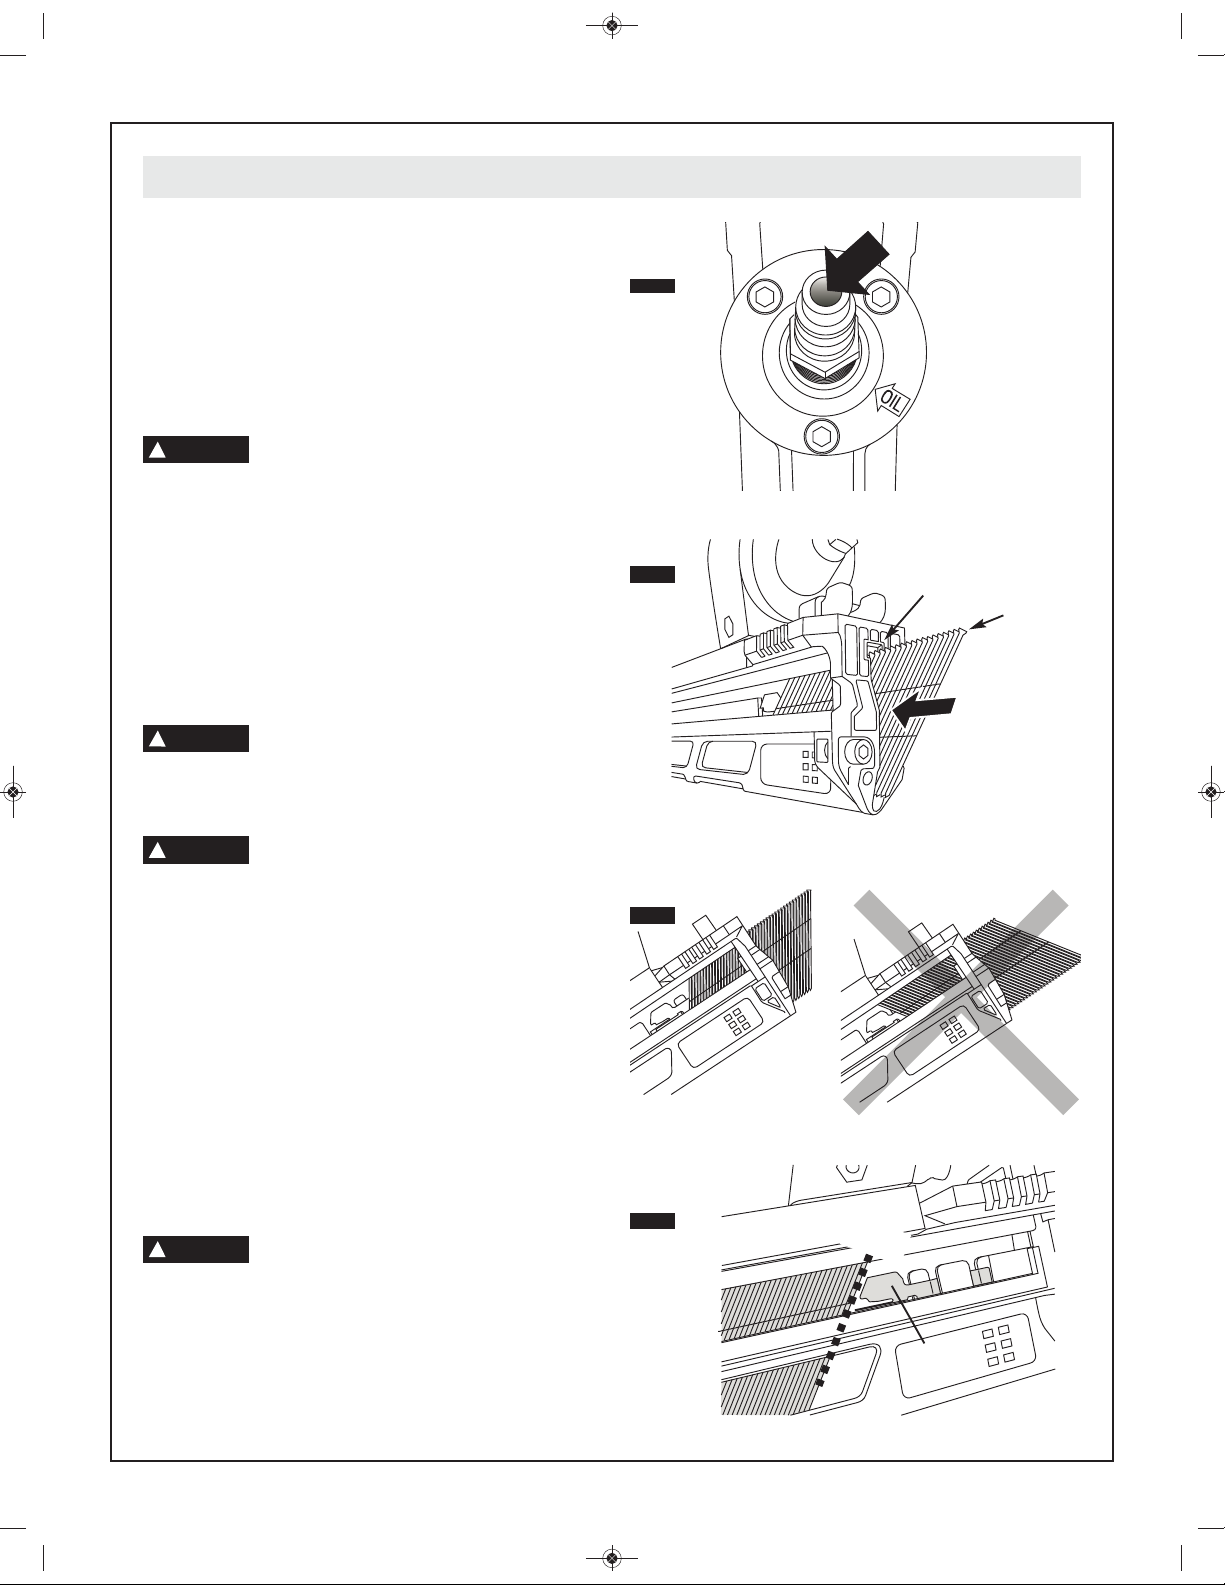
Lubrication
If the tool is not used with an in-line lubrication system on
the air supply it is necessary to periodically lubricate the tool
with air tool lubricant.
Under low use, lubricate once a day. Under heavy use,
lubricate twice a day. To lubricate, insert 2-3 drops of
lubricant into the air supply fitting attached to the tool
handle, see figure 2. Using to much oil will cause it to collect
in the tool and be noticeable in the exhaust.
!
WARNING
not use other lubricants as they may damage the tool.
Do not use detergent oil, WD-40, transmission fluid, motor
oil, or other lubricants not specifically designated as air tool
lubricants. These lubricants will cause accelerated wear to
the seals, o-rings, and bumpers in the tool, resulting in poor
tool performance and frequent maintenance.
BOSCH recommended lubricants: 10W Pneumatic Tool Oil,
Fuchs Air Lube 10W/NR.
Use only the air tool lubricants supplied
with the tool or specified by BOSCH. Do
Nail Loading
!
WARNING
Connecting the air supply after loading nails reduces the risk
of unintentionally driving a nail and injuring yourself or
someone else.
!
WARNING
pulling with finger. If not smooth, nails can be driven at
irregular angle.
1. Insert appropriate collated nail strips into loading slot in
back of magazine, see figure 3. See tool specifications to
determine appropriate nail sizes and angles.
2. Orient a strip of approved nails with the tips pointed down,
the nails should be inserted with the tips first into the slot,
see figure 4, and to align the head of the nail with the top
“T” portion of the slot. Insert nails fully into magazine
making sure that the last nail in the strip slides past the
Nail Hold Back Spring, see figure 5.
Note: The tool features a nail follower lockout that will
prevent the tool from firing when there are zero nails left
in the magazine. The tool will not allow the work contact
element to be depressed when there are no nails in the
tool.
!
WARNING
manual. Nails not identified for use with this tool can cause
the tool to malfunction and result in the risk of injury and/or
tool damage.
Always load nails into the tool's magazine
before the air supply is connected.
When loading the tool's magazine, check
that the nail follower slides smoothly by
Use only the nails meeting the criteria
listed in the “Specification” section of this
FIG. 2
FIG. 3
RIGHT WRONG
FIG. 4
FIG. 5
MAXIMUM
LOAD
2-3 Drops
of Air Tool
Lubricant
T-slot
INSERT
NAILS
Head of
nail
7.
Nail Hold
Back
BM 2610957377 02-09:BM FNA250 06-09 6/17/09 8:01 AM Page 8
3. This tool uses a spring loaded bypass lever in order to
load and unload the nails. Once the nails are properly
inserted, pull the follower completely to the back of the
magazine, pressing against the bypass lever of the
follower, see figure 6.
4. Once the follower hits the back of the magazine, allow the
follower to slide forward and engage the nails, pushing
them to the nose of the tool, see figure 7.
!
WARNING
pinch point area. When loading nails consider where your
hand is located. If it is within a pinch point, strongly consider
an alternative position. Injuries occur when hands or fingers
are between moving and stationary parts during the pinching
movement.
Watch for pinch points with the follower.
Never place any part of your body in a
Connecting Air Supply
!
WARNING
Combustible gases and other bottled gases are dangerous
and may cause the tool to explode.
!
WARNING
exceeding 200 PSI. Excessive pressure can cause
abnormal operation or cause the tool to burst, resulting in
personal injury.
Use only clean, dry, regulated compressed air within the
pressure range as marked on the tool. The correct pressure
is the lowest pressure that will do the job.
Before connecting the tool to the air supply, check the air
compressor regulator gauge to be sure it is functioning
properly, and that the air pressure is within the operational
range of the tool, 60-120 psi.
!
WARNING
prior to using the tool that the air source has been adjusted
within the rated air-pressure range. Be sure the air pressure
gauge is operating properly and check it at least twice a day.
Tools operated in excess of their maximum pressure rating
may operate abnormally or burst resulting in personal injury
To connect the tool to the compressor only use pneumatic air
hoses that meet the following criteria:
• Minimum hose pressure rating, 200 psi
• Minimum hose inner diameter, 3/8 in.
• Maximum hose length, 100 ft.
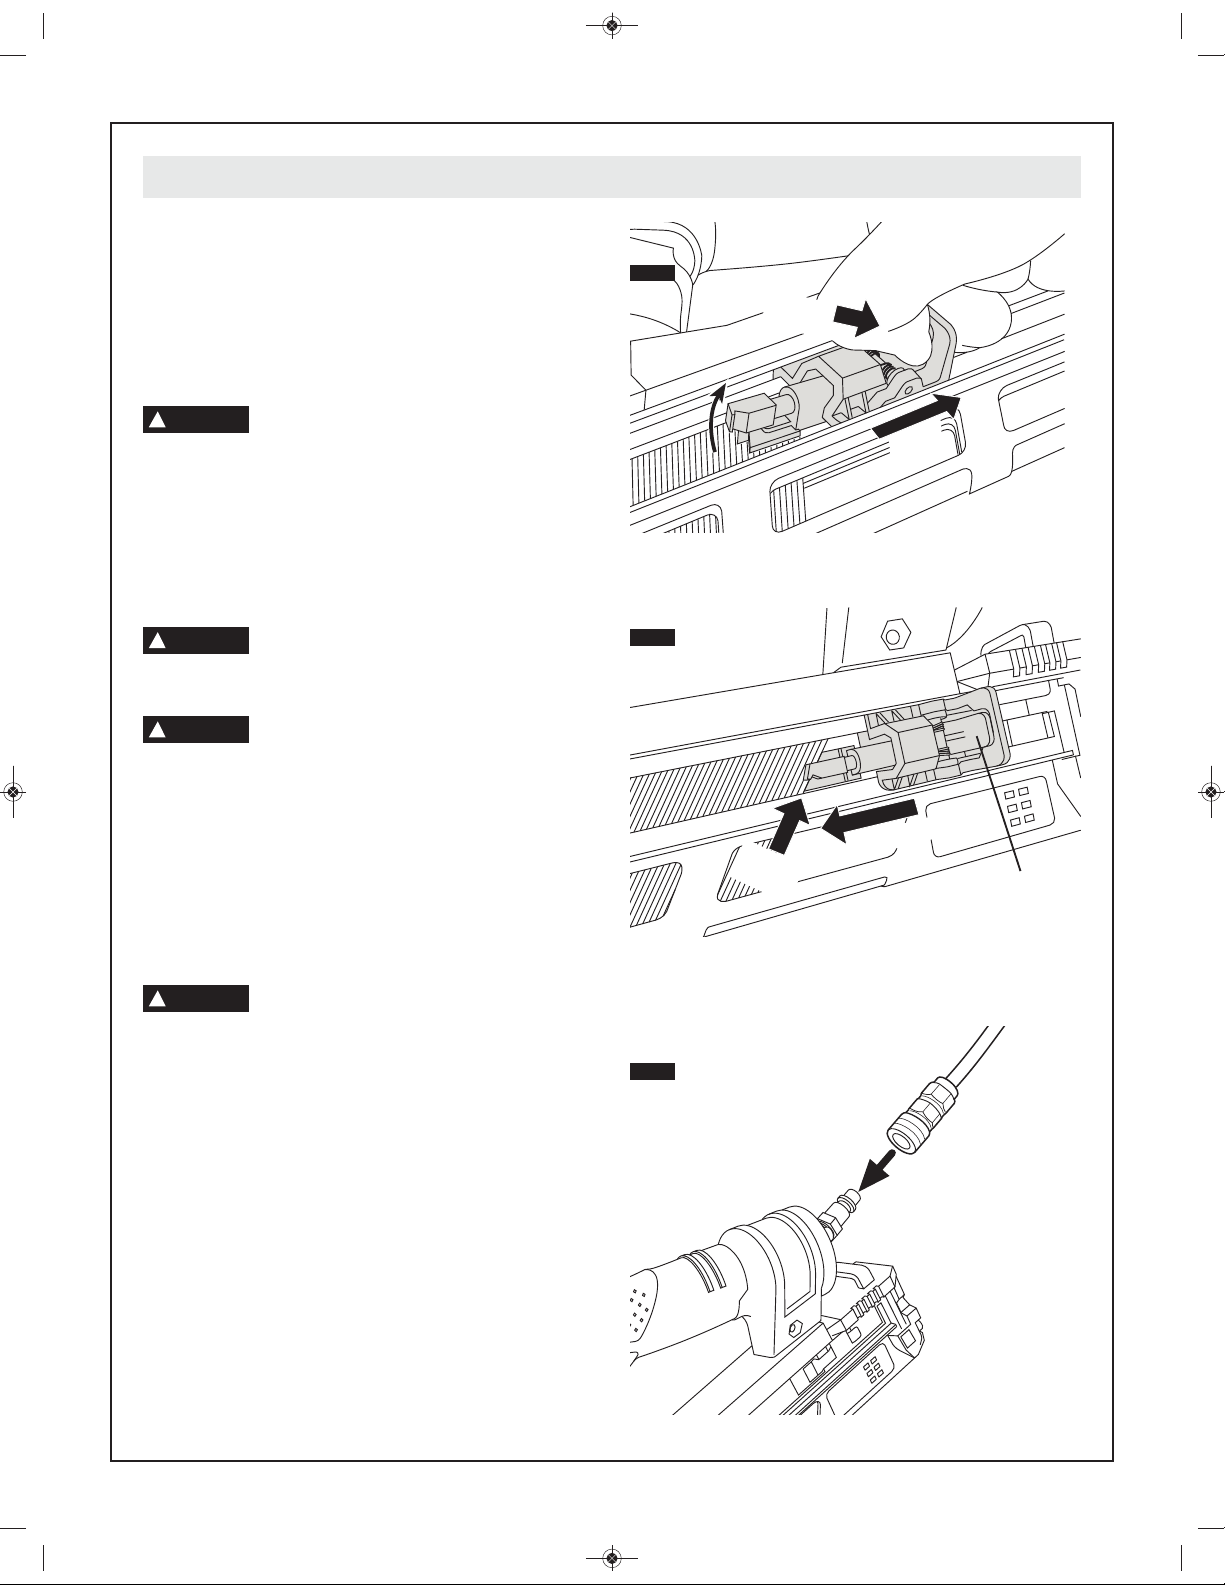
To connect the air supply:
1. Snap the air hose onto the quick connector, see figure 8.
2. Check for air leakage. If leakage is noted, cease using the
tool immediately and contact your BOSCH service center.
3. Be sure the air pressure gauge is operating properly and
check it at least twice a day.
Never use oxygen or other bottled gases
as a power source. Explosion may occur.
Never connect the tool to an air source
that is capable of producing air pressure
Do not exceed maximum recommended
air pressure marked on the tool. Verify
Operation
FIG. 6
FIG. 7
FIG. 8
PRESS
Bypass Lever
ENGAGE
NAILS
SLIDE
BACK
SLIDE FORWARD
Release
Bypass Lever
8.
BM 2610957377 02-09:BM FNA250 06-09 6/17/09 8:01 AM Page 9
Operation
Firing Modes
The tool is equipped with a trigger that can select one of two
firing modes.
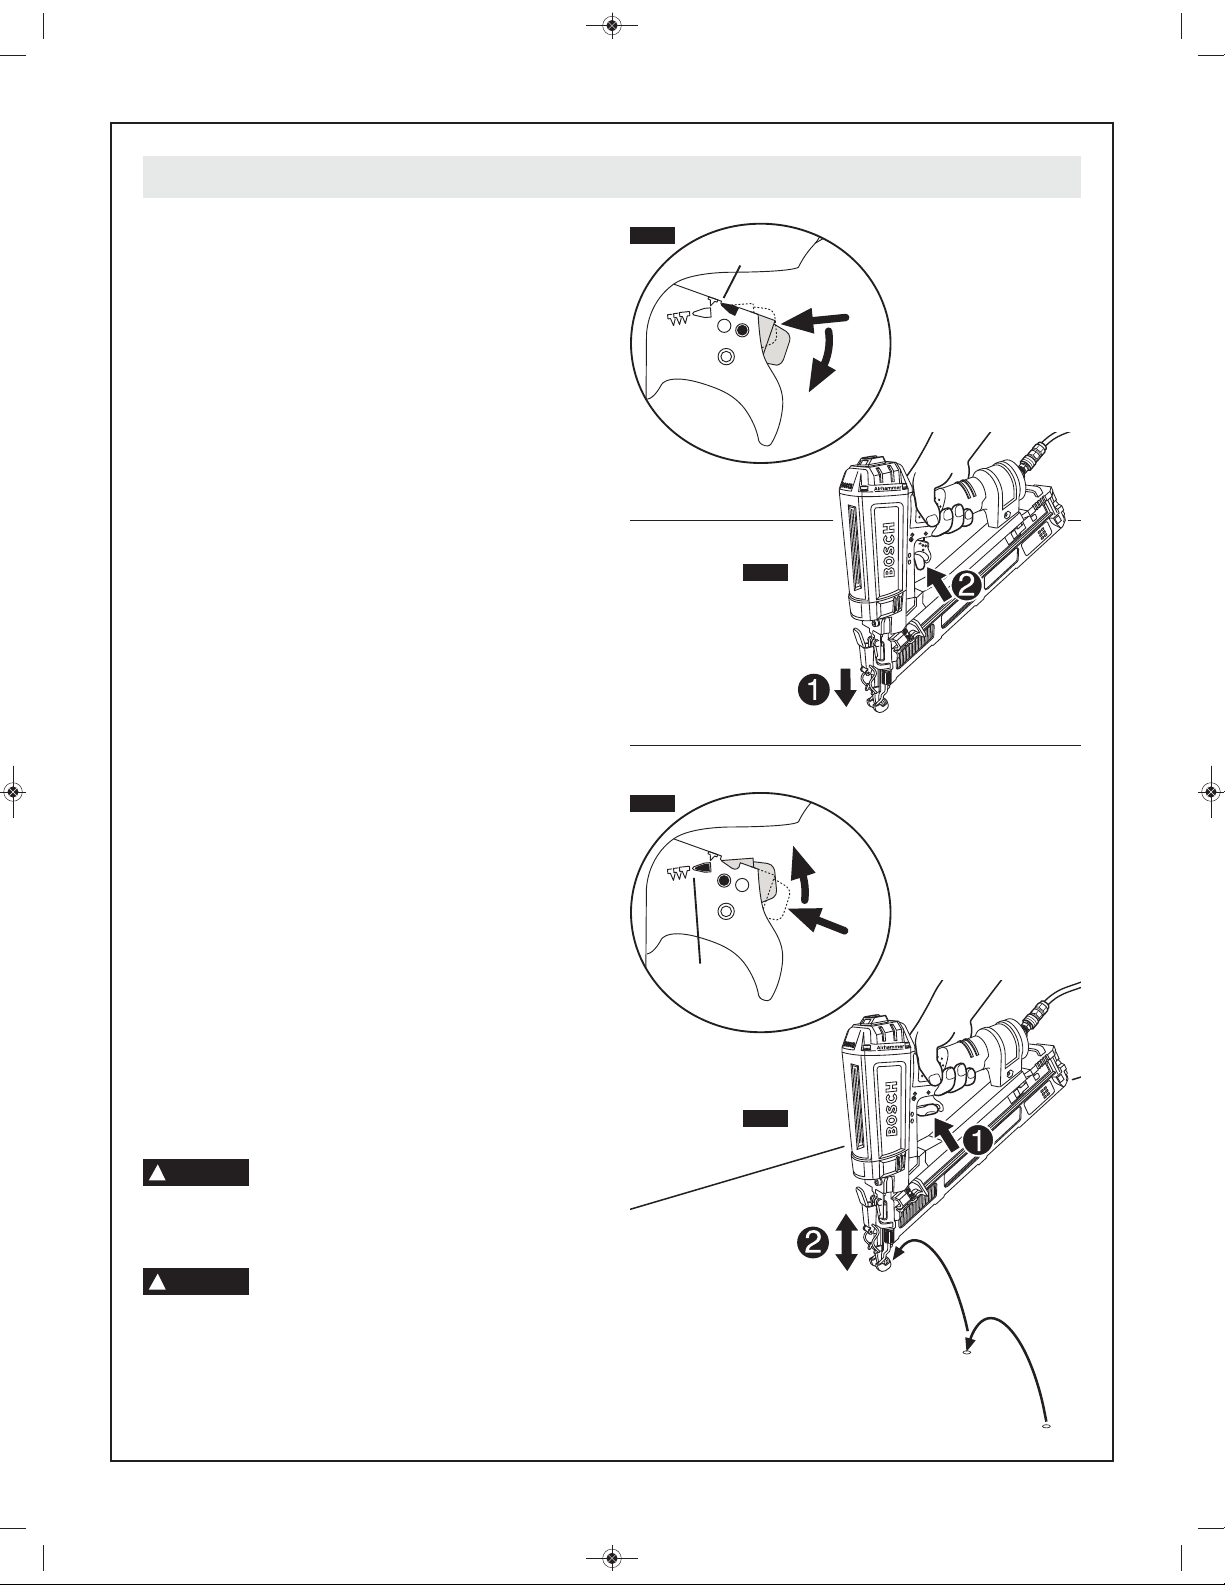
“Sequential” Firing Mode:
To use the tool to drive nails in this actuation mode, the
work contact element and trigger must be used in a specific
order:
1.Press and turn the selectable fire mode switch in the
downwards position. On the trigger, the firing mode
indicator should be pointing at the single nail icon, see
figure 9.
2. The work contact element must be completely depressed
by placing the nose of the tool against the work piece, see
figure 10.
3. The trigger must be pulled firmly and then released, see
figure 10.
4. The tool must be allowed to recoil away from the work
piece.
To continue operation in a separate location, move the tool
along the work piece, repeating steps 2 through 4 as
required.
“Bump” Firing Mode:
To use the tool to drive nails in this actuation mode the work
contact element and trigger can be actuated in any order.
1.Press and turn the selectable fire mode switch in the
upwards position. On the trigger the actuation mode
indicator should be pointing at the multi-nail icon, see
figure 11.
2. Pull and hold the trigger with the tool off the work piece.
3. Press the work contact element against the work piece. A
nail will be driven, see figure 12.
4. The tool must be allowed to recoil away from the work
piece.
5.Move the tool along the work piece with a bouncing
motion. Each time the work contact element is depressed
a nail will be driven, see figure 12.
6. As soon as the desired number of nails has been driven,
remove finger from trigger.
!
WARNING
handle only. Removing your finger from the trigger when
not operating the tool reduces the risk of unintentionally
firing a nail and injuring yourself or someone else.
!
WARNING
on top of another nail. If the tool is not moved before the
trigger is pulled again a second nail will be driven on top of
the previously driven nail. This could cause the nail to be
deflected or the tool to react in an unexpected manner.
Remove finger from the trigger when not
driving nails. Always carry the tool by the
The tool must be allowed to recoil away
from the work piece. Do not drive a nail
FIG. 9
FIG. 11
Fire Position
Trigger
Bump Fire
Position
Sequential
FIG. 10
FIG. 12
Press
then
turn
down
Press
then turn
up
9.
BM 2610957377 02-09:BM FNA250 06-09 6/17/09 8:01 AM Page 10
Cold Weather Operation
When using the tool in cold conditions the tool will cycle
slower than usual while driving the first nails. The cycle rate
will increase as the tool warms up. Keep tool warm to avoid
reduced cycle rate.
!
WARNING
impede internal components resulting in the risk of injury
and/or tool damage.
Do not use a frozen tool. Allow tool to thaw
before using. Moisture frozen in the tool may
Nail Unloading
!
WARNING
This avoids the risk of unintentional operation.
!
WARNING
element depressed. The tool can fire when reconnected to
air supply.
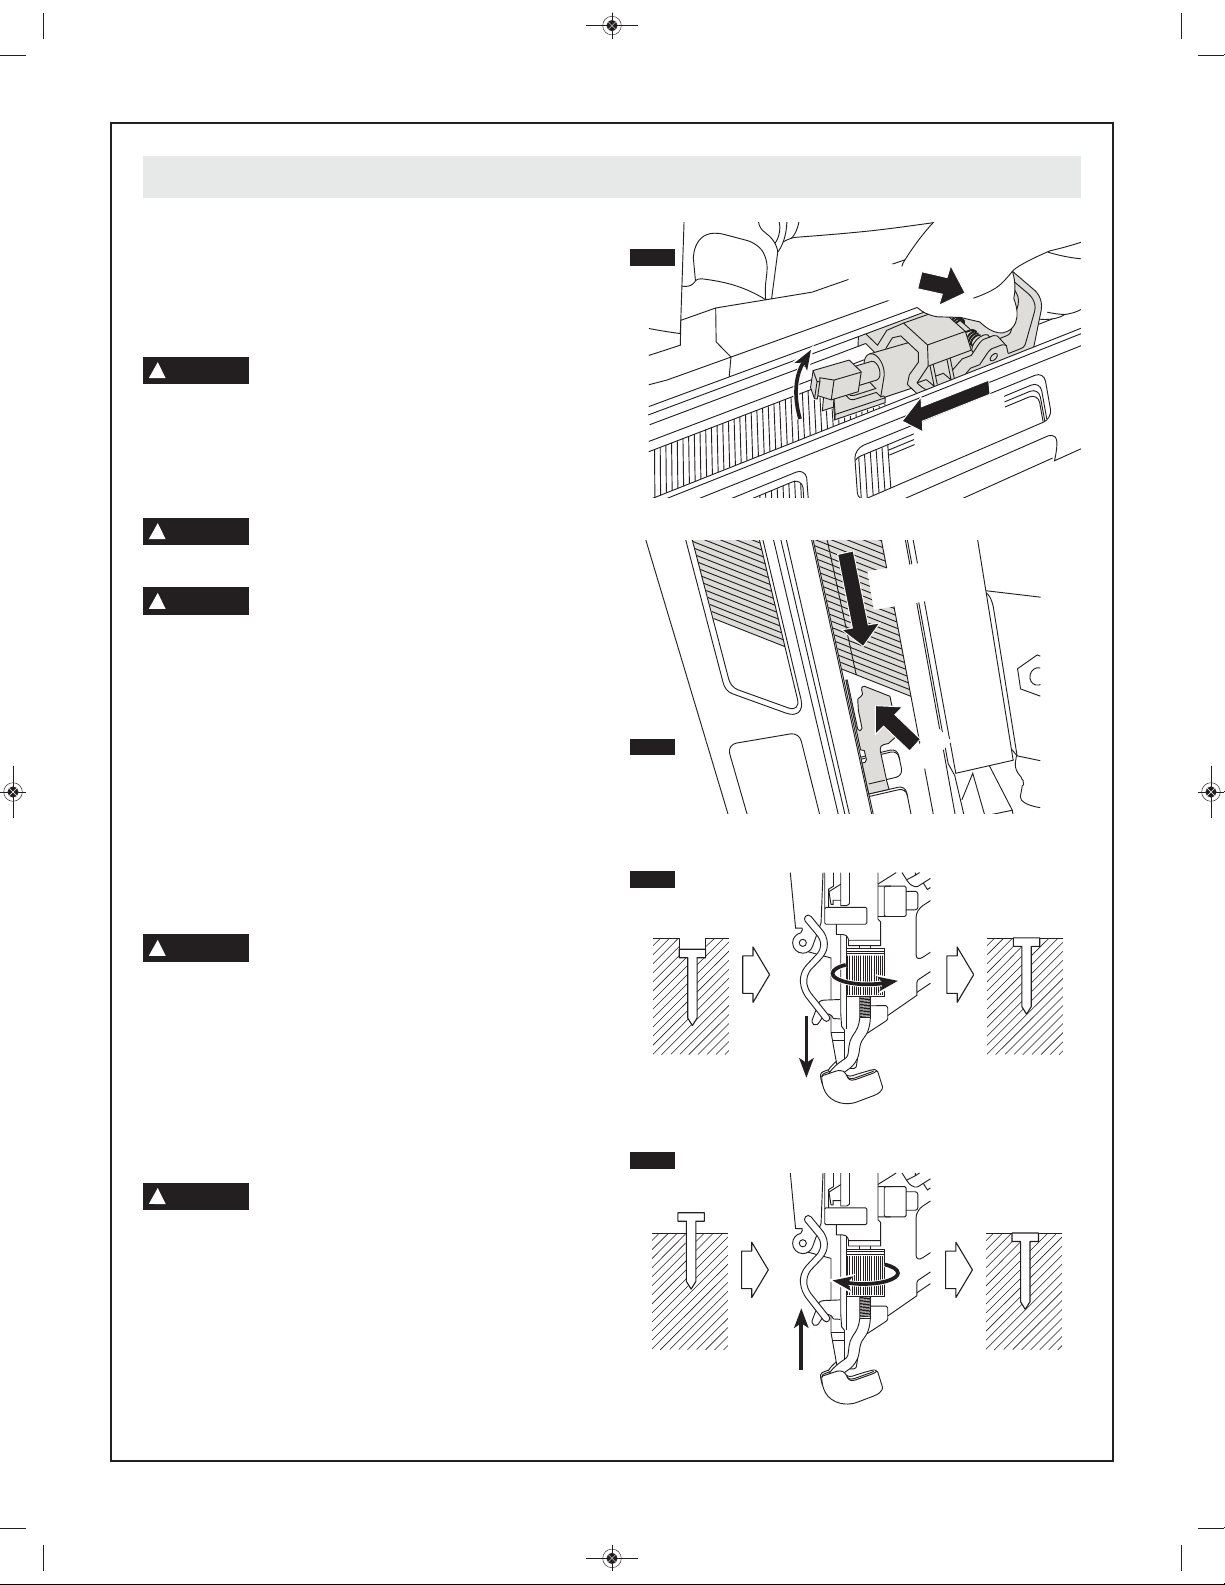
1. Disconnect air supply.
2. Pull back follower, pressing bypass lever of the follower to
allow follower to bypass nails and slowly allow follower to
return to nose of the tool, see figure 13.
3. Tilt the tool with the magazine vertical and the nose facing
up, this will allow the nails to slide to the back of the
magazine.
4. Once the nails have slid back to the hold back spring,
press the tab on the hold back spring to push the spring
back and allow the nails to come out of the magazine, see
figure 14.
!
WARNING
reaches its full forward position. Free recoil of the
follower could result in damage to the follower and/or
magazine or your fingers could become pinched.
Always disconnect tool from air supply
before removing nails from magazine.
Do not disconnect air hose from the tool
with finger on trigger or work contact
Do not allow the nail follower to freely
recoil. Guide the follower by hand until it
Operation
FIG. 13
FIG. 14
FIG. 15
PRESS
Bypass Lever
RELEASE
NAILS
SLIDE
FORWARD
PRESS
FlushToo Deep
Depth of Drive Adjustment
The depth with which nails are driven into the work piece
can be adjusted using the depth adjustment on the nose
piece of the tool.
!
WARNING
precautionary safety measures reduce the risk or
unintentional tool operation.
1. Disconnect tool from air supply.
2.Remove nails from tool as described in the “Nail
Unloading” section of this manual.
3. Adjust tool driving depth:
• To reduce the nail depth, turn the adjustment knob
counter clockwise, see figure 15.
Disconnect the tool from the air source
before making adjustments. Such
Turn the adjustment knob counter clockwise.
FIG. 16
Too Shallow
Flush
Turn the adjustment knob clockwise.
10.
BM 2610957377 02-09:BM FNA250 06-09 6/17/09 8:01 AM Page 11
• To drive the nail deeper, turn the adjustment knob
clockwise, see figure 16.
4. Reload nails as described in the “Nail Loading” section of
this manual.
5. Reconnect air supply
!
WARNING
without assuring the area on the opposite side is clear.
A nail could travel through the work piece, striking someone.
Know what is behind your work piece.
Do not fire nails into walls or floors
Jam Clearing
!
WARNING
Such precautionary safety measures reduce the risk or
unintentional tool operation.
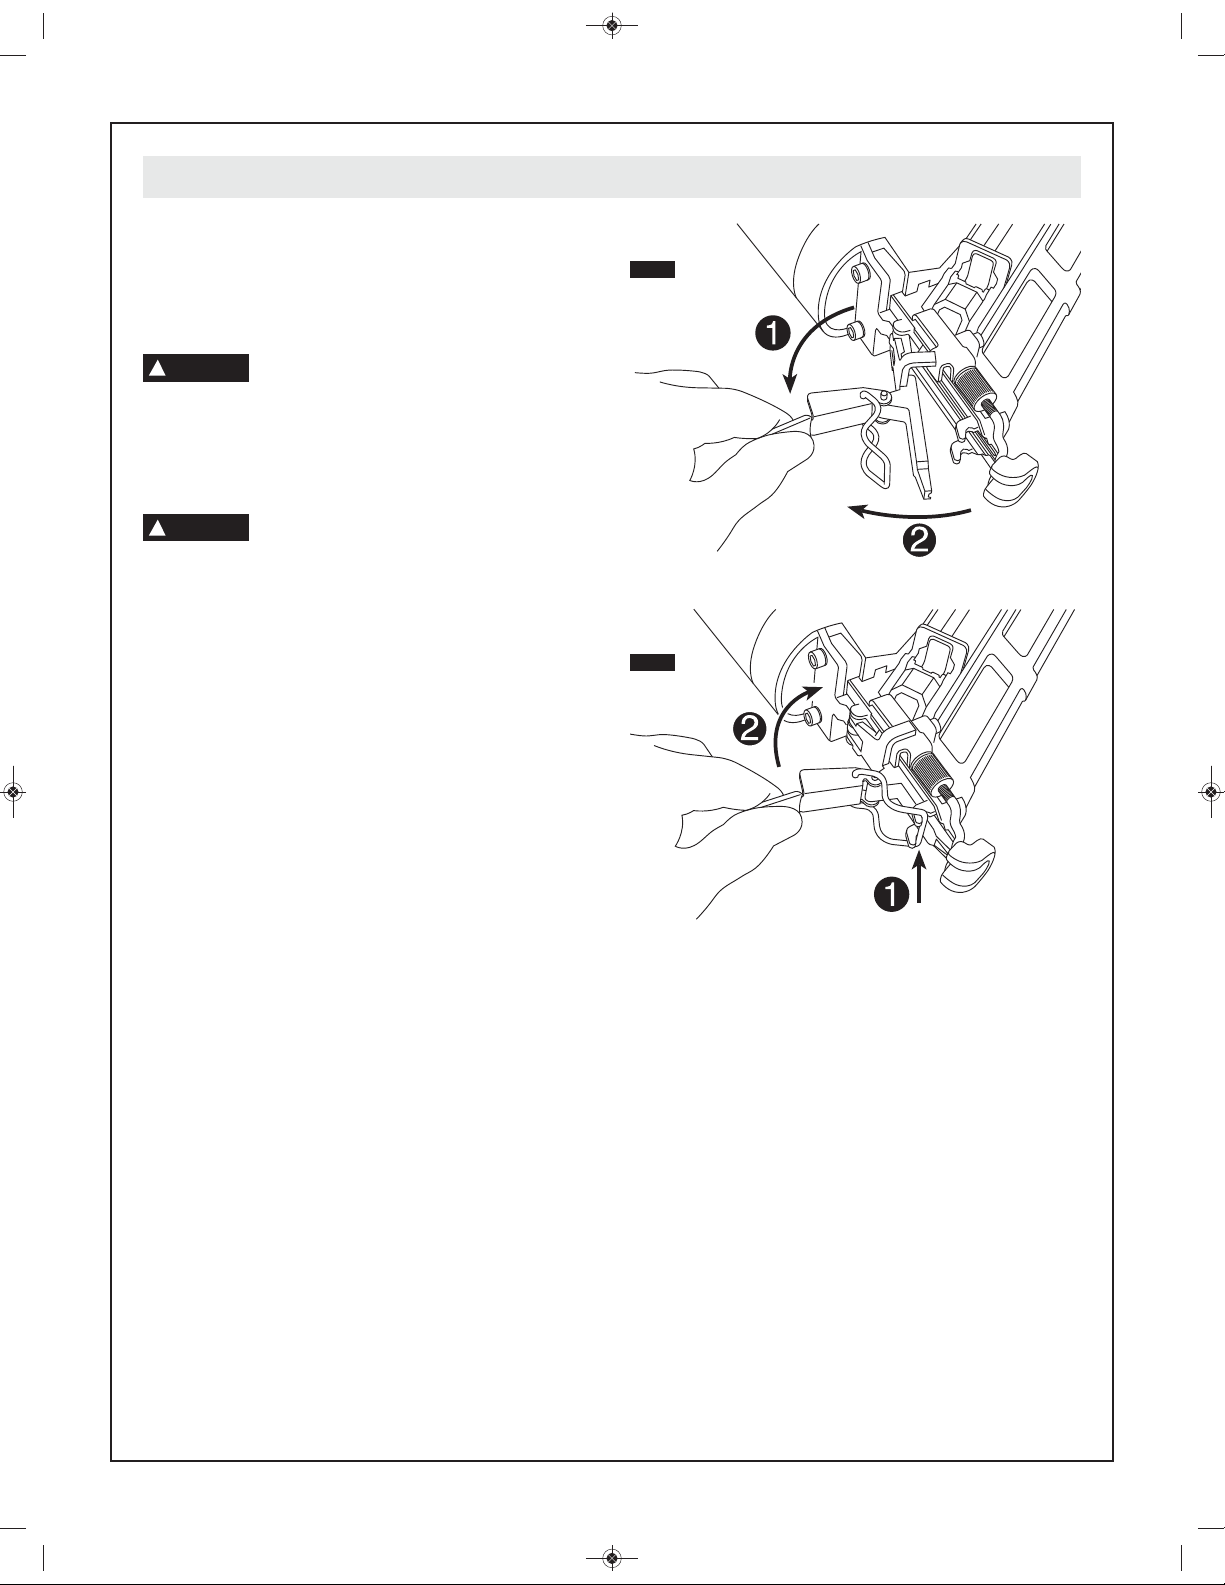
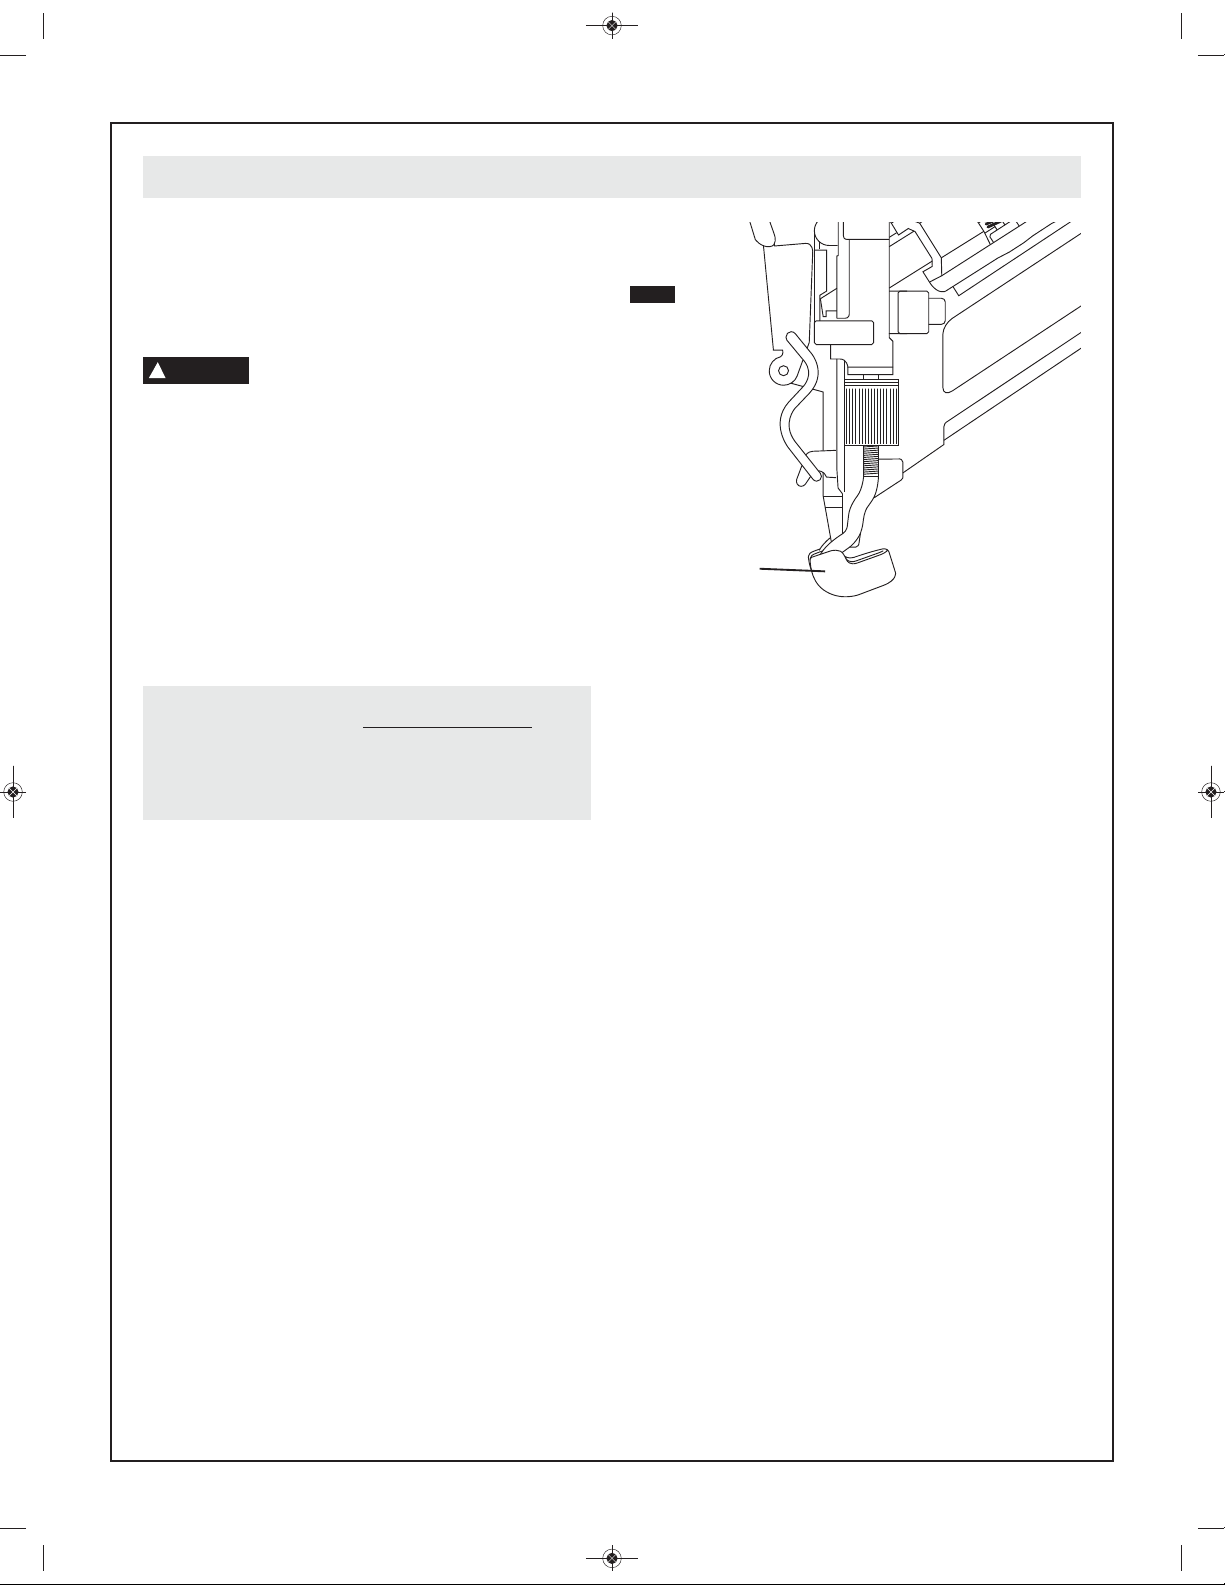
If a nail becomes jammed in the nosepiece, follow these
instructions to remove the jammed nail:
1. Release the trigger.
2. Disconnect the air supply from the tool.
3. Remove nails from the magazine as described in “Nail
Unloading.”
4. Open the nose of the tool by pulling quick release lever
forward. Pull open the nose of the tool to access the nail
jam, see figure 17.
5. Remove the nail, using pliers if necessary.
6. Close the nose of the tool by hooking the spring of the
quick clear lever on the two hooks on the nose. Press the
lever closed, see figure 18.
7.Reinsert nails into the magazine as described in “Nail
Loading”.
8.Reconnect air supply as described in “Connecting Air
Supply”.
NOTE: If the driver blade does not return to its up position,
disconnect air supply and contact a Bosch factory service
center or authorized Bosch service station.
NOTE: If nails continue to jam frequently in the nose piece,
contact BOSCH service center for repair.
Disconnect the tool from the air source
before attempting to clear a jammed nail.
Operation
FIG. 17
FIG. 18
Adjustable Exhaust Deflector
This tool has an adjustable exhaust deflector that allows the
exhaust air to be blown away from user or workpiece.
11.
BM 2610957377 02-09:BM FNA250 06-09 6/17/09 8:01 AM Page 12
Maintenance
Service
!
WARNING
internal components which could cause serious hazard.
We recommend that all tool service be performed by a
BOSCH factory service center or authorized BOSCH
service station.
Contact your BOSCH service center for instructions and the
following user replaceable parts; o-rings, bumpers, and
driver blades.
For all other repairs contact your BOSCH service center.
Maintenance performed by unauthorized
personnel may result in misplacing of the
Cleaning
!
WARNING
internal components may be misplaced or safety
components may be improperly mounted. Certain
cleaning agents such as gasoline, carbon tetrachloride,
ammonia, etc. may damage plastic parts and o-rings.
!
WARNING
edges may damage internal components causing a serious
hazard.
Ventilation openings, the work contact element, and the
trigger must be kept clean and free of foreign matter.
Periodically clean the tool with compressed air.
Clean the magazine. Remove plastic or wooden chips
which may have accumulated in the magazine. Lubricate
the magazine with pneumatic tool lubricant.
When cleaning a tool be careful not to
disassemble any portion of the tool since
Do not attempt to clean by inserting
pointed objects through openings. Sharp
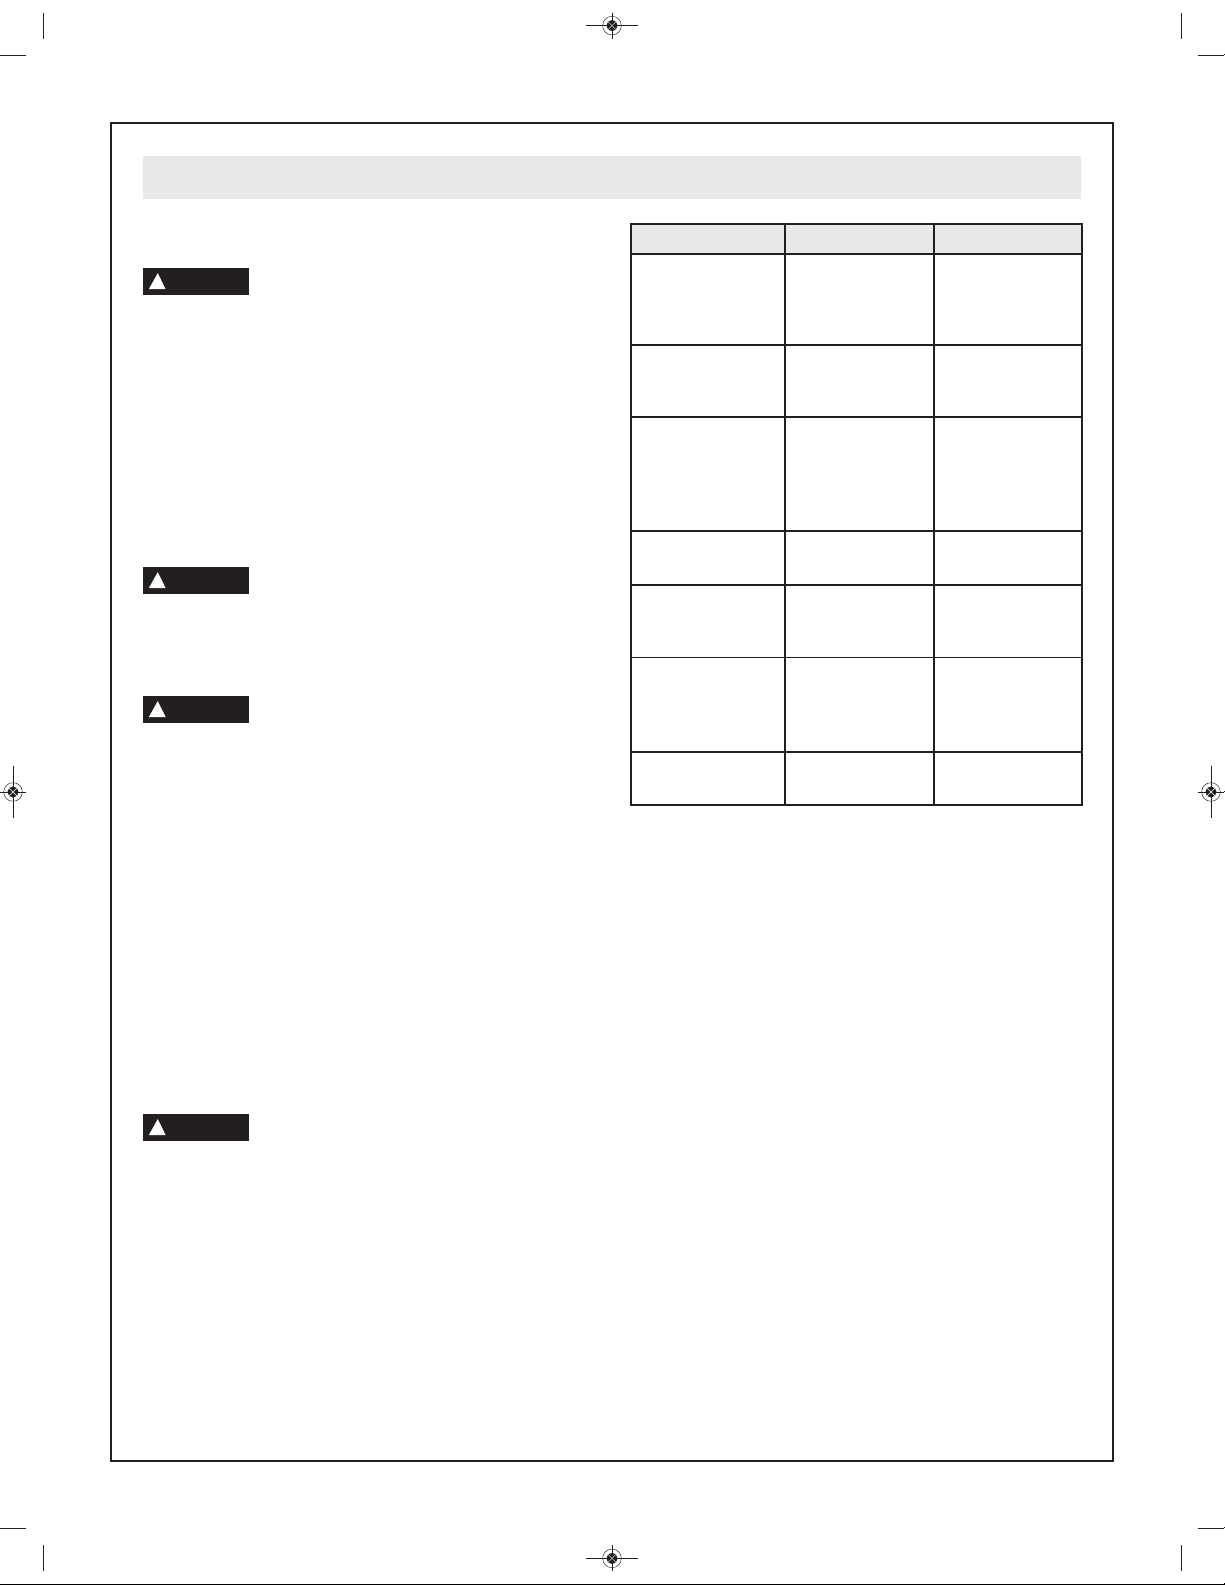
ACTION WHY HOW
Drain air line filter
daily.
Keep lubricator
filled
Clean filter element
- then blow air
through filter in
direction opposite
to normal flow.
Clean magazine
and feeder
Keep work contact
element working
properly
Lubricate the tool. Extend tool life. Place 2-3 drops of
Drain air
compressor.
Prevent
accumulation of
moisture
and dirt.
Keep the Nailer
lubricated
Prevent clogging
of filter with dirt.
Prevent a jam. Blow mechanism
Promote operator
safety and efficient
tool operation.
Keep water out of
tool.
Open manual
valve.
Fill with BOSCH
pneumatic tool
lubricant.
Follow
manufacturer's
instructions.
clean daily.
Blow clean daily.
lubricant
into the tool as
directed.
Open valve on air
compressor tank.
Storage
When not in use, the tool should be disconnected and
stored in the storage case in a warm and dry place. When
tool will not be in use for an extended period, apply a thin
coat of the lubricant to the steel parts to avoid rust.
Do not store the tool in a cold weather environment.
!
WARNING
Lock the storage area. Tools are dangerous in the hands of
personnel unfamiliar with the tool.
Keep out of reach of children and
personnel unfamiliar with tool operation.
12.
BM 2610957377 02-09:BM FNA250 06-09 6/17/09 8:01 AM Page 13
No-Mar Pad
The No-Mar Pad on the nose of the work contact element
protects the work piece from the work contact element toe
nailing teeth when the work piece contact is compressed
during actuation. The pad can be removed and replaced.
!
WARNING
or replacing no-mar pads. Such precautionary safety
measures reduce the risk or unintentional tool operation.
To remove the pad: Pull the no mar tip towards the back of
the tool following the bend of the wire nose.
To replace the pad. Push the no mar tip on to the tool
inserting the opening of the no mar tip on to the wire nose.
Disconnect the air supply from the tool
and remove nail strips before removing
Accessories
FIG. 19
Compressor
A correctly sized compressor is critical for maximum tool
performance. Use the following calculation to determine the
required compressor size.
Compressor size (CFM) =
x Shots per minute x Number of tools x 1.2
Air Consumption, one shot per second @ 100 psi: 3.1 CFM
Air Consumption(CFM)
60
No-Mar Pad
13.
 Loading...