


Bosch BORERADWMW243, BORERADWMW820, BORERADWMW757 User Manual
Induction Ranges
Use and Care Manual
Slide-In Ranges
HII8056U, HII8056C, HII8046U, HII8046C
HIIP056U, HIIP056C


Table of Contents
Use and care manual
Safety Definitions .......................................................... 4
IMPORTANT SAFETY INSTRUCTIONS ........................ 5
Proper Installation and Maintenance ................................ 5
Fire Safety .............................................................................. 6
Burn Prevention .................................................................... 6
Electromagnetic Interference ............................................. 7
Child Safety ........................................................................... 7
Cleaning Safety ..................................................................... 7
Cookware Safety .................................................................. 7
State of California Proposition 65 Warnings ................... 8
Food Safety ........................................................................... 8
Causes of Damage ........................................................ 9
Protecting the Environment ........................................ 10
Saving Energy .................................................................... 10
Getting Started ............................................................. 11
Parts ..................................................................................... 11
Accessories ........................................................................ 12
Getting familiar with the appliance ............................ 14
Control panel (800 Series)............................................... 14
The elements ...................................................................... 15
Residual heat indicator .................................................... 15
Operation ...................................................................... 15
Main power switch ............................................................ 15
Setting the cooktop ........................................................... 15
Cook time ........................................................................... 17
Kitchen timer ...................................................................... 18
®
SpeedBoost
function ...................................................... 18
AutoChef® ........................................................................... 18
Panel lock ........................................................................... 21
Wipe Protection ................................................................. 21
Automatic time limitation .................................................. 21
Basic settings ..................................................................... 21
Getting familiar with the appliance ............................ 23
Control panel (Benchmark Series).................................. 23
The elements ...................................................................... 24
Residual heat indicator .................................................... 24
Operation ...................................................................... 24
Main power switch ............................................................ 24
Setting the cooktop ........................................................... 24
Flex Induction...................................................................... 26
Power Move......................................................................... 27
Time-setting options ........................................................ 28
®
SpeedBoost
..................................................................... 29
ShortBoost ......................................................................... 29
Keep Warm ........................................................................ 30
Panel lock ........................................................................... 30
Wipe Protection ................................................................. 30
Automatic time limitation .................................................. 30
Basic settings ..................................................................... 30
Cooking with Induction ............................................... 33
Advantages of induction cooking ................................... 33
Cookware ............................................................................ 33
Cleaning and Maintenance-Cooktop ......................... 34
Daily Cleaning .................................................................... 34
Cleaning guidelines .......................................................... 35
Cleaning charts .................................................................. 35
Operation-Oven ........................................................... 36
Oven Control Panel ........................................................... 36
About the Oven .................................................................. 37
Basic Features ................................................................... 38
Special Features ................................................................ 40
Settings Menu Options ..................................................... 43
Getting the Most Out of Your Appliance ................... 44
General Tips ....................................................................... 44
% ............................................................................... 45
Bake
Auto Convection Conversion .......................................... 45
Convection Bake
2 ......................................................... 46
Convection Multi-Rack: ................................................. 46
2 ............................................................................... 46
Pizza
Roast % .............................................................................. 47
Convection Roast 2 ........................................................ 47
( ................................................................................ 47
Broil
Convection Broil 4 .......................................................... 48
Proof $ .............................................................................. 48
Warm
% ............................................................................. 48
Cleaning and Maintenance-Oven ............................... 49
Cleaning the Oven ............................................................ 49
Maintenance ....................................................................... 51
Operation-Warming Drawer ........................................ 54
About the Warming Drawer ............................................. 54
Warming Drawer Specifications ..................................... 54
Operation ............................................................................ 54
Gett
ing the Most Out of Your Warming Drawer ........ 55
About the Appliance ......................................................... 55
General Tips ....................................................................... 55
Use of Your Appliance ..................................................... 55
Preheating .......................................................................... 55
Warming Empty Serving Bowls and Plates .................. 55
Crisping Stale Items ......................................................... 55
Temperature Recommendations .................................... 56
Cleaning and Maintenance-Warming Drawer ........... 56
Cleaning the Warming Drawer ....................................... 56
Removing Drawer from Housing .................................... 57
Installing Drawer to Housing ........................................... 57
3

Service ......................................................................... 60
Frequently-asked questions and answers (FAQ) ........ 60
Fixing Malfunctions ........................................................... 61
Oven Troubleshooting ...................................................... 63
How to Obtain Service or Parts ...................................... 64
STATEMENT OF LIMITED PRODUCT WARRANTY ... 64
What this Warranty Covers & Who it Applies to ......... 64
How Long the Warranty Lasts ........................................ 64
Repair/Replace as Your Exclusive Remedy ................ 65
Out of Warranty Product .................................................. 65
Warranty Exclusions ......................................................... 65
Cooking Charts ........................................................... 66
Baked Goods/Entrees ..................................................... 66
Meats ................................................................................... 67
7KLV%RVFK$SSOLDQFHLVPDGHE\
%6++RPH$SSOLDQFHV&RUSRUDWLRQ
0DLQ6WUHHW6XLWH
,UYLQH&$
4XHVWLRQV"
ZZZERVFKKRPHFRPXV
:HORRNIRUZDUGWRKHDULQJIURP\RX
Safety Definitions
9 WARNING
This indicates that death or serious injuries may
occur as a result of non-observance of this warning.
9 CAUTION
This indicates that minor or moderate injuries may
occur as a result of non-observance of this warning.
NOTICE: This indicates that damage to the appliance or property may occur as a result of non-compliance with this advisory.
Note: This alerts you to important information and/or tips.
4

9 IMPORTANT SAFETY INSTRUCTIONS
READ AND SAVE THESE INSTRUCTIONS
IMPORTANT SAFETY INS READ AND SAVE THESE INSTRUCTIONS
WARNING
When properly cared for, your new appliance has been
designed to be safe and reliable. Read all instructions
carefully before use. These precautions will reduce the
risk of burns, electric shock, fire, and injury to persons.
When using kitchen appliances, basic safety precautions
must be followed, including those in the following pages.
Do not repair or replace any part of the appliance unless
specifically recommended in this manual. Refer all
servicing to an authorized servicer.
In the event of an error the display flashes and beeps
continuously. Disconnect appliance from the power
supply and call an authorized servicer.
WARNING
This appliance is intended for use at an elevation of no
more than 2000 meters above sea level.
Proper Installation and Maintenance
WARNING
TIP OVER HAZARD
A child or adult can tip the
range over and be killed.
Verify that the anti-tip
bracket is engaged whenever the range is moved
to a new location.
Do not operate the range without the anti-tip bracket
in place. Failure to follow the instructions in this manual can result in death or serious burns to children
and adults.
Check for proper installation and use of the anti-tip
bracket. Carefully tip the range forward pulling from
the back to ensure that the anti-tip bracket engages
the range leg and prevents tip-over. The range
should not move more than 1” (2.5cm).
Have the installer show you the location of the circuit
breaker or fuse. Mark it for easy reference.
This appliance must be properly installed and grounded
by a qualified technician. Connect only to properly
grounded outlet. Refer to Installation Instructions for
details.
This appliance is intended for normal family household
use only. It is not approved for outdoor use. See the
Statement of Limited Product Warranty. If you have any
questions, contact the manufacturer.
Do not store or use corrosive chemicals, vapors,
flammables or nonfood products in or near this
appliance. It is specifically designed for use when
heating or cooking food. The use of corrosive chemicals
in heating or cleaning will damage the appliance and
could result in injury.
Do not operate this appliance if it is not working properly,
or if it has been damaged. Contact an authorized
servicer.
Do not obstruct oven vents.
When removing the door make sure oven is cool and
power to the oven has been turned off before removing
the door. Failure to do so could result in burns.
The oven door is heavy and fragile. Use both hands to
remove the oven door. The door front is glass. Handle
carefully to avoid breaking.
Grasp only the sides of the oven door. Do not grasp the
handle as it may swing in your hand and cause injury or
damage.
Failure to grasp the oven door firmly and properly could
result in personal injury or product damage.
Lay the door on a flat smooth surface so that the door
cannot fall over. Failure to do so may result in personal
injury or damage to the appliance.
WARNING
To avoid injury from hinge bracket snapping closed, be
sure that both levers are securely in place before
removing door. Also, do not force door open or closed the hinge could be damaged and injury could result.
WARNING
Make sure the appliance and lights are cool and power
to the appliance has been turned off before replacing the
light bulb(s). Failure to do so could result in electrical
shock or burns. The lenses (if equipped) must be in
place when using the appliance. The lenses (if equipped)
serve to protect the light bulb from breaking. The lenses
(if equipped) are made of glass. Handle carefully to
avoid breaking. Broken glass can cause an injury.
WARNING
Light socket is live when door is open if main power
supply is not turned off.
5

9 IMPORTANT SAFETY INSTRUCTIONS
READ AND SAVE THESE INSTRUCTIONS
Fire Safety
WARNING
NEVER cover any slots, holes or passages in the oven
bottom or cover an entire rack with materials such as
aluminum foil. Doing so blocks air flow through the oven.
Aluminum foil linings may also trap heat, causing a fire
hazard.
If materials inside an oven or warming drawer should
ignite, keep door closed. Turn off the appliance and
disconnect the circuit at the circuit breaker box.
WARNING
Use this appliance only for its intended use as described
in this manual. NEVER use this appliance as a space
heater to heat or warm the room. Doing so may result in
overheating the appliance. Never use the appliance for
storage.
Always have a working smoke detector near the kitchen.
In the event that personal clothing or hair catches fire,
drop and roll immediately to extinguish flames.
Have an appropriate fire extinguisher available, nearby,
highly visible and easily accessible near the appliance.
Smother flames from food fires other than grease fires
with baking soda. Never use water on cooking fires.
WARNING
TO REDUCE THE RISK OF INJURY TO PERSONS IN THE EVENT OF A GREASE FIRE, OBSERVE THE FOLLOWING:
a.
SMOTHER FLAMES with a close-fitting lid, cookie
sheet, or metal tray, then turn off the burner. BE
CAREFUL TO PREVENT BURNS. If the flames do not
go out immediately, EVACUATE AND CALL THE FIRE
DEPARTMENT.
b.
NEVER PICK UP A FLAMING PAN – You may be
burned.
c.
DO NOT USE WATER, including wet dishcloths or
towels – a violent steam explosion will result.
d.
Use an extinguisher ONLY if:
- You know you have a Class ABC extinguisher, and
you already know how to operate it.
- The fire is small and contained in the area where it
started.
- The fire department is being called.
- You can fight the fire with your back to an exit.
Burn Prevention
DO NOT TOUCH HEATING ELEMENTS OR INTERIOR
SURFACES OF OVEN - Heating elements may be hot
even though they are dark in color. Interior surfaces of an
oven become hot enough to cause burns. During and
after use, do not touch, or let clothing, potholders, or
other flammable materials contact heating elements or
interior surfaces of oven until they have had sufficient
time to cool. Other surfaces of the appliance may
become hot enough to cause burns. Among these
surfaces are oven vent openings, surfaces near these
openings and oven doors.
Do not touch interior surface of the drawer while it is in
use. The interior drawer could become hot enough to
cause burns. Allow drawer and rack (if equipped) to cool
before handling.
Exercise caution when opening the appliance. Standing
to the side, open the door (or drawer) slowly and slightly
to let hot air and/or steam escape. Keep your face clear
of the opening and make sure there are no children or
pets near the unit. After the release of hot air and/or
steam, proceed with your cooking. Keep doors shut
unless necessary for cooking or cleaning purposes. Do
not leave open doors unattended.
Do not heat or warm unopened food containers. Build-up
of pressure may cause the container to burst and cause
injury.
Use high heat settings on the cooktop only when
necessary. To avoid bubbling and splattering, heat oil
slowly on no more than a low-medium setting. Hot oil is
capable of causing extreme burns and injury.
Use caution when cooking foods with high alcohol
content (e.g. rum, brandy, bourbon) in the oven. Alcohol
evaporates at high temperatures. There is a risk of
burning as the alcohol vapors may catch fire in the oven.
Use only small quantities of alcohol in foods, and open
the oven door carefully.
Always place oven racks in desired location while oven is
cool. Always use oven mitts, when the oven is warm. If a
rack must be moved while oven is hot, do not let
potholder contact the heating elements.
Never move a pan of hot oil, especially a deep fat fryer.
Wait until it is cool.
CAUTION
To avoid possible injury or damage to the appliance,
ensure rack is installed exactly per installation
instructions and not backwards or upside down.
Always use dry potholders. Moist or damp potholders on
hot surfaces may result in burns from steam. Do not let
potholder touch hot heating elements. Do not use a towel
or other bulky cloth.
Secure all loose garments, etc. before beginning. Tie
long hair so that it does not hang loose, and do not wear
loose fitting clothing or hanging garments, such as ties,
scarves, jewelry, or dangling sleeves.
6

9 IMPORTANT SAFETY INSTRUCTIONS
READ AND SAVE THESE INSTRUCTIONS
Avoid reaching or leaning over the appliance. Be aware
that certain clothing and hair sprays may contain
flammable chemicals that could be ignited if brought in
to contact with hot surface units or heating elements and
may cause severe burns.
Electromagnetic Interference
WARNING
This induction cooktop generates and uses ISM
frequency energy that heats cookware by using an
electromagnetic field. It has been tested and complies
with Part 18 of the FCC Rules for ISM equipment. This
induction cooktop meets the FCC requirements to
minimize interference with other devices in residential
installation. Induction cooktops may cause interference
with television or radio reception. If interference occurs,
the user should try to correct the interference by:
▯ Relocating the receiving antenna of the radio or
television.
▯ Increasing the distance between the cooktop and the
receiver.
▯ Connecting the receiver into an outlet different than the
receiver.
It is the user’s responsibility to correct any interference.
CAUTION
Persons with a pacemaker or similar medical device
should exercise caution when standing near an induction
cooktop while it is in use. Consult your doctor or the
manufacturer of the pacemaker or similar medical device
for additional information about its effects with
electromagnetic fields from an induction cooktop.
WARNING
HAZARD DUE TO MAGNETISM
The probe is magnetic. The magnetic elements can
damage electronic implants such as pacemakers or
insulin pumps. People with electronic implants should
therefore not put the temperature sensor in the pockets
of their clothes and should maintain a minimum distance
of 4 inches (10 cm) with respect to their pacemaker or
similar medical device.
Child Safety
When children become old enough to use the appliance,
it is the responsibility of the parents or legal guardians to
ensure that they are instructed in safe practices by
qualified persons.
Do not allow anyone to climb, stand, lean, sit, or hang on
any part of an appliance, especially a door, warming
drawer, or storage drawer. This can damage the
appliance, and the unit may tip over, potentially causing
severe injury.
Do not allow children to use this appliance unless closely
supervised by an adult. Children and pets should not be
left alone or unattended in the area where the appliance
is in use. They should never be allowed to play in its
vicinity, whether or not the appliance is in use.
CAUTION
Items of interest to children should not be stored in an
appliance, in cabinets above an appliance or on the
backsplash. Children climbing on an appliance to reach
items could be seriously injured.
Cleaning Safety
WARNING
RISK OF BURNS
; The appliance will become very hot on the outside
during the cleaning function. Never touch the appliance
door. Allow the appliance to cool down. Keep children
away from the appliance.
Notes
▯ Do not clean the appliance while it is still hot. Some
cleaners produce noxious fumes when applied to a
hot surface. Wet cloths or sponges can cause burns
from steam.
▯ When self-cleaning, confirm that the door locks and
will not open. If the door does not lock, do not run Self
Clean. Contact service.
▯ Birds have very sensitive respiratory systems. Keep
pet birds out of the kitchen or other rooms where
kitchen fumes could reach them. During Self Clean,
fumes are released that may be harmful to birds.
Other kitchen fumes such as overheating margarines
and cooking oils may also be harmful.
▯ Keep oven free from grease build up.
Cookware Safety
Notes
▯ Do not place food directly on oven bottom.
▯ Follow the manufacturer’s directions when using
cooking or roasting bags.
▯ Hold the handle of the pan when stirring or turning
food. This helps prevent spills and movement of the
pan.
▯ Use proper pan size.
The use of undersized cookware will expose a portion
of the heating element or burner to direct contact and
may result in ignition of clothing. Select cookware
having flat bottoms large enough to cover the surface
heating unit. This appliance is equipped with one or
more surface units of different size. Proper relationship
of cookware to heating element or burner will also
improve efficiency.
7

9 IMPORTANT SAFETY INSTRUCTIONS
READ AND SAVE THESE INSTRUCTIONS
▯ Cookware not approved for use with ceramic
cooktops may break with sudden temperature
changes. Use only pans that are appropriate for
ceramic cooktops. See Cookware Selection Guide.
▯ Always position handles of utensils inward so they do
not extend over adjacent work areas, burners or the
edge of the cooktop. This reduces the risk of fires,
spills and burns.
CAUTION
Plastic containers or plastic wrap can melt if in direct
contact with the drawer or hot utensil. If it melts on to the
drawer, it may not be removable.
WARNING
RISK OF INJURY
When cooking with a bain-marie, the cooktop and
cooking vessel may crack due to overheating. The
cooking vessel in the bain-marie must not come in direct
contact with the bottom of the pot filled with water. Use
only heat-resistant cookware.
Note: IMPORTANT SAFETY NOTICE: The California Safe Drinking and Toxic Enforcement Act requires the Governor of California to publish a list of substance known to the state to cause cancer, birth defect or other reproductive harm, and requires businesses to warn customers of potential exposure to such substances. The burning of gas cooking fuel and the elimination of soil during self-cleaning can generate small amounts of carbon monoxide. The fiberglass insulation in Self Clean ovens gives off very small amounts of formaldehyde during the first several cleaning cycles. California lists formaldehyde as a potential cause of cancer. Carbon monoxide is a potential cause of reproductive toxicity. Exposure to these substances can be minimized by:
1.
Providing good ventilation when cooking with gas.
2.
Providing good ventilation during and immediately after self-cleaning the oven.
3.
Operating the unit according to the instructions in this manual.
Food Safety
CAUTION
To maintain food safety, follow these guidelines:
WARNING
DANGER OF INJURY
Cookware may spring or bounce upward due to fluid
trapped between the cookware bottom and cooking
zone. Always keep cooking zone and cookware bottom
dry.
Proposition 65 Warning:
This product may contain a chemical known to the State
of California, which can cause cancer or reproductive
harm. Therefore, the packaging of your product may
bear the following label as required by California:
STATE OF CALIFORNIA PROPOSITION 65 WARNING:
WARNING
&DQFHUDQG5HSURGXFWLYH+DUPwww.P65Warnings.ca.gov
a. DO NOT use a warming drawer to heat cold food. It is
safe to use the drawer to crisp crackers, chips or dry
cereal and to warm plates.
b.
Be sure to maintain proper food temperature. The
USDA recommends holding hot food at 140°F or
warmer.
c.
DO NOT warm food for longer than one hour.
8

Causes of Damage
9 WARNING
RISK OF INJURY
Exercise caution when opening the appliance.
Standing to the side, open the door (or drawer)
slowly and slightly to let hot air and/or steam
escape. Keep your face clear of the opening and
make sure there are no children or pets near the
unit. After the release of hot air and/or steam, proceed with your cooking. Keep doors shut unless
necessary for cooking or cleaning purposes. Do not
leave open doors unattended.
NOTICES
▯ DO NOT place accessories or items such as foil,
greaseproof paper, oven liners or bakeware on the
oven cavity floor. This will cause heat to accumulate.
The baking and roasting times will no longer be
correct and the enamel will be damaged.
▯ Aluminum foil in the cooking compartment must not
come into contact with the door glass. This could
cause permanent discoloration of the door glass.
▯ Aluminum foil and plastic will melt in hot cooking
areas. Stove protective film is not suitable for your
cooktop.
▯ Do not cook on a broken cooktop. Cleaning solutions
and spillovers may create risk of electric shock.
▯ Cookware with rough bottoms will scratch the glass
ceramic surface.
▯ Salt, sugar and grains of sand will scratch the glass
ceramic surface. Never use the cooktop as a working
surface or for setting things down.
▯ Avoid heating pots or pans that are empty.
▯ Hard or sharp objects falling off the cooktop may
damage it.
▯ Sugar and products containing sugar may damage the
cooktop. Immediately eliminate spills of these
products with a glass scraper once the cooktop has
had sufficient time to cool.
▯ Never set down hot pans and pots on the control
panel or frame. This may cause damage.
▯ Always turn hood ON when cooking at high heat or
when flambéing food (i.e. Crepe Suzette, Cherries
Jubilee, Peppercorn Beef Flambé).
▯ When baking particularly juicy fruit pies, do not pack
the baking tray too generously. Fruit juice dripping
from the baking tray leaves stains that cannot be
removed. If possible, use the deeper universal pan.
▯ If the seal is very dirty, the appliance door will no
longer close properly during operation. The fronts of
adjacent units could be damaged. Always keep the
seal clean.
▯ Shimmering metallic discolorations on the glass
ceramic surface result from the use of inappropriate
cleaning agents and abrasion from cookware.
▯ Do not use the appliance door as a seat, shelf or
worktop. Do not place any cookware or accessories
on the appliance door.
▯ Depending on the appliance type, accessories can
scratch the door glass when closing the door. Always
slide accessories into the cooking compartment as far
as they will go.
▯ Do not carry or hold the appliance by the door handle.
The door handle cannot support the weight of the
appliance and could break.
9

Protecting the Environment
Your new appliance is energy-efficient. Here you can find
tips on how to save even more energy when using the
appliance, and how to dispose of your appliance
properly.
Unpack the appliance and dispose of the packaging in
an environmentally friendly manner.
Saving Energy
▯ Only preheat the appliance if this is specified in the
recipe or in the tables in the operating instructions.
▯ Use baking tins that are dark-colored, painted black or
have an enamel coating. They absorb the heat
particularly well.
▯ Open the appliance door as infrequently as possible
when the appliance is in use.
▯ It is best to bake several cakes one after the other.
The cooking compartment is still warm. This reduces
the baking time for the second cake. You can place
two cake tins next to each other in the cooking
compartment.
▯ For longer cooking times, you can switch the
appliance off 10 minutes before the end of the
cooking time and use the residual heat to finish
cooking.
▯ Always place a fitting lid on cookware. Cooking with
an uncovered pan will result in a four-fold increase in
energy use. Use a glass lid to provide visibility and
avoid having to lift the lid.
▯ Use cookware equipped with a solid, flat bottom.
Curved pan bases increase energy consumption.
▯ The diameter of the pan base must match the size of
the element. If not, energy may be wasted.
Note: The manufacturer normally indicates the pan’s
upper diameter. This is normally greater than the
diameter of the pan’s base.
▯ Choose cookware of a size suited to the amount of
food you are going to cook. A large pan that is only
half full will use more energy.
▯ Use a small amount of water when cooking. This
saves energy and vegetables retain a larger
percentage of their vitamins and minerals.
▯ Select a lower power level.
▯ When cooking, ensure that there is sufficient supply air
so that the extractor hood works efficiently and quietly.
▯ Fan level adjust to the intensity of the cooking fumes.
Only use the high mode if necessary. A lower fan level
means lower energy consumption.
▯ With intensive cooking fumes, select a higher fan level
early on. Cooking fumes that are already distributed in
the kitchen mean that the extractor hood will have to
be operated longer.
▯ Switch off the extractor hood when it is no longer
required.
▯ Switch off the lighting when it is no longer required.
▯ Clean and change the filter at the specified intervals in
order to increase the effectiveness of the ventilation
and prevent a risk of fire.
10
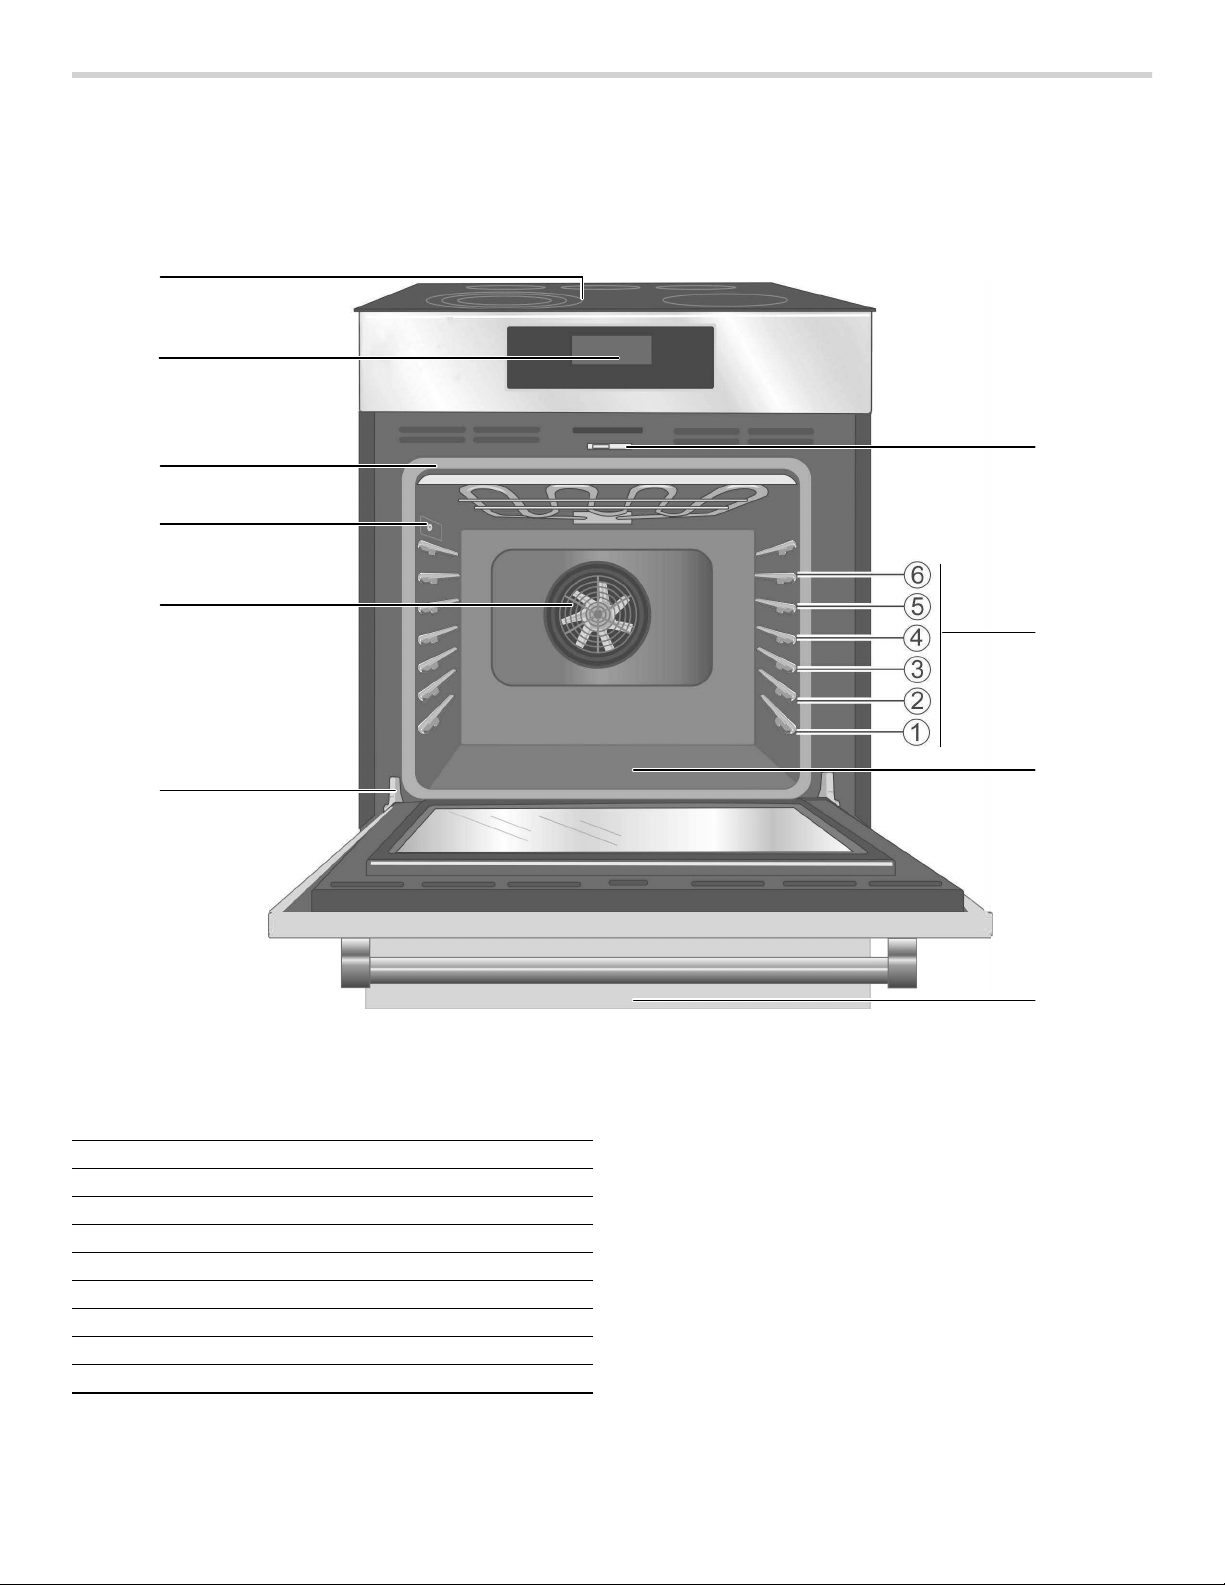
Getting Started
Parts
Your appliance may vary slightly.
1
2
3
5
6
4
7
9
1 Cooktop Control Panel
2 Oven Control Panel
3 Door Gasket
4 Door Latch
5 Probe Jack
6 Convection Fan
7 Rack Position Guides with 6 rack positions
8 Oven Bottom
9 Door Hinge
10 Warming Drawer
8
10
Range Features
Retained Heat
The glass cooking surface retains heat and stays hot
after the element(s) have been turned off. The retained
heat may be used to hold foods at serving temperatures
for a short time. If a hot surface light is on, use caution
when working or cleaning around the cooktop as the
cooktop is still hot.
Hot Surface Indicator
The cooktop displays a hot indicator light to show when
the cooking surface is too hot to touch. If a hot surface
light is on, use caution when working or cleaning around
the cooktop as the cooktop is still hot.
11
Oven Features
Accessories
Cooling Fan
The cooling fan runs during all cooking modes. The fan
can be heard when it is running, and warm air may be
felt as it is released from the oven vent. The fan may also
run after the oven is off.
Convection Fan
The convection fan operates during all convection
modes. When the oven is operating in a convection
mode, the fan turns off automatically when the door is
opened. The convection fan may also run during Fast
Preheat and Self-Clean.
Oven Bottom
The oven bottom conceals the lower heating element. As
a result the element is protected from damage and spills.
Tip: Do not place food directly on the oven bottom.
9 WARNING
Do not use aluminum foil or protective liners to line
any part of the appliance, especially the oven
bottom. Installation of these liners may result in a
risk of electric shock or fire.
Oven Vent
The oven vent is located at the bottom of the unit. Warm
air may be released from the vent before, during and
after cooking. It is normal to see steam escaping from
the vent, and condensation may collect in this area. This
area may be warm when the oven is in use. Do not block
the vent, since it is important for air circulation.
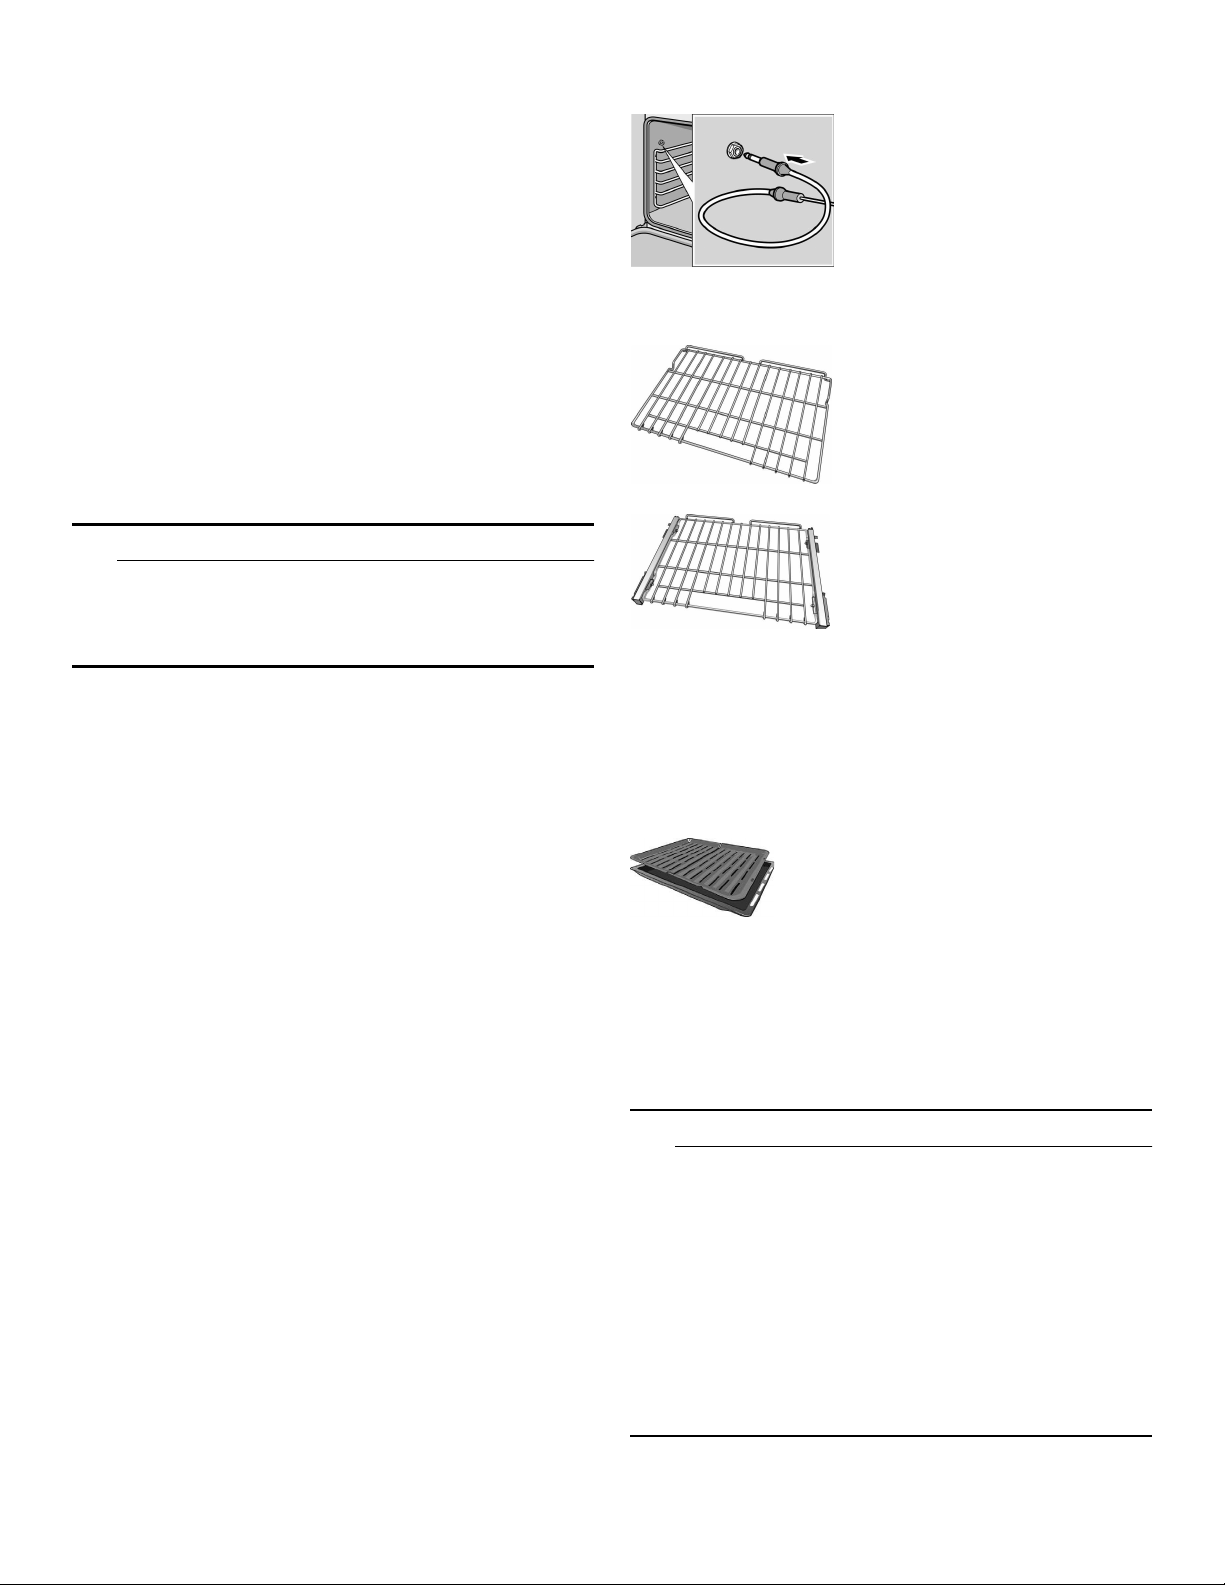
Automatic Shutoff
Probe
The probe can be used to
determine the internal doneness
or the end temperature of many
foods, especially meats and
poultry.
Do not clean in the Self Clean
oven or dishwasher.
Flat Rack
Use for most cooking. Can use
multiple racks in some modes.
Do not clean in the self-clean
oven.
Telescopic Rack (some models)
Additional 30-inch racks
available from e-Shop:
#HEZTR301
Use with heavier dishes to make
easier to place dishes into the
oven. Check on food while
cooking and remove dishes from
oven when done.
Do not clean in the self-clean
oven.
Broiling Pan
(available from e-Shop)
Pan: #00449757
Grill top: #00449756
The oven will automatically shut off after 24 hours.
Self-cleaning
The oven features a self-cleaning function that eliminates
the manual labor involved with cleaning your oven.
Indicators and Other Features
Default Settings-The cooking modes automatically
select the default temperature. These can be changed
when a different one is needed.
E Number Codes-These codes display when there is a
problem with the range.
Standby Mode-Standby mode means that the oven has
power but no cooking mode or timer is running.
Use for broiling and roasting.
Do not clean in the self-clean
oven.
Inserting Racks
9 CAUTION
▯ To avoid burns, place oven racks in desired
positions before turning oven on. Always use
oven mitts when the oven is warm. If a rack must
be moved while the oven is hot, do not let oven
mitts contact hot heating elements.
▯ Use caution when removing oven racks from the
lowest rack position to avoid contact with the hot
oven door.
▯ To avoid possible injury or damage to the
appliance, ensure racks are installed exactly per
installation instructions and not backwards or
upside down.
12
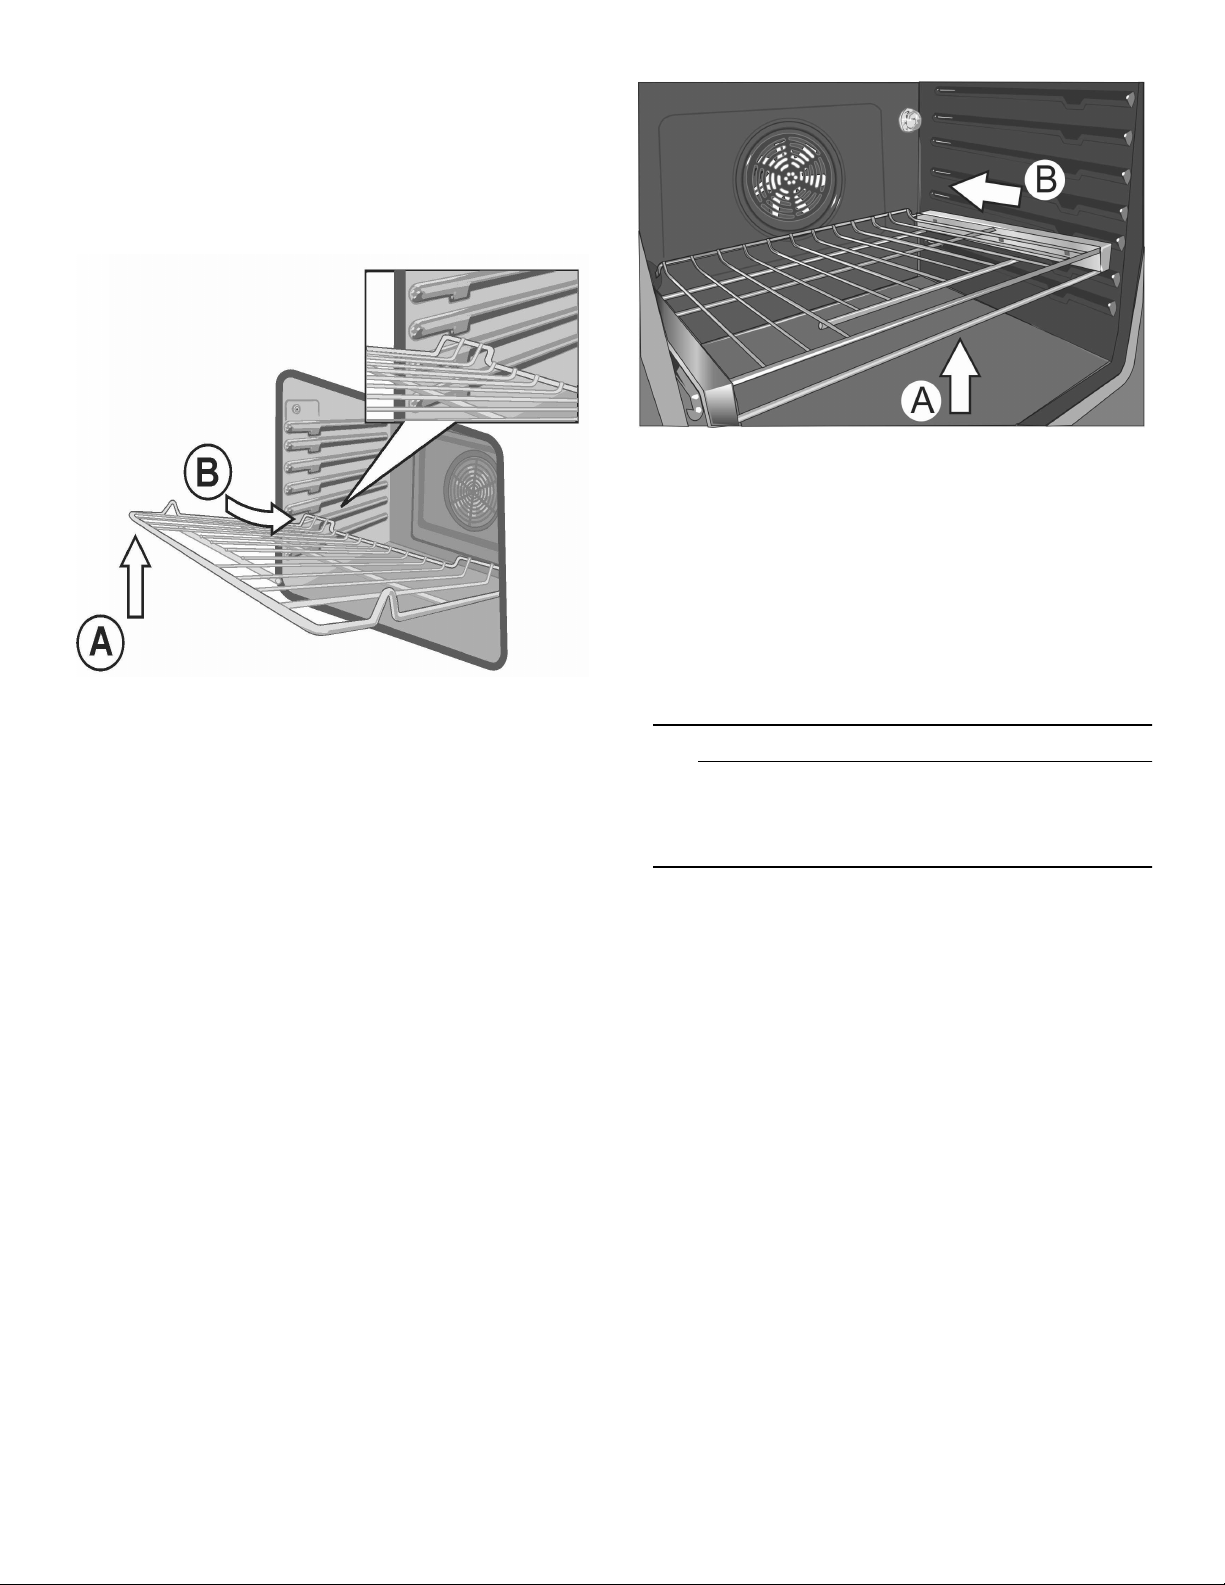
Flat Rack
The rack is designed with a stop so it will stop before
coming completely out of the oven and not tilt.
To insert Flat Rack into Oven:
1.
Grasp rack firmly on both sides.
2.
Insert rack (see picture).
3.
Tilt rack up to allow stop into rack guide.
4.
Bring rack to a horizontal position and push the rest of the way in.
Rack should be straight and flat, not crooked.
To remove Flat Rack from Oven:
1.
Grasp rack firmly on both sides and pull rack toward you.
2.
When the stop is reached, tilt rack up and pull the rest of the way out.
Telescopic Rack
To insert Telescopic Rack into Oven:
1.
Slide the rack in evenly until the rear of the rack is about two (2) inches from the back of the oven.
2.
Tilt the front of the rack up about 3/4” (A) and finish pushing the rack all the way back (B).
Note: Avoid striking the oven light cover glass when pushing the rack into position.
3.
The back of the telescopic rack drops in to place.
4.
Pull the rack forward to engage the bottom of the rack
onto the rear of the rack position guide.
5.
Lower the front of the rack to finish seating it on the
rack guide. The rack should feel stable when properly
seated.
6.
Slide the movable part of the telescopic rack in and
out a few times to make sure it is able to move freely
and that the non-moving part of the telescopic rack is
securely anchored.
9 CAUTION
To avoid possible injury or damage to the
appliance, ensure the telescopic rack is installed
exactly per installation instructions and not
backwards or upside down.
To Remove Telescopic Rack from the Oven:
1.
Lift the front of the telescopic rack assembly about
1/2” and push the rack to the rear about 3/4”. This
allows the rack to disengage from the rack position
guide.
2.
Lift the rear of the telescopic rack assembly so it
clears the rack position guide and gently pull the rack
from the oven.
Note: Take care to avoid pulling the rack unevenly
which will cause it to bind during removal, catching on
the oven walls.
13
Before Using the Appliance for the First Time
▯ Remove all packaging materials and labels from the
range.
▯ Range must be properly installed by a qualified
technician before use.
▯ Remove packing materials from inside the oven and
inside the drawer.
▯ While cool, wipe with clean, damp sponge and dry.
▯ Apply the glass ceramic cooktop cleaner to the glass
ceramic cooktop. Buff with a clean cloth. See Care
and Cleaning Section.
▯ There may be a slight odor during first uses. This is
normal and will disappear.
▯ Optimum cooking results depend on proper cookware
and bakeware being used.
▯ The cooking surface will hold the heat and remain hot
after the elements have been turned off.
▯ Read and understand all safety precautions and Use
and Care Manual information prior to operating.
Getting familiar with the appliance
In this section we describe the control panel, elements and displays.
These instructions apply to more than one cooktop, your appliance might vary slightly.
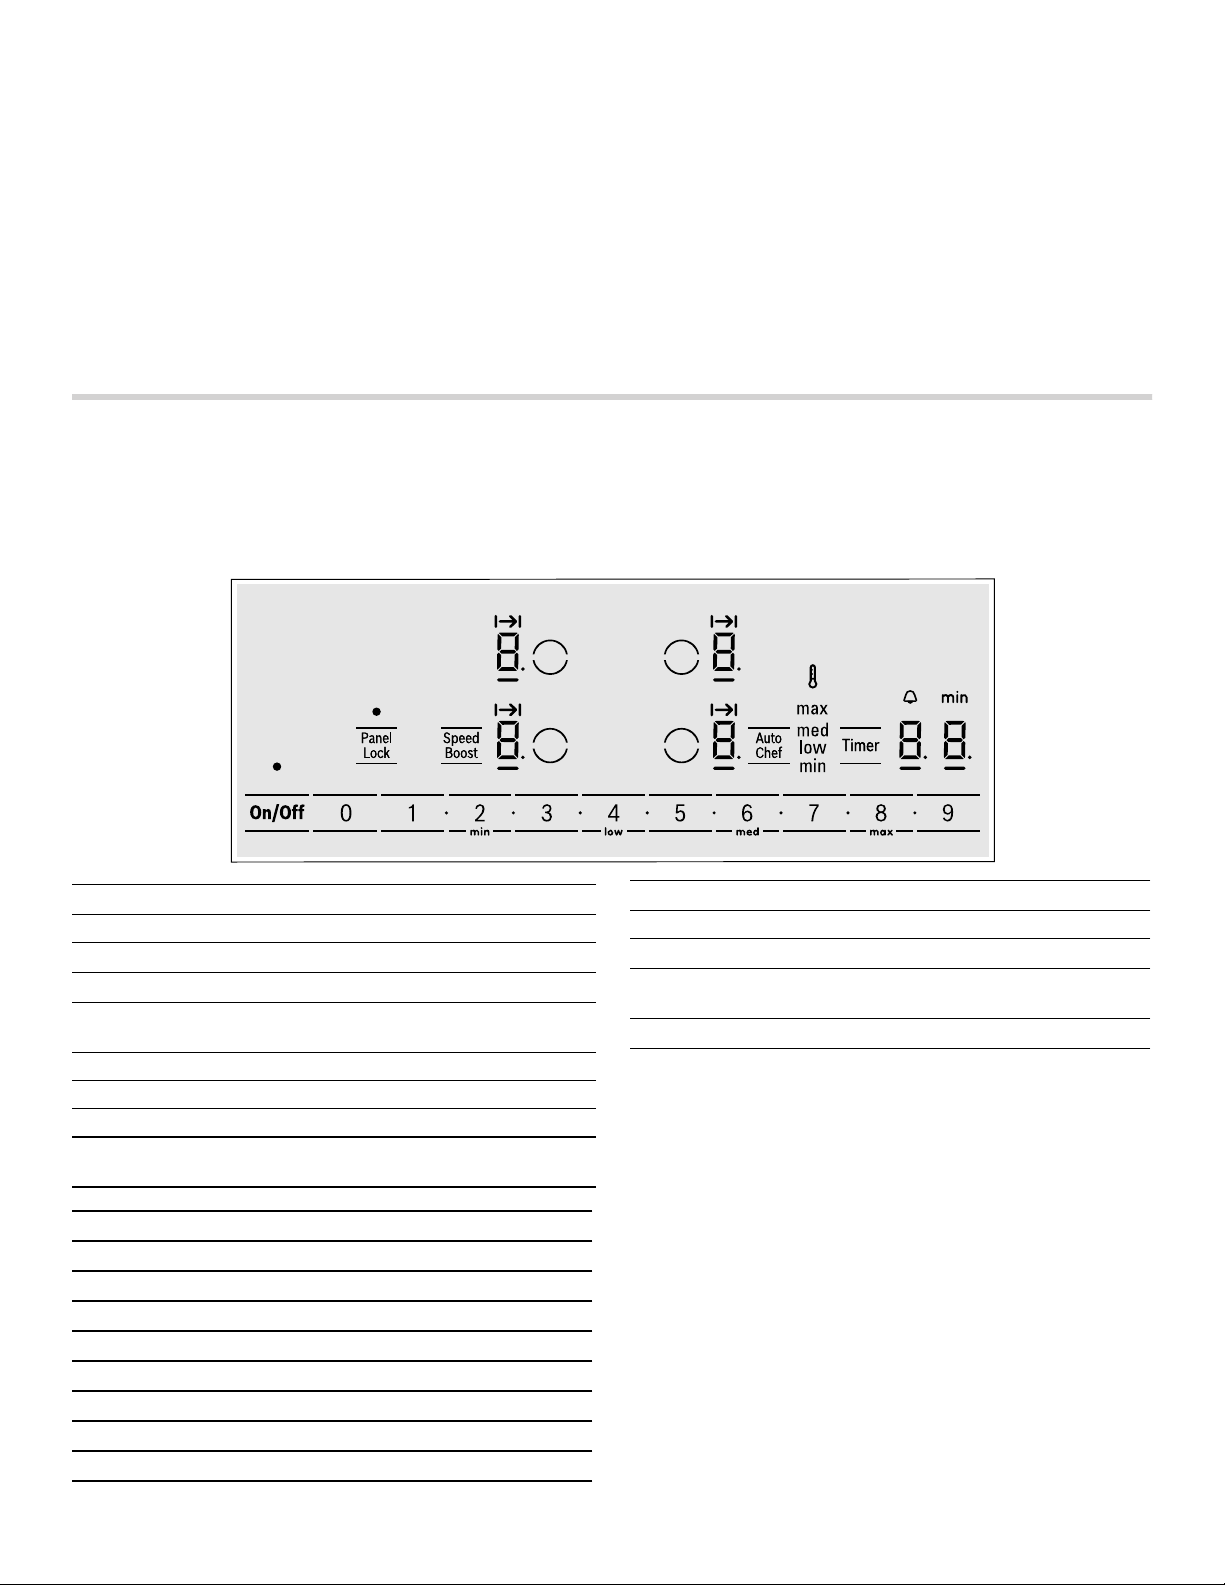
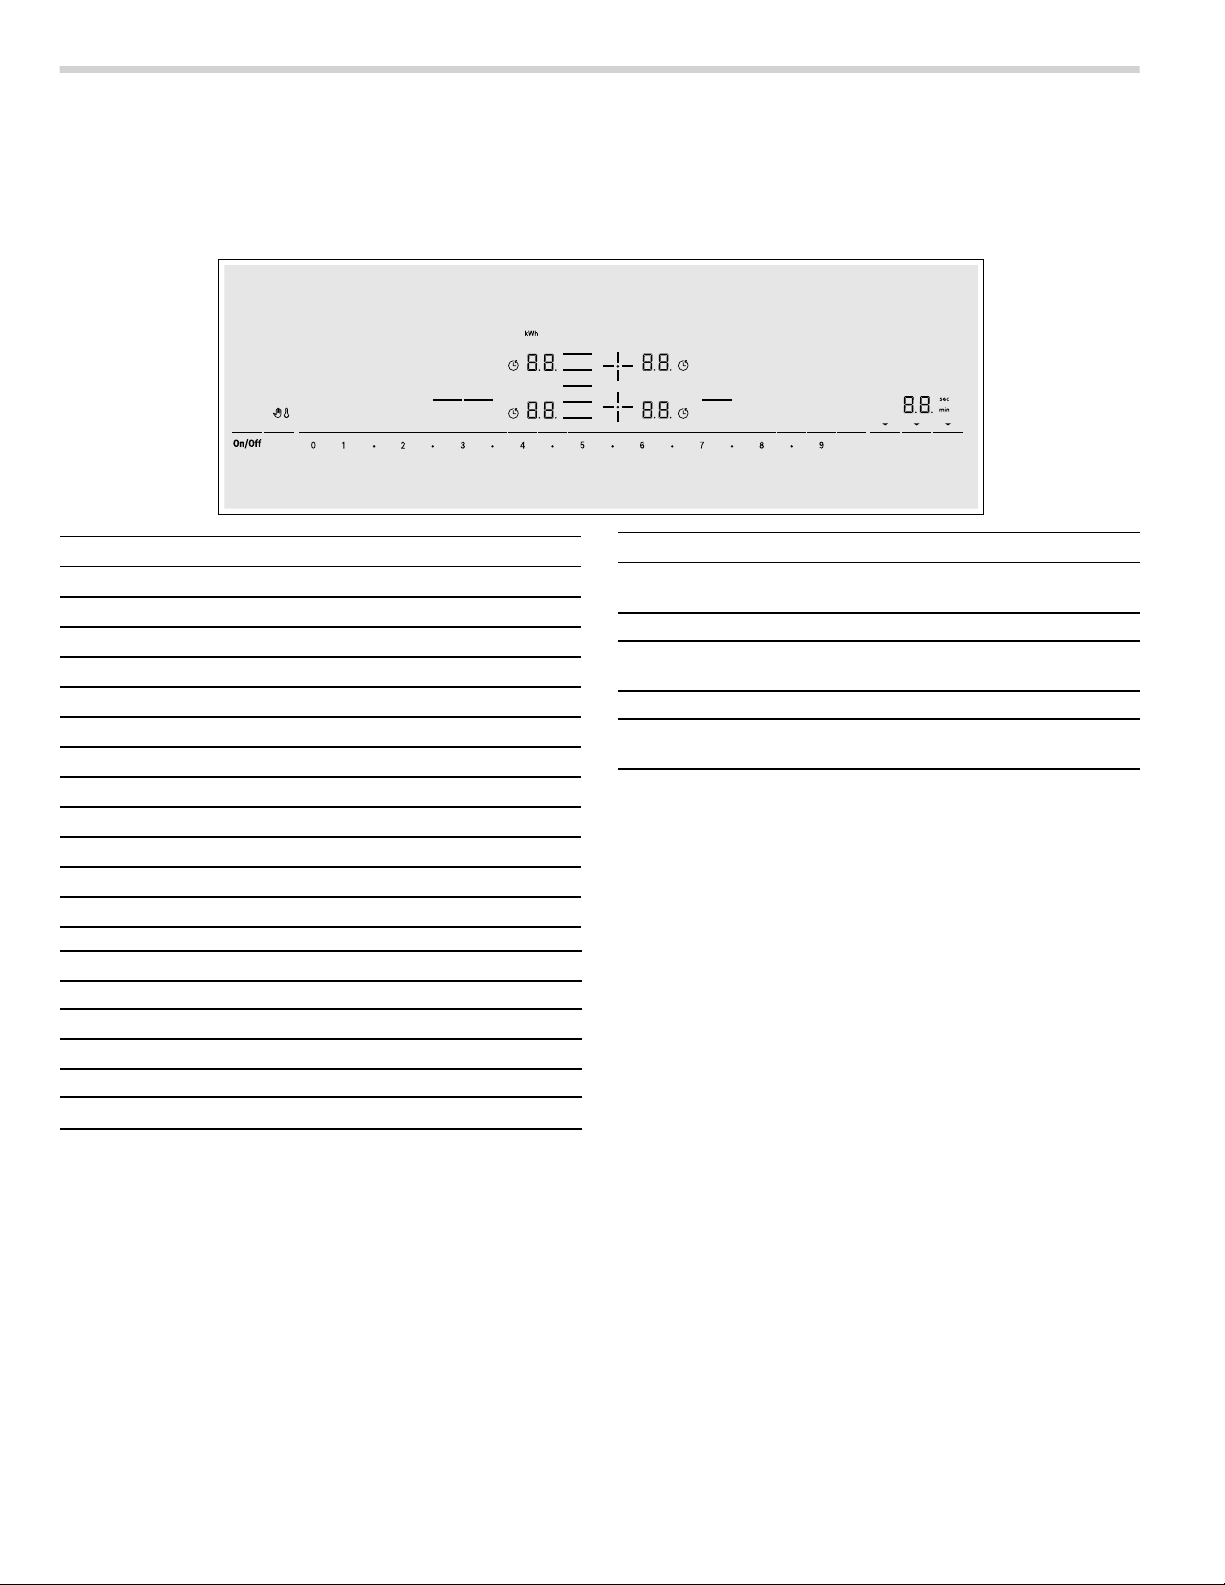
Control panel (800 Series)
Touch keys
On/Off Main switch
$
û 2 û ... 8 û 9
0 1
Select cooking element
Settings area
Panel Lock Panel lock / Wipe protection
Speed Boost
Auto Chef
SpeedBoost
AutoChef
®
function
®
frying function
Timer Timer functions
min / low / med
Select power level for AutoChef
/ max
Display icons
‹
Ú
x
A
‹‹
‚-Š
•/œ
›
‘
Cooktop ready
Indicated function active
Cook time set
Indicates selected element
Timer value
Power level
Residual heat
SpeedBoost® function
AutoChef® function
Display icons
min Time display
s
max, med,
AutoChef® temperature
Temperature settings
low, min
V min
Timer function
Touch control zone
When you touch a symbol, the corresponding function
®
will be activated.
Notes
▯ When you touch several symbols at once the settings
will not change. This enables you to clean the touch
control zone when food has spilled over.
▯ Always keep the touch control zone clean and dry.
Moisture and dirt can affect proper functioning.
14
The elements
Element
Single element Always use cookware of a suitable size.
$
Use only cookware suitable for induction cooking; see the section “Cooking with Induction”
Residual heat indicator
The cooktop has a residual heat indicator for each
element. This indicates that the cooktop surface is still
hot. Do not touch the cooktop surface while the residual
heat indicator is illuminated.
The following are shown depending on the amount of
residual heat:
Operation
Main power switch
Use the main switch to turn on the electronic circuitry for
the control panel. The cooktop is now ready to use.
Turning the cooktop on
Touch the On/Off touch key until the indicator above the
main switch and the temperature level indicators
to the heating elements turn on.
Turning the cooktop off
Touch the On/Off touch key. The __ indicator goes out.
The cooktop is switched off. The residual heat indicators
will remain on until the elements have cooled off
sufficiently.
Note: The cooktop switches off automatically when all the elements have been switched off for more than 20 seconds.
The residual heat indicator remains lit until the elements
have cooled down sufficiently.
the corresponding element symbol.
•/œ is displayed next to
Setting the cooktop
This section will show you how to set the elements. The
table contains details on the heat settings for a variety of
dishes.
Setting the element
Select the desired heat level using the number keys
1 to 9.
Heat level 1 = minimum power
Heat level 9 = maximum power
Each heat setting has an intermediate level. This level is
indicated by
touching the
û in the element display and is set by
û symbols between the number keys.
‹ next
▯ Display •: High temperature
▯ Display œ: Low temperature
If you remove the cookware from the element during
cooking, the residual heat indicator and the selected
heat setting will flash alternately.
When the element is switched off, the residual heat
indicator will light up. Even after the cooktop has been
switched off, the residual heat indicator will remain
illuminated for as long as the element is still warm.
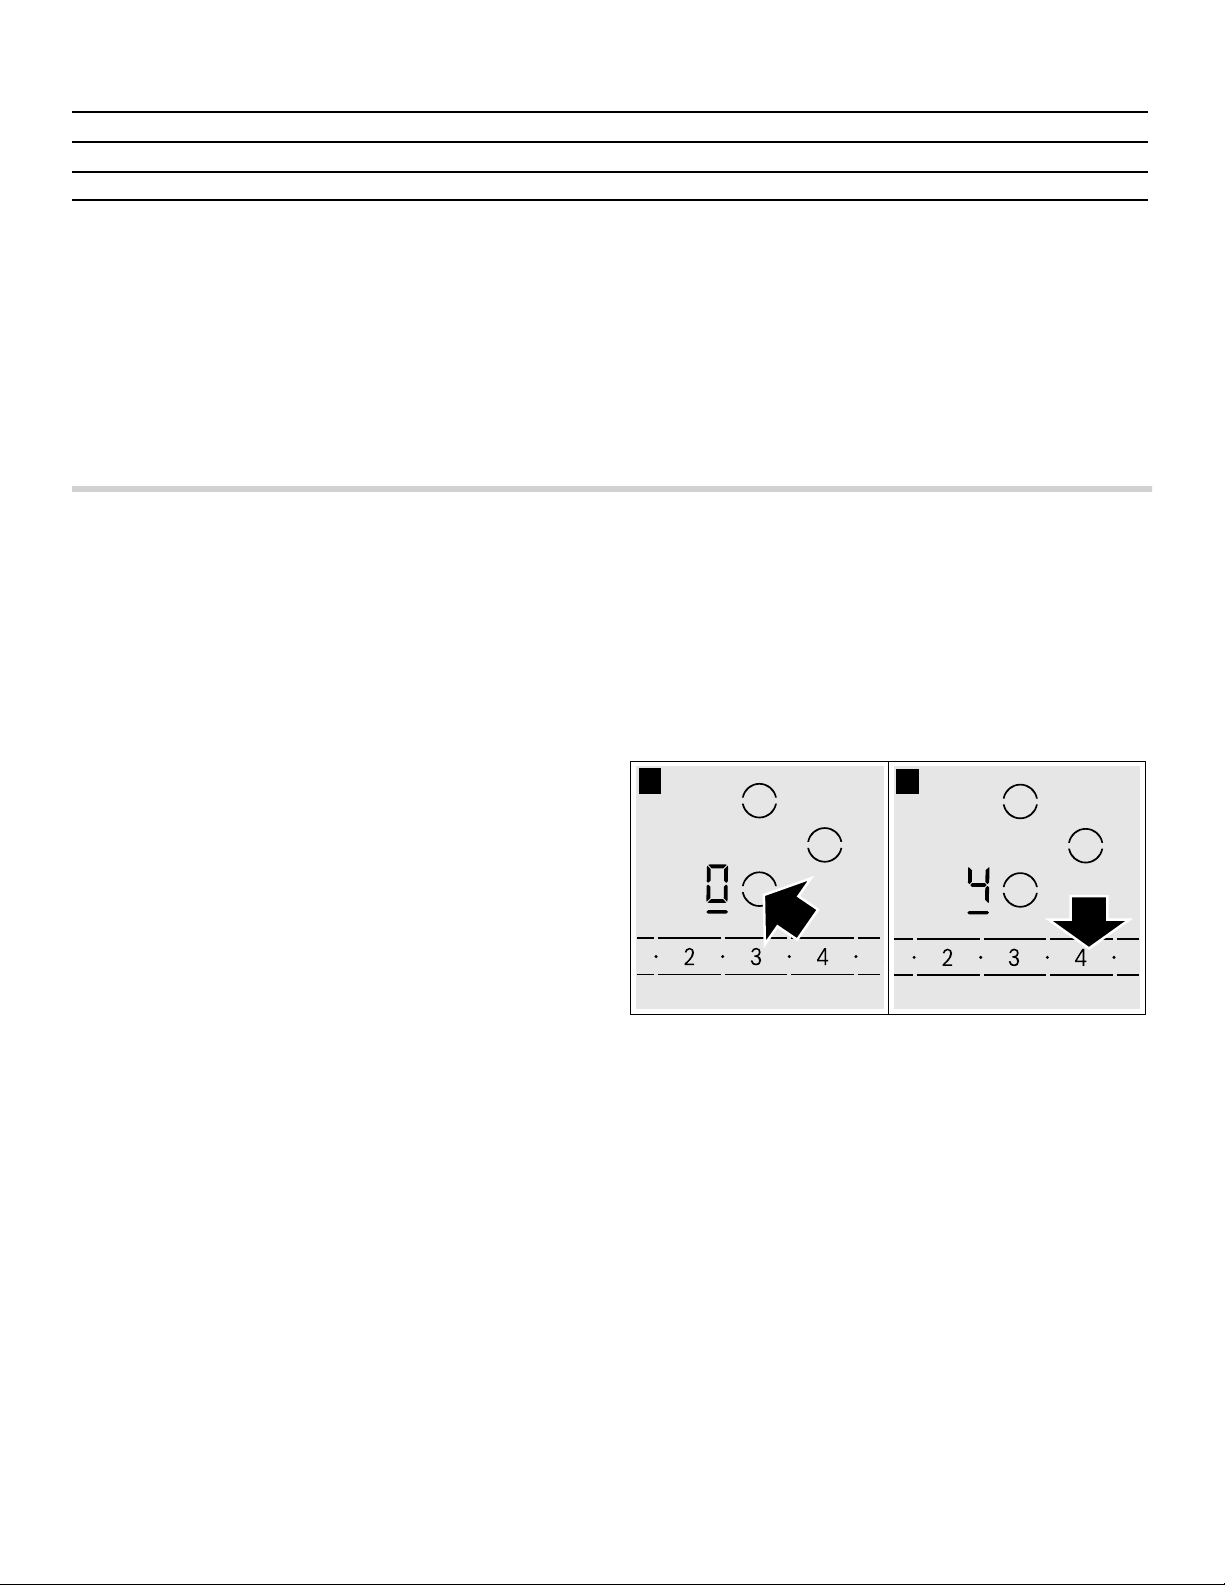
Selecting the heat level
The cooktop must be turned on.
1.
Select the desired element with by touching the $
symbol on the control panel. In the element display ‹
and the __ indicator light up.
2.
Within the following 10 seconds, set the desired power
level using the number keys.
3.
To change the power level, select the element and set
the desired power level using the number keys. To set
an intermediate level touch the û symbols between the
number keys.
Turning off the element
Select the element and set the heat level to 0. The
element is turned off and the residual heat indicator is
displayed.
Notes
▯ If there is no cookware on the induction cooking zone,
the heat setting display blinks. After a while, the
cooking zone will switch itself off.
▯ If cookware has been placed on the cooking zone
before you turn on the cooktop, it will be detected
within 20 seconds after you have touched the main
switch and the cooking zone will be selected
automatically. Once detected, set the power level
15

within the next 20 seconds, otherwise the cooking
zone will turn off.
Even if there are several pots and pans on the cooktop
when it is switched on, only one piece of cookware is
automatically selected.
▯ After cooking, keep the lid on the cookware until you
serve the food.
▯ To cook with the pressure cooker, observe the
manufacturer's instructions.
▯ Do not cook food for too long, otherwise the nutrients
will be lost. The kitchen timer can be used to set the
Recommendations
▯ When heating up puree, cream soups and thick
sauces, stir occasionally.
▯ Set heat setting 8 to 9 for preheating.
▯ When cooking with the lid on, turn the heat setting
down as soon as steam escapes between the lid and
the cookware.
optimum cooking time.
▯ For healthier cooking results, oil or grease should not
be heated until it smokes.
▯ To brown food, fry small portions in succession.
▯ Cookware may reach high temperatures while the food
is cooking. We recommend that you use pot holders.
▯ You can find recommendations for energy-efficient
cooking in section “Protecting the Environment”.
Settings table
The following table provides some examples. Cooking times may vary depending on the type of food, its weight and
quality. Deviations are therefore possible.
9 CAUTION
During cooking, stews or liquid meals such as
soups, sauces or drinks can heat up too quickly
unnoticed and overflow or spatter. For this reason
we recommend that you stir continuously, gradually
heating the food at a suitable power level.
Power levels
Melting
chocolate 1.
butter 1 - 2
Heating
frozen vegetables (e.g. spinach) 2. - 3.
broth 7 - 8
thick soup 1. - 2.
milk** 1 - 2
Simmering
delicate sauce e.g. Béchamel sauce 4 - 5
spaghetti sauce 2 - 3
pot roast 4 - 5
fish** 4 - 5
Cooking
rice (with double amount of water) 2 - 3
potatoes boiled in their skins with 1-2 cups of water 4 - 5
boiled potatoes with 1-2 cups of water 4 - 5
fresh vegetables with 1-2 cups of water 2 - 3.
frozen vegetables with 1-2 cups of water 3. - 4.
pasta (2-4 qt. water)* 6 - 7
pudding** 1 - 2
cereals 2 - 3
16

Power levels
Frying
pork chop 5. - 6.
chicken breast 5 - 6
bacon 6 - 7
eggs 5 - 6
fish 5 - 6
pancakes 6 - 7
Deep fat frying** (in 1-2 qt. oil)
deep frozen foods, e.g. chicken nuggets (0.5 lb per serving) 8 - 9
other e.g. doughnuts (0.5 lb per serving) 4. - 5.
Keep warm
tomato sauce 1.
* ongoing cooking without lid
** without lid
Cook time
You can use the timer function to set a cook time for any
element. The element will turn off automatically once the
set time has elapsed.
9 CAUTION
▯ When using the timer, always keep an eye on the
cooktop and do not allow anything to boil over or
burn. Boilovers can cause smoke and foods and
oils may catch on fire if left on high temperature
settings.
▯ This function should not be used for long periods
of time, especially at high heat settings.
▯ Make sure the cooktop is turned off with the main
power switch after each use.
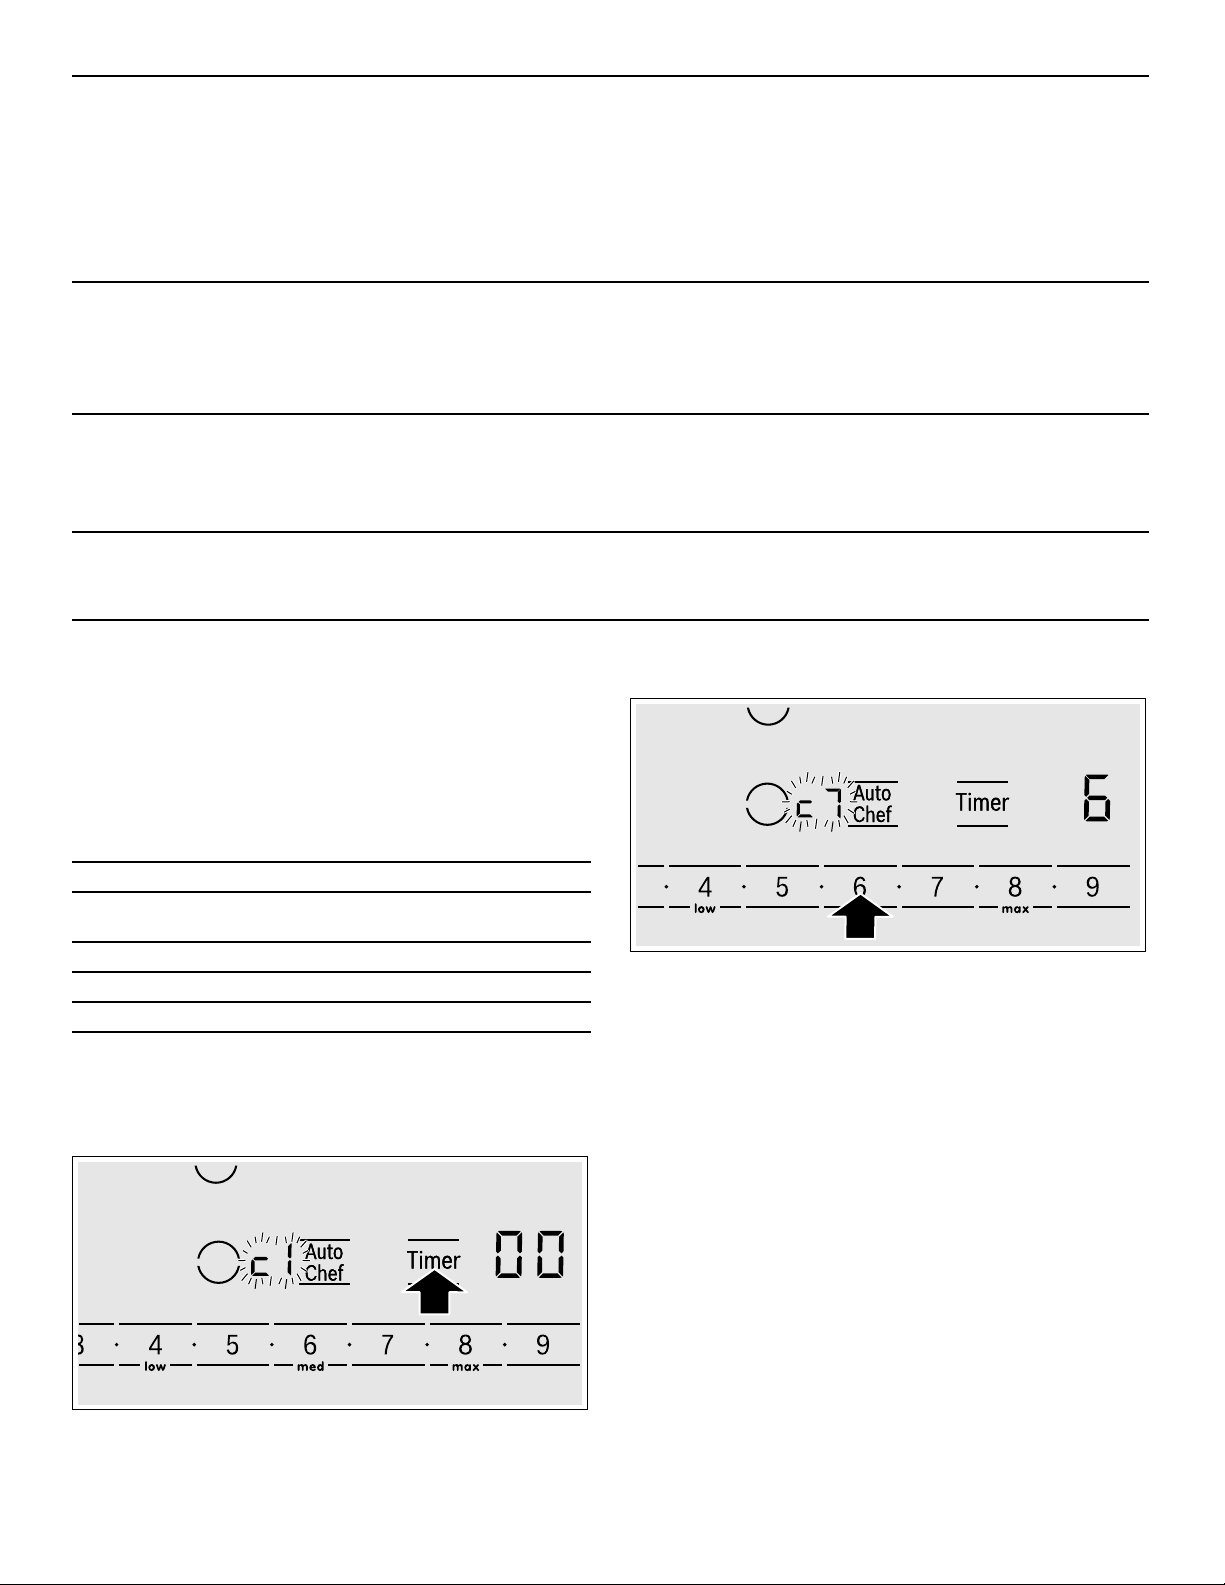
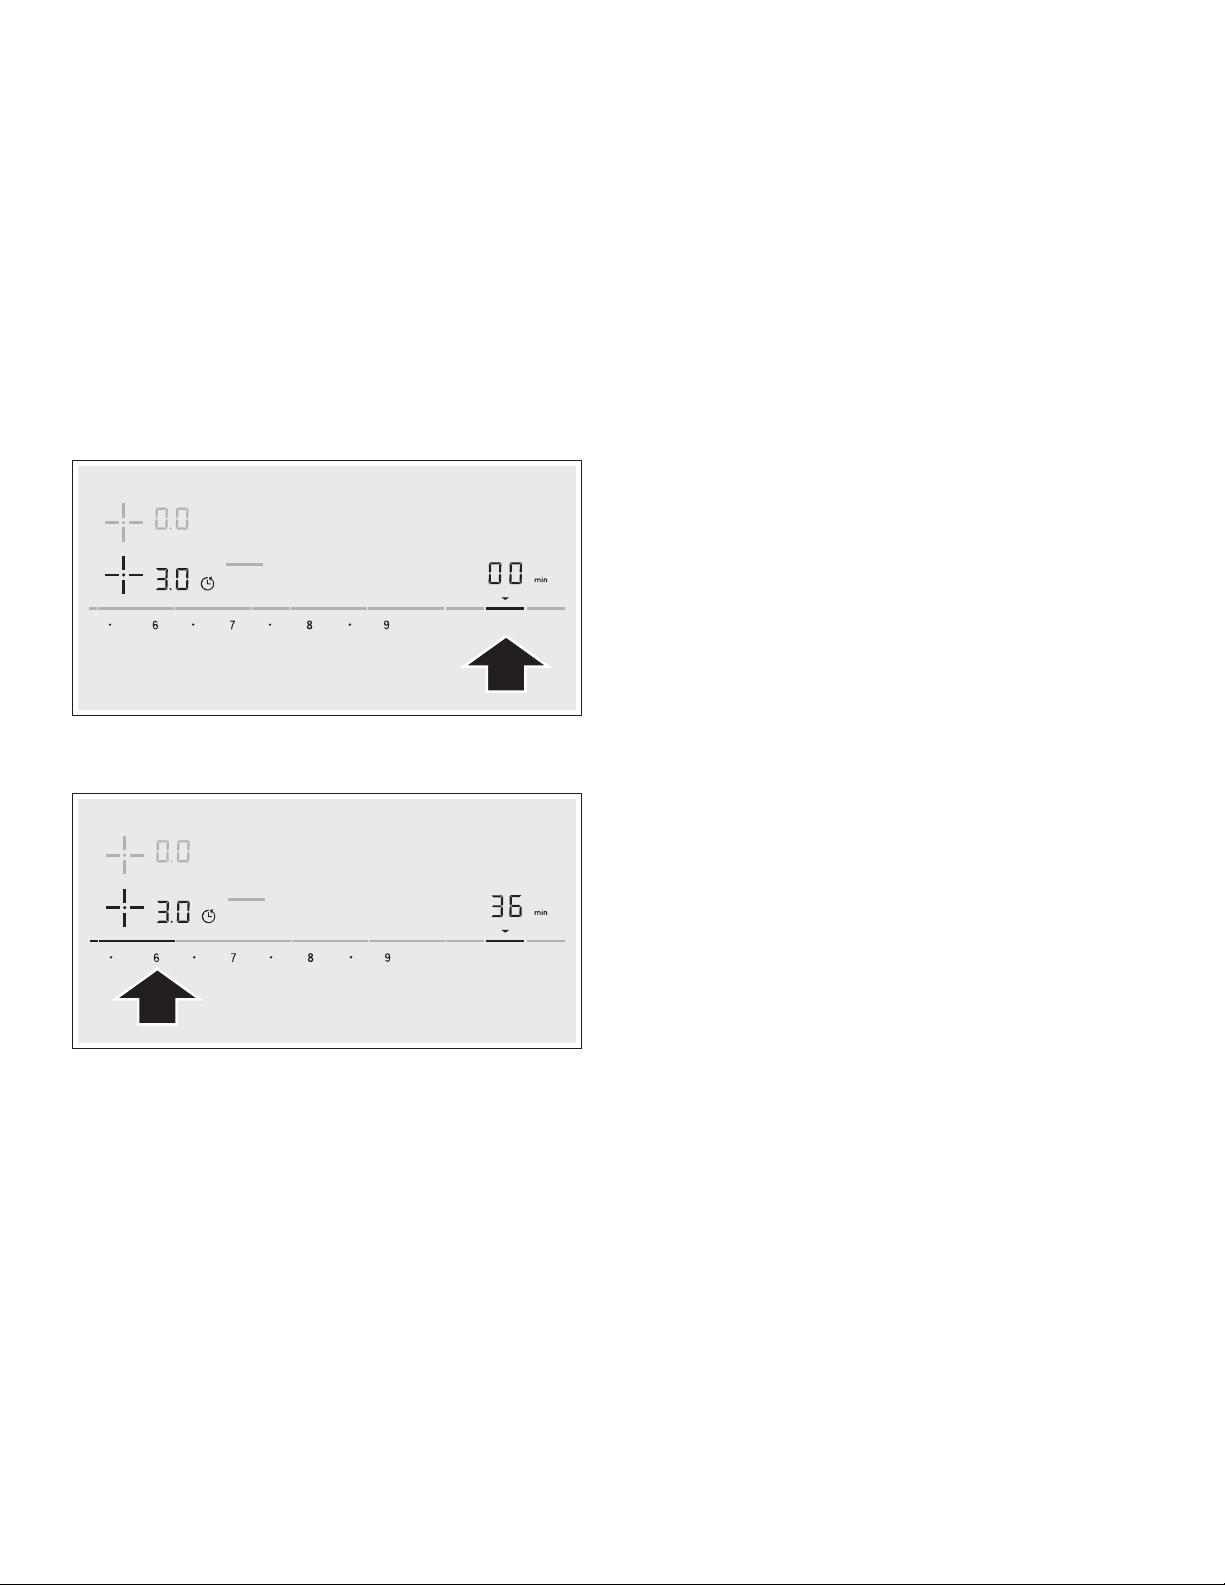
Setting a cook time
The cooktop must be turned on.
1.
Select the desired element and power level.
2.
Touch the Timer key. The x indicator lights up in the element display and ‹‹ is shown in the timer display.
3.
Whithin 10 seconds enter the desired cook time using the number keys.
AutoChef
®
If a cooking time has been programmed for an element
and AutoChef® has been activated, the cooking time will
not begin to count down until the selected temperature
setting has been reached.
Changing or canceling cook time
1.
Select the desired element and touch the Timer key.
2.
Adjust the cook time using the number keys. To
cancel cook time set the timer to ‹‹.
Once the cook time has elapsed
The element turns off once the set cook time has
elapsed. You will hear a beep. The indicator
‹ appears in
the element display and the timer display shows ‹‹ for
10 seconds. The x indicator in the element display
stays on.
Touch the Timer key, to turn the indicators and the beep
off.
Notes
▯ To set a cooking time of under 10 minutes, always
touch 0 before you select the required value.
▯ If a cooking time was set for several elements, the time
information for the selected element is shown in the
timer display.
▯ Select the relevant element to call up the remaining
cooking time.
▯ You can set a cooking time of up to ŠŠ minutes.
After a few seconds the timer will start to count down.
17

Automatic timer
With this function you may select a cook time for all
elements. Once an element is turned on, the selected
time will begin to count down. The element will
automatically turn off when the cook time has elapsed.
Instructions on activating the automatic timer are found in
the section on ~ "Basic settings".
Note: The cook time can be changed or canceled for any element:
Select the desired element and touch the Timer key
twice. The remaining cook time for the element is
displayed. Adjust the cook time using the number keys,
or deactivate it by setting the the timer value to ‹‹.
Kitchen timer
The timer can be set for periods of up to 99 minutes. It is
independent of the other settings. You can also use the
kitchen timer when the cooktop is turned off or locked.
This function does not automatically switch off an
element.
Activation
1.
Select an element.
2.
Touch the Speed Boost key.
› lights up on the display.
The function is activated.
Deactivation
1.
Select the element on which SpeedBoost® is set.
2.
Touch the Speed Boost key.
› goes out on the display and the element switched
back to heat setting Š.
The function is deactivated. Note: In certain circumstances, the function may be
deactivated automatically to protect the internal
electronic components of the cooktop.
AutoChef
When you are using AutoChef® to operate the heating
element, a sensor controls the temperature of the pan.
®
Setting the kitchen timer
1.
Touch the Timer key until the V indicator lights up.
‹‹ and min appear on the timer display.
2.
Set the desired time using the number keys.
The timer start to count down after a few seconds.
Changing or deleting the time
Touch the Timer key repeatedly until the V indicator
lights up.
Change the time using number keys, or set ‹‹ in order
to delete the programmed time.
When the time has elapsed
A beep sounds.
‹‹ appears on the timer display and the
V indicator lights up. The displays go out after
10 seconds.
When the Timer key is touched, the displays go out and
the beep stops.
®
SpeedBoost
The SpeedBoost® function can be used to heat large
amounts of water faster than by using heat level Š.
Limitation on use
This function can always be activated for an element,
provided the other element in the same group is not in
use (see illustration). Otherwise,
display for the selected element; heat setting Š will then
be set automatically without activating the function.
function
› and Š will flash in the
Advantages when frying
▯ The element only heats up if this is required to
maintain the temperature. This saves energy and
prevents the oil or fat from overheating.
▯ The AutoChef
®
function beeps when the empty frying
pan has reached the optimum temperature for adding
oil and then for adding the food.
9 CAUTION
▯ Never leave oil or fat cooking unattended.
▯ Place the pan in the center of the element. Make
sure that the base of the pan has the proper
diameter.
▯ Do not cover the pan with a lid. The automatic
regulation will not work. A mash splatter guard
can be used without affecting the automatic
regulation.
▯ Only use fat or oil that is suitable for frying. When
you are using butter, margarine, olive oil or pork
lard, select the min temperature setting.
▯ AutoChef
Suitable pans for AutoChef
®
is not suitable for boiling.
®
Suitable frying pans for use with AutoChef® are available
as optional accessories. Only use pans that are suitable
®
for use with AutoChef
. You can buy our system pans in
specialized stores, or through our Customer Support.
Always indicate the related reference code.
▯ HEZ390210 (Small)
▯ HEZ390220 (Medium)
▯ HEZ390230 (Large)
The frying pans have a non-stick coating, which means
that very little oil is needed for frying.
18

9 CAUTION
▯ The AutoChef
®
function was set especially for this
type of frying pan.
▯ Other frying pans may overheat. The temperature
can be set higher or lower. Try the lowest heat
setting first and then change it according to your
requirements.
▯ Make sure that the diameter of the base of the
frying pan corresponds to the size of the element.
Place the pan in the center of the element.
▯ If a different type of pan is used, try it first at the
lowest frying level, adjusting it as required. The
pans may overheat.
Frying levels
Power level Temperature Suitable for
max high potato pancakes, sautéed potatoes and rare beef steak
med medium-high thin fried foods like frozen pies, cutlets (pork or chicken), vegetables
low medium-low thick fried food such as hamburgers and sausages, fish
min low omelettes, using butter, olive oil or margarine
Frying chart
The chart lists which heat setting is suitable for each type of food. The frying time may vary depending on the type,
weight, size and quality of the food.
The set heat setting varies depending on the frying pan that is used.
Preheat the empty pan; add oil and food after the acoustic signal has sounded.
Temperature
setting
Total frying time from signal
(mins.)
Meat
Cutlet, pork or chicken, plain or breaded med 6 - 10
Fillet med 6 - 10
Chops* low 10 - 15
Cordon bleu med 10 - 15
Steak, medium rare; 1" (2.5 cm) thick max 6 - 8
Steak, medium or well-done; 1" (2.5 cm) thick med 8 - 12
Poultry breast; ¾" (2 cm) thick* low 10 - 20
Sausages, pre-boiled or raw* low 8 - 20
Hamburger, meatballs low 6 - 30
Meatloaf min 6 - 9
Gyros med 7 - 12
Ground meat med 6 - 10
Bacon min 5 - 8
Fish
Fish, fried, whole, e.g. trout low 10 - 20
Fish fillet, with or without breadcrumbs low - med 10 - 20
Shrimp med 4 - 8
* Turn several times.
** Total cooking time per portion. Fry in succession.
19
Temperature
setting
Total frying time from signal
(mins.)
Egg dishes
Pancakes** max Omelette** min 3 - 6
Fried eggs min - med 2 - 6
Scrambled eggs min 4 - 9
French toast** low 4 - 8
Potatoes
Fried potatoes; boiled in their skin max 6 - 12
French fries; made from raw potatoes med 15 - 25
Potato fritter** max 2.5 - 3.5
Glazed potatoes low 15 - 20
Vegetables
Garlic, onions min 2 - 10
Squash, egg plant low 4 - 12
Peppers, green asparagus low 4 - 15
Mushrooms med 10 - 15
Frozen products
Cutlet, pork or chicken med 15 - 20
Poultry breast* med 10 - 30
Chicken nuggets med 10 - 15
Fish fillet, with or without breadcrumbs low 10 - 20
Fish sticks med 8 - 12
French fries max 4 - 6
Stir-fried meals, e.g. fried vegetables with chicken low 6 - 10
Spring rolls med 10 - 30
Miscellaneous
Dry ready meals that require water to be added, e.g. pasta min 5 - 10
Croutons low 6 - 10
Almonds/walnuts/pine nuts med 3 - 15
* Turn several times.
** Total cooking time per portion. Fry in succession.
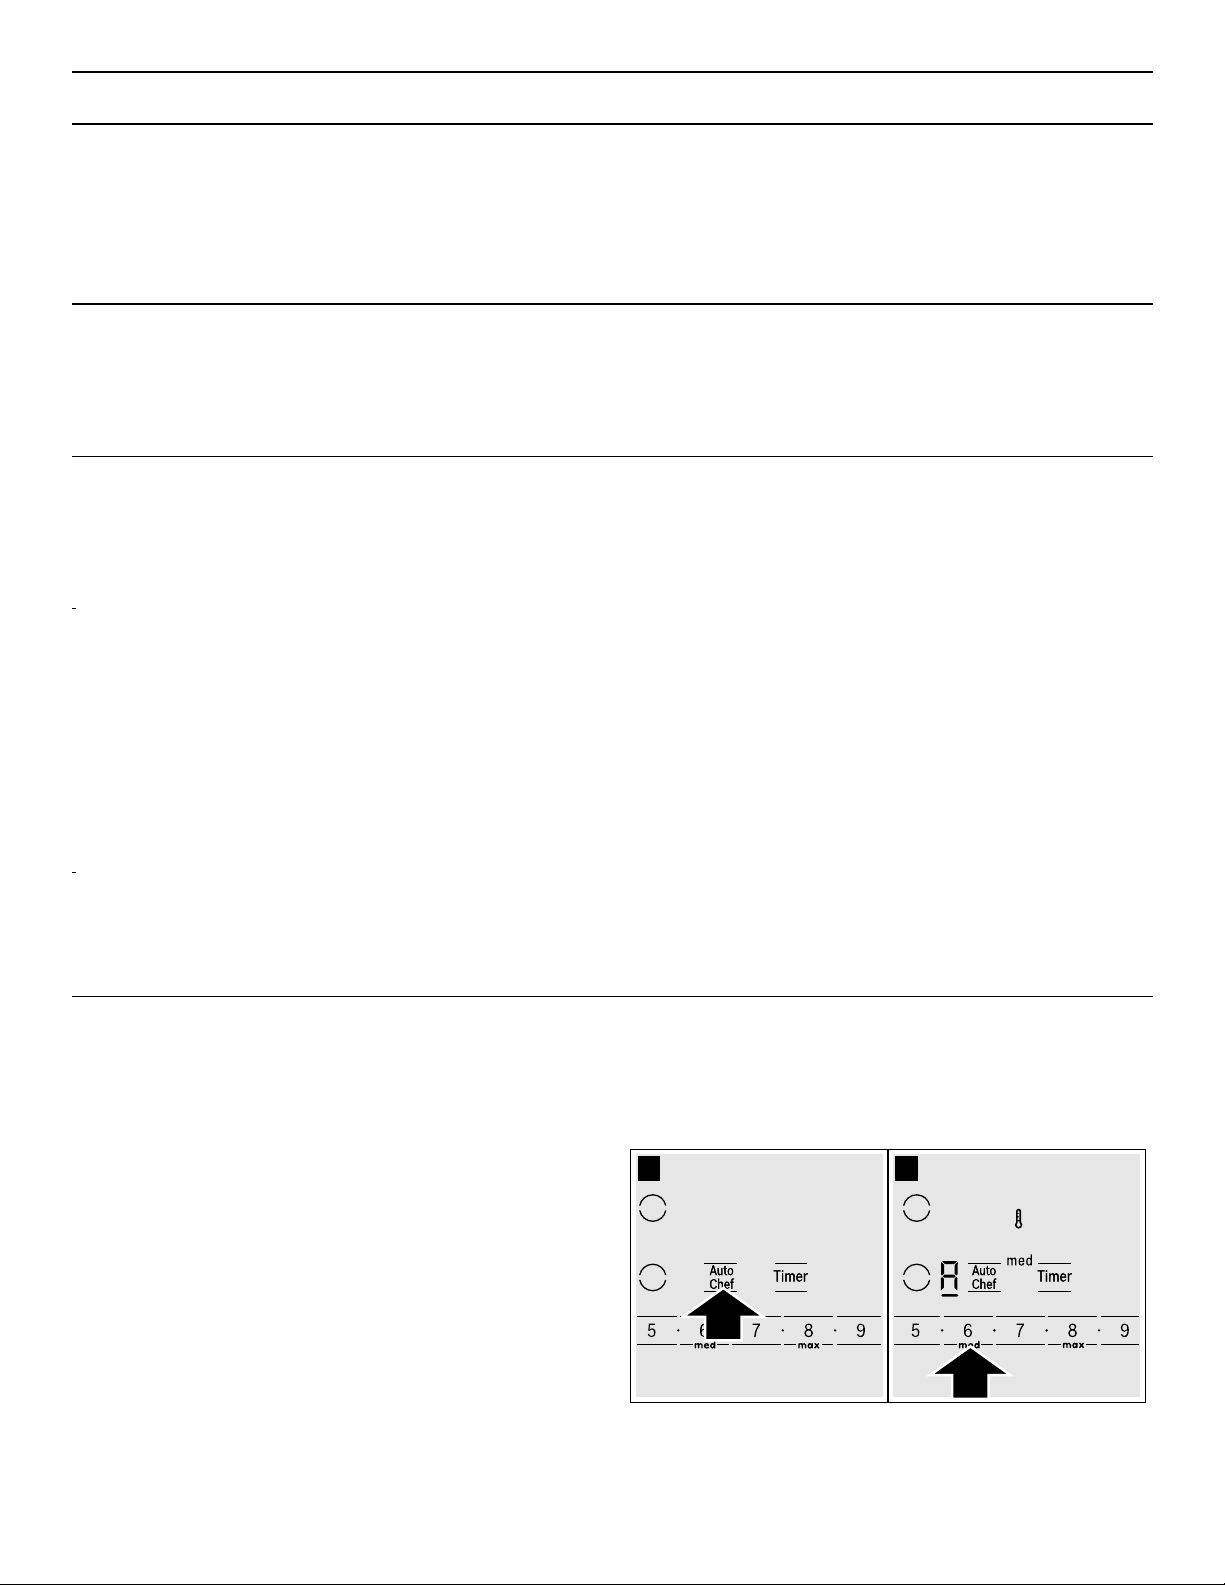
Setting the AutoChef
Select the appropriate frying level from the chart. Place
the system pan in the center of the element. The cooktop
®
feature
3.
Select the desired frying level using the number keys.
s symbol lights up on the display. The selected
The
frying level is displayed.
must be on.
1.
Select the element.
2.
Touch the AutoChef key. The ‘ lights up on the
element display.
The temperature symbol
s stays lit until the
temperature is reached. Then a beep sounds,
disappears.
s
20

4.
Add the frying oil to the pan, then add the ingredients. Turn the food over as usual to avoid burning.
Turning off AutoChef
Select the heating element and touch AutoChef.
®
Panel lock
You can use the panel lock to prevent the appliance
from being turned on accidentally.
Turning the panel lock on
The cooktop must be turned off.
Touch Panel Lock for 4 seconds. The
Panel Lock lights up for 10 seconds. The cooktop is
now locked.
Turning the panel lock off
Touch Panel Lock for 4 seconds. The panel lock is now
deactivated.
9 CAUTION
The panel lock may be accidentally turned on and
off due to:
▯ water spilled during cleaning
▯ food that has overflowed
▯ objects being placed on the Panel Lock key.
Automatic panel lock
With this function, the panel lock is automatically
activated whenever you turn off the cooktop.
Ú indicator over
Switching on and off: You can find out how to switch the
automatic panel lock on in the section ~ "Basic
settings"
Wipe Protection
Cleaning the control panel while the cooktop is on may
change the settings. In order to avoid this the cooktop
has a wipe protection function.
To activate: Touch the Panel Lock key. The
above the key lights up. The control panel is locked for
35 seconds.
You can now clean the surface of the control panel
without risk of changing the settings.
To deactivate: To deactivate the function before the time
has elapsed, touch the Panel Lock key. The
above the key turns off, the function is deactivated.
Notes
▯ An acoustic signal sounds 30 seconds after activation.
This indicates that the function is about to finish.
▯ The wipe protection function does not lock the main
switch. The cooktop can be switched off at any time.
Ú indicator
Ú indicator
Automatic time limitation
If the element is used for prolonged periods of time
without changes in the settings being made, the
automatic time limitation function is triggered.
The element stops heating.
indicator •/œ flash alternately in the display.
The indicator goes out when any symbol is pressed. The
element can now be reset.
When the automatic time limitation is activated depends
on the selected heat level (from 1 to 10 hours).
”‰ and the residual heat
Basic settings
The appliance has various basic settings. You can adjust these settings to the way you usually cook.
Display Function
™‚
™ƒ
™†
™‡
Automatic panel lock
‹ Off*
‚ On
Audible signals
‹ Confirmation signal and error signals deactivated
‚ Only error signals activated
ƒ Only confirmation signals activated
„ All signals activated*
Automatic timer
‹ Off*
‚-ŠŠ Automatic shut-off time
Length of timer end signal
‚ 10 seconds*
ƒ 30 seconds
„ 1 minute
21
™ˆ
™Š
™‚ƒ
™‹
*factory settings
Power Management function
‹ = Off*
‚ = 1.000 W. minimum power
‚.= 1.500 W
ƒ = 2.000 W
etc.
Š or Š. = maximum power of the element
Selection time for heating element
‹Unlimited*: You can adjust the settings of the last heating element used at any time without hav-
ing to select it again.
‚Restricted: You can adjust the settings for the last heating element used within 10 seconds after
selecting it. After that you will have to reselect the heating element before setting it.
Cookware, Checking result of cooking process
‹Not suitable
‚Not perfect
ƒSuitable
Reset to basic settings
‹ Off*
‚ Reset the appliance to basic settings
Changing the basic settings
The cooktop must be turned off.
1.
Turn on the cooktop with the main switch.
2.
Within10 seconds, touch the Timer key for about 4 seconds.
The first four displays provide product information.
Touch the settings area to view the individual displays.
Product information Display
Directory for the Customer Service Index
(K1)
FD number
FD number 1
FD number 2
3.
Touching the Timer key again takes you to the basic settings.
In the display
timer display ‹ lights up as a default setting.
™ and ‚ light up alternately and in the
‹‚
”š
Š†.
‹.†
5.
Select the desired setting using the number keys.
6.
Touch Timer again for 4 seconds. The setting is stored.
Quit basic settings
Turn the cooktop off with the main switch.
4.
Touch Timer repeatedly until the indicator for the desired function appears in the element display.
22
In this section we describe the control panel, elements
and displays.
Control panel (Benchmark Series)
3DQHO
/RFN
Display icons
‹.‹
‚-Š
•/œ
‹‹
>
Š
y
ö / ô
›.
˜›.
÷
–©
Cooktop ready
Power levels
Residual heat
Time programming functions
Wipe protection
Panel lock
Cook timer
Timer indicator
SpeedBoost® function
ShortBoost function
Energy consumption
Keep Warm function
Touch keys
On/Off Main switch
ø/ã
0 1
û2û...û8û9
Speed Boost
Select a cooking zone
Settings range
®
SpeedBoost
and ShortBoost function
Panel Lock Panel lock/wipe protection
Keep Warm Keep warm function
3RZHU
0RYH
)OH[
-RLQ6SOLW
.HHS
:DUP
6SHHG
.LWFKHQ
&RRN
7LPHU
7LPHU
&RXQW8S
7LPHU
%RRVW
Touch keys
Flex Join/
Flexible cooking zone
Split
Power Move PowerMove function
Kitchen
Kitchen Timer function
Timer
Cook Timer Setting the cooking time
Count Up
Stopwatch function
Timer
Touch controls
When the cooktop heats up, the keys for the touch
controls available at this time light up.
Touching a key activates the respective function.
Notes
▯ The corresponding keys for the controls light up
depending on whether they are available.
The displays for the elements or the selected functions
get brighter.
▯ Always keep the control panel clean and dry. Moisture
can prevent it from working properly.
23
The elements
Element
$ / Û
á
Only use suitable cookware for induction cooking; see section on Cooking with Induction
Single element Use cookware of suitable size.
Flexible cooking zone
See section on ~ "FlexInduction® cooking zone"
Residual heat indicator
The cooktop has a residual heat indicator for each
element. This indicates that an element is still hot. Do not
touch an element while the residual heat indicator is lit
up.
The following are shown depending on the amount of
residual heat:
▯ Display •: High temperature
▯ Display œ: Low temperature
Operation
9 WARNING
BOILOVER HAZARD
Never leave surface units unattended at high heat
settings. Boilover causes smoking and greasy
spillovers that may ignite.
Main power switch
Use the main switch to turn on the electronic circuitry for
the control panel. The cooktop is now ready to use.
Turning the cooktop on
Touch the On/Off touch key. An acoustic signal will
sound. The __ indicator located on top of the On/Off
touch key and the symbols for the cooking zones light
‹:‹ lights up next to the cooking zones. The cooktop
up.
is ready to use.
Turning the cooktop off
Touch the On/Off touch key. The __ indicator goes out.
The cooktop is switched off. The residual heat indicators
will remain on until the elements have cooled off
sufficiently.
Note: The cooktop switches off automatically when all the elements have been switched off for more than 20 seconds.
The residual heat indicator remains lit until the elements
have cooled down sufficiently.
the corresponding element symbol.
•/œ is displayed next to
If you remove the cookware from the element during
cooking, the residual heat indicator and the selected
heat setting will flash alternately.
When the element is switched off, the residual heat
indicator will light up. Even after the cooktop has been
switched off, the residual heat indicator will stay lit for as
long as the element is still warm.
Setting the cooktop
This section will show you how to set the elements. The
table contains details on the heat settings for a variety of
dishes.
Setting the element
Select the desired heat level using the number keys
1 to 9.
Heat level 1 = minimum power
Heat level 9 = maximum power
Each heat setting has an intermediate level. This level is
indicated by .5 in the element display and is set by
touching the
Selecting the heat level
The cooktop must be turned on.
1.
Select the desired element with by touching the ã or
ø symbol of the desired element. In the cooking zone
display ‹.‹ lights up brighter.
2.
Then select the desired power level using the number keys.
Ú symbols between the number keys.
24
3.
The power level is set.

Changing the power level
Select the cooking zone and then set the required power
level in the control panel.
Turning off the cooking zone
Select the cooking zone and set the power level to 0. The
cooking zone is turned off and the residual heat indicator
is displayed.
Notes
▯ If there is no cookware on the induction cooking zone,
the heat setting display blinks. After a while, the
cooking zone will switch itself off.
▯ If cookware has been placed on the cooking zone
before you turn on the cooktop, it will be detected
within 20 seconds after you have touched the main
switch and the cooking zone will be selected
automatically. Once detected, set the power level
within the next 20 seconds, otherwise the cooking
zone will turn off.
Even if there are several pots and pans on the cooktop
when it is switched on, only one piece of cookware is
detected.
Settings table
The following table provides some examples. Cooking
times may vary depending on the type of food, its weight
and quality. Deviations are therefore possible.
Recommendations for cooking
▯ Set heat setting 8 to 9 for preheating ; for delicate
dishes like milk, pudding, rice pudding or cereals heat
up with setting 8 - 8.5.
▯ When cooking with the lid on, turn the heat setting
down as soon as steam escapes between the lid and
the cookware. Steam does not need to escape for a
good cooking result.
▯ After cooking, keep the lid on the cookware until you
serve the food.
▯ To cook with the pressure cooker, observe the
manufacturer's instructions.
▯ Do not cook food for too long, otherwise more
nutrients than necessary will be lost. The kitchen timer
can be used to set the optimum cooking time.
▯ For a more healthy cooking result, smoking oil should
be avoided.
▯ To brown food, fry small portions in succession.
▯ Cookware may reach high temperatures while the food
is cooking. We recommend that you use oven mitts.
9 CAUTION
During cooking, stews or liquid meals such as
soups, sauces or drinks can heat up too quickly
unnoticed and overflow or spatter. For this reason
we recommend that you stir continuously, gradually
heating the food at a suitable power level.
Power levels
Melting
chocolate 1.5
butter 1.0 - 2.0
Heating
frozen vegetables, e.g. spinach 2.5 - 3.5
broth 7.0 - 8.0
thick soup 1.5 - 2.5
milk** 1.0 - 2.0
Simmering
delicate sauce e.g. Béchamel sauce 4.0 - 5.0
spaghetti sauce 2.0 - 3.0
pot roast 4.0 - 5.0
fish** 4.0 - 5.0
Cooking
rice (with double amount of water) 2.0 - 3.0
potatoes boiled in their skins (with 1-2 cups of water) 4.0 - 5.0
boiled potatoes (with 1-2 cups of water) 4.0 - 5.0
fresh vegetables (with 1-2 cups of water) 2.0 - 3.5
frozen vegetables (with 1-2 cups of water) 3.5 - 4.5
pasta (with 2-4 qt. water)* 6.0 - 7.0
25
Power levels
pudding** 1.0 - 2.0
cereals 2.0 - 3.0
Frying
pork chop 5.5 - 6.5
chicken breast 5.0 - 6.0
bacon 6.0 - 7.0
eggs 5.0 - 6.0
fish 5.0 - 6.0
pancakes 6.0 - 7.0
Deep fat frying** (in 1-2 qt. oil)
deep frozen foods, e.g. chicken nuggets (0.5 lb per serving) 8.0 - 9.0
other, e.g. doughnuts (0.5 lb per serving) 4.5 - 5.5
Keep warm
tomato sauce 1.5
* ongoing cooking without lid
** without lid
®
FlexInduction
cooking zone
You can combine the elements into a large cooking zone
as needed or use two elements that are independent of
one another.
The FlexInduction® cooking zone consists of 4 inductors,
which are controlled independently of one another. When
®
FlexInduction
is in use, only the area is activated that is
covered by cookware.
Cookware use recommendations
Place the cookware in the middle. This guarantees
optimal pot detection and heat distribution.
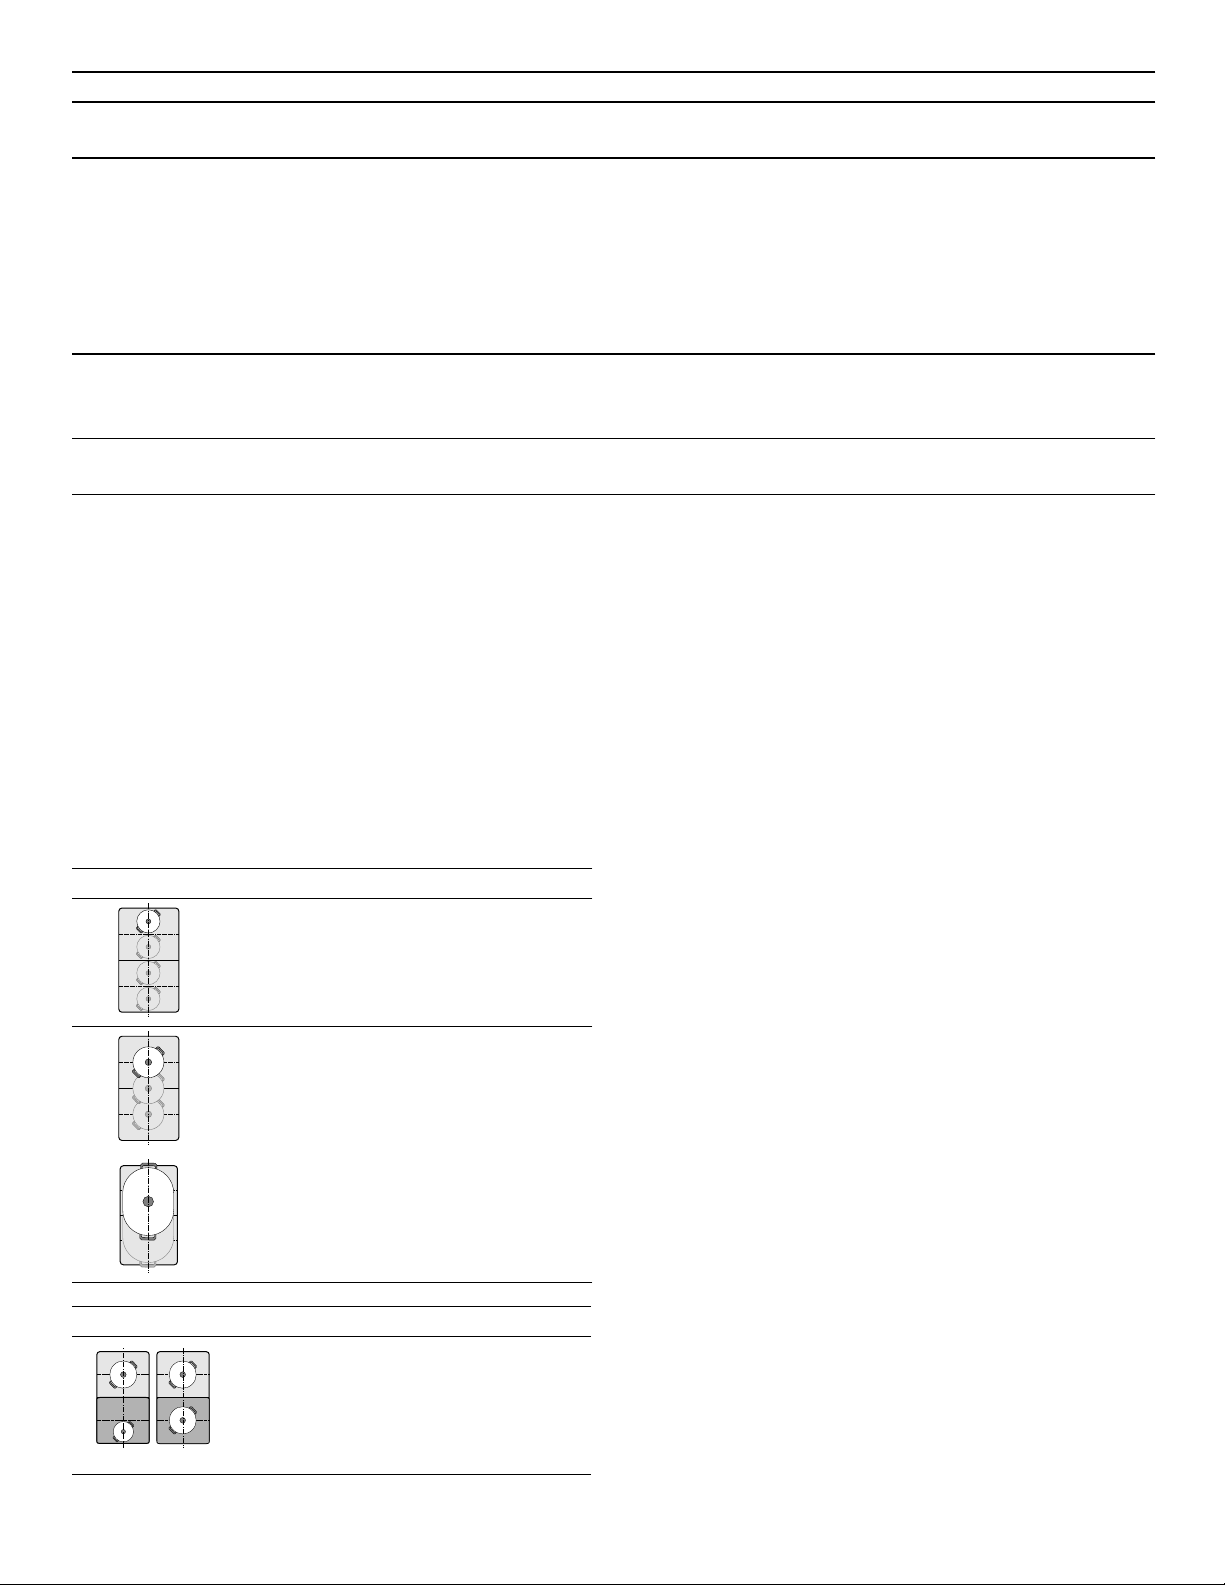
Flexible cooking zone - as an individual element
Diameter of the cookware max. 5
X"
(13 cm)
Place the cookware on one of the
4 positions visible in the figure.
Diameter larger than 5X" (13 cm)
Place the cookware on one of the
3 positions visible in the figure.
If the cookware takes up more than
one element, place it on the upper or
lower edge of the flexible cooking
zone.
Flexible cooking zone - two independent elements
The front and rear elements with two
inductors apiece can be used independently. The heat setting is set individually for each element. Use only
one piece of cookware on each element.
As two independent elements
The flexible cooking zone is used like two independent
elements.
Turning on
See section on ~ "Setting the cooktop".
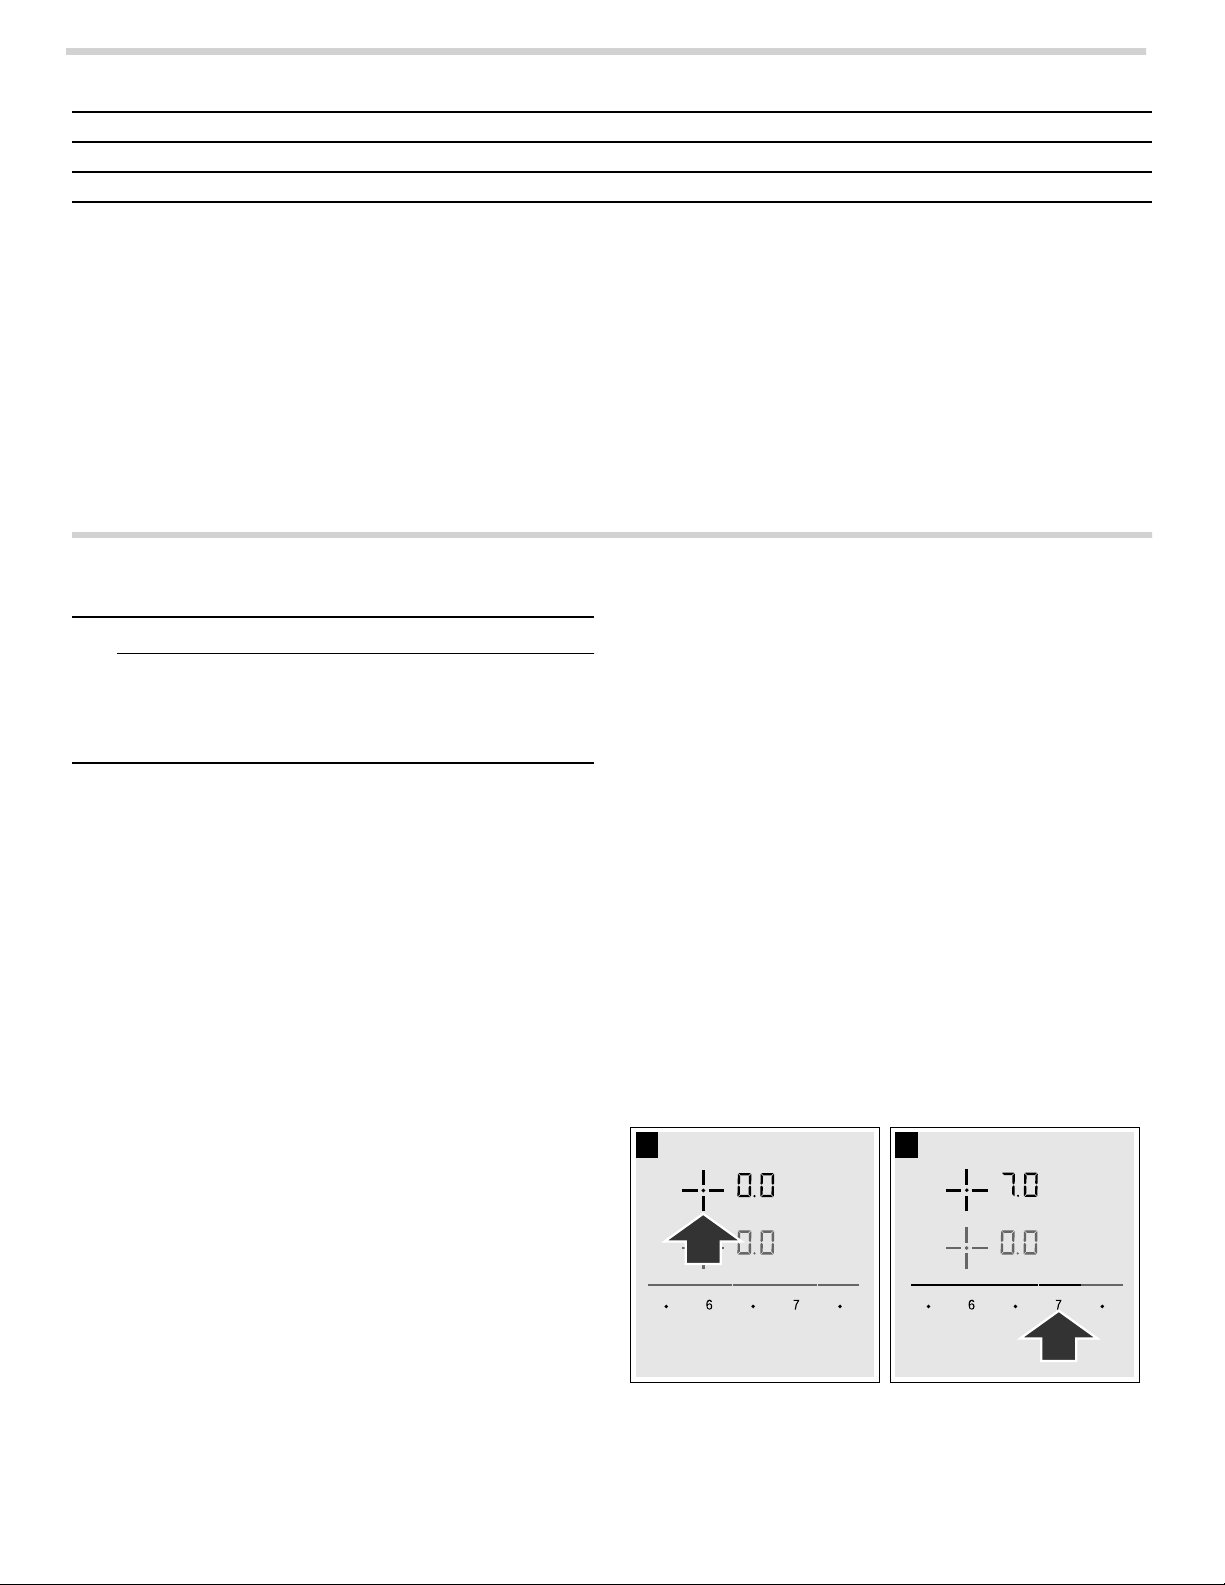
As a single element
Using the entire cooking zone by connecting both
elements.
Linking the two elements
The cooktop must be turned on.
1.
Set down the cookware. Select one of the two elements assigned to the flexible cooking zone and set the power level.
2.
Touch the Flex Join/Split key. The display lights up.
The heat setting appears in the display for the lower
element.
The flexible cooking zone is activated.
Changing the power level
Select one of the element in the flexible cooking zone
and change the power level with the number keys.
Add another piece of cookware
Set the new item of cookware down on the cooktop,
select one of the two elements in the flexible cooking
zone and then touch the Flex Join/Split key twice. The
new item of cookware will be detected and the power
level that was previously selected will be retained.
Note: If the cookware is moved to the element being used or lifted up, the element begins an automatic search and the heat setting selected previously is retained.
26
Separating the two elements
Select one of the two elements in the flexible cooking
zone and touch the Flex Join/Split key.
This deactivates the flexible cooking zone. The two
elements will now function independently.
Notes
▯ If the element is switched off, and then switched back
on again later, the flexible cooking zone is reset to
function as two independent elements.
▯ To change the configuration settings for the flexible
cooking zone, refer to the section on ~ "Basic
settings".
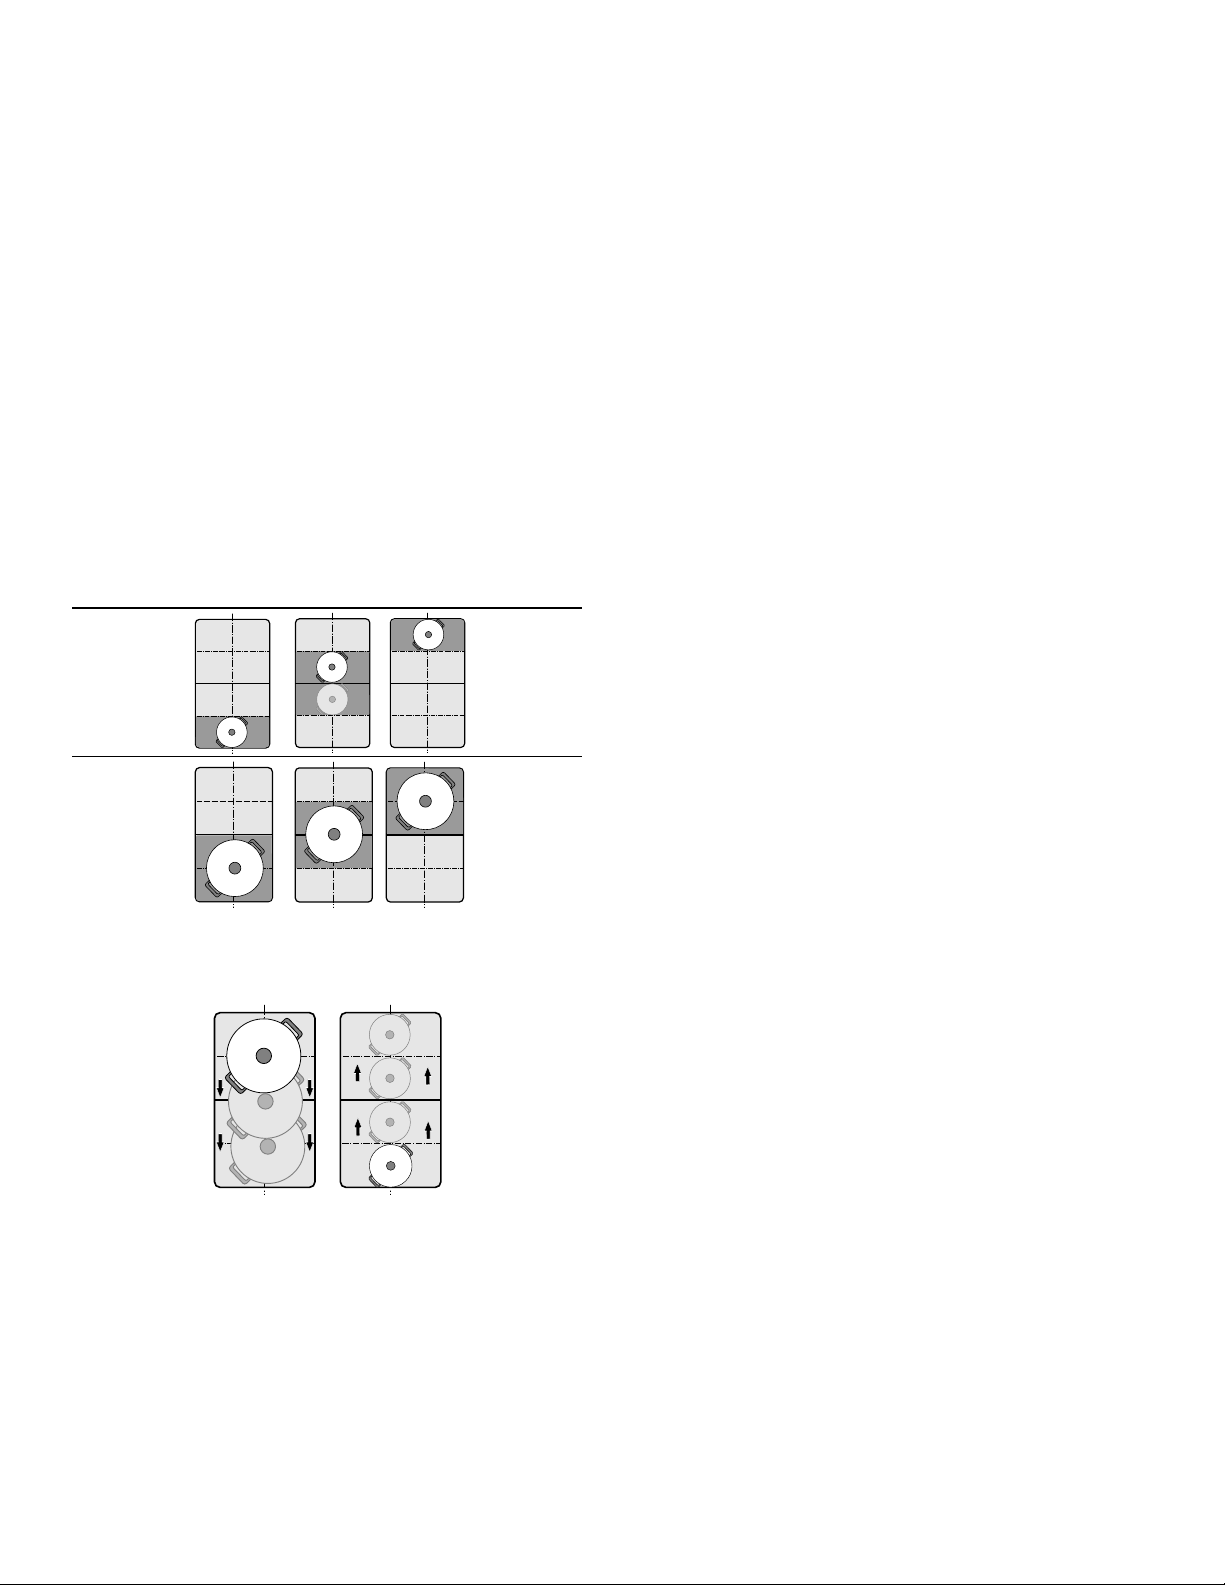
PowerMove function
This function activates the entire flexible cooking zone,
which is divided into three cooking areas and which has
preset power levels.
Only use one item of cookware. The size of the cooking
area depends on the cookware used and whether it is
positioned correctly.
Cooking areas
Notes
▯ If more than one item of cookware is detected on the
flexible cooking zone, the function is deactivated.
▯ If the cookware is moved within the flexible cooking
zone or lifted up, the cooktop automatically starts
searching and the power level of the area in which the
cookware was detected is set.
▯ You can find information on the size and positioning of
the cookware in the section on the function
®
~ "FlexInduction
cooking zone".
Activation
1.
Select one of the two elements in the flexible cooking zone.
2.
Touch the Power Move key. The indicator beside the
Power Move key lights up. The flexible cooking zone is
activated as a single cooking zone.
The power level in the area in which the cookware is
located lights up in the cooking zone display.
The function has now been activated.
Changing the power level
The power levels for the individual cooking areas can be
changed during the cooking process. Set the cookware
down on the cooking area and change the power level
using the number keys.
This means that an item of cookware can be moved
during the cooking process to another cooking area with
another power level:
Preset power levels:
Front area = power level
Š
Middle area = power level †
Rear area = power level‚.†
The preset power levels can be changed independently
of one another. You can find out how to change these in
the section on ~ "Basic settings"
Notes
▯ Only the power level in the area in which the cookware
is located is changed.
▯ If the function is deactivated, the power levels for the
three cooking areas are reset to the preset values.
Deactivating Touch the Power Move key. The indicator beside the
Power Move key goes out.
The function was deactivated. Note: If one of the cooking areas is set to
‹, the function
deactivates after a few seconds.
27
Time-setting options
Your cooktop has three timer functions:
▯ Programming the cooking time
▯ Kitchen timer
▯ Stopwatch function
Changing or deleting the time
Select the element and then touch the Cook Timer key.
Change the cooking time using the number keys or set
‹‹ to delete the programmed cooking time.
Touch the Cook Timer key to confirm the selected setting.
Programming the cooking time
The element automatically switches off after the set time
has elapsed.
Setting procedure:
1.
Select the element and the required power level.
2.
Touch the Cook Timer key. The ‹‹ symbol and theV indicator light up in the Cook Timer display.
y lights up in the display for the element.
.HHS
:DUP
6SHHG
.LWFKHQ
&RRN
%RRVW
7LPHU
3.
Within the next 10 seconds, set the required cooking time using the number keys.
7LPHU
&RXQW8S
7LPHU
When the time has elapsed
The element switches off, the y display flashes and the
element switches to power level ‹‹. An acoustic signal
sounds.
‹‹ and the V indicator flash in the timer display.
When the y symbol is touched, the indicators go out
and the acoustic signal ceases.
Notes
▯ To set a cooking time of under 10 minutes, always
touch 0 before you select the required value.
▯ If a cooking time was set for several elements, the time
information for the selected element is shown in the
timer display.
▯ Select the relevant element to call up the remaining
cooking time.
▯ You can set a cooking time of up to ŠŠ minutes.
Kitchen timer
The timer can be set for periods of up to 99 minutes. It is
independent of the other settings. You can also use the
kitchen timer when the cooktop is turned off or locked.
This function does not automatically switch off an
element.
.HHS
:DUP
6SHHG
.LWFKHQ
&RRN
%RRVW
7LPHU
4.
Touch the Cook Timer key to confirm the selected
7LPHU
&RXQW8S
7LPHU
setting.
The cooking time begins to elapse.
Notes
▯ The same cooking time can be set automatically for all
elements. The set time for each of the elements counts
down independently.
You can find information on automatically
programming the cooking time in section on “Cook
timer”.
▯ If the flexible cooking zone is selected as the only
element, the set time for the entire cooking zone is the
same.
▯ If the Move function is selected for the combined
cooking zone, the set time for the three elements is the
same.
Setting procedure
1.
Touch the Kitchen Timer key. The ‹‹ symbol and the
V indicator light up in the timer display.
2.
Select the required time on the control panel and touch the Kitchen Timer key to confirm.
After a few seconds, the time begins to elapse.
Changing or deleting the time
Touch the Kitchen Timer key.
Change the cooking time using the number keys or set
‹‹ to delete the programmed cooking time.
Touch the Kitchen Timer key to confirm the selected
setting.
When the time has elapsed
An audible signal sounds once the time has elapsed. ‹‹
and the
The indicators go out after touching the Kitchen Timer
key.
Count-up timer function
The count-up timer function displays the time that has
elapsed since activation.
This functions independently from the elements and from
other settings. This function does not automatically
switch off an element.
V symbol flash in the timer display.
28
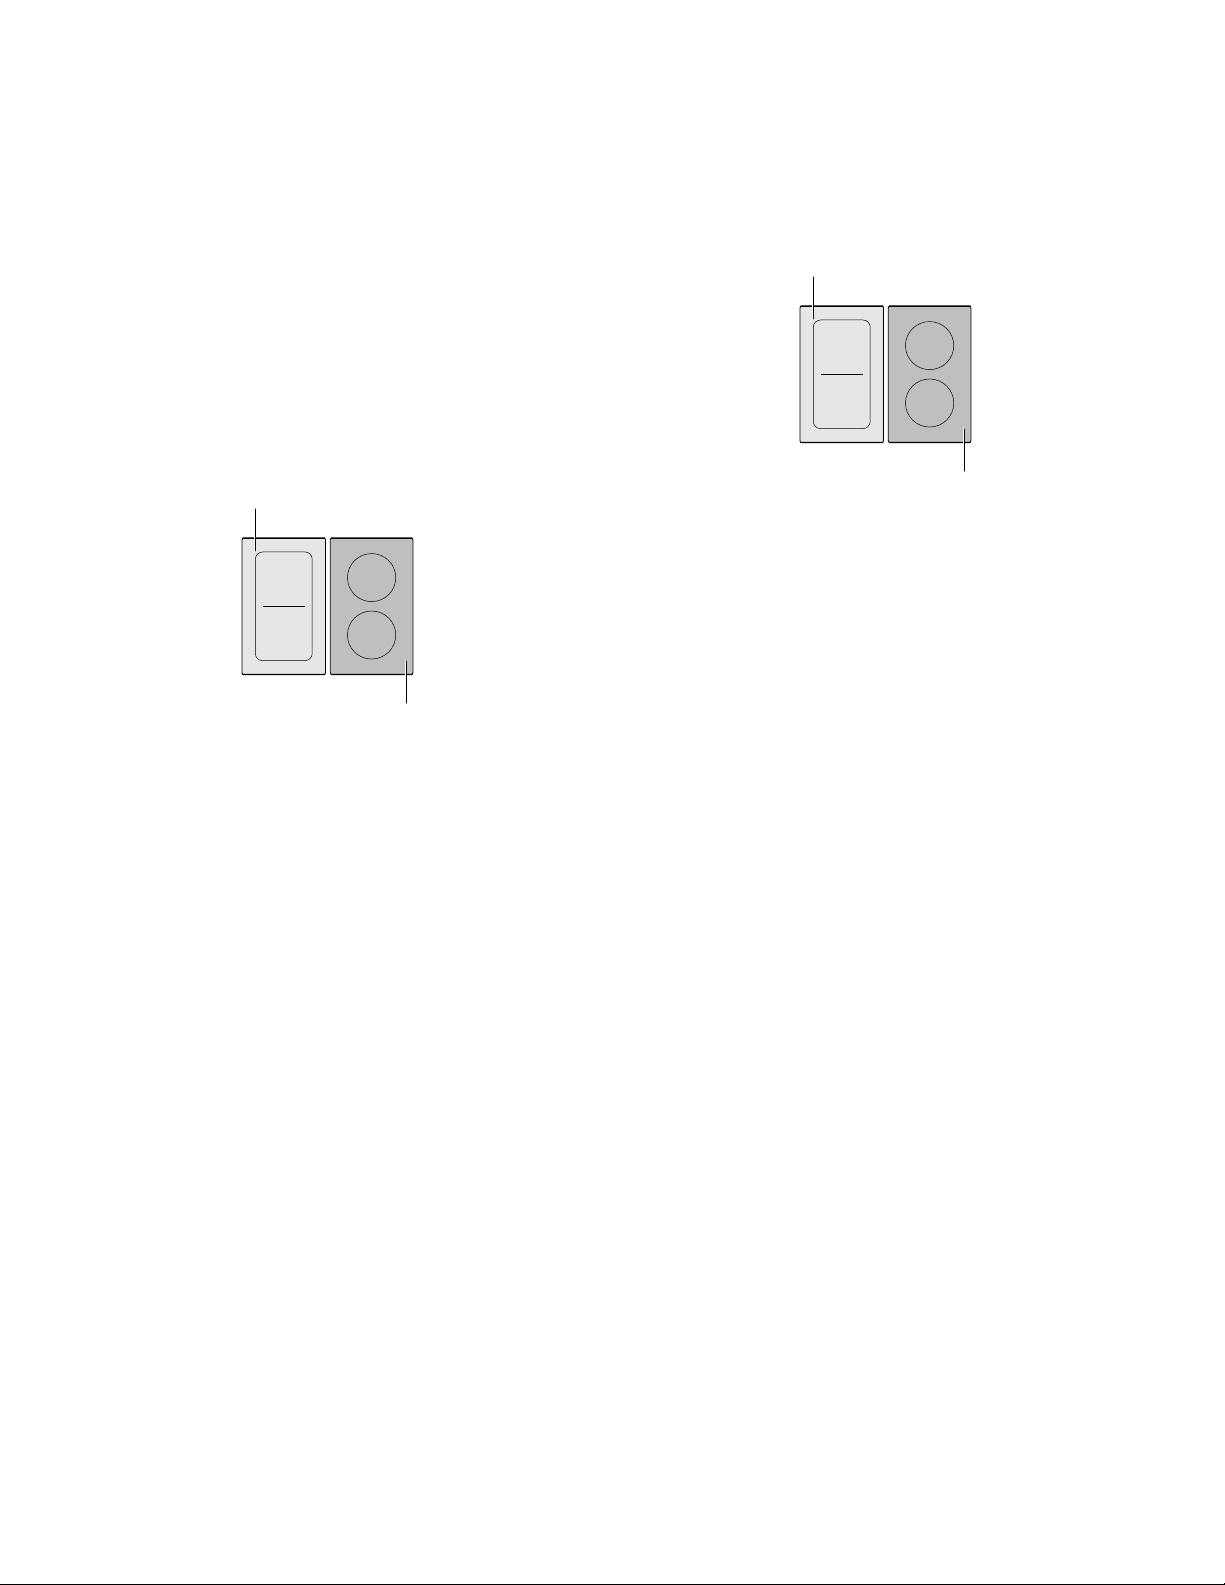
Activating
Touch the Count Up Timer key. The
‹‹ symbol and the
V indicator light up in the timer display.
The time begins to count up.
Deactivating
Touching the Count Up Timer key the stopwatch
function. The timer displays remain lit.
If you touch the Count Up Timer key again, the displays
go out.
The function is deactivated.
SpeedBoost® function
The SpeedBoost® function enables you to heat up large
quantities of water faster than when using heat setting
This function can always be activated for an element,
provided the other element in the same group is not in
use (see illustration).
Note: The SpeedBoost® function can also be activated in the FlexInduction® area if it is being used as a single cooking zone.
Activating
1.
Select a element.
2.
Touch the Speed Boost key.
› indicator lights up.
The
The function is activated.
Deactivating
1.
Select a element.
2.
Touch the Speed Boost key.
The
› display goes out and the element switches back
to heat setting Š.
The function is deactivated. Note: In certain circumstances, the SpeedBoost
function can switch itself off automatically in order to
protect the electronic elements inside the cooktop.
Š.
®
ShortBoost function
The ShortBoost function enables you to heat cookware
faster than when using heat setting Š.
After deactivating the function, select the appropriate
heat setting for your food.
This function can always be activated for an element,
provided the other element in the same group is not in
use (see illustration).
Note: The ShortBoost function can also be activated in the FlexInduction cooking zone.
Recommendations for use
▯ Always use cookware that has not been pre-heated.
▯ Use pots and pans with a flat base. Do not use
containers with a thin base.
▯ Never leave empty cookware, oil, butter or lard to heat
up unattended.
▯ Do not place a lid on the cookware.
▯ Place the cookware on the center of the element.
Ensure that the diameter of the base of the cookware
corresponds to the size of the element.
▯ You can find information on the type, size and
positioning of the cookware in section Cooking with
Induction.
Activating
1.
Select an element.
2.
Touch the Speed Boost key twice.
˜›Ú indicator lights up.
The
The function is activated.
Deactivating
1.
Select an element.
2.
Touch the Speed Boost key.
˜›Ú display goes out and the element switches
The
back to heat setting Š.
The function is deactivated. Note: In certain circumstances, the ShortBoost function
can switch itself off automatically to protect the electronic
elements inside the cooktop.
®
area if it is being used as a single
29

Keep Warm function
This function is suitable for melting chocolate or butter
and for keeping food warm.
Activating
1.
Select the required power level.
2.
Within the next 10 seconds, touch the Keep Warm key.
The –© indicator lights up.
The function is activated.
Deactivating
1.
Select an element.
2.
Touch the Keep Warm key.
–© display goes out. The element switches itself
The
off and the residual heat indicator appears.
The function is deactivated.
Panel Lock
You can use the panel lock to prevent the
appliance from being turned on accidentally.
Activating and deactivating the panel lock
The cooktop must be turned off.
The lock is released.
Automatic panel lock
With this function, the panel lock is automatically
activated whenever you turn off the cooktop.
Turning on and off
See "Basic settings" section.
Wipe protection
Cleaning the control panel while the cooktop is on may
change the settings. In order to avoid this the cooktop
has a wipe protection function.
To activate: Touch the Panel Lock key. An acoustic
signal sounds. The control panel is locked for
35 seconds. You can now wipe over the surface of the
control panel without altering any settings.
To deactivate: The control panel will be unlocked once
35 seconds have elapsed. To release the function early,
touch the Panel Lock key.
Notes
▯ An audible signal sounds 30 seconds after activation.
This indicates that the function is about to finish.
▯ The wipe protection function does not lock the main
switch. The cooktop can be switched off at any time.
To activate:
1.
Switch on the cooktop using the main switch.
2.
Touch the Panel Lock key for approx. 4 seconds.
D indicator lights up for 10 seconds.
The
The cooktop is locked.
To deactivate:
1.
Switch on the cooktop using the main switch.
2.
Touch the Panel Lock key for approx. 4 seconds.
Basic settings
The appliance has various basic settings. You can adjust
these settings to the way you usually cook.
Display Function
Automatic panel lock
‹ Manual*.
‚ Automatic.
™‚
™ƒ
™„
* Factory settings
ƒ Function deactivated.
Signal tones
‹ Confirmation and error signals are switched off.
‚ Only the error signal is switched on.
ƒ Only the confirmation signal is switched on.
„ All signal tones are switched on.*
Display energy consumption
‹ Switched off.*
‚ Switched on
Automatic time limitation
If the element is used for prolonged periods of time
without changes in the settings being made, the
automatic time limitation function is triggered.
The element stops heating.
indicator
The indicator goes out when any symbol is pressed. The
element can now be reset.
When the automatic time limitation is activated depends
on the selected heat level (from 1 to 10 hours).
•/œ flash alternately in the display.
”‰ and the residual heat
30
 Loading...