

Page 1

3FHJTUFS
\RXU
QHZGHYLFHRQ
0\%RVFKQRZDQG
JHWIUHHEHQHILWV
CPTDIIPNFDPN
XFMDPNF
Microwave
فﯾوورﻛﯾﻣﻟا نرﻓ
BEL554MS0M
[en] Instruction manual Microwave
[ar]
لﺎﻣﻌﺗﺳﻻا لﯾﻟد فﯾوورﻛﯾﻣﻟا نرﻓ
Page 2

Page 3

Table of contents
[en]I n st r u ct i on manual Microwave
8 Intended use . . . . . . . . . . . . . . . . . . . . . . . . . . . . . 4
en
3 Trouble shooting . . . . . . . . . . . . . . . . . . . . . . . . 16
( Important safety information . . . . . . . . . . . . . . . 4
General information . . . . . . . . . . . . . . . . . . . . . . . . . . . 4
Microwave . . . . . . . . . . . . . . . . . . . . . . . . . . . . . . . . . . 5
5 Installation and connection. . . . . . . . . . . . . . . . . 6
] Causes of damage . . . . . . . . . . . . . . . . . . . . . . . . 7
7 Environmental protection . . . . . . . . . . . . . . . . . . 7
Environmentally-friendly disposal . . . . . . . . . . . . . . . . . 7
* Getting to know your appliance . . . . . . . . . . . . . 7
Control panel . . . . . . . . . . . . . . . . . . . . . . . . . . . . . . . . 7
Controls . . . . . . . . . . . . . . . . . . . . . . . . . . . . . . . . . . . . 8
Changing the signal duration . . . . . . . . . . . . . . . . . . . . 8
_ Accessories . . . . . . . . . . . . . . . . . . . . . . . . . . . . . 9
Special accessories . . . . . . . . . . . . . . . . . . . . . . . . . . . 9
K Before using for the first time. . . . . . . . . . . . . . . 9
Cleaning the cooking compartment and putting the
turntable in place . . . . . . . . . . . . . . . . . . . . . . . . . . . . .9
Setting the clock . . . . . . . . . . . . . . . . . . . . . . . . . . . . . 9
Cleaning the cooking compartment and accessories 10
4 Customer service . . . . . . . . . . . . . . . . . . . . . . . . 17
E number and FD number . . . . . . . . . . . . . . . . . . . . .17
J Tested for you in our cooking studio. . . . . . . . 18
Suitable ovenware . . . . . . . . . . . . . . . . . . . . . . . . . . .18
Unsuitable cookware . . . . . . . . . . . . . . . . . . . . . . . . .18
Defrosting . . . . . . . . . . . . . . . . . . . . . . . . . . . . . . . . . .18
Heating frozen food . . . . . . . . . . . . . . . . . . . . . . . . . .19
Heating food. . . . . . . . . . . . . . . . . . . . . . . . . . . . . . . .20
Cooking food . . . . . . . . . . . . . . . . . . . . . . . . . . . . . . .21
Microwave tips . . . . . . . . . . . . . . . . . . . . . . . . . . . . . .22
E Test dishes . . . . . . . . . . . . . . . . . . . . . . . . . . . . . 23
Produktinfo
Additional information on products, accessories,
replacement parts and services can be found at
www.bosch-home.com and in the online shop
www.bosch-eshop.com
^ Microwave. . . . . . . . . . . . . . . . . . . . . . . . . . . . . . 10
Cookware. . . . . . . . . . . . . . . . . . . . . . . . . . . . . . . . . . 10
Microwave power settings . . . . . . . . . . . . . . . . . . . . . 11
Setting the microwave . . . . . . . . . . . . . . . . . . . . . . . . 11
d Grilling. . . . . . . . . . . . . . . . . . . . . . . . . . . . . . . . . 11
Setting the grill . . . . . . . . . . . . . . . . . . . . . . . . . . . . . . 11
Setting the microwave and grill . . . . . . . . . . . . . . . . . 12
B Memory . . . . . . . . . . . . . . . . . . . . . . . . . . . . . . . . 12
Saving memory settings. . . . . . . . . . . . . . . . . . . . . . . 12
Starting the memory. . . . . . . . . . . . . . . . . . . . . . . . . . 12
P Programmes . . . . . . . . . . . . . . . . . . . . . . . . . . . . 13
Setting a programme . . . . . . . . . . . . . . . . . . . . . . . . . 13
Defrosting using the automatic programmes . . . . . . . 13
Cooking with the automatic programmes . . . . . . . . . 14
Combicooking programme . . . . . . . . . . . . . . . . . . . .14
Q Basic settings. . . . . . . . . . . . . . . . . . . . . . . . . . . 14
D Cleaning . . . . . . . . . . . . . . . . . . . . . . . . . . . . . . . 15
Cleaning agent. . . . . . . . . . . . . . . . . . . . . . . . . . . . . . 15
3
Page 4

en Intended use
8Intended use
Intended us e
Read these instructions carefully. Only then
will you be able to operate your appliance
safely and correctly. Retain the instruction
manual and installation instructions for future
use or for subsequent owners.
This appliance is only intended to be fully fitted
in a kitchen. Observe the special installation
instructions.
Check the appliance for damage after
unpacking it. Do not connect the appliance if it
has been damaged in transport.
Only a licensed professional may connect
appliances without plugs. Damage caused by
incorrect connection is not covered under
warranty.
This appliance is intended for domestic use
only. The appliance must only be used for the
preparation of food and drink. The appliance
must be supervised during operation. Only
use this appliance indoors.
This appliance is intended for use up to a
maximum height of 4000 metres above sea
level.
This appliance may be used by children over
the age of 8 years old and by persons with
reduced physical, sensory or mental
capabilities or by persons with a lack of
experience or knowledge if they are
supervised or are instructed by a person
responsible for their safety how to use the
appliance safely and have understood the
associated hazards.
Children must not play with, on, or around the
appliance. Children must not clean the
appliance or carry out general maintenance
unless they are at least 15 years old and are
being supervised.
Keep children below the age of 8 years old at
a safe distance from the appliance and power
cable.
Always place the accessories into the cooking
compartment correctly. ~ "Before using for
the first time" on page 9
(Important safety
information
Impor t ant safet y informat i on
General information
:Warning – Risk of fire!
■ Combustible items stored in the cooking
compartment may catch fire. Never store
combustible items in the cooking
compartment. Never open the appliance
door if there is smoke inside. Switch off the
appliance and unplug it from the mains or
switch off the circuit breaker in the fuse box.
Risk of fire!
■ The appliance becomes very hot. If the
appliance is installed in a fitted unit with a
decorative door, heat will accumulate when
the decorative door is closed. Only operate
the appliance when the decorative door is
open.
:Warning – Risk of electric shock!
■ Incorrect repairs are dangerous. Repairs
may only be carried out and damaged
power cables replaced by one of our
trained after-sales technicians. If the
appliance is defective, unplug the appliance
from the mains or switch off the circuit
breaker in the fuse box. Contact the aftersales service.
Risk of electric shock and serious injury!
■ The cable insulation on electrical
appliances may melt when touching hot
parts of the appliance. Never bring
electrical appliance cables into contact with
hot parts of the appliance.
Risk of electric shock!
■ Do not use any high-pressure cleaners or
steam cleaners, which can result in an
electric shock.
Risk of electric shock!
■ Penetrating moisture may cause electric
shock. Never subject the appliance to
intense heat or humidity. Only use this
appliance indoors.
Risk of electric shock!
■ A defective appliance may cause electric
shock. Never switch on a defective
appliance. Unplug the appliance from the
mains or switch off the circuit breaker in the
fuse box. Contact the after-sales service.
Risk of electric shock!
■ The appliance is a high-voltage appliance.
Never remove the casing.
:Warning – Risk of burns!
■ The appliance becomes very hot. Never
touch the interior surfaces of the cooking
compartment or the heating elements.
Always allow the appliance to cool down.
Keep children at a safe distance.
Risk of serious burns!
4
Page 5

Important safety information en
■ Accessories and ovenware become very
hot. Always use oven gloves to remove
accessories or ovenware from the cooking
compartment.
Risk of burns!
■ Alcoholic vapours may catch fire in the hot
cooking compartment. Never prepare food
containing large quantities of drinks with a
high alcohol content. Only use small
quantities of drinks with a high alcohol
content. Open the appliance door with care.
:Warning – Risk of scalding!
■ When you open the appliance door, hot
steam may escape. Open the appliance
door with care. Keep children at a safe
distance.
Risk of scalding!
■ Water in a hot cooking compartment may
create hot steam. Never pour water into the
hot cooking compartment.
:Warning – Risk of injury!
Scratched glass in the appliance door may
develop into a crack. Do not use a glass
scraper, sharp or abrasive cleaning aids or
detergents.
Microwave
:Warning – Risk of fire!
■ Using the appliance for anything other than
its intended purpose is dangerous and may
cause damage.
The following is not permitted: drying out
food or clothing, heating slippers, grain or
cereal pillows, sponges, damp cleaning
cloths or similar.
For example, heated slippers and grain or
cereal pillows may catch fire, even several
hours after they have been heated.The
appliance must only be used for the
preparation of food and drinks.
Risk of fire!
■ Food may catch fire. Never heat food in
heat-retaining packages.
Do not leave food heating unattended in
containers made of plastic, paper or other
combustible materials.
Do not select a microwave power or time
setting that is higher than necessary. Follow
the information provided in this instruction
manual.
Never use the microwave to dry food.
Never defrost or heat food with a low water
content, e.g. bread, at too high a microwave
power or for too long.
Risk of fire!
■ Cooking oil may catch fire. Never use the
microwave to heat cooking oil on its own.
:Warning – Risk of explosion!
Liquids and other food may explode when in
containers that have been tightly sealed.
Never heat liquids or other food in containers
that have been tightly sealed.
:Warning – Risk of burns!
■ Foods with peel or skin may burst or
explode during, or even after, heating.
Never cook eggs in their shells or reheat
hard-boiled eggs. Never cook shellfish or
crustaceans. Always prick the yolk when
baking or poaching eggs. The skin of foods
that have a peel or skin, such as apples,
tomatoes, potatoes and sausages, may
burst. Before heating, prick the peel or skin.
Risk of burns!
■ Heat is not distributed evenly through baby
food. Never heat baby food in closed
containers. Always remove the lid or teat.
Stir or shake well after the food has been
heated. Check the temperature of the food
before it is given to the child.
Risk of burns!
■ Heated food gives off heat. The ovenware
may become hot. Always use oven gloves
to remove ovenware or accessories from
the cooking compartment.
Risk of burns!
■ Airtight packaging may burst when food is
heated. Always observe the instructions on
the packaging. Always use oven gloves to
remove dishes from the cooking
compartment.
Risk of burns!
■ The accessible parts become very hot when
in operation. Never touch hot parts. Keep
children at a safe distance.
Risk of burns!
■ Using the appliance for anything other than
its intended purpose is dangerous.
You are not permitted to use it to dry food
or clothing or to warm slippers, grain or
cereal pillows, sponges, damp cleaning
cloths or the like.
This is because, for instance, overheated
slippers, grain or cereal pillows, sponges
and damp cleaning cloths, etc., may cause
burns to the skin.
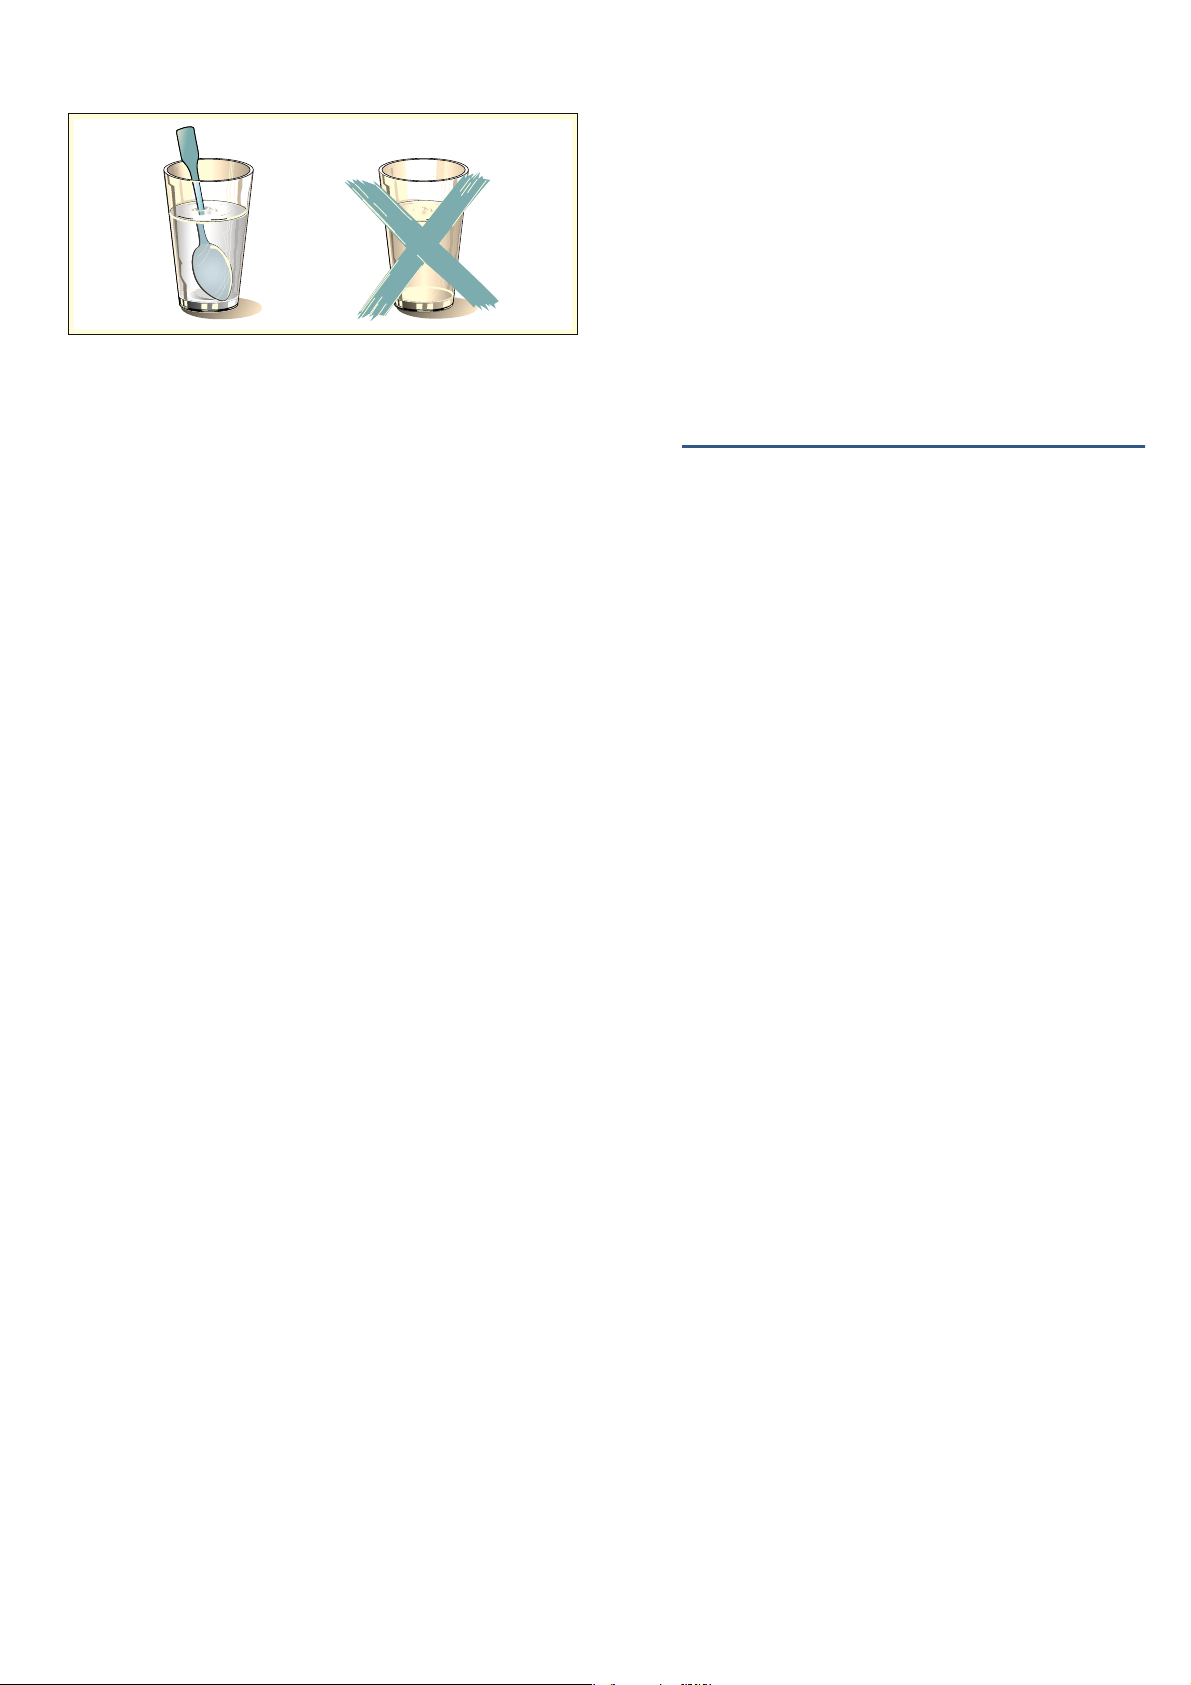
:Warning – Risk of scalding!
■ There is a possibility of delayed boiling
when a liquid is heated. This means that the
liquid reaches boiling temperature without
the usual steam bubbles rising to the
surface. Even if the container only vibrates a
little, the hot liquid may suddenly boil over
and spatter. When heating, always place a
spoon in the container. This will prevent
delayed boiling.
5
Page 6
en Installation and connection
:Warning – Risk of injury!
■ Scratched glass in the appliance door may
develop into a crack. Do not use a glass
scraper, sharp or abrasive cleaning aids or
detergents.
Risk of injury!
■ Unsuitable ovenware may crack. Porcelain
or ceramic ovenware can have small
perforations in the handles or lids. These
perforations conceal a cavity below. Any
moisture that penetrates this cavity could
cause the ovenware to crack. Only use
microwave-safe ovenware.
Risk of injury!
■ If using the appliance in microwave mode
only, placing cookware and containers
made of metal or featuring metal detailing
inside the appliance may cause sparks
when the appliance is operating. This may
damage the appliance. Never use metal
containers when using the appliance in
microwave mode only.
Risk of injury!
■ Using unsuitable cookware may result in
damage. For microwave combination mode,
always use cookware made from suitable
materials that can also withstand the
temperatures used for hot air and grilling
modes.
Risk of injury!
■ The glass turntable may splinter.Never allow
hard objects to strike the turntable.
Risk of injury!
■ Cracks or chinks in the glass turntable are
dangerous. Handle the turntable with care.
■ Microwave energy may escape if the
cooking compartment door or the door seal
is damaged. Never use the appliance if the
cooking compartment door or the door seal
is damaged. Contact the after-sales service.
Risk of serious damage to health!
■ Microwave energy will escape from
appliances that do not have any casing.
Never remove the casing. For any
maintenance or repair work, contact the
after-sales service.
5Installation and connection
Installation and connecti on
This appliance is designed for domestic use only.
This appliance is designed to be fully integrated into
kitchen units.
Please follow the dedicated installation instructions.
The appliance is ready to be plugged in and may only
be connected to a Schuko socket that has been
correctly installed. The circuit breaker must have a
rating of 10 A (L- or B-type circuit breaker).The mains
voltage must correspond to the voltage specified on the
rating plate.
Only a qualified electrician may install the socket or
replace the power cable.If the plug is no longer
accessible once the appliance has been installed, an
all-pole isolating switch with a contact gap of at least 3
mm must be provided for the wiring.
Do not use multi-socket adaptors, power strips or
extension leads. Overloading causes a risk of fire.
:Warning – Risk of electric shock!
The appliance is a high-voltage appliance.
Never remove the casing.
:Warning – Risk of serious damage to
health!
■ The surface of the appliance may become
damaged if it is not cleaned properly.
Microwave energy may escape. Clean the
appliance on a regular basis, and remove
any food residue immediately. Always keep
the cooking compartment, door seal, door
and door stop clean. ~ "Cleaning"
on page 15
Risk of serious damage to health!
6
Page 7
Causes of damage en
]Causes of damage
Causes of damage
Caution!
■ Heavily soiled seal: If the seal is very dirty, the
appliance door will no longer close properly during
operation. The fronts of adjacent units could be
damaged. Always keep the seal clean.
■ Operating the microwave without food: Operating
the appliance without food in the cooking
compartment may lead to overloading. Never switch
on the appliance unless there is food in the cooking
compartment.The only exception to this rule is when
performing a short cookware test.~ "Cookware
test" on page 10
■ Microwave popcorn: Never set the microwave
power too high. Use a power setting no higher than
600 watts. Always place the popcorn bag on a glass
plate. The disc may jump if overloaded.
■ Liquid that has boiled over must not be allowed to
run through the turntable drive into the interior of the
appliance. Monitor the cooking process. Choose a
shorter cooking time initially, and increase the
cooking time as required.
■ Never use the microwave oven without the turntable.
■ Creation of sparks: Metal e.g. a spoon in a glass
must be kept at least 2 cm from the oven walls and
the inside of the door. Sparks could irreparably
damage the glass on the inside of the door.
■ Foil containers: Do not use foil containers in the
appliance. They damage the appliance by producing
sparks.
■ Cooling with the appliance door open: Only leave
the cooking compartment to cool with the door
closed. Do not trap anything in the appliance door.
Even if the door is only slightly ajar, the fronts of
adjacent units may be damaged over time.
■ Condensation in the cooking compartment:
Condensation may appear on the door window,
interior walls and floor. This is normal and does not
adversely affect microwave operation. To prevent
corrosion, wipe off the condensation every time you
cook.
*Getting to know your
appliance
Gett i ng to know your appl i ance
In this section, we will explain the display and
controls.You will also find out about the various
functions of your appliance.
Note: Depending on the appliance model, individual
details and colours may differ.
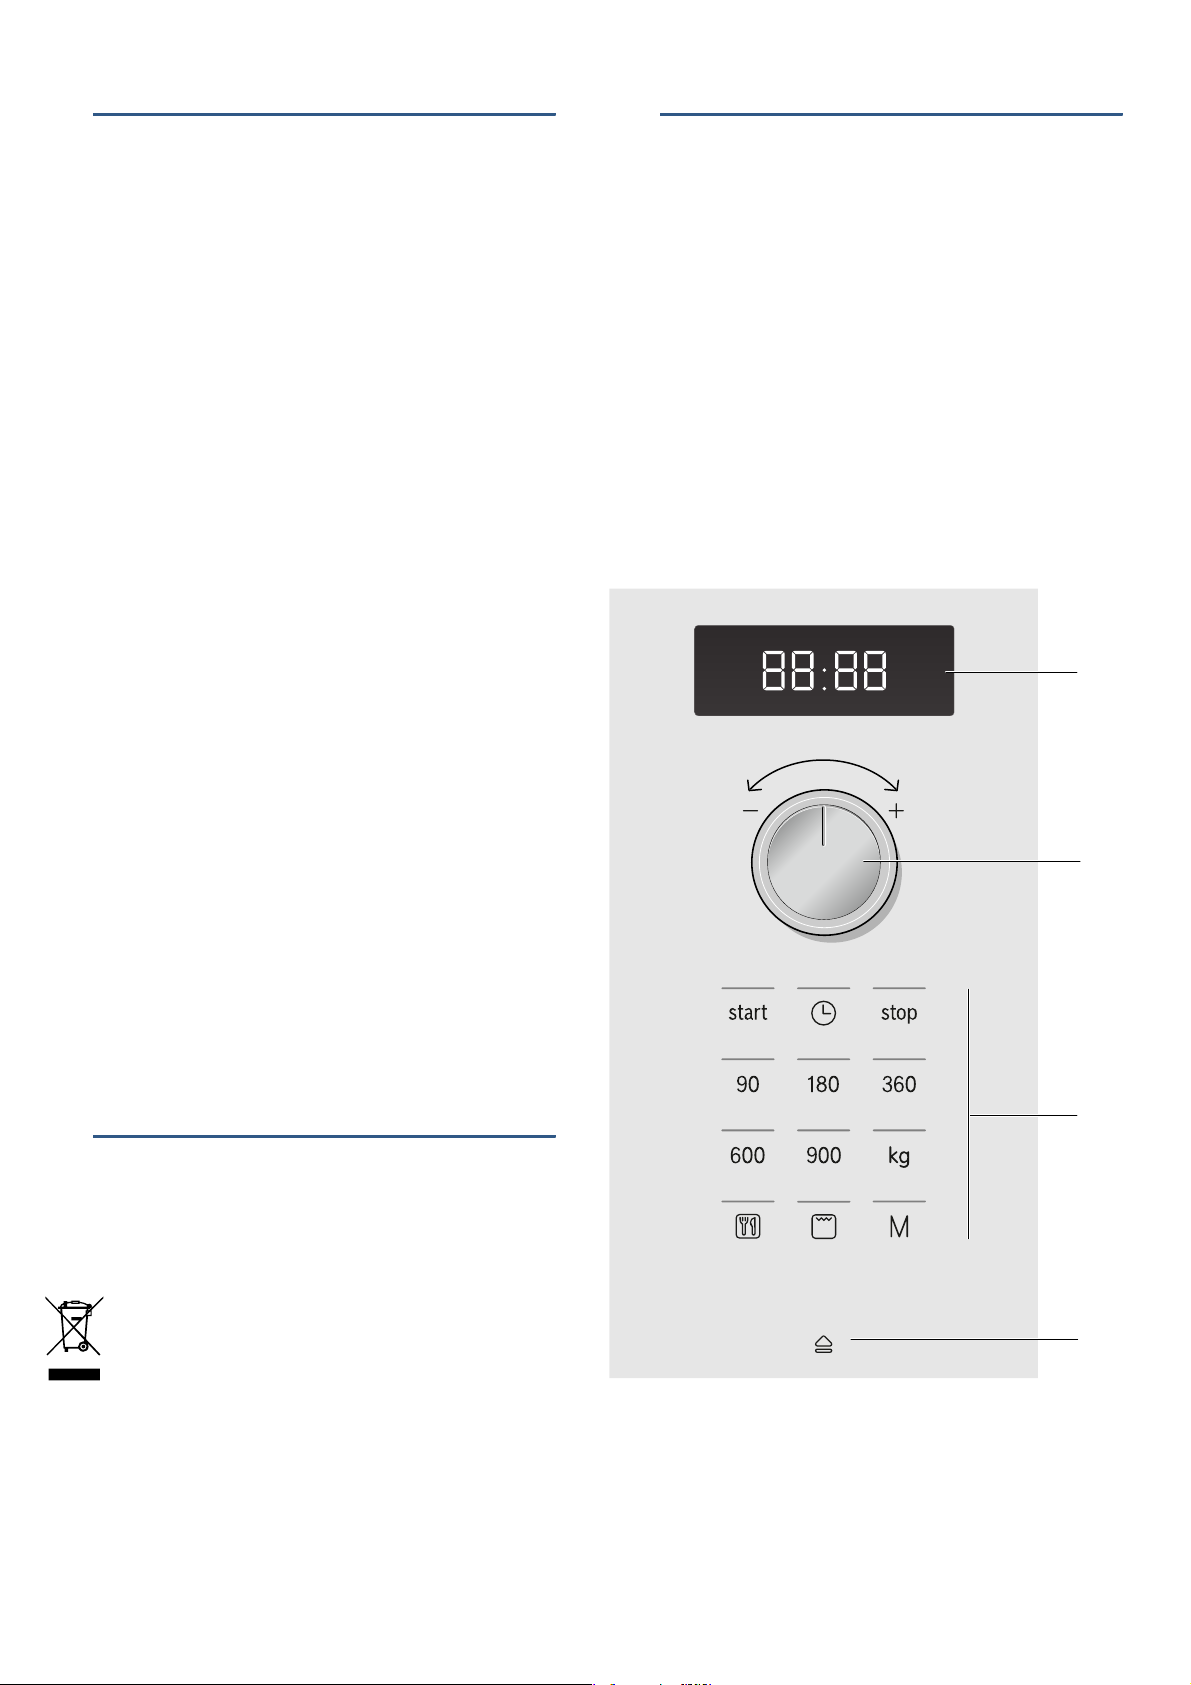
Control panel
You can set your appliance's various functions on the
control panel. The current settings are shown on the
display.
The overview shows the control panel when the
appliance is switched on with a clock time that has
been set.
h
min
kg
(
0
7Environmental protection
Env i r o nment al pr ot ec t i on
Environmentally-friendly disposal
Dispose of packaging in an environmentally-friendly
manner.
This appliance is labelled in accordance with
European Directive 2012/19/EU concerning
used electrical and electronic appliances
(waste electrical and electronic equipment WEEE). The guideline determines the
framework for the return and recycling of used
appliances as applicable throughout the EU.
Display
(
For clock and cooking times
Rotary selector
0
For setting the clock and cooking times or for
setting automatic programmes
Buttons
8
8
@
7
Page 8

en Getting to know your appliance
Automatic door opening button
@
Controls
You will find a brief explanation of the various buttons
below. These buttons allow you to set your appliance
simply and directly.
Buttons and their meaning
You will find a brief explanation of the various buttons
below.
Buttons Meaning
Symbol
start Start the appliance
0
stop Stop or pause the appliance
90 Select a microwave power output of 90 watts
180 Select a microwave power output of 180 watts
360 Select a microwave power output of 360 watts
600 Select a microwave power output of 600 watts
900 Select a microwave power output of 900 watts
h
%
(
i
v
--------
Rotary selector
The rotary selector is used to alter the default values
and set values.
The rotary selector is retractable. Press on the rotary
selector to lock it in or out.
Setting the time
Select a weight for the programmes
Select automatic programmes
Select the grill
Select the memory
Open appliance door
Cooling fan
The appliance is equipped with a cooling fan. The fan
may run on even if the oven has been switched off.
Notes
■ The cooking compartment remains cold during
microwave operation. The cooling fan will still switch
on. The fan may run on even when microwave
operation has ended.
■ Condensation may appear on the door window,
interior walls and floor. This is normal and does not
adversely affect microwave operation. Wipe away the
condensation after cooking.
Changing the signal duration
You will hear a signal when the appliance is switched
off. You can change the duration of the acoustic signal.
Press the "start" button for approx. 6 seconds.
The new signal duration is adopted.
The clock reappears.
The following are possible:
Short signal duration - 3 tones
Long signal duration - 30 tones.
Automatic door opening
The appliance door springs open if you activate the
automatic door opening. You can fully open the
appliance door manually.
The automatic door opening does not work in the event
of a power cut. You can open the door manually.
Notes
■ If you open the appliance door during operation, the
operation is paused.
■ When you close the appliance door, the operation
does not continue automatically. You must restart
the operation manually.
■ If the appliance has been switched off for a long
time, the appliance door will open after a time delay.
8
Page 9
Accessories en
_Accessories
Accessori es
Below, you will find an overview of the accessories
included and information on how to use them correctly.
Caution!
When removing dishes, make sure that the turntable
does not move. Make sure that the turntable is properly
locked. The turntable can turn left or right.
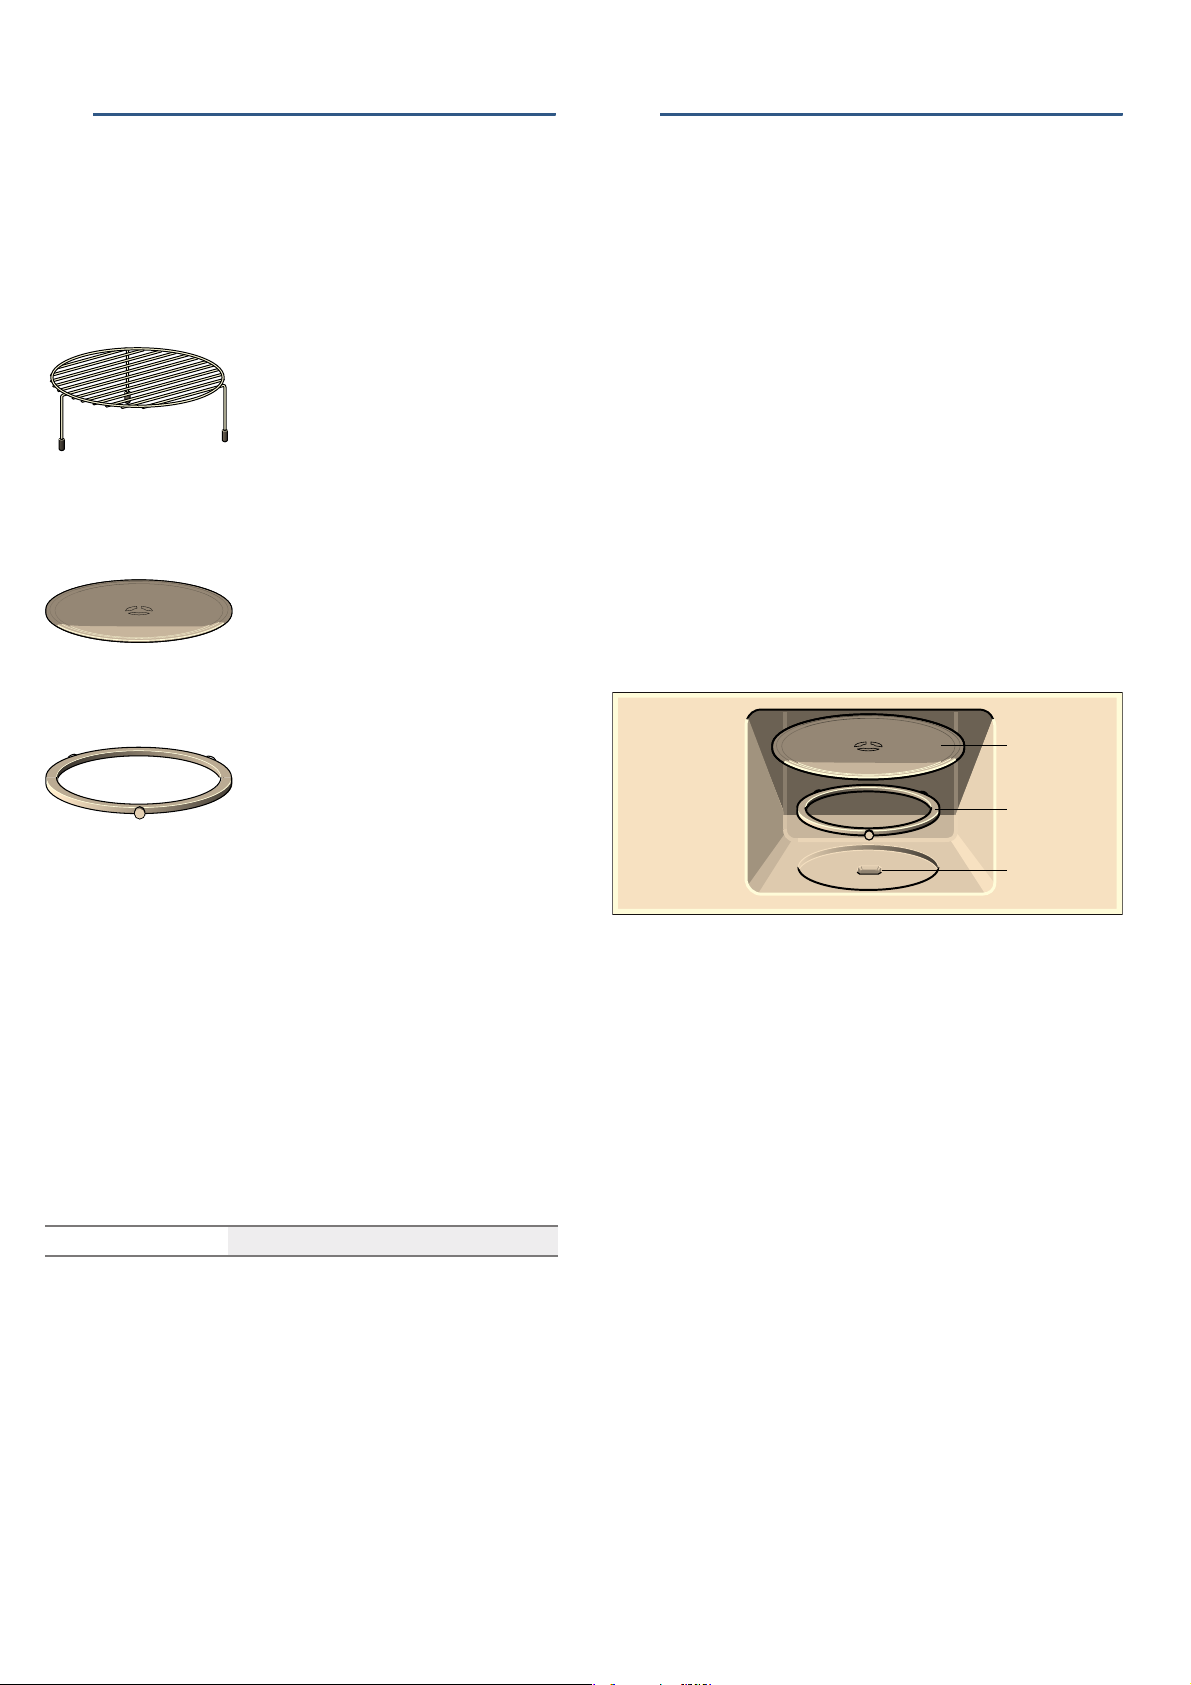
Wire rack
Wire rack for grilling, e.g. steak,
sausages or bread, or for
setting down cookware, e.g.
shallow ovenproof dishes.
Note: Place the wire rack onto
the turntable.
Turntable
Note: Never use the appliance
without the turntable.Make sure
that it is properly engaged. The
turntable can turn clockwise or
anti-clockwise.
KBefore using for the first
time
Bef or e usi ng for the first time
This section tells you what you need to do before using
your microwave to prepare food for the first time. Read
the section entitled "Safety information" beforehand.
~ "Important safety information" on page 4
Before you can use your new appliance, you will need
to put the turntable in place correctly. You must also
clean the cooking compartment and accessories.
Cleaning the cooking compartment and
putting the turntable in place
Before using the appliance to prepare food for the first
time, you must clean the cooking compartment and
accessories.
How to put the turntable in place
1. Place the roller ring a into the recess in the cooking
compartment.
2. Make sure that the turntable b engages in the drive c
in the centre of the cooking compartment floor.
Roller ring
Special accessories
Special accessories can be purchased from our aftersales service, from specialist retailers, or online. You
will find a comprehensive range of products in our
brochures and online.
Their availability and whether it is possible to order
them online varies from country to country. Please see
our sales brochures for more details.
Note: Not all special accessories are suitable for every
appliance. When purchasing, please always quote the
exact identification number (E-no.) of your appliance.
~ "Customer service" on page 17
Steaming utensils For cooking rice, potatoes and vegetables
E
D
F
Note: Never use the appliance without the turntable.
Make sure that it is properly engaged.The turntable can
turn clockwise or anti-clockwise.
Setting the clock
When the appliance is first connected or after a power
cut, three zeros will appear in the display panel.
1. Press the 0 button.
‚ƒ:‹‹
lamp above the 0 button lights up.
2. Set the clock using the rotary selector.
3. Press the 0 button again.
The current time is set.
Hiding the clock
Press the 0 button and then press Stop.
The display is blank.
œ
appears in the display and the indicator
Resetting the clock
Press the 0 button.
"12:00" appears in the display. Make settings as
detailed in points 2 and 3.
Change the clock, e.g. from summer to winter time
Set as described in point 1 to 3.
9
Page 10
en Microwave
Cleaning the cooking compartment and
accessories
To eliminate the new-appliance smell, heat up the
cooking compartment with nothing in it except the
turntable and with the oven door closed.
Make sure that there is no leftover packaging, such as
polystyrene pellets, in the cooking compartment. Before
heating the appliance, wipe the smooth surfaces in the
cooking compartment with a soft, damp cloth. Keep the
kitchen ventilated while the appliance is heating.
Settings
Grill (
10 minutes
^Microwave
Microwave
You can use the microwave to cook, heat up or defrost
food quickly. You can use the microwave on its own or
in combination with the grill.
To ensure optimum use of the microwave, please
observe the notes on cookware and familiarise yourself
with the data in the application tables at the end of the
instruction manual.
Try out the microwave straight away. You could heat up
a cup of water for your tea, for example.
Use a large cup without any decorative gold or silver
trim and place a teaspoon in it. Place the cup
containing the water on the turntable, slightly off-centre.
1. Press 900 W.
2. Use the rotary selector to set to 1:30 minutes.
3. Press the "Start" button.
A signal sounds after 1 minute and 30 seconds. The
water is hot.
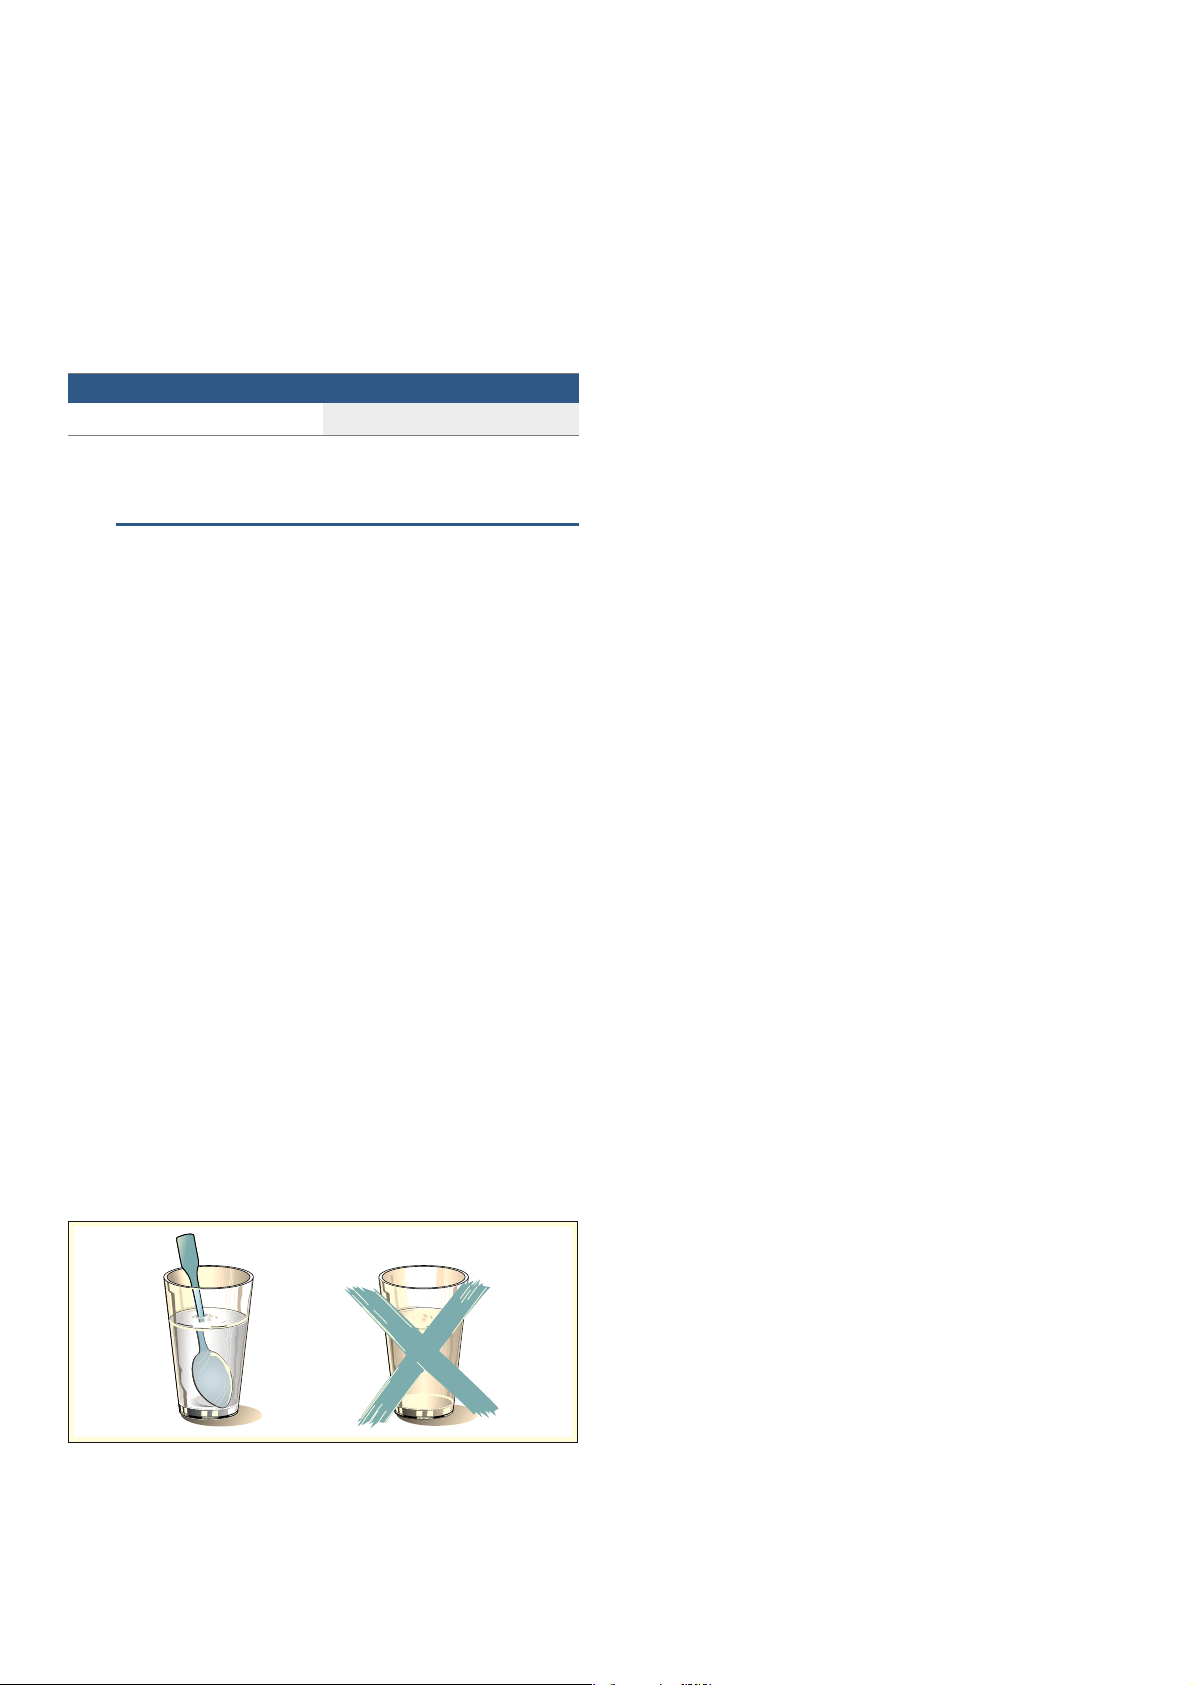
:Warning – Risk of scalding!
There is a possibility of delayed boiling when a liquid is
heated. This means that the liquid reaches boiling
temperature without the usual steam bubbles rising to
the surface. Even if the container only vibrates a little,
the hot liquid may suddenly boil over and spatter. When
heating, always place a spoon in the container. This will
prevent delayed boiling.
Heating up the cooking compartment
1. Press the grill ( button.
10:00 min will appear on the display and the
indicator light above the ( button will light up.
2. Press the "start" button.
An audible signal will sound once the time has elapsed.
Press the "stop" button or open the appliance door.
Tip: Once the cooking compartment has cooled down,
clean the smooth surfaces with soapy water and a dish
cloth.
Cleaning the accessories
Clean the accessories thoroughly using soapy water
and a dish cloth or soft brush.
Cookware
Not all cookware is microwavable. So that your food is
heated and the appliance is not damaged, only use
microwavable cookware.
Suitable cookware
Heat-resistant cookware made of glass, glass ceramic,
porcelain, ceramic or heat-resistant plastic are suitable.
These materials allow microwaves to pass through.
You can also use serving dishes. This saves you having
to transfer food from one dish to another. You should
only use cookware with decorative gold or silver trim if
the manufacturer guarantees that they are suitable for
use in microwaves.
Unsuitable cookware
Metal cookware is unsuitable. Metal does not allow
microwaves to pass through. Food in covered metal
containers will remain cold.
Caution!
Creation of sparks: Metal – e.g. a spoon in a glass –
must be kept at least 2 cm from the cooking
compartment walls and the inside of the door. Sparks
can irreparably damage the glass on the inside of the
door.
10
Cookware test
Never switch on the microwave unless there is food
inside. The short cookware test is the only exception to
this rule.
Perform the following test if you are unsure whether
your cookware is suitable for use in the microwave.
1. Heat the empty cookware at maximum power for ½
to 1 minute.
2. Check the temperature of the cookware during this
time.
The cookware should remain cold or warm to the touch.
The cookware is unsuitable if it becomes hot or sparks
are generated.
Page 11
Grilling en
In this case, stop the test.
:Warning – Risk of burns!
The accessible parts become very hot when in
operation. Never touch hot parts. Keep children at a
safe distance.
Microwave power settings
Microwave power
setting
90 W Defrosting delicate foods
180 W Defrosting and continued cooking
360 W Cooking meat and heating delicate foods
600 W Heating and cooking food
900 W Heating liquids
Note: You can set the 900 W microwave power setting
for 30 minutes, 600 W for 1 hour, the other power
settings for 1 hour and 39 minutes respectively.
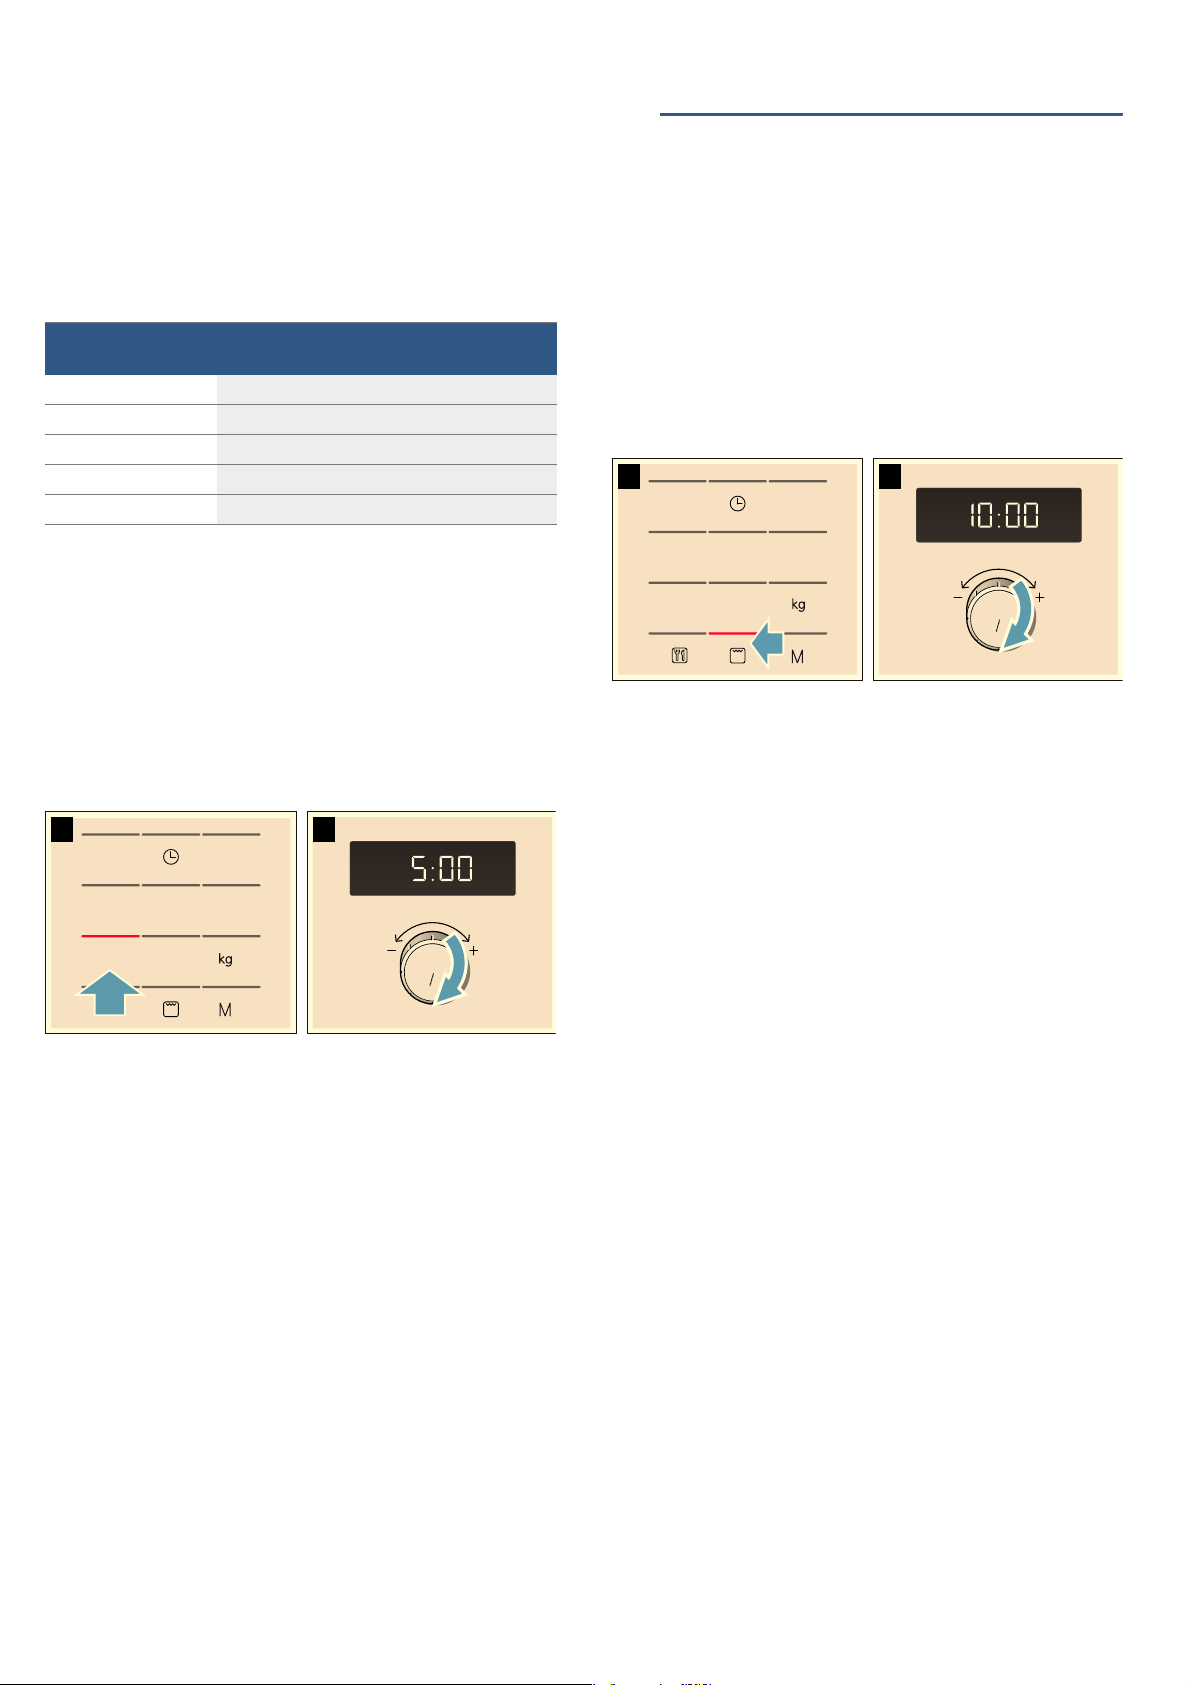
Setting the microwave
Example: Microwave power settings 600 watts,
5 minutes
1. Press the required microwave power setting.
The indicator lamp above the button lights up.
2. Set a cooking time using the rotary selector.
Suitable for
VWRSVWDUW
PLQ
PLQ
NJ
dGrilling
Gril ling
The grill is perfect for gratinating and browning the top
of dishes.
You can use the grill on its own or in combination with
the microwave.
Setting the grill
1. Press the grill button (.
10:00 min appears in the display and the indicator
lamp above the button lights up.
2. Set a cooking time using the rotary selector.
VWRSVWDUW
3. Press the "Start" button.
The cooking time counts down in the display.
The cooking time has elapsed
A signal sounds. Open the appliance door or press
Stop. The clock reappears.
Changing the cooking time
This can be done at any time. Change the cooking time
using the rotary selector.
PLQ
PLQ
NJ
3. Press the "Start" button.
The cooking time counts down in the display.
The cooking time has elapsed
A signal sounds. Open the appliance door or press
Stop. The clock reappears.
Changing the cooking time
This can be done at any time. Change the cooking time
using the rotary selector.
Pausing the appliance
Press the Stop button once or open the appliance door.
This pauses the appliance. The indicator above the
Stop button will light up.After closing the door, press the
Start button again.
Cancelling operation
Press the Stop button twice, or open the door and
press the Stop button once.
Pausing the appliance
Press the Stop button once or open the appliance door.
This pauses the appliance. The indicator above the
Stop button will light up.After closing the door, press the
Start button again.
Correction
You may correct a set cooking time at any time.
Cancelling
Press the "stop" button twice, or open the door and
press the "stop" button once.
Note: You can also adjust the cooking time first and
then the microwave power setting.
11
Page 12
en Memory
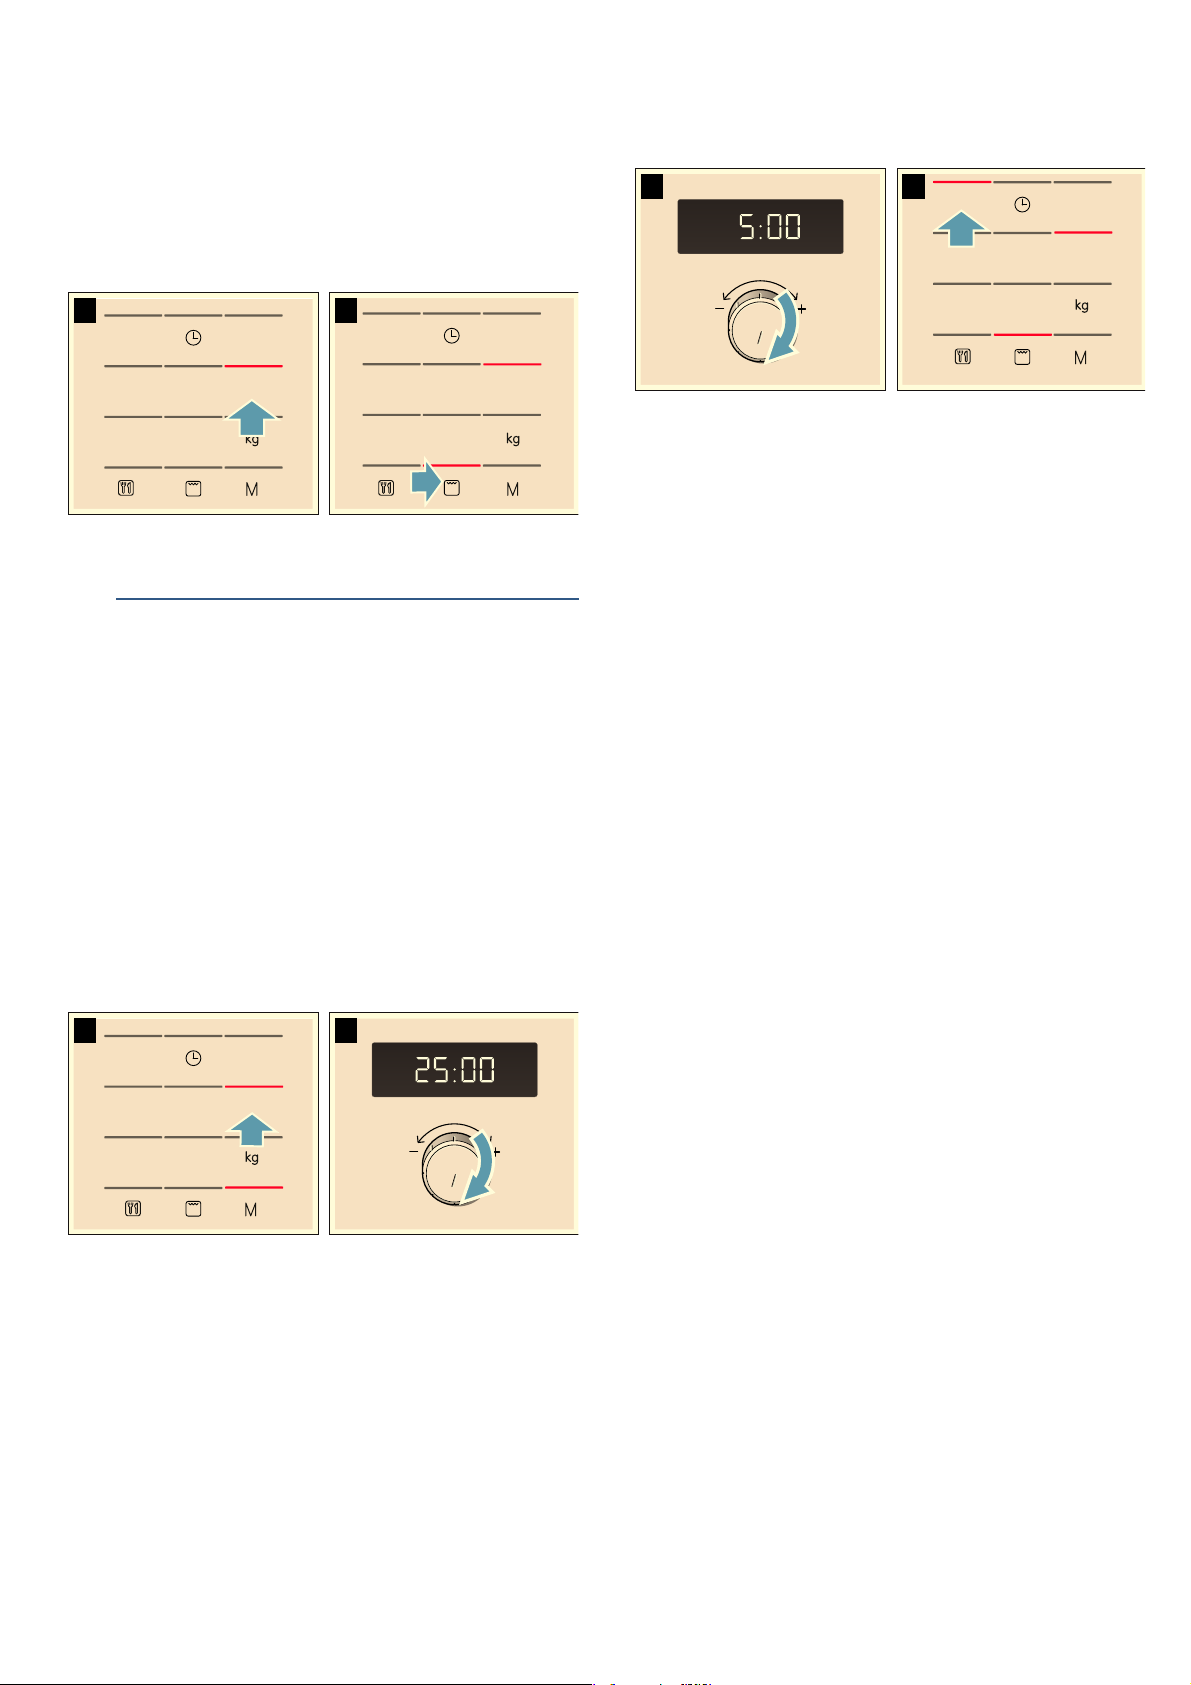
Setting the microwave and grill
Example: 360 W, grill (, 5 minutes
1. Press the required microwave power setting.
1:00 min appears in the display and the indicator
lamp above the button lights up.
2. Press the grill button (.
VWRSVWDUW
VWRSVWDUW
BMemory
Memor y
The memory function allows you to save the setting for
a dish and call it up at any time.
The memory function is useful if you prepare one dish
particularly frequently.
3. Set a cooking time using the rotary selector.
4. Press the "Start" button.
PLQ
NJ
PLQ
VWRSVWDUW
The cooking time counts down in the display.
■ Saving a new setting in the memory: press the
ibutton. The old settings appear. Save the new
programme as described in steps 1-4.
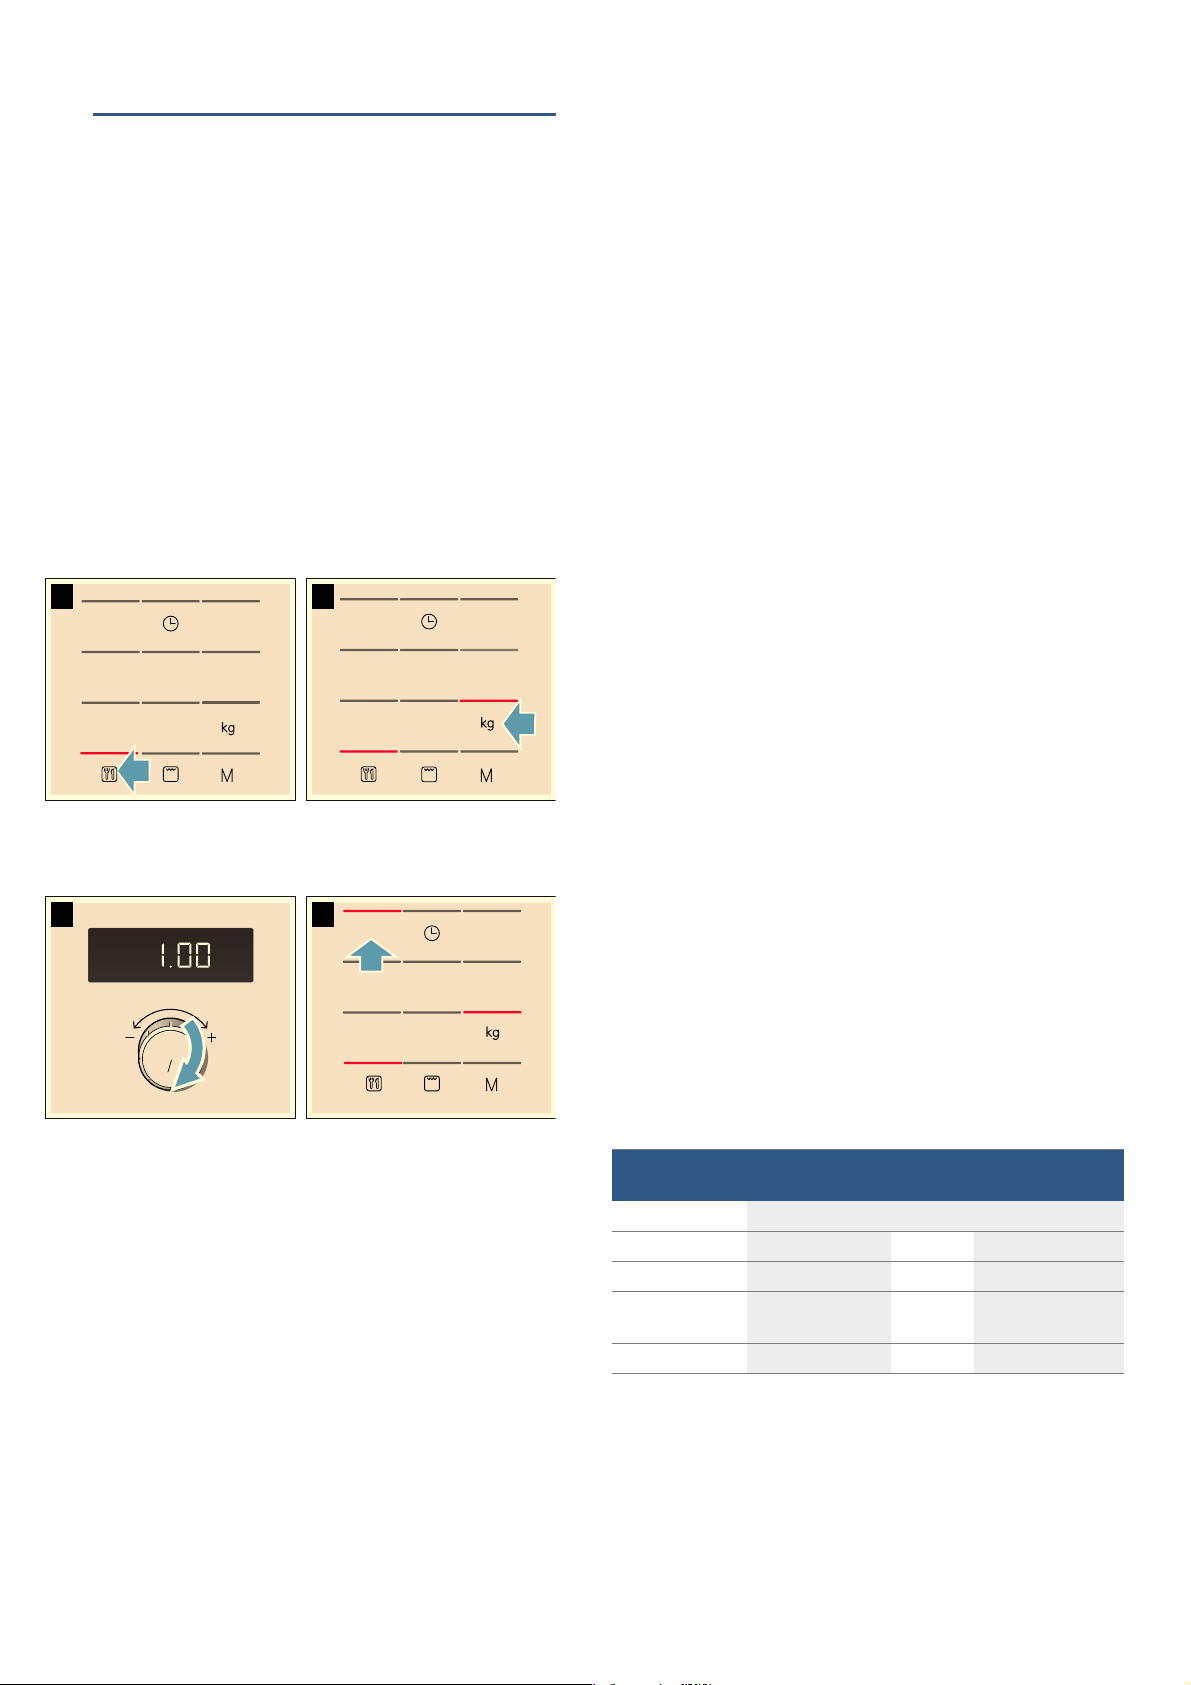
Saving memory settings
Example: 360 W, 25 minutes
1. Press the i button.
The indicator lamp above the button lights up.
2. Press the required microwave power setting.
1:00 min appears in the display and the indicator
lamp above the button lights up.
3. Set the cooking time using the rotary selector.
VWRSVWDUW
4. Confirm by pressing the i button.
The clock reappears. The setting has been saved.
Notes
■ You can also store grill only or grill combined with
microwave.
■ You cannot save several microwave power settings
one after the other.
■ You cannot save automatic programmes.
■ You can save the memory settings and start the
appliance immediately. When finishing, instead of
pressing i, press Start.
PLQ
PLQ
NJ
Starting the memory
It is very easy to start the saved programme. Place your
meal into the appliance. Close the appliance door.
1. Press the i button.
The saved settings are displayed.
2. Press the "Start" button.
The cooking time counts down in the display.
The cooking time has elapsed
A signal sounds. Open the appliance door or press
Stop. The clock reappears.
Pausing the appliance
Touch the Stop button once or open the appliance
door. This pauses the appliance. The indicator above
the Stop button will light up.After closing the door, touch
the Start button again.
Cancelling
Press the "stop" button twice, or open the door and
press the "stop" button once.
12
Page 13
Programmes en
PProgrammes
Pr og r a mmes
You can prepare food really easily using the various
programmes. You select a programme and enter the
weight of your food. The program then applies the most
suitable settings.
Note: You can choose from 8 programmes.
Setting a programme
Once you have selected a programme, make settings
as follows:
1. Press the ` button repeatedly until the required
programme number appears.
The indicator lamp above the button lights up.
2. Press the h button.
A suggested weight appears in the display and the
indicator lamp above the button lights up.
VWRSVWDUW
3. Turn the rotary selector to specify the weight of the
dish.
4. Press the "Start" button.
PLQ
NJ
NJ
You will see the cooking time for the programme
counting down.
The cooking time has elapsed
A signal sounds. Open the appliance door or press
Stop. The clock reappears.
Correction
Press the "stop" button twice and reset.
Pausing the appliance
Press the Stop button once or open the appliance door.
This pauses the appliance. The indicator above the
Stop button will light up.After closing the door, press the
Start button again.
VWRSVWDUW
VWRSVWDUW
Notes
■ For some programmes, a signal sounds after a
certain time. Open the appliance door and stir the
food or turn the meat or poultry. After closing the
door, press the "Start" button again.
■ You can query the programme number and weight
using ` or h. The queried value is shown for
3 seconds in the display.
Defrosting using the automatic programmes
You can use the 4 defrosting programmes to defrost
meat, poultry and bread.
Notes
■ Preparing food
Use food that has been frozen at -18 °C and stored
in portion-sized quantities that are as thin as
possible.
Take the food to be defrosted out of all packaging
and weigh it. You need to know the weight to set the
programme.
■ Liquid will be produced when defrosting meat or
poultry. Drain off this liquid when turning meat and
poultry and under no circumstances use it for other
purposes or allow it to come into contact with other
foods.
■ Ovenware
Place the food in a microwaveable shallow dish,
e.g. a china or glass plate, but do not cover.
■ Resting time
The defrosted food should be left to stand for an
additional 10 to 30 minutes until it reaches an even
temperature. Large pieces of meat require a longer
standing time than smaller pieces. Flat pieces of
meat and items made from minced meat should be
separated from each other before leaving to stand.
After this time, you can continue to prepare the food,
even though thick pieces of meat may still be frozen
in the middle. The giblets can be removed from
poultry at this point.
■ Signal
For some programmes, a signal sounds after a
certain time. Open the appliance door and separate
the food out or turn the meat or poultry. Close the
door and press the Start button.
Programme no. Cook-
ware
Defrosting
P 01 Minced meat Open 0.20 - 1.00
P 02 Pieces of meat Open 0.20 - 1.00
P 03
Chicken, chicken
pieces
Open 0.40 - 1.80
P 04 Bread Open 0.20 - 1.00
Weight range in
kg
Cancelling
Press the "stop" button twice, or open the door and
press the "stop" button once.
13
Page 14

en Basic settings
Cooking with the automatic programmes
With the 3 cooking programmes, you can cook rice,
potatoes or vegetables.
Notes
■ Ovenware
The food must be cooked in microwaveable
cookware with a lid. For rice, you should use a large,
deep dish.
■ Preparing food
Weigh out the food. You need to know the weight to
set the programme.
Rice:
Do not use boil-in-the-bag rice. Add the required
amount of water, as specified on the packaging. This
is usually two or three times the quantity of rice.
Potatoes:
For boiled potatoes, cut the fresh potatoes into
small, even-sized pieces. Add one tablespoon of
water for each 100 g boiled potatoes, and a little
salt.
Fresh vegetables:
Weigh out the fresh, trimmed vegetables. Cut the
vegetables into small, even-sized pieces. Add a tbsp
water for each 100 g vegetables.
■ Signal
While the programme is running, a signal sounds
after some time. Stir the food.
■ Resting time
Once the programme has finished, stir the food
again. You should leave it to stand for another
5 to 10 minutes until it reaches an even temperature.
The cooking result will depend on the quality and
consistency of the food.
Programme no. Cookware Weight range in
kg
Cooking
P 05 Rice With lid 0.05 - 0.2
P 06 Potatoes With lid 0.15 - 1.0
P 07 Vegetables With lid 0.15 - 1.0
QBasic settings
Bas i c set t i ngs
Your appliance has basic settings that you can change
to suit your needs.
Setting Options
Button tone
‚
Ž*
Œ
Demo mode
ƒ
š“‹
* Factory setting (factory settings may vary depending on the appli-
ance model)
You can change the button tone on your appliance if
you wish.
Changing the button tone
The appliance must be switched off when you do this.
1. Press and hold the start and stop buttons at the
same time for a couple of seconds.
‚ will appear in the display.
2. Touch the start button.
Ž will start flashing in the display.
3. Turn the rotary selector to Œ.
4. Touch the start button.
The setting has been applied.
5. Touch the stop button.
The button tone has been switched off.
You can change this setting at any time.
Switched on
Switched off
Button tone (will remain active for
the start and stop buttons)
The appliance is switched off. You
can use the buttons and the display,
but the buttons will not activate any
function on the appliance (i.e. the
microwave has no power). Demo
mode is mainly used by dealers.
Combicooking programme
Notes
■ Ovenware
Cook the food in ovenware which is not too big, and
is heat resistant and microwaveable.
■ Preparing food
Take the food out of its packaging and weigh it. If it
is not possible to enter the exact weight, you should
round it up or down.
■ Resting time
Once the programme has finished, allow the food to
rest for another 5 to 10 minutes so it reaches an
even temperature.
Programme
no.
P 08
14
Combi programme
Frozen bake, up to
3 cm deep
Cookware Weight range in
kg
Open 0.4 - 0.9
Page 15

Cleaning en
DCleaning
Cleani ng
With good care and cleaning, your appliance will retain
its appearance and remain fully functioning for a long
time to come. We will explain here how you should
correctly care for and clean your appliance.
:Warning – Risk of burns!
The appliance becomes very hot. Never clean the
appliance immediately after switching it off. Allow the
appliance to cool down.
:Warning – Risk of electric shock!
Do not use any high-pressure cleaners or steam
cleaners, which can result in an electric shock.
:Warning – Risk of injury!
Scratched glass in the appliance door may develop into
a crack. Do not use a glass scraper, sharp or abrasive
cleaning aids or detergents.
:Warning – Risk of serious harm to health!
The surface of the appliance may become damaged if it
is not cleaned properly. Microwave energy may escape.
Clean the appliance on a regular basis, and remove any
food remnants immediately.~ "Cleaning agent"
on page 15
:Warning – Risk of electric shock!
Do not immerse the appliance in water or clean under a
jet of water.
Note: Unpleasant odours, for example after fish has
been prepared, can be removed very easily. Add a few
drops of lemon juice to a cup of water. Always place a
spoon in the container to prevent delayed boiling. Heat
the water for 1 to 2 minutes at maximum microwave
output.
Area Cleaning product
Appliance front Hot soapy water: Clean using a dish cloth and
then dry with a soft cloth. Do not use metal or
glass scrapers for cleaning.
Appliance front with
stainless steel
Cooking compartment made of stainless steel
Recess in the cooking compartment
Turntable and roller
ring
Wire rack Hot soapy water: Soak and clean with a dish
Door panels Glass cleaner: Clean with a dish cloth. Do not
Hot soapy water: Clean using a dish cloth and
then dry with a soft cloth. Remove splashes
and patches of limescale, grease, starch and
albumin (e.g. egg white) immediately. Corrosion can form under these patches or
splashes. Special stainless-steel cleaning products are available from the after-sales service
or from specialist retailers. Do not use glass
cleaners or metal or glass scrapers for cleaning.
Hot soapy water or vinegar solution: Clean
using a dish cloth and then dry with a soft
cloth.Do not use oven spray or any other
aggressive oven cleaners or abrasive materials. Scouring pads, rough sponges and pan
cleaners are also unsuitable. These items
scratch the surface. Allow the interior surfaces
to dry completely.
Damp cloth: Water must not be allowed to run
into the appliance through the turntable drive.
Dry the turntable drive with a cloth.
Hot soapy water: When placing the turntable
back into its recess, it must engage properly.
cloth or brush. Do not scour.Do not use metal
or glass scrapers for cleaning.
use glass scrapers.
Cleaning agent
To ensure that the different surfaces are not damaged
by using the wrong cleaning agent, observe the
information in the table.
Do not use:
■ Harsh or abrasive cleaning agents.
■ Metal or glass scrapers to clean the door panels.
■ Metal or glass scrapers to clean the door seal.
■ Hard scouring pads or sponges.
■ Cleaning agents with a high alcohol content.
Wash new sponge cloths thoroughly before use.
15
Page 16

en Trouble shooting
3Trouble shooting
Troubl e shoot i ng
If a fault occurs, there is often a simple explanation.
Before calling the after-sales service, please refer to the
fault table and attempt to correct the fault yourself.
on page 18
:Warning – Risk of electric shock!
Incorrect repairs are dangerous. Repairs may only be
carried out and damaged power cables replaced by
one of our trained after-sales technicians. If the
settings.~ "Tested for you in our cooking studio"
Tip: If a dish does not turn out exactly as you wanted,
refer to the following chapter, where you will find lots of
tips and notes relating to the optimum
appliance is defective, unplug the appliance from the
mains or switch off the circuit breaker in the fuse box.
Contact the after-sales service.
Fault table
Fault Possible cause Remedy/information
The appliance is not working The plug is not plugged into the mains Connect the appliance to the electricity supply
Power failure Check whether other kitchen appliances are working
The circuit breaker/fuse is faulty Check in the fuse box to make sure that the circuit
breaker/fuse for the appliance is in working order
Faulty operation Switch off the circuit breaker/fuse for the appliance in
the fuse box and switch it back on after approximately
10 seconds
Three zeros are lit on the display. Power failure Reset the time.
The appliance is not operating. A
cooking time is shown on the display.
The rotary selector has been accidentally turned. Press the "stop" button.
The "start" button has not been pressed after the setting was applied.
Press the "start" button or cancel the setting by pressing the "stop" button.
The microwave is not working. The door has not been properly closed. Check whether food remnants or debris is/are
trapped in the door.
The "start" button has not been pressed. Press the "start" button.
It is taking longer than usual for food
to heat up
The microwave power output has been set too low. Select a higher microwave power setting.
A larger amount of food than usual has been placed in
Double the amount – double the time.
the appliance.
The food was colder than usual. Stir or turn the food during heating.
The turntable is making a scraping or
grinding noise.
The microwave has stopped for no
Dirt or debris in the area around the turntable drive. Clean the roller ring and the recess in the cooking
compartment.
The microwave has a fault. If this fault recurs, please call the after-sales service.
apparent reason.
An i is shown on the display.
The appliance is in demo mode Deactivate demo mode.
~ "Basic settings" on page 14
Error message "E - 3" Fault in automatic door opening system. If an error message is displayed, switch the appliance
off and on again; if the message disappears, it was a
one-off problem. If the fault occurs again or the error
message is still displayed, please contact the aftersales service and provide the fault code.
--------
16
Page 17

4Customer service
Cus t o mer servi ce
Our after-sales service is there for you if your appliance
needs to be repaired. We will always find an
appropriate solution, also in order to avoid after-sales
personnel having to make unnecessary visits.
E number and FD number
When calling us, please quote the full product number
(E no.) and the production number (FD no.) so that we
can provide you with the correct advice. The rating plate
bearing these numbers can be found on the right-hand
side when you open the cooking compartment door.
=1U)'(1U
7\SH
To save time, you can make a note of the numbers for
your appliance and the telephone number of the aftersales service in the space below in case you need
them.
Customer service en
E no. FD no.
After-sales service O
Please note that a visit from an after-sales service
engineer is not free of charge in the event that the
appliance has been misused, even during the warranty
period.
Please find the contact data of all countries in the
enclosed customer service list.
To book an engineer visit and product advice
GB 0344 892 8979
Calls charged at local or mobile rate.
IE 01450 2655
0.03 € per minute at peak. Off peak 0.0088 €
per minute.
Rely on the professionalism of the manufacturer. You
can therefore be sure that the repair is carried out by
trained service technicians who carry original spare
parts for your appliances.
This appliance corresponds to the standards EN 55011
and CISPR 11. It is a Group 2, Class B product.
Group 2 means that microwaves are produced for the
purpose of heating food. Class B states that the
appliance is suitable for private households.
17
Page 18

en Tested for you in our cooking studio
JTested for you in our
cooking studio
Test ed for you in our cooki ng st udi o
In the table below, you will find a selection of dishes
and the ideal settings for them. It tells you which
microwave power setting is best suited to your dish.
You can use the microwave on its own or in
combination with the grill. We have listed some tips with
regard to cookware and preparation methods.
Notes
■ The times specified in the tables are intended as a
guide only.They will depend on the quality and
composition of the food.
■ Time ranges are often specified in the tables. Set the
shortest time to begin with, and then extend the time
if necessary.
■ Always use an oven cloth or oven gloves when
taking hot cookware out of the cooking
compartment.
It may be that you have different quantities from those
specified in the tables. There is a rule of thumb for
operating the microwave: Double the amount = almost
double the time, half the amount = half the time.
Always place the cookware on the turntable.
The following tables provide you with numerous options
and settings for the microwave.
Suitable ovenware
Suitable dishes are heat-resistant ovenware made of
glass, glass ceramic, porcelain, ceramic or heatresistant plastic. These materials allow microwaves to
pass through.
You can also use serving dishes. This saves you having
to transfer food from one dish to another. You should
only use ovenware with decorative gold or silver trim if
the manufacturer guarantees that they are suitable for
use in microwaves.
Caution!
Sparks: Metal, e.g. a spoon in a glass, must be kept at
least 2 cm from the oven walls and the inside of the
door. Sparks could irreparably damage the glass on the
inside of the door.
Defrosting
Place the frozen food in an open container on the
turntable.
Delicate parts such as the legs and wings of chicken or
fatty outer layers of roasts can be covered with small
pieces of aluminium foil. The foil must not touch the
sides of the cooking compartment. You can remove the
foil half way through the defrosting time.
Liquid will be produced when defrosting meat or
poultry. Drain off this liquid when turning meat and
poultry and under no circumstances use it for other
purposes or allow it to come into contact with other
foods.
Turn or stir the food once or twice during the defrosting
time. Large pieces of food should be turned several
times.
Leave defrosted items to stand at room temperature for
a further 10 to 20 minutes so that the temperature can
even out. The giblets can be removed from poultry at
this point. The meat can also be processed further
when a small part of the core is frozen.
Tips for defrosting
The time has elapsed but the food
is not defrosted, hot or cooked.
Time has elapsed but the food is
overheated at the edge and not
done in the middle.
After defrosting, the poultry or
meat is defrosted on the outside
but not defrosted in the middle.
Set a longer time. Large quantities
and food which is piled high
require longer times.
Stir it during the cooking time and
next time, select a lower microwave power setting and a longer
cooking time.
Next time, select a lower microwave power setting. If you are
defrosting a large quantity, turn it
several times.
Unsuitable cookware
Metal cookware is unsuitable. Metal does not allow
microwaves to pass through. Food in covered metal
containers will remain cold.
Defrosting Weight Microwave power
setting in watts
Whole pieces of beef, veal or pork (on the bone
or boned)
18
800 g 180
90
1 kg 180
90
1.5 kg 180
90
Cooking
time in minutes
15
10-20
20
15-25
30
20-30
Notes
-
Page 19

Tested for you in our cooking studio en
Defrosting Weight Microwave power
setting in watts
Cooking
time in min-
Notes
utes
Meat in pieces or slices of beef, veal or pork 200 g 180
90
500 g 180
90
800 g 180
90
2
4-6
5
5-10
8
10-15
Separate any defrosted parts when turning
Minced meat, mixed 200 g 90 10 Freeze food flat if possible
500 g 180
90
800 g 180
90
Poultry or poultry portions 600 g 180
90
1.2 kg 180
90
Fish fillet, fish steak or slices 400 g 180
90
5
10-15
8
10-20
8
10-20
15
10-20
5
10-15
Turn several times, remove any defrosted meat
Separate any defrosted parts
Separate any defrosted parts
Vegetables, e.g. peas 300 g 180 10-15 -
Fruit, e.g. raspberries 300 g 180 7-10 Stir carefully during defrosting and separate any
500 g 180
90
Butter, defrosting 125 g 180
90
250 g 180
90
Loaf of bread 500 g 180
90
1 kg 180
90
8
5-10
1
2-3
1
3-4
6
5-10
12
10-20
defrosted parts
Remove all packaging
-
Cakes, dry, e.g. sponge cake 500 g 90 10-15 Only for cakes without icing, cream or crème pâtis-
750 g 180
90
Cakes, moist, e.g. fruit flan, cheesecake 500 g 180
90
750 g 180
90
5
10-15
5
15-20
7
15--20
sière, separate the pieces of cake.
Only for cakes without icing, cream or gelatine
Heating frozen food
Notes
■ Take ready meals out of the packaging. They will
heat up more quickly and evenly in microwaveable
cookware. The different components of the meal
may not require the same amount of time to heat up.
■ Food which lies flat will cook more quickly than food
which is piled high. You should therefore distribute
the food so that it is as flat as possible in the
cookware. Food should not be placed in layers on
top of one another.
■ Always cover the food. If you do not have a suitable
cover for your cookware, use a plate or special
microwave foil.
■ Stir or turn the food 2 or 3 times during cooking.
■ After heating, allow the food to stand for a further 2
to 5 minutes to allow the temperature to even out.
■ Always use an oven cloth or oven gloves when
removing cookware from the appliance.
19
Page 20

en Tested for you in our cooking studio
Heating frozen food Weight Microwave power set-
tings in watts
Menu, plated meal, ready meal
300-400 g 600 8-11 -
Cooking time in
minutes
Notes
(2-3 components)
Soup 400 g 600 8-10 -
Stew 500 g 600 10--13 -
Slices or pieces of meat in sauce, e.g. gou-
500 g 600 12-17 Separate the pieces of meat when stirring
lash
Bakes, e.g. lasagne, cannelloni 450 g 600 10-15 -
Side dishes, e.g. rice, pasta 250 g 600 2-5 Add a little liquid
500 g 600 8-10
Vegetables, e.g. peas, broccoli, carrots 300 g 600 8-10 Pour water into the dish so that it covers
600 g 600 14-17
the base
Creamed spinach 450 g 600 11-16 Cook without additional water
Heating food
heating, always place a spoon in the container. This will
prevent delayed boiling.
Caution!
Metal, e.g. a spoon in a glass, must be kept at least
2 cm from the oven walls and the inside of the door.
Sparks could irreparably damage the glass on the
inside of the door.
Notes
■ Take ready meals out of the packaging. They will
heat up more quickly and evenly in microwaveable
cookware. The different components of the meal
may not require the same amount of time to heat up.
■ Always cover the food. If you do not have a
dedicated lid for your cookware, use a plate or
special microwave film.
■ Stir or turn the food several times during the heating
time. Check the temperature.
■ After heating, allow the food to stand for a further 2
to 5 minutes to allow the temperature to even out.
■ Always use an oven cloth or oven gloves when
removing cookware from the appliance.
:Warning – Risk of scalding!
There is a possibility of delayed boiling when a liquid is
heated. This means that the liquid reaches boiling
temperature without the usual steam bubbles rising to
the surface. Even if the container only vibrates a little,
the hot liquid may suddenly boil over and spatter. When
Heating food Weight Microwave power
setting in watts
Beverages 200 ml 900 2-3 Place a spoon in the glass; do not overheat alcoholic
500 ml 900 3-4
Baby food, e.g. baby bottles 50 ml 360 approx. ½ Without teats or lids. Always shake well after heating. You
100 ml 360 approx. 1
200 ml 360
Soup, 1 cup 200 g 600 2-3 -
Soup, 2 cups 400 g 600 4-5 -
Menu, plated meal, ready meal
350-500 g 600 4-8 -
(2-3 components)
Meat in sauce 500 g 600 8-11 Separate the slices of meat
Cooking
time in minutes
1^
Notes
drinks; check occasionally while heating
must check the temperature
20
Page 21

Tested for you in our cooking studio en
Heating food Weight Microwave power
setting in watts
Stew 400 g 600 6-8 -
800 g 600 8-11 -
Vegetables 150 g 600 2-3 Add a little liquid
300 g 600 3-5
Cooking food
Food which lies flat will cook more quickly than food
which is piled high. You should therefore distribute the
food so that it is as flat as possible in the cookware.
Food should not be placed in layers on top of one
another.
Cook the food on its own in the microwave – always
use with a lid on the cookware. Place the cookware
directly on the turntable. If you do not have a suitable lid
for your cookware, use a plate or special microwave
foil.
This will help the food retain its flavour. This means that
you can use salt and seasonings sparingly.
After cooking, allow the food to stand for a further 2 to 5
minutes to allow the temperature to even out.
Always use an oven cloth or oven gloves when
removing cookware from the appliance.
Grilling:
Always grill on the wire rack with the cooking
compartment door closed and do not preheat.
Always place the wire rack on the turntable.
Cooking
time in minutes
Combined microwave and grill:
Combi mode is especially suitable for bakes and
gratins.
Always place the cookware on the turntable and do not
cover the food.
Use a deep dish when roasting. This will help keep the
cooking compartment clean.
Use large shallow cookware for bakes and gratins.
Food takes longer to cook in narrow, deep containers
and browns more on top.
Check that your cookware fits in the cooking
compartment. It must not be too big, the turntable must
still be able to turn.
Always set the maximum cooking time. Check the food
after the shorter time specified.
Leave the meat to rest for another 5-10 minutes before
carving it. This allows the meat juices to be distributed
evenly so that they do not run out when the meat is
carved.
Bakes and gratins should be left to cook in the
appliance for a further 5 minutes after the appliance has
been switched off.
All the values given in the table are guidelines and can
vary depending on the properties of your food.
Notes
Cooking food Accessories Microwave pow-
er setting in
watts
Chicken, whole, 1.2 kg Cookware with
lid
Chicken portions, e.g. chicken quarters,
800 g
Chicken wings, marinated frozen, 800 g Cookware
Pork without rind approx. 750 g, e.g.
neck
Bacon rashers, approx. 8 rashers Wire rack
Meat loaf, 750 g Cookware
Fish, e.g. fillet steaks, 400 g Cookware
Fish fillet, au gratin, approx. 400 g Cookware
Fish kebabs, 4-5 pieces Wire rack
Sweet bakes, e.g. quark and fruit soufflé, 1 kg
Cookware
without lid,
wire rack
without lid,
wire rack
Cookware
without lid
without lid
without lid
without lid
Cookware
without lid
600 25-30 Turn half way through the time
360 W + (
360 W + (
360 W + (
180 W + (
600
360 W + (
600 10-15 Add water, lemon juice or wine as desired
360 W + (
180 W + (
360 W + (
Cooking time in
minutes
30-40 Place with the skin side up, do not turn
15-25 Do not turn
40-50 Turn once or twice
10-15 -
20-25
25-35
10-15 Defrost frozen fish before cooking
10-15 Use wooden skewers
30-35 Maximum 5 cm deep
Notes
Cook without a lid
Maximum 6 cm deep
21
Page 22

en Tested for you in our cooking studio
Cooking food Accessories Microwave pow-
er setting in
watts
Savoury bakes made from raw ingredients, e.g. pasta bake, 1 kg
Savoury bakes made from cooked ingredients, e.g. potato gratin, 1 kg
Soup au gratin, e.g. onion soup, 24 cups
Vegetables, fresh, 250 g Cookware with
Vegetables, fresh, 500 g Cookware with
Vegetable kebabs, 4-5 pieces Wire rack
Potatoes, 250 g Cookware with
Potatoes, 500 g Cookware with
Potatoes, 750 g Cookware with
Rice, 125 g Cookware with
Rice, 250 g Cookware with
Bread (pre-toasting), 2-4 slices Wire rack
Toast with topping, 2-6 slices Wire rack
Fruit, compote, 500 g Cookware with
Sweet foods, e.g. blancmange (instant)
500 ml
Cookware
without lid
Cookware
without lid
Cookware
without lid
lid
lid
lid
lid
lid
lid
lid
lid
Cookware with
lid
360 W + (
360 W + (
(
600 5-10 Cut the vegetables into pieces of equal size;
600 10-15 -
180 W + (
600 8-10 Cut the potatoes into pieces of equal size;
600 11-14
600 15-22
900
180
900
180
(
(
600 9-12 -
600 6-8 Stir the blancmange thoroughly 2 to 3 times dur-
Cooking time in
minutes
30-35 Sprinkle with cheese, maximum 5 cm deep
30-40 Maximum 4 cm deep
approx. 15-20 -
15-20 Use wooden skewers
5-7
12-15
6-8
15-18
1st side:
Approx. 2-4
2nd side:
Approx. 2-4
7-10 Depending on topping
Notes
Add 1 to 2 tbsp water per 100 g of vegetables;
Stir during cooking
Add 1 to 2 tbsp water for every 100 g;
Stir during cooking
Add double the amount of liquid
-
ing cooking using an egg whisk
Microwave tips
You cannot find any information about the settings for the quantity of
food you have prepared.
The food has become too dry. Next time, set a shorter cooking time or select a lower microwave power set-
When the time has elapsed, the food is not defrosted, hot or cooked. Set a longer time. Large quantities and food which is piled high require
When the time has elapsed, the food is overheated at the edge but not
done in the middle.
After defrosting, the poultry or meat is defrosted on the outside but not
defrosted in the middle.
Condensation
Condensation may appear on the door window, interior
walls and floor. This is normal. This does not affect how
the microwave operates. Wipe away the condensation
after cooking.
22
Increase or reduce the cooking times using the following rule of thumb:
Double the amount = almost double the cooking time
Half the amount = half the cooking time
ting. Cover the food and add more liquid.
longer times.
Stir it during the cooking time and next time, select a lower microwave power
setting and a longer cooking time.
Next time, select a lower microwave power setting. If you are defrosting a
large quantity, turn it several times.
Page 23

Test dishes en
ETest dishes
Test di shes
These tables have been produced for test institutes to
facilitate the inspection of the appliance.
Microwave cooking
Dish Microwave power output in watts, cooking time in
minutes
Custard, 750 g 360 W, 12-17 mins + 90 W, 20-25 mins Place a 20 x 25 cm Pyrex dish onto the turntable.
Sponge 600 W, 8-10 mins Place a 22 cm Pyrex dish onto the turntable.
Meat loaf 600 W, 20-25 mins Place a Pyrex dish onto the turntable.
Microwave defrosting
Dish Microwave power output in watts, cooking time in
minutes
Meat 180 W, 5-7 mins + 90 W, 10-15 mins Place a 22 cm Pyrex dish onto the turntable.
Combined microwave cooking
Dish Microwave power setting in watts, cooking time in
minutes
Potato gratin
( grill + 360 W, 35-40 mins
In accordance with EN 60705:2012, IEC 60705:2010
and EN 60350-1:2013 or IEC 60350-1:2011
Note
Note
Note
Place a pyrex dish with a diameter of 22 cm on the turntable.
23
Page 24

ةرﺑﺗﺧﻣﻟا قﺎﺑطﻷاar
EN 60705:2012 وأ IEC 60705:2010
EN 60350-1:2013 وأ IEC 60350-1:2011
ﺔﻔﺻاوﻣﻠﻟ ﺎﻘﻓو
وأ
Eةرﺑﺗﺧﻣﻟا قﺎﺑطﻷا
.زﺎﮭﺟﻟا صﺣﻓ ﺔﯾﻠﻣﻋ لﯾﮭﺳﺗﻟ رﺎﺑﺗﺧﻻا دھﺎﻌﻣﻟ لوادﺟﻟا هذھ دادﻋإ مﺗ
فﯾوورﻛﯾﻣﻟا نرﻓ مادﺧﺗﺳﺎﺑ ﻲﮭطﻟا
ةرﺑﺗﺧﻣﻟا قﺎﺑطﻷا
ﻖﺑطﻟاﻖﺋﺎﻗدﻟﺎﺑ ﻲﮭطﻟا نﻣز ،طاوﻟﺎﺑ فﯾوورﻛﯾﻣﻟا نرﻓ ةردﻗﺔظﺣﻼﻣ
،درﺗﺳﺎﻛ750مﺟ360 ،طاو 12 -17 + ﺔﻘﯾﻗد 90 ،طاو 20 -25ﺔﻘﯾﻗد سﺎﻘﻣ سﻛرﯾﺎﺑﻟا ﻖﺑط ﻊﺿ20 x 25.راودﻟا نﺣﺻﻟا ﻰﻠﻋ مﺳ
ﻲﺟﻧﻔﺳإ كﯾﻛ600 ،طاو 8 -10ﺔﻘﯾﻗد سﻛرﯾﺎﺑﻟا ﻖﺑط ﻊﺿ22.راودﻟا نﺣﺻﻟا ﻰﻠﻋ مﺳ
مورﻔﻣ مﺣﻟ بﻟﺎﻗ600 ،طاو 20 -25ﺔﻘﯾﻗد .راودﻟا نﺣﺻﻟا ﻰﻠﻋ سﻛرﯾﺎﺑﻟا ﻖﺑط ﻊﺿ
فﯾوورﻛﯾﻣﻟا نرﻓ مادﺧﺗﺳﺎﺑ دﻣﺟﺗﻟا ﺔﺑاذإ
ﻖﺑطﻟاﻖﺋﺎﻗدﻟﺎﺑ ﻲﮭطﻟا نﻣز ،طاوﻟﺎﺑ فﯾوورﻛﯾﻣﻟا نرﻓ ةردﻗﺔظﺣﻼﻣ
موﺣﻟ180 ،طاو 5-7 + ﺔﻘﯾﻗد 90 ،طاو 10-15ﺔﻘﯾﻗد سﻛرﯾﺎﺑﻟا ﻖﺑط ﻊﺿ22.راودﻟا نﺣﺻﻟا ﻰﻠﻋ مﺳ
فﯾوورﻛﯾﻣﻟﺎﺑ كرﺗﺷﻣﻟا ﻲﮭطﻟا
ﻖﺑطﻟاﻖﺋﺎﻗدﻟﺎﺑ ﻲﮭطﻟا نﻣز ،طاوﻟﺎﺑ فﯾوورﻛﯾﻣﻟا نرﻓ ةردﻗ طﺑﺿﺔظﺣﻼﻣ
نﯾﺗارﺟ سطﺎطﺑ( + ﺔﯾاوﺷﻟا360 ،طاو 35-40ﺔﻘﯾﻗد رطﻘﺑ سﻛرﯾﺎﺑ ﻖﺑط ﻊﺿ22.راودﻟا نﺣﺻﻟا ﻰﻠﻋ مﺳ
23
Page 25

arﺎﻧﺑ صﺎﺧﻟا ﻲﮭطﻟا وﯾدوﺗﺳ ﻲﻓ ﺎھرﺎﺑﺗﺧا مﺗ ﻲﺗﻟا قﺎﺑطﻷا
تﺎظﺣﻼﻣ
ﻖﻣﻌﺑ4ﻰﺻﻗأ دﺣﻛ مﺳ
،مﺟﺣﻟا ﺔﯾوﺎﺳﺗﻣ ﻊطﻗ ﻰﻟإ تاورﺿﺧﻟا ﻊﯾطﻘﺗﺑ مﻗ
نﻣ نﯾﺗرﯾﺑﻛ نﯾﺗﻘﻌﻠﻣ وأ ةرﯾﺑﻛ ﺔﻘﻌﻠﻣ فﺿأ فﺿأ
100 ،تاورﺿﺧﻟا نﻣ مﺟ
لﻛﻟ ءﺎﻣﻟا
نﯾﺧﺳﺗﻟا ءﺎﻧﺛأ بﯾﻠﻘﺗﻟﺎﺑ مﻗ
ﺔﯾﺑﺷﺧ داوﻋأ مدﺧﺗﺳا
،مﺟﺣﻟا ﺔﯾوﺎﺳﺗﻣ ﻊطﻗ ﻰﻟإ سطﺎطﺑﻟا ﻊﯾطﻘﺗﺑ مﻗ
100 ،مﺟ
لﻛﻟ نﯾﺗﻘﻌﻠﻣ ﻰﻟإ ةرﯾﺑﻛ ﺔﻘﻌﻠﻣ ﺔﻓﺎﺿﺈﺑ مﻗ
ﻲﮭطﻟا ءﺎﻧﺛأ بﯾﻠﻘﺗﻟﺎﺑ مﻗ
لﺋﺎﺳﻟا نﻣ ﺔﯾﻣﻛﻟا فﻌﺿ فﺿأ
تﺎﻓﺎﺿﻹا عوﻧ بﺳﺣ
نﯾﺗرﻣ ضﯾﺑﻟا ﺔﻘﻔﺧﻣ مادﺧﺗﺳﺎﺑ اًدﯾﺟ ﺞﻧﯾدوﺑﻟا بﯾﻠﻘﺗﺑ مﻗ
.ﻲﮭطﻟا ءﺎﻧﺛأ ﺔﺛﻼﺛ وأ
-
-
-
ﻲﮭطﻟا نﻣز
ﻖﺋﺎﻗدﻟﺎﺑ
30 -40
ﻲﻟاوﺣ15 -20 -
15 -20
12 -15
15 -18
:لوﻷا بﻧﺎﺟﻟا
2 -4
ﻲﻟاوﺣ
:ﻲﻧﺎﺛﻟا بﻧﺎﺟﻟا
2 -4
ﻲﻟاوﺣ
مﺎﻌطﻟا ﻲﮭطتﺎﻘﺣﻠﻣﻟا نرﻓ ةردﻗ
فﯾوورﻛﯾﻣﻟا
طاوﻟﺎﺑ
نودﺑ ﻲﮭط ءﺎﻧإ
360 + طاو (
(
نودﺑ ﻲﮭط ءﺎﻧإ
6005 -10
نوﻛﻣ نﻣ ﺔﻋوﻧﺻﻣﻟا ﺔﮭﻛﻧﻣﻟا تازوﺑﺧﻣﻟا
1مﺟﻛ
ءﺎطﻏ
،سطﺎطﺑﻟا نﯾﺗارﺟ لﺛﻣ ،ﺔﯾﮭطﻣ
لﺻﺑﻟا ﺔﺑروﺷ لﺛﻣ ،تﺎﻓﺎﺿﺈﺑ ﺔﺑروﺷ
ءﺎطﻏ
،ﺔﺟزﺎط ،تاورﺿﺧ250مﺟ ﻲﮭط ﻲﻧاوأ
2 -4تﺎﺳﺎط
ءﺎطﻐﺑ
60010 -15
،ﺔﺟزﺎط ،تاورﺿﺧ500مﺟ ﻲﮭط ﻲﻧاوأ
ءﺎطﻐﺑ
،تاورﺿﺧﻟا بﺎﺑﻛ شﯾﺷ4 -5ﻊطﻗﺔﯾﻛﻠﺳﻟا ﺔﻛﺑﺷﻟا180 + طاو (
6008 -10
،سطﺎطﺑﻟا250مﺟ ﻲﮭط ﻲﻧاوأ
ءﺎطﻐﺑ
60011 -14
،سطﺎطﺑﻟا500مﺟ ﻲﮭط ﻲﻧاوأ
ءﺎطﻐﺑ
60015 -22
،سطﺎطﺑﻟا750مﺟ ﻲﮭط ﻲﻧاوأ
ءﺎطﻐﺑ
5 -7
6 -8
900
180
900
180
(
(7 -10
6009 -12
،زرﻷا125مﺟ ﻲﮭط ﻲﻧاوأ
ءﺎطﻐﺑ
،زرﻷا250مﺟ ﻲﮭط ﻲﻧاوأ
ءﺎطﻐﺑ
،(ﻲﻟوأ صﯾﻣﺣﺗ) زﺑﺧﻟا2 -4ﺢﺋارﺷﺔﯾﻛﻠﺳﻟا ﺔﻛﺑﺷﻟا
،تﺎﻓﺎﺿإ ﮫﯾﻠﻋ تﺳوﺗ2 -6بﻧاوﺟﺔﯾﻛﻠﺳﻟا ﺔﻛﺑﺷﻟا
،ﺔﮭﻛﺎﻔﻟا توﺑﻣﻛ500مﺟ ﻲﮭط ﻲﻧاوأ
ءﺎطﻐﺑ
6006 -8
ﻲﮭط ﻲﻧاوأ
ءﺎطﻐﺑ
ﺞﻧﯾدوﺑﻟا لﺛﻣ ،ةﻼﺣﻣﻟا ﺔﻣﻌطﻷا
500لﻣ
(زﯾﮭﺟﺗﻟا ﺔﻌﯾرﺳ)
:ﺔﯾﻟﺎﺗﻟا ﺔﯾﻠﻣﻌﻟا ةدﻋﺎﻘﻟا مادﺧﺗﺳﺎﺑ ﻲﮭطﻟا ﺔﻧﻣزأ لﯾﻠﻘﺗ وأ ةدﺎﯾزﺑ مﻗ
ﺎﺑﯾرﻘﺗ ﻲﮭطﻟا نﻣز فﻌﺿ = ﺔﯾﻣﻛﻟا فﻌﺿ
ﻲﮭطﻟا نﻣز فﺻﻧ = ﺔﯾﻣﻛﻟا فﺻﻧ
.لﺋاوﺳﻟا نﻣ دﯾزﻣﻟا فﺿأو مﺎﻌطﻟا ﺔﯾطﻐﺗﺑ مﻗ .فﯾوورﻛﯾﻣﻟا
تارﺗﻓ ﻰﻟإ جﺎﺗﺣﺗ تﺎﻘﺑطﻟا ةددﻌﺗﻣ ﺔﻣﻌطﻷاو ةرﯾﺑﻛﻟا تﺎﯾﻣﻛﻟا .لوطأ ةرﺗﻓ طﺑﺿا
.ﺎًﯾﺑﺳﻧ ﺔﻠﯾوط
ةردﻘﻟ لﻗأ طﺑﺿ ﻊﺿو ﺔﻣدﺎﻘﻟا ةرﻣﻟا ﻲﻓ رﺗﺧاو ﻲﮭطﻟا نﻣز ءﺎﻧﺛأ مﺎﻌطﻟا بﯾﻠﻘﺗﺑ مﻗ
.لوطأ ﻲﮭط نﻣزو فﯾوورﻛﯾﻣﻟا نرﻓ
ﺔﺑاذﺈﺑ موﻘﺗ ﺎﻣدﻧﻋ .فﯾوورﻛﯾﻣﻟا نرﻓ ةردﻘﻟ لﻗأ طﺑﺿ ﻊﺿو ﺔﻣدﺎﻘﻟا ةرﻣﻟا ﻲﻓ رﺗﺧا
.تارﻣ ةدﻋ ﺎﮭﺑﻠﻘﺑ مﻗ ،مﺎﻌطﻟا نﻣ ةرﯾﺑﻛ ﺔﯾﻣﻛ نﻋ دﻣﺟﺗﻟا
فﯾوورﻛﯾﻣﻟا نرﻔﺑ ﺔﺻﺎﺧ ﺢﺋﺎﺻﻧ
ﺔﻘﻠﻌﺗﻣﻟا طﺑﺿﻟا عﺎﺿوأ صوﺻﺧﺑ تﺎﻣوﻠﻌﻣ ﺔﯾأ ﻰﻠﻋ روﺛﻌﻟا كﻧﻛﻣﯾ ﻻ
.هدادﻋﺈﺑ تﻣﻗ يذﻟا مﺎﻌطﻟا ﺔﯾﻣﻛﺑ
.ةرﯾﺑﻛ ﺔﺟردﺑ ﺔﻣﻌطﻷا فﺎﻔﺟ نرﻓ ةردﻘﻟ لﻗأ طﺑﺿ ﻊﺿو رﺗﺧا وأ ﺔﻣدﺎﻘﻟا ةرﻣﻟا ﻲﻓ رﺻﻗأ ﻲﮭط نﻣز طﺑﺿا
وأ ﮫﻧﯾﺧﺳﺗ مﺗﯾ ﻻ وأ مﺎﻌطﻟا دﻣﺟﺗ ﺔﺑاذإ مﺗﯾ ﻻ ﻲﮭطﻟا نﻣز ءﺎﺿﻘﻧا دﻧﻋ
.ﮫﯾﮭط
ﺎﻣﻧﯾﺑ ﺔﻓﺎﺣﻟا نﻣ ﺔطرﻔﻣﻟا ﺔﻧوﺧﺳﻠﻟ مﺎﻌطﻟا ضرﻌﺗﯾ ﻲﮭطﻟا نﻣز ءﺎﺿﻘﻧا دﻧﻋ
.لﺧادﻟا نﻣ ﺞﺿﻧﯾ مﻟ
نﯾﺣ ﻲﻓ ،جرﺎﺧﻟا نﻣ مﺣﻠﻟا وأ روﯾطﻟا نﻋ دﻣﺟﺗﻟا ﺔﺑاذإ مﺗﯾ دﻣﺟﺗﻟا ﺔﺑاذإ دﻌﺑ
.لﺧادﻟا نﻣ ةدﻣﺟﺗﻣ لظﺗ
ءﺎﻣﻟا فﺛﻛﺗ
.زﺎﮭﺟﻟا ﺔﯾﺿرأو ﺔﯾﻠﺧادﻟا ناردﺟﻟاو بﺎﺑﻟا ةذﻓﺎﻧ ﻰﻠﻋ فﺛﻛﺗﻣ ءﺎﻣ رﮭظﯾ ﺎﻣﺑر
دﻌﺑ فﺛﻛﺗﻣﻟا ءﺎﻣﻟا ﺢﺳﻣا .نرﻔﻟا لﻣﻋ ﻰﻠﻋ رﺛؤﯾ ﻻ وھو .ﻲﻌﯾﺑط رﻣأ اذھ
.ﻲﮭطﻟا ﺔﯾﻠﻣﻋ نﻣ ءﺎﮭﺗﻧﻻا
22
Page 26

ﺎﻧﺑ صﺎﺧﻟا ﻲﮭطﻟا وﯾدوﺗﺳ ﻲﻓ ﺎھرﺎﺑﺗﺧا مﺗ ﻲﺗﻟا قﺎﺑطﻷاar
تﺎظﺣﻼﻣ
ﻲﮭطﻟا نﻣز
ﻖﺋﺎﻗدﻟﺎﺑ
مﺣﻠﻟا ﺢﺋارﺷ لﺻﻓا
-
-
لﺋﺎﺳﻟا نﻣ ًﻼﯾﻠﻗ اًردﻗ فﺿأ
:ﺔﯾاوﺷﻟاو فﯾوورﻛﯾﻣﻟا مادﺧﺗﺳﺎﺑ كرﺗﺷﻣﻟا ﻲﮭطﻟا
.نﯾﺗارﺟﻟاو تازوﺑﺧﻣﻟا دادﻋﻹ ﺎﺻﯾﺻﺧ ﺔﺑﺳﺎﻧﻣ كرﺗﺷﻣﻟا ﻲﮭطﻟا ﺔﻘﯾرط
.مﺎﻌطﻟا ﺔﯾطﻐﺗﺑ مﻘﺗ ﻻو راودﻟا نﺣﺻﻟا ﻰﻠﻋ ﻲﮭطﻟا ءﺎﻧإ ﻊﺿ
ﻰﻠﻋ ظﺎﻔﺣﻟا ﻲﻓ كﻟذ دﻋﺎﺳﯾ فوﺳو .صﯾﻣﺣﺗﻟا دﻧﻋ ﻖﯾﻣﻋ ﻖﺑط مدﺧﺗﺳا
.ﻲﮭطﻟا زﯾﺣ ﺔﻓﺎظﻧ
.نﺑﺟﻟﺎﺑ ةﺎطﻐﻣﻟا تﻼﻛﻷاو تﺎﻧﺟﻌﻣﻠﻟ ﺎًﻌﺳاوو ﺎًﺣطﺳﻣ ﻲﮭط ءﺎﻧإ مدﺧﺗﺳا
بﺳﺗﻛﯾو ﺔﻘﯾﻣﻋو ﺔﻘﯾﺿ ﻲﻧاوأ ﻲﻓ ﮫﯾﮭط دﻧﻋ لوطأ ﺎًﺗﻗو مﺎﻌطﻟا قرﻐﺗﺳﯾ
.رﺛﻛأ ﺎًﯾﻧﺑ ﺎًﻧوﻟ يوﻠﻌﻟا ﺢطﺳﻟا
رﺑﻛأ نوﻛﺗ ﻻأ بﺟﯾ .ﻲﮭطﻟا زﯾﺣ ﻲﻓ لوﺧدﻠﻟ ﺔﺑﺳﺎﻧﻣ ﻲﮭطﻟا ﻲﻧاوأ نأ دﻛﺄﺗ
.نارودﻟا ﻰﻠﻋ اردﺎﻗ راودﻟا نﺣﺻﻟا لظﯾ نأ بﺟﯾ ثﯾﺣ ،مزﻼﻟا نﻣ
نﻣزﻟا ءﺎﺿﻘﻧا دﻌﺑ مﺎﻌطﻟا صﺣﻓا .ﻲﮭطﻠﻟ نﻣز ﻰﺻﻗأ طﺑﺿﺑ ﺎﻣﺋاد مﻗ
.ددﺣﻣﻟا رﯾﺻﻘﻟا
ةدﻣﻟ أدﮭﺗ موﺣﻠﻟا كرﺗا
5 - 10 لﻌﺟﯾ اذھو .ﺎﮭﻌﯾطﻘﺗ لﺑﻗ ىرﺧأ ﻖﺋﺎﻗد
.مﺣﻠﻟا ﻊﯾطﻘﺗ دﻧﻋ ﻰﻠﻋﻷ رﺛﺎﻧﺗﯾ ﻻ ثﯾﺣﺑ يوﺎﺳﺗﻟﺎﺑ عزوﺗﯾ مﺣﻠﻟا صوﺻ
ﻲﻓ ﺎﮭﯾﮭط ضرﻐﻟ كرﺗﺗ نأ بﺟﯾ نﺑﺟﻟﺎﺑ ةﺎطﻐﻣﻟا تﻼﻛﻷاو تﺎﻧﺟﻌﻣﻟا
ةدﻣﻟ زﺎﮭﺟﻟا
5.زﺎﮭﺟﻟا فﺎﻘﯾإ دﻌﺑ ىرﺧأ ﻖﺋﺎﻗد
فﻠﺗﺧﺗ نأ نﻛﻣﯾو ﺔﯾدﺎﺷرﺗﺳا ﺎﻣﯾﻗ ﻻإ ﻲھ ﺎﻣ لودﺟﻟا ﻲﻓ ةروﻛذﻣﻟا مﯾﻘﻟا ﻊﯾﻣﺟ
.كﻣﺎﻌط صاوﺧ بﺳﺣ
مﺎﻌطﻟا نﯾﺧﺳﺗنزوﻟا نرﻓ ةردﻗ
طاوﻟﺎﺑ فﯾوورﻛﯾﻣﻟا
6008 -11
6006 -8
6008 -11
6002 -3
6003 -5
800مﺟ
300مﺟ
صوﺻﻟﺎﺑ مﺣﻟ500مﺟ
تاورﺿﺧﻟا150مﺟ
مﺎﻌطﻟا ﻲﮭط
ﺔﻣﻌطﻷا نﻣ عرﺳأ لﻛﺷﺑ ﺎﮭﯾﮭط مﺗﯾ ﻲﻘﻓأ ىوﺗﺳﻣ ﻰﻠﻋ ةدورﻔﻣﻟا ﺔﻣﻌطﻷا
هدرﻓ مﺗﯾ ثﯾﺣﺑ مﺎﻌطﻟا ﻊﯾزوﺗﺑ موﻘﺗ نأ ﻲﻐﺑﻧﯾ كﻟذﻟو .تﺎﻘﺑط ﻲﻓ ﺔﻋوﺿوﻣﻟا
.ﺎﮭﺿﻌﺑ قوﻓ تﺎﻘﺑط ﻲﻓ مﺎﻌطﻟا ﻊﺿو زوﺟﯾ ﻻ .نﺎﻛﻣﻹا ردﻗ ﻲﮭطﻟا ءﺎﻧإ ﻲﻓ
ءﺎﻧإ ﻰﻠﻋ ءﺎطﻏ ﺎﻣﺋاد ﻊﺿو – فﯾوورﻛﯾﻣﻟا نرﻓ ﻲﻓ هدرﻔﻣﺑ مﺎﻌطﻟا ﻲﮭطﺑ مﻗ
كﯾدﻟ رﻓوﺗﯾ مﻟ اذإ .ًةرﺷﺎﺑﻣ راودﻟا نﺣﺻﻟا ﻰﻠﻋ ﻲﮭطﻟا ءﺎﻧإ ﻊﺿ .ﻲﮭطﻟا
ﺔﯾﻧدﻌﻣﻟا ﺔﯾطﻐﺗﻟا ﻖﺋﺎﻗر وأ ﻖﺑط مدﺧﺗﺳﺎﻓ ،ﻲﮭطﻟا ءﺎﻧﻹ بﺳﺎﻧﻣ ءﺎطﻏ
.فﯾوورﻛﯾﻣﻟا نرﻔﻟ ﺔﺻﺻﺧﻣﻟا
ﺢﻠﻣﻟا مادﺧﺗﺳا نﻣ لﯾﻠﻘﺗﻟا ﻲﻧﻌﯾو .مﺎﻌطﻟا ﺔﮭﻛﻧﺑ ظﺎﻔﺗﺣﻻا ﻰﻠﻋ دﻋﺎﺳﯾ اذھو
5 ثﯾﺣﺑ ﺔﯾﻓﺎﺿإ ﻖﺋﺎﻗد
و نﯾﺗﻘﯾﻗد نﯾﺑ حوارﺗﺗ ةدﻣﻟ مﺎﻌطﻟا كرﺗا ،ﻲﮭطﻟا دﻌﺑ
.ﮫﺗرارﺣ ﺔﺟرد سﻧﺎﺟﺗﺗ
نﻣ قﺎﺑطﻷا جارﺧإ دﻧﻋ نرﻔﻠﻟ اًزﺎﻔﻗ وأ نرﻔﻠﻟ شﺎﻣﻗ ﺔﻌطﻗ ﺎًﻣﺋاد مدﺧﺗﺳا
ﻲﮭطﻟا زﯾﺣ بﺎﺑ ﻖﻠﻏ ةﺎﻋارﻣ ﻊﻣ ،ﺔﯾﻛﻠﺳﻟا ﺔﻛﺑﺷﻟا ﻰﻠﻋ مﺣﻠﻟا ءاوﺷﺑ ﺎًﻣﺋاد مﻗ
.ﻖﺑﺳﻣ لﻛﺷﺑ زﺎﮭﺟﻟا نﯾﺧﺳﺗﺑ مﻘﺗ ﻻو
.راودﻟا نﺣﺻﻟا ﻰﻠﻋ ﺎًﻣﺋاد ﺔﯾﻛﻠﺳﻟا ﺔﻛﺑﺷﻟا ﻊﺿ
ﺔﻧﺧﯾ400مﺟ
.لﺑاوﺗﻟاو
.زﺎﮭﺟﻟا
:ءاوﺷﻟا
تﺎظﺣﻼﻣ
ﻲﮭطﻟا نﻣز فﺻﺗﻧﻣ دﻌﺑ ﺎﮭﺑﻠﻗا
ﮫﺑﻠﻘﺗ ﻻو ،ﻰﻠﻋﻷ دﻠﺟﻟا ﻰﻠﻋ لﻣﺗﺷﻣﻟا بﻧﺎﺟﻟا ﻊﺿ
بﻠﻘﻟﺎﺑ مﻘﺗ ﻻ
نﯾﺗرﻣ وأ ةرﻣ مﺎﻌطﻟا بﻠﻗا
ءﺎطﻏ نودﺑ ﻲﮭط
ﻖﻣﻌﺑ
6 ﻰﺻﻗأ دﺣﻛ مﺳ
ﺔﺑﻏرﻟا بﺳﺣ نوﻣﯾﻠﻟا رﯾﺻﻋ وأ ءﺎﻣﻟا ضﻌﺑ فﺿأ
ﮫﯾﮭط لﺑﻗ دﻣﺟﻣﻟا كﻣﺳﻟا نﻋ دﻣﺟﺗﻟا بذأ
ﺔﯾﺑﺷﺧ داوﻋأ مدﺧﺗﺳا
ﻖﻣﻌﺑ5ﻰﺻﻗأ دﺣﻛ مﺳ
ﻖﻣﻌﺑ ،نﺑﺟﻟا نﻣ ﺔﻘﺑط5ﻰﺻﻗأ دﺣﻛ مﺳ
ﻲﮭطﻟا نﻣز
ﻖﺋﺎﻗدﻟﺎﺑ
فﯾوورﻛﯾﻣﻟا
مﺎﻌطﻟا ﻲﮭطتﺎﻘﺣﻠﻣﻟا نرﻓ ةردﻗ
طاوﻟﺎﺑ
60025 -30
،ﺔﻠﻣﺎﻛ ،ﺔﺟﺎﺟد1,2مﺟﻛ ﻲﮭط ﻲﻧاوأ
ءﺎطﻐﺑ
30 -40
360 + طاو (
،جﺎﺟدﻟا عﺎﺑرأ لﺛﻣ ،جﺎﺟد ﻊطﻗ800مﺟ نودﺑ ﻲﮭط ءﺎﻧإ
ﺔﻛﺑﺷﻟا ،ءﺎطﻏ
ﺔﯾﻛﻠﺳﻟا
15 -25
نودﺑ ﻲﮭط ءﺎﻧإ
360 + طاو (
ﺔﻛﺑﺷﻟا ،ءﺎطﻏ
،لﺧﻟا ﻲﻓ ﺔﻋوﻘﻧﻣو ةدﻣﺟﻣ ،جﺎﺟدﻟا ﺔﺣﻧﺟأ
800مﺟ
ﺔﯾﻛﻠﺳﻟا
40 -50
نودﺑ ﻲﮭط ءﺎﻧإ
360 + طاو (
ءﺎطﻏ
-
10 -15
20 -25
25 -35
600
+ طاو (
360
60010 -15
ءﺎطﻏ
ﻲﻟاوﺣ ﺔﯾﺟرﺎﺧ ةرﺷﻗ نودﺑ مﺳد مﺣﻟ
750ﺔﺑﻗرﻟا لﺛﻣ ،مﺟ
ﻲﻟاوﺣ ،نوﻛﺎﺑﻟا ﺢﺋارﺷ8ﺢﺋارﺷﺔﯾﻛﻠﺳﻟا ﺔﻛﺑﺷﻟا180 + طاو (
،مورﻔﻣ مﺣﻟ بﻟﺎﻗ750مﺟ نودﺑ ﻲﮭط ءﺎﻧإ
ﮫﯾﻠﯾﻓ ﺢﺋارﺷ لﺛﻣ ،كﺎﻣﺳأ400مﺟ نودﺑ ﻲﮭط ءﺎﻧإ
ءﺎطﻏ
10 -15
نودﺑ ﻲﮭط ءﺎﻧإ
360 + طاو (
ءﺎطﻏ
10 -15
30 -35
نودﺑ ﻲﮭط ءﺎﻧإ
360 + طاو (
ءﺎطﻏ
30 -35
نودﺑ ﻲﮭط ءﺎﻧإ
360 + طاو (
ءﺎطﻏ
ﻲﻟاوﺣ ،تﺎﻓﺎﺿﺈﺑ ﻰطﻐﻣ ،ﮫﯾﻠﯾﻓ كﻣﺳ
400مﺟ
،كﻣﺳﻟا بﺎﺑﻛ4 -5ﻊطﻗ ﺔﯾﻛﻠﺳﻟا ﺔﻛﺑﺷﻟا180 + طاو (
ﮫﯾﻠﻓوﺳو كراوﻛﻟا لﺛﻣ ،ةزوﺑﺧﻣ تﺎﯾوﻠﺣ
1مﺟﻛ
،ﮫﻛاوﻔﻟا
لﺛﻣ ،ﺔﺋﯾﻧ تﺎﻧوﻛﻣ نﻣ ﺔﮭﻛﻧﻣﻟا تازوﺑﺧﻣﻟا
1مﺟﻛ
نرﻓ ﺔﻧورﻛﻣ
21
Page 27

arﺎﻧﺑ صﺎﺧﻟا ﻲﮭطﻟا وﯾدوﺗﺳ ﻲﻓ ﺎھرﺎﺑﺗﺧا مﺗ ﻲﺗﻟا قﺎﺑطﻷا
تﺎظﺣﻼﻣ
بﯾﻠﻘﺗﻟا ءﺎﻧﺛأ مﺣﻠﻟا ﻊطﻗ لﺻﻓا
لﺋﺎﺳﻟا نﻣ ًﻼﯾﻠﻗ اًردﻗ فﺿأ
ﻲطﻐﺗ ثﯾﺣﺑ ﻖﺑطﻟا ﻲﻓ ءﺎﻣﻟا ضﻌﺑ بﺻﺑ مﻗ
ﻖﺑطﻟا رﻌﻗ
ﻲﻓﺎﺿإ ءﺎﻣ نودﺑ ﻲﮭطﻟﺎﺑ مﻗ
ﻲﮭطﻟا نﻣز
ﻖﺋﺎﻗدﻟﺎﺑ
-
طاوﻟﺎﺑ فﯾوورﻛﯾﻣﻟا
6008 -11
300 -400مﺟ
ةزھﺎﺟ ﺔﺑﺟو ،ﺔﺑﺟو ﻖﺑط ،ﺔﻠﻣﺎﻛﺗﻣ ﺔﺑﺟو
دﻣﺟﻣﻟا مﺎﻌطﻟا نﯾﺧﺳﺗنزوﻟا نرﻓ ةردﻗ طﺑﺿ عﺎﺿوأ
(ﺔﺛﻼﺛ وأ نﺎﻔﻧﺻ)
-
-
6008 -10
60010 -13
60012 -17
500مﺟ
لﺛﻣ ،صوﺻﻟﺎﺑ مﺣﻠﻟا ﻊطﻗ وأ ﺢﺋارﺷ
ءﺎﺳﺣ400مﺟ
ﺔﻧﺧﯾ500مﺟ
شﻼﺟمﺣﻠﻟا
-
60010 -15
6002 -5
6008 -10
6008 -10
60014 -17
60011 -16
500مﺟ
رزﺟﻟا ،ﻲﻠﻛورﺑﻟا ،ءﻻزﺎﺑﻟا لﺛﻣ تاورﺿﺧﻟا300مﺟ
600مﺟ
ﻲﻧوﻠﯾﻧﺎﻛﻟاو ﺎﯾﻧازﻼﻟا لﺛﻣ ،تﺎﻧﺟﻌﻣ450مﺟ
ﺔﻧورﻛﻌﻣﻟا ،زرﻷا لﺛﻣ ،ﺔﯾﺑﻧﺎﺟ قﺎﺑطأ250مﺟ
ﺦﻧﺎﺑﺳﻟا نوﺟﻌﻣ450مﺟ
مﺎﻌطﻟا نﯾﺧﺳﺗ
!ﮫﯾﺑﻧﺗ
ﺔﻓﺎﺳﻣ ﻰﻠﻋ ،بوﻛﻟا لﺧاد ﺔﻘﻌﻠﻣﻟا لﺛﻣ ،ﺔﯾﻧدﻌﻣﻟا ءﺎﯾﺷﻷا ﻊﺿوُﺗ نأ بﺟﯾ
2 بﺑﺳﺗﯾ دﻘﻓ .بﺎﺑﻠﻟ ﻲﻠﺧادﻟا بﻧﺎﺟﻟاو نرﻔﻟا ناردﺟ نﻣ مﺳ
.ﮫﺣﻼﺻإ بﻌﺻﯾ لﻛﺷﺑ بﺎﺑﻠﻟ ﻲﻠﺧادﻟا بﻧﺎﺟﻟﺎﺑ جﺎﺟزﻟا فﻼﺗإ ﻲﻓ ررﺷﻟا
ﻻ نﻋ لﻘﺗ
تﺎظﺣﻼﻣ
ﺔﯾﻟوﺣﻛﻟا تﺎﺑورﺷﻣﻟا نﯾﺧﺳﺗﺑ مﻘﺗ ﻻو ،بوﻛﻟا ﻲﻓ ﺔﻘﻌﻠﻣ ﻊﺿ
رﺧﻵ تﻗو نﻣ نﯾﺧﺳﺗﻟا ءﺎﻧﺛأ بورﺷﻣﻟا بﻗارو ،طرﻔﻣ لﻛﺷﺑ
ةرارﺣﻟا ﺔﺟرد ﺔﻌﺟارﻣ نﯾﻌﺗﯾو .نﯾﺧﺳﺗﻟا
ﻲﮭطﻟا نﻣز
-
-
-
ﻖﺋﺎﻗدﻟﺎﺑ
ﻲﻟاوﺣ^ دﻌﺑ ادﯾﺟ ﺔﺟﺎﺟزﻟا جرﺑ ﺎﻣﺋاد مﻗو .ﺔﯾطﻏأ وأ تﺎﻣﻠﺣ نودﺑ
ﻲﻟاوﺣ1
^1
نرﻔﻟ ﺔﺑﺳﺎﻧﻣﻟا ﻲﮭطﻟا ﻲﻧاوأ ﻲﻓ ﺎﺳﻧﺎﺟﺗ رﺛﻛأ لﻛﺷﺑو عرﺳأ
نﻣ ردﻘﻟا سﻔﻧﻟ ﺔﺑﺟوﻟﺎﺑ ﺔﻔﻠﺗﺧﻣﻟا فﺎﻧﺻﻷا جﺎﺗﺣﺗ ﻻ دﻗ .فﯾوورﻛﯾﻣﻟا
.نﯾﺧﺳﺗﻠﻟ مزﻼﻟا تﻗوﻟا
.فﯾوورﻛﯾﻣﻟا نرﻔﻟ ﺔﺻﺻﺧﻣﻟا ﺔﯾطﻐﺗﻟا ﻖﺋﺎﻗر وأ ﻖﺑط مدﺧﺗﺳﺎﻓ
.ةرارﺣﻟا
.ﮫﺗرارﺣ ﺔﺟرد سﻧﺎﺟﺗﺗ ثﯾﺣﺑ
ً
زﺎﻔﻗ وأ نرﻔﻠﻟ شﺎﻣﻗ ﺔﻌطﻗ ﺎًﻣﺋاد مدﺧﺗﺳا
.زﺎﮭﺟﻟا
لﺋﺎﺳﻟا نأ ﻲﻧﻌﯾ اذھو .لﺋاوﺳﻟا نﯾﺧﺳﺗ ءﺎﻧﺛأ نﺎﯾﻠﻐﻟا ﻲﻓ رﺧﺄﺗ ثدﺣﯾ نأ نﻛﻣﯾ
ﻰﻠﻋ ةدﺎﺗﻌﻣﻟا رﺎﺧﺑﻟا تﺎﻋﺎﻘﻓ دﻋﺎﺻﺗﺗ نأ نود نﺎﯾﻠﻐﻟا ﺔﺟرد ﻰﻟإ لﺻﯾ
وأ ةوﻘﺑ نﺧﺎﺳﻟا لﺋﺎﺳﻟا روﻔﯾ نأ نﻛﻣﯾ ءﺎﻋوﻠﻟ زازﺗھا لﻗأ ﻊﻣو .ﺢطﺳﻟا
.ءﺎﻋوﻟا لﺧاد ﺔﻘﻌﻠﻣ ﻊﺿو ﻰﻠﻋ ﺎًﻣﺋاد صرﺣا ،نﯾﺧﺳﺗﻟا ءﺎﻧﺛأ .ذاذر رﯾﺎطﺗﯾ
.نﺎﯾﻠﻐﻟا رﺧﺄﺗ ةرھﺎظ بﻧﺟﺗﺗ كﻟذﺑو
مﺎﻌطﻟا نﯾﺧﺳﺗنزوﻟا نرﻓ ةردﻗ
طاوﻟﺎﺑ فﯾوورﻛﯾﻣﻟا
9002 -3
9003 -4
360
360
360
6002 -3
6004 -5
6004 -8
500لﻣ
تﺎﺟﺎﺟز لﺛﻣ ،ﻊﺿرﻟا لﺎﻔطﻷا مﺎﻌط
50لﻣ
100لﻣ
200لﻣ
500-350مﺟ
ةزھﺎﺟ ﺔﺑﺟو ،ﺔﺑﺟو ﻖﺑط ،ﺔﻠﻣﺎﻛﺗﻣ ﺔﺑﺟو
تﺎﺑورﺷﻣﻟا200لﻣ
دﺣاو بوﻛ ،ءﺎﺳﺣ200مﺟ
نﺎﺑوﻛ ،ءﺎﺳﺣ400مﺟ
(ﺔﺛﻼﺛ وأ نﺎﻔﻧﺻ)
تﺎظﺣﻼﻣ
■ تﻗو ﻲﻓ تﺎﺑﺟوﻟا هذھ نﯾﺧﺳﺗ مﺗﯾ .ﺎﮭﺗاوﺑﻋ نﻣ ةزھﺎﺟﻟا تﺎﺑﺟوﻟا جرﺧأ
■ ،ﻲﮭطﻟا ءﺎﻧﻹ بﺳﺎﻧﻣ ءﺎطﻏ كﯾدﻟ رﻓوﺗﯾ مﻟ اذإ .مﺎﻌطﻟا ﺔﯾطﻐﺗﺑ ﺎﻣﺋاد مﻗ
■ ﺔﺟرد ﻊﺟارو .نﯾﺧﺳﺗﻟا ةدﻣ ءﺎﻧﺛأ تارﻣ ةدﻋ مﺎﻌطﻟا بﻠﻗ وأ بﯾﻠﻘﺗﺑ مﻗ
■ و نﯾﺗﻘﯾﻗد نﯾﺑ حوارﺗﺗ ةدﻣﻟ مﺎﻌطﻟا كرﺗا ،نﯾﺧﺳﺗﻟا دﻌﺑ5 ﺔﯾﻓﺎﺿإ ﻖﺋﺎﻗد
■ نﻣ قﺎﺑطﻷا جارﺧإ دﻧﻋ نرﻔﻠﻟ ا
:رﯾذﺣﺗ – !تاءاوﺗﻛﺎﺑ ﺔﺑﺎﺻﻹا رطﺧ
ﺔﻋﺎﺿرﻟا
20
Page 28

ﺎﻧﺑ صﺎﺧﻟا ﻲﮭطﻟا وﯾدوﺗﺳ ﻲﻓ ﺎھرﺎﺑﺗﺧا مﺗ ﻲﺗﻟا قﺎﺑطﻷاar
تﺎظﺣﻼﻣ
بﻠﻘﻟا ءﺎﻧﺛأ دﻣﺟﺗﻟا ﺎﮭﻧﻋ باذُﯾ ءازﺟأ ﺔﯾأ لﺻﻓا
ةدﻋ ﮫﺑﻠﻗاو هدﯾﻣﺟﺗ دﻧﻋ نﺎﻛﻣﻹا ردﻗ مﺎﻌطﻟا درﻓا
ﺎﮭﻧﻋ باذُﯾ مﺣﻟ ﻊطﻗ ﺔﯾأ لﺻﻓاو ،تارﻣدﻣﺟﺗﻟا
دﻣﺟﺗﻟا ﺎﮭﻧﻋ باذﯾ ءازﺟأ ﺔﯾأ لﺻﻓا
دﻣﺟﺗﻟا ﺎﮭﻧﻋ باذﯾ ءازﺟأ ﺔﯾأ لﺻﻓا
ءازﺟأ ﺔﯾأ لﺻﻓاو دﻣﺟﺗﻟا ﺔﺑاذإ ءﺎﻧﺛأ ﺔﯾﺎﻧﻌﺑ ﺎﮭﺑﯾﻠﻘﺗﺑ مﻗ
دﻣﺟﺗﻟا ﺎﮭﻧﻋ باذُﯾ
فﯾﻠﻐﺗﻟا داوﻣ ﻊﯾﻣﺟ ﺔﻟازﺈﺑ مﻗ
وأ سﻼﺟ ﻰﻠﻋ ﺔﯾوﺗﺣﻣﻟا رﯾﻏ كﯾﻛﻟا عاوﻧﻷ طﻘﻓ
.كﯾﻛﻟا ﻊطﻗ لﺻﻓا ،درﺗﺳﺎﻛ وأ ﺔﻣﯾرﻛ
وأ سﻼﺟ ﻰﻠﻋ ﺔﯾوﺗﺣﻣﻟا رﯾﻏ كﯾﻛﻟا عاوﻧﻷ طﻘﻓ
نﯾﺗﻼﯾﺟ وأ ﺔﻣﯾرﻛ
ﻲﮭطﻟا نﻣز
-
-
ﻖﺋﺎﻗدﻟﺎﺑ
10 -15
10 -15
10 -20
10 -20
15
10 -20
10 -15
12
10 -20
10 -15
15 -20
15 -20
طاوﻟﺎﺑ فﯾوورﻛﯾﻣﻟا
2
4 -6
5
5 -10
8
5
8
8
5
8
5 -10
1
2 -3
1
3 -4
6
5 -10
5
5
7
180
90
180
90
180
90
9010
180
90
180
90
180
90
180
90
180
90
18010 -15
180 7 -10
180
90
180
90
180
90
180
90
180
90
9010 -15
180
90
180
90
180
90
دﻣﺟﺗﻟا ﺔﺑاذإنزوﻟا نرﻓ ةردﻗ
وﻠﺗﺑﻟا مﺣﻟ وأ يرﻘﺑﻟا مﺣﻠﻟا ﺢﺋارﺷ وأ ﻊطﻗ200مﺟ
500مﺟ
800مﺟ
طﻠﺗﺧﻣ مورﻔﻣ مﺣﻟ200مﺟ
500مﺟ
800مﺟ
روﯾطﻟا ءازﺟأ وأ روﯾطﻟا600مﺟ
1.2مﺟﻛ
ﺢﺋارﺷ وأ كﻣﺳ ﺢﺋارﺷ ،ﮫﯾﻠﯾﻓ كﻣﺳ400مﺟ
ءﻻزﺎﺑﻟا لﺛﻣ تاورﺿﺧ300مﺟ
ﻖﯾﻠُﻌﻟا توﺗ لﺛﻣ ،ﺔﮭﻛﺎﻓ300مﺟ
500مﺟ
دﻣﺟﺗﻟا ﺔﺑاذإ ،دﺑزﻟا125مﺟ
250مﺟ
زﺑﺧ بﻟﺎﻗ500مﺟ
1مﺟﻛ
500مﺟ
750مﺟ
500مﺟ
750مﺟ
ً
ﻼﺛﻣ كﯾﻛ زﯾﺷﺗو ﮫﻛاوﻓ كﯾﻛ ،بطر ،كﯾﻛ
ً
ﻼﺛﻣ ﻲﺟﻧﻔﺳإ كﯾﻛ ،فﺎﺟ ،كﯾﻛ
19
.ﮫﺗرارﺣ ﺔﺟرد سﻧﺎﺟﺗﺗ ثﯾﺣﺑ
ً
زﺎﻔﻗ وأ نرﻔﻠﻟ شﺎﻣﻗ ﺔﻌطﻗ ﺎًﻣﺋاد مدﺧﺗﺳا
.زﺎﮭﺟﻟا
■.ﻲﮭطﻟا ءﺎﻧﺛأ تارﻣ ثﻼﺛ وأ نﯾﺗرﻣ ﮫﺑﻠﻗ وأ مﺎﻌطﻟا بﯾﻠﻘﺗﺑ مﻗ
■ و نﯾﺗﻘﯾﻗد نﯾﺑ حوارﺗﺗ ةدﻣﻟ مﺎﻌطﻟا كرﺗا ،نﯾﺧﺳﺗﻟا دﻌﺑ5 ﺔﯾﻓﺎﺿإ ﻖﺋﺎﻗد
دﻣﺟﻣﻟا مﺎﻌطﻟا نﯾﺧﺳﺗ
تﺎظﺣﻼﻣ
■ نﻣ قﺎﺑطﻷا جارﺧإ دﻧﻋ نرﻔﻠﻟ ا
■ تﻗو ﻲﻓ تﺎﺑﺟوﻟا هذھ نﯾﺧﺳﺗ مﺗﯾ .ﺎﮭﺗاوﺑﻋ نﻣ ةزھﺎﺟﻟا تﺎﺑﺟوﻟا جرﺧأ
نرﻔﻟ ﺔﺑﺳﺎﻧﻣﻟا ﻲﮭطﻟا ﻲﻧاوأ ﻲﻓ ﺎﺳﻧﺎﺟﺗ رﺛﻛأ لﻛﺷﺑو عرﺳأ
نﻣ ردﻘﻟا سﻔﻧﻟ ﺔﺑﺟوﻟﺎﺑ ﺔﻔﻠﺗﺧﻣﻟا فﺎﻧﺻﻷا جﺎﺗﺣﺗ ﻻ دﻗ .فﯾوورﻛﯾﻣﻟا
.نﯾﺧﺳﺗﻠﻟ مزﻼﻟا تﻗوﻟا
■ نﻣ عرﺳأ لﻛﺷﺑ ﺎﮭﯾﮭط مﺗﯾ ﻲﻘﻓأ ىوﺗﺳﻣ ﻰﻠﻋ ةدورﻔﻣﻟا ﺔﻣﻌطﻷا
مﺎﻌطﻟا ﻊﯾزوﺗﺑ موﻘﺗ نأ ﻲﻐﺑﻧﯾ كﻟذﻟو .تﺎﻘﺑط ﻲﻓ ﺔﻋوﺿوﻣﻟا ﺔﻣﻌطﻷا
ﻲﻓ مﺎﻌطﻟا ﻊﺿو زوﺟﯾ ﻻ .نﺎﻛﻣﻹا ردﻗ ﻲﮭطﻟا ءﺎﻧإ ﻲﻓ هدرﻓ مﺗﯾ ثﯾﺣﺑ
.ﺎﮭﺿﻌﺑ قوﻓ تﺎﻘﺑط
■ ،ﻲﮭطﻟا ءﺎﻋوﻟ بﺳﺎﻧﻣ ءﺎطﻏ كﯾدﻟ رﻓوﺗﯾ مﻟ اذإ .مﺎﻌطﻟا ﺔﯾطﻐﺗﺑ ﺎﻣﺋاد مﻗ
.فﯾوورﻛﯾﻣﻟا نرﻔﻟ ﺔﺻﺻﺧﻣﻟا ﺔﯾطﻐﺗﻟا ﻖﺋﺎﻗر وأ ﻖﺑط مدﺧﺗﺳﺎﻓ
Page 29

!ﮫﯾﺑﻧﺗ
ﻰﻠﻋ ،بوﻛﻟا لﺧاد ﺔﻘﻌﻠﻣﻟا لﺛﻣ ،ﺔﯾﻧدﻌﻣﻟا ءﺎﯾﺷﻷا ﻊﺿوُﺗ نأ بﺟﯾ :ررﺷﻟا
نﻋ لﻘﺗ ﻻ ﺔﻓﺎﺳﻣ
2 دﻘﻓ .بﺎﺑﻠﻟ ﻲﻠﺧادﻟا بﻧﺎﺟﻟاو نرﻔﻟا ناردﺟ نﻣ مﺳ
بﻌﺻﯾ لﻛﺷﺑ بﺎﺑﻠﻟ ﻲﻠﺧادﻟا بﻧﺎﺟﻟﺎﺑ جﺎﺟزﻟا فﻼﺗإ ﻲﻓ ررﺷﻟا بﺑﺳﺗﯾ
.ﮫﺣﻼﺻإ
دﻣﺟﺗﻟا ﺔﺑاذإ
.راودﻟا نﺣﺻﻟا ﻰﻠﻋ حوﺗﻔﻣ ءﺎﻋو ﻲﻓ دﻣﺟﺗﻣﻟا مﺎﻌطﻟا ﻊﺿ
ﺔﯾﺟرﺎﺧﻟا ﺔﯾﻧھدﻟا تﺎﻘﺑطﻟا وأ جﺎﺟدﻟا ﺔﺣﻧﺟأو لﺟرأ لﺛﻣ ،ﺔﺳﺎﺳﺣﻟا ءازﺟﻷا
نأ زوﺟﯾ ﻻ .موﯾﻧﻣوﻟﻷا ﻖﺋﺎﻗر نﻣ ةرﯾﻐﺻ ﻊطﻘﺑ ﺎﮭﯾﺗطﻐﺗ نﻛﻣﯾ ءاوﺷﻟا مﺣﻠﻟ
ﻖﺋﺎﻗر ﺔﻟازإ كﻧﻛﻣﯾ .ﻲﮭطﻟا زﯾﺣ ناردﺟ بﻧاوﺟ موﯾﻧﻣوﻟﻷا ﻖﺋﺎﻗر سﻣﻼﺗ
.دﻣﺟﺗﻟا ﺔﺑاذإ تﻗو فﺻﻧ ءﺎﺿﻘﻧا دﻌﺑ موﯾﻧﻣوﻟﻷا
لﺋﺎﺳﻟا اذھ نﻣ صﻠﺧﺗ .روﯾطﻟا وأ موﺣﻠﻟا نﻋ دﻣﺟﺗﻟا ﺔﺑاذإ دﻧﻋ لﺋﺎﺳ ﺞﺗﻧﯾ
ضارﻏأ ﺔﯾﻷ فورظ ﺔﯾأ تﺣﺗ ﮫﻣدﺧﺗﺳﺗ ﻻو روﯾطﻟاو موﺣﻠﻟا بﻠﻗ دﻧﻋ
.ىرﺧأ ﺔﻣﻌطأ ﺔﯾأ سﻣﻼﯾ ﮫﻠﻌﺟﺗ ﻻو ىرﺧأ
بﻠﻗ ﻲﻐﺑﻧﯾو .دﻣﺟﺗﻟا ﺔﺑاذإ ةدﻣ ءﺎﻧﺛأ نﯾﺗرﻣ وأ ةرﻣ مﺎﻌطﻟا بﯾﻠﻘﺗ وأ بﻠﻘﺑ مﻗ
.تارﻣ ةدﻋ ةرﯾﺑﻛﻟا مﺎﻌطﻟا ﻊطﻗ
10
نﻣ ةدﻣﻟ ﺔﻓرﻐﻟا ةرارﺣ ﺔﺟرد ﻲﻓ دﻣﺟﺗﻟا ﺎﮭﻧﻋ باذُﻣﻟا ءازﺟﻷا كرﺗا
20 .ﺔﻠﺛﺎﻣﺗﻣ ةرارﺣ ﺔﺟرد ﻰﻟإ ءازﺟﻷا ﻊﯾﻣﺟ لﺻﺗ ﻰﺗﺣ ﺔﻘﺣﻻ ﺔﻘﯾﻗد
ﻰﺗﺣ
مﺣﻠﻟا رﯾﺿﺣﺗ نﻛﻣﯾ .روﯾطﻠﻟ ﺔﯾﻠﺧادﻟا ءﺎﺷﺣﻷا ﺔﻟازإ تﻗوﻟا اذھ ﻲﻓ نﻛﻣﯾو
.لﺧادﻟا نﻣ ًﻼﯾﻠﻗ اًدﻣﺟﻣ لازﯾ ﻻ نﺎﻛ نإو ﻰﺗﺣ
arﺎﻧﺑ صﺎﺧﻟا ﻲﮭطﻟا وﯾدوﺗﺳ ﻲﻓ ﺎھرﺎﺑﺗﺧا مﺗ ﻲﺗﻟا قﺎﺑطﻷا
J وﯾدوﺗﺳ ﻲﻓ ﺎھرﺎﺑﺗﺧا مﺗ ﻲﺗﻟا قﺎﺑطﻷا
ﺎﻧﺑ صﺎﺧﻟا ﻲﮭطﻟا
فوﺳ .ﺎﮭﻟ ﺔﯾﻟﺎﺛﻣﻟا طﺑﺿﻟا عﺎﺿوأو قﺎﺑطﻷا نﻣ ﺔﻗﺎﺑ ﻲﻟﺎﺗﻟا لودﺟﻟا ﻲﻓ دﺟﺗ
موﻘﺗ يذﻟا ﻖﺑطﻠﻟ ﺔﺑﺳﻧﻟﺎﺑ فﯾوورﻛﯾﻣﻟا نرﻓ ةردﻘﻟ طﺑﺿ ﻊﺿو لﺿﻓأ دﺟﺗ
.ﺔﯾاوﺷﻟا ﻊﻣ كارﺗﺷﻻﺎﺑ وأ هدﺣو فﯾوورﻛﯾﻣﻟا نرﻓ مادﺧﺗﺳا كﻧﻛﻣﯾ .هدادﻋﺈﺑ
.رﯾﺿﺣﺗﻟا قرطو ﻲﮭطﻟا ﻲﻧاوﺄﺑ ﺔﺻﺎﺧﻟا ﺢﺋﺎﺻﻧﻟا ضﻌﺑ جاردﺈﺑ ﺎﻧﻣﻗو
تﺎظﺣﻼﻣ
.ﮫﻟ ﺔﻧوﻛﻣﻟا رﺻﺎﻧﻌﻟاو مﺎﻌطﻟا ةدوﺟ ﻰﻠﻋ دﻣﺗﻌﺗ
.موزﻠﻟا دﻧﻋ ﺎﮭﺗدﺎﯾزﺑ مﻗ مﺛ ،ﺔﯾادﺑﻟا ﻲﻓ ﺔﯾﻧﻣز
.ﻲﮭطﻟا زﯾﺣ نﻣ ﻲﮭطﻟا ﻲﻧاوأ وأ ﺔﻧﺧﺎﺳﻟا تﺎﯾﻟﺎﻣﻛﻟا جارﺧإ دﻧﻋ نرﻔﻟا
ةدﻋﺎﻗ كﺎﻧھ .لوادﺟﻟا ﻲﻓ ةددﺣﻣﻟا كﻠﺗ نﻋ ﺔﻔﻠﺗﺧﻣ تﺎﯾﻣﻛ كﯾدﻟ نوﻛﯾ دﻗ
،ﺎًﺑﯾرﻘﺗ نﻣزﻟا فﻌﺿ = ﺔﯾﻣﻛﻟا فﻌﺿ :فﯾوورﻛﯾﻣﻟا لﯾﻐﺷﺗﻟ ﺔﯾﺳﺎﺳأ
.نﻣزﻟا فﺻﻧ = ﺔﯾﻣﻛﻟا فﺻﻧو
.راودﻟا نﺣﺻﻟا ﻰﻠﻋ ﻲﮭطﻟا ءﺎﻧإ ﺎﻣﺋاد ﻊﺿ
.فﯾوورﻛﯾﻣﻟا نرﻔﻟ طﺑﺿﻟا عﺎﺿوأو تارﺎﯾﺧﻟا نﻣ دﯾدﻌﻟا ﺔﯾﻟﺎﺗﻟا لوادﺟﻟا كﻟ مدﻘﺗ
ﺎﻧﺑ صﺎﺧﻟا ﻲﮭطﻟا وﯾ دوﺗﺳ ﻲﻓ ﺎھرﺎﺑﺗﺧا مﺗ ﻲﺗﻟا قﺎﺑطﻷا
■ ﺎﮭﻧإ ثﯾﺣ .طﻘﻓ ﺎﮭﺑ دﺎﺷرﺗﺳﻼﻟ ﺔﺻﺻﺧﻣ لودﺟﻟا ﻲﻓ ةددﺣﻣﻟا تﺎﻗوﻷا
■ ةدﻣ رﺻﻗأ طﺑﺿا .لوادﺟﻟا ﻲﻓ ﺔﯾﻧﻣزﻟا تﺎﻗﺎطﻧﻟا دﯾدﺣﺗ ﺎﺑﻟﺎﻏ مﺗﯾﺗﺎظﺣﻼﻣ
■ تازﺎﻔﻗ وأ نرﻔﻠﻟ ﺔﺻﺻﺧﻣ شﺎﻣﻗ ﺔﻌطﻗ مادﺧﺗﺳا ﻰﻠﻋ ﺎﻣﺋاد صرﺣا
ةرﯾﺑﻛﻟا تﺎﯾﻣﻛﻟا .لوطأ ةرﺗﻓ طﺑﺿا
جﺎﺗﺣﺗ تﺎﻘﺑطﻟا ةددﻌﺗﻣ ﺔﻣﻌطﻷاو
.ﺎًﯾﺑﺳﻧ ﺔﻠﯾوط تارﺗﻓ ﻰﻟإ
ﻲﮭطﻟا نﻣز ءﺎﻧﺛأ مﺎﻌطﻟا بﯾﻠﻘﺗﺑ مﻗ
طﺑﺿ ﻊﺿو ﺔﻣدﺎﻘﻟا ةرﻣﻟا ﻲﻓ رﺗﺧاو
نﻣزو فﯾوورﻛﯾﻣﻟا نرﻓ ةردﻘﻟ لﻗأ
.لوطأ ﻲﮭط
طﺑﺿ ﻊﺿو ﺔﻣدﺎﻘﻟا ةرﻣﻟا ﻲﻓ رﺗﺧا
ﺎﻣدﻧﻋ .فﯾوورﻛﯾﻣﻟا نرﻓ ةردﻘﻟ لﻗأ
ةرﯾﺑﻛ ﺔﯾﻣﻛ نﻋ دﻣﺟﺗﻟا ﺔﺑاذﺈﺑ موﻘﺗ
.تارﻣ ةدﻋ ﺎﮭﺑﻠﻘﺑ مﻗ ،مﺎﻌطﻟا نﻣ
دﻣﺟﺗﻟا ﺔﺑاذإ ﺢﺋﺎﺻﻧ
دﻣﺟﺗﻟا باذﯾ نأ نود تﻗوﻟا ﻰﺿﻘﻧا
وأ ﮫﻧﯾﺧﺳﺗ مﺗﯾ نأ نود وأ مﺎﻌطﻟا نﻋ
.ﮫﯾﮭط
ضرﻌﺗﯾ ﻲﮭطﻟا نﻣز ءﺎﺿﻘﻧا دﻧﻋ
ﺔﻓﺎﺣﻟا نﻣ ﺔطرﻔﻣﻟا ﺔﻧوﺧﺳﻠﻟ مﺎﻌطﻟا
.لﺧادﻟا نﻣ ﺞﺿﻧﯾ مﻟ ﺎﻣﻧﯾﺑ
نﻋ دﻣﺟﺗﻟا ﺔﺑاذإ مﺗﯾ دﻣﺟﺗﻟا ﺔﺑاذإ دﻌﺑ
ﻲﻓ ،جرﺎﺧﻟا نﻣ مﺣﻠﻟا وأ روﯾطﻟا
.لﺧادﻟا نﻣ ةدﻣﺟﺗﻣ لظﺗ نﯾﺣ
تﺎظﺣﻼﻣ
ﻲﮭطﻟا نﻣز
ﻖﺋﺎﻗدﻟﺎﺑ
-
15
10 -20
20
15 -25
30
20 -30
جﺎﺟزﻟا نﻣ ﺔﻋوﻧﺻﻣﻟا ﺔﻧوﺧﺳﻠﻟ ﺔﻣوﺎﻘﻣﻟا نرﻔﻟا ﻲﻧاوأ ﻲھ ﺔﺑﺳﺎﻧﻣﻟا ﻲﻧاوﻷا
.ﺔﻧوﺧﺳﻠﻟ موﺎﻘﻣﻟا كﯾﺗﺳﻼﺑﻟا وأ فزﺧﻟا وأ نﯾﻠﺳروﺑﻟا وأ ﻲﺟﺎﺟزﻟا فزﺧﻟا وأ
ﻖﺑط نﻣ مﺎﻌطﻟا لﻘﻧ اذھ كﯾﻠﻋ رﻓوﯾو .ةدﺋﺎﻣﻟا قﺎﺑطأ مادﺧﺗﺳا ﺎﺿﯾأ كﻧﻛﻣﯾ
ﺔﯾﺿﻓ وأ ﺔﺑھذُﻣ تﺎﯾﻠﺣ ﻰﻠﻋ يوﺗﺣﺗ نرﻓ ﻲﻧاوأ مدﺧﺗﺳﺗ ﻻأ ﻲﻐﺑﻧﯾ .رﺧﻵ
.فﯾوورﻛﯾﻣﻟا تﺎﺟوﻣﻟ ذﻔﻧﻣ رﯾﻏ ندﻌﻣﻟﺎﻓ .ﺔﺑﺳﺎﻧﻣ رﯾﻏ ﺔﯾﻧدﻌﻣﻟا ﻲﮭطﻟا ﻲﻧاوأ
طاوﻟﺎﺑ فﯾوورﻛﯾﻣﻟا
180
90
180
90
180
90
ﺔﺑﺳﺎﻧﻣﻟا نرﻔﻟا ﻲﻧاوأ
.فﯾوورﻛﯾﻣﻟا تﺎﺟوﻣﻟ ةذﻔﻧﻣ ﺎﮭﻧﺄﺑ داوﻣﻟا هذھ زﯾﻣﺗﺗ ثﯾﺣ
ﻻإ.فﯾوورﻛﯾﻣﻟا نارﻓأ ﻲﻓ مادﺧﺗﺳﻼﻟ ﺎﮭﺗﻣءﻼﻣ ﺔﻌﻧﺎﺻﻟا ﺔﮭﺟﻟا تﻧﻣﺿ اذإ
ﺔﺑﺳﺎﻧﻣﻟا رﯾﻏ ﻲﮭطﻟا ﻲﻧاوأ
.ةدرﺎﺑ ةﺎطﻐﻣﻟا ﺔﯾﻧدﻌﻣﻟا ﻲﻧاوﻷا ﻲﻓ ةدوﺟوﻣﻟا ﺔﻣﻌطﻷا لظﺗ ﻲﻟﺎﺗﻟﺎﺑو
دﻣﺟﺗﻟا ﺔﺑاذإنزوﻟا نرﻓ ةردﻗ
800مﺟ
1مﺟﻛ
1.5مﺟﻛ
وﻠﺗﺑﻟا مﺣﻟ ،ﺔﻠﻣﺎﻛﻟا يرﻘﺑﻟا مﺣﻠﻟا ﻊطﻗ
(مظﻋ نودﺑ وأ مظﻌﻟﺎﺑ)
18
Page 30

ءﻼﻣﻌﻟا ﺔﻣدﺧar
4ءﻼﻣﻌﻟا ﺔﻣدﺧ
كزﺎﮭﺟ جﺎﺗﺣا ﺎﻣ اذإ نوﻌﻟا ﺎﻧﺑ ﺔﺻﺎﺧﻟا ﻊﯾﺑﻟا دﻌﺑ ﺎﻣ ﺔﻣدﺧ زﻛارﻣ كﻟ مدﻘﺗ
كﻟذو ،ﺎﺑﺳﺎﻧﻣ ﻼﺣ دﺎﺟﯾإ ﻰﻠﻋ ﺎﻣﺋاد صرﺣﻧ فوﺳو .حﻼﺻإ لﺎﻣﻋأ ﺔﯾﻷ
.عاد نود كﯾﻟإ ﻊﯾﺑﻟا دﻌﺑ ﺎﻣ ﺔﻣدﺧ ﻲﯾﻧﻓ بﺎھذ بﻧﺟﺗﻟ
ﺞﺗﻧﻣﻟا مﻗرE ﻊﻧﺻﻟا مﻗرو FD
ﺞﺗﻧﻣﻟا مﻗر رﻛذ ﻰﺟرﯾ ﺎﻧﺑ لﺎﺻﺗﻻا دﻧﻋ)E ( ﻊﻧﺻﻟا مﻗرو )FD ( ﻰﺗﺣ
هذھ لﻣﺣﺗ ﻲﺗﻟا ﻊﻧﺻﻟا ﺔﺣوﻟ دﺟوﺗ .ﺔﺣﯾﺣﺻﻟا ةروﺷﻣﻟا كﻟ مدﻘﻧ نأ ﻊﯾطﺗﺳﻧ
.نﻣﯾﻷا بﻧﺎﺟﻟا ﻰﻠﻋ ﻲﮭطﻟا زﯾﺣ بﺎﺑ ﺢﺗﻓ دﻧﻋ مﺎﻗرﻷا
=1U)'(1U
7\SH
فﺗﺎھ مﻗرو كزﺎﮭﺟ مﺎﻗرأ نﯾودﺗ كﻧﻛﻣﯾ لطﻋ ثودﺣ ﺔﻟﺎﺣ ﻲﻓ تﻗوﻟا رﯾﻓوﺗﻟ
.ﺎﮭﯾﻟإ ﺔﺟﺎﺣﻟا ﺔﻟﺎﺣ ﻲﻓ هﺎﻧدأ ةدوﺟوﻣﻟا تﺎﻏارﻔﻟا ﻲﻓ ﻊﯾﺑﻟا دﻌﺑ ﺎﻣ ﺔﻣدﺧ زﻛرﻣ
ﻊﻧﺻﻟا مﻗر
FD no.
ءوﺳ ﺔﻟﺎﺣ ﻲﻓ ﺔﯾﻧﺎﺟﻣ تﺳﯾﻟ ﻊﯾﺑﻟا دﻌﺑ ﺎﻣ ﺔﻣدﺧ ﻲﻧﻓ ةرﺎﯾز نأ ةﺎﻋارﻣ ﻰﺟرُﯾ
.نﺎﻣﺿﻟا نﺎﯾرﺳ ةرﺗﻓ ءﺎﻧﺛأ ﻰﺗﺣ ،زﺎﮭﺟﻟا مادﺧﺗﺳا
.ﺔﻘﻓرﻣﻟا ءﻼﻣﻌﻟا ﺔﻣدﺧ ﺔﺣﺋﻻ ﻲﻓ لودﻟا ﻊﯾﻣﺟﺑ ﺔﺻﺎﺧﻟا لﺎﺻﺗﻻا تﺎﻧﺎﯾﺑ دﺟﺗ
ﺞﺗﻧﻣﻟا مﻗر
E no.
ﻊﯾﺑﻟا دﻌﺑ ﺎﻣ ﺔﻣدﺧO
ءﻼﻣﻌﻟا ﺔﻣدﺧ
ﺞﺗﻧﻣﻟا نﻋ رﺎﺳﻔﺗﺳﻼﻟو ﻲﻧﻔﻟا نﻣ ةرﺎﯾز زﺟﺣﻟ
0344 892 8979
ﺎﯾﻧﺎطﯾرﺑ
.ﺔﻟاوﺟﻟا وأ ﺔﯾﻠﺣﻣﻟا تﻻﺎﺻﺗﻻا ﺔﻔﯾرﻌﺗﺑ تﺎﻣﻟﺎﻛﻣﻟا ﺔﻔﻠﻛﺗ بﺎﺳﺗﺣا مﺗﯾ
01450 2655
0.03 ةورذﻟا تﺎﻋﺎﺳ جرﺎﺧو .ةورذﻟا تﺎﻗوأ ﻲﻓ ﺔﻘﯾﻗدﻠﻟ وروﯾ
0.0088.ﺔﻘﯾﻗدﻠﻟ وروﯾ
ادﻧﻟرﯾأ
ذﻔﻧﯾﺳ يذﻟا نأ ﺎًﻧﺋﻣطﻣ نﻛﺗﻠﻓ .ﺔﻌﻧﺎﺻﻟا ﺔﮭﺟﻟا ﺔﯾﻓارﺗﺣا ﻰﻠﻋ دﺎﻣﺗﻋﻻا كﻧﻛﻣﯾ
.كﺗزﮭﺟﻷ ﺔﯾﻠﺻأ رﺎﯾﻏ ﻊطﻗ نوﻣدﺧﺗﺳﯾ نﯾﺑردﻣ نﯾﯾﻧﻓ حﻼﺻﻹا
EN 55011 و CISPR 11 جردﻧﯾو .
تﺎﻔﺻاوﻣﻠﻟ ﻖﺑﺎطﻣ زﺎﮭﺟﻟا اذھ
2 ﺔﺋﻔﻟا ،B.
ﺔﻋوﻣﺟﻣﻟا تﺎﺟﺗﻧﻣ نﻣﺿ
ﺔﻋوﻣﺟﻣﻟا ﻲﻧﻌﺗ
2 .مﺎﻌطﻟا نﯾﺧﺳﺗ ضرﻐﻟ ﺔﻌﻧﺻﻣ فﯾوورﻛﯾﻣﻟا نارﻓأ نأ
B.ﻲﻟزﻧﻣﻟا مادﺧﺗﺳﻼﻟ مﺋﻼﻣ زﺎﮭﺟﻟا نأ
ﺔﺋﻔﻟا ﺢﺿوﺗو
17
Page 31

arلﺎطﻋﻷا ﻰﻠﻋ بﻠﻐﺗﻟا
~
~
مﺗ ﻲﺗﻟا قﺎﺑطﻷا»
18
.ﺔﯾﻟﺎﺛﻣﻟا طﺑﺿﻟا عﺎﺿوﺄﺑ ﺔﻘﻠﻌﺗﻣﻟا تﺎظﺣﻼﻣﻟاو
ﺔﺣﻔﺻ ﻲﻓ «ﺎﻧﺑ صﺎﺧﻟا ﻲﮭطﻟا وﯾدوﺗﺳ ﻲﻓ ﺎھرﯾﺿﺣﺗ
:رﯾذﺣﺗ – !ﻲﺋﺎﺑرﮭﻛﻟا ﻖﻌﺻﻟا رطﺧ
لﺎﻣﻋأ ءارﺟإ زوﺟﯾ ﻻو .ةروطﺧ لﺛﻣﺗ ﺔﻣﯾﻠﺳﻟا رﯾﻏ حﻼﺻﻹا لﺎﻣﻋأ
نﯾﺑردﻣﻟا نﯾﯾﻧﻔﻟا دﺣأ ﺔﻓرﻌﻣﺑ ﻻإ ﺔﻔﻟﺎﺗﻟا ءﺎﺑرﮭﻛﻟا تﻼﺑﺎﻛ رﯾﯾﻐﺗ وأ حﻼﺻﻹا
لﻠﺧ روﮭظ ﺔﻟﺎﺣ ﻲﻓ .ﺎﻧﻟ ﺔﻌﺑﺎﺗﻟا ﻊﯾﺑﻟا دﻌﺑ ﺎﻣ ﺔﻣدﺧ زﻛارﻣ ﻲﻓ نﯾﻠﻣﺎﻌﻟا
ﺔﯾﺋﺎﺑرﮭﻛﻟا ةرﺋادﻟا ﻊطﺎﻗ لﺻﻓا وأ ءﺎﺑرﮭﻛﻟا نﻋ زﺎﮭﺟﻟا لﺻﻓا ،زﺎﮭﺟﻟﺎﺑ
.ﻊﯾﺑﻟا دﻌﺑ ﺎﻣ ﺔﻣدﺧ زﻛرﻣﺑ لﺻﺗا .رھﺎﺻﻣﻟا قودﻧﺻ ﻲﻓ دوﺟوﻣﻟا
.مﯾﻠﺳ لﻛﺷﺑ لﻣﻌﯾ زﺎﮭﺟﻟﺎﺑ صﺎﺧﻟا رﮭﺻﻣﻟا/ﺔﯾﺋﺎﺑرﮭﻛﻟا
ةرﻣ ﮫﻠﯾﺻوﺗﺑ مﻗ مﺛ ،رھﺎﺻﻣﻟا قودﻧﺻ ﻲﻓ دوﺟوﻣﻟاو
10ﻲﻧاوﺛ
ﻲﻟاوﺣ دﻌﺑ ىرﺧأ
رزﻟا ﻰﻠﻋ طﻐﺿا"start" ﻊﺿو ءﺎﻐﻟﺈﺑ مﻗ وأ (لﯾﻐﺷﺗ)
"stop".(فﺎﻘﯾإ)
رزﻟا ﻰﻠﻋ طﻐﺿﻟا لﻼﺧ نﻣ طﺑﺿﻟا
.بﺎﺑﻟﺎﺑ ةرﺻﺣﻧﻣ
.فﯾوورﻛﯾﻣﻟا نرﻓ ةردﻘﻟ ﻰﻠﻋأ طﺑﺿ ﻊﺿو رﺗﺧا
ﻲﻓ دوﺟوﻣﻟا فﯾوﺟﺗﻟاو ةراودﻟا ةرﻛﺑﻟا قوط فﯾظﻧﺗﺑ مﻗ
.ﻲﮭطﻟا زﯾﺣ
.ﻊﯾﺑﻟا دﻌﺑ ﺎﻣ
ﺔﺣﻔﺻ ﻲﻓ «ﺔﯾﺳﺎﺳﻷا طﺑﺿﻟا عﺎﺿوأ»
14
ثدﺣﺗ ﺔﺋرﺎط ﺔﻠﻛﺷﻣ ﻲﮭﻓ ﺔﻟﺎﺳرﻟا تﻔﺗﺧا اذﺈﻓ ،ىرﺧأ ةرﻣ
تﻠظ اذإ وأ ىرﺧأ ةرﻣ لﻠﺧﻟا ثدﺣ اذإ .طﻘﻓ ةدﺣاو ةرﻣ
ﺔﻣدﺧ زﻛرﻣﺑ لﺎﺻﺗﻻا ﻰﺟرﯾﻓ ،ﺔﺿورﻌﻣ ﺄطﺧﻟا ﺔﻟﺎﺳر
.ﺄطﺧﻟا دوﻛ مﮭﺋﺎطﻋإو ﻊﯾﺑﻟا دﻌﺑ ﺎﻣ
ﺔﺟرد ﻰﻠﻋ فﯾوورﻛﯾﻣﻟا نرﻓ جرﺧ ةردﻗ طﺑﺿ مﺗ
.زﺎﮭﺟﻟا ﻲﻓ دﺎﺗﻌﻣﻟا نﻣ رﺑﻛأ مﺎﻌط ﺔﯾﻣﻛ ﻊﺿو مﺗ.نﻣزﻟا فﻌﺿ – ﺔﯾﻣﻛﻟا فﻌﺿ
ةدوﺟوﻣﻟا ﺔﻘطﻧﻣﻟا ﻲﻓ ﺔﺑﯾرﻏ مﺎﺳﺟأ وأ تﺎﺧﺎﺳﺗا كﺎﻧھ
3لﺎطﻋﻷا ﻰﻠﻋ بﻠﻐﺗﻟا
زﻛرﻣﺑ لﺎﺻﺗﻻا لﺑﻗ .طﯾﺳﺑ حرﺷ بﻟﺎﻐﻟا ﻲﻓ ﮫﻟ نوﻛﯾ ﺎﻣ ﺄطﺧ ثدﺣ اذإ
ﺢﯾﺣﺻﺗ ﺔﻟوﺎﺣﻣو لﺎطﻋﻷا لودﺟ ﻰﻟإ عوﺟرﻟا ﻰﺟرﯾ ﻊﯾﺑﻟا دﻌﺑ ﺎﻣ ﺔﻣدﺧ
.كﺳﻔﻧﺑ ﺄطﺧﻟا
:ﺔﺣﯾﺻﻧ ﺎﮭﯾﻓ بﻏرﺗ تﻧﻛ ﻲﺗﻟا ﺔﺟﯾﺗﻧﻟا سﻔﻧﺑ قﺎﺑطﻷا دﺣأ جرﺧﯾ مﻟ اذإ
ﺢﺋﺎﺻﻧﻟا نﻣ رﯾﺛﻛﻟا ﮫﺑ دﺟﺗ ثﯾﺣ ،ﻲﻟﺎﺗﻟا لﺻﻔﻟا ﻰﻟإ ﻊﺟرﺎﻓ ،طﺑﺿﻟﺎﺑ
لﺎطﻋﻷا لودﺟ
ﻲﺋﺎﺑرﮭﻛﻟا سﺑﻘﻣﻟا ﻲﻓ عوﺿوﻣ رﯾﻏ سﺑﺎﻘﻟاءﺎﺑرﮭﻛﻟا ردﺻﻣﺑ زﺎﮭﺟﻟا لﯾﺻوﺗﺑ مﻗ
لﻣﻌﯾ ﻻ زﺎﮭﺟﻟا
ﻲﺋﺎﺑرﮭﻛﻟا رﺎﯾﺗﻟا عﺎطﻘﻧالﻣﻌﺗ ىرﺧأ ﺦﺑطﻣ ةزﮭﺟأ كﺎﻧھ تﻧﺎﻛ اذإ ﺎﻣ صﺣﻓا
رﮭﺻﻣﻟا/ﺔﯾﺋﺎﺑرﮭﻛﻟا ةرﺋادﻟا ﻊطﺎﻗ لطﻌﺗ ةرﺋادﻟا ﻊطﺎﻗ نأ دﻛﺄﺗو رھﺎﺻﻣﻟا قودﻧﺻ صﺣﻓا
لﯾﻐﺷﺗﻟﺎﺑ لﻠﺧ زﺎﮭﺟﻟﺎﺑ صﺎﺧﻟا رﮭﺻﻣﻟا/ﺔﯾﺋﺎﺑرﮭﻛﻟا ةرﺋادﻟا ﻊطﺎﻗ لﺻﻓا
.ضرﻌﻟا ةدﺣو ﻲﻓ رﺎﻔﺻأ ﺔﺛﻼﺛ ضﻣوﺗﻲﺋﺎﺑرﮭﻛﻟا رﺎﯾﺗﻟا عﺎطﻘﻧا.تﻗوﻟا طﺑﺿ دﻋأ
.دﺻﻗ نود راودﻟا رﺎﯾﺗﺧﻻا حﺎﺗﻔﻣ ةرادإ مﺗ رزﻟا ﻰﻠﻋ طﻐﺿا"stop".(فﺎﻘﯾإ)
زرﻟا ﻰﻠﻋ طﻐﺿﻟا مﺗ"start" ﻊﺿو ءارﺟإ دﻌﺑ (فﺎﻘﯾإ)
ﻲﻓ ﻲﮭطﻟا نﻣز رﮭظﯾ .لﻣﻌﯾ ﻻ زﺎﮭﺟﻟا
.ضرﻌﻟا ةدﺣو
.طﺑﺿﻟا
.لﻣﻌﯾ ﻻ فﯾوورﻛﯾﻣﻟا نرﻓ.ﺢﯾﺣﺻ لﻛﺷﺑ بﺎﺑﻟا ﻖﻠﻏ مﺗﯾ مﻟ ﺔﺑﯾرﻏ مﺎﺳﺟأ وأ مﺎﻌط ﺎﯾﺎﻘﺑ كﺎﻧھ تﻧﺎﻛ اذإ ﺎﻣ دﻛﺄﺗ
رزﻟا ﻰﻠﻋ طﻐﺿﻟا مﺗ"start".(لﯾﻐﺷﺗ) رزﻟا ﻰﻠﻋ طﻐﺿا"start".(لﯾﻐﺷﺗ)
دﺎﺗﻌﻣﻟا نﻣ لوطأ ﺎًﺗﻗو قرﻐﺗﺳﯾ ﺞﻣﺎﻧرﺑﻟا
.ﺔﯾﺎﻐﻠﻟ ﺔﺿﻔﺧﻧﻣ
مﺎﻌطﻟا نﯾﺧﺳﺗ ﻲﻓ
.دﺎﺗﻌﻣﻟا نﻣ ةدورﺑ رﺛﻛأ نﺎﻛ مﺎﻌطﻟا.نﯾﺧﺳﺗﻟا ءﺎﻧﺛأ مﺎﻌطﻟا بﯾﻠﻘﺗﺑ مﻗ
توﺻ راودﻟا نﺣﺻﻟا نﻋ ردﺻﯾ
.راودﻟا نﺣﺻﻟا ﺔﯾﻟآ لوﺣ
.فﯾوورﻛﯾﻣﻟا نرﻔﺑ لﻠﺧ كﺎﻧھ ﺔﻣدﺧ زﻛرﻣﺑ لﺎﺻﺗﻻا ﻰﺟرُﯾ ،لﻠﺧﻟا اذھ ثودﺣ ررﻛﺗ اذإ
بﺎﺑﺳﻷ فﯾوورﻛﯾﻣﻟا نرﻓ فﻗوﺗ دﻘﻟ
.كﺎﻛﺗﺣا وأ رﯾرﺻ
.ﺔﺣﺿاو رﯾﻏ
ﺄطﺧﻟا ﺔﻟﺎﺳر"E - 3".بﺎﺑﻠﻟ ﻲﻛﯾﺗﺎﻣوﺗوﻷا ﺢﺗﻔﻟا مﺎظﻧ ﻲﻓ لﻠﺧ ﮫﻠﯾﻐﺷﺗو زﺎﮭﺟﻟا فﺎﻘﯾﺈﺑ مﻗ ،ﺄطﺧ ﺔﻟﺎﺳر كﻟ ترﮭظ اذإ
لﺎطﻋﻷا ﻰﻠﻋ بﻠﻐﺗﻟا
لطﻌﻟالﻣﺗﺣﻣﻟا بﺑﺳﻟاتﺎﻣوﻠﻌﻣﻟا/لﺣﻟا
رﮭظﯾi.ضرﻌﻟا ةدﺣو ﻲﻓ ضارﻌﺗﺳﻻا ﺔﻘﯾرط ﻲﻓ زﺎﮭﺟﻟا .ضارﻌﺗﺳﻻا ﻊﺿو ﺔﯾﻟﺎﻌﻓ فﺎﻘﯾﺈﺑ مﻗ
--------
16
Page 32

فﯾظﻧﺗﻟاar
~
فﯾﻔﺟﺗﻟﺎﺑ مﻗ مﺛ ﻲﻧاوأ ﺔطوﻓ مادﺧﺗﺳﺎﺑ فﯾظﻧﺗﻟﺎﺑ مﻗ
تﺎطﺷﺎﻛ مدﺧﺗﺳﺗ ﻻ .ﺔﻣﻋﺎﻧ شﺎﻣﻗ ﺔﻌطﻗ مادﺧﺗﺳﺎﺑ
.فﯾظﻧﺗﻟا ﻲﻓ جﺎﺟزﻟا وأ ندﺎﻌﻣﻟا
:نﺧﺎﺳ ﻲﻧوﺑﺎﺻ لوﻠﺣﻣ
فﯾﻔﺟﺗﻟﺎﺑ مﻗ مﺛ ﻲﻧاوأ ﺔطوﻓ مادﺧﺗﺳﺎﺑ فﯾظﻧﺗﻟﺎﺑ مﻗ
ﻊﻘﺑﻟا ﺔﻟازﺈﺑ مﻗ .ﺔﻣﻋﺎﻧ شﺎﻣﻗ ﺔﻌطﻗ مادﺧﺗﺳﺎﺑ
لﺛﻣ) لﻻزﻟاو ﺎﺷﻧﻟا ﻊﻘﺑو ﺔﯾﻧھدﻟا وأ ﺔﯾرﯾﺟﻟاو
رداوﺑ رﮭظﺗ نأ نﻛﻣﯾ .روﻔﻟا ﻰﻠﻋ (ضﯾﺑﻟا ضﺎﯾﺑ
نﻛﻣﯾ .تﺎﺧﯾطﻠﺗﻟا وأ ﻊﻘﺑﻟا هذھ لﻔﺳأ لﻛﺂﺗﻟا
لﯾﺗﺳ سﻠﻧﺎﺗﺳﻼﻟ ﺔﺻﺎﺧ تﺎﻔظﻧﻣ ﻰﻠﻋ لوﺻﺣﻟا
رﺟﺎﺗﻣﻟا وأ ﻊﯾﺑﻟا دﻌﺑ ﺎﻣ ﺔﻣدﺧ زﻛارﻣ ىدﻟ
وأ جﺎﺟزﻟا تﺎﻔظﻧﻣ مدﺧﺗﺳﺗ ﻻ .ﺔﺻﺻﺧﺗﻣﻟا
.فﯾظﻧﺗﻟا ﻲﻓ جﺎﺟزﻟا وأ ندﺎﻌﻣﻟا تﺎطﺷﺎﻛ
مﻗ :لﺧﻟا لوﻠﺣﻣ وأ نﺧﺎﺳ ﻲﻧوﺑﺎﺻ لوﻠﺣﻣ
فﯾﻔﺟﺗﻟﺎﺑ مﻗ مﺛ ﻲﻧاوأ ﺔطوﻓ مادﺧﺗﺳﺎﺑ فﯾظﻧﺗﻟﺎﺑ
يارﺑﺳا مدﺧﺗﺳﺗ ﻻ .ﺔﻣﻋﺎﻧ شﺎﻣﻗ ﺔﻌطﻗ مادﺧﺗﺳﺎﺑ
وأ ىرﺧﻷا ﺔﻟﺎﻛﻷا نرﻔﻟا تﺎﻔظﻧﻣ نﻣ وأ نرﻔﻟا
ﺔﺷدﺎﺧﻟا ﺔﺷﻣﻗﻷا رﺑﺗﻌﺗ .ﺔﺷدﺎﺧﻟا داوﻣﻟا
تﺎﯾﻼﻘﻟﺎﺑ ﺔﺻﺎﺧﻟا تﺎﻔظﻧﻣﻟاو ﺔﻧﺷﺧﻟا تﺎﺟﻧﻔﺳﻹاو
ﻲﻓ ءﺎﯾﺷﻷا هذھ بﺑﺳﺗﺗ ثﯾﺣ .ﺎﺿﯾأ ﺔﺑﺳﺎﻧﻣ رﯾﻏ
ﺔﯾﻠﺧادﻟا ﺢطﺳﻷا كرﺗا .ﺢطﺳﻷﺎﺑ شودﺧ ثودﺣ
.ﺎًﻣﺎﻣﺗ فﺟﺗ
ﻰﻟإ ءﺎﻣﻟا لﻠﺧﺗﯾ ﻻأ بﺟﯾ :ﺔﺑطر شﺎﻣﻗ ﺔﻌطﻗ
ﺔﯾﻟآ فﻔﺟ .راودﻟا نﺣﺻﻟا ةرادإ ﺔﯾﻟآ رﺑﻋ زﺎﮭﺟﻟا
.شﺎﻣﻗ ﺔﻌطﻗ مادﺧﺗﺳﺎﺑ راودﻟا نﺣﺻﻟا ةرادإ
راودﻟا نﺣﺻﻟا ةدﺎﻋإ دﻧﻋ :نﺧﺎﺳ ﻲﻧوﺑﺎﺻ لوﻠﺣﻣ
.ﺢﯾﺣﺻ لﻛﺷﺑ ﮫﯾﻓ تﺑﺛﯾ نأ بﺟﯾ ،ﮫﻔﯾوﺟﺗ ﻰﻟإ
.كرﻔﻟﺎﺑ مﻘﺗ ﻻ .ةﺎﺷرﻓ وأ ﻲﻧاوأ ﺔطوﻓ مادﺧﺗﺳﺎﺑ
ﻲﻓ جﺎﺟزﻟا وأ ندﺎﻌﻣﻟا تﺎطﺷﺎﻛ مدﺧﺗﺳﺗ ﻻو
.فﯾظﻧﺗﻟا
.جﺎﺟزﻟا تﺎطﺷﺎﻛ مدﺧﺗﺳﺗ ﻻ .ﻲﻧاوأ
قﺎطﻧﻟافﯾظﻧﺗﻟا ةدﺎﻣ
زﺎﮭﺟﻟا ﺔﮭﺟاو :نﺧﺎﺳ ﻲﻧوﺑﺎﺻ لوﻠﺣﻣ
زﺎﮭﺟﻟا ﺔﮭﺟاو
نﻣ ﺔﻋوﻧﺻﻣﻟا
لﯾﺗﺳ سﻠﻧﺎﺗﺳﻻا
عوﻧﺻﻣﻟا ﻲﮭطﻟا زﯾﺣ
لﯾﺗﺳ سﻠﻧﺎﺗﺳﻻا نﻣ
زﯾﺣ ﻲﻓ فﯾوﺟﺗﻟا
ﻲﮭطﻟا
ﺔﻘﻠﺣﻟاو راودﻟا نﺣﺻﻟا
ةراودﻟا
ﺔﯾﻛﻠﺳﻟا ﺔﻛﺑﺷﻟا ﺎﮭﻔﯾظﻧﺗو ﺎﮭﻌﻘﻧﺑ مﻗ :نﺧﺎﺳ ﻲﻧوﺑﺎﺻ لوﻠﺣﻣ
بﺎﺑﻟا تﺎﺣوﻟ ﺔطوﻓ مادﺧﺗﺳﺎﺑ فﯾظﻧﺗﻟﺎﺑ مﻗ :جﺎﺟزﻟا فظﻧﻣ
Dفﯾظﻧﺗﻟا
هرﮭظﻣﺑ ﺎًظﻔﺗﺣﻣ كزﺎﮭﺟ لظﯾ دﯾﺟﻟا فﯾظﻧﺗﻟاو ةدﯾﺟﻟا ﺔﯾﺎﻧﻌﻟا لﻼﺧ نﻣ
ﺎﻧھ كﻟ حرﺷﻧ فوﺳو .ﺔﻠﯾوط ةرﺗﻔﻟ ﺔﻠﻣﺎﻛﻟا ةءﺎﻔﻛﻟﺎﺑ ﮫﺗﯾﻔﯾظو يدؤﯾو
.ﮫﻔﯾظﻧﺗو زﺎﮭﺟﻟﺎﺑ ﺔﯾﺎﻧﻌﻠﻟ ﺢﯾﺣﺻﻟا بوﻠﺳﻷا
:رﯾذﺣﺗ – !قورﺣﺑ ﺔﺑﺎﺻﻹا رطﺧ
زﺎﮭﺟﻟا كرﺗا .ﮫﻓﺎﻘﯾإ روﻓ زﺎﮭﺟﻟا فﯾظﻧﺗﺑ مﻘﺗ ﻻ .ﺔﯾﺎﻐﻠﻟ ﺎًﻧﺧﺎﺳ زﺎﮭﺟﻟا ﺢﺑﺻﯾ
.ًﻻوأ درﺑﯾ
:رﯾذﺣﺗ – !ﻲﺋﺎﺑرﮭﻛﻟا ﻖﻌﺻﻟا رطﺧ
نأ نﻛﻣﯾ ثﯾﺣ ،رﺎﺧﺑﻟﺎﺑ وأ ﻲﻟﺎﻌﻟا طﻐﺿﻟﺎﺑ فﯾظﻧﺗ ةزﮭﺟأ ﺔﯾأ مدﺧﺗﺳﺗ ﻻ
.ﻲﺋﺎﺑرﮭﻛ ﻖﻌﺻ ثودﺣ ﻲﻓ بﺑﺳﺗﺗ
:رﯾذﺣﺗ – !ﺔﺑﺎﺻﻹا رطﺧ
جﺎﺟز ﺔطﺷﺎﻛ مدﺧﺗﺳﺗ ﻻ .تﺎﻘﻘﺷﺗ ﻰﻟإ روطﺗﺗ دﻗ زﺎﮭﺟﻟا بﺎﺑ جﺎﺟز شودﺧ
.ﺔﻟﺎﻛأ وأ ﺔﻧﺷﺧ فﯾظﻧﺗ داوﻣ وأ فﯾظﻧﺗﻟا ﻰﻠﻋ ةدﻋﺎﺳﻣ لﺋﺎﺳو وأ
:رﯾذﺣﺗ – !ﺔﻣﯾﺳﺟ ﺔﯾﺣﺻ رارﺿأ ثودﺣ رطﺧ
نأ نﻛﻣﯾو .مﯾﻠﺳ لﻛﺷﺑ ﮫﻔﯾظﻧﺗ مﺗﯾ مﻟ اذإ ررﺿﻠﻟ زﺎﮭﺟﻟا ﺢطﺳ ضرﻌﺗﯾ دﻗ
مﻗو ،ﺔﻣظﺗﻧﻣ تارﺗﻓ ﻰﻠﻋ زﺎﮭﺟﻟا فﯾظﻧﺗﺑ مﻗ .فﯾوورﻛﯾﻣﻟا ﺔﻗﺎط برﺳﺗﺗ
ﺔﺣﻔﺻ ﻲﻓ «فﯾظﻧﺗﻟا ةدﺎﻣ»
15
.ﻲﺋﺎﻣ رﺎﯾﺗ تﺣﺗ ﮫﻔظﻧﺗ وأ ءﺎﻣﻟﺎﺑ زﺎﮭﺟﻟا رﻣﻐﺗ ﻻ
ﻰﻟإ نوﻣﯾﻠﻟا رﯾﺻﻋ تارطﻗ ضﻌﺑ فﺿأ .ﺔﻟوﮭﺳ لﻛﺑ ﺎﮭﻧﻣ صﻠﺧﺗﻟا نﻛﻣﯾ
نﯾﺧﺳﺗﺑ مﻗ .ﻲﻠﻐﻟا رﺧﺄﺗ ﻊﻧﻣﻟ ءﺎﻋوﻟا ﻲﻓ ﺔﻘﻌﻠﻣ ﺎﻣﺋاد ﻊﺿ .ءﺎﻣﻟا نﻣ بوﻛ
ةردﻗ ﻰﺻﻗأ ﻰﻠﻋ نﯾﺗﻘﯾﻗد وأ ﺔﻘﯾﻗد ةدﻣﻟ ءﺎﻣﻟافﯾوورﻛﯾﻣﻟا نرﻔﻟ.
رﯾﻏ فﯾظﻧﺗ ةدﺎﻣ مادﺧﺗﺳﻻ ًﺔﺟﯾﺗﻧ ﺔﻔﻠﺗﺧﻣﻟا ﺢطﺳﻷا ررﺿﺗ مدﻋ نﺎﻣﺿﻟ
.لودﺟﻟا ﻲﻓ ةدراوﻟا تﺎﻣوﻠﻌﻣﻟا ﻰﻋارﺗ ،ﺔﺑﺳﺎﻧﻣ
.روﻔﻟا ﻰﻠﻋ ﺔﻣﻌطﻷا ﺎﯾﺎﻘﺑ ﺔﻟازﺈﺑ
:رﯾذﺣﺗ – !ﻲﺋﺎﺑرﮭﻛﻟا ﻖﻌﺻﻟا رطﺧ
:ﺔظﺣﻼﻣ كﺎﻣﺳﻷا رﯾﺿﺣﺗ دﻌﺑ ًﻼﺛﻣ رﮭظﺗ ﻲﺗﻟﺎﻛ ﺔﺑﺣﺗﺳﻣ رﯾﻏ ﺢﺋاور ﺔﯾأ
فﯾظﻧﺗﻟا ةدﺎﻣ
:مدﺧﺗﺳﺗ ﻻ
فﯾظﻧﺗﻟا
■.لﻛﺂﺗﻠﻟ ﺔﺑﺑﺳﻣﻟا وأ ﺔﻧﺷﺧﻟا فﯾظﻧﺗﻟا داوﻣ
■.بﺎﺑﻟا تﺎﺣوﻟ فﯾظﻧﺗ دﻧﻋ جﺎﺟزﻟا وأ ندﺎﻌﻣﻟا تﺎطﺷﺎﻛ
■.بﺎﺑﻟا ﻖﻠﻏ مﺎﻛﺣإ رﺎطإ فﯾظﻧﺗ دﻧﻋ جﺎﺟزﻟا وأ ندﺎﻌﻣﻟا تﺎطﺷﺎﻛ
■.نﺷﺧﻟا فﯾظﻧﺗﻟا ﺞﻧﻔﺳإ وأ فﯾﻟ
■.لوﺣﻛﻟا نﻣ ﺔﯾﻟﺎﻋ ﺔﺑﺳﻧ ﻰﻠﻋ ﺔﯾوﺗﺣﻣﻟا فﯾظﻧﺗﻟا داوﻣ
15
.ﺎﮭﻣادﺧﺗﺳا لﺑﻗ اًدﯾﺟ ةدﯾدﺟﻟا فﯾظﻧﺗﻟا تﺎﺟﻧﻔﺳإ لﺳﻏا
Page 33

arﺔﯾﺳﺎﺳﻷا طﺑﺿﻟا عﺎﺿوأ
Qﺔﯾﺳﺎﺳﻷا طﺑﺿﻟا عﺎﺿوأ
.كﺗﺎﺟﺎﯾﺗﺣا بﺳﺎﻧﺗﻟ ﺎھرﯾﯾﻐﺗ كﻧﻛﻣﯾ ﺔﯾﺳﺎﺳأ طﺑﺿ عﺎﺿوأ ﻰﻠﻋ كزﺎﮭﺟ يوﺗﺣﯾ
طﺑﺿﻟا ﻊﺿوتارﺎﯾﺧﻟا
ﺔﻠﻐﺷﻣ
ﺔﻔﻗوﺗﻣ
رز ﻊﻣ ﺔﻟﺎﻌﻓ لظﺗ) رارزﻷا ﺔﻣﻐﻧ
start (لﯾﻐﺷﺗ) و stop (فﺎﻘﯾإ)(
مادﺧﺗﺳا كﻧﻛﻣﯾ .فﻗوﺗﻣ زﺎﮭﺟﻟا
نﻛﻟو ،ضرﻌﻟا ةدﺣوو رارزﻷا
زﺎﮭﺟﻟﺎﺑ ﺔﻔﯾظو يأ لﻌﻔﺗ نﻟ رارزﻷا
.(ﻲﺋﺎﺑرﮭﻛ رﺎﯾﺗ ﮫﺑ سﯾﻟ زﺎﮭﺟﻟا نأ يأ)
لﻛﺷﺑ ضارﻌﺗﺳﻻا ﻊﺿو مدﺧﺗﺳُﯾ
.نﯾﻋزوﻣﻟا لﺑﻗ نﻣ ﻲﺳﯾﺋر
.تدرأ اذإ كزﺎﮭﺟﺑ رزﻟا ﺔﻣﻐﻧ رﯾﯾﻐﺗ كﻧﻛﻣﯾ
.تﻗو يأ ﻲﻓ اذھ طﺑﺿﻟا ﻊﺿو رﯾﯾﻐﺗ كﻧﻛﻣﯾ
*Ž
Œ
š“‹
رزﻟا ﺔﻣﻐﻧ
ﺔﻘﯾرط
ضارﻌﺗﺳﻻا
(زﺎﮭﺟﻟا
رزﻟا ﺔﻣﻐﻧ رﯾﯾﻐﺗ
.كﻟذ ءارﺟإ دﻧﻋ زﺎﮭﺟﻟا فﺎﻘﯾإ بﺟﯾ
.ﻲﻧاوﺛ ةدﻌﻟ
‚.ضرﻌﻟا ةدﺣو ﻲﻓ
زﻣرﻟا رﮭظﯾ
.طﺑﺿﻟا ﻊﺿو ذﯾﻔﻧﺗ مﺗ
.رارزﻷا ﺔﻣﻐﻧ فﺎﻘﯾإ مﺗ
‚
ƒ
Ž.ضرﻌﻟا ةدﺣو ﻲﻓ ضﯾﻣوﻟا ﻲﻓ
أدﺑﯾ
ﺔﯾﻛﯾﺗﺎﻣوﺗوﻷا ﺞﻣارﺑﻟا مادﺧﺗﺳﺎﺑ ﻲﮭطﻟا
وأ سطﺎطﺑﻟا وأ زرﻷا ﻲﮭط كﻧﻛﻣﯾ ،ﺔﺛﻼﺛﻟا ﻲﮭطﻟا ﺞﻣارﺑ مادﺧﺗﺳﺎﺑ
ﺔﯾﺳﺎﺳﻷا طﺑﺿﻟا عﺎﺿوأ
.ءﺎطﻐﺑ ةدوزﻣو فﯾوورﻛﯾﻣﻠﻟ ﺔﺑﺳﺎﻧﻣ نرﻓ ﻲﻧاوأ ﻲﻓ مﺎﻌطﻟا ﻲﮭط بﺟﯾ
.ﻖﯾﻣﻋو رﯾﺑﻛ ﻖﺑط مادﺧﺗﺳا ﻲﻐﺑﻧﯾ ،زرﻸﻟ ﺔﺑﺳﻧﻟﺎﺑو
.مﺋﻼﻣﻟا ﺞﻣﺎﻧرﺑﻟا طﺑﺿ لﺟأ نﻣ ﮫﻧزو ﺔﻓرﻌﻣﻟ جﺎﺗﺣﺗﺳ .مﺎﻌطﻟا نزوﺑ مﻗ
،ﺔﺑوﻠطﻣﻟا ءﺎﻣﻟا ﺔﯾﻣﻛ فﺿأ .ﻲﮭطﻟا سﺎﯾﻛأ ﻲﻓ ﺄﺑﻌﻣﻟا زرﻷا مدﺧﺗﺳﺗ ﻻ
نوﻛﺗ ﺎﻣ ةدﺎﻋو .ةوﺑﻌﻟا ﻰﻠﻋ ﺔﻧودﻣﻟا تادﺎﺷرﻹا ﻲﻓ ﺢﺿوﻣ وھ ﺎﻣﻛ
.ﮫﻟﺎﺛﻣأ ﺔﺛﻼﺛ وأ زرﻷا نزو فﻌﺿ
ﻰﻟإ ﺔﺟزﺎطﻟا سطﺎطﺑﻟا ﻊﯾطﻘﺗ ﻰﻠﻋ صرﺣا ،ﺔﻗوﻠﺳﻣﻟا سطﺎطﺑﻠﻟ ﺔﺑﺳﻧﻟﺎﺑ
100 سطﺎطﺑﻟا نﻣ مﺟ
لﻛﻟ ءﺎﻣ ﺔﻘﻌﻠﻣ فﺿأ .ﺔﯾوﺎﺳﺗﻣو ةرﯾﻐﺻ ﻊطﻗ
* لﯾدوﻣ بﺳﺣ ﻊﻧﺻﻣﻟا طﺑﺿ عﺎﺿوأ فﻠﺗﺧﺗ دﻗ) ﻊﻧﺻﻣﻟا طﺑﺿ ﻊﺿو
.ﺢﻠﻣﻟا نﻣ ًﻼﯾﻠﻗو ،ﺔﻗوﻠﺳﻣﻟا
:ﺔﺟزﺎطﻟا تاورﺿﺧﻟا
مﻗ مﺛ .ﺎﮭﻧﻣ ةدﺋازﻟا ءازﺟﻷا ﺔﻟازإ دﻌﺑ ﺔﺟزﺎطﻟا تاورﺿﺧﻟا نزوﺑ مﻗ
ءﺎﻣﻟا نﻣ ﺔﻘﻌﻠﻣ فﺿأ .ﺔﯾوﺎﺳﺗﻣو ةرﯾﻐﺻ ﻊطﻗ ﻰﻟإ تاورﺿﺧﻟا ﻊﯾطﻘﺗﺑ
1. رزﻟا ﻰﻠﻋ طﻐﺿاstart (لﯾﻐﺷﺗ) و stop (فﺎﻘﯾإ) تﻗوﻠﻟ سﻔﻧ ﻲﻓ
2. رز سﻣﻟاstart (لﯾﻐﺷﺗ).
3. ﻰﻟإ راودﻟا رﺎﯾﺗﺧﻻا حﺎﺗﻔﻣ ردأŒ.
4. رز سﻣﻟاstart (لﯾﻐﺷﺗ).
5. رزﻟا سﻣﻟاstop (فﺎﻘﯾإ).
بﯾﻠﻘﺗﺑ مﻗ .ﺔﻧﯾﻌﻣ ةرﺗﻓ دﻌﺑ ﺔﯾﺗوﺻ ةرﺎﺷإ ردﺻﺗ ،ﺞﻣﺎﻧرﺑﻟا لﯾﻐﺷﺗ ءﺎﻧﺛأ
كرﺗ ﻲﻐﺑﻧﯾو .ىرﺧأ ةرﻣ مﺎﻌطﻟا بﯾﻠﻘﺗﺑ مﻗ ،ﺞﻣﺎﻧرﺑﻟا ءﺎﮭﺗﻧا درﺟﻣﺑ
5 ﻰﻟإ 10 ةرارﺣ ﺔﺟرد ﻰﻟإ لﺻﯾ ﻰﺗﺣ ىرﺧأ ﻖﺋﺎﻗد
.ﮫﺳﻧﺎﺟﺗو مﺎﻌطﻟا ةدوﺟ ﻰﻠﻋ دﻣﺗﻌﺗ ﻲﮭطﻟا ﺔﺟﯾﺗﻧ
مارﺟوﻠﯾﻛﻟﺎﺑ
ﻲﮭطﻟا
0.05 - 0.2
0.15 - 1.0
0.15 - 1.0
زرﻷاءﺎطﻐﺑ
سطﺎطﺑﻟاءﺎطﻐﺑ
تاورﺿﺧﻟاءﺎطﻐﺑ
.تاورﺿﺧﻟا
تﺎظﺣﻼﻣ
:زرﻷا
:سطﺎطﺑﻟا
100.تاورﺿﺧﻟا نﻣ مﺟ
لﻛﻟ
.مﺎﻌطﻟا
نﻣ ةدﻣﻟ مﺎﻌطﻟا
.ﺔﺳﻧﺎﺟﺗﻣ
ﺞﻣﺎﻧرﺑﻟا مﻗرﻲﮭطﻟا ﻲﻧاوأ نزوﻟا قﺎطﻧ
P 05
P 06
P 07
■نرﻔﻟا ﻲﻧاوأ
■ﺔﻣﻌطﻷا دادﻋإ
■ﺔﯾﺗوﺻﻟا ةرﺎﺷﻹا
■ﺔﺋدﮭﺗﻟا ةرﺗﻓ
كرﺗﺷﻣﻟا ﻲﮭطﻟا ﺞﻣﺎﻧرﺑ
تﺎظﺣﻼﻣ
نوﻛﺗ نأ بﺟﯾ ﺎﻣﻛ ،مزﻼﻟا نﻣ رﺑﻛأ نرﻓ ﻲﻧاوأ ﻲﻓ مﺎﻌطﻟا ﻲﮭطﺑ مﻘﺗ ﻻ
.فﯾوورﻛﯾﻣﻟا نرﻔﻟ ﺔﺑﺳﺎﻧﻣو ﺔﻧوﺧﺳﻠﻟ ﺔﻣوﺎﻘﻣ ﻲﻧاوﻷا
نزوﻟا لﺎﺧدإ رذﻌﺗ اذإ .ﮫﻧزوﺑ مﻗو فﯾﻠﻐﺗﻟا ةوﺑﻋ نﻣ مﺎﻌطﻟا جرﺧأ
.بﯾرﻘﺗﻟﺎﺑ ﮫﺑﺳﺣﺎﻓ ،ﻖﯾﻗدﻟا
5 ﻰﻟإ 10 ﻖﺋﺎﻗد
نﻣ ةدﻣﻟ أدﮭﯾ مﺎﻌطﻟا كرﺗا ﺞﻣﺎﻧرﺑﻟا ءﺎﮭﺗﻧا درﺟﻣﺑ
.ﺔﺳﻧﺎﺟﺗﻣ ةرارﺣ ﺔﺟرد ﻰﻟإ لﺻﯾ ﻰﺗﺣ ىرﺧأ
نزوﻟا قﺎطﻧ
مارﺟوﻠﯾﻛﻟﺎﺑ
0.4 - 0.9
ﻲﮭطﻟا
كرﺗﺷﻣﻟا ﻲﮭطﻟا ﺞﻣارﺑ
،ةدﻣﺟﻣﻟا تازوﺑﺧﻣﻟا
ﺢﺗﻓ
3مﺳ
ﻖﻣﻋ ﻰﺗﺣ
ﺞﻣﺎﻧرﺑﻟا مﻗر ﻲﻧاوأ
P 08
■نرﻔﻟا ﻲﻧاوأ
■ﺔﻣﻌطﻷا دادﻋإ
■ﺔﺋدﮭﺗﻟا ةرﺗﻓ
14
Page 34

ﺞﻣارﺑﻟاar
VWRSVWDUW
VWRSVWDUW
VWRSVWDUW
PLQ
NJ
NJ
تﺎظﺣﻼﻣ
،بﺎﺑﻟا ﻖﻠﻏ دﻌﺑ .روﯾطﻟا وأ مﺣﻠﻟا بﻠﻗ وأ مﺎﻌطﻟا بﯾﻠﻘﺗﺑ مﻗو زﺎﮭﺟﻟا
"Start".ىرﺧأ ةرﻣ (لﯾﻐﺷﺗ)
رزﻟا ﻰﻠﻋ طﻐﺿا
3.ضرﻌﻟا ةدﺣو ﻲﻓ ناوﺛ
ةدﻣﻟ ﺎﮭﻧﻋ مﻠﻌﺗﺳﻣﻟا ﺔﻣﯾﻘﻟا رﮭظﺗ
■ بﺎﺑ ﺢﺗﻓا .ددﺣﻣ تﻗو دﻌﺑ ﺔﯾﺗوﺻ ةرﺎﺷإ ردﺻﺗ ﺞﻣارﺑﻟا ضﻌﺑ ﻊﻣ
كﯾﻠﻋ ﺎﻣﻓ .ﺔﻋوﻧﺗﻣﻟا ﺞﻣارﺑﻟا مادﺧﺗﺳﺎﺑ ﺔﻟوﮭﺳ لﻛﺑ مﺎﻌطﻟا رﯾﺿﺣﺗ كﻧﻛﻣﯾ
■ رزﻟا مادﺧﺗﺳﺎﺑ نزوﻟاو ﺞﻣﺎﻧرﺑﻟا مﻗر نﻋ مﻼﻌﺗﺳﻻا كﻧﻛﻣﯾ` وأ h .
ﻖﯾﺑطﺗﺑ ﺞﻣﺎﻧرﺑﻟا موﻘﯾ كﻟذ دﻌﺑ .مﺎﻌطﻟا نزو لﺎﺧدإو ﺞﻣﺎﻧرﺑﻟا رﺎﯾﺗﺧا ىوﺳ
Pﺞﻣارﺑﻟا
ﺞﻣارﺑﻟا
.ﺔﻣءﻼﻣ رﺛﻛﻷا طﺑﺿﻟا عﺎﺿوأ
ﺔﯾﻛﯾﺗﺎﻣوﺗوﻷا ﺞﻣارﺑﻟا مادﺧﺗﺳﺎﺑ دﻣﺟﺗﻟا ﺔﺑاذإ
موﺣﻠﻟا نﻋ دﻣﺟﺗﻟا ﺔﺑاذﻹ ﺔﻌﺑرﻷا دﻣﺟﺗﻟا ﺔﺑاذإ ﺞﻣارﺑ مادﺧﺗﺳا كﻧﻛﻣﯾ
.زﺑﺧﻟاو روﯾطﻟاو
تﺎظﺣﻼﻣ
-º18 ﮫﻧﯾزﺧﺗو م
ةرارﺣ ﺔﺟرد دﻧﻋ هدﯾﻣﺟﺗ مﺗ يذﻟا مﺎﻌطﻟا مدﺧﺗﺳا
.نﺎﻛﻣﻹا ردﻗ ﺔﻌﯾﻓرو ﺔﯾوﺎﺳﺗﻣ تﺎﯾﻣﻛﺑ
مﻗو فﯾﻠﻐﺗﻟا داوﻣ ﻊﯾﻣﺟ نﻣ ﮫﻧﻋ دﻣﺟﺗﻟا ﺔﺑاذإ دارﻣﻟا مﺎﻌطﻟا جرﺧأ
.مﺋﻼﻣﻟا ﺞﻣﺎﻧرﺑﻟا طﺑﺿ لﺟأ نﻣ ﮫﻧزو ﺔﻓرﻌﻣﻟ جﺎﺗﺣﺗﺳ .ﮫﻧزوﺑ
ﺔﯾﻷ فورظ ﺔﯾأ تﺣﺗ ﮫﻣدﺧﺗﺳﺗ ﻻو روﯾطﻟاو موﺣﻠﻟا بﻠﻗ دﻧﻋ لﺋﺎﺳﻟا
.ىرﺧأ ﺔﻣﻌطأ ﺔﯾأ سﻣﻼﯾ ﮫﻠﻌﺟﺗ ﻻو ىرﺧأ ضارﻏأ
ﻲﺟﺎﺟز ﻖﺑطﻛ ،فﯾوورﻛﯾﻣﻠﻟ بﺳﺎﻧﻣ ﺢطﺳﻣ ءﺎﻋو ﻲﻓ مﺎﻌطﻟا ﻊﺿ
10 ﻰﻟإ 30 ىرﺧأ ﺔﻘﯾﻗد
نﻣ ةدﻣﻟ دﻣﺟﺗﻟا ﮫﻧﻋ باذُﻣﻟا مﺎﻌطﻟا كرﺗ بﺟﯾ
نأ بﻠطﺗﺗ ةرﯾﺑﻛﻟا مﺣﻠﻟا ﻊطﻗ .ﺔﺳﻧﺎﺟﺗﻣ ةرارﺣ ﺔﺟرد ﻰﻟإ لﺻﯾ ﻰﺗﺣ
مﺣﻠﻟا ﺢﺋارﺷ لﺻﻓ ﻲﻐﺑﻧﯾ ﺎﻣﻛ .ةرﯾﻐﺻﻟا ﻊطﻘﻟا نﻣ لوطأ ةرﺗﻔﻟ كرﺗُﺗ
.ﺎﮭﻛرﺗ لﺑﻗ ضﻌﺑﻟا ﺎﮭﺿﻌﺑ نﻋ مورﻔﻣﻟا مﺣﻠﻟا ﻊطﻗو ﺔﺣطﺳﻣﻟا
ﻊطﻗ تﻧﺎﻛ اذإ ﻰﺗﺣ ،مﺎﻌطﻟا دادﻋإ ﺔﻠﺻاوﻣ كﻧﻛﻣﯾ ةرﺗﻔﻟا هذھ ءﺎﺿﻘﻧا دﻌﺑ
ﺔﻟازإ تﻗوﻟا اذھ ﻲﻓ نﻛﻣﯾو .طﺳوﻟا ﻲﻓ ةدﻣﺟﺗﻣ لازﺗ ﻻ ﺔﻛﯾﻣﺳﻟا مﺣﻠﻟا
.روﯾطﻠﻟ ﺔﯾﻠﺧادﻟا ءﺎﺷﺣﻷا
بﺎﺑ ﺢﺗﻓا .ددﺣﻣ تﻗو دﻌﺑ ﺔﯾﺗوﺻ ةرﺎﺷإ ردﺻﺗ ﺞﻣارﺑﻟا ضﻌﺑ ﻊﻣ
.روﯾطﻟا وأ مﺣﻠﻟا ﻊطﻗ بﻠﻗا وأ ﺎﮭﺿﻌﺑ نﻋ مﺎﻌطﻟا ءازﺟأ لﺻﻓاو زﺎﮭﺟﻟا
Start.(لﯾﻐﺷﺗ)
رزﻟا ﻰﻠﻋ طﻐﺿا مﺛ بﺎﺑﻟا ﻖﻠﻏأ
8.ﺞﻣارﺑ
:ﺔظﺣﻼﻣ نﯾﺑ نﻣ رﺎﯾﺗﺧﻻا كﻧﻛﻣﯾ
ﺞﻣﺎﻧرﺑ طﺑﺿ
:ﻲﻠﯾ ﺎﻣﻛ طﺑﺿﻟا عﺎﺿوأ ءارﺟﺈﺑ مﻗ ،ﺞﻣﺎﻧرﺑ رﺎﯾﺗﺧﺎﺑ موﻘﺗ نأ درﺟﻣﺑ
■ﺔﻣﻌطﻷا دادﻋإ
.رزﻟا قوﻓ ةدوﺟوﻣﻟا نﺎﯾﺑﻟا ﺔﺑﻣﻟ ءﻲﺿﺗ
.رزﻟا ﻰﻠﻋأ نﺎﯾﺑﻟا ﺔﺑﻣﻟ ءﻲﺿﺗو ضرﻌﻟا ةدﺣو ﻲﻓ حرﺗﻘﻣﻟا نزوﻟا رﮭظﯾ
■ اذھ نﻣ صﻠﺧﺗ .روﯾطﻟا وأ موﺣﻠﻟا نﻋ دﻣﺟﺗﻟا ﺔﺑاذإ دﻧﻋ لﺋﺎﺳ ﺞﺗﻧﯾ
■نرﻔﻟا ﻲﻧاوأ
وأ.ﮫﺗﯾطﻐﺗ نود نﻛﻟو ،ًﻼﺛﻣ ﻲﻓزﺧ
■ﺔﺋدﮭﺗﻟا ةرﺗﻓ
■ﺔﯾﺗوﺻﻟا ةرﺎﺷﻹا
1. رزﻟا ﻰﻠﻋ طﻐﺿﻟا ررﻛ`.بوﻏرﻣﻟا ﺞﻣﺎﻧرﺑﻟا مﻗر ؤﮭظﯾ ﻰﺗﺣ
2. رزﻟا ﻰﻠﻋ طﻐﺿاh .
3..ﻖﺑطﻟا نزو دﯾدﺣﺗﻟ راودﻟا رﺎﯾﺗﺧﻻا حﺎﺗﻔﻣ ردأ
4. رزﻟا ﻰﻠﻋ طﻐﺿا"Start".(لﯾﻐﺷﺗ)
نزوﻟا قﺎطﻧ
مارﺟوﻠﯾﻛﻟﺎﺑ
0.20 - 1.00
0.20 - 1.00
0.40 - 1.80
0.20 - 1.00
ﻲﮭطﻟا
جﺎﺟد ﻊطﻗ ،جﺎﺟدﺢﺗﻓ
دﻣﺟﺗﻟا ﺔﺑاذإ
مورﻔﻣ مﺣﻟﺢﺗﻓ
مﺣﻟ ﻊطﻗﺢﺗﻓ
زﺑﺧﺢﺗﻓ
ﺞﻣﺎﻧرﺑﻟا مﻗر ﻲﻧاوأ
.ﺞﻣﺎﻧرﺑﻠﻟ ددﺣﻣﻟا ﻲﮭطﻟا نﻣزﻟ ﻲﻟزﺎﻧﺗﻟا دﻌﻟا كﻟ رﮭظﯾﻓ
P 01
P 02
P 03
P 04
رزﻟا ﻰﻠﻋ طﻐﺿا وأ زﺎﮭﺟﻟا بﺎﺑ ﺢﺗﻓا .ﺔﯾﺗوﺻ ةرﺎﺷإ ردﺻﺗ
Stop .(فﺎﻘﯾإ)
ﻲﮭطﻟا نﻣز ءﺎﺿﻘﻧا
.ىرﺧأ ةرﻣ ﺔﻋﺎﺳﻟا رﮭظﺗﻓ
ﺢﯾﺣﺻﺗﻟا
رزﻟا ﻰﻠﻋ طﻐﺿا
"stop".طﺑﺿﻟا دﻋأو نﯾﺗرﻣ (فﺎﻘﯾإ)
زﺎﮭﺟﻠﻟ تﻗؤﻣﻟا فﺎﻘﯾﻹا
رزﻟا ﻰﻠﻋ طﻐﺿا
Stop فﻗوﺗﯾﻓ .زﺎﮭﺟﻟا بﺎﺑ ﺢﺗﻓا وأ ةدﺣاو ةرﻣﻟ (فﺎﻘﯾإ)
Stop دﻌﺑ .(فﺎﻘﯾإ)
رزﻟا قوﻓ دوﺟوﻣﻟا نﯾﺑﻣﻟا ءﻲﺿﯾ .تﻗؤﻣ لﻛﺷﺑ زﺎﮭﺟﻟا
Start.(لﯾﻐﺷﺗ)
رزﻟا ﻰﻠﻋ طﻐﺿا بﺎﺑﻟا ﻖﻠﻏ
ءﺎﻐﻟﻹا
رزﻟا ﻰﻠﻋ طﻐﺿا
"stop" رزﻟا ﻰﻠﻋ طﻐﺿا مﺛ بﺎﺑﻟا ﺢﺗﻓا وأ نﯾﺗرﻣ (فﺎﻘﯾإ)
"stop".ةدﺣاو ةرﻣﻟ (فﺎﻘﯾإ)
13
Page 35

arةرﻛاذﻟا
VWRSVWDUW
VWRSVWDUW
VWRSVWDUW
PLQ
NJ
PLQ
VWRSVWDUW
PLQ
NJ
PLQ
ً
ﻧﻣز طﺑﺿا
.ضرﻌﻟا ةدﺣو ﻲﻓ ﻲﮭطﻟا نﻣزﻟ ﻲﻟزﺎﻧﺗﻟا دﻌﻟا أدﺑﯾﻓ
ﺢﺿوﻣ وھ ﺎﻣﻛ دﯾدﺟﻟا ﺞﻣﺎﻧرﺑﻟا نﯾزﺧﺗﺑ مﻗ .ﺔﻣﯾدﻘﻟا طﺑﺿﻟا عﺎﺿوأ
1-4.
ﻲﻓ تاوطﺧﻟا
3..راودﻟا رﺎﯾﺗﺧﻻا حﺎﺗﻔﻣ مادﺧﺗﺳﺎﺑ ﻲﮭطﻠﻟ ﺎ
4. رزﻟا ﻰﻠﻋ طﻐﺿا"Start".(لﯾﻐﺷﺗ)
ﺔﯾاوﺷﻟاو فﯾوورﻛﯾﻣﻟا نرﻓ طﺑﺿ
:لﺎﺛﻣ360 ﺔﯾاوﺷﻟا ،طاو( ،5ﻖﺋﺎﻗد
1:00.رزﻟا ﻰﻠﻋأ نﺎﯾﺑﻟا ﺔﺑﻣﻟ ءﻲﺿﺗو ،ضرﻌﻟا ةدﺣو ﻲﻓ ﺔﻘﯾﻗد
رﮭظﯾ
1..فﯾوورﻛﯾﻣﻟا نرﻓ ةردﻘﻟ بوﻏرﻣﻟا طﺑﺿﻟا ﻊﺿو ﻰﻠﻋ طﻐﺿا
2. ﺔﯾاوﺷﻟا رز ﻰﻠﻋ طﻐﺿا(.
Bةرﻛاذﻟا
■:ةرﻛاذﻟا ﻲﻓ دﯾدﺟ طﺑﺿ ﻊﺿو ظﻔﺣ رزﻟا ﻰﻠﻋ طﻐﺿا i رﮭظﺗﻓ .
ﻲﻓ هءﺎﻋدﺗﺳاو ﺎﻣ ﻖﺑطﺑ صﺎﺧﻟا طﺑﺿﻟا ﻊﺿو ظﻔﺣ ةرﻛاذﻟا ﺔﻔﯾظو ﺢﯾﺗﺗ
.ررﻛﺗﻣ لﻛﺷﺑ نﯾﻌﻣ ﻖﺑط رﯾﺿﺣﺗﺑ موﻘﺗ تﻧﻛ اذإ ةرﻛاذﻟا ﺔﻔﯾظو كدﯾﻔﺗ
ةرﻛاذﻟا
يأ.تﻗو
ةرﻛاذﻟا لﯾﻐﺷﺗ
بﺎﺑ ﻖﻠﻏأ .زﺎﮭﺟﻟا ﻲﻓ كﺗﺑﺟو ﻊﺿ .نزﺧﻣﻟا ﺞﻣﺎﻧرﺑﻟا لﯾﻐﺷﺗ ادﺟ لﮭﺳﻟا نﻣ
.زﺎﮭﺟﻟا
.ﺔﻧزﺧﻣﻟا طﺑﺿﻟا عﺎﺿوأ ضرﻋ مﺗﯾ
.ضرﻌﻟا ةدﺣو ﻲﻓ ﻲﮭطﻟا نﻣزﻟ ﻲﻟزﺎﻧﺗﻟا دﻌﻟا أدﺑﯾﻓ
ﻲﮭطﻟا نﻣز ءﺎﺿﻘﻧا
رزﻟا ﻰﻠﻋ طﻐﺿا وأ زﺎﮭﺟﻟا بﺎﺑ ﺢﺗﻓا .ﺔﯾﺗوﺻ ةرﺎﺷإ ردﺻﺗ
Stop .(فﺎﻘﯾإ)
.ىرﺧأ ةرﻣ ﺔﻋﺎﺳﻟا رﮭظﺗﻓ
زﺎﮭﺟﻠﻟ تﻗؤﻣﻟا فﺎﻘﯾﻹا
رزﻟا سﻣﻟا
Stop لﻛﺷﺑ زﺎﮭﺟﻟا فﻗوﺗﯾﻓ .زﺎﮭﺟﻟا بﺎﺑ ﺢﺗﻓا وأ ةرﻣ (فﺎﻘﯾإ)
Stop بﺎﺑﻟا ﻖﻠﻏ دﻌﺑ .(فﺎﻘﯾإ)
رزﻟا قوﻓ دوﺟوﻣﻟا نﯾﺑﻣﻟا ءﻲﺿﯾ .تﻗؤﻣ
Start.(لﯾﻐﺷﺗ)
رزﻟا ﻰﻠﻋ سﻣﻟا
ءﺎﻐﻟﻹا
رزﻟا ﻰﻠﻋ طﻐﺿا
"stop" رزﻟا ﻰﻠﻋ طﻐﺿا مﺛ بﺎﺑﻟا ﺢﺗﻓا وأ نﯾﺗرﻣ (فﺎﻘﯾإ)
ةرﻛاذﻟا ﻲﻓ طﺑﺿﻟا عﺎﺿوأ نﯾزﺧﺗ
:لﺎﺛﻣ360 ،طاو25ﺔﻘﯾﻗد
1. رزﻟا ﻰﻠﻋ طﻐﺿاi.
1. رزﻟا ﻰﻠﻋ طﻐﺿاi.
2. رزﻟا ﻰﻠﻋ طﻐﺿا"Start".(لﯾﻐﺷﺗ)
.طﺑﺿﻟا ﻊﺿو نﯾزﺧﺗ مﺗﯾ .ىرﺧأ ةرﻣ ﺔﻋﺎﺳﻟا رﮭظﺗﻓ
"stop".ةدﺣاو ةرﻣﻟ (فﺎﻘﯾإ)
.رزﻟا قوﻓ ةدوﺟوﻣﻟا نﺎﯾﺑﻟا ﺔﺑﻣﻟ ءﻲﺿﺗ
1:00.رزﻟا ﻰﻠﻋأ نﺎﯾﺑﻟا ﺔﺑﻣﻟ ءﻲﺿﺗو ،ضرﻌﻟا ةدﺣو ﻲﻓ ﺔﻘﯾﻗد
رﮭظﯾ
تﺎظﺣﻼﻣ
.رﺧﻵا
i رزﻟا ﻰﻠﻋ طﻐﺿا ،Start.(لﯾﻐﺷﺗ)
رزﻟا ﻰﻠﻋ طﻐﺿﻟا نﻣ ًﻻدﺑ ،ءﺎﮭﺗﻧﻻا
2..فﯾوورﻛﯾﻣﻟا نرﻓ ةردﻘﻟ بوﻏرﻣﻟا طﺑﺿﻟا ﻊﺿو ﻰﻠﻋ طﻐﺿا
3..راودﻟا رﺎﯾﺗﺧﻻا حﺎﺗﻔﻣ مادﺧﺗﺳﺎﺑ ﻲﮭطﻟا نﻣز طﺑﺿا
4. رزﻟا ﻰﻠﻋ طﻐﺿﻟا لﻼﺧ نﻣ دﻛأi.
■.فﯾوورﻛﯾﻣﻟا نرﻓ ﻊﻣ ﺔﯾاوﺷﻟا وأ طﻘﻓ ﺔﯾاوﺷﻟا ﻊﺿو نﯾزﺧﺗ ﺎﺿﯾأ كﻧﻛﻣﯾ
■ وﻠﺗ دﺣاوﻟا فﯾوورﻛﯾﻣﻟا نرﻓ ةردﻘﻟ طﺑﺿ عﺎﺿوأ ةدﻋ نﯾزﺧﺗ كﻧﻛﻣﯾ ﻻ
■.ﺔﯾﻛﯾﺗﺎﻣوﺗوﻷا ﺞﻣارﺑﻟا نﯾزﺧﺗ ﺎﺿﯾأ كﻧﻛﻣﯾ ﻻ ﺎﻣﻛ
■ دﻧﻋ .روﻔﻟا ﻰﻠﻋ زﺎﮭﺟﻟا لﯾﻐﺷﺗو ةرﻛاذﻟا ﻲﻓ طﺑﺿﻟا عﺎﺿوأ ظﻔﺣ كﻧﻛﻣﯾ
12
Page 36

ءاوﺷﻟاar
VWRSVWDUW
PLQ
NJ
PLQ
VWRSVWDUW
PLQ
NJ
PLQ
dءاوﺷﻟا
.قﺎﺑطﻷا ﺢطﺳ رﯾﻣﺣﺗو نﯾﺗارﺟﻟا دادﻋﻹ لﻣﻌﻟ ﺔﯾﻟﺎﺛﻣ ﺔﯾاوﺷﻟا
.فﯾوورﻛﯾﻣﻟا نرﻓ ﻊﻣ كارﺗﺷﻻﺎﺑ وأ ﺎھدﺣو ﺔﯾاوﺷﻟا مادﺧﺗﺳا كﻧﻛﻣﯾ
ﺔﯾاوﺷﻟا طﺑﺿ
10:00.رزﻟا ﻰﻠﻋأ نﺎﯾﺑﻟا ﺔﺑﻣﻟ ءﻲﺿﺗو ،ضرﻌﻟا ةدﺣو ﻲﻓ رﮭظﯾ
ً
ﻧﻣز طﺑﺿا
.ضرﻌﻟا ةدﺣو ﻲﻓ ﻲﮭطﻟا نﻣزﻟ ﻲﻟزﺎﻧﺗﻟا دﻌﻟا أدﺑﯾﻓ
ﻲﮭطﻟا نﻣز ءﺎﺿﻘﻧا
رزﻟا ﻰﻠﻋ طﻐﺿا وأ زﺎﮭﺟﻟا بﺎﺑ ﺢﺗﻓا .ﺔﯾﺗوﺻ ةرﺎﺷإ ردﺻﺗ
Stop
.ىرﺧأ ةرﻣ ﺔﻋﺎﺳﻟا رﮭظﺗﻓ .(فﺎﻘﯾإ)
:رﯾذﺣﺗ – !قورﺣﺑ ﺔﺑﺎﺻﻹا رطﺧ
.لﯾﻐﺷﺗﻟا ءﺎﻧﺛأ ﺔﯾﺎﻐﻠﻟ ﺔﻧﺧﺎﺳ ﺢﺑﺻﺗ ﺎﮭﯾﻟإ لوﺻوﻟا نﻛﻣﯾ ﻲﺗﻟا ءازﺟﻷا
ﻻ.ﺔﯾﻓﺎﻛ ﺔﻓﺎﺳﻣﻟ لﺎﻔطﻷا دﻌﺑأو .ﺔﻧﺧﺎﺳﻟا ءازﺟﻷا ادﺑأ سﻣﻠﺗ
ءاوﺷﻟا
فﯾوورﻛﯾﻣﻟا نرﻓ ةردﻗ طﺑﺿ عﺎﺿوأ
ـﻟ بﺳﺎﻧﻣ
1. ﺔﯾاوﺷﻟا رز ﻰﻠﻋ طﻐﺿا(.
2..راودﻟا رﺎﯾﺗﺧﻻا حﺎﺗﻔﻣ مادﺧﺗﺳﺎﺑ ﻲﮭطﻠﻟ ﺎ
39.ﻲﻟاوﺗﻟا ﻰﻠﻋ ﺔﻘﯾﻗد
و ةدﺣاو ﺔﻋﺎﺳ ةدﻣﻟ فﯾوورﻛﯾﻣﻟا
فﯾوورﻛﯾﻣﻟا نرﻓ طﺑﺿ
3. رزﻟا ﻰﻠﻋ طﻐﺿا"Start".(لﯾﻐﺷﺗ)
فﯾوورﻛﯾﻣﻟا ةردﻗ طﺑﺿ عﺎﺿوأ :لﺎﺛﻣ600 ،طاو5ﻖﺋﺎﻗد
.رزﻟا قوﻓ ةدوﺟوﻣﻟا نﺎﯾﺑﻟا ﺔﺑﻣﻟ ءﻲﺿﺗ
نرﻓ ةردﻗ طﺑﺿ
فﯾوورﻛﯾﻣﻟا
90طاو ةرارﺣﻠﻟ ﺔﺳﺎﺳﺣﻟا ﺔﻣﻌطﻷا نﻋ دﻣﺟﺗﻟا ﺔﺑاذإ
180طاو رﻣﺗﺳﻣﻟا ﻲﮭطﻟاو دﻣﺟﺗﻟا ﺔﺑاذإ
360طاو ةرارﺣﻠﻟ ﺔﺳﺎﺳﺣﻟا ﺔﻣﻌطﻷا نﯾﺧﺳﺗو موﺣﻠﻟا ﻲﮭط
600طاو مﺎﻌطﻟا ﻲﮭطو نﯾﺧﺳﺗ
900طاو لﺋاوﺳﻟا نﯾﺧﺳﺗ
:ﺔظﺣﻼﻣ فﯾوورﻛﯾﻣﻟا نرﻓ ةردﻗ طﺑﺿ كﻧﻛﻣﯾ900 ةدﻣﻟ طاو30 ﺔﻘﯾﻗد
600 نرﻓ ةردﻘﻟ ىرﺧﻷا طﺑﺿﻟا عﺎﺿوأو ،ةدﺣاو ﺔﻋﺎﺳ ةدﻣﻟ طاو
ً
ﻧﻣز طﺑﺿا
و
1..فﯾوورﻛﯾﻣﻟا نرﻓ ةردﻘﻟ بوﻏرﻣﻟا طﺑﺿﻟا ﻊﺿو ﻰﻠﻋ طﻐﺿا
2..راودﻟا رﺎﯾﺗﺧﻻا حﺎﺗﻔﻣ مادﺧﺗﺳﺎﺑ ﻲﮭطﻠﻟ ﺎ
ﻲﮭطﻟا نﻣز رﯾﯾﻐﺗ
حﺎﺗﻔﻣ مادﺧﺗﺳﺎﺑ ﻲﮭطﻟا نﻣز رﯾﯾﻐﺗﺑ مﻗ .تﻗو يأ ﻲﻓ كﻟذ ءارﺟإ نﻛﻣﯾ
.راودﻟا رﺎﯾﺗﺧﻻا
زﺎﮭﺟﻠﻟ تﻗؤﻣﻟا فﺎﻘﯾﻹا
Stop فﻗوﺗﯾﻓ .زﺎﮭﺟﻟا بﺎﺑ ﺢﺗﻓا وأ ةدﺣاو ةرﻣﻟ (فﺎﻘﯾإ)
رزﻟا ﻰﻠﻋ طﻐﺿا
Stop دﻌﺑ .(فﺎﻘﯾإ)
رزﻟا قوﻓ دوﺟوﻣﻟا نﯾﺑﻣﻟا ءﻲﺿﯾ .تﻗؤﻣ لﻛﺷﺑ زﺎﮭﺟﻟا
Start.(لﯾﻐﺷﺗ)
رزﻟا ﻰﻠﻋ طﻐﺿا بﺎﺑﻟا ﻖﻠﻏ
ﺢﯾﺣﺻﺗﻟا
.تﻗو يأ ﻲﻓ طوﺑﺿﻣﻟا ﻲﮭطﻟا نﻣز ﺢﯾﺣﺻﺗ كﻧﻛﻣﯾ
ءﺎﻐﻟﻹا
"stop" رزﻟا ﻰﻠﻋ طﻐﺿا مﺛ بﺎﺑﻟا ﺢﺗﻓا وأ نﯾﺗرﻣ (فﺎﻘﯾإ)
رزﻟا ﻰﻠﻋ طﻐﺿا
3. رزﻟا ﻰﻠﻋ طﻐﺿا"Start".(لﯾﻐﺷﺗ)
.ضرﻌﻟا ةدﺣو ﻲﻓ ﻲﮭطﻟا نﻣزﻟ ﻲﻟزﺎﻧﺗﻟا دﻌﻟا أدﺑﯾﻓ
ﻲﮭطﻟا نﻣز ءﺎﺿﻘﻧا
Stop
رزﻟا ﻰﻠﻋ طﻐﺿا وأ زﺎﮭﺟﻟا بﺎﺑ ﺢﺗﻓا .ﺔﯾﺗوﺻ ةرﺎﺷإ ردﺻﺗ
.ىرﺧأ ةرﻣ ﺔﻋﺎﺳﻟا رﮭظﺗﻓ .(فﺎﻘﯾإ)
"stop".ةدﺣاو ةرﻣﻟ (فﺎﻘﯾإ)
ﻲﮭطﻟا نﻣز رﯾﯾﻐﺗ
حﺎﺗﻔﻣ مادﺧﺗﺳﺎﺑ ﻲﮭطﻟا نﻣز رﯾﯾﻐﺗﺑ مﻗ .تﻗو يأ ﻲﻓ كﻟذ ءارﺟإ نﻛﻣﯾ
.راودﻟا رﺎﯾﺗﺧﻻا
زﺎﮭﺟﻠﻟ تﻗؤﻣﻟا فﺎﻘﯾﻹا
Stop فﻗوﺗﯾﻓ .زﺎﮭﺟﻟا بﺎﺑ ﺢﺗﻓا وأ ةدﺣاو ةرﻣﻟ (فﺎﻘﯾإ)
رزﻟا ﻰﻠﻋ طﻐﺿا
Stop دﻌﺑ .(فﺎﻘﯾإ)
رزﻟا قوﻓ دوﺟوﻣﻟا نﯾﺑﻣﻟا ءﻲﺿﯾ .تﻗؤﻣ لﻛﺷﺑ زﺎﮭﺟﻟا
Start.(لﯾﻐﺷﺗ)
رزﻟا ﻰﻠﻋ طﻐﺿا بﺎﺑﻟا ﻖﻠﻏ
11
رزﻟا ﻰﻠﻋ طﻐﺿا
Stop رزﻟا ﻰﻠﻋ طﻐﺿا مﺛ بﺎﺑﻟا ﺢﺗﻓا وأ نﯾﺗرﻣ (فﺎﻘﯾإ)
لﯾﻐﺷﺗﻟا ءﺎﻐﻟإ
Stop.ةدﺣاو ةرﻣﻟ (فﺎﻘﯾإ)
:ﺔظﺣﻼﻣ.فﯾوورﻛﯾﻣﻟا نرﻓ ةردﻗ طﺑﺿ مﺛ ًﻻوأ ﻲﮭطﻟا نﻣز طﺑﺿ ﺎًﺿﯾأ كﻧﻛﻣﯾ
Page 37

arفﯾوورﻛﯾﻣﻟا نرﻓ
ﻲﮭطﻟا زﯾﺣ نﯾﺧﺳﺗ
10:00 رزﻟا قوﻓ نﺎﯾﺑﻟا ﺔﺑﻣﻟ ءﻲﺿﺗو ﺔﻘﯾﻗد (.
ضرﻌﻟا ةدﺣو ﻲﻓ رﮭظﯾ
.طوﺑﺿﻣﻟا نﻣزﻟا ءﺎﺿﻘﻧا دﻧﻋ ﺔﯾﺗوﺻ ةرﺎﺷإ ردﺻﺗ
"stop".زﺎﮭﺟﻟا بﺎﺑ ﺢﺗﻓا وأ (فﺎﻘﯾإ)
رزﻟا ﻰﻠﻋ طﻐﺿا
:ﺔﺣﯾﺻﻧ مادﺧﺗﺳﺎﺑ ءﺎﺳﻠﻣﻟا ﺢطﺳﻷا فﯾظﻧﺗﺑ مﻗ ﻲﮭطﻟا زﯾﺣ درﺑﯾ نأ دﻌﺑ
.قﺎﺑطأ ﺔطوﻓو ﻲﻧوﺑﺎﺻ لوﻠﺣﻣ
تﺎﯾﻟﺎﻣﻛﻟا فﯾظﻧﺗ
وأ قﺎﺑطأ ﺔطوﻓو ﻲﻧوﺑﺎﺻ لوﻠﺣﻣ مادﺧﺗﺳﺎﺑ ادﯾﺟ تﺎﯾﻟﺎﻣﻛﻟا فﯾظﻧﺗﺑ مﻗ
.ﺔﻣﻋﺎﻧ ةﺎﺷرﻓ
ﻲﮭطﻟا ﻲﻧاوأ
مﺗﯾ ﻰﺗﺣ .فﯾوورﻛﯾﻣﻟا نرﻔﺑ مادﺧﺗﺳﻼﻟ ﺔﺑﺳﺎﻧﻣ ﻲﮭطﻟا ﻲﻧاوأ ﻊﯾﻣﺟ تﺳﯾﻟ
ﻲﻧاوأ مادﺧﺗﺳا ﻰﻠﻋ رﺻﺗﻗا ررﺿﻠﻟ زﺎﮭﺟﻟا ضرﻌﺗﯾ ﻻ ﻲﻛﻟو كﻣﺎﻌط نﯾﺧﺳﺗ
.فﯾوورﻛﯾﻣﻠﻟ ﺔﺑﺳﺎﻧﻣﻟا ﻲﮭطﻟا
ﺔﺑﺳﺎﻧﻣﻟا ﻲﮭطﻟا ﻲﻧاوأ
جﺎﺟزﻟا نﻣ ﺔﻋوﻧﺻﻣﻟا ﺔﻧوﺧﺳﻠﻟ ﺔﻣوﺎﻘﻣﻟا ﻲﮭطﻟا ﻲﻧاوأ ﻲھ ﺔﺑﺳﺎﻧﻣﻟا ﻲﻧاوﻷا
.ﺔﻧوﺧﺳﻠﻟ موﺎﻘﻣﻟا كﯾﺗﺳﻼﺑﻟا وأ فزﺧﻟا وأ نﯾﻠﺳروﺑﻟا وأ ﻲﺟﺎﺟزﻟا فزﺧﻟا وأ
.فﯾوورﻛﯾﻣﻟا تﺎﺟوﻣﻟ ةذﻔﻧﻣ ﺎﮭﻧﺄﺑ داوﻣﻟا هذھ زﯾﻣﺗﺗ ثﯾﺣ
ﻖﺑط نﻣ مﺎﻌطﻟا لﻘﻧ اذھ كﯾﻠﻋ رﻓوﯾو .ةدﺋﺎﻣﻟا قﺎﺑطأ مادﺧﺗﺳا ﺎﺿﯾأ كﻧﻛﻣﯾ
ﻻإ ﺔﯾﺿﻓ وأ ﺔﺑھذُﻣ تﺎﯾﻠﺣ ﻰﻠﻋ يوﺗﺣﺗ ﻲﮭط ﻲﻧاوأ مدﺧﺗﺳﺗ ﻻأ ﻲﻐﺑﻧﯾ .رﺧﻵ
.فﯾوورﻛﯾﻣﻟا نارﻓأ ﻲﻓ مادﺧﺗﺳﻼﻟ ﺎﮭﺗﻣءﻼﻣ ﺔﻌﻧﺎﺻﻟا ﺔﮭﺟﻟا تﻧﻣﺿ اذإ
ﺔﺑﺳﺎﻧﻣﻟا رﯾﻏ ﻲﮭطﻟا ﻲﻧاوأ
.فﯾوورﻛﯾﻣﻟا تﺎﺟوﻣﻟ ذﻔﻧﻣ رﯾﻏ ندﻌﻣﻟﺎﻓ .ﺔﺑﺳﺎﻧﻣ رﯾﻏ ﺔﯾﻧدﻌﻣﻟا ﻲﮭطﻟا ﻲﻧاوأ
.ةدرﺎﺑ ةﺎطﻐﻣﻟا ﺔﯾﻧدﻌﻣﻟا ﻲﻧاوﻷا ﻲﻓ ةدوﺟوﻣﻟا ﺔﻣﻌطﻷا لظﺗ ﻲﻟﺎﺗﻟﺎﺑو
!ﮫﯾﺑﻧﺗ
لﺧاد ﺔﻘﻌﻠﻣﻟا لﺎﺛﻣﻟا لﯾﺑﺳ ﻰﻠﻋ ،ندﻌﻣﻟا ﻊﺿوُﯾ نأ بﺟﯾ :ررﺷﻟا نوﻛﺗ
2 بﻧﺎﺟﻟاو ﻲﮭطﻟا زﯾﺣ ناردﺟ نﻣ مﺳ
نﻋ لﻘﺗ ﻻ ﺔﻓﺎﺳﻣ ﻰﻠﻋ ،بوﻛﻟا
بﺎﺑﻠﻟ ﻲﻠﺧادﻟا بﻧﺎﺟﻟﺎﺑ جﺎﺟزﻟا فﻼﺗإ ﻲﻓ ررﺷﻟا بﺑﺳﺗﯾ دﻘﻓ .بﺎﺑﻠﻟ ﻲﻠﺧادﻟا
.ﮫﺣﻼﺻإ بﻌﺻﯾ لﻛﺷﺑ
تﺎﯾﻟﺎﻣﻛﻟاو ﻲﮭطﻟا زﯾﺣ فﯾظﻧﺗ
1. ﺔﯾاوﺷﻟا رز ﻰﻠﻋ طﻐﺿا(.
2. رزﻟا ﻰﻠﻋ طﻐﺿا"start".(لﯾﻐﺷﺗ)
ﮫﯾﻓ ﻊﺿﺗ نأ نود ﻲﮭطﻟا زﯾﺣ نﯾﺧﺳﺗﺑ مﻗ ،دﯾدﺟﻟا زﺎﮭﺟﻟا ﺔﺣﺋار نﻣ صﻠﺧﺗﻠﻟ
.نرﻔﻟا بﺎﺑ ﻖﻠﻏ ﻊﻣ راودﻟا نﺣﺻﻟا ىوﺳ ﺎًﺋﯾﺷ
تﺎﺑﯾﺑﺣ لﺛﻣ ،ﻲﮭطﻟا زﯾﺣ ﻲﻓ ﺔﻛورﺗﻣ فﯾﻠﻐﺗ داوﻣ يأ دﺟوﺗ ﻻ ﮫﻧأ دﻛﺄﺗ
زﯾﺣ ﻲﻓ ةدوﺟوﻣﻟا ءﺎﺳﻠﻣﻟا ﺢطﺳﻷا ﺢﺳﻣا زﺎﮭﺟﻟا نﯾﺧﺳﺗ لﺑﻗ .نﯾرﺗﺳﯾﻟوﺑﻟا
ءﺎﻧﺛأ ﺦﺑطﻣﻟا ﺔﯾوﮭﺗ ﻰﻠﻋ صرﺣا .ﺔﻠﻠﺑﻣو ﺔﻣﻋﺎﻧ شﺎﻣﻗ ﺔﻌطﻗ مادﺧﺗﺳﺎﺑ ﻲﮭطﻟا
.زﺎﮭﺟﻟا نﯾﺧﺳﺗ
طﺑﺿﻟا عﺎﺿوأ
ﺔﯾاوﺷﻟا(10ﻖﺋﺎﻗد
^فﯾوورﻛﯾﻣﻟا نرﻓ
نﻋ دﻣﺟﺗﻟا ﺔﺑاذإ وأ نﯾﺧﺳﺗﻟا وأ ﻲﮭطﻟا ﻲﻓ فﯾوورﻛﯾﻣﻟا مادﺧﺗﺳا كﻧﻛﻣﯾ
ﻊﻣ كارﺗﺷﻻﺎﺑ وأ هدﺣو فﯾوورﻛﯾﻣﻟا نرﻓ مادﺧﺗﺳا كﻧﻛﻣﯾ .ﺔﻋرﺳﺑ مﺎﻌطﻟا
تﺎظﺣﻼﻣﻟا ةﺎﻋارﻣ ﻰﺟرﯾ ،فﯾوورﻛﯾﻣﻟا نرﻔﻟ ﻲﻟﺎﺛﻣﻟا مادﺧﺗﺳﻻا نﺎﻣﺿﻟ
لوادﺟ ﻲﻓ ةدوﺟوﻣﻟا تﺎﻧﺎﯾﺑﻟا ﻰﻠﻋ فرﻌﺗﻟاو ﻲﮭطﻟا ﻲﻧاوأ ﻰﻠﻋ ﺔﻧودﻣﻟا
.لﺎﻣﻌﺗﺳﻻا لﯾﻟد ﺔﯾﺎﮭﻧ ﻲﻓ مادﺧﺗﺳﻻا
نﺎﺟﻧﻓ دادﻋﻹ ءﺎﻣ بوﻛ نﯾﺧﺳﺗ كﻧﻛﻣﯾو .نﻵا فﯾوورﻛﯾﻣﻟا نرﻓ برﺟﺗﻠﻓ
.ﻼﺛﻣ يﺎﺷ
ﺔﻘﻌﻠﻣ ﻊﺿو ﺔﯾﺿﻓ وأ ﺔﺑھذُﻣ تﺎﯾﻠﺣ ﺔﯾأ ﻰﻠﻋ لﻣﺗﺷﯾ ﻻ اًرﯾﺑﻛ ﺎًﺑوﻛ مدﺧﺗﺳا
.راودﻟا نﺣﺻﻟا فﺻﺗﻧﻣ ﻰﻠﻋ ﻖﻓرﺑ ءﺎﻣﻟا ﮫﺑو بوﻛﻟا ﻊﺿ .ﮫﻠﺧادﺑ ةرﯾﻐﺻ
30 مﺗ دﻗ نوﻛﯾ ذﺋدﻧﻋ .ﺔﯾﺗوﺻ ةرﺎﺷإ ردﺻﺗ ﺔﯾﻧﺎﺛ
و ةدﺣاو ﺔﻘﯾﻗد دﻌﺑ
لﺋﺎﺳﻟا نأ ﻲﻧﻌﯾ اذھو .لﺋاوﺳﻟا نﯾﺧﺳﺗ ءﺎﻧﺛأ نﺎﯾﻠﻐﻟا ﻲﻓ رﺧﺄﺗ ثدﺣﯾ نأ نﻛﻣﯾ
.ﺢطﺳﻟا ﻰﻠﻋ ةدﺎﺗﻌﻣﻟا رﺎﺧﺑﻟا تﺎﻋﺎﻘﻓ دﻋﺎﺻﺗﺗ نأ نود نﺎﯾﻠﻐﻟا ﺔﺟرد ﻰﻟإ لﺻﯾ
.ذاذر رﯾﺎطﺗﯾ وأ ةوﻘﺑ نﺧﺎﺳﻟا لﺋﺎﺳﻟا روﻔﯾ نأ نﻛﻣﯾ ءﺎﻋوﻠﻟ زازﺗھا لﻗأ ﻊﻣو
بﻧﺟﺗﺗ كﻟذﺑو .ءﺎﻋوﻟا لﺧاد ﺔﻘﻌﻠﻣ ﻊﺿو ﻰﻠﻋ ﺎًﻣﺋاد صرﺣا ،نﯾﺧﺳﺗﻟا ءﺎﻧﺛأ
.نﺎﯾﻠﻐﻟا رﺧﺄﺗ ةرھﺎظ
فﯾوورﻛﯾﻣﻟا نرﻓ
.ﺔﯾاوﺷﻟا
1. ﻰﻠﻋ طﻐﺿا900.طاو
2. طﺑﺿﻟ راودﻟا حﺎﺗﻔﻣﻟا مدﺧﺗﺳا1:30.ﺔﻘﯾﻗد
3. رزﻟا ﻰﻠﻋ طﻐﺿا"Start".(لﯾﻐﺷﺗ)
نﯾﺧﺳﺗ.ءﺎﻣﻟا
:رﯾذﺣﺗ – !تاءاوﺗﻛﺎﺑ ﺔﺑﺎﺻﻹا رطﺧ
ﻲﮭطﻟا ﻲﻧاوأ رﺎﺑﺗﺧا
رﺎﺑﺗﺧا .ﮫﻠﺧادﺑ مﺎﻌطﻟا ﻊﺿو مﺗﯾ مﻟ ﺎﻣ فﯾوورﻛﯾﻣﻟا نرﻓ لﯾﻐﺷﺗﺑ ادﺑأ مﻘﺗ ﻻ
.ةدﻋﺎﻘﻟا هذﮭﻟ دﯾﺣوﻟا ءﺎﻧﺛﺗﺳﻻا وھ رﯾﺻﻘﻟا ﻲﮭطﻟا ﻲﻧاوأ
ﻲﮭطﻟا ءﺎﻧإ ﺔﻣءﻼﻣ نﻣ دﻛﺄﺗﻣ رﯾﻏ تﻧﻛ اذإ ﻲﻟﺎﺗﻟا رﺎﺑﺗﺧﻻا لﻣﻌﺑ مﻗ
.فﯾوورﻛﯾﻣﻟا ﻲﻓ مادﺧﺗﺳﻼﻟ
.ﺔﻠﻣﺎﻛ ﺔﻘﯾﻗدو ﺔﻘﯾﻗد فﺻﻧ
.ﺎﺋﻓاد وأ ادرﺎﺑ ﻲﮭطﻟا ءﺎﻧإ سﻣﻠﻣ نوﻛﯾ نأ بﺟﯾ
رﯾﻏ ﮫﻧأ ﻲﻧﻌﯾ اذﮭﻓ ،ررﺷ دﻟوﺗ ﺔﻟﺎﺣ ﻲﻓ وأ ﺎﻧﺧﺎﺳ ﻲﮭطﻟا ءﺎﻧإ ﺢﺑﺻأ اذإو
.بﺳﺎﻧﻣ
.رﺎﺑﺗﺧﻻا فﻗوأ ﺔﻟﺎﺣﻟا هذھ ﻲﻓ
1. نﯾﺑ حوارﺗﺗ ةدﻣﻟ ةردﻗ ﻰﺻﻗﺄﺑ نرﻔﻟا ﻲﻓ غرﺎﻔﻟا ﻲﮭطﻟا ءﺎﻧإ نﯾﺧﺳﺗﺑ مﻗ
2..ةدﻣﻟا هذھ ءﺎﻧﺛأ ﻲﮭطﻟا ءﺎﻧإ ةرارﺣ ﺔﺟرد صﺣﻓا
10
Page 38

تﺎﯾﻟﺎﻣﻛﻟاar
~
~
E
D
F
Kﻰﻟوﻷا ةرﻣﻠﻟ مادﺧﺗﺳﻻا لﺑﻗ
فﯾوورﻛﯾﻣﻟا نرﻓ مادﺧﺗﺳا لﺑﻗ ﮫﻠﻌﻓ كﯾﻠﻋ بﺟﯾ ﺎﻣﺑ كرﺑﺧﯾ مﺳﻘﻟا اذھ
.«نﺎﻣﻷا تادﺎﺷرإ» عوﺿوﻣ أرﻗا كﻟذ لﺑﻗو .ﻰﻟوﻷا ةرﻣﻠﻟ مﺎﻌطﻟا رﯾﺿﺣﺗﻟ
ﺔﺣﻔﺻ ﻲﻓ «ﺔﻣﮭﻣﻟا نﺎﻣﻷا تادﺎﺷرإ»
4
نﺣﺻﻟا كﻟذ لﺑﻗ ﻊﺿﺗ نأ بﺟﯾ ،دﯾدﺟﻟا كزﺎﮭﺟ مادﺧﺗﺳا ﻊﯾطﺗﺳﺗ ﻰﺗﺣ
.تﺎﯾﻟﺎﻣﻛﻟاو ﻲﮭطﻟا زﯾﺣ فﯾظﻧﺗ كﯾﻠﻋ بﺟﯾ .ﺢﯾﺣﺻ لﻛﺷﺑ ﮫﻧﺎﻛﻣ ﻲﻓ راودﻟا
ﮫﻧﺎﻛﻣ ﻲﻓ راودﻟا نﺣﺻﻟا ﻊﺿوو ﻲﮭطﻟا زﯾﺣ فﯾظﻧﺗ
فﯾظﻧﺗ كﯾﻠﻋ بﺟﯾ ،ﻰﻟوﻷا ةرﻣﻠﻟ مﺎﻌطﻟا رﯾﺿﺣﺗ ﻲﻓ زﺎﮭﺟﻟا مادﺧﺗﺳا لﺑﻗ
.تﺎﯾﻟﺎﻣﻛﻟاو ﻲﮭطﻟا زﯾﺣ
ﮫﻧﺎﻛﻣ ﻲﻓ راودﻟا نﺣﺻﻟا ﻊﺿو ﺔﯾﻔﯾﻛ
.ﻲﮭطﻟا زﯾﺣ ﺔﯾﺿرأ
_تﺎﯾﻟﺎﻣﻛﻟا
ﻰﻟوﻷا ةرﻣﻠﻟ ماد ﺧﺗﺳﻻا لﺑﻗ
ﺎﮭﻣادﺧﺗﺳا ﺔﯾﻔﯾﻛ لوﺣ تﺎﻣوﻠﻌﻣو ﺔﻘﻓرﻣﻟا تﺎﯾﻟﺎﻣﻛﻠﻟ ﺎﻣﺎﻋ ﺎﺿرﻋ ﻲﻠﯾ ﺎﻣﯾﻓ دﺟﺗ
.ﺢﯾﺣﺻ لﻛﺷﺑ
نﺣﺻﻟا نأ دﻛﺄﺗو .قﺎﺑطﻷا جارﺧإ دﻧﻋ راودﻟا نﺣﺻﻟا كﯾرﺣﺗ مدﻋ نﻣ دﻛﺄﺗ
.ﺎﻧﯾﻣﯾ وأ ارﺎﺳﯾ راودﻟا نﺣﺻﻟا رودﯾ نأ نﻛﻣﯾ .ﺢﯾﺣﺻ لﻛﺷﺑ تﺑﺛﻣ راودﻟا
ﺔﯾﻛﻠﺳﻟا ﺔﻛﺑﺷﻟا
وأ ﻼﺛﻣ كﯾﺗﺳﻻا ،ءاوﺷﻠﻟ ﺔﯾﻛﻠﺳ ﺔﻛﺑﺷ
نرﻔﻟا ﻲﻧاوأ ﻊﺿوﻟ وأ ،زﺑﺧﻟا وأ ﻖﺟﺳﻟا
.ﺔﺣطﺳﻣﻟا نرﻔﻟا قﺎﺑطأ لﺛﻣ ﺎﮭﯾﻠﻋ
1. ةراودﻟا ﺔﻘﻠﺣﻟا ﻊﺿوﺑ مﻗa.ﻲﮭطﻟا زﯾﺣ ﻲﻓ دوﺟوﻣﻟا فﯾوﺟﺗﻟا ﻲﻓ
2. راودﻟا نﺣﺻﻟا نأ دﻛﺄﺗb ةرادﻹا ةدﺣو ﻊﺿوﻣ ﻲﻓ رﻘﺗﺳﯾ c طﺳو ﻲﻓ
:ﺔظﺣﻼﻣ نﺣﺻﻟا ﻰﻠﻋ ﺔﯾﻛﻠﺳﻟا ﺔﻛﺑﺷﻟا ﻊﺿ
.راودﻟا
راودﻟا نﺣﺻﻟا
:ﺔظﺣﻼﻣ نودﺑ اًدﺑأ زﺎﮭﺟﻟا مدﺧﺗﺳﺗ ﻻ
لﻛﺷﺑ تﺑﺛﻣ ﮫﻧأ دﻛﺄﺗ .راودﻟا نﺣﺻﻟا
رودﯾ نأ نﻛﻣﯾ راودﻟا نﺣﺻﻟا .ﺢﯾﺣﺻ
ﻲﻓ.ﺔﻋﺎﺳﻟا برﺎﻘﻋ ﺔﻛرﺣ هﺎﺟﺗا سﻛﻋو
ةراودﻟا ﺔﻘﻠﺣﻟا
تﺎﯾﻟﺎﻣﻛﻟا
!ﮫﯾﺑﻧﺗ
:ﺔظﺣﻼﻣ نﺣﺻﻟا نأ دﻛﺄﺗ .راودﻟا نﺣﺻﻟا نودﺑ اًدﺑأ زﺎﮭﺟﻟا مدﺧﺗﺳﺗ ﻻ
ﺔﻛرﺣ هﺎﺟﺗا ﻲﻓ روادﻟا نﺣﺻﻟا ةرادإ نﻛﻣﯾ .ﺢﯾﺣﺻ لﻛﺷﺑ تﺑﺛﻣ راودﻟا
.ﺎﮭھﺎﺟﺗا سﻛﻋ ﻲﻓو ﺔﻋﺎﺳﻟا برﺎﻘﻋ
ﺔﻋﺎﺳﻟا طﺑﺿ
،ﻲﺋﺎﺑرﮭﻛﻟا رﺎﯾﺗﻟا عﺎطﻘﻧا دﻌﺑ وأ ﻰﻟوﻷا ةرﻣﻠﻟ ءﺎﺑرﮭﻛﻟﺎﺑ زﺎﮭﺟﻟا لﯾﺻوﺗ دﻧﻋ
.نﺎﯾﺑﻟا ﺔﺷﺎﺷ ﻲﻓ رﺎﻔﺻأ ﺔﺛﻼﺛ رﮭظﺗ
ﻰﻠﻋأ نﺎﯾﺑﻟا ﺔﺑﻣﻟ ءﻲﺿﺗو ،ضرﻌﻟا ةدﺣو ﻲﻓ رﮭظﯾ
.ﻲﻟﺎﺣﻟا تﻗوﻟا طﺑﺿ مﺗﯾ
0 ﻰﻠﻋ طﻐﺿا مﺛ Stop .(فﺎﻘﯾإ)
.ﺔﻏرﺎﻓ ضرﻌﻟا ةدﺣو ﺢﺑﺻﺗﻓ
ﺔﻋﺎﺳﻟا طﺑﺿ عﺎﺟرإ
0 .
رزﻟا ﻰﻠﻋ طﻐﺿا
2 و 3.
نﯾﺗوطﺧﻟا ﻲﻓ ﺢﺿوﻣ
‚ƒ:‹‹
رزﻟا ﻰﻠﻋ طﻐﺿا
œ
0.
رزﻟا
تﻗوﻟا ءﺎﻔﺧإ
"12:00" وھ ﺎﻣﻛ طﺑﺿﻟا عﺎﺿوأ ءارﺟﺈﺑ مﻗ .ضرﻌﻟا ةدﺣو ﻲﻓ
نﺎﯾﺑﻟا رﮭظﯾ
ﺔﺻﺎﺧﻟا تﺎﯾﻟﺎﻣﻛﻟا
نﯾﯾﻋزوﻣﻟا نﻣ وأ ﻊﯾﺑﻟا دﻌﺑ ﺎﻣ ﺔﻣدﺧ زﻛرﻣ نﻣ ﺔﺻﺎﺧﻟا تﺎﯾﻟﺎﻣﻛﻟا ءارﺷ نﻛﻣﯾ
تﻧرﺗﻧﻹا ﻊﻗوﻣ ﻰﻠﻋو ﺎﻧﺗﺎﺑﯾﺗﻛ ﻲﻓ دﺟﺗﺳو .تﻧرﺗﻧﻹا رﺑﻋ وأ نﯾﺻﺻﺧﺗﻣﻟا
.تﺎﺟﺗﻧﻣﻟا نﻣ ﺔﻠﻣﺎﺷ ﺔﻗﺎﺑ
تﻧرﺗﻧﻹا رﺑﻋ ﺎﮭﺋارﺷ نﻛﻣﻣﻟا نﻣ نﺎﻛ اذإ ﺎﻣو تﺎﺟﺗﻧﻣﻟا هذھ رﻓاوﺗ فﻠﺗﺧﯾ
1.رزﻟا ﻰﻠﻋ طﻐﺿا0.
2..راودﻟا رﺎﯾﺗﺧﻻا حﺎﺗﻔﻣ مادﺧﺗﺳﺎﺑ ﺔﻋﺎﺳﻟا طﺑﺿا
3.رزﻟا ﻰﻠﻋ طﻐﺿا0.ىرﺧأ ةرﻣ
.تﺎﻌﯾﺑﻣﻟا تﺎﺑﯾﺗﻛ ﻰﻠﻋ عﻼطﻻا ﻰﺟرﯾ لﯾﺻﺎﻔﺗﻟا نﻣ دﯾزﻣﻟ .رﺧآ ﻰﻟإ دﻠﺑ نﻣ
:ﺔظﺣﻼﻣ رﻛذ ﺎًﻣﺋاد ﻰﺟرﯾو .زﺎﮭﺟ لﻛﻟ ﺔﺑﺳﺎﻧﻣ ﺔﺻﺎﺧﻟا تﺎﯾﻟﺎﻣﻛﻟا لﻛ تﺳﯾﻟ
«ءﻼﻣﻌﻟا ﺔﻣدﺧ»
.)E no( .ءارﺷﻟا دﻧﻋ كزﺎﮭﺟﻟ
ﻖﯾﻗدﻟا فﯾرﻌﺗﻟا مﻗر
17
ﺔﺣﻔﺻ ﻲﻓ
رﺎﺧﺑﻟا ﻲﻧاوأتاورﺿﺧﻟاو سطﺎطﺑﻟاو رزﻷا ﻲﮭطﻟ
يوﺗﺷﻟا تﯾﻗوﺗﻟا ﻰﻟإ ﻲﻔﯾﺻﻟا تﯾﻗوﺗﻟا نﻣ لﺎﺛﻣﻟا لﯾﺑﺳ ﻰﻠﻋ ،ﺔﻋﺎﺳﻟا رﯾﯾﻐﺗ
1 ﻰﻟإ 3.
نﻣ تاوطﺧﻟا ﻲﻓ ﺢﺿوﻣ وھ ﺎﻣﻛ ﺎﮭطﺑﺿا
9
Page 39

arكزﺎﮭﺟ ﻰﻠﻋ فرﻌﺗﻟا
دﯾرﺑﺗﻟا ﺔﺣورﻣ
فﺎﻘﯾإ دﻌﺑ ﻰﺗﺣ ﺔﺣورﻣﻟا نارود رﻣﺗﺳﯾ دﻗو .دﯾرﺑﺗ ﺔﺣورﻣﺑ دوزﻣ زﺎﮭﺟﻟا
.نرﻔﻟا
تﺎظﺣﻼﻣ
ً
درﺎﺑ ﻲﮭطﻟا زﯾﺣ لظﯾ
نرﻓ لﯾﻐﺷﺗ ءﺎﮭﺗﻧا دﻌﺑ ﻰﺗﺣ ﺔﺣورﻣﻟا نارود رﻣﺗﺳﯾ دﻗو .ﺔﻠﻐﺷﻣ دﯾرﺑﺗﻟا
.فﯾوورﻛﯾﻣﻟا
.فﯾوورﻛﯾﻣﻟا نرﻓ لﯾﻐﺷﺗ ﻰﻠﻋ ﺎًﺑﻠﺳ رﺛؤﯾ ﻻو ﻲﻌﯾﺑط رﻣأ اذھو .زﺎﮭﺟﻟا
.ﻲﮭطﻟا ﺔﯾﻠﻣﻋ نﻣ ءﺎﮭﺗﻧﻻا دﻌﺑ فﺛﻛﺗﻣﻟا ءﺎﻣﻟا ﺢﺳﻣا
ﺔﯾﺗوﺻﻟا ةرﺎﺷﻹا ةدﻣ رﯾﯾﻐﺗ
رودﺻ ةدﻣ رﯾﯾﻐﺗ كﻧﻛﻣﯾو .زﺎﮭﺟﻟا ءﺎﻔطإ دﻧﻋ ﺔﯾﺗوﺻ ةرﺎﺷإ ﻊﻣﺳﺗ فوﺳ
.ﺔﯾﺗوﺻﻟا ةرﺎﺷﻹا
ناوﺛ
ٍ
.ةدﯾدﺟﻟا ةرﺎﺷﻹا ةدﻣ دﺎﻣﺗﻋا مﺗﯾﻓ
"start" ةدﻣﻟ (لﯾﻐﺷﺗ) 6.ﺎﺑﯾرﻘﺗ
رزﻟا ﻰﻠﻋ طﻐﺿا
.ىرﺧأ ةرﻣ ﺔﻋﺎﺳﻟا رﮭظﺗﻓ
:ﻲﻠﯾ ﺎﻣ رﺎﯾﺗﺧا نﻛﻣﯾ
- ةرﯾﺻﻗ ةرﺎﺷإ ةدﻣ
3 تﺎﻧر
30.ﺔﻧر
- ﺔﻠﯾوط ةرﺎﺷإ ةدﻣ
مﻛﺣﺗﻟا رﺻﺎﻧﻋ
طﺑﺿﺑ كﻟ ﺢﻣﺳﺗ رارزﻷا هذھ .ﺔﻔﻠﺗﺧﻣﻟا رارزﻸﻟ اًزﺟوﻣ ﺎًﺣرﺷ ﻲﻠﯾ ﺎﻣﯾﻓ دﺟﺗ
.ةرﺷﺎﺑﻣ ﺔﻘﯾرطﺑو ﺔﻟوﮭﺳﺑ زﺎﮭﺟﻟا
■ ﺔﺣورﻣ لظﺗو .فﯾوورﻛﯾﻣﻟا نرﻓ لﯾﻐﺷﺗ ءﺎﻧﺛأ ا
.ﺔﻔﻠﺗﺧﻣﻟا رارزﻸﻟ اًزﺟوﻣ ﺎًﺣرﺷ ﻲﻠﯾ ﺎﻣﯾﻓ دﺟﺗ
■ ﺔﯾﺿرأو ﺔﯾﻠﺧادﻟا ناردﺟﻟاو بﺎﺑﻟا ةذﻓﺎﻧ ﻰﻠﻋ فﺛﻛﺗﻣ ءﺎﻣ رﮭظﯾ ﺎﻣﺑر
تﻗوﻟا طﺑﺿ
تﻗؤﻣ لﻛﺷﺑ وأ ﺎًﻣﺎﻣﺗ زﺎﮭﺟﻟا فﺎﻘﯾإ
فﯾوورﻛﯾﻣﻟا نرﻓ جرﺧ ةردﻗ رﺗﺧا90طاو
فﯾوورﻛﯾﻣﻟا نرﻓ جرﺧ ةردﻗ رﺗﺧا180طاو
فﯾوورﻛﯾﻣﻟا نرﻓ جرﺧ ةردﻗ رﺗﺧا360طاو
فﯾوورﻛﯾﻣﻟا نرﻓ جرﺧ ةردﻗ رﺗﺧا600طاو
فﯾوورﻛﯾﻣﻟا نرﻓ جرﺧ ةردﻗ رﺗﺧا900طاو
ﺞﻣارﺑﻠﻟ نزو رﺗﺧا
ﺔﯾﻛﯾﺗﺎﻣوﺗوﻷا ﺞﻣارﺑﻟا رﺗﺧا
ﺔﯾاوﺷﻟا رﺗﺧا
ةرﻛاذﻟا رﺗﺧا
زﺎﮭﺟﻟا بﺎﺑ ﺢﺗﻓا
.ﺔطوﺑﺿﻣﻟا مﯾﻘﻟاو ﺔﯾﺳﺎﯾﻘﻟا مﯾﻘﻟا رﯾﯾﻐﺗﻟ راودﻟا رﺎﯾﺗﺧﻻا حﺎﺗﻔﻣ مدﺧﺗﺳُﯾ
رﺎﯾﺗﺧﻻا حﺎﺗﻔﻣ ﻰﻠﻋ طﻐﺿا .جرﺎﺧﻠﻟ راودﻟا رﺎﯾﺗﺧﻻا حﺎﺗﻔﻣ بﺣﺳ نﻛﻣﯾ
.ﻲﺟرﺎﺧﻟا وأ ﻲﻠﺧادﻟا ﻊﺿوﻟا ﻰﻠﻋ ﮫﺗﯾﺑﺛﺗﻟ راودﻟا
ﺎﮭﯾﻧﺎﻌﻣو رارزﻷا
رارزﻷاﻰﻧﻌﻣﻟا
زﻣرﻟا
start زﺎﮭﺟﻟا لﯾﻐﺷﺗ
0
stop
90
180
360
600
900
h
%
(
i
v
--------
راودﻟا رﺎﯾﺗﺧﻻا حﺎﺗﻔﻣ
بﺎﺑﻠﻟ ﻲﻛﯾﺗﺎﻣوﺗوﻷا ﺢﺗﻔﻟا ﺔﯾﺻﺎﺧ
.بﺎﺑﻠﻟ ﻲﻛﯾﺗﺎﻣوﺗوﻷا ﺢﺗﻔﻟا ﺔﯾﺻﺎﺧ لﯾﻌﻔﺗ ﺔﻟﺎﺣ ﻲﻓ زﺎﮭﺟﻟا بﺎﺑ ضﺑاوﻧ ﺢﺗﻔﻧﺗ
.يودﯾ لﻛﺷﺑ ﺎﻣﺎﻣﺗ زﺎﮭﺟﻟا بﺎﺑ ﺢﺗﻓ كﻧﻛﻣﯾ
.ﻲﺋﺎﺑرﮭﻛﻟا رﺎﯾﺗﻟا عﺎطﻘﻧا ﺔﻟﺎﺣ ﻲﻓ بﺎﺑﻠﻟ ﻲﻛﯾﺗﺎﻣوﺗوﻷا ﺢﺗﻔﻟا ﺔﯾﺻﺎﺧ لﻣﻌﺗ ﻻ
.ﺎﯾودﯾ بﺎﺑﻟا ﺢﺗﻓ كﻧﻛﻣﯾ
تﺎظﺣﻼﻣ
.ﺔﺗﻗؤﻣ ةروﺻﺑ
.ﺎﯾودﯾ لﯾﻐﺷﺗﻟا ةدﺎﻋإ كﯾﻠﻋ
.ﺔﯾﻧﻣز
■ ﻲﮭطﻟا ﺔﯾﻠﻣﻋ فﺎﻘﯾإ مﺗﯾ فوﺳﻓ ،لﯾﻐﺷﺗﻟا ءﺎﻧﺛأ زﺎﮭﺟﻟا بﺎﺑ ﺢﺗﻔﺑ تﻣﻗ اذإ
■ بﺟﯾ .ﺎﯾﻛﯾﺗﺎﻣوﺗوأ لﯾﻐﺷﺗﻟا ﺔﻠﺻاوﻣ مﺗﯾ ﻻ زﺎﮭﺟﻟا بﺎﺑ ﻖﻠﻐﺑ موﻘﺗ ﺎﻣدﻧﻋ
■ ةرﺗﻓ دﻌﺑ زﺎﮭﺟﻟا بﺎﺑ ﺢﺗﻓ مﺗﯾ فوﺳ ،ﺔﻠﯾوط ةرﺗﻔﻟ زﺎﮭﺟﻟا فﺎﻘﯾإ مﺗ اذإ
8
Page 40

رارﺿﻷا بﺎﺑﺳأar
~
*كزﺎﮭﺟ ﻰﻠﻋ فرﻌﺗﻟا
فوﺳ مﻛﺣﺗﻟا رﺻﺎﻧﻋو ضرﻌﻟا ةدﺣو مﺳﻘﻟا اذھ ﻲﻓ كﻟ ﺢﺿوﻧ فوﺳ
.كزﺎﮭﺟﻟ ﺔﻔﻠﺗﺧﻣﻟا فﺋﺎظوﻟا ﻰﻠﻋ ﺎﺿﯾأ فرﻌﺗﺗ
:ﺔظﺣﻼﻣ بﺳﺣ ناوﻟﻷاو لﯾﺻﺎﻔﺗﻟا ضﻌﺑ ﻲﻓ ﺔﻧﯾﻌﻣ تﺎﻓﻼﺗﺧا رﮭظﺗ دﻗ
.زﺎﮭﺟﻟا لﯾدوﻣ
مﻛﺣﺗﻟا ﺔﺣوﻟ
عﺎﺿوأ ضرﻌُﺗ .مﻛﺣﺗﻟا ﺔﺣوﻟ نﻣ ﺔﻔﻠﺗﺧﻣﻟا كزﺎﮭﺟ فﺋﺎظ طﺑﺿ كﻧﻛﻣﯾ
.ضرﻌﻟا ةدﺣو ﻲﻓ ﺔﯾﻟﺎﺣﻟا طﺑﺿﻟا
تﻗوﻟا طﺑﺿ مﺗ دﻗو لﻐﺷﻣ زﺎﮭﺟﻟا ﺎﻣﻧﯾﺑ مﻛﺣﺗﻟا ﺔﺣوﻟ مﺎﻌﻟا رظﻧﻣﻟا ضرﻌﯾ
.ﺔﻋﺎﺳﻟا ﻲﻓ
h
min
kg
(
0
كزﺎﮭﺟ ﻰﻠﻋ فرﻌﺗﻟا
ً
ﺧﺳﺗﻣ ﻖﻠﻐﻟا مﺎﻛﺣإ رﺎطإ نﺎﻛ اذإ
نأ ﺎﻣﻛ .لﯾﻐﺷﺗﻟا ءﺎﻧﺛأ ﺢﯾﺣﺻ لﻛﺷﺑ ﻖﻠﻐﻧﯾ نﻟ زﺎﮭﺟﻟا بﺎﺑ نﺈﻓ ،ةدﺷﺑ
بﺟﯾ كﻟذﻟ .ررﺿﺗﺗ نأ نﻛﻣﯾ ةروﺎﺟﻣﻟا تادﺣوﻠﻟ ﺔﯾﻣﺎﻣﻷا ءازﺟﻷا
.ﻖﻠﻐﻟا مﺎﻛﺣإ رﺎطإ ﺔﻓﺎظﻧ ﻰﻠﻋ ﺎًﻣﺋاد ﺔظﻓﺎﺣﻣﻟا
لﯾﻐﺷﺗﺑ اًدﺑأ مﻘﺗ ﻻ .لﯾﻣﺣﺗﻟا ةدﺎﯾز ﻰﻟإ يدؤﯾ نأ نﻛﻣﯾ ﻲﮭطﻟا زﯾﺣ ﻲﻓ
دﯾﺣوﻟا ءﺎﻧﺛﺗﺳﻻا .ﻲﮭطﻟا زﯾﺣ ﻲﻓ دوﺟوﻣ مﺎﻌط كﺎﻧھ نﻛﯾ مﻟﺎﻣ زﺎﮭﺟﻟا
رﺎﺑﺗﺧا»
.ﻲﮭطﻟا ﻲﻧاوﻷ طﯾﺳﺑ رﺎﺑﺗﺧا ءارﺟإ دﻧﻋ وھ ةدﻋﺎﻘﻟا هذﮭﻟ
ﺔﺣﻔﺻ ﻲﻓ «ﻲﮭطﻟا ﻲﻧاوأ
10
ً
دﺑأ طﺑﺿﺗ ﻻ
ﻣﺋاد ﻊﺿ .طاو
ً
600 رﺎﺷﻔﻟا سﯾﻛ ﺎ
نﻣ رﺑﻛأ ﺔﻣﯾﻗ ﻰﻠﻋ ةردﻘﻟا طﺑﺿﺗ ﻻو
.ﮫﯾﻠﻋ لﯾﻣﺣﺗﻟا ةدﺎﯾز ﺔﻟﺎﺣ ﻲﻓ صرﻘﻟا زﻔﻘﯾ دﻘﻓ .ﻲﺟﺎﺟز ﻖﺑط ﻰﻠﻋ
.ﻲﮭطﻟا ﺔﯾﻠﻣﻋ بﻗار .زﺎﮭﺟﻠﻟ ﻲﻠﺧادﻟا زﯾﺣﻟا ﻰﻟإ راودﻟا نﺣﺻﻟا ةرادإ
.ﺔﺟﺎﺣﻟا بﺳﺣ ﻲﮭطﻟا نﻣز ﺔﻟﺎطﺈﺑ مﻗ مﺛ ،رﺻﻗأ ﻲﮭط نﻣزﺑ أدﺑا
ً
دﺑأ فﯾوورﻛﯾﻣﻟا نرﻓ مدﺧﺗﺳﺗ ﻻ
ُ
ﺗ نأ بﺟﯾ
نﻋ لﻘﺗ ﻻ ﺔﻓﺎﺳﻣ ﻰﻠﻋ ،بوﻛﻟا2 ﻲﻠﺧادﻟا بﻧﺎﺟﻟاو نرﻔﻟا ناردﺟ نﻣ مﺳ
بﺎﺑﻠﻟ ﻲﻠﺧادﻟا بﻧﺎﺟﻟﺎﺑ جﺎﺟزﻟا فﻼﺗإ ﻲﻓ ررﺷﻟا بﺑﺳﺗﯾ دﻘﻓ .بﺎﺑﻠﻟ
.ﮫﺣﻼﺻإ بﻌﺻﯾ لﻛﺷﺑ
ررﺿﻟا ﻖﺣﻠﺗ دﻘﻓ .زﺎﮭﺟﻟا لﺧاد موﯾﻧﻣوﻟﻷا ﻖﺋﺎﻗر نﻣ ﺔﻋوﻧﺻﻣﻟا
.ررﺷﻟا دﯾﻟوﺗ لﻼﺧ نﻣ زﺎﮭﺟﻟﺎﺑ
ﻣﺋاد صرﺣا
ً
.زﺎﮭﺟﻟا بﺎﺑ ﻲﻓ رﺻﺣﻧﯾ ءﻲﺷ يأ لﻌﺟﺗ ﻻو .درﺑﯾ ﻲﮭطﻟا زﯾﺣ كرﺗ
تﺎﮭﺟاو نﺈﻓ ،طﻘﻓ طﯾﺳﺑ رادﻘﻣﺑ وﻟو ﺎًﺣوﺗﻔﻣ نﺎﻛ اذإ بﺎﺑﻟا نأ ﻰﻋارﯾو
.تﻗوﻟا رورﻣﺑ ررﺿﺗﺗ نأ نﻛﻣﯾ ةروﺎﺟﻣﻟا تادﺣوﻟا
ﺎًﺑﻠﺳ رﺛؤﯾ ﻻو ﻲﻌﯾﺑط رﻣأ اذھو .زﺎﮭﺟﻟا ﺔﯾﺿرأو ﺔﯾﻠﺧادﻟا ناردﺟﻟاو
فﺛﻛﺗﻣﻟا ءﺎﻣﻟا ﺢﺳﻣا ،أدﺻ ثودﺣ ﻊﻧﻣﻟ .فﯾوورﻛﯾﻣﻟا نرﻓ لﯾﻐﺷﺗ ﻰﻠﻋ
.ﻲﮭطﻟﺎﺑ ﺎﮭﯾﻓ موﻘﺗ ةرﻣ لﻛ
]رارﺿﻷا بﺎﺑﺳأ
!ﮫﯾﺑﻧﺗ
رارﺿﻷا بﺎﺑﺳأ
■ :ﻖﻠﻐﻟا مﺎﻛﺣإ رﺎطﻹ دﯾدﺷﻟا خﺎﺳﺗﻻا ﺎ
■ :مﺎﻌط نودﺑ فﯾوورﻛﯾﻣﻟا نرﻓ لﯾﻐﺷﺗ ﺔﻣﻌطأ دوﺟو نود زﺎﮭﺟﻟا لﯾﻐﺷﺗ
■ :فﯾوورﻛﯾﻣﻟا رﺎﺷﻓ .فﯾوورﻛﯾﻣﻟا نرﻔﻟ ﺔﯾﺎﻐﻠﻟ ﺔﯾﻟﺎﻋ ةردﻗ ا
■ ﺔﯾﻟآ رﺑﻋ لﻏوﺗﯾ ﮫﻛرﺗ مدﻋ بﺟﯾ ﮫﻧاروﻓ ﺔﻟﺎﺣ ﻲﻓ بﻛﺳﻧﯾ يذﻟا لﺋﺎﺳﻟا
■.راودﻟا نﺣﺻﻟا نودﺑ ا
■ :ررﺷﻟا دﻟوﺗ لﺧاد ﺔﻘﻌﻠﻣﻟا لﺛﻣ ،ﺔﯾﻧدﻌﻣﻟا ءﺎﯾﺷﻷا ﻊﺿو
■ :موﯾﻧﻣوﻟﻷا ﻖﺋﺎﻗر نﻣ ﺔﻋوﻧﺻﻣﻟا ﺔﯾﻋوﻷا ﺔﯾﻋوﻷا مدﺧﺗﺳﺗ ﻻ
■ :حوﺗﻔﻣ بﺎﺑﻟاو زﺎﮭﺟﻟا دﯾرﺑﺗ دﻧﻋ نرﻔﻟا بﺎﺑ ﻖﻠﻏ ﻰﻠﻋ ﺎ
■ :ﻲﮭطﻟا زﯾﺣ ﻲﻓ فﺛﻛﺗﻣﻟا ءﺎﻣﻟا بﺎﺑﻟا ةذﻓﺎﻧ ﻰﻠﻋ فﺛﻛﺗﻣ ءﺎﻣ رﮭظﯾ ﺎﻣﺑر
ضرﻌﻟا ةدﺣو
ﻲﮭطﻟا ﺔﻧﻣزأو ﺔﻋﺎﺳﻟا تﻗو طﺑﺿﻟ
راودﻟا رﺎﯾﺗﺧﻻا حﺎﺗﻔﻣ
ﺔﯾﻛﯾﺗﺎﻣوﺗوﻷا ﺞﻣارﺑﻟا طﺑﺿﻟ وأ ﻲﮭطﻟا ﺔﻧﻣزأو ﺔﻋﺎﺳﻟا طﺑﺿﻟ
رارزﻷا
بﺎﺑﻠﻟ ﻲﻛﯾﺗﺎﻣوﺗوﻷا ﺢﺗﻔﻟا رز
8
@
(
0
8
@
ﺔﺋﯾﺑﻟا ﻰﻠﻋ ﺔظﻓﺎﺣﻣ ﺔﻘﯾرطﺑ تﺎﻔﻠﺧﻣﻟا نﻣ صﻠﺧﺗﻟا
.ﺔﺋﯾﺑﻟا ﻰﻠﻋ ﺔظﻓﺎﺣﻣ ﺔﻘﯾرطﺑ فﯾﻠﻐﺗﻟا ةوﺑﻋ نﻣ صﻠﺧﺗ
2012/19/EU
.
ﺔﻠﻣﻌﺗﺳﻣﻟا ةزﮭﺟﻷا عﺎﺟرﺗﺳﻻ مﺎﻌﻟا رﺎطﻹا ﺔﻔﺻاوﻣﻟا هذھ ددﺣﺗو
.ﻲﺑوروﻷا دﺎﺣﺗﻻا لود ﻊﯾﻣﺟ ﻲﻓ ﮫﺑ لوﻣﻌﻣ وھ ﺎﻣﻛ ﺎھرﯾودﺗ ةدﺎﻋإو
ﺔﯾﺑوروﻷا ﺔﻔﺻاوﻣﻠﻟ ﺎﻘﺑط زﯾﻣﻣ زﺎﮭﺟﻟا اذھ
ﺎﻣﯾﻓﺔﻣﯾدﻘﻟا ﺔﯾﻧورﺗﻛﻟﻹاو ﺔﯾﺋﺎﺑرﮭﻛﻟا ةزﮭﺟﻷﺎﺑ ﻖﻠﻌﺗﯾ
7ﺔﺋﯾﺑﻟا ﺔﯾﺎﻣﺣ
ﺔﺋﯾﺑﻟا ﺔﯾﺎﻣﺣ
)waste electrical and electronic equipment - WEEE(
7
Page 41

مدﺧﺗﺳﺗ ﻻ .ررﺿﻠﻟ بﺎﺑﻟا ﻖﻠﻏ مﺎﻛﺣإ رﺎطإ وأ ﻲﮭطﻟا زﯾﺣ
~
مﺎﻛﺣإ رﺎطإ وأ ﻲﮭطﻟا زﯾﺣ بﺎﺑ ضرﻌﺗ ﺔﻟﺎﺣ ﻲﻓ اًدﺑأ زﺎﮭﺟﻟا
.ﻊﯾﺑﻟا دﻌﺑ ﺎﻣ ﺔﻣدﺧ زﻛرﻣﺑ لﺻﺗا .ررﺿﻠﻟ بﺎﺑﻟا ﻖﻠﻏ
لﺎﻣﻋأ ﺔﯾأ ءارﺟﻹ .زﺎﮭﺟﻟا مﺳﺟ كﻔﺑ اًدﺑأ مﻘﺗ ﻻ .ﺎﮭﻧﻣ زﺎﮭﺟﻟا
.ﻊﯾﺑﻟا دﻌﺑ ﺎﻣ ﺔﻣدﺧ زﻛرﻣﺑ لﺻﺗا ،حﻼﺻإ وأ ﺔﻧﺎﯾﺻ
5لﯾﺻوﺗﻟاو بﯾﻛرﺗﻟا
.طﻘﻓ ﻲﻟزﻧﻣﻟا مادﺧﺗﺳﻼﻟ مﻣﺻﻣ زﺎﮭﺟﻟا اذھ
.ﺦﺑطﻣﻟا تادﺣو ﻲﻓ لﻣﺎﻛ لﻛﺷﺑ ﺞﻣدﯾﻟ مﻣﺻﻣ زﺎﮭﺟﻟا اذھ
.بﯾﻛرﺗﻟﺎﺑ ﺔﺻﺎﺧﻟا تﺎﻣﯾﻠﻌﺗﻟا ةﺎﻋارﻣ ﻰﺟرُﯾ
Schuko
ﻊطﺎﻗ نوﻛﯾ نأ بﺟﯾ .ﺔﯾﺎﻣﺣ ﺔﻠﺻوﺑ دوزﻣو ﺢﯾﺣﺻ لﻛﺷﺑ بﻛرﻣ
ﻲﺋﺎﺑرﮭﻛﻟا دﮭﺟﻟا ﻊﻣ ﺔﯾﺋﺎﺑرﮭﻛﻟا ﺔﻛﺑﺷﻟا دﮭﺟ ﻖﺑﺎطﺗﯾ نأ بﺟﯾو
دوزﻣ بﺎطﻗﻷا ﻊﯾﻣﺟﻟ لزﻋ حﺎﺗﻔﻣ رﯾﻓوﺗ بﺟﯾﻓ ،زﺎﮭﺟﻟا بﯾﻛرﺗ
سﺑﻘﻣﺑ ﻻإ ﮫﻠﯾﺻوﺗ زوﺟﯾ ﻻو ،لﯾﺻوﺗﻠﻟ زھﺎﺟ زﺎﮭﺟﻟا
ﻎﻠﺑﺗ ةردﻘﺑ ةرﺋادﻟا
10 عوﻧﻟا نﻣ ةرﺋاد ﻊطﺎﻗ) رﯾﺑﻣأL وأ B .(
.ﻊﻧﺻﻟا ﺔﺣوﻟ ﻲﻓ ددﺣﻣﻟا
لﺑﺎﻛ رﯾﯾﻐﺗ وأ سﺑﻘﻣﻟا بﯾﻛرﺗﺑ لھؤﻣ ﻲﺋﺎﺑرﮭﻛ موﻘﯾ نأ بﺟﯾ
درﺟﻣﺑ سﺑﺎﻘﻟا ﻰﻟإ لوﺻوﻟا نﻛﻣﻣﻟا نﻣ دﻌﯾ مﻟ اذإ .ءﺎﺑرﮭﻛﻟا
نﻋ لﻘﺗ ﻻ سﻣﻼﺗ ةوﺟﻔﺑ
3.كﻼﺳﻸﻟ مﻣ
رﺎﯾﺗﻠﻟ تﻼﺻوﻣ ﻻو سﺑاوﻘﻟا ةددﻌﺗﻣ تﺎﺋﯾﺎﮭﻣ مدﺧﺗﺳﺗ ﻻ
.ﻖﯾرﺣ بوﺷﻧ ﻰﻟإ يدؤﺗ لﻣﺣﻟا ةدﺎﯾز .ﺔﻟﺎطإ تﻼﺻو ﻻو
arلﯾﺻوﺗﻟاو بﯾﻛرﺗﻟا
■ بﺎﺑ ضرﻌﺗ ﺔﻟﺎﺣ ﻲﻓ فﯾوورﻛﯾﻣﻟا ﺔﻗﺎط برﺳﺗﺗ نأ نﻛﻣﯾ
■ مﺳﺟ كﻓ ﺔﻟﺎﺣ ﻲﻓ ةزﮭﺟﻷا نﻣ فﯾوورﻛﯾﻣﻟا ﺔﻗﺎط برﺳﺗﺗ
:رﯾذﺣﺗ – !ﺔﺑﺎﺻﻹا رطﺧ
■ مدﺧﺗﺳﺗ ﻻ .تﺎﻘﻘﺷﺗ ﻰﻟإ روطﺗﺗ دﻗ زﺎﮭﺟﻟا بﺎﺑ جﺎﺟز شودﺧ
داوﻣ وأ فﯾظﻧﺗﻟا ﻰﻠﻋ ةدﻋﺎﺳﻣ لﺋﺎﺳو وأ جﺎﺟز ﺔطﺷﺎﻛ
لﯾﺻوﺗﻟاو بﯾﻛرﺗﻟا
ﻲﻓ ةرﯾﻐﺻ بوﻘﺛ ﻰﻠﻋ يوﺗﺣﺗ دﻗ فزﺧﻟا وأ نﯾﻠﺳروﺑﻟا نﻣ
هذھ فﻠﺧ ﻲﻔﺗﺧﺗ تﺎﻏارﻓ كﺎﻧھو .ﺎﮭﺗﯾطﻏأو ﺎﮭﺿﺑﺎﻘﻣ
نأ نﻛﻣﯾ تﺎﻏارﻔﻟا هذھ ﻰﻟإ لﻏوﺗﺗ ﺔﺑوطر ﺔﯾأو .بوﻘﺛﻟا
ﻲﻧاوأ مادﺧﺗﺳا ﻰﻠﻋ رﺻﺗﻗا .ﻲﻧاوﻷا كﻠﺗ رﺎﺳﻛﻧا ﻲﻓ بﺑﺳﺗﺗ
.فﯾوورﻛﯾﻣﻟا نرﻓ ﻲﻓ مادﺧﺗﺳﻼﻟ ﺔﻧﻣآ نرﻓ
ﻲﺗﻟا وأ ندﻌﻣﻟا نﻣ ﺔﻋوﻧﺻﻣﻟا ﺔﯾﻋوﻷاو نرﻔﻟا ﻲﻧاوأ ﻊﺿو
ررﺷ دﻟوﺗ ﻲﻓ بﺑﺳﺗﯾ دﻗ زﺎﮭﺟﻟا لﺧاد ﺔﯾﻧدﻌﻣ ءازﺟأ مﺿﺗ
ررﺿﻟا قﺎﺣﻟإ ﮫﻧﺄﺷ نﻣ اذھو .زﺎﮭﺟﻟا لﯾﻐﺷﺗ مﺗﯾ ﺎﻣدﻧﻋ
مادﺧﺗﺳا دﻧﻋ ﺔﯾﻧدﻌﻣ ﺔﯾﻋوأ ﺔﯾأ ادﺑأ مدﺧﺗﺳﺗ ﻻ .زﺎﮭﺟﻟﺎﺑ
.طﻘﻓ فﯾوورﻛﯾﻣﻟا ﺔﻘﯾرطﺑ زﺎﮭﺟﻟا
فﯾوورﻛﯾﻣﻠﻟ كرﺗﺷﻣﻟا ﻲﮭطﻟا ﻊﺿو ﻲﻓ .ررﺿ عوﻗو
ﻲﺗﻟا ﺔﺑﺳﺎﻧﻣ تﺎﻣﺎﺧ نﻣ ﺔﻋوﻧﺻﻣﻟا ﻲﻧاوﻷا ﺎًﻣﺋاد مدﺧﺗﺳا
ﻲﻌﺿو ﻲﻓ ﺔﻣدﺧﺗﺳﻣﻟا ةرارﺣﻟا تﺎﺟرد ﺔﻣوﺎﻘﻣ ﻊﯾطﺗﺳﺗ
.ادﺑأ راودﻟا صرﻘﻟﺎﺑ مدطﺻﺗ ﺔﺑﻠﺻﻟا ضارﻏﻷا
ﯾ راودﻟا ﻲﺟﺎﺟزﻟا صرﻘﻟا ﻲﻓ روﺳﻛ وأ تﺎﻘﻘﺷﺗ دوﺟو
ُ
.ﺔﻐﻟﺎﺑ ﺔﯾﺎﻧﻌﺑ راودﻟا صرﻘﻟا ﻊﻣ لﻣﺎﻌﺗ .ةرﯾﺑﻛ ةروطﺧ
.ﺔﻟﺎﻛأ وأ ﺔﻧﺷﺧ فﯾظﻧﺗ
■ ﺔﻋوﻧﺻﻣﻟا نرﻔﻟا ﻲﻧاوأ .ﻖﻘﺷﺗﺗ دﻗ ﺔﺑﺳﺎﻧﻣﻟا رﯾﻏ نرﻔﻟا ﻲﻧاوأ
■ نﺈﻓ ،طﻘﻓ فﯾوورﻛﯾﻣﻟا ﺔﻘﯾرطﺑ زﺎﮭﺟﻟا مادﺧﺗﺳا ﺔﻟﺎﺣ ﻲﻓ
■ ﻰﻟإ يدؤﯾ نأ نﻛﻣﯾ ﺔﺑﺳﺎﻧﻣﻟا رﯾﻏ ﻲﮭطﻟا ﻲﻧاوأ مادﺧﺗﺳا
.ءاوﺷﻟاو نﺧﺎﺳﻟا ءاوﮭﻟا
■ كرﺗﺗ ﻻ .رﺳﻛﻠﻟ راودﻟا ﻲﺟﺎﺟزﻟا صرﻘﻟا ضرﻌﺗﯾ دﻗ
■ لﺛﻣ
.زﺎﮭﺟﻟا مﺳﺟ كﻔﺑ اًدﺑأ مﻘﺗ ﻻ .ﻊﻔﺗرﻣ دﮭﺟﺑ لﻣﻌﯾ زﺎﮭﺟﻟا
فﯾظﻧﺗﺑ مﻗ .فﯾوورﻛﯾﻣﻟا ﺔﻗﺎط برﺳﺗﺗ نأ نﻛﻣﯾو .مﯾﻠﺳ
ﻰﻠﻋ ﺔﻣﻌطأ ﺎﯾﺎﻘﺑ ﺔﯾأ ﺔﻟازﺈﺑ مﻗو ،ﺔﻣظﺗﻧﻣ تارﺗﻓ ﻰﻠﻋ زﺎﮭﺟﻟا
ﻖﻠﻏ مﺎﻛﺣإ رﺎطإو ﻲﮭطﻟا زﯾﺣ ﺔﻓﺎظﻧ ﻰﻠﻋ ﺎًﻣﺋاد ظﻓﺎﺣ .روﻔﻟا
ﺔﺣﻔﺻ ﻲﻓ «فﯾظﻧﺗﻟا»
15
.بﺎﺑﻟا دﺻﻣو بﺎﺑﻟاو بﺎﺑﻟا
:رﯾذﺣﺗ – !ﻲﺋﺎﺑرﮭﻛﻟا ﻖﻌﺻﻟا رطﺧ
:رﯾذﺣﺗ – !ﺔﻣﯾﺳﺟ ﺔﯾﺣﺻ رارﺿأ ثودﺣ رطﺧ
■ لﻛﺷﺑ ﮫﻔﯾظﻧﺗ مﺗﯾ مﻟ اذإ ررﺿﻠﻟ زﺎﮭﺟﻟا ﺢطﺳ ضرﻌﺗﯾ دﻗ
6
Page 42

ﺔﻣﮭﻣﻟا نﺎﻣﻷا تادﺎﺷرإar
:رﯾذﺣﺗ – !رﺎﺟﻔﻧﻻا رطﺧ
لﺧاد ﺎﮭﻌﺿو ﺔﻟﺎﺣ ﻲﻓ رﺟﻔﻧﺗ دﻗ ىرﺧﻷا ﺔﻣﻌطﻷاو لﺋاوﺳﻟا
ﺔﻣﻌطﻷا وأ لﺋاوﺳﻟا نﯾﺧﺳﺗﺑ اًدﺑأ مﻘﺗ ﻻ اذﻟ .ﻖﻠﻐﻟا ﺔﻣﻛﺣﻣ ﺔﯾﻋوأ
.ﻖﻠﻐﻟا ﺔﻣﻛﺣﻣ ﺔﯾﻋوأ لﺧاد ىرﺧﻷا
:رﯾذﺣﺗ – !قورﺣﺑ ﺔﺑﺎﺻﻹا رطﺧ
اًدﺑأ مﻘﺗ ﻻ اذﻟ .نﯾﺧﺳﺗﻟا دﻌﺑ ﻰﺗﺣ وأ ءﺎﻧﺛأ رﺟﻔﻧﺗ وأ ﻖﻘﺷﺗﺗ دﻗ
ضﯾﺑﻟا نﯾﺧﺳﺗ ةدﺎﻋﺈﺑ اًدﺑأ مﻘﺗ ﻻو ،ﮫﺗرﺷﻗ لﺧاد ضﯾﺑﻟا ﻖﻠﺳﺑ
ﺔﻟﺎﺣ ﻲﻓ .تﺎﯾرﺷﻘﻟاو تﺎﯾﻓدﺻﻟا ﻖﻠﺳﺑ اًدﺑأ مﻘﺗ ﻻو .قوﻠﺳﻣﻟا
ﻲﻓ بﻘﺛ لﻣﻋ ﺎًﻣﺋاد بﺟﯾ ،(نوﯾﻋ) ضﯾﺑﻟا ﻲﻠﻗ وأ ﻲﮭط
ﺔﻘﺑطﻟا وأ ةرﺷﻘﻟا تاذ ﺔﻣﻌطﻷا رﺟﻔﻧﺗ دﻗ .ضﯾﺑﻟا رﺎﻔﺻ
ﻖﺟﺳﻟاو سطﺎطﺑﻟاو مطﺎﻣطﻟاو حﺎﻔﺗﻟا لﺛﻣ ،ﺔﯾﺟرﺎﺧﻟا ﺔﯾدﻠﺟﻟا
ﺔﯾدﻠﺟﻟا ﺔﻘﺑطﻟا وأ ةرﺷﻘﻟا ﻲﻓ بﻘﺛ لﻣﻌﺑ مﻗ .(ﻖﻧﺎﻘﻧﻟا)
.نﯾﺧﺳﺗﻟا ﺔﯾﻠﻣﻋ لﺑﻗ ﺔﯾﺟرﺎﺧﻟا
.ﺔﻘﻠﻐﻣ ﺔﯾﻋوأ ﻲﻓ ﻊﺿرﻟا لﺎﻔطﻷا مﺎﻌط نﯾﺧﺳﺗﺑ اًدﺑأ مﻘﺗ ﻻ
نﯾﺧﺳﺗ دﻌﺑ .ﺔﻣﻠﺣﻟا وأ ءﺎطﻐﻟا ﻊﻠﺧ ﻰﻠﻋ ﺎًﻣﺋاد صرﺣاو
ةرارﺣ ﺔﺟرد نﻣ دﻛﺄﺗ .اًدﯾﺟ ﮫﺟر وأ ﮫﺑﯾﻠﻘﺗﺑ مﻗ ،مﺎﻌطﻟا
.لﻔطﻠﻟ ﮫﻣﯾدﻘﺗ لﺑﻗ مﺎﻌطﻟا
ﻲﻧاوأ وأ تﺎﯾﻟﺎﻣﻛﻟا جارﺧﻹ نرﻔﻠﻟ اًزﺎﻔﻗ ﺎًﻣﺋاد مدﺧﺗﺳا .ﺔﻧﺧﺎﺳ
.ﻲﮭطﻟا زﯾﺣ نﻣ نرﻔﻟا
ﺎًﻣﺋاد مدﺧﺗﺳا .تاوﺑﻌﻟا ﻰﻠﻋ ةدوﺟوﻣﻟا تﺎﻧﺎﯾﺑﻟا ﺎًﻣﺋاد ﻰﻋارﺗ
.ﻲﮭطﻟا زﯾﺣ نﻣ قﺎﺑطﻷا جارﺧﻹ نرﻔﻠﻟ اًزﺎﻔﻗ
لﺎﻔطﻷا دﻌﺑأو .ﺔﻧﺧﺎﺳﻟا ءازﺟﻷا ادﺑأ سﻣﻠﺗ ﻻ .لﯾﻐﺷﺗﻟا
.ﺔﯾﻓﺎﻛ ﺔﻓﺎﺳﻣﻟ
.ارﯾطﺧ ارﻣأ دﻌﯾ ﮫﻟ صﺻﺧﻣﻟا
سﺑﻼﻣﻟا وأ مﺎﻌطﻟا فﯾﻔﺟﺗ ﻲﻓ زﺎﮭﺟﻟا مادﺧﺗﺳﺎﺑ حوﻣﺳﻣ رﯾﻏ
ﻊطﻗو تﺎﺷﻣرﻘﻣﻟا وأ بوﺑﺣﻟا سﺎﯾﻛأ وأ بﺷﺎﺑﺷﻟا ﺔﺋﻓدﺗ وأ
.كﻟذ ﮫﺑﺎﺷ ﺎﻣ وأ ﺔﺑطرﻟا فﯾظﻧﺗﻟا ﺔﺷﻣﻗأو ﺞﻧﻔﺳﻹا
وأ بوﺑﺣﻟا سﺎﯾﻛأ وأ بﺷﺎﺑﺷﻟا نأ وھ كﻟذ ﻲﻓ بﺑﺳﻟاو
ﮫﻓﻼﺧو ﺔﺑطرﻟا شﺎﻣﻘﻟا ﻊطﻗ وأ ﺞﻧﻔﺳﻹا ﻊطﻗ وأ تﺎﺷﻣرﻘﻣﻟا
.ةرﺷﺑﻠﻟ ﺎًﻗورﺣ بﺑﺳﺗ دﻗ ةدﺷﺑ ﺎﮭﻧﯾﺧﺳﺗ مﺗ اذإ
:رﯾذﺣﺗ – !تاءاوﺗﻛﺎﺑ ﺔﺑﺎﺻﻹا رطﺧ
دﻋﺎﺻﺗﺗ نأ نود نﺎﯾﻠﻐﻟا ﺔﺟرد ﻰﻟإ لﺻﯾ لﺋﺎﺳﻟا نأ ﻲﻧﻌﯾ
ءﺎﻋوﻠﻟ زازﺗھا لﻗأ ﻊﻣو .ﺢطﺳﻟا ﻰﻠﻋ ةدﺎﺗﻌﻣﻟا رﺎﺧﺑﻟا تﺎﻋﺎﻘﻓ
ءﺎﻧﺛأ .ذاذر رﯾﺎطﺗﯾ وأ ةوﻘﺑ نﺧﺎﺳﻟا لﺋﺎﺳﻟا روﻔﯾ نأ نﻛﻣﯾ
.ءﺎﻋوﻟا لﺧاد ﺔﻘﻌﻠﻣ ﻊﺿو ﻰﻠﻋ ﺎًﻣﺋاد صرﺣا ،نﯾﺧﺳﺗﻟا
.نﺎﯾﻠﻐﻟا رﺧﺄﺗ ةرھﺎظ بﻧﺟﺗﺗ كﻟذﺑو
ﻣﺋاد مدﺧﺗﺳا .ﺔﯾﺎﻐﻠﻟ ﺔﻧﺧﺎﺳ ﺢﺑﺻﺗ نرﻔﻟا ﻲﻧاوأو تﺎﯾﻟﺎﻣﻛﻟا
ً
■ ﺎ
زﯾﺣ نﻣ نرﻔﻟا ﻲﻧاوأ وأ تﺎﯾﻟﺎﻣﻛﻟا جارﺧﻹ نرﻔﻟا تازﺎﻔﻗ
.ﻲﮭطﻟا
■ اذﻟ .نﺧﺎﺳﻟا ﻲﮭطﻟا زﯾﺣ ﻲﻓ لﻌﺗﺷﺗ نأ نﻛﻣﯾ لوﺣﻛﻟا ةرﺧﺑأ
نﻣ ةرﯾﺑﻛ تﺎﯾﻣﻛ ﻰﻠﻋ يوﺗﺣﺗ ﺔﻣﻌطأ رﯾﺿﺣﺗﺑ اًدﺑأ مﻘﺗ ﻻ
ﻰﻠﻋ رﺻﺗﻗا .لوﺣﻛﻟا نﻣ ﺔﯾﻟﺎﻋ ﺔﺑﺳﻧ ﻰﻠﻋ ﺔﻠﻣﺗﺷﻣﻟا لﺋاوﺳﻟا
■ ﺔﯾﺟرﺎﺧ ﺔﯾدﻠﺟ ﺔﻘﺑط ﻰﻠﻋ ﺔﯾوﺗﺣﻣﻟا وأ ةرﺷﻘﻟا تاذ ﺔﻣﻌطﻷا
ﻰﻠﻋ يوﺗﺣﺗ ﻲﺗﻟا تﺎﺑورﺷﻣﻟا نﻣ ةرﯾﻐﺻ تﺎﯾﻣﻛ مادﺧﺗﺳا
.صرﺣﺑ زﺎﮭﺟﻟا بﺎﺑ ﺢﺗﻓا .لوﺣﻛﻟا نﻣ ﺔﯾﻟﺎﻋ ﺔﺑﺳﻧ
:رﯾذﺣﺗ – !تاءاوﺗﻛﺎﺑ ﺔﺑﺎﺻﻹا رطﺧ
■ بﺎﺑ ﺢﺗﻓا .زﺎﮭﺟﻟا بﺎﺑ ﺢﺗﻔﺗ ﺎﻣدﻧﻋ نﺧﺎﺳﻟا رﺎﺧﺑﻟا برﺳﺗﯾ دﻗ
.ﺔﯾﻓﺎﻛ ﺔﻓﺎﺳﻣﻟ لﺎﻔطﻷا دﻌﺑأو .صرﺣﺑ زﺎﮭﺟﻟا
■ رﺎﺧﺑﻟا نوﻛﺗ ﻰﻟإ يدؤﯾ دﻗ نﺧﺎﺳﻟا ﻲﮭطﻟا زﯾﺣ ﻲﻓ ءﺎﻣﻟا
.نﺧﺎﺳﻟا ﻲﮭطﻟا زﯾﺣ ﻲﻓ ءﺎﻣﻟا بﺻﺑ اًدﺑأ مﻘﺗ ﻻ .نﺧﺎﺳﻟا
■ اذﻟ .ﻊﺿرﻟا لﺎﻔطﻷا مﺎﻌط ﻲﻓ يوﺎﺳﺗﻟﺎﺑ ﺔﻧوﺧﺳﻟا عزوﺗﺗ ﻻ
مدﺧﺗﺳﺗ ﻻ .تﺎﻘﻘﺷﺗ ﻰﻟإ روطﺗﺗ دﻗ زﺎﮭﺟﻟا بﺎﺑ جﺎﺟز شودﺧ
:رﯾذﺣﺗ – !ﺔﺑﺎﺻﻹا رطﺧ
فﯾظﻧﺗ داوﻣ وأ فﯾظﻧﺗﻟا ﻰﻠﻋ ةدﻋﺎﺳﻣ لﺋﺎﺳو وأ جﺎﺟز ﺔطﺷﺎﻛ
.ﺔﻟﺎﻛأ وأ ﺔﻧﺷﺧ
■ نرﻔﻟا ﻲﻧاوأ ﺢﺑﺻﺗ دﻗو .ةرارﺣ ﮫﻧﻣ ثﻌﺑﻧﺗ نﺧﺳﻣﻟا مﺎﻌطﻟا
فﯾوورﻛﯾﻣﻟا
:رﯾذﺣﺗ – !ﻖﯾرﺣ بوﺷﻧ رطﺧ
■ ﻲﺳﺎﺳﻷا ضرﻐﻟا فﻼﺧﺑ ضرﻏ يﻷ زﺎﮭﺟﻟا مادﺧﺗﺳا نإ
■ .ﺔﻣﻌطﻷا نﺧﺳﺗ ﺎﻣدﻧﻋ رﺟﻔﻧﺗ دﻗ ﻖﻠﻐﻟا ﺔﻣﻛﺣﻣ تاوﺑﻌﻟا
ﺔﺋﻓدﺗ وأ سﺑﻼﻣﻟا وأ مﺎﻌطﻟا فﯾﻔﺟﺗ :ﻲﻠﯾ ﺎﻣﺑ مﺎﯾﻘﻟﺎﺑ ﺢﻣﺳﯾ ﻻ
ﺞﻧﻔﺳﻹا ﻊطﻗو تﺎﺷﻣرﻘﻣﻟا وأ بوﺑﺣﻟا سﺎﯾﻛأ وأ بﺷﺎﺑﺷﻟا
■ ءﺎﻧﺛأ ﺔﯾﺎﻐﻠﻟ ﺔﻧﺧﺎﺳ ﺢﺑﺻﺗ ﺎﮭﯾﻟإ لوﺻوﻟا نﻛﻣﯾ ﻲﺗﻟا ءازﺟﻷا
ةﺄﻓدﻣﻟا بﺷﺎﺑﺷﻟا لﻌﺗﺷﺗ نأ لﺎﺛﻣﻟا لﯾﺑﺳ ﻰﻠﻋ نﻛﻣﻣﻟا نﻣﻓ
■ ﻲﺳﺎﺳﻷا ضرﻐﻟا فﻼﺧﺑ ضرﻏ يﻷ زﺎﮭﺟﻟا مادﺧﺗﺳا نإ
ﻲﻓ زﺎﮭﺟﻟا مادﺧﺗﺳا ﻰﻠﻋ رﺎﺻﺗﻗﻻا بﺟﯾ .ﺎﮭﺗﺋﻓدﺗ نﻣ تﺎﻋﺎﺳ
وأ كﯾﺗﺳﻼﺑﻟا نﻣ ﺔﻋوﻧﺻﻣ ﺔﯾﻋوأ لﺧاد ﺔﻣﻌطأ نﯾﺧﺳﺗﺑ مﻘﺗ ﻻ
وأ مزﻼﻟا نﻣ ﻰﻠﻋأ ةردﻗ ﻰﻠﻋ فﯾوورﻛﯾﻣﻟا نرﻓ طﺑﺿﺗ ﻻ
ﻲﻓ ةدراوﻟا تﺎﻧﺎﯾﺑﻟﺎﺑ دﺷرﺗﺳا .مزﻼﻟا نﻣ لوطأ مادﺧﺗﺳا ةرﺗﻓ
■ اذھو .لﺋاوﺳﻟا نﯾﺧﺳﺗ ءﺎﻧﺛأ نﺎﯾﻠﻐﻟا ﻲﻓ رﺧﺄﺗ ثدﺣﯾ نأ نﻛﻣﯾ
نﻣ ﺔﻠﯾﻠﻗ ﺔﺑﺳﻧ ﻰﻠﻋ ﺔﯾوﺗﺣﻣﻟا ﺔﻣﻌطﻷا دﻣﺟﺗ ﺔﺑاذﺈﺑ اًدﺑأ مﻘﺗ ﻻو
.تﺎﯾﻔﻠﺗ بﺑﺳﯾ دﻗو ارﯾطﺧ ارﻣأ دﻌﯾ ﮫﻟ صﺻﺧﻣﻟا
.ﮫﺑﺎﺷ ﺎﻣ وأ ﺔﺑطرﻟا فﯾظﻧﺗﻟا ﺔﺷﻣﻗأو
ةدﻋ رورﻣ دﻌﺑ ﻰﺗﺣ ،تﺎﺷﻣرﻘﻣﻟا وأ بوﺑﺣﻟا سﺎﯾﻛأو
.تﺎﺑورﺷﻣﻟاو ﺔﻣﻌطﻷا دادﻋإ
ً
دﺑأ مﻘﺗ ﻻ .لﻌﺗﺷﺗ نأ نﻛﻣﯾ ﺔﻣﻌطﻷا
.ﺔﻧوﺧﺳﻠﻟ ﺔظﻓﺎﺣ تاوﺑﻋ
.ﺔﺑﻗارﻣ نود لﺎﻌﺗﺷﻼﻟ ﺔﻠﺑﺎﻗ ىرﺧأ داوﻣ ﺔﯾأ وأ قروﻟا
.لﯾﻟدﻟا اذھ
.ﺔﻣﻌطﻷا فﯾﻔﺟﺗ ﻲﻓ اًدﺑأ فﯾوورﻛﯾﻣﻟا نرﻓ مدﺧﺗﺳﺗ ﻻ
نرﻔﻟ ﺔﯾﺎﻐﻠﻟ ﺔﯾﻟﺎﻋ ةردﻘﺑ ،ًﻼﺛﻣ زﺑﺧﻟﺎﻛ ،ﺎﮭﻧﯾﺧﺳﺗ وأ ءﺎﻣﻟا
.مزﻼﻟا نﻣ لوطأ ةرﺗﻔﻟ وأ فﯾوورﻛﯾﻣﻟا
.هدﺣو ﻲﮭطﻟا تﯾز نﯾﺧﺳﺗ ﻲﻓ اًدﺑأ
■ لﺧاد ﺔﻣﻌطأ نﯾﺧﺳﺗﺑ ا
■ فﯾوورﻛﯾﻣﻟا نرﻓ مدﺧﺗﺳﺗ ﻻ .لﻌﺗﺷﯾ نأ نﻛﻣﯾ ﻲﮭطﻟا تﯾز
5
Page 43

arتﺎﻣﯾﻠﻌﺗﻠﻟ ﻖﺑﺎطﻣﻟا لﺎﻣﻌﺗﺳﻻا
~
ﺔﻣﺎﻋ تﺎﻣوﻠﻌﻣ
زﯾﺣ ﻲﻓ لﺎﻌﺗﺷﻼﻟ ﺔﻠﺑﺎﻗ داوﻣﺑ اًدﺑأ ظﻔﺗﺣﺗ ﻻ .لﻌﺗﺷﺗ نأ نﻛﻣﯾ
.ﮫﻠﺧادﺑ ﺔﻧﺧدأ دوﺟو ﺔﻟﺎﺣ ﻲﻓ اًدﺑأ زﺎﮭﺟﻟا بﺎﺑ ﺢﺗﻔﺗ ﻻ .ﻲﮭطﻟا
لﺻﻓا وأ ﻲﺋﺎﺑرﮭﻛﻟا رﺎﯾﺗﻟا ﺔﻛﺑﺷ نﻋ ﮫﻠﺻﻓاو زﺎﮭﺟﻟا فﻗوأ
.رھﺎﺻﻣﻟا قودﻧﺻ ﻲﻓ ﺔﯾﺋﺎﺑرﮭﻛﻟا ةرﺋادﻟا ﻊطﺎﻗ
ً
ﻧﺧﺎﺳ زﺎﮭﺟﻟا ﺢﺑﺻﯾ
ﺔﻧوﺧﺳﻟا مﻛارﺗﺗ فوﺳﻓ ،يروﻛﯾد بﺎﺑﺑ ةدوزﻣ تﯾﺑﺛﺗ ةدﺣو
نوﻛﯾ ﺎﻣدﻧﻋ ﻻإ زﺎﮭﺟﻟا لﯾﻐﺷﺗﺑ مﻘﺗ ﻻ .ةدﺣوﻟا بﺎﺑ ﻖﻠﻏ دﻧﻋ
.ﺎًﺣوﺗﻔﻣ يروﻛﯾدﻟا بﺎﺑﻟا
ﺔﻓرﻌﻣﺑ ﻻإ ﺔﻔﻟﺎﺗﻟا ءﺎﺑرﮭﻛﻟا تﻼﺑﺎﻛ رﯾﯾﻐﺗ وأ حﻼﺻﻹا لﺎﻣﻋأ
ﻊﯾﺑﻟا دﻌﺑ ﺎﻣ ﺔﻣدﺧ زﻛارﻣ ﻲﻓ نﯾﻠﻣﺎﻌﻟا نﯾﺑردﻣﻟا نﯾﯾﻧﻔﻟا دﺣأ
نﻋ زﺎﮭﺟﻟا لﺻﻓا ،زﺎﮭﺟﻟﺎﺑ لﻠﺧ روﮭظ ﺔﻟﺎﺣ ﻲﻓ .ﺎﻧﻟ ﺔﻌﺑﺎﺗﻟا
ﻲﻓ دوﺟوﻣﻟا ﺔﯾﺋﺎﺑرﮭﻛﻟا ةرﺋادﻟا ﻊطﺎﻗ لﺻﻓا وأ ءﺎﺑرﮭﻛﻟا
.ﻊﯾﺑﻟا دﻌﺑ ﺎﻣ ﺔﻣدﺧ زﻛرﻣﺑ لﺻﺗا .رھﺎﺻﻣﻟا قودﻧﺻ
تﻼﺑﺎﻛ لﻌﺟﺗ ﻻ .زﺎﮭﺟﻠﻟ ﺔﻧﺧﺎﺳﻟا ءازﺟﻷا ﺔﺳﻣﻼﻣ ﺔﻟﺎﺣ
.اًدﺑأ زﺎﮭﺟﻠﻟ ﺔﻧﺧﺎﺳﻟا ءازﺟﻷا سﻣﻼﺗ ﻲﺋﺎﺑرﮭﻛﻟا زﺎﮭﺟﻟا
.ﻲﺋﺎﺑرﮭﻛ ﻖﻌﺻ ثودﺣ ﻲﻓ بﺑﺳﺗﺗ نأ نﻛﻣﯾ ثﯾﺣ
ﺔﺑوطرﻟا وأ ةرارﺣﻠﻟ اًدﺑأ زﺎﮭﺟﻟا ضرﻌﺗ ﻻ .ﻲﺋﺎﺑرﮭﻛﻟا
.طﻘﻓ لزﻧﻣﻟا لﺧاد زﺎﮭﺟﻟا اذھ مدﺧﺗﺳا .ةدﯾدﺷﻟا
.لطﻋ ﮫﺑ نﺎﻛ اذإ زﺎﮭﺟﻟا لﯾﻐﺷﺗﺑ ادﺑأ مﻘﺗ ﻻ اذﻟ .ﻲﺋﺎﺑرﮭﻛﻟا
ﻊطﺎﻗ لﺻﻓا وأ ﻲﺋﺎﺑرﮭﻛﻟا رﺎﯾﺗﻟا ﺔﻛﺑﺷ نﻋ زﺎﮭﺟﻟا لﺻﻓا
زﻛرﻣﺑ لﺻﺗا .رھﺎﺻﻣﻟا قودﻧﺻ ﻲﻓ ﺔﯾﺋﺎﺑرﮭﻛﻟا ةرﺋادﻟا
.ﻊﯾﺑﻟا دﻌﺑ ﺎﻣ ﺔﻣدﺧ
ً
دﺑأ مﻘﺗ ﻻ .ﻊﻔﺗرﻣ دﮭﺟﺑ لﻣﻌﯾ زﺎﮭﺟﻟا
(ﺔﻣﮭﻣﻟا نﺎﻣﻷا تادﺎﺷرإ
ﺔﻣﮭﻣﻟا نﺎﻣﻷا تادﺎﺷرإ
:رﯾذﺣﺗ – !ﻖﯾرﺣ بوﺷﻧ رطﺧ
■ ﻲﮭطﻟا زﯾﺣ ﻲﻓ ﺎﮭﻧﯾزﺧﺗ مﺗﯾ ﻲﺗﻟا لﺎﻌﺗﺷﻼﻟ ﺔﻠﺑﺎﻘﻟا داوﻣﻟا
كزﺎﮭﺟ لﯾﻐﺷﺗ كﻧﻛﻣﯾﺳ طﻘﻓ ذﺋدﻧﻌﻓ .ﺔﯾﺎﻧﻌﺑ تﺎﻣﯾﻠﻌﺗﻟا هذھ أرﻗا
بﯾﻛرﺗﻟا لﯾﻟدو لﺎﻣﻌﺗﺳﻻا لﯾﻟدﺑ ظﻔﺗﺣا .نﻣآو ﺢﯾﺣﺻ لﻛﺷﺑ
.دﯾدﺟﻟا كﻟﺎﻣﻠﻟ ﺎﻣﮭﻣﯾﻠﺳﺗﻟ وأ ﺎﻘﺣﻻ ﺎﻣﮭﻣادﺧﺗﺳﻻ
8تﺎﻣﯾﻠﻌﺗﻠﻟ ﻖﺑﺎطﻣﻟا لﺎﻣﻌﺗﺳﻻا
تﺎﻣﯾﻠﻌﺗﻠﻟ ﻖﺑﺎطﻣﻟا لﺎﻣﻌﺗﺳﻻا
ﻰﻋارﺗ .ﺦﺑطﻣ ﻲﻓ لﻣﺎﻛﻟﺎﺑ بﯾﻛرﺗﻠﻟ طﻘﻓ صﺻﺧﻣ زﺎﮭﺟﻟا اذھ
.بﯾﻛرﺗﻟﺎﺑ ﺔﺻﺎﺧﻟا تﺎﻣﯾﻠﻌﺗﻟا
ةوﺑﻋ نﻣ ﮫﺟارﺧإ دﻌﺑ زﺎﮭﺟﻟﺎﺑ رارﺿأ دوﺟو مدﻋ نﻣ ﻖﻘﺣﺗ
رارﺿأ فﺎﺷﺗﻛا ﺔﻟﺎﺣ ﻲﻓ زﺎﮭﺟﻟا لﯾﺻوﺗﺑ مﻘﺗ ﻻو .فﯾﻠﻐﺗﻟا
■ ﻲﻓ زﺎﮭﺟﻟا بﯾﻛرﺗ ﺔﻟﺎﺣ ﻲﻓ .ﺔﯾﺎﻐﻠﻟ ﺎ
.لﻘﻧﻟا ﺔﯾﻠﻣﻋ نﻋ ﺔﺟﺗﺎﻧ
.دﻣﺗﻌﻣ ﻲﻧﻓ ﺔﻓرﻌﻣﺑ ﻻإ سﺑاوﻗ نودﺑ ةزﮭﺟﻷا لﯾﺻوﺗ زوﺟﯾ ﻻ
رﯾﻏ لﻛﺷﺑ زﺎﮭﺟﻟا لﯾﺻوﺗ نﻋ ﺞﺗﺎﻧﻟا ررﺿﻟا لﻣﺷﯾ ﻻ نﺎﻣﺿﻟﺎﻓ
.ﺢﯾﺣﺻ
:رﯾذﺣﺗ – !ﻲﺋﺎﺑرﮭﻛﻟا ﻖﻌﺻﻟا رطﺧ
■ ءارﺟإ زوﺟﯾ ﻻو .ةروطﺧ لﺛﻣﺗ ﺔﻣﯾﻠﺳﻟا رﯾﻏ حﻼﺻﻹا لﺎﻣﻋأ
نوﻛﯾ نأ بﺟﯾ .طﻘﻓ ﻲﻟزﻧﻣﻟا مادﺧﺗﺳﻼﻟ صﺻﺧﻣ زﺎﮭﺟﻟا اذھ
.تﺎﺑورﺷﻣﻟاو ﺔﻣﻌطﻷا رﯾﺿﺣﺗ ﻰﻠﻋ اًروﺻﻘﻣ زﺎﮭﺟﻟا مادﺧﺗﺳا
لﺧاد زﺎﮭﺟﻟا اذھ مدﺧﺗﺳا .لﯾﻐﺷﺗﻟا ءﺎﻧﺛأ زﺎﮭﺟﻟا ﺔﺑﻗارﻣ نﯾﻌﺗﯾو
.طﻘﻓ لزﻧﻣﻟا
4000 قوﻓ رﺗﻣ
عﺎﻔﺗرا ﻰﺗﺣ مادﺧﺗﺳﻼﻟ بﺳﺎﻧﻣ زﺎﮭﺟﻟا اذھ
.رﺣﺑﻟا ﺢطﺳ ىوﺗﺳﻣ
■ ﻲﻓ ﺔﯾﺋﺎﺑرﮭﻛﻟا ةزﮭﺟﻷا تﻼﺑﺎﻛﻟ ﺔﻟزﺎﻌﻟا ةدﺎﻣﻟا رﮭﺻﻧﺗ دﻗ
وأ ﺔﯾﻧﺎﻣﺳﺟﻟا تاردﻘﻟا ﻲﻓ صﻘﻧ نﻣ نوﻧﺎﻌﯾ نﯾذﻟا صﺎﺧﺷﻷا وأ
نﺳ قوﻓ لﺎﻔطﻷا لَﺑِﻗ نﻣ زﺎﮭﺟﻟا اذھ مادﺧﺗﺳﺎﺑ ﺢﻣﺳُﯾ8 تاوﻧﺳ
وأ ةرﺑﺧﻟا ﻲﻓ روﺻﻗ مﮭﯾدﻟ نﯾذﻟا صﺎﺧﺷﻷا وأ ﺔﯾﻠﻘﻌﻟا وأ ﺔﯾﺳﺣﻟا
■ ،رﺎﺧﺑﻟﺎﺑ وأ ﻲﻟﺎﻌﻟا طﻐﺿﻟﺎﺑ فﯾظﻧﺗ ةزﮭﺟأ ﺔﯾأ مدﺧﺗﺳﺗ ﻻ
■ ﻖﻌﺻﻟا ﻲﻓ بﺑﺳﺗﺗ دﻗ زﺎﮭﺟﻟا ﻲﻓ لﻏوﺗﺗ ﻲﺗﻟا ﺔﺑوطرﻟا
مﮭﺗﺑﻗارﻣﺑ مﮭﺗﻣﻼﺳ نﻋ لوؤﺳﻣ صﺧﺷ موﻘﯾ نأ ﺔطﯾرﺷ ﺔﻓرﻌﻣﻟا
نﻣ دﻛﺄﺗﻟا ﻊﻣ نﺎﻣﺄﺑ زﺎﮭﺟﻟا مادﺧﺗﺳا ﺔﯾﻔﯾﻛ ﻰﻟإ مﮭﮭﯾﺟوﺗ وأ
.كﻟذﺑ ﺔطﺑﺗرﻣﻟا رﺎطﺧﻸﻟ مﮭﻛاردإ
وأ ﮫﯾﻠﻋ بﻌﻠﻟا وأ زﺎﮭﺟﻟﺎﺑ ثﺑﻌﻟﺎﺑ لﺎﻔطﻸﻟ حﺎﻣﺳﻟا زوﺟﯾ ﻻ
لﺎﻣﻋأ ءارﺟإ وأ زﺎﮭﺟﻟا فﯾظﻧﺗ لﺎﻔطﻸﻟ زوﺟﯾ ﻻ .ﮫﻧﻣ برﻘﻟﺎﺑ
نﺳ ﻲﻓ اوﻧوﻛﯾ مﻟ ﺎﻣ ﮫﯾﻠﻋ ﺔﻣﺎﻌﻟا ﺔﻧﺎﯾﺻﻟا
■ ﻖﻌﺻﻟا ﻲﻓ بﺑﺳﺗﯾ نأ نﻛﻣﯾ زﺎﮭﺟﻟا ﻲﻓ لطﻋ دوﺟو
15 ،لﻗﻷا ﻰﻠﻋ ﺔﻧﺳ
.كﻟذ ءﺎﻧﺛأ مﮭﺗﺑﻗارﻣ مﺗﯾ نأ ﻰﻠﻋ
8 لﺑﺎﻛو زﺎﮭﺟﻟا نﻋ مھدﺎﻌﺑإ بﺟﯾ تاوﻧﺳ
نﺳ نود لﺎﻔطﻷا
.ﺔﻧﻣآ ﺔﻓﺎﺳﻣﻟ ءﺎﺑرﮭﻛﻟا
لﻛﺷﺑ ﻲﮭطﻟا زﯾﺣ ﻲﻓ تﺎﯾﻟﺎﻣﻛﻟا لﺎﺧدإ ﻰﻠﻋ ﺎًﻣﺋاد صرﺣا
■.زﺎﮭﺟﻟا مﺳﺟ كﻔﺑ ا
ﺔﺣﻔﺻ ﻲﻓ «ﻰﻟوﻷا ةرﻣﻠﻟ مادﺧﺗﺳﻻا لﺑﻗ»
9
.ﺢﯾﺣﺻ
ً
دﺑأ سﻣﻠﺗ ﻻ .ﺔﯾﺎﻐﻠﻟ ﺎًﻧﺧﺎﺳ زﺎﮭﺟﻟا ﺢﺑﺻﯾ
كرﺗ ﻰﻠﻋ ﺎًﻣﺋاد صرﺣا .نﯾﺧﺳﺗﻟا رﺻﺎﻧﻋ وأ ﻲﮭطﻟا زﯾﺣﻟ
.ﺔﯾﻓﺎﻛ ﺔﻓﺎﺳﻣﻟ لﺎﻔطﻷا دﻌﺑأو .درﺑﯾ زﺎﮭﺟﻟا
:رﯾذﺣﺗ – !قورﺣﺑ ﺔﺑﺎﺻﻹا رطﺧ
■ ﺔﯾﻠﺧادﻟا ﺢطﺳﻷا ا
4
Page 44

ar
تﺎﯾوﺗﺣﻣﻟا سرﮭﻓ
]ar[
ﻻا لﯾﻟدلﺎ ﻣ ﻌ ﺗ ﺳ فﯾوورﻛﯾﻣﻟا نرﻓ
3لﺎطﻋﻷا ﻰﻠﻋ بﻠﻐﺗﻟا. . . . . . . . . . . . . . . . . . . . . . . .16
8تﺎﻣﯾﻠﻌﺗﻠﻟ ﻖﺑﺎطﻣﻟا لﺎﻣﻌﺗﺳﻻا . . . . . . . . . . . . . . . . . . . .4
4ءﻼﻣﻌﻟا ﺔﻣدﺧ. . . . . . . . . . . . . . . . . . . . . . . . . . . .17
ﺞﺗﻧﻣﻟا مﻗرE ﻊﻧﺻﻟا مﻗرو FD. . . . . . . . . . . . . . . . . . . . . . 17
Jﺎﻧﺑ صﺎﺧﻟا ﻲﮭطﻟا وﯾدوﺗﺳ ﻲﻓ ﺎھرﺎﺑﺗﺧا مﺗ ﻲﺗﻟا قﺎﺑطﻷا. . . .18
ﺔﺑﺳﺎﻧﻣﻟا نرﻔﻟا ﻲﻧاوأ. . . . . . . . . . . . . . . . . . . . . . . . . . . . 18
ﺔﺑﺳﺎﻧﻣﻟا رﯾﻏ ﻲﮭطﻟا ﻲﻧاوأ. . . . . . . . . . . . . . . . . . . . . . . . .18
دﻣﺟﺗﻟا ﺔﺑاذإ. . . . . . . . . . . . . . . . . . . . . . . . . . . . . . . . . 18
دﻣﺟﻣﻟا مﺎﻌطﻟا نﯾﺧﺳﺗ. . . . . . . . . . . . . . . . . . . . . . . . . . . .19
مﺎﻌطﻟا نﯾﺧﺳﺗ. . . . . . . . . . . . . . . . . . . . . . . . . . . . . . . .20
مﺎﻌطﻟا ﻲﮭط. . . . . . . . . . . . . . . . . . . . . . . . . . . . . . . . .21
فﯾوورﻛﯾﻣﻟا نرﻔﺑ ﺔﺻﺎﺧ ﺢﺋﺎﺻﻧ. . . . . . . . . . . . . . . . . . . . . 22
Eةرﺑﺗﺧﻣﻟا قﺎﺑطﻷا. . . . . . . . . . . . . . . . . . . . . . . . . .23
ﺞﺗﻧﻣﻟا تﺎﻣوﻠﻌﻣ
تﺎﻣدﺧﻟاو رﺎﯾﻐﻟا ﻊطﻗو تﺎﯾﻟﺎﻣﻛﻟاو تﺎﺟﺗﻧﻣﻟا لوﺣ تﺎﻣوﻠﻌﻣﻟا نﻣ دﯾزﻣﻟا
www.bosch-home.com رﺟﺗﻣﻟا ﻲﻓو
www.bosch-eshop.com
تﻧرﺗﻧﻹا ﻊﻗوﻣ ﻰﻠﻋ ﺎھدﺟﺗ
ﻊﻗوﻣ ﻰﻠﻋ ﻲﻧورﺗﻛﻟﻹا
(ﺔﻣﮭﻣﻟا نﺎﻣﻷا تادﺎﺷرإ. . . . . . . . . . . . . . . . . . . . . . .4
ﺔﻣﺎﻋ تﺎﻣوﻠﻌﻣ . . . . . . . . . . . . . . . . . . . . . . . . . . . . . . . .4
فﯾوورﻛﯾﻣﻟا . . . . . . . . . . . . . . . . . . . . . . . . . . . . . . . . .5
5لﯾﺻوﺗﻟاو بﯾﻛرﺗﻟا . . . . . . . . . . . . . . . . . . . . . . . . . . . . 6
]رارﺿﻷا بﺎﺑﺳأ. . . . . . . . . . . . . . . . . . . . . . . . . . . 7
7ﺔﺋﯾﺑﻟا ﺔﯾﺎﻣﺣ . . . . . . . . . . . . . . . . . . . . . . . . . . . . .7
ﺔﺋﯾﺑﻟا ﻰﻠﻋ ﺔظﻓﺎﺣﻣ ﺔﻘﯾرطﺑ تﺎﻔﻠﺧﻣﻟا نﻣ صﻠﺧﺗﻟا . . . . . . . . . . . . 7
*كزﺎﮭﺟ ﻰﻠﻋ فرﻌﺗﻟا. . . . . . . . . . . . . . . . . . . . . . . . 7
مﻛﺣﺗﻟا ﺔﺣوﻟ . . . . . . . . . . . . . . . . . . . . . . . . . . . . . . . . . 7
مﻛﺣﺗﻟا رﺻﺎﻧﻋ . . . . . . . . . . . . . . . . . . . . . . . . . . . . . . . .8
ﺔﯾﺗوﺻﻟا ةرﺎﺷﻹا ةدﻣ رﯾﯾﻐﺗ . . . . . . . . . . . . . . . . . . . . . . . . .8
_تﺎﯾﻟﺎﻣﻛﻟا. . . . . . . . . . . . . . . . . . . . . . . . . . . . . . .9
ﺔﺻﺎﺧﻟا تﺎﯾﻟﺎﻣﻛﻟا . . . . . . . . . . . . . . . . . . . . . . . . . . . . . .9
Kﻰﻟوﻷا ةرﻣﻠﻟ مادﺧﺗﺳﻻا لﺑﻗ . . . . . . . . . . . . . . . . . . . . 9
ﮫﻧﺎﻛﻣ ﻲﻓ راودﻟا نﺣﺻﻟا ﻊﺿوو ﻲﮭطﻟا زﯾﺣ فﯾظﻧﺗ . . . . . . . . . . .9
ﺔﻋﺎﺳﻟا طﺑﺿ . . . . . . . . . . . . . . . . . . . . . . . . . . . . . . . . .9
تﺎﯾﻟﺎﻣﻛﻟاو ﻲﮭطﻟا زﯾﺣ فﯾظﻧﺗ. . . . . . . . . . . . . . . . . . . . . . .10
^فﯾوورﻛﯾﻣﻟا نرﻓ. . . . . . . . . . . . . . . . . . . . . . . . . .10
ﻲﮭطﻟا ﻲﻧاوأ. . . . . . . . . . . . . . . . . . . . . . . . . . . . . . . . .10
فﯾوورﻛﯾﻣﻟا نرﻓ ةردﻗ طﺑﺿ عﺎﺿوأ. . . . . . . . . . . . . . . . . . . 11
فﯾوورﻛﯾﻣﻟا نرﻓ طﺑﺿ. . . . . . . . . . . . . . . . . . . . . . . . . . .11
dءاوﺷﻟا. . . . . . . . . . . . . . . . . . . . . . . . . . . . . . . .11
ﺔﯾاوﺷﻟا طﺑﺿ. . . . . . . . . . . . . . . . . . . . . . . . . . . . . . . . 11
ﺔﯾاوﺷﻟاو فﯾوورﻛﯾﻣﻟا نرﻓ طﺑﺿ. . . . . . . . . . . . . . . . . . . . . 12
Bةرﻛاذﻟا. . . . . . . . . . . . . . . . . . . . . . . . . . . . . . . .12
ةرﻛاذﻟا ﻲﻓ طﺑﺿﻟا عﺎﺿوأ نﯾزﺧﺗ. . . . . . . . . . . . . . . . . . . . . 12
ةرﻛاذﻟا لﯾﻐﺷﺗ. . . . . . . . . . . . . . . . . . . . . . . . . . . . . . . . 12
Pﺞﻣارﺑﻟا. . . . . . . . . . . . . . . . . . . . . . . . . . . . . . . 13
ﺞﻣﺎﻧرﺑ طﺑﺿ. . . . . . . . . . . . . . . . . . . . . . . . . . . . . . . . .13
ﺔﯾﻛﯾﺗﺎﻣوﺗوﻷا ﺞﻣارﺑﻟا مادﺧﺗﺳﺎﺑ دﻣﺟﺗﻟا ﺔﺑاذإ. . . . . . . . . . . . . . . .13
ﺔﯾﻛﯾﺗﺎﻣوﺗوﻷا ﺞﻣارﺑﻟا مادﺧﺗﺳﺎﺑ ﻲﮭطﻟا. . . . . . . . . . . . . . . . . . .14
كرﺗﺷﻣﻟا ﻲﮭطﻟا ﺞﻣﺎﻧرﺑ. . . . . . . . . . . . . . . . . . . . . . . . . . .14
Qﺔﯾﺳﺎﺳﻷا طﺑﺿﻟا عﺎﺿوأ. . . . . . . . . . . . . . . . . . . . . .14
Dفﯾظﻧﺗﻟا. . . . . . . . . . . . . . . . . . . . . . . . . . . . . . . 15
فﯾظﻧﺗﻟا ةدﺎﻣ. . . . . . . . . . . . . . . . . . . . . . . . . . . . . . . . .15
3
Page 45

6
Page 46

6
Page 47

6
Page 48

5IBOLZPVGPSCVZJOHB
#PTDI)PNF"QQMJBODF
5HJLVWHU\RXUQHZGHYLFHRQ0\%RVFKQRZDQGSURILWGLUHFWO\IURP
t&YQFSUUJQTUSJDLTGPSZPVSBQQMJBODF
t8BSSBOUZFYUFOTJPOPQUJPOT
t%JTDPVOUTGPSBDDFTTPSJFTTQBSFQBSUT
t%JHJUBMNBOVBMBOEBMMBQQMJBODFEBUBBUIBOE
t&BTZBDDFTTUP#PTDI)PNF"QQMJBODFT4FSWJDF
)UHHDQGHDV\UHJLVWUDWLRQ²DOVRRQPRELOHSKRQHV
XXXCPTDIIPNFDPNXFMDPNF
-PPLJOHGPSIFMQ
:PV}MMGJOEJUIFSF
([SHUWDGYLFHIRU\RXU%RVFKKRPHDSSOLDQFHVQHHGKHOSZLWKSUREOHPV
RUDUHSDLUIURP%RVFKH[SHUWV
)LQGRXWHYHU\WKLQJDERXWWKHPDQ\ZD\V%RVFKFDQVXSSRUW\RX
XXXCPTDIIPNFDPNTFSWJDF
$POUBDUEBUBPGBMMDPVOUSJFTBSFMJTUFEJOUIFBUUBDIFETFSWJDFEJSFDUPSZ
3PCFSU#PTDI)BVTHFSÉUF(NC)
&DUO:HU\6WUDH
0QFKHQ
*HUPDQ\
XXXCPTDIIPNFDPN
*9001277420*
9001277420
00228(04)
 Loading...