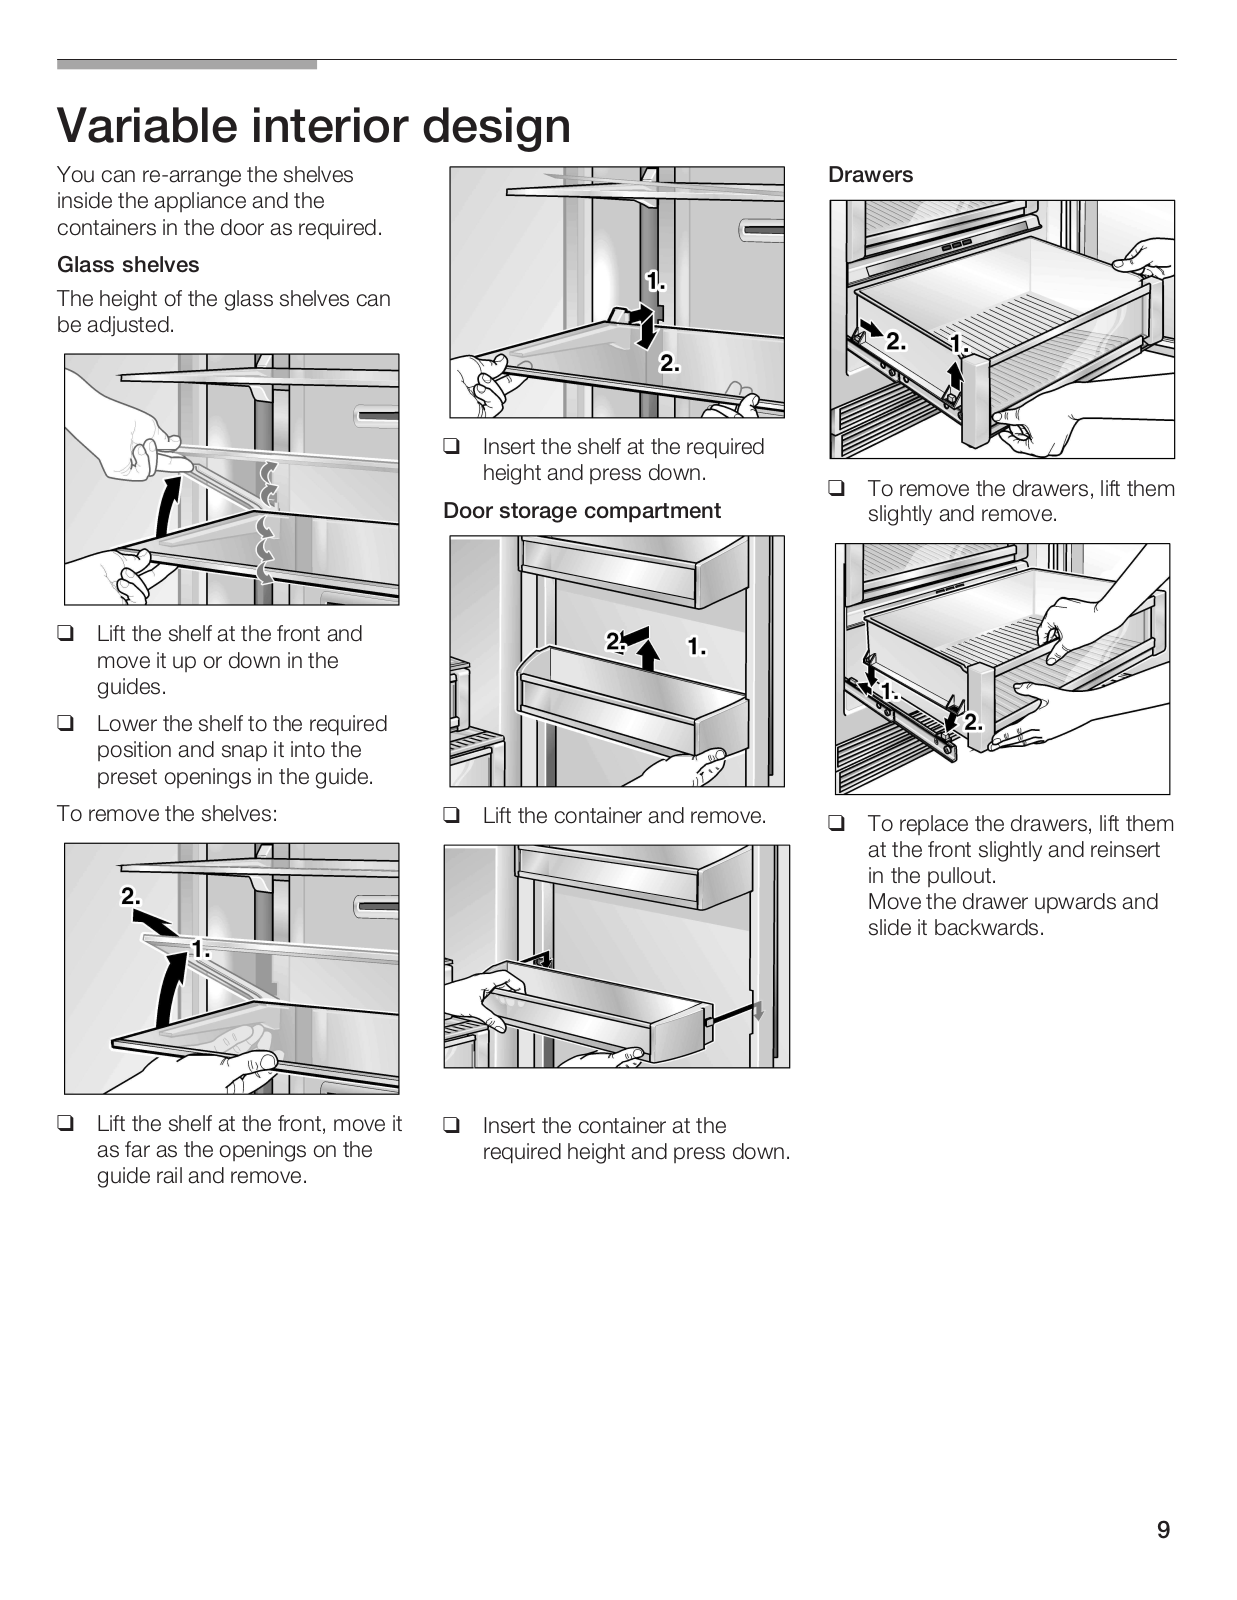
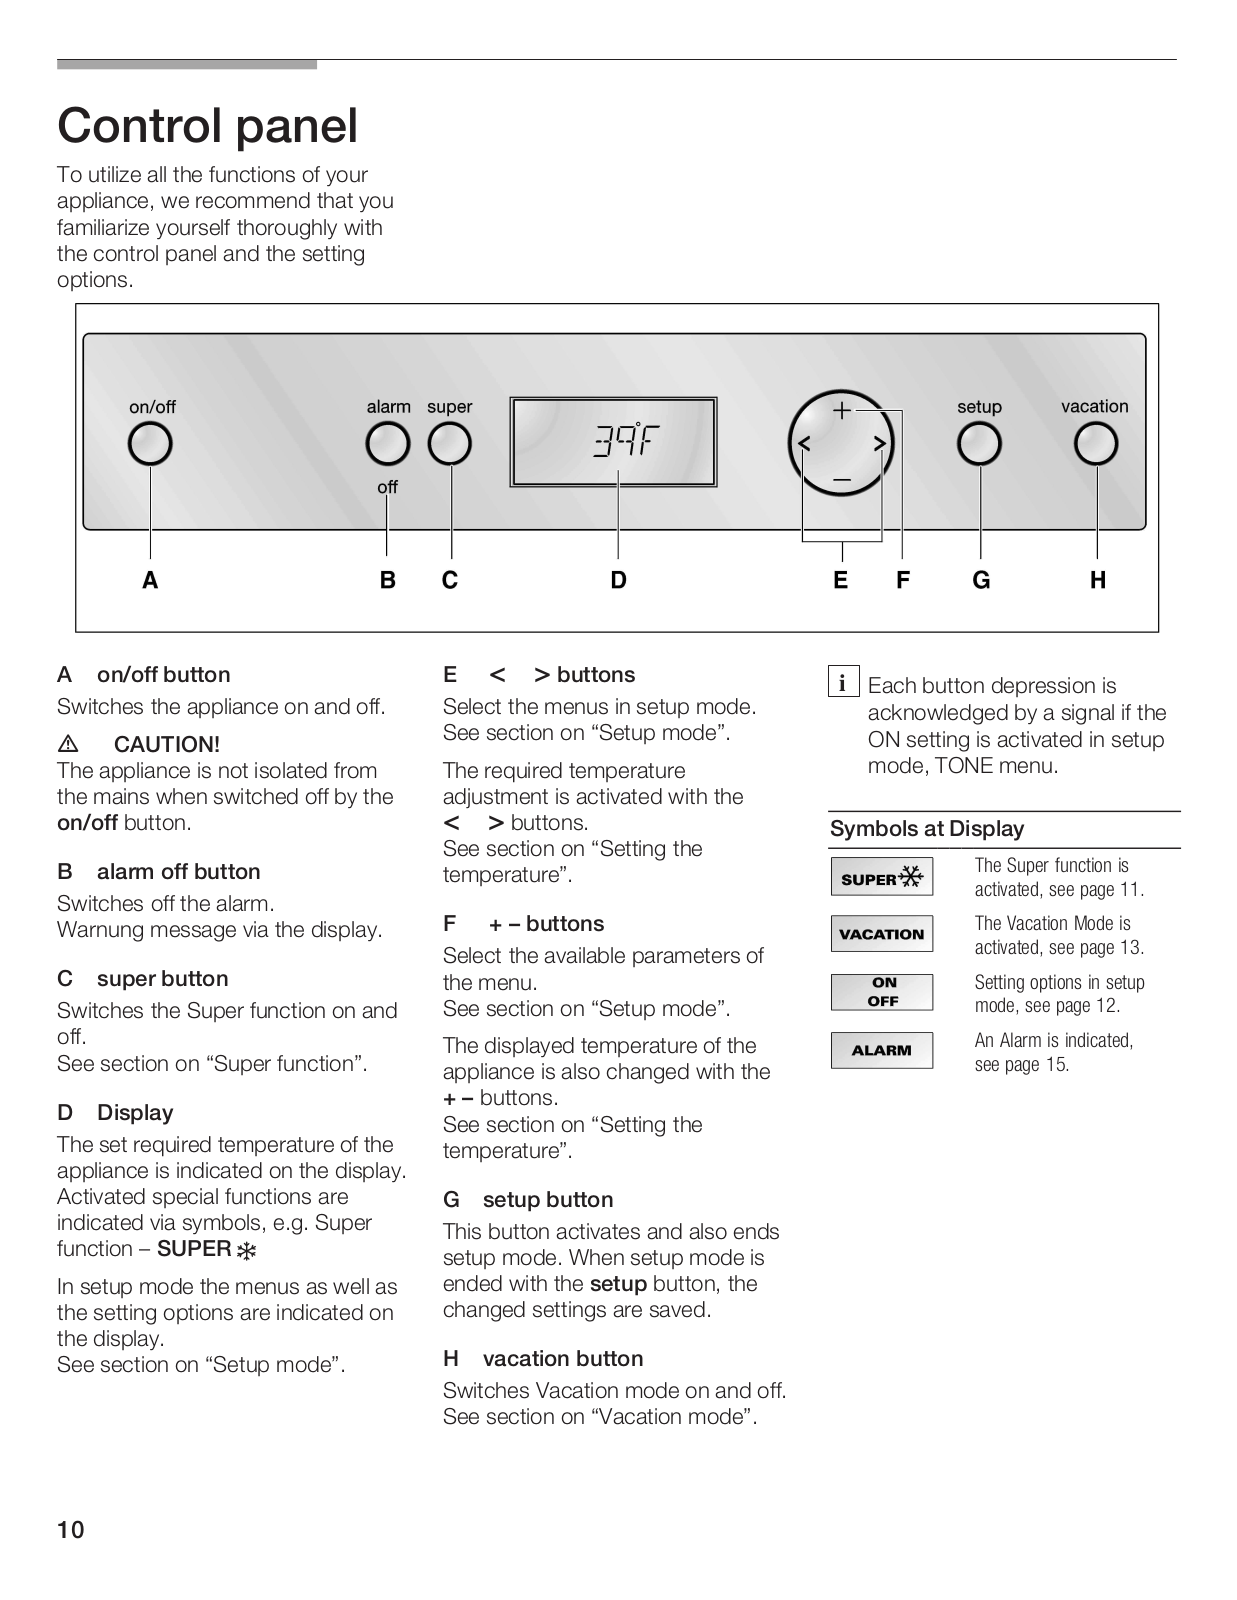
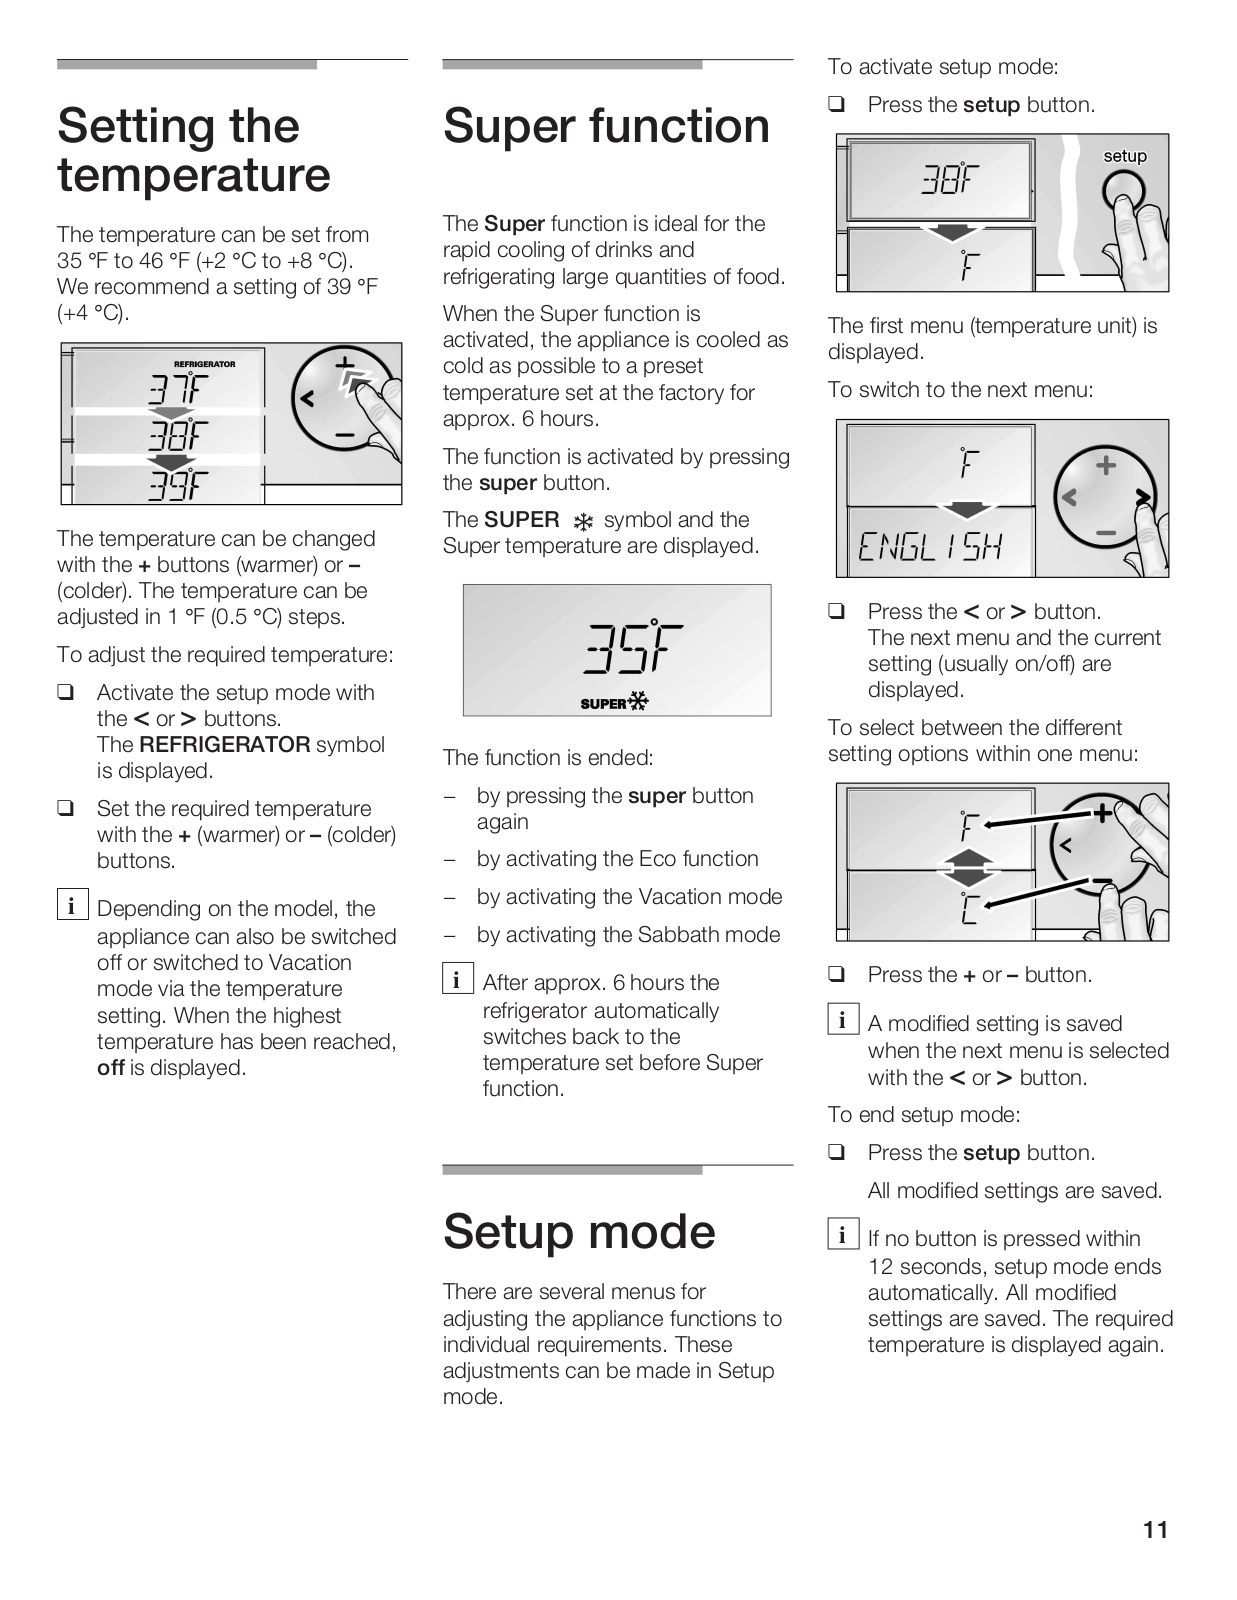
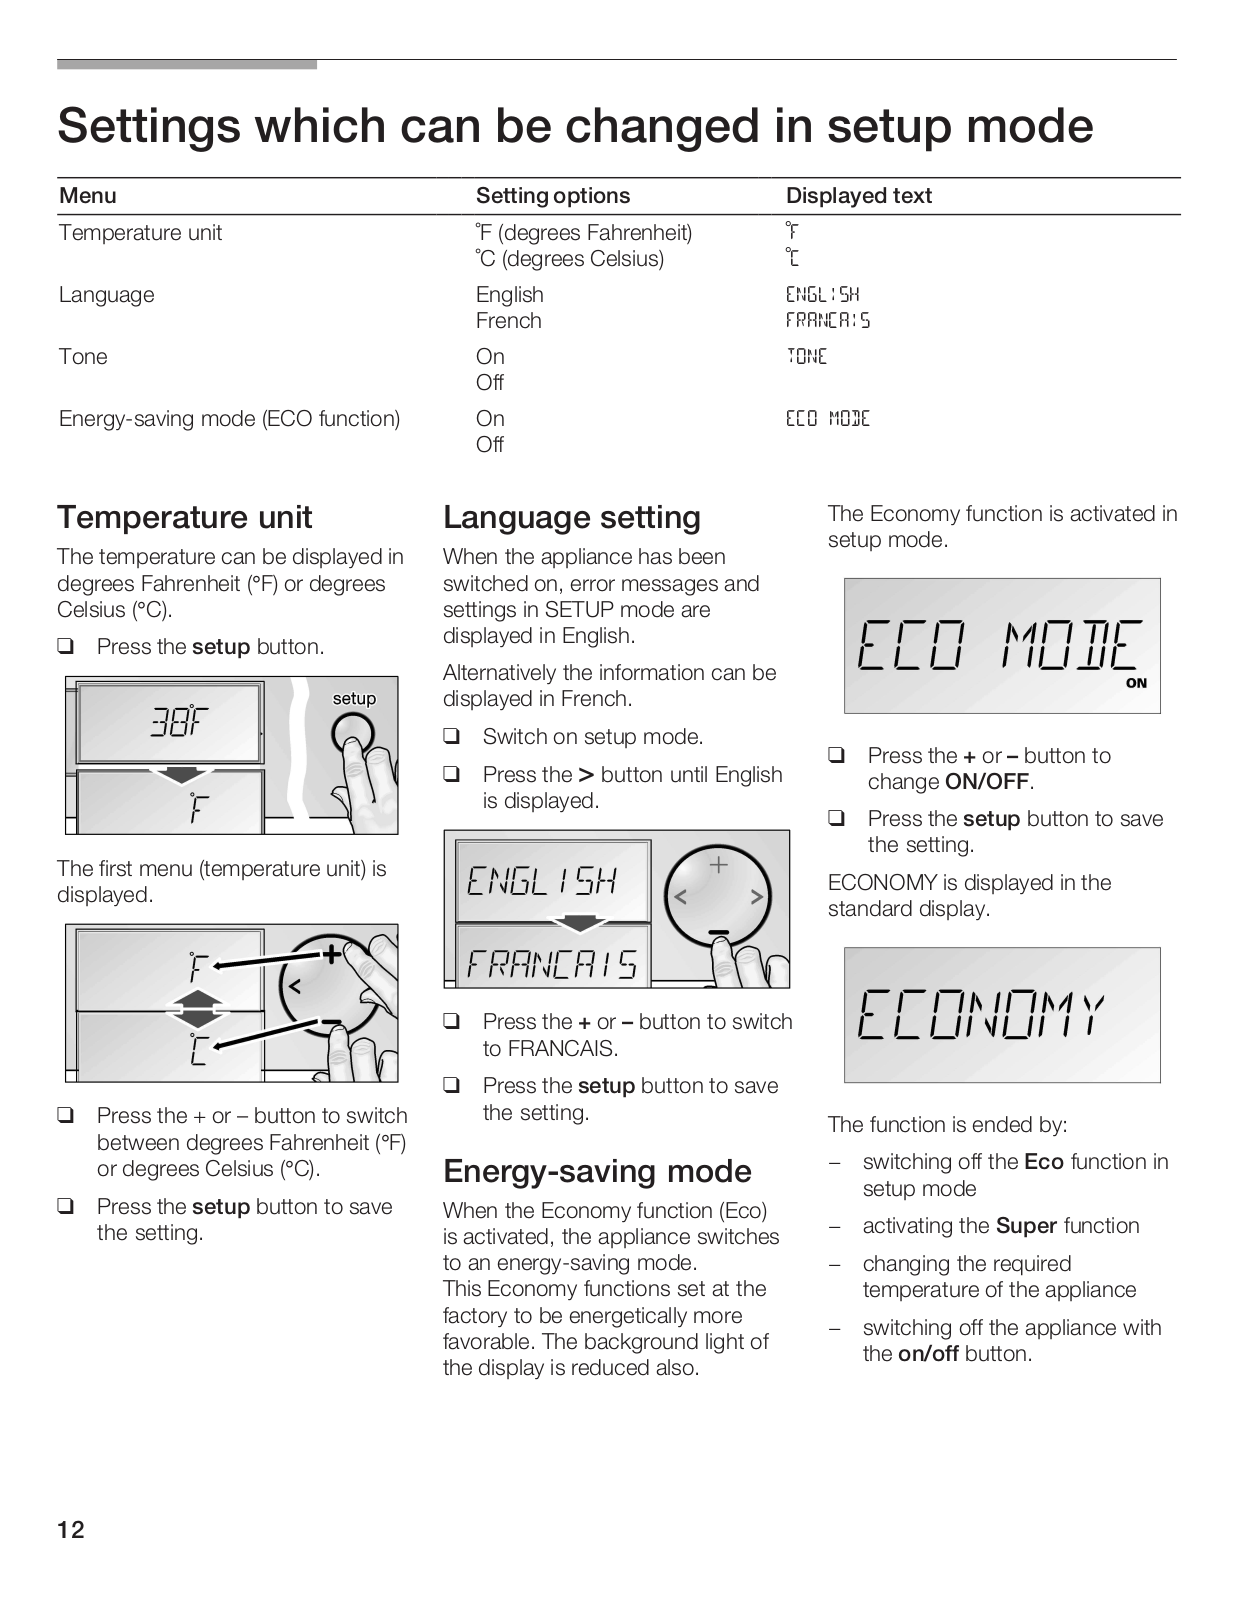
Bosch B30IR70NSP/08 Use and Care Manual

B24IR...

B30IR...

USE & CARE GUIDE

GUIDE D'UTILISATION ET D'ENTRETIEN MANUAL DE USO Y CUIDADO

Contents

IMPORTANT SAFETY INSTRUCTIONS. . . . . . . . .

.

.

. .

.

.

.

. .

.

.

.

.

.

.. .. .. .. 4.. .. .. . . .

Congratulations . . . . . . . . . . . . . . . . . . .

.

.

. .

. .. .. .. .. .. .. ... ... ... ... ... ... ..5. .. .. .. .. ..

Your new appliance. . . . . . . . . . . . . . . . .

.

.

. .

.

.

.. .. .. .. .. .. .. .. .. .. .. .. 6.. .. .. .. .. .

Installation . . . . . . . . . . . . . . . . . . . . .

.

. . .. .. .. .. .. .. ... ... ... ... ... ... ... .. ..7.. .. .. .. ..

Installing and connecting the appliance. . . . . . . . .

.

.

. .

.

.

.

. .

.

.

.

.

.

.. .. .. ..7.. .. . . .

Connection

to the

power supply. . . . . . . . . . . .

.

.

. .

.

.

.

. .

.

.

.. .. .. .. .. .. .. 7.. .. .. .. .. .

Additional grounding procedure. . . . . . . . . . . .

.

.

. .

.

.

.

. .

.

.

.. .. .. .. .. .. .. 8.. .. .. .. .. .

Grounding instruction. . . . . . . . . . . . . . . .

.

.

. .

.

.

.

.. ..

..

..

..

..

..

.. .. .. .. 8.. .. .. .. . .

Switching

on the

appliance. . . . . . . . . . . . . .

.

.

. .

.

.

.

. .

.. .. .. .. .. .. .. .. ..8.. .. .. .. ..

Switching off and disconnecting the appliance. . . . . . . . . . . . . . . . . . . . . . . .8 . . . . .

Functions . . . . . . .

. . . . . . . .

. . . . . . .

. . .. .. .. .. .. .. ... ... ... ... ... ... ... .. .. .8. .. .. .. .. ..

Variable

interior design. .

. . . . . . . .

. . . . . . .

. .

.

. . .

.. .. .. .. .. .. .. .. .. .. ..9.. .. .. . .

Control panel. . . . . .

. . . . . . . .

. . . . . . .

. .

.. .. .. .. .. .. .. .. .. .. .. .. .. .. .10. .. .. .. .. ..

Setting

the temperature.

. . . . . . . .

. . . . . . .

. .

.

. . . .

.. .. .. .. .. .. .. .. .. ..11.. .. .. .. . .

Super function. . . . .

. . . . . . . .

. . . . . . .

. .

.

.. .. .. .. .. .. .. .. .. .. .. .. .. ..11.. .. .. .. .. ..

Setup mode. . . . . .

. . . . . . . .

. . . . . . .

. .

..

.. .. .. ..

.. .. .. .. .. .. .. .. .. ..11.. .. .. .. .. ..

Settings which can be changed in setup. mode. . . . . . . . . . . . . . . . . . . . . . 12. . . . . .

Vacation Mode. . . . . .

. . . . . . .

. . . . .

.

.

.

. .

.. .. .. .. .. .. .. .. .. .. .. .. .. .13. .. .. .. .. .. .

Sabbath Mode. . . . . .

. . . . . . .

. . . . .

.

.

.

. .

.. .. .. .. .. .. .. .. .. .. .. .. .. .13. .. .. .. .. .. .

Refrigerating . . . . . . .

. . . . . . .

. . . . .

.

.

.

. . .. .. .. .. .. .. ... ... ... ... ... ... ... .14. .. .. .. .. .. .

How to save energy. . . .

. . . . . . .

. . . . .

.

.

.

. .

.

.

.. .. .. .. .. .. .. .. .. .. .. ..14.. .. .. .. . .

Operating noises. . . . .

. . . . . . .

. . . . .

.

.

.

. .

.

.. .. .. .. .. .. .. .. .. .. .. .. .14. .. .. .. .. .. .

Defrosting . . . . . . . .

. . . . . . .

. . . . .

.

.

. . .. .. .. .. .. .. ... ... ... ... ... ... ... .. .14. .. .. .. .. ..

Cleaning the appliance. . .

. . . . . . .

. . . . .

.

.

.

.

.

.

. .

.. .. .. .. .. .. .. .. .. .. 15.. .. .. .. . .

Odors . . . . . . . . . .

. . . . . . .

. . . . .

. . .. .. .. .. .. .. ... ... ... ... ... ... ... .. .. .. 15.. .. .. .. .. ..

Warning

messages via the

display. . . . .

. . . . .

.

.

.

. .

.

.

.

.

.

. .

.

.. .. .. .. .. .16. .. .. .. .. . .

Appliance self7test. . . . .

. . . . . . .

. . . . .

.

.

.

.

.

.

.. .. .. .. .. .. .. .. .. .. .. .. 16.. .. .. .. .. .

Resetting

factory settings.

. . . . . . .

. . . . .

.

.

.

. .

.

.

.

.

.

.. .. .. .. .. .. .. .. ..16.. .. .. .. .. .

Troubleshooting . . . . . . . . . . . . . . . . . . . . . .

. . .. .. .. .. .. .. ... ... ... ... ... ... 17... .. .. .. .. ..

Changing the bulb. . . . .

. . . . . . .

. . . . .

.

.

.

.

.

.

.. .. .. .. .. .. .. .. .. .. .. .. 17.. .. .. .. .. .

Changing the filters. . . .

. . . . . . .

. . . . .

.

.

.

. .

.

.

..

..

..

.. ..

..

.. .. .. .. .. ..18.. .. .. .. . .

Service . . . . . . . . .

. . . . . . .

. . . . .

.

. . .. .. .. .. .. .. ... ... ... ... ... ... ... .. .. ..19.. .. .. .. .. ..

Warranty . . . . . . . . .

. . . . . . .

. . . . .

.

.

. .. .. .. .. .. .. ... ... ... ... ... ... ... .. .. 20.. .. .. .. .. ..

Français . . . . . . . . . . . . . . . . . . . . . . . .. .. .. .. .. .. .. .. .. .. .. 21.. .. .. .. . .

Español . . . . . . . . . . . . . . . . . . . . . . . . .. .. .. .. .. .. ... ... ... ... ...41... ... .. .. .

3

IMPORTANT SAFETY INSTRUCTIONS

READ

AND

SAVE

THESE


INSTRUCTIONS!


e WARNING


7. Unplug


your

refrigerator

before


Electrical


Connection

When

using

this


appliance,


cleaning

and

making

repairs.


NOTE: We

strongly

recommend The

appliance


comes


with

an UL

always


exercise

basic

safety


that

any

servicing

be

performedlisted,

37wire

power supply

cord.

precautions,

including

the


by

a


qualified

individual.


The

appliance


requires

a

37wire

following:


8. Before

replacing a

burned7out


receptacle.


1. Use

this

appliance

only

for

its


light

bulb,

set

the

on/off

switchThe

receptacle

must

be

installed by

intended

purpose

as


described


in

the

OFF

position

to

turn

offa licensed

electrician

only.


in

this

Owner's


Manual.


the lights in order to avoid


2. This

refrigerator

must

be


contact

with

a

live

wire

filament.


properly

installed

in

accordance

9. A

burned7out

light

bulb

may


Grounding

instruction

with

the

Installation

Instructions


break

when

being

replaced.


This

appliance


must

be

grounded.

before

it

is

used.


NOTE: Setting

the

refrigerator


In the

event of

a malfunction

or

3. Do


not

allow

children

to climb,


temperature

controls to

OFF


breakdown,

grounding

will

reduce

stand or

hang

on

the

shelves

in

does

not remove power to thethe

risk

of

electric shock

by

the


refrigerator.

They


could


light

circuit.


providing

a

path of

least

resistance

seriously

injure

themselves and


for

the electric

current.


damage

the

refrigerator.


e WARNING


Improper

connection

of the


4. After

your

refrigerator

is

in


RISK

OF

CHILD

ENTRAPMENT


equipment

grounding

conductor

operation,

do

not

touch

the


may

result

in


electric


shock.

Have

cold


surfaces

in


the

refrigerator


Child

entrapment

and

suffocation


the

appliance

checked

by

a

qualified


compartment,

particularly

when

are

not

problems

of

the

past.

Junked


or

service

technician if


electrician

hands

are

damp

or

wet. Skin

or

abandoned

refrigeration

products you

are

in

doubt as


to

whether the

may

adhere

to

these

extremely

are

still

dangerous...

even

if

they

will


has


been properly


appliance


cold

surfaces.


sit

for

•just


a

few

days."

If

you

are


getting

rid


of

your

old

appliance,


grounded.


5. Do


not

store

or

use


gasoline or


follow

these instructions

to

Some

local

regulations

may

require

other flammable


vapors

and


please


orhelp prevent

accidents.


a seperate

ground. In

such

cases,


liquids

in

the

vicinity


of

this


the required accessory ground wire,


any

other

appliance.


Before You Throw Away Your Old clamp and screw must be


6. In

refrigerators


with


an


Refrigeration


Product:


purchased

seperately.


automatic

icemaker,

avoid


-

Take

off


the

doors.


Never

ground


the appliance

to

contact

with

the

moving parts

of


Leave


the

shelves

in

place

so


plastic

plumbing lines,

gas

lines or

the


ejector


mechanism,

or with

-


that children

may

not

easily


water

pipes.


the


heating

element

located

on


climb


inside.


the bottom of the icemaker.


Do not

place

fingers

or

hands


on the

automatic

icemaking


mechanism

while

the

refrigerator


is

plugged

in.


4

CFC


DISPOSAL


Definitions


Your old refrigerator may have a


d WARNING

d


Congratulations

cooling system that used CFC's


(chlorofluorocarbons).

CFC's

are


WARNING - This

indicates

that


With the purchase of your new

believed

to

harm

stratospheric


death

or

serious

injuries may


ozone.


refrigerator you have opted for


occur

as

a result

of not


observing


high2quality

domestic

If you

are

throwing

away

an old


this warning.


a modern,


appliance.


refrigeration product, make sure the


CFC refrigerant is removed for


Your refrigerator is distinguished by


d CAUTION

d


proper disposal by a qualified


its economical energy

consumption.

servicer.

If

you intentionally

release


Each appliance which leaves our


CAUTION - This

indicates

that


this CFC

refrigerant,

you can be


factory is inspected thoroughly to

subject

to

fines

and

imprisonment


minor

or

moderate injuries

may


ensure that it functions properly and


under

provisions

of environmental


occur

as

a result

of not


observing


legislation.


this warning.


is in perfect condition.


If you have any questions 3


IMPORTANT


particularly

concerning

installation


i

This

symbol is

used to


draw


the


and connection of the appliance 3


Save these

instructions

for

local


user's attention to something inplease do not hesitate to contact

inspector's

use. Observe

all


particular.


our customer service,

see

section


governing

codes

and

ordinances.


•Service".


Note to Installer3 Be sure to leave


Further

information and a

selection

these

instructions

with the


of our products can be found on ou

Consumer.


home

page.


Note to Consumer3 Keep these


Please

read these operating

instructions

with

your

Owner's


instructions as well as the

Manual

for

future reference.


installation

instructions

and

all


information

enclosed with

the


appliance

and follow

accordingly.


Retain all documents for subsequent


use or

for the next

owner.

General information

This appliance is suitable for refrigerating food.

This appliance is designed for domestic use only.

5

Your new appliance

These operating instructions refer to several models. Diagrams may vary.

1 Control

panel


2 Glass

shelves

in

refrigerator

for storing

cooked

food, dairy

products,

meat

products

3Container

for storing deli, snacks

4 Vegetable container

5 Control buttons for Temperature Controlled Drawer (FlexTemp)

6 Temperature Controlled Drawer (FlexTemp) for optimum storage of fish, meat, poultry and vegetables

7 Butter

and

cheese compartment

for storage

of

various,

condiments,


bottles and jars

8 Door

storage

bins

9 Gallon

door

bin

6

Installation


Connection


Furniture/fixtures


to the

power


d WARNING

d


The new appliance will be mounted


securely

to

adjacent

and

overhead


supply


Do

not

install

the

appliance:


furniture/fixtures.


-


outdoors,


alld WARNING


d


-

in an environment with drippingFor

this

reason

it is

essential that


water,


attachable

furniture/fixtures are


Avoid

Electrical

Shock


-


in


rooms which

are


at risk of connected

securely to

the

base

or


frost.


the

wall

by

suitable

means.


Hazard


The

appliance is very

heavy

:


for


-

Plug

into a grounded

3 prong


outlet.


empty weight see the following


Base


table:


To ensure that the appliance is


-

Do

not

remove

ground

prong.


Refrigerator 24" 310 lbs / 140 kginstalled securely and functions


- Do not use an adapter.


Refrigerator

30"

350

lbs

/ 158


kgproperly, the base must be flat

and -

Do

not

use an

extension

cord.


level.


Installation

room


The base must be made of a

hard,Failure to follow these instructions

The

appliance should

be

installed


rigid

material.


can result

in

death,

fire,

or


in


electrical

shock.


a

dry, well

ventilated

room.


The

installation

area

must

be the


Improper connection

of

the


same height

as

the

rest

of

the


The

ambient temperature

should


room.


not


equipment

grounding

conductor

drop

below

55°F

(13°C)

or

rise


On

account

of


the heavy

weight

of may result

in

electric shock.


above


110°F

(43°C),

otherwise


a fully loaded

appliance,


Have the

appliance

checked by

malfunctions

may occur.


a load9bearing

base is

required.


a qualified

electrician


or

service


The

installation location

should

not


For

fully9loaded


weight

see

the


technician

if you are

in

doubt as

be

exposed

to

direct

sunlight

and


following

table:


to whether the appliance has


not

placed

near

a

heat


source,

such

Refrigerator

24" 890

lbs

/

400


been

properly

grounded.


as

an oven, radiator,

etc.


-


kg


If installation

next

to

a

heat source -is Refrigerator

30" 1110

lbs

/


The appliance

comes

with

an

UL

unavoidable,

use

a

suitable


500 kg


listed,

39wire power

supply

cord.


insulating plate or observe the


If

in

doubt,

contact

an

architect


orThe appliance

requires

a

39wire

following

minimum distances from


a building expert.


receptacle.


the

heat

source:


-

1.2"

(3 cm)

from an


electric


Installing


and


The receptacle

must

be

installed by


a

licensed

electrician

only.


cooker,


connecting

the


-

12" (30

cm)

from

an

oil or


The receptacle

must

be

fitted

with


appliance


solid9fuel

cooker.


a 10A

fuse

or

higher.

Please observe


Installation

cavity


d CAUTION


d


in

this

coherence the

following

table:


anAppliance


MAX

load

at

one

time

It

is


important to observe the


Have the

appliance

installed

by


electrician

according

to

the


Refrigerator

24"


2

Ampere


specified

dimensions

of

the


enclosed

installation

instructions.


installation cavity for a trouble9free


Refrigerator

30"


2

Ampere


installation of the appliance and

forAfter installing the appliance,

wait

at


the subsequent general view of theleast before switching on the


furniture

front.


appliance. During transit the oil

in


In

particular

ensure

that


the cavity


the

refrigeration


system

may

have


is


moved.


square. Squareness can be checked


by

suitable

means,

e.g.

spirit

level, Before switching

on

the

appliance


diagonal

measurements,

etc.


for

the

first

time, clean

the

inside


of


the

appliance.


7

Vegetable container with controllable ventilation
Functions

Switching on the appliance

q Press theon/off button.

Temperature con trolled drawer (FlexTemp)

The temperature in this compart3 ment is kept at almost°F 32(0°C). This provides optimum storage conditions for fresh food.

When the appliance has been


switched on, the appliance begins

Theto air humidity in the vegetable

cool down. When the doors are

container can be regulated with the

open, the interior lights come on.

controllable ventilation openings.

iThe preset temperatures (factory settings) are reached after approx. 248 hours. Do not put any food in the appliance beforehand.

To change the preset temperatures 4> see •Setting the temperature".

Switching off and disconnecting the appliance

-Slide all the way to the right: Ventilation completely open =

low air humidity.

-Slide all the way to the left: Ventilation completely closed = high air humidity

qSelect the appropriate food (fish/meat-poultry/produce) with the selection button.

The selection is displayed when the corresponding LED comes on.

The FlexTemp features an exchangeable filter. See •Cleaning the FlexTemp filter".

Door alarm

Switching off the appliance

qPress theon/off button.

Disconnecting the appliance

If you do

not use the appliance for

a prolonged

period:

qTake all food out of the appliance.

q Pull

out

the mains plug or switch

off

the

fuse.

qClean the appliance interior

(see •Cleaning the appliance").

qTo prevent odors, leave the doors open.

If one of the appliance doors is left open, an alarm signal sounds after one minute.

The alarm is switched off with the alarm offbutton and by closing the door. If the door has still not been closed properly, the alarm sounds again after one minute.

8

Variable

interior design

You

can re"arrange

the shelves

Drawers

inside the appliance and the


containers in the door as required.

Glass shelves


The

height of the

glass shelves

can

be

adjusted.


q Insert the shelf at the required height and press down.

Door storage compartment

qLift the shelf at the front and move it up or down in the guides.

qLower the shelf to the required position and snap it into the preset openings in the guide.

To remove the shelves:

q Lift the container and remove.

qTo remove the drawers, lift them slightly and remove.

q To

replace

the drawers,

lift them

at

the

front

slightly and

reinsert

in

the

pullout.


Move the drawer upwards and

slide it

backwards.


q Lift

the shelf

at the front,

moveq it Insert the container

at the

as

far

as

the

openings on

the

required height and

press down.

guide

rail

and

remove.


9

Switches Vacation mode on and off. See section on •Vacation mode".

Control panel

To utilize all the functions of your appliance, we recommend that you familiarize yourself thoroughly with the control panel and the setting options.

A

on/off

button


E

<

> buttons


i

Each

button

depression


is


Switches

the

appliance on

and off.Select

the

menus in setup mode.


acknowledged


by

a

signal if the


See section

on •Setup

mode".


d

CAUTION!


ON setting is activated in setup


The

appliance is not isolated from The

required

temperature


mode,

TONE

menu.


the

mains

when switched

off by

theadjustment

is activated

with the


on/off button.


<

> buttons.


Symbols

at Display


See

section

on •Setting

the


B

alarm

off

button


The

Super function

is


temperature".


activated,

see

page

11.


Switches

off

the

alarm.


display. F

+

*

buttons


The

Vacation

Mode

is

Warnung

message

via the


Select the available parameters of


activated,

see

page

13.


C

super

button


the menu.


Setting

options in

setup

Switches the Super function on

See

section

on •Setup

mode".


mode,

see page

12.


and


off.


The displayed temperature of the


An Alarm

is

indicated,

See

section on •Super function".


see page

15.


appliance

is

also changed with

the


D

Display


+ * buttons.


See section on •Setting the


The set required temperature of thetemperature".


appliance is indicated on the display.


Activated

special functions

are

G

setup

button


indicated

via

symbols, e.g.

Super

This

button

activates and also

ends


function (SUPER $


setup mode. When setup mode is


In setup mode the menus


ended

with

thesetup button, the


as well as


the

setting options are indicated onchanged settings are saved.


the

display.


H

vacation

button


See

section on •Setup mode".


10

Setting the temperature

The

temperature

can

be

set from

35 °F

to 46°F (+2°C to

+8°C).

We recommend a

setting

of °F39

(+4 °C).


To

activate setup

mode:


Super

function

q

Press thesetup

button.

The Super function is ideal for the


rapid cooling of drinks and


refrigerating large quantities of food.


When the Super function

is

The first menu (temperature unit) is

activated, the

appliance is


cooled as


cold as possible to a preset

displayed.


temperature set at the factory for

To switch to the

next menu:

approx. 6 hours.


The function

is activated

by pressing


the super button.

The temperature can be changed with the+ buttons (warmer) !or (colder). The temperature can be adjusted in °1F (0.5°C) steps.

To adjust the required temperature:

The SUPER $ symbol

and the

Super temperature are

displayed.

qActivate the setup mode with the < or> buttons.

The REFRIGERATOR symbol is displayed.

qSet the required temperature with the+ (warmer) or! (colder) buttons.

The function is ended:

-by pressing thesuper button again

-by activating the Eco function

qPress the< or> button.

The next menu and the current setting (usually on/off) are displayed.

To select between the different setting options within one menu:

i

Depending

on

the

model, the

-


appliance

can

also

be switched-


off or

switched to

Vacation


i


mode

via

the

temperature


setting.

When

the

highest


temperature has been reached,


off is

displayed.


by activating the Vacation mode

by activating the Sabbath mode

After approx. 6 hours the refrigerator automatically switches back to the temperature set before Super function.

q Press the+ or! button.

iA modified setting is saved

when the next menu is selected with the< or> button.


To

end

setup mode:


q

Press

thesetup button.


All

modified

settings are

saved.


Setup

mode


If

no

button

is pressed

within

i


127seconds,

setup mode

ends


There are several menus for


automatically.

All modified


adjusting the appliance functions to


settings are saved. The required

individual requirements. These


temperature

is displayed

again.

adjustments can be made in Setup


mode.


11

Energy&saving mode

Settings which

can be changed in setup mo


Menu


Setting options

Displayed text


Temperature

unit

°F

(degrees Fahrenheit)

°F


°C

(degrees Celsius)

°C

Language


English

ENGLISH


French

FRANCAIS

Tone


On


TONE


Off


Energy2saving

mode (ECO function)

On


ECO MODE


Off


Temperature

unit

Language setting

The temperature can be displayed

Whenin the appliance has been

degrees Fahrenheit°F)( or degrees

switched on, error messages and

Celsius °(C).


settings in SETUP mode are

q Press thesetup

button.

displayed in English.


Alternatively the information can be displayed in French.

The Economy function is activated in setup mode.

q Switch on setup mode.

q Press the> button until English is displayed.

The first menu (temperature unit) is displayed.

q Press the+ or' button to switch to FRANCAIS.

q Press thesetup button to save

qPress the + or 3 button to switchthe setting. between degrees Fahrenheit°F)(

or degrees Celsius°C)(.

qPress the+ or' button to change ON/OFF.

qPress thesetup button to save the setting.

ECONOMY is displayed in the standard display.

The function is ended by:

-switching off theEco function in setup mode

q Press thesetup

button to save When the

Economy function (Eco)

-

activating

theSuper

function

the setting.

is activated,

the

appliance switches


to an energy2saving mode.

-

changing

the

required


This Economy functions set at the


temperature

of

the

appliance


factory to be energetically more

-

switching

off

the appliance with


favorable. The

background light of


the display

is

reduced also.


the on/off

button.


12

Vacation Mode Sabbath Mode Refrigerating

If

you

are away for a prolonged

When

Sabbath

mode

is active

period,

you can switch the appliance


to

an

energetically more favorable

-

the

Superfunction

ends


mode. When Vacation mode is


(if switched

on),


active,


-

the

acknowledge


signal is

-

the

appliance

switches to


deactivated when the button is


pressed (if

switched on),


ECO function

(see section

on


•Energy6saving

mode"),


-

the

interior

light

switches

off,

-

the

interior light switches

off,

-

the

background

light of

the

- the Super

function

display

is

reduced.

ends


(if switched

on).

To switch

on

Sabbath mode:

To switch on Vacation mode:

q Press thevacation button.

Arrange food as follows:

-On the shelves:

Cakes and pastries, ready meals, dairy products, meat and sausage

-In the vegetable container:

Vegetables, lettuce, fruit

- In the Temperature controlled Drawer (FlexTemp) :

Fish, poultry, meat, vegetables

-In the door

(from top to bottom):

Butter, cheese, eggs, gallons, small bottles, large bottles, milk, juice cartons

The VACATION symbol is

displayed.


Instead of the required temperature,


the presetting temperature

is


displayed.


To end Vacation mode, press the


vacation button. The previous

q

Press and hold down superth

settings and temperature values are


button.


used again.


q

Press

thevacation button.


q

Hold

down

thsuper button for


a further 3

seconds.


The VACATION symbol flashes


on the display.

When placing food in the appliance, please note:

- Allow warm food and drinks to cool down outside the appliance.

-Place food in the appliance well packed or wrapped. Flavor and freshness will then be retained. This will also prevent transfer of flavors and discoloration of the plastic parts.

-Do not allow oil and grease to come into contact with plastic

parts or the door seal.

-Store high percentage alcohol upright in sealed containers only.

SABBATH is displayed.

To end Sabbath mode, press the vacation button. The previous settings and temperature values are used again.

d WARNING d

Do not store explosive substances in the appliance. Risk of explosion!

13

Defrosting
The appliance is defrosted automatically.
Move bottles or receptacles away from each other.

When

buying

food,


please

note:


Operating


Cleaning

the


The •purchase freshness" is


important for the shelf3life of your


noises


appliance


food. In principle the following


applies: the fresher the food is


Quite

normal

noises


d WARNING

d


placed in

the Temperature


Controlled

Drawer

(FlexTemp),


the longer

it will keep. When buyingGrumbling

4 refrigerating

unit

is


To

avoid

electrical shock

which


food, always note

the

degree of


running. Fan in the recirculating

air


can cause

death

or

severe


freshness.


system

is

running.


personal injury, disconnect power


Bubbling,

humming

or

gurgling


to

appliance

before cleaning.


noises 4 refrigerant is flowing


After cleaning, reconnect

power.


through

the tubes.


Clicking

4

motor

is

switching

on or


How

to

save


d WARNING

d


off.


energy


Noises

which

can


To avoid personal injuries or


property damage,

observe

the


-

Install

the appliance in a dry,


easily


be

eliminated


following:


The appliance

is

not

level


-

Do not

clean

the

appliance


with


ventilated room; do

not expose


to direct sunlight and do not


Level

the

appliance with

the

aid

of


a

steam

cleaner.


place near a heat source (e.g.


a spirit

level.


- Do not let the water used

for


radiator, cooker). If

required, use


height3adjustable feet

or


cleaning

drip onto

the

light

or


an insulating plate.


Use the


control panel.


place

something

underneath.


-

Allow

warm food and drinks to


Drawers,

baskets

or storage


- Do not use abrasive or acidic


cool down before placing them


cleaning

agents

or

solvents


in the

appliance.


areas

wobble

or

stick


which may

damage

the


Check

the

removable

parts

and,


surfaces

of

the

appliance.


-

Defrost frozen

food

by placing

itif required,

reinsert

them.


- Never clean shelves and


in the refrigerator. The low


temperature of the frozen food


Receptacles are

touching

each


containers

in the dishwasher.


will refrigerate the food in the


other


The parts

may

warp.


refrigerator compartment.


-Open the appliance door as briefly as possible!

q Switch

off

the

appliance with

the on/off

button!

Pull out the mains plug or

switch

off

the

fuse.

qClean the door seal with water

only and dry thoroughly.

qClean the appliance with lukewarm water and a little dishwashing liquid.

Do not let the water used for cleaning drip onto the control panel or light.

qCheck the ventilation openings on the base panel. Remove dirt with a vacuum cleaner.

14

After cleaning:

Low voltage

qReinsert the mains plug or


switch on the fuse. Switch on Warning


the appliance with theon/off

messages


button.


i

Have your supplier inform you

via the

display


about special cleaning and care


information for

appliance

If several warning messages are


surfaces.


displayed

simultaneously, deal with

q Wipe appliance

surfaces

with

each message individually.


a damp cloth.


While a warning message is


Then immediately wipe

dry.

displayed,

buttons

cannot be


pressed.


Door

alarm


Odors

If the appliance is emitting unpleasant odors:

The display light has gone out.

Cause

-The mains voltage has dropped below the permitted limit value.

Remedial action

Buttons cannot be pressed. When the mains voltage reaches the stipulated value again, the warning message goes out. If the warning message is prolonged, inform your power supply company.

qSwitch off the appliance with


the

on/off

button!

Cause


q

Take

all food out

of the

-

An appliance door

has not been


appliance.


closed properly or has been

q

Clean the interior.


open

too long.


See

section

on •Cleaning the

Remedial

action


appliance".


q

Close

the door.


q

Change the

odor

filter.


The display goes

out.


See section on •Changing the Sensor fault odor filter".

qThoroughly clean all packing containers used in the appliance.

qPack strong,smelling food in airtight containers to prevent the build up of odors.

qSwitch on the appliance again with theon/off button.

Cause

- A technical defect is possible.

q

Stack food in

the appliance.

Remedial action


q

After

24

hours

check

whether q Conduct an appliance self,test.


the

odors

have

been

eliminated.

15

If the appliance self%test does not - an appliance which is switched establish any faults, the required
temperature is displayed on off switches on,
completion of the self%test. - the Super function switches off,
- settings changed in Setup mode are reset to factory settings.
q Simultaneously hold down the setup andalarm off
buttons for 3 seconds.
If the factory settings are reset:

Appliance self test

If a fault is detected during the self%test, theALARM symbol and a corresponding error message,

e.g. for a sensor fault, are displayed

Before you call customer service, conduct an appliance self%test.

qSwitch off the appliance and wait 5 minutes. Keep the door closed.

q Switch on the appliance.

qSimultaneously hold down the

setup andalarm off buttons for 5 seconds.

Inform customer service about the error message.

Resetting factory settings

The self%test

starts. Different

Recommended after a change of


messages are

display in succession.owner.


Troubleshooting

Fault


Possible cause


Remedial

action


Appliance has no

cooling capacity.Power failure; the

fuse

has actuated;Check

that

the

power

is

on. The

fuse must be switched

The interior light

does not functionthe. mains plug is

not

in properly.


on.

Check

that

the mains

plug is

plugged in.

The display does not come on.


The refrigerating unit switches onAppliance door opened

frequently.


Do

not

open the door

unnecessarily.


more and more frequently and for

fresh food placedSwitchin

on

Super

function.


Large quantities of


longer.

the appliance.


The ventilation openings are covered.Remove obstacles and dirt.

The temperature in the refrigeratorTemperature has been set too low. Set a warmer temperature (see •Setting the compartment is too cold. temperature").

The interior light does not functionThe. bulb is defective.

The light switch is sticking.

Change the bulb (see •Changing the bulb").

Check whether it can be moved.

The appliance is giving off odors.Strong(smelling foods have not

been Clean

the appliance. Pack strong(smelling foods in

packed in airtight containers.

airtight

containers (see •Odors").


16

q Pull out the defective halogen

bulb.

Changing the bulb

d WARNING d

To avoid electrical shock which


can cause death or severe


personal

injury, disconnect power

q

to

appliance

before

making


repairs. After

making repairs,


reconnect

power.


q

Switch

off

the

appliance with


the on/off button! Pull out t


mains plug or switch off the


fuse.


Insert a new halogen bulb. Touch the halogen bulb with a soft cloth only.

qInsert a new halogen bulb.

Touch

the

halogen bulb with

a soft

cloth

only.

CAUTION

Never touch a halogen bulb with bare fingers.

When inserting a glass halogen bulb, always hold with a soft cloth.

Halogen bulbs above

Halogen bulb type: 20 W/12 V/socket G4

qTo release the cover, turn it anti"clockwise until it can be removed.

qPull out the defective halogen bulb.

qTo reattach the cover, insert it and turn it clockwise until it is locked.

Halogen bulbs at the side

Halogen bulb type: 10 W/12 V/socket G4

q

Insert

the

disc.

q

Insert

the

cover rail.

q Pull out the cover rail forwards.

q Remove the disc forwards.

17

Bosch B30IR70NSP/08 Use and Care Manual

Halogen bulb in the FlexTemp drawer

Halogen

bulb type:

5 W/12

V/socket G4

Cleaning the Changing the FlexTemp filter odor filter

To clean the filter mats in the

Temperature Controlled Drawer:

qRelease the cover and remove from the clip.

q Pull out the defective halogen

q Remove the Temperature

Controlled Drawer.

bulb.


iReplacement filters are available from your dealer.

q Open the filter holder.

qInsert a new halogen bulb.

Touch

the

halogen bulb with

a soft

cloth

only.


q Attach

the

cover

and connect

to the

clip.


q

Pull out used odor filter.

q

Insert a new odor filter.

qPull down the filter holder at front with both hands (1.).


q Close the filter holder.

i

Open the filter holder for


cleaning only.

qRemove the filter mats (2.). Clean the filter mats in clear water.

q Insert the filter mats.

qPress up the partition until it snaps into place.

qRe%insert the Temperature Controlled Drawer.

18


You will need to know your complete


model number

and

serial number.

Service


If you need service, first see the


"Troubleshooting" section


of

this


book.

After

checking


"Troubleshooting," additional

help


can be found by calling the Bosch


Customer Interaction Center,


1-800-944-2904 (toll&free), from


anywhere in

the U.S.A.

In Canada,


contact

your designated


Bosch


Canada

service company

or

call


You can find

this

information on the

1-800-944-2904 .


model and serial number label


Write


down

the following

informationlocated on the inside wall of the

about

your

refrigerator

to

better


helprefrigerator compartment.

you

obtain

assistance

or


service


if


you

ever need it.


Dealer


name:


Address:


Phone number:

Purchase date:

Model number:

FD number:

Serial number:

Type:

19

Loading...
+ 43 hidden pages