

Bosch Power Tools 1942 User Manual
Operating/Safety Instructions
Consignes de fonctionnement/sécurité
Instrucciones de funcionamiento
y seguridad
IMPORTANT: IMPORTANT : IMPORTANTE:
Read Before Using Lire avant usage Leer antes de usar
For English Parlez-vous français? ¿Habla español?
See page 2 Voir page 11 Ver página 20
Consumer Information
Renseignement des consommateurs
Información para el consumidor
Toll Free Number: Appel gratuit : Número de teléfono gratuito:
1-877-BOSCH99 (1-877-267-2499) http://www.boschtools.com.
1942
BM 2610615924 2/02 2/1/02 12:36 PM Page 1

-2-
Paint Stripping Safety Instructions
Extreme care should be
taken when stripping
paint. The peelings, residue and vapors of
paint may contain lead, which is poisonous.
Any pre-1977 paint may contain lead and
paint applied to homes prior to 1950 is likely
to contain lead. Once deposited on surfaces,
hand to mouth contact can result in the
ingestion of lead. Exposure to even low
levels of lead can cause irreversible brain
and nervous system damage; young and
unborn children are particularly vulnerable.
Before beginning any paint removal process
you should determine whether the paint you
are removing contains lead. This can be
done by your local health department or by a
professional who uses a paint analyzer to
check the lead content of the paint to be
removed. LEAD-BASED PAINT SHOULD
ONLY BE REMOVED BY A PROFESSIONAL
AND MUST NOT BE REMOVED USING A
HEAT GUN.
Persons removing paint should follow
these guidelines:
1) Move the work piece outdoors. If this is
not possible, keep the work area well
ventilated. Open the windows and put an
exhaust fan in one of them. Be sure the fan
is moving the air from inside to outside.
2) Remove or cover any household items
in the area such as carpets, rugs,
furniture, and clothing, cooking utensils
and air ducts.
3) Place drop cloths in the work area to
catch any paint chips or peelings. Wear
protective clothing such as extra work shirts,
overalls and hats.
4) Work in one room at a time. Furnishings
should be removed or placed in the center of
the room and covered. Work areas should
be sealed off from the rest of the dwelling by
sealing doorways with drop cloths.
5) Children, pregnant or potentially
pregnant women and nursing mothers
should not be present in the work area
until the work is done and all clean up is
complete.
6) Wear a dust respirator mask or a dual
filter (dust and fume) respirator mask,
which has been approved by the
Occupational Safety and Health
Administration (OSHA), the National
Institute of Safety and Health (NIOSH), or
the United States Bureau of Mines. These
masks and replaceable filters are readily
available at major hardware stores. Be sure
the mask fits. Beards and facial hair may
keep masks from sealing properly. Change
filters often. DISPOSABLE PAPER MASKS
ARE NOT ADEQUATE.
7) Use caution when operating the heat
gun. Keep the heat gun moving, as
excessive heat will generate fumes that can
be inhaled by the operator.
8) Keep food and drink out of the work
area. Wash hands, arms and face and rinse
mouth before eating or drinking. Do not
smoke or chew gum or tobacco in the work
area.
!
WARNING
Important Safety Instructions for Heat Guns
SAVE THESE INSTRUCTIONS
Read and understand all instructions. Failure to follow all instructions
listed below, may result in electric shock, fire and/or serious personal injury.
!
WARNING
Hidden areas such as behind walls, ceilings, floors, soffit boards and other panels may
contain flammable materials (dust, cob webs, mice nests, etc.) that could be ignited by
the heat gun when working in these locations. The ignition of these materials may not be
readily apparent and could result in property damage and injury to persons.
When working in locations that may have hidden areas, keep the heat gun moving in a
back-and-forth motion. Lingering or pausing in one spot could ignite the panel or the
material behind it.
BM 2610615924 2/02 2/1/02 12:36 PM Page 2

-3-
General Safety Rules for Heat Guns
Never use heat guns as
hairdryers! You will be
seriously injured.
Avoid contact with nozzle of heat gun
during use. This heat gun generates
temperatures as high as 1000 degrees
Fahrenheit. You may be seriously burned.
Do not use heat guns in the rain, moisture
or immerse in water. Exposing the heat
gun element to water or other liquids may
cause electrical shock hazard.
Do not use heat guns in areas where
flammable liquids or gases may be stored
or are present. The heat gun generates
high temperatures and may ignite these
materials.
Work Area
Keep your work area clean and well lit.
Cluttered and dark areas invite accidents.
Do not operate heating appliance in
explosive atmospheres, such as in the
presence of flammable liquids, gases or
dust, dry grass, leaves and paper. Heating
appliances generate high temperatures
which may ignite the dust or fumes.
Combustible materials like dry grass, leaves
and paper will scorch and may catch fire.
Keep bystanders, children and visitors
away while operating a heating appliance.
Distractions can cause you to lose control.
Electrical Safety
Before plugging in the heating appliance,
be certain the outlet voltage supplied is
compatible with the voltage marked on
the nameplate within 10%. An outlet
voltage incompatible with that specified on
the nameplate can result in serious hazards
and damage to the heating appliance.
When operating a heating appliance use
Ground Fault Circuit Interrupter (GFCI) on
the circuit or outlet. Don’t expose heating
appliance to rain or wet conditions. Water
entering a heating appliance will create an
electric shock hazard.
Do not abuse the cord. Never use the
cord to carry the heating appliance or pull
the plug from an outlet. Keep cord away
from heat, oil, sharp edges or moving
parts. Replace damaged cords
immediately. Damaged cords create
electric shock hazard.
9) Clean up all removed paint and dust by
wet mopping the floors. Use a wet cloth to
clean all walls, sills and any other surface
where paint or dust is clinging. DO NOT
SWEEP, DRY DUST OR VACUUM. Use a
high phosphate detergent or trisodium
phosphate (TSP) to wash and mop areas.
10) At the end of each work session put
the paint chips and debris in a double
plastic bag, close it with tape or twist ties
and dispose of properly.
11) Remove protective clothing and work
shoes in the work area to avoid carrying
dust into the rest of the dwelling. Wash
work clothes separately. Wipe shoes off with
a wet rag that is then washed with the work
clothes. Wash hair and body thoroughly with
soap and water.
Some dust created by
power sanding, sawing,
grinding, drilling, and other construction
activities contains chemicals known to
cause cancer, birth defects or other
reproductive harm. Some examples of
these chemicals are:
• Lead from lead-based paints,
• Crystalline silica from bricks and cement
and other masonry products, and
• Arsenic and chromium from chemically-
treated lumber.
Your risk from these exposures varies,
depending on how often you do this type of
work. To reduce your exposure to these
chemicals: work in a well ventilated area,
and work with approved safety equipment,
such as those dust masks that are specially
designed to filter out microscopic particles.
!
DANGER
!
WARNING
BM 2610615924 2/02 2/1/02 12:36 PM Page 3

-4-
When operating a heating appliance with an
extension cord while outdoors, use only
extension cords marked W–A or W. These
cords are rated for outdoor use and
reduce the risk of electric shock.
Personal Safety
Stay alert, watch what you are doing and
use COMMON SENSE when operating a
heating appliance. A moment of inattention
or use of drugs, alcohol or medication while
operating a heating appliance can be
dangerous.
Use safety equipment. Always wear safety
goggles. Dust mask, protective gloves,
safety shoes or non-skid shoes, must be
used for appropriate conditions.
Avoid accidental starting. Be sure switch
is “OFF” before plugging in. Carrying the
heating appliance with your finger on the
switch or plugging in the heating appliance
that has switch “ON” invites accidents.
Do not direct hot tip or nozzle toward
clothing, hands or other body parts.
Intense heat from tip or nozzle can cause
serious burns or cause clothing to ignite.
Do not touch nozzle or shield until
completely cool. During use very high
temperatures are generated in these areas.
Dress properly. Do not wear loose
clothing or jewelry. Contain long hair.
Keep your hair, body, clothing and gloves
away from nozzle or shield. Clothing or
hair could ignite from extreme heat.
Do not overreach, keep proper footing
and balance at all times. Proper footing
and balance enables better control of the
heating appliance in unexpected situations.
Tool Use and Care
Do not use heating appliance if switch
does not turn it “ON” or “OFF”. Any tool
which cannot be controlled by the switch is
dangerous.
Disconnect the plug from the power
source before making any adjustments or
changing accessories. Such preventative
safety measures reduce the risk of starting
the heating appliance accidentally.
Store idle heating appliance only after
adequate cooling period, indoors in high,
dry place out of the reach of children and
untrained persons. Heating appliances are
dangerous in the hands of untrained
persons.
Do not leave heating appliance
unattended while it is running or cooling
down. Always set tool on a flat, level surface
so that nozzle tip is directed upwards, away
from supporting surface while running or
cooling down.
Keep a fully charged fire extinguisher
close at hand for emergency use.
Service
Heating appliance service must be
performed only by qualified repair
personnel. Service or maintenance
performed by unqualified personnel may
result in misplacing internal wiring and
components which could cause serious
hazard.
BM 2610615924 2/02 2/1/02 12:36 PM Page 4
-5-
If an extension cord is
necessary, a cord with
adequate size conductors that is capable
of carrying the current necessary for your
tool must be used. This will prevent
excessive voltage drop, loss of power or
overheating. Grounded tools must use 3wire extension cords that have 3-prong
plugs and receptacles.
NOTE: The smaller the gauge number, the
heavier the cord.
RECOMMENDED SIZES OF EXTENSION CORDS
120 VOLT ALTERNATING CURRENT TOOLS
Tool’s
Ampere
Rating
Cord Size in A.W.G.
Wire Sizes in mm
2
3-6
6-8
8-10
10-12
12-16
18 16 16 14 .75 .75 1.5 2.5
18 16 14 12 .75 1.0 2.5 4.0
18 16 14 12 .75 1.0 2.5 4.0
16 16 14 12 1.0 2.5 4.0 —
14 12 — — — — — —
25 50 100 150 15 30 60 120
Cord Length in Feet Cord Length in Meters
!
WARNING
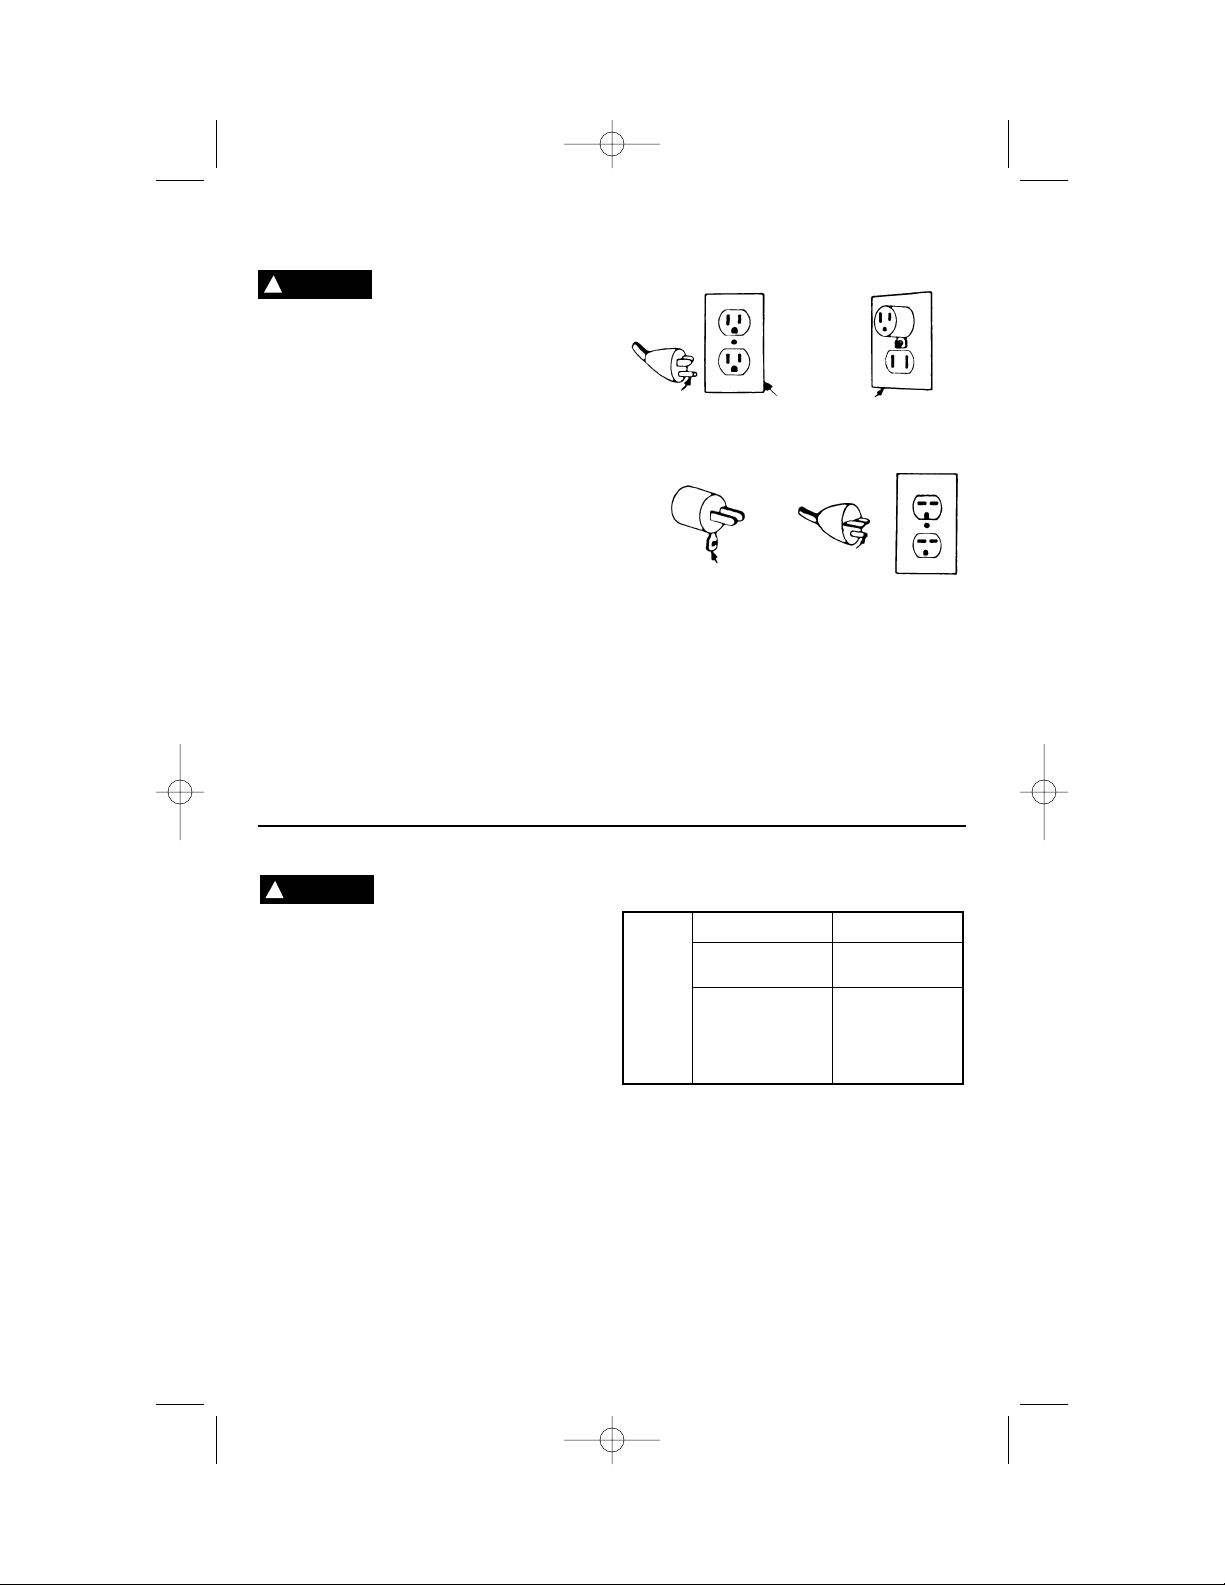
Improper grounding can
shock, burn or electrocute.
Grounding of this tool is necessary while in
use to protect you from electric shock or
electrocution. This tool is equipped with an
approved three-conductor cord and threeprong grounding-type plug to fit the proper
grounding-type receptacle. Do not remove
grounding prong from the three prong
grounding-type plug. The green (or green
and yellow) conductor in the cord is the
grounding wire. Never connect the green (or
green and yellow) wire to a live terminal.
Your unit is for use on less than 150 volts
and it has a plug that looks like Fig. “A”.
An adapter, Fig. “B” and “C” is available for
connecting Fig. “A” plugs to two-prong
receptacles. The green colored rigid ear, lug,
etc., extending from the adapter must be
connected to a permanent ground such as a
properly grounded outlet box.
NOTE: The grounding adapter, Fig. “C” is
prohibited in Canada by Canadian Electrical
Code-Part 1. Therefore the instructions for
its use are not applicable in Canada.
Grounding Instructions For Tools With Three Prong Plugs
If your unit is for use on 150 to 250 volts, it
has a plug that looks like Fig. “D” plugs. No
adapter is available for a plug like Fig. “D”.
Grounding
Prong
FIG. D
Grounding
Means
Adapter
FIG. C
Cover of Grounded
Outlet Box
FIG. B
Grounding
Prong
FIG. A
!
WARNING
BM 2610615924 2/02 2/1/02 12:36 PM Page 5
-6-
Size . . . . . . . . . . . . . . . . . . . . . . . . . . . . . . 8"L x 5-1/4"W x 9-1/2”H
Nozzle opening . . . . . . . . . . . . . . . . . . . . . . . . . . . . . . . 1-3/16" dia.
Avg. air velocity . . . . . . . . . . . . . . . . . . . . . . . 3000 FPM at ambient
Avg. air volume . . . . . . . . . . . . . . . . . . . . . . . . . 23 CFM at ambient
Net weight . . . . . . . . . . . . . . . . . . . . . . . . . . . . . . . . . . . . . 3-1/2 Ibs.
120V models . . . . . . . . . . . . . . . . . . . . . . . . . . . . . . . . . . . . . . 60 Hz
Temperature Range . . . . . . . . . . . . . . . . . . . . . . . . . 750ºF (400ºC)
1000ºF (540ºC)
Nozzle shield . . . . . . . . . . . . . . . . . . . . . . . . . . . . . . . . . . . 4-3/16” L
Cord length. . . . . . . . . . . . . . . . . . . . . . . . . . . . . . . . . . . . . . . 6 Ft. L
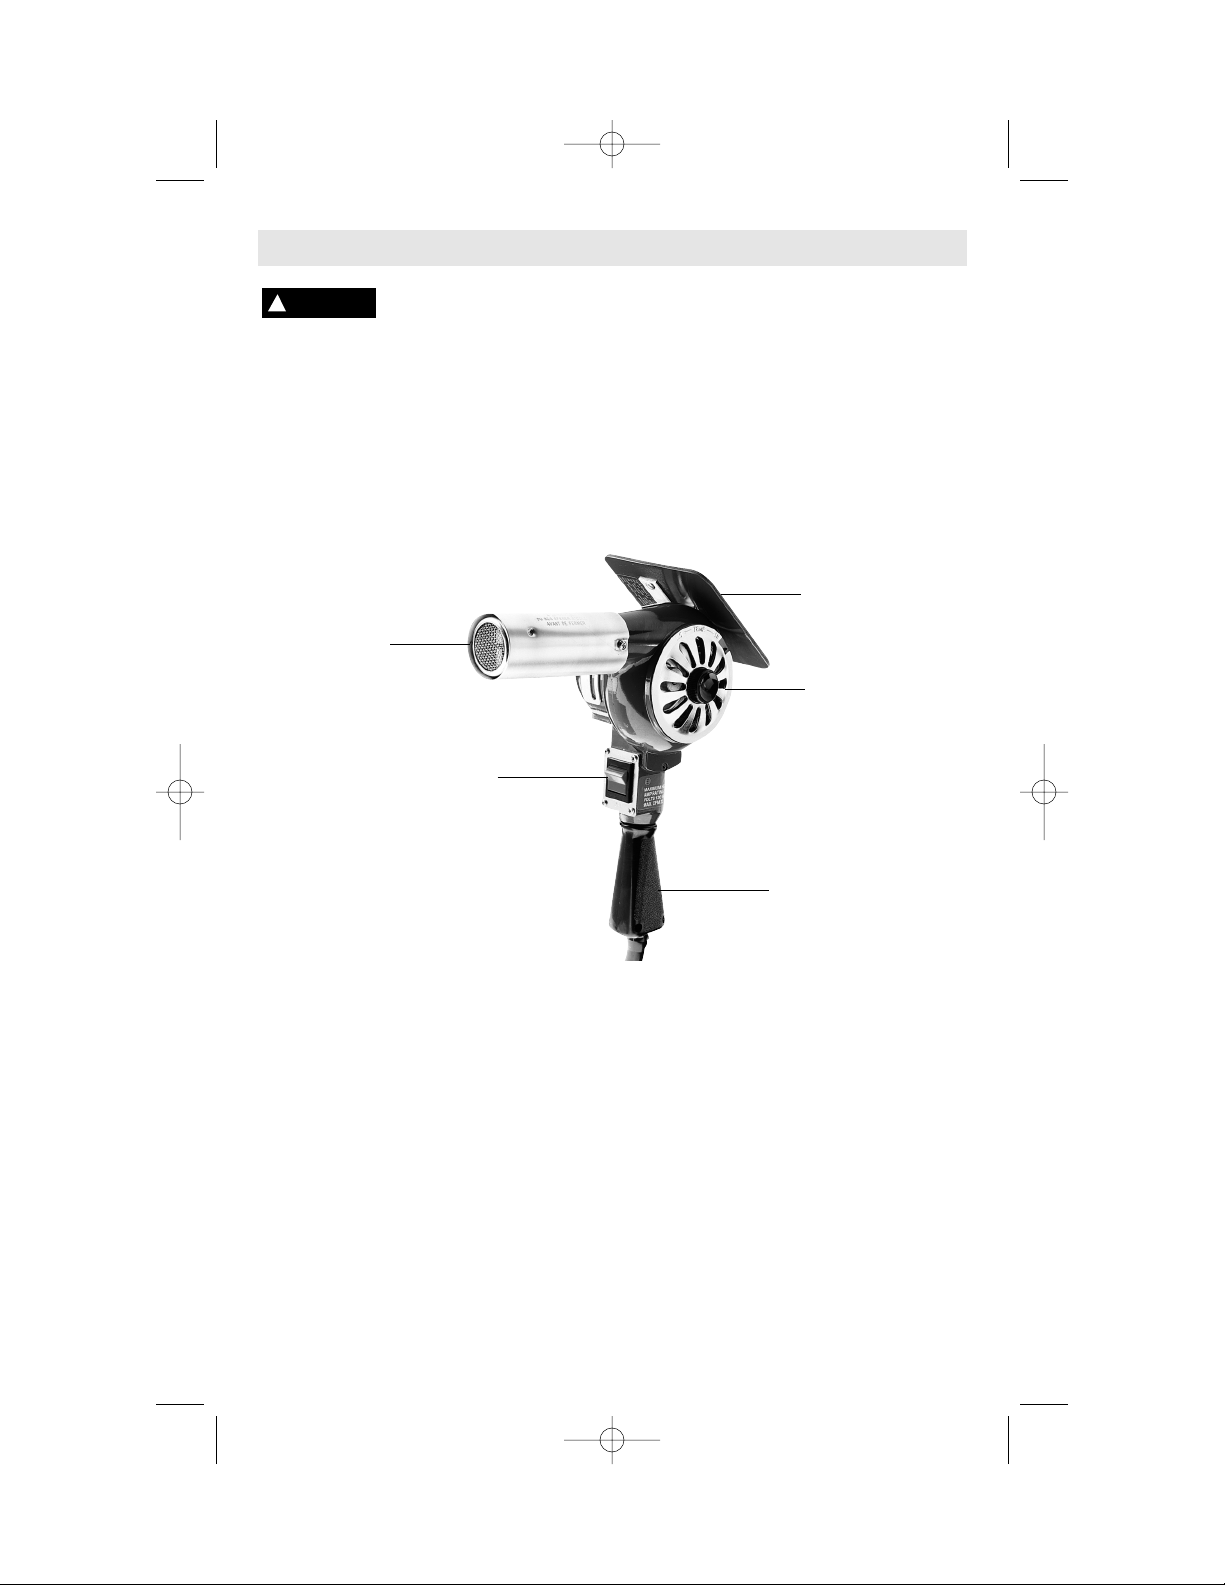
Functional Description and Specifications
Disconnect the plug from the power source before making any
assembly, adjustments or changing accessories. Such preventive safety
measures reduce the risk of starting the tool accidentally.
!
WARNING
Heat Gun
ADJUSTABLE
STAND
ROCKER
SWITCH
NOZZLE
ASSEMBLY
AIR INTAKE
SHUTTER
HANDLE
BM 2610615924 2/02 2/1/02 12:36 PM Page 6
-7-
Operating Instructions
Your Bosch Heat Gun is a heavy-duty,
industrial-quality, general-purpose heat gun.
You can do more heating jobs faster with this
heat gun because of its high power and air
flow ratings.
This product provides a fast flow of heated
air for applications such as activating
adhesives, bending and forming plastics,
curing epoxies, deburring plastics, defrosting
frozen coils, drying negatives and parts,
heating solids and liquids, loosening nuts
and bolts, removing floor tiles and putty,
repairing vinyl, shrinking tubing and
packaging, softening materials and stripping
paint. It's your dependable answer,
“Wherever a fast, portable heat is the need.”
The proper amount of heat for each
application is dependent upon the
adjustment of the air intake shutter, the
distance of the nozzle opening from the work
surface and length of time that heat is
applied to the work surface.
Before performing an application, we
recommend that you experiment with a piece
of scrap material. Use care in approaching
the work until you find the proper
combination of shutter adjustment, distance
from the work surface and heat application
time.
Use a gentle back and forth motion when
applying heat unless it is found that a
concentrated heat is desired.
TO OPERATE HEAT GUN
1) Plug heat gun into properly rated outlet.
2) Move rocker switch to “Hot” position. Heat
gun will come up to full operating
temperature in approximately two minutes.
3) Adjust air intake shutter to desired
position. Open will provide slightly cooler
air. Closed will provide the highest
temperature.
4) Adjustable stand is provided to allow
nozzle to be rotated from almost horizontal
to vertical position.
5) To turn heat gun off after use, move switch
to “COLD” position. Run on cold for
approximately three minutes. This will
allow the heat gun to cool down and the
nozzle to become cool to the touch.
6) Move switch to "OFF" position.
When heat gun is used in an enclosed
container, such as a shrink tunnel or special
enclosure, ambient air must be allowed to
pass into the heat gun and there must be an
outlet of equal size for the heated air to pass
out of the enclosure also. Total enclosure will
cause damage or possible failure to the heat
gun due to the extreme heat generated.
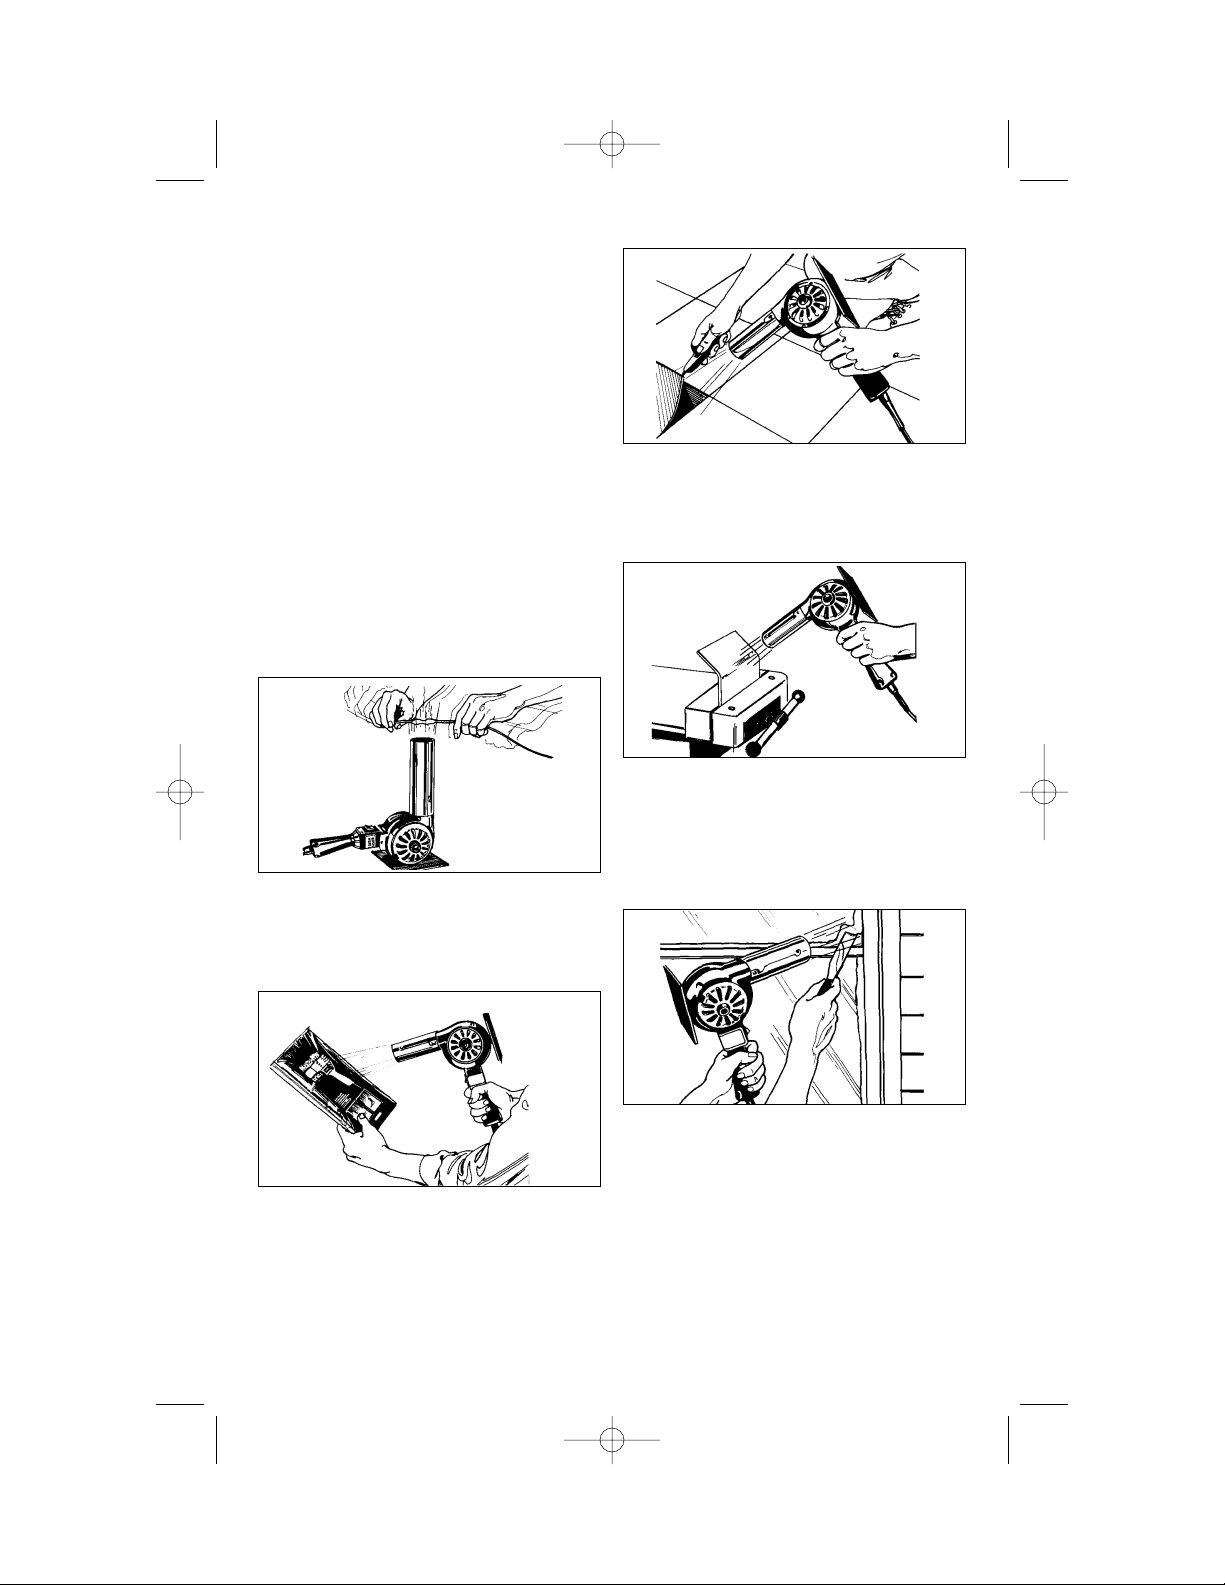
Typical Applications
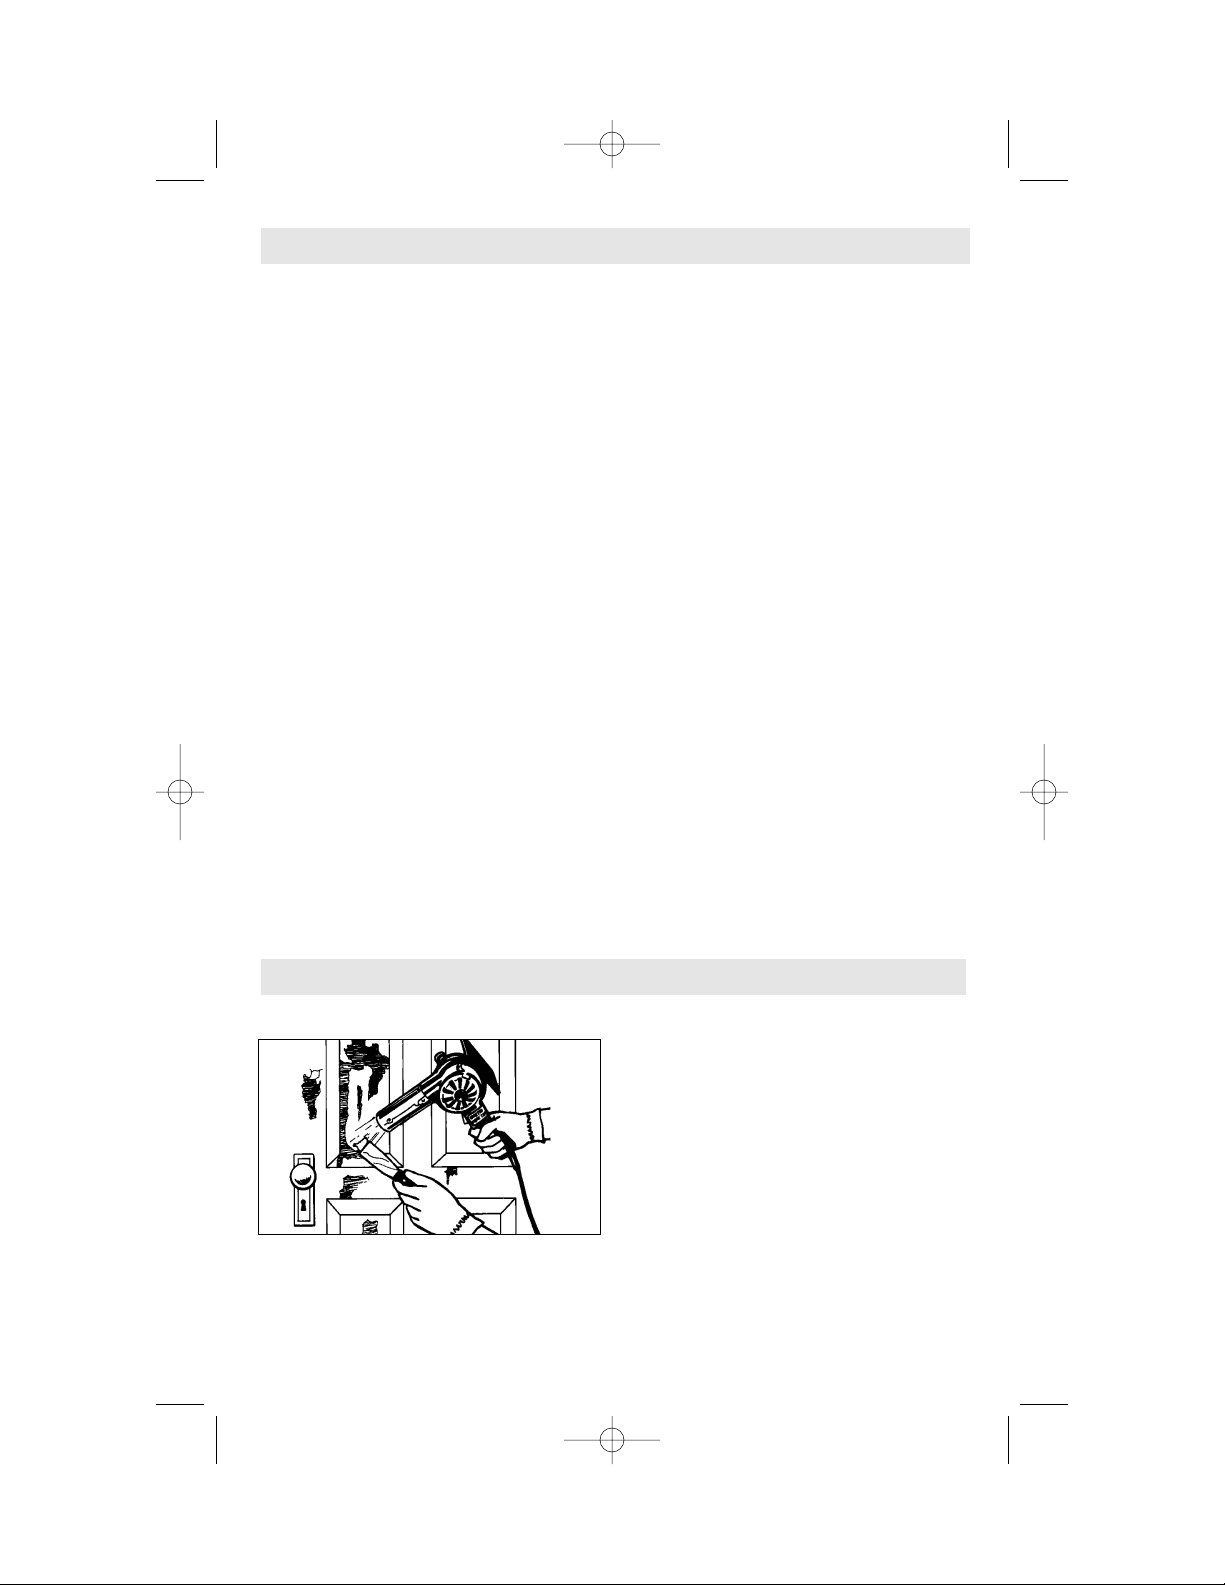
STRIPPING PAINT
1) To strip paint, turn unit on and hold it
about 1 inch from the surface being
stripped. Proper distance and speed of
stripping should be determined by
experience. It is an advantage to hold the
gun further from the surface and to move
forward slowly. Slower speed is
compensated by the wider softened areas.
Heat will also penetrate deeper.
2) Outlet temperature can be regulated by
the shutter at the side of the unit. With
shutter open, temperature is about
750°F/400°C at a distance of 1 inch from
the nozzle. With shutter closed,
temperature is about 1000°F/540°C.
Experiment to see which setting gives the
best results with the paint you are
stripping.
BM 2610615924 2/02 2/1/02 12:36 PM Page 7
3) As paint begins to blister and bubble,
move gun slowly in a steady progression
across the surface. Follow closely with a
scraping knife (a 2-inch wall scraper works
best) to scrape the loosened paint. Preheat
scraper as you are heating the paint
surface. This increases the speed of paint
stripping.
a. Removal of paint by using heat is based
on the fact that all organic paints soften
at elevated temperatures. When soft,
the paint can be easily lifted off without
damage to the surface.
b. When stripping paint from grooves in
moldings, you can devise your own
scraping tools. Old screwdrivers with
ground-down blades and linoleum
knives are often used.
4) When the task is completed, move rocker
switch to "Cool" position. Allow blower to
operate for a few minutes on cool.
SHRINKING TUBING
Use stand to free both hands. Slide tubing
over area to be insulated. Place in air stream
and move with a side to side motion until
tubing has shrunk. Remove from air stream.
SHRINKING PACKAGING
After shrink wrap has been sealed around
product, poke a small hole in it to allow
trapped air to escape. Then wave heated air
stream back and forth across package until
shrink wrap has evenly shrunk.
REMOVING FLOOR TILE
Direct heated air stream at tile to be removed
in a back and forth motion. This will soften
the adhesive backing. Place putty knife under
tile and lift to remove.
BENDING AND FORMING PLASTICS
Experiment with a piece of scrap material
first to develop a proper technique. Place
plastic piece into a proper holding fixture.
Wave hot air along the whole length of the
“Bend” line until plastic softens along that
area. Bend plastic to desired position.
REMOVING OLD PUTTY
When removing putty from a broken window,
carefully remove the broken glass first. When
removing putty from an undamaged window,
direct the hot air stream away from the glass
to prevent cracking due to thermal shock. It
is convenient to shield the glass from the hot
air with a large putty knife. Wave the hot air
stream at putty until softened. Remove with
putty knife.
-8-
BM 2610615924 2/02 2/1/02 12:36 PM Page 8
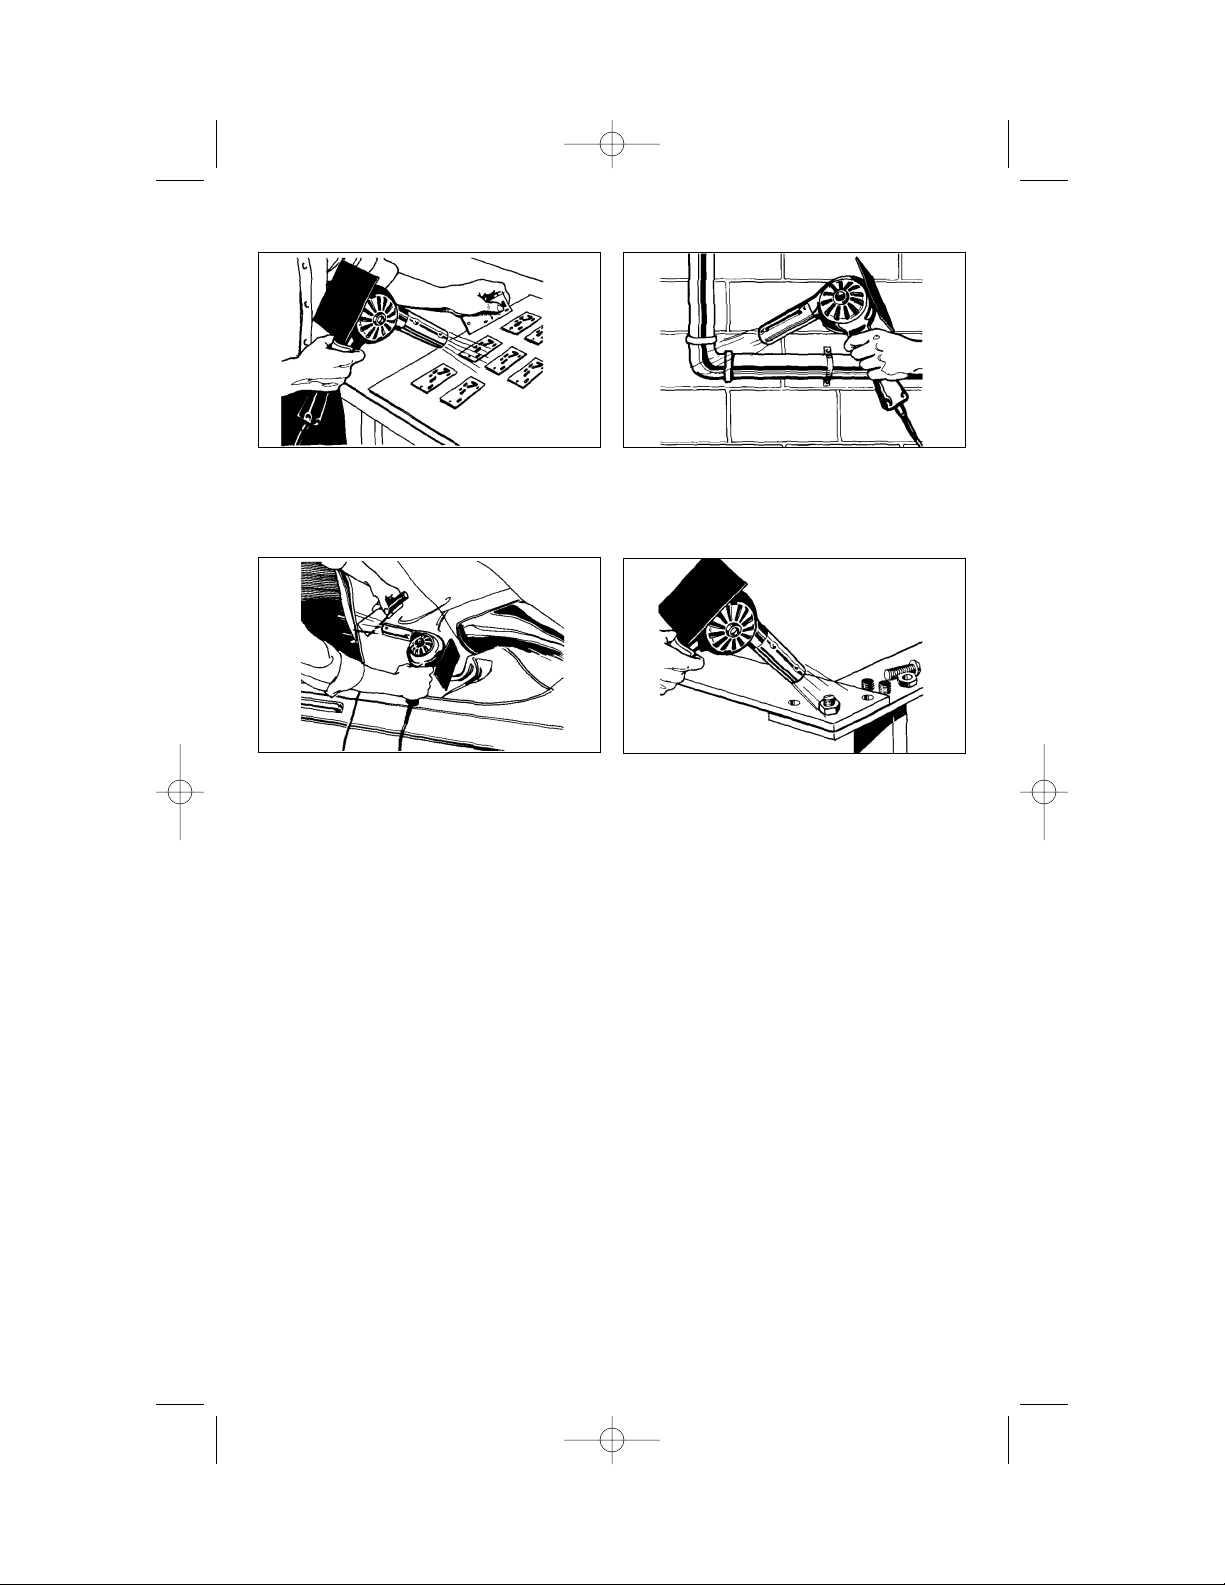
SPEED DRYING PARTS
Parts and other materials can be speed dried
by waving the heated air stream over the
work until dried.
STRETCHING, SHAPING AND
INSTALLING VINYL
Direct hot air stream at vinyl section and
wave heat gun in a back and forth motion.
Stretch and shape until wrinkles are
removed. DO NOT aim at glass.
DEFROSTING FROZEN COILS OR PIPES
Direct hot air stream at frozen part and wave
back and forth until part is defrosted or
thawed.
LOOSENING NUTS AND BOLTS
Direct hot air stream at nut or bolt to be
loosened for a short period of time. Heating
the nut or bolt will cause the metal to
expand. Remove the air stream from work
piece. Loosen nut or bolt with proper wrench.
-9-
BM 2610615924 2/02 2/1/02 12:36 PM Page 9

Reflectors**
Concentrator**
Spreader**
(*= standard equipment)
(**= optional accessories)
Accessories
-10-
Service
Preventive maintenance
performed by unauthorized personnel may result in misplacing
of internal wires and components which
could cause serious hazard. We
recommend that all tool service be
performed by a Bosch Factory Service
Center or Authorized Bosch Service Station.
TOOL LUBRICATION
Your Bosch tool has been properly
lubricated and is ready to use. It is
recommended that tools with gears be
lubricated with Bosch lubricant at every
brush change.
CARBON BRUSHES
The brushes and commutator in your tool
have been engineered for many hours of
dependable service. To maintain peak
efficiency of the motor, we recommend
every two to six months the brushes be
examined. Only genuine Bosch replacement
brushes specially designed for your tool
should be used.
BEARINGS
Every second brush change, the bearings
should be replaced at Bosch Factory Service
Center or Authorized Bosch Service Station.
Bearings which become noisy should be
replaced at once to avoid overheating or
motor failure.
Cleaning
To avoid accidents always
disconnect the tool from
the power supply before cleaning or
performing any maintenance. The tool may
be cleaned most effectively with
compressed dry air. Always wear safety
goggles when cleaning tools with
compressed air.
Ventilation openings and switch levers must
be kept clean and free of foreign matter. Do
not attempt to clean by inserting pointed
objects through openings.
Certain cleaning agents
and solvents damage
plastic parts. Some of these are: gasoline,
carbon tetrachloride, chlorinated cleaning
solvents, ammonia and household
detergents that contain ammonia.
!
WARNING
Maintenance
!
WARNING
!
CAUTION
BM 2610615924 2/02 2/1/02 12:36 PM Page 10
 Loading...