

BMW M2, M2 COMPETITION Owner's Manual

LINK:
CONTENT & A-Z
The Ultimate
Driving Machine®
OWNER'S MANUAL.
THE BMW M2 COMPETITION.
Online Edition for Part no. 01402720665 - II/19

Online Edition for Part no. 01402720665 - II/19

WELCOME TO BMW.
Owner's Manual.
BMW M2 COMPETITION.
Thank you for choosing a BMW M2.
The more familiar you are with your vehicle, the better control you will have on
the road. We therefore strongly suggest:
Read this Owner's Manual before starting off in your new BMW M2. Also use
the Integrated Owner's Manual in your vehicle. It contains important informa‐
tion on vehicle operation that will help you make full use of the technical fea‐
tures available in your BMW M2. The manual also contains information de‐
signed to enhance operating reliability and road safety, and to contribute to
maintaining the value of your BMW M2.
Any updates made after the editorial deadline can be found in the appendix of
the printed Owner's Manual for the vehicle.
You can find supplementary information in the additional brochures in the on‐
board literature.
We wish you a safe and enjoyable ride.
Online Edition for Part no. 01402720665 - II/19
3

TABLE OF CONTENTS
Navigation, Entertainment and Communication can be called up via the
Integrated Owner's Manual in the vehicle.
NOTES
Information ......................................................................................................................... 8
QUICK REFERENCE
Entering ............................................................................................................................ 18
Set-up and use ............................................................................................................... 22
On the road ...................................................................................................................... 27
AT A GLANCE
Cockpit .............................................................................................................................. 36
iDrive .................................................................................................................................. 40
Voice activation system ............................................................................................... 49
General settings ............................................................................................................. 52
Owner's Manual media ................................................................................................ 64
CONTROLS
Opening and closing ..................................................................................................... 68
Seats, mirrors, and steering wheel ............................................................................ 85
Transporting children safely ....................................................................................... 98
Driving ............................................................................................................................. 102
Displays .......................................................................................................................... 119
Lights .............................................................................................................................. 133
Safety .............................................................................................................................. 138
Driving stability control systems .............................................................................. 157
Driving comfort ............................................................................................................. 163
Climate control ............................................................................................................. 172
Interior equipment ....................................................................................................... 181
Storage compartments .............................................................................................. 191
4
Online Edition for Part no. 01402720665 - II/19

DRIVING TIPS
BMW M2 Technology ............................................................................................... 198
Things to remember when driving ......................................................................... 199
Loading .......................................................................................................................... 203
Saving fuel ..................................................................................................................... 206
MOBILITY
Refueling ........................................................................................................................ 210
Fuel .................................................................................................................................. 212
Wheels and tires .......................................................................................................... 214
Engine compartment ................................................................................................. 229
Engine oil ....................................................................................................................... 232
Coolant ........................................................................................................................... 236
Maintenance ................................................................................................................. 238
Replacing components .............................................................................................. 240
Breakdown assistance ............................................................................................... 246
Care ................................................................................................................................. 253
REFERENCE
Technical data .............................................................................................................. 260
Appendix ........................................................................................................................ 262
Everything from A to Z ............................................................................................... 264
© 2019 Bayerische Motoren Werke
Aktiengesellschaft
Munich, Germany
Reprinting, including excerpts, only with the written consent of BMW AG, Munich.
US English ID5 II/19, 03 19 490
Printed on environmentally friendly paper, bleached without chlorine, suitable for recycling.
Online Edition for Part no. 01402720665 - II/19
5

6
Online Edition for Part no. 01402720665 - II/19

NOTES
Information .................................................................................................... 8
Online Edition for Part no. 01402720665 - II/19
7

NOTES
Information
Information
Using this Owner's Manual
Orientation
The fastest way to find information on a particu‐
lar topic is by using the index.
An initial overview of the vehicle is provided in
the first chapter.
Updates made after the editorial
deadline
Due to updates after the editorial deadline, differ‐
ences may exist between the printed Owner's
Manual and the Integrated Owner's Manual in
the vehicle.
Notes on updates can be found in the appendix
of the printed Owner's Manual for the vehicle.
Owner's Manual for Navigation,
Entertainment, Communication
The Owner's Manual for Navigation, Entertain‐
ment, and Communication can be obtained as a
printed book from the service center.
The topics are also discussed in the Integrated
Owner's Manual in the vehicle.
Integrated Owner's Manual in the
vehicle
The Integrated Owner's Manual specifically de‐
scribes features and functions found in the vehi‐
cle. The Integrated Owner's Manual can be dis‐
played on the Control Display. Additional
information, refer to page 64.
BMW Driver's Guide app
Driver’s Guide App shows the most suitable in‐
formation for the selected vehicle. If possible,
only equipment and functions that are actually in‐
stalled in the vehicle will be explained.
BMW Driver’s Guide Web
Driver’s Guide Web shows the most suitable in‐
formation for the selected vehicle. If possible,
only equipment and functions that are actually in‐
stalled in the vehicle will be explained. Driver’s
Guide Web can be displayed in any current
browser.
Symbols and displays
Symbols in the Owner's Manual
Additional sources of information
Service center
A service center will be glad to answer questions
at any time.
Internet
Vehicle information and general information on
BMW, for instance. on technology, are available
on the Internet: www.bmwusa.com.
8
Online Edition for Part no. 01402720665 - II/19
Symbol Meaning
Precautions that must be followed in
order to avoid the possibility of injury
to yourself and to others as well as
serious damage to the vehicle.
Measures that can be taken to help
protect the environment.
"..." Texts in vehicle used to select
individual functions.

Information
NOTES
Symbol Meaning
›...‹ Verbal instructions to use with the
voice activation system.
››...‹‹ Responses generated by the voice
activation system.
Action steps
Action steps to be carried out are presented as a
numbered list. The steps must be carried out in
the defined order.
1. First action step.
2. Second action step.
Enumerations
Enumerations without mandatory order or alter‐
native possibilities are presented as a list with
bullet points.
▷ First possibility.
▷ Second possibility.
Symbols on vehicle components
This symbol on a vehicle component
indicates that further information on the
component is available in the Owner's Manual.
Vehicle features and options
This Owner's Manual describes all models and
all standard, country-specific and optional equip‐
ment that is offered in the model series. There‐
fore, this Owner's Manual also describes and il‐
lustrates features and functions that are not
available in a vehicle, for example because of the
selected optional features or the country-specific
version.
This also applies to safety-related functions and
systems.
When using these functions and systems, the
applicable laws and regulations must be ob‐
served.
For any options and equipment not described in
this Owner's Manual, refer to the Supplementary
Owner's Manuals.
Your dealer’s service center is happy to answer
any questions that you may have about the fea‐
tures and options applicable to your vehicle.
Status of the Owner's Manual
Basic information
The manufacturer of your vehicle pursues a pol‐
icy of constant development that is conceived to
ensure that our vehicles continue to embody the
highest quality and safety standards. In rare
cases, therefore, the features described in this
Owner's Manual may differ from those in your
vehicle.
Updates made after the editorial
deadline
Due to updates after the editorial deadline, differ‐
ences may exist between the printed Owner's
Manual and the Integrated Owner's Manual in
the vehicle.
Notes on updates can be found in the appendix
of the printed Owner's Manual for the vehicle.
For Your Own Safety
Intended use
Heed the following when using the vehicle:
▷ Owner's Manual.
▷ Information on the vehicle. Do not remove
stickers.
▷ Technical vehicle data.
Online Edition for Part no. 01402720665 - II/19
9

NOTES
Information
▷ The traffic, speed, and safety laws where the
vehicle is driven.
▷ Vehicle documents and statutory documents.
Warranty
Your vehicle is technically configured for the op‐
erating conditions and registration requirements
applying in the country of first delivery, also
known as homologation. If your vehicle is to be
operated in a different country it might be neces‐
sary to adapt your vehicle to potentially differing
operating conditions and registration require‐
ments. If your vehicle does not comply with the
homologation requirements in a certain country
you may not be able to lodge warranty claims for
your vehicle there. Further information on war‐
ranty is available from a service center.
Maintenance and repairs
Warning
Improperly performed work on the vehicle paint
can lead to a failure or malfunction of the radar
sensors and thereby result in a safety risk.
There may be a risk of accident or risk of dam‐
age to property. Have paintwork or paintwork
repairs on bumpers of vehicles with radar sen‐
sors performed by a dealer’s service center or
another qualified service center or repair shop
only.
Advanced technology, for instance the use of
modern materials and high-performance elec‐
tronics, requires suitable maintenance and repair
work.
The manufacturer of the vehicle recommends
that you entrust corresponding procedures to a
BMW center. If you choose to use another serv‐
ice facility, BMW recommends use of a facility
that performs work, e.g., maintenance and repair,
according to BMW specifications with properly
trained personnel, referred to in the Owner's
Manual as "another qualified service center or re‐
pair shop".
If work is performed improperly, for instance
maintenance and repair, there is a risk of subse‐
quent damage and related safety risks.
Parts and accessories
BMW recommends the use of parts and acces‐
sory products approved by BMW.
Approved parts and accessories, and advice on
their use and installation are available from a
BMW center.
BMW parts and accessories have been tested by
BMW for their safety and suitability in BMW vehi‐
cles.
BMW warrants genuine BMW parts and acces‐
sories.
BMW does not evaluate whether each individual
product from another manufacturer can be used
with BMW vehicles without presenting a safety
hazard, even if a country-specific official approval
was issued. BMW does not evaluate whether
these products are suitable for BMW vehicles
under all usage conditions.
California Proposition 65
Warning
For vehicles sold in California, the law requires
vehicle manufacturers to provide the following
warning:
Warning
Engine exhaust and a wide variety of Automo‐
bile components and parts, including compo‐
nents found in the interior furnishings in a vehi‐
cle, contain or emit chemicals known to the
State of California to cause cancer and birth
defects and reproductive harm. In addition, cer‐
tain fluids contained in vehicles and certain
products of component wear contain or emit
chemicals known to the State of California to
cause cancer and birth defects or other repro‐
ductive harm. Battery posts, terminals and re‐
lated accessories contain lead and lead com‐
pounds. Batteries also contain other chemicals
10
Online Edition for Part no. 01402720665 - II/19

Information
NOTES
known to the State of California to cause can‐
cer. Wash your hands after handling. Used en‐
gine oil contains chemicals that have caused
cancer in laboratory animals. Always protect
your skin by washing thoroughly with soap and
water. For more information go to
www.P65Warnings.ca.gov/passenger-vehicle.
Warning
Operating, servicing and maintaining a passen‐
ger vehicle or off-highway motor vehicle can
expose you to chemicals including engine ex‐
haust, carbon monoxide, phthalates, and lead,
which are known to the State of California to
cause cancer and birth defects or other repro‐
ductive harm. To minimize exposure, avoid
breathing exhaust, do not idle the engine ex‐
cept as necessary, service your vehicle in a
well-ventilated area and wear gloves or wash
your hands frequently when servicing your ve‐
hicle. For more information go to
www.P65Warnings.ca.gov/passenger-vehicle.
Service and warranty
We recommend that you read this publication
thoroughly. Your vehicle is covered by the follow‐
ing warranties:
▷ New Vehicle Limited Warranty.
▷ Rust Perforation Limited Warranty.
▷ Federal Emissions System Defect Warranty.
▷ Federal Emissions Performance Warranty.
▷ California Emission Control System Limited
Warranty.
Detailed information about these warranties is
listed in the Service and Warranty Information
Booklet for US models or in the Warranty and
Service Guide Booklet for Canadian models.
Your vehicle has been specifically adapted and
designed to meet the particular operating condi‐
tions and homologation requirements in your
country and continental region in order to deliver
the full driving pleasure while the vehicle is oper‐
ated under those conditions. If you wish to oper‐
ate your vehicle in another country or region, you
may be required to adapt your vehicle to meet
different prevailing operating conditions and ho‐
mologation requirements. You should also be
aware of any applicable warranty limitations or
exclusions for such country or region. In such
case, please contact Customer Relations for fur‐
ther information.
Maintenance
Maintain the vehicle regularly to sustain the road
safety, operational reliability and the New Vehicle
Limited Warranty.
Specifications for required maintenance meas‐
ures:
▷ BMW Maintenance system.
▷ Service and Warranty Information Booklet for
US models.
▷ Warranty and Service Guide Booklet for
Canadian models.
If the vehicle is not maintained according to
these specifications, this could result in damag‐
ing the vehicle. Such damage is not covered by
the BMW New Vehicle Limited Warranty.
Data memory
General information
Electronic control devices are installed in the ve‐
hicle. Electronic control units process data they
receive from vehicle sensors, self-generate or
exchange with each other. Some control units
are necessary for the vehicle to function safely or
provide assistance during driving, for instance
driver assistance systems. Furthermore, control
units facilitate comfort or infotainment functions.
Information about stored or exchanged data can
be requested from the manufacturer of the vehi‐
cle, in a separate booklet, for example.
Online Edition for Part no. 01402720665 - II/19
11

NOTES
Information
Personal reference
Each vehicle is marked with a unique vehicle
identification number. Depending on the country,
the vehicle owner can be identified with the vehi‐
cle identification number, license plate and corre‐
sponding authorities. In addition, there are other
options to track data collected in the vehicle to
the driver or vehicle owner, for instance, via the
ConnectedDrive account that is used.
Operating data in the vehicle
Control units process data to operate the vehicle.
For example, this includes:
▷ Status messages for the vehicle and its indi‐
vidual components, e.g., wheel rotational
speed, wheel speed, deceleration, transverse
acceleration, engaged safety belt indicator.
▷ Ambient conditions, e.g., temperature, rain
sensor signals.
The processed data is only processed in the ve‐
hicle itself and generally volatile. The data is not
stored beyond the operating period.
Electronic components, e.g. control units and ig‐
nition keys, contain components for storing tech‐
nical information. Information about the vehicle
condition, component usage, maintenance re‐
quirements events or faults can be stored tem‐
porarily or permanently.
This information generally records the state of a
component, a module, a system, or the environ‐
ment, for instance:
▷ Operating states of system components, for
instance, fill levels, tire inflation pressure, bat‐
tery status.
▷ Malfunctions and faults in important system
components, for instance lights and brakes.
▷ Responses by the vehicle to special situa‐
tions such as airbag deployment or engage‐
ment of the driving stability control systems.
▷ Information on vehicle-damaging events.
The data is required to perform the control unit
functions. Furthermore, it also serves to recog‐
nize and correct malfunctions, and helps the ve‐
hicle manufacturer to optimize vehicle functions.
The majority of this data is volatile and is only
processed within the vehicle itself. Only a small
share of the data is stored event-related in event
or fault memories.
When servicing, for instance during repairs, serv‐
ice processes, warranty cases, and quality assur‐
ance measures, this technical information can be
read out from the vehicle together with the vehi‐
cle identification number.
A dealer’s service center or another qualified
service center or repair shop can read out the in‐
formation. The socket for OBD Onboard Diagno‐
sis required by law in the vehicle is used to read
out the data.
The data is collected, processed, and used by
the relevant organizations in the service network.
The data documents technical conditions of the
vehicle, helps with the identification of the fault,
compliance with warranty obligations and quality
improvement.
Furthermore, the manufacturer has product
monitoring duties to meet in line with product lia‐
bility law. To fulfill these duties, the vehicle man‐
ufacturer needs technical data from the vehicle.
The data from the vehicle can also be used to
check customer claims for warranty and guar‐
anty.
Fault and event memories in the vehicle can be
reset when a dealer’s service center or another
qualified service center or repair shop performs
repair or servicing work.
Data entry and data transfer into
the vehicle
General information
Depending on the vehicle equipment, comfort
and individual settings can be stored in the vehi‐
cle and modified or reset at any time.
For example, this includes:
12
Online Edition for Part no. 01402720665 - II/19

Information
NOTES
▷ Settings for the seat and steering wheel posi‐
tions.
▷ Suspension and climate control settings.
If necessary, data can be transferred to the en‐
tertainment and communication system of the
vehicle, for instance via smartphone.
This includes the following depending on the re‐
spective equipment:
▷ Multimedia data such as music, films or pho‐
tos for playback in an integrated multimedia
system.
▷ Address book data for use in conjunction with
an integrated hands-free system or an
integrated navigation system.
▷ Entered navigation destinations.
▷ Data on the use of Internet services.
This data can be stored locally in the vehicle or is
found on a device that has been connected to
the vehicle, e.g., a smartphone, USB stick or
MP3 player. If this data is stored in the vehicle, it
can be deleted at any time.
This data is only transmitted to third parties upon
personal request as part of the use of online
services. The transmission depends on the se‐
lected settings for the use of the services.
Incorporation of mobile devices
Depending on the vehicle equipment, mobile de‐
vices connected to the vehicle, for instance
smartphones, can be controlled via the vehicle
control elements.
The sound and picture from the mobile device
can be played back and displayed through the
multimedia system. Certain information is trans‐
ferred to the mobile device at the same time. De‐
pending on the type of incorporation, this in‐
cludes, for instance position data and other
general vehicle information. This optimizes the
way in which selected apps, for instance naviga‐
tion or music playback, work.
There is no further interaction between the mo‐
bile device and the vehicle, such as active access
to vehicle data.
How the data will be processed further is deter‐
mined by the provider of the particular app being
used. The extent of the possible settings de‐
pends on the respective app and the operating
system of the mobile device.
Services
General information
If the vehicle has a wireless network connection,
this enables data to be exchanged between the
vehicle and other systems. The wireless network
connection is realized via an in-vehicle transmit‐
ter and receiver unit or via personal mobile devi‐
ces brought into the vehicle, for instance smart‐
phones. This wireless network connection
enables 'online functions' to be used. These in‐
clude online services and apps supplied by the
vehicle manufacturer or by other providers.
Services from the vehicle
manufacturer
Where online services from the vehicle manufac‐
turer are concerned, the corresponding functions
are described in the appropriate place, for in‐
stance the Owner's Manual or manufacturer's
website. The relevant legal information pertaining
to data protection is provided there too. Personal
data may be used to perform online services.
Data is exchanged over a secure connection,
for instance with the IT systems of the vehicle
manufacturer intended for this purpose.
Any collection, processing, and use of personal
data above and beyond that needed to provide
the services must always be based on a legal
permission, contractual arrangement or consent.
It is also possible to activate or deactivate the
data connection as a whole. That is, with the ex‐
ception of functions and services required by law
such as Assist systems.
Services from other providers
When using online services from other providers,
these services are the responsibility of the rele‐
vant provider and subject to their data privacy
Online Edition for Part no. 01402720665 - II/19
13

NOTES
Information
conditions and terms of use. The vehicle manu‐
facturer has no influence on the content ex‐
changed during this process. Information on the
way in which personal data is collected and used
in relation to services from third parties, the
scope of such data, and its purpose, can be ob‐
tained from the relevant service provider.
Event Data Recorder EDR
This vehicle is equipped with an event data re‐
corder EDR. The main purpose of an EDR is to
record, in certain crash or near crash-like situa‐
tions, such as an air bag deployment or hitting a
road obstacle, data that will assist in understand‐
ing how a vehicle’s systems performed. The
EDR is designed to record data related to vehicle
dynamics and safety systems for a short period
of time, typically 30 seconds or less.
The EDR in this vehicle is designed to record
such data as:
▷ How various systems in your vehicle were op‐
erating.
▷ Whether or not the driver and passenger
safety belts were fastened.
▷ How far, if at all, the driver was depressing the
accelerator and/or brake pedal.
▷ How fast the vehicle was traveling.
This data can help provide a better understand‐
ing of the circumstances in which crashes and
injuries occur.
EDR data is recorded by your vehicle only if a
nontrivial crash situation occurs; no data is re‐
corded by the EDR under normal driving condi‐
tions and no personal data, for instance name,
gender, age, and crash location, are recorded.
However, other parties, such as law enforce‐
ment, could combine the EDR data with the type
of personally identifying data routinely acquired
during a crash investigation.
To read data recorded by an EDR, special equip‐
ment is required, and access to the vehicle or the
EDR is needed. In addition to the vehicle manu‐
facturer, other parties, such as law enforcement,
that have the special equipment, can read the in‐
formation if they have access to the vehicle or
the EDR.
Vehicle identification number
Engine compartment
The vehicle identification number can be found
in the engine compartment, on the right-hand
side of the vehicle.
Windshield
The vehicle identification number can also be
found behind the windshield.
Reporting safety defects
For US customers
The following only applies to vehicles owned and
operated in the US.
14
Online Edition for Part no. 01402720665 - II/19

If you believe that your vehicle has a defect
which could cause a crash or could cause injury
or death, you should immediately inform the Na‐
tional Highway Traffic Safety Administration
NHTSA, in addition to notifying BMW of North
America, LLC, P.O. Box 1227, Westwood, New
Jersey 07675-1227, Telephone
1-800-831-1117.
If NHTSA receives similar complaints, it may
open an investigation, and if it finds that a safety
defect exists in a group of vehicles, it may order a
recall and remedy campaign.
However, NHTSA cannot become involved in in‐
dividual problems between you, your dealer, or
BMW of North America, LLC.
To contact NHTSA, you may call the Vehicle
Safety Hotline toll-free at 1-888-327-4236 (TTY:
1-800-424-9153); go to http://www.safercar.gov;
or write to: Administrator, NHTSA, 400 Seventh
Street, SW., Washington, DC 20590. You can
also obtain other information about motor vehicle
safety from http://www.safercar.gov.
Information
NOTES
For Canadian customers
Canadian customers who wish to report a safetyrelated defect to Transport Canada, Defect In‐
vestigations and Recalls, may call the toll-free
hotline 1-800-333-0510. You can also obtain
other information about motor vehicle safety
from http://www.tc.gc.ca/roadsafety.
Online Edition for Part no. 01402720665 - II/19
15

16
Online Edition for Part no. 01402720665 - II/19

QUICK REFERENCE
Entering ....................................................................................................... 18
Set-up and use ........................................................................................... 22
On the road ................................................................................................. 27
17
Online Edition for Part no. 01402720665 - II/19
QUICK REFERENCE
Entering
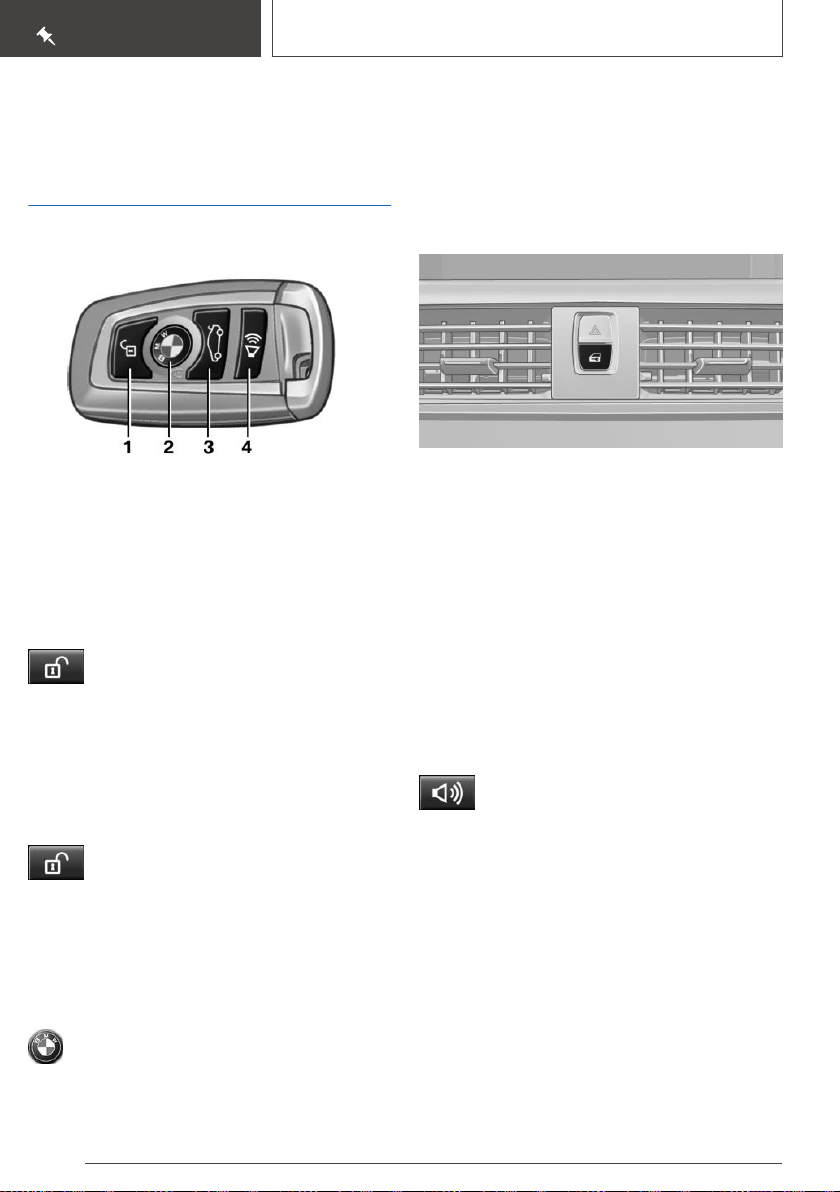
Entering
Opening and closing
Buttons on the remote control
1 Unlocking
2 Locking
3 Unlocking the trunk lid
4 Panic mode
Unlocking the vehicle
Press the button on the remote control.
Depending on the settings, either only the driv‐
er's door or all vehicle access points are un‐
locked.
If only the driver's door is unlocked, press the
button on the remote control again to unlock the
other vehicle access points.
Press and hold the button on the re‐
mote control after unlocking.
The windows and the glass sunroof are opened,
as long as the button on the remote control is
pressed.
Locking the vehicle
Press the button on the remote control.
All vehicle access points are locked.
Button for central locking system
Overview
Button for the central locking system.
Unlocking and locking
Pressing the central locking system button locks
or unlocks the vehicle with the doors closed.
▷ The fuel filler flap remains unlocked.
▷ The vehicle is not secured against theft when
locking.
Panic mode
You can trigger the alarm system if you find your‐
self in a dangerous situation.
Press the button on the remote control
for at least 3 seconds.
To switch off the alarm: press any button.
Comfort Access
Concept
The vehicle can be accessed without activating
the remote control.
All you need to do is to have the remote control
with you, such as in your pants pocket.
The vehicle automatically detects the remote
control when it is in close proximity or in the car's
interior.
18
Online Edition for Part no. 01402720665 - II/19

Entering
QUICK REFERENCE
Unlocking the vehicle
Grasp the door handle on the driver's or front
passenger door completely.
Locking the vehicle
Touch the surface on the door handle of the driv‐
er's or front passenger door with your finger for
approx. 1 second without grasping the door han‐
dle.
▷ Press the button on the remote con‐
trol for approx. 1 second.
Depending on the setting, the doors may also
be unlocked.
Displays and control elements
In the vicinity of the steering
wheel
1 Light switch element
2 High beams, headlight flasher, turn signal
3 Instrument cluster
4 Start/Stop button
5 Wiper system
Unlocking the trunk lid
▷ Unlock the vehicle and press the button on
the trunk lid.
▷ If carrying the remote control, press the but‐
ton on the trunk lid.
Online Edition for Part no. 01402720665 - II/19
Indicator/warning lights
Instrument cluster
The indicator/warning lights can light up in a vari‐
ety of combinations and colors.
Several of the lights are checked for proper func‐
tioning and light up temporarily when the engine
is started or the ignition is switched on.
19

QUICK REFERENCE
Entering
Driver's door
1 Power windows
2 Exterior mirrors
Switch console
1 Selector lever
2 Controller
3 Drivelogic
4 Parking brake
5 ▷ Driving dynamics systems
▷ Parking assistance systems
Controller
General information
The buttons can be used to open the menus di‐
rectly. The Controller can be used to select
menu items and enter the settings.
Buttons on the Controller
Button Function
Press once: calls up the main menu.
Press twice: displays all menu items
of the main menu.
Opens the Communication menu.
Opens the Media/Radio menu.
Opens destination input menu for
navigation.
Opens navigation map.
Press once: opens the previous dis‐
play.
Press and hold: open the menus used
last.
Opens the Options menu.
Voice activation
iDrive
Concept
The iDrive combines the functions of many
switches. These functions can be operated via
the Controller and, depending on the equipment
version, the touchscreen.
20
Online Edition for Part no. 01402720665 - II/19
Using the voice activation system
Activating the voice activation system
1. Press the button on the steering
wheel.
2. Wait for the signal.
3. Say the command.

The symbol on the Control Display indi‐
cates that the voice activation system is
active.
If no other commands are possible, operate the
function via iDrive.
Terminating the voice activation system
Press the button on the steering wheel
or ›Cancel‹.
Help on the voice activation system
▷ To have information on the operating princi‐
ple of the voice activation system read out
loud: ›General information on voice control‹.
▷ To have help for the current menu read out
loud: ›Help‹.
Information on Emergency Requests
Do not use the voice activation system to initiate
an Emergency Request. In stressful situations,
the voice and vocal pitch can change. This can
unnecessarily delay the establishment of a
phone connection.
Instead, use the SOS button close to the interior
mirror.
Entering
QUICK REFERENCE
Online Edition for Part no. 01402720665 - II/19
21

QUICK REFERENCE
Set-up and use
Set-up and use
Seats, mirrors, and steering wheel
Manually adjustable seats
1 Forward/backward
2 Thigh support
3 Seat tilt
4 Backrest width
5 Lumbar support
6 Height
7 Backrest tilt
Electrically adjustable seats
Adjusting the head restraint
Height
▷ To raise: push the head restraint up.
▷ To lower: press button, arrow 1, and push
head restraint down.
Adjusting the exterior mirrors
1 Memory function
2 Backrest width
3 Lumbar support
4 Backrest tilt
5 Forward/back, height, tilt
22
1 Adjusting
2 Selecting a mirror, Automatic Curb Monitor
3 Folding in and out
Online Edition for Part no. 01402720665 - II/19
Set-up and use
QUICK REFERENCE
Adjusting the steering wheel
Manual steering wheel adjustment
1. Fold the lever down.
2. Move the steering wheel to the preferred
height and angle to suit your seating position.
3. Fold the lever back up.
Memory function
Concept
The following settings can be stored and, if nec‐
essary, retrieved using the memory function:
▷ Seat position.
▷ Exterior mirror position.
Entering the rear
Manual forward/back adjustment
1. Pull lever up to the stop.
2. Fold backrest forward.
3. Push the seat forward.
Manual forward/back adjustment:
original position
Push the seat back into the original position.
1.
2. Fold back the backrest to lock the seat.
Electric forward/back adjustment
Pull lever up to the stop.
1.
Storing
Switch on the ignition.
1.
2. Set the desired position.
3.
4. Press the desired button 1 or 2 while the
Press the button. The LED in the
button lights up.
LED is lit. The LED goes out.
Calling up settings
The stored position is called up automatically.
Press the desired button 1 or 2.
The procedure stops when a seat adjustment
switch or one of the memory buttons is pressed.
Once underway, adjustment of the seat position
on the driver's side is disabled after a short while.
Online Edition for Part no. 01402720665 - II/19
2. Fold the rear seat backrest forward.
3. To change the entry area:
▷ Press and hold this button until the
seat has moved to the desired posi‐
tion. Releasing the button stops window/
roof movement.
▷ Press the button briefly. The seat
automatically moves to the end po‐
sition. Pressing again stops the motion.
23

QUICK REFERENCE
Set-up and use
Electric forward/back adjustment:
original position
1. Moving the seat to its original position:
▷ Press and hold this button until the
seat has returned to its original po‐
sition. Releasing the button stops window/
roof movement.
▷ Press the button briefly. The seat
moves to its original position. Press‐
ing again stops the motion.
2. Fold the rear seat backrest back.
Infotainment
Radio
Control elements
1 Changing the entertainment source
2 Sound output on/off, volume
3 Programmable memory buttons
4 Changing the station/track
5 Eject CD/DVD
6 CD/DVD drive
7 Changing the waveband
Navigation destination entry
Entering a destination via address
State/province
1. "Navigation"
2. "Enter address"
3. "State/Province?"
4. Move the Controller to the right to select the
state from the list.
Entering the address
The address can be entered in any order.
Example: entering the address via the town/city
"City/Postal code?"
1.
2. Enter the town/city.
The list is narrowed down further with each
entry.
3. Select the symbol.
4. Select a town/city from the list.
5. If necessary, enter the street.
6. Select the street as you would the town/city.
7. If necessary, enter a house number.
8. Select the symbol.
9. Select a house number or range of house
numbers from the list.
Starting destination guidance
"Start guidance"
If only the town/city was entered: destination
guidance is started to the town/city center.
Connecting a mobile phone
After the mobile phone is connected once to the
vehicle, the mobile phone can be operated using
iDrive, the steering wheel buttons and spoken in‐
structions.
"My Vehicle"
1.
2. "iDrive settings"
24
Online Edition for Part no. 01402720665 - II/19

Set-up and use
QUICK REFERENCE
3. "Mobile devices"
4. "Connect new device"
5. Select the functions for which the mobile
phone is to be used.
The vehicle's Bluetooth name is displayed on
the Control Display.
6. To perform additional steps on the mobile
phone, refer to the mobile phone owner's
manual: e.g., search for or connect the Blue‐
tooth device or a new device.
The Bluetooth name of the vehicle appears
on the mobile phone display. Select the Blue‐
tooth name of the vehicle.
7. Depending on the mobile device, a control
number is displayed or the control number
must be entered.
▷ Compare the control number displayed
on the Control Display with the control
number on the display of the device.
Confirm the control number on the device
and on the Control Display.
▷ Enter and confirm the same control num‐
ber on the device and via iDrive.
The device is connected and displayed in the
device list.
Using the phone
Dialing a number
1. "Communication"
2. "Dial number"
3. Enter the numbers.
4. Select the symbol. The connection is es‐
tablished via the mobile phone to which this
function has been assigned.
Establish the connection via the additional
phone:
1.
Press the button.
2. "Call via"
Apple CarPlay preparation
Concept
CarPlay allows certain functions of a compatible
Apple iPhone to be used via Siri voice operation
and iDrive.
Functional requirements
▷ Compatible iPhone.
iPhone 5 or later with iOS 7.1 or later.
▷ Corresponding mobile contract.
▷ Bluetooth, WiFi, and Siri voice operation are
switched on on the iPhone.
Accepting a call
Incoming calls can be accepted via iDrive or the
button on the steering wheel.
Via iDrive
"Accept"
Via the button on the steering wheel
Press the button.
Via the instrument cluster
Use the thumbwheel on the steering wheel to
select: "Accept"
Online Edition for Part no. 01402720665 - II/19
Switching on Bluetooth and CarPlay
Via iDrive:
"My Vehicle"
1.
2. "iDrive settings"
3. "Mobile devices"
4. "Settings"
5. Select the following settings:
▷ "Bluetooth®"
▷ "Apple CarPlay"
Pairing the iPhone with CarPlay
Pair iPhone via Bluetooth with the vehicle.
25

QUICK REFERENCE
Select CarPlay as the function:
"Apple CarPlay"
The iPhone is connected to the vehicle and dis‐
played in the device list.
Set-up and use
26
Online Edition for Part no. 01402720665 - II/19

On the road
On the road
QUICK REFERENCE
Driving
Starting and stopping the engine
Ignition on/off
▷ On: press the Start/Stop but‐
ton.
Most of the indicator/warning
lights light up for a varied
length of time.
▷ Off: press the Start/Stop button again.
All indicator lights go out.
▷ Radio-ready state: when the ignition is
switched off, press the ON/OFF button on
the radio or when the engine is running, press
the Start/Stop button.
Some electronic systems/power consumers
remain ready for operation.
Start/stop engine
M double-clutch transmission: starting
Depress the brake pedal.
1.
2. Press the Start/Stop button.
Manual transmission: switching off
1. With the vehicle at a standstill, press the
Start/Stop button.
2. Shift into first gear or reverse.
3. Set the parking brake.
Auto Start/Stop function
Manual transmission: switches the engine off au‐
tomatically while stationary to save fuel. As soon
as the clutch pedal is depressed, the engine
starts automatically.
M double-clutch transmission: switches the en‐
gine off automatically while stationary to save
fuel. The engine starts automatically when the
brake pedal is released.
Parking brake
Applying
The lever automatically engages after being
pulled up.
Releasing
Manual transmission: starting
Depress the brake pedal.
1.
2. Press on the clutch pedal and shift to neutral.
3. Press the Start/Stop button.
M double-clutch transmission: switching
off
Depress the brake pedal.
1.
2. Press the Start/Stop button.
3. Set the parking brake, if needed.
Online Edition for Part no. 01402720665 - II/19
Raise lever slightly, press the button and guide
the lever down.
27

QUICK REFERENCE
On the road
Manual transmission
Shifting
When shifting to a lower gear, excessive speeds
can damage the engine. There is a risk of dam‐
age to property. When shifting into 5th or 6th
gear, press the gearshift lever to the right.
Reverse gear
Select only when the vehicle is stationary.
To overcome the resistance push the gearshift
lever dynamically to the left and engage reverse
gear with a forward shifting movement.
M double-clutch transmission
Engaging selector lever positions
Press on the brake pedal and pull or push the se‐
lector lever in the corresponding direction.
S is Sequential mode
Use the shift paddles or the selector lever to up‐
shift or downshift without letting off the gas.
R is reverse
Select only when the vehicle is stationary.
N is Neutral
Use in automatic vehicle washes, for instance.
The vehicle can then roll.
P Park
The drive wheels are blocked.
P is engaged automatically:
▷ After the engine is switched off, if the vehicle
is in radio-ready state or if the ignition is
switched off and if position R or D is set.
▷ With the ignition is off, if position N is set.
High beams, headlight flasher,
turn signal, roadside parking
light
High beams, headlight flasher
▷ R: reverse gear.
▷ N: neutral.
▷ Center position, forward position.
▷ +: manual upshifting.
▷ -: manual downshifting.
▷ D/S: switch between drive mode and sequen‐
tial mode.
D is Drive mode
In Drive mode, all forward gears are automatically
changed.
28
Online Edition for Part no. 01402720665 - II/19
Push the lever forward or pull it backward.
▷ High beams on, arrow 1.
The high beams light up when the low beams
are switched on.
▷ High beams off/headlight flasher, arrow 2.

On the road
QUICK REFERENCE
Turn signal
▷ On: press the lever past the resistance point.
▷ Off: press the lever past the resistance point
in the opposite direction.
▷ Triple turn signal activation: lightly tap the
lever up or down.
▷ Brief signaling: press the lever to the resist‐
ance point and hold it there for as long as you
want the turn signal to flash.
Canada: roadside parking light
Lights and lighting
Light functions
Symbol Function
Automatic headlight control.
Adaptive light functions.
Lights off.
Daytime running lights.
Parking lights.
Low beams.
Instrument lighting.
Wiper system
Switching the wipers on/off and
brief wipe
To illuminate the vehicle on one side.
▷ On: with the ignition switched off, press the
lever either up or down past the resistance
point.
▷ Off: press the lever back into the standard
position.
Online Edition for Part no. 01402720665 - II/19
Switching on
Press the lever up until the desired position is
reached.
▷ Resting position of the wipers: position 0.
▷ Rain sensor: position 1.
▷ Normal wiper speed: position 2.
▷ Fast wiper speed: position 3.
29

QUICK REFERENCE
On the road
Brief wipe and switching off
Press the lever down.
▷ Switching off: press the lever down until it
reaches its standard position.
▷ Brief wipe: press the lever down from the
standard position.
Rain sensor
Activating/deactivating
Set interval or sensitivity of the rain sensor
Turn the thumbwheel on the wiper lever.
Cleaning the windshield and
headlights
Pull the lever.
To activate: press the lever up once from its
standard position, arrow 1.
To deactivate: press the lever back into the
standard position.
30
Online Edition for Part no. 01402720665 - II/19
Climate control
Automatic climate control
Button Function
Temperature.
Air conditioning.
AUTO program.
 Loading...