

Page 1

Owner's Manual
Contents
A - Z
Online Edition for Part No. 01 41 0 157 006 - © 07/02 BMW AG
for Onboard
Computer
Page 2

The onboard computer offers you an array of functions designed to foster safety
Online Edition for Part No. 01 41 0 157 006 - © 07/02 BMW AG
while simultaneously enhancing your driving pleasure.
The GPS navigation system frees you from the burden of reading maps or looking
for road signs. It will guide you to any destination recorded on your map CD/DVD.
The radio, with its superb reception quality, joins the cassette and CD players in
providing optimal sound to satisfy every taste while serving up entertainment to
make every trip seem short.
The computer calculates vital operating data – including average fuel consumption,
cruising range on the remaining fuel and the estimated time of arrival. It provides
additional safety before driving – for example, with entry of a code number for the
engine immobilizer – and during driving – for example, with an acoustic warning
tone so that you do not drive faster than you intend to.
We wish you an enjoyable driving experience.
BMW AG
Vorwort
Page 3

Contents
Online Edition for Part No. 01 41 0 157 006 - © 07/02 BMW AG
The onboard computer at a
glance 8
The radio controls at a
glance 10
Overview
Functions at a glance 12
Screen displays at a glance 14
Control concept 16
Explanation of function
selection 18
Safety notice 19
Settings 19
© 2002 Bayerische Motoren Werke
Aktiengesellschaft
Munich, Germany
Reprinting, including excerpts, only with the
written consent of BMW AG, Munich.
Order no. 01 41 0 157 006
US English VIII/02
Printed in Germany
Printed on environmentally friendly paper –
bleached without chlorine, suitable for recycling.
To activate the system
Safety 22
GPS 22
Map CD/DVD 22
Starting GPS navigation 23
Navigation
Selecting a destination
Selection options 23
Destination entry 23
Manual destination entry 24
Map-supported destination
selection 27
Selecting destination in
information 29
Recent destinations 30
Returning to the starting
point 31
Selecting route 32
Destination guidance system
Starting the destination guid-
ance system 33
Displaying route 34
Changing route 36
Voice messages 37
Continuing guidance 38
Terminating/interrupting active
guidance 38
Address book
Creating address book 39
Selecting an address 40
Deleting an address 40
Additional functions
Current position 41
Wordmatch principle 42
Troubleshooting
What to do if ... 43
Page 4

3n
Online Edition for Part No. 01 41 0 157 006 - © 07/02 BMW AG
Radio controls
Switching radio on and off 46
Varying volume 46
Tone control 47
Radio reception
Selecting the frequency band 48
Entertainment
Selecting radio stations 48
Program type (PTY) 51
Storing radio stations 52
Calling up a station 53
Playing recorded media
Starting and stopping the
cassette 54
Mode displays 54
Noise suppression 55
Music track search 55
CD changer 56
Starting and stopping the CD 57
Mode displays 58
Using the buttons to search for
music tracks 58
Menu-guided track search 59
DSP sound system
Switching on and off 61
Selecting sound pattern 61
Individual tone control
memory 62
Calling up tone control
memory 62
Computer
Starting computer 64
Range 64
Outside temperature 64
Time of arrival 65
Computer
Fuel consumption 65
Average speed 65
Speed limit 66
Distance 67
Stopwatch 68
Remote control 68
Code
Choosing and activating
code 69
Deactivating code 70
Auxiliary ventilation
Setting timer 71
Switching direct mode on/off 72
Everything from A to Z 76
Index
OverviewNavigationEntertainmentComputerIndex
Page 5

4n
Online Edition for Part No. 01 41 0 157 006 - © 07/02 BMW AG
Notes on the Owner's Manual
To start using your onboard computer
right away, consult the overview of controls and displays and the concise
operating instructions in the first
chapter.
In addition, you will find
>
all the essentials you will need to
adjust the screen and care for your
computer in the "Overview" chapter
>
all information on using the GPS navigation system in the "Navigation"
chapter
>
all the essentials on radio use and
broadcast reception, combined with
instructions on how to use the cas-
*
sette and compact disc
in the "Entertainment" chapter.
chapter also contains information on
the "Digital Sound Processing
(DSP)" sound system
(CD) players
*
This
>
information on how you can use the
computer to calculate various data
related to vehicle operation in the
"Computer" chapter.
This chapter also contains information on the engine immobilizer code
and the settings for the auxiliary heat-
*
/-ventilation.
ing
The fastest way to find information on
any specific topic is by turning to the
index.
Because the control options for
the mobile phone also include
provisions for using it without the
onboard computer, the operating
instructions have been compiled in a
separate manual.
<
A separate manual has also been
provided for the "Emergency"
functions.
A list explaining all of the abbreviations
that appear on the computer screen
can be found in the glossary at the end
of the manual.
Should the day arrive when you wish to
sell your BMW, please remember to
hand this Owner's Manual to the next
owner – it is an important part of the
vehicle.
<
Information on care
For complete information on the care of
cassettes, CDs, DVDs and the device,
please refer to the caring for your
vehicle brochure.
Hinweise
Symbole
Ihr individuelles Fahrzeug
Page 6
5n
Online Edition for Part No. 01 41 0 157 006 - © 07/02 BMW AG
Symbols used
Indicates precautions that must
be followed precisely in order to
avoid the possibility of personal injury
and serious damage to the vehicle or
the onboard computer.
Contains information that will
assist you in gaining the optimum
benefit from your onboard computer
and enable you to care more effectively
for your onboard computer.
<
Marks the end of a specific item of
information.
*
Indicates special equipment, country-
specific equipment and optional extras.
If you have additional questions, please
consult your BMW center for information and advice.
<
<
Editorial notice
To ensure that our accessories and invehicle equipment continue to combine advanced technology with unexcelled levels of quality, we at BMW pursue a policy of continuous, ongoing
development embracing every aspect
of design. It is therefore possible that
some of your own vehicle's equipment
and features may vary from those
described in this manual. We are also
unable to guarantee that all of the
descriptions and illustrations contained
in the manual will be completely accurate in all respects. We must therefore
request your understanding for the fact
that we are unable to recognize legal
claims based on the data, descriptions
and illustrations in this manual and your
own vehicle's equipment.
Software release version
When you select the "Set" menu the
version number of your onboard computer appears at the upper right of the
screen.
"SW 4-1/XX" means:
>
4: Generation 4
>
1: Top Navigation
>
XX: Current version.
The information in this Owner's Manual
is based on the following software version: 1.0.
Please contact your BMW center
if you have any questions regard-
ing the software version.
<
OverviewNavigationEntertainmentComputerIndex
Aktualität bei Drucklegung
Zu Ihrer eigenen Sicherheit
Page 7

6n
Online Edition for Part No. 01 41 0 157 006 - © 07/02 BMW AG
Page 8

Overview
Online Edition for Part No. 01 41 0 157 006 - © 07/02 BMW AG
Navigation
Entertainment
Computer
7n
OverviewNavigationEntertainmentComputerIndex
Index
Overview
Page 9
8n
Online Edition for Part No. 01 41 0 157 006 - © 07/02 BMW AG
The onboard computer at a glance
Page 10
The onboard computer at a glance
Online Edition for Part No. 01 41 0 157 006 - © 07/02 BMW AG
9n
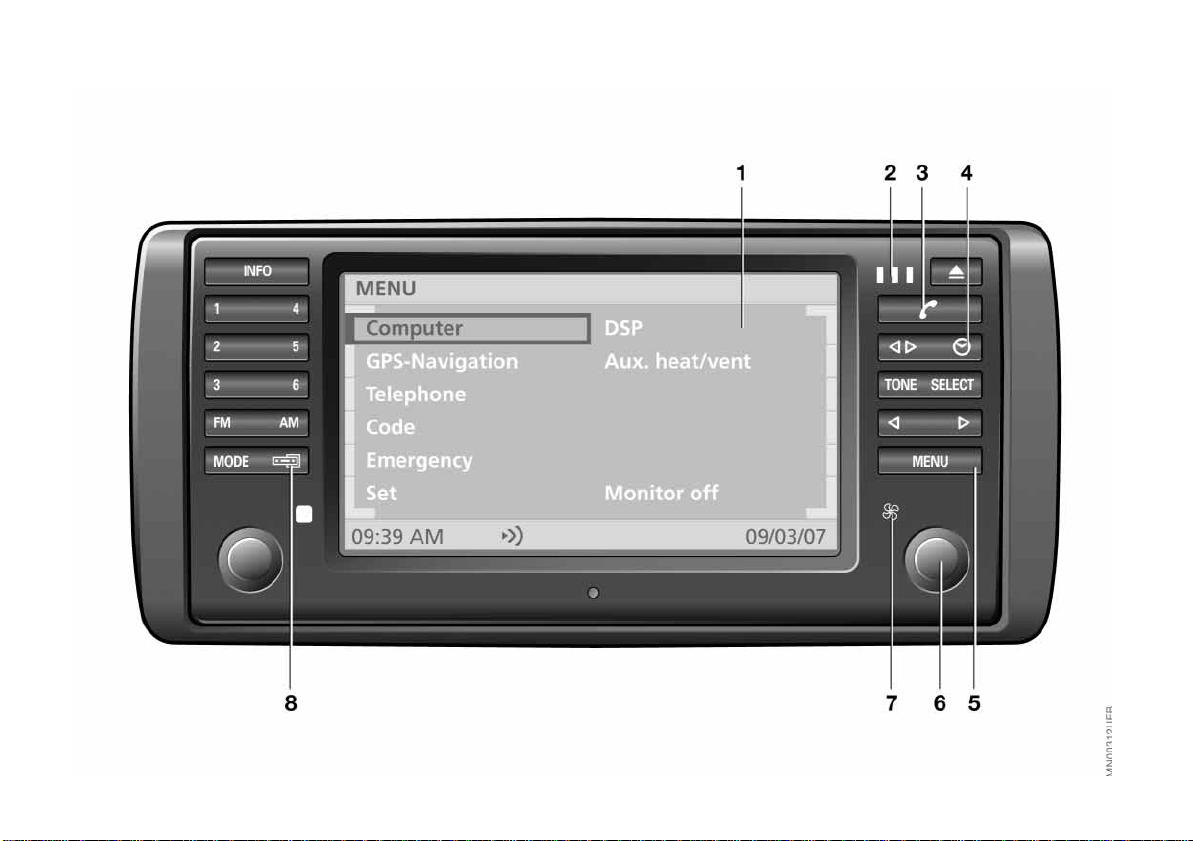
Displays and controls
1 Display screen
>
Function displays
2 Indicator lamps for phone
>
Yellow:
Call is being routed through
alternate network
>
Green:
Call is connected
>
Red:
Phone not available
>
Flashes:
Phone is not registered with a service provider
Please consult the separate
manual for instructions on oper-
ating the telephone.
3 Receiver symbol
>
Dial telephone number
>
End call
4 Clock symbol
>
Display the time when the ignition
is off (ignition key in position 0 or
removed from the ignition lock)
5 MENU
>
Select top menu 16
*
<
mode
6 Using onboard computer 16
>
Turn: highlight function or adjust
setting
>
Press: confirm selection or save
setting
7 Indicator lamp for operation of the
*
auxiliary heating
>
Red:
Timer activated
>
Flashes:
Direct operation activated
8 Switch display to
>
Radio functions
>
Onboard computer functions
Radio display and control elements, refer to page 10.
You can retrofit your onboard
monitor with an AUX socket for
connecting a third unit, such as a CD or
MP3 player.
/ventilation
<
OverviewNavigationEntertainmentComputerIndex
Page 11
10n
Online Edition for Part No. 01 41 0 157 006 - © 07/02 BMW AG
The radio controls at a glance
Page 12
The radio controls at a glance
Online Edition for Part No. 01 41 0 157 006 - © 07/02 BMW AG
11n
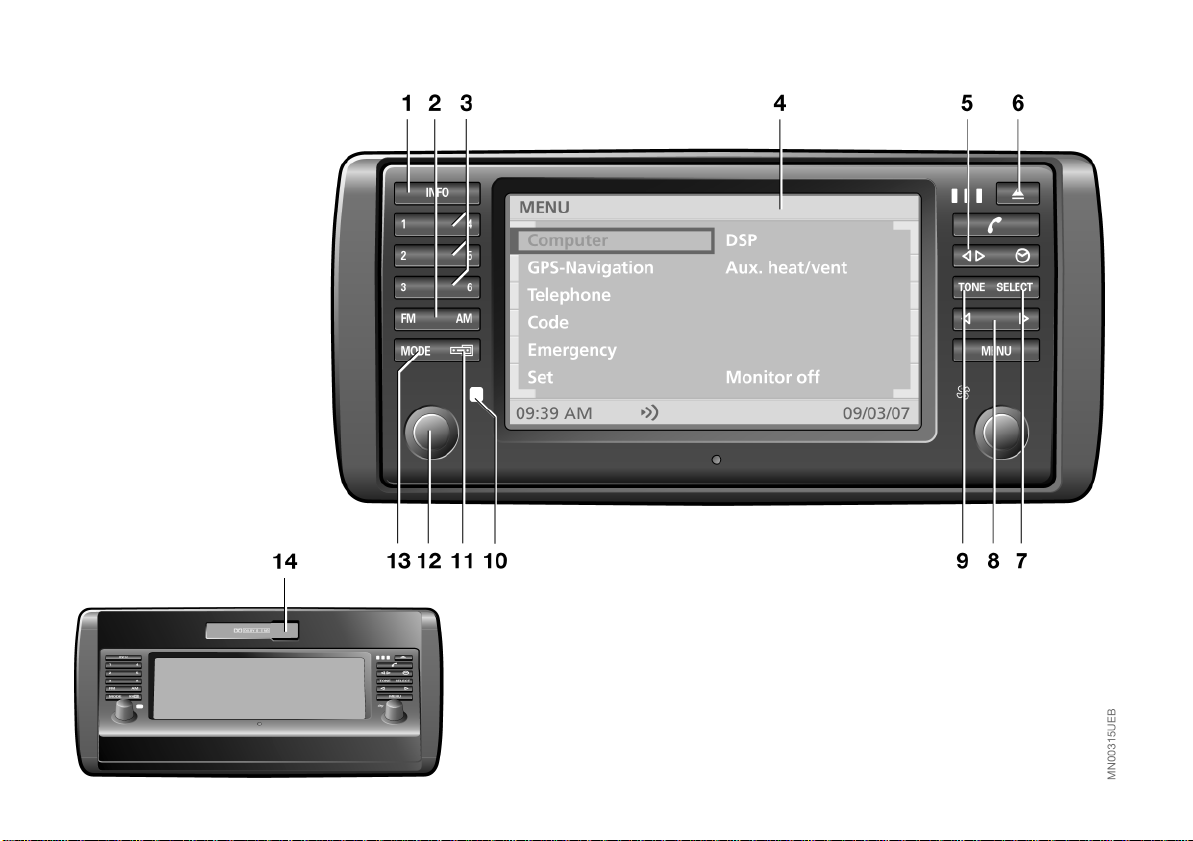
Displays and controls
1 INFO
>
Activating RDS functions 49
>
Activating PTY functions 51
2 Waveband/Memory level
>
FM (FM1/FM2/FMA) 48, 52
>
AM (AM/AMA) 48, 52
3 Buttons for
>
Station selection for radio 52
>
CD selection for CD changer 58
4 Display screen
>
Function displays
5 Changing tape side 54
6 Lower cover, eject cassette 54
7 SELECT
>
Selecting station scan functions
Manual station selection 49
Sample station 50
Scan sensitivity level 50
>
Dolby control 55
>
Menu-guided search for music
tracks 59
8 Station/track search
>
Station scan 50
>
Tape forward/Tape rewind 55
>
Music search
Cassette 55
*
CD changer
9 TONE
>
Selecting sound settings 47
10 Indicator lamp for radio mode
11 Switch display to
>
Onboard computer functions
>
Radio functions
12 Operating the radio
>
Press: turn radio on/off
>
Turn: adjust volume for radio and
information on navigation
13 MODE
Switching sound source to
>
Radio
>
Cassette
>
CD changer
14 Cassette slot
58
*
If your vehicle is equipped with a
*
multifunction steering wheel
can use its integrated controls to
operate the functions of the radio, the
*
CD changer
to the vehicle Owner's Manual for additional information.
and the telephone*, refer
<
, you
OverviewNavigationEntertainmentComputerIndex
Page 13
12n
Online Edition for Part No. 01 41 0 157 006 - © 07/02 BMW AG
Functions at a glance
Page 14
Functions at a glance
Online Edition for Part No. 01 41 0 157 006 - © 07/02 BMW AG
13n
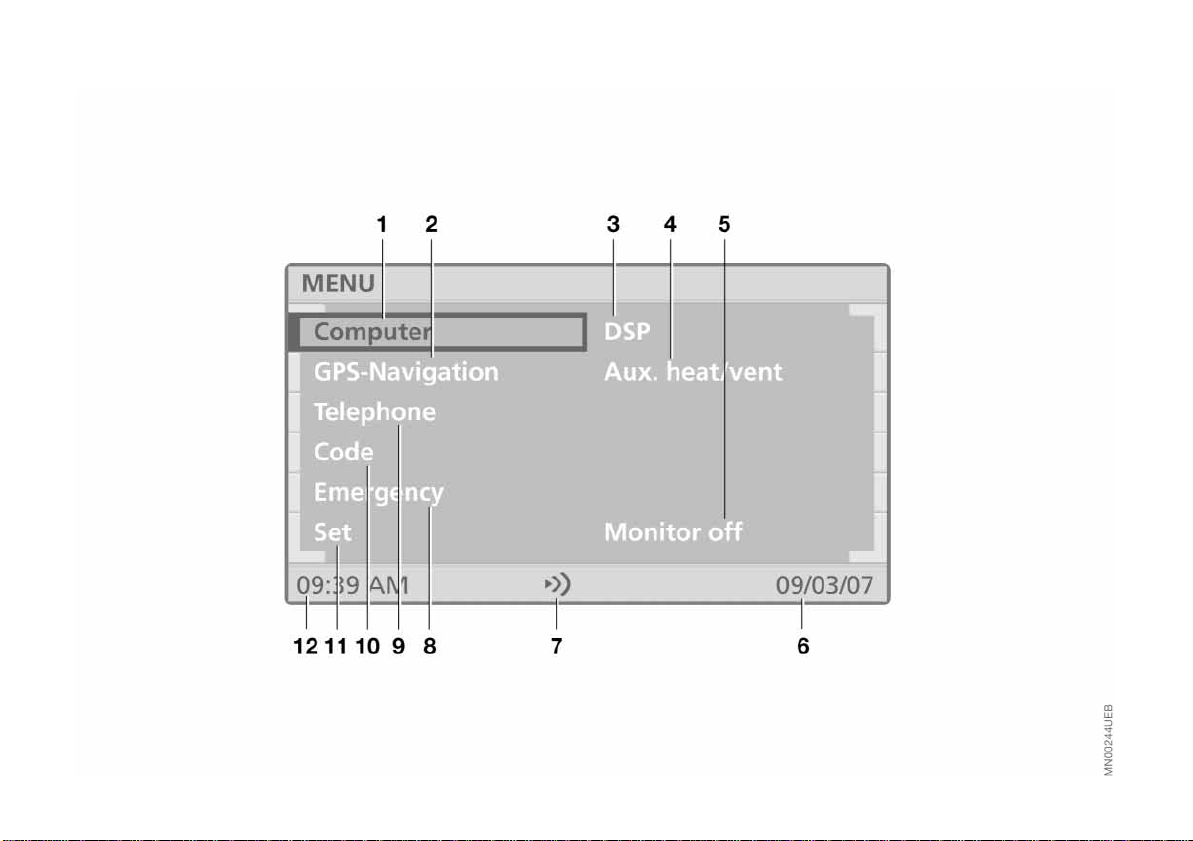
1 Computer
>
Cruising range display 64
>
Outside temperature display 64
>
Time of arrival display 65
>
Starting fuel consumption
calculations 65
>
Starting calculations of average
speed 65
>
Setting speed limit 66
>
Setting/displaying distance 67
>
Switching stopwatch on/off 68
2 GPS-Navigation
>
Changing the map CD/DVD 22
>
Selecting the destination 23
>
Route selection 32
>
Guidance to destination 33
>
Displaying route 34
>
Address book entries and
access 39
>
Current location display 41
*
3 DSP
(Digital Sound Processing)
>
Selecting sound pattern 61
>
Changing tone control
individually 62
>
Calling up tone control memory 62
*
4 Auxiliary heating
>
Entering and storing starting
times 71
>
Switching heating or ventilation
on/off 72
5 Screen deactivation
6 Current date
7 Selectable settings, e.g.:
>
"Memo" function activated via
"Set" 19
8 Emergency
Contacting emergency call centers
Please consult the separate
manual for instructions on
operation and use.
9 Mobile phone
Please consult the separate
phone manual for information
on operation and use.
10 Code
>
Choosing and activating code 69
>
Deactivating code 70
/ventilation
<
*
<
11 Settings
>
Screen display mode
selection 19
>
Date and time display mode
selection 19
>
Audio guidance volume
adjustment 19
>
Screen color pattern
selection 19
>
Language selection 19
>
Unit selection 19
>
Switching Memo on/off 19
12 Current time
OverviewNavigationEntertainmentComputerIndex
Page 15
14n
Online Edition for Part No. 01 41 0 157 006 - © 07/02 BMW AG
Screen displays at a glance
Page 16

Screen displays at a glance
Online Edition for Part No. 01 41 0 157 006 - © 07/02 BMW AG
15n
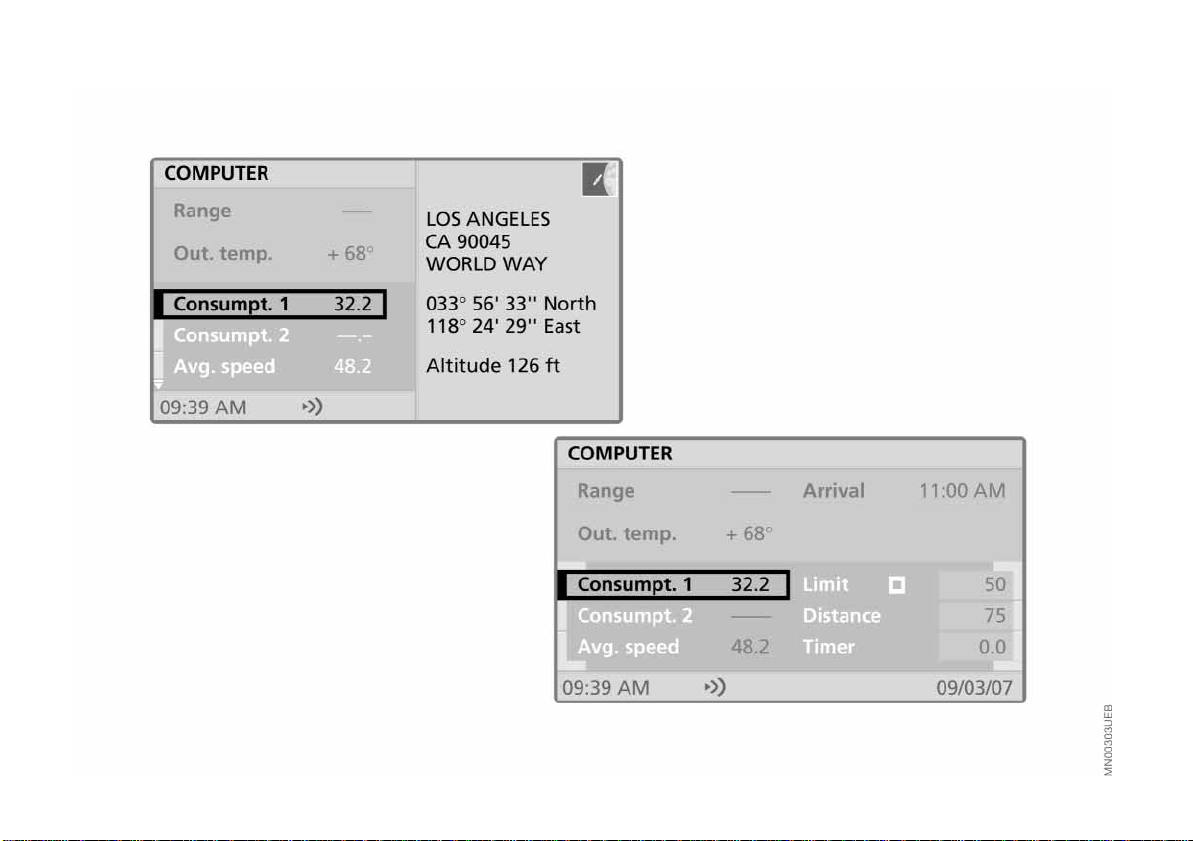
Split-screen display mode (Split)
Left side of screen
>
Information on the audio source
(such as radio stations) 52
>
Information from computer
(such as current average fuel
consumption) 65
>
Route information
(such as map section for scale) 35
Right side of screen
>
Information on current location
(longitude, latitude and altitude)
or
>
Information on the destination guidance
(such as turning direction) 33.
When calculating the altitude,
which only takes place during
GPS reception, deviations from the
actual altitude of the current location
can result.
<
Full screen
>
Information on communications
(such as SMS bulletins)
>
Changes to the code, to the settings,
*
to the DSP
*
/ventilation.
ing
and to the auxiliary heat-
Full-screen display mode (Full)
All available information and selection
data are displayed across the entire
screen, regardless of the currently
selected function.
If you prefer this display mode, please
select the "Set" function in the menu
(MENU) to change the default setting
"Split"; refer to page 19.
OverviewNavigationEntertainmentComputerIndex
Page 17
16n
Online Edition for Part No. 01 41 0 157 006 - © 07/02 BMW AG
Control concept
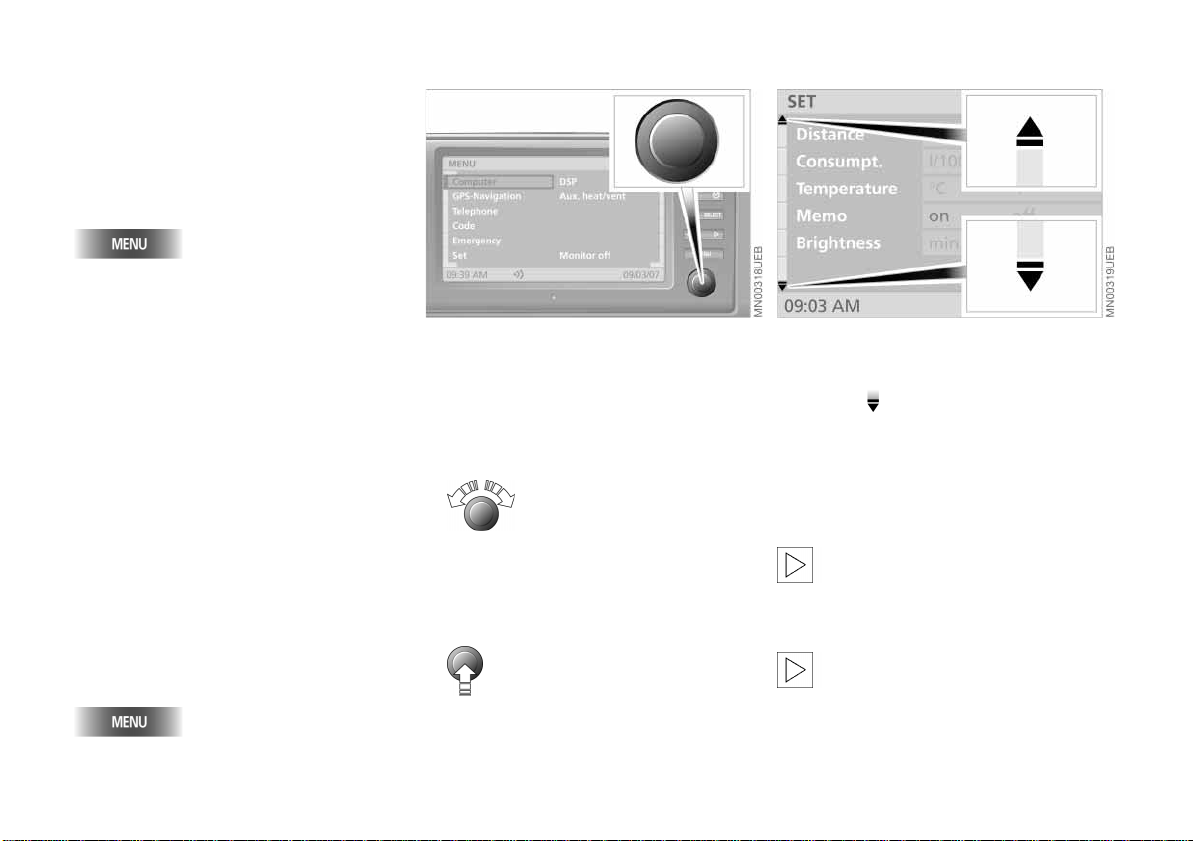
MENU selection
The onboard computer integrates an
extensive range of functions. Select the
top menu (MENU) for a list of the
various functions, refer to page 12.
Select "MENU"
When you select a function from the
MENU, a list of selection options or of
submenus will appear in the display:
>
For information on selecting functions, refer to "Selecting function"
>
For information on how to request a
display of additional functions, refer
to the section on "Additional functions"
>
For information on settings for menu
selection, refer to "Resetting history"
on page 17
>
To return to the higher menu level,
refer to the "Selecting return symbol"
section on page 17
>
For a display of additional entries in
lists, refer to "Scrolling forward and
back" on page 17.
To return to the main MENU from any
other menu/any other function:
Selecting functions
To select a function, use the right-hand
rotary button to complete the two
following steps:
1. Mark the function
Turn the right-hand rotary button
until the desired function is highlighted
2. Confirm your selection
Press the right-hand rotary button.
On the following pages these two steps
are summarized as:
Select "Function“.
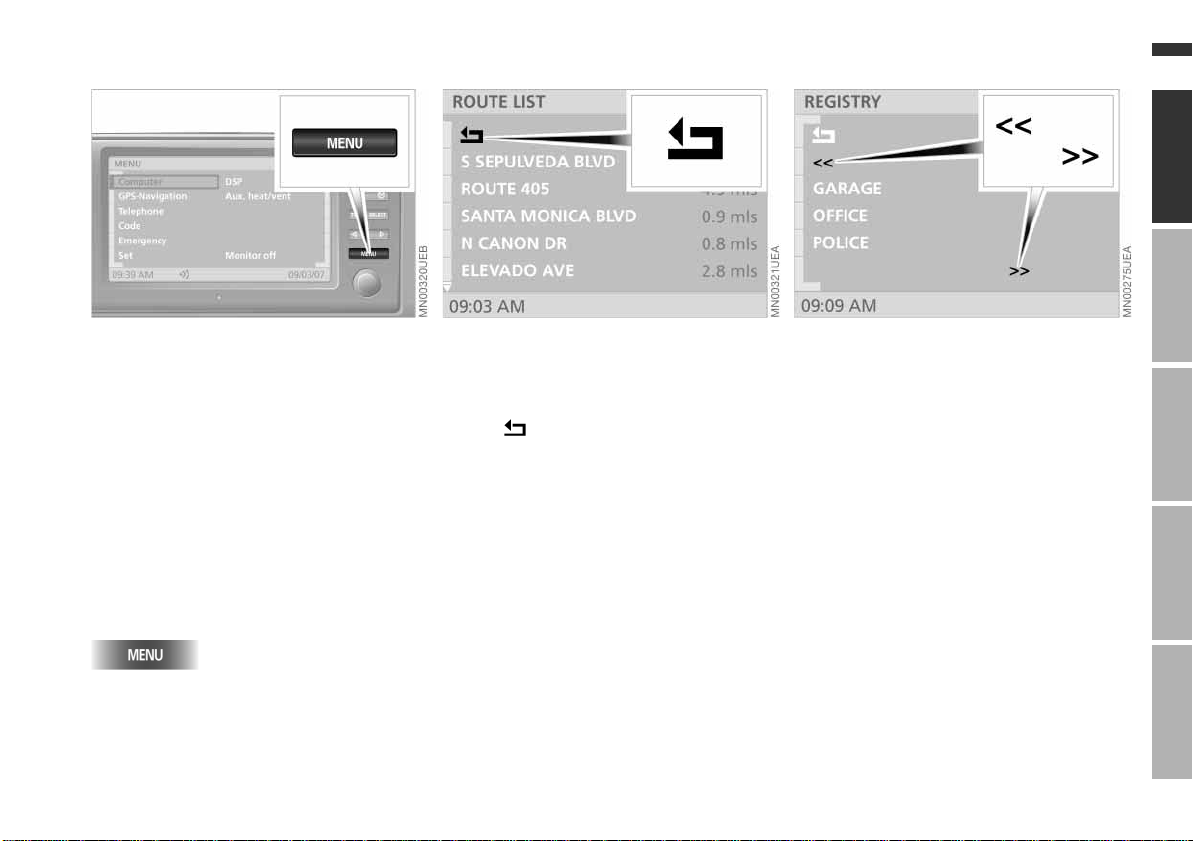
Additional functions
Additional functions can be displayed
using the symbol.
Turn the right-hand rotary button
toward the corresponding symbol. Now
you can proceed to mark and select
one of the functions in the display, refer
to "Selecting functions".
Depending on the range of avail-
able functions, it may take a few
seconds until all additional functions
appear on the screen.
You can only select those menu
entries or functions that are displayed on the screen in white letters.
<
<
Page 18
Control concept
Online Edition for Part No. 01 41 0 157 006 - © 07/02 BMW AG
17n
OverviewNavigationEntertainmentComputerIndex
Resetting history
This function makes it easier for you to
access previously viewed information
or an edited function after switching off
the onboard computer or changing the
menu.
If you switch on the onboard computer
again or select the corresponding function again under "MENU", you will automatically enter the menu level previously used.
To interrupt this function to return to the
initial menu level:
Briefly press twice in a row.
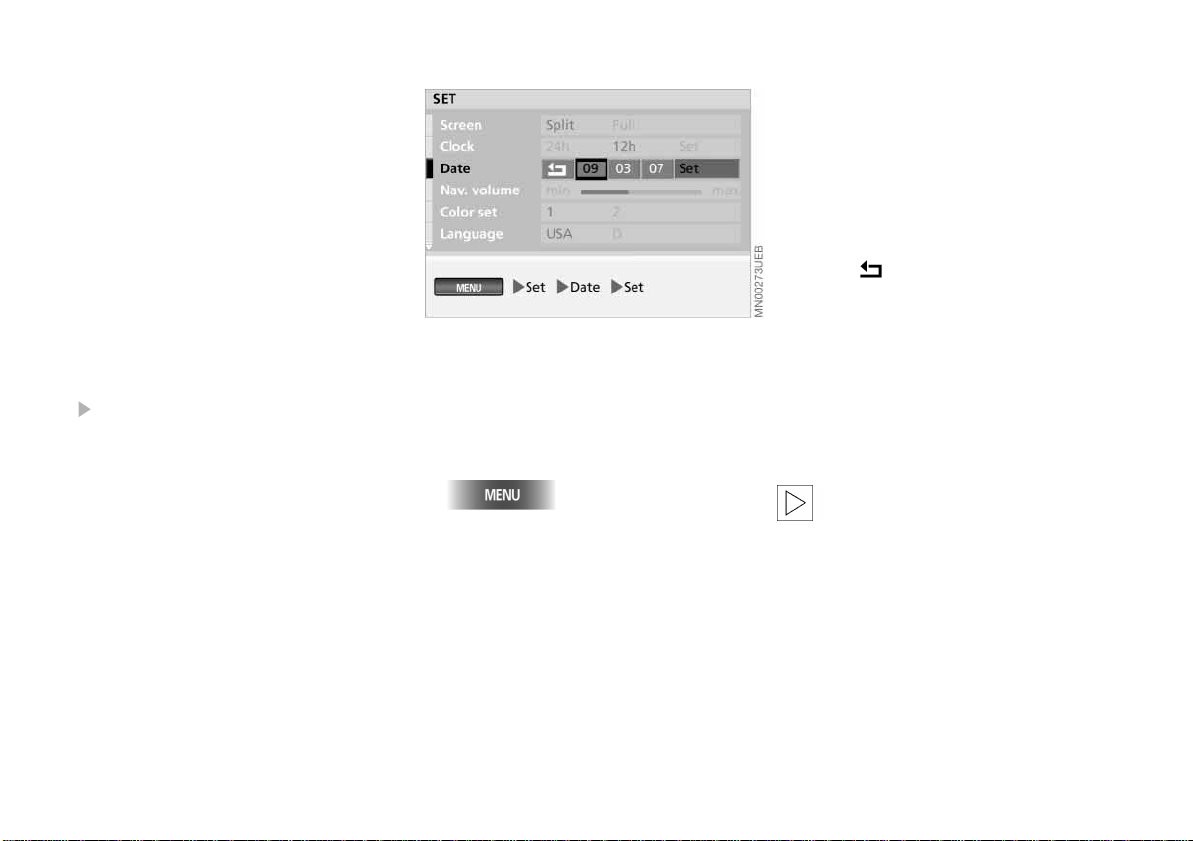
Selecting return symbol
To return to a previous menu or function, proceed as follows:
Select .
As described in the section on
"Selecting functions", it is also possible
to use the right-hand rotary button to
highlight the "Return" symbol and then
select it by pressing.
Scrolling forward and back
When one of the above symbols
appears on the screen, this indicates
that further entries are available for
viewing in the current list.
As described in the "Selecting functions" section, you can also highlight
this symbol with the right-hand rotary
button before proceeding to confirm
your entry by presssing the button.
Page 19
18n
Online Edition for Part No. 01 41 0 157 006 - © 07/02 BMW AG
Explanation of function selection
To help you get oriented as quickly as
possible, the individual selection procedures are provided immediately below
each menu option.
Individual control and entry processes
may include the following elements:
>
Buttons that you press
>
Functions that you select using the
right-hand rotary button. "Selecting
functions", refer to page 16
>
The right-hand rotary button appears
with arrows for control procedures in
which it is pressed or turned only.
Individual steps are separated by the
symbol.
An example: setting the date
Here setting the date serves as an
example to illustrate the control
concept:
1. Select "MENU"
2. Select "Set"
3. Select "Date"
4. Select "Set"
5. Select the year
7. Press the right-hand rotary button to
save
8. Set and then save the month and day
with the same procedure.
The system adopts the selected set-
tings for the date
9. Select .
You exit the date entry mode once
you complete this final step.
You can also select the order in which
the elements of the date will be displayed: you can display the days (dd)
first and then the months (mm) – or you
can have them displayed in the opposite order.
To exit a function or a selection
mode accidentally selected,
please reselect it again. Then you can
select any desired function.
<
6. Turn the right-hand rotary button to
set the year
Page 20
Safety notice Settings
Online Edition for Part No. 01 41 0 157 006 - © 07/02 BMW AG
Selecting settings
The onboard computer of your vehicle
has a basic setting for all displays. You
can change these to suit your personal
preferences as desired. Before doing
so, please take note of the safety information provided on this page.
1. Select "MENU"
19n
OverviewNavigationEntertainmentComputerIndex
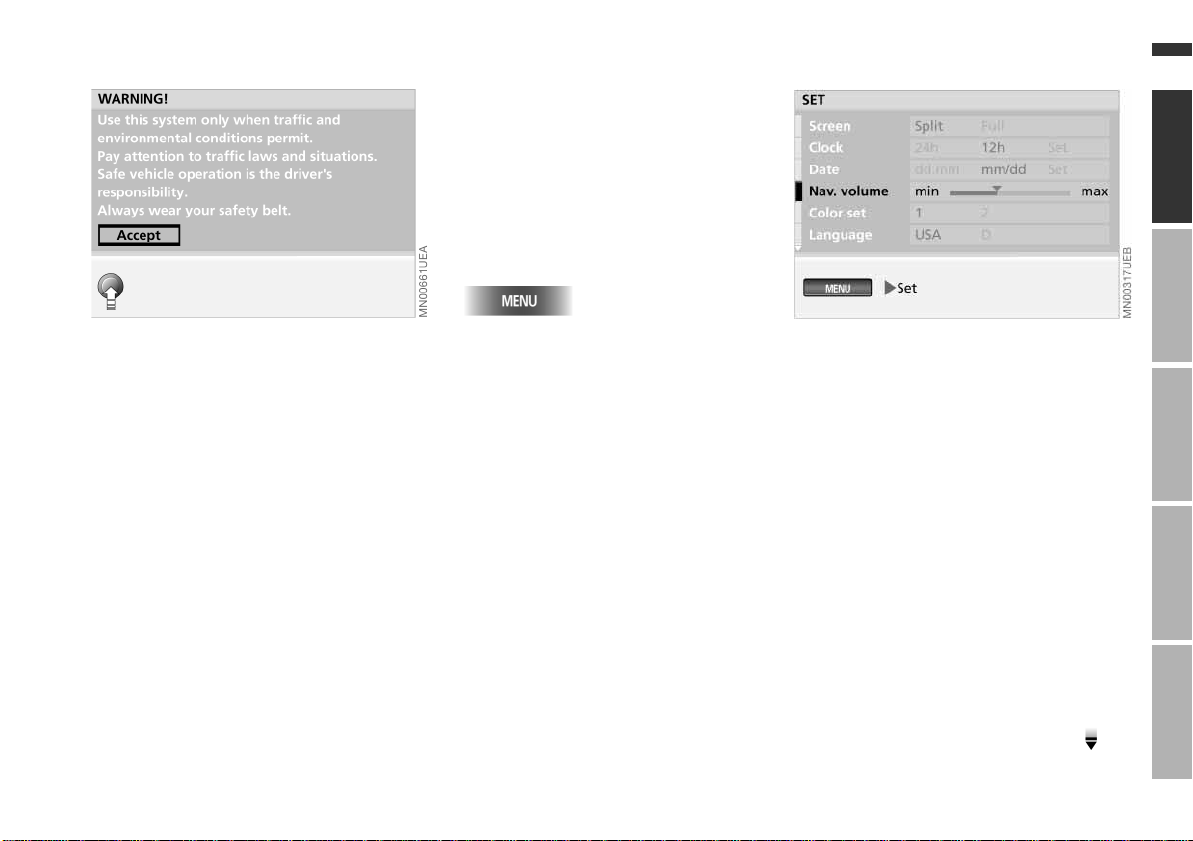
As soon as the device is put into operation, the onboard computer shows the
following safety precautions:
"WARNING!
Use this system only when traffic and
environmental conditions permit.
Pay attention to traffic laws and
situations.
Safe vehicle operation is the driver's
responsibility.
Always wear your safety belt."
To accept these safety precautions
after reading:
Select "Accept".
2. Select "Set".
The adjustment options appear on
the display screen.
You can adjust:
>
"Screen"
You can choose display mode
(Split or Full), refer to page 15
>
"Clock"
>
"Date"
You can set the time and date, and
also define the display mode
>
"Nav. volume"
You can set the volume of the navigation system's voice messages relative
to other sound sources (min to max)
>
"Color set"
Use this function to select color settings for the display
>
"Language"
This option allows you to select the
language of the display texts.
For additional settings, follow the
symbol.
Page 21
20n
Online Edition for Part No. 01 41 0 157 006 - © 07/02 BMW AG
Settings
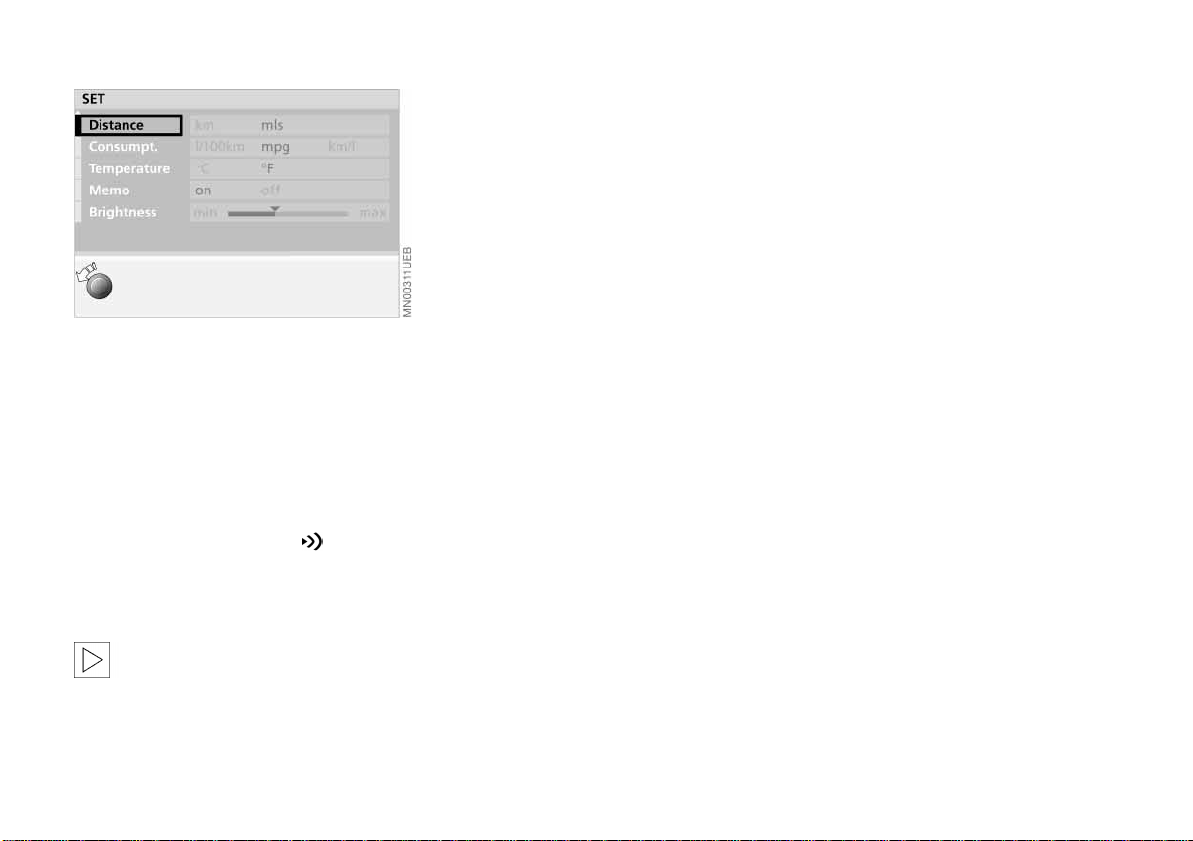
Your options include:
>
"Distance" in miles or km
>
"Consumpt." (l/100 km, mpg or km/l)
>
"Temperature" (6 or 7)
You can specify the units for
distance, fuel consumption and
temperature
>
"Memo"
You can set a signal to sound at the
full hour; related symbol
>
"Brightness"
You can set the brightness (min to
max).
For information on how to enter
these selection options, refer to
page 18.
<
Page 22

Overview
Online Edition for Part No. 01 41 0 157 006 - © 07/02 BMW AG
Navigation
Entertainment
Computer
21n
OverviewNavigationEntertainmentComputerIndex
Index
Enter-
Page 23
22n
Online Edition for Part No. 01 41 0 157 006 - © 07/02 BMW AG
GPS Map CD/DVD
Only enter data when the vehicle
is stationary, and always obey the
traffic regulations and road signs in the
event of any contradiction between the
traffic situation and the instructions
given by the navigation system. If you
do not observe this precaution, you
may be in violation of the law, and can
endanger vehicle occupants and other
highway users.
Never place any metallic objects,
such as umbrellas, on the rear tray
(sedan and coupe) near the GPS
antenna, as such objects can interfere
with the GPS reception and may prevent the GPS navigation system from
operating correctly.
The GPS navigation system eliminates
the need to consult conventional road
maps as you drive. It therefore makes
an important contribution to traffic
safety.
GPS stands for Global Positioning System.
This integral component within your
vehicle's navigation system relies on
reference satellites to determine the
precise position of your vehicle.
The result: the GPS navigation system
automatically offers reliable guidance to
your selected destination.
<
<
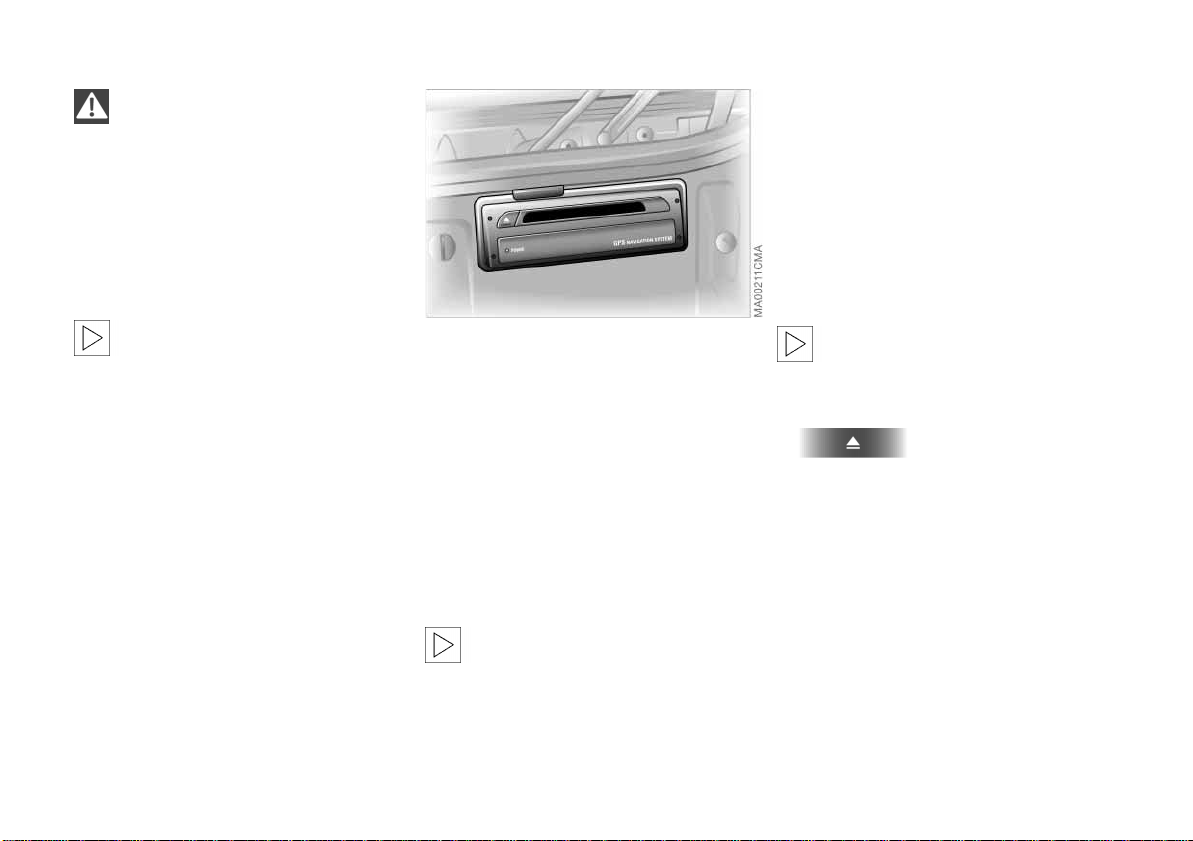
Map CDs/DVDs are inserted in the navigation computer located at the left rear
of the luggage compartment.
To ensure that your vehicle's navigation
system has access to the latest highway network information, always load
the most recent CD/DVD version of the
digital road map. As is the case with
conventional road maps, the map CDs/
DVDs are subject to periodic updates to
ensure that they reflect the latest information and surveys.
The DVD will be available at a later
time and will provide additional
features such as larger map scales.
<
Changing the map CD/DVD
Map CDs/DVDs contain road maps
covering one or more countries or
regions. When you drive your BMW, the
navigation system will alert you when
you are leaving the area stored on the
map CD/DVD that is currently loaded.
You should respond by changing the
map CD/DVD in the navigation computer.
Only map CDs of version
2001-1 or higher can be used.
To change the map CD/DVD:
1.
The CD/DVD is ejected from the
navigation computer (press button
several times if necessary)
2. Remove the CD/DVD
3. Insert the new CD/DVD
4. Allow approx. eight seconds for the
new CD/DVD to start.
<
Page 24
Starting GPS navigation Selection options Destination entry
Online Edition for Part No. 01 41 0 157 006 - © 07/02 BMW AG
23n
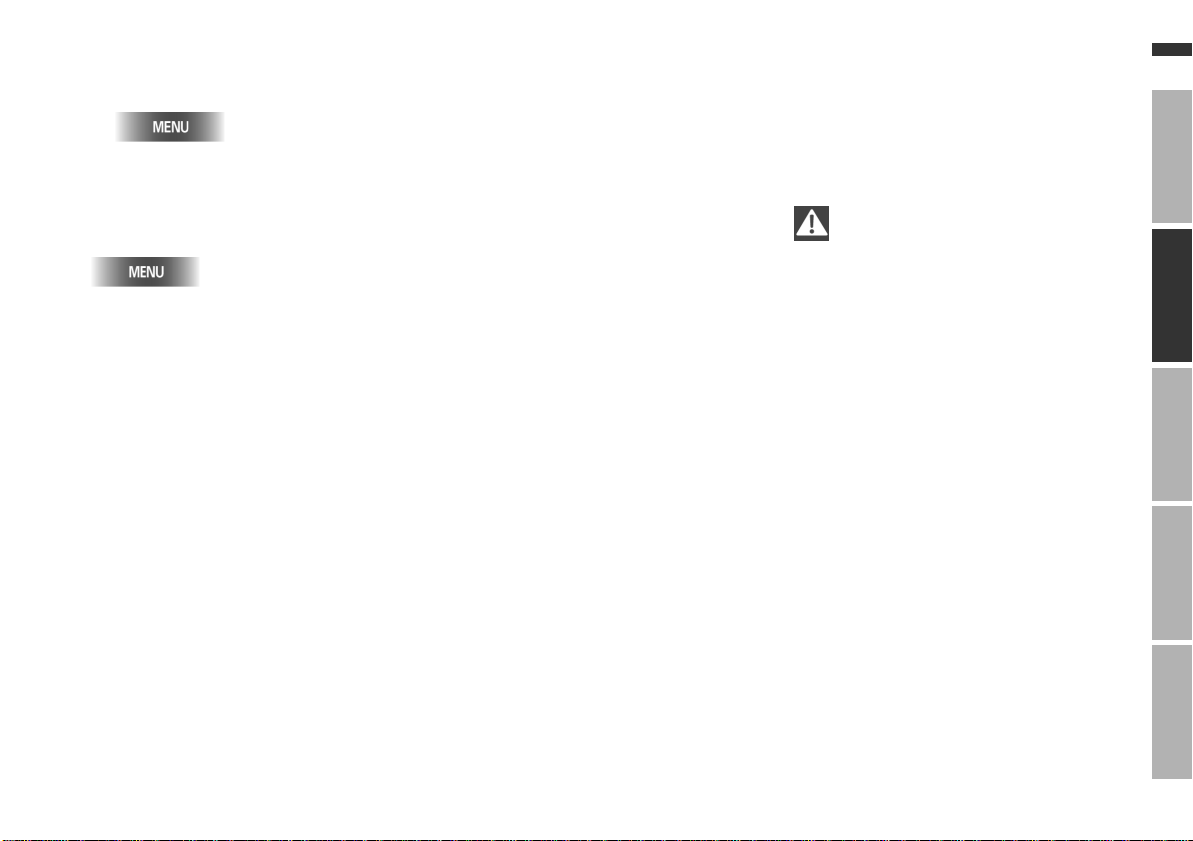
1. Select "MENU"
2. Select "GPS-Navigation".
To exit the GPS navigation system,
press the button again:
When entering your destination, you
can select from among the following
options:
>
Destination entry and selection
>
To select destination from map, refer
to page 27
>
To select the destination via information on the destination, current location or country, refer to page 29
>
To select from among recent destinations, refer to page 30
>
To return to initial location, refer to
page 31
>
To select destination from address
book, refer to page 40.
After selecting your destination, you
can proceed to activate the guidance
function, refer to page 33.
The example shows how to use the
GPS navigation system to find the
following destination:
455 N Rexford Drive, Beverly Hills
Only enter data when the vehicle
is stationary, and always obey the
traffic regulations and road signs in the
event of any contradiction between the
traffic situation and the instructions
given by the navigation system. If you
do not observe this precaution, you
may be in violation of the law, and can
endanger vehicle occupants and other
highway users.<
OverviewNavigationEntertainmentComputerIndex
Page 25
24n
Online Edition for Part No. 01 41 0 157 006 - © 07/02 BMW AG
Destination entry Manual destination entry
Note the following special features:
> Use to correct your last entry.
Maintain pressure on the right-hand
rotary button to delete the entire
entry line
> The system relies on a wordmatch
principle to make it easier for you to
enter names. It supports various
spellings as well as automatic name
completion, refer to page 42
> The selection of a country, a town or
city or a street can be canceled at
any time by selecting
> If entries in a selection menu (sub
menu) are not made within eight seconds, you will need to repeat the procedure.
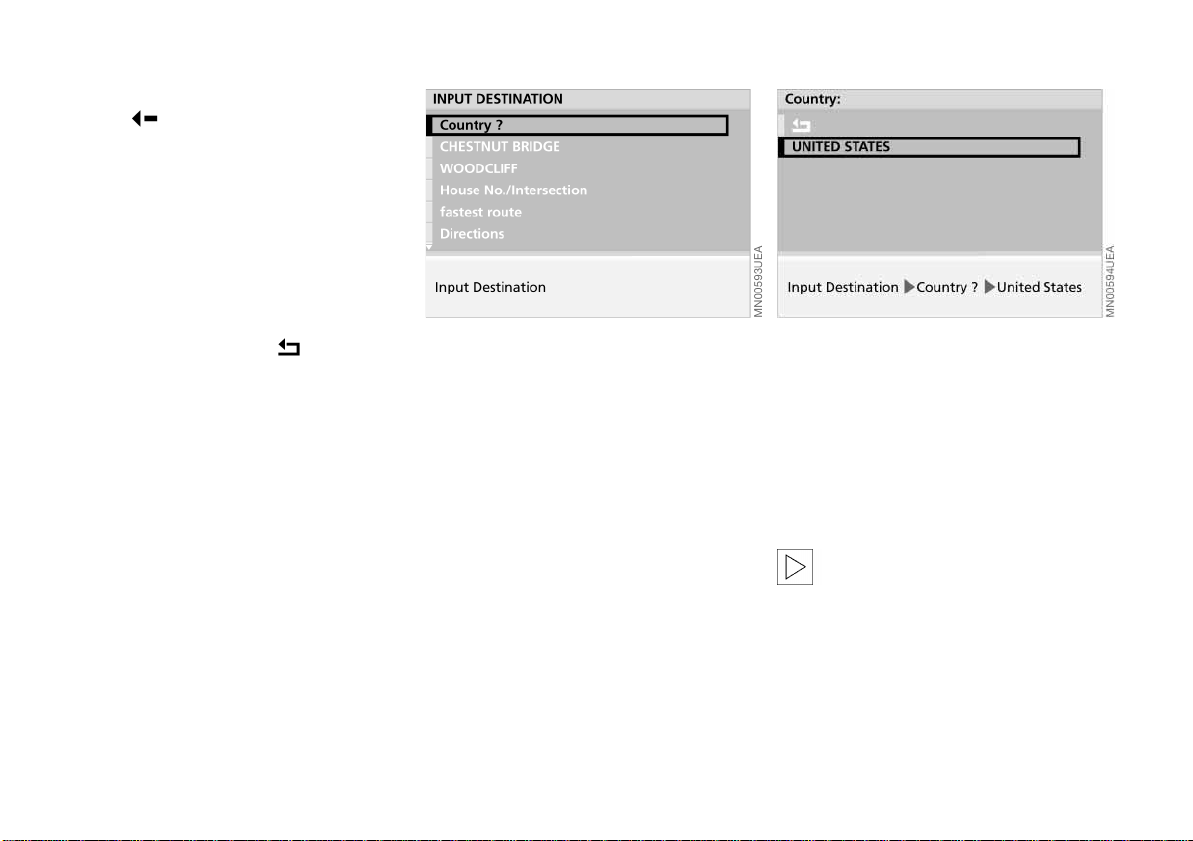
Enter destination country
If the name of a country appears on the
screen in white letters, data for more
than one country may be stored on the
map CD/DVD.
To select a destination country, e.g.
when traveling to a foreign country:
1. Turn the right-hand rotary button
until the current country name is
highlighted.
"Country ?" appears in the display
2. Press the right-hand rotary button on
the right.
A list of the available countries is
displayed
3. Select "United States".
The system adopts your selection as
the destination entry.
If you wish to retain your current
entries without change, you can
skip the entry of a country or city of
destination.<
Page 26
Manual destination entry
Online Edition for Part No. 01 41 0 157 006 - © 07/02 BMW AG
25n
OverviewNavigationEntertainmentComputerIndex
Entering destination
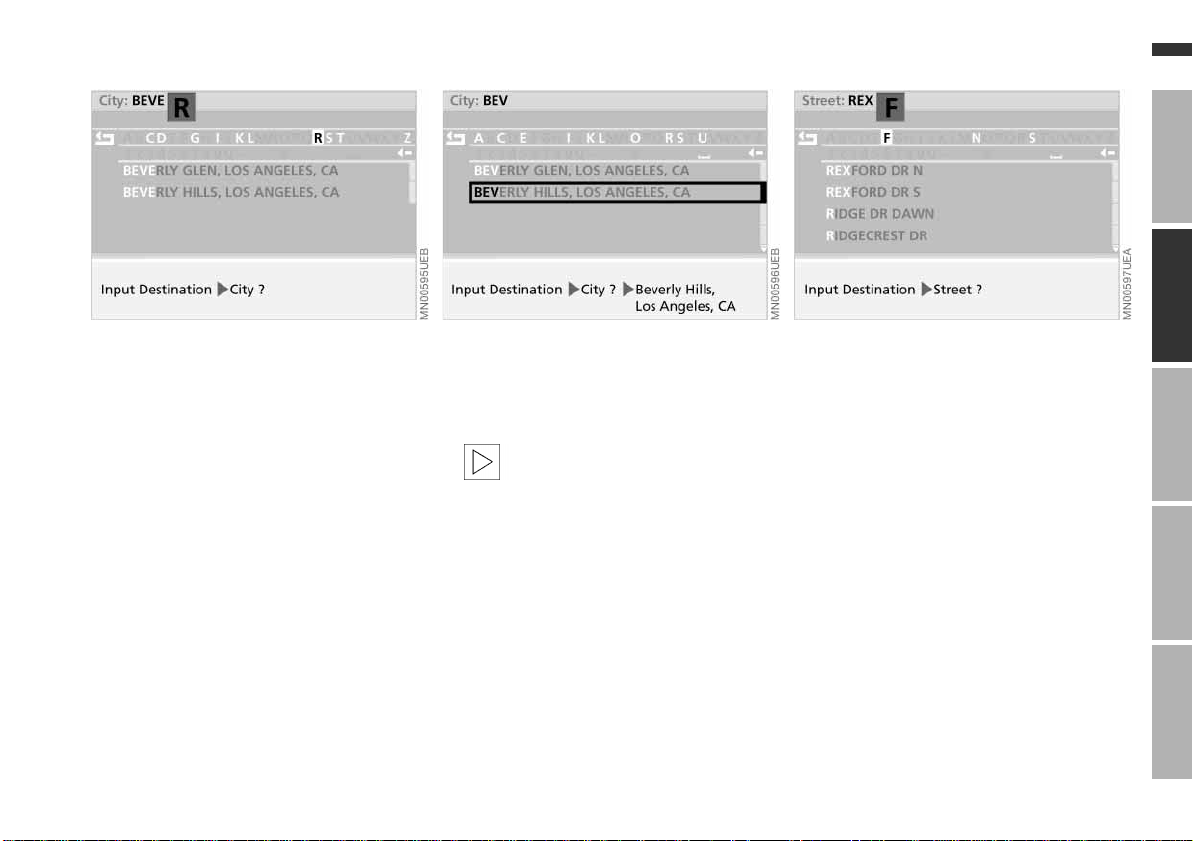
"City ?" is highlighted.
1. Press the right-hand rotary button to
start your entry
2. Select "B".
The selected letter is highlighted in
the display
3. Use the same procedure to select
remaining letters in "Beverly Hills" to
ensure positive recognition of your
destination, which the system will
then signal by highlighting the entry
in the list
4. Select "Beverly Hills, Los Angeles,
CA".
The computer registers your city of
destination.
If the city name or its spelling is
not exactly known, then the city
concerned can also be selected from
the list after entering a first letter.
Some map CDs/DVDs also list additional cities or parts of a city with the
city name you have selected.<
5. Here you can select "Beverly Hills,
CA" from the list (CA = California).
The computer registers your city of
destination.
Entering street
"Street ?" is highlighted.
1. Press the right-hand rotary button to
start your entry
2. Select "R".
The selected letter is highlighted in
the display
3. Continue to select letters from
"Rexford Drive" until the system
responds with positive recognition of
your destination by highlighting the
entry in the list
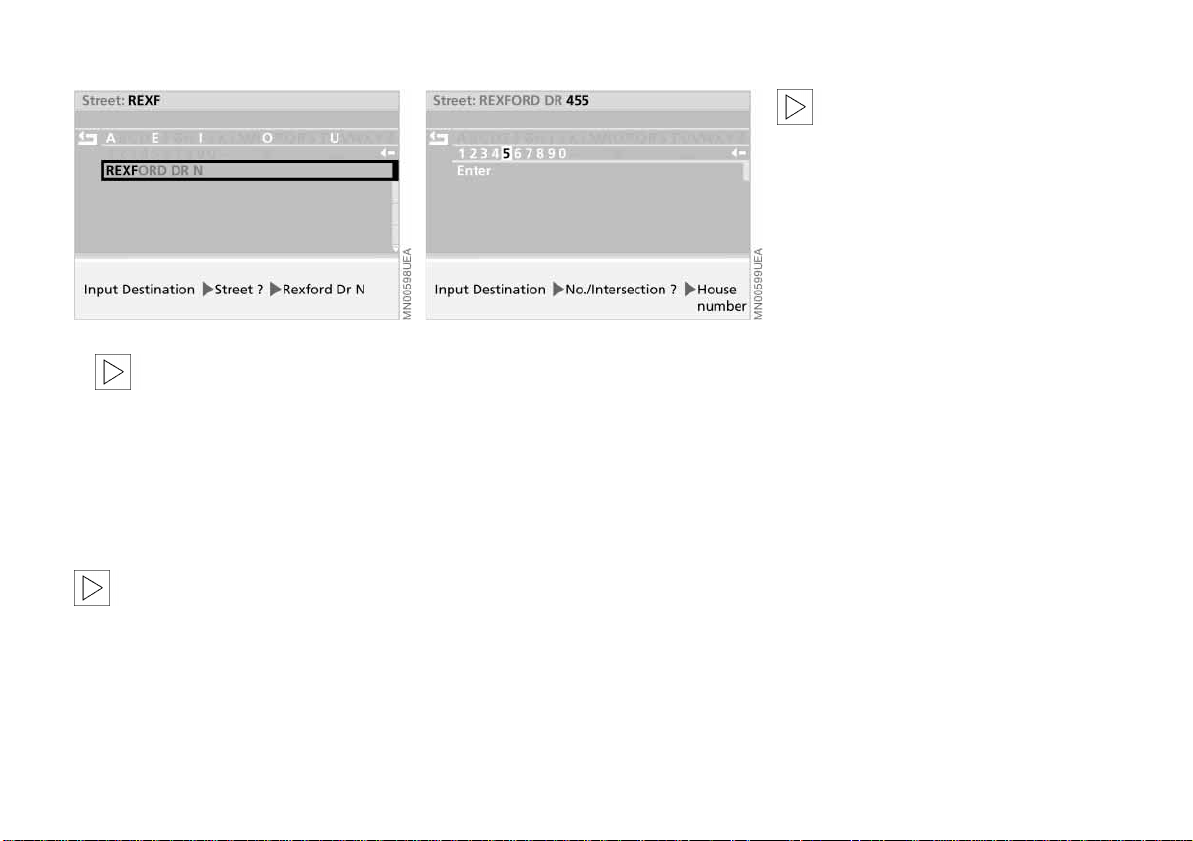
4. Select "Rexford Dr N".
The system adopts the street name.
Page 27
26n
Online Edition for Part No. 01 41 0 157 006 - © 07/02 BMW AG
Manual destination entry
If the street name or its spelling
is not exactly known, then the
street concerned can also be
selected from the list after entering a
first letter.<
Availability of the house number
selection function for specific
streets varies from one map CD/DVD to
the next. If no house numbers are
stored for a particular street on your
current CD/DVD, no display for numerical entry will appear on the screen. In
this case an intersection can be
selected – if present. The destination
guidance then ends the next time the
previously selected street is
accessed.<
Entering house number or
intersection
After entering the street, you can select
a house number or intersection, such
as "455".
5. In our example you would now select
"Rexford Dr N" from the list.
The system adopts the street name.
If you do not select a street, the
guidance system will only take
you as far as the town or city limits.<
1. Select "No./Intersection ?"
2. Select "House number"
3. Select "4"
4. Select the remaining digits in the
number
5. Select "Enter".
The system adopts the house
number.
Page 28
Map-supported destination selection
Online Edition for Part No. 01 41 0 157 006 - © 07/02 BMW AG
27n
OverviewNavigationEntertainmentComputerIndex
You know the town or city, but only the
general location of the street, and not
its name. The system offers you maps
on which you can identify your destination with a target cursor for subsequent
transfer to the guidance system.
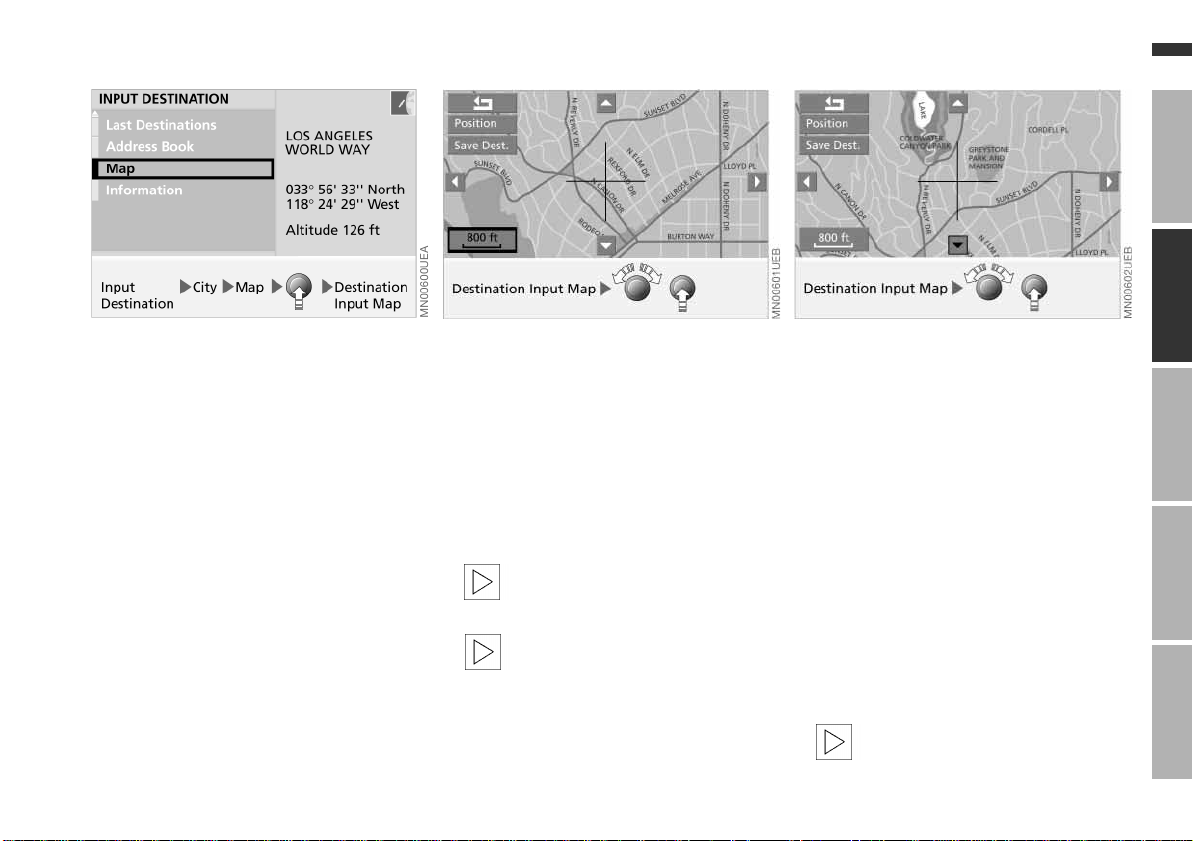
1. To enter the destination, refer to
page 25
2. Select "Map"
3. Press right-hand rotary button.
A selection menu appears on the
screen
4. Select "Dest. Input Map"
5. If necessary, change the scale:
> Turn the right-hand rotary button,
continuing until the map scale is
highlighted
> Press the right-hand rotary button
to select the map scale
> Turn the right-hand rotary button
again to set the desired map scale
> Press the right-hand rotary button
to store the scale.
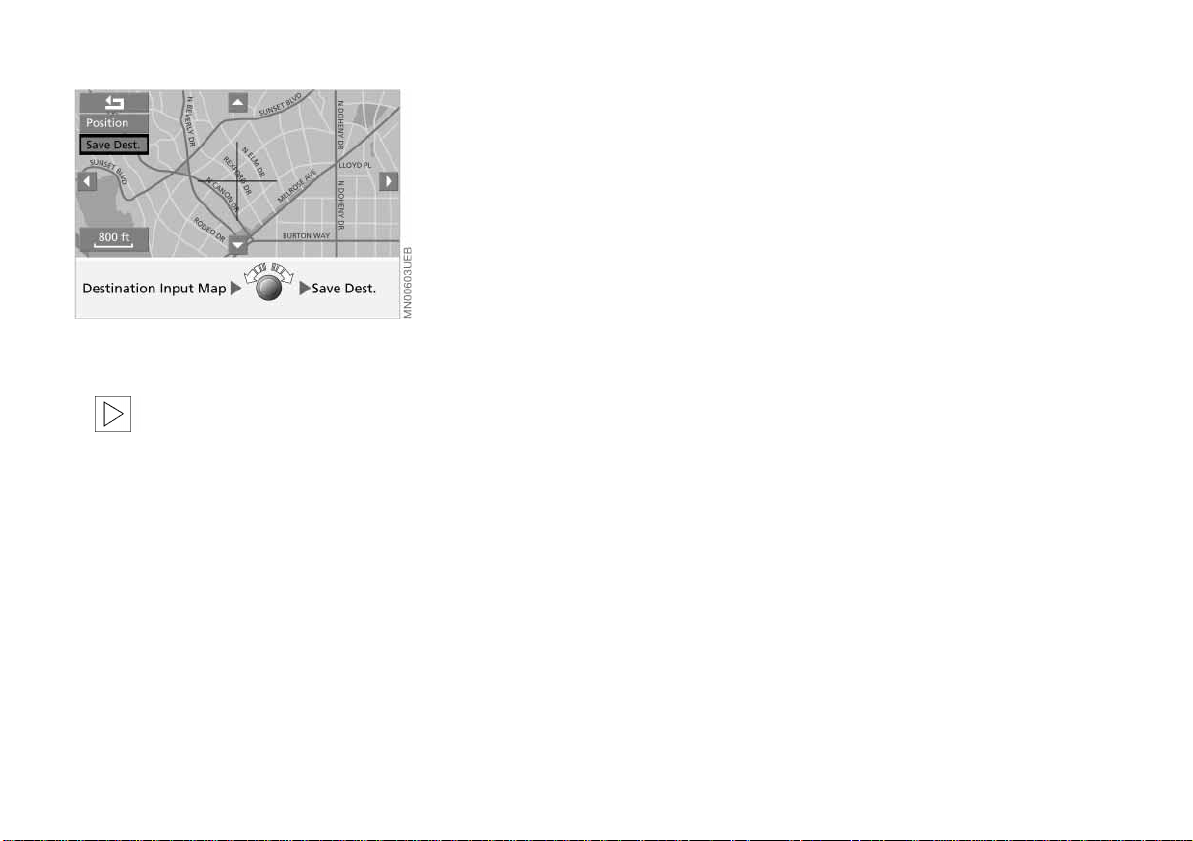
The "Save Dest." function can
only be selected if the map
scale is less than 1 mile or 2 km.<
After the resolution scale is
changed, a few seconds may
pass until the map is displayed.<
Localize the destination with the
target cursor:
> Turn the right-hand rotary button to
mark the desired change in direction with the cursor
> Press and hold down the right-
hand rotary button until the map
has been moved in the desired
direction below the target cursor
> Release the right-hand rotary
button to fix the change
> Select another "Cursor" as neces-
sary
> Press and hold down the right-
hand rotary button to move the
map in the other direction
> Release it to fix the change.
A few seconds may pass until
the new section of the map is
displayed.<
Page 29
28n
Online Edition for Part No. 01 41 0 157 006 - © 07/02 BMW AG
Map-supported destination selection
6. To enter in guidance system:
Select "Save Dest.".
You can also use the destina-
tion entry map without
specifying a town or city name. To
select a destination in this way, start
by specifying the desired map
scale.<
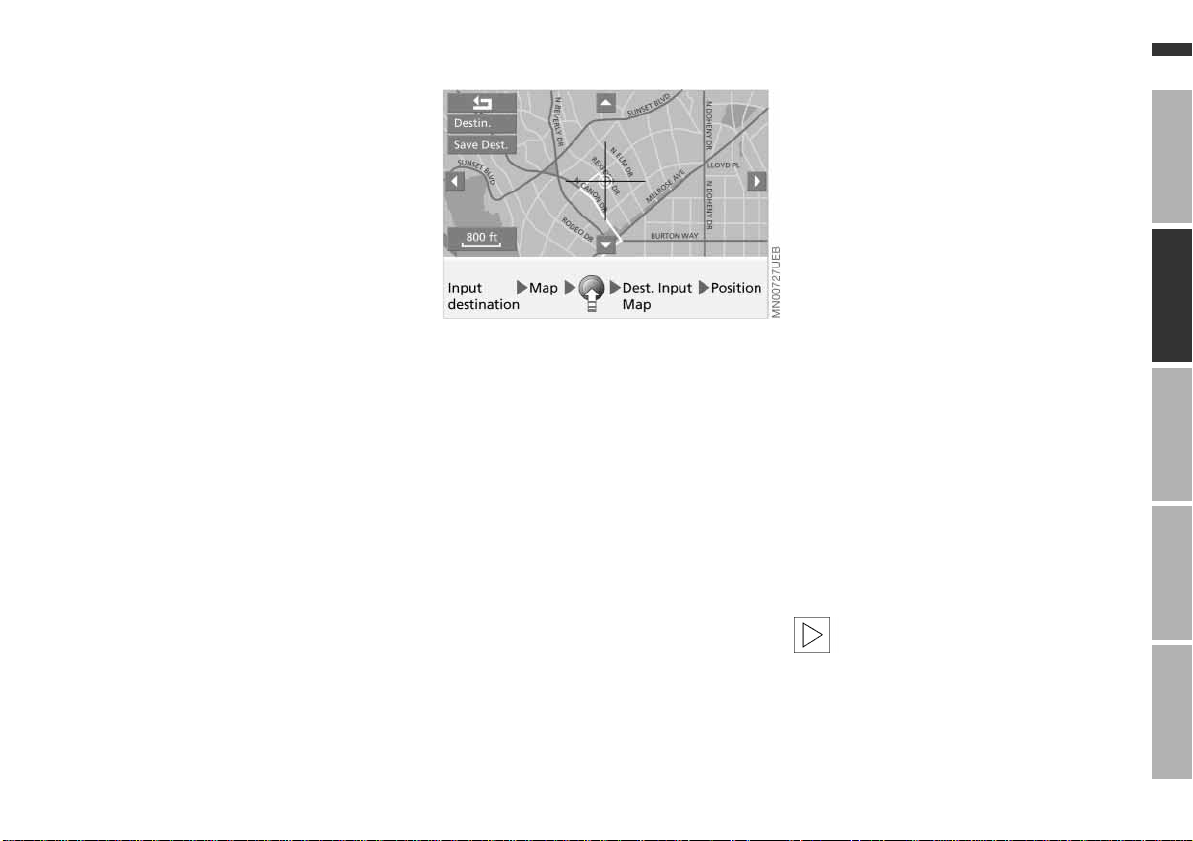
If you would like information on the current position on the map, then select
"Position" with the right-hand rotary
button, refer to page 41.
Page 30
Selecting destination in information
Online Edition for Part No. 01 41 0 157 006 - © 07/02 BMW AG
29n
OverviewNavigationEntertainmentComputerIndex
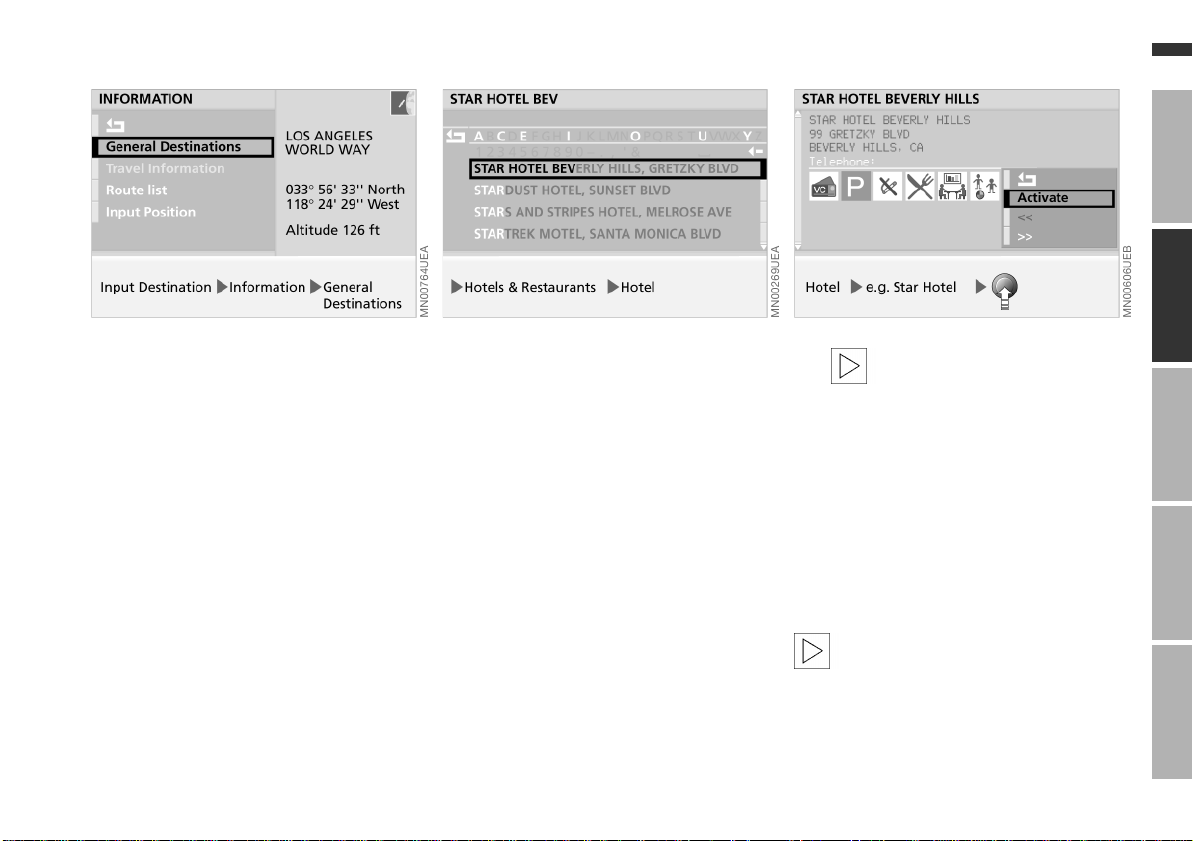
You are searching for a particular location within a town or city, such as a
hotel, a gas station, the nearest BMW
center, tourist attractions, a hospital,
etc., but do not know the exact
address.
1. Enter the desired destination, refer to
page 25
2. Select "Information"
3. Select "General Destinations"
4. Select "Info on destination".
A list containing various types of
destination appears on the screen
5. Select the desired destination type,
for instance "Hotels & Restaurants"
6. Select "Hotel"
7. Select the first letter of the hotel's
name, in this example "S".
The selected letter is highlighted in
the display
8. Continue to select the remaining
letters in the name until the system
signals positive recognition by highlighting the name in the list
9. Select the highlighted name in the
list.
Additional information appears in the
form of text displays or symbols on
the screen.
The amount of available infor-
mation and the number of
symbols will vary according to the
individual CD/DVD.<
10. Press right-hand rotary button.
A selection menu appears on the
screen
11. Select "Activate".
The guidance system adopts the
hotel's address as your destination.
If the name of the hotel is not
exactly known, then it can also be
selected from the list after entering a
first letter.<
Page 31
30n
Online Edition for Part No. 01 41 0 157 006 - © 07/02 BMW AG
Selecting destination in information Recent destinations
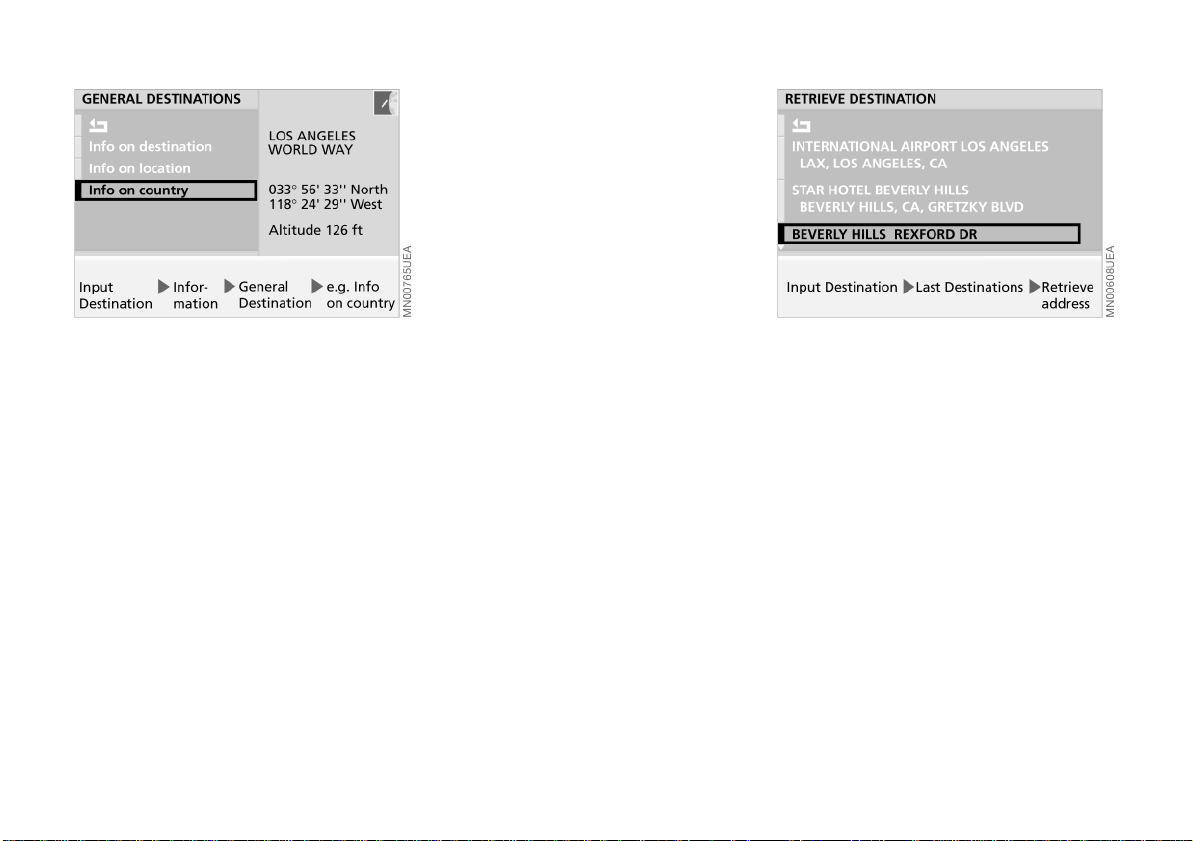
The "Info on country" function provides
you with a selection of points of particular interest, such as tourist attractions,
government buildings, important
exhibits, trade shows, commercial airports and border crossings.
To learn how to adopt these kinds
of locations as destinations for your
guidance system, refer to page 29.
Selecting other interesting
destinations
The "Info on location" function provides
you with an overview of potential destinations in your immediate area.
For the destination types, you will be
offered a selection of a maximum of ten
entries sorted according to distance,
wherein an arrow indicates the direction from the current position to the
destination.
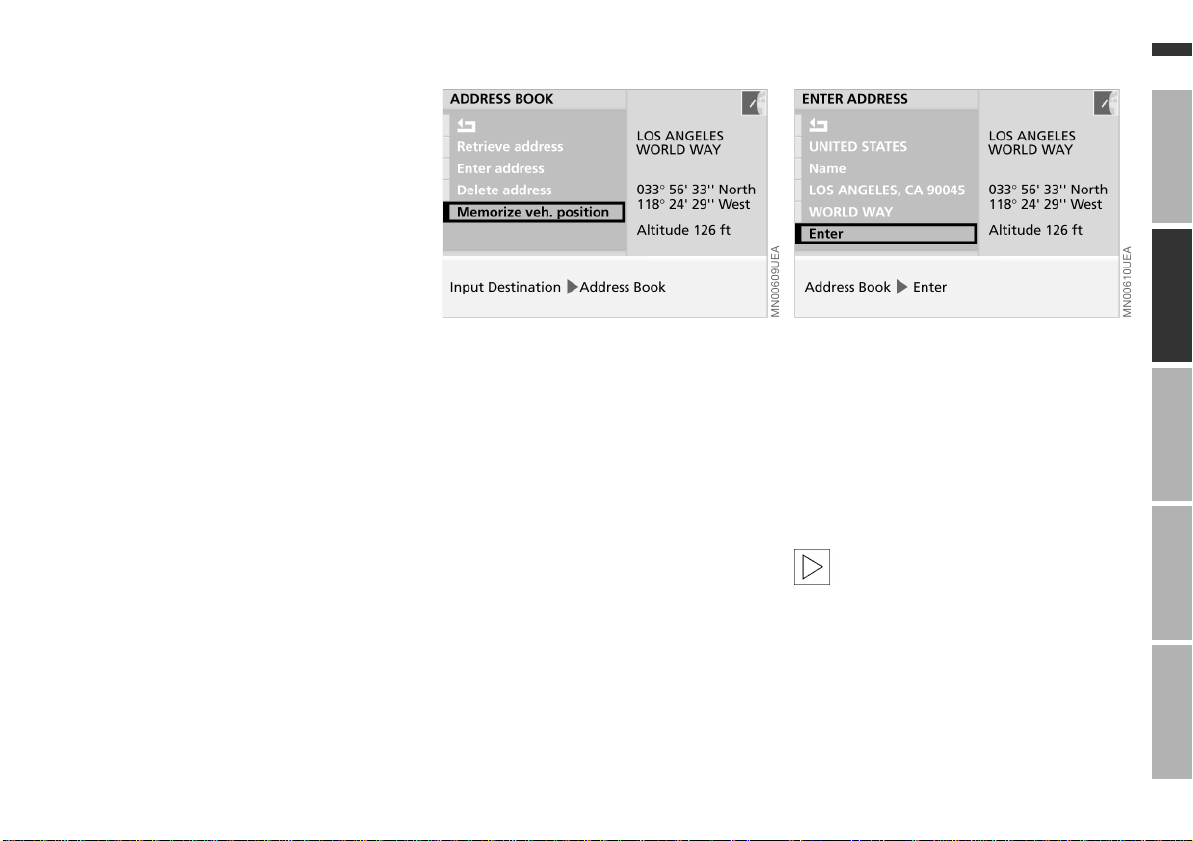
Returning to a recent destination
The system automatically stores the
last 20 destinations. To select one of
these addresses:
1. Select "Last Destinations"
2. Select "Retrieve address".
A list of the 20 most recent destina-
tions appears on the screen
3. Select the desired address.
The guidance system adopts the
address as your destination.
Page 32
Recent destinations Returning to the starting point
Online Edition for Part No. 01 41 0 157 006 - © 07/02 BMW AG
Deleting destination addresses
You can delete any of the addresses
contained in the list of your 20 most
recent destinations:
31n
1. Select "Last Destinations"
2. Select "Delete address".
A list with your 20 most recent desti-
nations appears on the screen
3. Select desired address.
"Delete address ?" appears on the
screen
4. Select "yes".
The address is deleted.
To delete all of the addresses, use the
right-hand rotary button to highlight
"Delete address" and then maintain
pressure on it for at least one second.
You can make it easier to enter the
destination for your return trip by
storing the address of your initial
location before starting off:
1. Select "Address Book"
2. Select "Memorize veh. position".
The address appears on the screen
to allow you to add supplementary
information
3. Select "Name ?" if necessary.
You can enter a designation for the
address, e.g. "Los Angeles office".
Confirm with "Enter"
OverviewNavigationEntertainmentComputerIndex
4. Select "Enter".
The address for the location is stored
in the address book.
To return to your starting point later on,
all you now have to do is select the
address from the address book as the
destination for the guidance system,
refer to page 40.
If you used the GPS navigation
system to reach your current location, then it will already be registered in
the "Last Destinations" list. You can
transfer entries from this list directly to
the guidance system, refer to
page 30.<
Page 33
32n
Online Edition for Part No. 01 41 0 157 006 - © 07/02 BMW AG
Selecting route
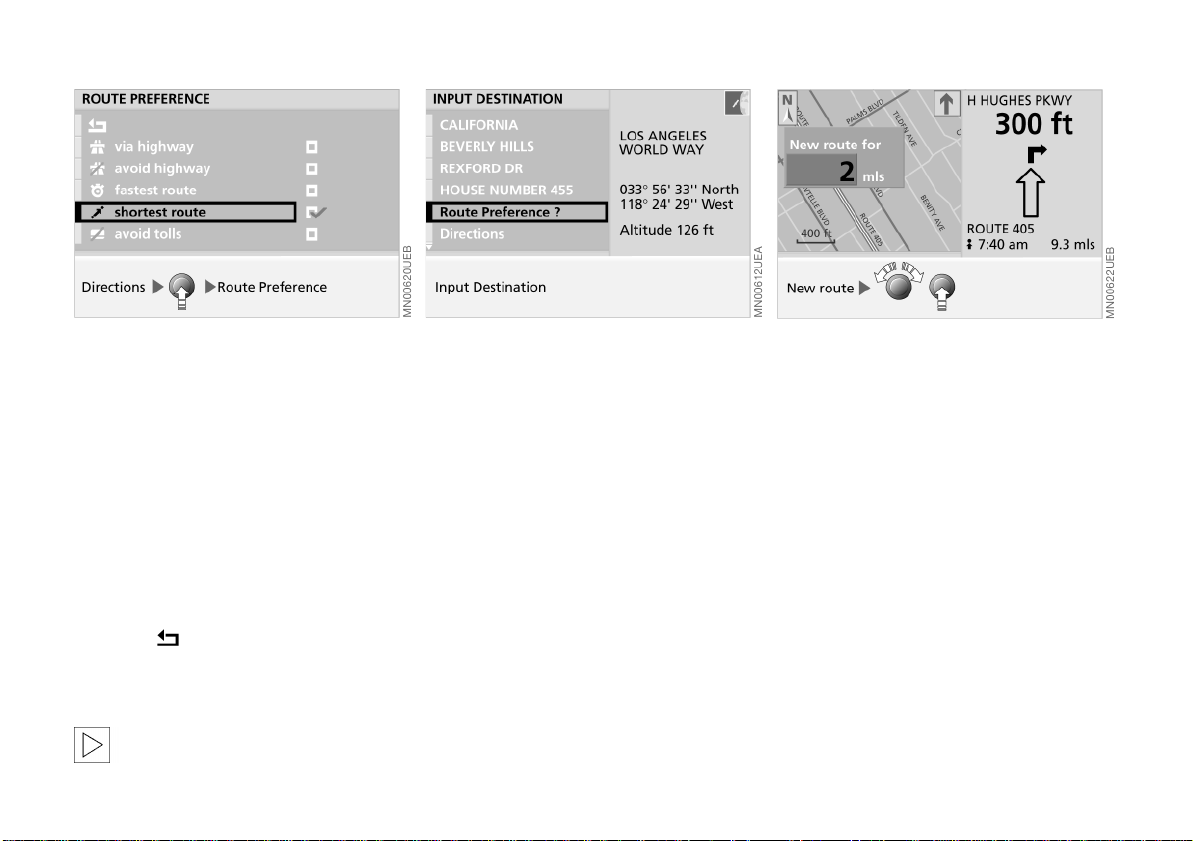
To revise the route preference
while underway with the guidance
system, refer to page 36.<
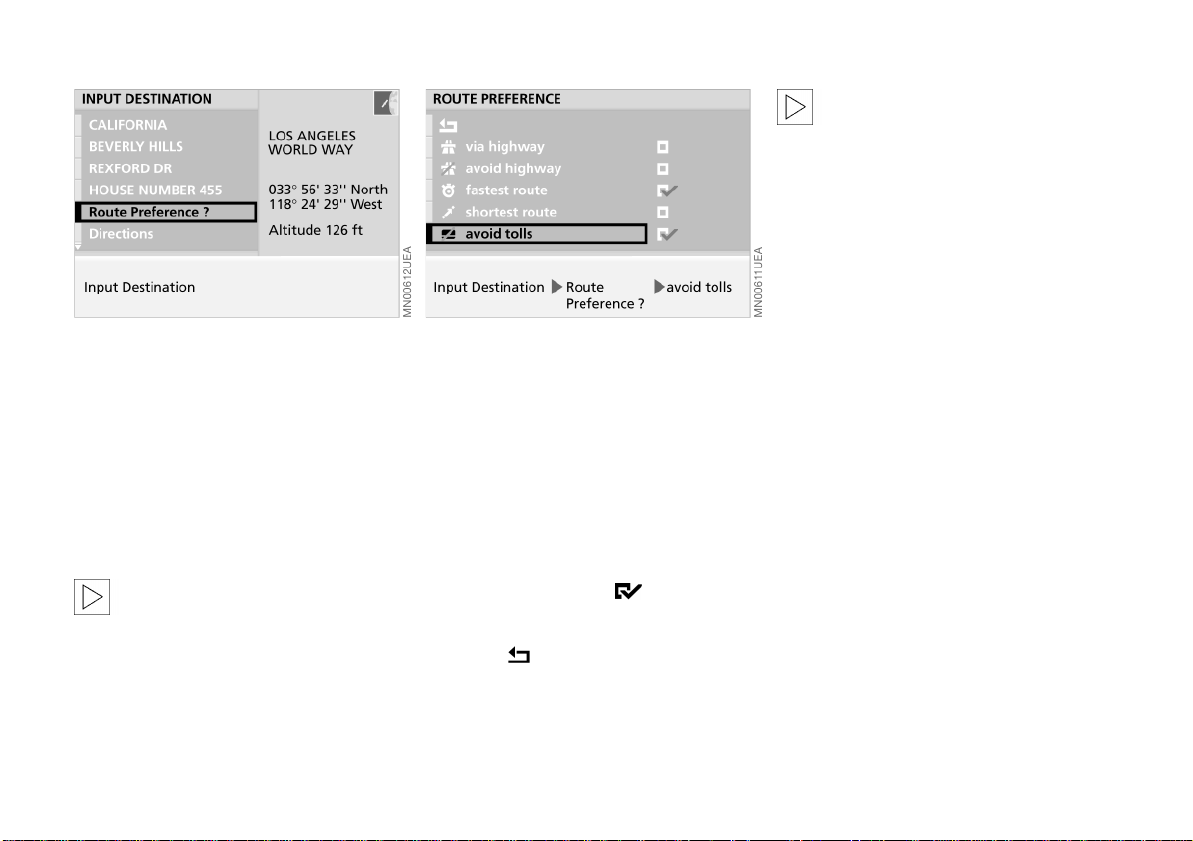
The GPS navigation system allows you
to choose from among various available
routes. This feature allows you to define
the system's priorities in selecting from
individual travel options:
> "via highway"
> "avoid highway"
> "fastest route"
> "shortest route"
> "avoid tolls".
The GPS navigation system relies
on specific logical structures to
determine suggested travel routes.
These vary according to the different
kinds of roads stored on the map CD/
DVD. As a result, the routes recommended by the navigation system may
not always be the same ones that you
would choose based on personal
experience.<
You can change the selected route as
often as you like, both when entering
your destination and at any time while
the system is guiding you to it – the
system revises its recommendations
accordingly:
1. Select "Route Preference ?"
2. Select the priorities for use in calculating your route.
The corresponding symbol is
highlighted
3. Select .
Your route preference appears on
the screen, and is adopted by the
system for use in determining the
best route.
Page 34
Starting the destination guidance system
Online Edition for Part No. 01 41 0 157 006 - © 07/02 BMW AG
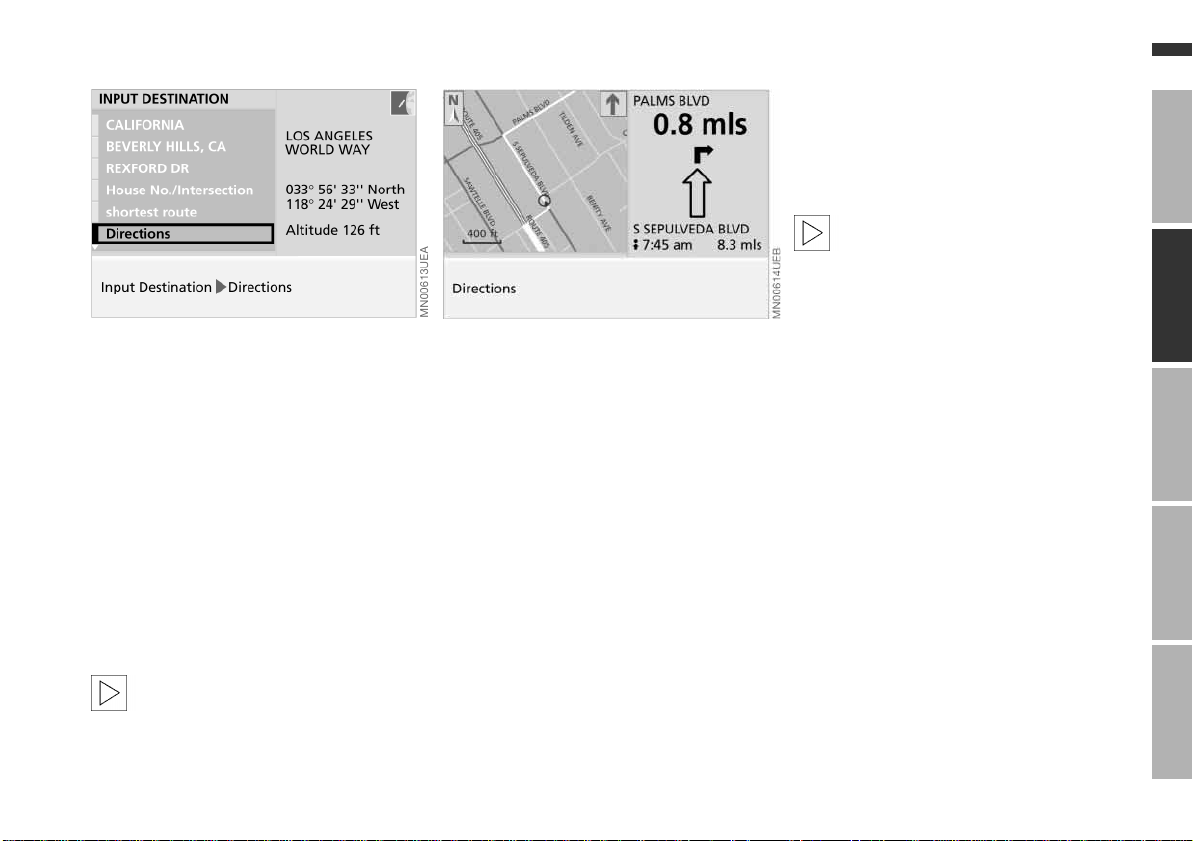
Once you have entered or selected the
complete destination address, the city
or town will appear on the screen,
along with the street and house number; "Directions" is highlighted.
Press the right-hand rotary button to
start active guidance.
When you select the split-screen option
(Split), the estimated time of arrival and
the distance to your destination appear
in the lower right half of the screen after
the destination guidance system is
started, while the navigation computer
calculates the best travel route.
The calculation of a new route, its
display and the display of the
exact value for the distance to the
destination can take up to one minute.<
Once the computer has completed its
calculations a route map appears on
the left side of the display screen; this is
accompanied by arrows indicating both
your general direction and true north.
On the right side of the split screen you
will see the name of the street where
you will make your next turn (in the
direction indicated by the arrow) along
with the distance to the intersection,
your direction of travel and your current
position.
In addition, you will also be provided
with voice messages that can be
repeated, refer to page 37.
In the lower right half of the screen
the estimated time of arrival and the
distance to the destination will also
continue to be displayed (Distance,
refer to page 67).
The system continues to provide
active guidance to your destination, even if you then select one of the
onboard computer's other functions,
such as the radio or the computer.
Voice messages combine with the display on the screen to inform you of
upcoming turns well before you arrive
at intersections.<
33n
OverviewNavigationEntertainmentComputerIndex
Page 35
34n
Online Edition for Part No. 01 41 0 157 006 - © 07/02 BMW AG
Displaying route
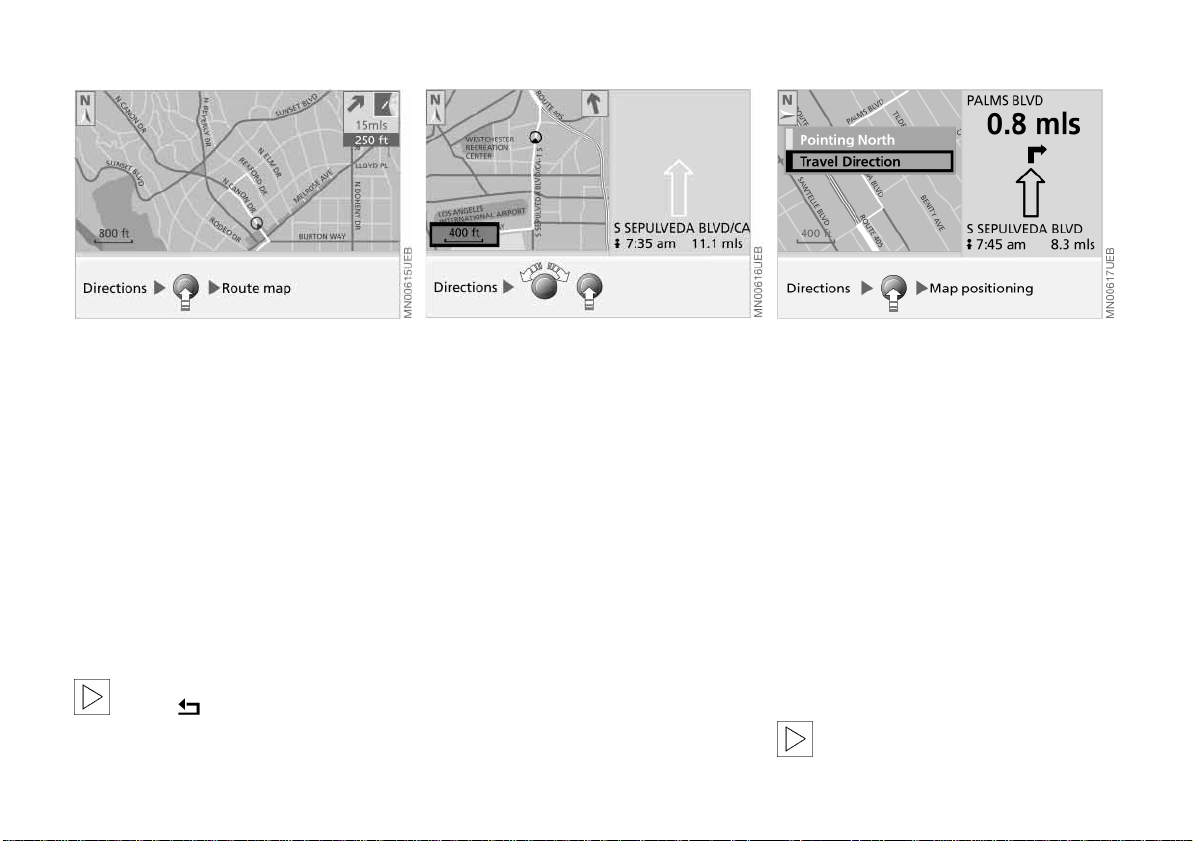
Viewing the route map
Provided that you have selected the
undivided display mode (Full), you can
display a map showing the planned
route while the system is guiding you to
your destination.
1. Press the right-hand rotary button.
A selection menu appears, also refer
to page 23
2. Select "Route map".
The route map appears on the
screen.
To change to directional display,
select .<
Revising the scale
Regardless of which display mode you
have selected (Split/Full), you always
have the option of selecting the scale
that best suits your personal preferences.
1. Turn the right-hand rotary button
to mark the field with the specified
scale
2. Turn the right-hand rotary button
again to set the desired map scale
3. Do not move the rotary button for a
few seconds or press it to save the
map scale.
The map scale will change after a
few seconds.
Altering direction display
When you select a scale of less than
1 mile or 2 km, you have the option of
rotating the map to orient it either to the
north or to your direction of travel.
1. Press the right-hand rotary button.
A selection menu appears, also refer
to page 23
2. Select "Map positioning".
Another selection menu appears on
the screen
3. Select the desired directional orientation.
After changing the directional
orientation, it may take a few
seconds until the route map is shown.<
Page 36
Displaying route
Online Edition for Part No. 01 41 0 157 006 - © 07/02 BMW AG
The directional orientation of the route
map affects the screen display as follows:
> With a northern directional orienta-
tion, the map is continuously moved
slightly below the direction of travel
symbol
> The map is redisplayed for each
directional orientation in the direction
of travel when the direction of the
travel symbol reaches the edge of
the map section.
The respective map adjustment to
the direction of travel can take a
few seconds.<
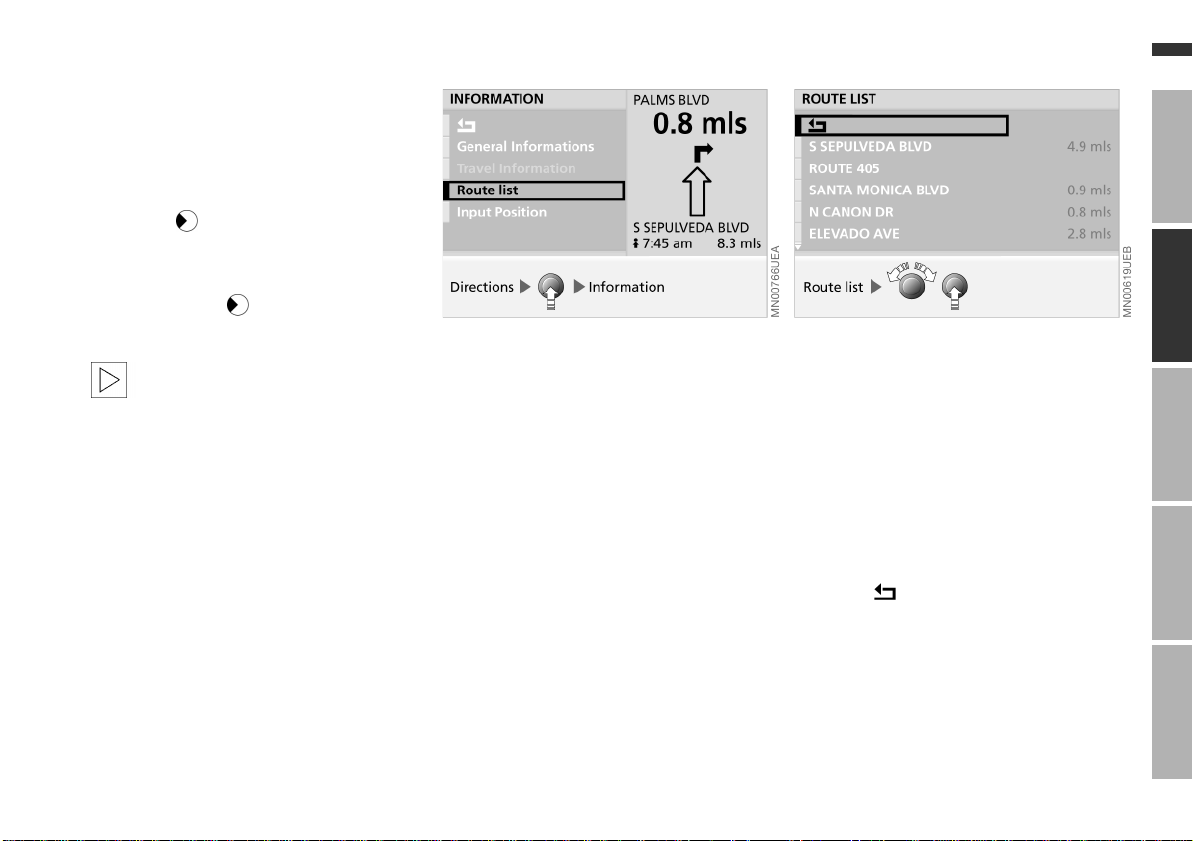
Route list display
You can access a listing of streets and
towns or cities on your route whenever
the guidance system is active. This list
is based on the GPS navigation system's suggested travel route.
The distances remaining to be traveled
on each individual road are also displayed.
To display the route list while the destination guidance system is active:
1. Press the right-hand rotary button.
A selection menu appears, also refer
to page 23
2. Select "Information"
35n
OverviewNavigationEntertainmentComputerIndex
3. Select "Route list".
The route list appears on the screen
4. Turn the right-hand rotary button to
scroll through the list
5. You can now select an entry from the
list to obtain more detailed information
6. To exit this information mode,
select .
Page 37
36n
Online Edition for Part No. 01 41 0 157 006 - © 07/02 BMW AG
Changing route
Revising route preference
You have the option of revising your
route preferences by active destination.
1. Press the right-hand rotary button.
A selection menu appears on the
screen
2. Select "Route Preference"
3. Select your priorities for the route
selection process
4. Select .
The system bases its subsequent
recommendations on the new route
preference entry.
The calculation of the new route
and its display can take up to one
minute.<
Revising route section
During active system guidance you can
program the navigation system to avoid
individual sections of the recommended
travel route. You simply enter the number of miles (kilometers) you want to
drive before returning to the original
route.
1. Press the right-hand rotary button.
A selection menu appears, also refer
to page 23
2. Select "New route"
3. Turn the right-hand rotary button to
select the desired distance.
You can select distances ranging
from 1 to 10 miles (km)
4. Press the right-hand rotary button to
save the desired distance.
The system will start to guide you
along the new route as soon as possible.
Page 38
Voice messages
Online Edition for Part No. 01 41 0 157 006 - © 07/02 BMW AG
37n
OverviewNavigationEntertainmentComputerIndex
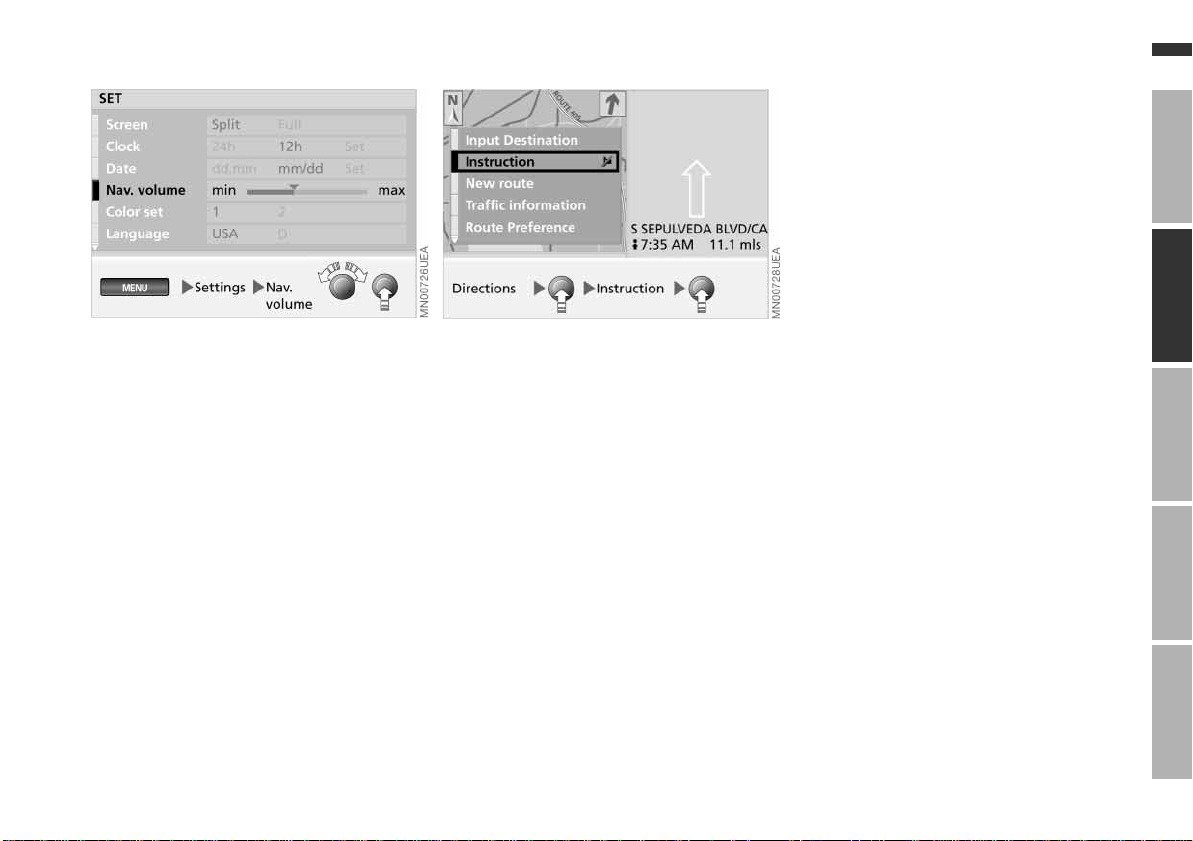
Varying volume
You can raise or lower the volume of
the navigation system's voice messages relative to that of other sound
sources.
Should you have also reduced the volume of all sound sources to zero with
the left knob, then the navigation
instructions are output at a minimum
volume.
For instructions on how to adjust the
minimum volume, refer to page 46.
Repeating or interrupting voice
messages
To repeat the last audio voice message:
1. Press the right-hand rotary button.
A selection menu appears in which
"Instruction" is already highlighted
2. Press the right-hand rotary button
briefly.
The last audio voice message is
repeated.
To interrupt the audio voice message,
press and hold the right-hand rotary
button for a longer time in the second
step.
Select "Instruction" again to reactivate
the voice output.
Page 39
38n
Online Edition for Part No. 01 41 0 157 006 - © 07/02 BMW AG
Continuing guidance Terminating/interrupting active guidance
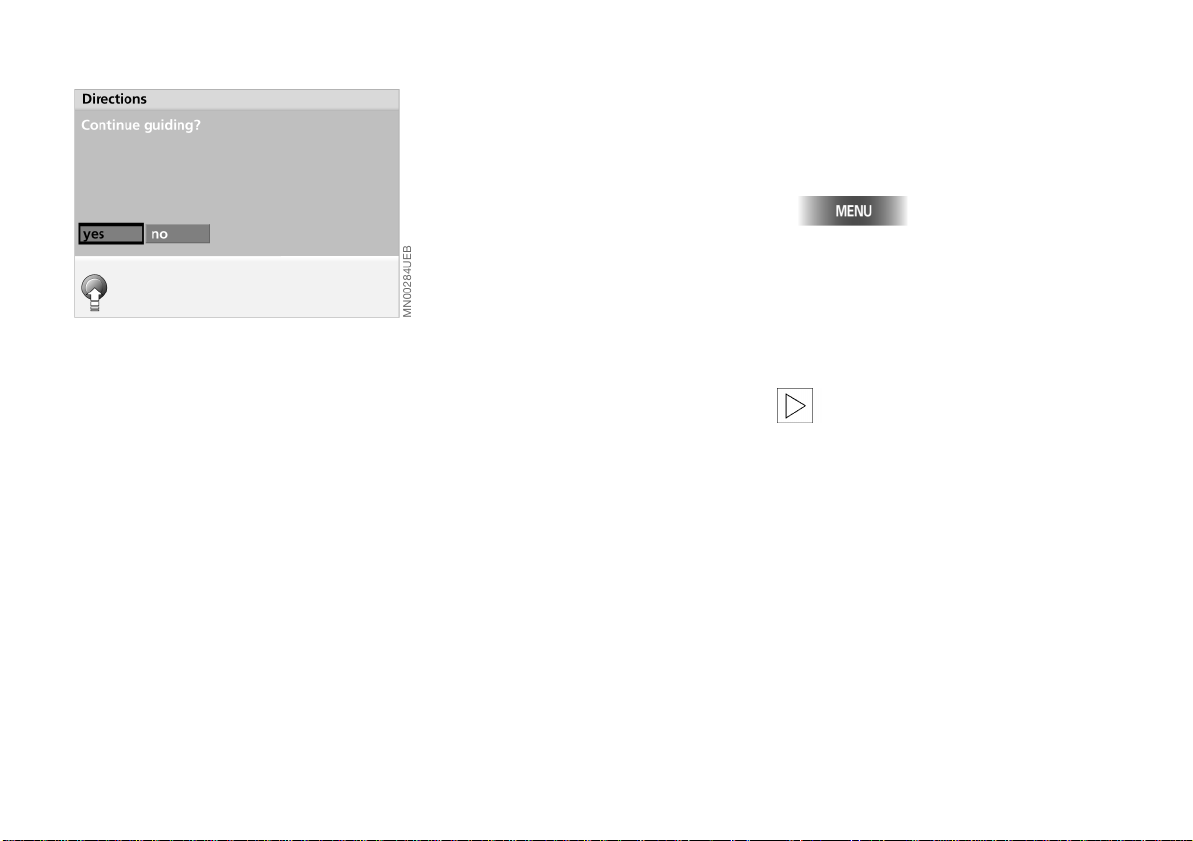
After stopping (for instance, to refuel)
you can decide whether to continue
using the guidance system to remain on
your previous route.
Select "yes".
The GPS navigation system resumes
active guidance along your original
route.
To terminate or interrupt the active destination guidance system:
1. Press the right-hand rotary button.
A selection menu appears, also refer
to page 23
2. Highlight "Input Destination" with the
right-hand rotary button.
The display changes to "Terminate
guidance ?"
3. Press the right-hand rotary button.
The destination guidance system is
ended.
If you want to reactivate the destination
guidance system at a later time with the
same specifications:
1. Select "MENU"
2. Select "GPS-Navigation"
3. Select "Directions".
The destination guidance system is
restarted.
Steps 1 and 2 are not necessary
if the "GPS-Navigation" menu has
not been exited.<
Page 40
Creating address book
Online Edition for Part No. 01 41 0 157 006 - © 07/02 BMW AG
Address and destination memory
You can — depending on the length
of the addresses — store up to
100 addresses and copy them directly
as a destination for GPS navigation:
Storing current position
You can enter your current position
directly in the address book or to the
destination memory and add a designation for this location.
The current position can also be
added to the address book when
the area marked on the map CD/DVD
has been exited. In this case the town
or city, the street name or a name must
be entered.<
You can also enter all current vehicle
positions while proceeding under active
guidance from the system.
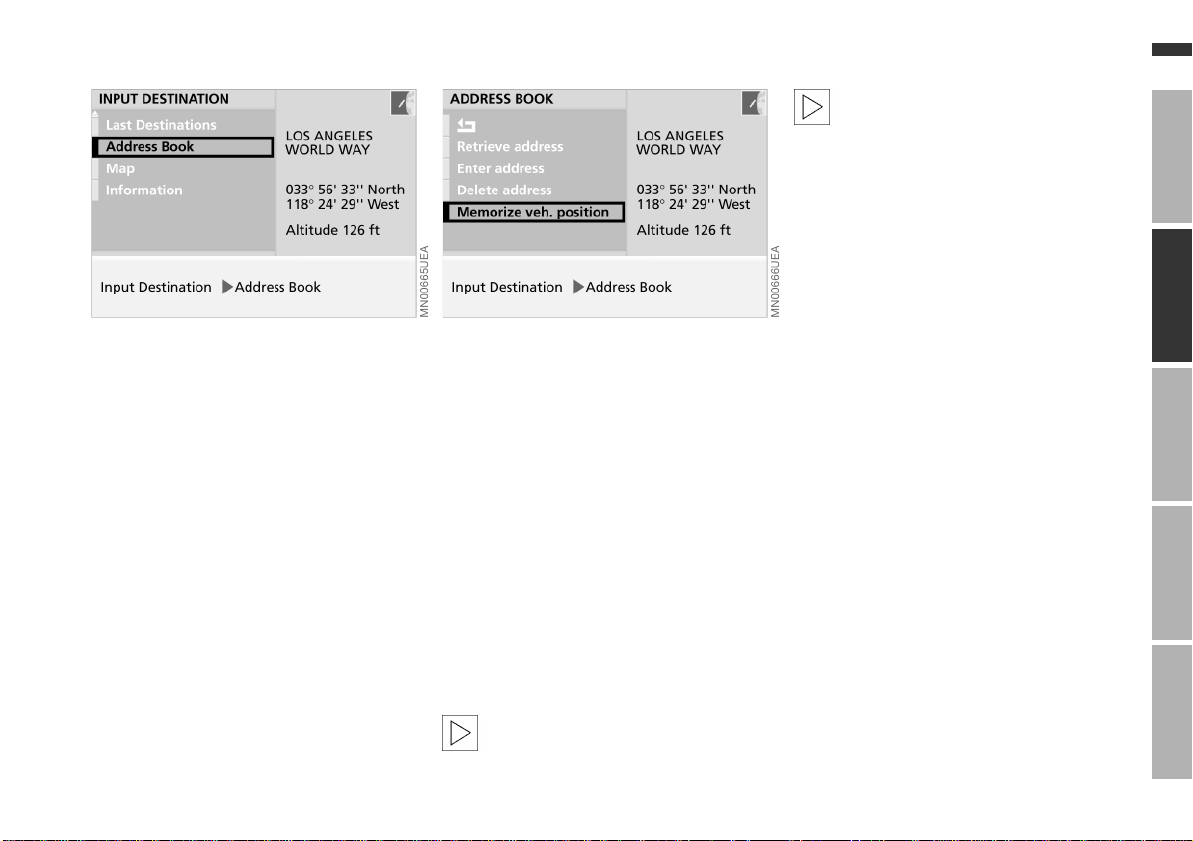
1. Press the right-hand rotary button.
A selection menu appears on the
screen
2. Select "Input Destination"
3. Select "Address Book"
39n
OverviewNavigationEntertainmentComputerIndex
1. Select "Address Book"
2. Select "Enter address"
3. Enter the requested data.
A name is not required for active
guidance or for storing a destination
in the address book
4. After entering the complete address,
confirm by selecting "Enter".
The system stores the address.
1. Select "Address Book"
2. Select "Memorize veh. position"
3. Add a designation for the location if
desired
4. Select "Enter".
The system stores your current posi-
tion in the address book.
To store current position for the
return journey, refer to page 31.<
4. Select "Memorize veh. position"
5. Add a designation for the position if
desired
6. Select "Enter".
Your current position is stored in the
address book.
Page 41
40n
Online Edition for Part No. 01 41 0 157 006 - © 07/02 BMW AG
Selecting an address Deleting an address
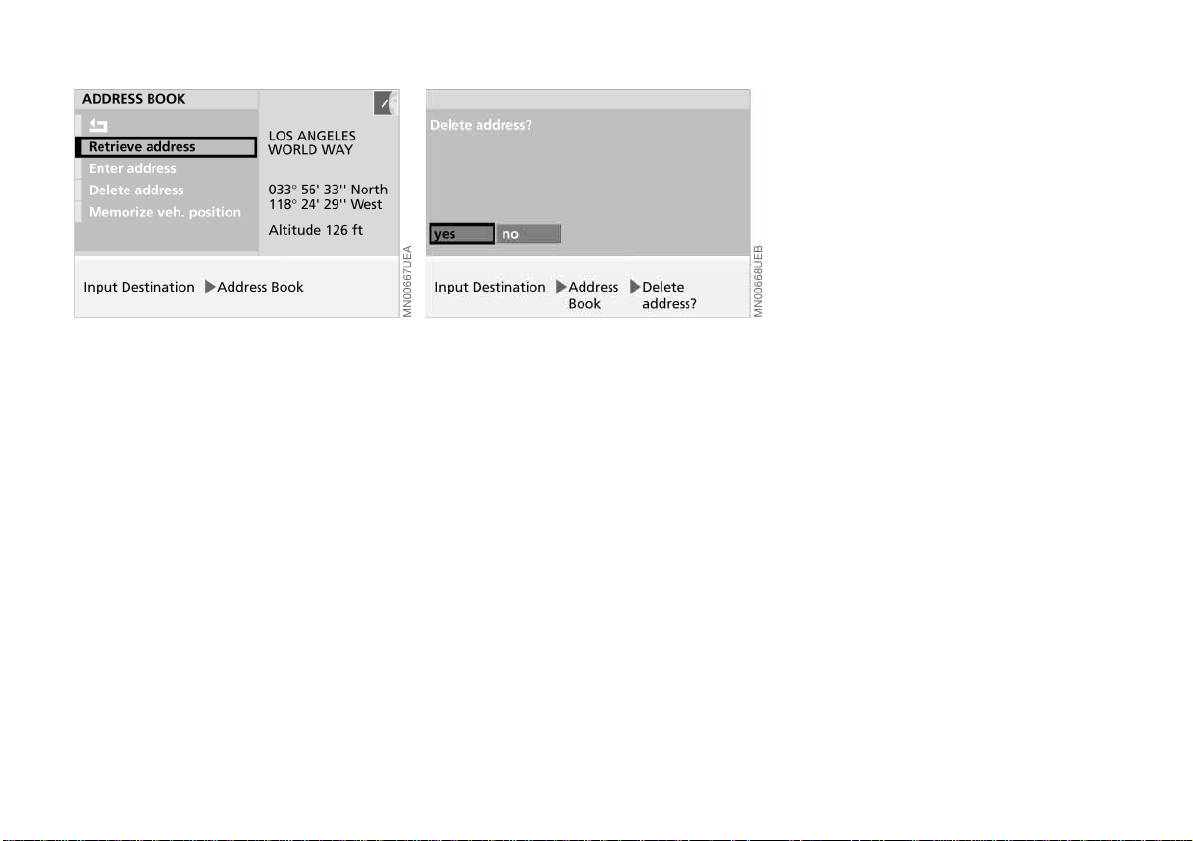
You can use the direct access feature
to select destinations from the address
book.
1. Select "Address Book"
2. Select "Retrieve address".
An alphabetical listing containing all
stored addresses and destinations
appears on the screen
3. Select desired address.
The guidance system adopts the
address as your destination.
You can delete addresses from the
address book either individually or all at
once.
1. Select "Address Book"
2. Select "Delete address"
3. Select desired address.
"Delete address?" appears on the
screen
4. Select "yes".
The address is deleted.
To delete all addresses at once, use the
right-hand rotary button to select
"Delete address", then maintain pressure on the button for at least one
second.
Page 42
Current position
Online Edition for Part No. 01 41 0 157 006 - © 07/02 BMW AG
41n
Current position display
Before starting off, you would like to
have a look at the map to determine
your current position.
To view this map:
Select "Map".
The current position of your vehicle is
indicated on the map.
To store this position:
1. Press the right-hand rotary button.
A selection menu appears on the
screen
2. Select "Dest. Input Map".
A map showing current position and
destination appears along with a cursor
3. Select "Position".
The current position of your vehicle is
indicated on the map.
If the display is set to a scale of 1 mile
or 2 km or less, you can use "Save
dest." to enter your current position in
the address book, refer to page 39.
Entering the current position
A correction of the position is only recommended in exceptional cases
because the GPS receiver onl y r equir es
a few minutes to find the position, for
example, after the v ehicle is transported
with a car-carrying train.
To enter your current position:
1. Select "Information"
2. Select "Input Position"
3. Select city and street if desired.
Enter your current position with the
same procedure used to enter destinations, refer to page 24
4. Select "Intersection ?".
The information "Crossing intersec-
tion" is output and the current position is copied from the navigation
system.
If the GPS navigation system was
able to determine the current
position itself, this will be copied to the
system.<
OverviewNavigationEntertainmentComputerIndex
Page 43

42n
Online Edition for Part No. 01 41 0 157 006 - © 07/02 BMW AG
Wordmatch principle
Your GPS navigation system features a
"wordmatch" system designed to make
it easier for you to enter names. The
system runs ongoing checks, comparing your destination entries with the
data stored on the map CD/DVD as the
basis for instant response. The user
benefits include:
> When you make an entry that
consists of more than one word, the
system can identify the name regardless of the sequence in which you
enter the individual words.
Example:
Official version:
J.F. Kennedy Square
Possible entries:
Kennedy Square J.F.
or:
Square J.F. Kennedy
> Names of specific locations can also
vary from the official versions,
provided that the spelling of the entry
corresponds to a standard form used
in another country
> When you are entering the names of
cities and streets the system will
complete them automatically as soon
as enough letters are available to
ensure unambiguous identification.
Example:
You want to drive to Rexford Drive in
Beverly Hills; as soon as you enter
the letter "x", the system has enough
information for positive identification
and can then finish the entry
automatically
> The system only accepts name
entries beginning with letters that are
stored on the map CD/DVD. This
makes it impossible to enter an incorrect name or address.
Page 44

What to do if ...
Online Edition for Part No. 01 41 0 157 006 - © 07/02 BMW AG
43n
What to do if …
> you request the current position of
your vehicle, but do not receive a
precise display?
The system is unable to receive
enough GPS signals at your current
position owing to obstructions, your
position is not yet available on your
CD/DVD, or the system is in the process of calculating your position.
Please try again later
> the GPS logo disappears from the
screen?
Reception is interrupted; a building or
similar obstruction may be the cause
> the guidance system fails to adopt an
address from the address book as its
destination?
The address is not on the map CD/
DVD currently in use. Choose an
address as close as possible to the
original one, using the map for saving
destinations as necessary
> the guidance system does not adopt
an address without the street?
No specified center is defined for the
selected city or town on your CD/
DVD. Enter any street, or a destination such as the railway station, for
the town or city, then start the guidance system
> you wish to enter a destination
address into the guidance system,
but the letters for it cannot be
selected?
The address is not on the map CD/
DVD currently in use. In this case, the
system will not offer you any letters to
choose from. Choose an address as
close as possible to the original one,
if necessary using the map for saving
destinations
> you attempt to enter a destination
address using the target cursor, but
the guidance system refuses to
accept your entry?
Your current scale does not offer
adequate resolution. The system only
accepts destinations from scales of
up to 1 mile or 2 km ("Save dest." can
be highlighted)
> the system stops furnishing direc-
tions on which way to turn as you
approach intersections?
You are driving in an area that has
not yet been completely recorded on
the map CD/DVD. The output route
arrow points in the direction of the
next point already recorded or the
destination already recorded,
or
you have left the recommended route
and the system requires a few
seconds to calculate a new recommended route
> the route map automatically appears
while you are being guided to your
destination (full screen mode)?
You are driving in an area that has not
yet been recorded on the map CD/
DVD. The guidance system cannot
operate under these conditions.
However, you will see the current
position of your BMW in the map display to help you orient yourself
> the battery has been disconnected?
It will take approx. 15 minutes for the
system to resume operation.
OverviewNavigationEntertainmentComputerIndex
Page 45

44n
Online Edition for Part No. 01 41 0 157 006 - © 07/02 BMW AG
Page 46

Overview
Online Edition for Part No. 01 41 0 157 006 - © 07/02 BMW AG
Navigation
Entertainment
Computer
45n
OverviewNavigationEntertainmentComputerIndex
Index
Computer
Page 47
46n
Online Edition for Part No. 01 41 0 157 006 - © 07/02 BMW AG
Switching radio on and off Varying volume
Press the left-hand rotary button.
The sound system will start with the last
selected audio source (radio, cassette
or CD player
If the monitor is set for display in the
split screen mode, the current sound
system settings will appear on the left
side of the screen.
To select a different display mode, refer
to page 19.
Note the following special features:
> To display the "Info" selection menu
or to open it again
> If the entries in a selection menu are
not made within eight seconds, you
will need to repeat the procedure.
*).
Adjusting volume
Turn the left-hand rotary button to
adjust to the desired volume level.
The sound system automatically
reverts to the mute mode
whenever you dial out or receive a
telephone call.<
Adjusting volume for audio driving
instructions
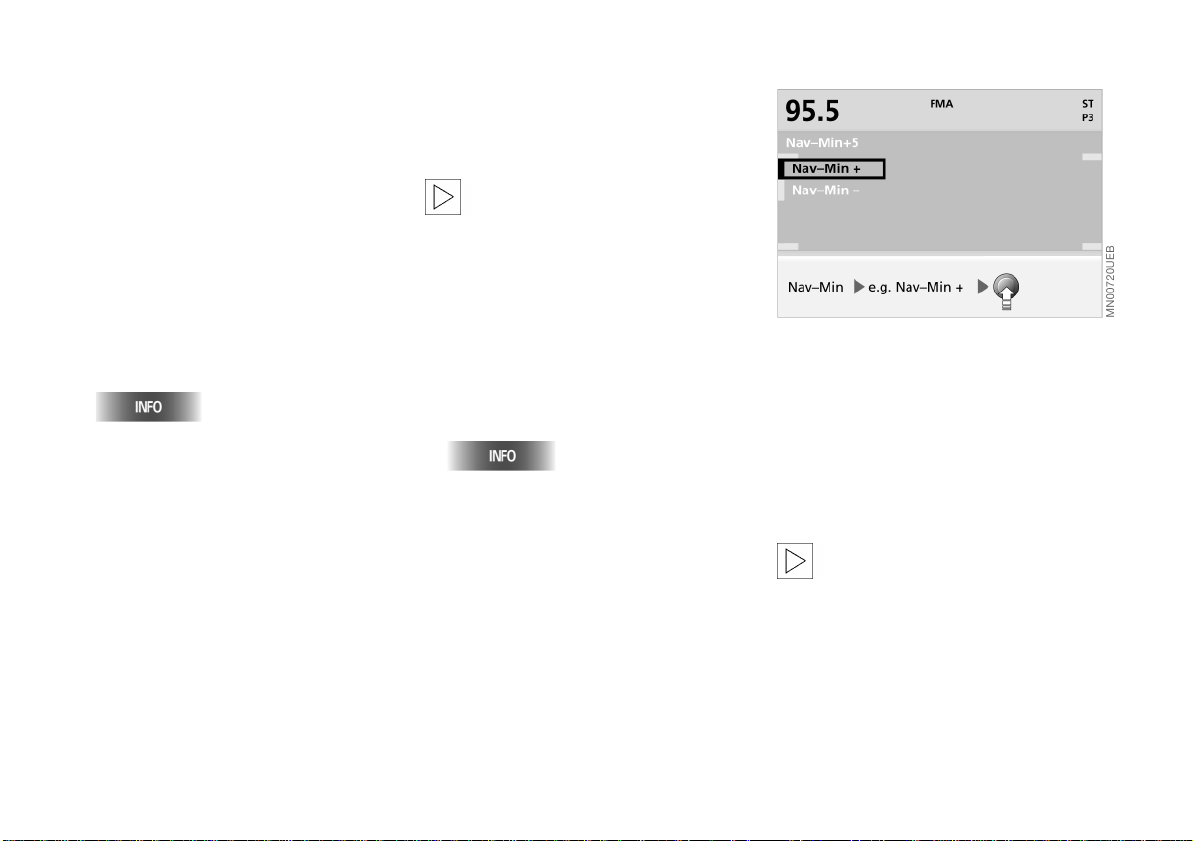
With the "Nav-Min" function you set a
minimum volume for the audio driving
instructions.
1. Enter the selection menu
2. Use the right-hand rotary button to
select "Nav-Min".
A selection menu appears on the
screen
3. Select "Nav-Min +" or "Nav-Min -"
4. Press the right-hand rotary button
repeatedly until the desired volume is
set.
You can select a step between -9
and +9; step 0 is equal to a moderate
volume.
The selected minimum volume is
maintained for all audio driving
instructions.<
Refer to page 19 for how to set the volume of the navigation voice messages
relative to that of the other audio
sources.
Page 48
Tone control
Online Edition for Part No. 01 41 0 157 006 - © 07/02 BMW AG
47n
Playing audio recordings
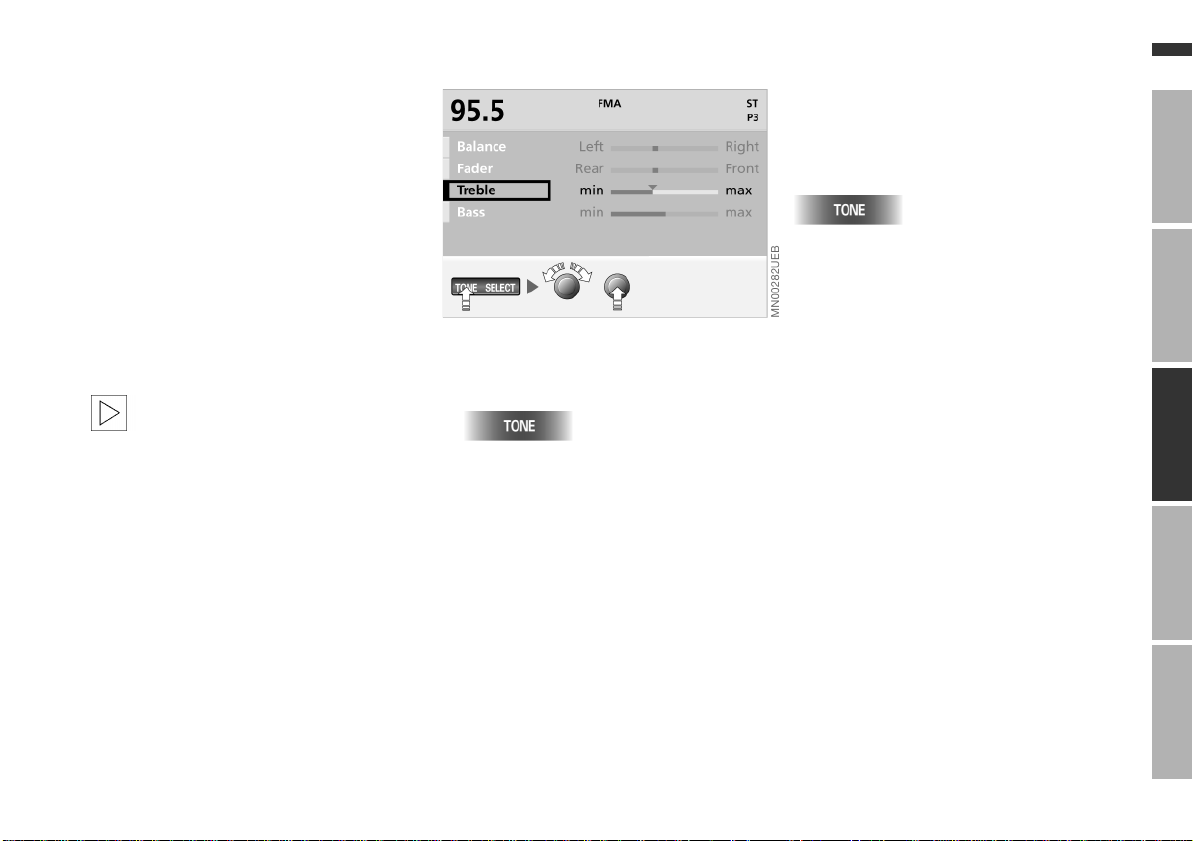
You can choose from the following
settings:
> "Right"/"Left" volume distribution
("Balance"):
On the left or right, louder/softer
> "Front"/"Rear" volume control
("Fader"):
Front or rear, high/low volume
> "Treble":
Amplify or reduce high frequencies
> "Bass":
Amplify or reduce low frequencies.
The treble and bass setting is
source-dependent, i.e. can be
adjusted separately for the radio, cassette and CD changer
select a new sound source the system
automatically adopts your settings.<
*. When you then
Tone adjustment
1. Select tone adjustment
2. Select desired tone settings
3. Turn the right-hand rotary button to
adjust to the desired level.
The display disappears approx. eight
seconds after the last adjustment.
The modified settings are stored
automatically.
Resetting the tone adjustment
You can reset all settings for radio,
cassette or CD changer
levels.
Hold down for longer than two
seconds.
* to standard
OverviewNavigationEntertainmentComputerIndex
Page 49
48n
Online Edition for Part No. 01 41 0 157 006 - © 07/02 BMW AG
Selecting the frequency band Selecting radio stations
Your car radio is designed for the
reception of the FM and AM reception
bands.
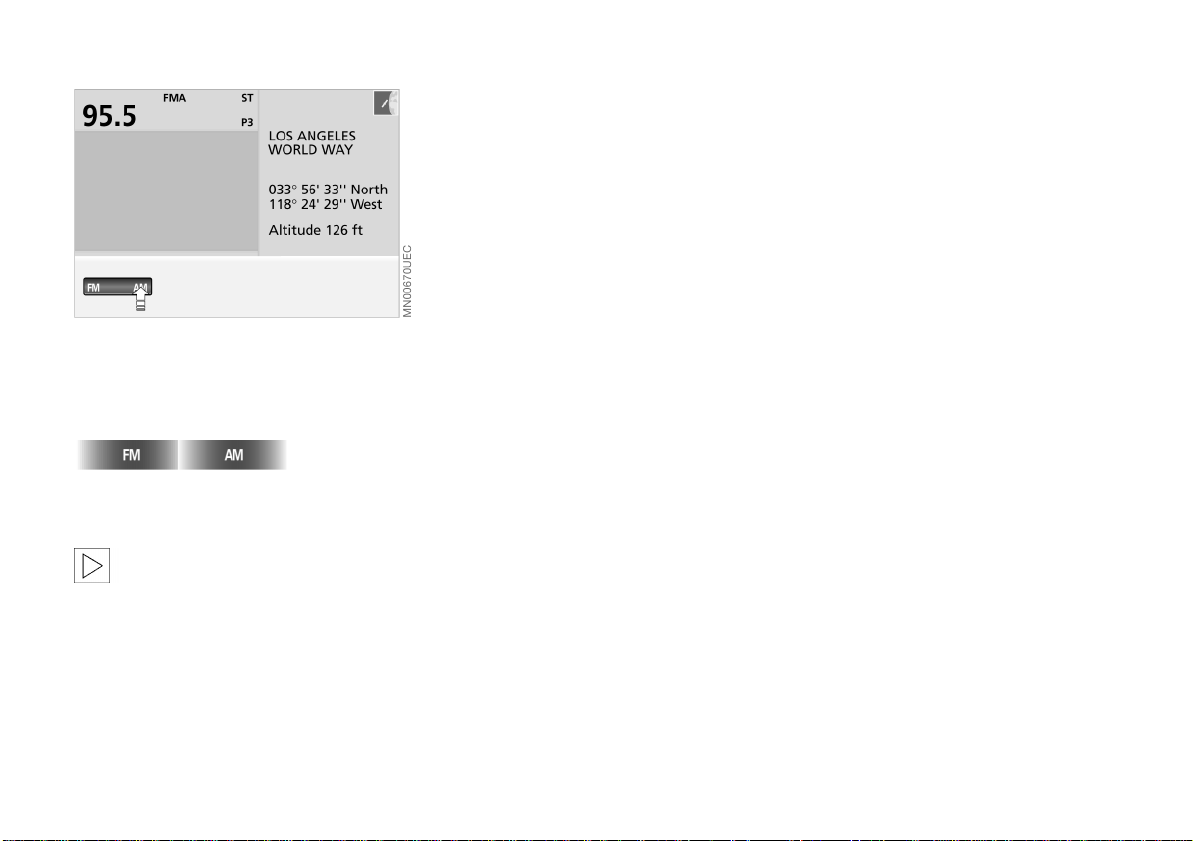
Selecting the frequency band
Your current selection appears in the
display screen.
The reception range buttons are
multiply assigned with the various
memory levels. Each time FM is
touched, the radio switches between
FM1, FM2 and FMA.
Each time AM is touched, the radio
switches between AM and AMA. Refer
to Automatic storage, page 53.<
Information display
Information on your current settings is
provided in the upper left section of the
split screen display. For example, in the
FM frequency band:
> 95.5
Frequency of the current station or, if
an RDS signal has been received, the
station name
> FMA
FM frequency band, automatic data
storage (Autostore), refer to page 52
> ST
The current station is received in
stereo quality
> P3
Station key, number of memory location, refer to page 53.
RDS – Radio Broadcast Data
System
Specially designed systems offer
improved sound quality by compensating for the inherent limitations of mobile
reception:
The Radio Broadcast Data System
(RDS) transmits supplementary information in the FM range. RDS stations
provide the following services:
> During reception from stations broad-
casting on more than one frequency,
the radio automatically changes to
the frequency with the best reception
quality
> The receiver processes the RDS sig-
nals and provides the name of
the station on the screen
> Additional information can be indi-
cated or called up in the display (such
as text bulletins from the station).
Remember that reception of RDS data
is only possible under favorable reception conditions. If reception is poor or
interference is present, there may be a
delay before the station's name
appears on the display screen.
Page 50
Selecting radio stations
Online Edition for Part No. 01 41 0 157 006 - © 07/02 BMW AG
49n
OverviewNavigationEntertainmentComputerIndex
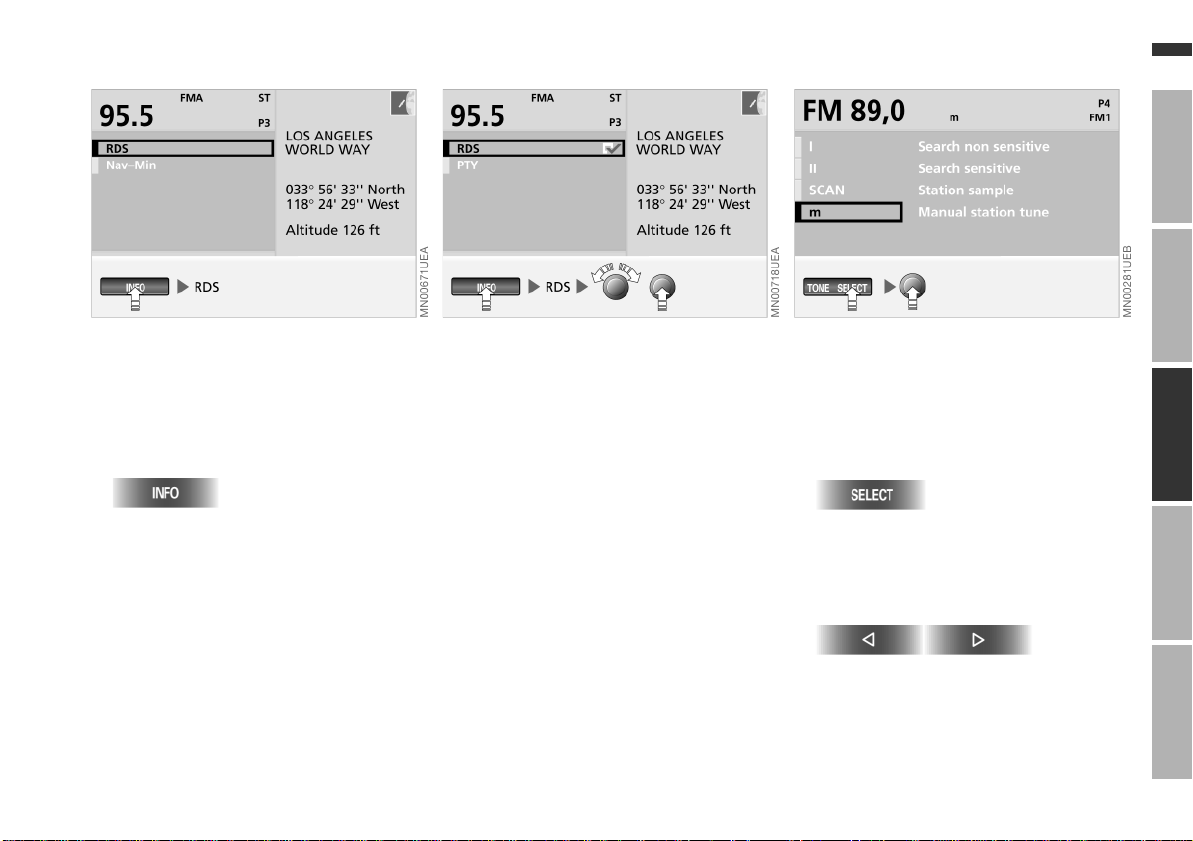
Switching RDS on/off
Switch on RDS when you want to display the names of the stations in the FM
reception range.
1. Enter the selection menu
2. Use the right-hand rotary button to
select "RDS".
A selection menu appears, also refer
to page 46
3. Use the right-hand rotary button to
select "RDS".
A highlighted selection box appears
next to the letters "RDS".
Manual station selection
You are looking for a particular station,
using either the name or the broadcast
frequency.
1. Enter the selection menu
2. Use the right-hand rotary button to
select "m Manual station tune"
3. Select a station
Press, maintain pressure,
or
turn the right-hand rotary button until
the desired station appears in the
display.
Page 51

50n
Online Edition for Part No. 01 41 0 157 006 - © 07/02 BMW AG
Selecting radio stations
Sampling and selecting (Scan)
You can use the automatic SCAN
feature to sample stations offering good
reception one after the other.
1. Enter the selection menu
2. Use the right-hand rotary button to
select "SCAN Station sample".
The receiver starts to scan
3. Select a station
This interrupts the SCAN function,
and the radio remains set to the
selected station.
Scan
You have the option of using the scan
feature in either one of two modes:
> "I Search non sensitive" scans the
waveband for stations with strong
broadcast signals
> "II Search sensitive" scans for all
stations, including those with limited
reception quality.
1. Enter the selection menu
2. Use the right-hand rotary button to
select either "I Search non sensitive"
or
"II Search sensitive"
3.
or
turn the right-hand rotary button until
you hear the station you require.
If the receiver is unable to detect any
stations during the "I Search non
sensitive" scan, it will start a second
scan in which it also searches for
weaker broadcast signals.
Next station
Press in either direction:
The search mode scans for the next
station.
Page 52
Program type (PTY)*
Online Edition for Part No. 01 41 0 157 006 - © 07/02 BMW AG
51n
You can also base the selection of a
station on the program type (PTY).
Via RDS (Radio Broadcast Data System) some stations transmit short information that is briefly displayed on the
screen when the corresponding frequency is selected, and which provides
information on the type of program
being received: news (NEWS), sports
(SPORTS), pop (POP MUSIC), culture
(CULTURE), etc.
If reception is poor or interference is
present, there may be a delay before
PTY is available.
PTY can also provide information
on emergencies and natural
disasters. If the station transmits
emergency PTY information, "ALERT"
appears on the screen.<
Selecting program type
1. Enter the selection menu
2. Use the right-hand rotary button to
select "RDS".
A selection menu appears, also refer
to page 46
3. Use the right-hand rotary button to
select "PTY".
A highlighted selection box appears
next to the letters "PTY".
OverviewNavigationEntertainmentComputerIndex
Page 53
52n
Online Edition for Part No. 01 41 0 157 006 - © 07/02 BMW AG
Storing radio stations
Memory locations
Your radio can store 30 stations:
> In the FM reception range you can
store twelve stations of your choice
and in the AM reception range you
can store six stations of your choice
(buttons 1...6)
> In addition, the radio also automati-
cally stores the respective six strongest stations in the FMA and AMA
reception range, refer to the following
page.
The memory locations of the indi-
vidual reception ranges are
distributed among the FM1, FM2 and
FMA or AM and AMA memory levels.<
Due to the various memory levels, the
station buttons are multiply assigned.
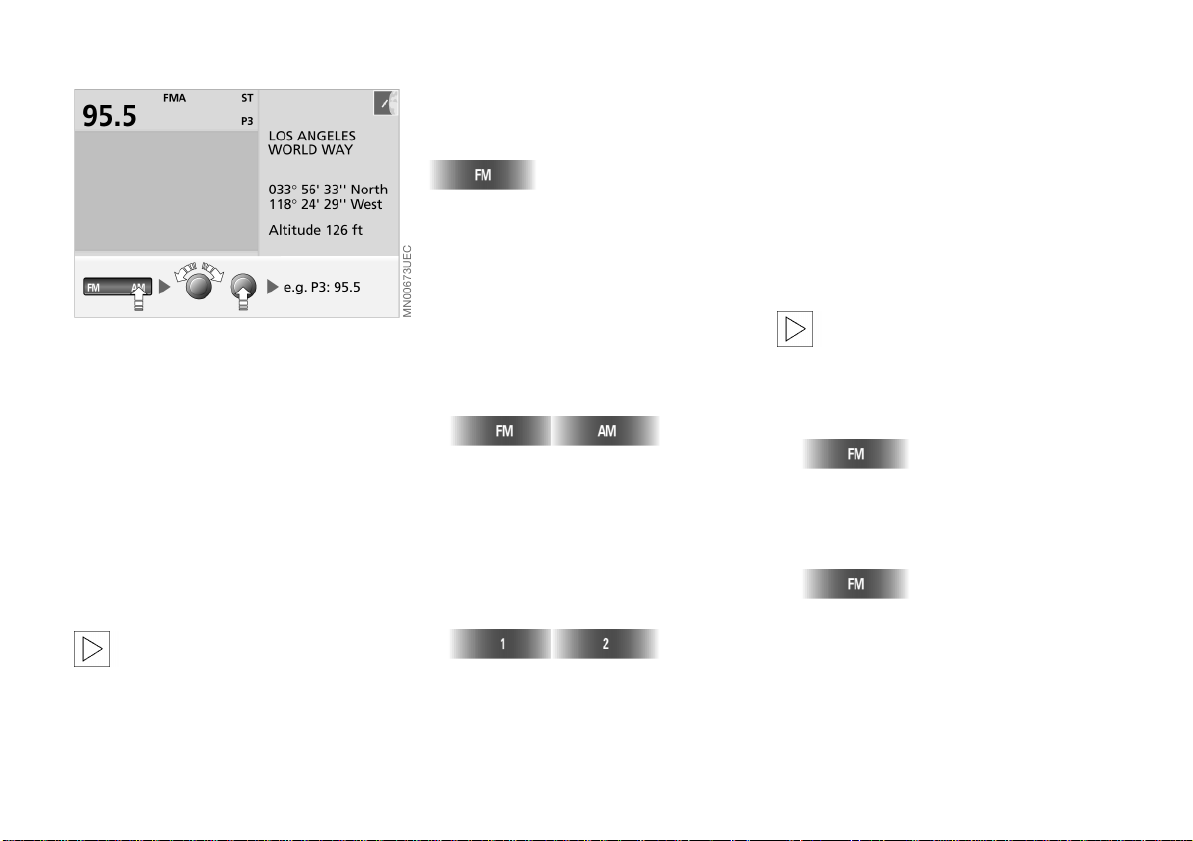
Select the desired waveband
Each time the button is touched, you
switch within the FM and AM memory
level.
The selected memory level is displayed
in the upper status line of the Radio
screen view.
Storing stations with buttons
1. Select the waveband
Each time the button is touched, you
switch within the FM and AM
memory level
2. To select a radio station, refer to
page 49
3. Store station
Maintain pressure on the left or right
of the desired button (1…6) until you
again hear the station after a brief
interruption.
Automatic storage
The automatic storage (Autostore) is
advantageous when you want to have
quick access to the currently strongest
stations of the FM and AM reception
ranges during long-distance driving.
On the FMA and AMA memory levels
the respective six strongest stations
can automatically be saved.
The stations already stored in this
reception range are deleted as
soon as you activate automatic storage.<
1. To select FMA memory level, press
repeatedly until the desired memory
area is displayed
2. To store:
Press and hold the button.
Automatic storage for the AMA memory
level is carried out in the same way.
Page 54
Storing radio stations Calling up a station
Online Edition for Part No. 01 41 0 157 006 - © 07/02 BMW AG
53n
The radio automatically switches over
to the FMA or AMA memory level. The
six currently strongest stations are
automatically stored and the station
stored under station button 1 is
selected.
If you do not want to use this func-
tion, you can store six additional
stations of your choice on both the FMA
and AMA memory levels, refer to
page 52.<
Calling up a station stored in
memory
1. Select the waveband
Each time the button is touched, you
switch within the FM and AM
memory level
2. Select the stored station
Press the desired button (1…6) on
the left or right
or
use the right-hand rotary button to
select the desired station.
OverviewNavigationEntertainmentComputerIndex
Page 55

54n
Online Edition for Part No. 01 41 0 157 006 - © 07/02 BMW AG
Starting and stopping the cassette Mode displays
Starting
1. Switch on radio, refer to page 11 or
page 46
2.
The cassette module is lowered
3. Insert the cassette all the way into
the slot, ensuring that the exposed
tape side is on the right.
The cassette module automatically
returns to its original position.
"TAPE 1" appears in the display
panel.
The cassette module is equipped
with integral finger protection. It
immediately stops retracting if it
encounters any kind of obstacle.<
If a cassette is already in the cassette
slot:
Start play by pressing
until "TAPE 1" appears in the display.
Select side 1 or 2 as desired
Stopping
The cassette module is lowered and the
cassette is ejected from its slot
or
switch off the radio, refer to page 46
or
press
until the desired audio source (radio or
CD changer
panel.
The sound output changes
> directly to radio reception, refer to
page 46
> to CD operation when the CD maga-
zine is filled, refer to page 56.
*) appears in the display
TAPE ERROR
The tape in the inserted cassette has
seized playing.
In order to avoid damage, press
until the cassette is ejected; then
remove the cassette from the slot.
If the tape is loose, you can insert a pen
in one side of the winding mechanism
and turn it to retension the tape.
Insert the cassette in the slot again,
then use the "fast forward" and
"rewind" functions to run the tape to the
end of its travel in both directions; this
ensures that the tape is evenly wound.
If the warning display reappears in the
display panel, you should not attempt
to use the tape again.
TAPE CLEAN
After about 50 hours of operation, this
status display will appear twice in a
row, on two successive occasions
when you insert a cassette. This display
reminds you to clean the player at the
recommended intervals. Cassette care,
refer to the Caring for your vehicle brochure.
Page 56
Noise suppression Music track search
Online Edition for Part No. 01 41 0 157 006 - © 07/02 BMW AG
55n
Dolby B and C suppress noise during
playback of audio cassettes.
They amplify high frequencies during
recording, and reduce their intensity
during playback. Because background
noise consists primarily of high frequencies generated during play, this
strategy results in lower levels of background noise.
Dolby and the symbol are registered
trademarks of the Dolby Laboratories
Licensing Corporation.
Turning Dolby on/off
Use this feature only with
cassettes that have been
recorded with Dolby B or Dolby C, as
use with standard cassettes results in
reduced sound quality.<
Press
until you obtain the best sound reproduction. The system progresses one
step through a sequence consisting of
Dolby B, Dolby C and Dolby off each
time you press the button.
The display " B" or " C" shows
the current level of noise suppression.
Fast forward/rewind
Select the direction
Press twice briefly or once for a longer
period.
When it reaches the end of the tape,
the player automatically switches to the
other side.
To interrupt fast forward/rewind:
Press once briefly.
Music track search
The music track search function
will only work when there is a
pause of at least four seconds between
music selections on the tape.<
To use music track search
The tape winds forward to the next
music selection. The player automatically switches to the other side when it
reaches the end of the tape.
To stop the fast forward mode:
Press once briefly.
OverviewNavigationEntertainmentComputerIndex
Page 57
56n
Online Edition for Part No. 01 41 0 157 006 - © 07/02 BMW AG
CD changer*
Location
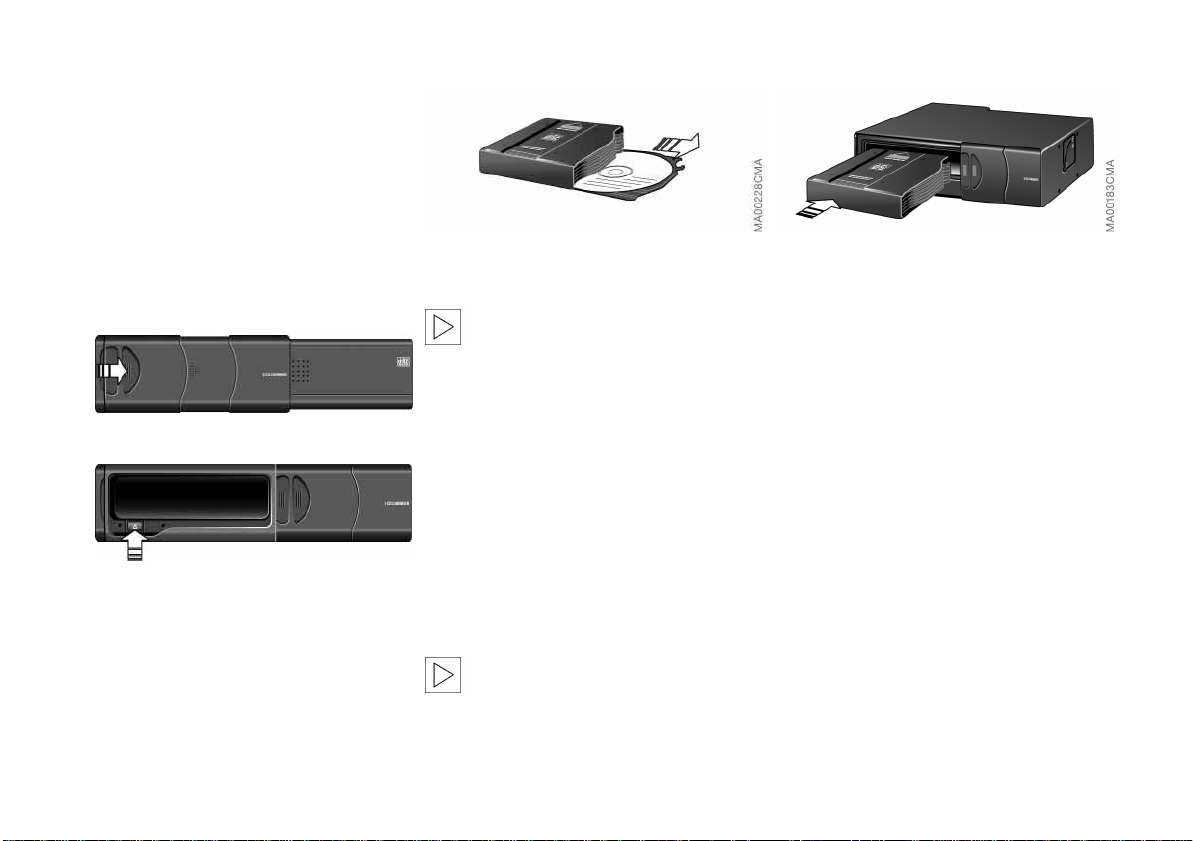
The BMW CD changer for 6 CDs is
located at the left rear of the luggage
compartment.
Removing the CD magazine
You must remove the CD magazine
from the changer to add or remove
CDs.
1. Slide the cover to the right
Reloading/unloading CD
magazine
When inserting and removing CDs
you should always grasp them by
their edges, being sure to avoid all contact between your fingers and the
reflective data side of the disc.<
Inserting the CD magazine
1. Slide the cover to the right
2. Press the CD magazine all the way
into the changer by pressing in the
direction indicated by the arrow
2. Press the button
The magazine slides out for removal.
The CD compartments in the changer
have the same numbers as the CD
selector buttons on the radio.
To load:
Insert the CD in its slot with the label
side on top.
To unload:
Pull out the drawer and remove the CD,
as shown in the illustration.
We recommend that you refrain
from using the changer to play
single-track CDs with the aid of an
adapter. The CD or the adapter could
jam. Suitable magazines for singletrack CDs are commercially available.<
3. Close the cover.
Page 58
CD changer* Starting and stopping the CD
Online Edition for Part No. 01 41 0 157 006 - © 07/02 BMW AG
57n
Operating temperatures
You should not use the CD
changer at less than 5 7 (–15 6)
or over 140 7 (+60 6), as the unit may
malfunction when operated at extreme
temperatures.
Even when switched off, the unit should
never be exposed to temperatures outside a range extending from –13 7
(–25 6) to 185 7 (+85 6).<
Atmospheric humidity
High levels of humidity inside the player
can condense on the laser's scan lens
and prevent it from reading the CD.
Precautions when using laser
equipment
The BMW CD changer is a "Class 1"
laser product.
Never remove the cover from the
housing. Do not operate the unit if
the cover is damaged. Operation
without the cover can lead to serious
eye injury from invisible laser beams.
Have all repair and maintenance
operations carried out by qualified
technicians only.<
Starting
1. Switch on radio, refer to pages 11
and 46
2. Press
until the CD control display appears.
After a few seconds, play will resume
at the point where the CD stopped
earlier.
If the CD magazine has been
reloaded, the system will start to
play the first track on the CD in the
lowest loaded slot, i.e. CD 1, track 1.<
Stopping
Switch off radio, refer to page 46
or
press
until the desired audio source (radio or
cassette) appears in the display panel.
The sound output changes
> directly to radio reception, refer to
page 46
> to cassette operation if cassette has
been inserted, refer to page 54.
If you play self-recorded CDs,
faults may occur (e.g. drop-
outs).<
To prevent CDs from being copied
illegally, they are often provided
with copy protection by the manufacturer. Please observe the information
on your CD. These CDs differ from the
Red Book CD audio standard, on the
basis of which all CD players and
changers are designed. Under certain
circumstances this can prevent or
restrict the playing of CDs on your CD
player. In this case please contact the
CD dealer or manufacturer.
OverviewNavigationEntertainmentComputerIndex
Page 59

58n
Online Edition for Part No. 01 41 0 157 006 - © 07/02 BMW AG
Mode displays Using the buttons to search for music tracks
NO DISC
There is no CD in the slot, or the CD
has been inserted incorrectly.
NO DISCS
The magazine is empty.
NO MAGAZINE
No magazine has been inserted.
CD CHECK
The unit is scanning the loaded CDs.
HIGH TEMP
Operating temperature is too high.
Play will begin again automatically as
soon as the temperature falls to within
the normal operating range.
CD selection
Press the button on the left or right for
the desired CD number (1...6).
The number of the selected CD appears
in the display panel. The unit starts to
play the first track. At the end of the last
track, the next CD will be selected.
Title search
Select a direction
Keep pressing until you get to the
desired title.
The CD will start playing at the title
selected.
Fast forward/reverse
1. Select the direction
Press and hold the button. The
tracks can be heard, but the sound is
distorted
2. To interrupt fast forward/reverse,
release the button.
The CD will start playing at the point
selected.
Page 60
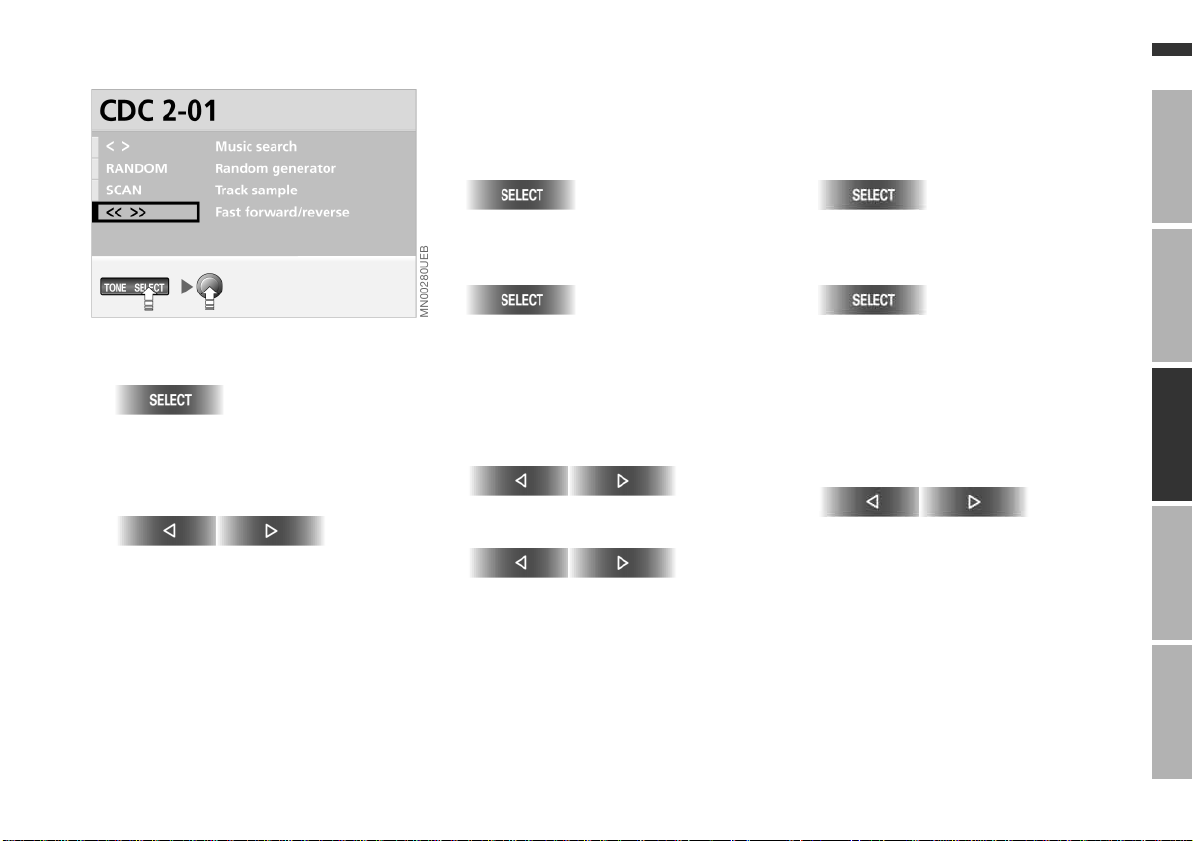
Menu-guided track search
Online Edition for Part No. 01 41 0 157 006 - © 07/02 BMW AG
59n
Fast forward/reverse
1.
The selection menu appears. "<< >>
Fast forward/reverse" is highlighted
2. Select the direction
Press and hold the button. The
tracks can be heard, but the sound is
distorted
3. To interrupt fast forward/reverse,
release the button.
The CD will start play at the point
selected.
Sampling and selecting (Scan)
The system plays a brief sample from
each CD track.
1.
The selection menu appears on the
screen
2.
or
turn the right-hand rotary button,
continuing until "SCAN Track sample" is highlighted
3. Start track
4. Select track
The scan function is interrupted.
Play resumes at the same point on
the CD.
Random play
The system plays the tracks on the CD
in a random sequence.
1.
The selection menu appears on the
screen
2.
Press repeatedly
or
turn the right-hand rotary button until
"RANDOM Random generator" is
highlighted
3. Start play in the random mode
To terminate play in the random mode:
Select another function or select
"RANDOM Random generator" again.
OverviewNavigationEntertainmentComputerIndex
Page 61

60n
Online Edition for Part No. 01 41 0 157 006 - © 07/02 BMW AG
Menu-guided track search
Track search
1.
The selection menu appears on the
screen
2.
Press repeatedly
or
turn the right-hand rotary button until
"< > Music search" is highlighted
3. Select a direction
Keep pressing until you get to the
desired title.
The CD will start playing at the title
selected.
Page 62
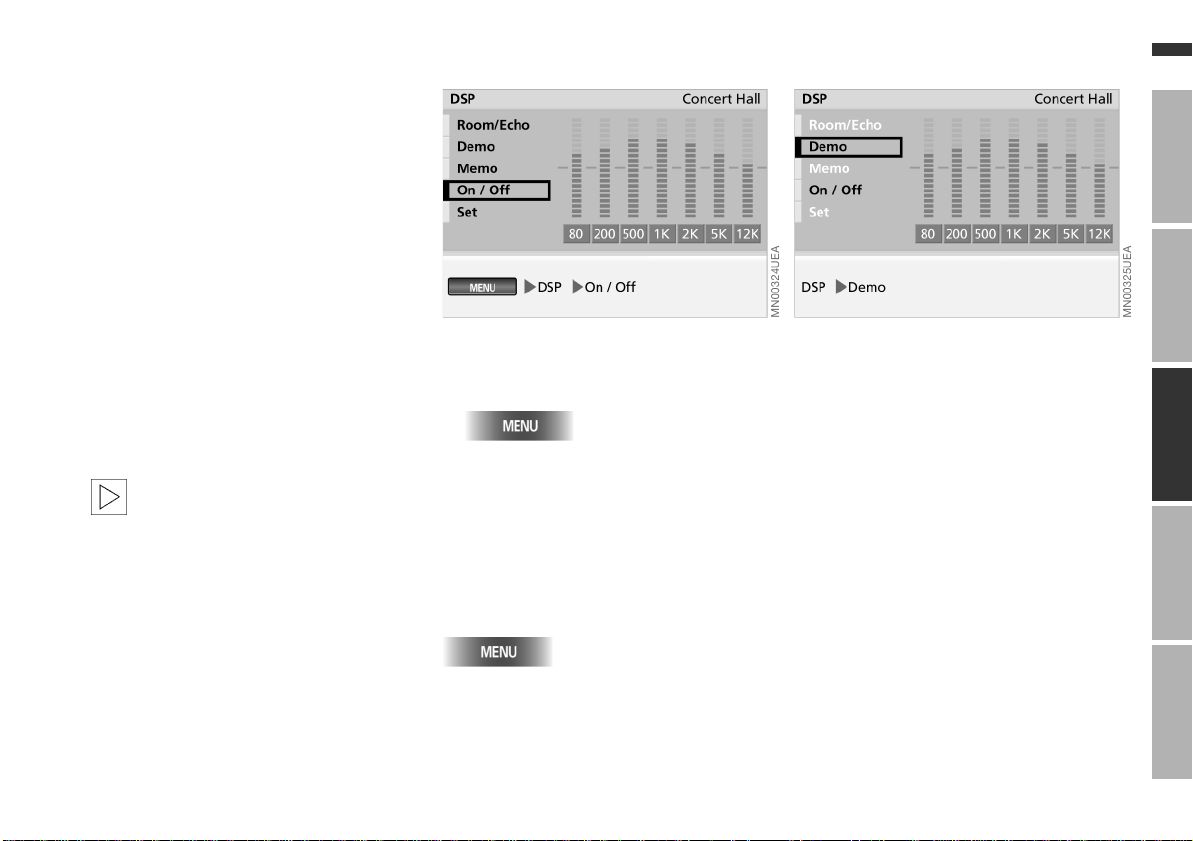
DSP sound system*
Online Edition for Part No. 01 41 0 157 006 - © 07/02 BMW AG
Digital Sound Processing (DSP) assures
an optimum level of audio reproduction
quality by means of spatial simulation
and also by providing equalizer functions.
You can choose from the following
settings:
> "Demo":
Sound pattern
> "Memo":
Selection between three specified
and three individually settable sound
patterns with influence on the 3D
sound and Hall effect
> "On / Off":
Resets sound settings to midrange
values.
The functions "Room/Echo" and
"Set" are only available, if an individual sound memory is selected
(memory 1 – 3).<
Switching on and off
1. Select "MENU"
2. Select "DSP"
3. Select "On / Off".
Setting "Off" sets the sound setting
to a mean value.
To exit DSP, press again:
You can use this menu to access the
DSP functions described in the
following section.
61n
OverviewNavigationEntertainmentComputerIndex
Selecting sound pattern
1. Select "Demo".
The pre-defined sound patterns,
Concert Hall, Jazz Club and Cathedral, are activated one after the other
for the music currently playing
2. Press the right-hand rotary button.
The presentation of the sound
patterns is interrupted. The previous
pattern is reactivated.
To activate one of the preset sound
patterns or one of the sound patterns
you have created, refer to the following
page.
Page 63
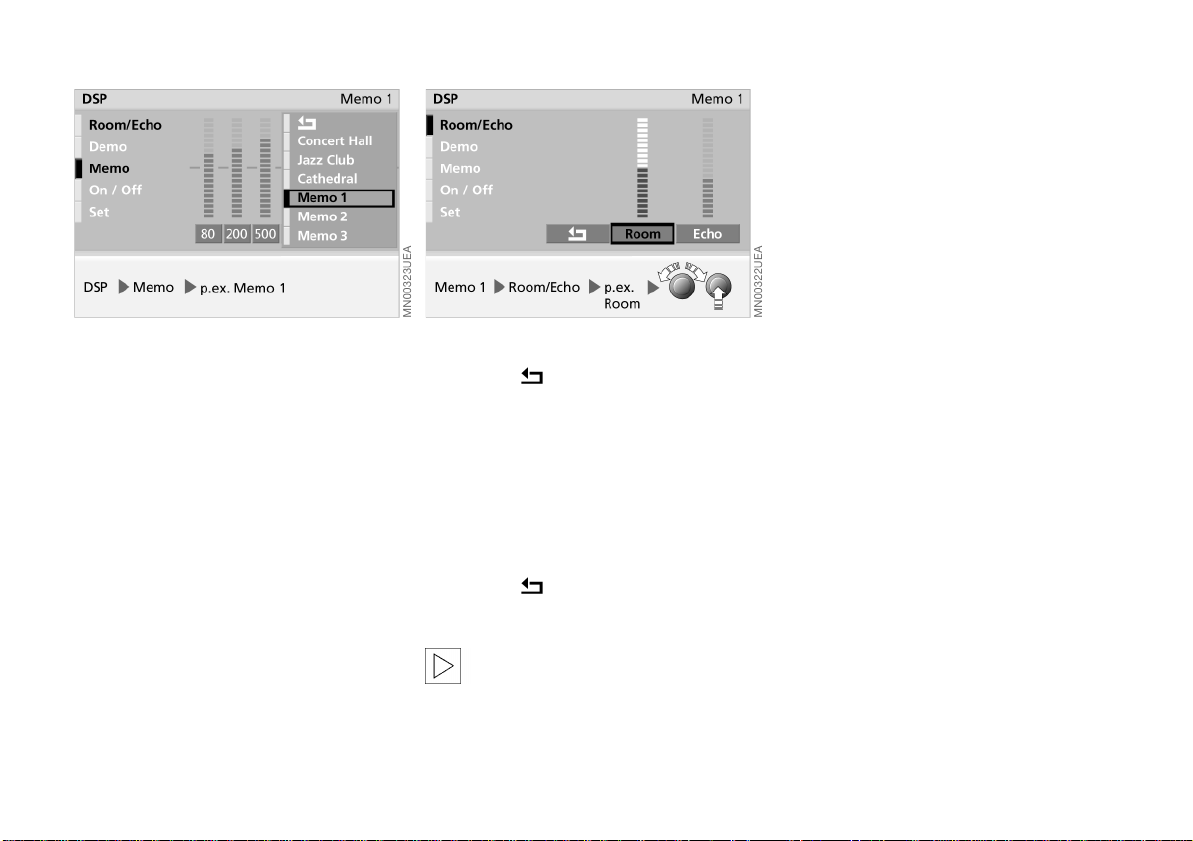
62n
Online Edition for Part No. 01 41 0 157 006 - © 07/02 BMW AG
DSP sound system*
Individual tone control memory
Tone control memories 1 to 3 can be
adjusted individually:
1. Select "Memo".
A selection menu appears on the
screen
2. Select the desired memory.
Previous sound pattern is displayed
3. Select "Set"
4. Select the aspect to be changed
5. Turn the right-hand rotary button to
set the change variable and press to
store your entry
Calling up tone control memory
1. Select "Memo".
A selection menu appears on the
screen
2. Select the desired memory.
The corresponding sound pattern is
stored.
6. Select
7. Select "Room/Echo"
8. Select desired room control
9. Turn the right-hand rotary button to
set the room control and press to
store your entry
10. Select .
The new sound pattern is assigned
to the memory previously selected.
Concert Hall, Jazz Club and
Cathedral are preset sound
patterns and cannot be modified.<
Page 64

Overview
Online Edition for Part No. 01 41 0 157 006 - © 07/02 BMW AG
Navigation
Entertainment
Computer
63n
OverviewNavigationEntertainmentComputerIndex
Index
Index
Page 65
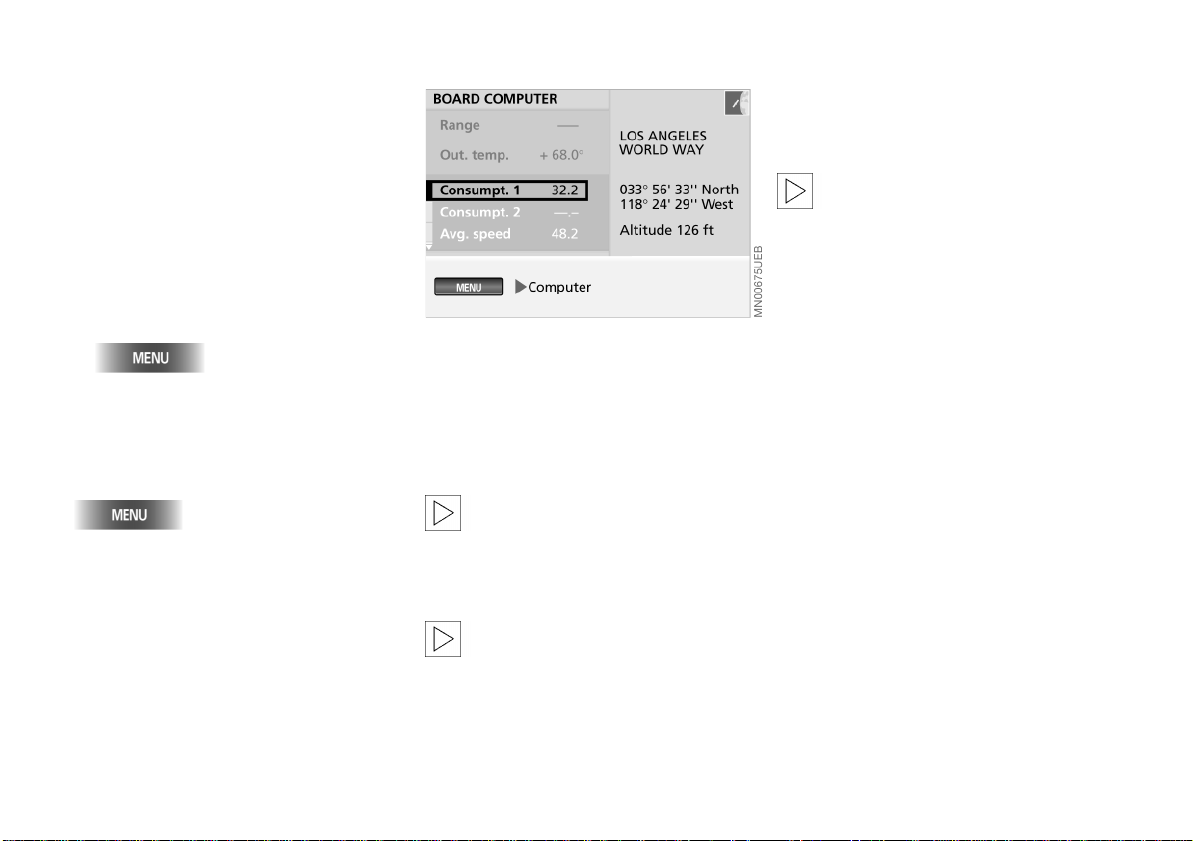
64n
Online Edition for Part No. 01 41 0 157 006 - © 07/02 BMW AG
Starting computer Range Outside temperature
You can use the computer to access
the following information:
> Range > Outside temperature > Time of arrival, refer to page 65 > Fuel consumption, refer to page 65 > Average speed, refer to page 65 > Speed limit, refer to page 66 > Distance, refer to page 67 > Stopwatch (timer), refer to page 68.
1. Select "MENU"
2. Select "Computer".
Press again to exit from the computer
mode:
You can use this menu to access the
computer functions described in the
following section.
The "Out. temp." function provides you
with a display of the outside temperature.
The "Out. temp." function consists
of a passive display provided in
the degree scale that you have selected
in "Set", refer to page 19.<
The "Range" function provides an estimate of the distance that you can travel
on your remaining fuel based on your
rate of average fuel consumption in the
period immediately preceding your data
request.
The "Range" function consists
exclusively of a passive display
provided in the units of distance you
have previously selected using "Set",
refer to page 19.<
During refueling, more than
1.1 gallons (4 liters) of fuel must
flow into the tank before it will be
registered by the computer.<
Page 66
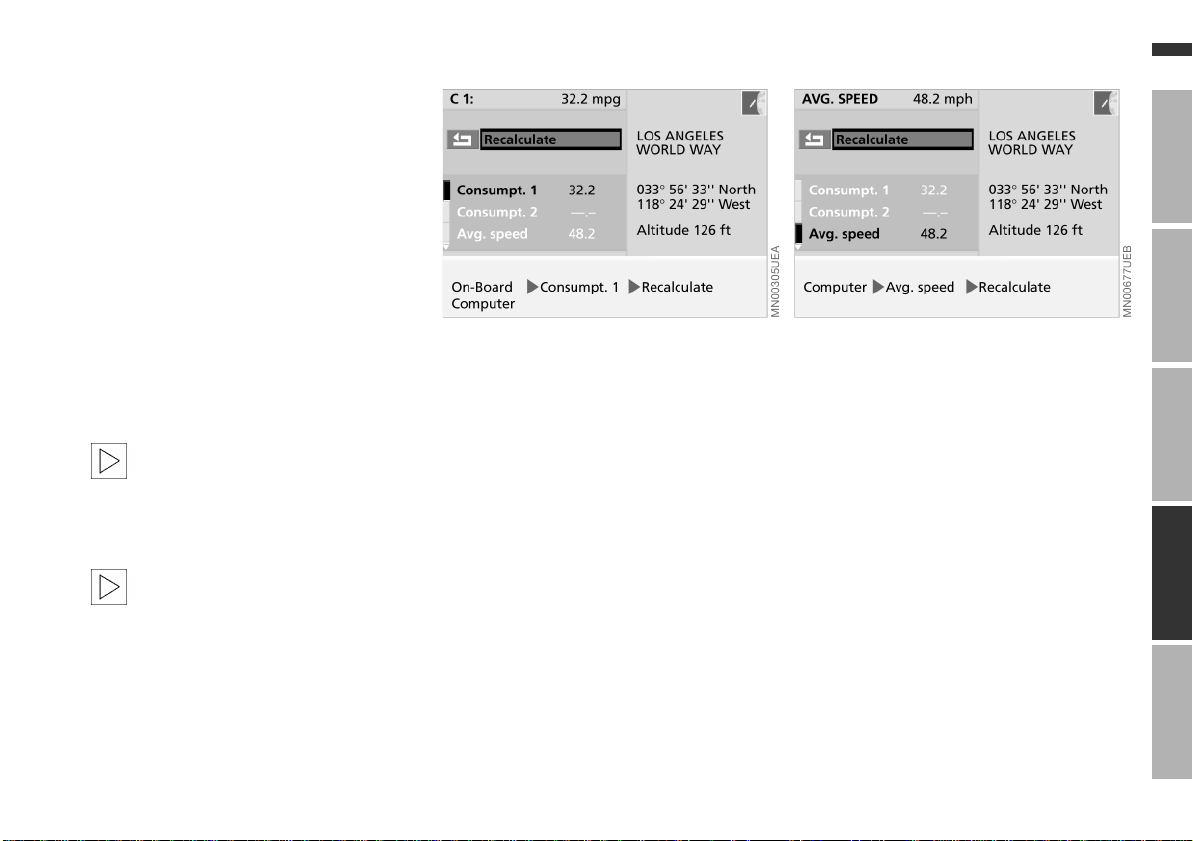
Time of arrival Fuel consumption Average speed
Online Edition for Part No. 01 41 0 157 006 - © 07/02 BMW AG
The "Arrival" function provides your
estimated time of arrival at your destination. The navigation computer bases
its calculations on the projected travel
route, the type of route and your average road speed.
Requirements:
> With the "Distance" function a value
between the starting point and destination has been entered manually
before the start of driving or
> a destination is entered in the GPS
navigation system, see from page 33.
The computer automatically adopts the
time of arrival for the projected route.
The "Arrival" function consists
exclusively of a passive display
provided in units based on the selections you have made in the "Set" mode,
refer to page 19.<
This display appears in the full-
screen display mode (Full) at the
upper right, refer to page 15.
In the split-screen display mode (Split)
this only takes place while the destination guidance system is running, in the
lower right half of the screen, refer to
page 33.<
You can have the average fuel
consumption displayed for two different
distances, such as a complete journey
and a single stretch (for instance,
following a stop to refuel). The average
fuel consumption is calculated for the
time during which the engine is running.
With the ignition key in position 1 or
higher, to start calculating fuel consumption:
1. Select "Consumpt." (1 or 2)
2. Select "Recalculate".
The recalculated average fuel
consumption appears in the display.
You can select a display of the vehicle's
average speed. The average speed is
calculated for the time during which the
engine is running.
To start calculation of the average
speed, with ignition key in position 1 or
higher:
1. Select "Avg. speed"
2. Select "Recalculate".
65n
OverviewNavigationEntertainmentComputerIndex
Page 67
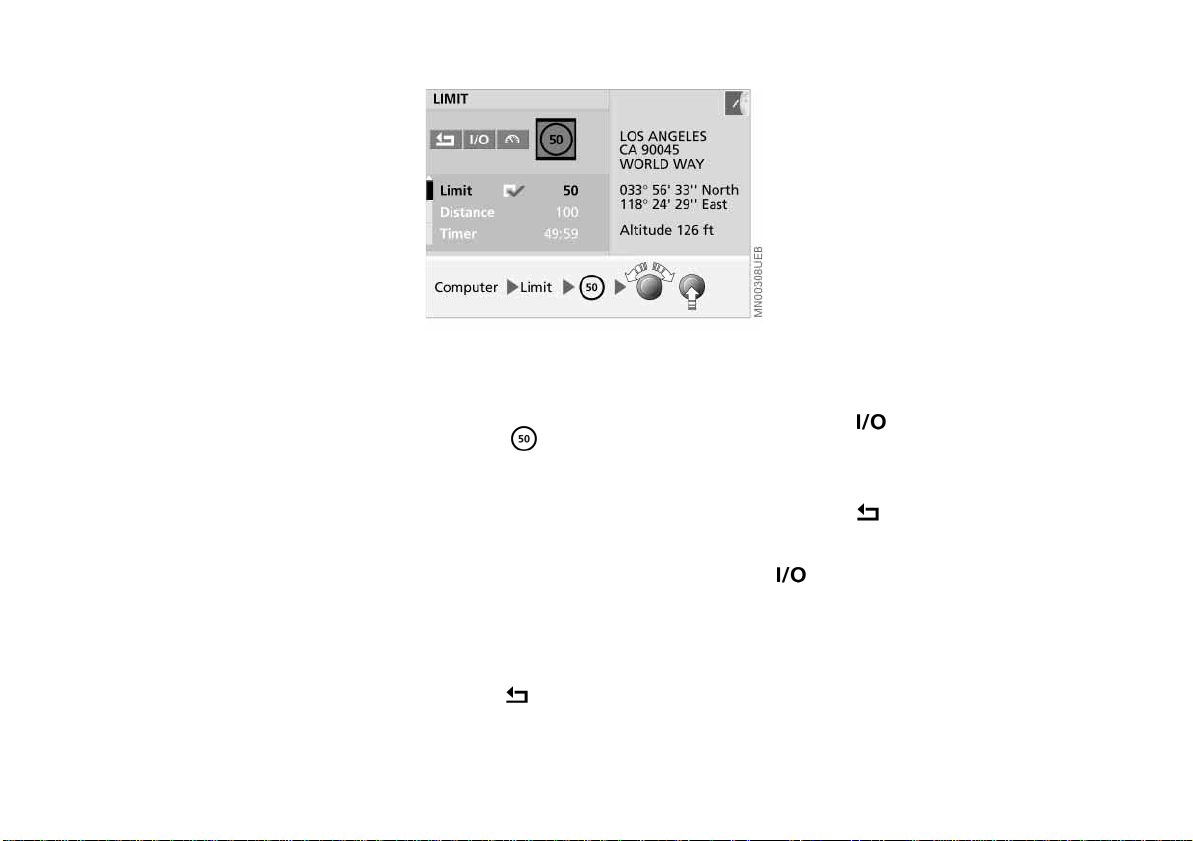
66n
Online Edition for Part No. 01 41 0 157 006 - © 07/02 BMW AG
Speed limit
Assume that you do not want to exceed
50 mph on a stretch of freeway, and
want to know when you reach this
speed (limit).
Setting the speed limit
1. Select "Limit"
2. Select
3. Turn the right-hand rotary button
until the desired speed appears in
the display panel (50 mph in the
example)
4. Press the right-hand rotary button to
store this value.
The selection box is highlighted in
the display
When you reach the limit
> A signal tone sounds.
The speed limit reminder will only be
repeated if you drop below the limit by
more than 2 mph (approx. 5 km/h)
before speeding up again.
Deactivating or reactivating the
limit function
You would like to deactivate the active
speed limit reminder while still retaining
your speed entry for later use.
1. Select "Limit"
2. Select
The selection box is no longer
highlighted
3. Select .
To reactivate the stored speed, select
again.
5. Select .
Page 68
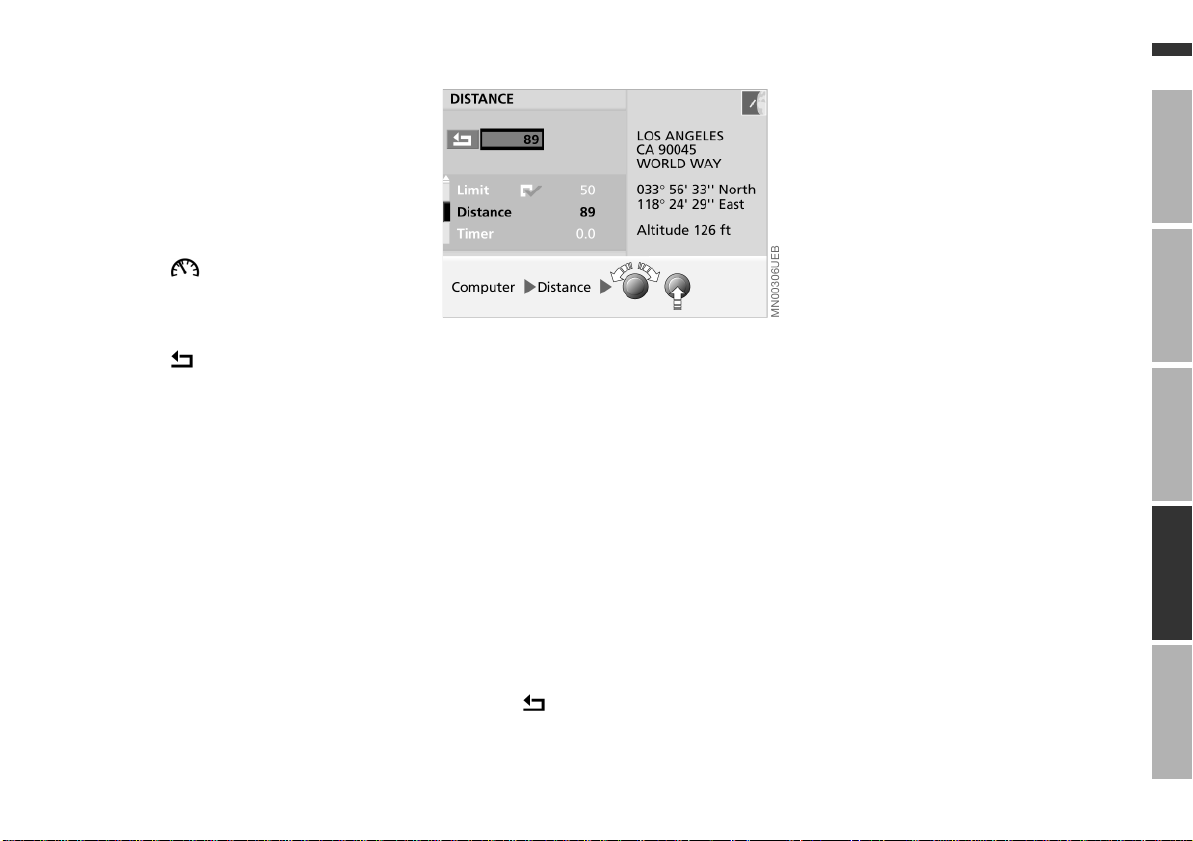
Speed limit Distance
Online Edition for Part No. 01 41 0 157 006 - © 07/02 BMW AG
67n
Adopting your current speed as
the limit
You would like to adopt your current
speed as the speed limit for the rest of
your trip in your BMW.
1. Select "Limit"
2. Select .
The new limit appears in the display
and the selection box is highlighted
3. Select .
The "Distance" function displays the
distance remaining to the destination.
Requirement:
> The distance between the starting
point and the destination has been
entered manually before the start of
driving or
> a destination is entered in the GPS
navigation system, see from page 24.
1. Select "Distance"
2. Set the desired value by turning the
right-hand rotary button and store by
pressing
If the distance is calculated with the
GPS navigation system, then the following calculation steps are run
through after the destination guidance
system is
started:
> Beeline between starting and desti-
nation location as basis
> Approximation in the route calcula-
tion still running
> Adjustment of the value to the calcu-
lated value and the route shown with
the map.
The distance value displayed at the
beginning can still change accordingly
up until the entire route is calculated,
refer to page 33.
OverviewNavigationEntertainmentComputerIndex
3. Select .
Page 69
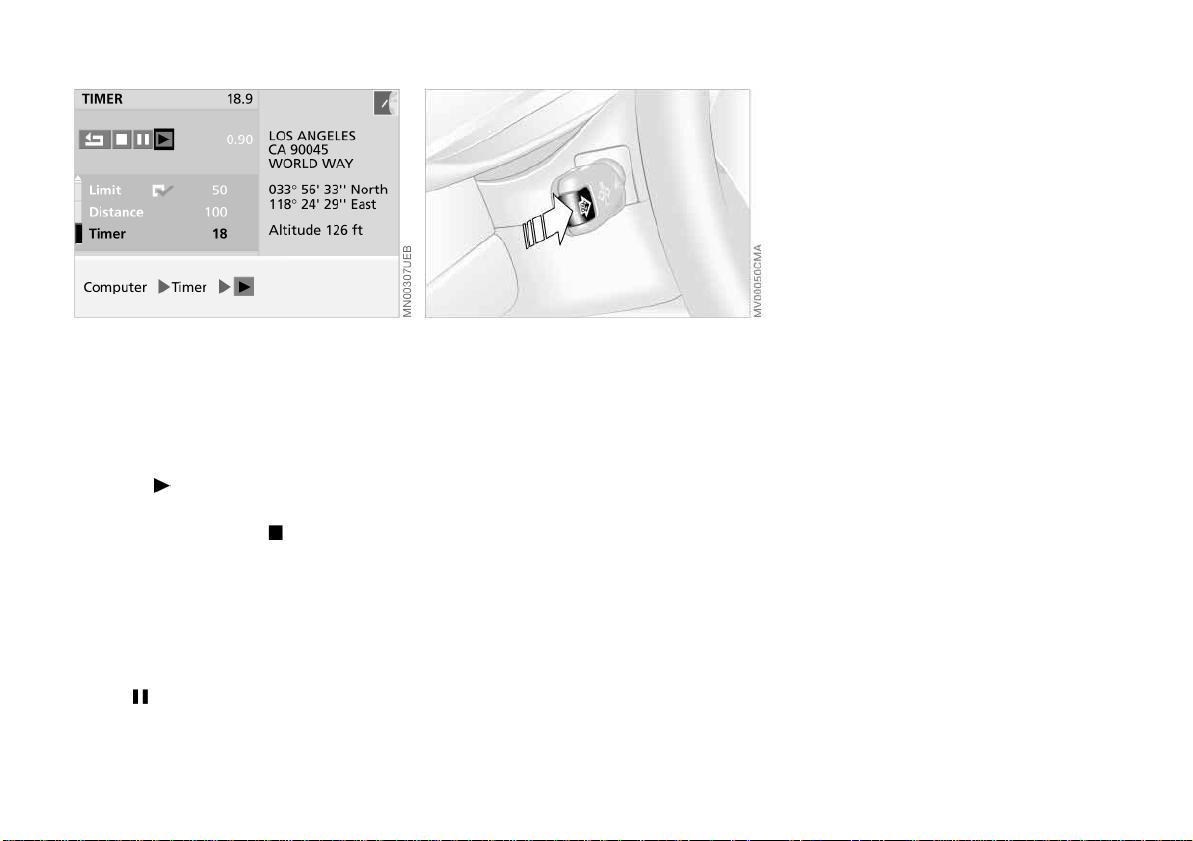
68n
Online Edition for Part No. 01 41 0 157 006 - © 07/02 BMW AG
Stopwatch Remote control
The display can include:
> Time
> Average fuel consumption (1 and 2)
> Range
> Limit
> Distance
> Time of arrival
> Average speed
> Date
> Stopwatch.
Starting and stopping
You want to measure the time between
the starting point and the destination.
1. Select "Timer"
2. Select .
The stopwatch is started and the
marking changes to .
The passing time is displayed next to
the "Timer" function.
To stop the time, select the marked
stop symbol.
Taking an interim time reading
Select .
The interim time is shown on the right.
The stopwatch continues running.
With the ignition key in position 1 and
higher, you can access information
from the computer for display using the
button integrated within the turn signal
lever. Each time the button is pressed
toward the steering column, another
function is displayed in accordance
with the selected settings of the computer.
Page 70
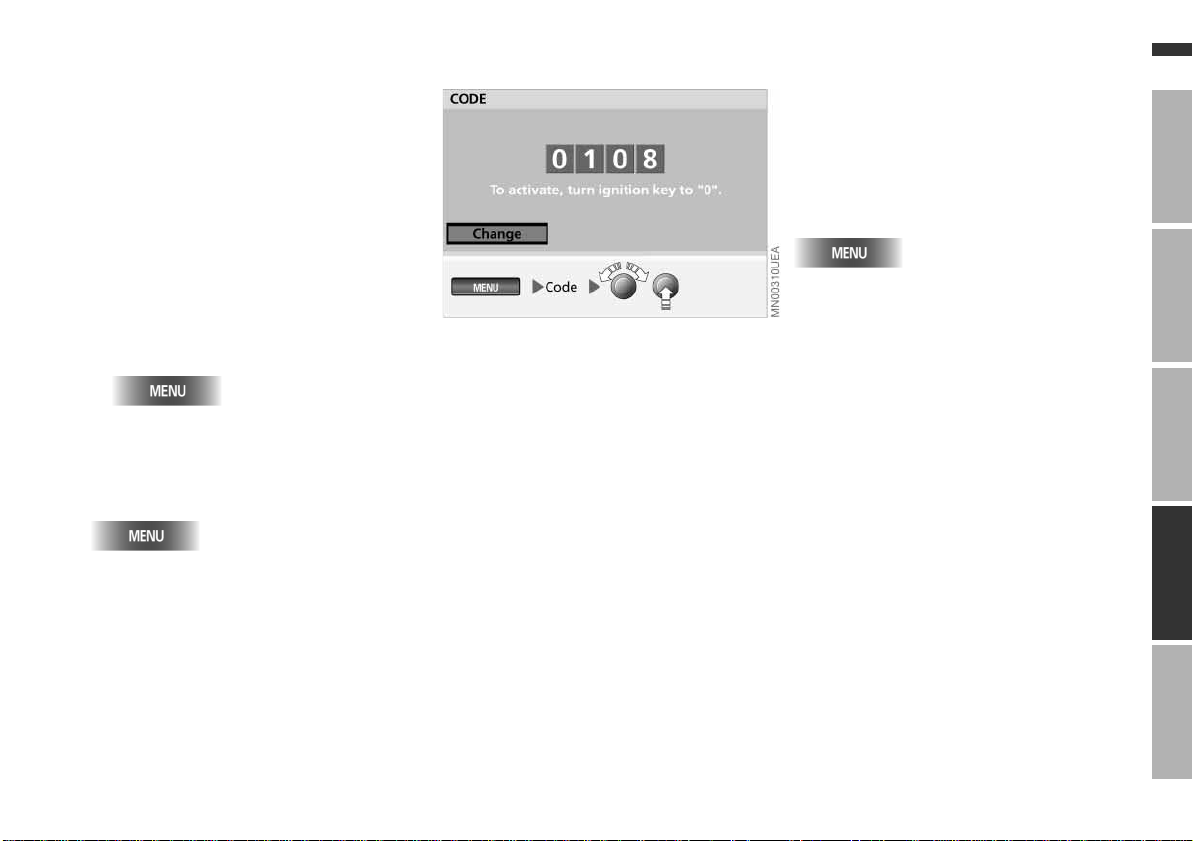
Code: preventing unauthorized persons from starting the engine
Online Edition for Part No. 01 41 0 157 006 - © 07/02 BMW AG
69n
You can choose and enter a code
without which the engine cannot be
started. When the code has been activated, you are required to enter it with
the ignition key in position 1.
Each time the code is activated, it is
valid only until the next time the engine
is started.
If the code is no longer available, emergency deactivation is possible, refer to
page 70.
1. Select "MENU"
2. Select "Code".
To exit this function, press the button
again:
You can use this menu to access the
code functions described in the
following section.
Choosing and activating code
1. Select "Code"
2. Select first input field
3. Enter desired number sequence:
> Turn right-hand rotary button until
desired number between 0 and 9 is
displayed
> Press right-hand rotary button to
confirm entry
> Enter the three subsequent
numbers in the same way.
A note on further procedures
appears.
To correct an entry:
1. Select "Change"
2. Repeat the entry.
To cancel entry of the code, press:
OverviewNavigationEntertainmentComputerIndex
4. To activate the code.
Turn the ignition key to 0.
Page 71
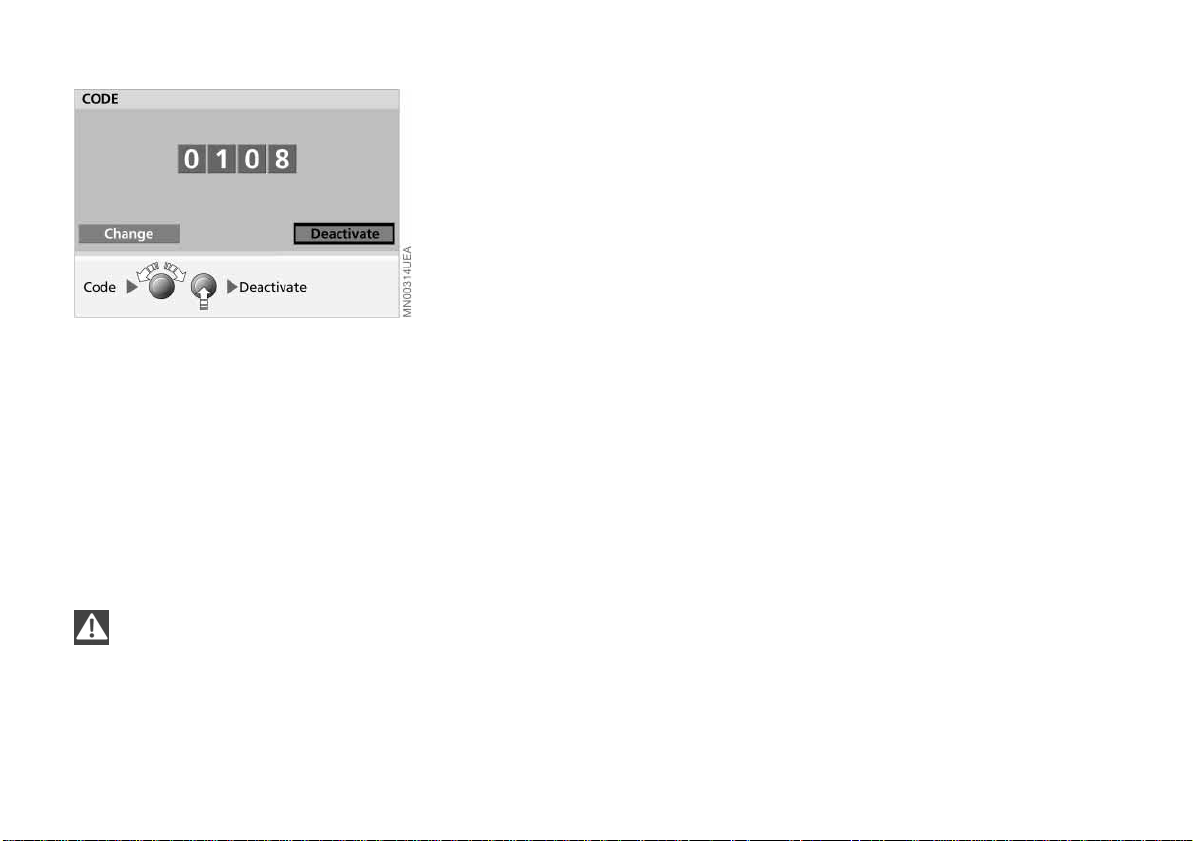
70n
Online Edition for Part No. 01 41 0 157 006 - © 07/02 BMW AG
Code: preventing unauthorized persons from starting the engine
Emergency deactivation
Emergency deactivation can also be
carried out before the three attempts to
start the engine or three incorrect code
entries have been made and the alarm
sounded.
1. Disconnect the battery and wait
about 5 minutes before reconnecting
it; refer to Owner's Manual for Vehicle
Deactivating code
When you are required to enter the
code (ignition key position 1):
1. Enter the code
2. Select "Deactivate".
To correct an entry:
Select "Change" and repeat the code
entry.
After three incorrect code entries
or after three attempts to start the
engine without a code entry, an alarm
sounds for 30 seconds; refer also to
Emergency deactivation.<
2. Turn the ignition key to position 1.
A ten-minute countdown appears on
the screen.
After the ten minutes have elapsed, you
can start the engine.
Page 72
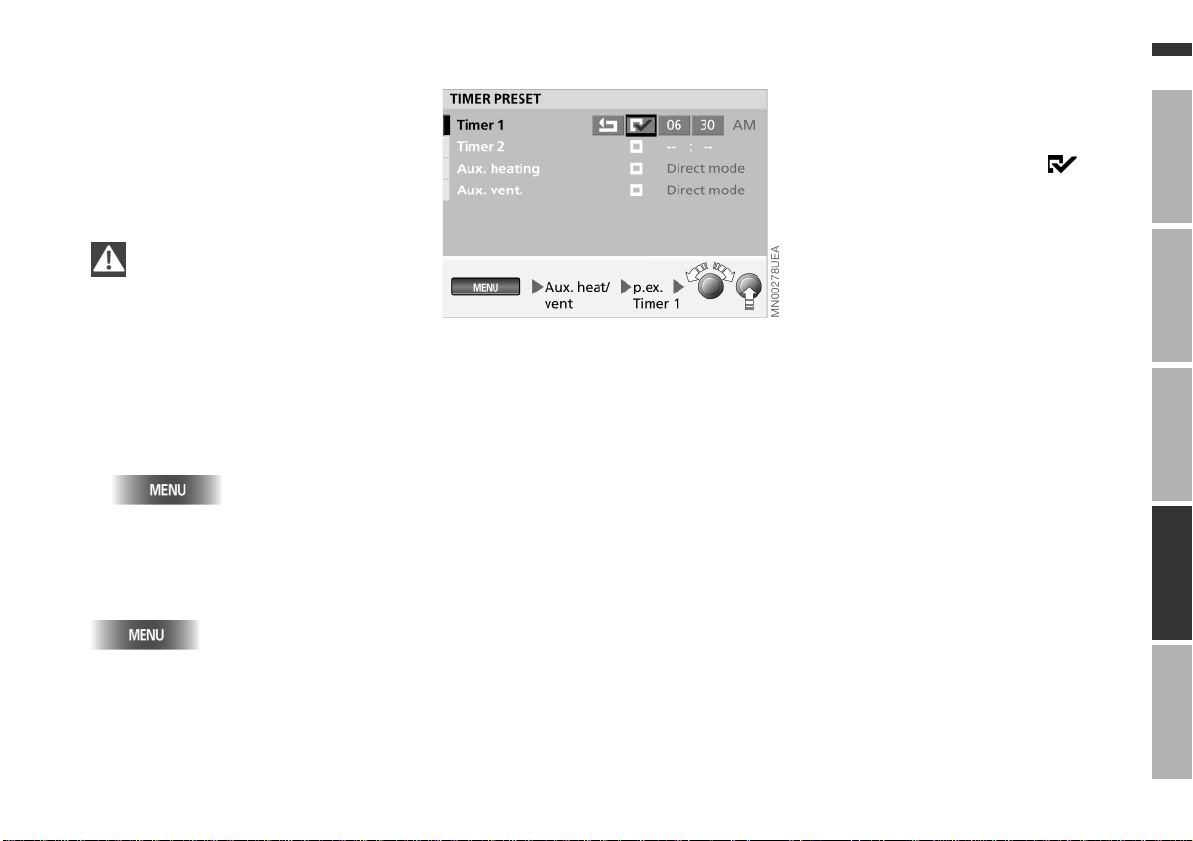
Auxiliary heating*/ventilation
Online Edition for Part No. 01 41 0 157 006 - © 07/02 BMW AG
71n
For your information and your own
safety, please comply with the instructions regarding the auxiliary heating and
ventilation in the corresponding Owner's Manual. The following instructions
refer only to the operation via the
onboard computer.
Never operate the auxiliary heat-
ing/ventilation in enclosed areas.
Otherwise, the inhalation of harmful
exhaust fumes can lead to unconsciousness and death. Exhaust fumes
contain the colorless and odorless yet
poison-ous gas carbon monoxide.
Switch off the auxiliary heating/ventilation when refueling.<
1. Select "MENU"
2. Select "Aux. heat/vent".
To exit this function, press the button
again:
You can use this menu to access the
auxiliary heating/ventilation functions
described in the following section.
Setting timer
Two switch-on times are available (ignition key position 1).
1. Select "Aux. heat/vent"
2. Select desired timer (Timer 1 or
Timer 2)
3. Select hours or minutes on the timer
4. Set the desired time by turning the
right-hand rotary button and store by
pressing.
The corresponding symbol is
highlighted on the screen. The auxiliary heating/ventilation switches off
automatically at the set time.
OverviewNavigationEntertainmentComputerIndex
Page 73
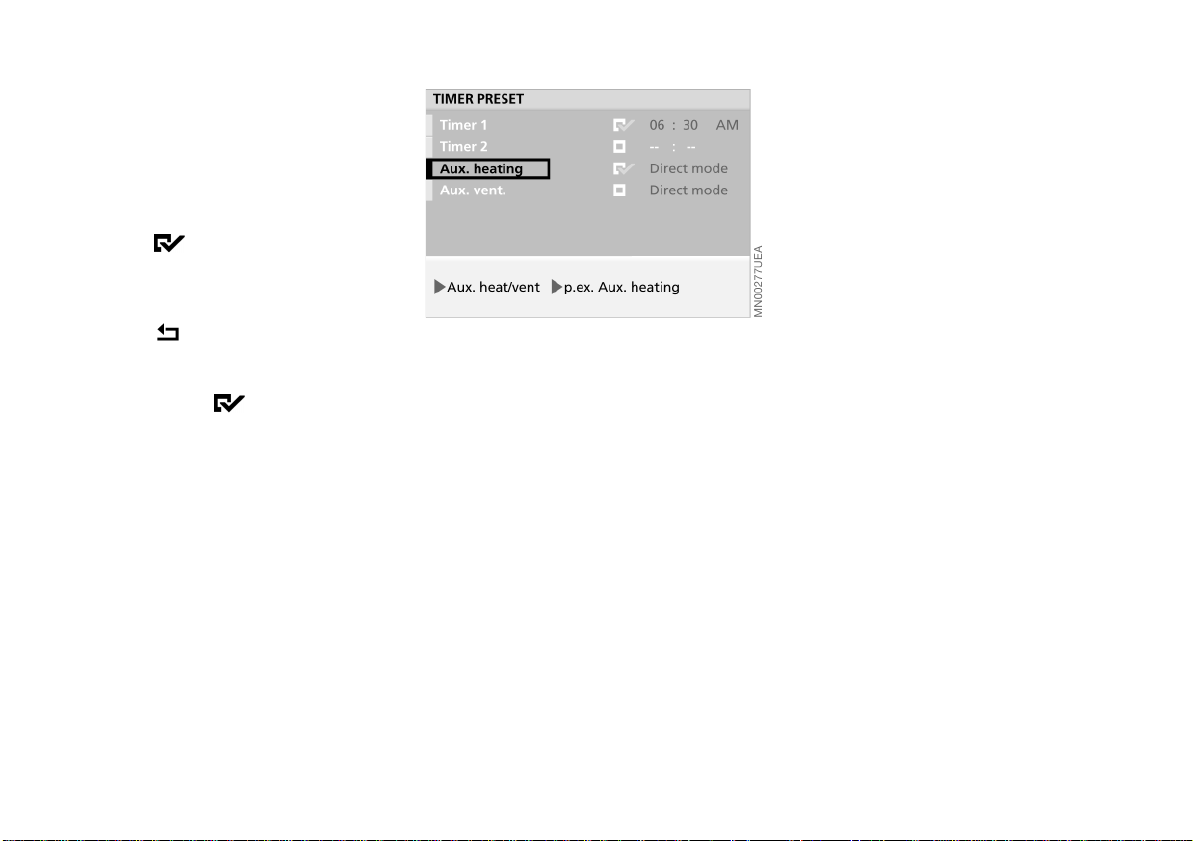
72n
Online Edition for Part No. 01 41 0 157 006 - © 07/02 BMW AG
Auxiliary heating/ventilation
Deactivating or reactivating timer
1. Select "Aux. heat/vent"
2. Select the desired timer (Timer 1 or
Timer 2)
3. Select .
The corresponding selection box is
no longer highlighted
4. Select .
To reactivate the times previously
set, reselect the corresponding
selection box .
To switch off beforehand:
> Repeat steps 1 and 2 or
> press the clock symbol until the
flashing red fan symbol in the screen
panel goes out.
Switching direct mode on/off
You wish to rapidly increase the temperature in your vehicle after an interruption in driving.
1. Select "Aux. heat/vent"
2. Select "Aux. heating" (ignition key
position 1 and 2) or "Aux. ventilation"
(ignition key position 1).
The corresponding selection box is
highlighted on the screen.
After 30 minutes, the auxiliary heating/
ventilation switches off automatically.
Page 74

73n
Online Edition for Part No. 01 41 0 157 006 - © 07/02 BMW AG
OverviewNavigationEntertainmentComputerIndex
Page 75

74n
Online Edition for Part No. 01 41 0 157 006 - © 07/02 BMW AG
Page 76

Overview
Online Edition for Part No. 01 41 0 157 006 - © 07/02 BMW AG
Navigation
Entertainment
Computer
75n
OverviewNavigationEntertainmentComputerIndex
Index
Stichworte
Page 77

Online Edition for Part No. 01 41 0 157 006 - © 07/02 BMW AG
Everything from A to Z
A
Abbreviations 81
Address
deleting 40
entry 23
memory 39
storing 39
Adjusting navigation
volume 19
Adjustments 19
ALARM 51
Arrival 65
Audio
directions 33, 37
instructions 37
output 46
Autoreverse, refer to
Fast forward/rewind 55
Autostore 52
Auxiliary heating/
ventilation 71
switching direct mode on/
off 72
timer 71
Average fuel consumption,
units 20
Average speed 65
B
Balance 47
Bass 47
C
Calling up an address 40
Care, refer to the Caring for
your vehicle brochure
Cassette
Dolby B/C 55
eject button 11
ejecting 54
fast forward 55
music scan 55
noise suppression 55
rewind 55
selecting 11
side selection 54
slot 11
starting 54
stopping 54
TAPE CLEAN 54
TAPE ERROR 54
track search 55
track selection 54
Cassette care, refer to the
Caring for your vehicle
brochure
CD care, refer to the Caring
for your vehicle brochure
CD changer 56
atmospheric humidity 57
audio sampling 59
CD CHECK 58
copy protection 57
fast forward 58, 59
HIGH TEMP 58
installation location 56
music track search 58
NO DISC 58
NO DISCS 58
NO MAGAZINE 58
operating
temperatures 57
random 59
random play 59
reverse 58, 59
safety 57
SCAN 59
selecting 11
selecting a CD 58
self-recorded CD 57
skipping tracks 58, 60
starting 57
stopping 57
temperature range 57
CD CHECK 58
Changing the time
display 19
City
center 43
limits 26
multiple entries for one
name 25
selection 25
Cleaning, refer to the Caring
for your vehicle brochure
Clock, setting 19
Code
choosing and
activating 69
deactivating 70
emergency
deactivation 70
Color set 19
Consumption 19, 65
Control concept 16
Controls
at a glance 8
in summary 10
onboard computer 9
radio 11
Copyright 2
Current position 41
correcting 41
display 41
storing 39
Current position, refer to
Position 39
Current speed 67
Cursor 27
D
Date
display mode 19
setting 18
Default settings 47
Deleting the entry 24
A-Z
Page 78

Everything from A to Z
Online Edition for Part No. 01 41 0 157 006 - © 07/02 BMW AG
77n
Destination
entering 25
entry map 41
input map 27
manual entry 23
selection options 23
storing 27
Destination address,
deleting 31
Destination guidance
system, launching 33
Destination memory,
creating 39
Destination selection with
information 29
map 27
Device
cleaning, refer to the
Caring for your vehicle
brochure
Device, display 10
Directional orientation
in direction of travel 34
in northern direction 34
Display 8
texts 19
Display elements
onboard computer 8
radio 10
Distance
unit of measure 20
Distance to destination 67
Dolby B/C 55
DSP sound system 61
calling up tone control
memory 62
demo 61
equalizer functions 61
individual tone control
memory 62
sound pattern 61
sound simulation 61
switching on and off 61
E
Editorial notice 5
Eject button 11
Emergency deactivation 70
Entering destination
country 24
Entry map for position and
destination 41
F
Fader 47
Fahrenheit 19
Fast forward
cassette 55
CD 58
Fastest route 32
Fuel consumption 65
Full screen 34
display 15
Functions
at a glance 12
G
Global Positioning System
(GPS) 22
GPS (Global Positioning
System) 22
logo 43
GPS navigation 19
GPS navigation system
map CD/DVD 22
reception 22
safety 22
starting 23
Guidance system
interrupting 38
terminating 38
H
HIGH TEMP 58
I
Indicator lamps
phone 9
radio mode 11
Information
on location 30
on the destination 29
Installation location
CD changer 56
K
Keys 8, 10
L
List
country 24
Locations with the same
name 25
M
Main highways 32
Manual station search 49
Map
destination entry 41
destination input 27
Map CD
country name 25
Map CD/DVD
changing 22
country name 25
house number 26
location 22
stored sector 22
street name 26
Map positioning, altering 34
Map scale,
changing 27, 34
Memory, radio 52
MENU 16
Menu or function level,
returning 17
Menu selection
menu 16
OverviewNavigationEntertainmentComputerIndex
Page 79

Everything from A to Z
Online Edition for Part No. 01 41 0 157 006 - © 07/02 BMW AG
Modifying
route preference 36
route section 36
Monitor mode, split
screen 33
Multifunction steering wheel,
refer to vehicle Owner's
Manual
Music scan 55
Music track search, using
buttons 58
Music track, random
sequence 59
N
Navigation computer 22
Navigation system GPS
reception 22
safety 22
New route 36
NO DISC 58
NO DISCS 58
NO MAGAZINE 58
Noise suppression 55
O
Operating temperature
range, CD changer 57
Operation
via multifunction steering
wheel, refer to vehicle
Owner's Manual
Operation via turn signal
lever 68
Outside temperature 64
Overview
functions 12
onboard computer
controls 8
radio controls 10
screen displays 14
P
Position
display 41
Preventing unauthorized
persons from starting the
engine 69
Q
Quality of sound
reproduction 55
R
Radio
automatic storage 52
SCAN audio sampling 50
selecting 11
station selection 53
storing frequencies 52
storing stations 52
switching off 46
switching on 46
volume 46
Radio Data System
(RDS) 48
Radio station
audio sampling 50
scan 50
RANDOM 59
Random CD track
selection 59
RANDOM sequence
generator 59
Range 64
RDS (Radio Broadcast Data
System)
activating 49, 51
Recent destinations 30
Remote control 68
Resume guidance 38
Return symbol
selection 17
Returning
menu or function level 17
to the starting point 31
Reverse, CD 58
Rewind, cassette 55
Road map 34
Rotary button
onboard computer
operation 8
radio operation 10
Route
display 34
instruction 37
listing 35
map 34
selection 32
Route list, traffic
information 35
Route preference,
changing 36
Route selection 32
Route, changing 36
S
Safety
CD changer 57
emergency
deactivation 70
navigations system 22
Safety notice 19
audio source 19
computer 66
onboard computer 19
Sampling function
CD 58
menu-guided 59
Satellite 22
Scale, changing 27, 34
Scan
cassette 55
radio station 50
Page 80

Everything from A to Z
Online Edition for Part No. 01 41 0 157 006 - © 07/02 BMW AG
79n
SCAN audio sampling
CD 59
radio 50
Screen display mode
full screen 15, 34
selection 19
split screen 15
Screen displays, at a
glance 14
Search, CD 58
Secondary roads 32
Selecting
audio source 11
function 16
language 19
preset stations 53
route 32
Selection
from map 27
return symbol 17
Shortest distance 32
Software status 5
Sound system, adjustment
options 47
Sound, center positions 47
Speed
average 65
limit 66
Speed limit 66
Split screen 15, 33
Station keys 52
Status at time of printing 5
Stopwatch 68
interim time reading 68
starting and stopping 68
Stored sector, map CD 22
Storing stations, radio 52
Street entry 25
Symbol
additional functions 16
navigation 29
Owner’s Manual 5
scrolling back 17
scrolling forward 17
T
TAPE CLEAN 54
TAPE ERROR 54
Temperature
resetting display 20
unit of measure 19
Text information,
navigation 29
Time of arrival 65
Time, display mode 19
Timer 68
setting 71
TONE 47
Track search
cassette 55
CD 59
Track, sampling 59
Traffic information, route
list 35
Treble 47
U
Unit
distance 19
fuel consumption 19
portrayal 8
temperature 19
Using
the Owner's Manual 4
V
Vehicle position, refer to
Position 39
Viewing screen, two
sections 33
Voice messages 37
Volume
audio driving
instructions 46
navigation 37
radio 46
Volume control
front/rear 47
right/left 47
W
Waveband 48
Wordmatch principle, input
name 42
OverviewNavigationEntertainmentComputerIndex
Page 81

Abbreviations
Online Edition for Part No. 01 41 0 157 006 - © 07/02 BMW AG
Screen display Meaning
AM Amplitude Modulation — AM waveband/AM memory mode
Aux. heat/vent Auxiliary heating/ventilation
Avg. speed Average speed
BC Computer
CD Compact Disc
Consumpt. Fuel consumption 1 and 2
Dest. guide Destination guidance system — start of destination guidance system after destination input
Dest. input map Destination input map — destination input via map
Destin. Destination
Direct. of travel Direction of travel
B/ C Dolby B/Dolby C — noise suppression
DSP Digital Sound Processing
DVD Digital Versatile Disc
FM Frequency Modulation — FM waveband/FM memory mode
GPS Global Positioning System — navigation system
min – max Minimum to maximum
Navi. volume Navigation volume – adjustment option
No./Intersection House number or intersection — destination input
Out. temp. Outside temperature
P 1…6 Station number on the FM and AM wavebands
PTY Program type (news, sports, pop, etc.) in FM waveband
RDS Radio Broadcast Data System in FM waveband
Save dest. Save destination – destination input via map
Page 82

More about BMW
Online Edition for Part No. 01 41 0 157 006 - © 07/02 BMW AG
bmwusa.com
The Ultimate
Driving Machine
01 410 157 006 ue Bordmonitor mit Navigation
 Loading...