


Internet Camera
User’s Manual
Version: 1.0
Released Date: March 2007
|
|
|
Contents |
|
1. |
Introduction |
.......................................................................................................... |
1 |
|
2. |
Package Content................................................................................................. |
1 |
||
3. |
System Requirement........................................................................................... |
1 |
||
4. |
Hardware Installation........................................................................................... |
2 |
||
|
4.1. |
LED ............................................................................................and Focusing |
2 |
|
|
4.2. |
Camera ....................................................................................................Ports |
3 |
|
|
4.3. |
Installation .......................................................................................Procedure |
4 |
|
5. |
Software Installation ............................................................................................ |
5 |
||
6. Using the Administrator ...........................................................................Utility |
11 |
|||
|
6.1. |
General ...............................................................................................Setting |
12 |
|
|
6.2. |
Detail ..................................................................................................Setting |
14 |
|
|
6.2.1. |
....................................................................................... |
Network Setting |
15 |
|
6.2.2. |
.............................................. |
Wireless Settings (*Wireless Model Only) |
16 |
|
6.2.3. |
.......................................................................................... |
E - Mail Setting |
19 |
|
6.2.4. |
...................................................................................... |
PPPoE Settings |
20 |
|
6.2.5. |
........................................................................................... |
FTP Settings |
21 |
|
6.2.6. |
............................................................................... |
Date / Time Settings |
22 |
|
6.2.7. |
............................................................................................... |
Resolution |
23 |
|
6.2.8. |
.................................................................................... |
Advanced Setting |
24 |
|
6.2.9. |
....................................................................................................... |
Users |
25 |
|
6.2.10. ....................................................................................................... |
Tools |
26 |
|
|
6.2.11. ....................................................................................................... |
About |
27 |
|
|
6.3. |
Setting ................................................................................................Wizard |
28 |
|
7. Using the Camera ..................................................................................Viewer |
30 |
|||
|
7.1. |
Panel ...........................................................................................Introduction |
30 |
|
|
7.2. |
Camera ..............................................................................................Buttons |
31 |
|
|
7.3. |
Camera ................................................................................................Status |
32 |
|
|
7.4. |
Control ...............................................................................................Buttons |
32 |
|
|
7.5. |
Video .............................................................................................Recording |
34 |
|
|
7.6. |
Change .........................................................................................Resolution |
34 |
|
|
7.7. |
View ...............................................................Four Cameras Simultaneously |
35 |
|
|
7.8. |
Viewer .......................................................................................Utility Setting |
36 |
|
|
7.8.1. |
..................................................................................................... |
Setting |
38 |
|
7.8.2. |
................................................................................................ |
Recording |
39 |
|
7.8.3. |
...................................................................................................... |
Status |
42 |
|
7.8.4. |
................................................................................................... |
General |
43 |
|
7.8.5. |
About....................................................................................................... |
45 |
|
7.9. |
Playback ......................................................................................................... |
46 |
|
7.10. |
Rotate Video ................................................................................................... |
48 |
8. Web Connection and Setup............................................................................... |
49 |
||
|
8.1. |
Camera Setting............................................................................................... |
51 |
|
8.2. |
LAN Setting..................................................................................................... |
53 |
|
8.3. |
WLAN ............................................................................................................. |
56 |
|
8.4. |
E-Mail and FTP............................................................................................... |
58 |
|
8.5. |
Motion Detection............................................................................................. |
60 |
|
8.6. |
System............................................................................................................ |
61 |
|
8.7. |
Status.............................................................................................................. |
62 |
|
8.8. |
Users .............................................................................................................. |
63 |
|
8.9. |
Log.................................................................................................................. |
64 |
Frequently Asked Questions..................................................................................... |
65 |
||
9. |
Technical Specifications .................................................................................... |
66 |
|
10. |
Appendix A Router/Gateway Setup for Internet Viewing ................................... |
67 |
|
11. |
Appendix B Set up WLAN step by step ............................................................. |
69 |
|
12. |
Appendix C Viewing via UPnP in Windows XP ................................................. |
75 |
|
13. |
Appendix D Configure Windows 2003 Server ................................................... |
79 |
|
1.Introduction
Thank you for choosing the Internet Camera. This Internet Camera sends live video through 10/100Mbps wired network to a web browser or camera viewer across Internet anywhere in the world! This compact, self-contained unit lets you keep an eye on your home, your kids, and your workplace—whatever’s important to you.
How does the Camera do all of this? Unlike standard “web cams” that require an attached PC, the Internet Camera can connect directly to a network. The MJPEG video compression produces a high quality, high-frame rate, 640 x 480 video stream.
The included Camera Viewer utility lets you record the video to your local hard drive, “live” or on a predetermined schedule.
Use the instructions in this Guide to help you integrate the Camera into your network. These instructions should be all you need to get the most out of the Internet Camera.
2.Package Content
One Internet Camera
One Power Adapter
One Camera Stand
One 100M Category 5 Ethernet Cable
One Quick Installation Guide
One CD (Including Manual/Utility/Driver)
One Antenna(Wireless Model)
If any of the above items are missing, please contact your supplier.
3.System Requirement
System requirement for PC, MAC or Notebook PC to access the Internet Camera are:
OS System: Windows 98 , ME , 2000, XP + SP2, Server 2003
IE Version: 6.0.29 + SP2 or above
CPU: Intel Pentium III 750MHz above or Intel Celeron 1GHz above
Memory Size: 128MB (256MB recommended)
DirectX 9.0 or above
VGA card with fully DirectX 9.0 supported.
VGA Card Resolution: 800 x 600 or above
1
4.Hardware Installation
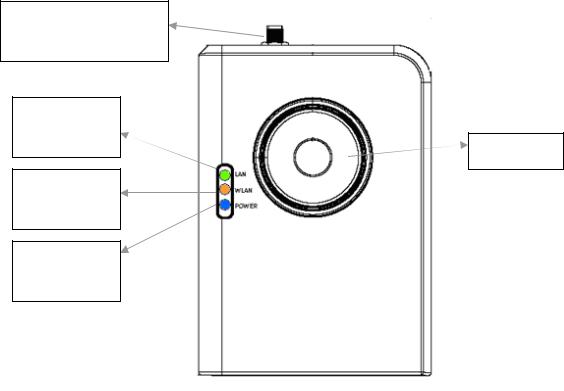
4.1.LED and Focusing
The Camera head and its focus ring allow you to modify the aim and focus of the Camera. To adjust the Camera’s focus, rotate the dark focus ring.
There are four LEDs indicating the camera status and networking status.
yMonitoring
When someone is viewing the camera, the LED will light.
yReady
When the camera is power on and ready for access, the LED will light.
yLAN
When the Internet Camera is linking to wired network, the LED is lighting. The LED is flashing when video is transmitted or received through wired network.
yWLAN
When the Internet Camera is linking to wireless network, the LED is lighting. The LED is flashing when video is transmitted or received through wireless network.
Wireless SMA Connector
(*Wireless Model Only)
LED Green:
LAN Activity
Focus Ring
LED Amber:
WLAN Activity
LED Blue:
Power On
2
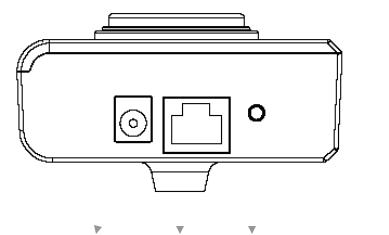
4.2.Camera Ports
The Camera features three ports and a Reset button.
yPower
The Power port is where you can connect the power adapter.
yLAN
The LAN port is where you can connect the Ethernet network cable.
yWLAN (Antenna Connector)
This round connection is standard Reverse SMA connector where any antennas with Reverse SMA connector can connect to the Internet Camera..
yReset
1.If problems occur with your Internet Camera, press the reset button with a pencil tip (for less than 2 seconds) and the Internet Camera will re-boot itself, keeping your original configurations.
2.If problems persist or you experience extreme problems or you forgot your password, press the reset button for longer than 5 seconds and the Internet Camera will reset itself to the factory default settings (warning: your original configurations will be replaced with the factory default settings).
Power Jack |
|
LAN Port |
|
Reset Button |
|
|
|
|
|
3
4.3.Installation Procedure
1.Unpack the Internet Camera package and verify that all the items listed in the Chapter 2 are provided.
2.Connect the Internet Camera to your network by attached the network cable from the switch/router to the UTP port of the Internet Camera.
3.Connect the power adapter to the Internet Camera and plug the power adapter to power outlet. The Internet Camera will be powered on. When the Internet Camera is ready, the Ready LED will light.
4.Make sure that you have installed correct VGA driver and DirectX 9.0 or above.
Note: It is highly recommended to use the power adapter shipped with the Internet Camera, do NOT use any other power adapter from any sources.
4
5.Software Installation
Follow the simple steps below to run the Install Wizard to guide you quickly through the Installation process. The following installation is implemented in Windows XP. The installation procedures in Windows 2000/Server 2003 are similar.
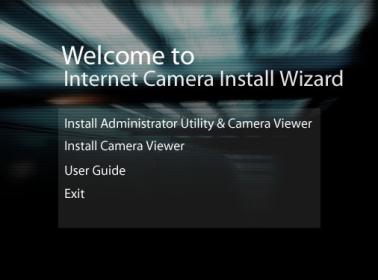
1.Insert the CD shipped along with the Internet Camera into your CD-ROM drive. The “Autorun.exe” program should be executed automatically. If not, run “Autorun.exe” manually from “Autorun” folder in the CD.
2.The Install Wizard will show four selections, select the program you want to install or click “Exit” to install the program later. The following installation steps are the demonstration of “Install Administrator Utility & Camera Viewer”.
5

3. The system will start the installation procedures. Click “Next” to continue installation.
4.If you wish to install the software program in an alternate location, click “Change”; otherwise click “Next” to move on to the next step.
6
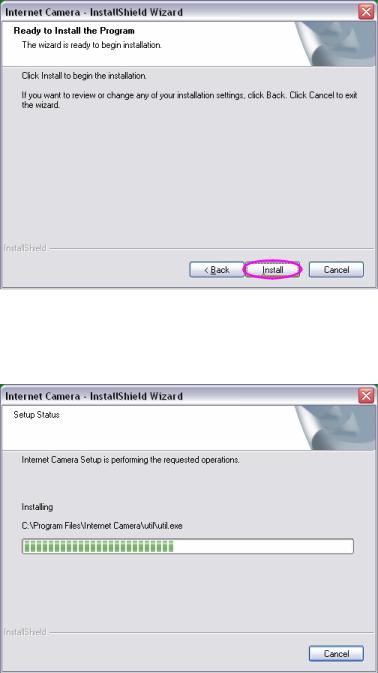
5. Click “Install” to start installing the program.
6. The system will install the program automatically.
7

7. Click “Finish” to complete the software installation.
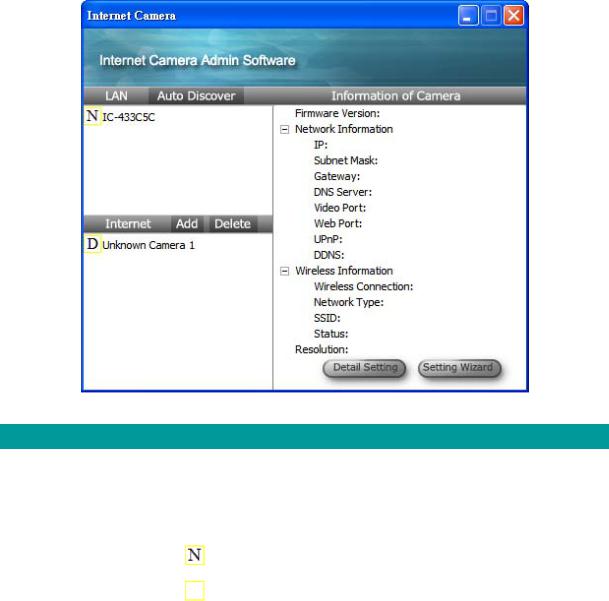
8.”Administrator Utility“ will be run automatically after installation. On the Internet Camera first page, the cameras found in the network are listed in the left window. Choose the one you want to configure and click “Setting Wizard” to proceed.
“N” means the camera is new and not configured.
8
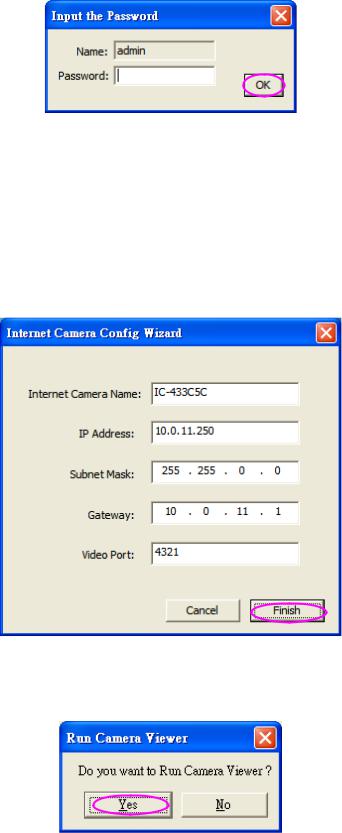
9. Please enter the default password “1234” and click “OK” to login to the IP setup page.
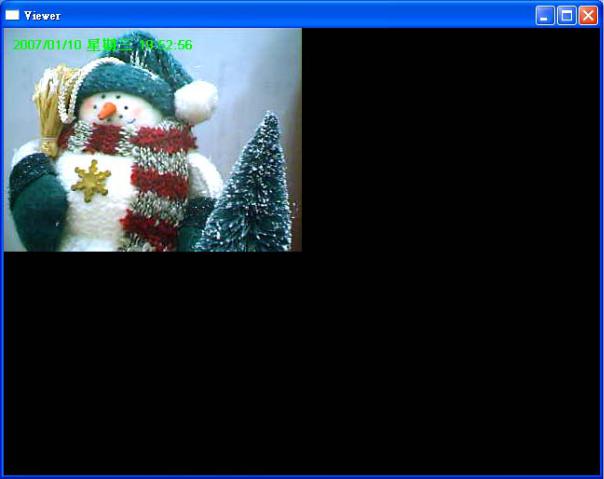
10.Internet Camera is working through the network (TCP/IP Protocol). The IP address and subnet mask setting must be correct, or you cannot access to the camera. The wizard program will detect the IP address status of your network automatically and suggest a free IP address for the Camera. You can accept the suggested value or enter the value manually. If you enter the value manually, please be aware that the “Subnet Mask” must be the same for both the camera and the PC. Click “Finish” to apply the configuration.
11.This wizard will pop up a window to ask you if you want to run the “Camera Viewer” and see the video of the Camera immediately. Select “OK” to run “Camera Viewer”.
9
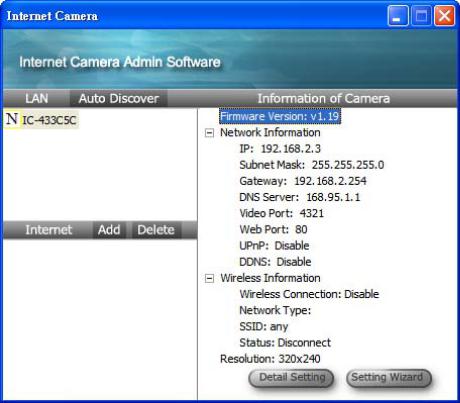
12.The “Camera Viewer” will show the video automatically. Congratulations, you can use the camera through the network to view the video from now on.
10
6.Using the Administrator Utility
The Administrator Utility allows users to search and setup the cameras located within the Intranet or on the Internet. From the utility, users can view all the information of the selected camera; furthermore, it provides a setting wizard, which can guide users to add the camera to the network easily and promptly.
There are two ways to run the Administrator Utility as follows.
1.Click “Start”, select “Programs\IP Camera\Admin Utility” to run the utility.
2.Double click the “IP Camera Admin” icon  to run the utility.
Once the utility is started, it will search all the cameras within the network. To do more settings, please refer to the description in the following sections.
11
6.1.General Setting
LAN
Auto Discover |
Click the button will search the camera within the network. |
Camera List |
The list shows the camera name and the setup status of the |
|
camera. |
|
It means the camera is in the default setting. |
|
It means the camera is configured before. |
|
|
Internet |
|
Add |
Click “Add” will appear a window for you to enter the IP Address |
|
of the camera on the Internet. |
Delete |
Click “Delete” to delete the camera from the list. |
Camera List |
The list shows the camera name and the connect status of the |
|
camera. |
|
12 |
|
It means the camera is disconnected or not in |
|
the Internet. |
|
It means the camera is connected. |
|
|
Information of Camera |
|
Camera Information |
It displays all information of the selected camera. The information |
|
includes Firmware Version, Network Information, IP Address, |
|
UPnP Setting, DDNS Setting, Resolution and E-mail setting, etc. |
|
|
Camera Setting |
|
Detail Setting |
Click “Detail Setting” to do more setting of the camera such as IP |
|
address, Resolution, password and firmware upgrade, etc. |
Setting Wizard |
Click “Setting Wizard” to setup the necessary setting for the |
|
camera. |
|
|
13
6.2.Detail Setting
When you click the “Detail Setting”, a screen will pop up for you to enter the “Administrator Name” and “Password”. The default value is as follows.
Name: “Admin”
Password: “1234”
If the name and password you enter are correct, you can start to setup the camera.
14
6.2.1.Network Setting
Network Setting
Internet Camera Name |
The default camera name is “IC1500WG”. It is recommended to |
|
name a meaningful name for the camera. |
IP Address |
Enter an unused IP Address within the IP address range used on |
|
your LAN. If the IP Address of your LAN is from the 192.168.2.1 |
|
to 192.168.2.254, you can set an unused IP Address from the |
|
range for the camera, for example: 192.168.2.250. |
Subnet Mask |
The Subnet Mask field must match the subnet setting on your |
|
LAN. For example: 255.255.255.0. |
Gateway |
The Gateway is used to forward frames to destinations in a |
|
different subnet on the Internet. The Gateway setting must be the |
|
15 |
|
same with the gateway used by the PCs on your LAN. |
DNS Server |
DNS Server (Domain Name Server) that translates names to IP |
|
addresses. Set the same DNS Server as the PCs on your LAN. |
|
|
|
|
Network Setting |
|
Video Port |
The Video Port is used to transmit or receive the video streaming |
|
in the network. The default port setting is “4321”. If you want to |
|
view the video from the camera, the port setting should be |
|
correct. |
Web Port |
This camera support web connection, the default web port is 80. |
|
Since the web server may use port 80, you can use a different |
|
port for the camera. If you change the web port from 80 to 8080, |
|
you must type http://192.168.2.3:8080 to connect the camera |
|
through the web browser. |
|
|
6.2.2.Wireless Settings (*Wireless Model Only)
16
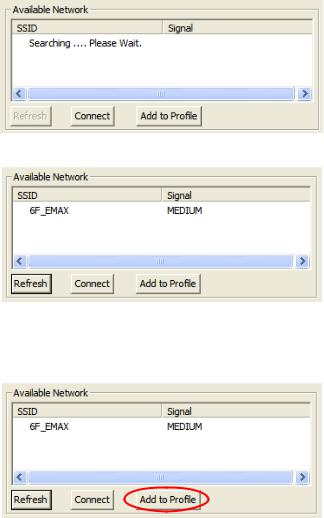
Utility will site survey automatically or you can press “Refresh” button to survey the AP router manually.
After site survey procedure, there will show existing AP SSID.
Then press “Connect” to connect AP router or press “Add to Profile” to configure the Wireless WEP and WPA encryption.
17
There are WEP(Open System/Shared Key) ,WPA-PSK,WPA2-PSK and WPANone encryption settings. You can choose one to match AP router wireless settings.
After set the profile, Please remove the LAN cable then IP Camera will connect to AP router automatically.
LED Status Diagram
Wired Setting Environment |
Wireless Setting Environment |
You must configure the wireless settings from wired environment. Then you can remove the wired cable and start wireless connection.
18
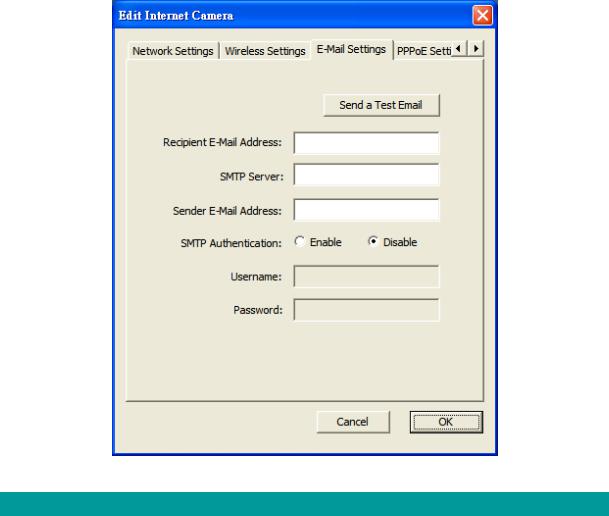
6.2.3.E-Mail Setting
E-Mail Setting
Recipient E-Mail Address |
This camera supports “Snap Shot” and “Motion Detection” |
|
functions. You can snapshot a picture and send the picture by |
|
E-Mail. Enter the E-Mail Account for receiving the picture. |
SMTP Server |
Enter the SMTP Server for the E-Mail sending. |
Sender E-Mail Address |
Specified the e-mail address of the e-mail sender. |
Authentication |
Enable or Disable the SMTP Authentication function |
Username |
When Authentication is enabled, input the SMTP Username. |
Password |
When Authentication is enabled, input the password. |
|
19 |

Send a Test Email |
Press this button to send a test e-mail to your mailbox. You can |
|
use this function to test if your setting is correct. |
|
|
6.2.4.PPPoE Settings
FTP Settings
Enable/Disable |
If enable the PPPoE function, IP Camera will use PPPoE for |
|
network connection first. The default value is “Disable”. |
Username |
Enter the Username of PPPoE connection. |
Password |
Enter the Password of PPPoE connection |
MTU |
A maximum transmission unit (MTU) is the largest size packet or |
|
frame, specified in octets (eight-bit bytes), that can be sent in a |
|
packetor frame-based network such as the Internet. |
20
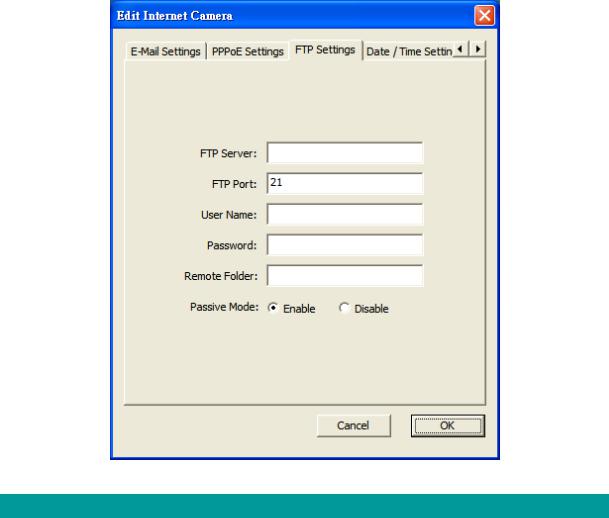
6.2.5.FTP Settings
FTP Settings
FTP Server |
This camera supports “Motion Detection” functions. When Motion |
|
Detection event occurred, you can record the pictures to FTP |
|
server. Enter the FTP address for receiving the pictures. |
FTP Port |
Enter the port of the FTP server. |
User Name |
Specify the user account of ftp server. |
Password |
Specify the Password of your ftp account. |
Remote Folder |
Specify the folder of the ftp site that you want to store the video. |
Passive Mode |
If your Camera is under NAT, you usually need to enable this |
|
|
|
21 |
feature.
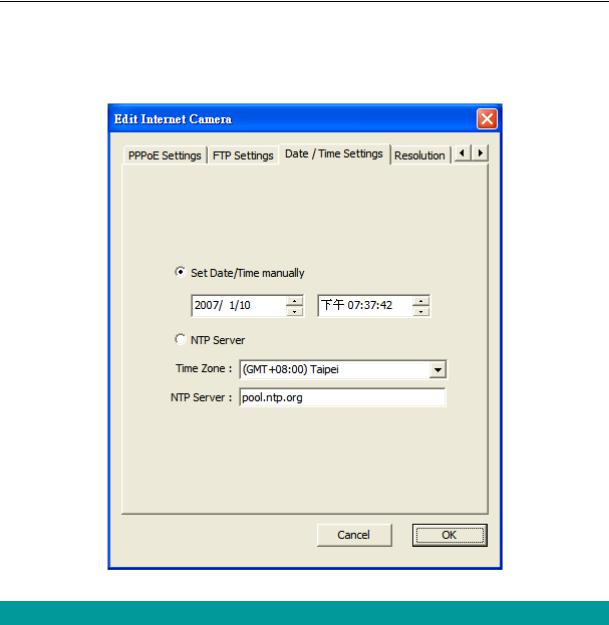
6.2.6.Date / Time Settings
Date / Time Settings
Set Date/Time manually |
Set the current Date and Time. |
NTP Server |
Synchronize the Date and Time with NTP server. |
Time Zone |
Select the time zone that your camera put on. |
NTP Server |
Specify the IP Address of the NTP Server. |
|
|
22
 Loading...