


®
OPERATOR, PARTS AND INSTALLATION MANUAL
BX4322
Rangefinder® II Tow Bar
Class III (5000 lb) 2 Inch Coupler
TOWING PRODUCTS DIVISION
SAFETY
DO NOT INSTALL, OPERATE OR USE THIS EQUIPMENT UNTIL THE FOLLOWING OPERATING AND SAFETY INSTRUCTIONS HAVE BEEN READ AND UNDERSTOOD.
This symbol is used to bring attention to safety precautions and instructions. When you see this symbol, be alert and pay attention to all instructions. YOUR PERSONAL
SAFETY IS INVOLVED.
1.Blue Ox tow bars are designed for the coupler to be parallel to the ground when it is attached to the towed and towing vehicles. If the tow bar coupler is at an angle, damage or accident could occur.
2.Blue Ox tow bars are designed to tow manual transmission cars or automatics equipped with a transmission pump, drive shaft disconnect or half shaft disconnect.
3.The transmission is in neutral when towing.
4.Unlock the steering wheel to allow the front wheels of the towed vehicle to “track”.
5.Be sure the front end of the car being towed is properly aligned.
6.The use of safety cables or chains is REQUIRED BY LAW. Blue Ox Model BX8805 (5ft) or BX8806 (6ft) Safety Cables are recommended. The shorter BX8805 is normally best.
7.Adjust the coupler for proper fit to the ball (see coupler fit adjustment). For added security, place a lock, pin or bolt through the hole provided in the coupler locking lever.
8.Check clearance between vehicles in a turning situation.
9.Most states require rear lighting on the towed car. A BX8811 Wiring Kit is recommended.
COUPLER FIT ADJUSTMENT
10.Prior to a towing trip, be sure all towing accessories and attachment points are secure. Check for cracked welds and loose bolts. This is important on all occasions but particularly on a new installation, when they should be checked just prior to initial towing and again after 100-200 miles of towing.
11.Do Not Back Up when towing. This may damage the tow bar assembly or the towed car’s chassis.
12.Avoid sharp turns and rough terrain. Check assembly after unusual events and periodically on long trips.
13.Do not use towed vehicle for storing luggage, etc.; you may exceed the towing capacity of the tow bar.
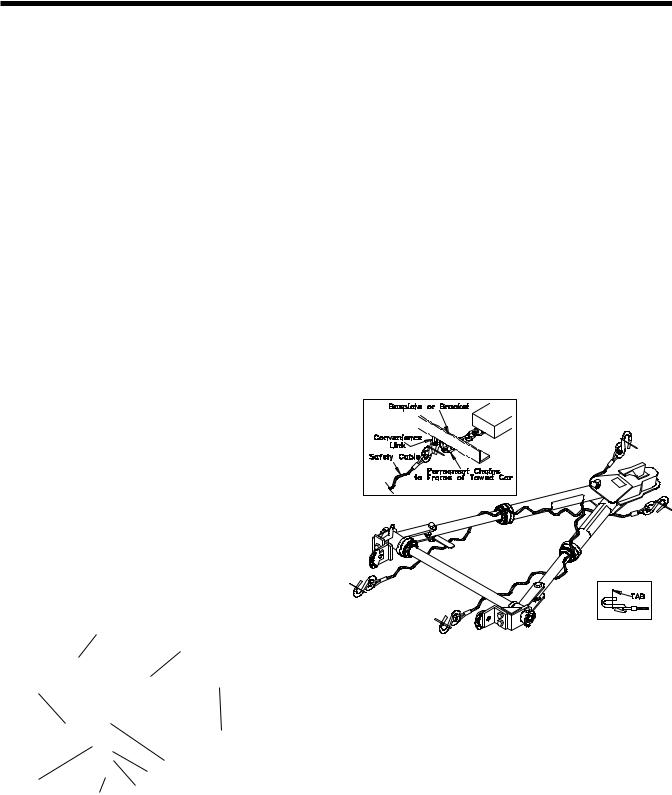
SAFETY CABLE INSTALLATION
(UnlockedPosition) |
LockingLever |
|
|
|
(LockedPosition) |
|
Pin&Chain |
Housing |
(Optional) |
|
Bal |
|
LightSpring |
|
HeavySpring |
|
Clamp |
LockNut |
ChannelLock |
|
||
|
|
1.Using a 3/4" socket, tighten or loosen the nut until firm contact between coupler and ball is established.
2.Check ball to housing tension periodically and tighten if needed.
3.Lightly lubricate the ball.
1.Using the cable hooks, attach the cables to a solid part of the chassis of the towed vehicle or to the bracket convenience links on unibody cars. NOTE: It is best to have permanent chains that connect the convenience links to the frame.
2.Wrap each cable once or twice around their respective tow bar leg and cross them under the coupler area.
3.Using the cable hooks, attach the opposite ends of the cables to a solid part of the chassis of the towing vehicle if at all possible.
4.Adjust slack so that the cables cannot touch the ground or become caught beneath the ball. If either of these things happen, the cables may become damaged and ineffective. DO NOT USE DAMAGED CABLES!
5.If BX8805 or BX8806 cables are not used, be sure each cable or chain used has at least the load rating of the coupler.
292-1190 3/01 1 of 6

INSTALLATION / HOOKING UP
Figure 1
 CAUTION: As with any mechanical product, care should be taken during installation and operation, to prevent your fingers from being pinched.
Installation
1.Refer to figure 1 while installing the tow bar. Hold the Rangefinder II in position with its tabs aligned inside the baseplate tabs. Insert the 1/2 in. diameter pins, provided with the baseplate, through the holes labeled "A". Be sure to secure the pins with the hairpin clips provided.
NOTE: If the tabs do not line up, the mount angles on the tow bar can be adjusted by loosening the bolts labeled "B". Be sure to tighten the bolts when finished.
2.Fully extend the tow bar. (See Operating Instructions) Hold the coupler parallel to the ground and rotate the tow bar up or down until the top surfaces of the mount angles are parallel with the coupler. Insert the 5/16 in. diameter pins through holes labeled "C" in the baseplate and the nearest hole in the tow bar tab.
NOTE: On baseplates manufactured prior to 1991, these holes "C" must be drilled. Using a 3/8 drill bit, drill holes on the center line of the baseplate tabs, 1 7/16 inches from the center of the existing hole.
(Figure 2) Be sure to secure the pins with the hairpin clips provided.
Figure 2
3.Fold the tow bar for storage. (See Unhooking / Folding section) Check for retainer pin and receiver tube alignment. NOTE: If adjustment is required, the retainer pin can be adjusted by loosening the bolts labeled "D". Be sure to tighten the bolts when finished.
4.DEALER OR INSTALLER: BE CERTAIN USER RECEIVES INSTRUCTION SHEETS.
Hooking up:
1.Refer to figure 1 for part names. Engage the towing vehicle parking brake. Position the towed vehicle behind the towing vehicle in the approximate towing position and engage the parking brake.
Figure 3
2.Refer to figures 3 & 4. Face the folded tow bar on the front of the towed vehicle. Remove the hair pin clip from the tow bar retainer pin. Swing the coupler up and away towards the passenger side until the driver side leg latch locks in place. (Latch is locked when rubber seal is not exposed. Figure 5) Slide the driver side leg towards the driver side until the cross brace latch locks. (Figure 4)
3.Unlock the driver and passenger side leg latches and compress the tow bar. NOTE: Leg latches are unlocked by sliding the collar back to expose the rubber seal under the collar. (Figure 5) Attach the coupler to the towing vehicle's 2 inch ball and lock in place. (See Coupler Fit Adjustment On Page 1)
 Caution: It is possible to extend the tow bar by driving away with the towing vehicle. As you drive away, the towed vehicle will wander around until, eventually, both sides may lock. Even though they may lock this way, we DO NOT recommend towing any vehicle until the operator has confirmed that the leg latches have been properly locked as outlined in the following step.
292-1190 7/96 2 of 6
 Loading...