

Page 1
DUAL
M
American
IC
English Version
USER MANUAL
DUAL MIC
Page 2

Page 3
BlueAnt
V1 USER GUIDE
Introduction
The revolutionary BlueAnt V1 voice controlled por table headset marks the future of voice controlled Bluetooth devices. Its
voice activated ‘prompt and response’ interface combined with the BlueAnt Voice Isolation Technology™ software, provide
the BlueAnt V1 with high quality and easy to use voice communications. Its dual microphones provide clear and clean voice
input enabling superb Noise Suppression, Echo Cancellation and Wind Noise Reduction.
Your headset is a Bluetooth 2.1 qualifi ed product and suppor ts both the Headset and Handsfree Bluetooth profi les. The V1
can store information and wirelessly interact with up to eight different Bluetooth compliant devices (backwar d and forward
compatible), including mobile phones, PDA’s, PC’s / Mac’s or any Bluetooth enabled device that supports Headset profi le
or Handsfree profi le. This manual focuses on how to use your headset with your Bluetooth enabled phone.
The V1 can be used in Voice Control or Button Only modes. No voice training is required.
“PAIR ME” “TEACH ME” “WHAT CAN I SAY?” These voice commands get you to everything you need to use the BlueAnt V1.
There are two settings of Voice Isolation - STANDARD and MAX
Voice Isolation Standard is for use in normal environments and gives you a natural sounding voice removing mild noise.
Voice Isolation Max gives you superior voice clarity in a wide variety of high noise areas.
ENGLISH
3
Page 4

BlueAnt
Features of the BlueAnt V1
• Voice Controlled user interface
• Two microphones for pure speech
• Voice Isolation Technology ™ BlueAnt’s revolutionary Digital Signal Processor (DSP) software
• During a call, users can switch between two Voice Isolation modes – Standard and Max
• This world class DSP provides echo suppression, noise reduction and wind noise reduction which separates the
desired voice signal from background noise enabling cr ystal clear conversation in even the noisiest of environments
• The V1 can be paired with 8 devices
• Different ringtones for known and unknown contacts (Phone Dependent)
• Innovative tie clip for attaching to shirt or cuf f, when not in use
• Stylish, translucent ear hook plus a soft rubber ear hook
• Small and Large rubber ear gels, plus Small and Large Comply™ Foam Tips.
• 3 Charging options – Car, Wall and USB
• Small & lightweight (1.5” in length & weighs only 0.35 oz) (41mm & 10grams)
• Up to 5hrs talk-time or 200 hrs standby
• 2 Year Replacement Warranty
• Bluetooth v2.1
What is Bluetooth wireless technology?
Bluetooth is the most advanced cable-replacement technology available today. It enables effortless wireless connections
between your Bluetooth devices within a range of up to 10m (30 ft).
4
Page 5
BlueAnt
What is Voice Control?
Voice control is the V1’s method of controlling actions on
it or the phone it is connected to. With simple commands
you can activate most of the headsets functions. To answer
a call with your voice just say “Answer”, to reject a call say
“Ignore”. To “Call Home”, just say the words, it’s that simple.
To initiate a new Bluetooth connection with your phone, just
say “Pair Me”. It’s that easy. The BlueAnt V1 listens to YOU.
What’s in the Package?
> A BlueAnt V1 Voice Control Bluetooth Headset
> 1 rubberized metal ear hook
> 1 translucent ear hook
> Small and Large rubber ear gels
> Small and Large Comply™ Foam Tips
> Gooseneck USB Cable
> USB Adapter
> USB Car Charger
> AC Power Adaptor
> Quick Start Guide
> V1 User Manual
> Warranty Card
Volume Down
Volume Up
Microphones
Ear Hook
Overview
BAB
(BlueAnt Button)
USB Charging
and
Upgrade Port
Speaker
ENGLISH
5
Page 6

BlueAnt
Getting Started - Before you can use your headset, you must do the following:
1. Fully charge your headset until the red LED goes out, using one of the chargers provided.
2. Pair your headset with a Bluetooth enabled device, e.g. Cell phone, PDA, Computer
Charging
Your V1 comes with a built-in rechargeable battery. For fi r st time use, you must fully charge your V1. During charging, the
indicator shows a steady red light. When the battery is fully charged, the red light will turn of f. It takes 120-150 minutes
to fully charge the battery. The more you talk using your headset, the less standby time your batter y has. Your headset will
require longer charging times when not used over extended periods of time.
Charging the V1 with the Gooseneck USB cable
1. Plug the Gooseneck USB charging cable into the PC/Mac’s USB port
2.
Plug the other end of the USB charging cable into the charging port of your headse t. Make sure the USB plug matches up
to the USB socket on the headset. Do not force the plug into the socket, it should slide in easily. The red LED will turn ON.
3. When charging is complete the red LED will turn OFF. Remove the charging adapter.
Charging the V1 with the AC Power Adapter
1. Plug the AC Adapter into a power socket and the gooseneck USB cable into the wall charger.
2. Plug the other end of the USB charging cable into the charging port of your headset. Make sure the USB plug matches
to the USB socket on the headset. Do not force the plug into the socket it should slide in easily. The red LED will turn ON.
3. When charging is complete the red LED will turn OFF. Remove the charging adapter.
Using the USB Converter Plug
1.
Plug the adapter into the headset to give you the larger mini-usb connecter most common with cell phones and USB devices.
2. This allows you to use any standard USB cable to charge your headset.
6
up
Page 7
BlueAnt
Charging the V1 with the Car Charger
1.
Plug the car charger into your car’s cigarette lighter, and the gooseneck USB cable into the car charger
2.
Plug the other end of the gooseneck USB charging cable into the charging por t of your headset. Make sure the USB plug matches
up to the USB socket on the headset. Do not force the plug into the socket it should slide in easily. The red LED will turn ON.
3.
When charging is complete the red LED will turn OFF. Remove the charger
Wearing the BlueAnt V1
Push the ear hook through the ear hook hole which sits on the headset clip and adjust its length to fi t comfortably on your
ear. Ensure that the headset is pointing towards your mouth. You can wear the V1 on left or right ears, but for optimal
performance, wear the V1 on the right ear and angle it so that it points towards your mouth.
For optimal performance of the
V1 headset, angle the headset so
that it points towards your mouth.
ENGLISH
7
Page 8
BlueAnt
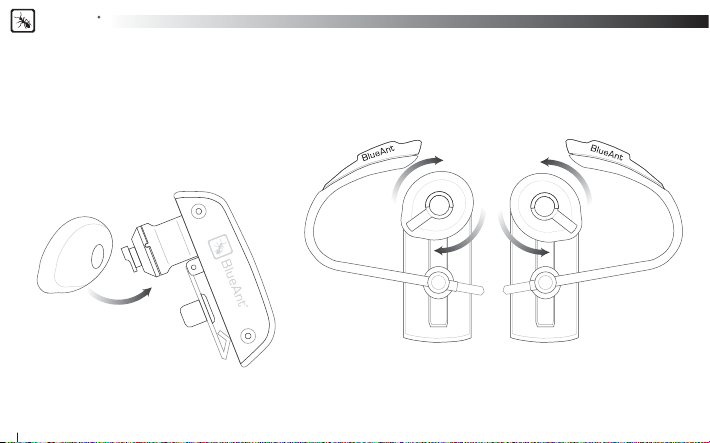
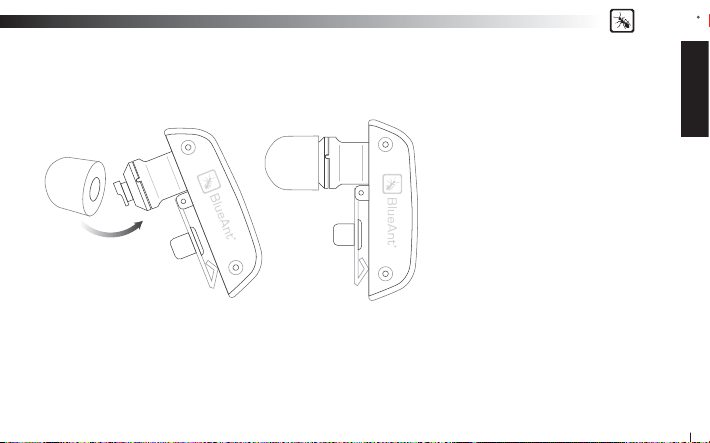
Swapping and Fitting the Ear Gels and Comply™ Foam Tips
The V1 comes with four different options for Ear gels. The larger rubber ear gel is fi tted on the unit already.
When trying the different options, carefully pull the ear gel of f and replace as per below.
Rubber Gels
Gently lift to remove.
Gently press to attach. Push on fi rmly to click into place.
Right Ear Left Ear
The rubber ear gels should be placed so that the tip of the rubber is directed into your ear canal.
In most cases the gel should be spun about 45 degrees from the tie clip as per below.
8
Page 9
BlueAnt
Comply™ Foam Tips
Gently pull to remove. Gently press to attach.
Push on fi rmly to make sure of correct attachment.
Note: The Foam tips will last for many
months providing they are kept clean.
We recommend carefully cleaning your
ears before using these tips.
Disclaimer: The warranty period for the
Comply™ Foam tips is 3 months only.
This warranty covers workmanship and
defects but does not cover normal use
and wear and tear.
Compress the Comply Foam Tips™ around all sides by rolling the tip into a thin round cylinder, then insert into your ear.
Hold the V1 in place while the foam expands. This should take around 30 seconds.
Comply™ Foam Tips use super soft memory foam providing a comfortable seal that securely holds the V1 in the ear while
blocking outside noise.
To reorder Comply™ Foam Tips for BlueAnt devices go to www.blueantwireless.com/foamtips
ENGLISH
9
Page 10

BlueAnt
VOICE CONTROL – “Say a command”
Step 1: Press the BlueAnt Button (BAB), a voice prompt asks you to “Say a command”
Step 2: Say one of the available commands such as “What Can I Say?”.
A voice prompt responds and the headset makes the action.
VOICE CONTROL - Getting the best results
1. After the “Say A Command” prompt, speak your command clearly.
2. If the headset does not respond immediately to your command, say it again.
3. Speak at a consistent speed and pronounce each syllable clearly.
4. Make sure the microphone is not covered and is pointed towards your mouth.
5. Speak louder than any background noise.
6. Say “What Can I Say” for a reminder of the usable commands.
7. You can say “cancel” in any menu.
8. Press the BlueAnt Button to cancel at any time.
9. Use the “Am I connected?” command to fi nd out your headsets s tatus
10
Page 11

VOICE CONTROL – Set up your Speed Dials
There are two methods of inputting and activating the speed dials from your headset.
The fi rst is to Set up the speed dialing in your phone. The second (used if your phone does not adhere to the Bluetooth
specifi cation for Speed Dialling) is to input the numbers into the headset.
We recommend to try the fi rst method fi rst.
Speed dials in the phone.
To use effectively you are required to store the associated
numbers into each speed dial position on your phone as follows:
Speed Dials in the V1
This method requires that you fi rst receive an incoming
call from the number you want to input into the
headset for later dialing.
1. Receive a call from the number you want the
headset to later dial
2. Press and Hold Vol – for 3 seconds
3. The headset will ask you which voice command
you would like to associate with the number.
BlueAnt
ENGLISH
Note: Call GOOG-411 is preset to dial GOOG-411.
11
Page 12

BlueAnt
VOICE CONTROL – Available Commands
The following is a comprehensive list of the commands available in the V1.
At any time you can use the “What can I say?” command to hear the available commands
Pair Me – Puts your V1 into pairing mode ready to connect with your phone. Follow the Prompts.
Teach Me - This menu helps you to understand and use the V1
Try it Now – Takes you through a program which lets you practice the voice commands.
Speed Dial Set Up – Assistance in how to set up the Speed list in your phone
Tips and Tricks – Some helpful information to get the most out of the kit
What Can I Say? – Gives you a list of all the available commands
Am I Connected? – Checks to see if there is a phone connected. If not it will attempt to connect to your phone.
Check Battery – Tells you the status of your battery charge level
Settings Menu – Puts you into the Settings menu
‘Say a command’ Prompt - Enables or Disables the ‘Say a Command” prompt. With it disabled, you will hear a beep instead.
Incoming Call Function – Disable the Incoming call ID prompt and Voice Answer functions.
Turn Off Voice Control – Turns OFF the Voice Control. To re-enable, Hold Vol+ and Vol – for 6 seconds
Sensitivity Level – Choose from High Medium and Low. High will reject more, low will reject less.
LED Light – Turns the LED Lights OFF
Reset the V1 – Deletes all pairing information resets the Voice Interface and reboots the headset back into pairing mode
12
Page 13

Phone Commands – Triggers the Voice Dial function of your cell phone (If your phone supports voice dialing)
Redial – Calls the number you last dialed
Call Back – Calls the last received number
Call Voice Mail – Calls your Voicemail
Call Home – Calls your Home
Call Offi ce – Calls your Offi ce
Call Favorite – Dials your favorite number
Call GOOG-411 – Connects you to the GOOG-411 service, see http://www.google.com/goog411/ for details
Call Speed Dial 6 – Dials the number you have set to Speed Dial 6
Call Speed Dial 7– Dials the number you have set to Speed Dial 7
Call Speed Dial 8 – Dials the number you have set to Speed Dial 8
Call Speed Dial 9 – Dials the number you have set to Speed Dial 9
Switch Headset Off - Turns the headset OFF
Cancel – Cancels the active operation
BlueAnt
ENGLISH
13
Page 14

BlueAnt
VOICE CONTROL – Voice Answer
On an incoming call the headset will announce the Caller ID.
It will then ask you if you want to Answer or Ignore the Call
Say “ANSWER” to accept the call
OR “IGNORE” to reject the call
Note : If the voice recognition in the V1 cannot understand you because of high noise or a loud ringtone coming from the
phone, it will ask you to press the BAB once to answer or twice to Ignore the call.
BUTTON OPERATION
To Turn Voice Control ON or OFF
Press and Hold Vol + and Vol - for 6 Seconds
Pairing
Pairing need only be done once for each device you use. The V1 can store pairing information for up to 8 different Bluetooth
devices. To pair another phone, make sure the fi rst paired phone has Bluetooth switched off or is out of range. If you want
to connect to a previously paired phone, use that phones Bluetooth Menu to connect.
Note: You can say ‘Pair Me’ to enter pair mode at any time, or follow the steps below
14
Page 15

BlueAnt
Pairing Procedure
(This is an example only and may differ from your phone, but the process will be the same.)
1. First turn the phone OFF and then back ON again to refresh its memor y.
2. Bring the mobile phone to about 30cm from the V1 Device.
3. Find the Bluetooth menu in your mobile phone. Turn Bluetooth ON. (Check your mobile phone user guide if necessary)
4. With the V1 OFF, Press and Hold the BAB for about 6 seconds. The LED will appear a solid Blue, and then will start
fl ashing. The V1 is now in Pairing mode and ready to be found in searches by other Bluet ooth devices. Pairing mode will
be active for 2 minutes.
5. Perform a Blue tooth device discovery on your mobile phone to add a new device. (It takes a few seconds to search for
and fi nd other Bluetooth devices around you).
6. When Bluetooth devices are found, the phone will display “BlueAnt V1”. Scroll to it and press OK to confi rm that you
want to Pair with it.
7. Enter Passkey “0000” when your phone prompts you. The phone and V1 will now Pair.
8. An additional security setting in your phone may be needed to allow the headset and phone to connect automatically
without confi rmation each time you connect your V1. Generally in the options for the BlueAnt V1, it will be referred to as
“set as authorized”, “add to trusted devices”, ‘’allow connection’’ or similar.
9. If required for fi rst time connection, select the BlueAnt V1 to connect with your phone. OR, Click the BAB
to connect with the phone.
on the V1,
ENGLISH
15
Page 16

BlueAnt
Basic Headset Functions
For easy reference, also see the Button/Function Matrix and the Quick Start Guide.
1. Power ON: Press and Hold the BAB
will be displayed. After powering ON, your headset will automatically connect to your last used phone if it is in operating
range. If this phone is not range, the V1 will enter idle mode after 60 seconds. If no phone has yet been Paired, it will enter
the welcome prompt.
2. Power OFF: Press and Hold the BAB
Idle mode.
3. Enter Pairing Mode: With the V1 OFF, Press and Hold the BAB for about 6 seconds until the LED fl ashes Blue. The V1 will
stay in pairing mode for 2 minutes then will go into idle mode. To re-enter pairing mode, repeat this step, or say “Pair Me”
4. Make a Call: Dial the number using your phones keypad as normal. Audio will automatically transfer to the headset.
5. To Answer a call: Click the BAB
6. To End a call: Double Click the BAB to end the call.
7. Reject: Double Click the BAB
8. Redial the last call : Press and Hold Vol
9. Activate Phone Commands (Voice Dialling)*: While connected to a phone, press the BAB once. Voice commands must
have been previously recorded into your phone (see your phones user guide for specifi c instructions. (Button Only Mode)
10. Reconnect: To reconnect your phone to the V1, simply turn the V1 ON. Or if already powered ON, Click Volume and
Volume
together. Alternatively, you can use the menu of your Bluetooth phone.
16
for 3 seconds. The solid Blue LED will light up. If the battery is low a solid Red LED
for 3 seconds. The Red LED fl ashes three times. Power Off works on Standby/
once when there is an incoming call.
to reject an incoming call.
for about 3 seconds. To cancel Redial, click the BAB
Page 17

BlueAnt
11. Volume level: Click Volume or Volume during a call to adjust the desired level. Volume changes will be
remembered for the next call. Be sure to use the headset at a comfortable and safe volume level. Note: Volume levels for
Voice Prompts and Active calls are independent.
12. Mute/Unmute the microphone. Press and Hold Vol
and Vol for 3 seconds during a call.
Advanced Headset Functions
1. Disconnect / Transfer: To transfer the audio to the phone, Click Volume and Volume together once. To transfer audio
back to the V1, Click Volume
2. Disable/Enable the LED indicators: (for night time driving): When your headset is in idle or standby mode Press and
Hold Volume
will be active again by default. Note the LED’s are turned OFF while a call is active.
3. Turn Voice Control ON/OFF: Press and Hold Vol
4. V1 Reset: To reset the V1 to factor y settings; while in idle mode (not connected to any device), Click Volume ,
Volume
the welcome message will play in the headset.
and Volume together for 3 seconds. Af ter turning the headset OFF and back ON, the LED Indicators
and BAB together (3 buttons). The V1 will refresh its memor y, delete all current pairing information and
and Volume together again
and Vol for 6 Seconds
ENGLISH
17
Page 18

BlueAnt
Button Function Matrix
V1 Function Button Time Status
Power ON/OFF
Activate Voice Control
Enter Pairing Mode
Answer Call
End Call
Reject Call
Redial Last Number
Phone Commands
(Button Only mode)
Switch Voice Isolation
between Standard and Max
Volume Up
Volume Down
Mute
To cancel a command, simply click BAB
18
BAB
BAB
BAB
BAB
BAB
BAB
Vol
BAB
BAB
Vol
Vol
Vol
& Vol
3 Seconds
From Off/Standby/Idle
Click Idle/Standby
6 Seconds From OFF
Click Ringing
Double Click
Active Call
Double Click
Ringing
3 Seconds Standby
Click Standby
Click Active Call
Click Active Call
Click Active Call
3 Seconds Active Call
at any time.
Standby Mode
means connected to a device but not on a call.
Idle Mode
means the V1 is ON but not connected to any device
Multiple
button presses mean click together
Advanced Button Function Matrix
Advanced V1 Functions
V1 Function Button Time Status
Transfer Audio to phone
Transfer Audio to headset
Set up Speed dials
directly in the V1
Turn LED’s OFF/ON
Turn Voice Control ON/OFF
Reset the V1
Vol & Vol
Vol & Vol
Vol & Vol
Vol & Vol
BAB &
Vol
&
Click Audio on Headset
Click Audio on Phone
3 Seconds
Standby
3 Seconds
Idle/Standby
6 Seconds
Idle/Standby
Idle/Standby/
Click
Active call
Page 19

BlueAnt
LED Indicator Chart
Power ON Solid Blue for 5 Seconds
Power OFF Red fl ash 3 times
Pairing Mode Blue fl ashing
Reset Blue fl ashing
Charging Solid Red
Charging with Power ON Solid Red with a Purple Flash
Charging Complete Red indicator OFF
Low Battery All LED’s change to Red
Idle Blue fl ash every 8 seconds
Standby 2 Blue fl ashes every 5 seconds
Ongoing call NO LED’s
Pairing your headset with multiple Bluetooth devices
The V1 can be paired with 8 devices. If you want to connect to a previously paired phone, use that phones Bluetooth Menu
to connect.
1. Make sure the last phone used has Bluetooth switched off or is out of range.
2. Follow the procedure in ‘Pairing Procedure’ above for each device you want to pair.
Firmware upgrade
The BlueAnt V1 is fi rmware upgradeable via the USB port and provided USB cable.
Please see the support section at www.blueantwireless.com for information and downloads of available upgrades.
ENGLISH
19
Page 20

BlueAnt
BlueAnt Voice Isolation Technology™
You can switch between two settings of Voice Isolation - STANDARD and MAX.
Voice Isolation Standard - For use in normal ever yday environments and gives you a natural sounding voice
while removing mild noise.
Voice Isolation Max - Gives you more intelligible voice in a wide variety of high noise environments.
• When switching between Standard and Max you will hear a confi rmation voice tag played from the V1 speaker.
• When you fi rst turn the headset ON, it will be in the Standard setting.
• After switching the headset OFF and back ON, the headset will return to the St andard setting by default.
• Standard and Max both use the same amount of battery power.
To switch between Standard and Max: Click the BAB
HOW DO I SWITCH?
while on a call
What Voice Isolation mode should I use when?
STANDARD MAX
Offi ce In Vehicle, Restaurant
Home Walking
Quiet environment Music in back ground
20
Page 21

BlueAnt
Further Information
Setting up a Phone Profi le (different to Bluetooth Profi les)
In your phone, set up a Profi le with appropriate ringing volumes and keypad tones and select and activate when
using with the V1. Some phones can automatically activate a desired profi le when connecting to a Car Kit or Headset
Accessory. E.g. Go to Enhancement Settings and select a Default Profi le to activate when the headset connects. With
some phones you can also personalize levels to make suitable for yourself (see your phone’s user manual for instructions
on using and activating Phone Profi les). Typical phone Profi les are
Headset, Portable handsfree and Carkit.
Phone/PDA/Computer Software
Please make sure you have the latest fi rmware upgrade for your phone especially if you are using a PDA Phone. Go to the
support section of the manufacturers’ website to check that you have the lates t version. Many new mobile phones, PDA’s
and computer phones require a Bluetooth patch to improve Bluetooth functionality from the original released version.
Resetting Your Phone/PDA
Phones and PDA’s can become prone to software and memory issues which may cause Bluetooth reconnection
problems. This can be fi xed simply by turning the phone OFF and back ON again. The phone will be reset and the working
memory cleared. Resetting your phone weekly can help maintain it’s functionality including Bluetooth.
Troubleshooting and Support Documents
See the support section of www.blueantwireless.com for troubleshooting and Frequently Asked Questions (FAQ) as well
as info on using with computers for VOIP application\s.
General, Outdoor, Meeting, Silent, Handsfree,
ENGLISH
21
Page 22

BlueAnt
Specifi cations
> Bluetooth v2.1
General Specifi cation
RF Spec.
User Interface
Audio 3GPP with DSP solution
Battery type 3.7V Lithium Polymer battery
Talk Time Up to 5.0 Hours
Stand-By time 200hrs.
Weight 0.35 oz / 10 grams without ear hook or 11 grams with ear-hook
Dimensions 1.5 x 0.69 x 0.44 (inches) / 41 x 17.5 x 11.2 (mm)
22
> Up to 10 meters RF coverage
> CE, FCC, BQB, Ctick, RoHS / WEEE Compliant
> Headset Profi le, Hands-Free profi le
> Carrier Frequency 2.402 ~ 2.480GHz
> < 0.1% BER at -80 dBm
> 0 ± 4 dBm (Class 2)
> Blue color LED for operation indication.
> Red color LED for low battery indication.
> Mini USB for Charging battery or F/W upgrade
Page 23

BlueAnt
FAQ V1 Bluetooth Headset
1. Is my phone compatible?
If your phone has Bluetooth it more than likely supports a Handsfree or Headset Bluetooth profi le, and so will work with
the V1. Check your phones manual for up to date information.
2. What is the passcode/passkey of the V1?
The Passcode for the V1 is “0000”.
3. Can I connect more than one device to my V1 at the same time?
No, the V1 can store pairing information for 8 phones but can connect to only one phone or device at a time.
4. My V1 worked great but now it won’t connect. What can I do?
As newer phones are increasingly like mini-computers, they may become corrupt over time and you may need to reset
them every so often (at least once a week is good). Simply switc h off your phone remove the battery for a few seconds,
replace and reboot. The V1 should now connect. If not, remove existing pairing and re-pair the devices.
5. I am having trouble pairing a second phone. What can I do?
When pairing a second mobile phone, make sure the fi rst is off or out of range. If you cannot connect to a previously
paired and connected phone, go to the Bluetooth menu in the phone, select the V1 and Press Connect. Some phones may
require this if it is the second device used. You do not have to re-pair the devices just manually connect.
ENGLISH
23
Page 24

BlueAnt
6. The incoming caller ID does not play and I cannot answer the call using my voice. Why?
Some phones that support in-band ringtones do not send the caller ID number to the headset on an incoming call. Inband ringtones basically mean the ability of your phone to play a MP3 or music fi le instead of a standard ringtone. If you
wish to use the Voice Answer feature you will need to use a standard ringtone.
7. Phone commands (Your phones inbuilt voice dialing if it has it) are not successful ever y time. What can I do?
Using your headset to record the voice tags can enhance the recognition rate. Please refer to the user guide of your phone.
Noisy environments can affect voice recognition. Record your voice commands in a quiet environment.
8. How do I upgrade the fi rmware for my V1?
Log onto the support section of our web site www.blueantwireless.com and follow the links to download the V1 upgrade
instructions and the V1 Upgrade zip fi les. Unzip both fi les to your computer then follow the instructions to upgr ade the fi rmware.
9. Can I transfer an ongoing call back to my phone to continue it there?
Yes. Simply short press the Volume Up & Volume Down buttons simultaneously to disconnect from the V1 and transfer the
call to the phone.
10. I have read all the solutions in this document but I still cannot get my V1 to work properly. What can I do?
Log onto our website for more extensive troubleshooting and FAQ, make an enquiry to customercare@myblueant.com or
call the BlueAnt Nth America Customer Service Team on 1 866 891-3032
24
Page 25

BlueAnt
Help
BlueAnt Warranty Process
1. Should you be having diffi culties in operation please refer to the online FAQ and support documents, or call us.
Our number is on the bac k page of this manual
2. Check our website for more information, updated manuals and troubleshooting. www.blueantwireless.com
3. Call us and speak to one of the BlueAnt Wireless Customer Service Team
We will clarify whether you have a hardware or connection issue.
4. If your unit is confi rmed to be faulty, a Return Merchandise Authorization
(RMA) will be issued.
5. Return the unit directly to BlueAnt for testing and replacement of faulty items.
Warranty Terms and Conditions
1. BlueAnt Warrant the original purchaser of this product only.
2. BlueAnt will replace or repair any faulty product provided it has not been misused or abused in any way.
3. There are no user serviceable parts inside this pr oduct. Using a non-authorized repairer will void the warranty.
4. The Warranty is valid for 2 years (24 months) from the date of purchase. (excluding the Comply™ Foam Tips)
• Proof of purchase must be provided to obtain warr anty service.
• Headset must be in original packaging with serial number for warranty to be valid.
5. The warranty period for the Comply™ Foam tips is 3 months only. This warranty covers workmanship and defects but
does not cover normal use and wear and tear.
6. Warranties are effective from the proof of pur chase date and not from the date of any subsequent repair or replacement.
ENGLISH
25
Page 26

BlueAnt
Disclaimers:
This manual is published by BlueAnt. The information contained in this document is subject to change without notice.
All rights reserved. The Bluetooth word, mark and logos are owned by the Bluetooth SIG, Inc. and any use of such marks
by BlueAnt is under license. Comply is are registered trademark of Hearing Components. Manufactured under Hearing
Components U.S. Patent number 4,880,076 and international equivalent. Google, GOOG-411, and the Google Logo are
trademarks of Google Inc. Other trademarks and trade names are those of their respective owner s.
Please protect your ears.
Warning: This headset can reach a maximum volume of 101 decibels. Prolonged use of a headset at high volumes may affect
your hearing capacity. Using for extensive time periods may result in noise induced hearing loss (NIHL). Hearing loss may
occur if the headset is used at maximum volumes for more than 5 minutes per day. Hearing loss may occur if the headset is
used at medium volumes if used for more than 1 hour per day. Exposure to sound at such a close range may result in hearing
loss, even at low levels. Do not listen at high volume levels. Remember that your ears will adapt to the volume level set and if
you change to higher levels your ear may feel no discomfort but may be doing damage to your ear.
26
Page 27

BlueAnt
Correct Disposal of This Product (Waste Electrical & Electronic Equipment)
(Applicable in the European Union and other European countries with separate collection)
This marking shown on the product or its literature, indicates that it should not be disposed with other
household wastes at the end of its working life. To prevent possible harm to the environment or human
health from uncontrolled waste disposal, please separate this from other types of wastes and recycle
it responsibly to promote the sustainable reuse of material resources. Household users should contact
either the retailer where they purchased this product, or their local government offi ce, for details of where
and how they can take this item for environmentally safe recycling. Business users should contact their
supplier and check the terms and conditions of the purchase contract. This product should not be mixed
with other commercial wastes for disposal.
This equipment is in compliance with the essential requirements and other relevant provisions of Directive 1999/5/EC
FCC Notices
This device contains FCC ID: VHFBLUEANTV1 which complies with par t 15 of the FCC rules. Operation is subject to
the following two conditions: (1) This device may not cause harmful interference, and (2) This device must accept any
interference received, including interference that may cause undesired operation.
FCC RF Exposure requirements:
“This device and its antenna(s) must not be co-located or operating in conjunction with any other antenna or transmitter.”
ENGLISH
27
Page 28

BlueAnt
Contact BlueAnt:
Nth America
customercare@myblueant.com
1 866 891-3032
28
 Loading...