

Page 1
Page 2

BlueAnt
InterPhone Features
Automatic Volume Adjusting
High/Low Volume Modes
Voice Dial and Voice Answer
Bluetooth Helmet Handsfree
Rider to Passenger Intercom
Bike to Bike Intercom
All Weather Water Resistant
Index
Package Contents ................................................................................................. 2
Product Descriptions ............................................................................................ 2
Charging the Headset ........................................................................................... 3
Powering On and Off ............................................................................................ 3
Pairing to your Bluetooth Mobile Phone ............................................................. 3
Installing the Clip Mount ...................................................................................... 4
Using the Headset Clip Mount with Fastening Clamp ......................................... 4
Using the Headset Clip Mount with Adhesive ...................................................... 5
Mounting the InterPhone ...................................................................................... 5
Quick removal of the InterPhone ......................................................................... 6
Basic Operations .................................................................................................. 7
Make a Call: ........................................................................................................ 7
Answer a Call: ..................................................................................................... 7
End a Call: ........................................................................................................... 7
Voice Dial: ........................................................................................................... 7
Reject a Call (For Handsfree Profile Phones only): ............................................. 8
Volume Settings: ................................................................................................. 8
Reconnect the Interphone: .................................................................................. 8
Special Features ................................................................................................... 9
High Volume or Low Volume Mode ..................................................................... 9
Voice Answer and Reject Mode ........................................................................ 10
Advanced Functions ........................................................................................... 11
Intercom Pairing Procedure: .............................................................................. 11
Using as an Intercom: ....................................................................................... 11
Multi-Pairing / Switching Connections between Phones .................................... 12
Specifications ...................................................................................................... 13
Help ...................................................................................................................... 14
Page 3

Package Contents
Product Descriptions
The BlueAnt InterPhone is a Bluetooth Headset designed for the motorcycle rider
and passenger who wish to have clear and reliable wireless communications while
riding. This headset is equipped with hi-tech features: Voice and Answer Reject,
Auto-Volume Level Adjusting, Low/High Volume Modes and Rider to Passenger or
Bike to Bike Intercom. Note: You must have two Interphone Headsets to use the
Intercom feature. This headset is compatible with Bluetooth cellular phones and
can be suited to any sort of helmet for motorcyclists.
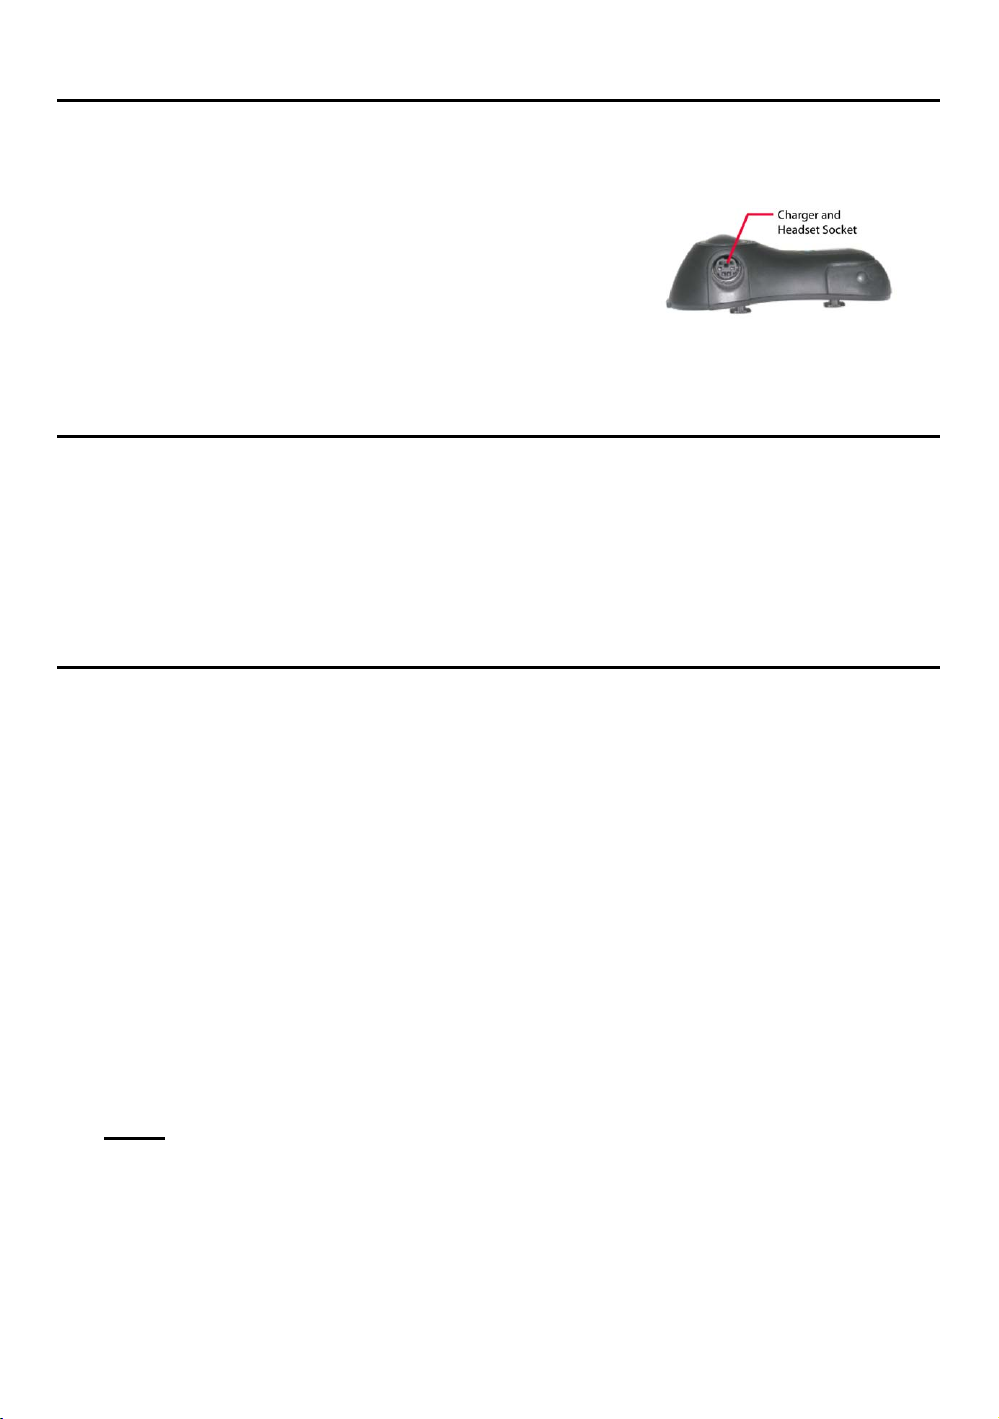
1. Multi-function Button (MFB) 5. Charger and Headset Socket
2. LED Status Indicator 6. Hook
3. Volume Up Button 7. Ear Speaker
4. Volume Down Button 8. Microphone
9. Headset Plug
2
Page 4
Charging the Headset
Note: After opening the box please charge the InterPhone before using.
1. Connect the provided AC charger’s plug to the Charger Socket(5).
2. Plug the charger to 110-240v electricity socket and Turn On.
3. The LED will blink Red to Green while charging.
4. When the LED turns a Steady Green, charging
is complete. Disconnect the charger
5. When the LED turns to a blinking red,
the battery is low. Charge the unit as above.
Note: A normal charge from a low battery will take about 4 hours.
Powering On and Off
To Power On: Press and Hold the MFB(1) for approximately 1 second until the
LED turns blue and begins to flash. Headset will beep once.
To Power Off: Press and Hold the MFB for approximately 5 seconds.
The Headset will beep 3 times and the LED will turn red.
After a few seconds the headset will switch off.
Pairing to your Bluetooth Mobile Phone
Pairing will create a stored connection in the InterPhone and your Bluetooth cell
phone. Pairing has to be done only once when first connecting to a phone.
1. From OFF, Press and Hold the MFB on the InterPhone for about 5
seconds until the LED turns to a blinking red/blue. InterPhone is now in
pairing mode ready to be found in by your phone.
2. While the headset is in pairing mode, access the Bluetooth menu of your
phone. Turn Bluetooth ON.
3. Go to the Devices list and execute a Bluetooth search (discover/add/pair)
See your phone’s manual for exact search procedure if required.
4. After several seconds your phone will display a list of Bluetooth devices
found. Select InterPhone and Press Ok/Next.
5. The phone will ask for a pin key/password, enter 0000 (4 zeros) and press
Ok. (The devices will then use 128 bit encryption for security)
6. If the Pairing is successful the LED will change to a blinking Blue.
7. The phone and the InterPhone will then connect.
Note: Some phones do not connect directly after entering 0000.
You may need to connect manually after pairing by-
1. Press MFB (1st beep) once to connect.
2. Go to the phones Bluetooth Paired device list, select the InterPhone and
Press Connect.
The InterPhone is now ready to be installed.
3
Page 5
Installing the Clip Mount
Important: There are 2 types of Headset Clips included
in this package. Either can be used with full
or open faced helmets, on either side of
the helmet.
- Headset Clip Mount with Fastening Clamp.
(removable)
- Headset Clip Mount with Adhesive. (fixed)
Use the one which best suits your helmets design.
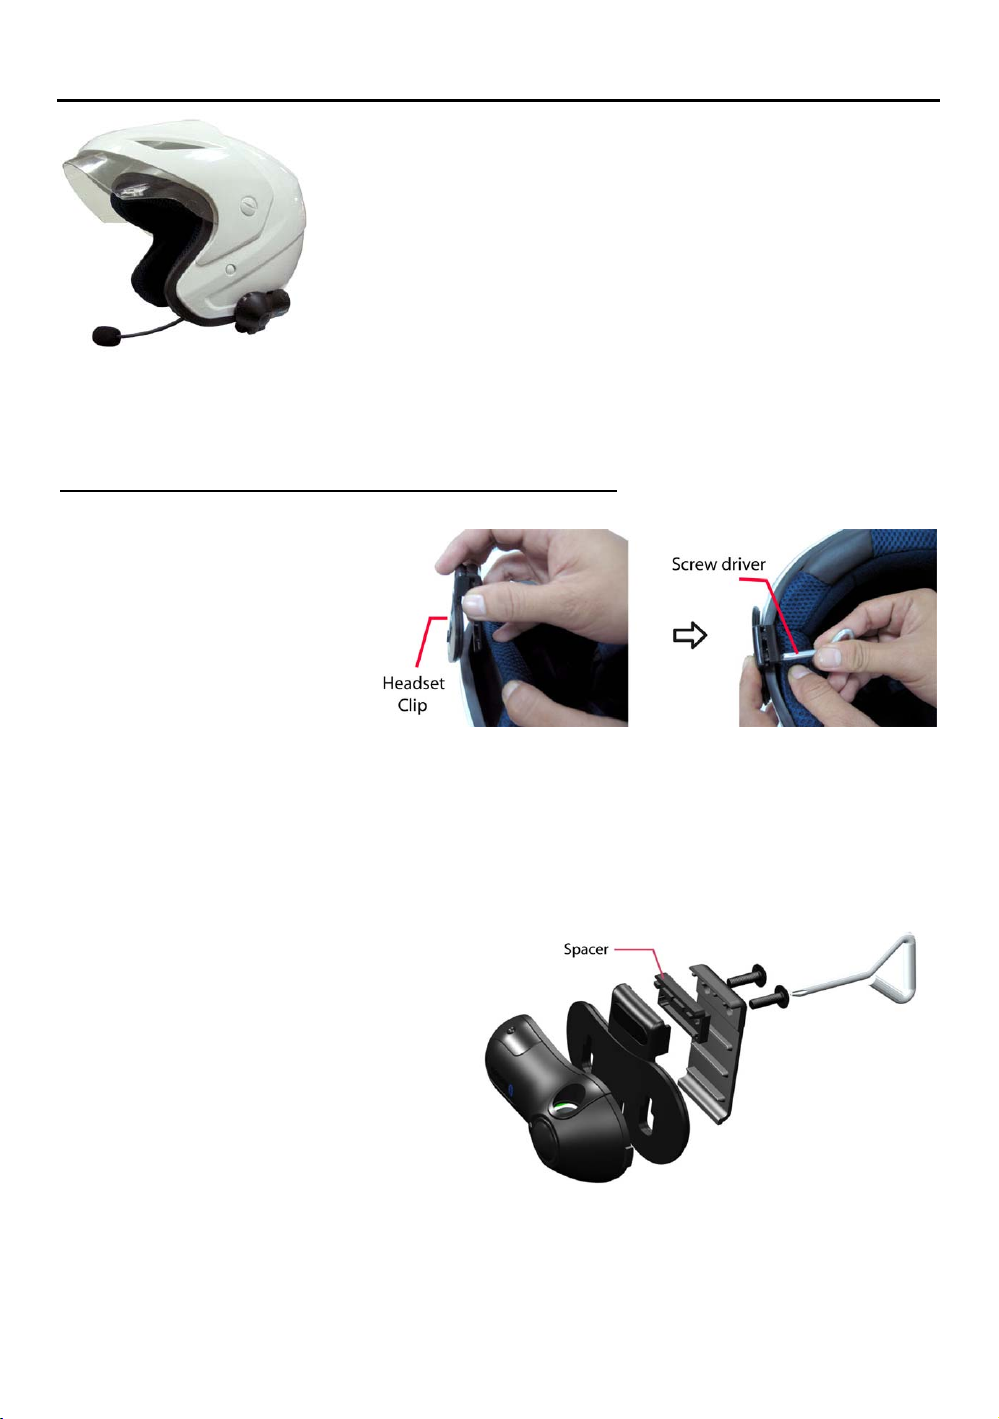
Using the Headset Clip Mount with Fastening Clamp
1. Using the provided
screw driver, loosen
the Clips’ screws
enough to allow the
Clip to slide onto
either side of the
Helmets’ shell.
2. Make sure you put
the clip under the helmets padding.
3. Adjust the Clip until you find the best location for your helmet.
4. Tighten the screws to hold the clip firmly in place.
Note: If the helmet’s shell is too
thick, the Spacer (provided) may
be needed to put in between the 2
parts of the Headset Clip, as
shown in the picture on the right.
Use the additional longer screws
(provided) for this purpose.
4
Page 6
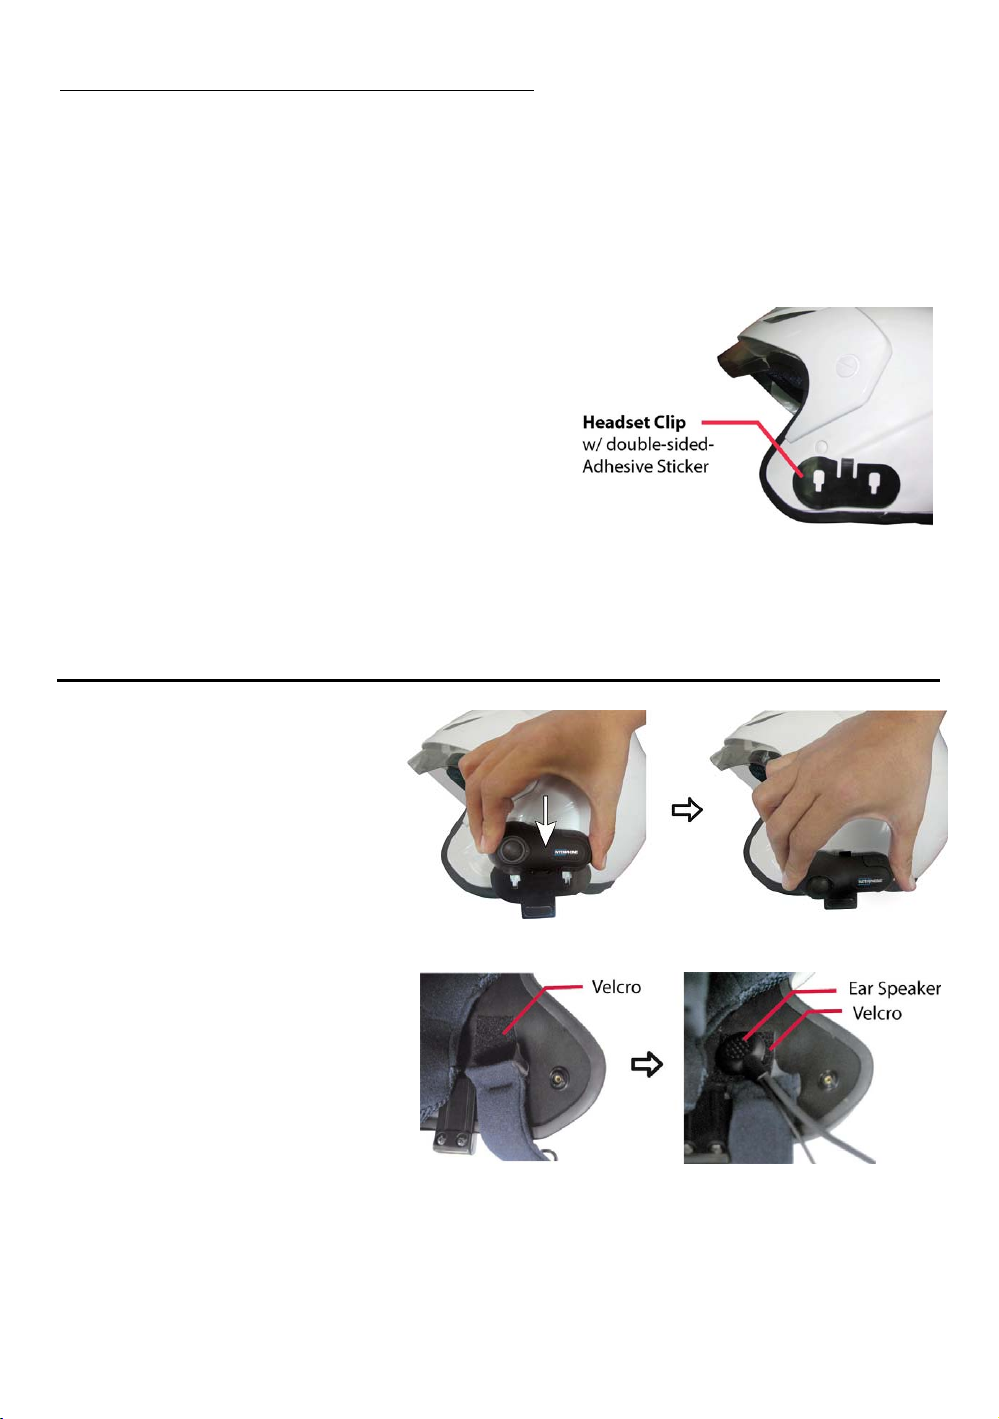
Using the Headset Clip Mount with Adhesive
1. Before removing the protective strip from the double-sided adhesive, find
the best location to place the Headset Clip Mount.
2. Clean the part of the helmet that the Headset Clip Mount with Adhesive will
be attached to. Remove any dirt or grease. Do not use cleaners that may
damage the helmet or that will leave an oily residue. Make sure the surface
is dry before continuing.
3. Check again the positioning of the clip. Once it is mounted it will not be
possible to move without making the
adhesive unusable. So please take care
when choosing its position.
4. Note that the small section of the two
holes/slots in the Clip must be faced
towards the bottom of the helmet. As
shown in the picture to the right.
5. Remove the protective strip from the
double-sided adhesive and carefully
attach the Clip to the outside shell of the
helmet.
Mounting the InterPhone
1. Take your InterPhone
Headset and slide it down
into the slots in the
Headset Clip Mount.
Make sure that it’s
perfectly fitted and locked
into place by trying to
extract it, pulling upwards.
2. Now you need to attach the
speaker and microphone
arm to the inside of the
helmet. Take the Velcro
pad which the speaker will
attach to, and test for the
best position to fix it. The
Velcro Pad should be fixed
at the height of your ear in the helmets ear pocket. You will need to put the
helmet on a few times to find the optimum position to apply the pad. When the
correct positioning is found, remove the protective strip and apply the Velcro
Pad.
5
Page 7

3. Next, take the Ear Speaker(7) and attach it to the Velcro Pad. Run the
Microphone Arm down along down to where your mouth will be. As the
Microphone Arm is flexible, you can adjust it so it sits in the optimum position in
front of your mouth. Some helmets have removable padding; if yours does, it is
recommended to run the speaker and mic under the padding.
4. Taking care to match the
pins up, connect the
Headset Plug(9) to the
Headset Socket(5). The
plug can only be inserted
in one position.
5. Secure the cord of the Headset
Plug(9) inside the helmet. Tuck
any extra wire into the helmet.
Ensure that only few centimeters
of the cord comes out.
You have successfully mounted the InterPhone
Quick removal of the InterPhone
Remove the BlueAnt InterPhone by pushing down the lock
as shown and then take out the InterPhone Module in an
upward motion.
6
Page 8

Basic Operations
IMPORTANT:
The BLUEANT INTERPHONE needs to be ‘paired’ with your Bluetooth mobile
phone before you can use the following functions. (See Pairing to your
Bluetooth Mobile Phone on page 3.)
Make a Call:
Dial the number using your phone as normal. Audio will automatically be on the
headset.
Note: With some phones like Siemens S55 and Panasonic X70, audio is always
on the phone during an outgoing call. You will need to press MFB(1) to transfer
the audio to your headset.
Answer a Call:
To answer an incoming call just press the MFB(1) for 1 second (1
Or, Assuming the InterPhone Voice Answer and Reject is activated:
st
beep).
Accept a call by loudly saying a word within 10 seconds. (Example: When you
receive the ring tone, Say loudly ”Hello!”) The call will be answered. Audio will be
on the headset.
Note: See InterPhone Voice Dial and Reject Activation / Deactivation on page 10
End a Call:
Press the MFB (1) for 1 second to end the call (1st beep).
Voice Dial:
Important: First, make sure to activate the voice dial function of your phone.
Record at least one voice tag. (Kindly refer to the procedure in your phone’s
manual.) Note: Voice dialing entries must be stored in the phone’s memory, not on
the SIM card!
1. Press MFB (1) for 1 second (
1st beep) to manually activate voice dialing. The
Voice dial tone/ beep will be heard on the headset prompting the user to say
the voice tag of the contact to call.
2. Say the voice tag. The voice will be played back to you then the phone will
dial the number automatically.
7
Page 9

Reject a Call (For Handsfree Profile Phones only):
To reject an incoming call just press the MFB(1) for 2 seconds (2
Or, Assuming the InterPhone Voice Answer and Reject is activated, be
nd
beep).
silent for 10 seconds. The call will automatically be rejected.
Note: See InterPhone Voice Dial and Reject Activation / Deactivation on page 10
Audio Transfer (For Handsfree Profile Phones only):
During an ongoing call, audio transfer can be made.
From BLUEANT INTERPHONE to Phone:
Press the MFB(1) for 2 seconds (2nd beep). The audio will be transferred to
the phone.
From Phone to BLUEANT INTERPHONE: Press the MFB(1) for 1 second (1st
beep). The audio will be transferred back to the headset.
Volume Settings:
Note: This is for basic volume adjustment once set up. Please see the section in
Special Features on High or Low Volume Mode to set the correct volume range for
your helmet.
Press Volume Up(3) or down(4) button until desired level is reached.
Automatic Volume Adjustment. When the bike is in motion (motorcycle
running and there is driving and background noise): The BLUEANT INTERPHONE
will automatically adjust the volume in response to the background noise. Thus,
the user can continuously hear the audio clearly even when there is loud
background noise.
Reconnect the Interphone:
To reconnect your cell phone to the Interphone after switching off or going out
of range.
1) Turn the Interphone ON and Press the MFB(1) once (first beep)
2) Or, use your phones Bluetooth Menu to connect
8
Page 10

Special Features
High Volume or Low Volume Mode
Setting to high or low volume mode depends on user’s helmet design or
structure. Some helmet types may require near or far positioning of the
InterPhones Ear Speaker(7) from the user’s ear. Please try both modes to
discover which mode is appropriate for your helmet.
High Volume Mode Activation
far from your ear. This will enable you to still have a clear and audible audio.
Procedure:
1. From Off, press and hold the Volume Up(3).
2. Keep the Volume Up(3) pressed and then press the MFB(1) for 5
3. Power On beep followed by a HIGH TONE can be heard. The Status
4. Release both buttons.
Note: Be careful. At full volume, the Ear Speaker(7) can be very loud. Do
not position your Ear Speaker close to your ear.
Low Volume Mode Activation is advised if the positioning of your Ear
Speaker(7) is very near to your ear.
Procedure:
1. From Off, press and hold the Volume Down(4).
2. Keep the Volume Down(4) pressed and then press the MFB(1) for 5
3. Power On beep followed by a LOW TONE can be heard. The Status
4. Release both buttons.
seconds.
Indicator(2) will flash red-blue.
seconds.
Indicator(2) will flash red-blue.
is advised if you position the Ear Speaker(7)
9
Page 11

Voice Answer and Reject Mode
• When activated, the user can accept a call by saying any word within 10
seconds. The user can also reject a call by being silent for 10 seconds.
• When deactivated, apply normal answer and normal rejection of call.
Activation:
1. From Off, press and hold simultaneously the Volume Up(3) & Volume
down(4) buttons.
2. Keep both buttons pressed and then press the MFB(1) for 5 seconds.
3. Power On beep followed by a HIGH TONE can be heard. The Status
Indicator(2) will flash red-blue.
4. Release all 3 buttons.
Deactivation:
1. From Off, press and hold simultaneously the Volume Up(3) & Volume
Down(4) buttons;
2. Keep both buttons pressed and then press the MFB(1) for 5 seconds.
3. Power On beep followed by a LOW TONE can be heard. The Status
Indicator(2) will flash red-blue.
4. Release all 3 buttons.
10
Page 12

Advanced Functions
Driver to Passenger or Bike to Bike INTERCOM
The BLUEANT INTERPHONE has motorcycle intercom system that allows driver
to passenger conversations. This intercom features full-duplex communication so
driver and passenger may enjoy simultaneous conversations just like on the
telephone. To use this feature you must have two BlueAnt InterPhone Headsets
Intercom Pairing Procedure:
1. Prepare two BLUEANT INTERPHONES.
Note: Make sure to switch off the phones paired to these two headsets.
2. Set the two units to pairing mode (from off, press and hold the MFB(1) of the
BLUEANT INTERPHONE for about 5 seconds or until you hear the 2
beep).
3. When the two are set to pairing, press Volume Up(3) button of BLUEANT
INTERPHONE N°1 for about 5 seconds (1
beeps will be heard and then BLUEANT INTERPHONE N°1 turns off).
4. Wait for 3 seconds and then switch on BLUEANT INTERPHONE N°1.
5. Press Volume Down(4) button of BLUEANT INTERPHONE N°2 for about 5
seconds (1st beep followed by 5 successive beeps will be heard). BLUEANT
INTERPHONE N°2 pairing blink will change to blinking blue while BLUEANT
INTERPHONE N°1 will again turn off.
6. Wait for 3 seconds and then switch on again BLUEANT INTERPHONE N°1.
7. Press MFB(1) of BLUEANT INTERPHONE N°1 for about 3 seconds (2
beep) to connect to BLUEANT INTERPHONE N°2.
The set-up has been successful. Both headsets are now connected. Full-
duplex conversations can be made.
Note: This has to be done only once every time you want to use 2 different
BLUEANT INTERPHONE together.
Using as an Intercom:
To switch from phone to intercom, press MFB(1) for 3 seconds or until
you hear the 2nd beep.
To switch from intercom to phone, press MFB(1) for 1 second or until
you hear the 1st beep.
Important Notes:
1. Both BLUEANT INTERPHONES’ must be in intercom mode to allow
intercom.
2. When the BlueAnt Interphones go out of range of each other they will
drop out of intercom mode and will need to be manually reconnected
when back in range. This is done by simply pressing and holding the MFB
nd
st
beep followed by 5 successive
nd
11
Page 13

down on one of the Interphones until you hear the second beep, then
both units will resume intercom mode.
3. During intercom mode, the ring of the phone will not be transferred to the
BLUEANT INTERPHONE automatically. (Tip: Switch on your phone’s
vibrate option to notice an incoming call.)
4. On an incoming call, Press the MFB(1) for 1 second to transfer the call to
your headset. Some phones may require 2 times press on MFB(1) in
order to answer an incoming phone call from intercom mode (1st press to
nd
transfer the call to the headset, 2
press to answer the call).
Multi-Pairing / Switching Connections between Phones
The BLUEANT INTERPHONE can be paired to 5 different Bluetooth phones. An
additional pairing will automatically delete the phone that has not been used for
the longest time. Thus, maintaining 5 phones in its memory.
You can easily switch to any of the paired phones by:
1. Disconnecting the currently used phone using the “Active devices” in the
Bluetooth menu of that phone.
2. Connect to the wanted phone by using the “Paired devices” in the Bluetooth
menu of that wanted phone.
Note: Reconnection to a paired phone can also be done by pressing the
MFB(1). But when you press the MFB(1), the BLUEANT INTERPHONE will
attempt to connect to the last used phone only. So it is recommended to connect
to another paired phone using the phone’s menu.
12
Page 14

Specifications
Bluetooth Compliance:
Bluetooth Version 1.2 Specifications
Supported Bluetooth Profiles:
Bluetooth Headset and Handsfree Profiles with Automatic Detection
Operating Range:
Up to 33ft (10m) for cell phones
Up to 450ft (150m) for two Interphones
Frequency:
2.4GHz
Talk Time:
Up to 10 hours
Standby Time:
Up to 700 hours
Charging Time:
4 hours
Battery type:
Rechargeable Lithium Polymer 350mAh
Special features:
Full Duplex
Full DSP Noise Cancellation / Echo Cancellation
Automatic Volume Adjustment depending on ambient noise and speed level
Intercom Mode
Easy to find Volume / Multi-Function buttons
Digital Volume Control
Voice Recognition Dialing (If phone supports)
Answer or reject incoming calls by voice control
Water Resistant
Aerodynamic and Compact Shape
Easy to install, compatible with most common helmets available in the market
Main unit detachable from helmet mounting clip
Accessories:
*High Power ultra slim speaker with integrated microphone boom
*Two helmet mounting clips (clamp type and permanent type)
*Wall Charger
Dimensions (mm):
87x 43x 23
Weight:
35g excluding accessories
13
Page 15

Help
Phone/Device Software
Please make sure you have the latest firmware upgrade for your Phone
especially if you are using a PDA Phone. Go to the support section of the
manufacturers’ website to check you have the latest version. Many new mobile
phones, pda’s and computers phones require a Bluetooth patch to improve
Bluetooth functionality from the original released version.
Resetting Your Phone/Device
Phones can become prone to software and memory issues which may cause
Bluetooth reconnection problems. This can be fixed simply by turning the phone
off and back on again.
The phone will be reset and the working memory cleared.
Trouble Shooting and Support Documents
See the support section of www.blueantwireless.com for troubleshooting and
Frequently Asked Questions (FAQ) as well as info on using with computers for
VOIP application\s.
BlueAnt Warranty Process
1. Should you be having difficulties in operation please refer to the online FAQ
and support documents, or call us. Our number is on the back page.
2. Check our website for more information, updated manuals and
troubleshooting. www.blueantwireless.com
3. Call us and speak to one of the BlueAnt Wireless Customer Service Team
We will clarify whether you have a hardware or connection issue.
4. Return the unit directly to BlueAnt for testing and replacement of faulty items
– Please call to arrange a Return Merchandise Authorization (RMA) number.
Warranty Terms and Conditions
1. BlueAnt Warrant the original purchaser of this product only.
2. BlueAnt will replace or repair any faulty product provided it has not been
misused or abused in any way.
3. There are no user serviceable parts inside this product. Using a nonauthorized repairer will void the warranty.
4. The Warranty is valid for 2 years (24 months) from the date of purchase.
• Proof of purchase must be supplied to obtain warranty.
• Headset must be in original packaging with serial number
for warranty to be valid.
5. Warranties are effective from the proof of purchase date
and not from the date of any subsequent repair or
replacement.
14
Page 16

Disclaimers:
This manual is published by BlueAnt. The information contained in this document is subject to
change without notice. All rights reserved. The Bluetooth word, mark and logos are owned by
the Bluetooth SIG, Inc. and any use of such marks by BlueAnt is under license. Other
trademarks and trade names are those of their respective owners.
Warning: Prolonged use of a headset at high volumes may affect your hearing capacity. Using
for extensive time periods may result in noise induced hearing loss (NIHL). Be careful about
using in noisy environments as the tendency is to turn the headset up to compensate. Hearing
loss may occur if the headset is used at maximum volumes for more than 5 minutes per day.
Hearing loss may occur if the headset is used at medium volumes if used for more than 1 hour
per day. Exposure to sound at such a close range for more than eight hours a day may result in
hearing loss, even at low levels.
Correct Disposal of This Product
(Waste Electrical & Electronic Equipment)
English
This equipment is in compliance with the essential requirements and other relevant provisions of
Directive 1999/5/EC
FCC Notices
This device complies with part 15 of the FCC rules. Operation is subject to the following two
conditions: (1) This device may not cause harmful interference, and (2) This device must
accept any interference received, including interference that may cause undesired operation.
You are cautioned that changes or modifications not expressly approved by the part
responsible for compliance could void the user’s authority to operate the equipment.
FCC RF Exposure requirements:
(Applicable in the European Union and other European countries with separate collection
systems)
This marking shown on the product or its literature, indicates that it should not be disposed with
other household wastes at the end of its working life. To prevent possible harm to the
environment or human health from uncontrolled waste disposal, please separate this from other
types of wastes and recycle it responsibly to promote the sustainable reuse of material resources.
Household users should contact either the retailer where they purchased this product, or their local
government office, for details of where and how they can take this item for environmentally safe
recycling.
Business users should contact their supplier and check the terms and conditions of the purchase
contract. This product should not be mixed with other commercial wastes for disposal.
“This device and its antenna(s) must not be co-located or operating in conjunction with any
other antenna or transmitter.”
15
Page 17

 Loading...