


Congratulations on your purchase of the Spark from Blue Microphones. The Spark is a cardioid, solid-state condenser microphone designed to help you achieve professional quality recordings in any creative environment. We’ve designed the Spark’s acoustic performance to ignite your inspiration and passion for recording, and we think you’ll find its unique look and quality construction to be inspiring as well!
The Spark combines Blue’s unique condenser capsule with Class-A discrete electronics to produce stunning recordings. A new feature found only on the Spark microphone is the unique Focus Control, providing two different usage modes: the Normal mode (out position) providing increased low frequency sensitivity for recordings with great impact and definition, along with the Focus mode, (in position) for even greater clarity and detail. In addition, the Spark microphone ships with Blue’s custom-designed pop-filter and shockmount as well as a convenient and stylish wood case for easy transport. With the Spark, you’ve got everything you need to make professional recordings.
We all know Sparks and wood boxes don’t mix, so let’s take out your mic and have a look around. |
3 |
The Spark’s electronics are Class A and fully discrete with a transformerless output. Simply put, this means that
the sound which arrives at the diaphragm (mic capsule) is converted to electrical energy (transduced) is then amplified as accurately as possible, with minimal coloration and absolutely no integrated circuits (also known as “IC’s”) in the signal path. Integrated circuits, by the way, are smaller and inexpensive versions of large ‘discrete’ components that talk a big game but really don’t perform quite as well.
The engineers at Blue take your sound seriously, so we designed the Spark’s signal path exclusively with those high quality discrete components. The individual differences may be subtle, but when added up it’s a difference you can appreciate. As a result, we think you’ll find the Spark’s overall sonic character is superbly detailed and pleasing to the ear, a microphone with truly professional capabilities. These features make it your ideal microphone for recording vocals, drums, guitars, pianos, brass, woodwinds, and just about anything else that you can throw onto the fire.
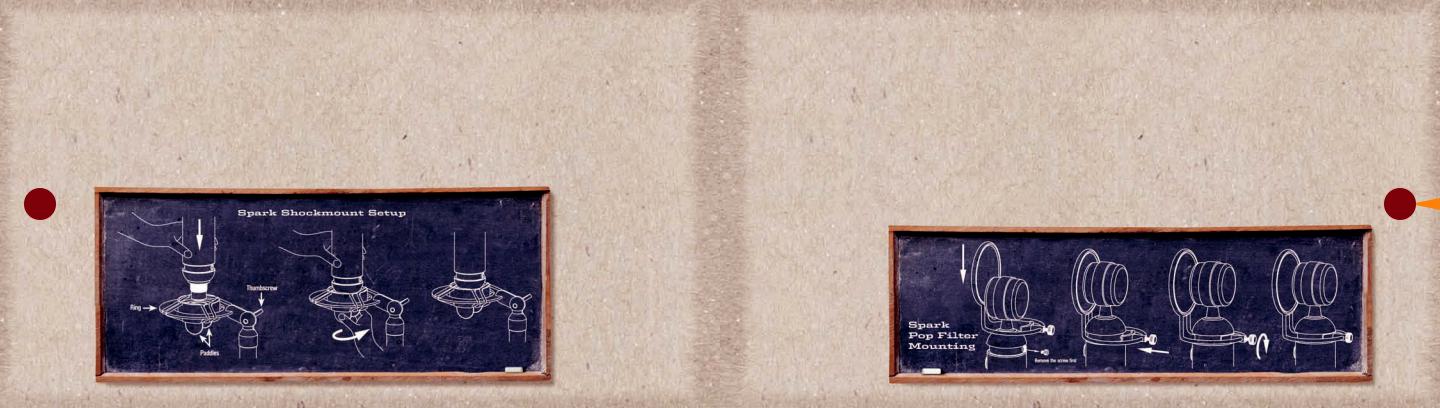
Shockmount Setup
The Spark includes a uniquely-designed shockmount that is designed to help isolate your microphone (and, thus, your recordings) from vibrations, bumps, and any low frequency noises you may have resonating through your recording area (air conditioning unit, nearby computers, passing semi-trucks, whales in your bathtub). First, mount your Spark shockmount to any standard threaded mic stand. You can adjust the angle of the shockmount by loosening the large “Blue” thumbscrew, adjusting the shockmount basket to the desired angle, and tightening again. Next, simply thread the bottom of the Spark microphone into the shockmount by grasping the paddles at the base of the ring and rotating counterclockwise while firmly holding the Spark microphone. After the mic is tightened down against the shockmount, you can rotate the mic and lower rotating ring so that the Blue logo (and address side of the microphone) is facing your sound source.
 4
4
Pop Filter Mounting Procedure
In the old days, many folks would slide an old pair of nylon stockings over their microphones, using the fine mesh to help block ‘plosive’ sounds that resulted in undesirable pops in their recordings. Well, we’ve learned that nylon stockings and Sparks certainly don’t mix, so we’ve included a custom-designed pop filter that will cut down on those plosive sounds without impacting sound quality. Mounting the Spark’s pop filter couldn’t be simpler. First, locate the installed filler plug at the rear of the Spark’s body, located inside the painted groove near the top of the mic body. Remove this plug by unscrewing with your fingers. Next, simply lower the Spark pop filter over the head of the microphone, keeping the mesh screen lined up with the front of the microphone (the logo side), and align the pop filter mounting tab with the back side of the painted groove at the top of the mic body. After ensuring that the pop filter is centered over the upper groove, tighten the thumbscrew into the hole at the rear of the body tube until the pop filter is secured
against the body tube. Connect an XLR cable, such as the Blue Quad or Blue Dual Cable, at the bottom of the |
5 |
microphone and you’re ready to record! |
 Loading...