

Page 1

Washing Machine
Waschmaschine
WNF 9422 SC20
User’s Manual
Bedienungsanleitung
Page 2

Please read this user manual first!
Dear Customer,
We hope that you get the best results from the product which has been manufactured in
state-of-the-art plants and passed through a strict quality control procedure.
Therefore, please read the entire user manual carefully before using the product and
keep it as a reference for future use. In case of transferring the product to someone else,
give the manual as well.
The user manual will help you use your machine in a fast
and safe way.
• Read the user manual before installing and starting your product.
• Always follow the safety instructions.
• Keep this user manual within easy reach for future reference.
• Read also the other documents supplied with the product.
Remember that this user manual is also applicable for several other models. Differences
between models will be identified in the manual.
Explanation of symbols
Throughout this user manual the following symbols are used:
C Important information or useful hints about usage.
A Warning for hazardous situations with regard to life and property.
B Warning for electric shock.
2820521905_EN/240311.1718
This appliance’s packaging material is recyclable. Help recycle it and
protect the environment by dropping it off in the municipal receptacles
provided for this purpose. Your appliance also contains a great amount
of recyclable material. It is marked with this label to indicate the used
appliances that should not be mixed with other waste. This way, the
appliance recycling organised by your manufacturer will be done under
the best possible conditions, in compliance with European Directive
2002/96/EC on Waste Electrical and Electronic Equipment. Contact
your town hall or your retailer for the used appliance collection points
closest to your home. We thank you doing your part to protect the
environment.
2 - EN
Page 3

TABLE OF CONTENTS
1 Your washing machine 4
Overview . . . . . . . . . . . . . . . . . . . . . . . . 4
Technical specifications . . . . . . . . . . . . . 5
2 Important safety
instructions 6
General safety . . . . . . . . . . . . . . . . . . . . 6
Intended use . . . . . . . . . . . . . . . . . . . . . 6
Children's safety . . . . . . . . . . . . . . . . . . 7
3 Installation 8
Appropriate installation location . . . . . . . 8
Removing packaging reinforcement. . . . 8
Removing the transportation locks. . . . . 8
Connecting water supply. . . . . . . . . . . . 9
Connecting to the drain . . . . . . . . . . . . . 9
Adjusting the feet. . . . . . . . . . . . . . . . . 10
Electrical connection . . . . . . . . . . . . . . 10
First use . . . . . . . . . . . . . . . . . . . . . . . 11
Disposing of packaging material . . . . . 11
Transportation of the product. . . . . . . . 11
Disposing of the old product . . . . . . . . 11
Special programmes . . . . . . . . . . . . . . 19
Temperature selection . . . . . . . . . . . . . 20
Spin speed selection . . . . . . . . . . . . . . 20
Programme and consumption table. . . 21
Auxiliary function selection. . . . . . . . . . 23
Time display . . . . . . . . . . . . . . . . . . . . 23
Starting the programme. . . . . . . . . . . . 24
Progress of programme. . . . . . . . . . . . 24
Loading door lock . . . . . . . . . . . . . . . . 25
Changing the selections after programme
has started . . . . . . . . . . . . . . . . . . . . . 25
Child Lock . . . . . . . . . . . . . . . . . . . . . . 25
Canceling the programme . . . . . . . . . . 26
Machine is in Rinse Hold mode . . . . . . 26
End of programme . . . . . . . . . . . . . . . 26
6 Maintenance and cleaning 27
Cleaning the detergent drawer. . . . . . . 27
Cleaning the loading door and the drum 27
Cleaning the body and control panel . . 27
Cleaning the water intake filters . . . . . . 27
Draining remaining water and cleaning the
pump filter . . . . . . . . . . . . . . . . . . . . . . 28
4 Preparation 12
Things to be done for energy saving . . 12
Sorting the laundry . . . . . . . . . . . . . . . 12
Preparing laundry for washing . . . . . . . 12
Correct load capacity . . . . . . . . . . . . . 13
Loading the laundry. . . . . . . . . . . . . . . 13
Using detergent and softener . . . . . . . 14
5 Operating the product 17
Control panel. . . . . . . . . . . . . . . . . . . . 17
Display symbols. . . . . . . . . . . . . . . . . . 17
Preparing the machine. . . . . . . . . . . . . 18
Programme selection. . . . . . . . . . . . . . 18
Main programmes . . . . . . . . . . . . . . . 18
Additional programmes . . . . . . . . . . . . 18
7 Troubleshooting 30
3 - EN
Page 4

1 Your washing machine
Overview
8
1
2
3
7
6
4
5
1- Power cable
2- Top panel
3- Control panel
4- Filter cap
5- Adjustable feet
6- Loading door
7- Detergent drawer
8- Drain hose
4 - EN
Page 5

Technical specifications
Models
Maximum dry laundry capacity (kg)
Height (cm)
Width (cm)
Depth (cm)
Net weight (±4 kg.)
Electrical input (V/Hz)
Total current (A)
Total power (W)
Spin speed (rpm max.)
WNF 9422 SC20
9
84
60
59
74
220-240 V / 50Hz
10
2000-2350
1200
Technical specifications may be changed without prior notice to improve the quality
C
of the product.
Figures in this manual are schematic and may not match the product exactly.
C
Values stated on the product labels or in the documentation accompanying it
C
are obtained in laboratory conditions in accordance with the relevant standards.
Depending on operational and environmental conditions of the product, these values
may vary.
5 - EN
Page 6

2 Important safety instructions
This section contains safety instructions
that will help protect from risk of personal
injury or property damage. Failure to follow
these instructions shall void any warranty.
General safety
• This product should not be used
by persons with physical, sensory
or mental disorders or unlearned
or inexperienced people (including
children) unless they are attended by
a person who will be responsible for
their safety or who will instruct them
accordingly for use of the product.
• Never place the product on a carpet-
covered floor; otherwise, lack of
airflow beneath the machine will cause
electrical parts to overheat. This will
cause problems with your product.
• Do not operate the product if the
power cable / plug is damaged. Call
the Authorized Service Agent.
• Have a qualified electrician connect
a 16-Ampere fuse to the installation
location of the product.
• If the product has a failure, it should
not be operated unless it is repaired
by the Authorized Service Agent.
There is the risk of electric shock!
• This product is designed to resume
operating in the event of powering
on after a power interruption. If you
wish to cancel the programme, see
"Cancelling the programme" section.
• Connect the product to a grounded
outlet protected by a fuse complying
with the values in the "Technical
specifications" table. Do not neglect
to have the grounding installation
made by a qualified electrician. Our
company shall not be liable for any
damages that will arise when the
product is used without grounding in
accordance with the local regulations.
• The water supply and draining hoses
must be securely fastened and remain
undamaged. Otherwise, there is the
risk of water leakage.
• Never open the loading door or
remove the filter while there is still
water in the drum. Otherwise, risk of
flooding and injury from hot water will
occur.
• Do not force open the locked loading
door. The loading door will be ready
to open just a few minutes after the
washing cycle comes to an end.
In case of forcing the loading door
to open, the door and the lock
mechanism may get damaged.
• Unplug the product when not in use.
• Never wash the product by spreading
or pouring water onto it! There is the
risk of electric shock!
• Never touch the plug with wet hands!
Never unplug by pulling on the cable,
always pull out by grabbing the plug.
• Use detergents, softeners and
supplements suitable for automatic
washing machines only.
• Follow the instructions on the textile
tags and on the detergent package.
• The product must be unplugged
during installation, maintenance,
cleaning and repairing procedures.
• Always have the installation and
repairing procedures carried out
by the Authorized Service Agent.
Manufacturer shall not be held
liable for damages that may arise
from procedures carried out by
unauthorized persons.
Intended use
• This product has been designed for
domestic use. It is not suitable for
commercial use and it must not be
used out of its intended use.
• The product must only be used for
washing and rinsing of laundry that are
marked accordingly.
• The manufacturer waives any
responsibility arisen from incorrect
usage or transportation.
6 - EN
Page 7

Children's safety
• Electrical products are dangerous for
the children. Keep children away from
the product when it is in use. Do not
let them to tamper with the product.
Use child lock to prevent children from
intervening with the product.
• Do not forget to close the loading
door when leaving the room where the
product is located.
• Store all detergents and additives in a
safe place away from the reach of the
children.
7 - EN
Page 8
3 Installation
Refer to the nearest Authorised Service
Agent for installation of the product. To
make the product ready for use, review
the information in the user manual and
make sure that the electricity, tap water
supply and water drainage systems are
appropriate before calling the Authorized
Service Agent. If they are not, call a
qualified technician and plumber to have
any necessary arrangements carried out.
Preparation of the location and
C
electrical, tap water and waste water
installations at the place of installation
is under customer's responsibility.
Installation and electrical connections
B
of the product must be carried out
by the Authorized Service Agent.
Manufacturer shall not be held
liable for damages that may arise
from procedures carried out by
unauthorized persons.
Prior to installation, visually check if
A
the product has any defects on it. If
so, do not have it installed. Damaged
products cause risks for your safety.
Make sure that the water inlet and
C
discharge hoses as well as the power
cable are not folded, pinched or
crushed while pushing the product
into its place after installation or
cleaning procedures.
Appropriate installation location
• Place the machine on a rigid floor. Do
not place it on a long pile rug or similar
surfaces.
• Total weight of the washing machine
and the dryer -with full load- when
they are placed on top of each other
reaches to approx. 180 kilograms.
Place the product on a solid and flat
floor that has sufficient load carrying
capacity!
• Do not place the product on the
power cable.
• Do not install the product at places
where temperature may fall below
0ºC.
• Place the product at least 1 cm away
from the edges of other furniture.
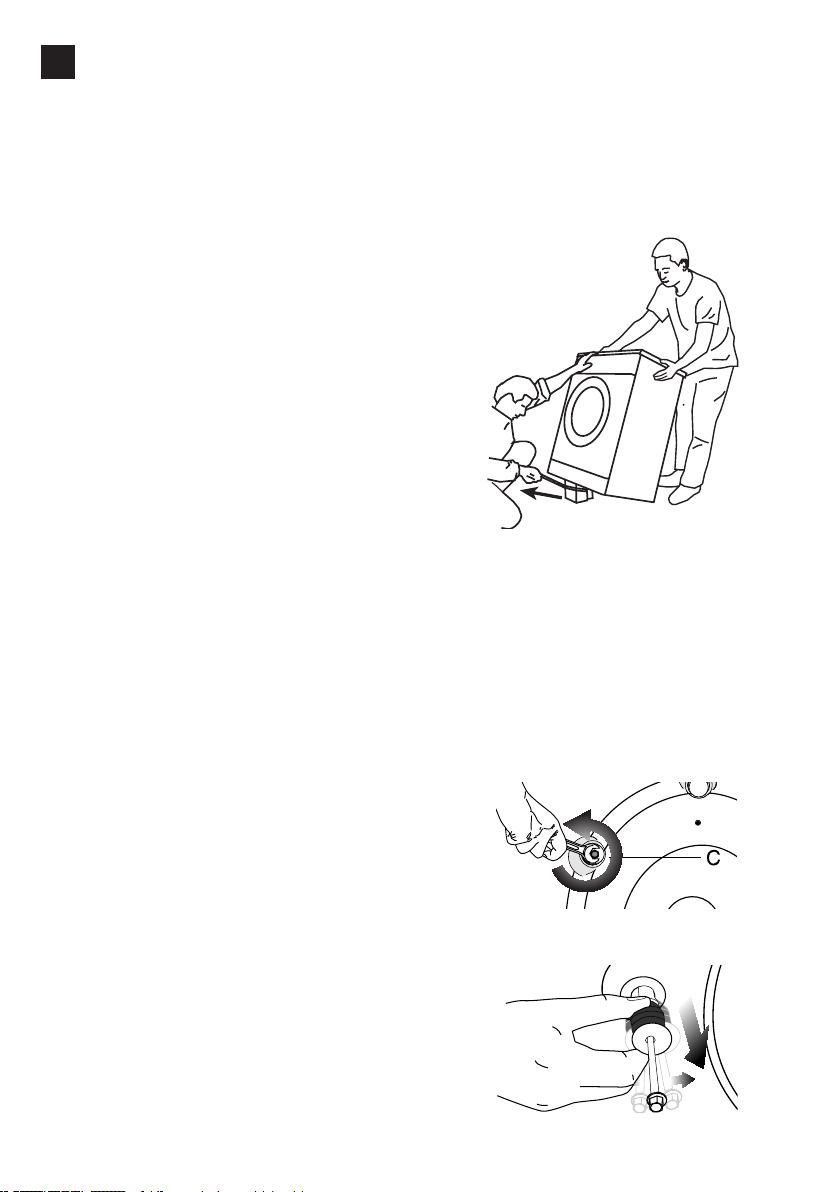
Removing packaging
reinforcement
Tilt the machine backwards to remove
the packaging reinforcement. Remove the
packaging reinforcement by pulling the
ribbon.
Removing the
transportation locks
Do not remove the transportation
A
locks before taking out the packaging
reinforcement.
Remove the transportation safety
A
bolts before operating the washing
machine, otherwise, the product will
be damaged.
1. Loosen all the bolts with a spanner
until they rotate freely (C).
2. Remove transportation safety bolts by
turning them gently.
8 - EN
Page 9
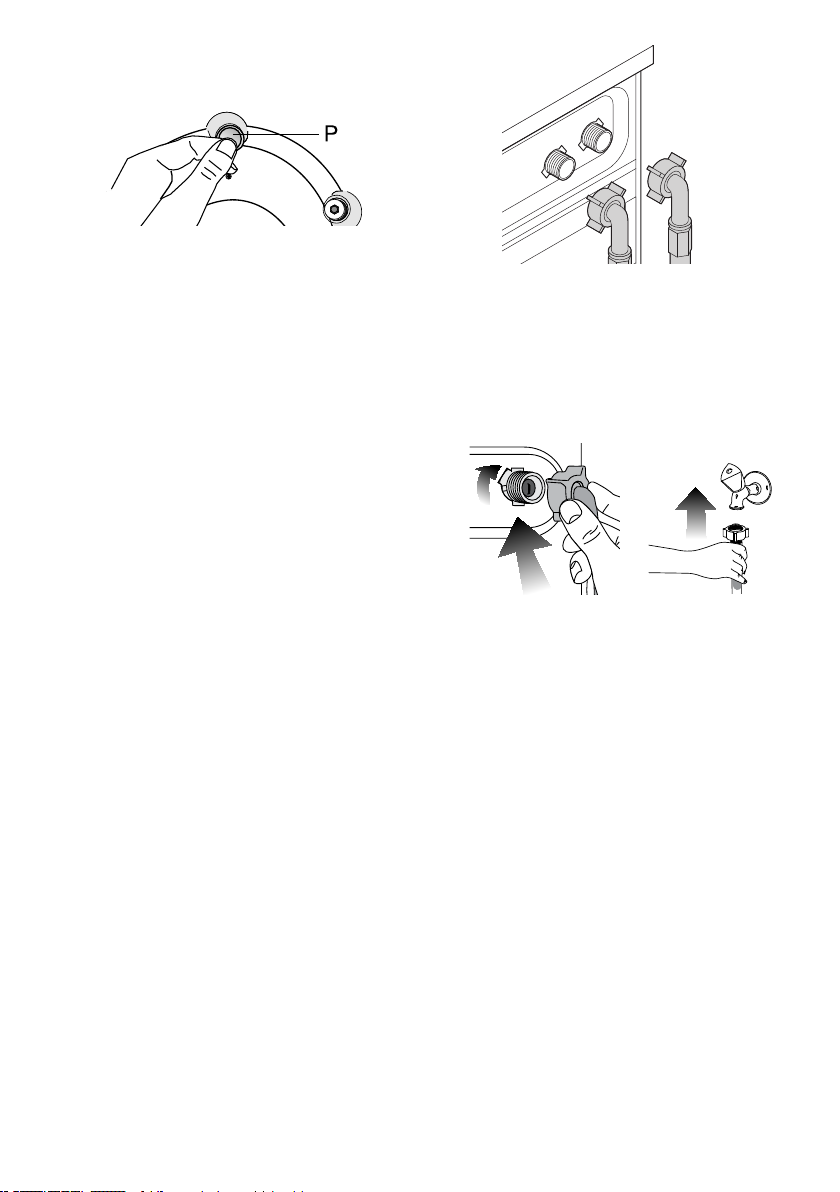
3. Attach the plastic covers supplied in
the User Manual bag into the holes on
the rear panel. (P)
Keep the transportation safety bolts
C
in a safe place to reuse when the
washing machine needs to be moved
again in the future.
Never move the product without the
C
transportation safety bolts properly
fixed in place!
Connecting water supply
The water supply pressure required
C
to run the product is between 1 to 10
bars (0.1 – 10 MPa). It is necessary
to have 10 – 80 liters of water flowing
from the fully open tap in one minute
to have your machine run smoothly.
Attach a pressure reducing valve if
water pressure is higher.
If you are going to use the double
C
water-inlet product as a single (cold)
water-inlet unit, you must install the
supplied stopper to the hot water
valve before operating the product.
(Applies for the products supplied with
a blind stopper group.)
If you want to use both water inlets
C
of the product, connect the hot water
hose after removing the stopper and
gasket group from the hot water valve.
(Applies for the products supplied with
a blind stopper group.)
Models with a single water inlet should
A
not be connected to the hot water
tap. In such a case the laundry will get
damaged or the product will switch to
protection mode and will not operate.
Do not use old or used water inlet
A
hoses on the new product. It may
cause stains on your laundry.
1. Connect the special hoses supplied
with the product to the water inlets
on the product. Red hose (left) (max.
90 ºC) is for hot water inlet, blue hose
(right) (max. 25 ºC) is for cold water
inlet.
Ensure that the cold and hot water
A
connections are made correctly when
installing the product. Otherwise, your
laundry will come out hot at the end of
the washing process and wear out.
2. Tighten all hose nuts by hand. Never
use a wrench when tightening the
nuts.
3. Open the taps completely after
making the hose connection to check
for water leaks at the connection
points. If any leaks occur, turn off the
tap and remove the nut. Retighten
the nut carefully after checking the
seal. To prevent water leakages and
damages caused by them, keep the
taps closed when the machine is not
in use.
Connecting to the drain
• The end of the drain hose must be
directly connected to the wastewater
drain or to the washbasin.
Your house will be flooded if the
A
hose comes out of its housing during
water discharge. Moreover, there is
risk of scalding due to high washing
temperatures! To prevent such
situations and to ensure smooth water
intake and discharge of the machine,
fix the end of the discharge hose
tightly so that it cannot come out.
• The hose should be attached to a
height of at least 40 cm, and 100 cm
9 - EN
Page 10

at most.
• In case the hose is elevated after
laying it on the floor level or close to
the ground (less than 40 cm above the
ground), water discharge becomes
more difficult and the laundry may
come out excessively wet. Therefore,
follow the heights described in the
figure.
• To prevent flowing of dirty water back
into the machine and to allow for easy
discharge, do not immerse the hose
end into the dirty water or drive it in
the drain more than 15 cm. If it is too
long, cut it short.
• The end of the hose should not be
bent, it should not be stepped on
and the hose must not be pinched
between the drain and the machine.
• If the length of the hose is too short,
use it by adding an original extension
hose. Length of the hose may not be
longer than 3.2 m. To avoid water leak
failures, the connection between the
extension hose and the drain hose of
the product must be fitted well with an
appropriate clamp as not to come off
and leak.
Adjusting the feet
In order to ensure that the product
A
operates more silent and vibrationfree, it must stand level and balanced
on its feet. Balance the machine by
adjusting the feet. Otherwise, the
product may move from its place
and cause crushing and vibration
problems.
1. Loosen the lock nuts on the feet by
hand.
2. Adjust the feet until the product
stands level and balanced.
3. Tighten all lock nuts again by hand.
Do not use any tools to loosen the
A
lock nuts. Otherwise, they will get
damaged.
Electrical connection
Connect the product to a grounded outlet
protected by a fuse complying with the
values in the "Technical specifications"
table. Our company shall not be liable
for any damages that will arise when the
product is used without grounding in
accordance with the local regulations.
• Connection must comply with national
regulations.
• Power cable plug must be within easy
reach after installation.
• The voltage and allowed fuse or
breaker protection are specified in the
“Technical specifications” section. If
the current value of the fuse or breaker
in the house is less than 16 Amps,
10 - EN
Page 11

have a qualified electrician install a 16
Amp fuse.
• The specified voltage must be equal
to your mains voltage.
• Do not make connections via
extension cables or multi-plugs.
Damaged power cables must be
B
replaced by the Authorized Service
Agents.
First use
Before starting to use the product, make
sure that all preparations are made in
accordance with the instructions in
sections "Important safety instructions"
and "Installation".
To prepare the product for washing
laundry, perform first operation in Drum
Cleaning programme. If your machine
is not featured with Drum Cleaning
programme, use Cottons-90 programme
and select Additional Water or Extra Rinse
auxiliary functions as well. Before starting
the programme, put max. 100 g of
powder anti-limescale into the main wash
detergent compartment (compartment nr.
II). If the anti-limescale is in tablet form, put
only one tablet into compartment nr. II. Dry
the inside of the bellow with a clean piece
of cloth after the programme has come to
an end.
Dispose of them properly and sort
in accordance with recycled waste
instructions. Do not dispose of them with
normal domestic waste.
Transportation of the product
1. Unplug the product before
transporting it.
2. Remove water drain and water supply
connections.
3. Drain the remaining water in the
product completely; see, "Draining
remaining water and cleaning the
pump filter".
4. Install transportation safety bolts in the
reverse order of removal procedure;
see, "Removing the transportation
locks".
Never move the product without the
C
transportation safety bolts properly
fixed in place!
Disposing of the old product
Dispose of the old product in an
environmentally friendly manner.
Refer to your local dealer or solid waste
collection centre in your area to learn how
to dispose of your product.
For children's safety, cut the power
cable and break the locking mechanism
of the loading door so that it will be
nonfunctional before disposing of the
product.
Use an anti-limescale suitable for the
C
washing machines.
Some water might have remained in
C
the product due to the quality control
processes in the production. It is not
harmful for the product.
Disposing of packaging material
Packaging materials are dangerous to
children. Keep packaging materials in
a safe place away from reach of the
children.
Packaging materials of the product are
manufactured from recyclable materials.
11 - EN
Page 12
4 Preparation
Things to be done for
energy saving
Following information will help you use
the product in an ecological and energyefficient manner.
• Operate the product in the highest
capacity allowed by the programme
you have selected, but do not
overload; see, "Programme and
consumption table".
• Always follow the instructions on the
detergent packaging.
• Wash slightly soiled laundry at low
temperatures.
• Use faster programmes for small
quantities of lightly soiled laundry.
• Do not use prewash and high
temperatures for laundry that is not
heavily soiled or stained.
• If you plan to dry your laundry in a
dryer, select the highest spin speed
recommended during washing
process.
• Do not use detergent in excess of
the amount recommended on the
detergent package.
Sorting the laundry
• Sort laundry according to type of
fabric, colour, and degree of soiling
and allowable water temperature.
• Always obey the instructions given on
the garment tags.
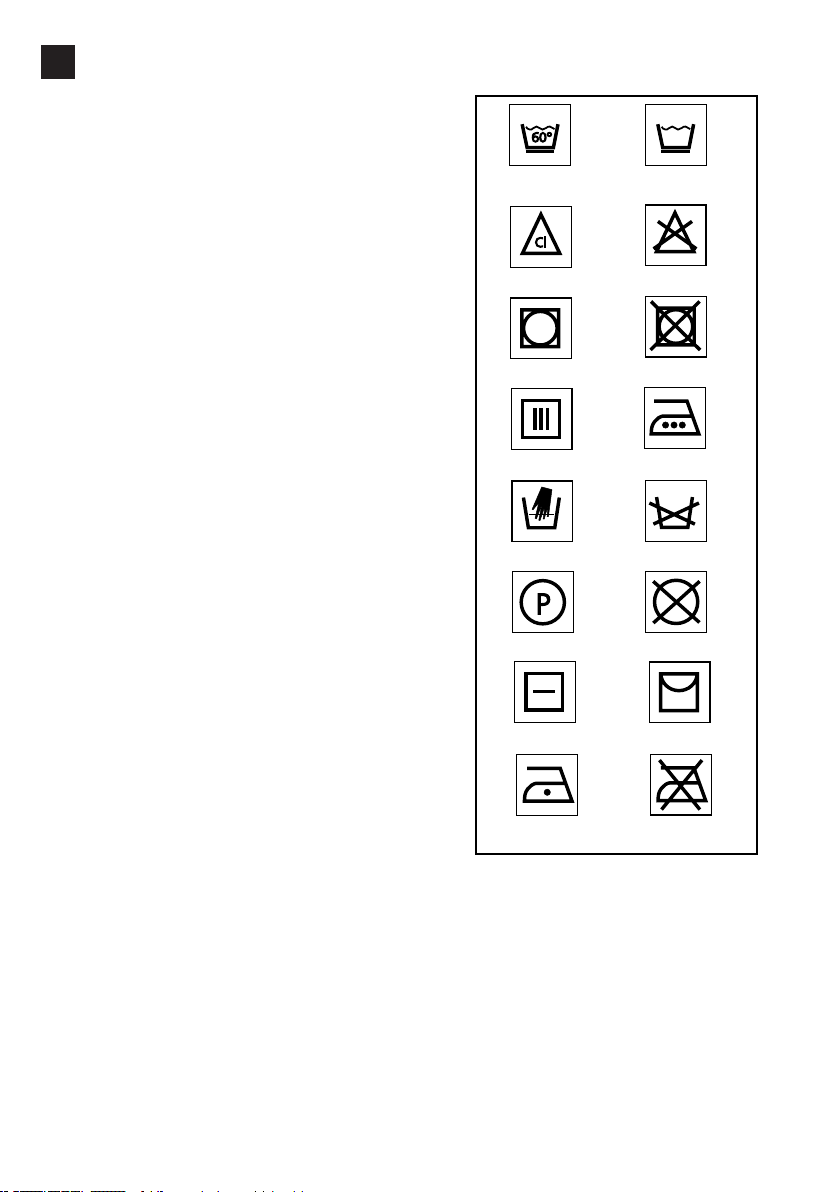
Washing water
temperature
Bleach can be
used
Suitable for drier
Hang without
spinning
Non machine-washable Do not wash
Dry-cleanable Do not dry-clean
Dry horizontally Dry on a hanger
Wash with sensitive,
.short programmes
Do not use bleach
Do not dry with drier
Can be ironed with
hot iron
Can be ironed
with warm iron
Do not iron
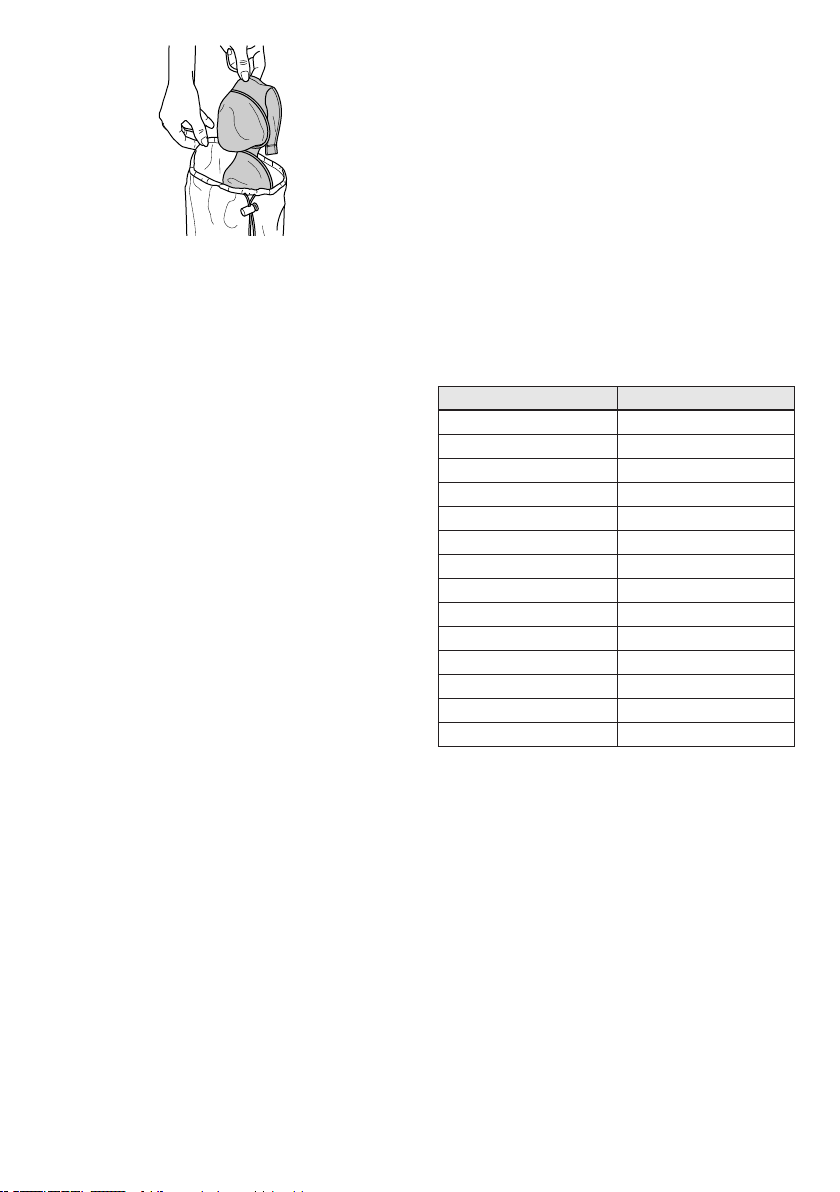
Preparing laundry for washing
• Laundry items with metal attachments
such as, underwired bras, belt buckles
or metal buttons will damage the
machine. Remove the metal pieces or
wash the clothes by putting them in a
laundry bag or pillow case.
12 - EN
Page 13
• Take out all substances in the pockets
such as coins, pens and paper clips,
and turn pockets inside out and
brush. Such objects may damage the
product or cause noise problem.
• Put small size clothes such as infant's
socks and nylon stockings in a laundry
bag or pillow case.
• Place curtains in without compressing
them. Remove curtain attachment
items.
• Fasten zippers, sew loose buttons
and mend rips and tears.
• Wash “machine washable” or “hand
washable” labeled products only with
an appropriate programme.
• Do not wash colours and whites
together. New, dark coloured cottons
release a lot of dye. Wash them
separately.
• Tough stains must be treated properly
before washing. If unsure, check with
a dry cleaner.
• Use only dyes/colour changers
and limescale removers suitable for
machine wash. Always follow the
instructions on the package.
• Wash trousers and delicate laundry
turned inside out.
• Keep laundry items made of Angora
wool in the freezer for a few hours
before washing. This will reduce
pilling.
• Laundry that are subjected to
materials such as flour, lime dust,
milk powder, etc. intensely must be
shaken off before placing into the
machine. Such dusts and powders on
the laundry may build up on the inner
parts of the machine in time and can
cause damage.
Correct load capacity
The maximum load capacity depends on
the type of laundry, the degree of soiling
and the washing programme desired.
The machine automatically adjusts the
amount of water according to the weight
of the loaded laundry.
Follow the information in the
A
“Programme and consumption table”.
When overloaded, machine's washing
performance will drop. Moreover,
noise and vibration problems may
occur.
Laundry types and their average weights
in the following table are given as
examples.
Laundry type Weight (g)
Bathrobe 1200
Napkin 100
Duvet cover 700
Bed Sheet 500
Pillowcase 200
Tablecloth 250
Towel 200
Hand towel 100
Evening gown 200
Underclothing 100
Men’s overalls 600
Men’s shirt 200
Men’s pajamas 500
Blouses 100
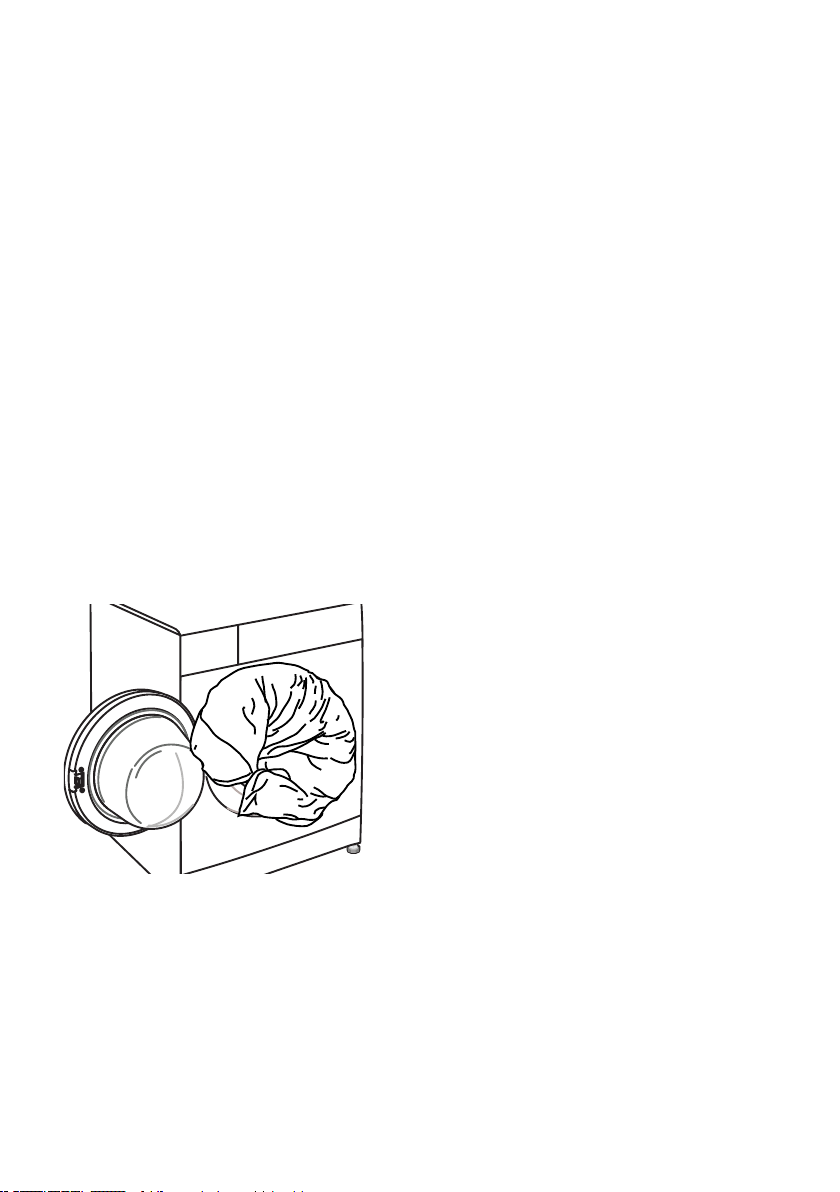
Loading the laundry
• Open the loading door.
• Place laundry items loosely into the
machine.
• Push the loading door to close until
you hear a locking sound. Ensure that
no items are caught in the door.
The loading door is locked while a
C
programme is running. The door
can only be opened a while after the
programme comes to an end.
In case of misplacing the laundry,
A
noise and vibration problems may
occur in the machine.
13 - EN
Page 14

Using detergent and softener
Detergent Drawer
The detergent drawer is composed of
three compartments:
- (I) for prewash
- (II) for main wash
– (III) for softener
– (*) in addition, there is siphon piece in
the softener compartment.
The detergent dispenser may be
C
in two different types according to
the model of your machine as seen
above.
Detergent, softener and other
cleaning agents
• Add detergent and softener before
starting the washing programme.
• Never open the detergent drawer
while the washing programme is
running!
• When using a programme without
prewash, do not put any detergent
into the prewash compartment
(compartment nr. I).
• In a programme with prewash, do not
put liquid detergent into the prewash
compartment (compartment nr. I).
• Do not select a programme with
prewash if you are using a detergent
bag or dispensing ball. Place the
detergent bag or the dispensing ball
directly among the laundry in the
machine.
• If you are using liquid detergent, do
not forget to place the liquid detergent
cup into the main wash compartment
(compartment nr. II).
Choosing the detergent type
The type of detergent to be used depends
on the type and colour of the fabric.
• Use different detergents for coloured
and white laundry.
• Wash your delicate clothes only with
special detergents (liquid detergent,
wool shampoo, etc.) used solely for
delicate clothes.
• When washing dark coloured clothes
and quilts, it is recommended to use
liquid detergent.
• Wash woolens with special detergent
made specifically for woolens.
Use only detergents manufactured
A
specifically for washing machines.
Do not use soap powder.
A
Adjusting detergent amount
The amount of washing detergent to be
used depends on the amount of laundry,
the degree of soiling and water hardness.
Read the manufacturer's instructions on
the detergent package carefully and follow
the dosage values.
• Do not use amounts exceeding the
dosage quantities recommended
on the detergent package to avoid
problems of excessive foam, poor
rinsing, financial savings and finally,
environmental protection.
• Use lesser detergent for small
amounts or lightly soiled clothes.
• Use concentrated detergents in the
recommended dosage.
Using softeners
Pour the softener into the softener
compartment of the detergent drawer.
• Use the dosages recommended on
the package.
• Do not exceed the (>max<) level
marking in the softener compartment.
• If the softener has lost its fluidity, dilute
it with water before putting it in the
detergent drawer.
Using liquid detergents
If the product contains a liquid
detergent cup:
• Make sure that you have placed the
liquid detergent cup in compartment
nr. "II".
• Use the detergent manufacturer's
measuring cup and follow the
instructions on the package.
• Use the dosages recommended on
the package.
• If the liquid detergent has lost its
fluidity, dilute it with water before
putting in the detergent cup.
14 - EN
Page 15

If the product does not contain a
liquid detergent cup:
• Do not use liquid detergent for
the prewash in a programme with
prewash.
• Use the detergent manufacturer's
measuring cup and follow the
instructions on the package.
• Liquid detergent stains your clothes
when used with Delayed Start
function. If you are going to use the
Delayed Start function, do not use
liquid detergent.
Using gel and tablet detergent
When using tablet, gel, etc. detergents,
read the manufacturer's instructions
on the detergent package carefully and
follow the dosage values. If there is not
any instruction on the package, apply the
following.
• If the gel detergent thickness is fluidal
and your machine does not contain
a special liquid detergent cup, put
the gel detergent into the main wash
detergent compartment during
first water intake. If your machine
contains a liquid detergent cup, fill the
detergent into this cup before starting
the programme.
• If the gel detergent thickness is not
fluidal or in the shape of capsule liquid
tablet, put it directly into the drum
before washing.
• Put tablet detergents into the main
wash compartment (compartment
nr. II) or directly into the drum before
washing.
Tablet detergents may leave residues
C
in the detergent compartment. If you
encounter such a case, place the
tablet detergent between the laundry,
close to the lower part of the drum in
future washings.
Use the tablet or gel detergent without
C
selecting the prewash function.
Using starch
• Add liquid starch, powder starch
or the dyestuff into the softener
compartment as instructed on the
package.
• Do not use softener and starch
together in a washing cycle.
• Wipe the inside of the machine with
a damp and clean cloth after using
starch.
Using bleaches
• Select a programme with prewash
and add the bleaching agent at
the beginning of the prewash. Do
not put detergent in the prewash
compartment. As an alternative
application, select a programme
with extra rinse and add the
bleaching agent while the machine
is taking water from the detergent
compartment during first rinsing step.
• Do not use bleaching agent and
detergent by mixing them.
• Use just a little amount (approx. 50
ml) of bleaching agent and rinse the
clothes very well as it causes skin
irritation. Do not pour the bleaching
agent onto the clothes and do not use
it for coloured clothes.
• When using oxygen based bleaches,
follow the instructions on the package
and select a programme that washes
at a lower temperature.
• Oxygen based bleaches can be used
together with detergents; however,
if its thickness is not the same with
the detergent, put the detergent first
into the compartment nr. "II" in the
detergent drawer and wait until the
detergent flows while the machine
is taking in water. Add the bleaching
agent from the same compartment
while the machine is still taking in
water.
15 - EN
Page 16

Using limescale remover
• When required, use limescale
removers manufactured specifically for
washing machines only.
• Always follow instructions on the
package.
16 - EN
Page 17

5 Operating the product
Control panel
1
2
6 7
3
8
1 - Spin Speed Adjustment button
2 - Display
3 - Temperature Adjustment button
4 - Programme Selection knob
5 - On / Off button
6 - Delayed Start buttons (+ / -)
7 - Auxiliary Function buttons
8 - Start / Pause / Cancel button
4
5
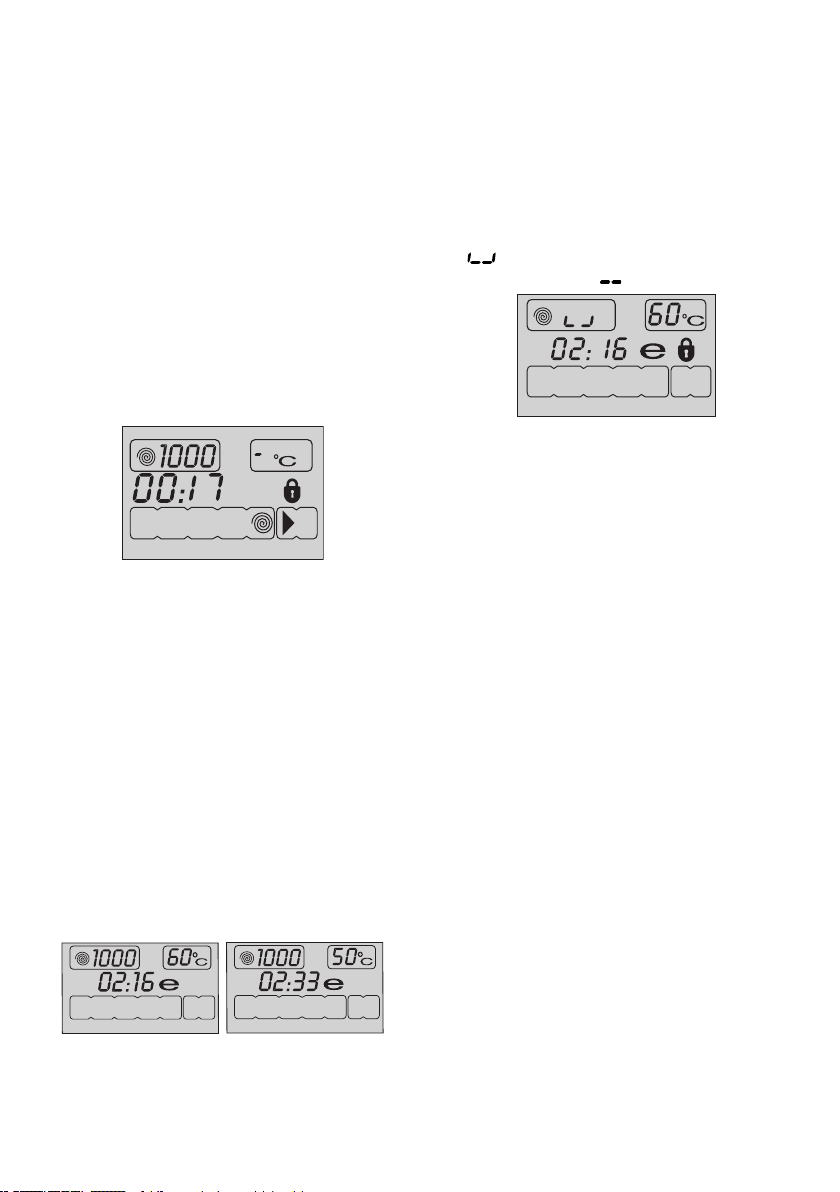
Display symbols
F2
F1
a - Spin Speed indicator
b - Temperature indicator
c - Spin symbol
d - Temperature symbol
e - Remaining Time and Delayed
Start indicator
f - Programme Indicator symbols
(Prewash / Main Wash / Rinse /
Softener / Spin)
g - Economy symbol
F3
F4
h - Delayed Start symbol
i - Door Locked symbol
j - Start symbol
k - Pause symbol
l - Auxiliary Function symbols
m - No Water symbol
17 - EN
Page 18

Preparing the machine
1. Make sure that the hoses are
connected tightly.
2. Plug in your machine.
3. Turn the tap on completely.
4. Place the laundry in the machine.
5. Add detergent and fabric softener.
Programme selection
1. Select the programme suitable for
the type, quantity and soiling degree
of the laundry in accordance with the
"Programme and consumption table"
and the temperature table below.
Heavily soiled white cottons
90˚C
60˚C
40˚C30˚CCold
2. Select the desired programme with
the Programme Selection button.
Programmes are limited with the
C
highest spin speed appropriate for
that particular type of fabric.
When selecting a programme, always
C
consider the type of fabric, colour,
degree of soiling and permissible
water temperature.
Always select the lowest required
C
temperature. Higher temperature
means higher power consumption.
For further programme details, see
C
"Programme and consumption table".
and linens. (coffee table
covers, tableclothes, towels,
bed sheets, etc.)
Normally soiled, coloured,
fade proof cottons or synthetic
clothes (shirt, nightgown,
pajamas, etc.) and lightly
soiled white linens (underwear,
etc.)
Blended laundry including
delicate textile (veil curtains,
etc.), synthetics and woolens.
Main programmes
Depending on the type of fabric, use the
following main programmes.
• Cottons
Use this programme for your cotton
laundry (such as bed sheets, duvet and
pillowcase sets, towels, bathrobes,
underwear, etc.). Your laundry will be
washed with vigorous washing action for a
longer washing cycle.
• Synthetics
Use this programme to wash your
synthetic clothes (shirts, blouses,
synthetic/cotton blends, etc.). It washes
with a gentle action and has a shorter
washing cycle compared to the Cottons
programme.
For curtains and tulle, use the Synthetic
40˚C programme with prewash and
anti-creasing functions selected. As
their meshed texture causes excessive
foaming, wash the veils/tulle by putting
little amount of detergent into the main
wash compartment. Do not put detergent
in the prewash compartment.
• Woollen
Use this programme to wash your
woolen clothes. Select the appropriate
temperature complying with the tags of
your clothes. Use appropriate detergents
for woolens.
Additional programmes
For special cases, additional programmes
are available in the machine.
Additional programmes may differ
C
according to the model of the
machine.
• Cottons Eco
Use this programme to wash your
laundry washable in cottons programme
for a longer time, still with a very good
performance for saving purposes.
Cottons Eco programme consumes
C
less energy compared to other
cottons programmes.
• Hygiene
Use this programme to wash baby
laundry, and the laundry that belongs to
allergic persons. Longer heating time and
an additional rinsing step provide a higher
level of hygiene.
• Hand Wash
Use this programme to wash your woolen/
delicate clothes that bear “not machinewashable” tags and for which hand wash
is recommended. It washes laundry with
a very gentle washing action to not to
damage clothes.
18 - EN
Page 19
• Mini
Use this programme to wash your lightly
soiled cotton clothes in a short time.
• Mini 14
Use this programme to wash your little
amount of lightly soiled cotton clothes in a
short time.
• Dark Wash
Use this programme to wash your dark
coloured laundry or the laundry that you
do not want it get faded. Washing is
performed with little mechanic action and
at low temperatures. It is recommended to
use liquid detergent or woolen shampoo
for dark coloured laundry.
• Bedding
Use this programme to wash your fiber
duvets that bear “machine washable”
tag. Make sure that you have loaded the
duvet correctly in order not to damage the
machine and the duvet. Remove the duvet
cover before loading the duvet into the
machine. Fold the duvet into two and load
it into the machine. Load the duvet into
the machine paying attention to place it in
a way that it will not contact the bellow.
Do not load more than 1 double fibre
C
duvet (200 x 200 cm).
Do not wash your duvets, pillows
C
and etc. that contain cotton in the
machine.
Do not wash the items apart from
A
duvets such as carpets, rugs and etc.
in the machine. Permanent damage
occurs in the machine.
• Lingerie
Use this programme to wash delicates
such as underwears. If there is little
amount of laundry, use a laundry net.
Enclasp and button the clothes,
C
and zip up. Washing is made at
low temperatures and with less
mechanical movements.
Better rinsing results are obtained
C
thanks to the additional rinsing.
• Refresh
Use this programme to remove the odour
on the laundry that are worn only for once
and do not contain any stains or dirt.
• Cotton 20
Use this programme, which is much
more sensitive to environment and natural
resources, to wash your lightly soiled and
unstained cotton laundry (max. 3.5 kg) in
a short time and economically.
It is recommended to use liquid
C
detergent or gel washing detergent.
• Machine Care
Use this programme regularly (once in
every 1-2 months) to clean the drum and
provide the required hygiene. Run the
programme without any laundry in the
machine. To obtain better results, put
powder limescale remover for washing
machines into the detergent compartment
II. When the programme is over, leave the
loading door ajar so that the inside of the
machine gets dry.
This is not a washing programme. It is
C
a maintenance programme.
Do not run the programme when there
C
is something in the machine. If you
try to do so, the machine detects that
there is a load inside and aborts the
programme.
Special programmes
For specific applications, select any of the
following programmes.
• Rinse
Use this programme when you want to
rinse or starch separately.
• Spin+Drain
Use this programme to apply an additional
spin cycle for your laundry or to drain the
water in the machine.
Before selecting this programme, select
the desired spin speed and press Start /
Pause / Cancel button. The machine will
spin the laundry with the set spin speed
and drain the water coming out of them.
19 - EN
Page 20
If you wish to drain only the water
without spinning your laundry, select the
Pump+Spin programme and then select
the No Spin function with the help of Spin
Speed Adjustment button. Press Start /
Pause / Cancel button.
Use a lower spin speed for delicate
C
laundries.
Temperature selection
Whenever a new programme is selected,
the maximum temperature for the selected
programme appears on the temperature
indicator.
To decrease the temperature, press
the Temperature Adjustment button.
Temperature decreases with increments
of 10° and finally, “-” symbol indicating the
cold wash option appears on the display.
If you scroll to cold wash option and
C
press Temperature Adjustment button
again, the recommended temperature
for the selected programme appears
on the display. Press the Temperature
Adjustment button again to decrease
the temperature.
Economy symbol
Indicates the programmes and
temperatures that provide energy savings.
Economy symbol can not be selected
C
in Intensive and Hygiene programmes
since washing is performed in long
times and at high temperatures in
order to provide hygiene. Similarly,
Economy symbol can not be selected
in Baby, Refresh, Drum Cleaning, Spin
and Rinse programmes as well.
spin speed indicator.
To decrease the spin speed, press
the Spin Speed Adjustment button.
Spin speed decreases gradually. Then,
depending on the model of the product,
"Rinse Hold" and "No Spin" options
appear on the display. See "Auxiliary
function selection" section for explanations
of these options.
Rinse Hold option is indicated with “
C
” symbol and No Spin option is
indicated with “ ” symbol.
F3
F2
F1
F4
Spin speed selection
Whenever a new programme is selected,
the recommended spin speed of the
selected programme is displayed on the
20 - EN
Page 21
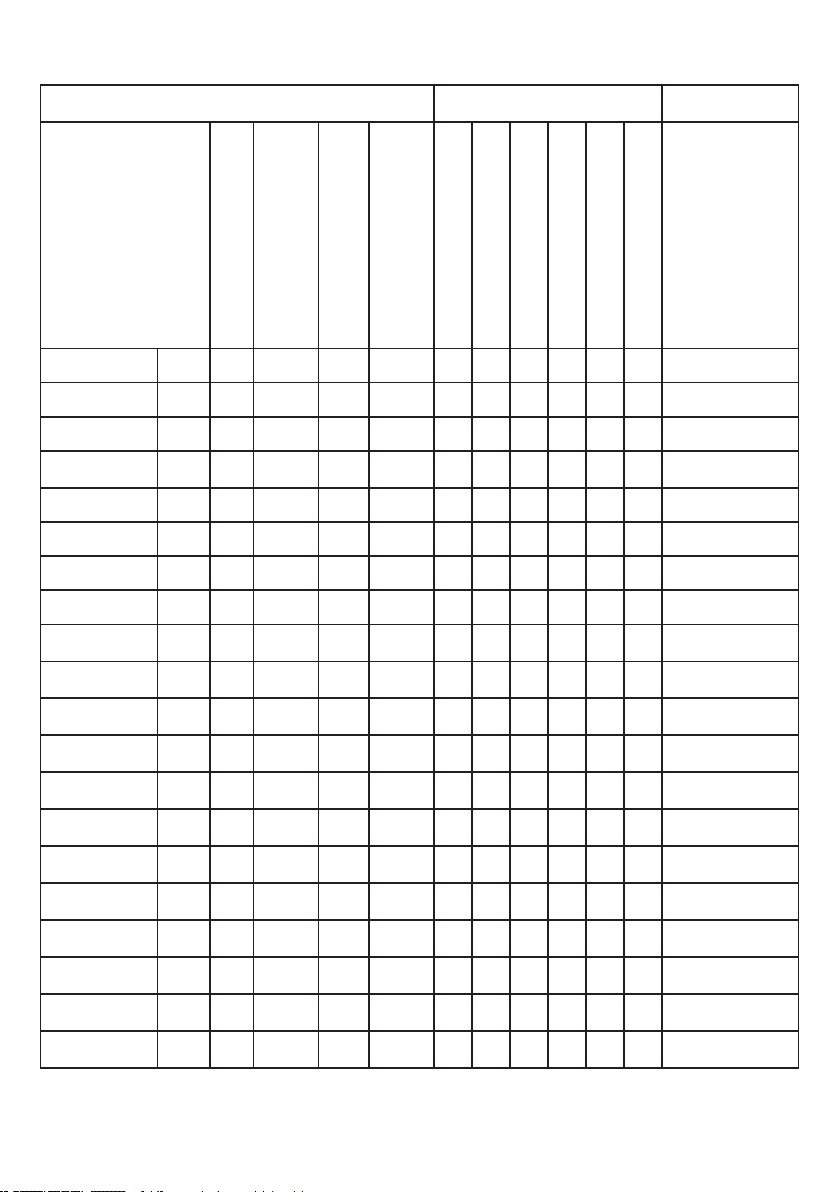
Programme and consumption table
EN
Programme (°C)
Cottons 90 9 87 2.70 1600 • • • • • • 90-Cold
Cottons 60 9 85 1.80 1600 • • • • • • 90-Cold
Cottons 40 9 85 1.00 1600 • • • • • • 90-Cold
Hygiene 90 9 80 2.70 1600 * • 90-30
Cottons Eco 60** 9 66 1.35 1600 • • • • • • 60-Cold
Cottons Eco 40 9 80 0.95 1600 • • • • • • 60-Cold
Synthetics 60 4 55 1.00 1000 • • • • • • 60-Cold
Synthetics 40 4 55 0.52 1000 • • • • • • 60-Cold
Cotton 20 20 3.5 45 0.16 1600 • 20
Lingerie 30 1 50 0.25 1000 • 30-Cold
2
Max. Load (kg)
Water Consumption (l)
Energy Consumption (kWh)
Max. Speed***
Auxiliary functions
Prewash
Quick Wash
Rinse Plus
Anti Crease
temperature range
Rinse Hold
Pet hair removal
Selectable
°C
Bedding 40 - 60 0.60 1000 60-40
Mini 14’ 30 2 42 0.10 1400 • • 30-Cold
Mini 90 9 70 2.02 1400 • • 90-Cold
Mini 60 9 70 1.20 1400 • • 90-Cold
Mini 30 9 80 0.30 1400 • • 90-Cold
Woollen 40 2 56 0.30 1000 • • 40-Cold
Hand Wash 30 1.5 40 0.25 1000 30-Cold
Dark Wash 40 4 95 0.60 1000 * • 40-Cold
Machine Care 70 - 110 2.00 800 * 70
Refresh - 2 35 0.03 1000 • -
21 - EN
Page 22

• : Selectable
* : Automatically selected, no canceling.
** : Energy Label programme (EN 60456)
*** If maximum spin speed of the machine is lower then this value, you can only select
up to the maximum spin speed.
- : See the programme description for maximum load.
The auxiliary functions in the table may vary according to the model of your machine.
C
Water and power consumption may vary subject to the changes in water pressure,
C
water hardness and temperature, ambient temperature, type and amount of laundry,
selection of auxiliary functions and spin speed, and changes in electric voltage.
You can see the washing time of the programme you have selected on the display of
C
the machine. It is normal that small differences may occur between the time shown
on the display and the real washing time.
22 - EN
Page 23

Auxiliary function selection
a b c d
Select the desired auxiliary functions
before starting the programme.
Furthermore, you may also select or
cancel auxiliary functions that are suitable
to the running programme by pressing
the Start / Pause / Cancel button when
the machine is operating. For this, the
machine must be in a step before the
auxiliary function you are going to select or
cancel.
Depending on the programme, press a,
b, c or d buttons to select the desired
auxiliary function. Symbol of the selected
auxiliary function appears on the display.
Some functions cannot be selected
C
together. If a second auxiliary function
conflicting with the first one is selected
before starting the machine, the
function selected first will be canceled
and the second auxiliary function
selection will remain active. For
example, if you want to select Quick
Wash after you have selected the
Prewash, Prewash will be canceled
and Quick Wash will remain active.
An auxiliary function that is not
C
compatible with the programme
cannot be selected. (See "Programme
and consumption table")
Auxiliary Function buttons may
C
vary according to the model of the
machine.
• Prewash
A Prewash is only worthwhile for heavily
soiled laundry. Not using the Prewash will
save energy, water, detergent and time.
F1 appears on the display when you
select this function (a).
• Quick Wash
This function can be used in Cottons and
Synthetics programmes. It decreases the
washing times and also the number of
rinsing steps for lightly soiled laundry.
F2 appears on the display when you
select this function (b).
When you select this function,
C
load your machine with half of the
maximum laundry specified in the
programme table.
• Rinse Plus
This function enables the machine to
make another rinsing in addition to the
one already made after the main wash.
Thus, the risk for sensitive skins (babies,
allergic skins, etc.) to be effected by
the minimal detergent remnants on the
laundry can be reduced.
F3 appears on the display when you
select this function (c).
• Anti Crease
This function creases the clothes lesser
when they are being washed. Drum
movement is reduced and spinning speed
is limited to prevent creasing. In addition,
washing is done with a higher water level.
F4 appears on the display when you
select this function (d).
• Rinse Hold
If you are not going to unload your
clothes immediately after the programme
completes, you may use rinse hold
function to keep your laundry in the final
rinsing water in order to prevent them
from getting wrinkled when there is no
water in the machine. Press Start / Pause
/Cancel button after this process if you
want to drain the water without spinning
your laundry. Programme will resume and
complete after draining the water.
If you want to spin the laundry held in
water, adjust the Spin Speed and press
Start / Pause / Cancel button.
The programme resumes. Water
is drained, laundry is spun and the
programme is completed.
• Soaking
The Soaking auxiliary function ensures
better removal of stains ingrained into the
clothes by holding them in the detergent
water prior to startup of the programme.
Time display
Remaining time to complete the
programme appears on the display
while the programme is running. Tim is
23 - EN
Page 24

displayed as “01:30” in hours and minutes
format.
Programme time may differ from
C
the values in the "Programme and
consumption table" depending on the
water pressure, water hardness and
temperature, ambient temperature,
amount and the type of laundry,
auxiliary functions selected and the
changes at the mains voltage.
Delayed start
With the Delayed Start function the startup
of the programme may be delayed up
to 24 hours. Delayed start time can be
increased by increments of 30 minutes.
Do not use liquid detergents when you
C
set Delayed Start! There is the risk of
staining of the clothes.
1. Open the loading door, place the
laundry and put detergent, etc.
2. Select the washing programme,
temperature, spin speed and, if
required, the auxiliary functions.
3. Set the desired delayed start time
by pressing the Delayed Start + or buttons. Delayed Start symbol flashes.
4. Press Start / Pause / Cancel button.
Delayed start countdown starts.
Delayed Start symbol illuminates
steadily. Start symbol appears. “:” sign
in the middle of the delayed start time
on the display starts flashing.
Additional laundry may be loaded
C
during the delayed start period. At the
end of the countdown, Delayed Start
symbol disappears, washing cycle
starts and the time of the selected
programme appears on the display.
Changing the delayed start period
If you want to change the time during
countdown:
1. Press Start / Pause / Cancel button.
“:” sign in the middle of the delayed
start time on the display stops
flashing. Pause symbol appears.
Delayed Start symbol flashes. Start
symbol disappears.
2. Set the desired delayed start time
by pressing the Delayed Start + or buttons.
3. Press Start / Pause / Cancel button.
Delayed Start symbol illuminates
steadily. Pause symbol disappears.
Start symbol appears.
4. “:” sign in the middle of the delayed
start time on the display starts
flashing.
Canceling the Delayed Start function
If you want to cancel the delayed start
countdown and start the programme
immediately:
1. Press Start / Pause / Cancel button.
“:” sign in the middle of the delayed
start time on the display stops
flashing.
2. Start symbol disappears. Pause
symbol and Delayed Start symbol
flashes.
3. Decrease the delayed start time by
pressing the Delayed Start - button.
Programme duration appears after 30
minutes.
4. Press Start / Pause / Cancel button to
start the programme.
Starting the programme
1. Press Start / Pause / Cancel button to
start the programme.
2. Start symbol showing the startup of
the programme will turn on.
3. Loading door is locked and Door
Locked symbol appears on the
display.
4. The symbol of the step from which
the programme has started appears
on the display (Prewash, Main Wash,
Rinse, Softener and Spin).
Progress of programme
Progress of a running programme is
indicated on the display with a set of
symbols.
Relevant symbol appears on the display
at the beginning of each programme step
and all symbols remain lit at the end of the
programme. The farthermost right symbol
indicates the current programme step.
Prewash
24 - EN
Page 25

If the Prewash auxiliary function is
selected, Prewash symbol appears on the
display indicating that the prewash step
has started.
Main Wash
Main Wash symbol indicating that the
main wash step has started appears on
the display.
Rinse
Rinse symbol indicating that the rinsing
step has started appears on the display.
Softener
Softener symbol indicating that the
softener step has started appears on the
display.
Spin
Appears at the beginning of the final
spin step and remains lit during Spin and
Pump special programmes.
If the machine does not pass to the
C
spinning step, Rinse Hold function
might be active or the automatic
unbalanced load detection system
might be activated due to the
unbalanced distribution of the laundry
in the machine.
Loading door lock
There is a locking system on the loading
door of the machine that prevents opening
of the door in cases when the water level
is unsuitable.
Door Locked symbol appears when the
loading door is locked. This symbol will
flash until the loading door becomes ready
to open when programme completes or
the machine is paused. Do not force to
open the loading door in this step. Symbol
disappears when the door is ready to
open. You can open the door when the
symbol disappears.
Changing the selections after
programme has started
Switching the machine to pause mode
Press the Start / Pause / Cancel button
to switch the machine to pause mode.
Pause symbol appears on the display
indicating that the machine is paused.
Start symbol disappears.
F3
F2
F1
Changing the speed and temperature
settings for auxiliary functions
Depending on the step the programme
has reached, you may cancel or activate
the auxiliary functions; see, "Auxiliary
function selection".
You may also change the speed and
temperature settings; see, "Spin speed
selection" and "Temperature selection".
Adding or taking out laundry
1. Press the Start / Pause / Cancel
button to switch the machine to pause
mode. The programme follow-up light
of the relevant step during which the
machine was switched into the pause
mode will flash.
2. Wait until the Loading Door can be
opened.
3. Open the Loading Door and add or
take out the laundry.
4. Close the Loading Door.
5. Make changes in auxiliary functions,
temperature and speed settings if
necessary.
6. Press Start / Pause / Cancel button to
start the machine.
The loading door will not open if the
C
water temperature in the machine is
high or the water level is above the
door opening.
F4
Child Lock
Use Child Lock function to prevent
children from tampering with the machine.
Thus you can avoid any changes in a
running programme.
You can switch on and off the
C
machine with On / Off button when
the Child Lock is active. When
you switch on the machine again,
programme will resume from where it
has stopped.
To activate the Child Lock:
Press and hold 2nd and 4th Auxiliary
Function buttons for 3 seconds. “Con”
appears on the display.
25 - EN
Page 26

Same phrase will appear on the
C
display if you press any button when
Child Lock is enabled.
To deactivate the Child Lock:
Press and hold 2nd and 4th Auxiliary
Function buttons for 3 seconds. “COFF”
appears on the display.
Do not forget to disable the child
C
lock at the end of the programme
if it was enabled before. Otherwise,
machine will not allow to select a new
programme.
Canceling the programme
Press and hold Start / Pause / Cancel
button for 3 seconds. Start symbol
flashes. Symbol of the step at which
the programme was cancelled remains
lit. "End" appears on the display and the
programme is cancelled.
Adjust the spin speed and press Start /
Pause / Cancel button. Pause symbol
disappears and Start symbol appears.
Programme resumes, discharges the
water and spins the laundry.
If you only want to drain the water without
spinning:
Just press Start / Pause / Cancel button.
Pause symbol disappears. Start symbol
appears. Programme resumes and
discharges the water only.
End of programme
“End” appears on the display at the
end of the programme. Symbols of the
programme steps remain lit. Auxiliary
function, spin speed and temperature
that were selected at the beginning of the
programme remain selected.
If you want to open the loading
C
door after you have cancelled the
programme but it is not possible
to open the loading door since the
water level in the machine is above
the loading door opening, then turn
the Programme Selection knob
to Pump+Spin programme and
discharge the water in the machine.
Machine is in Rinse Hold mode
Spin symbol flashes and Pause symbol
illuminates when the machine is in Rinse
Hold mode.
If you want to spin your laundry when the
machine is in this mode:
26 - EN
Page 27

6 Maintenance and cleaning
Service life of the product extends and
frequently faced problems decrease if
cleaned at regular intervals.
Cleaning the detergent drawer
Clean the detergent drawer at regular
intervals (every 4-5 washing cycles)
as shown below in order to prevent
accumulation of powder detergent in time.
1. Press the dotted point on the siphon
in the softener compartment and pull
towards you until the compartment is
removed from the machine.
If more than normal amount of water
C
and softener mixture starts to gather
in the softener compartment, the
siphon must be cleaned.
2. Wash the detergent drawer and the
siphon with plenty of lukewarm water
in a washbasin. Wear protective
gloves or use an appropriate brush to
avoid touching of the residues in the
drawer with your skin when cleaning.
3. Insert the drawer back into its place
after cleaning and make sure that it is
seated well.
Cleaning the loading
door and the drum
Residues of softener, detergent and
dirt may accumulate in your machine in
time and may cause unpleasant odours
and washing complaints. To avoid this,
use the Drum Cleaning programme. If
your machine is not featured with Drum
Cleaning programme, use Cottons-90
programme and select Additional Water
or Extra Rinse auxiliary functions as well.
Before starting the programme, put
max. 100 g of powder anti-limescale into
the main wash detergent compartment
(compartment nr. II). If the anti-limescale
is in tablet form, put only one tablet into
compartment nr. II. Dry the inside of the
bellow with a clean piece of cloth after the
programme has come to an end.
Repeat Drum Cleaning process in
C
every 2 months.
Use an anti-limescale suitable for the
C
washing machines.
After every washing make sure that no
foreign substance is left in the drum.
If the holes on the bellow shown in the
figure is blocked, open the holes using a
toothpick.
Foreign metal substances in your
C
machine will cause rust stains. Clean
the stains on the drum surface by
using cleaning agents for stainless
steel. Never use steel wool or wire
wool.
Cleaning the body
and control panel
Wipe the body of the machine with soapy
water or non-corrosive mild gel detergents
as necessary, and dry with a soft cloth.
Use only a soft and damp cloth to clean
the control panel.
Never use sponge or scrub materials.
A
These will damage the painted and
plastic surfaces.
Cleaning the water intake filters
There is a filter at the end of each water
intake valve at the rear of the machine
and also at the end of each water intake
hose where they are connected to the tap.
These filters prevent foreign substances
and dirt in the water to enter the washing
machine. Filters should be cleaned as they
do get dirty.
27 - EN
Page 28

1. Close the taps.
2. Remove the nuts of the water intake
hoses to access the filters on the
water intake valves. Clean them with
an appropriate brush. If the filters are
too dirty, take them out by means of
pliers and clean them.
3. Take out the filters on the flat ends of
the water intake hoses together with
the gaskets and clean thoroughly
under running water.
4. Replace the gaskets and filters
carefully in their places and tighten the
hose nuts by hand.
Draining remaining water and
cleaning the pump filter
The filter system in your machine prevents
solid items such as buttons, coins and
fabric fibers clogging the pump impeller
during discharge of washing water. Thus,
the water will be discharged without any
problem and the service life of the pump
will extend.
If the machine fails to drain water, the
pump filter is clogged. Filter must be
cleaned whenever it is clogged or in every
3 months. Water must be drained off first
to clean the pump filter.
In addition, prior to transporting the
machine (eg., when moving to another
house) and in case of freezing of the
water, water may have to be drained
completely.
Foreign substances left in the pump
A
filter may damage your machine or
may cause noise problem.
In order to clean the dirty filter and
discharge the water:
1. Unplug the machine to cut off the
supply power.
Temperature of the water inside the
A
machine may rise up to 90 ºC. To
avoid burning risk, filter must be
cleaned after the water in the machine
cools down.
2. Open the filter cap.
If the filter cap is composed of two
pieces, press the tab on the filter cap
downwards and pull the piece out
towards yourself.
If the filter cap is one piece, pull the cap
from both sides at the top to open.
You can remove the filter cover by
C
slightly pushing downwards with a
thin plastic tipped tool, through the
gap above the filter cover. Do not
use metal tipped tools to remove the
cover.
3. Some of our products have
emergency draining hose and some
does not have. Follow the steps below
to discharge the water.
Discharging the water when the product
has an emergency draining hose:
a. Pull the emergency draining hose out
from its seat
b. Place a large container at the end
of the hose. Drain the water into
the container by pulling out the plug
at the end of the hose. When the
28 - EN
Page 29

container is full, block the inlet of the
hose by replacing the plug. After the
container is emptied, repeat the above
procedure to drain the water in the
machine completely.
c. When draining of water is finished,
close the end by the plug again and fix
the hose in its place.
d. Turn the pump filter to take it out.
Discharging the water when the product
does not have an emergency draining
hose:
a. Place a large container in front of the
filter to catch water from the filter.
b. Loosen pump filter (anticlockwise) until
water starts to flow. Fill the flowing
water into the container you have
placed in front of the filter. Always
keep a piece of cloth handy to absorb
any spilled water.
c. When the water inside the machine is
finished, take out the filter completely
by turning it.
4. Clean any residues inside the filter as
well as fibers, if any, around the pump
impeller region.
5. Install the filter.
If your product has a water jet feature,
A
be sure to fit the filter into its housing
in the pump. Never force the filter
while installing it into its housing. Seat
the filter into its place completely.
Otherwise, water may leak from the
filter cap.
6. If the filter cap is composed of two
pieces, close the filter cap by pressing
on the tab. If it is one piece, seat the
tabs in the lower part into their places
first, and then press the upper part to
close.
29 - EN
Page 30

7 Troubleshooting
Programme cannot be started or selected.
• Washing machine has switched to self protection mode due to a supply problem
(line voltage, water pressure, etc.). >>> Press and hold Start / Pause / Cancel
button for 3 seconds to reset the machine to factory settings. (See "Canceling the
programme")
Water in the machine.
• Some water might have remained in the product due to the quality control
processes in the production. >>> This is not a failure; water is not harmful to the
machine.
There is water leaking from the bottom of the washing machine.
• Likely problems with hoses or the pump filter. >>> Be sure the seals of the water
inlet hoses are securely fitted. Attach the hose to the tap tightly.
• Pump filter might not be closed fully. >>> Make sure that the pump filter is
completely closed.
Machine does not fill with water.
• Tap is turned off. >>> Open the inlet water taps fully.
• Water inlet hose is bent. >>> Flatten the water inlet hose.
• Water inlet filter is clogged. >>> Clean the water inlet filter.
• The loading door is ajar. >>> Close the Loading Door.
Machine does not drain water.
• Water drain hose might be clogged or twisted. >>> Clean or flatten the hose.
• Pump filter is clogged. >>> Clean the pump filter.
Machine vibrates or makes noise.
• Machine might be standing unbalanced. >>> Adjust the feet to level the machine.
• A hard substance might have entered into the pump filter. >>> Clean the pump
filter.
• Transportation safety bolts are not removed. >>> Remove the transportation
safety bolts.
• Laundry quantity in the machine might be too little. >>> Add more laundry to the
machine.
• Machine might be overloaded with laundry. >>> Take out some of the laundry
from the machine or distribute the load by hand to balance it homogenously in the
machine.
• Machine might be leaning on a rigid item. >>> Make sure that the machine is not
leaning on anything.
Machine stopped shortly after the programme started.
• Machine might have stopped temporarily due to low voltage. >>> It will resume
running when the voltage restores to the normal level.
Machine directly discharges the water it takes in.
• Draining hose might not be at adequate height. >>> Connect the water draining
hose as described in the operation manual.
No water can be seen in the machine during washing.
The water level is not visible from outside of the washing machine. This is not a
C
failure.
30 - EN
Page 31

Loading door cannot be opened.
• Door lock is activated because of the water level in the machine. >>> Drain the
water by running the Pump or Spin programme.
• Machine is heating up the water or it is at the spinning cycle. >>> Wait until the
programme completes.
• Child lock is engaged. Door lock will be deactivated a couple of minutes after
the programme has come to an end. >>> Wait for a couple of minutes for
deactivation of the door lock.
Washing takes longer time than the one specified in the manual.
• Water pressure is low. >>> Machine waits until taking in adequate amount of
water to prevent poor washing quality due to the decreased amount of water.
Therefore, the washing time extends.
• Voltage might be low. >>> Washing time is prolonged to avoid poor washing
results when the supply voltage is low.
• Input temperature of water might be low. >>> Required time to heat up the water
extends in cold seasons. Also, washing time can be lengthened to avoid poor
washing results.
• Number of rinses and/or amount of rinse water might have increased. >>>
Machine increases the amount of rinse water when good rinsing is needed and
adds an extra rinsing step if necessary.
• Excessive foam might have occurred and automatic foam absorption system
might have been activated due to too much detergent usage. >>> Use
recommended amount of detergent.
Machine does not switch to spinning step when the laundry is not evenly
C
distributed in the drum to prevent any damage to the machine and to its
surrounding environment. Laundry should be rearranged and re-spun.
Programme time does not countdown. (On models with display)
• Timer may stop during water intake. >>> Timer indicator will not countdown until
the machine takes in adequate amount of water. The machine will wait until there
is sufficient amount of water to avoid poor washing results due to lack of water.
Timer indicator will resume countdown after this.
• Timer may stop during heating step. >>> Timer indicator will not countdown until
the machine reaches the selected temperature.
• Timer may stop during spinning step. >>> Automatic unbalanced load detection
system might be activated due to the unbalanced distribution of the laundry in the
drum.
Machine does not switch to spinning step when the laundry is not evenly
C
distributed in the drum to prevent any damage to the machine and to its
surrounding environment. Laundry should be rearranged and re-spun.
Programme time does not countdown.
• There might be an imbalance of laundry in the machine. >>> Automatic
unbalanced load detection system might be activated due to the unbalanced
distribution of the laundry in the drum.
Machine does not switch to spinning step when the laundry is not evenly
C
distributed in the drum to prevent any damage to the machine and to its
surrounding environment. Laundry should be rearranged and re-spun.
31 - EN
Page 32

Machine does not switch to spinning step.
• There might be an imbalance of laundry in the machine. >>> Automatic
unbalanced load detection system might be activated due to the unbalanced
distribution of the laundry in the drum.
Machine does not switch to spinning step when the laundry is not evenly
C
distributed in the drum to prevent any damage to the machine and to its
surrounding environment. Laundry should be rearranged and re-spun.
• The machine will not spin if water is not drained completely. >>> Check the filter
and the draining hose.
• Excessive foam might have occurred and automatic foam absorption system
might have been activated due to too much detergent usage. >>> Use
recommended amount of detergent.
Washing performance is poor: Laundry turns gray.
• Insufficient amount of detergent was used over a long period of time. >>> Use
the recommended amount of detergent appropriate for water hardness and the
laundry.
• Washing was made at low temperatures for a long time over a long period of time.
>>> Select the proper temperature for the laundry to be washed.
• Insufficient amount of detergent is used with hard waters. >>> Using insufficient
amount of detergent with hard water causes the soil to stick on the cloth and this
turns the cloth into gray in time. It is difficult to eliminate graying once it happens.
Use the recommended amount of detergent appropriate for water hardness and
the laundry.
• Too much detergent is used. >>> Use the recommended amount of detergent
appropriate for water hardness and the laundry.
• Regular drum cleaning is not applied. >>> Clean the drum regularly. For this,
please see "Cleaning the loading door and the drum".
Washing performance is poor: Stains persist or the laundry is not whitened.
• Insufficient amount of detergent is used. >>> Use recommended amount of
detergent appropriate for the laundry.
• Excessive laundry was loaded in. >>> Do not load the machine in excess. Load
with amounts recommended in the "Programme and consumption table".
• Wrong programme and temperature were selected. >>> Select the proper
programme and temperature for the laundry to be washed.
• Wrong type of detergent is used. >>> Use original detergent appropriate for the
machine.
• Detergent is put in the wrong compartment. >>> Put the detergent in the correct
compartment. Do not mix the bleaching agent and the detergent with each other.
• Regular drum cleaning is not applied. >>> Clean the drum regularly. For this,
please see "Cleaning the loading door and the drum".
Washing performance is poor: Oily stains appeared on the laundry.
• Regular drum cleaning is not applied. >>> Clean the drum regularly. For this,
please see "Cleaning the loading door and the drum".
Washing performance is poor: Clothes smell unpleasantly.
• Odours and bacteria layers are formed on the drum as a result of continuous
washing at lower temperatures and/or in short programmes. >>> Leave the
detergent drawer as well as the loading door of the machine ajar after each
washing. Thus, a humid environment favorable for bacteria cannot occur in the
machine.
• Regular drum cleaning is not applied. >>> Clean the drum regularly. For this,
please see "Cleaning the loading door and the drum".
32 - EN
Page 33

Colour of the clothes faded.
• Excessive laundry was loaded in. >>> Do not load the machine in excess.
• Detergent in use is damp. >>> Keep detergents closed in an environment free of
humidity and do not expose them to excessive temperatures.
• A higher temperature is selected. >>> Select the proper programme and
temperature according to the type and soiling degree of the laundry.
• Regular drum cleaning is not applied. >>> Clean the drum regularly. For this,
please see "Cleaning the loading door and the drum".
It does not rinse well.
• The amount, brand and storage conditions of the detergent used are
inappropriate. >>> Use a detergent appropriate for the washing machine and
your laundry. Keep detergents closed in an environment free of humidity and do
not expose them to excessive temperatures.
• Detergent is put in the wrong compartment. >>> If detergent is put in the
prewash compartment although prewash cycle is not selected, machine can take
this detergent during rinsing or softener step. Put the detergent in the correct
compartment.
• Pump filter is clogged. >>> Check the filter.
• Drain hose is folded. >>> Check the drain hose.
Laundry became stiff after washing.
• Insufficient amount of detergent is used. >>> Using insufficient amount of
detergent for the water hardness can cause the laundry to become stiff in time.
Use appropriate amount of detergent according to the water hardness.
• Detergent is put in the wrong compartment. >>> If detergent is put in the
prewash compartment although prewash cycle is not selected, machine can take
this detergent during rinsing or softener step. Put the detergent in the correct
compartment.
• Detergent might be mixed with the softener. >>> Do not mix the softener with
detergent. Wash and clean the dispenser with hot water.
• Regular drum cleaning is not applied. >>> Clean the drum regularly. For this,
please see "Cleaning the loading door and the drum".
Laundry does not smell like the softener.
• Detergent is put in the wrong compartment. >>> If detergent is put in the
prewash compartment although prewash cycle is not selected, machine can take
this detergent during rinsing or softener step. Wash and clean the dispenser with
hot water. Put the detergent in the correct compartment.
• Detergent might be mixed with the softener. >>> Do not mix the softener with
detergent. Wash and clean the dispenser with hot water.
• Regular drum cleaning is not applied. >>> Clean the drum regularly. For this,
please see "Cleaning the loading door and the drum".
33 - EN
Page 34

Detergent residue in the detergent drawer.
• Detergent is put in wet drawer. >>> Dry the detergent drawer before putting in
detergent.
• Detergent has gotten damp. >>> Keep detergents closed in an environment free
of humidity and do not expose them to excessive temperatures.
• Water pressure is low. >>> Check the water pressure.
• The detergent in the main wash compartment got wet while taking in the prewash
water. Holes of the detergent compartment are blocked. >>> Check the holes
and clean if they are clogged.
• There is a problem with the detergent drawer valves. >>> Call the Authorized
Service Agent.
• Detergent might be mixed with the softener. >>> Do not mix the softener with
detergent. Wash and clean the dispenser with hot water.
• Regular drum cleaning is not applied. >>> Clean the drum regularly. For this,
please see "Cleaning the loading door and the drum".
There is detergent left on the laundry.
• Excessive laundry was loaded in. >>> Do not load the machine in excess.
• Wrong programme and temperature were selected. >>> Select the proper
programme and temperature for the laundry to be washed.
• Wrong detergent was used. >>> Select the proper detergent for the laundry to be
washed.
• Regular drum cleaning is not applied. >>> Clean the drum regularly. For this,
please see "Cleaning the loading door and the drum".
Too much foam forms in the machine.
• Improper detergents for the washing machine are being used. >>> Use
detergents appropriate for the washing machine.
• Excessive amount of detergent is used. >>> Use only sufficient amount of
detergent.
• Detergent was stored under improper conditions. >>> Store detergent in a closed
and dry location. Do not store in excessively hot places.
• Some meshed laundry such as tulle may foam too much because of their texture.
>>> Use smaller amounts of detergent for this type of item.
• Detergent is put in the wrong compartment. >>> Put the detergent in the correct
compartment.
• Softener is being taken early. >>> There may be problem in the valves or in the
detergent dispenser. Call the Authorized Service Agent.
• Regular drum cleaning is not applied. >>> Clean the drum regularly. For this,
please see "Cleaning the loading door and the drum".
34 - EN
Page 35

Foam is overflowing from the detergent drawer.
• Too much detergent is used. >>> Mix 1 tablespoonful softener and ½ l water and
pour into the main wash compartment of the detergent drawer.
Put detergent into the machine suitable for the programmes and maximum loads
C
indicated in the “Programme and consumption table”. When you use additional
chemicals (stain removers, bleaches and etc), reduce the amount of detergent.
Laundry remains wet at the end of the programme
• Excessive foam might have occurred and automatic foam absorption system might
have been activated due to too much detergent usage. >>> Use recommended
amount of detergent.
Machine does not switch to spinning step when the laundry is not evenly
C
distributed in the drum to prevent any damage to the machine and to its
surrounding environment. Laundry should be rearranged and re-spun.
Machine does not start. Nothing appears on the display.
Machine may be unplugged. >>> Check the plug and attach it to the socket.
Fuse may be defective. >>> Check the fuse and have it replaced by a qualified
electrician if necessary.
Power may be out. >>> Check if there is any power outage.
On / Off button might not be pressed. >>> Press On / Off button.
Machine does not start when Start / Pause / Cancel button is pressed after selecting
the programme.
Loading door may be open. >>> Close the loading door.
Rinse symbol flashes in the display. (No Water symbol may also be lit depending on
the model of your machine).
Water may be cut off. >>> Make sure that the water is not cut off and press Start /
Pause / Cancel button again to start your machine.
If you cannot eliminate the problem although you follow the instructions in this
A
section, consult your dealer or the Authorized Service Agent. Never try to repair a
nonfunctional product yourself.
35 - EN
Page 36

36 - EN
Page 37

Page 38

Bitte lesen Sie dieses Dokument zuerst!
Sehr geehrte Kundin, lieber Kunde,
Wir wünschen uns, dass unser Produkt, das in modernsten Betrieben hergestellt wurde
und strikte Qualitätskontrollen durchlaufen hat, bei Ihnen optimal und zu Ihrer vollsten
Zufriedenheit arbeitet.
Lesen Sie daher bitte die gesamte Bedienungsanleitung aufmerksam durch und bewahren
Sie sie auf, damit Sie bei Bedarf darin nachlesen können. Falls Sie das Gerät eines Tages
an jemand anderen weitergeben sollten, vergessen Sie bitte nicht, die Anleitung ebenfalls
mitzugeben.
Diese Bedienungsanleitung soll Ihnen dabei helfen, Ihre
Maschine schnell und sicher zu bedienen.
• Lesen Sie die Bedienungsanleitung, bevor Sie Ihr neues Gerät aufstellen und benutzen.
• Halten Sie sich immer an die Sicherheitshinweise.
• Bewahren Sie diese Bedienungsanleitung gut auf, damit Sie später darin nachlesen
können.
• Lesen Sie auch alle weiteren Dokumente, die mit Ihrem Gerät geliefert wurden.
Bitte beachten Sie, dass diese Bedienungsanleitung für unterschiedliche Modelle
geschrieben wurde. Unterschiede zwischen den verschiedenen Modellen werden natürlich
in der Anleitung erwähnt.
Die Symbole
In dieser Bedienungsanleitung verwenden wir folgende Symbole:
C Wichtige Informationen oder nützliche Tipps zum Gebrauch.
A Warnung vor gefährlichen Situationen, die eine Gefahr für Leben und Besitz darstellen
können.
B Warnung vor Stromschlägen.
Dieses Gerät ist mit dem Symbol zur selektiven Behandlung von Elektro- und
Elektronikausstattungen gekennzeichnet. Dies bedeutet, dass das ausgediente
2820521905_DE/240311.1718
Gerät gemäß der EG-Richtlinie 2002/96 zwecks Zerlegen oder Recycling
von einem selektiven Sammelsystem erfasst werden muss, um jegliche
Auswirkungen auf die Umwelt zu reduzieren
Weitere Auskünfte können von den zuständigen örtlichen oder landesweiten
Behörden erhalten werden.
Nicht selektiv behandelte Elektronikprodukte können auf Grund der in ihnen
enthaltenen Schadstoffe für die Umwelt und die menschliche Gesundheit
schädlich sein.
38
DE
Page 39

INHALT
1 Ihre Waschmaschine 40
Überblick. . . . . . . . . . . . . . . . . . . . . . . 40
Technische Daten . . . . . . . . . . . . . . . . 41
2 Wichtige Hinweise zu Ihrer
Sicherheit 42
Allgemeine Sicherheit . . . . . . . . . . . . . 42
Bestimmungsgemäßer Gebrauch . . . . 43
Sicherheit von Kindern. . . . . . . . . . . . . 43
3 Installation/Aufstellung 44
Der richtige Aufstellungsort . . . . . . . . . 44
Transportstabilisatoren entfernen . . . . . 44
Transportsicherungen entfernen . . . . . 44
Wasseranschluss. . . . . . . . . . . . . . . . . 45
Wasserablauf anschließen . . . . . . . . . . 46
Füße einstellen. . . . . . . . . . . . . . . . . . . 46
Elektrischer Anschluss. . . . . . . . . . . . . 47
Erste Inbetriebnahme. . . . . . . . . . . . . . 47
Verpackungsmaterialien entsorgen . . . 47
Gerät transportieren. . . . . . . . . . . . . . . 48
Altgeräteentsorgung . . . . . . . . . . . . . . 48
5 Bedienung 54
Bedienfeld . . . . . . . . . . . . . . . . . . . . . . 54
Symbole im Display . . . . . . . . . . . . . . . 54
Maschine vorbereiten . . . . . . . . . . . . . 55
Programmauswahl. . . . . . . . . . . . . . . . 55
Hauptprogramme . . . . . . . . . . . . . . . . 55
Zusätzliche Programme . . . . . . . . . . . 55
Spezialprogramme . . . . . . . . . . . . . . . 57
Temperatur auswählen. . . . . . . . . . . . . 57
Schleudergeschwindigkeit auswählen . 57
Programm- und Verbrauchstabelle . . . 59
Zusatzfunktionen auswählen . . . . . . . . 61
Zeitanzeige . . . . . . . . . . . . . . . . . . . . . 62
Programm starten . . . . . . . . . . . . . . . . 63
Programmfortschritt. . . . . . . . . . . . . . . 63
Türsperre. . . . . . . . . . . . . . . . . . . . . . . 63
Änderungen nach Programmstart . . . . 63
Kindersicherung . . . . . . . . . . . . . . . . . 64
Programme abbrechen . . . . . . . . . . . . 64
Die Maschine befindet sich im
Spülstopp . . . . . . . . . . . . . . . . . . . . . . 64
Programmende . . . . . . . . . . . . . . . . . . 65
4 Vorbereitung 49
Tipps zum Energiesparen . . . . . . . . . . 49
Wäsche sortieren. . . . . . . . . . . . . . . . . 49
Wäsche vorbereiten. . . . . . . . . . . . . . . 49
Die richtige Wäschemenge . . . . . . . . . 50
Wäsche in die Maschine geben . . . . . . 51
Waschmittel und Weichspüler
verwenden. . . . . . . . . . . . . . . . . . . . . . 51
6 Reinigung und Wartung 66
Waschmittelschublade reinigen . . . . . . 66
Waschmaschinentür und Trommel
reinigen . . . . . . . . . . . . . . . . . . . . . . . . 66
Gehäuse und Bedienfeld reinigen . . . . 66
Wasserzulauffilter reinigen . . . . . . . . . . 67
Restliches Wasser ablaufen lassen und
Pumpenfilter reinigen . . . . . . . . . . . . . . 67
7 Problemlösung 69
39
DE
Page 40

1 Ihre Waschmaschine
Überblick
8
1
2
3
7
6
4
5
1 - Netzkabel
2 - Deckplatte
3 - Bedienfeld
4 - Filterkappe
5 - Einstellbare Füße
6 - Tür
7 - Waschmittelschublade
8 - Wasserablaufschlauch
40
DE
Page 41

Technische Daten
Modelle
Maximale Trockenwäschefüllmenge (kg)
Höhe (cm)
Breite (cm)
Tiefe (cm)
Nettogewicht (±4 kg)
Stromversorgung (V/Hz)
Maximaler Strom (A)
Gesamtleistung (W)
Schleudergeschwindigkeit (U/min, max.)
WNF 9422 SC20
9
84
60
59
74
220-240 V / 50Hz
10
2000-2350
1200
Im Zuge der Qualitätsverbesserung können sich die technischen Daten dieses Gerätes
C
ohne Vorankündigung ändern.
Bei den Abbildungen in dieser Anleitung handelt es sich um schematische
C
Darstellungen, die möglicherweise nicht exakt mit Ihrem Gerät übereinstimmen.
Die am Gerät oder in der Dokumentation angegebenen Werte wurden unter
C
Laborbedingungen in Übereinstimmung mit den zutreffenden Normen ermittelt. Diese
Werte können je nach Einsatz- und Umweltbedingungen variieren.
41
DE
Page 42

2 Wichtige Hinweise zu Ihrer Sicherheit
In diesem Abschnitt finden Sie Hinweise,
die für Ihre und die Sicherheit anderer
Personen unerlässlich sind. Halten
Sie sich unbedingt an diese Hinweise,
damit es nicht zu Verletzungen oder
Sachschäden kommt. Bei Nichteinhaltung
dieser Anweisungen erlöschen sämtliche
Garantieansprüche.
Allgemeine Sicherheit
• Dieses Produkt sollte nicht von
Personen genutzt werden, die
unter körperlichen oder geistigen
Einschränkungen leiden oder die nicht
über die nötige Erfahrung im Umgang
mit solchen Geräten verfügen – dies
gilt auch für Kinder. Eine Ausnahme
kann gemacht werden, wenn solche
Personen von einer kompetenten
Aufsichtsperson gründlich in der
Bedienung des Gerätes unterwiesen
und beaufsichtigt werden.
• Stellen Sie das Gerät niemals auf
Teppichen, Teppichböden oder
ähnlichen Unterlagen auf: Durch
mangelnde Luftzirkulation unterhalb
des Gerätes kann es ansonsten zur
Überhitzung elektrischer Komponenten
kommen. Dies kann zu Problemen mit
Ihrem Gerät führen.
• Benutzen Sie das Gerät nicht, falls
Netzkabel oder Netzstecker beschädigt
sind! Wenden Sie sich an den
autorisierten Kundendienst.
• Lassen Sie eine 16 A-Sicherung
durch einen qualifizierten Elektriker
installieren, sofern der Stromanschluss
am Aufstellungsort des Gerätes nicht
auf diese Weise abgesichert sein sollte.
• Bei Fehlfunktionen darf das Gerät erst
dann wieder in Betrieb genommen
werden, nachdem es durch den
autorisierten Kundendienst repariert
wurde. Es besteht Stromschlaggefahr!
• Nach einem Stromausfall setzt das
Gerät den Betrieb wieder automatisch
fort. Wenn Sie ein Programm
abbrechen möchten, schauen Sie
sich bitte den Abschnitt „Programm
abbrechen“ an.
• Schließen Sie das Gerät an eine
Schutzkontaktsteckdose an, die mit
einer ausreichend dimensionierten
Sicherung abgesichert wurde –
schauen Sie sich dazu die Tabelle
„Technische Daten“ an. Die Installation
der Schutzerde muss grundsätzlich
von einem qualifizierten Elektriker
ausgeführt werden. Wir haften nicht
für jegliche Schäden, die durch
mangelhafte, nicht den örtlichen
Vorschriften entsprechende, Erdung
entstehen.
• Wasserzulauf- und
Wasserablaufschläuche müssen fixiert
und dürfen nicht beschädigt werden.
Andernfalls kann Wasser auslaufen.
• Öffnen Sie niemals die Tür des
Gerätes, nehmen Sie niemals den
Filter heraus, wenn sich noch Wasser
in der Trommel befindet. Andernfalls
besteht Überschwemmungsgefahr
und Verletzungsgefahr durch heißes
Wasser.
• Versuchen Sie niemals, die
Waschmaschinentür mit Gewalt zu
öffnen. Die Waschmaschinentür
lässt sich erst ein paar Minuten
nach dem Ende des Waschzyklus
öffnen. Falls Sie versuchen, die Tür
gewaltsam zu öffnen, können Tür
und Sperrmechanismus beschädigt
werden.
• Ziehen Sie den Netzstecker, wenn Sie
das Gerät nicht benutzen.
• Gießen Sie niemals Wasser oder
andere Flüssigkeiten direkt auf das
Gerät! Es besteht Stromschlaggefahr!
• Berühren Sie den Stecker niemals mit
feuchten oder gar nassen Händen!
Ziehen Sie den Netzstecker niemals,
indem Sie am Kabel ziehen: Fassen Sie
grundsätzlich den Stecker selbst.
• Verwenden Sie ausschließlich
für Waschmaschinen geeignete
Waschmittel, Weichspüler und
Zusatzstoffe.
• Halten Sie sich an die Hinweise
auf Pflegeetiketten und auf der
Waschmittelpackung.
42
DE
Page 43

• Vor Aufstellung, Wartung, Reinigung
und vor Reparaturen muss unbedingt
der Netzstecker gezogen werden.
• Lassen Sie Installations- und
Reparaturarbeiten grundsätzlich vom
autorisierten Kundendienst ausführen.
Der Hersteller haftet nicht bei Schäden,
die durch den Eingriff nicht autorisierter
Personen entstehen.
Bestimmungsgemäßer Gebrauch
• Dieses Produkt wurde für den
Hausgebrauch entwickelt. Es darf
nicht für kommerzielle Zwecke
und nicht außerhalb seines
bestimmungsgemäßen Einsatzgebietes
eingesetzt werden.
• Das Gerät darf nur zum Waschen und
Spülen von Textilien verwendet werden,
die entsprechend gekennzeichnet sind.
• Der Hersteller haftet nicht bei Schäden,
die durch falschen Gebrauch oder
unsachgemäßen Transport entstehen.
Sicherheit von Kindern
• Elektrogeräte können für Kinder
gefährlich sein. Halten Sie Kinder im
Betrieb daher unbedingt vom Gerät
fern. Lassen Sie Kinder nicht mit
dem Gerät spielen. Nutzen Sie die
Kindersicherung, damit Kinder das
Gerät nicht manipulieren können.
• Vergessen Sie nicht, die Tür des
Gerätes zu schließen, wenn Sie den
Raum verlassen.
• Lagern Sie sämtliche Wasch- und
Zusatzmittel an einem sicheren Ort und
außerhalb der Reichweite von Kindern.
43
DE
Page 44

3 Installation/Aufstellung
Lassen Sie Ihr Gerät vom autorisierten
Kundendienst in Ihrer Nähe installieren.
Wenn Sie Ihre Maschine betriebsbereit
machen, achten Sie darauf, dass
Wasserzulauf und Wasserablauf in
einwandfreiem Zustand sind (schauen Sie
dazu auch in die Bedienungsanleitung),
ehe Sie sich an den Kundendienst wenden.
Falls dies nicht der Fall sein sollte, lassen
Sie die nötigen Arbeiten durch einen
qualifizierten Klempner und/oder Techniker
ausführen.
Die Vorbereitung des Aufstellungsortes,
C
der Wasserzu- und -ableitung sowie
des elektrischen Anschlusses sind
Sache des Kunden.
Installation und elektrischer Anschluss
B
des Gerätes müssen vom autorisierten
Kundendienst ausgeführt werden. Der
Hersteller haftet nicht bei Schäden,
die durch Aktivitäten nicht autorisierter
Personen entstehen.
Untersuchen Sie das Gerät vor der
A
Installation auf eventuelle, sichtbare
Defekte. Falls Defekte vorliegen, darf
das Gerät nicht installiert werden.
Beschädigte Geräte können gefährlich
sein.
Achten Sie darauf, dass Wasserzulauf-
C
und -ablaufschläuche sowie das
Netzkabel nicht geknickt und nicht
anderweitig beschädigt werden, wenn
Sie das Gerät nach dem Anschluss an
Ort und Stelle rücken oder es reinigen.
Der richtige Aufstellungsort
• Stellen Sie die Maschine auf einem
stabilen Untergrund auf. Stellen Sie das
Gerät nicht auf langflorigen Teppichen
oder ähnlichen Unterlagen auf.
• Eine Kombination aus Waschmaschine
und Trockner kann – voll beladen –
bis etwa 180 kg Gewicht erreichen.
Stellen Sie das Gerät auf einem
stabilen, ebenen Untergrund auf, der
das Gewicht der Maschine(n) mühelos
tragen kann!
• Stellen Sie das Gerät nicht auf das
Netzkabel.
• Stellen Sie das Gerät nicht an Stellen
auf, an denen die Temperatur unter 0
°C abfallen kann.
• Sorgen Sie für einen Abstand von
mindestens 1 cm zwischen den
Seiten des Gerätes und anderen
Möbelstücken.
Transportstabilisatoren entfernen
Zum Entfernen der Transportstabilisatoren
neigen Sie die Maschine etwas nach
hinten. Entfernen Sie die Stabilisatoren
durch Ziehen am Band.
Transportsicherungen entfernen
Entfernen Sie die Transportsicherungen
A
erst nachdem die
Transportstabilisatoren entfernt wurden.
Die Transportsicherungen (Bolzen)
A
müssen unbedingt entfernt werden,
bevor Sie die Maschine benutzen!
Andernfalls wird das Gerät beschädigt!
1. Lösen Sie sämtliche Bolzen mit einem
Schlüssel, bis sie sich frei drehen
lassen (C).
2. Entfernen Sie die
Transportsicherungen, indem Sie diese
vorsichtig herausdrehen.
44
DE
Page 45

3. Setzen Sie die Kunststoffabdeckungen
(diese finden Sie in der Tüte mit der
Bedienungsanleitung) in die Löcher an
der Rückwand ein. (P)
Bewahren Sie die
C
Transportsicherungen an einem
sicheren Ort auf. Sie brauchen sie,
wenn Sie die Waschmaschine zukünftig
transportieren möchten.
Transportieren Sie das Gerät
C
niemals ohne korrekt angebrachte
Transportsicherungen!
Wasseranschluss
Die Maschine benötigt zum Arbeiten
C
einen Wasserdruck zwischen 1 und
10 bar (0,1 bis 10 MPa). (In der Praxis
bedeutet dies, dass innerhalb einer
Minute 10 bis 80 Liter Wasser aus dem
voll geöffneten Wasserhahn laufen
müssen, damit Ihre Maschine richtig
arbeiten kann.) Falls der Wasserdruck
höher sein sollte, verwenden Sie ein
Druckreduzierventil.
Wenn Sie ein Gerät mit doppeltem
C
Wasserzulauf mit nur einem
Wasserzulauf (Kaltwasser) nutzen
möchten, muss der mitgelieferte
Stopfen am Warmwasserzulaufventil
installiert werden. (Dies gilt für Geräte,
die mit einem Blindstopfen geliefert
werden.)
Sofern Sie beide Wasserzuläufe
C
nutzen möchten, schließen Sie den
Warmwasserzulauf erst an, nachdem
Sie die Stopfen/Dichtung-Kombination
aus dem Warmwasserventil entfernt
haben. (Dies gilt für Geräte, die mit
einem Blindstopfen geliefert werden.)
Modelle mit einzelnem Wasserzulauf
A
sollten nicht an den Warmwasserhahn
angeschlossen werden. Falls Sie dies
dennoch versuchen, wird Ihre Wäsche
beschädigt – oder das Gerät wechselt
in den Sicherheitsmodus und arbeitet
nicht.
Verwenden Sie keine alten oder
A
gebrauchten Wassereinlaufschläuche
mit Ihrem neuen Gerät. Diese können
zu Verschmutzungen Ihrer Wäsche
führen.
1. Schließen Sie die mit der Maschine
gelieferten Spezialschläuche an
die Wasserzuläufe des Gerätes an.
Der rote Schlauch (links) dient als
Warmwassereinlass (maximal 90
°C), der blaue Schlauch (rechts) als
Kaltwassereinlass (maximal 25 °C).
Achten Sie bei der Installation Ihres
A
Gerätes darauf, dass Kalt- und
Warmwasseranschlüsse korrekt
durchgeführt werden. Andernfalls
kommt Ihre Wäsche am Ende des
Waschvorgangs eventuell heiß aus der
Maschine und verschleißt schneller.
2. Ziehen Sie sämtliche Schlauchmuttern
mit der Hand an. Ziehen Sie die
Muttern niemals mit einer Zange oder
ähnlichen Werkzeugen an.
3. Nach dem Anschluss der Schläuche
öffnen Sie die Wasserzuläufe (Hähne)
komplett und überzeugen sich
45
DE
Page 46

davon, dass kein Wasser an den
Anschlussstellen austritt. Falls Wasser
austreten sollte, drehen Sie den Hahn
zu und lösen anschließend die Mutter.
Überprüfen Sie die Dichtung und
ziehen Sie die Mutter anschließend
wieder gut an. Um ein Auslaufen von
Wasser und daraus entstehende
Wasserschäden zu vermeiden, halten
Sie die Wasserhähne geschlossen,
wenn Sie die Maschine nicht benutzen.
Wasserablauf anschließen
• Das Ende des Wasserablaufschlauches
muss direkt an den Wasserablauf
(Abfluss) in der Wand oder am
Waschbecken angeschlossen werden.
Ansonsten kann es zu
A
Überschwemmungen kommen, falls
sich der Schlauch beim Abpumpen
des Wassers lösen sollte. Bei
hohen Waschtemperaturen besteht
Verbrühungsgefahr! Damit es nicht zu
unangenehmen Situationen kommt und
damit Wasserzu-/-ablauf reibungslos
funktionieren, fixieren Sie das Ende
des Ablaufschlauches so, dass es sich
keinesfalls lösen kann.
• Der Schlauch sollte in einer Höhe von
mindestens 40 und maximal 100 cm
angeschlossen werden.
• Wenn der Ablaufschlauch zuerst am
Boden (bis etwa 40 cm über dem
Boden) und danach wieder nach oben
verläuft, kann es zu Schwierigkeiten
beim Wasserablauf kommen; es kann
vorkommen, dass die Wäsche beim
Herausnehmen noch sehr nass ist.
Halten Sie sich deshalb an die in der
Abbildung angegebenen Höhen.
zu erleichtern, darf das Ende des
Schlauches nur maximal 15 cm tief in
den Ablauf eingeführt werden. Falls
das Schlauchende zu lang sein sollte,
schneiden Sie ein Stück ab.
• Das Schlauchende sollte nicht gebogen
werden, es sollte nicht darauf getreten
werden und es darf nicht zwischen
Ablauf und Maschine eingeklemmt
werden.
• Falls der Schlauch zu kurz sein
sollte, können Sie einen OriginalVerlängerungsschlauch verwenden.
Die Gesamtlänge des Schlauches
ab Austrittspunkt aus der Maschine
darf 3,2 m nicht überschreiten.
Um ein Auslaufen von Wasser zu
vermeiden, müssen Ablaufschlauch
und Verlängerungsschlauch mit einer
passenden Schelle gesichert werden,
damit sich die Verbindung nicht lösen
und kein Wasser austreten kann.
Füße einstellen
Damit Ihre Maschine leise und
A
vibrationsfrei arbeiten kann, muss
sie absolut gerade und ausbalanciert
stehen. Sie balancieren die Maschine
aus, indem Sie die Füße entsprechend
einstellen. Sollte das Gerät nicht fest
und gerade stehen, kann es sich im
Betrieb bewegen, stark vibrieren und
gegen andere Gegenstände oder
Möbelstücke stoßen.
• Damit kein verschmutztes Wasser in
die Maschine zurücklaufen kann und
um der Maschine das Abpumpen
46
DE
Page 47

1. Lösen Sie die Kontermuttern an den
Füßen von Hand.
2. Stellen Sie die Füße so ein, dass das
Gerät stabil und absolut gerade steht.
3. Ziehen Sie die Kontermuttern
anschließend mit der Hand an.
Lösen Sie die Kontermuttern
A
grundsätzlich nur mit den Händen,
benutzen Sie keinerlei Werkzeuge
dafür. Andernfalls kann es zu
Beschädigungen kommen.
Elektrischer Anschluss
Schließen Sie das Gerät an eine
Schutzkontaktsteckdose an, die mit einer
ausreichend dimensionierten Sicherung
abgesichert wurde – schauen Sie sich
dazu die Tabelle „Technische Daten“ an.
Wir haften nicht für jegliche Schäden, die
durch mangelhafte, nicht den örtlichen
Vorschriften entsprechende, Erdung
entstehen.
• Der Anschluss muss gemäß örtlichen
Vorschriften erfolgen.
• Der Netzstecker muss nach der
Installation frei zugänglich bleiben.
• Angaben zu Spannung und
erforderlicher Absicherung durch
Sicherung oder Unterbrecher finden
Sie im Abschnitt „Technische Daten“.
Falls Ihre Stromversorgung mit einer
geringeren als einer 16 A-Sicherung
ausgestattet ist, lassen Sie eine 16
A-Sicherung durch einen qualifizierten
Elektriker installieren.
• Die angegebene Spannung muss mit
Ihrer Netzspannung übereinstimmen.
• Schließen Sie das Gerät nicht
über Verlängerungskabel oder
Mehrfachsteckdosen an.
Beschädigte Netzkabel müssen durch
B
den autorisierten Kundendienst ersetzt
werden.
Erste Inbetriebnahme
Bevor Sie Ihr neues Gerät zum ersten Mal
benutzen, machen Sie sich unbedingt
mit den Abschnitten „Wichtige Hinweise
zu Ihrer Sicherheit“ und „Installation/
Aufstellung“ vertraut.
Bereiten Sie die Maschine
entsprechend vor, indem Sie zuerst
das Trommelreinigung-Programm
ausführen. Sofern Ihre Maschine nicht
mit einem Trommelsreinigungsprogramm
ausgestattet ist, wählen Sie das
Baumwolle 90-Programm und dazu
die Zusatzfunktionen „Zusätzliches
Wasser“ oder „Extraspülen“. Bevor
Sie das Programm starten, geben Sie
maximal 100 g Entkalkungspulver in
das Hauptwaschmittelfach (Fach II). Bei
Entkalkungsmitteln in Tablettenform geben
Sie eine einzelne Tablette in das Fach
II. Reinigen Sie die Gummidichtung im
Türbereich mit einem sauberen Lappen,
nachdem das Programm durchgelaufen ist.
Verwenden Sie nur für
C
Waschmaschinen geeignete
Kalkentferner.
Eventuell befindet sich noch etwas
C
Wasser in der Trommel. Dies liegt
daran, dass das Gerät vor der
Auslieferung noch einmal gründlich
geprüft wurde. Ihrer Maschine schadet
dies nicht.
Verpackungsmaterialien
entsorgen
Verpackungsmaterialien können eine
Gefahr für Kinder darstellen. Lagern Sie
sämtliche Verpackungsmaterialien an
einem sicheren Ort und außerhalb der
Reichweite von Kindern.
Das Verpackungsmaterial Ihres Gerätes
wurde aus recyclingfähigen Rohstoffen
hergestellt. Achten Sie auf eine
ordnungsgemäße, getrennte Entsorgung
47
DE
Page 48

der Materialien. Entsorgen Sie das
Verpackungsmaterial nicht mit dem
normalen Hausmüll.
Gerät transportieren
1. Ziehen Sie grundsätzlich den
Netzstecker, bevor Sie das Gerät
transportieren oder verrücken.
2. Trennen Sie Wasserablauf und
Wasserzulauf (Hahn zuvor schließen).
3. Lassen Sie restliches Wasser
komplett aus dem Gerät ab –
siehe„Restliches Wasser ablaufen
lassen und Pumpenfilter reinigen“.
4. Bringen Sie die Transportsicherungen
(Bolzen) wieder an; schauen
Sie sich dazu den Abschnitt
„Transportsicherungen entfernen“ an,
gehen Sie in umgekehrter Reihenfolge
vor.
Transportieren Sie das Gerät
C
niemals ohne korrekt angebrachte
Transportsicherungen!
Altgeräteentsorgung
Entsorgen Sie Ihre Altgeräte auf
umweltfreundliche Weise.
Ihr Händler und sowie Sammelstellen vor
Ort informieren Sie gerne über die richtige
Entsorgung Ihres Gerätes.
Damit Kinder nicht in Gefahr gebracht
werden, schneiden Sie das Netzkabel
ab und machen die Türverriegelung
unbrauchbar, bevor Sie das Gerät
entsorgen.
48
DE
Page 49

4 Vorbereitung
Tipps zum Energiesparen
Die folgenden Hinweise helfen Ihnen,
Ihr neues Gerät ökologisch sinnvoll und
energiesparend einzusetzen.
• Nutzen Sie möglichst die maximale
Beladung des jeweiligen Programms
– dabei jedoch nicht überladen.
Schauen Sie sich die „Programm- und
Verbrauchstabelle“ an.
• Beachten Sie grundsätzlich
die Hinweise auf den
Waschmittelpackungen.
• Waschen Sie leicht verschmutzte
Wäsche bei niedrigen Temperaturen.
• Nutzen Sie schnelle Programme,
wenn Sie nur geringe Mengen leicht
verschmutzter Wäsche waschen.
• Verzichten Sie bei nur leicht
verschmutzter Wäsche auf Vorwäsche
und hohe Temperaturen.
• Wenn Sie Ihre Wäsche in einem
Wäschetrockner trocknen
möchten, wählen Sie beim
Waschen die höchstmögliche
Schleudergeschwindigkeit.
• Verwenden Sie nicht mehr Waschmittel
als auf der Waschmittelverpackung
angegeben.
Wäsche sortieren
• Sortieren Sie die Wäsche
nach Textilientyp, Farbe,
Verschmutzungsgrad und zulässiger
Waschtemperatur.
• Halten Sie sich grundsätzlich an die
Angaben auf den Pflegeetiketten.
Waschwasser-
temperatur
Bleichmittel-
geeignet
Trockner-
geeignet
Ungeschleudert
aufhängen.
Nicht
waschinenwaschbar.
Kann chemisch
gereinigt werden.
Horizontal
trocknen.
Darf warm
gebügelt werden.
Mit sanften, kurzen
Programmen waschen.
Nicht bleichen.
Nicht im Trockner
trocknen.
Darf heiß gebügelt
werden.
Nicht waschen
Nicht chemisch
reinigen.
Auf Kleiderbügel
trocknen.
Nicht bügeln.
Wäsche vorbereiten
• Wäsche mit Metallteilen wie
Büstenhalter, Gürtelschnallen und
Metallknöpfe beschädigen die
Maschine. Entfernen Sie die Metallteile
oder waschen Sie die Textilien in
einem Wäschebeutel oder einem
Kissenbezug.
49
DE
Page 50

• Leeren Sie sämtliche Taschen komplett
aus und entfernen Sie Münzen,
Kugelschreiber, Büroklammern,
Papiertaschentücher und ähnliche
Dinge, bevor Sie die Wäsche in
die Maschine geben. Drehen Sie
Taschen auf links, entfernen Sie
Fusseln. Fremdkörper können das
Gerät beschädigen und zu lauten
Betriebsgeräuschen führen.
• Geben Sie sehr kleine Textilien wie
Kinder- und Nylonstrümpfe in einen
Wäschebeutel oder Kissenbezug.
• Drücken Sie Vorhänge nicht
zusammen, wenn Sie diese in die
Maschine geben. Bei Vorhängen
entfernen Sie zuvor sämtliche
Applikationen und sonstige nicht textile
Teile.
• Schließen Sie Reißverschlüsse, nähen
Sie lose Knöpfe an und reparieren Sie
Risse und sonstige Defekte.
• Waschen Sie Textilien, die mit
„maschinenwaschbar“ oder
„Handwäsche“ gekennzeichnet sind,
ausschließlich mit dem passenden
Waschprogramm.
• Waschen Sie bunte und weiße
Textilien nicht zusammen. Neue,
intensiv gefärbte Baumwollsachen
(z. B. schwarze Jeans) können beim
Waschen stark abfärben. Waschen Sie
solche Wäschestücke grundsätzlich
separat.
• Hartnäckige Verschmutzungen müssen
vor dem Waschen richtig behandelt
werden. Fragen Sie im Zweifelsfall bei
einer chemischen Reinigung nach.
• Verwenden Sie ausschließlich
Färbemittel oder Mittel zur
Kalkentfernung, die sich ausdrücklich
zur Verwendung in der Waschmaschine
eignen. Beachten Sie dabei immer die
Hinweise auf der Verpackung.
50
• Waschen Sie Hosen und empfindliche
Kleidungsstücke „auf links“, also mit
der Innenseite nach außen.
• Legen Sie Wäschestücke aus
Angorawolle vor dem Waschen ein
paar Stunden in das Gefrierfach Ihres
Kühlschranks. Dadurch bilden sich
weniger Knötchen im Material.
• Wäsche, die mit Substanzen wie
Mehl, Kalk, Milchpulver oder ähnlichen
Dingen verunreinigt ist, muss zuvor
gründlich ausgeschüttelt werden, bevor
sie in die Maschine gegeben wird.
Andernfalls können sich staub- oder
pulverförmige Substanzen innerhalb
der Maschine ablagern und im Laufe
der Zeit Schäden verursachen.
Die richtige Wäschemenge
Die maximale Ladungskapazität
(Wäschemenge) hängt vom Textilientyp,
dem Verschmutzungsgrad und dem
gewünschten Waschprogramm ab.
Die Maschine reguliert die Wassermenge
automatisch je nach Wäschevolumen.
Halten Sie sich an die Hinweise in der
A
„Programm- und Verbrauchstabelle“.
Bei Überlastung nimmt die
Waschleistung ab. Zusätzlich kann es
zu starker Geräuschentwicklung und zu
Vibrationen kommen.
In der folgenden Tabelle finden Sie einige
Anhaltspunkte zu unterschiedlichen
Wäschearten und ihrem durchschnittlichen
Gewicht.
Wäschetyp Gewicht (g)
Bademantel 1200
Taschentuch 100
Bettbezug 700
Bettlaken 500
Kissenbezug 200
Tischtuch 250
Handtuch 200
Kleines Handtuch 100
Abendkleid 200
Unterwäsche 100
Herren-Overall 600
Herrenhemd 200
Herrenschlafanzug 500
Blusen 100
DE
Page 51

Wäsche in die Maschine geben
• Öffnen Sie die Waschmaschinentür.
• Legen Sie die Wäschestücke lose in die
Maschine.
• Drücken Sie die Waschmaschinentür
zu, bis sie hörbar einrastet.
Vergewissern Sie sich, dass nichts in
der Tür eingeklemmt wurde.
Bei laufender Maschine wird die
C
Gerätetür gesperrt. Die Tür kann erst
eine Weile nach dem Abschluss des
Programms geöffnet werden.
Falls die Wäsche falsch (also schlecht
A
verteilt) in die Maschine gegeben wird,
kann es zu starken Betriebsgeräuschen
und zu Vibrationen kommen.
Waschmittel und
Weichspüler verwenden
Waschmittelschublade
Die Waschmittelschublade besteht aus drei
Fächern:
- (I) für Vorwaschmittel
- (II) für Hauptwaschmittel
– (III) für Weichspüler
– (*) im Weichspülerfach befindet sich
zusätzlich ein Siphon.
Je nach Modell Ihrer Maschine
C
können zwei unterschiedliche
Waschmittelschubladen eingesetzt
werden.
Waschmittel, Weichspüler und andere
Reinigungsmittel
• Geben Sie Waschmittel und
Weichspüler in die Maschine, bevor Sie
das Waschprogramm starten.
• Öffnen Sie niemals die
Waschmittelschublade, während ein
Waschprogramm läuft!
• Wenn Sie ein Programm ohne
Vorwäsche nutzen, füllen Sie kein
Waschmittel in das Vorwaschmittelfach
(Fach I) ein.
• Wenn Sie ein Programm mit
Vorwäsche nutzen, füllen Sie
51
kein Flüssigwaschmittel in das
Vorwaschmittelfach (Fach I) ein.
• Wenn Sie Waschmittel im Säckchen
oder in einer Dosierkugel zur Wäsche
geben, sollten Sie grundsätzlich auf
eine Vorwäsche verzichten. Geben Sie
das Waschmittelsäckchen oder die
Dosierkugel direkt zur Wäsche in die
Maschine.
• Wenn Sie Flüssigwaschmittel
verwenden, vergessen Sie nicht, den
Flüssigwaschmittelbehälter in das
Hauptwaschmittelfach (Fach II) zu
geben.
Der richtige Waschmitteltyp
Die richtige Waschmittelauswahl hängt von
Typ und Farbe der Textilien ab.
• Für Buntwäsche und Weißwäsche
sollten Sie unterschiedliche
Waschmittel benutzen.
• Waschen Sie empfindliche
Textilien ausschließlich mit
speziellen Waschmitteln (spezielle
Flüssigwaschmittel, Wollshampoo,
usw.), die speziell auf den jeweiligen
Textilientyp abgestimmt sind.
• Für dunkle Wäsche und Bettzeug
empfehlen wir Flüssigwaschmittel.
• Wollsachen waschen Sie mit einem
speziellen Wollwaschmittel.
Verwenden Sie ausschließlich
A
Waschmittel, die speziell für
Waschmaschinen hergestellt wurden.
Verzichten Sie auf Seifenpulver.
A
Die richtige Waschmittelmenge
Die richtige Waschmittelmenge
hängt von der Wäschemenge, dem
Verschmutzungsgrad und der Wasserhärte
ab. Lesen Sie die Dosierungsanweisungen
auf der Waschmittelverpackung
sorgfältig, halten Sie sich eng an die
Dosierungsempfehlungen.
• Benutzen Sie nicht mehr Waschmittel
als auf der jeweiligen Verpackung
angegeben; Sie verhindern damit
übermäßige Schaumbildung und
schlechtes Ausspülen. Außerdem
sparen Sie Geld und leisten einen
Beitrag zum Umweltschutz, wenn
Sie nur so viel Waschmittel wie nötig
verwenden.
• Verwenden Sie weniger Waschmittel,
wenn Sie nur geringe Wäschemengen
DE
Page 52

oder nur leicht verschmutzte Kleidung
waschen.
• Halten Sie sich bei
Waschmittelkonzentraten an die
jeweiligen Dosierungsempfehlungen
des Herstellers.
Weichspüler
Gießen Sie den Weichspüler
in das Weichspülerfach der
Waschmittelschublade.
• Verwenden Sie die auf der Verpackung
empfohlenen Mengen.
• Für die Weichspüler nicht über die
Maximalmarkierung (> MAX <) im
Weichspülerfach hinaus ein.
• Falls der Weichspüler fest geworden
ist, lösen Sie den Weichspüler in
etwas Wasser auf, bevor Sie ihn in die
Schublade geben.
Flüssigwaschmittel
Bei Flüssigwaschmitteln mit
Flüssigwaschmittelbehälter:
• Geben Sie den
Flüssigwaschmittelbehälter in das Fach
II.
• Benutzen Sie den Messbecher
des Waschmittelherstellers und
beachten Sie die Anweisungen auf der
Verpackung.
• Verwenden Sie die auf der Verpackung
empfohlenen Mengen.
• Falls das Flüssigwaschmittel
fest geworden ist, lösen Sie das
Waschmittel in etwas Wasser auf,
bevor Sie es in die Schublade geben.
Flüssigwaschmittel, ohne
Flüssigwaschmittelbehälter:
• Benutzen Sie Flüssigwaschmittel nicht
als Vorwaschmittel.
• Benutzen Sie den Messbecher
des Waschmittelherstellers und
beachten Sie die Anweisungen auf der
Verpackung.
• Flüssigwaschmittel können Flecken in
der Kleidung verursachen, wenn Sie
solche Waschmittel in Kombination mit
der Zeitverzögerungsfunktion benutzen.
Verzichten Sie daher grundsätzlich auf
Flüssigwaschmittel, wenn Sie mit der
Zeitverzögerung arbeiten.
Gel- und Tab-Waschmittel
Lesen Sie die Gel- und Tab-Waschmitteln
die Dosierungsanweisungen
auf der Waschmittelverpackung
sorgfältig, halten Sie sich eng an die
Dosierungsempfehlungen. Falls sich keine
Hinweise auf der Verpackung finden,
beachten Sie die folgenden Hinweise:
• Wenn Sie dünnflüssige Gel-
Waschmittel verwenden und Ihre
Maschine nicht über einen speziellen
Flüssigwaschmittelbehälter verfügt,
geben Sie das Flüssigwaschmittel in
das Hauptwaschmittelfach, sobald
das Wasser einläuft. Ist Ihre Maschine
mit einem Flüssigwaschmittelbehälter
ausgestattet, geben Sie das
Waschmittel in den Behälter, bevor Sie
das Programm starten.
• Bei dickflüssigem Gel-Waschmittel und
bei Waschmittelkapseln geben Sie das
Waschmittel vor Programmstart direkt
zur Wäsche in die Trommel.
• Waschmittel in Tablettenform geben
Sie entweder in das Hauptwäschefach
(Fach II) oder direkt zur Wäsche die
Trommel.
Tab-Waschmittel können Rückstände
C
im Waschmittelfach hinterlassen. Falls
dies geschieht, geben Sie das TabWaschmittel direkt zur Wäsche im
unteren Bereich der Trommel.
Verzichten Sie grundsätzlich auf die
C
Vorwäsche, wenn Sie Gel- oder TabWaschmittel verwenden.
Stärke
• Geben Sie Wäschestärke (auch in
Pulverform) sowie Färbemittel in das
52
DE
Page 53

Weichspülerfach; beachten Sie aber
in jedem Fall die Anweisungen auf der
Verpackung.
• Verwenden Sie Weichspüler und
Stärke niemals gemeinsam in einem
Waschprogramm.
• Wischen Sie das Innere der Trommel
mit einem sauberen, feuchten
Tuch ab, wenn Sie Wäschestärke
verwendet haben.
Bleichmittel
• Wählen Sie ein Programm mit
Vorwäsche, geben Sie das
Bleichmittel zu Beginn der Vorwäsche
hinzu. Geben Sie kein Waschmittel in
das Vorwäschefach. Alternativ können
Sie ein Programm mit Extraspülen
wählen und das Bleichmittel beim
ersten Spülungsschritt in das
Waschmittelfach geben.
• Vermischen Sie niemals Bleichmittel
und Waschmittel miteinander.
• Verwenden Sie lediglich eine geringe
Menge (etwa 50 ml) Bleichmittel,
spülen Sie die Wäsche anschließend
sehr gut aus, damit es nicht zu
Hautreizungen kommt. Geben Sie
Bleichmittel niemals direkt auf die
Wäsche, behandeln Sie Buntwäsche
nicht mit Bleichmitteln.
• Wenn Sie Bleichmittel auf
Sauerstoffbasis verwenden, halten
Sie sich streng an die Anweisungen
auf der Verpackung und wählen
ein Waschprogramm mit niedriger
Temperatur.
• Bleichmittel auf Sauerstoffbasis
können gemeinsam mit Waschmitteln
verwendet werden. Falls Bleichmittel
und Waschmittel jedoch eine
unterschiedliche Konsistenz
aufweisen (das eine ist flüssiger
als das andere), geben Sie zuerst
das Waschmittel in das Fach II der
Waschmittelschublade und warten ab,
bis das Waschmittel aus dem Fach
gespült wurde. Anschließend geben
Sie das Bleichmittel in dasselbe Fach,
während die Maschine noch Wasser
aufnimmt.
Kalkentferner
• Bei Bedarf verwenden Sie einen
speziell für Waschmaschinen
hergestellten Kalkentferner.
• Beachten Sie dabei immer die
Hinweise auf der Verpackung.
53
DE
Page 54

5 Bedienung
Bedienfeld
1
2
6 7
Symbole im Display
F3
F2
F1
3
4
8
1 - Schleudergeschwindigkeit-Einstelltaste
2 - Display
3 - Temperatureinstelltaste
4 - Programmauswahlknopf
5 - Ein-/Austaste
6 - Zeitverzögerungstasten (+ / -)
7 - Zusatzfunktionstasten
8 - Start-/Pause-/Abbrechen-Taste
a - Schleudergeschwindigkeitsanzeige
b - Temperaturanzeige
c - Schleudern-Symbol
d - Temperatur-Symbol
e - Restzeit- und
Zeitverzögerungsanzeige
f - Programmsymbole (Vorwäsche,
Hauptwäsche, Spülen,
F4
g - Öko-Symbol
h - Zeitverzögerung-Symbol
i - Türsperre-Symbol
j - Start-Symbol
k - Pause-Symbol
l - Zusatzfunktionen-Symbol
m - Kein Wasser-Symbol
Weichspüler, Schleudern)
5
54
DE
Page 55

Maschine vorbereiten
1. Sorgen Sie dafür, dass sämtliche
Schläuche fest und dicht
angeschlossen sind.
2. Stecken Sie den Netzstecker der
Maschine ein.
3. Drehen Sie den Wasserhahn vollständig
auf.
4. Geben Sie die Wäsche in die Maschine.
5. Füllen Sie Waschmittel und
Weichspüler ein.
Programmauswahl
1. Wählen Sie ein geeignetes
Programm aus der „Programm- und
Verbrauchstabelle“ (Temperaturtabelle
darunter beachten). Orientieren Sie sich
dabei an Wäschetyp, Wäschemenge
und Verschmutzungsgrad.
Stark verschmutzte weiße
90 ˚C
60 ˚C
40 ˚C
30 ˚C -
Kalt
2. Wählen Sie das gewünschte Programm
mit dem Programmauswahlknopf.
Die maximale
C
Schleudergeschwindigkeit dieser
Programme wird durch den jeweiligen
Textilientyp begrenzt.
Beachten Sie bei der Auswahl
C
eines Waschprogramms
grundsätzlich Textilientyp, Farbe,
Verschmutzungsgrad und zulässige
Wassertemperatur.
Wählen Sie grundsätzlich die
C
niedrigstmögliche Temperatur. Eine
höhere Temperatur führt auch zu
höherem Stromverbrauch.
Baumwolle und Leinen.
(Platzdeckchen, Tischtücher,
Handtücher, Betttücher, usw.)
Normal verschmutzte,
ausbleichsichere Baumwolloder Synthetiktextilien (z.
B.: Hemden, Nachthemden,
Schlafanzüge und dergleichen)
sowie leicht verschmutzte
weiße Leinenwäsche
(Unterwäsche, usw.).
Mischtextilien einschließlich
empfindlichen Textilien (z.
B. Gardinen), Synthetik und
Wolle.
55
Weitere Details zu den Programmen
C
finden Sie in der „Programm- und
Verbrauchstabelle“.
Hauptprogramme
Je nach Textilientyp können Sie unter
folgenden Hauptprogrammen wählen:
• Cottons (Koch-/Buntwäsche)
Dieses Programm empfehlen wir für
Ihre Baumwolltextilien wie Bettlaken,
Bettbezüge, Kissenbezüge, Handtücher,
Bademäntel, Unterwäsche, etc.).
Ihre Wäsche wird in einem längeren
Waschprogramm mit intensiveren
Bewegungen gewaschen.
• Synthetics (Pflegeleicht)
Mit diesem Programm waschen Sie
Ihre Synthetiktextilien (Hemden, Blusen,
Synthetik/Baumwoll-Mischtextilien, usw.).
Dieses Programm arbeitet mit sanften
Waschbewegungen und reinigt Ihre
Textilien schneller als das „Baumwolle“-
Programm.
Für Gardinen und Schleier empfehlen
wir das „Synthetik 40 °C“-Programm mit
Vorwäsche und Knitterschutz. Geben
Sie etwas weniger Waschmittel in das
Hauptwäschefach, da die Maschenstruktur
der Textilien sonst zu einer übermäßigen
Schaumbildung führt. Geben Sie kein
Waschmittel in das Vorwäschefach.
• Woollen (Wolle)
Mit diesem Programm waschen Sie Ihre
Wollsachen. Die richtige Waschtemperatur
entnehmen Sie bitte den Pflegeetiketten
der jeweiligen Textilien. Benutzen Sie für
Wollsachen ein spezielles Wollwaschmittel.
Zusätzliche Programme
Für spezielle Fälle stehen Ihnen zusätzliche
Programme zur Verfügung.
Zusatzprogramme können je nach
C
Modell Ihrer Maschine abweichen.
• Cottons Eco (Baumwoll-Öko)
Dieses Programm wäscht Ihre
maschinenwaschbaren Wollsachen auf
schonende Weise; dies dauert etwas
länger, spart jedoch Energie.
Das Baumwoll-Öko-Programm
C
verbraucht dabei weniger Energie als
andere Baumwolle-Programme.
• Hygiene
Mit diesem Programm waschen Sie
Säuglingswäsche und Wäsche von
DE
Page 56

besonders empfindlichen Personen;
beispielsweise Allergikern. Längere
Wärmephasen und ein zusätzlicher
Spülgang wirken sich positiv auf die
Hygiene aus.
• Hand Wash (Handwäsche)
Mit diesem Programm können Sie Ihre
Baumwollsachen und empfindlichen
Textilien waschen, die laut Etikett nicht mit
der Maschine gewaschen sollen. Dieses
Programm reinigt Ihre Wäsche besonders
schonend und nutzt dabei besonders
sanfte Waschbewegungen.
• Mini
Dieses Programm eignet sich zum
schnellen Waschen leicht verschmutzter
Baumwolltextilien.
• Mini 14
Dieses Programm eignet sich zum
schnellen Waschen von kleineren Mengen
leicht verschmutzter Baumwolltextilien.
• Dark Wash (Dunkles)
Mit diesem Programm waschen Sie dunkle
Textilien oder Wäsche, die leicht zum
Ausbleichen neigt. Das Programm arbeitet
mit sanfteren Bewegungen und geringerer
Temperatur. Für dunkle Wäsche empfehlen
wir Flüssig- oder Wollwaschmittel.
• Bedding (Bettdecken )
Mit diesem Programm waschen Sie
Bettdecken, die ausdrücklich als
maschinenwaschbar gekennzeichnet sind.
Gehen Sie beim Beladen der Maschine
besonders sorgfältig vor, damit weder
Maschine noch Bettdecke beschädigt
werden. Nehmen Sie den Bezug ab, bevor
Sie Bettdecken in die Maschine geben.
Falten Sie die Bettdecke einmal, geben
Sie sie dann in die Maschine. Achten Sie
darauf, dass die Bettdecke nicht an die
Gummidichtung stößt.
Geben Sie nicht mehr als eine
C
Doppelbettdecke (200 × 200 cm) in die
Maschine.
Waschen Sie keine Bettdecken,
C
Kissen und ähnliche Textilien mit
Baumwollanteil in der Maschine.
Waschen Sie ausschließlich
A
Bettdecken, keine Teppiche und
ähnlich schwere Textilien, in der
Maschine. Andernfalls kann es zu
bleibenden Beschädigungen der
Maschine kommen.
• Lingerie (Damenwäsche (Dessous))
Mit diesem Programm waschen Sie
empfindliche Damenwäsche. Kleinere
Wäschemengen geben Sie in ein
Wäschesäckchen. Haken, Knöpfe
und Reißverschlüsse müssen dabei
geschlossen sein. Ihre Wäsche wird
bei niedriger Temperatur mit sanften
Bewegungen gewaschen. Durch einen
zusätzlichen Spülgang werden auch die
letzten Waschmittelreste entfernt.
• Refresh (Auffrischen)
Mit diesem Programm entfernen Sie
lästige Gerüche aus Wäschestücken, die
nur einmal getragen wurden und nicht
verschmutzt sind.
• Cotton 20 (Öko-Rein)
Mit diesem Programm, das sich besonders
schonend zur Umwelt und zu natürlichen
Ressourcen verhält, waschen Sie leicht
verschmutzte Baumwollwäsche (maximal
3,5 kg) in kurzer Zeit und auf ökonomische
Weise.
Wir empfehlen, ein Flüssig- oder Gel-
C
Waschmittel zu verwenden.
• Machine Care (Selbstreinigen)
Mit diesem Programm reinigen Sie die
Trommel alle 1 – 2 Monate; so bleibt
56
DE
Page 57

die nötige Hygiene erhalten. Lassen
Sie dieses Programm ohne Wäsche in
der Maschine durchlaufen. Um einen
noch besseren Reinigungseffekt zu
erzielen, geben Sie Kalkentferner für
Waschmaschinen in das Waschmittelfach
II. Nach Abschluss des Programms lassen
Sie die Waschmaschinentür offen stehen,
damit das Innere der Maschine trocknen
kann.
Hierbei handelt es sich nicht um ein
C
Waschprogramm, sondern um ein
Wartungsprogramm.
Starten Sie dieses Programm
C
nicht, wenn sich noch etwas in der
Maschine befinden sollte. Falls Sie
es dennoch versuchen, erkennt
die Maschine den Fremdkörper im
Inneren und bricht das Programm ab.
Spezialprogramme
Für spezielle Zwecke können Sie die
folgenden Programme wählen:
• Rinse (Spülen)
Dieses Programm benutzen Sie, wenn Sie
separat spülen oder stärken möchten.
• Spin+Drain (Schleudern +
Abpumpen)
Dieses Programm nutzen Sie, um Ihre
Wäsche ein weiteres Mal zu schleudern
oder das Wasser aus der Maschine
abzupumpen.
Dazu wählen Sie zunächst die
gewünschte Schleudergeschwindigkeit
und starten das Programm anschließend
mit der Start-/Pause-/AbbrechenTaste. Anschließend wird die Wäsche
mit der festgelegten Geschwindigkeit
geschleudert und weitestgehend von
Nässe befreit.
Falls Sie lediglich das Wasser abpumpen
möchten, ohne die Wäsche zu
schleudern: Wählen Sie das „Abpumpen
+ Schleudern“-Programm, stellen Sie
anschließend „Nicht schleudern“ über die
Schleudergeschwindigkeit-Einstelltaste
ein. Drücken Sie die Start-/Pause-/
Abbrechen-Taste.
Bei empfindlichen Wäschestücken
C
sollten Sie eine geringere
Schleudergeschwindigkeit wählen.
Temperatur auswählen
Sobald Sie ein neues Programm
auswählen, wird die Maximaltemperatur
des jeweiligen Programms in der
Temperaturanzeige angezeigt.
Zum Vermindern der Temperatur drücken
Sie die Temperatureinstelltaste. Die
Temperatur nimmt in Schritten von 10 °
ab, letztendlich erscheint das Symbol „-“
(Kaltwäsche) im Display.
Wenn Sie bis zur Kaltwäsche-
C
Option blättern und die
Temperatureinstelltaste anschließend
noch einmal drücken, erscheint die
für das ausgewählte Programm
empfohlene Temperatur im
Display. Drücken Sie die
Temperatureinstelltaste erneut, wenn
Sie die Temperatur weiter senken
möchten.
Öko-Symbol
Weist auf Programme und Temperaturen
hin, mit denen sich Energie sparen lässt.
Das Öko-Symbol kann bei den
C
Intensiv- und Hygiene-Programmen
nicht gewählt werden, da bei diesen
Programmen zur besseren Hygiene
mit längeren Waschzeiten und
höheren Temperaturen gearbeitet
wird. Aus ähnlichen Gründen ist
die Öko-Funktion auch bei den
Programmen Säugling, Auffrischen,
Trommelreinigung, Schleudern und
Spülen nicht auswählbar.
Schleudergeschwindigkeit
auswählen
Nachdem Sie ein Programm
ausgewählt haben, wird die
empfohlene Schleudergeschwindigkeit
57
DE
Page 58

des gewählten Programms in der
Schleudergeschwindigkeitsanzeige
dargestellt.
Zum Vermindern der
Schleudergeschwindigkeit drücken Sie die
Schleudergeschwindigkeit-Einstelltaste.
Die Schleudergeschwindigkeit wird Schritt
für Schritt vermindert. Anschließend
werden je nach Modell die Optionen
„Spülstopp“ und „Nicht schleudern“
angezeigt. Hinweise zu diesen Optionen
finden Sie im Abschnitt „Zusatzfunktionen
auswählen“.
Die Spülstopp-Option wird durch das
C
Symbol , die Nicht schleudernOption durch das Symbol
angezeigt.
F3
F2
F1
F4
58
DE
Page 59

Programm- und Verbrauchstabelle
DE
Programm (°C)
Cottons 90 9 87 2.70 1600 • • • • • • 90-Kalt
Cottons 60 9 85 1.80 1600 • • • • • • 90-Kalt
Cottons 40 9 85 1.00 1600 • • • • • • 90-Kalt
Hygiene 90 9 80 2.70 1600 * • 90-30
Cottons Eco 60** 9 66 1.35 1600 • • • • • • 60-Kalt
Cottons Eco 40 9 80 0.95 1600 • • • • • • 60-Kalt
Synthetics 60 4 55 1.00 1000 • • • • • • 60-Kalt
Synthetics 40 4 55 0.52 1000 • • • • • • 60-Kalt
Cotton 20 20 3.5 45 0.16 1600 • 20
Lingerie 30 1 50 0.25 1000 • 30-Kalt
4
Max. Beladung (kg)
Wasserverbrauch (Liter)
Stromverbrauch (kWh)
Maximalgeschwindigkeit ***
Zusatzfunktion
Prewash
Quick Wash
Rinse Plus
Anti Crease
Spülstopp
Tierhaare entfernen
Wählbarer
Temperaturbereich
(°C)
Bedding 40 - 60 0.60 1000 60-40
Mini 14’ 30 2 42 0.10 1400 • • 30-Kalt
Mini 90 9 70 2.02 1400 • • 90-Kalt
Mini 60 9 70 1.20 1400 • • 90-Kalt
Mini 30 9 80 0.30 1400 • • 90-Kalt
Woollen 40 2 56 0.30 1000 • • 40-Kalt
Hand Wash 30 1.5 40 0.25 1000 30-Kalt
Dark Wash 40 4 95 0.60 1000 * • 40-Kalt
Machine Care 70 - 110 2.00 800 * 70
Refresh - 2 35 0.03 1000 • -
59
DE
Page 60

• : Wählbar
* : Automatisch ausgewählt, nicht abwählbar.
** : Energieprogramm (EN 60456 Ed.3)
*** Falls die maximale Schleudergeschwindigkeit Ihrer Maschine unterhalb dieses Wertes
liegt, lässt sich lediglich die maximal mögliche Schleudergeschwindigkeit auswählen.
- : Entnehmen Sie die maximale Beladung bitte der Programmbeschreibung.
Die Zusatzfunktionen in der Tabelle können je nach Modell Ihrer Maschine abweichen.
C
Wasser- und Stromverbrauch können sich abhängig von Wasserdruck, Wasserhärte
C
und Wassertemperatur, Umgebungstemperatur, Wäscheart und Wäschemenge,
Einsatz von Zusatzfunktionen, der Schleudergeschwindigkeit sowie Schwankungen
der Versorgungsspannung ändern.
Die Dauer des ausgewählten Programms erscheint im Display der Maschine. Dabei
C
kann es durchaus zu kleinen Abweichungen zwischen der angezeigten und der
tatsächlichen Dauer kommen.
60
DE
Page 61

Zusatzfunktionen auswählen
a b c d
Wählen Sie die gewünschten
Zusatzfunktionen, bevor Sie das
Programm starten. Darüber hinaus
können Sie auch im Betrieb zum
laufenden Programm passende
Zusatzfunktionen auswählen oder
aufheben, ohne die Start-/Pause-/
Abbrechen-Taste zu drücken. Allerdings
darf der Schritt, in dem die jeweilige
Zusatzfunktion eingesetzt wird, natürlich
noch nicht erreicht sein.
Je nach Programm wählen Sie die
gewünschte Zusatzfunktion mit den
Tasten 2a, 2b, 2c oder 2d. Das Symbol
der ausgewählten Zusatzfunktion
erscheint im Display.
Bestimmte Funktionen lassen sich
C
nicht gleichzeitig auswählen. Wenn
Sie eine Zusatzfunktion wählen, die
mit einer zuvor gewählten Funktion
kollidiert (also nicht gleichzeitig
ausgewählt werden kann), wird
die zuerst ausgewählte Funktion
aufgehoben, die zuletzt gewählte
Zusatzfunktion bleibt aktiv. Ein
Beispiel: Wenn Sie zunächst
„Vorwäsche“ wählen und sich dann
für „Schnellwäsche“ entscheiden,
wird die Vorwäsche aufgehoben, die
Schnellwäsche bleibt aktiv.
Zusatzfunktionen, die nicht mit dem
C
gewählten Programm vereinbar
sind, können nicht ausgewählt
werden. (Siehe „Programm- und
Verbrauchstabelle“.)
Je nach Modell Ihrer Maschine
C
können die Zusatzfunktionstasten
etwas anders aussehen.
• Prewash (Vorwäsche)
Eine Vorwäsche ist nur bei stark
verschmutzter Wäsche erforderlich. Wenn
Sie auf die Vorwäsche verzichten, sparen
Sie Energie, Wasser, Waschmittel und
Zeit.
Wenn Sie diese Funktion (a) wählen,
erscheint F1 im Display.
• Quick Wash (Schnellwäschen)
Diese Funktion können Sie bei
Baumwolle- und Synthetik-Programmen
verwenden. Dies reduziert die Waschzeit
und die Anzahl der Spülgänge bei leicht
verschmutzter Wäsche.
Wenn Sie diese Funktion (b) wählen,
erscheint F2 im Display.
Wenn Sie diese Funktion wählen,
C
beladen Sie Ihre Maschine nur mit
der halben in der Programmtabelle
angegebenen maximalen
Wäschemenge.
• Rinse Plus (Spülen Plus)
Bei dieser Funktion führt Ihre Maschine
einen zusätzlichen Spülgang nach der
Hauptwäsche aus. Dadurch verringert
sich die Gefahr von Hautreizungen
bei empfindlichen Personen (z. B.
Kleinkindern, Allergikern), weil weniger
Waschmittelreste in der Wäsche
verbleiben.
Wenn Sie diese Funktion (c) wählen,
erscheint F3 im Display.
• Anti Crease (Bügelleicht)
Mit dieser Funktion verknittert Wäsche
deutlich weniger als bei einem normalen
Waschgang. Die Textilien werden mit
sanfteren Bewegungen gewaschen
und mit geringerer Geschwindigkeit
geschleudert. Zusätzlich wird Ihre Wäsche
mit mehr Wasser gewaschen.
Wenn Sie diese Funktion (d) wählen,
erscheint F4 im Display.
• Spülstopp
Wenn Sie Ihre Textilien nicht gleich nach
dem Abschluss des Waschprogramms
aus der Maschine nehmen möchten,
können Sie die Spülstopp-Funktion
einsetzen, damit Ihre Wäsche nicht
durch Antrocknen in der Maschine
verknittert. Wenn Sie anschließend die
Start-/Pause-/Abbrechen-Taste drücken,
wird das Wasser ohne Schleudern
abgepumpt. Nach dem Abpumpen
wird das Programm fortgesetzt und
abgeschlossen.
61
DE
Page 62

Wenn Sie die im Wasser einweichende
Wäsche schleudern möchten, wählen Sie
die gewünschte Schleudergeschwindigkeit
und drücken anschließend die Start-/
Pause-/Abbrechen-Taste.
Das Programm wird fortgesetzt.
Das Wasser wird abgepumpt, die
Wäsche geschleudert, das Programm
abgeschlossen.
• Einweichen
Durch Einweichen lassen sich hartnäckige
Verschmutzungen leichter entfernen:
Dazu verbleibt die Wäsche eine Zeit lang
im Waschwasser, bevor das eigentliche
Programm beginnt.
Zeitanzeige
Im laufenden Programm erscheint die
restliche Zeit bis zum Programmende im
Display. Die Zeit wird im Format „01:30“ in
Stunden und Minuten angezeigt.
Die Programmdauer kann
C
abhängig von Wasserdruck,
Wasserhärte und Wassertemperatur,
Umgebungstemperatur, Wäscheart
und Wäschemenge, Einsatz von
Zusatzfunktionen sowie Schwankungen
der Versorgungsspannung von den
Angaben in der „Programm- und
Verbrauchstabelle“ abweichen.
Zeitverzögerung
Wenn Sie den Waschvorgang erst später
beginnen lassen möchten, können Sie den
Programmstart durch die Zeitverzögerung
um bis zu 24 Stunden hinausschieben.
Die Verzögerungszeit kann in 30-MinutenSchritten eingestellt werden.
Benutzen Sie keine Flüssigwaschmittel,
C
wenn Sie die Zeitverzögerungsfunktion
nutzen! Es besteht die Gefahr, dass
sich Flecken auf Ihren Textilien bilden
können.
1. Öffnen Sie die Waschmaschinentür,
treffen Sie die nötigen Vorbereitungen
wie Einfüllen von Wäsche und
Waschmittel, usw.
2. Wählen Sie Waschprogramm,
Temperatur, Schleudergeschwindigkeit
und – sofern gewünscht –
Zusatzfunktionen.
3. Wählen Sie die gewünschte Zeit mit
den Zeitverzögerungstasten (+ / -). Das
Zeitverzögerung-Symbol blinkt.
4. Drücken Sie die Start-/Pause-/
Abbrechen-Taste. Der Countdown
bis zum verzögerten Start beginnt.
Das Zeitverzögerung-Symbol
leuchtet dauerhaft. Das Start-Symbol
erscheint. “:” Der Doppelpunkt in der
Verzögerungszeitanzeige beginnt zu
blinken.
Während die Zeitverzögerung
C
läuft, können Sie weitere Wäsche
hinzugeben. Nach Ablauf des
Countdowns verschwindet das
Zeitverzögerung-Symbol, das Waschen
beginnt, die Programmdauer erscheint
im Display.
Verzögerungszeit ändern
Wenn Sie die Zeit bei laufendem
Countdown ändern möchten:
1. Drücken Sie die Start-/Pause-/
Abbrechen-Taste. “:” der Doppelpunkt
in der Verzögerungszeitanzeige hört
auf zu blinken. Das Pause-Symbol
erscheint. Das Zeitverzögerung-Symbol
blinkt. Das Start-Symbol verschwindet.
2. Wählen Sie die gewünschte Zeit mit
den Zeitverzögerungstasten (+ / -).
3. Drücken Sie die Start-/
Pause-/Abbrechen-Taste. Das
Zeitverzögerung-Symbol leuchtet
dauerhaft. Das Pause-Symbol
verschwindet. Das Start-Symbol
erscheint.
4. “:” Der Doppelpunkt in der
Verzögerungszeitanzeige beginnt zu
blinken.
Zeitverzögerung aufheben
Wenn Sie die Zeitverzögerung aufheben
und das Waschprogramm sofort starten
möchten:
1. Drücken Sie die Start-/Pause-/
Abbrechen-Taste. “:” der Doppelpunkt
in der Verzögerungszeitanzeige hört auf
zu blinken.
2. Das Start-Symbol verschwindet. Die
Symbole Pause und Zeitverzögerung
blinken.
62
DE
Page 63

3. Vermindern Sie die gewünschte Zeit mit
der (-)-Zeitverzögerungstaste. Nach 30
Minuten erscheint die Programmdauer.
4. Starten Sie das Programm mit der
Start-/Pause-/Abbrechen-Taste.
Programm starten
1. Starten Sie das Programm mit der
Start-/Pause-/Abbrechen-Taste.
2. Das Start-Symbol leuchtet auf, das
Programm beginnt.
3. Die Waschmaschinentür wird gesperrt,
dass Türsperre-Symbol erscheint im
Display.
4. Im Display leuchten Symbole für
den jeweiligen Programmschritt
(Vorwäsche, Hauptwäsche, Spülen,
Weichspüler und Schleudern) auf.
Programmfortschritt
Der Programmfortschritt wird im Display
durch eine Reihe von Symbolen angezeigt.
Der jeweils aktive Programmschritt
wird durch das entsprechende Symbol
angezeigt, bis zum Abschluss des
Programms sämtliche Symbole leuchten.
Der jeweils aktuelle Programmschritt wird
durch das Symbol ganz rechts dargestellt.
Vorwäsche
Wenn die Zusatzfunktion Vorwäsche
gewählt ist, erscheint das VorwäscheSymbol im Display, sobald die Vorwäsche
beginnt.
Hauptwäsche
Das Hauptwäsche-Symbol erscheint im
Display, sobald die Hauptwäsche beginnt.
Spülen
Sobald das Spülen beginnt, erscheint das
Spülen-Symbol im Display.
Weichspüler
Das Weichspüler-Symbol zeigt an, dass
die Maschine gerade mit dem Weichspülen
beschäftigt ist.
Schleudern
Das Schleudern-Symbol leuchtet auf,
sobald die Maschine mit dem letzten
Schleuderschritt beginnt; dieses Symbol
leuchtet auch beim Schleudern +
Abpumpen-Programm.
Falls die Maschine nicht schleudern
C
sollte, ist die Spülstopp-Funktion
eventuell aktiv – oder die Wäsche ist so
ungleichmäßig in der Trommel verteilt,
dass Schleudern nicht ratsam wäre.
Türsperre
Ein spezielles Sicherungssystem
verhindert das Öffnen der Tür, solange der
Wasserpegel innerhalb der Maschine noch
nicht als sicher gilt.
Das Türsperre-Symbol erscheint, wenn
die Waschmaschinentür gesperrt ist.
Dieses Symbol blinkt, bis sich die
Waschmaschinentür wieder öffnen lässt
– beispielsweise zum Abschluss des
Programms oder wenn die Maschine
angehalten wurde. Versuchen Sie nicht,
die Waschmaschinentür bei diesem
Schritt mit Gewalt zu öffnen. Das Symbol
verschwindet, sobald sich die Tür öffnen
lässt.
Änderungen nach Programmstart
Maschine anhalten (Pause)
Halten Sie die Maschine durch Drücken der
Start-/Pause-/Abbrechen-Taste an. Das
Pause-Symbol im Display zeigt an, dass
die Maschine angehalten wurde. Das StartSymbol verschwindet.
F3
F2
F1
Geschwindigkeits- und
Temperatureinstellungen bei
Zusatzfunktionen ändern
Je nach aktuellem Programmschritt lassen
sich Zusatzfunktionen aufheben oder
zuschalten – siehe „Zusatzfunktionen
auswählen“.
Darüber hinaus können Sie
auch Geschwindigkeits- und
Temperatureinstellungen ändern; schauen
Sie sich dazu bitte die Abschnitte
„Schleudergeschwindigkeit auswählen“
und „Temperatur auswählen“ an.
Wäsche hinzugeben oder
herausnehmen
1. Halten Sie die Maschine durch Drücken
der Start-/Pause-/Abbrechen-Taste an.
In der Programmfolgeanzeige blinkt
der Programmschritt, bei dem das
Programm angehalten wurde.
F4
63
DE
Page 64

2. Warten Sie, bis sich die Tür öffnen
lässt.
3. Öffnen Sie die Waschmaschinentür,
geben Sie weitere Wäsche hinzu oder
nehmen Sie Wäsche heraus.
4. Schließen Sie die
Waschmaschinentür.
5. Ändern Sie bei Bedarf
Zusatzfunktionen, Temperatur und
Schleudergeschwindigkeit.
6. Starten Sie die Maschine mit der
Start-/Pause-/Abbrechen-Taste.
Die Waschmaschinentür lässt sich
C
nicht öffnen, wenn die Temperatur im
Inneren der Maschine zu hoch ist oder
der Wasserspiegel noch oberhalb der
Tür steht.
Kindersicherung
Mit der Kindersicherung können Sie
verhindern, dass Kinder die Einstellungen
Ihrer Maschine und des laufenden
Programms manipulieren.
Auch bei aktiver Kindersicherung
C
können Sie die Maschine mit der Ein-/
Austaste ein- und ausschalten. Beim
Wiedereinschalten der Maschine
wird das Programm an der Stelle
fortgesetzt, an der es zuvor gestoppt
wurde.
So schalten Sie die Kindersicherung ein:
Halten Sie die 2. und 4.
Zusatzfunktionstaste drei Sekunden lang
gedrückt. „Con“ erscheint im Display.
Dieselbe Meldung wird angezeigt,
C
wenn bei aktiver Kindersicherung eine
beliebige Taste gedrückt wird.
So schalten Sie die Kindersicherung ab:
Halten Sie die 2. und 4.
Zusatzfunktionstaste drei Sekunden lang
gedrückt. „COFF“ erscheint im Display.
Vergessen Sie nicht, die
C
Kindersicherung nach Abschluss des
Programms wieder abzuschalten.
Andernfalls können Sie kein neues
Programm auswählen.
Programme abbrechen
Halten Sie die Start-/Pause-/Abbrechen-
Taste 3 Sekunden lang gedrückt.
Das Start-Symbol blinkt. Das Symbol
des Programmschritts, bei dem das
Programm abgebrochen wurde, leuchtet
weiter. "END“ erscheint im Display, das
Programm ist abgebrochen.
Falls sich die Waschmaschinentür
C
nach Abbruch eines Programms
nicht öffnen lässt, weil sich noch
zu viel Wasser in der Maschine
befindet, wählen Sie das Abpumpen
+ Schleudern-Programm mit dem
Programmauswahlknopf und
befördern so das Wasser aus der
Maschine.
Die Maschine befindet
sich im Spülstopp
Das Schleudern-Symbol blinkt, das
Pause-Symbol leuchtet, wenn der
Spülstopp erreicht wurde.
Wenn Sie Ihre Wäsche zu diesem
Zeitpunkt schleudern möchten:
Stellen Sie die Schleudergeschwindigkeit
ein, drücken Sie anschließend die Start-/
Pause-/Abbrechen-Taste. Das Pause-
Symbol verschwindet, das Start-Symbol
erscheint. Das Programm wird fortgesetzt,
das Wasser abgepumpt, die Wäsche wird
geschleudert.
Wenn Sie das Wasser ohne zu schleudern
abpumpen möchten:
Drücken Sie einfach die Start-/Pause-/
Abbrechen-Taste. Das Pause-Symbol
verschwindet. Das Start-Symbol
erscheint. Das Programm wird fortgesetzt,
dass Wasser abgepumpt.
64
DE
Page 65

Programmende
Nach Abschluss des Programms
wird „End“ im Display angezeigt. Die
Programmschritt-Symbole leuchten
weiter. Die zu Beginn des Programms
ausgewählten Zusatzfunktionen
sowie Schleudergeschwindigkeit und
Temperatur bleiben ausgewählt.
65
DE
Page 66

6 Reinigung und Wartung
Viele Probleme lassen sich vermeiden,
wenn Sie Ihre Waschmaschine in
regelmäßigen Abständen reinigen;
zusätzlich verlängern Sie die Lebensdauer
Ihres neuen Gerätes.
Waschmittelschublade reinigen
Reinigen Sie die Waschmittelschublade
regelmäßig (jeweils nach 4 – 5 Wäschen),
damit sich im Laufe der Zeit keine
Waschmittelreste ansammeln. Gehen Sie
dazu wie folgt vor:
1. Drücken Sie die runde Markierung im
Weichspülerfach hinab und ziehen Sie
die Schublade zu sich hin, bis Sie sie
aus der Maschine nehmen können.
Wenn sich eine Mischung aus Wasser
C
und Weichspüler im Weichspülerfach
ansammelt, ist es Zeit, den Siphon zu
reinigen.
2. Waschen Sie die Waschmittelschublade
und den Siphon mit reichlich warmem
Wasser im Waschbecken aus. Tragen
Sie beim Reinigen Schutzhandschuhe
oder benutzen Sie eine Bürste, damit
die Rückstände bei der Reinigung nicht
an Ihre Haut gelangen können.
3. Schieben Sie die
Waschmittelschublade nach der
Reinigung wieder an Ort und Stelle;
vergewissern Sie sich, dass sie richtig
sitzt.
Waschmaschinentür und
Trommel reinigen
Rückstände von Weichspüler, Waschmittel
und andere Verunreinigungen können
sich im Laufe der Zeit in der Maschine
ansammeln, unangenehme Gerüche
verursachen und die Waschleistung
schmälern. Damit es nicht dazu
kommt, verwenden Sie von Zeit zu
Zeit das Trommelreinigungsprogramm.
66
Sofern Ihre Maschine nicht mit einem
Trommelsreinigungsprogramm
ausgestattet ist, wählen Sie das
Baumwolle 90-Programm und dazu
die Zusatzfunktionen „Zusätzliches
Wasser“ oder „Extraspülen“. Bevor
Sie das Programm starten, geben Sie
maximal 100 g Entkalkungspulver in
das Hauptwaschmittelfach (Fach II). Bei
Entkalkungsmitteln in Tablettenform geben
Sie eine einzelne Tablette in das Fach
II. Reinigen Sie die Gummidichtung im
Türbereich mit einem sauberen Lappen,
nachdem das Programm durchgelaufen ist.
Lassen Sie das
C
Trommelreinigungsprogramm alle zwei
Monate durchlaufen.
Verwenden Sie nur für
C
Waschmaschinen geeignete
Kalkentferner.
Achten Sie nach jeder Wäsche darauf,
dass keine Fremdkörper in der Trommel
zurückbleiben.
Falls die in der Abbildung gezeigten
Öffnungen in der Gummidichtung verstopft
sein sollten, entfernen Sie die Verstopfung
mit einem Zahnstocher.
Metallgegenstände können zu
C
Rostflecken in Ihrer Maschine führen.
Reinigen Sie die Trommel mit einem
Edelstahlreiniger. Benutzen Sie niemals
Stahlwolle oder ähnliche Scheuermittel.
Gehäuse und Bedienfeld reinigen
Wischen Sie das Gehäuse der Maschine
bei Bedarf mit Seifenwasser oder
einem milden Gel-Reinigungsmittel ab;
anschließend mit einem weichen Tuch
trocknen.
Das Bedienfeld reinigen Sie lediglich mit
einem weichen, leicht angefeuchteten
Tuch.
DE
Page 67

Benutzen Sie niemals
A
Scheuerschwämme oder andere
Scheuermittel. Solche Mitte
beschädigen lackierte Flächen und
Kunststoffteile.
Wasserzulauffilter reinigen
Am Endstück jedes Wasserzulaufventils
an der Rückseite der Maschine sowie am
Ende der Wasserzulaufschläuche (dort, wo
diese an den Wasserhahn angeschlossen
werden) befindet sich ein Filter. Diese
Filter verhindern, dass Fremdkörper
und Schmutz mit dem Wasser in die
Waschmaschine gelangen. Die Filter sollten
bei Verschmutzung gereinigt werden.
1. Schließen Sie die Wasserhähne.
2. Entfernen Sie die Muttern an den
Wasserzulaufschläuchen und reinigen
Sie die Filter am Wassereinlauf mit
einer passenden Bürste. Falls die Filter
stark verschmutzt sein sollten, können
Sie diese mit einer kleinen Zange
herausnehmen und säubern.
3. Die Filter an den flachen Enden der
Wasserzulaufschläuche nehmen
Sie zusammen mit den Dichtungen
heraus und reinigen sie gründlich unter
fließendem Wasser.
4. Setzen Sie die Dichtungen und Filter
sorgfältig wieder an den alten Platz
und ziehen Sie die Muttern an den
Schläuchen von Hand an.
Restliches Wasser ablaufen
lassen und Pumpenfilter reinigen
Die Filtersysteme in Ihrer Maschine sorgen
dafür, dass Festkörper wie Knöpfe, Münzen
und Textilfasern ausgefiltert werden und
den Propeller der Pumpe beim Ablaufen
des Wassers nicht zusetzen können. So
wird die Pumpe beim Abpumpen des
Wassers weniger stark belastet und hält
länger.
Falls das Wasser nicht mehr vollständig aus
Ihrer Maschine abgepumpt wird, kann der
Pumpenfilter verstopft sein. Dieser Filter
muss mindestens alle drei Monate (und
natürlich, wenn er verstopft ist) gereinigt
werden. Zum Reinigen des Pumpenfilters
muss das Wasser zunächst abgelassen
werden.
In bestimmten Fällen – beispielsweise bei
einem Umzug oder wenn Frostgefahr droht
– muss das Wasser komplett abgelassen
werden.
Im Pumpenfilter verbliebene
A
Fremdkörper können die Maschine
beschädigen und zu starken
Betriebsgeräuschen führen.
So lassen Sie das Wasser ab und reinigen
einen verschmutzten Filter:
1. Trennen Sie das Gerät vollständig von
der Stromversorgung, indem Sie den
Netzstecker ziehen.
Die Wassertemperatur im Inneren der
A
Maschine kann bis zu 90 °C erreichen.
Damit es nicht zu Verbrühungen oder
Verbrennungen kommt, darf der Filter
erst gereinigt werden, wenn das
Wasser in der Maschine abgekühlt ist.
2. Öffnen Sie die Filterkappe.
Wenn die Filterkappe aus zwei Teilen
besteht, drücken Sie die Lasche an der
Filterkappe nach unten und ziehen das
Teil zu sich hin heraus.
Bei einer einteiligen Filterkappe öffnen Sie
die Kappe, indem Sie sie an beiden Seiten
nach oben ziehen.
67
DE
Page 68

Die Filterabdeckung lässt sich
C
entfernen, indem Sie einen dünnen
Gegenstand mit Kunststoffspitze zur
Hand nehmen und die Abdeckung
durch die Öffnung oberhalb der
Filterabdeckung etwas nach unten
drücken. Versuchen Sie nicht, die
Abdeckung mit Metallgegenständen zu
lösen.
3. Bestimmte Modelle sind mit einem
Notfall-Ablaufschlauch ausgestattet.
Mit den nachstehenden Schritten
lassen Sie das Wasser ab.
Wasser bei Geräten mit Notfall-
Ablaufschlauch ablassen:
a. Ziehen Sie den Notfall-Ablaufschlauch
aus seinem Gehäuse.
b. Stellen Sie ein großes Gefäß unter das
Ende des Schlauches. Lassen Sie
das Wasser in den Behälter ablaufen,
indem Sie den Stopfen am Ende des
Schlauches herausziehen. Wenn der
Behälter voll ist, verschließen Sie das
Ende des Schlauches, indem Sie den
Stopfen wieder einsetzen. Leeren
Sie den Behälter aus. Anschließend
wiederholen Sie den Vorgang und
lassen das restliche Wasser aus der
Maschine ablaufen.
c. Nachdem das Wasser komplett
abgelaufen ist, verschließen Sie das
Ende des Schlauches mit dem Stopfen
und schieben den Schlauch wieder an
seinen Platz.
d. Drehen Sie den Pumpenfilter heraus.
Wasser bei Geräten ohne Notfall-
Ablaufschlauch ablassen:
a. Stellen Sie ein großes Gefäß unter
die Öffnung des Filters, damit das
ablaufende Wasser hineinfließen kann.
b. Lösen Sie den Pumpenfilter (gegen
den Uhrzeigersinn), bis Wasser
austritt. Leiten Sie den Wasserfluss in
das Gefäß, das Sie unter dem Filter
aufgestellt haben. Halten Sie am
besten einen Lappen für den Fall bereit,
dass etwas Wasser auf den Boden
gelangen sollte.
c. Wenn das Wasser vollständig aus der
Maschine abgelaufen ist, drehen Sie
den Filter komplett heraus.
4. Reinigen Sie den Filter sorgfältig
von sämtlichen Rückständen und
entfernen Sie sämtliche Textilfasern
(sofern vorhanden) in der Nähe der
Pumpenflügel.
5. Installieren Sie den Filter.
Falls Ihre Maschine mit einer
A
Wasserdüse ausgestattet sein sollte,
achten Sie besonders gut darauf, den
Filter wieder richtig an seinen Platz
in der Pumpe zu setzen. Versuchen
Sie niemals, den Filter mit Gewalt
wieder an Ort und Stelle zu bringen.
Achten Sie darauf, dass der Filter
wieder vollständig im Gehäuse sitzt.
Andernfalls kann Wasser durch die
Filterkappe auslaufen.
6. Falls die Filterkappe aus zwei Teilen
besteht, schließen Sie die Filterkappe,
indem Sie auf die Lasche drücken.
Bei einer einteiligen Filterkappe setzen
Sie zuerst die Nasen im unteren
Teil entsprechend ein, anschließend
drücken Sie zum Verschließen den
oberen Teil nach unten.
68
DE
Page 69

7 Problemlösung
Programme lassen sich nicht starten oder auswählen.
• Die Waschmaschine hat sich eventuell aus Sicherheitsgründen selbst
abgeschaltet; dies kann äußere Ursachen (z. B. Schwankungen von Spannung
oder Wasserdruck, etc.) haben. >>> Setzen Sie die Maschine auf die
Werkseinstellungen zurück, indem Sie die Start-/Pause-/Abbrechen-Taste 3
Sekunden lang gedrückt halten. (Siehe „Programme abbrechen“.)
Wasser in der Maschine.
• Eventuell befindet sich noch etwas Wasser in der Trommel. Dies liegt daran,
dass das Gerät vor der Auslieferung noch einmal gründlich geprüft wurde. >>>
Dies ist kein Defekt – natürlich wird Ihre Waschmaschine nicht von Wasser
beeinträchtigt.
Wasser tritt aus dem unteren Teil der Waschmaschine aus.
• Vermutlich liegt ein Problem mit den Schläuchen oder dem Pumpenfilter
vor. >>> Vergewissern Sie sich, dass die Dichtungen an den
Wasserzulaufschläuchen fest und sicher sitzen. Schließen Sie den Schlauch
fest und dicht an den Wasseranschluss an.
• Der Pumpenfilter ist eventuell nicht richtig geschlossen. >>> Vergewissern Sie
sich, dass der Pumpenfilter komplett geschlossen ist.
Die Maschine füllt sich nicht mit Wasser.
• Der Wasserhahn ist geschlossen. >>> Öffnen Sie die Wasserzulaufhähne
vollständig.
• Der Wasserzulaufschlauch ist gebogen. >>> Begradigen Sie den
Wasserzulaufschlauch.
• Der Filter im Wasserzulauf ist verstopft. >>> Reinigen Sie den
Wasserzulauffilter.
• Die Waschmaschinentür ist nicht ganz geschlossen. >>> Schließen Sie die
Waschmaschinentür.
Das Wasser fließt nicht aus der Maschine ab.
• Der Wasserablaufschlauch ist eventuell verstopft oder geknickt. >>> Reinigen
oder begradigen Sie den Schlauch.
• Der Pumpenfilter ist verstopft. >>> Reinigen Sie den Pumpenfilter.
Die Maschine vibriert stark oder arbeitet sehr laut.
• Die Maschine steht eventuell nicht gerade. >>> Balancieren Sie die Maschine
mit den einstellbaren Füßen aus.
• Ein Fremdkörper ist in den Pumpenfilter eingedrungen. >>> Reinigen Sie den
Pumpenfilter.
• Die Transportsicherungen (Bolzen) wurden nicht entfernt. >>> Entfernen Sie
die Transportsicherungsbolzen.
• Zu wenig Wäsche in der Maschine. >>> Geben Sie mehr Wäsche in die
Maschine.
• Die Maschine wurde eventuell überladen. >>> Reduzieren Sie die
Wäschemenge in der Maschine oder verteilen Sie die Wäsche von Hand
gleichmäßiger.
• Die Maschine stößt gegen einen anderen Gegenstand. >>> Achten Sie darauf,
dass die Maschine nirgendwo anstößt.
69
DE
Page 70

Die Maschine stoppt kurz nach Programmbeginn.
• Die Maschine kann vorübergehend anhalten, wenn die Spannung zu niedrig
ist. >>> Sie setzt den Betrieb fort, wenn die Spannung wieder den Normalwert
erreicht hat.
Gleich nach dem Einlaufen wird das Wasser wieder ausgestoßen.
• Eventuell befindet sich der Ablaufschlauch nicht in der richtigen
Höhe. >>> Schließen Sie den Wasserablaufschlauch genau wie in der
Bedienungsanleitung beschrieben an.
Beim Waschen ist kein Wasser in der Maschine zu sehen.
Der Wasserstand ist von außen oft nicht zu erkennen. Dies ist kein Problem.
C
Die Waschmaschinentür lässt sich nicht öffnen.
• Die Türsperre ist aktiv, da das Wasser recht hoch in der Maschine steht. >>>
Entfernen Sie das Wasser mit dem Abpumpen- oder Schleudern-Programm.
• Die Maschine heizt gerade das Wasser auf oder befindet sich im
Schleudergang. >>> Warten Sie, bis das Programm abgeschlossen ist.
• Die Kindersicherung ist aktiv. Die Türsperre wird wenige Minuten nach
Abschluss des Programms wieder aufgehoben. >>> Warten Sie ein paar
Minuten ab, bis die Türsperre nicht mehr wirkt.
Das Waschen dauert länger als in der Anleitung angegeben.
• Der Wasserdruck ist sehr niedrig. >>> Die Maschine wartet ab, bis genügend
Wasser eingeflossen ist, damit das Waschergebnis nicht durch eine
unzureichende Wassermenge leidet. Dadurch verlängert sich die Waschzeit
entsprechend.
• Die Netzspannung ist eventuell zu niedrig. >>> Bei geringer
Versorgungsspannung verlängert sich der Waschvorgang, damit dennoch gute
Resultate erzielt werden können.
• Das einlaufende Wasser ist möglicherweise sehr kalt. >>> Die Maschine
braucht mehr Zeit zum Aufheizen des Wassers, dies gilt insbesondere in der
kalten Jahreszeit. Darüber hinaus kann sich die Programmdauer verlängern,
wenn dies zum Erreichen eines guten Waschergebnisses erforderlich ist.
• Die Anzahl der Spülvorgänge steigt an und/oder es wird mehr Wasser zum
Spülen gebraucht. >>> Wenn nötig, nutzt die Maschine mehr Wasser zum
Spülen oder hängt einen zusätzlichen Spülgang an, um die Waschqualität zu
verbessern.
• Durch übermäßig viel Waschmittel hat sich zu viel Schaum gebildet; das
automatische Schaumbeseitigungssystem wurde aktiv. >>> Verwenden Sie
nicht mehr als die empfohlene Waschmittelmenge.
Bei unregelmäßiger Wäscheverteilung (Unwucht) in der Trommel schleudert
C
die Maschine nicht, damit es nicht zu Beschädigungen der Maschine oder
ihrer Umgebung kommt. In diesem Fall sollten Sie die Wäsche auflockern,
gleichmäßiger verteilen und erneut schleudern.
70
DE
Page 71

Die Programmdauer wird nicht heruntergezählt. (bei Modellen mit Anzeige)
• Der Timer hält an, solange Wasser in die Maschine einläuft. >>> Die Zeit läuft
erst dann weiter, wenn sich ausreichend viel Wasser in der Maschine befindet.
Die Maschine wartet, bis eine ausreichende Menge Wassers eingelaufen ist;
ansonsten kann es vorkommen, dass die Wäsche nicht richtig sauber wird.
Anschließend läuft die Zeit weiter.
• Der Timer hält an, solange das Wasser aufgewärmt wird. >>> Die Zeit läuft erst
dann weiter, wenn das Wasser die vorgegebene Temperatur erreicht hat.
• Die Zeit läuft beim Schleudern eventuell nicht weiter. >>> Bei sehr
ungleichmäßiger Wäscheverteilung spricht eine spezielle Schutzschaltung an.
Bei unregelmäßiger Wäscheverteilung (Unwucht) in der Trommel schleudert
C
die Maschine nicht, damit es nicht zu Beschädigungen der Maschine oder
ihrer Umgebung kommt. In diesem Fall sollten Sie die Wäsche auflockern,
gleichmäßiger verteilen und erneut schleudern.
Die Programmdauer wird nicht heruntergezählt.
• Dies kann an ungleichmäßiger Verteilung der Wäsche in der Maschine
liegen. >>> Bei sehr ungleichmäßiger Wäscheverteilung spricht eine spezielle
Schutzschaltung an.
Bei unregelmäßiger Wäscheverteilung (Unwucht) in der Trommel schleudert
C
die Maschine nicht, damit es nicht zu Beschädigungen der Maschine oder
ihrer Umgebung kommt. In diesem Fall sollten Sie die Wäsche auflockern,
gleichmäßiger verteilen und erneut schleudern.
Die Maschine schleudert nicht.
• Dies kann an ungleichmäßiger Verteilung der Wäsche in der Maschine
liegen. >>> Bei sehr ungleichmäßiger Wäscheverteilung spricht eine spezielle
Schutzschaltung an.
Bei unregelmäßiger Wäscheverteilung (Unwucht) in der Trommel schleudert
C
die Maschine nicht, damit es nicht zu Beschädigungen der Maschine oder
ihrer Umgebung kommt. In diesem Fall sollten Sie die Wäsche auflockern,
gleichmäßiger verteilen und erneut schleudern.
• Die Maschine schleudert nicht, wenn das Wasser nicht komplett abgepumpt
werden konnte. >>> Überprüfen Sie Filter und Ablaufschlauch.
• Durch übermäßig viel Waschmittel hat sich zu viel Schaum gebildet; das
automatische Schaumbeseitigungssystem wurde aktiv. >>> Verwenden Sie
nicht mehr als die empfohlene Waschmittelmenge.
Die Waschleistung ist schlecht: Die Wäsche wird grau.
• Über längere Zeit wurde zu wenig Waschmittel benutzt. >>> Benutzen Sie die
für Wasserhärte und Wäsche empfohlene Waschmittelmenge.
• Über längere Zeit wurde bei niedrigen Temperaturen gewaschen. >>> Wählen
Sie die zur Wäsche passende Temperatur.
• Bei hoher Wasserhärte wurde nicht die richtige Waschmittelmenge verwendet.
>>> Wenn Sie bei hoher Wasserhärte zu wenig Waschmittel verwenden, haften
Verschmutzungen an der Wäsche an und färben die Textilien mit der Zeit grau.
Ein Grauschleier der Wäsche lässt sich nur schwierig beseitigen, wenn dieses
Problem einmal aufgetreten ist. Benutzen Sie die für Wasserhärte und Wäsche
empfohlene Waschmittelmenge.
• Zu viel Waschmittel. >>> Benutzen Sie die für Wasserhärte und Wäsche
empfohlene Waschmittelmenge.
• Die Trommel wurde nicht regelmäßig gereinigt. >>> Reinigen Sie die Trommel
regelmäßig. Lesen Sie dazu bitte unter „Waschmaschinentür und Trommel
reinigen“ nach.
71
DE
Page 72

Die Waschleistung ist schlecht: Flecken verschwinden nicht oder die Wäsche wird
nicht richtig weiß.
• Zu wenig Waschmittel. >>> Benutzen Sie die für die jeweilige Wäsche
empfohlenen Waschmittelmengen.
• Es wurde zu viel Wäsche in die Maschine gegeben. >>> Überladen Sie die
Maschine nicht. Orientieren Sie sich bei der Beladung an den Angaben in der
„Programm- und Verbrauchstabelle“.
• Es wurde ein falsches Programm/eine falsche Temperatur gewählt.
>>> Wählen Sie das zur Wäsche passende Waschprogramm und die
entsprechende Temperatur.
• Ein falsches Waschmittel wurde verwendet. >>> Wählen Sie ein für die
Maschine geeignetes Waschmittel.
• Das Waschmittel wurde in das falsche Fach eingefüllt. >>> Achten Sie darauf,
das Waschmittel in das richtige Fach einzufüllen. Mischen Sie Waschmittel
nicht mit Bleichmitteln.
• Die Trommel wurde nicht regelmäßig gereinigt. >>> Reinigen Sie die Trommel
regelmäßig. Lesen Sie dazu bitte unter „Waschmaschinentür und Trommel
reinigen“ nach.
Die Waschleistung ist schlecht: Die Wäsche weist ölige Flecken auf.
• Die Trommel wurde nicht regelmäßig gereinigt. >>> Reinigen Sie die Trommel
regelmäßig. Lesen Sie dazu bitte unter „Waschmaschinentür und Trommel
reinigen“ nach.
Die Waschleistung ist schlecht: Die Wäsche riecht unangenehm.
• Bei permanenter Nutzung von geringen Temperaturen und/oder
Kurzprogrammen können sich Bakterien in der Trommel bilden, die auch
einen üblen Geruch verursachen können. >>> Lassen Sie nach jeder Wäsche
sowohl Waschmittelschublade als auch Waschmaschinentür offen. Dadurch
kann sich kein feuchter Nährboden für Bakterien in der Maschine bilden.
• Die Trommel wurde nicht regelmäßig gereinigt. >>> Reinigen Sie die Trommel
regelmäßig. Lesen Sie dazu bitte unter „Waschmaschinentür und Trommel
reinigen“ nach.
Die Farben der Textilien verblassen.
• Es wurde zu viel Wäsche in die Maschine gegeben. >>> Überladen Sie die
Maschine nicht.
• Das Waschmittel ist feucht geworden. >>> Lagern Sie Waschmittel an einem
trockenen Ort, meiden Sie starke Temperaturschwankungen.
• Eine zu hohe Temperatur wurde ausgewählt. >>> Wählen Sie das richtige
Programm und die richtige Temperatur je nach Typ und Verschmutzungsgrad
der Wäsche.
• Die Trommel wurde nicht regelmäßig gereinigt. >>> Reinigen Sie die Trommel
regelmäßig. Lesen Sie dazu bitte unter „Waschmaschinentür und Trommel
reinigen“ nach.
72
DE
Page 73

Die Wäsche wird nicht richtig gespült.
• Waschmittelmenge, Marke und Lagerbedingungen des Waschmittels
waren möglicherweise nicht optimal. >>> Wählen Sie ein für Wäsche und
Waschmaschine geeignetes Waschmittel. Lagern Sie Waschmittel an einem
trockenen Ort, meiden Sie starke Temperaturschwankungen.
• Das Waschmittel wurde in das falsche Fach eingefüllt. >>> Wenn Waschmittel
in das Vorwäschefach eingefüllt wird, jedoch keine Vorwäsche erfolgt,
kann dieses Waschmittel beim Spülen oder Weichspülen in die Maschine
geschwemmt werden. Achten Sie darauf, das Waschmittel in das richtige Fach
einzufüllen.
• Der Pumpenfilter ist verstopft. >>> Überprüfen Sie den Filter.
• Der Ablaufschlauch ist geknickt. >>> Überprüfen Sie den Ablaufschlauch.
Die Wäsche wird nach dem Waschen steif.
• Zu wenig Waschmittel. >>> Bei hoher Wasserhärte kann die Wäsche mit der
Zeit steif werden, wenn Sie zu wenig Waschmittel benutzen. Verwenden Sie
eine an die Wasserhärte angepasste Waschmittelmenge.
• Das Waschmittel wurde in das falsche Fach eingefüllt. >>> Wenn Waschmittel
in das Vorwäschefach eingefüllt wird, jedoch keine Vorwäsche erfolgt,
kann dieses Waschmittel beim Spülen oder Weichspülen in die Maschine
geschwemmt werden. Achten Sie darauf, das Waschmittel in das richtige Fach
einzufüllen.
• Das Waschmittel wurde mit Weichspüler vermischt. >>> Weichspüler nicht mit
dem Waschmittel vermischen. Waschen Sie die Waschmittelschublade gut mit
heißem Wasser aus.
• Die Trommel wurde nicht regelmäßig gereinigt. >>> Reinigen Sie die Trommel
regelmäßig. Lesen Sie dazu bitte unter „Waschmaschinentür und Trommel
reinigen“ nach.
Die Wäsche riecht nicht nach Weichspüler.
• Das Waschmittel wurde in das falsche Fach eingefüllt. >>> Wenn Waschmittel
in das Vorwäschefach eingefüllt wird, jedoch keine Vorwäsche erfolgt,
kann dieses Waschmittel beim Spülen oder Weichspülen in die Maschine
geschwemmt werden. Waschen Sie die Waschmittelschublade gut mit
heißem Wasser aus. Achten Sie darauf, das Waschmittel in das richtige Fach
einzufüllen.
• Das Waschmittel wurde mit Weichspüler vermischt. >>> Weichspüler nicht mit
dem Waschmittel vermischen. Waschen Sie die Waschmittelschublade gut mit
heißem Wasser aus.
• Die Trommel wurde nicht regelmäßig gereinigt. >>> Reinigen Sie die Trommel
regelmäßig. Lesen Sie dazu bitte unter „Waschmaschinentür und Trommel
reinigen“ nach.
73
DE
Page 74

Waschmittelrückstände in der Waschmittelschublade.
• Das Waschmittel wurde eingefüllt, während die Waschmittelschublade noch
feucht war. >>> Trocknen Sie die Waschmittelschublade, bevor Sie das
Waschmittel einfüllen.
• Das Waschmittel ist feucht geworden. >>> Lagern Sie Waschmittel an einem
trockenen Ort, meiden Sie starke Temperaturschwankungen.
• Der Wasserdruck ist sehr niedrig. >>> Prüfen Sie den Wasserdruck.
• Das Waschmittel im Hauptfach wurde beim Einlassen des Wassers zur
Vorwäsche durchnässt. Die Öffnungen in der Waschmittelschublade sind
verstopft. >>> Prüfen Sie die Öffnungen, reinigen Sie diese, falls sie verstopft
sein sollten.
• Ein Problem mit den Düsen der Waschmittelschublade ist aufgetreten. >>>
Wenden Sie sich an den autorisierten Kundendienst.
• Das Waschmittel wurde mit Weichspüler vermischt. >>> Weichspüler nicht mit
dem Waschmittel vermischen. Waschen Sie die Waschmittelschublade gut mit
heißem Wasser aus.
• Die Trommel wurde nicht regelmäßig gereinigt. >>> Reinigen Sie die Trommel
regelmäßig. Lesen Sie dazu bitte unter „Waschmaschinentür und Trommel
reinigen“ nach.
Waschmittelrückstände in der Wäsche.
• Es wurde zu viel Wäsche in die Maschine gegeben. >>> Überladen Sie die
Maschine nicht.
• Es wurde ein falsches Programm/eine falsche Temperatur gewählt.
>>> Wählen Sie das zur Wäsche passende Waschprogramm und die
entsprechende Temperatur.
• Ein falsches Waschmittel wurde benutzt. >>> Wählen Sie ein zur Wäsche
passendes Waschmittel.
• Die Trommel wurde nicht regelmäßig gereinigt. >>> Reinigen Sie die Trommel
regelmäßig. Lesen Sie dazu bitte unter „Waschmaschinentür und Trommel
reinigen“ nach.
Zu starke Schaumbildung in der Maschine.
• Ein falsches, eventuell nicht für Waschmaschinen geeignetes, Waschmittel
wurde benutzt. >>> Nutzen Sie ein für Waschmaschinen geeignetes
Waschmittel.
• Zu viel Waschmittel. >>> Benutzen Sie lediglich die erforderliche
Waschmittelmenge.
• Das Waschmittel wurde falsch gelagert. >>> Lagern Sie Waschmittel gut
verschlossenen an einem trockenen Ort. Lagern Sie Waschmittel nicht an
übermäßig warmen Stellen.
• Bei bestimmten Textilien (wie zum Beispiel Gardinen) kommt es durch
die Maschenstruktur des Materials zu übermäßiger Schaumbildung. >>>
Verwenden Sie für solche Textilien eine geringere Waschmittelmenge.
• Das Waschmittel wurde in das falsche Fach eingefüllt. >>> Achten Sie darauf,
das Waschmittel in das richtige Fach einzufüllen.
• Der Weichspüler wurde zu früh freigegeben. >>> Eventuell liegt eine Störung
der Ventile oder der Waschmittelschublade vor. Wenden Sie sich an den
autorisierten Kundendienst.
• Die Trommel wurde nicht regelmäßig gereinigt. >>> Reinigen Sie die Trommel
regelmäßig. Lesen Sie dazu bitte unter „Waschmaschinentür und Trommel
reinigen“ nach.
74
DE
Page 75

Schaum tritt aus der Waschmittelschublade aus.
• Zu viel Waschmittel. >>> Mischen Sie einen Teelöffel Weichspüler mit einem
halben Liter Wasser, gießen Sie die Mischung in das Hauptwäschefach der
Waschmittelschublade.
Orientieren Sie sich bei der Auswahl der passenden Waschmittelmenge an
C
den Angaben zu Programmen und maximaler Beladung in der „Programm-
und Verbrauchstabelle“. Wenn Sie zusätzliche Chemikalien (Fleckentferner,
Bleichmittel und dergleichen) verwenden, geben Sie weniger Waschmittel
hinzu.
Die Wäsche ist nach Abschluss des Programms noch nass
• Durch übermäßig viel Waschmittel hat sich zu viel Schaum gebildet; das
automatische Schaumbeseitigungssystem wurde aktiv. >>> Verwenden Sie
nicht mehr als die empfohlene Waschmittelmenge.
Bei unregelmäßiger Wäscheverteilung (Unwucht) in der Trommel schleudert
C
die Maschine nicht, damit es nicht zu Beschädigungen der Maschine oder
ihrer Umgebung kommt. In diesem Fall sollten Sie die Wäsche auflockern,
gleichmäßiger verteilen und erneut schleudern.
Die Maschine startet nicht. Im Display wird nichts angezeigt.
Eventuell wurde der Netzstecker nicht eingesteckt. >>> Stecken Sie den Netzstecker
richtig in die Steckdose ein.
Möglicherweise ist die Sicherung defekt. >>> Überprüfen Sie die Sicherung, lassen
Sie die Sicherung bei Bedarf durch einen qualifizierten Elektriker austauschen.
Eventuell ist der Strom ausgefallen. >>> Erkundigen Sie sich, ob es sich um einen
Stromausfall handelt.
Möglicherweise wurde die Ein-/Austaste nicht betätigt. >>> Drücken Sie die Ein-/
Austaste.
Die Maschine startet nicht, wenn die Start-/Pause-/Abbrechen-Taste nach der
Programmauswahl betätigt wird.
Die Waschmaschinentür ist eventuell geöffnet. >>> Schließen Sie die
Waschmaschinentür.
Das Spülen-Symbol blinkt im Display. (Je nach Modell der Waschmaschine kann
zusätzlich auch das Kein Wasser-Symbol leuchten.)
Möglicherweise wurde die Wasserversorgung abgestellt. >>> Überzeugen Sie sich
davon, dass die Wasserversorgung funktioniert, starten Sie die Maschine mit der
Start-/Pause-/Abbrechen-Taste erneut.
Falls sich Störungen nicht durch die Hinweise in diesem Abschnitt beseitigen
A
lassen sollten, wenden Sie sich bitte an Ihren Händler oder an den autorisierten
Kundendienst. Versuchen Sie niemals, ein defektes Gerät selbst zu reparieren.
75
DE
 Loading...