

Page 1
BATTERY CHARGER
SMART CHARGER 170
SMART CHARGER 170
2010 016 123 576
Page 2

1 8
9 16
17 24
Page 3

2010 016 123 576
1
Page 4

Before using the product, please read this manual carefully. The manual is to guide your
usage of this product specially.
INTRODUCTION
We congratulate your choice of a high quality product. The instruction manual for this
product contains important information concerning safety, use and disposal. Before using
the product, please familiarize yourself with all of the safety information and instructions
for use. Only use the unit as described and for the specied applications. If you pass the
product on to anyone else, please ensure that the instruction manual is included.
Intended use
This model is a multistep battery charger (may be referred to as appliance) for charging
and charge retention of 6V or 12V rechargeable lead acid batteries of the following types:
Flooded Cell, Ca/Ca, VRLA, MF AGM or GEL with electrolyte solution.
This charger is not suitable for Lithium batteries!
The manufacturer is not liable for damage caused by improper use. The device is not
intended for commercial use and to be used indoors only.
Parts included
1 Charger; 2 types of detachable terminal lead sets [Clamp & Cigarette Lighter Plug]; 1
Instruction Booklet.
Parts description
Refer to Figure A:
1 12V 0.8A - (Program 2) 2 12V 3.8A - (Program 3)
3 12V 3.8A - (Program 4) 4 6V 0.8A - (Program 1)
5 LED reverse connection 6 LED stand-by
7 Charge display 8 Condition Bar display
9 Voltage display 10 Program selection button (MODE)
11 Charger
12 Fastening eyelets
13 Input cable lead 14 “+” pole clamp (red)
15 “-” pole clamp (black) 16 Cigarette lighter plug set
17 Output cable lead 18 SAE socket
Technical Data
Input voltage: 220-240V~50/60Hz Rated power: 60W
Rated voltage outgoing: 6V/12V Rated output current: 0.8A/3.8A
Ambient temperature:
0°C to 40°C Housing protection type: IP 65
Protection class: II/
Charging battery types: 6V lead acid battery1.2Ah-14Ah
12V Lead acid battery1.2Ah-120Ah
2
Page 5
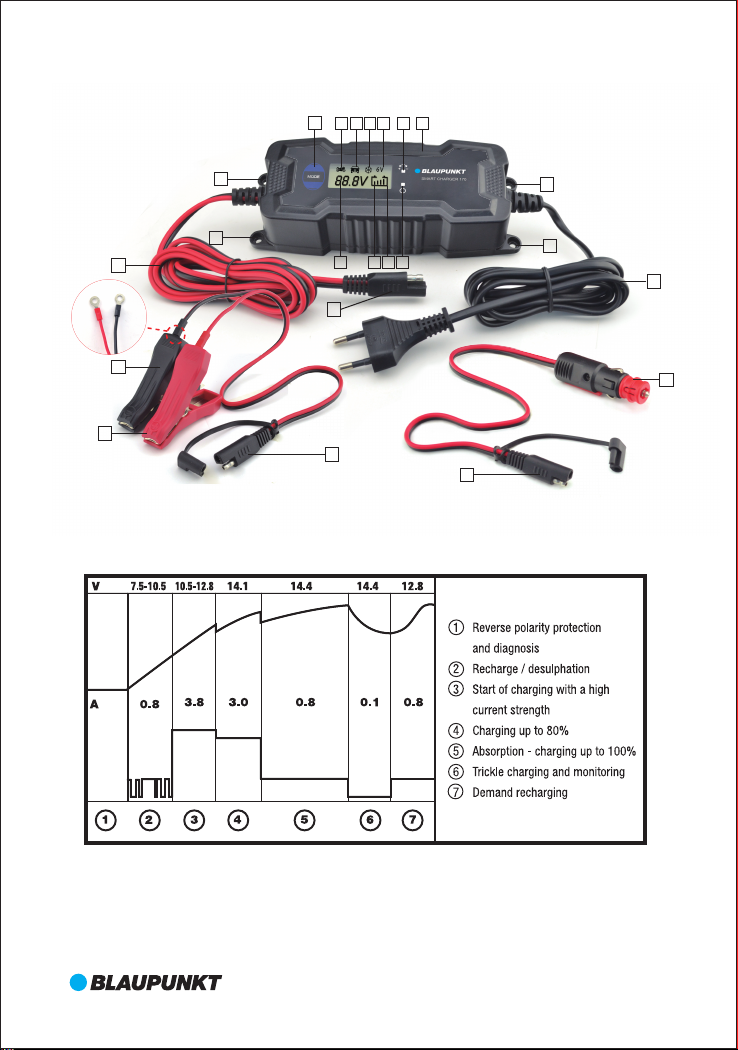
Figure A:
10
1 2 3 4
5 11
17
15
14
Figure B:
12
12
6789
18
18
18
12
12
13
16
3
Page 6

OPERATION
Before use
Before connecting the charger, the operating instructions must be observed. Furthermore,
the instructions of the vehicle manufacturer regarding a permanently connected battery
charger must be observed. Secure the vehicle, switch o the ignition and locate the
battery compartment.
Clean the battery poles and terminal leads. Wear eye protection and ensure sucient
ventilation is available while charging.
Connect the pole clamp lead set or cigarette lighter plug lead set to the output cable 17
using the SAE sockets 18 .
Connecting with Pole Clamp Set:
Connect the “+” pole clamp (red) 14 to the “+” pole of the battery.
Connect the “-” pole clamp (black) 15 to the “-” pole of the battery.
Connecting with Cigarette Lighter Plug Set:
Charge or maintain your battery without lifting the hood.
Insert the cigarette lighter plug 16 into the 12V accessory outlet. Route the power
cord from the charger through the vehicle’s open window.
The battery voltage display 9 shows the current battery terminal voltage – display light 6
illuminates.
Make sure to place the charger on a dry, non-ammable surface like metal or concrete.
Then connect the mains cable 13 of the charger to a mains power socket and switch on.
Should the connection of the clamps or cigarette lighter plug be incorrectly connected
[reversed polarity], the “LED reverse connection” indicator will illuminate 5 .
Disconnecting with Pole Clamps:
Disconnect the appliance from the mains supply by switching the power o and removing
the mains cable 13 .
Remove the “-” pole clamp (black) 15 from the “-” pole of the battery.
Remove the “+” pole clamp (red) 14 from the “+” pole of the battery.
Disconnecting with Cigarette Lighter Plug Set:
Disconnect the appliance from the mains supply by switching the power o and removing
the mains cable 13 .
Disconnect the cigarette lighter plug lead set from the 17 output cable using the inline 18
SAE sockets.
If leaving the cigarette lighter plug lead set attached to the 12V accessory outlet for later
use, then securely store the attached cigarette lighter plug lead set. Ensure the SAE socket
will not make electrical contact with any metal or moving component/s.
4
Page 7
Battery charging
Connect the battery to the charger using Pole Clamp method [described above]. Connect
the Battery Charger to the mains power outlet and switch on to enter the Standby mode –
display light 6 illuminates. Only the battery voltage will be indicated in the LCD display 9
and the segments of the condition bar display 8 will be empty.
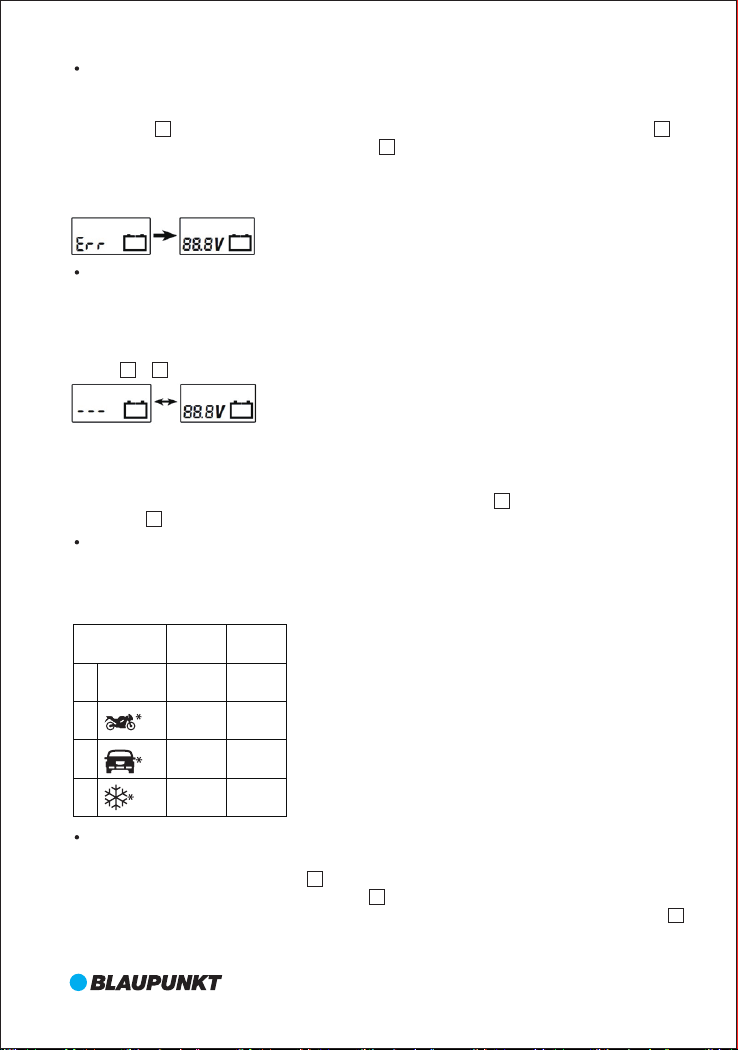
Note: If the voltage is below 3.8V [for 6 Volt series], 7.5V [12 Volt series] or above 15V, the
battery charger will remain in the Standby mode. The display will briey shows the error
message “Err”.
Commence battery charging
6V Batteries: If the voltage range of the battery is measured between 3.8V ~ 7.3V, only
program1 can be selected.
12V Batteries: If the voltage range is between 7.5V ~ 10.5V, the charger will perform a
controlled test for approximately 90 seconds to determine the battery condition. The LCD
display 7 & 9 will ash alternately indicating the battery voltage during the controlled test.
If the battery is deemed defective, the charger will remain in the Standby mode.
If the battery tests OK, the battery charger will commence charging in Program 2 [14.4V with
0.8A]. Charging starts with a pulse charge step for revitalizing. Once 10.5V are reached, the
appliance switches to the next charge steps. The charge display 7 ashes and the condition
bar display 8 will indicate the charge state.
Program selection
NOTES: Depending on the selected Program, the characteristic charge curve is monitored
for voltage, time and temperature. Included are the diagnostics testing, bulk charge mode
and maintenance mode [Refer to Figure C].
Program Max.(V) Max.(A)
6V 0.8A
1
2
3
4
7.3V
14.4V
14.4V
14.7V
0.8A
3.8A
3.8A
Program 1 : 6V (7.3V/0.8A)
For charging 6V batteries with a capacity of less than 14Ah.
◆
Press the Mode selection button 10 , to select program 1. The symbol “6V” is displayed on
the LCD. During charging, the charge display 7 ashes and shows the progress of the
charge procedure (1 ~ 4 bars). When the battery is fully charged, the condition bar display 8
shows 4 bars. When the ashing stops, the appliance will automatically switch to
maintenance charge mode.
5
Page 8

Program 2 : 12V (14.4V/0.8A)
For charging 12V batteries with a capacity of less than 14Ah.
◆
Press the Mode selection button 10 , to select program 2. The symbol is displayed
on the LCD. During charging, the charge display 7 ashes and shows the progress of the
charge procedure (1 ~ 4 bars). When the battery is fully charged, the condition bar display
8 shows 4 bars. When the ashing stops, the appliance will automatically switch to
maintenance charge mode.
Program 3 : 12V (14.4V/3.8A)
For charging 12V batteries with a capacity of between 14Ah ~ 120Ah.
◆
Press the Mode selection button 10 , to select program 3. The symbol is displayed
on the LCD. During charging, the charge display 7 ashes and shows the progress of the
charge procedure (1 ~ 4 bars). When the battery is fully charged, the condition bar display
8 shows 4 bars. When the ashing stops, the appliance will automatically switch to
maintenance charge mode.
Program 4 : 12V (14.7V/3.8A)
For charging 12V AGM Series batteries with a capacity of between 14Ah ~ 120Ah or under
cold conditions.
◆
Press the Mode selection button 10 , to select program 4. The symbol is displayed
on the LCD. During charging, the charge display 7 ashes and shows the progress of the
charge procedure (1 ~ 4 bars). When the battery is fully charged, the condition bar display
8 shows 4 bars. When the ashing stops, the appliance will automatically switch to
maintenance charge mode.
Maintenance charge mode
Depending on the voltage drop of the battery, caused by continuous current drain from
attached accessories or natural self-discharge, the charger will react accordingly to
maintain the battery condition. The battery can remain connected to the charger for
longer periods of time if it is disconnected from the vehicle.
Appliance protection function
The charger will switch o if an abnormal situation occurs, such as short circuit, critical
voltage drop during charging, broken circuit or reversed connection is detected.
Should the appliance become too hot during charging, the output current is automatically
reduced. This protects the appliance from damage.
MAINTENANCE AND CARE
!
WARNING
Before you carry out any work with the battery charger always pull the mains
plug out of the mains socket.
The appliance is maintenance-free. Ensure that all of the battery charger components are
in place and in good working condition. Do not under any circumstances use solvents or
other aggressive cleaning agents. Clean the plastic surfaces of the device with a clean dry
cloth. No internal servicing required, as there are no user-serviceable parts.
Store the battery charger the upright position in a cool, dry place. Failure to do so could
result in personal injury or property damage.
SAFETY INSTRUCTIONS
Children or persons who lack the knowledge or experience to use this type of device
should not attempt to use it without supervision or instruction by a qualied person
responsible for their safety. This appliance is not a toy.
6
Page 9

!
WARNING
Never use the charger for non-rechargeable lead acid batteries or alkaline
batteries.
Only use the charger for 6V and 12V lead acid batteries. Do not attempt to charge frozen
batteries.
During charging, ensure there is sucient ventilation available.
DANGER OF ELECTRIC SHOCK! Do not operate the appliance if the cables, the mains
cable or mains plug are damaged. A damaged mains cable indicates a life-threatening
danger due to electric shock.
Before connecting to the power, ensure that the power connection is earthed, is
230V~50Hz, and is 16A fused and equipped with an RCCB (Residual Current Circuit
Breaker) switch in accordance with the current regulations.
Disconnect the charger from the grid, before you make or break connections to the
battery.
First, connect the clamp that is not connected to the bodywork. Then connect the other
clamp to the bodywork, away from battery and fuel pipe. Only after this, connect the
charger to the grid.
After charging, disconnect the charger from the grid. Only after this remove the clamp
from the bodywork. Following this, remove the clamp from the battery.
DANGER OF EXPLOSION AND FIRE HAZARD! Protect yourself from a highly explosive
hydrogen-oxygen reaction.
Ensure that during charge and maintenance charge procedures, there are no naked lights
(ames, cinders or sparks).
Ensure that the positive cable does not come into contact with fuel lines (e.g. petrol pipe).
Ensure that there is no possibility of ignition of explosive or ammable substances (e.g.
petrol or solvents), while using the charger.
DANGER OF CHEMICAL BURNS! Wear protective glasses! Wear protective gloves. If eyes
or skin has come into contact with battery acid, rinse the aected body region o with a
large amount of clean water and consult a doctor straight away.
Avoid causing a short circuit when connecting the charger to the battery. Connect the
negative pole connector cable only to the negative (-) pole battery or to the body work.
Connect the positive pole connector cable only to the positive (+) pole of the battery.
Do not place the charger close to re, heat or to places with long-term exposure to
temperatures over 50°C.
Ensure that no fuel lines, electric cables, hydraulic or coolant pipes are damaged when
connecting the charger.
Do not cover the charger with any objects. Protect the electrical contact surfaces of the
battery from short circuiting.
Competence Center Car Multimedia
Evo-Sales GmbH
Robert-Henseling-Straße 11
31789 Hameln/Deutschland
www.blaupunkt.com After the manual, if any change, we will not notice!
7
Page 10

8
Page 11

Bedienungsanleitung
2010 016 123 576
9
Page 12

Bevor Sie dieses Produkt verwenden, lesen Sie diese Bedienungsanleitung zunächst
sorgfältig durch. Diese Bedienungsanleitung wurde speziell für die korrekte Anwendung
dieses Produkts zusammengestellt.
EINFÜHRUNG
Wir gratulieren Ihnen zum Erwerb dieses hochqualitativen Produkts. Die
Bedienungsanleitung dieses Produkts beinhaltet wichtige Informationen im Bezug auf die
Sicherheit, den Gebrauch und die Entsorgung dieses Geräts. Bevor Sie dieses Produkt
verwenden, lesen Sie sich bitte die Sicherheitsinformationen und den Bedienungsabschnitt
sorgfältig durch. Verwenden Sie das Gerät nur wie in der Bedienungsanleitung angegeben.
Sollten Sie dieses Produkt an Dritte weitergeben, vergewissern Sie sich, dass die
Bedienungsanleitung immer zusammen mit dem Produkt ausgehändigt wird.
Verwendungszweck
Dieses Modell ist ein mehrstuges Batterieladegerät (kann als Gerät bezeichnet werden) zum
Laden von 6V oder 12V wiederauadbaren Bleibatterien folgender Typen: Bleibatterien,
Ca/Ca, VRLA, MF AGM oder GEL mit Elektrolytlösung.
Dieses Ladegerät eignet sich nicht für Lithiumbatterien!
Der Hersteller haftet nicht für Schäden, die durch unsachgemäßen Gebrauch entstehen. Das
Gerät ist nicht für den gewerblichen Einsatz bestimmt und darf nur im Innenbereich
verwendet werden.
Im Lieferumfang enthaltene Teile
1 Ladegerät; 2 verschiedene Typen von Anschlussleitungen [Klemmen &
Zigarettenanzünder-Stecker]; 1 Bedienungsanleitung.
Beschreibung der Teile
Beziehen Sie sich auf Bild A:
1 12V 0.8A - (Programm 2)
3 12V 3.8A - (Programm 4)
2 12V 3.8A - (Programm 3)
4 6V 0.8A - (Programm 1)
5 LED-Anzeige bei falscher Verbindung 6 LED Bereitschaftsanzeige
7 Ladeanzeige
8 Balkenanzeige des Ladestands
9 Spannungsanzeige 10 Programmwahltaste (MODUS)
11 Ladegerät
13 Netzkabel
12 Befestigungsösen
14 “+” Polklemme (rot)
15 “-” Polklemme (schwarz) 16 Zigarettenanzünder-Stecker-Set
17 Ausgangskabel 18 SAE-Stecker
Technische Daten
Eingangsspannung: 220-240V~50/60Hz Nennleistung: 60W
Ausgangsspannung: 6V/12V Ausgangsstrom:
0.8A/3.8A
Umgebungstemperatur: 0°C bis 40°C Gehäuseschutzart: IP 65
Schutzklasse: II/
Batterietypen: 6V Bleibatterie 1.2Ah-14Ah
12V Bleibatterie 1.2Ah-120Ah
10
Page 13

Bild A:
10
1 2 3 4
5 11
14
Bild B:
12
12
17
18
15
18
6789
18
12
12
13
16
11
Page 14

BEDIENUNG
Vor dem Gebrauch
Vor dem Anschließen des Ladegeräts ist die Bedienungsanleitung zu beachten. Darüber hinaus
ist die Anleitung des Fahrzeugherstellers bezüglich eines dauerhaft angeschlossenen
Ladegeräts zu beachten. Sichern Sie das Fahrzeug, schalten Sie die Zündung aus und
lokalisieren Sie die Batterie des Fahrzeugs.
Reinigen Sie die Batteriepole und Anschlussleitungen. Tragen Sie einen Augenschutz und
vergewissern Sie sich, dass eine ausreichende Belüftung während des Auadens gewährleistet
ist.
Verbinden Sie die Polklemmen oder Zigarettenanzünder-Stecker mit dem Ausgangskabel 17
unter Verwendung des SAE-Steckers 18 .
Anschluss mit Polklemmen-Set:
Verbinden Sie die “+” Polklemme (rot) 14 mit dem “+” Pol der Batterie.
Verbinden Sie die “-” Polklemme (schwarz) 15 mit dem “-” Pol der Batterie.
Anschluss mit Zigarettenanzünder-Stecker-Set
Laden Sie Ihre Batterie ohne die Haube des Fahrzeugs anzuheben.
Stecken Sie den Zigarettenanzünder-Stecker 16 in die 12V Steckdose. Verlegen Sie das
Netzkabel des Ladegeräts durch das oene Fenster des Fahrzeugs.
Die Spannungsanzeige 9 zeigt die aktuelle Batteriespannung an – das Anzeigelicht 6
leuchtet.
Stellen Sie das Ladegerät auf eine trockene, nicht brennbare Oberäche wie zum Beispiel
Metall oder Beton. Verbinden Sie dann das Netzkabel 13 des Ladegeräts an eine Steckdose
und schalten Sie das Ladegerät ein.
Sollte der Anschluss der Klemmen oder des Zigarettenanzünder-Steckers falsch verbunden
sein (umgekehrte Polarität), leuchtet die “LED-Anzeige bei falscher Verbindung” 5 auf.
Trennen der Polklemmen:
Trennen Sie das Gerät von der Netzversorgung, indem Sie das Gerät ausschalten und das
Netzkabel 13 entfernen.
Entfernen Sie die “-” Polklemme (schwarz) 15 vom “-” Pol der Batterie.
Entfernen Sie die “+” Polklemme (rot) 14 vom “+” Pol der Batterie.
Trennen des Zigarettenanzünder-Stecker-Sets:
Trennen Sie das Gerät von der Netzversorgung, indem Sie das Gerät ausschalten und das
Netzkabel 13 entfernen. Trennen Sie den Zigarettenanzünder-Stecker vom Ausgangskabel 17
unter Verwendung des SAE-Steckers 18 .
12
Page 15

Wenn Sie das Zigarettenanzünder-Stecker-Set mit der 12V Zubehörsteckdose für den
späteren Gebrauch angeschlossen lassen möchten, lagern Sie das
Zigarettenanzünder-Stecker-Set sicher auf. Stellen Sie sicher, dass der SAE-Stecker keinen
elektronischen Kontakt mit Metall oder beweglichen Komponenten herstellt.
Auaden der Batterie
Verbinden Sie die Batterie mit dem Ladegerät unter Verwendung der Polklemmen-Methode
[oben beschrieben]. Verbinden Sie das Kfz-Batterie-Ladegerät mit einer Steckdose und
schalten Sie das Gerät ein, um in den Standby-Modus zu gelangen – die
Bereitschaftsanzeige 6 leuchtet auf. Im LCD-Display 9 wird nur die Batteriespannung
angezeigt. Die Segmente der Balkenanzeige des Ladestands 8 sind in diesem Fall leer.
Hinweis: Wenn die Spannung unter 3.8V [für 6 Volt Serie], 7.5V [12 Volt Serie] oder über 15V
liegt, bleibt das Kfz-Batterie-Ladegerät im Standby-Modus. Im Display erscheint kurz die
Fehlermeldung “Err”.
Mit dem Auaden der Batterie starten
6V Batterie: Wenn der Spannungsbereich der Batterie zwischen 3.8V ~ 7.3V liegt, kann nur
Programm 1 ausgewählt werden.
12V Batterie: Wenn der Spannungsbereich der Batterie zwischen 7.5V ~ 10.5V liegt, führt
das Ladegerät einen Kontrolltest für circa 90 Sekunden aus, um den Batteriezustand zu
bestimmen. Das LCD-Display 7 & 9 blinkt abwechselnd und zeigt die Batteriespannung
während des Kontrolltests an.
Wenn die Batterie defekt ist, bleibt das Ladegerät im Standby-Modus.
Wenn die Batterie OK testet, beginnt das Ladegerät im Programm 2 [14.4V mit 0.8A] zu
laden. Der Ladevorgang beginnt mit einer Impulsladung für die Revitalisierung. Nach
Erreichen von 10.5V, schaltet sich das Gerät auf den nächsten Ladevorgang. Die Ladeanzeige
7 blinkt und die Balkenanzeige des Ladestands 8 zeigt den Ladezustand an.
Programmauswahl
HINWEISE: Abhängig vom ausgewählten Programm wird die Ladekennlinie auf Spannung,
Zeit und Temperatur kontrolliert. Auch Diagnosetests, Hauptlade-Modus und
Ladeerhaltungsmodus [Beziehen Sie sich auf Bild C] sind beinhaltet.
Programm Max.(V) Max.(A)
6V 0.8A
1
2
3
4
7.3V
14.4V
14.4V
14.7V
0.8A
3.8A
3.8A
13
Page 16

Programm 1 : 6V (7.3V/0.8A)
Zum Laden von 6V Batterien mit einer Kapazität von weniger als 14Ah.
◆
Drücken Sie die Programmwahltaste (MODUS) 10 , um Programm 1 auszuwählen. Das
Symbol “6V” wird auf dem LCD angezeigt. Während des Ladens, blinkt die Ladeanzeige 7
und zeigt den Ladevorgang (1 ~ 4 Balken) an. Wenn die Batterie vollständig aufgeladen ist,
zeigt die Balkenanzeige des Ladestands 8 4 Balken an. Wenn das Blinken aufhört, schaltet
sich das Gerät automatisch in den Ladeerhaltungsmodus.
Programm 2 : 12V (14.4V/0.8A)
Zum Laden von 12V Batterien mit einer Kapazität von weniger als 14Ah.
◆
Drücken Sie die Programmwahltaste (MODUS) 10 , um Programm 2 auszuwählen. Das
Symbol wird auf dem LCD angezeigt. Während des Ladens, blinkt die Ladeanzeige 7
und zeigt den Ladevorgang (1 ~ 4 Balken) an. Wenn die Batterie vollständig aufgeladen ist,
zeigt die Balkenanzeige des Ladestands 8 4 Balken an. Wenn das Blinken aufhört, schaltet
sich das Gerät automatisch in den Ladeerhaltungsmodus.
Programm 3 : 12V (14.4V/3.8A)
Zum Laden von 12V Batterien mit einer Kapazität von 14 Ah ~ 120 Ah.
◆
Drücken Sie die Programmwahltaste (MODUS) 10 , um Programm 3 auszuwählen. Das
Symbol wird auf dem LCD angezeigt. Während des Ladens, blinkt die Ladeanzeige 7
und zeigt den Ladevorgang (1 ~ 4 Balken) an. Wenn die Batterie vollständig aufgeladen ist,
zeigt die Balkenanzeige des Ladestands 8 4 Balken an. Wenn das Blinken aufhört, schaltet
sich das Gerät automatisch in den Ladeerhaltungsmodus.
Programm 4 : 12V (14.7V/3.8A)
Zum Laden von Batterien der 12V AGM Serie mit einer Kapazität von 14Ah ~ 120Ah oder
unter kalten Witterungsbedingungen.
◆
Drücken Sie die Programmwahltaste (MODUS) 10 , um Programm 4 auszuwählen. Das
Symbol erscheint auf dem LCD. Während des Ladens, blinkt die Ladeanzeige 7 und
zeigt den Ladevorgang (1 ~ 4 Balken) an. Wenn die Batterie vollständig geladen ist, zeigt
die Balkenanzeige des Ladestands 8 4 Balken an. Wenn das Blinken aufhört, schaltet sich
das Gerät automatisch in den Ladeerhaltungsmodus.
Ladeerhaltungsmodus
Abhängig vom Spannungsabfall der Batterie, verursacht durch den stetigen Stromabuss
von angeschlossenem Zubehör oder natürlicher Selbstentladung, reagiert das Ladegerät
entsprechend, um den Batteriezustand zu erhalten. Die Batterie kann längere Zeit am
Ladegerät angeschlossen bleiben, wenn diese vom Fahrzeug getrennt ist.
Geräteschutzfunktion
Das Ladegerät schaltet sich ab, wenn eine anormale Situation eintritt, wie z.B. Kurzschluss,
kritischer Spannungsabfall während des Ladevorgangs, defekter Stromkreis oder falscher
Anschluss.
Wird das Gerät während des Ladevorgangs zu heiß, reduziert sich der Ausgangsstrom
automatisch. Dadurch wird das Gerät vor Beschädigungen geschützt.
WARTUNG UND PFLEGE
!
WARNUNG
Bevor Sie Arbeiten am Ladegerät vornehmen ziehen Sie den Netzstecker aus
der Steckdose.
Das Gerät ist wartungsfrei. Vergewissern Sie sich, dass alle Komponenten des
Kfz-Batterie-Ladegeräts vorhanden sind und einwandfrei funktionieren.
14
Page 17

Verwenden Sie auf keinen Fall Lösungsmittel oder andere aggressive Reinigungsmittel.
Reinigen Sie die Kunststooberächen des Geräts mit einem sauberen, trockenen Tuch.
Keine interne Wartung erforderlich da keine vom Benutzer zu wartenden Teile vorhanden
sind.
Bewahren Sie das Ladegerät an einem kühlen, trockenen Ort auf. Andernfalls kann es zu
Verletzungen oder Sachschäden kommen.
SICHERHEITSHINWEISE
Kinder oder Personen, die nicht über das Wissen oder die Erfahrung verfügen, um diese Art
von Gerät zu verwenden, sollten nicht versuchen, es ohne Aufsicht oder Anweisung von
einer qualizierten Person zu benutzen. Dieses Gerät ist kein Spielzeug.
!
Verwenden Sie das Ladegerät niemals für nicht wiederauadbare
WARNUNG
Bleibatterien oder Alkalibatterien.
Verwenden Sie das Ladegerät nur für 6V- und 12V Blei-Säure-Batterien. Versuchen Sie
nicht, gefrorene Batterien aufzuladen.
Achten Sie beim Laden auf ausreichende Belüftung.
GEFAHR EINES STROMSCHLAGS! Betreiben Sie das Gerät nicht, wenn die Kabel, das
Netzkabel oder der Netzstecker beschädigt sind. Ein beschädigtes Netzkabel weist auf eine
lebensbedrohliche Gefahr durch einen elektrischen Schlag hin.
Vergewissern Sie sich vor dem Anschließen des Geräts, dass der Stromanschluss geerdet
ist, 230V~50Hz beträgt und 16A abgesichert ist und mit einem RCCB
(Fehlerstromschutzschalter) gemäß den geltenden Vorschriften ausgestattet ist.
Trennen Sie das Ladegerät vom Netz bevor Sie die Batterie anschließen oder wieder
trennen.
Verbinden Sie zuerst die Klemme, die nicht mit der Karosserie verbunden ist. Verbinden Sie
dann die andere Klemme mit der Karosserie, weit weg von der Batterie und der
Kraftstoeitung. Erst danach das Ladegerät an das Netz anschließen.
Nach dem Laden, trennen Sie das Ladegerät vom Netz. Erst danach die Klemme von der
Karosserie entfernen. Anschließend die Klemme von der Batterie entfernen.
EXPLOSIONSGEFAHR UND BRANDGEFAHR! Schützen Sie sich vor einer hochexplosiven
Wassersto-Sauersto-Reaktion.
Stellen Sie sicher, dass während des Lade- und Ladeerhaltungsmodus kein oenes Feuer
(Flammen, Asche oder Funken) vorhanden ist.
Stellen Sie sicher, dass das Pluskabel nicht mit Kraftstoeitungen (z.B. einer Benzinleitung)
in Berührung kommt.
Achten Sie darauf, dass keine explosiven oder brennbaren Stoe (z.B. Benzin oder
Lösungsmittel) entzündet werden können, während Sie das Ladegerät verwenden.
VERÄTZUNGSGEFAHR! Tragen Sie eine Schutzbrille! Tragen Sie Schutzhandschuhe. Wenn
Ihre Augen oder Ihre Haut mit Batteriesäure in Berührung gekommen ist, spülen Sie den
betroenen Körperbereich mit einer großen Menge von sauberem Wasser ab und suchen
Sie sofort einen Arzt auf.
Vermeiden Sie einen Kurzschluss, wenn Sie das Ladegerät an die Batterie anschließen.
Verbinden Sie die Minuspol-Anschlussleitung nur mit dem Minuspol (-) der Batterie oder
des Gehäuses. Verbinden Sie die Pluspol-Anschlussleitung nur mit dem Pluspol (+) der
Batterie.
Verwenden oder lagern Sie das Ladegerät nicht in der Nähe von Feuer, Hitze oder an Orten
mit langfristiger Einwirkung von Temperaturen über 50°C.
Achten Sie darauf, dass keine Kraftstoeitungen, elektrische Kabel, Hydraulik- oder
Kühlmittelleitungen beim Anschließen des Ladegeräts beschädigt werden.
15
Page 18

Decken Sie das Ladegerät nicht mit Gegenständen ab. Schützen Sie die elektrischen
Kontaktächen der Batterie vor Kurzschlüssen.
Competence Center Car Multimedia
Evo-Sales GmbH
Robert-Henseling-Straße 11
31789 Hameln/Germany
www.blaupunkt.com Änderungen vorbehalten
16
Page 19

Instrukcja obsługi
2010 016 123 576
17
Page 20

Przed rozpoczęciem użytkowania produktu prosimy o uważne przeczytanie niniejszej
instrukcji. Instrukcja ma na celu przypominanie specjalnego wykorzystywania tego produktu.
WSTĘP
Gratulujemy wyboru produktu wysokiej jakości. Instrukcja obsługi tego produktu zawiera
ważne informacje o bezpieczeństwie, użytkowaniu i utylizacji. Przed rozpoczęciem używania
produktu należy zapoznać się ze wszystkimi informacjami o bezpieczeństwie oraz z instrukcją
użytkowania. Produkt musi być wyłącznie używany tak, jak opisano i we wskazanych
obszarach zastosowań. Jeśli produkt zostanie przekazany komuś innemu, należy pamiętać,
aby dołączyć instrukcję obsługi.
Użytkowanie zgodne z przeznaczeniem
Ten model jest wielostopniową ładowarką akumulatorów (może być określana jako
urządzenie), przeznaczoną do ładowania i retencji następujących akumulatorów o napięciu 6
V lub 12 V: kwasowo-ołowiowe, Ca/Ca, VRLA, MF AGM lub GEL z roztworem elektrolitu.
Ta ładowarka nie nadaje się do ładowania akumulatorów litowych!
Producent nie bierze odpowiedzialności za uszkodzenia, spowodowane niewłaściwym
użytkowaniem. Urządzenie nie jest przeznaczone do zastosowań komercyjnych i nie może
być używane na zewnątrz.
Dołączone elementy
1 Ładowarka; 2 zestawy odpinanych przewodów [zaciski i wtyczka zapalniczki
samochodowej]; 1 Instrukcja.
Opis części
Patrz Rysunek A:
1 12 V; 0,8 A - (Program 2)
3 12 V; 3,8 A - (Program 4)
2 12 V; 3,8 A - (Program 3)
4 6 V; 0,8 A - (Program 1)
5 Wskaźnik LED połączenia odwrotnego 6 Wskaźnik LED trybu gotowości
7 Wskaźnik ładowania
8 Paskowy wskaźnik stanu
9 Wskaźnik napięcia 10 Przycisk wyboru programu (MODE)
11 Ładowarka
13 Wejściowy przewód zasilania
12 Oczka do mocowania
14 Zacisk bieguna "+" (czerwony)
15 Zacisk bieguna "–" (czarny) 16 Zespół wtyczki zapalniczki samochodowej
17 Przewód wyjściowy
18 Gniazdo SAE
Dane techniczne
Napięcie wejściowe: 220 – 240 V~50/60 Hz Moc nominalna: 60 W
Nominalne napięcie wyjściowe: 6 V / 12 V Nominalny prąd wyjściowy: 0,8 A / 3,8 A
Temperatura otoczenia: 0 °C do 40 °C Stopień ochrony obudowy: IP 65
Klasa ochrony: II/
Rodzaje ładowanych akumulatorów: Kwasowo-ołowiowy; 6 V; 1,2 – 14 Ah
Kwasowo-ołowiowy; 12 V; 1,2 – 120 Ah
18
Page 21

Rysunek A:
10
1 2 3 4
5 11
17
15
14
Rysunek B:
12
12
6789
18
18
18
Ochrona przed odwrotną
polaryzacją i diagnoza
Doładowywanie /
Odsiarczanie
Rozpoczęcie ładowania
dużym prądem
Ładowanie do 80 %
Absorpcja – ładowanie do
100 %
Ładowanie podtrzymujące i
monitoring
Doładowywanie na żądanie
12
12
13
16
19
Page 22

OBSŁUGA
Przed rozpoczęciem użytkowania
Przed podłączeniem ładowarki należy zapoznać się z instrukcją obsługi. Ponadto należy
przestrzegać instrukcji producenta pojazdu, odnośnie trwale podłączanej ładowarki
akumulatorów. Zabezpieczyć pojazd, wyłączyć zapłon i zlokalizować komorę akumulatora.
Wyczyścić bieguny akumulatora i zaciski przewodów. Założyć okulary ochronne i zapewnić
odpowiednią wentylację na czas ładowania.
Używając gniazd SAE 18 , podłączyć zaciski przewodów biegunów lub kabel z wtyczką
zapalniczki do kabla wyjściowego 17 .
Połączenie z zestawem zacisków biegunów:
Zacisk bieguna "+" (czerwony) 14 połączyć z biegunem "+" akumulatora.
Zacisk bieguna "–" (czarny) 15 połączyć z biegunem "–" akumulatora.
Połączenie z wtyczką zapalniczki :
Akumulator ładować lub konserwować bez podnoszenia kołpaka.
Wtyczkę zapalniczki samochodowej 16 włożyć do gniazda akcesoriów 12 V. Kabel
zasilania ładowarki wyprowadzić przez otwarte okno pojazdu.
Wskaźnik napięcia akumulatora 9 pokaże aktualne napięcie na zaciskach akumulatora –
zaświeci się wskaźnik 6 .
Upewnić się, że ładowarka leży na suchej, niepalnej powierzchni, jak metal lub beton.
Następnie kabel zasilania ładowarki 13 podłączyć do źródła zasilania i włączyć zasilanie.
Jeśli zaciski przewodów lub wtyczkę zapalniczki podłączono nieprawidłowo [połączenie
odwrotne], zaświeci się "wskaźnik LED połączenia odwrotnego" 5 .
Odłączanie zacisków biegunów:
Odłączyć urządzenie od źródła zasilania, wyłączając zasilanie i odłączając kabel zasilania 13 .
Zacisk bieguna "–" (czarny) 15 odłączyć od bieguna "–" akumulatora.
Zacisk bieguna "+" (czerwony) 14 odłączyć od bieguna "+" akumulatora.
Odłączanie wtyczki zapalniczki samochodowej:
Odłączyć urządzenie od źródła zasilania, wyłączając zasilanie i odłączając kabel zasilania 13 .
Odłączyć przewód z wtyczką zapalniczki od kabla wyjściowego 17 , rozłączając gniazda SAE
18 .
Jeśli kabel z wtyczką zapalniczki pozostanie połączony z wyjściem akcesoriów 12 V w celu
późniejszego użycia, należy go bezpiecznie schować. Upewniać się, że gniazdo SAE nie będzie
stykać się z żadnym elektryczny kontakt z żadnym metalowym lub ruchomym przedmiotem
lub przedmiotami.
20
Page 23

Ładowanie akumulatora
)
A)
Podłączyć akumulator do ładowarki za pomocą przewodów z zaciskami [jak opisano wyżej].
Połączyć ładowarkę do źródła zasilania i włączyć, aby włączyć tryb gotowości – zaświeci się
wskaźnik 6 . Na ekranie LCD 9 pokazywane będzie napięcie akumulatora, a paskowy
wskaźnik stanu 8 będzie pusty.
Uwaga: Jeśli napięcie będzie poniżej 3,8 V [dla serii 6 Volt], 7,5 V [dla serii 12 Volt] lub
powyżej 15 V, ładowarka będzie pozostawać w trybie gotowości. Na ekranie na krótko
pojawi się komunikat „Err”.
Rozpoczynanie ładowania akumulatora
Akumulatory 6 V: Jeśli zmierzone napięcie będzie się mieścić w zakresie 3,8 V ~ 7,3 V,
dostępny będzie tylko Program 1.
Akumulatory 12 V: Jeśli zmierzone napięcie będzie się mieścić w zakresie 7,5 V ~ 10,5 V,
ładowarka wykona 90-sekundowy test sprawdzający w celu określenia stanu akumulatora.
Na ekranie LCD będą na przemian migać wskaźniki 7 i 9 , sygnalizując napięcie
akumulatora podczas testu diagnostycznego.
Jeśli akumulator zostanie potraktowany jako uszkodzony, ładowarka pozostanie w trybie
gotowości.
Jeśli test wypadnie pomyślnie, ładowarka rozpocznie ładowanie zgodnie z programem 2
[14,4 V prądem 0,8 A]. W celu uaktywnienia akumulatora, ładowanie rozpocznie się fazą
ładowania impulsowego. Po uzyskaniu napięcia 10,5 V nastąpi przełączenie na następne
etapy ładowania. Wskaźnik ładowania 7 będzie migać, a paskowy wskaźnik stanu 8
będzie pokazywać stan naładowania.
Wybieranie programu
UWAGI: Zależnie od wybranego programu, krzywa ładowania jest monitorowana pod
względem napięcia, czasu i temperatury. Wliczone są badania diagnostyczne, tryb
ładowania masowego i tryb konserwacji (patrz Rysunek C).
Program Maks.(V
6V 0,8A
1
2
3
4
7,3V
14,4V
14,4V
14,7V
Maks.(
0,8A
3,8A
3,8A
21
Page 24

Program 1 : 6 V (7,3 V / 0,8 A)
Ładowanie akumulatorów 6 V o pojemności mniejszej, niż 14 Ah.
◆
Naciśnij przycisk MODE 10, aby wybrać program 1. Na ekranie LCD pojawi się wskaźnik
„6 V". Podczas ładowania wskaźnik ładowania 7 miga i pokazuje postęp procedury
ładowania (1 ~ 4 pasków). Po pełnym naładowaniu paskowy wskaźnik stanu 8 pokazuje 4
paski. Gdy wskaźnik przestanie migać, urządzenie automatycznie przełączy się na tryb
ładowania konserwującego.
Program 2 : 12 V (14,4 V / 0,8 A)
Ładowanie akumulatorów 12 V o pojemności mniejszej, niż 14 Ah.
◆
Naciśnij przycisk MODE 10 , aby wybrać program 2. Symbol pojawi się na ekranie
LCD. Podczas ładowania wskaźnik ładowania 7 miga i pokazuje postęp procedury
ładowania (1 ~ 4 pasków). Po pełnym naładowaniu paskowy wskaźnik stanu 8 pokazuje 4
paski. Gdy wskaźnik przestanie migać, urządzenie automatycznie przełączy się na tryb
ładowania konserwującego.
Program 3 : 12 V (14,4 V / 3,8 A)
Ładowanie akumulatorów 12 V o pojemności od 14 ~120 Ah.
◆
Naciśnij przycisk MODE 10 , aby wybrać program 3. Symbol pojawi się na ekranie
LCD. Podczas ładowania wskaźnik ładowania 7 miga i pokazuje postęp procedury
ładowania (1 ~ 4 pasków). Po pełnym naładowaniu paskowy wskaźnik stanu 8 pokazuje 4
paski. Gdy wskaźnik przestanie migać, urządzenie automatycznie przełączy się na tryb
ładowania konserwującego.
Program 4 : 12 V (14,7 V / 3,8 A)
Ładowanie akumulatorów 12 V serii AGM o pojemności od 14 ~120 Ah lub w stanie
zimnym.
◆
Naciśnij przycisk MODE 10 , aby wybrać program 4. Symbol pojawi się na ekranie
LCD. Podczas ładowania wskaźnik ładowania 7 miga i pokazuje postęp procedury
ładowania (1 ~ 4 pasków). Po pełnym naładowaniu paskowy wskaźnik stanu 8 pokazuje 4
paski. Gdy wskaźnik przestanie migać, urządzenie automatycznie przełączy się na tryb
ładowania konserwującego.
Tryb ładowania konserwującego
W zależności od spadku napięcia akumulatora, spowodowanego ciągłym poborem prądu
przez podłączone akcesoria lub naturalnym samowyładowaniem, ładowarka będzie
odpowiednio reagować w celu podtrzymania stanu akumulatora. Akumulator może być
podłączony do ładowarki przez dłuższy okres czasu, jeśli jest odłączony od pojazdu.
Funkcja ochrony urządzenia
Ładowarka wyłącz się w przypadku wystąpienia nienormalnej sytuacji, takiej jak krótkie
spięcie, krytyczny spadek napięcia podczas ładowania lub przerwanie obwodu albo w
przypadku wykrycia połączenia odwrotnego.
Jeśli podczas ładowania ładowarka rozgrzeje się nadmiernie, prąd wyjściowy zostanie
automatycznie zmniejszony. Chroni to urządzenie przed uszkodzeniem.
CZYSZCZENIE I KONSERWACJA
!
OSTRZEŻENIE
Przed wykonaniem jakichkolwiek prac z ładowarką należy wyciągnąć
wtyczkę kabla zasilania z gniazdka sieciowego.
Urządzenie jest bezobsługowe. Upewniać się, że wszystkie elementy ładowarki
akumulatorów znajdują się na miejscu i są w dobrym stanie technicznym.
22
Page 25

Pod żadnym pozorem nie używać do czyszczenia żadnych rozpuszczalników lub innych
agresywnych środków czyszczących. Wykonane z tworzywa sztucznego powierzchnie
urządzenia czyścić suchą szmatką. Serwisowanie nie jest wymagane, ponieważ urządzenie
nie posiada żądnych części, wymagających serwisowania przez użytkownika.
Ładowarkę przechowywać w pozycji pionowej, w chłodnym i suchym miejscu.
Niedopełnienie tego obowiązku może doprowadzić do poważnych obrażeń lub
uszkodzenia mienia.
INSTRUKCJE ZWIĄZANE Z BEZPIECZEŃSTWEM
Dzieci lub osoby, którym brakuje wiedzy lub doświadczenia w posługiwaniu się
urządzeniem tego typu, dla swego bezpieczeństwa nie powinny używać go bez nadzoru
lub pouczenia przez osobę wykwalikowaną. To urządzenie nie jest zabawką.
!
Nigdy nie używać ładowarki z bateriami kwasowo-ołowiowymi lub
OSTRZEŻENIE
alkalicznymi, których nie można ładować.
Używać wyłącznie do ładowania akumulatorów kwasowo-ołowiowych o napięciu 6 V i 12
V. Nie próbować ładowania zamarzniętych baterii.
Podczas ładowania zapewniać odpowiednią wentylację pomieszczenia.
NIEBEZPIECZEŃSTWO PORAŻENIA PRĄDEM! Nie używać urządzenia, jeśli uszkodzeniu
uległy kable albo przewód zasilania lub jego wtyczka. Uszkodzony kabel sieciowy wskazuje
na zagrażające życiu niebezpieczeństwo porażenia prądem.
Przed podłączeniem do źródła zasilania należy upewnić się, że gniazdo sieciowe jest
uziemione, dostarcza prąd zmienny 230 V/50 Hz, jest chronione bezpiecznikiem 16 A oraz
wyposażone w ochronny przełącznik różnicowy, zgodnie z przepisami.
Przed podłączeniem lub odłączeniem ładowarki do akumulatora należy najpierw odłączyć
ją od sieci.
Po pierwsze, podłączyć zacisk, który nie jest połączony z nadwoziem. Następnie drugi
zacisk należy połączyć z nadwoziem, z daleka od akumulatora przewodu paliwowego.
Dopiero wtedy można podłączyć ładowarkę do sieci.
Po zakończeniu ładowania odłączyć ładowarkę od sieci. Dopiero wtedy można odłączyć
zacisk od nadwozie. A następnie można odłączyć zacisk od akumulatora.
NIEBEZPIECZEŃSTWO EKSPLOZJI I ZAGROŻENIE POŻAREM! Chroń się przed bardzo
wybuchową reakcją wodoru z tlenem.
Upewniać się, że podczas ładowania i konserwacji nie ma w pobliżu otwartych źródeł
światła (płomienie, popiół lub iskry).
Upewniać się, że plusowy kabel nie styka się z przewodami paliwowymi (np. rurkami z
benzyną).
Upewniać się, że podczas uzywania ładowarki nie ma możliwości wystąpienia zapłonu
substancji wybuchowych lub palnych (np. benzyny lub rozpuszczalników).
NIEBEZPIECZEŃSTWO POPARZEŃ CHEMICZNYCH! Używać okularów ochronnych!
Zakładać rękawice ochronne. Jeśli oczy lub skóra wejdą w kontakt z kwasem
akumulatorowym, przemyć dużą ilością czystej wody i od razu skonsultować się z
lekarzem.
Podczas podłączania ładowarki do akumulatora nie powodować krótkich spięć. Złącze
bieguna minusowego podłączać tylko do minusowego (–) zacisku akumulatora lub do
nadwozia. Złącze bieguna plusowego podłączać tylko do plusowego (+) zacisku
akumulatora.
Nie stawiać ładowarki w pobliżu ognia, pieca lub miejsc, wystawianych przez dłuższy czas
na temperatury powyżej 50 °C.
Podczas podłączania ładowarki upewniać się, że nie ma uszkodzonych przewodów
paliwowych, kabli elektrycznych, przewodów hydraulicznych lub chłodzących.
23
Page 26

Niczym nie przykrywać ładowarki. Chronić przed zwarciem powierzchnie elektrycznych
styków akumulatora.
Competence Center Car Multimedia
Evo-Sales GmbH
Robert-Henseling-Straße 11
31789 Hameln/Deutschland
www.blaupunkt.com Niniejsza instrukcja nie podlega aktualizacji!
24
Page 27

Page 28

Competence Center Car Multimedia
Evo-Sales GmbH
Robert-Henseling-Straße 11
31789 Hameln/Deutschland
www.blaupunkt.com
 Loading...