

Page 1
Page 2

Your DAB+ Radios
Contents
Contents ......... ........................................... ......................... ..........................
Introduction...................... ........................................... ......................... .........
Safety Instructi ons........................................ ....................................................
Your DAB+ ... ........................................... .......................................................
What Is DAB+......................... .................................................................... ....
Getting Started. .................................................................... ..........................
Opera ting Instructions....... ......................... ........................................... ...........
Warn ing /Troubleshooting/Specifications................................. .............................
Introduction
Thank you for buying the Blaupunkt Digital Radio.The following instructions will assist you in operating
all the features of this product.
You may already be familiar with using a similar unit, but please take the time to read the
instructions relevant for your model.
Your safety is very important, so please ensure you read the safety instructions before you operate
this unit.
This Digital Radio has been designed to give you many years of trouble -free ser vice.In the unlikely
event that your product fails to work normally, please call one of our qualified service engineers
on the full free warranty line -1300 055 518 .
2
2
3
4
5
6-7
8-11
12
2
Page 3

Safety Instructions
Please ensure that you re ad all of the safety instructions be fore using this unit.
Safety Considerations
Position th e power cable and o ther connected cables so that they are not likely to be w alked
on, pinched or where items can be placed on or against them.
Do not use the unit in humid o r damp cond itions.
Do not allow th e unit t o get wet.
Never allow chil dren to inser t f oreign objects into h oles or slots on the unit.
The ventilation should not be impeded by covering the openings with items such as newspaper s, tablecloths, curtains, etc. This may cause overheating
No naked flame sources, such a s lit candles, should be placed on the unit.
Do not expose the unit to dripping or splashing, and no objects filled wit h liquids,such as
vases ,they should not be placed on t he unit.
Do not place the unit in clo sed bookc ases or racks wit hout proper ventilation.
Cleaning
Disconnect the unit fr om the mains s upply befo re cleaning.
Do not use any liquids or aerosol cleaner s, as th is may damage the unit. Use a sof t , dust
free cloth.
Servicing
Please refer t o the warrant y line f or all servicing of units under warranty.
Consult your retailer if you are ever in doubt about the installation/operation/ safety o f
the product.
3
Page 4
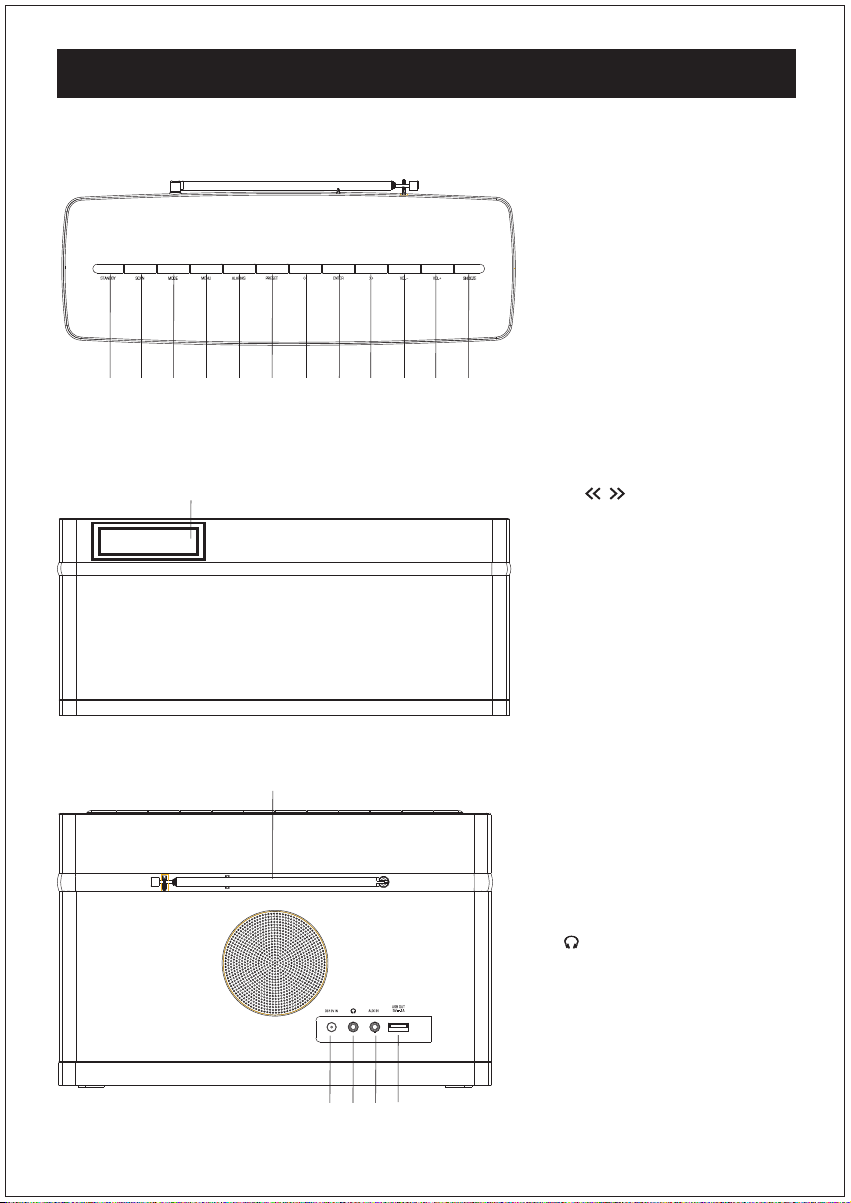
Your DAB+ Radios
Top view
Front view
Back view
1.STA NDBY
Press t o star t,pres s to go to
STANDBY mode.
2.SC AN
Press t o scan radio channels.
3.MO DE
Press t o select DAB o r FM
radio and A UX input.
4.ME NU
Press t o view channel/tim e/
date/RDS.
3
21
5 6
4
7
8 9 10
11 12
13
14
15
16
17
18
5.AL A RMS
Press t o setup alarm .
6.PRESET
Press to store and preset radio
stations .
7/9.
/
Back /Press to store and preset
radio stations ,or Next/Previous music
8.EN TER
Press t o confir m the selecti on.
Play / Pau se in B luetoo th mo de
10/11.VOL-/VOL+
Press to adjust the volume level.
12.SNOO ZE
Press t o ent er SN OOZE mode .
13.Disp lay
LED di splay showing all
infor mation on the r adio.
14.ANTENNA
The radio comes with a
telescopic antenna. adjust
the antenna for best reception.
15.DC12V IN
Use this to th e enclosed DC
power sup ply.
16. (HEADPHONE)
You can connect your headphone
to this unit for personal listening.
17.AUX IN
Use 3. 5mm a udio cable to
conn ect t o audio de vic e.
18.USB PORT
Char ge for mobile phone.
4
Page 5

What Is DAB+
Digit al DAB+ was developed in Eur ope by a consortiu m of broadcaster s and manufactur es.
DAB+ uses digital compression techniques to tra nsform the source material, i.e. music and
speech,into better quality audio.
Interference free reception
Analogue systems suffer from an ef fect called "multipath di stortion". This is cau sed because
waves d o not behave in a orderly fashion, bu t bounce and reflect off buildings etc. DAB+ sees
this as an advantage and uses the direct and reflected signals to actually reinforce the end
result, allowing for better s ervice most of the time.
No need to re-tune
A signal DAB+ frequency can be used t o cover the whole of Australia, solving many of
the problems experienced with the earlier analogue system. DAB+ scan automatically tun es in
all of the available stations in your area .
Scrolling Test
Broadcasters can transmit t ext to your radio, this way you can read the name of the DJ,
Ar tist ,song title or any other infor mation they choose.
DAB+ Coverage
Check you local coverage at www.digitalradioplus.com.au
5
Page 6

Getting Started
Carefully r emove your DAB+ r eceiver form the box.(we recommend you keep the package for
futur e reference.)
1.Connect the power 2.Exetend the telescopic aerial
Connect the power adaptor provided
to t he unit and then connect to you wall
outlet and turn on the power.
Extend the telescopic aerial for the
best recept ion possible
3.Turning on the radio
1.Pr ess the STANDBY button to turn on the radio.
2.Press the STA NDBY butt on again to en ter STANDBY mode.
Note: It is recommended t hat the unit is switched off and remove the adapter
from outlet during stor ms or if being left unused for long period of time.
6
Page 7

Getting Started
4.Connecting headphones
Connect your headphones to the 3.5mm
headphone socket on the back of the unit as shown above.
5. Changing the volume
Adjust the volum e level by pr essing the V OL+ button t o incr ease
the volume or decrease the volume by press ing the VOL- button .
7
Page 8

Operating Instructions
Playing your DAB+ radio
1.Please make sure your unit is switch ed on.
2.Press the MODE button t o sele ct the DAB+ radio mode.
3.Press the and buttons t o scroll through the stations i n the st ation list.
4.To sc an for all new s tations or t o rescan for weak stations, press the SCAN button
and the radio will scan and store all available st atio ns. We recommend scanning for
new station s ever y so often to pick up any newly launched digital radio stations.
<
Storing a station preset
You can st ore up to 10 DAB+ station presets f or easy play back.
1.Select the station you wish to pr eset, press and hold the PRESET but ton until
the display show s, then release the butt on.
2.Using the and buttons choose the prese t number(1-10) you wish to use, then
press the ENTER button to st ore the station.
3.Repeat t his access to pres et all 10 stat ions.
<
Recalling a station preset
1.Pr ess the PRESET button and use t he and buttons to select your desir ed preset station.
(This is to override any st ation you have pr e-se t which you no longer set in your list)
2.Press the ENTER button to pla y the st ation.
<
<
<<<
<
<
<<<
Using the menu in DAB+ mode
Press and hold the MENU button to s elect the main menu, pr ess the and buttons
to scroll through the opti ons listed: Full scan ,Manual tune, DRC,Prune,SW:V1.3 4+.
<
<<<
<Full scan>
1.In the main menu, use t he navigation buttons to select the Full scan menu.
2.Press the ENTER button to con firm and the unit will per f orm a full scan and st ore all
available DAB+ stations.
<Manual tune>
You can also choose t o manually scan for your f avou rite DAB+/FM st ation to obtain optimum
reception.
1.In the main menu, use t he navigation buttons to select the Manual t une menu.
2.Press the ENTER button to con firm
3.Use t he navigation buttons to sc roll through the available f requencies.
4.Press the ENTER button to con firm and play.
8
Page 9

Operating Instructions
<DRC>
Dynamic range control(DRC) adds or removes a degr ee of compensation for the
differences in the dynamic range bet ween radio stations.
1.Pr ess the MENU button to access the main menu .
2.Press the and button until DRC is displayed.
3.Press the ENTER button to con firm.
4.Using the and buttons to select off ,low or high to prune and then press the
ENTER button to confirm.
<Prune>
If your stati on list includes that you can no longer receive, you can select the Prune
option to remove any stations t hat can no longer be rece ived f orm the station list.
1.Pr ess the MENU button to access the main menu .
2.Press the and button until Prune is displayed.
3.Press the ENTER button to con firm.
4.Use t he and buttons to select Yes or No t o prune and then press the ENTER
button to confirm.
<SW version>
In the main menu ,you can find what software version your DAB+ radio . This option will display
the version number of the softwa re curr ently inst alled in your rad io. This will be helpful to a
technician who is servicing the radio currently has.
<
<<<
<
<<<
<
<<<
<
<<<
Radio information
Press the MENU button to view the various radio information provided by the station
broadcaster, the information will be displayed on the second line. Press the MENU button
repeatedly to scroll though the information provided, please refer below.
Note: Once you reach the last info setting the next press will return you to the first setting.
Audio mode-This shows the current station is broadcast in stereo or mono.
DLS(Dynamic label segment)-This is the scrolling message that the broadcaster may
include with their transmissions.
Signal strength-This shows the signal transmission level.
Program type-This is the type and description of the program provided by the DAB+ station.
Time and Date-This shows the current time and date provided by the broadcaster.
Channel frequency-This displays the channel number and the transmission frequency
Signal error-If the transmission signal contains any error, it will apply corrections.
The amount of signal corrections are displayed as a numerical value between 0 and
99, as the value increases, you will hear the signal degrade . To improve reception ,try
adjusting the position of the antenna.
9
Page 10

Operating Instructions
Playing your FM radio
To swit ch f om DAB+ t o FM , press the MODE button t o select the F M mode.r
Auto tune
1.Pr ess the SCAN butto n to automatically search for the next available fr equency.
2.If you find t he reception is poor, use t he Manual tunin g option to fine tune stat ion or make
sure your aerial is adjusted accor dingly.
Alarm setting
Setting ALARM1 or ALARM2 is simple, when you follow the below steps:
1.Press the ALARMS button to select ALARM1 or ALARM2 ,then press the and buttons
to select OFF/ON,after that ,press the ENTER button to confirm.
2.Once in ALARM1 or AL ARM2 , press the and buttons to adjust the Hours ,then press the
ENTER button to confirm; press the and button to adjust minutes then press the ENTER
button to confirm.
3.Press the and buttons to select the ALARM mode (once,daily,weekends,weekdays) ,then
press the ENTER button to confirm.
4.Press the and buttons to select AL ARM type(DAB+,FM, Beep tone1,Beep tone2),then press
the ENTER button to confirm. If you select DAB or FM, you should select station you desired.
5.Press the and buttons to adjust alarm volume as desired, then press the ENTER button to
confirm.
6.To turn off the alarm you will need to change the ON setting to OFF.
7.To silence the alarm , press the STANDBY button.
NOTE: The alarm will keep sounding for 60 minutes if not press the STANDBY button.
<
<<<
<
<<<
<
<<<
<
<
<<<
<<<
<
<<<
Clock setting
The radio clock can be set manually as below;
1.Press MENU button in standby mode to enter clock setting.
2.Press and buttons to select 12H or 24H, then press the ENTER button to confirm.
3.Press the and buttons to adjust the Hours ,then press the ENTER button to confirm
press the and button to adjust Minutes ,then press the ENTER button to confirm
4.Press the and button to select Year, then press the ENTER button to confirm
5.Press the and button to select Month ,then press the ENTER button to confirm.
6.Press the and button to select Day ,then press the ENTER button to confirm.
<
<<<
<
<<<
<
<<<
<
<<<
<
<<<
<
<<<
10
Page 11

Operating Instructions
Snooze function
The alarm will stop sounding and will sound again after a 9 minutes period.
Brightness function
Press the SNOOZE button t o cycle through the 10 light setting.
AUX connection
The rad io has an auxiliary inp ut. This can be used to connect an external sour ce such
as MP3 players and other audio sources by using t he included 3.5 mm cable.
1. Press the MODE button t o select the AUX mode.
2. Connect the 3.5mm cable to your radio and to your external device.
3. Press the VOL- and VOL+ buttons t o adjust volume level.
Bluetooth connection
1. Press the MODE button t o enter Bluetooth mode .(operate y our bluetooth device to pair
with the speaker )
2. LCD will display "pairing" af ter enter Bluetooth mode , i t will keep f lashing until successful
pairing .
3. LCD will display "paired" after successful pairing, press ENTER button to pl ay music.
Press the and buttons to move to the previous or next tracks.
4.
5. Press the ENTER button t o Play /Pause music playing.
NOTE: The Bluetooth name is "OSLO BLUDAB".
You need t o re-pairing again if your Bluetooth device not in a vailable dist ance.
You can pr ess an d hold ENTER butt on to search and pai r anot her bluetooth device.
<
<<<
11
Page 12

War ning/Troubleshooting/Technical Specif ications
If a fault occurs, first check the points listed below before taking the set f or repair.
If you ar e unable to remedy a problem by following these hints ,consult you retailer or
service centre.
WARNING: Under no circumstances should you tr y to repair the set
yourself ,as this would void y our guarantee.
Troubleshooting
All electrical and electronic products must not be disposed of with hou sehold
waste. Plea se refer to the retail er from whom you purchase this item for
disposal instructions.
Packaging materials can be r ecycled using y our local collection facilities.
PROBLEM
Poor reception
No radio sound
No AUX input sound
No Bluetoot h
1.Weak radio aerial sig nal
interferenc e caused by
other electrical equipment.
2.The stati on is not tuned in.
1.Volume may not be adjusted.
2.Headphone are connected.
3.Power is not correctly connected.
1.Volume may not be adjusted.
2.Headphone are connected.
3.Power is not correctly connected.
4.3.5mm cable not connected correctly.
1.Unit not in Bluetooth mode.
2.Audio device not open Bluetooth mode.
POSSIBLE
Technical specification
Bluet ooth st andard :Bluetooth V3.0+EDR
Transmission power: CLASS 2dBm
Bluet ooth Frequency r ange: 2.402GHz-2.480GHz
Wireless tr ansmission ra nge: 10Metre
Supply volt age: DC 12V 3A
DAB+: 174-240MHz
FM: 87.5-108MHz
REMEDY
1.Extend and aim the aerial for
the best reception possible,keep
the unit away from other electrical
equipment.
2.Fine tune the station.
1.Increase the volume level.
2.Disconnect Headphone .
3.Check the Power prope rly.
1.Increase the volume level.
2.Disconnect Headphone .
3.Check the Power and connect
power p roperly.
4.Connect 3.5mm cable connect.
1.Put unit in Bluetooth mode
2.Open audio device Bluetooth mode
12
Page 13

Warranty
Please keep your r eceipt as pr oof of purchase. This p roducts is warra nted for any defect in
materials or work manship for 1year after the original date of purchase. This product is f or
normal domestic & of fice use only.
This warran ty does not cover damage from misuse or neglec t, accidental damage, vermin
infest ation,excessive voltages such us lightning or power surges or any alter nation that
af f ects t he per f ormance or reliability of the product.
Our goods come wit h guar antees that cannot be excluded under the Australian Consumer Law.
You are entitl ed to replacement or ref und for a major failure& f or compensation for any other
reasonabl y foreseeable lo ss or damage. You ar e also e ntitled to
have the goods repa ired or replaced if the goods fa il to be of acceptable qualit y & t he failure
does not amount to a major f ailure.
In the unlikely event that your prod uct fails to work normally, please contac t the Warra nty on
1300 055 518 and have you receipt of purchase on hand.
This guarantee is subject to t he following provisions:
It is only valid wit hin boundaries of the country of pu rchase.
The product must be correctly assemble d & operated in accordance with the instructions
contained in the manual.
This pr oduct must be use solely for domestic purposes.
The guarant ee does not cover accidental damage.
The guarant ee will be rendered invalid if the pr oduct is resold or has been damaged by
inexpert repair.
The manufacturer disclaims any liabilit y f or incidental or consequential dam aged.
This guarantee is in addition to ,& does not diminish, your statutory or legal rights.
PO BOX 6287
Silve r water NSW 1811
Warr anty: 1300 055 518
www.bushaustralia.com.au
13
Page 14

 Loading...