

Page 1
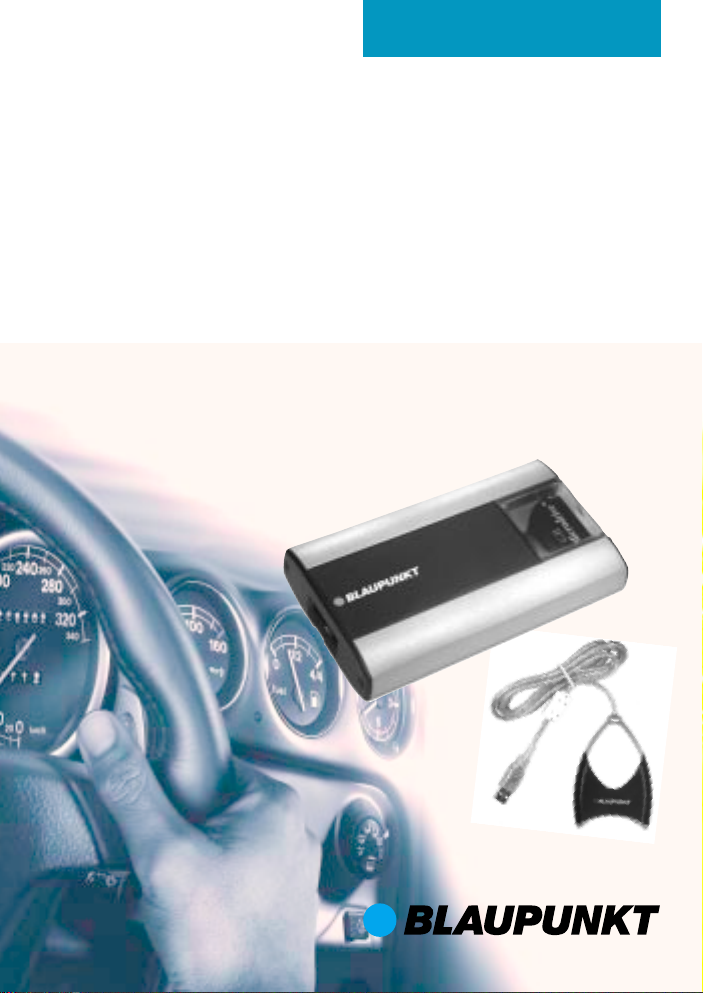
Compact Drive MP3
Operating and installation instructions
MP3-Player
Page 2

CONTENTS
General .................................. 11
Road safety ................................... 11
Installation ..................................... 12
Accessories .................................. 12
Handling the Microdrive™ ............. 12
Installation steps .................... 13
Write-/ read device ........................ 13
Microdrive™ (hard disk) ........ 13
Storing MP3 files on your
hard disk ....................................... 13
Converting audio files into
MP3 files ....................................... 13
Compatibility with Blaupunkt
car radios ...................................... 14
Display-Anzeige ............................. 14
Display .......................................... 14
Changing the display ..................... 14
Temperature monitoring ................. 14
MP3 mode .............................. 15
Switching to MP3 mode ................ 15
Selecting directories ...................... 15
Selecting tracks ............................ 15
Fast searching............................... 15
Repeating individual tracks or
whole directories (REPEAT) ........... 15
Random track play (MIX) ............... 15
Scanning all tracks in all
directories (SCAN) ........................ 16
Pausing playback (PAUSE)............ 16
TPM .............................................. 16
Update ................................... 17
Update over the Internet ................ 17
Accessories .................................. 17
Guarantee .............................. 17
Installation instructions .......... 74
10
Page 3
GENERAL
Thank you for deciding to use a Blaupunkt product. We hope you enjoy using this new piece of equipment.
Before using the device for the first
time, please read these operating instructions. The Blaupunkt editors are
constantly working on making the operating instructions clearer and easier
to understand. However, if you still have
any questions on how to operate the
unit, please contact your dealer or the
telephone hotline for your country . You
will find the hotline telephone numbers
printed at the back of this booklet.
Road safety
Road safety has absolute priority. Only operate your COMPACT
DRIVE MP3 Player if the road and
traffic conditions allow you to do so.
Familiarise yourself with the unit before setting off on your journey.
You should always be able to hear
police, fire and ambulance sirens
from afar. For this reason, set the
volume of whatever you are listening to to a reasonable level.
s). If a lower bit rate is used to convert
CD audio data to MP3, you can create
smaller files but there will be a loss of
quality. You can store MP3 files on the
Microdrive™ (hard disk) using the supplied SCM (write-/ read device). For further details, please read the chapter entitled “Write-/ read device”.
You can connect the COMP ACT DRIVE
MP3 Player to many Blaupunkt car radios. For further details, please read the
chapter entitled “Compatibility with Blaupunkt car radios”.
DEUTSCH
ENGLISH
FRANÇAIS
ITALIANO
NEDERLANDS
SVENSKA
The COMP ACT DRIVE MP3 is an MP3
player that plays MP3 music files stored
on the Microdrive™ (hard disk).
CF cards (storage media) are not recognized by the COMPACT DRIVE
MP3. MP3 is a process developed by
the Fraunhofer Institute for compressing CD audio data. Compression allows
data to be reduced to around 15% of
their original size without a noticeable
loss in quality (at a bit rate of 192 Kbit/
ESPAÑOL
PORTUGUÊS
DANSK
11
Page 4

GENERAL
Installation
If you want to install your COMPACT
DRIVE MP3 Player yourself, please
read the installation and connection instructions that follow these operating
instructions.
Accessories
We recommend you use accessories
that have been approved by Blaupunkt.
Handling the Microdrive™
Please observe the following details to
ensure trouble-free operation and to
make optimal use of all the Microdrive™
features.
● Regularly create a backup of your
data. Blaupunkt does not accept
responsibility for any loss of data.
● Always carry and keep your Micro-
drive™ in the supplied protective
transportation cover.
● Never drop the Microdrive™.
● Ensure that the Microdrive™ does
not become wet.
● Never expose the Microdrive™ to
strong magnetic fields.
● Never expose the Microdrive™ to
extreme temperatures.
● Never attach any additional stick-
ers.
● Do not remove the sticker that is al-
ready attached.
● Do not write anything on the sticker
that is already attached.
● Never press down on the out-
side cover of the Microdrive™.
● Always switch off the car radio
before removing the Microdrive™.
● Always take care when remov-
ing it. The Microdrive™ may be
warm after use.
12
Page 5
INSTALLATION STEPS
MICRODRIVE
Installation steps
Before starting the installation process,
please back up your personal data and
close any programs running on your PC.
We do not accept liability for any deleted data.
Write-/ read device
➮ Connect the write-/ read device to
your computer using the USB connection.
➮ The Windows Installation Man-
ager starts automatically .
➮ Please close it again.
➮ Insert the CD-ROM into the CD-
ROM drive. If the CD-ROM does
not start automatically, open Window’s Desktop icon and then open
the CD-ROM drive. Run the
“Start.html” file by double clicking
on it.
➮ Select your language and then the
“Write-/ read device”, and start unpacking the drivers by clicking on
“Driver installation”.
➮ This Step 1 will be completed when
you close the “WinZip Self-Extractor”.
➮ During Step 2 you will install the
driver on your PC.
After Step 2 is complete, the “Write-/
read device” will appear as a “Compact
Flash Drive” in Explorer or in Desktop.
Microdrive™ (hard disk)
The hard disk can be inserted into
and removed from the write-/ read
device whilst the computer is
switched on.
➮ Carefully hold and pull the hard
disk between your thumb and index finger out of the protective
transportation cover.
➮ Insert the hard drive (with its con-
tact edge foremost) into the write-/
read device. Click it into place with
a light press.
● The hard disk is visible as a “Re-
movable disk” in Explorer or in
Desktop, and data can now be written onto it.
Storing MP3 files on your hard
disk
You can create up to 99 directories.
Each of these directories can contain
up to 99 music tracks. The maximum
number of characters for directory
names and track names is 90.
Note:
Subdirectories are not recognized by
the car radio.
Converting audio files into MP3
files
➮ Run the “MP3 Software” on the
CD-ROM and follow the program’s
instructions.
Tip: You can also use any other standard conversion program.
DEUTSCH
ENGLISH
FRANÇAIS
ITALIANO
NEDERLANDS
SVENSKA
ESPAÑOL
PORTUGUÊS
13
DANSK
Page 6

COMPATIBILITY WITH BLAUPUNKT CAR RADIOS
Compatibility with Blaupunkt car
radios
Our engineers have made it possible to
connect the COMPACT DRIVE MP3
Player to the following car radios:
● Skyline 2 and future Skyline de-
vices
Dallas MD 70, Denver CD 70,
Frankfurt C 70, Hamburg CD 70,
London CD 70, Madrid C 70, New
Orleans CD 70, Orlando MD 70,
San Francisco CD 70
● Funline 3 devices (only with CD-
Naming) and future Funline devices
Acapulco CD 51, Casablanca CD
51, Heidelberg CD 51, Palm Beach
C 51, Verona C 51
Note:
Some devices cannot display the whole
character set.
The following characters are either incorrectly displayed or not displayed at
all.
● Funline 3 series:
; : ! ß § % & = ? Ü Ö Ä # ¤ @
● Skyline 2 series:
$ ~ ¤ ^ ´
● Antares Radiophone:
§ ¤ ~ ^ ´
Display-Anzeige
Display
In order to display directory names
and tracks (scrolling) in the display,
you have to switch to the “Track
number and CD name” display
mode.
After you select a directory, its name
appears in the display and scrolls once
across the display .
Afterwards, a track name will appear
and will continuously scroll across the
display until you operate the radio again.
Changing the display
➮ To switch between the track
number and playing time display /
track number and clock display /
track number and CD number display / track number and CD name
display , press the
/ DIS button
7 once or several times for longer
than two seconds until the required
display appears.
Temperature monitoring
Your device is fitted with a protection
system to deal with extreme temperatures in the vehicle. The device will either switch off or will not switch on if
extreme temperatures are detected.
Display if the temperature is too low:
ERROR TEMPERA TURE TOO LOW
Display if the temperature is too high:
ERROR TEMPERA TURE TOO HIGH.
14
Page 7

MP3 MODE
MP3 mode
Switching to MP3 mode
Note:
The Microdrive™ must only be inserted or removed from the Compact
Drive MP3 when the car radio is
switched off.
Info:
The control functions for MP3 mode
correspond to those described in
your car radio’s operating instructions for CDC mode.
The following description of functions is
taken from the Acapulco CD 51 car radio in the FunLine series. Other car radios are similar.
➮ Keep pressing the CD•C button @
until “CHANGER” appears in the
display.
Playback begins with the directory
containing MP3 files that was listened to last.
Selecting directories
➮ To move up/down from one CD to
another, press the or button
: once or several times.
Selecting tracks
➮ To move up/down from one track to
another in the current directory,
press the
several times.
or button : once or
Fast searching
To fast search backwards or forwards,
➮ keep one of the buttons :
pressed until fast searching backwards / forwards begins.
Repeating individual tracks or
whole directories (REPEAT)
➮ If you wish to repeat the current
track, briefly press button 4 RPT
>.
“REPEAT TRCK” appears briefly and
RPT lights up in the display.
➮ If you wish to repeat the current di-
rectory , press button 4 RPT >
again.
“REPEAT DISC” appears briefly and
RPT lights up in the display.
Cancelling REPEAT
➮ If you want to stop repeating the
current track or current directory ,
press button 4 RPT > until “REPEA T OFF” appears briefly in the
display and RPT disappears.
Random track play (MIX)
Info:
Limited MIX function. It is possible
that a track is repeated.
➮ To play all the tracks in the current
directory in random order, briefly
press button 5 MIX >.
“MIX CD” appears briefly and MIX lights
up in the display .
DEUTSCH
ENGLISH
FRANÇAIS
ITALIANO
NEDERLANDS
SVENSKA
ESPAÑOL
PORTUGUÊS
15
DANSK
Page 8

MP3 MODE
➮ To play the tracks in all the directo-
ries in random order, press button
5 MIX > again.
“MIX ALL” appears briefly and MIX lights
up in the display .
Note:
Cancelling MIX
➮ Press button 5 MIX > until “MIX
OFF” appears briefly in the display
and MIX disappears.
Scanning all tracks in all directories (SCAN)
➮ To briefly play all the tracks in all di-
rectories in ascending order, press
the OK button ; for longer than
two seconds.
“SCAN” appears in the display .
“CD 1” remains in the display during the
scanning process.
Cancelling SCAN
➮ To cancel scanning, briefly press
the OK button ;.
The currently scanned track will then
continue to be played normally .
Note:
You can set the scanning time (scantime). For further details on setting the
scantime, please read the section entitled “Setting the scantime” in the “Radio mode” chapter of the radio’s operating instructions.
Pausing playback (PAUSE)
➮ Press button 3 >.
“PAUSE” appears in the display.
Cancelling pause
➮ Press button 3 > while in
pause mode.
Playback is resumed.
TPM
A TPM function (Track Program
Memory) is not available.
16
Page 9

UPDATE
GUARANTEE
Update over the Internet
Notes on the update facility
Your COMPACT DRIVE MP3 is
equipped with an update facility for new
functions.
An update can be downloaded free of
charge over the Internet from
www.blaupunkt.de
The installation path is as follows: Internet > PC > Write-/ read device >
Microdrive™ > COMPACT DRIVE MP3.
Accessories
We recommend you use accessories
that have been approved by Blaupunkt.
Guarantee
The scope of the guarantee depends
on the regulations in force within the
country in which the unit was purchased.
If your unit develops a fault, please contact your dealer and present the purchase receipt.
Regardless of what the legal regulations
may stipulate, Blaupunkt provides a
twelve-month manufacturer guarantee
covering production defects. This guarantee does not cover damage due to
wear, incorrect usage or commercial
use. If you wish to enforce a claim under the manufacturer’s guarantee that
is provided by Blaupunkt, please send
the faulty equipment together with the
purchase receipt to the Blaupunkt customer service centre in your country . Y ou
can find out which address is closest to
you by contacting the telephone hotline
listed on the back page of this booklet.
Blaupunkt retains the right to rectify
defects or supply a replacement.
DEUTSCH
ENGLISH
FRANÇAIS
ITALIANO
NEDERLANDS
SVENSKA
17
ESPAÑOL
PORTUGUÊS
DANSK
Page 10

Einbauanleitung • Installation instructions • Notice de
montage • Istruzioni di installazione • Inbouwhandleiding •
Monteringsanvisning • Instrucciones de instalación •
Instruções de montagem • Monteringsvejledning
Mitgelieferte Montage- und
Anschlussteile
Supplied Mounting Hardware
Materiel de montage fourni
Componenti di fissaggio
compresi nella fornitura
Meegeleverde montagematerialen
Medföljande monteringsdetaljer
Elementos de montaje
suministrados
Elementos de montagem e
ligação fornecidos
Medleverede monterings- og
tilslutningsdele
Anschlusskabel / Connecting cable / Câble de
branchement / Cavo di allacciamento / Aansluitkabel / Anslutningskabel / Cable de conexión /
Cabo de ligação / Tilslutningskabel
Compact Drive MP3
Microdrive™
mit Transportschutz / with protective transportation cover / avec Bac de transport / con custodia
per il transporto / met Transportcassette / med
transportskydd / con estuche de transporte / com
Estojo de transporte / med transportbeskyttelse
74
Schreib-/Leseeinheit / Read/Write device / Lecteurenregistreur / Unità di scrittura/lettura / Schrijf-/
leeseenheid / Skriv-/läsenhet / Unidad de escritura/lectura / Unidade de leitura/escrita / Skrive-/
læseenhed
Halter / Bracket / Support / Supporto / Houder /
Fäste / Soporte / Suporte / Holder
Page 11

D
Sicherheitshinweise
– Bei fehlerhafter Installation oder
Wartung können bei elektronischen
Kraftfahrzeug-Systemen Fehlfunk-
tionen auftreten.
– Für die Dauer des Ein-/Ausbaus
klemmen Sie den Minuspol der
Batterie ab.
– Beim Bohren von Löchern darauf
achten, dass keine Fahrzeugteile
beschädigt werden.
Empfohlener Einbauort
Unterseite vom Armaturenbrett oder im
Handschuhfach.
Einbaulage
Beliebig.
Einbau
Den Halter an einen geeigneten Ort so
verschrauben, das der Compact Drive
MP3 Player bis zum Einrasten aufgeschoben werden kann. Ausbau durch
Einschieben der Kulisse (siehe Fig. 1).
Den breiten Stecker des Anschlusskabels adaptieren.
Anschluss an Radios in der
Kammer C3
Bei Anschluss des „Compact Drive
MP3“ an Ihr Autoradio, muß das Autoradio von der Bordspannung genommen werden!
Anschlusskabel an die C3 Kammer anschliessen (siehe Fig. 2).
GB
Safety precautions
– If the installation or maintenance is
carried out incorrectly, malfunctions
may occur in electronic vehicle
systems.
– Whilst installing or removing the
unit, always disconnect the
battery’s negative terminal.
– When drilling holes, always make
sure that vehicle components are
not damaged in the process.
Recommended installation location
Underside of the dashboard or in the
glove compartment.
Installation position
Any.
Installation
Using screws, attach the bracket in a
suitable location so that you are left with
sufficient space to slide the Compact
Drive MP3 Player onto the bracket until
it clicks into place. To detach the unit,
press the locking mechanism to unlock
the mounting bracket (see Fig. 1) Connect the broad plug of the connecting
cable to the Compact Drive MP3.
Connection to radios using
terminal area C3
Whilst connecting the “Compact
Drive MP3” to your car radio, the car
radio must be disconnected from the
vehicle’s electrical supply!
Connect the connecting cable to the C3
terminal area (see Fig. 2).
DEUTSCH
ENGLISH
FRANÇAIS
ITALIANO
NEDERLANDS
SVENSKA
ESPAÑOL
PORTUGUÊS
DANSK
75
Page 12

F
Indications de sécurité
– En cas d’installation ou de mainte-
nance incorrecte, des erreurs de
fonctionnement peuvent survenir
au niveau des systèmes électro-
niques du véhicule.
– Pour la durée du montage / dé-
montage, débrancher le pôle (-) de
la batterie.
– En perçant des trous, veiller à n’
endommager aucune pièce du
véhicule.
I
Cenni sulla sicurezza
– Nel caso di un’installazione o una
manutenzione difettosi si possono
avere dei disturbi di funzionamento
nei sistemi elettronici
dell’autovettura.
– Durante gli interventi di montaggio
e smontaggio staccate il polo negativo dalla batteria.
– Quando eseguite dei fori fate atten-
zione a non danneggiare componenti d’auto.
Lieu de montage recommandé
En dessous du tableau de bord ou dans
la boîte à gants
Position de montage
Quelconque.
Installation
Visser le support à un endroit approprié
de façon à ce que le lecteur Compact
Drive MP3 puisse être glissé jusqu’au
bout. Pour le démonter, insérer la coulisse (cf. Fig. 1). Raccorder la fiche large du câble de branchement au Compact Drive MP3.
Connexion à des autoradios
dans la chambre C3
Lors de la connexion du Compact
Drive MP3 sur votre autoradio,
l’autoradio doit être coupé de la tension de bord !
Raccorder le câble de branchement à
la chambre C3 (cf. Fig. 2).
Punto di montaggio raccomandato
Parte inferiore del cruscotto o cassettino portaoggetti.
Posizione di montaggio
Scelta a piacere.
Montaggio
Avvitate il supporto in un punto adatto
in modo tale che sia poi possibile spingere in posizione il Compact Drive MP3
Player fino all’inserimento a scatto. Per
smontare spingete in dentro il corsoio
(v. Fig. 1). Adattate la spina larga del
cavo di allacciamento.
Allacciamento di radio nella
camera C3
Prima di allacciare il Compact Drive
MP3 Player all’autoradio bisogna
staccare l’autoradio dalla tensione di
bordo.
Eseguite l’allacciamento alla camera C3
(v. Fig. 2).
76
Page 13

NL
Veiligheidsinstructies
– Bij onjuiste installatie of onderhoud
kunnen storingen optreden in de
elektronische systemen van de
auto.
–Voor de duur van de montage dient
de minpool van de accu te worden
losgekoppeld.
– Let er bij het boren van gaten op
dat er geen onderdelen van de
auto beschadigd worden.
Aanbevolen plaats van inbouw
Onderzijde van het dashboard of in het
handschoenenvak.
Inbouwpositie
Naar wens.
Inbouw
Schroef de houder op een geschikte
plaats zodanig vast dat de Compact
Drive MP3-speler erin kan worden geschoven totdat hij vergrendelt. Verwijder de speler door de schaar naar binnen te schuiven (zie fig. 1). Adapteer
de brede stekker van de aansluitkabel.
Aansluiting op radio’s in kamer
C3
Bij de aansluiting van de Compact
Drive MP3 op uw autoradio moet de
autoradio worden losgekoppeld van
de bedrijfsspanning!
Sluit de aansluitkabel aan op kamer C3
(zie fig. 2).
S
Säkerhetsanvisningar
–Vid felaktig installation eller bristan-
de underhåll kan funktionsfel uppträda i elektroniska fordonssystem.
–Ta loss batteriets minuspol under
montering/demontering.
– Se vid borrning av hål till att inga
andra fordonsdetaljer skadas.
Rekommenderad monteringsplats
Undersidan av instrumentpanelen eller
i handskfacket.
Monteringsposition
Valfri.
Montering
Skruva fast fästet på lämplig plats så
att spelaren kan skjutas på tills den går
i spärr.
Ta loss spelaren genom att skjuta in
kulissen (se fig. 1).
Anslut anslutningskabelns breda stickpropp.
Anslutning till radio i modul C3
För anslutning av ”Compact Drive
MP3” till din bilradio, måste bilradion
skiljas från fordonets strömnät!
Anslut anslutningskabeln i modul C3
(se fig. 2).
DEUTSCH
ENGLISH
FRANÇAIS
ITALIANO
NEDERLANDS
SVENSKA
ESPAÑOL
PORTUGUÊS
77
DANSK
Page 14

E
Normas de seguridad
– La instalación y el mantenimiento
incorrectos del equipo pueden pro-
vocar fallos en el funcionamiento
de los sistemas electrónicos del
vehículo.
– Desemborne el polo negativo de la
batería durante el montaje y des-
montaje del equipo.
– En caso de perforar agujeros,
asegúrese de no dañar ninguna
parte del vehículo.
Lugar de instalación recomendado
Parte inferior del tablero de mandos o
en la guantera.
Posición de montaje
Cualquiera.
Instalación
Atornille el soporte en lugar apropiado
de modo que se pueda colocar el Compact Drive MP3 hasta que quede bien
encajado. Para desmontarlo, introduzca la corredera (v . Fig. 1).
Adapte el conector ancho del cable de
conexión.
Conexión a la radio en la cámara
C3
¡No se olvide de cortar el suministro
eléctrico de la radio antes de conectar el «Compact Drive MP3»!
Enchufe el cable de conexión en la cámara C3 (v . Fig. 2).
P
Indicações de segurança
– No caso de instalação ou manu-
tenção incorrecta, podem surgir
falhas nos sistemas electrónicos
do automóvel.
– Durante a montagem e desmonta-
gem, corte o contacto negativo da
bateria.
– Quando se torna necessário furar
buracos, ter cuidado em não danificar os componentes da viatura.
Lugar de instalação
recomendado
Parte inferior do painel de instrumentos ou no porta-luvas.
Posição de instalação
Variável.
Instalação
Fixar o suporte num lugar apropriado
mediante os parafusos, de forma a que
o leitor Compact Drive MP3 possa ser
introduzido até ao engate. Desmontagem empurrando a corrediça para dentro (ver fig. 1). Adaptar a ficha larga do
cabo de ligação.
Ligação aos rádios na câmara
C3
Quando proceder à ligação do ”Compact Drive MP3” ao seu auto-rádio,
tem de separar primeiro o auto-rádio da energia de bordo!
Ligar o cabo de ligação à câmara C3
(ver fig. 2).
78
Page 15

DK
Sikkerhedshenvisninger
–Ved forkert installation eller vedli-
geholdelse kan der ske fejlfunktio-
ner hos elektroniske mo-
torkøretøjssystemer.
– Mens monteringen/udbygningen
foretages, skal batteriets negative
pol afbrydes.
– Vær opmærksom på, at ingen
bildele ødelægges, når der bores
huller.
Anbefalet monteringssted
Underside af instrumentbræt eller i
handskerummet.
Einbau / Installation / Montage /
Montaggio / Inbouw / Montering /
Instalación / Instalação /
Montering
1.
DEUTSCH
ENGLISH
FRANÇAIS
Monteringsposition
Vilkårlig.
Montering
Holderen skrues på således fast et egnet sted, at Compact Drive MP3-afspilleren kan skubbes på, indtil den kommer i indgreb. Afmonteringen foretages
ved at skubbe glideklodsen indad (se
fig. 1). Tilslutningskablets brede stik tilsluttes.
Tilslutning til radioer i kammer
C3
Når „Compact Drive MP3“ tilsluttes
bilradioen, skal bilradioen afbrydes
fra bilens forsyningsspænding.
Tilslutningskablet tilsluttes til C3-kammeret (se fig. 2).
2.
ITALIANO
12V
NEDERLANDS
SVENSKA
ESPAÑOL
PORTUGUÊS
Fig. 1
DANSK
79
Page 16

3.
4.
710 131619
14
369121518
58114 17
2
1
5
7
6
234
1
2
345
8
7
6
8
C3
C3
13 CDC Data-IN
14 CDC Data-OUT
20
15 +12V Permanent / 3A
16 +12V switch voltage (max. 300mA)
17 CDC Data-GND
Radio
18 CDC AF/AUX-GND
19 CDC AF/AUX-L
20 CDC AF/AUX-R
Compact Drive MP3
Fig. 2
Änderungen vorbehalten!
This information is subject to change
without notice!
Sous réserve de modifications!
Modifiche riservate!
80
12V
Wijzigingen voorbehouden!
Ändringar förbehålles!
Modificaciones reservadas!
Sob reserva de alterações!
Ret til ændringer forbeholdes!
 Loading...