

In Car Entertainment
DVD monitor IVOD-1022
7 607 003 507
Operating and installation instructions
! ጇѰЊཆ
사용 및 장착 설명서
사용 및 장착 설명서
www.blaupunkt.com
10
12
14
1
2
3
4
26
25
24
5
6
7
8
23
22
9
11
21
20
13
19
18
15
17
16
29
1
2
10
3
28
10
27
26

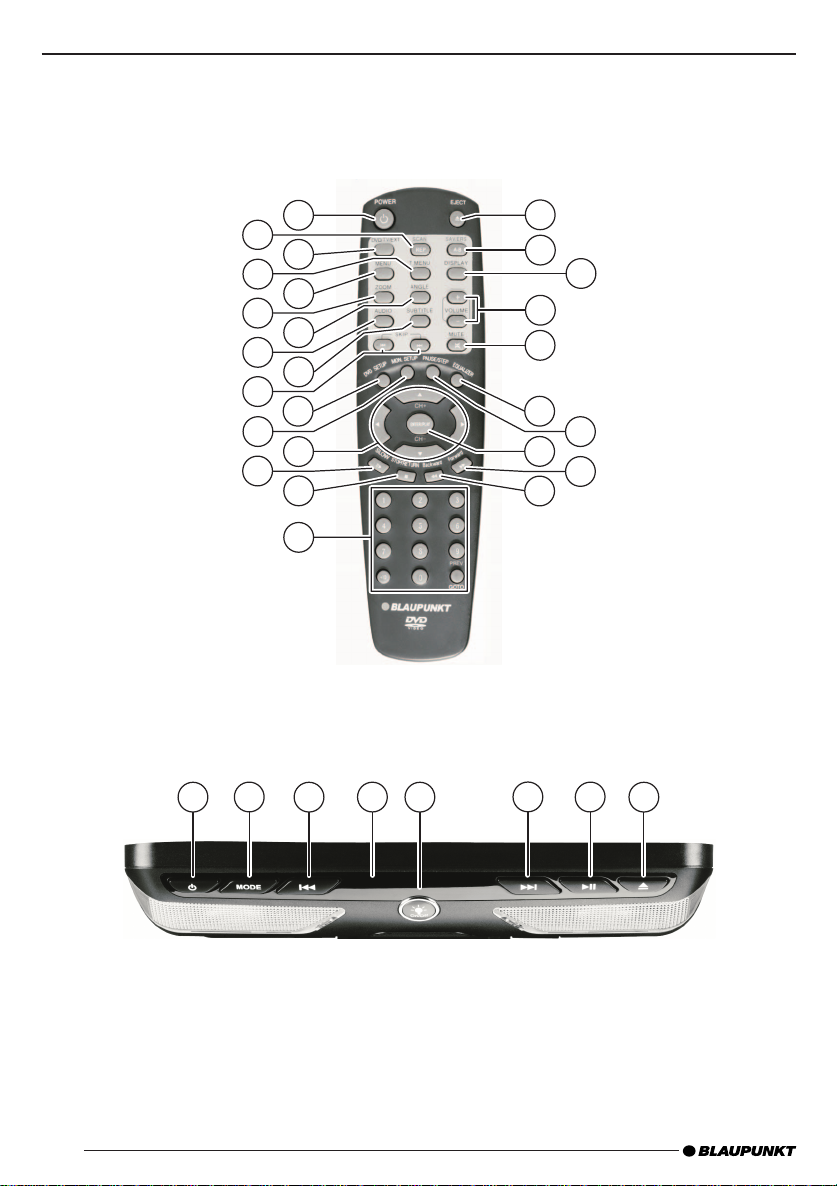
CONTROLS
1 POWER, to switch the device on/off.
2 REP, to activate/deactivate the REPEAT
function.
SCAN mode is only available in TV
mode.
3 DVD/TV/EXT, to switch between DVD/
CD/MP3 operation and external sources AUX1 and AUX2.
4 T.MENU, for access to the DVD title
menu.
5 MENU, for access to the DVD main
menu (root).
6 ZOOM, to enlarge an image area duri-
ng playback.
7 ANGLE, to change the viewing angle.
8
AUDIO, to switch between the audio
tracks available on the DVD.
9
SUBTITLE, to switch between the sub-
titles available on the DVD.
:
SKIP buttons to call up the previous or
next chapter (DVD) or track (CD/MP3).
;
DVD SETUP, to call up the setup menu
for the basic settings.
<
MON.SETUP, basic settings for the
monitor.
=
Arrow buttons for navigation within
the menus.
CH+ and CH- have no function.
> SLOW, to start/end the slow motion
function.
?
STOP/RETURN, to end playback.
@
Number buttons 0-9 and
PREV./
GOTO button, to directly select
chapters or sections within chapters.
A
BACKWARD, to switch on fast rewind.
B
FORWARD, to switch on fast forward.
C
ENTER/PLAY, to select and confi rm
menu entries and start playback.
D PAUSE/STEP, button to pause play-
back (freeze frame).
E EQUALIZER, to select an EQ preset, to
defi ne your own EQs and to switch off
EQs.
F
MUTE, to cut the sound of the audio
playback.
G
Volume + -, to set the volume.
H
DISPLAY, to select between different
display modes.
I
A-B button to determine the start and
end time of the repeat function. To
switch the repeat function on/off.
SAV/ ERS, has no function.
J
EJECT button to eject the CD/DVD.
K
button on the device, PAUSE/PLAY.
L
Infrared receiver for the remote con-
trol.
M
ON/OFF light switch
N Button to unlock the monitor.
ENGLISH
3

CONTENTS
Controls ..................................... 3
Notes .......................................... 6
Road safety ....................................... 6
Safety notes ...................................... 6
Recycling and disposal ..................... 6
Scope of delivery ....................... 7
Optional equipment .........................7
Infrared headphones ........................7
Installation and connection ....... 8
Installation and safety notes ............. 8
Installation of the monitor ................ 8
Connections...................................... 9
Connection without relay ...............10
Connection with relay .....................10
Changing the bulbs ................... 11
Changing the batteries
in the remote control ............... 11
First use ................................... 12
Activating the remote control ......... 12
Using the remote control ................ 12
Switching on/off ...................... 12
Switching on the IVOD-1022
interior lighting ............................... 12
Opening the LCD screen ................. 12
Closing the LCD screen .................. 12
Adjusting the volume ............... 13
Mute................................................13
Cancelling mute .............................. 13
DVD operation ......................... 13
Inserting/removing a DVD/CD ........14
Starting playback ............................ 14
Display ............................................ 14
Fast forward ................................... 15
Stopping fast forward ..................... 15
Slow motion .................................... 15
Interrupting playback (pause)
and starting again ........................... 15
Freeze frame ................................... 15
Skipping a chapter ......................... 15
Repeated playback of a DVD title ... 16
Direct selection of a chapter .......... 16
Resuming playback at the start
of the fi rst title of a DVD .......................16
Displaying subtitles ........................17
Changing the camera perspective .. 17
Enlarging an image area (Zoom) ..... 17
DVD menu ................................ 18
Displaying the DVD menu ............... 18
Selecting menu entries ................... 18
Exiting the DVD menu ..................... 18
Displaying the title menu ................ 18
Monitor setup .......................... 19
Operation ....................................... 19
Monitor setup menu ....................... 19
External sources ...................... 20
CD/DVD/MP3 operation .......... 20
Audio CD ......................................... 20
Photo CD/DVD ................................ 20
MP3 CD ........................................... 20
Equalizer .................................. 21
Selecting fi xed sound presets.........21
Selecting variable sound settings
(personal equalizer) .......................21
Setting the "personal" equaliser .......22
Switching off the equaliser ............. 22
Tips for adjusting the equaliser ...... 23
DVD setup ................................ 24
Calling up the setup menu .............. 24
Performing settings
in the setup menu ........................... 24
Selecting the language for the
screen display ................................. 24
Selecting the playback language.....24
Selecting the language of
subtitles .......................................... 24
Selecting the language for the
DVD menu ....................................... 24
Selecting the monitor setting ......... 24
4

DivX ................................................ 24
Parental control .............................. 25
Defi ning the parental control ......... 25
Changing the password .................. 26
Setting the colour television
standard of the TV device ............... 26
Displaying the camera perspective .... 26
AV OUT output ............................... 26
Setting the "Dual Mono" ................. 26
Setting compression ....................... 27
Downmix of Dolby Digital DVDs ...... 27
Activating the screensaver .............. 27
Resetting the device ....................... 27
Specifi cations .......................... 28
CONTENTS
ENGLISH
5
NOTES
Notes
Thank you for choosing a Blaupunkt product. We hope you enjoy using this new
piece of equipment.
Please read these operating instructions
before using the equipment for the fi rst
time.
The Blaupunkt editors are constantly working on making the operating instructions
clearer and easier to understand. However,
if you still have any questions on how to operate the device, please contact your dealer
or the telephone hotline for your country.
You will fi nd the telephone number printed
at the back of this booklet.
We provide a manufacturer guarantee for
our products bought within the European
Union. You can view the guarantee conditions at www.blaupunkt.de or ask for
them directly at:
Blaupunkt GmbH
Hotline
Robert-Bosch-Str. 200
D-31139 Hildesheim, Germany
Road safety
Road safety has absolute priority.
Only operate this device if the road and
traffi c conditions allow you to do so. Familiarise yourself with the device before
setting off on your journey.
You should always be able to hear police,
fi re and ambulance sirens in good time
from inside your vehicle. For this reason,
listen to your car sound system at a suitable volume level during your journey.
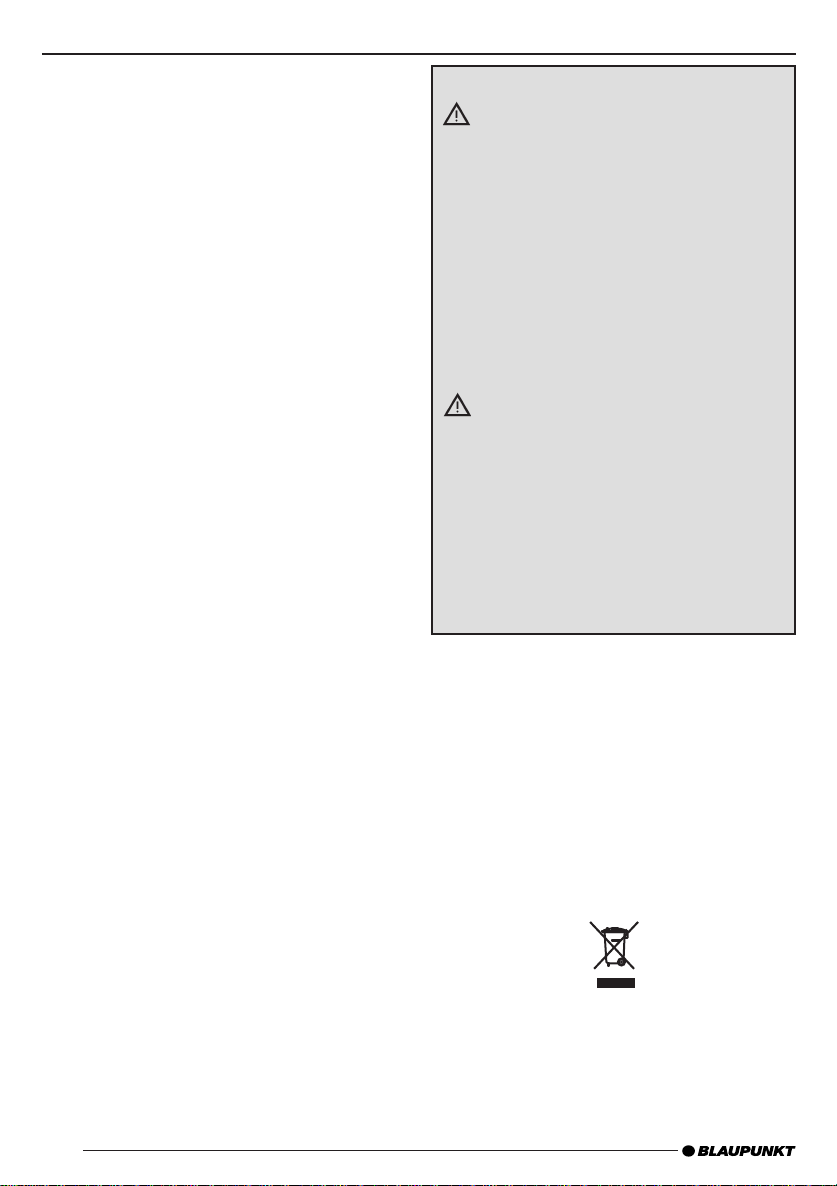
Safety notes
CAUTION:
The DVD player is a class 1 laser product
with an invisible laser beam which can
produce laser radiation that is hazardous to humans. The DVD drive may only
be operated according to the specifi ed
instructions. Never open the housing and
do not attempt to perform any repairs
yourself. Service should always be performed by trained personnel.
Recycling and disposal
Our product has been manufactured from
materials that are disposed of in an environmentally-friendly manner and can be
professionally recycling. Old products must
be collected separately from household
rubbish. Please use the return and collection systems available to dispose of the
product.
6
SCOPE OF DELIVERY/OPTIONAL EQUIPMENT
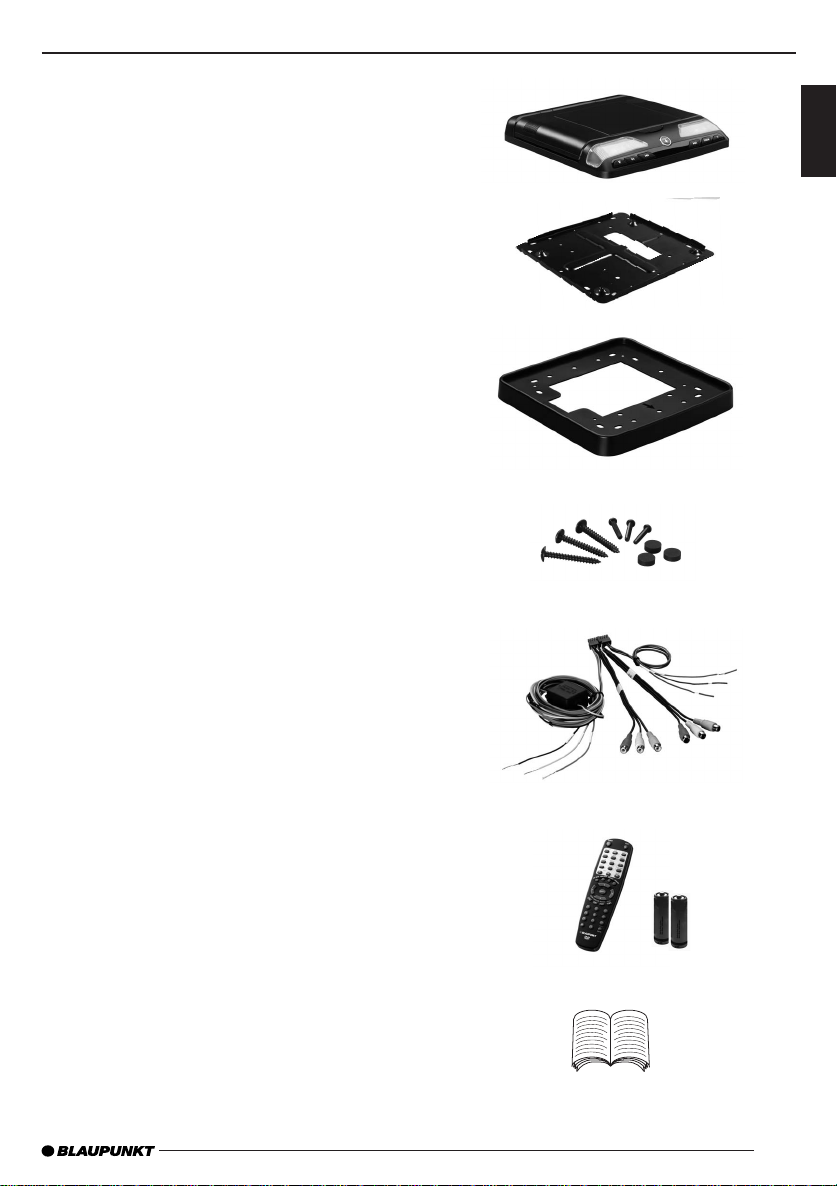
Scope of delivery
The scope of delivery of the IVOD-1022
includes all the parts listed below. Check
whether the scope of delivery of your
device is complete. Please contact your
dealer immediately if one of the listed
parts is missing.
IVOD-1022
•
•
Mounting sheet
Installation frame
•
•
6 self-tapping screws 4x40
•
4 thread screws 4x20
•
4 rubber covers
•
Connector cable
•
Remote control with 2 batteries
•
1 operating instructions
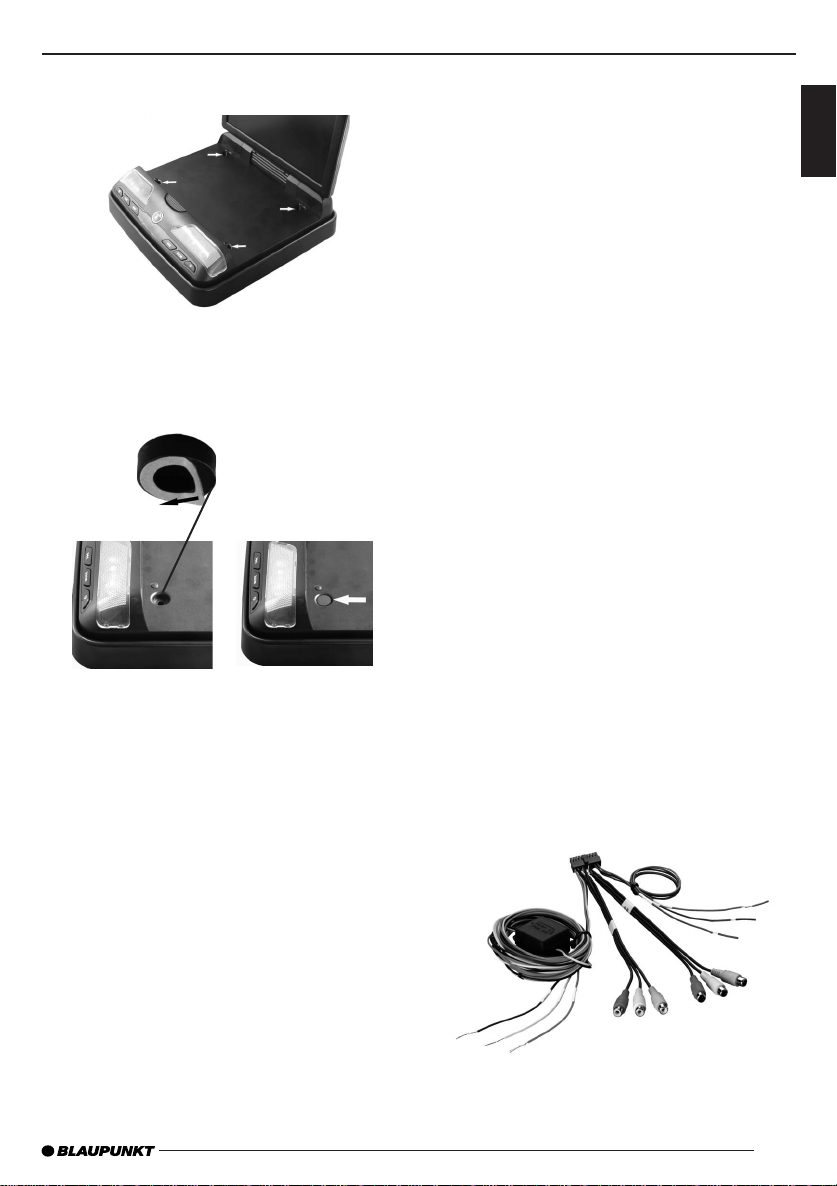
Optional equipment
Infrared headphones
When the IVHS-01 infrared headphones (optional equipment) are in use, the infrared
transmitter window L must not be covered.
ENGLISH
7
INSTALLATION AND CONNECTION
Installation and connection
Installation and safety notes
Please read the following information carefully before plugging in your IVOD-1022
DVD player.
The negative terminal on the battery must
be disconnected while the device is being
installed and connected.
Observe the safety notes from the vehicle
manufacturer (airbag, alarm systems, onboard computer, immobiliser).
When installing the device, choose a place
to which the IVOD-1022 can be securely
screwed so that it does not hinder the driver
or endanger the vehicle occupants should
the vehicle come to an abrupt stop, e.g. in
the case of emergency braking.
Do not store the remote control in the
infl ation range of the airbags, make sure
it is stored securely so as not to endanger
vehicle occupants in the event of an emergency braking.
Do not install the IVOD-1022 in a place,
where it distracts the driver or restricts
•
his range of vision.
•
where it hinders getting into and getting
out of the vehicle.
•
so that the function of other vehicle components is impaired (e.g. sunroof).
•
where it is subject to direct sunlight.
•
near hot air outlets (heating, etc.).
where it is subject to rain or moisture.
•
where it is subject to dust or dirt.
•
where it is subject to strong vib
•
rations.
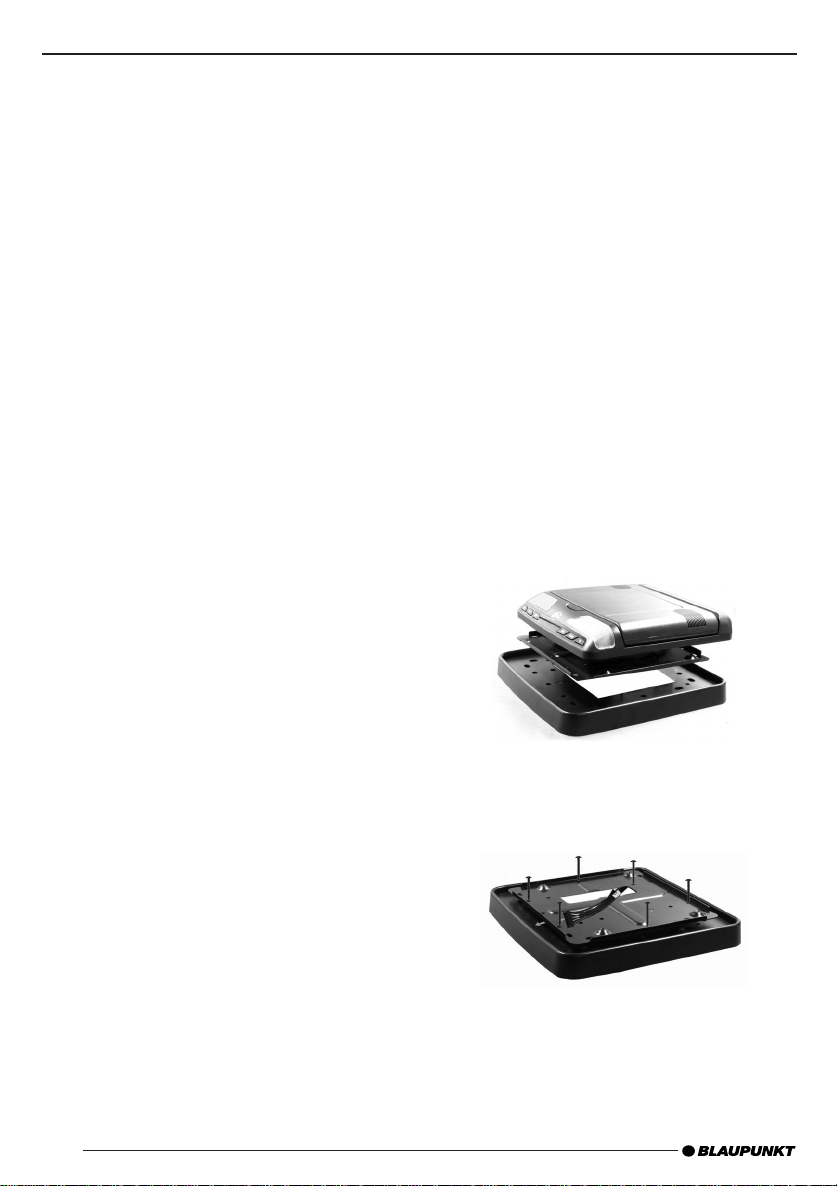
Installation of the monitor
Only use the mounting parts included.
Note the following when selecting a place
for installation:
•
No safety-relevant parts (fuel tank, cable,
etc.) of the vehicle may be damaged by
the screws.
•
Do not mount the device to the roof
interior lining only.
•
Use a solid base which is suitable for
supporting the woodscrews included.
•
Make sure that the device is installed in
a secure, solid place and that it cannot
come loose in the event of emergency
braking.
•
Avoid using the monitor over a long period of time while the engine is not running to avoid draining the battery.
Fig. 1
Fig. 2
8
INSTALLATION AND CONNECTION
Fig. 3
Fig. 4
Fig. 5
Connections
Connect the free ends of the connector
cable included to your vehicle's power
supply.
Yellow: Steady plus (+12 V)
Black: Earth
Red: ACC +12 V
(terminal 15 ignition)
Green: Interior lighting (+12 V)
Blue: Interior lighting earth
Brown: For the door switch
(door open = minus 12 V)
The steady plus cable between the battery and IVOD-1022 must also be fused
directly on the battery with a fuse carrier
(5 amps).
Connect the connector plug into the jack
on the base of the device.
AV OUT:
The audio/video output can be connected to
the corresponding inputs on your system.
AV IN:
You can connect external audio/video sources to the audio/video input. For further
details, please read the chapter entitled
"External sources".
AUX 1:
You can also connect external audio/video
sources to the AUX 1 input.
ENGLISH
red
yellow
green
brown
blue
AV IN
AV OUT
black
9
INSTALLATION AND CONNECTION
e
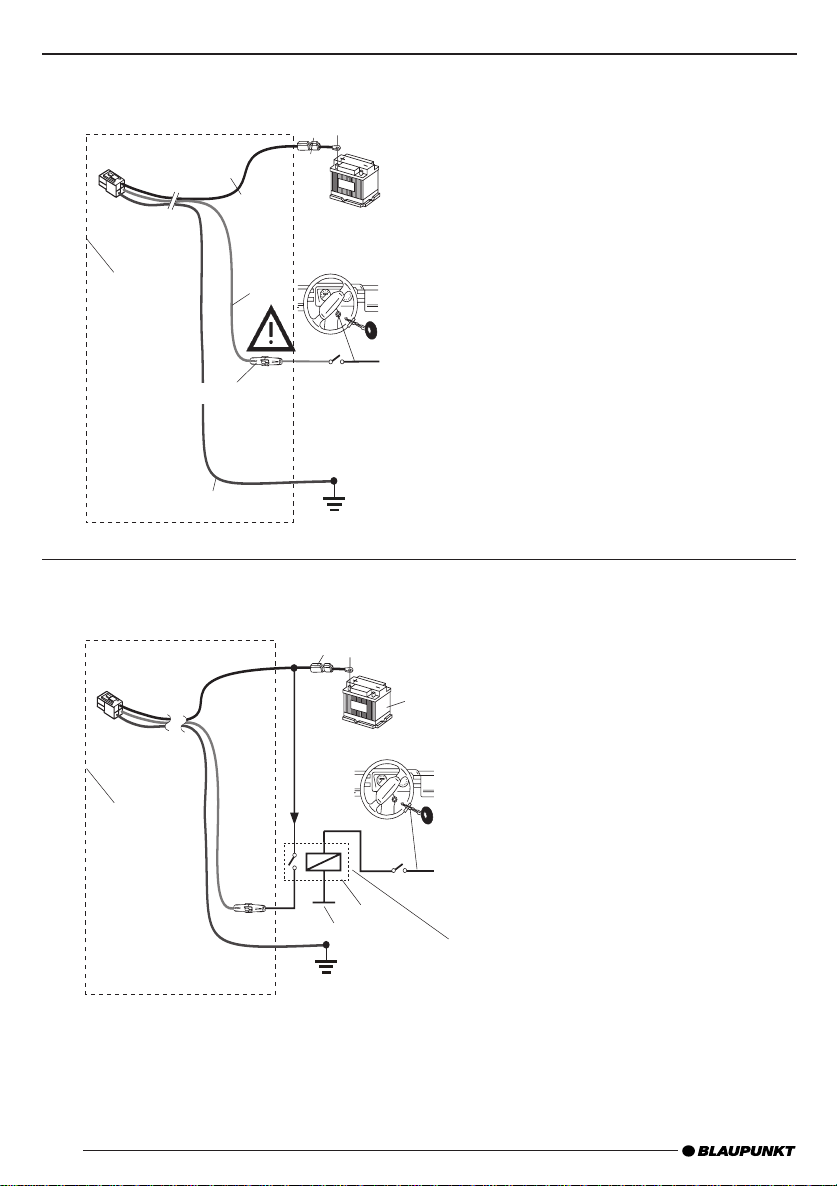
Connection without relay
Fuse 5A
yellow
Scope of
delivery
I =<2A, 0.8A typ.*)
black
red
Connection with relay
yellow
12V
Battery
ACC+B
Earth
Fuse 5A
Sicherung (Fuse) 5A
Battery
Batteri
12V
*)
When connecting to terminal 15 from
the vehicle, a fuse carrier (0.8 A fuse)
must be connected a maximum of 30 cm
away from terminal 15 to fuse the switch
plus cable.
Scope of
delivery
+1
red
black
ACC+B
Ground
Relais
optional
Caution:
This connection should be made by an authorised after-sales services department.
10
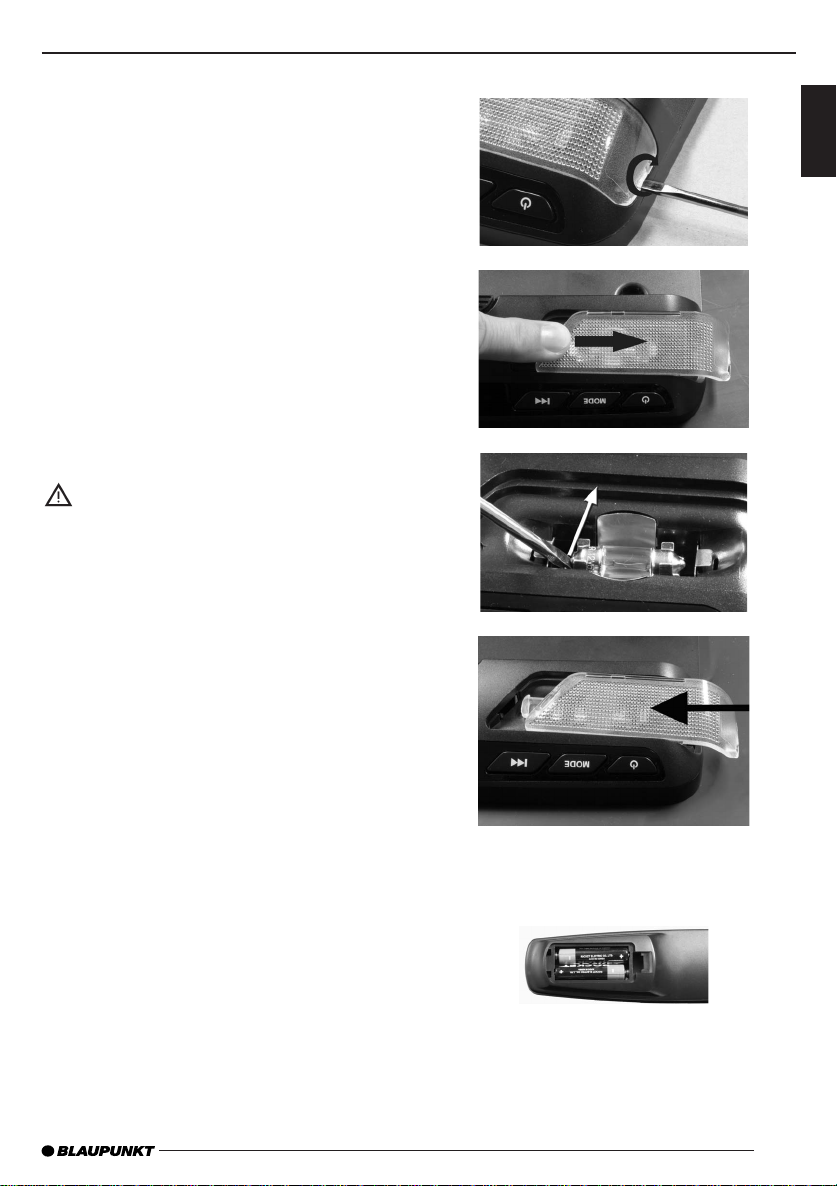
Changing the bulbs
Remove the plastic cover from the
쏅
bulb.
Slide a screwdriver of approximately
쏅
3 mm into the sideways slot.
Turn it carefully to lift this side of the
쏅
cover.
Push and slide at the same time to move
쏅
the cover away.
Remove the old bulb.
쏅
CAUTION:
The bulb may still be very hot. Let it cool
down before you touch it.
BULBS/BATTERIES
ENGLISH
Insert a new bulb (12 V, 5 W).
쏅
Slide the cover back on.
쏅
Bulb technical data
Diameter: 8 mm
Length: 28 mm
Voltage: 12 V, 5 W
Changing the batteries in the
remote control
Slide the lug towards the battery com-
쏅
partment cover and then upwards and
away.
Remove the batteries and insert the
쏅
new 1.5 V batteries (type AAA) in accordance with the diagram in the battery
compartment.
11

FIRST USE SWITCHING ON/OFF
First use
When you operate the IVOD-1022 for the
fi rst time, you must insert the batteries in
the remote control.
Activating the remote control
Inserting the batteries
1. Open the battery compartment by removing the cover.
2. Insert the new batteries. Battery classifi cation: Two AAA batteries. Make
sure that the battery poles are positioned as shown in the battery compartment.
3. Close the battery compartment.
Using the remote control
Point the remote control at the infrared
receiver in the front of the device.
Operating angle: Approximately 30° in each
direction from the front of the infrared
receiver.
Switching on/off
Comment:
The device is ready for operation when
button 1 lights up on the device.
쏅
To switch on/off, press the POWER but-
ton 1 on the remote control or the
POWER button 1 on the device.
Switching on the IVOD-1022 interior
lighting
There are two ways to switch on the lights:
1. ON/OFF switch M.
2. Vehicle door switch
(door open = minus 12 V).
Opening the LCD screen
Press the release button N of the
쏅
IVOD-1022 to fold down the LCD
screen.
Lower the LCD screen to watch TV until
쏅
it is at an angle of approximately 90° to
the IVOD-1022 base unit.
12
Closing the LCD screen
Slide the LCD screen back into the base
쏅
unit until it engages again in the release/
holding mechanism.
ADJUSTING THE VOLUME
DVD OPERATION
Adjusting the volume
Note:
There are no loudspeakers available on the
IVOD-1022.
Please connect infrared headphones or
AV OUT NF.
You can adjust the volume in increments
from 0 (off) to 16 (maximum).
To increase the volume,
쏅
press the VOLUME + button G.
To decrease the volume,
쏅
press the VOLUME - button G.
Mute
You can decrease the volume abruptly.
Press the MUTE button F.
쏅
"MUTE" is displayed on the screen.
Cancelling mute
Press the MUTE button F again.
쏅
DVD operation
The IVOD-1022 can be used to play DVDs,
video CDs (VCD), super video CDs (SVCD),
commercial audio CDs and photo CDs
(VCD 2.0) and MP3 CDs.
These instructions are for operation with
DVDs. The button functions for playing
audio CDs are identical.
The IVOD-1022 is intended for the playback
of DVDs with the country code 2. Should
the device be intended for other country
codes, this is indicated by a sticker on the
last page of these instructions and on the
device.
CD-Rs and CD-RWs ("self-burned" CDs)
can usually be played. Due to the varying
CD quality, however, Blaupunkt cannot guarantee a faultless function.
To ensure proper functioning, use only CDs
with the Compact-Disc logo. Copy-protected CDs can cause playback problems.
Blaupunkt cannot guarantee the proper
functioning of copy-protected CDs.
Self-created media such as VCD/SVCD and
DVD-R/RW, DVD+R/RW can usually be played.
Blaupunkt cannot guarantee a faultless
compatibility and playback depending on
the recordable media and software used
to create and write these media.
ENGLISH
Risk of severe damage to the DVD
drive.
Contoured DVDs/CDs (shape CDs) and
DVDs/CDs with a diameter of 8 cm must
not be used.
We accept no responsibility for any damage to the DVD drive that may occur as
a result of the use of unsuitable DVDs/
CDs.
13

DVD OPERATION
Disc formats supported by this player:
DVD 12 cm
•
•
DVD-R / DVD-RW
•
DVD+R / DVD+RW
•
DVD DivX 3.11; 4.0; 5.0...x
•
Video CD (VCD) super video CD (SVCD)
12 cm
•
Photo CD (VCD 2.0) T-menu PBC ON/OFF
•
Audio CD (with CD text are not supported), CD-R and CD-RW 12 cm
•
MP3 CD with MP3 fi les for music playback. Only "Joliet" or "ISO 9660" MP3
CD formats are supported.
The following discs are not supported by
this player:
•
DVD-ROM
•
CDV
•
CD-G
•
DVDs with another region code.
Inserting/removing a DVD/CD
The IVOD-1022 is equipped with a slot-in
drive without a loading drawer. The use of
slot-in drives is the only way to guarantee
a good vibration damping of the drive in
the device.
Inserting a CD/DVD
쏅
Slide the DVD/CD with the printed side
at the back into the DVD/CD slot on the
rear of the screen until you feel a slight
resistance.
The DVD/CD is drawn into the drive; this
process must not be hindered or aided.
The DVD/CD is loaded. Either the DVD menu
is displayed or playback starts. This action
is dependent upon the inserted DVD.
Removing a DVD/CD
쏅
Press the EJECT button J on the re-
mote control or the EJECT button J
on the device.
The DVD/CD is ejected.
쏅
Carefully remove the DVD/CD.
Starting playback
After the desired DVD/CD is loaded, either
the DVD menu is displayed or playback
starts. This action is dependent upon the
inserted DVD.
press the ENTER/PLAY button C on
쏅
the remote control or the
on the device.
The DVD starts playing.
button K
Display
Different information about the playing time
can be shown on the screen. The display
can be hidden.
The following displays are available:
•
TITLE 01/02 CHAPTER 33/45
01 : 26 : 14:
The fi rst of two main sections (titles)
and the 33rd of 45 chapters of this section is played. The elapsed playing time
is displayed beneath.
•
TITLE REMAIN
00 : 31 : 58:
The time remaining of the current title
is displayed.
•
CHAPTER ELAPSED
00 : 01 : 34:
The elapsed playing time of the current
chapter is displayed.
•
CHAPTER REMAIN
00 : 05 : 22:
The remaining playing time of the current chapter is displayed.
14

DVD OPERATION
Showing/changing the display
information
Press the DISPLAY button H on the
쏅
remote control until the desired information is displayed.
The display information is shown at the top
edge of the display.
Hiding the display information
Press the DISPLAY button H until "OFF" is dis-
played briefl y and the screen display is hidden.
Fast forward
You can fast forward the DVD at 2x, 4x, 8x,
16x, 32x and 64x the speed (dependent
upon the DVD; some DVDs can only be
played up to 16x the speed).
To fast forward or fast reverse the DVD,
press the FORWARD B button on the
쏅
remote control until the desired speed
is displayed.
Stopping fast forward
To stop fast forward,
press the ENTER/PLAY button C on
쏅
the remote control or the button K
on the device.
The DVD is played back at normal speed.
Slow motion
The DVD can be played forward or reversed
at reduced speed.
Press the SLOW button > on the remote
쏅
control once or several times to reduce
the playing speed.
After pressing the SLOW button > once,
the playback is switched to forwards speed
at half the speed (SF 1/2x).
The speed is reduced further each time
you press it again (a quarter, a sixth and an
eighth). The speed and SF for slow forward
are displayed on the screen.
Once the speed has reached an eighth, the
fi lm is played backwards in slow motion
each time you press the button again. The
speed and SR for slow rewind are displayed
on the screen.
To play the DVD at regular speed again,
press the ENTER/PLAY button C on
쏅
the remote control or the
on the device.
button K
Interrupting playback (pause) and
starting again
Interrupting playback
Press the PAUSE/STEP button D on the
쏅
remote control or the
the front of the device.
Playback is interrupted.
Continuing playback
Press the PAUSE/STEP button D on the
쏅
remote control or the
the front of the device again.
button K on
button K on
Freeze frame
Press the PAUSE/STEP button D on the
쏅
remote control or the button K on
the device during playback.
The playback is interrupted and shown as
a freeze frame.
Continuing playback
To continue the playback,
press the ENTER/PLAY button C on
쏅
the remote control or the
on the device.
button K
Skipping a chapter
A title of the DVD can be divided into several
smaller chapters.
To jump to the next or another chapter,
press the SKIP
쏅
remote control or on the front of the
device once or several times.
The playback jumps to the beginning of
the next or the corresponding following
chapter.
button : on the
ENGLISH
15

DVD OPERATION
To jump to the beginning of the current or
a previous chapter,
쏅
press the SKIP
remote control or on the front of the
device once or several times.
The playback jumps to the beginning of
the current or the corresponding previous
chapter.
Note:
If a DVD is played with DivX, the SKIP
buttons
forwards or backwards 3, 5 or 10 minutes.
See page 24 for how to set this.
/ : can be used to skip
button : on the
Repeated playback of a DVD title
A DVD is divided into different chapters
and titles, which can be selected on an
individual basis.
Repeated playback of a chapter or title
To repeat the current chapter,
쏅
press the REP button 2 on the remote
control.
"CHAPTER REPEAT ON" is displayed on the
screen.
To repeat the current title,
쏅
press the REP button 2 on the remote
control for a second time.
"TITLE REPEAT ON" is displayed on the
screen.
Cancelling repeat
If you want to cancel the repeat function,
쏅
press the REP button 2 on the remote
control repeatedly until "REPEAT OFF" is
displayed on the screen.
Selecting a chapter
To directly select a chapter,
쏅
press the PREV./GOTO button @ on the
remote control.
The number of the current title and the
total number of titles are displayed next to
"TITLE" on the screen. Next to this, you will
see the number of the chapter and the total
number of available chapters. The chapter
number is highlighted yellow.
쏅
Use the number buttons @ on the remote control of enter the number of
the chapter you require and press the
ENTER/PLAY button C.
Playback is continued at the desired position.
Selecting the playing time
You can directly select a specifi c position
on the DVD by entering the playing time of
this position.
To jump to a specifi c position,
쏅
press the PREV./GOTO button @ on the
remote control twice.
The number of the current title and the
total number of titles are displayed next to
"TITLE" on the screen.
Next to this, you will see "TIME" and the
input fi eld for the playing time. The input
fi eld is highlighted yellow.
쏅
Use the number buttons @ on the remo-
te control to enter the required position
in the format "hh.mm.ss" and press the
ENTER/PLAY button C.
Playback is continued at the desired position.
Direct selection of a chapter
The remote control can also be used to directly select a chapter or a specifi c position
(playing time).
16
Resuming playback at the start of
the fi rst title of a DVD
Press the STOP/RETURN button ? on
쏅
the remote control twice.
Press the ENTER/PLAY button C on the
쏅
remote control.
Playback resumes at the start of the title.

DVD OPERATION
Note:
For most DVDs, this is the main menu (root)
of the DVD.
Displaying subtitles
To display subtitles,
press the SUBTITLE button 9 on the
쏅
remote control.
The subtitles are displayed. The display
information appears. The current language and the number of languages available for subtitles are displayed next to
"SUBTITLE".
To change the language of the subtitles,
press the SUBTITLE button 9 once or
쏅
repeatedly until the subtitles are displayed in the desired language.
Note:
You can also determine in the menu of the
DVD whether and in which language subtitles are displayed (see DVD menu). In addition, you can set your preferred language
for subtitles in the setup menu. For further
details, read the section "Presetting the
subtitle language" in the "Setup" chapter.
Selecting the playback language
To select the playback language,
press the AUDIO button 8 on the remo-
쏅
te control once or several times.
The playback language is changed. The
display information is shown. The current
language, the number of the language and
the number of available playback languages
are shown.
Note:
You can also select the playback language in
the menu of the DVD (see DVD menu). In addition, you can set your preferred language
for playback in the setup menu. For further
details, read the section "Presetting the
playback language" in the "Setup" chapter.
Changing the camera perspective
There are DVDs that offer two or more different camera perspectives for a scene.
The number of the current camera perspective and the number of possible camera
perspectives is shown in the display information next to the camera symbol.
To change the camera perspective,
쏅
press the ANGLE button 7 on the re-
mote control.
The scene is shown from the next camera perspective. The display information is
shown.
Note:
You can specify in the setup menu that a
camera symbol
camera perspectives are available. For further details, read the section "Displaying
the camera perspective" in the "Setup"
chapter.
is shown if additional
Enlarging an image area (Zoom)
You can enlarge any area of the fi lm which
is being played by up to three times.
To enlarge the image area,
press the ZOOM button 6 on the remo-
쏅
te control once or several times.
Every time you press the button, the central
image area is enlarged incrementally. 1.5x,
2x and 3x zoom levels are available.
Note:
After setting the desired zoom, you can
freely move the image area with the arrow
buttons = on the remote control.
Zooming out
To continue viewing the movie without
zoom,
press the ZOOM button 6 on the remo-
쏅
te control repeatedly until "ZOOM OFF"
is displayed on the screen.
ENGLISH
17

DVD MENU
DVD menu
The DVD menu is offered by the inserted
DVD. If you insert a DVD and playback
starts, the DVD menu automatically appears
on the screen.
Note:
The selection options offered by the DVD
menu are dependent upon the respective
DVD.
The DVD menu of a DVD can offer the following:
•
You can select from different languages
for the playback or the subtitles.
In addition to the actual fi lm, you can
•
also view the trailer that was used in
the cinema or on television to promote
the fi lm or view the "Making of ..." for
the fi lm.
A fi lm is divided into several sequential
•
chapters. You can select a chapter and
start the playback directly in the chapter
without fi rst having to "fast forward" to
the corresponding position like you have
to with a video cassette.
Exiting the DVD menu
When you make a corresponding selection
in the DVD menu, e.g. the playback of the
movie, you automatically leave the DVD
menu and the playback starts.
Displaying the title menu
You can also call the title menu directly to
conveniently select the individual titles/
chapters:
Press the T.MENU button 4 on the
쏅
remote control.
The title menu appears.
Displaying the DVD menu
You can end the playback at any time and
display the menu of the DVD.
Press the MENU button 5 on the remote
쏅
control.
Selecting menu entries
DVDs generally provide menus in which you
can select among different options, such as
"Start fi lm", "Chapter selection", etc.
To switch between the individual menu
entries,
쏅
press one of the arrow buttons = on
the remote control.
To confi rm a menu entry,
쏅
press the ENTER/PLAY button C on the
remote control.
18
Monitor setup
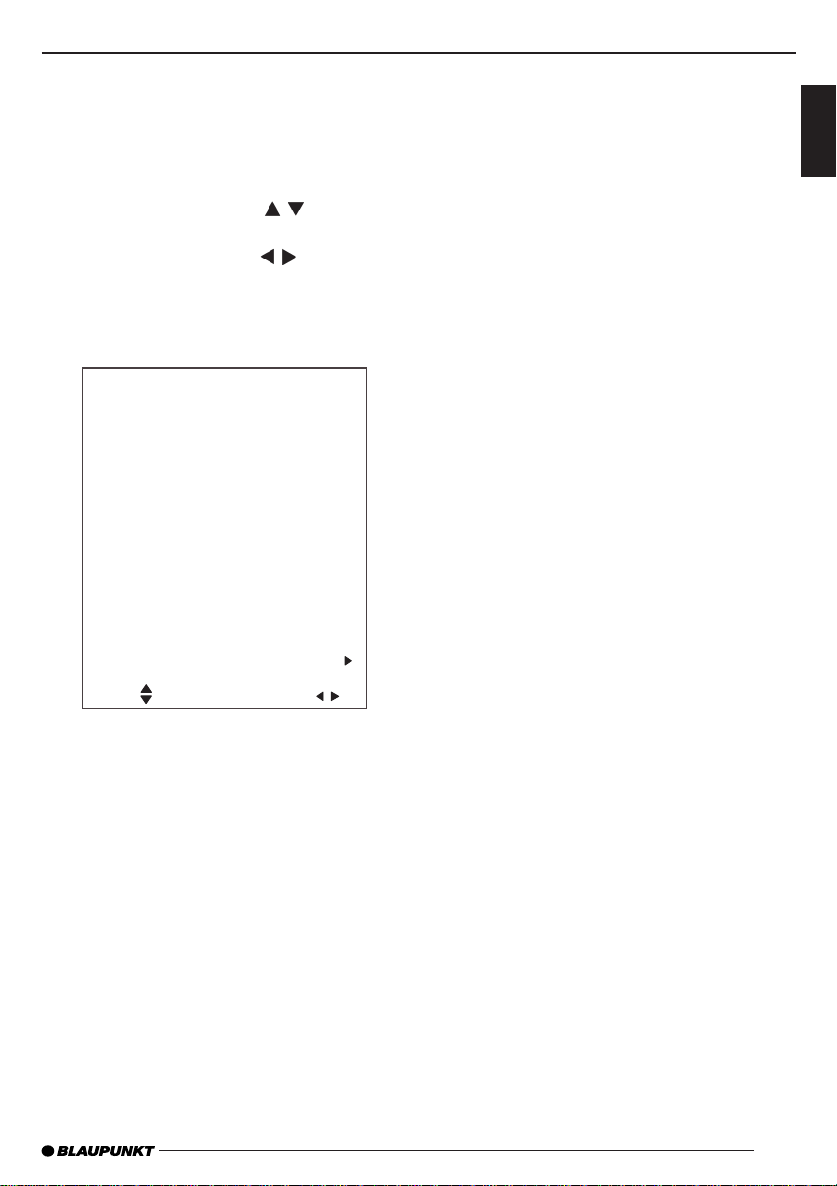
Operation
Press the MON.SETUP button < on the
쏅
remote control to call up the MONITOR
SETUP menu.
Use the arrow buttons
쏅
the options.
Use the arrow buttons / = to change
쏅
the settings.
Press the MON.SETUP button again to
쏅
exit <.
Options Settings
Optionen Einstellungen
PICTURE USER
BRIGHTNESS 0-50
CONTRAST 0-50
COLOR 0-50
TINT 0-50
SHARPNESS 0-50
ZOOM NORMAL
DISPLAY DOWN
SYSTEM RESET
/ = to select
NORMAL
CINEMA
SPORTS
WIDE 1
WIDE 2
UP
MONITOR SETUP MENU
TINT
•
Set the picture tint (only for NTSC)
SHARPNESS
•
Set the sharpness of the picture
ZOOM
•
Change the picture height/width
- NORMAL
- WIDE 1
- WIDE 2
DISPLAY
•
Change the picture display
- UP - DOWN
- Flip vertically
SYSTEM RESET
•
Reset to the parameters preset at the
factory.
ENGLISH
SEL: ADJ:
Monitor setup menu
PICTURE
•
Make picture settings under USER:
BRIGHTNESS, CONTRAST, COLOR, TINT
(only with NTSC) and SHARPNESS can
be set from 0-50. The settings are fi xed
for NORMAL, CINEMA and SPORTS.
•
BRIGHTNESS
Set the brightness
CONTRAST
•
Set the contrast
COLOR
•
Set the colour intensity
19
EXTERNAL SOURCES CD/DVD/MP3 operation
External sources
You can connect two external sources to the
IVOD-1022. For example, a television tuner
via the AUDIO/VIDEO-IN jacks and a games
console via the AUX -IN jacks.
The internal AUDIO/VIDEO signals can be
output via the AV-Out jacks.
Note:
To prevent damage to the devices when connecting external sources, make sure that the
colour of the cables/jacks correspond on
the external sources and the IVOD-1022.
Jacks
VIDEO IN (yellow)
AUDIO IN (red/white)
- Red cinch = right-hand channel
- White cinch = left-hand channel
To switch between playback from the internal DVD drive and the external sources,
press the DVD/TV/EXT button 3 on
쏅
the remote control repeatedly until the
desired source is displayed.
CD/DVD/MP3 operation
As well as DVDs and video CDs, you can
also play audio CDs, photo CDs (VCD 2.0)
and MP3 CDs.
Audio CD
If you insert and play an audio CD, you can
use the functions, such as play, search,
pause and repeat, in the same way as in
DVD mode.
Photo CD/DVD
If you insert a photo CD, the slide show will
begin after approximately 3 seconds.
쏅
Press the STOP/RETURN button ? to
bring up the "(MP3 . JPG) SMART NAVI"
menu.
Use the arrow buttons = on the remote
control to switch easily between tracks and
folders in the smart navi menu.
쏅
Once you have made your selection press
the ENTER/PLAY button C on the remote control.
Photo CDs VCD 2.0
쏅
When "Press play to continue" appears,
press the
Press the T.MENU button 4 on the re-
쏅
mote control, > "PBC on" appears.
Press the
쏅
> the start page which you have set
appears.
Press the button K on the device,
쏅
> the slide show starts.
button K on the device.
button K on the device,
20
MP3 CD
MP3 CDs must be in the "Joliet" or
"ISO 9660" format.
When you insert an MP3 CD, the "(MP3 . JPG)
SMART NAVI" navigation menu appears on
the screen.

EQUALIZERCD/DVD/MP3 operation
Once you have pressed the STOP/RETURN button ?, you can use the arrow
buttons = on the remote control to switch
easily between the tracks and folders.
Once you have made your selection press
쏅
the ENTER/PLAY button C on the remote control.
Note:
The other functions – play, search, pause
and repeat (as described for DVD mode)
– can also be used in MP3 mode.
Equalizer
The IVOD-1022 features an integrated 7-band
equaliser which allows you to optimise the
music sound to your vehicle or to the music
style. There are seven fi xed sound presets
and a variable personal sound setting.
Fixed sound presets:
classic
•
•
jazz
rock
•
•
pops
•
ballad
•
dance
•
standard
Variable sound setting:
•
personal
Selecting fi xed sound presets
press the EQUALIZER button E on the
쏅
remote control.
The current setting or the last used setting
is displayed.
Press the ENTER/PLAY button C on
쏅
the remote control repeatedly until the
desired setting is displayed.
The setting is saved and closed with the
쏅
ENTER/PLAY button C or automatically
after 3 seconds.
ENGLISH
Selecting variable sound settings
(personal equalizer)
The personal sound settings allow you to
adjust the music playback to your personal
taste.
21

EQUALIZER
Notes on adjusting the settings
We recommend you use a CD that you are
familiar with for making changes to the
settings.
쏅
Listen to the CD.
쏅
What kind of impression does the sound
make?
쏅
Adjust the values for the equaliser – see
the "Tips for adjusting the equaliser"
table.
Setting the "
To set the personal equaliser,
쏅
press the EQUALIZER button E on the
remote control.
The current setting or the last used setting
is displayed.
쏅
Press the ENTER/PLAY button C on the
remote control repeatedly until "perso-
nal" is displayed.
쏅
Use the arrow buttons 왗/왘 = on the
remote control to move the selection
marker (yellow) to the frequency that
you wish to change.
쏅
Use the arrow buttons 왖/왔 = on the
remote control to move the frequency up
or down to the desired value.
Note:
Playback is adjusted to the setting while you
are making the settings.
The equaliser display is hidden a few seconds after the last setting is made, but the
equaliser remains active until you switch
it off.
personal" equaliser
Switching off the equaliser
To deactivate the equaliser,
press the EQUALIZER button E on the
쏅
remote control.
"EQUALIZER OFF" is briefl y displayed on
the screen.
22
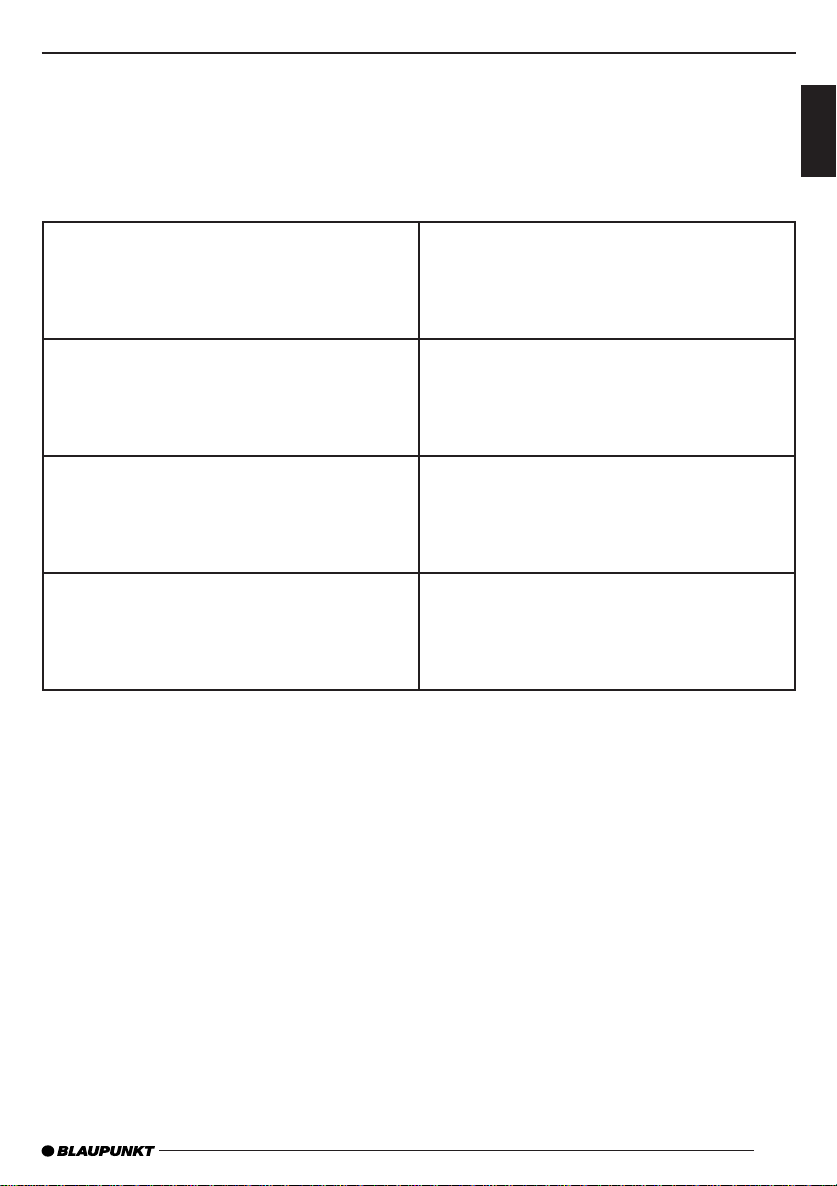
Tips for adjusting the equaliser
Initially set the mid range/treble and then
the bass.
Sound impression/problem Action
EQUALIZER
ENGLISH
Bass sound is too weak
Dirty bass
Booming sound
Unpleasant pressure
Sound very much in the foreground,
aggressive, no stereo effect.
Dull sound
Little clarity
No brilliance to the instruments
Increase bass to
frequency: 60 to 150 Hz
gain: +4 to +6
Reduce the lower mid range to
frequency: 150 to 400 Hz
gain: Approx. -4
Reduce the lower mid range to
frequency: 1,000 to 2,000 Hz
gain: -4 to -6
Boost the treble range to
frequency: 6,000 to 15,000 Hz
gain: +2 to +4
23

DVD SETUP BASIC SETTINGS
DVD setup
The setup of the IVOD-1022 offers a variety
of options to customise the device.
Calling up the setup menu
To call up the setup menu,
press the DVD SETUP button ; on the
쏅
remote control.
Performing settings in the setup
menu
Settings in the setup menu are basically
made as described under "Selecting the
language for the screen display".
Note:
The settings under "PREFERENCES" can
only be made when no DVD has been
inserted.
Selecting the language for the
screen display
Call up the setup menu.
쏅
Use the arrow buttons 왖/왔 = to select
쏅
the "GENERAL SETUP" menu entry.
Confirm with the ENTER/PLAY but-
쏅
ton C.
Use the arrow buttons 왖/왔 = to select
쏅
the "OSD LANG" menu entry.
Press the arrow button 왘 =.
쏅
The available languages for the screen display
are shown.
Use the arrow buttons 왖/왔 = to se-
쏅
lect the menu entry for the desired language.
Confirm with the ENTER/PLAY but-
쏅
ton C.
Exit the setup with the DVD SETUP
쏅
button ;.
The setting is stored and you exit the setup
menu.
Selecting the playback language
The playback language is set under the
"AUDIO" menu entry in the "PREFERENCES"
menu.
Selecting the language of subtitles
Subtitles are set under the "SUBTITLE"
menu entry in the "PREFERENCES" menu.
Selecting the language for the DVD
menu
The language for the DVD menu is set under the "DISC MENU" menu item in the
"PREFERENCES" menu.
Selecting the monitor setting
The monitor is set under the "TV DISPLAY"
menu entry in the "PREFERENCES" menu.
The following monitor settings are available:
•
Normal/PS: The DVD player is connected
to a 4:3 monitor. The wide image is displayed on the screen at full width with
black bars at the top and bottom edge
of the screen.
Normal/LB: The DVD player is connected
•
to a 4:3 monitor.
played using the full height of the screen.
The left and right edge of the wide image
is automatically cut off.
WIDE: The DVD player is connected to
•
a 16:9 monitor. The wide image is displayed on the screen at full size.
The wide image is dis-
DivX
3, 5 or 10 minutes is set under "SOFT CHAP.
ON" menu entry in the "PREFERENCES"
menu.
24

DVD SETUP BASIC SETTINGS
Parental control
You can secure the device against unauthorised use by assigning a password. In addition, you can specify a rating level. Rating
level means that some DVDs are equipped
with a code that defi nes the age-appropriate release. If you set a rating level that is
lower than the one found on the inserted
DVD, it can be played only after entering
the password.
Note:
Not all DVDs support the Rating Level
function.
In the menu you can defi ne which movies
can be played. These ratings follow the
recommendations of the Motion Picture
Association of America (MPAA).
The following options can be selected:
1 G: Approved for children
2: Approved for children
3 PG: Accompanying adult during
playback is suggested.
4 PG 13: Accompanying adult is sug-
gested, not suitable for children under the age of 13.
5: There is no rating for the con-
tent of the DVD.
6 PG-R: Prohibited for children and
adolescents, content portrays
violence, obscene language,
etc.
7 NC 17: Contents not suitable for ado-
lescents under the age of 17.
8 ADULT: Contents for adults only: vio-
lence, sex, etc.
No
PARENTAL: No parental control.
Note:
Some blocked DVDs can be released directly at the start with YES (ENTER) and the
password. Others require you to change the
rating level in the setup before the playback
of the DVD. This action is dependent upon
the DVD.
Defi ning the parental control
To set parental control,
call up the setup menu.
쏅
Use the arrow buttons 왖/왔 = to select
쏅
the "PREFERENCES" menu entry.
Confirm with the ENTER/PLAY but-
쏅
ton C.
The menu for the preferences is displayed.
Use the arrow buttons 왖/왔 = to select
쏅
the "PARENTAL" menu entry.
Press the arrow button 왘 =.
쏅
The available age-appropriate releases are
displayed.
Use the arrow buttons 왖/왔 = to select
쏅
the desired age-appropriate release.
Confirm with the ENTER/PLAY but-
쏅
ton C.
Enter the password with the number
쏅
buttons 0-9 @ on the remote control.
Note:
If you have not yet assigned a password, the
preset password is 0000.
Confirm with the ENTER/PLAY but-
쏅
ton C.
Exit the setup with the DVD
쏅
button ;.
The setting is stored, you exit the setup
menu.
SETUP
ENGLISH
25

DVD SETUP BASIC SETTINGS
Changing the password
To change the password,
쏅
call up the setup menu.
쏅
Use the arrow buttons 왖/왔 = to select
the "PREFERENCES" menu entry.
쏅
Confirm with the ENTER/PLAY button C.
The menu for the preferences is displayed.
쏅
Use the arrow buttons 왖/왔 = to select
the "PASSWORD" menu entry.
쏅
Press the arrow button 왘 =.
쏅
Confirm "CHANGE" with the ENTER/
PLAY button C.
쏅
If you have not yet assigned a password,
enter the new password next to "NEW
PASSWORD" with the number buttons
0-9 @.
쏅
If you have already assigned a password,
fi rst enter the old password next to "OLD
PASSWORD" with the number buttons
0-9 @.
Note:
If you have not yet assigned a password, the
preset password is 0000.
쏅
Enter the new password twice with the
number buttons 0-9 @.
쏅
Confirm with the ENTER/PLAY button C.
쏅
Exit the setup with the DVD
button ;.
The setting is stored, you exit the setup
menu.
SETUP
Setting the colour television
standard of the TV device
For a perfect image quality, set the colour
television standard on the DVD player which
is used by the attached monitor.
"PAL" is the standard used in Europe,
"NTSC" is the standard for the American/
Asiatic region.
If you select the "MULTI" setting, the standard of the DVD is used for the output.
The television standard is set under the "TV
TYPE" menu item in the "PREFERENCES".
Displaying the camera perspective
You can specify that a camera symbol
"
" is shown if more than one camera
perspective is available on the DVD. For
this purpose, select the setting "ON".
The camera perspective is set under the
"ANGLE MARK" menu item in the "GENERAL
SETUP" menu.
AV OUT output
When the device is fi tted in the vehicle, the
vehicle system (amplifi er, monitor) can be
connected via the AV-OUT output.
Setting the "Dual Mono"
For DVDs with 1+1 audio mode (two mono
channel), you can set how the two channels
should be played back.
The following settings are available:
•
Stereo:
Stereo playback of a 1+1 programme.
Channel 1 is played back from the left
output, channel 2 from the right output.
L - MONO:
•
The left channel of the DVD is played back
from both outputs (left and right).
R - MONO:
•
The right channel of the DVD is played
back from both outputs (left and
right).
Mix - MONO:
•
Channels 1 and 2 of the DVD are played
back from both outputs (left and
right).
26

Call up the setup menu.
쏅
Use the arrow buttons 왖/왔 = to select
쏅
the "AUDIO SETUP" menu entry.
Confirm with the ENTER/PLAY but-
쏅
ton C.
Use the arrow buttons 왖/왔 = to select
쏅
the "DUAL MONO" menu entry.
Press the arrow button 왘 =.
쏅
Use the arrow buttons 왖/왔 = to select
쏅
the desired setting.
Confirm with the ENTER/PLAY but-
쏅
ton C.
Exit the setup menu with the DVD SETUP
쏅
button ;.
The setting is stored, you exit the setup
menu.
Setting compression
You can use "COMPRESSION" to set the dynamics of a Dolby programme in increments
from "OFF" to "Full". Select the "FULL" setting for full dynamic adjustment.
Call up the setup menu.
쏅
Use the arrow buttons 왖/왔 = to select
쏅
the "AUDIO SETUP" menu entry.
Confirm with the ENTER/PLAY but-
쏅
ton C.
Use the arrow buttons 왖/왔 = to select
쏅
the "COMPRESSION" menu entry.
Press the arrow button 왘 =.
쏅
Use the arrow buttons 왖/왔 = to select
쏅
the desired setting.
Confirm with the ENTER/PLAY but-
쏅
ton C.
Exit the setup with the DVD SETUP
쏅
button ;.
The setting is stored, you exit the setup
menu.
DVD SETUP BASIC SETTINGS
Downmix of Dolby Digital DVDs
The IVOD-1022 uses the downmix function
to calculate a compatible stereo signal from
the Dolby Digital signal.
You will fi nd the downmix setting under
"SPEAKER SETUP" in the setup menu.
Activating the screensaver
The IVOD-1022 has a screensaver which
prevents images (e.g. menus) being burnt
into the liquid crystal display.
If the screensaver is activated, a logo is
displayed approximately 60 seconds after
the last user action to prevent individual
images being burnt into the screen.
You will fi nd the setting for the screen saver
under "SCREEN SAVER" in the "GENERAL
SETUP" menu.
Resetting the device
You can reset the device, thereby clearing
all personal settings.
Note:
This cannot be performed when a DVD is
inserted.
Call up the DVD setup menu.
쏅
Use the arrow buttons 왖/왔 = to select
쏅
the "PREFERENCES" menu entry.
Confirm with the ENTER/PLAY but-
쏅
ton C.
The menu for the preferences is displayed.
Use the arrow buttons 왖/왔 = to select
쏅
the "DEFAULTS" memory entry.
Press the 왘 button =.
쏅
The "RESET" menu entry is marked.
If you really wish to reset the device,
press the ENTER/PLAY button C.
쏅
The basic factory settings are loaded.
ENGLISH
27

SPECIFICATIONS
Specifi cations
Screen size: 10.2" monitor
Screen resolution: 800 (H) x 3 (RGB) x 480 (V)
Active area: 222 (H) x 133.2 (V)
Signal system: Dual system NTSC/PAL
Brightness: 400 cd/m
Contrast: 400:1
Viewing angle range: Left/right: +/-65°
Up/down: +50/-65°
Video input level: 1 Vpp 10%
Audio input level: 2.0 Vrms
Carrier frequency infrared sensor: L-CH: 2.3 MHz
R-CH: 2.8 MHz
Operating voltage (DC): 10-18 V
Current consumption: Device "ON" < 2.2 A (at +12 V)
Current consumption: Device "OFF" 120 mA (at +12 V)
Closed current: "Ignition OFF" < 1 mA (at +12 V)
Operating temperature: -20 °C to +70 °C
Storage temperature: - 40 °C to +85 °C
Dimensions (WxHxD): 252 x 40 x 253 mm
Weight: ≤ 1800 g
2
Subject to changes!
28

MEMO
ENGLISH
29

控制
1 POWER(電源),用作開啟∕關閉設備。
2 REP,用作激活∕關閉 REPEAT(重複)
功能。
SCAN(掃描)模式只限在電視模式使用。
3 DVD/TV/EXT,用作切換 DVD/CD/MP3
操作和外部音源 AUX1 和 AUX2。
4 T.MENU,用作進入 DVD 標題菜單。
5 MENU,用作進入 DVD 主菜單(根菜
單)。
6 ZOOM,播放時用作放大圖像區域。
7 ANGLE,用作更改視角。
8
AUDIO,用作切換 DVD 上的曲目。
9 SUBTITLE,用作切換 DVD 上的字幕。
: SKIP 鍵用作跳至上一個或下一個章節
(DVD)或曲目(`3)。
; DVD SETUP,用作打開設定菜單進入基本設
置。
< MON.SETUP,顯示器的基本設置。
= 箭頭鍵用作選擇菜單項目。
+ 和 CH- 沒有功能。
CH
> SLOW,用作開始∕停止慢動作功能。
? STOP/RETURN,用作停止播放。
@
號碼鍵 0 至 9 和 PREV./GOTO 鍵,用作直
接選擇章節或章節內的片段。
A
BACKWARD,用作快速倒帶。
B FORWARD,用作快速進帶。
C ENTER/PLAY,用作選擇和確定菜單項目以
及開始播放。
D PAUSE/STEP,用作暫停播放(定格)。
E EQUALIZER,用作選擇 EQ 預設、定制您自
設的 EQ 和關閉 EQ。
F MUTE,用作切斷播放音頻。
G Volume + -,用作設置音量。
H DISPLAY,用作選擇不同的顯示模式。
I A-B 鍵,用作指定重複功能的起點和終點。
如何開啟∕關閉重複功能。
SAV/ERS,沒有功 能。
J EJECT 鍵,用作彈出 CD/DVD。
K 在設備上的 鍵,PAUSE/PLAY。
L 遙控器的紅外線接收器。
M 開啟∕關閉燈光開關
N 鍵用作解鎖顯示器。
30

目錄
控制 ........................................... 30
注意事項 .................................... 33
馬路安全 .......................................... 33
安全備注 .......................................... 33
循環和處理 ....................................... 33
交貨內容 .................................... 34
選擇性裝備 ....................................... 34
紅外線耳機 ....................................... 34
安裝和連接 ................................. 35
安裝和安全備注 ................................ 35
顯示器安裝 ....................................... 35
連接 ................................................. 36
不使用繼電器之連接 .......................... 37
使用繼電器之連接 ............................. 37
更改燈泡 .................................... 38
更換遙控器內的電池 ................... 38
第一次使用 ................................. 39
激活遙控器 ....................................... 39
使用遙控器 ....................................... 39
啟動∕關閉開關 .......................... 39
開啟 IVOD-1022 的內部照明 .............. 39
打開液晶顯示器 ................................ 39
關閉液晶顯示屏幕 ............................. 39
調節音量 .................................... 40
靜音 ................................................. 40
取消靜音 .......................................... 40
DVD 操作................................... 40
插入∕拿出 DVD/CD ......................... 41
開始播放 .......................................... 41
顯示 ................................................. 41
快進 ................................................. 42
停止快進 .......................................... 42
慢動作 .............................................. 42
暫停播放(暫停)和重新開始 ............ 42
定格 ................................................. 42
跳章節 ............................................. 42
重複播放某個 DVD 標題 .................... 43
直接選擇章節 .................................... 43
從 DVD 的第一個標題的起點恢復播放 ....43
顯示字幕 .......................................... 44
更改畫面視角 .................................... 44
放大圖像區域(圖像放大縮小) ......... 44
DVD 菜單................................... 45
顯示 DVD 菜單 .................................. 45
選擇菜單選項 .................................... 45
退出 DVD 菜單 .................................. 45
顯示標題菜單 .................................... 45
顯示器設定 ................................. 46
操作 ................................................. 46
顯示器設定菜單 ................................ 46
外部音源 .................................... 47
CD/DVD/MP3 操作 ................... 47
音頻 CD ........................................... 47
照片 CD/DVD ................................... 47
MP3 CD ........................................... 47
等化器 ....................................... 48
選擇固定預設聲音 ............................. 48
選擇變量預設聲音(個人等化器) ...... 48
設置“個人”等化器 .......................... 49
關閉等化器 ....................................... 49
調節等化器的提示 ............................. 50
DVD 設定................................... 51
打開設定菜單 .................................... 51
執行設定菜單內的設置 ...................... 51
選擇顯示屏幕顯示語言 ...................... 51
選擇播放語言 .................................... 51
選擇字幕語言 .................................... 51
選擇 DVD 菜單語言 ........................... 51
選擇顯示器設置 ................................ 51
中文
31

目錄
DivX ................................................ 51
影片級別控制 .................................... 52
定制影片級別控制 ............................ 52
更改密碼 .......................................... 53
設置電視機設備的彩色電視標準 ......... 53
顯示畫面視角 .................................... 53
AV OUT 輸出 ................................... 53
設置“雙單聲道” ............................. 53
設置壓縮率 ....................................... 54
杜比數碼 DVD 的低音混和 ................. 54
激活屏幕保護程式 ............................. 54
重新設置設備 .................................... 54
規格 ........................................... 55
32

注意事項
注意事項
感謝您選擇 Blaupunkt 產品。我們希望您喜歡
使用這款新產品。
首次使用本裝置時請先細讀此操作手冊。
Blaupunkt 的編輯人員一直不斷改善操作手冊
的制作以便更為清楚易懂。但是,如果您在如
何操作該設備上還有任何問題,請與您的經銷
商或您的國家的熱線電話聯系。您會在該手冊
的背面找到印刷的電話號碼。
我們對在歐洲聯盟內購買的本公司產品提供廠
家保證。您可以在 www.blaupunkt.de 閱讀
有關保 證條款或直接向以下地點索取:
Blaupunkt GmbH
熱線
Robert-Bosch-Str. 200
D-31139 Hildesheim, Germany
馬路安全
行車安全具有絕對的優先權。請只在道
路和交通狀況允許的情況 下操作該設備。請
您在旅程中進行設置前務必熟悉該設備。
當您在車內時,應當確保可以聽到警報、火
警和救護車警報聲。出於這個原因,在您的
旅途中,應當在一個合適的音量水平上收聽
您的車載音響系統。
安全備注
小心:
本 DVD 播放機是第一級雷射產品,所產生
的無形雷射束的雷射輻射對人體是有害的。
本 DVD 驅動器只可以根據指定的指示操作。
千萬不可打開其外殼且不要嘗試自行進行
任何修理。維修 工作應該由經過訓練的技
術人員進行。
循環和處理
我們的產品是使用不會破壞環境的環保材料製
造的,而且可以進行專業回收循環再用。舊產
品 應該與一般家居垃圾分開處理。請使用可用
的循環回收系統處理本產品。
中文
33

交貨內容∕選擇性裝備
交貨內容
IVOD-1022 的交貨內容包括以下所列的所有
零件。請檢查您的設備的交貨內容已確定一切
齊全。如果發現漏了任何一件零件,請即刻聯
絡您的經銷商。
IVOD-1022
•
•
裝配托盤
•
安裝框架
•
6 枚自攻螺釘 4x40
•
4 枚螺紋螺釘 4x20
•
4 個橡皮蓋子
•
連接器電纜
•
遙控器和 2 枚電池
•
1 本操作指示
選擇性裝備
紅外線耳機
當使用 IVHS-01 紅外線耳機時(選擇性裝備),
紅外線發送器窗 L 必須沒有被覆蓋。
34

安裝和連接
安裝和連接
安裝和安全備注
在插入您的 IVOD-1022 DVD 播放機之前,請
仔細閱讀以下資訊。
正在安裝和連接本設備的時候,電池的負極必
須被拆開。
請遵守汽車廠商的安全備注(氣袋、警報系
統、里程表、發動機防盜鎖)。
安裝人員本設備使,請選擇一個可以將 IVOD-
1022 鎖穩的位置,此位置必須在突然停車的
情下,例如緊急煞車時,也不會阻礙駕駛者或
危及汽車乘客。
不要將遙控器放置在氣袋的膨脹範圍內,並確
定它被安全地放置在一個在緊急剎車的情形下
亦 不會危害汽車乘客的地方。
不要將 IVOD-1022 安裝在以下位置,
•
會令司機分心或阻礙其視線的位置。
•
會阻礙乘客上下汽車的位置。
•
會妨礙其它汽車組件(例如遮陽篷頂)功
能的位置。
•
會被陽光直接照射的位置。
•
在熱氣排氣口(制熱等等)附近。
•
會被雨水或濕氣沾到的位置。
•
會有多塵或肮髒的位置。
•
會有激烈震蕩的位置。
顯示器安裝
只使用提供的裝配零件。
選擇安裝位置時請注意以下幾點:
•
螺絲絕對不可以損壞到汽車內的任何一個
與汽車安全有關的零件(油箱、電纜等
等)。
•
不要將本設備只是裝配在車頂的內部線。
•
使用堅固又適合支撐提供的木螺絲的墊
底。
•
確保本設備被安裝在一個安全、穩固的位
置,同時不會在緊急剎車時松脫。
•
避免在沒有開動引擎的情況下長時間使用顯
示器以避免電池電源流失。
圖 1
圖 2
中文
35

安裝和連接
圖 3
圖 4
圖 5
連接
將配備的連接電纜的末端連接至您的汽車的電
源。
黃色: 穩定器(+12V)
黑色: 地線
紅色: ACC +12 V
(終端 15 發動引擎)
綠色: 內部照明(+12V)
藍色: 內部照明地線
棕色: 車門開關
(車門打開 = 負 12 V)
在電池和 IVOD-1022 之間的穩定器電纜必須直
接在電池端加熔絲座(5 安培)。
將連接器插座連接至設備底部的插口。
AV OUT:
音頻∕視頻輸出可以被連接至您的系統的相關
輸入。
AV IN:
您可以將外部音頻∕視頻音源連接至音頻∕視
頻輸入。請參閱“外部音源”章節有關進一步
細節。
AUX 1:
您也可以將外部音頻∕視頻音源連接至 AUX
1 輸入。
36
紅色
黃色
綠色
棕色
藍色
AV IN
AV OUT
黑色

不使用繼電器之連接
e
安裝和連接
保險絲 5A
交貨內容
I =<2A, 0.8A typ.*)
黑色
使用繼電器之連接
黃色
黃色
12V
電池
紅色
ACC+B
地線
保險絲 5A
Sicherung (Fuse) 5A
12V
*)
當您由汽車連接至終端 15 時,必須將一個
熔絲座(0.8 A 熔絲)連接在離開終端 15 最
多30厘米的 位置以保護開關和電纜。
電池
Batteri
中文
交貨內容
紅色
黑色
ACC+B
Ground
接地
注意:
此連接應該由授權顧客服務中心進行。
Relais
繼電器
+1
選擇性
37

燈泡∕電池
更改燈泡
쏅
拆開燈泡的塑膠蓋。
쏅
將螺絲起子插入側面隙縫大約 3 毫米。
쏅
小心地扭轉之以掀起蓋子的一邊。
同時將螺絲起子推入和滑向一邊將蓋子拆
쏅
開。
拆下舊燈泡。
쏅
小心:
燈泡可能還是很熱。讓它冷卻後才接觸它。
裝上新燈泡(12 伏,5 瓦特)。
쏅
將蓋子重新蓋好。
쏅
燈泡技術數據
直徑: 8 毫米
長度: 28 毫米
電壓: 12 伏,5 瓦特
更換遙控器內的電池
將接線片滑向電池盒蓋子然後推向上和拆
쏅
開。
拿出電池然後按照電池盒內的插圖插入新的
쏅
1.5 伏電池(AAA 類型)。
38

第一次使用 啟動∕關閉開關
第一次使用
當您第一次操作 IVOD-1022 的時候,您必須將
電池插入遙控器。
激活遙控器
插入電池
1. 拆開蓋子以打開電池盒。
2. 放入新電池。電池分類:兩枚 AAA 電池。
確定電池電極依照電池盒內的顯示放置。
3. 蓋上電池盒。
使用遙控器
將遙控器指向設備前的紅外線接收器。
操作角度:在紅外線接收器前的任何方向大約
30 度。
啟動∕關閉開關
注釋:
當本設備上的鍵 1 亮起時,本設備就已經準
備就緒可以操作了。
若要開啟∕關閉本設備,按遙控器上的
쏅
POWER 鍵 1 或本設備上的 POWER 鍵
1。
開啟 IVOD-1022 的內部照明
開啟照明可用兩個方法:
1. ON/OFF(開啟∕關閉)開關 M。
2. 車門開關
(車門打開 = 負 12 V)。
打開液晶顯示屏幕
按 IVOD-1022 上的鍵 N 打開液晶顯示屏
쏅
幕。
將液晶顯示屏幕拉低直至它與 IVOD-1022
쏅
底座成大約 90 度以觀賞電視節目。
關閉液晶顯示屏幕
將液晶顯示器滑回底座直至它再次嚙入打
쏅
開∕固定機械裝置內。
中文
39

調節音量
DVD 操作
調節音量
備注:
IVOD-1022 沒有揚聲器。
請連接紅外線耳機活 AV OUT NF。
您可從以 0(關閉)至 16(最大)的步幅調
節音量。
若要調高音量,
쏅
按 VOLUME +(音量調上)鍵 G。
若要調低音量,
쏅
按 VOLUME -(音量調下)鍵 G。
靜音
您可以霎時降低音量。
按 MUTE(靜音)鍵 F。
쏅
“MUTE”(靜音)被顯示在顯示屏幕上。
取消靜音
再按 MUTE(靜音)鍵 F 。
쏅
DVD 操作
您可以使用 IVOD-1022 播放 DVD、錄影 CD
(VCD)、超級錄影 CD(SVCD)、商業音頻
CD 和相片 CD(VCD 2.0)以及 MP3 CD。
以下操作指示指的是 DVD。但是播放音頻 CD
的鍵功能是相同的。
IVOD-1022 被設計播放國家代碼 2 的 DVD。
如果本設備被設計播放其它國家代碼,本說明
書的最後一頁和本設備上會有一張貼紙注明這
一 點。
CD-R 和 CD-RW(“自行燒錄”的 CD)一般
上都可以被播放。由于各類 CD 的品質不一,
Blaupunkt 不能保證播放功能無誤。
為確保功能操作正常,請只使用有激光唱片標
志的 CD。有版權保護的 CD 會引起播放問題。
Blaupunkt 不能擔保有版權保護的 CD 可以正
常操作。
自行錄製的媒體,例如 VCD/SVCD 和 DVD-R/
RW、DVD+R/RW一般上都能被播放。
Blaupunkt 不能保證完全沒有兼容問題和播放
功能無誤,視用作創建和錄製這些媒體的可錄
製媒體和所使用的軟件而定。
嚴重損壞 DVD 驅動器的風險。
不可以使用形狀不規則的 DVD/CD(特別形
狀 CD)和直徑為 8 厘米的 DVD/CD。
我們對因使用不合適的 DVD/CD 而對 DVD
驅動器所造成的任何損壞不負任何責任。
40

DVD 操作
本播放機所支援的光碟格式:
12 厘米 DVD
•
•
DVD-R / DVD-RW
•
DVD+R / DVD+RW
•
DVD DivX 3.11;4.0; 5.0 ... x
•
12 厘米錄影 CD(VCD)、超級錄影 CD
(SVCD)
•
相片 CD(VCD 2.0)T-菜單 PBC 開啟∕關
閉
•
音頻 CD(不支援含 CD 文字的 CD)、12
厘米 CD-R 和 CD-RW
•
含 MP3 文件用作音樂播放的 MP3 CD。
只支援“Joliet”或“ISO 9660”的 MP3
CD 格式。
本播放機不支援以下光碟格式:
•
DVD-ROM
•
CDV
•
CD-G
•
使用另一地方代碼的 DVD。
插入∕拿出 DVD/CD
IVOD-1022 備有一個沒有托盤的插入槽驅動
器。使用插入槽驅動器是唯一能夠保證本設備
能夠達到好的振動衰減效果的方法。
插入 CD/DVD
쏅
將印刷面在後的 DVD/CD 插入本設備的顯
示屏幕後的 DVD/CD 插槽直至您感覺到輕
微的抗力。
DVD/CD 被載入驅動器;不要干涉或幫助此
過程。
DVD/CD 被載入。DVD 菜單被顯示或 DVD 開始
播放。其操作方式取決于被插入的 DVD。
拿出 DVD/CD
按遙控器上的 EJECT 鍵 J 或本設備上的
쏅
EJECT 鍵 J。
DVD/CD 被彈出。
쏅
小心地拿出 DVD/CD。
開始播放
在所要的 DVD/CD 被載入後,本設備會顯示
DVD 菜單或開始播放。其操作方式取決于被插
入的 DVD。
按遙控器上的 ENTER/PLAY 鍵 C 或本設
쏅
備上的
DVD 開始播放。
鍵 K。
顯示
播放時間的各種不同信息可以被顯示在顯示屏
幕上。此顯示可以被隱藏。
本設備有以下幾種顯示供選擇:
•
TITLE 01/02 CHAPTER 33/45
01 : 26 : 14:
兩個片段(標題)的第一個片段和本片段的
45 個章節的第 33 個章節正在被播放。已播
放時間被顯示在下面。
•
TITLE REMAIN
00 : 31 : 58:
當前標題的剩餘播放時間被顯示。
CHAPTER ELAPSED
•
00 : 01 : 34:
當前章節的已播放時間被顯示。
CHAPTER REMAIN
•
00 : 05 : 22:
當前章節的剩餘播放時間被顯示。
中文
41

DVD 操作
顯示∕更改顯示信息
쏅
按遙控器上的 DISPLAY 鍵 H 直至所要的
信息被顯示。
顯示信息被顯示在顯示器上緣。
隱藏顯示信息
按 DISPLAY 鍵 H 直至“OFF”(關閉)字樣短暫
地被顯示和顯示屏幕顯示被隱藏。
快進
您可以以 2 倍速、4 倍速、8 倍速、16 倍速、
32 倍速和 64 倍速向前播放 DVD(按各別
DVD 而定;有些 DVD 最快只可以以 16 倍速
播放)。
如何快速向前或向後播放 DVD,
쏅
按遙控器上的 FORWARD B 鍵直至所要的
速度被顯示。
停止快進
如何停止快速向前,
쏅
按遙控器上的 ENTER/PLAY 鍵 C 或本設
備上的 鍵 K。
DVD 恢復正常速度播放。
慢動作
DVD 可以以慢速向前或向後播放。
쏅
按遙控器上的 SLOW 鍵 > 一次或多次以
減低播放速度。
按 SLOW 鍵 > 一次後,播放速度會換成半速
(SF 1/2x)向前播放。
每再按一次,速度將不斷低(至四分之一、
六分之一和八分之一)。有關速度和 SF 字眼表
示“慢速向前”被顯示在顯示屏幕上。
一旦速度到達了八分之一,接著每鍵一次將使
影片以慢動作向後播放。有關速度和 SR 字眼
表示“慢速向後”被顯示在顯示屏幕上。
如何恢復正常速度播放 DVD,
按遙控器上的 ENTER/PLAY 鍵 C 或本設
쏅
備上的
鍵 K。
暫停播放(暫停)和重新開始
暫停播放
按遙控器上的 PAUSE/STEP 鍵 D 或本設
쏅
備前的 鍵 K。
播放被暫停。
繼續播放
按遙控器上的 PAUSE/STEP 鍵 D 或本設
쏅
備前的
鍵 K。
定格
在播放半途按遙控器上的 PAUSE/STEP 鍵
쏅
D 或本設備上的 鍵 K。
播放將會被暫停和顯示定格畫面。
繼續播放
如何繼續播放,
按遙控器上的 ENTER/PLAY 鍵 C 或本設
쏅
備上的
鍵 K。
跳章節
DVD 標題可以被劃分成數個小章節。
如何跳至下一個或其它章節,
按遙控器上或設備前的 SKIP
쏅
次或多次。
播放跳至下一個章節或下一個相應章節的起
點。
鍵 : 一
42

DVD 操作
如何跳至當前或上一個章節的起點,
쏅
按遙控器上或設備前的 SKIP
次或多次。
播放跳至上一個章節或上一個相應章節的起
點。
備注:
如果 DVD 正在播放 DivX,SKIP 鍵
: 可以用作跳前或跳後 3、5 或 10 分鐘。請
參閱第 24 頁有關如何設置。
鍵 : 一
∕
重複播放某個 DVD 標題
DVD 被劃分成不同的章節和標題,各個都可以
個別被選擇。
重複播放章節或標題
如何重複當前章節,
쏅
按遙控器上的 REP 鍵 2。
“CHAPTER REPEAT ON”(章節重複啟動)
被顯示在顯示屏幕上。
如何重複當前標題,
쏅
再按一次遙控器上的 REP 鍵 2。
“TITLE REPEAT ON”(標題重複啟動)被顯
示在顯示屏幕上。
取消重複
如果您想要取消重複功能,
쏅
重複按遙控器上的 REP 鍵 2 直 至 “ REPEAT
OFF”(重複關閉)字眼出現在顯示屏幕
上。
直接選擇章節
遙控器也可以被用作直接選擇章節或特定位置
(播放時間)。
選擇章節
如何直接選擇章節,
쏅
按遙控器上的 PREV./GOTO 鍵 @。
當前標題號碼和標題的數量被顯示在顯示屏幕
上的“TITLE”(標題)旁。在其後,您將可
以看到章節號碼和章節的數量。章節號碼是突
出的黃色。
쏅
用遙控器上的數字鍵 @ 輸入您想要的章節
號碼然後按 ENTER/PLAY 鍵 C。
播放將在所選擇的位置繼續。
選擇播放時間
您可以輸入與所要的位置的播放時間以直接選
擇 DVD 上的某一個特定位置。
如何跳至一個特定位置,
쏅
按遙控器上的 PREV./GOTO 鍵 @ 兩次。
當前標題號碼和標題的數量被顯示在顯示屏幕
上的“TITLE”(標題)旁。
在其後,您將看見“TIME”(時間)和播放時
間的輸入格。輸入格是突出的黃色。
쏅
用遙控器上的數字鍵 @ 以“ hh.mm.ss”格
式輸入您想要的位置然後按 ENTER/PLAY
鍵 C。
播放將在所選擇的位置繼續。
從 DVD 的第一個標題的起點恢復播放
按遙控器上的 STOP/RETURN 鍵 ? 兩
쏅
次。
按遙控器上的 ENTER/PLAY 鍵 C。
쏅
播放在標題的起點繼續。
中文
43

DVD 操作
備注:
對于大部分 DVD,這是 DVD 的主菜單(根目
錄)。
顯示字幕
如何顯示字幕,
按遙控器上的 SUBTITLE 鍵 9。
쏅
對白字幕被顯示。顯示信息出現。當前語言
和可供選擇的對白字幕語言的數目被顯示在
“SUBTITLE”(對白字幕)旁邊。
如何更改字幕語言,
按 SUBTITLE 鍵 9 一次或多次直至字幕顯
쏅
示所要的語言。
備注:
您也可以從 DVD 菜單確定字幕顯示的是什語
言(請參閱 DVD 菜單)。除此以外,您可以在
設 定菜單設置您所喜愛的對白字幕語言。有關
進一步細節,請參閱“設定”章節的“預設對
白字幕語言”部分。
選擇播放語言
如何選擇播放語言,
按遙控器上的 AUDIO 鍵 8一次或多次。
쏅
播放語言改變。有關顯示信息同時被顯示。當
前語言、語言數目和可用的語言數目被顯示。
備注:
您也可以從 DVD 菜單選擇播放語言(請參閱
DVD 菜單)。除此以外,您可以在設定菜單設
置您所喜愛的播放語言。有關進一步細節,請
參閱“設定”章節的“預設播放語言”部分。
更改畫面視角
有些 DVD 為單一場景提供兩個或以上的畫面
視角。
當前畫面視角的數目和可使用的畫面視角數目
被顯示在照相機標志旁邊的顯示信息。
如何更改畫面視角,
쏅
按遙控器上的 ANGLE 鍵 7。
有關場景以下一個畫面視角顯示。有關顯示信
息同時被顯示。
備注:
您可以在設定菜單內指定在有多個畫面視角的
情況下顯示照相機標志
請參閱“設定”章節的“顯示畫面視角”部
分。
。有關進一步細節,
放大圖像區域(圖像放大縮小)
您可以將正在播放的電影的任何一個部分放大
至最多三倍。
如何放大圖像區域,
按遙控器上的 ZOOM 鍵 6 一次或多次。
쏅
每次您按此鍵,圖像區域的中央部分將逐步
放大。可使用的放大倍數是 1.5 倍、2 倍和 3
倍。
備注:
在設置所要的放大倍數後,您可以使用遙控器
上的箭頭鍵 = 任意移動圖像區域。
縮小
如何不要使用放大縮小模式繼續看電影,
重複按遙控器上的 ZOOM 鍵 6 直
쏅
至“ZOOM OFF”(放大縮小關閉)字眼
出現在顯示屏幕上。
44

DVD 菜單
DVD 菜單
DVD 菜單是由被插入的 DVD 提供的。如果您
插入 DVD 後開始播放,DVD 菜單將自動出現
在顯示屏幕上。
備注:
DVD 菜單所提供的選擇是按各別 DVD 而定。
DVD 的 DVD 菜單提供以下功能:
您可以為播放影片選擇不同的語言或字
•
幕。
除了電影外,您也可以觀看常用于電影院或
•
在電視機播放的電視宣傳片,或觀看電影的
製造過程。
影片被劃分成幾個連貫的章節。您可以選擇
•
某個章節並直接開始播放此章節,無須像一
般錄像帶一樣需要先使用“快進”功能跳至
相關的位置。
顯示 DVD 菜單
您可以在任何時候結束播放和顯示 DVD 菜
單。
按遙控器上的 MENU 鍵 5。
쏅
選擇菜單選項
DVD 一般都有提供菜單讓您選擇例如“播放電
影”、“章節選擇”等等不同的選項。
如何切換各別的菜單選項,
쏅
按遙控器上的其中一個箭頭鍵 =。
如何確定菜單選項,
쏅
按遙控器上的 ENTER/PLAY 鍵 C。
退出 DVD 菜單
當您在 DVD 菜單做了選擇,譬如播放電影,您
將自動退出 DVD 菜單和開始播放。
顯示標題菜單
您也可以直接打開標題菜單以方便地選擇各標
題∕章節:
按遙控器上的 T.MENU 鍵 4。
쏅
標題菜單出現。
中文
45

顯示器設定菜單
顯示器設定
操作
按遙控器上的 MON.SETUP 鍵 < 打開
쏅
MONITOR SETUP(顯示器設定)菜單。
使用箭頭鍵
쏅
使用箭頭鍵 / = 選擇設置。
쏅
쏅
再按 MON.SETUP 鍵退出 <。
Options Settings
Optionen Einstellungen
PICTURE USER
BRIGHTNESS 0-50
CONTRAST 0-50
COLOR 0-50
TINT 0-50
SHARPNESS 0-50
ZOOM NORMAL
DISPLAY DOWN
SYSTEM RESET
SEL: ADJ:
/ = 選擇選項。
NORMAL
CINEMA
SPORTS
WIDE 1
WIDE 2
UP
TINT (色調)
•
設置圖像色調(只限 NTSC)
SHARPNESS (清晰度)
•
設置圖像清晰度
ZOOM (放大縮小)
•
更改圖像的高∕寬
- NORMAL (普通)
- WIDE 1 (寬 1)
- WIDE 2 (寬 2)
DISPLAY (顯示)
•
更改圖像顯示
- UP - DOWN (調上、調下)
- Flip vertically (垂直對翻)
SYSTEM RESET (系統重設)
•
重置回廠家所預設的參數。
顯示器設定菜單
PICTURE ( 圖像)
•
在 USER(用戶)菜單下更改圖像設置:
BRIGHTNESS(量度)、CONTRAST(對
比)、COLOR(顏色)、TINT(色調)
(只限 NTSC)和 SHARPNESS(清晰度)
可以由 0 調至 50。NORMAL(普通)、
CINEMA(電影院)和 SPORTS(運動)的
設置是固定的。
•
BRIGHTNESS (亮度)
設置亮度
CONTRAST (對比)
•
設置對比
COLOR (顏色)
•
設置顏色深度
46

外部音源
CD/DVD/MP3 操作
外部音源
您可以連接兩個外部音源至 IVOD-1022。例
如,您可以連接電視條頻器至 AUDIO/VIDEO-
IN(音頻∕視頻輸入)插座和連接游戲控制臺
至 AUX-IN(輔助輸入)插座。
內部音頻∕視頻信號可以通過 AV-Out(音頻視
頻輸出)插座輸出。
備注:
為避免損壞本設備,請確保連接外部音源時
有關電纜∕插座的顏色和外部音源和 IVOD-
1022上的相同。
插座
VIDEO IN (視頻輸入)(黃色)
AUDIO IN (音頻輸入)(紅色∕白色)
- 紅色非平衡式插座 = 右頻道
- 白色非平衡式插座 = 左頻道
若要切換內部 DVD 驅動器播放和外部音源播
放,
重複按遙控器上的 DVD/TV/EXT 鍵 3 直
쏅
至您所要的音源被顯示。
CD/DVD/MP3 操作
除了 DVD 和錄影 CD 以外,您也可以播放音頻
CD、相片 CD(VCD 2.0)和 MP3 CD。
音頻 CD
如果您插入和播放音頻 CD,您可以使用以上
DVD 模式的解說使用播放、搜索、暫停和重
複等功能。
照片 CD/DVD
如果您插入照片 CD,幻燈片將會在大約 3 秒
鐘後開始。
按 STOP/RETURN 鍵 ? 打開“(MP3 .
쏅
JPG)SMART NAVI”((MP3 . JPG)精
明瀏覽)菜單。
用遙控器上的箭頭鍵 = 輕鬆地在精明瀏覽菜單
內切換于曲目和檔夾之間。
一旦您已經做出了您的選擇後,按遙控器上
쏅
的 ENTER/PLAY 鍵 C。
照片 CD VCD 2.0
當“Press play to continue”(按播放以
쏅
繼續)字眼出現後,按本設備上的
K。
按遙控器上的 T.MENU 鍵 4,>“PBC
쏅
on”出現。
按本設備上的
쏅
頁出現。
按本設備上的 鍵 K,> 幻燈片開始。
쏅
鍵 K,> 您所設置的首
鍵
中文
MP3 CD
MP3 CD 必須使用“Joliet”或“ISO 9660”格
式。
當您插入 MP3 CD 時,“(MP3 . JPG)
SMART NAVI”((MP3 . JPG)精明瀏覽)
瀏覽菜單出現在顯示屏幕上。
47

CD/DVD/MP3 操作
等化器
一旦您按了 STOP/RETURN 鍵 ? ,您就可
以使用遙控器上的箭頭鍵 = 輕鬆地切換于曲目
和檔夾之間。
一旦您已經做出了您的選擇後,按遙控器上
쏅
的 ENTER/PLAY 鍵 C。
備注:
其它功能 – 播放、搜尋、暫停和重複(使用
在DVD 模式的功能)也可以被使用在 MP3 模
式上。
等化器
IVOD-1022 備有一個內置的 7 波段等化器讓
您可以優化您的汽車音響或讓您調節適合您的
音樂風格。共有七種固定的聲音預設設置和一
個變量個人聲音設置。
固定聲音預設:
•
古典音樂
•
爵士樂
•
搖滾樂
•
流行音樂
•
民謠
•
舞蹈
•
標準
變量聲音設置:
•
個人
選擇固定預設聲音
按遙控器上的 EQUALIZER 鍵 E。
쏅
當前設置或最後被使用的設置被顯示。
重複按遙控器上的 ENTER/PLAY 鍵 C 直
쏅
至所要的設置被顯示。
設置會在您按 ENTER/PLAY 鍵 C 時或在
쏅
3 秒鐘後自動被存檔和關閉。
48
選擇變量聲音設置 (個人等化器)
個人聲音設置讓您按照您的個人喜好調節音樂
播放。

調節設置注意
我們建議您使用您所熟悉的 CD 更改設置。
쏅
傾聽 CD。
쏅
這聲音給您什麼樣的印象?
쏅
調節等化器的數值– 請參看“調節等化器的
提示”製錶。
設置“個人”等化器
若要設置個人等化器,
쏅
按遙控器上的 EQUALIZER 鍵 E。
當前設置或最後被使用的設置被顯示。
쏅
重複按遙控器上的 ENTER/PLAY 鍵 C 直
至“personal”(個人)被顯示。
쏅
用遙控器上的箭頭鍵 왗/왘 = 移動選擇標志
(黃色)至您想要更改的頻率。
쏅
用遙控器上的箭頭鍵 왖/왔 = 調上或調下頻
率至所要的數值。
備注:
當您更改設置時,播放會同時調節至相關的設
置。
等化器顯示會在最後設置被設定後的幾秒鐘從
屏幕消失,但有關等化器仍是激活的,直至您
關閉它為止。
等化器
中文
關閉等化器
如何撤銷等化器,
按遙控器上的 EQUALIZER 鍵 E。
쏅
“EQUALIZER OFF”(等化器關閉)被短暫
地顯示在顯示屏幕上。
49

等化器
調節等化器的提示
先設置中音∕高音然後才設置低音。
聲音印象∕問題 解決方案
低音太微弱
不清晰的低音
爆音聲
令人不快的壓力
聲音集中在前面、
太烈、沒有立體聲音效。
呆滯的聲音
不清晰
對儀器不清晰動人
增加低音至
頻率:60 至 150 赫茲
增益:+4至 +6
減低下中音範圍至
頻率:150 至 400 赫茲
增益:大約 -4
減低下中音範圍至
頻率:1,000 至 2,000 赫茲
增益:-4 至 -6
增強高音範圍至
頻率:6,000 至 15,000 赫茲
增益:+2 至 +4
50

DVD 設定基本設置
DVD 設定
IVOD-1022 的設定提供各種各樣的選擇定制
設備。
打開設定菜單
如何打開設定菜單,
按遙控器上的 DVD SETUP 鍵 ;。
쏅
執行設定菜單內的設置
設定菜單內的設置可以使用“選擇顯示屏幕顯
示語言”一節所描述的相似方法調整。
備注:
“PREFERENCES”(偏好)內的設置只有在
沒有插入 DVD 時才能被更改。
選擇顯示屏幕顯示語言
打開設定菜單。
쏅
使用箭頭鍵 왖 /왔 = 選擇“GENERAL
쏅
SETUP”(一般設定)菜單選項。
用 ENTER/PLAY 鍵 C 確定。
쏅
使用箭頭鍵 왖/왔 = 選擇“OSD LANG”
쏅
(屏幕顯示語言)菜單選項。
按箭頭鍵 왘 =。
쏅
可供選擇的顯示屏幕顯示語言被顯示。
使用箭頭鍵 왖/왔 = 選擇所要的語言的菜
쏅
單選項。
用 ENTER/PLAY 鍵 C 確定。
쏅
按 DVD SETUP 鍵 ; 退出設定。
쏅
設置被儲存然後您退出設定菜單。
選擇播放語言
播放語言可以在“PREFERENCES”(偏好)菜
單內的“AUDIO”(音頻)菜單項目下設定。
選擇字幕語言
字幕可以在“PREFERENCES”(偏好)菜單內
的“SUBTITLE”(字幕)菜單項目下設定。
選擇 DVD 菜單語言
DVD 菜單語言可以在“PREFERENCES”(偏
好)菜單內的“DISC MENU”(光碟菜單)菜
單項目下設定。
選擇顯示器設置
顯示器可以在“PREFERENCES”(偏好)菜
單內的“TV DISPLAY”(電視機顯示)菜單
項目下設定。
以下顯示器設置可供選擇:
•
Normal/PS:DVD 播放機被連接至 4:3 顯
示器。寬圖像會以全寬度顯示在顯示屏幕
上,在顯示器上緣和下緣有黑條。
•
Normal/LB:DVD 播放機被連接至 4:3 顯
示器。寬圖像會以屏幕高度顯示在顯示屏幕
上。寬圖像的左右邊緣自動被削去。
•
WIDE:DVD 播放機被連接至 16:9 顯示
器。寬圖像會以實際大小顯示在顯示屏幕
上。
DivX
3、5 或 10 分鐘可以在“PREFERENCES”
(偏好)菜單內的“SOFT CHAP. ON”(軟件
設置章節啟動)菜單項目下設定。
中文
51

DVD 設定基本設置
影片級別控制
您可以設定密碼以防止本設備在未經許可的情
況下被使用。除此以外,您可以指定級別水
平。級別水平表示某些 DVD 備有特別的編碼
定義它是只適合特定年齡的版本。如果您設置
的級別水平低過被插入的 DVD 的水平,它只
可以在輸入密碼後方可以播放。
備注:
不是所有 DVD 支持級別水平功能。
在菜單內,您可以定義哪一些電影可以被播
放。這些級別是遵照美國電影協會(MPAA)
所推薦的。
以下選項可供選擇:
1 G: 小孩可以觀看
2: 小孩可以觀看
3 PG: 建議在播放時有成人陪伴。
4 PG 13: 建議由成人陪同觀看,不適合 13
歲以下的小孩觀看。
5: DVD 內容沒有級別。
6 PG-R: 禁止小孩和青少年觀看,內容
含暴力成分、淫穢語言等等的描
述。
7 NC 17: 內容不適合 17 歲以下的青少年
觀看。
8 ADULT: 內容只險成人觀看:含暴力、色
情等等。
No
PARENTAL:沒有影片級別控制。
備注:
一些不被播放的 DVD 可以在播放開始時通過
按 YES(ENTER)(是(進入))和輸入密碼
後解禁。其它的則需要您在開始播放 DVD 之
前在設置內更改級別水平。其操作方式取決于
有關 DVD。
定制影片級別控制
如何設定影片級別控制,
打開設定菜單。
쏅
使用箭頭鍵 왖/왔 = 選擇“PREFERENC-
쏅
ES”(偏好)菜單選項。
用 ENTER/PLAY 鍵 C 確定。
쏅
偏好菜單被顯示。
使用箭頭鍵 왖/왔 = 選擇“PARENTAL”
쏅
(影片級別)菜單選項。
按箭頭鍵 왘 =。
쏅
可供選擇的年齡限制被顯示。
使用箭頭鍵 왖/왔 = 選擇所要的年齡限制
쏅
選項。
用 ENTER/PLAY 鍵 C 確定。
쏅
用遙控器上的數字鍵 0 至 9 @ 輸入密碼。
쏅
備注:
如果您還未曾設定密碼,則預設密碼是
0000。
用 ENTER/PLAY 鍵 C 確定。
쏅
按 DVD SETUP 鍵 ; 退出設定。
쏅
設置被儲存然後您退出設定菜單。
52

DVD 設定基本設置
更改密碼
若要更改密碼,
쏅
打開設定菜單。
쏅
使用箭頭鍵 왖/왔 = 選擇“PREFERENCES”(偏好)菜單選項。
쏅
用 ENTER/PLAY 鍵 C 確定。
偏好菜單被顯示。
쏅
使用箭頭鍵 왖/왔 = 選擇“PASSWORD”
(密碼)菜單選項。
쏅
按箭頭鍵 왘 =。
쏅
用 ENTER/PLAY 鍵 C 確定“CHANGE”
(更改)。
쏅
如果您還未設置密碼,用數字鍵 0 至 9 @
將新密碼輸入“NEW PASSWORD”(新
密碼)旁。
쏅
如果您已經設置了密碼,用數字鍵 0 至 9
@ 將舊密碼輸入“OLD PASSWORD”
(舊密碼)旁。
備注:
如果您還未曾設定密碼,則預設密碼是
0000。
쏅
用數字鍵 0 至 9 @ 輸入新密碼兩次。
쏅
用 ENTER/PLAY 鍵 C 確定。
쏅
按 DVD SETUP 鍵 ; 退出設定。
設置被儲存然後您退出設定菜單。
設置電視機設備的彩色電視標準
若要獲得完美的圖像素質,請設定連接顯示器
所使用的 DVD 播放機的彩色電視標準。
“PAL”是在歐洲使用的標準,“NTSC”則是
在美洲∕亞洲地區使用的標準。
如果您選擇“MULTI”設置,DVD 所使用的標
準將會被用作輸出。
電視機標準可以在“PREFERENCES”(偏
好)菜單內的“TV TYPE”(電視機類型)菜
單項目下設定。
顯示畫面視角
您可以設定當 DVD 上有超過一個畫面視角時
顯示照相機標志“ ”。選擇設置“ON”以
啟動此 功能。
畫面視角可以在“GENERAL SETUP”(一般
設定)菜單內的“ANGLE MARK”(視角標
記)菜單項目下設定。
AV OUT 輸出
當本設備已經被安裝入汽車內後,汽車系統
(擴音器、顯示器)可以通過 AV-OUT 輸出
連接。
設置“雙單聲道”
對于備有 1+1 音頻模式(兩個單音頻道)的
DVD,您可以設置如何播放此兩個頻道。
以下設置可供選擇:
•
立體音響:
以立體聲播放 1+1 節目。頻道 1 由左邊輸
出播放,而頻道 2 則從右邊輸出。
L - MONO (左單音):
•
DVD 的左頻道在兩個輸出播放(左和
右)。
R - MONO (右單音):
•
DVD 的右頻道在兩個輸出播放(左和
右)。
Mix - MONO (混合單音):
•
DVD 的頻道 1 和 2 在兩個輸出播放(左
和右)。
中文
53

DVD 設定基本設置
打開設定菜單。
쏅
使用箭頭鍵 왖/왔 = 選擇“AUDIO
쏅
SETUP”(音頻設定)菜單選項。
用 ENTER/PLAY 鍵 C 確定。
쏅
使用箭頭鍵 왖 / 왔 = 選擇“DUAL
쏅
MONO”(雙單聲道)菜單選項。
按箭頭鍵 왘 =。
쏅
使用箭頭鍵 왖/왔 = 選擇所要的設置。
쏅
用 ENTER/PLAY 鍵 C 確定。
쏅
按 DVD SETUP 鍵 ; 退出設定菜單。
쏅
設置被儲存然後您退出設定菜單。
設置壓縮率
您可以使用“COMPRESSION”(壓縮)
的“OFF”(關閉)至“Full”(全開)設置
杜比節目的動態。選擇“FULL”(全開)設
置以獲得最完整的動態調整。
打開設定菜單。
쏅
使用箭頭鍵 왖/왔 = 選擇 “AUDIO SETUP”
쏅
(音頻設定)菜單選項。
用 ENTER/PLAY 鍵 C 確定。
쏅
使用箭頭鍵 왖/왔 = 選擇“COMPRES-
쏅
SION”(壓縮)菜單選項。
按箭頭鍵 왘 =。
쏅
使用箭頭鍵 왖/왔 = 選擇所要的設置。
쏅
用 ENTER/PLAY 鍵 C 確定。
쏅
按 DVD SETUP 鍵 ; 退出設定。
쏅
設置被儲存然後您退出設定菜單。
杜比數碼 DVD 的低音混和
IVOD-1022 使用低音混和功能從杜比數碼信號
計算出一個兼容的立體聲信號。
您可以在設定菜單內的“SPEAKER SETUP”
(喇叭設置)找到低音混和設置。
激活屏幕保護程式
IVOD-1022 備有屏幕保護程式以防止圖片(例
如菜單)被燒印入液晶顯示。
如果屏幕保護程式被激活,一個商標會在用戶
最後一項操作後的大約 60 秒後被顯示以防止
個別 的圖片被燒印入顯示屏幕。
您可以在“GENERAL SETUP”(一般設定)
菜單內的“SCREEN SAVER”(屏幕保護程
式)找到屏幕保護程式的設置。
重新設置設備
您可以重置本設備以清除掉所有個人設置。
備注:
這不能在 DVD 被插入後執行。
打開 DVD 設定菜單。
쏅
使用箭頭鍵 왖/왔 = 選擇“PREFERENC-
쏅
ES”(偏好)菜單選項。
用 ENTER/PLAY 鍵 C 確定。
쏅
偏好菜單被顯示。
使用箭頭鍵 왖/왔 = 選擇“DEFAULTS”
쏅
(默認)記憶選項。
按 왘 鍵 =。
쏅
“RESET”(重設)菜單項目被突出。
如果您真的想要重置本設備,
按 ENTER/PLAY 鍵 C。
쏅
基本廠家設置被載入。
54

規格
顯示屏幕大小: 10.2 寸顯示器
顯示屏幕解析度: 800 (H) x 3 (RGB) x 480 (V)
有效面積: 222 (H) x 133.2 (V)
信號系統: 雙系統 NTSC∕PAL
亮度: 400 cd/m
對比: 400:1
視角範圍: 右∕右: +/-65°
調上∕調下: +50/-65°
視頻輸入水平: 1 Vpp 10%
音頻輸入水平: 2.0 Vrms
載波頻率紅外線傳感器: L- C H (左頻道): 2.3 兆赫茲
R-CH(右頻道): 2.8 兆赫茲
操作電壓(直流電): 10-18 伏
電流消耗:設備“開”時 < 2.2 安培 (+12 伏)
電流消耗:設備“關閉”時 120 毫安 (+12 伏)
關閉電流:“引擎關閉”時 < 1 毫安 (+12 伏)
操作溫度: -20 °C 至 +70 °C
存放溫度: - 40 °C 至 +85 °C
尺寸(寬 x 高 x 深): 252 x 40 x 253 毫米
重量: ≤ 1800 斤
2
規格
中文
將隨時更該 !
55

通告
56

조작버튼조작버튼
1 POWER 버튼, 기기를 켜고/끌 때 누름.
2 REP 버튼, REPEAT 기능을 작동/해제할
때 누름.
SCAN 모드는 TV 모드에서만 작동합니
다.
3 DVD
/TV/EXT 버튼, DVD/CD/MP3 의
조작과 AUX1 및 AUX2 의 외장음원을 전
환할 때 누름.
4 T
.MENU 버튼, DVD 타이틀을 액세스할
때 누름.
5 MENU 버튼, DVD 의 메인메뉴(루트)를
액세스할 때 누름.
6 ZOOM 버튼, 재생 중 이미지 구역을 확
대할 때 누름.
7 ANGLE 버튼, 시청각도를 변경할 때 누
름.
8
AUDIO 버튼, DVD 의 오디오 트랙을 전환
할 때 누름.
9 SUBTITLE 버튼, DVD 의 자막언어를 변경
할 때 누름.
: SKIP 버튼, 이전 또는 다음 챕터(DVD) 또
는 트랙(CD/MP3)을 호출할 때 누름.
; DVD SETUP 버튼, 기본설정을 위하여 설정
메뉴를 부를 때 누름.
< MON.SETUP 버튼, 모니터의 기본설정을
할 때 누름.
= 화살표 버튼화살표 버튼, 메뉴내에서 네비게이션을 할
때 누름.
CH+ 와 CH- 버튼은 기능이 없습니다.
> SLOW 버튼, 슬로우모션 기능을 시작/종료
할 때 누름.
? STOP/RETURN 버튼, 재생을 정지할 때 누
름.
@
숫자버튼숫자버튼 0-9 및 PREV./GOTO 버튼, 챕터나
챕터의 섹션을 직접 선택할 때 누름.
A
BACKWARD 버튼, 뒤로 빨리감기를 할 때
누름.
B FORWARD 버튼, 빨리감기를 할 때 누름.
C ENTER/PLAY 버튼, 메뉴의 항목을 선택하
고 확인할 때 및 재생을 시작할 때 누름.
D PAUSE/STEP 버튼, 재생을 일시정지할 때
누름 (프레임 정지).
E EQUALIZER 버튼, EQ 프리세트를 선택할
때, 사용자 EQ 를 설정할 때 및 EQ 를 취소
할 때 누름.
F MUTE 버튼, 오디오의 재생음을 소거할 때
누름.
G 음량 음량 + - 버튼, 음량을 설정할 때 누름.
H DISPLAY 버튼, 디스플레이모드 중에서 선
택을 할 때 누름.
I A-B 버튼, 반복기능의 시작 및 종료시간을
지정할 때 누름. 반복기능을 켜고/끌 때 누
름.
SAV/ERS, 버튼은 기능이 없습니다.
J
EJECT 버튼, CD/DVD 를 배출할 때 누름.
K 기기의 버튼, PAUSE/PLAY.
L 리모컨의 적외선 수신창.
M ON/OFF 전등 스위치
N 모니터의 잠금을 해제할 떄 누름.
한국어한국어
57

차레차레
조작버튼조작버튼 .................................... 57
참고정보참고정보 .................................... 60
도로 안전 ......................................... 60
안전주의 사항 .................................. 60
재활용 및 폐기처분에 대하여 ............ 60
공급품공급품 ....................................... 61
옵션용품 .......................................... 61
적외선 헤드폰 .................................. 61
설치 및 연결하기설치 및 연결하기 ....................... 62
설치 및 안전주의 사항 ...................... 62
모니터 설치하기 ............................... 62
연결하기 .......................................... 63
릴레이 없이 연결하기 ....................... 64
릴레이를 사용하여 연결하기 ............. 64
전구 교체하기전구 교체하기 ............................ 65
리모컨의 건전지 교체하기리모컨의 건전지 교체하기 .......... 65
처음 사용하기 전에처음 사용하기 전에 .................... 66
리모컨 작동시키기 ............................ 66
리모컨 사용하기 ............................... 66
전원 켜기/끄기전원 켜기/끄기 .......................... 66
IVOD-1022 의 내부전등 켜기 ............ 66
LCD 화면 열기 ................................. 66
LCD 화면 닫기 ................................. 66
음량 조절하기음량 조절하기 ............................ 67
음소거하기 ....................................... 67
음소거 취소하기 ............................... 67
DVD 조작하기 조작하기 ............................ 67
DVD/CD 넣기/꺼내기 ....................... 68
재생을 시작하기 ............................... 68
디스플레이 ....................................... 68
빨리감기 .......................................... 69
빨리감기 정지하기 ............................ 69
슬로우모션 ....................................... 69
재생을 일시정지했다가(일시정지)
다시 시작하기 .................................. 69
프레임 정지하기 ............................... 69
챕터 건너뛰기 ................................. 69
DVD 타이틀의 재생을 반복하기 ........ 70
챕터를 직접 선택하기 ....................... 70
DVD의 첫 타이틀부터 재생을
시작하기 .................................................70
자막 표시하기 .................................. 71
카메라의 각도 변경하기 .................... 71
이미지 구역 확대하기 (줌) ............... 71
DVD 메뉴 메뉴 .................................. 72
DVD 메뉴 표시하기 .......................... 72
메뉴항목 선택하기 ............................ 72
DVD 메뉴 종료하기 .......................... 72
타이틀 메뉴 표시하기 ....................... 72
모니터 설정하기모니터 설정하기 ......................... 73
조작하기 .......................................... 73
모니터 설정 메뉴 .............................. 73
외장음원외장음원 .................................... 74
CD/DVD/MP3
오디오 CD ....................................... 74
포토 CD/DVD .................................. 74
MP3 CD ........................................... 74
조작하기 조작하기 ............ 74
이퀄라이져이퀄라이져 ................................. 75
고정된 사운드 프리세트 선택하기 ..... 75
사용자 사운드 설정 선택하기
(퍼스널 이퀄라이져) ........................ 75
“퍼스널” 이퀄라이져 설정하기 ...... 76
이퀄라이져 취소하기 ........................ 76
이퀄라이져 조절에 관한 도움말 ........ 77
DVD 설정하기 설정하기 ............................ 78
설정메뉴 부르기 ............................... 78
설정메뉴에서 설정을 조절하기 .......... 78
화면표시 언어 선택하기 .................... 78
음성언어 선택하기 ............................ 78
자막언어 선택하기 ............................ 78
DVD 의 메뉴언어 선택하기 ............... 78
모니터 설정 선택하기 ....................... 78
58

DivX ................................................ 78
시청제한 기능 .................................. 79
시청제한 기능 설정하기 ................... 79
암호 변경하기 .................................. 80
TV 의 컬러방식 설정하기 .................. 80
카메라 각도 표시하기 ....................... 80
AV OUT 출력 ................................... 80
“듀얼 모노” 설정하기 .................... 80
압축강도 설정하기 ............................ 81
돌비 디지털 DVD 의 다운믹스
설정하기 .......................................... 81
화면보호 기능 작동시키기 ................ 81
기기를 리세트하기 ........................... 81
제품사양제품사양 .................................... 82
차레 차레
한국어한국어
59

참고정보참고정보
참고정보참고정보
Blaupunkt 제품을 구입해 주셔서 감 사합니
다. 본 기기를 최대한으로 만 끽하시길 바랍
니다.
본 기기를 처음으로 사용하기 전에 사용 설명본 기기를 처음으로 사용하기 전에 사용 설명
서를 먼저 읽어 주시기 바랍니다.서를 먼저 읽어 주시기 바랍니다.
Blaupunkt 사의 편집부는 본 사용설 명서를
더욱 선명하고 이해하기 쉽게 만들기 위하여
항상 노력하고 있습니 다. 그러나 본 기기의
사용에 대하여 의문점이 있을 때에는, 구입하
신 대 리점이나 귀하의 국가에 있는 핫라인 전
화번호로 문의주시기 바랍니다. 전 화번호는
본 책자의 뒷면에 나와 있습 니다.
당사는 유럽연합 지역내에서 구입하 신 당사당사는 유럽연합 지역내에서 구입하 신 당사
제품에 대하여 보증을 해드립 니 다 . 보증조제품에 대하여 보증을 해드립 니 다 . 보증조
건에 관한 설명은 건에 관한 설명은 www.blaupunkt.de 에서 에서
참고하시거나 아래의 장소에서 직접 문의하참고하시거나 아래의 장소에서 직접 문의하
실 수 있 습니다:실 수 있 습니다:
Blaupunkt GmbH
핫라인
Robert-Bosch-Str. 200
D-31139 Hildesheim, Germany
도로안전도로안전
도로안전은 무엇보다도 중요합 니다.
귀하의 카 사운드 시스템은 도로와 교통상
태가 원만할 때에만 사용하시기 바랍니다.
운전을 시작 하기 전에 본 기기를 충분히
익히 도록 하십시오.
먼 거리에서도 자동차 내부에서 교 통경찰
과 소방차 및 구급차의 사이 렌을 항상 들
을 수 있어야 합니다. 이를 위하여, 운전 중
귀하의 카 사 운드 시스템을 적절한 음량으
로 청 취하시기 바랍니다.
안전주의 사항안전주의 사항
주의:주의:
본 DVD 플레이어는 레이저 1 등급 제품으
로서 신체에 해로운 방사선을 창출할 수 있
는 눈에 보이지 않는 레이저 광선이 흐르고
있습니다. DVD 드라이브를 설명서의 지시
에 따라 사용하여 주십시오. 절대로 하우징
을 열거나 사용자 스스로 수리를 시 도하지
말아 주십시오. 제품의 서비스는 반드시 전
문요원에게 맏겨 주시기 바랍니다.
60
재활용 및 폐기처분에 대하여재활용 및 폐기처분에 대하여
당사의 제품은 친환경적으로 폐기된 자재를 사
용하여 제조되었으며 재활용이 가능합 니다.
오래된 제품은 반드시 다른 쓰레기와 분리하여
수거하여 주십시오. 제품을 폐 기할 때에는 재
활용품 수집처에 보내 주시기 바랍니다.

공급품공급품
IVOD-1022 모델에는 아래에 열거된 부품 모델에는 아래에 열거된 부품
이 모두 공급됩니다. 귀하의 제품에 빠진 부이 모두 공급됩니다. 귀하의 제품에 빠진 부
품이 있는지 확인하여 주시기 바랍니다. 빠품이 있는지 확인하여 주시기 바랍니다. 빠
진 부품이 있을 때에는 즉시 대리점에 연락진 부품이 있을 때에는 즉시 대리점에 연락
해 주십시오.해 주십시오.
•
IVOD-1022
•
마운팅 시트
•
장착 프레임
•
밖는 나사 4x40 6 개
•
돌림 나사 4x20 4 개
•
돌림 나사 4x20 4 개
•
커넥터 케이블
•
리모컨과 건전지 2 개
•
사용설명서 1 부
옵션용품옵션용품
적외선 헤드폰적외선 헤드폰
IVHS-01 모델의 적외선 헤드폰(옵션용품)을 사
용할 때에는, 적외선 수신창 L 이 가려지지 않
도록 하십시오.
공급품/옵션용품공급품/옵션용품
한국어한국어
61

설치 및 연결하기설치 및 연결하기
설치 및 연결하기설치 및 연결하기
설치 및 안전주의 사항설치 및 안전주의 사항
IVOD-1022 DVD 플레이어를 전원에 연결하기
전에 다음 사항을 숙지하여 주십시 오.
기기를 설치하고 연결하는 동안에 배터리의 기기를 설치하고 연결하는 동안에 배터리의
음극단자의 연결을 반드시 제거하여 주 십음극단자의 연결을 반드시 제거하여 주 십
시오.시오.
자동차 제조업체에서 공급한 안전지침을 숙
지하여 주시기 바랍니다 (에어백, 경보장 치,
온-보드 컴퓨터, 이모빌라이져).
IVOD-1022 를 설치할 때에는 자동차를 위급
정차하거나 갑자기 정차했을 때 운전자 나 승
차인이 다치지 않도록 나사로 단단히 고정시킬
수 있는 장소를 선택하여 주십 시오.
리모컨은 에어백이 부풀게 될 공간에 두지 마
시고, 위급 정차시 승차인이 다치지 않 도록
안전하게 보관하여 주십시오.
다음과 같은 장소에 다음과 같은 장소에 IVOD-1022 를 설치하지 를 설치하지
말아 주십시오,말아 주십시오,
•
운전자를 산만하게 하거나 운전자의 시야
를 가리는 곳.
자동차에 타거나 내릴 때 방해가 되는 곳.
•
•
다른 자동차 컴포넌트의 기능에 방해가 되
는 곳 (예: 썬루프).
직사광선을 받는 곳.
•
뜨거운 바람의 출구에 근접한 곳 (히터,
•
등).
비에 젖거나 습한 곳.
•
먼지가 있거나 더러운 곳.
•
심한 진동이 있는 곳.
•
모니터 설치하기모니터 설치하기
공급된 장착부품만 사용하여 주십시오.
설치장소를 선택할 때 다음 사항을 유의하여 설치장소를 선택할 때 다음 사항을 유의하여
주십시오:주십시오:
•
자동차의 안정장치(연료탱크, 케이블,
등)가 나사로 인하여 훼손되지 않도록 하
십시오.
•
기기가 루프의 내부 라이닝에만 장착되지
않도록 하십시오.
•
나무나사를 조일 때에는 단단한 받침을 사
용하여 주십시오.
•
위급 정차시에 기기가 떨어지지 않도록
안전하고 단단한 장소에 설치하여 주십
시오.
•
배터리가 소모되지 않도록 엔진이 걸리지
않은 상태에서 모니터를 장시간 사용하지
말아 주십시오.
그림그림 1
그림그림 2
62

설치 및 연결하기설치 및 연결하기
그림그림 3
그림그림 4
그림그림 5
연결하기연결하기
공급된 커넥터 케이블의 양쪽 끝을 자동차의 공급된 커넥터 케이블의 양쪽 끝을 자동차의
전원공급장치에 연결합니다.전원공급장치에 연결합니다.
노란색: 스테디 플러스 (+12 V)
검정색: 접지
빨간색: ACC +12 V
(터미널 15 시동)
녹색: 내부조명 (+12 V)
파란색: 내부조명 접지
밤색: 도어 스위치
(도어 오픈
배터리와 IVOD-1022 간의 스테디 플러스 케이
블에는 퓨즈 캐리어(5 앰프)를 사용 하여 퓨즈
를 직접 배터리에 반드시 장치해야 합니다.
커넥터 케이블을 기기의 밑면에 있는 잭에 연
결합니다.
AV OUT:
오디오/비디오 출력은 귀하 시스템의 해당 입
력에 연결합니다.
:
AV IN
외장 오디오/비디오 음원을 오디오/비디오 입
력에 연결할 수 있습니다. 자세한 설명 은 “외
장음원” 편을 참조하시기 바랍니다.
:
AUX 1
외장 오디오/비디오 음원을 AUX 1 입력에 연
결할 수도 있습니다.
== 마이너스마이너스 12 V)
한국어한국어
빨간색
노란색
녹색
밤색
파란색
AV 입력
AV 출력
검정색
63

설치 및 연결하기설치 및 연결하기
e
릴레이 없이 연결하기릴레이 없이 연결하기
퓨즈 5A
노란색
공급품공급품
I =<2A, 0.8A typ.*)
빨간색
검정색
릴레이를 사용하여 연결하기릴레이를 사용하여 연결하기
노란색
12V
배터리
ACC+B
접지
퓨즈 5A
Sicherung (Fuse) 5A
배터리
Batteri
12V
*)
자동차의 15 번 단자에 연결할 경 우, 15
번 단자에서 최장 30 cm 의 거리에 퓨즈
홀더(0.8 A 퓨즈)를 설 치하여 스위치된
포지티브 케이블 을 보호해야 합니다.
공급품공급품
+1
Relais
빨간색
검정색
ACC+B
접지
Ground
릴레이
옵션항목옵션항목
주의:주의:
이 연결은 반드시 공인된 아프터서비스 대리점에서 하도록 해야 합
니다.
64

전구 교체하기전구 교체하기
전구의 플라스틱 커버를 제거합니다.
쏅
약 3 mm 짜리 드라이버를 옆면의 슬롯에
쏅
끼워 넣습니다.
그 쪽 부위의 커버가 들어 올려지도록 드
쏅
라이버를 조심스럽게 돌립니다.
커버를 손으로 누른채 밀어서 엽니다.
쏅
구 전구를 제거합니다.
쏅
주의:주의:
전구가 아직 뜨거울 수 있습니다. 전구를 만지
기 전에 식을 때 까지 기다리십시오.
전구/건전지전구/건전지
한국어한국어
새 전구를 넣습니다 (12 V, 5 W).
쏅
커버를 다시 밀어서 닫습니다.
쏅
전구의 기술사양전구의 기술사양
직경: 8 mm
길이: 28 mm
전압: 12 V, 5 W
리모컨의 건전지 교체하기리모컨의 건전지 교체하기
돌출버튼을 건전지 삽입구 커버 방향으로
쏅
밀은 다음 커버를 위로 올려 제거 합니다.
건전지를 빼내고 새 1.5 V 건전지(AAA 타
쏅
입)를 건전지 삽입구의 도면에 맞 추어 넣
습니다.
65

처음 사용하기 전에처음 사용하기 전에 전원 켜기/끄기전원 켜기/끄기
처음 사용하기 전에처음 사용하기 전에
IVOD-1022 를 처음으로 사용하기 전에, 리모
컨에 건전지를 넣어야 합니다.
리모컨 작동시키기리모컨 작동시키기
건전지 넣기건전지 넣기
1. 커버를 제거하여 건전지 투입구를 엽니
다.
2. 새 건전지를 넣습니다. 건전지 유형: 두
개의 AAA 건전지. 건전지의 극성이 건전
지 삽입구의 도면에 일치하는지 확인하십
시오.
3. 건전지 투입구를 닫습니다.
리모컨 사용하기리모컨 사용하기
기기 앞에서 리모컨이 적외선 수신창을 향하
도록 잡습니다.
조작각도: 적외선 수신창의 앞면에서 양 쪽
으로 약 30°.
전원 켜기/끄기전원 켜기/끄기
도움말:도움말:
기기의 1 번 버튼의 표시등이 켜지면 기기가
조작할 준비가 되었음을 의미합니다.
쏅
기기를 켜거나/끄려면, 리모컨의 POWER
버튼 1 을 누르거나 기기의 POWER 버
튼 1 을 누릅니다.
IVOD-1022 의 내부전등 켜기 의 내부전등 켜기
두 가지 방법으로 전등을 켤 수 있습니다:
1. ON/OFF 스위치 M.
2. 자동차의 도어 스위치
(도어 오픈 = 마이너스 12 V).
LCD 화면 열기화면 열기
IVOD-1022 의 릴리즈 버튼 N 을 누르면
쏅
LCD 화면이 아래로 열립니다.
화면이 IVOD-1022 본체로 부터 약 90° 각
쏅
도가 되도록 LCD 화면을 아래로 내려 TV
를 시청합니다.
LCD 화면 닫기 화면 닫기
LCD 화면이 열림/닫힘 메카니즘에 클릭할
쏅
때 까지 본체로 올려서 닫습니다.
66

음량 조절하기음량 조절하기
DVD 조작하기 조작하기
음량 조절하기음량 조절하기
주의:주의:
IVOD-1022 에는 라우드 스피커가 없습니다.
적외선 헤드폰이나 AV OUT NF 를 연결하여
주십시오.
음량은 0(꺼짐)부터 16(최대) 사이에서 조절
할 수 있습니다.
음량을 늘리려면,
쏅
VOLUME + 버튼 G 을 누릅니다.
음량을 줄이려면,
쏅
VOLUME - 버튼 G 을 누릅니다.
음소거하기음소거하기
음량을 신속하게 줄일 수 있습니다.
MUTE 버튼 F 을 누릅니다.
쏅
화면에“MUTE”가 나타납니다.
음소거 취소하기음소거 취소하기
MUTE 버튼 F 을 다시 한 번 누릅니다.
쏅
DVD 조작하기 조작하기
IVOD-1022 에서는 DVD, 비디오 CD(VCD),
슈퍼 비디오 CD(SVCD), 시중의 일반 오디오
CD 와 포토 CD(VCD 2.0) 및 MP3 CD 를 재
생할 수 있습니다.
본 설명서는 DVD 조작을 위한 것입니다. 오
디오 CD 를 조작할 때에도 버튼의 기능 은
같습니다.
IVOD-1022 는
DVD 를 재생하도록 제작되었습니다. 본 기기
가 다른 국가코드에서도 작동할 때에는, 본 설
명서의 마지막 페이지나 기기의 표면에 이에 대
한 정보가 스티커로 표시되어 있습니다.
일반적으로 CD-R 과 CD-RW(“사용자가 구
운”CD)는 본 기기에서 재생을 할 수 있 습
니다. 하지만 CD 의 품질에 따라 경우가 다르
므로 Blaupunkt 는 이러한 디스크의 정상적
인 재생을 보증하지는 않습니다.
재생에 문제가 없도록 컴팩트 디스크의 로고
가 있는 CD 만 사용하여 주십시오. 복사 방
지가 되어 있는 CD 를 재생하면 문제가 생길
수 있습니다. Blaupunkt는 복사방지 가 되
어 있는 CD 의 정상적인 재생을 보증하지 않
습니다.
일반적으로 VCD/SVCD 및 DVD-R/RW,
DVD+R/RW 등 사용자가 구운 미디어는 본
기기에서 재생이 가능합니다.
이러한 미디어를 기록하는 데에 사용된 레코
더블 미디어
다르므로 Blaupunkt 는 이러한 미디어의 호
환성과 정상적인 재생에 대하여 보 증하지 않
습니다.
국가코드가 국가코드가 2 번 번 인 지역에서
및및 소프트웨어에 따라 경 우가
한국어한국어
DVD 드라이브가 심하게 훼손될 위험 드라이브가 심하게 훼손될 위험
이 있습니다.이 있습니다.
표준모형이 아닌 DVD/CD (특수모형 CD)
및 직경이 8 cm 인 DVD/CD 는 절대로 사
용하지 마십시오.
부적당한 DVD/CD 의 사용으로 인하여 발
생한 DVD 드라이브의 훼손에 대하여 당사
는 책임을 지지 않습니다.
67

DVD 조작하기 조작하기
본 플레이어에서 지원되는 디스크 포멧:본 플레이어에서 지원되는 디스크 포멧:
DVD 12 cm
•
•
DVD-R / DVD-RW
•
DVD+R / DVD+RW
•
DVD DivX 3.11; 4.0; 5.0...x
•
비디오 CD(VCD) 슈퍼 비디오 CD(SVCD)
12 cm
•
포토 CD(VCD 2.0) T-메뉴 PBC ON/OFF
•
오디오 CD(CD 텍스트가 지원되지 않는
것), CD-R 및 CD-RW 12 cm
•
MP3 뮤직파일이 들어 있는 MP3 CD. “줄
리엣” 또는 “ISO 9660” 형식의 MP3
CD 포멧만 지원됩니다.
본 플레이어에서 지원되지 않는 디스크 포본 플레이어에서 지원되지 않는 디스크 포
멧:멧:
•
DVD-ROM
•
CDV
•
CD-G
•
지역코드가 다른 DVD.
DVD/CD 넣기/꺼내기 넣기/꺼내기
IVOD-1022 는 로딩 트레이없이 슬롯-인 드
라이브로 되어 있습니다. 슬롯-인 드라이 브
는 기기의 드라이브가 진동하는 것을 가장 효
과적으로 감폭시켜 줍니다.
CD/DVD
쏅
DVD/CD 가 드라이브로 빨려 들어갑니다;
이 과정을 방해하거나 손으로 밀어 넣지 말
아 주십시오.
DVD/CD 가 로딩됩니다. DVD 메뉴가 나타나
거나 재생이 시작됩니다. 이 작동은 로딩 한
DVD 에 따라 결정됩니다.
넣기 넣기
DVD/CD 의 레벨면이 뒤로 향하도록 잡
고 더 이상 들어 가지 않는 느낌이 들 때
까지 화면의 후면에 있는 DVD/CD 슬롯에
밀어 넣습니다.
DVD/CD
쏅
DVD/CD 가 나옵니다.
쏅
꺼내기 꺼내기
리모컨의 EJECT 버튼 J 또는 기기의
EJECT 버튼 J 을 누릅니다.
DVD/CD 를 주의해서 꺼냅니다.
재생을 시작하기재생을 시작하기
원하는 DVD/CD 가 로딩되고 나면, DVD 메
뉴가 나타나거나 재생이 시작됩니다. 이 작동
은 로딩한 DVD 에 따라 결정됩니다.
쏅
리모컨의 ENTER/PLAY 버튼 C 또는 기
기의 버튼 K 을 누릅니다.
DVD 의 재생이 시작됩니다.
디스플레이디스플레이
재생시간에 관한 다양한 정보를 화면에 디스
플레이할 수 있습니다. 이 디스플레이는 표시
하지 않을 수도 있습니다.
다음과 같은 디스플레이를 표시할 수 있습다음과 같은 디스플레이를 표시할 수 있습
니다:니다:
•
TITLE 01/02 CHAPTER 33/45
01 : 26 : 14:
두 메인 섹션(타이틀) 중 첫 섹션, 그리고
이 섹션의 45 개의 챕터 중 33 번 째 챕터
를 재생중입니다. 재생경과 시간은 그 밑
에 표시됩니다.
•
•
•
REMAIN
TITLE
00 : 31 : 58:
현재 타이틀의 재생 잔여시간이 표시됩
니다.
CHAPTER
00 : 01 : 34:
현재 챕터의 재생경과 시간이 표시됩니
다.
CHAPTER
00 : 05 : 22:
현재 챕터의 재생 잔여시간이 표시됩니
다.
ELAPSED
REMAIN
68

DVD 조작하기 조작하기
디스플레이 정보 표시하기/변경하기디스플레이 정보 표시하기/변경하기
원하는 정보가 표시될 때 까지 리모컨의
쏅
DISPLAY 버튼 H 을 누릅니다.
디스플레이 정보가 화면의 윗쪽 끝에 표시
됩니다.
디스플레이 정보 감추기디스플레이 정보 감추기
“OFF”가 잠시 동안 표시된 후 화면의 디스플레
이가 사라질 때 까지 DISPLAY 버튼 H 을 누릅
니다.
빨리감기빨리감기
DVD 를 2 배속, 4 배속, 8 배속, 16 배속, 32
배속 및 64 배속으로 빠르게 진행할 수 있습니
다 (속도는 DVD 에 따라 다릅니다; 최대 속도
가 16 배속인 DVD 도 있습니다).
전진 또는 역방향으로 빨리감기를 하려면,
원하는 속도가 표시될 때 까지 리모컨의
쏅
FORWARD B 버튼을 누릅니다.
빨리감기 정지하기빨리감기 정지하기
빨리감기를 정지하려면,
리모컨의 ENTER/PLAY 버튼 C 또는 기
쏅
기의 버튼 K 을 누릅니다.
DVD 가 정상속도로 재생됩니다.
슬로우모션슬로우모션
DVD 를 전진방향 또는 역방향으로 느리게 재
생할 수 있습니다.
리모컨의 SLOW 버튼 > 을 한 번 또는 여
쏅
러 번 눌러 재생속도를 늦춥니 다.
SLOW 버튼 > 을 한 번 누르고 나면, 재생속
도가 반으로 줄어 듭니다 (SF 1/2x).
이 버튼을 누를 때 마다 속도가 더 줄여 집니
다 (4 분의 1 배속, 6 분의 1 배속, 8 분의 1
배속). 재생속도와 슬로우 진행의 SF 표시가
화면에 디스플레이됩니다.
속도가 8 분의 1 배속으로 줄여지면, 이 버
튼을 추가로 누를 때 마다 필름이 슬로 모션
으로 역방향으로 재생됩니다. 재생속도와 슬
로우 역진행의 SR 표시가 화면 에 디스플레
이됩니다.
DVD 를 정상속도로 다시 재생하려면,
쏅
리모컨의 ENTER/PLAY 버튼 C 또는 기
기의
버튼 K 을 누릅니다.
재생을 일시정지했다가(일시정지) 다시 재생을 일시정지했다가(일시정지) 다시
시작하기시작하기
재생을 일시정지하기재생을 일시정지하기
쏅
리모컨의 PAUSE/STEP 버튼 D 또는 기기
전면의 버튼 K 을 누릅 니다.
재생이 일시적으로 정지됩니다.
재생을 계속하기재생을 계속하기
리모컨의 PAUSE/STEP 버튼 D 또는 기
쏅
기 전면의 버튼 K 을 다시 한 번 누
릅니다.
프레임 정지하기프레임 정지하기
쏅
재생 중 리모컨의 PAUSE/STEP 버튼 D
또는 기기의 버튼 K 을 누 릅니다.
재생이 일시적으로 정지되고 정지된 화면이
나타납니다.
재생을 계속하기재생을 계속하기
재생을 계속하려면,
리모컨의 ENTER/PLAY 버튼 C 또는 기
쏅
기의
버튼 K 을 누릅니다.
챕터 건너뛰기챕터 건너뛰기
DVD 의 타이틀은 다시 여러 개의 작은 챕터
로 나뉘어 집니다.
다음 또는 다른 챕터로 건너뛰려면,
쏅
리모컨 또는 기기의 전면에서 SKIP
튼 : 을 한 번 또는 여러 번 누 릅니다.
재생이 다음 또는 해당 챕터의 시작부분으로
건너뜁니다.
버
한국어한국어
69

DVD 조작하기 조작하기
현재 또는 이전 챕터의 시작부분으로 건너
뛰려면,
쏅
리모컨 또는 기기의 전면에서 SKIP
튼 : 을 한 번 또는 여러 번 누 릅니다.
재생이 현재 또는 이전 챕터의 시작부분으로
건너뜁니다.
주의:주의:
DivX 로 DVD 를 재생할 때에는, SKIP 버튼
/ : 을 눌러 전진 또는 역방향으로
3, 5 또는 10 분을 건너뛸 수 있습니다. 설정
방법은 24 페이지를 참조하십시오.
버
DVD 타이틀의 재생을 반복하기 타이틀의 재생을 반복하기
DVD 는 챕터와 타이틀로 나누어져 있으며 이
를 개별적으로 선택할 수 있습니다.
챕터 또는 타이틀을 반복하기챕터 또는 타이틀을 반복하기
현재의 챕터를 반복하려면,
쏅
리모컨의 REP 버튼 2 을 누릅니다.
화면에 “CHAPTER REPEAT ON”이 나타
납니다.
현재의 타이틀을 반복하려면,
쏅
리모컨의 REP 버튼 2 을 다시 한 번 누
릅니다.
화면에“TITLE REPEAT ON”이 나타납니
다.
반복재생을 취소하기반복재생을 취소하기
반복을 취소하려면,
화면에“REPEAT OFF”가 나타날 때 까
쏅
지 리모컨의 REP 버튼 2 을 반복해서 누
릅니다.
챕터를 직접 선택하기챕터를 직접 선택하기
리모컨을 사용하여 챕터나 특정의 포지션(재
생시간)을 직접 선택할 수 있습니다.
챕터 선택하기챕터 선택하기
챕터를 직접 선택하려면,
쏅
리모컨의 PREV./GOTO 버튼 @ 을 누
릅니다.
화면에 “TITLE” 옆으로 현재의 타이틀 번
호와 총 타이틀 수가 표시됩니다. 그 다음으
로 챕터의 번호와 재생이 가능한 총 챕터의 수
가 표시됩니다. 챕터번호는 노란색으로 하이
라이트됩니다.
쏅
리모컨의
챕터의 번호를 입력한 후 ENTER/PLAY 버
튼 C 을 누릅니다.
원하는 포지션에서부터 재생이 시작됩니다.
재생시간 선택하기재생시간 선택하기
DVD 에서 재생을 원하는 특정 포지션의 재
생시간을 입력하여 이를 직접 선택할 수 있
습니다.
특정의 포지션으로 건너뛰려면,
쏅
리모컨의 PREV./GOTO 버튼 @ 을
누릅니다.
화면에 “TITLE” 옆으로 현재의 타이틀 번호
와 총 타이틀 수가 표시됩니다.
그 다음에 “TIME” 표시와 재생시간의 입력
란이 나타납니다. 입력란은 노란색으로 하이
라이트됩니다.
리모컨의
쏅
는 포지션을 “hh.mm.ss”의 포멧 으로
입력한 후 ENTER/PLAY 버튼 C 을 누
릅니다.
원하는 포지션에서부터 재생이 계속됩니다.
숫자버튼숫자버튼 @ 을 사용하여 원하는
두 번두 번
숫자버튼숫자버튼 @ 을 사용하여 원하
DVD 의 첫 타이틀부터 재생을 시작하기 의 첫 타이틀부터 재생을 시작하기
리모컨의 STOP/RETURN 버튼 ? 을 두 두
쏅
번번 누릅니다.
리모컨의 ENTER/PLAY 버튼 C 을 누
쏅
릅니다.
타이틀의 첫 부분부터 재생이 시작됩니다.
70

DVD 조작하기 조작하기
주의:주의:
대부분의 DVD 의 경우, 이것이 DVD 의 메인
메뉴(루트)입니다.
자막 표시하기자막 표시하기
자막을 표시하려면,
리모컨의 SUBTITLE 버튼 9 을 누릅니
쏅
다.
자막이 표시됩니다. 디스플레이 정보가 나타
납니다. 현재의 언어와 총 자막언어의 수 가
“SUBTITLE” 옆에 표시됩니다.
자막언어를 변경하려면,
쏅
원하는 언어로 자막이 나타날 때 까지 리
모컨의 SUBTITLE 버튼 9 을 한 번 또 는
반복해서 누릅니다.
주의:주의:
DVD 의 메뉴에서도 자막을 표시할 지의 여부
와 원하는 자막의 언어를 설정할 수 있 습니
다 (DVD 메뉴 참조). 또한, 설정메뉴에서도
원하는 자막언어를 설정할 수 있습 니다. 자
세한 설명은, “설정” 챕터의 “자막언어 설
정하기” 를 참조하시기 바랍니다.
음성언어 선택하기음성언어 선택하기
음성언어를 선택하려면,
리모컨의 AUDIO 버튼 8 을 한 번 또는
쏅
여러 번 누릅니다.
음성언어가 바뀝니다. 디스플레이 정보가 나
타납니다. 현재의 언어와 언어의 번호와 음성
언어의 총 수가 표시됩니다.
주의:주의:
DVD 의 메뉴에서도 음성언어를 선택할 수 있
습니다 (DVD 메뉴 참조). 또한, 설정메 뉴에
서도 원하는 음성언어를 설정할 수 있습니다.
자세한 설명은,“설정”챕터의“음 성언어 설
정하기”를 참조하시기 바랍니다.
카메라의 각도 변경하기카메라의 각도 변경하기
한 장면에 두 개 또는 그 이상의 다른 카메라
각도가 들어 있는 DVD 가 있습니다.
현재 카메라의 각도 번호와 총 카메라 각도의
수가 디스플레이 정보에서 카메라 심 볼 옆에
표시됩니다.
카메라의 각도를 변경하려면,
쏅
리모컨의 ANGLE 버튼 7 을 누릅니다.
화면의 장면이 다른 카메라 각도로 나옵니다.
디스플레이 정보가 나타납니다.
주의:주의:
디스크에 카메라 각도가 하나 이상 들어 있을
경우 카메라 심볼
뉴에서 지정할 수 있습니다. 자세한 설명은,
“설정” 챕터의 “카메라 각도 표시 하기”
편을 참조하시기 바랍니다.
이 표시되도록 설 정 메
이미지 구역 확대하기 (줌)이미지 구역 확대하기 (줌)
재생 이미지의 원하는 구역을 최대 세 배까지
확대할 수 있습니다.
이미지 구역을 확대하려면,
쏅
리모컨의 ZOOM 버튼 6 을 한 번 또는
여러 번 누릅니다.
이 버튼을 누를 때 마다, 중심 이미지가 확대
됩니다. 1.5 배속, 2 배속 및 3 배속으 로 확
대할 수 있습니다.
주의:주의:
이미지를 원하는 크기로 확대한 후, 리모컨의
화살표 버튼화살표 버튼 = 을 사용하여 이미지 구역을
자유자재로 이동할 수 있습니다.
확대 취소하기확대 취소하기
이미지를 확대하지 않고 계속해서 영화를 시
청하려면,
“ZOOM OFF” 가 화면에 나타날 때 까
쏅
지 리모컨의 ZOOM 버튼 6 을 반복해서
누 릅니다.
한국어한국어
71

DVD 메뉴 메뉴
DVD 메뉴 메뉴
DVD 메뉴는 로딩한 DVD 에서 제공합니다.
DVD 를 넣고 재생이 시작되면, DVD 메뉴 가
자동으로 화면에 나타납니다.
주의:주의:
DVD
메뉴에서 선택할 수 있는 항목들은 각 메뉴에서 선택할 수 있는 항목들은 각
DVD 에 따라 다릅니다. 에 따라 다릅니다.
DVD 에 들어 있는 DVD 메뉴는 다음 사항을
제공합니다:
•
음성언어나 자막언어를 원하는 대로 선택
할 수 있습니다.
실제 영화이외에, 영화관이나 TV 에서 이
•
영화의 홍보시에 사용되었던 광고 나 이
영화의 “… 만들기” 프로그램을 볼 수
있습니다.
하나의 영화는 몇 개의 챕터로 나누어져
•
있습니다. 특정의 포지션에서부터 재생을
하고자 할 때는 비디오 카세트의 경우처
럼 “빨리감기” 를 실행하지 않 고도 해
당 챕터를 직접 선택하여 재생을 시작할
수 있습니다.
DVD 메뉴 표시하기 메뉴 표시하기
재생을 언제 어느때나 정지시키고 DVD 메뉴
를 디스플레이할 수 있습니다.
리모컨의 MENU 버튼 5 을 누릅니다.
쏅
DVD 메뉴 종료하기 메뉴 종료하기
영화 시작하기 등, 원하는 항목을 DVD 메뉴
에서 선택하면, DVD 메뉴가 자동으로 닫히고
재생이 시작됩니다.
타이틀 메뉴 표시하기타이틀 메뉴 표시하기
타이틀/챕터를 간편하게 개별적으로 선택하
기 위하여 타이틀 메뉴를 직접 불러올 수 도
있습니다:
쏅
리모컨의 T
타이틀 메뉴가 나타납니다.
.MENU 버튼 4 을 누릅니다.
메뉴항목 선택하기메뉴항목 선택하기
일반적으로 DVD 에는 “영화 시작하기”,
“챕터 선택하기” 등의 항목을 선택할 수 있
는 메뉴가 들어 있습니다.
각 메뉴항목 사이를 전환하려면,
쏅
리모컨의
릅니다.
메뉴항목을 확인하려면,
리모컨의 ENTER/PLAY 버튼 C 을 누
쏅
릅니다.
72
화살표 버튼화살표 버튼 = 중 하나를 누

모니터 설정하기모니터 설정하기
조작하기조작하기
리모컨의 MON.SETUP 버튼 < 을 눌러
쏅
MONITOR SETUP 메뉴를 불러 옵니다.
화살표 버튼화살표 버튼 / = 을 사용하여 옵션옵션 을
쏅
선택합니다.
화살표 버튼화살표 버튼 / = 을 사용하여 설정 설정 을
쏅
변경합니다.
MON.SETUP 버튼 < 을 다시 한 번 눌러
쏅
메뉴에서 나옵니다.
Options Settings
Optionen Einstellungen
PICTURE USER
BRIGHTNESS 0-50
CONTRAST 0-50
COLOR 0-50
TINT 0-50
SHARPNESS 0-50
ZOOM NORMAL
DISPLAY DOWN
SYSTEM RESET
NORMAL
CINEMA
SPORTS
WIDE 1
WIDE 2
UP
모니터 설정 메뉴모니터 설정 메뉴
TINT
•
화면의 색조를 설정합니다 (NTSC 전용)
SHARPNESS
•
화면의 선명도를 설정합니다
ZOOM
•
화면의 높이/폭을 변경합니다
- NORMAL
- WIDE 1
- WIDE 2
DISPLAY
•
화면의 디스플레이를 변경합니다
- UP - DOWN
- 왼쪽과 오른쪽 표시의 전환
SYSTEM RESET
•
기기를 공장 출하시의 사전설정으로 리세
트합니다.
한국어한국어
SEL: ADJ:
모니터 설정 메뉴모니터 설정 메뉴
PICTURE
•
USER 항목하에 화면을 설정합니다:
BRIGHTNESS, CONTRAST, COLOR,
TINT (NTSC 전용) 및 SHARPNESS 를 0
부터 50 까지에서 설정할 수 있습니다. 이
설정은 NORMAL, CINEMA 및 SPORTS
로 정해져 있습니다.
•
BRIGHTNESS
밝기를 설정합니다
•
CONTRAST
대비를 설정합니다
COLOR
•
색의 강도를 설정합니다
73

외장음원외장음원 CD/DVD/MP3 조작하기 조작하기
외장음원외장음원
두 개의 외장음원을 IVOD-1022 에 연결할 수
있습니다. 예를 들어 AUDIO/VIDEO IN 잭을
통하여 텔레비젼 튜너를 연결하고 AUX-IN 잭
을 통하여 게임기를 연결할 수 있습니다.
내장의 AUDIO/VIDEO 신호는 AV-출력 잭을
통하여 출력될 수 있습니다.
주의:주의:
외장음원을 연결할 때 본 기기가 훼손되지 않
도록, 외장음원과 IVOD-1022 의 케이 블/잭
의 색이 일치하도록 하십시오.
잭
VIDEO IN (노란색)
AUDIO IN (빨간색/흰색)
- 빨간색 신치 = 오른쪽 채널
- 흰색 신치 = 왼쪽 채널
내장 DVD 드라이브와 외장음원의 재생을 전
환하려면,
원하는 음원이 표시될 때 까지 리모컨의
쏅
DVD/TV/EXT 버튼 3 을 반복해서 누
릅 니다.
CD/DVD/MP3 조작하기 조작하기
DVD 와 비디오 CD 이외에도 오디오 CD, 포
토 CD(VCD 2.0) 및 MP3 CD 를 재생할 수
있습니다.
오디오 오디오 CD
오디오 오디오 CD 를 넣고 재생할 때에는, 재생, 검색,
일시정지 및 반복재생의 기능을 DVD 모드에서
와 같은 방법으로 사용할 수 있습니다.
포토 포토 CD/DVD
포토 포토 CD 를 넣으면, 약 3 초 후에 슬라이드쇼
가 시작됩니다.
STOP/RETURN 버튼 ? 을 눌러 “(MP3 .
쏅
JPG) SMART NAVI” 메뉴를 불 러옵니다.
리모컨의 화살표 버튼화살표 버튼 = 을 사용하여 스마
트 네비 메뉴에서 트랙과 폴더사이를 쉽게 이
동합니다.
원하는 항목을 선택한 후 리모컨의 ENTER/
쏅
PLAY 버튼 C 을 누릅니다.
포토 포토 CD VCD 2.0
“Press play to continue”가 나타났을 때
쏅
기기의 버튼 K 을 누릅니다.
리모컨의 T.MENU 버튼 4 을 누릅니다,
쏅
> “PBC on”이 나타납니다.
기기의
쏅
설정한 시작 페이지가 나타납니 다.
기기의 버튼 K 을 누릅니다, > 슬라이
쏅
드쇼가 시작됩니다.
버튼 K 을 누릅니다, > 귀하가
74
MP3 CD
MP3 CD 는 반드시 “줄리엣” 또는 “ISO
9660” 포멧이어야 합니다.
MP3 CD 를 넣으면, “(MP3 . JPG) SMART
NAVI” 네비 메뉴가 화면에 나타납니다.

이퀄라이져이퀄라이져CD/DVD/MP3 조작하기 조작하기
STOP/RETURN 버튼 버튼 ? 을 한 번 누르고 난 후을 한 번 누르고 난 후
에는에는, 리모컨의 화살표 버튼화살표 버튼 = 을 사용하여 트
랙과 폴더사이를 쉽게 이동할 수 있습니다.
쏅
원하는 선택을 하고 난 후 리모컨의 ENTER/
PLAY 버튼 C 을 누릅니다.
주의:주의:
다른 기능도 - 재생, 검색, 일시정지 및 반복
재생 (DVD 모드에서 설명한 바 있음) - MP3
모드에서 사용할 수 있습니다.
이퀄라이져이퀄라이져
IVOD-1022 에는 7-밴드 이퀄라이져가 내장되
어 있어 뮤직 사운드가 귀하의 자동차 나 뮤직
스타일에 최적으로 어울리도록 할 수 있습니
다. 본 기기에는 일곱 개의 고 정 사운드 프리
세트와 사용자가 설정할 수 있는 퍼스널 사운
드 설정이 있습니다.
고정 사운드 프리세트:고정 사운드 프리세트:
클래식
•
재즈
•
•
록
팝
•
•
발라드
•
댄스
•
표준
사용자 사운드 설정:사용자 사운드 설정:
•
퍼스널
고정된 사운드 프리세트 선택하기고정된 사운드 프리세트 선택하기
리모컨의 EQUALIZER 버튼 E 을 누릅
쏅
니다.
현재의 설정 또는 최종으로 사용했던 설정이
표시됩니다.
원하는 설정이 나타날 때 까지 리모컨의
쏅
ENTER/PLAY 버튼 C 을 반복해 서 누
릅니다.
설정이 저장되고 ENTER/PLAY 버튼 C 을
쏅
누르거나 3 초가 경과하면 자 동으로 설정
화면이 닫힙니다.
한국어한국어
사용자 사운드 설정 선택하기 (퍼스널 사용자 사운드 설정 선택하기 (퍼스널
이퀄라이져)이퀄라이져)
퍼스널 사운드 설정으로 귀하의 취향에 맞도
록 음악을 재생할 수 있습니다.
75

이퀄라이져이퀄라이져
설정 조절시 유의할 사항설정 조절시 유의할 사항
설정을 조절할 때에는 귀하에게 익숙한 CD 를
사용하시기를 권장합니다.
쏅
CD 를 청취합니다.
쏅
사운드로부터 어떤 느낌을 받습니까?
쏅
이퀄라이져의 설정값을 조절합니다 – “이
퀄라이져 조절에 관한 도움말” 참 조.
“퍼스널” 이퀄라이져 설정하기“퍼스널” 이퀄라이져 설정하기
퍼스널 이퀄라이져를 설정하려면,
쏅
리모컨의 EQUALIZER 버튼 E 을 누릅
니다.
현재의 설정 또는 최종으로 사용했던 설정이
표시됩니다.
“personal”이 나타날 때 까지 리모컨
쏅
의 ENTER/PLAY 버튼 C 을 반복해 서
누릅니다.
리모컨의
쏅
변경하고자 하는 주파수로 선택마크(노란
색)를 이동합니다.
리모컨의 화살표 버튼화살표 버튼 왖/왔 = 을 사용하
쏅
여 원하는 설정값으로 주파수를 올리거나
내립니다.
주의:주의:
설정을 조절하는 동안 재생이 설정에 따라 같
이 조절됩니다.
이퀄라이져 표시는 최종 설정을 한 후 수 초가
경과한 뒤에 화면에서 감춰지지만, 이퀄라이져
를 취소할 때까지 계속해서 작동합니다.
화살표 버튼화살표 버튼 왗/왘 = 을 사용하여
이퀄라이져 취소하기이퀄라이져 취소하기
이퀄라이져의 작동을 해제하려면,
리모컨의 EQUALIZER 버튼 E 을 누릅
쏅
니다.
화면에 “EQUALIZER OFF”가 잠시 동안 표
시됩니다.
76

이퀄라이져 조절에 관한 도움말이퀄라이져 조절에 관한 도움말
미드 레인지/고음을 먼저 설정한 다음 저음
을 설정합니다.
사운드의 느낌/문제사운드의 느낌/문제 조치조치
이퀄라이져이퀄라이져
저음이 너무 약하다
저음이 깨끗하지 않다
붐 소리가 난다
소리가 편하지 않다
사운드가 앞쪽으로 치우져있고, 거칠며,
스테레오 효과가 나지 않는다.
소리가 둔하다
선명하지 않다
음악기기의 소리가 좋지 않다
저음을 보강합니다
주파수: 60 에서 150 Hz
게인: +4 에서 +6
한국어한국어
로어 미드레인지를 줄입니다
주파수: 150 에서 400 Hz
게인: 약 -4
로어 미드레인지를 줄입니다
주파수: 1,000 에서 2,000 Hz
게인: -4 에서 -6
고음을 보강합니다.
주파수: 6,000 에서 15,000 Hz
게인: +2 에서 +4
77

DVD 기본설정하기기본설정하기
DVD 설정하기설정하기
IVOD-1022 에서는 다양한 설정 옵션으로 기
기를 개인화할 수 있습니다.
설정메뉴 불러오기설정메뉴 불러오기
설정메뉴를 불러오려면,
리모컨의 DVD SETUP 버튼 ; 을 누릅
쏅
니다.
설정메뉴에서 설정을 조절하기설정메뉴에서 설정을 조절하기
설정메뉴에서 설정을 조절하는 방법은 기본
적으로 “화면표시 언어 선택하기”의 과정
과 같습니다.
주의:주의:
“PREFERENCES”의 설정은 ”의 설정은 DVD 가 들어 가 들어
있지 않을 때에만 실행할 수 있습니다.있지 않을 때에만 실행할 수 있습니다.
화면표시 언어 선택하기화면표시 언어 선택하기
쏅
설정메뉴를 부릅니다.
쏅
화살표 버튼화살표 버튼 왖/왔 = 을 사용하여 “GENERAL
SETUP” 메뉴항목을 선택 합니다.
쏅
ENTER/PLAY 버튼 C 으로 선택을 확인
합니다.
쏅
화살표 버튼화살표 버튼 왖/왔 = 을 사용하여 “OSD
LANG” 메뉴항목을 선택합니다.
화살표 버튼화살표 버튼 왘 = 을 누릅니다.
쏅
선택할 수 있는 화면표시 언어가 나타납니다.
쏅
화살표 버튼화살표 버튼 왖/왔 = 을 사용하여 원하는
언어의 메뉴항목을 선택합니다.
ENTER/PLAY 버튼 C 으로 선택을 확인
쏅
합니다.
DVD SETUP 버튼 ; 을 눌러 설정을 종
쏅
료합니다.
설정이 저장되고 설정메뉴가 닫힙니다.
음성언어 선택하기음성언어 선택하기
음성언어는 “PREFERENCES” 메뉴의 “AU-
DIO” 항목에서 설정합니다.
자막언어 선택하기자막언어 선택하기
자막언어는 “PREFERENCES” 메뉴의
“SUBTITLE” 항목에서 설정합니다.
DVD의 메뉴언어 선택하기의 메뉴언어 선택하기
DVD 의 메뉴언어는 “PREFERENCES” 메뉴
의 “DISC MENU” 항목에서 설정합니다.
모니터 설정 선택하기모니터 설정 선택하기
모니터는 “PREFERENCES” 메뉴의 “TV
DISPLAY” 항목에서 설정합니다.
모니터의 설정을 다음에서 선택합니다:
•
Normal/PS
의 모니터에 연결되었을 때 선택합 니다.
와이드 이미지가 화면의 좌우 폭 전체에
나타나고 화면의 상단과 하단 에 검은 띠
가 나타납니다.
Normal/LB: DVD 플레이어가 4:3 화면
•
비의 모니터에 연결되었을 때 선택합 니
다. 와이드 이미지가 화면의 상하 폭 전체
에 나타납니다. 와이드 이미지의 오른쪽
과 왼쪽 가장자리 부위는 자동으로 잘려
서 나옵니다.
WIDE: DVD 플레이어가 16:9 화면비의 모
•
니터에 연결되었을 때 선택합니 다. 와이드
이미지가 화면 전체에 나옵니다.
: DVD 플레이어가 4:3 화면비
DivX
“PREFERENCES” 메뉴의 “SOFT CHAP.
ON” 항목에서 3, 5 또는 10 분울 설정합
니 다.
78

DVD 기본설정하기기본설정하기
시청제한 기능시청제한 기능
기기에 암호를 부여하여 허가없이 기기를 사
용하는 것을 방지할 수 있습니다. 또한, 시청
등급도 지정할 수 있습니다. 시청등급이란 특시청등급이란 특
정의 정의 DVD 에 나이에 따라 시청을 제한하는 코에 나이에 따라 시청을 제한하는 코
드가 부여되어 있음을 말합니다.드가 부여되어 있음을 말합니다. 시청등급을
로딩된 DVD 에 설정되어 있 는 등급보다 더
낮게 설정할 경우에는, 암호를 입력해야만 재
생을 할 수 있게됩니다.
주의:주의:
모든모든 DVD 가 시청등급의 기능을 지원하는 것가 시청등급의 기능을 지원하는 것
은 아닙니다.은 아닙니다.
메뉴에서 시청할 수 있는 영화를 지정할 수 있
습니다. 이 시청등급은 미국의 모션픽 쳐협회
(MPAA) 에서 권장하는 기준에 따릅니다.
다음의 등급중에서 선택을 할 수 있습니다:다음의 등급중에서 선택을 할 수 있습니다:
1 G: 어린이 시청가능
2: 어린이 시청가능
3 PG: 부모가 동반해야 시청이 가능한
등급.
4 PG 13: 부모가 동반해야 시청이 가능한
등급, 13 세 이하 관람불가.
5: DVD 에 설정된 등급이 없음.
6 PG-R: 어린이 및 청소년 관람불가, 폭
력과 욕설이 포함된 디스크.
7 NC 17: 17 세 미만의 청소년 관람불
가.
8 ADULT: 성인용: 폭력, 성행위 등이 포함
된 디스크.
No
PARENTAL: 시청제한 없음.
주의:주의:
잠금장치가 되어 있는 DVD 중에는 재생을 하
기 전에 YES (ENTER)와 암호를 입력 하여
장치를 풀 수 있는 경우가 있습니다. 그 외의
경우에는 DVD 를 재생하기 전에 설정메뉴에
서 시청등급을 변경해야만 합니다. 이 작동은
DVD 에 따라 경우가 다릅니 다.
시청제한 기능 설정하기시청제한 기능 설정하기
시청제한 기능을 설정하려면,
설정메뉴를 부릅니다.
쏅
화살표 버튼화살표 버튼 왖/왔 = 을 사용하여 “PREF-
쏅
ERENCES” 메뉴항목을 선택합 니다.
ENTER/PLAY 버튼 C 으로 선택을 확인
쏅
합니다.
프리퍼런스의 설정메뉴가 나타납니다.
쏅
화살표 버튼화살표 버튼 왖/왔 = 을 사용하여 원하는
“PARENTAL” 메뉴항목을 선택 합니다.
화살표 버튼화살표 버튼 왘 = 을 누릅니다.
쏅
나이에 따른 시청을 제한하는 등급이 나타
납니다.
화살표 버튼화살표 버튼 왖/왔 = 을 사용하여 원하는
쏅
시청등급을 선택합니다.
ENTER/PLAY 버튼 C 으로 선택을 확인
쏅
합니다.
리모컨의 숫자버튼 숫자버튼 0-9 @ 을 사용하여 암
쏅
호를 입력합니다.
주의:주의:
암호를 아직 지정하지 않았을 때에는, 기본암
호 0000 번을 사용합니다.
ENTER/PLAY 버튼 C 으로 선택을 확인
쏅
합니다.
SETUP 버튼 ; 을 눌러 설정을 종
DVD
쏅
료합니다.
설정이 저장되고, 설정메뉴가 닫힙니다.
한국어한국어
79

기본설정하기기본설정하기
DVD
암호 변경하기암호 변경하기
암호를 변경하려면,
쏅
설정메뉴를 부릅니다.
화살표 버튼화살표 버튼 왖/왔 = 을 사용하여 “PREF-
쏅
ERENCES” 메뉴항목을 선택합 니다.
ENTER/PLAY 버튼 C 으로 선택을 확인
쏅
합니다.
프리퍼런스의 설정메뉴가 나타납니다.
쏅
화살표 버튼화살표 버튼 왖/왔 = 을 사용하여 “PASS-
WORD” 메뉴항목을 선택합니다.
쏅
화살표 버튼화살표 버튼 왘 = 을 누릅니다.
쏅
ENTER/PLAY 버튼 C 으로 “CHANGE”를
확인합니다.
쏅
암호를 아직 설정하지 않았을 때에는 리
모컨의
“NEW PASSWORD” 옆에 새새 암호를 입
력합니다.
암호를 이미 지정했을 때에는, 숫자버튼 숫자버튼 0-9
쏅
@ 을 사용하여 “OLD PASSWORD” 옆
에 구구 암호를 먼저 입력합니다.
주의:주의:
암호를 아직 지정하지 않았을 때에는, 기본암
호 0000 번을 사용합니다.
숫자버튼 숫자버튼 0-9 @ 을 사용하여 새 암호를 두
쏅
번 입력합니다.
ENTER/PLAY 버튼 C 으로 입력사항을
쏅
확인합니다.
DVD
쏅
료합니다.
설정이 저장되고, 설정메뉴가 닫힙니다.
숫자버튼 숫자버튼 0-9 @ 을 사용 하여
SETUP 버튼버튼 ; 을 눌러 설정을 종
TV 의 컬러방식 설정하기의 컬러방식 설정하기
최상의 화질을 위하여 부착된 모니터의 컬러
텔레비젼 방식을 DVD 플레이어에서 설정하
여 주십시오.
“PAL”은 유럽지역의 표준이고, “NTSC”는
미국/아시아 지역의 표준입니다.
“MULTI” 설정을 선택하면, DVD 에 설정되
어 있는 방식으로 출력이 됩니다.
텔레비젼의 컬러방식은 “PREFERENCES”
메뉴의 “TV TYPE” 항목에서 설정합니다.
카메라 각도 표시하기카메라 각도 표시하기
DVD 에 카메라 각도가 하나 이상 들어 있을
경우 카메라 심볼 “
정할 수 있습니다. 이를 위해서는 “ON” 설
정을 선택하십시오.
카메라의 각도는 “GENERAL SETUP” 메
뉴의 “ANGLE MARK” 항목에서 설정합
니 다.
” 이 표시되도록 설
AV OUT 출력출력
기기를 자동차에 장착했을 때에는, 자동차의
시스템(앰프, 모니터 등)을 AV-OUT 출력을
통해 연결할 수 있습니다.
“듀얼 모노” 설정하기“듀얼 모노” 설정하기
1+1 오디오 모드(두 개의 모노채널)의 DVD
에서는 두 개의 채널을 어떻게 사용할 지를 설
정할 수 있습니다.
다음의 설정중에서 선택합니다:다음의 설정중에서 선택합니다:
Stereo:
•
1+1 프로그램의 스테레오 재생방식. 채널
1은 왼쪽 출력에서 재생되고, 채널 2 는 오
른쪽 출력에서 재생됩니다.
L - MONO:
•
DVD 의 왼쪽 채널이 양 쪽(왼쪽 및 오른
쪽) 출력에서 재생됩니다.
R - MONO:
•
DVD 의 오른쪽 채널이 양 쪽(왼쪽 및 오
른쪽) 출력에서 재생됩니다.
Mix - MONO:
•
DVD 의 채널 1 과 2 가 양 쪽(왼쪽 및 오
른쪽) 출력에서 재생됩니다.
80

쏅
설정메뉴를 부릅니다.
화살표 버튼화살표 버튼 왖/왔 = 을 사용하여 “AUDIO
쏅
SETUP” 메뉴항목을 선택합 니다.
ENTER/PLAY 버튼 C 으로 선택을 확인
쏅
합니다.
화살표 버튼화살표 버튼 왖/왔 = 을 사용하여 “DUAL
쏅
MONO” 메뉴항목을 선택합니 다.
화살표 버튼화살표 버튼 왘 = 을 누릅니다.
쏅
화살표 버튼화살표 버튼 왖/왔 = 을 사용하여 원하는
쏅
설정을 선택합니다.
ENTER/PLAY 버튼 C 으로 선택을 확인
쏅
합니다.
쏅
DVD SETUP 버튼 ; 을 눌러 설정을 종
료합니다.
설정이 저장되고, 설정메뉴가 닫힙니다.
압축강도 설정하기압축강도 설정하기
“COMPRESSION” 메뉴에서 돌비 프로그램
의 다이나믹스를 “OFF”에서 “Full” 사 이
에서 설정할 수 있습니다. 다이나믹스의 최대
효과를 위해서는 “FULL” 설정을 선
택하십시오.
설정메뉴를 부릅니다.
쏅
화살표 버튼화살표 버튼 왖/왔 = 을 사용하여 “AUDIO
쏅
SETUP” 메뉴항목을 선택합 니다.
ENTER/PLAY 버튼 C 으로 선택을 확인
쏅
합니다.
화살표 버튼화살표 버튼 왖/왔 = 을 사용하여 “COM-
쏅
PRESSION” 메뉴항목을 선택합 니다.
화살표 버튼화살표 버튼 왘 = 을 누릅니다.
쏅
화살표 버튼화살표 버튼 왖/왔 = 을 사용하여 원하는
쏅
설정을 선택합니다.
ENTER/PLAY 버튼 C 으로 선택을 확인
쏅
합니다.
DVD SETUP 버튼 ; 을 눌러 설정을 종
쏅
료합니다.
설정이 저장되고, 설정메뉴가 닫힙니다.
DVD 기본설정하기 기본설정하기
돌비 디지털 돌비 디지털 DVD 의 다운믹스 설정하기의 다운믹스 설정하기
IVOD-1022 는 다운믹스 기능을 사용하여 돌
비 디지털 (Dolby Digital) 신호로부터 호 환
되는 스테레오 신호를 산출합니다.
다운믹스는 설정메뉴의 “SPEAKER SETUP”
항목에서 설정할 수 있습니다.
화면보호 기능 작동시키기화면보호 기능 작동시키기
IVOD-1022 에는 액정화면에 이미지(예: 메
뉴)의 자국이 생기지 않도록 화면보호 기 능
이 탑재되어 있습니다.
화면보호 기능을 작동시키면, 화면에 이미지
자국이 남지 않도록 사용자가 최종 조 작을
한 뒤로 약 60 초가 경과하고 나면 로고가 디
스플레이됩니다.
화면보호 기능은 “GENERAL SETUP” 메
뉴의 “SCREEN SAVER” 항목에서 설정할
수 있습니다.
기기를 리세트하기기기를 리세트하기
기기를 리세트하여 사용자 설정을 모두 삭제
할 수 있습니다.
주의:주의:
DVD 가 로딩되어 있을 때에는 기기를 리세트가 로딩되어 있을 때에는 기기를 리세트
할 수 없습니다.할 수 없습니다.
쏅
DVD 의 설정메뉴를 부릅니다.
쏅
화살표 버튼화살표 버튼 왖/왔 = 을 사용하여 “PREF-
ERENCES” 메뉴항목을 선택합 니다.
쏅
ENTER/PLAY 버튼 C 으로 선택을 확인
합니다.
프리퍼런스의 설정메뉴가 나타납니다.
화살표 버튼화살표 버튼 왖/왔 = 을 사용하여 “DE-
쏅
FAULTS” 메뉴항목을 선택합니다.
왘 버튼버튼 = 을 누릅니다.
쏅
“RESET” 메뉴항목이 마크됩니다.
기기를 정말 리세트하려면,
ENTER/PLAY 버튼 C 을 누릅니다.
쏅
기기가 공장 출하시의 기본설정으로 돌아갑
니다.
한국어한국어
81

제품사양제품사양
제품사양제품사양
화면크기: 10.2" 모니터
화면의 해상도: 800 (H) x 3 (RGB) x 480 (V)
표시면적: 222 (H) x 133.2 (V)
신호시스템: 듀얼시스템 NTSC/PAL
밝기: 400 cd/m
대비: 400:1
시청각도 범위: 좌/우: +/-65°
상/하: +50/-65°
비디오 입력레벨: 1 Vpp 10%
오디오 입력레벨: 2.0 Vrms
주파수 적외선센서: L-CH: 2.3 MHz
R-CH: 2.8 MHz
작동전원 (DC): 10-18 V
소비전력: 기기가 “ON”으로 켜져 있을 때 < 2.2 A (+12 V 에서)
소비전력: 기기가 “OFF”로 꺼져 있을 때 120 mA (+12 V 에서)
대기전력:“시동이 OFF 로 꺼져 있을 때” < 1 mA (+12 V 에서)
작동온도: -20 °C 에서 +70 °C
보관온도: - 40 °C 에서 +85 °C
치수 (길이 x 높이 x 폭): 252 x 40 x 253 mm
중량: ≤ 1800 g
2
이 정보는 별경될 수 있슴니다 !
82

메모메모
한국어한국어
83

Service numbers / 服務電話號碼 / 문의 연락처문의 연락처
Country: Phone: Fax:
Germany (D) 0180-5000225 05121-49 4002
Austria (A) 01-610 390 01-610 393 91
Belgium (B) 02-525 5454 02-525 5263
Denmark (DK) 44 898 360 44-898 644
Finland (FIN) 09-435 991 09-435 99236
France (F) 01-4010 7007 01-4010 7320
Great Britain (GB) 01-89583 8880 01-89583 8394
Greece (GR) 210 57 85 350 210 57 69 473
Ireland (IRL) 01-4149400 01-4598830
Italy (I) 02-369 6331 02-369 6464
Luxembourg (L) 40 4078 40 2085
Netherlands (NL) 023-565 6348 023-565 6331
Norway (N) 66-817 000 66-817 157
Portugal (P) 01-2185 00144 01-2185 11111
Spain (E) 902-120234 916-467952
Sweden (S) 08-7501500 08-7501810
Switzerland (CH) 01-8471644 01-8471650
Czech. Rep. (CZ) 02-6130 0441 02-6130 0514
Hungary (H) 01-333 9575 01-324 8756
Poland (PL) 0800-118922 022-8771260
Turkey (TR) 0212-3350677 0212-3460040
USA (USA) 800-2662528 708-6817188
Brasil
(Mercosur) (BR) +55-19 3745 2769 +55-19 3745 2773
Malaysia
(Asia Pacifi c) (MAL) +604-6382 474 +604-6413 640
Blaupunkt GmbH
Robert-Bosch-Str. 200
D-31139 Hildesheim
02/06 CM-AS/SCS1 - 8 622 404 913
 Loading...