

Page 1
CD-Changer
IDC A09
Bedienungs- und Einbauanleitung
Operating and installation instructions (GB)
Operating and installation instructions (US)
Notice d’emploi et de montage
Istruzioni d’uso e di montaggio
Gebruiksaanwijzing en inbouwhandleiding
Bruks- och monteringsanvisning
Instucciones de manejo y de conexión
Instruções de serviço e de montagem
Page 2
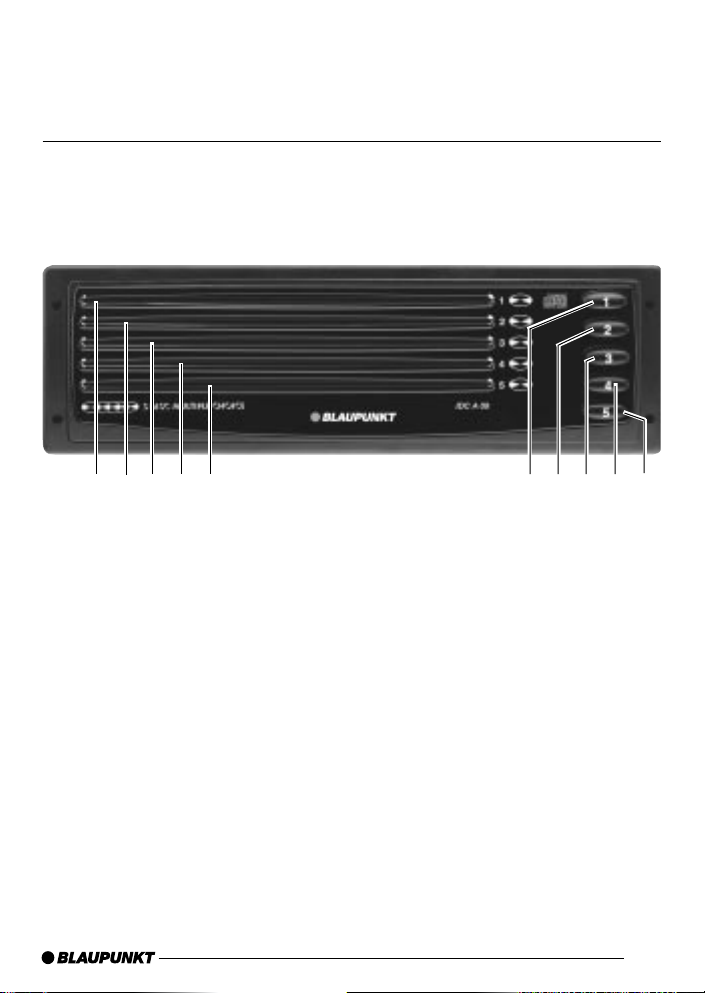
ÜBERSICHTSBILD/OVERVIEW DIAGRAM/
APERÇU/VISTA D’INSIEME/
OVERZICHTSFOTO/ÖVERSIKTSBILD/
VISTA GENERAL/VISTA DE CONJUNTO
ENGLISH-GB DEUTSCHFRANÇAISIT ALIANO
ENGLISH-US
12345
1 - 5 CD Schächte,
CD Compartments,
Compartiments CD,
Vano di CD,
Cd-openingen,
Cd-fack,
Bandejas,
Compartimentos
6789:
NEDERLANDS
SVENSKAESPAÑOL
6 - : Eject-Knöpfe,
Eject buttons,
Bouton d’éjection,
Tasto di espulsione,
Eject-toetsen,
Utmatningsknapar,
Botones de expulsión,
Botão de ejecção
PORTUGUÊS
3
Page 3
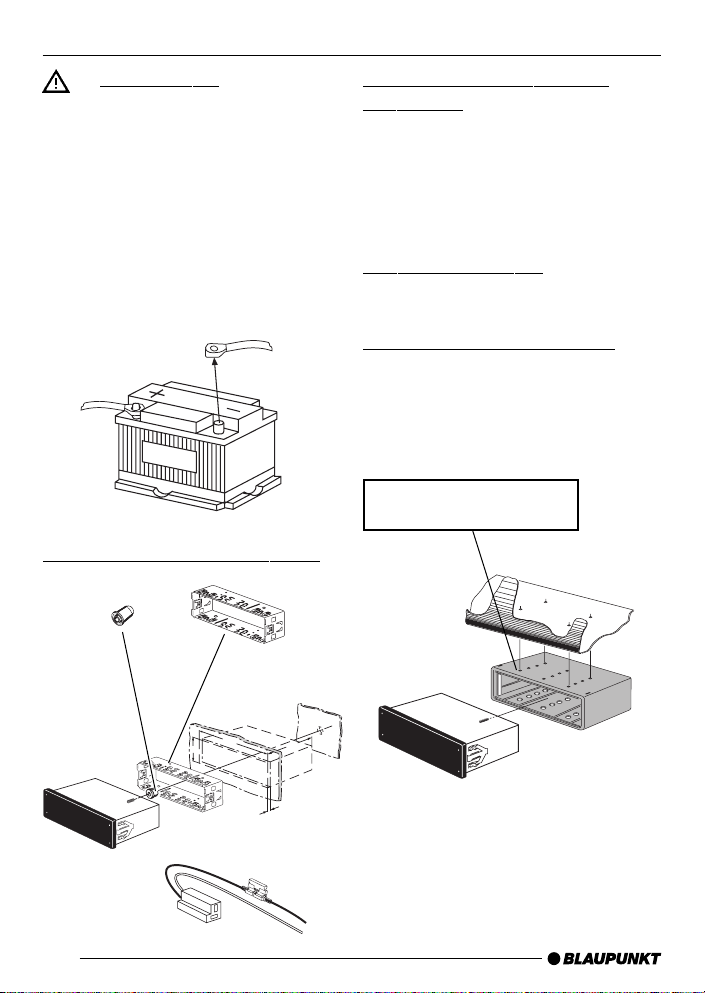
INSTALLATION
Safety notice
– Electronic vehicle systems may fail
if they are incorrectly installed or
serviced.
– Disconnect the negative terminal of
the battery before installing or
removing any equipment.
– When drilling any holes, ensure
that no vehicle components are
damaged.
12V
Supplied installation materials
Recommended location for
installation
Dashboard
Vehicle trunk
glove box
center console
SUV storage bin
Installation position
From -10° to 105°
Recommended accessories
Extension cable (4-feet 4-inches)
7 607 621 154
Extension cable (19-feet 6-inches)
7 607 621 155
Universal mounting frame
7 608 002 377
14
182
53
165
1-20
Spacer installation frame 6 mm
7 608 002 076
Spacer installation frame 10 mm
7 608 002 176
Page 4

Connection to radios without
+12V in compartment C3/*Pin 15
(see installation instructions for the car
radio)
In this installation situation, the accompanying connection cable must be installed (see Fig. 1).
C-1 C-2 C-3
7
10 131619
14
9
C
B
A
6
3
581114 17
2
1
234
345
1
2
15
18
12
5
7
6
8
7
6
8
C3
13 CDC Data-IN
14 CDC Data-OUT
15 +12V Permanent
16 +12V switch voltage (max. 300mA)
17 CDC Data-GND
18 CDC AF/AUX-GND
19 CDC AF/AUX-L
20 CDC AF/AUX-R
* Pin 15
20
INSTALLATION
ENGLISH-GB DEUTSCHFRANÇAISIT ALIANO
ENGLISH-US
NEDERLANDS
SVENSKAESPAÑOL
5A
Fig. 1
PORTUGUÊS
+12V (Perm.)
15
Page 5

OPERATION
ENCODING (AFTER IN STALLATION)
Theft protection
The IDC A09 is equipped with a theft
protection system that is supported by
several car radios.
Radios supporting this system show
“ CDC CODE ” in their displays when
the CD changer is selected.
The methods for activating and deactivating the theft protection system
when the changer is installed or
uninstalled are described on pages
16 - 18.
Inserting a CD
Insert one CD with the printed side up
into each of the compartments 1-5.
Ejecting a CD
Press the eject button 6-: that corresponds with the CD you want to remove from compartments 1-5.
If a CD is being played, e.g. CD 5, you
can insert or eject any of the remaining
CDs in compartments 1-4.
For further operating details, please
refer to your car radio’s operating instructions.
Activating the code for car
radios with a key card
The master code is printed on your IDC
A09 pass card.
1. Switch on the radio.
2. Press the CDC button.
The following appears briefly in the
display:
“ CDC CODE ”
The display then changes to:
“ 0000 ”
3. You can set digits 0-9 using the
buttons.
You can move from one digit to the
next by pressing the << / >> buttons.
Example 1234:
a) Press the button once.
b) Press the >> button once.
c) Press the
d) Press the >> button once.
e) Press the
f) Press the >> button once.
g) Press the
4. Once you have correctly entered the
entire code, confirm your entry by
pressing the ENT button.
button twice.
button three times.
button four times.
/
16
Page 6

ENCODING (AFTE R INSTALLATION)
DECODING (BEFORE R EMOVAL)
Activating the code for car
radios that have a fixed code
The master code is printed on your IDC
A09 pass card.
1. Switch on the radio.
2. Press the CDC button.
The following appears briefly in the
display:
“ CDC CODE ”
The display then changes to:
“ 0000 ”
3. You can enter the master code by
pressing the station buttons 1-4.
Example 4321:
a) Press station button 1 four times.
b) Press station button 2 three times.
c) Press station button 3 twice.
d) Press station button 4 once.
4. Once you have correctly entered the
complete numerical code, there are
two possible ways of confirming your
entry:
a) on car radios that have an “OK but-
ton”, confirm your entry by pressing
this button,
b) on car radios that do not have an
“OK button”, confirm your entry by
pressing the search button “
”.
Before uninstalling the IDC A09 and
using it with a different car radio, you
must first of all decode the IDC A09.
Decoding using a car radio that
has a key card
The master code is printed on your IDC
A09 pass card.
1. Switch on the radio.
2. Press the CDC button.
3. Press the IDC A09’s eject buttons
2+5 simultaneously, keep them
pressed for at least 1 second and
then release them.
The IDC A09 stops playing.
The red LEDs
begin to light up.
4. Switch off the radio.
5. Switch on the radio again.
The following appears briefly in the
display:
“ CDC CODE ”
The display then changes to:
“ 0000 ”
6. You can set digits 0-9 using the
buttons.
You can move from one digit to the
next by pressing the << / >> buttons.
for all the eject buttons
/
ENGLISH-GB DEUTSCHFRANÇAISIT ALIANO
ENGLISH-US
NEDERLANDS
SVENSKAESPAÑOL
17
PORTUGUÊS
Page 7

DECODING (BEFO RE REMOVAL)
Example 1234:
a) Press the button once.
b) Press the >> button once.
c) Press the
d) Press the >> button once.
e) Press the
f) Press the >> button once.
g) Press the
7. Once you have correctly entered the
entire code, confirm your entry by
pressing the ENT button.
The red LEDs
begin to light up.
Switch off the radio (do not switch it
on again).
The IDC A09’ s code is now deactivated.
Y ou may now remove the IDC A09.
button twice.
button three times.
button four times.
for all the eject buttons
Decoding using a car radio that
has a fixed code
The master code is printed on your IDC
A09 pass card.
1. Switch on the radio.
2. Press the CDC button.
3. Press the IDC A09’s eject buttons
2+5 simultaneously, keep them
pressed for at least 1 second and
then release them.
4. Switch off the radio.
5. Switch on the radio again.
The following appears briefly in the
display:
“ CDC CODE ”
The display then changes to:
“ 0000 ”
6. You can enter the master code by
pressing the station buttons 1-4.
Example 4321:
a) Press station button 1 four times.
b) Press station button 2 three times.
c) Press station button 3 twice.
d) Press station button 4 once.
7. Once you have correctly entered the
complete numerical code, there are
two possible ways of confirming your
entry:
a) on car radios that have an “OK but-
ton”, confirm your entry by pressing
this button,
b) on car radios that do not have an
“OK button”, confirm your entry by
pressing the search button “
The red LEDs
begin to light up.
Switch off the radio (do not switch it
on again).
The IDC A09’s code is now deactivated.
for all the eject buttons
”.
The IDC A09 stops playing.
The red LEDs
begin to light up.
18
for all the eject buttons
You may now remove the IDC A09.
Page 8

Service-Nummern / Service numbers / Numéros du service aprèsvente / Numeri del servizio di assistenza / Servicenummers /
Telefonnummer för service / Números de servicio / Número de
serviçco
Tel.: Fax:
Deutschland 018 050 002 25 051 214 940 02
Belgique 025 255 444 025 255 448
France 014 010 70 07 014 010 73 20
Nederland 023 565 63 48 023 565 63 31
Great Britain 018 958 383 66 018 958 383 94
Danmark 44 89 83 60 44 89 86 44
Sverige 08 750 15 00 08 750 18 10
Norway 66 81 70 00 66 81 71 57
Suomi 094 359 91 094 359 92 36
Österreich 045 989 90 28 016 103 93 91
Greece 015 762 241 015 769 473
âeská republika 026 130 04 41 026 130 05 14
USA 800-266 25 28 708-681 71 88
Singapore 006 535 054 47 006 535 053 12
Slovensko 042 175 873 212 042 175 873 229
Blaupunkt-Werke GmbH
Bosch Gruppe
02/00 K7/VKD 8 622 402 201
 Loading...