

Page 1
2-IN-1 VEHICLE
TRACKING SYSTEM with DVR
GT320D
Operating and Installation Instructions
Page 2

Page 3

CAUTIONS
Safety Notes
This device has been manufactured according to
established safety guidelines. However, dangers may still
occur if the safety notes in this manual is not observed.
This manual is intended to familiarize the user with the
device’s important functions. Read this carefully, prior to
using the device. Keep this manual in an easily accessible
location. In addition, do observe the instructions of the
devices used in conjunction with this device.
Attentions
•
This device is intended for installation and operation
in a vehicle with 12V and 24V vehicle system voltage.
•
Please insert the micro SD card in the right direction
to avoid damage to the card or the device. If device
shows error message, please format the micro
SD card from device menu. Please reset device or
change micro SD card if similar error continues.
Note : All les will be deleted when formatting
micro SD card or rmware update, please backup the
important les prior to that. When reset function is
selected, the device will return to default setting.
•
Ensure bracket is installed correctly & rmly
on windscreen to avoid damage to device
and for better recording angle.
•
Please do not record or take picture facing sunlight.
•
To obtain clear image, please clean windscreen and
device lens regularly. Avoid using device in dusty
environment.
•
Handle device with care and avoid direct impact on
the device. Avoid using device in high
electromagnetic environment.
•
Keep the device away from children.
•
Keep the device away from ammable areas or
liquids.
•
The device should be stored in dry and low humidity
place.
•
Please operate the product within the temperature
of -20°C ~ 80°C. Continuous exposure to sunlight,
especially when locked in cabin where temperature
exceeds 80°C may result to device malfunction,
colour change, housing and image distortion.
Weak signal or signal interference of device can
•
arise from obstacle locations such as underground
parking.
•
For abnormalities, please refer to the “Troubleshooting” section. Consult with Blaupunkt dealer
for further assistance, in case if the problem cannot
be resolved.
This manual may be updated from time to time without
any notice. Visit www.blaupunkt.com/ase for latest info.
Disclaimer
•
Blaupunkt is not liable for any loss or damage
caused or resulting from unauthorized disassembly
or modication to the product.
•
In no event shall Blaupunkt be liable for any direct,
indirect, punitive, incidental, special consequential
damages to property or life and whatsoever arising
out of or connected with the use or misuse of our
products.
•
USA & CANADA: This product is not intended for sale
in the United States and Canada. If purchased in the
U.S. or Canada, this product is purchased on as-is
basis. No warranty, whether expressed or implied is
provided in the U.S. or Canada.
•
This device is NOT intended to be used for illegal
purpose, surveillance and shall not be used in any
form as evidence for claim purposes.
•
Some countries prohibit drivers from mounting
anything on the windshield, or restrict mounting
to specic areas of the windshield. It is the owner’s
responsibility to mount the device in compliance
with local laws.
•
Error may occur depending on the surrounding
environment and the voltage of the car.
•
Blaupunkt is not liable/responsible for non-recorded
event, missing les, etc.
•
Blaupunkt does not warrant the performance of
the local telecommunication network used with
our product. It is recommended to test for network
compatibility prior to purchase.
1
Page 4
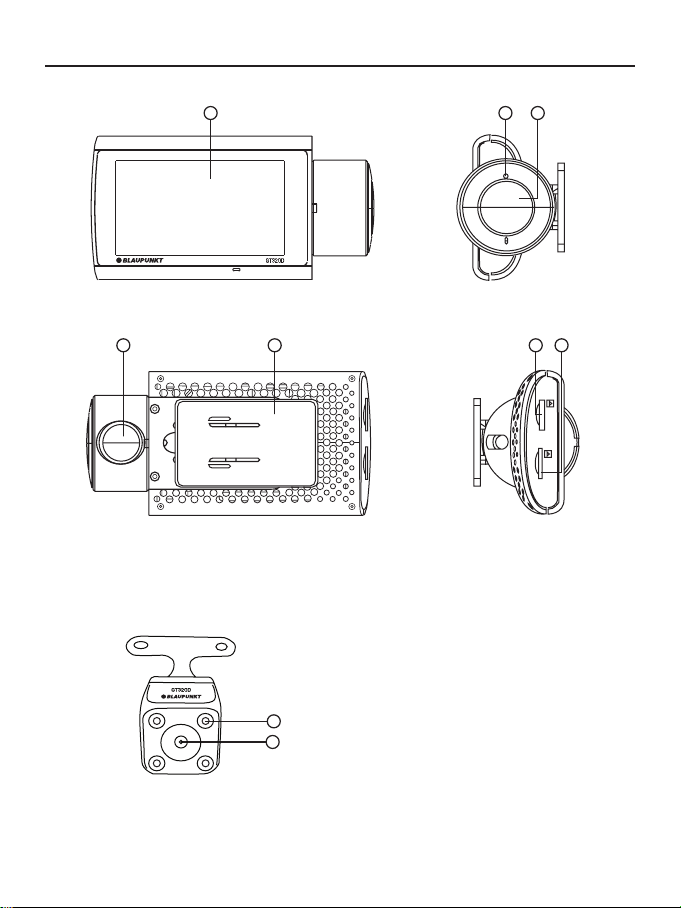
STRUCTURE & FUNCTIONS
Front Camera
Rear Camera
1
4 5
32
76
T-Flash
SD
Functions
LCD Touch Screen
1.
Reset Button
2.
Power Button (On/O)
3.
Front DVR Lens
4.
DVR Bracket
5.
T-Flash Card Slot
6.
MicroSD card Slot
8
9
7.
LED Light
8.
Rear DVR Lens
9.
2
Page 5

SPECIFICATIONS
Real-time location and speed tracking
•
Historical tracking via wireless control app (Available
•
on iOS and Google)
Real-time alarms notication: Acc On/O, Geofence
•
Entry/Exit, Power Disconnection, Overspeed
Real-time vehicle status report : Mileage, speed &
•
overspeeding, parking
Operating Voltage : DC 9V-36V (Suitable for 12V &
•
24V vehicle)
Current : 10mA
•
Resolution : Front 2MP FHD 1920 x 1080 (30 fps);
•
Rear 2MP HD 1280 x 720 (30fps)
FUNCTIONS LIST OF THE DEVICE
Functions
Vehicle Status Detection
Alarm
Notication
Other Features
Setting
Video
Image
WiFi
Date / Time
Language
Screensavers
Frequency
Format
Default setting
Version
Resolution
Loop Recording
Record Audio
Date Stamp
G-sensor
Quick Review
Date Stamp
Details
Acc On/ O
External Power Disconnection
Low External Battery
External Power Supply
External Power Disconnection
Enter Fence
Leave Fence
Speeding Start
Vibration Alarm
SOS Start
ON/OFF
MM/DD/YY, According to the network or GPS
English, Simplied Chinese, Thai, Vietnamese
O/1-min/3-min/5-min
50Hz/60Hz
All data will be deleted. Backup data to prevent unwanted les from being deleted
Restore setting to default setting
PRL_DT45-V1.2.14
1080P 1920x1080 30FPS
720P 1280x720 30FPS
O/30s/1-min/3-min
ON/OFF
ON
O/ Low/ Medium/ High
O/2-sec/5-sec
ON
Vehicle Tracking System
DVR
Wide viewing angle : Front - 151°; Rear - 110°
•
3” touch screen LCD display
•
Automatic park recording with smart motion/ time-
•
lapse (24-hour park monitoring)
SOS for manual emergency alert broadcast, G-sensor,
•
loop recording, low car battery voltage cut-o
Built-in microphone & speaker
•
Language : English, Simplied Chinese, Thai,
•
Vietnamese
Support up to 32GB Micro SD, class 10 & above
•
Descriptions
Uploaded data include the Acc On/ O status each time
in dynamic view.
When the vehicle voltage is reached 11.8V, vehicle
battery consumption is stopped, the tracking function
will be disconnected.
Vehicle battery voltage is between 5V to 10V. It is an
indicate that the vehicle battery is low.
Power is supplied to the device.
Power supply has been disconnected from the device.
The vehicle enters the dened area set by user.
The vehicle leaves the dened area set by user.
Vehicle speed exceeds value set.
Default is 120km/hr for 10 seconds.
Vehicle vibration is experienced. The sensivity of collision
detection can be adjusted (Low/Normal/High).
The SOS button is enabled by the user for emergency.
3
Page 6

WIRING DIAGRAM
BLACK (Ground)
YELLOW (DC12~24V)
RED (ACC)
BATTERY
OFF
TROUBLESHOOTING
If any of the following problem occur, please resort to Troubleshooting for the possible solutions. Consult Blaupunkt
authorized dealer if problem persist.
Problems
Weak or no GPS
signal
The device is not
responding to SMS
commands
The device is not
functioning
Unable to record
video
Memory card cannot be regconized
The videos are
blurry and unclear
Possible Causes
GPS tracking device is not positioned
properly.
SIM card has run out of credit.
Improper installation of SIM card.
The connecting cable is loose or not
connected properly.
The vehicle’s battery is low.
The memory card is full.
Memory card is not inserted properly
or it is damaged.
The protective lm on the lens is not
removed.
The camera lens or windshield is
covered with ngerprints or stains.
Improper installation location of the
camera.
Solutions
Check the installation location of the device.
Ensure it is not being shielded by metal.
Top up the SIM card.
Check whether the SIM card has been slotted correctly.
Check that the SMS command is correct.
Check if the connecting cable is connected to the
vehicle and the device properly.
Check the vehicle’s battery level.
Check the remaining space on memory card, delete or
format the les if necessary.
Ensure that the memory card has been inserted in the
correct direction.
Replace it with a new memory card if it is damaged.
Ensure that the protective lm on the camera lens has
been removed.
Do not touch the lens with ngers and ensure the
windshield is clean.
Check the installation location of the camera and adjust
the camera’s viewing angle.
5
Page 7

INSTALLATION INSTRUCTION
3
M
3
M
3
M
3
M
3
M
3
M
3
M
3
M
3
M
3
M
3
M
3
3
M
3
M
3
M
3
M
3
M
3
M
3
M
3
M
3
M
3
M
3
M
3
Front Camera
Select an ideal installation location that with-
1.
out obstructing the driver’s vision. Ensure that
the front camera lens is located in the center of
the windscreen.
Slide the mount to the mount rail on the
2.
device.
Remove 3M tape from the mount and bracket
3.
before joining them together.
Clean the preferred location on the windscreen
4.
before installing the device.
Adjust the viewing angle against the preview
5.
screen to ensure that the camera is facing
the front.
Insert the microSD card into microSD card Slot
6.
& insert the T-Flash card to T-Flash Card Slot.
Ensure the cards are in the correct direction
before inserting them into the device.
It is recommended to place the GPS antenna
7.
on the top right of the windshield in order
to keep a distance between the devices to
prevent signal disruption.
6
Page 8

OPERATION INSTRUCTION SOFTWARE OPERATION
Rear Camera
1.
Select an ideal installation location.
a)
Tail Light
• Remove one side of the reverse light socket
from its housing then remove the bulb from
its socket.
• Connect the reverse light power cable to the
camera, screwn the housing & camera back
into position with a screwdriver.
b)
Hatch Handle
• Use a screwdriver to remove the original
hatch handle
• Mount the camera where the original hatch
handle used to be
c)
Car Plate
• Remove the rotating mount before
installation. Drill an access hole for the camera
cables
Wireless Control Application
Search “Blaupunkt Tracker” on
Google Play Store or iOS App
Store to download the App.
Home Page
1.0 Click on the menu button
2.0 Click to enter tracking interface.
1
2
1.0 Menu
• Mount the camera onto the acces hole &
secure it in position with 3M tape/ screws
7
Page 9

OPERATION INSTRUCTION
1.1 Setting
2.0 Tracking
• Click to enter tracking details interface.
2.1 Tracking Details
2.1.1 Playback
8
Page 10
OPERATION INSTRUCTION
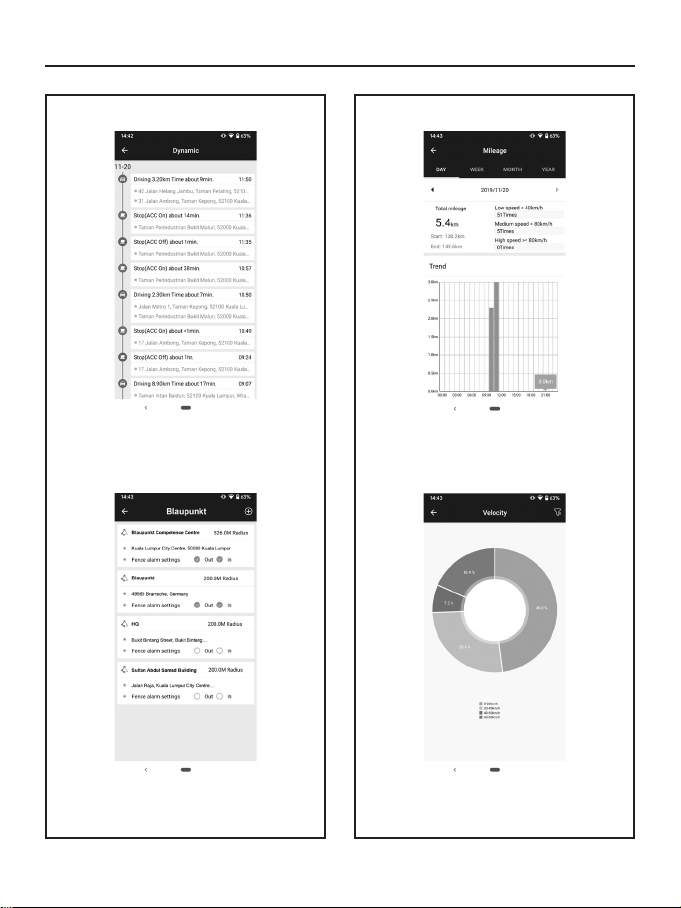
2.1.2 Dynamic
2.1.3 Fence
2.1.4 Mileage Analysis & Report
2.1.5 Velocity Analysis & Report
9
Page 11

Page 12

Designed and engineered by Blaupunkt Competence Centre 1 351 19 002 18 01
 Loading...