

Page 1
Blaupunkt Competence Center Security
www.blaupunkt.com/service
DC-S4 / DC-S4B
White/Brown
on the
, you can also use the
door/ window surface, otherwise the
Nicht an Türen oder Fenstern mit magnetischer
Anstelle der Schraubmontage können Sie auch das
Install the main body of the door contact on the
Instead of screw installation, you can also use the
against the door/ window surface, otherwise the
Follow instruction in this document to setup and use the
accessory. For further setting and operation detail, please
visit Blaupunkt website
service.blaupunkt-security.com
manual.
Registration
1. Pull out the battery insulator to activate the battery.
2. For Q Series: Go to the Web Portal
https://eu.bphomeconnect.com/BP/
account credentials.
3. Put the Hub into learning mode: Go to Settings Device
and click on the “+” Add device button.
4. Press Learn Button (1) to learn-in the DC-S4. When the
panel receives the “learn signal”, it will emit a double beep
tone and the web interface will display the device info.
5. Check the box in front of the device info, then click OK to
add the device into the system.
6. Input the name of the device (e.g. Door Contact Front
Door) and select the desired zone.
7. To change the attribute of the accessory click on the 3
dots on the right side of this accessory and select the
desired attribute (burglar, Entry, home omit) from the
attribute pull down menu.
Note: For SA series refer to panel manual to learn how to
register a device.
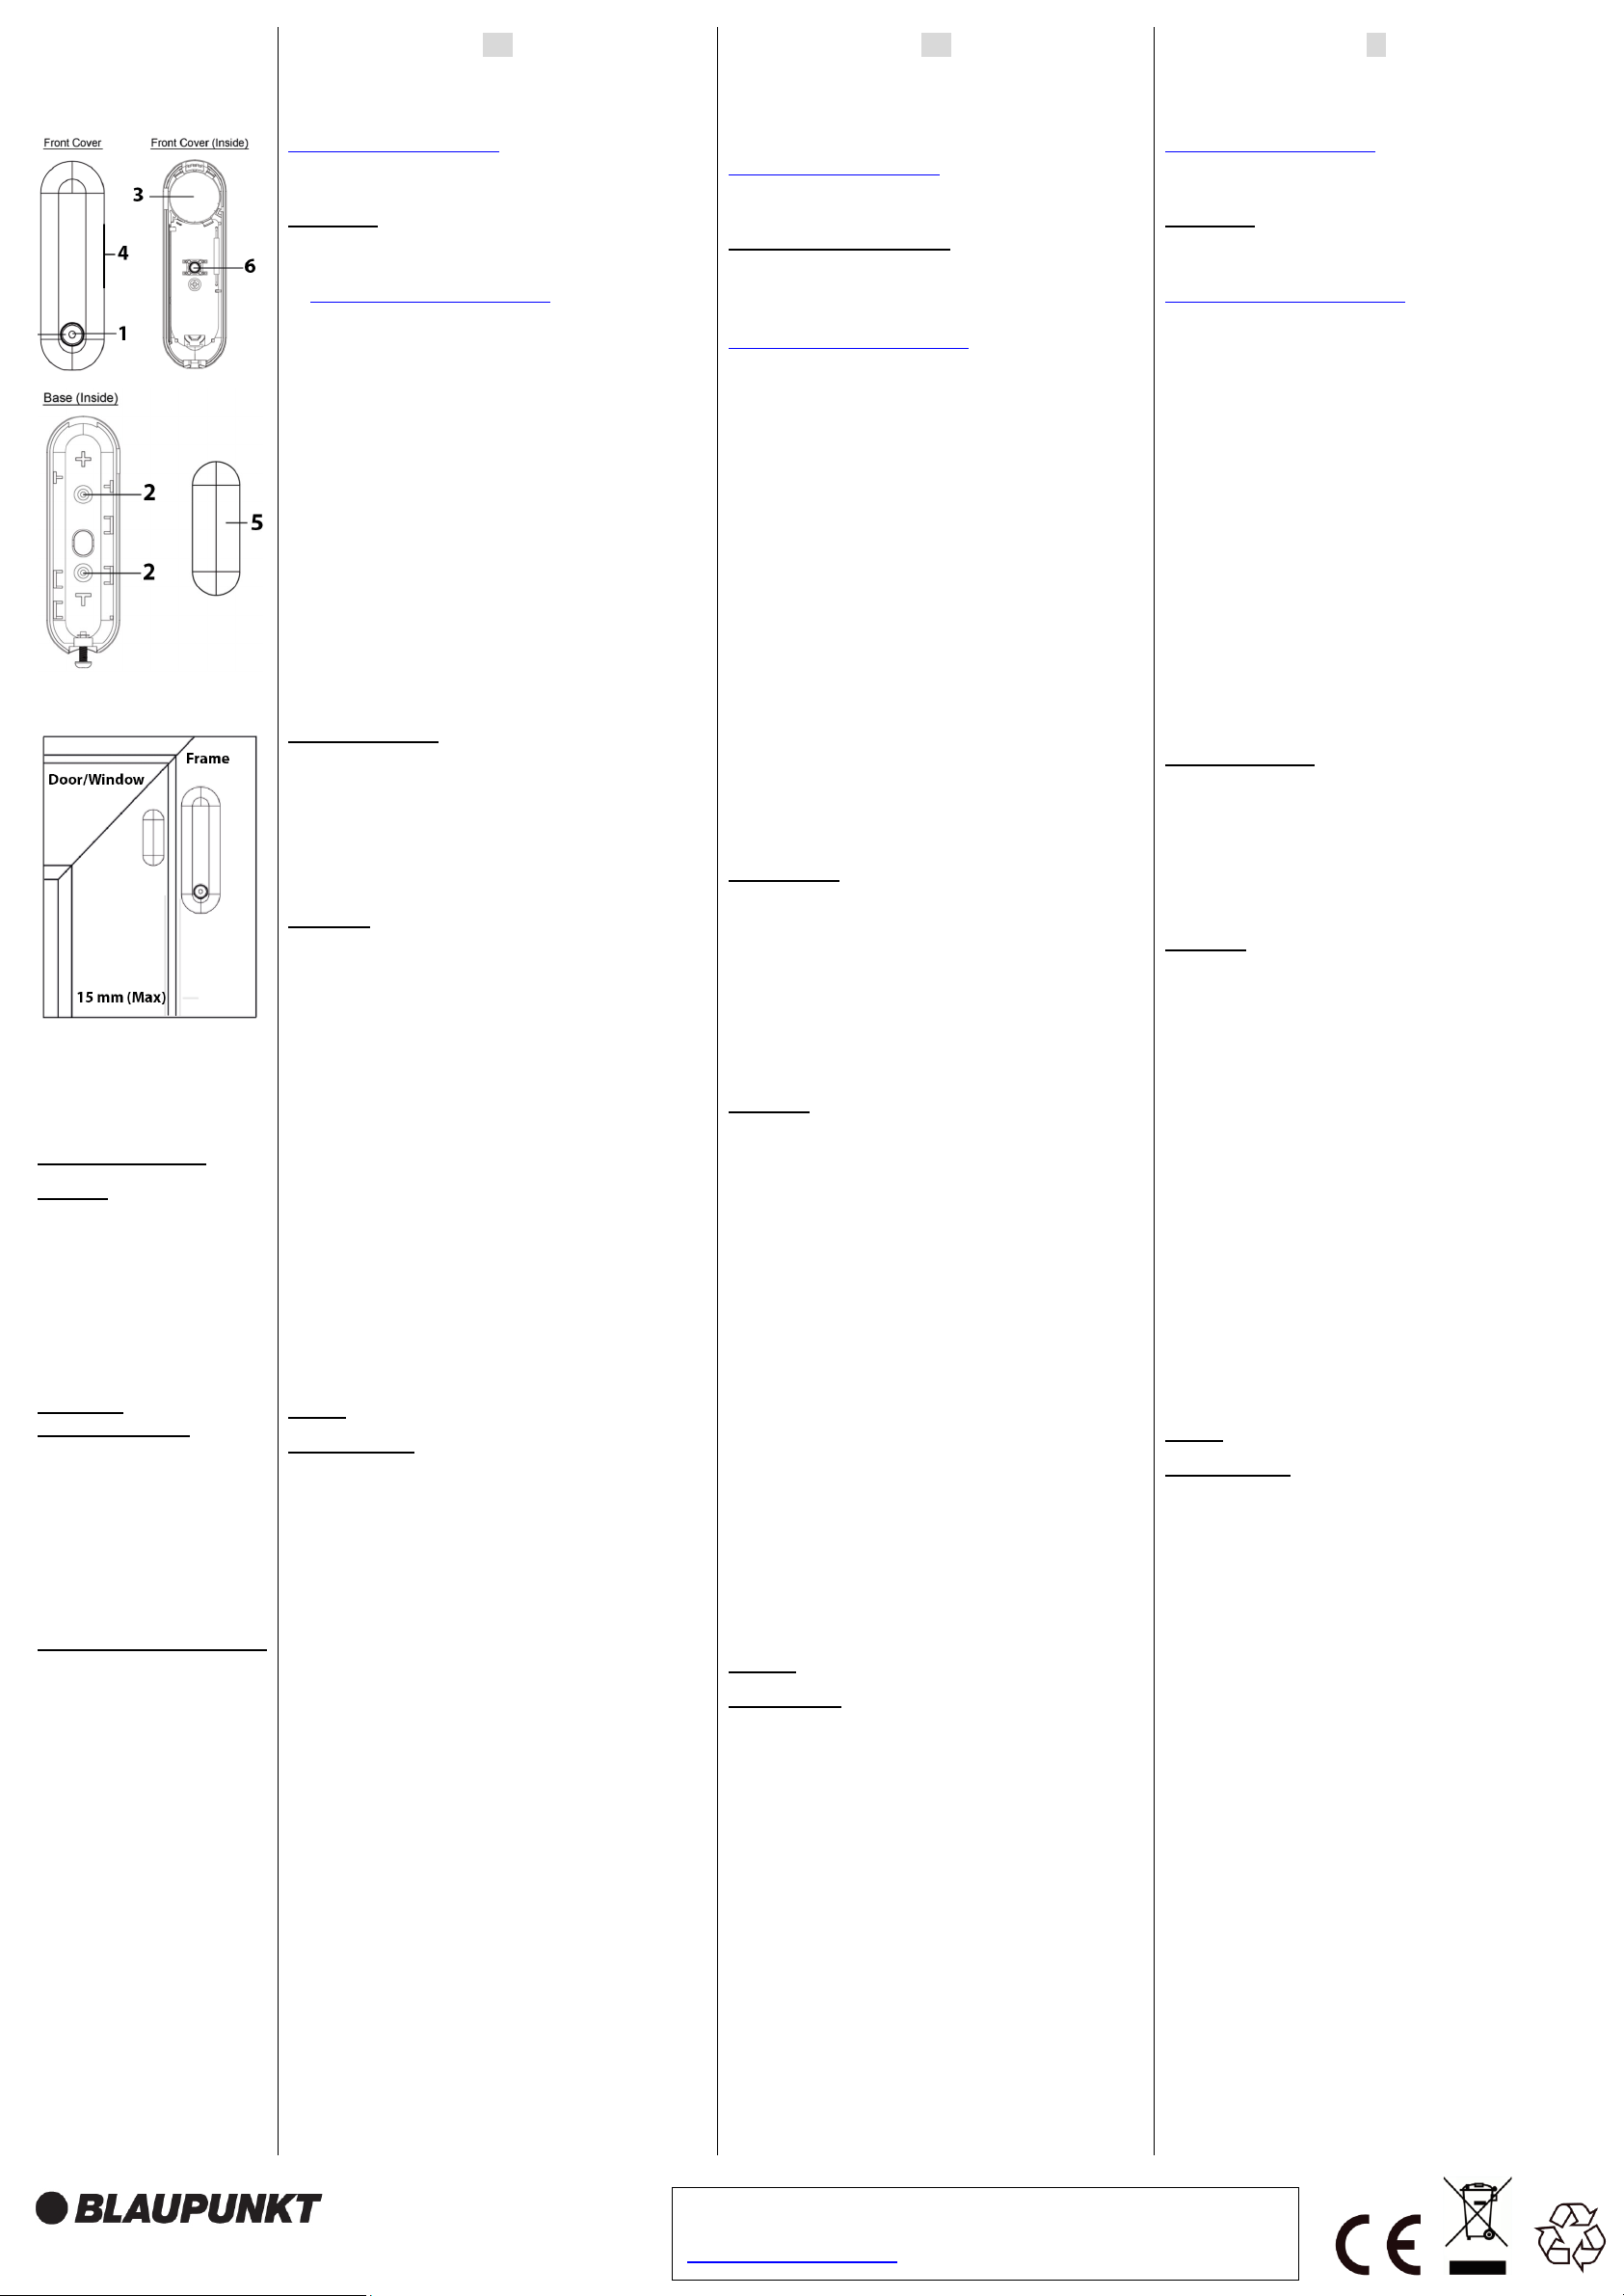
Installation Location
Install the main body of the door contact
door/window frame, and the magnet on the door/window.
Install it on the highest part from the door / window
Don’t aim a PIR Movement Detector to this door/window.
Don’t install on doors or windows with magnetic surface
as iron or steel.
EN | Door / Window
Detector
1. LED Indicator / Learn
Button
2. Knockouts
3. Battery Insulator
4. Rib Mark
5. Magnet
6. Tamper
DE | FunkTür/Fenstersensor
1. LED-Anzeige/ Lern-/
Testtaste
2. Aussparungen für Montage
3. Batterieisolator
4. Sensormarkierung
5. Magnet
6. Sabotagekontakt
IT | Sensore Porta / Finestra
1. Indicatore LED / Pulsante
Apprendimento
2. Tamper
3.Fori per Viti
4. Isolante Batteria
5. Segni
6. Magnete
Installation
1. For screw installation remove the back cover and push
through the 2 knockouts on the back (for example with a
screwdriver) where the plastic is thinner.
2. Drill 2 holes into the surface using the knockouts as
template.
3. Fix the Door Contact back cover onto the surface with the
screws and plugs provided
4. Place the back cover back to the main body and screw it
back.
5. Align the magnet with the Rib Mark from the main body,
the gap between the main body and the magnet should
be no more than 15 mm. Fix the magnet onto the door/
window with the double tape provided.
Instead of screw installation
included double side adhesive tape to install the main
body of the door contact.
Make sure that the tamper protection is pressed down
against the
accessory will trigger a tamper alert.
This accessory has not supervision mode.
Battery: 1 x 3V CR2032 lithium battery (Pre-inserted)
Radio frequency: 868 MHz
EN
Befolgen Sie die Anweisungen in dieser
Schnellstartanleitung, um das Zubehör einzurichten und zu
nutzen. Weitere Informationen zu den Einstellungen und
to download the complete
and login with your
zum Betrieb finden Sie auf der Blaupunkt-Website
service.blaupunkt-security.com
Handbuch herunterzuladen.
Einlernen des DC-S4 / DC-S4B
1. Ziehen Sie den Batterieisolator heraus, um die Batterie zu
aktivieren.
2. Für die Q-Serie: Rufen Sie das Web Portal
https://eu.bphomeconnect.com/BP/
mit Ihren Kontoanmeldeinformationen an.
3. Versetzen Sie das Hub in den Lernmodus: Gehen Sie zu
Einstellungen
„+“ Gerät hinzufügen.
4. Drücken Sie die Learn-Taste (1), um den DC-S4
einzulernen. Wenn das Panel das „Lernsignal“ empfängt,
ertönt ein doppelter Piepton und das Web Portal zeigt die
Geräteinformationen an.
5. Aktivieren Sie das Kontrollkästchen vor den
Geräteinformationen und klicken Sie auf OK, um das Gerät
dem System hinzuzufügen.
6. Geben Sie den Namen des Geräts ein (z. B. Türkontakt
Eingangstür) und wählen Sie die gewünschte Zone aus.
7. Um das Attribut des Zubehörs zu ändern, klicken Sie auf
die 3 Punkte auf der rechten Seite dieses Zubehörs und
wählen Sie das gewünschte Attribut (Einbruch, Eingang, Zu
Hause aus) aus dem Attribute Menü aus.
Hinweis: Informationen zum einlernen des DC-S4/DCS4B in das Panel der SA-Serie finden Sie in der
Bedienungsanleitung der SA-Serie.
Installationsort
Gerät und klicken Sie auf die Schaltfläche
Montieren Sie das Gehäuse des Türkontakts am Tür- /
Fensterrahmen und den Magneten an der Tür / Fenster.
Installieren Sie den Türkontakt am höchsten Punkt der
Tür / des Fensters
Richten Sie keinen PIR-Bewegungsmelder auf diese Tür
/ dieses Fenster.
Oberfläche wie Eisen oder Stahl installieren.
Installation
1. Für die Schraubenmontage entfernen Sie die hintere
Abdeckung und drücken Sie (z. B. mit einem
Schraubendreher) durch die zwei Aussparungen auf der
Rückseite an der Stelle, an der der Kunststoff dünner ist.
2. Bohren Sie 2 Löcher in die Oberfläche. Verwenden Sie
dabei die Aussparungen als Schablone.
3. Befestigen Sie die hintere Abdeckung des Türkontakts
mit den mitgelieferten Schrauben und Dübeln an der
gewünschten Stelle.
4. Setzen Sie die hintere Abdeckung wieder auf das
Hauptgehäuse und schrauben sie dieses fest.
5. Richten Sie den Magneten mit der Rippenmarkierung am
Hauptkörper aus, der Abstand zwischen Hauptkörper und
Magnet sollte nicht mehr als 15 mm betragen.
Befestigen Sie den Magneten mit dem mitgelieferten
Doppelklebeband an der Tür oder am Fenster.
mitgelieferte doppelseitige Klebeband verwenden, um
den Türkontakt zu installieren.
Stellen Sie sicher, dass der Sabotagekontakt gegen die
Tür- / Fensteroberfläche gedrückt wird. Andernfalls löst
der Türkontakt einen Sabotagealarm aus.
Dieses Zubehör hat keinen Überwachungsmodus.
Batterie: 1 x 3V CR2032 Lithiumbatterie
Radiofrequenz: 868 MHz
DE
, um das vollständige
auf und melden Sie sich
IT
Follow instruction in this document to setup and use the
accessory. For further setting and operation detail, please visit
Blaupunkt website
service.blaupunkt-security.com
manual.
Registration
1. Pull out the battery insulator to activate the battery.
2. Per la serie Q: Go to the Web Portal
https://eu.bphomeconnect.com/BP/
account credentials.
3. Put the Hub into learning mode: Go to Settings Device
and click on the “+” Add device button.
4. Press Learn Button (1) to learn-in the DC-S4. When the
panel receives the “learn signal”, it will emit a double beep
tone and the web interface will display the device info.
5. Check the box in front of the device info, then click OK to
add the device into the system.
6. Input the name of the device (e.g. Door Contact Front
Door) and select the desired zone.
7. To change the attribute of the accessory click on the 3 dots
on the right side of this accessory and select the desired
attribute (burglar, Entry, home omit) from the attribute pull
down menu.
Nota: per le serie SA fare riferimento al manuale del
pannello per informazioni su come registrare un
dispositivo.
Installation Location
door/window frame, and the magnet on the door/window.
Install it on the highest part from the door / window
Don’t aim a PIR Movement Detector to this door/window.
Don’t install on doors or windows with magnetic surface
as iron or steel.
Installation
1. For screw installation remove the back cover and push
through the 2 knockouts on the back (for example with a
screwdriver) where the plastic is thinner.
2. Drill 2 holes into the surface using the knockouts as
template.
3. Fix the Door Contact back cover onto the surface with the
screws and plugs provided
4. Place the back cover back to the main body and screw it
back.
5. Align the magnet with the Rib Mark from the main body, the
gap between the main body and the magnet should be no
more than 15 mm. Fix the magnet onto the door/ window
with the double tape provided.
included double side adhesive tape to install the main
body of the door contact.
Make sure that the tamper protection is pressed down
accessory will trigger a tamper alert.
This accessory has not supervision mode.
Battery: 1 x 3V CR2032 lithium battery (Pre-inserted)
Radio frequency: 868 MHz
to download the complete
and login with your
Security Brand Pro GmbH
Mondstrasse 2-4
85622 Feldkirche n, Germany
E-Mail: contact@blaupunkt-sc.com
Follow the instruction in this document to setup and use the accessory.
For further setting and operation details, please visit the Blaupunkt website
service.blaupunkt-security.com to download the complete manual.
Page 2
Blaupunkt Competence Center Security
www.blaupunkt.com/service
DC-S4 / DC-S4B
White/Brown
un Detector de Movimiento PIR a esa
No instale en puertas o ventanas con superficie
Asegúrese de que el interruptor de sabotaje está
do powierzchni drzwi / okna, w przeciwnym razie
Siga las instrucciones de este documento para configurar y
usar el accesorio. Para más detalles de configuración y
manejo, visite la página web service.blaupunkt-security.com
para descargar el manual completo.
Registro
1. Retire el aislante de la pila para activar la pila.
2. Para la serie Q: Ve a la interfaz web
https://eu.bphomeconnect.com/BP/
credenciales.
3. Pon el panel en modo aprendizaje: ve a configuración
Dispositivo y aprieta el botón “+” para añadir dispositivo.
4. Aprieta el botón de aprendizaje (1) para añadir el DC-S4.
Cuando el panel reciba la señal, el panel emitirá un doble
pitido y la interfaz mostrará la información del dispositivo.
5. Marca la casilla en frente de la información del dispositivo
y después aprieta Aceptar para añadir el dispositivo.
6. Introduzca el nombre del dispositivo (p.ej. Puerta
Principal) y seleccione la zona deseada.
7. Para cambiar el atributo del accesorio, aprieta sobre los 3
puntos a la derecha del accesorio y selecione el atributo
deseado (robo, entrada, omitir en casa, etc.) de la lista
desplegable de atributos.
Nota: Para la serie SA, consulte el manual del panel para
saber cómo registrar un dispositivo.
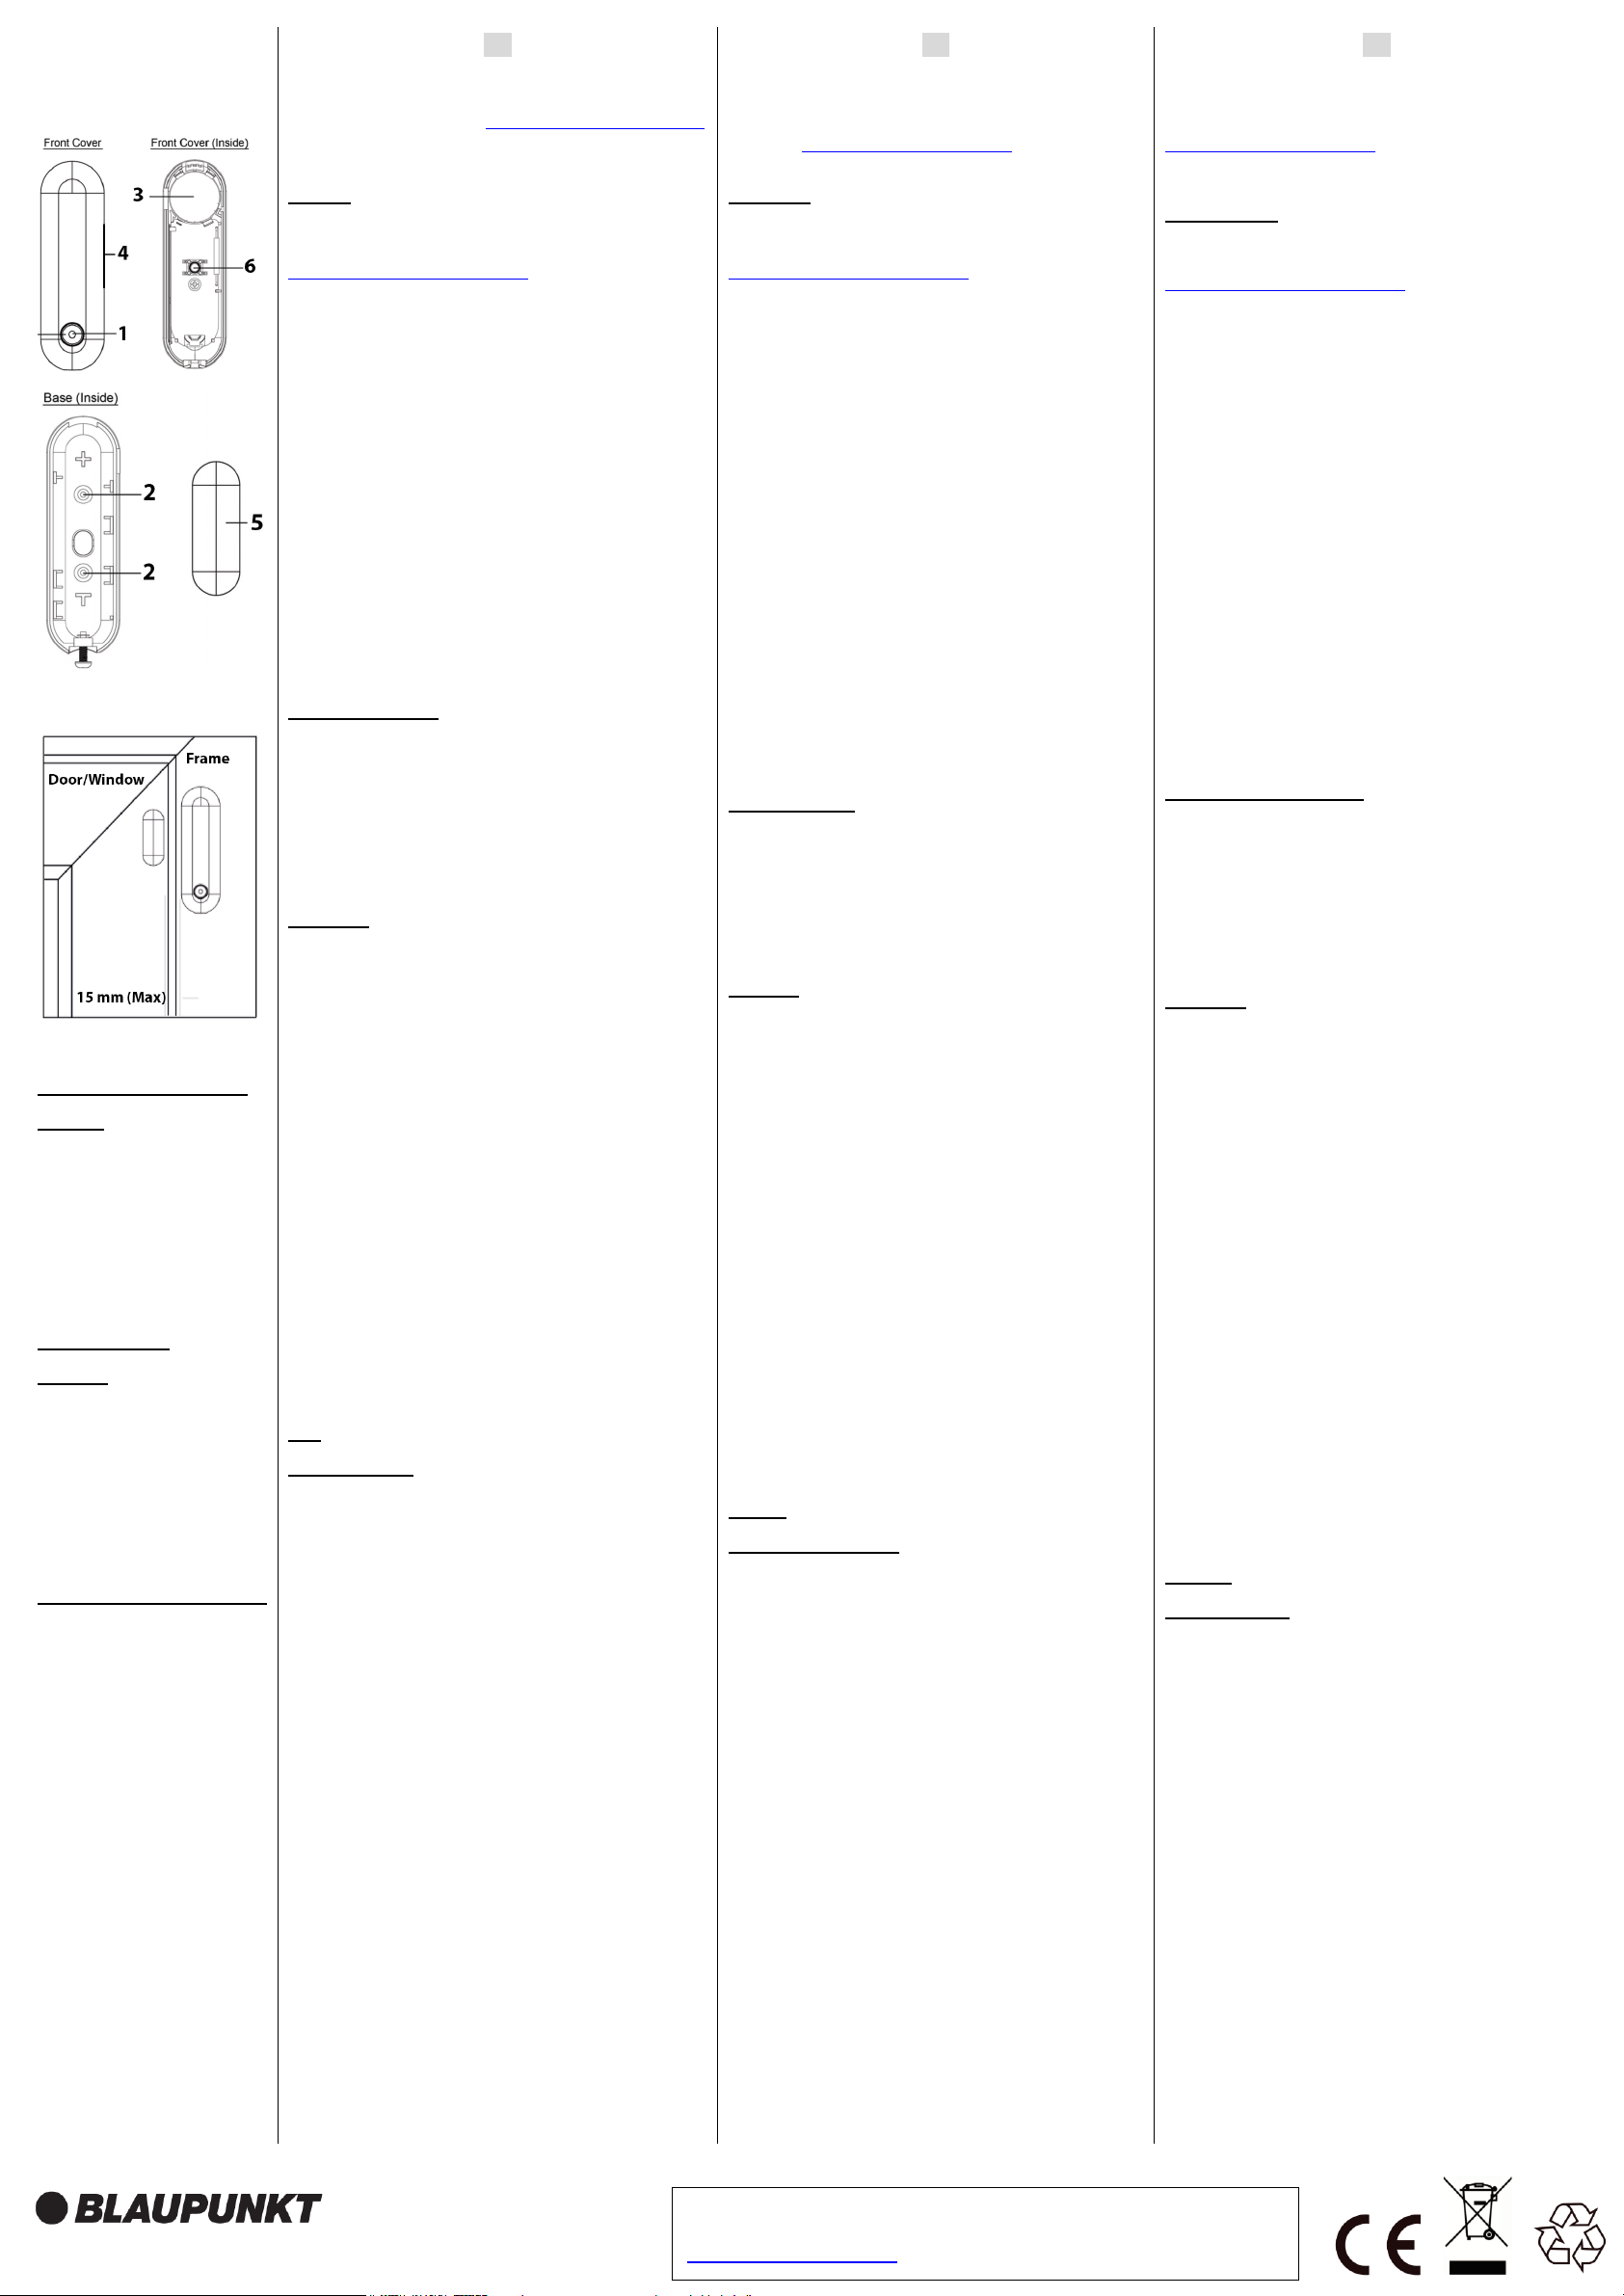
Lugar de Instalación
Instala el cuerpo principal del sensor en el marco de la
Puerta/Ventana y el imán en la Puerta/Ventana.
Instálalo en el punto mas alto de la Puerta/Ventana.
No apunte
Puerta/Ventana
ES | Detector de Puerta /
Ventana
1. Indicator LED / Botón de
Aprendijaze
. Agujeros Ciegos
2
. Aislante de la Pila
3
. Marca Lateral
4
. Imán
5
. Sabotaje
6
PL | Drzwi/Okno
Detektor
1. Wskaźnik LED / przycisk
uczenia
2. Knockouts
3. Izolator akumulatora
4. Rib Mark
5. Magnes
6. Sabotaż
FR | Détecteur Porte/fenêtre
1. Voyant LED / Bouton
d’apprentissage
2. Encoches défonçables pour
l’installation
3. Isolant batterie
4. Marquage du capteur
5. Aimant
6. Interrupteur d’auto
protection.
magnética, como el hierro o acero.
Instalación
1. Para la instalación con tornillos, retire la cubierta trasera y
atraviesa los 2 agujeros ciegos (por ejemplo, con un
destornillador) donde el plástico es más fino.
2. Taladra 2 agujeros en la superficie usando los agujeros
ciegos como plantilla.
3. Asegure la cubierta trasera del dispositivo a la superficie
de instalación con los tacos y tornillos proporcionados.
4. Coloque la parte delantera del sensor con su parte
delantera y atornillalo
5. Alinee el imán con la marca lateral del sensor. El espacio
entre el cuerpo principal y el imán no debe ser superior a
15 mm. Fije el imán sobre la Puerta/Ventana con la cinta de
doble cara.
En lugar de una instalación con tornillos, también puede
usar la cinta de doble cara incluida en el kit para instalar
el cuerpo principal del sensor.
presionado correctamente contra la Puerta/Ventana. De
lo contrario se activará un aviso de sabotaje.
Este accesorio no dispone de supervisión.
Pila: 1 x 3V CR2032 de litio (Pre-insertada)
Radiofrecuencia: 868 MHz
ES
Postępuj zgodnie z instrukcjami w tym dokumencie, aby
skonfigurować i używać akcesoriów. Więcej szczegółów
dotyczących ustawień i operacji można znaleźć na stronie
Blaupunkt service.blaupunkt-security.com
instrukcję.
Rejestracja
1. Wyciągnij izolator akumulatora, aby aktywować baterię.
2. Dla serii Q: Przejdź do interfejsu internetowego
e inicie session con sus
https://eu.bphomeconnect.com/BP/
swoich danych.
3. Przełącz Panel sterowania w parowania: Przejdź do
Ustawienia . Urządzenie i kliknij przycisk "+" Dodaj
urządzenie.
4. Naciśnij przycisk prawowania i (1), aby sparować DC-S4.
Gdy panel odbierze "parowania", wyemituje podwójny
sygnał dźwiękowy, a interfejs internetowy wyświetli
informacje o urządzeniu.
5. Zaznacz pole przed informacjami o urządzeniu, a
następnie kliknij przycisk OK, aby dodać urządzenie do
systemu.
6. Wprowadź nazwę urządzenia (np. drzwi wejściowe) i
wybierz żądaną strefę.
7. Aby zmienić atrybut akcesorium, kliknij 3 kropki po prawej
stronie tego akcesorium i wybierz żądaną funkcję (włamanie,
wyjście z domu, wejście do domu domu) z rozwijanego
menu atrybutów.
Uwaga: W przypadku serii SA należy zapoznać się z
instrukcją panelu, aby dowiedzieć się, jak zarejestrować
urządzenie.
Miejsce instalacji
Zainstaluj główną część styku drzwi na ramie drzwi /
okna i magnes na drzwiach / oknach.
Zainstaluj go na najwyższej części drzwi / okna.
Nie kieruj czujnika ruchu PIR do tego okna / drzwi
Nie należy instalować na drzwiach lub oknach z
powierzchnią magnetyczną, jak żelazo lub stal.
Instalacja
1. W przypadku montażu śrubowego zdejmij tylną pokrywę i
wywierć 2 otwory z tyłu (na przykład śrubokrętem), w miejscu
gdzie plastik jest cieńszy.
2. Wywierć 2 otwory w powierzchni przy użyciu szablonu.
3. Zamocuj tylną pokrywę drzwi na powierzchni za pomocą
dostarczonych śrub i zatyczek.
4. Umieść tylną pokrywę z powrotem na korpusie i przykręć
ją z powrotem.
5. Wyrównaj magnes z żebrowaniem do głównego korpusu,
odstęp między korpusem a magnesem nie powinien być
większy niż 15 mm. Przymocuj magnes do drzwi / okna za
pomocą podwójnej taśmy.
Zamiast montażu śrubowego można również użyć
dołączonej dwustronnej taśmy samoprzylepnej, aby
zainstalować główną część na styku drzwi.
Upewnij się, że ochrona antysabotażowa jest dociśnięta
akcesorium uruchomi alarm sabotażowy.
To akcesorium nie ma trybu nadzoru.
Bateria: 1 x 3V CR2032 bateria litowa (wcześniej włożona)
Częstotliwość radiowa: 868 MHz
PL
, aby pobrać pełną
i zaloguj się przy użyciu
FR
Suivez les instructions de ce document pour configurer et
utiliser le détecteur. Pour plus de détails sur les réglages et le
fonctionnement, visitez le site Web de Blaupunkt :
service.blaupunkt-security.com
complet.
Enregistrement
1. Retirez l'isolant de la batterie pour activer celle-ci.
2. Pour la série Q : Accédez au portail Web
https://eu.bphomeconnect.com/BP/
les informations d'identification de votre compte.
3. Mettez le hub en mode d'apprentissage: Allez dans
Paramètres
un appareil.
4. Appuyez sur le bouton d'apprentissage (1) pour reconnaitre
le DC-S4. Lorsque le panneau reçoit le «signal
d'apprentissage», il émet un double bip et l'interface Web
affiche les informations relatives à l'appareil.
5. Cochez la case en regard des informations sur le
périphérique, puis cliquez sur OK pour ajouter le périphérique
au système.
6. Saisissez le nom du périphérique (par exemple, Porte
avant à contact de porte) et sélectionnez la zone souhaitée.
7. Pour modifier l'attribut de l'accessoire, cliquez sur les 3
points situés à droite de cet accessoire et sélectionnez
l'attribut souhaité (antivol, Entrée, domicile, omission) dans le
menu déroulant des attributs.
Remarque: pour la série SA, reportez-vous au manuel du
panneau pour savoir comment enregistrer un
périphérique.
Emplacement d'installation
Appareil et cliquez sur le bouton «+» Ajouter
Installez le corps principal du contact de porte sur le cadre
de la porte / fenêtre et l'aimant sur la porte / fenêtre.
Installez-le sur la partie la plus haute de la porte / fenêtre
Ne dirigez pas un détecteur de mouvement PIR vers cette
porte / fenêtre.
Ne pas installer sur des portes ou des fenêtres à surface
magnétique en fer ou en acier.
Installation
1. Pour l'installation par vissage, retirez le capot arrière et
poussez à travers les 2 entrées défonçables à l'arrière (par
exemple avec un tournevis) là où le plastique est plus mince.
2. Percez 2 trous dans la surface en utilisant les découpes
comme gabarit.
3. Fixez le couvercle arrière du contacteur de porte sur la
surface à l'aide des vis et des bouchons fournis.
4. Replacez le capot arrière dans le corps principal et vissezle à nouveau.
5. Alignez l'aimant avec la marque du côté du corps principal
(item #4 de l’image). L'écart entre le corps principal et
l'aimant ne doit pas dépasser 15 mm. Fixez l’aimant sur la
porte / fenêtre à l’aide du ruban double faces fourni.
Au lieu d'une installation à vis, vous pouvez également
utiliser le ruban adhésif double face inclus pour installer
le corps principal du contact de porte.
Assurez-vous que la protection anti-sabotage est bien
appuyée contre la surface de la porte / fenêtre, sinon
l'accessoire déclenchera une alerte de sabotage.
Cet accessoire n'a pas de mode supervision.
Batterie: 1 x pile lithium 3 V CR2032 (pré-insérée)
Fréquence radio: 868 MHz
pour télécharger le manuel
et connectez-vous avec
Security Brand Pro GmbH
Mondstrasse 2-4
85622 Feldkirche n, Germany
E-Mail: contact@blaupunkt-sc.com
Follow the instruction in this document to setup and use the accessory.
For further setting and operation details, please visit the Blaupunkt website
service.blaupunkt-security.com to download the complete manual.
 Loading...