

Page 1
Radio / Cassette
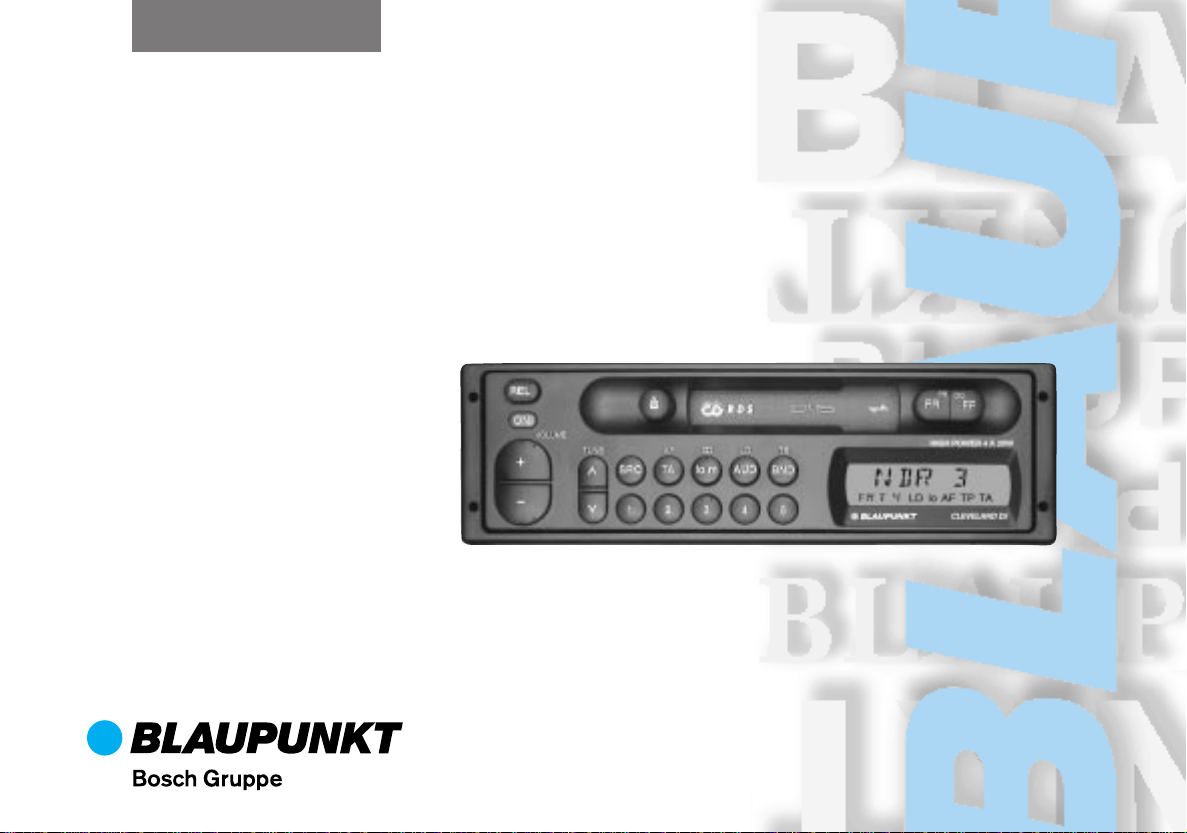
Cleveland DJ A (Proton)
Cleveland DJ I (Proton)
Operating instructions
Page 2
DEUTSCH
14 13 11
12
...
1
2
3
5
4
6
8
7
9
10
ENGLISH FRANÇAISNEDERLANDSESPAÑOLPORTUGUÊS
63
Page 3

Contents
Quick reference ............................ 65
FOREWORD.................................. 68
Traffic safety ......................................... 68
Detachable face............................ 68
Detaching the face................................ 68
Attaching the face................................. 68
Selecting the audio mode ........... 69
Radio operation with RDS ........... 69
AF - Alternative frequency.................... 69
Selecting a waveband
(only Cleveland DJ A)........................... 69
Station tuning........................................ 70
Automatic tuning
Manual tuning.................................... 70
Selecting the seek tuning sensitivity .... 70
Changing the memory bank ................. 70
Storing stations ..................................... 70
Automatically storing the strongest
stations with Travelstore....................... 71
Recalling stored stations ...................... 71
Switching between stereo and mono ... 71
Loudness .............................................. 71
/ ....................... 70
Receiving traffic programme
stations with RDS-EON................ 72
Traffic announcement priority on/off .... 72
Beep tone ............................................. 72
Switching off the beep tone............... 72
Automatic seek tuning start
(tape and CD changer operation)......... 72
Adjusting the volume for traffic
messages.............................................. 73
Tape operation ............................. 73
Inserting a tape ..................................... 73
Removing a tape................................... 73
Fast winding.......................................... 73
Reversing the tape (autoreverse)......... 73
Care notes ............................................ 74
CD changer operation.................. 74
Switching CD changer operation on..... 74
Selecting CDs and titles ....................... 7 4
Appendix....................................... 75
Specifications........................................ 75
Blaupunkt telephone help line .............. 75
64
Page 4
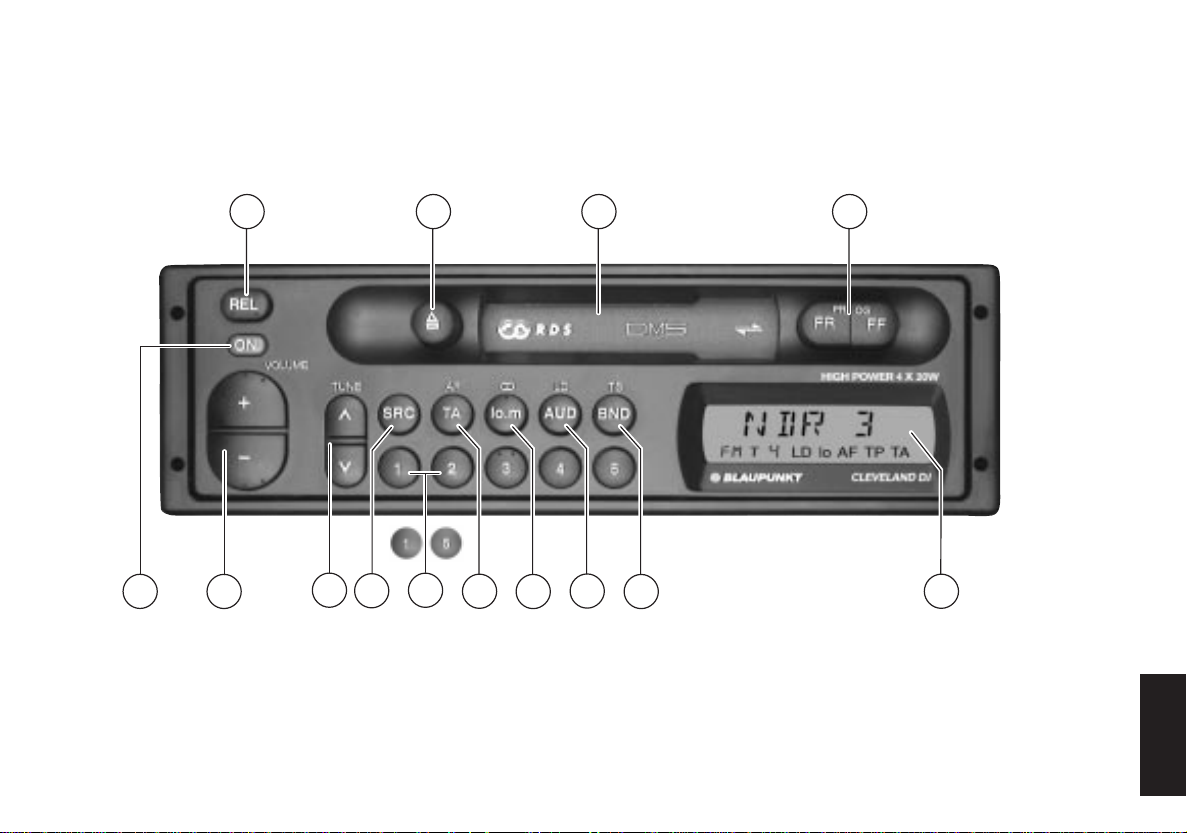
Quick reference
1 Switching on/off with the ON button
Press ON for more than 1 second.
The unit will play at the volume selected last.
Switching on/off via the ignition:
If connected accordingly, the set can
also be turned on and off with the vehicle ignition.
Extra function of ON button
You can instantly turn down the volume by pressing ON briefly. “MUTE” will
appear. The volume will be set to “0”.
The function is cancelled by pressing
ON or + briefly.
2 + / - (VOLUME)
To alter the volume.
Each time you switch the unit on, it will
play at the volume selected last.
3 / Tune
/ Automatic tuning
Up
Down
if “m” does not light up in the
display
Manual tuning
/ Up/down in short intervals, if “m”
lights up in the display. “m” stands
for manual and can be turned on
and off by pressing lo.m. Press button several times if required.
4 SRC ( source)
You can switch between the radio,
cassette and CD changer mode, if a
cassette/CD is inserted.
5 1, 2, 3, 4, 5 - preset buttons
You can store five stations for each of
the memory banks FM I, II and T.
With the Cleveland DJ A you can store
five medium-wave (M) and long-wave
(L) stations each as well.
To store a station: Press a preset
button during radio operation and hold
down until you hear a beep.
To recall a station: Select the desired
memory bank and press the relevant
preset button briefly.
6 TA/AF
TA - priority for traffic announcements
If “TA” lights up in the display, the
system will play traffic stations only.
Priority on/off: Press TA/AF briefly.
AF - alternative frequency during RDS
operation:
If “AF” lights up in the display, the
system will automatically seek a
frequency offering better reception for
the same RDS programme.
AF on/off: Press TA/AF for about 1
second.
Extra function
To adjust the volume of traffic
messages:
In radio or tape mode, press + / - to
adjust the desired volume for traffic
messages.
Press TA/AF for 3 seconds until
“TA VOL” appears in the display.
DEUTSCH
ENGLISH FRANÇAISNEDERLANDSESPAÑOLPORTUGUÊS
65
Page 5

7 lo.m
lo - to select the seek tuning sensitivity
level
m - manual tuning
“lo” is displayed - normal seek tuning
sensitivity
“lo” is off - high seek tuning sensitivity
“m” is displayed - manual tuning with
/ .
Press lo.m several times if required to
select the desired funtion.
8 AUD/LD
AUD – audio
To adjust the treble, bass, balance and
fader.
If the display shows “TREB” or
“BASS”, you can adjust the playback
of the treble and bass frequencies
using the rocker switch.
If “BAL” or “FAD” is displayed, you can
set the balance (left/right) and fader
(front/rear).
Press AUD/LD as many times as required and make the setting using the
rocker switch.
The last setting will be stored automatically.
To switch off AUD: Press button once
again.
If you do not change the setting within
8 seconds, the display will switch back
to the previous condition.
LD - Loudness
When the system is played at a low volume level, the Loudness function
creates a more natural sound by
boosting the low frequency range.
Loudness on/off:
Press AUD/LD for approximately
1 sec.
“LD” lights up in the display, if the
Loudness function is switched on.
9 BND/TS
BND - Toggle switch for the FM me-
mory banks I, II and T. With the Cleveland DJ A you can also use BND to
switch over to medium-wave (M) or
long-wave (L).
To switch over:
Press BND as often as required. The
selected mode appears in the display.
TS - Travelstore
To store and recall the five most
powerful stations with Travelstore.
To store: Press button for approximately 1 sec. until you hear a beep
and “T-STORE” appears in the display.
To recall: Select the memory bank “T”
and press the corresponding preset
button (1 - 5) briefly.
66
Page 6

: Display
a
d
b
c
h
e f g i j
; Reversing the tape/fast winding
Reversing the tape
Press FR and FF buttons at a time.
l
k
“TR1” or “TR2” will appear.
Attaching the face:
Apply the right hand side of the face to
the chassis first and then gently push
the left side of the face against the
front of the chassis until it snaps into
DEUTSCH
place.
Fast winding
FR: Fast rewind - press FF to stop.
FF: Fast forward - press FR to stop.
m
a) NDR 3 - Station name
b) TR 1 - Track (side) 1 of the cassette
c) CD 9 - CD number in changer mode
d) FM - Waveband
e) l, II, T - Memory bank I, II or Travel-
store
f) 4 - Preset button (1-5)
g) LD - Loudness active
h) lo - Seek tuning sensitivity
i) AF - Alternative frequency for
RDS operation
j) TP - A traffic station is being recei-
ved
k) TA - Priority for traffic stations
l) m - Manual station tuning
m) T5 - CD track
< Cassette loading slot
Insert the tape with side A or 1 facing
up, the open side showing to the right.
= Cassette ejection
Press
.
> REL (Releasing the detachable face)
The face of this unit can be detached
for extra antitheft protection. You
should take the detachable face with
you when you leave your car.
Detaching the face:
Press REL.
ENGLISH FRANÇAISNEDERLANDSESPAÑOLPORTUGUÊS
67
Page 7

FOREWORD
Detachable face
We thank you for and congratulate you on
your choice of new car.
This handbook contains essential information about the car radio of your new Proton
as well as other important advice to be rigorously followed.
Before starting to use your new car radio,
please read the information carefully and
keep it for reference.
Traffic safety
As the driver of a motor vehicle if is your
responsibility to pay attention to the traffic
situation at all times. Never use your car
radio in a way that could distract you. Please keep in mind that you travel a distance
of 14 m per second of a speed of only 50
km/h.
Should that traffic situation become particularly demanding, we advise you not to use
the radio. Always make sure that you are
still able to hear any meaning signals coming from outside of the vehicle, such as
police or fire engine sirens, so that you can
react accordingly.
This unit is equipped with a detachable face.
You can remove the control face at a push
of the REL button.
In order to prevent the unit from being stolen, we recommend you to take the detachable face with you when you leave your car.
Re-inserting the face is child’s play. The set
will be ready for use immediately and you
will find all of your previous settings re-adjusted.
Detaching the face
• Press the REL button.
The unit will be switched off automatically.
The control panel will be released in order
for you to remove it.
Attaching the face
• First, apply the right hand side of the
face to the chassis.
• Second, gently push the left side of the
face against the front of the chassis
until it snaps into place.
The unit is now ready for use with the settings selected before the face was removed.
68
Page 8

Selecting the audio mode
Radio operation with RDS (Radio Data System)
Using the SRC button you can switch between the following audio sources: radio,
cassette, CD changer.
When you insert a cassette, the unit switches automatically to tape mode.
Tape/CD changer operation is only available if a cassette/CD is inserted.
To switch to the other source,
• press SRC.
The Radio Data System offers you more
convenience when you listen to FM radio
stations.
More and more radio stations have begun
to broadcast RDS information along with
their programmes.
As soon as a programme has been identified, the station name including a regional
identifier, if applicable, will appear in the display, for example, NDR1 NDS (regional programme in Lower Saxony, Germany).
If RDS is activated, the preset buttons become programme buttons. You now know
exactly which programme you have tuned
into, making it easy to find the desired station quickly.
But RDS also offers you further advantages:
AF - Alternative frequency
The AF (Alternative Frequency) function
makes sure that the strongest frequency of
the currently selected programme is always
tuned in automatically.
This function is activated if “AF” appears in
the display.
In order to switch this function on or off,
• press the AF button for about 1 second.
While searching for the strongest reception
signal, the radio may switch to mute briefly.
If “SEARCH” appears in the display when
you switch the radio on or when you recall
one of the stored frequencies, the unit is
automatically searching for an alternative
frequency.
“SEARCH” will disappear from the display
when the alternative frequency has been
found or after the frequency band has been
run through completely.
If the sound quality of the selected programme deteriorates appreciably:
• Tune into another station.
Selecting a waveband
(only Cleveland DJ A)
You can select between the following wa-
vebands:
FM 87.5 - 108 MHz
M 531 - 1602 kHz
L 153 - 279 kHz
• Press the BND button until the desired
waveband shows on the display panel.
DEUTSCH
ENGLISH FRANÇAISNEDERLANDSESPAÑOLPORTUGUÊS
69
Page 9

Station tuning
Automatic tuning /
• Press / ; the car radio will automatically search for the next station, if “m”
does not light up in the display.
If you hold down the upper or lower part
/ of the rocker switch, seek tuning will
speed up in the upwards or downwards direction.
Automatic tuning
/ Up/down, if “m” does not light up in
the display
Manual tuning
/ Up/down in short intervals, if “m”
lights up in the display.
Manual tuning
Manual tuning is only possible if “m” lights
up in the display. “m” stands for manual and
can be turned on/off:
• Press lo.m several times if required.
To tune to a station manually:
• Press
in short intervals in the downwards or
upwards direction.
If you hold down
will speed up.
/ - the frequency will change
/ , the frequency scan
Selecting the seek tuning sensitivity
You can alter the automatic seek tuning
sensitivity.
To alter the sensitivity level:
• Press lo.m briefly.
If “lo” is displayed, the radio will only pick up
strong, local stations.
If “lo” it off, the radio will also pick up weaker, distant stations.
If “m” light up, manual tuning has been activated. Please refer to the section on “Manual tuning” for more information.
Changing the memory bank
You can shift between the memory banks I,
II and T in order to store stations and recall
them later.
The selected memory bank is indicated in
the display.
• Press the BND button as many times
as necessary until the desired memory
bank lights up in the display.
With the Cleveland DJ A you can also use
BND to switch over to medium-wave (M) or
long-wave (L).
Storing stations
On FM, you can store five stations on the
preset buttons 1, 2, 3, 4, 5 for each of the
memory banks I, II and T.
Only Cleveland DJ A: On M (medium-wave)/
L (long-wave), you can also store five stations each.
• Select the desired memory bank.
• Tune in a station with the rocker switch
(either automatically or manually).
• Press and hold down the desired preset button until you hear a beep.
Now the station has been stored.
The activated preset button is indicated in
the display.
70
Page 10

Note:
Should you tune in a station which has already been stored before, then the corresponding preset position and memory bank
will briefly flash in the display.
Automatically storing the strongest stations with Travelstore
You can automatically store the five most
powerful FM stations of your current reception area sorted according to their signal
strength. This function is particularly convenient on longer trips.
• Press the BND/TS button for 1 sec.
“T-STORE” will appear in the display.
The five strongest FM stations will be automatically stored on the memory bank “T”
(Travelstore). After this process has been
completed, the radio will play the first station stored on preset 1.
If desired, stations can also be stored manually on the Travelstore bank (see “Storing
stations”).
Recalling stored stations
You can recall any stored station at the touch
of a button.
• Select the memory bank with BND/TS.
• Press the corresponding preset button
briefly to recall the station.
Switching between stereo and
mono
Each time the radio is switched on, stereo
playback is activated automatically.
The unit will gradually switch to mono if reception is poor.
You can also switch between mono and stereo reception manually:
• Press the lo.m /
mately 1 sec.
The selected condition will briefly appear in
the display.
button for approxi-
Loudness
If the system is played at a low volume level, the Loudness function creates a more
natural sound by boosting the low frequency range.
To turn Loudness on/off:
• Press AUD for about 1 second.
“LD” appears in the dislay, if the Loudness
function is activated.
DEUTSCH
71
ENGLISH FRANÇAISNEDERLANDSESPAÑOLPORTUGUÊS
Page 11

Receiving traffic programme stations with RDS-EON
EON stands for Enhanced Other Networks,
meaning the exchange of information within
a radio network.
Many FM broadcasters offer traffic messages for their service area at regular
intervals.
All traffic programme stations transmit a
special carrier signal along with their programmes, which is decoded by your car radio. If this signal is identified, “TP” will appear in the display (Traffic Programme).
In addition to these, there are also stations
which do not actually transmit traffic programmes themselves, but by using RDSEON they make it possible to receive the
traffic messages broadcast by another traffic programme station in the same radio
network.
If you wish to have the priority for traffic announcements activated while listening to
one of these stations (e.g. NDR3), “TA” must
appear on the display panel.
If a traffic announcement is broadcast, the
radio will automatically switch to the linked
traffic programme station (in this case,
NDR2) for the duration of the message and
return to the original programme (NDR3)
afterwards.
Traffic announcement priority
on/off
If the priority for traffic announcement programmes is activated, “TA” will light
up in the display.
To switch the priority on or off:
• Press the TA button.
If TA is pressed while a message is broadcast, this message will be interrupted.
The unit will then switch back to the previous condition. The priority for all
other traffic messages remains active.
Please note that several buttons have no
function while a traffic announcement
is broadcast.
Beep tone
If you leave the reception area of the traffic
programme station currently tuned into, you
will hear a beep tone approximately every
30 seconds.
This tone will also be released if a preset
button is pressed which has no traffic programme allocated to it.
Switching off the beep tone
a) Tune into another station offering traf-
fic information:
• Press the rocker switch
• press a preset button which has a traffic programme station allocated to it.
Alternatively:
b) Switch off the priority for traffic an-
nouncements:
• Press TA.
“TA” will disappear from the display.
/ or
Automatic seek tuning start
(tape and CD changer operation)
When you leave the reception area of the
tuned in traffic programme station while listening to a tape or CD, the system will automatically start searching for a new TA programme.
If no such station is found within approximately 30 seconds, tape operation will be
stopped and a beep tone will sound. To
switch off the beep tone proceed as described above.
72
Page 12

Tape operation
Adjusting the volume for traffic
messages
This volume was preset at the factory, though you can alter the value.
To alter the volume of traffic messages:
• During radio, cassette or CD playback,
use +/- to adjust the desired traffic
message volume.
• Press TA/AF for about 3 seconds until
“TA VOL” appears briefly in the display.
Traffic messages will be played at a higher
volume than the normal audio playback, if
the priority for traffic messages has been
activated before.
If the volume level is altered while a message is played, this will only affect the current
announcement.
The car radio has to be switched on.
The unit will automatically switch to tape
operation when a tape is inserted.
Inserting a tape
• Turn on the set.
• Insert a tape.
Side A or 1 will be played.
During tape operation, “TR 1” or “TR 2”
(track) will be indicated on the display panel.
Insert the tape with side A or 1 facing up, the
open side showing to the right.
Removing a tape
• Press .
The cassette will be ejected.
Fast winding
Fast forward
• Press FF (fast forward).
When the end of the tape is reached,
the mechanism will reverse the tape
and start playing the other side.
Stop fast forward
• Press FR
Fast rewind
• Press FR (fast rewind).
When the beginning of the tape is reached,
the mechanism will start playback.
Stop fast rewind
• Press FF .
Fast winding
FR: Fast rewind; press FF to stop
FF: Fast forward; press FR to stop
Reversing the tape
Press both buttons at a time.
“TR 1” or “TR 2” will appear in the display.
Reversing the tape (autoreverse)
To change the tape direction during cassette playback:
• Press FR and FF briefly.
At the end of a tape side the mechanism
changes directions automatically to play the
other side (autoreverse).
The display shows “TR 1” for track (side) 1
or “TR 2” for track 2.
DEUTSCH
ENGLISH FRANÇAISNEDERLANDSESPAÑOLPORTUGUÊS
73
Page 13

CD changer operation
Note:
If there is too much tension on the tape during playback, the set may switch over by
itself before having reached the end of the
tape side. In this case check the condition
of the cassette tape. Sometimes it helps to
rewind it completely.
Care notes
To avoid possible problems, we recommend
you to use C-60/C-90 type cassette tapes
only. Store your tapes in a cool place away
from dirt, dust and temperatures exceeding
50 °Celsius. Allow very cold tapes to warm
up before playing them in order to avoid
uneven tape transport. After approximately
100 hours of use, dust particles collected
on the playback head or roller may lead to
tape run problems and sound distortions.
Use a head cleaning tape to remove normal dirt build-up. For tougher cases, use a
cotton swab (Q-Tip) dipped in alcohol. Do
not attempt to clean by inserting a hard object into the player!
The changer CDC A 072 is included in the
scope of delivery.
Note:
Use only standard circular CDs measuring
12 cm in diameter!
CDs measuring 8 cm in diameter or CDs in
different shapes such as a butterfly or beer
mug are not suitable for playback using this
equipment.
This may result in the destruction of the CD
or the CD drive.
We assume no liability for damage to the
equipment caused by playing unsuitable
CDs.
Switching CD changer operation
on
A magazine containing at least one CD must
be inserted.
Use SRC to switch the audio source:
• Press SRC until the changer functions
appear in the display.
Selecting CDs and titles
CD selection
Up/down:
Press / for approx. 1 sec.
Track selection
Up:
Press briefly.
Down:
Press twice or as many times as
required.
To re-start the current track:
Press briefly.
74
Page 14

Appendix
Specifications
Amplifier
Output power: 4 x 19 W RMS power
acc. to DIN 45324 at
14.4 V
4 x 20 W max. power
Tuner
Wavebands:
FM: 87.5 - 108 MHz
only Cleveland DJ A:
M: 531 - 1.602 kHz
L: 153 - 279 kHz
FM sensitivity: 1.0 µV at 26 dB
signal-to-noise ratio
FM frequency response:
35 - 15.000 Hz
Tape player
Frequency response:
35 - 15.000 Hz
CD changer
Frequency response:
5 - 20.000 Hz
Blaupunkt
telephone help line
Address of the next service
centre in your vicinity
(only for Germany)
If you would like to know the address of
the next Blaupunkt service centre of
your area but haven’t got our service
list at hand:
- Find out your area code.
- Then call the following phone
number (subject to charges):
01 80 / 5 25 56 66.
- Using the area code you enter this
service will automatically provide
you with the address and phone
number of the Blaupunkt service
centre nearest to you. You can
also request this information by
fax.
DEUTSCH
Subject to modifications!
ENGLISH FRANÇAISNEDERLANDSESPAÑOLPORTUGUÊS
75
Page 15

Blaupunkt-Werke GmbH
Bosch Gruppe
10/97Pf K7/VKD 8 622 401 294
 Loading...