


Installation and Operation Manual
Teranex Mini Converters
September 2015
English, 日本語,
中文, 한국어, Русский
Français, Deutsch, Español,
and
Italiano.

Teranex Mini Converters
English 3
日本語
Français 70
Deutsch 104
Español 138
中文
한국어
Русский
Italiano 274
36
172
206
240

Welcome!
Thank you for purchasing Teranex Mini Converters.
Teranex Minis are 12G-SDI converters that let you convert video and audio for broadcast
and production work in the field, on your desk, or mounted in a rack.
With an efficient, compact design, they are not much bigger than Mini Converters and
can be placed into any production environment, from single operator post production
studios, to large rack based SDI workflows.
This instruction manual contains all the information you need to start using your Teranex
Mini Converters.
Please check the support page on our website at www.blackmagicdesign.com for the
latest version of this manual and for updates to your Teranex Mini converter’s software.
Keeping your software up to date will ensure you get all the latest features as well as
support for any new SDI formats that might be invented in the future! When downloading
software, please register with your information so we can keep you updated when new
software is released or you can follow us on twitter to get notifications of any software
updates. We are continually working on new features and improvements, so we would
love to hear from you!
Grant Petty
CEO Blackmagic Design

Contents
Teranex Mini Converters
Getting Started 5
Plugging in Power 5
Plugging in Video 5
Plugging in Audio 5
Installing Administration Software 6
Installing Blackmagic Teranex Setup 6
Installing Teranex Mini Smart Panel 7
Smart Panel Features 8
Changing Settings 9
Changing Settings using Switches 9
Changing Settings using Blackmagic
Teranex Setup 9
Changing Settings using Teranex Mini Smart Panel 10
Changing Network Settings 11
Changing network settings using
Blackmagic Teranex Setup 11
Changing network settings using Teranex
Mini Smart Panel 11
Teranex Mini - SDI to HDMI 12G 12
Teranex Mini - HDMI to SDI 12G 16
Teranex Mini - SDI to Analog 12G 19
Teranex Mini - Analog to SDI 12G 23
Teranex Mini - SDI to Audio 12G 26
Teranex Mini - Audio to SDI 12G 30
Teranex Mini Rack Shelf 34
Help 34
Warranty 35

Getting Started
ETHERNET PoE+
01:23:47:08
2160p59.94
SDI t
o A
nalog 12G
OPTICAL
AUDIO
STEREO OUT
L R
Plugging in Power
Getting started is as simple as plugging in power and
connecting your signal input and output.
To supply power, plug in a standard IEC power cable to
your Teranex Mini converter’s power input on the rear panel.
MENU
1
VIDEO
2
AUDIO
SET
Teranex Mini Converters support 12G-SDI data rates so
will automatically switch between SD, HD and Ultra HD
all the way up to 2160p60.
Plugging in Video
HDMI OUT
ETHERNET PoE+ SDI IN
SDI LOOP OUT
L - ANALOG
AES/EBU
Connect power to your Teranex Mini converter using a standard
IEC power cable. Power can also be supplied via a PoE+
compatible Ethernet switch.
R - ANALOG
AES/EBU - T/C
Plug your source video into your Teranex Mini converter’s
video input and plug the video output into your destination
equipment. Video input and output varies by converter.
Plugging in Audio
If you’re using embedded audio in SDI or HDMI, audio is
already transported via the video input. If using external
digital or analog audio, plug into the XLR connectors. The
‘R’ channel XLR connector can be used for timecode. Some
OPTICAL
AUDIO
ETHERNET PoE SDI IN
Connect analog or digital audio to your Teranex Mini converter’s optical audio, RCA, or balanced XLR connectors.
That’s all there is to getting started! Now you can change
your conversion settings and start using your Teranex Mini.
See the ‘changing settings’ section to learn more.
Depending on your Teranex Mini model, you may have the
option of SDI, HDMI, component, composite or S-video
input or output.
Teranex Mini converters also support RCA and optical
audio. Refer to the individual converters detailed in this
manual for more information.
L R
STEREO OUT
SDI OUT
L - ANALOG
AES/EBU
R - ANALOG
AES/EBU - T/C
5

Installing Administration Software
Installing Blackmagic Teranex Setup
The Teranex setup software is used to update your Teranex
Mini and to change video, audio and network settings.
Installation on Mac OS X
Step 1. Download the Blackmagic Teranex Setup
software from www.blackmagicdesign.com
Step 2. Unzip the downloaded file and open the resulting
disk image to reveal its contents
Step 3. Drag the Blackmagic Teranex Setup icon and
drop it on the Applications icon.
The Teranex setup utility is now installed.
Installation on Windows
Step 1. Download Blackmagic Teranex Setup from www.
blackmagicdesign.com
Step 2. Unzip the downloaded file. You should see a
Blackmagic Teranex Setup folder containing
this PDF manual and the Teranex setup utility
installer.
Step 3. Double click the installer and follow the prompts
to complete the installation.
Step 4. When the installation has finished, it will prompt
you to restart your computer. Click ‘restart’ to
complete the installation.
Once the computer has restarted, Blackmagic Teranex
Setup will be ready to use.
Updating the Internal Software
It is important to ensure that power is connected to the
Teranex Mini before connecting a USB cable between the
computer and converter.
Step 1. Power your converter.
Step 2. Attach a USB cable from the computer to the
converter or connect via Ethernet launch the
Teranex setup utility.
If the converter is missing or not detected, Blackmagic
Teranex Setup will report, “No converter connected” in the
title bar. Otherwise, it will report the model name of your
Teranex Mini.
If Blackmagic Teranex Setup contains newer internal
software than that currently installed in your Teranex Mini,
it will prompt you to update. Just follow the on screen
instructions to complete the update. Once the internal
software update is complete, you will be able to make
adjustments to your Teranex Mini using the Teranex
setup utility.
Blackmagic Teranex Setup can be installed on
Mac OS X and Windows computers.
If you have previously set your Teranex Mini to use a static IP
address, you can find it on your network by entering the IP
Address from the Teranex setup utility home screen.
6

Installing Teranex Mini Smart Panel
01:23:47:08
2160p59.94
SDI to Analog 12G
1
2
SET
VIDEO
MENU
AUDIO
You can also change settings using the optional Teranex
Mini Smart Panel. This control panel mounts to the front of
your Teranex Mini and replaces the original blank front
panel that shipped with the converter. You get fast access
to your settings using buttons and a rotary knob and you
can see the input on the built in LCD.
Installing your optional Smart Panel is easy and because
the panels are hot swappable you don’t even need to turn
off your Teranex Mini converter when installing it.
Step 1. Remove the two M3 screws on each side of
your converter’s basic front panel using a
Pozidriv 2 screwdriver and gently pull the panel
away from the front of your Teranex Mini.
Step 2. Remove and retain the light tube connecting
the LED to the indicator at the bottom of the
basic panel.
This tube is necessary to illuminate your mini
converter’s multi-use indicator when the Smart
Panel is not installed.
Step 3. Align the connector on the rear of the Smart
Panel with the adjoining connector on the face
of your Teranex Mini converter and gently push
the Smart Panel towards your converter until the
connectors are firmly seated. The Smart Panel
should make a firm connection and fit neatly
inside the face of your Teranex Mini converter.
Step 4. Re-insert the M3 screws from the original fascia.
If your Teranex Mini is installed in a Teranex Mini Rack Shelf,
you will need to remove the mini converter from the rack
shelf to access the front panel screws.
See the ‘Teranex Mini Rack Shelf’ section for more
information.
The Teranex Mini’s USB port is still accessible with the
Teranex Smart Panel attached. To access the port, simply
open the plastic cover. With the Smart Panel installed, the
front panel small switches are covered up and no longer
used and this is because all the switch settings and more
are now in the menu on the Teranex Smart Panel and can
be set using the LCD. The settings available will vary
between Teranex Mini’s because the features are different
between models, but navigation layout on screen is the
same, so it’s easy to move between models to make
changes to settings.
Refer to the ‘changing settings’ section for information on
changing settings using an optional Teranex Mini
Smart Panel.
When installing the Teranex Mini Smart Panel to your Teranex Mini, holding the panel with your
fingers and thumb aligned with the panel’s rear connector will help guide it into place.
7

Smart Panel Features
1 MENU
2 VIDEO
SET AUDIO
your Teranex Mini converter.
the Teranex Mini Smart Panel.
Teranex mini converter’s XLR connector.
2160p59.94
SDI to Analog 12G
01:23:47:08
LCD Display
The home screen is the first feature you’ll see on your
Teranex Mini Smart Panel’s LCD display. The home screen
shows you important information, including:
1 MENU
2 VIDEO
SET AUDIO
Input video format - The format and frame
rate of your video source connected to
Converter model - The model of Teranex
Mini converter currently connected to
Control Buttons and Rotary Knob
Your Teranex Mini Smart Panel has a set of buttons and a
rotary knob that are used to navigate your Teranex Mini
Converter’s settings menu.
1 and 2 buttons - Press these buttons to increase or
decrease numeric setting values, or to move up or down
through menu settings.
Set - After changing a setting using the 1 and 2 buttons,
press the ‘set’ button to confirm your setting.
2160p59.94 SDI to Analog 12G
01:23:47:08
Timecode - The timecode embedded in the
video input, or external timecode via the
Menu - Press to enter the settings menu for your Teranex
Mini converter. You can also press the menu button to step
back through menu items.
Video and Audio Buttons - Press the ‘video’ and ‘audio’
buttons to take you directly to your Teranex Mini converter’s
video or audio settings. The settings available will depend
on which model your Smart Panel is connected to.
Rotary knob - Turn the rotary knob clockwise or counter
clockwise to navigate through the menu settings and adjust
numeric setting values.
Control Buttons
1 MENU
2160p59.94 SDI to Analog 12G
01:23:47:08
2 VIDEO
SET AUDIO
Video monitor - displays the input video
format so you can instantly see
your conversion.
8
Rotary Knob
Audio meters - Displays the audio levels
of your video source connected to your
Teranex Mini converter.

Changing Settings
1ON2 3 4 5 6 7 8
There are three ways to change settings on your Teranex
Mini. You can use the switches on the front panel, the
Blackmagic Teranex Setup utility, or by mounting a Teranex
Changing Settings using Switches
On the front panel of your Teranex Mini you’ll see a plastic
door which protects a set of small switches used for settings
on your converter. The ‘on/off’ switches are used to
configure internal settings and you can easily change them
using the tip of a pen.
You’ll find a switch settings diagram printed on the base
of your converter. Ensure your switch settings correspond
to the legend by observing the switch numbers from 1 to
8, left to right. When using the optional Teranex Mini Smart
Mini Smart Panel which lets you change settings using
control buttons, a rotary knob and LCD.
Panel, the switch settings will be overridden by the Smart
Panel settings. Your Teranex Mini will retain its last settings
whether applied via switch, Smart Panel or Blackmagic
Teranex Setup software. If reverting to switch control after
removing the Smart Panel or updating your converter’s
settings via software, you may need to toggle individual
switches for new settings to take effect.
For a full description of the switches and their settings,
refer to your converter model in this manual.
Change settings by adjusting the switches with a pen.
Changing Settings using Blackmagic Teranex Setup
Once installed on your computer, connect the setup utility
to your Teranex Mini via USB or Ethernet. If you can’t find
your Teranex Mini via Ethernet, you may first need to
configure it using a USB connection as detailed in the
section ‘changing network settings.’
The first thing you’ll see when launching the software is
the home page. Here you can select the Teranex Mini you
want to configure. To change settings, click on the ‘settings’
icon below the image of your Teranex Mini.
If you have more than one Teranex Mini connected to your
network, only the relevant settings for your selected Teranex
Mini will be visible. Select your desired converter by clicking
the arrows on the left and right side of the Blackmagic
Teranex Setup home page.
Adjustments will be immediately saved to your Teranex
Mini. This means if power is lost, your settings will be reestablished as soon as power is restored.
The Teranex setup utility lets you update your Teranex Mini’s internal software
and adjust your settings using a Mac OS X or Windows computer.
9

The configure and about tabs in Blackmagic Teranex Setup
are common across all Teranex Mini models.
Configure Tab
The ‘configure’ tab is the same for all Teranex Minis and
contains your converter’s network settings. Here you can
toggle your converter between dynamic and static network
addresses, as well as set up the IP address, subnet mask,
and gateway for your Teranex Mini. See the ‘changing
network settings’ section for more detail.
About Tab
You can use the settings in this tab to name your Teranex
Mini, and to identify individual converters. To name your
Teranex Mini converter, simply click in the ‘name’ text box
and type your desired converter name. Click ‘save’ to
confirm the change. To easily identify your selected Teranex
Mini converter, click on the ‘identify’ checkbox. This will
flash the multi use indicator on your converter’s basic
Teranex Mini panel. If you have a Teranex Mini Smart Panel
installed, you will see the model name in the LCD turn from
grey to red. Deselect the checkbox to turn off the
identification indicators.
The ‘software settings’ menu in the ‘about’ tab identifies
which software version your Teranex Mini is running. If your
converter’s internal software is older than the current
version that comes with Blackmagic Teranex Setup, an
update button will be present here that allows you to bring
your converter’s software up to date.
Use the ‘configure’ tab in Blackmagic Teranex Setup
to access network settings.
The ‘about’ tab in Blackmagic Teranex Setup is used to
name and identify your Teranex Mini. You can also check
the version of the setup software.
Changing Settings using Teranex Mini Smart Panel
You can also change settings using the optional Teranex
Mini Smart Panel. This control panel mounts to the front of
your Teranex Mini and replaces the original blank front
panel that shipped with the converter. You get fast access
to your settings using buttons and a rotary knob and you
can see the input on the built in LCD.
The converter’s USB port is still accessible with the Teranex
Smart Panel attached. To access the port, simply open the
1 MENU
2 VIDEO
SET AUDIO
plastic cover. With the Teranex Smart Panel installed, the
front panel small switches are covered up and no longer
used and this is because all the switch settings and more
are now in the menu on the Teranex Smart Panel and can
be set using the LCD. The settings available will vary
between Teranex Mini converters because the features
are different between models, but navigation layout on
screen is the same, so its easy to move between models
to make changes to settings.
2160p59.94 SDI to Analog 12G
01:23:47:08
You can quickly check your settings and set new ones using an optional Teranex Mini Smart Panel.
The Smart Panel easily mounts to the front of your Teranex Mini converter.
10

Changing Network Settings
Accessing your Teranex Minis over a network is the easiest
way to manage multiple converters. You can do this using
Blackmagic Teranex Setup. By default, your Teranex Minis
are configured to automatically acquire a network address,
making it easy to immediately select them from the
Blackmagic Teranex Setup splash screen, as detailed in
the section ‘changing settings using Blackmagic
Teranex Setup.’
If you are having trouble finding a Teranex Mini on your
network, or you have previously set it to use a static address
incompatible with your current network, you may need to
change its network settings locally. You can do this via
USB or the Teranex Mini Smart Panel.
Changing network settings using Blackmagic Teranex Setup
To change network settings via USB, connect your Teranex
Mini to a computer running the Teranex setup utility with
a USB cable. You can find your Teranex Mini’s USB
connector on its front panel, regardless of whether you are
using the basic fascia or the Smart Panel.
Once connected, select your Teranex Mini from the Teranex
setup utility splash screen, and navigate to the ‘configure’
tab. Here you can toggle your converter between dynamic
and static network addresses. If you select a static IP, you
can manually configure your converter’s IP address, subnet
mask, and gateway.
Changing network settings using Teranex Mini Smart Panel
A useful feature of Teranex Mini Smart Panel is locally
changing network settings. To do this:
Step 1. Press the ‘menu’ button to open the
settings menu.
Step 2. Select ‘network’ using the rotary knob or 1 and
2 buttons, and press ‘set.’
Step 3. Select ‘configure IP’ by using the rotary knob
or 1 and 2 buttons, and press ‘set.’
Step 4. Select ‘manually’ by using the rotary knob or 1
and 2 buttons, and press set. Then follow the
same procedure to select ‘IP address.’
Step 5. Use the rotary knob or 1 and 2 buttons to cycle
through the available numbers for your IP address
and confirm them by pressing ‘set.’ Repeat the
procedure for ‘subnet’ and ‘gateway’ settings.
Use the ‘configure’ tab in Blackmagic Teranex
Setup to change network settings via USB
Use the network menu on Teranex Mini Smart Panel to
change network settings on your mini coverter.
11

Teranex Mini - SDI to HDMI 12G
ETHERNET PoE+ SDI IN
L - ANALOG
AES/EBU
R - ANALOG
AES/EBU - T/C
HDMI OUT
SDI LOOP OUT
Connect a huge range of HDMI displays and video
projectors to SDI based equipment. Your Teranex Mini SDI
to HDMI 12G provides automatic switching between SD
SDI, HD-SDI, 3G-SDI, 6G-SDI and 12G-SDI input sources
and converts to HDMI with embedded audio, plus balanced
1 2
Connectors
1. Mini-B USB port
Connects to the Blackmagic Teranex Setup software via
a Mac OS X or Windows computer for adjusting settings
and updating your Teranex Mini’s internal software.
2. Switches
Adjustable switches for changing settings.
AES/EBU or analog audio out. The ‘R analog’ XLR connector
can also be set to output timecode. If an HD monitor or TV
is connected to the HDMI output, any Ultra HD source is
automatically down converted to HD.
4 5
6 8 9 1073
6. Ethernet PoE+
Connects to a network switch or computer so you can
change settings using the Teranex setup utility. TheEthernet
port also supports power over Ethernet plus.
7. SDI In
SDI video input BNC connector.
3. LED Multi-Use Indicator
Glows white when the converter is receiving power and
green when a valid video input signal is detected. Will flash
on/off to identify individual converters via Blackmagic
Teranex Setup.
4. Power
Standard built in IEC C14 connector for 90 - 240 volt AC
power supply.
5. HDMI
HDMI video output.
8. SDI Loop Out
SDI video loop output BNC connector.
9. L - Analog or AES/EBU
Balanced left channel analog audio, or digital AES/EBU
audio output XLR connector.
10. R - Analog, AES/EBU or Timecode
Balanced right channel analog audio, or digital AES/EBU
audio output XLR connector. Can also be configured for
timecode output.
12

Switches
Teranex Mini SDI to HDMI 12G’s switches provide the
following settings:
Switch 8 - Analog Audio, AES/EBU Audio
Set switch 8 to ‘off’ to output balanced analog audio. Set
to ‘on’ for digital AES/EBU audio.
Switch 7 - Output Audio/Timecode
Set switch 7 to ‘on’ to output timecode via the R channel
audio XLR connector. Set to ‘off’ to output audio.
Switches 4, 3, 2 - SDI Audio De-Embed Bit 2, 1, 0
Switches 4, 3 and 2 are represented as bits 2, 1, and 0
respectively. This simply means that by setting various
on/off combinations for switches 4, 3, and 2, you can choose
which pair of audio channels from your SDI input you would
like to output to HDMI, analog or AES/EBU audio.
SDI Audio Selection Table
By using the following combinations of switch settings, you
can select which SDI audio channels to embed into your
Teranex Mini SDI to HDMI 12G’s output signal.
The switch legend on the base of your converter gives you
all the information you need to change conversion settings.
Audio Channels Switch 4 Switch 3 Switch 2 Switch Diagram
1 and 2 OFF OFF OFF
3 and 4 OFF OFF ON
5 and 6 OFF ON OFF
7 and 8 OFF ON ON
9 and 10 ON OFF OFF
11 and 12 ON OFF ON
13 and 14 ON ON OFF
15 and 16 ON ON ON
AES/EBU Audio Channels Switch 4 Switch 3 Switch 2 Switch Diagram
1-4 OFF OFF OFF
5-8 OFF OFF ON
9-12 OFF ON OFF
13

AES/EBU Audio Channels Switch 4 Switch 3 Switch 2 Switch Diagram
13-16 OFF ON ON
Blackmagic Teranex Setup Settings
The Teranex setup utility can change all the same settings
that are available using the switches, plus additional
settings. You can access these settings by moving between
the ‘video,’ ‘audio,’ ‘configure,’ and ‘about’ tabs.
The ‘about’ and ‘configure’ tabs are detailed in the ‘changing
settings’ section in this manual. The ‘video’ tab for Teranex
Mini SDI to HDMI 12G contains the following settings.
Video output menu
Clip HDMI Output to legal levels
This checkbox controls clipping of your SDI input
to ensure that it stays within HDMI legal levels and
should be kept on by default.
The ‘audio’ tab for Teranex Mini SDI to HDMI 12G contains
the following settings.
Audio output menu
Set XLR Output
You can choose between analog and AES/EBU
output by highlighting the ‘analog,’ ‘AES/EBU,’ or
‘timecode’ buttons in the ‘audio output’ menu. When
you select ‘timecode’ the left XLR connector will
output analog audio, while the right XLR output will
provide a timecode signal.
Depending on which audio output option you select,
you can then pick which audio channels of your SDI
input to send to your HDMI, AES/EBU, or Analog audio
output, as well as adjusting their gain per channel or
channel pair. If you are outputting AES/EBU audio
via both XLR connectors, you can select up to four
channels. If you are outputting analog audio, you
can select up to two channels. If you are using the
right XLR connector to output a timecode signal,
the left XLR connector will output one channel of
analog audio.
Your Teranex Mini will retain its last settings whether applied
via switch, Smart Panel or Teranex setup utility. If reverting
to switch control after removing the Smart Panel or updating
your converter’s settings via software, you may need to
toggle individual switches for new settings to take effect.
Adjust your analog audio levels and AES/EBU levels using the ‘audio’
settings page in Blackmagic Teranex Setup.
14

Teranex Mini Smart Panel Settings
If you have installed the optional Teranex Mini Smart Panel
on your SDI to HDMI 12G converter, the following menus
will be available - ‘video,’ ‘audio,’ and ‘network.’ The settings
available in these menus are identical to those detailed in
the ‘Blackmagic Teranex Setup settings’ section above.
For more information on changing settings using the
Teranex Mini Smart Panel, refer to the ‘changing
settings’ section.
Teranex Mini Smart Panel gives you access to the same settings as Blackmagic Teranex Setup.
Teranex Mini SDI to HDMI 12G Block Diagram
Input automatically
detects between
SD/HD/6G/12G-SDI
SDI In
Equalizer,
Re-Clocker and
10 bit De-Serializer
Customizable
Video Processor
AES/EBU
Audio Formatter
Audio Digital to
Analog with
Balanced Output
Automatic
SD/HD/6G/12G-SDI
Cable Driver
Analog or AES/EBU
Audio Out Switch
Loop SDI Out
Left Analog Out
or AES/EBU
1+2 Out
Right Analog Out
or AES/EBU 3+4
Out or Timecode
USB
Ethernet
with Power
Central Processor
and Firmware
Mini Switches
SDI Audio
De-Embedder
15
HDMI Video and
Audio Formatter
HDMI Out

Teranex Mini - HDMI to SDI 12G
ETHERNET PoE+ SDI OUT
L - ANALOG
AES/EBU
R - ANALOG
AES/EBU - T/C
PUSH PUSH
HDMI IN
SDI OUT
Convert HDMI outputs from devices such as HDV cameras,
Ultra HD cameras and game consoles to SDI with the choice
to embed audio from HDMI, AES/EBU or balanced analog
1 2
Connectors
1. Mini-B USB port
Connects to Blackmagic Teranex Setup via a Mac OS X or
Windows computer for changing settings and updating
your Teranex Mini’s internal software.
2. Switches
Adjustable switches for changing settings.
3. LED Multi-Use Indicator
Glows white when the converter is receiving power and
green when a valid video input signal is detected. Will flash
on/off to identify individual converters via Blackmagic
Teranex Setup.
4. Power
Standard built in IEC C14 connector for 90 - 240 volt AC
power supply.
5. HDMI
HDMI video input.
audio inputs. This means you can send video signals from
HDMI over SDI using the longest SDI cables. You can even
add SDI outputs to computers with HDMI compatibility.
4 5
6 8 9 1073
6. Ethernet PoE+
Connects to a network switch or computer so you can
change settings using Blackmagic Teranex Setup. The
Ethernet port also supports power over Ethernet plus.
7. SDI Out
SDI video output BNC connector.
8. SDI Out
Secondary SDI output BNC connector.
9. L - Analog or AES/EBU
Balanced left channel analog audio, or digital AES/EBU
audio input XLR connector.
10. R - Analog, AES/EBU or Timecode
Balanced right channel analog audio, or digital AES/EBU
audio input XLR connector. Can also be configured for
timecode input.
Switches
Teranex Mini HDMI to SDI 12G’s switches provide the
following settings:
Switch 8 - Analog Audio, AES/EBU Audio
Set switch 8 to ‘off’ to embed balanced analog audio. Set
to ‘on’ for digital AES/EBU audio. To use these inputs switch
7 must also be set to ‘on’.
Switch 7 - HDMI Audio, Input Audio
Set switch 7 to ‘off’ to select embedded HDMI audio, or to
‘on’ for analog or AES/EBU audio.
Switch 6 - Input Audio/Timecode
Set switch 6 to ‘on’ to input timecode via the R channel
audio XLR connector. Set to ‘off’ to input audio.
The switch legend on the base of your converter gives you
all the information you need to change conversion settings.
16

Switch 5 - 60 to 59.94 Off/On
Set switch 5 to ‘on’ if you need to convert 60p video to
interlaced 59.94 when connecting to a switcher. Set to ‘off’
to bypass the conversion and output the original 60 frames
per second progressive format.
Switches 2, 1 - Select Format Bit 1, 0
Switches 2 and 1 are represented as bits 1 and 0 respectively.
This simply means that by setting various on/off combinations
for switches 2 and 1, you can choose which conversion
format you would like to use.
There are 3 conversion formats to choose from.
Auto - switch 1 to OFF, switch 2 to OFF.
The SDI output resolution will match the HDMI input.
For example, if the HDMI input is Ultra HD, the SDI
output will be Ultra HD.
Force to HD - switch 1 to OFF, switch 2 to ON.
The SDI output is down converted to HD if the input
is Ultra HD. Your Teranex Mini will attempt to switch
the HDMI input format to HD if the source equipment
supports this feature. If the HDMI input is SD, the
output will remain SD.
Force to Ultra HD - switch 1 to ON, switch 2 to OFF.
The SDI output is up converted to Ultra HD if the input
is HD. Your Teranex Mini will attempt to switch the
HDMI input format to Ultra HD if the source equipment
supports this feature. If the HDMI input format is SD,
the output will remain SD.
Select between ‘auto’, ‘force to HD’, or ‘force to Ultra HD’
upconversion settings using the ‘video’ settings page
in Blackmagic Teranex Setup. You can also choose
to convert 60p video to 59.94i for when
connecting to a switcher.
Blackmagic Teranex Setup Settings
The Teranex setup utility can change all the same settings
that are available using the switches, plus additional
settings. You can access these settings by moving between
the ‘video,’ ‘audio,’ ‘configure,’ and ‘about’ tabs.
The ‘about’ and ‘configure’ tabs are detailed in the ‘changing
settings’ section in this manual.
The ‘video’ tab for Teranex Mini HDMI to SDI 12G contains
the following settings.
Video Processing menu
Upconversion
Click on the ‘upconversion’ drop down menu to select
upconversion settings for your SDI output. Setting this
to ‘auto’ will match the SDI output to the HDMI input,
while ‘Force HD’ and ‘Force Ultra HD’ will output HD
and Ultra HD video respectively, regardless of the
HDMI input, up or down- converting as necessary.
However, SD will remain SD.
Frame Rate
Toggle this checkbox to convert 60p video to 59.94i
for use with interlaced switcher workflows.
timecode inputs, as well as which channels of your
SDI audio output you wish to embed these into. You
can also adjust the gain on the audio signal.
Selecting AES/EBU allows the additional option of
checking ‘sample rate converter.’ When this is selected,
the sample rate of your SDI audio output will be forced
to 48kHz, the correct sample rate for television.
Your Teranex Mini will retain its last settings whether applied
via switch, Smart Panel or Teranex setup utility. If reverting to
switch control after removing the Smart Panel or updating
your converter’s settings via software, you may need to toggle
individual switches for new settings to take effect.
The ‘audio’ tab for Teranex Mini HDMI to SDI 12G contains
the following settings.
Audio Input menu
Set XLR input / Set Audio input
This menu allows you to select between XLR and
HDMI audio input. Selecting HDMI will embed the
HDMI audio into the SDI video output. Selecting
‘XLR’ lets you choose between analog, AES/EBU, and
Adjust your analog audio levels and AES/EBU levels using the
‘audio’ settings page in Blackmagic Teranex Setup.
17

Teranex Mini Smart Panel Settings
If you have installed the optional Teranex Mini Smart Panel
on your HDMI to SDI 12G converter, the following menus
will be available - ‘video,’ ‘audio,’ and ‘network.’ The settings
For more information on changing settings using the
Teranex Mini Smart Panel, refer to the ‘changing settings
section in this manual.
available in these menus are identical to those detailed in
the section above.
Using Teranex Mini Smart Panel gives you access to the same settings as Blackmagic Teranex Setup.
Teranex Mini HDMI to SDI 12G Block Diagram
Analog or AES/EBU
Left Analog In
or AES/EBU 1+2
Audio Switch
Right Analog In
or AES/EBU 3+4
or Timecode
HDMI In
USB
USB
Ethernet
with Power
Analog or AES/EBU
Audio Switch
HDMI Video and
Audio Decoder
Central
Processor and
Firmware
Mini Switches
AES/EBU Sample
Rate Converter
Audio Analog to
Digital from
Balanced Input
Customizable
Video Processor
SDI Audio
Embedder
Automatic
SD/HD/6G/12G-SDI
Cable Driver
SDI Out
SDI Out
18

Teranex Mini - SDI to Analog 12G
ETHERNET PoE+ SDI IN
L - ANALOG
AES/EBU
R - ANALOG
AES/EBU - T/C
Y or NTSC/PAL B-Y or S-VIDEO Y R-Y or S-VIDEO C
SDI LOOP OUT
Convert from SD SDI, HD-SDI, 3G-SDI, 6G-SDI and 12G-SDI
input sources to analog component, NTSC and PAL video
out, plus balanced AES/EBU and analog audio out. The
built in down converter lets you connect 12G-SDI video to
1 2
3 11 12
Connectors
1. Mini-B USB port
Connects to the Blackmagic Teranex Setup software via
a Mac OS X or Windows computer for adjusting settings
and updating your Teranex Mini’s internal software.
2. Switches
Adjustable switches for changing settings.
SD and HD analog equipment and easily connects to video
monitors and decks such as Betacam SP and VHS. You
can even output pairs of analog audio from 16 de-embedded
SDI audio channels.
4 5 6
8 9 10
7
7. R-Y or S-VIDEO C
Analog component R-Y, or S-Video C output BNC connector.
8. Ethernet PoE+
Connects to a network switch or computer so you can
change settings using Blackmagic Teranex Setup.
TheEthernet port also supports power over Ethernet plus.
3. LED Multi-Use Indicator
Glows white when the converter is receiving power and
green when a valid video input signal is detected. Will flash
on/off to identify individual converters via Blackmagic
Teranex Setup.
4. Power
Standard built in IEC C14 connector for 90 - 240 volt AC
power supply.
5. Y or NTSC/PAL
Analog component Y, NTSC or PAL composite output
BNC connector.
6. B-Y or S-VIDEO Y
Analog component B-Y, or S-Video Y output BNC connector.
Switches
Teranex Mini SDI to Analog 12G’s switches provide the
following settings:
Switch 8 - Analog Audio, AES/EBU Audio
Set switch 8 to ‘off’ to select balanced analog audio, or to
‘on’ for digital AES/EBU audio output.
Switch 7 - 7.5 IRE, 0.0 IRE
The USA and countries using NTSC with 7.5 setup should
set switch 7 to ‘off’. If you’re working in countries not using
7.5 setup, set switch 7 to ‘on’. This setting only affects
composite or S-Video outputs.
9. SDI IN
SDI video input BNC connector.
10. SDI Loop Out
SDI video loop output BNC connector.
11. L - Analog or AES/EBU
Balanced left channel analog audio, or digital AES/EBU
audio output XLR connector.
12. R - Analog, AES/EBU or Timecode
Balanced right channel analog audio, or digital AES/EBU
audio output XLR connector. Can also be configured for
timecode output.
Switch 6 - SMPTE Levels, Betacam Levels
Set switch 6 to ‘off’ for SMPTE levels, or ‘on’ for Betacam
levels. SMPTE levels are more common and even Betacam
SP decks can use SMPTE levels, so only switch this to
Betacam if you are sure that Betacam levels are being used.
Switch 5 - Component, Composite or S-Video
Set switch 5 to ‘off’ to select analog component video
output, or ‘on’ for composite and S-Video outputs.
To display the HD video input as SD on the S-Video and
composite outputs, down conversion must be set to ‘on’
19

by toggling switch 1. Component analog video supports
both HD and SD video.
Switch 4, 3 and 2 - SDI Audio De-Embed
Switches 4, 3 and 2 are represented as bits 2, 1, and 0
respectively. This simply means that by setting various on/
off combinations for switches 4, 3, and 2, you can choose
which pair of audio channels from your SDI input you would
like to output to analog or AES/EBU audio.
Switch 1 - Processing Off - Processing On
Down conversion with 3 types of aspect ratios by cycling
through switch 1. Toggle switch 1 between off and on to
cycle between anamorphic, center cut, and letterbox
aspect ratios.
When converting Ultra HD or HD, set switch 1 to ‘off’ to
force HD output via the analog component connectors.
4K DCI will be scaled on the component HD output.
You’ll also need to make sure switch 5 is selected for your
desired output. For example, to select component output
set switch 5 to ‘off’.
SDI Audio Selection Table
By using the following combinations of switch settings, you
can select which SDI audio channels to output as analog
Audio Channels Switch 4 Switch 3 Switch 2 Switch Diagram
1 and 2 OFF OFF OFF
3 and 4 OFF OFF ON
5 and 6 OFF ON OFF
7 and 8 OFF ON ON
9 and 10 ON OFF OFF
The switch legend on the base of your converter gives you
all the information you need to change conversion settings.
or digital AES/EBU audio with your Teranex Mini SDI to
Analog 12G.
11 and 12 ON OFF ON
13 and 14 ON ON OFF
15 and 16 ON ON ON
AES/EBU Audio Channels Switch 4 Switch 3 Switch 2 Switch Diagram
1-4 OFF OFF OFF
5-8 OFF OFF ON
9-12 OFF ON OFF
20

AES/EBU Audio Channels Switch 4 Switch 3 Switch 2 Switch Diagram
13-16 OFF ON ON
Blackmagic Teranex Setup Settings
The Teranex setup utility can change all the same settings
that are available using the switches, plus additional settings.
You can access these settings by moving between the ‘video,’
‘audio,’ ‘configure,’ and ‘about’ tabs.
The ‘about’ and ‘configure’ tabs are detailed in the ‘changing
settings’ section in this manual.
The ‘video’ tab for Teranex Mini SDI to Analog 12G contains
the following settings.
Video Output menu
This lets you pick between component, or s-video and
composite video output as well as setting the luminance
and chroma levels, and the B-Y and R-Y component
levels independently.
If you have selected s-video and composite output, you
can additionally choose between 7.5 IRE and 0.0 IRE black
levels, depending on the region you are working in. If you
have selected component video, you can switch between
SMPTE and Betacam levels.
SMPTE levels are more common and even Betacam SP
decks can use SMPTE levels, so only switch this to Betacam
if you are sure that Betacam levels are being used.
Video Processing menu
This menu allows you to set the aspect ratio of down
converted video. The options are letterbox, anamorphic,
center cut or no processing.
The ‘audio’ tab for Teranex Mini SDI to Analog 12G contains
the following settings.
Audio Output menu
This menu allows you to select between analog, AES/EBU,
and timecode audio outputs, as well as which channels of
your SDI audio input you wish to de-embed. You can also
adjust the gain on the audio output.
Your Teranex Mini will retain its last settings whether
applied via switch, Smart Panel or Teranex setup utility. If
reverting to switch control after removing the Smart Panel
or updating your converter’s settings via software, you may
need to toggle individual switches for new settings to
take effect.
Adjust your video luminance and chroma levels and
component chroma levels using the ‘video’ settings page
in Blackmagic Teranex Setup.
Adjust your analog audio levels and
AES/EBU levels using the ‘audio’ settings page.
21

Teranex Mini Smart Panel Settings
If you have installed the optional Teranex Mini Smart Panel
on your SDI to Analog 12G converter, the following menus
will be available - ‘video,’ ‘audio,’ and ‘network.’ The settings
available in these menus are identical to those detailed in
the ‘Blackmagic Teranex Setup settings’ section above.
For more information on changing settings using the
Teranex Mini Smart Panel, refer to the ‘changing settings’
section in this manual.
Using Teranex Mini Smart Panel gives you access to the same settings as Blackmagic Teranex Setup.
Teranex Mini SDI to Analog 12G Block Diagram
SDI In
USB
Ethernet
with Power
Input automatically
detects between
SD/HD/6G/12G-SDI
Central Processor
and Firmware
Mini Switches
Equalizer,
Re-Clocker and
10 bit De-Serializer
10 bit HD to
SD Down
Converter
SDI Audio
De-Embedder
AES/EBU
Audio Sample Rate
Converter
Stereo Audio
Analog to Digital
Converter
12 Bit Digital to
Analog SD/HD
Video Converter
Automatic
SD/HD/6G/12G-SDI
Cable Driver
Analog or AES/EBU
Audio Out Switch
Component output can switch to
S-Video and Composite
Loop SDI Out
Left Analog Out
or AES/EBU
1+2 Out
Right Analog Out
or AES/EBU
3+4 Out or
Timecode
Y
R-Y
B-Y
22

Teranex Mini - Analog to SDI 12G
ETHERNET PoE+ SDI OUT
L - ANALOG
AES/EBU
R - ANALOG
AES/EBU - T/C
Y or NTSC/PAL B-Y or S-VIDEO Y R-Y or S-VIDEO C
PUSH PUSH
SDI OUT
Convert video and audio from analog equipment such as
Betacam SP decks, HDV cameras and game consoles to
SD-HDI, HD-SDI and 12G-SDI video. A choice of analog
input formats is supported, including component SD/HD,
1 2
3 11 12
Connectors
1. Mini-B USB port
Connects to the Teranex setup utility via a Mac OS X or
Windows computer for adjusting settings and updating
your Teranex Mini’s internal software.
2. Switches
Adjustable switches for changing settings.
S-Video, or composite NTSC and PAL. The converter’s
12G-SDI outputs include the option to embed digital
AES/EBU or analog audio.
4 5 6
8 9 10
7
7. R-Y or S-VIDEO C
Analog component R-Y, or S-Video C input BNC connector.
8. Ethernet PoE+
Connects to a network switch or computer so you can
change settings using Blackmagic Teranex Setup. The
Ethernet port also supports power over Ethernet plus.
3. LED Multi-Use Indicator
Glows white when the converter is receiving power and
green when a valid video input signal is detected. Will flash
on/off to identify individual converters via Blackmagic
Teranex Setup.
4. Power
Standard built in IEC C14 connector for 90 - 240 volt AC
power supply.
5. Y or NTSC/PAL
Analog component Y, NTSC or PAL composite input
BNC connector.
6. B-Y or S-VIDEO Y
Analog component B-Y, or S-Video Y input BNC connector.
Switches
Teranex Mini Analog to SDI 12G’s switches provide the
following settings:
Switch 8 - Analog Audio, AES/EBU Audio
Set switch 8 to OFF to select balanced analog audio, or to
ON for digital AES/EBU audio input.
Switch 7 - 7.5 IRE - 0.0 IRE
The USA and countries using NTSC with 7.5 setup should
set switch 7 to OFF. If you’re working in countries not using
7.5 setup, set switch 7 to ON. This setting only affects
composite or S-Video outputs.
9. SDI OUT
SDI video output BNC connector.
10. SDI OUT
SDI video output BNC connector.
11. L - Analog or AES/EBU
Balanced left channel analog audio, or digital AES/EBU
audio input XLR connector.
12. R - Analog, AES/EBU or Timecode
Balanced right channel analog audio, or digital AES/EBU
audio input XLR connector. Can also be configured for
timecode input.
Switch 6 - SMPTE Levels - Betacam Levels
This setting selects between SMPTE or Betacam video
levels. Set switch 6 to OFF for SMPTE levels, or to ON for
Betacam levels. SMPTE levels are more common and even
Betacam SP decks can use SMPTE levels so only switch
this to Betacam if you are sure that Betacam levels are
being used.
Switch 5 - Component, Composite or S-Video
Set switch 5 to OFF to select analog component video input,
or to ON for composite video and S-Video analog inputs.
23

Switch 4 - Composite - S-Video
Set switch 4 to OFF to select composite video input, or to
ON for S-Video input.
Switch 3 - SD to HD
Set switch 3 to ‘on’ to up convert the SDI output resolution
from SD to HD if the Composite, S-Video or Component
inputs are SD. Set to ‘off’ to match the input resolution.
Switch 2 - HD to UHD
Set switch 2 to ‘on’ to up convert SDI output resolution to
Ultra HD if the Component video input is HD. Set to ‘off’
to match the input resolution.
Switch 1 - Input Audio / Timecode
Set switch 1 to ‘on’ to input timecode via the R channel
audio XLR connector. Set to ‘off’ to input audio.
Blackmagic Teranex Setup Settings
The switch legend on the base of your Teranex Mini gives you
all the information you need to change conversion settings.
The Teranex setup utility can change all the same settings
that are available using the switches, plus additional settings.
You can access these settings by moving between the ‘video,’
‘audio,’ ‘configure,’ and ‘about’ tabs.
The ‘about’ and ‘configure’ tabs are detailed in the ‘Changing
settings’ section in this manual.
The ‘video’ tab for Teranex Mini Analog to SDI 12G contains
the following settings.
Video Input menu
This lets you pick between component, s-video, and
composite video input as well as setting the luminance
and chroma levels, and the B-Y and R-Y component
levels independently.
If you have selected S-Video or composite input, you can
additionally choose between 7.5 IRE and 0.0 IRE black
levels, depending on the region you are working in.
If you have selected component video, you can switch
between SMPTE and Betacam levels. SMPTE levels are
more common and even Betacam SP decks can use SMPTE
levels, so only switch this to Betacam if you are sure that
Betacam levels are being used.
Video Processing menu
This menu allows you to set up conversion options, dependent
on your analog video input. Component video inputs can
be converted from SD to HD, and HD to Ultra HD. S-Video
and composite inputs can only be converted from SD to HD.
The ‘audio’ tab for Teranex Mini Analog to SDI 12G contains
the following settings.
Audio input menu
This menu allows you to select between analog, AES/EBU,
and timecode audio inputs, as well as which channels of
your SDI audio output you wish to embed these into. You
can also adjust the gain on the audio signal.
Selecting AES/EBU allows the additional option of checking
‘sample rate conversion.’ When this is selected, the sample
rate of your SDI audio output will be up- or down- converted
to 24-bit, 48kHz.
Your Teranex Mini will retain its last settings whether
applied via switch, Smart Panel or Teranex setup utility. If
reverting to switch control after removing the Smart Panel
or updating your converter’s settings via software, you may
need to toggle individual switches for new settings to
take effect.
24

Adjust your video luminance and chroma levels and
component chroma levels using the ‘video’ settings page
in Blackmagic Teranex Setup.
Teranex Mini Smart Panel Settings
Adjust your analog audio levels and
AES/EBU levels using the ‘audio’ settings page.
If you have installed the optional Teranex Mini Smart Panel
on your Analog to SDI 12G to converter, the following menus
will be available - ‘video,’ ‘audio,’ and ‘network.’ The settings
available in these menus are identical to those detailed in
the ‘Blackmagic Teranex Setup settings’ section above.
Using Teranex Mini Smart Panel gives you access to the same settings as Blackmagic Teranex Setup.
For more information on changing settings using the
Teranex Mini Smart Panel, refer to the ‘changing settings
section in this manual.
25

Teranex Mini Analog to SDI 12G Block Diagram
Analog or AES/EBU
Left Analog In
or AES/EBU 1+2
Right Analog In
or AES/EBU 3+4 In
or Timecode In
Audio Switch
Analog or AES/EBU
Audio Switch
AES/EBU Sample
Rate Converter
Audio Analog to
Digital from
Balanced Input
Y
R-Y
B-Y
USB
Ethernet
with Power
12 Bit Digital to
Analog SD/HD
Video Converter
Central Processor
and Firmware
Mini Switches
Customizable
Video Processor
Component input can switch to
S-Video and Composite
SDI Audio
Embedder
Teranex Mini - SDI to Audio 12G
De-embed audio from any SDI video connection and output
to two channels of analog audio or four channels of
AES/EBU digital. Output to audio equipment such as audio
mixers, analog decks and reference monitors.
Additional SDI audio channels can be de-embedded by
daisy chaining another Teranex Mini SDI to Audio 12G to
your converter’s SDI output.
4 5 6
Automatic
SD/HD/6G/12G-SDI
Cable Driver
7
SDI Out
SDI Out
1 2
3 11 12
Connectors
1. Mini-B USB port
Connects to the Teranex setup utility via a Mac OS X or
Windows computer for adjusting settings and updating
your Teranex Mini’s internal software.
2. Switches
Adjustable switches for changing settings.
OPTICAL
AUDIO
ETHERNET PoE SDI IN
8 9 10
L R
STEREO OUT
SDI OUT
L - ANALOG
AES/EBU
AES/EBU - T/C
3. LED Multi-Use Indicator
Glows white when the converter is receiving power and
green when a valid video input signal is detected. Will flash
on/off to identify individual converters via Blackmagic
Teranex Setup.
4. Power
Standard built in IEC C14 connector for 90 - 240 volt AC
power supply.
26
R - ANALOG

5. Optical S/PDIF Audio Output
S/PDIF Signal with TOSLINK Connector.
9. SDI In
SDI video input BNC connector.
6. L - Unbalanced Analog Line Level Output
Unbalanced left channel analog audio output RCA
connector.
7. R - Unbalanced Analog Line Level Output
Unbalanced right channel analog audio output RCA
connector.
8. Ethernet PoE
Connects to a network switch or computer so you can
change settings using Blackmagic Teranex Setup. The
Ethernet port also supports power over Ethernet.
Switches
Teranex Mini SDI to Audio 12G’s switches provide the
following settings:
Switch 8 - Analog Audio, AES/EBU Audio
Set switch 8 to OFF to select balanced analog audio, or to
ON for digital AES/EBU audio output.
Switch 7 - Output Audio/Timecode
Set switch 7 to ‘on’ to output timecode via the R channel
audio XLR connector. Set to ‘off’ to output audio.
10. SDI Loop Out
SDI video loop output BNC connector.
11. L - Analog or AES/EBU
Balanced left channel analog audio, or digital AES/EBU
audio output XLR connector.
12. R - Analog, AES/EBU or Timecode
Balanced right channel analog audio, or digital AES/EBU
audio output XLR connector. Can also be configured for
timecode output.
Switches 6, 5, 4 - SDI Audio De-Embed Bit 2, 1, 0
Switches 6, 5 and 4 are represented as bits 2, 1 and 0
respectively. This simply means that by setting various
on/off combinations for switches 6, 5 and 4, you can choose
which audio channels to de-embed from the SDI input
signal into your audio output.
SDI Audio De-Embed Table
Analog Audio Channels Switch 6 Switch 5 Switch 4 Switch Diagram
1-2 OFF OFF OFF
3-4 OFF OFF ON
5-6 OFF ON OFF
7-8 OFF ON ON
The switch legend on the base of your converter gives you all
the information you need to change conversion settings.
9-10 ON OFF OFF
11-12 ON OFF ON
13-14 ON ON OFF
27

Analog Audio Channels Switch 6 Switch 5 Switch 4 Switch Diagram
15-16 ON ON ON
AES/EBU Audio Channels Switch 6 Switch 5 Switch 4 Switch Diagram
1-4 OFF OFF OFF
5-8 OFF OFF ON
9-12 OFF ON OFF
13-16 OFF ON ON
Blackmagic Teranex Setup Settings
The Teranex setup utility can change all the same settings
that are available using the switches, plus additional settings.
You can access these settings by moving between the
‘audio,’ ‘configure,’ and ‘about’ tabs.
The ‘about’ and ‘configure’ tabs are detailed in the ‘Changing
settings’ section in this manual.
The ‘audio’ tab for Teranex Mini SDI to Audio 12G contains
the following settings.
Audio Output menu
This menu allows you to select between analog, AES/EBU,
and timecode audio outputs, as well as which channels of
your SDI audio input you wish to de-embed. You can also
adjust the gain on the audio output.
Your Teranex Mini will retain its last settings whether applied
via switch, Smart Panel or Teranex setup utility. If reverting to
switch control after removing the Smart Panel or updating
your converter’s settings via software, you may need to toggle
individual switches for new settings to take effect.
Adjust your analog audio levels and AES/EBU levels using the ‘audio’
settings page in Blackmagic Teranex Setup.
28

Teranex Mini Smart Panel Settings
If you have installed the optional Teranex Mini Smart Panel
on your SDI to Audio 12G converter, the following menus
will be available - ‘audio,’ and ‘network.’ The settings
available in these menus are identical to those detailed in
the ‘Blackmagic Teranex Setup settings’ section above.
For more information on changing settings using the
Teranex Mini Smart Panel, refer to the ‘changing settings
section in this manual.
Using Teranex Mini Smart Panel gives you access
to the same settings as Blackmagic Teranex Setup.
Teranex Mini SDI to Audio 12G Block Diagram
Automatic
SD/HD/6G/12G-SDI
Cable Driver
Analog or AES/EBU
Loop SDI Out
Ch 1 Analog or
Ch 1&2 AES/EBU
SDI In
USB
Ethernet
with Power
Input automatically
detects between
SD/HD/6G/12G-SDI
Central Processor
and Firmware
Mini Switches
Equalizer,
Re-Clocker and
10 bit De-Serializer
SDI Audio
De-Embedder
AES/EBU
Audio Sample Rate
Converter
Stereo Audio
Analog to Digital
Converter
Analog or AES/EBU
Analog
Digital
Ch 2 Analog or
Ch 3&4 AES/EBU
or Timecode Out
L
Stereo Out
R
Optical Out
29

Teranex Mini - Audio to SDI 12G
Embed two channels of analog audio, or four channels of
AES/EBU digital audio into any SDI video connection. You
can use this Teranex Mini to embed audio from equipment,
such as audio mixers and analog decks, into SDI video
1 2
3 11 12
Connectors
1. Mini-B USB port
Connects to the Blackmagic Teranex Setup software via
a Mac OS X or Windows computer for adjusting settings
and updating your Teranex Mini’s internal software.
2. Switches
Adjustable switches for changing settings.
connections for use with SDI routers and decks. Additional
SDI audio channels can be embedded by daisy chaining
another Teranex Mini Audio to SDI 12G to your converter’s
SDI output.
4 5 6
OPTICAL
AUDIO
ETHERNET PoE SDI IN
8 9 10
L R
STEREO IN
7
SDI OUT
PUSH PUSH
L - ANALOG
AES/EBU
R - ANALOG
AES/EBU - T/C
7. R - Unbalanced Analog Line Level Input
Unbalanced right channel analog audio input RCA connector.
8. Ethernet PoE
Connects to a network switch or computer so you can
change settings using Blackmagic Teranex Setup. The
Ethernet port also supports power over Ethernet.
3. LED Multi-Use Indicator
Glows white when the converter is receiving power and green
when a valid video input signal is detected. Will flash on/off
to identify individual converters via Blackmagic Teranex Setup.
4. Power
Standard built in IEC C14 connector for 90 - 240 volt AC
power supply.
5. Optical S/PDIF Audio Input
S/PDIF Signal with TOSLINK Connector.
6. L - Unbalanced Analog Line Level Input
Unbalanced left channel analog audio input RCA connector.
Switches
Teranex Mini Audio to SDI 12G’s switches provide the
following settings:
Switch 8, 7 - Input Audio Selection Bit 1, 0
Switches 8 and 7 are represented as bits 1 and 0,
respectively. This simply means that by setting various
on/off combinations for switches 8 and 7 you can select
from four input audio options.
Switch 6, 5, 4 - Embed Audio Bit 2, 1, 0
Switches 6, 5, and 4 are represented as bits 2, 1, and 0,
respectively. This simply means that by setting various
on/off combinations for switches 6, 5, and 4 you can select
9. SDI In
SDI video input BNC connector.
10. SDI Out
SDI video output BNC connector.
11. L - Analog or AES/EBU
Balanced left channel analog audio, or digital AES/EBU
audio input XLR connector.
12. R - Analog, AES/EBU or Timecode
Balanced right channel analog audio, or digital AES/EBU
audio input XLR connector. Can also be configured for
timecode input.
which channels of your SDI signal you wish to embed
audio into.
If you are embedding analog audio, there are eight
combinations, allowing you to embed audio into the channel
pairs from 1-2 through to 15-16.
If you are embedding AES/EBU audio, there are four
combinations. You can select between embedding audio
into channels 1 to 4, 5 - 8, 9 - 12, or 13 - 16.
30

Switch 3 - Sample Rate Conversion, No Sample
Rate Conversion
Set switch 3 to OFF to enable sample rate conversion, or
ON to disable sample rate conversion. This switch should
almost always be set to OFF to ensure audio is embedded
at the correct sample rate for television.
When switch 3 is set to OFF this setting converts the sample
rate of your analog or AES/EBU audio and embeds audio
into the SDI output at a sample rate of 48 kHz.
Switch 2 - Ch 2 or AES/EBU 3+4 Embed / Bypass
Once you have selected your audio channels, use switches
2 and 1 to select which channels to embed or disable. The
disable setting lets you avoid overwriting audio channels
you wish to keep in the audio signal.
Set switch 2 to ON to bypass channel 2, or AES/EBU
channels 3 and 4. Set switch 1 to ON to bypass channel 1,
or AES/EBU channels 1 and 2.
Switch 1 - Ch 1 or AES/EBU 1+2 Embed/Bypass
See switch 2 description.
The switch legend on the base of your converter gives you
all the information you need to change conversion settings.
Audio Selection Tables
Input Audio Source Switch 8 Switch 7 Switch Diagram
XLR Analog OFF OFF
XLR AES/EBU OFF ON
Rca Analog ON OFF
Optical ON ON
SDI Channel Tables
Analog Audio Channels Switch 6 Switch 5 Switch 4 Switch Diagram
1-2 OFF OFF OFF
3-4 OFF OFF ON
5-6 OFF ON OFF
7-8 OFF ON ON
9-10 ON OFF OFF
31

Analog Audio Channels Switch 6 Switch 5 Switch 4 Switch Diagram
11-12 ON OFF ON
13-14 ON ON OFF
15-16 ON ON ON
AES/EBU Audio Channels Switch 6 Switch 5 Switch 4 Switch Diagram
1-4 OFF OFF OFF
5-8 OFF OFF ON
9-12 OFF ON OFF
13-16 OFF ON ON
Blackmagic Teranex Setup Settings
The Teranex setup utility can change all the same settings
that are available using the switches, plus additional
settings.You can access these settings by moving between
the ‘audio,’ ‘configure,’ and ‘about’ tabs in Blackmagic
Teranex Setup. The ‘about’ and ‘configure’ tabs are detailed
in the ‘Changing settings’ section in this manual.
Adjust your analog audio levels and AES/EBU levels using
the ‘audio’ settings page in Blackmagic Teranex Setup.
32

The ‘audio’ tab for Teranex Mini Audio to SDI 12G contains
the following settings.
Audio Input menu
This menu allows you to select between RCA, XLR, and
optical inputs.
If you have selected XLR, you can further select between
analog, AES/EBU, and timecode inputs.
Selecting AES/EBU allows the additional option of checking
‘sample rate conversion.’ When this is selected, the sample
rate of your SDI audio output will be forced to 48kHz, the
correct sample rate for television.
Teranex Mini Smart Panel Settings
The audio input menu also allows you to chose which
channel pair, or channel quad in the case of AES/EBU audio,
of your SDI signal you wish to embed audio into, as well
as adjusting the audio gain.
You can bypass channels or channel pairs if you want to
avoid overwriting audio in your SDI signal.
Your Teranex Mini will retain its last settings whether applied
via switch, Smart Panel or Blackmagic Teranex Setup.
If reverting to switch control after removing the Smart Panel
or updating your converter’s settings via software, you may
need to toggle individual switches for new settings to
take effect.
If you have installed the optional Teranex Mini Smart Panel
on your Audio to SDI 12G converter, the following menus
will be available - ‘audio,’ and ‘network.’ The settings
For more information on changing settings using the
Teranex Mini Smart Panel, refer to the ‘changing settings
section in this manual.
available in these menus are identical to those detailed in
the ‘Blackmagic Teranex Setup settings’ section above.
Using Teranex Mini Smart Panel gives you access
to the same settings as Blackmagic Teranex Setup.
Teranex Mini Audio to SDI 12G Block Diagram
Serializer and
SDI Cable Driver
Analog or AES/EBU
Embedded
SDI Out
Ch 1 Analog or
Ch 1&2 AES/EBU
SDI In
USB
Ethernet
with Power
Input automatically
detects between
SD/HD/6G/12G-SDI
Central Processor
and Firmware
Mini Switches
Equalizer,
Re-Clocker and
10 bit De-Serializer
33
SDI Audio
Embedder
AES/EBU
Audio Sample Rate
Converter
Stereo Audio
Analog to Digital
Converter
Analog or AES/EBU
Analog
Digital
Ch 2 Analog or
Ch 3&4 AES/EBU
or Timecode
L
Stereo In
R
Optical In

Teranex Mini Rack Shelf
If you’re running multiple Teranex Minis, you can use Teranex
Mini Rack Shelf to install your mini converters into a
broadcast rack or road case. Up to three Teranex Minis
can fit neatly onto each 1RU Teranex Mini Rack Shelf.
Installing your mini converters into a Teranex Mini Rack
Shelf is as easy as removing your mini converter’s rubber
feet, if installed, and screwing each converter into Teranex
Help
Getting Help
Mini Rack Shelf using the mounting holes on bottom of your
mini converters. The Teranex Mini Rack Shelf ships with
two blank fascias which you can use to fill in gaps in your
Rack Shelf if you don’t need to install additional Teranex Minis.
For more information on pricing and availability, check the
Blackmagic Design website at www.blackmagicdesign.com
The fastest way to obtain help is to go to the Blackmagic
Design online support pages and check the latest support
material available for your Teranex Mini.
Blackmagic Design Online Support Pages
The latest manual, software and support notes can be
found at the Blackmagic Design support center at
www.blackmagicdesign.com/support.
Contacting Blackmagic Design Support
If you can’t find the help you need in our support material,
please use the “Send us an email” button on the support
page to email a support request. Alternatively, click on the
“Find your local support team” button on the support page
and call your nearest Blackmagic Design support office.
Checking the Software Version Currently Installed
To check which version of Blackmagic Teranex Setup
software is installed on your computer, open the About
Blackmagic Teranex Setup window.
On Mac OS X, open Blackmagic Teranex Setup from
the Applications folder. Select About Blackmagic
Teranex Setup from the application menu to reveal
the version number.
On Windows 7, open Blackmagic Teranex Setup
from your Start menu. Click on the Help menu and
select About Blackmagic Teranex Setup to reveal
the version number.
On Windows 8, open Blackmagic Teranex Setup from
the Blackmagic Teranex Setup tile on your Start page.
Click on the Help menu and select About Blackmagic
Teranex Setup to reveal the version number.
How to Get the Latest Software Updates
After checking the version of Blackmagic Teranex Setup
software installed on your computer, please visit the
Blackmagic Design support center at www.
blackmagicdesign.com/support to check for the latest
updates. While it is usually a good idea to run the latest
updates, it is wise to avoid updating any software if you
are in the middle of an important project.
34

Warranty
36 Month Limited Warranty
Blackmagic Design warrants that Teranex Minis will be free
from defects in materials and workmanship for a period of
36 months from the date of purchase excluding connectors,
cables, fiber optic modules, fuses and batteries which will
be free from defects in materials and workmanship for a
period of 12 months from the date of purchase. If a product
proves to be defective during this warranty period,
Blackmagic Design, at its option, either will repair the
defective product without charge for parts and labor, or
will provide a replacement in exchange for the
defective product.
In order to obtain service under this warranty, you the
Customer, must notify Blackmagic Design of the defect
before the expiration of the warranty period and make
suitable arrangements for the performance of service. The
Customer shall be responsible for packaging and shipping
the defective product to a designated service center
nominated by Blackmagic Design, with shipping charges
pre paid. Customer shall be responsible for paying all
shipping charges, insurance, duties, taxes, and any other
charges for products returned to us for any reason.
This warranty shall not apply to any defect, failure or damage
caused by improper use or improper or inadequate
maintenance and care. Blackmagic Design shall not be
obligated to furnish service under this warranty: a) to repair
damage resulting from attempts by personnel other than
Blackmagic Design representatives to install, repair or
service the product, b) to repair damage resulting from
improper use or connection to incompatible equipment, c)
to repair any damage or malfunction caused by the use of
non Blackmagic Design parts or supplies, or d) to service
a product that has been modified or integrated with other
products when the effect of such a modification or integration
increases the time or difficulty of servicing the product.
THIS WARRANTY IS GIVEN BY BLACKMAGIC DESIGN IN
LIEU OF ANY OTHER WARRANTIES, EXPRESS OR IMPLIED.
BLACKMAGIC DESIGN AND ITS VENDORS DISCLAIM ANY
IMPLIED WARRANTIES OF MERCHANTABILITY OR FITNESS
FOR A PARTICULAR PURPOSE. BLACKMAGIC DESIGN’S
RESPONSIBILITY TO REPAIR OR REPLACE DEFECTIVE
PRODUCTS IS THE WHOLE AND EXCLUSIVE REMEDY
PROVIDED TO THE CUSTOMER FOR ANY INDIRECT,
SPECIAL, INCIDENTAL OR CONSEQUENTIAL DAMAGES
IRRESPECTIVE OF WHETHER BLACKMAGIC DESIGN OR
THE VENDOR HAS ADVANCE NOTICE OF THE POSSIBILIT Y
OF SUCH DAMAGES. BLACKMAGIC DESIGN IS NOT LIABLE
FOR ANY ILLEGAL USE OF EQUIPMENT BY CUSTOMER.
BLACKMAGIC IS NOT LIABLE FOR ANY DAMAGES
RESULTING FROM USE OF THIS PRODUCT. USER
OPERATES THIS PRODUCT AT OWN RISK.
© Copyright 2015 Blackmagic Design. All rights reserved. ‘Blackmagic Design’,
‘DeckLink’, ‘HDLink’, ‘Workgroup Videohub’, ‘Multibridge Pro’, ‘Multibridge
Ext reme’, ‘Intensity’ and ‘Lead ing the creati ve video revolution’ a re registered
trademarks in the US and other countries. All other company and product
names may be trade marks of their respective companies with which they
are associated.
35

Manuel d'utilisation et d'installation
Teranex Mini Converters
Septembre 2015
Français

Bienvenue
Nous vous remercions d'avoir fait l'acquisition d'un convertisseur Teranex Mini !
Les convertisseurs Teranex Mini sont dotés de la technologie 12G-SDI et convertissent de
la vidéo et de l'audio destinés à la diffusion et à la production de contenu. Ils peuvent être
utilisés partout, en extérieur comme en studio, posés sur votre bureau ou montés sur rack.
Ces convertisseurs sont presque aussi compacts que les Mini Converters. Ils peuvent être
utilisés dans tout type de situation, des petits studios de post-production aux workflows
SDI comportant de nombreux racks.
Ce manuel d'utilisation comprend toutes les informations dont vous avez besoin pour utiliser
votre convertisseur Teranex Mini.
Consultez notre page d’assistance sur www.blackmagicdesign.com pour obtenir la dernière
version du manuel et les mises à jour du logiciel Teranex Mini. Nous vous recommandons
de mettre le logiciel à jour régulièrement afin de disposer des fonctions les plus récentes
et de pouvoir prendre en charge les futurs formats SDI. Veuillez entrer vos coordonnées
lorsque vous téléchargerez le logiciel afin d'être tenu informé des mises à jour. Vous avez
également la possibilité de nous suivre sur twitter pour recevoir les notifications concernant
les mises à jour. Nous souhaitons continuer à améliorer nos produits, n'hésitez donc pas à
nous faire part de vos commentaires !
Grant Petty
PDG de Blackmagic Design

Sommaire
Teranex Mini Converters
Mise en route 73
Branchement de l'alimentation 73
Branchement de la vidéo 73
Branchement de l'audio 73
Installation du logiciel
d'administration 74
Installation de Blackmagic Teranex Setup 74
Installation du Teranex Mini Smart Panel 75
Caractéristiques clés du Teranex Mini Smart Panel 76
Réglage des paramètres 77
Réglage des paramètres à l'aide des interrupteurs 77
Réglage des paramètres à l'aide de
Blackmagic Teranex Setup 77
Réglage des paramètres à l'aide du
Teranex Mini Smart Panel 78
Réglage des paramètres réseau 79
Réglage des paramètres réseau à l'aide
deBlackmagic Teranex Setup 79
Réglage des paramètres réseau à l'aide
duTeranex Mini Smart Panel 79
Teranex Mini - SDI to HDMI 12G 80
Teranex Mini - HDMI to SDI 12G 84
Teranex Mini - SDI to Analog 12G 87
Teranex Mini - Analog to SDI 12G 91
Teranex Mini - SDI to Audio 12G 94
Teranex Mini - Audio to SDI 12G 98
Teranex Mini Rack Shelf 102
Assistance 102
Garantie 103

Mise en route
ETHERNET PoE+
01:23:47:08
2160p59.94
SDI t
o A
nalog 12G
OPTICAL
AUDIO
STEREO OUT
L R
Branchement de l'alimentation
Afin de démarrer le convertisseur Teranex Mini, il suffit de le
brancher à une source d'alimentation et de relier les signaux
d’entrée et de sortie à l'appareil.
Pour alimenter l'appareil, branchez un câble d'alimentation
CEI standard au connecteur d'alimentation situé sur le
panneau arrière.
MENU
1
VIDEO
2
AUDIO
SET
Les Teranex Mini Converters prennent en charge les débits
de données 12G-SDI et commutent automatiquement entre les
standards SD, HD et Ultra HD, jusqu'à 2160p60.
Branchement de la vidéo
HDMI OUT
ETHERNET PoE+ SDI IN
SDI LOOP OUT
L - ANALOG
AES/EBU
Branchez le Teranex Mini à une source d'alimentation à l'aide d'un
câble CEI standard. Vous pouvez également l'alimenter à l'aide
d'un commutateur Ethernet PoE+ compatible.
R - ANALOG
AES/EBU - T/C
Branchez la source vidéo à l'entrée vidéo du Teranex Mini et
branchez la sortie vidéo au connecteur de la destination. Les
peuvent disposer d'entrées et de sorties SDI, HDMI, composante,
composite et S-Video.
entrées et sorties vidéo varient en fonction des modèles qui
Branchement de l'audio
Si vous utilisez de l'audio intégré à des signaux SDI ou HDMI,
l'audio est déjà acheminé via la sortie vidéo. Si vous utilisez de
l'audio analogique ou numérique externe, branchez-le aux
connecteurs XLR. Le canal 'R' du connecteur XLR peut être
OPTICAL
AUDIO
ETHERNET PoE SDI IN
Connectez l'audio analogique et numérique aux connecteurs optiques, RCA ou XLR symétriques du convertisseur Teranex Mini.
C'est tout ce que vous devez savoir pour démarrer ! Vous pouvez
désormais régler les paramètres de conversion et commencer
à utiliser le Teranex Mini. Consultez la section « Réglage des
paramètres » pour en savoir plus.
utilisé pour le timecode. Certains convertisseurs Teranex Mini
prennent également en charge les connecteurs audio optique
et RCA. Pour plus d'informations, consultez la section
correspondant à votre convertisseur.
L R
STEREO OUT
SDI OUT
L - ANALOG
AES/EBU
R - ANALOG
AES/EBU - T/C
73

Installation du logiciel d'administration
Installation de Blackmagic Teranex Setup
Le logiciel Teranex Setup permet de mettre à jour votre Teranex
Mini et de modifier les paramètres vidéo, audio et réseau.
Installation sur Mac OS X
Étape 1. Téléchargez le logiciel Blackmagic Teranex Setup
sur www.blackmagicdesign.com
Étape 2. Dézippez le fichier et cliquez sur l'icône pour l'ouvrir.
Étape 3. Glissez l'icône Blackmagic Teranex Setup vers
l'icône Applications.
L'utilitaire Teranex Setup est maintenant installé.
Installation sur Windows
Étape 1. Téléchargez le logiciel Blackmagic Teranex Setup
sur www.blackmagicdesign.com
Étape 2. Dézippez le fichier téléchargé. Le dossier Blackmagic
Teranex Setup s’affiche, il contient le manuel et le
programme d'installation de Teranex.
Étape 3. Double-cliquez sur le programme d'installation
et suivez les instructions à l’écran pour terminer
l’installation.
Étape 4. Quand l'installation est terminée, il vous sera
demandé de redémarrer l'ordinateur. Cliquez sur
« Redémarrer » pour terminer l’installation.
Une fois que l'ordinateur a redémarré, Blackmagic Teranex
Setup est prêt à être utilisé.
Mise à jour du logiciel interne
Il est important de veiller à ce que le Teranex Mini soit branché
à une source d’alimentation avant de brancher un câble USB
entre l'ordinateur et le convertisseur.
Étape 1. Branchez le convertisseur à une source
d’alimentation.
Étape 2. Connectez l'ordinateur et le convertisseur à l'aide
d'un câble USB ou connectez-les via Ethernet.
Lancez l'utilitaire Teranex Setup.
Si le convertisseur n'est pas détecté, le message « No converter
connected » s'affiche dans la barre de titre. Si le convertisseur
est détecté, le nom du modèle apparaît sur le logiciel.
Si Blackmagic Teranex Setup propose une version du logiciel
plus récente que celle installée sur le Teranex Mini, une mise
à jour vous sera proposée. Suivez simplement les instructions
à l'écran pour effectuer la mise à jour. Une fois la mise à jour
terminée, vous pourrez effectuer des modifications sur le Teranex
Mini grâce à l'utilitaire Teranex Setup.
Le logiciel Blackmagic Teranex Setup peut être installé sur
les ordinateurs Mac OS X et Windows.
Si vous aviez réglé le Teranex Mini sur une adresse IP statique,
vous pouvez la trouver sur le réseau en saisissant l'adresse IP
affichée sur l'écran d'accueil du logiciel Teranex Setup.
74

Installation du Teranex Mini Smart Panel
01:23:47:08
2160p59.94
SDI to Analog 12G
1
2
SET
VIDEO
MENU
AUDIO
Le Teranex Mini Smart Panel vous donne accès aux mêmes
paramètres que le logiciel Blackmagic Teranex Setup. Le
panneau de contrôle s'installe sur la face avant du Teranex
Mini afin de remplacer le panneau vide d'origine. Les boutons
et la molette de défilement vous offrent un accès rapide aux
paramètres et le flux entrant est affiché sur l'écran LCD.
L'installation du Smart Panel en option est simple, et comme il est
échangeable à chaud, vous n'avez même pas besoin d'éteindre
le Teranex Mini pour l'installer.
Étape 1. À l'aide d'un tournevis Pozidriv 2, dévissez les deux
vis M3 placées de chaque côté du panneau avant
et retirer-le doucement.
Étape 2. Retirez le tube lumineux qui relie la LED au voyant
et conservez-le précieusement.
Ce tube permet d’allumer le voyant multi-usages
du Teranex Mini lorsque le Smart Panel n'est
pas installé.
Étape 3. Alignez le connecteur situé sur la face arrière du
Smart Panel avec le connecteur correspondant
sur la face avant vide du Teranex Mini et poussez
doucement le Smart Panel vers le convertisseur
jusqu'à ce que les connecteurs soient fermement
enfoncés. Le Smart Panel doit être correctement
aligné avec le convertisseur Teranex Mini et être
fermement enfoncé.
Étape 4. Vissez de nouveau les vis M3 sur le boîtier du
convertisseur.
Si le Teranex Mini est monté sur le Teranex Mini Rack Shelf, le
convertisseur devra être retiré du rack avant de retirer les vis.
Pour plus d'informations, consultez la section « Teranex Mini
Rack Shelf ».
Le port USB du Teranex Mini est accessible même lorsque le
Smart Panel est attaché. Pour y accéder, soulevez simplement
le volet en plastique. Lorsque le Smart Panel est installé, les
mini-interrupteurs situés sur le panneau avant sont inaccessibles.
Cependant, il est possible de modifier ces paramètres à l'aide
du menu proposé sur le Teranex Smart Panel et sur l'écran LCD.
Les paramètres et les fonctionnalités disponibles diffèrent d'un
modèle à l'autre mais la navigation à l'écran reste la même. Il est
donc facile d'utiliser le même Smart Panel avec les différents
modèles pour régler les paramètres.
Consultez la section « Réglage des paramètres » pour savoir
comment régler les paramètres à l'aide du Teranex Mini Smart
Panel en option.
Pour installer correctement le Teranex Mini Smart Panel sur le Teranex Mini, tenez le panneau entre
vos doigts et votre pouce afin d’aligner le Smart Panel à la façade du Teranex Mini.
75

Caractéristiques clés du Teranex Mini Smart Panel
convertisseur Teranex Mini.
2160p59.94
SDI to Analog 12G
01:23:47:08
1 MENU
2 VIDEO
SET AUDIO
Écran LCD
La page d’accueil est la première chose que vous verrez
sur l'écran LCD du Teranex Mini Smart Panel. Elle affiche les
informations principales, notamment :
1 MENU
2 VIDEO
SET AUDIO
Format de l'entrée vidéo -
Le format et la fréquence d'images
de la source vidéo connectée à votre
Modèle du convertiseur - Le
modèle deTeranex Mini connecté
auTeranexMini Smart Panel.
Boutons de contrôle et molette de défilement
Le Teranex Mini Smart Panel dispose de boutons de contrôle
et d'une molette de défilement qui servent à naviguer au sein
des menus du convertisseur.
Boutons 1 et 2 - Appuyez sur ces boutons pour augmenter ou
diminuer les valeurs numériques des paramètres ou pour faire
défiler les options du menu.
SET - Après avoir réglé les paramètres à l'aide des boutons 1 et
2, appuyez sur le bouton SET pour confirmer votre sélection.
2160p59.94 SDI to Analog 12G
01:23:47:08
Timecode - Le timecode intégré à l'entrée
vidéo, ou le timecode externe acheminé
via le connecteur XLR du Teranex Mini.
MENU - Appuyez sur ce bouton pour ouvrir le menu de
paramétrage de votre Teranex Mini Converter. Vous pouvez
également appuyer sur le bouton Menu pour revenir en arrière.
Boutons VIDEO et AUDIO - Appuyez sur les boutons VIDEO
et AUDIO pour ouvrir directement les menus de paramétrage
Audio et Video de votre Teranex Mini. Les paramètres disponibles
dépendent du modèle que vous utilisez avec le Smart Panel.
Molette de défilement - Tournez la molette de défilement vers
la gauche ou vers la droite pour naviguer dans les différents
menus et régler les paramètres, notamment les valeurs
numériques.
Boutons de contrôle
1 MENU
2160p59.94 SDI to Analog 12G
01:23:47:08
2 VIDEO
SET AUDIO
Moniteur vidéo - Affiche le format de
l'entrée vidéo pour vous permettre de voir
instantanément la conversion.
76
Molette
Vumètres - Affichent les niveaux audio
de la source vidéo connectée à votre
convertisseur Teranex Mini.

Réglage des paramètres
1ON2 3 4 5 6 7 8
Il existe trois façons régler les paramètres de votre Teranex
Mini. Vous pouvez utiliser les interrupteurs situés sur le panneau
avant ou l'utilitaire Blackmagic Teranex Setup ou, si vous avez
installé le Teranex Mini Smart Panel, il est possible de régler les
paramètres à l'aide des boutons de contrôle, de la molette de
défilement et de l'écran LCD.
Réglage des paramètres à l'aide des interrupteurs
Sur le Smart Panel, le volet en plastique protège les interrupteurs
qui servent à régler les paramètres. Les interrupteurs « On/Off »
permettent de régler les paramètres internes. Ils peuvent être
modifiés à l'aide de la pointe d'un stylo.
Un schéma fonctionnel est imprimé sous le convertisseur.
Veillez à ce que la position des interrupteurs corresponde au
schéma représenté sur le convertisseur. La lecture du schéma
s'effectue de 1 à 8 et de gauche à droite. Cependant, si vous
installez le Teranex Mini Smart Panel, les paramètres choisis
avec ce dernier primeront sur la position des interrupteurs. Le
Teranex Mini garde en mémoire les derniers paramètres choisis,
qu'ils aient été réglés via les interrupteurs, le Smart Panel ou le
logiciel Blackmagic Teranex Setup. Si vous utilisez le contrôle
par interrupteur après avoir retiré le Smart Panel ou mis à jour
les paramètres du convertisseur par logiciel, il se peut que vous
deviez ajuster certains interrupteurs pour activer les nouveaux
paramètres.
Pour une description complète des interrupteurs et de leurs
réglages, consultez la section du manuel relative au modèle de
convertisseur que vous possédez.
Réglez les paramètres en changeant la position des interrupteurs avec un stylo
Réglage des paramètres à l'aide de Blackmagic Teranex Setup
Une fois le logiciel installé sur votre ordinateur, connectez-le
au convertisseur via USB ou Ethernet. Si le Teranex Mini ne
se monte pas sur votre ordinateur lorsque celui-ci est branché
via Ethernet, suivez les instructions de la section « Réglage
des paramètres réseau » afin de le configurer à l'aide de la
connexion USB.
La page d'accueil s'affiche lorsque vous ouvrez le logiciel. Sur
cette page, vous pouvez choisir quel Teranex Mini vous souhaitez
configurer. Pour modifier les paramètres, cliquez sur l'icône
« paramètres » situé sous l'image du Teranex Mini.
Si plusieurs Teranex Mini sont connectés au réseau, seul les
paramètres du convertisseur sélectionné apparaîtront. Afin de
choisir le convertisseur que vous souhaitez configurer, utilisez
les flèches situées à gauche et à droite de la page d'accueil
du logiciel.
Les réglages effectués sur le logiciel sont alors automatiquement
reproduits dans le Teranex Mini. Cela signifie que si une
coupure de courant se produit, les réglages pourront être
rapidement rétablis.
L'utilitaire Teranex Setup vous permet de mettre à jour le logiciel interne de votre Teranex
Mini et d'ajuster les paramètres à l'aide d'un ordinateur Mac OS X ou Windows.
77

Les onglets Configure (Configuration) et About (À propos) du
Blackmagic Teranex Setup sont les mêmes pour tous les modèles.
Onglet Configure (Configuration)
L'onglet Configuration est commun à tous les modèles de
convertisseurs et contient les paramètres réseau. Dans cet
onglet, vous pouvez configurer l'adresse réseau de votre
convertisseur pour qu’elle soit statique ou dynamique. Vous
pouvez également régler l'adresse IP, le masque de sousréseau et la passerelle du Teranex Mini. Pour plus d’informations,
consultez la section « Réglage des paramètres réseau ».
Onglet About (À propos)
Utilisez cet onglet pour renommer votre convertisseur et pour
repérer l'appareil dans une installation (Identify). Pour renommer
le convertisseur, cliquez simplement dans le champ « Name » et
saisissez le nom que vous avez choisi. Cliquez sur « Save » pour
confirmer le changement. Afin de repérer votre convertisseur
Teranex Mini dans une installation, cochez la case « Identify ».
Cette fonction active le clignotement du voyant situé sur le
panneau d'origine du Teranex Mini. Si un Teranex Mini Smart
Panel est installé sur le convertisseur, le nom du modèle affiché
sur l’écran LCD change du gris au rouge. Décochez la case pour
désactiver le voyant de repérage.
Le menu « Software settings » situé dans l'onglet About, vous
permet de savoir quelle version du logiciel est installée. Si
la version du logiciel interne de votre convertisseur est plus
ancienne que celle utilisée par Blackmagic Teranex Setup, le
bouton « Update » vous permettra de mettre à jour le logiciel.
L'onglet About du Blackmagic Teranex Setup permet de nommer
Utilisez l'onglet Configure du Blackmagic Teranex Setup
pour changer les paramètres réseau.
et d'identifier votre Teranex Mini. Il vous indique également la
version du logiciel.
Réglage des paramètres à l'aide du Teranex Mini Smart Panel
Le Teranex Mini Smart Panel vous donne accès aux mêmes
paramètres que le logiciel Blackmagic Teranex Setup. Le
panneau de contrôle s'installe sur la face avant du Teranex
Mini afin de remplacer le panneau vide d'origine. Les boutons
et la molette de défilement vous offrent un accès rapide aux
paramètres et le flux entrant est affiché sur l'écran LCD.
Le port USB du convertisseur est accessible même lorsque le
Smart Panel est installé. Pour y accéder, soulevez simplement
1 MENU
2 VIDEO
SET AUDIO
le volet en plastique. Lorsque le Smart Panel est installé, les
mini-interrupteurs situés sur le panneau avant sont inaccessibles.
Cependant, il est possible de modifier ces paramètres à l'aide
du menu proposé sur le Teranex Smart Panel et sur l'écran LCD.
Les paramètres et les fonctionnalités disponibles diffèrent d'un
modèle à l'autre mais la navigation à l'écran reste la même. Il est
donc facile d'utiliser le même Smart Panel avec les différents
modèles pour régler les paramètres.
2160p59.94 SDI to Analog 12G
01:23:47:08
Le Teranex Mini Smart Panel en option vous permet d’avoir un aperçu des paramètres et de les modifier rapidement.
Le Smart Panel s’installe facilement sur la face avant du convertisseur Teranex Mini.
78

Réglage des paramètres réseau
Accéder aux Teranex Mini en réseau facilite la gestion de plusieurs
convertisseurs. Il est possible de configurer les convertisseurs
en réseau à l'aide de Blackmagic Teranex Setup. Par défaut, les
Teranex Mini sont configurés pour détecter automatiquement une
adresse réseau, ce qui permet de choisir l’appareil rapidement
sur la page d'accueil du Blackmagic Teranex Setup. Pour en
savoir plus, consultez la section « Réglage des paramètres à
l'aide du Blackmagic Teranex Setup ».
Si vous rencontrez des problèmes pour trouver le Teranex Mini
sur le réseau, ou si la configuration statique de l'adresse n'est
pas compatible avec le réseau que vous utilisez, vous devrez
peut-être modifier localement les réglages du réseau. Ces
réglages peuvent être effectués à l'aide d'une connexion USB
ou du Teranex Mini Smart Panel.
Réglage des paramètres réseau à l'aide
deBlackmagic Teranex Setup
Afin de changer les paramètres réseau via USB, branchez le
Teranex Mini à votre ordinateur (doté du logiciel Teranex Setup)
avec un câble USB. Le port USB du Teranex Mini est situé sur
le panneau avant du panneau d'origine et est accessible même
si le Smart Panel est installé.
Une fois connecté, sélectionnez votre Teranex Mini sur la page
d'accueil du logiciel et allez sur l'onglet « Configure ». Vous
pouvez alors choisir de configurer l'adresse réseau du
convertisseur sur statique ou dynamique. Si vous choisissez
l’option statique, vous pouvez configurer manuellement l'adresse
IP, le masque de sous-réseau et la passerelle.
Réglage des paramètres réseau à l'aide
duTeranex Mini Smart Panel
Une des fonctionnalités très utile du Teranex Mini Smart Panel
est de pouvoir changer localement les paramètres réseau.
Suivez les étapes suivantes :
Étape 1. Appuyez sur le bouton MENU pour ouvrir le menu
de paramétrage.
Étape 2. Sélectionnez « Network » à l'aide de la molette
de défilement ou à l'aide des boutons 1 et 2, puis
appuyez sur SET.
Étape 3. Sélectionnez « Configure IP » à l'aide de la molette
de défilement ou à l'aide des boutons 1 et 2, puis
appuyez sur SET.
Étape 4. Sélectionnez « Manually » à l'aide de la molette
de défilement ou à l'aide des boutons 1 et 2,
puis appuyez sur SET. Répétez ces étapes pour
sélectionner l'adresse IP de votre choix.
Étape 5. Utilisez la molette de défilement ou les boutons 1et
2 pour faire défiler les valeurs numériques de votre
adresse IP. Appuyez sur SET pour confirmer. Répétez
ces étapes pour les paramètres « Subnet »
(sous-réseau) et « Gateway » (passerelle).
Utilisez l'onglet « Configure » du Blackmagic Teranex Setup
pour changer les paramètres réseau via USB.
Le Teranex Mini Smart Panel vous donne accès aux mêmes
paramètres que le logiciel Blackmagic Teranex Setup.
79

Teranex Mini - SDI to HDMI 12G
ETHERNET PoE+ SDI IN
L - ANALOG
AES/EBU
R - ANALOG
AES/EBU - T/C
HDMI OUT
SDI LOOP OUT
Connectez une large gamme d'écrans et de vidéoprojecteurs
HDMI à du matériel SDI. Le Teranex Mini SDI to HDMI 12G offre
une commutation automatique entre les sources d'entrée
SD-SDI, HD-SDI, 3G-SDI, 6G-SDI et 12G-SDI. Il convertit ces
signaux en HDMI avec audio intégré et fournit également une
1 2
Connecteurs
1. Port USB Mini-B
Permet de connecter le logiciel Blackmagic Teranex Setup
au convertisseur Teranex Mini via un ordinateur Mac OS X ou
Windows afin de modifier les paramètres et de mettre à jour le
logiciel interne de votre Teranex Mini.
sortie audio symétrique AES/EBU ou audio analogique.
Leconnecteur XLR « R analog » peut également être réglé pour
acheminer le timecode. Lorsqu'un moniteur ou un téléviseur
HD est connecté à la sortie HDMI, la source Ultra HD est
automatiquement down-convertie en HD.
4 5
6 8 9 1073
6. Ethernet PoE+
Ce port se connecte à un commutateur réseau ou à un ordinateur
pour vous permettre de modifier les paramètres au sein du
logiciel Blackmagic Teranex Setup. Prend également en charge
le PoE plus.
2. Interrupteurs
Interrupteurs réglables permettant de modifier les paramètres.
3. Voyant LED multi-usages
Le voyant est blanc lorsque le convertisseur est alimenté. Il est
vert lorsqu'un signal d'entrée vidéo valable est détecté. Peut
être réglé au sein du logiciel Blackmagic Teranex Setup pour
activer son clignotement sur le convertisseur dans le but de le
repérer dans une installation.
4. Alimentation
Connecteur C14 CEI standard pour une alimentation
AC90 - 240 V.
5. HDMI
Sortie vidéo HDMI.
7. Entrée SDI
Connecteur BNC pour entrée vidéo SDI.
8. Sortie SDI en boucle
Connecteur BNC pour sortie vidéo en boucle SDI.
9. L - Analog ou AES/EBU
Connecteur XLR pour le canal audio symétrique analogique
gauche, ou la sortie audio numérique AES/EBU.
10. R - Analog, AES/EBU ou Timecode
Connecteur XLR pour le canal audio symétrique analogique
droit, ou la sortie audio numérique AES/EBU. Peut également
être configuré pour acheminer le timecode.
80

Interrupteurs
Les interrupteurs du Teranex Mini SDI to HDMI 12G donnent
accès aux paramètres suivants :
Interrupteur 8 - Analog Audio, AES/EBU Audio
Réglez l'interrupteur 8 sur Off pour acheminer de l'audio
symétrique analogique. Réglez-le sur On pour acheminer de
l'audio numérique AES/EBU.
Interrupteur 7 - Output Audio/Timecode
Réglez l'interrupteur 7 sur On pour acheminer le timecode via
le canal audio R du connecteur XLR. Réglez-le sur Off pour
acheminer de l'audio en entrée.
Interrupteurs 4, 3, 2 - SDI Audio De-Embed Bit 2, 1, 0
Les interrupteurs 4, 3 et 2 représentent respectivement
les unités binaires 2, 1 et 0. Cela signifie que lorsque vous
réglez les interrupteurs 4, 3 et 2 sur différentes combinaisons
On/Of f, vous pouvez choisir la paire de canaux audio appartenant
à l'entrée SDI que vous souhaitez acheminer en HDMI, audio
analogique ou audio AES/EBU.
Tableau de sélection de l'audio SDI
La légende située sous le convertisseur vous donne
toutes les informations nécessaires pour changer
les paramètres de conversion.
En utilisant les réglages d'interrupteur suivants, vous pouvez
sélectionner les canaux audio SDI à intégrer au signal de sortie
de votre Teranex Mini SDI to HDMI 12G.
Canaux audio Interrupteur 4 Interrupteur 3 Interrupteur 2 Schéma
1 et 2 OFF OFF OFF
3 et 4 OFF OFF ON
5 et 6 OFF ON OFF
7 et 8 OFF ON ON
9 et 10 ON OFF OFF
11 et 12 ON OFF ON
13 et 14 ON ON OFF
15 et 16 ON ON ON
Canaux audio AES/EBU Interrupteur 4 Interrupteur 3 Interrupteur 2 Schéma
1-4 OFF OFF OFF
5-8 OFF OFF ON
9-12 OFF ON OFF
13-16 OFF ON ON
81

Paramètres du Blackmagic Teranex Setup
Le logiciel Blackmagic Teranex Setup permet de modifier les
mêmes paramètres que les interrupteurs, ainsi que des paramètres
supplémentaires. Vous pouvez accéder à ces paramètres en
utilisant les onglets Video, Audio, Configure et About.
Vous trouverez de plus amples informations concernant les
onglets About et Configure dans la section « Réglage des
paramètres » de ce manuel. L'onglet Video du Teranex Mini SDI
to HDMI 12G donne accès aux paramètres suivants.
Menu Video Output
Clip HDMI Output to legal levels
Cette case contrôle l'écrêtage de l'entrée SDI pour garantir
des niveaux HDMI légaux. Elle est cochée par défaut.
L'onglet Audio du Teranex Mini SDI to HDMI 12G donne
accès aux paramètres suivants.
Menu Audio Output
Set XLR Output
Vous pouvez choisir entre une sortie analogique ou AES/
EBU en sélectionnant les boutons Analog, AES/EBU ou
Timecode dans le menu Audio Output. Lorsque vous
sélectionnez l'option Timecode, le connecteur XLR du
canal gauche achemine de l'audio analogique, tandis que
la sortie XLR du canal droit fournit un signal de timecode.
En fonction de la sortie audio sélectionnée, vous pouvez
choisir les canaux audio de l'entrée SDI que vous souhaitez
envoyer à la sortie audio HDMI, AES/EBU ou analogique.
Il est également possible d'ajuster leur gain par canal
ou par paire de canaux. Lorsque vous acheminez de
l'audio AES/EBU sur les deux connecteurs XLR, vous
pouvez sélectionner jusqu'à quatre canaux. Lorsque
vous acheminez de l'audio analogique, vous pouvez
sélectionner jusqu'à deux canaux. Lorsque vous utilisez
le connecteur XLR droit pour acheminer un signal de
timecode, le connecteur XLR gauche achemine un canal
audio analogique.
Le Teranex Mini garde les derniers paramètres en mémoire,
qu'ils aient été réglés via les interrupteurs, le Smart Panel
ou l'utilitaire Teranex Setup. Si vous utilisez le contrôle par
interrupteur après avoir retiré le Smart Panel ou mis à jour
les paramètres du convertisseur par logiciel, il se peut que
vous deviez ajuster certains interrupteurs pour activer les
nouveaux paramètres.
Ajustez les niveaux audio analogique et AES/EBU
à l’aide de la page Audio du Blackmagic Teranex Setup.
82

Paramètres du Teranex Mini Smart Panel
Si vous avez installé un Teranex Mini Smart Panel (en option)
sur votre convertisseur Teranex Mini SDI to HDMI 12G, vous
aurez accès aux menus suivants : Video, Audio et Network. Les
paramètres disponibles dans ces menus sont identiques à ceux
décrits précédemment dans la section « Paramètres du
Blackmagic Teranex Setup ». Pour obtenir de plus amples
informations sur le réglage des paramètres à l'aide du Teranex
Mini Smar t Panel, consultez la section « Réglage des paramètres ».
Le Teranex Mini Smart Panel vous donne accès aux mêmes paramètres que le logiciel Blackmagic Teranex Setup.
Schéma fonctionnel du Teranex Mini SDI to HDMI 12G
SDI In
USB
Ethernet
with Power
Input automatically
detects between
SD/HD/6G/12G-SDI
Central Processor
and Firmware
Mini Switches
Equalizer,
Re-Clocker and
10 bit De-Serializer
Customizable
Video Processor
SDI Audio
De-Embedder
AES/EBU
Audio Formatter
Audio Digital to
Analog with
Balanced Output
HDMI Video and
Audio Formatter
Automatic
SD/HD/6G/12G-SDI
Cable Driver
Analog or AES/EBU
Audio Out Switch
Loop SDI Out
Left Analog Out
or AES/EBU
1+2 Out
Right Analog Out
or AES/EBU 3+4
Out or Timecode
HDMI Out
83

Teranex Mini - HDMI to SDI 12G
ETHERNET PoE+ SDI OUT
L - ANALOG
AES/EBU
R - ANALOG
AES/EBU - T/C
PUSH PUSH
HDMI IN
SDI OUT
Convertissez des signaux HDMI provenant d'appareils tels que
des caméras HDV, des caméras Ultra HD et des consoles de
jeux en SDI, avec la possibilité d'intégrer de l'audio à partir des
entrées audio HDMI, AES/EBU ou audio symétrique analogique.
1 2
Connecteurs
1. Port USB Mini-B
Permet de connecter le logiciel Blackmagic Teranex Setup
au convertisseur Teranex Mini via un ordinateur Mac OS X ou
Windows afin de modifier les paramètres et de mettre à jour le
logiciel interne de votre Teranex Mini.
2. Interrupteurs
Interrupteurs réglables permettant de modifier les paramètres.
Vous pouvez ainsi envoyer des signaux vidéo provenant
d'appareils HDMI à du matériel SDI à l'aide de longs câbles SDI.
Vous pouvez même ajouter des sorties SDI à des ordinateurs
compatibles avec l'HDMI.
4 5
6 8 9 1073
6. Ethernet PoE+
Ce port se connecte à un commutateur réseau ou à un ordinateur
pour vous permettre de modifier les paramètres au sein du
logiciel Blackmagic Teranex Setup. Prend également en charge
le PoE plus.
7. Sortie SDI
Connecteur BNC pour sortie vidéo en boucle SDI.
3. Voyant LED multi-usages
Le voyant est blanc lorsque le convertisseur est alimenté. Il est
vert lorsqu'un signal d'entrée vidéo valable est détecté. Peut
être réglé au sein du logiciel Blackmagic Teranex Setup pour
activer son clignotement sur le convertisseur dans le but de le
repérer dans une installation.
4. Alimentation
Connecteur C14 CEI standard pour une alimentation AC
90 - 240 V.
5. HDMI
Entrée vidéo HDMI.
Interrupteurs
Les interrupteurs du Teranex Mini HDMI to SDI 12G donnent
accès aux paramètres suivants :
Interrupteur 8 - Analog Audio, AES/EBU Audio
Réglez l'interrupteur 8 sur Off pour intégrer l'audio analogique
symétrique. Réglez-le sur On pour acheminer de l'audio
numérique AES/EBU. Pour utiliser ces entrées, l'interrupteur 7
doit également être réglé sur On.
8. Sortie SDI
Connecteur BNC pour sortie vidéo en boucle SDI secondaire.
9. L - Analog ou AES/EBU
Connecteur XLR pour le canal audio symétrique analogique
gauche, ou l'entrée audio numérique AES/EBU.
10. R - Analog, AES/EBU ou Timecode
Connecteur XLR pour le canal audio symétrique analogique
droit, ou l'entrée audio numérique AES/EBU. Peut également
être configuré pour le signal d'entrée du timecode.
Interrupteur 7 - HDMI Audio, Input Audio
Réglez l'interrupteur 7 sur Off pour sélectionner de l'audio HDMI
intégré, ou sur On pour de l'audio analogique ou AES/EBU.
Interrupteur 6 - Input Audio/Timecode
Réglez l'interrupteur 6 sur On pour acheminer le timecode en
entrée via le canal audio R du connecteur XLR. Réglez-le sur
Off pour acheminer de l'audio en entrée.
La légende située sous le convertisseur vous donne toutes
les informations nécessaires pour changer les paramètres
deconversion.
84

Interrupteur 5 - 60 vers 59.94 Off/On
Réglez l'interrupteur 5 sur On si vous souhaitez convertir de la
vidéo 60p en vidéo entrelacée 59.95 lors d'une connexion à
un mélangeur. Réglez-le sur Off pour désactiver la conversion
et acheminer la vidéo au format progressif original à 60 images
par seconde.
Interrupteurs 2, 1 - Select Format Bit 1, 0
Les interrupteurs 2 et 1 représentent respectivement les
unités binaires 1 et 0. Cela signifie que lorsque vous réglez les
interrupteurs 2 et 1 sur différentes combinaisons On/Off, vous
pouvez choisir le format de conversion que vous souhaitez utiliser.
Faites votre choix entre 3 formats de conversion.
Auto - Interrupteur 1 sur Off, interrupteur 2 sur Off.
La résolution de la sortie SDI correspondra à l'entrée
HDMI. Par exemple, si l'entrée HDMI est en Ultra HD, la
sortie SDI sera également en Ultra HD.
Force to HD - Interrupteur 1 sur Off, interrupteur 2
surOn.
La sortie SDI est down-convertie en HD si l'entrée est en
Ultra HD. Votre Teranex Mini tentera de convertir le format
de l'entrée HDMI en HD si le matériel source le permet. Si
l'entrée HDMI est en SD, la sortie restera en SD.
Force to Ultra HD - Interrupteur 1 sur On, interrupteur
2 sur Off.
La sortie SDI est up-convertie en Ultra HD si l'entrée est
en HD. Votre Teranex Mini tentera de convertir le format
de l'entrée HDMI en Ultra HD si le matériel source le
permet. Si l'entrée HDMI est en SD, la sortie restera en SD.
Choisissez entre les paramètres d’up-conversion Auto, Force to
HD et Force to Ultra HD sur la page Video du Blackmagic Teranex
Setup. Vous pouvez également choisir de convertir de la vidéo
60p en 59.94i lors d’une connexion avec un mélangeur.
Paramètres du Blackmagic Teranex Setup
Le logiciel Blackmagic Teranex Setup permet de modifier les
mêmes paramètres que les interrupteurs, ainsi que des paramètres
supplémentaires. Vous pouvez accéder à ces paramètres en
utilisant les onglets Video, Audio, Configure et About.
Vous trouverez de plus amples informations concernant les
onglets About et Configure dans la section « Réglage des
paramètres » de ce manuel.
L'onglet Video du Teranex Mini HDMI to SDI 12G donne accès
aux paramètres suivants :
Menu Video Processing
Upconversion
Utilisez ce menu déroulant pour sélectionner les
paramètres de la up-conversion pour votre sortie SDI.
Lorsque vous réglez ce paramètre sur Auto, la sortie SDI
correspondra à l'entrée HDMI. Les paramètres Force HD et
Force Ultra HD achemineront respectivement de la vidéo
HD et Ultra HD, indépendamment de l'entrée HDMI, en
up ou down-convertant le signal si besoin est. Toutefois,
le format SD ne change pas.
Fréquence d’images
Sélectionnez cette case pour convertir de la vidéo 60p en
59.94i pour une utilisation avec des workflows entrelacés
sur un mélangeur.
L'onglet Audio du Teranex Mini HDMI to SDI 12G donne
accès aux paramètres suivants.
choisir entre des entrées analogiques, AES/EBU et
timecode. Vous pouvez également sélectionner les canaux
de votre sor tie audio SDI auxquels vous souhaitez intégrer
ces entrées. Il est également possible d'ajuster le gain
du signal audio.
Lorsque vous sélectionnez l'option AES/EBU, vous
avez accès à l'option supplémentaire Sample Rate
Converter. Lorsque cette case est cochée, la fréquence
d'échantillonnage de votre sortie audio sera de 48Khz,
ce qui est la fréquence d'échantillonnage appropriée
pour la télévision.
Le Teranex Mini garde les derniers paramètres en mémoire, qu'ils
aient été réglés via les interrupteurs, le Smart Panel ou l'utilitaire
Teranex Setup. Si vous utilisez le contrôle par interrupteur
après avoir retiré le Smart Panel ou mis à jour les paramètres
du convertisseur par logiciel, il se peut que vous deviez ajuster
certains interrupteurs pour activer les nouveaux paramètres.
Menu Audio Input
Set XLR input / Set Audio input
Ce menu vous permet de sélectionner entre une entrée
audio XLR et HDMI. Lorsque vous sélectionnez l'option
HDMI, l'audio HDMI sera intégré à la sortie vidéo SDI.
Lorsque vous sélectionnez l'option XLR, vous pouvez
Ajustez les niveaux audio analogique et AES/EBU à l’aide
de la page Audio du Blackmagic Teranex Setup.
85

Paramètres du Teranex Mini Smart Panel
Si vous avez installé un Teranex Mini Smart Panel (en option)
sur votre convertisseur Teranex Mini HDMI to SDI 12G, vous
aurez accès aux menus suivants : Video, Audio et Network.
Pour obtenir de plus amples informations sur le réglage des
paramètres à l'aide du Teranex Mini Smart Panel, consultez la
section « Réglage des paramètres ».
Les paramètres disponibles dans ces menus sont identiques à
ceux décrits dans la section ci-dessus.
Le Teranex Mini Smart Panel vous donne accès aux mêmes paramètres que le logiciel Blackmagic Teranex Setup.
Schéma fonctionnel du Teranex Mini HDMI to SDI 12G
Analog or AES/EBU
Left Analog In
or AES/EBU 1+2
Audio Switch
Right Analog In
or AES/EBU 3+4
or Timecode
HDMI In
USB
USB
Ethernet
with Power
Analog or AES/EBU
Audio Switch
HDMI Video and
Audio Decoder
Central
Processor and
Firmware
Mini Switches
AES/EBU Sample
Rate Converter
Audio Analog to
Digital from
Balanced Input
Customizable
Video Processor
SDI Audio
Embedder
Automatic
SD/HD/6G/12G-SDI
Cable Driver
SDI Out
SDI Out
86

Teranex Mini - SDI to Analog 12G
ETHERNET PoE+ SDI IN
L - ANALOG
AES/EBU
R - ANALOG
AES/EBU - T/C
Y or NTSC/PAL B-Y or S-VIDEO Y R-Y or S-VIDEO C
SDI LOOP OUT
Convertissez des entrées SD-SDI, HD-SDI, 3G-SDI, 6G-SDI et
12G-SDI en vidéo analogique composante, NTSC et PAL, ainsi
qu'en audio symétrique AES/EBU et audio analogique.
Ledown-convertisseur intégré vous permet de connecter de
la vidéo 12G-SDI à du matériel analogique SD et HD, et de
1 2
3 11 12
Connecteurs
1. Port USB Mini-B
Permet de connecter le logiciel Blackmagic Teranex Setup
au convertisseur Teranex Mini via un ordinateur Mac OS X ou
Windows afin de modifier les paramètres et de mettre à jour le
logiciel interne de votre Teranex Mini.
2. Interrupteurs
Interrupteurs réglables permettant de modifier les paramètres.
3. Voyant LED multi-usages
Le voyant est blanc lorsque le convertisseur est alimenté. Il est
vert lorsqu'un signal d'entrée vidéo valable est détecté. Peut
être réglé au sein du logiciel Blackmagic Teranex Setup pour
activer son clignotement sur le convertisseur dans le but de le
repérer dans une installation.
4. Alimentation
Connecteur C14 CEI standard pour une alimentation AC
90 - 240 V.
5. Y or NTSC/PAL
Connecteur BNC pour sortie composante analogique Y,
composite NTSC ou PAL.
6. B-Y or S-VIDEO Y
Connecteur BNC pour sortie composante analogique B-Y, ou
S-Video Y.
connecter facilement des moniteurs vidéo et des enregistreurs
tels que Betacam SP et VHS. Vous pouvez également acheminer
une paire de canaux audio analogique en sortie, à partir de
16canaux audio SDI isolés.
4 5 6
8 9 10
7
7. R-Y or S-VIDEO C
Connecteur BNC pour sortie composante analogique R-Y, ou
S-Video C.
8. Ethernet PoE+
Ce port se connecte à un commutateur réseau ou à un ordinateur
pour vous permettre de modifier les paramètres au sein du
logiciel Blackmagic Teranex Setup. Prend également en charge
le PoE plus.
9. Entrée SDI
Connecteur BNC pour entrée vidéo SDI.
10. Sortie SDI en boucle
Connecteur BNC pour sortie vidéo en boucle SDI.
11. L - Analog ou AES/EBU
Connecteur XLR pour le canal audio symétrique analogique
gauche, ou la sortie audio numérique AES/EBU.
12. R - Analog, AES/EBU ou Timecode
Connecteur XLR pour le canal audio symétrique analogique
droit, ou la sortie audio numérique AES/EBU. Peut également
être configuré pour acheminer le timecode.
Interrupteurs
Les interrupteurs du Teranex Mini SDI to Analog 12G donnent
accès aux paramètres suivants :
Interrupteur 8 - Analog Audio, AES/EBU Audio
Réglez l'interrupteur 8 sur Off pour sélectionner de l'audio
symétrique analogique, ou sur On pour une sortie audio
numérique AES/EBU.
Interrupteur 7 - 7.5 IRE, 0.0 IRE
Les États-Unis et les pays qui utilisent le système NTSC conf iguré
sur 7.5 devraient régler l'interrupteur 7 sur Off. Si vous travaillez
dans des pays qui n'utilisent pas la configuration 7.5, réglez
l'interrupteur 7 sur On. Ce paramètre affecte uniquement les
sorties composite ou S-Video.
Interrupteur 6 - SMPTE Levels, Betacam Levels
Réglez l'interrupteur 6 sur Off pour obtenir des niveaux SMPTE,
ou sur On pour des niveaux Betacam. Les niveaux SMPTE sont
plus répandus que les niveaux Betacam. Même les enregistreurs
Betacam SP prennent en charge les niveaux SMPTE. Ne
commutez sur l'option Betacam que si vous êtes certain que
votre matériel utilise des niveaux Betacam.
Interrupteur 5 - Component, Composite or S-Video
Réglez l'interrupteur 5 sur Off pour sélectionner une sortie
vidéo composante analogique, ou sur On pour des sorties
composite et S-Video.
87

Pour afficher l'entrée vidéo en SD sur les sorties S-Video et
composite, réglez la down-conversion sur On en faisant basculer
l'interrupteur 1. La vidéo composante analogique prend en
charge la vidéo HD et SD.
Interrupteurs 4, 3 et 2 - SDI Audio De-Embed
Les interrupteurs 4, 3 et 2 représentent respectivement les
unités binaires 2, 1 et 0. Cela signifie que lorsque vous réglez
les interrupteurs 4, 3 et 2 sur différentes combinaisons On/Off,
vous pouvez choisir la paire de canaux audio appartenant à
l'entrée SDI que vous souhaitez acheminer en audio analogique
ou audio AES/EBU.
Interrupteur 1 - Processing Off - Processing On
Down-conversion avec 3 types de formats d'image. Faites
basculer l'interrupteur 1 entre Off et On pour passer du format
d'image anamorphosé au format d'image center cut puis au
format letterbox.
Lorsque vous convertissez de l'Ultra HD ou de la HD, réglez
l'interrupteur 1 sur Off pour acheminer de la HD via les connecteurs
composante analogique.
Vous devrez également veiller à ce que l'interrupteur 5 soit
sélectionné sur la sortie désirée. Par exemple, pour sélectionner
une sortie composante, réglez l'interrupteur 5 sur Off.
Le DCI 4K sera redimensionné sur la sortie HD composante.
La légende située sous le convertisseur vous donne toutes
les informations nécessaires pour changer les paramètres
deconversion
Tableau de sélection de l'audio SDI
En utilisant les réglages d'interrupteur suivants, vous pouvez
sélectionner les canaux audio SDI à acheminer en tant que
Canaux audio Interrupteur 4 Interrupteur 3 Interrupteur 2 Schéma
1 et 2 OFF OFF OFF
3 et 4 OFF OFF ON
5 et 6 OFF ON OFF
7 et 8 OFF ON ON
9 et 10 ON OFF OFF
11 et 12 ON OFF ON
13 et 14 ON ON OFF
15 et 16 ON ON ON
signal audio analogique ou AES/EBU à l'aide de votre Teranex
Mini SDI to Analog 12G.
Canaux audio AES/EBU Interrupteur 4 Interrupteur 3 Interrupteur 2 Schéma
1-4 OFF OFF OFF
5-8 OFF OFF ON
9-12 OFF ON OFF
13-16 OFF ON ON
88

Paramètres du Blackmagic Teranex Setup
Le logiciel Blackmagic Teranex Setup permet de modifier
les mêmes paramètres que les interrupteurs, ainsi que des
paramètres supplémentaires.
Vous pouvez accéder à ces paramètres en utilisant les onglets
Video, Audio, Configure et About.
Vous trouverez de plus amples informations concernant les
onglets About et Configure dans la section « Réglage des
paramètres » de ce manuel.
L'onglet Video du Teranex Mini SDI to Analog 12G donne accès
aux paramètres suivants.
Menu Video Output
Ce menu vous permet de choisir entre une sortie vidéo
composante, s-video ou vidéo composite. Vous pouvez
également régler les niveaux de luminance et de chroma ainsi
que les niveaux de la vidéo composante B-Y et R-Y de manière
indépendante.
Si vous avez sélectionné une sortie s-video ou vidéo composite,
vous pouvez choisir entre les niveaux de noir 7.5 IRE et 0.0 IRE,
en fonction de la région dans laquelle vous travaillez. Si vous
avez sélectionné l’option vidéo composante, vous pouvez choisir
entre des niveaux SMPTE et Betacam.
Les niveaux SMPTE sont plus répandus que les niveaux Betacam.
Même les enregistreurs Betacam SP prennent en charge les
niveaux SMPTE. Ne commutez sur l'option Betacam que si vous
êtes certain que votre matériel utilise des niveaux Betacam.
Menu Video Processing
Ce menu vous permet de régler le format d'image de la vidéo
down-convertie. Les options sont : Letterbox, Anamorphic,
Center Cut ou Off.
L'onglet Audio du Teranex Mini SDI to Analog 12G donne accès
aux paramètres suivants :
Menu Audio Output
Ce menu vous permet de sélectionner entre des sorties audio
analogique, AES/EBU et timecode. Vous pouvez également
choisir les canaux de l'entrée audio SDI que vous souhaitez
isoler. Il est également possible d'ajuster le gain du signal audio.
Le Teranex Mini garde les derniers paramètres en mémoire, qu'ils
aient été réglés via les interrupteurs, le Smart Panel ou l'utilitaire
Teranex Setup. Si vous utilisez le contrôle par interrupteur
après avoir retiré le Smart Panel ou mis à jour les paramètres
du convertisseur par logiciel, il se peut que vous deviez ajuster
certains interrupteurs pour activer les nouveaux paramètres.
Ajustez la luminance et les niveaux chromatiques de votre vidéo à
l'aide de la page Video du Blackmagic Teranex Setup.
Ajustez les niveaux audio analogique et AES/EBU à l'aide de la
page Audio du Blackmagic Teranex Setup.
89

Paramètres du Teranex Mini Smart Panel
Si vous avez installé un Teranex Mini Smart Panel (en option)
sur votre convertisseur Teranex Mini SDI to Analog 12G, vous
aurez accès aux menus suivants : Video, Audio et Network. Les
paramètres disponibles dans ces menus sont identiques à ceux
décrits précédemment dans la section « Paramètres du
Blackmagic Teranex Setup ». Pour obtenir de plus amples
informations sur le réglage des paramètres à l'aide du Teranex
Mini Smar t Panel, consultez la section « Réglage des paramètres ».
Le Teranex Mini Smart Panel vous donne accès aux mêmes paramètres que le logiciel Blackmagic Teranex Setup.
Schéma fonctionnel du Teranex Mini SDI to Analog 12G
SDI In
USB
Ethernet
with Power
Input automatically
detects between
SD/HD/6G/12G-SDI
Central Processor
and Firmware
Mini Switches
Equalizer,
Re-Clocker and
10 bit De-Serializer
10 bit HD to
SD Down
Converter
SDI Audio
De-Embedder
AES/EBU
Audio Sample Rate
Converter
Stereo Audio
Analog to Digital
Converter
12 Bit Digital to
Analog SD/HD
Video Converter
Automatic
SD/HD/6G/12G-SDI
Cable Driver
Analog or AES/EBU
Audio Out Switch
Component output can switch to
S-Video and Composite
Loop SDI Out
Left Analog Out
or AES/EBU
1+2 Out
Right Analog Out
or AES/EBU
3+4 Out or
Timecode
Y
R-Y
B-Y
90

Teranex Mini - Analog to SDI 12G
ETHERNET PoE+ SDI OUT
L - ANALOG
AES/EBU
R - ANALOG
AES/EBU - T/C
Y or NTSC/PAL B-Y or S-VIDEO Y R-Y or S-VIDEO C
PUSH PUSH
SDI OUT
Convertissez de la vidéo et de l'audio provenant d'équipements
analogiques tels que des enregistreurs Betacam SP, des caméras
HDV et des consoles de jeux en vidéo SD-SDI, HD-SDI et
12G-SDI. Ce convertisseur prend en charge toute une gamme
1 2
3 11 12
Connecteurs
1. Port USB Mini-B
Permet de connecter le logiciel Blackmagic Teranex Setup
au convertisseur Teranex Mini via un ordinateur Mac OS X ou
Windows afin de modifier les paramètres et de mettre à jour le
logiciel interne de votre Teranex Mini.
2. Interrupteurs
Interrupteurs réglables permettant de modifier les paramètres.
3. Voyant LED multi-usages
Le voyant est blanc lorsque le convertisseur est alimenté. Il est
vert lorsqu'un signal d'entrée vidéo valable est détecté. Peut
être réglé au sein du logiciel Blackmagic Teranex Setup pour
activer son clignotement sur le convertisseur dans le but de le
repérer dans une installation.
4. Alimentation
Connecteur C14 CEI standard pour une alimentation AC
90 - 240 V.
5. Y or NTSC/PAL
Connecteur BNC pour entrée composante analogique Y ou
entrée composite NTSC ou PAL.
6. B-Y or S-VIDEO Y
Connecteur BNC pour entrée composante analogique B-Y, ou
S-Video Y.
de formats d'entrée analogique, notamment la vidéo composante
SD/HD, S-Video ou composite NTSC et PAL. Les sorties 12G-SDI
du convertisseur permettent d'intégrer l'audio numérique AES/
EBU ou l'audio analogique.
4 5 6
8 9 10
7
7. R-Y or S-VIDEO C
Connecteur BNC pour entrée composante analogique R-Y, ou
S-Video C.
8. Ethernet PoE+
Ce port se connecte à un commutateur réseau ou à un ordinateur
pour vous permettre de modifier les paramètres au sein du
logiciel Blackmagic Teranex Setup. Prend également en charge
le PoE plus.
9. Sortie SDI
Connecteur BNC pour sortie vidéo en boucle SDI.
10. Sortie SDI
Connecteur BNC pour sortie vidéo en boucle SDI.
11. L - Analog ou AES/EBU
Connecteur XLR pour le canal audio symétrique analogique
gauche, ou l'entrée audio numérique AES/EBU.
12. R - Analog, AES/EBU ou Timecode
Connecteur XLR pour le canal audio symétrique analogique
droit, ou l'entrée audio numérique AES/EBU. Peut également
être configuré pour le signal d'entrée du timecode.
Interrupteurs
Les interrupteurs du Teranex Mini Analog to SDI 12G donnent
accès aux paramètres suivants :
Interrupteur 8 - Analog Audio, AES/EBU Audio
Réglez l'interrupteur 8 sur Off pour sélectionner de l'audio
symétrique analogique, ou sur On pour une entrée audio
numérique AES/EBU.
Interrupteur 7 - 7.5 IRE - 0.0 IRE
Les États-Unis et les pays qui utilisent le système NTSC conf iguré
sur 7.5 devraient régler l'interrupteur 7 sur Off. Si vous travaillez
dans des pays qui n'utilisent pas la configuration 7.5, réglez
l'interrupteur 7 sur On. Ce paramètre affecte uniquement les
sorties composite ou S-Video.
Interrupteur 6 - SMPTE Levels - Betacam Levels
Ce paramètre permet de choisir entre les niveaux vidéo SMPTE
et Betacam. Réglez l'interrupteur 6 sur Off pour obtenir des
niveaux SMPTE, ou sur On pour des niveaux Betacam. Les
niveaux SMPTE sont plus répandus que les niveaux Betacam.
Même les enregistreurs Betacam SP prennent en charge les
niveaux SMPTE. Ne commutez sur l'option Betacam que si vous
êtes certain que votre matériel utilise des niveaux Betacam.
Interrupteur 5 - Component, Composite or S-Video
Réglez l'interrupteur 5 sur Off pour sélectionner une entrée
vidéo composante analogique, ou sur On pour des entrées
vidéo composite et S-Video.
91

Interrupteur 4 - Composite - S-Video
Réglez l'interrupteur 4 sur Off pour sélectionner une entrée
vidéo composite, ou sur On pour une entrée S-Video.
Interrupteur 3 - SD to HD
Réglez l'interrupteur 3 sur On pour up-convertir la résolution
de la sortie SDI, de la SD vers la HD, lorsque les entrées vidéo
composite, S-Video et composante sont en SD. Réglez-le sur
Off pour faire correspondre la résolution de la sortie à celle
de l'entrée.
Interrupteur 2 - HD to UHD
Réglez l'interrupteur 2 sur On pour up -convertir la résolution de la
sortie SDI vers de l'Ultra HD, lorsque l'entrée vidéo composante
est en HD. Réglez-le sur Off pour faire correspondre la résolution
de la sortie à celle de l'entrée.
Interrupteur 1 - Input Audio/Timecode
Réglez l'interrupteur 1 sur On pour acheminer le timecode en
entrée via le canal audio R du connecteur XLR. Réglez-le sur
Off pour acheminer de l'audio en entrée.
La légende située sous le Teranex Mini vous donne toutes
les informations nécessaires pour changer les paramètres
deconversion.
Paramètres du Blackmagic Teranex Setup
Le logiciel Blackmagic Teranex Setup permet de modifier
les mêmes paramètres que les interrupteurs, ainsi que des
paramètres supplémentaires.
Vous pouvez accéder à ces paramètres en utilisant les onglets
Video, Audio, Configure et About.
Les onglets About et Configure sont décrits dans la section
«Réglage des paramètres » de ce manuel.
L'onglet Video du Teranex Mini Analog to SDI 12G donne accès
aux paramètres suivants.
Menu Video Input
Ce menu vous permet de choisir entre une entrée vidéo
composante, S-Video ou vidéo composite. Vous pouvez
également régler les niveaux de luminance et de chroma ainsi
que les niveaux de la vidéo composante B-Y et R-Y de manière
indépendante.
Si vous avez sélectionné une entrée S-Video ou composite,
vous pouvez choisir entre les niveaux de noir 7.5 IRE et 0.0 IRE,
selon la région dans laquelle vous travaillez.
Si vous avez sélectionné l'option vidéo composante, vous
pouvez choisir entre des niveaux SMPTE et Betacam. Les
niveaux SMPTE sont plus répandus que les niveaux Betacam.
Même les enregistreurs Betacam SP prennent en charge les
niveaux SMPTE. Ne commutez sur l'option Betacam que si vous
êtes certain que votre matériel utilise des niveaux Betacam.
Menu Video Processing
Ce menu vous permet de régler les paramètres de la conversion,
selon l'entrée vidéo analogique. Les entrées vidéo composante
peuvent être converties de la SD vers la HD et de la HD vers
l'Ultra HD. Les entrées S-Video et composite peuvent uniquement
être converties de la SD vers la HD.
L'onglet Audio du Teranex Mini Analog to SDI 12G donne accès
aux paramètres suivants.
Menu Audio Input
Ce menu vous permet de choisir entre des entrées audio
analogique, AES/EBU et timecode. Vous pouvez également
choisir les canaux de sortie audio SDI auxquels vous souhaitez
les intégrer. Il est également possible d'ajuster le gain du
signal audio.
Lorsque vous sélectionnez l'option AES/EBU, vous avez accès à
l'option supplémentaire Sample Rate Converter. Lorsque cette
case est cochée, la fréquence d'échantillonnage de votre sortie
audio SDI sera up ou down-convertie vers 24 bits, 48Khz.
Le Teranex Mini garde les derniers paramètres en mémoire, qu'ils
aient été réglés via les interrupteurs, le Smart Panel ou l'utilitaire
Teranex Setup. Si vous utilisez le contrôle par interrupteur
après avoir retiré le Smart Panel ou mis à jour les paramètres
du convertisseur par logiciel, il se peut que vous deviez ajuster
certains interrupteurs pour activer les nouveaux paramètres.
92

Ajustez la luminance et les niveaux chromatiques de votre vidéo à
l'aide de la page Video du Blackmagic Teranex Setup.
Paramètres du Teranex Mini Smart Panel
Ajustez les niveaux audio analogique et AES/EBU à l'aide de la
page Audio du Blackmagic Teranex Setup.
Si vous avez installé un Teranex Mini Smart Panel (en option)
sur votre convertisseur Teranex Mini Analog to SDI 12G, vous
aurez accès aux menus suivants : Video, Audio et Network.
Les paramètres disponibles dans ces menus sont identiques à
ceux décrits précédemment dans la section « Paramètres du
Blackmagic Teranex Setup ».
Le Teranex Mini Smart Panel vous donne accès aux mêmes paramètres que le logiciel Blackmagic Teranex Setup.
Pour obtenir de plus amples informations sur le réglage des
paramètres à l'aide du Teranex Mini Smart Panel, consultez la
section « Réglage des paramètres ».
93

Schéma fonctionnel du Teranex Mini Analog to SDI 12G
Analog or AES/EBU
Left Analog In
or AES/EBU 1+2
Right Analog In
or AES/EBU 3+4 In
or Timecode In
Audio Switch
Analog or AES/EBU
Audio Switch
AES/EBU Sample
Rate Converter
Audio Analog to
Digital from
Balanced Input
Y
R-Y
B-Y
USB
Ethernet
with Power
12 Bit Digital to
Analog SD/HD
Video Converter
Central Processor
and Firmware
Mini Switches
Customizable
Video Processor
Component input can switch to
S-Video and Composite
SDI Audio
Embedder
Teranex Mini - SDI to Audio 12G
Ce convertisseur permet d'isoler de l'audio de n'importe quelle
connexion vidéo SDI et de l'acheminer sur deux canaux audio
analogique ou quatre canaux audio numérique AES/EBU. Vous
pouvez acheminer les signaux sur du matériel audio tel que
des consoles de mixage, des enregistreurs analogiques et
des moniteurs.
Les canaux audio SDI supplémentaires peuvent être isolés en
reliant un autre Teranex Mini SDI to Audio 12G à la sortie SDI de
votre convertisseur.
4 5 6
Automatic
SD/HD/6G/12G-SDI
Cable Driver
7
SDI Out
SDI Out
1 2
3 11 12
Connecteurs
1. Port USB Mini-B
Permet de connecter le logiciel Blackmagic Teranex Setup
au convertisseur Teranex Mini via un ordinateur Mac OS X ou
Windows afin de modifier les paramètres et de mettre à jour le
logiciel interne de votre Teranex Mini.
2. Interrupteurs
Interrupteurs réglables permettant de modifier les paramètres.
OPTICAL
AUDIO
ETHERNET PoE SDI IN
8 9 10
L R
STEREO OUT
SDI OUT
L - ANALOG
AES/EBU
AES/EBU - T/C
3. Voyant LED multi-usages
Le voyant est blanc lorsque le convertisseur est alimenté. Il est
vert lorsqu'un signal d'entrée vidéo valable est détecté. Peut
être réglé au sein du logiciel Blackmagic Teranex Setup pour
activer son clignotement sur le convertisseur dans le but de le
repérer dans une installation.
4. Alimentation
Connecteur C14 CEI standard pour une alimentation AC
90 - 240 V.
94
R - ANALOG

5. Sortie audio optique S/PDIF
Signal S/PDIF avec connecteur TOSLINK.
9. Entrée SDI
Connecteur BNC pour entrée vidéo SDI.
6. L - Sortie analogique asymétrique de niveau ligne
Connecteur RCA pour sortie audio analogique asymétrique canal gauche.
7. R - Sortie analogique asymétrique de niveau ligne
Connecteur RCA pour sortie audio analogique asymétrique canal droit.
8. Ethernet PoE
Ce port se connecte à un commutateur réseau ou à un
ordinateur pour vous permettre de modifier les paramètres au
sein du logiciel Blackmagic Teranex Setup. Prend également
en charge le PoE.
Interrupteurs
Les interrupteurs du Teranex Mini SDI to Audio 12G donnent
accès aux paramètres suivants :
Interrupteur 8 - Analog Audio, AES/EBU Audio
Réglez l'interrupteur 8 sur Off pour sélectionner de l'audio
symétrique analogique, ou sur On pour une sortie audio
numérique AES/EBU.
10. Sortie SDI en boucle
Connecteur BNC pour sortie vidéo en boucle SDI.
11. L - Analog ou AES/EBU
Connecteur XLR pour le canal audio symétrique analogique
gauche, ou la sortie audio numérique AES/EBU.
12. R - Analog, AES/EBU ou Timecode
Connecteur XLR pour le canal audio symétrique analogique
droit, ou la sortie audio numérique AES/EBU. Peut également
être configuré pour acheminer le timecode.
Interrupteur 7 - Output Audio/Timecode
Réglez l'interrupteur 7 sur On pour acheminer le timecode via
le canal audio R du connecteur XLR. Réglez-le sur Off pour
acheminer de l'audio en entrée.
Interrupteurs 6, 5, 4 - SDI Audio De-Embed Bit 2, 1, 0
Les interrupteurs 6, 5 et 4 représentent respectivement les
unités binaires 2, 1 et 0. Cela signifie que lorsque vous réglez
les interrupteurs 6, 5 et 4 sur différentes combinaisons On/Off,
vous pouvez choisir les canaux audio que vous souhaitez isoler
du signal SDI et acheminer en sortie audio.
Tableau : Isoler de l'audio du signal SDI
Canaux audio analogique Interrupteur 6 Interrupteur 5 Interrupteur 4 Schéma
1-2 OFF OFF OFF
3-4 OFF OFF ON
5-6 OFF ON OFF
La légende située sous le convertisseur vous donne toutes
les informations nécessaires pour changer les paramètres
deconversion.
7-8 OFF ON ON
9-10 ON OFF OFF
11-12 ON OFF ON
95

Canaux audio analogique Interrupteur 6 Interrupteur 5 Interrupteur 4 Schéma
13-14 ON ON OFF
15-16 ON ON ON
Canaux audio AES/EBU Interrupteur 6 Interrupteur 5 Interrupteur 4 Schéma
1-4 OFF OFF OFF
5-8 OFF OFF ON
9-12 OFF ON OFF
13-16 OFF ON ON
Paramètres du Blackmagic Teranex Setup
Le logiciel Blackmagic Teranex Setup permet de modifier
les mêmes paramètres que les interrupteurs, ainsi que des
paramètres supplémentaires.
Vous pouvez accéder à ces paramètres en utilisant les onglets
Audio, Configure et About.
Les onglets About et Configure sont décrits dans la section
«Réglage des paramètres » de ce manuel.
L'onglet Audio du Teranex Mini SDI to Audio 12G donne accès
aux paramètres suivants :
Menu Audio Output
Ce menu vous permet de sélectionner entre des sorties audio
analogique, AES/EBU et timecode. Vous pouvez également
choisir les canaux de l'entrée audio SDI que vous souhaitez
isoler. Il est également possible d'ajuster le gain du signal audio.
Le Teranex Mini garde les derniers paramètres en mémoire,
qu'ils aient été réglés via les interrupteurs, le Smart Panel ou
l'utilitaire Teranex Setup. Si vous utilisez le contrôle par
interrupteur après avoir retiré le Smart Panel ou mis à jour les
paramètres du convertisseur par logiciel, il se peut que vous
deviez ajuster certains interrupteurs pour activer les nouveaux
paramètres.
Ajustez les niveaux audio analogique et AES/EBU à l'aide
de la page Audio du Blackmagic Teranex Setup.
96

Paramètres du Teranex Mini Smart Panel
Si vous avez installé un Teranex Mini Smart Panel (en option)
sur votre convertisseur Teranex Mini SDI to Audio 12G, vous
aurez accès aux menus suivants : Audio et Network. Les
paramètres disponibles dans ces menus sont identiques à ceux
décrits précédemment dans la section « Paramètres du
Blackmagic Teranex Setup ». Pour obtenir de plus amples
informations sur le réglage des paramètres à l'aide du Teranex
Mini Smar t Panel, consultez la section « Réglage des paramètres ».
Le Teranex Mini Smart Panel vous donne accès aux mêmes
paramètres que le logiciel Blackmagic Teranex Setup.
Schéma fonctionnel du Teranex Mini SDI to Audio 12G
SDI In
USB
Ethernet
with Power
Input automatically
detects between
SD/HD/6G/12G-SDI
Central Processor
and Firmware
Mini Switches
Equalizer,
Re-Clocker and
10 bit De-Serializer
SDI Audio
De-Embedder
Automatic
SD/HD/6G/12G-SDI
Cable Driver
AES/EBU
Audio Sample Rate
Converter
Stereo Audio
Analog to Digital
Converter
Analog or AES/EBU
Analog or AES/EBU
Analog
Digital
Loop SDI Out
Ch 1 Analog or
Ch 1&2 AES/EBU
Ch 2 Analog or
Ch 3&4 AES/EBU
or Timecode Out
L
Stereo Out
R
Optical Out
97

Teranex Mini - Audio to SDI 12G
Ce convertisseur permet d'intégrer deux canaux d'audio
analogique, ou quatre canaux d'audio numérique AES/EBU à
n'importe quelle connexion vidéo SDI. Vous pouvez utiliser ce
Teranex Mini pour intégrer de l'audio provenant d'équipements
tels que des consoles de mixage audio et des enregistreurs
1 2
3 11 12
Connecteurs
1. Port USB Mini-B
Permet de connecter le logiciel Blackmagic Teranex Setup
au convertisseur Teranex Mini via un ordinateur Mac OS X ou
Windows afin de modifier les paramètres et de mettre à jour le
logiciel interne de votre Teranex Mini.
2. Interrupteurs
Interrupteurs réglables permettant de modifier les paramètres.
3. Voyant LED multi-usages
Le voyant est blanc lorsque le convertisseur est alimenté. Il est
vert lorsqu'un signal d'entrée vidéo valable est détecté. Peut
être réglé au sein du logiciel Blackmagic Teranex Setup pour
activer son clignotement sur le convertisseur dans le but de le
repérer dans une installation.
analogiques à des signaux vidéo SDI pour une utilisation avec
des grilles de commutation et des enregistreurs SDI. Les canaux
audio SDI supplémentaires peuvent être intégrés au signal SDI
en reliant un autre Teranex Mini Audio to SDI 12G à la sortie SDI
de votre convertisseur.
4 5 6
OPTICAL
AUDIO
ETHERNET PoE SDI IN
8 9 10
L R
STEREO IN
7
SDI OUT
PUSH PUSH
L - ANALOG
AES/EBU
R - ANALOG
AES/EBU - T/C
7. R - Entrée analogique asymétrique de niveau ligne
Connecteur RCA pour entrée audio analogique asymétrique
- canal droit.
8. Ethernet PoE
Ce port se connecte à un commutateur réseau ou à un
ordinateur pour vous permettre de modifier les paramètres au
sein du logiciel Blackmagic Teranex Setup. Prend également
en charge le PoE.
9. Entrée SDI
Connecteur BNC pour entrée vidéo SDI.
10. Sortie SDI
Connecteur BNC pour sortie vidéo en boucle SDI.
4. Alimentation
Connecteur C14 CEI standard pour une alimentation AC
90 - 240 V.
5. Entrée audio optique S/PDIF
Signal S/PDIF avec connecteur TOSLINK.
6. L - Entrée analogique asymétrique de niveau ligne
Connecteur RCA pour entrée audio analogique asymétrique
- canal gauche.
Interrupteurs
Les interrupteurs du Teranex Mini Audio to SDI 12G donnent
accès aux paramètres suivants :
Interrupteurs 8, 7 - Input Audio Selection Bit 1, 0
Les interrupteurs 8 et 7 représentent respectivement les
unités binaires 1 et 0. Cela signifie que lorsque vous réglez les
interrupteurs 8 et 7 sur différentes combinaisons On/Off, vous
pouvez choisir entre quatre options d'entrée audio.
Interrupteurs 6, 5, 4 - Embed Audio Bit 2, 1, 0
Les interrupteurs 6, 5 et 4 représentent respectivement les
unités binaires 2, 1 et 0. Cela signifie que lorsque vous réglez
11. L - Analog ou AES/EBU
Connecteur XLR pour le canal audio symétrique analogique
gauche, ou l'entrée audio numérique AES/EBU.
12. R - Analog, AES/EBU ou Timecode
Connecteur XLR pour le canal audio symétrique analogique
droit, ou l'entrée audio numérique AES/EBU. Peut également
être configuré pour le signal d'entrée du timecode.
les interrupteurs 6, 5 et 4 sur différentes combinaisons On/Off,
vous pouvez choisir les canaux de votre signal SDI auxquels
vous souhaitez intégrer de l'audio.
Si vous intégrez de l'audio analogique, il y a huit combinaisons
possibles, ce qui vous permet d'intégrer de l'audio aux paires
de canaux allant de 1-2 à 15-16.
Si vous souhaitez intégrer de l'audio AES/EBU, il y a quatre
combinaisons possibles. Vous pouvez choisir d'intégrer de
l'audio aux canaux 1 à 4, 5-8, 9-12 ou 13-16.
98

Interrupteur 3 - Sample Rate Conversion, No Sample
Rate Conversion
Réglez l'interrupteur 3 sur Off pour activer la conversion de
fréquence d'échantillonnage, ou sur On pour la désactiver.
Il est préférable que cet interrupteur soit réglé sur Off sauf
exception pour que l'audio soit intégré au signal à la fréquence
d'échantillonnage appropriée pour la télévision.
Lorsque l'interrupteur 3 est réglé sur Off, cela convertit la
fréquence d'échantillonnage de l'audio analogique ou AES/EBU
et intègre l'audio à la sortie SDI à une fréquence d'échantillonnage
de 48 kHz.
Interrupteur 2 - Ch 2 or AES/EBU 3+4 Embed / Bypass
Une fois les canaux audio sélectionnés, utilisez les interrupteurs
2 et 1 pour choisir les canaux que vous souhaitez intégrer ou
désactiver. La fonction de désactivation du canal permet d'éviter
d'effacer des canaux audio que vous souhaitiez garder dans
le signal audio.
Réglez l'interrupteur 2 sur On pour désactiver le canal 2, ou
les canaux AES/EBU 3 et 4. Réglez l'interrupteur 1 sur On pour
désactiver le canal 1, ou les canaux AES/EBU 1 et 2.
Interrupteur 1 - Ch 1 or AES/EBU 1+2 Embed/Bypass
Référez-vous à la description de l'interrupteur 2.
La légende située sous le convertisseur vous donne toutes
les informations nécessaires pour changer les paramètres
deconversion.
Tableau de sélection de l'audio
Source d'entrée audio Interrupteur 8 Interrupteur 7 Schéma
XLR analogique OFF OFF
XLR AES/EBU OFF ON
RCA analogique ON OFF
Optique ON ON
Tableaux pour les canaux SDI
Canaux audio analogique Interrupteur 6 Interrupteur 5 Interrupteur 4 Schéma
1-2 OFF OFF OFF
3-4 OFF OFF ON
5-6 OFF ON OFF
7-8 OFF ON ON
9-10 ON OFF OFF
99

Canaux audio analogique Interrupteur 6 Interrupteur 5 Interrupteur 4 Schéma
11-12 ON OFF ON
13-14 ON ON OFF
15-16 ON ON ON
Canaux audio AES/EBU Interrupteur 6 Interrupteur 5 Interrupteur 4 Schéma
1-4 OFF OFF OFF
5-8 OFF OFF ON
9-12 OFF ON OFF
13-16 OFF ON ON
Paramètres du Blackmagic Teranex Setup
Le logiciel Teranex Setup permet de modifier les mêmes
paramètres que les interrupteurs, ainsi que des paramètres
supplémentaires. Vous pouvez accéder à ces paramètres à
l'aide des onglets Audio, Configure et About de ce logiciel. Les
onglets About et Configure sont décrits dans la section « Réglage
des paramètres » de ce manuel.
Ajustez les niveaux audio analogique et AES/EBU à l'aide
de la page Audio du Blackmagic Teranex Setup.
100

L'onglet Audio du Teranex Mini Audio to SDI 12G donne accès
aux paramètres suivants.
Menu Audio Input
Ce menu vous permet de choisir entre des entrées RCA, XLR
et optique.
Lorsque vous sélectionnez l'option XLR, vous avez accès aux
paramètres Analog, AES/EBU et Timecode.
Lorsque vous sélectionnez l'option AES/EBU, vous avez accès à
l'option supplémentaire Sample Rate Converter. Lorsque cette
case est cochée, la fréquence d'échantillonnage de votre sortie
audio sera de 48Khz, ce qui est la fréquence d'échantillonnage
appropriée pour la télévision.
Paramètres du Teranex Mini Smart Panel
Le menu Audio Input vous permet également de choisir la paire
de canaux ou les quatre canaux AES/EBU de votre signal SDI,
auxquels vous souhaitez intégrer de l'audio. Il est aussi possible
d'ajuster le gain audio.
Vous pouvez désactiver des canaux ou des paires de canaux
pour éviter d'effacer de l'audio de votre signal SDI.
Le Teranex Mini conserve les derniers paramètres
sélectionnés, qu'ils aient été réglés via les interrupteurs,
le Smart Panel ou le logiciel Blackmagic Teranex Setup.
Si vous utilisez le contrôle par interrupteur après avoir retiré le
Smart Panel ou mis à jour les paramètres du convertisseur par
logiciel, il se peut que vous deviez ajuster certains interrupteurs
pour activer les nouveaux paramètres.
Si vous avez installé un Teranex Mini Smart Panel (en option) sur
votre convertisseur Teranex Mini Audio to SDI 12G, vous aurez
accès aux menus suivants : Audio et Network. Les paramètres
Pour obtenir de plus amples informations sur le réglage des
paramètres à l'aide du Teranex Mini Smart Panel, consultez la
section « Réglage des paramètres ».
disponibles dans ces menus sont identiques à ceux décrits
précédemment dans la section « Paramètres du Blackmagic
Teranex Setup ».
Le Teranex Mini Smart Panel vous donne accès aux mêmes
paramètres que le logiciel Blackmagic Teranex Setup.
Schéma fonctionnel du Teranex Mini Audio to SDI 12G
Serializer and
SDI Cable Driver
Analog or AES/EBU
Embedded
SDI Out
Ch 1 Analog or
Ch 1&2 AES/EBU
SDI In
USB
Ethernet
with Power
Input automatically
detects between
SD/HD/6G/12G-SDI
Central Processor
and Firmware
Mini Switches
Equalizer,
Re-Clocker and
10 bit De-Serializer
101
SDI Audio
Embedder
AES/EBU
Audio Sample Rate
Converter
Stereo Audio
Analog to Digital
Converter
Analog or AES/EBU
Analog
Digital
Ch 2 Analog or
Ch 3&4 AES/EBU
or Timecode
L
Stereo In
R
Optical In

Teranex Mini Rack Shelf
Si vous utilisez plusieurs convertisseurs Teranex Mini, vous
pouvez utiliser le Teranex Mini Rack Shelf pour les installer
dans une baie de stockage ou dans une caisse de transport.
Il est possible d'installer jusqu'à 3 Teranex Mini sur chaque
Teranex Mini Rack Shelf d'une unité de rack. L'installation est
extrêmement rapide, il suffit de retirer les pieds en caoutchouc
des convertisseurs et de les visser sur le Teranex Mini Rack Shelf
Assistance
Obtenir de l'aide
en vous servant des pas de vis pourvus à cet effet sous les
convertisseurs. Le Teranex Mini Rack Shelf dispose de deux
façades vides que vous pouvez utiliser pour couvrir la partie
du rack qui n'est pas utilisée par les convertisseurs.
Pour plus d'informations sur le prix et la disponibilité de ce
produit, consultez le site Internet de Blackmagic Design : w ww.
blackmagicdesign.com.
Le moyen le plus rapide d'obtenir de l'aide est d'accéder
aux pages d'assistance en ligne de Blackmagic Design et de
consulter les dernières informations de support concernant
votre Teranex Mini.
Pages d'assistance en ligne
deBlackmagicDesign
Les dernières versions du manuel, du logiciel et des
notes d'assistance peuvent être consultées sur le
centre de support technique de Blackmagic Design :
www.blackmagicdesign.com/fr/support.
Contacter le service d'assistance
deBlackmagic Design
Si vous ne parvenez pas à trouver l'aide dont vous avez besoin
dans nos pages d'aide, veuillez utiliser l'option « Envoyez-nous
un email », accessible sur la page d'assistance pour envoyer
une demande d'assistance par email. Vous pouvez également
cliquer sur le bouton « Trouver un support technique » situé
sur la page d'assistance et contacter ainsi le centre de support
technique Blackmagic Design le plus proche de chez vous.
Vérification du logiciel actuel
Pour vérifier quelle version du logiciel Blackmagic Teranex
Setup est installée sur votre ordinateur, ouvrez la fenêtre About
Blackmagic Teranex Setup.
Sur Mac OS X, ouvrez le logiciel Blackmagic Teranex Setup
dans le dossier Applications. Sélectionnez À propos de
Blackmagic Teranex Setup dans le menu d’application
pour connaître le numéro de version.
Sur Windows 7, ouvrez le logiciel Blackmagic Teranex
Setup dans le menu de Démarrage. Cliquez sur le menu
Aide et sélectionnez À propos de Blackmagic Teranex
Setup pour connaître le numéro de version.
Sur Windows 8, ouvrez le logiciel Blackmagic Teranex
Setup dans le menu de Démarrage. Cliquez sur le menu
Aide et sélectionnez À propos de Blackmagic Teranex
Setup pour connaître le numéro de version.
Comment obtenir les dernières
mises à jour du logiciel
Après avoir vérifié quelle version du logiciel Blackmagic
Teranex Setup est installée sur votre ordinateur, veuillez vous
rendre au centre de support technique Blackmagic Design à
l’adresse suivante www.blackmagicdesign.com/fr/support pour
vérifier les dernières mises à jour. Même s'il est généralement
conseillé d'exécuter les dernières mises à jour, il est prudent
d’éviter d’effectuer une mise à jour logicielle au milieu d'un
projet important.
102

Garantie
Garantie limitée à 36 mois
Par la présente, Blackmagic Design garantit que les Teranex Mini
seront exempts de défauts matériels et de fabrication pendant
une durée de 36 mois à compter de la date d'achat, ceci excluant
les connecteurs, câbles, ventilateurs, modules à fibre optique,
fusibles, claviers et batteries qui seront exempts de défauts
matériels et de fabrication pendant une durée de 12 mois à
compter de la date d'achat. Si un produit s’avère défectueux
pendant la période de garantie, Blackmagic Design peut, à sa
seule discrétion, réparer le produit défectueux sans frais pour
les pièces et la main d’œuvre, ou le remplacer.
Pour se prévaloir du service offert en vertu de la présente
garantie, il vous incombe d’informer Blackmagic Design de
l’existence du défaut avant expiration de la période de garantie,
et de prendre les mesures nécessaires pour l’exécution des
dispositions de ce service. Le consommateur a la responsabilité
de s’occuper de l’emballage et de l'expédition du produit
défectueux au centre de service nommément désigné par
Blackmagic Design, en frais de port prépayé. Il incombe au
Consommateur de payer tous les frais de transport, d’assurance,
droits de douane et taxes et toutes autres charges relatives
aux produits qui nous auront été retournés et ce quelle que
soit la raison.
La présente garantie ne saurait en aucun cas s’appliquer à
des défauts, pannes ou dommages causés par une utilisation
inappropriée ou un entretien inadéquat ou incorrect. Blackmagic
Design n’a en aucun cas l’obligation de fournir un service en
vertu de la présente garantie : a) pour réparer les dommages
résultant de tentatives de réparations, d’installations ou tous
services effectués par du personnel non qualifié par Blackmagic
Design, b) pour réparer tout dommage résultant d'une utilisation
inadéquate ou d'une connexion à du matériel incompatible, c)
pour réparer tout dommage ou dysfonctionnement causé par
l’utilisation de pièces ou de fournitures n’appartenant pas à la
marque de Blackmagic Design, d) pour examiner un produit
qui a été modifié ou intégré à d’autres produits quand l’impact
d’une telle modification ou intégration augmente les délais ou
la difficulté d’examiner ce produit.
CETTE GARANTIE REMPLACE TOUTE GARANTIE EXPLICITE
OU IMPLICITE. BLACKMAGIC DESIGN ET SES REVENDEURS
DÉCLINENT EXPRESSEMENT TOUTE GARANTIE IMPLICITE DE
COMMERCIALISATION OU D'ADAPTATION DANS QUELQUE
BUT QUE CE SOIT. LA RESPONSABILITÉ DE BLACKMAGIC
DESIGN POUR RÉPARER OU REMPLACER UN PRODUIT
S'AVÉRANT DÉFECTUEUX CONSTITUE L A TOTALITÉ ET LE S EUL
RECOURS EXCLUSIF PRÉVU ET FOURNI AU CONSOMMATEUR
POUR TOUT DOMMAGE INDIRECT, SPÉCIFIQUE, ACCIDENTEL
OU CONSÉCUTIF, PEU IMPORTE QUE BLACKMAGIC DESIGN
OU SES REVENDEURS AIENT ÉTÉ INFORMÉS OU SE SOIENT
RENDUS COMPTE AU PRÉALABLE DE L'ÉVENTUALITÉ DE CES
DOMMAGES. BL ACKMAGIC DESI GN NE PEUT ÊTRE TENU POU R
RESPONSABLE DE TOUTE UTILISATION ILLICITE OU ABUSIVE
DU MATÉRIEL PAR LE CONSOMMATEUR. BLACKMAGIC DESIGN
N'EST PAS RESPONSABLE DES DOMMAGES RÉSULTANT
DE L'UTILISATION DE CE PRODUIT. LE CONSOMMATEUR
MANIPULE CE PRODUIT À SES SEULS RISQUES.
© Copyright 2015 Blackmagic Design. Tous droits réservés. 'Blackmagic Design’,
‘DeckLink’, ‘HDLink’, ‘Workgroup Videohub’, ‘Multibridge Pro’, ‘Multibridge
Ext reme’, ‘Intensi ty’ et ‘Lead ing the creative vid eo revolutio n’ sont des marqu es
déposées aux USA et dans d'autres pays. Tous les autres noms de société et
de produits peuvent être des marques déposées des sociétés respectives
auxquelles ils sont associés.
103

Installations- und Bedienungsanleitung
Teranex Mini Converters
September 2015
Deutsch

Willkommen!
Danke, dass Sie sich Teranex Mini „Converter“ angeschafft haben.
Teranex Minis sind 12G-SDI-Konverter, mit denen Sie für die Broadcast-Arbeit von unterwegs,
vom Schreibtisch oder vom Rack-Mount aus Video und Audio umwandeln können.
Verpackt in ein effizientes Kompaktdesign sind sie kaum größer als die Konverter der
Blackmagic Mini „Converter“ Serie. So finden die Teranex Minis in jeder Produktionsumgebung
Platz, vom Ein-Mann-Postproduktionsstudio bis zu komplexen Rack-basierten SDI-Workflows.
Diese Bedienungsanleitung gibt Ihnen alle Informationen, die Sie für die Inbetriebnahme
Ihrer Teranex Mini „Converter“ brauchen.
Bitte sehen Sie auf der Support-Seite unter www.blackmagicdesign.com/de/support nach
der aktuellsten Auflage der Bedienungsanleitung und Aktualisierungen der Produktsoftware
Ihrer Teranex Mini „Converter“. Indem Sie Ihre Software immer auf dem aktuellsten Stand
halten, sichern Sie sich den Zugriff auf die neuesten Features ebenso wie Unterstützung für
neue SDI-Formate, die die Zukunft bringen mag! Bitte registrieren Sie beim Herunterladen
von Software Ihre Kontaktdaten, damit wir Sie über künftige Versionen informieren können.
Oder folgen Sie uns auf Twitter und erhalten so Benachrichtigungen über Softwareupdates.
Wir arbeiten ständig an neuen Features und Verbesserungen und würden uns freuen, von
Ihnen zu hören!
Grant Petty
CEO, Blackmagic Design

Inhalt
Teranex Mini Converters
Erste Schritte 107
Anschluss an den Netzstrom 107
Anschließen von Videogeräten 107
Anschließen von Audiogeräten 107
Installation der Verwaltungssoftware 108
Blackmagic Teranex Setup installieren 108
Installation eines Teranex Mini Smart Panels 109
Funktionsmerkmale des Smart Panels 110
Einstellungen ändern 111
Einstellungen über die Switches ändern 111
Einstellungen mit Blackmagic Teranex
Setup ändern 111
Einstellungen mit dem Teranex Mini
Smart Panel ändern 112
Netzwerkeinstellungen ändern 113
Netzwerkeinstellungen mit dem
Blackmagic Teranex Setup ändern 113
Netzwerkeinstellungen mit dem Teranex
Mini Smart Panel ändern 113
Teranex Mini – SDI to HDMI 12G 114
Teranex Mini – HDMI to SDI 12G 118
Teranex Mini – SDI to Analog 12G 121
Teranex Mini – Analog to SDI 12G 125
Teranex Mini – SDI to Audio 12G 128
Teranex Mini – Audio to SDI 12G 132
Teranex Mini Rack-Wanne 136
Hilfe 136
Garantie 137

Erste Schritte
ETHERNET PoE+
01:23:47:08
2160p59.94
SDI t
o A
nalog 12G
OPTICAL
AUDIO
STEREO OUT
L R
Anschluss an den Netzstrom
Zur Inbetriebnahme brauchen Sie bloß ein Stromkabel
einzustecken und Ihre Signalein- und -ausgabequellen
anzuschließen.
Stecken Sie ein Stromkabel gemäß IEC-Norm in die
Strombuchse an der Rückseite Ihres Teranex Mini „Converters“,
um ihn mit Netzstrom zu versorgen.
MENU
1
VIDEO
2
AUDIO
SET
Teranex Mini „Converter“ unterstützen 12G-SDI-Datenraten und
schalten automatisch zwischen SD, HD und Ultra HD
bis 2160p/60 um
Anschließen von Videogeräten
HDMI OUT
ETHERNET PoE+ SDI IN
SDI LOOP OUT
L - ANALOG
AES/EBU
Ihr Teranex Mini „Converter“ wird über ein Stromkabel gemäß IEC-
Norm mit Netzstrom versorgt. Die Stromversorgung kann zudem über
einen PoE+-kompatiblen Ethernet-Schalter erfolgen
R - ANALOG
AES/EBU - T/C
Koppeln Sie Ihr Quell-Videogerät an den Videoeingang Ihres
Teranex Mini „Converters“ und den Videoausgang an Ihr ZielVideogerät. Die Videoeingabe und -ausgabe hängen vom
Anschließen von Audiogeräten
Wenn Sie in SDI oder HDMI eingebettetes Audio verwenden,
werden die Audiosignale sowieso über die Videoeingabe
transportiert. Bei Verwendung von externem Audio oder
analogem Audio, schließen Sie die Quellen an die XLRBuchsen an. Kanal „R” der XLR-Buchse kann für Timecode
OPTICAL
AUDIO
ETHERNET PoE SDI IN
Analoge oder digitale Audiogeräte sind über die „Optical Audio"-, RCA- oder
symmetrischen XLR-Buchsen Ihres Teranex Mini „Converters“ anzuschließen
Konvertertyp ab. Je nach Ihrem Teranex Mini Modell haben
Sie ggf. die Wahl von Videoein- und -ausgaben in SDI-,
Komponente-, FBAS- oder S-Video.
verwendet werden. Einige Teranex Mini „Converter“
unterstützen Audio auch per RCA und Glasfaser („Optical
Audio"). Einzelheiten finden Sie in den jeweiligen Abschnitten
über die einzelnen Konverter.
L R
STEREO OUT
SDI OUT
L - ANALOG
AES/EBU
R - ANALOG
AES/EBU - T/C
Für den Einstieg war das schon alles. Jetzt können Sie Ihre
Konvertierungseinstellungen ändern und Ihren Teranex Mini
in Betrieb nehmen. Weitere Informationen siehe Abschnitt
„Einstellungen ändern („Change Settings”).
107

Installation der Verwaltungssoftware
Blackmagic Teranex Setup installieren
Die Teranex Setup-Software (= Dienstprogramm) dient der
Aktualisierung Ihres Teranex Mini und der Änderung von
Video-, Audio- und Netzwerkeinstellungen.
Installation unter Mac OS X
Schritt 1. Laden Sie die Blackmagic Teranex Setup-Software
von der Blackmagic Website herunter www.
blackmagicdesign.com/de
Schritt 2. Entpacken Sie die heruntergeladene Datei und
öffnen Sie das anzeigte Disk-Symbol, um den
Inhalt zu sichten
Schritt 3. Ziehen Sie das Blackmagic Teranex Setup-Symbol
auf das Anwendungssymbol.
Das Teranex Setup-Dienstprogramm („Setup Utility”) ist nun
installiert.
Installation unter Windows
Schritt 1. Laden Sie die Blackmagic Teranex Setup-Software
von der Blackmagic Website herunter www.
blackmagicdesign.com/de
Schritt 2. Entpacken Sie die heruntergeladene Datei. Nun
müsste ein Ordner namens Blackmagic Teranex
Setup sichtbar sein. Darin sind eine PDF-Version
dieses Handbuchs und das Installationsprogramm
für das Teranex Setup-Dienstprogramm enthalten.
Nach erfolgtem Neustart ist Ihr Blackmagic Teranex Setup
betriebsbereit.
Aktualisierung der Produktsoftware
Wichtig: Sorgen Sie dafür, dass Ihr Teranex Mini mit Strom
versorgt wird, ehe Sie den Rechner und Konverter per USB-
Kabel verbinden.
Schritt 1. Versorgen Sie Ihren Konverter mit Strom.
Schritt 2. Verbinden Sie Computer und Konverter per USB-
Kabel oder verbinden Sie sie via Ethernet, um das
Teranex Setup-Dienstprogramm zu starten.
Wenn der Konverter fehlt oder nicht erkannt wird, meldet
Blackmagic Teranex Setup „No Converter Connected” in der
Titelzeile. Andernfalls zeigt die Software den Modellnamen
Ihres Teranex Mini an.
Wenn das Blackmagic Teranex Setup eine neuere
Produktsoftware enthält, als in ihrem Teranex Mini installiert
ist, werden Sie zu einem Update aufgefordert. Folgen Sie
einfach den Anweisungen auf dem Bildschirm, um die
Aktualisierung auszuführen. Wenn das Update Ihrer
Produktsoftware beendet ist, können Sie anhand des Teranex
Mini Setup-Dienstprogramms Einstellungsänderungen an
Ihrem Teranex Mini vornehmen.
Schritt 3. Doppelklicken Sie auf das Installationsprogramm
und folgen Sie den Anweisungen zur Fertigstellung
der Installation.
Schritt 4. Nach abgeschlossener Installation werden Sie
aufgefordert, Ihren Computer neu zu starten.
Klicken Sie auf Neustart („Restart”), um die
Installation fertigzustellen.
Blackmagic Teranex Setup kann auch Computern unter Mac
OS X und Windows installiert werden
Falls Sie auf Ihrem Teranex Mini zuvor Einstellungen für eine statische
IP-Adresse vorgenommen haben, ist sie auf Ihrem Netzwerk zu finden,
indem Sie die IP-Adresse über den Homescreen des Teranex Setup-
Dienstprogramms eingeben
108

Installation eines Teranex Mini Smart Panels
01:23:47:08
2160p59.94
SDI to Analog 12G
1
2
SET
VIDEO
MENU
AUDIO
Einstellungsänderungen lassen sich auch über das optionale
Teranex Mini Smart Panel vornehmen. Dieses Bedienpanel
lässt sich optional vorne auf den Teranex Mini aufstecken und
ersetzt die mitgelieferte Standard-Frontblende. Das Smart
Panel bietet mittels Tasten und Drehregler schnellen Zugriff
auf Einstellungen und Sie haben alle eingehenden Signale
auf dem integrierten LCD im Blick.
Die Installation Ihres optionalen Smart Panels ist einfach. Panel
und Frontblende sind während des Betriebs austauschbar,
d.h. Ihr Teranex Mini „Converter“ braucht während der
Installation nicht ausgeschaltet zu werden.
Schritt 1. Entfernen Sie die zwei M3-Schrauben beiderseitig
der Standard-Frontblende mithilfe eines PZSchraubendrehers der Größe 2. Nehmen Sie die
Blende vorsichtig von der Vorderseite Ihres
Teranex Mini ab.
Schritt 2. Entfernen und verwahren Sie die Leuchtröhre, die
die LED mit dem Anzeigelämpchen unten an der
Standard-Frontblende verbindet.
Diese Röhre wird zur Erleuchtung des
Multifunktionslämpchens Ihres Teranex Mini
Converters benötigt, wenn kein Smart Panel
installiert ist.
Schritt 3. Richten Sie die Verbinder an der Rückseite des
Smart Panels auf deren Gegenstücke an der Front
Ihres Teranex Mini Converters aus. Drücken Sie
das Smart Panel leicht gegen Ihren Konverter
bis die Verbinder fest sitzen. Das Smart Panel
sollte präzise angelegt sein und fest an der
Vorderseite Ihres Teranex Mini Converters
einrasten.
Schritt 4. Setzen Sie die vorhandenen M3-Schrauben der
Original-Frontblende wieder ein.
Wenn Ihr Teranex Mini in einem Teranex Mini Rack installiert
ist, nehmen Sie diesen aus dem Rack heraus, um an die
Schrauben der Frontblende zu gelangen.
Weitere Informationen finden Sie im Abschnitt „Teranex Mini
Rack-Wanne”
Der USB-Port des Teranex Mini ist auch bei Verwendung des
Teranex Smart Panels bedienbar. Öffnen Sie einfach die
Gummiabdeckung, um an den Port zu gelangen. Das installierte
Smart Panel verdeckt die Mini-Switches (Minischalter) an der
Frontblende, die man nun nicht mehr betätigen kann.
Stattdessen sind alle Einstellungen für die Schalter u.a. über
das Menü des Teranex Smart Panels verfügbar und können
über das LCD vorgenommen werden. Einstellungen sind von
Gerät zu Gerät verschieden, weil jedes Teranex Mini Modell
über andere Features verfügt. Das auf dem Display angezeigte
Navigations-Layout ist auf allen Modellen gleich. So springen
Sie zum Ändern von Einstellungen flink zwischen mehreren
Modellen hin und her.
Weitere Informationen über Einstellungsänderungen mit dem
optionalen Teranex Mini Smart Panel finden Sie im Abschnitt
„Einstellungen ändern”.
Halten Sie das Teranex Mini Smart Panel zur Installation zwischen Finger und Daumen und richten
Sie diese mit dem Verbinder am Rücken des Panels aus. So lässt sich das Panel leicht aufsetzen
109

Funktionsmerkmale des Smart Panels
1 MENU
2 VIDEO
SET AUDIO
2160p59.94
SDI to Analog 12G
01:23:47:08
LC-Display
Die erste sichtbare Feature auf dem LC-Display Ihres Teranex
Mini Smart Panels ist der Homescreen (Startbildschirm). Der
Homescreen zeigt Ihnen wichtige Informationen an:
1 MENU
2 VIDEO
SET AUDIO
„Input video format" – Format und
Framerate der an Ihren Teranex Mini
„Converter“ gekoppelten Videoquelle
„Converter model" – Das aktuell an das
Teranex Mini Smart Panel angeschlossene
Teranex Mini „Converter“ Modell
Bedientasten und Drehregler
Ihr Teranex Mini Smart Panel verfügt über einen Satz an Tasten
und einen Drehregler, mit denen Sie zwischen den
Einstellungen im Menü Ihres Teranex Mini Converters
navigieren.
Tasten 1 und 2 – Drücken Sie diese Tasten, um numerische
Einstellungen zu vergrößern oder zu verkleinern. Alternativ
bewegen Sie sich mit diesen Tasten auf- und abwärts durch
die Menüeinstellungen.
Set – Nachdem Sie eine Einstellung mit den Tasten 1 und 2
vorgenommen haben, drücken Sie zur Bestätigung „Set”.
2160p59.94 SDI to Analog 12G
01:23:47:08
„Timecode" – Der in die Videoeingabe
eingebettete Timecode oder über die XLR-
Buchse des Teranex Minis eingehender
externer Timecode
Menu – Drücken Sie „Menu”, um zum Einstellungsmenü Ihres
Teranex Mini Converters zu gelangen. Alternativ dient die
„Menu”-Taste dazu, zurück zu den einzelnen Menü-Posten
zu gelangen.
Video- und Audio-Tasten – Drücken Sie die Video- und
Audio-Tasten, um direkt zu den Video- oder Audioeinstellungen
Ihres Teranex Mini Converters zu gelangen. Die verfügbaren
Einstellungen richten sich nach dem jeweiligen Modell, an
das Ihr Smart Panel angeschlossen ist.
Drehregler – Bewegen Sie den Drehregler im oder gegen
den Uhrzeigersinn, um durch die Menüeinstellungen zu
navigieren und um numerische Einstellungen anzupassen.
Bedientasten
1 MENU
2160p59.94 SDI to Analog 12G
01:23:47:08
2 VIDEO
SET AUDIO
Video-Monitor – Zeigt das Eingabeformat
Ihrer Videoquelle an und macht Ihre
Konvertierung sofort sichtbar
110
Drehregler
Audiopegelmesser – Zeigen die Audiopegel
für die an Ihren Teranex Mini „Converter“
angeschlossene Videoquelle an

Einstellungen ändern
1ON2 3 4 5 6 7 8
Die Einstellungen auf Ihrem Teranex Mini lassen sich auf
dreifache Art ändern. Verwenden Sie hierzu entweder die
Mini-Switches an der Frontblende oder das Blackmagic
Teranex Setup-Dienstprogramm. Alternativ können Sie ein
Einstellungen über die Switches ändern
An der Frontblende Ihres Teranex Mini befindet sich eine
Gummiabdeckung, hinter der sich die Mini-Switches befinden,
mit denen Sie die Einstellungen Ihres Konverters vornehmen.
Die Ein- und Ausschalter dienen der Konfigurierung interner
Einstellungen und lassen sich einfach mit der Spitze eines
Stifts umlegen.
Ein Einstellungsdiagramm für die Minischalter ist am Boden
Ihres Konverters abgedruckt. Stellen Sie sicher, dass Ihre
Einstellungen mit der Legende übereinstimmen, indem Sie
die Switch-Nummern von 1 bis 8 und von rechts nach links
beachten. Bei Gebrauch des optionalen Teranex Mini Smart
Panels werden die Switch-Einstellungen durch die Smart
Teranex Mini Smart Panel installieren, um
Einstellungsänderungen per Bedientasten, Drehregler und
LCD vorzunehmen.
Panel-Einstellungen außer Kraft gesetzt. Ihr Teranex Mini
behält die letzten Einstellungen bei, unabhängig davon, ob
sie via Mini-Switch, Smart Panel oder über das Blackmagic
Teranex Setup-Dienstprogramm ausgeführt wurden. Wenn
Sie das Smart Panel entfernt oder Ihre Konverter-Einstellungen
über die Software geändert haben und zur Switch-Steuerung
zurückkehren, müssen Sie die einzelnen Schalter unter
Umständen hin- und herbewegen, um die neuen Einstellungen
anzuwenden.
Eine ausführliche Beschreibung der Switches und ihrer
Einstellungen finden Sie im Abschnitt des jeweiligen
Konvertermodells in diesem Handbuch.
Einstellungen ändern durch Umlegen der Switches mit einem Stift
Einstellungen mit Blackmagic Teranex Setup ändern
Nach erfolgreicher Installierung auf Ihrem Computer verbinden
Sie Ihr Setup-Dienstprogramm mit Ihrem Teranex Mini via USB
oder Ethernet. Wenn sich Ihr Teranex Mini nicht via Ethernet
erkennen lässt, müssen Sie das Gerät möglicherweise zuerst
per USB-Anschluss konfigurieren, wie in Abschnitt
„Netzwerkeinstellungen ändern” beschrieben.
Wenn Sie das Programm starten, sehen Sie zuerst auf die
Homepage. Hier können Sie den zu konfigurierenden Teranex
Mini „Converter“ auswählen. Um Einstellungen zu ändern,
drücken Sie auf das Symbol „Einstellungen” unterhalb der
Abbildung Ihres Teranex Mini.
Sind mehr als ein Teranex Mini an Ihr Netzwerk gekoppelt,
werden nur die relevanten Einstellungen des ausgewählten
Teranex Mini angezeigt. Wählen Sie Ihren bevorzugten
Konverter aus, indem Sie die Pfeile links und rechts auf der
Homepage des Blackmagic Teranex Setup anklicken.
Justierungen werden sofort auf Ihrem Teranex Mini gespeichert.
D.h. nach einem Stromausfall werden Ihre Einstellungen nach
Wiederherstellung der Stromversorgung rekonstruiert.
Das Teranex Setup-Dienstprogramm gestattet Ihnen, über einen Mac-OS-X- oder Windows-Rechner die
Produktsoftware Ihres Teranex Minis zu aktualisieren und seine Einstellungen anzupassen
111

Der Reiter „Configure” mit Konfigurationsanweisungen und
„About” mit anderen Informationen über die Einstellungen
Ihres Blackmagic Teranex Setup sind auf allen Teranex Mini
Modellen gleich.
Der Reiter „Configure”
Der Konfigurations-Reiter ist für alle Teranex Mini Modelle
gleich. Er enthält die Netzwerkeinstellungen für Ihren Konverter.
Hier können Sie zwischen dynamischen und statischen
Netzwerkadressen für Ihren Konverter hin- und herschalten
sowie die IP-Adresse, Subnetz-Maske und GatewayInformationen für Ihren Teranex Mini einrichten. Weitere
Informationen finden Sie unter „Netzwerkeinstellungen ändern”.
Der Reiter „About”
Mit den Einstellungen unter diesem Reiter können Sie Ihren
Teranex Mini benennen und einzelne Konverter identifizieren.
Um Ihren Teranex Mini „Converter“ zu benennen, klicken Sie
auf das Textfeld „Name” und geben Sie Ihre gewünschte
Konverterbezeichnung ein. Klicken Sie auf „Save”, um die
Änderung zu bestätigen. Um Ihren ausgewählten Teranex
Mini „Converter“ schnell zu identifizieren, klicken Sie auf die
Dialogbox „Identify”. Dies bewirkt ein Blinken des
Multifunktionslämpchens an der Standard-Frontblende Ihres
Teranex Minis. Bei Verwendung eines Teranex Mini Smart
Panels wechselt die Farbe der Modellbezeichnung auf dem
LCD von Grau nach Rot. Deaktivieren Sie die Dialogbox, um
die Identifikationsanzeigen auszuschalten.
Das Menü „Software Settings” (Softwareeinstellungen) unter
dem Reiter „About” erkennt, welche Softwareversion Ihr
Teranex Mini betreibt. Wenn die Produktsoftware Ihres
Konverters älter ist als die aktuell in Ihrem Blackmagic Teranex
Setup enthaltene Version, erscheint an dieser Stelle ein
Update-Button, über den Sie die Software Ihres Konverters
aktualisieren können.
Verwenden Sie den Reiter „Configure” des
Blackmagic Teranex Setup-Dienstprogramms,
um auf Netzwerkeinstellungen zuzugreifen
Der Reiter „About” des Blackmagic Teranex Setup-Dienstprogramms
dient der Benennung und Identifizierung Ihres Teranex Mini.
Hier können Sie auch die Versionsnummer Ihres
Setup-Dienstprogramms nachsehen
Einstellungen mit dem Teranex Mini Smart Panel ändern
Einstellungsänderungen lassen sich auch über das optionale
Teranex Mini Smart Panel vornehmen. Dieses Bedienpanel
lässt sich optional vorne auf den Teranex Mini aufstecken und
ersetzt die mitgelieferte Standard-Frontblende. Das Smart
Panel bietet mittels Tasten und Drehregler schnellen Zugriff
auf Einstellungen und Sie haben alle eingehenden Signale
auf dem integrierten LCD im Blick.
Der integrierte USB-Port am Konverter bleibt auch mit
installiertem Teranex Smart Panel zugänglich. Öffnen Sie
einfach die Gummiabdeckung, um an den Port zu gelangen.
1 MENU
2 VIDEO
SET AUDIO
Das installierte Smart Panel verdeckt die Mini-Switches
(Minischalter) an der Frontblende, die man nun nicht mehr
betätigen kann. Stattdessen sind alle Einstellungen für die
Schalter u.a. über das Menü des Teranex Smart Panels
verfügbar und können über das LCD vorgenommen werden.
Da jedes Teranex Mini Modell andere Features aufweist,
unterscheiden sich die verfügbaren Einstellungen von Gerät
zu Gerät. Das auf dem Bildschirm angezeigte Navigations-
Layout ist auf allen Modellen gleich. So springen Sie zum
Ändern von Einstellungen flink zwischen mehreren Modellen
hin und her.
2160p59.94 SDI to Analog 12G
01:23:47:08
Das optionale Teranex Mini Smart Panel ermöglicht die schnelle Kontrolle von Einstellungen und gestattet neue Einstellungen.
Das Smart Panel lässt sich bequem vorne an Ihrem Teranex Mini „Converter“ installieren
112

Netzwerkeinstellungen ändern
Die Verwaltung mehrerer Teranex Mini „Converter“ erfolgt
am einfachsten über ein Netzwerk. Dies geht mit dem
Blackmagic Teranex Setup-Dienstprogramm. Ihre Teranex
Minis sind standardmäßig konfiguriert, automatisch eine
Netzwerkadresse zu finden. Auf diese Weise können
Auswahlen direkt auf dem Blackmagic Teranex Setup-Startlogo
getroffen werden. Einzelheiten finden Sie im Abschnitt
„Einstellungen mit dem Blackmagic Teranex Setup ändern”.
Sollte ein Teranex Mini nicht auf Ihrem Netzwerk erkannt
werden, müssen Sie eventuell Netzwerkeinstellungen lokal
ändern. Gleiches gilt für den Fall, dass Sie zuvor Einstellungen
für eine statische Adresse vorgenommen haben, die nicht mit
Ihrem aktuellen Netzwerk kompatibel ist. Dies erfolgt per USB
oder über das Teranex Mini Smart Panel.
Netzwerkeinstellungen mit dem Blackmagic Teranex Setup ändern
Um Netzwerkeinstellungen per USB zu ändern, schließen Sie
Ihren Teranex Mini an einen Computer an und betreiben Sie
das Teranex Setup-Dienstprogramm mit einem USB-Kabel.
Der USB-Anschluss Ihres Teranex Minis befindet sich an der
Frontblende, unabhängig davon, ob Sie die StandardFrontblende oder das Smart Panel verwenden.
Sobald der Anschluss erstellt ist, wählen Sie Ihren Teranex
Mini auf dem Startbildschirm des Teranex SetupDienstprogramms aus und wechseln Sie zum Reiter „About”.
Hier können Sie Ihren Konverter zwischen dynamischen und
statischen Netzwerkadressen hin- und herschalten. Wenn Sie
eine statische IP auswählen, können Sie IP-Adresse, SubnetzMaske und Gateway Ihres Konverters manuell konfigurieren.
Netzwerkeinstellungen mit dem Teranex Mini
Smart Panel ändern
Eine nützliche Feature des Teranex Mini Smart Panels ist die
lokale Änderung von Netzwerkeinstellungen. Das geht so:
Schritt 1. Halten Sie die Menü-Taste gedrückt, um das
Einstellungsmenü aufzurufen.
Schritt 2. Wählen Sie „Network” (Netzwerk) mit dem
Drehregler oder den Tasten „1” und „2” und
drücken Sie „Set”.
Schritt 3. Wählen Sie „Configure IP” (IP konfigurieren) mit
dem Drehregler oder den Tasten „1” und „2” und
drücken Sie „Set”.
Schritt 4. Wählen Sie „Manually” (manuell) mit dem Drehregler
oder den Tasten „1” und „2” und drücken Sie „Set”.
Wählen Sie Ihre „IP-Adresse” nach dem gleichen
Verfahren aus.
Schritt 5. Durchlaufen Sie die verfügbaren Nummern für
Ihre IP-Adresse mit dem Drehregler oder den
Tasten „1” und „2”. Drücken Sie zur Bestätigung
„Set”. Wiederholen Sie diese Schritte, um die
Einstellungen für Subnetz („Subnet”) und Gateway
vorzunehmen.
Netzwerkeinstellungen per USB lassen sich
unter dem Reiter „Configure” Ihres Blackmagic
Teranex Setup ändern
Verwenden Sie das „Network"-Menü auf Ihrem
Teranex Mini Smart Panel, um Netzwerkeinstellungen
für Ihren Teranex Mini „Converter“ vorzunehmen
113

Teranex Mini – SDI to HDMI 12G
ETHERNET PoE+ SDI IN
L - ANALOG
AES/EBU
R - ANALOG
AES/EBU - T/C
HDMI OUT
SDI LOOP OUT
Koppeln Sie HDMI-Monitore und Videoprojektoren aus einem
breiten Angebotsspektrum an SDI-basiertes Equipment. Ihr
Teranex Mini SDI to HDMI 12G schaltet automatisch zwischen
Eingabequellen in SD SDI, HD-SDI, 3G-SDI, 6G-SDI und
12G-SDI um und wandelt diese Signale in HDMI mit
eingebettetem Ton sowie symmetrisches AES/EBU-Audio
1 2
Anschlüsse
1. Mini-B USB-Port
Dient zum Anschluss eines Mac-OS-X- oder WindowsRechners mit Blackmagic Teranex Setup-Dienstprogramm,
über das man Einstellungen anpasst und die Produktsoftware
Ihres Teranex Minis aktualisiert.
oder analoge Audio-Ausgaben um. Die XLR-Buchse „R
ANALOG” kann auch zur Ausgabe von Timecode eingestellt
werden. Ist ein HD-Monitor oder Fernseher an den HDMI-
Anschluss gekoppelt, wird jede Ultra-HD-Quelle automatisch
nach HD abwärtskonvertiert.
4 5
6 8 9 1073
6. „Ethernet PoE+”
Zum Anschluss an einen Netzwerk-Switch oder Computer,
damit Sie Einstellungen mithilfe des Teranex Setup-
Dienstprogramms ändern können. Der Ethernet-Port
unterstützt auch Power-over-Ethernet-Plus.
2. Switches
Anpassbare Minischalter zum Ändern von Einstellungen.
3. LED-Multifunktionslämpchen
Leuchtet weiß, wenn der Konverter Strom empfängt und grün,
wenn ein gültiges eingehendes Videosignal erkannt wird.
Abwechselndes Ein-/Aus-Blinken zeigt individuelle Konverter
über das Blackmagic Teranex Setup-Dienstprogramm an.
4. Stromversorgung
Eingebaute Normbuchse gemäß IEC C14 zur Versorgung mit
90–240-Volt Wechselstrom.
5. „HDMI”
HDMI-Videoausgang.
7. „SDI IN”
BNC-Buchse für eingehende SDI-Videosignale.
8. „SDI Loop Out” (Durchschleif-SDI-Ausgang)
BNC-Ausgang für durchgeschleifte SDI-Videosignale.
9. „L – Analog oder AES/EBU”
XLR-Ausgang für symmetrisches Analog-Audio für den linken
Kanal oder digitales AES/EBU-Audio.
10. „R – Analog, AES/EBU oder Timecode”
Ausgabe von symmetrischem Analog-Audio für den rechten
Kanal oder digitalem AES/EBU-Audio. Die Buchse ist auch
zur Ausgabe von Timecode konfigurierbar.
114

Switches
Die Minischalter am Teranex Mini SDI to HDMI 12G erlauben
folgende Einstellungen:
„Switch 8 – Analog-Audio, AES/EBU-Audio”
Legen Sie Schalter 8 für die Ausgabe von symmetrischem
Analog-Audio auf „Off” um. In der „On”-Position wird digitales
AES/EBU-Audio ausgegeben.
„Switch 7 – Output Audio/Timecode”
Legen Sie Switch 7 auf „On” um, damit Timecode über den
rechten Audiokanal (R channel) der XLR-Buchse ausgegeben
wird. In der „Off”-Position wird Audio ausgegeben.
„Switches 4, 3, 2 – SDI Audio De-Embed Bit 2, 1, 0"
Minischalter 4, 3 und 2 repräsentieren jeweils Bit 2, 1 und 0.
So können Sie anhand der verschiedenen
On/Off-Kombinationen der Schalter 4, 3 und 2 vorgeben,
welches Audiokanalpaar von Ihrer SDI-Eingabe Sie als HDMI,
Analog- oder AES/EBU-Audio ausgeben möchten.
Auswahltabelle für SDI-Audio
Anhand der nachstehenden Kombinationen von
Schaltereinstellungen können Sie auswählen, welche SDIAudiokanäle in das von Ihrem Teranex Mini SDI to HDMI 12G
ausgegebene Signal eingebettet werden.
Die Schalterlegende am Boden Ihres Konverters gibt
Ihnen alle erforderlichen Informationen, um die
Umwandlungseinstellungen zu modifizieren
„Audio Channels”
(Audiokanäle)
1 und 2 OFF OFF OFF
3 und 4 OFF OFF ON
5 und 6 OFF ON OFF
7 und 8 OFF ON ON
9 und 10 ON OFF OFF
11 und 12 ON OFF ON
13 und 14 ON ON OFF
15 und 16 ON ON ON
AES/EBU Audio Channels
(AES/EBU-Audiokanäle)
Switch 4 Switch 3 Switch 2 „Switch Diagram”
Switch 4 Switch 3 Switch 2 „Switch Diagram”
(Schaltdiagramm)
(Schaltdiagramm)
1-4 OFF OFF OFF
5-8 OFF OFF ON
115

AES/EBU Audio Channels
(AES/EBU-Audiokanäle)
9-12 OFF ON OFF
13-16 OFF ON ON
Switch 4 Switch 3 Switch 2 „Switch Diagram”
Blackmagic Teranex Setup-Einstellungen
(Schaltdiagramm)
Mithilfe des Teranex Setup-Dienstprogramms lassen sich
neben allen unter Einsatz der Switches verfügbaren
Einstellungen überdies zusätzliche Einstellungen modifizieren.
Greifen Sie auf diese Einstellungen jeweils über die Reiter
„Video”, „Audio”, „Configure” und „About” zu.
Näheres über die Reiter „About” (Info) und „Configure”
(Konfigurieren) siehe Abschnitt „Einstellungen ändern” in
diesem Handbuch. Der „Video”-Reiter für den Teranex Mini
SDI to HDMI 12G weist folgende Einstellungen auf.
„Video Output”-Menü
„Clip HDMI Output to legal levels”
Diese Dialogbox steuert das Abschneiden von
Videoüberpegeln der SDI-Eingabe, damit Ihre HDMISignale im zulässigen Pegelbereich bleiben. Sie sollte
standardmäßig aktiviert sein.
Der „Audio”-Reiter für den Teranex Mini SDI to HDMI 12G weist
folgende Einstellungen auf.
„Video Output”-Menü
Den „XLR Output” vorgeben
Geben Sie wahlweise die Ausgabe von Analog- oder
AES/EBU-Audio vor, indem Sie die Schaltflächen
„Analog”, „AES/EBU” oder „Timecode” im „Audio
Output”-Menü markieren. Bei Auswahl von „Timecode”
gibt die linke XLR-Buchse Analog-Audio aus, während
der rechte XLR-Ausgang ein Timecodesignal ausgibt.
Je nach Ihrem vorgegebenen Ausgabemodus können
Sie auswählen, welche Audiokanäle aus Ihrer SDIEingabe an die Ausgänge für HDMI, AES/EBU-Audio
oder Analog-Audio übermittelt werden, und deren
Verstärkung („Gain”) pro Kanal oder Kanalpaar justieren.
Wenn Sie AES/EBU-Audio über beide XLR-Buchsen
ausgeben, können Sie bis zu vier Kanäle ausgeben. Bei
der Ausgabe von Analog-Audio stehen Ihnen bis zu zwei
Kanäle zur Wahl. Wenn Sie die rechte XLR-Buchse zur
Ausgabe eines Timecode-Signals verwenden, so wird
über die linke XLR-Buchse einkanaliges Analog-Audio
ausgegeben.
Ihr Teranex Mini behält die letzten Einstellungen bei, ungeachtet
ob diese über einen Mini-Switch, ein Smart Panel oder das
Teranex Setup-Dienstprogramm vorgenommen wurden. Wenn
Sie das Smart Panel entfernt oder Ihre Konverter-Einstellungen
über die Software geändert haben und zur Switch-Steuerung
zurückkehren, müssen Sie die einzelnen Schalter unter
Umständen hin- und herbewegen, um die neuen Einstellungen
anzuwenden.
Justieren Sie die Pegel Ihres Analog-Audios und AES/EBU-Audios über die Seite für „Audio”
-Einstellungen im Blackmagic Teranex Setup-Dienstprogramm
116
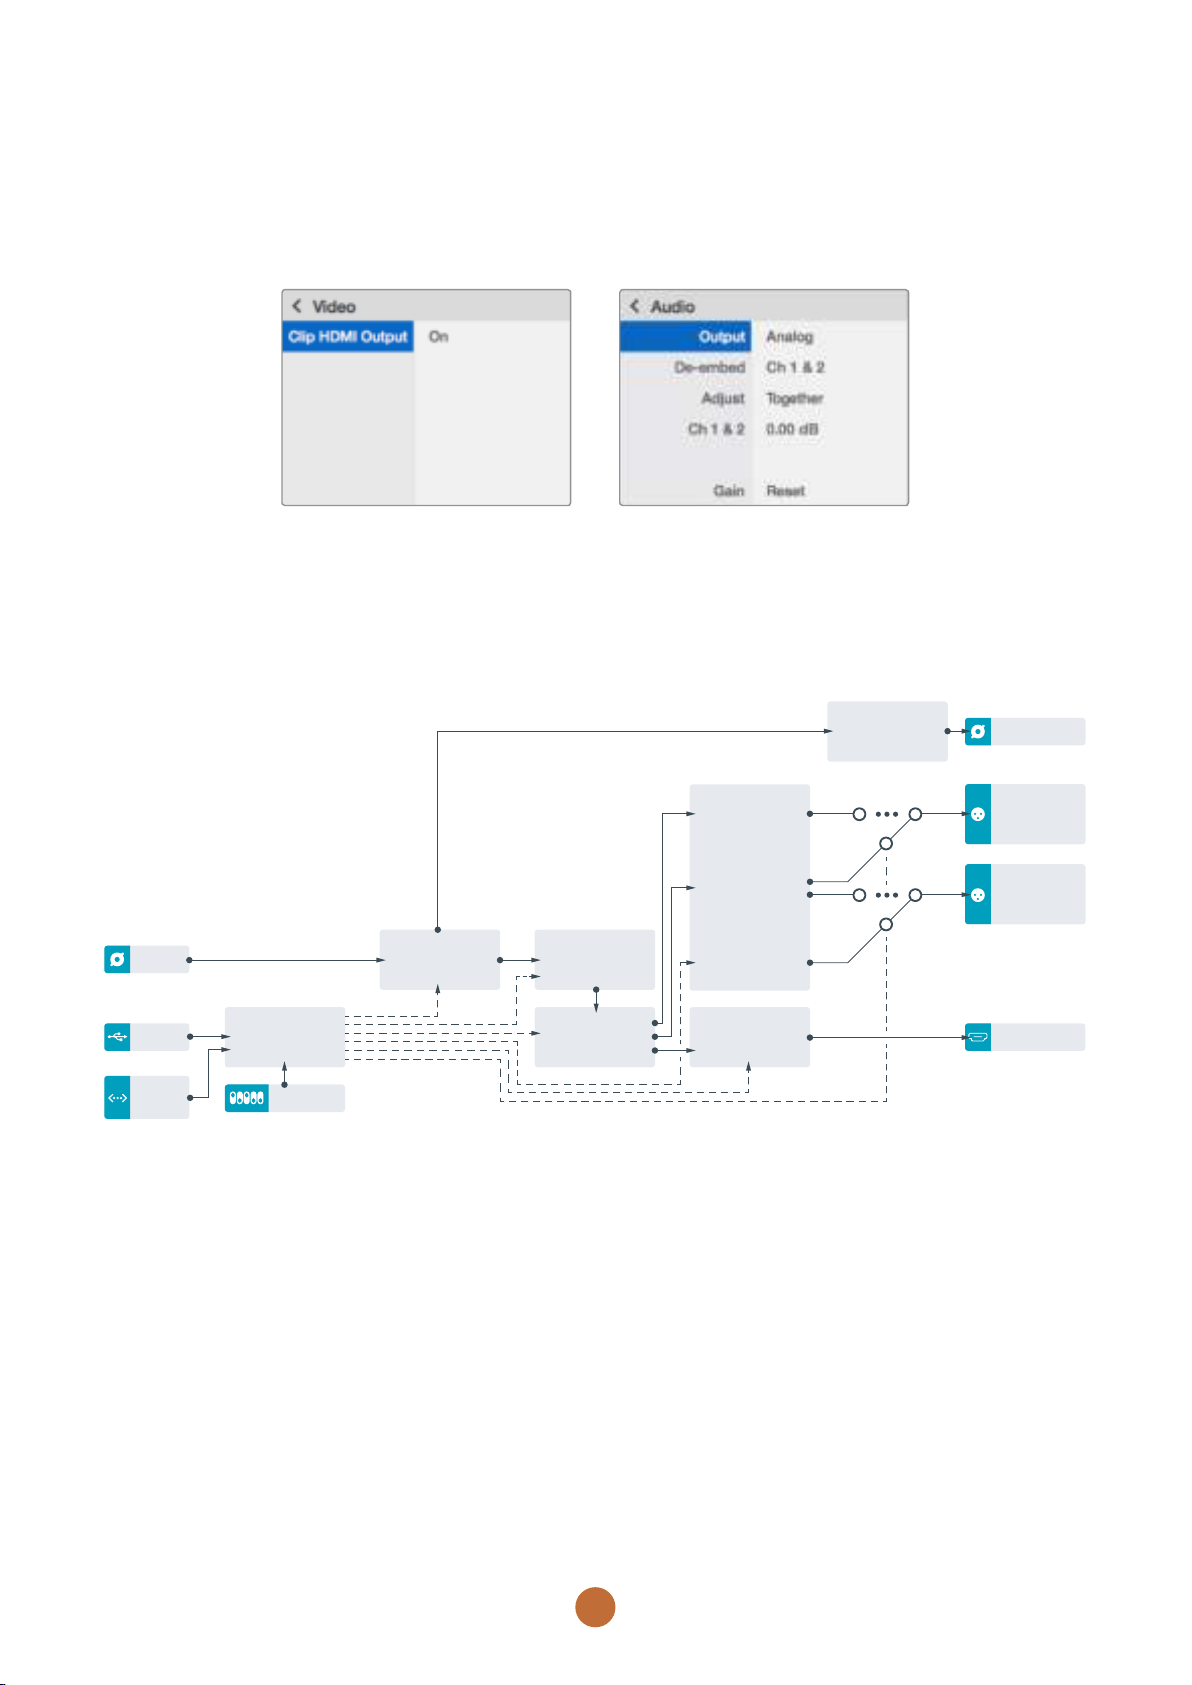
Einstellungen des Teranex Mini Smart Panels
Wenn Ihr SDI to HDMI 12G „Converter“ mit dem optionalen
Teranex Mini Smart Panel ausgerüstet ist, sind die Menüs
„Video”, „Audio” und „Network” verfügbar. Die in diesen Menüs
verfügbaren Einstellungen sind die gleichen, wie die im obigen
Abschnitt „Blackmagic Teranex Setup-Einstellungen”
beschriebenen. Näheres zur Änderung von Einstellungen
mithilfe des Teranex Mini Smart Panels, siehe Abschnitt
„Einstellungen ändern”.
Das Teranex Mini Smart Panel gibt Ihnen Zugriff auf die gleichen Einstellungen wie das Blackmagic Teranex Setup
Teranex Mini SDI to HDMI 12G Blockschaltbild
Input automatically
detects between
SD/HD/6G/12G-SDI
SDI In
Equalizer,
Re-Clocker and
10 bit De-Serializer
Customizable
Video Processor
AES/EBU
Audio Formatter
Audio Digital to
Analog with
Balanced Output
Automatic
SD/HD/6G/12G-SDI
Cable Driver
Analog or AES/EBU
Audio Out Switch
Loop SDI Out
Left Analog Out
or AES/EBU
1+2 Out
Right Analog Out
or AES/EBU 3+4
Out or Timecode
USB
Ethernet
with Power
Central Processor
and Firmware
Mini Switches
SDI Audio
De-Embedder
HDMI Video and
Audio Formatter
HDMI Out
117

Teranex Mini – HDMI to SDI 12G
ETHERNET PoE+ SDI OUT
L - ANALOG
AES/EBU
R - ANALOG
AES/EBU - T/C
PUSH PUSH
HDMI IN
SDI OUT
Konvertieren Sie HDMI-Ausgaben von Geräten wie HDVKameras, Ultra-HD-Kameras und Spielekonsolen nach SDI
mit wahlweiser Einbettung von Audio der Eingänge für HDMI,
AES/EBU oder symmetrisches Analog-Audio.
1 2
Anschlüsse
1. Mini-B USB-Port
Dient zum Anschluss eines Mac-OS-X- oder WindowsRechners mit Blackmagic Teranex Setup-Software, über die
man Einstellungen anpasst und die Produktsoftware Ihres
Teranex Minis aktualisiert.
2. Switches
Anpassbare Minischalter zum Ändern von Einstellungen.
3. LED-Multifunktionslämpchen
Leuchtet weiß, wenn der Konverter Strom empfängt und grün,
wenn ein gültiges eingehendes Videosignal erkannt wird.
Abwechselndes Ein-/Aus-Blinken zeigt individuelle Konverter
über das Blackmagic Teranex Setup-Dienstprogramm an.
4. Stromversorgung
Eingebaute Normbuchse gemäß IEC C14 zur Versorgung mit
90–240-Volt Wechselstrom.
5. „HDMI”
HDMI-Videoeingang
Dies gestattet die Übermittlung von Videosignalen von HDMI
über SDI mit SDI-Kabeln maximaler Länge. Sie können HDMI-
kompatible Computer sogar mit SDI-Ausgängen versehen.
4 5
6 8 9 1073
6. „Ethernet PoE+”
Zum Anschließen an einen Netzwerk-Switch oder Computer,
damit Sie Einstellungen mit dem Teranex Setup ändern können.
Der Ethernet-Port unterstützt auch Power-over-Ethernet-Plus.
7. „SDI Out” (SDI-Ausgang)
BNC-Buchse für ausgehende SDI-Videosignale.
8. „SDI Out” (SDI-Ausgang)
Sekundäre BNC-Buchse für die SDI-Ausgabe.
9. „L – Analog oder AES/EBU”
XLR-Eingang für symmetrisches Analog-Audio für den linken
Kanal oder digitales AES/EBU-Audio.
10. „R – Analog, AES/EBU oder Timecode”
XLR-Eingang für symmetrisches Analog-Audio für den rechten
Kanal oder digitales AES/EBU-Audio. Auch für Timecode-
Eingabe konfigurierbar.
Switches
Die Minischalter am Teranex Mini HDMI to SDI 12G erlauben
folgende Einstellungen:
„Switch 8 – Analog-Audio, AES/EBU-Audio”
Stellen Sie Schalter 8 auf „Off", um symmetrisches Analogaudio
einzubetten. In der „On”-Position wird digitales AES/EBU-Audio
ausgegeben. Zum Gebrauch dieser Eingänge muss Schalter
8 auch auf „On” stehen.
Switch 7 – „HDMI Audio, Input Audio”
Stellen Sie Schalter 7 zur Auswahl von eingebettetem HDMIAudio auf „Off”, oder für Analog- oder AES/EBU-Audio auf „On”.
„Switch 6 – „Input Audio/Timecode”
Stellen Sie Schalter 6 für die Eingabe von Timecode über den
rechten Audiokanal (R channel) der XLR-Buchse auf „On". In
der „Off”-Position wird Audio empfangen.
Die Schalterlegende am Boden Ihres Konverters gibt
Ihnen alle erforderlichen Informationen, um die
Umwandlungseinstellungen zu modifizieren
118

„Switch 5 – 60 to 59.94 Off/On"
Stellen Sie Schalter 5 auf „On", um 60p-Video in 59,94 für die
Halbbild-Abtastung zu konvertieren, wenn ein Mischer
angebunden wird. Geben Sie „Off" vor, um die Konvertierung
zu umgehen und im ursprünglichen Progressiv-Format mit 60
Frames pro Sekunde auszugeben.
„Switches 2, 1 – Select Format Bit 1, 0”
Minischalter 2 und 1 repräsentieren jeweils Bit 1 und 0. So
können Sie anhand der verschiedenen On/Off-Kombinationen
der Schalter 2 und 1 vorgeben, welche Konvertierung Sie
anwenden möchten.
Es stehen drei Konvertierungsformate zur Wahl.
„Auto – Switch 1 to OFF, Switch 2 to OFF”
Die Auflösung der SDI-Ausgabe wird der HDMI-Eingabe
angeglichen. Beispiel: Erfolgt die HDMI-Eingabe in Ultra
HD, so wird SDI in Ultra HD ausgegeben.
„Force to HD – switch 1 to OFF, switch 2 to ON”
Wenn die Eingabe in Ultra HD erfolgt, wird die SDIAusgabe nach HD abwärtskonvertiert. Ihr Teranex Mini
wird versuchen, die HDMI-Eingabe im HD-Format zu
erwirken, wenn das Quellgerät diese Feature unterstützt.
Wenn die HDMI-Eingabe in SD erfolgt, bleibt die
Ausgabe in SD.
Blackmagic Teranex Setup-Einstellungen
„Force to Ultra HD – switch 1 to ON, switch 2 to OFF”
Die SDI -Ausgabe wird zu Ul tra HD aufwärtskonvert iert, wenn
die Eingabe in HD erfolgt. Ihre Teranex Mini wird versuchen,
die HDMI-Eingabe im Ultra-HD-Format zu erwirken, wenn
das Quellgerät diese Feature unterstützt. Wenn die HDMIEingabe in SD erfolgt, bleibt die Ausgabe in SD.
Selektieren Sie eine der Optionen „Auto", „Force to HD"
oder „Force to Ultra HD" für die Up-Konvertierung auf der
„Video"-Einstellungsseite in in Blackmagic Teranex Setup.
Sie können auch die Konvertierung von 60p-Video nach
59,94i vorgeben, falls ein Mischer angeschlossen wird
.
Mithilfe des Teranex Setup-Dienstprogramms lassen sich
neben allen unter Einsatz der Switches verfügbaren
Einstellungen überdies zusätzliche Einstellungen modifizieren.
Greifen Sie auf diese Einstellungen jeweils über die Reiter
„Video”, „Audio”, „Configure” und „About” zu.
Näheres über die Reiter „About” (Info) und „Configure”
(Konfigurieren) siehe Abschnitt „Einstellungen ändern” in
diesem Handbuch.
Der „Video”-Reiter für den Teranex Mini HDMI to SDI 12G weist
folgende Einstellungen auf.
„Video Processing”-Menü
Up-Konvertierung
Klicken Sie auf das Aufklappmenü "Upconversion", um
die Einstellungen für die Aufwärtskonvertierung Ihrer
SDI-Ausgabe auszuwählen. Die Vorgabe von „Auto”
bewirkt, dass die SDI-Ausgabe der HDMI-Eingabe
angepasst wird. „Force HD” und „Force Ultra HD” geben
unabhängig von der HDMI-Eingabe jeweils HD- bzw.
Ultra-HD-Video aus. Bei Bedarf erfolgt eine Up- bzw.
Down-Konvertierung. Dabei bleibt SD immer SD.
Framerate
Aktivieren bzw. deaktivieren Sie diese Dialogbox, um
Video in 60p zur Verwendung für Mischer-Workflows mit
Halbbild-Abtastung (Interlaced) in 59,94i umzuwandeln.
Der „Audio”-Reiter für den Teranex Mini HDMI to SDI 12G weist
folgende Einstellungen auf.
diese einzubetten sind. Die Verstärkung („Gain”) des
Audiosignals kann hier ebenfalls justiert werden.
Die Auswahl von AES/EBU gestattet außerdem, die Option
„Sample Rate Converter" zu aktivieren. Ist diese aktiviert,
erfolgt die Abtastung Ihrer SDI-Audioausgabe zwangsläufig
mit 48Khz, der korrekten Abtastrate für Fernsehen.
Ihr Teranex Mini behält die letzten Einstellungen bei, ungeachtet
ob diese über einen Mini-Switch, ein Smart Panel oder das Teranex
Setup-Dienstprogramm vorgenommen wurden. Wenn Sie das
Smart Panel entfernt oder Ihre Konverter-Einstellungen über die
Software geändert haben und zur Switch-Steuerung zurückkehren,
müssen Sie die einzelnen Schalter unter Umständen hin- und
herbewegen, um die neuen Einstellungen anzuwenden.
„Audio Input”-Menü (Audioeingabe)
„Set XLR Input” / „Set Audio Input”
Dieses Menü lässt Sie zwischen dem XLR- und dem HDMIAudioeingang auswählen. Bei Auswahl von HDMI wird das
HDMI-Audio in die SDI-Videoausgabe eingebettet. Die
Vorgabe von „XLR" lässt Sie zwischen Analog-, AES/EBUoder Timecode-Eingaben auswählen. Hier geben Sie
überdies vor, in welche Kanäle Ihrer SDI-Audioausgabe
Justieren Sie die Pegel Ihres Analog-Audios und AES/EBU-
Audios über die Seite für „ Audio”-Einstellungen im
Blackmagic Teranex Setup-Dienstprogramm
119

Einstellungen des Teranex Mini Smart Panels
Wenn Ihr HDMI to SDI 12G „Converter“ mit dem optionalen
Teranex Mini Smart Panel ausgerüstet ist, sind die Menüs
„Video”, „Audio” und „Network” verfügbar. Die in diesen Menüs
Näheres zur Änderung von Einstellungen mithilfe des Teranex
Mini Smart Panels, siehe Abschnitt „Einstellungen ändern” in
diesem Handbuch.
verfügbaren Einstellungen sind identisch mit den im obigen
Abschnitt beschriebenen.
Das Teranex Mini Smart Panel gibt Ihnen Zugriff auf die gleichen Einstellungen wie das Blackmagic Teranex Setup-Dienstprogramm
Teranex Mini HDMI to SDI 12G Blockschaltbild
Analog or AES/EBU
Left Analog In
or AES/EBU 1+2
Audio Switch
Right Analog In
or AES/EBU 3+4
or Timecode
HDMI In
USB
USB
Ethernet
with Power
Analog or AES/EBU
Audio Switch
HDMI Video and
Audio Decoder
Central
Processor and
Firmware
Mini Switches
AES/EBU Sample
Rate Converter
Audio Analog to
Digital from
Balanced Input
Customizable
Video Processor
SDI Audio
Embedder
Automatic
SD/HD/6G/12G-SDI
Cable Driver
SDI Out
SDI Out
120

Teranex Mini – SDI to Analog 12G
ETHERNET PoE+ SDI IN
L - ANALOG
AES/EBU
R - ANALOG
AES/EBU - T/C
Y or NTSC/PAL B-Y or S-VIDEO Y R-Y or S-VIDEO C
SDI LOOP OUT
Konvertieren Sie Video von Eingabequellen in SD SDI, HDSDI, 3G-SDI, 6G-SDI und 12G-SDI nach analogem
Komponenten-, NTSC- und PAL-Video sowie symmetrischem
AES/EBU- und Analog-Audio für die Ausgabe.
1 2
3 11 12
Anschlüsse
1. Mini-B USB-Port
Dient zum Anschluss eines Mac-OS-X- oder WindowsRechners mit dem Blackmagic Teranex Setup-Dienstprogramm,
über das man Einstellungen anpasst und die Produktsoftware
Ihres Teranex Minis aktualisiert.
2. Switches
Anpassbare Minischalter zum Ändern von Einstellungen.
Der interne Down-Konverter lässt Sie 12G-SDI-Videoquellen
an SD- und HD- Analoggeräte anschließen. Auch die
Anbindung von Videomonitoren und MAZen wie Betacam SP
und VHS ist möglich. Sie können sogar paarweise Analog-
Audio von 16 herausgelösten SDI-Audiokanälen ausgeben.
4 5 6
8 9 10
7
7. „R-Y or S-VIDEO C”
BNC-Buchse zur Ausgabe von analogen Komponentensignalen
R-Y oder S-Video C.
8. „Ethernet PoE+”
Zum Anschließen an einen Netzwerk-Switch oder Computer,
damit Sie Einstellungen mit dem Teranex Setup ändern können.
Der Ethernet-Port unterstützt auch Power-over-Ethernet-Plus.
3. LED-Multifunktionslämpchen
Leuchtet weiß, wenn der Konverter Strom empfängt und grün,
wenn ein gültiges eingehendes Videosignal erkannt wird.
Abwechselndes Ein-/Aus-Blinken zeigt individuelle Konverter
über das Blackmagic Teranex Setup-Dienstprogramm an.
4. Stromversorgung
Eingebaute Normbuchse gemäß IEC C14 zur Versorgung mit
90–240-Volt Wechselstrom.
5. „Y oder NTSC/PAL”
BNC-Buchse zur Ausgabe von analogen Komponentensignalen
Y, NTSC- oder PAL-FBAS-Signalen.
6. „B-Y oder S-VIDEO Y”
BNC-Buchse zur Ausgabe von analogen Komponentensignalen
B-Y oder S-Video Y.
Switches
Die Minischalter am Teranex Mini SDI to Analog 12G erlauben
folgende Einstellungen:
„Switch 8 – Analog-Audio, AES/EBU-Audio”
Stellen Sie Schalter 8 auf „Off”, um symmetrisches AnalogAudio auszuwählen oder auf „On”, um digitales AES/EBU-Audio
auszugeben.
„Switch 7 – 7.5 IRE, 0.0 IRE”
In den USA und anderen Ländern, wo NTSC mit einem IREWert von 7,5 üblich ist, sollte Schalter 7 auf „Off” eingestellt
sein. In Ländern, wo das 7,5-IRE-Setup nicht üblich ist, stellen
Sie Schalter 7 auf „On”. Diese Einstellung berührt nur die
Ausgabe von Komponenten- oder S-Videosignalen.
9. „SDI IN”
BNC-Buchse für eingehende SDI-Videosignale.
10. „SDI Loop Out” (Durchschleif-SDI-Ausgang)
BNC-Ausgang für durchgeschleifte SDI-Videosignale.
11. „L – Analog oder AES/EBU”
XLR-Ausgang für symmetrisches Analog-Audio für den linken
Kanal oder digitales AES/EBU-Audio.
12. „R – Analog, AES/EBU oder Timecode”
Ausgabe von symmetrischem Analog-Audio für den rechten
Kanal oder digitalem AES/EBU-Audio. Die Buchse ist auch
zur Ausgabe von Timecode konfigurierbar.
„Switch 6 – SMPTE Levels, Betacam Levels”
Stellen Sie Schalter 6 für SMPTE-Pegel auf „Off” oder für
Betacam-Pegel auf „On”. Da SMPTE-Pegel gebräuchlicher
sind und sogar Betacam SP-MAZen SMPTE-Pegel verarbeiten,
sollte Betacam nur eingestellt werden, wenn Sie sicher sind,
dass Betacam-Pegel verwendet werden.
„Switch 5 – Component, Composite oder S-Video”
Stellen Sie Schalter 5 auf „Off”, um analoges Komponentenvideo
auszugeben oder auf „On” zur Ausgabe von FBAS- und S-Video.
Um eingehende HD-Videosignale an den S-Video- und FBAS-
Ausgängen als SD anzuzeigen, muss die Down-Konvertierung
durch Umlegen von Schalter 1 auf „On” eingestellt sein.
121

Analoges Komponentenvideo unterstützt HD- und SD-Video.
„Switch 4, 3 and 2 – SDI Audio De-Embed”
Minischalter 4, 3 und 2 repräsentieren jeweils Bit 2, 1 und 0.
So können Sie anhand der verschiedenen On/OffKombinationen der Schalter 4, 3 und 2 vorgeben, welches
Audiokanalpaar von Ihrer SDI-Eingabe Sie als Analog- oder
AES/EBU-Audio ausgeben möchten.
„Switch 1 – Processing Off – Processing On”
Down-Konvertierung mit drei Seitenverhältnis-Modi, die durch
Umlegen von Schalter 1 durchlaufen werden. Schalten Sie
Switch 1 zwischen „Off” und „On” hin und her, um die Modi
„Anamorphic”, „Center Cut” und „Letterbox” zu durchlaufen.
Stellen Sie Switch 1 beim Konvertieren von Ultra HD oder HD
auf „Off”, um die Ausgabe von HD über die Buchsen für
analoges Komponenten-Video zu erzwingen.
Versichern Sie sich außerdem, dass Switch 5 auf Ihre
gewünschte Ausgabe eingestellt ist. Beispiel: Stellen Sie
Switch 5 auf „Off”, um die Ausgabe von Komponentensignalen
auszuwählen.
Auswahltabelle für SDI-Audio
Die Skalierung von 4K-DCI-Material erfolgt am Komponenten-
HD-Ausgang.
Die Schalterlegende am Boden Ihres Konverters gibt
Ihnen alle erforderlichen Informationen, um die
Umwandlungseinstellungen zu modifizieren
Anhand der nachstehenden Kombinationen von
Schaltereinstellungen können Sie auswählen, über welche
„Audio Channels”
(Audiokanäle)
1 und 2 OFF OFF OFF
3 und 4 OFF OFF ON
5 und 6 OFF ON OFF
7 und 8 OFF ON ON
9 und 10 ON OFF OFF
11 und 12 ON OFF ON
13 und 14 ON ON OFF
15 und 16 ON ON ON
Switch 4 Switch 3 Switch 2 „Switch Diagram”
SDI-Audiokanäle Ihr Teranex Mini SDI to Analog 12G analoges
oder digitales AES-EBU-Audio ausgibt.
(Schaltdiagramm)
AES/EBU Audio Channels
(AES/EBU-Audiokanäle)
1-4 OFF OFF OFF
5-8 OFF OFF ON
9-12 OFF ON OFF
Switch 4 Switch 3 Switch 2 „Switch Diagram”
122
(Schaltdiagramm)

AES/EBU Audio Channels
Switch 4 Switch 3 Switch 2 „Switch Diagram”
(AES/EBU-Audiokanäle)
13-16 OFF ON ON
Blackmagic Teranex Setup-Einstellungen
(Schaltdiagramm)
Mithilfe des Teranex Setup-Dienstprogramms lassen sich
neben allen unter Einsatz der Switches verfügbaren
Einstellungen überdies zusätzliche Einstellungen modifizieren.
Greifen Sie auf diese Einstellungen jeweils über die Reiter
„Video”, „Audio”, „Configure” und „About” zu.
Näheres über die Reiter „About” (Info) und „Configure”
(Konfigurieren) siehe Abschnitt „Einstellungen ändern” in
diesem Handbuch.
Der „Video”-Reiter für den Teranex Mini SDI to Analog 12G
weist folgende Einstellungen auf.
„Video Output”-Menü
Das Videoausgabe-Menü ermöglicht Ihnen die Auswahl der
Signalausgabe in Komponenten- oder S-Video- und FBASVideo („Component” oder „S-Video/Composite”) sowie die
separate Einstellung der Luminanz- und Chroma-Werte der
B-Y- und R-Y-Komponenten-Pegel.
Wenn Sie die Ausgabe von S-Video und FBAS-Video
vorgegeben haben, können Sie zusätzlich zwischen den
ortsabhängigen Schwarzpegeln 7,5 IRE und 0,0 IRE auswählen.
Bei Vorgabe von Komponentenvideo besteht die Wahl
zwischen SMPTE- und Betacam-Pegeln.
Da SMPTE-Pegel gebräuchlicher sind und sogar Betacam
SP-MAZen SMPTE-Pegel verarbeiten, sollte Betacam nur
eingestellt werden, wenn Sie sicher sind, dass Betacam-Pegel
verwendet werden.
„Video Processing”-Menü
Im Bearbeitungs-Menü geben Sie das Seitenverhältnis des
abwärtskonvertierten Videos vor. Verfügbare Optionen sind
„Letterbox”, „Anamorphic”, „Center Cut” oder „Off” (keine
Bearbeitung).
Der „Audio”-Reiter für den Teranex Mini SDI to Analog 12G
weist folgende Einstellungen auf.
„Audio Output”-Menü
In diesem Menü geben Sie vor, ob auf den Audioausgängen
Analog- oder AES/EBU-Audio oder Timecode ausgegeben
werden soll und welche Kanäle aus Ihrem eingehenden SDI-
Audiosignal herauszulösen sind. Die Verstärkung („Gain”) des
Audiosignals kann hier ebenfalls justiert werden.
Ihr Teranex Mini behält die letzten Einstellungen bei, ungeachtet
ob diese über einen Mini-Switch, ein Smart Panel oder das Teranex
Setup-Dienstprogramm vorgenommen wurden. Wenn Sie das
Smart Panel entfernt oder Ihre Konverter-Einstellungen über die
Software geändert haben und zur Switch-Steuerung zurückkehren,
müssen Sie die einzelnen Schalter unter Umständen hin- und
herbewegen, um die neuen Einstellungen anzuwenden.
Justieren Sie die Luminanz- und Chromawerte Ihres Videos bzw.
die Chromawerte für „Component”-Video über die Seite für
„Video”-Einstellungen in Blackmagic Teranex Setup
Justieren Sie die Pegel Ihres Analog- und AES/EBU-Audios
über die Seite für „Audio”-Einstellungen im Blackmagic
Teranex Setup-Dienstprogramm
123

Einstellungen des Teranex Mini Smart Panels
Wenn Ihr SDI to Analog 12G „Converter“ mit dem optionalen
Teranex Mini Smart Panel ausgerüstet ist, sind die Menüs
„Video”, „Audio” und „Network” verfügbar. Die in diesen Menüs
verfügbaren Einstellungen sind die gleichen, wie die im obigen
Abschnitt „Blackmagic Teranex Setup-Einstellungen”
beschriebenen. Näheres zur Änderung von Einstellungen
mithilfe des Teranex Mini Smart Panels, siehe Abschnitt
„Einstellungen ändern” in diesem Handbuch.
Das Teranex Mini Smart Panel gibt Ihnen Zugriff auf die gleichen Einstellungen wie das Blackmagic Teranex Setup-Dienstprogramm
Teranex Mini SDI to Analog 12G Blockschaltbild
Automatic
SD/HD/6G/12G-SDI
Cable Driver
Loop SDI Out
SDI In
USB
Ethernet
with Power
Input automatically
detects between
SD/HD/6G/12G-SDI
Central Processor
and Firmware
Mini Switches
Equalizer,
Re-Clocker and
10 bit De-Serializer
10 bit HD to
SD Down
Converter
SDI Audio
De-Embedder
AES/EBU
Audio Sample Rate
Converter
Stereo Audio
Analog to Digital
Converter
12 Bit Digital to
Analog SD/HD
Video Converter
Analog or AES/EBU
Audio Out Switch
Component output can switch to
S-Video and Composite
Left Analog Out
or AES/EBU
1+2 Out
Right Analog Out
or AES/EBU
3+4 Out or
Timecode
Y
R-Y
B-Y
124

Teranex Mini – Analog to SDI 12G
ETHERNET PoE+ SDI OUT
L - ANALOG
AES/EBU
R - ANALOG
AES/EBU - T/C
Y or NTSC/PAL B-Y or S-VIDEO Y R-Y or S-VIDEO C
PUSH PUSH
SDI OUT
Konvertiert Video und Audio von Analoggeräten wie Betacam
SP-MAZen, HDV-Kameras und Spielekonsolen nach SD-HDI-,
SD-SDI- und 12G-SDI-Video. Unterstützt werden mehrere
analoge Eingabeformate wie Komponenten-SD/HD, S-Video
1 2
3 11 12
Anschlüsse
1. Mini-B USB-Port
Dient zum Anschluss eines Mac-OS-X- oder WindowsRechners mit dem Blackmagic Teranex Setup-Dienstprogramm,
über das man Einstellungen anpasst und die Produktsoftware
Ihres Teranex Minis aktualisiert.
2. Switches
Anpassbare Minischalter zum Ändern von Einstellungen.
oder FBAS-NTSC und PAL. Über die 12G-SDI-Ausgänge des
Konverters ist u. a. die Einbettung von digitalem
AES/EBU- oder Analog-Audio möglich.
4 5 6
8 9 10
7
7. „R-Y oder S-VIDEO C”
BNC-Buchse zur Ausgabe von analogen Komponentensignalen
R-Y oder S-Video C.
8. „Ethernet PoE+”
Zum Anschließen an einen Netzwerk-Switch oder Computer,
damit Sie Einstellungen mit dem Teranex Setup ändern können.
Der Ethernet-Port unterstützt auch Power-over-Ethernet-Plus.
3. LED-Multifunktionslämpchen
Leuchtet weiß, wenn der Konverter Strom empfängt und grün,
wenn ein gültiges eingehendes Videosignal erkannt wird.
Abwechselndes Ein-/Aus-Blinken zeigt individuelle Konverter
über das Blackmagic Teranex Setup-Dienstprogramm an.
4. Stromversorgung
Eingebaute Normbuchse gemäß IEC C14 zur Versorgung mit
90–240-Volt Wechselstrom.
5. „Y oder NTSC/PAL”
BNC-Buchse zur Ausgabe von analogen Komponentensignalen
Y, NTSC- oder PAL-FBAS-Signalen.
6. „B-Y oder S-VIDEO Y”
BNC-Buchse zur Ausgabe von analogen Komponentensignalen
B-Y oder S-Video Y.
Switches
Die Minischalter am Teranex Mini Analog to SDI 12G erlauben
folgende Einstellungen:
„Switch 8 – Analog-Audio, AES/EBU-Audio”
Stellen Sie Schalter 8 auf „Off”, um symmetrisches AnalogAudio auszuwählen oder auf „On”, um digitales AES/EBU-Audio
zu empfangen.
„Switch 7 – 7.5 IRE - 0.0 IRE”
In den USA und anderen Ländern, wo NTSC mit einem IREWert von 7,5 üblich ist, sollte Schalter 7 auf „Off” eingestellt
sein. In Ländern, wo das 7,5-IRE-Setup nicht
üblich ist, stellen Sie Schalter 7 auf „On”. Diese Einstellung
berührt nur die Ausgabe von FBAS- oder S-Videosignalen.
9. „SDI OUT”
BNC-Buchse für ausgehende SDI-Videosignale.
10. „SDI OUT”
BNC-Buchse für ausgehende SDI-Videosignale.
11. „L – Analog oder AES/EBU”
XLR-Eingang für symmetrisches Analog-Audio für den linken
Kanal oder digitales AES/EBU-Audio.
12. „R – Analog, AES/EBU oder Timecode”
XLR-Eingang für symmetrisches Analog-Audio für den rechten
Kanal oder digitales AES/EBU-Audio. Auch für Timecode-
Eingabe konfigurierbar.
„Switch 6 – SMPTE Levels – Betacam Levels”
Diese Einstellung bietet die Wahl zwischen SMPTE- oder
Betacam-Videopegeln. Stellen Sie Schalter 6 für SMPTE-Pegel
auf „Off” oder für Betacam-Pegel auf „On”. Da SMPTE-Pegel
gebräuchlicher sind und sogar Betacam SP-MAZen SMPTE-
Pegel verarbeiten, sollte Betacam nur eingestellt werden,
wenn tatsächlich Betacam-Pegel verwendet werden.
„Switch 5 – Component, Composite oder S-Video”
Stellen Sie Schalter 5 auf „Off”, um die Eingabe von analogem
Komponentenvideo auszuwählen oder auf „On” für die
Analogeingabe von FBAS- und S-Video.
125

„Switch 4 – Composite – S-Video”
Stellen Sie Schalter 4 auf „Off”, um die Eingabe von FBASVideo auszuwähen oder auf „On” für die Eingabe von S-Video.
„Switch 3 – SD to HD”
Stellen Sie Schalter 3 auf „On”, um die Auflösung der SDIAusgabe von SD nach HD umzuwandeln, wenn die
eingehenden FBAS-, S-Video- oder Komponentensignale in
SD vorliegen. Steht der Schalter auf „Off”, wird das Signal der
Eingabeauflösung angeglichen.
„Switch 2 – HD to UHD”
Stellen Sie Schalter 2 auf „On”, um die Auflösung der SDIAusgabe nach Ultra HD umzuwandeln, wenn das eingehende
Komponentensignal in HD vorliegt. Steht der Schalter auf
„Off”, wird das Signal der Eingabeauflösung angeglichen.
„Switch 1 – Input Audio / Timecode”
Stellen Sie Schalter 1 für die Eingabe von Timecode über den
rechten Kanal (R channel) der XLR-Buchse auf „On”. In der
„Off”-Position wird Audio empfangen.
Blackmagic Teranex Setup-Einstellungen
Mithilfe des Teranex Setup-Dienstprogramms lassen sich
neben allen unter Einsatz der Switches verfügbaren
Einstellungen überdies zusätzliche Einstellungen modifizieren.
Greifen Sie auf diese Einstellungen jeweils über die Reiter
„Video”, „Audio”, „Configure” und „About” zu.
Näheres über die Reiter „About” (Info)” und Configure”
(Konfigurieren) siehe Abschnitt „Einstellungen verändern” in
diesem Handbuch.
Der „Video”-Reiter für den Teranex Mini Analog to SDI 12G
weist folgende Einstellungen auf.
„Video Input”-Menü
Dieses Menü gibt Ihnen die Auswahl zwischen der Eingabe
von Komponenten-, S-Video- und FBAS-Video („Component”,
„S-Video, „Composite”). Stellen Sie hier auch die Luminanzund Chroma-Pegel ein und geben Sie die Pegel für B-Y and
R-Y Komponentensignale unabhängig voneinander ein.
Wenn Sie die Eingabe von S-Video oder FBAS-Video
vorgegeben haben, können Sie zusätzlich zwischen den
ortsabhängigen Schwarzpegeln 7,5 IRE und 0,0 IRE auswählen.
Bei Vorgabe von Komponentenvideo besteht die Wahl
zwischen SMPTE- und Betacam-Pegeln. Da SMPTE-Pegel
gebräuchlicher sind und sogar Betacam SP-MAZen SMPTEPegel verarbeiten, sollte Betacam nur eingestellt werden,
wenn Sie sicher sind, dass Betacam-Pegel verwendet werden.
Die Schalterlegende am Boden Ihres Konverters gibt
Ihnen alle erforderlichen Informationen, um die
Umwandlungseinstellungen zu modifizieren
„Video Processing”-Menü
In diesem Menü richten Sie Umwandlungsoptionen ein, die
Ihrer analogen Videoeingabe entsprechen. Eingehende
Komponentensignale können von SD nach HD sowie von HD
nach Ultra HD umgewandelt werden. Eingehende S-Video-
und FBAS-Signale lassen sich nur von SD nach HD konvertieren.
Der „Audio”-Reiter für den Teranex Mini Analog to SDI 12G
weist folgende Einstellungen auf.
„Audio Input”-Menü
In diesem Menü geben Sie vor, ob Analog- oder AES/EBU-
Audio oder Timecode empfangen werden soll und in welche
Kanäle Ihrer ausgehenden SDI-Audiosignale diese einzubetten
sind. Die Verstärkung („Gain”) des Audiosignals kann hier
ebenfalls justiert werden.
Die Auswahl von AES/EBU gestattet außerdem, die Option
„Sample Rate Converter” zu aktivieren. Ist diese Option
aktiviert, wird die Abtastrate Ihrer SDI-Audioausgabe auf 24-
Bit, 48Khz abwärts- bzw. aufwärtskonvertiert.
Ihr Teranex Mini behält die letzten Einstellungen bei, ungeachtet
ob diese über einen Mini-Switch, ein Smart Panel oder das
Teranex Setup-Dienstprogramm vorgenommen wurden. Wenn
Sie das Smart Panel entfernt oder Ihre Konverter-Einstellungen
über die Software geändert haben und zur Switch-Steuerung
zurückkehren, müssen Sie die einzelnen Schalter unter
Umständen hin- und herbewegen, um die neuen Einstellungen
anzuwenden.
126

Justieren Sie die Luminanz- und Chromawerte Ihres Videos bzw.
die Chromawerte für „Component”-Video über die Seite für
„Video”-Einstellungen im Blackmagic Teranex Setup
Einstellungen des Teranex Mini Smart Panels
Justieren Sie die Pegel Ihres Analog- und AES/EBU-Audios
über die Seite für „Audio”-Einstellungen im Blackmagic
Teranex Setup
Wenn Ihr Analog to 12G „Converter“ mit dem optionalen
Teranex Mini Smart Panel ausgerüstet ist, sind die Menüs
„Video”, „Audio” und „Network” verfügbar. Die in diesen Menüs
Näheres zur Änderung von Einstellungen mithilfe des Teranex
Mini Smart Panels, siehe Abschnitt „Einstellungen ändern” in
diesem Handbuch.
verfügbaren Einstellungen sind die gleichen, wie die im obigen
Abschnitt „Blackmagic Teranex Setup-Einstellungen”
beschriebenen.
Das Teranex Mini Smart Panel gibt Ihnen Zugriff auf die gleichen Einstellungen wie das Blackmagic Teranex Setup-Dienstprogramm
127

Teranex Mini Analog to SDI 12G Blockschaltbild
Analog or AES/EBU
Left Analog In
or AES/EBU 1+2
Right Analog In
or AES/EBU 3+4 In
or Timecode In
Audio Switch
Analog or AES/EBU
Audio Switch
AES/EBU Sample
Rate Converter
Audio Analog to
Digital from
Balanced Input
Y
R-Y
B-Y
USB
Ethernet
with Power
12 Bit Digital to
Analog SD/HD
Video Converter
Central Processor
and Firmware
Mini Switches
Customizable
Video Processor
Component input can switch to
S-Video and Composite
SDI Audio
Embedder
Teranex Mini – SDI to Audio 12G
Lösen Sie Audiosignale aus beliebigen SDI-Videoquellen
heraus, um sie in zwei Kanälen Analog-Audio oder in
vier Kanälen AES/EBU-Digitalaudio auszugeben. Geben Sie
Signale an Audiogeräte wie Audiomixer, analoge MAZen und
Referenzmonitore aus.
Um zusätzliche SDI-Audiokanäle auszulesen, können Sie
einen weiteren Teranex Mini SDI to Audio 12G mit Ihrem
vorhandenen Konverter in Reihe schalten, indem sie das
zweite Gerät an seinen SDI-Ausgang anschließen.
4 5 6
Automatic
SD/HD/6G/12G-SDI
Cable Driver
7
SDI Out
SDI Out
1 2
3 11 12
Anschlüsse
1. Mini-B USB-Port
Dient zum Anschluss eines Mac-OS-X- oder WindowsRechners mit dem Blackmagic Teranex Setup-Dienstprogramm,
über das man Einstellungen anpasst und die Produktsoftware
Ihres Teranex Minis aktualisiert.
2. Switches
Anpassbare Minischalter zum Ändern von Einstellungen.
OPTICAL
AUDIO
ETHERNET PoE SDI IN
8 9 10
L R
STEREO OUT
SDI OUT
L - ANALOG
AES/EBU
3. LED-Multifunktionslämpchen
Leuchtet weiß, wenn der Konverter Strom empfängt und grün,
wenn ein gültiges eingehendes Videosignal erkannt wird.
Abwechselndes Ein-/Aus-Blinken zeigt individuelle Konverter
über das Blackmagic Teranex Setup-Dienstprogramm an.
4. Stromversorgung
Eingebaute Normbuchse gemäß IEC C14 zur Versorgung mit
90–240-Volt Wechselstrom.
128
R - ANALOG
AES/EBU - T/C

5. „Optical S/PDIF Audio Output”
S/PDIF-Signal mit TOSLINK-Verbinder.
9. „SDI IN”
BNC-Buchse für eingehende SDI-Videosignale.
6. „L – Unbalanced Analog Line Level Output”
RCA-Buchse zur Ausgabe von linkskanaligem asymmetrischen
Analog-Audio.
7. „R – Unbalanced Analog Line Level Output”
RCA-Buchse zur Ausgabe von rechtskanaligem asymmetrischen
Analog-Audio.
8. „Ethernet PoE”
Zum Anschließen an einen Netzwerk-Switch oder Computer,
damit Sie Einstellungen mit dem Teranex Setup ändern können.
Der Ethernet-Port unterstützt auch Power-over-Ethernet-Plus.
Switches
Die Minischalter am Teranex Mini SDI to Audio 12G erlauben
folgende Einstellungen:
„Switch 8 – Analog-Audio, AES/EBU-Audio”
Stellen Sie Schalter 8 auf „Off”, um symmetrisches AnalogAudio auszuwählen oder auf „On”, um digitales AES/EBU-Audio
auszugeben.
„Switch 7 – Output Audio/Timecode”
Legen Sie Switch 7 auf „On” um, damit Timecode über den
rechten Audiokanal (R channel) der XLR-Buchse ausgegeben
wird. In der „Off”-Position wird Audio ausgegeben.
10. „SDI Loop Out” (Durchschleif-SDI-Ausgang)
BNC-Ausgang für durchgeschleifte SDI-Videosignale.
11. „L – Analog oder AES/EBU”
XLR-Ausgang für symmetrisches Analog-Audio für den linken
Kanal oder digitales AES/EBU-Audio.
12. „R – Analog, AES/EBU oder Timecode”
XLR-Buchse zur Ausgabe von symmetrischem Analog-Audio
für den rechten Kanal oder digitalem AES/EBU-Audio. Die
Buchse ist auch zur Ausgabe von Timecode konfigurierbar.
„Switches 6, 5, 4 – SDI Audio De-Embed Bit 2, 1, 0"
Minischalter 6, 5 und 4 repräsentieren jeweils Bit 2, 1 und 0.
So können Sie anhand der verschiedenen
On/Off-Kombinationen der Schalter 6, 5 und 4 vorgeben,
welche Audiokanäle aus dem eingehenden SDI-Signal
herausgelöst werden und in Ihre Audioausgabe
einfließen sollen.
Tabelle für die Herauslösung von SDI-Audio
Analog Audio Channels
(Analoge Audiokanäle)
1-2 OFF OFF OFF
3-4 OFF OFF ON
5-6 OFF ON OFF
7-8 OFF ON ON
Switch 6 Switch 5 Switch 4 „Switch Diagram”
Die Schalterlegende am Boden Ihres Konverters gibt
Ihnen alle erforderlichen Informationen, um die
Umwandlungseinstellungen zu modifizieren
(Schaltdiagramm)
9-10 ON OFF OFF
11-12 ON OFF ON
13-14 ON ON OFF
129

Analog Audio Channels
(Analoge Audiokanäle)
15-16 ON ON ON
Switch 6 Switch 5 Switch 4 „Switch Diagram”
(Schaltdiagramm)
AES/EBU Audio Channels
(AES/EBU-Audiokanäle)
1-4 OFF OFF OFF
5-8 OFF OFF ON
9-12 OFF ON OFF
13-16 OFF ON ON
Switch 6 Switch 5 Switch 4 „Switch Diagram”
Blackmagic Teranex Setup-Einstellungen
Mithilfe des Teranex Setup-Dienstprogramms lassen sich
neben allen unter Einsatz der Switches verfügbaren
Einstellungen überdies zusätzliche Einstellungen modifizieren.
Greifen Sie auf diese Einstellungen jeweils über die Reiter
„Audio”, „Configure” und „About” zu.
Näheres über die Reiter „About” (Info)” und Configure”
(Konfigurieren) siehe Abschnitt „Einstellungen ändern” in
diesem Handbuch.
Der „Audio”-Reiter für den Teranex Mini SDI to Audio 12G
weist folgende Einstellungen auf.
(Schaltdiagramm)
„Audio Output”-Menü
In diesem Menü geben Sie vor, ob auf den Audioausgängen
Analog- oder AES/EBU -Audio oder Timecode ausgegeben werden
soll und welche Kanäle aus Ihrem eingehenden SDI-Audiosignal
herauszulösen sind. Die Verstärkung („Gain”) des Audiosignals
kann hier ebenfalls justiert werden.
Ihr Teranex Mini behält die letzten Einstellungen bei, ungeachtet
ob diese über einen Mini-Switch, ein Smart Panel oder das Teranex
Setup-Dienstprogramm vorgenommen wurden. Wenn Sie das
Smart Panel entfernt oder Ihre Konverter-Einstellungen über die
Software geändert haben und zur Switch-Steuerung zurückkehren,
müssen Sie die einzelnen Schalter unter Umständen hin- und
herbewegen, um die neuen Einstellungen anzuwenden.
Justieren Sie die Pegel Ihres Analog-Audios und AES/EBU-Audios über die Seite für „Audio”
-Einstellungen im Blackmagic Teranex Setup-Dienstprogramm
130

Einstellungen des Teranex Mini Smart Panels
Wenn Ihr SDI to Analog 12G „Converter“ mit dem optionalen
Teranex Mini Smart Panel ausgerüstet ist, sind die Menüs
„Audio” und „Network” verfügbar. Die in diesen Menüs
verfügbaren Einstellungen sind die gleichen, wie die im obigen
Abschnitt „Blackmagic Teranex Setup-Einstellungen”
beschriebenen. Näheres zur Änderung von Einstellungen
mithilfe des Teranex Mini Smart Panels, siehe Abschnitt
„Einstellungen verändern” in diesem Handbuch.
Das Teranex Mini Smart Panel gibt Ihnen Zugriff auf die gleichen
Einstellungen wie das Blackmagic Teranex Setup-Dienstprogramm
Teranex Mini SDI to Audio 12G Blockschaltbild
Automatic
SD/HD/6G/12G-SDI
Cable Driver
Analog or AES/EBU
Loop SDI Out
Ch 1 Analog or
Ch 1&2 AES/EBU
SDI In
USB
Ethernet
with Power
Input automatically
detects between
SD/HD/6G/12G-SDI
Central Processor
and Firmware
Mini Switches
Equalizer,
Re-Clocker and
10 bit De-Serializer
SDI Audio
De-Embedder
AES/EBU
Audio Sample Rate
Converter
Stereo Audio
Analog to Digital
Converter
Analog or AES/EBU
Analog
Digital
Ch 2 Analog or
Ch 3&4 AES/EBU
or Timecode Out
L
Stereo Out
R
Optical Out
131

Teranex Mini – Audio to SDI 12G
Betten Sie zwei Kanäle Analogaudio oder vier Kanäle AES/
EBU-Digitalaudio in ein beliebiges SDI-Videosignal ein. Dieser
Teranex Mini gestattet Ihnen, von Geräten wie Audiomischern
und analogen MAZen eingehendes Audio in SDI-Videoquellen
einzubetten, die mit SDI-Kreuzschienen und MAZen verwendet
1 2
3 11 12
Anschlüsse
1. Mini-B USB-Port
Dient zum Anschluss eines Mac-OS-X- oder WindowsRechners mit dem Blackmagic Teranex Setup-Dienstprogramm,
über das man Einstellungen anpasst und die Produktsoftware
Ihres Teranex Minis aktualisiert.
2. Switches
Anpassbare Minischalter zum Ändern von Einstellungen.
werden. Um zusätzliche SDI-Audiokanäle einzubetten, können
Sie einen weiteren Teranex Mini Audio to SDI 12G mit Ihrem
vorhandenen Konverter in Reihe schalten, indem sie das
zweite Gerät an seinen SDI-Ausgang anschließen.
4 5 6
OPTICAL
AUDIO
ETHERNET PoE SDI IN
8 9 10
L R
STEREO IN
7
SDI OUT
PUSH PUSH
L - ANALOG
AES/EBU
R - ANALOG
AES/EBU - T/C
7. „L – Unbalanced Analog Line Level Input”
RCA-Buchse zur Eingabe von rechtskanaligem asymmetrischen
Analog-Audio.
8. „Ethernet PoE”
Zum Anschließen an einen Netzwerk-Switch oder Computer,
damit Sie Einstellungen mit dem Teranex Setup ändern können.
Der Ethernet-Port unterstützt auch Power-over-Ethernet-Plus.
3. LED-Multifunktionslämpchen
Leuchtet weiß, wenn der Konverter Strom empfängt und grün,
wenn ein gültiges eingehendes Videosignal erkannt wird.
Abwechselndes Ein-/Aus-Blinken zeigt individuelle Konverter
über das Blackmagic Teranex Setup-Dienstprogramm an.
4. Stromversorgung
Eingebaute Normbuchse gemäß IEC C14 zur Versorgung mit
90–240-Volt Wechselstrom.
5. „Optical S/PDIF Audio Input”
S/PDIF-Signal mit TOSLINK-Verbinder.
6. „L – Unbalanced Analog Line Level Input”
RCA-Buchse zur Eingabe von linkskanaligem asymmetrischen
Analog-Audio.
Switches
Die Minischalter am Teranex Mini Audio to SDI 12G erlauben
folgende Einstellungen:
„Switch 8, 7 – Input Audio Selection Bit 1, 0”
Minischalter 8 und 7 repräsentieren jeweils Bit 1 und 0. So
haben Sie anhand verschiedener On/Off-Kombinationen der
Schalter 8 und 7 die Wahl aus vier Optionen für die
Audioeingabe.
„Switch 6, 5, 4 – Embed Audio Bit 2, 1, 0”
Minischalter 6, 5 und 4 repräsentieren jeweils Bit 2, 1 und 0.
So können Sie anhand der verschiedenen On/Off-
9. „SDI IN”
BNC-Buchse für eingehende SDI-Videosignale.
10. „SDI Out” (SDI-Ausgang)
BNC-Buchse für ausgehende SDI-Videosignale.
11. „L – Analog oder AES/EBU”
XLR-Eingang für symmetrisches Analog-Audio für den linken
Kanal oder digitales AES/EBU-Audio.
12. „R – Analog, AES/EBU oder Timecode”
XLR-Eingang für symmetrisches Analog-Audio für den rechten
Kanal oder digitales AES/EBU-Audio. Auch für Timecode-
Eingabe konfigurierbar.
Kombinationen der Schalter 6, 5 und 4 vorgeben, in welche
Kanäle Ihres SDI-Signals Audio einfließen soll.
Bei der Einbettung von Analogaudio gibt es acht Kombinationen.
Somit können Sie Audiosignale in die Kanalpaare 1–2 bis hin
zu 15–16 einbetten.
Bei der Einbettung von AES/EBU-Audio sind vier Kombinationen
verfügbar. Sie können Audio wahlweise in die Kanäle 1–4,
5–8, 9–12 oder 13–16 einbetten.
132

„Switch 3 – Sample Rate Conversion, No Sample
Rate Conversion”
Stellen Sie Schalter 3 auf „OFF”, um die Konvertierung der
Abtastrate zu aktivieren oder auf „ON”, damit die Abtastrate
nicht konvertiert wird. Dieser Schalter sollte fast ausnahmslos
auf „OFF” stehen, da dies die Einlesung von Audio mit der
korrekten Abtastrate für die Fernsehwiedergabe gewährleistet.
Steht Schalter 3 auf „OFF”, so wird in dieser Einstellung die
Abtastrate Ihres Analog- oder AES-EBU-Audios mit einer
Abtastrate von 48kHz in die SDI-Ausgabe eingebettet.
„Switch 2 – Ch 2 or AES/EBU 3+4 Embed / Bypass”
Geben Sie nach erfolgter Auswahl Ihrer Audiokanäle über
Schalter 2 und 1 vor, welche Kanäle eingebettet oder deaktiviert
werden sollen. Durch Deaktivieren dieser Einstellung können
Sie verhindern, dass erwünschte Audiokanäle in Ihrem
Audiosignal überschrieben werden.
Stellen Sie Schalter 2 auf „ON”, um Kanal 2 oder die AESEBU-Kanäle 3 und 4 zu umgehen. Stellen Sie Schalter 1 auf
„ON”, um Kanal 1 oder die AES-EBU -Kanäle 1 und 2 zu umgehen.
„Switch 1 – Ch 1 or AES/EBU 3+4 Embed / Bypass”
Siehe Erklärung für Schalter 2.
Die Schalterlegende am Boden Ihres Konverters gibt
Ihnen alle erforderlichen Informationen, um die
Umwandlungseinstellungen zu modifizieren
Auswahltabellen für SDI-Audio
Input Audio Source
(Audioeingabequelle)
XLR Analog OFF OFF
XLR AES/EBU OFF ON
RCA Analog ON OFF
Optical ON ON
Switch 8 Switch 7 „Switch Diagram”
„SDI Channel Tables" SDIKanal-Tabellen)
„Analog Audio Channels"
(Analoge Audiokanäle)
1-2 OFF OFF OFF
Switch 6 Switch 5 Switch 4 „Switch Diagram”
(Schaltdiagramm)
(Schaltdiagramm)
3-4 OFF OFF ON
5-6 OFF ON OFF
7-8 OFF ON ON
9-10 ON OFF OFF
133

„Analog Audio Channels"
(Analoge Audiokanäle)
11-12 ON OFF ON
13-14 ON ON OFF
15-16 ON ON ON
Switch 6 Switch 5 Switch 4 „Switch Diagram”
(Schaltdiagramm)
AES/EBU Audio Channels
(AES/EBU-Audiokanäle)
1-4 OFF OFF OFF
5-8 OFF OFF ON
9-12 OFF ON OFF
13-16 OFF ON ON
Switch 6 Switch 5 Switch 4 „Switch Diagram”
Blackmagic Teranex Setup-Einstellungen
Mithilfe des Teranex Setup-Dienstprogramms lassen sich
neben allen unter Einsatz der Switches verfügbaren
Einstellungen überdies zusätzliche Einstellungen modifizieren.
Greifen Sie auf diese Einstellungen jeweils über die Reiter
(Schaltdiagramm)
„Audio”, „Configure” und „About” zu. Näheres über die Reiter
„About” (Info)” und Configure” (Konfigurieren) siehe Abschnitt
„Einstellungen ändern” in diesem Handbuch.
Justieren Sie die Pegel Ihres Analog-Audios und AES/EBU-Audios im Blackmagic
Teranex Setup-Dienstprogramm über die Seite für „Audio” -Einstellungen
134
 Loading...