

Page 1

Windows
™
September 2012
Mac OS X
™
Installation and Operation Manual
Teranex 2D Processor
Page 2

Welcome
Welcome to Teranex!
Thank you for purchasing a Blackmagic Design Teranex converter for your facility.
The Teranex converter you have purchased is an amazing quality standards converter that you will spend
hours playing with to discover all the wonderful functions it has. I am still playing with it myself to see all the
other things I can use it for! We have packed it with the latest SDI, HDMI and analog connections so you
can use it to convert and connect anything!
One of the exciting advantages of the Teranex converter is the amazing quality of the conversions.
It features a powerful SIMD processor that allows more complex calculations, allowing the Teranex to do a
better job at processing video, removing field movement, detecting cadence, noise reduction, timecode
conversions, subtitle conversion and much more!
Enjoy exploring your Teranex processor and we all hope you have many years of enjoyment out of it. Please
let us know of any ideas and features you would like to see, as we are constantly updating the software so
it gets better and better!
Grant Petty
CEO Blackmagic Design
Page 3
Contents
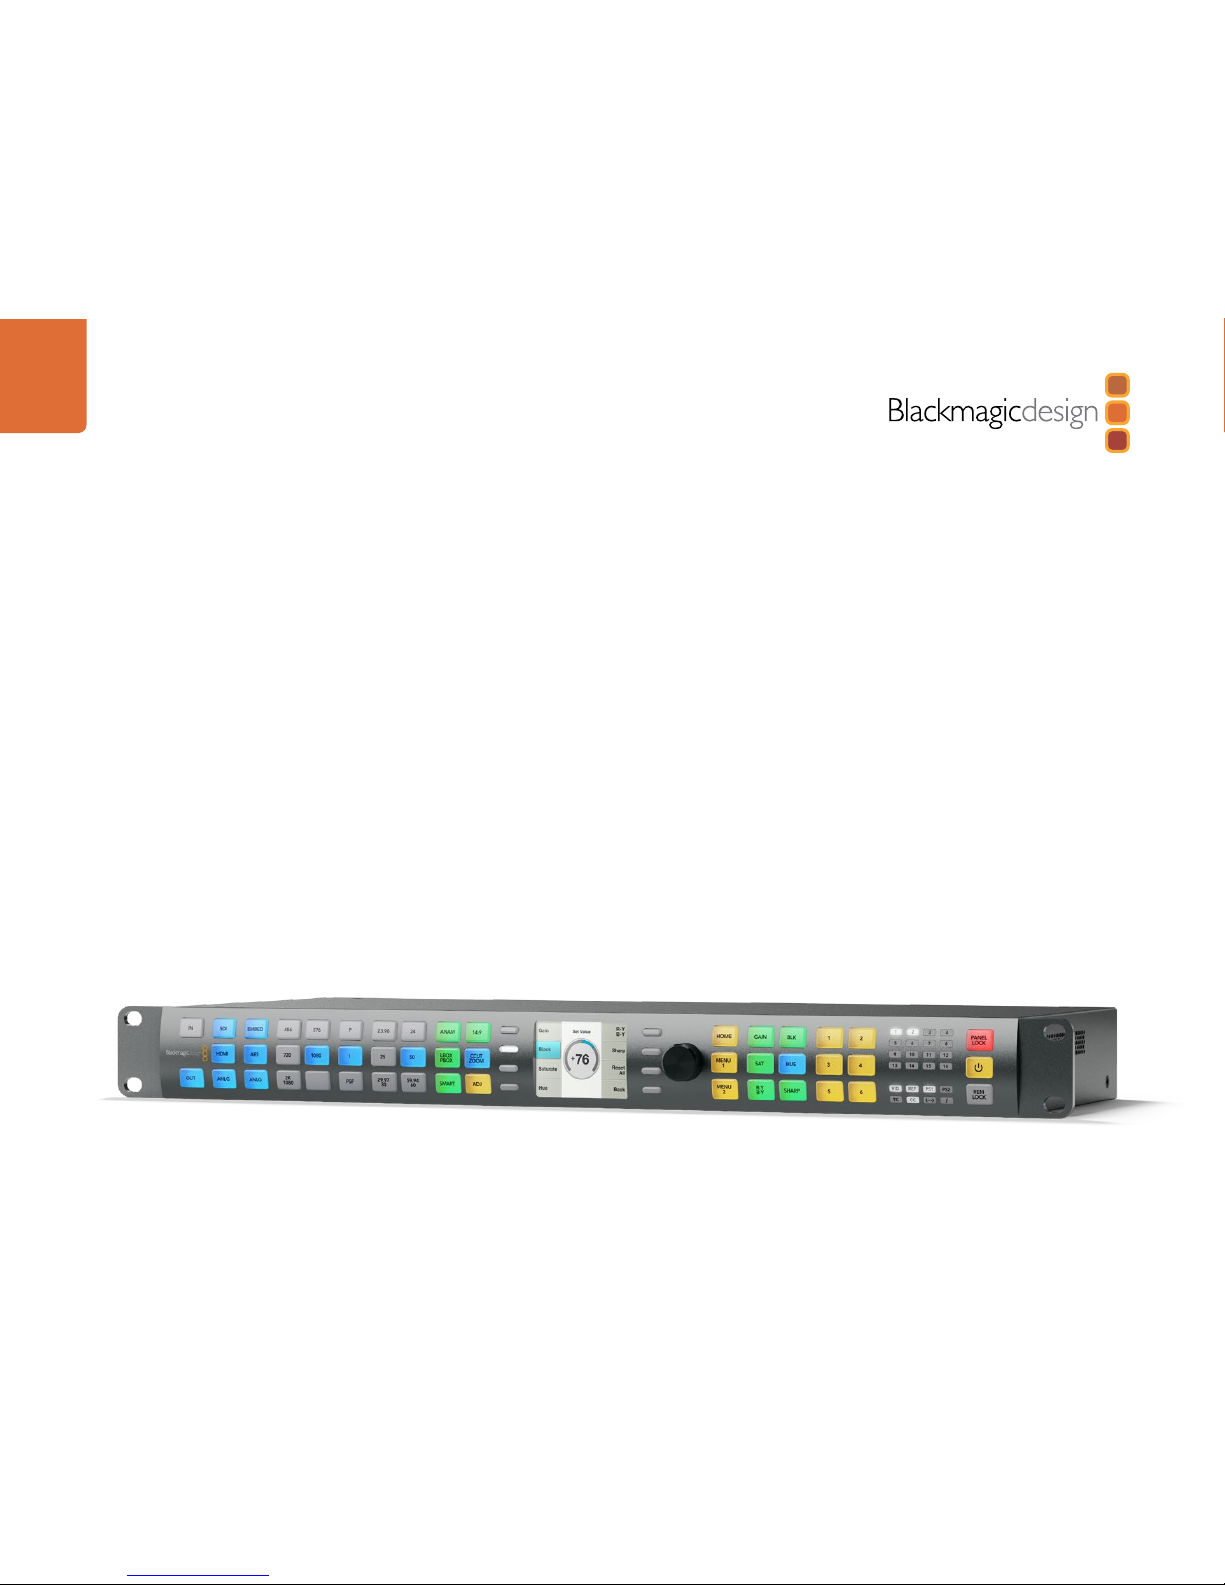
Teranex 2D Processor
Getting Started with Conversion
Introducing Teranex 5
Understanding the Teranex Processor 6
How to Set Up as a Standalone Converter 8
Connecting Video and Audio Hardware 9
Teranex 2D Processor Connection Reference Guide 12
How to update the Blackmagic Teranex Software 13
Getting Started with Capture and Playback
How to Set Up for Capture and Playback with Conversion 14
How to Set Up Waveform Monitoring 15
Connecting Video and Audio Hardware 16
Teranex 2D Processor Connection Reference Guide 19
Install the Blackmagic Teranex Software 20
How to update the Blackmagic Teranex Software 21
Capturing and Playing Back Video
Understanding the Control Panel
Teranex Processor Control Panel Layout 24
Control Panel LED Color Code 24
Input/Output Selection 25
Video Selection 25
Audio Selection 26
Video Format, Frame Type and Frame Rate Selection 26
Format Conversion Table 28
Aspect Ratio Selection 30
LCD User Interface and Menu Controls 35
Video Proc Amp 35
5
14
23
24
39
Presets 36
Status LEDs 37
Panel Lock / Power / Remote Lock 38
Understanding the LCD Menus
Main Menu 39
Video Menu 39
Color Correction Menu 40
Clip Menu 41
Aspect Fill 41
Proc Amp Menu 42
Test Patterns Menu 43
Advanced Menu 44
Clean Cadence 45
Scene Detection 45
Source Type 45
Frame Rate Conversion Aperture 46
Noise Reduction Menu 47
Bias 48
Split Screen On/Off 48
Red Overlay On/Off 49
Ancillary Data Menu 49
Closed Caption Menu 50
Timecode Menu 50
Video Index Menu 63
Setup Menu 65
Reference Setup Menu 66
Line Offset 67
Pixel Offset 67
Page 4
Contents
Teranex 2D Processor
70
107
97
86
110
111
112
113
Video Setup Menu 68
No Input Menu 68
Input Analog Video Setup Menu 68
Output Analog Video Setup Menu 69
Audio Setup Menu 69
Using your Favourite Editing Software
Editing with your Teranex 2D Processor 70
Using Blackmagic System Preferences 71
Avid Media Composer 6 73
Adobe Final Cut Pro 7 77
Adobe Final Cut Pro X 79
Adobe Premiere Pro CS6 81
Adobe After Effects CS6 84
Adobe Photoshop CS6 85
Using Blackmagic Media Express
Using Blackmagic UltraScope
Blackmagic Disk Speed Test
Developer Information
Getting Help
Warnings
Warranty
Page 5
Getting Started with Conversion
5
Introducing Teranex
The Teranex Processor is a high end video standards converter capable of extremely high quality image
processing for standards conversion and format conversion, as well as 16 channels of frame accurate audio
conversions. You can move from virtually any format to any other format in real time with literally hundreds
of combinations, perfect for live production.
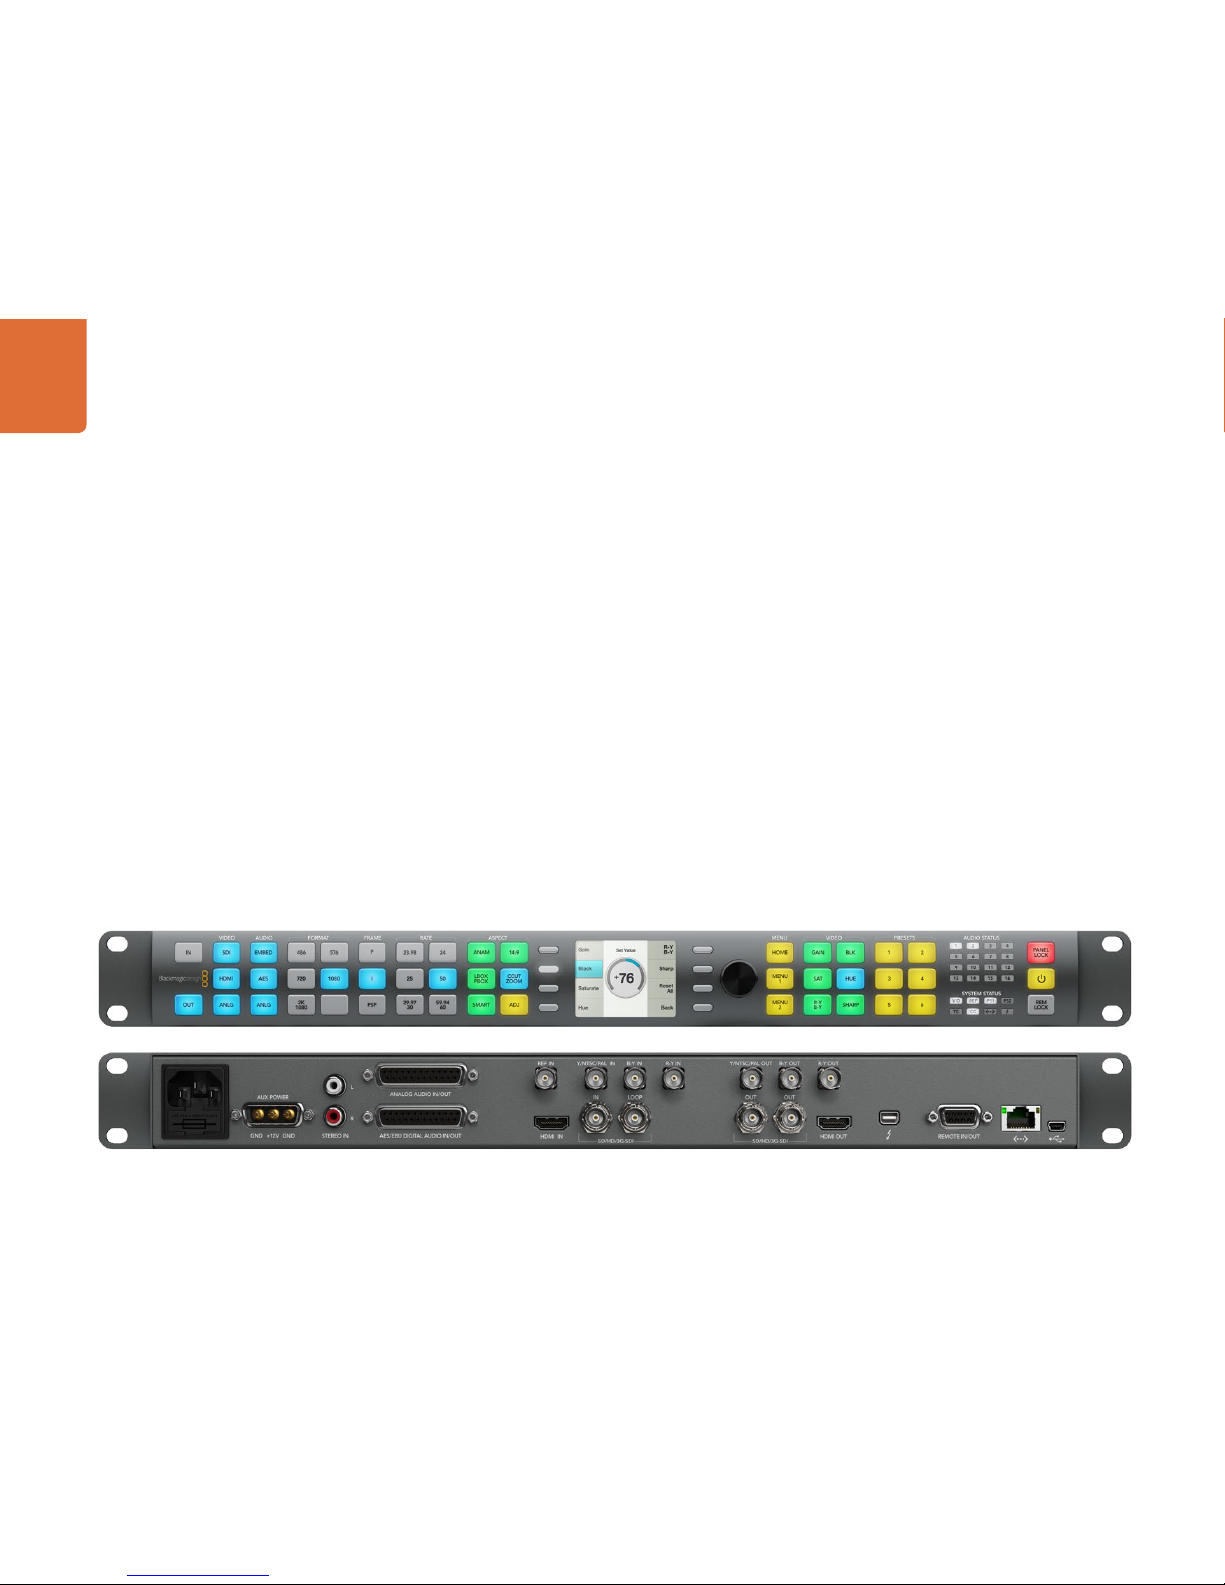
The Teranex Processor does not need a connection to a computer and you can just switch it on and push
the buttons on the built-in control panel. The integrated LCD lets you view the incoming video signal and
preview the conversion without even needing an external monitor.
When connected to a Mac OS X computer with Thunderbolt technology, the Teranex Processor can also be
used for cleaning and converting content for authoring as well as video capture and playback for editing,
design and effects. Alternatively you can use the Thunderbolt connection for waveform monitoring with the
included Blackmagic UltraScope software!
If you want to update the internal software of the Teranex Processor with new features, bug fixes, and
increased compatibility with third party software and video devices, you'll need a Mac OS X or Windows
computer with a USB connection to run the included Teranex Utility software. Please check the
support page on our web site at www.blackmagicdesign.com for the latest version of software for your
Teranex Processor.
Page 6
Getting Started with Conversion
6
Understanding the Teranex Processor
The Teranex Processor features patented processing technology for the highest quality conversion
between video standards, frame rates and resolutions. The incredible power of Teranex processing
includes: up conversion, down conversion, SD/HD cross conversion, SD/HD standards conversion,
cadence detection and removal, noise reduc tion, adjustable scaling, aspect ratio conversion including
Smart aspect, timecode conversion, 16 channel audio processing, and more.
Proprietary PixelMotion de-interlacing, 3:2 detection and detail enhancement, combined with a powerful
array processing module, provide the highest image quality up, down and cross conversions. The first step
in the conversion process is to identify whether the input material is video or film originated so as to apply
the appropriate filter to recover the full vertical resolution of the input material. The identification process
is fully automatic and selects either PixelMotion de-interlacing for video based material or 3:2 detection for
film based material.
PixelMotion De-interlacing
PixelMotion de-interlacing of video originated material produces perfect progressive frames in preparation
for further processing. The processing aperture is adjusted on a pixel-by-pixel basis, which preserves all
of the detail of the original interlaced image and eliminates jaggies in the output image, providing welldefined edges on objects and producing the sharpest images possible.
3:2 Detection
3:2 cadence detection recognizes the redundant fields inserted during the conversion from 24 frames
per second to 30. This advanced 3:2 pull down filter avoids frame rate conversion artifacts and provides
the highest vertical resolution and motion quality.
Since the quality of the video de-interlacing is so high, there will be no difference visible in the vertical
resolution seen with film originated material and that of the de-interlaced video originated material.
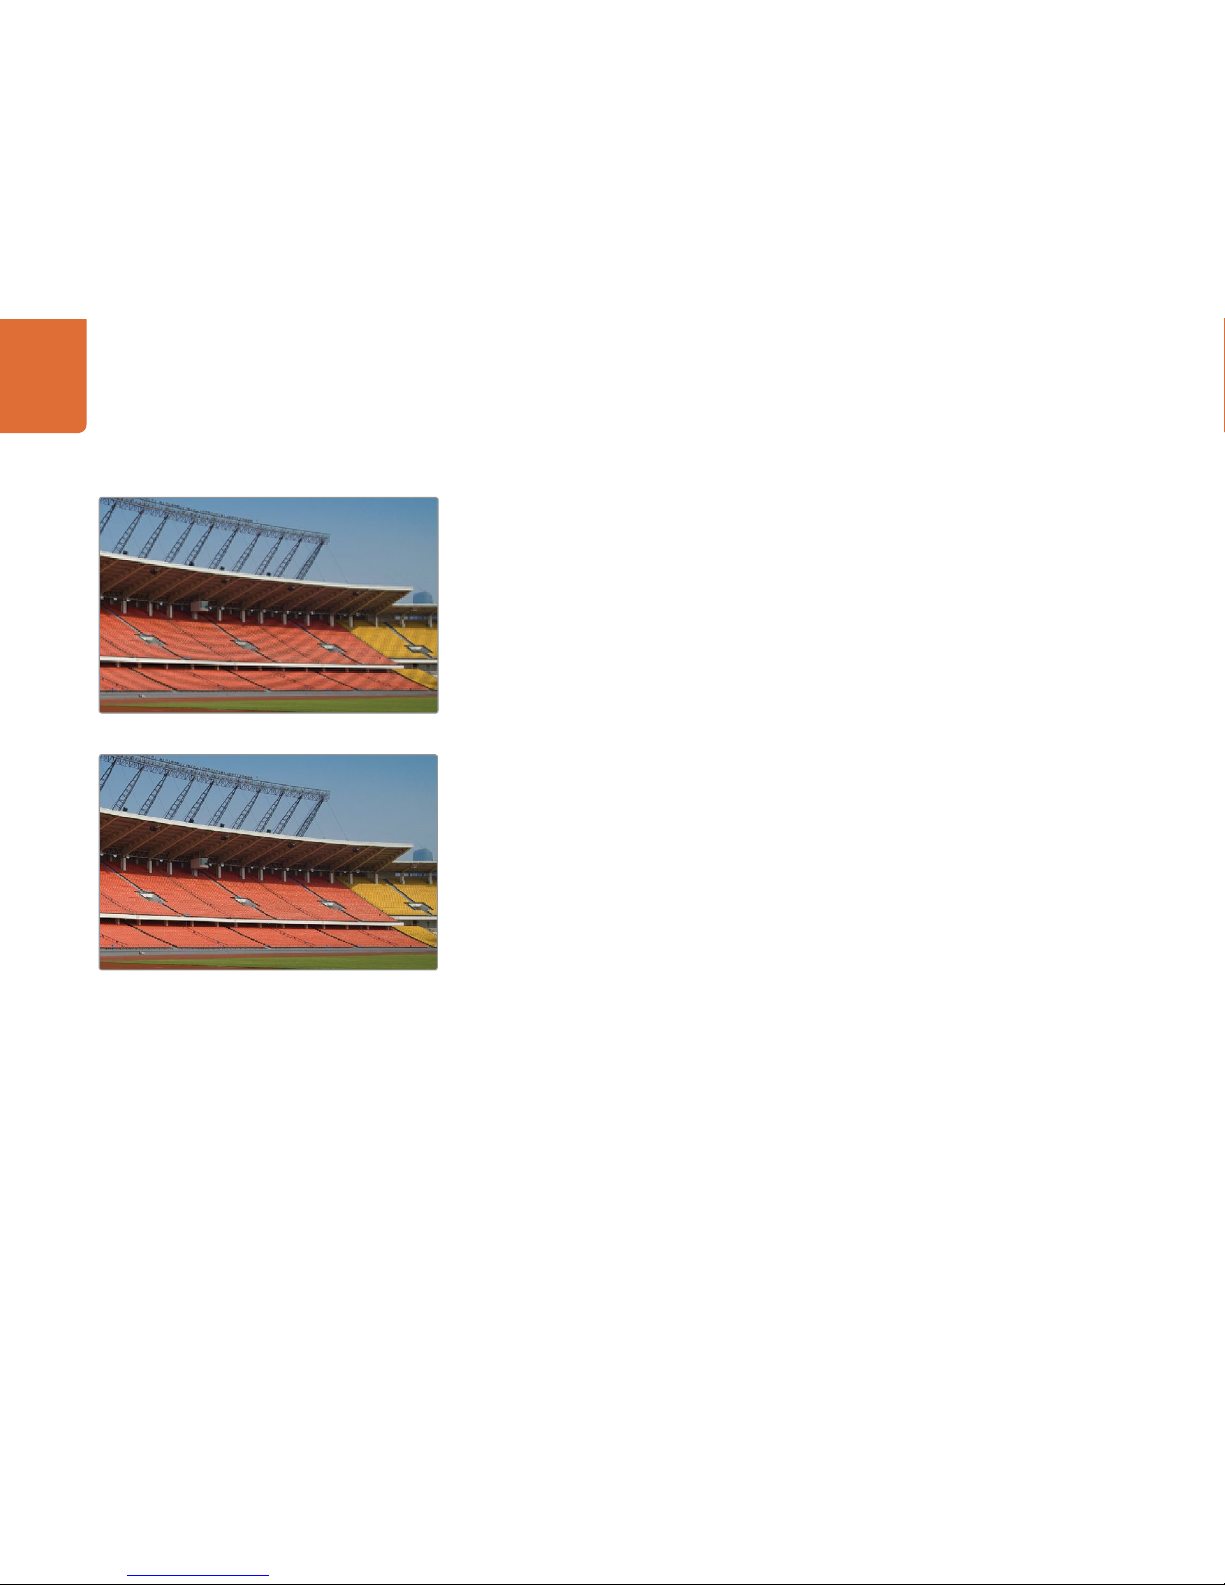
Cadence Detection, Removal and Correction
Teranex is unique because it can automatically remove cadence (3:2 pulldown) from video when converting
to 24 fps, even when the footage has been previously edited and suffers from flash fields. That’s perfect for
mastering clean online content! You can even take edited 3:2 sequences, remove the broken cadence and
re-insert clean cadence all in one pass.
Improper cadence detection can cause a loss of resolution,
resulting in moiré patterns. Advanced cadence detection
eliminates these annoying moiré artifacts.
Before Cadence Detection
After Cadence Detection
Page 7

Getting Started with Conversion
7
Aspect Ratio Conversion
Teranex supports a wide range of aspect ratios, including variable and fixed aspect ratios. Also included
is the proprietary Smart aspect that warps images from 4:3 to 16:9 without visible stretching of the center
action area of the image that normally occurs.
Noise Reduction
Adjustable noise reduction controls offer a greater degree of temporal recursive noise reduction with fewer
artifacts. A bias control allows the aggressiveness to be fine-tuned. For filter performance testing, a Red
Overlay can be applied that will color pixels red that are in motion.
Frame rate Conversion
Moving images exist in three dimensions. Firstly, in the horizontal direction, images are made up of
individual pixels. Secondly, in the vertical direc tion, they are made up of the lines contained in the field
or frame. The combination is referred to as the spatial domain. Thirdly, the motion image is composed
of a number of fields or frames per second, which is referred to as the temporal domain.
The process of frame rate conversion, also known as standards conversion, is a form of sample rate
conversion in two or three of the above dimensions. It consists of expressing moving images sampled
on a three-dimensional sampling lattice to a different three-dimensional lattice.
Frame rate conver sions generally involve changing the number of lin es and fields (or frames) per sec ond
in an image. Examples of standards conversions include: 486i59.94 to 576i50; 720p59.94 to 1080i50;
1080i59.94 to 1080i50.
Teranex uses a process called linear interpolation to convert between these various spaces. Interpolation is
defined as computing the value of a sample, or samples, which lie outside the sampling matrix of the source
signal. In other words, it is the process of computing the values of output samples that lie between the input
samples. Teranex processing allows for the processing aperture to be adjusted to provide the optimal result.
Clean incoming source material in real time as a result of
Noise Reduction.
Before Noise Reduction
After Noise Reduction
Page 8
Getting Started with Conversion
8
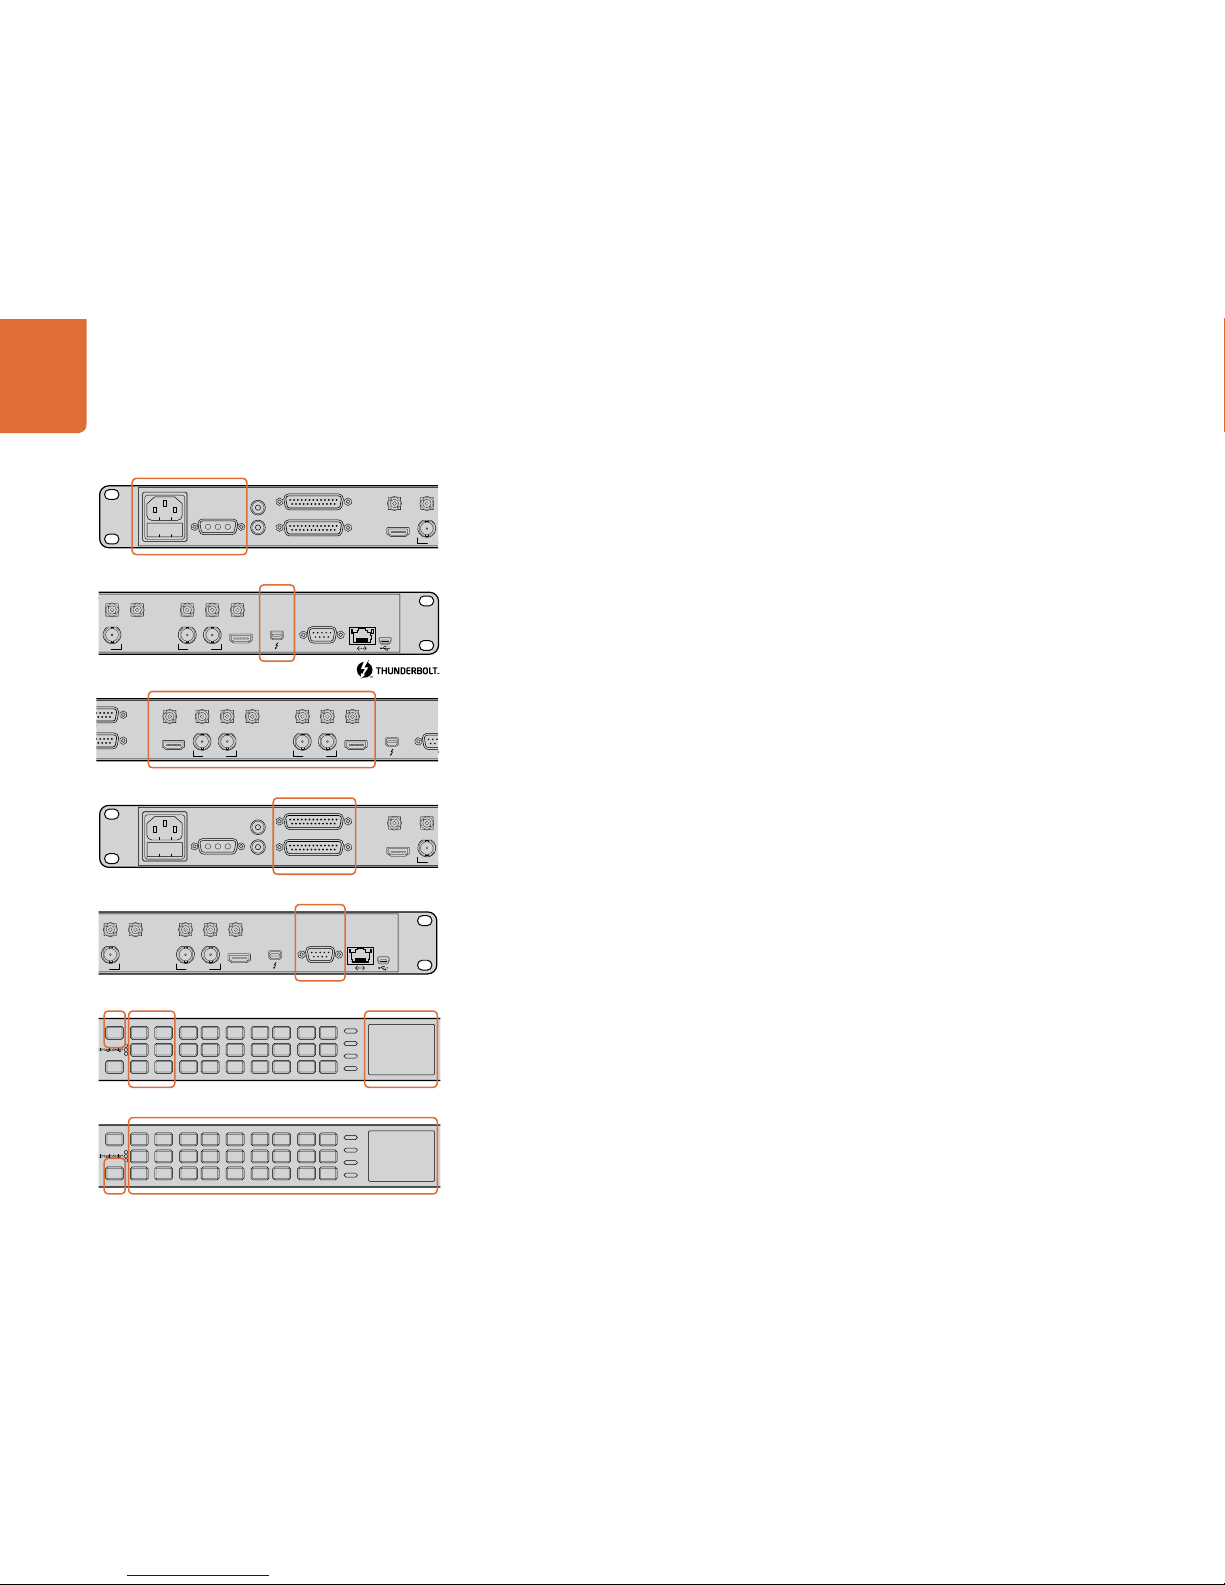
How to Set Up as a Standalone Converter
This section guides you through how to set up your Teranex 2D Processor hardware as a standalone
video format converter.
Connecting the Teranex 2D Processor as a standalone converter
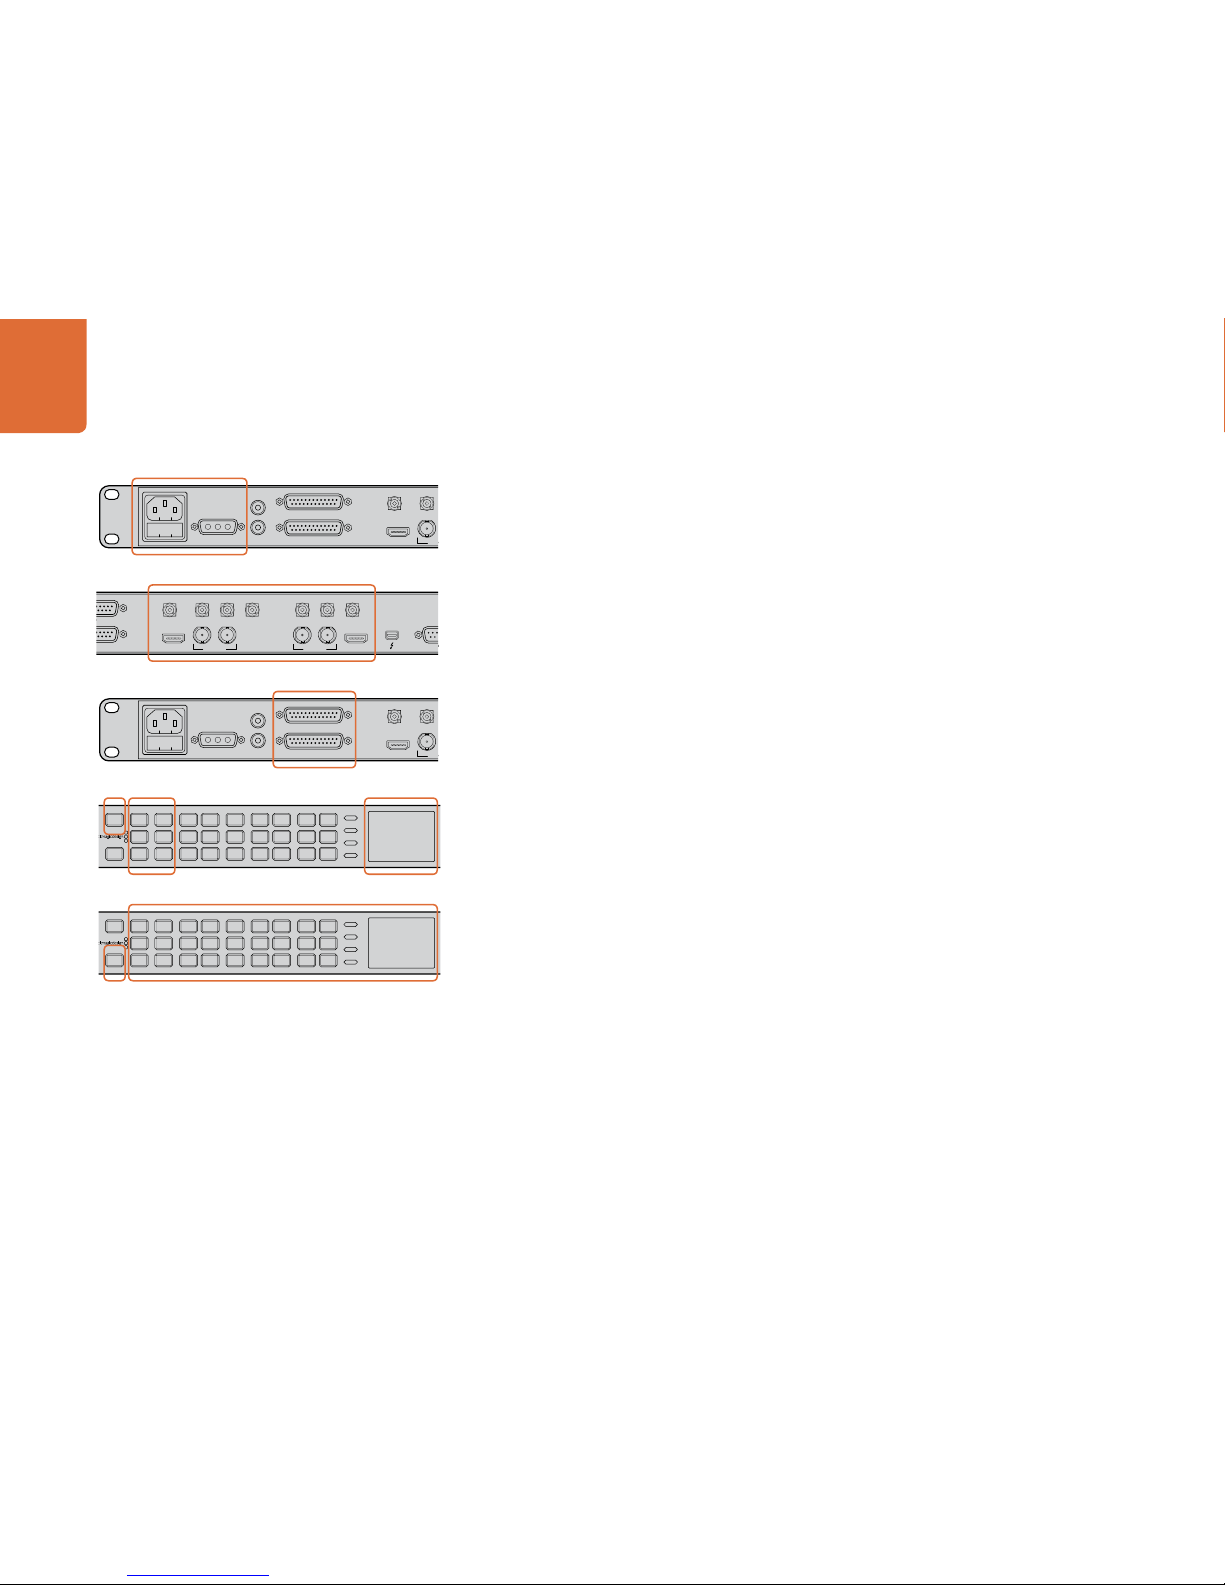
Step 1. Connect power to one or both power sockets. The easiest way to power the Teranex 2D Processor
is to connect an IEC cable to its AC power socket. Alternatively the 12V DC military grade port
can be used for external battery power and/or failover redundancy with an optional “brick” DC
adapter.
Step 2. Connect cables between the video and audio connections on your Teranex 2D Processor and
your video equipment.
Step 3. If you are using analog or AES/EBU audio, rather than SDI or HDMI embedded audio, connect
common third party breakout cables to the DB-25 audio connectors for analog and AES/EBU
audio. Pinout diagrams for the DB-25 audio connectors can be seen in the "Connecting Video
and Audio Hardware" section of this manual.
Step 4. On the front panel press the IN button and set the video source to SDI, HDMI or Analog. If you
are using embedded SDI or HDMI audio, set the audio source to Embed. Otherwise select from
AES or Analog audio. The processor will detect the format of the video input and automatically
configure the unit. The integrated LCD will show the incoming video signal.
Step 5. Press the OUT button on the front panel and use the buttons to select your desired output format,
frame type, frame rate and also set the output aspect ratio if needed. Press “Accept” on the
integrated LCD to confirm the new selection. You will notice that all video and audio output
buttons will be lit, indicating that all output types are active simultaneously.
MENU
MENU
HOME
MENU
1
MENU
2
REM
LOCK
PANEL
LOCK
24
50
59.94
60
VIDEO
VIDEO
GAIN
SAT
R-Y
B-Y
BLK
HUE
SHARP
PRESETS AUDIO STATUS
SYSTEM STATUS
PRESETS
1
3
5
2
4
6
ANAM
LBOX
PBOX
ASPECT
ASPECT
SMART
14:9
CCUT
ZOOM
ADJ
REF IN Y/NTSC/PAL IN
SD/HD/3G-SDI
B-Y IN
IN LOOP OUT OUT
R-Y IN B-Y OUT R-Y OUT
Y/NTSC/PAL OUT
HDMI IN HDMI OUT
REMOTE IN/OUT
SD/HD/3G-SDI
Step 2.
IN
OUT
SDI
VIDEO
VIDEO
HDMI
ANLG
AUDIO
AUDIO
EMBED
AES
ANLG
FORMAT
FORMAT
486
720
2K
1080
576
1080
FRAME
FRAME
P
I
PSF
MENU
MENU
HOME
MENU
1
MENU
2
REM
LOCK
PANEL
LOCK
RATE
RATE
23.98
25
29.97
30
24
50
59.94
60
VIDEO
VIDEO
GAIN
SAT
R-Y
B-Y
BLK
HUE
SHARP
PRESETS AUDIO STATUS
SYSTEM STATUS
PRESETS
1
3
5
2
4
6
ANAM
LBOX
PBOX
ASPECT
ASPECT
SMART
14:9
CCUT
ZOOM
ADJ
L
R
GND +12V GND
AUX POWER
STEREO IN AES/EBU DIGITAL AUDIO IN/OUT
ANALOG AUDIO IN/OUT
REF IN Y/NTSC/PAL
IN
SD/HD/3G-SDI
B-Y IN
IN
LOOP OUT OUT
R-Y IN B-Y OUT R-Y OUT
Y/NTSC/PAL OUT
HDMI IN
HDMI OUT REMOTE IN/OUT
SD/HD/3G-SDI
Step 3.
IN
OUT
SDI
VIDEO
VIDEO
HDMI
ANLG
AUDIO
AUDIO
EMBED
AES
ANLG
FORMAT
FORMAT
486
720
2K
1080
576
1080
FRAME
FRAME
P
I
PSF
MENU
MENU
HOME
MENU
1
MENU
2
REM
LOCK
PANEL
LOCK
RATE
RATE
23.98
25
29.97
30
24
50
59.94
60
VIDEO
VIDEO
GAIN
SAT
R-Y
B-Y
BLK
HUE
SHARP
PRESETS AUDIO STATUS
SYSTEM STATUS
PRESETS
1
3
5
2
4
6
ANAM
LBOX
PBOX
ASPECT
ASPECT
SMART
14:9
CCUT
ZOOM
ADJ
L
R
GND +12V GND
AUX POWER
STEREO IN AES/EBU DIGITAL AUDIO IN/OUT
ANALOG AUDIO IN/OUT
REF IN Y/NTSC/PAL
IN
SD/HD/3G-SDI
B-Y IN
IN
LOOP OUT OUT
R-Y IN B-Y OUT R-Y OUT
Y/NTSC/PAL OUT
HDMI IN
HDMI OUT REMOTE IN/OUT
SD/HD/3G-SDI
Step 1.
IN
OUT
SDI
VIDEO
VIDEO
HDMI
ANLG
AUDIO
AUDIO
EMBED
AES
ANLG
FORMAT
FORMAT
486
720
2K
1080
576
1080
FRAME
FRAME
P
I
PSF
MENU
MENU
HOME
MENU
1
MENU
2
REM
LOCK
PANEL
LOCK
RATE
RATE
23.98
25
29.97
30
24
50
59.94
60
VIDEO
VIDEO
GAIN
SAT
R-Y
B-Y
BLK
HUE
SHARP
PRESETS AUDIO STATUS
SYSTEM STATUS
PRESETS
1
3
5
2
4
6
ANAM
LBOX
PBOX
ASPECT
ASPECT
SMART
14:9
CCUT
ZOOM
ADJ
Step 5.
IN
OUT
SDI
VIDEO
VIDEO
HDMI
ANLG
AUDIO
AUDIO
EMBED
AES
ANLG
FORMAT
FORMAT
486
720
2K
1080
576
1080
FRAME
FRAME
P
I
PSF
MENU
MENU
HOME
MENU
1
MENU
2
REM
LOCK
PANEL
LOCK
RATE
RATE
23.98
25
29.97
30
24
50
59.94
60
VIDEO
VIDEO
GAIN
SAT
R-Y
B-Y
BLK
HUE
SHARP
PRESETS AUDIO STATUS
SYSTEM STATUS
PRESETS
1
3
5
2
4
6
ANAM
LBOX
PBOX
ASPECT
ASPECT
SMART
14:9
CCUT
ZOOM
ADJ
Step 4.
Page 9

Getting Started with Conversion
9
Connecting Video and Audio Hardware
Your Teranex Processor includes a wide variety of input and output connections, providing a flexible solution
for just about any system configuration you may have. Once you have connected and selected your input
video and audio source, the video and audio output signals will be present on all of the output connectors
simultaneously.
SD/HD/3G SDI Video and Audio
The Serial Digital Interface (SDI) input and output connec tions supports SD, HD and 3 Gb/s signals. To
use the SDI signal as your video input, press the IN button on the front panel and then select SDI as
your video source.
If your program audio is embedded in the SDI video input signal, you must select EMBED on the front
panel.
A reclocked, SDI Input Loop connector is provided which always shows the SDI input signal regardless of
whether the analog, HDMI or SDI input button has been selected on the front panel.
Analog Video
Both analog composite and component video sources are suppor ted in the Teranex Processor, and
you may change which signal type you are using at any time. You will note that the BNC connectors
labeled Y/NTSC/PAL serve double duty as connections for the Y (luminance) component signal OR
NTSC/PAL composite video sources. You can define the desired analog video signal type, composite
or component, via the front panel LCD menu.
If the analog video output is configured as composite, HD video output formats will be down converted
to SD as a monitoring quality output. If the analog video output is configured as component, HD will be
provided, as there is no need for downconversion.
Page 10
Getting Started with Conversion
10
Analog Audio
Two methods of connecting analog audio are available:
a DB-25 multi-pin connector for connecting 4 channels of balanced analog audio In and Out
a pair of RCA phono connectors for stereo left and right input.
The DB-25 connector is used for connection of 4 input channels and 4 output channels of balanced
analog audio to the Teranex 2D Processor. An optional breakout cable is required, which is a standard
Yamaha format cable for balan ced XLR connection s. This inexpensive breakou t cable may be purchased
through many vendors, or may be fabricated using off the shelf connectors and cable.
For input of HiFi Stereo audio, a pair of RCA phono connectors are provided to permit connection
of devices that have stereo unbalanced RCA audio outputs. These devices may include DVD players,
VTR’s, etc. that do not have professional, balanced analog outputs.
When you select the ANLG button on the front panel as the audio input type, a menu page will appear on
the front panel LCD allowing you to choose which of the two analog audio sources you want to use.
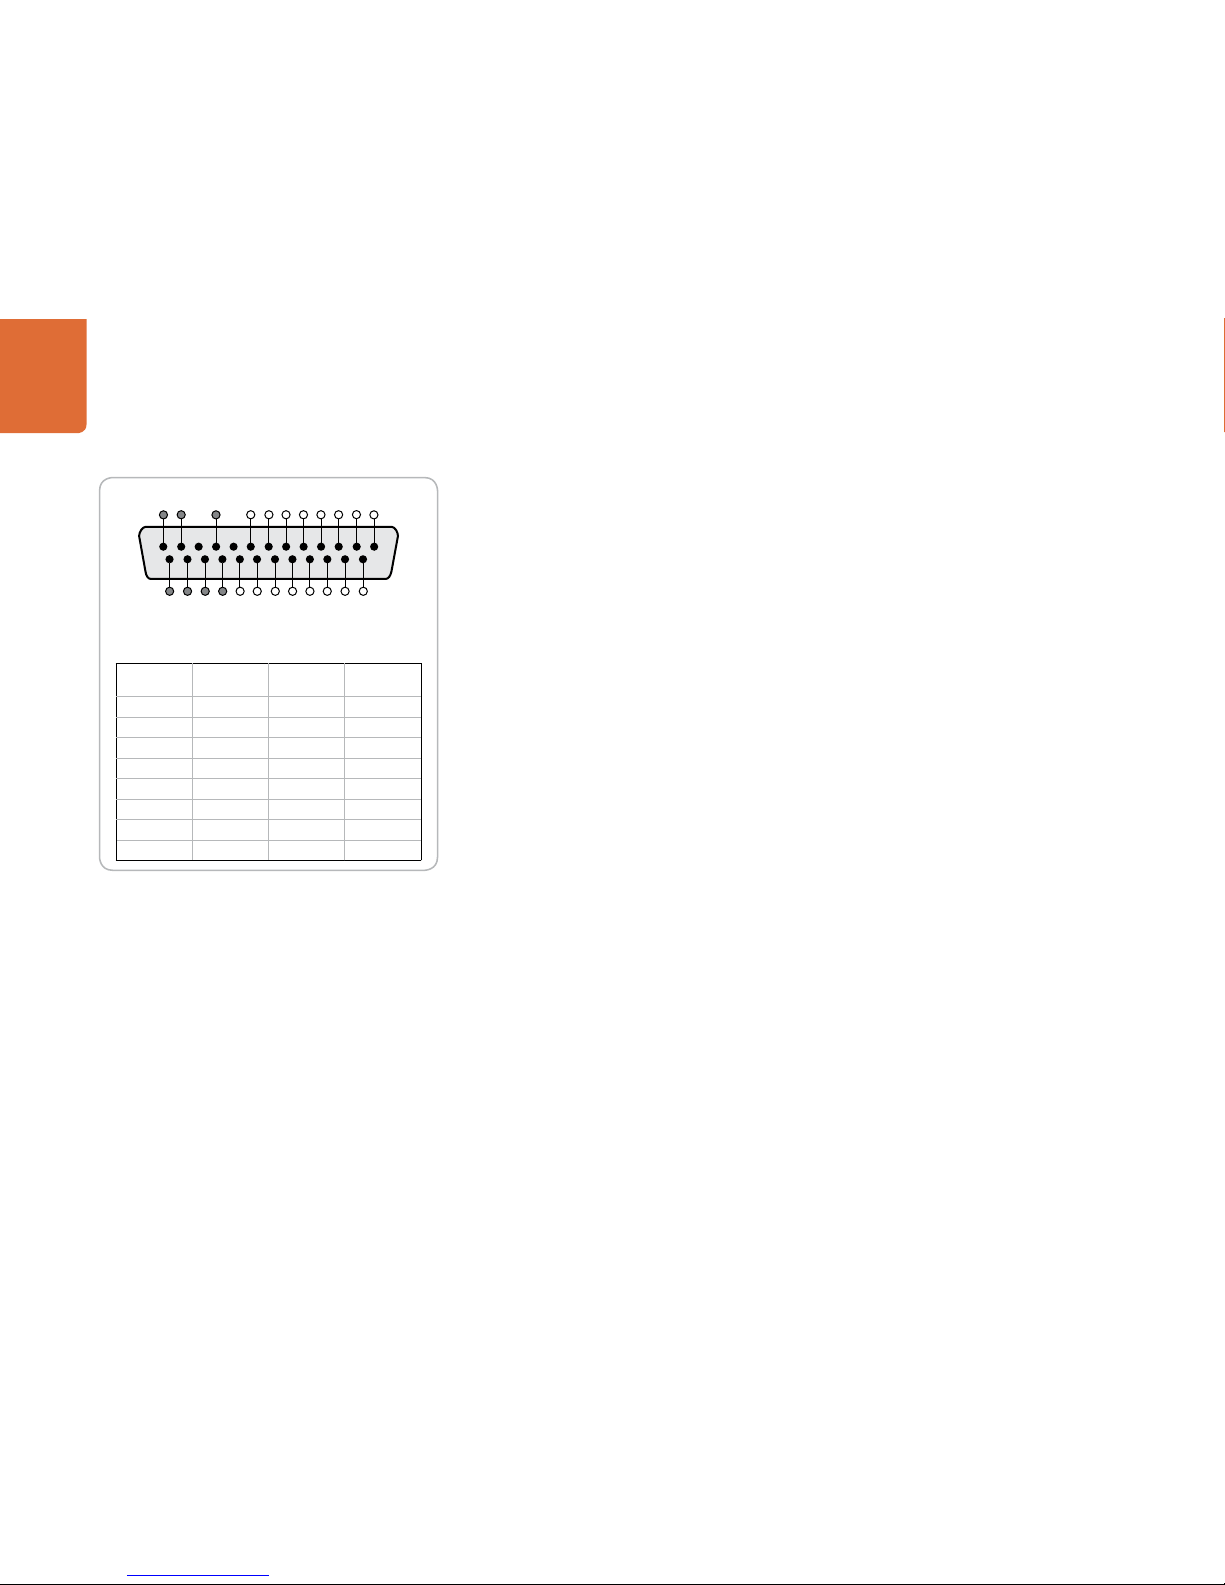
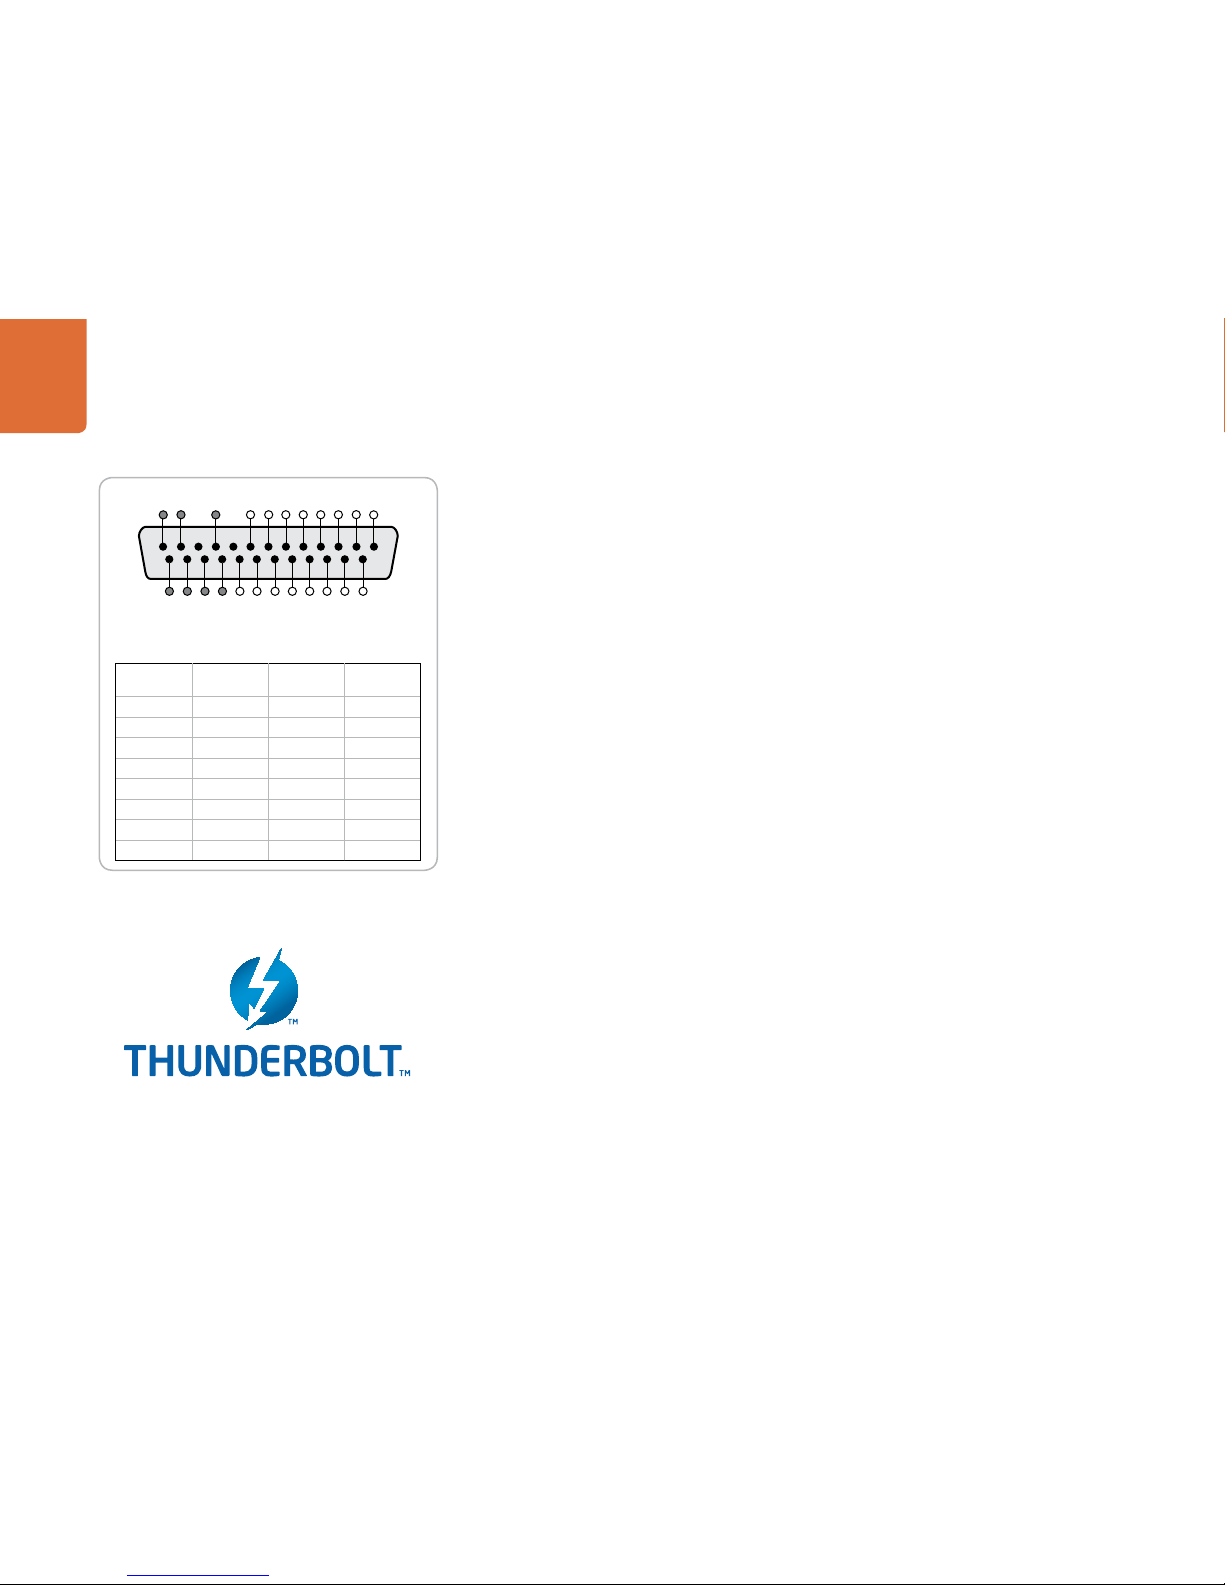
Teranex 2D Processor analog audio pin connections.
Analog
Audio Ch.
Hot Pins (+) Cold Pins (–) Ground Pins
1 IN 1 14 10
2 IN 2 15 12
3 IN 3 16 13
4 IN 4 17 22
1 OUT 5 18 23
2 OUT 6 19 24
3 OUT 7 20 25
4 OUT 8 21 25
13 12 10 8 7 6 5 4 3 2 1
25 24 23 22 21 20 19 18 17 16 15 14
DB-25 pin outs also compatible with Yamaha™, Mackie™,
Sony™ and Apogee™ connectors.
Page 11

Getting Started with Conversion
11
AES/EBU Audio
A DB-25 connector is provided for connecting up to 8 input channels (4 pairs) and 8 output channels (4 pairs)
of balanced AES/EBU digital audio to the Teranex 2D Processor. An optional breakout cable is required,
which is a standard Yamaha format cable for balanced XLR connections. This inexpensive breakout cable
may be purchased through many vendors, or may be fabricated using off the shelf connectors and cable.
HDMI Video and Audio
The Teranex Processor supports video and audio via HDMI inputs and outputs. Any audio associated
with the HDMI input is treated as an embedded source, so you should select EMBED as the audio Input
source to use it.
HDMI cable quality varies greatly so we recommend buying high quality cables from a high end video
reseller. High quality cables help eliminate unwanted sparkles or glitches in the HDMI video input.
If you don't see video on the HDMI video input, even though you have a device connected, then
you might want to check if the HDMI device you have connected uses HDCP. This content protection
prevents the HDMI video from being seen on anything other than a television, so you won't be able to
see images from these devices. Devices with HDCP include DVD players, and set top boxes.
In general, cameras and computers don't create content containing content protection, so you should
not have any problems connecting these devices.
Please always be sure you have copyright ownership before using or displaying content publicly.
Teranex 2D Processor AES/EBU audio pin connections.
AES/EBU
Audio Ch.
Hot Pins (+) Cold Pins (–) Ground Pins
1&2 IN 1 14 10
3&4 IN 2 15 12
5&6 IN 3 16 13
7&8 IN 4 17 22
1&2 OUT 5 18 23
3&4 OUT 6 19 24
5&6 OUT 7 20 25
7&8 OUT 8 21 25
13 12 10 8 7 6 5 4 3 2 1
25 24 23 22 21 20 19 18 17 16 15 14
DB-25 pin outs also compatible with Yamaha™, Mackie™,
Sony™ and Apogee™ connectors.
Page 12
Getting Started with Conversion
12
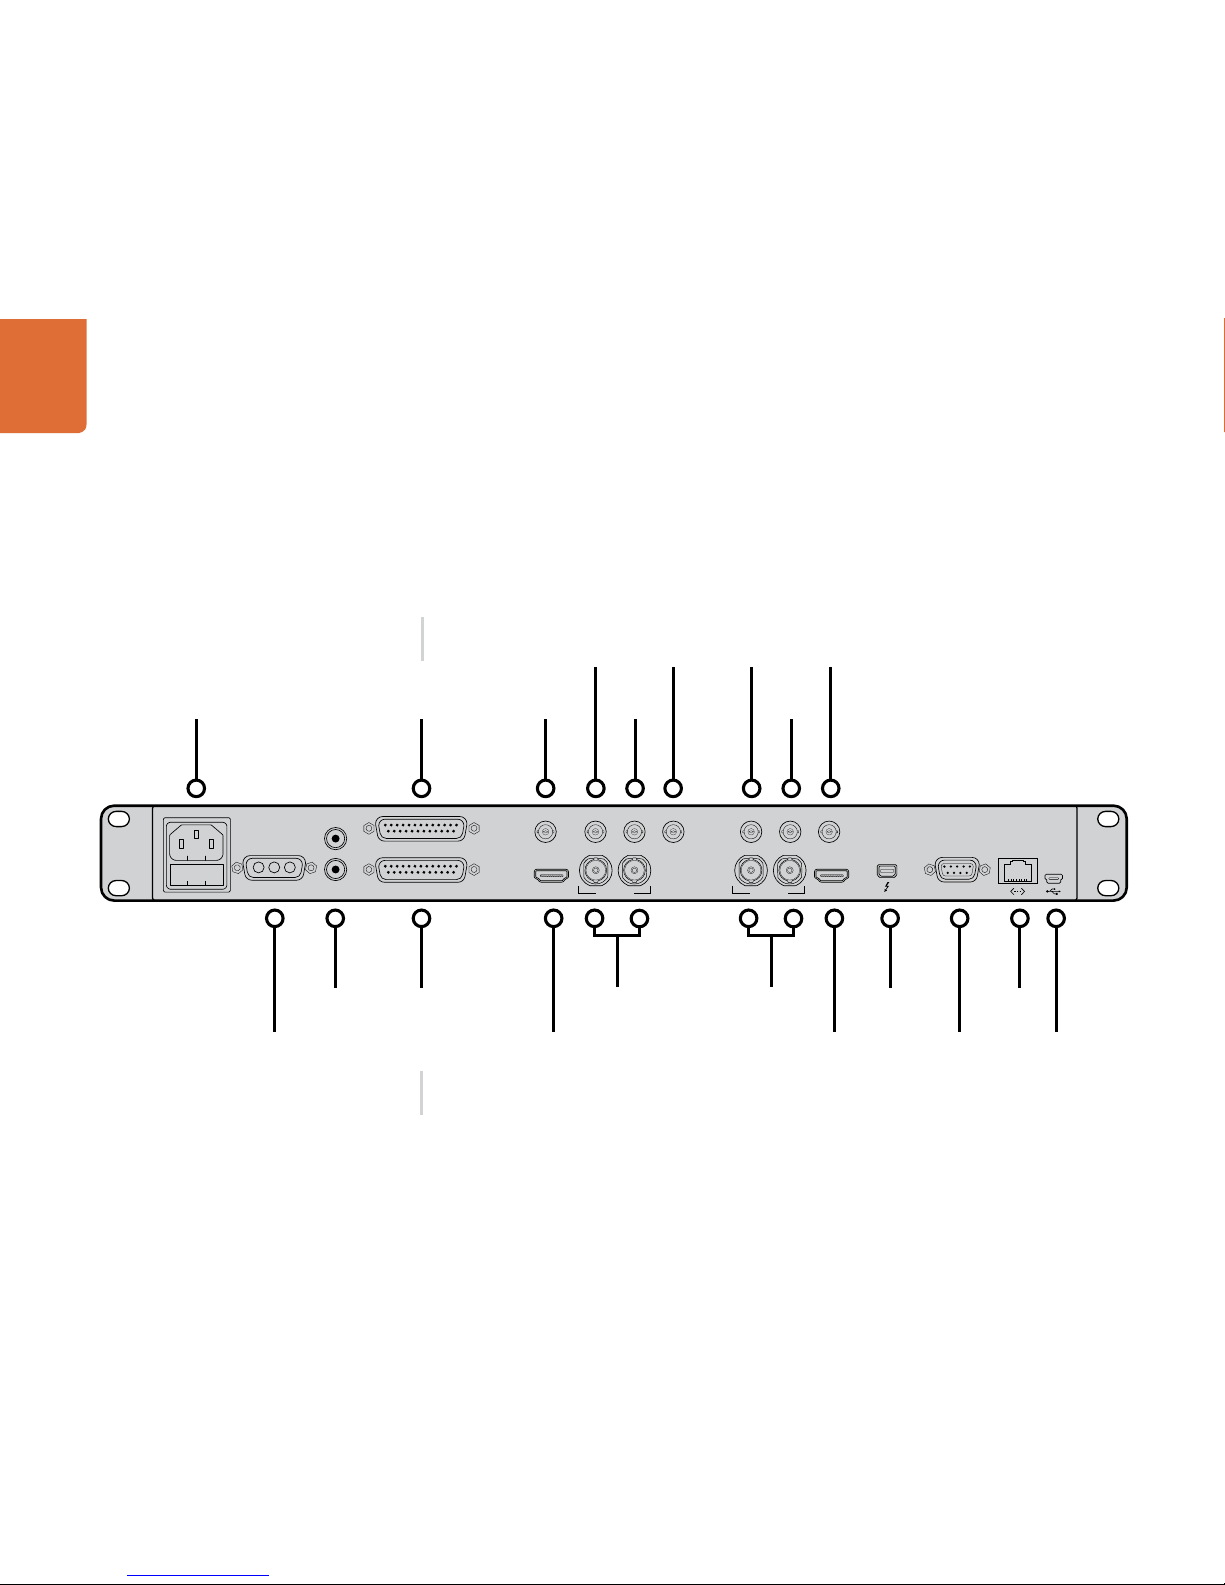
Teranex 2D Processor Connection Reference Guide
DB-25 pin outs also compatible
with Yamaha™, Mackie™, Sony™
and Apogee™ connectors.
DB-25 pin outs also compatible
with Yamaha™, Mackie™, Sony™
and Apogee™ connectors.
STEREO IN AES/EBU DIGITAL AUDIO IN/OUT HDMI IN
IN
REF IN Y/NTSC/PAL IN Y/NTSC/PAL OUTB-Y IN B-Y OUTR-Y IN R-Y OUT
LOOP OUT OUT
SD/HD/3G-SDI
HDMI OUT
ANALOG AUDIO IN/OUT
GND +12V GND
AUX POWER
L
R
REMOTE IN/OUT
SD/HD/3G-SDI
Power
Connection
B-Y In B-Y Out
Y/NTSC/PAL
In
Y/NTSC/PAL
Out
R-Y In R-Y Out
REF In
Analog Audio
In/Out
(4 Channels)
SD/HD/3G-SDI
In/Loop
SD/HD/3G-SDI
Out
HDMI In HDMI Out Remote In/Out USB
AES/EBU
Digital Audio
In/Out
(8 Channels)
Stereo In
L /R
+12V AUX
Power Connection
(Power Supply
Optional)
Thunderbolt
™
Ethernet
Page 13
Getting Started with Conversion
13
How to update the Blackmagic Teranex Software
From time to time Blackmagic Design will release new software for your Teranex Processor, with new
features, bug fixes, and increased compatibility with third party software and video devices.
To update your Teranex Processor with new software, you need to use the Teranex Utility to connect to the
Teranex Processor via USB. This utility checks the internal Teranex Processor software and lets you know if
there is new software.
First, download the latest Blackmagic Teranex software and install it on your computer using the instructions
in the Installing Blackmagic Teranex Software section of this manual. Once installed, the new software for
your Teranex Processor will be included in the Teranex Utility.
Updating the Teranex Processor Software
Step 1. Connect the Teranex Processor via USB to your computer. The switcher chassis is equipped with
a mini-USB 2.0 port which can be connected to your computer's USB 2.0 or USB 3.0 port using a
USB cable. When upgrading software, make sure there is only one Teranex Processor connected
via USB to the computer running the Teranex Utility software.
Step 2. Launch the Teranex Utility software.
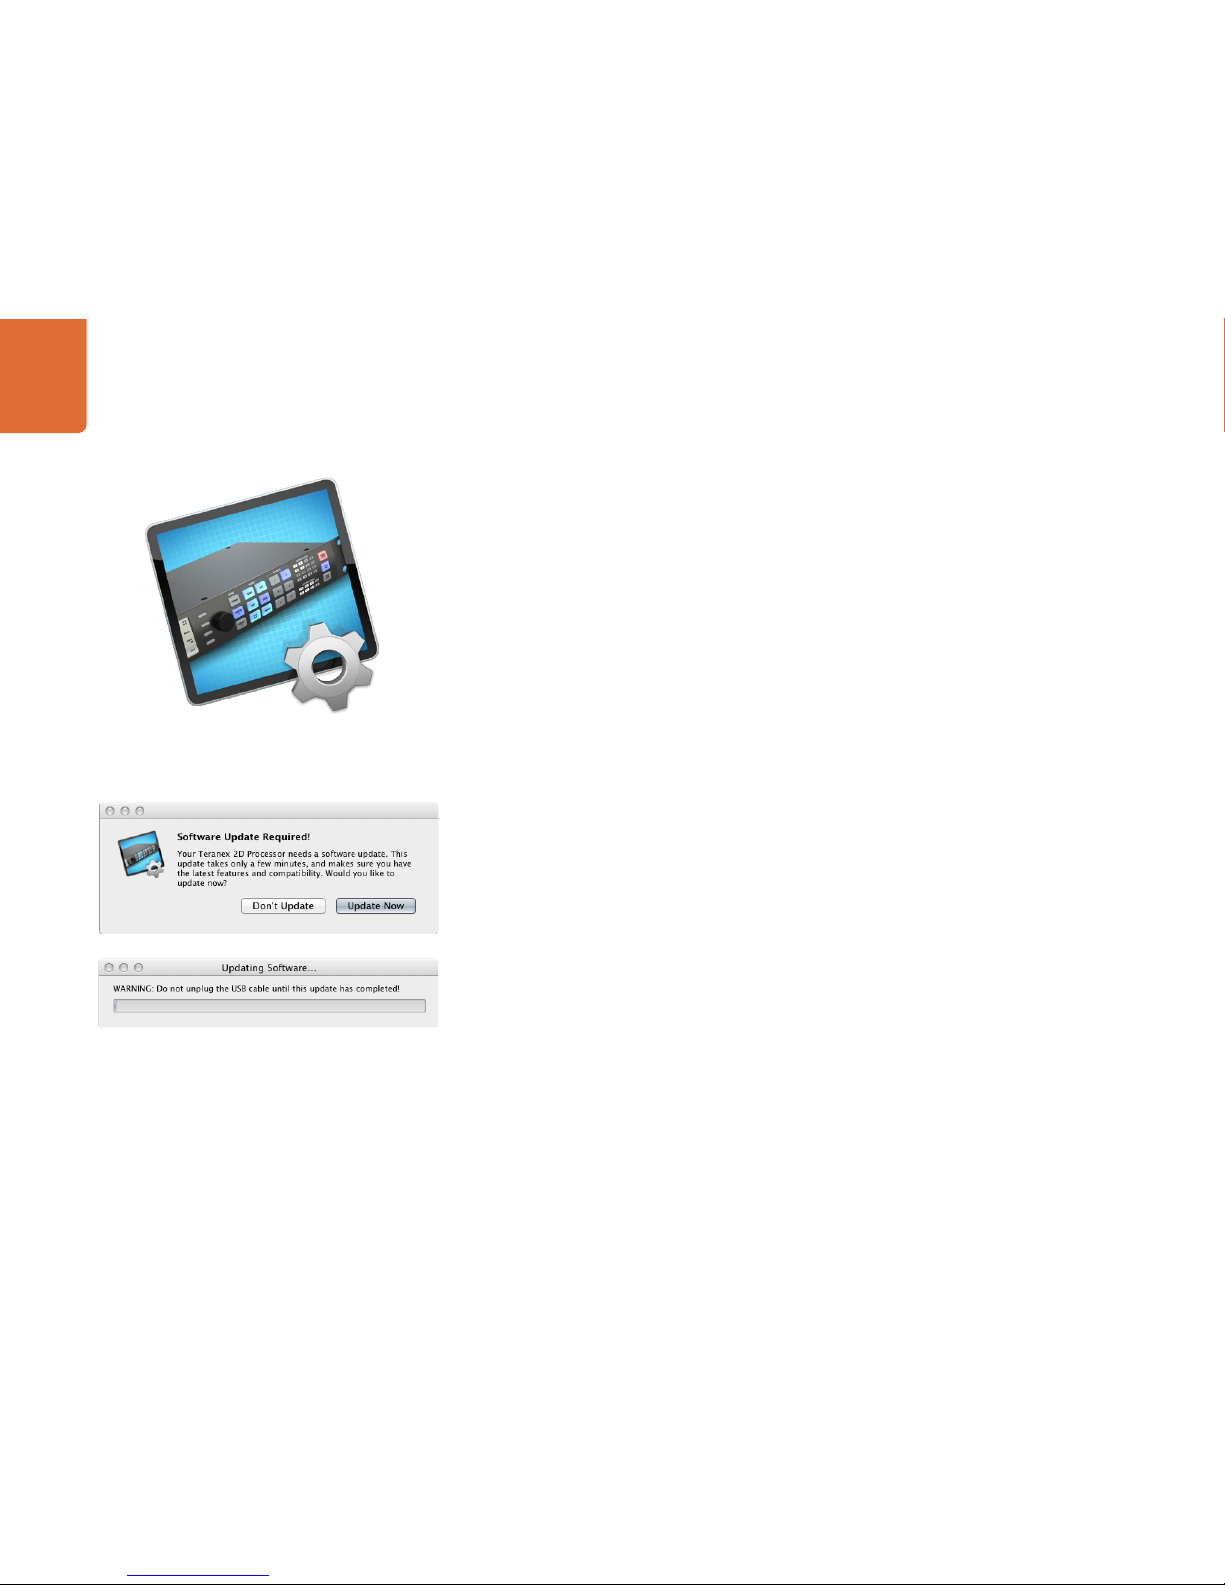
Step 3. If the Teranex Processor software requires updating, you will be prompted by a window asking
if you would like to update the software. Select Update Now to initiate the update process. The
update process may take a few minutes. Do not unplug power from the Teranex Processor during
the software update.
Step 4. Once the software update is complete, the Teranex Processor will automatically restart to enable
the new software.
Teranex Utility
Page 14
Getting Started with Capture and Playback
14
How to Set Up for Capture and Playback with Conversion
This section guides you through how to set up your Teranex 2D Processor hardware with your computer for
video capture and playback with conversion, including RS-422 remote deck control.
Connecting the Teranex 2D Processor to your computer
Step 1. Connect power to one or both power sockets. The easiest way to power the Teranex 2D Processor
is to connect an IEC cable to its AC power socket. Alternatively the 12V DC military grade port
can be used for external battery power and/or failover redundancy with an optional “brick” DC
adapter.
Step 2. Connect a Thunderbolt cable between the Teranex 2D Processor and a Thunderbolt port on your
computer, or to a Thunderbolt disk array which is attached to your computer.
Step 3. Connect cables between the video and audio connections on your Teranex 2D Processor and
your video equipment.
Step 4. If you are using analog or AES/EBU audio, rather than SDI or HDMI embedded audio, connect
common third party breakout cables to the DB-25 audio connectors for analog and AES/EBU
audio. Pinout diagrams for the DB-25 audio connectors can be seen in the "Connecting Video
and Audio Hardware" section of this manual.
Step 5. If you want to remotely control a video deck with RS-422 deck control, connect an RS-422 cable
between the RS-422 remote ports of the Teranex 2D Processor and the deck.
Step 6. On the front panel press the IN button and set the video source to SDI, HDMI or Analog. If you
are using embedded SDI or HDMI audio, set the audio source to Embed. Otherwise select from
AES or Analog audio. The processor will detect the format of the video input and automatically
configure the unit. The integrated LCD will show the incoming video signal.
Step 7. Press the OUT button on the front panel and use the buttons to select your desired output format,
frame type, frame rate and also set the output aspect ratio if needed. Press “Accept” on the
integrated LCD to confirm the new selection. You will notice that all video and audio output
buttons will be lit, indicating that all output types are active simultaneously.
MENU
MENU
HOME
MENU
1
MENU
2
REM
LOCK
PANEL
LOCK
VIDEO
VIDEO
GAIN
SAT
R-Y
B-Y
BLK
HUE
SHARP
PRESETS AUDIO STATUS
SYSTEM STATUS
PRESETS
1
3
5
2
4
6
B-Y IN
LOOP OUT OUT
R-Y IN B-Y OUT R-Y OUT
Y/NTSC/PAL OUT
HDMI OUT REMOTE IN/OUT
SD/HD/3G-SDI
Step 2.
IN
OUT
SDI
VIDEO
VIDEO
HDMI
ANLG
AUDIO
AUDIO
EMBED
AES
ANLG
FORMAT
FORMAT
486
720
2K
1080
576
1080
FRAME
FRAME
P
I
PSF
MENU
MENU
HOME
MENU
1
MENU
2
REM
LOCK
PANEL
LOCK
RATE
RATE
23.98
25
29.97
30
24
50
59.94
60
VIDEO
VIDEO
GAIN
SAT
R-Y
B-Y
BLK
HUE
SHARP
PRESETS AUDIO STATUS
SYSTEM STATUS
PRESETS
1
3
5
2
4
6
ANAM
LBOX
PBOX
ASPECT
ASPECT
SMART
14:9
CCUT
ZOOM
ADJ
L
R
GND +12V GND
AUX POWER
STEREO IN AES/EBU DIGITAL AUDIO IN/OUT
ANALOG AUDIO IN/OUT
REF IN Y/NTSC/PAL
IN
SD/HD/3G-SDI
B-Y IN
IN
LOOP OUT OUT
R-Y IN B-Y OUT R-Y OUT
Y/NTSC/PAL OUT
HDMI IN
HDMI OUT REMOTE IN/OUT
SD/HD/3G-SDI
Step 1.
MENU
MENU
HOME
MENU
1
MENU
2
REM
LOCK
PANEL
LOCK
24
50
59.94
60
VIDEO
VIDEO
GAIN
SAT
R-Y
B-Y
BLK
HUE
SHARP
PRESETS AUDIO STATUS
SYSTEM STATUS
PRESETS
1
3
5
2
4
6
ANAM
LBOX
PBOX
ASPECT
ASPECT
SMART
14:9
CCUT
ZOOM
ADJ
REF IN Y/NTSC/PAL IN
SD/HD/3G-SDI
B-Y IN
IN LOOP OUT OUT
R-Y IN B-Y OUT R-Y OUT
Y/NTSC/PAL OUT
HDMI IN HDMI OUT
REMOTE IN/OUT
SD/HD/3G-SDI
Step 3.
IN
OUT
SDI
VIDEO
VIDEO
HDMI
ANLG
AUDIO
AUDIO
EMBED
AES
ANLG
FORMAT
FORMAT
486
720
2K
1080
576
1080
FRAME
FRAME
P
I
PSF
MENU
MENU
HOME
MENU
1
MENU
2
REM
LOCK
PANEL
LOCK
RATE
RATE
23.98
25
29.97
30
24
50
59.94
60
VIDEO
VIDEO
GAIN
SAT
R-Y
B-Y
BLK
HUE
SHARP
PRESETS AUDIO STATUS
SYSTEM STATUS
PRESETS
1
3
5
2
4
6
ANAM
LBOX
PBOX
ASPECT
ASPECT
SMART
14:9
CCUT
ZOOM
ADJ
L
R
GND +12V GND
AUX POWER
STEREO IN AES/EBU DIGITAL AUDIO IN/OUT
ANALOG AUDIO IN/OUT
REF IN Y/NTSC/PAL
IN
SD/HD/3G-SDI
B-Y IN
IN
LOOP OUT OUT
R-Y IN B-Y OUT R-Y OUT
Y/NTSC/PAL OUT
HDMI IN
HDMI OUT REMOTE IN/OUT
SD/HD/3G-SDI
Step 4.
MENU
MENU
HOME
MENU
1
MENU
2
REM
LOCK
PANEL
LOCK
VIDEO
VIDEO
GAIN
SAT
R-Y
B-Y
BLK
HUE
SHARP
PRESETS AUDIO STATUS
SYSTEM STATUS
PRESETS
1
3
5
2
4
6
B-Y IN
LOOP OUT OUT
R-Y IN B-Y OUT R-Y OUT
Y/NTSC/PAL OUT
HDMI OUT REMOTE IN/OUT
SD/HD/3G-SDI
Step 5.
IN
OUT
SDI
VIDEO
VIDEO
HDMI
ANLG
AUDIO
AUDIO
EMBED
AES
ANLG
FORMAT
FORMAT
486
720
2K
1080
576
1080
FRAME
FRAME
P
I
PSF
MENU
MENU
HOME
MENU
1
MENU
2
REM
LOCK
PANEL
LOCK
RATE
RATE
23.98
25
29.97
30
24
50
59.94
60
VIDEO
VIDEO
GAIN
SAT
R-Y
B-Y
BLK
HUE
SHARP
PRESETS AUDIO STATUS
SYSTEM STATUS
PRESETS
1
3
5
2
4
6
ANAM
LBOX
PBOX
ASPECT
ASPECT
SMART
14:9
CCUT
ZOOM
ADJ
Step 7.
IN
OUT
SDI
VIDEO
VIDEO
HDMI
ANLG
AUDIO
AUDIO
EMBED
AES
ANLG
FORMAT
FORMAT
486
720
2K
1080
576
1080
FRAME
FRAME
P
I
PSF
MENU
MENU
HOME
MENU
1
MENU
2
REM
LOCK
PANEL
LOCK
RATE
RATE
23.98
25
29.97
30
24
50
59.94
60
VIDEO
VIDEO
GAIN
SAT
R-Y
B-Y
BLK
HUE
SHARP
PRESETS AUDIO STATUS
SYSTEM STATUS
PRESETS
1
3
5
2
4
6
ANAM
LBOX
PBOX
ASPECT
ASPECT
SMART
14:9
CCUT
ZOOM
ADJ
Step 6.
Page 15
Getting Started with Capture and Playback
15
How to Set Up for Waveform Monitoring
This section guides you through how to set up your Teranex 2D Processor hardware with your computer for
waveform monitoring of your video input signal.
Connecting the Teranex 2D Processor to your Computer
Step 1. Connect power to one or both power sockets. The easiest way to power the Teranex 2D Processor
is to connect an IEC cable to its AC power socket. Alternatively the 12V DC military grade port
can be used for external battery power and/or failover redundancy with an optional “brick” DC
adapter.
Step 2. Connect a Thunderbolt cable between the Teranex 2D Processor and a Thunderbolt port on your
computer, or to a Thunderbolt disk array which is attached to your computer.
Step 3. Connect cables between the video and audio connections on your Teranex 2D Processor and
your video source equipment.
Step 4. If you are using analog or AES/EBU audio, rather than SDI or HDMI embedded audio, connect
common third party breakout cables to the DB-25 audio connectors for analog and AES/EBU
audio. Pinout diagrams for the DB-25 audio connectors can be seen in the "Connecting Video
and Audio Hardware" section of this manual.
Step 5. On the front panel press the IN button and set the video source to SDI, HDMI or Analog. If you
are using embedded SDI or HDMI audio, set the audio source to Embed. Otherwise select from
AES or Analog audio. The processor will detect the format of the video input and automatically
configure the unit. The integrated LCD will show the incoming video signal.
Step 6. Press the OUT button on the front panel and use the buttons to select your desired output
format, frame type, frame rate and also set the output aspect ratio if needed. You can set the
output format to match the input format if you don't want any conversion. Press “Accept” on
the integrated LCD to confirm the new selection. You will notice that all video and audio output
buttons will be lit, indicating that all output types are active simultaneously.
Step 7. Launch the Blackmagic UltraScope software on your computer. The video scopes will appear after
a few seconds and will allow you to monitor the converted output of your Teranex 2D Processor.
MENU
MENU
HOME
MENU
1
MENU
2
REM
LOCK
PANEL
LOCK
VIDEO
VIDEO
GAIN
SAT
R-Y
B-Y
BLK
HUE
SHARP
PRESETS AUDIO STATUS
SYSTEM STATUS
PRESETS
1
3
5
2
4
6
B-Y IN
LOOP OUT OUT
R-Y IN B-Y OUT R-Y OUT
Y/NTSC/PAL OUT
HDMI OUT REMOTE IN/OUT
SD/HD/3G-SDI
Step 2.
IN
OUT
SDI
VIDEO
VIDEO
HDMI
ANLG
AUDIO
AUDIO
EMBED
AES
ANLG
FORMAT
FORMAT
486
720
2K
1080
576
1080
FRAME
FRAME
P
I
PSF
MENU
MENU
HOME
MENU
1
MENU
2
REM
LOCK
PANEL
LOCK
RATE
RATE
23.98
25
29.97
30
24
50
59.94
60
VIDEO
VIDEO
GAIN
SAT
R-Y
B-Y
BLK
HUE
SHARP
PRESETS AUDIO STATUS
SYSTEM STATUS
PRESETS
1
3
5
2
4
6
ANAM
LBOX
PBOX
ASPECT
ASPECT
SMART
14:9
CCUT
ZOOM
ADJ
L
R
GND +12V GND
AUX POWER
STEREO IN AES/EBU DIGITAL AUDIO IN/OUT
ANALOG AUDIO IN/OUT
REF IN Y/NTSC/PAL
IN
SD/HD/3G-SDI
B-Y IN
IN
LOOP OUT OUT
R-Y IN B-Y OUT R-Y OUT
Y/NTSC/PAL OUT
HDMI IN
HDMI OUT REMOTE IN/OUT
SD/HD/3G-SDI
Step 1.
MENU
MENU
HOME
MENU
1
MENU
2
REM
LOCK
PANEL
LOCK
24
50
59.94
60
VIDEO
VIDEO
GAIN
SAT
R-Y
B-Y
BLK
HUE
SHARP
PRESETS AUDIO STATUS
SYSTEM STATUS
PRESETS
1
3
5
2
4
6
ANAM
LBOX
PBOX
ASPECT
ASPECT
SMART
14:9
CCUT
ZOOM
ADJ
REF IN Y/NTSC/PAL IN
SD/HD/3G-SDI
B-Y IN
IN LOOP OUT OUT
R-Y IN B-Y OUT R-Y OUT
Y/NTSC/PAL OUT
HDMI IN HDMI OUT
REMOTE IN/OUT
SD/HD/3G-SDI
Step 3.
IN
OUT
SDI
VIDEO
VIDEO
HDMI
ANLG
AUDIO
AUDIO
EMBED
AES
ANLG
FORMAT
FORMAT
486
720
2K
1080
576
1080
FRAME
FRAME
P
I
PSF
MENU
MENU
HOME
MENU
1
MENU
2
REM
LOCK
PANEL
LOCK
RATE
RATE
23.98
25
29.97
30
24
50
59.94
60
VIDEO
VIDEO
GAIN
SAT
R-Y
B-Y
BLK
HUE
SHARP
PRESETS AUDIO STATUS
SYSTEM STATUS
PRESETS
1
3
5
2
4
6
ANAM
LBOX
PBOX
ASPECT
ASPECT
SMART
14:9
CCUT
ZOOM
ADJ
L
R
GND +12V GND
AUX POWER
STEREO IN AES/EBU DIGITAL AUDIO IN/OUT
ANALOG AUDIO IN/OUT
REF IN Y/NTSC/PAL
IN
SD/HD/3G-SDI
B-Y IN
IN
LOOP OUT OUT
R-Y IN B-Y OUT R-Y OUT
Y/NTSC/PAL OUT
HDMI IN
HDMI OUT REMOTE IN/OUT
SD/HD/3G-SDI
Step 4.
IN
OUT
SDI
VIDEO
VIDEO
HDMI
ANLG
AUDIO
AUDIO
EMBED
AES
ANLG
FORMAT
FORMAT
486
720
2K
1080
576
1080
FRAME
FRAME
P
I
PSF
MENU
MENU
HOME
MENU
1
MENU
2
REM
LOCK
PANEL
LOCK
RATE
RATE
23.98
25
29.97
30
24
50
59.94
60
VIDEO
VIDEO
GAIN
SAT
R-Y
B-Y
BLK
HUE
SHARP
PRESETS AUDIO STATUS
SYSTEM STATUS
PRESETS
1
3
5
2
4
6
ANAM
LBOX
PBOX
ASPECT
ASPECT
SMART
14:9
CCUT
ZOOM
ADJ
Step 6.
Step 7.
IN
OUT
SDI
VIDEO
VIDEO
HDMI
ANLG
AUDIO
AUDIO
EMBED
AES
ANLG
FORMAT
FORMAT
486
720
2K
1080
576
1080
FRAME
FRAME
P
I
PSF
MENU
MENU
HOME
MENU
1
MENU
2
REM
LOCK
PANEL
LOCK
RATE
RATE
23.98
25
29.97
30
24
50
59.94
60
VIDEO
VIDEO
GAIN
SAT
R-Y
B-Y
BLK
HUE
SHARP
PRESETS AUDIO STATUS
SYSTEM STATUS
PRESETS
1
3
5
2
4
6
ANAM
LBOX
PBOX
ASPECT
ASPECT
SMART
14:9
CCUT
ZOOM
ADJ
Step 5.
Blackmagic UltraScope
Page 16
Getting Started with Capture and Playback
16
Connecting Video and Audio Hardware
Your Teranex Processor includes a wide variety of input and output connections, providing a flexible solution
for just about any system configuration you may have. Once you have connected and selected your input
video and audio source, the video and audio output signals will be present on all of the output connectors
simultaneously.
SD/HD/3G SDI Video and Audio
The Serial Digital Interface (SDI) input and output connec tions supports SD, HD and 3 Gb/s signals. To
use the SDI signal as your video input, press the IN button on the front panel and then select SDI as
your video source.
If your program audio is embedded in the SDI video input signal, you must select EMBED on the front
panel.
A reclocked, SDI Input Loop connector is provided which always shows the SDI input signal regardless of
whether the analog, HDMI or SDI input button has been selected on the front panel.
Analog Video
Both analog composite and component video sources are suppor ted in the Teranex Processor, and
you may change which signal type you are using at any time. You will note that the BNC connectors
labeled Y/NTSC/PAL serve double duty as connections for the Y (luminance) component signal OR
NTSC/PAL composite video sources. You can define the desired analog video signal type, composite
or component, via the front panel LCD menu.
If the analog video output is configured as composite, HD video output formats will be down converted
to SD as a monitoring quality output. If the analog video output is configured as component, HD will be
provided, as there is no need for downconversion.
Page 17

Getting Started with Capture and Playback
17
Analog Audio
Two methods of connecting analog audio are available:
a DB-25 multi-pin connector for connecting 4 channels of balanced analog audio In and Out
a pair of RCA phono connectors for stereo left and right input.
The DB-25 connector is used for connection of 4 input channels and 4 output channels of balanced
analog audio to the Teranex 2D Processor. An optional breakout cable is required, which is a standard
Yamaha format cable for balan ced XLR connection s. This inexpensive breakou t cable may be purchased
through many vendors, or may be fabricated using off the shelf connectors and cable.
For input of HiFi Stereo audio, a pair of RCA phono connectors are provided to permit connection
of devices that have stereo unbalanced RCA audio outputs. These devices may include DVD players,
VTR’s, etc. that do not have professional, balanced analog outputs.
When you select the ANLG button on the front panel as the audio input type, a menu page will appear on
the front panel LCD allowing you to choose which of the two analog audio sources you want to use.
Teranex 2D Processor analog audio pin connections.
Analog
Audio Ch.
Hot Pins (+) Cold Pins (–) Ground Pins
1 IN 1 14 10
2 IN 2 15 12
3 IN 3 16 13
4 IN 4 17 22
1 OUT 5 18 23
2 OUT 6 19 24
3 OUT 7 20 25
4 OUT 8 21 25
13 12 10 8 7 6 5 4 3 2 1
25 24 23 22 21 20 19 18 17 16 15 14
DB-25 pin outs also compatible with Yamaha™, Mackie™,
Sony™ and Apogee™ connectors.
Page 18
Getting Started with Capture and Playback
18
AES/EBU Audio
A DB-25 connector is provided for connecting up to 8 input channels (4 pairs) and 8 output channels (4 pairs)
of balanced AES/EBU digital audio to the Teranex 2D Processor. An optional breakout cable is required,
which is a standard Yamaha format cable for balanced XLR connections. This inexpensive breakout cable
may be purchased through many vendors, or may be fabricated using off the shelf connectors and cable.
HDMI Video and Audio
The Teranex Processor supports video and audio via HDMI inputs and outputs. Any audio associated
with the HDMI input is treated as an embedded source, so you should select EMBED as the audio Input
source to use it.
HDMI cable quality varies greatly so we recommend buying high quality cables from a high end video
reseller. High quality cables help eliminate unwanted sparkles or glitches in the HDMI video input.
If you don't see video on the HDMI video input, even though you have a device connected, then
you might want to check if the HDMI device you have connected uses HDCP. This content protection
prevents the HDMI video from being seen on anything other than a television, so you won't be able to
see images from these devices. Devices with HDCP include DVD players, and set top boxes.
In general, cameras and computers don't create content containing content protection, so you should
not have any problems connecting these devices.
Please always be sure you have copyright ownership before using or displaying content publicly.
Thunderbolt
The Teranex Processor includes a super fast 10 Gb/s Thunderbolt port so you can connect it to your
computer for capture and playback of video and audio. Simply plugging in a Thunderbolt cable
transforms the Teranex Processor into a high end capture and playback solution with full software and
SDK support. Now you can perform high quality conversions and capture all in one pass! With the
Teranex Processor and included software, you get compatibility with editing software including Apple
Final Cut Pro, Avid Media Composer and Adobe Premiere Pro, plus support for Adobe After Ef fects,
Photoshop, Nuke
™
, ProTools, as well as the included Media Express and UltraScope software from
Blackmagic Design.
The Thunderbolt connection supports up to 16 channels of audio capture and playback.
Teranex 2D Processor AES/EBU audio pin connections.
AES/EBU
Audio Ch.
Hot Pins (+) Cold Pins (–) Ground Pins
1&2 IN 1 14 10
3&4 IN 2 15 12
5&6 IN 3 16 13
7&8 IN 4 17 22
1&2 OUT 5 18 23
3&4 OUT 6 19 24
5&6 OUT 7 20 25
7&8 OUT 8 21 25
13 12 10 8 7 6 5 4 3 2 1
25 24 23 22 21 20 19 18 17 16 15 14
DB-25 pin outs also compatible with Yamaha™, Mackie™,
Sony™ and Apogee™ connectors.
Page 19

Getting Started with Capture and Playback
19
Teranex 2D Processor Connection Reference Guide
DB-25 pin outs also compatible
with Yamaha™, Mackie™, Sony™
and Apogee™ connectors.
DB-25 pin outs also compatible
with Yamaha™, Mackie™, Sony™
and Apogee™ connectors.
STEREO IN AES/EBU DIGITAL AUDIO IN/OUT HDMI IN
IN
REF IN Y/NTSC/PAL IN Y/NTSC/PAL OUTB-Y IN B-Y OUTR-Y IN R-Y OUT
LOOP OUT OUT
SD/HD/3G-SDI
HDMI OUT
ANALOG AUDIO IN/OUT
GND +12V GND
AUX POWER
L
R
REMOTE IN/OUT
SD/HD/3G-SDI
Power
Connection
B-Y In B-Y Out
Y/NTSC/PAL
In
Y/NTSC/PAL
Out
R-Y In R-Y Out
REF In
Analog Audio
In/Out
(4 Channels)
SD/HD/3G-SDI
In/Loop
SD/HD/3G-SDI
Out
HDMI In HDMI Out Remote In/Out USB
AES/EBU
Digital Audio
In/Out
(8 Channels)
Stereo In
L /R
+12V AUX
Power Connection
(Power Supply
Optional)
Thunderbolt
™
Ethernet
Page 20
Getting Started with Capture and Playback
20
Install the Blackmagic Teranex Software
After installing your hardware, the next step is to install the Blackmagic Teranex software.
Installing Blackmagic Teranex Software on Mac OS X
Before installing any software you will need administrator privileges.
Step 1. Ensure you have the very latest driver. Visit www.blackmagicdesign.com/support
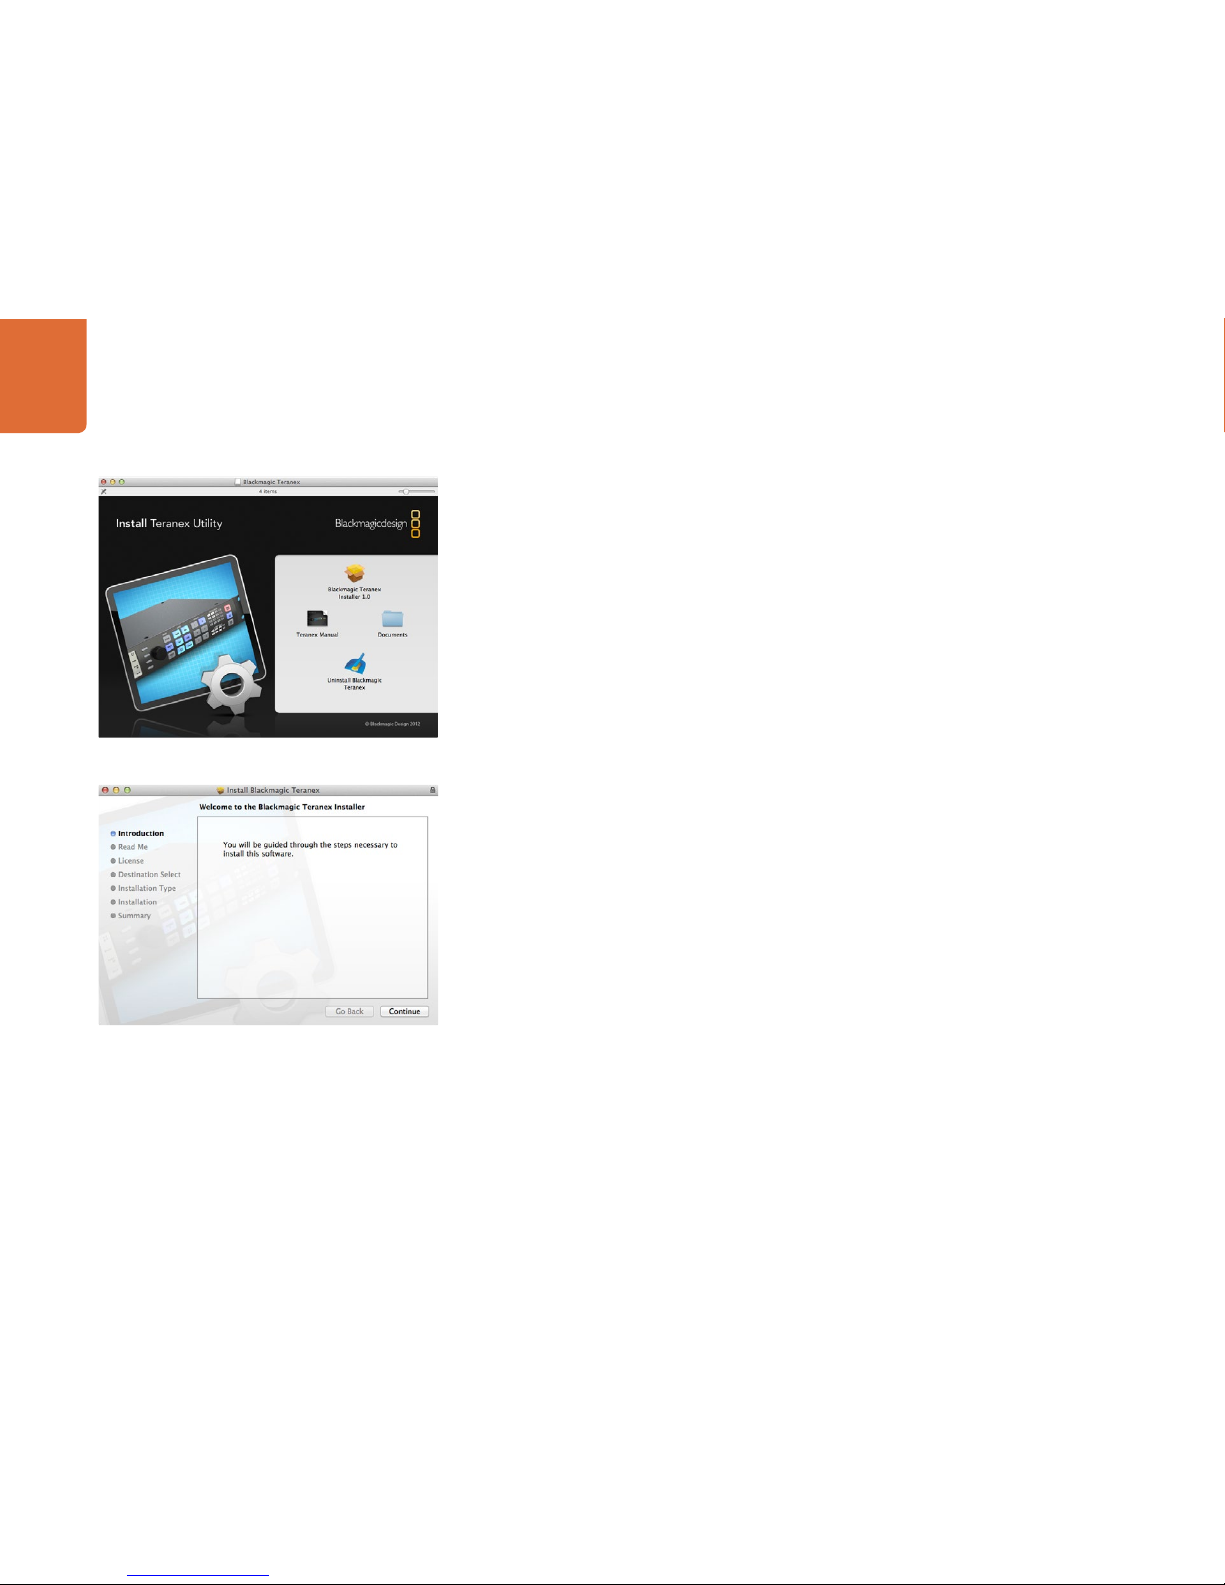
Step 2. Open the “Blackmagic Teranex” folder from the disc or downloaded disk image and launch the
“Blackmagic Teranex Installer”.
Step 3. Click Continue, Agree and Install buttons and the software will be installed on your system.
Step 4. Now restart your computer to enable the new software drivers.
Plugins and Applications that are installed
The Desktop Video software installs the following components:
Teranex Utility
Blackmagic Desktop Video drivers
Blackmagic Design system preference
Blackmagic Design LiveKey
Blackmagic Media Express
Blackmagic QuickTime
™
codecs
Blackmagic Disk Speed Test
Adobe
®
Premiere Pro, After Effects, Photoshop presets and plug-ins
Apple Final Cut Pro
™
7 Easy Setups, presets and enablers
Apple Final Cut Pro
™
X plug-ins
Avid Media Composer 6 plug-ins
On Mac OS X, all the files needed to run your Teranex Processor will be installed into a folder called
Blackmagic Teranex in the Applications folder. In this folder, you will see Teranex Utility which allows you to
update the internal software via USB. Also included in the folder is this instruction manual.
In the Applications folder, you will see Blackmagic Media Express which allows you to capture and
playback video when your Teranex Processor is connected to your computer via a Thunderbolt connection.
Alternatively the Thunderbolt connection allows you to perform waveform monitoring of your video input
using the Blackmagic UltraScope software.
Follow install prompts
Page 21

Getting Started with Capture and Playback
21
Installing Blackmagic Teranex Software on Windows
Step 1. Ensure you have the very latest software. Visit www.blackmagicdesign.com/support
Step 2. Open the “Blackmagic Teranex” folder and launch the “Blackmagic Teranex Installer”.
Step 3. The software will now be installed on your system. An alert will appear: “Do you want to allow the
following program to install software on this computer?” Click Yes to continue.
Step 4. You might see a dialog bubble saying “found new hardware” and the hardware wizard will appear.
Select “install automatically” and the system will find the required Teranex drivers. You will then
receive another dialog bubble saying “your new hardware is ready for use.”
Step 5. Now restart your computer to enable the new software drivers.
Plugins and Applications that are Installed
The Blackmagic Teranex software installs the following components:
Teranex Utility
The Blackmagic Teranex software also installs additional Blackmagic Desktop Video components which are
used by other Blackmagic Design capture products when installed on the same computer:
Once the computer has restarted, all the Blackmagic Teranex software applications will be installed and can
be accessed from Start > Programs > Blackmagic Design.
In the Teranex folder, you will see Teranex Utility, which allows you to update the internal software via USB.
Also included in the folder is this instruction manual.
How to update the Blackmagic Teranex Software
From time to time Blackmagic Design will release new software for your Teranex Processor, with new
features, bug fixes, and increased compatibility with third party software and video devices.
To update your Teranex Processor with new software, you need to use the Teranex Utility to connect to the
Teranex Processor via USB. This utility checks the internal Teranex Processor software and lets you know if
there is new software.
First, download the latest Blackmagic Teranex software and install it on your computer using the instructions
in the Installing Blackmagic Teranex Software section of this manual. Once installed, the new software for
your Teranex Processor will be included in the Teranex Utility.
Follow install prompts
Teranex Utility
Page 22
Getting Started with Capture and Playback
22
Updating the Teranex Processor Software
Step 1. Connect the Teranex Processor via USB to your computer. The switcher chassis is equipped with
a mini-USB 2.0 port which can be connected to your computer's USB 2.0 or USB 3.0 port using a
USB cable. When upgrading software, make sure there is only one Teranex Processor connected
via USB to the computer running the Teranex Utility software.
Step 2. Launch the Teranex Utility software.
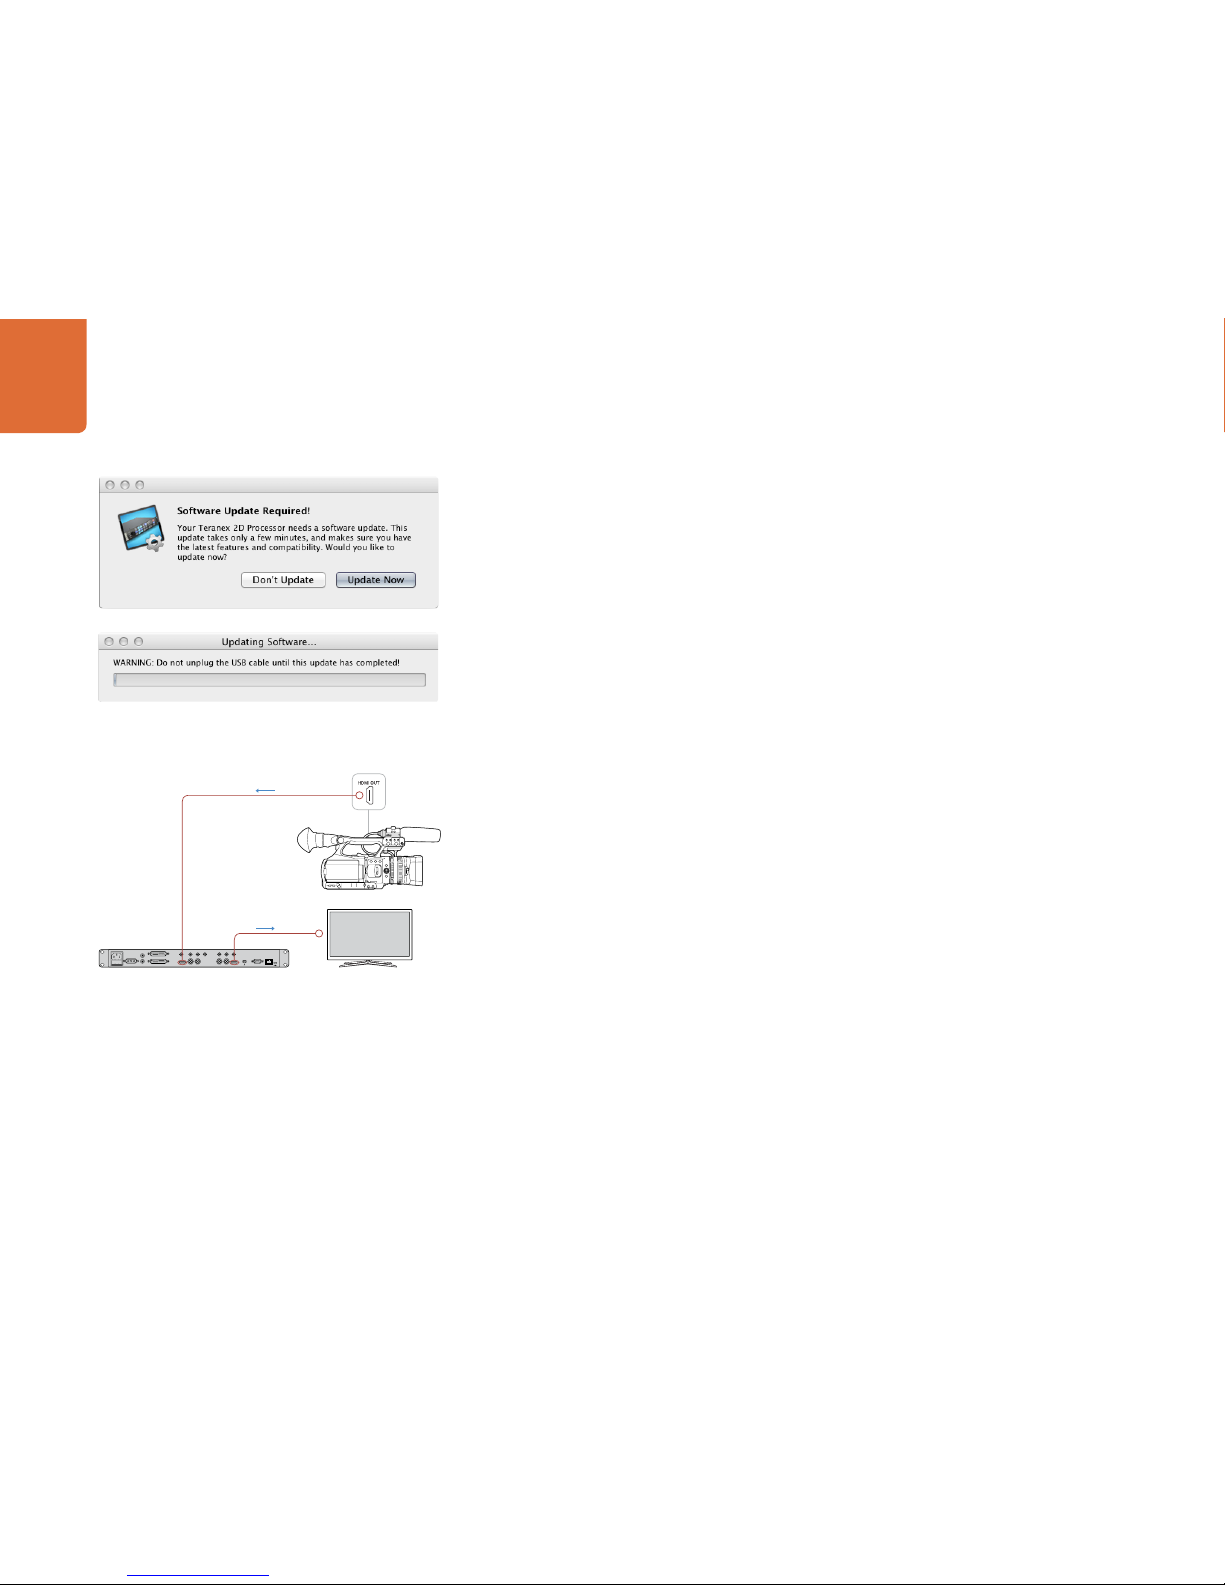
Step 3. If the Teranex Processor software requires updating, you will be prompted by a window asking
if you would like to update the software. Select Update Now to initiate the update process.
The update process may take a few minutes. Do not unplug power from the Teranex Processor
during the software update.
Step 4. Once the software update is complete, the Teranex Processor will automatically restart to enable
the new software.
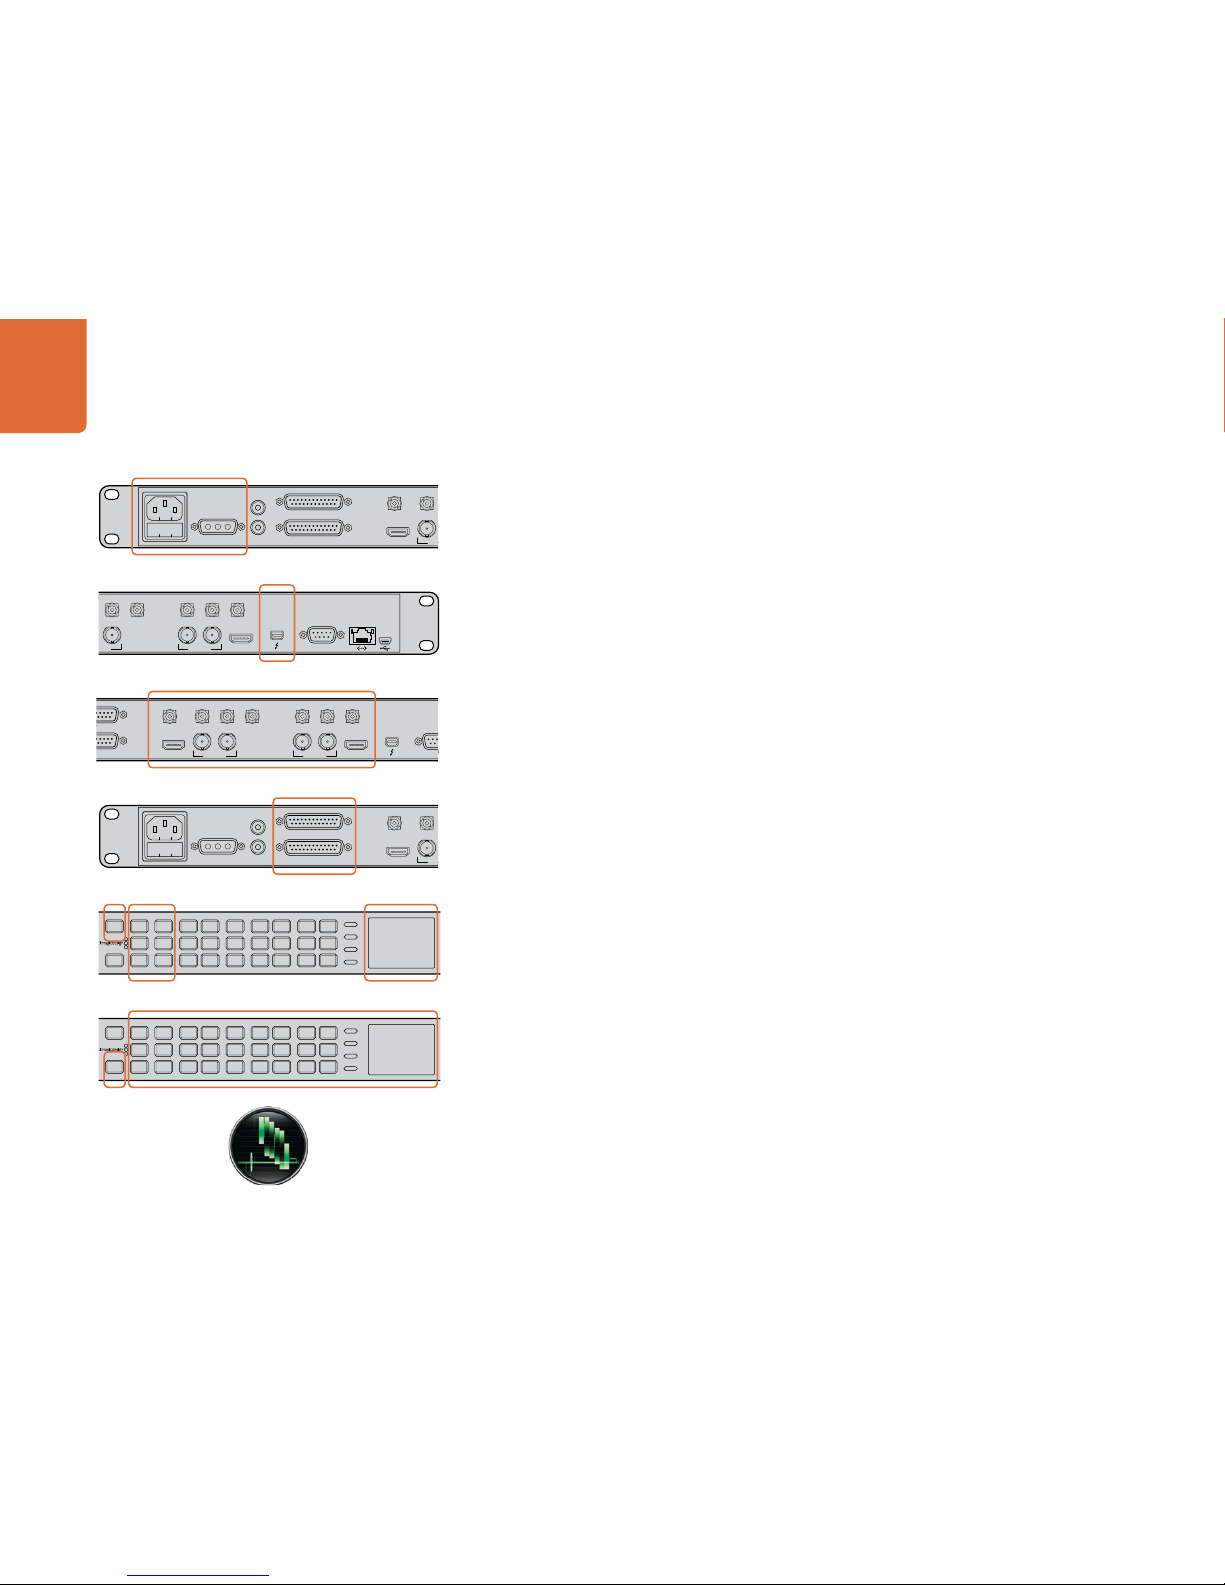
It's a good idea to run a quick test to ensure you can capture and play back video before you need to use
your Teranex 2D Processor hardware for anything important:
Connect a video monitor or TV to the video output of your Teranex 2D Processor. An HDMI TV is
very convenient for this test as both video and audio can be monitored without needing external
audio connections.
Connect a video source to the video input of your Teranex 2D Processor, especially a camera or
deck. DVD players shouldn't be used for this test as they typically have copy protection on their
HDMI and analog outputs so you won't be able to capture from them even if you're using home
made DVD's.
Use the buttons on the Teranex 2D Processor to set your video and audio connections for input
and output.
Locate Blackmagic Media Express and open it:
- on Mac OS X, look in the Applications folder.
Camera Outputs
HDTV
Connect a video monitor and source to your Teranex 2D Processor
Page 23
Capturing and Playing Back Video
23
Video Playback test using Blackmagic Media Express
Import a test clip in to Media Express. If you see a message that the selected video format is not compatible
with the current project, click "Don't save" to discard the current project and create a new project for
the test clip.
Double click the test clip and you should see the video on the monitor connected to the output of your
Teranex 2D Processor. Audio output can also be monitored.
Video Capture test using Blackmagic Media Express
Go to Media Express>Preferences on Mac OS X.
Select a project format which matches your converted video output rather than the source video.
Choose a capture file format.
Set the storage location for your captured video and audio and choose whether to stop capture
or playback if dropped frames are detected. Choose a compressed capture file format so you can
capture to any disk.
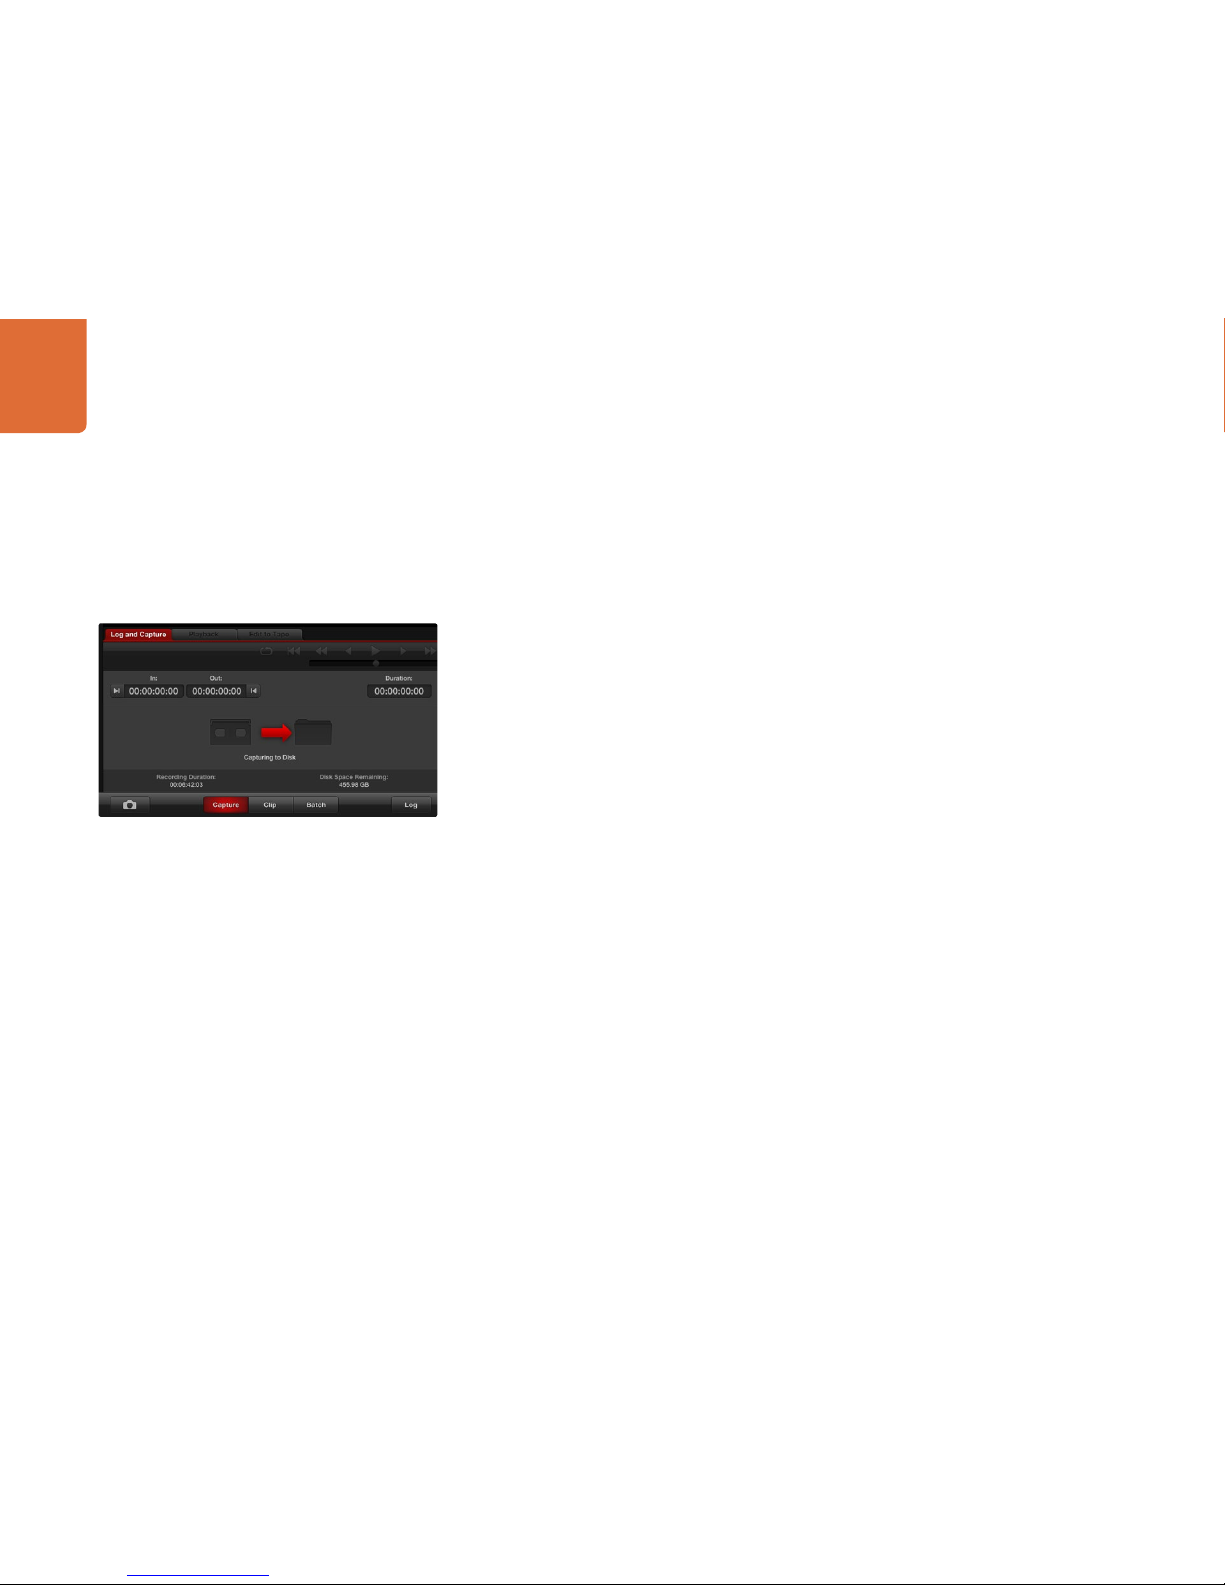
Close the Preferences and click on the Log and Capture tab. You should immediately see your
converted video source in the video preview pane of Media Express.
Click Capture to perform the capture test. Click Capture again to finish the test. Double click on
the captured clip in the Media List to play it back on screen and on the outputs of your Teranex 2D
Processor hardware.
For further information on Blackmagic Design Media Express refer to detailed section in this manual.
Click the "Capture" button to commence recording
Page 24
Understanding the Control Panel
24
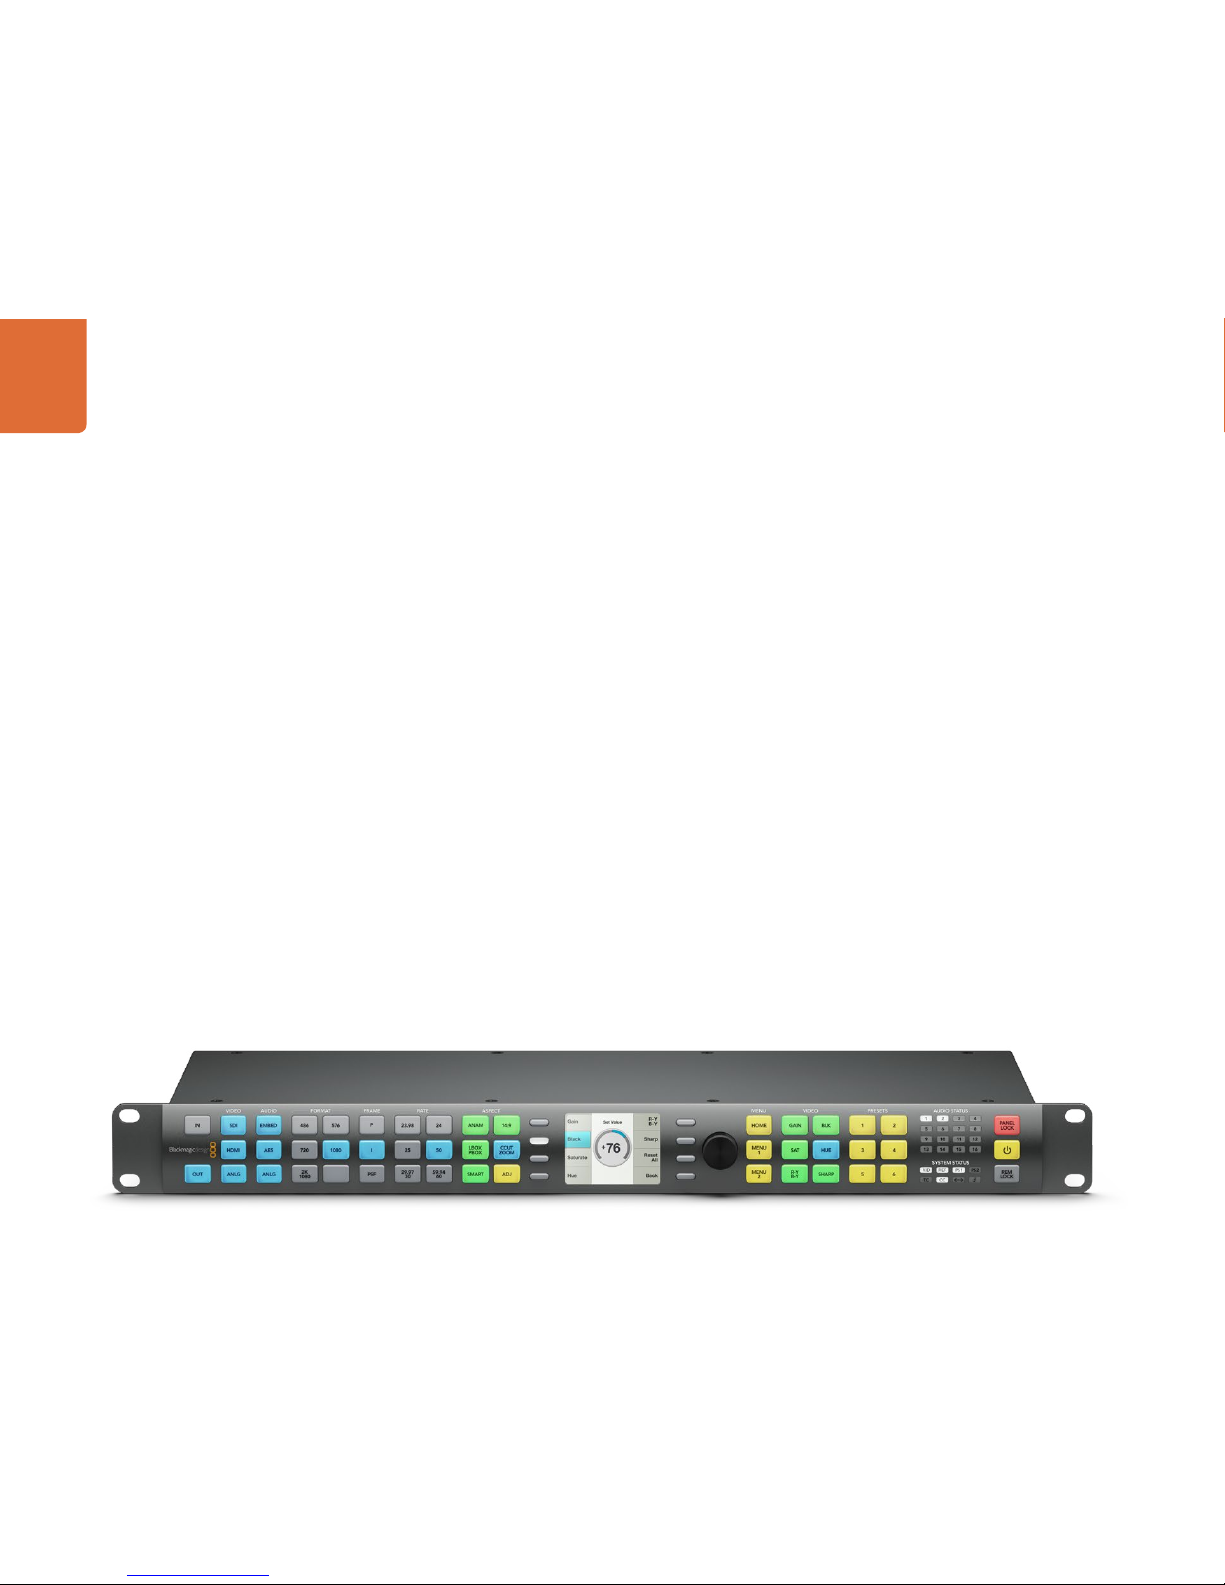
Teranex Processor Control Panel Layout
When you use the Teranex Processor as a stand alone format converter and frame synchronizer, the
control panel provides intuitive and quick access to critical functions and status. The selection buttons
are easy to read multicolored LEDs, which allows you to easily view the current system status. Selection
of video & audio sources, output formats and the desired output aspec t ratio are all accomplished via
the front panel buttons.
The LCD display is used as a video display and for menu navigation. This allows for confidence monitoring
of the input or output signals, with a text overlay showing the format and frame rate of the monitored signal.
Control Panel LED Color Code
When you selec t the IN or OUT button on the front panel, the remaining sections of the control panel
will display your current input or output set tings, respectively, providing an intuitive look at the current
settings in use.
Two colors are used for the control panel buttons, blue and green.
Blue buttons will indicate the current settings of the processor. For example, the portion shown of the
front panel shown here indicates that the output (OUT) signal is being routed to the SDI, HDMI, and
analog video output connectors, audio is being routed via the embedded, AES and analog outputs,
and the current output format is 1080i50.
When you make a new selection, such as a new output format selection, green buttons will light to indicate
your pending choices and indicate that the Processor is in “update” mode. The changes will not be made
until you confirm the new settings via the LCD menu. If you change your mind, press the cancel button on
the LCD menu. If you make a button choice that is not permitted, other buttons will flash green momentarily,
indicating the choices that are available for the selection.
Page 25
Understanding the Control Panel
25
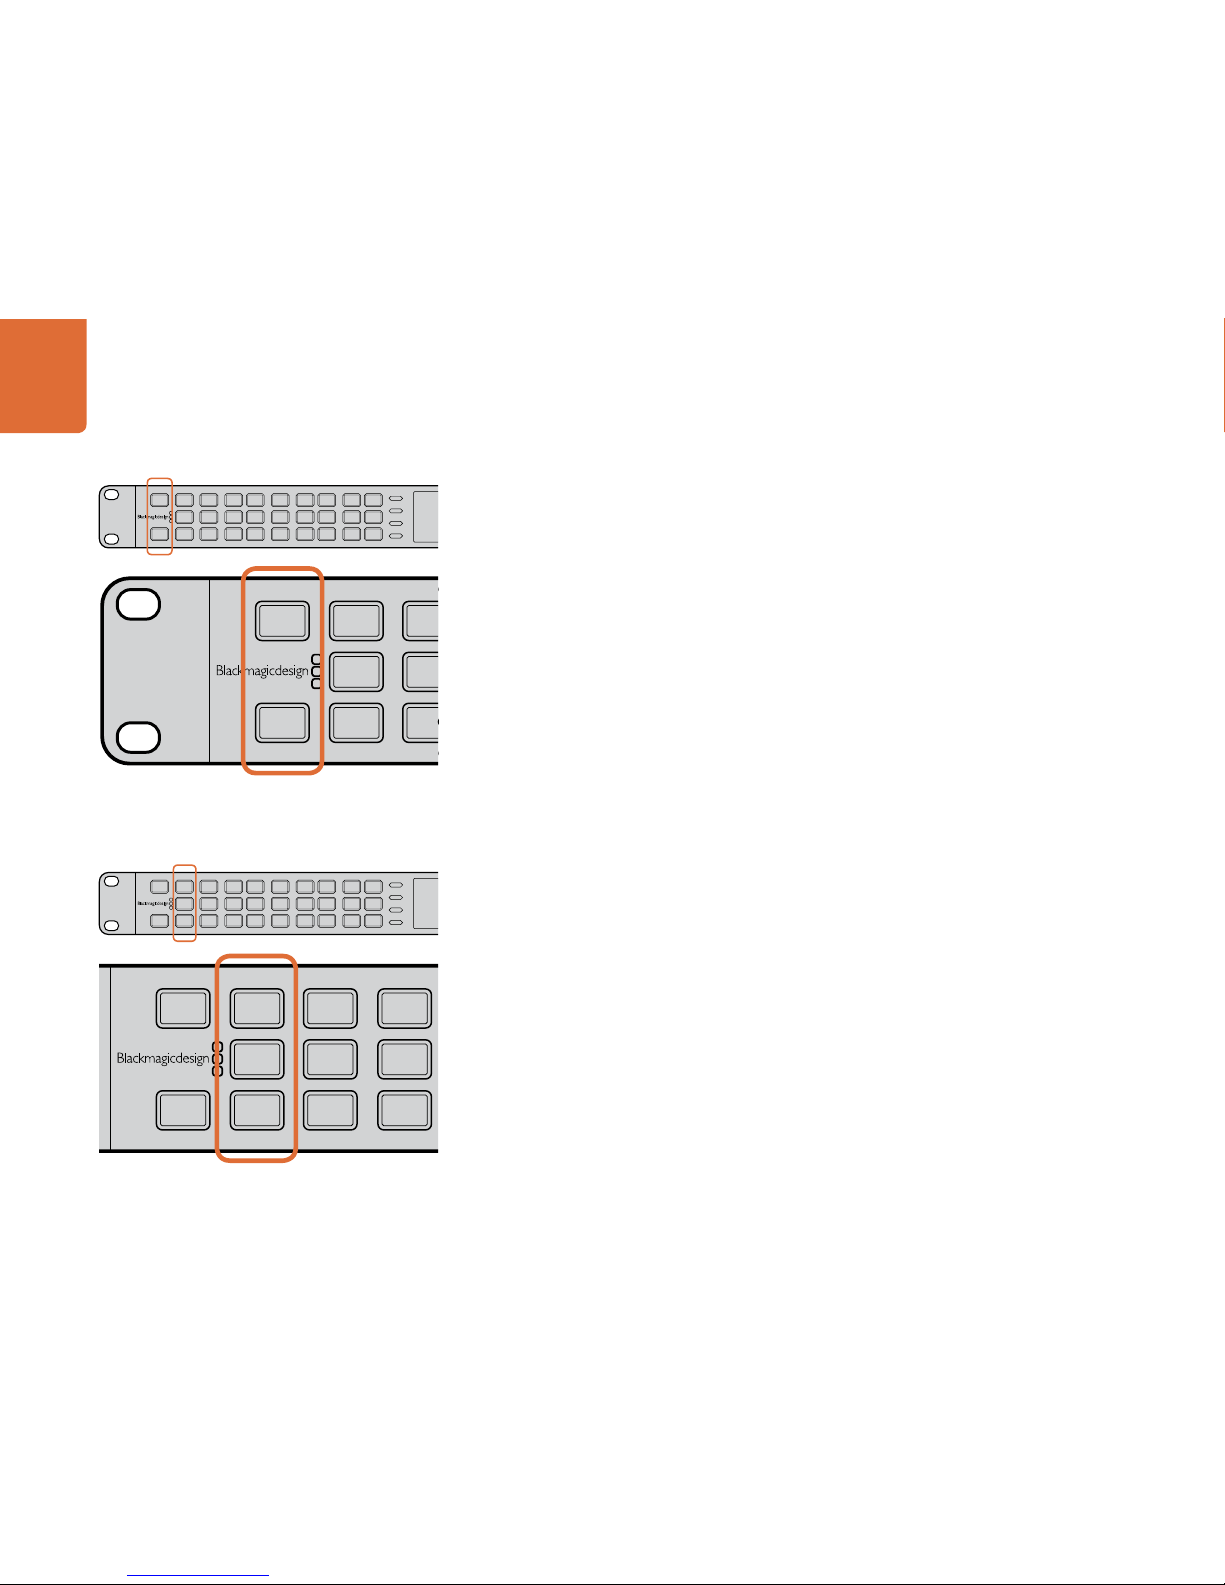
Input/Output Selection
The IN/OUT section allows you to select whether the front panel is displaying settings related to the Input
signal or the Output signal. When selected, the button is lit BLUE and the buttons on the front panel will
indicate the current settings for that selected mode. It’s easy to glance at the panel and determine your
current settings, such as the current format, frame rate and aspect ratio conversion in use. The LCD will show
the video signal related to the IN or OUT – great for confidence checking.
Video Selection
The buttons in the Video section define the type of video in use.
When IN is selected in the IN/OUT section, the Video section buttons will indicate the current
input type in use, SDI, HDMI or analog. You can change the video type by pressing the button
corresponding to the input type you want to use. The type of analog video output, composite or
component, can be selected in the Video Setup Menu.
- SDI – Press to select the SDI video input as the video input to the processor.
- HDMI – Press to select the HDMI input as the video input to the processor.
- ANLG – Press to select the analog video input. A menu will appear on the LCD allowing you
to select composite or component as the analog input type to the processor.
When OUT is selected in the IN/OUT section, all buttons in the Video section will be lit
BLUE, which indicates that all output types are active simultaneously, SDI, HDMI and analog.
If you press the ANLG button, the composite/component menu will appear allowing you to define
the analog output type you wish to use.
IN
OUT
SDI
VIDEO
VIDEO
HDMI
ANLG
AUDIO
AUDIO
EMBED
AES
ANLG
FORMAT
FORMAT
486
720
2K
1080
576
1080
FRAME
FRAME
P
I
PSF
RATE
RATE
23.98
25
29.97
30
24
50
59.94
60
ANAM
LBOX
PBOX
ASPECT
ASPECT
SMART
14:9
CCUT
ZOOM
ADJ
IN
OUT
SDI
VIDEO
VIDEO
HDMI
ANLG
AUDIO
AUDIO
EMBED
AES
ANLG
FORMAT
FORMAT
486
720
2K
1080
576
1080
FRAME
FRAME
P
I
PSF
MENU
MENU
HOME
MENU
1
MENU
2
REM
LOCK
PANEL
LOCK
RATE
RATE
23.98
25
29.97
30
24
50
59.94
60
VIDEO
VIDEO
GAIN
SAT
R-Y
B-Y
BLK
HUE
SHARP
PRESETS AUDIO STATUS
SYSTEM STATUS
PRESETS
1
3
5
2
4
6
ANAM
LBOX
PBOX
ASPECT
ASPECT
SMART
14:9
CCUT
ZOOM
ADJ
Input/Output Selection - Left Side of Panel
IN
OUT
SDI
VIDEO
VIDEO
HDMI
ANLG
AUDIO
AUDIO
EMBED
AES
ANLG
FORMAT
FORMAT
486
720
2K
1080
576
1080
FRAME
FRAME
P
I
PSF
MENU
MENU
HOME
MENU
1
MENU
2
REM
LOCK
PANEL
LOCK
RATE
RATE
23.98
25
29.97
30
24
50
59.94
60
VIDEO
VIDEO
GAIN
SAT
R-Y
B-Y
BLK
HUE
SHARP
PRESETS AUDIO STATUS
SYSTEM STATUS
PRESETS
1
3
5
2
4
6
ANAM
LBOX
PBOX
ASPECT
ASPECT
SMART
14:9
CCUT
ZOOM
ADJ
IN
OUT
SDI
VIDEO
VIDEO
HDMI
ANLG
AUDIO
AUDIO
EMBED
AES
ANLG
FORMAT
FORMAT
486
720
2K
1080
576
1080
FRAME
FRAME
P
I
PSF
RATE
RATE
23.98
25
29.97
30
24
50
59.94
60
ANAM
LBOX
PBOX
ASPECT
ASPECT
SMART
14:9
CCUT
ZOOM
ADJ
Video Selection - Left Side of Panel
Page 26
Understanding the Control Panel
26
Audio Selection
The buttons in the Audio sec tion define the type of audio in use.
When IN is selected in the IN/OUT section, the Audio section buttons will indicate the current input
type in use (embedded, AES or analog). You can change the audio type by pressing the button
corresponding to the input type you want to use. The type of analog audio input, DB-25 or Stereo
RCA Phono, must be selected by you in the Audio Setup Menu.
- EMBED – Press to select the embedded audio input as the input to the processor. Use this setting
if your audio is embedded in your SDI or HDMI inputs.
- AES – Press to select the AES/EBU input available via the AES In/Out DB-25 connector.
- ANLG – Press to select analog audio input. A menu will appear on the LCD allowing you to select
the RCA or DB-25 connector as your input.
When OUT is selected in the IN/OUT section, all buttons in the Audio section will be lit blue, which
indicates that all output types are active simultaneously, embedded, AES and analog.
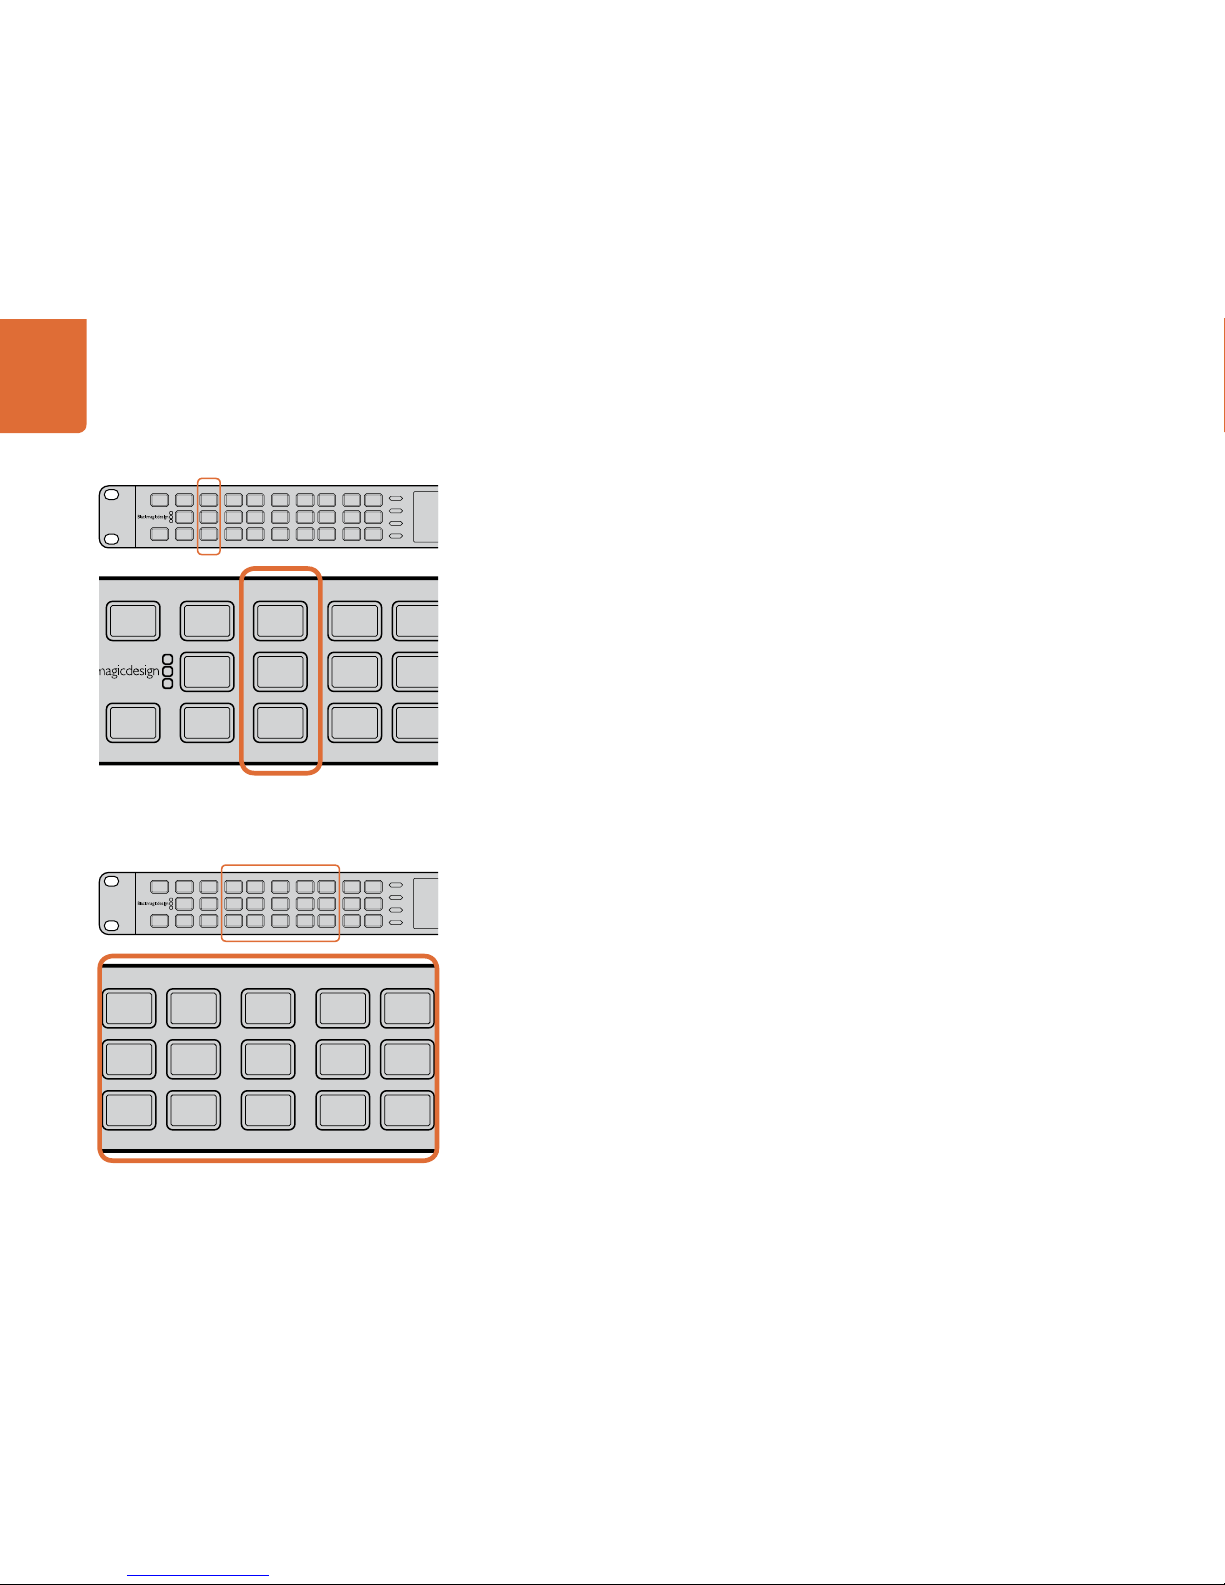
Video Format, Frame Type and Frame Rate Selection
The buttons in the Format, Frame and Rate sections define the specific video format.
Video production formats are described by three factors: format line rate, frame type and frame rate
(e.g. 486i59.94, 720p50, 1080PsF23.98, etc.).
The buttons in the Format section correspond to the line rate and are labeled: 486 (SD/NTSC),
576 (SD/PAL ), 720, 1080 and 2K 1080.
The buttons in the Frame section are labeled: P (Progressive), I (Interlaced) and PSF (Progressive
Segmented Frame).
The buttons in the Rate section are labeled: 23.98, 24, 25, 50, 29.97/30 and 59.94/60.
Input Format Detection is Automatic
The Automatic Input Format Detec tion feature permits the processor to automatically configure
itself for the current video input format. Once you manually define the desired output format, the
Auto Input Detection feature provides for automatic, unattended operation. Should the input format
change upstream from the processor, the output format will remain as previously selected if the new
conversion is a permitted format conversion.
IN
OUT
SDI
VIDEO
VIDEO
HDMI
ANLG
AUDIO
AUDIO
EMBED
AES
ANLG
FORMAT
FORMAT
486
720
2K
1080
576
1080
FRAME
FRAME
P
I
PSF
MENU
MENU
HOME
MENU
1
MENU
2
REM
LOCK
PANEL
LOCK
RATE
RATE
23.98
25
29.97
30
24
50
59.94
60
VIDEO
VIDEO
GAIN
SAT
R-Y
B-Y
BLK
HUE
SHARP
PRESETS AUDIO STATUS
SYSTEM STATUS
PRESETS
1
3
5
2
4
6
ANAM
LBOX
PBOX
ASPECT
ASPECT
SMART
14:9
CCUT
ZOOM
ADJ
Audio Selection - Left Side of Panel
IN
OUT
SDI
VIDEO
VIDEO
HDMI
ANLG
AUDIO
AUDIO
EMBED
AES
ANLG
FORMAT
FORMAT
486
720
2K
1080
576
1080
FRAME
FRAME
P
I
PSF
MENU
MENU
HOME
MENU
1
MENU
2
RATE
RATE
23.98
25
29.97
30
24
50
59.94
60
ANAM
LBOX
PBOX
ASPECT
ASPECT
SMART
14:9
CCUT
ZOOM
ADJ
IN
OUT
SDI
VIDEO
VIDEO
HDMI
ANLG
AUDIO
AUDIO
EMBED
AES
ANLG
FORMAT
FORMAT
486
720
2K
1080
576
1080
FRAME
FRAME
P
I
PSF
MENU
MENU
HOME
MENU
1
MENU
2
REM
LOCK
PANEL
LOCK
RATE
RATE
23.98
25
29.97
30
24
50
59.94
60
VIDEO
VIDEO
GAIN
SAT
R-Y
B-Y
BLK
HUE
SHARP
PRESETS AUDIO STATUS
SYSTEM STATUS
PRESETS
1
3
5
2
4
6
ANAM
LBOX
PBOX
ASPECT
ASPECT
SMART
14:9
CCUT
ZOOM
ADJ
Video Format, Frame Type and Frame Rate Selection -
Left Side of Panel
FORMAT
FORMAT
486
720
2K
1080
576
1080
FRAME
FRAME
P
I
PSF
MENU
MENU
HOME
MENU
1
MENU
2
RATE
RATE
23.98
25
29.97
30
24
50
59.94
60
VIDEO
VIDEO
GAIN
SAT
R-Y
B-Y
BLK
HUE
SHARP
PRESETS AUDIO STATUS
PRESETS
1
3
5
ANAM
LBOX
PBOX
ASPECT
ASPECT
SMART
14:9
CCUT
ZOOM
ADJ
Page 27

Understanding the Control Panel
27
Output Format Selection
The current Format, Frame and Rate settings will be indicated by BLUE front panel buttons.
To change the output format, we recommend that you work from left to right on the control panel.
Select the desired format line rate, frame type and frame rate via the control panel buttons, which will
turn GREEN if available. If a selection is NOT available, other buttons will flash GREEN momentarily to
indicate permissible selections.
During selection of a new output mode, the LCD menu will display the pending conversion, as seen in the
graphic. After selecting the desired line rate, frame type and frame rate, press the “Accept” soft button
along side the LCD menu to enable the new selection. Press “Cancel” to abandon the selection.
486 and 576 Formats
The 486 and 576 Format buttons indicate the NTSC and PAL standard definition interlaced formats,
respectively. The numbers refer to the active lines in each standard (486 for NTSC, 576 for PAL). When
the 486 button is pressed, the system will default to an interlaced (I), 59.94 setting in the Frame and Rate
sections. Likewise, when the 576 button is selected, the system will default to an interlaced (I), 50 setting. The
LCD Menu will display NTSC or PAL as the pending output mode.
720 Formats
The 720 Format button will indicate that the line rate of the input or output is 720. When chosen as the
output format, the P button will turn GREEN automatically, as a Progressive frame is the only permissible
type for 720 signals. You can then select a frame rate of either 59.94 (for 720p59.94) or 50 (for 720p50) to
define the desired output format.
1080 Formats
The 1080 Format button will indicate that the line rate of the input or output is 1080. When 1080 is chosen
as the output format, the P, I and PSF buttons are all permissible frame types. Select your desired output
Frame type, and then select the desired Rate button to finalize the output format selection. If you select a
frame rate that is not permissible for a given Line rate and Frame type, the buttons for the valid rates will
flash green momentarily.
2K 1080 Formats
The 2K 1080 video formats are not currently available. They will be added in a future software release.
Change Output Mode
720p59.94
Accept Cancel
Page 28
Understanding the Control Panel
28
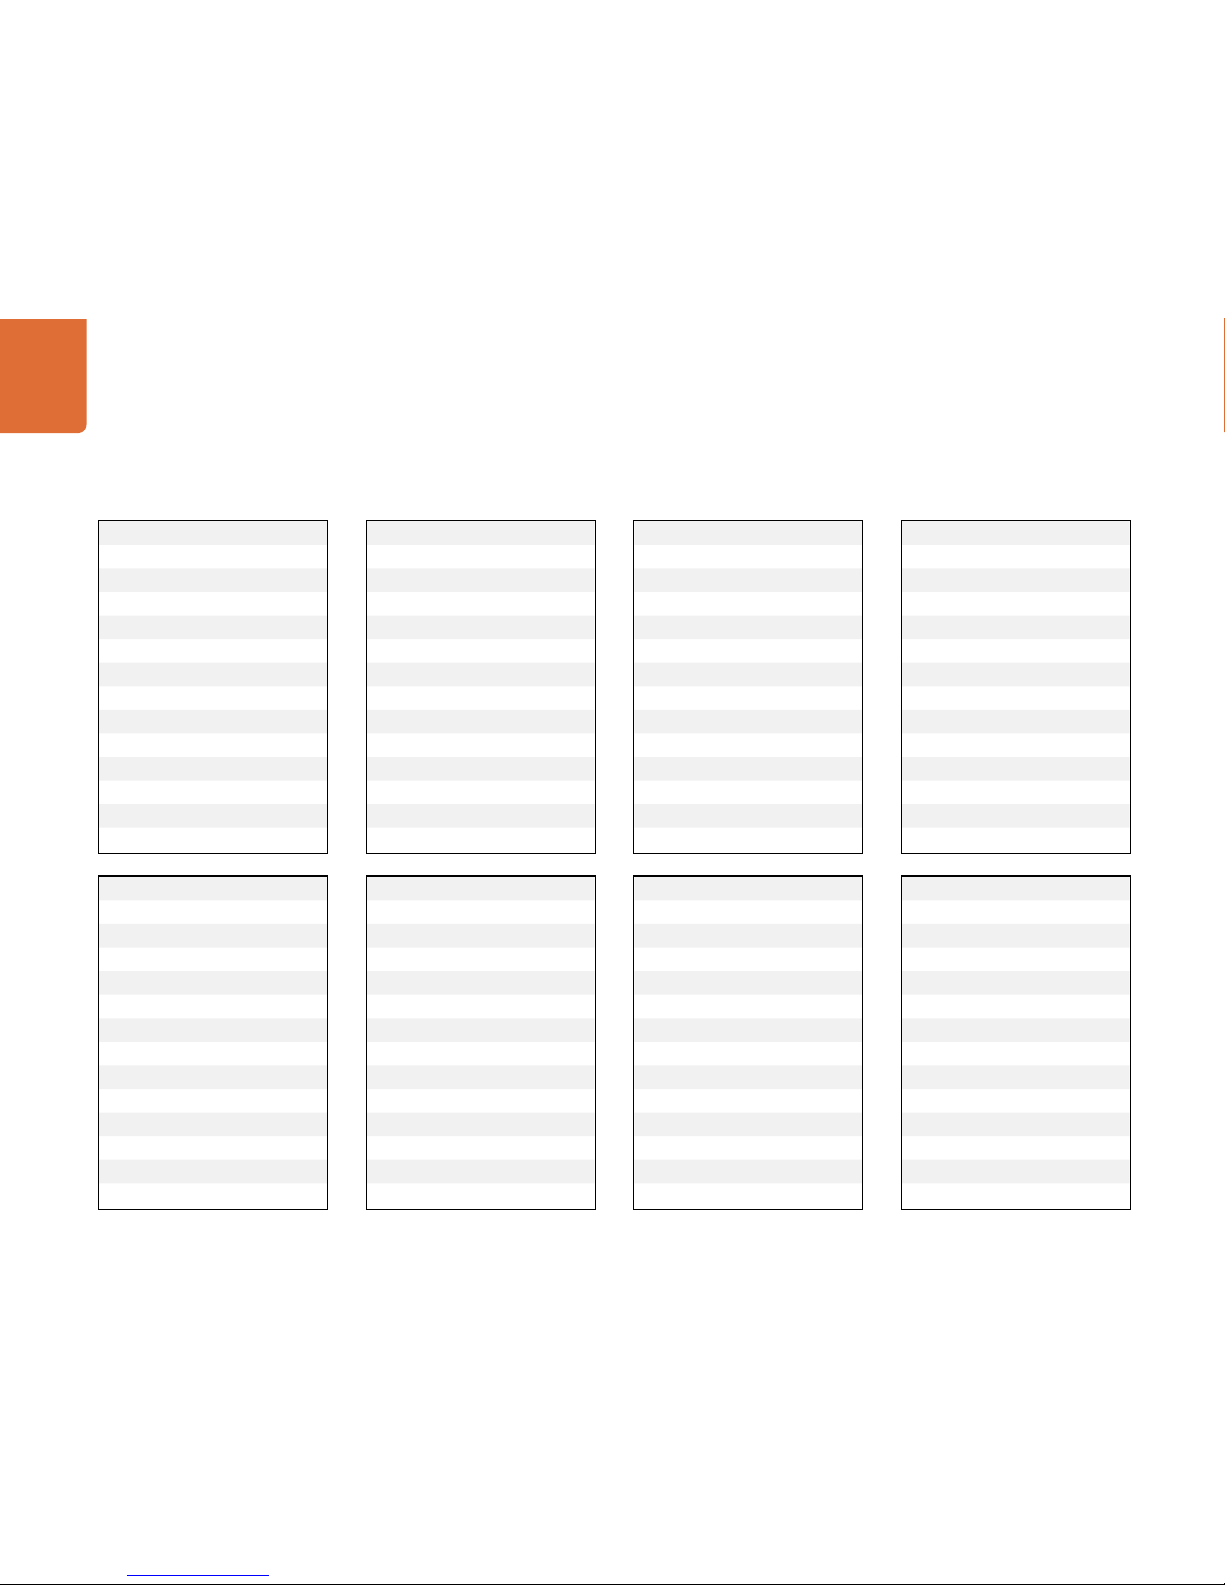
Output Input
486 i59.94 486 i59.94
576 i5 0
720p50
72 0 p59.94
1080p23.98
1080PsF23.98
1080p24
1080PsF24
1080p25
1080p29.97
1080i50
1080p59.94
1080i59.94
Output Input
1080i50 48 6i5 9.94
576 i5 0
720p50
72 0 p59.94
1080p23.98
1080PsF23.98
1080p24
1080PsF24
1080p25
1080p29.97
1080p50
1080i50
1080i59.94
Output Input
1080i59.94 486 i59.94
576 i5 0
720p50
72 0 p59.94
1080p23.98
1080PsF23.98
1080p24
1080PsF24
1080p25
1080p29.97
1080i50
1080p59.94
1080i59.94
Output Input
1080p23.98 4 86i 59.94
576 i5 0
720p50
72 0 p59.94
1080p23.98
1080PsF23.98
1080p24
1080PsF24
1080p25
1080p29.97
1080i50
1080i59.94
Output Input
1080p24 486 i59.94
576 i5 0
720p50
72 0 p59.94
1080p23.98
1080PsF23.98
1080p24
1080PsF24
1080p25
1080p29.97
1080i50
1080i59.94
Output Input
576 i5 0 486 i59.94
576 i5 0
720p50
72 0 p59.94
1080p23.98
1080PsF23.98
1080p24
1080PsF24
1080p25
1080p29.97
1080p50
1080i50
1080i59.94
Output Input
720p50 486 i59.94
576 i5 0
720p50
72 0 p59.94
1080p23.98
1080PsF23.98
1080p24
1080PsF24
1080p25
1080p29.97
1080p50
1080i50
1080i59.94
Output Input
72 0 p59.94 4 86i 59.94
576 i5 0
720p50
72 0 p59.94
1080p23.98
1080PsF23.98
1080p24
1080PsF24
1080p25
1080p29.97
1080i50
1080p59.94
1080i59.94
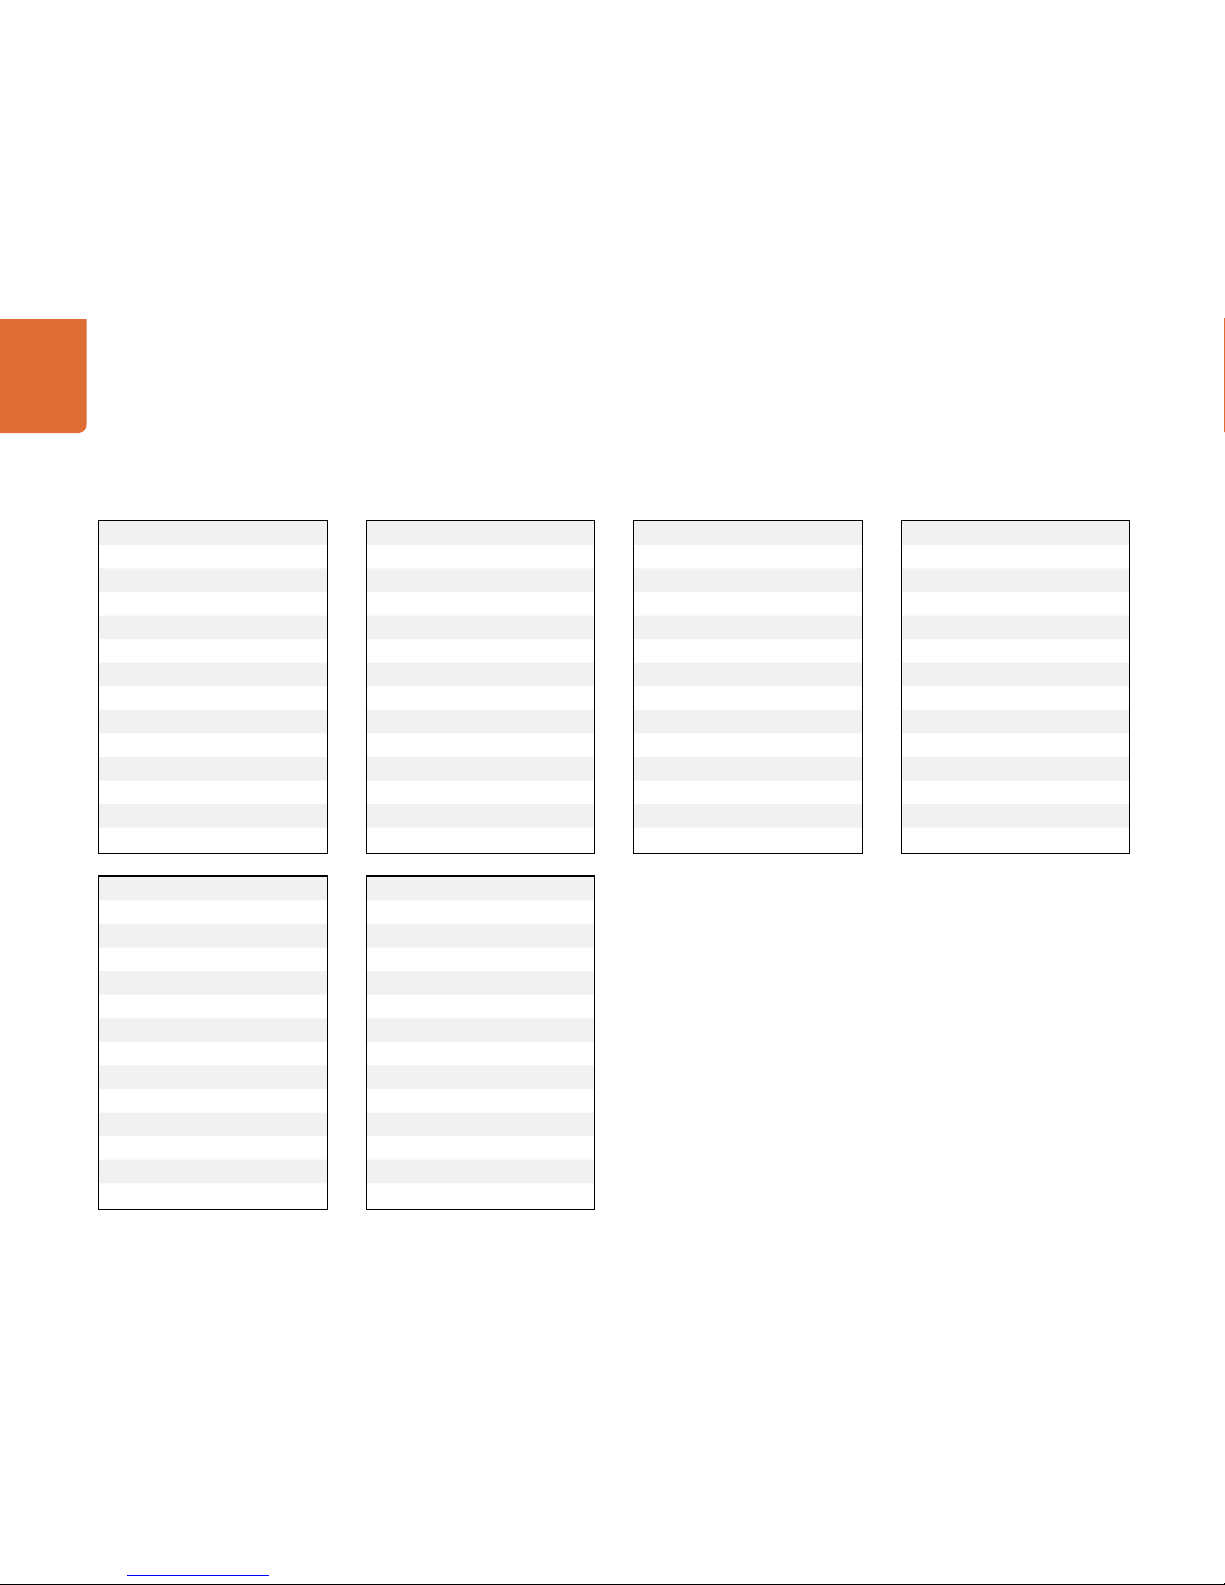
Format Conversion Table
Page 29
Understanding the Control Panel
29
Output Input
1080p25 486 i59.94
576 i5 0
720p50
72 0 p59.94
1080p23.98
1080PsF23.98
1080p24
1080PsF24
1080p25
1080p29.97
1080p50
1080i50
1080i59.94
Output Input
1080p59.94 486 i59.94
576 i5 0
720p50
72 0 p59.94
1080p23.98
1080PsF23.98
1080p24
1080PsF24
1080p25
1080p29.97
1080i50
1080p59.94
1080i59.94
Output Input
1080PsF23.98 4 86i59.94
576 i5 0
720p50
72 0 p59.94
1080p23.98
1080PsF23.98
1080p24
1080PsF24
1080p25
1080p29.97
1080i50
1080i59.94
Output Input
1080PsF24 486i59.94
576 i5 0
720p50
72 0 p59.94
1080p23.98
1080PsF23.98
1080p24
1080PsF24
1080p25
1080p29.97
1080i50
1080i59.94
Output Input
1080p29.97 4 86i 59.94
576 i5 0
720p50
72 0 p59.94
1080p23.98
1080PsF23.98
1080p24
1080PsF24
1080p25
1080p29.97
1080i50
1080p59.94
1080i59.94
Output Input
1080p50 48 6i59.94
576 i5 0
720p50
72 0 p59.94
1080p23.98
1080PsF23.98
1080p24
1080PsF24
1080p25
1080p29.97
1080p50
1080i50
1080i59.94
Format Conversion Table
Page 30
Understanding the Control Panel
30
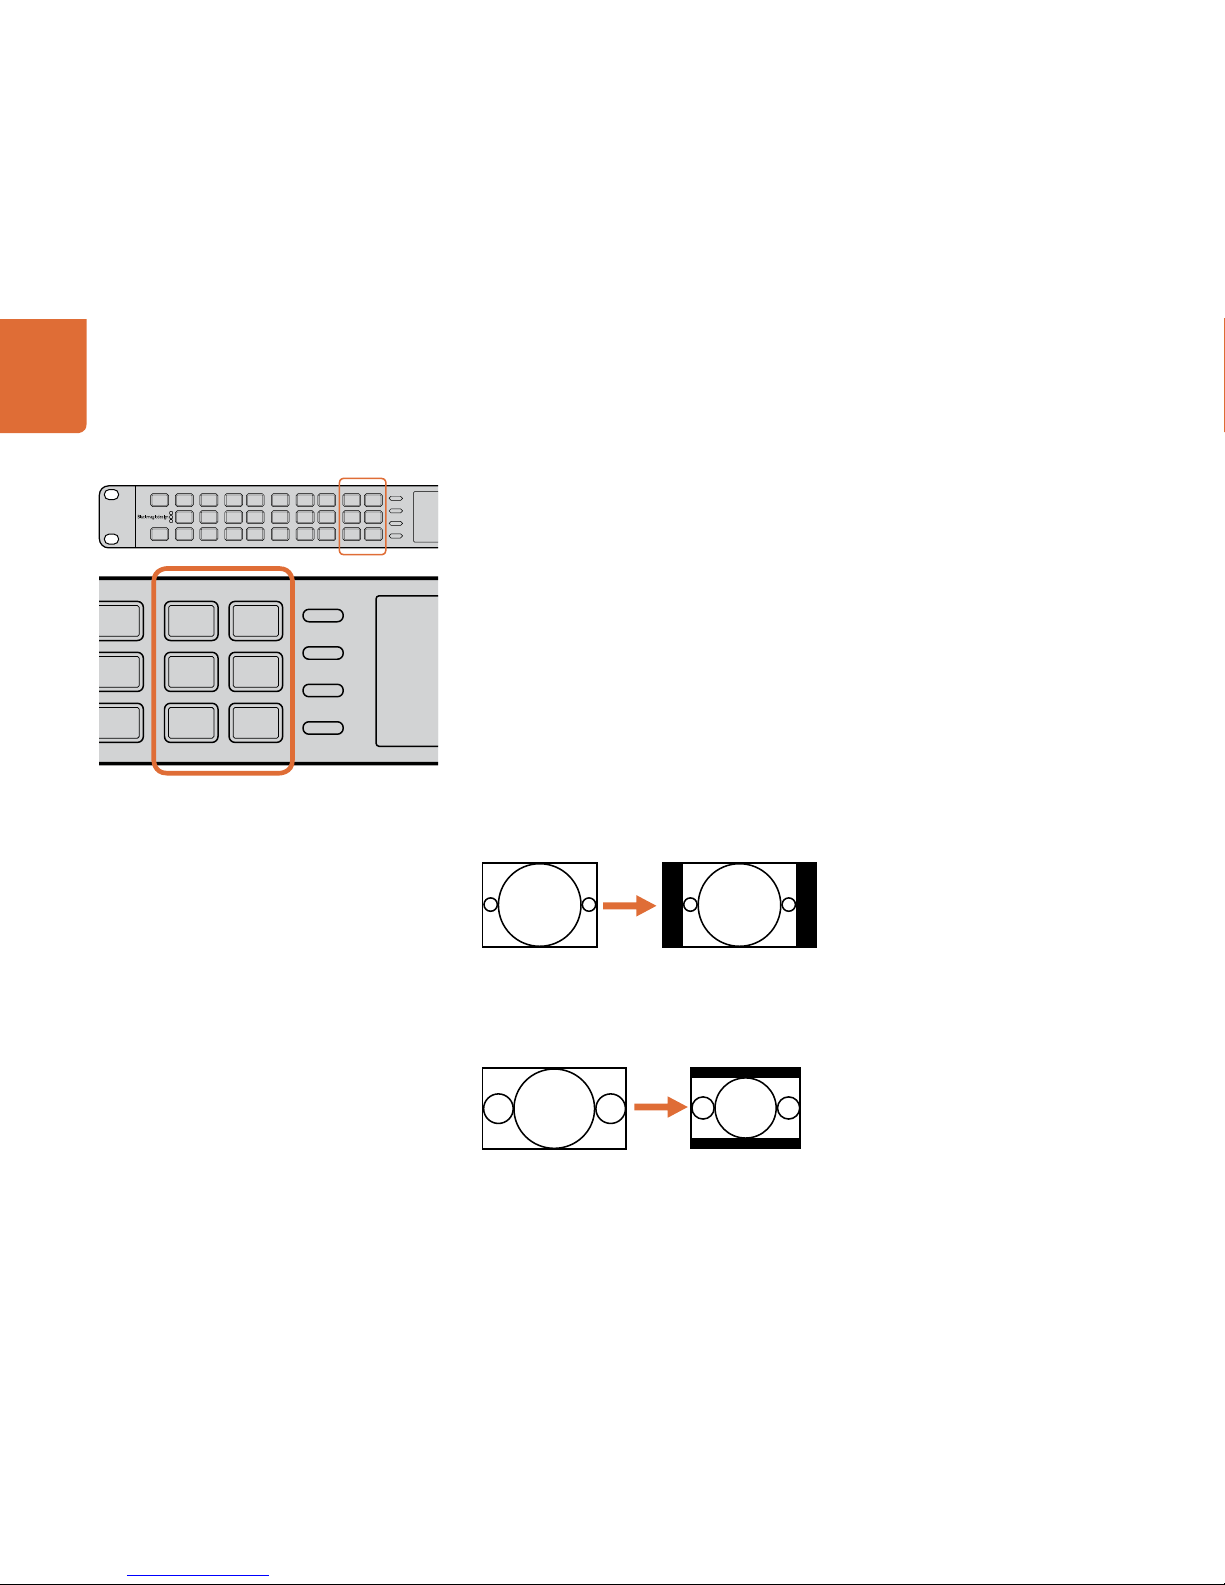
Aspect Ratio Selection
Aspect ratio conversion (ARC) provided in the Teranex Processor includes fixed modes such as
Anamorphic (ANAM), 14x9, Letterbox/Pillarbox (LBOX/PBOX), Center Cut/Zoom (CC UT/Z OOM) and
SMART conversion. An adjustable (ADJ) aspect ratio conversion will be added in a future software
release. The output aspec t ratio conversion you use is dic tated by your desired output format. HD
to HD conversions are always Anamorphic, while SD to HD and HD to SD conversions may use any
aspect ratio conversion, depending on your needs for the output video aspect ratio. The sections
below provide details of the aspect ratio conversions available.
The Teranex Processor is an “output centric” processor. This means that you may establish parameters
for your chosen output video format that will automatically be maintained regardless of the input
format received. For example, if you decide that your output will be 1080i59.94 (16:9), you can set the
output ARC to Anamorphic and all input signals will formatted for the widescreen, 16:9 output. This
may be OK if your input format is also 16:9. But what happens if your source is a standard definition 4:3
aspect ratio? In that case, the Anamorphic stretch would be applied, which may not be desirable. To
prevent the geometric distor tion caused by the Anamorphic stretch, you may set your OUTPUT aspect
to LBOX/PBOX mode, which will automatically put the 4:3 image inside a 16:9 pillarbox output! (See
illustration below.) Since the Processor defaults to the anamorphic mode for all HD to HD conversions,
any HD input will retain its proper 16:9 aspect ratio, even with the chosen LBOX/PBOX setting.
Similarly, if your OUTPUT is a standard definition 4:3 format and your input is sometimes a 16:9 HD
source, you can set the output aspect ratio to LBOX/PBOX to achieve a letterboxed 16:9 display
inserted into your 4:3 output.
16:9 Ratio Display4:3 Ratio Image
IN
OUT
SDI
VIDEO
VIDEO
HDMI
ANLG
AUDIO
AUDIO
EMBED
AES
ANLG
FORMAT
FORMAT
486
720
2K
1080
576
1080
FRAME
FRAME
P
I
PSF
MENU
MENU
HOME
MENU
1
MENU
2
REM
LOCK
PANEL
LOCK
RATE
RATE
23.98
25
29.97
30
24
50
59.94
60
VIDEO
VIDEO
GAIN
SAT
R-Y
B-Y
BLK
HUE
SHARP
PRESETS AUDIO STATUS
SYSTEM STATUS
PRESETS
1
3
5
2
4
6
ANAM
LBOX
PBOX
ASPECT
ASPECT
SMART
14:9
CCUT
ZOOM
ADJ
Aspect Ratio Selection - Left Side of Panel
MENU
MENU
HOME
MENU
1
MENU
2
REM
LOCK
PANEL
LOCK
24
50
59.94
60
VIDEO
VIDEO
GAIN
SAT
R-Y
B-Y
BLK
HUE
SHARP
PRESETS AUDIO STATUS
SYSTEM STATUS
PRESETS
1
3
5
2
4
6
ANAM
LBOX
PBOX
ASPECT
ASPECT
SMART
14:9
CCUT
ZOOM
ADJ
16:9 Ratio Image
4:3 Ratio Display
Page 31
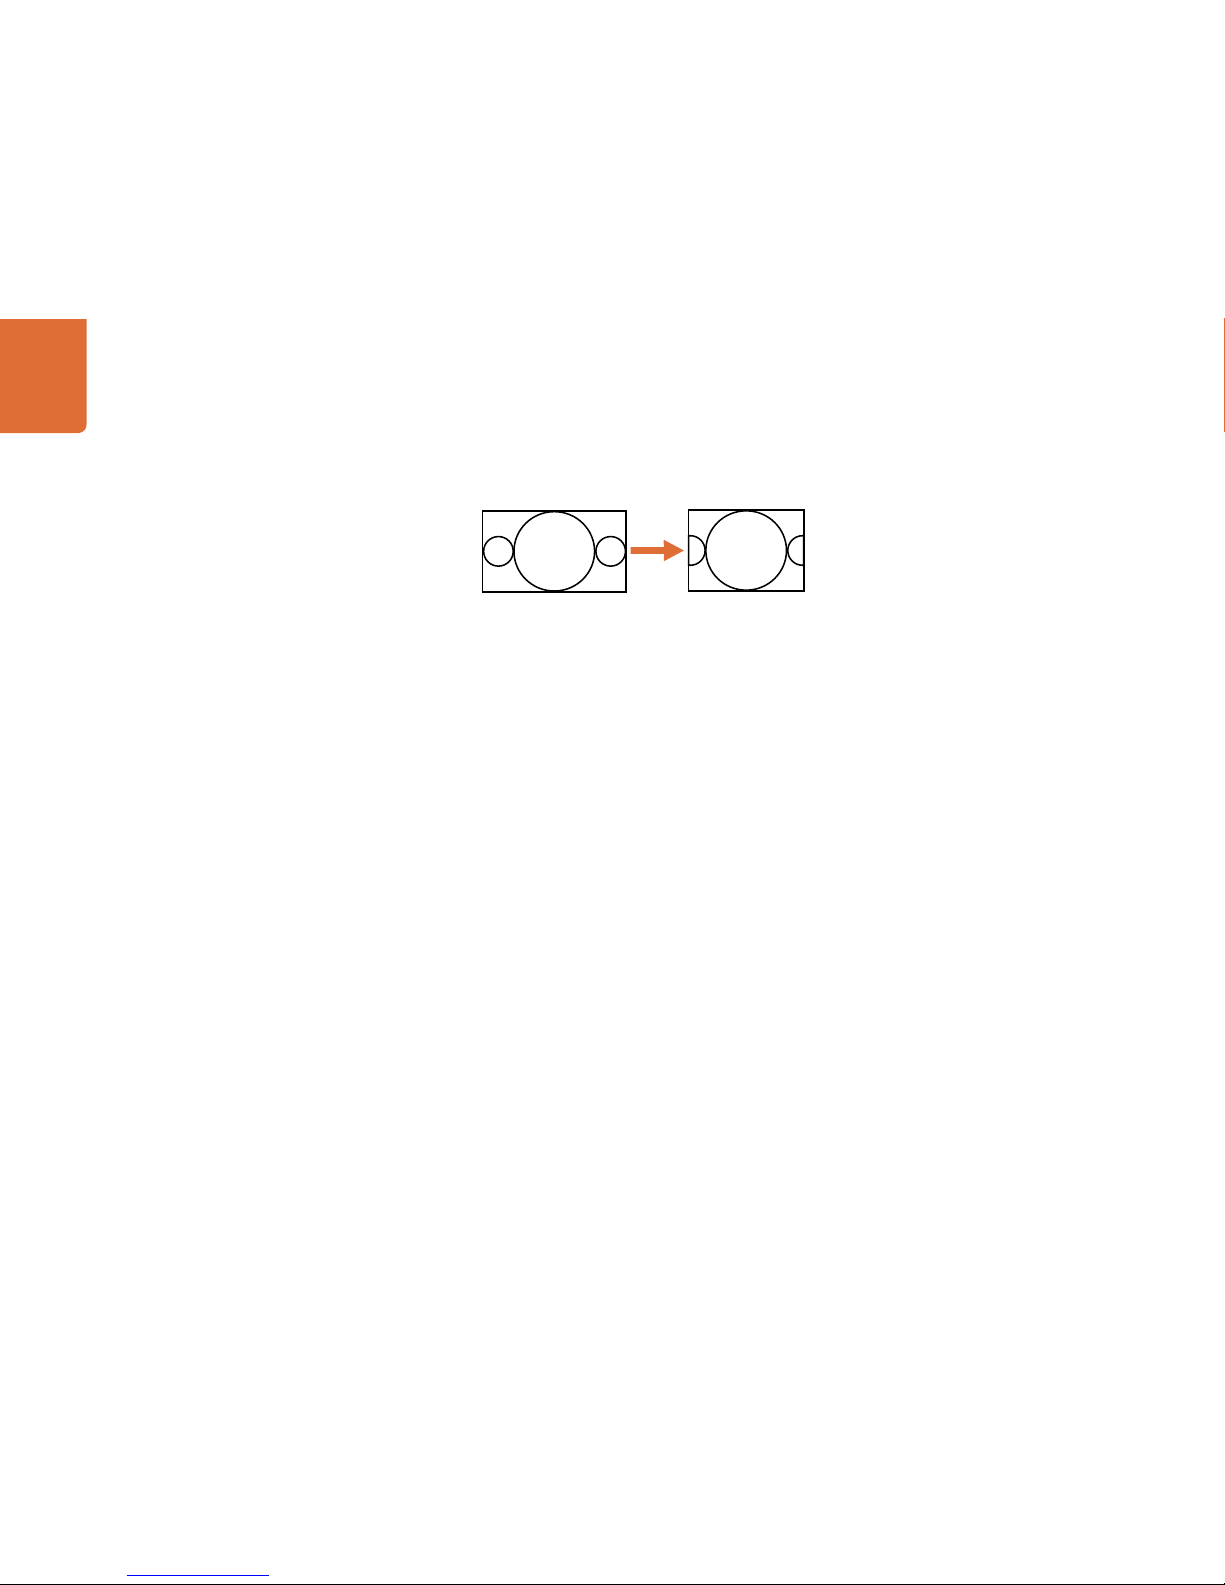
Understanding the Control Panel
31
If you prefer a center cut output rather that letter box, select the CCUT/ZOOM as your aspect ratio selection:
SD to SD conversions
A special note must be made concerning the operational modes used for SD to SD conversions. While
most SD programming may utilize a 4:3 aspec t ratio, some SD source material may exist in 16:9. For
such projects, you have to tell the Teranex Processor that the SD source is 16:9.
First, press the IN button on the front panel. If you are currently feeding your source to the Processor,
the SD input format will be automatically detected as either NTSC or PAL. Next, in the ASPECT control
section, press the LBOX/PBOX button to define the input as 16:9. This step is required if you are
processing an SD 16:9 widescreen source.
If the SD video input is 4:3, press the CCUT/ZOOM button.
ANAM - Anamorphic
Anamorphic mode ensures that the entire output screen is filled by either stretching or squeezing the input
image. This mode is designed for use with material that was originally captured with an anamorphic lens,
thereby generating an output image with correct geometry when stretched horizontally to 16:9. When used
with standard 4:3 source material, it will have the effect of stretching the material horizontally to 16:9, causing
circles to appear as ovals, etc.
16:9 Ratio Image 4:3 Ratio Display
Page 32

Understanding the Control Panel
32
LBOX/PBOX - Letterbox / Pillarbox
If the input aspect ratio is 16:9 and it is passed on to a 4:3 display, as in a down conversion, the LBOX/
PBOX aspect ratio will produce a Let terbox output, where the entire image appears vertically centered
in the 4:3 display with bars at the top and bottom of the image.
If the input aspect ratio is 4:3 and the output aspect ratio is 16:9, as in an up conversion, the LBOX/
PBOX aspect ratio will produce a Pillarbox output, where the image appears horizontally centered in
the 16:9 display with bars on the left and right sides of the image.
16:9 Ratio Image
(correct geometry)
4:3 Ratio Image
(shot with an
anamorphic lens)
4:3 Ratio Image 4:3 Ratio Image
(incorrect geometry)
Upconversion
Downconversion
16:9 Ratio Image
4:3 Ratio Display
(incorrect geometry)
16:9 Ratio Image
4:3 Ratio Display
Page 33

Understanding the Control Panel
33
This aspect ratio yields an image with no loss of picture information, but the disadvantage is that it does not
fill the entire output display.
CCUT/ZOOM - Center Cut / Zoom
If the aspec t ratio of the input video is 16:9 and is to conver ted to a 4:3 display, as in a down conversion,
the original image will be cropped on the left and right sides, which is often called a “Center Cut,” so
that the center of the original image will fill the output display. This setting maintains correc t geometry,
but results in a loss of picture on each side.
If the aspec t ratio of the input video is 4:3 and it is to be converted to a 16:9 display, as in an up
conversion, the original 4:3 image will be cropped on the top and bottom, which is often called a
“Zoom”, so that the image will fill the output display. This setting maintains correct geometr y, but
results in a loss of picture on the top and bottom.
This aspec t ratio fills the entire output image while maintaining correct geometry, but results in a loss
of picture information.
16:9 Ratio Display4:3 Ratio Image
16:9 Ratio Image
4:3 Ratio Display
4:3 Ratio Image
16:9 Ratio Display
Page 34

Understanding the Control Panel
34
14:9
The fixed 14:9 mode is often used as a compromise between Center Cut and Letterbox in down
conversions and between Zoom and Pillarbox in up conversions. The 14:9 mode scales the input image
to occupy a 14:9 ratio area of the output display.
If a 4:3 input aspect ratio is to be up converted to a 16:9 display, the input image will be zoomed to fill
only a 14:9 aspect ratio of the 16:9 output image, leaving a display with small bars on the left and right
sides (pillarboxed). A small amount of pic ture information will be lost from the top and bottom of the
input image.
If a 16:9 input aspect ratio is to be down converted to a 4:3 ratio display, the input image will be zoomed
to fill a 14:9 aspect ratio of the 4:3 output image, leaving a display with bars at the top and bottom
(letterboxed). A small amount of pic ture information will be lost from the left and right of the input image.
This aspect ratio maintains correct geometry and results in a minor loss of picture information in both up
and down conversions.
SMART
Smart is a non linear anamorphic aspect ratio designed for use when converting a 4:3 source to a
16:9 output without the traditional distortion of an anamorphic stretch. Smart, which is available in
up-conversions only, leaves the center portion of the image virtually untouched, while providing
increasing amounts of stretch towards the left and right edges of the image, filling the 16:9 image
without distorting the center action area.
Downconversion
4:3 Ratio Image
Upconversion
16:9 Ratio Image
4:3 Ratio Display
16:9 Ratio Display
4:3 Original
Ratio Image
16:9 Ratio Display
Page 35

Understanding the Control Panel
35
LCD User Interface and Menu Controls
LCD User Interface
The LCD user inter face utilizes a menu displayed on an LCD with 8 associated “soft buttons”. The menu
tree employs a hierarchical structure offering multiple layers of parameter selec tion. The 8 buttons are
called “soft but tons” because their function will change based on the current menu tree page. In some
menus, they will take you to the next menu in the menu tree; in other cases they are used for parameter
selection.
The rotary encoder knob to the right of the LCD is used to adjust parameter values by turning it clockwise to
increment or counterclockwise to decrement. In menu parameters where a “default” value exists, you can
press the encoder to quickly reset the parameter to its default value.
MENU Buttons
The HOME button toggles the control panel LCD display between active video and the main menu of
the menu tree.
The MENU 1 and MENU 2 buttons may be used to save specific menu pages for instant recall, which
can be useful when a specific parameter must be accessed repeatedly. To store a menu page, navigate
to the desired menu tree page, then press and hold the MENU 1 or MENU 2 buttons for 3 seconds
to save the current menu page. The but ton will be illuminated to indicate that a menu tree page has
been assigned to it and, when the button is pressed, the LCD will switch directly to the stored menu
tree page.
Video Proc Amp
The following Proc Amp controls are available and will take you directly to the corresponding LCD
menu tree page:
GAIN Luminance Gain
BLK Black Level
SAT Chroma Saturation
HUE Chroma Hue
R-Y/B-Y Color Difference value
SHARP Sharpness setting
P
I
PSF
MENU
MENU
HOME
MENU
1
MENU
2
REM
LOCK
PANEL
LOCK
RATE
RATE
23.98
25
29.97
30
24
50
59.94
60
VIDEO
VIDEO
GAIN
SAT
R-Y
B-Y
BLK
HUE
SHARP
PRESETS AUDIO STATUS
SYSTEM STATUS
PRESETS
1
3
5
2
4
6
ANAM
LBOX
PBOX
ASPECT
ASPECT
SMART
14:9
CCUT
ZOOM
ADJ
LCD User Interface and Menu Controls - Right Side of Panel
MENU
MENU
HOME
MENU
1
MENU
2
REM
LOCK
PANEL
LOCK
VIDEO
VIDEO
GAIN
SAT
R-Y
B-Y
BLK
HUE
SHARP
PRESETS AUDIO STATUS
SYSTEM STATUS
PRESETS
1
3
5
2
4
6
MENU
MENU
HOME
MENU
1
MENU
2
REM
LOCK
PANEL
LOCK
VIDEO
VIDEO
GAIN
SAT
R-Y
B-Y
BLK
HUE
SHARP
PRESETS AUDIO STATUS
SYSTEM STATUS
PRESETS
1
3
5
2
4
6
Video Proc Amp - Right Side of Panel
MENU
MENU
HOME
MENU
1
MENU
2
REM
LOCK
PANEL
LOCK
VIDEO
VIDEO
GAIN
SAT
R-Y
B-Y
BLK
HUE
SHARP
PRESETS
AUDIO STATUS
SYSTEM STATUS
PRESETS
1
3
5
2
4
6
Page 36

Understanding the Control Panel
36
Press the pushbutton of the desired parameter. The button will immediately turn green and the
corresponding LCD Menu will be displayed (see below). Turn the rotary encoder to adjust the
parameter. You can push the rotary encoder to reset the parameter to its default value. Once
the adjustment is complete, the button will remain illuminated white, indicating that it is not at its
default value.
For more details about these controls, see the Proc Amp section in the Video Menu chapter.
Presets
PRESET BUTTONS (1 – 6)
Six Presets are available, which allow the user to save and recall custom set tings for the system.
To SAVE a preset into memory, press and HOLD the desired preset button number for three
seconds. The button will flash to indicate that the save command has been completed. The
pushbutton will remain illuminated to indicate that parameters were stored and are available for
recall.
To RECALL a preset, press the desired preset button 1 through 6. A message will be displayed on
the LCD requiring you to “Accept” or “Cancel” your request. Once the preset has been recalled,
the corresponding preset button will remain lit. If any system parameter is changed, the Preset
button will turn off.
Please note that under certain conditions, recalling a preset may cause a disruption or loss of output video
and audio while the new parameters are being loaded. An example would be a preset that calls for a
change in format conversion. The Processor must load new software code to affect the new conversion,
which will cause a loss of output for a few seconds. A preset that only changes Proc Amp settings or Aspect
Ratio settings will not typically cause a loss of output. If you are operating in a live, “on the air” environment,
be sure to test your presets prior to using them.
Set Value
0
Back
Sharp
Hue
Black
Reset
All
R-Y
B-Y
Saturate
Gain
Recall Preset 1?
Accept Cancel
MENU
MENU
HOME
MENU
1
MENU
2
REM
LOCK
PANEL
LOCK
VIDEO
VIDEO
GAIN
SAT
R-Y
B-Y
BLK
HUE
SHARP
PRESETS AUDIO STATUS
SYSTEM STATUS
PRESETS
1
3
5
2
4
6
Presets - Right Side of Panel
REM
LOCK
PANEL
LOCK
VIDEO
VIDEO
BLK
HUE
SHARP
PRESETS
AUDIO STATUS
SYSTEM STATUS
PRESETS
1
3
5
2
4
6
Page 37

Understanding the Control Panel
37
Status LEDs
Audio Status LEDs
When illuminated, the Audio Status LEDs will indicate the presence of audio on the active input audio
channels. The maximum numbers of channels supported for each audio type are:
Embedded Audio: 1 through 16
AES/EBU Audio: 1 through 8
Analog Audio: 1 through 4 for DB-25 I/O
1 and 2 for Stereo R/L Input
System Status LEDs
When illuminated, the System Status LEDs will indicate the following:
VID Input video is present
REF External Reference is selected and External Reference Input is present
PS1 Power Supply 1 is operational
PS2 Power Supply 2 is operational (optional)
TC Timecode is present in input video
CC Closed Captions are present in input video
<--> Ethernet communication is present
Thunderbolt™ communication is present
MENU
MENU
HOME
MENU
1
MENU
2
REM
LOCK
PANEL
LOCK
VIDEO
VIDEO
GAIN
SAT
R-Y
B-Y
BLK
HUE
SHARP
PRESETS AUDIO STATUS
SYSTEM STATUS
PRESETS
1
3
5
2
4
6
Status LEDs - Right Side of Panel
REM
LOCK
PANEL
LOCK
PRESETS AUDIO STATUS
SYSTEM STATUS
PRESETS
2
4
6
Page 38

Understanding the Control Panel
38
MENU
MENU
HOME
MENU
1
MENU
2
REM
LOCK
PANEL
LOCK
VIDEO
VIDEO
GAIN
SAT
R-Y
B-Y
BLK
HUE
SHARP
PRESETS AUDIO STATUS
SYSTEM STATUS
PRESETS
1
3
5
2
4
6
Panel Lock / Power / Remote Lock - Right Side of Panel
REM
LOCK
PANEL
LOCK
AUDIO STATUS
SYSTEM STATUS
Panel Lock / Power / Remote Lock
PANEL LOCK Button
The PANEL LOCK button allows you to lock the control panel to prevent accidental changes to system
settings. To activate or deactivate, press and hold the button for 3 seconds. When locked, the PANEL LOCK
button will be red. If the button is not held long enough to lock or unlock the panel, the button will flash
three times and you should try again.
Power Switch
Press the power switch to power ON the system. Press and hold for three seconds to power OFF. If the
button is not held long enough, the button will flash three times and you should try again.
REM LOCK Button
REM LOCK prevents a remote device from connec ting to and controlling this chassis via ethernet.
To activate or deactivate, press and hold the button for 3 seconds. When locked, the REM LOCK
button will be red. If the button is not held long enough to lock or unlock the panel, the but ton will flash
three times and you should try again.
Page 39

Understanding the LCD Menus
39
The LCD Menu on the control panel provides the primary means for setting the Teranex Processor's
parameters. The menu is arranged in a hierarchical, tree structure.
Main Menu
Press the HOME but ton on the control panel to access the Main Menu. The Main Menu is the top
level menu in the processor’s menu tree and provides access to the top level functions in the menu
structure, which are listed below.
Video – Video menu
Noise Reduction – Noise Reduction menu
Ancillary Data – Closed Caption, Timecode and Video Indexing menus
Setup – External Reference, Video and Audio Setup menus
Back – Press Back to move back one level in the menu tree.
Video Menu
Selecting the Video Menu provides access to the following user functions:
Color – Color Correction
Clip – Luminance and Chrominance clipping
Aspect Fill – Selection of fill color used in pillar box and letterbox outputs
Proc Amp – Access to Proc Amp and Sharpness settings
Test Patterns – Selection of video test patterns
Advanced – Access to settings such as cadence correction and sce
Main Menu
Back
Setup
Ancillary
Data
Noise
Reduction
Video
1
Main Menu
Page 40

Understanding the LCD Menus
40
Color Correction Menu
The Color menu takes you to the Color Correction controls, which provide access to Red, Green and Blue
Gain adjustments. Turn the rotary encoder to make adjustments on each color channel until the color
correction process is complete.
The Range of each color control is -200 to +200.
The default is 0.
Main Menu
Back
Setup
Ancillary
Data
Noise
Reduction
Video
1
Main Menu
Video
Back
Advanced
Test
Patterns
Proc
Amp
Aspect
Fill
Clip
Color
2
Video
Set Value
0
Back
Reset
All
Blue
Green
Red
3
Color / Red
Main Menu
Back
Setup
Ancillary
Data
Noise
Reduction
Video
1
Main Menu
Video
Back
Advanced
Test
Patterns
Proc
Amp
Aspect
Fill
Clip
Color
2
Video
Page 41

Understanding the LCD Menus
41
Clip Menu
The Clip menu allows you to clip luminance and chrominance (Y & C) overshoots and undershoots from the
incoming video signal. The Clip function is not defined as a "legalizer"; however, adjusting the luminance
and chroma settings will assist in obtaining the desired output video levels.
Luma Low – Range: 4 to 1018. Default: 4.
Luma High – Range: 5 to 1019. Default: 1019.
Chroma Low – Range: 4 to 1018. Default: 4.
Chroma High – Range: 5 to 1019. Default: 1019.
Aspect Fill
The Aspect Fill menu allows you to define a desired color for use in aspect ratios requiring a fill, such as pillar
box or letterbox aspect ratios. Luminance and Cb and Cr chroma values may be independently adjusted
using the front panel rotary encoder.
Luma – Range: 64 to 940. Default: 64
Cb – Range: 64 to 960. Default: 512
Cr – Range: 64 to 960. Default: 512
Main Menu
Back
Setup
Ancillary
Data
Noise
Reduction
Video
1
Main Menu
Video
Back
Advanced
Test
Patterns
Proc
Amp
Aspect
Fill
Clip
Color
2
Video
Set Value
4
Back
Reset
All
Chroma
High
Chroma
Low
Luma
High
Luma
Low
3
Clip / Luma Low
Main Menu
Back
Setup
Ancillary
Data
Noise
Reduction
Video Video
Back
Advanced
Test
Patterns
Proc
Amp
Aspect
Fill
Clip
Color
2
Video
Set Value
64
Back
Reset
All
Cr
Cb
Luma
3
Aspect Fill / Luma
Page 42
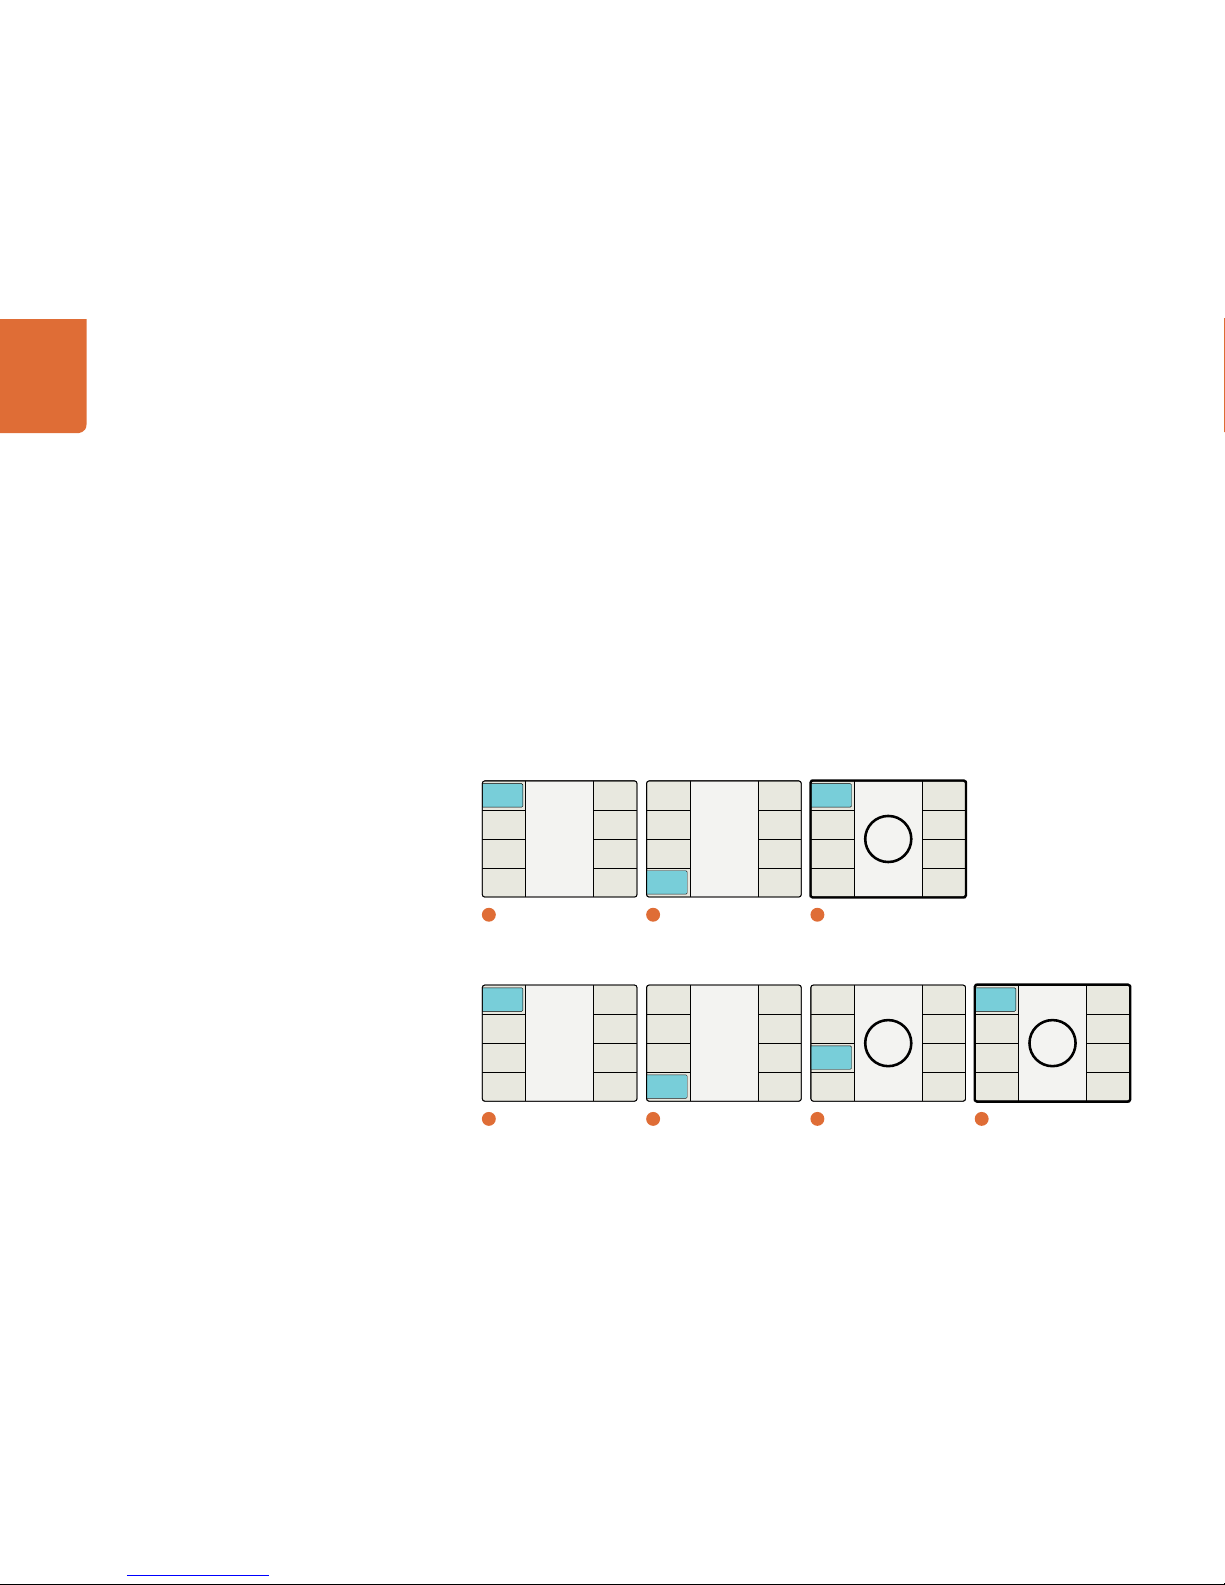
Understanding the LCD Menus
42
Proc Amp Menu
The Proc Amp Menu may be accessed via the Video menu above, or by pressing the desired adjustment
parameter directly from the front panel. Available parameters are: Gain, Saturation, Black Level, Hue, R-Y
and B-Y color difference and Sharpness. Select the desired parameter to adjust on the menu or via the
corresponding front panel button, and then turn the Rotary Encoder to adjust. You can press the rotary
encoder knob to return the default value for the current parameter.
Gain – Range: -60 to +60. Default: 0
Saturate (Saturation) – Range: -60 to +60. Default: 0
Black – Range: -30 to +30. Default: 0
Hue – Range: -179 to +180. Default: 0 degrees
R-Y and B-Y – Range: -200 to +200. Default: 0
Sharp (Sharpness) – Range:-50 to 50. Default: 0
Reset All – Resets all Proc Amp parameters to their default values
Please note that the R-Y and B-Y selection will open another menu page, as shown below
Main Menu
Back
Setup
Ancillary
Data
Noise
Reduction
Video
1
Main Menu
Main Menu
Back
Setup
Ancillary
Data
Noise
Reduction
Video
1
Main Menu
Video
Back
Advanced
Test
Patterns
Proc
Amp
Aspect
Fill
Clip
Color
2
Video
Video
Back
Advanced
Test
Patterns
Proc
Amp
Aspect
Fill
Clip
Color
2
Video
Set Value
0
Back
Sharp
Hue
Black
Reset
All
R-Y
B-Y
Saturate
Gain
3
Proc Amp / Gain
Set Value
0
Back
Sharp
Hue
Black
Reset
All
R-Y
B-Y
Saturate
Gain
3
Proc Amp
Set Value
0
Back
B-Y
R-Y
4
R-Y B-Y / R-Y
Page 43
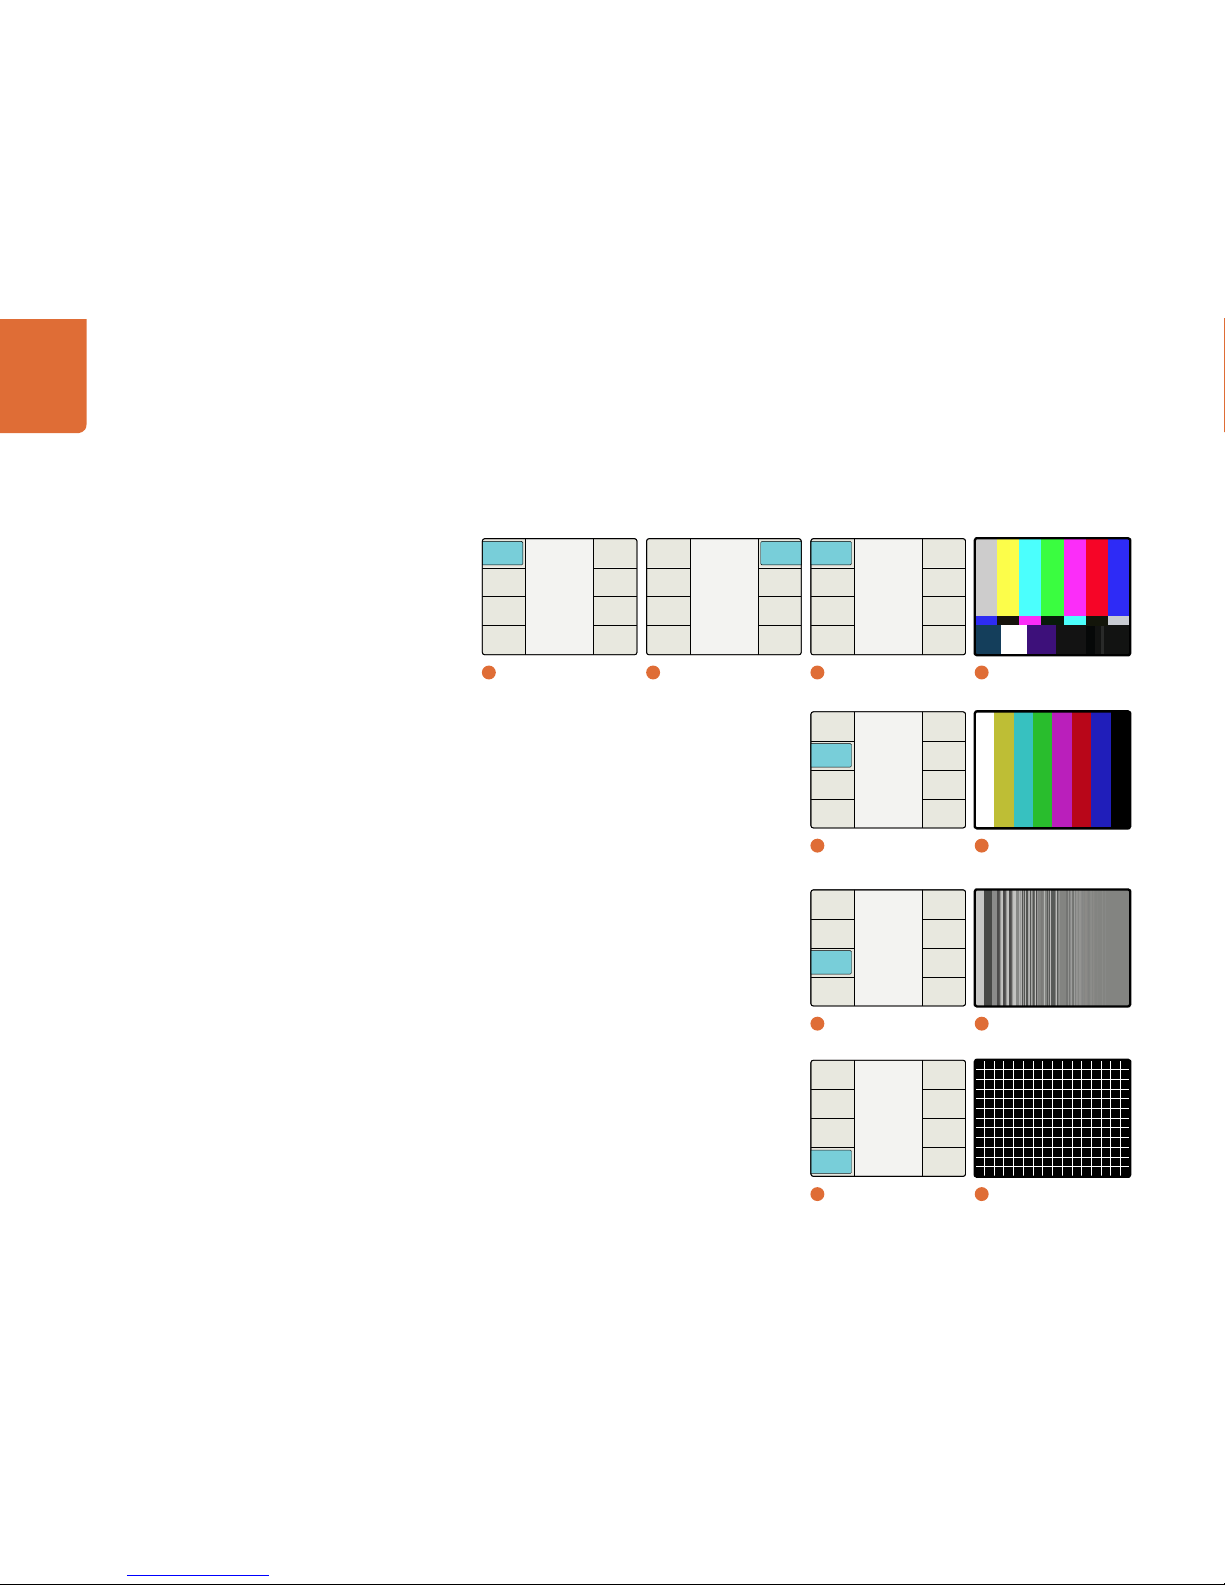
Understanding the LCD Menus
43
Test Patterns Menu
The internal video test signal generator will provide Blackburst output and the test patterns shown below.
Main Menu
Back
Setup
Ancillary
Data
Noise
Reduction
Video
1
Main Menu
Video
Back
Advanced
Test
Patterns
Proc
Amp
Aspect
Fill
Clip
Color
2
Video
Test Patterns
Back
Off
Black
Grid
Res
Chart
Colorbar
75%
SMPTE
75%
3
Test Patterns
Test Patterns
Back
Off
Black
Grid
Res
Chart
Colorbar
75%
SMPTE
75%
3
Test Patterns
Test Patterns
Back
Off
Black
Grid
Res
Chart
Colorbar
75%
SMPTE
75%
3
Test Patterns
Test Patterns
Back
Off
Black
Grid
Res
Chart
Colorbar
75%
SMPTE
75%
3
Test Patterns
4
SMPTE 75%
4
Colorbar 75%
4
Res Chart
4
Grid
Page 44

Understanding the LCD Menus
44
Advanced Menu
The Video Advanced menu provides access to the following user controls.
Clean Cadence – Forces the creation of a clean 3:2 sequence in the output video.
Scene Detect – Scene change detection prevents blending of scenes at scene boundaries.
Source Type – Sets the algorithmic response of the system based on the type of input video being
received.
FRC Aperture – Adjusts the response of filters used during frame rate conversions
Clean Cadence
The Clean Cadence Menu allows you to remove broken, non standard and mixed cadences and creates a
clean 3:2 sequence from a source that originally contained film based material.
On – Selects the Clean Cadence mode
Off – Selects the Normal video mode of operation
The default mode is OFF
Please note that you should only use the Clean Cadence mode when you are certain that your source
material was originated with a 3:2 sequence, such as film transferred to video by a Telecine. If the Clean
Cadence algorithm is used on video rather than a film source, unwanted artifacts may be seen.
Clean Cadence is available for the following format conversions ONLY:
486i59.94 to 486i59.94
486i59.94 to 1080i59.94
1080i59.94 to 486i59.94
1080i59.94 to 1080i59.94
Main Menu
Back
Setup
Ancillary
Data
Noise
Reduction
Video
1
Main Menu
Video
Back
Advanced
Test
Patterns
Proc
Amp
Aspect
Fill
Clip
Color
2
Video
Off
On
Clean Cadence
Back
FRC
Aperture
Source
Type
Scene
Detect
Clean
Cadence
3
Advanced /
Clean Cadence
Page 45

Understanding the LCD Menus
45
Scene Detection
The Scene Detection menu allows you to enable scene cut (or scene change) detection, which will preserve
clean cuts between scenes. Upon detecting a cut, the temporal aperture is reduced from 4 fields to 2 fields
for the first frame of the new scene. This prevents the mixing of fields from the previous and new scenes.
On – Enables Scene Cut Detection
Off – Disables Scene Cut Detection
The default mode is ON
Some video sequences may “stutter” when Scene Detection is turned ON due to the momentary change
in temporal resolution. Video with a text crawl at the bottom of the picture may show this effect. If you see
this anomaly, set the Scene Detection mode to OFF.
Source Type
The Source type sets the algorithmic response of the system based on the type of input video being
received. The default mode is Auto; however, if you want to force the response to either the Film of Video
modes, choose the desired Source Type in the menu.
Auto – This mode will look for film and video based material and will select the appropriate
algorithm. Since the Processor can automatically detect film or video, this mode should be used
in most cases.
Film – Select this mode when the source material contains a film like cadence. This means that
duplicate fields have been inserted into the material in order to transfer lower frame rate material
into a higher frame rate transport. An example of this is material shot at a 23.98 frame rate that has
a 3:2 cadence insertion to create material that has a 59.94 frame rate.
Video – Select this mode if the source material does not have duplicate frames inserted into it to
force a particular cadence.
Main Menu
Back
Setup
Ancillary
Data
Noise
Reduction
Video
1
Main Menu
Video
Back
Advanced
Test
Patterns
Proc
Amp
Aspect
Fill
Clip
Color
2
Video
Off
On
Scene Detect
Back
FRC
Aperture
Source
Type
Scene
Detect
Clean
Cadence
3
Advanced / Scene Detect
Page 46
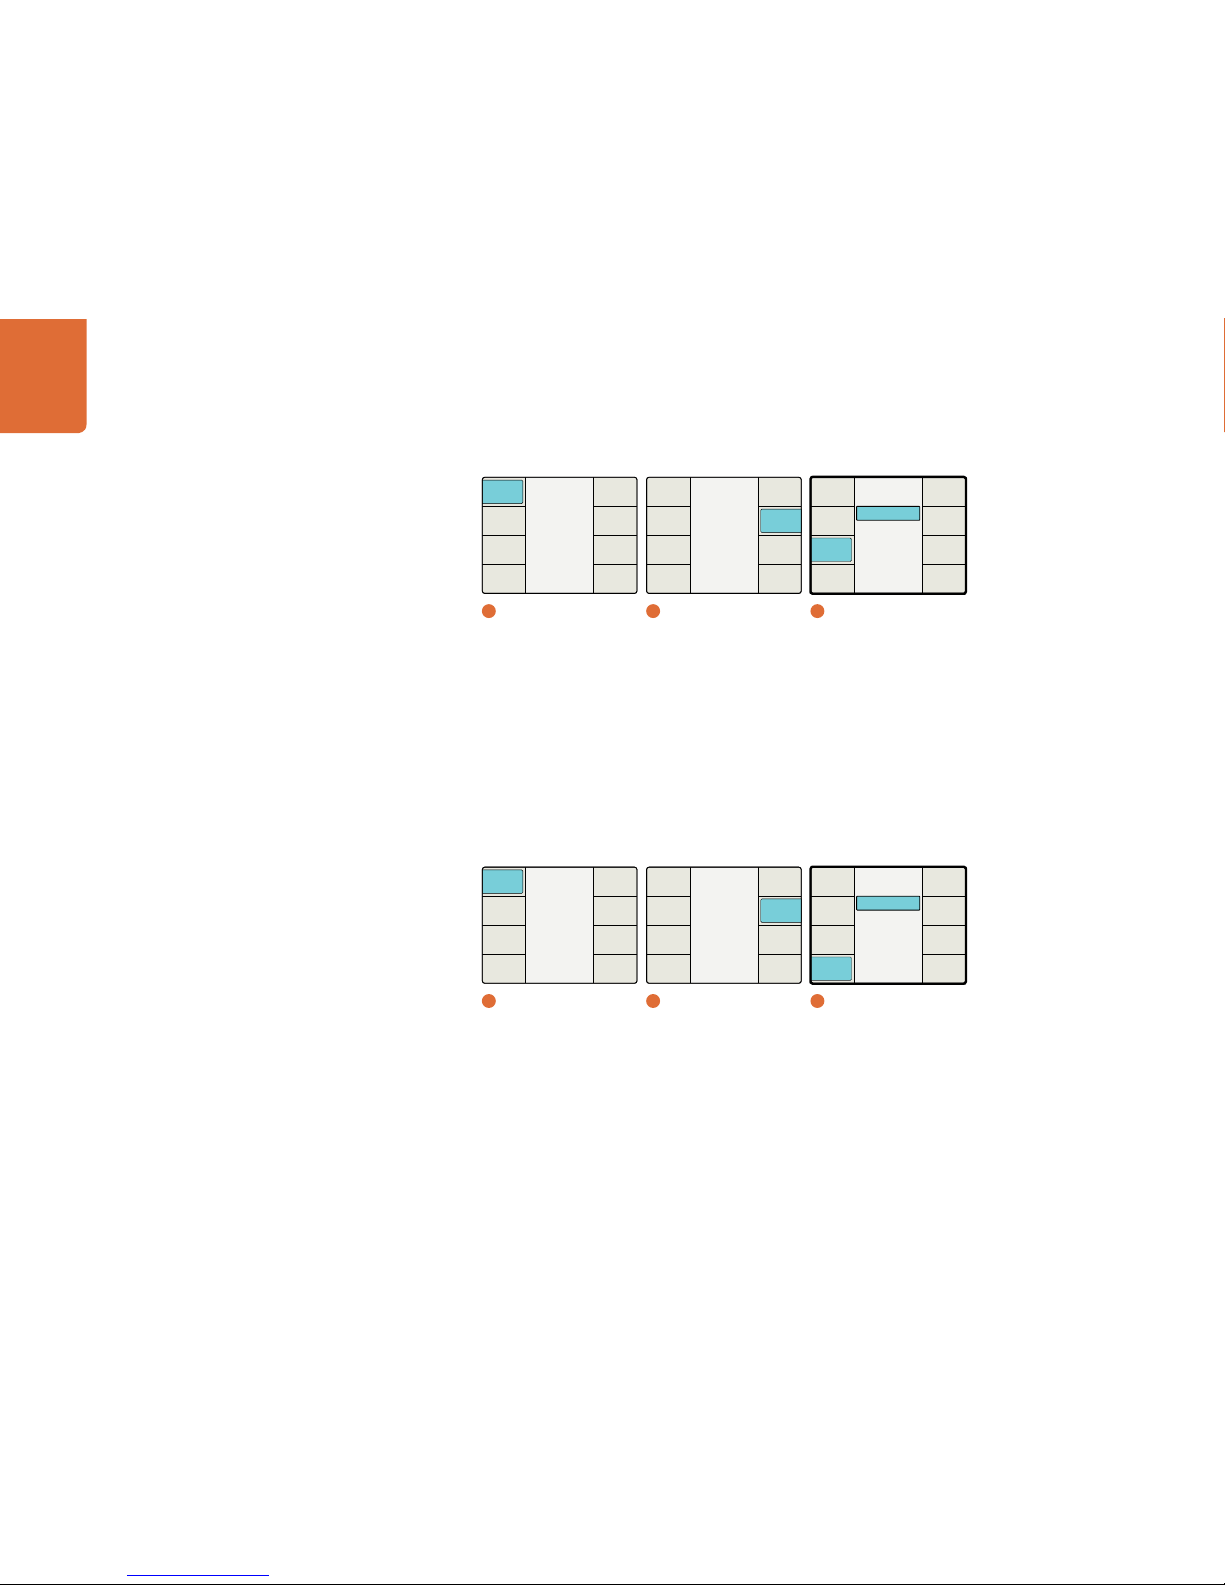
Understanding the LCD Menus
46
Frame Rate Conversion Aperture
FRC Aperture allows you to adjust the interpolation aperture during frame rate conversions.
Please note that this adjustment will only be available while performing frame rate conversions.
The linear interpolation aperture is used to set the characteristics of the filter used to create the synthetic
information in a frame rate conversion. A setting of 0 is typically used for dramatic scenes with little motion
and will produce a sharper image with potential for judder in motion areas. A setting of 3 is typically used for
scenes with faster motion, such as sporting events, and will produce a softer image with less motion judder.
The range is 0 to 3
The default value is 0
Main Menu
Back
Setup
Ancillary
Data
Noise
Reduction
Video
1
Main Menu
Video
Back
Advanced
Test
Patterns
Proc
Amp
Aspect
Fill
Clip
Color
2
Video
Film
Video
Auto
Source Type
Back
FRC
Aperture
Source
Type
Scene
Detect
Clean
Cadence
3
Advanced / Source Type
Main Menu
Back
Setup
Ancillary
Data
Noise
Reduction
Video
1
Main Menu
Video
Back
Advanced
Test
Patterns
Proc
Amp
Aspect
Fill
Clip
Color
2
Video
3 (Sport)
2
1
0 (Drama)
FRC Aperture
Back
FRC
Aperture
Source
Type
Scene
Detect
Clean
Cadence
3
Advanced / FRC Aperture
Page 47
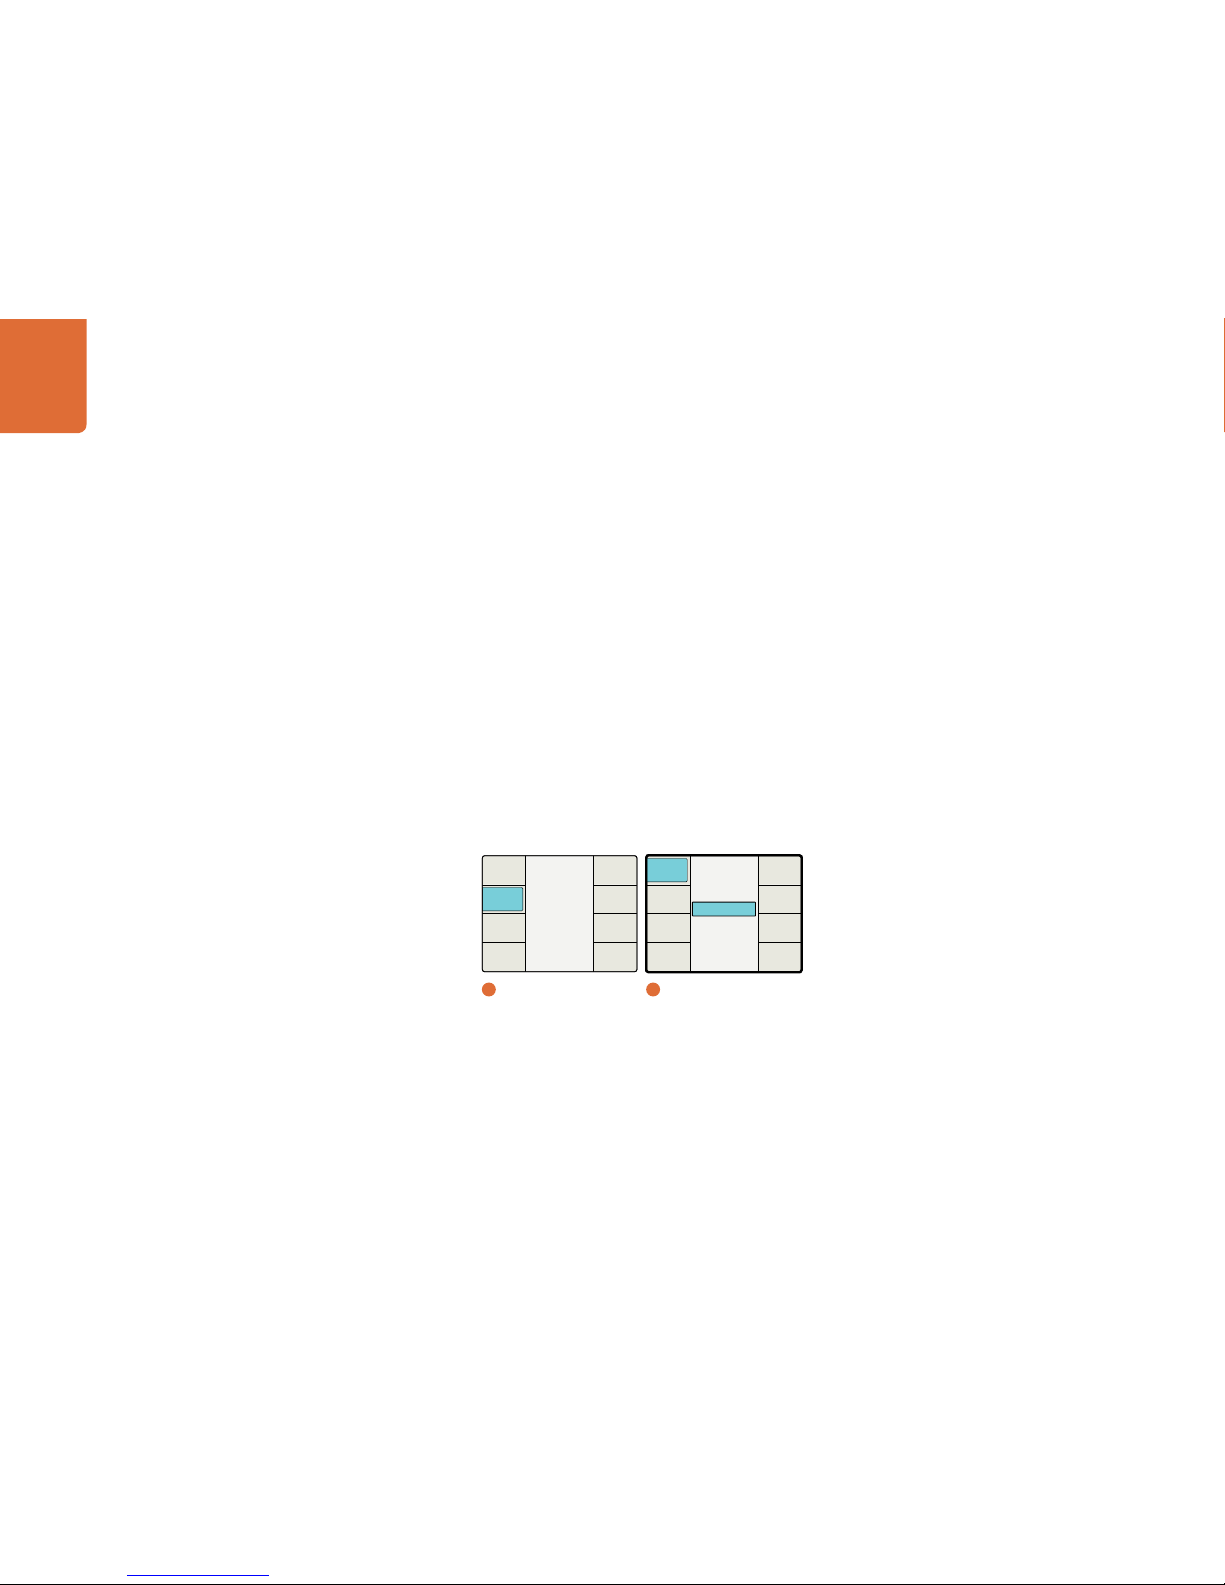
Understanding the LCD Menus
47
Noise Reduction Menu
The Noise Reduc tion algorithm is a mot ion adaptive temporal recu rsive filter that works we ll in removing
random and Gaussian noise. Each pixel is labeled as motion, no motion, or noise. Each of these classes
of pixels is treated differently in the noise reduc tion process. For pixels in which there is no motion, low
level Gaussian noise may be reduced via temporal processing by a weighted averaging over successive
frames. For pixels labeled as random noise, spatial processing replaces these pixels. Pixels labeled
as being “in motion” are retained “as is” to avoid artifacts that may be introduced through temporal
processing.
Enable – Enables/disables noise reduction.
- The default setting is OFF.
The menu items below will be grayed out (unavailable) until Noise Reduction is turned ON.
Bias – Takes you to the Noise Reduction Bias level adjustment
Split Screen – Takes you to the Split Screen menu.
Red Overlay – Takes you to the Red Overlay menu.
Please note that Noise Reduction is NOT available while performing frame rate conversions, such as
486i59.94 to 576i50 (NTSC to PAL) or 1080i59.94 to 1080i50.
Main Menu
Back
Setup
Ancillary
Data
Noise
Reduction
Video
1
Main Menu
Off
On
Noise Reduction
Back
Red
Overlay
Split
Screen
Bias
Enable
2
Noise Reduction / Enable
Page 48

Understanding the LCD Menus
48
Bias
The Bias level sets the aggressiveness of the noise reduction. The higher the Bias value, the more aggressive
the noise reduction will be.
The range is -6 to +6.
The default value is 0.
Split Screen On/Off
The Split Screen menu Enables/Disables the noise reduction Split Screen mode. In this mode, the image is
divided vertically, with the right half of the image having noise reduction applied and the left half having no
noise reduction applied.
ON – Enables the Split Screen mode.
OFF – Disables the Split Screen mode.
The default value is OFF.
Main Menu
Back
Setup
Ancillary
Data
Noise
Reduction
Video
1
Main Menu
Set Value
0
Back
Red
Overlay
Split
Screen
Bias
Enable
2
Noise Reduction / Bias
Main Menu
Back
Setup
Ancillary
Data
Noise
Reduction
Video
1
Main Menu
Off
On
Split Screen
Back
Red
Overlay
Split
Screen
Bias
Enable
2
Noise Reduction /
Split Screen
Page 49

Understanding the LCD Menus
49
Red Overlay On/Off
In the Red Overlay mode, pixels that are interpreted as being “in motion” will be colored red. The red
overlay helps to identify how pixels are being processed by the temporal recursive noise reduction filter.
ON – Enables the Red Overlay.
OFF – Disables the Red Overlay.
The default value is OFF.
Ancillary Data Menu
The Ancillar y Data menu provides access to Closed Caption, Timecode and Video Index features.
Please note that the system does not process the entire ancillary data space and will only pass the items
available on the Ancillary Data Menu.
Main Menu
Back
Setup
Ancillary
Data
Noise
Reduction
Video
1
Main Menu
Off
On
Red Overlay
Back
Red
Overlay
Split
Screen
Bias
Enable
2
Noise Reduction /
Red Overlay
Main Menu
Back
Setup
Ancillary
Data
Noise
Reduction
Video
1
Main Menu
Ancillary Data
Back
Video
Index
Timecode
Closed
Caption
2
Ancillary Data
Page 50

Understanding the LCD Menus
50
Closed Caption Menu
The Closed Caption menu allows you to configure the closed caption functions in the system for CEA608B and CEA-708B sta ndards, depending on the for mat conversion being per formed. In NTSC analog
video and SMPTE 259M digital video systems, CEA-608B is the reference standard and captions are
encoded on line 21 of the vertical blanking inter val (VBI). For HD-SDI video systems, the CEA-708B
standard describes the method for encoding captions in the SMPTE 292M digital bit stream, typically
on line 9.
The default settings for closed caption processing in the Teranex Processor will likely be the best
settings for you to start with, but the menus below provide you with flexibility in handling unusual
closed caption situations.
The Teranex Processor will automatically discover digital captions if they exist in both SD and HD video
formats therefore no user interface menus or adjustments are provided. Keep in mind that digital captions
take precedence over analog captions in SD input signals. If no digital captions are present, the processor
will look for analog captions by default on line 21. If you believe the program has captions but don’t see
captions on line 21, you can use the Analog In Line selection menu to look for captions on lines 20 or 22.
Closed Caption Processing in SD Sources
Standard definition formats will output 608 captions in both analog and digital formats.
Closed Caption Processing in HD Sources
For high definition output formats, closed captions will be inserted on line 9 by the Teranex Processor.
This setting is not adjustable.
Closed caption processing also suppor ts up-conversion of the 608 CC2 and CC3 secondary language
services to the 708 Service 2 (S2) via the Ser vice 2 Source menu described below.
The Closed Captioning menu offers the following selections and adjustments:
CC Enable – Turns Closed Captions ON or OFF in the output video.
Analog In Line – Allows you to select the Analog Closed Caption Input Line.
Analog Out Line – Allows you to select the Analog Closed Caption Output Line.
Service 2 Source – Allows you to select between CC2 and CC3 as the Closed Caption Service 2
Source.
Service 1 Language – Allows you to select the language used for Service 1.
Service 2 Language – Allows you to select the language used for Service 2.
Page 51

Understanding the LCD Menus
51
CC Enable
The CC Enable menu allows you to turn closed captioning ON or OFF in the output video of the Processor.
Disabling the captions may be helpful if the incoming closed caption data is incorrect or corrupt.
The default setting for this menu is Off.
Analog In Line
The Analog In Line selection is used to identify the line on which closed caption information will be
located in the incoming video. This menu applies only to sources with analog closed captions. If your
captions are digital, they will be automatically detected.
The range of adjustment is lines 20 to 22.
The default setting is line 21.
Main Menu
Back
Setup
Ancillary
Data
Noise
Reduction
Video
1
Main Menu
Ancillary Data
Back
Video
Index
Timecode
Closed
Caption
2
Ancillary Data
On
Off
Closed Caption
Back
Service 2
Language
Service 1
Language
Service 2
Source
Analog
Out Line
Analog
In Line
CC
Enable
3
Closed Caption /
CC Enable
Main Menu
Back
Setup
Ancillary
Data
Noise
Reduction
Video
1
Main Menu
Ancillary Data
Back
Video
Index
Timecode
Closed
Caption
2
Ancillary Data
Set Value
21
Back
Service 2
Language
Service 1
Language
Service 2
Source
Analog
Out Line
Analog
In Line
CC
Enable
3
Closed Caption /
Analog In Line
Page 52

Understanding the LCD Menus
52
Analog Out Line
The Analog Out Line selection is used to identify the line on which closed caption information will be
located in the output video. This menu applies only to the analog SD output.
The range of adjustment is lines 20 to 22.
The default setting is line 21.
Service 2 Source
The Service 2 Source menu allows you to select CEA-608 CC2 or CC3 for up converting to CEA-708,
Service 2.
The choices are CC2 and CC3.
The default setting is CC2.
Main Menu
Back
Setup
Ancillary
Data
Noise
Reduction
Video
1
Main Menu
Ancillary Data
Back
Video
Index
Timecode
Closed
Caption
2
Ancillary Data
Set Value
21
Back
Service 2
Language
Service 1
Language
Service 2
Source
Analog
Out Line
Analog
In Line
CC
Enable
3
Closed Caption /
Analog Out Line
Main Menu
Back
Setup
Ancillary
Data
Noise
Reduction
Video
1
Main Menu
Ancillary Data
Back
Video
Index
Timecode
Closed
Caption
2
Ancillary Data
Set Value
CC 3
CC 2
Back
Service 2
Language
Service 1
Language
Service 2
Source
Analog
Out Line
Analog
In Line
CC
Enable
3
Closed Caption /
Service 2 Source
Page 53
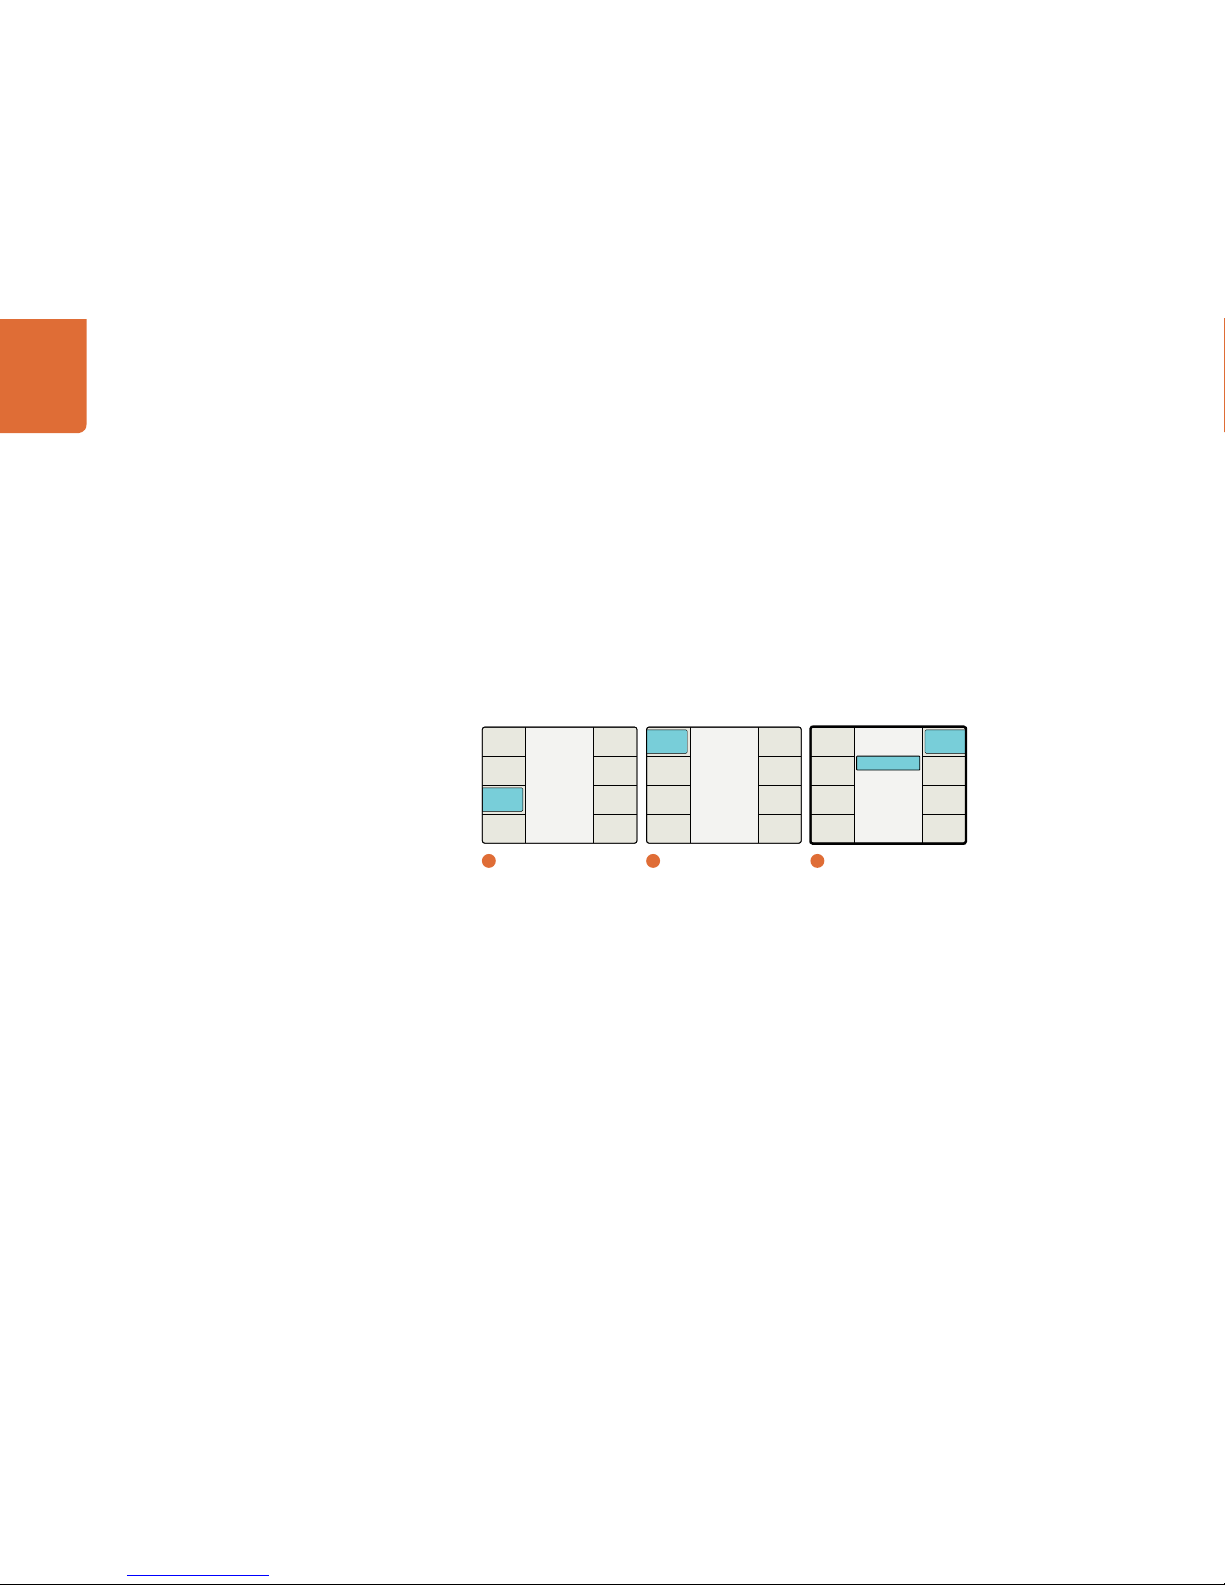
Understanding the LCD Menus
53
Service 1 Language
The Service 1 Language menu allows you to select the language for that Service in CEA-708 closed
captions.
The language choices are:
- English
- French
- German
- Italian
- Spanish
The default language is English.
Service 2 Language
The Service 2 Language menu allows you to select the language for that Service in CEA-708 closed
captions.
The language choices are:
- English
- French
- German
- Italian
- Spanish
The default language is English.
Main Menu
Back
Setup
Ancillary
Data
Noise
Reduction
Video
1
Main Menu
Ancillary Data
Back
Video
Index
Timecode
Closed
Caption
2
Ancillary Data
Spanish
Italian
German
French
English
Select Language
Back
Service 2
Language
Service 1
Language
Service 2
Source
Analog
Out Line
Analog
In Line
CC
Enable
3
Closed Caption /
Service 1 Language
Page 54

Understanding the LCD Menus
54
Timecode Menu
A wide range of options are available for defining the processor’s response to incoming timecode or
for generation of new timecode. This flexibility allows you to pass the incoming timecode to the output,
strip incoming timecode completely or regenerate timecode based on your project’s needs.
The Timecode menu, shown below, permits selection of the desired timecode mode of operation and
provides access to registers for setting specific timecode data.
Please note that Timecode processing is TURNED OFF as the default setting for the processor. It
should be turned ON via one of the selections in the Mode menu below, if needed.
While timecode detection is usually automatic in the Teranex Processor, the timecode Setup menu
page allows you to manually define the line on which timecode will be detected on the input or inserted
in the output. The Setup menu also permits selection of drop frame or non drop frame operation in
format conversions where drop frame timecode is applicable.
Main Menu
Back
Setup
Ancillary
Data
Noise
Reduction
Video
1
Main Menu
Ancillary Data
Back
Video
Index
Timecode
Closed
Caption
2
Ancillary Data
Spanish
Italian
German
French
English
Select Language
Back
Service 2
Language
Service 1
Language
Service 2
Source
Analog
Out Line
Analog
In Line
CC
Enable
3
Closed Caption /
Service 2 Language
Main Menu
Back
Setup
Ancillary
Data
Noise
Reduction
Video
1
Main Menu
Ancillary Data
Back
Video
Index
Timecode
Closed
Caption
2
Ancillary Data
Timecode
Back
Next
Start
Source
Setup
Start
Prev
Set
Timecode
Mode
Select
3
Timecode / Mode Select
Page 55

Understanding the LCD Menus
55
Mode Select– When Mode is selected, five available timecode modes will be displayed. Detailed
descriptions for each mode are provided on the following pages.
- Off (default)
- Input
- Input Regen
- Generate
- Jam Sync
Setup – Displays the Timecode Setup menu, described below
Start Source – The timecode source may be the timecode from the Input video or a Start Value
defined by you in the internal timecode generator.
Set Timecode – Displays the timecode register fields. This control is only active when Generate or
Jam Sync modes are selected via the Mode selection above.
Start – Manually starts the internal timecode generator or initiates the Jam Sync mode, depending
on current settings.
Timecode Setup Menu
The items found i n the timecode Setup men u are typically set for au tomatic (AUTO) operation. However,
some projects may require custom settings, which are described on the following pages. The possible
settings are:
Input Line – The timecode Input Line setting defines the line on which timecode will be detected
in the input video.
Output Line – The timecode Output Line setting defines the line on which timecode will be
inserted in the output video.
DF Mode – The DF Mode menu allows you to select between Automatic, Drop Frame or Non
Drop Frame timecode modes.
Jam Sync
Generate
Input Regen
Input
Off
Timecode
Back
Next
Start
Source
Setup
Start
Prev
Set
Timecode
Mode
1
Mode Select
Page 56

Understanding the LCD Menus
56
Input Line
By default, the timecode Input Line selec tor is set for AUTO detect, where the system scans each
input video frame for timecode. The Input Line selector allows you to manually select the line on which
timecode is located, which may be useful if the timecode is not detected via the AUTO detect mode.
The range for this menu is dependent on the current input video format:
- For 486i59.94 (NTSC), the range is lines 10-20.
- For 576i50 (PAL), the range is lines 6-22.
- For HD 1080 formats, the range is lines 9-20.
- For HD 720 formats, the range is lines 9-25.
The default is Auto. To return to the default value, press the rotary encoder.
Output Line
The timecode Output Line is usually set for the default value associated with the current output video
format. The default settings are provided below. The Output Line selector allows you to manually
select the output line, if needed.
The range for this menu is dependent on the current output video format:
- For 486i59.94 (NTSC), the range is lines 10-20.
- For 576i50 (PAL), the range is lines 6-22.
- For all HD formats, the range is lines 9-20.
The default values are also dependent on the current output format:
- For 486i59.94 (NTSC), the default is line 14.
- For 576i50 (PAL), the default is line 19.
- For all HD formats, the default is line 9.
To return to the default value, press the rotary encoder.
Main Menu
Back
Setup
Ancillary
Data
Noise
Reduction
Video
1
Main Menu
Ancillary Data
Back
Video
Index
Timecode
Closed
Caption
2
Ancillary Data
Set Value
Auto
Back
DF Mode
Output
Line
Input
Line
4
Setup / Input Line
Timecode
Back
Next
Start
Source
Setup
Start
Prev
Set
Timecode
Mode
Select
3
Timecode
Page 57

Understanding the LCD Menus
57
Drop Frame Mode
The Drop Frame Mode menu allows for automatic or manual selection of the timecode type in use.
In the AUTO mode, the output timecode t ype will be the same as the input type. You can manually
force the timecode into drop frame or non drop frame mode, depending on the requirements of your
project. You might want to use this feature, for example, if some of your source material is drop frame,
but your current project is being produced using non drop frame timecode.
Auto – The output timecode type will match the input type.
Drop Frame – Forces the output to drop frame timecode, regardless of the input type.
Non Drop Frame – Forces the output to non drop frame timecode, regardless of the input type.
Please note that Drop Frame time code only applies to 23.98, 29.97 and 59.94 frame rates. For other
frame rates, the processor will automatically use the Non Drop Frame mode, even if Drop Frame is
selected.
If the AUTO mode is selec ted, but no input timecode is present, the processor will default to the Non
Drop Frame mode. If Drop Frame timecode is required, select Drop Frame mode in this menu.
Main Menu
Back
Setup
Ancillary
Data
Noise
Reduction
Video
1
Main Menu
Ancillary Data
Back
Video
Index
Timecode
Closed
Caption
2
Ancillary Data
Set Value
9
Back
DF Mode
Output
Line
Input
Line
4
Setup / Output Line
Timecode
Back
Next
Start
Source
Setup
Start
Prev
Set
Timecode
Mode
Select
3
Timecode
Main Menu
Back
Setup
Ancillary
Data
Noise
Reduction
Video
1
Main Menu
Ancillary Data
Back
Video
Index
Timecode
Closed
Caption
2
Ancillary Data
Non Drop Frame
Drop Frame
Auto
Timecode
Back
DF Mode
Output
Line
Input
Line
4
Setup / DF Mode
Timecode
Back
Next
Start
Source
Setup
Start
Prev
Set
Timecode
Mode
Select
3
Timecode
Page 58
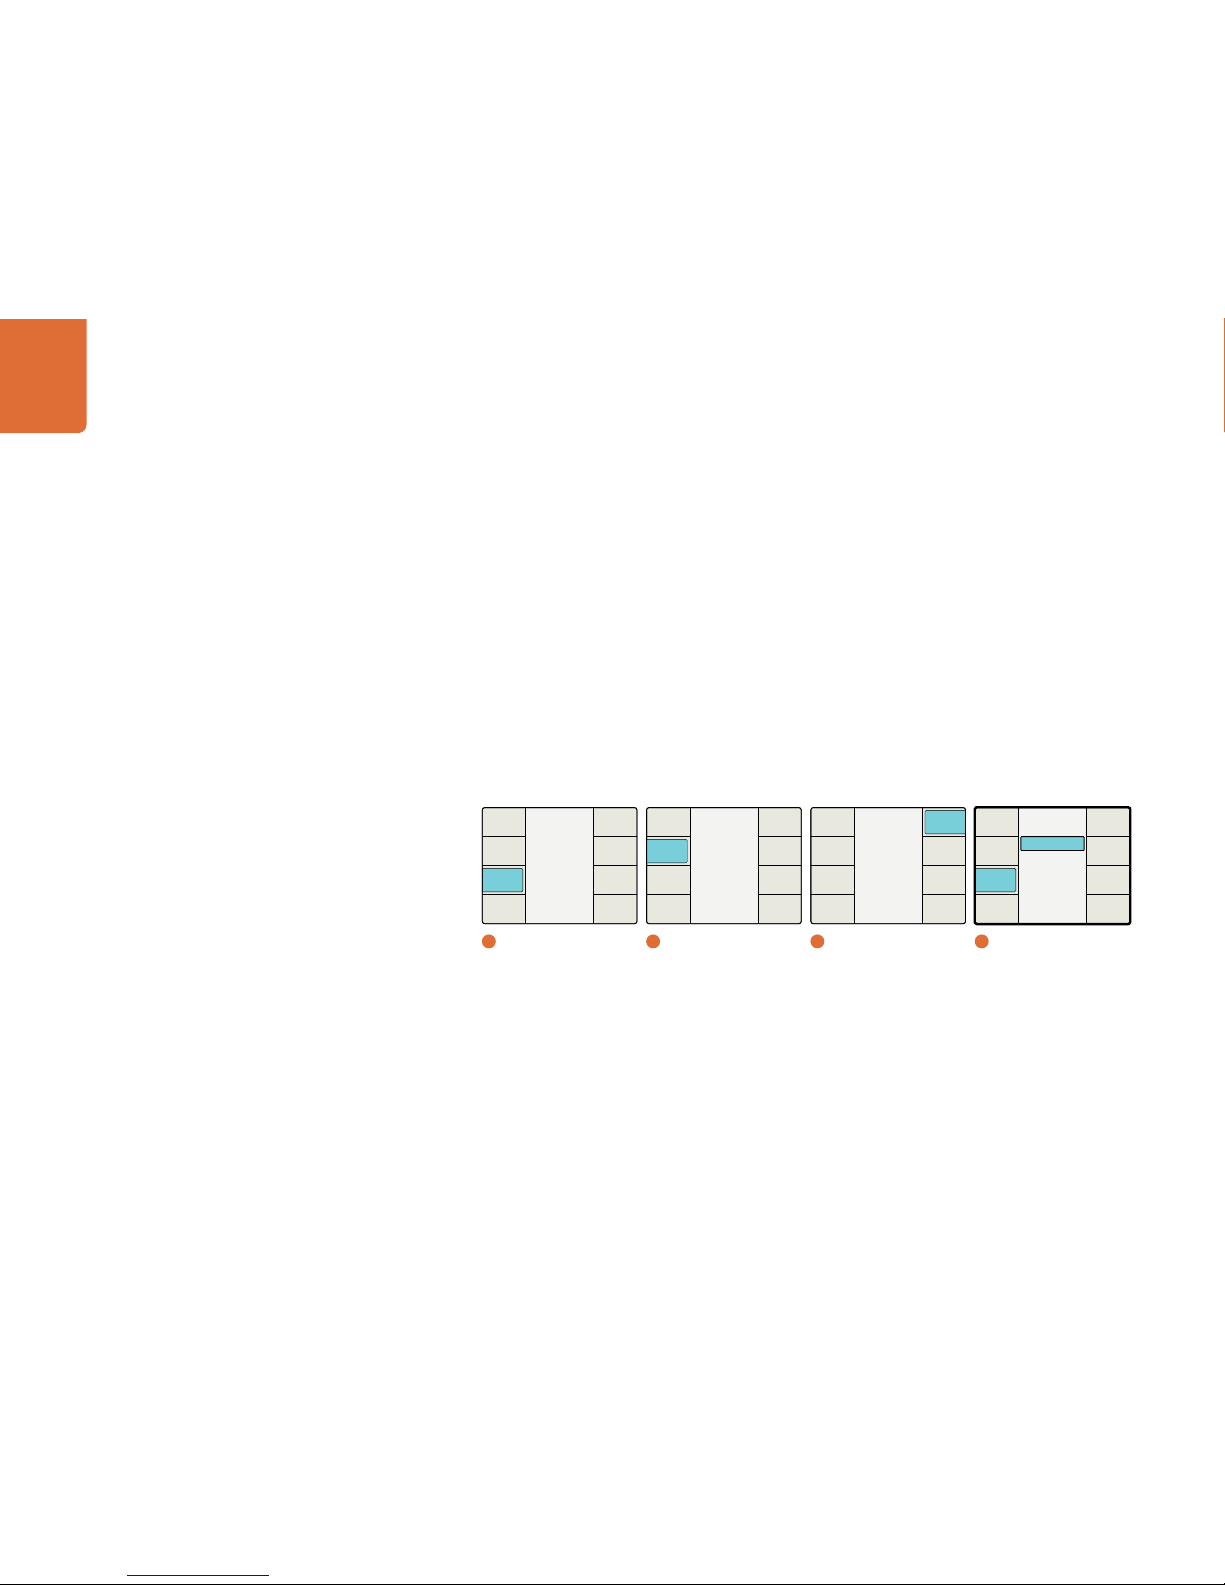
Understanding the LCD Menus
58
Drop Frame Mode
The Drop Frame Mode menu allows for automatic or manual selection of the timecode type in use.
In the AUTO mode, the output timecode t ype will be the same as the input type. You can manually
force the timecode into drop frame or non drop frame mode, depending on the requirements of your
project. You might want to use this feature, for example, if some of your source material is drop frame,
but your current project is being produced using non drop frame timecode.
Auto – The output timecode type will match the input type.
Drop Frame – Forces the output to drop frame timecode, regardless of the input type.
Non Drop Frame – Forces the output to non drop frame timecode, regardless of the input type.
Please note that Drop Frame time code only applies to 23.98, 29.97 and 59.94 frame rates. For other
frame rates, the processor will automatically use the Non Drop Frame mode, even if Drop Frame is
selected.
If the AUTO mode is selec ted, but no input timecode is present, the processor will default to the Non
Drop Frame mode. If Drop Frame timecode is required, select Drop Frame mode in this menu.
Start Source Menu
The Start Source menu allows you to select the source for the timecode generator. If you want the
generator to reproduce the timecode received on your video input, select “Input” as the Star t Source.
If you want to define a specific timecode for the generator, select “Start Value” as the Start Source.
When you selec t either the Generate or Jam Sync modes from the Mode menu, you will be presented
with a timecode register in which you can program a specific timecode start value.
Main Menu
Back
Setup
Ancillary
Data
Noise
Reduction
Video
1
Main Menu
Ancillary Data
Back
Video
Index
Timecode
Closed
Caption
2
Ancillary Data
Non Drop Frame
Drop Frame
Auto
Timecode
Back
DF Mode
Output
Line
Input
Line
4
Setup / DF Mode
Timecode
Back
Next
Start
Source
Setup
Start
Prev
Set
Timecode
Mode
Select
3
Timecode
Page 59
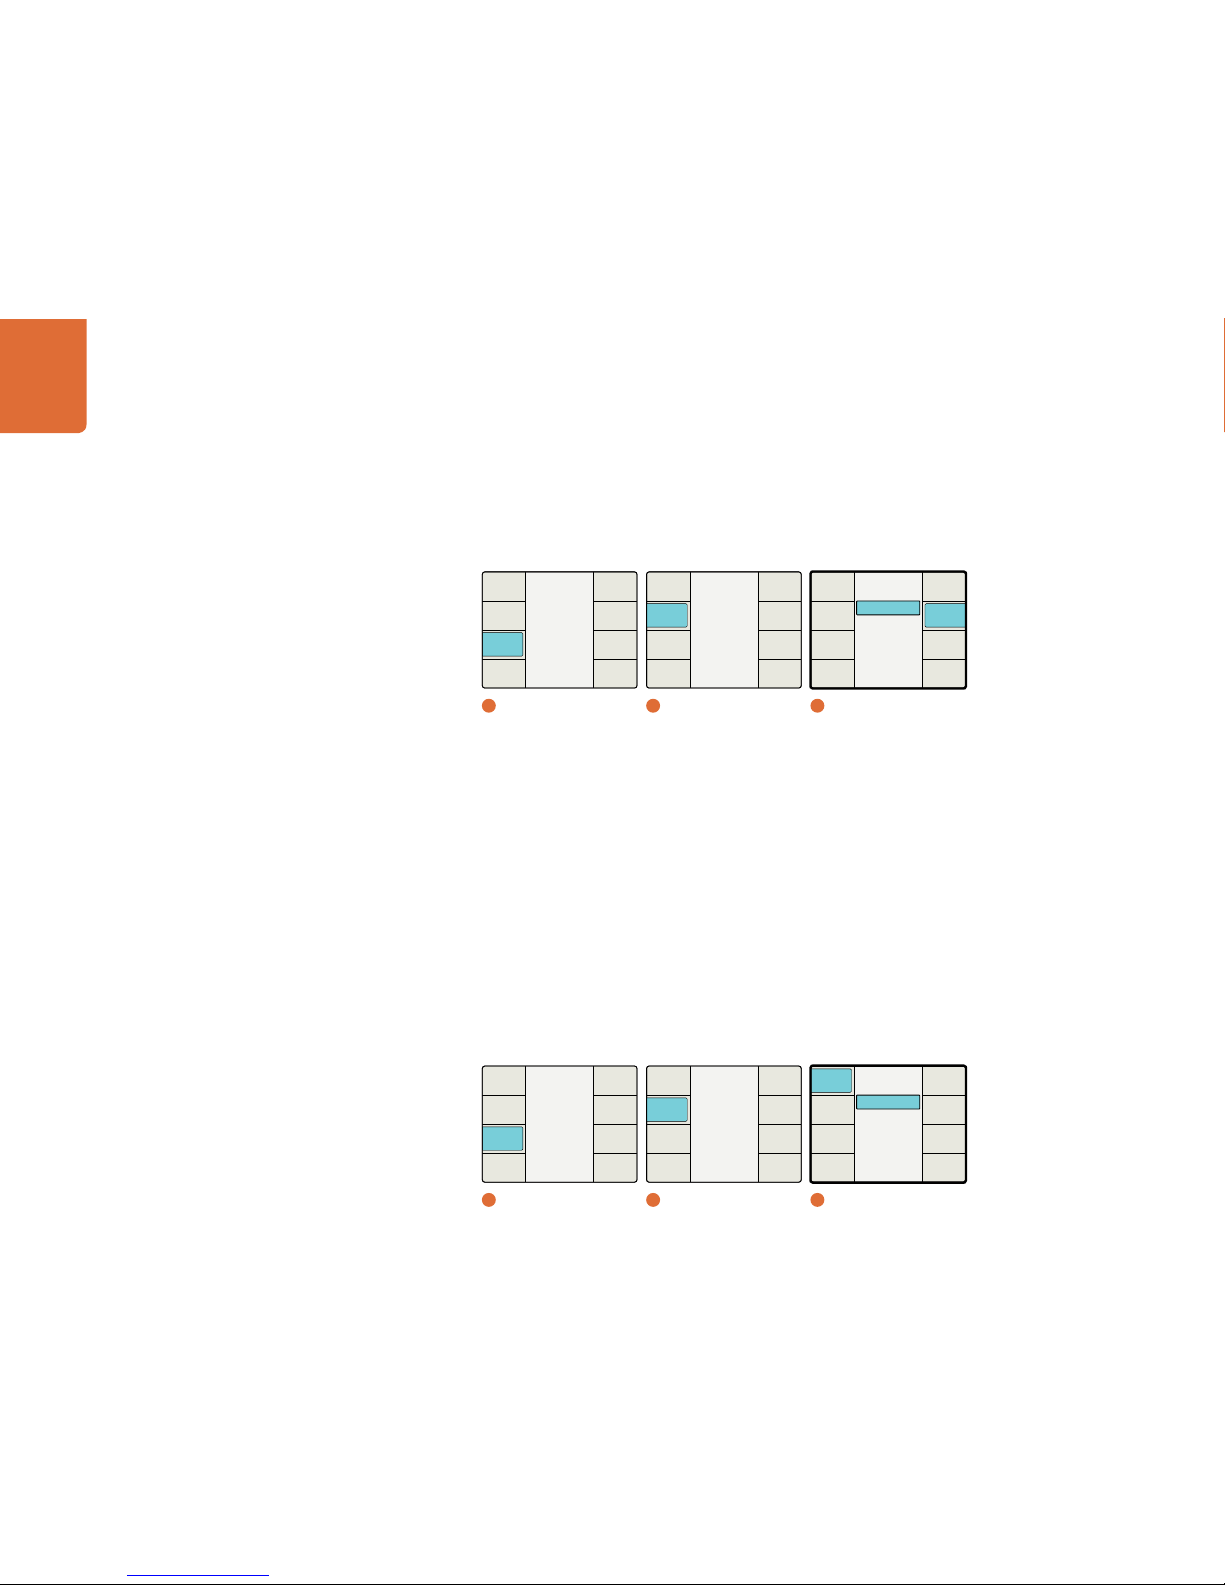
Understanding the LCD Menus
59
Start Value – A specific timecode value will be used when the timecode generator is started.
The desired value will be entered in the Generate or Jam Sync menus.
Input – The timecode present on the input video source will be used by the timecode generator.
If no timecode is present, the generator will start at 00:00:00:00.
Mode Menu
The Mode Select menu will display a choice of five timecode processing modes, selectable by turning
the rotary encoder on the control panel. Each mode will display a sub menu of choices or timecode
registers.
Off – Prevents any timecode from being inserted into the output video. (Default)
Input – Converts the incoming timecode to the appropriate output rate.
Input Regen – Synchronizes the output timecode to the input timecode. This is a useful mode
when converting between frame rates.
Generate – Starts generating output timecode when the Start button is pressed. The starting value
for the output timecode generator may be set to match the input timecode or may be a user
defined value set via a register on the Generate mode timecode menu.
Jam Sync – Pauses the output timecode generator until a user-defined input timecode value is
reached, at which time the generator starts counting. The starting value for the output timecode
generator may be set to match the input timecode or may be a user-defined value set via a register
on the Jam Sync mode timecode menu.
Main Menu
Back
Setup
Ancillary
Data
Noise
Reduction
Video
1
Main Menu
Ancillary Data
Back
Video
Index
Timecode
Closed
Caption
2
Ancillary Data
Input
Start Value
Timecode
Back
Next
Start
Source
Setup
Start
Prev
Set
Timecode
Mode
Select
3
Timecode / Start Source
Main Menu
Back
Setup
Ancillary
Data
Noise
Reduction
Video
1
Main Menu
Ancillary Data
Back
Video
Index
Timecode
Closed
Caption
2
Ancillary Data
Jam Sync
Generate
Input Regen
Input
Off
Timecode
Back
Next
Start
Source
Setup
Start
Prev
Set
Timecode
Mode
Select
3
Timecode / Mode Select
Page 60

Understanding the LCD Menus
60
Input Mode
Select Input to route or copy the input timecode directly to the output. This is useful when the frame
rates of the input and output are the same and you want to preserve the original timecode.
It’s important to make sure that the Drop Frame mode in the timecode Setup menu is set to Auto to
ensure the output timecode will match the input timecode.
Please note that if you want to ensure that the output timecode matches your input timecode, do not
use the processor as a frame synchronizer with external reference. You should set the Reference menu
to “Input.” The external reference can cause a dropped or duplicated frame in the output, which will
affect your timecode count.
Input Regen Mode
The Input Regen mode synchronizes the output timecode to the input timecode and is often used
when performing frame rate conversions, such as PAL-to-NTSC or 1080i50-to-1080i59.94. When using
this mode, the output timecode will resynchronize to the input timecode at the top of every second.
This keeps the “seconds” digits synchronized between the input and output timecode.
The Input Regen mode should only be used when your Teranex processor is locked to your input video.
If you must reference the processor to an external reference, the Jam Sync timecode mode should be
used instead. Jam Sync mode will start the new output timecode from a cer tain user-defined input
timecode value, then “free-run” the output timecode, as opposed to syncing to the input timecode
every second.
Main Menu
Back
Setup
Ancillary
Data
Noise
Reduction
Video
1
Main Menu
Ancillary Data
Back
Video
Index
Timecode
Closed
Caption
2
Ancillary Data
Jam Sync
Generate
Input Regen
Input
Off
Timecode
Back
Next
Start
Source
Setup
Start
Prev
Set
Timecode
Mode
Select
3
Timecode / Mode Select /
Input
Page 61
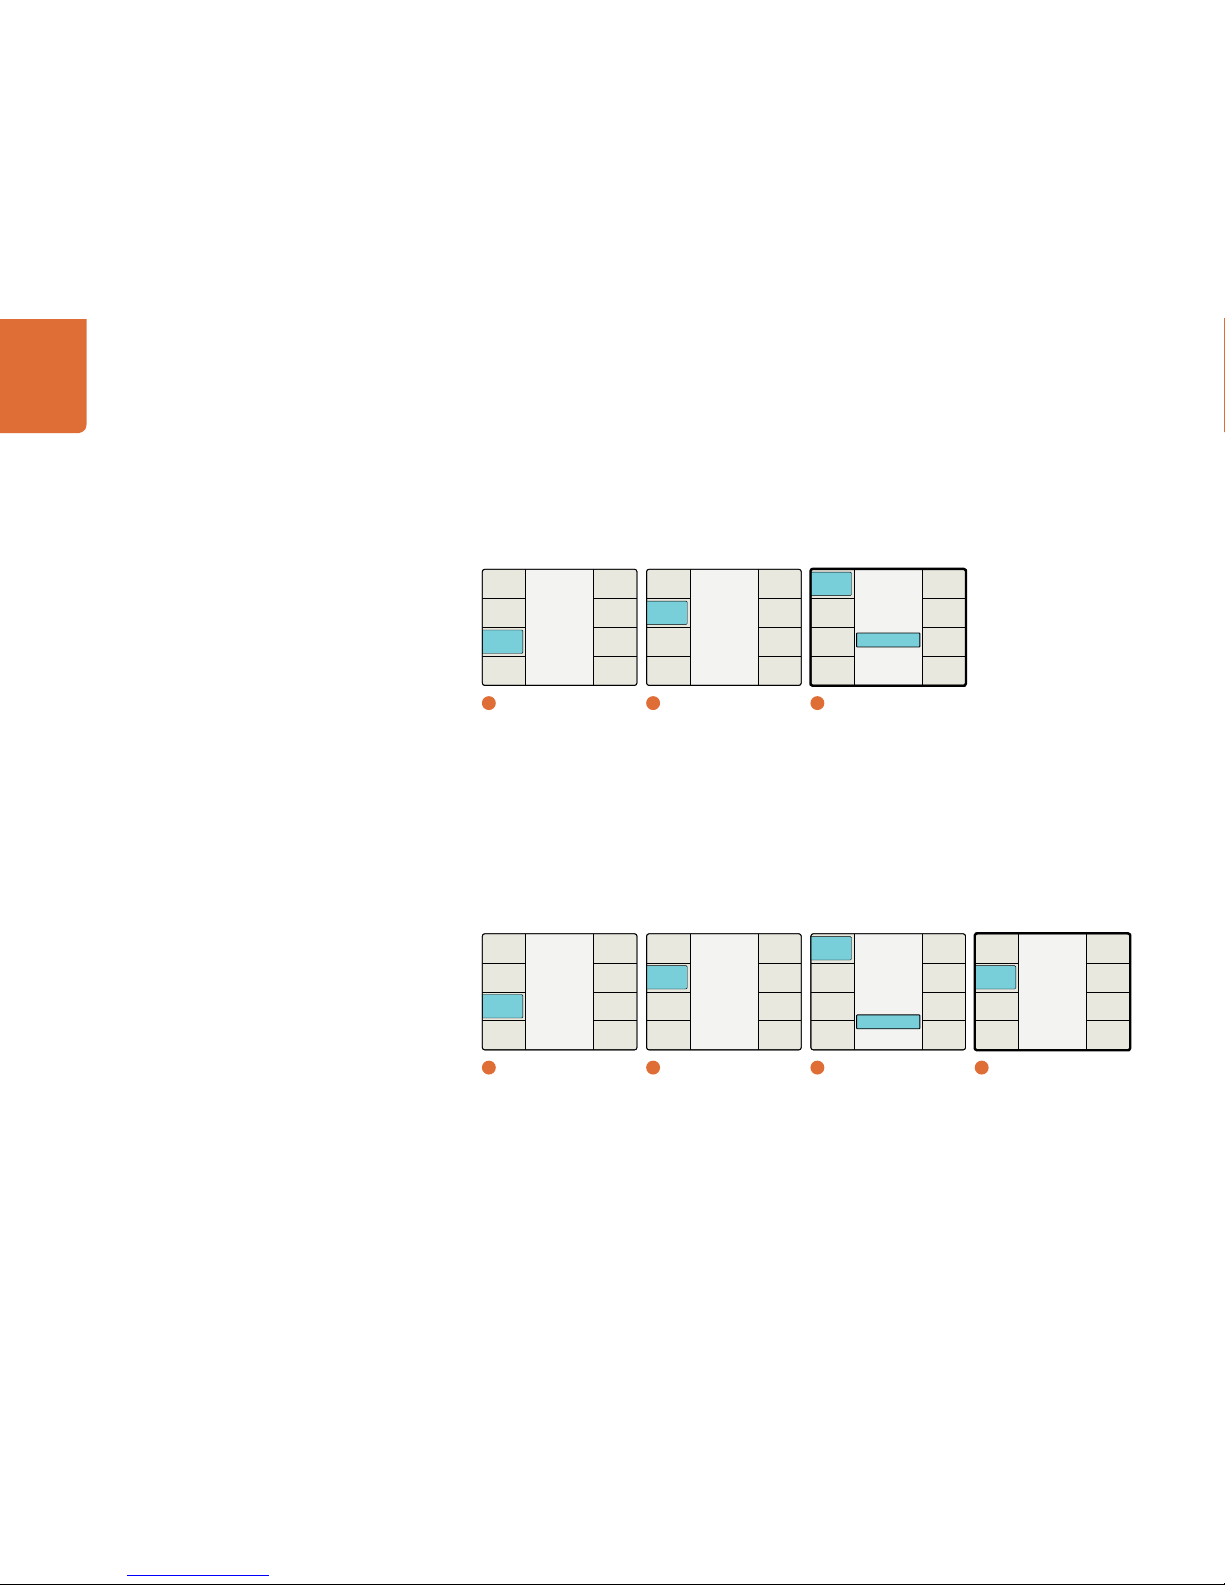
Understanding the LCD Menus
61
In Input Regen mode, drop frame and non drop frame modes are both supported in 23.98, 29.97 and 59.94
frame rates. However, in a conversion where the source timecode is drop frame and the video output format
does not support drop frame timecode, (e.g. 50Hz or 60Hz integer frame rates), the output timecode will
automatically be converted to non drop frame.
Generate Mode
The timecode generator will generate free running output timecode appropriate for the selected
output format, even if no timecode is present on your video input signal. The Set Timecode menu seen
is dependent on the choice you made in the Start Source menu, “Input” or “Start Value.”
If the Start Source menu is set to “Input,” the Set Timecode menu will show “Input” as the Start Value
for the generator (see below). When you press the Start button, the generator will capture the current
input timecode value and use that value to start outputting free running timecode. If no timecode is
present on your input video source, the generator will begin counting at 00:00:00:0 0.
Menu number 4 above will be seen when the Set Timecode but ton is pressed and the Start Source menu is set to Input.
Main Menu
Back
Setup
Ancillary
Data
Noise
Reduction
Video
1
Main Menu
Ancillary Data
Back
Video
Index
Timecode
Closed
Caption
2
Ancillary Data
Jam Sync
Generate
Input Regen
Input
Off
Timecode
Back
Next
Start
Source
Setup
Start
Prev
Set
Timecode
Mode
Select
3
Timecode / Mode Select /
Input Regen
Main Menu
Back
Setup
Ancillary
Data
Noise
Reduction
Video
1
Main Menu
Ancillary Data
Back
Video
Index
Timecode
Closed
Caption
2
Ancillary Data
Start Value
Input
Timecode
Back
Next
Start
Source
Setup
Start
Prev
Set
Timecode
Mode
4
Mode Select / Generate /
Set Timecode
Jam Sync
Generate
Input Regen
Input
Off
Timecode
Back
Next
Start
Source
Setup
Start
Prev
Set
Timecode
Mode
Select
3
Timecode
Page 62
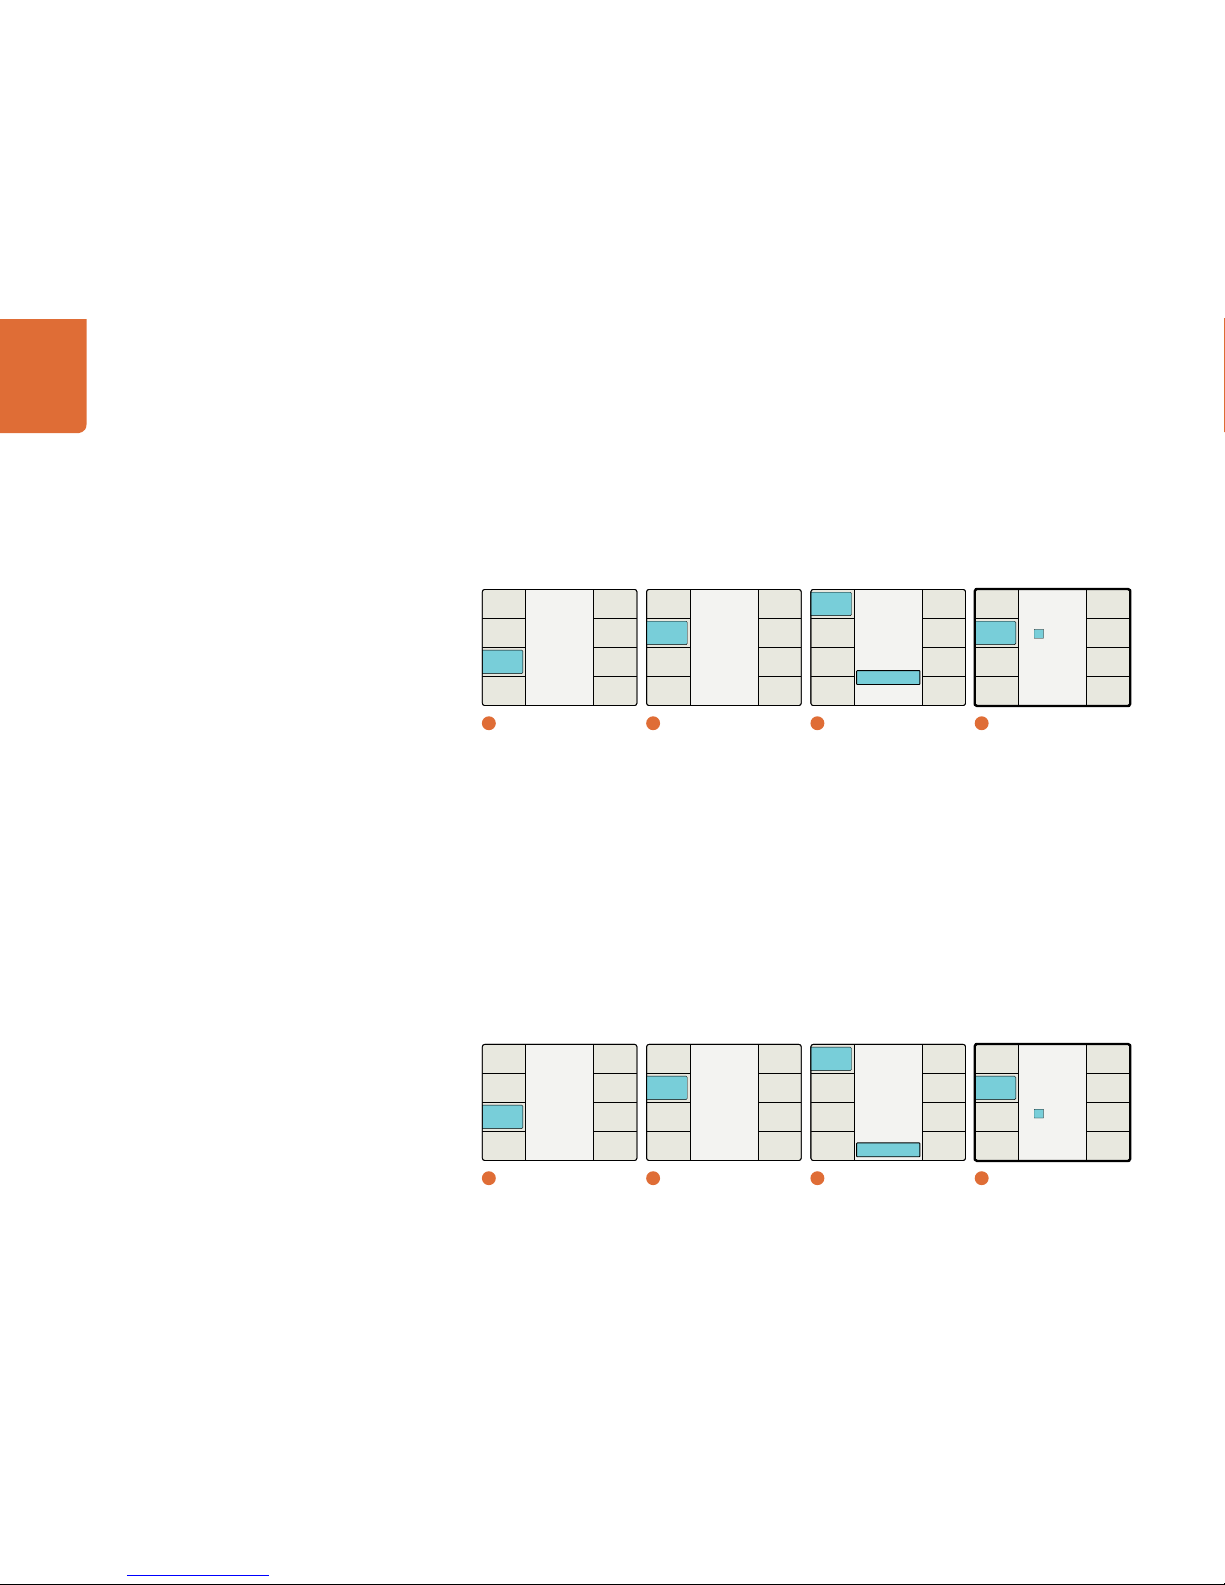
Understanding the LCD Menus
62
If the Start Source menu is set to “Star t Value,” the Set Timecode menu will display an eight-character
register that will permit you to enter a specific timecode generator Start Value. Turn the rotary encoder
to adjust the timecode generator values. Use the Previous and Next buttons to move the cursor left
or right. When you press the “Star t” button to start the Generator, the timecode generator will begin
outputting timecode based on your Star t Value choice.
Menu number 4 above will be seen when the Set Timecode but ton is pressed and the Start Source menu is set to
Start Value.
Jam Sync Mode
The Jam Sync mode is similar to the Generate mode. However, when you press the “Start” button, Jam
Sync mode allows you to hold the output timecode generator until a pre-determined timecode point is
reached in your input video, called the Jam Sync value. The Jam Sync value must be entered via the Set
Timecode menus shown below. The Set Timecode menu seen is dependent on the choice you made
in the Start Source menu, “Input” or “Start Value.”
If the Start Source menu is set to “Input,” the Set Timecode menu will show “Input” as the Start Value
for the timecode generator. When you press the “Start” button, the generator will start looking for a
timecode match to the Jam Sync value you have entered. When the timecode in the input video signal
matches the Jam Sync value, the generator will use that “Input” timecode as the star t value to generate
free running output timecode.
Menu number 4 above will be seen when the Set Timecode but ton is pressed and the Start Source menu is set to Input.
Main Menu
Back
Setup
Ancillary
Data
Noise
Reduction
Video
1
Main Menu
Ancillary Data
Back
Video
Index
Timecode
Closed
Caption
2
Ancillary Data
Start Value
00:00:00:00
Timecode
Back
Next
Start
Source
Setup
Start
Prev
Set
Timecode
Mode
4
Mode Select / Generate /
Set Timecode
Jam Sync
Generate
Input Regen
Input
Off
Timecode
Back
Next
Start
Source
Setup
Start
Prev
Set
Timecode
Mode
Select
3
Timecode
Main Menu
Back
Setup
Ancillary
Data
Noise
Reduction
Video
1
Main Menu
Ancillary Data
Back
Video
Index
Timecode
Closed
Caption
2
Ancillary Data
Jam Sync
00:00:00:00
Start Value
Input
Timecode
Back
Next
Start
Source
Setup
Start
Prev
Set
Timecode
Mode
4
Mode Select / Jam Sync /
Set Timecode
Jam Sync
Generate
Input Regen
Input
Off
Timecode
Back
Next
Start
Source
Setup
Start
Prev
Set
Timecode
Mode
Select
3
Timecode
Page 63
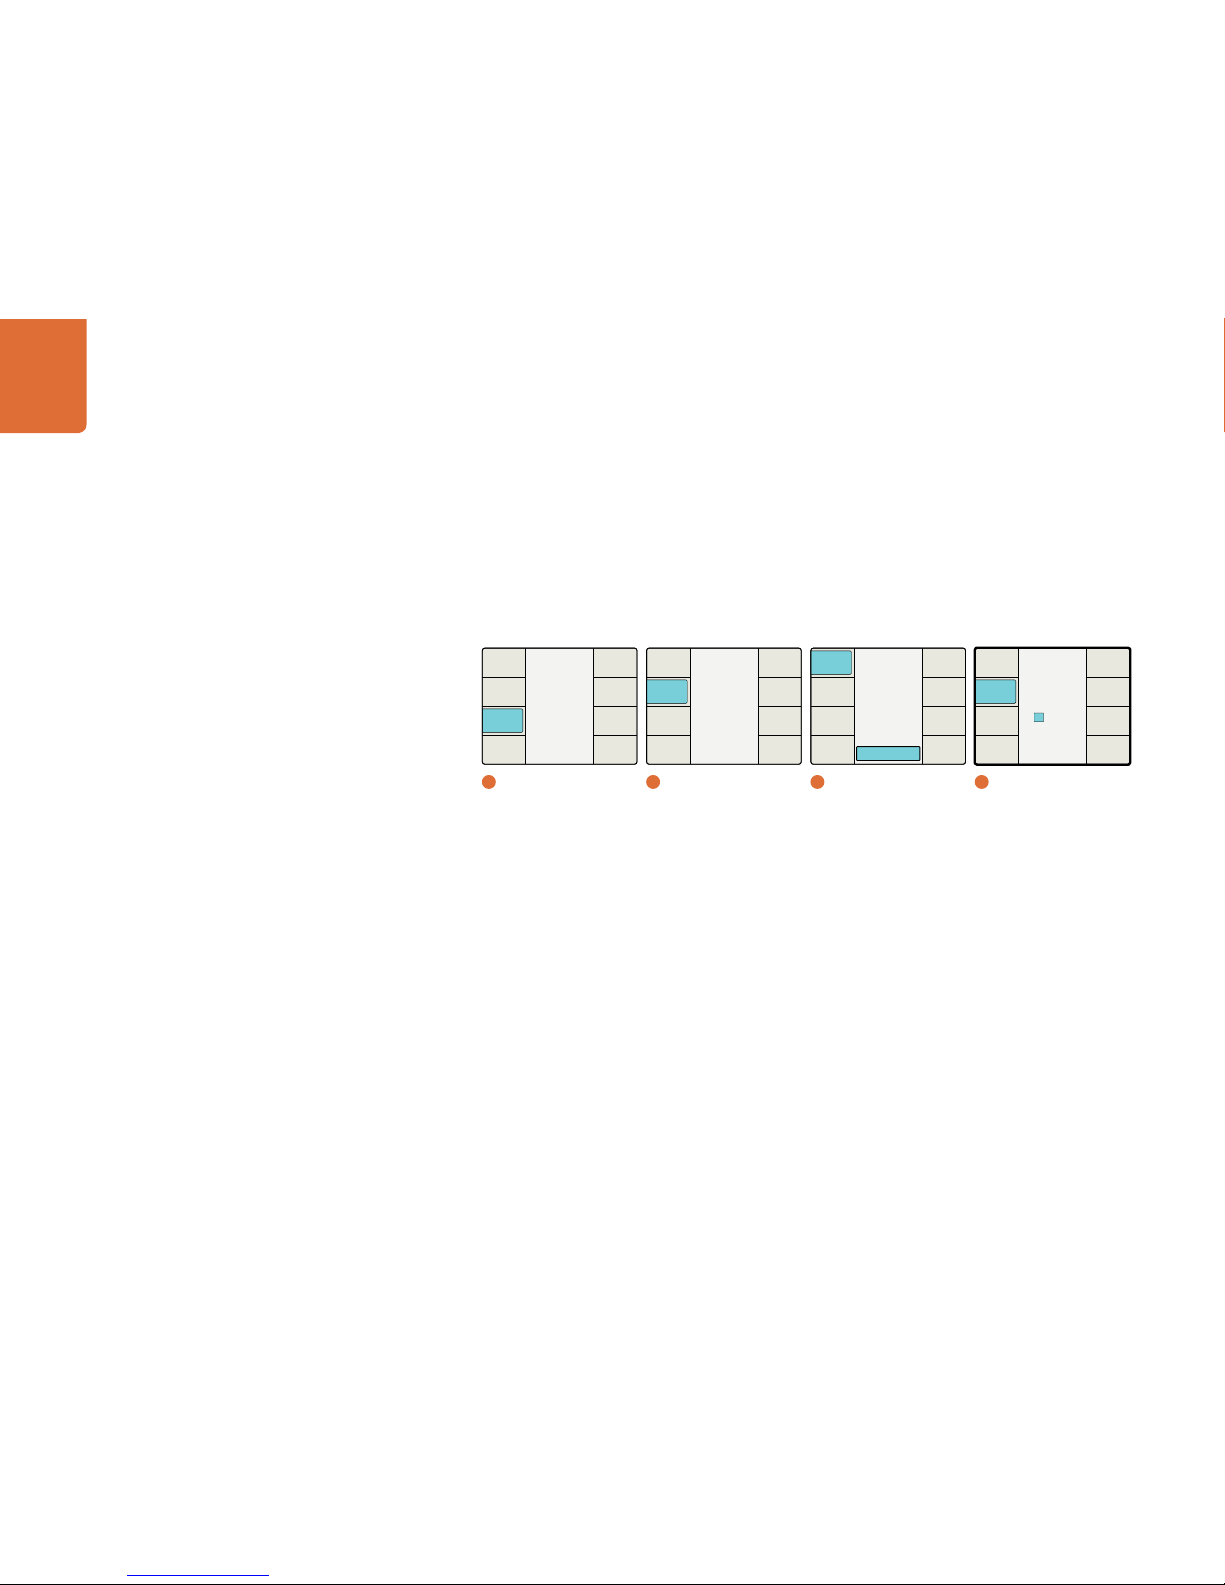
Understanding the LCD Menus
63
If the Start Source menu is set to “Start Value,” the Set Timecode menu will display an additional
eight charac ter register that will permit you to set a specific Start Value for the timecode generator.
(As before, the Jam Sync register will be used to enter the Jam Sync value.) Turn the rotary encoder
to adjust the timecode values. Use the Previous and Next buttons to move the cursor left or right.
When you press the “Start” button, the generator will start looking for a timecode match to the
Jam Sync value you have entered. When the timecode in the input video signal matches the Jam Sync
value, the generator will use the Star t Value you entered as the start value to generate free running
output timecode.
Menu number 4 above will be seen when the Set Timecode but ton is pressed and the Start Source menu is set to
Start Value.
Video Index Menu
The Video Index menu enables/disables reaction to video indexing signals that may be embedded in
your source video. The three video indexing modes that are supported are Active Format Description
(AFD), Wide Screen Signaling (WSS) and SMPTE RP186.
If the Video Index Mode is turned ON, the Teranex Processor will be set to react to incoming video
indexing signals. The processor will automatically scan for the presence of video index packets
and will react to them if found. AFD indexing takes precedence over the WSS, which takes precedence
over RP186.
The default setting is Off.
Please note that the Processor will not pass or inser t WSS or RP186 codes. It will only react to them if
they are present on the input.
Main Menu
Back
Setup
Ancillary
Data
Noise
Reduction
Video
1
Main Menu
Ancillary Data
Back
Video
Index
Timecode
Closed
Caption
2
Ancillary Data
Jam Sync
00:00:00:00
Start Value
00:00:00:00
Timecode
Back
Next
Start
Source
Setup
Start
Prev
Set
Timecode
Mode
4
Mode Select / Jam Sync /
Set Timecode
Jam Sync
Generate
Input Regen
Input
Off
Timecode
Back
Next
Start
Source
Setup
Start
Prev
Set
Timecode
Mode
Select
3
Timecode
Page 64

Understanding the LCD Menus
64
AFD Insertion Menu
This menu allows you to select the desired AFD code that will be inserted in the output video.
The output line on which the code will be inser ted can be selected in the AFD Insert Line menu.
Settings include:
- Off – No AFD code will be inserted in the output ancillary data space.
- Auto – The appropriate code will be inserted based on the current video output format.
- Bypass – Any code present in the incoming video stream will be passed through to the output.
- AFD codes 0000 – 1111 – These codes are manual selections which may be used as needed.
The default setting is Off.
Main Menu
Back
Setup
Ancillary
Data
Noise
Reduction
Video
1
Main Menu
Ancillary Data
Back
Video
Index
Timecode
Closed
Caption
2
Ancillary Data
On
Off
Index Reaction
Back
AFD
Insert Line
AFD
Insertion
Index
Reaction
3
Video Index /
Index Reaction
Main Menu
Back
Setup
Ancillary
Data
Noise
Reduction
Video
1
Main Menu
Ancillary Data
Back
Video
Index
Timecode
Closed
Caption
2
Ancillary Data
6
0001
0000
Bypass
Auto
Off
Back
AFD
Insert Line
AFD
Insertion
Index
Reaction
3
Video Index /
AFD Insertion
Page 65

Understanding the LCD Menus
65
AFD Insert Line Menu
If AFD Insertion is enabled in the AFD Insertion menu above, the AFD Insert Line menu allows you to
select the line on which the AFD code will be inserted in the ancillary data space of the output video
signal.
The range of adjustment is dependent on the current output video format:
- For SD formats, the range is lines 10 to 19. The default value is line 15.
- For HD 1080 formats, the range is lines 9 to 20. The default value is line 11.
- For HD 720 formats, the range is lines 9 to 25. The default value is line 11.
Press the rotary encoder to go back to the default value.
Setup Menu
The Setup menu provides access to the external Reference, Video and Audio Setup menus.
Reference – Allows selection and timing adjustment of the external reference, if used.
Video – Defines the analog video input and output signal types to be used, composite or
component.
Audio – Permits selection of the desired analog audio input and output connections to be used on
the rear panel, RCA Phono or DB-25.
Main Menu
Back
Setup
Ancillary
Data
Noise
Reduction
Video
1
Main Menu
Ancillary Data
Back
Video
Index
Timecode
Closed
Caption
2
Ancillary Data
11
Back
AFD
Insert Line
AFD
Insertion
Index
Reaction
3
Video Index /
AFD Insert Line
Main Menu
Back
Setup
Ancillary
Data
Noise
Reduction
Video
1
Main Menu
Setup
Back
Audio
Video
Reference
2
Setup
Page 66

Understanding the LCD Menus
66
Reference Setup Menu
The Reference menu allows you to lock the processor to your input video source or to an external
reference.
Input – Selects the current input video source as the reference.
External – Selects the external reference (REF) input.
Valid external reference signals that may be used are dependent on the OUTPUT format conversion
you have chosen. The Processor will auto-detect the reference source, but the reference you are using
must be compatible with the output format.
For SD interlaced output formats (e.g. 486i59.94, 576i50), ONLY blackburst (BLACK) may be used.
The frame rate must match the output format (59.94 or 50).
For HD interlaced output formats (e.g. 1080i59.94, 1080i50), either blackburst (BLACK) or tri-level
interlaced (TRI-I), in the respective frame rate (59.94 or 50), may be used.
For HD Progressive Segmented Frame output formats (e.g. 1080PsF23.98, 1080PsF25), tri-level
interlaced (TRI-I), in the respective frame rate (59.94 or 50), may be used.
For HD progressive output formats (e.g. 720p59.94 or 720p50), either blackburst (BLACK) or tri-level
progressive (TRI-P), in the respective frame rate (59.94 or 50), may be used.
Examples:
Output Format Applicable External Reference Comments
486 i59.94 Black (59.94) only Tri-I and Tri-P are not applicable
576 i5 0 Black (50) only Tri-I and Tri-P are not applicable
1080i59.94 Black (59.94) or Tri-I (59.94) Tri-P is not applicable
72 0 p59.94 Black (59.94) or Tri-P (59.94) Tri-I is not applicable
Please note that if External reference is selected and a valid reference signal has been applied, the REF
Status LED on the front panel will be illuminated.
Page 67

Understanding the LCD Menus
67
If the external reference is removed or lost, the processor will go into a free run condition until the
reference is restored. The REF Status LED on the front panel will be NOT be illuminated.
Line Offset
This control adjusts the Line timing of the output relative to the external reference selected.
The Range is determined by the current output format selection.
Pixel Offset
This control adjusts the Pixel timing of the output relative to the external reference selected.
The Range is determined by the current output format selection.
Main Menu
Back
Setup
Ancillary
Data
Noise
Reduction
Video
1
Main Menu
Main Menu
Back
Setup
Ancillary
Data
Noise
Reduction
Video
1
Main Menu
Setup
Back
Audio
Video
Reference
2
Setup
Setup
Back
Audio
Video
Reference
2
Setup
External
Input
Reference Type
Back
Pixel
Offset
Line
Offset
Type
3
Reference / Type
Line Offset
0
Back
Pixel
Offset
Line
Offset
Type
3
Reference / Line Offset
Main Menu
Back
Setup
Ancillary
Data
Noise
Reduction
Video
1
Main Menu
Setup
Back
Audio
Video
Reference
2
Setup
Pixel Offset
0
Back
Pixel
Offset
Line
Offset
Type
3
Reference / Pixel Offset
Page 68

Understanding the LCD Menus
68
Video Setup Menu
The Video Setup menu allows you to define the type of analog video being used for the input and
output video connections on the rear panel. The choice will be either composite or component.
This menu is also used to define which video signal will be output when there is a loss of input video.
No Input – Allows you to define the video signal that the processor will output when input video
is lost
Input Analog – Allows you to define the type of input analog video that you are using
Output Analog– Allows you to define the type of output analog video that you are using
No Input Menu
This menu allows you to define whether Black or Colorbars will be output when there is a loss of input
video.
The default setting is Black.
Input Analog Video Setup Menu
This menu allows you to define the type of input analog video that you are using.
Component – Defines the analog input BNC connections as component Y, R-Y and B-Y.
Composite – Defines the analog Y/NTSC/PAL input BNC connector as composite.
The default setting is Component.
Main Menu
Back
Setup
Ancillary
Data
Noise
Reduction
Video
1
Main Menu
Setup
Back
Audio
Video
Reference
2
Setup
Colorbars
Black
No Input
Back
Output
Analog
Input
Analog
No Input
3
Video / No Input
Main Menu
Back
Setup
Ancillary
Data
Noise
Reduction
Video
1
Main Menu
Setup
Back
Audio
Video
Reference
2
Setup
Composite
Component
Analog Input
Back
Output
Analog
Input
Analog
No Input
3
Video / Input Analog
Page 69

Understanding the LCD Menus
69
Output Analog Video Setup Menu
This menu allows you to define the type of output analog video that you are using.
Component – Routes component Y, R-Y and B-Y to the respective output BNC connections.
Composite – Routes composite video to the Y/NTSC/PAL output BNC connector.
The default setting is Component.
Audio Setup Menu
The Audio Setup menu allows you to select the analog audio input source that you want to use on the
rear panel. The choices are the RCA Phono or DB-25.
RCA – Stereo RCA Phono connectors (L/R).
DB-25 – 4-channel balanced analog audio via the DB-25 connector.
The default setting is DB-25.
Main Menu
Back
Setup
Ancillary
Data
Noise
Reduction
Video
1
Main Menu
Setup
Back
Audio
Video
Reference
2
Setup
Composite
Component
Analog Output
Back
Output
Analog
Input
Analog
No Input
3
Video / Output Analog
Main Menu
Back
Setup
Ancillary
Data
Noise
Reduction
Video
1
Main Menu
Setup
Back
Audio
Video
Reference
2
Setup
DB25
RCA
Analog Input
Back
Input
Analog
3
Audio / Input Analog
Page 70

Using your Favourite Editing Software
70
Editing with your Teranex 2D Processor
When connected to a Mac OS X computer with Thunderbolt technology, your Teranex Processor can
be used as a powerful editing solution for video capture, conversion and playback. The Teranex Installer
software installs Blackmagic System Preferences which allow your favorite video editing software to work
with your Teranex Processor. The Blackmagic System Preferences are exclusively used by your video
software and do not change any of the settings in your Teranex Processor hardware. You still need to use
the buttons on the Teranex Processor itself to change any settings in the Teranex Processor, just as you
would if using it as a standalone converter.
Video Capture
When an application is capturing video, the Teranex Processor LCD will show the word "capture" followed
by the video format of the input signal, e.g. Capture 1080p24. Applications including Blackmagic Media
Express, DaVinci Resolve, Adobe Premiere Pro CS6, Adobe Photoshop CS6, Apple Final Cut Pro 7 and Avid
Media Composer 6 can capture video from your Teranex Processor.
In contrast to traditional capture cards, the converted video output signal of the Teranex Processor is used
in your video capture software. Accordingly you should set the project preferences, in your video capture
software, to match the converted output of your Teranex Processor. To do so, press the OUT button on your
Teranex Processor and make sure the project preferences match the video format, frame type and frame
rate shown by the illuminated buttons. Once you have correctly configured the project preferences and set
your application to capture, the converted video will appear on your computer screen within a few seconds.
If no video image appears in your video capture software, make sure the project settings are not accidentally
set to the video input signal displayed on the Teranex Processor LCD. Double-check your project settings
and ensure they match the output format of your Teranex Processor.
If you still can't see an image in your video capture software, quit out of the software and launch Blackmagic
UltraScope. Make a note of the output video standard which is displayed on the left side of the Picture
Display. Quit out of UltraScope, launch your video capture software and set the project preferences to
match the standard reported by UltraScope.
Batch captures with RS-422 deck control might not be exactly frame accurate because of the conversion
processing delay. Accordingly it is a good idea to use an offset or add handles to your captures. Alternatively
you can capture without deck control.
Page 71

Using your Favourite Editing Software
71
Video Playback
When any video application is in playing back a clip, the Teranex Processor LCD will show the word
"playback" followed by the video format being played by the application, e.g. Playback 1080p24. The only
illuminated buttons will be those that match the video format of the clip being played. All other buttons will
be unlit and unavailable as the playback format is set by the clip and so no conversions are allowed. Some
video applications, including Adobe After Effects and Apple Final Cut Pro X, are always in playback mode.
Using Blackmagic System Preferences
Blackmagic system preferences provide a central location so you don't need to configure the same software
settings in each video application that you use.
On Mac OS X, open the System Preferences and look in the “Other” category to locate the
Blackmagic Design icon. Click the Blackmagic Design icon to gain access to the settings.
The Blackmagic system preferences are only used by your video software and do not change any of the
settings in your Teranex Processor. You still need to use the buttons on the Teranex Processor itself to make
any changes to the Teranex Processor settings, just as you would if using it as a standalone converter.
The following section takes you through the Blackmagic system preferences seen when using a Teranex
Processor. When other Blackmagic video capture hardware is connected to your computer, additional
settings may be available.
Video and Audio connections
All of the video and audio outputs of of your Teranex Processor are active all of the time so no configuration
is required. The video and audio inputs are set using the buttons on your Teranex Processor and so the input
settings are grayed out in the Blackmagic system preferences.
Progressive HD1080 video playback switch
Choose between 1080PsF and 1080p on playback.
Remove Field Jitter
When interlaced video is paused on old CRT monitors, eliminate field flicker by only displaying a single field.
We do not recommend using this option with modern flat screens.
Set default video standard
On Mac OS X, if you want to use broadcast monitoring with Final Cut Pro X, set the video standard in these
preferences so that it matches your Final Cut Pro X project. This setting is exclusively used by Final Cut Pro X.
Blackmagic Design system preferences in Mac OS X
Progressive HD1080 video playback switch
Set the default video standard to match your Final Cut Pro X project
Page 72

Using your Favourite Editing Software
72
Frame output switch
If you have switched out of a video application and video is no longer being played, this setting determines
whether your Blackmagic video hardware will output black or the last played frame of video.
Reference Output Timing
A reference signal may also be known as genlock, black burst, house sync or tri-sync. If you have reference
connected but your picture is rolling, adjust the "Set reference output timing" until the picture locks and is
no longer rolling on the Blackmagic video output.
VITC Reader A Frame - Reverse 3:2 Pulldown
This option decodes the VITC and uses it to correctly locate the A-frame when performing reverse 3:2
pulldown while capturing video at 23.98fps. Carefully set the correct A-frame VITC reference to match the
timecode on tape. Selecting the wrong A-frame will generate incorrect presentation of fields and frames.
Preserving Blanking Data or VANC
This feature lets you use up to 3 video lines at the top of a captured movie file to store any 3 lines from
vertical blanking. This allows 3 line timecode, VITC (vertical interval test signals) subtitle info or any other
VANC data to be preserved during capture. These lines are then inserted back into the video blanking when
the file is played back.
To preserve VANC data, select the VANC and 3:2 Pulldown tab and tick the On check box for video line
1, 2 or 3 depending on how many blanking lines you want to capture.
Video file line 1 needs to be enabled for lines 2 and 3 to work.
Because these lines can be passed to the application, a developer could write software to read the VANC
data and use it for various purposes, e.g. 3-line timecode and audio chasing, or other uses.
An example of VANC data is 3-line timecode, which uses lines 18, 19, and 20 in NTSC or lines 19, 20 and
21 in PAL. 3-line timecode, as used in AATON
™
equipped telecine suites, featuring audio timecode and
keycode information along with the normal timecode numbers.
Genlock timing adjustment.
Frame output switch
The Processing Tab
Set the A-Frame VITC Reference when performing 3:2 pulldown.
VANC preferences.
Page 73

Using your Favourite Editing Software
73
Media Composer
Avid Media Composer 6
Avid Media Composer 6 captures and plays back standard definition and high definition video and audio
with Teranex 2D Processor hardware, and also supports RS-422 deck control. Blackmagic plug-ins for Media
Composer are automatically installed if Media Composer is installed before the Desktop Video software.
You can use the buttons on your Teranex Processor to select your video and audio connections including
SDI, analog and HDMI, as well as other settings such as up, down and cross conversion, reference clocking
and HD progressive frame type.
Setting up
Step 1. Launch Media Composer and the Select Project dialog box will appear.
Step 2. Choose your preferred User Profile if you have previously created one.
Step 3. Select the folder in which you want to create the project: Private, Shared or External.
Step 4. Click the New Project button.
Step 5. Type a project name and set the project options including Format, Color Space and Stereoscopic.
Click OK. Once the project has been created, the frame rate and raster cannot be changed. The
color space and stereoscopic settings can be changed later in the Format tab of the project.
Step 6. Double-click the project name in the Select Project dialog box. The Media Composer interface
will appear along with the project window for your new project. You have completed setting up
your project.
Playback
As a quick test to make sure everything is connected correctly, go to the Media Composer Editing Guide
and follow the section entitled "Importing Color Bars and Other Test Patterns". Double-click the imported
file to play it in a pop-up monitor. You should now see the image on both your computer monitor and your
Blackmagic output.
If you can’t see any video on your Blackmagic output, check the connections again. If using an analog
monitor, use the Teranex Processor LCD to go to Setup>Video>Output Analog and check that component
or composite analog video has been correctly selected to match your monitor.
Step 5. Type a project name and set the project options.
Page 74
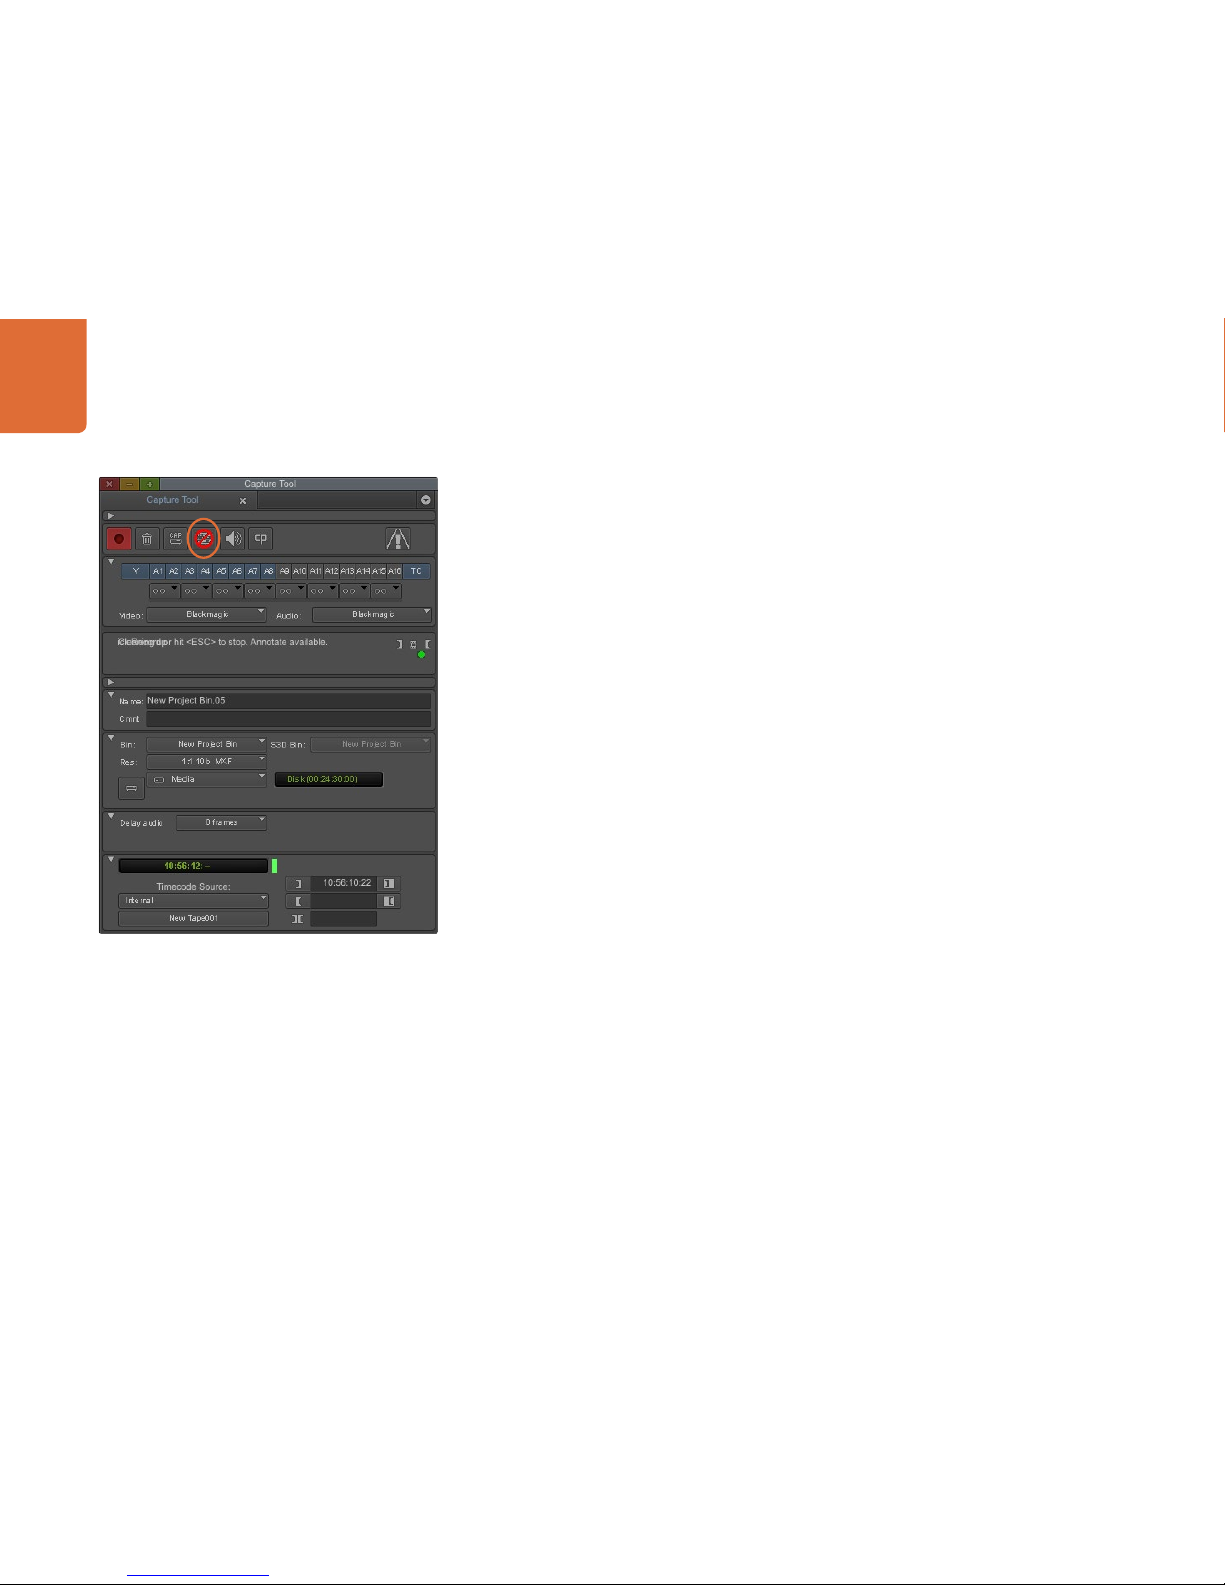
Using your Favourite Editing Software
74
Capture from Non-Controllable devices
Many video sources including all kinds of modern cameras and disk recorders, as well as old cameras and
VHS tape players, do not have any device control. To capture video without deck control:
Step 1. Choose Tools > Capture to open the Capture Tool.
Step 2. Click the Toggle Source button so that the button's icon of a deck shows a red circle-slash symbol.
This symbol indicates that deck control has been disabled.
Step 3. Set the Video and Audio input menus to "Blackmagic".
Step 4. Select the video source track (V) and the audio source tracks (A1, A2, ...) you wish to capture.
Step 5. Use the Bin menu to select a Target Bin from the list of open bins.
Step 6. From the Res (resolution) menu, choose which compressed or uncompressed codec you wish
to use for your captured clips. For maximum quality uncompressed video, choose "1:1" for 8-bit
video capture or "1:1 10b" for 10-bit video capture.
Step 7. Select the disk storage for your captured video and audio. Use the Single/Dual Drive Mode
button to determine if video and audio will be stored together on a single drive or video on one
drive and audio on another drive. Select the target drive(s) for your captured media from the
Target Drives menu(s).
Step 8. Click the "Tape Name?" button at the bottom of the window to open the Select Tape dialog box.
Select the desired tape, or add a new one, and then click OK.
Step 9. Ensure your video and audio source is ready or playing and then click the Capture button or press
the F4 key. The Capture button will flash red while recording. Click the Capture button again or
press the Escape button on your keyboard to end the capture.
Step 2. Set up the Capture Tool to capture video without deck
control by clicking the Toggle Source button.
Page 75
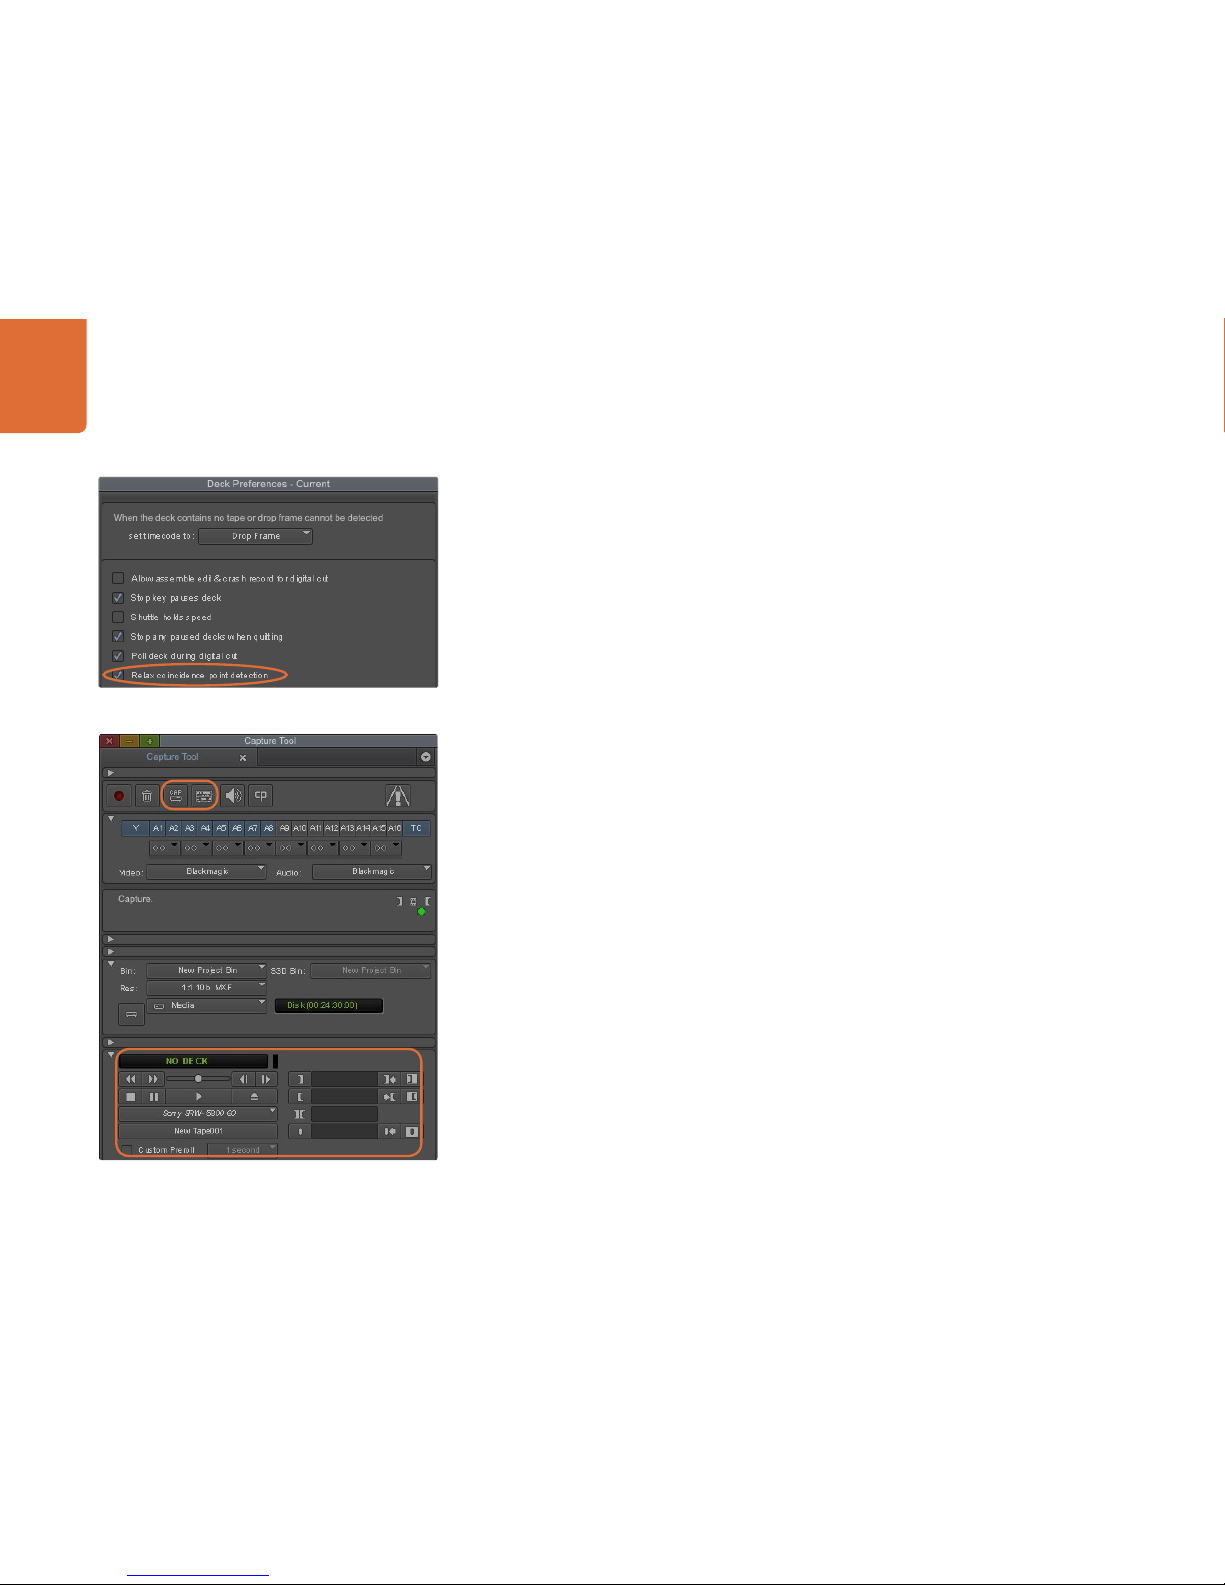
Using your Favourite Editing Software
75
Capture from Controllable devices
If you have a deck which connects via RS-422, you will need to configure the deck settings before performing
a capture with deck control:
Step 1. From your project window, click the Settings tab and double-click on Deck Configuration.
Step 2. In the Deck Configuration dialog box, click Add Channel and then set the Channel Type to Direct
and the Port to RS-422 Deck Control. Click OK and choose "No" when asked, "Do you want to
autoconfigure the channel now?"
Step 3. Click Add Deck and then select your brand and model of deck from the Device menus and also
set the desired preroll. Click OK and then Apply.
Step 4. Under the Settings tab, double-click on Deck Preferences.
Step 5. If you plan to make assemble edits to tape, enable the option to "Allow assemble edit & crash
record for digital cut". If this option is left unchecked, you will only be able to perform insert edits.
Step 6. Enable the option to "Relax coincidence point detection" and set other settings as needed. Click
OK. You have completed setting up the RS-422 connection to your deck.
To test the RS-422 connection, ensure an RS-422 serial cable is connected between your Teranex 2D
Processor and the deck. The Remote/Local switch must be set to Remote on the deck so you can use the
transport controls in Media Composer. Open the Capture Tool and use the standard j, k, l shortcut keys to
shuttle backwards, pause and shuttle forwards on the deck. If a deck name appears in italics in the Deck
Selection menu, or "NO DECK" is displayed, click the menu and select Check Decks one or more times,
until the deck is listed without italics, to reestablish deck control.
To capture with deck control on-the-fly:
Step 1. Choose Tools > Capture to open the Capture Tool.
Step 2. The Capture/Log Mode button should show the CAP icon. If this button displays a LOG icon, click
the button to switch to capture mode and the CAP icon should appear.
Step 3. The Toggle Source button should show the icon of a deck. If a red circle-slash symbol is present,
click the button to enable deck control and make the red symbol disappear.
Step 4. Configure video and audio input, video and audio source tracks, target bin, res, target drive and
tape name the same way as in "Capture from non-controllable devices".
Step 5. Use the Deck Controller Window in the Capture Tool to cue the tape and start playing.
Step 6. Click the Capture button or press the F4 key. The Capture button will flash red while recording.
Click the Capture button again or press the Escape button on your keyboard to end the capture.
Step 6. In the Deck Preferences, enable the option to "Relax
coincidence point detection".
Set the CAP and Toggle Source buttons to use deck control. Use
the Deck Controller Window to cue the tape and start playing.
Page 76

Using your Favourite Editing Software
76
Batch Capture
To log clips for batch capture:
Step 1. Choose Tools > Capture to open the Capture Tool.
Step 2. Click on the Capture/Log Mode button so it displays the LOG icon.
Step 3. Configure video and audio input, video and audio source tracks, target bin, res, target drive and
tape name the same way as in "Capture from non-controllable devices".
Step 4. Use the Deck Controller Window, or use the standard j, k, l shortcut keys, to shuttle backwards,
pause and shuttle forwards on the deck and locate the video you want to capture.
Step 5. Click the Mark IN/OUT button, to the left of the LOG button. The icon will alternate between IN
and OUT so you only have to click the one button to mark all your in and out points. This can be
more convenient that using the separate Mark IN and Mark OUT buttons in the Deck Controller
Window. Alternatively use the "i" and "o" keys on the keyboard to mark in and out points.
Step 6. When you have finished logging in and out points, open the logging bin, select the clips you want
to capture.
Step 7. Choose Clip > Batch Capture, select the desired options in the resulting dialog box and click OK.
Recording to Tape
Once you have captured your clips, dragged them in to the timeline, edited them and applied and rendered
any effects, you will want to record the completed project to tape.
Step 1. Double-click on a sequence, in your project bin, to open it into the Timeline window.
Step 2. Choose Output > Digital Cut to open the Digital Cut Tool.
Step 3. Set Output Mode to Real-Time, Bit Depth to 10-bit, and Deck Control to Remote.
Step 4. From the Edit Menu, choose to Insert Edit or Assemble Edit for precise edits onto a timecode
striped tape. Alternatively choose Crash Record for an easy way to record. If Insert Edit is the
only option, go to the Settings tab in your project, double-click on Deck Preferences and enable
"Allow assemble edit & crash record for digital cut".
Step 5. If a deck name appears in italics in the Deck Selection menu, or "NO DECK" is displayed, click
the menu and select Check Decks one or more times, until the deck is listed without italics, to
reestablish deck control.
Step 6. Press the Play Digital Cut button (red triangle icon) to record your sequence to tape.
Step 5. Click on the Mark IN/OUT button or use the "i" and "o"
keys on the keyboard to mark in and out points.
The Digital Cut Tool is used for recording to tape.
Page 77
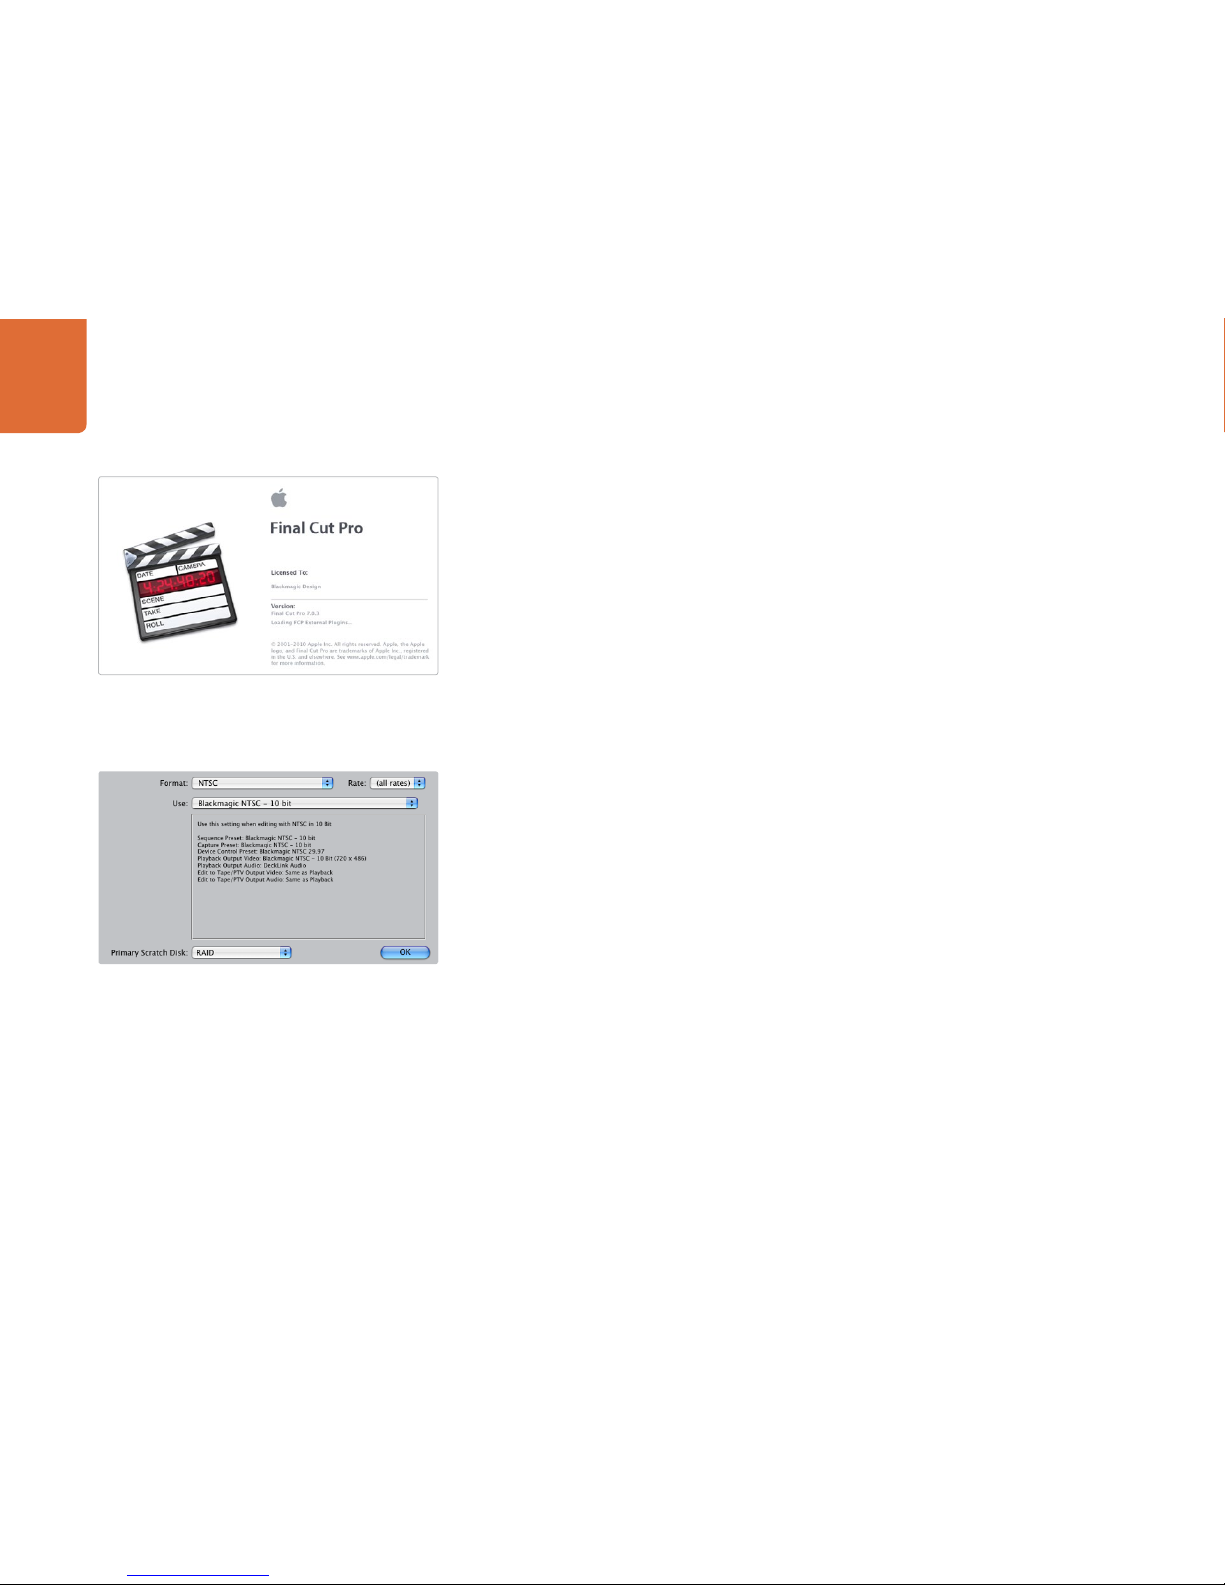
Using your Favourite Editing Software
77
Final Cut Pro 7
Select a Blackmagic Easy Setup
Apple Final Cut Pro 7
“Easy Setups” for Final Cut Pro 7 are automatically installed if Final Cut Pro is installed before the Teranex
software. The Teranex 2D Processor is fully compatible with Apple’s RT Extreme
™
real time effects.
Setting up
Step 1. Launch Final Cut Pro 7 and the Easy Setup window will appear.
Step 2. Click on the popup menu and select the desired Blackmagic Easy Setup. For each video format
(NTSC, PAL and HDTV) you will find a range of Blackmagic compressed and uncompressed file
formats you can choose.
Step 3. Click on the popup menu named Primary Scratch Disk and select your disk array from the popup
menu.
Step 4. Click OK and the Final Cut Pro interface will appear.
Playback
As a quick test to make sure everything is connected correctly, use the Blackmagic test media (bars and
tone) which can be found on the installer CD or disk image. Find a test clip which matches the format of
your project, e.g. NTSC 8 bit, and copy it to your disk array. Import this clip into your Final Cut Pro project
and drop it into the timeline. You should now see the image on both your computer desktop and your
Blackmagic output.
If you can’t see any video on your Blackmagic output, check the connections again and ensure you have the
correct output settings configured within Final Cut Pro by going to the View > Video Devices. In the same
menu, make sure “External Video” is set to “All Frames”.
Capture from Non-Controllable devices
Many video sources including all kinds of modern cameras and disk recorders, as well as old cameras and
VHS tape players, do not have any device control. For this reason, after selecting a Blackmagic Easy Setup,
Final Cut Pro will sometimes warn that device control has been set to “non-controllable device”. This is as
expected. Click OK and then create a project with these settings.
To capture video from a non-controllable device, choose File > Log & Capture. (Command + 8). Press play
on your video source and then press the Now button in the Log and Capture window. Final Cut Pro will
show you a preview of the video you are capturing. Press the ‘esc’ key at the top left of your keyboard to
stop capturing.
Page 78
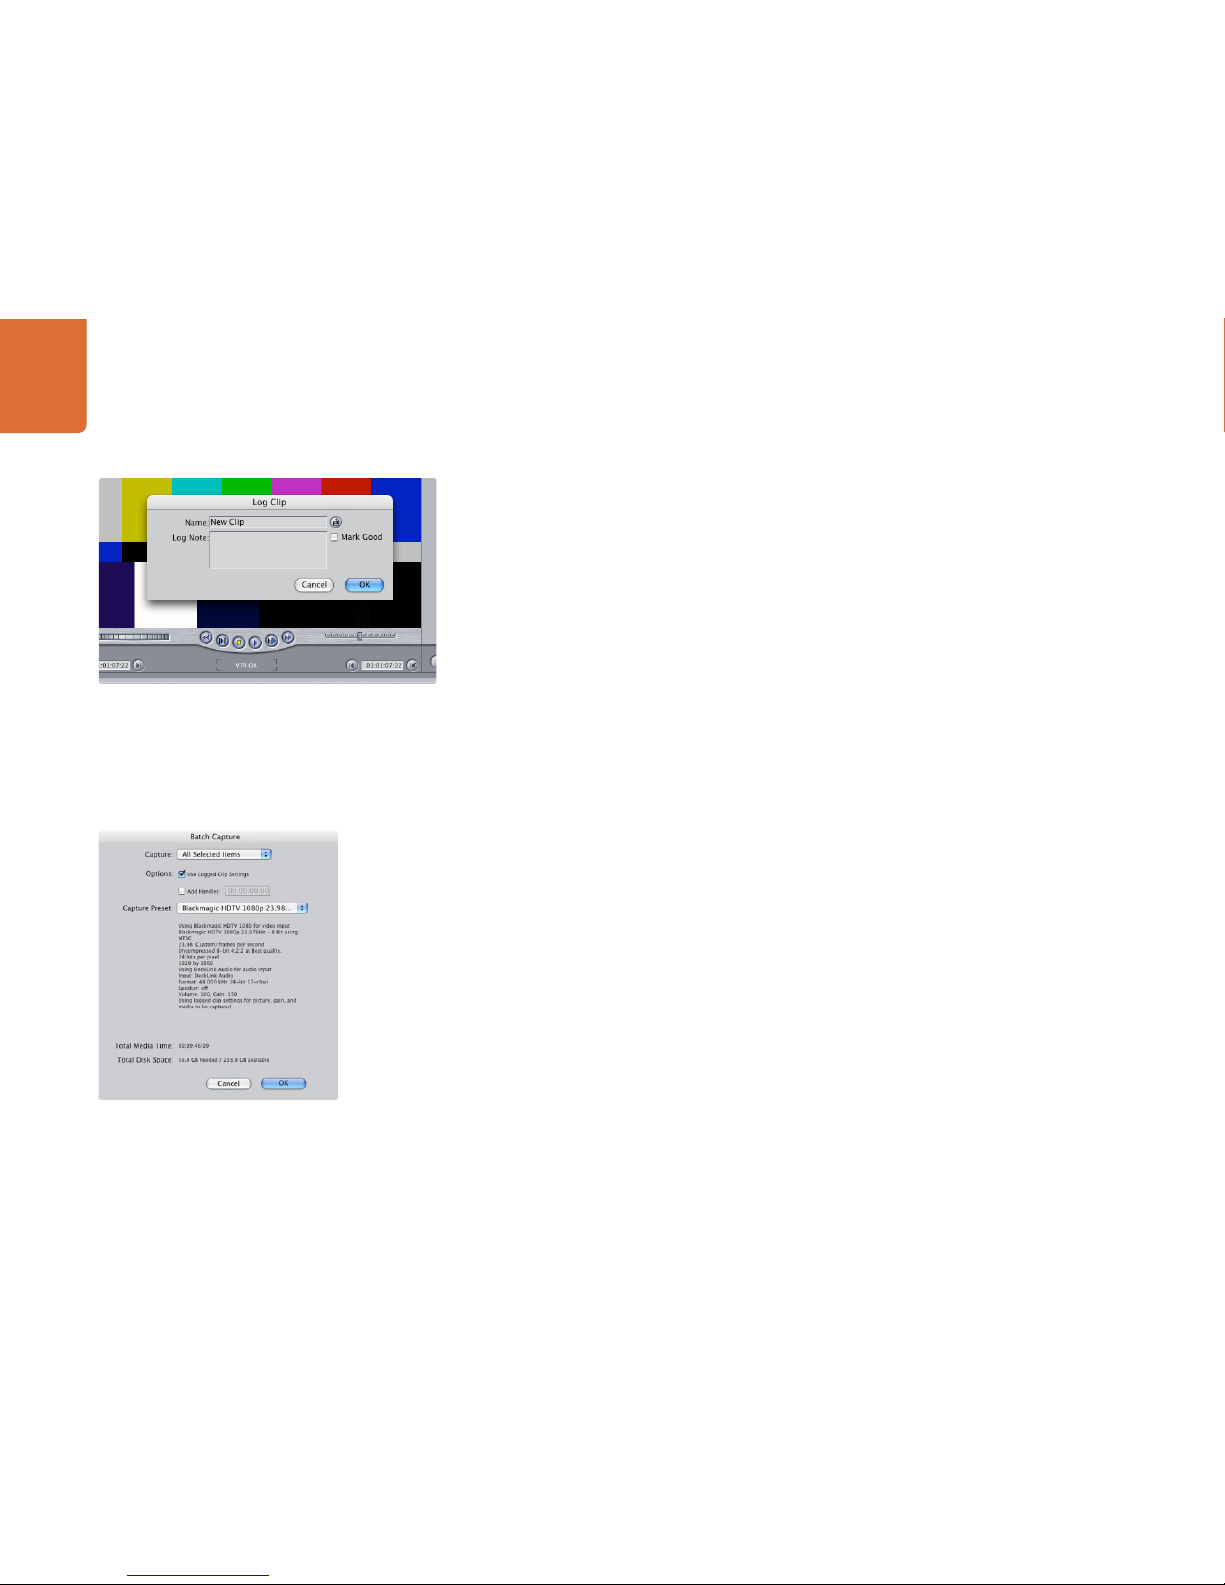
Using your Favourite Editing Software
78
Capture from controllable devices
To capture with RS-422 deck control, choose File > Log & Capture. (Command + 8)
Your video deck will respond in the same way as a clip in the timeline, via the “<spacebar>”, “j”, “k” and
“l” keys.
To immediately capture, click the Capture Now button.
To log the clip, enter the desired “in” and “out” points using either the “i” and “o” keys on your keyboard,
or manually by typing in the timecode and clicking Log Clip. The clip will appear in your browser with a
diagonal red line indicating that it’s “offline”. Repeat this until you have logged all of the clips you wish to
capture in a batch.
Batch Capture
Select the clips you wish to capture by drag selecting or shift-click. Select File > Batch Capture or click on
the Batch button in the “Logging” tab of the “Log & Capture“ window. (Control + C)
Enable the “Add Handles” box if you wish to capture additional frames (“handles”) before and after the
“In” and “Out” points of a clip.
Recording to Tape
Once you have captured your clips, edited them and applied any effects, you will want to record the
completed project to tape.
One easy method is to select File > Print to Video (Control + M).
If you want to perform precise insert and assemble edits onto a timecode striped tape, select File > Edit
to Tape.
Naming a clip in the Log and Capture window
Batch Capture
Page 79
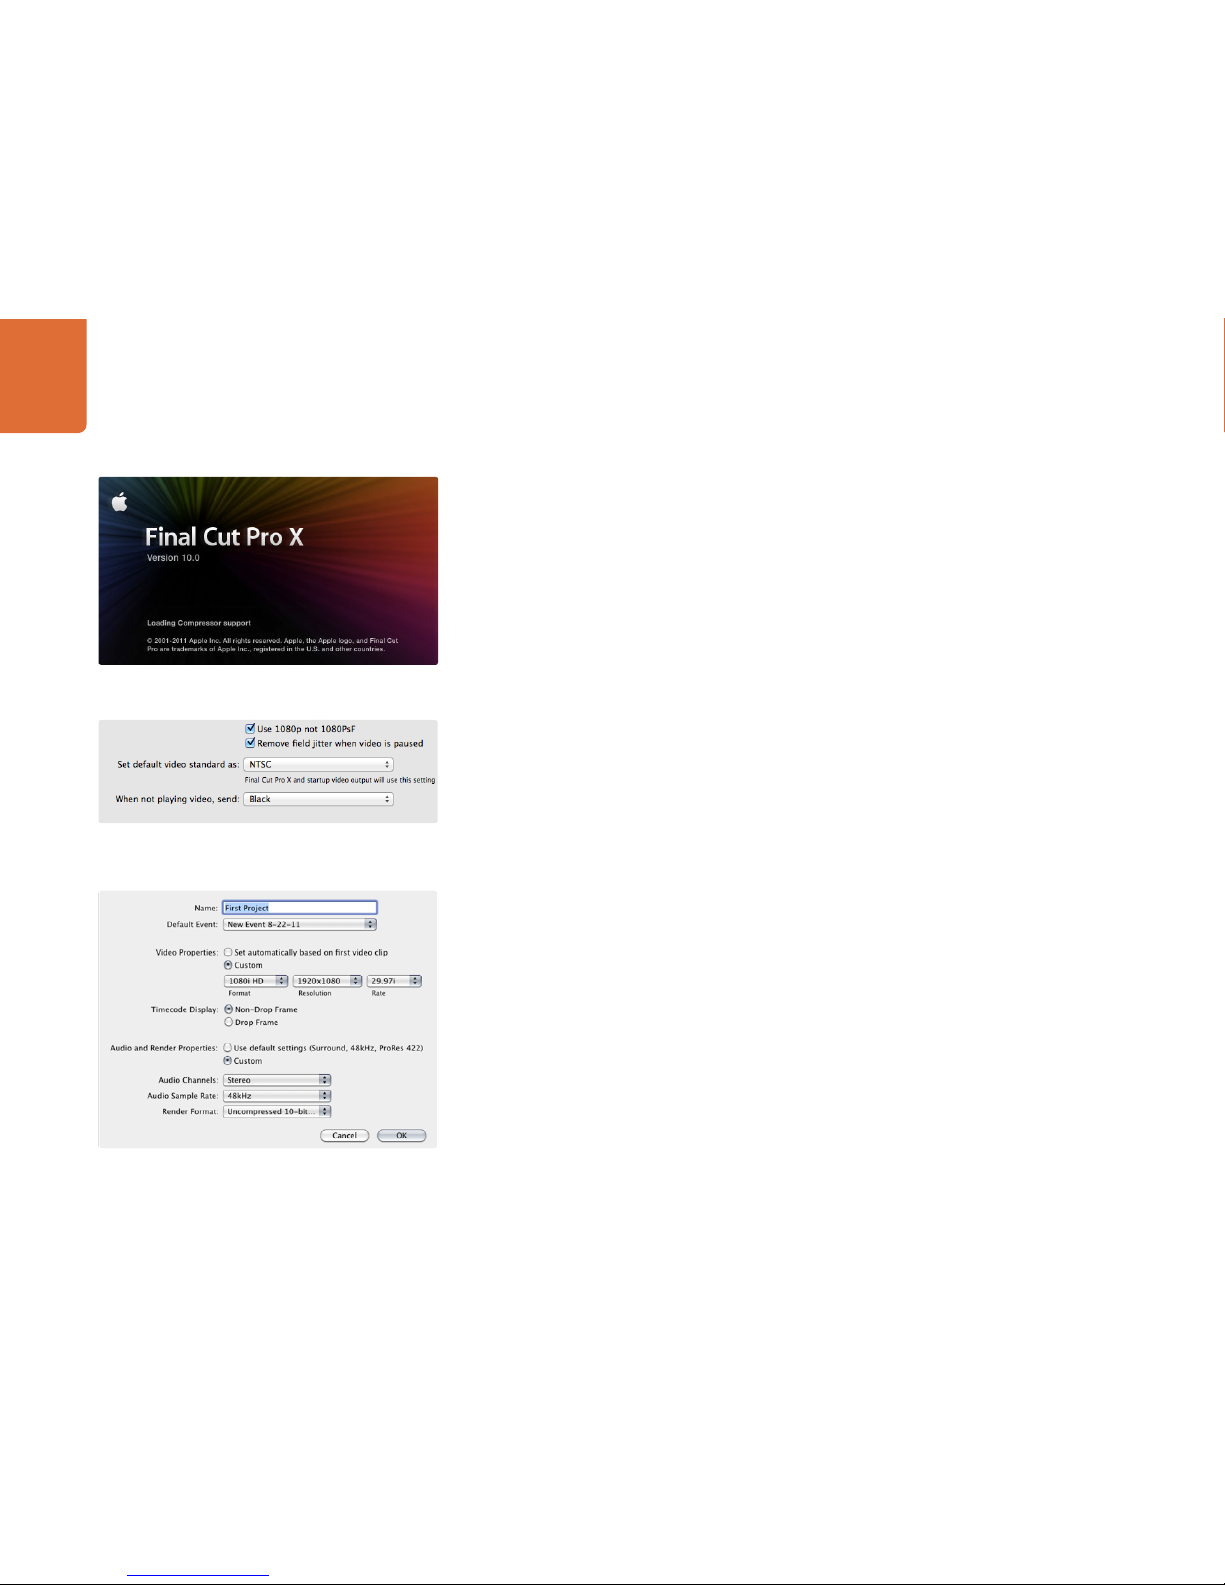
Using your Favourite Editing Software
79
Final Cut Pro X
Apple Final Cut Pro X
If you want to use Final Cut Pro X to play back video on an external video monitor or TV, you can use the
broadcast monitoring feature of Final Cut Pro X 10.0.4 and newer to output your video through Teranex 2D
Processor hardware. You can also use as many as two computer monitors for the Final Cut Pro X interface.
Setting up Final Cut Pro X
Step 1. Ensure you are running Final Cut Pro X 10.0.4 or newer with the latest version of Mac OS X Lion or
Mountain Lion.
Step 2. Open the System Preferences and click on Blackmagic Design. Go to the setting, "Set default
video standard as" and then set the same standard that you will use in your Final Cut Pro X
project, e.g. HD 1080i59.94. The standard should be the same as the video format of your clips.
Step 3. Launch Final Cut Pro X and create a new project.
Step 4. Type a name and choose a location for the new project.
Step 5. Set the Video Properties to Custom and then set the format, resolution and frame rate to match
the default video standard set in the Blackmagic Design Desktop Video system preferences.
Step 6. Set the Audio and Render Properties to Custom. Set the audio channels to Stereo or else you can
choose Surround for 6 audio channels. Set the audio sample rate to the television rate of 48kHz.
Set the render format to the same format as your video clips. Final Cut Pro X defaults to using
ProRes compression but you can switch this to Uncompressed 10-bit 4:2:2 for an uncompressed
workflow. Click OK to complete the creation of your new project.
Step 7. Go to the Final Cut Pro menu, choose Preferences and then click the Playback tab. Ensure the A/V
Output menu has selected "Blackmagic" and the same video standard as your project and then
close the Preferences.
Step 8. Go to the Window menu and select A/V Output to enable video output via your Teranex 2D
Processor hardware.
If you also wish to monitor audio via your Teranex 2D Processor, open the System Preferences, click the
Sound icon, click the Output tab and then select "Blackmagic Audio" for the sound output.
Step 6. Set the Audio and Render Properties to Custom.
Step2. Set the default video standard in the System Preferences
to match your Final Cut Pro X project.
Page 80

Using your Favourite Editing Software
80
Playback
Step 1. Import some clips in to your new project.
Step 2. You can now use the Final Cut Pro X timeline on your computer monitor and view the video
preview on the monitor or TV connected to the output of your Teranex 2D Processor.
Capturing Video and Audio
You can use Blackmagic Media Express to capture video and audio with your Teranex 2D Processor. Once
you have captured the clips, you can import them in to Final Cut Pro X for editing.
When capturing clips with Media Express, make sure you choose one of the video formats which is also
supported by Final Cut Pro X, i.e.: Apple ProRes 4444, Apple ProRes 422 (HQ), Apple ProRes 422 or
Uncompressed 10-bit 4:2:2.
Editing to Tape
Once you have completed a project in Final Cut Pro X, you can render the project to a movie file and then
use Blackmagic Media Express to master the movie to tape with your Teranex 2D Processor.
Step 1. Select your clips from the timeline in Final Cut Pro X.
Step 2. Go to the Share menu and choose Export Movie.
Step 3. In the Export Movie window, leave Export on "Current Settings" and also set Include to "Video
and Audio". Click "Next".
Step 4. Open Media Express and import the clip that was exported from Final Cut Pro X.
Step 5. Refer to the Blackmagic Media Express section of this manual for "Editing video and audio files
to tape".
Step 3. In the Export Movie window, leave Export on "Current
Settings" and also set Include to "Video and Audio".
Page 81

Using your Favourite Editing Software
81
Adobe Premiere Pro CS6
Setting up a Blackmagic Design project
Step 1. Launch Premiere Pro.
Step 2. Create a New Project and click on the Scratch Disks tab.
Step 3. Set the desired Location and Name for your project at the bottom of this window.
Step 4. Set the locations for your captured video, captured audio, video previews and audio previews.
Step 5. Click on the General tab and review the Video Rendering and Playback settings. If your graphics
card is supported by Premiere Pro's Mercury Playback Engine, the Renderer option will be
available and you should switch it to "Mercury Playback Engine GPU Acceleration".
Step 6. Set the Capture Format to Blackmagic Capture and click on the Settings button to reveal the
Blackmagic Capture Settings for your project. The Video Standard can be set to NTSC, PAL,
HD720 or HD1080. The Video Format can be uncompressed or compressed. Now click OK.
Step 7. The New Sequence window will appear. To preserve maximum video quality, you'll need to create
a full resolution uncompressed sequence. To do so, click the discovery triangle next to "Blackmagic
Design" select a preset to match the video standard and choose from uncompressed 8 bit YUV,
10 bit YUV or 10 bit RGB. If you don't have the storage space or disk speed for uncompressed
video, choose a JPEG sequence preset for a full resolution, open-standard codec.
Premiere Pro CS6 also includes a variety of sequence presets for compressed and RAW camera
formats. Any clips you drop in to a resulting sequence will be rendered in the compressed or RAW
camera format. For example any clips dropped into a DVCPRO HD sequence will be rendered in
the compressed DVCPRO HD format even if they are uncompressed clips.
When you have selected the desired sequence preset, give the sequence a name and click OK.
Audio
Blackmagic audio hardware needs to be selected each time a new project is created. Go to Preferences >
Audio Hardware and set the Default Device to Blackmagic Audio.
Now go to Preferences > Audio Output Mapping and set "Map Output for" to "Blackmagic Audio".
Configure the mix of the multi-channel audio as desired.
Adobe Premiere Pro
New Sequence
Audio Output Mapping
Page 82

Using your Favourite Editing Software
82
Device Control
The Teranex 2D Processor features RS-422 device control for controlling decks. Blackmagic Device Control
needs to be selected each time a new project is created. Go to Preferences > Device Control and select
"Blackmagic Device Control".
The Options button is disabled as the settings are automatically detected and configured when you choose
Blackmagic Device Control.
Playback
Playback settings need to be selected each time a new project is created by going to Preferences > Playback.
The default player is Adobe Player but the Audio Device needs to be switched to "Blackmagic Playback".
Under "Video Device," enable the checkbox for "Blackmagic Playback" and ensure the other checkboxes
are cleared. If working with other video applications such as After Effects, you'll usually want to enable the
option to "Disable video output when in the background." Click OK to close out of the Preferences.
As a quick test to make sure everything is connected correctly, use the Premiere Pro test media (Bars and
Tone or Universal Counter Leader). Drag your test media from within the Premiere Pro project and drop it
on to the timeline. You should now see the image on both your computer desktop and the output of your
Teranex 2D Processor. If you can’t see any video on your Teranex output, check the connections again and
ensure you have the correct output settings configured with the buttons on your Teranex 2D Processor. SDI,
HDMI and analog outputs are always active during playback.
Capture
To capture choose: File > Capture [F5]
To immediately capture, or to capture from a non-controllable device, click the red record button [G].
If you wish to log the clip using RS-422 deck control, enter the desired In and Out points using either the Set
In and Set Out buttons, or manually by typing the timecode and clicking Log Clip. The empty clip will now
appear in the Project window. Repeat this until you have logged all of the clips you wish to batch capture.
To change the capture format, click on the Settings tab and then the Edit button. Ensure the Capture Format
is set to Blackmagic Capture, click on the Settings button and then change the Blackmagic Capture Settings
as desired.
Playback
Capture
Page 83

Using your Favourite Editing Software
83
Batch Capture
If you wish to batch capture using RS-422 deck control, select the clips you wish to capture by drag-selecting
or shift-clicking each clip. Then choose: File > Batch Capture [F6]. To set handles on the clips, enable the
option to Capture with handles and type the number of additional frames you require at the start and end
of each clip.
Export to Tape
To export to tape via RS-422 deck control, select the sequence you require and then choose File >
Export > Tape
Insert editing requires unbroken timecode over the full length of the project which is to be laid to tape.
In assemble mode the tape needs only to be “blacked” until a point just beyond the start time of the
project. As assemble editing erases the tape ahead of the record heads, it should not be used where other
projects already exist on the tape after the out point of your edit.
When editing to tape, the software waits at the first frame of your project for the deck to drop into record
at the predetermined timecode. Should you find that either the first frame of your program is repeated or
lost, during the edit to tape procedure, you will need to adjust the playback offset to bring the deck and
computer in sync. You should only need to do this once with any combination of deck and computer and
the correct setting will be retained.
Now, simply enter the desired in point and offsets if required, and click OK.
Export to Tape
Page 84

Using your Favourite Editing Software
84
After Effects
“Output Module Settings” rendering options
“Video Preview” preferences
Adobe After Effects CS6
How to use Blackmagic as a preview output frame buffer
To allow your Adobe After Effects composition to be displayed in real-time through your Teranex 2D
Processor, go to Preferences > Video Preview. Select Blackmagic Video Output and the appropriate Output
Mode. This lets you view your Adobe After Effects compositions in the correct video colorspace on your
broadcast monitor as you work. You will always see the correct color and interlace when working, and you
don’t have to wait until your composition is rendered to see what it looks like when output as video.
If you also want to listen to audio through your Teranex 2D Processor, set the "Default Device" to "Blackmagic
Audio" in Preferences > Audio Hardware and Preferences > Audio Output Mapping.
Rendering
When you have completed your composition, you will need to render to a pixel format supported by your
Teranex 2D Processor hardware. You can render to a DPX image sequence or any of the following supported
codecs:
Other codecs including ProRes and DVCPRO HD will be available if Final Cut Pro is installed on the same
computer.
Blackmagic RGB 10 bit (uncompressed)
Apple Uncompressed YUV 10 bit 4:2:2
Apple Uncompressed YUV 8 bit 4:2:2
Apple Photo - JPEG (compressed)
Apple DV - NTSC (compressed)
Apple DV - PAL (compressed)
QuickTime codecs on Mac OS X
Page 85

Using your Favourite Editing Software
85
Adobe Photoshop CS6
How to grab and output video frames
Import an image into Photoshop
Step 1. From Photoshop select File > Import > Blackmagic Image Capture
Step 2. Select the “Video Input Format” and the “Image Bit Depth” and then click Capture Image
Export an image from Photoshop
Step 1. Select File > Export > Blackmagic Image Export
Step 2. Select Video Output Format and then click Output Image
Once you have set the options in the “Import” or “Export” windows, each subsequent Import and Export
will not display the window, so you can grab and output frames much faster. However if you would like to
change your import or export formats, hold the Option key, when selecting import or export.
Adobe Photoshop
Image Capture
Image Export
Page 86

Using Blackmagic Media Express
86
What is Media Express?
Blackmagic Media Express software is included with every Teranex 2D Processor. Media Express 3 lets you batch
capture and play back in DPX, ProRes, uncompressed YUV and RGB, DVCPRO 50 and DVCPRO HD files.
Media Express 3 also supports CMX EDL import, frame accurate deck control via RS-422, and will even insert and
assemble to tape! Media Express is fast, accurate, easy to use and works on Mac OS X. You can even grab still
frames directly from your deck and save them as perfect digital quality still images. That's a complete solution
for capture and playback!
Blackmagic Media Express 3 is a great tool when you don’t need the complexity of NLE software but simply
want to capture, play back and output clips to tape, especially when working with video compositing software.
The User Interface
Media Express can easily be scaled for different sizes of monitors or even small notebook screens. When
you open Media Express, you'll notice the log and capture, playback and edit to tape views are color-coded
so you will know at a glance which mode is being used.
Media List
The left "media list" always displays the scratch, any bins you have created and also any media you have
imported, captured or logged for capture. Media can be displayed in Timecode List view or Thumbnail
view and you can even filter media by favorites. The Search field makes it easy to find media by name or
by attributes captured in the media metadata. The project name and format are shown in the bottom-left
corner of the Media Express window.
The top-right pane always displays the video preview. Timecode is displayed at the top of the video preview
pane and NO REMOTE will be indicated if no RS-422 device control is connected.
Log and Capture
Click on the red Log and Capture tab. The video preview pane shows the source video from your camera or
deck. Here you can enter metadata for the clips you will capture including name, description, reel number,
favorite and more. You can capture with or without device control, log clips with in and out points, and
batch capture. Double-clicking a captured clip in the media list will automatically switch Media Express to
Playback view.
Playback
In the green Playback view, the video preview pane shows the video of the clip being played. Click the
favorites button to add to your favorites in the media list.
Page 87

Using Blackmagic Media Express
87
Edit to Tape
After clicking the blue Edit to Tape tab, select clips from the media list to be mastered to tape using RS-422
device control. Set the In/Out points for your edit and choose between Assemble or Insert edit. You can
even preview before mastering to tape. The video preview pane shows the clips being sent to tape.
Capturing Video and Audio files
Setting up a Project
Before capturing any clips in Media Express, you will need to select the settings for your project. Go to
Media Express>Preferences on Mac OS X.
Select from a range of professional compressed and uncompressed capture file formats or even a DPX
image sequence.
Set the storage location for your captured video and audio and choose whether to stop capture or playback
if dropped frames are detected.
Standard definition projects are set to the 4:3 aspect ratio unless you enable the Anamorphic SD 16:9
checkbox.
Usually video applications stop playing video if you send them to the background. If you want Media
Express to keep playing video through your
Teranex 2D Processor, even if you open another application in
the foreground, enable the checkbox to "Continue playback when in the background".
The final options relate to tape decks with RS-422 deck control.
Your tape deck requires a pre-roll of a few seconds before performing an edit so the tape speed is stable by
the time it is used for an edit.
Timecode offsets can also be set to calibrate the timecode to the video.
Page 88

Using Blackmagic Media Express
88
Media List Search FieldTimecode List, Thumbnail and Favorites view VTR / deck timecode Video Preview
Clip Bins Capture
options
Transport
Controls
Grab Still
Frame
Project name, video format
and frame rate
Remote
indicator
Logging
Information
Mark In /
Mark Out
Audio MetersAudio channel
enable/disable
Page 89

Using Blackmagic Media Express
89
Capture
Capturing video is easy and all you need to do is connect a video source, set the Media Express preferences
and press the Capture button.
Start by connecting your video source to an input of your
Teranex 2D Processor and check that the video
input buttons are set to the same video input, e.g. SDI, HDMI or analog.
Open Media Express and set its preferences to the converted project video format and capture file format.
The project video format must be set correctly otherwise you will not see your video in the preview pane.
Click the red Log and Capture tab and enter a description for your video into the Description field of the
logging information area.
Click the "+" button next to the Description to add it to the automatic Name field. Click the "+" button next
to any of the other fields that you wish to add to the Name field.
You can increment the value in each of these fields by clicking on the corresponding clapper board
icon. Alternatively you can type directly in to any field to customize its name and number.
The text in the automatic Name field will be applied to the clip(s) which are about to be captured.
Click the "star" icon next to the Name field if you want to log the clip as a favorite.
Click the "!" icon next to the Name field if you wish a clip name confirmation prompt to appear
before every capture. This will provide you with the chance to change the clip name.
Set the desired number of audio channels to be captured and then click the “Capture” button to start
recording.
To end capture, click the “Capture” button again to automatically keep the clip. Alternatively press the
“Esc” key if you want to be prompted to delete or save the clip.
The captured clips will be added to the Media List.
Logging clips
Ensure an RS-422 serial cable is connected between your
Teranex 2D Processor and the deck. The Remote/
Local switch must be set to Remote on the deck so you can use the transport controls in Media Express. Use
the standard j, k, l shortcut keys to shuttle backwards, pause and shuttle forwards on the deck.
Click the Mark In button to mark the In point, or use the shortcut key
i.
Click the Mark Out button to mark the Out point, or use the shortcut key
o.
Click the Log Clip button to log the clip, or use the shortcut key
p. The entry should now appear in the
Media List with a red X in its icon to indicate the media is offline.
Set the desired number of audio channels to be captured
Enter a description for your video
Click the "Capture" button to commence recording
Page 90

Using Blackmagic Media Express
90
Batch Capture
After logging a clip, you can click the Clip button if you just want to capture a single clip.
If you want to capture multiple clips, continue logging all the clips that you wish to batch capture.
When logging is completed, select the logged clips in the Media List and:
click the Batch button, or
right-click on the selection and select ‘Batch Capture’, or
go to the File menu and choose Batch Capture.
Media Express will cue the tape and precisely capture the clip from the In to the Out timecode points,
including any handles specified in the Media Express preferences.
DPX Capture
If you want to capture a DPX image sequence rather than a movie file, open the Media Express preferences
and set the Capture File Format to DPX 10-Bit RGB. You will need a fast disk array to cope with the
uncompressed, 10-bit RGB format.
Create a DPX project by setting the capture file format to DPX.
Capture.
When the capture has been completed, a single thumbnail will appear in the Media List representing the
entire frame sequence. The sequence of DPX frames will be stored in its own folder in your disk storage.
Audio will be stored in a .wav file in the same folder.
By default, DPX captures are assumed to be from YUV sources. If you need to capture from an RGB source,
disable the "Capture to DPX from a YUV source" option otherwise your DPX files will show weird pink and
green colors.
If you want the DPX frame numbers to be based on the timecode of the captured video, rather than just
starting from zero, enable the option to "Use absolute frame numbering when capturing DPX".
If you aren't performing long DPX captures, you may wish to reduce the number of zeroes in the frame
numbers by changing the option, "When capturing DPX files, use (2-8) digit numbers in the frame count.
DPX capture preferences
Page 91

Using Blackmagic Media Express
91
Clip Bins Favorites
Selection
Transport
Controls
Grab Still
Frame
Project name, video format
and frame rate
Remote
indicator
Clip
Information
Mark In /
Mark Out
Audio Meters
Media List Search FieldTimecode List, Thumbnail and Favorites view VTR / deck timecode Video Preview
Audio channel
enable/disable
Page 92
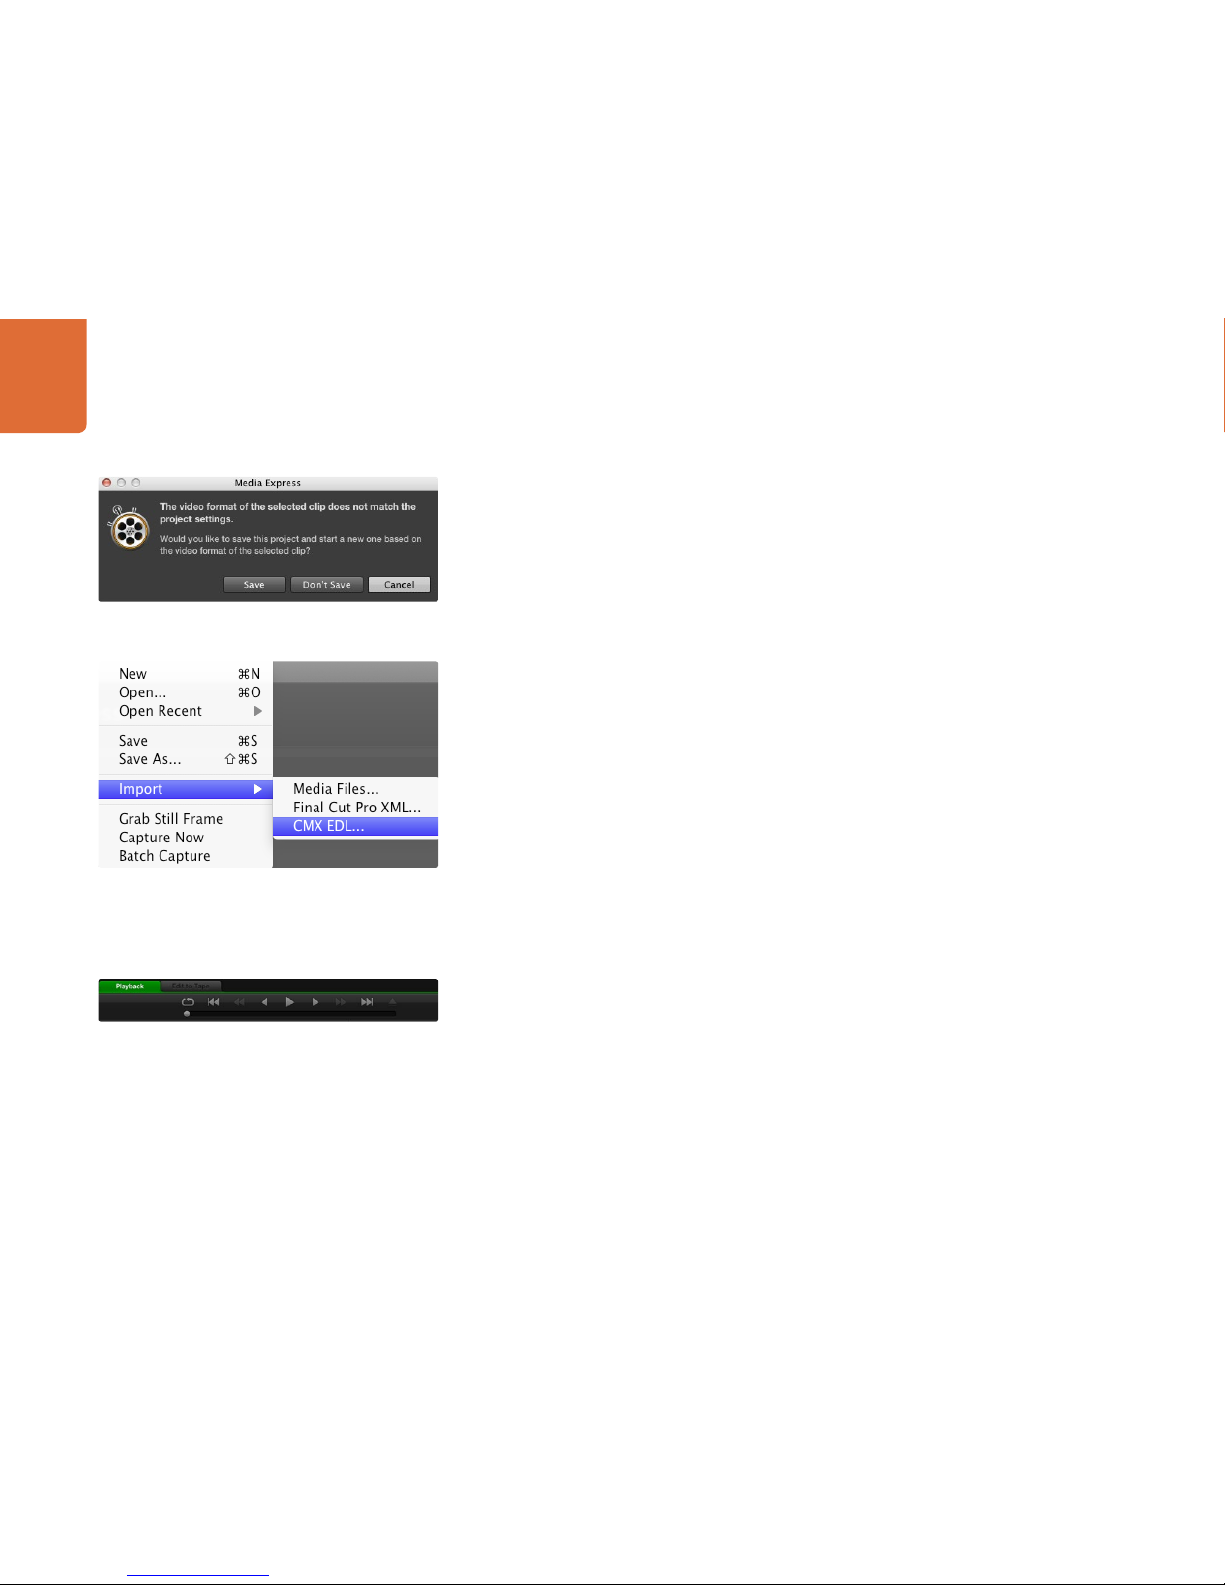
Using Blackmagic Media Express
92
Playing back Video and Audio Files
Importing clips
You can play back your video and audio files after importing media in to Media Express in any of the
following ways:
Double-click an empty area of the Media List.
Right-click an empty area of the Media List and select Import Clip from the contextual menu.
Go to the File menu, select Import and then Media Files.
Then select the clip(s) you wish to import from the Open Video Clip dialog box. The clips will appear in the
Scratch area of the Media List. If you have created your own bins in the Media List, you can drag the clips in
to the desired bin.
If you want to import media directly to a bin, right-click within the desired bin and select Import Clip from
the contextual menu.
If the files being imported do not match the frame rate and size of existing clips in the Media List, you will
be prompted to create a new project and to save the current project.
Another way to import media is to use an XML file which has been exported from Final Cut Pro 7. Go to the
File menu, select Import and then Final Cut Pro XML. Open the desired XML and all the bins and media
from the Final Cut Pro project will appear in the Media List.
Media Express also supports the import of CMX EDL files to batch capture clips using EDL files from other
video software. Go to the File menu, select Import and then CMX EDL. Select the EDL and open it. The
logging information will appear in the Media List. Select the logged clips and perform a batch capture to
import the clips from your deck.
Playing back single and multiple clips
To play back a single clip, double-click the clip in the Media List. Alternatively select the clip in the Media List
and press the space bar on your keyboard or the play button in the transport controls.
To play back multiple clips, select the clips in the Media List and then press the space bar on your keyboard
or the play button in the transport controls.
Your video will play back in the video preview pane of Media Express and on all the video outputs of your
Teranex 2D Processor hardware. During playback, the audio channels being monitored can be switched on
or off via the track enable/disable buttons.
There are three ways to import clips in to Media Express
You can use the transport controls to play, stop, jump to the next
or previous clip and loop playback of your clips.
Page 93
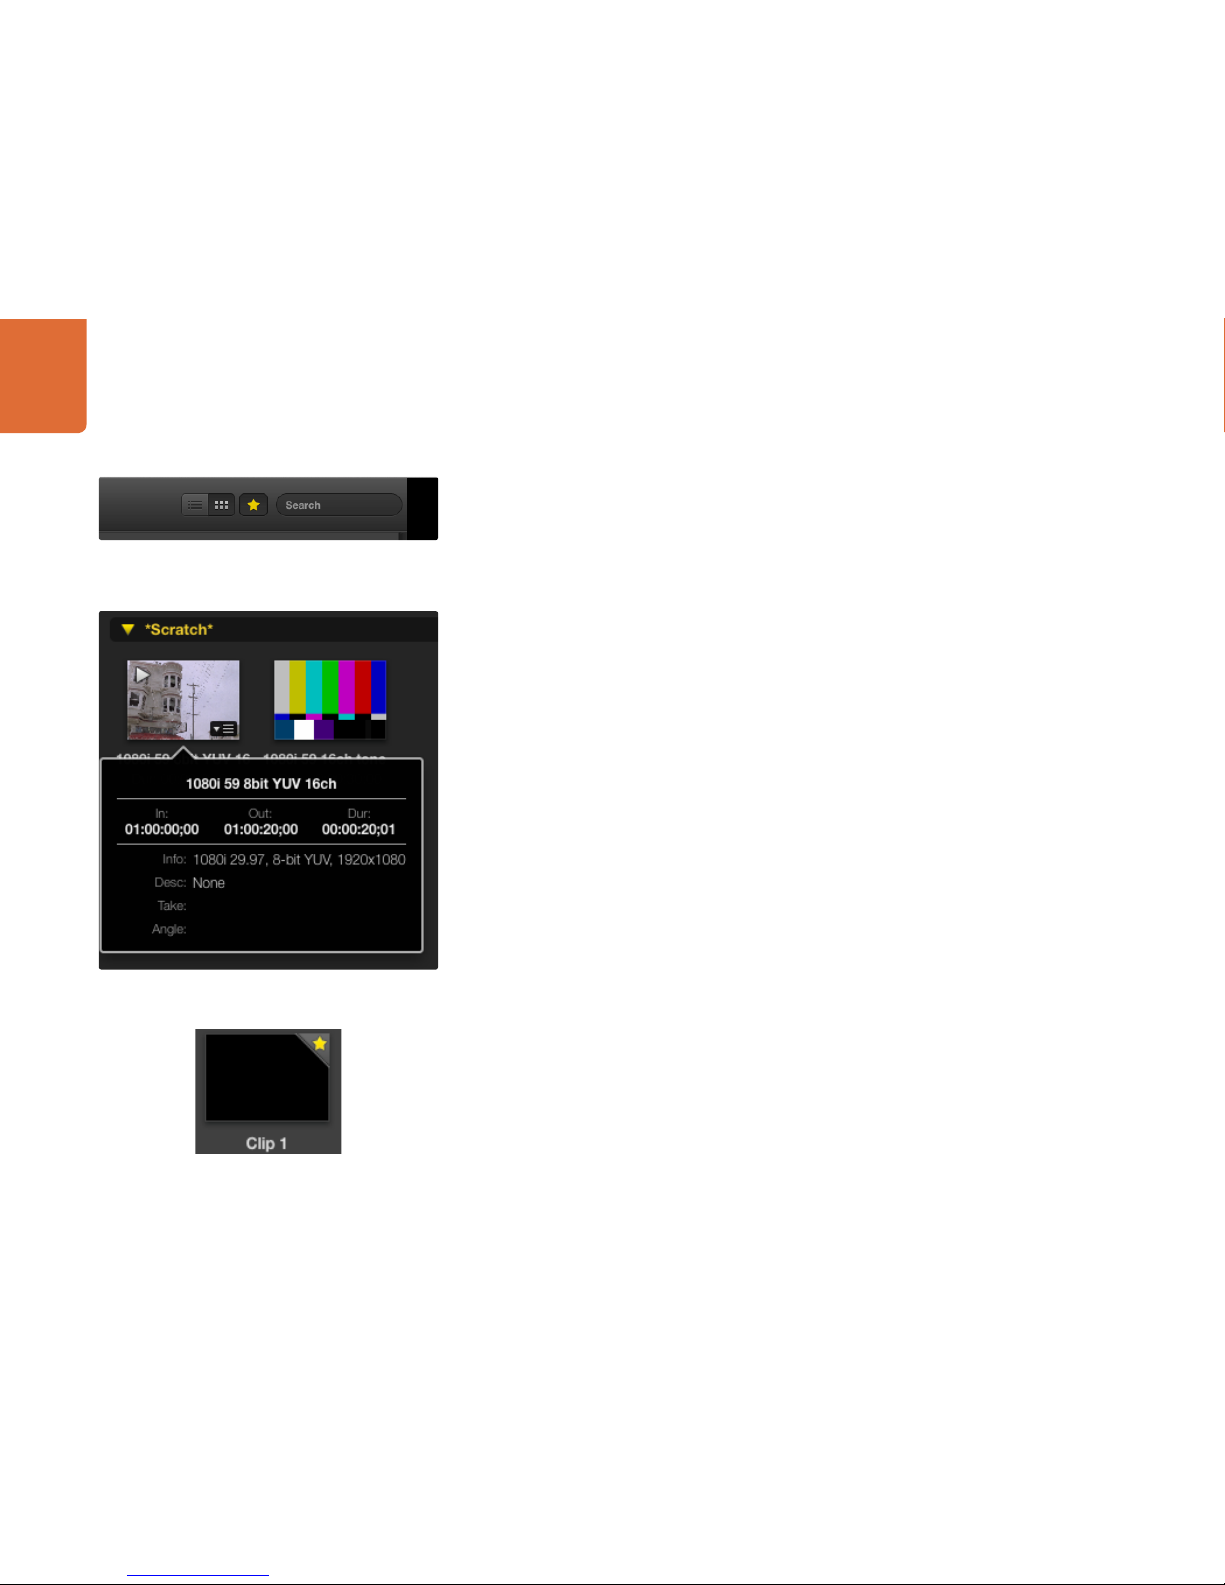
Using Blackmagic Media Express
93
Browsing Media
In the Media List, you can view your clips in Thumbnail view or Timecode List view by clicking on the desired
view button at the top-right of the Media List.
Thumbnail view
Thumbnails are the most intuitive way to display your clips. To get information for a clip, hover your mouse
over the clip's thumbnail and then click on the popup info icon which will appear at the bottom-right of the
thumbnail. Click the info bubble to hide it.
List view
You can view your clips in Timecode List view by clicking on the Timecode List button at the top-right
of the Media List. Use the horizontal scroll bar at the bottom of the Media List to view all the columns of
information for your clips including: in and out points, video format, audio channels, field dominance and
logging information.
Creating and using bins
To create a bin for your clips, right click an empty spot in the Media List and select "Create Bin". Type in a
name for the new bin.
You can move clips from the Scratch, or from one bin to another, by dragging the clip icons to the desired
bin. If you want a clip to appear in more than one bin, import the same clip again by right-clicking on the bin
and choosing "Import Clip".
By default, logged clips appear in the Scratch. If you want to log clips and have them appear in a new bin,
right-click the new bin and choose "Select As Log Bin".
Creating and using favorites
In the Log and Capture tab, click the "star" icon next to the Name field if you want to log a clip as a favorite.
In the Playback tab, clicking the "star" icon will make the clip a favorite if it is selected in the Media List. Click the
"star" icon again to deselect it as a favorite.
Clips marked as favorites will show a yellow star in their icon in Timecode List view and Thumbnail view.
In the Media List, choose to view your clips in Timecode List view
or Thumbnail view.
Click the popup info icon on a thumbnail to view its info bubble.
Clips marked as favorites are easily identified by the yellow star in
their icon.
Page 94
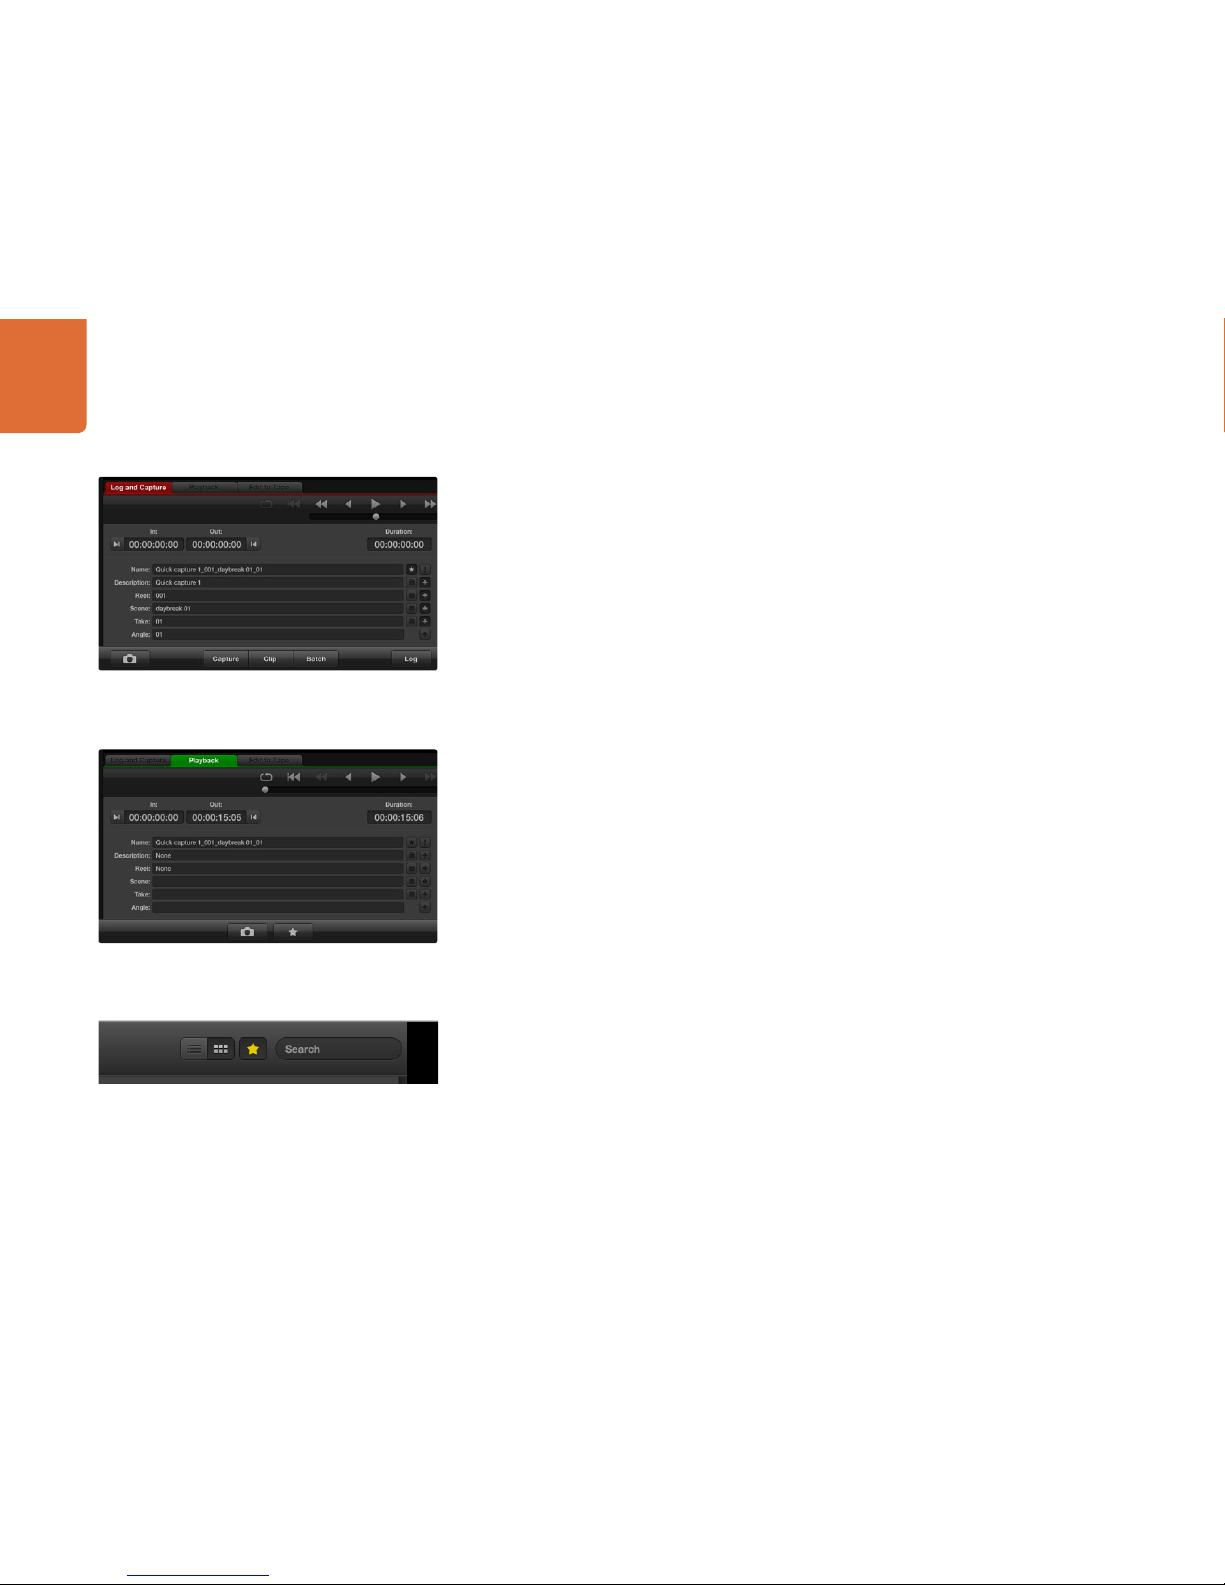
Using Blackmagic Media Express
94
Once you have marked clips as favorites, click on the gray, Favorites, star button at the top of the Media
list and it will turn yellow. All clips in your Media List will be hidden except for those marked as favorites.
This is similar to creating a playlist and makes it easy to only play back your favorite clips and even master
them to tape.
Deleting clips and bins
To delete clips, select the unwanted clips and press the forward delete button on your keyboard. This will
only delete the clips from the Media List and they will safely remain on your disk storage.
To delete bins, right-click within a bin and choose "Delete Bin". This action will delete the bin and any clips it
contained. This will only delete the clips from the Media List and they will safely remain on your disk storage.
Searching the Media List
Clips can easily be found in a project by typing the name of your clips in the Search field at the top of the
Media List. When used in conjunction with the favorites feature, the search will be confined to your favorite
clips so you will see a shorter list of found clips.
Click the Favorites button at the top of the Media List to only
show your favorite clips. Type in the Search field to find your
favorite clips.
In the Log and Capture tab, click the "star" icon next to the
Name field if you want to log the clip as a favorite.
In the Playback tab, clicking the "star" icon will mark a clip as a
favorite if it is selected in the Media List.
Page 95
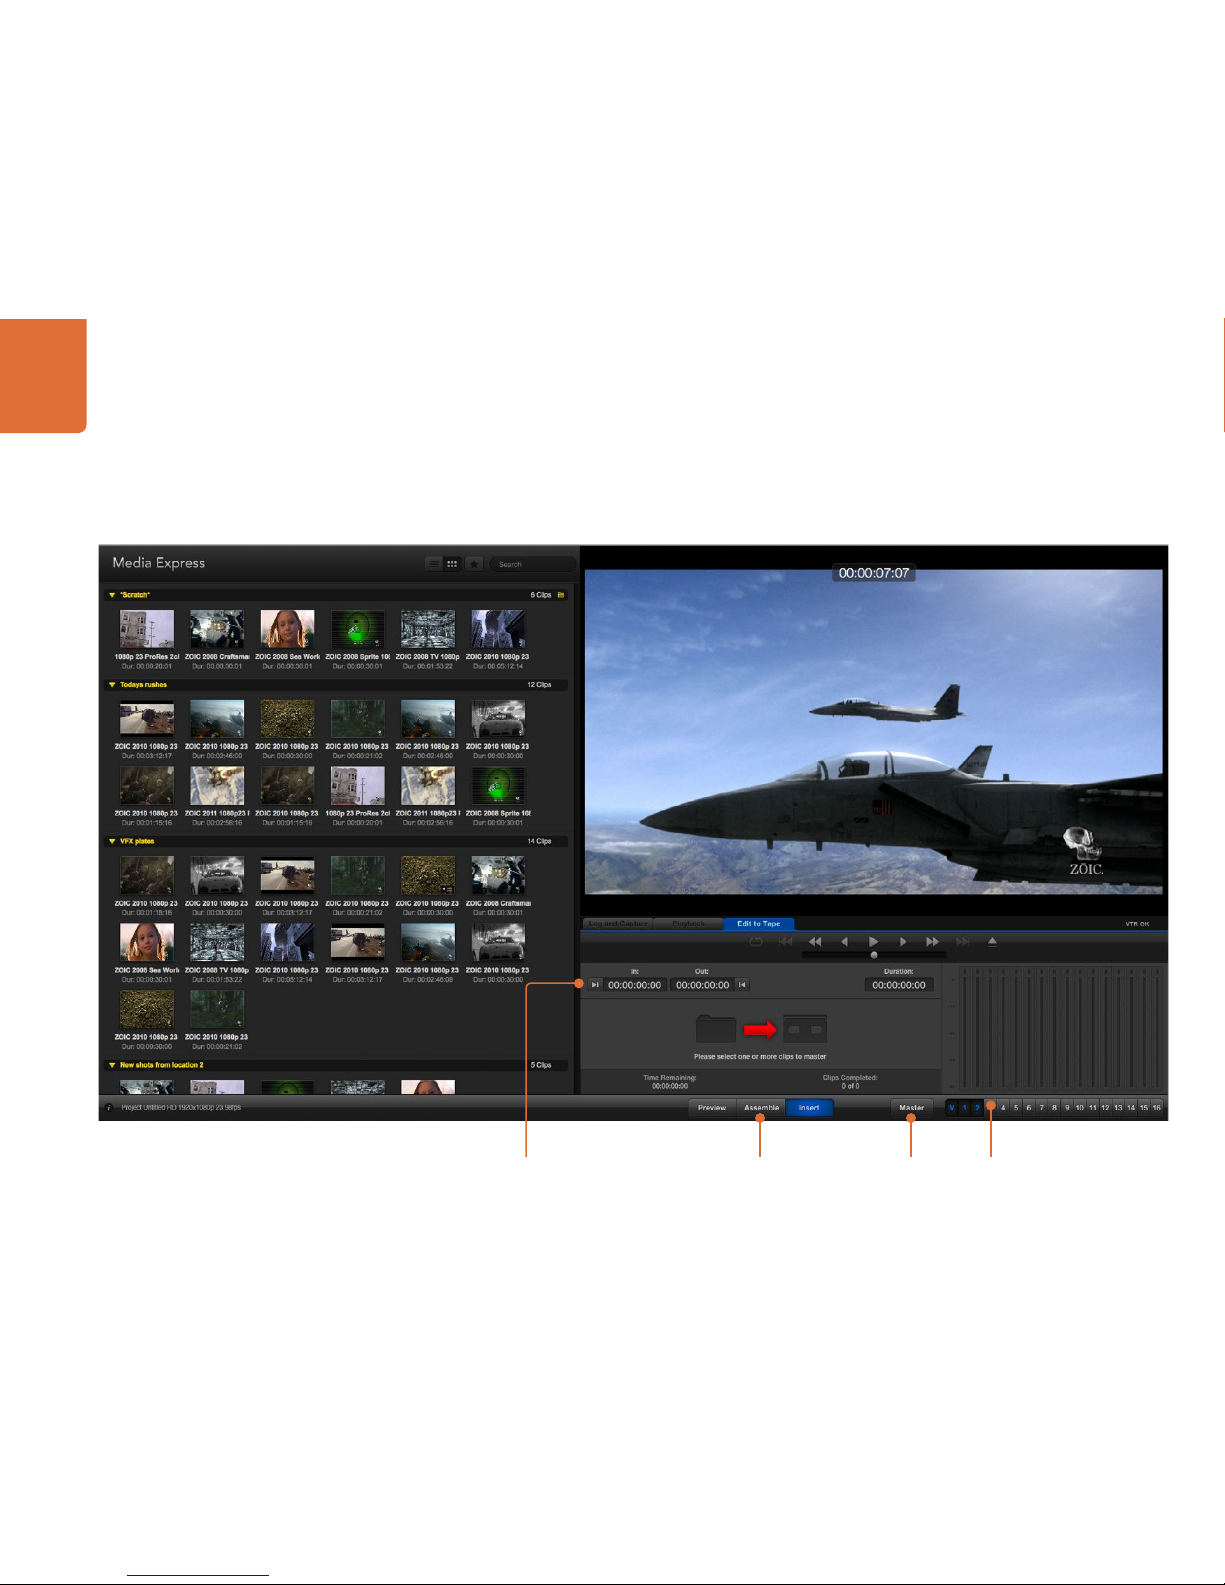
Using Blackmagic Media Express
95
Master to
Tape
Record
Modes
Audio channel
enable/disable
Mark In /
Mark Out
Page 96

Using Blackmagic Media Express
96
Editing Video and Audio Files to Tape
Mastering your clips to a deck is easy. While we usually talk about mastering or editing to "tape", it doesn't
matter if your deck uses tapes or disks. To master your clips:
Select the clips you want to send to tape.
Click the blue Edit to Tape tab.
Set the In point and type of edit.
Master to tape.
Selecting clips to master
From the Media List, select the clips you wish to master to tape. If you only want to send your favorite clips
to tape, click the favorite (star) icon at the top of the Media List to show your favorites and hide all other clips.
Then select the favorite clips you wish to send to tape.
Insert and Assemble to tape
Click the blue Edit to Tape tab. If "No Remote" appears in the video preview pane, check that an RS-422
serial cable is connected between your Teranex 2D Processor and the deck. The Remote/Local switch needs
to be set to Remote on the deck so you can use the transport controls in Media Express.
Enter the In point of the tape by entering timecode into the In point field, or by cueing the tape to the
desired point via the transport control and then clicking the Mark In button, or use the shortcut key i.
If no Out point is entered, Media Express will set the duration of the edit to the total length of the clips in
the Media List. If an out point is defined, Media Express will stop recording once the Out point timecode is
reached, even if some clips have not been output.
The Assemble and Insert buttons are mutually exclusive and only one mode can be selected at a time.
Choose to master to tape using Assemble or Insert edit. Then press the Master button.
The Preview and Master buttons are also mutually exclusive. Preview mode mimics the edit process but
does not record to tape. This mode lets you check the edit point is correct. Preview edit operations should
always be checked on monitors connected directly to the output of the deck. This lets you view the video
already on tape and the new video.
If Record Inhibit is enabled either on the deck or on the tape, Media Express will display a dialog box, that
Record Inhibit is enabled when you click the Master button. Check the deck and tape. Disable Record
Inhibit before trying again.
Before mastering, the audio channels to be put to tape can be selected on or off via the track enable/
disable buttons.
Click the favorite (star) icon at the top of the Media List to only
show your favorites
This picture shows that 2 clips have been selected to be sent
to tape
Set the desired number of audio channels to be mastered
Page 97

Using Blackmagic UltraScope
97
What is Blackmagic UltraScope?
Now with Teranex 2D Processor, you get the incredible features of Blackmagic UltraScope which you can
even use with compatible iMac and MacBook Pro notebook computers with Thunderbolt technology!
Blackmagic UltraScope software is installed by the Teranex 2D Processor Installer.
Previously broadcast quality television and post production scopes were incredibly expensive custom
solutions that only let you see one scope at a time on a tiny screen! Some scopes look ugly and don’t really
look good in front of your client. With Blackmagic UltraScope, you get 6 wonderful scopes that let you see
all aspects of your converted video signals!
Blackmagic UltraScope is perfect for quality control checks of the converted output of your Teranex 2D
Processor no matter which SDI, HDMI, component analog or composite analog video input you use. Simply
connect a Thunderbolt cable between your Teranex 2D Processor and a Mac computer and away you go!
Installation Requirements for Mac OS X
Teranex 2D Processor connects to Mac OS X computers with Thunderbolt technology.
The Blackmagic UltraScope software interface requires a computer display with a minimum resolution of
1280 x 800 pixels to view two scopes simultaneously. Blackmagic Design recommends viewing all 6 scopes
simultaneously by using a computer display resolution of 1920 x 1200 or 1920 x 1080 pixels.
Please see the support pages at www.blackmagicdesign.com for a comprehensive list of the latest, minimum
system requirements for Blackmagic UltraScope for Mac.
Page 98

Using Blackmagic UltraScope
98
1. Parade Display 2. Waveform Display 3. Vectorscope Display
4. Histogram Display 6. Audio Metering Display 7. Picture Display
5. Error Logging
Blackmagic UltraScope Interface
Page 99

Using Blackmagic UltraScope
99
Understanding Blackmagic UltraScope Views
Blackmagic UltraScope has two different views available depending on your workflow needs and screen
resolution. You have the choice of viewing six displays in “Full Screen” view, or for more compact viewing,
choose any 2 displays in “2-up” view.
The display view can be selected from the
View menu.
Choose
Full Screen to enter “Full Screen” view. If this option is unchecked, “2-up” view will be displayed.
You can quickly switch between Full Screen view and 2-up view by using the hot key CMD-F on Mac OS X.
In “2-up” view, select the desired left and right scopes by opening the
View menu or by right-clicking
anywhere in the UltraScope window. Make your selections from the
Left View and Right View menu
options. If you attempt to choose the same scopes for both the
Left View and Right View, the existing
scopes will swap sides.
Screen Resolution Requirements for Display Views
Full Screen view: 1920 x 1200 pixels or 1920 x 1080 pixels. If your monitor doesn’t support these
resolutions, then Full Screen view will not be available.
2-up view: minimum resolution of 1280 x 800 pixels.
Full Screen view
2-Up view
Page 100

Using Blackmagic UltraScope
100
Zoom Function
Blackmagic UltraScope allows you to zoom in on various displays for a more detailed analysis.
This helpful function will also pan and zoom the graticules for each display in high resolution.
The zoom function is available in the Parade, Waveform, Vectorscope and Picture displays.
To zoom in, simply click on the bottom right of each respective display. Now you will be able to
view the display in finer detail. Drag the mouse within the display area to pan around the zoomed display.
Clicking again, will return the display back to its normal view.
1. Parade Display
Parade Display is perfect for checking for illegal colors and checking levels.
Press the RGB button to display the full height of each color channel as red, green and blue. Monitoring the
levels of each red, green and blue color channel makes it is easy to view color balance in the blacks, mids
and whites of the video signal. Parade Display enables you to identify details common to the red, green and
blue channels.
It’s often important to make sure you’re not clipping the video levels. Make sure the video is full level but
not clipped. You can turn on the GAMUT function, and any illegal levels will be highlighted in bright red,
so they are easy to see. Instructions for setting gamut limits can be found in the Error Logging Display
section of this manual. If you want to increase the video level, then make sure it doesn’t go above upper
RGB limit or you will encounter illegal levels. Some equipment won’t let you generate illegal 100% RGB
levels, however other equipment will. Blackmagic UltraScope lets you see illegal levels whenever they occur.
Illegal video can also happen in blacks as well as whites. Some equipment produces black levels which
can be lowered below the black point of 0%. The levels will be shown as bright red if this falls below the
lower gamut limit and the GAMUT warning mode is enabled. If you observe illegal black levels, just add
some “lift” or gain to eliminate them but check the 100% graticule level to make sure the whole video
signal has not lifted and generated illegal colors in the whites.
To check levels, simply press the YUV or YUV+ button.
The COLOR setting switches the RGB display to color rather than traditional black and white. When the
COLOR setting is used with the YUV or YUV+ display, luma (brightness) remains white, B-Y (difference
between blue and luma) appears blue and R-Y (difference between red and luma) appears red. The COLOR
setting is not a professional setting and should usually be switched off, especially when showing video
to clients.
Zoom button
Zoom Function
Parade Display
 Loading...