

Page 1

In
struction Guide
DVI Extender
Windows
™
August 2009
Mac OS X
™
USO RESTRITO
Page 2
Contents
DVI Extender
How to Install
Hardware Installation 6
Installation and Removal on Mac OS X 7
Installation and Removal on Windows 7
Using Blackmagic Converter Utility 8
The Converter Utility Interface 9
Using DVI Extender 10
Using DVI Extender with a Mac OS X computer 11
Using DVI Extender with a Windows computer 12
Troubleshooting 14
Frequently Asked Questions 16
Support 18
Warranty
Warranty Terms and Conditions 20
05
19
USO RESTRITO
Page 3

Welcome
3
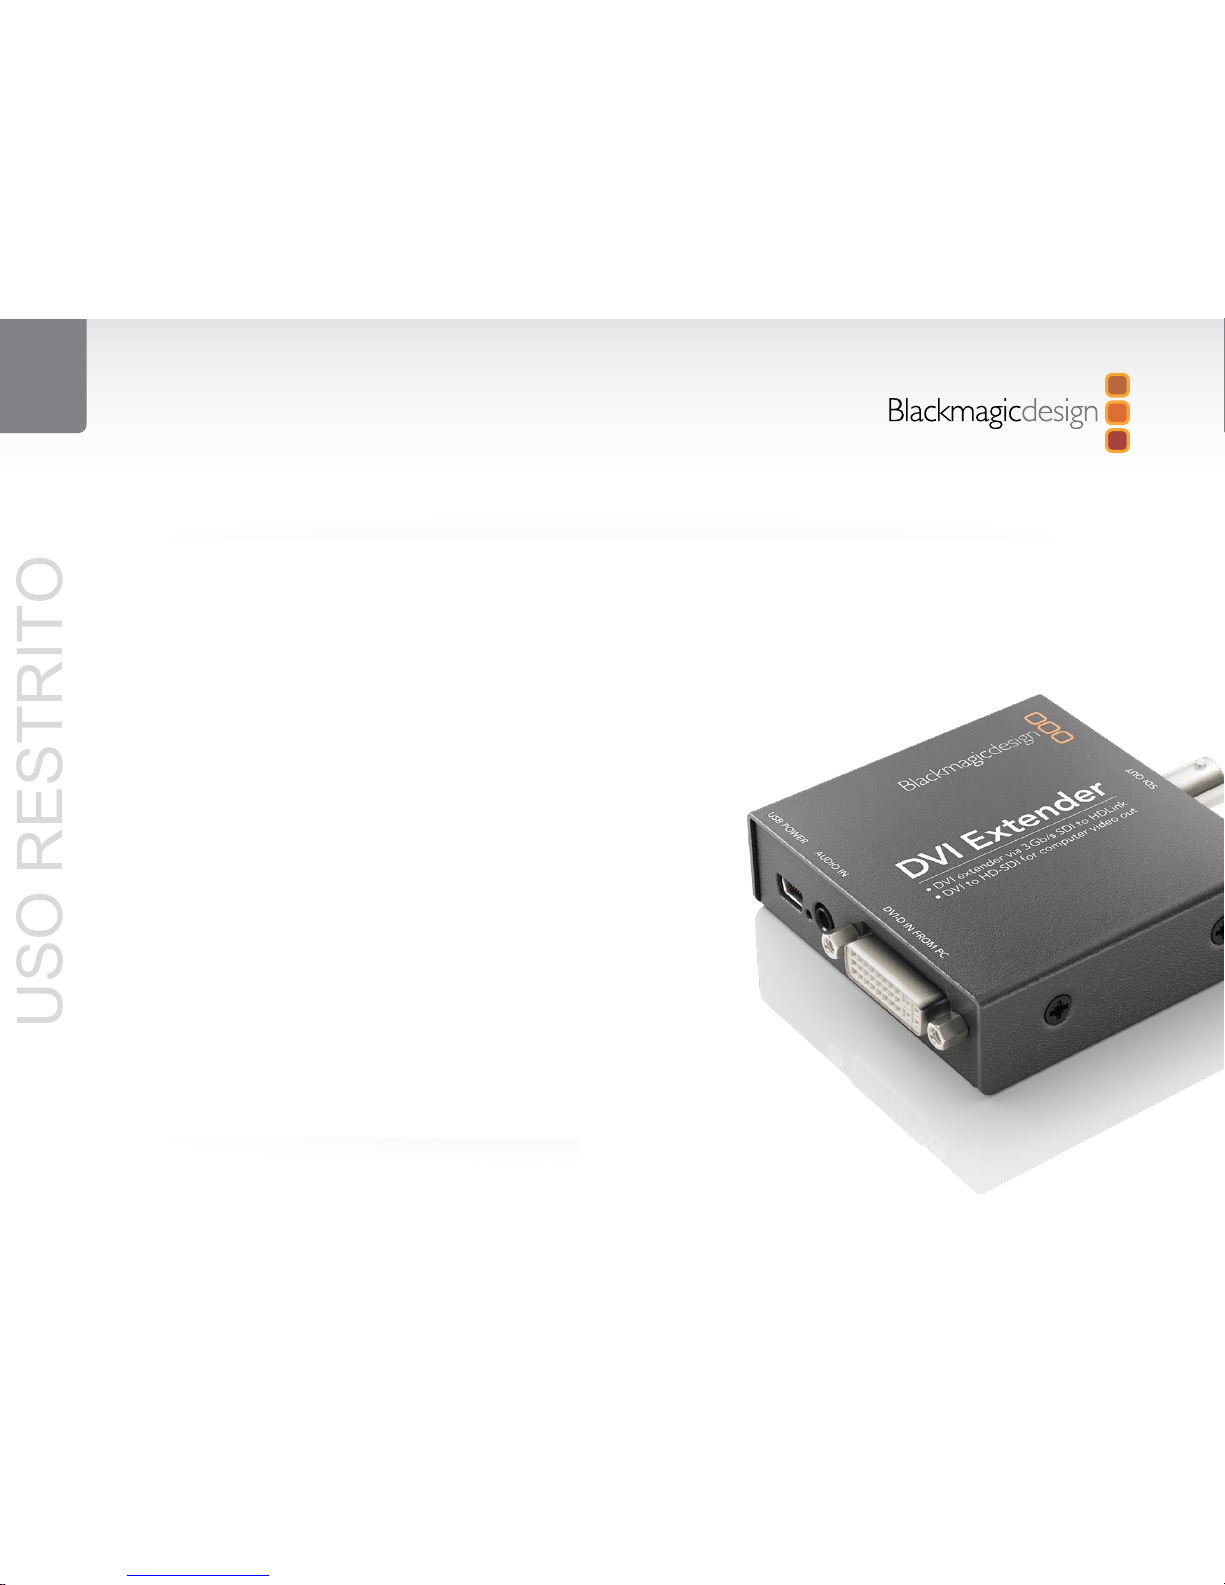
Welcome to DVI Extender!
Welcome to DVI Extender, the easy way to extend your computer display using 3 Gb/s SDI video
connections so you can route your computer display anywhere in your facility!
DVI Extender simply plugs into the DVI-D monitor connector on your computer, and powers from the
USB port. A short USB and DVI cable is included so you keep the cable mess behind your computer to
a minimum! DVI Extender also includes an audio input using the same mini jack connector common on
computer audio outputs!
DVI Extender is compatible with HDLink Pro and HDLink Optical Fiber models for the monitor end of
the computer display connection. The advantage of using HDLink Pro for the SDI to DVI extensions is
you can router either DVI Extender or regular SDI video to your monitor, and the display will
automatically change!
If you want to convert computer graphics to SDI video, then DVI Extender can be switched to video mode
using Blackmagic Design’s Converter Utility software. This software lets you change between Extender
and Video modes, and then your computer will be able to select from a range of video resolutions. Please
note that not all operating systems and display drivers support all video formats.
We think it should take only a few minutes to connect DVI Extender! Before you install, please
check for the latest version of the Converter Utility software on the support page of our website at
www.blackmagic-design.com
Lastly, please register your DVI Extender when downloading software updates. We would love to keep you
updated on new software updates and new features for your DVI Extender. Please send us any suggestions
for improvements to the software as we are constantly working on new features and improvements, so
we would love to hear from you!
Grant Petty
CEO Blackmagic Design
USO RESTRITO
USO RESTRITO
Page 4
Welcome
4
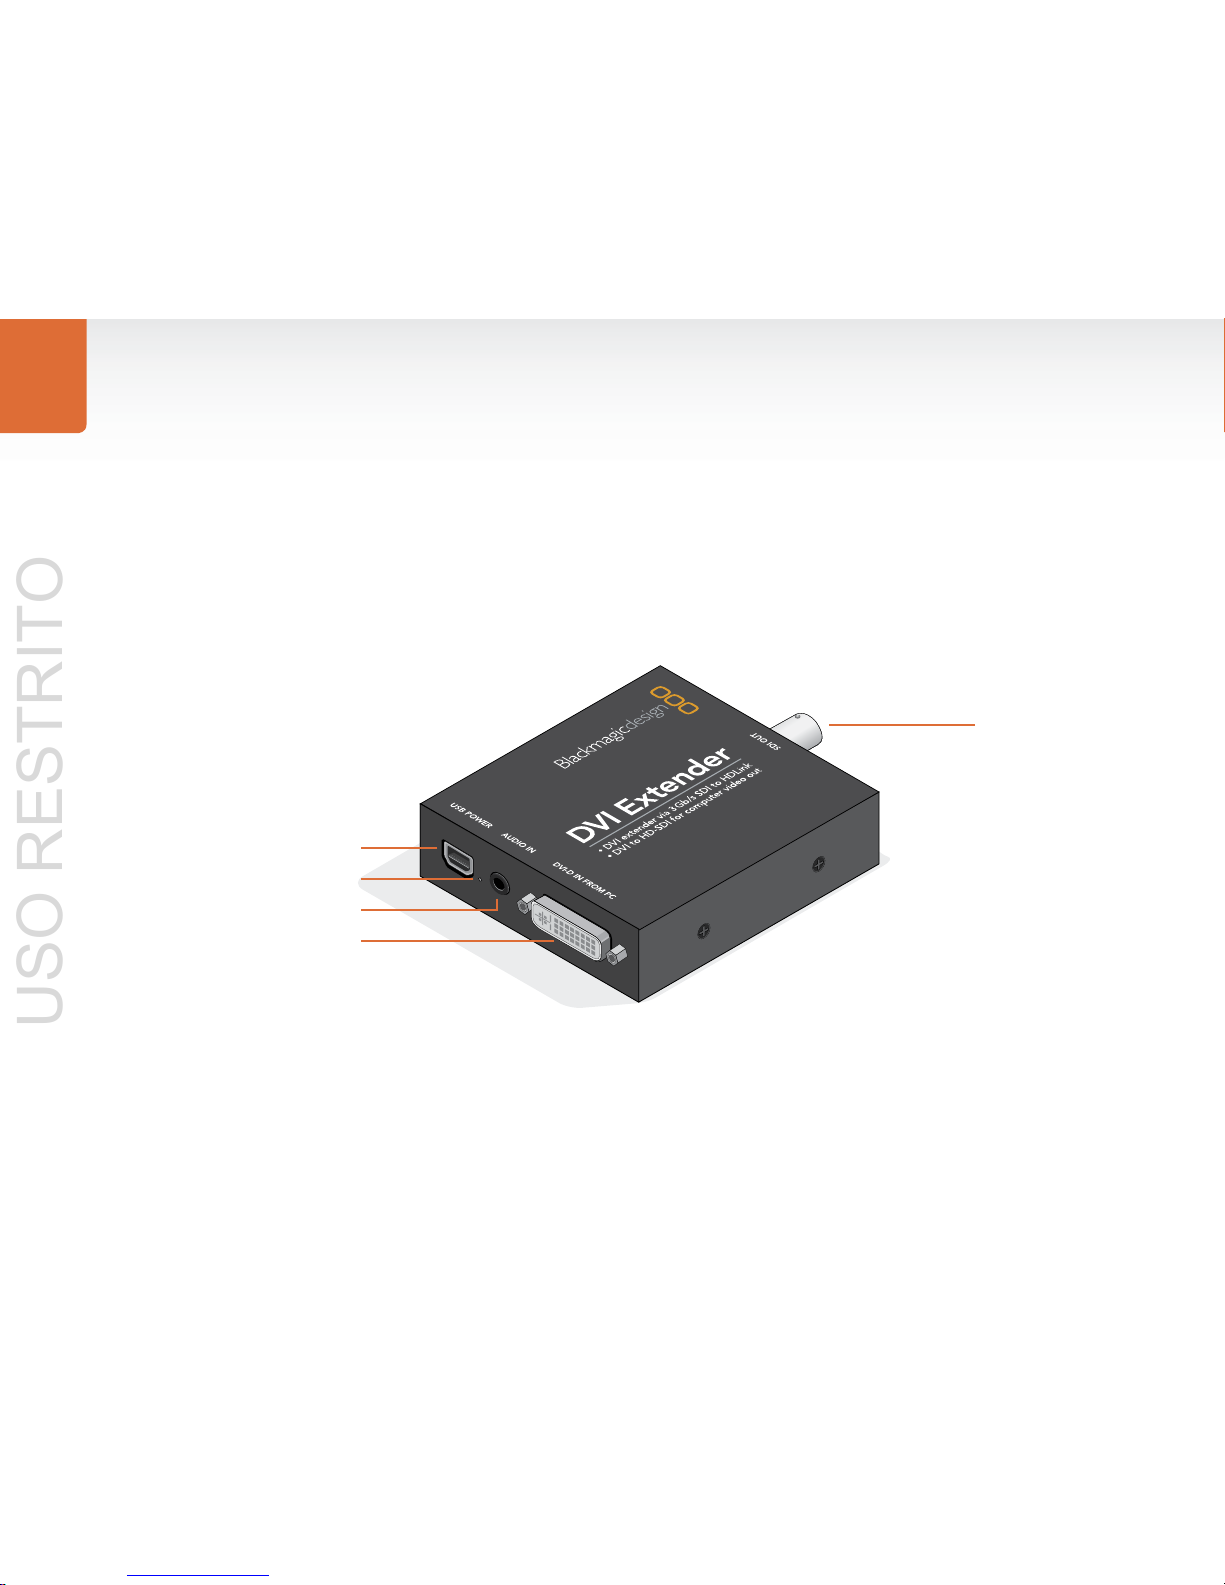
USB 2.0 connection to computer
Analog audio input from computer
Power lamp
DVI-D input from computer graphics card
SDI output
DVI Extender at a Glance
USO RESTRITO
Page 5

How to Install
5
USO RESTRITO
Page 6
Installation
6
Hardware Installation
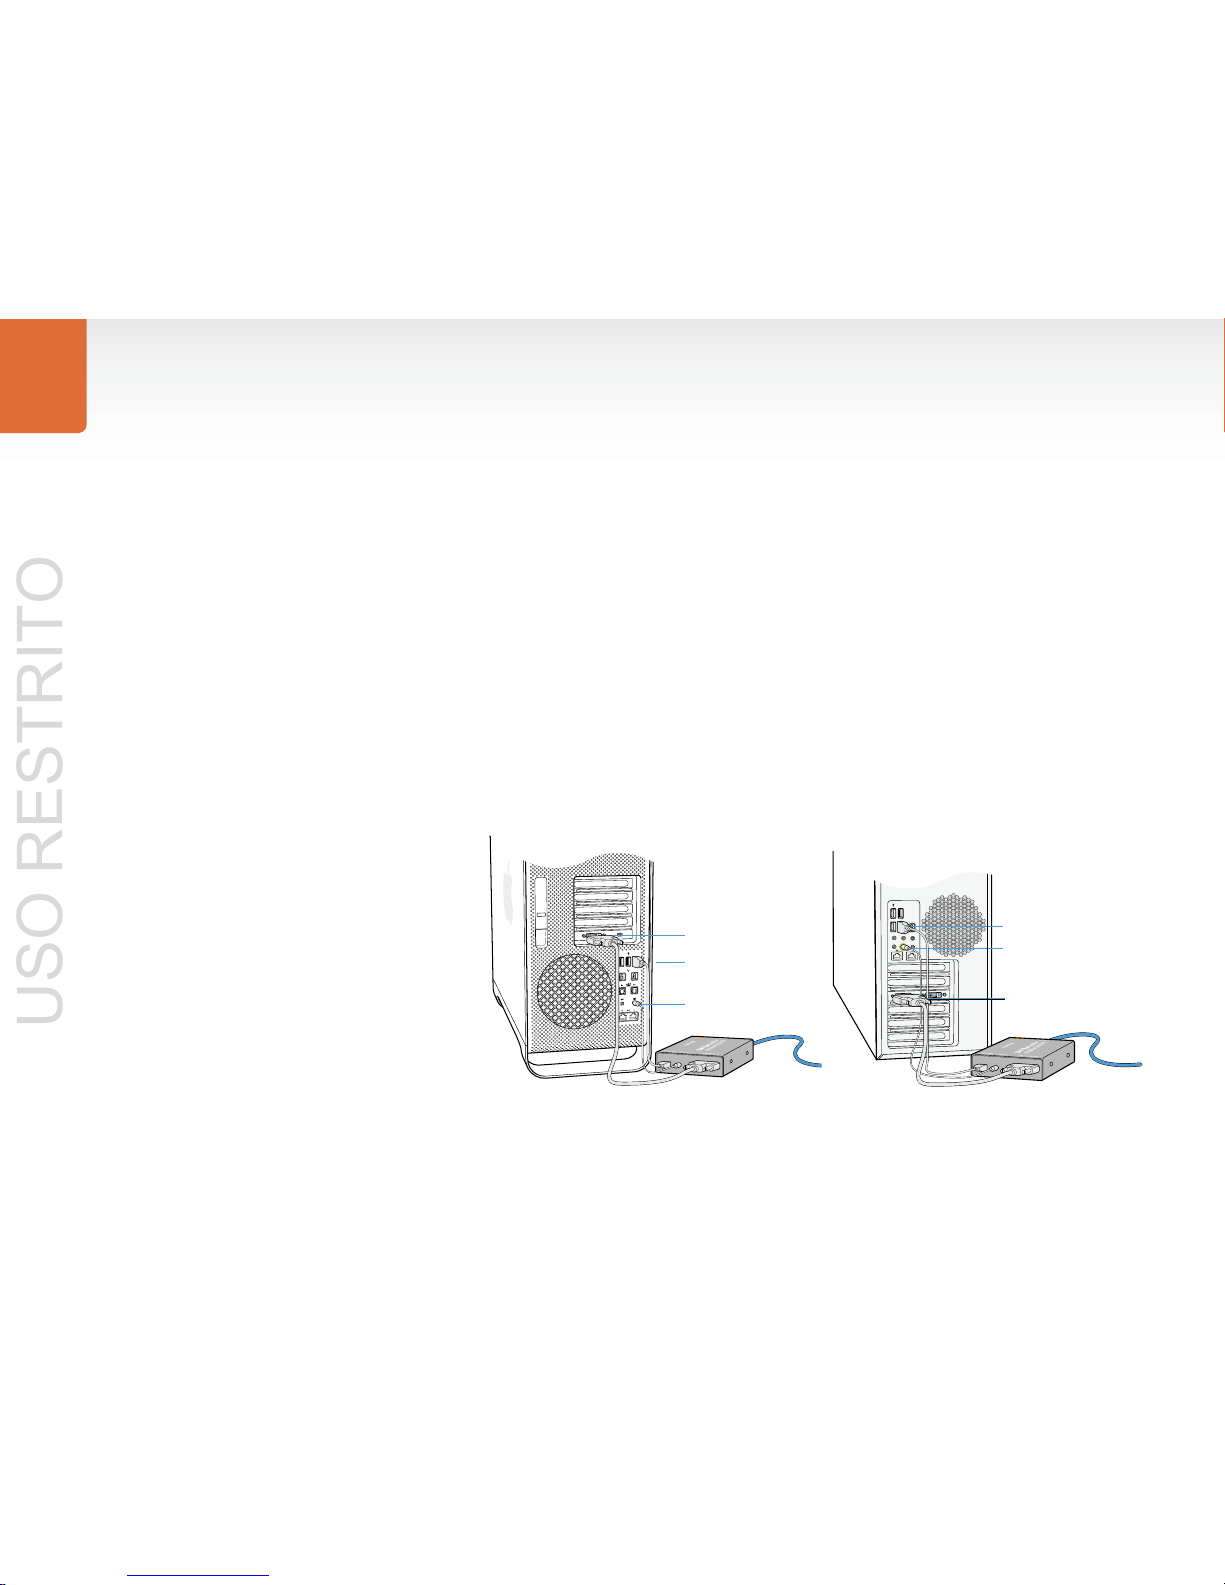
The DVI Extender package includes cables for USB, audio and DVI-D so there is nothing extra to buy. You
can use longer cables if you wish, particularly if you have a computer where the DVI, USB and audio ports
are not close to each other. DVI-D cables should be no longer than 6 feet, or 2 meters, in length.
Firstly connect DVI Extender to a USB 2.0 port on your computer using a USB cable. The power lamp
should illuminate. We recommend DVI Extender be directly connected to a dedicated USB 2.0 port on
your computer for reliable operation. If you work in a secure computing environment, where USB ports are
unavailable, DVI Extender can be powered using a third-party, AC-to-USB power adapter.
Connect the regular analog audio output of your computer to the “AUDIO IN” port of DVI Extender using
an audio cable. On most computers, the regular analog audio output will show a headphone icon and/or
be colored lime green.
Connect the DVI output of your computer to the “DVI-D IN FROM PC” port of DVI Extender using a
DVI-D cable.
Connection to Mac Connection to PC
DVI Out
USB
Audio Out
USB
Audio Out
DVI Out
DVI Out
USB
Audio Out
USO RESTRITO
Page 7

Installation
7
Installation and Removal on Mac OS X
After downloading the Converter Utility software and unzipping the downloaded file, open the resulting
disk image to reveal it’s contents.
Drag the Blackmagic Converter Utility icon and drop it on to the Applications icon. Blackmagic Converter
Utility is now installed.
To remove Blackmagic Converter Utility from your Mac, simply drag its icon from the Applications folder to
the Trash and then choose to Empty Trash.
Installation and Removal on Windows
After downloading the Converter Utility software and unzipping the downloaded file, you should see a
Converter Utility folder containing this PDF manual and the Converter Utility installer.
Double-click the installer and follow the onscreen prompts to complete the installation. When the installation
has finished, it will prompt you to restart the computer. The restart will load a USB driver for Converter Utility
so that it can communicate with any Blackmagic Design Mini Converter. Click “restart” to complete the
installation process. Once the computer has restarted, Blackmagic Converter Utility will be fully installed
and ready to use.
To remove Blackmagic Converter Utility from Windows XP, go to the Add or Remove Programs control
panel, select Blackmagic Converter Utility and click on Remove.
To remove Blackmagic Converter Utility from Windows Vista, go to the Programs and Features control
panel, select Blackmagic Converter Utility and click on Uninstall.
USO RESTRITO
Page 8

Using Blackmagic Converter Utility
8
Using Blackmagic Converter Utility
It does not matter whether you launch Blackmagic Converter Utility before or after connecting the DVI
Extender to your computer with a USB cable. If DVI Extender is missing or is not detected for some reason,
the Converter Utility will report, “No converter connected” in its title bar. Otherwise it will report the name
of “DVI Extender” in the title bar.
If Converter Utility contains newer firmware than that currently installed in your DVI Extender, it will prompt
you to update the firmware. Just follow the on screen instructions to complete the firmware update. Once
the firmware update is complete, or if no firmware update is required, you will be able to make adjustments
to your DVI Extender using the Converter Utility.
Any adjustments made through the Converter Utility interface will immediately be saved to the DVI
Extender itself. This means that if power is lost to the DVI Extender, the new settings will be re-established
as soon as power is restored to the DVI Extender. This means you never need to worry about losing your
settings on the DVI Extender.
The Converter Utility interface is the same as that used with Blackmagic Design’s range of Mini Converter
and OpenGear Converter products, and is the same on both Mac OS X and Windows. Any features that
are not applicable to your DVI Extender will be grayed out and inactive. For example, DVI Extender does
not include any analog video and so all the adjustments for Video Levels are grayed out and inactive. DVI
Extender does not include AES/EBU audio and so those settings are also grayed out.
USO RESTRITO
Page 9

Using Blackmagic Converter Utility
9
The Converter Utility Interface
The Converter Utility interface is composed of three panes for Video Levels, Audio Levels and Settings.
Click these tabs in order to reveal any adjustable options for DVI Extender. Most of the settings are selfexplanatory but there are a couple of points worth mentioning.
The Video Levels pane is grayed out as there are no analog video adjustments to be made. DVI Extender
uses an all-digital video path from DVI to SDI. This means that your video output will be perfect and no
adjustments are necessary.
In the Audio Levels pane, two analog audio input channels can be adjusted independently as analog audio
levels may vary between channels because analog is not perfect. The other two analog audio channels
are grayed out as they are used by other Blackmagic Design products and are not applicable to DVI
Extender. Similarly, the 8 channels of AES/EBU digital audio are grayed out as they are not applicable to
DVI Extender.
The Settings pane provides two options for DVI Extender.
Extender mode supports most regular computer display resolutions up to 1920 x 1200. It requires the use
of a Blackmagic Design HDLink Pro (or newer HDLink model) at the other end of the SDI cable. HDLink
products support connection to digital displays including DVI and HDMI.
Video mode configures DVI Extender to output SMPTE compliant SDI video and audio which can be
used with virtually any other SDI hardware from Blackmagic Design and other companies including Sony
™
,
Panasonic
™
and many more. Video resolutions supported by this mode are: 720 x 480, 720 x 576, 1280 x
720 and 1920 x 1080.
USO RESTRITO
Page 10

Using DVI Extender
10
After connecting DVI Extender to a second DVI graphics output of your computer, and plugging in the USB
cable to provide power, the primary display on your computer is likely to blink off and on as the computer
detects the new DVI display. This is normal computer display behavior and does not indicate a problem.
If you have not already chosen between the Extender and Video modes, launch Blackmagic Converter
Utility on a Windows or Mac OS X computer, click on the Settings tab and select the desired mode.
Extender mode should be chosen if you wish to work with computer display resolutions. It assumes that
you have a Blackmagic Design HDLink Pro or HDLink Optical Fiber, at the other end of the SDI cable, and
also a DVI-D display.
Video mode should be chosen if you wish to work with video resolutions, i.e. NTSC, PAL and HDTV. By
working at video resolutions, you will be able to connect the SDI output of DVI Extender to almost any
other SDI hardware such as SDI tape decks, SDI video capture cards, SDI waveform monitors and SDI
broadcast monitors.
Your choice of mode will take immediate effect and might cause your primary graphics display to blink off
and on as the computer detects the new DVI setting.
While Blackmagic Converter Utility only runs on Mac OS X and Windows, DVI Extender should work with
the DVI output of computers running almost any operating system, such as Linux.
USO RESTRITO
Page 11

Using DVI Extender
11
Using DVI Extender with a Mac OS X computer
In Mac OS X, go to the Apple menu, click on System Preferences and then click on Displays. Click on the
Gather Windows button to move the display settings for DVI Extender on to your main computer display.
This window might be partially obscured, by the display settings window for your primary computer display,
and which case clicking on the obscured window will bring it to the foreground. Select the Resolution you
wish to use and the Refresh Rate, e.g. 1920 x 1080 (interlaced) and 60 Hz (NTSC).
The display settings window shows many resolutions including those supported by DVI Extender.
“(interlaced)” must appear next to any supported video resolution with the exception of 720p and 1080p24
video. Many other resolutions and non-interlaced formats might appear in the list and it is important to
choose from one of the supported video resolutions listed above.
Many other resolutions may appear in the list and it is important to choose from one of the supported video
resolutions listed above.
When working in Video mode, the following video resolutions are supported:
1920 x 1080
1280 x 720
720 x 576
720 x 480
When working in Extender mode, the following computer resolutions are supported at 60 Hz:
1024 x 768
1280 x 1024
1360 x 768
1600 x 1200
1680 x 1050
1920 x 1200
USO RESTRITO
Page 12

Using DVI Extender
12
Using DVI Extender with a Windows computer
In Windows XP, go to choose Start Menu>Control Panel and open Display. Click on the Settings
tab. You should see an extra display which represents the DVI Extender. Select the second display and then
enable Extend my Windows desktop onto this monitor.
In Windows Vista and Windows 7, go to choose
Start Menu>Control Panel>Personalization and
click on
Display Settings. You should see an extra display which represents the DVI Extender. Select
the second display and then enable Extend the desktop onto this monitor.
Click on the Advanced or Advanced Settings button and then click the List All Modes button. This will
display all the modes supported by your graphics card. List All Modes shows many resolutions including
those supported by DVI Extender. Select the desired setting and click OK to return to the Display Settings
window. Click OK to apply the new settings and close the Display Settings window.
USO RESTRITO
Page 13

Using DVI Extender
13
Using DVI Extender with a Windows computer
“(interlaced)” must appear next to any supported video resolution with the exception of 720p and 1080p24
video. Many other resolutions and non-interlaced formats might appear in the list and it is important to
choose from one of the supported video resolutions listed above.
Many other resolutions may appear in the list and it is important to choose from one of the supported video
resolutions listed above.
When working in Video mode, the following video resolutions are supported:
1920 x 1080
1280 x 720
720 x 576
720 x 480
When working in Extender mode, the following computer resolutions are supported at 60 Hz:
1024 x 768
1280 x 1024
1360 x 768
1600 x 1200
1680 x 1050
1920 x 1200
USO RESTRITO
Page 14

Troubleshooting
14
Q. DVI Extender does not seem to work with the DVI output of my graphics card. What’s wrong?
A. DVI Extender is designed to be connected to the DVI-D output of your computer graphics card using a
DVI-D cable. Some older graphics cards only have one DVI port but most have two. Occasionally there
might be a subtle difference between the two DVI ports on a graphics card so if DVI Extender doesn’t
work properly with one port, try the other one. If you choose to use a DVI cable other than the one
supplied, ensure it is a single-link DVI-D cable and preferably no longer than 6 feet or 2 meters. It is also
essential to connect Extender to a USB 2.0 port on your computer. If the lamp next to DVI Extender’s
USB port fails to illuminate, there is not enough power for the unit to operate. Another USB port should
be tried or else an AC to USB adapter can be used to supply power.
Q. Why does my Windows graphics driver sometimes report that an HDMI-to-DVI display connection
has been detected even though I’m not using a HDMI connection? Does it matter?
A. This message is just for your information and there is no problem. Your graphics card has detected that
DVI Extender is using a HDMI function to support both DVI video and computer audio. You may wish to
enable the option “Don’t display this message again” before clicking OK to dismiss the message.
Q. Why can’t I output NTSC or PAL video through DVI Extender?
A. DVI Extender supports interlaced NTSC or PAL video via SDI. If your graphics card only supports
progressive NTSC and PAL video, you will be unable to output standard definition video via DVI
Extender. It is difficult to predict whether a graphics card will support interlaced or progressive standard
definition video as this is dictated by a confusing combination of factors including: version of operating
system, model of graphics card and the version of graphics driver. For example, the update from Mac
OS X 10.5.6 to 10.5.7 replaced the interlaced NTSC and PAL video modes with progressive NTSC and
PAL video modes on some or all models of Macintosh computers. They are no longer able to output
interlaced standard definition video but it is possible that a future update might reinstate these modes.
Please check the specifications of your graphics card.
USO RESTRITO
Page 15

Troubleshooting
15
Q. Why can’t I find a particular video mode listed for my graphics card, e.g. 1920 x 1080 at 59 Hz,
even though other video modes are listed?
A. Your graphics card might not support this mode. Graphics cards have traditionally been created to
support computer resolutions and frequencies. More recent graphics cards have added some support
for television video modes but might not support all video modes. In particular, we have noticed the lack
of support for 1920 x 1080 at 59 Hz (HDTV 1080i59.94) on a considerable number of computers. Please
check the specifications of your graphics card and check for updated graphics drivers.
Q. Why can’t I output 1920 x 1080 at 59 Hz (HDTV 1080i59.94) when using Video Mode with
Windows 7RC and an NVIDIA graphics card?
A. When attempting to set the DVI Extender display to 1920 x 1080 at 59.94 Hz, NVIDIA drivers for Windows
7RC may display 59 Hz but are really outputting at 60 Hz. There appears to be no way to output HDTV
1080i59.94 with the NVIDIA drivers for Windows 7RC. Please check the NVIDIA website for updated
drivers, to resolve this problem, once Windows 7 has been released by Microsoft.
Q. Why does my video appear jerky through DVI Extender even though it looks fine on my primary
computer monitor?
A. If movement, such as the movement of a mouse, looks smooth on your primary computer monitor but
appears jerky via DVI Extender, then your graphics card is not performing fast enough to support a
second display at full frame rate. Choosing to mirror your primary and secondary displays should ensure
smooth output via DVI Extender and the primary computer monitor. Alternatively remove the primary
computer display so that DVI Extender is the only display output. Either of these methods should help
your graphics card to output video at full frame rate so that all video movement is smooth. Sometimes
it helps to restart the computer after using one of these methods to ensure the computer provides
smooth video output. Alternatively a more powerful graphics card may solve this problem. Expensive
graphics cards do not necessarily help provide full frame rate support for two displays and it is best
to ask your reseller for advice as to which graphics card is best for your computer. Typically a suitable
graphics card should cost under US$100.
USO RESTRITO
Page 16

Frequently Asked Questions
16
Q. Can I use DVI Extender with the VGA output of my graphics card?
A. No, VGA is an old analog graphics format and is not supported.
Q. Can I use DVI Extender with the HDMI output of my graphics card?
A. This is not a supported configuration but DVI Extender may well work with the HDMI output of graphics
cards so long as a single-link DVI-D adapter is used.
Q. Can I use DVI Extender with the DisplayPort output of my graphics card?
A. This is not a supported configuration but DVI Extender may well work with the DisplayPort or Mini
DisplayPort output of graphics cards so long as a single-link DVI-D adapter is used.
Q. On Mac OS X, can I use the Displays menu to switch between DVI Extender display settings?
A. The graphics card in your Mac supports a large number of display settings but the Displays menu only
shows up to 10 most recently used settings. To ensure that the maximum range of settings is available
to you, it is necessary to open the Display Preferences window in the System Preferences.
Q. On Windows, can I use the Resolution slider in the Display Settings control panel to switch
between DVI Extender display settings?
A. The graphics card in your PC supports a large number of resolutions and frequencies but the Resolution
slider only shows you the resolution. To ensure that the correct frequency has been chosen for a
particular video format, such as 50 Hz or 60 Hz, it is essential to select the correct setting from the List
All Modes window.
Q. How compatible is the SDI signal, from DVI Extender, with regular SDI equipment such as decks
and monitors?
A. The SDI output of DVI Extender conforms to SMPTE specifications when working in Video mode. It
always outputs legal video levels and has low SDI jitter performance so it should work with almost
any SDI hardware. SMPTE specifications do not cover using computer resolutions via SDI and so
the Extender mode must be used with Blackmagic Design’s HDLink Pro or HDLink Optical Fiber
monitoring products.
USO RESTRITO
Page 17

Frequently Asked Questions
17
Q. Can I output a computer display resolution to regular SDI hardware?
A. In theory it is not possible to output a computer display resolution, such as 1440 x 900, to regular SDI
hardware as computer resolutions do not usually match standard TV resolutions. However in many
cases, you may find that such a resolution will successfully output as 1920 x 1080 at 60 Hz interlaced.
We cannot guarantee this will work with all computer modes as success is entirely dependent upon the
way the graphics card works. Some graphics cards will scale the video to fill a 1920 x 1080 display while
others will place a black border around the lower resolution image to fill a 1920 x 1080 display.
Q. Does DVI Extender support audio when using Extender mode?
A. Yes, you can use the Channel 1 & 2 outputs of a Blackmagic Design HDLink Pro to monitor your
computer audio.
Q. Can I use a 30” dual-link DVI-D monitor with HDLink Pro to monitor the Extender mode output
of DVI Extender?
A. No, when using Extender mode, a single-link DVI-D monitor should be used with HDLink Pro and
it’s resolution should be a maximum of 1920 x 1200 pixels. All current 30” DVI monitors are dual-link
DVI-D monitors and have a much higher resolution of 2560 × 1600 which means they cannot be used in
conjunction with Extender mode.
A DVI or HDMI display can be used when working in Video mode. However if you intend to switch
between Extender and Video modes, you will need a DVI display.
Q. Can I power DVI Extender using a USB 1 port?
A. No, there is not enough power supplied by the old USB 1 ports. DVI Extender must be powered either
from a USB 2.0 port or from an AC to USB adapter.
USO RESTRITO
Page 18

Support
18
If things go wrong
There are four steps to getting help.
Step 1. Check out the Blackmagic Design web site www.blackmagic-design.com and click on the
“Support” page for the latest support information.
Step 2. Call your dealer.
Your dealer will have the latest technical updates from Blackmagic Design and should be able
to give you immediate assistance. We also recommend you check out the support options your
dealer offers as they can arrange various support plans based on your workflow requirements.
Step 3. The next option is to email us with your questions using the web form at
www.blackmagic-design.com/support/contact
Step 4. Phone a Blackmagic Design support office. Check our web site for current support phone
numbers in your area. www.blackmagic-design.com/company.
Please provide us with as much information as possible regarding your technical problem and
system specifications so that we may try to respond to your problem as quickly as possible.
USO RESTRITO
Page 19

Warranty
19
USO RESTRITO
Page 20

Warranty
20
12 Month Warranty
Blackmagic Design warrants that this product will be free from defects in materials and workmanship for
a period of 12 months from the date of purchase. If a product proves to be defective during this warranty
period, Blackmagic Design, at its option, either will repair the defective product without charge for parts
and labor, or will provide a replacement in exchange for the defective product.
In order to obtain service under this warranty, you the Customer, must notify Blackmagic Design of the
defect before the expiration of the warranty period and make suitable arrangements for the performance
of service. The Customer shall be responsible for packaging and shipping the defective product to a
designated service center nominated by Blackmagic Design, with shipping charges pre paid. Customer
shall be responsible for paying all shipping changes, insurance, duties, taxes, and any other charges for
products returned to us for any reason.
This warranty shall not apply to any defect, failure or damage caused by improper use or improper or
inadequate maintenance and care. Blackmagic Design shall not be obligated to furnish service under
this warranty: a) to repair damage resulting from attempts by personal other than Blackmagic Design
representatives to install, repair or service the product, b) to repair damage resulting from improper
use or connection to incompatible equipment, c) to repair any damage or malfunction caused by the
use of non Blackmagic Design parts or supplies, or d) to service a product that has been modified or
integrated with other products when the effect of such a modification or integration increases the time or
difficulty of servicing the product. THIS WARRANTY IS GIVEN BY BLACKMAGIC DESIGN IN LIEU OF ANY
OTHER WARRANTIES, EXPRESS OR IMPLIED. BLACKMAGIC DESIGN AND ITS VENDORS DISCLAIM
ANY IMPLIED WARRANTIES OF MERCHANTABILITY OR FITNESS FOR A PARTICULAR PURPOSE.
BLACKMAGIC DESIGN’S RESPONSIBILITY TO REPAIR OR REPLACE DEFECTIVE PRODUCTS IS THE
WHOLE AND EXCLUSIVE REMEDY PROVIDED TO THE CUSTOMER FOR ANY INDIRECT, SPECIAL,
INCIDENTAL OR CONSEQUENTIAL DAMAGES IRRESPECTIVE OF WHETHER BLACKMAGIC DESIGN
OR THE VENDOR HAS ADVANCE NOTICE OF THE POSSIBILITY OF SUCH DAMAGES. BLACKMAGIC
DESIGN IS NOT LIABLE FOR ANY ILLEGAL USE OF EQUIPMENT BY CUSTOMER. BLACKMAGIC IS
NOT LIABLE FOR ANY DAMAGES RESULTING FROM USE OF THIS PRODUCT. USER OPERATES THIS
PRODUCT AT OWN RISK.
© Copyright 2009 Blackmagic Design. All rights reserved. ‘Blackmagic Design’, ‘DeckLink’, ‘HDLink’, ‘Workgroup Videohub’, ‘ Videohub’,
‘DeckLink’, ‘Intensity’ and ‘Leading the creative video revolution’ are registered trademarks in the US and other countries. All other company and
product names may be trade marks of their respective companies with which they are associated.
USO RESTRITO
 Loading...