

Black+Decker PR100, PR100SD Use And Care Manual
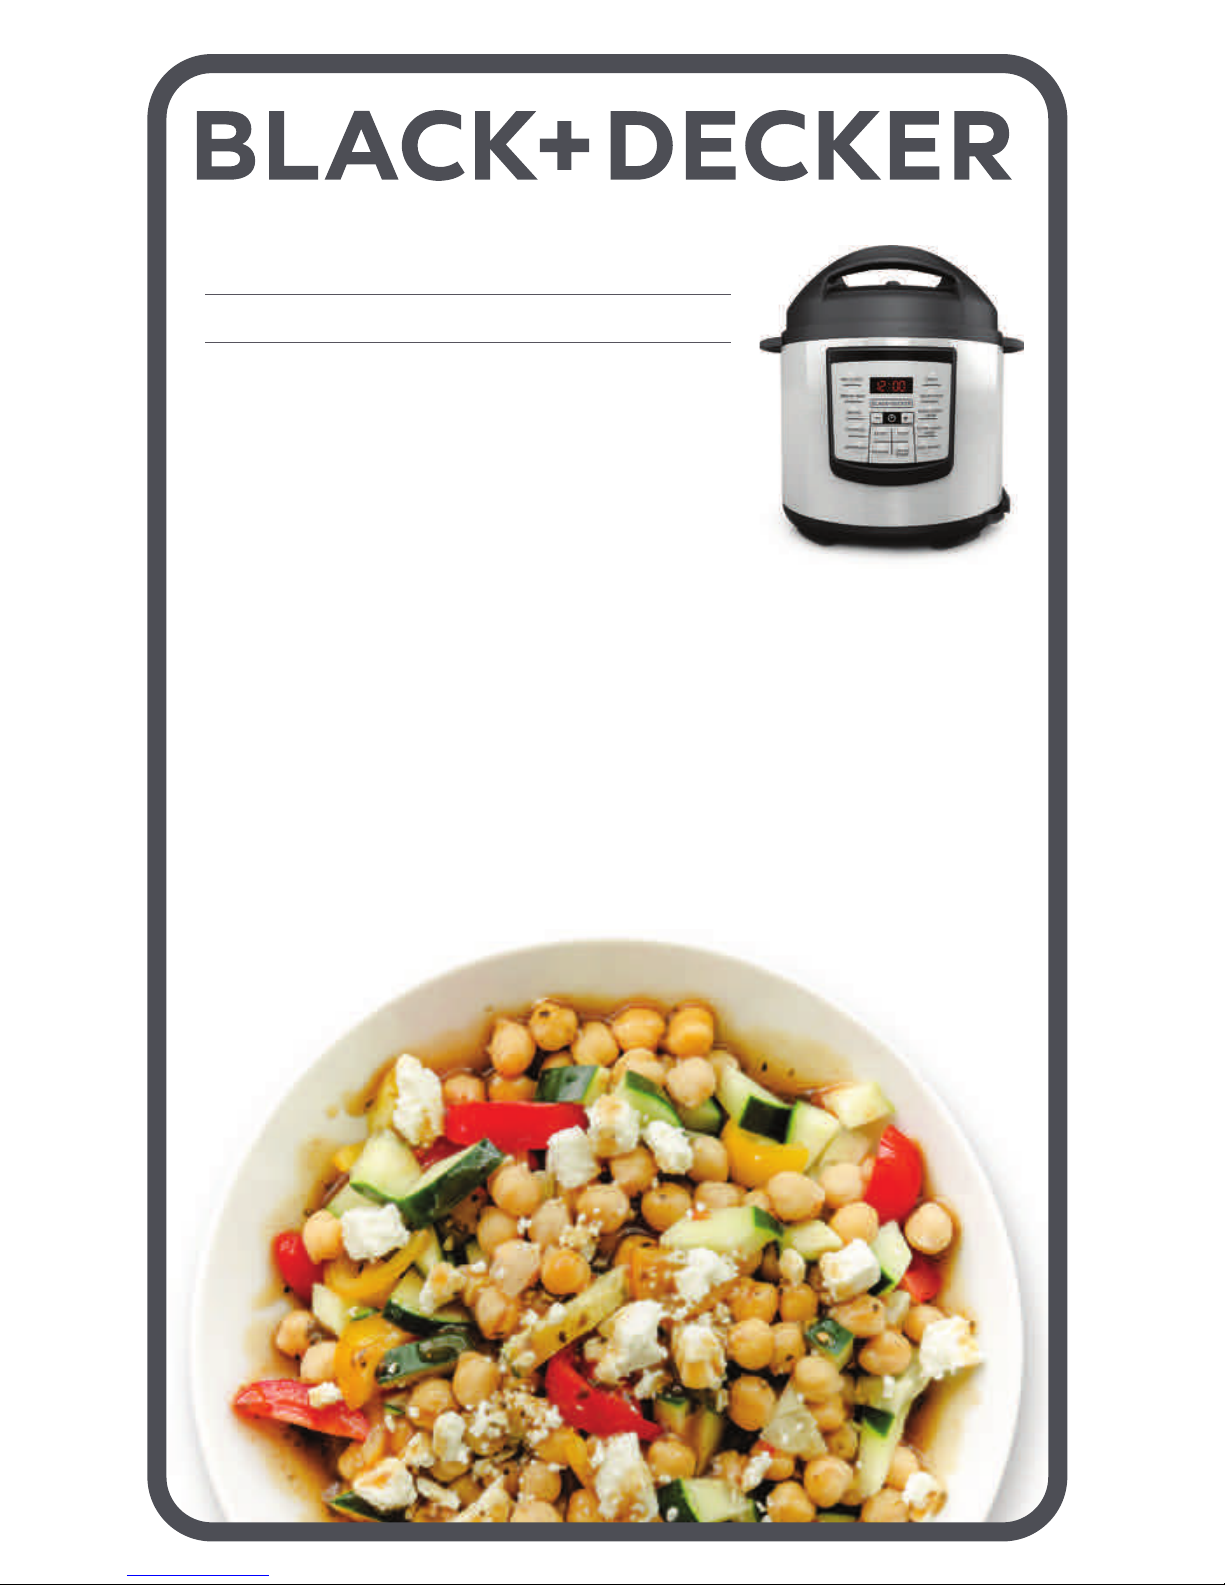
TM
6 QUART PRESSURE COOKER
OLLA DE PRESIÓN DE 6 CUARTOS
AUTOCU ISE UR ÉLE CTR IQU E
DE 6 PINTES
use and care manual
manual de uso y cuidado
guide d’utilisation et d’entretien
PR100, PR100SD

Should you have any questions or concerns with your new product,
please call our Customer Service Line at 1-800-231-9786 (US and
Canada). Please do not return to the store.
Si usted tiene alguna inquietud o pregunta con su producto, por
favor llame a nuestra línea de servicio al cliente una atención
inmediata 1-800-231-9786 (EE.UU/Canadá) 01-800-714-2503
(México). No devuela a la tienda.
Si vous avez des questions ou des préoccupations à propos de
votre nouveau produit, veuillez communiquer avec notre Service à
la clientèle au 1 800 231-9786 (États-Unis et Canada). Veuillez ne
pas rapporter le produit au magasin.
Thank you for your purchase!
Gracias por su compra!
Merci de votre achat!

CONTENTS
Important Safeguards ............................................... 4
Getting to Know Your Electric Pressure Cooker ..........................6
Getting Started . . . . . . . . . . . . . . . . . . . . . . . . . . . . . . . . . . . . . . . . . . . . . . . . . . . . 7
Operating Instructions . . . . . . . . . . . . . . . . . . . . . . . . . . . . . . . . . . . . . . . . . . . . . . 8
Preset Cooking Functions............................................10
Care and Cleaning ..................................................17
Helpful Hints And Tips . . . . . . . . . . . . . . . . . . . . . . . . . . . . . . . . . . . . . . . . . . . . . .18
Trou bleshooting....................................................19
Warranty and Customer Service Information . . . . . . . . . . . . . . . . . . . . . . . . . . . 22
WELCOME!
Congratu l ations o n your p u rchase of the B la c k+Decker™ 6 Quart Pre s s u re
Cooker! We have developed this guid e to e n s u re opti m a l product p e r fo r m a n ce
for your co m p l ete satisfaction. Save this use and care manual and be s u re to
registe r your appliance o n l ine at w w w.prodprote c t . c o m /applic a.

4
Please Read and Save this Use and Care Book.
IMPORTANT SAFEGUARDS.
When using electrical appliances, basic safety precautions should always be followed to reduce the risk of fire, electric shock, and/or injury, including the following:
• READ ALL INSTRUCTIONS.
• To protect against electrical shock, do not
immerse cord, plug, or base unit in water or
other liquid.
• Do not touch hot surfaces. Use handles or
knobs. Use hot pads when removing the
cooking bowl as bowl will be hot after cooking.
• Close supervision is necessary when any
appliance is used by or near children.
• Unplug from outlet when not in use and before
cleaning. Allow to cool before putting on, taking
off, or cleaning parts.
• It is recommended to regularly inspect the
appliance. Do not operate any appliance
with a damaged cord or plug, or after
the appliance malfunctions or has been
damaged in any manner. Contact consumer
support at the toll-free number listed in the
warranty section.
• The use of accessory attachments
not recommended by the appliance
manufacturer may cause injuries.
• Do not use outdoors.
• Do not let cord hang over edge of table or
counter, or touch hot surfaces.
• Do not place on or near a hot gas or electric
burner, or in a heated oven.
• Extreme caution must be used when moving a
pressure cooker containing hot food, water or
other hot liquids.
• To disconnect, press the stop button
to
turn the appliance off; then remove plug
from wall outlet.
• Do not use pressure cooker for other than
intended use.
• To prevent the risk of electric shock, do not
cook directly in the cooking base. Cook only
in the cooking bowl provided.
• This appliance is not intended for use by
persons (including children) with reduced
physical, sensory or mental capabilities,
or lack of experience and knowledge,
unless they have been given supervision or
instructions concerning use of the appliance
by a person responsible for their safety.
• Children should be supervised to ensure that
they do not play with the appliance.
• Do not operate pressure cooker while it is
covered or touching flammable materials,
including curtains, draperies, walls and the like.
• The appliance is not intended to be operated
by means of an external timer or separate
remote control system.
• Do not use this appliance on an unstable surface.
• Do not attempt to heat or cook non-food
items in this appliance.
• Do not use this appliance for home canning.
• Always be sure the float valve is positioned
correctly before use. If assembled incorrectly,
the cooker may not build pressure, or release
steam properly.
• This appliance cooks under pressure.
Improper use may result in scalding injury.
Make certain unit is properly closed before
operating. See Operating Instructions.
• Always check the pressure release devices
for clogging before use.
• This appliance generates extreme heat and
escaping steam during use. Provide adequate
amount of air space on all sides, top and bottom.

5
POLARIZED PLUG
This appliance has a polarized plug (one blade is wider than the other). To reduce
the risk of electric shock, this plug is intended to fit into a polarized outlet only one
way. If the plug does not fit fully into the outlet, reverse the plug. If it still does not fit,
contact a qualified electrician. Do not attempt to modify the plug in any way.
TAMPER-RESISTANT SCREW
Warning: This appliance is equipped with a tamper-resistant screw to prevent
removal of the outer cover. To reduce the risk of fire or electric shock, do not attempt
to remove the outer cover. There are no user-serviceable parts inside. Repair should
be done only by authorized service personnel.
ELECTRICAL CORD
A short power-supply cord is provided to reduce the risks resulting from children
grabbing the cord or someone becoming entangled in or tripping over a longer cord.
Note: If the power cord is damaged, please contact the warranty department listed
in these instructions.
SAVE THESE INSTRUCTIONS.
This product is for household use only.
• Do not open the pressure cooker until it has
cooled and all internal pressure has been
released. If the lid is difficult to open, it’s an
indication that the unit is still under pressure
and should not be opened: do not force it
open. Any pressure in the cooker can be
hazardous. See Operating Instructions.
• NEVER FORCE OPEN the pressure cooker.
This could result in serious injury. If you need
to open the pressure cooker, press the stop
button
once, and using tongs or a kitchen
tool, carefully rotate the pressure release
valve to the RELEASE position. Once all
steam has escaped from the unit, carefully
open the lid by rotating counter-clockwise
and lifting straight up.
• Never fill the unit above the MAX LINE in the
cooking bowl. Overfilling may cause clogging,
allowing excess pressure to develop.
• To avoid scratching, do not cut foods directly
in the cooking bowl.
• Do not use this pressure cooker for pressure
frying with oil.
• To prevent risk of explosion and injury, replace
the rubber gasket as recommended by the
manufacturer. See Operating Instructions.
• Intended for countertop use only.
WARNING: Spilled food can cause serious
burns. Keep appliance and cord away from
children. Never drape cord over edge of
counter, never use outlet below counter, and
never use with an extension cord.

6
Product may vary slightly from what is illustrated.
11
12
15 16
1
2
4
3
GE TTING TO KNOW YOUR
ELECTRIC PRESSURE COOKER
5
6
10
13
14
7
9
8
1. Cooking bowl (Part # PR100-07)
2. Interior
3. Control panel
4. Base
5. Lid (Part # PR100-01)
6. Lid Handle
7. Inside of lid
8. Base Handle
9. Pressure Release Valve
(Part # PR100-03)
10. Red Float Valve (Part # PR100-02)
11. Rubber Gasket (Part # PR100-04)
12. Anti-block shield (Part # PR100-06)
13. Rubber Float valve seal
(Part # PR100-05)
14. Rice scoop (Part # PR100-08)
15. Trivet (Part # PR100-09)
16. Rice measure (Part # PR100-10)

7
CONTROL PANEL
Model # PR100SD Model # PR100
GE TTING STARTED
This appliance is intended for household use only.
• Remove all packing material, any stickers, and the plastic band around the
power plug.
• Remove all accessories and components.
• Go to www.prodprotect.com/applica to register your product.
• Wash all removable parts as instructed in CARE AND CLEANING. Place
the clean, dry cooking bowl in the cooking base.
• Select a location where this unit is to be used. This unit should be placed
on a stable, heat resistant surface, free from cloth, liquids and any other
flammable materials. Allow enough space from the back, front and sides
of the unit and the wall to allow heat to flow without damage to cabinets
and walls.
• To avoid steam or heat damage, do not place the pressure cooker directly
under cupboards while in use.
• Do not place the cooking bowl in an oven or directly on a stovetop. The
cooking bowl is only intended to be used with this pressure cooker.
• Always unplug the pressure cooker from the wall outlet when not in use.
IMPORTANT INFORMATION ABOUT YOUR
ELECTRIC PRESSURE COOKER
• The cooking bowl gets hot. When in use, always use oven mitts or
potholders when touching any outer or inner surface of the appliance.
• During the first few minutes of use you may notice smoke and a slight
odor. This is caused by oil that may have been used during manufacturing
of the unit and will not impact the performance.

8
• To switch to different functions on the pressure cooker, you must be in
the stop mode
. The display screen will flash ----. The unit is then in stop
mode and you will be able to switch to another function.
• As most meals cook, steam will escape through the red float valve or
the pressure release valve. Do not place hand over valves while meal is
cooking. The hot steam may burn.
• Use a wooden or plastic spoon to stir and remove food. Do not use metal
utensils that can scratch the nonstick cooking bowl.
• Do not fill cooking bowl higher than the MAX fill line. Overfilling may clog
the pressure release valve, which can cause excess pressure to build.
OPERATING INSTRUCTIONS
Your BLACK+DECKER™ Electric Pressure Cooker has
been specially designed to safely control the steam
pressure and temperature during cooking. Below are
instructions on how to properly assemble your pressure
cooker to ensure optimal results.
Note: Place the pressure cooker on a dry, level
surface. Because small amounts of steam will escape
during the heating, and sometimes the cooking
process, do not use the pressure cooker under
overhanging cabinets.
1. To open the lid: Hold the lid handle and turn the
lid counter-clockwise until the “
” marking on
the lid aligns with the “OPEN
” marking on the
pressure cooker; lift the lid straight up and off
the pressure cooker. (A)
2. Place the pressure release valve on the lid. (B)
The valve will snap into place, but will fit loosely
so steam escapes properly.
3. Ensure that the rubber gasket is clean and
securely fitted around the metal ring inside of
the lid. (C)
4. Add foods and liquids to be cooked to the
cooking bowl according to the recipe, and place
in the interior of the pressure cooker.
Note: Never fill the cooking bowl above the MAX fill
line as it may clog the pressure release valve and cause
excess pressure to build. When cooking foods such as
dried beans, vegetables, rice and grains, do not fill the
cooking bowl above the 5 cup line as these foods will
expand during cooking.
5. To close the lid: Hold the lid handle and turn th e lid
clockwise until the “
” marking on the lid aligns
C
A
D
B
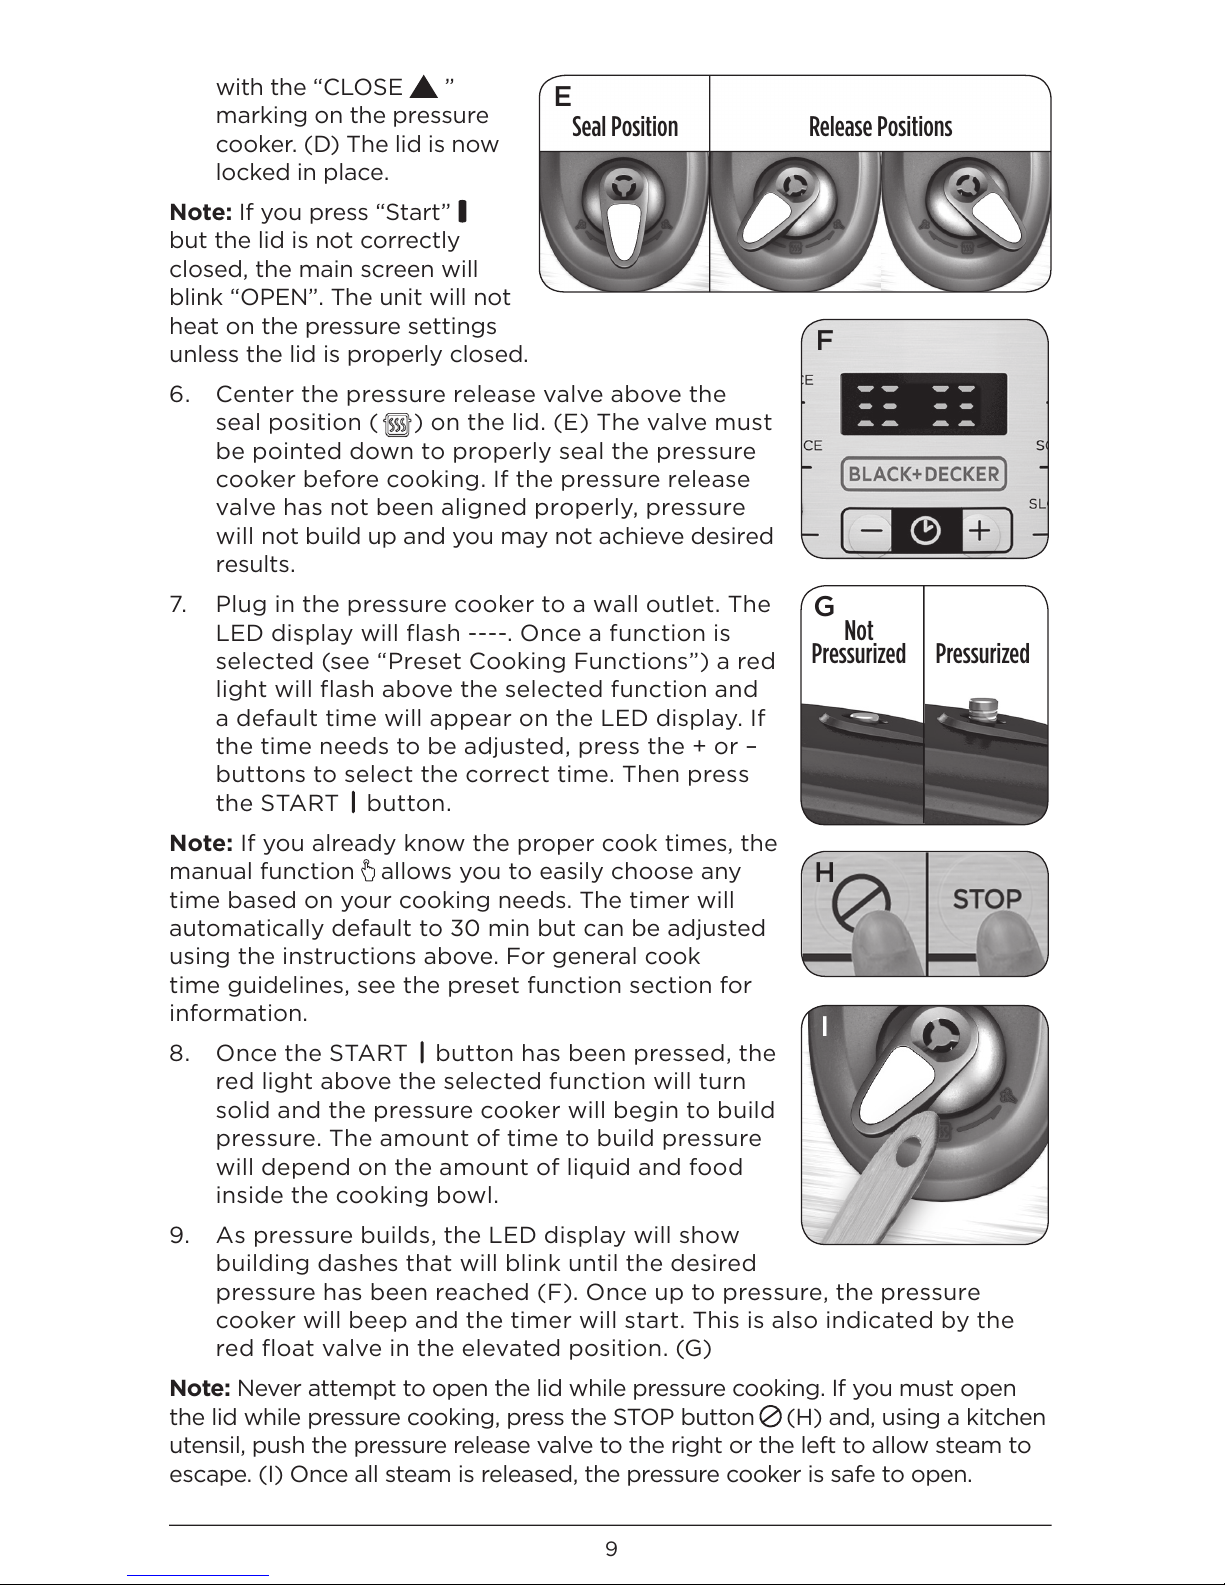
9
with the “CLOSE ”
marking on the pressure
cooker. (D) The lid is now
locked in place.
Note: If you press “Start”
but the lid is not correctly
closed, the main screen will
blink “OPEN”. The unit will not
heat on the pressure settings
unless the lid is properly closed.
6. Center the pressure release valve above the
seal position (
) on the lid. (E) The valve must
be pointed down to properly seal the pressure
cooker before cooking. If the pressure release
valve has not been aligned properly, pressure
will not build up and you may not achieve desired
results.
7. Plug in the pressure cooker to a wall outlet. The
LED display will flash ----. Once a function is
selected (see “Preset Cooking Functions”) a red
light will flash above the selected function and
a default time will appear on the LED display. If
the time needs to be adjusted, press the + or –
buttons to select the correct time. Then press
the START
button.
Note: If you already know the proper cook times, the
manual function
allows you to easily choose any
time based on your cooking needs. The timer will
automatically default to 30 min but can be adjusted
using the instructions above. For general cook
time guidelines, see the preset function section for
information.
8. Once the START
button has been pressed, the
red light above the selected function will turn
solid and the pressure cooker will begin to build
pressure. The amount of time to build pressure
will depend on the amount of liquid and food
inside the cooking bowl.
9. As pressure builds, the LED display will show
building dashes that will blink until the desired
pressure has been reached (F). Once up to pressure, the pressure
cooker will beep and the timer will start. This is also indicated by the
red float valve in the elevated position. (G)
Note: Never attempt to open the lid while pressure cooking. If you must open
the lid while pressure cooking, press the STOP button
(H) and, using a kitchen
utensil, push the pressure release valve to the right or the left to allow steam to
escape. (I) Once all steam is released, the pressure cooker is safe to open.
E
Seal Position Release Positions
H
I
F
G
Not
Pressurized Pressurized

10
10. When time has ended, the pressure cooker will beep and will
automatically switch to Keep Warm. A solid red light will illuminate
above the Keep Warm button
and the timer will flash and begin to
count up. At this time you can choose either Natural Pressure Release
or Quick Pressure Release:
Natural Pressure Release: after the cook time is complete, the pressure
will begin to drop. During this time food will continue to cook, which is
recommended for some cuts of meats and beans. See preset cooking
function section for tips on recommended cooking methods. At any time
during the natural release process, you can switch methods to the Quick
release option.
Note: The amount of time for the pressure to drop depends on the amount of
food/liquid inside the cooking bowl.
Quick Pressure Release: after cook time is complete, use tongs or a
kitchen utensil to move the pressure release valve to the right or left, to
release the pressure. Steam will instantly release from the valve. Keep face
and hands away as steam is released. Quick pressure release immediately
stops the cooking process. If additional cooking is needed, choose the
necessary function to bring cooker back up to pressure.
Note: The steam is fully released when the red float
valve is in the lower position (J), only then will the lid
be safe to open.
11. To open the lid: Hold the lid handle and turn
the lid counter-clockwise until the “
” marking
on the lid aligns with the “OPEN
” marking on
the pressure cooker; lift the lid straight up and
off the pressure cooker.
Note: Steam will escape when opening the lid, even
after release. Always lift the lid straight off and use caution when opening.
12. Always allow the pressure cooker to fully cool before cleaning and storage.
PRESET COOKING FUNCTIONS
There are 11 preset functions to aid in making the cooking process as easy as
possible. Below are approximate cooking times to use as general guidelines.
Times will vary depending on amounts of food cooked.
Note: the below cooking times do not include the time it takes for the
pressure cooker to build up to pressure.
FUNCTIONS WITH PRESSURE:
WHITE RICE
:
1. Measure out the desired amount of rice or grains with the provided
measure cup and add to the cooking bowl. Then add the corresponding
amount of water indicated in the chart.
J

11
2. Add 1–2 tablespoons of butter or oil to the rice to minimize frothing.
Note: Do not fill the cooking bowl more than half full, as the rice will expand
during cooking.
3. If the bowl is not already in the cooking base, add the bowl to the base and
follow the cooking process outlined in the “Operating Instructions” section.
4. Use the Natural Pressure Release method for best results. If making
sticky rice, use the Quick Pressure Release method.
BROWN RICE
:
1. Measure out the desired amount of rice with the provided measure cup,
add to the cooking bowl. Then add the corresponding amount of water
indicated in the chart below.
2. Add 1–2 tablespoons of butter or oil to the rice to minimize frothing.
Note: Do not fill the cooking bowl more than half full, as the rice will expand
during cooking.
3. If the bowl is not already in the cooking base, add the bowl to the base and
follow the cooking process outlined in the “Operating Instructions” section.
4. Use the Natural Pressure Release method for best results.
All directions below are based on one rice measure, or using provided measuring cup.
Food Water Amount Cooking Time Recommended
Pressure Release Method
Couscous 2 cups 2–3 minutes
(manual)
Natural Release,
10 minutes, KEEP WARM
Quinoa 2 cups 4–6 minutes
(manual)
Natural Release,
10 minutes, KEEP WARM
Rice, Basmati 1 ½ cups 5–7 minutes
(manual)
Natural Release,
10 minutes, KEEP WARM
Rice, white 1 cup 14–16 min. Natural Release,
10 minutes, KEEP WARM
Arborio 3 cups 14–16 minutes Natural Release,
10 minutes, KEEP WARM
Sushi Rice 1 ½ cups 14–16 minutes Quick Release
Quick Cooking
Oats
1 2/3 cups 5–6 minutes
(manual)
Natural Release,
10 minutes, KEEP WARM
Steel Cut Oats 1 2/3 cups 15 minutes Natural Release,
10 minutes, KEEP WARM
12
BEANS :
1. Sort beans and remove any pebbles or bad looking beans. Rinse dried
beans under cold water and drain. Add the beans to the cooking bowl.
Note: You do not need to soak beans before pressure cooking. The cooking
chart displays both unsoaked and soaked cook times.
2. Add 1–2 tablespoons of butter or oil to the beans to minimize frothing.
Note: Do not fill the cooking bowl more than half full, as the beans will
expand during cooking. Always use enough liquid to cover the beans.
3. If the bowl is not already in the cooking base, add the bowl to the base and
follow the cooking process outlined in the “Operating Instructions” section.
4. Use the Natural Pressure Release method for best results.
All directions below are based on one rice measure, or using provided measuring cup.
Food Water Amount Cooking Time Recommended
Pressure Release Method
Barley 3 cups 20–25 minutes Natural Release,
15 minutes, KEEP WARM
Rice, brown 2 cups 20–25 minutes Natural Release,
10 minutes, KEEP WARM
Rice, wild 3 cups 20–25 minutes Natural Release,
15 minutes, KEEP WARM.
Drain remaining water
after releasing pressure.
Food COOKING TIME
(soaked
overnight)
COOKING TIME
(unsoaked)
Preset at 40 minutes
Recommended
Pressure Release Method
Black Beans 20–25 minutes 28–30 minutes Natural Release
Cannellini 18–22 minutes 33 to 38 minutes Natural Release
Chickpeas (Gar-
banzo Beans)
35 minutes 50 minutes
Great Northern 30 minutes
(less)
40 minutes
(normal)
Natural Release
Lentils N.A. 8–10 minutes Natural Release
Pinto Beans 20–24 minutes 30–35 minutes Natural Release
Navy Beans 22–25 minutes 30–35 minutes Natural Release
Red Beans 22–25 minutes 30–35 minutes Natural Release
Soy Beans 26–33 minutes 33–40 minute Natural Release

13
STEAMING :
1. While steaming use the provided trivet for more evenly cooked results.
Place the trivet in the bottom of the cooking bowl before adding the
ingredients.
2. Add approximately 1 cup of liquid to the cooking bowl while steaming
vegetables.
3. If the bowl is not already in the cooking base, add the bowl to the base and
follow the cooking process outlined in the “Operating Instructions” section.
4. Use the Quick Pressure Release method when pressure cooking
vegetables, to prevent over cooking.
Note: If cooking frozen vegetables, allow an additional 1–2 minutes of
cooking time.
Fresh Vegetable
(not frozen)
Amount of food COOKING TIME
Preset at 5 minutes
Recommended
Pressure Release Method
Zucchini, sliced 1 medium 1–3 minutes Quick Release
Green Beans ½ lb. 2 minutes Quick Release
Carrots, sliced
into ½-inch
pieces
2 cups 2–3 minutes Quick Release
Carrots, whole 4–6 4–5 minutes Quick Release
Corn 3 cobs on trivet 8–10 minutes Quick Release
Broccoli 3 cups (6 oz.) 0–3 minutes Quick Release
Fresh Beets,
quartered
1 cup 20 – 25 minutes Quick Release
Brussel Sprouts,
whole
1 lb. 0–2 minutes Quick Release
Kale 2 cups 5–7 minutes Quick Release
Winter squash
(Pumpkin, Butternut, Acorn)
peeled and
sliced
2 cups 3–5 minutes Quick Release
White potatoes
1-inch cubes
2 cups 5–7 minutes Quick Release
Baby Potatoes,
whole
8 medium 8–10 minutes Quick Release
New Potatoes,
whole
6 medium (1 lb.) 10–12 minutes Quick Release
Sweet Potato,
cubed
2 cups 4–6 minutes Quick Release
14
MEAT :
1. Cut meats/poultry into equal sizes to ensure even cooking.
Tip: Brown the meats before pressure cooking using the Browning preset
function
within this section.
2. Add liquids and other ingredients to the bowl according to the recipe
along with meat.
3. If the bowl is not already in the cooking base, add the bowl to the base and
follow the cooking process outlined in the “Operating Instructions” section.
4. Use the release method indicated in the cooking chart for best results.
Meat
(Non-frozen)
Amount of food COOKING TIME
Preset at 20 minutes
Recommended
Pressure Release Method
CHICKEN
Chicken Breasts,
boneless
1 pound 8–10 minutes Quick Release
Chicken Thighs,
boneless
8 (3 oz.) 20 minutes Quick Release
Whole Chicken 3–4 lbs. 20–30 minutes Quick Release
BEEF
Stew (1 inch
cubes) plus
potatoes and
vegetables
1 ½ lbs. 15–20 minutes Natural Release,
10 minutes
Corned Beef 3 lbs. 50 minutes Natural Release,
10 minutes
Short Ribs, 2
inches
4 pounds 45–60 minutes Natural Release,
10 minutes
Brisket / Skirt 3 pounds 30 minutes Natural Release,
10 minutes
Pot Roast, Topside / Chuck
2–3 lbs. 30 minutes Natural Release,
10 minutes
LAMB
Shanks 3 X ½ pound 15–20 minutes Natural Release,
10 minutes
Shoulder Roast,
boneless
3 pounds 20–30 minutes Natural Release,
10 minutes
PORK
Chops, loin,
1 inch thick
(10–12 oz.)
2 chops 8–10 minutes Quick Release
Spareribs 3 pounds 30 minutes Quick Release

15
Meat
(Non-frozen)
Amount of food COOKING TIME
Preset at 20 minutes
Recommended
Pressure Release Method
Shoulder Roast,
boneless
3 pounds 30 minutes Natural Release,
10 minutes
Ham 30 minutes Natural Release
SOUP/STEW
:
Note: The preset time for this function is 30 minutes, but can be adjusted
up and down to desired cook time.
1. Place all the prepared ingredients into the pressure cooking bowl, being
sure not to fill beyond the MAX fill line.
2. If the bowl is not already in the cooking base, add the bowl to the base and
follow the cooking process outlined in the “Operating Instructions” section.
3. Use the natural release method to decrease any spatter from the steam
release value and continue cooking the foods for a deeper flavor.
MANUAL COOKING FUNCTIONS
The Manual pressure function
can be used when preset menu functions
and timings do not suit your required cooking preferences. Follow the steps
outlined in the “Operating Instructions” section to use this function.
FUNCTIONS WITHOUT PRESSURE
BROWNING
:
This is not a pressurized setting and it is intended to be used without the lid
in place. Use this function to brown or sauté meats and vegetables at a high
heat before pressure cooking or slow cooking.
1. Place the cooking bowl in the interior of the pressure cooker.
2. Add the proper amount of oil or butter to the bowl, according to the recipe.
3. Press the Browning button
. A red light will begin flashing above
the Browning function
, and the LED display will flash with 15
minute default. Press the + or – buttons to adjust the time.
Note: The locking lid should remain off while browning.
4. Press the START button
and allow the butter or oil to heat for about
1 minute. Add the food using caution once the oil or butter is hot, as it
could spatter, and then brown/sauté to desired doneness.
Note: Pat foods dry with a paper towel before browning
and brown/
sauté food in small batches to ensure best results.
5. Once you are done browning/sautéing, press the STOP button
to
cancel the Browning function. You can now switch to any other function
to continue cooking the recipe (refer to the specific function within this
section for directions).

16
SLOW COOK :
This is not a pressurized setting, but is intended to be used with the lid in
place. When slow cooking, it is extremely important that you do not often
open the lid to check on the cooking progress. Each time the lid is opened,
your cook time will need to be increased.
1. Place the cooking bowl in the interior of the pressure cooker.
2. Place all necessary ingredients into the cooking bowl. Do not fill above
the MAX fill line.
3. Place the lid on the pressure cooker and rotate
clockwise to align the “
” marking on the lid
with the “CLOSE
” marking on the pressure
cooker. The pressure release valve should be left
in the release position (K) during slow cooking.
4. Press either the Slow Cook High
or the Slow
Cook Low
button. A red light will begin
flashing above the selected function, and the LED
display will flash with 6 hour default for HIGH and
an 8 hour default for LOW. Press the + or – buttons to adjust the time.
5. Press the START button
. The red light will turn solid above the chosen
function and the timer will begin to countdown.
6. Once the time is up, the pressure cooker will automatically switch to
keep warm. A flashing red light will illuminate above the Keep Warm
button
and the timer will flash and begin to count up.
7. To open the lid: Hold the lid handle and turn the lid counter-clockwise
until the “
” marking on the lid aligns with the “OPEN ” marking on
the pressure cooker; lift the lid straight up and off the pressure cooker.
Note: Steam may escape when opening the lid. Always lift the lid straight off
and use caution when opening.
8. Always allow the pressure cooker to fully cool before cleaning and
storage.
Note: Do not cut meats in the cooking bowl as this may scratch the finish.
DELAY START :
The delay start feature is ideal for planning out meals on your schedule,
allowing you to delay cooking for a set amount of time. This feature works
for all functions except browning, slow cook, and keep warm. Always be sure
to follow food safety recommendations while cooking.
See https://www.foodsafety.gov/ for additional information.
1. Once a function is selected (see “Preset Cooking Functions”) a red light
will flash above the selected function and a default time will appear
on the LED display. If the time needs to be adjusted, press the + or –
buttons to select the correct time.
K

17
2. Press the delay start button , a red light will flash above the function
and a default time will appear on the LED display. First adjust the hours
as needed by pressing the + or – buttons (adjusts in 1 hour increments),
then press delay start
again to adjust the minutes by pressing the + or
– buttons (adjusts in 10 minute increments).
3. Once adjusted to desired delay start time, then press the Start button
and follow the standard instructions.
CARE AND CLEANING
This product contains no user serviceable parts. Refer service to qualified
service personnel.
CLEANING
IMPORTANT: Never immerse cooking base in water or other liquids.
1. Always unplug and allow to completely cool before cleaning.
2. Wash cooking bowl and lid in warm, soapy water. If food sticks to the
cooking bowl fill the bowl with warm, soapy water and allow it to soak
before cleaning with plastic scouring pad.
NOTE: the cooking bowl is dishwasher safe.
3. Rinse and dry thoroughly.
4. Wipe interior and exterior of the cooking base with a soft, slightly damp
cloth or sponge. Never use abrasive cleaners or scouring pads to clean
the cooking base, as they may damage the surfaces.
5. Remove the gasket, anti block shield and pressure release valve from lid
and wash in warm soapy water. Allow parts to dry completely before
reassembling.
STORING
Make sure that the appliance is thoroughly dry. Never wrap the cord tightly
around the appliance; keep it loosely coiled.

18
HELPFUL HINTS AND TIPS
• Always make sure the pressure release valve is in the “seal” position,
otherwise pressure will not build and your meal will take much longer
to cook.
• If using any sort of carbonated beverage to cook with, always use Natural
Pressure Release until the pressure release valve no longer releases
steam. This will ensure the carbonation has time to dissipate and not boil
over the pressure cooker.
• Do not cook pasta on its own in the pressure cooker. It’s very likely it will
stick together and turn out like a brick of pasta.
• Have a favorite slow cooker recipe? The pressure cooker is a perfect
way to turn a 4–6 hour recipe into one that’s done in about an hour
(depending on amount of food/liquid).
• Forgot to put all of your ingredients in the slow cooker in the morning?
No problem! Place all of those ingredients in the pressure cooker and
create a delicious meal just in time for dinner.
• The Browning function
is a great way to brown meats and veggies
in one pot before cooking the rest of your meal. Use a small amount of oil
(1–2 Tbsp.) and sauté meats or veggies for added flavor.
• If cooking cuts of meat on their own, always make sure to allow a “rest”
period by taking the meat out of the pressure cooker. Place it on a cutting
board to rest for 5–10 minutes before cutting. This allows the meat to
redistribute and retain its delicious juices.
• Make sure that meat and vegetables are of uniform size when cooking in
the pressure cooker. This will allow for more even cooking.
• Liquid evaporates while in the pressure cooker, so always make sure
there’s enough liquid in the pressure cooker to ensure food does not burn
or get stuck to the bottom of the pressure cooker.
• Do not overfill the pot with liquid or food. Because the pressure cooker
uses steam to cook, it needs space to build up and circulate.
• Most vegetables cook very quickly on the steaming function
; follow
the chart in the steaming section to make sure they’re not overcooked
and mushy.
• Add any thickeners (such as flour or corn starch) after pressure cooking
has finished. It takes your meal longer to cook when they are added at
the beginning.
• Use the browning function
at the end of cooking a sauce to thicken it.

19
TROUBLESHOOTING
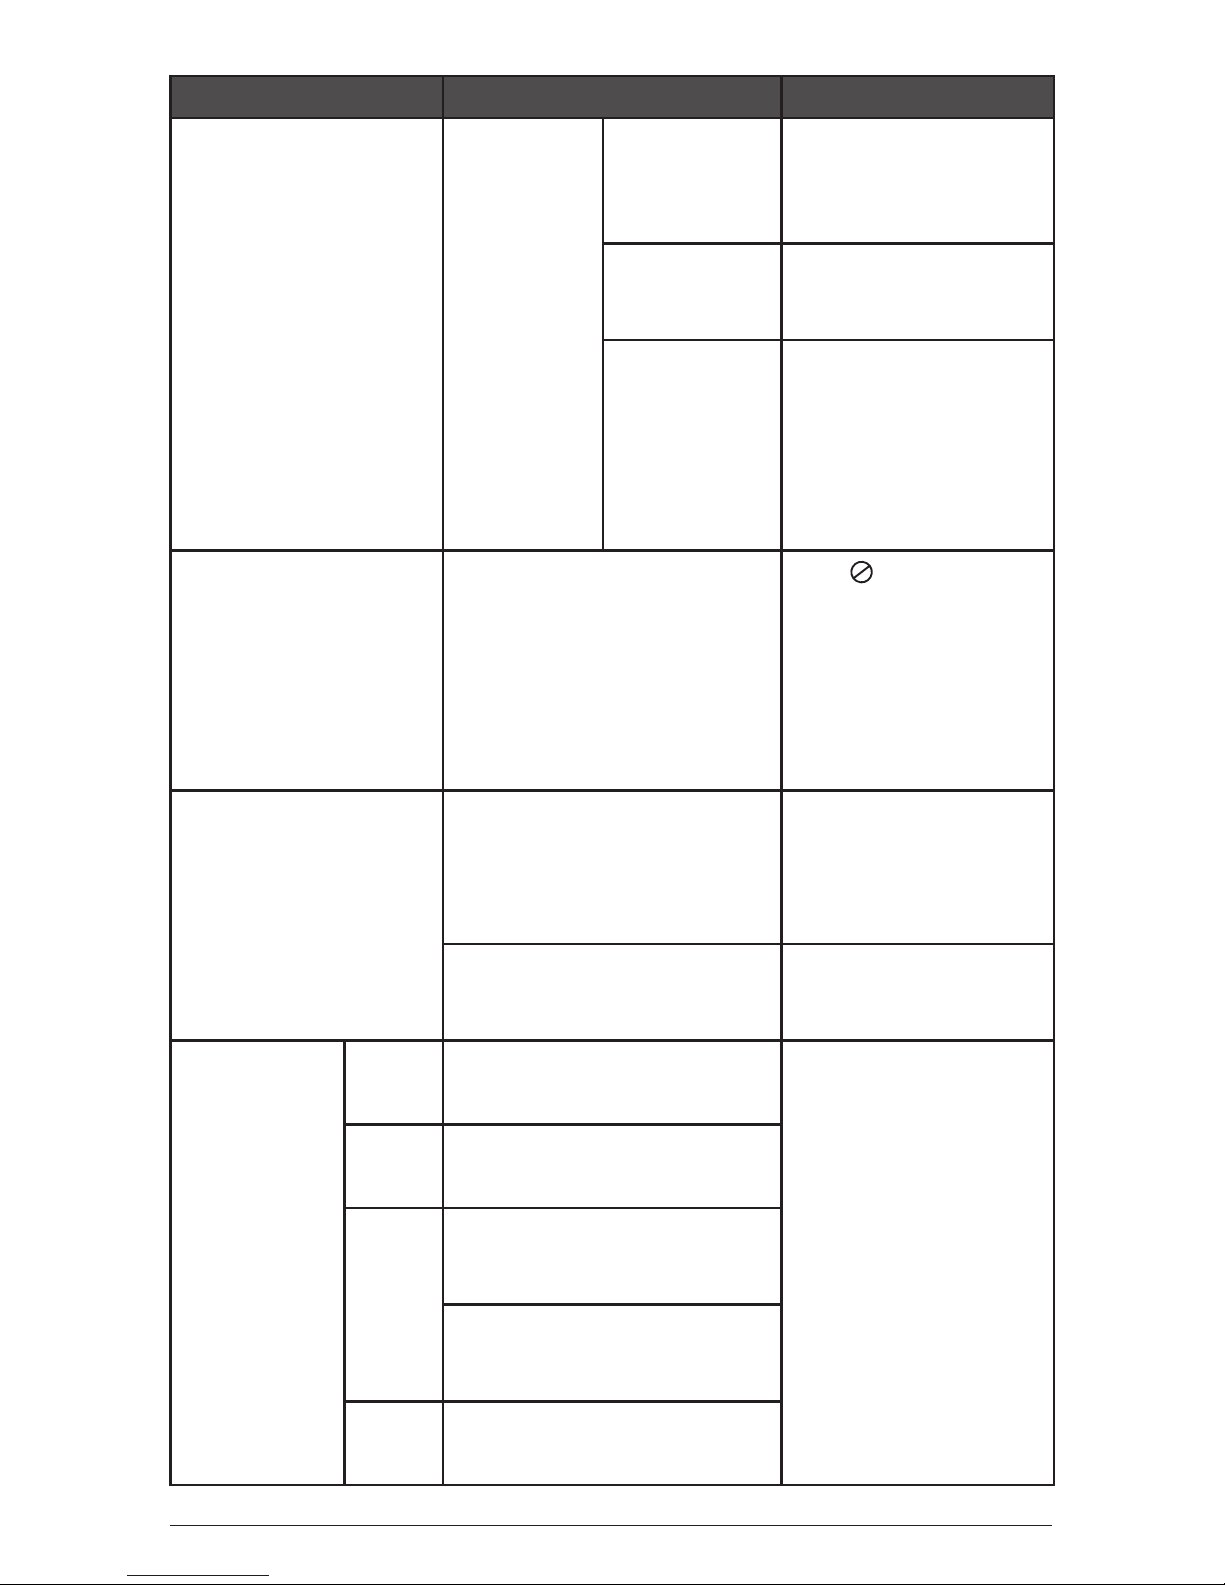
PROBLEM POSSIBLE CAUSE SOLUTION
Difficult to
close the lid
Rubber gasket not installed
properly
Check the position of
the rubber gasket
Red float valve in the
popped-up position
Press the red float
valve downward
lightly
Difficult to
open the lid
Pressure exists inside the
cooker
Use the pressure
release valve to
reduce the internal
pressure. Open the lid
after the pressure is
completely released
Red float valve stuck at the
popped-up position
Press the red
float valve lightly
downward with a
kitchen utensil
Steam leaks
from the side of
the lid
Rubber gasket not in place Install the rubber
gasket correctly
Rubber gasket damaged Replace the rubber
gasket
Food debris attached to
the rubber gasket
Clean the rubber
gasket
Lid not closed properly Open then close the
lid again
Red float valve
unable to rise
Not enough food or water
in the cooking bowl
Add water according
to the recipe
Red float valve is
obstructed by the locking
lid pin
Close the lid
completely,
see “Operating
Instructions” section
Steam comes
out from the
exhaust valve
without stopping
Lid is not in the seal
position
Turn the pressure
release valve to the
seal position
Pressure control fails Contact the
consumer service
team
Display flashes
“OPEN”
Lid is not at the correct
position for the selected
program
Close the lid for
pressuring cooking
or open the lid for
browning
20
PROBLEM POSSIBLE CAUSE SOLUTION
Display
flashes 3
blinking bars
but timer
doesn’t start
Working
pressure
isn’t
reached
inside
during
preheating
cycle
Pressure
release valve
is not in the
seal position
Check if pressure
release value is
turned to the seal
position
Rubber
gasket is not
in place
Install the rubber
gasket correctly
Red interlock
pin with
rubber
retainer ring
on bottom of
lid is not in
place
Check that red
interlock pin is
installed with the
rubber retainer ring
on the bottom of lid
Display flashes
“C5” and the
pressure cooker
shuts down
Overheating is detected on
the cooking bowl
Stop
the program,
use the pressure
release valve to
reduce the internal
pressure and check
if the food at the
bottom of the
cooking bowl is burnt
Display remains
blank after
connecting the
power cord
Bad power connection or
no power
Inspect the power
cord to ensure a
good connection,
check that the power
outlet is active
Appliance electrical issue Contact the
consumer service
team
All LEDs
flash with
a code
appearing
on screen
C1
code
Faulty temperature sensor
(cannot be detected)
Contact the
consumer service
team
C2
code
Faulty temperature sensor
(short circuited)
C5
code
Temperature is too high
because cooking bowl is
not in the pressure cooker
Temperature is too high
because there is no water
in cooking bowl
C6
code
Faulty pressure sensor

21
PROBLEM POSSIBLE CAUSE SOLUTION
Rice half cooked
or too hard
Not enough water Adjust dry rice and
water ratio according
to the recipe
Lid was opened
prematurely
After cooking cycle
is complete, leave
the lid on for 5 more
minutes
Rice too soft
Too much water Adjust dry rice and
water ratio according
to the recipe
Intermittent
beeping after
pressure cooker
has been
cooking for a
while
Indication of overheating.
Pressure cooker has
reduced the heating
temperature and may not
reach cooking pressure
Possible starch
deposits at the
bottom of the
cooking bowl have
clogged the heat
dissipation. Stop
the pressure cooker,
use the pressure
release valve to
reduce internal
pressure and inspect
the bottom of the
cooking bowl
Occasional
ticking or light
cracking sound
The normal sound of power
switching and expanding
because pressure board is
changing temperature
This is normal, do not
worry about it
Wet cooking bowl bottom Wipe cooking bowl
bottom dry before
cooking
If additional assistance is needed, please contact our consumer service team at
1-800-231-9786.

22
Two-Year Limited Warranty
(Applies only in the United States and Canada)
For service, repair or any questions regarding your appliance, call the
appropriate 800 number listed within this section. Please DO NOT return the
product to the place of purchase. Also, please DO NOT mail product back to
manufacturer, nor bring it to a service center. You may also want to consult
the website listed on the cover of this manual.
What does it cover?
• Any defect in material or workmanship provided; however,
Spectrum Brands, Inc.’s liability will not exceed the purchase price of product.
For how long?
• Two years from the date of original purchase with proof of purchase.
What will we do to help you?
• Provide you with a reasonably similar replacement product that is either new or
factory refurbished.
How do you get service?
• Save your receipt as proof of date of sale.
• Visit the online service website at www.prodprotect.com/applica, or call toll-free
1-800-231-9786, for general warranty service.
• If you need parts or accessories, please call 1-800-738-0245.
What does your warranty not cover?
• Damage from commercial use
• Damage from misuse, abuse or neglect
• Products that have been modified in any way
• Products used or serviced outside the country of purchase
• Glass parts and other accessory items that are packed with the unit
• Shipping and handling costs associated with the replacement of the unit
• Consequential or incidental damages (Please note, however, that some states do
not allow the exclusion or limitation of consequential or incidental damages, so
this limitation may not apply to you.)
How does state law relate to this warranty?
• This warranty gives you specific legal rights. You may also have other rights that
vary from state to state or province to province.
WARRANTY INFORMATION
 Loading...