

Black & Decker JS305B Instruction Manual
2
3
Important Safety Warnings and Instructions
WARNING: When using electric tools, basic safety precautions should always be followed
to reduce risk of fire, electric shock, and personal injury, including the following.
READ ALL INSTRUCTIONS
TO REDUCE RISK OF INJURY :
• Before any use, be sure everyone using this tool reads and understands all safety
instructions and other information contained in this manual.
• Save these instructions and review frequently prior to use and in instructing others.
GENERAL SAFETY WARNINGS AND INSTRUCTIONS FOR ALL TOOLS
• KEEP WORK AREACLEAN. Cluttered areas and benches invite injuries.
• CONSIDER WORK AREA ENVIRONMENT. Don’t expose power tools to rain. Don’t use
power tools in damp or wet locations. Keep work area well lit. Do not use in presence of
flammable liquids or gases. Motors in these tools normally spark, and the sparks may ignite
the fumes.
• GUARD AGAINST ELECTRIC SHOCK. Prevent body contact with grounded surfaces. For
example; pipes, radiators, ranges, refrigerator enclosures. Use extreme caution when
drilling, driving, or cutting into walls, floors, ceilings or other areas or wherever live electrical
wires may be contacted, do not touch any metal parts of the tool. Hold the tools only by the
plastic handle to prevent electric shock.
• KEEP CHILDREN AW AY. Do not let children and visitors contact tool or extension cord. All
children and visitors should be kept away from work area.
• STORE IDLE TOOLS. When not in use, tools should be stored in dry, and high or locked-up
place–out of reach of children.
• DON’T FORCE TOOL. It will do the job better and safer at the rate for which it was intended.
• USE RIGHT TOOL. Don’t force small tool or attachment to do the job of a heavy-duty tool.
Don’t use tool for purposes not intended.
• DRESS PROPERLY. Do not wear loose clothing or jewelry. They can be caught in moving
parts. Rubber gloves and non-skid footwear are recommended when working outdoors.
Wear protective hair covering to contain long hair.
• USE SAFETY GLASSES AND OTHER SAFETY EQUIPMENT. Use safety goggles or
safety glasses with side shields, complying with applicable safety standards and, when
needed, a face shield. Also use face or dust mask if cutting operation is dusty . This applies to
all persons in the work area. Also use a hard hat, hearing protection, gloves, safety shoes
and dust collection systems when specified or required.
• DON’T ABUSE CORD. Never carry tool by cord or yank it to disconnect from receptacle.
Keep cord from heat, oil, and sharp edges.
• SECURE WORK. Use clamps or a vise to hold work. It’s safer than using your hand and it
frees both hands to operate tool.
• DON’T OVERREACH. Keep proper footing and balance at all times.
• MAINTAIN TOOLS WITH CARE. Keep tools sharp and clean for better and safer
performance. Follow instructions for lubricating and changing accessories. Inspect tool cords
periodically and if damaged, have repaired by authorized service facility. Inspect extension
cords periodically and replace if damaged. Keep handles dry, clean, and free from oil and
grease.
• DISCONNECT TOOLS. Unplug the tool when not in use, when moving tool from place to
place, before servicing, and when changing accessories (such as blades, bits, cutters) or
making adjustments.
• REMOVE ADJUSTING KEYS AND WRENCHES. Form habit of checking to see that keys
and adjusting wrenches are removed from tool before turning it on.
• AVOID UNINTENTIONAL STARTING. Don’t carry tool with finger on switch. Be sure switch
is off when plugging in.
• OUTDOOR USE EXTENSION CORDS. When tool is used outdoors, use only extension
cords intended for use outdoors and so marked.
• STA YALERT. W atch what you are doing. Use common sense. Do not operate tool when you
are tired or otherwise impaired.
• CHECK DAMAGED PARTS. Before further use of the tool, a guard or other part that is
damaged should be carefully checked to determine that it will operate properly and perform
its intended function. Check for alignment of moving parts, binding of moving parts,
breakage of parts, mounting, and any other conditions that may affect its operation. Aguard
or other part that is damaged should be properly repaired or replaced by an authorized
service center. Do not use tool if switch does not turn it on and off.
• REPAIRS AND SERVICE. Repairs, maintenance and any adjustments not specified in this
manual should be performed by Black & Decker authorized service centers or other qualified
service organizations, always using identical replacement parts.
• USE OF ACCESSORIES AND ATTACHMENTS. The use of any accessory or attachment
not recommended for use with the tool could be hazardous. Note: Refer to the accessory
section of this manual for further details.
SAFETY WARNINGS AND INSTRUCTIONS: DOUBLE INSULATION
Double insulated tools are constructed throughout with two separate layers of electrical
insulation or a double thickness of insulation between you and the tool’s electrical system.
Tools built with double insulation are not intended to be grounded. As a result, your tool is
equipped with a two prong plug which permits you to use extension cords without concern for
maintaining a ground connection.
Double insulation does not take the place of normal safety precautions when operating this
tool. The insulation system is for added protection against injury resulting from a possible
electrical insulation failure within the tool.
REPLACEMENT PARTS: When servicing use only identical replacement parts. Repair or
replace damaged cords.
SAFETY WARNINGS AND INSTRUCTIONS: POLARIZED PLUGS
Polarized plugs (one blade is wider than the other) are used on equipment to reduce the risk
of electric shock. When provided, this plug will fit into a polarized outlet only one way. If the
plug does not fit fully into the outlet, reverse the plug. If it still does not fit, contact a qualified
electrician to install the proper outlet. Do not change the plug in any way.
The label on your tool may include the following symbols.
V..............volts
A..............amperes
Hz............hertz
W ............watts
min ..........minutes
............alternating current
........direct current
no............no load speed
............Class II Construction
…/min......revolutions or reciprocation per minute
............earthing terminal
............safety alert symbol
WARNING: Some dust created by power sanding, sawing, grinding, drilling, and other
construction activities contains chemicals known to cause cancer, birth defects or other
reproductive harm. Some examples of these chemicals are:
• lead from lead-based paints,
• crystalline silica from bricks and cement and other masonry products, and
• arsenic and chromium from chemically-treated lumber. (CCA)
Your risk from these exposures varies, depending on how often you do this type of work. To
reduce your exposure to these chemicals: work in a well ventilated area, and work with
approved safety equipment, such as those dust masks that are specially designed to filter
out microscopic particles.
A
INSTRUCTION MANUAL
Cat. No. JS305B
VEA EL ESPAÑOL EN LA CONTRAPORTADA.
SAVE THIS MANUAL FOR FUTURE REFERENCE.
INSTRUCTIVO DE OPERACIÓN, CENTROS DE SERVICIO Y PÓLIZA DE
GARANTÍA. ADVERTENCIA: LÉASE ESTE INSTRUCTIVO ANTES DE USAR EL
PRODUCTO.
CAT. NO. JS305B FORM NO. 809784-05 Copyright © 2001 Black & Decker (OCT-01) Printed in U.S.A.
1-800-54-HOW-TO
BEFORE RETURNING THIS PRODUCT
FOR ANY REASON PLEASE CALL
IF YOU SHOULD EXPERIENCE A PROBLEM
WITH YOUR BLACK & DECKER PURCHASE,
CALL 1-800-54-HOW-TO (1-800-544-6986).
IN MOST CASES, A BLACK & DECKER REPRESENTATIVE
CAN RESOLVE YOUR PROBLEM OVER THE PHONE.
IF YOU HAVE A SUGGESTION OR COMMENT,
GIVE US A CALL. YOUR FEEDBACK IS VITAL
TO THE SUCCESS OF BLACK & DECKER'S QUALITY
IMPROVEMENT PROGRAM.
(544-6986)
OOOOrrrrbbbbiiiittttaaaallll AAAAccccttttiiiioooonnnn VVVVaaaarrrriiiiaaaabbbblllleeee SSSSppppeeeeeeeedddd JJJJiiiigggg SSSSaaaaww
ww
1
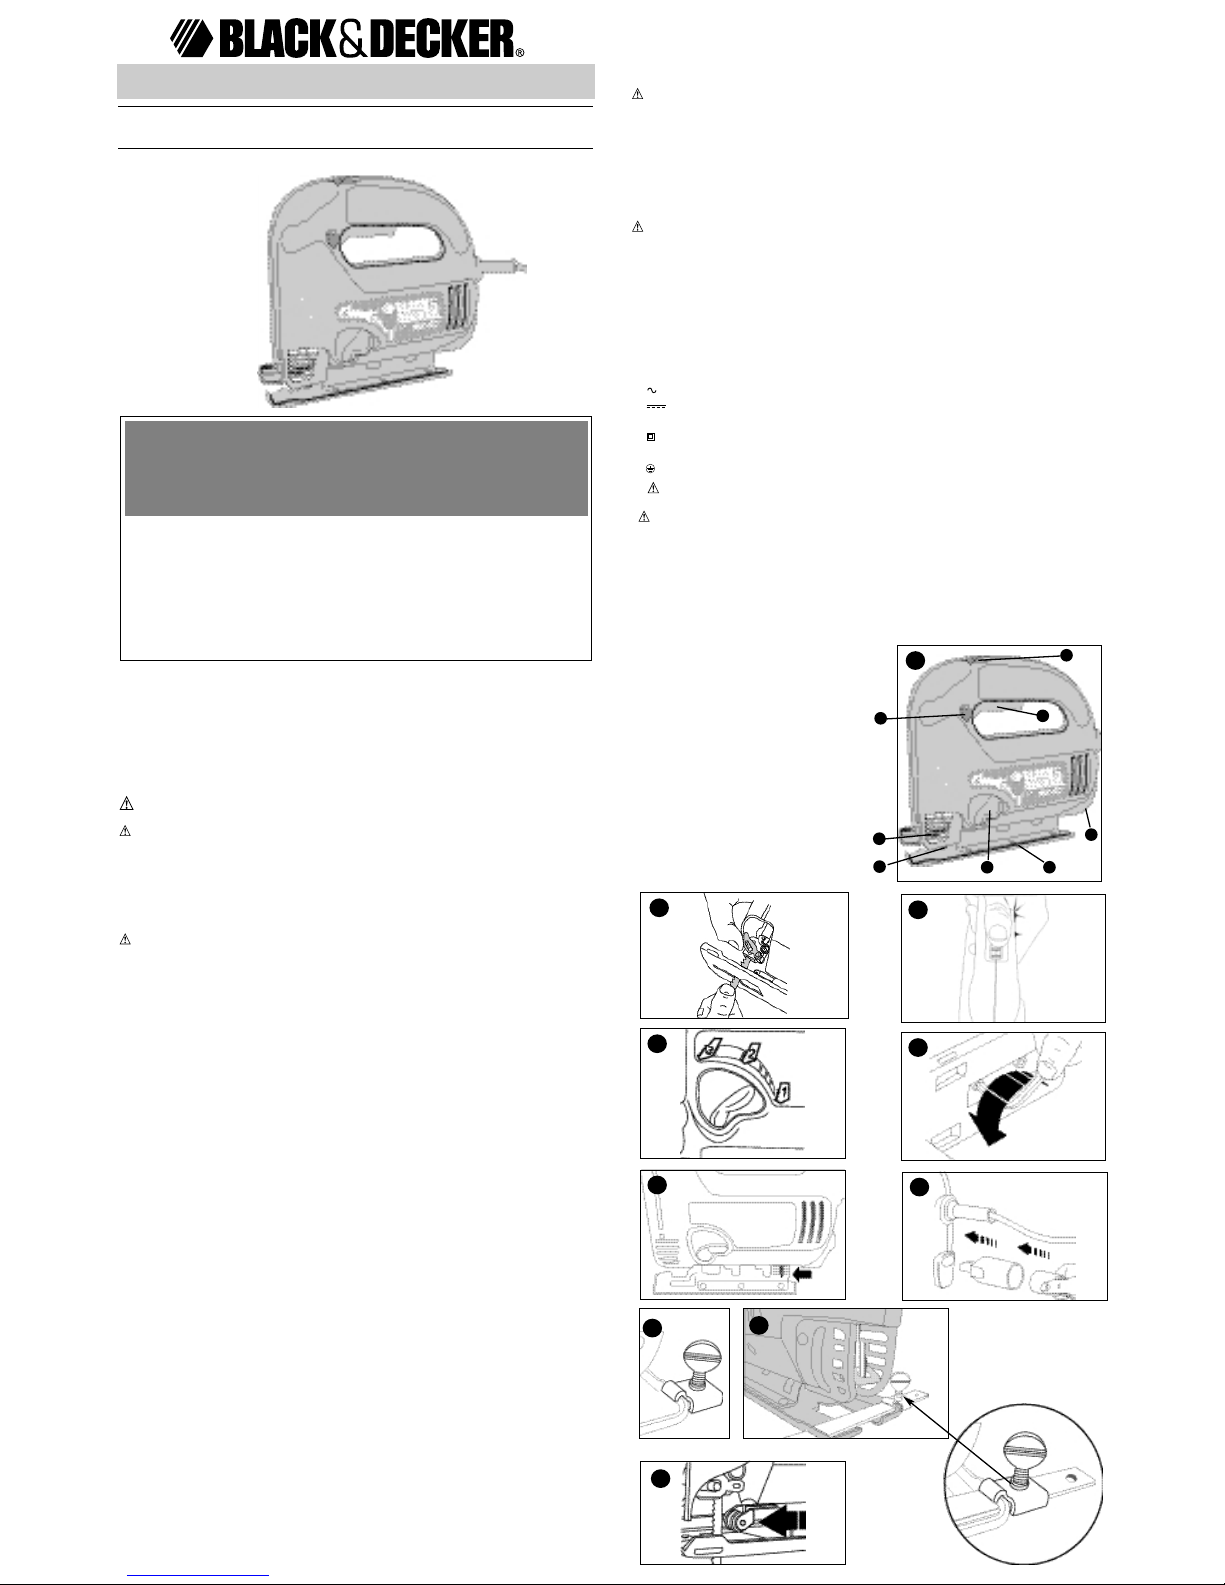
Features
1. Quick Clamp™Blade holder
2. Orbital stroke adjustment
3. Electronic speed control wheel
4. On/off switch
5. Lock on button
6. Dust extraction
7. Shoe plate
8. Support roller
1
2
3
4
5
6
7
8
4
5
6
7
8
7A

• After using the saw for extended periods on slow stroke settings, run the saw on maximum speed for 3 minutes to aid cooling.
• Lubricate between the support roller (figure 8) and the steel mounting bracket on both
sides with a drop of oil, to extend the life of the roller.
Use only mild soap and damp cloth to clean the tool. Never let any liquid get inside the tool;
never immerse any part of the tool into a liquid.
IMPORTANT: To assure product SAFETY and RELIABILITY, repairs, maintenance and
adjustment should be performed by authorized service centers or other qualified service
personnel, always using identical replacement parts.
ACCESSORIES
Recommended accessories for use with your tool are available from your local dealer or
authorized service center. If you need assistance regarding accessories, please call:
1-800-544-6986.
WARNING: The use of any accessory not recommended for use with this tool could be haz-
ardous.
SERVICE INFORMATION
Black & Decker offers a full network of company-owned and authorized service locations
throughout North America. All Black & Decker Service Centers are staffed with trained
personnel to provide customers with efficient and reliable power tool service. Whether you
need technical advice, repair, or genuine factory replacement parts, contact the Black &
Decker location nearest you. To find your local service location, refer to the yellow page
directory under "Tools—Electric" or call: 1-800-544-6986.
FULL TWO-YEAR HOME USE WARRANTY
Black & Decker (U.S.) Inc. warrants this product for two years against any defects in
material or workmanship. The defective product will be replaced or repaired at no charge in
either of two ways.
The first, which will result in exchanges only, is to return the product to the retailer from
whom it was purchased (provided that the store is a participating retailer). Returns should
be made within the time period of the retailer’s policy for exchanges (usually 30 to 90 days
after the sale). Proof of purchase may be required. Please check with the retailer for their
specific return policy regarding returns that are beyond the time set for exchanges.
The second option is to take or send the product (prepaid) to a Black & Decker owned or
authorized Service Center for repair or replacement at our option. Proof of purchase may be
required. Black & Decker owned and authorized Service Centers are listed under
"Tools–Electric" in the yellow pages of the phone directory.
This warranty does not apply to accessories. This warranty gives you specific legal rights
and you may have other rights which vary from state to state. Should you have any
questions, contact the manager of your nearest Black & Decker Service Center. This
product is not intended for commercial use.
See ‘Tools-Electric’
– Yellow Pages –
for Service & Sales
Black & Decker (U.S.) Inc.,
701 E. Joppa Rd.
Towson, MD 21286 U.S.A.
AVANTDE RETOURNER LEPRODUIT, PEU IMPORTE
LA RAISON PRIÈRE DECOMPOSER 1 800 544-6986
JS305
GUIDE D’UTILISA TION
CONSERVER LE PRÉSENT GUIDE À TITRE DE RÉFÉRENCE.
USE OF EXTENSION CORDS
Make sure the extension cord is in good condition before using. Always use the proper size
extension cords with the tool – that is, proper wire size for various lengths of cord and heavy
enough to carry the current the tool will draw. Use of an undersized cord will cause a drop in
line voltage resulting in loss of power and overheating. For proper size cords see chart
below.
MOTOR
Your Black & Decker tool is powered by a Black & Decker-built motor. Be sure your power
supply agrees with nameplate marking. 120 Volts AC only means your tool will operate on
standard 60 Hz household power. Do not operate AC tools on DC. A rating of 120 volts
AC/DC means that you tool will operate on standard 60 Hz AC or DC power. This information
is printed on the nameplate. Lower voltage will cause loss of power and can result in overheating. All Black & Decker tools are factory-tested; if this tool does not operate, check the
power supply.
SAVE THESE INSTRUCTIONS
ASSEMBLY/ADJUSTMENT SET-UP
ON/OFF SWITCH
To turn the saw on, squeeze the trigger switch (4). To turn the tool off, release the trigger
switch. The tool can be locked on for continuous operation by fully squeezing and holding the
trigger switch while you depress the lock-on button (5). With the lock-on button depressed,
release the trigger switch and the tool will continue to run. To release from lock position,
squeeze and release the trigger. Always disengage the lock before disconnecting from the
power supply.
INSTALLING BLADES - FIGURE 1
BEFORE INSTALLING BLADES, TURN OFF AND UNPLUG T OOL.
Your jig saw uses the Quick Clamp™blade changing system. T o install a blade, lift the Quick
Clamp™ lever (Figure 1). Ensure the blade teeth are facing forward and the blade is
positioned towards the back of the blade holder. Insert the saw blade shank fully into the
blade clamp. Release the lever and the blade will be clamped securely in place. To release
the blade, lift the lever.
ELECTRONIC SPEED CONTROL - FIGURE 2
The electronic speed control wheel (3) permits the setting of the optimum speed for a specific
material. The recommended speed is given in the table that follows:
MATERIAL
SPEED SETTING
Wood 6 - max
Metal 2 - 3
Aluminum 2 - 5
PVC 3 - 4
Ceramic 3 - 5
ORBITAL STROKE ADJUSTMENT - FIGURE 3
The orbital stroke lever (2) is used together with the electronic speed control wheel to set the
best combination of blade speed and aggressiveness to give the desired cut rate and finish.
The best orbital setting for particular applications is listed in the following table:
WOOD METAL PLASTICS
3 Thick workpiece _ Fiberglass
Fast cuts Acrylic
2 Plywood Aluminum Plastics
Chipboard Non-ferrous
1 Thin workpiece Sheet metal _
ADJUSTING THE SAW SHOE FOR BEVEL CUTTING - FIGURES 4 & 5
TURN OFF AND UNPLUG TOOL.
To adjust the bevel angle, loosen the screws on the bottom of the shoe, as shown in figure 4.
Move the shoe plate (7) forward and set the desired angle according to the scale or move the
shoe plate rearward to the fixed locks at 0°, 15°, 30° or 45° (figure 5). Tighten the screws.
Although the scale and notches are accurate for most purposes it is advisable for very
accurate angle cutting to use a protractor to set the shoe. Make a test cut on some scrap
material to check the accuracy of the angle. To reset the shoe for a square cut, loosen the
clamp screws and move the shoe until it is approximately 90° to the blade, and then, while
applying slight forward pressure on the shoe, retighten the clamp screws. If necessary, readjust the blade support roller using only the front screw.
DUST EXTRACTION SYSTEM - FIGURE 6
For dust extraction purposes, you can connect a vacuum cleaner to your orbital jig saw. An
adaptor is included for this purpose. To connect the adaptor, align the arrow on the narrow
end with the arrow on the rear of the jig saw. Push the adaptor and turn it clockwise. The hose
of the vacuum cleaner fits either in or over the adaptor, depending on the size of the hose.
GENERAL CUTTING
Be sure material is firmly secured. Hold jig saw by the handle and operate switch to turn the
unit on. Don’t attempt to turn on the unit when blade is against material to be cut. This could
stall the motor. Place front of shoe on material to be cut and hold jig saw shoe down firmly
against the work surface while cutting. Don’t force the tool; let the blade cut at its own speed.
Whenever possible, clamp or support work close to the line of cut; when the cut is completed,
shut off power and lay the saw aside before loosening the work.
METAL & PLASTIC CUTTING
In cutting thin gauge sheet metals, it is best to clamp wood or plywood to the bottom of the
metal sheet; this will insure a clean cut without the danger of vibration or tearing of metal. Use
a fine-tooth blade for ferrous metals (for those that have an iron content); and use a coarser
blade for nonferrous metals (those that do not have an iron content).
Cutting thin metal will take longer than cutting relatively thick wood so do not be tempted to
speed up the process by forcing the saw. Spread a thin film of cutting lubricant along the
cutting line (any light weight oil).
Use low speeds for cutting metals, plastics and composition tile. When cutting laminated
plastic, place the finished side down and use a fine tooth hollow ground blade.
POCKET CUTTING
• Measure the surface to be cut and mark clearly with a pencil. Next, tip the saw forward
until the front edge of the shoe sits firmly on the work surface, but with the blade well clear
of it.
• Turn the tool on and set the speed wheel on maximum speed.
• Grip the handle firmly and slowly lower the back edge of tool until the blade cuts smooth-
ly into material. Do not move the jig saw forward along the cut line until the saw blade has
completely entered the material and shoe comes to rest flat on its surface.
RIPPING - FIGURE 7 AND 7A
Ripping without a pencil line can easily be done with the rip fence included with your jig saw.
To use the rip fence, position the jig saw on a flat surface. Thread the thumbscrew into the
metal clamp and place the clamp on the jig saw shoe as shown in Figure 7. Next, insert the
rip fence into the slot on the opposite side of the shoe and slide it over through the other slot
and through the clamp as shown in Figure 7A. Set the cross bar at desired distance from
blade and tighten screw. When ripping, the cross bar should be down and against the straight
edge of the workpiece.
TOOL CARE AND MAINTENANCE
• Excessive force on the saw will prevent the orbital action from operating correctly and
reduce the cutting efficiency.
Minimum Gage for Cord Sets
Volts Total Length of Cord in Feet
120V 0-25 26-50 51-100 101-150
240V 0-50 51-100 101-200 201-300
Ampere Rating
More Not more American Wire Gage
Than Than
0-6 18 16 16 14
6 - 10 18 16 14 12
10 - 12 16 16 14 12
12 - 16 14 12 Not Recommended
DIRECTIVES ET CONSIGNES DE SÉCURITÉ IMPORTANTES
AVERTISSEMENT : lorsqu’on utilise un outil électrique, on doit suivre les consignes de
sécurité élémentaires, y compris les directives indiquées aux présentes, afin d’éviter les risques
d’incendie, de choc électrique et de blessure.
LIRE TOUTES LES DIRECTIVES
AFIN DE RÉDUIRE LES RISQUES DE BLESSURE :
• S’assurer d’avoir bien lu et compris toutes les directives et consignes de sécurité
contenues dans le présent guide, y compris les consignes de sécurité énumérées cidessous, avant d’utiliser l’outil.
• Conserver les présentes directives et les relire fréquemment, particulièrement avant
d’utiliser l’outil ou d’en expliquer le fonctionnement à autrui.
DIRECTIVES ET AVERTISSEMENTS GÉNÉRAUX CONCERNANT TOUS LES OUTILS
• GARDER LA ZONE DE TRAVAIL PROPRE; les espaces de travail et les établis encombrés
sont propices aux blessures.
• UTILISER L’OUTIL DANS DES ENDROITS APPROPRIÉS; ne pas exposer l’outil à la pluie,
ni l’utiliser dans des endroits humides ou mouillés. Garder la zone de travail bien éclairée.
Ne pas utiliser l’outil en présence de gaz ou de liquides inflammables; le moteur crée
normalement des étincelles susceptibles d’enflammer les vapeurs environnantes.
• ÉVITER LES RISQUES DE CHOC ÉLECTRIQUE; l’utilisateur doit éviter tout contact avec
les surfaces mises à la terre (tuyaux, radiateurs, cuisinières et réfrigérateurs). Faire preuve
d’extrême prudence lorsqu’on perce un trou, qu’on enfonce un clou ou qu’on effectue une
coupe dans un mur, un plancher ou un plafond, ou à tout autre endroit où la scie pourrait
entrer en contact avec des fils électriques sous tension. Ne pas toucher les pièces
métalliques de l’outil; toujours le tenir au moyen de la poignée en plastique afin d’éviter les
risques de choc électrique.
• TENIR LES ENFANTS À L’ÉCART; s’assurer que personne ne s’approche de la zone de
travail ni ne touche à l’outil ou à la rallonge.
• RANGER L’OUTIL APRÈS CHAQUE UTILISATION;lorsqu’on n’utilise pas l’outil, le ranger
dans un endroit sec, élevé ou sous clé, hors de la portée des enfants.
• NE PAS FORCER L’OUTIL; pour obtenir de meilleurs résultats et prévenir les risques de
blessure, laisser l’outil couper à la vitesse pour laquelle il a été conçu.
• UTILISER L’OUTIL APPROPRIÉ; ne pas utiliser des outils ni des accessoires à service
léger pour des travaux destinés à des outils de service intensif. N’utiliser cet outil que pour
des travaux pour lesquels il a été conçu.
• PORTER DES VÊTEMENTS APPROPRIÉS; ne pas porter de vêtements amples ni de
bijoux, car ceux-ci peuvent rester coincés dans les pièces mobiles. On recommande le port
de gants en caoutchouc et de chaussures antidérapantes lorsqu’on effectue des travaux à
l’extérieur. Couvrir ou attacher les cheveux longs.
• PORTER LE MATÉRIEL DE PROTECTION APPROPRIÉ; porter des lunettes de sécurité
munies d’écrans latéraux approuvées selon la norme de sécurité en vigueur, ainsi qu’un
écran facial, le cas échéant. Le port d’un masque facial ou d’un masque anti-poussières est
aussi recommandé pour toute personne présente dans la zone de travail lorsque l’utilisateur
soulève de la poussière. Utiliser un casque de sécurité, des protecteurs auditifs, des gants,
des chaussures antidérapantes et un système de dépoussiérage lorsque la situation le
requiert.
• NE PAS UTILISER LE CORDON DE MANIÈRE ABUSIVE; on ne doit pas transporter l’outil
en le tenant par le cordon ni tirer sur ce dernier pour débrancher l’outil. On doit tenir le cordon
à l’écart des sources de chaleur, de l’huile et des bords tranchants.
• IMMOBILISER LA PIÈCE; retenir la pièce au moyen d’un étau ou de butées fixes afin de
pouvoir tenir l’outil avec les deux mains et travailler en toute sécurité.
• NE PAS TROP ÉTENDRE LES BRAS; les pieds doivent rester ancrés fermement au sol afin
de maintenir son équilibre en tout temps.
• BIEN ENTRETENIR L’OUTIL; afin d’obtenir de meilleurs résultats et de faire preuve de
prudence, garder l’outil propre et bien aiguisé. Suivre les consignes lorsqu’on lubrifie ou
qu’on remplace les accessoires. Inspecter périodiquement le cordon et la rallonge utilisés,
afin de s’assurer qu’ils ne sont pas endommagés; faire réparer le cordon par un centre de
SCIE SAUTEUSE À VITESSE VARIABLE ET À
MOUVEMENT ORBITAL
 Loading...