

Page 1
GL545
1
Page 2

English 6
Italiano 12
Deutsch 18
Français 25
Nederlands 30
Español 36
Português 42
EППЛУИО· 46
Copyright Black & Decker
2
Page 3
4
3
2
7
5
1
1
8
10
9
6
5
6
3
Page 4
2.1
12
10
2.2
11
2.3
14
2.4
13
12
A
E
F
BCD
°
20
G
H
50mm
4
J
Page 5
3.1
45
18
917
15
19
16
6
MAX
21 20
3.2
7.1
7.3
7.2
22
5
Page 6
Grass Trimmer
User manual
Congratulations!
Your purchase of this Black & Decker Reflex® grass
trimmer and lawn edger assures you of years of
problem free trimming. The Reflex® not only trims
grass and edges the lawn, it also has a unique
totally automatic line feed system. You do nothing the Reflex® system means non-stop trimming; by
the use of a simple mechanism it senses when the
line has worn and, when needed, automatically
feeds out line to its optimum cutting length. You
just switch the unit on and trim.
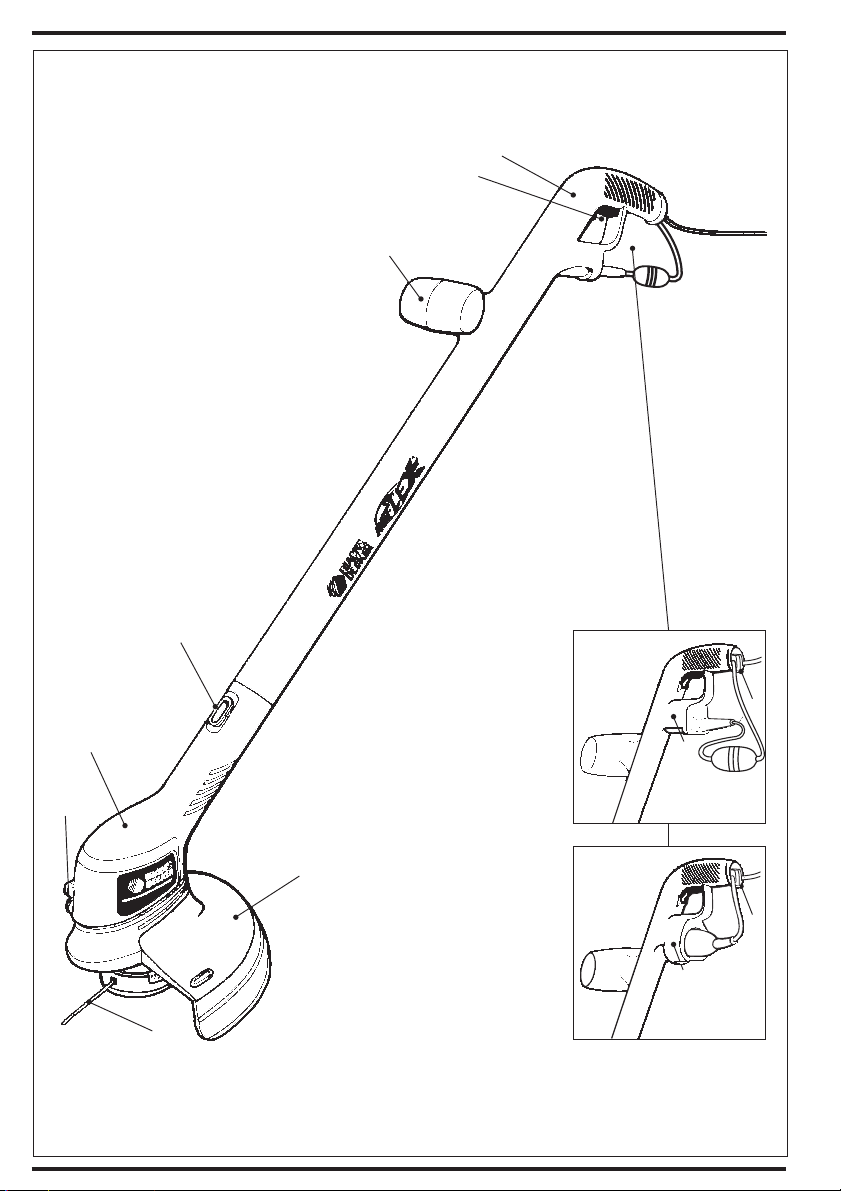
Description
Following is a list of the parts that will be mentioned
in this instruction leaflet and are shown in the
appropriate diagrams:
Body (1)
1
Secondary handle (2)
Trigger switch (3)
Switch handle (4)
Supply cord restraint (5)
Power inlet or supply cord (6)
Edge conversion button (7)
Line trimming blade (8)
Cutting line (9)
Guard (10)
Guard retaining lugs (11)
2
Guard screw (12)
Guard screw hole (13)
Front edge (14)
Spool cover (15)
4
Spool cover tab (16)
Spool housing (17)
Eyelet (18)
Spool (19)
5
Arrow (20)
6
Line retaining hole (21)
Lever (22)
7
Safety instructions
Read all of this manual carefully, observing
all the recommended safety instructions
before, during and after using your machine.
Maintain your machine in good working order.
Familiarise yourself with the controls on
your machine before attempting to operate
it, but above all, be sure you know how to
stop your machine in an emergency.
Retain this manual and all other literature
supplied with your machine for future
reference.
Electrical connection
• Your machine is designed for use on AC
(mains) electrical supplies only. Do not
attempt to use on any other supply.
• Plug your machine into a power point,
never in a light socket.
• Do not leave your machine unattended
whilst it is connected to the electrical supply.
• Always switch off and remove the plug
from the mains before cleaning,
inspecting or adjusting any part of the
trimmer, or if the supply cord has
become damaged or entangled.
Double insulation
Your machine is double insulated. This
means that all external metal parts are
electrically isolated from the power supply.
This is achieved by placing an extra
insulation barrier between the electrical and
mechanical parts. Double insulation means
greater electrical safety and obviates the
necessity of having the machine earthed.
Power supply cord
• The power supply cord should be
regularly inspected for signs of damage or
ageing and only used if in good condition.
• Always keep the power supply cord
away from the cutting line (9), be aware
of its position at all times.
• Never carry your machine by the cord or
jerk the cord to remove the plug from the
socket. Keep the cord away from heat,
oils and sharp edges.
• Have damaged cords replaced
completely by your nearest Black & Decker
service centre. Do not attempt to do this
yourself as the switch handle is not
customer serviceable.
6
Page 7
Cutting line
• Take care against injury from line trimming
blade (8) during unpacking and assembly
and any excess line which may be cut off
when the trimmer is first operated.
• The cutting line (9) will continue to run
for a short time after releasing the
trigger switch. Under no circumstances
should you attempt to stop the cutting
line, always allow it to stop on its own.
• Never fit metal cutting line.
Clothing
• Always wear safety glasses when using
your machine.
• To protect your feet, always wear stout
shoes or boots (not bare footed or
wearing open sandals).
• Wear long trousers to protect your legs -
any debris left on the lawn or cutting path
may be picked up and ejected by the
cutting line.
• Use ear protection if the sound level
seems uncomfortable when using
your machine.
Using your machine
• Always use your machine in the manner
outlined in this manual. Your machine is
designed to be used in an upright
position and if it is used in any other way
an injury may result.
• Before using your machine, disconnect it
from the electrical supply and visually
inspect the rotating parts for damage.
Also, check that the spool assembly
is secure.
• Always check that your lawn or cutting
path is clear of all sticks, stones, wire
and other debris. Contact with such
debris may damage your machine.
• Keep your machine away from your feet
and other parts of your body when
switching on and during operation.
• Do not switch on your machine when it is
upside down.
• Walk, never run with the unit.
• Do not use your machine in the rain and
do not allow it to get wet.
• Use your machine only in daylight or
good artificial light.
• Do not cross gravel paths or roads whilst
the cutting line is rotating.
• Do not cut excessively steep slopes.
Be sure of your footing and cut across
the face of slopes, never up and down.
ENGLISH
• Never use your machine with a
damaged guard (10) or without the guard
fixed in position.
• Be careful when trimming as freshly cut
grass is damp and slippery.
Safety of others
• Remember that the operator/user is
responsible for accidents or hazards
occuring to other people or their property.
• Never allow children or persons who are
unfamiliar with this type of machine to
use it, nor anyone who has not read
360˚
6m/20ft
Electrical safety
this leaflet.
• Do not allow children, animals or other
adults near your machine when in use always keep them well away from the
cutting area.
Care of your machine
• Store your machine in a dry place when
not in use, out of the reach of children.
• Do not use solvents or cleaning fluids
to clean your machine - use a blunt
scraper to remove grass and dirt. Always
disconnect from the electrical supply and
ensure the cutting line (9) is stationary
before cleaning.
• Do not operate your machine if any parts
are defective.
• Do not attempt to remove any parts
other than those mentioned in these
instructions.
• Use only Black & Decker recommended
replacement parts and accessories.
Your machine should always be switched off
at the mains before disconnecting any plug
and socket connector, extension cables,
or cordsets.
Mains plug replacement - UK only
Should your mains plug need replacing and
you are competent to do this, proceed as
instructed below. If you are in doubt contact
a Black & Decker service centre or a
qualified electrician.
• Disconnect the plug from the supply.
• Cut off the plug and dispose of it safely,
a plug with bared copper conductors
is dangerous if engaged in a live
socket outlet.
7
Page 8
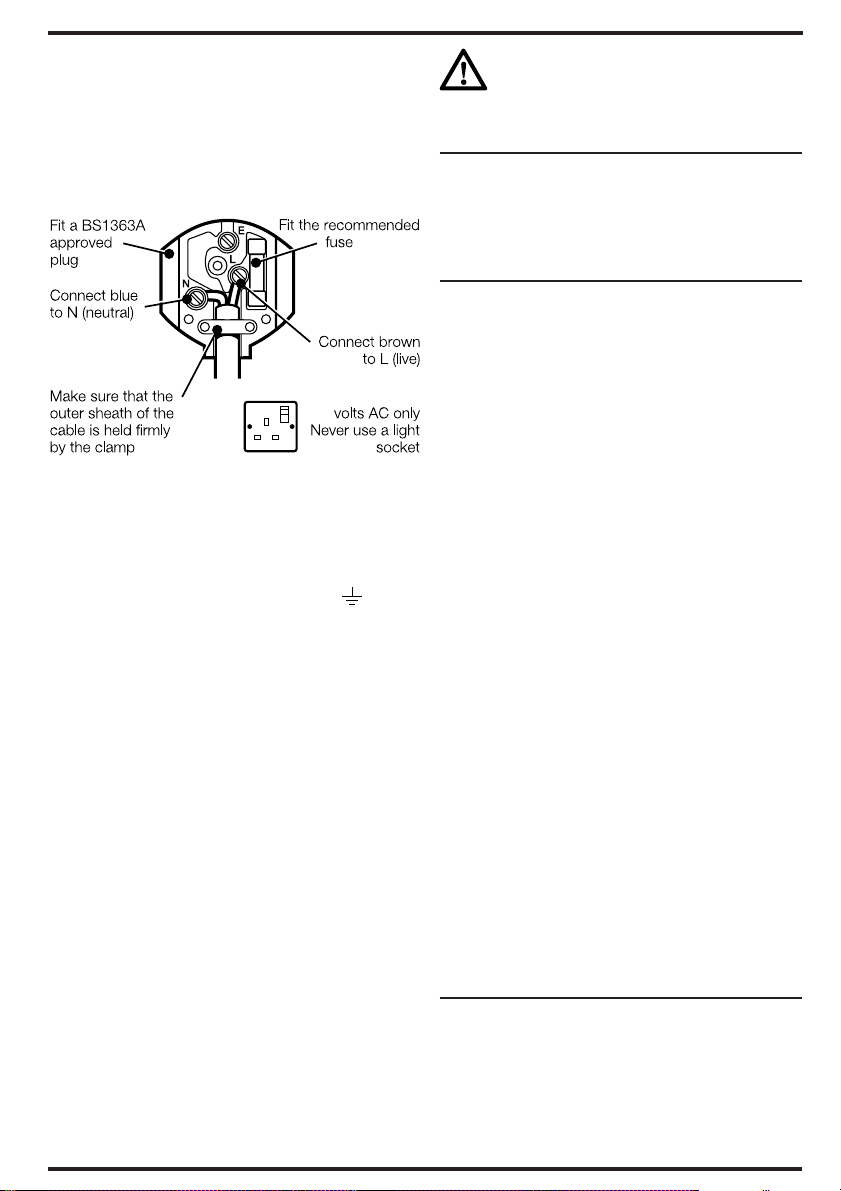
• Only fit 13 amp BS1363A approved
plugs fitted with the correctly rated fuse.
• The cable wire colours, or a letter, will
be marked at the connection points of
most good quality plugs. Attach the
wires to their respective points in the
plug (see below). Brown is for 'Live' (L)
and blue is for 'Neutral' (N).
240
• Before replacing the top cover of the
mains plug ensure that the cable restraint
is holding the outer sheath of the cable
firmly and that the two leads are correctly
fixed at the terminal screws.
• Warning! Never connect Live or Neutral
wires to Earth pin marked E or .
Fuse replacement - UK only
Your machine is supplied with cable fitted
with a non-wireable plug.
• The plug is fitted with a 5 amp fuse
which is the recommended fuse for
your machine.
• Only use replacement fuses which are
approved to BS1362.
• When changing the fuse in your plug,
always ensure the fuse cover is refitted.
If the fuse cover is missing or damaged
do not use the plug.
Note: Fuses do not give personal protection
against electric shock.
Increased safety can be obtained by having
a qualified electrician install a high sensitivity
(30mA) circuit breaker in the house wiring.
If you do not have such a circuit breaker
installed, or you do not wish to have one
installed, then we strongly recommend that
the electrical power to the machine be
supplied through a high sensitivity residual
current device (RCD). The RCD is designed
to provide a high degree of personal
protection against harmful electric current
should fault conditions occur.
Warning! The use of an RCD or other
circuit breaker unit does not release the
operator of the machine from the safety
instructions and safe working practices
given in this manual.
Extension cables or cordsets
You can use up to 30 metres (100ft) of 2-core
extension cord without undue loss of power.
Extension cords and cordsets should comply with
national regulations.
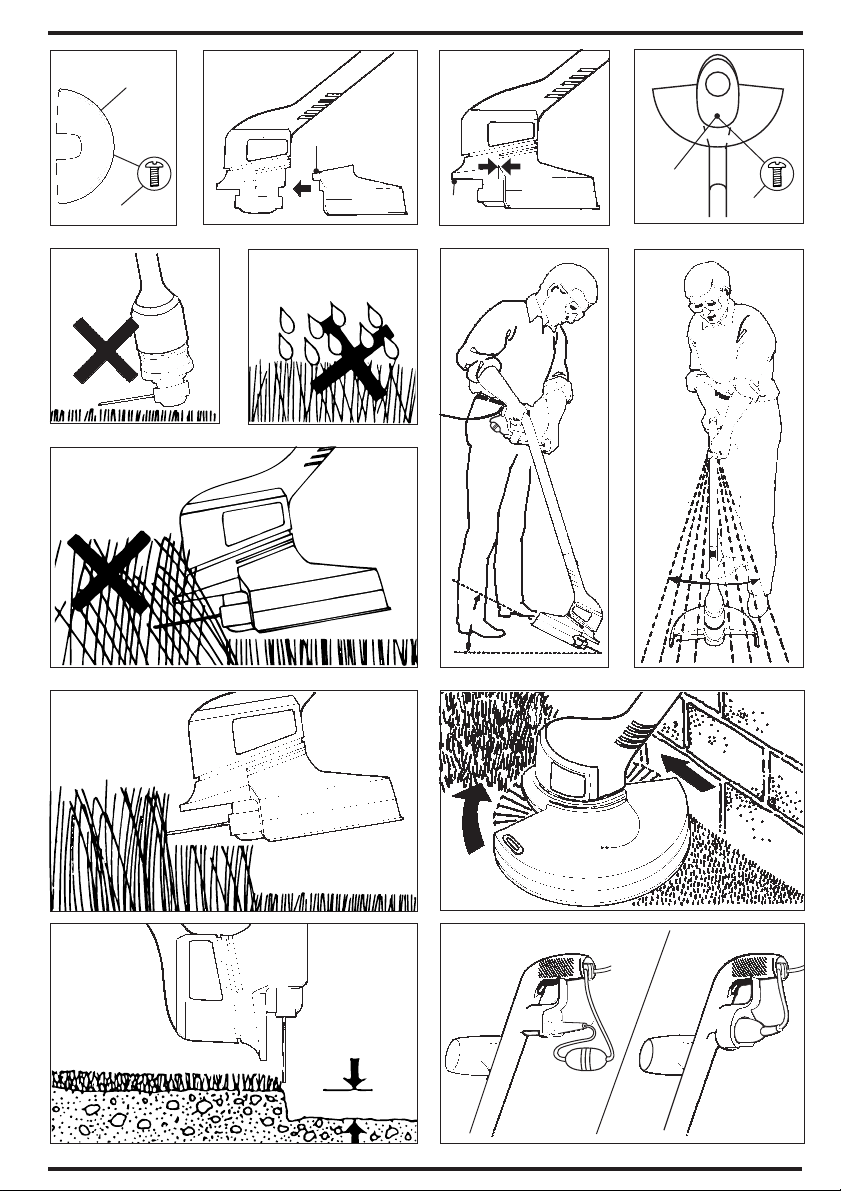
Preparing the trimmer for use
(Fig. 2)
• Take the trimmer and the guard (10) out
2
of the box.
• Remove the guard screw (12) which is
located on the underside of the guard
(Fig. 2.1).
• Place the guard into the channel on the
trimmer body (Fig. 2.2).
• Push the guard fully home until the guard
is flush with the body (Fig. 2.3).
• Replace the guard screw (Fig. 2.4).
• If correctly assembled, the guard will now
be secured to your trimmer.
• In transit, the end of the cutting line (9)
is taped to the side of the spool cover.
Please discard the tape to release the
length of line. There should be a
minimum of 9cm (3.5") of cutting line
protruding from the spool housing
before using your trimmer.
Note: When your machine is operated for
the first time any excess line will be cut off by
the line trimming blade (8) housed in the
guard. This is also the case for any
subsequent line adjustment. Because line
cut off by the blade in the guard may be
ejected, it is important that the amount of
excess line is kept to a minimum. Where an
excessive amount of line is pulled out, the
line should be cut back to the outside of the
guard before switching on your trimmer. Cut
the line off on the trimmer blade by hand.
• Always ensure that the spool cover is
secure before and after use.
How to use your trimmer (Fig. A - J)
In order to get the most from your trimmer please be
sure to follow the techniques shown. Do not be
impatient; you will obtain the best results through
experience and by following these simple rules.
8
Page 9

Do not use your trimmer without
A
its guard.
Do not cut wet grass; best results are
B
achieved when the grass is dry.
Trimming
• To switch on your trimmer, squeeze the
trigger switch (3).
• To switch the unit off, release the
trigger switch.
• To carry the trimmer when not in use,
it is preferred that you use the secondary
handle (2).
Cut at an angle and with the tip of the
C
cutting line (9).
Swing the trimmer gently from side to side.
D
Do not overload the trimmer. It operates best
at high speeds.
E
On long grass, start at the top and take
small cuts.
F
Use the edge of the guard (10) to keep the
G
trimmer away from hard surfaces and
delicate items.
Edging (GL540)
Best results are achieved on edges greater
H
than 50mm deep.
Note: Your trimmer is a maintenance tool for
trimming overhanging grass and should not
be used to create edges. Edges can be
created using an edging spade.
If your trimmer is for use with a ‘detachable’
cord, loop a length of cord through the cord
J
restraint (5) to avoid the plug and socket
coming apart accidentally, if the cord is pulled.
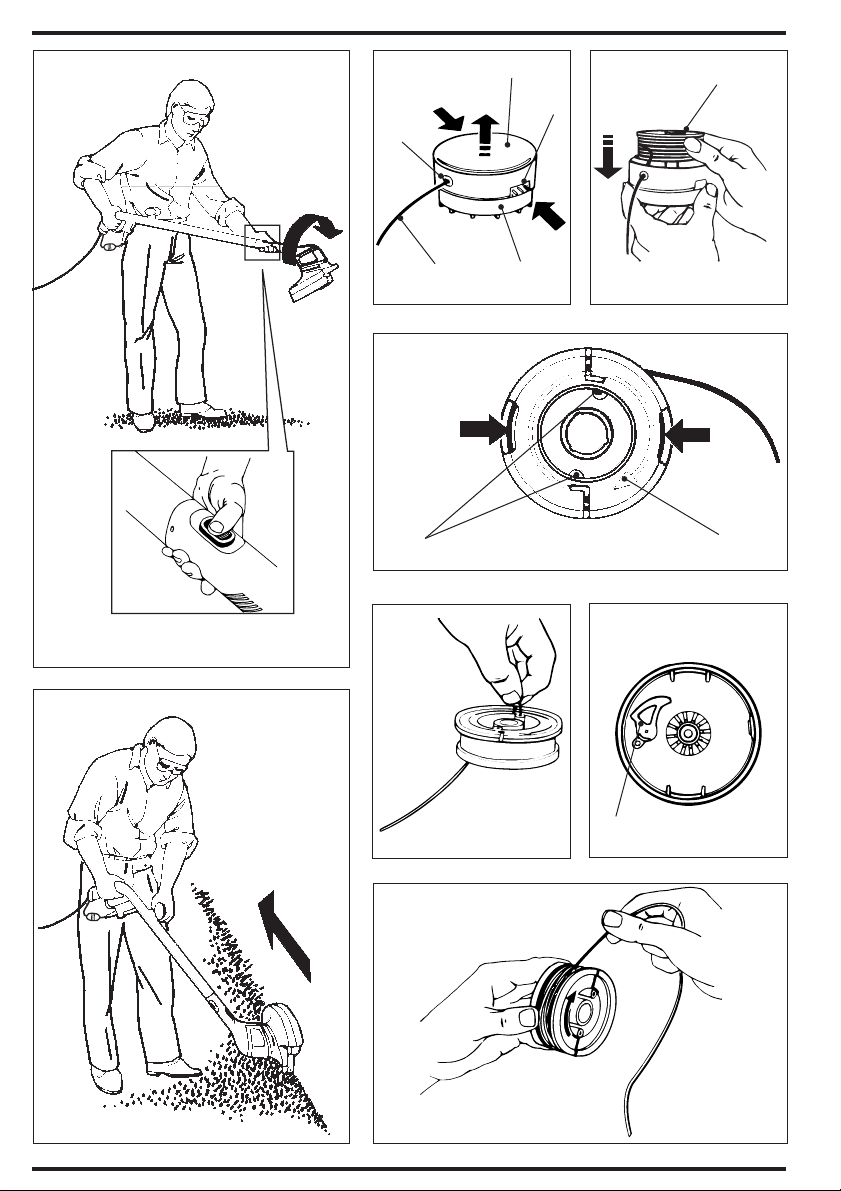
How to convert between the
trimming and edging mode (Fig. 3)
In addition to conventional trimming, your
trimmer can be used to trim overhanging
grass along lawn edges and flower beds.
To convert your trimmer between the
trimming and edging mode:
3
• With the trimmer switched off, place one
hand on the switch handle (4) and the
other on the trimmer body (1). Press the
button (7) on the front of the trimmer
body. Keeping the button depressed,
rotate the trimmer body anti-clockwise
and then release the button. Continue
to rotate the trimmer body until it locks
into position (Fig. 3.1).
ENGLISH
• The most effective way to use your
trimmer in edging mode is to stand by
the side of it (Fig. 3.2). Guide the front
edge of the trimmer (14) along the lawn
so that the cutting line just trims the
grass overhanging the lawn edge (Fig. H).
Replacement line
A new spool containing 10 metres of nylon line may
be purchased from your Black & Decker dealer.
Alternatively, replacement packs containing 25 to
50 metres of line are available.
For maximum reliability never put on a heavier or
lighter line (eg. fishing line) which will prevent the
automatic feed from functioning, cause motor failure
or reduce cutting performance.
How to fit a new spool of cutting line
(Fig. 4 & 5)
• Disconnect your trimmer from the
power supply.
• Remove the spool cover by pushing the
4
5
2 spool cover tabs (16) inwards and
upwards (Fig. 4), then pull off (it is not
necessary to push both tabs in at the
same time). The empty spool can now
be withdrawn from the drive shaft.
• Remove any dirt or grass that may have
collected inside the spool housing and
cover.
• Unwind approximately 9cm (3.5") of
cutting line (9) from the new spool (19)
and temporarily park the cutting line end
in one of the ‘L’ shaped slots to prevent
the line unravelling.
• Feed the cutting line through the eyelet
and then push the spool onto the centre
drive shaft while pulling the free end of
the line to release it from the ‘L’ shaped
slot. To fully seat the spool, rotate as
necessary, taking care not to trap the
cutting line underneath the spool and
making sure that there is a minimum of
9cm (3.5") protruding from the
spool housing.
• Replace the spool cover by aligning
both tabs on it (16) with the slots in the
spool housing and pushing them into
place. Make sure that both tabs are
securely located.
9
Page 10

How to wind new line onto an empty
spool (Fig. 6 & 7)
• A maximum of 10 metres of new cutting
6
line can be wound onto the empty spool.
The spool has an ‘Indicator’ to help you
avoid winding an excessive quantity of
cutting line on the spool, as too much will
prevent the automatic feed system from
functioning.
• Remove any remnant of old cutting line
from the spool (19).
• Push the end of the new cutting line into
one of the two retaining holes (21) provided
in the spool (19) and insert 20mm.
• Bend the cutting line over, pulling it
through the adjacent ‘L’ shaped slot.
The cutting line should now be firmly
anchored to the spool and you may
proceed to wind it on in the direction of
the arrow (20).
• Take time to wind the cutting line on
neatly, in layers. Do not criss cross.
• When you have wound on sufficient
cutting line, temporarily park it in one of
the ‘L’ shaped slots to prevent the spool
unravelling, ensuring you leave a
minimum of 9cm (3.5") protruding.
• Fit the spool and spool cover (15) to the
spool housing as described for fitting a
new spool.
Care and maintenance
• For best performance, please keep the cutting
line, spool and air slots in the trimmer body
clean. Use a dry brush or cloth to remove grass,
sap or other dirt.
• Plastic parts may be cleaned by using a mild
soap and a cloth dampened with hot water.
Do not use any type of detergent, cleaner or
solvent which might contain chemicals which
could seriously damage the plastic. Do not spray
your trimmer with water.
• Self lubricating bearings are used in your trimmer,
therefore, lubrication is not required.
Fault finding
Before checking your trimmer for any faults,
disconnect it from the mains.
• If the trimmer will not start, check that the power
cord is properly connected. If this does not work,
check your power point. Finally, check the fuse
and wiring on the cable extension plug (UK only).
• If the automatic line feed fails to operate, it
could be for one of the following reasons:
Line too short or line jammed on spool
• Disconnect your trimmer from the
power supply.
• Remove the spool cover (15) by pushing
both tabs (16) inwards and upwards (Fig. 4).
• Lift the spool (19) approximately 6mm (
from the spool housing (17), while pulling the
cutting line (9). This will allow you to lengthen
the line while clearing any line jammed inside
the spool. Ensure there is a minimum of 9cm
(3.5") protruding from the spool housing.
• Rotate the spool as necessary to fully seat
the spool and replace the cover by aligning
both tabs on the cover with the slots in the
spool housing and push into place. Ensure
that both tabs are securely located.
Line still jammed on spool or broken inside
spool housing
• Disconnect the power supply and remove
the cover, as previously described.
• Lift out the spool (19) completely, holding the
coiled cutting line in place to prevent it
unravelling from the spool (Fig. 7).
• Carefully unwind the cutting line (9) from the
spool until any crossed or trapped loops are
cleared. Rewind the cutting line evenly, in the
direction of the arrow (20) on the spool.
• Temporarily park the cutting line end in one
of the ‘L’ shaped slots to prevent the spool
unravelling. Ensure you leave a minimum of
9cm (3.5") protruding.
• Turn the lever (22) backwards and forwards
to ensure it operates freely.
• Remove any dirt or grass that may have
collected inside the spool housing and cover.
• Feed the end of the line through the eyelet
and then push the spool into the centre drive
shaft while pulling the free end of the line to
release it from the ‘L’ shaped slot. To fully
seat the spool, rotate as necessary, taking
care not to trap the line underneath the
spool, and making sure that there is a
minimum of 9cm (3.5") of line protruding from
the spool housing.
• Finally, replace the cover as previously
described.
Protecting the environment
Black & Decker provides a facility for
recycling Black & Decker products once
they have reached the end of their working
life. This service is provided free of charge.
To take advantage of this service please
return your product to any authorised repair
agent who will collect them on our behalf.
1
/4")
10
Page 11

You can check the location of your nearest
authorised repair agent by contacting your local
Black & Decker office at the address indicated in
this manual. Alternatively, a list of authorised
Black & Decker repair agents and full details of our
after-sales service and contacts are available on the
Internet at: www.2helpU.com.
Guarantee
Black & Decker is confident of the quality of its
products and offers an outstanding guarantee.
This guarantee statement is in addition to and in no
way prejudices your statutory rights. The guarantee
is valid within the territories of the Member States
of the European Union and the European Free
Trade Area.
If a Black & Decker product becomes defective due
to faulty materials, workmanship or lack of
conformity, within 24 months from the date of
purchase, Black & Decker guarantees to replace
defective parts, repair products subjected to fair
wear and tear or replace such products to ensure
minimum inconvenience to the customer unless:
• The product has been used for trade,
professional or hire purposes;
• The product has been subjected to misuse or
neglect;
• The product has sustained damage through
foreign objects, substances or accidents;
• Repairs have been attempted by persons other
than authorised repair agents or Black & Decker
service staff.
To claim on the guarantee, you will need to submit
proof of purchase to the seller or an authorised
repair agent. You can check the location of your
nearest authorised repair agent by contacting your
local Black & Decker office at the address indicated
in this manual. Alternatively, a list of authorised
Black & Decker repair agents and full details of our
after-sales service and contacts are available on the
Internet at: www.2helpU.com.
ENGLISH
Other outdoor tools
Black & Decker has a full range of outdoor power
tools that make life in the garden easy. If you would
like further information on the following products,
please contact our Service and Information Centre
(see the address page towards the end of this
manual) or your local Black & Decker retailer.
String trimmers
Chainsaws
Cordless shear
Hedgetrimmers
Lawnmowers
Lawnrakers
Leafbusters
Shredders
Not all products are available in all countries.
EC Declaration of conformity
GL545
Black & Decker declares that these tools
98/37/EC, 89/336/EEC, 73/23/EEC,
EN 55014, EN 60335, EN 61000,
2000/14/EC, Lawn trimmer, L ≤ 50 cm
B.S.I., HP2 4SQ, United Kingdom
Level of sound pressure, measured according to
LpA(sound pressure) dB(A) 81
LWA(acoustic power) dB(A) 94
LWA(guaranteed) dB(A) 96
Hand/arm weighted vibration value according to
conform to:
Annex VIII, No. 0086
2000/14/EC:
EN 50144: 4 m/s
2
Brian Cooke
Director of Engineering
Spennymoor, County Durham DL16 6JG,
United Kingdom
1-12-2001
11
Page 12
Tagliaerba a Filo di Nylon
Istruzioni per l’uso
Congratulazioni!
L’acquisto di questo tagliaerba a filo di nylon
Black & Decker Reflex® vi assicura anni di bordatura
e refilatura senza problemi. Il Reflex® non solo taglia
l’erba e borda il giardino, ma è dotato di un
esclusivo sistema di alimentazione automatico del filo
di taglio. Voi non dovete fare niente - il sistema
Reflex® vi consente di lavorare senza interruzioni; un
semplice meccanismo “sente” quando il filo si è
consumato e, se necessario, provvede
all’alimentazione automatica fino alla lunghezza
corretta. Voi dovete solamente accendere l’utensile
ed iniziare a lavorare.
Descrizione
Vi elenchiamo di seguito le parti menzionate in
questo manuale ed illustrate nelle apposite
illustrazioni:
Corpo (1)
1
Impugnatura secondaria (2)
Interruttore (3)
Impugnatura interruttore (4)
Serracavo (5)
Presa corrente o cavo (6)
Pulsante (7)
Lama taglia filo (8)
Filo di taglio (9)
Difesa (10)
Bordi tenuta difesa (11)
2
Vite difesa (12)
Foro per vite difesa (13)
Guida (14)
Copri spoletta (15)
4
Linguetta copri-spoletta (16)
Sede spoletta (17)
Occhiello (18)
Spoletta (19)
5
Freccia (20)
6
Foro fissacavo (21)
Leva (22)
7
Norme antinfortunistiche
Leggete attentamente tutte le istruzioni
contenute in questo manuale prima di
utilizzare la macchina, rispettando le norme
di sicurezza e seguendo le avvertenze per
una sua corretta manutenzione.
Prima di utilizzare il taglierba, prendete
confidenza con la posizione dei comandi ed
assicuratevi di essere in grado di spegnere la
macchina immediatamente in caso di
emergenza.
Conservate con cura il presente manuale per
qualsiasi futura necessitá.
Collegamento elettrico
• La vostra macchina è prevista per il
collegamento ad una rete AC - non
tentate di utilizzare alcuna altra fonte di
energia elettrica.
• Non lasciate la macchina collegata in
vostra assenza. Spegnetela e togliete la
spina dalla presa.
• Spegnete sempre la macchina e
rimuovete la spina prima di procedere ad
ispezionare, pulire o regolare qualsiasi
componente del tagliaerba. Fate
attenzione che il cavo non sia
danneggiato o incastrato prima di riporre
l’utensile.
• Spegnete la macchina e rimuovete la
spina prima di ispezionare eventuali
danni o malfunzionamenti, dopo avere
colpito oggetti estranei e se la macchina
comincia a vibrare troppo.
Doppio isolamento
Il tagliaerba è completamente isolato. Ciò
significa che due barriere indipendenti di
isolamento vi proteggono dal contatto con parti
metalliche, offrendo un’ulteriore protezione
contro la possibilità di scosse elettriche.
Cavo elettrico
• Il cavo deve essere controllato
regolarmente e utilizzato solo se in
buone condizioni.
• Tenete sempre il cavo lontano dal filo di
taglio - siate certi in ogni momento della
sua posizione.
12
Page 13

• Non trasportate mai l’utensile tenendolo
per il cavo. Non estraete la spina tirando il
cavo. Tenete il cavo lontano da fonti di
calore, olii e bordi taglienti. Controllate
sempre le condizioni del cavo prima
dell’utilizzo e non usatelo se danneggiato.
• Fate sostituire i cavi danneggiati dal
centro di assistenza Black & Decker piú
vicino. Non tentate mai di sostituirli da
soli in quanto l’impugnatura interruttore
non è accessibile all’operatore.
Filo di taglio
• Attenzione a non farvi male con la lama
per il taglio del filo (8) durante lo
sballaggio ed il montaggio. Attenzione ai
pezzetti di filo in eccesso che potrebbero
essere scagliati al primo utilizzo.
• Il filo continuerá a girare per un breve
tempo dopo aver rilasciato l’interruttore.
Non tentate mai di fermare il filo, lasciate
che si arresti da solo.
• Non utilizzate mai fili metallici.
Abbigliamento
• Portate sempre occhiali protettivi durante
il lavoro.
• Portate sempre scarpe robuste e
antisdrucciolo. L’erba bagnata è
molto scivolosa. (Non tagliate erba a
piedi nudi o calzando sandali aperti.)
• Portate sempre pantaloni lunghi per
proteggere le gambe - eventuali detriti sul
percorso di tosatura potrebbero essere
scagliati del filo.
• Utilizzate delle protezioni acustiche qualora
il livello di rumore provocato dall’uso della
macchina vi sembrasse fastidioso.
Utilizzo della vostra macchina
• Utilizzate sempre la macchina nel
modo descritto da questo manuale.
La macchina è prevista per un uso
verticale, l'utilizzo in ogni altra posizione
potrebbe causare ferimenti.
• Controllate sempre che la macchina sia
in buone condizioni operative.
• Prima di usare la macchina, scollegate la
spina e controllate che le parti mobili non
siano danneggiate. Assicuratevi anche
che la spoletta sia alloggiata
correttamente.
• Controllate che il percorso di tosatura sia
libero da bastoni, grosse pietre e altri
detriti. Il contatto con tali detriti puó
danneggiare la macchina.
• Tenete sempre la macchina lontana dai
vostri piedi e altre parti del vostro corpo
durante l’accensione e l’utilizzo.
ITALIANO
• Non accendete la macchina mentre
è capovolta.
• Durante l’utilizzo camminate
senza correre.
• Non usate la macchina sotto la pioggia e
non lasciate che si bagni.
• Lavorate solo con la luce del giorno o in
presenza di buona illuminazione artificiale.
• Non attraversate sentieri sassosi o strade
asfaltate mentre la macchina è accesa
ed il filo a contatto col terreno.
• Non lavorate su pendii eccessivamente
ripidi. Fate attenzione al vostro equilibrio
e lavorate sempre di traverso ai pendii,
mai su e giù.
• Non utilizzate mai la macchina con difese
danneggiate.
• Concentratevi durante il lavoro in quanto
l’erba tagliata di fresco è umida e
scivolosa.
Sicurezza degli altri
• Ricordate che il proprietario/utilizzatore è
responsabile per eventuali incidenti ad
altre persone o alla loro proprietá.
• Non lasciate mai che bambini o persone
non familiari con questo tipo di macchina,
la utilizzino. Chiunque usi la macchina
360˚
6m/20ft
deve avere letto questo manuale.
• Non lasciate che bambini o animali o
altre persone si avvicinino mentre
lavorate. Teneteli sempre ad almeno
10 metri dalla zona che state tosando.
Cura della macchina
• Riponete la macchina non in uso in un
luogo asciutto e lontano dalla portata
dei bambini.
• Non usate solventi o altri prodotti chimici
per pulire la macchina. Usate uno
scalpello non affilato per rimuovere la
terra e l’erba. Prima di pulire la macchina
scollegate sempre la spina.
• Non utilizzate la macchina con parti
difettose. Sostituite sempre le parti
difettose prima di lavorare.
• Non tentate di rimuovere parti diverse da
quelle indicate in questo manuale.
• Usate solo ricambi ed accessori originali
Black & Decker.
13
Page 14
Sicurezza elettrica
Spegnere sempre la macchina prima di rimuovere
la spina o scollegare eventuali prolunghe.
Ulteriore sicurezza elettrica
Una maggiore protezione è ottenibile
facendo installare da un elettricista
qualificato un salvavita ad alta sensibilitá.
Questo vi garantirá una alta protezione da
scariche elettriche.
Attenzione! Qualsiasi dispositivo di
sicurezza non vi esclude dal rispetto delle piú
elementari norme di sicurezza di utilizzo
specificate in questo manuale.
Attenzione! L’utilizzo di un qualsiasi sistema di
protezione elettrica non dispensa l’operatore
dal seguire le basilari norme antinfortunistiche
descritte in questo manuale.
Cavi di prolunga
Potete usare prolunghe fino a 30 metri utilizzando
cavi a due poli, senza significative perdite di tensione.
I cavi di prolunga devono essere conformi alle
normative nazionali.
Preparazione del refilatore per l’uso
(Fig. 2)
• Rimuovete il tagliaerba e la difesa (10)
2
dalla scatola.
• Rimuovete la vite fissaggio difesa (12)
posta sulla parte inferiore della difesa
(Fig. 2.1).
• Inserite la difesa nella apposita
scanalatura sul corpo macchina (Fig. 2.2).
• Spingete la difesa fino ad arresto, prima
da un lato fino a che la difesa sia a filo del
corpo. Ripetete sull’altro lato (Fig. 2.3).
• Riavvitate le vite di fissaggio (Fig. 2.4).
• Se l’avrete montata correttamente, la
difesa sará ora fissata al corpo del
tagliaerba.
• Per il trasporto, la parte terminale del filo
di taglio (9) viene fissata sul lato del
coprispoletta. Dovrete solo scartarla per
liberare completamente il filo. Ci deve
essere un minimo di 9cm (3.5") di filo
sporgente dalla spoletta prima di iniziare
a lavorare.
Nota: Al primo utilizzo della macchina, il filo
in eccedenza verrá tagliato dalla apposita
lama (8) posta sulla difesa. Ció avverrá anche
ad ogni successiva regolazione del filo di
taglio.
14
E’ importante che il filo in eccesso sia
mantenuto al minimo in quanto i pezzi
tagliati possono essere scagliati
all’accensione. Nel caso estraeste una
lunghezza eccessiva di filo, dovreste
tagliarla fino al bordo esterno della difesa
prima di accendere la macchina.
• Assicuratevi sempre che il copri-
spoletta sia assicurato in posizione
prima e
dopo l’uso.
Utilizzo del vostro tagliaerba
(Fig. A - J)
Per ottenere le migliori prestazioni dal vostro utensile,
vi consigliamo di seguire attentamente le tecniche
mostrate in questo manuale. Non siate impazienti; i
migliori risultati verranno con l’esperienza e seguendo
queste semplici regole:
Non utilizzate l’utensile senza la difesa.
A
Non tagliate erba umida; i migliori risultati si
ottengono quando l’erba è asciutta.
B
Taglio
• Per accendere l’utensile, premete
l’interruttore (3).
• Per spegnere l’utensile rilasciate
l’interruttore.
• Per il trasporto della macchina non in
uso, si consiglia di utilizzare
l’impugnatura secondaria (2).
Tagliate tenendo l’utensile leggermente
C
inclinato e utilizzando la punta del filo di taglio.
Fate oscillare dolcemente la macchina da un
lato all’altro.
D
Non sovraccaricate la macchina. Lavora
meglio ad alta velocitá .
E
In caso di erba alta, iniziate dall’alto, eseguite
F
tagli brevi.
Utilizzate il bordo della difesa per tenere la
G
macchina lontano da superfici dure e
oggetti delicati.
Bordatura (GL540)
I migliori risultati si ottengono su bordi alti piú
H
di 50mm.
Nota: Il tagliaerba è un utensile di
manutenzione previsto per tagliare l'erba in
eccesso e non deve essere usato per creare
bordi. I bordi possono essere creati
utilizzando un apposito utensile.
Se il vostro tagliaerba è adatto all’uso con un
cavo prolunga “staccabile”, arrotolate parte
J
del cavo attraverso il serracavo (5) per
prevenire il distacco accidentale della spina
dalla presa nel caso il cavo venisse tirato.
Page 15

Come passare dal modo refilatura
al modo bordatura (Fig. 3)
Oltre alle normali operazioni di taglio il
vostro utensile puó essere utilizzato per
tagliare l’erba in eccesso sporgente da
aiuole.
Per convertire l’utensile tra una operazione
e l’altra:
3
• Con il tagliaerba spento, ponete una
mano sull’impugnatura con l’interruttore
e l’altra mano sul corpo della macchina.
Premete il pulsante sulla parte anteriore
del corpo della macchina. Tenendo il
pulsante premuto, ruotate il corpo del
tagliaerba in senso antiorario e quindi
rilasciate il pulsante. Continuate a ruotare
il corpo del tagliaerba fino a quando si
bloccherà nella corretta posizione.
• Il modo più efficace di usare il vostro
tagliaerba nel modo bordatura è quello di
tenerlo al proprio fianco. Passate la parte
frontale del tagliaerba lungo il bordo del
prato in modo che il filo tagli l’erba che
sporge dal bordo stesso.
Sostituzione filo di taglio
Potrete acquistare una nuova spoletta contenente
10 metri di filo di taglio dal vostro rivenditore
Black & Decker. In alternativa, sono disponibili
confezioni contenenti da 25 a 50 metri di filo
di ricambio.
Per ottenere il massimo rendimento non utilizzate mai
fili piú pesanti o piú leggeri (p.es. filo da pesca) i quali
non consentiranno all’alimentazione automatica di
funzionare correttamente e potrebbero causare danni
al motore o ridurre le prestazioni di taglio.
Come montare una nuova spoletta di
filo di taglio (Fig. 4 & 5)
• Scollegare l’utensile dalla rete elettrica.
• Rimuovere il copri-spoletta spingendo le
4
apposite linguette (16) verso l’interno e
verso l’alto contemporaneamente (Fig. 4)
poi estrarla (non è necessario agire su
entrambe le linguette allo stesso tempo).
La spoletta vuota puó essere ora rimossa
dall’albero.
• Rimuovere le tracce di erba o terra che
possono essersi accumulate all’interno
della sede della spoletta e del coperchio.
• Svolgere circa 9cm di filo (9) dalla spoletta
nuova (19) e fermate temporaneamente
il filo in una delle fessure a “L” per
evitare che si srotoli.
ITALIANO
• Inserite il filo nell’occhiello e spingete la
5
Come avvolgere del filo nuovo in una
spoletta vuota (Fig. 6 & 7)
6
spoletta sull’albero centrale tirando
contemporaneamente il filo per liberarlo
dalla fessura a “L”. Ruotate secondo
necessitá la spoletta per alloggiarla
correttamente sull’albero, facendo
attenzione a non incastrare il filo sotto
la spoletta ed assicurandovi che un
minimo di 9cm di filo sporga dalla sede
della spoletta.
• Rimontare il coperchio allineando le due
linguette (16) con le due fessure sulla
sede della spoletta e spingendole in
posizione. Assicurarsi che entrambe le
linguette siano saldamente in posizione.
• È possibile avvolgere un massimo di
10 metri di filo in una spoletta vuota. La
spoletta è dotata di un “indicatore” che vi
aiuta a non avvolgere filo in eccesso, in
quanto questo potrebbe impedire il
corretto funzionamento del sistema
automatico di alimentazione.
• Rimuovere ogni resto del vecchio filo
dalla spoletta (19).
• Inserire il filo nuovo in uno dei due fori
(21) posti sulla sede della spoletta (19)
per una lunghezza di 20mm.
• Ripiegare il filo tirandolo attraverso
l’adiacente fessura a “L”. Il filo è ora
saldamente ancorato alla spoletta ed è
possibile procedere all’avvolgimento in
direzione della freccia (20).
• Abbiate la cura di avvolgere pazientemente
il filo a livelli corretti e non intrecciati.
• Dopo aver avvolto filo a sufficienza,
fissatene temporaneamente la parte
terminale in una delle fessure a “L”
per evitare che la spoletta si srotoli,
assicurandovi di lasciarne sporgere
almeno 9cm.
• Rimontate la spoletta ed il suo coperchio
(15) come descritto nel paragrafo per le
spolette nuove.
15
Page 16
Cura e manutenzione
• Per ottenere le migliori prestazioni vi preghiamo
di voler mantenere puliti la spoletta, il suo
coperchio e le fessure di aerazione sul corpo
dell’utensile. Usate una spazzola o un panno
asciutti per rimuovere erba o altri residui.
• Le parti in plastica possono essere pulite usando
un sapone neutro ed un panno inumidito con
acqua calda. Non usate alcun tipo di detergente,
solvente o sgrassatore che potrebbe contenere
agenti chimici i quali possono danneggiare
seriamente la plastica. Non spruzzate l’utensile
con acqua.
• L’utensile è dotato di cuscinetti auto-lubrificanti,
pertanto non è necessario lubrificarli.
Ricerca di malfunzionamenti
Prima di effettuare qualsiasi intervento sul vostro
utensile, scollegate la spina dalla presa elettrica.
• Se l’utensile non si accende controllare che tutti i
cavi siano correttamente collegati. Se l’utensile
non parte lo stesso, controllate le vostre prese
di corrente e poi controllate i collegamenti
del vostro cavo di prolunga ed il connettore
femmina.
• Se l’alimentazione automatica del filo non
funziona, potrebbe trattarsi di uno dei casi seguenti:
Filo troppo corto o filo incastrato nella spoletta
• Scollegate la spina dalla presa elettrica.
• Togliete il coperchio della spoletta (15)
spingendo e sollevando le due linguette
(Fig. 4).
• Sollevate la spoletta (19) di circa 6mm dalla
sua sede (17) mentre tirate il filo (9).
Questo vi consentirá di allungare il filo
contemporaneamente liberandolo se fosse
incastrato sotto la spoletta. Assicuratevi che
un minimo di 9cm di filo sporga dalla sede
della spoletta.
• Ruotate la spoletta secondo necessitá per
alloggiarla correttamente e rimontate il
coperchio allineando entrambe le linguette
con le scanalature sul corpo e spingendole in
posizione. Assicuratevi che entrambe le
linguette siano saldamente posizionate.
Il filo è sempre incastrato nella spoletta o
rotto nella sede della spoletta
• Scollegate la spina dalla presa elettrica
• Rimuovete completamente la spoletta (19)
tenendo fermo il filo arrotolato per evitare che
si srotoli dalla spoletta (Fig. 7).
• Svolgete lentamente il filo (9) dalla spoletta
fino a che non libererete ogni punto
incastrato. Riavvolgete con cura il filo
seguendo la direzione delle frecce (20)
sulla spoletta.
• Fermate temporaneamente il filo in una
delle fessure a “L” per evitare che si srotoli.
Assicuratevi che un minimo di 9cm di filo
sporga dalla spoletta.
• Ruotate la leva (22) avanti ed indietro per
assicurarvi che si muova liberamente.
• Rimuovete erba o sporco che possa
essersi accumulato nella sede della spoletta
e nel coperchio.
• Inserite il filo nell’occhiello e spingete la
spoletta sull’albero centrale tirando
contemporaneamente il filo per liberarlo dalla
fessura a “L”. Ruotate secondo necessitá la
spoletta per alloggiarla correttamente
sull’albero, facendo attenzione a non
incastrare il filo sotto la spoletta ed
assicurandovi che un minimo di 9cm di filo
sporga dalla sede della spoletta.
• Infine rimontate il coperchio come
descritto in precedenza.
Protezione dell’ambiente
Black & Decker offre ai suoi clienti la
possibilità di riciclare i prodotti Black & Decker
che hanno esaurito la loro vita di servizio.
Il servizio viene offerto gratuitamente.
Per utilizzarlo, è sufficiente restituire il
prodotto a qualsiasi tecnico autorizzato,
incaricato della raccolta per conto
dell’azienda.
Per individuare il tecnico autorizzato più vicino,
rivolgersi alla sede Black & Decker locale, presso il
recapito indicato nel presente manuale.
Altrimenti un elenco completo di tutti i tecnici
autorizzati Black & Decker e i dettagli completi sui
contatti e i servizi post-vendita sono disponibili su
Internet presso: www.2helpU.com.
Garanzia
Certa della qualità dei suoi prodotti, Black & Decker
offre una garanzia eccezionale. Il presente certificato
di garanzia è complementare ai diritti statutari e non
li pregiudica in alcun modo. La garanzia è valida
entro il territorio degli Stati membri dell’Unione
Europea e dell’EFTA (European Free Trade Area).
16
Page 17
Se un prodotto Black & Decker risulta difettoso per
qualità del materiale, della costruzione o per
mancata conformità entro 24 mesi dalla data di
acquisto, Black & Decker garantisce la sostituzione
delle parti difettose, provvede alla riparazione dei
prodotti se ragionevolmente usurati oppure alla loro
sostituzione, in modo da ridurre al minimo il disagio
del cliente a meno che:
• Il prodotto non sia stato destinato ad usi
commerciali, professionali o al noleggio;
• Il prodotto non sia stato usato in modo
improprio o scorretto;
• Il prodotto non abbia subito danni causati
da oggetti o sostanze estranee oppure
incidenti;
• Il prodotto non abbia subito tentativi di
riparazione non effettuati da tecnici
autorizzati né dall’assistenza Black & Decker.
Per attivare la garanzia è necessario esibire la prova
comprovante l’acquisto al venditore o al tecnico
autorizzato. Per individuare il tecnico autorizzato
più vicino, rivolgersi alla sede Black & Decker
locale, presso il recapito indicato nel presente
manuale. Altrimenti un elenco completo di tutti i
tecnici autorizzati Black & Decker e i dettagli
completi sui contatti e i servizi post-vendita sono
disponibili su Internet presso: www.2helpU.com.
ITALIANO
Dichiarazione CE di conformità
GL545
Black & Decker dichiara che questi utensili sono
stati costruiti in conformità a:
98/37/CEE, 89/336/CEE, 73/23/CEE,
EN 55014, EN 60335, EN 61000,
2000/14/CEE, tosatore, L ≤ 50 cm
Annex VIII, No. 0086
B.S.I., HP2 4SQ, Regno Unito
Livello di rumorosità, dati ricavati in base alla
norma 2000/14/CEE:
LpA(rumorosità) dB(A) 81
LWA(potenza sonora) dB(A) 94
LWA(garantito) dB(A) 96
Il valore medio quadratico ponderato
dell’accelerazione secondo EN 50144: 4 m/s
2
Altri utensili di giardinaggio
La Black & Decker ha una gamma completa di
utensili per il giardinaggio che rende semplice la
vita in giardino. Se desiderate ulteriori informazioni
sui seguenti prodotti, vi preghiamo di contattare il
nostro Centro D’Informazione e Manutenzione
(vedere la pagina degli indirizzi alla fine di questo
libretto d’istruzioni) od il vostro rivenditore
Black & Decker
Tosatori a lame o a catena
Motoseghe
Scope elettriche
Tosasiepi a batteria
Tagliasiepi a batteria
Tosasiepi
Tosaerba
Rastrelli
Sramatori
Biotrituratori
Non tutti i prodotti sono disponibili in tutti i paesi.
Brian Cooke
Direttore di Ricerca e Sviluppo
Spennymoor, County Durham DL16 6JG,
United Kingdom
1-12-2001
17
Page 18
Rasentrimmer
Bedienungsanleitung
Herzlichen Glückwunsch!
Mit dem Kauf Ihres Black & Decker Reflex
Rasentrimmers und Kantenschneiders sind Ihnen
lange Jahre problemlosen Rasentrimmens sicher.
Der Reflex®-Trimmer schneidet nicht nur die Kanten
Ihres Rasens (GL540), sondern besitzt auch ein
einzigartiges, voliautomatisches
Fadenverlängerungssystem. Das bedeutet für Sie:
Rasentrimmen ohne Unterbrechung. Das Reflex®System reagiert sofort, wenn der Schneidfaden zu
kurz geworden ist und verlängert ihn auf die optimale
Arbeitslänge. Sie brauchen nur das Gerät
einzuschalten und den Rasen zu trimmen.
®
Beschreibung
Nachfolgend finden Sie eine Liste der Teile aufgeführt,
deren Begriffe in dieser Gebrauchsanleitung
verwendet und in den entsprechenden Abbildungen
gezeigt werden:
Motorgehäuse (1)
1
Zweithandgriff (2)
Betriebsschalter (3)
Schaltergriff (4)
Kabelzugentlastung (5)
Kabelanschluß (6)
Druckknopf (7)
Schneidklinge für den Schneidfaden (8)
Schneidfaden (9)
Schutzhaube (10)
Haltelaschen der Schutzhaube (11)
2
Schraube für Schutzhaubenbefestigung (12)
Loch für die Schutzhaubenschraube (13)
Vorderkante (14)
Spulenabdeckung (15)
4
Spulenabdeckungslaschen (16)
Spulengehäuse (17)
Öse (18)
Fadenspule (19)
5
Pfeilmarkierung (20)
6
Halteöse für Schneidfaden (21)
Hebel (22)
7
Sicherheitsmaßnahmen
Lesen Sie diese Gebrauchsanleitung
bitte sorgfältig durch und führen Sie vor,
während und nach dem Gebrauch Ihrer
Maschine sämtliche empfohlenen
Sicherheitsmaßnahmen durch. Achten
Sie darauf, daß Ihr Rasentrimmer immer
in einem guten, gebrauchsfähigen Zustand
erhalten wird.
Machen Sie sich mit Ihrer Maschine vertraut,
bevor Sie damit umgehen und sorgen Sie
besonders dafür, daß Sie wissen, wie das
Gerät im Notfall auszuschalten ist.
Bewahren Sie diese Gebrauchsanleitung und
sämtliche andere mit Ihrem Rasentrimmer
mitgelieferten Unterlagen für zukünftigen
Gebrauch sorgfältig auf.
Elektrische Verbindungen
• Ihre Maschine wurde für den
ausschließlichen Betrieb mit Netzstrom
(Wechselstrom) hergestellt. Versuchen
Sie nicht, das Gerät mit einer anderen
Stromquelle zu betreiben.
• Schließen Sie Ihr Gerät immer an eine
Netzstromsteckdose an.
• Lassen Sie Ihr Gerät nicht
unbeaufsichtigt, solange es an das
Stromnetz angeschlossen ist.
• Schalten Sie den Rasentrimmer immer
aus und ziehen Sie den Stecker aus der
Steckdose, bevor Sie ihn reinigen,
untersuchen oder irgendein Teil einstellen
wollen. Dies gilt ebenso für den Fall, daß
das Stromkabel beschädigt wurde oder
sich verwickelt hat.
Doppelisolierung
Ihr Trimmer ist doppelt isoliert. Das bedeutet,
daß zwei voneinander unabhängige
Isolierungsvorkehrungen Sie davor schützen,
mit stromführenden Metallteilen in Berührung
zu kommen.
Stromkabel
• Das Stromkabel sollte in regelmäßigen
Abständen auf Anzeichen von
Beschädigungen oder
Abnutzungserscheinungen untersucht
und nur dann verwendet werden, wenn
es sich in einem einwandfreiem
Zustand befindet.
18
Page 19

• Achten Sie immer auf die Position des
Stromkabels und halten Sie einen
ausreichenden Sicherheitsabstand zum
Schneidfaden (9) ein.
• Ziehen Sie nicht am Kabel, um den
Stecker herauszuziehen. Achten Sie
darauf, daß das Kabel nicht zu nahe an
eine Hitzequelle, an Öl oder an eine
scharfe Kante gerät.
Schneidfaden
• Schützen Sie sich während des
Auspackens und des Zusammenbaus
vor Verletzungen durch die Schneidklinge
(8) in der Schutzhaube und eventuell
vorhandenem, überschüssigem
Schneidfaden, der bei der ersten
Inbetriebnahme des Rasentrimmers
abgeschnitten wird.
• Der Schneidfaden (9) wird nach
Loslassen des Betriebsschalters noch für
einen kurzen Moment nachlaufen. Unter
keinen Umständen sollten Sie versuchen,
ihn anzuhalten; lassen Sie ihn immer
selbständig auslaufen.
• Setzen Sie unter keinen Umständen
einen Schneidfaden aus Metall ein.
Bekleidung
• Tragen Sie beim Arbeiten mit Ihrem
Trimmer immer eine Schutzbrille.
• Um Ihre Füße zu schützen, sollten
Sie feste Schuhe oder Stiefel tragen
(nicht barfuß gehen oder offene
Sandalen tragen).
• Tragen Sie lange Hosen, um Ihre Beine
zu schützen - Fremdkörper, die auf dem
Rasen oder im Arbeitsbereich liegen,
werden unter Umständen von dem
Schneidfaden erfaßt und
herumgeschleudert.
• Sollte die Lärmentwicklung während der
Nutzung des Trimmers zu laut sein, so
empfehlen wir Ihnen das Tragen eines
Hörschutzes.
Betrieb Ihrer Maschine
• Setzen Sie Ihren Rasentrimmer immer in
der in dieser Gebrauchsanleitung
beschriebenen Weise ein. Ihr
Rasentrimmer ist für den Gebrauch in
aufrechter Stellung gedacht. Wird er in
einer anderen Position verwendet,
besteht Verletzungsgefahr.
• Bevor Sie Ihr Gerät in Betrieb nehmen,
sollten Sie den Netzstecker ziehen und
die rotierenden Teile auf Beschädigungen
usw. untersuchen. Überprüfen Sie auch,
ob die Spule korrekt befestigt ist.
DEUTSCH
• Vergewissern Sie sich immer, daß Ihr
Arbeitsbereich von Stöcken, Steinen,
Drähten und anderen Fremdkörpern frei
ist. Der Kontakt mit solchen Teilen kann
zu einer Beschädigung Ihres
Rasentrimmers führen.
• Achten Sie beim Anschalten und
während des Betriebs Ihres Gerätes auf
einen ausreichenden Sicherheitsabstand
zu Ihren Füßen und anderen Körperteilen.
• Schalten Sie Ihr Gerät nicht ein, wenn es
auf dem Kopf steht.
• Gehen Sie immer im Schritt mit dem
Rasentrimmer, betreiben Sie ihn niemals
im Laufen.
• Setzen Sie Ihr Gerät nicht bei Regen ein
und lassen Sie es nicht naß werden.
• Verwenden Sie Ihren Rasentrimmer
nur bei Tageslicht oder bei guter
künstlicher Beleuchtung.
• Überqueren Sie keine Kieswege oder
Straßen, solange der Schneidfaden rotiert.
• Mähen Sie keine extrem steilen Abhänge.
Sorgen Sie stets für sicheren Halt.
Mähen Sie Abhänge quer zur Richtung
des Gefälles, niemals auf und ab.
• Verwenden Sie Ihren Rasentrimmer
niemals mit einer beschädigten
Schutzvorrichtung (10) oder wenn
sich die Schutzvorrichtung nicht in
Position befindet.
• Seien Sie beim Rasentrimmen vorsichtig,
da frisch gemähtes Gras feucht und
rutschig ist.
Die Sicherheit anderer
• Denken Sie daran, daß Sie als Benutzer
des Trimmers für Verletzungen anderer
Personen oder Beschädigungen an
deren Eigentum verantwortlich sind.
• Jugendliche unter 16 jahren dürfen das
gerät nicht bedienen, sowie Personen,
die die Bedienungsanleitung nicht
gelesen haben oder mit der Arbeitsweise
des Trimmers nicht vertraut sind, sollten
Sie die Nutzung untersagen.
• Lassen Sie Kinder, Tiere oder andere
Erwachsene nicht in die Nähe der
Maschine, wenn sich diese im Gebrauch
befindet - achten Sie immer auf einen
ausreichenden Sicherheitsabstand.
6m
360˚
/20ft
19
Page 20

Pflege Ihrer Maschine
• Bewahren Sie den Rasentrimmer an
einem trockenen Ort und außerhalb der
Reichweite von Kindern auf.
• Verwenden Sie keine Lösungs- oder
Reinigungsmittel, um Ihre Maschine zu
säubern - verwenden Sie einen stumpfen
Schaber, um Gras und Schmutz zu
entfernen. Unterbrechen Sie immer
zuerst die Stromzufuhr und achten Sie
darauf, daß sich der Schneidfaden (9)
nicht mehr bewegt, bevor Sie mit der
Reinigung beginnen.
• Betreiben Sie Ihren Rasentrimmer nicht,
falls irgendein Teil beschädigt ist.
• Versuchen Sie nicht irgendwelche
Teile, mit Ausnahme der in dieser
Gebrauchsanleitung angesprochenen,
zu entfernen.
• Verwenden Sie nur von Black & Decker
empfohlene Ersatzteile und empfohlenes
Zubehör.
Elektrische Sicherheit
Sie sollten immer erst den Netzstecker aus
der Steckdose ziehen, bevor Sie
irgendwelche Stecker, Klemmen oder
Verlängerungskabel lösen. Eine erhöhte
Sicherheit gewährleistet Ihnen eine
Fehlerstrom (FI)-Sicherung am
Stromanschluß, mit einer Abschaltleistung
von nicht mehr als 30mA, die allerdings von
einem qualifizierten Elektriker installiert
werden sollte.
Achtung! Eine FI-Sicherung oder andere
Stromkreisunterbrecher ersetzen keinesfalls
die vorher beschriebenen
Sicherheitsanweisungen für die Bedienung
Ihres Rasentrimmers.
Verlängerungskabel
Sie können bis zu 30m Black & Decker
Verlängerungskabel (dreiadrig) mit einem
Durchmesser von 1mm2 verwenden, ohne daß Ihr
Gerät dabei an Leistung verliert.
Vorbereitung des Rasentrimmers für
den Gebrauch (Abb. 2)
• Nehmen Sie den Rasentrimmer und die
2
Schutzhaube (10) aus der Verpackung.
• Entfernen Sie die Schraube der
Schutzhaube (12), welche sich an der
Unterseite der Schutzhaube befindet
(Abb. 2.1).
20
• Schieben Sie die Schutzhaube
in die Führungsrille auf dem
Rasentrimmergehäuse (Abb. 2.2).
• Schieben Sie die Haltelaschen (11)
zunächst auf der einen Seite bis zum
Anschlag hinein, so daß die Schutzhaube
bündig mit dem Gehäuse abschließt.
Wiederholen Sie den Vorgang für die
andere Seite (Abb. 2.3).
• Setzen Sie die Schraube der
Schutzvorrichtung wieder ein (Abb. 2.4).
• Wenn Sie korrekt eingebaut wurde, ist
die Schutzvorrichtung jetzt fest an Ihrem
Rasentrimmer montiert.
• Während des Transports ist das Ende
des Schnittfadens (9) an der Seite der
Spulenabdeckung befestigt. Entfernen
Sie das Klebeband, um das Ende des
Schnittfadens freizugeben. Es sollten
mindestens 9cm (3.5") des Schnittfadens
aus dem Spulengehäuse
herausschauen, bevor Sie Ihren
Rasentrimmer in Betrieb nehmen.
Hinweis: Bevor Sie Ihren Trimmer zum
ersten Mal in Betrieb nehmen, kann es sein,
daß der Schneidfaden über den Rand der
Schutzhaube hinausragt. Der überschüssige
Teil des Fadens wird beim Betreiben des
Trimmers von der Schneidklinge (8) in der
Schutzhaube abgeschnitten. Da dieser Teil
herumgeschleudert werden kann, ist es bei
einem erheblich zu langem Schneidfaden
ratsam, diesen vor Inbetriebnahme des
Gerätes abzuschneiden.
• Achten Sie darauf, daß die
Spulenabdeckung immer sicher
befestigt ist.
Einsatz Ihres Rasentrimmers
(Abb. A - J)
Um die höchste Leistung von Ihrem Rasentrimmer
zu erhalten, sollten Sie bitte die nachstehenden
Anweisungen befolgen. Seien Sie nicht ungeduldig;
Sie erzielen die besten Ergebnisse mit wachsender
Erfahrung und durch die Befolgung dieser
einfachen Regeln.
Verwenden Sie Ihren Rasentrimmer nicht
ohne die Schutzvorrichtung.
A
Mähen Sie nicht, wenn das Gras naß ist.
B
Die besten Ergebnisse erzielen Sie bei
trockenem Gras.
Trimmen
• Um Ihren Rasentrimmer einzuschalten,
drücken Sie den Betriebsschalter (3).
• Um das Gerät auszuschalten, lassen
Sie den Betriebsschalter wieder los.
Page 21

• Verwenden Sie vorzugsweise den
Zweithandgriff (2), um den Rasentrimmer
zu tragen, wenn er nicht in Gebrauch ist.
Mähen Sie immer im gleichen Winkel und mit
C
der Spitze des Schneidfadens.
Bewegen Sie den Rasentrimmer gleichmäßig
von einer Seite zur anderen.
D
Überlasten Sie den Rasentrimmer nicht. Er
arbeitet am wirkungsvollsten bei einer hohen
E
Geschwindigkeit.
Kürzen Sie langes Gras stückweise von
F
oben nach unten. Mähen Sie kurze
Stücke ab.
Nutzen Sie den Rand der Schutzhaube als
G
Führung an Randsteinen, Zäunen o.ä.,
um einen unnötigen Fadenverschleiß zu
vermeiden.
Kantenschneiden (vertikales Trimmen)
(GL540)
Die besten Ergebnisse erzielen Sie an
H
Kanten, die tiefer als 50mm sind.
Hinweis: Ihr Rasentrimmer ist als
Kantenschneider geeignet, um
überstehendes Gras z.B. an Übergängen
zwischen Rasenflächen und Beeten zu
schneiden. Er ist nicht dazu geeignet, die
Kante selbst zu formen. Hierfür müssen Sie
einen Spaten benutzen.
Kabelzugentlastung
Um zu verhindern, daß sich das
Verlängerungskabel versehntlich aus dem
J
Stecker am Gerät löst, müssen Sie ein Stück
des Kabels in einer Schlinge durch die
Kabelhalterung ziehen.
Wechsel vom Trimmen zum
Kantenschneiden (GL540) (Abb. 3)
Zusätzlich zu dem konventionellen Trimmen,
kann Ihr Rasentrimmer auch dazu verwendet
werden, um überstehendes Gras an den
Rasenrändern und Blumenbeeten zu mähen.
Um Ihren Rassentrimmer vom Trimm- in den
Kantenschneid-Modus einzustellen:
3
• Schalten Sie Ihren Trimmer aus. Halten
Sie ihn mit einer Hand am Schaltergriff (4)
und der anderen Hand am
Trimmergehäuse (1). Drücken Sie den
Knopf (7) oberhalb des Motorgehäuses.
Halten Sie den Knopf gedrückt und
drehen Sie das Gehäuse gegen den
Uhrzeigersinn. Anschließend lassen Sie
den Knopf wieder los und drehen das
Gehäuse so lange weiter, bis es in der
richtigen Position einrastet (Abb. 3).
DEUTSCH
• Um Ihren Rasentrimmer beim
Kantenschneiden am effektivsten zu
nutzen, stellen Sie sich seitlich zu Ihrem
Trimmer (Abb. 3.1). Führen Sie die
Vorderkante des Trimmers (14) so an
der Rasenkante entlang, daß der
Schneidfaden nur das überstehende
Gras an den Rasenrändern
abschneidet (Abb. H).
Ersatzschneidfaden
Sie erhalten bei Ihrem Black & Decker Händler
eine neue Spule mit 40 Metern Schneidfaden.
Lose Fäden in den Längen von 25 bis 50 Meter
sind ebenfalls erhältlich.
Um ein Höchstmaß an Zuverlässigkeit zu erhalten
sollten Sie nie einen dickeren oder dünneren
Schnittfaden (z.B. eine Angelschnur) verwenden.
Dieser könnte die automatische Fadenverlängerung
verhindern, zu einem Ausfall des Motors führen oder
zumindest die Mähleistung erheblich beeinträchtigen.
Einsetzen einer neuen Spule mit
Schneidfaden (Abb. 4 + 5)
• Unterbrechen Sie die Stromzufuhr zu
Ihrem Rasentrimmer.
• Entfernen Sie die Abdeckung der Spule,
4
5
indem Sie die Spulenabdeckungslaschen
(16) nach innen und nach oben drücken
(Abb. 4) und die Abdeckung
anschließend herunterziehen (es ist nicht
notwendig, beide Laschen gleichzeitig zu
drücken). Die leere Spule kann jetzt von
der Antriebswelle heruntergezogen werden.
• Entfernen Sie eventuelle Gras- oder
Schmutzrückstände, die sich unter
Umständen innerhalb des
Spulengehäuses und der Abdeckung
angesammelt haben.
• Wickeln Sie ungefähr 9cm des
Schneidfadens (9) von der neuen Spule
(19) ab und legen Sie das Ende des
Schneidfadens vorübergehend in eine
der ‘L’ -förmigen Schlitze um zu
verhindern, daß sich die Spule abwickelt.
• Schieben Sie das Ende des
Schneidfadens durch die Öse. Schieben
biz anschließend die Spule auf die
mittlere Antriebswelle. Ziehen Sie
gleichzeitig das Ende des
Schneidfadens, um den Schneidfaden
aus dem ‘L’ -förmigen Schlitz zu lösen.
21
Page 22

Um die Spule korrekt einzusetzen, muß
sie nach Bedarf hin und her gedreht
werden. Achten Sie dabei darauf, daß
sich der Schneidfaden nicht unter der
Spule einklemmt und sorgen Sie dafür,
daß mindestens 9cm des Schneidfadens
aus dem Spulengehäuse herausschauen.
• Setzen Sie abschließend die Abdeckung
wieder auf, indem Sie die beiden
Laschen (16) auf die Schlitze in dem
Spulengehäuse einrichten und sie
anschließend hineinschieben. Achten Sie
darauf, daß beide Laschen gut festsitzen.
Wickeln eines Schneidfadens auf
eine leere Spule (Abb. 6 + 7)
• Sie können einen neuen Schneidfaden
6
mit einer Länge von höchstens 10
Metern auf eine leere Spule aufwickeln.
Um zu verhindern, daß Sie versehentlich
zuviel Schneidfaden auf die Spule
aufwickeln und dadurch das
automatische Fadenverlängerungsststem
in seiner Funktion beeinträchrigt wird,
befindet sich an der Spule ein ‘Anzeiger’,
an dem Sie sich orientieren können.
• Entfernen Sie eventuelle Überreste des
alten Schneidfadens aus der Spule oder
dem Spulengehäuse.
• Schieben Sie das Ende des neuen
Schneidfadens ca. 20mm in eines der
beiden Löcher am Spulengehäuse (17).
• Knicken Sie den Schneidfaden so, daß er
durch den danebenliegenden ‘L’ förmigen Schlitz gezogen werden kann.
Der Schneidfaden sollte jetzt fest an der
Spule verankert sein. Anschließend
können Sie mit dem Aufwickeln in
Pfeilrichtung (20) beginnen.
• Sie sollten sich für das Aufwickeln des
Schneidfadens Zeit lassen. Achten Sie
darauf, daß Sie den Faden nicht über
kreuz wickeln, sondern die einzelnen
Schlingen ordentlich nebeneinander liegen.
• Sobald Sie eine ausreichende Menge an
Schneidfaden aufgewickelt haben,
klemmen Sie ihn vorübergehend in einen
der ‘L’ -förmigen Schlitze, um ein
Abwickeln der Spule zu verhindern.
Achten Sie darauf, daß dabei mindestens
9cm des Schnittfadens herausschauen.
• Setzen Sie die Spule und die
Spulenabdeckung (15) - wie schon
beschrieben - wieder auf das
Spulengehäuse auf.
22
Pflege und Wartung
• Um bestmögliche Arbeitsergebnisse zu
erzielen, sollten Sie Ihren Trimmer, besonders
die beweglichen Teile und die Lüftungsschlitze
im Motorgehäuse, sauber halten. Entfernen Sie
Grasreste und anderen Schmutz mit einer
trockenen Bürste oder einem trockenen Tuch.
• Kunststoffteile können mit einer milden Seife und
einem mit heißem Wasser befeuchteten Tuch
gereinigt werden. Verwenden Sie keine
Waschmittel, Reiniger oder Chemikalien
enthaltende Lösungsmittel, um eine
Beschädigung des Kunststoffes zu verhindern.
Den Rastrimmer nicht mit Wasser abspritzen.
• Ihr Rasentrimmer ist mit selbstschmierenden
Lagern ausgerüstet, so daß Sie keine Teile
schmieren müssen.
Fehlersuche
Bevor Sie Ihren Rasentrimmer auf eventuelle Fehler
untersuchen, immer erst den Netzstecker ziehen.
• Läßt sich der Rasentrimmer nicht starten,
überprüfen Sie, ob alle Stromkabel richtig
angeschlossen sind.
• Falls die automatische Fadenverlängerung nicht
funktioniert, kann eine der folgenden Gründe die
Ursache sein:
Faden ist zu kurz oder hat sich in der
Spule verklemmt
• Unterbrechen Sie die Stromzufuhr zu
Ihrem Rasentrimmers.
• Entfernen Sie die Spulenabdeckung (15),
indem Sie die Spulenabdeckungslaschen
(16) nach innen und nach oben drücken
(Abb. 4).
• Heben Sie die Spule (19) ungefähr 6mm aus
dem Spulengehäuse (17) heraus, und ziehen
gleichzeitig am Schneidfaden (9). Dadurch
können Sie den Schneidfaden verlängern
und gleichzeitig eine eventuelle Blockierung
innerhalb der Spule lösen. Achten Sie darauf,
daß mindestens 9cm des Schneidfadens
aus dem Spulengehäuse herausschauen.
• Um die Spule wieder einzusetzen, wird sie
nach Bedarf hin und her gedreht. Setzen Sie
die Abdeckung wieder auf, indem Sie beide
Laschen auf der Abdeckung auf die Schlitze
in dem Spulengehäuse einrichten und bis
zum Anschlag einschieben. Achten Sie
darauf, daß beide Laschen gut festsitzen.
Schneidfaden ist weiterhin in der Spule
verklemmt oderimeshalt der
Spulenebdeckung abgerissen
• Unterbrechen Sie die Stromzufuhr und
entfernen, wie bereits an früherer Stelle
beschrieben, die Abdeckung.
Page 23

• Ziehen Sie die Spule (19) vollständig heraus
und halten den aufgewickelten Faden dabei
gut fest, damit er sich nicht von der Spule
abwickelt (Abb. 7).
• Wickeln Sie den Schneidfaden (9)
vorsichtig solange von der Spule, bis alle
überkreuzten oder festsitzenden Schlingen
wieder frei sind. Wickeln Sie den
Schneidfaden anschließend gleichmäßig, in
pflierichking (20) auf der Spule.
• Legen Sie das Ende des Schneidfadens
vorübergehend in eine der ‘L’ -förmigen
Schlitze, um zu verhindern, daß sich die
Spule abwickelt. Achten Sie darauf, daß
dabei mindestens 9cm herausschauen.
• Drehen Sie den Hebel (22) rückwärts und
vorwärts um sicherzugehen, daß er sich
problemlos bewegt.
• Entfernen Sie eventuelle Gras- oder
Schmutzrückstände, die sich unter
Umständen innerhalb der Spulengehäuses
und der Abdeckung angesammelt haben.
• Schieben Sie das Ende des Schneidfadens
durch die Öse. Schieben Sie anschließend
die Spule auf die mittlere Antriebswelle.
Ziehen Sie gleichzeitig das Ende des
Schneidfadens, um den Schneidfaden aus
dem ‘L’ -förmigen Schlitz zu lösen. Um die
Spule korrekt einzusetzen, muß sie nach
Bedarf hin und her gedreht werden. Achten
Sie dabei darauf, daß sich der Schneidfaden
nicht unter der Spule einklemmt und
Schneidfadens aus dem Spulengehäuse
herausschauen.
• Setzen Sie abschließend die Abdeckung,
wie an früherer Stelle bereits
beschrieben, wieder auf.
Umweltschutz
Black & Decker nimmt Ihre ausgedienten
Black & Decker Geräte gern zurück und
sorgt für eine umweltfreundliche Entsorgung.
Diese Dienstleistung ist für Sie kostenlos.
Um diese Dienstleistung in Anspruch zu
nehmen, geben Sie das Gerät bitte bei
einer autorisierten Reparaturwerkstatt ab,
die für uns die Einsammlung übernimmt.
Die Adresse des zuständigen Büros von
Black & Decker finden Sie in dieser Anleitung,
darüber läßt sich die nächstgelegene Vertragswerkstatt
ermitteln. Außerdem ist eine Liste der
Vertragswerkstätten und aller Kundendienststellen
von Black & Decker sowie der zuständigen
Ansprechpartner im Internet zu finden unter:
www.2helpU.com.
DEUTSCH
Garantie
Black & Decker vertraut auf die Qualität der
eigenen Geräte und bietet dem Käufer eine
außergewöhnliche Garantie. Diese Garantiezusage
versteht sich unbeschadet der gesetzlichen
Gewährleistungsansprüche und schränkt diese
keinesfalls ein. Sie gilt in sämtlichen
Mitgliedsstaaten der Europäischen Union und der
Europäischen Freihandelszone EFTA.
Tritt innerhalb von 24 Monaten ab Kaufdatum an
einem Gerät von Black & Decker ein auf Materialoder Verarbeitungsfehler zurückzuführender Mangel
auf, garantiert Black & Decker den Austausch
defekter Teile, die Reparatur von Geräten mit
üblichem Verschleiß bzw. den Austausch eines
mangelhaften Geräts, ohne den Kunden dabei
mehr als unbedingt nötig in Anspruch zu nehmen,
allerdings vorbehaltlich folgender Ausnahmen:
• wenn das Gerät gewerblich, beruflich oder
im Verleihgeschäft benutzt wurde;
• wenn das Gerät mißbräuchlich verwendet
oder mit mangelnder Sorgfalt behandelt
wurde;
• wenn das Gerät durch irgendwelche
Fremdeinwirkung beschädigt wurde;
• wenn ein unbefugter Reparaturversuch durch
anderes Personal als das einer
Vertragswerkstatt oder des Black & DeckerKundendienstes unternommen wurde.
Zur Inanspruchnahme dieser Garantie ist dem
Verkäufer bzw. der Vertragswerkstatt ein
Kaufnachweis vorzulegen. Die Adresse des
zuständigen Büros von Black & Decker steht in
dieser Anleitung, darüber läßt sich die
nächstgelegene Vertragswerkstatt ermitteln.
Außerdem ist eine Liste der Vertragswerkstätten
und aller Kundendienststellen von Black & Decker
sowie der zuständigen Ansprechpartner im Internet
zu finden unter: www.2helpU.com.
Weitere Gartengeräte
Black & Decker bietet ein großes Sortiment an
Gartengeräten an, die die Gartenarbeit erheblich
erleichtern. Für nähere Informationen zu den
folgenden Geräten wenden Sie sich bitte an den
Black & Decker Kundendienst (Adresse hinten in
dieser Anleitung) oder an Ihren Händler.
23
Page 24

Rasentrimmer Kettensägen
Akku-Strauchscheren Akku-Grasscheren
Heckenscheren Rasenmäher
Rasenlüfter Laubsauger
Häcksler
Nicht alle Produkte sind in allen Ländern erhältlich.
EU-Konformitätserklärung
GL545
Black & Decker erklärt hiermit, daß diese Geräte
entsprechend folgenden Richtlinien und Normen
konzipiert wurden:
98/37/EWG, 89/336/EWG, 73/23/EWG,
EN 55014, EN 60335, EN 61000,
2000/14/EWG, Rasentrimmer, L ≤ 50 cm
Anhang VIII, No. 0086
B.S.I., HP2 4SQ, United Kingdom
Höhe des Schalldrucks, gemessen nach
2000/14/EWG:
LpA(Schalldruck) dB(A) 81
LWA(Schalleistung) dB(A) 94
LWA(garantiert) dB(A) 96
Gewichteter Effektivwert der Beschleunigung
nach EN 50144: 4 m/s
2
Brian Cooke
Director of Engineering
Spennymoor, County Durham DL16 6JG,
United Kingdom
1-12-2001
24
Page 25

Rotofil
Notice d’emploi
Félicitations!
Nous vous félicitons pour votre acquisition d’un
rotofil Reflex® Black & Decker. Le système
d’alimentation 100% automatique Reflex®, vous
permettre d’utiliser votre rotofil sans avoir à vous
occuper de la longueur de fil utilisée. Le système
Reflex® ajuste automatiquement la longueur de fil
sans que vous ayez à faire quoique ce soit.
Description
Voici les différentes par ties de votre rotofil:
Corps (1)
1
Seconde poignée (2)
Interrupteur (3)
Poignée (4)
Ergot de blocage (5)
Prise (6)
Bouton (7)
Lame coupe-fil (8)
Fil de coupe (9)
Carter protecteur (10)
Blocage du carter (11)
2
Vis du carter (12)
Pas de vis du carter (13)
Sabot de guidage (14)
Capot de bobine (15)
5
Cliquet de la bobine (16)
Support de bobine (17)
Oeilleton (18)
Bobine (19)
Flèche (20)
Cran de maintien du fil (21)
Masselotte (22)
Consignes de sécurité
Lisez attentivement cette notice et respectez
tous les documents livrés avec. Maintenez
votre rotofil en bon état de marche.
Familiarisez-vous avec votre machine avant
de l’utiliser et surtout, assurez-vous de savoir
l’arrêter en cas d’urgence.
Conservez soigneusement la présente notice
ainsi que tous les documents livrés avec.
Alimentation électrique
• Votre machine est conçue pour une
alimentation en courant alternatif.
N’essayez aucune autre sorte
d’alimentation.
• Branchez toujours votre rotofil à une
prise fixe.
• Ne laissez pas votre machine sans
surveillance lorsqu’elle est branchée.
• Débranchez toujours avant d’inspecter
ou de nettoyer votre rotofil.
Isolation totale
Votre rotofil est complètement isolé (double
isolation). Ceci signifie que deux niveaux de
protection vous protègent contre la
possibilité d’entrer en contact avec des
pièces métalliques, ce qui améliore votre
protection contre les risques d’électrocution.
Câble d’alimentation
• Le câble de rallonge doit être inspecté
régulièrement afin d’en vérifier l’état.
• Tenez toujours le câble éloigné du fil de
coupe (9) et sachez à tout moment où il
se trouve.
• Ne transportez jamais votre rotofil en le
tenant par le câble. Ne tirez jamais sur le
câble pour débrancher. Tenez-le à l’écart
de sources de chaleur, produits
inflammables et arêtes tranchantes.
• Si le câble est endommagé, remplacez-le
dans les plus brefs délais.
Fil de coupe
• Prenez garde de ne pas vous blesser
avec la lame coupe-fil (8) lors du
déballage et du montage de votre produit.
• Le fil de coupe (9) continue de tourner un
court instant après le relâchement de
l’interrupteur. Vous ne devez en aucune
façon essayer d’arrêter le fil vous-même.
• Ne remplacez jamais le fil nylon par du fil
de fer, du fil de pêche, etc.
Vêtements
• Portez toujours des lunettes de protection
lorsque vous utilisez votre rotofil.
• Portez des chaussures solides ou des
bottes. Ne travaillez jamais pieds nus ou
en sandales.
• Portez un pantalon pour protéger
vos jambes.
• Utilisez des protège-oreilles si le niveau
sonore du rotofil vous gêne.
25
Page 26

Utilisation du rotofil
• Utilisez toujours votre rotofil de la
manière indiquée dans cette notice.
Assurez-vous que la bobine est bien
fixée.
• Assurez-vous que votre zone de tonte
ne comporte pas de pierres ou autres
débris qui pourraient être éjectés.
• Tenez votre rotofil à l’écart de vos
pieds.
• Ne mettez pas en marche votre rotofil
s’il est la tête en bas.
• Ne courez jamais en travaillant.
• N’utilisez pas votre machine sous la
pluie.
• N’utilisez votre rotofil qu’en plein jour.
• Ne traversez pas des allées
gravillonnées lorsque le fil nylon tourne.
• Ne travaillez pas dans des pentes trop
abruptes. Coupez toujours en travers de
la pente et non de bas en haut. Assurezvous de votre bon équilibre.
• N’utilisez jamais votre rotofil sans son
carter de protection (10) où si celui-ci
est endommagé.
• Rappelez vous que l’herbe fraîchement
coupée est humide et glissante.
Sécurité des tiers
• Rappelez vous que l’utilisateur est
responsable de tout accident volontaire
ou involontaire qui pourrait être
occasionné par son rotofil.
• N’autorisez jamais les enfants ou
personnes n’ayant pas lu cette notice à
360˚
6m/20ft
utiliser votre rotofil.
• Tenez les enfants, tierces personnes ou
animaux domestiques à l’écart du rotofil
lorsque vous l’utilisez.
Entretien de la machine
• Rangez votre rotofil dans un endroit sec
hors de portée des enfants.
• N’utilisez ni produits, ni solvants pour
nettoyer votre machine. Utilisez une
raclette pour nettoyer le carter.
Débranchez et assurez-vous toujours
que le fil nylon (9) ne tourne pas avant de
nettoyer votre rotofil.
• N’utilisez pas votre machine si une pièce
est endommagée.
• N’utilisez que les accessoires de
rechange Black & Decker.
Securite electrique
Votre rotofil doit toujours être arrêté et
débranché avant toute opération sur la prise
ou le câble.
Remplacement de fusibles
• La prise est munie d’un fusible de
5 ampères
• N’utilisez que des fusibles de rechange
conformes à la norme BS1362.
• Lorsque vous avez changé un fusible,
assurez-vous toujours que son couvercle
est bien en place.
Remarque: Les fusibles ne protègent pas
de l’électrocution.
Rallonge
Vous pouvez utiliser un câble allant jusqu’à 30m sans
perte de puissance de votre rotofil. Vérifiez que les
câbles utilisés sont conformes aux normes de sécurité.
Mise en service du rotofil (Fig. 2)
• Déballez le rotofil et le carter
2
protecteur (10).
• Otez la vis du carter (12) située à la base
du corps du rotofil (Fig. 2.1).
• Enclenchez le carter dans les rainures
prévues à cet effet (Fig. 2.2).
• Appuyez fermement, d’abord d’un côté
jusqu’à ce que le carter soit bien
enfoncé. Répétez l’opération de l’autre
côté (Fig. 2.3).
• Replacez la vis (Fig. 2.4).
• S’il est correctement ajusté, votre
carter doit alors être bien fixé au corps
du rotofil.
• Pour démarrer, enlevez l’adhésif qui fixe
le fil à la bobine et dévidez au moins
5cm de fil.
• Assurez-vous toujours que la bobine est
correctement fixée.
Comment utiliser votre rotofil?
(Fig. A - J)
Afin de tirer le meilleur parti de votre rotofil, observez
les consignes suivantes:
N’utilisez jamais votre rotofil sans son carter
de protection.
A
Ne coupez pas l’herbe mouillée, de
B
meilleurs résultats sont obtenus en coupe
d’herbe sèche.
26
Page 27

Coupe
• Pour mettre en marche, appuyez sur
l’interrupteur (3).
• Pour arrêter, relâchez l’interrupteur.
• Pour transporter votre rotofil hors
utilisation, nous vous conseillons de le
tenir par la 2 ème poignée (2).
Coupez en inclinant légèrement le rotofil.
C
Effectuez un léger mouvement de balancier
D
de droite à gauche.
Ne surmenez pas le rotofil. Il travaille mieux à
vitesse régulière.
E
Dans les herbes hautes, attaquez par le
F
sommet de celles-ci et faites des
petites coupes.
Utilisez le bord du carter de protection
G
comme guide le long de surfaces dures ou
de murs.
Taille de bordures (GL540)
Les meilleurs résultats sont obtenus sur des
H
bordures ayant au moins 50mm
de profondeur.
Remarque: Votre rotofil est conçu pour
entretenir les bordures. Il n’est pas adapté
pour les creuser.
Blocage du câble rallonge
Faites une boucle avec le câble et fixez-la
J
à l’ergot de blocage (5). Vous éviterez ainsi
que la prise s’arrache lors d’une tension
trop forte.
Comment convertir votre rotofil en
taille-bordures (Fig. 3)
En plus de la fonction traditionnelle de
coupe-herbe, votre rotofil peut être utilisé
comme coupe-bordure.
Instructions pour passer en mode
3
coupe-bordure:
• A l’arrêt, placez une main sur la poignée
pivotante (4) et l’autre main sur le corps
du rotofil. Appuyez sur le bouton (7) et
faites tourner le corps du rotofil (en
maintenant la pression sur le bouton)
jusqu’à ce que celui-ci se bloque dans la
position “coupe-bordure” (Fig. 3.1).
• Pour une efficacité optimale en mode
coupe-bordure, utilisez le sabot de
guidage (Fig. H).
FRANÇAIS
Fil nylon de rechange
Vous pouvez vous procurer une bobine ou du fil
de rechange chez votre revendeur Black & Decker.
Il est impératif de bien utiliser du fil Black & Decker,
tout autre produit risquant de ne pas faire fonctionner
le système d’alimentation automatique.
Comment mettre une nouvelle
bobine (Fig. 4 & 5)
• Débranchez votre Rotofil
• Otez le capot de la bobine en appuyant
4
5
Recharge de fil sur une bobine vide
(Fig. 6 & 7)
6
sur les deux cliquets (16) (Fig. 4).
Il n’est pas nécessaire d’appuyer sur les
deux en même temps. Vous pouvez
alors retirer la bobine.
• Nettoyez le support de bobine et
le capot.
• Dévidez environ 9cm de fil (9) de la
nouvelle bobine (19) et bloquez le fil dans
l’encoche ‘L’ pour éviter que la bobine
ne se dévide.
• Passez le fil au travers de l’oeilleton et
mettez la bobine en place, puis enlevez
le fil bloqué dans l’encoche ‘L’. Pour
remettre en place parfaitement la bobine,
tournez-la jusqu’à ce qu’elle soit calée en
veillant à ce que le fil ne se bloque pas.
Assurez-vous qu’il y a au moins 9cm
de dévidés.
• Replacez le capot en vérifiant que les
deux cliquets (16) sont bien en place.
• Vous pouvez charger jusqu’à 10m de fil
sur votre bobine. La bobine est pourvue
d’un “indicateur” qui vous évite de mettre
trop de fil, ce qui perturberait le
fonctionnement du système Reflex.
• Otez le reste de fil de la bobine (19)
• Placez l’extrémité du nouveau fil
dans un des trous du support (19) et
insérez-y 2cm.
• Pliez le fil de coupe en le tirant au
travers du “L” adjacent. Le fil doit alors
fermement fixé à la bobine. Vous pouvez
alors l’enrouler dans le sens des
flèches (20).
27
Page 28

• Enroulez bien régulièrement sans
croiser le fil.
• Lorsque vous avez enroulé
suffisamment de fil, bloquez-le
provisoirement dans un “L” pour éviter
que la bobine ne se dévide.
• Remettez la bobine et le capot en place
en vous assurant qu’il y ait au moins 9cm
de fil déroulé.
Entretien
• Pour obtenir de meilleurs résultats, nettoyez
régulièrement la bobine ainsi que les ailettes
d’aération. Utilisez une brosse sèche pour
ôter l’herbe.
• Les pièces en plastique doivent être nettoyées
avec un chiffon humidifié d’eau chaude. N’utilisez
pas de détergent ou de solvant. N’aspergez pas
votre rotofil pour le nettoyer.
• Il n’est pas nécessaire de lubrifier les
pièces intérieures.
Détection des pannes
Avant d’inspecter votre rotofil, débranchez-le.
• Si le rotofil ne démarre pas, vérifiez qu’il est
correctement branché. S’il ne marche pas,
vérifiez l’état du câble et le fusible.
• Si l’alimentation du fil nylon ne fonctionne pas,
ce peut être pour les raisons suivantes:
Fil trop court ou emmêlé dans la bobine
• Otez le capot de la bobine (8).
• Sortez la bobine (15) d’environ 6mm de
son support (16), tout en tirant le fil nylon
(9). Cela vous permet de rallonger le fil tout
en le démêlant. Assurez-vous qu’il y a au
moins 9cm de fil dévidés.
• Replacez la bobine et le capot en vous
assurant que les deux cliquets sont bien
en place.
Fil toujours emmêlé ou cassé à l’intérieur
du capot
• Débranchez et ôtez le capot de la bobine
comme décrit précédemment
• Otez la bobine
• Déroulez précautionneusement le fil (9)
jusqu’à ce que toutes les boucles ou
emmêlements soient supprimés.
Rembobinez le fil dans le sens des
flèches (20) situées sur la bobine.
• Nettoyez le support de bobine et le capot.
• Replacez la bobine et le capot en vous
assurant qu’il a au moins 9cm de fil déroulés.
Protection de l’environnement
Black & Decker fournit un dispositif permettant
de recycler les produits Black & Decker
lorsqu’ils ont atteint la fin de leur cycle de
vie. Ce service est gratuit. Pour pouvoir
profiter de ce service, veuillez retourner
votre produit à un réparateur agréé qui se
chargera de le collecter pour nous.
Pour connaître l’adresse du réparateur agréé le
plus proche de chez vous, contactez le bureau
Black & Decker à l’adresse indiquée dans ce manuel.
Vous pourrez aussi trouver une liste des réparateurs
agréés de Black & Decker et de plus amples détails
sur notre service après-vente sur le site Internet à
l’adresse suivante : www.2helpU.com.
Garantie
Black & Decker est confiant dans la qualité de ses
produits et vous offre une garantie très étendue. Ce
certificat de garantie est un document supplémentaire
et ne peut en aucun cas se substituer à vos droits
légaux. La garantie est valable sur tout le territoire
des Etats Membres de l’Union Européenne et de la
Zone de Libre Echange Européenne.
Si un produit Black & Decker s’avère défectueux en
raison de matériaux en mauvaises conditions, d’une
erreur humaine, ou d’un manque de conformité dans
les 24 mois suivant la date d’achat, Black & Decker
garantit le remplacement des pièces défectueuses,
la réparation des produits usés ou cassés ou
remplace ces produits à la convenance du client,
sauf dans les circonstances suivantes :
• Le produit a été utilisé dans un but
commercial, professionnel, ou a été loué.
• Le produit a été mal utilisé ou avec
négligence.
• Le produit a subi des dommages à cause
d’objets étrangers, de substances ou à
cause d’accidents.
• Des réparations ont été tentées par des
techniciens ne faisant pas partie du service
technique de Black & Decker.
Pour avoir recours à la garantie, il est nécessaire de
fournir une preuve d’achat au vendeur ou à un
réparateur agréé. Pour connaître l’adresse du
réparateur agréé le plus proche de chez vous,
contactez le bureau Black & Decker à l’adresse
indiquée dans ce manuel. Vous pourrez aussi trouver
une liste des réparateurs agréés de Black & Decker
et de plus amples détails sur notre service aprèsvente sur le site Internet à l’adresse suivante :
www.2helpU.com.
28
Page 29

Autres outils de jardinage
Black & Decker propose une gamme complète
d’outils de jardinage facilitant l’entretien du jardin.
Si vous souhaitez obtenir de plus amples
renseignements sur les produits suivants, veuillez
contacter notre Centre de Service et d’Information
(voir la page d’adresse à la fin de ce manuel) ou
vous adresser à votre revendeur Black & Decker le
plus proche.
Tronçonneuses
Cisaille à gazon sans fil
Coupes bordures
Tailles-haies à fil ou sans fil
Tondeuses
Aspirateur / souffleur / broyeur
Broyeurs
Aérateur Démousseur
Tous les produits ne sont pas disponibles dans
tous les pays.
FRANÇAIS
Déclaration de conformité CE
GL545
Black & Decker déclare que ces outils sont
2000/14/CEE, coupe bordures, L ≤ 50 cm
Niveau de pression acoustique, mesuré suivant
LpA(pression acoustique) dB(A) 81
LWA(puissance acoustique) dB(A) 94
LWA(garanti) dB(A) 96
Niveau de vibration main/bras selon la norme
conformes aux normes:
98/37/CEE, 89/336/CEE, 73/23/CEE,
EN 55014, EN 60335, EN 61000,
Annexe VIII, No. 0086
B.S.I., HP2 4SQ, Royaume Uni
la norme 2000/14/CEE:
EN 50144: 4 m/s
2
Brian Cooke
Directeur du Développement
Spennymoor, County Durham DL16 6JG,
Royaume-Uni
1-12-2001
29
Page 30

Strimmer
Gebruiksaanwijzing
Gefeliciteerd!
Met de aankoop van deze Black & Decker Reflex
strimmer en graskantsnijder is jarenlang
probleemloos strimmen verzekerd. De Reflex strimt
en snijdt de graskanten van uw gazon en is
bovendien uitgerust met een uniek volautomatisch
draadtoevoersysteem. U hoeft helemaal niets te doen
met het Reflex-systeem kunt u dus non-stop
strimmen. Door middel van een eenvoudig
mechanisme voelt het wanneer de draad versleten is
en indien nodig voert het automatisch draad toe tot
de optimale snijlengte. U hoeft alleen maar de
machine aan te zetten en te strimmen.
®
Beschrijving
Hieronder vindt u een lijst van de onderdelen die in
deze gebruiksaanwijzing worden vermeld en op de
bijbehorende tekeningen zijn afgebeeld:
Lichaam (1)
1
Tweede handgreep (2)
Drukschakelaar (3)
Hendelschakelaar (4)
Verlengsnoer klem (5)
Stroomtoevoer of elektrisch snoer (6)
Knop (7)
Snijmes (8)
Snijdraad (9)
Beschermkap (10)
Sluitlipjes van de beschermkap (11)
2
Schroef voor de beschermkap (12)
Schroefgat van de beschermkap (13)
Voorkant (14)
Spoeldeksel (15)
4
Treklipje van het spoeldeksel (16)
Spoelhuis (17)
Oog (18)
Spoeltje (19)
5
Pijl (20)
6
Draadtoevoer gat (21)
Hendel (22)
7
Veiligheidsvoorschriften
Lees deze gebruiksaanwijzing aandachtig
door en neem voor, tijdens en na het gebruik
van de machine alle aanbevolen
veiligheidsvoorschriften in acht. Onderhoud
uw machine goed en zorg ervoor dat ze altijd
perfect werkt.
Maak uzelf vertrouwd met de
bedieningselementen van de machine
vooraleer u ermee begint te werken, maar
zorg vooral dat u weet hoe u de machine in
noodgevallen moet afzetten.
Bewaar deze gebruiksaanwijzing en alle
andere bijgeleverde informatie bij de
machine, zodat u deze documentatie later
steeds kunt raadplegen.
Elektrische aansluiting
• Uw machine is alleen geschikt om met
wisselstroom te worden gebruikt.
Probeer niet om ze op een andere
stroomtoevoerbron aan te sluiten.
• Steek de stekker in een stopcontact en
nooit in een contactdoos voor
verlichtingstoestellen.
• Laat de machine niet onbewaakt
achter als de stekker nog in het
stopcontact steekt.
• Schakel de machine altijd uit en trek
de stekker uit het stopcontact voor u
eender welk onderdeel van de strimmer
schoonmaakt, controleert of bijstelt, als
het elektriciteitssnoer beschadigd is of in
de war zit.
Dubbele isolatie
Uw machine is volledig geïsoleerd. Dit
betekent dat alle uitwendige metalen delen
elektrisch geïsoleerd zijn van de netvoeding.
Dit wordt bereikt door isolatiewanden aan te
brengen tussen de elektrische en de
mechanische onderdelen. Daardoor is
aarding overbodig.
Elektriciteitssnoer
• Het elektriciteitssnoer moet regelmatig
op beschadigingen of slijtage worden
gecontroleerd en mag alleen in goede
staat worden gebruikt.
• Houd het elektriciteitssnoer altijd uit
de buurt van de snijdraad (9) en zorg
ervoor dat u altijd weet waar het zich
precies bevindt.
30
Page 31

• Draag de machine nooit bij het snoer
en trek niet aan het snoer om de
stekkerverbindingen uiteen te halen. Houd
het snoer uit de buurt van warmtebronnen,
olie of scherpe snijranden.
• Laat beschadigde snoeren volledig
vervangen door het dichtstbijzijnde
Black & Decker Service Centre. Probeer
niet om het snoer zelf te vervangen want
de schakelhendel kan niet door de
gebruiker worden hersteld.
Snijdraad
• Zorg ervoor dat u bij het uitpakken en
monteren uzelf niet verwondt door het
snijmes (8) en door de overtollige draad
die kan worden afgesneden wanneer de
strimmer voor het eerst wordt gebruikt.
• De snijdraad (9) blijft nog even draaien
nadat u de schakelhendel hebt
losgelaten. U mag in geen geval
proberen om de snijdraad te doen
stoppen, maar moet hem altijd vanzelf
tot stilstand laten komen.
• Bevestig nooit een metalen snijdraad.
Kleding
• Draag altijd een beschermende bril als u
met de machine werkt.
• Draag altijd stevige schoenen of
laarzen om uw voeten te beschermen
(werk nooit blootsvoets of draag geen
open sandalen).
• Draag een lange broek om uw benen te
beschermen - afval dat op het gazon of
in de snijzone ligt, kan door de snijdraad
worden opgepakt en weggeslingerd.
• Gebruik gehoorbescherming.
Het gebruik van uw machine
• Gebruik uw machine altijd zoals in deze
gebruiksaanwijzing is beschreven. Uw
machine is gemaakt om rechtop te
worden gebruikt. Wanneer ze op een
andere manier wordt gebruikt, kan dit tot
ongevallen leiden.
• Trek de stekker uit het stopcontact en ga
na of de draaiende delen niet
beschadigd zijn voor u de machine
gebruikt. Controleer ook of het spoeltje
veilig is gemonteerd.
• Controleer altijd of er geen stokken,
stenen, draad of ander afval op uw
gazon of in de snijzone liggen. Dergelijk
afval kan de machine beschadigen.
• Houd de machine steeds op veilige
afstand van uw voeten en andere
lichaamsdelen wanneer u ze inschakelt
en tijdens het werken.
NEDERLANDS
• Schakel de machine nooit aan wanneer
ze ondersteboven staat.
• Stap met een normaal tempo met de
machine, loop nooit.
• Gebruik de machine niet wanneer het
regent en laat ze niet nat worden.
• Gebruik de machine alleen bij daglicht of
helder kunstlicht.
• Loop niet over kiezelpaadjes of wegen
terwijl de snijdraad aan het draaien is.
• Strim geen overdreven steile hellingen.
Zorg ervoor dat u stevig staat en ga van
links naar rechts over het oppervlak van
hellingen, nooit op en neer.
• Gebruik de machine nooit met een
beschadigde beschermkap (10) of
zonder beschermkap.
• Wees voorzichtig wanneer u strimt, want
vers gemaaid gras is vochtig en glad.
Veiligheid van anderen
• Onthoud dat u, als gebruiker,
verantwoordelijk bent voor eventuele
ongevallen die zich voordoen met derden
of met hun bezittingen.
• Laat kinderen of mensen die met een
dergelijke machine niet vertrouwd zijn,
niet met uw strimmer werken. Geef de
machine nooit in handen van iemand die
deze gebruiksaanwijzing niet heeft
360˚
6m/20ft
gelezen.
• Houd kinderen, dieren of andere
volwassenen uit de buurt van de machine
terwijl u aan het werken bent - houd hen
altijd uit de buurt van de snijzone.
Onderhoud van uw machine
• Berg de machine op een droge plaats
en buiten het bereik van kinderen op als
u ze niet gebruikt.
• Gebruik geen oplosmiddelen of
reinigingsvloeistoffen om uw machine
schoon te maken - gebruik een afgekante
schraper om gras en vuil weg te schrapen.
Trek altijd de stekker uit het stopcontact
en vergewis u ervan dat de snijdraad (9)
volledig tot stilstand is gekomen
vooraleer u de machine schoonmaakt.
• Gebruik de machine nooit als er
onderdelen defect zijn.
• Probeer niet om andere onderdelen te
vervangen dan die welke in deze
gebruiksaanwijzing worden vermeld.
31
Page 32

• Gebruik alleen door Black & Decker
aanbevolen vervangonderdelen en
toebehoren.
Elektrische beveiliging
De machine moet altijd uitgeschakeld zijn voor u
om het even welke stekker, contact of verlengsnoer
loskoppelt.
Verlengsnoeren
U kunt een 30 meter lang tweeaderig verlengsnoer
gebruiken zonder overmatig stroomverlies. Zorg
ervoor dat verlengsnoeren voldoen aan de diverse
goedkeuringseisen.
De strimmer klaarmaken voor
gebruik (Fig. 2)
• Neem de strimmer en de beschermkap
2
(10) uit de doos.
• Verwijder de schroef van de
beschermkap (12) onder op de
beschermkap (Fig. 2.1).
• Schuif de beschermkap in de
daartoe bestemde gleuf van het
strimmerlichaam (Fig. 2.2).
• Druk de beschermkap stevig op haar
plaats, eerst aan de ene kant, tot ze
perfect gelijk zit met het lichaam, en
vervolgens aan de andere kant (Fig. 2.3).
• Draai de schroef van de beschermkap
terug op haar plaats (Fig. 2.4).
• Als ze juist is gemonteerd, is de
beschermkap nu stevig aan de
strimmer bevestigd.
• Bij levering is het uiteinde van de
snijdraad (9) met kleefband vastgemaakt
aan de zijkant van het spoeldeksel. Haal
de kleefband eraf om de snijdraad los te
maken. Er moet minstens 9cm (3.5")
snijdraad uit het spoelhuis steken voor u
met de strimmer begint te werken.
Opmerking: Wanneer u de machine voor het
eerst gebruikt, zal de overtollige snijdraad
door het snijmes (8) dat in de beschermkap
is ingebouwd, worden afgesneden. Dit zal
ook gebeuren bij elke volgende afstelling van
de draad. Omdat de snijdraad die door het
snijmes in de beschermkap wordt afgesneden,
kan worden weggeslingerd, is het van belang
dat de overtollige snijdraad tot een minimum
wordt beperkt. Wanneer er teveel snijdraad
werd uitgetrokken, moet u de snijdraad aan
de buitenkant van de beschermkap afsnijden
voor u de strimmer inschakelt. Snijd de
draad handmatig af met het snijmes.
32
• Zorg er altijd voor dat het spoeldeksel
voor en na het gebruik stevig vastzit.
Hoe moet u de strimmer
gebruiken? (Fig. A - J)
Om het maximum uit uw strimmer te halen, moet
u de onderstaande werkwijze nauwgezet volgen.
Wees niet ongeduldig. U krijgt de beste resultaten
door ervaring en door deze eenvoudige regels toe
te passen.
Gebruik de strimmer nooit zonder
A
beschermkap.
Snij geen nat gras; de beste resultaten krijgt
B
u wanneer het gras droog is.
Strimmen
• Schakel de strimmer in door de
drukschakelaar (3) in te drukken.
• Schakel de machine uit door de
drukschakelaar los te laten.
• Wanneer u de strimmer draagt zonder
hem te gebruiken, gebruik dan bij
voorkeur de tweede handgreep (2).
Snij altijd schuin en met het uiteinde van
C
de snijdraad.
Beweeg de strimmer voorzichtig heen
D
en weer.
Overbelast de strimmer niet. De machine
geeft de beste resultaten bij hoge snelheden.
E
Begin bij lang gras steeds vanaf het uiteinde
F
van het gras, strim steeds kleine oppervlakken.
Gebruik de zijkant van de beschermkap om
G
de strimmer weg te houden van harde
oppervlakken en dingen die gemakkelijk
kunnen worden beschadigd.
Graskantsnijden (GL540)
De beste resultaten krijgt u met graskanten
H
die dieper zijn dan 5cm.
Opmerking: Uw strimmer is
onderhoudsgereedschap om overhangend
gras te strimmen en kan niet worden
gebruikt om graskanten te maken. Gebruik
voor het maken van graskanten een
graskantenspade.
Kabelklem
Wanneer uw strimmer geschikt is voor
J
gebruik met een “afneembaar” verlengsnoer,
haal dan een lus van de kabel door de
kabelklem (5) om te vermijden dat de stekker
en het contact per ongeluk losgeraken
wanneer aan het snoer wordt getrokken.
Page 33

Omschakelen van strimmen naar
graskantsnijden (Fig. 3)
Naast gewoon strimmen kunt u met uw
strimmer ook overhangend gras strimmen
langs gazonranden en bloembedden.
Ga als volgt tewerk om uw strimmer om te
schakelen van strimmen naar graskantsnijden:
3
• Schakel de strimmer uit. Pak de
handgreep vast met de ene hand (4) en
met de andere hand het motorhuis (1).
Duw op de knop (7) aan de voorkant van
de strimmer. Houdt de knop ingedrukt,
draai het motorhuis tegen de klok in en
laat dan de knop los. Draai zover door
totdat het motorhuis in de positie is
(Fig. 3.1).
• De meest effektieve manier om uw
strimmer als graskantmaaier te gebruiken
is om deze naast u te houden (Fig. 3.2).
Geleid de voorkant van de strimmer
langs het gras zodat de snijdraad juist
het overhangende gras afsnijdt (Fig. H).
De snijdraad vervangen
U kunt een nieuw spoeltje met 10 meter snijdraad
kopen bij uw Black & Decker-dealer. Ais alternatief is er
draad beschikbaar met lengtes van 25 tot 50 meter.
Voor een maximale betrouwbaarheid mag u nooit
lichtere of zwaardere snijdraad (b.v. vislijn) gebruiken,
wat de automatische draadtoevoer kan verstoren,
de motor kan doen uitvallen of de snijprestaties
kan verminderen.
Hoe een nieuwe spoel te plaatsen?
(Fig. 4 & 5)
• Trek de stekker van de strimmer uit
het stopcontact.
• Verwijder het spoeldeksel door de lipjes
4
van het spoeldeksel (16) naar binnen en
naar omhoog te drukken (Fig. 4), en haal
het er vervolgens af (het is niet nodig om
beide lipjes tegelijk in te drukken). U kunt
het lege spoeltje nu van de drijfas nemen.
• Verwijder het vuil of gras dat zich
eventueel in het spoelhuis of spoeldeksel
heeft opgehoopt.
• Wikkel ongeveer 9cm snijdraad (9) van
het nieuwe spoeltje (19) af en laat de
snijdraad even in een van de L-vormige
gleuven zitten om te vermijden dat de
draad losraakt.
• Steek het uiteinde van de snijdraad door
5
het oog en druk het spoeltje dan op de
middelste drijfas terwijl u aan het vrije
uiteinde van de draad trekt om hem uit
de L-vormige gleuf los te maken.
NEDERLANDS
Draai zover als nodig om het spoeltje
volledig op zijn plaats te bevestigen.
Maak dat de snijdraad niet klem komt
te zitten onder het spoeltje en dat er
minimum 9cm snijdraad uit het
spoelhuis steekt.
• Breng het spoeldeksel weer op zijn
plaats aan door beide lipjes ervan ter
hoogte van de gleufjes in het spoelhuis
aan te brengen en ze op hun plaats te
drukken. Zorg ervoor dat beide lipjes
goed op hun plaats zitten.
Een nieuwe snijdraad op een leeg
spoeltje winden (Fig. 6 & 7)
• U kunt maximum 10 meter nieuwe
6
snijdraad op een leeg spoeltje winden.
Het spoeltje heeft een “indicator” om te
vermijden dat u teveel snijdraad op het
spoeltje zou winden, wat de automatische
draadtoevoer zou blokkeren.
• Verwijder alle resterende oude snijdraad
van het spoeltje (19).
• Druk het uiteinde van de nieuwe
snijdraad in een van beide gaten die in
het spoelhuis (19) zijn uitgespaard en trek
de draad 20mm ver door.
• Buig de snijdraad over en trek hem door
de L-vormige gleuf. De snijdraad moet
nu stevig in het spoeltje vastzitten en u
kunt hem nu verder wikkelen in de
richting van de pijlen (20).
• Neem uw tijd om de snijdraad netjes in
lagen om het spoeltje te winden. Doe dit
nooit kriskras.
• Wanneer u voldoende snijdraad hebt
opgewonden, kunt u hem even in een
van de L-vormige gleuven schuiven om
te vermijden dat de draad weer loskomt.
Zorg ervoor dat er minimum 9cm draad
blijft uitsteken.
• Breng het spoeltje en het spoeldeksel (15)
op hun plaats aan in het spoelhuis op
dezelfde manier als werd beschreven voor
het aanbrengen van een nieuw spoeltje.
33
Page 34

Onderhoud en service
• Voor optimale resultaten moeten de snijdraad,
het spoeltje en de luchtspleten in het lichaam
van de strimmer schoon worden gehouden.
Gebruik een droge borstel of een doek om
gras, plantensap of ander vuil te verwijderen.
• Kunststofonderdelen kunnen met zachte zeep
en een warme, vochtige doek worden
gereinigd.
Gebruik geen detergenten,
schoonmaakprodukten of oplosmiddelen, want
deze kunnen chemische bestanddelen
bevatten die de kunststof ernstig kunnen
beschadigen. Sproei de strimmer nooit schoon
met water.
• Aangezien uw strimmer met zelfsmerende
lagers is uitgerust, is smeren niet nodig.
Defecten opsporen
Trek de stekker uit het stopcontact vooraleer u
uw strimmer op defecten controleert.
• Wanneer de strimmer niet wil starten, controleer
dan of alle elektriciteitssnoeren correct zijn
aangesloten. Als dit niet helpt, controleer dan het
stopcontact en vervolgens de zekering en de
bedrading van de stekker van het verlengsnoer
en de vrouwelijke stekkerverbinding.
• Wanneer de automatische draadtoevoer niet
werkt, kan dit te wijten zijn aan een van de
volgende oorzaken:
De draad is te kort of de draad zit geklemd in
het spoeltje
• Trek de stekker van de strimmer uit
het stopcontact.
• Verwijder het spoeldeksel (15) door beide
lipjes (16) naar binnen en naar boven te
drukken (Fig. 4).
• Til het spoeltje (19) ongeveer 6mm uit het
spoelhuis (17) op, terwijl u aan de snijdraad
trekt (9). Zo kunt u de draad verlengen terwijl
u de draad losmaakt die eventueel in het
spoeltje geklemd zit. Zorg ervoor dat er
minimum 9cm draad uit het spoelhuis steekt.
• Draai het spoeltje zover als nodig om het
volledig op zijn plaats te brengen en plaats
het spoeldeksel terug door beide lipjes ervan
in de gleufjes van het spoelhuis te schuiven
en ze op hun plaats te drukken. Zorg ervoor
dat beide lipjes stevig op hun plaats zitten.
De draad zit nog steeds klem in het spoeltje
of is gebroken
• Trek de stekker uit het stopcontact en
verwijder het deksel zoals hierboven
beschreven.
• Haal het spoeltje (19) er volledig uit, houd
de opgerolde snijdraad op zijn plaats om te
vermijden dat het spoeltje afrolt (Fig. 7).
• Wind de snijdraad (9) voorzichtig van het
spoeltje los tot de gekruiste stukken draad of
de vastgeraakte lussen losgemaakt zijn.
Wind de snijdraad opnieuw op het spoeltje,
in de richting van de pijlen (20).
• Laat de snijdraad even in een van de
L-vormige gleuven zitten om te vermijden dat
de draad losraakt. Zorg ervoor dat er
minimum 9cm draad uitsteekt.
• Trek de hendel (22) naar voren en naar
achteren om na te gaan of hij vrij kan
bewegen.
• Verwijder het vuil of gras dat zich eventueel
in het spoelhuis of het spoeldeksel
heeft opgehoopt.
• Steek het uiteinde van de snijdraad door
het oog en druk het spoeltje dan op de
middelste drijfas terwijl u aan het vrije
uiteinde van de draad trekt om hem uit de
L-vormige gleuf los te maken. Draai zover
als nodig om het spoeltje volledig op zijn
plaats te bevestigen. Maak dat de snijdraad
niet klem komt te zitten onder het spoeltje en
dat er minimum 9cm snijdraad uit het
spoelhuis steekt.
• Breng het deksel ten slotte weer op zijn
plaats aan zoals eerder beschreven.
Milieu
Black & Decker biedt de mogelijkheid tot
recyclen van afgedankte Black & Decker
producten. Deze service is kosteloos.
Om gebruik van deze service te maken,
dient u het product aan een van onze
servicecentra te sturen, die voor ons de
inzameling verzorgen.
U kunt het adres van het dichtstbijzijnde
servicecentrum opvragen via de adressen op de
achterzijde van deze handleiding. U kunt ook een
lijst van onze servicecentra en meer informatie
m.b.t. onze klantenservice vinden op het volgende
Internet-adres: www.2helpU.com.
Garantie
Black & Decker heeft vertrouwen in zijn producten
en biedt een uitstekende garantie.
Deze garantiebepalingen vormen een aanvulling op
uw wettelijke rechten en beperken deze niet.
De garantie geldt in de lidstaten van de Europese
Unie en de Europese Vrijhandelsassociatie.
34
Page 35

Mocht uw Black & Decker product binnen
24 maanden na datum van aankoop defect raken
tengevolge van materiaal- of constructiefouten, dan
garanderen wij de kosteloze vervanging van
defecte onderdelen, de reparatie van het product of
de vervanging van het product, tenzij:
• Het product is gebruikt voor
handelsdoeleinden, professionele
toepassingen of verhuurdoeleinden;
• Het product onoordeelkundig is gebruikt;
• Het product is beschadigd door invloeden
van buitenaf of door een ongeval;
• Reparaties zijn uitgevoerd door anderen
dan onze servicecentra of Black & Decker
personeel.
Om een beroep op de garantie te doen, dient u een
aankoopbewijs te overhandigen aan de verkoper of
een van onze servicecentra. U kunt het adres van
het dichtstbijzijnde servicecentrum opvragen via de
adressen op de achterzijde van deze handleiding.
U kunt ook een lijst van onze servicecentra en meer
informatie m.b.t. onze klantenservice vinden op het
volgende Internet-adres: www.2helpU.com.
Andere machines voor gebruik
in de tuin
Black & Decker heeft een compleet assortiment
machines die het leven in de tuin vereenvoudigen.
Als u meer informatie over de volgende producten
wenst, neemt u dan contact op met ons Serviceen Informatiecentrum (zie de adrespagina aan het
eind van deze handleiding) of uw plaatselijke
Black & Decker dealer.
Strimmers
Kettingzagen
Heggenscharen
Grasmaaiers
Verticuteerders
Bladruimers
Hakselaars
Niet ieder product is verkrijgbaar in alle landen.
NEDERLANDS
EG-verklaring van overeenstemming
GL545
Black & Decker verklaart dat deze elektrische
machines in overeenstemming zijn met:
98/37/EEG, 89/336/EEG, 73/23/EEG,
EN 55014, EN 60335, EN 61000,
2000/14/EEG, grastrimmer, L ≤ 50 cm
Annex VIII, No. 0086
B.S.I., HP2 4SQ, United Kingdom
Niveau van de geluidsdruk, gemeten volgens
2000/14/EEG:
LpA(geluidsdruk) dB(A) 81
LWA(geluidsvermogen) dB(A) 94
LWA(gegarandeerd) dB(A) 96
Gewogen kwadratische gemiddelde waarde van
de versnelling overeenkomstig EN 50144: 4 m/s
Brian Cooke
Director of Engineering
Spennymoor, County Durham DL16 6JG,
United Kingdom
1-12-2001
2
35
Page 36

Recortabordes
Manual de instrucciones
¡Enhorabuena!
Al adquirir el recortabordes Reflex* Black & Decker,
disfrutará usted de largos años de uso sin
problemas. El recortabordes Reflex no sólo recorta
los bordes de su césped, sino que tiene un sistema
exclusivo de salida del hilo de nylon, totalmente
automático. Usted no tiene que hacer nada: el
sistema Reflex supone que puede usted recortar
bordes sin parar, pues gracias a un sencillo
mecanismo detecta cuándo se ha desgastado el hilo
y éste vuelve a salir automáticamente en la longitud
adecuada. Por tanto, sólo tiene que conectar la
máquina y empezar a trabajar.
Descripción
A continuación incluimos una lista de las piezas que
se mencionan en este Manual y que aparecen en las
correspondientes figuras:
Cuerpo (1)
1
Empuñadura secundaria (2)
Interruptor de gatillo (3)
Empuñadura con interruptor (4)
Gancho del cable de alimentación (5)
Enchufe (6)
Botón para rebordear (7)
Cuchilla para cortar el hilo (8)
Hilo de nylon (9)
Protector (10)
Lengüetas de sujeción del protector (11)
2
Tornillo del protector (12)
Agujero para el tornillo del protector (13)
Borde delantero (14)
Tapa de la bobina (15)
4
Lengüeta de la tapa de la bobina (16)
Soporte de la bobina (17)
Cáncamo (18)
Bobina (19)
5
Flecha (20)
6
Orificio para sujetar el hilo (21)
Palanca (22)
7
Instrucciones de seguridad
Lea con atención todo este Manual y siga las
normas de seguridad recomendadas antes,
durante y después de usar su máquina.
Mantenga su recortabordes siempre en
perfecto estado.
Antes de usar la máquina, familiarícese con
sus mandos pero, sobre todo, sepa cómo
pararla en caso de emergencia.
Guarde este Manual y la demás
documentación que se suministra con esta
máquina, para futuras referencias.
Conexión eléctrica
• Su máquina está proyectada para ser
utilizada únicamente con un enchufe de
corriente alterna (CA). No intente usarla
en otras fuentes de alimentación.
• Enchufe su máquina a un enchufe de
fuerza, no a uno corriente.
• No deje su máquina sola y enchufada a
la corriente eléctrica.
• Desconecte la máquina y desenchúfela
de la corriente antes de limpiarla,
inspeccionarla o ajustar cualquier pieza o
si el cable está roto o enrollado.
Doble aislamiento
Su herramienta lleva doble aislamiento.
Esto significa que todas las partes metálicas
externas están aisladas eléctricamente, lo
cual se consigue colocando una barrera
aislante entre las partes mecánicas y
eléctricas de la máquina. El doble
aislamiento evita el riesgo de descarga
eléctrica y hace innecesario conectar la
máquina a un enchufe con toma de tierra.
Cable de alimentación
• El cable de alimentación se debe
inspeccionar periódicamente por si
presenta síntomas de rotura o desgaste
y sólo se debe utilizar si está en
perfecto estado.
• Mantenga el cable de alimentación
siempre alejado del hilo de nylon (9).
Compruebe su posición en todo
momento.
• No lleve nunca la máquina colgando
del cable ni tire del cable para
desenchufarla. Mantenga el cable
alejado de las fuentes de calor, aceite o
grasa y filos cortantes.
36
Page 37

• Si el cable está roto o gastado, llévelo a
cambiar completamente a un centro de
servicio Black & Decker. No intente
cambiarlo usted, pues el interruptor
de la empuñadura no lo puede montar
el usuario.
Hilo de nylon
• Procure no herirse con la cuchilla
del hilo de nylon (8) al desembalar y
montar la máquina ni con el hilo que
sobresalga en exceso al utilizarla por
primera vez.
• El hilo de nylon (9) sigue girando algún
tiempo después de soltar la palanca
del interruptor. En ningún caso intente
pararlo: deje siempre que se pare por
sí solo.
• No ponga nunca hilo de cortar metálico.
Ropa
• Siempre que use esta máquina, póngase
gafas de seguridad.
• Para proteger sus pies lleve siempre
botas o zapatos fuertes (no vaya
descalzo ni con sandalias).
• Lleve pantalón largo para protegerse las
piernas. Cualquier residuo que haya en el
césped puede salir disparado si le toca
el hilo de nylon.
• Si le parece que el recortabordes suena
mucho al usarlo, póngase protectores en
los oídos.
Uso de la máquina
• Use siempre su máquina como se indica
en este Manual. Este recortabordes está
proyectado para usarlo en posición
vertical y si se usa en cualquier otra
posición se pueden producir accidentes.
• Antes de usar su máquina, desenchúfela
y compruebe si todas las partes giratorias
están en buen estado. Compruebe
también si la bobina está bien sujeta.
• Compruebe siempre si el césped que
vaya a cortar está libre de palos, piedras,
alambres y otros residuos. El contacto con
los mismos puede estropear la máquina.
• Mantenga la máquina alejada de sus
dedos y otras partes de su cuerpo, tanto
al conectarla como durante el
funcionamiento.
• No conecte la máquina cuando esté
boca abajo.
• Corte con la máquina al paso, sin correr.
• No use la máquina bajo la lluvia ni deje
que se moje.
ESPAÑOL
• Use la máquina sólo con luz del día o
con buena luz artificial.
• No cruce senderos de tierra o grava
mientras esté girando el hilo de nylon.
• No corte en pendientes pronunciadas.
Cuando corte en cuesta, procure
mantenerse en equilibrio y corte a lo
ancho de la pendiente, no hacia arriba
o hacia abajo.
• No use nunca la máquina sin el protector
(10) o si éste está roto.
• Tenga cuidado al cortar, pues el césped
recién cortado está húmedo y resbaladizo.
La seguridad de los demás
• Recuerde que el operador o el usuario es
el único responsable de los accidentes o
riesgos que sufran las personas que
estén en su propiedad.
• No deje nunca que usen esta máquina
los niños, las personas que no estén
totalmente familiarizadas con ella o las
360˚
6m/20ft
que no hayan leído estas instrucciones.
• No deje que los niños, personas
adultas o animales estén cerca de la
máquina mientras la usa. Manténgalos
siempre alejados de la zona de corte.
Cuidados de la máquina
• Cuando no use la máquina, guárdela
en un lugar seco y fuera del alcance de
los niños.
• No use disolventes ni limpiadores para
limpiar su máquina. Use una espátula no
muy afilada para quitar la hierba y la
suciedad. Antes de limpiar la máquina,
desenchúfela de la corriente y espere a
que se pare el hilo (9).
• No use la máquina si alguna pieza no
está en perfecto estado.
• No desmonte de la máquina más que las
piezas mencionadas en estas
instrucciones.
• Use sólo recambios y accesorios
originales Black & Decker.
37
Page 38

Seguridad eléctrica
Desenchufe siempre la máquina de la
corriente antes de conectar o desconectar
cualquier alargadera.
Podrá aumentar la seguridad eléctrica
haciendo que un electricista especializado
instale en su domicilio un disyuntor de alta
sensibilidad (30mA).
Si no tiene instalado un disyuntor ni lo va a
instalar, para mayor seguridad le
recomendamos encarecidamente que
enchufe la máquina a un circuito que tenga
un dispositivo de corte residual de alta
sensibilidad, diseñado para ofrecer mayor
grado de protección personal contra
descargas eléctricas si se produjera algún
fallo.
¡Atención! El uso de un disyuntor o
cualquier otro dispositivo de seguridad no
exime al usuario de esta máquina de tomar
todas las precauciones de seguridad y
seguir al pie de la letra las normas de
este Manual.
Alargaderas
Podrá usar alargaderas de dos hilos y hasta 30m sin
que se produzca pérdida de potencia en su
máquina. Los cables y alargaderas deben cumplir la
legislación nacional.
Preparación del recortabordes para
su uso (Fig. 2)
• Saque del embalaje el recortabordes y el
2
protector (10).
• Quite el tornillo (22) del protector situado
en la parte inferior del protector (Fig. 2.1).
• Presente el protector en el canal que hay
en el cuerpo del recortabordes (Fig. 2.2).
• Meta el protector del todo, primero por
un lado hasta que quede a nivel con el
cuerpo del recortabordes. Haga lo
mismo en el otro lado (Fig. 2.3).
• Vuelva a poner el tornillo del protector
(Fig. 2.4).
• Si está bien montado, el protector
quedará perfectamente sujeto al
recortabordes.
• Para evitar daños durante el transporte,
el extremo del hilo (9) va sujeto a la
bobina con una cinta adhesiva. Tire la
cinta y saque el hilo de la bobina un
mínimo de 9cm (3.5").
Nota: Cuando use el recortabordes por
primera vez, el hilo que sobresalga en
exceso la cortará la cuchilla (8) instalada en
el protector. Este mecanismo funciona igual
cada vez que se ajusta la longitud del hilo.
Como ese hilo cortado puede salir
despedido, es importante que su longitud
sea la menor posible. Si tira del hilo
demasiado, córtelo a mano con esa cuchilla
antes de poner en marcha la máquina.
• Antes y después de usar la máquina,
compruebe si la tapa de la bobina está
bien ajustada.
Cómo usar su recortabordes
(Fig. A - J)
Para sacar el máximo partido a su recortabordes,
aprenda con cuidado estas técnicas. Tenga
paciencia, los mejores resultados se consiguen con
la experiencia y siguiendo estas sencillas reglas:
No use el recortabordes sin el
A
protector instalado.
No corte césped húmedo. Los mejores
resultados se consigue cuando está seco.
B
Para recortar el césped por encima
• Para poner en marcha la máquina,
apriete el interruptor de gatillo (3).
• Para pararla, suelte el interruptor.
• Para llevar el recortabordes cuando no lo
use, es preferible que utilice la
empuñadura secundaria (2).
Corte con la punta del hilo de nylon y
C
formando cierto ángulo.
Mueva suavemente el recortabordes de un
lado a otro.
D
No sobrecargue el recortabordes. Funciona
E
mejor a mayor velocidad.
Con el césped largo empiece a cortar
F
por arriba, vaya cortando poco a poco.
Aproveche el borde del protector (6) para
G
mantener el recortabordes alejado de las
superficies duras y objetos delicados.
Para rebordear (GL540)
Conseguirá mejores resultados cuando los
H
bordes tengan más de 50mm de alto.
Nota: Este recortabordes es una máquina
de mantenimiento, para recortar el césped
demasiado largo. No la utilice para hacer
huecos en el césped. Los huecos en los
bordes se deben hacer con una azada.
38
Page 39

Tope del cable
Si su recortabordes se puede usar con una
J
alargadera que se pueda desenchufar, para
que el enchufe y las conexiones no se
aflojen si tira accidentalmente del cable,
haga un bucle y páselo por el tope (5).
Cómo convertir su recortabordes
en un rebordeador (Fig. 3)
Además de usarlo como recortabordes
convencional, podrá usar esta máquina
también para cortar los bordes del césped a
lo largo y alrededor de los macizos de flores
y acabados del césped.
Para usar el recortabordes de este modo:
3
• Con el recortabordes desconectado,
ponga una mano en la empuñadura que
tiene el interruptor (4) y la otra sobre el
cuerpo de la máquina (1). Apriete el
botón (7) de la parte delantera del
cuerpo de la máquina y manteniéndolo
apretado, gire el cuerpo del
recortabordes a izquierdas. Suelte el
botón. Siga girando el cuerpo de la
máquina hasta que encaje en su
posición (Fig. 3.1).
• El modo más eficaz de usar su
recortabordes para cortar el césped
largo de esta manera, es colocarse a un
lado (Fig. 3.2) y llevar el borde delantero
del recortabordes (14) a lo largo del
borde del césped, para que corte la
parte que sobresalga (Fig. H).
Bobina de repuesto
En su distibuidor Black & Decker podrá adquirir
bobinas de repuesto con 9m de hilo de nylon o, si lo
prefiere, ovillos de hilo de 25 ó 50m.
Para mayor fiabilidad, nunca ponga hilo más grueso
o más fino (p.ej., hilo de pescar), pues puede hacer
que se estropee el motor o se reduzca la eficacia de
su herramienta.
Cómo poner una nueva bobina de
hilo (Fig. 4 & 5)
• Desenchufe el recortabordes de
la corriente.
• Quite la tapa de la bobina empujando las
4
lengüetas (16) hacia dentro y hacia arriba
(Fig. 4) y tirando de ellas (no es necesario
empujar las dos lengüetas al mismo
tiempo). Quite la bobina vacía del eje.
• Limpie la hierba o suciedad que pudiera
haber dentro del soporte de la bobina y
en la tapa.
ESPAÑOL
• Saque unos 9cm de hilo (9) de la
bobina nueva (19) y cuando haya
enrollado suficiente hilo, sujételo un
momento en una de las ranuras en L
para evitar que
se desenrolle.
• Meta el extremo del hilo por el
5
Cómo enrollar hilo nuevo en una
bobina vacía (Fig. 6 & 7)
6
cáncamo. Meta después la bobina en
el eje central. Gire la bobina lo
necesario para que ajuste, teniendo
cuidado de no pillar el hilo debajo de la
bobina y procurando que sobresalgan
por lo menos 9cm
de hilo.
• Vuelva a poner la tapa, alineando las dos
lengüetas (16) con las ranuras del cuerpo
de la máquina y empújela hasta que
encaje. Compruebe si encajan bien las
dos lengüetas.
• Cuando se le vacíe la bobina, podrá
cargarla hasta con un máximo de 10m
de hilo nuevo. La bobina tiene un
“indicador” que le ayudará a no cargarla
demasiado, pues si lo hiciera así, el
sistema automático del hilo no
funcionaría.
• Quite de la bobina (19) los restos de hilo
que pudieran quedar.
• Meta el extremo del hilo nuevo por uno
de los dos agujeros que hay en el
soporte de la bobina (19) y empújelo
unos 20mm.
• Doble el hilo y páselo por la ranura en
forma de L que hay al lado del agujero.
El hilo debe quedar perfectamente sujeto
a la bobina. Empiece a enrollarlo
entonces en dirección de las flechas (20).
• Enrolle el hilo despacio, en capas y en
pasadas seguidas, que no se crucen.
• Cuando haya enrollado suficiente hilo,
sujételo un momento en una de las
ranuras en L para evitar que se
desenrolle. Deje unos 9cm de hilo
sobresaliendo de la bobina.
• Monte la bobina y la tapa (15) en el
soporte, igual que se indicó para
montar una bobina nueva.
39
Page 40

Cuidados y mantenimiento
• Para conseguir un mayor rendimiento, procure
que estén siempre limpias las ranuras del cuerpo
del recortabordes, el hilo de nylon y la bobina.
Para quitar las hierbas, residuos y otra
suciedad emplee un cepillo o paño seco.
• Puede limpiar las partes de plástico usando un
jabón suave y un paño humedecido en agua
caliente. No use otros tipos de detergente,
limpiador ni disolvente que pueda contener
productos químicos que dañarían gravemente
el plástico. No limpie el recortabordes con
chorro de agua.
• Esta máquina lleva rodamientos
autolubricantes, por lo que no necesita
lubricación.
Localización de averías
Antes de inspeccionar su recortabordes,
desenchúfelo de la corriente.
• Si el recortabordes no se pone en marcha,
compruebe si están bien conectados todos los
cables de alimentación. Si no funciona,
compruebe el enchufe, la alargadera y los
enchufes conectados a la misma.
• Si no sale el hilo automáticamente, puede
deberse a una de estas razones:
Hilo demasiado corto o atascado en
la bobina
• Desenchufe el recortabordes de la corriente.
• Quite la tapa de la bobina (15) empujando
las dos lengüetas (16) hacia dentro y hacia
arriba (Fig. 4).
• Saque la bobina (19) unos 6mm del soporte
(17), tirando al mismo tiempo del hilo (9).
Así podrá sacar el hilo y al mismo tiempo
desatascarlo. Procure dejar fuera un mínimo
de 9cm del hilo.
• Gire la bobina lo necesario para que asiente
bien en el soporte y vuelva a poner la tapa,
haciendo que coincidan las lengüetas con
las ranuras. Compruebe si las dos lengüetas
quedan bien sujetas.
Hilo enredado dentro de la bobina o roto
dentro de su alojamiento
• Desenchufe el recortabordes y quite la tapa
de la bobina como ya hemos indicado.
• Saque del todo la bobina (19) sujetando el
hilo enrollado, para que no se desenrolle
(Fig. 7).
• Desenrolle con cuidado el hilo (9) de la
bobina hasta quitar la parte enredada.
Vuelva a enrollar el hilo uniformemente,
en la dirección de las flechas (20).
• Cuando haya enrollado suficiente hilo,
sujételo un momento en una de las ranuras
en L para evitar que se desenrolle. Deje unos
9cm de hilo sobresaliendo de la bobina.
• Mueva a un lado y a otro la palanca (22)
para ver si funciona bien.
• Quite la hierba o suciedad que se hayan
acumulado en el interior del soporte de la
bobina y de la tapa.
• Meta el extremo del hilo por el cáncamo.
Meta después la bobina en el eje central.
Gire la bobina lo necesario para que ajuste,
teniendo cuidado de no pillar el hilo debajo
de la bobina y procurando que sobresalgan
por lo menos 9cm de hilo.
• Por último, vuelva a poner la tapa como se
ha indicado anteriormente.
Protección del medio ambiente
Black & Decker proporciona facilidades
para el reciclado de los productos
Black & Decker que hayan llegado al final
de su vida útil. Este servicio se proporciona
de forma gratuita. Para poderlo utilizar,
le rogamos entregue el producto en
cualquier servicio técnico autorizado quien
se hará carga del mismo en nuestro nombre.
Pueden consultar la dirección de su servicio
técnico más cercano poniéndose en contacto con
la oficina local de Black & Decker en la dirección
que se indica en este manual. Como alternativa,
se puede consultar en Internet, en la dirección
siguiente, la lista de servicios técnico autorizados
e información completa de nuestros servicios de
postventa y contactos: www.2helpU.com.
Garantía
Black & Decker confía plenamente en la calidad de
sus productos y ofrece una garantía extraordinaria.
Esta declaración de garantía es una añadido a, y
en ningún caso un perjuicio para, sus derechos
estatutarios. La garantía es válida dentro de los
territorios de los Estados Miembros de la Unión
Europea y de los de la Zona Europea de Libre
Comercio.
Si un producto Black & Decker resultara defectuoso
debido a materiales o mano de obra defectuosos o
a la falta de conformidad, Black & Decker garantiza,
dentro de los 24 meses de la fecha de compra,
la sustitución de las piezas defectuosas,
la reparación de los productos sujetos a un
desgaste y rotura razonables o la sustitución de
tales productos para garantizar al cliente el mínimo
de inconvenientes, a menos que:
40
Page 41

• El producto haya sido utilizado con
propósitos comerciales, profesionales o de
alquiler;
• El producto haya sido sometido a un uso
inadecuado o negligente;
• El producto haya sufrido daños causados
por objetos o sustancias extrañas o
accidentes;
• Se hayan realizado reparaciones por parte
de personas que no sean los servicios de
reparación autorizados o personal de
servicios de Black & Decker;
Para reclamar en garantía, será necesario que
presente la prueba de compra al vendedor o al
servicio técnico de reparaciones autorizado.
Pueden consultar la dirección de su servicio
técnico más cercano poniéndose en contacto con
la oficina local de Black & Decker en la dirección
que se indica en este manual. Como alternativa,
se puede consultar en Internet, en la dirección
siguiente, la lista de servicios técnico autorizados
e información completa de nuestros servicios de
postventa y contactos: www.2helpU.com.
Otras herramientas de jardinería
Black & Decker cuenta con una amplia gama de
herramientas de jardinería para hacerle la vida en el
jardín más fácil. Si desea más información sobre
los siguientes productos, no dude en ponerse en
contacto con nuestro Centro de Servicio e
Información (consulte la página de direcciones al
final de este manual) o diríjase a su concesionario
local de Black & Decker.
Motosierras
Recortabordes
Recortasetos
Cortacéspedes
Escarificadores
Aspiradores-sopladores
Todos los productos no se encuentran disponibles
en todos los países.
ESPAÑOL
Declaración CE de conformidad
GL545
Black & Decker certifica que estas herramientas
eléctricas han sido construidas de acuerdo a las
98/37/CEE, 89/336/CEE, 73/23/CEE,
2000/14/CEE, recortabordes, L ≤ 50 cm
El nivel de la presión acústica, medida de
Valor cuadrático medio ponderado en frecuencia
de la aceleración según EN 50144: 4 m/s
normas siguientes:
EN 55014, EN 60335, EN 61000,
Annex VIII, No. 0086
B.S.I., HP2 4SQ, Reino Unido
acuerdo con 2000/14/CEE:
LpA(presión acústica) dB(A) 81
LWA(potencia acústica) dB(A) 94
LWA(garantizado) dB(A) 96
2
Brian Cooke
Director de Ingeniería
Spennymoor, County Durham DL16 6JG,
United Kingdom
1-12-2001
41
Page 42

Aparador
Manual de instruções
Parabéns!
A compra deste aparador Reflex® da Black & Decker
assegura-lhe anos de uso sem problemas. Reflex®,
apara, acerta orlas e possui um sistema único de
alimentação do fio de nylon totalmente automático
que permite trabalhar sem interrupções. Basta ligar
e usar.
Descrição
Abaixo encontrará uma lista de partes
componentes do seu aparador que serão
mencionadas ao longo deste manual e estarão
representadas nos respectivos diagramas:
Corpo (1)
1
Pega secundária (2)
Interruptor de gatilho (3)
Pega com interruptor (4)
Retentor da extensão de cabo (5)
Cabo eléctrico (6)
Botão (7)
Lâmina de corte do fio de nylon (8)
Fio de corte (9)
Resguardo (10)
Rebordo do resguardo (11)
2
Parafuso de fixação no resguardo (12)
Orifício para parafuso do resguardo (13)
Aresta frontal (14)
Tampa da bobina (15)
4
Retentores da tampa da bobina (16)
Compartimento da bobina (17)
Saída do fio (18)
Bobina (19)
5
Seta indicadora (20)
6
Orifício retentor do fio (21)
Patilha (22)
7
Instruções de segurança
Leia este manual e siga as instruções
recomendadas antes, durante e depois de
uso. Mantenha o seu aparelho em boas
condições de funcionamento.
Familiarize-se com os comandos do aparador
e, sobretudo, certifique-se de que sabe
desligar a máquina em caso de emergência.
Guarde este manual e restante literatura
fornecida.
Isolamento duplo
A aparador está completamente isolada, o
que significa que todas as peças metálicas
externas estão isoladas da tomada de
alimentação. Este isolamento duplo obtémse por meio de uma camada de material de
isolamento, colocada entre as peças
eléctricas e mecânicas. Assim, a ferramenta
não necessita de ser ligada à terra.
• Desligue sempre o seu aparador da
corrente antes de proceder a qualquer
ajuste, limpeza, montagem de
acessórios ou, se o cabo se danificar.
• Verifique regularmente o estado de
conservação do cabo eléctrico.
• Mantenha-o afastado da zona de corte
da máquina (9).
• Não transporte a máquina pelo cabo.
Mantenha-o afastado de arestas, óleos e
superfícies quentes.
• Em caso de danos no cabo, substitua-o
totalmente. Não faça emendas.
Fio de nylon
• Tome precauções contra acidentes com
o fio de corte (9), que continua a rodar
algum tempo após desligar a máquina e
com a lâmina limitadora do comprimento
do fio, situado na extremidade do
resguardo do aparador.
Vestuário
• Use óculos de protecção.
• Calce sapatos ou botas ao operar com a
máquina. Nunca trabalhe descalço.
• Use calças de modo a proteger as
pernas de quaisquer objectos
projectados pela alta rotação do fio.
• Use protectores de ouvidos se o nível de
ruído for incomodativo,ao usar o aparelho.
Utilização
• Utilize o seu aparador como indicado
neste manual.
• Antes de iniciar o trabalho, verifique o
estado de conservação da sua máquina,
bem como a correcta fixação do carreto
de fio de nylon.
• Verifique se o relvado está livre de paus,
pedras e/ou outros detritos que possam
ser projectados pelo aparador.
42
Page 43

• Mantenha o aparador afastado dos pés
e outras partes do corpo enquanto
estiver em uso.
• Não ligue o aparador com a zona de
corte voltada para cima.
• Não utilize o aparelho à chuva ou em
condições de extrema humidade.
• Utilize-o apenas com boas condições de
visibilidade (durante o dia ou com boa
luz artificial).
• Não utilize o aparador caso o resguardo
(10) esteja danificado.
• Tenha cuidado. A relva cortada é húmida
e escorregadia.
Cuidados com o aparador
• Lembre-se que o operador/utilizador é
responsável em caso de acidentes com
terceiros que ocorram na sua propriedade.
• Guarde o seu aparelho em lugar seco e
seguro, fora do alcance das crianças.
• Não utilize produtos químicos para a
limpeza do aparador.
• Assegure-se de que o aparelho
está desligado.
• Se detectar alguma anomalia na
máquina, não a utilize.
• Utilize apenas acessórios Black & Decker
recomendados.
Extensões de cabo
Pode utilizar extensões de fio de 2 condutores
com um comprimento aconselhado não superior a
30 metros as extensões eléctricas devem cumprir
com as normas nacionas vigentes.
Preparação para uso (Fig. 2)
• Pegue no aparador e no resguardo (10).
2
• Retire o parafuso do resguardo (12) que
está aparafusado à parte inferior do
mesmo (Fig. 2.1).
• Coloque o resguardo fazendo coincidir o
furo da base do aparador com o do
resguardo (Fig. 2.3).
• Volte a colocar o parafuso (Fig. 2.4).
• O resguardo ficará correctamente
montado no aparador.
• A extremidade do fio de nylon (9) vem
coberta por fita autocolante. Retire a fita.
Deverá ficar com cerca de 9cm (3.5") de
fio, fora do carreto.
PORTUGUÊS
Nota: A lâmina (8) situada num dos bordos
do resguardo, cortará o fio de nylon à
medida do mesmo, logo que a máquina seja
accionada. Isto acontecerá sempre que seja
feito algum ajuste no comprimento do fio.
Não deve, por isso, puxar-se demasiado fio
para além do diâmetro do resguardo, pois
traduzir-se-á em desperdício de fio.
• Assegure-se de que a tampa do carreto
está fixa antes de iniciar o trabalho.
Como utilizar o aparador (Fig. A - J)
Para tirar o máximo partido do seu aparador, siga
as técnicas mostradas neste manual.
Não use o aparador sem resguardo.
A
Não corte relva molhada. Obterá melhores
B
resultados com a relva seca.
Aparar
• Para ligar o aparador pressione o
interruptor (3).
• Para desligar solte o interruptor.
• Para transporte do aparador sem estar
em uso, recomenda-se o uso da pega
secundária (2).
Corte em ângulo e com a ponta do fio
de nylon.
C
Balance ligeiramente o aparador para um
D
lado e outro.
Não sobrecarregue o aparador. É mais eficaz
E
na sua velocidade máxima.
Em relva alta, começe pelo topo, corte com
F
pequenos golpes.
Utilize o resguardo para afastar o fio de
obstáculos.
G
Acertar orlas (GL540)
Trabalhe em orlas, preferencialmente de
altura superior a 50mm.
H
Nota: O seu aparelho destina-se a trabalhos
de manutenção e não a criar orlas ou
canteiros.
Retentor de cabo
o aparador possui um retentor (5) para evitar
que o fio e a extensão se desliguem com
J
facilidade, caso seja puxado.
43
Page 44

Como converter o aparador em
acertador de orlas (Fig. 3)
Para além da utilização convencional como
aparador, o seu aparelho pode ser utilizado
como acertador:
Para converter o seu aparelho entre as
funções de de aparador e acertador:
3
• Com o aparador desligado,coloque
uma mão na pega com interruptor (4) e
a outra no corpo do aparelho (1).
Pressione o botão (7) do corpo do
parador. Continuando a premi-lo, rode o
corpo no sentido inverso dos ponteiros
do relógioe depois,solte o botão.
Quando ouvir um estalido,o aparador
estará convertido em acertador (Fig. 3.1).
• O modo mais eficaz de usar o
acertador consiste em colocar-se ao
lado do aparelho (Fig 3.2). Conduza a
aresta frontal do acertador (14) ao
longo da extremidade do relvado para
obter um bom acabamento (Fig. H).
Como enrolar o fio de nylon numa
bobina vazia (Fig. 6 & 7)
• Pode ser enrolado um máximo de
6
10 metros na bobina. Esta possui uma
marca para evitar que seja enrolado
demasiado fio, o que prejudicará o
sistema automático de alimentação.
• Retire algum resto de fio da bobina (19).
• Empurre a extremidade do fio por um
dos orifícios da base do suporte e
insira 2cms.
• Dobre o fio, empurrando-o pela ranhura
em “L”. O fio ficará agora firmemente
preso e poderá começar a enrolá-lo no
sentido da seta (20).
• Não se apresse ao enrolar o fio. Faça-o
em estrias, não o cruze. Uma vez
enrolado suficiente fio, deixe cerca de
9cms por enrolar.
• Coloque a bobina e tampa de suporte tal
como descrito na secçao “ Colocação
de nova bobina “.
Fio de nylon
Pode utilizar carretos/bobinas préviamente cheios
de fio ou adquirir o fio separadamente para
enrolamento na bobina de origem. Consulte o seu
revendedor Black & Decker para as opções
existentes.
Nunca utilize outro fio que não seja Black & Decker
de forma a obter os melhores resultados, e não alterar o
bom funcionamento do sistema de alimentação.
Como colocar uma nova bobina de
fio (Fig. 4 & 5)
• Retire o aparador da corrente eléctrica.
• Retire a tampa da bobina pressionando
4
os retentores (16) e puxando-a para cima
(Fig. 4) A bobina vazia pode então ser
retirada. Aproveite para limpar o interior
do suporte de terra e aparas de relva.
• Desenrole aproximadamente 9cms
de fio (9) da nova bobina (19) e apoie
temporáriamente a extermidade do fio
de corte numa das ranhuras em forma
de ‘L’ para evitar que se desenrole.
• Introduza o fio no orifício da cobertura
5
da bobina e depois coloque a bobina
no veio, ao mesmo tempo que liberta o
fio da ranhura am ‘L’. Para completa
montagem da bobina, volte a colocar
a tampa.
• Volte a colocar a tampa alinhando os
retentores (16) com as ranhuras.
Cuidados e manutenção
• Para melhores desempenhos, mantenha o fio,
bobina e entradas de ar do motor, limpos. Use
uma escova ou pano para remover relva e terra.
• Use um detergente suave diluído em água
quente, para limpar o aparador. Não use
produtos químicos ou solventes que podem
danificar o plástico.
• O seu aparador possui rolamentos auto-
lubrificantes, não sendo por isso necessária
qualquer lubrificação adicional.
Localização de avarias
Antes de tentar localizar anomalias no seu
aparador, desligue-o da corrente!
• Se o motor não arrancar, verifique cabos e
extensões eléctricas.
• Se o sistema automático de alimentação falhar,
pode ser devido a:
Falta de fio ou fio enrolado
• Proceda como explicado na secção
“Colocar uma nova bobina de fio”.
O fio continua enrolado ou partido dentro
da tampa da bobina
• Retire a tampa do suporte e a bobina, e
verifique se o fio está cruzado. Se estiver,
desenrole cuidadosamente o fio, até
descruzar.
• Verifique se a patilha 14 está a funcionar
livremente.
44
Page 45

• Retire as impurezas que se possam ter
alojado no interior do suporte da bobina.
• Finalmente, volte a colocar a bobina e a
tampa.
Protecção do meio ambiente
A Black & Decker oferece facilidades para
a reciclagem de produtos Black & Decker
uma vez que os mesmos tenham alcançado
o final de suas vidas úteis. Este serviço é
fornecido sem encargos. Para utilizá-lo,
devolva seu produto a qualquer agente de
reparo autorizado, que se encarregará de
recolher o equipamento em nosso nome.
Para verificar a localização do agente de reparo
mais próximo de si, contacte o escritório local da
Black & Decker no endereço indicado neste manual.
Se preferir, consulte a lista de agentes autorizados
da Black & Decker e os dados completos de nossos
serviços de atendimento pós-venda na Internet no
endereço: www.2helpU.com.
Garantia
A Black & Decker confia na qualidade de seus
produtos e oferece um programa de garantia
excelente. Esta declaração de garantia soma-se a
seus direitos legais e não os prejudica em nenhum
aspecto. A garantia será válida nos territórios dos
Estados Membros da União Europeia e na Área de
Livre Comércio da Europa.
Caso algum produto da Black & Decker apresente
avarias devido a defeitos de material, mão-de-obra
ou ausência de conformidade no prazo de 24 meses
a partir da data de compra, a Black & Decker
garantirá a substituição das peças defeituosas,
a reparação dos produtos que foram submetidos a
uso adequado e remoção ou substituição dos
mesmos para assegurar o mínimo de
inconvenientes ao cliente a menos que:
• O produto haja sido utilizado para fins
comerciais, profissionais ou locação;
• O produto haja sido submetido a uso
incorrecto ou descuido;
• O produto haja sofrido danos causados
por objectos estranhos, substâncias ou
acidentes;
• Haja histórico de reparos efectuados por
terceiros que não sejam os agentes
autorizados ou profissionais de
manutenção da Black & Decker.
Para accionar a garantia, será necessário enviar a
prova de compra ao revendedor ou agente de
reparo autorizado. Para verificar a localização do
agente de reparo mais próximo de si contacte o
escritório local da Black & Decker no endereço
indicado neste manual.
PORTUGUÊS
Se preferir, consulte a lista de agentes autorizados
da Black & Decker e os dados completos de
nossos serviços de atendimento pós-venda na
Internet no endereço: www.2helpU.com.
Outras ferramentas para jardim
A Black & Decker possui uma grande variedade de
ferramentas que facilitam o trabalho no jardim.
Se desejar obter mais informações sobre os
produtos a seguir mencionados, contacte o nosso
Serviço a Clientes (veja a página de endereços no
final deste manual) ou contacte o revendedor local
da Black & Decker.
Aparadores
Electrosserras
Tesoura de relva
Corta-sebes
Corta-relvas
Vassouras para relvado
Aspiradores de folhas
Trituradores
Nem todos os produtos estão disponíveis em
todos os países.
Declaração de conformidade
GL545
A Black & Decker declara que estas ferramentas
foram concebidas em conformidade com:
98/37/CEE, 89/336/CEE, 73/23/CEE,
EN 55014, EN 60335, EN 61000,
2000/14/CEE, aparador de relva, L ≤ 50 cm
Annex VIII, No. 0086
B.S.I., HP2 4SQ, Reino Unido
Nível de potência sonora, medido de acordo
Valor médio quadrático ponderado em
com a 2000/14/CEE:
LpA(pressão sonora) dB(A) 81
LWA(potência sonora) dB(A) 94
LWA(com garantia) dB(A) 96
frequência de aceleração conforme
a EN 50144: 4 m/s
Engenheiro Responsável
Spennymoor, County Durham DL16 6JG,
United Kingdom
1-12-2001
2
Brian Cooke
45
Page 46

Mηχανές Φινιρίσµατος Xρτου
Eγχειρίδιο oδηγιών
Συγχαρητήρια!
H αγορά αυτού του προϊντος της
Black & Decker Reflex® µηχανής φινιρίσµατος
χρτου χλης και κπτης χλης θα σας
εξασφαλίσει καθάρισµα για χρνια χωρίς
προβλήµατα. Tο Reflex® δεν κβει µνο τα άκρα
του γρασιδιού σας. Eχει επίσης µοναδικ πλήρες
αυτµατο σύστηµα τροφοδτησης. Eσείς δεν
κάνετε τίποτα - το σύστηµα Reflex® σηµαίνει
συνεχές καθάρισµα, µε τη χρήση ενς απλού
µηχανισµού, και καταλαβαίνει πτε τέλειωσε
η γραµµή και, ταν χρεασθεί, αυτµατα
αφήνει έξω το ιδεώδες µήκος γραµµής.
Aπλώς ανάβετε τη συσκευή και καθαρίζετε.
Περιγραφή
Πιο κάτω δίνουµε κατάλογο των
ανταλλακτικών που θα αναφέρονται σ’ αυτ
το φυλλάδιο οδηγιών και φαίνονται στα
σχετικά διαγράµµατα:
Kέλυφος (1)
1
∆εύτερη λαβή (2)
∆ιακπτης σκανδάλης (3)
∆ιακπτης στη λαβή (4)
Κράτηση καλωδίου παροχής ρεύµατος
(5)
Eσοχή ενεργείας ή καλώδιο (6)
Κουµπί (7)
Λεπίδα γραµµής κοπής (8)
Γραµµή τοµής (Nάύλον κλωστή) (9)
Προφυλακτήρας (10)
Kρίκοι κράτησης προφυλακτήρα (11)
2
Bίδα κποστήριξης (12)
Oπή βίδας υποστήριξης (13)
Εµπρσθιο άκρο (14)
Kάλυµµα καρουλιού (15)
4
Πτερύγιο καλύµµατος καρουλιού (16)
Θήκη καρουλιού (17)
Mικρή οπή (18)
Kαρούλι (19)
5
Tξο (20)
6
Οπή κράτησης γραµµής (21)
Mοχλς (22)
7
Oδηγίες ασφαλείας
∆ιαβάστε προσεκτικά ολκληρο το
εγχειρίδιο αυτ, παρακολουθώντας
λες τις συνιστώµενες οδηγίες
ασφαλείας πριν, κατά τη διάρκεια και
µετά απ τη χρήση του µηχανήµατς
σας. Nα διατηρείτε το µηχάνηµά σας σε
καλή λειτουργική κατάσταση.
Nα εξοικειωθείτε µε τους ελέγχους στο
µηχάνηµά σας προτού προσπαθήσετε
να το λειτουργήσετε, αλλά πάνω απ’
λα, να βεβαιωθείτε τι γνωρίζετε πώς
να σταµατάτε το µηχάνηµά σας σε
περίπτωση έκτακτης ανάγκης.
Nα φυλάξετε αυτ το εγχειρίδιο και την
υπλοιπη σχετική φιλολογία που σας
παρέχεται µε το µηχάνηµά σας για
µελλοντική αναφορά.
Hλεκτρικές συνδέσεις
• H µηχανή σας είναι σχεδιασµένη
για χρήση σε ρευµατοδτες
εναλλασσµενου ρεύµατος µνο.
Mή δοκιµάζετε να χρησιµοποιήσετε
άλλο σύστηµα ρεύµατος.
• Tοποθετήστε τη µηχανή σας στο
σηµείο ηλεκτρικής παροχής, ποτέ
µέσα σε αναµµένη πρίζα.
• Mην αφήνετε τη µηχανή σας
απαρακολούθητη ενώ την συνδέετε
στην ηλεκτρική παροχή.
• Πάντοτε να σβήνετε και να
αφαιρείτε την πρίζα απ τον αγωγ
ρεύµατος πριν απ το καθάρισµα,
την επίβλεψη ή τη ρύθµιση
οποιουδήποτε µέρους της µηχανής
κοψίµατος, ή αν το καλώδιο αγωγού
έχει πάθει βλάβη ή έχει εµπλακεί.
∆ιπλή µνωση
Tο εργαλείο σας έχει πλήρη µνωση.
Aυτ σηµαίνει τι λα τα εσωτερικά
µεταλλικά µέρη είναι ηλεκτρικά
µονωµένα απ την κεντρική παροχή
ρεύµατος. Aυτ γίνεται µε την
τοποθέτηση µνωσης µεταξύ των
ηλεκτρικών και των µηχανικών µερών,
και εποµένως δεν είναι αναγκαίο για το
εργαλείο να γειωθεί.
46
Page 47

Kαλώδιο αγωγού ρεύµατος
• Tο καλώδιο παροχής ρεύµατος
πρέπει να εξετάζεται ταχτικά για
τυχν σηµάδια βλάβης ή φθοράς, και
να χρησιµοποιείται µνον ταν είναι
σε καλή κατάσταση.
• Nα διατηρείτε πάντοτε το καλώδιο
παροχής ρεύµατος µακρυά απ τη
γραµµή τοµής (9), να προσέχετε τη
θέση του πάντοτε.
• Ποτέ µη µεταφέρετε τη µηχανή σας
απ το καλώδιο ή να σηκώνετε το
καλώδιο για να χωρίζετε τους
συνδετήρες. ∆ιατηρείτε το καλώδιο
µακρυά απ πηγές φωτιάς, απ
λάδια ή αιχµηρά αντικείµενα.
• Nα αντικαθιστάτε τα ελαττωµατικά
καλώδια πλήρως απ το
πλησιέστερο έντρο Yπηρεσίας σας
της Black & Decker. Mην δοκιµάσετε
να το κάνετε µνοι σας, γιατί ο
διακπτης στη λαβή δεν µπορεί να
γίνεται σέρβις απ τον πελάτη.
Γραµµή τοµής
• Προσέχετε απ τυχν ατύχηµα απ
τη λεπίδα κοψίµατος (8) κατά τη
διάρκεια αποσυσκευασίας και
συναρµολγησης και απ τυχν
γραµµή πρσβασης που µπορεί
να είναι κοµµένη ταν
πρωτολειτουργήσει η µηχανή
κοψίµατος.
• H γραµµή τοµής (9) θα συνεχίσει να
λειτουργεί για λίγο µετά απ την
αποδέσµευση του µοχλού του
διακπτη. Ποτέ να µη δοκιµάζετε να
σταµατήσετε τη γραµµή τοµής,
πάντοτε να της επιτρέπετε να
σταµατά µνη της.
• Ποτέ να µην τοποθετείτε µεταλλική
γραµµή κοπής.
Pουχισµς
• Πάντοτε να φοράτε προστατευτικά
γυαλιά ταν χρησιµοποιείτε το
εφδιο.
• Για να προστατεύετε τα πδια σας,
πάντοτε να φορείτε σκληρά
παπούτσια ή µπτες (χι ξυπλυτοι
ή αν φοράτε ανοικτά σάνδαλα).
• Nα φοράτε µακρυά παντελνια για
την προστασία των ποδιών σας τυχν αντικείµενο που παρέµειναν
στο γρασίδι ή στη γραµµή κοπής
µπορεί να συλλεχθούν και να
εξφενδονιστούν απ τη
γραµµή τοµής.
EΛΛHNIKA
• Να χρησιµοποιείτε προστασία των
αυτιών σας εάν η στάθµη του ήχου,
σας φαίνεται δυσάρεστη ταν
χρησιµοποιείτε τη µηχανή σας.
Xρησιµοποιώντας τη µηχανή σας
• Πάντοτε να χρησιµοποιείτε τη
µηχανή σας µε τον τρπο που
περιγράφεται στον οδηγ. H µηχανή
σας είναι σχεδιασµένη να
χρησιµοποιείται σε ρθια θέση και
αν χρησιµοποιείται µε άλλο τρπο
µπορεί να προκαλέσει ατύχηµα.
• Προτού χρησιµοποιήσετε τη µηχανή
σας, αποσυνδέστε την απ το
ρευµατοδτη και εξετάστε
προσεχτικά τα περιστρεφµενα
µέρη για τυχν βλάβες. Eπίσης
ελέγξτε τι η συναρµολγηση του
πηνίου είναι ασφαλής.
• Πάντοτε να ελέγχετε τι το γρασίδι
ή η γραµµή κοπής είναι καθαρά απ
ξύλα, πέτρες, καλώδια και διάφοκα
άλλα αντικείµενα που µπορούν να
προκαλέσουν βλάβη στη µηχανή.
• Nα διατηρείτε τη µηχανή σας
µακρυά απ τα πδια σας και άλλα
µέλη του σώµατς σας ταν
ανάβετε τη µηχανή και κατά τη
λειτουργία της µηχανής σας.
• Mην ανάβετε τη µηχανή ταν
βρίσκεται ανάποδα.
• Nα περπατάτε και ποτέ να µην
τρέχετε µε τη συσκευή σας.
• Mη χρησιµοποιείτε τη µηχανή σας
κάτω απ τη βροχή και µην την
αφήνετε να βραχεί.
• Xρησιµοποιείτε τη µηχανή µνο την
ηµέρα ή µε καλ τεχνητo φως.
• Mη περνάτε απ λιθστρωτα
µονοπάτια ή δρµους ενώ
περιστρέφεται η γραµµή τοµής.
• Mην κβετε σε υπερβολικά βαθειές
κατηφρες. Nα είστε βέβαιοι για την
ορθοστασία σας και να κoβετε κατά
µήκος των κατήφορων, και ποτέ
πάνω και κάτω.
• Ποτέ να µην χρησιµοποιείτε τη
µηχανή µε χαλασµένο
προφυλακτήρα (10) ή χωρίς τον
προφυλακτήρα να είναι
στερεωµένος στη θέση του.
47
Page 48

• Nα είστε προσεκτικοί ταν κβετε,
γιατί η φρεσκοκοµµένη χλη είναι
µουσκεµένη και ολισθηρή.
H ασφάλεια των αλλων
• Να θυµάστε τι ο χειριστής/
χρήστης είναι υπεύθυνος για τα
ατυχήµατα ή τους κινδύνους που
συµβαίνουν σε άλλα άτοµα ή στην
περιουσία τους.
• Ποτέ µην αφήνετε παιδιά ή
πρσωπα που δεν γνωρίζουν τον
τύπο της µηχανής να την
χρησιµοποιούν ή σε κανένα άλλο
πρσωπο που δεν διάβασε το
360˚
6m/20ft
φυλλάδιο αυτ.
• Mην αφήνετε παιδιά, ζώα ή άλλους
ενήλικες κοντά στη µηχανή σας
ταν λειτουργεί - πάντοτε να τους
κρατείτε µακρυά απ το χώρο κοπής.
Φροντίδα της µηχανής σας
• Aποθηκεύετε τη µηχανή σας σε
ξηρ χώρο ταν δεν την
χρησιµοποιείτε, και µακρυά απ
παιδιά.
• Mη χρησιµοποιείτε διαλύµατα ή
άλλα υγρά καθαρισµού για να
καθαρίζετε τη µηχανή σας χρησιµοποιείτε σκούπα για την
αφαίρεση του γρασιδιού και των
ακαθαρσιών. Πάντοτε να την
αποσυνδέετε απ το ρευµατοδτη
και να βεβαιώνεστε τι η γραµµή
τοµής (9) είναι σταµατηµένη πριν
απ το καθάρισµα.
• Mη λειτουργείτε τη µηχανή σας
αν µερικά εξαρτήµατά της είναι
ελαττωµατικά.
• Mη δοκιµάζετε να αφαιρείτε τυχν
µέρη εκτς εκείνων που
αναφέρονται σ’ αυτές τις οδηγίες.
• Xρησιµοποιείτε µνο συστηµένα
ανταλλακτικά µέρη και
συναρµολογήσεις της Black & Decker.
Hλεκτρική ασφάλεια
Πρέπει πάντοτε να σβήνετε τη µηχανή
σας στην πηγή τροφοδτησης, προτού
αποσυνδέετε τυχν πρίζες ή συνδέσεις
πρίζας ή καλώδια επέκτασης.
Σηµείωση: Βι ασφάλειες δεν προσφέρουν
προστασία απ ηλεκτρικ σοκ.
Mπορεί να ληφθεί αυξηµένη ασφάλεια
ταν αφήσετε ένα προσοντούχο
ηλεκτρολγο να εγκαταστήσει ένα
αυτµατο διακπτη κυκλώµατος
υψηλής ευαισθησίας στη
48
συναρµολγηση (30mA).
Aν δεν έχετε εφαρµσει τέτοιο
διακπτη κυκλώµατος, ή αν δεν θέλετε
να εφαρµσετε κάτι τέτοιο, ττε σας
συνιστούµε ιδιαίτερα πως η
ηλεκτρική παροχή στη µηχανή
παρέχεται απ µια πολύ ευαίσθητη
συσκευή του εναποµένοντος
ρεύµατος (RCD). Tο RCD είναι
σχεδιασµένο να παρέχει υψηλής
στάθµης προστασία ενάντια στο
επικίνδυνο ηλεκτρικ ρεύµα άν
παρουσιασθούν ανώµαλες συνθήκες.
Προσοχή: H χρήση ενς RCD ή άλλου
διακπτη κυκλώµατος δεν αποδεσµεύει
τον χειριστή της µηχανής απ τις
οδηγίες ασφάλειας και της πολιτικής
ασφαλούς εργασίας που δίνονται
στον οδηγ.
Προέκταση καλωδίων
Mπορείτε να χρησιµοποιήσετε µέχρι
30 µέτρα (100 πδια) δικλωνική προέκταση
καλωδίου της χωρίς καµία ορατή απώλεια
ενέργειας. Προεκτάσεις καλωδίων και σειρές
καλωδίων θα πρέπει να συµµορφώνονται µε
τους εθνικούς κανονισµούς.
Προετοιµάζοντας τη µηχανή για χρήση
(Eικνα 2)
• Bγάλτε τη µηχανή φινιρίσµατος
2
χρτου και τον προφυλακτήρα (10)
απ το κιβώτιο.
• Aφαιρέστε τη βίδα προφυλακτήρα
(12) που βρίσκεται στη κάτω απ τον
προφυλακτήρα (Εικνα 2.1).
• ∆ώστε τον προφυλακτήρα στο
κανάλι υποδοχής επάνω στο
κέλύφος της µηχανής (Eικνα 2.2).
• Ωθήστε τον προφυλακτήρα πλήρως
προς τα µέσα, πρώτα στο πλευρ,
µέχρις του είναι επίπεδος µε το
αµάξωµα. Eπαναλάβετε την
διαδικασία για την άλλη πλευρά
(Eικνα 2.3).
• Aντικαταστήστε τη βίδα του
προφυλακτήρα (Eικνα 2.4).
• Eάν συναρµολογήθηκε σωστά,
ο προφυλακτήρας τώρα θα
στερεωθεί στη µηχανή σας.
• Στη µεταβίβαση, το τέλος της
γραµµής τοµής (9) επικολλάται
στην πλευρά του καλύµµατος του
πηνίου. Παρακαλώ ξεκολλήστε την
ταινία και αποδεσµεύσατε το µήκος
της γραµµής.
Page 49

Θα υπάρχει ελάχιστη γραµµή τοµής
9cm (3,5") για να εξέχει απ τη
θήκη του πηνίου προτού
χρησιµοποιήσετε τη
µηχανή σας.
Σηµείωση: Oταν η µηχανή σας
λειτουργήσει για πρώτη φορά,
οποιαδήποτε υπερβολική γραµµή θα
αποκοπεί απ τη λεπίδα γραµµής τοµής
(8) που βρίσκεται στον προφυλακτήρα.
Tο ίδιο ισχύει και για οποιαδήποτε
µελλοντική ρύθµιση γραµµής. Λγω του
τι η αποκοπή απ τη λεπίδα κοψίµατος
στον προφυλακτήρα µπορεί να
αποβάλλεται, είναι σηµαντικ πως η
ποστητα υπερβολικής γραµµής
διατηρείται στο ελάχιστο. Oταν µια
υπερβολική ποστητα γραµµής
τραβιέται προς τα έξω, η γραµµή πρέπει
να αποκπτεται στα έξω του
προφυλακτήρα προτού ανάψετε τη
µηχανή σας. Aποκψτε τη γραµµή επάνω
στη λεπίδα της µηχανής µε το χέρι.
• Πάντα να βεβαιώνεστε πως το
κάλυµµα του πηνίου είναι
ασφαλισµένο πριν και µετά απ
τη χρήση.
Πώς να χρησιµοποιήσετε τη µηχανή
σας (Eικνες A - J)
Για να έχετε τα καλύτερα δυνατά αποτελέσµατα
απ τη µηχανή σας, παρακαλώ µάθετε τις
ακλουθες τεχνικές. Mήν είστε ανυπµονοι. Θα
έχετε τα καλύτερα αποτελέσµατα απ την πείρα,
ακολουθώντας αυτούς τους απλούς καννες:
Mη χρησιµοποιείτε τη µηχανή σας
χωρίς τον προφυλακτήρα.
A
Mην κβετε µουσκεµένο γρασίδι. ’Eχετε
B
καλύτερα αποτελέσµατα ταν το
γρασίδι είναι στεγν.
Kοπή
• Για να ανάψετε τη µηχανή σας,
πατήστε το µοχλ διακπτη (3).
• Για να σβήσετε τη συσκευή,
αποδεσµεύσατε το µοχλ διακπτη.
• Για να µεταφέρετε τη µηχανή ταν
δεν την χρησιµοποιείτε, σας
συστήνουµε να χρησιµοποιείτε το
βοηθητικ χεροούλι (2).
Kβετε γωνιακά µε την άκρη της
γραµµής τοµής (9).
C
Περιστρέφετε τη µηχανή απαλά απ
πλευρά σε πλευρά.
D
Mην βαρυφορτώνετε τη µηχανή.
E
Λειτουργεί καλύτερα σε υψηλές
ταχύτητες.
EΛΛHNIKA
Για µεγάλο γρασίδι, αρχίστε απ
F
την κορυφή και κάνετε µικρά κοψίµατα.
Xρησιµοποιείτε την άκρη του
G
προφυλακτήρα για να διατηρείται η
µηχανή µακρυά απ σκληρές
επιφάνειες και λεπτά αντικείµενα.
Kοπή άκρων (GL540)
Tα καλύτερα αποτελέσµατα
H
σηµειώνονται σε άκρα µε βάθος
µεγαλύτερο των 50mm.
Σηµείωση: H µηχανή φινιρίσµατος
χρτου είναι εργαλείο συντήρησης για
το κψιµο χλης που επικρέµεται και
δεν πρέπει να χρησιµοποιείται για τη
δηµιουργία άκρων. Aκρα µπορούν να
γίνονται µε τη χρήση φτυαριού κοπής.
Kράτηση καλωδίου
Eάν ο η µηχανή σας είναι κατάλληλη για
J
χρήση µε καλώδιο προέκτασης τύπου
“Aποδέσµευσης”, κάνετε κύκλο σε ένα
µήκος µέσω της κράτησης καλωδίου (5)
έτσι ώστε η φίσα και ο ρευµατοδτης
να ξεχωρίζονται τυχαία, εάν τραβηχθεί
το καλώδιο.
Πώς να αλλάζετε απ τη µέθοδο κοπής
στη µέθοδο κοπής των άκρων
(Eικνα 3)
Eπιπρσθετα προς την παραδοσιακή
κοπή, η µηχανή σας µπορεί να
χρησιµοποιηθεί για να περικβει χλη
που κρέµµεται κατά µήκος των άκρων
του χορταριού και των στρωµάτων
λουλουδιών.
Για να µετατρέψετε την µηχανή σας
µεταξύ της µεθδου κοπής στη µέθοδο
3
κοπής άκρων:
• Με τη µηχανή φινιρίσµατος σβηστή,
τοποθετήστε το ένα χέρι σας στη
λαβή του διακπτη (4) και το άλλο
σας χέρι στο αµάξωµα της µηχανής
φινιρίσµατος (1). Πατήστε το κουµπί
(7) µπροστά στο αµάξωµα της
µηχανής φινιρίσµατος.
Κρατώντας το κουµπί πατηµένο,
περιστρέψατε το αµάξωµα της
µηχανής φινιρίσµατος
αριστερστροφα και µετά αφήστε
το κουµπί ελεύθερο.
49
Page 50

Συνεχίστε να περιστρέφετε το
αµάξωµα της µηχανής φινιρίσµατος
µέχρις του είναι ασφαλισµένο στη
θέση του (Εικνα 3.1).
• Η πιο αποτελεσµατική µέθοδος για
να χρησιµοποιείτε τη µηχανή
φινιρίσµατος στην µέθοδο κοπής
άκρων είναι να στέκεστε στην
πλευρά της (Εικνα 3.2).
Ευθυγραµµίστε την εµπρσθια
άκρη της µηχανής φινιρίσµατος
(14) κατά µήκος της χλης έτσι στε
η γραµµή κοπής να κβει το
χορτάρι που κρέµεται απ την άκρη
του χορταριού (Εικνα Η).
Γραµµή αντικατάστασης
(νάυλον κλωστή)
Mπορείτε ν’ αγοράσετε ένα νέο πηνίο που έχει
10 µέτρα γραµµής τοµής απ τον αντιπρσωπο
της Black & Decker αλλακτικά, διατίθενται
γραµµές αντικατάστασης που περιέχουν
γραµµή µήκους 25 µέχρι 50 µέτρων.
Για µέγιστη αξιοπιστία, ποτέ µην εφαρµζετε
βαρύτερη ή ελαφρτερη γραµµή (π.χ. γραµµή
ψαρέµατος) που θα εµποδίζει την αυτµατη
τροφοδοσία απ του να λειτουργεί, και που
µπορεί να προκαλέσει βλάβη στο µοτέρ ή να
µειώσει την απδοση κοψίµατος.
Πώς να εφαρµσετε καινούριο εηνίο
εραµµής κοτής (Eικνες 4 & 5)
• Aποσυνδέστε τη µηχανή σας απ τη
ρευµατοδτηση.
• Aφαιρέστε το κάλυµµα του πηνίου,
4
ωθώντας προς τα µέσα και προς τα
άνω και τα δύο πτερύγια του
καλύµµατος του καρουλιού (16)
(Eικνα 4), µετά τραβήξτε (δεν είναι
ανάγκη να ωθήσετε και τα δύο
πτερύγια προς τα µέσα την ίδια
στιγµή). Ιο άδειο πηνίο τώρα
µπορεί να αποσυρθεί απ το
πτερύγιο κίνησης.
• Aφαιρέστε τυχν ακαθαρσίες ή
γρασίδι που µπορεί να έχουν
συσσωρευθεί µέσα στη θήκη του
πηνίου και το κάλυµµα.
• Ξαναπεριστρέψατε περίπου 9εκ.
(3,5”) γραµµής τοµής (9) απ το νέο
πηνίο (19) και τοποθετήστε
προσωρινά το άκρο της γραµµής
τοµής σε µια απ τις διαµορφωµένες
εσοχές τύπου “L” για να
παρεµποδίσετε το καρούλι να
ξετυλιχθεί.
• Tροφοδοτήστε το άκρο της
5
γραµµής µέσω της οπής κι ακµα
ωθήστε το καρούλι µέσα στον
κεντρικ αξονίσκο κίνησης ενώ
τραβάτε το ελεύθερο άκρο της
γραµµής για να το αποδεσµεύσετε
απ τη διαµορφωµένη εσοχή τύπου
“L”. Για να καθίσει πλήρως το
καρούλι, περιστρέψτε σο
χρειάζεται, προσέχοντας έτσι ώστε
να µην εµπλακεί µέσα στη γραµµή
κάτω απ το καρούλι,
επβεβαιώνοντας τι υπάρχει
ελάχιστη γραµµή 9cm (3,5") να
εξέχει απ τη θήκη του καρουλιού.
• Aντικαταστήστε το κάλυµµα του
καρουλιού, ευθυγραµµζοντας και
τα δύο πτερύγια (16) στο κάλυµµα
µε τις οπές εισδου στη θήκη του
καρουλιού και σπρώχνοντάς το στη
θέση του. Bεβαιωθείτε τι και τα
δύο πτερύγια βρίσκονται ασφαλώς
τοποθετηµένα.
Πώς να τυλίξετε νέα γραµµή τοµής
(νάυλον κλωστή) επάνω σε άδειο
καρούλι (Eικνα 6 & 7)
• Mπορείτε να τυλίξετε νέα γραµµή
6
τοµής 10 µέτρων το πιο πολύ επάνω
στο άδειο καρούλι. Tο καρούλι έχει
ένα “δείκτη” για να σας βοηθήσει να
τυλίξετε υπερβολική ποστητα
γραµµή τοµής επάνω στο καρούλι,
γιατί η υπερβολική ποστητα θα
παρεµποδίσει το αυτµατο σύστηµα
τροφοδοσίας απ του να
λειτουργήσει.
• Aφαιρέστε την εναποµείνασα
γραµµή τοµής απ το καρούλι (19).
• Ωθήστε το άκρο της νέας γραµµής
τοµής σε µία απ ις δύο οπές που
παρέχονται στη θήκη του καρουλιού
(19) και βάλτε µέσα 20mm.
• Παρακάµψετε την γραµµή τοµής,
τραβώντας την µέσω της επ·οµενης
διαµορφωµένης “L” εσοχής. H
γραµµή τοµής τώρα θα πρέπει να
είναι σταθερά στερεωµένη στο
καρούλι και µπορείτε να
προχωρήσετε να την τυλίγετε στην
κατεύθυνση των τξων (20).
• Xρησιµοποιήστε λίγο χρνο να
τυλίξετε τη γραµµή τοµής καθαρά, σε
στρώµατα. Mην βάζετε τη µια πάνω
στην άλλη.
50
Page 51

• Oταν έχετε τυλίξει αρκετή γραµµή
τοµής, προσωρινά τοποθετείστε
την σε µια απ τις διαµορφωµένες
εσοχές τύπου “L” για να
εµποδίσετε το καρούλι να
ξετυλιχθεί, εξασφαλίζοντας έτσι
ώστε να αφήνετε µια ελάχιστη
προεξοχή 9cm (3,5").
• Eφαρµστε το καρούλι και το
κάλυµµα του καρουλιού (15) στη
θήκη του καρουλιού, πως
περιγράφεται για την εφαρµογή
ενς νέου καρουλιού.
Φροντίδα και συντήρηση
• Για καλύτερα αποτελέσµατα, παρακαλώ
διατηρείτε καθαρά, τη γραµµή τοµής, το
πηνίο και τις οπές εισδου αέρα στο κέλυφος
της µηχανής σας. Xρησιµοποιείτε στεγνή
βούρτσα ή ύφασµα για την αφαίρεση
γρασιδιού, χυµούς ή άλλης ακαθαρσίας.
• Tα πλαστικά µέρη µπορούν να καθαρίζονται
χρησιµοποιώντας µαλακ σαπούνι και
βρεγµένο ύφασµα µε ζεστo νερ. Mη
χρησιµοποιείτε άλλου τύπου απορρυπαντικά,
καθαριστήρα ή διάλυµα που µπορεί να
περιέχουν χηµικές ουσίες και που πιθανν
να βλάψουν σηµαντικά το πλαστικ. Mην
βρέχετε τη µηχανή µε νερ.
• Σ’ αυτήν την µηχανή φινιρίσµατος χρτου
χρησιµοποιούνται αυτολίπαντα κουζινέτα
και γι’ αυτ δεν χρειάζονται λιπαντικά.
Aνίχνευση λαθών
Προτού ελέγξετε τη µηχανή σας για
τυχν λάθη, αποσυνδέστε την απ τον
αγωγ ηλεκτρισµού.
• Aν η µηχανή δεν ξεκινά, ελέγξατε κατά
πσον λα τα καλώδια είναι κανονικά
εφαρµοσµένα. Kι αν πάλι δεν λειτουργεί,
ελέγξατε τα σηµεία ηλεκτρικής παροχής
και µετά την ασφάλεια και τη
συνδεσµολγηση στην πρίζα επέκτασης
καλωδίου και στον θηλυκ συνδετήρα.
• Aν η παροχή της αυτµατης γραµµής
(νάυλον κλωστή) αποτύχει να λειτουργήσει,
θα πρέπει να είναι ένας απ τους εξής
λγους:
H γραµµή είναι πολύ κοντή ή η γραµµή είναι
εµφραγµένη στο καρούλι
• Aποσυνδέστε το εργαλείο σας απ την
κεντρική παροχή ρεύµατος.
• Aφαιρέστε το κάλυµµα του καρουλιού
(15), ωθώντας και τα δύο πτερύγια (16)
προς τα µέσα και έξω (Eικνα 4).
EΛΛHNIKA
• Σηκώστε το καρούλι (19) περίπου 6mm
(1/4") απ τη θήκη του καρουλιού (17),
ενώ τραβάτε τη γραµµή τοµής (9). Aυτ
θα σας επιτρέψει να επιµακρύνετε τη
γραµµή ενώ καθαρίζετε τυχν γραµµή
που έχει εµφραχθεί µέσα στο καρούλι.
Bεβαιωθείτε τι υπάρχει ελάχιστη
γραµµή 9cm (3,5") που να εξέχει απ
τη θήκη.
• Περιστρέψτε το καρούλι σο
χρειάζεται έτσι ώστε να καθίσει
πλήρως το καρούλι και να
αντικαταστήσετε το κάλυµµα
ευθυγραµµίζοντας και τις δύο θηλειές
στο κάλυµµα µε τις εσοχές στη θήκη
του καρουλιού και ωθήστε στη θέση
τους. Bεβαιωθείτε πως και οι δύο
θηλειές στερεώνονται καλά.
H γραµµή ακµη είναι εµφραγµένη
στο καρούλι ή είναι σπασµένο εσωτερικά
το καρούλι
• Aποσυνδέστε την κεντρική παροχή
ρεύµατος και αφαιρέστε το κάλυµµα,
πως έχει περιγραφεί προηγουµένως.
• Bγάλτε το καρούλι (19) πλήρως,
κρατώντας την σπειωτή γραµµή τοµής
στη θέση της για να τη εµποδίσετε απ
του να ξετυλιχθεί απ το καρούλι
(Eικνα 7).
• Ξετυλίξετε προσεκτικά τη γραµµή τοµής
(9) απ το καρούλι µέχρις του τα
τυλιγµένα ή εµφραγµένα κυκλώµατα
έχουν καθαρίσει. Ξετυλίξτε οµαλά τη
γραµµή τοµής, προς την κατεύθυνση τω
τξων (20) επάνω στο καρούλι.
• Tοποθετήστε προσωρινά το άκρο της
γραµµής τοµής σε µια απ τις
διαµορφωµένες εσοχές τύπου “L” για
να παρεµποδίσετε το καρούλι να
ξετυλιχθεί. Bεβαιωθείτε τι αφήνετε
προεξοχή τουλάχιστο 9cm (3,5").
• Πυρίστε τον µοχλ (22) προς τα πίσω
και προς τα εµπρς για να βεβαιωθείτε
τι λειτουργεί κανονικά.
• Nα αφαιρείτε τυχν ακαθαρσίες ή
χορτάρι που πιθανν να έχουν
συσσωρευθεί µέσα στη θήκη και το
κάλυµµα του καρουλιού.
51
Page 52

• Tροφοδοτήστε το άκρο της γραµµής
µέσω της οπής κι ακµα ωθήστε το
καρούλι µέσα στον κεντρικ αξονίσκο
κίνησης ενώ τραβάτε το ελεύθερο
άκρο της γραµµής για να το
αποδεσµεύσετε απ τη διαµορφωµένη
εσοχή τύπου “L”.
Για να καθίσει πλήρως το καρούλι,
περιστρέψτε σο χρειάζεται,
προσέχοντας έτσι ώστε να µην
εµπλακεί µέσα στη γραµµή κάτω απ
το καρούλι, επβεβαιώνοντας τι
υπάρχει ελάχιστη γραµµή 9cm (3,5")
να εξέχει απ τη θήκη του καρουλιού.
• Tελικά αντικαταστήστε το κάλυµµα
πως έχει περιγραφεί προηγουµένως.
Προστασια του περιβαλλοντος
Η Black & Decker δίνει τη δυναττητα
ανακύκλωσης των προϊντων της που
έχουν συµπληρώσει τη διάρκεια ζωής
τους. Η υπηρεσία αυτή είναι δωρεάν.
Αν θέλετε να χρησιµοποιήσετε την εν
λγω υπηρεσία, επιστρέψτε το προϊν
σας σε οποιοδήποτε εξουσιοδοτηµένο
κέντρο επισκευών, που θα το
παραλάβουν εκ µέρους σας.
Eνηµερωθείτε για το πλησιέστερο κέντρο
επισκευών της περιοχής σας, επικοινωνώντας
µε τα γραφεία της Black & Decker στη
διεύθυνση που αναγράφεται στο εγχειρίδιο.
Eπίσης, για να πληροφορηθείτε για τα
εξουσιοδοτηµένα κέντρα επισκευών της
Black & Decker, τις λεπτοµέρειες και τους
αρµδιους των υπηρεσιών που παρέχονται
µετά την πώληση, µπορείτε να ανατρέξτε στο
∆ιαδίκτυο στη διεύθυνση: www.2helpU.com.
Σε περίπτωση που κάποιο προϊν της
Black & Decker παρουσιάσει βλάβη εξαιτίας
ελαττωµατικών υλικών, ποιτητας εργασίας ή
έλλειψης συµφωνίας µε τις προδιαγραφές
εντς 24 µηνών απ την ηµεροµηνία αγοράς,
η Black & Decker εγγυάται την αντικατάσταση
των ελαττωµατικών τµηµάτων, την επισκευή
προϊντων που έχουν υποστεί εύλογη φθορά
λγω χρήσης ή την αντικατάσταση των
προϊντων προκειµένου να εξασφαλίσει την
ελάχιστη ενχληση στους πελάτες της, εκτς
αν:
• Το προϊν έχει χρησιµοποιηθεί σε
εργασιακ, επαγγελµατικ περιβάλλον ή
αν έχει ενοικιαστεί
• Eχει γίνει εσφαλµένη χρήση του
προϊντος ή αν έχει παραµεληθεί
• Το προϊν έχει υποστεί βλάβη απ άλλα
αντικείµενα, απ ουσίες ή λγω
ατυχήµατος
• Eχει γίνει προσπάθεια επισκευής απ µη
εξουσιοδοτηµένα κέντρα επισκευών ή απ
προσωπικ που δεν ανήκει στο προσωπικ
της Black & Decker
Για να ισχύσει η εγγύηση, πρέπει να
υποβάλετε απδειξη αγοράς στον πωλητή ή
το εξουσιοδοτηµένο κέντρο επισκευών.
Eνηµερωθείτε για το πλησιέστερο κέντρο
επισκευών της περιοχής σας, επικοινωνώντας
µε τα γραφεία της Black & Decker στη
διεύθυνση που αναγράφεται στο εγχειρίδιο.
Eπίσης, για να πληροφορηθείτε για τα
εξουσιοδοτηµένα κέντρα επισκευών της
Black & Decker, τις λεπτοµέρειες και τους
αρµδιους των υπηρεσιών που παρέχονται
µετά την πώληση, µπορείτε να ανατρέξτε στο
∆ιαδίκτυο στη διεύθυνση: www.2helpU.com.
Eγγυηση
Η Black & Decker είναι σίγουρη για την
ποιτητα των προϊντων της και παρέχει
σηµαντική εγγύηση. Η παρούσα γραπτή
εγγύηση αποτελεί πρσθετο δικαίωµά σας και
δεν ζηµιώνει τα συνταγµατικά σας
δικαιώµατα. Η εγγύηση ισχύει εντς της
επικράτειας των Κρατών Μελών της
Eυρωπαϊκής Eνωσης και της Eυρωπαϊκής
Ζώνης Eλευθέρων Συναλλαγών.
52
Αλλα εργαλεια κηπου
Η Black & Decker διαθέτει µία πλήρη σειρά
εργαλείων κήπου, τα οποία διευκολύνουν την
εργασία σας στον κήπο. Για περισστερες
πληροφορίες σχετικά µε τα προϊντα που
αναφέρονται παρακάτω, επικοινωνήστε µε το
Κέντρο Eξυπηρέτησης και Πληροφρησης
(στη διεύθυνση που αναφέρεται προς το
τέλος αυτών των οδηγιών χρήσης) ή µε το
πλησιέστερο εξουσιοδοτηµένο κατάστηµα της
Black & Decker.
Μηχανές φινιρίσµατος χρτου
Αλυσοπρίονα
Φορτιζµενα ψαλίδια
Χλοοκοπτικές µηχανές
Απορροφητήρας/Φυσητήρας φύλλων
Σπαστήρας φύλλων/κλαδιών
∆εν είναι λα τα προϊντα διαθέσιµα σε λες
τις χώρες.
Page 53

∆ηλωση συµµορφωσης EΚ
GL545
Black & Decker δηλώνει τι αυτά τα
ηλεκτρικά εργαλεία σχεδιάστηκαν
σύµφωνα µε:
98/37/EC, 89/336/EEC, 73/23/EEC,
EN 55014, EN 60335, EN 61000,
2000/14/EC, Μηχανή φινιρίσµατος χρτου,
L ≤ 50 cm
Annex VIII, No. 0086
B.S.I., HP2 4SQ, Ηνωµένο Βασίλειο
Ανώτατο ριο ηχητικής πίεσης, µέτρηση
κατά 2000/14/CEE:
L
(ηχητική πίεση) dB(A) 81
pA
L
(ακουστική δύναµη) dB(A) 94
WA
L
(εγγυηµένο προϊν) dB(A) 96
WA
Ο σταθµισµένος τετραγωνικς µέσος ρος
επιτάχυνσης κατά EN 50144: 4 m/s
2
Brian Cooke
∆ιευθυντής µηχανολογίας
Spennymoor, County Durham DL16 6JG,
United Kingdom
1-12-2001
EΛΛHNIKA
53
Page 54

GL530 / GL540
GL545
TYP.
1/2
2
2
6
11
10
3
GL540
4
5
7
4
5
9
8
3
23
54
E11554 / 808868-02
11
12
14
13
24
16
15
17
20
08 / 95
1
22
1
18
19
21
Page 55

55
Page 56

Page 57

Page 58

Australia Black & Decker (Australia) Pty. Ltd. Tel. 03-8720 5100
20 Fletcher Road, Mooroolbark, Victoria, 3138 Fax 03-9727 5940
Belgique/België Black & Decker (Belgium) N.V. Tel. 015 - 47 92 11
Campus Noord, Schaliënhoevedreef 20E Fax 015 - 47 92 10
2800 Mechelen
Danmark Black & Decker Tel. 70 20 15 10
Hejrevang 26B, 3450 Allerød Fax 48 14 63 30
Internet: www.blackdecker.dk
Deutschland Black & Decker GmbH Tel. 06126/21 - 0
Black & Decker Str. 40, D - 65510 Idstein Fax 06126/21 29 80
EÏÏ¿‰· Black & Decker (EÏÏ·˜) ∞.E. ∆ËÏ. 210 8981616
™ÙÚ¿‚ˆÓÔ˜ 7 & §ÂˆÊ. µÔ˘ÏÈ·Á̤Ó˘ 159 ∆ËÏ. 210 8982630
166 74 °Ï˘Ê¿‰· - ∞ı‹Ó· º·Í Service 210 8983285
España Black & Decker Ibérica, S.C.A. Tel. 934 797 400
Parque de Negocios “Mas Blau” Fax 934 797 419
Edificio Muntadas, c/Bergadá, 1, Of. A6
08820 El Prat de Llobregat (Barcelona)
France Black & Decker (France) S.A.S. Tel. 04 72 20 39 20
B.P. 21, 69571 Dardilly Cédex Fax 04 72 20 39 00
Helvetia ROFO AG Tel. 026-6749391
Gewerbezone Seeblick Fax 026-6749394
3213 Kleinbösingen
Italia Black & Decker Italia SpA Tel. 039-23871
Viale Elvezia 2 Fax 039-2387592/2387594
20052 Monza (MI) Numero verde 800-213935
Nederland Black & Decker Benelux Tel. 0164 - 283000
Joulehof 12, 4622 RG Bergen op Zoom Fax 0164 - 283100
New Zealand Black & Decker Tel. 09 579 7600
81 Hugo Johnston Drive Fax 09 579 8200
Penrose, Auckland, New Zealand
Norge Black & Decker (Norge) A/S Tlf. 22 90 99 00
Postboks 248, Leirdal, 1011 Oslo Fax 22 90 99 01
Internet: www.blackdecker.no
Österreich Black & Decker Vertriebsges.m.b.H Tel. 01 66116-0
Erlaaerstraße 165, 1231 Wien Fax 01 66116-14
Portugal Black & Decker Tel. 214667500
Rua Egas Moniz 173 Fax 214667575
S. João do Estoril
2766-651 Estoril
Suomi Black & Decker Oy Puh: (09) 825 4540
Palotie 3, 01610 Vantaa Fax: (09) 8254 5444
Black & Decker Oy, Tel: (09) 825 4540
Brandvägen 3, 01610 Vanda Fax: (09) 8254 5444
Sverige Black & Decker AB Tel: 031-68 60 00
Box 603, 421 26 Västra Frölunda, Fax: 031-68 60 08
Besöksadr. Ekonomivägen 11
Türkiye İntratek Mühendislik ve Dş Tic. A.Ş. Tel. 0212 211 22 10
Ortaklar Cad. No:19/2 Faks 0212 266 33 03
80290 Mecidiyeköy / İstanbul
United Kingdom Black & Decker Tel. 01753 511234
210 Bath Road Fax 01753 551155
Slough, Berkshire SL1 3YD Helpline 01753 574277
808876-06
Page 59

✁
Venligst sæt
◆
Bitte ankreuzen, falls Sie
◆
Si vous ne souhaitez pas
◆
Barrate la casella se non
◆
Data protection act: Tick the box if
you prefer not to receive further
◆
information.
keine weiteren Informationen erhalten
möchten.
Sí
¡·È
◆
◆
Ja
Kyllä
◆
◆
Si
Ja
◆
◆
Oui
E›Ó·È ÙÔ ÂÚÁ·Ï›Ô
◆
Onko tämä ensimmäinen
◆
verktøj?
B&D-koneesi?
Ist dieses Gerät
◆
S’agit-il d’un cadeau?
◆
Is this tool a gift?
◆
ein Geschenk?
Ja
◆
◆
Ja
Ja
◆
◆
Yes
Sim
◆
◆
·˘Ùfi Ë ÚÒÙË Û·˜ ·ÁÔÚ¿?
Kreeg u de
◆
¿Ha recibido
◆
Är verktyget en gåva?
◆
Si tratta di un regalo?
Recebeu esta ferramenta como
machine als cadeau?
◆
presente?
◆
usted esta herramienta como regalo?
A.u.b. dit vakje aankruisen indien u
recevoir d’informations, cochez cette
case.
◆
desiderate ricevere informazioni.
Nee
Nej
◆
◆
No
Nei
◆
◆
Non
Nej
◆
◆
Nein
Não
√¯È
◆
◆
◆
No
No
Ei
◆
◆
◆
Er verktøjet
◆
Onko kone lahja?
◆
Er verktøyet en gave?
∆Ô ÂÚÁ·ÏÂ›Ô Â›Ó·È ‰ÒÚÔ?
◆
◆
en gave?
Por favor, assinale com
Vänligen kryssa för i
◆
◆
Señale en la casilla sino quiere recibir
geen informatie wenst te ontvangen.
información.
◆
Indirizzo del
◆
Händleradresse
◆
Adres van de dealer
◆
Dealer address
Cachet du revendeur
◆
◆
rivenditore
Sí
¡·È
◆
◆
Ja
Kyllä
◆
◆
Si
Ja
◆
◆
Oui
Ja
◆
◆
Ja
Ja
◆
◆
Yes
Sim
◆
◆
Vennligst kryss av dersom du ikke
uma cruz se não desejar receber
informação.
◆
rutan om Ni inte vill ha information.
Morada do
Forhandler
◆
◆
Återförsäljarens adress
◆
Jälleenmyyjän osoite
◆
Forhandlerens adresse
Dirección del detallista
◆
revendedor
adresse
◆
Nee
Nej
◆
◆
No
Nei
◆
◆
Non
Nej
◆
◆
Nein
Não
√¯È
◆
◆
◆
No
No
Ei
◆
◆
◆
Merkitkää rasti ruutuun, mikäli ette
kryds i ruden såfremt De ikke måtte
ønsker informasjon.
¢È‡ı˘ÓÛË ·ÓÙÈÚÔÛÒÔ˘
◆
Ist
◆
Est-ce un
◆
Is this tool your first purchase?
◆
dieses Gerät ein Erstkauf?
¶·Ъ·О·ПВ›ЫЩВ У· ЫЛМВИТЫВЩВ В¿У
ønske at modtage information.
halua vastaanottaa informaatiota.
◆
‰ВУ ı¤ПВЩВ У· ¿ЪВЩВ ПЛЪФКФЪ›В˜.
◆
Cat. no.:
...........................................................
...........................................................
¿Es esta
Is deze machine uw
◆
◆
Questo prodotto è il suo
◆
Esta ferramenta é a sua primeira
primo acquisto?
1er achat?
eerste aankoop?
herramienta la primera de este tipo?
◆
✍
Är detta ditt första B&D-
Er dette ditt første B&D
Er dette dit første B&D
◆
◆
◆
compra?
verktyg?
verktøy?
Dealer address Date of purchase
Händleradresse Kaufdatum
Cachet du revendeur Date d’achat
Indirizzo del rivenditore Data d’acquisto
Adres van de dealer Aankoopdatum
Dirección del detallista Fecha de compra
Morada do revendedor Data de compra
Återförsäljarens adress Inköpsdatum
Forhandlerens adresse Innkjøpsdato
Forhandler adresse Indkøbsdato
Jälleenmyyjän osoite Ostopäivä
¢È‡ı˘ÓÛË ·ÓÙÈÚÔÛÒÔ˘ ∏МВЪФМЛУ›· ·БФЪ¿˜
Namn
◆
Nome
◆
Nome
◆
Nom
◆
Nombre
Name
◆
◆
Name
Naam
◆
◆
Osoite
◆
Morada
◆
◆
√ÓÔÌ·:
◆
Nimi
◆
Navn
◆
Navn
◆
Adresse
Adresse
◆
◆
Dirección
◆
Adresse
Adresse
Adres
◆
◆
◆
Address
Adress
◆
Indirizzo
¢È‡ı˘ÓÛË:
...........................................................
◆
...........................................................
◆
...........................................................
By
◆
By
Plaats
◆
◆
Ort
◆
Cittá
◆
Ville
◆
Localidade
Ort
◆
◆
Town
Ciudad
◆
◆
Code
Postnr.
◆
◆
Postcode
◆
Postinumero
◆
¶fiÏË:
◆
Paikkakunta
◆
Postleitzahl
◆
Código postal
Postnr.
◆
◆
Codice postale
◆
Postal code
Código
Postnr.
postal
◆
∫ˆ‰ÈÎfi˜
...........................................................
◆
◆
...........................................................
◆
Page 60

○○○○○○○○○○○○○○○○○○○○○○○○○○○○○○○○○○○○○○○○○○○○○○○○○○○○○○○○○○○○○○○○○○○○○○○○○○
Nederlands Knip dit gedeelte uit en zend het direct na aankoop in
Black & Decker nella vostra nazione.
een gefrankeerde, geadresseerde envelop naar het
adres van Black & Decker in uw land.
Suomi Leikkaa irti tämä osa, laita se kuoreen ja postita kuori
EППЛУИО· ¶·Ú·Î·ÏÒ Îfi„ÂÙ ·˘Ùfi ÙÔ ÎÔÌÌ¿ÙÈ Î·È Ù·¯˘‰ÚÔÌ‹Û·ÙÂ
Italiano Per favore ritagliate questa parte, inseritela in una
busta con francobollo e speditela subito dopo
l’acquisto del prodotto all’indirizzo della
Dansk Venligst klip denne del ud og send frankeret til
Français Découpez cette partie et envoyez-la sous enveloppe
timbrée à l’adresse de Black & Decker dans votre pays,
ceci immédiatement après votre achat.
Norsk Vennligst klipp ut denne delen umiddelbart etter du
Deutsch Bitte schneiden Sie diesen Abschnitt ab, stecken ihn in
your country. If you live in Australia or New Zealand,
please register by using the alternative guarantee card
supplied.
einen frankierten Umschlag und schicken ihn an die
Black & Decker Adresse Ihres Landes.
Svenska Var vänlig klipp ur denna del och sänd den i ett frankerat
Português Por favor, recorte esta parte, coloque-a num envelope
✁
English Please complete this section immediately after the
purchase of your tool and send it to Black & Decker in
Español Después de haber comprado su herramienta envíe
◆
◆
◆
GUARANTEE CARD
GARANTIEKAART
GARANTI KORT
◆
◆
◆
GARANTIEKARTE
TARJETA DE GARANTÍA
GARANTI KORT
◆
◆
◆
CARTE DE GARANTIE
CARTÃO DE GARANTIA
TAKUUKORTTI
‰È‡ı˘ÓÛË Ù˘ Black & Decker ÛÙËÓ EÏÏ¿‰·.
808876-06
usted, por favor, esta tarjeta a la central de
Black & Decker en su país.
selado e endereçado e envie-o logo após a compra do
seu produto para o endereço da Black & Decker do
seu país.
kuvert till Black & Deckers adress i Ditt land.
har pakket ut ditt produkt og legg det i en adressert
konvolutt til Black & Decker (Norge) A/S.
Black & Decker i dit land.
paikalliseen Black & Decker osoitteeseen.
ÙÔ ·Ì¤Ûˆ˜ ÌÂÙ¿ ÙËÓ ·ÁÔÚ¿ ÙÔ˘ ÚÔ˚fiÓÙÔ˜ Û·˜ ÛÙËÓ
◆
◆
◆
TAGLIANDO DI GARANZIA
GARANTIBEVIS
∫∞ƒ∆∞ E°°À∏™∏™
 Loading...