

Page 1

Please read before returning this product for any reason.
àLIRE avant de retourner ce produit pour quelque raison que ce soit.
LEA EL MANUAL antes de devolver este producto por cualquier motivo.
INSTRUCTION MANUAL
MODE D’EMPLOI
MANUAL DE INSTRUCCIONES
HEDGE TRIMMER
TAILLE-HAIE
PODADORA DE SETOS
BEHT200
BEHTS300
BEHT350
BEHTS400
Page 2

ENGLISH
English (original instructions) 1
Français (traduction de la notice d’instructions originale) 9
Español (traducido de las instrucciones originales) 18
To register your new product, visit
www.BlackandDecker.com/NewOwner
Consulter le site Web www.BlackandDecker.com/NewOwner
pour enregistrer votre nouveauproduit.
Visite www.BlackandDecker.com/NewOwner para registrar su
nuevoproducto.
Thank you for choosing BLACK+DECKER!
If you have a question or experience a problem with your
BLACK+DECKER purchase, go to: http://www.blackanddecker.com/
instantanswers
If you can’t find the answer or do not have access to the Internet,
call 1-800-544-6986 from 8 a.m. to 5 p.m. EST Mon. – Fri. to speak with
an agent. Please have the CATALOG NUMBER available when youcall.
KEY INFORMATION YOU SHOULD KNOW
• To insure extension cord does not come loose see Fig. E for properattachment.
• In order to operate the trimmer, the lock button must first be pulled back (see Fig. F) then squeezetrigger.
RENSEIGNEMENTS IMPORTANTS
• Afin de s’assurer que la rallonge ne se débranche pas, la raccorder conformément aux Fig.E.
• Pour faire fonctionner l’outil, on doit tirer sur le bouton de verrouillage (Fig. F), puis enfoncer l’actionneur
vers le haut.
INFORMACION CLAVE QUE DEBE SABER
• Para asegurarse de que el cable de extensión no se vaya a soltar, ver Figura E para su acopleapropiado.
• Para operar el cortacerco, primero tire del botón de seguridad hacia atrás (ver Figura F) y luego apriete el
accionador
Page 3
ENGLISH
1
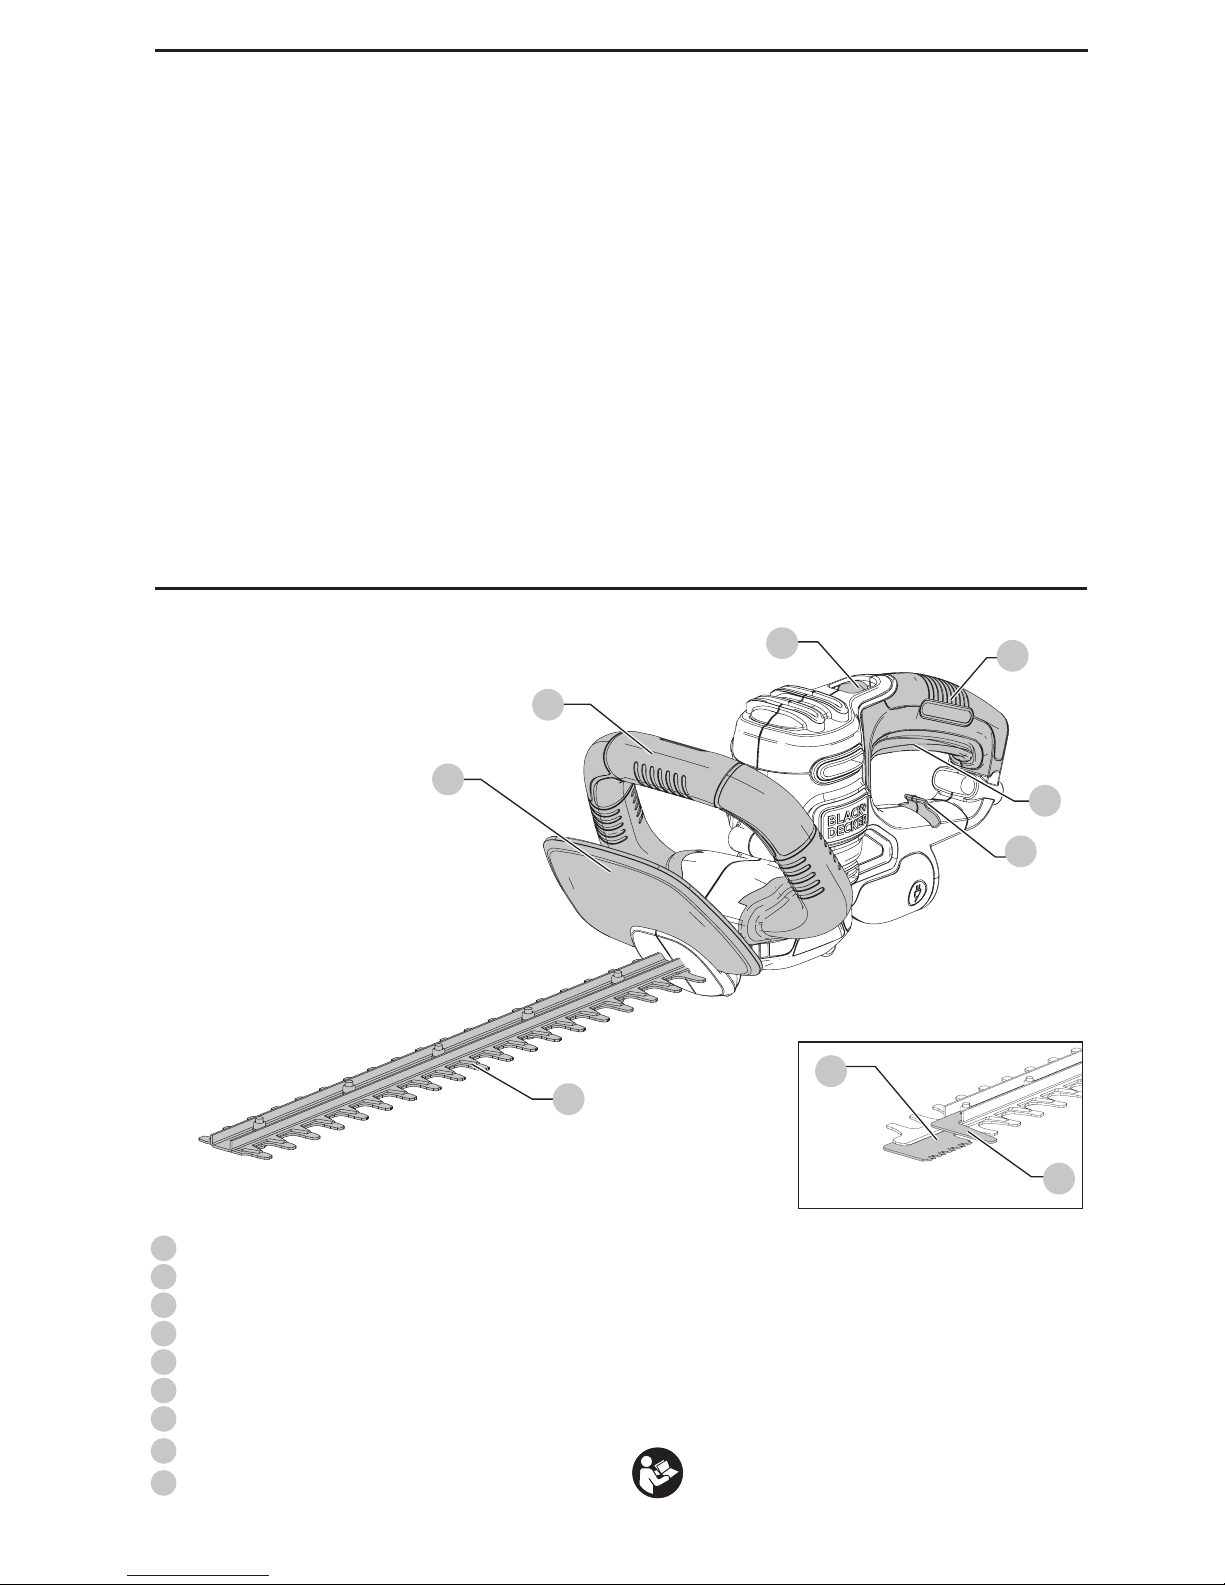
1
Blade
2
Guard
3
Bail Handle
4
Lock Off Button
5
Trigger Switch
6
Switch Handle
7
Cord Retainer
8
sawBLADE™ (BEHTS300, BEHTS400)
9
sawBLADE™ shoe (BEHTS300, BEHTS400)
Definitions: Safety Alert Symbols and Words
This instruction manual uses the following safety alert symbols and words to alert you to hazardous situations and your risk
of personal injury or propertydamage.
DANGER: Indicates an imminently hazardous situation which, if not avoided, will result in death or
seriousinjury.
WARNING: Indicates a potentially hazardous situation which, if not avoided, could result in death or
seriousinjury.
CAUTION: Indicates a potentially hazardous situation which, if not avoided, may result in minor or
moderateinjury.
(Used without word) Indicates a safety relatedmessage.
NOTICE: Indicates a practice not related to personal injury which, if not avoided, may result in
propertydamage.
WARNING! Read all safety warnings
and all instructions. Failure to follow the warnings
and instructions may result in electric shock, fire and/
or seriousinjury.
WARNING: To reduce the risk of injury,
read the instructionmanual.
Fig. A
9
8
1
3
2
4
5
7
6
9
8
BEHTS300 / BEHTS400
Page 4

ENGLISH
2
GENERAL POWER TOOL SAFETY WARNINGS
WARNING! Read all safety warnings
and all instructions. Failure to follow the warnings
and instructions may result in electric shock, fire and/
or seriousinjury.
SAVE ALL WARNINGS AND
INSTRUCTIONS FOR FUTURE
REFERENCE
The term “power tool” in the warnings refers to your mainsoperated (corded) power tool or battery-operated (cordless)
powertool.
1) Work Area Safety
a ) Keep work area clean and well lit. Cluttered or dark
areas inviteaccidents.
b ) Do not operate power tools in explosive
atmospheres, such as in the presence of
flammable liquids, gases or dust. Power tools
create sparks which may ignite the dust orfumes.
c ) Keep children and bystanders away while
operating a power tool. Distractions can cause you
to losecontrol.
2) Electrical Safety
a ) Power tool plugs must match the outlet. Never
modify the plug in any way. Do not use any
adapter plugs with earthed (grounded) power
tools. Unmodified plugs and matching outlets will
reduce risk of electricshock.
b ) Avoid body contact with earthed or grounded
surfaces such as pipes, radiators, ranges and
refrigerators. There is an increased risk of electric
shock if your body is earthed orgrounded.
c ) Do not expose power tools to rain or wet
conditions. Water entering a power tool will increase
the risk of electricshock.
d ) Do not abuse the cord. Never use the cord for
carrying, pulling or unplugging the power tool.
Keep cord away from heat, oil, sharp edges or
moving parts. Damaged or entangled cords increase
the risk of electricshock.
e ) When operating a power tool outdoors, use an
extension cord suitable for outdoor use. Use of
a cord suitable for outdoor use reduces the risk of
electricshock.
f ) If operating a power tool in a damp location
is unavoidable, use a ground fault circuit
interrupter (GFCI) protected supply. Use of a GFCI
reduces the risk of electricshock.
3) Personal Safety
a ) Stay alert, watch what you are doing and use
common sense when operating a power tool. Do
not use a power tool while you are tired or under
the influence of drugs, alcohol or medication. A
moment of inattention while operating power tools
may result in serious personalinjury.
b ) Use personal protective equipment. Always wear
eye protection. Protective equipment such as dust
mask, non-skid safety shoes, hard hat, or hearing
protection used for appropriate conditions will reduce
personalinjuries.
c ) Prevent unintentional starting. Ensure the
switch is in the off position before connecting to
power source and/or battery pack, picking up or
carrying the tool. Carrying power tools with your
finger on the switch or energizing power tools that
have the switch on invitesaccidents.
d ) Remove any adjusting key or wrench before
turning the power tool on. A wrench or a key left
attached to a rotating part of the power tool may
result in personalinjury.
e ) Do not overreach. Keep proper footing and
balance at all times. This enables better control of
the power tool in unexpectedsituations.
f ) Dress properly. Do not wear loose clothing or
jewelry. Keep your hair, clothing and gloves
away from moving parts. Loose clothes, jewelry or
long hair can be caught in movingparts.
g ) If devices are provided for the connection of dust
extraction and collection facilities, ensure these
are connected and properly used. Use of dust
collection can reduce dust-relatedhazards.
4) Power Tool Use and Care
a ) Do not force the power tool. Use the correct
power tool for your application. The correct power
tool will do the job better and safer at the rate for
which it wasdesigned.
b ) Do not use the power tool if the switch does not
turn it on and off. Any power tool that cannot be
controlled with the switch is dangerous and must
berepaired.
c ) Disconnect the plug from the power source and/
or the battery pack from the power tool before
making any adjustments, changing accessories,
or storing power tools. Such preventive safety
measures reduce the risk of starting the power
toolaccidentally.
d ) Store idle power tools out of the reach of children
and do not allow persons unfamiliar with the
power tool or these instructions to operate the
power tool. Power tools are dangerous in the hands
of untrainedusers.
e ) Maintain power tools. Check for misalignment or
binding of moving parts, breakage of parts and
any other condition that may affect the power
tool’s operation. If damaged, have the power
tool repaired before use. Many accidents are
caused by poorly maintained powertools.
f ) Keep cutting tools sharp and clean. Properly
maintained cutting tools with sharp cutting edges are
less likely to bind and are easier tocontrol.
g ) Use the power tool, accessories and tool bits, etc.
in accordance with these instructions, taking
Page 5

ENGLISH
3
into account the working conditions and the
work to be performed. Use of the power tool for
operations different from those intended could result
in a hazardoussituation.
5) Service
a ) Have your power tool serviced by a qualified
repair person using only identical replacement
parts. This will ensure that the safety of the power
tool ismaintained.
Hedge Trimmer Safety Warnings
DANGER: Keep hands away from
blade. Contact with blade will result in serious
personalinjury.
• Use both hands when operating the hedge trimmer.
Using one hand could cause loss of control and
result in serious personalinjury.
• Keep all parts of the body away from the cutter
blade. Do not remove cut material or hold material
to be cut when blades are moving. Make sure
the switch is off when clearing jammed material.
Blades coast after turn off. A moment of inattention
while operating the hedge trimmer may result in serious
personalinjury.
• Carry the hedge trimmer by the handle with the
cutter blade stopped. Proper handling of the hedge
trimmer will reduce possible personal injury from
the cutter blades.
• Hold the power tool by insulated gripping surfaces
only, because the cutter blade may contact hidden
wiring. Cutter blades contacting a “live” wire may
make exposed metal parts of the power tool “live”
and could give the operator an electric shock.
• Keep extension cord away from cutting area. During
operation the extension cord may be hidden in
shrubs and can be accidentally cut by the blade.
• Check the hedge for foreign objects, e.g. wirefences.
WARNING: Do not expose torain.
WARNING: Only use with bail handle
and guard properly assembled to hedge trimmer. The
use of the hedge trimmer without the proper guard or
handle provided may result in serious personalinjury.
WARNING: Remove plug from the outlet
immediately if the extension cord becomes damaged
orcut.
WARNING: Some dust created by
this product contains chemicals known to the
State of California to cause cancer, birth defects or
other reproductive harm. Some examples of these
chemicalsare:
• compounds in fertilizers
• compounds in insecticides, herbicides and
pesticides
• arsenic and chromium from chemically treated
lumber
To reduce your exposure to these chemicals, wear approved
safety equipment such as dust masks that are specially
designed to filter out microscopicparticles.
• If using an extension cord outdoors, it is absolutely
necessary to use an extension cord suitable for
outdoor use. Use of a cord suitable for outdoor use
reduces the risk of electricshock.
• To reduce the risk of disconnection of appliance cord from
the extension cord during operating:
i) Make a knot as shown in below; or
ii) Use one of the plug-receptacle retaining straps or
connectors described in thismanual.
OR
iii) Secure the extension cord to the appliance plug as
shown or described in the OperatingInstructions.
WARNING: To reduce the risk of personal
injury due to a loose electrical connection between
the appliance’s plug and extension cord, firmly and
fully attach the appliance plug to the extension cord.
Periodically check the connection while operating to
ensure it is fully attached. Do not use an extension
cord that provides a loose connection. A loose
connection may result in overheating, fire, and
increases the risk of aburning.
• An extension cord must have adequate wire size
(AWG or American Wire Gauge) for safety. The smaller
the gauge number of the wire, the greater the capacity
of the cable, that is, 16 gauge has more capacity than 18
gauge. An undersized cord will cause a drop in line voltage
resulting in loss of power and overheating. When using
more than one extension to make up the total length,
be sure each individual extension contains at least the
minimum wire size. The following table shows the correct
size to use depending on cord length and nameplate
ampere rating. If in doubt, use the next heavier gauge. The
lower the gauge number, the heavier thecord.
Page 6
ENGLISH
4
Minimum Gauge for Cord Sets
Volts
Total Length of Cord in Feet
(meters)
120 V 25 (7.6) 50 (15.2) 100 (30.5) 150 (45.7)
240 V 50 (15.2) 100 (30.5) 200 (61.0) 300 (91.4)
Ampere Rating
American Wire Gauge
More
Than
Not
More
Than
0 6 18 16 16 14
6 10 18 16 14 12
10 12 16 16 14 12
12 16 14 12 Not Recommended
The label on your tool may include the following symbols. The
symbols and their definitions are asfollows:
V ......................... volts
Hz ....................... hertz
min ..................... minutes
or DC ......direct current
...................... Class I Construction
(grounded)
…/min ..............per minute
BPM .................... beats per minute
IPM ..................... impacts per minute
RPM .................... revolutions per
minute
sfpm ................... surface feet per
minute
SPM .................... strokes per minute
A ......................... amperes
W ........................ watts
or AC ...........alternating current
or AC/DC .... alternating or
direct current
...................... Class II
Construction
(double insulated)
no ....................... no load speed
n ......................... rated speed
...................... earthing terminal
..................... safety alert symbol
..................... visible radiation
..................... wear respiratory
protection
..................... wear eye
protection
..................... wear hearing
protection
..................... read all
documentation
CSPM .................. cut strokes per
minute
SAVE THESE INSTRUCTIONS FOR
FUTURE USE
COMPONENTS (FIG. A)
WARNING: Never modify the power
tool or any part of it. Damage or personal injury
couldresult.
Refer to Figure A at the beginning of this manual for a
complete list ofcomponents.
Intended Use
This hedge trimmer is designed for residential
trimmingapplications.
DO NOT use under wet conditions or in presence of
flammable liquids orgases.
This hedge trimmer is a residential power tool. DO NOT
let children come into contact with the tool. Supervision is
required when inexperienced operators use thistool.
ASSEMBLY
WARNING: To reduce the risk of
serious personal injury, turn unit off and
disconnect it from power source before making
any adjustments or removing/installing
attachments or accessories. An accidental start-up
can causeinjury.
Assembly Tools Required (Not Supplied)
• Phillips Screwdriver
Attaching Guard and Bail Handle to
Trimmer
WARNING: Only use with handle and
guard properly assembled to hedge trimmer.
The use of the hedge trimmer without the proper
guard or handle provided may result in serious
personalinjury.
The trimmer is shipped with the guard and bail handle
attached to the trimmer with a plastic zip tie.
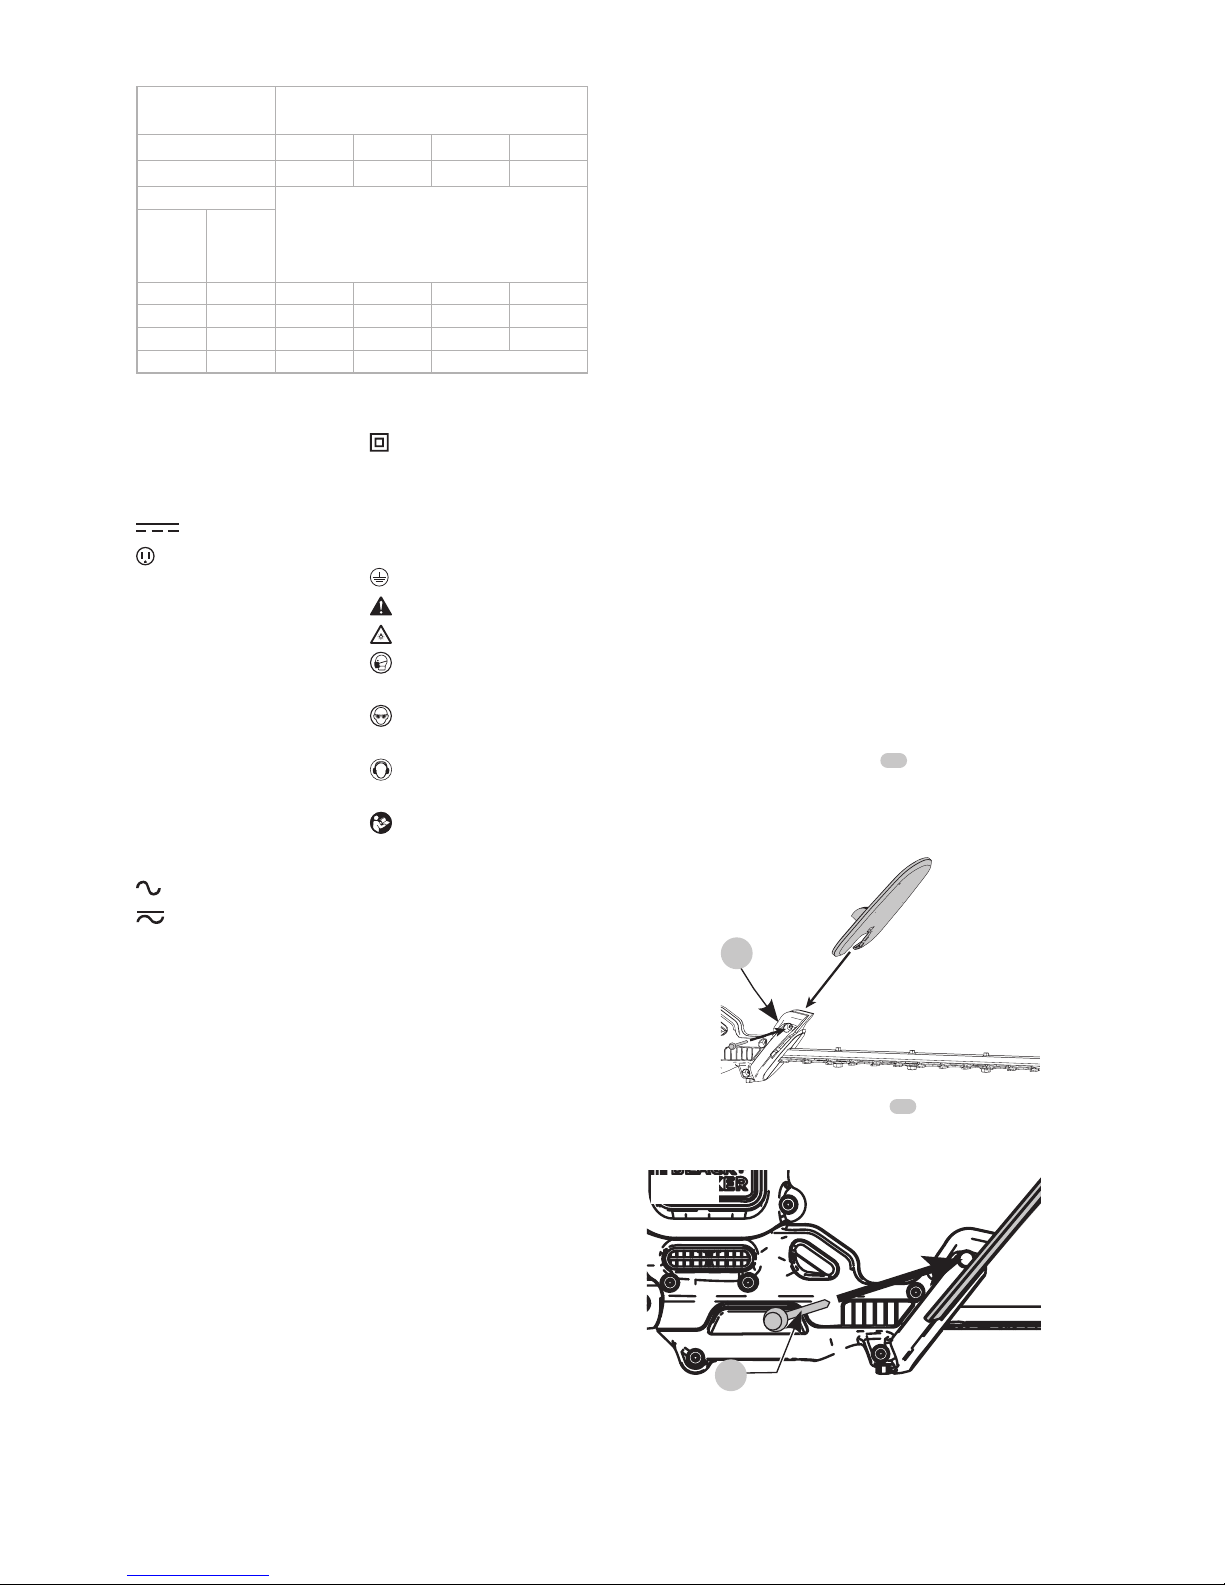
Attaching Guard to trimmer (FIG. B, C)
The trimmer is shipped with the guard unattached to the
trimmer. To attach the guard:
1. Remove guard retaining screw
10
with the Phillips
screwdriver (notsupplied).
2. Position the guard in place as shown in Fig.B. Ensuring
the guard slots into the grooves on theunit.
Fig. B
10
3. Insert the guard retaining screw
10
into the opening
on the side of the guard and tighten securely as shown
in Fig.C.
Fig. C
10
Page 7
ENGLISH
5
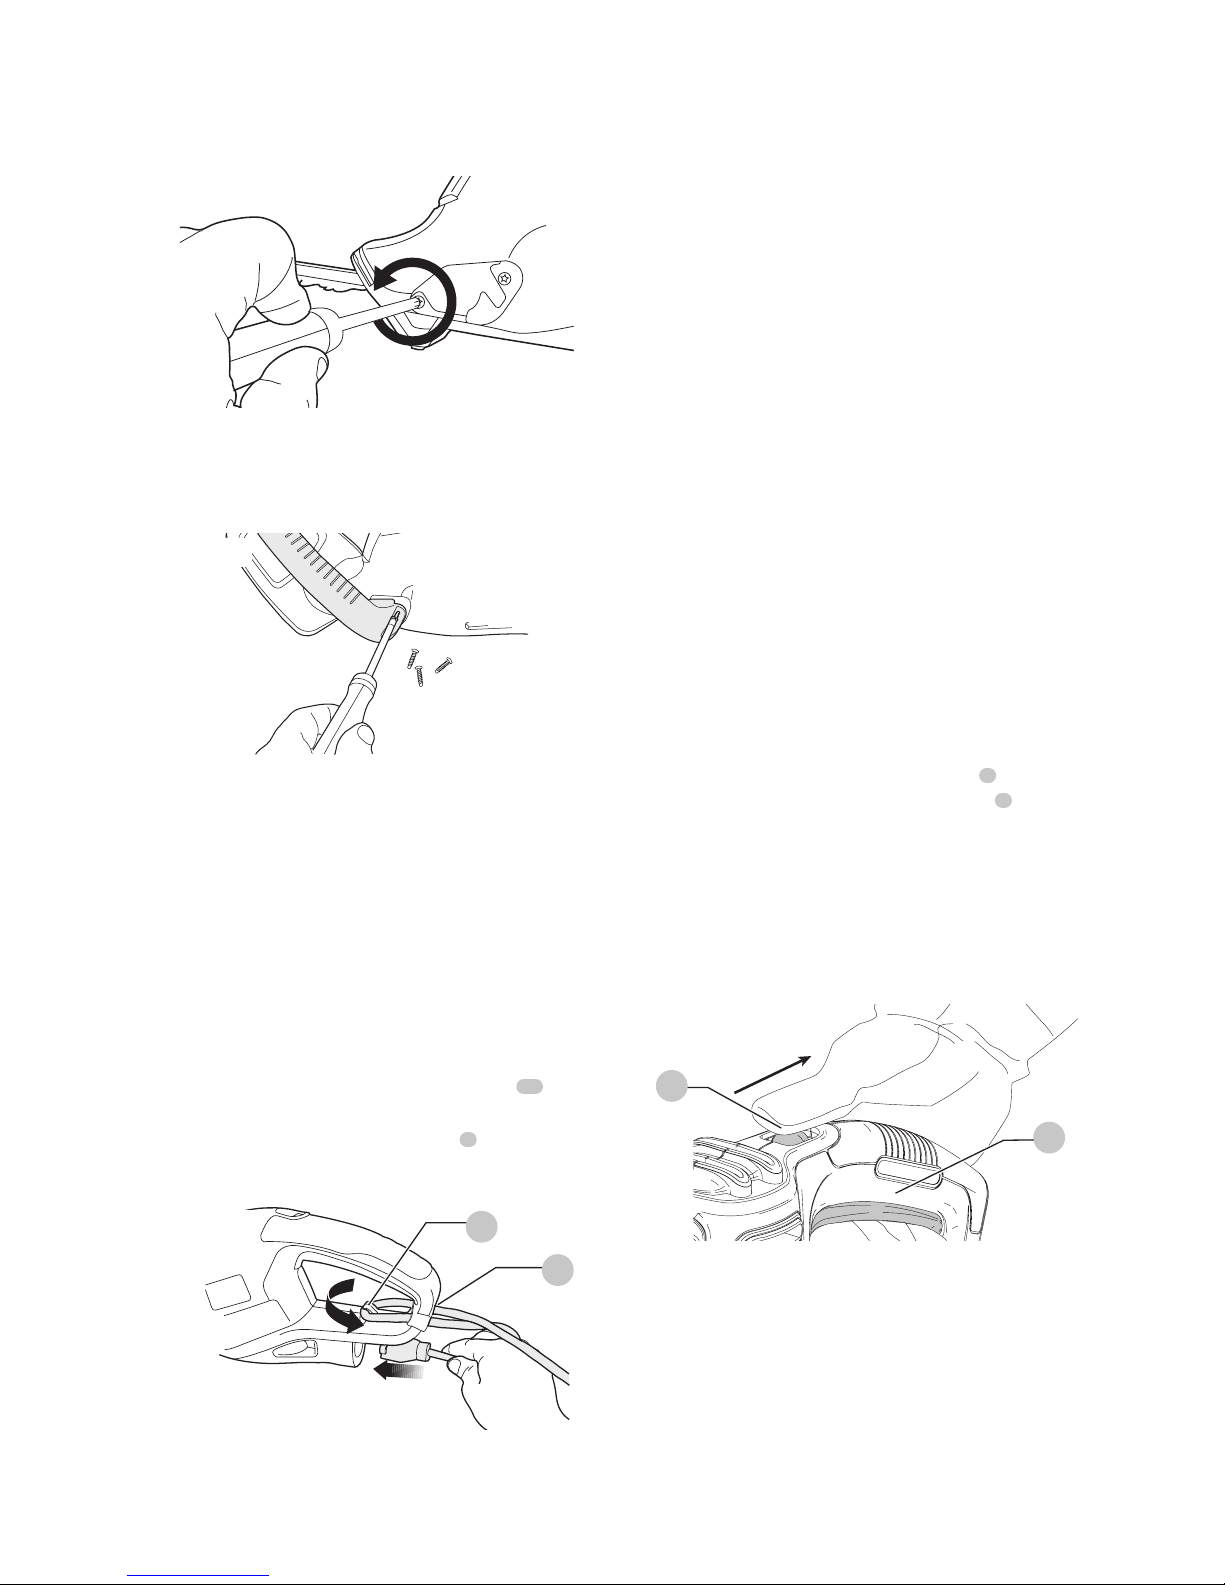
Attaching the Bail Handle (FIG. D, E)
1. Cut the plastic ziptie.
2. Remove the 4 screws that are partially run into the
trimmer housing (Fig.D).
Fig. D
3. Slide the bail handle onto the front of the trimmer
housing behind theguard.
4. Insert the four screws into the openings on the side of
the bail handle and tighten securely as shown in Fig.E.
Fig. E
Attaching Extension Cord to Trimmer
(FIG. F)
WARNING: Ensure the trigger switch
is not engaged to reduce the risk of starting the
appliance accidentally.
A cord retainer is incorporated into the rear of the handle on
the power head.
1. Near the end of the extension cord, fold the extension
cord to create aloop.
2. Feed the loop into the cord retainer housing
10
as
shown in Fig.F.
3. Hook the loop onto the cord retainer
7
so it rests in the
cord retainer.
4. Plug the extension cord into the powerhead.
11
7
Fig. F
SAVE THESE INSTRUCTIONS FOR
FUTURE USE
OPERATION
WARNING: To reduce the risk of
serious personal injury, turn unit off and
disconnect it from power source before making
any adjustments or removing/installing
attachments or accessories. An accidental start-up
can causeinjury.
Proper Hand Position (Fig. G)
WARNING: To reduce the risk of serious
personal injury, ALWAYS use proper hand position
as shown.
WARNING: To reduce the risk of serious
personal injury, ALWAYS hold securely in anticipation
of a suddenreaction.
Always hold the trimmer, as shown in the illustrations in
this manual, with one hand on the switch handle and one
hand on the bail handle (Fig. G). Never hold the unit by the
bladeguard.
Switch
To turn the tool “ON”, slide the lock off button
4
, shown in
Fig. G, backward and squeeze the trigger switch
5
. Once
the unit is running, you may release the lock off button.
In order to keep the unit running you must continue
to squeeze the trigger. To turn the tool “OFF”, release
thetrigger.
WARNING: Never attempt to lock a
switch in the ONposition.
Fig. G
4
5
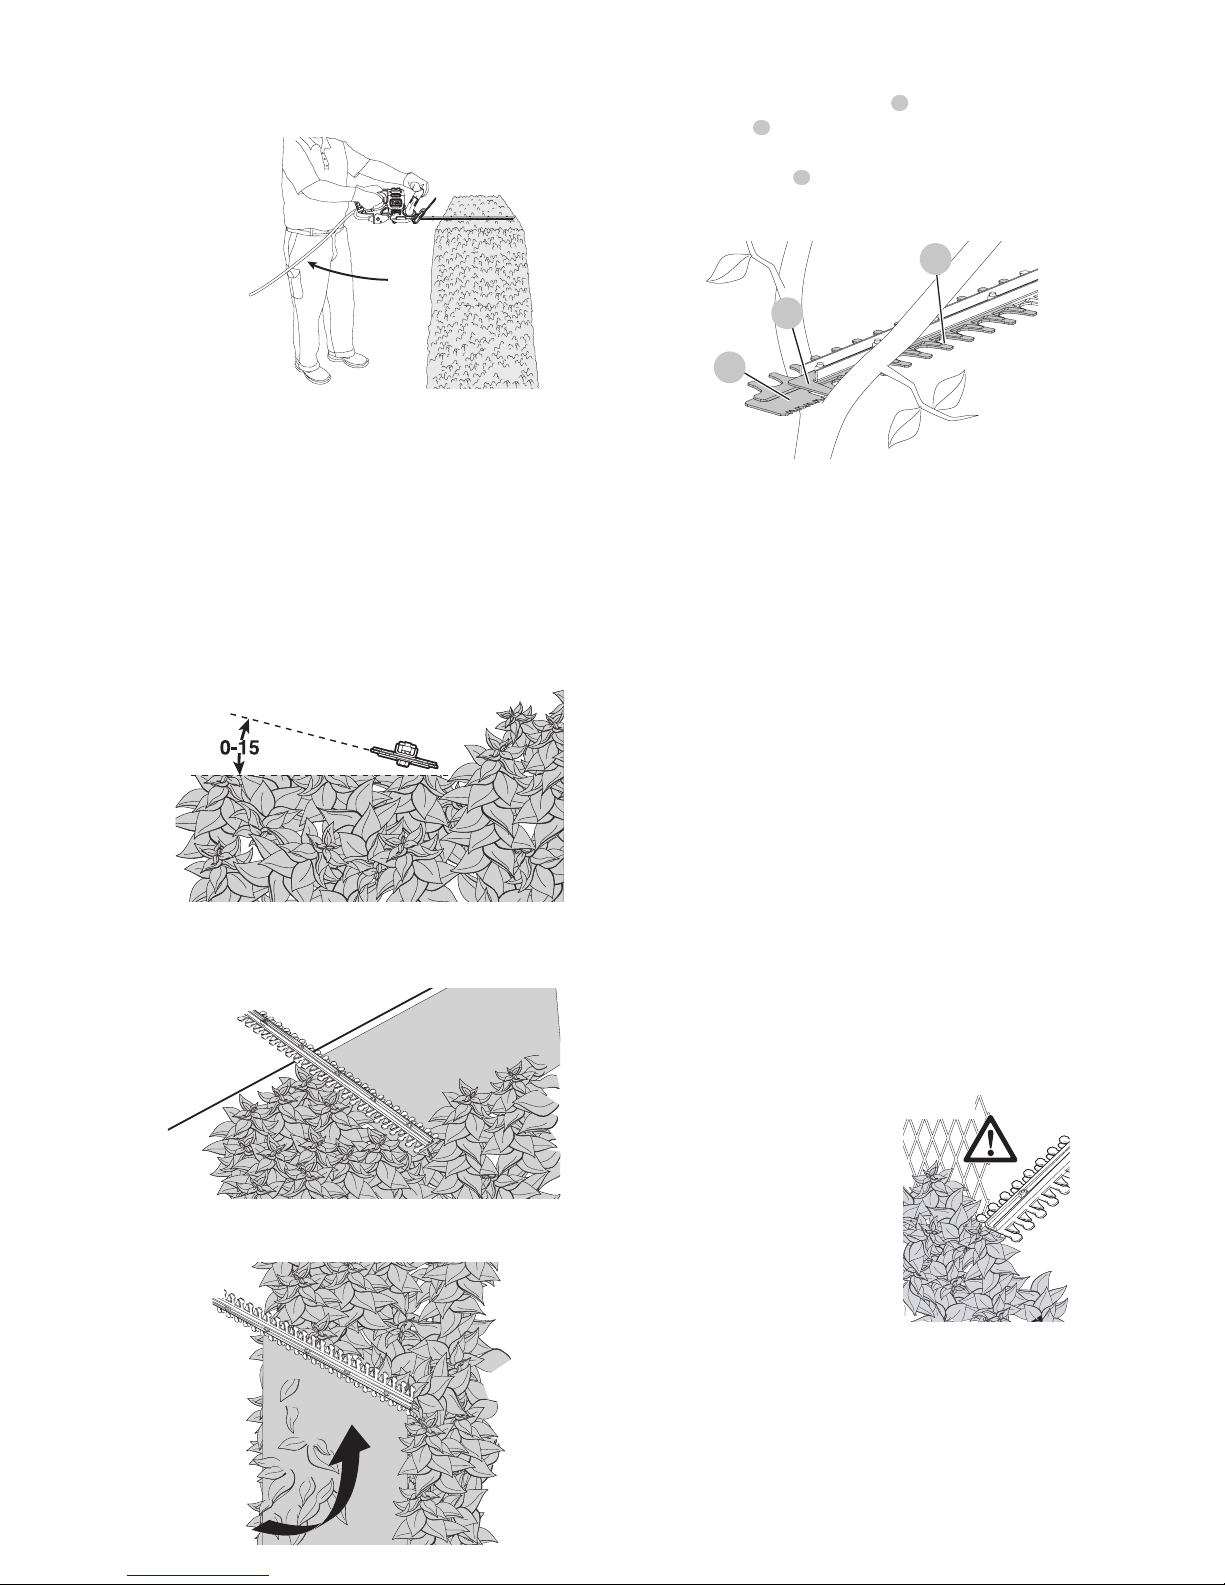
Trimming Instructions
1. EXTENSION CORD – (Fig. H) – Always keep extension
cord behind trimmer and away from the trimming
operation. Never drape it over a hedge being trimmed.
If you cut or damage the cord, unplug it at the electrical
outlet immediately, before inspecting or repairingcord.
2. WORKING POSITION – Maintain proper footing and
balance and do not overreach. Wear safety goggles,
non-skid footwear and rubber gloves when trimming.
Hold the tool firmly in both hands and turn the tool ON.
Page 8
ENGLISH
6
Always hold the trimmer, as shown in Fig. G, with one
hand on the switch handle and one hand on the bail
handle. Never hold the tool by the bladeguard.
Fig. H
3. TRIMMING NEW GROWTH– (Fig. I) – A wide,
sweeping motion, feeding the blade teeth through the
twigs is most effective. A slight downward tilt of the
blade, in the direction of motion gives the bestcutting.
CAUTION: Do not use trimmers for cutting
stems greater than 3/4 in. (19mm). (Do not use
BEHT200 trimmer for cutting stems greater
than 5/8 in. (16mm)). Use the trimmer only for
cutting normal shrubbery found around houses
andbuildings.
Fig. I
4. LEVEL HEDGES (Fig. J) – To obtain exceptionally level
hedges, a piece of string can be stretched along the
length of the hedge as aguide.
Fig. J
5. SIDE-TRIMMING HEDGES (Fig. K) – Begin at the
bottom and sweepup.
Fig. K
6. sawBLADE™ (Fig.L) (BEHTS300, BEHTS400) – For
branches too large for the blade
1
to cut, use the
sawBLADE™
8
. Position the sawBLADE™ as close
to the bottom of the branch as possible. Place the
sawBLADE™ shoe
9
against the branch. Turn the
hedge trimmer on as described above, allowing the tool
to work at its own pace until the branch is fullycut.
Fig. L
1
8
9
WARNING: TO GUARD AGAINST INJURY,
OBSERVE THE FOLLOWING:
• READ INSTRUCTION MANUAL BEFORE USING,
SAVE INSTRUCTIONMANUAL.
• CHECK THE HEDGE FOR FOREIGN OBJECTS SUCH
AS WIRE OR FENCES BEFORE EACHUSE.
• KEEP HANDS ON HANDLES. DON’TOVERREACH.
• DO NOT USE UNDER WETCONDITIONS.
• DO NOT USE WITH DAMAGED EXTENSIONCORD.
DANGER: KEEP HANDS AWAY
FROMBLADES.
CAUTION: BLADE COASTS AFTER
TURNOFF.
MAINTENANCE
WARNING: Remove extension cord
from trimmer before servicing, cleaning or removing
material from the gardeningappliance.
The cutting blades are made from
Fig. M
high quality, hardened steel and
with normal usage, they will not
require resharpening. However, if
you accidentally hit a wire fence
(Fig. M), stones, glass or other hard
objects, you may put a nick in the
blade. There is no need to remove
this nick as long as it does not
interfere with the movement of the
blade. If it does interfere, unplug
the cord and use a fine toothed file or sharpening stone to
remove the nick. If you drop the trimmer, carefully inspect it
for damage. If the blade is bent, housing cracked, or handles
broken or if you see any other condition that may affect the
trimmer’s operation contact your local BLACK+DECKER
Service Center for repairs before putting it back intouse.
Page 9

ENGLISH
7
Fertilizers and other garden chemicals contain agents which
greatly accelerate the corrosion of metals. Do not store the
unit on or adjacent to fertilizers orchemicals.
Cleaning
WARNING: Blow dirt and dust out of all
air vents with clean, dry air at least once a week. To
minimize the risk of eye injury, always wear ANSI Z87.1
approved eye protection when performingthis.
WARNING: Never use solvents or other
harsh chemicals for cleaning the non-metallic parts
of the tool. These chemicals may weaken the plastic
materials used in these parts. Use a cloth dampened
only with water and mild soap. Never let any liquid
get inside the tool; never immerse any part of the tool
into aliquid.
Repairs
WARNING: To assure product
SAFETY and RELIABILITY, repairs, maintenance
and adjustment (including brush inspection
and replacement) should be performed by
a BLACK+DECKER factory service center or a
BLACK+DECKER authorized service center. Always use
identical replacementparts.
Accessories
WARNING: DO NOT use the hedge
trimmer with any type of accessory or attachment.
Such usage might behazardous.
Register Online
Thank you for your purchase. Register your product nowfor:
• WARRANTY SERVICE: Registering your product will
help you obtain more efficient warranty service in case
there is a problem with yourproduct.
• CONFIRMATION OF OWNERSHIP: In case of
an insurance loss, such as fire, flood or theft, your
registration of ownership will serve as your proof
ofpurchase.
• FOR YOUR SAFETY: Registering your product will
allow us to contact you in the unlikely event a safety
notification is required under the Federal Consumer
SafetyAct.
Register online at www.BlackandDecker.com/NewOwner.
TWO-YEAR LIMITED WARRANTY
Black & Decker (U.S.) Inc. warranties this product to be free
from defects in material or workmanship for a period of
two (2) years following the date of purchase, provided that
the product is used in a home environment. This limited
warranty does not cover failures due to abuse, accidental
damage or when repairs have been made or attempted
by anyone other than BLACK+DECKER and its Authorized
Service Centers. A defective product meeting the warranty
conditions set forth herein will be replaced or repaired at no
charge in either of two ways:
The first, which will result in exchanges only, is to return
the product to the retailer from whom it was purchased
(provided that the store is a participating retailer). Returns
should be made within the time period of the retailer’s
policy for exchanges. Proof of purchase may be required.
Please check with the retailer for its specific return policy
regarding time limits for returns or exchanges. The
second option is to take or send the product (prepaid) to
a BLACK+DECKER owned or authorized Service Center
for repair or replacement at BLACK+DECKER’s option.
Proof of purchase may be required. BLACK+DECKER
owned and authorized service centers are listed online
at www.blackanddecker.com. This warranty does not
apply to accessories. This warranty gives you specific
legal rights aand you may have other rights which vary
from state to state or province to province. Should
you have any questions, contact the manager of your
nearest BLACK+DECKER Service Center. This product is
not intended for commercial use, and accordingly, such
commercial use of this product will void this warranty.
All other guarantees, express or implied, are hereby
disclaimed. LATIN AMERICA: This warranty does not
apply to products sold in Latin America. For products
sold in Latin America, check country specific warranty
information contained in the packaging, call the local
company or see the website for such information.
Imported by Black & Decker (U.S.) Inc.,
701 E. Joppa Rd.
Towson, MD 21286
BlackandDecker.com
1-800-544-6986
Page 10

ENGLISH
8
TROUBLESHOOTING
Problem Possible Cause Possible Solution
Slow running, noisy or hot
blades.
• Dry, corrodedblades. • Lubricateblades.
• Blades or blade supportbent. • Straighten blade or bladesupport.
• Bent or damaged teeth. • Straightenteeth.
• Loose bladebolts. • Tighten bladebolts.
Unit will notstart. • Lock off not fully operated. • Check that lock off is fully forward prior to
moving maintrigger.
• Cord not plugged in. • Plug cord into a workingoutlet.
• Circuit fuse is blown. • Replace circuit fuse. (If the product
repeatedly causes the circuit fuse to blow,
discontinue use immediately and have it
serviced at a BLACK+DECKER service center
or authorized servicer.)
• Circuit breaker is tripped. • Reset circuit breaker. (If the product
repeatedly causes the circuit breaker to trip,
discontinue use immediately and have it
serviced at a BLACK+DECKER service center
or authorized servicer.)
• Cord or switch isdamaged. • Have cord or switch replaced at
BLACK+DECKER Service Center or
AuthorizedServicer.
For assistance with your product, visit our website www.blackanddecker.com for the location of the service center nearest
you or call the BLACK+DECKER help line at 1-800-544-6986.
Page 11

FRANÇAIS
9
Définitions : symboles et termes d'alarmes sécurité
Ces guides d'utilisation utilisent les symboles et termes d'alarmes sécurité suivants pour vous prévenir de situations
dangereuses et de risques de dommages corporels oumatériels.
DANGER : indique une situation dangereuse imminente qui, si elle n’est pas évitée, entraînera la mort ou
des blessuresgraves.
AVERTISSEMENT :
indique une situation potentiellement dangereuse qui, si elle n’est pas évitée,
pourrait entraîner la mort ou des blessuresgraves.
ATTENTION : indique une situation potentiellement dangereuse qui, si elle n’est pas évitée, pourrait
entraîner des blessures légères oumodérées.
(Si utilisé sans aucun terme) Indique un message propre à lasécurité.
AVIS : indique une pratique ne posant aucun risque de dommages corporels mais qui par contre, si rien
n’est fait pour l’éviter, pourrait poser des risques de dommages matériels.
AVERTISSEMENT! lire tous
les avertissements de sécurité et toutes les
directives. Le non-respect des avertissements et des
directives pourrait se solder par un choc électrique, un
incendie et/ou une blessuregrave.
AVERTISSEMENT : afin de
réduire le risque de blessures, lire le mode d’emploi
del’outil.
1
Lame
2
Protecteur
3
Anse
4
Bouton de verrouillage
5
Gâchette
6
Poignée de la gâchette
7
Enrouleur du cordon
8
SAWBLADE™ (BEHTS300, BEHTS400)
9
Patin SAWBLADE™ (BEHTS300, BEHTS400)
Fig. A
9
8
1
3
2
4
5
7
6
9
8
BEHTS300 / BEHTS400
Page 12

FRANÇAIS
10
AVERTISSEMENTS DE SÉCURITÉ GÉNÉRAUX
POUR LES OUTILS ÉLECTRIQUES
AVERTISSEMENT! lire tous
les avertissements de sécurité et toutes les
directives. Le non-respect des avertissements et des
directives pourrait se solder par un choc électrique, un
incendie et/ou une blessuregrave.
CONSERVER TOUS LES
AVERTISSEMENTS ET TOUTES
LES DIRECTIVES POUR UN USAGE
ULTÉRIEUR
Le terme « outil électrique » cité dans les avertissements se
rapporte à votre outil électrique à alimentation sur secteur
(avec fil) ou par piles (sansfil).
1) Sécurité du lieu de travail
a ) Tenir l’aire de travail propre et bien éclairée.
Les lieux encombrés ou sombres sont propices
auxaccidents.
b ) Ne pas faire fonctionner d’outils électriques
dans un milieu déflagrant, tel qu’en présence de
liquides, de gaz ou de poussières inflammables.
Les outils électriques produisent des étincelles qui
pourraient enflammer la poussière ou lesvapeurs.
c ) Éloigner les enfants et les personnes à proximité
pendant l’utilisation d’un outil électrique. Une
distraction pourrait en faire perdre la maîtrise à
l’utilisateur.
2) Sécurité en matière d’électricité
a ) Les fiches des outils électriques doivent
correspondre à la prise. Ne jamais modifier la
fiche d’aucune façon. Ne jamais utiliser de fiche
d’adaptation avec un outil électrique mis à la
terre. Le risque de choc électrique sera réduit par
l’utilisation de fiches non modifiées correspondant à
laprise.
b ) Éviter tout contact physique avec des surfaces
mises à la terre comme des tuyaux, des
radiateurs, des cuisinières et des réfrigérateurs.
Le risque de choc électrique est plus élevé si votre corps
est mis à laterre.
c ) Ne pas exposer les outils électriques à la pluie ou
à l’humidité. La pénétration de l’eau dans un outil
électrique augmente le risque de chocélectrique.
d ) Ne pas utiliser le cordon de façon abusive.
Ne jamais utiliser le cordon pour transporter,
tirer ou débrancher un outil électrique. Tenir le
cordon éloigné de la chaleur, de l’huile, des bords
tranchants et des pièces mobiles. Les cordons
endommagés ou enchevêtrés augmentent les risques
de chocélectrique.
e ) Pour l’utilisation d’un outil électrique à
l’extérieur, se servir d’une rallonge convenant à
cette application. L’utilisation d’une rallonge conçue
pour l’extérieur réduira les risques de chocélectrique.
f ) S’il est impossible d’éviter l’utilisation d’un
outil électrique dans un endroit humide,
brancher l’outil dans une prise ou sur un circuit
d’alimentation dotés d’un disjoncteur de fuite à
la terre (GFCI). L’utilisation de ce type de disjoncteur
réduit les risques de chocélectrique.
3) Sécurité personnelle
a ) Être vigilant, surveiller le travail effectué et faire
preuve de jugement lorsqu’un outil électrique
est utilisé. Ne pas utiliser d’outil électrique en
cas de fatigue ou sous l’influence de drogues,
d’alcool ou de médicaments. Un simple moment
d’inattention en utilisant un outil électrique peut
entraîner des blessures corporellesgraves.
b ) Utiliser des équipements de protection
individuelle. Toujours porter une protection
oculaire. L’utilisation d’équipements de protection
comme un masque antipoussière, des chaussures
antidérapantes, un casque de sécurité ou des
protecteurs auditifs lorsque la situation le requiert
réduira les risques de blessurescorporelles.
c ) Empêcher les démarrages intempestifs. S’assurer
que l’interrupteur se trouve à la position
d’arrêt avant de relier l’outil à une source
d’alimentation et/ou d’insérer un bloc-piles, de
ramasser ou de transporter l’outil. Transporter
un outil électrique alors que le doigt repose sur
l’interrupteur ou brancher un outil électrique dont
l’interrupteur est à la position de marche risque de
provoquer unaccident.
d ) Retirer toute clé de réglage ou clé avant de
démarrer l’outil. Une clé ou une clé de réglage
attachée à une partie pivotante de l’outil électrique
peut provoquer des blessurescorporelles.
e ) Ne pas trop tendre les bras. Conserver
son équilibre en tout temps. Cela permet
de mieux maîtriser l’outil électrique dans les
situationsimprévues.
f ) S’habiller de manière appropriée. Ne pas porter
de vêtements amples ni de bijoux. Garder les
cheveux, les vêtements et les gants à l’écart des
pièces mobiles. Les vêtements amples, les bijoux ou
les cheveux longs risquent de rester coincés dans les
piècesmobiles.
g ) Si des composants sont fournis pour le
raccordement de dispositifs de dépoussiérage
et de ramassage, s’assurer que ceux-ci sont bien
raccordés et utilisés. L’utilisation d’un dispositif de
dépoussiérage peut réduire les dangers engendrés par
lespoussières.
4) Utilisation et entretien d’un outil
électrique
a ) Ne pas forcer un outil électrique. Utiliser l’outil
électrique approprié à l’application. L’outil
électrique approprié effectuera un meilleur travail,
de façon plus sûre et à la vitesse pour laquelle il a
étéconçu.
Page 13

FRANÇAIS
11
b ) Ne pas utiliser un outil électrique dont
l’interrupteur est défectueux. Tout outil électrique
dont l’interrupteur est défectueux est dangereux et
doit êtreréparé.
c ) Débrancher la fiche de la source d’alimentation
et/ou du bloc-piles de l’outil électrique avant de
faire tout réglage ou changement d’accessoire
ou avant de ranger l’outil. Ces mesures préventives
réduisent les risques de démarrage accidentel de
l’outilélectrique.
d ) Ranger les outils électriques hors de la portée
des enfants et ne permettre à aucune personne
n’étant pas familière avec un outil électrique ou
son mode d’emploi d’utiliser cet outil. Les outils
électriques deviennent dangereux entre les mains
d’utilisateursinexpérimentés.
e ) Entretien des outils électriques. Vérifier si les
pièces mobiles sont mal alignées ou coincées,
si des pièces sont brisées ou présentent toute
autre condition susceptible de nuire au bon
fonctionnement de l’outil électrique. En cas de
dommage, faire réparer l’outil électrique avant
toute nouvelle utilisation. Beaucoup d’accidents
sont causés par des outils électriques malentretenus.
f ) S’assurer que les outils de coupe sont aiguisés et
propres. Les outils de coupe bien entretenus et affûtés
sont moins susceptibles de se coincer et sont plus
faciles àmaîtriser.
g ) Utiliser l’outil électrique, les accessoires, les
forets, etc. conformément aux présentes
directives en tenant compte des conditions de
travail et du travail à effectuer. L’utilisation d’un
outil électrique pour toute opération autre que celle
pour laquelle il a été conçu estdangereuse.
5) Réparation
a ) Faire réparer l’outil électrique par un réparateur
professionnel en n’utilisant que des pièces de
rechange identiques. Cela permettra de maintenir
une utilisation sécuritaire de l’outilélectrique.
AVERTISSEMENTS DE SÉCURITÉ POUR LE
TAILLE-HAIE
DANGER : maintenir les mains à l’écart
de la lame. Tout contact avec la lame pose des
risques de dommages corporelsgraves.
• Utiliser les deux mains pour faire fonctionner le taille-
haie. Utiliser une main seulement risque d’entraîner
la perte de maîtrise de l’outil et de causer de graves
blessurescorporelles.
• Tenir toutes les parties du corps loin de la lame de
l’outil de coupe. Ne pas enlever la matière coupée
ni tenir la matière à couper lorsque les lames
fonctionnent. S’assurer que l’interrupteur est en
position d’arrêt lors du dégagement de la matière
coincée. Les lames continuent de fonctionner après
l’arrêt de l’outil. Un moment d’inattention, durant
l’utilisation d’un taille-haie, peut se solder par de graves
blessurescorporelles.
• Transporter le taille-haie par sa poignée une fois la
lame de l’outil de coupe arrêtée. Une manutention
adéquate du taille-haie permet de réduire les blessures
corporelles possibles avec les lames de l’outil decoupe.
• Tenir l’outil électrique uniquement par sa surface de
prise isolée, car la lame de l’outil de coupe pourrait
entrer en contact avec des fils cachés ou son propre
cordon. Une lame qui entre en contact avec un fil sous
tension peut mettre sous tension des pièces métalliques
dénudées de l’outil électrique et ainsi donner une décharge
électrique à l’opérateur.
• Gardez la rallonge éloignée de la zone de coupe.
Durant l’utilisation, la rallonge peut être cachée
dans les arbustes et elle peut être accidentellement
coupée par la lame.
• Vérifiez la haie pour tout objet étranger, par ex., les
clôtures engrillage.
AVERTISSEMENT : ne pas
exposer à lapluie.
AVERTISSEMENT : n’utiliser le
taille-haie qu’avec sa poignée étrier et son dispositif
de protection correctement installés. L’utilisation du
taille-haie sans le dispositif de protection correct ou
la poignée fournie avec l’outil pose des risques de
dommages corporelsgraves.
AVERTISSEMENT : retirer
immédiatement la fiche de la prise si la rallonge
électrique est endommagée oucoupée.
AVERTISSEMENT : le produit
génère de la poussière qui peut renfermer des produits
chimiques. Selon l’état de la Californie, ces produits
chimiques peuvent causer le cancer ainsi que des
malformations congénitales, et ils présentent d’autres
dangers au système reproductif humain. Voici des
exemples de tels produits chimiques :
• les composés d’engrais;
• les composés d’insecticides, d’herbicides et de
pesticides;
• l’arsenic et le chrome provenant de boistraité.
Afin de minimiser les risques, porter de l’équipement de
sécurité approuvé comme des masques antipoussières
spécialement conçu pour filtrer les particulesmicroscopiques.
• Si vous utilisez un rallonge à l’extérieur, il est
essentiel d’utiliser une rallonge appropriée
pour l’utilisation extérieure. L’utilisation d’une
rallonge appropriée pour l’extérieur réduit le risque de
chocélectrique.
• Afin de réduire le risque de débranchement du cordon de
l’appareil de la rallonge durant le fonctionnement :
i) Faites un nœud comme illustré ci-dessous; ou
Page 14

FRANÇAIS
12
ii) Utilisez une des sangles de fixation du connecteur
femelle de la fiche ou les connecteurs décrit dans
cemanuel.
OU
iii) Branchez bien la rallonge avec la fiche de
l’appareil comme illustré ou décrit dans le mode
d’emploi.
AVERTISSEMENT : afin de
réduire le risque de blessure corporelle due à un
mauvais branchement électrique entre la fiche de
l’outil et la rallonge, fixez entièrement et fermement la
fiche de l’outil à la rallonge. Vérifiez régulièrement le
branchement durant l’utilisation afin de vous assurer
qu’il entièrement fixé. Ne pas utiliser une rallonge qui
est mal branchée. Un mauvais branchement peut
entraîner une surchauffe, un incendie et augmente le
risque debrûlure.
• Pour la sécurité de l’utilisateur, utiliser une rallonge
de calibre adéquat (AWG, American Wire Gauge
[calibrage américain normalisé des fils électriques]).
Plus le calibre est petit, et plus sa capacité est grande. Un
calibre16, par exemple, a une capacité supérieure à un
calibre18. L’usage d’une rallonge de calibre insuffisant
causera une chute de tension qui entraînera perte de
puissance et surchauffe. Si plus d’une rallonge est utilisée
pour obtenir une certaine longueur, s’assurer que chaque
rallonge présente au moins le calibre de fil minimum. Le
tableau ci-dessous illustre les calibres à utiliser selon la
longueur de rallonge et l’intensité nominale indiquée sur
la plaque signalétique. En cas de doute, utiliser le calibre
suivant. Plus le calibre est petit, plus la rallonge peut
supporter decourant.
Calibre minimum pour les cordons d'alimentation
Volts
Longueur totale du cordon
d'alimentation en mètre (pieds)
120 V 7,6 (25) 15,2 (50) 30,5 (100) 45,7 (150)
240 V 15,2 (50) 30,5 (100) 61,0 (200) 91,4 (300)
Ampères
AWG
Plus que Pas plus
que
0 6 18 16 16 14
6 10 18 16 14 12
10 12 16 16 14 12
12 16 14 12 Non recommandé
L’étiquette apposée sur votre outil peut inclure les symboles
suivants. Les symboles et leur définition sont indiqués ci-après:
V ......................... volts
Hz ....................... hertz
min ..................... minutes
or DC ...... courant continu
...................... fabrication classe I
(mis à la terre)
…/min .............. par minute
BPM .................... battements par
minute
IPM ..................... impacts par minute
RPM .................... revolutions per
minute
sfpm ................... pieds linéaires par
minute (plpm)
SPM (FPM) ......... fréquence par
minute
A ......................... ampères
W ........................ watts
or AC ........... courant alternatif
or AC/DC .... courant alternatif
ou continu
...................... fabrication classe II
(double isolation)
no ....................... vitesse à vide
n ......................... vitesse nominale
...................... borne de terre
...................... symbole
d’avertissement
..................... radiation visible
..................... protection
respiratoire
..................... protection oculaire
.....................protection auditive
..................... lire toute la
documentation
CSPM .................. course de travail
par minute
CONSERVER CES CONSIGNES POUR
UTILISATION ULTÉRIEURE
DESCRIPTION (FIG. A)
AVERTISSEMENT : ne jamais
modifier l’outil électrique ni aucun de ses composants,
car il y a risques de dommages corporels oumatériels.
Reportez-vous en Fig.A au début de ce manuel pour
obtenir la liste complète descomposants.
Usage prévu
Ce taille-bordure a été conçu pour des applications de
taillerésidentielle.
NE PAS les utiliser en milieu ambiant humide ou en
présence de liquides ou de gazinflammables.
Ce taille-bordure est un outil électrique pour lesparticuliers.
NE PAS le laisser à la portée des enfants. Une supervision
est nécessaire auprès de tout utilisateur nonexpérimenté
ASSEMBLAGE
AVERTISSEMENT: pour réduire
le risque de blessures graves, éteindre l’outil
et retirer le débrancher avant d’effectuer
tout réglage et d’enlever ou d’installer tout
accessoire. Un démarrage accidentel peut provoquer
desblessures.
Outils pour assemblage requis (non
fournis)
• Tournevis Phillips
Fixer le protecteur et l’anse au taille-haie
AVERTISSEMENT : utilisez
seulement avec la poignée et le protecteur
approprié assemblé au taille-haie. L’utilisation
Page 15

FRANÇAIS
13
du taille-haie sans le protecteur ou la poignée
approprié fourni peut entraîner une blessure
corporellegrave.
Le taille-haie est expédié avec le protecteur et l’anse fixés au
taille-haie avec une attache mono-usage en plastique.
Fixer le protecteur au taille-haie
(FIG. B, C)
Le taille-haie est expédié avec le protecteur non fixé au
taille-haie. Pour fixer le protecteur:
1. Retirez la vis
10
retenant le protecteur avec un
tournevis Phillips (nonfourni).
2. Placez le protecteur comme illustré dans la Fig. B. en
vous assurant les fentes du protecteur sont dans les
rainures sur l’outil.
Fig. B
10
3. Insérez la vis
10
retenant le protecteur dans l’ouverture
sur le côté du protecteur et serrez solidement comme
illustré dans la Fig. C
Fig. C
10
Fixer l’anse (FIG. D, E)
1. Coupez l’attache mono-usage enplastique.
2. Retirez les 4 vis qui sont partiellement dans le boîtier du
taille-haie (Fig.D).
Fig. D
3. Glissez l’anse sur le devant du boîtier du taille-haie
derrière leprotecteur.
4. Insérez les quatre vis dans les ouvertures sur le côté de
l’anse et serrez solidement comme illustré dans la Fig.E.
Fig. E
Raccordement de la rallonge au
taille-haie (FIG. F)
AVERTISSEMENT : s’assurer que
la détente n’est pas engagée pour réduire le risque de
mettre l’outil en marcheaccidentellement.
Un dispositif de retenue est intégré à l’outil, à l’arrière de la
poignée sur le bloc-moteur.
1. À proximité de l’extrémité de la rallonge, repliez le
cordon pour faire uneboucle.
2. Insérer la rallonge dans le boîtier du dispositif de
retenue
11
(Fig. E).
3. Enrouler la rallonge autour du dispositif de retenue
du cordon
7
de manière à ce qu’elle repose dans le
dispositif deretenue.
4. Brancher ensuite la rallonge au bloc-moteur.
11
7
Fig. F
CONSERVER LES PRÉSENTES
DIRECTIVES À TITRE DE RÉFÉRENCE
UTILISATION
AVERTISSEMENT: pour réduire
le risque de blessures graves, éteindre l’outil
et retirer le débrancher avant d’effectuer
tout réglage et d’enlever ou d’installer tout
accessoire. Un démarrage accidentel peut provoquer
desblessures.
Page 16

FRANÇAIS
14
Position correcte des mains (Fig. G)
AVERTISSEMENT : pour réduire
tout risque de dommages corporels graves, adopter
SYSTÉMATIQUEMENT la position des mainsillustrée.
AVERTISSEMENT : pour réduire
tout risque de dommages corporels graves, maintenir
SYSTÉMATIQUEMENT l’outil fermement pour
anticiper toute réactionsoudaine.
Toujours tenir le taille-haie comme indiqué à la Fig. G, c’est-àdire avec une main sur la poignée à gâchette et une main sur
l’anse. Ne jamais saisir l’outil par son dispositif deprotection.
Détente
1. Pour mettre l’appareil en Marche, pousser vers l’avant
l’interrupteur de verrouillage
4
, comme illustré en
Fig. G, et appuyer sur la gâchette
5
. Une fois l’outil en
marche, relâcher le levier de blocage.
2. Pour que l’outil continue de fonctionner, il faut
maintenir la détente enfoncée. Pour L’éteindre, relâcher
ladétente.
AVERTISSEMENT : Ne jamais
tenter de verrouiller la gâchette lorsque l’outil est
enmarche.
Fig. G
4
5
Méthode de coupe
1. RALLONGE (Fig. H). Toujours placer la rallonge
derrière soi en l’éloignant de la zone de coupe. Ne
jamais la déposer sur la haie à tailler. Si on coupe ou
on endommage la rallonge, on doit la débrancher
immédiatement de la prise murale avant de procéder à
l’inspection ou aux réparationsrequises.
Fig. H
2. POSITION DE TRAVAIL. S’assurer que les pieds sont
bien ancrés au sol afin de maintenir son équilibre en
tout temps. Ne pas trop étendre les bras. Porter des
lunettes de sécurité, des chaussures antidérapantes et
des gants de caoutchouc. Tenir le taille-haie fermement
des deux mains avant de la mettre en marche .Toujours
tenir le taille-haie comme indiqué à la Fig. G, c’est-àdire avec une main sur la poignée à gâchette et une
main sur l’anse. Ne jamais saisir l’outil par son dispositif
deprotection.
3. TAILLE DE JEUNES POUSSES (Fig. I). La méthode la
plus efficace est d’incliner légèrement les lames vers
le bas, dans le sens d’avance, puis de les faire passer
directement sur les tiges et de tailler en effectuant de
larges mouvements debalayage.
ATTENTION : Ne pas utiliser les taille-haies
pour couper les tiges plus grand que 3/4 po (19 mm). (Ne
pas utiliser le taille-haie BEHT200 pour couper les tiges
plus grand que 5/8 po (16mm)). Utilisez le taille-haie
seulement pour couper les arbustes situés autour des
maisons et des édifices.
Fig. I
4. NIVELAGE DES HAIES (Fig. J). Pour bien niveler
les haies, il suffit de tendre une ficellesur toute leur
longueur afin de guider la coupe.
Fig. J
Page 17

FRANÇAIS
15
5. TAILLE LATÉRALE DES HAIES (Fig. K). Commencer
par le bas et se diriger vers lehau.
Fig. K
6.
sawBLADE
MC
(Fig. L) (BEHTS300, BEHTS400) –
Pour
couper des branches trop grosses pour la lame
1
, utilisez
la sawBLADE
MC
8
. Positionnez la sawBLADE
MC
au
plus près possible de la base de la branche. Placez le patin
de la
sawBLADE
MC
9
contre la branche. Démarrez le
taille-bordure comme décrit ci-dessus, en laissant l’outil
tourner à son propre rythme jusqu’à ce que la branche soit
complètementcoupée.
Fig. L
1
8
9
AVERTISSEMENT : POUR
ÉVITER LES RISQUES DE BLESSURES, RESPECTER LES
CONSIGNESSUIVANTES.
• LIRE LE GUIDE AVANT L’UTILISATION; CONSERVER
LE GUIDE D’UTILISATION.
• VÉRIFIER LA HAIE POUR LA PRÉSENCE DE TOUT
OBJET ÉTRANGER COMME DU FIL DE FER OU DES
CLÔTURES AVANT CHAQUEUTILISATION.
• LAISSER LES MAINS SUR LES POIGNÉES. NE PAS
DÉPASSER SAPORTÉE.
• NE PAS UTILISER DANS DES
CONDITIONSMOUILLÉES.
• NE PAS UTILISER LORSQUE LE CORDON
ESTENDOMMAGÉ.
DANGER : TENIR LES MAINS ÉLOIGNÉES
DESLAMES.
ATTENTION : LA LAME CONTINUE DE
BOUGER APRÈS AVOIR MIS L’OUTIL HORSTENSION..
MAINTENANCE
AVERTISSEMENT : débrancher la
rallonge du taille-haie avant toute réparation ou tout
nettoyage ou retrait de matière de l’appareil électrique
dejardin.
Les lames sont faites d’acier trempé
Fig. M
de qualité supérieure qui ne
nécessite pas d’affûtage suite àune
utilisation dans des conditions
normales. Toutefois, la lame peut
s’émousser si on touche au fil d’une
clôture (Fig. M), àdes pierres, àdu
verre ou àtout autre objet dur. Il
n’est pas nécessaire d’enlever la
faille si elle ne nuit pas au
mouvement de lalame.
Si il nuit, débrancher le cordon, puis utiliser une lime à
dents fines ou une pierre à affûter pour enlever l’entaille.
En cas de chute, examiner attentivement le taille-haie
pour s’assurer qu’il n’est pas endommagé. Lorsque la lame
est croche, le boîtier est craqué, les poignées sont brisées
ou en cas de tout autre dommage qui peut nuire au bon
fonctionnement de l’outil, en confier les réparations au
centre de service BLACK+DECKER de la région avant de s’en
servir denouveau.
Les engrais et autres produits chimiques pour le jardinage
contiennent des ingrédients qui contribuent à accélérer
fortement la corrosion des métaux. Ne pas ranger l’outil sur
de tels produits ni àproximité de ceux-ci.
Fertilizers and other garden chemicals contain agents which
greatly accelerate the corrosion of metals. Do not store the
unit on or adjacent to fertilizers orchemicals.
Nettoyage
AVERTISSEMENT : enlever
les saletés et la poussière hors des évents au moyen
d’air comprimé propre et sec, au moins une fois par
semaine. Pour minimiser le risque de blessure aux
yeux, toujours porter une protection oculaire conforme
à la norme ANSI Z87.1 lors dunettoyage.
AVERTISSEMENT : ne jamais
utiliser de solvants ni d’autres produits chimiques
puissants pour nettoyer les pièces non métalliques
de l’outil. Ces produits chimiques peuvent affaiblir les
matériaux de plastique utilisés dans ces pièces. Utiliser
un chiffon humecté uniquement d’eau et de savon
doux. Ne jamais laisser de liquide pénétrer dans l’outil
et n’immerger aucune partie de l’outil dans unliquide.
Réparations
AVERTISSEMENT : pour assurer
la SÉCURITÉ et la FIABILITÉ du produit, les réparations,
l’entretien et les réglages doivent être réalisés (cela
Page 18

FRANÇAIS
16
comprend l’inspection et le remplacement du balai)
par un centre de réparation en usine BLACK+DECKER
ou un centre de réparation agréé BLACK+DECKER.
Toujours utiliser des pièces de rechangeidentiques.
Accessoires
AVERTISSEMENT : NE PAS
utiliser le taille-haie avec un accessoire. Une telle
utilisation peut êtredangereuse.
Registre en ligne
Merci pour votre achat. Enregistrez dès maintenant
votreprodui:
• RÉPARATIONS SOUS GARANTIE: cette carte remplie
vous permettra de vous prévaloir du service de
réparations sous garantie de façon plus efficace dans le
cas d’un probléme avec leproduit.
• CONFIRMATION DE PROPRIÉTÉ: en cas de perte
provoquée par un incendie, une inondation ou un vol,
cette preuve de propriété vous servira de preuve auprès
de votre compagnie d’assurances.
• SÉCURITÉ: l’enregistrement de votre produit
nous permettra de communiquer avec vous dans
l’éventualité peu probable de l’envoi d’un avis de
sécurité régi par la loi fédérale américaine de la
protection desconsommateurs.
Registre en ligne à www.BlackandDecker.com/NewOwner.
GARANTIE LIMITÉE DE DEUX ANS
Black & Decker (U.S.) In. garantit ce produit être libre de
défaut de matériau et de main-d’œuvre pour une durée de
deux (2) ans suivant la date d’achat, à condition qu’il ait été
utilisé en milieu domiciliaire. La présente garantie limitée
ne couvre pas les pannes causées par abus d’utilisation,
dommage accidentel ou si une réparation a été faite ou
tentée par quiconque autre que les centres de service
autorisés BLACK+DECKER. Un produit défectueux selon
les termes de la garantie décrits dans les présentes sera
remplacé ou réparé sans frais de l’une ou l’autre des façon
suivantes:
La première, qui résultera en un simple échange, est de
retourner le produit au détaillant chez lequel il a été acheté
(pourvu que le magasin est un détaillant participant). Les
retours devraient être faits à l’intérieur de la période de
temps de la politique du détaillant pour les échanges.
Une preuve d’achat pourrait être requise. Veuillez
consulter le détaillant pour connaître la limite de temps
pour échange selon sa politique particulière. La seconde
façon est d’apporter ou d’expédier le produit (port payé
d’avance) à un centre de service autorisé ou propriété de
BLACK+DECKER pour réparation ou remplacement. Une
preuve d’achat pourrait être requise. La liste des centres de
service de BLACK+DECKER et ateliers autorisés est offerte
en ligne à www.blackanddecker.com. La présente garantie
ne s’applique pas aux accessoires. La présente garantie
vous donne des droits légaux particuliers et vous pouvez
avoir d’autres droits qui varient d’une province ou d’un
état à l’autre. Pour toute question, veuillez communiquer
avec le directeur d’un centre de service de BLACK+DECKER.
L’outil acheté n’est pas prévu pour usage commercial,
conséquemment, un tel usage annulera sa garantie. Les
présentes constituent un désistement à toute garantie
expresse ou implicite d’autres sources. AMÉRIQUE LATINE
La présente garantie ne s’applique pas aux produits vendus
en Amérique latine. Pour les produits vendus en Amérique
latine, consulter les renseignements sur la garantie
particulière au pays incluse dans l’emballage, appeler
l’agence locale de distribution ou consulter le site Web pour
plus deprécisions.
Imported by Black & Decker (U.S.) Inc.,
701 E. Joppa Rd.
Towson, MD 21286
BlackandDecker.com
1-800-544-6986
Page 19

FRANÇAIS
17
DEPANNAGE
Problème Cause possible Solution possible
Lames lentes, bruyantes
ouchaudes.
• Lames sèches etcorrodées. • Lubrifier leslames.
• Lames ou support de lamepliés. • Redresser la lame ou sonsupport.
• Dents pliées ouendommagées. • Redresser lesdents.
• Boulons de lamedesserrés. • Serrer les boulons delame.
L’appareil refuse
dedémarrer.
• Verrouillageimparfait. • S’assurer que le dispositif de verrouillage
est complètement réglé à la position avant,
avant de déplacer la détenteprincipale.
• Cordon d’alimentation
nonbranché.
• Brancher le cordon dans une prise
quifonctionne.
• Le fusible du circuit estgrillé. • Remplacer le fusible du circuit. (Si le
produit fait griller de façon répétée le
fusible du circuit, arrêter immédiatement
d’utiliser le produit et le faire réparer dans
un centre de réparation BLACK+DECKER ou
un centre de réparation autorisé.)
• Le disjoncteur estdéclenché. • Remettre le disjoncteur à zéro . (Si le
produit fait déclencher de façon répétée
le disjoncteur, arrêter immédiatement
d’utiliser le produit et le faire réparer dans
un centre de réparation BLACK+DECKER ou
un centre de réparation autorisé.)
• Le cordon d’alimentation
ou la prise de courant est
endommagé(e)
• Faire remplacer le cordon ou l’interrupteur
au centre de réparation BLACK+DECKER ou
à un centre de réparationautorisé.
Pour obtenir de l’aide avec l’outil, consulter notre site Web www.blackanddecker.com pour l’emplacement du centre de
réparation le plus près ou communiquer avec l’assistance BLACK+DECKER au 1-800-544-6986.
Page 20

ESPAÑOL
18
ADVERTENCIA: Lea todas
las advertencias de seguridad e instrucciones. El
incumplimiento de las advertencias e instrucciones
puede provocar descargas eléctricas, incendios o
lesionesgraves.
ADVERTENCIA: Para reducir
el riesgo de lesiones, lea el manual deinstrucciones.
1
Cuchilla
2
Protección
3
Manija de travesaño
4
Botón de bloqueo de apagado
5
Interruptor de gatillo
6
Manija de interruptor
7
Retenedor de cable
8
SAWBLADE™ (BEHTS300, BEHTS400)
9
Zapata SAWBLADE™ (BEHTS300, BEHTS400)
Definiciones: Símbolos y palabras de alerta de seguridad
Este manual de instrucciones utiliza los siguientes símbolos y palabras de alerta de seguridad para alertarle de situaciones
peligrosas y del riesgo de lesiones corporales o dañosmateriales.
PELIGRO: Indica una situación de peligro inminente que, si no se evita, provocará la muerte o
lesionesgraves.
ADVERTENCIA: Indica una situación de peligro potencial que, si no se evita, podría provocar la
muerte o lesionesgraves.
ATENCIÓN: Indica una situación de peligro potencial que, si no se evita, posiblemente provocaría
lesiones leves omoderadas.
(Utilizado sin palabras) indica un mensaje de seguridadrelacionado.
AVISO: Se refiere a una práctica no relacionada a lesiones corporales que de no evitarse puede resultar
en daños a la propiedad.
Fig. A
1
3
2
4
5
7
6
9
8
Page 21

ESPAÑOL
19
ADVERTENCIAS GENERALES DE SEGURIDAD
PARA HERRAMIENTAS ELÉCTRICAS
ADVERTENCIA: Lea todas las
advertencias de seguridad e instrucciones. El
incumplimiento de las advertencias e instrucciones
puede provocar descargas eléctricas, incendios o
lesionesgraves.
CONSERVE TODAS LAS ADVERTENCIAS
E INSTRUCCIONES PARA FUTURAS
CONSULTAS
El término “herramienta eléctrica” incluido en las advertencias
hace referencia a las herramientas eléctricas operadas con
corriente (con cable eléctrico) o a las herramientas eléctricas
operadas con baterías (inalámbricas).
1) Seguridad en el Área de Trabajo
a ) Mantenga el área de trabajo limpia y bien
iluminada. Las áreas abarrotadas y oscuras
propicianaccidentes.
b ) No opere las herramientas eléctricas en
atmósferas explosivas, como ambientes donde
haya polvo, gases o líquidos inflamables. Las
herramientas eléctricas originan chispas que pueden
encender el polvo o losvapores.
c ) Mantenga alejados a los niños y a los
espectadores de la herramienta eléctrica en
funcionamiento. Las distracciones pueden provocar
la pérdida decontrol.
2) Seguridad Eléctrica
a ) Los enchufes de la herramienta eléctrica deben
adaptarse al tomacorriente. Nunca modifique el
enchufe de ninguna manera. No utilice ningún
enchufe adaptador con herramientas eléctricas
con conexión a tierra. Los enchufes no modificados
y que se adaptan a los tomacorrientes reducirán el
riesgo de descargaeléctrica.
b ) Evite el contacto corporal con superficies con
descargas a tierra como, por ejemplo, tuberías,
radiadores, cocinas eléctricas y refrigeradores.
Existe mayor riesgo de descarga eléctrica si su cuerpo
está puesto atierra.
c ) No exponga las herramientas eléctricas a la
lluvia o a condiciones de humedad. Si entra agua
a una herramienta eléctrica, aumentará el riesgo de
descargaeléctrica.
d ) No maltrate el cable. Nunca utilice el cable para
transportar, tirar o desenchufar la herramienta
eléctrica. Mantenga el cable alejado del calor, el
aceite, los bordes filosos y las piezas móviles. Los
cables dañados o enredados aumentan el riesgo de
descargaeléctrica.
e ) Al operar una herramienta eléctrica en el
exterior, utilice un cable prolongador adecuado
para tal uso. Utilice un cable adecuado para
uso en exteriores a fin de reducir el riesgo de
descargaeléctrica.
f ) Si el uso de una herramienta eléctrica en un
lugar húmedo es imposible de evitar, utilice
un suministro protegido con un interruptor de
circuito por falla a tierra (GFCI). El uso de un GFCI
reduce el riesgo de descargaseléctricas.
3) Seguridad Personal
a ) Permanezca alerta, controle lo que está
haciendo y utilice el sentido común cuando
emplee una herramienta eléctrica. No utilice
una herramienta eléctrica si está cansado o bajo
el efecto de drogas, alcohol o medicamentos.
Un momento de descuido mientras se opera una
herramienta eléctrica puede provocar lesiones
personalesgraves.
b ) Utilice equipos de protección personal. Siempre
utilice protección para los ojos. En las condiciones
adecuadas, el uso de equipos de protección,
como máscaras para polvo, calzado de seguridad
antideslizante, cascos o protección auditiva, reducirá
las lesionespersonales.
c ) Evite el encendido por accidente. Asegúrese de
que el interruptor esté en la posición de apagado
antes de conectarlo a la fuente de energía
o paquete de baterías, o antes de levantar
o transportar la herramienta. Transportar
herramientas eléctricas con el dedo apoyado en el
interruptor o enchufar herramientas eléctricas con
el interruptor en la posición de encendido puede
propiciaraccidentes.
d ) Retire la clavija de ajuste o la llave de tuercas
antes de encender la herramienta eléctrica. Una
llave de tuercas o una clavija de ajuste que quede
conectada a una pieza giratoria de la herramienta
eléctrica puede provocar lesionespersonales.
e ) No se estire. Conserve el equilibrio y párese
adecuadamente en todo momento. Esto permite
un mejor control de la herramienta eléctrica en
situacionesinesperadas.
f ) Use la vestimenta adecuada. No use ropas
holgadas ni joyas. Mantenga el cabello, la ropa y
los guantes alejados de las piezas en movimiento.
Las ropas holgadas, las joyas o el cabello largo pueden
quedar atrapados en las piezas enmovimiento.
g ) Si se suministran dispositivos para la conexión
de accesorios con fines de recolección y
extracción de polvo, asegúrese de que estén
conectados y que se utilicen correctamente. El
uso de dispositivos de recolección de polvo puede
reducir los peligros relacionados con elpolvo.
4) Uso y Mantenimiento de la
Herramienta Eléctrica
a ) No fuerce la herramienta eléctrica. Utilice la
herramienta eléctrica correcta para el trabajo
que realizará. Si se la utiliza a la velocidad para la
Page 22

ESPAÑOL
20
que fue diseñada, la herramienta eléctrica correcta
permite trabajar mejor y de manera mássegura.
b ) No utilice la herramienta eléctrica si no puede
encenderla o apagarla con el interruptor. Toda
herramienta eléctrica que no pueda ser controlada
mediante el interruptor es peligrosa y deberepararse.
c ) Desconecte el enchufe de la fuente de energía
o el paquete de baterías de la herramienta
eléctrica antes de realizar ajustes, cambiar
accesorios o almacenar la herramienta eléctrica.
Estas medidas de seguridad preventivas reducen
el riesgo de encender la herramienta eléctrica en
formaaccidental.
d ) Guarde la herramienta eléctrica que no esté en
uso fuera del alcance de los niños y no permita
que otras personas no familiarizadas con ella o
con estas instrucciones operen la herramienta.
Las herramientas eléctricas son peligrosas si son
operadas por usuarios nocapacitados.
e ) Realice el mantenimiento de las herramientas
eléctricas. Revise que no haya piezas en
movimiento mal alineadas o trabadas, piezas
rotas o cualquier otra situación que pueda
afectar el funcionamiento de la herramienta
eléctrica. Si encuentra daños, haga reparar
la herramienta eléctrica antes de utilizarla.
Se producen muchos accidentes a causa de
las herramientas eléctricas que carecen de un
mantenimientoadecuado.
f ) Mantenga las herramientas de corte afiladas
y limpias. Las herramientas de corte con
mantenimiento adecuado y con los bordes de corte
afilados son menos propensas a trabarse y son más
fáciles decontrolar.
g ) Utilice la herramienta eléctrica, los accesorios
y las brocas de la herramienta, etc. de acuerdo
con estas instrucciones y teniendo en cuenta
las condiciones de trabajo y el trabajo que debe
realizarse. El uso de la herramienta eléctrica para
operaciones diferentes de aquéllas para las que fue
diseñada podría originar una situaciónpeligrosa.
5) Mantenimiento
a ) Solicite a una persona calificada en reparaciones
que realice el mantenimiento de su herramienta
eléctrica y que sólo utilice piezas de repuesto
idénticas. Esto garantizará la seguridad de la
herramientaeléctrica.
ADVERENCIAS DE SEGURIDAD PARA
CORTASETOS
PELIGRO: Mantenga las manos
alejadas de la hoja. El contacto con la hoja resultará
en una lesión corporalgrave.
• Utilice ambas manos al operar el cortasetos. Si
utiliza una sola mano podría perder el control y
provocar graves lesionespersonales.
• Mantenga todas las partes del cuerpo alejadas de
la hoja cortadora. No saque el material cortado
ni sujete el material que va a ser cortado cuando
las hojas estén en movimiento. Asegúrese de que
el interruptor esté apagado cuando saque material
atascado. Las hojas se deslizan después de apagarse.
Un momento de falta de atención cuando se maneja
la podadora de setos puede ocasionar lesiones
corporalesgraves.
• Transporte el cortasetos sosteniéndolo por el
mango con la hoja cortadora inmóvil. Una correcta
manipulación del cortasetos reducirá la posibilidad de
lesiones personales provocadas por las hojascortadoras.
• Sostenga la herramienta eléctrica únicamente
por las superficies de agarre aisladas, ya que la
hoja de corte podría entrar en contacto con cables
eléctricos ocultos o con su propio cable. El contacto
de las hojas de corte con un cable con corriente eléctrica
puede provocar que las partes metálicas expuestas de la
herramienta eléctrica también conduzcan la corriente y
que el operador sufra una descargaeléctrica.
• Aléjate del área de corte de cable de extensión.
Durante la operación el cable de extensión puede
ser ocultado en arbustos y puede ser cortado
accidentalmente por lahoja.
• Compruebe la cobertura por objetos extraños, por
ejemplo cercas dealambre.
ADVERTENCIA:
No lo exponga a
lalluvia.
ADVERTENCIA:
Usar solamente con
el manija de travesaño y el protector bien ensamblados
en la podadora de setos. El uso de la podadora de
setos sin el protector adecuado o el asa provista puede
ocasionar graves lesionespersonales.
ADVERTENCIA: Retire el enchufe del
tomacorriente de inmediato si el cable de extensión se
daña o secorta.
ADVERTENCIA: El polvo creado
por este producto contiene sustancias químicas
reconocidas por el Estado de California como
causantes de cáncer, defectos de nacimiento u otros
problemas reproductivos. Algunos ejemplos de estas
sustancias químicas son:
• compuestos en fertilizantes
• compuestos en insecticidas, herbicidas y pesticidas
• arsénico y cromo de madera con tratamiento
químico
Para reducir su exposición a estos productos químicos,
use equipo de seguridad aprobado, como máscaras para
polvo que están diseñadas especialmente para filtrar las
partículasmicroscópicas.
Page 23

ESPAÑOL
21
• Si utiliza un cable de extensión en exteriores, es
absolutamente necesario utilizar un cable de
extensión adecuado para uso en exteriores. El uso de
un cable adecuado para uso en exteriores reduce el riesgo
de descargaeléctrica.
• Para reducir el riesgo de desconexión del cable del aparato
del cable de extensión durante la operación:
i) Realice un nudo como se muestra en a
continuación; o
ii) Use una de las correas o conectores de retención
de enchufe-receptáculo descritos en estemanual.
O
iii) Asegure el cable de extensión al enchufe
del aparato como se muestra o describe en las
Instrucciones deOperación.
ADVERTENCIA: Para reducir el
riesgo de lesiones personales debidas a una conexión
eléctrica suelta entre el enchufe y el cable de extensión
del aparato, conecte firme y completamente el
enchufe del aparato al cable de extensión. Revise
periódicamente la conexión mientras opera para
asegurar que esté conectada completamente. No use
un cable de extensión que proporcione una conexión
holgada. Una conexión holgada puede resultar en
sobrecalentamiento, incendio, e incrementa el riesgo
dequemaduras.
• Los hilos del alargador deben ser de un calibre
apropiado (AWG o American Wire Gauge) para
su seguridad. Mientras menor sea el calibre del hilo,
mayor la capacidad del cable. Es decir, un hilo calibre
16 tiene mayor capacidad que uno de 18. Un cable de
un calibre insuficiente causará una caída en la tensión
de la línea dando por resultado una pérdida de energía
y sobrecalentamiento. Cuando se utilice más de un
alargador para completar el largo total, asegúrese que
los hilos de cada alargador tengan el calibre mínimo.
La tabla siguiente muestra el tamaño correcto a utilizar,
dependiendo de la longitud del cable y del amperaje
nominal de la placa de identificación. Si tiene dudas sobre
cuál calibre usar, use un calibre mayor. Cuanto menor sea
el número del calibre, más resistente será elcable.
Calibre mínimo de conjuntos de cables
Voltios
Longitud total del cable en pies
(metros)
120 V 25 (7,6) 50 (15,2) 100 (30,5) 150 (45,7)
240 V 50 (15,2) 100 (30,5) 200 (61,0) 300 (91,4)
Amperaje
nominal
AWG
Más de Más de
0 6 18 16 16 14
6 10 18 16 14 12
10 12 16 16 14 12
12 16 14 12 No recomendado
La etiqueta de su herramienta puede incluir los siguientes
símbolos. A continuación se indican los símbolos y
susdefiniciones:
V ......................... voltios
Hz ....................... hertz
min ..................... minutos
or DC ...... direct current
...................... Construcción de
Clase I (tierra)
…/min .............. por minuto
BPM .................... golpes por minuto
IPM ..................... impactos por
minuto
RPM .................... revoluciones por
minuto
sfpm ................... pies de superficie
por minuto
SPM .................... pasadas por
minuto
A ......................... amperios
W ........................ vatios
or AC ........... corriente alterna
or AC/DC .... corriente alterna
o directa
...................... Construcción de
Clase II (doble
aislamiento)
no ....................... velocidad sin carga
n ......................... velocidad nominal
...................... terminal de
conexión a tierra
...................... símbolo de
advertencia de
seguridad
..................... radiación visible
..................... protección
respiratoria
..................... protección ocular
.....................protección auditiva
..................... lea toda la
documentación
CSPM .................. carreras de corte
por minuto
LEA TODAS LAS INSTRUCCIONES
COMPONENTES (FIGURA A)
ADVERTENCIA: Nunca modifique
la herramienta eléctrica, ni tampoco ninguna de sus
piezas. Podría producir lesiones corporales odaños.
Consulte la Figura A al principio de este manual para
obtener una lista completa de loscomponentes.
Uso debido
Este cortasetos está diseñado para aplicaciones de
corteresidenciales.
NO utilice la herramienta en condiciones de humedad o en
presencia de líquidos o gasesinflamables.
Este cortasetos es una herramienta eléctricaresidencial.
NO permita que los niños toquen la herramienta. Si el
operador no tiene experiencia operando esta herramienta,
su uso deberá sersupervisado.
MONTAJE
ADVERTENCIA: Para reducir el
riesgo de lesiones personales graves, apague
la herramienta y desconéctela de la fuente de
alimentación antes de realizar ajustes o de
Page 24

ESPAÑOL
22
retirar/instalar dispositivos o accesorios. Un
arranque accidental podría causarlesiones.
Herramientas de ensamble requeridas
(No incluidas)
• Destornillador Phillips
Conexión de protección y manija de
travesaño a podadora
ADVERTENCIA: Utilice solamente
con la manija y la protección ensamblados
apropiadamente en la podadora. El uso de
la podadora sin la protección o la manija
apropiados proporcionados puede dar lugar a
lesiones personalesserias.
La podadora se envía con la protección y la manija de
travesaño sujetos a la podadora con un amarre plástico.
Conexión de protección a podadora
(FIG. B, C)
La podadora se envía con la protección desconectada de la
podadora. Para colocar la protección:
1. Retire el tornillo de retención de la protección
10
con el
destornillador Phillips (noincluido).
2. Coloque la protección en su lugar como se muestra en
la Fig. B. Asegurando las ranuras de la protección en las
ranuras de launidad.
Fig. B
10
3. Inserte el tornillo de retención de la protección
10
en la abertura del lado de la protección y apriételo
firmemente como se muestra en la Fig.C.
Fig. C
10
Conexión de manija auxiliar (FIG. D, E)
1. Corte el amarre deplástico.
2. Retire los 4 tornillos que se encuentran parcialmente en
el alojamiento de la podadora (Fig.D).
Fig. D
3. Deslice la manija del travesaño en la parte delantera del
alojamiento de la podadora detrás de laprotección.
4. Inserte los cuatro tornillos en las aberturas en el lado de
la manija del travesaño y apriételos firmemente como se
muestra en la Fig.E.
Fig. E
Conexión de un cable prolongador
al cortasetos (FIG. F)
ADVERTENCIA: Asegúrese de que el
interruptor de gatillo no esté accionado para reducir el
riesgo de encender la herramientaaccidentalmente.
La parte posterior del mango en la unidad motriz tiene
incorporado un retenedor paracable.
1. Cerca del extremo del cable de extensión, doble el cable
de extensión para crear unlazo.
2. Inserte el cable prolongador en el alojamiento del
retenedor para cable
11
(FiguraF).
3. Forme un lazo con el cable prolongador alrededor
del retenedor para cable
7
de manera que se apoye
en este.
10
7
Figura F
Page 25

ESPAÑOL
23
GUARDE ESTAS INSTRUCCIONES PARA
VOLVER A CONSULTAR EN EL FUTURO
OPERATION
ADVERTENCIA: Para reducir el
riesgo de lesiones personales graves, apague
la herramienta y desconéctela de la fuente de
alimentación antes de realizar ajustes o de
retirar/instalar dispositivos o accesorios. Un
arranque accidental podría causarlesiones.
Posición adecuada de las manos (FIG. G)
ADVERTENCIA: Para reducir el riesgo
de lesión personal grave, tenga SIEMPRE las manos en
una posición adecuada como se muestra.
ADVERTENCIA: Para reducir el riesgo
de lesión personal grave, sujete SIEMPRE bien en caso
de que haya una reacciónrepentina.
Sostenga siempre la unidad como se muestra en las
ilustraciones, con una mano en la empuñadura del
interruptor y la otra en el asa (Figura G). Nunca sostenga la
herramienta de laguarda.
Interruptor (FIG. G)
Para encender la unidad, empuje el interruptor de bloqueo
en apagado
4
hacia adelante, como se muestra en la
Figura F, y apriete el interruptor de gatillo
5
. Una vez que
la unidad esté funcionando, puede soltar la palanca de
bloqueo en apagado.
Para mantener la unidad funcionando, debe seguir
oprimiendo el gatillo. Para apagar la unidad, suelte elgatillo.
ADVERTENCIA: Nunca intente
bloquear un interruptor en la posiciónON.
Fig. G
4
5
Instrucciones para cortar cercos (FIG. H, L )
1. CABLE DE EXTENSIÓN – (Figura H) Mantenga siempre
el cable de extensión detrás del cortacerco y alejado de
la operación de corte. No lo deje nunca sobre un cerco
que se está cortando. Si usted corta o daña el cable,
desconéctelo del tomacorriente inmediatamente, antes
de inspeccionar oreparar.
Fig. H
2. POSICIÓN DE TRABAJO – Mantenga la pisada
firme y el balance apropiado todo el tiempo y no
se extralimite. Use protección para los ojos, calzado
protector antirresbalante y guantes de goma mientras
corta. Mantenga la herramienta firmemente con
ambas manos y PRENDA la herramienta. Siempre
sostenga la podadora, como se muestra en la FiguraI,
con una mano en el mango del interruptor y una
mano en el estribo de suspensión. Nunca sujete la
herramientaporelprotegehoja.
3. CORTE DE NUEVA VEGETACIÓN - (Figura I) – Lo
más efectivo es un movimiento de barrido amplio,
con los dientes de la hoja avanzando a través de las
ramitas. Una inclinación leve de la hoja, en dirección del
movimiento, da el mejor resultado alcortar.
ATENCIÓN: No use podadoras para
cortar tallos mayores a 3/4 pulg. (19mm). (No use la
podadora BEHT200 para cortar tallos mayores
a 5/8 pulg. (16mm)). Use la podadora únicamente
para cortar arbustos normales que se encuentran
alrededor de las casas yedificios.
Fig. I
4. CERCOS NIVELADOS (Figura J) – Para obtener cercos
perfectamente nivelados, se puede montar un cordel a
lo largo del cerco y usar éste como guía.
Fig. J
Page 26

ESPAÑOL
24
5. CORTE LATERAL (Figura K) – Comience por la parte
inferior, y vaya ascendiendo con movimiento de barrido.
Fig. K
6.
sawBLADE™ (Figura L) (BEHTS300, BEHTS400)–
Para las ramas demasiado grandes para cortarse con la
hoja
1
, use la sawBLADE™
8
. Coloque la sawBLADE
TM
lo más cerca posible de la parte inferior de la rama.
Coloque la base de la sawBLADE™
9
contra la rama.
Encienda el cortasetos como se describe más arriba,
dejando que la herramienta funcione a su propia
velocidad hasta que la rama esté cortada porcompleto.
Fig. L
1
8
9
ADVERTENCIA: PARA PROTEGERSE
CONTRA LESIONES, OBSERVE LO SIGUIENTE:
• LEA EL MANUAL DE INSTRUCCIONES ANTES DE
USAR LA PODADORA, CONSERVE ELMANUAL.
• COMPRUEBE SI EXISTEN OBJETOS EXTRAÑOS
EN EL SETO COMO CABLES O CERCOS ANTES DE
CADAUSO.
• CONSERVE LAS MANOS EN LOS MANGOS. NO SE
SOBREEXTIENDA.
• NO UTILICE LA HERRAMIENTA EN CONDICIONES
DEHUMEDAD.
• NO USE CON EL CABLE DAÑADO.
PELIGRO: MANTENGA LAS MANOS
ALEJADAS DE LASHOJAS.
ATENCIÓN: LA CUCHILLA GIRA DESPUES
DE APAGAR.
MANTENIMIENTO
ADVERTENCIA:
Retire
el paquete de baterías antes del efectuar el
mantenimiento, limpiar o retirar material del
artefacto parajardinería.
L
as hojas de corte están hechas de
Figura M
acero templado de gran calidad y
no requieren ser afiladas si se les da
un empleo normal. Sin embargo, si
golpea accidentalmente una cerca
de alambre, piedras, vidrios u otros
objetos de dureza similar, la hojas
pueden resultar con mellas
(FiguraM). No hay necesidad de
eliminar las
melladuras mientras no interfieran con el movimiento de las
hojas; si lo hacen, desconecte la batería y utilice una lima o
una piedra de afilar para eliminar la o lasmelladuras.
Si accidentalmente suelta la podadora, revísela con cuidado
en busca de daños. Si la hoja se dobla, se cuartea la cubierta
o se rompen el asa o la empuñadura, o si encuentra alguna
otra condición que afecte la operación de la podadora, lleve
la unidad a su Centro de Servicio BLACK+DECKER para que la
reparen antes de volverla autilizar.
Los fertilizantes y otros productos químicos para jardinería
contienen agentes que aceleran la corrosión en los
metales. No guarde la herramienta en lugares adyacentes a
fertilizantes u otros productosquímicos.
Limpieza
ADVERTENCIA: Sople la suciedad y
el polvo de todos los conductos de ventilación con aire
seco, al menos una vez por semana. Para reducir el
riesgo de lesiones, utilice siempre protección para los
ojos aprobada ANSI Z87.1 al realizar estatarea.
ADVERTENCIA: Nunca utilice
solventes ni otros químicos abrasivos para limpiar
las piezas no metálicas de la herramienta. Estos
productos químicos pueden debilitar los materiales
plásticos utilizados en estas piezas. Utilice un paño
humedecido sólo con agua y jabón neutro. Nunca
permita que penetre líquido dentro de la herramienta
ni sumerja ninguna de las piezas en unlíquido.
Reparaciones
ADVERTENCIA: Para asegurar
la SEGURIDAD y la CONFIABILIDAD del producto,
las reparaciones, el mantenimiento y los ajustes
deben (inclusive inspección y cambio de carbones)
ser realizados en un centro de mantenimiento
en la fábrica BLACK+DECKER u en un centro de
mantenimiento autorizado BLACK+DECKER. Utilice
siempre piezas de repuestoidénticas.
Page 27

ESPAÑOL
25
Accesorios
ADVERTENCIA:
NO utilice la
podadora con ningún tipo de accesorio o dispositivo.
Puede serpeligroso.
Registro en línea
Gracias por su compra. Registre su producto ahorapara:
• SERVICIO EN GARANTÍA: Si completa esta tarjeta,
podrá obtener un servicio en garantía más eficiente, en
caso de que exista un problema con suproducto.
• CONFIRMATCIÓN DE PROPIEDAD: En caso de una
pérdida que cubra el seguro, como un incendio, una
inundacíon o un robo, el registro de propiedad servirá
como comprobante decompra.
• PARA SU SEGURIDAD: Si registra el producto,
podremos comunicarnos con usted en el caso
improbable que se deba enviar una notificación de
seguridad conforme a la Federal Consumer Safety
Act (Ley Federal de Seguridad de Productos para
elConsumidor).
Registro en línea en www.BlackandDecker.com/NewOwner.
GARANTÍA LIMITADA DE DOS AÑOS
Black & Decker (EUA) Inc. garantiza que este producto
está libre de defectos en material o mano de obra por un
periodo de dos (2) años a partir de la fecha de compra,
previendo que el producto se use en un ambiente
doméstico. Esta garantía limitada no cubre fallas debidas
a abuso, daño accidental o cuando se hayan realizado o
intentado reparaciones por cualquier otra persona diferente
a BLACK+DECKER y sus Centros de Servicio Autorizados.
Un producto defectuoso que cumpla con las condiciones
DETECCIÓN DE PROBLEMAS
Problema Causa posible Solución posible
Hojas que funcionan con
lentitud, producen mucho
ruido o secalientan.
• Hojas secas uoxidadas. • Lubrique lashojas.
• Hojas o soporte para
hojasdoblados.
• Enderece la hoja o el soporte parahojas.
• Dientes doblados odañados. • Enderece losdientes.
• Pernos de la hojasueltos. • Ajuste los pernos de lahoja.
de la garantía establecidas en el presente se reemplazará o
reparará sin cargo en cualquiera de dos maneras:
La primera, que resultará en intercambios únicamente,
es devolver el producto al minorista en donde se compró
(previendo que la tienda sea un minorista participante).
Las devoluciones se deben realizar dentro del periodo
de tiempo de la política de intercambios del minorista.
Se puede requerir un comprobante de compra. Por favor
revise con el minorista su política de devolución específica
respecto a los límites de tiempo para devoluciones o
intercambios. La segunda opción es llevar o enviar el
producto (prepagado) a un Centro de Servicio propiedad
o autorizado por BLACK+DECKER para reparación o
reemplazo a opción de BLACK+DECKER. Se puede requerir
un comprobante de compra. Los centros de servicio
propiedad o autorizados por BLACK+DECKER se indican
en línea en www.blackanddecker.com. Esta garantía no
aplica a los accesorios. Esta garantía le da derechos legales
específicos y puede tener otros derechos que varían
de estado a estado o de una provincia a otra. Si tiene
cualquier pregunta, póngase en contacto con el gerente
de su Centro de Servicio BLACK+DECKER más cercano.
Este producto no está diseñado para uso comercial, y de
forma correspondiente, tal uso comercial de este producto
anulará la garantía. Se renuncia a todas las demás garantías,
expresas o implícitas, por medio del presente. AMÉRICA
LATINA: Esta garantía no aplica a productos vendidos en
América Latina. Para productos vendidos en América Latina,
revise la información de garantía específica contenida en el
empaque, llame a la compañía local o consulte la página de
Internet respecto a talinformación.
Imported by Black & Decker (U.S.) Inc.,
701 E. Joppa Rd.
Towson, MD 21286
BlackandDecker.com
1-800-544-6986
Page 28

ESPAÑOL
26
La unidad noenciende. • Bloqueo no está
totalmenteaccionado.
• Revise que el bloqueo esté completamente
adelante antes de mover el gatilloprincipal.
• Cabledesenchufado. • Enchufe el cable en un tomacorriente
quefuncione.
• Fusiblequemado. • Reemplace el fusible quemado. (Si
repetidamente el producto hace que el
fusible del circuito se queme, deje de
utilizarlo inmediatamente y haga que le
realicen mantenimiento en un centro de
mantenimiento BLACK+DECKER o en un
centro de servicio autorizado.)
• El interruptor automático
estáactivado.
• Reinicie el interruptor automático. (Si
repetidamente el producto hace que el
fusible del circuito se queme, deje de
utilizarlo inmediatamente y haga que le
realicen mantenimiento en un centro de
mantenimiento Black & Decker o en un
centro de servicio autorizado.)
• Interruptor o cabledañado. • Haga reparar el cable o el interruptor
en un centro de mantenimiento
BLACK+DECKER o en un centro de
mantenimientoautorizado.
Solamente para Propósitos de México
Para conocer la ubicación del centro de servicio más cercano a fin de recibir ayuda con su producto, visite nuestro sitio Web
www.blackanddecker.com.mx o llame a la línea de ayuda BLACK +DECKER al 01 800 847 2309/01 800 847 2312
Page 29

ESPAÑOL
27
Page 30

ESPAÑOL
28
Page 31

ESPAÑOL
29
· GARANTÍA BLACK+DECKER · BLACK+DECKER WARRANTY
. SOLAMENTE PARA PROPOSITOS DE MEXICO
Distributor Name · Sello firma del distribuidor
Date of purchase · Fecha de compra Invoice No. · No. de factura
Product Infomation · Identificación del Producto
Cat. No. · Catalogo ó Modelo Serial Number · No. de serie
Name · Nombre Last Name · Apellido
Address · Dirección
City · Ciudad State · Estado
Postal Code · Código Postal Country · País
Telephone · No. Teléfono
2 AÑOS DE GARANTIA
Este producto cuenta con dos años de garantía a partir de la fecha de compra contra cualquier defecto de su
funcionamiento, así como cualquier falla debido a materiales empleados para su fabricación ó mano de obradefectuosa.
Nuestra garantía incluye la reparación o reposición del producto y/o componentes sin cargo alguno para el cliente incluyendo
la mano de obra, esta incluye los gastos de trasportación erogados para lograr cumplimiento de esta garantía en los domicilios
diversosseñalados.
Para hacer efectiva esta garantía deberá presentar su herramienta y esta póliza sellada por el establecimiento comercial
donde se adquirió elproducto.
Nos comprometemos a entregar el producto en un lapso no mayor a 30 días hábiles contados a partir de la fecha de recepción
del mismo en nuestros talleres de servicioautorizados.
ESTA GARANTIA NO APLICA CUANDO:
El producto se hubiese utilizado en condiciones distintas a lasnormales.
El producto no hubiese sido operado de acuerdo con el instructivo de uso que seacompaña.
El producto hubiese sido alterado o reparado por personas no autorizadas pornosotros.
Importador:BLACK+DECKER S.A. de .C.V
Bosque de Cidros Acceso Radiatas No.42
3ra.Seccion de Bosques de las lomas
C.P.05120, Mexico, D.F. Tel: (01 55) 5326 7100
Page 32

Black & Decker (U.S.)Inc.
701 East Joppa Road, Towson, MD 21286
Part No. N562310 REV00
BEHT200, BEHTS300, BEHT350, BEHTS400
OCT17
Copyright © 2017 BLACK+DECKER
Grupo Realsa en herramientas,
S.A. de C.V.
Súper Manzana 69 MZ.01 Lote 30
(Av. Torcasita)
Col. Puerto Juárez
Cancún, Quintana Roo
Tel. 01 998 884 72 27
Ferre Pat de Puebla, S.A. de C.V.
16 de Septiembre No. 6149
Col. El Cerrito
Puebla, Puebla
Tel. 01 222 264 12 12
Ferre Pat de Puebla, S.A. de C.V.
Ejército Mexicano No. 15
Col. Ejido 1ro. de Mayo
Boca del Rio, Veracruz
Tel. 01 229 167 89 89
Servicio de Fabrica BLACK+DECKER,
S.A. de C.V.
Lázaro Cardenas No. 18
Col. Obrera
Distrito Federal
Tel. 55 88 95 02
Representaciones Industriales Robles, S.A. de C.V.
Tezozomoc No. 89
Col. La Preciosa
Distrito Federal
Tel. 55 61 86 82
Gpo. Comercial de Htas. y Refacciones de Occidente,
S.A. de C.V.
Av. La Paz No. 1779
Col. Americana, S. Juaréz
Guadalajara, Jalisco
Tel. 01 33 38 25 69 78
Herramientas y Equipos Profesionales
Av. Colón 2915Ote.
Col. Francisco I. Madero
Monterrey, Nvo. León
Tel. 01 81 83 54 60 06
Htas. Portátiles de Chihuahua,
S.A. de C.V.
Av. Universidad No. 2903
Col. Fracc. Universidad
Chihuahua, Chihuahua
Tel. 01 614 413 64 04
Fernando González Armenta
Bolivia No. 605
Col. Felipe Carrillo Puerto
Cd. Madero, Tamaulipas
Tel. 01 833 221 34 50
Perfiles y Herramientas de Morelia
Gertrudis Bocanegra No. 898
Col. Ventura Puente
Morelia, Michoacán
Tel. 01 443 313 85 50
Enrique Robles
Av. de la Solidaridad No. 12713
Col. La Pradera
Irapuato, Guanajuato
Tel. 01 462 626 67 39
Hernández Martinez Jeanette
Prolongación Corregidora Nte. No. 1104
Col. Arboledas
Queretaro,Qro.
Tel. 01 442 245 25 80
SOLAMENTE PARA PROPOSITOS DE MEXICO
PARA OTRAS LOCALIDADES LLAME AL 01 800 847 2309 o 01 800 8472312.
BLACK+DECKER S.A. DE C.V.
BOSQUES DE cidros acceso RADIATAS NO. 42
col. BOSQUES DE LASLOMAS.
05120 México, D.F
TEL. (01 55) 5326 7100
01 800 847 2309/01 800 847 2312
 Loading...