

Page 1
VEA EL ESPAÑOL EN LA CONTRAPORTADA.
SAVE THIS MANUAL FOR FUTURE REFERENCE.
INSTRUCTIVO DE OPERACIÓN, CENTROS DE SERVICIO Y PÓLIZADE GARANTÍA.
ADVERTENCIA: LÉASE ESTE INSTRUCTIVO ANTES DE USAR EL PRODUCTO.
INSTRUCTION MANUAL
PPPPOOOORRRRTTTTAAAABBBBLLLLEEEE CCCCLLLLAAAAMM
MMPPPPIIIINNNNGGGG
WW
WWOOOORRRRKKKKSSSSTTTTAAAATTTT
II
IIOOOONNNN
Catalog Number
BDWM1000
BEFORE RETURNING THIS PRODUCT
FOR ANY REASON PLEASE CALL
1-800-544-6986
BEFORE YOU CALL, HAVE THE CATALOG No. AND DATE CODE AVAILABLE. IN MOST CASES, A
BLACK & DECKER REPRESENTATIVE CAN RESOLVE THE PROBLEM OVER THE PHONE. IF YOU
HAVE A SUGGESTION OR COMMENT, GIVE US ACALL. YOUR FEEDBACK IS VITAL TO
BLACK & DECKER.
T
T
HANK
HANK
YOU
YOU
FOR
FOR
CHOOSING
CHOOSING
B
B
LACK
LACK
&&D
D
ECKER
ECKER
!
!
G
G
OOTTOOWWW
WWW
.B
.B
LACKAND
LACKAND
D
D
ECKER
ECKER
.
.
COM
COM
/N
/N
EW
EW
O
O
WNER
WNER
TTOOREGISTER
REGISTER
YOUR
YOUR
NEW
NEW
PRODUCT
PRODUCT
.
.
90539119 BDWM1000 6/5/08 10:17 AM Page 1
Page 2
IMPORTANT SAFETY INSTRUCTIONS
1. Do not load with more than 400 lbs. (181kg). Do not leave heavy loads on work surface
for extended periods of time.
2. Do not apply an unbalanced load which could cause the workbench to tip over.
3. Do not use the work center as a stepladder or standing platform. Do not use the lower
platform as a step.
4. Do not store workbench outdoors or in a damp location.
5. Avoid applying excessive force when clamping with the supplied clamps.
6. Be sure that the legs are fully open and the center support is in position and locked
before use.
7. When using a power tool with the workbench, follow the safety instructions in the tool’s
instruction manual.
8. Do not mount or clamp power tools to any surface.
9. Always wear safety glasses when operating power tools.
10. Cutting or drilling into work surface may weaken supports, damaging tool or workbench.
11. Caution required when using high temperature tools (heat guns, torch, solder
iron, etc.). May damage work surface and reduce clamping capability.
12. Do not store flammable liquids on the workbench.
SAFETY GUIDELINES - DEFINITIONS
It is important for you to read and understand this manual. The information it contains
relates to protecting YOUR SAFETY and PREVENTING PROBLEMS. The symbols
below are used to help you recognize this information.
DANGER: Indicates an imminently hazardous situation which, if not avoided, will
result in death or serious injury.
WARNING: Indicates a potentially hazardous situation which, if not avoided, could
result in death or serious injury.
CAUTION: Indicates a potentially hazardous situation which, if not avoided, may
result in minor or moderate injury.
CAUTION: Used without the safety alert symbol indicates a potentially hazardous
situation which, if not avoided, may result in property damage.
SAVE THESE INSTRUCTIONS FOR FUTURE USE
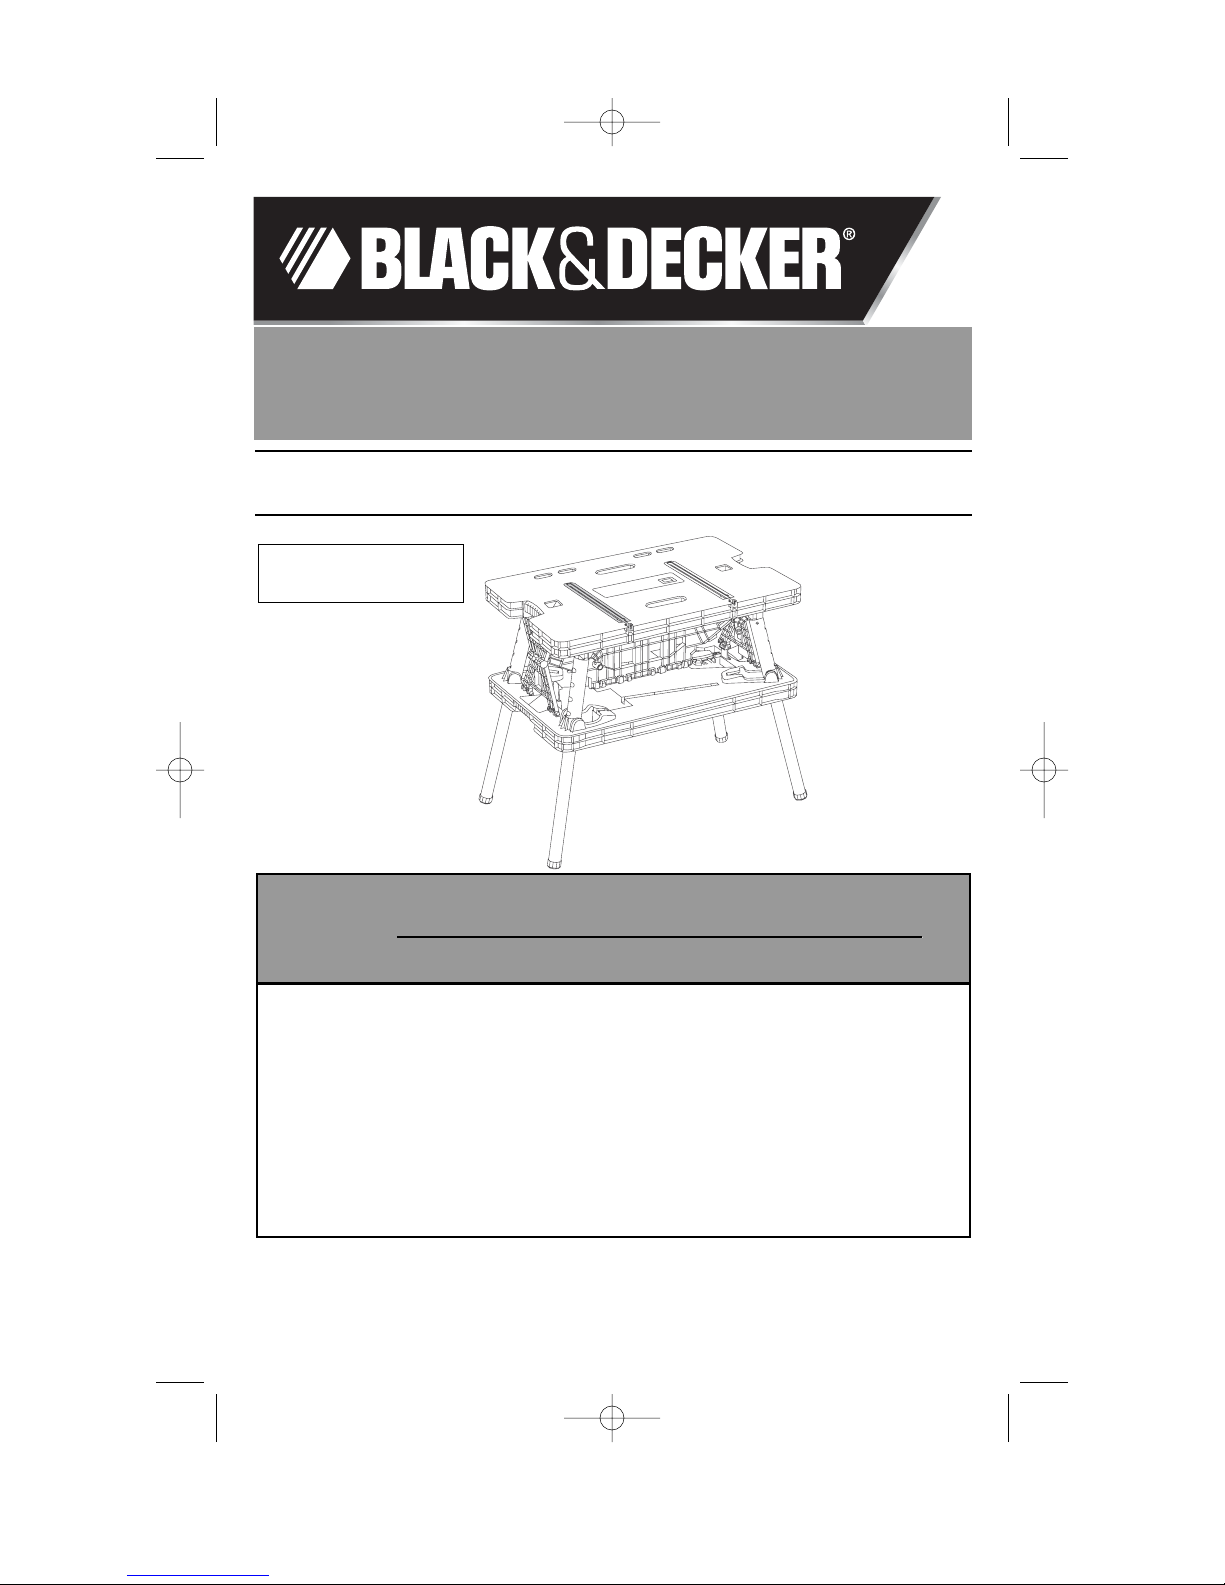
OPERATION
OPENING THE WORKBENCH
The BDWM1000 is packaged completely
folded in the carton.
To open:
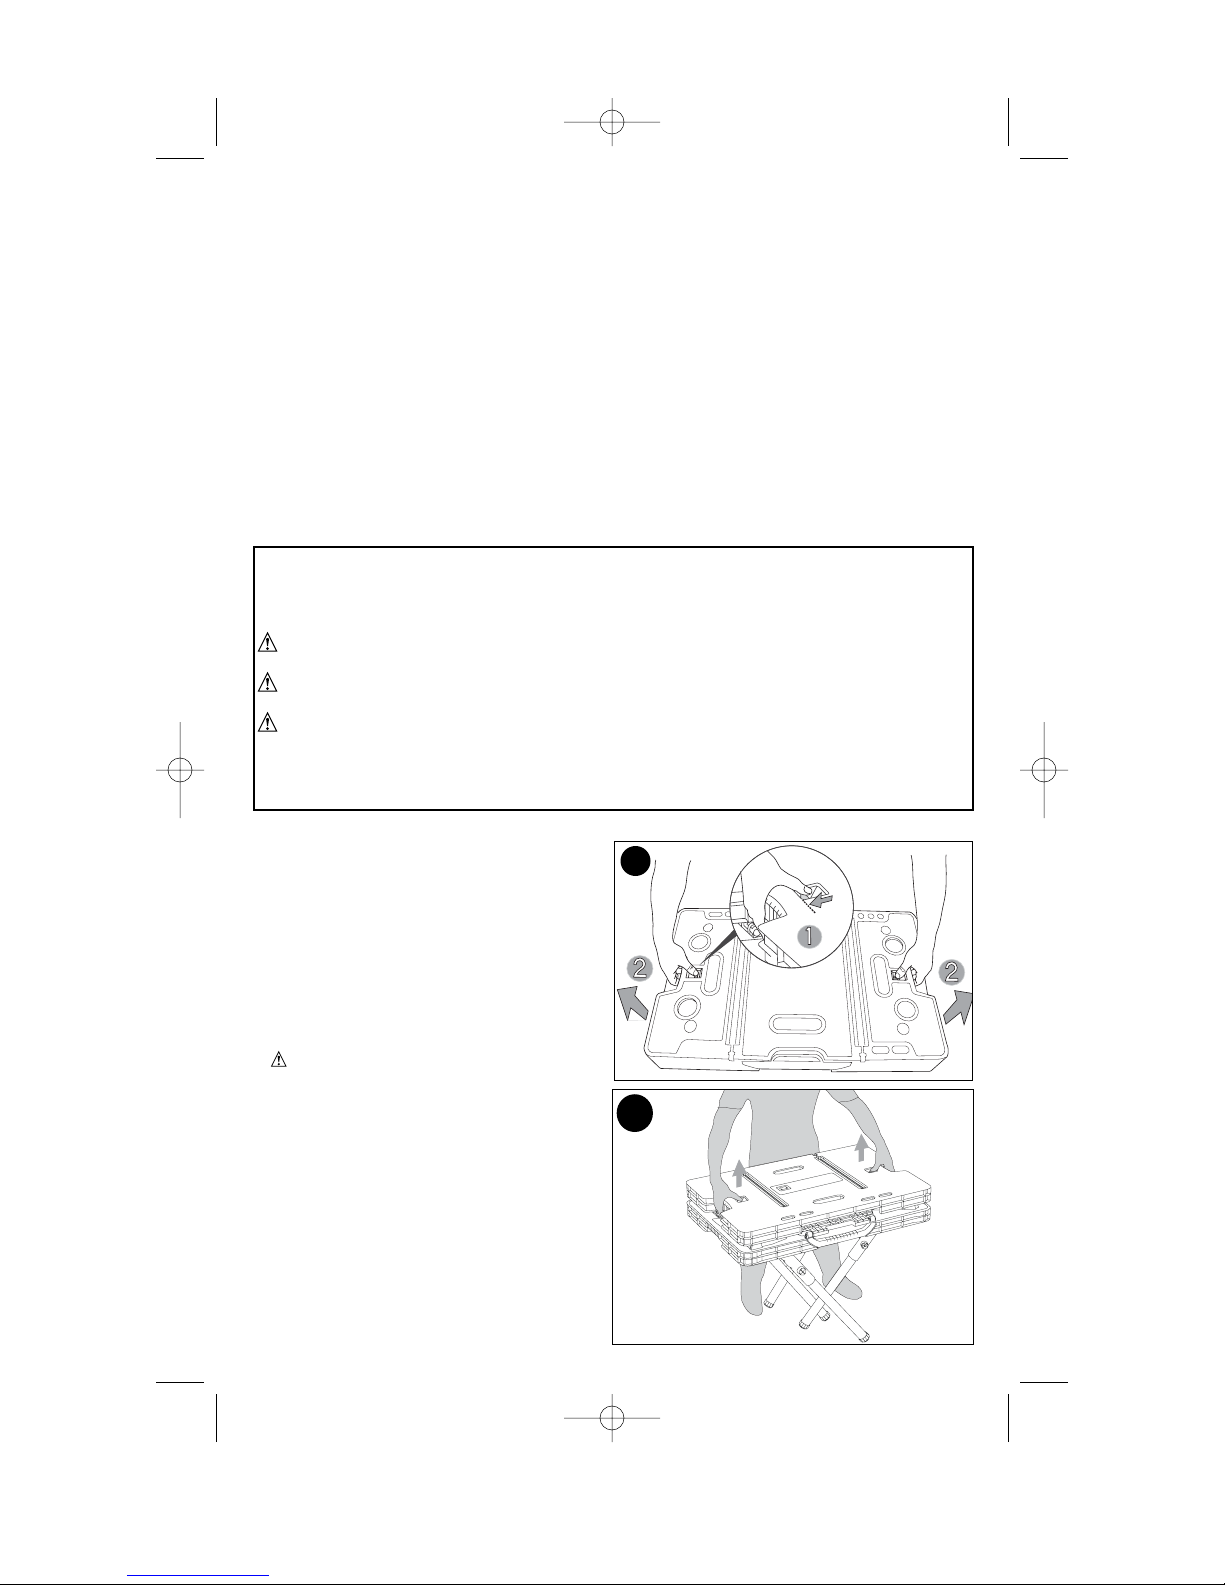
1. Place the workbench flat on the floor.
2. Grasp the openings on both sides of the
table top and pull out on the release latches
as shown in figure A.
CAUTION: Do not pull the legs out when
the workbench is in a closed position.
3. With the release latches pulled in, lift the
table top. The four legs will drop down and
lock into place and the side supports will lift
up. (figure B)
A
B
2
90539119 BDWM1000 6/5/08 10:17 AM Page 2
1
Page 3
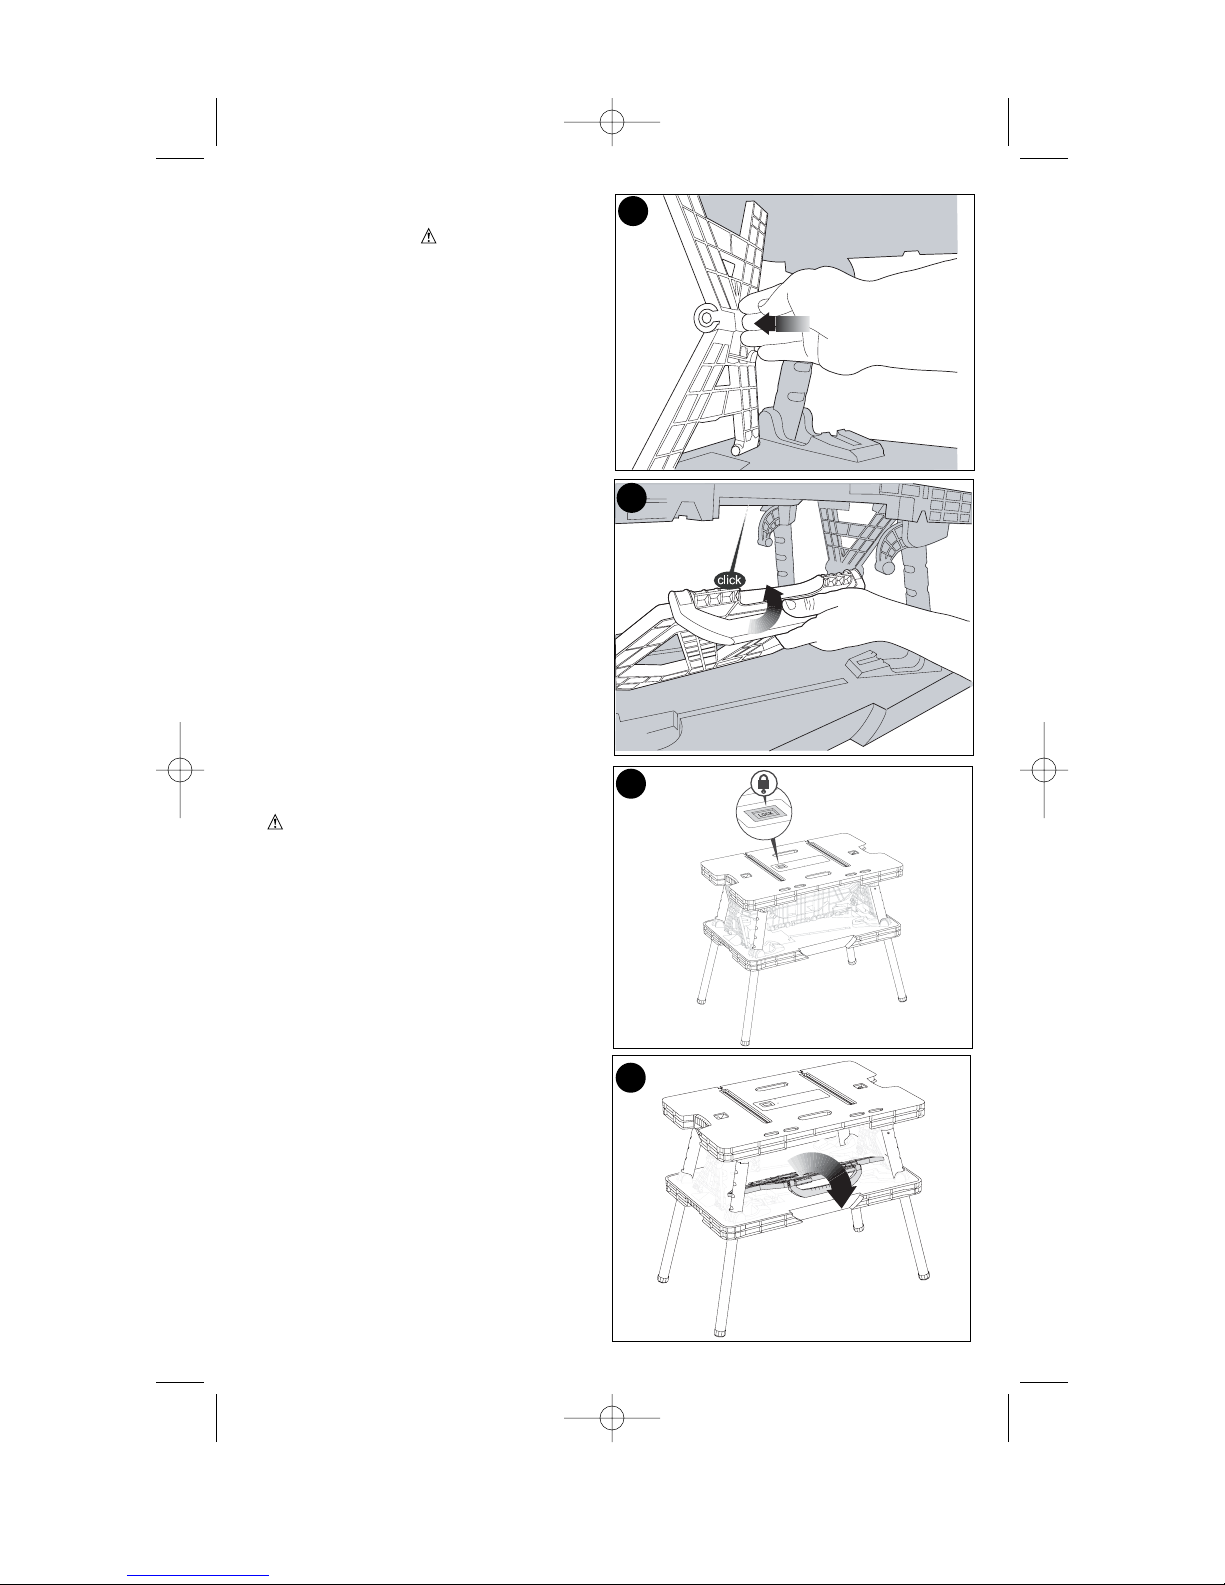
4. To lock the side supports, push out from
the inside until the support locks into
position (figure C.) CAUTION: Risk of
Unsafe Operation. Make sure all four legs
and both side supports are locked in place.
5. After locking the side supports in place,
lift the center support section by the
carrying handle until you hear it “click” into
place as shown in figure D.
6. When the center support section is
properly locked in position, the LOCK button
shown in figure E will be visible.
CAUTION: Risk of Unsafe Operation.
Make sure the center support section is
locked in place.
CLOSING THE WORKBENCH
1. Fold the center support section down and
push in on the side supports to unlock them.
(figure F)
C
D
E
F
3
90539119 BDWM1000 6/5/08 10:17 AM Page 3
Page 4
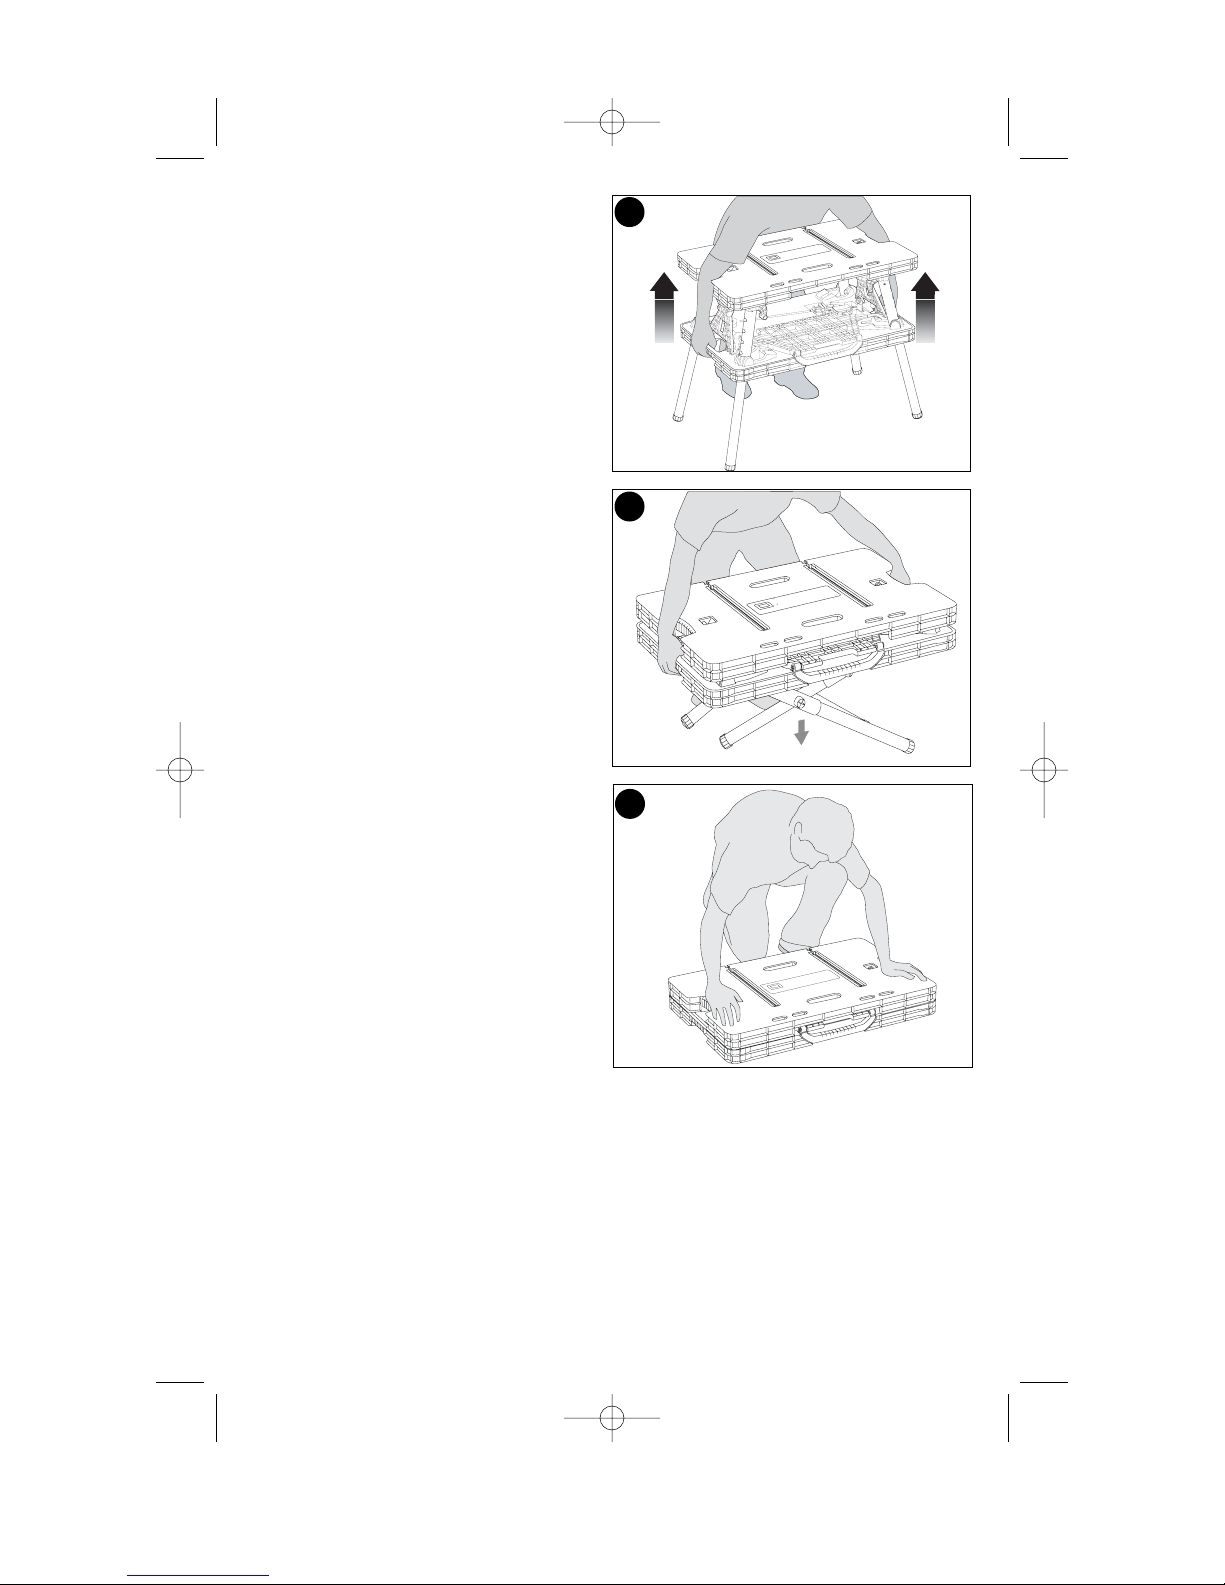
2. Reach through the openings in the table
top and grasp the lower section of the
bench. Pull up on the lower section to begin
collapsing the legs. (figure G)
3. Lower the unit to the ground as shown in
figure H.
4. Once the unit is flat on the ground, press
down on the table top to place the unit into
its fully closed position as shown in figure I.
G
I
H
4
ADJUSTABLE CLAMPS
The two adjustable clamps can be used in both a vertical and horizontal mode. The long
channels in the table top allow the clamps to be anchored in a stationary horizontal
position. The shorter slots in the table top allow for the clamps to be used in a vertical
position. (figure J). J1 through J6 illustrate how to use the clamps in both horizontal and
vertical modes.
J1 - To expand the opening of the clamp jaws, press in on the release lever and move the
jaw as shown. The jaw that is attached to the handle can also be moved in the same
manner or by squeezing and releasing the front handle.
J2 - Line up the round post on the end of the clamp bar with the mating openings on both
sides of the main slot in the tabletop as shown.
J3 - To lock the clamp in a horizontal position, squeeze the front handle and line up the
round protruding tabs with the mating openings in the tabletop (behind the openings
mentioned in J2 above).
90539119 BDWM1000 6/5/08 10:17 AM Page 4
Page 5
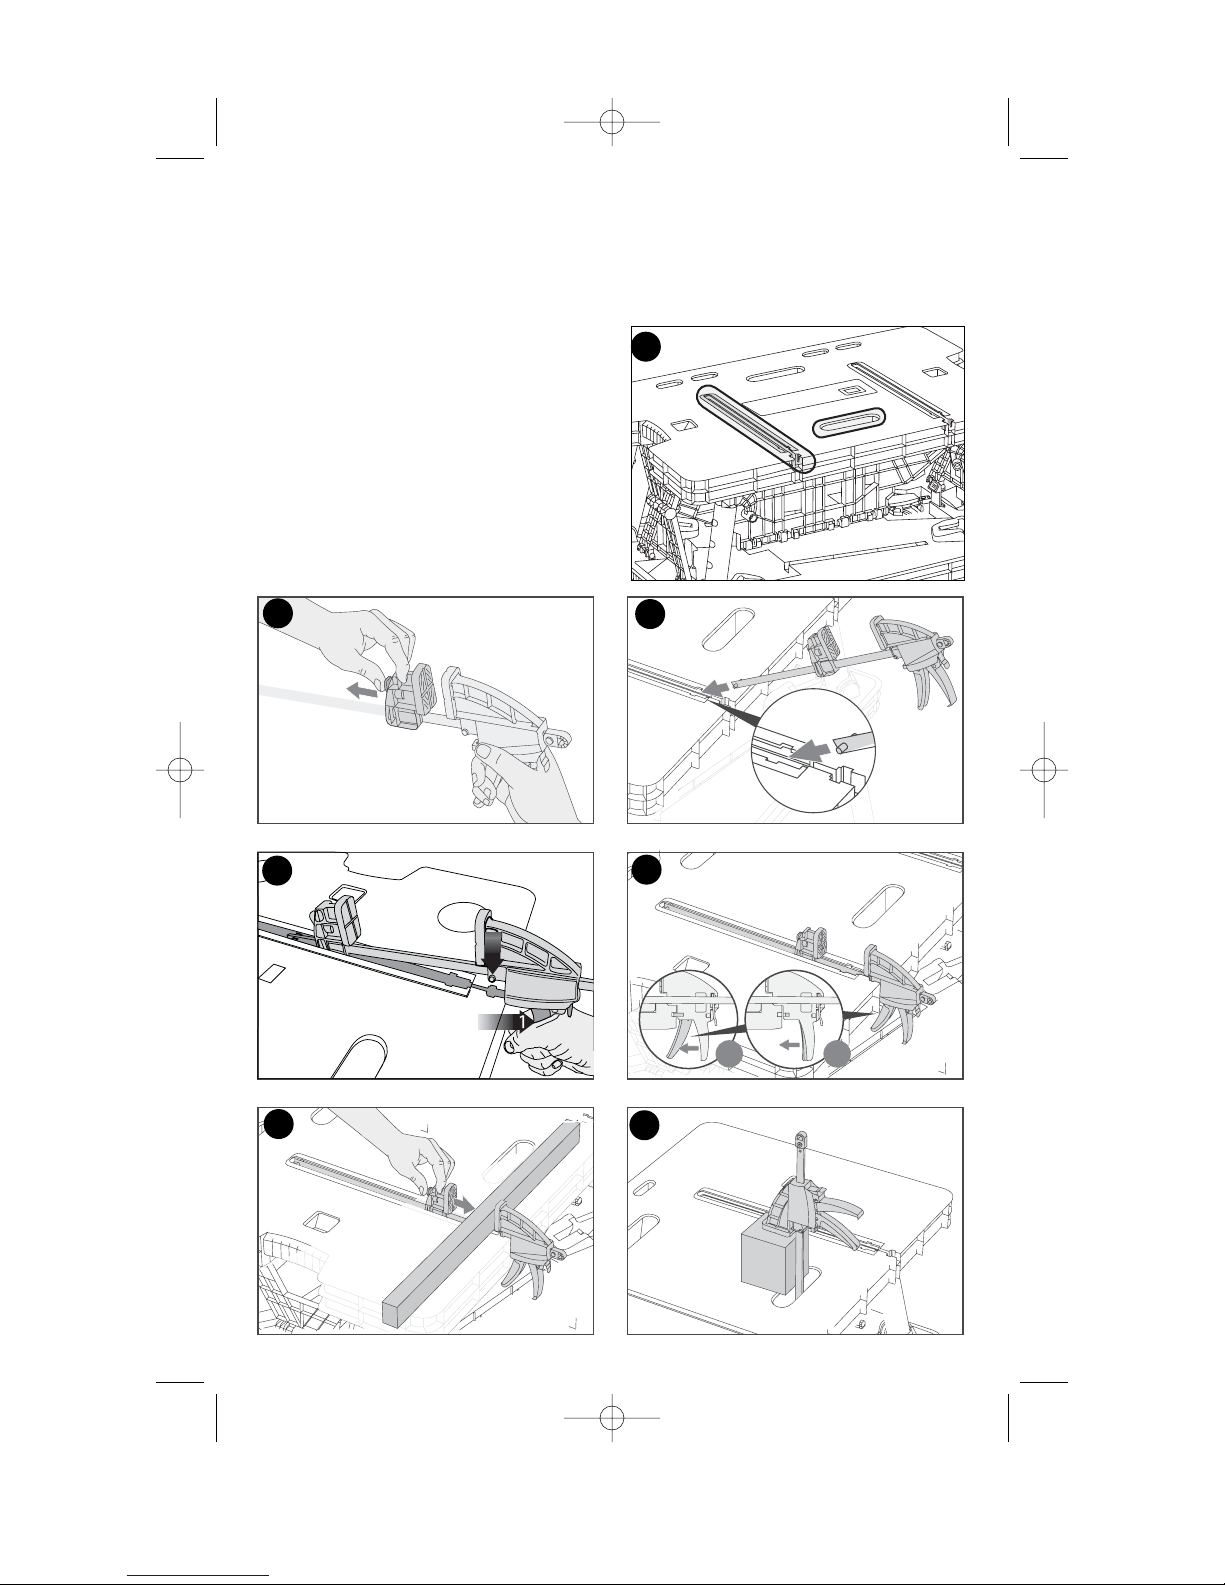
J4 - With the clamp in a fully horizontal position, release the front handle to lock the clamp
in place. (To remove the clamp, squeeze the handle and lift up.)
J5 - Depress the release lever and move the front jaw into position against the material to
be clamped. Squeeze the front handle to apply pressure.
J6 - To clamp vertically, insert the clamp through the slot in the tabletop as shown.
J1
J2
J3
J4
J5
J6
J
5
90539119 BDWM1000 6/5/08 10:17 AM Page 5
2
12
Page 6
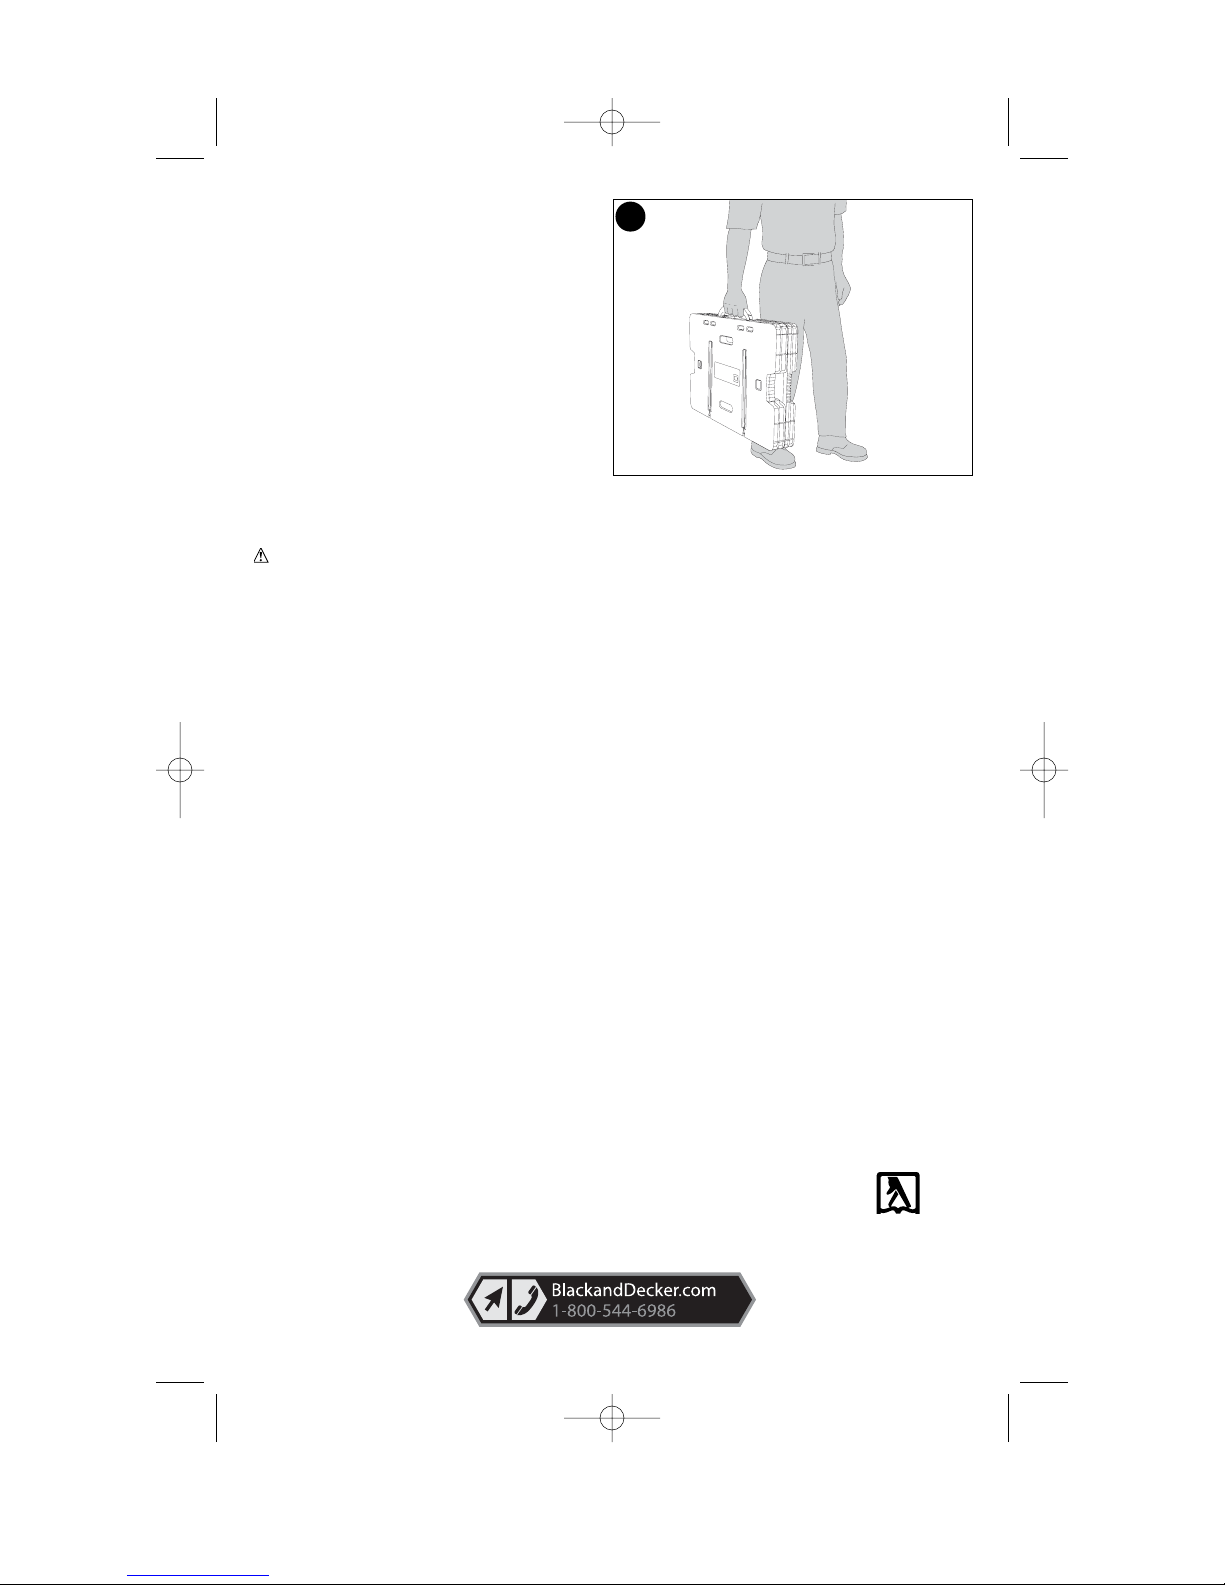
TRANSPORTING
1. Carry the unit by the convenient carrying
handle as shown in figure K.
Maintenance
Use only mild soap and damp cloth to clean
the tool. Never let any liquid get inside the
tool; never immerse any part of the tool into
a liquid.
IMPORTANT: To assure product SAFETY
and RELIABILITY, repairs, maintenance and
adjustment should be performed by
authorized service centers or other qualified
service personnel, always using identical
replacement parts.
Accessories
Recommended accessories for use with your tool are available from your local dealer or
authorized service center. If you need assistance regarding accessories, please call:
1-800-544-6986.
WARNING: The use of any accessory not recommended for use with this tool could be
hazardous.
Service Information
All Black & Decker Service Centers are staffed with trained personnel to provide
customers with efficient and reliable power tool service. Whether you need technical
advice, repair, or genuine factory replacement parts, contact the Black & Decker location
nearest you. To find your local service location, refer to the yellow page directory under
"Tools—Electric" or call: 1-800-544-6986 or visit www.blackanddecker.com
Full Two-Year Home Use Warranty
Black & Decker (U.S.) Inc. warrants this product for two years against any defects in
material or workmanship. The defective product will be replaced or repaired at no charge
in either of two ways.
The first, which will result in exchanges only, is to return the product to the retailer from
whom it was purchased (provided that the store is a participating retailer). Returns should
be made within the time period of the retailer’s policy for exchanges (usually 30 to 90 days
after the sale). Proof of purchase may be required. Please check with the retailer for their
specific return policy regarding returns that are beyond the time set for exchanges.
The second option is to take or send the product (prepaid) to a Black & Decker owned or
authorized Service Center for repair or replacement at our option. Proof of purchase may
be required. Black & Decker owned and authorized Service Centers are listed under
"Tools-Electric" in the yellow pages of the phone directory and on our website
www.blackanddecker.com.
This warranty does not apply to accessories. This warranty gives you specific legal rights
and you may have other rights which vary from state to state or province to province.
Should you have any questions, contact the manager of your nearest Black & Decker
Service Center. This product is not intended for commercial use.
FREE WARNING LABEL REPLACEMENT: If your warning labels become illegible or are
missing, call 1-800-544-6986 for a free replacement.
Patents Pending
K
6
See ‘Tools-Electric’
– Yellow Pages –
for Service & Sales
Imported by:
Black & Decker (U.S.) Inc.,
701 E. Joppa Rd.
Towson, MD 21286 U.S.A.
90539119 BDWM1000 6/5/08 10:17 AM Page 6
Page 7

CONSERVER CE MANUEL POUR UN USAGE ULTÉRIEUR.
GUIDE D’UTILISATION
7
ÉÉÉÉTTTTAAAABBBBLLLLIIII PPPPOOOORRRRTTTTAAAATTTTIIIIFF
FF
AAAAVVVVEEEECCCC SSSSEEEERRRRRRRREEEE----JJJJOOOOIIIINNNNTTTTSS
SS
N° de catalogue
BDWM1000
AVANT DE RETOURNER CE PRODUIT POUR
QUELQUE RAISON QUE CE SOIT, COMPOSER LE
1-800-544-6986
AVANT D’APPELER, AYEZ EN MAIN LE N° DE CATALOGUE ET LE CODE DE DATE. DANS LA PLUPART
DES CAS, UN REPRÉSENTANT DE BLACK & DECKER PEUT RÉSOUDRE LE PROBLÈME PAR
TÉLÉPHONE. SI VOUS AVEZ UNE SUGGESTION OU UN COMMENTAIRE, APPELEZ-NOUS. VOS
IMPRESSIONS SONT CRUCIALES POUR BLACK & DECKER.
M
M
ERCI
ERCIDD
’
’
AAVOIR
VOIR
CHOISI
CHOISI
B
B
LACK
LACK
&&D
D
ECKER
ECKER
!
!
V
V
ISITEZ
ISITEZ
WWW
WWW
.B
.B
LACKAND
LACKAND
D
D
ECKER
ECKER
.
.
COM
COM
/P
/P
RODUCT
RODUCT
R
R
EGISTRA
EGISTRA
TION
TION
POUR
POUR
ENREGISTRER
ENREGISTRER
VOTRE
VOTRE
NOUVEAU
NOUVEAU
PRODUIT
PRODUIT
.
.
90539119 BDWM1000 6/5/08 10:17 AM Page 7
Page 8

DIRECTIVES DE SÉCURITÉ IMPORTANTES
1. Ne pas charger plus de 181 kg (400 lb). Ne pas laisser de charges très lourdes sur la
surface de travail pour des périodes de temps prolongées.
2. Équilibrer toujours les charges pour éviter un basculement de l’établi.
3. Ne pas utiliser l’atelier comme escabeau ou plate-forme fixe. Ne pas utiliser la
plate-forme inférieure comme marche.
4. Ne pas ranger l’établi à l’extérieur ou dans un endroit humide.
5. Éviter d’utiliser une force excessive lors de l’utilisation des serre-joints fournis.
6. S’assurer que les pattes sont complètement déployées et que la surface centrale de
soutien est en position et bien bloquée avant d’utiliser l’établi.
7. Lors de l’utilisation d’un outil électrique avec l’établi, suivre les consignes de sécurité de
l’outil décrites dans le mode d’emploi de celui-ci.
8. Ne pas assembler ou fixer les outils électriques à une surface.
9. Toujours porter des lunettes protectrices lors de l’utilisation d’outils électriques.
10. Couper ou percer des trous dans la surface de travail de l’établi risque d’affaiblir la
structure de soutien, d’endommager l’outil ou l’établi.
11. Être prudent lors de l’utilisation d’outils chauffants à haute température (pistolets
thermiques, chalumeau, fer à souder et autres). Ces outils risquent d’endommager la
surface de travail et de réduire la stabilité de l’établi lors de la fixation de matériel.
12. Ne pas ranger de liquides inflammables dans l’établi.
LIGNES DIRECTRICES EN MATIÈRE DE SÉCURITÉ - DÉFINITIONS
Il est important que vous lisiez et compreniez ce mode d’emploi. Les informations qu’il
contient concernent VOTRE SÉCURITÉ et visent à ÉVITER TOUT PROBLÈME. Les
symboles ci-dessous servent à vous aider à reconnaître cette information.
DANGER : Indique une situation dangereuse imminente qui, si elle n’est pas évitée,
causera la mort ou des graves blessures.
AVERTISSEMENT : Indique une situation potentiellement
dangereuse qui, si elle n’est pas évitée, pourrait causer la mort ou de graves blessures.
MISE EN GARDE : Indique une situation potentiellement dangereuse qui, si elle
n’est pas évitée, pourrait causer des blessures mineures ou modérées.
MISE EN GARDE : Utilisé sans le symbole d’alerte à la sécurité, indique une situation
potentiellement dangereuse qui, si elle n’est pas évitée, peut résulter en des dommages à la
propriété.
CONSERVER CES DIRECTIVES POUR UN USAGE ULTÉRIEUR
FONCTIONNEMENT
DÉPLOIEMENT DE L’ÉTABLI
L’établi BDWM1000 est livré complètement
plié dans la boîte.
Pour déployer l’établi :
1. Déposer l’établi à plat sur le sol.
2. Saisir les ouvertures des deux côtés du
dessus de l’établi et tirer sur les loquets de
blocage comme indiqué à la figure A.
MISE EN GARDE : ne pas déployer les
pattes lorsque l’établi est plié (position
fermée).
3. Avec les loquets en position ouverte,
relever le dessus de l’établi. Les quatre
pattes se déploieront et se bloqueront en
position. Les appuis latéraux se déploieront
également. (figure B)
8
A
B
90539119 BDWM1000 6/5/08 10:17 AM Page 8
1
Page 9

4. Pour bloquer les appuis latéraux,
appuyer sur leur surface interne jusqu’à ce
qu’ils se bloquent en position (figure C).
MISE EN GARDE : Risque d’utilisation
dangereuse. S’assurer que toutes les
pattes (4) et les deux appuis latéraux sont
correctement bloqués en position.
5. Une fois les appuis latéraux en position,
soulever la section centrale de soutien par
la poignée de transport jusqu’à ce qu’elle
s’enclenche au centre (figure D).
6. Une fois la section centrale de soutien
correctement bloquée en position, le
bouton de VERROUILLAGE, comme
indiqué à la figure E, sera visible.
MISE EN GARDE : risque d’utilisation
dangereuse. S’assurer que la section
centrale de soutien est bloquée en position.
FERMETURE DE L’ÉTABLI
1. Replier la section centrale de soutien et
poussez les appuis latéraux vers l’intérieur
pour les débloquer. (figure F)
C
D
9
E
F
90539119 BDWM1000 6/5/08 10:17 AM Page 9
Page 10

2. Saisir la section inférieure de l’établi en
passant par les ouvertures du dessus de
l’établi. Relever la section inférieure pour
replier les pattes. (figure G)
3. Abaisser le module au sol comme
indiqué à la figure H.
4. Une fois le module bien à plat, appuyer
sur le dessus de l’établi pour fermer
complètement le module comme indiqué
à la figure I.
SERRE-JOINTS RÉGLABLES
Les deux serre-joints réglables s’utilisent en
position verticale ou horizontale. Les deux grandes rainures sur le dessus de l’établi
permettent de fixer les serre-joints en position horizontale stable. Les rainures plus courtes
permettent l’utilisation des serre-joints en position verticale. (figure J). Les figures J1 à J6
illustrent l’utilisation des serre-joints en positions horizontale et verticale.
J1 - Pour ouvrir les mâchoires du serre-joint, enfoncer le levier de dégagement et déplacer
la mâchoire libre comme indiquée. Il est également possible de déplacer la mâchoire fixe
de la poignée de la même façon ou en pressant et en relâchant la poignée avant.
J2 - Aligner les goupilles, à l’extrémité de la barre du serre-joint, avec les ouvertures
correspondantes, des deux côtés de la rainure principale du dessus de l’établi comme
indiqué.
J3 - Pour bloquer le serre-joint en position horizontale, presser la poignée avant et aligner
les onglets ronds en saillie avec les ouvertures correspondantes du dessus de l’établi
(elles sont derrières les ouvertures pour les goupilles mentionnées précédemment en J2).
10
G
I
H
90539119 BDWM1000 6/5/08 10:17 AM Page 10
Page 11

J4 - Une fois le serre-joint bien horizontal, relâcher la poignée avant pour le verrouiller en
position. (pour dégager le serre-joint, presser la poignée et relever la barre).
J5 - Enfonce le levier de dégagement et appuyer la mâchoire avant contre le matériau à
fixer. Presser sur la poignée avant pour appliquer une pression.
J6 - Pour installer le serre-joint en position verticale, l’enfiler dans la rainure comme
indiqué.
J1
J2
J3
J4
J5
J6
11
J
90539119 BDWM1000 6/5/08 10:17 AM Page 11
2
12
Page 12

TRANSPORT
1. Transporter le module par la poignée de
transport commode comme indiqué à la
figure K.
Entretien
N’utiliser qu’un détergent doux et un chiffon
humide pour nettoyer l’outil. Ne jamais
laisser de liquide pénétrer dans l’outil et
n’immerger aucune partie de l’outil dans un
liquide.
IMPORTANT : pour assurer la SÉCURITÉ
et la FIABILITÉ de ce produit, toutes les
opérations de réparation, d’entretien et de
réglage (autres que celles décrites aux
présentes) doivent être effectuées dans un
centre de service autorisé ou par du
personnel qualifié; on ne doit utiliser que des pièces de rechange identiques.
ACCESSOIRES
Les accessoires recommandés pour cet outil sont offerts au centre de service autorisé ou
chez le dépositaire local; pour obtenir de plus amples renseignements sur ces
accessoires, composer le 1 800 544-6986.
AVERTISSEMENT : il pourrait s'avérer dangereux d'utiliser des accessoires autres que
ceux recommandés pour cet outil.
INFORMATION SUR LES RÉPARATIONS
Tous les centres de réparation Black & Decker sont dotés de personnel qualifié en
matière d’outillage électrique; ils sont donc en mesure d’offrir à leur clientèle un service
efficace et fiable. Que ce soit pour un avis technique, une réparation ou des pièces de
rechange authentiques installées en usine, communiquer avec l’établissement Black &
Decker le plus près de chez vous. Pour trouver l’établissement de réparation de votre
région, consulter le répertoire des Pages jaunes à la rubrique « Outils électriques » ou
composer le numéro suivant : 1-800-544-6986 ou consulter le site
www.blackanddecker.com
GARANTIE COMPLÈTE DE DEUX ANS POUR UNE UTILISATION DOMESTIQUE
Black & Decker (É.-U.) Inc. garantit ce produit pour une durée de deux ans contre tout
défaut de matériau ou de fabrication. Le produit défectueux sera remplacé ou réparé sans
frais de l’une des deux façons suivantes :
La première façon consiste en un simple échange chez le détaillant qui l’a vendu (pourvu
qu’il s’agisse d’un détaillant participant). Tout retour doit se faire durant la période
correspondant à la politique d’échange du détaillant (habituellement, de 30 à 90 jours
après l’achat). Une preuve d’achat peut être requise. Vérifier auprès du détaillant pour
connaître sa politique concernant les retours hors de la période définie pour les échanges.
La deuxième option est d’apporter ou d’envoyer le produit (transport payé d’avance) à un
centre de réparation autorisé ou à un centre de réparation de Black & Decker pour faire
réparer ou échanger le produit, à notre discrétion. Une preuve d’achat peut être requise.
Les centres Black & Decker et les centres de service autorisés sont répertoriés dans les
pages jaunes, sous la rubrique « Outils électriques ».
Cette garantie ne s’applique pas aux accessoires. Cette garantie vous accorde des droits
légaux spécifiques et vous pourriez avoir d’autres droits qui varient d’un État ou d’une
province à l’autre. Pour toute question, communiquer avec le directeur du centre de
réparation Black & Decker le plus près de chez vous. Ce produit n’est pas destiné à un
usage commercial.
12
K
90539119 BDWM1000 6/5/08 10:17 AM Page 12
Page 13

Imported by / Importé par
Black & Decker Canada Inc.
100 Central Ave.
Brockville (Ontario) K6V 5W6
Voir la rubrique
“Outils électriques”
des Pages Jaunes
pour le service et les ventes.
13
REMPLACEMENT GRATUIT DES ÉTIQUETTES D’AVERTISSEMENT : si les étiquettes
d’avertissement deviennent illisibles ou sont manquantes, composer le 1-800-544-6986
pour en obtenir le remplacement gratuit.
Brevets en instance
90539119 BDWM1000 6/5/08 10:17 AM Page 13
Page 14

14
BBBBAAAANNNNCCCCOOOO DDDDEEEE SSSSUUUUJJJJEEEECCCCIIIIÓÓÓÓNN
NN
PPPPOOOORRRRTTTTÁÁÁÁTTTTIIIILL
LL
Catálogo N°
BDWM1000
CONSERVE ESTE MANUAL PARA FUTURAS CONSULTAS.
MANUAL DE INSTRUCCIONES
ANTES DE DEVOLVER ESTE PRODUCTO POR
CUALQUIER MOTIVO, LLAME AL
(55)5326-7100
ANTES DE LLAMAR, TENGA ELNÚMERO DE CATÁLOGO Y EL CÓDIGO DE FECHAPREPARADOS. EN
LA MAYORÍA DE LOS CASOS, UN REPRESENTANTE DE BLACK & DECKER PUEDE RESOLVER EL
PROBLEMA POR TELÉFONO. SI DESEAREALIZAR UNA SUGERENCIA O COMENTARIO, LLÁMENOS.
SU OPINIÓN ES FUNDAMENTALPARA BLACK & DECKER.
¡G
¡G
RACIAS
RACIAS
POR
POR
ELEGIR
ELEGIR
B
B
LACKAND
LACKAND
D
D
ECKER
ECKER
!
!
V
V
AAYYAAA
A
WWW
WWW
.B
.B
LACKAND
LACKAND
D
D
ECKER
ECKER
.
.
COM
COM
/P
/P
RODUCT
RODUCT
R
R
EGISTRA
EGISTRA
TION
TION
PPARA
ARA
REGISTRAR
REGISTRARSUSU
NUEVO
NUEVO
PRODUCT
PRODUCTOO
.
.
90539119 BDWM1000 6/5/08 10:17 AM Page 14
Page 15

INSTRUCCIONES IMPORTANTES SOBRE SEGURIDAD
1. No cargue más de 181 kg (400 lb). No deje cargas pesadas sobre la superficie de
trabajo durante períodos prolongados.
2. No coloque una carga desequilibrada que pueda volcar el banco.
3. No utilice el centro de trabajo como un escalón o una plataforma. No use la plataforma
inferior como un escalón.
4. No guarde el banco a la intemperie o en un lugar húmedo.
5. Evite aplicar fuerza excesiva cuando use las abrazaderas suministradas.
6. Asegúrese de que las patas estén completamente abiertas y de que el soporte central
esté en posición y trabado en el lugar.
7. Cuando use una herramienta eléctrica con el banco, siga las instrucciones de seguridad
del manual de la herramienta.
8. No monte ni asegure herramientas eléctricas a ninguna superficie.
9. Cuando opere herramientas eléctricas, utilice siempre lentes de seguridad.
10. Cortar o taladrar sobre la superficie de trabajo puede debilitar los puntos de apoyo o
dañar la herramienta o el banco.
11. Tenga cuidado cuando use herramientas de altas temperaturas (pistolas de calor,
sopletes, soldadores, etc.). Pueden dañar la superficie de trabajo y reducir la capacidad
de sujeción.
12. No guarde líquidos inflamables en el banco.
PAUTAS DE SEGURIDAD/DEFINICIONES
Es importante que lea y comprenda este manual. La información que contiene se
relaciona con la protección de SU SEGURIDAD y la PREVENCIÓN DE PROBLEMAS.
Los símbolos que siguen se utilizan para ayudarlo a reconocer esta información.
PELIGRO: indica una situación de peligro inminente que, si no se evita, provocará la
muerte o lesiones graves.
ADVERTENCIA: indica una situación de peligro potencial que, si no se evita, provocará la
muerte o lesiones graves.
PRECAUCIÓN: indica una situación de peligro potencial que, si no se evita, provocará
lesiones leves o moderadas.
PRECAUCIÓN: utilizado sin el símbolo de alerta de seguridad indica una situación de peligro
potencial que, si no se evita, puede provocar daños en la propiedad.
CONSERVE LAS INSTRUCCIONES PARA VOLVER A CONSULTAR
EN EL FUTURO.
FUNCIONAMIENTO
CÓMO ABRIR EL BANCO
El banco BDWM1000 viene completamente
plegado en la caja.
Para abrirlo:
1. Coloque el banco horizontal en el piso.
2. Agarre las aberturas en ambos costados
de la parte superior de la mesa y tire de los
cerrojos de liberación, como se muestra en
la figura A.
PRECAUCIÓN: No tire de las patas
cuando el banco esté cerrado.
3. Con los cerrojos de liberación hacia
adentro, levante la parte superior de la
mesa. Las cuatro patas se desplegarán y se
trabarán en el lugar y los puntos de apoyo
laterales se levantarán. (figura B)
A
15
B
90539119 BDWM1000 6/5/08 10:17 AM Page 15
1
Page 16

4. Para trabar los puntos de apoyo
laterales, empuje hacia afuera desde el
interior hasta que traben en el lugar
(figura C).
PRECAUCIÓN: Riesgo de operación
insegura. Asegúrese de que las cuatro
patas y ambos puntos de apoyo laterales
estén trabados en el lugar.
5. Para levantar la sección de apoyo
central, después de bloquear los puntos de
apoyo en posición, arrastre el mango hasta
que escuche que encaja en el lugar, como
se muestra en la figura D.
6. Cuando la sección de apoyo central esté
correctamente trabada en el lugar, podrá ver
el botón de bloqueo (LOCK) que se muestra
en la figura E.
PRECAUCIÓN: Riesgo de operación
insegura. Asegúrese de que la sección de
apoyo central esté trabada en el lugar.
CÓMO CERRAR EL BANCO
1. Pliegue la sección de apoyo central hacia
abajo y empuje hacia adentro en los puntos
de apoyo laterales para trabarlos. (figura F)
C
D
16
E
F
90539119 BDWM1000 6/5/08 10:17 AM Page 16
Page 17

2. Alcance las aberturas en la parte
superior de la mesa y tome la sección
inferior del banco. Tire hacia arriba de la
sección inferior para comenzar a plegar las
patas. (figura G)
3. Baje la unidad al piso como se muestra
en la figura H.
4. Una vez que la unidad está horizontal en
el piso, presione la parte superior de la
mesa hacia abajo para cerrar la unidad por
completo, como se muestra en la figura I.
ABRAZADERAS AJUSTABLES
Las dos abrazaderas ajustables se pueden usar en posición vertical y horizontal. Los
canales largos en la parte superior de la mesa permiten que las abrazaderas se fijen en
posición horizontal. Las ranuras más cortas en la parte superior de la mesa permiten que
las abrazaderas se usen en posición vertical. (figura J). Las figuras J1 a J6 muestran
cómo usar las abrazaderas en las posiciones vertical y horizontal.
J1 - Para expandir la abertura de las mordazas de las abrazaderas, presione la palanca
de liberación y mueva la mordaza como se muestra. La mordaza que está acoplada al
mango también se puede mover de la misma manera o apretando y liberando el mango
delantero.
J2 - Alinee el poste redondo en el extremo de la barra de la abrazadera con las aberturas
correspondientes en ambos lados de la ranura principal en la parte superior de la mesa
como se muestra.
J3 - Para trabar la abrazadera en posición horizontal, apriete el mango delantero y alinee
las lengüetas redondas que sobresalen con las aberturas correspondientes en la parte
17
G
I
H
90539119 BDWM1000 6/5/08 10:17 AM Page 17
Page 18

superior de la mesa (detrás de las aberturas mencionadas en J2).
J4 - Con la abrazadera completamente en posición horizontal, libere el mango delantero
para trabar la abrazadera en el lugar. (Para quitar la abrazadera, apriete el mango y
levante).
J5 - Oprima la palanca de liberación y mueva la mordaza delantera contra el material que
desea sujetar. Apriete el mango delantero y aplique presión.
J6 - Para sujetar en posición vertical, introduzca la abrazadera en la ranura que está en la
parte superior de la mesa como se muestra.
18
J1
J2
J3
J4
J5
J6
J
90539119 BDWM1000 6/5/08 10:17 AM Page 18
2
12
Page 19

19
TRANSPORTE
1. Transporte la unidad del mango de
transporte correspondiente, como se muestra
en la figura K.
Mantenimiento
Para limpiar la herramienta, sólo utilice jabón
suave y un paño húmedo. Nunca permita que
penetre líquido dentro de la herramienta ni
sumerja ninguna de las piezas en un líquido.
IMPORTANTE: Para garantizar l
SEGURIDAD y la CONFIABILIDAD del
producto, la reparaciones, el mantenimiento y
los ajustes deberán efectuarse en centros de
servicio autorizado u otras organizaciones de
servicio calificado, que utilicen siempre
refacciones idénticas.
ACCESORIOS
Los accesorios recomendados para emplearse con su herramienta, están a su
disposición con el distribuidor o centro de servicio autorizado de su localidad. Si necesita
ayuda en relación con los accesorios, por favor llame: (55)5326-7100
ADVERTENCIA: El uso de cualquier accesorio no recomendado para emplearse con
esta herramienta puede ser peligroso.
INFORMACIÓN DE MANTENIMIENTO
Todos los Centros de mantenimiento de Black & Decker cuentan con personal altamente
capacitado dispuesto a brindar a todos los clientes un servicio eficiente y confiable en la
reparación de herramientas eléctricas. Si necesita consejo técnico, reparaciones o piezas
de repuesto originales de fábrica, póngase en contacto con el centro de mantenimiento de
Black & Decker más cercano a su domicilio. Para ubicar su centro de servicio local,
consulte la sección “Herramientas eléctricas” (Tools-Electric) de las páginas amarillas,
llame al (55)5326-7100 o visite nuestro sitio www.blackanddecker.com.
GARANTÍA COMPLETA DE DOS AÑOS PARA USO EN EL HOGAR
Black & Decker (Estados Unidos) Inc. ofrece una garantía de dos años por cualquier
defecto del material o de fabricación de este producto. El producto defectuoso se reparará
o reemplazará sin costo alguno de dos maneras.
La primera opción, el reemplazo, es devolver el producto al comercio donde se lo adquirió
(siempre y cuando se trate de un comercio participante). Las devoluciones deben
realizarse conforme a la política de devolución del comercio (generalmente, entre 30 y 90
días posteriores a la venta). Le pueden solicitar comprobante de compra. Consulte en el
comercio acerca de la política especial sobre devoluciones una vez excedido el plazo
establecido.
La segunda opción es llevar o enviar el producto (con flete pago) a un Centro de
mantenimiento propio o autorizado de Black & Decker para su reparación o reemplazo
según nuestro criterio. Le pueden solicitar el comprobante de compra. Los Centros de
mantenimiento autorizados y de propiedad de Black & Decker se detallan en la sección
“Herramientas eléctricas” (Tools-Electric) de las páginas amarillas de la guía telefónica.
Esta garantía no se extiende a los accesorios. Esta garantía le concede derechos legales
específicos; usted puede tener otros derechos que pueden variar según el estado o la
provincia. Si tiene alguna pregunta, comuníquese con el gerente del Centro de
mantenimiento de Black & Decker de su zona. Este producto no está diseñado para uso
comercial.
PATENTES PENDIENTES
K
90539119 BDWM1000 6/5/08 10:17 AM Page 19
Page 20

Copyright © 2008 Black & Decker Printed in Israel
Cat. No. BDWM1000 Form No. 90539119 June 2008
CULIACAN, SIN
Av. Nicolás Bravo #1063 Sur
(667) 7 12 42 11
Col. Industrial Bravo
GUADALAJARA, JAL
Av. La Paz #1779
(33) 3825 6978
Col. Americana Sector Juarez
MEXICO, D.F.
Eje Central Lázaro Cardenas
No. 18
(55) 5588 9377
Local D, Col. Obrera
MERIDA, YUC
Calle 63 #459-A
(999) 928 5038
Col. Centro
MONTERREY, N.L.
Av. Francisco I. Madero
No.831
(81) 8375 2313
Col. Centro
PUEBLA, PUE
17 Norte #205
(222) 246 3714
Col. Centro
QUERETARO, QRO
Av. Madero 139 Pte.
(442) 214 1660
Col. Centro
SAN LUIS POTOSI, SLP
Av. Universidad 1525
(444) 814 2383
Col. San Luis
TORREON, COAH
Blvd. Independencia, 96 Pte.
(871) 716 5265
Col. Centro
VERACRUZ, VER
Prolongación Díaz Mirón #4280
(229)921 7016
Col. Remes
VILLAHERMOSA, TAB
Constitución 516-A
(993) 312 5111
Col. Centro
PARA OTRAS LOCALIDADES LLAME AL: (55) 5326 7100
Para reparación y servicio de sus herramientas eléctricas, favor de dirigirse
al Centro de Servicio más cercano:
BLACK & DECKER S.A. DE C.V.
BOSQUES DE CIDROS ACCESO
RADIATAS NO. 42
COL. BOSQUES DE LAS LOMAS.
05120 MÉXICO, D.F
TEL. 55-5326-7100
SECCI N
AMARILLA
Si funciona…
y funciona muy bien.
Vea “Herramientas
eléctricas (Tools-Electric)”
– Páginas amarillas –
para Servicio y ventas
90539119 BDWM1000 6/5/08 10:17 AM Page 20
 Loading...