

Page 1
To register your new product, visit
www.BlackandDecker.com/NewOwner
KEY INFORMATION YOU SHOULD KNOW:
• Do not push down—let the sander do the work.
• Extended drywall sanding is not recommended for this product.
INSTRUCTION MANUAL
20V MAX* MOUSE SANDER
Thank you for choosing BLACK+DECKER!
PLEASE READ BEFORE RETURNING THIS PRODUCT FOR
ANY REASON.
If you have a question or experience a problem with your BLACK+DECKER
purchase, go to http://www.blackanddecker.com/instantanswers
If you can’t find the answer or do not have access to the Internet, call
1-800-544-6986 from 8 a.m. to 5 p.m. EST Mon. - Fri. to speak with an agent.
Please have the catalog number available when you call.
SAVE THIS MANUAL FOR FUTURE REFERENCE.
VEA EL ESPANOL EN LA CONTRAPORTADA.
INSTRUCTIVO DE OPERACIÓN, CENTROS DE SERVICIO Y PÓLIZA DE GARANTÍA.
ADVERTENCIA: LÉASE ESTE INSTRUCTIVO ANTES DE USAR EL PRODUCTO.
*Maximum initial battery pack voltage (measured without a workload) is 20 volts. The nominal voltage is 18.
CATALOG NUMBER
BDCMS20
Page 2

2
WARNING: Read all safety
warnings and all instructions.
Failure to follow the warnings and
instructions may result in electric shock,
fire and/or serious injury.
SAVE ALL WARNINGS AND
INSTRUCTIONS FOR FUTURE
REFERENCE
The term “power tool” in the warnings
refers to your mains-operated
(corded) power tool or batteryoperated (cordless) power tool.
SAVE THESE INSTRUCTIONS
1) WORK AREA SAFETY
a) Keep work area clean and well
lit. Cluttered or dark areas invite
accidents.
b) Do not operate power tools in
explosive atmospheres, such as in the
presence of flammable liquids, gases
or dust. Power tools create sparks which
may ignite the dust or fumes.
c) Keep children and bystanders
away while operating a power tool.
Distractions can cause you to lose control.
2) ELECTRICAL SAFETY
a) Power tool plugs must match the
outlet. Never modify the plug in any
way. Do not use any adapter plugs
with earthed (grounded) power tools.
Unmodified plugs and matching outlets
will reduce risk of electric shock.
b) Avoid body contact with earthed or
grounded surfaces such as pipes,
radiators, ranges and refrigerators.
There is an increased risk of electric
shock if your body is earthed or
grounded.
c) Do not expose power tools to rain
or wet conditions. Water entering
a power tool will increase the risk of
electric shock.
d) Do not abuse the cord. Never use
the cord for carrying, pulling or
unplugging the power tool. Keep
cord away from heat, oil, sharp
edges or moving parts. Damaged or
entangled cords increase the risk of
electric shock.
e) When operating a power tool
outdoors, use an extension cord
suitable for outdoor use. Use of a
cord suitable for outdoor use reduces
the risk of electric shock.
f) If operating a power tool in a damp
location is unavoidable, use a
ground fault circuit interrupter
(GFCI) protected supply. Use of
a GFCI reduces the risk of electric
shock.
3) PERSONAL SAFETY
a) Stay alert, watch what you are
doing and use common sense when
operating a power tool. Do not use
a power tool while you are tired
or under the influence of drugs,
alcohol or medication. A moment of
inattention while operating power tools
may result in serious personal injury.
b) Use personal protective equipment.
Always wear eye protection.
Protective equipment such as dust
mask, nonskid safety shoes, hard
hat, or hearing protection used for
appropriate conditions will reduce
personal injuries.
c) Prevent unintentional starting.
Ensure the switch is in the off
position before connecting to power
source and/ or battery pack, picking
up or carrying the tool. Carrying
power tools with your finger on the
switch or energizing power tools that
have the switch on invites accidents.
d) Remove any adjusting key or
wrench before turning the power
tool on. A wrench or a key left
attached to a rotating part of the
power tool may result in personal
injury.
e) Do not overreach. Keep proper
footing and balance at all times.
This enables better control of the
power tool in unexpected situations.
f) Dress properly. Do not wear loose
Definitions: Safety Alert Symbols and Words
This instruction manual uses the following safety alert symbols and words to alert you
to hazardous situations and your risks of personal injury or property damage.
DANGER: Indicates an imminently hazardous situation which, if not avoided, will
result in death or serious injury.
WARNING: Indicates a potentially hazardous situation which, if not avoided,
could result in death or serious injury.
CAUTION: Indicates a potentially haz ard ous situation which, if not avoided, may
result in minor or mod er ate injury.
NOTICE: Used without the safety alert symbol indicates potentially hazardous
situation which, if not avoided, may result in property damage.
Page 3

clothing or jewelry. Keep your hair,
clothing and gloves away from
moving parts. Loose clothes, jewelry
or long hair can be caught in moving
parts.
g) If devices are provided for the
connection of dust extraction and
collection facilities, ensure these
are connected and properly used.
Use of dust collection can reduce
dust-related hazards.
4) POWER TOOL USE AND CARE
a) Do not force the power tool. Use
the correct power tool for your
application. The correct power tool
will do the job better and safer at the
rate for which it was designed.
b) Do not use the power tool if the
switch does not turn it on and
off. Any power tool that cannot
be controlled with the switch is
dangerous and must be repaired.
c) Disconnect the plug from the power
source and/or the battery pack from
the power tool before making any
adjustments, changing accessories,
or storing power tools. Such
preventive safety measures reduce
the risk of starting the power tool
accidentally.
d) Store idle power tools out of the reach
of children and do not allow persons
unfamiliar with the power tool or
these instructions to operate the
power tool. Power tools are dangerous
in the hands of untrained users.
e) Maintain power tools. Check for
misalignment or binding of moving
parts, breakage of parts and any
other condition that may affect the
power tool’s operation. If damaged,
have the power tool repaired before
use. Many accidents are caused by
poorly maintained power tools.
f) Keep cutting tools sharp and clean.
Properly maintained cutting tools with
sharp cutting edges are less likely to
bind and are easier to control.
g) Use the power tool, accessories
and tool bits, etc. in accordance
with these instructions, taking into
account the working conditions and
the work to be performed. Use of
the power tool for operations different
from those intended could result in a
hazardous situation.
5) BATTERY TOOL USE AND CARE
a) Recharge only with the charger
specified by the manufacturer. A
charger that is suitable for one type of
battery pack may create a risk of fire
when used with another battery pack.
b) Use power tools only with
specifically designated battery
packs. Use of any other battery packs
may create a risk of injury and fire.
c) When battery pack is not in use,
keep it away from other metal
objects like paper clips, coins, keys,
nails, screws, or other small metal
objects that can make a connection
from one terminal to another.
Shorting the battery terminals together
may cause burns or a fire.
d) Under abusive conditions,
liquid may be ejected from the
battery, avoid contact. If contact
accidentally occurs, flush with
water. If liquid contacts eyes,
additionally seek medical help.
Liquid ejected from the battery may
cause irritation or burns.
6) SERVICE
a) Have your power tool serviced by a
qualified repair person using only
identical replacement parts. This will
ensure that the safety of the power
tool is maintained.
SPECIFIC SAFETY RULES
• Hold power tools by insulated gripping
surfaces when performing an operation
where the sanding pad may contact
hidden wiring or its own cord. Contact with
a “live” wire will make exposed metal parts
of the tool “live” and shock the operator.
WARNING: ALWAYS use safety
glasses. Everyday eye glasses are NOT
safety glasses. Also use face or dust
mask if cutting operation is
dusty. ALWAYS WEAR CERTIFIED
SAFETY EQUIPMENT:
• ANSI Z87.1 eye protection (CAN/CSA Z94.3)
• ANSI S12.6 (S3.19) hearing protection
•
NIOSH/OSHA/MSHA respiratory protection
WARNING: Some dust created by
power sanding, sawing, grinding,
drilling, and other construction activities
contains chemicals known to the State of
California to cause cancer, birth defects
or other reproductive harm. Some
examples of these chemicals are:
• lead from lead-based paints,
• crystalline silica from bricks and cement
and other masonry products, and
• arsenic and chromium from chemically-
treated lumber.
Your risk from these exposures varies, depending on
how often you do this type of work. To reduce your
exposure to these chemicals: work in a well ventilated
area, and work with approved safety equipment, such as
those dust masks that are specially designed to filter out
microscopic particles.
• Avoid prolonged contact with dust
from power sanding, sawing, grinding,
drilling, and other construction
activities. Wear protective clothing
and wash exposed areas with soap
3
Page 4

4
and water. Allowing dust to get into
your mouth, eyes, or lay on the skin may
promote absorption of harmful chemicals.
WARNING:
Use of this tool can
generate and/or disperse dust, which may
cause serious and permanent respiratory
or other injury. Always use NIOSH/OSHA
approved respiratory protection appropriate
for the dust exposure. Direct particles away
from face and body.
• Sanding of lead-based paint is not
recommended. See Sanding: Lead
Based Paint for additional information
before sanding paint.
• Clean your tool out periodically.
Extension Cords
When using an extension cord, be sure to
use one heavy enough to carry the current
your product will draw. An undersized cord
will cause a drop in line voltage resulting
in loss of power and overheating. The
following table shows the correct size
to use depending on cord length and
nameplate ampere rating. If in doubt, use
the next heavier gauge. The smaller the
gauge number, the heavier the cord.
SYMBOLS
The label on your tool may include the
following symbols. The symbols and their
definitions are as follows:
V ..................volts
A ..................amperes
Hz ................ hertz
W .................watts
min ..............minutes
or AC ...... alternating current
or DC ...direct current
n
o ................ no load speed
................Class I Construction
(grounded)
................earthing terminal
................safety alert symbol
................Class II Construction
(double insulated)
.../min or rpm...revolutions or
reciprocation per minute
OPM ............ oscillations per minute
...............Read instruction manual
before use
................ Use proper respiratory
protection
................ Use proper eye protection
................ Use proper hearing
protection
OTHER IMPORTANT SAFETY
WARNINGS AND INSTRUCTIONS
SANDING
LEAD BASED PAINT
Sanding of lead based paint is NOT
RECOMMENDED due to the difficulty of
controlling the contaminated dust. The
greatest danger of lead poisoning is to
children and pregnant women.
Since it is difficult to identify whether or not
a paint contains lead without a chemical
analysis, we recommend the following
precautions when sanding any paint:
PERSONAL SAFETY
• No children or pregnant women should
enter the work area where the paint
sanding is being done until all clean up is
completed.
• A dust mask or respirator should be
worn by all persons entering the work
area. The filter should be replaced daily
or whenever the wearer has difficulty
breathing.
• NOTE: Only those dust masks suitable for
working with lead paint dust and fumes
should be used. Ordinary painting masks
do not offer this protection. See your local
hardware dealer for the proper (NIOSH
approved) mask.
• NO EATING, DRINKING or SMOKING
should be done in the work area to
prevent ingesting contaminated paint
particles. Workers should wash and clean
up BEFORE eating, drinking or smoking.
Articles of food, drink, or smoking should
not be left in the work area where dust
would settle on them.
ENVIRONMENTAL SAFETY
• Paint should be removed in such a
manner as to minimize the amount of dust
generated.
• Areas where paint removal is occurring
should be sealed with plastic sheeting of
4 mils thickness.
• Sanding should be done in a manner to
reduce tracking of paint dust outside the work
area.
CLEANING AND DISPOSAL
• All surfaces in the work area should be
vacuumed and thoroughly cleaned daily
for the duration of the sanding project.
Vacuum filter bags should be changed
frequently.
• Plastic drop cloths should be gathered up
and disposed of along with any dust chips
or other removal debris. They should be
placed in sealed refuse receptacles and
disposed of through regular trash pick-up
procedures. During clean up, children
and pregnant women should be kept
away from the immediate work area.
• All toys, washable furniture and utensils
used by children should be washed
thoroughly before being used again.
IMPORTANT SAFETY INSTRUCTIONS
FOR BATTERY CHARGERS
SAVE THESE INSTRUCTIONS: This
manual contains important safety
instructions for battery chargers.
• Before using charger, read all
Page 5

5
individual extension contains at least the
minimum wire size.
Recommended Minimum Wire Size for
Extension Cords
Minimum Gage for Cord Sets
Volts Total Length of Cord in Feet
120V 0-25 26-50 51-100 101-150
(0-7,6m) (7,6-15,2m) (15,2-30,4m) (30,4-45,7m)
Ampere Rating
More Not more American Wire Gage
Than Than
0 -6 18 16 16 14
6 -10 18 16 14 12
10 -12 16 16 14 12
12 -16 14 12 Not Recommended
• Do not place any object on top of
charger or place the charger on a soft
surface that might block the ventilation
slots and result in excessive internal
heat. Place the charger in a position
away from any heat source. The
charger is ventilated through slots in the
top and the bottom of the housing.
• Do not mount charger on wall or
permanently affix charger to any
surface. The charger is intended to use
on a flat, stable surface (i.e., table top,
bench top).
• Do not operate charger with damaged
cord or plug — have them replaced
immediately.
• Do not operate charger if it has
received a sharp blow, been dropped,
or otherwise damaged in any way.
Take it to an authorized service center.
• Do not disassemble charger; take it
to an authorized service center when
service or repair is required. Incorrect
reassembly may result in a risk of electric
shock, electrocution or fire.
• Disconnect the charger from the outlet
before attempting any cleaning. This
will reduce the risk of electric shock.
Removing the battery pack will not
reduce this risk.
• NEVER attempt to connect 2 chargers
together.
• The charger is designed to operate on
standard household electrical power
(120 Volts). Do not attempt to use it on
any other voltage.
IMPORTANT SAFETY INSTRUCTIONS
FOR BATTERY PACKS
WARNING:
WARNING: READ ALL
SAFETY WARNINGS and all instructions
for the battery pack, charger and power
tool. Failure to follow the warnings and
instructions may result in electric shock, fire
and/or serious injury.
The battery pack is not fully charged out of
the carton. Before using the battery pack
and charger, read the safety instructions
below. Then follow charging procedures
outlined.
READ ALL INSTRUCTIONS
instructions and cautionary markings on
charger, battery pack, and product using
battery pack.
WARNING:
SHOCK HAZARD. Disconnect
the charger from the AC outlet before
cleaning. Dirt and grease may be removed
from the exterior of the charger using a cloth
or soft non-metallic brush. Do not use water
or any cleaning solutions.
WARNING:
SHOCK HAZARD.
Do not
allow any liquid to get inside the charger.
Electric shock may result.
WARNING:
BURN HAZARD. Do not
submerge the battery pack in any liquid or
allow any liquid to enter the battery pack.
Never attempt to open the battery pack for
any reason. If the plastic housing of the
battery pack breaks or cracks, return to a
service center for recycling.
CAUTION: BURN HAZARD. To reduce
the risk of injury, charge only
BLACK+DECKER rechargeable battery
packs. Other types of batteries may
overheat and burst resulting in personal
injury and property damage.
CAUTION: Under certain conditions,
with the charger plugged into the power
supply, the charger can be shorted by
foreign material.
WARNING:
• DO NOT attempt to charge the battery
pack with any chargers other than
those specified by the manufacturer.
The charger and battery pack are
specifically designed to work together.
• These chargers are not intended for any
uses other than charging designated
BLACK+DECKER rechargeable batteries.
Any other uses may result in risk of fire,
electric shock or electrocution.
• Do not expose charger to rain or snow.
• Pull by plug rather than cord when
disconnecting charger. This will reduce
risk of damage to electric plug and cord.
•
Make sure that cord is located so that it
will not be stepped on, tripped over, or
otherwise subjected to damage or stress.
• When operating a charger outdoors,
always provide a dry location.
• If use of an extension cord is absolutely
necessary outdoors, use an extension
cord suitable for outdoor use. Use of a
cord suitable for outdoor use reduces the
risk of electric shock.
• An extension cord must have
adequate wire size (AWG or American
Wire Gauge) for safety. The smaller the
gauge number of the wire, the greater
the capacity of the cable, that is 16
gauge has more capacity than 18 gauge.
When using more than one extension to
make up the total length, be sure each
Page 6

6
OR CARRY BATTERY SO THAT METAL OBJECTS
CAN CONTACT EXPOSED BATTERY TERMINALS.
FOR EXAMPLE, DO NOT PLACE BATTERY
IN APRONS, POCKETS, APPLIANCE BOXES,
PRODUCT KIT BOXES, DRAWERS, ETC.,
WITH LOOSE NAILS, SCREWS, KEYS, ETC.
TRANSPORTING BATTERIES CAN POSSIBLY
CAUSE FIRES IF THE BATTERY TERMINALS
INADVERTENTLY COME IN CONTACT WITH
CONDUCTIVE MATERIALS SUCH AS KEYS,
COINS, HAND APPLIANCES AND THE LIKE. THE
US DEPARTMENT OF TRANSPORTATION
HAZARDOUS MATERIAL REGULATIONS
(HMR) ACTUALLY PROHIBIT
TRANSPORTING BATTERIES IN
COMMERCE OR ON AIRPLANES (I.E.,
PACKED IN SUITCASES AND CARRY-ON
LUGGAGE) UNLESS THEY ARE PROPERLY
PROTECTED FROM SHORT CIRCUITS. SO
WHEN TRANSPORTING INDIVIDUAL
BATTERIES, MAKE SURE THAT THE
BATTERY TERMINALS ARE PROTECTED
AND WELL INSULATED FROM MATERIALS
THAT COULD CONTACT THEM AND
CAUSE A SHORT CIRCUIT. NOTE:
BATTERIES SHOULD NOT BE PUT IN
CHECKED BAGGAGE.
IMPORTANT CHARGING NOTES
1. Longest life and best performance can be obtained if
the battery pack is charged when the air temperature is
between 65°F and 75°F (18°- 24°C). DO NOT charge the
battery pack in an air temperature below +40°F (+4.5°C),
or above +105°F (+40.5°C). This is important and will
prevent serious damage to the battery pack.
2. The charger and battery pack may become warm to touch
while charging. This is a normal condition, and does not
indicate a problem. To facilitate the cooling of the battery
pack after use, avoid placing the charger or battery pack
in a warm environment such as in a metal shed, or an
uninsulated trailer.
3.
If the battery pack does not charge properly:
a. Check current at receptacle by plugging in a
lamp or other appliance.
b. Check to see if receptacle is connected to a light
switch which turns power off when you turn out the
lights.
c. Move charger and battery pack to a location
where the surrounding air
temperature is approximately 65°F - 75°F (18°24°C).
d. If charging problems persist, take the tool,
battery pack and charger to your local service
center.
4. The battery pack should be recharged when it
fails to produce sufficient power on jobs which were
easily done previously. DO NOT CONTINUE
to use under these conditions. Follow the
charging procedure. You may also charge
a partially used pack whenever you desire
with no adverse affect on the battery pack.
5. Foreign materials of a conductive
nature such as, but not limited to, steel
wool, aluminum foil, or any buildup of
metallic particles should be kept away
from charger cavities. Always unplug the
charger from the power supply when there
• NEVER force the battery pack into the
charger. DO NOT modify the battery
pack in any way to fit into a noncompatible charger as battery pack
may rupture causing serious personal
injury. Consult the chart at the end of
this manual for compatibility of batteries
and chargers.
• Do not incinerate the battery pack
even if it is severely damaged or is
completely worn out. The battery pack
can explode in a fire. Toxic fumes and
materials are created when battery
packs are burned.
•
Do not charge or use battery in explosive
atmospheres, such as in the presence of
flammable liquids, gases or dust. Inserting
or removing the battery from the charger may
ignite the dust or fumes.
•
If battery contents come into contact with
the skin, immediately wash area with mild
soap and water. If battery liquid gets into
the eye, rinse water over the open eye for 15
minutes or until irritation ceases. If medical
attention is needed, the battery electrolyte
for Li-ion batteries is composed of a mixture
of liquid organic carbonates and lithium
salts.
• Contents of opened battery cells may
cause respiratory irritation. Provide
fresh air. If symptoms persist, seek
medical attention.
• Do not dispose of the battery in a fire. The
cell may explode. Check with local codes
for possible special disposal instructions.
• Do not open or mutilate the battery.
Released electrolyte is corrosive and
may cause damage to the eyes or skin. It
may be toxic if swallowed.
WARNING: BURN HAZARD.
BATTERY LIQUID MAY BE FLAMMABLE IF
EXPOSED TO SPARK OR FLAME.
• Charge the battery packs only in
BLACK+DECKER chargers.
• DO NOT splash or immerse in water or
other liquids. This may cause premature
cell failure.
• Do not store or use the appliance and
battery pack in locations where the
temperature may reach or exceed
105°F (40˚C) (such as outside sheds or
metal buildings in summer).
WARNING: NEVER ATTEMPT TO OPEN THE
BATTERY PACK FOR ANY REASON. IF BATTERY
PACK CASE IS CRACKED OR DAMAGED, DO NOT
INSERT INTO CHARGER. DO NOT CRUSH, DROP
OR DAMAGE BATTERY PACK. DO NOT USE A
BATTERY PACK OR CHARGER THAT HAS RECEIVED
A SHARP BLOW, BEEN DROPPED, RUN OVER OR
DAMAGED IN ANY WAY (I.E., PIERCED WITH A
NAIL, HIT WITH A HAMMER, STEPPED ON).
DAMAGED BATTERY PACKS SHOULD BE
RETURNED TO SERVICE CENTER FOR RECYCLING.
WARNING:
FIRE HAZARD. DO NOT STORE
Page 7
1
6
4
7
5
2
3
7
is no battery pack in the cavity. Unplug
charger before attempting to clean.
6. Do not freeze or immerse charger in
water or any other liquid.
WARNING: Shock hazard. Do not
allow any liquid to get inside charger.Never
attempt to open the battery pack for any
reason. If the plastic housing of the
battery pack breaks or cracks, return to a
service center for recycling.
STORAGE RECOMMENDATIONS
1. The best storage place is one that is
cool and dry away from direct sunlight and
excess heat or cold.
2. For long storage, it is recommended to
store a fully charged battery pack in a cool
dry place out of the charger for optimal
results.
NOTE: Do not store the battery packs in
a tool with the trigger switch locked on.
Never tape the trigger switch in the ON
position.
NOTE: Battery packs should not be stored
completely depleted of charge. The battery
pack will need to be recharged before use.
CHARGING PROCEDURE
BLACK+DECKER chargers are designed to
charge BLACK+DECKER battery packs.
NOTE: To ensure maximum performance
and life of lithium ion BATTERY PACKS:
• Charge the battery pack fully before
first use.
• Recharge discharged batteries as soon
as possible after every use.
• Do not discharge batteries fully.
1. Plug the charger into an appropriate
outlet before inserting the battery pack.
2. Insert the battery pack into the charger.
3. The green LED will flash indicating that
the battery is being charged.
4.
The completion of charge is indicated by
the green LED remaining on continuously.
The pack is fully charged and may be
used at this time or left on the charger.
LEAVING THE BATTERY IN THE
CHARGER
The charger and battery pack can be left
connected with the green LED glowing
indefinitely. The charger will keep the
battery pack fresh and fully charged.
Description Catalog #
These products use the batteries and chargers listed in the chart below.
20v Max** Lithium-Ion Battery: LBXR20
20v Max** Lithium-Ion Battery: LBXR20BT
20v Max** Type 1 22wh Lithium-Ion Battery: LB20
Lithium 2 Amp Fast Charger: L2AFC
Lithium 2 Amp Fast Charger: L2AFCBST
20v Max** Lithium-Ion Battery Charger: LCS20
20v Max** Lithium-Ion Battery Charger: LCS201
20v Max** Lithium-Ion Battery Charger: LCS1620
20v Max** Lithium-Ion Battery Charger: LCS200
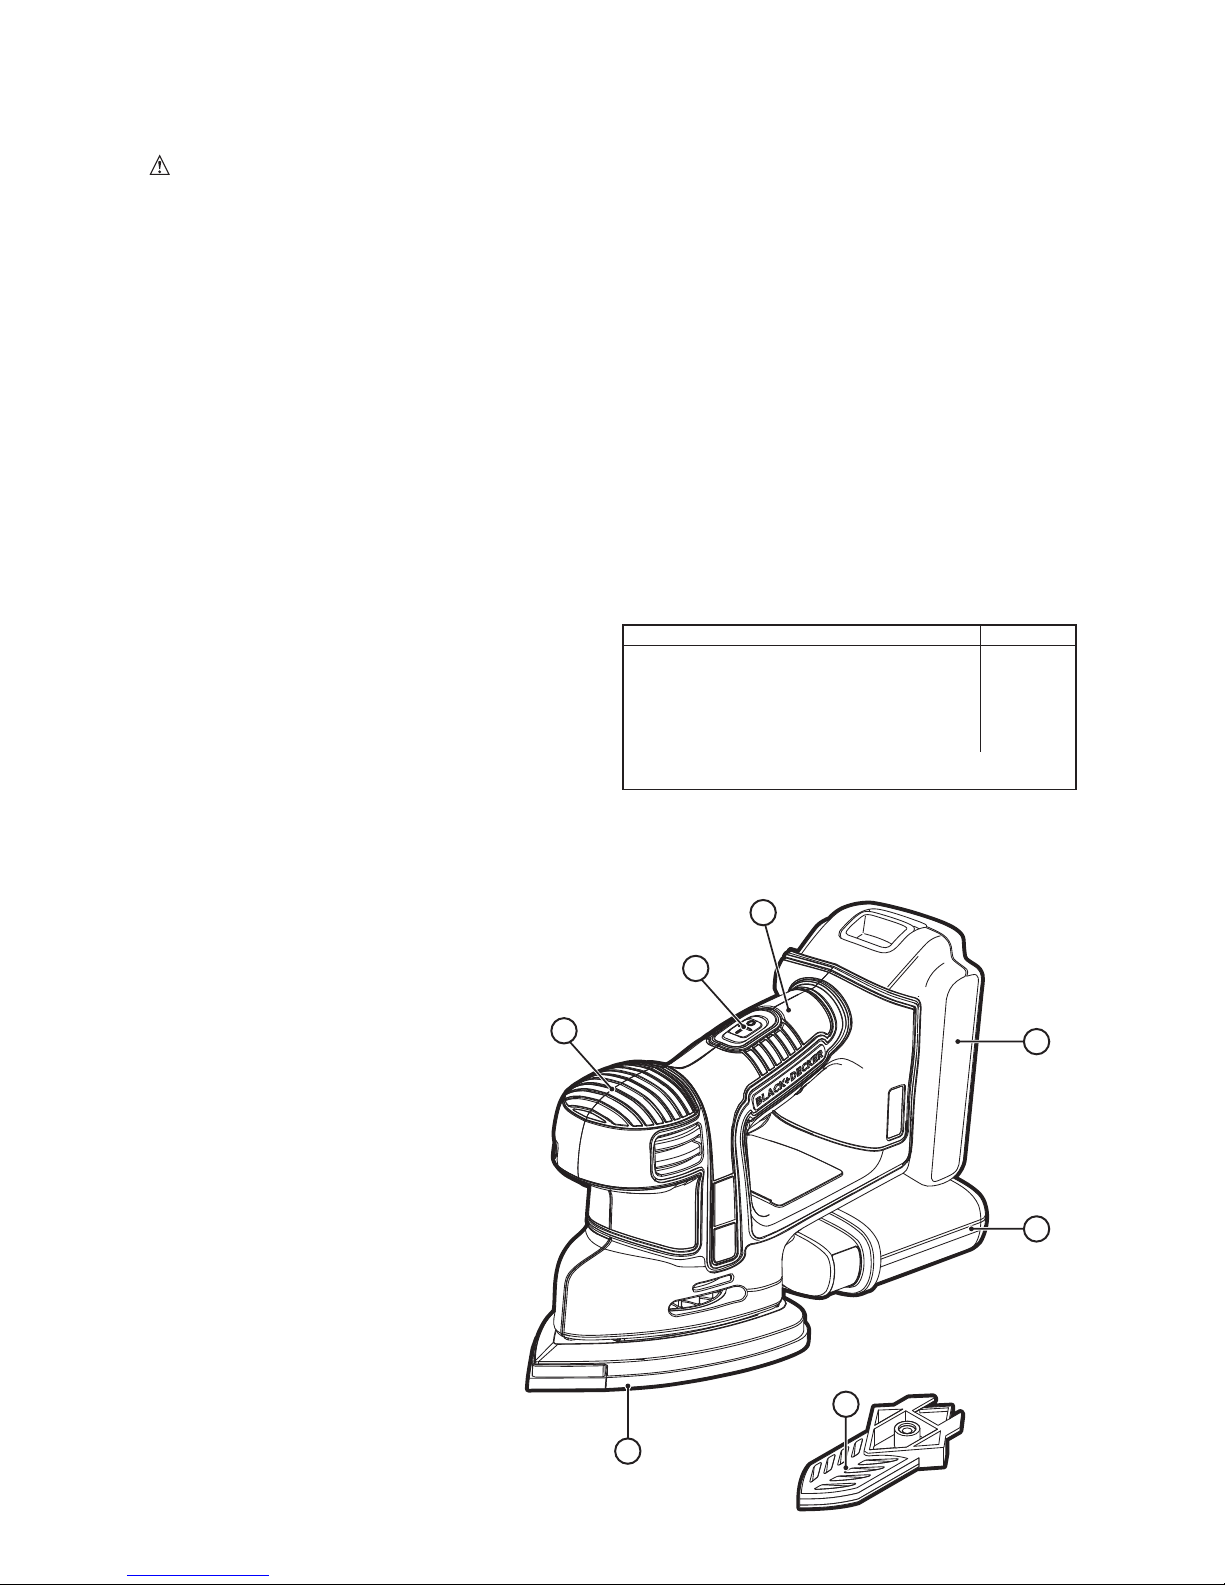
FUNCTIONAL DESCRIPTION
1. On/off switch
2. Back handle
3. Front handle
4. Dust collection canister
5. Sanding base
6.Finger attachment
7. Battery
Tools required: PH1 Phillips
screwdriver
Page 8

8
INTENDED USE
Your BLACK+DECKER BDCMS20 sander
has been designed for sanding wood,
metal, plastics and painted surfaces. This
tool is intended for consumer use only.
OPERATING INSTRUCTIONS
WARNING: To reduce the risk of
serious personal injury, read and follow all
important safety warnings and instructions
prior to using this tool.
INSTALLING AND REMOVING THE
BATTERY PACK FROM THE TOOL
CAUTION: Make certain the switch is off prior
to installing or removing the battery pack.
TO INSTALL BATTERY PACK:
Insert battery pack (7) into tool until fully
seated and an audible click is heard
(figure A). Make sure battery pack is fully
seated and fully latched into position.
TO REMOVE BATTERY PACK: Depress
the battery release button in the back of
the battery pack and pull battery pack out
of tool (figure B).
OPERATION
NOTE: Do not rest fingers on platen during
use. Move the sander in long sweeping
strokes across the surface, letting the
tool do the work. Light pressure is all
that is required for sanding, polishing or
scrubbing. Excessive pressure will slow
the tool and produce inferior results. Check
your work often, product is capable of
removing material rapidly.
WARNING: Shock hazard. Under no
circumstances should this product be used
near water.
CAUTION: To reduce the risk of
injury, turn off and remove the battery from
the tool before making any adjustments or
removing or installing attachments or
accessories.
SWITCHING ON AND OFF
• To switch the tool “ON”, depress the on/off
switch (1) at the forward position I.
• To switch the tool “OFF”, depress the on/
off switch (1) at the back position O.
FITTING SANDING SHEET (FIG. C)
• Hold the tool with the sanding base facing
upwards.
•
Place the sanding sheet (8) onto the
sanding base, making sure that the holes in
the sheet line up with the holes in the base.
FITTING SANDING TIPS (FIG. C)
• Detach the two additional diamond-shaped
tips (9) from the sanding sheet (8).
NOTE: The diamond-shaped tip (10) can
be reversed and replaced when worn.
• When the front part of the tip (9) is worn,
detach it from the sheet, reverse it and
press it onto the sanding base again.
• When the whole tip is worn, remove it from
the sanding base and fit a new tip.
NOTE: For optimal dust collection, ensure
the correct type of sanding paper is used.
B
A
899
C
Page 9

9
FINGER ATTACHMENT (FIG. D OPTIONAL ACCESSORY)
The finger attachment is used for fine detail
sanding.
• Remove the screw (10).
• Remove the diamond-shaped pad tip
(11) from the base.
• Fit the finger attachment (6) onto the
sanding base as shown in Figure E.
• Fit and tighten the screw.
• Align the appropriate sanding sheet with
the finger attachment.
REPLACING DIAMOND SHAPED
TIP (FIG. F)
• Replace the diamond shaped tip (11).
• Replace and tighten screw (10).
FITTING AND REMOVING THE
DUST CANISTER (FIG. G)
CAUTION:
To reduce the risk of injury,
turn off and remove the battery from the tool
before making any adjustments or removing
or installing attachments or accessories.
CAUTION:
Respiratory hazard. Never
operate this tool for wood sanding unless
the dust canister is in place. Sanding dust
exhaust may create a breathing hazard.
WARNING: Fire hazard.
Collected
sanding dust from sanding surface coatings
(polyurethane, linseed oil, etc.) can self-ignite
in sander dust canister or elsewhere and
cause fire. To reduce risk, empty canister
frequently and strictly follow sander manual
and coating manufacturer’s instructions.
WARNING: Fire hazard. When
working on metal surfaces, do not use the
dust canister or a vacuum cleaner because
sparks are generated. Wear safety glasses
and a dust mask. Due to the danger of fire,
do not use your sander to sand magnesium
surfaces. Do not use for wet sanding.
•
The dust collection canister (4) should be
emptied after every 10 minutes of sanding.
• Slide the dust canister (4) onto the
connector (4a) and make sure that it is
securely located.
• To remove the dust canister, pull it to the
rear and away from the rear end of the tool.
HINTS FOR OPTIMUM USE
WARNING:
Let the tool work at its
own pace. Do not overload.
• Do not place your hands over the
ventilation slots.
•
Do not exert too much pressure on the tool.
•
Regularly check the condition of the
sanding sheet. Replace when necessary.
• Always sand with the grain of the wood.
•
When sanding new layers of paint before
applying another layer, use extra fine grit.
• On very uneven surfaces, or when
removing layers of paint, start with a
coarse grit. On other surfaces, start with
a medium grit. In both cases, gradually
change to a fine grit for a smooth finish.
•
When sanding on a vertical surface, hold the
back handle (2) for better grip and control
.
ACCESSORIES
A variety of Mouse
®
accessories are
available at extra cost. Listings per retailer
may vary. Note: Use only sandpaper with
holes in the same configuration as on the
base of the sander. Sandpaper without
holes will not allow dust to enter the
canister.
The hook and loop pad and individual
bases are replaceable parts. If they
become worn, contact your local service
center. For more information call: 1-800544-6986.
WARNING:
The use of any accessory
not recommended for use with this tool
could be hazardous.
1110
6
E
10
11
F
4
4a
G
Page 10
10
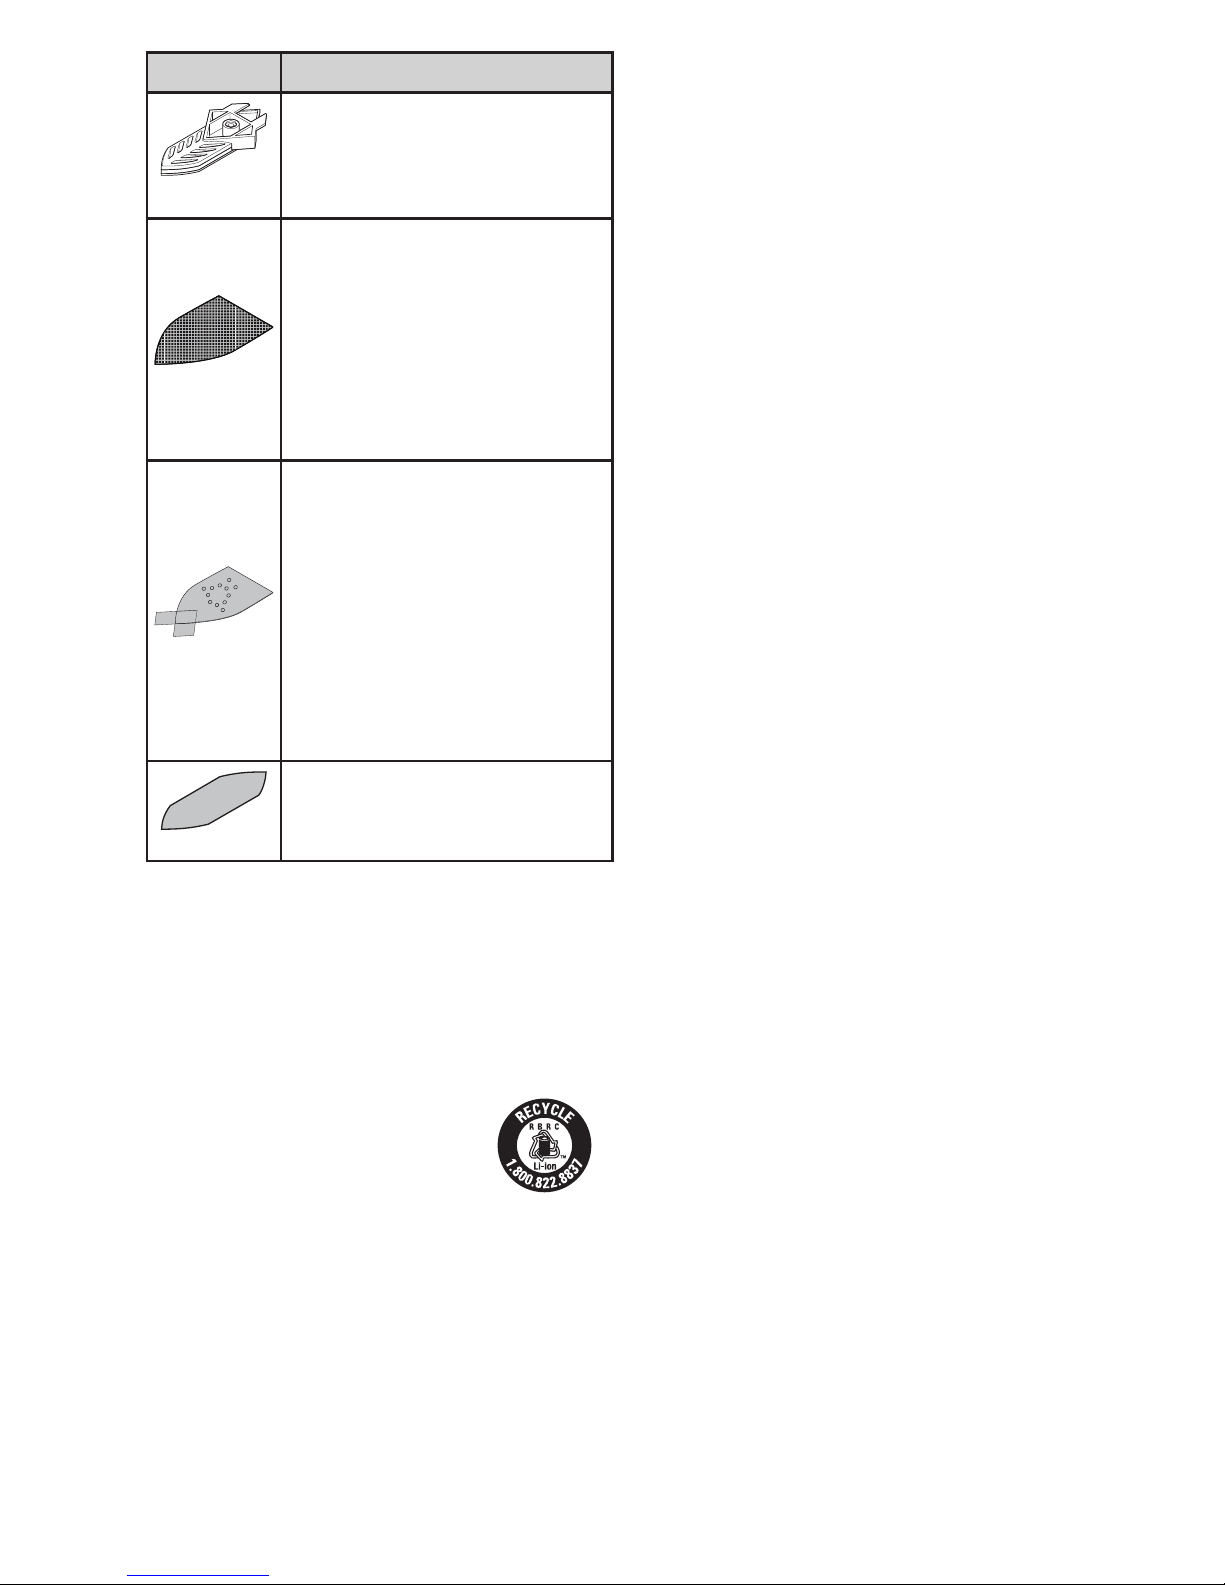
Item Description
Detail nger.
For small hard-to-reach areas. The detail nger can be
used for light sanding and for sanding into corners.
(Part Number - X32214-XJ)
240 grit sanding mesh.
For a ne nish for large detail sanding.
(Part Number - X39132-XJ)
120 grit sanding mesh.
For a medium nish for large detail sanding.
(Part Number - X39127-XJ)
80 grit sanding mesh.
For a coarse nish for large detail sanding.
(Part Number - X39122-XJ)
240 grit large detail sanding sheet with two
replacement tips.
For a ne nish for large detail sanding.
(Part Number - X31019-XJ)
120 grit large detail sanding sheet with two
replacement tips.
For a medium nish for large detail sanding.
(Part Number - X31009-XJ)
60 grit large detail sanding sheet with two
replacement tips.
For a coarse nish for large detail sanding.
(Part Number - X31039-XJ)
120 grit detailed nger sanding sheet.
For a medium nish for detailed sanding.
(Part Number - X3277-XJ)
MAINTENANCE
Use only mild soap and damp cloth to clean the tool. Never
let any liquid get inside the tool; never immerse any part of
the tool into a liquid.
IMPORTANT: To assure product SAFETY and
RELIABILITY, repairs, maintenance and adjustment
should be performed by authorized service centers or
other qualified service organizations, always using
identical replacement parts.
The RBRC® Seal
The RBRC® (Rechargeable Battery
Recycling Corp oration) Seal on the
nickel cadmium, nickel metal hydride
or lithium-ionbatteries (or battery packs) indicates
that the costs to recycle these batteries (or battery
packs) at the end of their useful life have already been
paid by BLACK+DECKER. In some areas, it is illegal
to place spent nickel cadmium, nickel metal hydride
or lithium-ion batteries in the trash or municipal
solid waste stream and the Call 2 Recycle® program
provides an environmentally conscious alternative. Call
2 Recycle, Inc., in cooperation with BLACK+DECKER
and other battery users, has established the program in
the United States and Canada to facilitate the collection
of spent nickel cadmium, nickel metal hydride or
lithium-ion batteries. Help protect our environment and
conserve natural resources by returning the spent nickel
cadmium, nickel metal hydride or lithium-ion batteries
to an authorized BLACK+DECKER service center or to
your local retailer for recycling. You may also contact
your local recycling center for information on where
to drop off the spent battery. RBRC® is a registered
trademark of Call 2 Recycle, Inc. This Class B digital
apparatus complies with Canadian ICES-003.
This device complies with part 15 of the FCC rules.
Operation is subject to the following two conditions: (1)
This device may not cause harmful interference, and
(2) this device must accept any interference received,
including interference that may cause undesired
operation. NOTE: This equipment has been tested and
found to comply with the limits for a Class B digital
device, pursuant to Part 15 of the FCC Rules. These
limits are designed to provide reasonable protection
against harmful interference in a residential installation.
This equipment generates, uses and can radiate radio
frequency energy and, if not installed and used in
accordance with the instructions, may cause harmful
interference to radio communications. However, there
is no guarantee that interference will not occur in a
particular installation. If this equipment does cause
harmful interference to radio or television reception,
which can be determined by turning the equipment
off and on, the user is encouraged to try to correct the
interference by one or more of the following measures:
• Reorient or relocate the receiving antenna.
• Increase the separation between the equipment and
receiver.
• Connect the equipment into an outlet on a circuit
different from that to which the receiver is connected.
• Consult the dealer or an experienced radio/TV
technician for help.
Changes or modifications to this unit not expressly
approved by the party responsible for compliance could
void the user’s authority to operate the equipment. This
Class B digital apparatus complies with Canadian ICES-003.
SERVICE INFORMATION
All BLACK+DECKER Service Centers are
staffed with trained personnel to provide
customers with efficient and reliable power
tool service. Whether you need technical
advice, repair, or genuine factory replacement
parts, contact the BLACK+DECKER location
nearest you. To find your local service
location, call: 1-800-544-6986 or visit www.
blackanddecker.com
TWO-YEAR LIMITED WARRANTY
Black & Decker (U.S.) Inc. warranties this product to be
free from defects in material or workmanship for a period
of two (2) years following the date of purchase, provided
that the product is used in a home environment. This
limited warranty does not cover failures due to abuse,
accidental damage or when repairs have been made or
attempted by anyone other than Black+Decker and its
Authorized Service Centers. A defective product meeting
the warranty conditions set forth herein will be replaced
or repaired at no charge in either of two ways:
The first, which will result in exchanges only, is to
return the product to the retailer from whom it was
purchased (provided that the store is a participating
retailer).Returns should be made within the time period
of the retailer’s policy for exchanges. Proof of purchase
Page 11

may be required. Please check with the retailer for its
specific return policy regarding time limits for returns
or exchanges. The second option is to take or send
the product (prepaid) to a Black+Decker owned or
authorized Service Center for repair or replacement
at Black+Decker’s option. Proof of purchase may be
required. Black+Decker owned and authorized service
centers are listed online at www.blackanddecker.com.
This warranty does not apply to accessories. This
warranty gives you specific legal rights and you may
have other rights which vary from state to state. Should
you have any questions, contact the manager of your
nearest Black+Decker Service Center. This product is
not intended for commercial use, and accordingly, such
commercial use of this product will void this warranty.
All other guarantees, express or implied, are hereby
disclaimed.
LATIN AMERICA: This warranty does not apply to
products sold in Latin America. For products sold
in Latin America, check country specific warranty
information contained in the packaging, call the local
company or see the website for such information.
TROUBLESHOOTING
PROBLEM POSSIBLE CAUSE POSSIBLE SOLUTION
• Unit will not start. • Battery not installed properly. • Check battery installation.
• Battery not charged. • Check battery charging requirements.
• Battery will not charge. •
Battery not inserted into charger
. • Insert battery intocharger until green
LED appears.
• Charger not plugged in. • Plug charger into a working outlet.
Refer to “Important Charging Notes”
for more details.
• Check current at receptacle by
plugging in a lamp or other appliance.
• Check to see if receptacle is
connected to a light switch which
turns power off when you
turn out the lights.
• Surrounding air tempera- •
Move charger and tool to a surrounding
ture too hot or too cold. air temperature of above 40 degree F
(4.5°C) or below 105 degree F (+40.5°C).
• Dust is not • Sandpaper holes do not align. • Use Mouse® sandpaper with the
being collected. appropriate hole configuration.
• Dust canister is full. • Separate dust canister and gently
shake or tap to empty.
For assistance with your product, visit our website www.blackanddecker.com for the
location of the service center nearest you or call the
BLACK+DECKER
help line at
1-800-544-6986.
11
Application / Accessory Matrix
ACCESSORY RECOMMENDED APPLICATIONS / USES
MediuM grit sandpaper paint, Varnish, rust reMoVal
Fine grit sandpaper surFace blending and Finishing
extra Fine grit sandpaper sanding between coats oF paint or Varnish
detail sanding tips corners / hard to reach places
1 ot polishing / stripping wool polishing Metals / stripping Varnish or urethane
4 ot Fine polishing wool Fine polishing, satin Finish on paint / Varnish / urethane
grey FoaM pad applying and reMoVing polish
white
non-woVen pad light scrubbing
red
non-woVen pad heaVy scrubbing / rust reMoVal
The pads described above may be available in kits where Mouse® products are sold. For more information call 1-800-544-6986.
Imported by
Black & Decker (U.S.) Inc.,
701 E. Joppa Rd.
Towson, MD 21286 U.S.A.
Page 12

IMPORTANTS RENSEIGNEMENTS :
· Ne pas appuyer trop fort sur l’outil; laisser ce dernier faire le travail.
· Il est déconseillé d’utiliser cet outil pour poncer des cloisons sèches
pendant de longues périodes.
12
Définitions : Symboles et termes d’alarmes sécurité
Ce guide d’utilisation utilise les symboles et termes d’alarmes sécurité suivants pour vous
prévenir de situations dangereuses et de risques de dommages corporels ou matériels.
DANGER : Indique une situation dangereuse imminente qui, si elle n’est pas évitée,
causera la mort ou des graves blessures.
AVERTISSEMENT : Indique une situation potentiellement dangereuse qui, si
elle n’est pas évitée, pourrait causer la mort ou de graves blessures.
MISE EN GARDE : Indique une situation potentiellement dangereuse qui, si elle
n’est pas évitée, pourrait causer des blessures mineures ou modérées.
AVIS :
Utilisé sans le symbole d’alerte à la sécurité, indique une situationvpotentiellement
dangereuse qui, si elle n’est pas évitée, peut résulter en des dommages à la propriété.
MODE D’EMPLOI
PONCEUSE MOUSE 20V MAX*
Merci d’avoir choisi BLACK+DECKER! Consulter le site Web
www.BlackandDecker.com/NewOwner pour enregistrer votre nouveau produit.
ÀLIRE AVANT DE RETOURNER CE PRODUIT POUR QUELQUE
RAISON QUE CE SOIT :
Si des questions ou des problèmes surgissent après l’achat d’un produit
BLACK+DECKER, consulter le site Web www.blackanddecker.com/instantanswers
pour obtenir des réponses instantanément 24 heures par jour. Si la réponse est
introuvable ou en l’absence d’accès à l’Internet, composer le 1 800 544-6986 de 8 h à
17 h HNE, du lundi au vendredi, pour parler avec un agent. Prière d’avoir le numéro de
catalogue sous la main lors de l’appel.
CONSERVER CE MODE D’EMPLOI POUR UN USAGE ULTÉRIEUR.
*La tension initiale maximum du bloc-piles (mesurée à vide) est de 20 volts. La tension nominale est de 18.
NUMERO DE CATALOGUE
BDCMS20
Page 13

Avertissements de sécurité
généraux pour les outils
électriques
AVERTISSEMENT! Lire tous les
avertissements de sécurité et toutes
les directives. Le non-respect des
avertissements et des directives
pourrait se solder par un choc
électrique, un incendie et/ou une
blessure grave.
Conserver tous les avertissements
et toutes les directives pour un
usage ultérieur.
Le terme «outil électrique» cité dans
les avertissements se rapporte à votre
outil électrique à alimentation sur
secteur (avec fil) ou par piles (sans fil).
1) Sécurité du lieu de travail
a) Tenir la zone de travail propre et
bien éclairée. Les endroits sombres
sont souvent des causes d’accidents.
b) Ne pas faire fonctionner d’outils
électriques dans un milieu
déflagrant, soit en présence de
liquides inflammables, de gaz ou
de poussière. Les outils électriques
produisent des étincelles qui peuvent
enflammer la poussière ou les vapeurs.
c) Éloigner les enfants et les curieux
au moment d’utiliser un outil
électrique. Une distraction pourrait
vous en faire perdre la maîtrise.
2) Sécurité en matière d’électricité
a) Les fiches des outils électriques
doivent correspondre à la prise.
Ne jamais modifier la fiche en
aucune façon. Ne jamais utiliser
de fiche d’adaptation avec un outil
électrique mis à la terre. Le risque
de choc électrique sera réduit par
l’utilisation de fiches non modifiées
correspondant à la prise.
b) Éviter tout contact physique
avec des surfaces mises à la
terre comme des tuyaux, des
radiateurs, des cuisinières et des
réfrigérateurs. Le risque de choc
électrique est plus élevé si votre
corps est mis à la terre.
c) Ne pas exposer les outils
électriques à la pluie ou à d’autres
conditions où il pourrait être
mouillé. La pénétration de l’eau dans
un outil électrique augmente le risque
de choc électrique.
d) Ne pas utiliser abusivement le
cordon d’alimentation. Ne jamais
utiliser le cordon pour transporter,
tirer ou débrancher un outil
électrique. Tenir le cordon éloigné
de la chaleur, de l’huile, des bords
tranchants ou des pièces mobiles.
Les cordons endommagés ou
emmêlés augmentent les risques de
choc électrique.
e) Pour l’utilisation d’un outil
électrique à l’extérieur, se servir
d’une rallonge
convenant à une telle utilisation.
L’utilisation d’une rallonge conçue
pour l’extérieur réduit les risques de
choc électrique.
f) S’il est impossible d’éviter l’utilisation
d’un outil électrique dans un endroit
humide, brancher l’outil dans une
prise ou sur un circuit d’alimentation
dotés d’un disjoncteur de fuite à la
terre (GFCI). L’utilisation de ce type de
disjoncteur réduit les risques de choc
électrique.
3) Sécurité personnelle
a)
Être vigilant, surveiller le travail
effectué et faire preuve de jugement
lorsqu’un outil électrique est utilisé.
Ne pas utiliser d’outil électrique en
cas de fatigue ou sous l’influence de
drogues, d’alcool ou de médicaments.
Un simple moment d’inattention en
utilisant un outil électrique peut entraîner
des blessures corporelles graves.
b) Utiliser des équipements de
protection individuelle. Toujours
porter une protection oculaire.
L’utilisation d’équipements de protection
comme un masque antipoussière, des
chaussures antidérapantes, un casque
de sécurité ou des protecteurs auditifs
lorsque la situation le requiert réduira
les risques de blessures corporelles.
c) Empêcher les démarrages
intempestifs. S’assurer que
l’interrupteur se trouve à la position
d’arrêt avant de relier l’outil à
une source d’alimentation et/ou
d’insérer un bloc-piles, de ramasser
ou de transporter l’outil. Transporter
un outil électrique alors que le doigt
repose sur l’interrupteur ou brancher
un outil électrique dont l’interrupteur
est à la position de marche risque de
provoquer un accident.
d) Retirer toute clé de réglage ou clé
standard avant de démarrer l’outil.
Une clé standard ou une clé de réglage
attachée à une partie pivotante peut
causer des blessures.
e) Ne pas trop tendre les bras.
Conserver son équilibre en tout
temps. Cela permet de mieux
maîtriser l’outil électrique dans les
situations imprévues.
f) S’habiller de manière appropriée.
Ne pas porter de vêtements amples
ni de bijoux. Garder les cheveux,
13
Page 14

les vêtements et les gants à l’écart
des pièces mobiles. Les vêtements
amples, les bijoux ou les cheveux
longs risquent de rester coincés
dans les pièces mobiles.
g) Si des composants sont fournis
pour le raccordement de dispositifs
de dépoussiérage et de ramassage,
s’assurer que ceux-ci sont bien
raccordés et utilisés. L’utilisation
d’un dispositif de dépoussiérage peut
réduire les dangers engendrés par les
poussières.
4) Utilisation et entretien d’un outil électrique
a) Ne pas forcer un outil électrique.
Utiliser l’outil électrique approprié
à l’application. L’outil électrique
approprié effectuera un meilleur
travail, de façon plus sûre et à la
vitesse pour laquelle il a été conçu.
b) Ne pas utiliser un outil électrique
dont l’interrupteur est défectueux.
Tout outil électrique dont l’interrupteur
est défectueux est dangereux et doit
être réparé.
c) Débrancher la fiche du secteur ou
le bloc-piles de l’outil électrique
avant de faire tout réglage ou
changement d’accessoire, ou avant
de ranger l’outil électrique. Ces
mesures préventives réduisent les
risques de démarrage accidentel de
l’outil électrique.
d) Ranger les outils électriques
hors de la portée des enfants, et
ne permettre à aucune personne
n’étant pas familière avec un
outil électrique (ou son manuel
d’instruction) d’utiliser ce dernier.
Les outils électriques deviennent
dangereux entre les mains
d’utilisateurs inexpérimentés.
e) Entretenir les outils électriques.
Vérifier les pièces mobiles pour
s’assurer qu’elles sont bien
alignées et tournent librement,
qu’elles sont en bon état et ne
sont affectées par aucun trouble
susceptible de nuire au bon
fonctionnement de l’outil électrique.
En cas de dommage, faire réparer
l’outil électrique avant toute
nouvelle utilisation. Beaucoup
d’accidents sont causés par des
outils électriques mal entretenus.
f) S’assurer que les outils de coupe
sont aiguisés et propres. Les outils
de coupe bien entretenus et affûtés
sont moins susceptibles de se coincer
et sont plus faciles à contrôler.
g) Utiliser l’outil électrique, les
accessoires, les forets, etc.
conformément aux présentes
directives en tenant compte des
conditions de travail et du travail
à effectuer. L’utilisation d’un outil
électrique pour toute opération autre
que celle pour laquelle il a été conçu
est dangereuse.
5) Utilisation et entretien du bloc-piles
a) Ne recharger l’outil qu’au moyen du
chargeur précisé par le fabricant.
L’utilisation d’un chargeur qui convient
à un type de bloc-piles risque de
provoquer un incendie s’il est utilisé
avec un autre type de bloc-piles.
b) Utiliser les outils électriques
uniquement avec les blocs-piles
conçus à cet effet. L’utilisation de tout
autre bloc-piles risque de causer des
blessures ou un incendie.
c) Lorsque le bloc-piles n’est pas
utilisé, le tenir éloigné des objets
métalliques, notamment des
trombones, de la monnaie, des clés,
des clous, des vis, etc., qui peuvent
établir une connexion entre les deux
bornes. Le court-circuit des bornes
du bloc-piles risque de provoquer des
étincelles, des brûlures ou un incendie.
d) En cas d’utilisation abusive, le
liquide peut gicler hors du blocpiles, éviter tout contact. Si un
contact accidentel se produit, laver
à grande eau. Si le liquide entre en
contact avec les yeux, obtenir des
soins médicaux. Le liquide qui gicle
hors du bloc-piles peut provoquer des
irritations ou des brûlures.
6) Réparation
a) Faire réparer l’outil électrique
par un réparateur professionnel
en n’utilisant que des pièces
de rechange identiques. Cela
permettra de maintenir une utilisation
sécuritaire de l’outil électrique.
Consignes de sécurité particulières
• Saisir l’outil électrique par ses
surfaces de prises isolées lorsque
l’outil peut entrer en contact avec
des fils cachés ou son cordon. En
cas de contact avec un fil sous tension,
les pièces métalliques de l’outil seront
sous tension et l’utilisateur subira des
secousses électriques.
AVERTISSEMENT : TOUJOURS
porter des lunettes de sécurité. Les
lunettes de vue ne constituent PAS des
lunettes de sécurité. Utiliser également
un masque facial ou anti-poussière si
l’opération de découpe génère de la
poussière.
TOUJOURS PORTER UN ÉQUIPEMENT
DE PROTECTION HOMOLOGUÉ :
14
Page 15

· protection oculaire conforme à la
norme ANSI Z87.1 (CAN/CSA Z94.3);
· protection auditive ANSI S12.6
(S3.19);
· protection des voies respiratoires
conformes aux normes NIOSH/OSHA/
MSHA.
AVERTISSEMENT : certains
outils électriques, tels que les sableuses,
les scies, les meules, les perceuses ou
certains autres outils de construction,
peuvent produire de la poussière
contenant des produits chimiques
reconnus par l’État de la Californie
comme étant susceptibles d’entraîner le
cancer, des malformations
congénitales ou pouvant être nocifs pour
le système reproductif. Parmi ces
produits chimiques, on retrouve :
· le plomb dans les peintures à base de
plomb,
· la silice cristalline dans les briques et le
ciment et autres produits de maçonnerie,
· l’arsenic et le chrome dans le bois de
sciage ayant subi un traitement chimique.
Le risque associé à de telles expositions
varie selon la fréquence avec laquelle
on effectue ces travaux. Pour réduire
l’exposition à de tels produits, il faut
travailler dans un endroit bien aéré
et utiliser le matériel de sécurité
approprié, tel un masque anti-poussières
spécialement conçu pour filtrer les
particules microscopiques.
· Éviter tout contact prolongé avec la
poussière soulevée par cet outil ou
autres outils électriques. Porter des
vêtements de protection et nettoyer
les parties exposées du corps à l’eau
savonneuse. S’assurer de bien se
protéger afin d’éviter d’absorber par
la bouche, les yeux ou la peau des
produits chimiques nocifs.
AVERTISSEMENT : Cet outil
peut produire et répandre de la
poussière susceptible de causer des
dommages sérieux et permanents au
système respiratoire. Toujours utiliser un
appareil respiratoire anti-poussières
approprié approuvé par le NIOSH ou
l’OSHA. Diriger les particules dans le sens
opposé du visage et du corps.
• Le ponçage de peintures à base
de plomb n’est pas recommandé.
Se reporter à la section Mesures de
précaution concernant le ponçage
de peinture Précautions à prendre
pour poncer les peintures pour plus
d’informations quant au ponçage des
peintures.
• Nettoyer l’outil régulièrement.
SYMBOLES
L’étiquette apposée sur votre outil pourrait
comprendre les symboles suivants et leurs
définitions sont indiqués ci-après :
V ................. volts
A. ................ ampères
Hz ............... hertz
W ................ watts
min .............. minutes
............... courant alternatif
............ courant continue
non.............. régime à vide
................ Construction classe II
.............. borne de terre
.............symbole d’alerte à la
sécurité
.../min or rpm ..... révolutions ou alternance
par minute
OPM .. oscillations par minute
..... Lire le mode d’emploi avant
l’utilisation
....... Utiliser une protection respiratoire
adéquate.
....... Utiliser une protection oculaire
adéquate.
....... Utiliser une protection auditive
adéquate.
AUTRES MESURES DE
SÉCURITÉ IMPORTANTES
Ponçage
Ponçage de peinture à base de
plomb
IL N’EST PAS RECOMMANDÉ de
poncer de la peinture à base de plomb
puisqu’il est difficile d’en maîtriser la
poussière contaminée. Ce genre de
ponçage présente de sérieux risques
d’empoisonnement au plomb pour les
femmes enceintes et les enfants.
Puisqu’il est difficile de déterminer si la
peinture renferme du plomb sans en faire
une analyse chimique, il est conseillé de
se conformer aux mesures suivantes lors
du ponçage de tout type de peinture.
Sécurité personnelle
• Ne laisser aucun enfant ni aucune
femme enceinte entrer dans la pièce où
il y a ponçage de peinture jusqu’à ce
que la pièce soit nettoyée.
• Toute personne entrant dans la pièce
de travail devrait porter un masque ou
un respirateur. L’utilisateur devrait en
remplacer le filtre chaque jour ou dès
qu’il éprouve de la difficulté à respirer.
• NOTE : Il faut seulement utiliser des
masques conçus pour le travail en présence
de poussières ou de vapeurs de plomb.
Les masques ordinaires ne sont pas conçus
à cet effet. Consulter le quincaillier pour
choisir le masque approprié.
15
Page 16

16
• IL EST DÉCONSEILLÉ DE MANGER,
DE BOIRE ET DE FUMER dans la pièce
de travail afin de ne pas ingérer de
particules contaminées. L’utilisateur
doit se laver et se nettoyer AVANT de
manger, de boire ou de fumer. Il ne
faut pas laisser dans la pièce de travail
de la nourriture, des boissons ou des
cigarettes car de la poussière pourrait se
déposer sur ces articles.
Protection de l’environnement
• Il faut enlever la peinture de manière à
produire un minimum de poussière.
• Il faut sceller la zone de travail à l’aide
de feuilles de plastique d’une épaisseur
minimale de 4 mils.
• Il faut poncer de façon à réduire la
propagation de la poussière hors de la
pièce de travail.
Nettoyage et déchets
• Il faut bien aspirer toutes les surfaces
de la pièce de travail et les nettoyer à
fond chaque jour pendant la durée des
travaux. Il faut remplacer fréquemment
le filtre de l’aspirateur.
• Ramasser les feuilles de plastique et
les jeter avec la poussière et les autres
débris dans des contenants étanches à
placer avec les ordures ménagères pour
l’enlèvement. Tenir les enfants et les
femmes enceintes à l’écart de la zone de
travail pendant les travaux de nettoyage.
• Il faut nettoyer à fond les jouets, les
meubles et les ustensiles des enfants
avant de les utiliser de nouveau.
DIRECTIVES DE SÉCURITÉ
IMPORTANTES PROPRES AUX
CHARGEURS DE BLOCS-PILES
CONSERVER CES INSTRUCTIONS
Ce guide d’utilisation contient des
directives de sécurité importantes propres
aux chargeurs de piles.
• Avant d’utiliser le chargeur, lire toute
consigne et tout avertissement apposés
sur le chargeur, le bloc-piles et le produit
utilisant le bloc-piles.
AVERTISSEMENT : risques de
chocs électriques. Débrancher le chargeur
de la prise de courant alternatif avant tout
entretien. Éliminer toute saleté ou graisse
de la surface externe du chargeur à l’aide
d’un chiffon ou d’une brosse non
métallique douce. N’utiliser ni eau ni aucun
nettoyant liquide.
AVERTISSEMENT : risques de
chocs électriques. Ne laisser aucun liquide
pénétrer dans le chargeur, des chocs
électriques pourraient en résulter.
AVERTISSEMENT : risques de
brûlures. Ne submerger le bloc-piles dans
aucun liquide et le protéger de toute
infiltration de liquide. Ne jamais tenter
d’ouvrir le bloc-piles pour quelque raison
que ce soit. Si le boîtier plastique du blocpiles est brisé ou fissuré, le retourner dans
un centre de réparation pour y être
recyclé.
MISE EN GARDE : risques de
brûlures. Pour réduire tout risque de
dommages corporels, ne recharger que
des blocs-piles rechargeables
BLACK+DECKER. Tout autre type de blocpiles pourrait surchauffer et éclater posant
ainsi des risques de dommages corporels
et matériels.
MISE EN GARDE : sous certaines
conditions, lorsque le chargeur est
branché au bloc d’alimentation, des
matériaux étrangers pourraient courtcircuiter le chargeur.
AVERTISSEMENT :
• NE PAS tenter de recharger un blocpiles avec des chargeurs autres que
ceux recommandés par le fabricant.
Le chargeur et son bloc-piles ont
été conçus tout spécialement pour
fonctionner ensemble.
• Ces chargeurs n’ont pas été
conçus pour une utilisation autre
que recharger les blocs-piles
rechargeables Black+Decker. Toute
autre utilisation comporte des risques
d’incendie, de chocs électriques ou
d’électrocution.
• Protéger le chargeur de la pluie ou de
la neige.
• Tirer sur la fiche plutôt que sur le
cordon pour débrancher le chargeur.
Cela permet de réduire les risques
d’endommager la fiche ou le cordon
d’alimentation.
• S’assurer que le cordon est protégé
de manière à ce que personne ne
marche, ni ne trébuche dessus, ou
à ce qu’il ne soit, ni endommagé, ni
soumis à aucune tension.
• Pour utiliser un chargeur à l’extérieur,
le placer systématiquement dans un
endroit sec.
• Si l’utilisation d’une rallonge est
absolument nécessaire à l’extérieur,
utiliser une rallonge adéquate pour
l’extérieur. Utiliser un cordon adéquat
pour l’extérieur réduit les risques de
chocs électriques.
• Pour la sécurité de l’utilisateur,
utiliser une rallonge de calibre
adéquat (AWG, American Wire Gauge
[calibrage américain normalisé des
fils électriques]). Plus le calibre est
petit, et plus sa capacité est grande. Un
calibre 16, par exemple, a une capacité
supérieure à un calibre 18. Lorsque
Page 17

plusieurs rallonges sont nécessaires
pour raccorder l’appareil, s’assurer que
chaque rallonge présente au moins le
calibre de fil minimum.
Calibre de fil minimum recommandé
pour rallonges
• Ne pas mettre d’objet sur le
chargeur ni mettre ce dernier sur
une surface souple, ce qui pourrait
causer l’obstruction des fentes de
ventilation et, du fait, provoquer une
chaleur interne excessive. Éloigner le
chargeur de toute source de chaleur.
La ventilation du chargeur se fait par
les fentes pratiquées dans les parties
supérieures et inférieures du boîtier.
• Ne pas installer le chargeur sur un mur
ni le fixer de manière permanente sur
toute surface. Le chargeur est destiné
à une utilisation sur une surface plane
et stable (c.-à-d. un dessus de table ou
d’établi).
• Ne pas faire fonctionner le chargeur si
la fiche ou le cordon est endommagé;
les remplacer immédiatement.
• Ne jamais se servir d’un chargeur qui a
subi un choc violent, qui est tombé par
terre ou qui est endommagé de quelque
manière que ce soit. Le faire vérifier dans
un centre de réparation autorisé.
• Ne pas démonter le chargeur; confier
l’entretien ou la réparation de l’appareil
à un centre de réparation autorisé. Le
remontage non conforme du chargeur
comporte des risques de choc électrique,
d’électrocution ou d’incendie.
• Débrancher le chargeur avant de le
nettoyer. Cela réduira le risque de choc
électrique. Le risque ne sera pas éliminé
en enlevant simplement le bloc-piles.
• NE JAMAIS relier deux chargeurs
ensemble.
• Le chargeur est conçu pour être
alimenté en courant domestique
standard (120 V). Ne pas utiliser une
tension supérieure pour le chargeur
CONSERVER CES DIRECTIVES
CONSIGNES DE SÉCURITÉ
IMPORTANTES PROPRES AUX
BLOCS-PILES
AVERTISSEMENT :
AVERTISSEMENT : lire toutes les
instructions et toutes les consignes de
sécurité propres au bloc-piles, au
chargeur et à l’outil électrique. Tout
manquement aux directives et consignes
pose des risques de décharge électrique,
d’incendie et/ou de blessure grave.
Le bloc-piles n’est pas totalement chargé
d’usine. Avant d’utiliser le bloc-piles et le
chargeur, lire les consignes de sécurité
ci-dessous. Puis suivre la procédure de
charge indiquée.
Lire toutes les directives
• NE JAMAIS forcer un bloc-piles dans le
chargeur. NE modifier un bloc-piles en
AUCUNE FAÇON pour le faire rentrer
dans un chargeur incompatible, car le
bloc-piles pourrait éclater et causer
des dommages corporels graves.
Consulter le tableau en fin de manuel
pour connaître les compatibilités entre
chargeurs et blocs-piles.
• Ne pas incinérer le bloc-piles,
même s’il est très endommagé ou
complètement usé, car il peut exploser
au contact de flammes. Des vapeurs
et des matières toxiques sont dégagées
lorsque les blocs-piles sont incinérés.
•
Ne pas charger ou utiliser un bloc-piles
dans un milieu déflagrant, en présence
de liquides, de gaz ou de poussière
inflammables. Insérer ou retirer un bloc-
piles du chargeur peut enflammer de la
poussière ou des émanations.
• Si le contenu de la pile entre en contact
avec la peau, laver immédiatement
la zone touchée au savon doux et à
l’eau. Si le liquide de la pile entre en
contact avec les yeux, rincer l’oeil ouvert
à l’eau pendant 15 minutes ou jusqu’à
ce que l’irritation cesse. Si des soins
médicaux sont nécessaires, l’électrolyte
des piles au Lithium-Ion est composé
d’un mélange de carbonates organiques
liquides et de sels de lithium.
• Le contenu des cellules de pile
ouvertes peut provoquer une irritation
respiratoire. Exposer la personne à de
l’air frais. Si les symptômes persistent,
obtenir des soins médicaux.
AVERTISSEMENT : risque de
brûlure. Le liquide du bloc-piles peut
s’enflammer s’il est exposé à des
étincelles ou à une flamme.
• Charger les blocs-piles uniquement au
moyen de chargeurs
BLACK+DECKER
.
• NE PAS éclabousser le bloc-piles
ou l’immerger dans l’eau ou tout
autre liquide. Cela peut entraîner une
défaillance prématurée de l’élément.
• Ne pas ranger ni utiliser l’outil et
le bloc-piles dans un endroit où
la température peut atteindre ou
17
Calibre minimal des cordons de rallonge
Tension Longueur totale du cordon en pieds
120V 0-25 26-50 51-100 101-150
(0-7,6m) (7,6-15,2m) (15,2-30,4m) (30,4-45,7m)
240V 0-50 51-100 101-200 201-300
(0-15,2m) (15,2-30,4m) (30,4-60,9m) (60,9-91,4m)
Intensité (A)
Au Au Calibre moyen des fils (AWG)
moins plus
0 - 6 18 16 16 14
6 - 10 18 16 14 12
10 - 12 16 16 14 12
12 - 16 14 12 Non recommandé
Page 18

18
charge.
4.
La fin de la charge est indiquée par le
voyant DEL vert qui demeure allumé. Le
bloc-piles est chargé à plein et peut être
utilisé à ce moment-ci ou laissé sur le
chargeur.
Recharger les piles épuisées aussitôt
que possible après leur utilisation
pour prolonger leur durée de vie. Pour
préserver le plus possible la durée de
vie du bloc-piles, ne pas le décharger
tout à fait. Il est recommandé de recharger
le bloc-piles après chaque utilisation.
REMARQUES IMPORTANTES
POUR LE CHARGEMENT
1.
Pour augmenter la durée de vie du
bloc-piles et optimiser son rendement,
le charger à une température entre 18 et
24 °C (65 et 75 °F). NE PAS charger le
bloc-piles à des températures inférieures
à 4,5 °C (40 °F) ou supérieures à 40,5 °C
(105 °F). Ces consignes sont importantes
et permettent d’éviter d’endommager
gravement le bloc-piles.
2. Le chargeur et le bloc-piles peuvent
devenir chauds au toucher pendant la
charge. Il s’agit d’un état normal et cela
n’indique pas un problème. Pour faciliter
le refroidissement du bloc-piles après son
utilisation, éviter de mettre le chargeur
ou le bloc piles dans un endroit chaud
comme dans une remise métallique ou une
remorque non isolée.
3. Si le bloc-piles ne se charge pas
adéquatement, on doit :
a.
vérifier le courant à la prise en
branchant une lampe ou un autre appareil
électrique;
b. vérifier si la prise est reliée à un
interrupteur mural qui la met hors
tension lorsque la lumière sont éteinte;
c
. déplacer le chargeur et le bloc-piles
dans un endroit où la température ambiante
est entre 18 et 24 °C (65 et 75 °F);
d. si le problème persiste, apporter
ou envoyer l’outil, le bloc-piles et le
chargeur au centre de réparation de
votre région.
4. Le bloc-piles doit être rechargé lorsqu’il
n’arrive pas à produire suffisamment
de puissance pour des travaux qui
étaient facilement réalisés auparavant.
NE PAS CONTINUER à utiliser le blocpiles dans ces conditions. Suivre les
procédures de charge. On peut également
recharger à tout moment un bloc-piles
partiellement déchargé sans nuire à son
fonctionnement.
5. Tout corps étranger conducteur, tel
que notamment la laine d’acier, le papier
d’aluminium, ou toute accumulation de
particules métalliques, doit être maintenu
à distance des ouvertures du chargeur.
Débrancher systématiquement celuici si aucun bloc-piles n’y est inséré.
dépasser les 40 °C (105 °F) (comme
dans les remises extérieures ou les
bâtiments métalliques en été).
AVERTISSEMENT : ne jamais
ouvrir le bloc-piles pour quelque
raison que ce soit. Si le boîtier du bloc-
piles est fissuré ou endommagé, ne pas
l’insérer dans un chargeur. Ne pas
écraser, faire tomber ou endommager le
bloc-piles. Ne pas utiliser un bloc-piles ou
un chargeur qui a reçu un choc violent,
qui est tombé, a été écrasé ou est
endommagé de quelque manière que ce
soit (p. ex. percé par un clou, frappé d’un
coup de marteau, piétiné). Les blocs-piles
endommagés doivent être envoyés au
centre de réparation pour être recyclés.
AVERTISSEMENT : r
isque
d’incendie. Ne pas ranger ou transporter
les piles de manière à ce que des objets
métalliques puissent entrer en contact
avec les bornes exposées des piles. Par
exemple, ne pas mettre un bloc-piles dans un
tablier, une poche, une boîte à outils, une
boîte de nécessaire de produit ou un tiroir
contenant des objets tels que des clous, des
vis ou des clés, car tout contact accidentel
entre les bornes à découvert et un objet
métallique conducteur comme une clé, une
pièce de monnaie, un outil à main, etc. risque
de provoquer un incendie. La Hazardous
Material Regulations (réglementation sur les
produits dangereux) du département
américain des transports interdit en fait le
transport des blocs-piles pour le commerce
et dans les avions (c.-à-d. dans des valises et
les bagages à main) À MOINS qu’ils ne soient
bien protégés contre les courts-circuits. Pour
le transport de piles individuelles, on doit
donc s’assurer que les bornes sont protégées
et bien isolées contre toute matière pouvant
entrer en contact avec elles et provoquer un
court-circuit.
REMARQUE : il ne faut pas laisser
de piles au Lithium-Ion dans les
bagages enregistrés.
RECOMMANDATIONS EN
MATIÈRE DE RANGEMENT
1. Le meilleur endroit de rangement est
celui qui est frais et sec, loin de toute
lumière directe du soleil et protégé d’une
température extrême (chaleur ou froid).
2. Un entreposage prolongé ne nuira pas
au bloc-piles ou au chargeur.
PROCÉDURE DE CHARGE
Les chargeurs
BLACK+DECKER
sont
conçus pour charger les blocs-piles
BLACK+DECKER
.
1. Brancher le chargeur dans une prise
appropriée avant d’insérer le bloc-piles).
2. Insérer le bloc-piles dans le chargeur
(Figure B).
3. Le voyant DEL vert clignotera indiquant
ainsi que le bloc-piles est en cours de
Page 19

19
1
6
4
7
5
2
3
Les chargeurs Black+Decker ont été
conçus pour recharger les blocs-piles
Black+Decker.
REMARQUE : pour optimiser les
performances et la durée de vie des
blocs-piles au lithium-ion :
• Recharger pleinement les blocs-piles
avant toute utilisation initiale.
• Recharger les blocs-piles déchargés
dès que possible après chaque
utilisation.
• Ne pas décharger complètement les
blocs-piles.
1.
Branchez le chargeur dans la prise
appropriée avant d’y insérer le bloc-piles.
2. Insérez le bloc-piles dans le chargeur.
3. Le voyant DEL vert clignotant indique
que le bloc-piles est en cours de charge.
4. La fin de charge est indiquée par le
voyant vert restant allumé de façon
continue. Le bloc-piles est alors
complètement chargé et peut être utilisé
ou laissé dans le chargeur.
LAISSER LE BLOC-PILES
DANS LE CHARGEUR
Le chargeur et son bloc-piles peuvent
rester connectés, le voyant vert
demeurant indéfiniment allumé. Le
chargeur maintiendra le bloc-piles sain et
pleinement chargé.
USAGE PRÉVU
Votre ponceuse BLACK+DECKER
BDCMS20 a été conçue pour poncer
le bois, le métal, les plastiques et les
surfaces peintes. Cet outil a été conçu
pour l’usage domestique seulement.
Débrancher le chargeur avant tout
nettoyage.
6. Ne pas congeler le chargeur, l’immerger
ans l’eau ou dans tout autre liquide.
AVERTISSEMENT :
risque de
choc électrique. Ne jamais ouvrir le
bloc-piles pour quelque raison que ce
soit. Si le boîtier en plastique du blocpiles est brisé ou fissuré, le retourner à
un centre de réparation pour qu’il soit
recyclé.
Recommandations de stockage
1. Le lieu idéal de rangement est un lieu
frais et sec, à l’abri de toute lumière solaire
directe et de toute température excessive
(froide ou chaude).
2. Pour un stockage prolongé, il est
recommandé d’entreposer le bloc-piles
pleinement chargé dans un lieu frais et
sec, hors du chargeur pour optimiser les
résultats.
REMARQUE : ne pas insérer de blocspiles dans un outil dont la gâchette et
verrouillée en position de marche. Ne
jamais bloquer l’interrupteur en position de
MARCHE.
REMARQUE : les blocs-piles ne devraient
pas être entreposés complètement
déchargés. Il sera nécessaire de
recharger le bloc-piles avant réutilisation.
PROCÉDURE DE CHARGE
Description Nº de catalogue
Ces produits peuvent être utilisés avec les modèles de blocs-piles et de
chargeurs énumérés dans le tableau ci-après.
Bloc-piles au lithium-ion de 20 V max.**: LBXR20
Bloc-piles au lithium-ion de 20 V max.**: LBXR20BT
Bloc-piles au lithium-ion de type 1 de 20 V max.**, 22 Wh : LB20
Chargeur rapide pour bloc-piles au lithium-ion de 2 A : L2AFC
Chargeur rapide pour bloc-piles au lithium-ion de 2 A : L2AFCBST
Chargeur de bloc-piles au lithium-ion de 20 V max.**: LCS20
Chargeur de bloc-piles au lithium-ion de 20 V max.**: LCS201
Bloc-piles au lithium-ion de 20 V max.**: LCS1620
Bloc-piles au lithium-ion de 20 V max.**: LCS200
DESCRIPTION FONCTIONNELLE
1. Interrupteur marche/arrêt
2. Poignée arrière
3. Poignée avant
4. Compartiment à poussière
5. Patin de ponçage
6. Accessoire en forme de doigt
7. Bloc-pile
Outils nécessaires : tournevis à tête
cruciform nº 1
Page 20

20
est capable de retirer rapidement des
quantités importantes de matériau.
AVERTISSEMENT : risques de
chocs électriques. Cet outil ne doit en
aucun cas être utilisé à proximité d’eau.
MISE EN GARDE : pour réduire
tout risque de dommages corporels,
arrêter l’outil et retirer son bloc-piles avant
tout réglage ou avant de retirer ou installer
toute pièce ou tout accessoire.
MISE EN MARCHE ET ARRÊT
• Pour mettre l’outil en MARCHE, poussez
l’interrupteur marche/arrêt (1) sur la
position avant I.
• Pour ARRÊTER l’outil, poussez
l’interrupteur marche/arrêt (1) sur la
position arrière O.
INSTALLATION DE PAPIER
ABRASIF (FIG. C)
• Maintenez l’outil avec la base abrasive
dirigée vers le haut.
• Placez le papier abrasif (8) sur la base
abrasive, en vous assurant que les
orifices du papier s’alignent sur les
orifices de la base.
CONSEILS D’INSTALLATION
DU PAPIER ABRASIF (FIG. C)
• Détacher les deux pointes
supplémentaires en forme de losange (9)
du papier abrasif (8).
Remarque : les pointes en forme de
losange (10) peuvent être inversées ou
changées lorsqu’elles sont usées.
•
Lorsque l’avant de la pointe (9) est usé,
détacher cette dernière du papier, l’inverser
puis la réappliquer sur la base abrasive.
• Quand l’ensemble de la pointe est usé, la
retirer de la base abrasive puis réinsérer
une pointe neuve.
Remarque : pour optimiser l’aspiration
des poussières, s’assurer d’utiliser le bon
type de papier abrasif.
899
C
MODE D’EMPLOI
AVERTISSEMENT : pour réduire
tout risque de dommages corporels graves,
lire et suivre toutes les consignes
importantes de sécurité et toutes les
instructions avant d’utiliser l’outil.
INSTALLATION ET RETRAIT
DU BLOC-PILES DE L’OUTIL
MISE EN GARDE : s’assurer que
l’interrupteur est à l’arrêt avant d’installer ou de retirer le
bloc-piles.
Installation du bloc-piles : Poussez à
fond le bloc-piles (7) dans l’outil jusqu’à
ce qu’un clic se fasse entendre (figure A).
Assurez-vous que le bloc-piles est bien
calé et complètement verrouillé en place.
Retrait du bloc-piles : Appuyez sur
le bouton de libération du bloc-piles à
l’arrière du bloc-piles puis tirez-le hors de
l’outil (figure B).
UTILISATION
REMARQUE : ne pas poser les doigts sur
la plaquette pendant l’utilisation. Déplacer
la ponceuse en large mouvement de va-etvient en laissant l’outil faire le travail. Il suffit
d’exercer une pression légère pour poncer,
polir ou frotter. Toute pression excessive
ralentira l’outil et produira des résultats
médiocres. Vérifier le travail souvent, l’outil
B
A
Page 21

21
(polyuréthane, huile de lin, etc.) peut
prendre feu dans le bac à poussière de la
ponceuse ou ailleurs et provoquer un
incendie. Pour réduire ces risques, vider
fréquemment le bac et se conformer
strictement aux directives du manuel de la
ponceuse et à celles du fabricant des
enduits.
AVERTISSEMENT : risques
d’incendie. Lors du travail sur des surfaces
métalliques, ne pas utiliser le bac à
poussières ou un aspirateur, car des
étincelles seront produites. Porter une
protection oculaire et un masque antipoussières. Pour éviter tout risque
d’incendie, ne pas utiliser la ponceuse sur
des surfaces traitées au magnésium. Ne
jamais utiliser la ponceuse pour des
ponçages humides.
• Le bac à poussières (4) devrait être vidé
toutes les 10 minutes de ponçage.
• Insérez le bac à poussières (4) sur le
raccord (4a) et assurez-vous qu’il y est
soigneusement verrouillé.
• Pour retirer le bac à poussières, tirez-le
vers l’arrière, hors de l’extrémité de l’outil.
4
4a
F
CONSEILS POUR UN USAGE
OPTIMUM
AVERTISSEMENT : laisser
l’outil fonctionner à son propre rythme.
Ne pas le forcer.
• Ne pas placer les mains sur les orifices
d’aération.
• Ne pas exercer de pression excessive sur
l’outil.
• Vérifier régulièrement la condition du
papier abrasif. Le changer le cas
échéant.
• Poncer systématiquement dans le fil du
bois.
• Pour poncer des couches fraiches
de peinture avant d’en appliquer une
nouvelle, utiliser un grain extra fin.
• Pour poncer des surfaces très inégales
ou pour retirer des couches de peinture,
utiliser un gros grain. Pour toute autre
surface, commencer avec un grain
moyen. Dans tous les cas, passer
graduellement à un grain plus fin pour un
fini lisse.
BANDE ÉTROITE (FIG. D ACCESSOIRE EN OPTION)
La bande étroite est utilisée pour effectuer
des travaux de finition minutieux.
• Retirez la vis (10).
• Retirez la pointe en forme de losange (11)
de la base.
• Installez la bande étroite (6) sur la base
abrasive, comme illustré en figure D.
• Insérez et resserrez la vis.
• Alignez le papier abrasif approprié sur la
bande étroite.
1110
6
D
REMPLACEMENT DE LA
POINTE EN FORME DE
LOSANGE (FIG. E)
•
Changez la pointe en forme de losange (11).
• Réinsérez puis resserrez la vis (10).
10
11
E
INSTALLATION ET RETRAIT DU
BAC À POUSSIÈRES (FIG. F)
MISE EN GARDE : pour réduire
tout risque de dommages corporels,
arrêter l’outil et retirer son bloc-piles avant
tout réglage ou avant de retirer ou installer
toute pièce ou tout accessoire.
MISE EN GARDE : risques pour
les voies respiratoires. Ne jamais utiliser
cet outil pour poncer le bois sans le bac à
poussières correctement installé.
L’évacuation des poussières du ponçage
pose des risques au système respiratoire.
AVERTISSEMENT : risques
d’incendie. La poussière accumulée par le
ponçage des enduits de certaines surfaces
Page 22

22
• Pour poncer des surfaces verticales,
maintenir la poignée arrière (2) pour
optimiser la prise et le contrôle.
ACCESSOIRES
Une gamme d’accessoires MouseMD
est disponible et vendue séparément.
La gamme offerte peut varier selon
les détaillants. Remarque : utiliser
exclusivement du papier abrasif avec une
configuration de trous identique à celle de
la base de la ponceuse. Les feuilles sans
orifices ne permettront pas à la poussière
d’être évacuée.
Les tampons crochet et boucle et les bases
individuelles sont des pièces remplaçables.
En cas d’usure, veuillez contacter votre
centre de réparation local. Pour plus
d’informations, veuillez appeler le 1-800544-6986.
AVERTISSEMENT : l’usage d’un
accessoire non recommandé avec cet outil
peut présenter un danger.
Article
Description
Bande étroite de précision.
Pour les endroits étroits difficiles d’accès. La bande
étroite de précision peut être utilisée pour le ponçage
léger et pour poncer dans les coins.
(Pièce numéro - X32214-XJ)
Maille abrasive, grain 240.
Pour le fini lisse et précis de large surface à poncer.
(Pièce numéro - X39132-XJ)
Maille abrasive, grain 120.
Pour le fini moyen et précis de large surface à poncer.
(Pièce numéro - X39127-XJ)
Maille abrasive, grain 80.
Pour le fini grossier et précis de large surface à poncer.
(Pièce numéro - X39122-XJ)
Papier abrasif de précision pour large surface, grain
240, avec deux pointes de remplacement.
Pour le fini lisse et précis de large surface à poncer.
(Pièce numéro - X31019-XJ)
Papier abrasif de précision pour large surface, grain
120, avec deux pointes de remplacement.
Pour le fini moyen et précis de large surface à poncer.
(Pièce numéro - X31009-XJ)
Papier abrasif de précision pour large surface, grain 60,
avec deux pointes de remplacement.
Pour le fini grossier et précis de large surface à poncer.
(Pièce numéro - X31039-XJ)
P
apier abrasif en bande étroite de précision, grain 120.
Pour le fini moyen du ponçage de précision.
(Pièce numéro - X3277-XJ)
ENTRETIEN
Utiliser seulement du savon doux et un chiffon
humide pour nettoyer l’outil. Ne laisser aucun
liquide s’infiltrer dans l’outil et ne jamais
immerger tout composant de l’outil.
IMPORTANT : Pour assurer la SÉCURITÉ
D’EMPLOI et la FIABILITÉ de l’outil, en confier
les réparations, l’entretien et les réglages
au personnel d’un centre de service ou d’un
atelier d’entretien autorisé n’utilisant que des
pièces de rechange identiques.
INFORMATION SURE LES
RÉPARATIONS
Tous les centres de réparation
BLACK+DECKER sont dotés de personnel
qualifié en matière d’outillage électrique; ils
sont donc en mesure d’offrir à leur clientèle
un service efficace et fiable. Que ce soit pour
un avis technique, une réparation ou des
pièces de rechange authentiques installées
en usine, communiquer avec l’établissement
BLACK+DECKER
le plus près de chez vous.
Pour trouver l’établissement de réparation de
votre région, composer le numéro suivant :
1-800-544-6986 ou consulter le site
www.blackanddecker.com
ACCESSOIRES
Une gamme d’accessoires Mouse® est offerte
et vendue séparément. La gamme offerte peut
varier selon le détaillant. Remarque : utiliser
uniquement le papier abrasif perforé conforme
au motif de la semelle de la ponceuse. Le
papier abrasif non perforé ne permettra
pas l’aspiration de la poussière dans le
compartiment à poussière.
Le tampon en Velcromc et les socles
individuels sont des pièces remplaçables.
Communiquer avec le centre de service de
la région lorsque ces pièces sont usées.
Pour obtenir de plus amples renseignements,
composer le numéro suivant : 1 (800) 544-
6986.
AVERTISSEMENT : L’utilisation
de tout accessoire non recommandé pour
l’outil peut être dangereuse.
Les tampons décrits ci-dessous pourraient
être offerts en trousses chez les détaillants
revendant les produits Mouse®. Pour
obtenir de plus amples renseignements,
composer le numéro suivant : 1 (800) 544-
6986.
Le sceau SRPRC
®
Le sceau SRPRC® (Société
de recyclage des piles
rechargeables du Canada)
apposé sur une pile au
nickel-cadmium, à hydrure
métallique de nickel ou au lithium-ion (ou
un bloc-piles) indique que les coûts de
recyclage de ces derniers en fin d’utilisation
ont déjà été réglés par BLACK+DECKER.
Dans certaines régions, la mise au rebut ou
aux ordures municipales des piles au nickelcadmium, à l’hydrure métallique de nickel
ou au lithium-ion, est illégale ; le programme
de l’Appel à Recycler® constitue donc une
Page 23

23
MATRICE D’UTILISATION/ACCESSOIRES
ACCESSOIRE UTILISATIONS RECOMMANDÉES
Papier abrasif grain moyen Retrait de peinture, vernis, rouille
Papier abrasif grain fin Lissage et fini des surfaces
Papier abrasif grain extra fin Ponçage entre les couches de peinture ou de vernis
Pointes de ponçage de finition Coins/endroits difficiles d’accès
Laine à polir/décaper 1 OT Polissage des métaux/décapage du vernis ou de l’uréthane
Laine à polir fine 4 OT Polissage de finition, finition satinée de peinture/vernis/uréthane
Tampon de mousse gris Application et retrait de produit à polir
Tampon non tissé blanc Récurage léger
Tampon non tissé rouge Récurage intense/retrait de la rouille
Les tampons décrits ci-dessus sont aussi disponibles en trousse auprès des revendeurs de produits MouseMD. Pour plus
d’informations, appeler le 1-800-544-6986.
DÉPANNAGE
PROBLÈME CAUSE POSSIBLE SOLUTION POSSIBLE
• Ne fonctionne • Mauvaise installation du • Vérifier l’installation du
bloc-piles. bloc-piles.
• Bloc-piles non chargée. • Vérifier les exigences
de charge pour le bloc-piles.
• Le bloc-piles ne se • Bloc-piles non insérée • Insérer le bloc-piles
charge pas. dans le chargeur. dans le chargeur de sorte
que le voyant DEL vert
apparaisse.
• Chargeur non branché. • Brancher le chargeur
dans une prise qui
fonctionne. Se reporter à
la rubrique « Remarques
importantes de
chargement » pour plus
de renseignements.
• Température ambiante •
Déplacer le chargeur
trop chaude ou froide et l’outil à une
température ambiante de
plus de 4.5 °C (40 °F)
ou sous les 40.5 °C (105 °F).
• L’appareil s’éteint • Le bloc-piles a atteint sa •
Laisser le bloc-piles refroidir.
soudainement. limite thermique maximale.
• Bloc-piles épuisé. (Pour • Placer dans le chargeur le
maximiser la durée de vie du temps d’une charge.
bloc-piles, celui-ci est conçu
pour s’éteindre soudainement
lorsqu’il est épuisé.)
Pour de l’aide avec l’outil, consulter notre site Web www.blackanddecker.com pour
l’emplacement du centre de réparation le plus près ou communiquer avec l’assistance
BLACK+DECKER
au 1-800-544-6986.
solution pratique et écologique.
Appel à Recycler Canada, Inc., en
collaboration avec BLACK+DECKER et
d’autres utilisateurs de piles, a mis sur
pied de programme aux États-Unis et au
Canada pour faciliter la collecte des piles
au nickel-cadmium, à l’hydrure métallique
de nickel ou au lithium-ion usagées.
Aidez-nous à protéger l’environnement et
à conserver nos ressources naturelles en
renvoyant les piles au nickel-cadmium, à
l’hydrure métallique de nickel ou au lithiumion usagées à un centre de réparation
autorisé BLACK+DECKER ou chez votre
Page 24

Imported by / Importé par
Black & Decker Canada Inc.
100 Central Ave.
Brockville (Ontario) K6V 5W6
24
détaillant afin qu’elles y soient recyclées.
On peut en outre se renseigner auprès d’un
centre de recyclage local pour connaître
d’autres sites les acceptant. SRPRC® est
une marque déposée de l’Appel à Recycler
Canada, Inc.
Cet appareil numérique de la classe B est
conforme à la norme NMB-003 du Canada.
Cet appareil est conforme aux dispositions
du paragraphe 15 des règlements de la
FCC. Son fonctionnement est régi par les
deux conditions suivantes : (1) Cet appareil
ne peut pas causer d’interférence nuisible
et (2) cet appareil doit accepter toutes les
interférences reçues, y compris celles qui
risquent d’en gêner le fonctionnement.
REMARQUE : ce matériel a été testé et a
été déclaré conforme aux limites en vigueur
concernant les dispositifs numériques de
classe B, en vertu de la partie 15 de la
réglementation FCC. Ces limites visent
à assurer une protection raisonnable
contre tout brouillage nuisible dans une
installation résidentielle. Ce matériel produit,
consomme et peut émettre une énergie
de radiofréquence et, s’il n’est pas installé
et utilisé conformément aux directives
qui l’accompagnent, il peut entraîner un
brouillage nuisible des communications
radio. Cependant, nous ne garantissons pas
l’absence de brouillage dans tous les types
d’environnement. Si, après avoir effectué
une vérification en mettant l’appareil hors
tension puis sous tension, l’utilisateur
s’aperçoit que ce matériel provoque un
brouillage nuisible à la réception des
signaux de radio ou de télévision, il lui
faudra essayer de corriger ce brouillage
en prenant une ou plusieurs des mesures
ci-dessous :
• Réorienter ou repositionner l’antenne de
réception.
• Éloigner le plus possible le matériel du
récepteur.
• Brancher le matériel dans une prise électrique
située sur un circuit différent de celui du
récepteur.
• Consulter le distributeur ou un technicien
radio/télévision expérimenté pour obtenir de
l’aide.
Tout changement ou toute modification à
cet appareil qui n’est pas expressément
approuvé par l’institution responsable de
la conformité peut faire annuler le droit
de l’utilisateur d’utiliser ce matériel. Cet
appareil numérique de la classe B est
conforme à la norme NMB-003 du Canada.
GARANTIE LIMITÉE DE DEUX ANS
Black & Decker (É.-U.) Inc. garantit que le
produit est exempt de défauts de matériau
et de fabrication pendant deux(2) ans à
partir de la date d’achat, à condition que le
produit soit utilisé en milieu domestique. La
présente garantie limitée ne couvre pas les
défaillances provoquées par un abus, un
dommage accidentel ou des réparations
ou tentatives de réparations effectuées
par toute autre personne que le personnel
de Black+Decker et de ses centres de
réparation agréés. Un produit défectueux
qui remplit les conditions stipulées par
la présente garantie sera remplacé ou
réparé sans frais d’une des deux façons
suivantes : La première façon consiste
en un échange chez le détaillant où le
produit a été acheté (à la condition que
le magasin soit un détaillant participant).
Tout retour doit se faire durant la période
correspondant à la politique d’échange
du détaillant. Une preuve d’achat peut
être requise. Prière de vérifier la politique
de retour du détaillant au sujet des délais
impartis pour les retours ou les échanges.
La deuxième option est d’apporter ou
d’envoyer le produit (en port payé) à
un centre de réparation agréé ou à un
centre de réparation Black+Decker pour
faire réparer ou échanger le produit, à la
discrétion de Black+Decker. Une preuve
d’achat peut être requise. Les centres
de réparation de Black+Decker et les
centres de réparation ou en ligne sur www.
blackanddecker.com.
Cette garantie ne s’applique pas aux
accessoires. Cette garantie accorde des
droits légaux propres au propriétaire de
l’outil. Ce dernier pourrait avoir d’autres
droits selon l’État ou la province qu’il
habite. Pour toute question, communiquer
avec le directeur du centre de réparation
Black+Decker le plus près. Ce produit
n’est pas destiné à un usage commercial.
L’usage commercial de ce produit annule
par conséquent cette garantie. Toutes
autres garanties, expresses ou implicites,
sont déclinées par la présente.
Page 25

INFORMACIÓN CLAVE QUE DEBE CONOCER:
· No presione hacia abajo —deje que la lijadora realice el trabajo.
· No se recomienda utilizar este producto en muros de mampostería de
gran extensión.
25
PAUTAS DE SEGURIDAD - DEFINICIONES
Es importante que lea y comprenda este manual. La información que contiene se refiere
la protección de SU SEGURIDAD y la PREVENCIÓN DE PROBLEMAS. Los símbolos a
continuación se utilizan para ayudarle a reconocer esta información.
PELIGRO: Indica una situación de peligro inminente que, de no evitarse,
ocasionará la muerte o lesiones graves.
ADVERTENCIA: Indica una situación potencialmente peligrosa que, de no
evitarse, podría ocasionar la muerte o lesiones graves.
ATENCIÓN: Indica una situación potencialmente peligrosa que, de no evitarse,
puede ocasionar lesiones leves o moderadas.
AVISO: Si se usa sin el símbolo de alerta de seguridad indica una situación
potencialmente peligrosa que, de no evitarse, puede ocasionar daño material.
MANUAL DE INSTRUCCIONES
LIJADORA MOUSE DE 20v MAX*
Gracias por elegir BLACK+DECKER!
Visite www.BlackandDecker.com/NewOwner para registrar su nuevo producto.
LEA EL MANUAL ANTES DE DEVOLVER ESTE PRODUCTO POR
CUALQUIER MOTIVO:
Si tiene una consulta o algún inconveniente con su producto BLACK+DECKER,
visite http://www.blackanddecker.com/instantanswers
para obtener respuestas instantáneas las 24 horas del día.
Si no encuentra la respuesta o no tiene acceso a Internet, llame al 1-800-544-6986
de lunes a viernes de 8 a. m. a 5 p. m. hora del Este para hablar con un agente.
Cuando llame, tenga a mano el número de catálogo.
CONSERVE ESTE MANUAL PARA FUTURAS CONSULTAS.
SÓLO PARA USO DOMÉSTICO.
*El voltaje inicial máximo de la batería (medido sin carga de trabajo) es de 20 voltios. El voltaje nominal es de 18.
CATÁLOGO N°
BDCMS20
Page 26

26
ADVERTENCIAS GENERALES DE
SEGURIDAD PARA HERRAMIENTAS
ELÉCTRICAS
ADVERTENCIA:
Lea todas las
advertencias de seguridad e instrucciones El
incumplimiento de las advertencias e
instrucciones puede provocar descargas
eléctricas, incendios o lesiones graves.
Conserve todas las advertencias e
instrucciones para futuras consultas.
El término “herramienta eléctrica” incluido
en las advertencias hace referencia a las
herramientas eléctricas operadas con
corriente (con cable eléctrico) o a las
herramientas eléctricas operadas con
baterías (inalámbricas).
1) Seguridad en el área de trabajo
a)
Mantenga el área de trabajo limpia y
bien iluminada. Las áreas abarrotadas
y oscuras propician accidentes.
b)
No opere herramientas eléctricas
en atmósferas explosivas, como
ambientes donde se encuentran
líquidos, gases o polvo inflamables.
Las herramientas eléctricas originan
chispas que pueden encender el polvo
o los vapores.
c)
Mantenga a los niños y
espectadores alejados de la
herramienta eléctrica en
funcionamiento. Las distracciones
pueden provocar la pérdida de control.
2) Seguridad eléctrica
a) Los enchufes de la herramienta
eléctrica deben adaptarse al
tomacorriente. Nunca modifique
el enchufe de ninguna manera. No
utilice ningún enchufe adaptador con
herramientas eléctricas con conexión
a tierra. Los enchufes no modificados
y que se adaptan a los tomacorrientes
reducirán el riesgo de descarga eléctrica.
b) Evite el contacto corporal con
superficies puestas a tierra, como
por ejemplo tuberías, radiadores,
rangos y refrigeradores. Existe
mayor riesgo de descarga eléctrica si
su cuerpo está puesto a tierra.
c) No exponga las herramientas
eléctricas a la lluvia o a
condiciones de humedad. Si ingresa
agua a una herramienta eléctrica,
aumentará el riesgo de descarga
eléctrica.
d) No maltrate al cable. Nunca utilice
el cable para transportar, tirar
o desenchufar la herramienta
eléctrica. Mantenga el cable lejos
del calor, aceite, bordes afilados o
piezas móviles. Los cables dañados
o enredados aumentan el riesgo de
descarga eléctrica.
e) Al operar una herramienta eléctrica
en el exterior, utilice un cable
prolongador adecuado para tal uso.
Utilice un cable adecuado para uso en
exteriores a fin de reducir el riesgo de
descarga eléctrica.
f)
Si el uso de una herramienta eléctrica
en un lugar húmedo es imposible de
evitar, utilice un suministro protegido
con un interruptor de circuito por
falla a tierra (GFCI). El uso de un GFCI
reduce el riesgo de descargas eléctricas.
3) Seguridad personal
a) Permanezca alerta, controle lo
que está haciendo y utilice el
sentido común cuando emplee una
herramienta eléctrica. No utilice
una herramienta eléctrica si está
cansado o bajo el efecto de drogas,
alcohol o medicamentos. Un momento
de descuido mientras se opera una
herramienta eléctrica puede provocar
lesiones personales graves.
b) Utilice equipos de protección
personal. Siempre utilice
protección para los ojos. En las
condiciones adecuadas, el uso
de equipos de protección, como
máscaras para polvo, calzado de
seguridad antideslizante, cascos
o protección auditiva, reducirá las
lesiones personales.
c) Evite el encendido por accidente.
Asegúrese de que el interruptor esté
en la posición de apagado antes de
conectarlo a la fuente de energía
o paquete de baterías, o antes de
levantar o transportar la herramienta.
Transportar herramientas eléctricas con el
dedo apoyado en el interruptor o enchufar
herramientas eléctricas con el interruptor
en la posición de encendido puede
propiciar accidentes.
d) Retire las clavijas de ajuste o llaves
de tuercas antes de encender la
herramienta eléctrica. Una llave de
tuercas o una clavija de ajuste que se
deje conectada a una pieza giratoria de
la herramienta eléctrica pueden provocar
lesiones personales.
e) No se estire. Conserve el equilibrio
adecuado y manténgase parado
correctamente en todo momento. Esto
permite un mejor control de la herramienta
eléctrica en situaciones inesperadas.
f) Use la vestimenta adecuada. No use
ropas holgadas ni joyas. Mantenga el
cabello, la ropa y los guantes alejados
de las piezas en movimiento. Las ropas
holgadas, las joyas o el cabello largo
pueden quedar atrapados en las piezas en
movimiento.
g) Si se suministran dispositivos para
la conexión de accesorios con
fines de recolección y extracción
de polvo, asegúrese de que estén
conectados y que se utilicen
correctamente. El uso de dispositivos
de recolección de polvo puede reducir
Page 27

27
los peligros relacionados con el polvo.
4) Uso y mantenimiento de la
herramienta eléctrica
a)
No fuerce la herramienta eléctrica.
Utilice la herramienta eléctrica
correcta para el trabajo que realizará.
La herramienta eléctrica correcta hará
el trabajo mejor y más seguro a la
velocidad para la que fue diseñada.
b)
No utilice la herramienta eléctrica
si no puede encenderla o apagarla
con el interruptor. Toda herramienta
eléctrica que no puede ser controlada
mediante el interruptor es peligrosa y
debe ser reparada.
c)
Desconecte el enchufe de la fuente
de energía y/o el paquete de baterías
de la herramienta eléctrica antes de
realizar ajustes, cambiar accesorios
o almacenar herramientas eléctricas.
Estas medidas de seguridad
preventivas reducen el riesgo de
encender la herramienta eléctrica en
forma accidental.
d) Guarde las herramientas
eléctricas que no están en uso
fuera del alcance de los niños y
no permite que otras personas
no familiarizadas con ella o con
estas instrucciones operen la
herramienta. Las herramientas
eléctricas son peligrosas en las
manos de usuarios no entrenados.
e) Mantenimiento de las herramientas
eléctricas. Controle que no haya
piezas móviles mal alineadas
o trabadas, piezas rotas y
toda otra situación que pueda
afectar el funcionamiento de
las herramientas eléctricas.
Si encuentra daños, haga
reparar la herramienta eléctrica
antes de utilizarla. Se producen
muchos accidentes a causa de las
herramientas eléctricas que carecen
de un mantenimiento adecuado.
f) Mantenga las herramientas
de corte afiladas y limpias.
Las herramientas de corte con
mantenimiento adecuado, con los
bordes de corte afilados son menos
propensas a trabarse y son más
fáciles de controlar.
g) Utilice la herramienta eléctrica,
los accesorios y las brocas de la
herramienta, etc. de acuerdo con
estas instrucciones y teniendo en
cuenta las condiciones de trabajo
y el trabajo que debe realizarse. El
uso de la herramienta eléctrica para
operaciones diferentes de aquéllas
para las que fue diseñada podría
originar una situación peligrosa.
5) Uso y mantenimiento de la
herramienta con baterías
a)
Recargue solamente con el cargador
especificado por el fabricante. Un
cargador adecuado para un tipo de
paquete de baterías puede originar
riesgo de incendio si se utiliza con
otro paquete de baterías.
b) Utilice herramientas eléctricas
sólo con paquetes de baterías
específicamente diseñados. El uso
de cualquier otro paquete de baterías
puede producir riesgo de incendio y
lesiones.
c) Cuando no utilice el paquete de
baterías, manténgalo lejos de otros
objetos metálicos como sujetapapeles,
monedas, llaves, clavos, tornillos u
otros objetos metálicos pequeños que
puedan realizar una conexión desde
un terminal al otro. Los cortocircuitos
en los terminales de la batería pueden
provocar quemaduras o incendio.
d) En condiciones abusivas, el
líquido puede ser expulsado de
la batería. Evite su contacto. Si
entra en contacto accidentalmente,
enjuague con agua. Si el líquido
entra en contacto con sus ojos,
busque atención médica. El líquido
expulsado de la batería puede
provocar irritación o quemaduras.
6) Mantenimiento
a) Haga que una persona de
reparaciones calificada realice el
mantenimiento de su herramienta
eléctrica y utilice piezas de
repuesto idénticas solamente.
Esto garantizará la seguridad de la
herramienta eléctrica.
NORMAS DE SEGURIDAD
ESPECÍFICAS
• Sujete la herramienta eléctrica por las
superficies aislantes cuando realice
una operación en que la herramienta
pueda hacer contacto con cableados
ocultos. Al hacer contacto con un
cable “vivo”, las partes metálicas de la
herramienta se vuelven “vivas” y pueden
originar un choque al operador.
ADVERTENCIA: USE SIEMPRE
LENTES DE SEGURIDAD. Los anteojos
de uso diario NO son lentes de
seguridad. Utilice también máscaras
faciales o para polvo si el corte produce
polvillo. UTILICE SIEMPRE EQUIPOS DE
SEGURIDAD CERTIFICADOS:
• Protección para los ojos según la
norma ANSI Z87.1 (CAN/CSA Z94.3)
• Protección auditiva según la norma
ANSI S12.6 (S3.19)
• Protección respiratoria según las
normas NIOSH/OSHA/MSHA
ADVERTENCIA: parte del polvo
producido por las herramientas
Page 28

eléctricas al lijar, aserrar, esmerilar,
taladrar y realizar otras actividades de la
construcción, contiene productos
químicos reconocidos por el Estado de
California como causantes de cáncer,
defectos de nacimiento u otros problemas
reproductivos. Algunos de estos
productos químicos son:
• el plomo de las pinturas de base plomo,
• la sílice cristalina de ladrillos, el cemento
y otros productos de mampostería, y
• el arsénico y el cromo de la madera con
tratamiento químico.
El riesgo derivado de estas exposiciones
varía según la frecuencia con la que se
realice este tipo de trabajo. Para reducir
la exposición a estos productos químicos:
trabaje en áreas bien ventiladas y trabaje
con equipos de seguridad aprobados, como
las máscaras para polvo especialmente
diseñadas para filtrar las partículas
microscópicas.
• Evite el contacto prolongado con el
polvo procedente del lijado, serrado,
esmerilado y taladrado eléctricos,
así como de otras actividades del
sector de la construcción. Lleve ropa
protectora y lave con agua y jabón
las zonas expuestas. Si permite que
el polvo se introduzca en la boca u ojos
o quede sobre la piel, puede favorecer
la absorción de productos químicos
peligrosos.
ADVERTENCIA: El uso de esta
herramienta puede generar o dispersar
polvo lo cual puede causar lesiones
respiratorias serias y permanentes y
otros tipos de lesión. Siempre use
protección respiratoria aprobada por
NIOSH/OSHA para la exposición al polvo.
Dirija las partículas en dirección opuesta a
su cara y cuerpo.
• No se recomienda el lijado de pintura
con base de plomo. Ver Precauciones
para el lijado de pintura para mayor
información antes de lijar pintura.
• Limpie su herramienta periódicamente.
Uso de cables de extension
Asegúrese que el cable de extensión esté
en buenas condiciones antes de usarlo.
Utilice siempre extensiones con el calibre
adecuado con su herramienta – esto es, el
calibre apropiado para diferentes longitudes
del cable, con la capacidad suficiente para
soportar la corriente que su herramienta
necesita. El uso de un cable con calibre
insuficiente causará una caída en el voltaje
de la línea resultando en pérdida de potencia
y sobrecalentamiento. Consulte la tabla que
sigue para conocer los calibre del cable.
SÍMBOLOS
La etiqueta de su herramienta puede incluir
los siguientes símbolos. Los símbolos y sus
definiciones son los siguientes:
V ................. voltios
A ................. amperios
Hz ............... hertz
W ................ vatios
min .............. minutos
............... corriente alterna
............ corriente continua
n
o................ no velocidad sin carga
................
Construcción de clase II
.............. terminal a tierra
OPM ............ oscilaciones por minuto
.............símbolo de alerta de seguridad
.../min or rpm ... revoluciones o reciprocidad
por minuto
...Lea el manual de instrucciones
antes del uso
....... Use protección adecuada para las
vías respiratorias
.......
Use protección adecuada para los ojos
.......
Use protección adecuada para los oídos
OTRAS ADVERTENCIAS
E INSTRUCCIONES DE
SEGURIDAD IMPORTANTES
Lijado
Lijado de pinturas con base de
plomo
NO SE RECOMIENDA el lijado de pinturas
con base de plomo debido a la dificultad
para controlar el polvo contaminado. El
mayor peligro de envenenamiento por plomo
es para niños y mujeres embarazadas.
Ya que es difícil identificar si una pintura
contiene plomo o no sin efectuar un análisis
químico, recomendamos que tenga en
cuenta las siguientes precauciones cuando
lije cualquier tipo de pintura:
Seguridad personal
• No permita que entren al área de trabajo
niños ni mujeres embarazadas cuando
lije pintura hasta que haya terminado de
asear el lugar.
• Se recomienda el uso de máscaras o
respiradores para todas las personas
que entren al área de trabajo. El filtro se
debe reemplazar diariamente o cuando el
usuario tenga dificultad para respirar.
NOTA: Sólo deben utilizarse mascaras
adecuadas para trabajo con polvo
y vapores de pintura. Las mascaras
ordinarias para pintura no ofrecen esta
protección. Vea a su distribuidor de
herramienta local para conseguir la
máscara adecuada.
• NO COMA, BEBA O FUME en la zona
de trabajo para evitar ingerir partículas
28
Page 29

29
de pintura contaminadas. Los usuarios
deberán lavarse y limpiarse ANTES de
comer, beber o fumar. No deben dejarse
artículos para comer beber o fumar en
el área de trabajo donde el polvo se
asentaría en ellos.
Seguridad ambiental
• La pintura debe removerse de tal manera
que se minimice la cantidad generada de
polvo.
• Se deben sellar las áreas en que se
remueve pintura con láminas de plástico
de 4 mils. de espesor.
• El lijado debe hacerse en tal forma que se
reduzca el desalojo de pintura fuera de la
zona de trabajo.
limpieza y desecho
• Todas las superficies en el área de
trabajo deben ser aspiradas y limpiadas
a conciencia diariamente el tiempo que
dure el proyecto de lijado. Las bolsas
filtro de las aspiradoras deben cambiarse
frecuentemente.
• Las láminas de plástico deben recogerse y
desecharse con cualquier resto de pintura.
Deben depositarse en receptáculos
sellados y deben desecharse a través
de los procedimientos de recolección de
basura normales. Durante la limpieza,
niños y mujeres embarazadas deben
permanecer alejados de la zona de trabajo
inmediata.
• Todo tipo de juguetes, mobiliario lavable y
utensilios usados por niños deben lavarse
a conciencia antes de volver a utilizarse.
INSRUCCIONES DE SEGURIDAD
IMPORTANTES PARA CARGADORES
DE BATERÍAS
GUARDE ESTAS INSTRUCCIONES:
Este manual contiene instrucciones de
seguridad importantes para cargadores de
baterías.
• Antes de usar el cargador, lea todas
las instrucciones y advertencias que se
encuentren en el cargador, en la batería
y en el producto que usa la batería.
ADVERTENCIA: Riesgo de descarga
eléctrica. Desconecte el cargador de la
toma de corriente alterna antes de
limpiarlo. Para limpiar la suciedad y grasa
del exterior del cargador puede usarse un
paño o cepillo suave no metálico. No use
agua ni soluciones limpiadoras.
ADVERTENCIA: Riesgo de descarga
eléctrica. No permita que ningún líquido
entre en el cargador. Podrían provocarse
descargas eléctricas.
ADVERTENCIA: Riesgo de
quemaduras. No sumerja la batería en
ningún líquido ni permita que se
introduzca ningún líquido en la misma. No
intente nunca abrir la batería por ningún
motivo. Si la caja protectora de plástico de
la batería se rompe o se raja, devuélvala a
un centro de servicio para su reciclaje.
ATENCIÓN: Riesgo de quemaduras.
Para reducir el riesgo de lesiones, cargue
solo baterías recargables
BLACK+DECKER. Otros tipos de baterías
pueden calentarse en exceso y explotar
provocando lesiones corporales y daños
materiales.
ATENCIÓN: Bajo ciertas condiciones,
cuando el cargador está enchufado a una
toma de corriente, algunas materias
extrañas pueden provocar un cortocircuito
en el cargador.
ADVERTENCIA:
• NO intente cargar la batería con
otros cargadores que no sean los
especificados por el fabricante. El
cargador y la batería están diseñados
específicamente para funcionar juntos.
• Estos cargadores están diseñados
exclusivamente para la carga de
baterías recargables Black+Decker
indicadas. Cualquier otro uso puede
provocar riesgo de incendio, descarga
eléctrica o electrocución.
• No exponga el cargador a la lluvia ni a
la nieve.
• Tire del enchufe y no del cable al
desconectar el cargador. De esta
manera se disminuirá el riesgo de dañar
el enchufe y el cable.
• Asegúrese de que el cable esté
ubicado de modo que no lo pise
nadie, ni se tropiece con él, y que no
esté sujeto a daños o tensiones.
• Al utilizar un cargador en el exterior,
hágalo siempre en un lugar seco.
• Si es absolutamente necesario
utilizar un alargador al aire libre,
use un alargador apropiado para
uso en exteriores. La utilización de
un alargador adecuado para uso en
exteriores reduce el riesgo de descarga
eléctrica.
• Los hilos del alargador deben ser
de un calibre apropiado (AWG o
American Wire Gauge) para su
seguridad. Cuanto más pequeño sea
el número del calibre del hilo, mayor
será la capacidad del cable, es decir
el calibre 16 tiene más capacidad que
el calibre 18. Cuando utilice más de un
alargador para completar el largo total,
asegúrese de que los hilos de cada
alargador individual tengan el calibre
mínimo.
Page 30

30
Calibre mínimo recomendado para
alargadores
• No coloque objetos en la parte superior
del cargador ni coloque el cargador
en una superficie blanda que pueda
bloquear las ranuras de ventilación y
provocar un calor interno excesivo.
Coloque el cargador en una posición
alejada de cualquier fuente de calor. El
cargador se ventila a través de ranuras en
la parte superior e inferior de la cubierta.
• No monte el cargador en la pared ni
lo instale en forma permanente sobre
ninguna superficie. El cargador está
diseñado para ser utilizado sobre una
superficie plana y estable (p. ej., un
banco o una mesa).
• No opere el cargador con cables o
enchufes dañados: reemplácelos de
inmediato.
• No opere el cargador si éste ha
recibido un golpe fuerte, se ha
caído, o se ha dañado de cualquier
otra manera. Llévelo a un centro de
mantenimiento autorizado.
• No desarme el cargador; llévelo a un
centro de mantenimiento autorizado
cuando se requiera mantenimiento o
una reparación. El armado incorrecto
puede implicar un riesgo de descarga
eléctrica, electrocución o incendio.
• Antes de limpiarlo, desconecte el
cargador del tomacorriente. Esto
reducirá el riesgo de descarga eléctrica.
Quitar el paquete de baterías no reducirá
este riesgo.
• NUNCA intente conectar 2 cargadores
juntos.
• El cargador está diseñado para operar
con corriente eléctrica doméstica
estándar (120 voltios). No intente
utilizarlo con otro voltaje.
CONSERVE ESTAS INSTRUCCIONES
INSTRUCCIONES DE SEGURIDAD
IMPORTANTES PARA BATERÍAS
ADVERTENCIA: ADVERTENCIA:
Lea todas las advertencias de seguridad
y todas las instrucciones para la batería,
el cargador y la herramienta eléctrica. El
incumplimiento de las advertencias e
instrucciones podría provocar descarga
eléctrica, incendio y/o lesiones graves.
La batería no viene completamente
cargada de fábrica. Antes de utilizar la
batería y el cargador, lea las instrucciones
de seguridad a continuación. Luego siga
los procedimientos de carga descritos.
Lea todas las instrucciones
•
No fuerce NUNCA la batería en el
cargador. NO modifique la batería
de ningún modo para que entre en
un cargador no compatible, ya que
ésta puede romperse y causar graves
lesiones corporales. Consulte la tabla
al final de este manual para información
sobre compatibilidad entre baterías y
cargadores.
• No incinere el paquete de baterías,
aun si tiene daños importantes o está
completamente desgastado. El paquete
de baterías puede explotar en el fuego.
Cuando se queman paquetes de baterías,
se generan vapores y materiales tóxicos.
• No cargue ni use la batería en
atmósferas explosivas, como
ambientes en los que hay líquidos,
gases o polvo inflamables. Insertar
o retirar la batería del cargador puede
encender el polvo o los vapores.
• Si el contenido de las baterías entra
en contacto con la piel, lave el área de
inmediato con agua y jabón suave. Si el
líquido de la batería entra en contacto con
los ojos, enjuague con agua manteniendo
los ojos abiertos durante 15 minutos o
hasta que la irritación cese. Si se necesita
atención médica, el electrolito de las
baterías de Lithium-Ion contiene una
mezcla de carbonatos orgánicos líquidos
y sales de litio.
• El contenido de las células de la
batería abierta puede generar irritación
respiratoria. Respire aire fresco. Si los
síntomas persisten, busque atención médica.
ADVERTENCIA: Peligro de
quemaduras. El líquido de la batería puede
encenderse si se expone a chispas o llamas.
• Cargue los paquetes de baterías sólo con
cargadores de
BLACK+DECKER
.
• NO salpique o sumerja en agua u otros
líquidos. Esto puede causar una falla
prematura de las células.
• No almacene ni utilice la herramienta
y el paquete de baterías en lugares en
los que la temperatura pueda alcanzar
o superar los 40 °C (105 °F) (como en
toldos al aire libre o construcciones de
metal en verano).
ADVERTENCIA: Nunca intente
abrir el paquete de baterías por ningún
motivo. Si la caja del paquete de baterías
está agrietada o dañada, no la introduzca en
el cargador. No comprima, deje caer ni dañe
Calibre mínimo para cables de extensión
Volts Longitud total del cable en pies
120V 0-25 26-50 51-100 101-150
(0-7,6m) (7,6-15,2m) (15,2-30,4m) (30,4-45,7m)
240V 0-50 51-100 101-200 201-300
(0-15,2m) (15,2-30,4m) (30,4-60,9m) (60,9-91,4m)
Amperaje
Más de No más de American Wire Gage
0 - 6 18 16 16 14
6 - 10 18 16 14 12
10 - 12 16 16 14 12
12 - 16 14 12 No se recomienda
Page 31

31
el paquete de baterías. No utilice un paquete
de baterías o un cargador que haya recibido
un golpe fuerte, se haya caído, esté agotado
o dañado de alguna forma (por ejemplo,
perforado con un clavo, golpeado con un
martillo, pisado). Los paquetes de baterías
dañados deben devolverse al centro de
mantenimiento para su reciclado.
ADVERTENCIA: Riesgo de
incendio. No guarde o transporte la
batería de ninguna manera que permita
que los terminales expuestos de la
batería entren en contacto con objetos
metálicos. Por ejemplo, no coloque la
batería en delantales, bolsillos, cajas de
herramientas, cajas de juegos de productos,
cajones, etc. con clavos, llaves, tornillos
sueltos, etc.
Transportar baterías puede provocar
incendios si los terminales de la batería
entran en contacto accidentalmente
con materiales conductores como
llaves, monedas, herramientas de mano
u objetos similares. Las Normas para
Materiales Peligrosos del Departamento
de Transporte de los EE.UU. (HMR)
concretamente prohíben transportar baterías
comercialmente o en aviones (es decir,
empacadas en maletas y equipaje de
mano) A MENOS que estén debidamente
protegidas de cortocircuitos. Por lo tanto,
cuando transporte baterías individuales,
asegúrese de que los terminales de la
batería estén protegidos y bien aislados de
materiales que puedan hacer contacto y
causar un cortocircuito.
NOTA: Las baterías de iones de
Lithium-Ion no deben colocarse dentro del
equipaje registrado.
NOTAS IMPORTANTES SOBRE LA CARGA
1. Obtendrá una duración más prolongada
y un mejor rendimiento si el paquete de
baterías se carga cuando la temperatura
ambiente está entre 18 °C y 24 °C (65 °F y
75 °F). NO cargue el paquete de batería con
una temperatura ambiental por debajo de
+4,5 °C (+40 °F) o por encima de +40,5 °C
(+105 °F). Esto es importante y evitará daños
graves en el paquete de baterías.
2. El cargador y el paquete de baterías
pueden estar calientes al tacto durante
la carga. Esto es una condición normal
y no indica un problema. Para facilitar el
enfriado del paquete de baterías después
de su uso, evite colocar el cargador o el
paquete de baterías en un ambiente cálido,
como debajo de un toldo de metal o en un
remolque sin aislamiento.
3. Si el paquete de baterías no se carga
adecuadamente:
a. Revise el tomacorriente enchufando una
lámpara u otro aparato
b. Verifique si el tomacorriente está
conectado a un interruptor que corta la
energía cuando usted apaga las luces.
c. Mueva el cargador y el paquete
de baterías a un lugar donde
la temperatura ambiental sea de
aproximadamente 18 °C a 24 °C (65 °F
a 75 °F).
d. Si los problemas de carga persisten, lleve
la herramienta, el paquete de baterías
y el cargador al centro de mantenimiento
local.
4.
Se debe recargar el paquete de baterías
cuando no produce energía suficiente
para tareas que previamente realizaba
con facilidad. NO CONTINÚE utilizando la
herramienta en estas condiciones. Siga el
procedimiento de carga. También se puede
cargar un paquete de baterías parcialmente
usado cuando se desee, sin ningún efecto
negativo sobre éstas.
5. Se deben mantener lejos de las
cavidades del cargador los materiales
extraños de naturaleza conductora, entre
los que se incluyen la lana de acero, el
papel de aluminio o cualquier acumulación
de partículas metálicas. Éstos son sólo
algunos ejemplos y no constituyen una lista
taxativa. Siempre desenchufe el cargador del
tomacorriente cuando no haya un paquete
de baterías en la cavidad. Desenchufe el
cargador antes de intentar limpiarlo.
6. No congele ni sumerja el cargador en
agua ni en ningún otro líquido.
ADVERTENCIA:
Riesgo de
descarga eléctrica. No permita que
ningún líquido entre en el cargador. Nunca
intente abrir el paquete de baterías por
ningún motivo. Si la caja protectora de
plástico del paquete de baterías se rompe
o agrieta, devuélvala a un centro de
mantenimiento para su reciclado.
Recomendaciones de almacenamiento
1. El mejor lugar de almacenamiento es
uno que sea fresco y seco, que no esté
expuesto directamente a la luz del sol ni a
un exceso de frío o calor.
2. Para resultados óptimos durante períodos
prolongados de almacenamiento, se
recomienda guardar la batería totalmente
cargada en un lugar fresco y seco fuera del
cargador.
NOTA: No almacene la batería en una
herramienta con el interruptor de gatillo en
posición encendida. No use nunca cinta
adhesiva para mantener el interruptor de
gatillo en la posición de ENCENDIDO.
NOTA: Las baterías no deben almacenarse
totalmente descargadas. La batería deberá
recargarse antes de usarse.
Procedimiento de carga
Los cargadores Black+Decker están
diseñados para cargar baterías
Black+Decker.
Page 32

32
Nota: Para garantizar un rendimiento
y vida útil máximos de las baterías de
iones de litio:
• Cargue la batería totalmente antes de
utilizarla por primera vez.
• Recargue las baterías descargadas lo
más pronto posible después de cada
uso.
• No descargue las baterías totalmente.
1. Enchufe el cargador en una toma de
corriente apropiada antes de insertar la
batería.
2. Introduzca la batería en el cargador.
3. La luz verde LED destellará, lo cual
indica que la batería se está cargando.
4. La terminación de la carga está
indicada por la luz verde LED que
permanece encendida continuamente.
La batería está totalmente cargada y
podrá utilizarse en este momento o
dejarse en el cargador.
PERMANENCIA DE LA BATERÍA EN
EL CARGADOR
El cargador y la batería pueden dejarse
conectados con la LED verde encendida
indefinidamente. El cargador mantendrá la
batería nueva y totalmente cargada.
USO PREVISTO
Su lijadora BLACK+DECKER BDCMS20
ha sido diseñada para lijar madera, metal,
plásticos y superficies pintadas. Esta
herramienta está destinada solamente al
uso por particulares.
Descripción
N.° de catálogo
Estos productos utilizan las baterías y los cargadores indicados en el cuadro a continuación.
Batería de iones de litio de 20 V Máx**: LBXR20
Batería de iones de litio de 20 V Máx**: LBXR20BT
Batería de iones de litio tipo 1 de 20 V Máx** y 22 Wh: LB20
Cargador rápido de baterías de iones de litio de 2 amperios: L2AFC
Cargador rápido de baterías de iones de litio de 2 amperios: L2AFCBST
Cargador de baterías de iones de litio de 20 V Máx**: LCS20
Cargador de baterías de iones de litio de 20 V Máx**: LCS201
Cargador de baterías de iones de litio de 20 V Máx**: LCS1620
Cargador de baterías de iones de litio de 20 V Máx**: LCS200
1
6
4
7
5
2
3
DESCRIPCIÓN DE LAS FUNCIONES
1. Interruptor de encendido/apagado
2. Mango trasero
3. Mango delantero
4. Cartucho para recolección de polvo
5. Almohadilla de lijado
6. Aditamento para detalles
7. Batería
Herramientas necesarias:
destornillador de cabeza Phillips n.º 1
Page 33

33
superficie, dejando que la herramienta
haga el trabajo. Solo se requiere una
presión ligera para lijar, pulir o restregar.
Una presión excesiva ralentizará la
herramienta y producirá resultados
inferiores. Compruebe su trabajo a
menudo, el producto puede retirar material
rápidamente.
ADVERTENCIA: Riesgo de descarga
eléctrica. Este producto no debería usarse
cerca de agua en ninguna circunstancia.
ATENCIÓN: Para reducir el
riesgo de lesiones, apague la
herramienta y saque la batería antes de
realizar ajustes o de extraer o instalar
accesorios.
ENCENDIDO Y APAGADO
• Para encender la herramienta, presione
el interruptor de encendido/apagado (1)
hacia la posición delantera I.
• Para apagar la herramienta, presione el
interruptor de encendido/apagado (1)
hacia la posición trasera O.
INSTALACIÓN DE LAS HOJAS DE
LIJADO (FIG. C)
•
Sujete la herramienta con la base de
lijado mirando hacia arriba.
• Coloque la hoja de papel de lija (8) en
la base de lijado, asegurándose de que
los orificios de la hoja se alineen con los
orificios de la base.
INSTALACIÓN DE LAS PUNTAS
PARA LIJADO (FIG. C)
•
Separe las dos puntas con forma de
diamante adicionales (9) de la hoja de
lijado (8).
Nota: Puede darse la vuelta a la punta
con forma de diamante (10) y cambiarse
cuando esté desgastada.
• Cuando la parte delantera de la punta
(9) esté desgastada, sepárela de la
hoja, dele la vuelta y presiónela de
nuevo sobre la base de lijado.
• Cuando la punta entera se haya
desgastado, retírela de la base de lijado
y cámbiela por una punta nueva.
Nota: Para una recolección óptima
del polvo, asegúrese de utilizar el tipo
correcto de papel de lija.
INSTRUCCIONES DE OPERACIÓN
ADVERTENCIA: Para reducir el
riesgo de lesiones corporales graves, lea
y siga todas las advertencias e
instrucciones de seguridad importantes
antes de utilizar esta herramienta.
CÓMO INSTALAR Y SACAR LA
BATERÍA DE LA HERRAMIENTA
ATENCIÓN: Asegúrese de que el
interruptor esté apagado antes de instalar o retirar la
batería.
Para instalar la batería: Introduzca la
batería (7) en la herramienta hasta que
esté totalmente asentada y se oiga un clic
(figura A). Compruebe que la batería esté
bien asentada y totalmente asegurada en
su sitio.
Para sacar la batería: Presione el botón
de liberación de la batería en la parte de
atrás de la misma y tire de la batería para
sacarla de la herramienta (figura B).
B
A
FUNCIONAMIENTO
Nota:
No apoye los dedos en la placa
cuando esté usando la herramienta.
Mueva la lijadora con desplazamientos
de barrido amplios a lo largo de la
Page 34

34
INSTALACIÓN Y EXTRACCIÓN DEL
DEPÓSITO PARA POLVO (FIG. F)
ATENCIÓN: Para reducir el
riesgo de lesiones, apague la
herramienta y saque la batería antes de
realizar ajustes o de extraer o instalar
accesorios.
ATENCIÓN: Peligro para las vías
respiratorias. Nunca opere esta
herramienta para lijar madera sin que el
depósito para polvo esté en su lugar. El
polvo que se produce al lijar puede crear
un peligro de inhalación.
ADVERTENCIA: Peligro de
incendio. El polvo acumulado que se
produce al lijar los revestimientos de las
superficies (poliuretano, aceite de lino,
etc.) puede iniciar una combustión
espontánea dentro del depósito para
polvo de la lijadora o en algún otro lugar y
ocasionar un incendio Para reducir este
riesgo, vacíe el depósito frecuentemente y
siga estrictamente las instrucciones del
manual de la lijadora y del fabricante del
revestimiento.
ADVERTENCIA: Peligro de
incendio. Al trabajar sobre superficies de
metal, no utilice el depósito para polvo ni
una aspiradora debido a que se originan
chispas. Utilice gafas de seguridad y una
máscara para polvo. Debido al riesgo de
incendio, no utilice la lijadora para lijar
superficies de magnesio. No la utilice para
lijar superficies húmedas.
• El depósito para recolección de polvo
(4) debe vaciarse después de cada 10
minutos de lijado.
• Deslice el depósito para polvo (4) en el
conector (4a) y asegúrese de que esté
ubicado firmemente.
• Para sacar el depósito para polvo, tire de
él hacia atrás y lejos del extremo trasero
de la herramienta.
4
4a
F
CONSEJOS PARA UN USO ÓPTIMO
ADVERTENCIA: Deje que la
herramienta funcione a su propio ritmo.
No la sobrecargue.
• No coloque las manos sobre las ranuras
de ventilación.
899
C
ACCESORIO TIPO DEDO (FIG. D ACCESORIO OPCIONAL)
El accesorio tipo dedo se utiliza para
lijado de detalles a precisión.
• Saque el tornillo (10).
• Saque de la base la punta de la
almohadilla con forma de diamante (11).
• Instale el accesorio tipo dedo (6) sobre
la base de lijado, como se muestra en la
Figura D.
• Instale y ajuste el tornillo.
• Alinee la hoja de lijado apropiada con el
accesorio tipo dedo.
1110
6
D
CAMBIO DE LA PUNTA CON FORMA
DE DIAMANTE (FIG. E)
•
Cambie la punta con forma de diamante
(11).
• Cambie y ajuste el tornillo (10).
10
11
E
Page 35

35
Artículo Descripción
Accesorio tipo dedo para detalles.
Para áreas pequeñas de difícil acceso. El accesorio tipo
dedo para detalles puede utilizarse para lijado ligero o
lijado en esquinas.
(Pieza número - X32214-XJ)
Malla para lijado de grano 240.
Para un acabado fino para lijado de detalles grandes.
(Pieza número - X39132-XJ)
Malla para lijado de grano 120.
Para un acabado medio para lijado de detalles grandes.
(Pieza número - X39127-XJ)
Malla para lijado de grano 80.
Para un acabado grueso para lijado de detalles grandes.
(Pieza número - X39122-XJ)
Hoja de lijado para detalles grandes de grano 240 con
dos puntas de repuesto.
Para un acabado fino para lijado de detalles grandes.
(Pieza número - X31019-XJ)
Hoja de lijado para detalles grandes de grano 120 con
dos puntas de repuesto.
Para un acabado medio para lijado de detalles grandes.
(Pieza número - X31009-XJ)
Hoja de lijado para detalles grandes de grano 60 con dos
puntas de repuesto
Para un acabado grueso para lijado de detalles grandes.
(Pieza número - X31039-XJ)
Hoja de lijado de accesorio tipo dedo para detalles de
grano 120.
Para un acabado medio para lijado de detalles.
(Pieza número - X3277-XJ)
ACCESORIOS
Los accesorios que se recomiendan
para la herramienta están disponibles
en su distribuidor local o en el centro de
servicio autorizado. Si necesita ayuda con
respecto a los accesorios, llame al: 1-800-
544-6986.
ADVERTENCIA: El uso de
accesorios no recomendados para
utilizar con esta herramienta puede
resultar peligroso.
REEMPLAZO DE LAS ETIQUETAS DE
ADVERTENCIA
Si sus etiquetas de advertencia se vuelven
ilegibles o faltan, llame al (888) 848-5175
para que se las reemplacen gratuitamente.
AMÉRICA LATINA: esta garantía no
se aplica a los productos que se venden en
América Latina. Para los productos que se
venden en América Latina, debe consultar
la información de la garantía específica del
país que viene en el empaque, llamar a la
compañía local o visitar el sitio Web a fin de
obtener esa información.
INFORMACIÓN DE MANTENIMIENTO
Todos los Centros de servicio de
BLACK+DECKER
cuentan con personal
altamente capacitado dispuesto a
brindar a todos los clientes un servicio
• No ejerza demasiada presión sobre la
herramienta.
• Revise el estado de la hoja de lijado
periódicamente. Reemplácela cuando
sea necesario.
• Siempre lije con la veta de la madera.
• Cuando lije capas nuevas de pintura
antes de aplicar otra capa, utilice grano
extra fino.
• Sobre superficies muy disparejas
o cuando retire capas de pintura,
comience con un grano grueso. En
otras superficies, comience con un
grano mediano. En ambos casos,
cambie gradualmente a un grano fino
para un acabado liso.
• Al lijar sobre una superficie vertical,
sostenga el mango trasero (2) para un
mejor agarre y control.
ACCESORIOS
Una variedad de accesorios Mouse
®
están a su disposición por un costo
adicional. Las listas pueden variar
entre un comercio y otro. Nota: Utilice
solamente papel de lija con orificios que
tengan la misma configuración que los de
la base de la lijadora. El papel de lija sin
orificios no permitirá que el polvo entre al
depósito.
La almohadilla con velcro y las bases
individuales son piezas reemplazables.
Si se desgastan, contacte con su centro
de servicio local. Para obtener más ayuda
llame al: 1-800-544-6986
ADVERTENCIA: El uso de cualquier
accesorio no recomendado para utilizarse
con esta herramienta podría ser peligroso.
Page 36

36
Estos límites están diseñados para
brindar protección razonable contra
interferencia perjudicial en una instalación
residencial. Este equipo genera, usa
y puede irradiar energía en frecuencia
de radio y, si no se instala y se usa de
acuerdo con las instrucciones, puede
provocar interferencia perjudicial en las
comunicaciones de radio. Sin embargo,
no hay garantía de que la interferencia no
ocurra en una instalación en particular.
Si este equipo provoca interferencia
perjudicial en la recepción de radio o
televisión, lo que se puede determinar al
apagar y encender el equipo, el usuario
debe tratar de corregir la interferencia
mediante una o más de las siguientes
medidas:
• Cambiar la orientación o la ubicación de
la antena de recepción.
• Aumentar la separación entre el equipo
y el receptor.
• Conectar el equipo a un tomacorriente
sobre un circuito diferente de aquel al
que está conectado el receptor.
• Consultar al vendedor o pedir la ayuda
de un técnico en radio y televisión con
experiencia.
Los cambios o las modificaciones que se
le realicen a esta unidad sin aprobación
expresa del tercero responsable
del cumplimiento pueden anular la
autorización del usuario para operar el
equipo. Este aparato digital de la clase B
se conforma con
ICES-003 canadiense.
eficiente y confiable en la reparación
de herramientas eléctricas. Si necesita
consejo técnico, reparaciones o piezas de
repuesto originales de fábrica, póngase
en contacto con el centro de servicio
de
BLACK+DECKER
más cercano a su
domicilio. Para ubicar su centro de servicio
local, llame al 1-800-544-6986 o visite
nuestro sitio www.blackanddecker.com.
El sello RBRC
®
El sello RBRC®
(Rechargeable Battery
Recycling Corporation) en
las baterías (ounidades de
batería) de níquel cadmio,
níquel e hidruro metálico o
de iones de litio indica que el costo de
reciclaje de estas baterías (o unidades
de batería) al llegar al final de su vida
de servicio ya ha sido pagado por
BLACK+DECKER. En algunas áreas,
es ilegal depositar baterías de níquel
cadmio, níquel e hidruro metálico o de
iones de litio gastadas en la basura o la
corriente de residuos sólidos urbanos; el
programa Call 2 Recycle® proporciona
una alternativa ecológica.
Call 2 Recycle, Inc., en cooperación
con BLACK+DECKER y otros usuarios
de baterías, han establecido programas
en los Estados Unidos y Canadá para
facilitar la recolección de baterías de
níquel cadmio, níquel e hidruro metálico
o de iones de litio gastadas. Al llevar sus
baterías de níquel cadmio, níquel e hidruro
metálico y de iones de litio gastadas
a un centro de servicio autorizado por
BLACK+DECKER o al minorista local para
que sean recicladas, ayuda a proteger el
medio ambiente y a conservar recursos
naturales. También puede comunicarse
con el centro de reciclaje de su localidad
para mayor información sobre dónde
llevar sus baterías gastadas. RBRC® es
una marca comercial registrada de Call 2
Recycle, Inc.
Este aparato digital Clase B cumple con
la norma canadiense ICES-003.
Este mecanismo cumple con la parte 15
de las normas de la Comisión Federal
de Comunicaciones de Estados Unidos
(FCC). La operación está sujeta a las
dos condiciones siguientes: (1) Este
mecanismo posiblemente no cause
interferencia perjudicial; y (2) este
mecanismo puede aceptar cualquier
interferencia recibida, incluso interferencia
que podría provocar una operación no
deseada.
NOTA: Este equipo ha sido probado y
se encontró que cumple con los límites
para dispositivo digital Clase B, según
la parte 15 de las normas de la FCC.
Page 37

37
APLICACIÓN /MATRIZ DE ACCESORIOS
ACCESORIO APLICACIONES / USOS RECOMENDADOS
Papel de lija de grano mediano Pintura, barniz, eliminación de óxido
Papel de lija de grano fino Acabado de superficies
Papel de lija de grano extra fino Lijado entre capas de pintura o barniz
Puntas para lijado de detalles Esquinas / sitios de difícil acceso
1 Lana para pulir / remover Pulir metales / remover barniz o uretano
4 Lana para pulir fino Pulido fino, acabado satín sobre pintura / barniz / uretano
almohadilla de esponja gris aplicar y remover pulimento
almohadilla blanca no tejida restregado ligero
almohadilla roja no tejida restregado pesado / eliminación de óxido
Las almohadillas descritas más arriba pueden estar disponibles en kits donde se vendan los productos Mouse®.
Para más información llame al 1-800-544-6986.
DETECCIÓN DE PROBLEMAS
Problema Causa posible Solución posible
• La herramienta no funcionará.
• El paquete de baterías no • Controle la instalación del
está bien instalado. paquete de baterías.
• El paquete de baterías no • Verifique los requisitos de carga
está cargado. del paquete de baterías.
• El paquete de baterías • El paquete de baterías no • Inserte el paquete de
no carga. está insertado en el baterías en el cargador hasta (LED).
cargador. que se encienda la luz verde
• El cargador no está • Enchufe el cargador en un
enchufado. tomacorriente que funcione.
Consulte “Notas importantes sobre
la carga” para conocer más
detalles.
• Temperatura ambiental. •
Traslade el cargador y la batería a
una temperatura ambiental que
esté por encima de 40 °F (4.5 °C) o
por debajo de 105 °F (+40.5 °C).
• La unidad se apaga • El paquete de baterías alcanzó • Espere que el paquete de
repentinamente. baterías el límite térmico máximo.
se enfríe.
• No tiene más carga. (Para • Colóquelo en el cargador
maximizar la vida útil del para que se cargue.
paquete de baterías, este
está diseñado para apagarse
repentinamente cuando no
tiene más carga).
Para conocer la ubicación del centro de mantenimiento más cercano a fin de recibir
ayuda con su producto, visite nuestro sitio Web www.blackanddecker.com.mx o llame
a la línea de ayuda
BLACK+DECKER
al 01 800 847 2309/01 800 847 2312.
Page 38

38
aplica a productos vendidos en América
Latina. Para los productos que se venden
en América Latina, consulte la información
de garantía específica del país contenida
en el empaque, llame a la compañía local
o visite el sitio web para obtener dicha
información.
GARANTÍA LIMITADA DE DOS
AÑOS
Black & Decker (U.S.) Inc. garantiza que
este producto está libre de defectos
de material o mano de obra durante un
período de dos (2) años desde la fecha
de compra, siempre y cuando el producto
se utilice en un entorno doméstico. Esta
garantía limitada no cubre contra fallas
debidas a mal uso, daño accidental o
cuando se han realizado o intentado
reparaciones por parte de cualquier otra
persona ajena a Black+Decker y sus
centros de mantenimiento autorizados. Un
producto defectuoso que cumple con las
condiciones de la garantía establecidas en
el presente documento será remplazado o
reparado sin costo de una dos maneras:
La primera, que únicamente dará lugar
a intercambios, consiste en devolver
el producto al comerciante minorista
donde fue comprado (siempre y cuando
la tienda sea un comerciante minorista
participante). Las devoluciones deben
realizarse dentro del período establecido
en la política para intercambios del
comerciante minorista. Es posible que
se requiera el comprobante de compra.
Consulte al comerciante minorista sobre
su política específica de devoluciones
con respecto a los límites de tiempo para
devoluciones o intercambios.
La segunda opción es llevar o enviar
(pagado por adelantado) el producto a un
centro de mantenimiento de propiedad o
con autorización de Black+Decker para
su reparación o remplazo a discreción de
Black+Decker. Es posible que se requiera
un comprobante de compra. Los centros
de mantenimiento de propiedad o con
autorización de Black+Decker en línea en
www.blackanddecker.com.
Esta garantía no se aplica a los
accesorios. Esta garantía le otorga
derechos legales específicos y es posible
que tenga otros derechos que varían de
un estado a otro. En caso de que tenga
alguna pregunta, comuníquese con el
gerente del centro de mantenimiento
de Black+Decker más cercano a usted.
Este producto no está diseñado para
uso comercial y, en consecuencia, dicho
uso comercial de este producto anulará
la garantía. Por medio del presente
documento, se declina la responsabilidad
de todas las demás garantías, explícitas o
implícitas.
AMÉRICA LATINA: Esta garantía no se
Page 39

39
· GARANTÍA BLACK+DECKER · BLACK+DECKER WARRANTY
. SOLAMENTE PARA PROPOSITOS DE MEXICO
Distributor Name · Sello firma del distribuidor
Date of purchase · Fecha de compra Invoice No. · No. de factura
PRODUCT INFOMATION · IDENTIFICACIÓN DEL PRODUCTO
Cat. No. · Catalogo ó Modelo Serial Number · No. de serie
Name · Nombre Last Name · Apellido
Address · Dirección
City · Ciudad State · Estado
Postal Code · Código Postal Country · País
Telephone · No. Teléfono
2 AÑOS DE GARANTIA
Este producto cuenta con dos años de garantía a partir de la fecha de compra contra
cualquier defecto de su funcionamiento, así como cualquier falla debido a materiales
empleados para su fabricación ó mano de obra defectuosa.
Nuestra garantía incluye la reparación o reposición del producto y/o componentes sin
cargo alguno para el cliente incluyendo la mano de obra, esta incluye los gastos de
trasportación erogados para lograr cumplimiento de esta garantía en los domicilios
diversos señalados.
Para hacer efectiva esta garantía deberá presentar su herramienta y esta póliza sellada
por el establecimiento comercial donde se adquirió el producto.
Nos comprometemos a entregar el producto en un lapso no mayor a 30 días hábiles contados
a partir de la fecha de recepción del mismo en nuestros talleres de servicio autorizados.
ESTA GARANTIA NO APLICA CUANDO:
El producto se hubiese utilizado en condiciones distintas a las normales.
El producto no hubiese sido operado de acuerdo con el instructivo de uso que se
acompaña.
El producto hubiese sido alterado o reparado por personas no autorizadas por
nosotros.
Importador: Black & Decker S.A. de .C.V
Bosque de Cidros Acceso Radiatas No.42
3ra.Seccion de Bosques de las lomas
C.P.05120, Mexico, D.F. Tel: (01 55) 5326 7100
Page 40

40
Cat No. BDCMS20 Form No. N504017 November 2016
Copyright © 2016
BLACK+DECKER
Printed in China
Grupo Realsa en
herramientas,
S.A. de C.V.
Súper Manzana 69 MZ.01
Lote 30
(Av. Torcasita)
Col. Puerto Juárez
Cancún, Quintana Roo
Tel. 01 998 884 72 27
Ferre Pat de Puebla, S.A.
de C.V.
16 de Septiembre No. 6149
Col. El Cerrito
Puebla, Puebla
Tel. 01 222 264 12 12
Ferre Pat de Puebla, S.A.
de C.V.
Ejército Mexicano No. 15
Col. Ejido 1ro. de Mayo
Boca del Rio, Veracruz
Tel. 01 229 167 89 89
Servicio de Fabrica
BLACK+DECKER,
S.A. de C.V.
Lázaro Cardenas No. 18
Col. Obrera
Distrito Federal
Tel. 55 88 95 02
Representaciones
Industriales Robles, S.A.
de C.V.
Tezozomoc No. 89
Col. La Preciosa
Distrito Federal
Tel. 55 61 86 82
Gpo. Comercial de
Htas. y Refacciones de
Occidente, S.A. de C.V.
Av. La Paz No. 1779
Col. Americana, S. Juaréz
Guadalajara, Jalisco
Tel. 01 33 38 25 69 78
Herramientas y Equipos
Profesionales
Av. Colón 2915 Ote.
Col. Francisco I. Madero
Monterrey, Nvo. León
Tel. 01 81 83 54 60 06
Htas. Portátiles de
Chihuahua,
S.A. de C.V.
Av. Universidad No. 2903
Col. Fracc. Universidad
Chihuahua, Chihuahua
Tel. 01 614 413 64 04
SOLAMENTE PARA PROPOSITOS DE MEXICO
PARA OTRAS LOCALIDADES LLAME AL 01 800 847 2309 o 01 800 847 2312.
Fernando González
Armenta
Bolivia No. 605
Col. Felipe Carrillo Puerto
Cd. Madero, Tamaulipas
Tel. 01 833 221 34 50
Perfiles y Herramientas de
Morelia
Gertrudis Bocanegra No. 898
Col. Ventura Puente
Morelia, Michoacán
Tel. 01 443 313 85 50
Enrique Robles
Av. de la Solidaridad No.
12713
Col. La Pradera
Irapuato, Guanajuato
Tel. 01 462 626 67 39
Hernández Martinez
Jeanette
Prolongación Corregidora
Nte. No. 1104
Col. Arboledas
Queretaro, Qro.
Tel. 01 442 245 25 80
BLACK & DECKER S.A. DE C.V.
BOSQUES DE CIDROS ACCESO RADIATAS NO. 42
COL. BOSQUES DE LAS LOMAS.
05120 MÉXICO, D.F
TEL. (01 55) 5326 7100
01 800 847 2309/01 800 847 2312
 Loading...