

Page 1
GENERAL SAFETY RULES - FOR ALL BATTERY OPERATED TOOLS
WARNING! READ AND UNDERSTAND ALL INSTRUCTIONS. Failure to follow all
instructions listed below, may result in electric shock, fire and/or serious personal injury .
SAVE THESE INSTRUCTIONS
WORK AREA
• Keep your work area clean and well lit. Cluttered benches and dark areas invite
accidents.
• Do not operate power tools in explosive atmospheres, such as in the presence of
flammable liquids, gases, or dust. Power tools create sparks which may ignite the dust or
fumes.
• Keep bystanders, children, and visitors away while operating a power tool.
Distractions can cause you to lose control.
ELECTRICAL SAFETY
• Do not abuse the cord. Never use the cord to carry the tool. Keep cord away from
heat, oil, sharp edges or moving parts. Replace damaged cords immediately.
Damaged cords may create a fire.
• A battery operated tool with integral batteries or a separate battery pack must be
recharged only with the specified charger for the battery. Acharger that may be
suitable for one type of battery may create a risk of fire when used with another battery.
• Use battery operated tool only with specifically designated battery pack. Use of any
other batteries may create a risk of fire.
PERSONAL SAFETY
• Stay alert, watch what you are doing and use common sense when operating a
power tool. Do not use tool while tired or under the influence of drugs, alcohol, or
medication. A moment of inattention while operating power tools may result in serious
personal injury,
• Dress properly. Do not wear loose clothing or jewelry. Contain long hair. Keep your
hair, clothing , and gloves away from moving parts. Loose clothes, jewelry , or long hair
can be caught in moving parts.
• Avoid accidental starting. Be sure switch is in the locked or off position before
inserting battery pack. Carrying tools with your finger on the switch or inserting the battery
pack into a tool with the switch on invites accidents.
• Remove adjusting keys or wrenches before turning the tool on. Awrench or a key that
is left attached to a rotating part of the tool may result in personal injury.
• Do not overreach. Keep proper footing and balance at all times. Proper footing and
balance enable better control of the tool in unexpected situations.
• Use safety equipment. Always wear eye protection. Dust mask, non-skid safety shoes,
hard hat, or hearing protection must be used for appropriate conditions.
TOOL USE AND CARE
• Use clamps or other practical way to secure and support the workpiece to a stable
platform. Holding the work by hand or against your body is unstable and may lead to loss
of control.
• Do not force tool. Use the correct tool for your application. The correct tool will do the
job better and safer at the rate for which it is designed.
• Do not use tool if switch does not turn it on or off. Atool that cannot be controlled with
the switch is dangerous and must be repaired.
• Disconnect battery pack from tool or place the switch in the locked or off position
before making any adjustments, changing accessories, or storing the tool. Such
preventative safety measures reduce the risk of starting the tool accidentally.
• Store idle tools out of reach of children and other untrained persons. Tools are
dangerous in the hands of untrained users.
VEA EL ESPAÑOL EN LA CONTRAPORTADA.
SAVE THIS MANUAL FOR FUTURE REFERENCE.
INSTRUCTIVO DE OPERACIÓN, CENTROS DE SERVICIO Y
PÓLIZADE GARANTÍA. ADVERTENCIA: LÉASE ESTE
INSTRUCTIVO ANTES DE USAR ELPRODUCT O.
INSTRUCTION MANUAL
Catalog No. BDC752
7777....2222 VVVVoooolllltttt CCCCoooorrrrddddlllleeeessssssss DDDDrrrriiiillllll
ll
KEY INFORMATION YOU SHOULD KNOW :
• Drill must be charged for 16 hours before first use.
• Charger may hum; batteries or charger may become
warm while charging.
• For bulb replacement information, see “Maintenance”
section.
Cat #BDC752 Form # 606428-00 (JUN-01-1) Copyright © 2001 Black & Decker Printed in China
• When battery pack is not in use, keep it away from other metal objects like: paper
clips, coins, keys, nails, screws or other small metal objects that can make a
connection from one terminal to another. Shorting the battery terminals together may
cause sparks, burns, or a fire.
• Maintain tools with care. Keep cutting tools sharp and clean. Properly maintained tools,
with sharp cutting edge are less likely to bind and are easier to control.
• Check for misalignment or binding of moving parts, breakage of parts, and any other
condition that may affect the tool’s operation. If damaged, have the tool serviced
before using. Many accidents are caused by poorly maintained tools.
• Use only accessories that are recommended by the manufacturer for your model.
Accessories that may be suitable for one tool may create a risk of injury when used on
another tool.
SERVICE
• Tool service must be performed only by qualified repair personnel. Service or
maintenance performed by unqualified personnel may result in a risk of injury.
• When servicing a tool, use only identical replacement parts. Follow instructions in the
Maintenance section of this manual. Use of unauthorized parts or failure to follow
Maintenance Instructions may create a risk of shock or injury.
SPECIFIC SAFETY RULES
• Hold tool by insulated gripping surfaces when performing an operation where the
cutting tool may contact hidden wiring or its own cord. Contact with a "live" wire will also
make exposed metal parts of the tool "live" and shock the operator.
• When working on a ladder or on scaffolding be sure to lay the tool down on its side
when not in use. Some tools with large battery packs will stand upright but may be easily
knocked over.
The label on your tool may include the following symbols.
V ..........................volts A..........................amperes
Hz ........................hertz W ........................watts
min ........................minutes ......................alternating current
......................direct current
n
o........................no load speed
..........................
Class II Construction
........................earthing terminal
........................safety alert symbol .../min ..................revolutions or
reciprocations
per minute
WARNING: Some dust created by power sanding, sawing, grinding, drilling, and other con-
struction activities contains chemicals known to cause cancer, birth defects or other reproductive harm. Some examples of these chemicals are:
• lead from lead-based paints,
• crystalline silica from bricks and cement and other masonry products, and
• arsenic and chromium from chemically-treated lumber. (CCA)
Your risk from these exposures varies, depending on how often you do this type of work. To
reduce your exposure to these chemicals: work in a well ventilated area, and work with
approved safety equipment, such as those dust masks that are specially designed to filter out
microscopic particles.
2
Trigger Switch
Interrupteur à détente
Gatillo interruptor
3
Depress for reverse (this side)
Enfoncer pour la marche arrière
Oprima para marcha hacia adelante
Depress for forward (other side)
Enfoncer pour la marche avant
Oprima para reversa
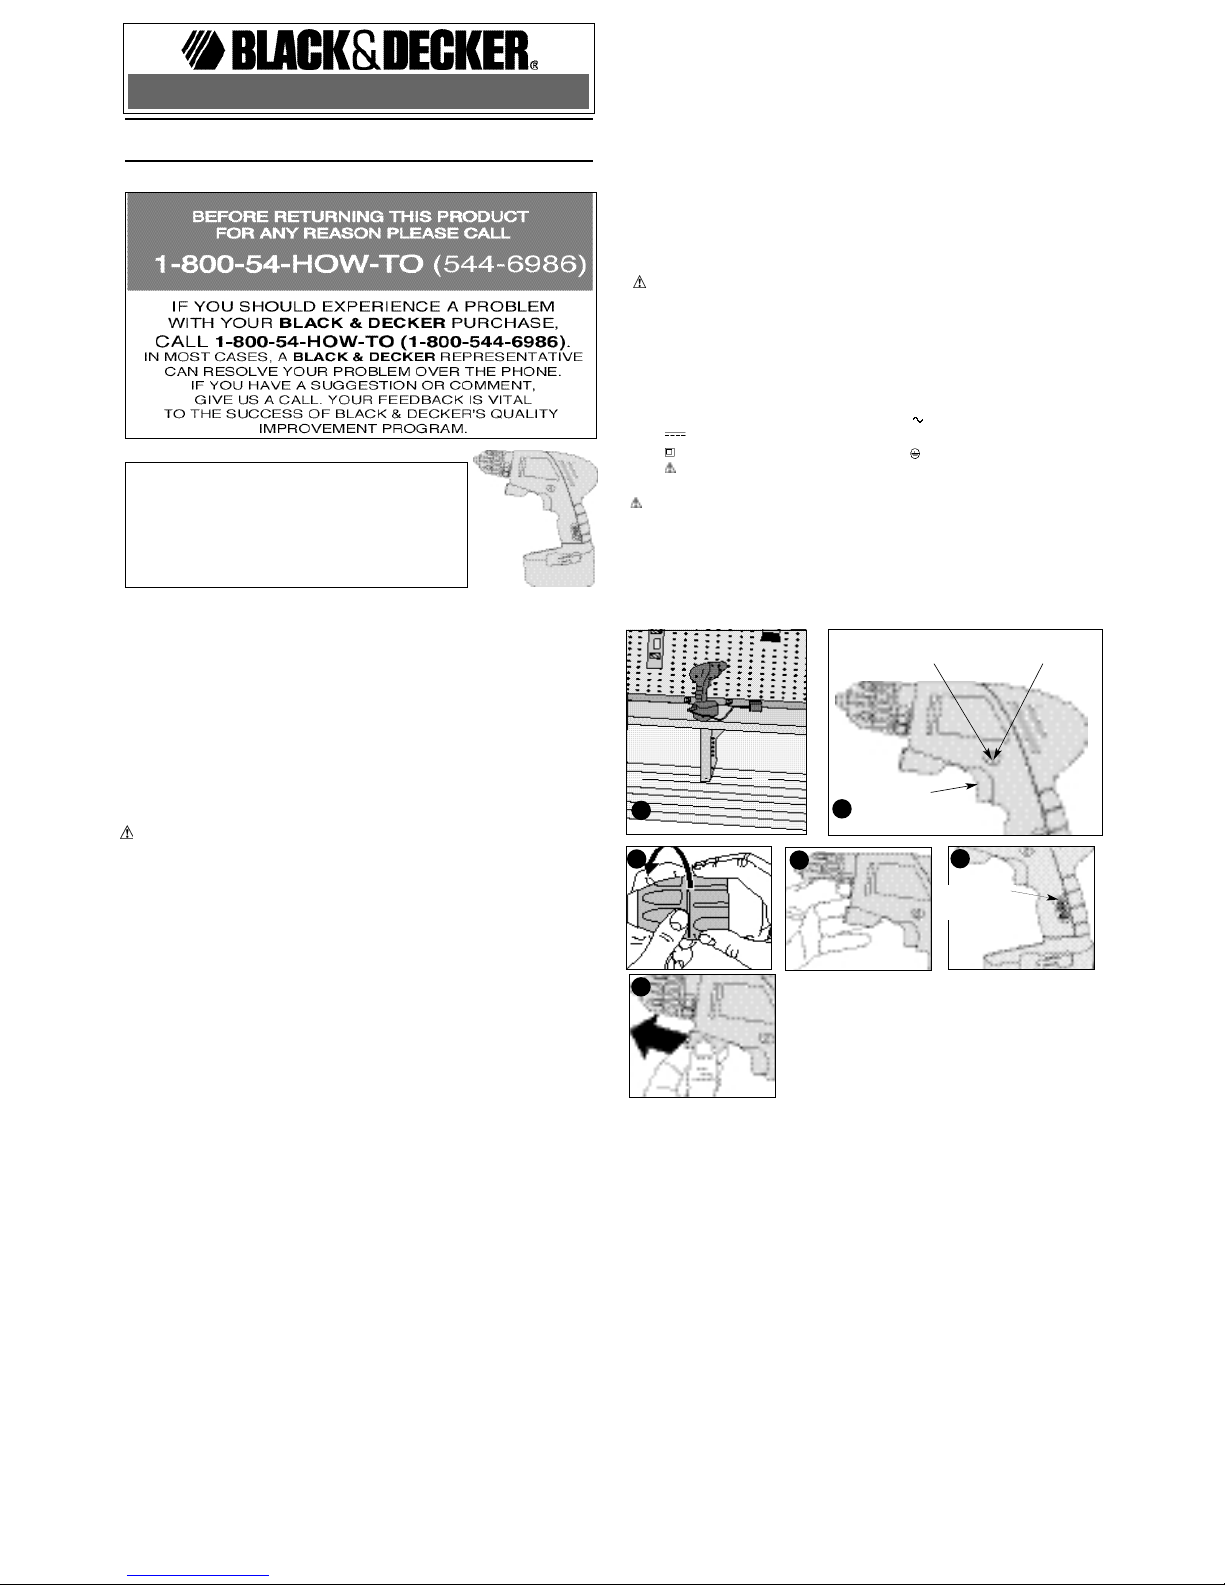
Charging the Drill
Before attempting to charge your drill, thoroughly read ALL of the safety instructions. To
charge your drill, follow the steps below.
1. Remove any accessories from the chuck.
2. Plug the output cord of the charger into the socket in the drill handle.
3. Plug the charger into any standard electrical outlet as shown in Figure 1.
4. Allow the tool to remain in this condition for 16 hours.
Important Charging Notes
1. After normal usage, your drill should be fully charged in 16 hours or less. Your drill was
sent from the factory in an uncharged condition. Before attempting to use it, it must be
charged for at least 16 hours.
2. DO NOT charge the batteries in an air temperature below +40°F or above +105°F. This
is important and will prevent serious damage to the batteries.
3. While charging, the charger may hum and become warm to touch. This is a normal condition and does not indicate a problem.
4. If the batteries do not charge properly –
(1) Check current at receptacle by plugging in a lamp or other appliance.
(2) Check to see if the receptacle is connected to a light switch which turns power off
when you turn out the lights.
(3) Move charger and drill to a surrounding air temperature of +40°F to +105°F.
(4) If the receptacle and temperature are OK, and you do not get proper charging, take
or send the tool and charger to your local Black & Decker service center. See "Tools
Electric"’ in yellow pages.
5. The drill should be recharged when it fails to produce sufficient power on the jobs which
previously were done easily. DO NOT CONTINUE to use the drill with its battery in a
depleted condition.
6. To prolong battery life, avoid leaving the tool on charge for more than 2 days. Although
overcharging is not a safety concern, it can significantly reduce overall battery life.
7. Since the unit is designed for cordless applications, use of the unit while plugged in is of
no benefit. Batteries will still become depleted.
1
4
6
5
Charge Indicator
Indicateur de charge
Indicador de carga
Page 2

IMPORTANTES MESURES DE SÉCURITÉ - POUR TOUS LES OUTILS
ALIMENTÉS PAR PILES
AVERTISSEMENT! Lire et comprendre toutes les directives. Le non-respect de toutes
les directives suivantes présente des risques de secousses électriques, d’incendie ou de
blessures graves.
CONSERVER CES MESURES.
ZONE DE TRAVAIL
• S’assurer que la zone de travail est propre et bien éclairée. Des établis encombrés et
des endroits sombres présentent des risques d’accidents.
• Ne pas utiliser des outils électriques en présence de vapeurs explosives (comme
celles dégagées par des liquides, des gaz ou des poussières inflammables). Les
étincelles générées par le moteur des outils électriques peuvent enflammer les poussières
ou les vapeurs.
• Éloigner les curieux, les enfants et les visiteurs de la zone de travail lorsqu’on utilise
un outil électrique. Une distraction peut entraîner la perte de maîtrise de l’outil.
MESURES DE SÉCURITÉ RELATIVES À L’ÉLECTRICITÉ
• Manipuler le cordon avec soin. Ne jamais se servir du cordon afin de transporter
l’outil ni tirer sur le cordon pour débrancher l’outil. Éloigner le cordon des sources de
chaleur, des flaques d’huile, des arêtes tranchantes et des pièces mobiles.
Remplacer immédiatement les cordons endommagés. Les cordons endommagés
augmentent les risques de secousses électriques.
• Il faut charger un outil à piles intégrées ou un ensemble de piles seulement dans le
chargeur conçu à cet effet. Un chargeur convenant pour un type de piles peut présenter
un risque d’incendie lorsqu’on s’en sert avec un autre type de piles.
• Utiliser un outil alimenté par piles seulement avec la pile appropriée. L’utilisation de
toute autre pile présente des risques d’incendie.
SÉCURITÉ PERSONNELLE
• Demeurer vigilant, prendre soin et faire preuve de jugement lorsqu’on utilise un outil
électrique. Ne pas s’en servir lorsqu’on est fatigué ou affaibli par des drogues, de
l’alcool ou des médicaments. De graves blessures peuvent résulter d’un moment
d’inattention lors de l’utilisation d’un outil électrique.
• Porter des vêtements appropriés. Éviter de porter des vêtements amples ou des
bijoux. Recouvrir la chevelure si elle est longue. Éloigner les cheveux, les vêtements
et les gants des pièces en mouvement qui peuvent les happer.
• Éviter les démarrages accidentels. S’assurer que l’interrupteur est en position hors
tension avant d’insérer la pile. Afin d’éviter les risques de blessures, ne pas transporter
l’outil avec le doigt sur l’interrupteur ni insérer la pile dans un outil dont l’interrupteur est en
position sous tension.
• Enlever les clés de réglage avant de mettre l’outil sous tension. Une clé qui est laissée
sur une pièce rotative de l’outil présente des risques de blessures.
• Ne pas dépasser sa portée. Garder son équilibre en tout temps. On s’assure d’une
meilleure maîtrise de l’outil dans des situations imprévues grâce à une position stable et un
bon équilibre.
• Porter de l’équipement de sécurité. Toujours porter des lunettes de sécurité. Dans
certaines conditions, il faut porter des masques respiratoires, des chaussures
antidérapantes, un casque de sécurité ou des protège-tympans.
UTILISATION ET ENTRETIEN DE L’OUTIL
• Utiliser des pinces de serrage ou de tout autre moyen pratique afin de fixer et de
soutenir la pièce à ouvrer sur une plate-forme stable. La pièce est instable lorsqu’elle
est retenue par la main ou le corps de l’utilisateur. Cela présente des risques de perte de
maîtrise de l’outil.
• Ne pas forcer l’outil. Utiliser l’outil approprié à la tâche. L’outil approprié fonctionne
mieux et sûrement lorsqu’on s’en sert à son rendement nominal.
• Ne pas se servir de l’outil lorsque l’interrupteur est défectueux. Le cas échéant, l’outil
est dangereux et il faut le réparer.
• Enlever la pile de l’outil ou placer celui-ci en position hors tension avant de le régler,
d’en remplacer les accessoires ou de le ranger. On minimise de la sorte le risque de
démarrage accidentel de l’outil.
• Ranger l’outil hors de portée des enfants et de toute autre personne qui n’en connaît
pas le fonctionnement. L’outil est dangereux entre les mains de ces personnes.
• Lorsque la pile ne sert pas, l’éloigner de tout objet métallique (comme des trombones,
des pièces de monnaie, des clés, des clous, des vis ou tout autre petit objets
métalliques qui peut créer une connexion d’une borne à l’autre). Lorsque les bornes
sont court-circuitées, cela peut générer des étincelles, des brûlures ou un incendie.
• Prendre soin des outils. S’assurer que les outils de coupe sont tranchants et propres.
Des outils bien entretenus à arêtes tranchantes ont moins tendance à se coincer et ils se
maîtrisent mieux.
• Vérifier l’alignement et les attaches des pièces mobiles, le degré d’usure des pièces
ainsi que tout autre facteur susceptible de nuire au bon fonctionnement de l’outil.
Faire réparer un outil endommagé avant de s’en servir. Des outils mal entretenus sont la
cause de nombreux accidents.
• Utiliser seulement les accessoires recommandés par le fabricant. Des accessoires qui
conviennent à un outil peuvent présenter des risques avec un autre outil.
ENTRETIEN
• Confier l’entretien de l’outil seulement à du personnel qualifié. Le non-respect de la
présente directive présente des risques de blessures.
• Lors de l’entretien de l’outil, utiliser seulement des pièces de rechange identiques.
Respecter les consignes relatives à l’entretien du présent guide d’utilisation. Il y a
risque de secousses électriques ou de blessures lorsqu’on utilise des pièces non autorisées
ou lorsqu’on ne respecte pas les consignes relatives à l’entretien
MESURES DE SÉCURITÉ SPÉCIFIQUES
• Saisir l’outil par ses surfaces de prises isolées lorsque l’outil peut entrer en contact
AVANT DE RETOURNER LE PRODUIT, PEU IMPORTE LA RAI-
SON PRIÈRE DE COMPOSER
1 800 544-6986
RENSEIGNEMENTS IMPORT ANTS
• Il faut charger la perceuse pendant 16 heures avant de s'en servir.
• Le chargeur peut émettre un bourdonnement; les piles ou le chargeur peuvent
devenir chauds au toucher pendant le chargement.
• Pour obtenir de plus amples renseignements sur les ampoules de rechange,
consulter la section « Entretien » du présent manuel.
8. Unplug your tool’s charger from the power supply before disconnecting the charger from
the tool. Under certain conditions, with the charger plugged in to the power supply, the
exposed charging plug can be shorted by foreign material and may create a fire hazard.
Foreign materials of a conductive nature, such as but not limited to, steel wool, aluminum
foil, or any build up of metallic particles should be kept away from the charging plug.
Unplug charger before attempting to clean.
Operating Instructions
TRIGGER SWITCH & REVERSING BUTTON
The drill is turned ON and OFF by pulling and releasing the trigger switch shown in Figure 2.
Your drill is equipped for two speed drilling. To operate at low speed, squeeze the trigger
switch halfway. This will produce a low speed to be used for driving screws and starting holes
without a centerpunch. Squeezing the trigger switch all the way will produce a high speed for
normal drilling operation. NOTE: There is a slight pause between speeds. Keep squeezing
the trigger, and the drill will start again.
The reversing button, also shown in Figure 2, switches the drill’s direction from forward to
reverse. If it is in the middle, the drill will not function.
KEYLESS CHUCK
To insert a drill bit or other accessory:
1. Grasp the rear half of the chuck with one hand and use your other hand to rotate the
front half in the counterclockwise direction, (Fig. 3) as viewed from the chuck end.
2. Insert the bit or other accessory fully into the chuck, and tighten securely by holding the
rear half of the chuck and rotating the front portion in the clockwise direction as viewed
from the chuck end.
WARNING: Do not attempt to tighten drill bits (or any other accessory) by gripping the
front part of the chuck and turning the tool on. Damage to the chuck and personal injury may
occur when changing accessories.
INTEGRAL LIGHT
Your drill is equipped with a built-in light. To turn the light on, slide the switch downward as
shown in Figure 4. The light will remain on until the switch is returned to its original position.
BATTERYLEVEL INDICATOR
Figure 5 illustrates the location of the charge indicator. To display the charge status, press the
black button at the bottom of the indicator.
When fully charged batteries are installed, all three lights will be illuminated. As the charge is
depleted, there will be less lights illuminated.
SCREW DRIVING
For driving fasteners, the reversing button should be pushed to the left. Use reverse (button
pushed to the right) for removing fasteners. When moving from forward to reverse, or vice
versa, always release the trigger switch first.
DRILLING
• Use sharp drill bits only.
• Support and secure work properly, as instructed in the Safety Instructions.
• Use appropriate and required safety equipment, as instructed in the Safety Instructions.
• Secure and maintain work area, as instructed in the Safety Instructions.
• Run the drill very slowly, using light pressure, until the hole is started enough to keep the
drill bit from slipping out of it.
• Apply pressure in a straight line with the bit. Use enough pressure to keep the bit biting but
not so much as to stall the motor or deflect the bit.
• Hold the drill firmly to control its twisting action.
• DO NOT CLICK THE TRIGGER OF ASTALLED DRILLOFF AND ON IN AN ATTEMPTTO
STARTIT. DAMAGE TO THE DRILLCAN RESULT.
• Minimize stalling on breakthrough by reducing pressure and slowly drilling through the last
part of the hole.
• Keep the motor running while pulling the bit out of a drilled hole. This will help reduce
jamming.
• Use a cutting lubricant when drilling metals. The exceptions are cast iron and brass which
should be drilled dry. The lubricants that work best are sulphurized cutting oil or lard oil.
Bacon grease will also serve.
• When using twist drill bits to drill holes in wood, it will be necessary to pull the bits out
frequently to clear chips from the flutes.
• Make sure switch turns drill on and off.
WARNING: It is important to support the work properly and to hold the drill firmly to
prevent loss of control which could cause personal injury. If you have any questions on how
to properly operate tool, call: 1-800-54-HOW-TO (544-6986).
Maintenance
BULB REPLACEMENT - PART NUMBER 5100084-00
Remove the bulb cover by pulling it toward the front of the drill as shown in Figure 6. The
bulb, part number 5100084-00 can be obtained by contacting the Black and Decker location
nearest you. To find your local service location, refer to the yellow page directory under
"Tools—Electric" or call: 1-800-54-HOW T O. (544-6986)
Use only mild soap and damp cloth to clean the tool. Never let any liquid get inside the tool;
never immerse any part of the tool into a liquid.
IMPORTANT: To assure product SAFETY and RELIABILITY, repairs, maintenance and
adjustment (other than those listed in this manual) should be performed by authorized service
centers or other qualified service organizations, always using identical replacement parts.
Battery Pack Removal
IMPORTANT: This tool is designed for easy disassembly for the purpose of battery pack
removal. It is not designed to be re-assembled by the consumer. Before attempting to
disassemble this tool, turn it on and run it in either direction until it stops to ensure a complete
discharge of the battery pack. To disassemble the tool, remove the screws in the side of the
tool body. Take the two body halves apart and you will find the battery pack. Lift the battery
pack out and pull off the terminal clips.
The RBRC™ Seal
The RBRC™ (Rechargeable Battery Recycling Corporation)
Seal on the nickel-cadmium battery (or battery pack) indicates that the costs to
recycle the battery (or battery pack) at the end of its useful life have already been
paid by Black & Decker. In some areas, it is illegal to place spent nickel-cadmium
batteries in the trash or municipal solid waste stream and the RBRC program
provides an environmentally conscious alternative.
RBRC in cooperation with Black & Decker and other battery users, has established programs
in the United States and Canada to facilitate the collection of spent nickel-cadmium batteries.
Help protect our environment and conserve natural resources by returning the spent nickelcadmium battery to an authorized Black & Decker service center or to your local retailer for
recycling. You may also contact your local recycling center for information on where to drop
off the spent battery, or call 1-800-8-BATTERY.
Accessories
Recommended accessories for use with your tool are available from your local dealer or
authorized service center. If you need assistance regarding accessories, please call:
1-800-54-HOW-TO (544-6986).
WARNING:The use of any accessory not recommended for use with this tool could be
hazardous.
For safety in use, the following accessories should be used only in the sizes specified:
BITS, METALDRILLING–Up to 3/8" (9.5mm).BITS, WOOD DRILLING–Up to 1/2" (12.7mm).
Service Information
All Black & Decker Service Centers are staffed with trained personnel to provide customers
with efficient and reliable power tool service. Whether you need technical advice, repair, or
genuine factory replacement parts, contact the Black & Decker location nearest you. To find
your local service location, refer to the yellow page directory under "Tools—Electric" or call:
1-800-54-HOW TO. (544-6986)
Full Two-Year Home Use Warranty
Black & Decker (U.S.) Inc. warrants this product for two years against any defects in material
or workmanship. The defective product will be replaced or repaired at no charge in either of
two ways.
The first, which will result in exchanges only, is to return the product to the retailer from whom
it was purchased (provided that the store is a participating retailer). Returns should be made
within the time period of the retailer’s policy for exchanges (usually 30 to 90 days after the
sale). Proof of purchase may be required. Please check with the retailer for their specific
return policy regarding returns that are beyond the time set for exchanges.
The second option is to take or send the product (prepaid) to a Black & Decker owned or
authorized Service Center for repair or replacement at our option. Proof of purchase may be
required. Black & Decker owned and authorized Service Centers are listed under "ToolsElectric" in the yellow pages of the phone directory.
This warranty does not apply to accessories. This warranty gives you specific legal rights and
you may have other rights which vary from state to state. Should you have any questions,
contact the manager of your nearest Black & Decker Service Center.
This product is not intended for commercial use.
See ‘Tools-Electric’
– Yellow Pages –
for Service & Sales
Imported by
Black & Decker (U.S.) Inc.,
701 E. Joppa Rd.
Towson, MD 21286 U.S.A.
Page 3

avec des fils cachés. En cas de contact avec un fil sous tension, les pièces métalliques de
l’outil seront sous tension et l’utilisateur subira des secousses électriques.
• Lorsqu’on est installé sur une échelle ou un échafaudage pour travailler, on doit
déposer l’outil sur le côté lorsqu’on ne s’en sert plus. Bien que certains outils munis d’un
gros bloc-piles puissent être placés à la verticale, dans cette position, ils peuvent facilement
être renversés.
L’étiquette de l’outil peut comporter les symboles suivants.
V ....................................volts A..........................ampères
Hz ..................................hertz W ........................watts
min ..................................minutes ......................courant alternatif
................................courant continu
n
o........................sous vide
....................................
Construction de classe II
........................borne de mise à la
minute
..................................symbole d´avertissement .../min ..................tours ou courses
à la minute
CONSERVER CES MESURES.
Chargement de la perceuse
Avant de charger la perceuse, bien lire TOUTES les mesures de sécurité. Faire ce qui suit
pour charger la perceuse.
1. Retirer tout accessoire du mandrin.
2. Brancher le cordon de sortie du chargeur dans la douille de la poignée de la perceuse.
3. Brancher le chargeur dans une prise standard Figure 1.
4. Laisser l'outil de cette façon pendant 16 heures.
Notes importantes relatives au chargement
1. Après une utilisation normale, le chargement complet de la perceuse se fait en moins de
16 heures. La perceuse n'est pas chargée à sa sortie de l'usine. Il faut la charger pendant au moins 16 heures avant de s'en servir.
2. NE PAS charger l'ensemble de piles lorsque la température ambiante est inférieure à
4,5 °C (40 °F) ou supérieure à 40,5 °C (105 °F). Cette mesure est importante et aide à
prévenir les risques de graves dommages à l'ensemble de piles.
3. Le chargeur peut émettre des sons et les piles ainsi que le chargeur peuvent devenir
chauds au toucher pendant le chargement. Cette situation est normale et ne pose
aucun problème.
4. Lorsque la pile n’est pas bien chargée (1) vérifier l’alimentation de la prise en y branchant une lampe ou un autre appareil, (2) vérifier si la prise est reliée à un interrupteur
pour l’éclairage qui met la prise hors circuit lorsqu’on éteint les lumières, (3) déplacer
l’ensemble de piles et le chargeur dans une pièce où la température ambiante se situe
entre 5 °C et 40 °C (40 °F et 105 °F), (4) si le problème persiste, il faut confier la pile et
le chargeur au centre de service Black & Decker de la région. Consulter la rubrique
«Outils électriques» des Pages Jaunes.
5. Il faut charger la perceuse lorsqu'elle ne fournit plus la puissance nécessaire pour
effectuer les tâches avec autant de facilité qu'auparavant. NE PLUS SE SERVIR de
l'outil lorsque sa pile est à plat.
6. Afin de prolonger la durée de la pile, éviter de laisser l'outil dans le chargeur pendant
plus de deux jours. Le chargement prolongé ne pose aucun problème de sécurité, mais
cela peut grandement réduire la durée utile de la pile.
7. Puisque l'outil a été conçu pour fonctionner sans fil, il n'est d'aucune utilité de s'en servir
lorsqu'il est branché. La pile se décharge de toute façon.
8. Débrancher le chargeur de la source d'alimentation avant de le débrancher de l'outil.
Dans certaines conditions, la fiche de chargement à découvert du chargeur branché
peut être court-circuitée par des corps étrangers et cela présente des risques d'incendie.
Il faut éloigner de la fiche de chargement des corps étrangers de nature conductrice
(comme de la laine d'acier, du papier d'aluminium ou toute accumulation de particules
métalliques, entre autres). Débrancher le chargeur avant de le nettoyer.
Mode d’emploi
INTERRUPTEUR À GÂCHETTE ET BOUTON DE COMMANDE DE MARCHE ARRIÈRE
Pour mettre la perceuse en position de marche ou d’arrêt, il suffit de tirer sur l’interrupteur à
gâchette, puis de le relâcher, tel qu’illustré à la figure 2. La perceuse est munie d’un
interrupteur à deux vitesses, qu’on doit enfoncer à mi-distance pour bien serrer une vis ou
amorcer un trou sans pointeau à basse vitesse, ou enfoncer jusqu’au fond pour percer
normalement à haute vitesse. REMARQUE : l’outil s’arrête brièvement lorsque la vitesse
change; continuer à appuyer sur la gâchette pour remettre l’outil en marche.
Le bouton de marche arrière, aussi illustré à la figure 4, sert à modifier le sens de rotation de
l’outil, soit de la position de marche avant à la position de marche arrière.
MANDRIN SANS CLÉ
Pour insérer une mèche ou tout autre accessoire, on doit :
1. saisir la partie arrière du mandrin d’une main et utiliser l’autre pour faire tourner la partie
avant vers la gauche (fig. 3), lorsqu’on le regarde de l’extrémité du mandrin.
2. insérer la mèche ou l’accessoire jusqu’au fond du mandrin, puis serrer fermement en
tenant la partie arrière du mandrin d’une main et en faisant tourner de l’autre la partie avant
vers la droite (lorsqu’on le regarde de l’extrémité du mandrin).
AVERTISSEMENT : ne pas serrer la mèche (ou l’accessoire) en saisissant la partie avant
du mandrin et en faisant fonctionner l’outil, ce qui aurait pour effet d’endommager le mandrin ou de blesser l’utilisateur lorsqu’il change les accessoires.
ÉCLAIRAGE INTÉGRÉ
La perceuse est munie d’une lampe intégrée. Pour l’allumer, faire glisser l’interrupteur vers le
bas, tel qu’illustré à la figure 4; remettre l’interrupteur à sa position initiale pour éteindre la
lampe.
ÉTAT DE CHARGE
La figure 5 illustre l’emplacement de l’indicateur de charge. Pour afficher l’état de charge,
appuyer sur le bouton noir situé au bas de l’indicateur.
Lorsqu’on installe des piles complètement chargées, les trois témoins s’allument; ils
s’éteignent graduellement à mesure que la charge s’affaiblit.
PERÇAGE
• N’utiliser que des forets bien affûtés.
• Veiller à ce que la pièce à percer soit solidement retenue ou fixée en place, selon les
mesures de sécurité.
• Porter l’équipement de sécurité approprié et requis, selon les mesures de sécurité.
• Rendre la zone de travail sûre et en assurer l’entretien, selon les mesures de sécurité.
• Actionner la perceuse à basse vitesse en exerçant une pression minimale jusqu’à ce que
le trou soit suffisamment percé afin d’empêcher le glissement du foret hors du trou.
• Toujours exercer la pression en ligne directe avec le foret. N’user que de la force nécessaire pour que le foret continue de percer; éviter de trop forcer, ce qui pourrait faire étouffer le moteur ou dévier le foret.
• Bien saisir la perceuse afin d’en maîtriser l’effet de torsion.
• NE PAS ACTIONNER À PLUSIEURS REPRISES LA DÉTENTE D’UNE PERCEUSE
BLOQUÉE DANS LE BUT DE LA DÉCOINCER AU RISQUE DE L’ENDOMMAGER.
• Réduire la pression exercée sur l’outil et le foret vers la fin de la course afin d’éviter que
le moteur ne cale en traversant le matériau.
• Laisser le moteur en marche lorsqu’on retire le foret du trou afin d’en prévenir le coincement.
• Utiliser de l’huile de coupe pour percer dans les métaux, sauf la fonte et le laiton qui se percent
à sec. Les huiles de coupe les plus efficaces sont l’huile sulfurisée ou l’huile de lard; la graisse
de bacon est parfois suffisante.
• Les forets hélicoïdaux à métal peuvent servir à percer le bois, mais il faut les retirer souvent du trou pour chasser les copeaux et rognures des goujures.
• S’assurer que l’interrupteur met l’outil en marche et qu’il l’arrête.
AVERTISSEMENT : Il est essentiel de bien soutenir la pièce à ouvrer et de saisir fermement la perceuse afin de prévenir la perte de maîtrise de l’outil qui pourrait occasionner
de graves blessures. Pour obtenir de plus amples renseignements relatifs au bon fonctionnement de l’outil, composer le 1 800 544-6986.
ENTRETIEN
Ampoule de rechange – Numéro de pièce 5100084-00
Pour communiquer avec le centre Black & Decker le plus près de chez soi, consulter les
pages jaunes sous la rubrique « Outils - électriques » pour obtenir le numéro du centre de
service autorisé de votre région, ou composer le 1 800 544-6986.
Nettoyer l’outil seulement à l’aide d’un savon doux et d’un linge humide. Ne laisser aucun
liquide s’infiltrer dans l’outil et ne jamais immerger l’outil.
IMPORTANT: Pour assurer la SÉCURITÉ D’EMPLOI et la FIABILITÉ de l’outil, n’en confier
la réparation, l’entretien et les rajustements qu’à un centre de service ou à un atelier
d’entretien autorisé n’utilisant que des pièces de rechange identiques.
Retrait de l'ensemble de piles
IMPORTANT : L'outil se démonte facilement afin de retirer l'ensemble de piles. Il n'est pas
conçu pour être remonté par l'utilisateur. Avant de démonter l'outil, l'actionner et le faire
fonctionner jusqu'à ce qu'il s'arrête afin de s'assurer que l'ensemble de piles est
complètement à plat. Pour démonter l'outil, desserrer les vis sur le côté du corps de l'outil.
Séparer les deux moitiés de l'outil et on peut voir l'ensemble de piles. Soulever l'ensemble
de piles hors de l'outil et tirer sur les pinces de la borne.
LE SCEAU RBRCmc*
Le sceau RBRCmcde la pile au nickel-cadmium indique que Black & Decker
défraie le coût du recyclage de la pile à la fin de sa durée utile. Le programme
RBRCmc offre une solution de rechange pratique à la mise au rebut des piles au
nickel-cadmium usées, que ce soit à la poubelle ou dans le système municipal car
cette mise au rebut est illégale à certains endroits.
L'organisme RBRC en collaboration avec Black & Decker et d'autres utilisateurs de piles a
mis sur pied des programmes aux États-Unis afin de faciliter la collecte des piles au nickelcadmium usées. Pour aider à préserver l'environnement et à conserver les ressources
naturelles, il suffit de retourner les piles au nickel-cadmium usées à un centre de service
Black & Decker ou chez le détaillant de la région pour qu'elles soient recyclées. On peut
également communiquer avec le centre de recyclage de la région afin de savoir où déposer
les piles usées, ou composer le 1 (800) 822-8837.
*RBRCmc est une marque de commerce de l'organisme américain Rechargeable Battery
Recycling Corporation.
Accessoires
Les détaillants et le centre de service de la région vendent les accessoires recommandés
pour l’outil. Pour trouver un accessoire, composer le 1 800 544-6986.
AVERTISSEMENT: L’utilisation de tout accessoire non recommandé pour l’outil peut
être dangereuse.
Par mesure de sécurité, utiliser les accessoires suivants seulement aux dimensions
spécifiées.
FORETS À MÉTAL– Diamètre maximal de 9.5 mm (3/8 po).
FORETS À BOIS – Diamètre maximal de 12.7 mm (1/2 po).
Renseignements relatifs au service
Black & Decker exploite un réseau complet de centres de service et d'ateliers d'entretien
autorisés par toute l'Amérique du Nord. Le personnel de tous les centres de service Black &
Decker a reçu la formation voulue pour assurer l'entretien efficace et fiable des outils
électriques.
Pour obtenir des renseignements d'ordre technique, des conseils relatifs aux réparations ou
des pièces de rechange d'origine, communiquer avec le centre de service Black & Decker de
la région. On peut trouver l'adresse du centre de service de la région dans l'annuaire des
Pages Jaunes à la rubrique «Outils électriques» ou en composant le numéro suivant :
1 (800) 544-6986.
Garantie complète de deux ans pour utilisation domestique
Black & Decker garantit le produit pour une période de deux ans contre les vices de matière
ou de fabrication. Le produit défectueux sera réparé ou remplacé sans frais conformément à
l'une des conditions suivantes.
Pour échanger l'outil, il suffit de le retourner au détaillant (si le détaillant participe au
programme d'échange rapide Black & Decker). Le retour doit être effectuer dans les délais
impartis par la politique de retour du détaillant (habituellement entre 30 et 90 jours suivant la
date d'achat). Le détaillant peut exiger une preuve d'achat. Prière de vérifier la politique de
retour du détaillant au-delà des délais impartis.
On peut également retourner l'outil (port payé) à un centre de service Black & Decker ou à
tout autre atelier d'entretien accrédité pour y être remplacé ou réparé, à notre gré. On peut
exiger une preuve d'achat. Les adresses des centres de service Black & Decker se trouvent
à la rubrique «Outils électriques» des Pages Jaunes.
La présente garantie ne vaut pas pour les accessoires. Les modalités de la présente
garantie donnent des droits légaux spécifiques. L'utilisateur peut également se prévaloir
d'autres droits selon l'état ou la province qu'il habite. Pour obtenir de plus amples
renseignements, communiquer avec le directeur du centre de service Black & Decker de la
région. Le produit n'est pas conçu pour un usage commercial.
Imported by / Importé par
Black & Decker Canada Inc.
100 Central Ave.
Brockville (Ontario) K6V 5W6
Voir la rubrique “Outils électriques”
des Pages Jaunes
pour le service et les ventes.
ANTES DE DEVOLVER ESTE PRODUCTO POR CUALQUIER
RAZON POR FAVOR LLAME
326-7100
INFORMACION CLAVE QUE DEBE SABER
• El taladro debe cargarse durante 16 horas antes de usarlo.
• El cargador puede zumbar; las baterías o el cargador pueden calentarse durante
la carga.
•Para información sobre bombillas de repuesto, véase la sección
“Mantenimiento”.
REGLAS GENERALES DE SEGURIDAD - PARA TODAS LAS
HERRAMIENTAS OPERADAS CON BATERÍAS
¡ADVERTENCIA! LEA Y COMPRENDA TODAS LAS INSTRUCCIONES. No hacerlo
puede originar riesgos de choque eléctrico, incendio y lesiones personales de gravedad.
CONSERVE ESTAS INSTRUCCIONES
ÁREA DE TRABAJO
• Conserve su área de trabajo limpia y bien iluminada. Las bancas amontonadas y las
zonas oscuras propician los accidentes.
• No opere herramientas eléctricas en atmósferas explosivas, como en presencia de
líquidos, gases o polvos inflamables. Las herramientas eléctricas producen chispas que
pueden originar la ignición de los polvos o los vapores.
• Conserve a observadores, niños y visitantes alejados mientras opera una
herramienta eléctrica. Las distracciones pueden ocasionar que pierda el control.
SEGURIDAD ELÉCTRICA
• No maltrate el cable. Nunca utilice el cable para transportar la herramienta. Conserve
el cable alejado de calor, aceite, bordes afilados o piezas móviles. Reemplace
inmediatamente los cables dañados. Los cables dañados pueden originar incendio.
• Una herramienta de baterías con baterías integradas o por separado debe recargarse
únicamente con el cargador especificado para esas baterías. Un cargador que pueda
adecuarse a un tipo de batería puede crear riesgos de incendio cuando se emplea con otra
batería.
Page 4

• Utilice su herramienta de baterías únicamente con la batería especialmente diseñada
para ella. El empleo de otras baterías puede crear riesgos de incendio.
SEGURIDAD PERSONAL
• Esté alerta, concéntrese en lo que está haciendo. Recurra al sentido común cuando
opere una herramienta eléctrica. No opere ninguna herramienta si se encuentra fatigado
o bajo la influencia de drogas, alcohol o medicamentos. Un momento de desatención
mientras se operan herramientas eléctricas puede ocasionar lesiones graves.
• Vístase de manera adecuada. No tenga puestas ropas o artículos de joyería flojos.
Cubra su cabello si lo tiene largo. Conserve su cabello, sus ropas y guantes alejados de
las piezas móviles. Las piezas de vestir flojas, las joyas y el cabello largo pueden resultar
atrapados por las piezas móviles.
• Evite el encendido accidental. Asegúrese que el interruptor esté en posición de apagado
antes de instalar la batería. Sostener una batería con el dedo en el interruptor o conectarla
sin fijarse si el interruptor está en posición de encendido propicia los accidentes.
• Retire las llaves de ajuste antes de encender la herramienta. Una llave que se deja en
una pieza giratoria puede ocasionar lesiones personales.
• No se sobreextienda. Conserve siempre los pies bien apoyados, al igual que el
equilibrio. La posición correcta de los pies y el equilibrio permiten controlar mejor la
herramienta en situaciones inesperadas.
• Utilice equipo de seguridad. Siempre utilice protección en los ojos. Se deben utilizar
mascarillas contra polvo, zapatos antiderrapantes, casco o protectores para los oídos para
tener las condiciones apropiadas.
USO Y CUIDADOS DE LA HERRAMIENTA
• Utilice prensas u otros medios prácticos para asegurar y apoyar la pieza de trabajo en
una plataforma estable. Sujetar las piezas con la mano o contra su cuerpo es inestable y
puede originar la pérdida de control.
• No fuerce la herramienta. utilice la herramienta adecuada para su aplicación. La
herramienta adecuada hará mejor el trabajo y de manera más segura bajo las
especificaciones para las que se diseñó.
• No utilice la herramienta si el interruptor no enciende y apaga. Cualquier herramienta
que no pueda controlarse por medio del interruptor es peligrosa y debe repararse.
• Desconecte la batería de la herramienta o coloque el interruptor en posición de
apagado antes de hacer cualquier ajuste, cambio de accesorios o de guardar la
herramienta. Tales medidas de seguridad preventivas reducirán el riesgo de que la
herramienta se encienda accidentalmente.
• Guarde las herramientas fuera del alcance de los niños y de otras personas no
capacitadas. Las herramientas son peligrosas en manos de personas no capacitadas.
• Cuando no utilice la batería consérvela alejada de objetos metálicos como: clips,
monedas, llaves, clavos, tornillos y otras piezas de metal que puedan establecer una
conexión entre una terminal y otra. Hacer corto en las terminales de la batería puede
ocasionar chispas, quemaduras o incendios.
• Cuide sus herramientas. Conserve las herramientas de corte afiladas y limpias. Las
herramientas que reciben un mantenimiento adecuado, con piezas de corte afiladas,
difícilmente se atascan y son más fáciles de controlar.
• Verifique la alineación de las piezas móviles, busque fracturas en las piezas y
cualesquiera otras condiciones que puedan afectar la operación de las herramientas.
Si está dañada, lleve su herramienta a servicio antes de usarla de nuevo. Muchos
accidentes se deben a herramientas con mantenimiento pobre.
• Solamente use accesorios que el fabricante recomiende para su modelo de
herramienta. Los accesorios que estén diseñados para una herramienta, pueden volverse
peligrosos cuando se emplean con otra.
SERVICIO
• El servicio a las herramientas lo debe efectuar únicamente personal calificado. El
servicio o mantenimiento realizado por personal no calificado puede originar riesgos de
lesiones.
• Cuando efectúe servicio a una herramienta, utilice únicamente refacciones idénticas.
Siga las instrucciones de la sección de Mantenimiento de este manual. El empleo de
piezas no autorizadas o no seguir las instrucciones de mantenimiento puede originar
riesgos de choque eléctrico o lesiones.
REGLAS ESPECÍFICAS DE SEGURIDAD
• Sujete la herramienta por las superficies aislantes cuando realice una operación en
que la herramienta pueda hacer contacto con cableados ocultos.Al hacer contacto con
un cable “vivo”, las partes metálicas de la herramienta se vuelven “vivas” y pueden originar
un choque al operador.
• Cuando trabaje en una escalera o una plataforma asegúrese de dejar la herramienta
de lado cuando no la use. Algunas herramientas con baterías grandes se paran sobre su
base, pero se pueden volcar fácilmente.
La etiqueta de su herramienta puede incluir los siguientes símbolos.
V ..........................volts A..........................amperes
Hz ........................hertz W ........................watts
min ........................minutos ......................corriente alterna
......................corriente directa
n
o........................velocidadsin carga
..........................construcción clase II
........................erminales de
conexión a tierre
........................símbolo de alerta seguridad .../min ..................revoluciones o
reciprocaciones
porminuto
CONSERVE ESTAS INSTRUCCIONES
Instrucciones de operación
CARGA DEL TALADRO
Antes de intentar cargar su taladro, lea con cuidado TODAS las instrucciones de seguridad.
Para cargar su taladro, siga los pasos descritos a continuación.
1. Quite cualquier accesorio del portabrocas.
2. Conecte el cable de salida del cargador al mango del taladro.
3. Conecte el cargador a una toma de corriente estándar Figure 1.
4. Deje que la herramienta permanezca en esta condición durante 16 horas.
NOTAS IMPORTANTES SOBRE LA CARGA
1. Después de uso normal, su taladro quedará cargado en 16 horas o menos. Su taladro
viene de la fábrica descargado. Antes de intentar usarlo, debe cargarlo durante 16 horas
por lo menos.
2. NO cargue las baterías cuando la temperatura del aire sea inferior a 4,5°C (+40°F) o
superior a 40,5°C (+105°F). Esto es importante y evitará daños serios a las baterías.
3. Durante la carga, el cargador puede zumbar y calentarse al tacto. Esto es una condición
normal y no indica problemas.
4. Si las baterías no cargan apropiadamente – (1) Revise la corriente en la toma conectando una lámpara u otro aparato. (2) Revise si la toma de corriente está conectada a un
interruptor de luz que corte la corriente al apagar las luces. (3) Mueva el cargador y el
taladro a un sitio en el que la temperatura del aire se encuentre entre 4.5°C y 40.5°C.
(4) Si la toma de corriente y la temperatura son correctas, y usted no obtiene la carga
apropiada, lleve o envíe la herramienta y el cargador al centro de servicio Black &
Decker de su localidad. Consulte “herramientas eléctricas” en la sección amarilla del
directorio telefónico.
5. El taladro debe recargarse cuando deja de producir la potencia suficiente para realizar
tareas que se hicieron con facilidad anteriormente. NO CONTINUE utilizando el taladro
con la batería en estas condiciones.
6. Para prolongar la vida útil de la batería, evite dejar la herramienta conectada al cargador
durante más de 2 días. Aún cuando la sobrecarga no es materia de seguridad, puede
reducir significativamente la vida útil de la batería.
7. Ya que la unidad está diseñada para aplicaciones inalámbricas, usarla cuando esté
conectada no ofrece beneficios. Las baterías se descargarán de cualquier manera.
8. Desconecte el cargador de su herramienta de la toma de corriente antes de desconectar el cargador de la unidad. Bajo ciertas condiciones, con el cargador conectado a la
toma de corriente, la clavija de carga expuesta puede hacer corto con algún material
extraño y puede crear peligro de incendio. Los materiales de naturaleza conductora,
como la fibra de acero, láminas de aluminio, o cualquier limadura de metales deberán
permanecer apartadas de la clavija del cargador. Desconecte el cargador antes de
intentar limpiarlo.
INTERRUPTOR DE DISPARO & BOTÓN DE REVERSA
El taladro se PRENDE (ON) y se APAGA ( OFF) apretando y soltando el interruptor de
disparo como lo ilustra la Figura 4. El taladro viene equipado para taladrar a dos velocidades.
Para usarlo a velocidad baja, apriete el interruptor a medio camino. Esto producirá una
velocidad baja para atornillar tornillos y comenzar huecos sin la marca de centro. Apretando
el interruptor hasta el fondo generará velocidad alta para taladrado normal. NOTA: Hay una
pequeña pausa entre las velocidades. Siga apretando el interruptor, y el taladro arrancará
otra vez.
El botón de reversa, que también se ilustra en la Figura 2, cambia la dirección del taladro de
adelante a reversa.
PORTABROCA SIN LLA VE
Para insertar una broca u otro accesorio:
1. Asir la mitad posterior del portabroca con una mano y usar la otra para girar la mitad
frontal en sentido antihorario (Fig. 3) visto desde el extremo del portabroca.
2. Insertar completamente la broca u otro accesorio dentro del portabroca y apretar bien,
manteniendo sujetada la parte posterior del portabroca y a la vez girando la parte delantera
en sentido horario, visto del extremo del portabroca.
[symbol] ADVERTENCIA: No trate de apretar las brocas (u otro accesorio), agarrando la
parte frontal del portabrocas y prendiendo la herramienta. Esto podría dañar el portabrocas u
ocasionar lesiones personales al hacer el cambio de accesorios.
LUZ INTEGRAL
El taladro viene equipado con luz incorporada. Para prender la luz, deslice el interruptor
hacia abajo como lo ilustra la Figura 4. La luz quedará prendida hasta que el interruptor
regrese a su posición original.
INDICADOR DEL ESTADO DE LA CARGA
La Figura 5 ilustra la ubicación del indicador de carga. Para mostrar el estado de la carga,
oprima el botón negro en la parte inferior del indicador.
Cuando las baterías se instalan completamente cargadas, las tres luces están todas
iluminadas. Según se vayan descargando, habrá menor número de luces iluminadas.
TALADRADO
• Solamente utilice brocas afiladas.
• Apoye y asegure apropiadamente la pieza de trabajo, como se recomienda en las
instrucciones de seguridad.
• Utilice el equipo de seguridad apropiado y requerido, como se señala en las instrucciones
de seguridad.
• Cuide el área de trabajo, como se menciona en las instrucciones de seguridad.
• Haga funcionar el taladro muy lentamente, utilizando poca presión, hasta haber perforado lo
suficiente para evitar que la broca se deslice hacia afuera del barreno.
• Aplique presión en línea recto con la broca. Haga presión suficiente para conservar a la
broca cortando, pero no tanta como para que el motor se atasque o la broca se desvíe.
• Sujete firmemente el taladro para controlar su acción de torsión.
• NO OPRIMAEL GATILLO DE UN TALADRO A TASCADO PARAINTENTAR ENCENDERLO
YAPAGARLO. PUEDE DAÑARLO.
• Minimice el atascamiento al iniciar el barreno reduciendo la presión y perforando lentamente
a través de la última parte del barreno.
• Conserve el motor en funcionamiento mientras saca la broca de un barreno. Esto ayudará a
evitar atascaduras.
• Emplee un lubricante para corte cuando perfore metales. Las excepciones son el hierro
colado y el latón, que deben taladrarse en seco. Los lubricantes que tienen mejor
funcionamiento son el aceite sulfúrico para corte y la manteca de cerdo. La grasa de tocino
funciona también.
• Cuando emplee brocas helicoidales para perforar en madera, será necesario sacarlas del
barreno con frecuencia para limpiar las virutas de los canales.
• Asegúrese que el interruptor enciende y apaga el taladro.
ADVERTENCIA: Es importante apoyar la pieza de trabajo adecuadamente y sujetar al
taladro con firmeza para evitar la pérdida de control que pudiese ocasionar lesiones personales. Si tiene preguntas sobre la operación correcta de la herramienta, llame:
326-7100
MANTENIMIENTO
Bombilla de repuesto – Repuesto número 5100084-00
Contacte a su proveedor Black and Decker más cercano. Para encontrar el centro de
servicio de su localidad, consulte las páginas amarillas del directorio telefónico bajo
"Herramientas—Eléctricas" o llame al: 326-7100
Solamente utilice jabón suave y un trapo húmedo para limpiar la herramienta. Nunca permita
que ningún líquido se introduzca en la herramienta; nunca sumerja ninguna parte de la
herramienta en ningún líquido.
IMPORTANTE: Para garantizar la SEGURIDAD y la CONFIABILIDAD del producto, las
reparaciones, el mantenimiento y los ajustes deben ser realizados por centros de servicio
autorizados u otras organizaciones de servicio calificadas, que siempre utilicen partes de
repuesto idénticas.
REMOCIÓN DE LA BATERÍA
IMPORTANTE: Esta herramienta está diseñada para desarmarse con facilidad para el
cambio de la batería. No está diseñada para re ensamblarse por el usuario. Antes de intentar
desarmar la herramienta, enciéndala y déjela funcionar en cualquier dirección hasta que se
detenga para asegurar que la batería se descargue completamente. Para desarmar la
herramienta, quite los tornillos que se encuentran a un lado del cuerpo. Separe las dos
mitades del cuerpo y encontrará la batería. Levante la batería y tire de ella hacia fuera de los
clips de la terminal.
EL SELLO RBRC™
El sello RBRC™ (Rechargeable Battery Recycling Corporation) en las baterías
de níquel-cadmio indica que Black & Decker participa voluntariamente en un
programa industrial para recolectar y reciclar estas baterías al término de su vida
útil, cuando se retiran de servicio dentro de los Estados Unidos. El programa
RBRC™ proporciona una conveniente alternativa para el depósito en los lotes de
basura municipales de las baterías de níquel-cadmio desgastadas, hecho que es ilegal en
algunas regiones.
Los pagos de Black & Decker a RBRC™ hacen más sencillo para usted deshacerse de sus
baterías desgastadas con los distribuidores de baterías de níquel-cadmio de su localidad, o
en los centros de servicio autorizado Black & Decker. También puede comunicarse al centro
de reciclaje de su localidad para que le informen de los lugares a los que puede regresar las
baterías desgastadas. La entrada de Black & Decker a este programa es parte de su
compromiso para proteger nuestro medio ambiente y conservar los recursos naturales
Accesorios
Los accesorios recomendados para emplearse con su herramienta se encuentran a su
disposición con su distribuidor local o en los centros de servicio autorizado. Si necesita
ayuda en relación con los accesorios, por favor llame 326-7100
ADVERTENCIA: El uso de cualquier accesorio no recomendado para emplearse con
esta herramienta puede ser peligroso.
Los siguientes accesorios deben utilizarse únicamente en las medidas especificadas para
mayor seguridad:
BROCAS PARAMETAL–Hasta 9,5 mm (3/8").
BROCAS PARAMADERA–Hasta 12,7 mm (1/2").
Page 5

PARA REPARACION Y SERVICIO DE SUS HERRAMIENTAS ELECTRICAS F AVOR DE
DIRIGIRSE AL CENTRO DE SERVICIO MAS CERCANO
CULIACAN
Av. Nicolas Bravo #1063 Sur (91 671) 242 10
GAUDALAJARA
Av. La Paz #1779 (91 3) 826 69 78
MEXICO
Eje Lázaro Cárdenas No. 18 Local D, Col. Obrera 588-9377
MERIDA
Calle 63 #459-A (91 99) 23 54 90
MONTERREY
Av. Francisco I. Madero Pte. 1820-A (91 83) 72 11 25
PUEBLA
17 Norte #205 (91 22) 46 37 14
QUERETARO
Av. Madero 139 Pte. (91 42) 14 16 60
SAN LOUIS POTOSI
Pedro Moreno #100 Centro (91 48) 14 25 67
TORREON
Blvd. Independencia, 96 pte. (91 17) 16 52 65
VERACRUZ
Prolongación Diaz Miron #4280 (91 29) 21 70 16
VILLAHERMOSA
Constitucion 516-A (91 93) 12 53 17
PARAOTRAS LOCALIDADES LLAME AL: 326 7100
Información de servicio
Black & Decker ofrece una red completa de centros de servicio propiedad de la compañía y
franquiciados a través de toda Norteamérica. Todos los centros de servicio Black & Decker
cuentan con personal capacitado para proporcionar el servicio a herramientas más eficiente y
confiable.
Siempre que necesite consejo técnico, reparaciones o partes de repuesto genuinas,
comuníquese con el centro Black & Decker más cercano a usted.
Para encontrar su centro de servicio local, consulte la sección amarilla bajo “Herramientas
eléctricas”, o llame al: 326-7100.
Garantía para uso doméstico por dos años completos
Black & Decker (U.S.) garantiza este producto por dos años completos contra cualquier falla
originada por materiales o mano de obra defectuosos. El producto defectuoso será
reemplazado o reparado sin cargo alguno en cualquiera de las siguientes dos maneras:
La primera, que resulta únicamente en cambios, es regresar el producto al vendedor al que se
compró (en la suposición que es un distribuidor participante). Las devoluciones deberán
hacerse dentro del tiempo estipulado por la política de cambios del distribuidor (usualmente de
30 a 90 días después de la venta). Se puede requerir prueba de compra. Por favor verifique
con el vendedor las políticas específicas de devolución relacionadas a las devoluciones en
tiempo posterior al estipulado para cambios.
La segunda opción es llevar o enviar el producto (con porte pagado) a los centros de servicio
Black & Decker propios o autorizados, para que la reparemos o reemplacemos a nuestra
opción. Se puede requerir prueba de compra. Los centros de servicio Black & Decker propios y
autorizados están enlistados bajo “Herramientas eléctricas” en la sección amarilla del
directorio telefónico.
Esta garantía no se aplica a los accesorios. Esta garantía le otorga derechos legales
específicos, y usted puede tener otros que varíen de estado a estado. Si tiene usted cualquier
pregunta, comuníquese con el gerente del centro de servicio Black & Decker más cercano.
Estos productos no están destinados a uso comercial.
IMPORTADO: BLACK & DECKER S.A. DE C.V.
BOSQUES DE CIDROS ACCESO RADIATAS NO. 42
COL. BOSQUES DE LAS LOMAS.
05120 MÉXICO, D.F
TEL. 3-26-71-00
Para servicio y ventas consulte
“HERRAMIENTAS ELECTRICAS”
en la sección amarilla.
ESPECIFICACIONES Cargador: 120V, 60 Hz, 7W
Salida: 4,35 VDC @ 420mA
 Loading...