

Page 1
BDASL101 BDASL102 BDASL103 BDASL201 BDASL202 BDASL203
9
Please have the model number available when you call.
Page 2

2
IMPORTANT SAFETY INSTRUCTION
SAFETY GUIDELINES - DEFINITIONS
situation which, if not avoided, may result in property damage.
It is important for you to read and understand this manual.
The information it contains relates to protecting YOUR SAFETY and PREVENTING
PROBLEMS. The symbols below are used to help you recognize this information.
DANGER: Indicates an imminently hazardous situation which, if not
avoided, will result in death or serious injury.
WARNING: Indicates a potentially hazardous situation which, if not
avoided, could result in death or serious injury.
CAUTION: Indicates a potentially hazardous situation which, if not
avoided, may result in minor or moderate injury.
NOTICE: Used without the safety alert symbol indicates potentially hazardous
When using an electrical appliances,
basic precautions should always be
followed, including the following:
READ ALL INSTRUCTIONS
BEFORE USING THE
APPLIANCE.
WARNINGS: Before
using this appliance, read and follow
all warnings and instructions in this
manual, even if you are familiar with
this product.
This appliance is not intended for use by
persons (including children) with reduced
physical, sensory or mental capabiliti es,
or lack of experience and knowledge,
unless they have been given supervision
or instruction concerning use of the
appliance by a person resp ons ible for
their safety.
Young children should be supervised to
ensure that they do not play with the
appliance.
Safety Direction
Please read this instruction manual
carefully before first use. It is advisable
to keep this instruction manual for future
reference.
DO NOT vacuum water, wet objects,
liquids, ashes, hot coals, cigarette butts,
matches or any hot, smoking or burning
objects, etc.
DO NOT pick up flammable or
combustible materials (i.e. lighter fluid,
petrol, kerosene, etc.) or use in the
presence of explosive liquids or vapor.
DO NOT pick up toxic material (i.e.
chlorine bleach, ammonia, drain cleaner,
etc.)
DO NOT vacuum Toner (for laser printer,
copy machines etc.) as there is a risk
of fire and explosion.
DO NOT vacuum plaster, cement etc. as
the filter can become blocked.
DO NOT use the vacuum without all the
filters fitted.
DO NOT store or use the appliance near
high temperature areas.
DO NOT run over the power cord with the
vacuum cleaner.
DO NOT use the vacuum cleaner if it is
blocked. Turn off and clear all
blockages before continuing.
Page 3

3
DO NOT use the vacuum cleaner with
blocked filters. Clean or replace filters
before continuing. (refer to User
Maintenance section).
DO NOT use the vacuum cleaner if the
appliance malfunctions, abnormal
noise, smell, smoke, is dropped or
damaged in any manner or any breakage
is found during operation.
DO NOT misuse the cord. Never pull the
appliance by the cord or pull to
disconnect it from the outlet. Instead,
grasp the plug and pull to disconnect.
DO NOT use the vacuum cleaner to pick
up large objects, hard or sharp objects
such as glass, nails, screws, coins, etc.
that are likely to cause damage.
DO NOT Leave Unattended when plugged
in and / or switched on.
DO NOT use vacuum cleaner if it has
been dropped, damaged, left outdoors,
or dropped into liquid (water etc.)
DO NOT close door on cord, or pull cord
around sharp edges or corners.
DO NOT handle the plug or vacuum
cleaner with wet hands.
DO NOT put any objects into openings.
DO NOT use with any openings blocked
and do not restrict airflow.
DO NOT operate the appliance with
a damaged cord or plug.
If the supply cord is damaged, it must be
replaced by the manufacturer, its
service agent or similarly qualified persons
in order to avoid a hazard.
DO NOT use without filters in place.
DO NOT attempt to modify this product in
any way.
DO empty the Dust Canister and clean the
filters regularly for optimal
operation of the vacuum.
DO keep hair, loose clothing, fingers, feet
and body parts away from openings
or moving parts.
DO disconnect the appliance from the
mains supply before connecting the
flexible suction hose.
DO turn off controls before you connect or
disconnect the appliance to or from
the mains supply.
DO disconnect the appliance from the
power supply when not in use, before
changing the filters, cleaning the filters or
connecting / disconnecting the
accessories.
DO use only on dry, indoor surfaces.
DO use only as described in this manual.
Use only manufacturer’s
recommended attachments.
DO Keep cord away from heated surfaces.
DO Keep all openings free of dust, lint.
hair, and anything that may reduce
airflow.
DO use extra care when vacuuming on
stairs.
DO keep your work area well lit.
DO store your appliance indoors in a cool.
dry area.
DO ensure children and babies cannot
play with plastic bags or any packaging
materials.
DO operate the appliance from a power
source of the same voltage, frequency
and rating as indicated on the product
identification plate.
If this appliance is used by a third party,
DO supply the instruction manual with it.
No liability can be accepted for any
damage caused by non-compliance with
these instructions or any other improper
use or mishandling of appliance.
This product has not been designed for
any uses other than those specified in
this manual.
DO NOT modify the polarized plug to fit
a non‐polarized outlet or extension cord.
Keep appliance on a level surface.
ONLY for domestic use.
Industrial or commercial use invalidates
the warranty.
Page 4
4
IMPORTANT SAFETY INS TRUCTION CONT.
Volts
120V
Minimum Gauge for Cord Sets
Total Length of Cord in Feet
0-25
(0-7,6m)
0-50
26-50 51-100 101-150
(7,6-15,2m) (15,2-30,4m) (30,4-45,7m)
240V 51-100 101-200 201-300
(0-15,2m) (15,2-30,4m) (30,4-60,9m) (60,9-91,4m)
Ampere Rating
More
Than
Not more
Than
American Wire Gauge
12
- 16
14
12 Not Recommended
0 -
6 18 16 16 14
6 -
10 18 16 14 12
10 -
12 16 16 14 12
READ AND SAVE THESE INSTRUCTIONS
Symbols
• The label on your tool may include the following symbols.
The symbols and their definitions are as follows:
V....................volts
A.....................amperes
Hz...................hertz
W....................watts
min .................minutes
or AC.........alternating current
or DC ....direct current
n
o ...................no load speed
.................Class I Construction
...................earthing terminal
(grounded)
..................safety alert symbol
...................Class II Construction (double insulated)
.../min or rpm...revolutions or reciprocation per minute
• When using an extension cord, be sure to
use one heavy enough to carry the current
your product will draw. An undersized cord
will cause a drop in line voltage resulting in
loss of power and overheating.
The following table shows the correct size
to use depending on cord length and
nameplate ampere rating. If in doubt, use
the next heavier gauge. The smaller the
gauge number, the heavier the cord.
Transporting your Vacuum
To move your vacuum cleaner from room to room, unplug the unit and either push the
appliance or carry using the carry handle.
Never pull or carry the vacuum cleaner by its cord.
Never carry or pull the vacuum cleaner by the flexible hose.
Page 5
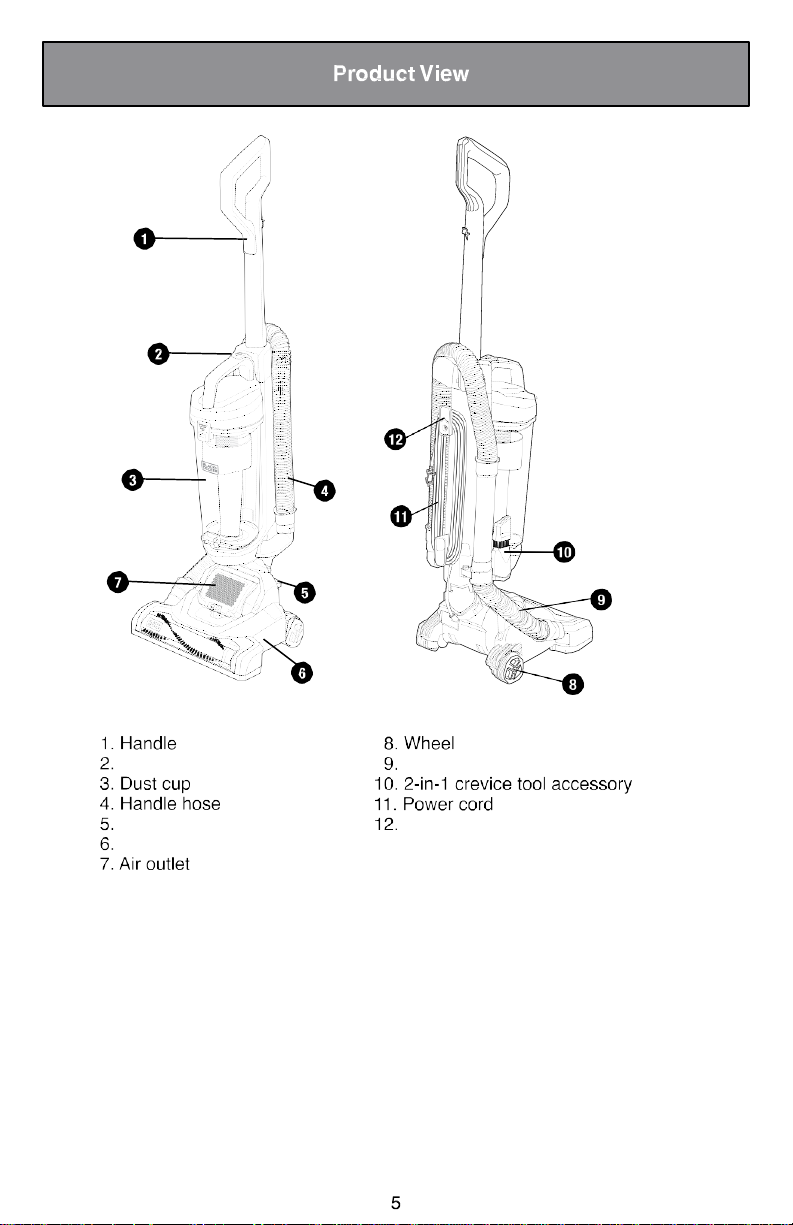
Connecting hose
Power cord wrap
Dust cup release
Power on/off
Nozzle
Page 6

6
1
3
2
WARNING:
instructions and operation procedures.
Assembly
Please Note: Always remove the plug from the power socket before fitting or
removing accessories. Ensure all Filters are fitted, and fitted correctly before using.
DO NOT plug in your vacuum cleaner until you have
completely assembled it per the following instructions and are familiar with all
2
1
Remove the dust cup before installing handle.
Insert the handle into the vacuum body, then rotate the
screw into body as shown.
must be inserted first before re-placing the dust cup.
IMPORTANT: The handle
Place the dust cup back onto
the machine and push until
it clicks into place.
Insert the handle hose end into the
conector hose and rotate clockwise to
join. Then insert the handle into the
other hose of the body.
Insert the 2-in-1 crevice tool accessory
into the on-board storage reservoir, as
shown.
Page 7

7
Twist the quick release cord hook to
release the power cord.
Operation
Step on the brush cover and pull back on
handle, to engage for operation.
2
1
Plug in your machine and push ON/OFF
button to switch ON/OFF.
To maintain optimal performance, please
emtpy dust cup when debris reaches
MAX FILL line.
Page 8

The 2-in-1 crevice tool with brush allows for vacuuming
in narrow and hard-to-reach places.
Page 9

3
2
filter cover
filter
1
Maintenance And Care - Emptying
WARNING: Turn off and unplug vacuum cleaner before performing
maintenance to the vacuum cleaner.
Press dust cup release
button to remove the dust
cup.
Maintenance And Care - Cleaning Exhaust Filter
Emptying and cleaning the dust cup
Hold dust cup over garbage
bin and unclip the lock on the
bottom of the cup, allowing
the dust to empty.
Locate and unlock filter cover as shown.
Push left to un-lock, right to lock.
Close the base of the dust
cup, align the cup base back
onto the machine and push
until it clicks back into place.
Remove filter cover with filter.
Wipe with cloth over garbage bin,
removing dirt and debris.
Wash with water every 3 months, allow
at least 24 hours to dry and make sure
it is dry thoroughly before re-using.
9
Page 10

10
WARNING:
Maintenance And Care - Cleaning Dust Cup Filter
Turn off and unplug vacuum cleaner before performing
maintenance to the vacuum cleaner.
1. Remove the dust cup.
2. Open the dust cup
filter lid, located on the
top of the cup.
3. Remove the dust
cup foam filter.
4. Hand wash the foam filter.
5. Allow filter to dry 24 hours
before putting back into
vacuum cleaner.
6. Push the release button,
open the dust cup
and clean all parts of the
dust cup.
DO NOT operate without filter installed.
DO NOT wash dust cup in the dishwasher.
DO NOT install filter damp.
CAUTION: Do not turn appliance on when dust cup is removed.
• In order to keep the suction force optimized, the dust cup and filters must be
cleaned regularly.
• Reassemble after cleaning
Page 11

11
.&.
WARN I
NG:
maintena
nce to the
va
cuum cl
Turn off and
ean
Carefully remove any string, hair or debris located on the brush roll.
You can use a tool such as a small knife
or scissors to remove and cut any hair or
string.
er.
unpl
ug
vacuum cl
eaner before performi
ng
Page 12

12
Maintenance And Care - Cleaning Vacuum And Tools
Do not clean the vacuum cleaner, components or accessories using petrol
or any other flammable liquid or solvents, etc.
Clean only the outside of the vacuum cleaner.
Use only a moist cloth and mild detergent for cleaning the vacuum cleaner,
components and accessories.
After cleaning, wipe off the moisture on vacuum cleaner, components and
accessories with a dry cloth.
Do Not place accessories, tools or components in a dishwasher.
Page 13

Six Screws
Page 14

Dust cup is
dust cup
cup
Cool Grey 4C
Cool Grey 4C
full Filter is
dirty
Dust cup
dust cup dust
Item
Name
Part No. Color
L0101 Black
L0102
1
2 in 1
Crevice Tool
L0301 Black
2
Hose
L0302
3
L0401
Brush Roll
Blue
L0402 Red
Page 15

authorized Service Agent
please call customer service at
one (1)
authorized
service agent.
1-800-524-6716.
Imported By
Midea USA, Inc.
5 Sylvan Way Parsippany,
NJ 07054, USA
1-800-524-6716
 Loading...