

Page 1
User’s Manual
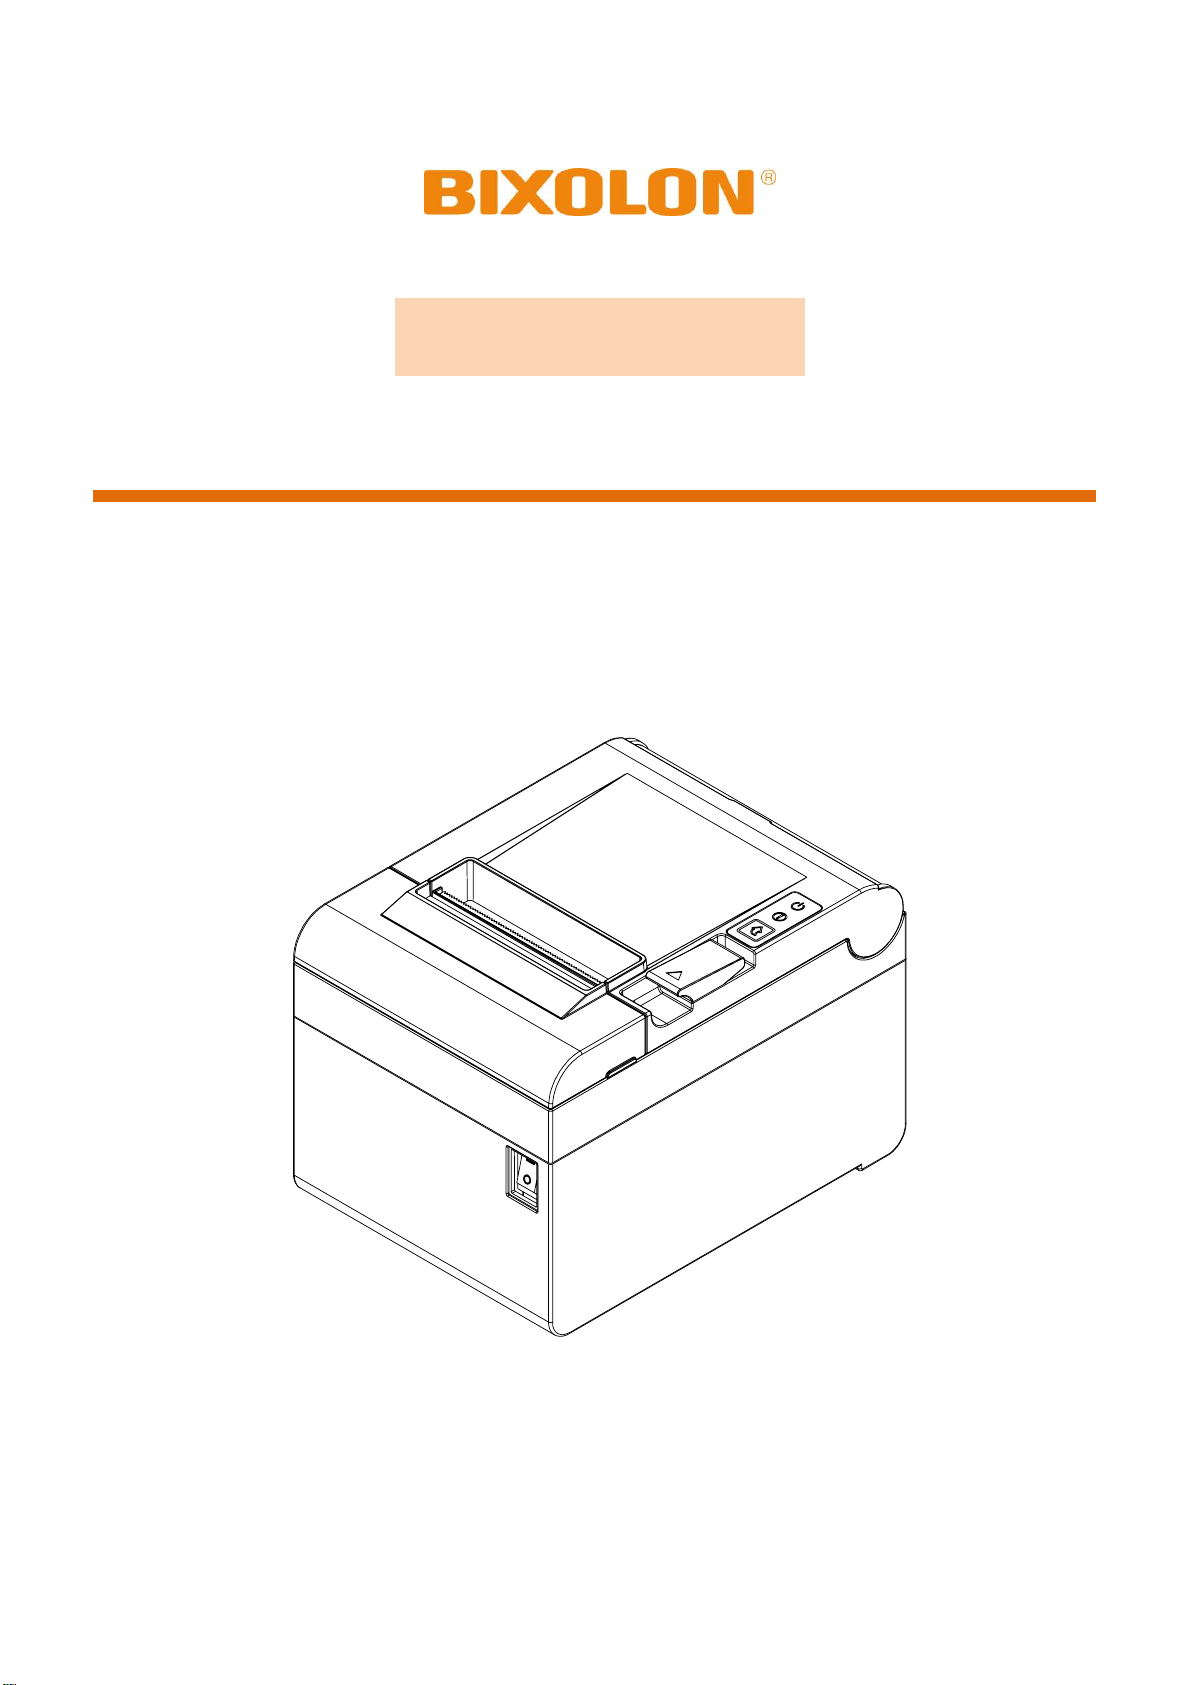
SRP-E300/E302
THERMAL RECEIPT PRINTER
Ver. 1.00
http://www.bixolon.com
Page 2

Ver. 1.00
- 2 -
SRP-E300/E302
Introduction
SRP-E300/E302 series printers have been designed to be connected to various types of
electronic devices such as POS (Point Of Sales), and computer peripheral devices.
※ The main features of the printer are as follows
1. THERMAL RECEIPT PRINTER
2. Low-noise thermal transfer method printing
3. Maximum 220mm/s printing speed
4. 132 x 182.4 x 128.5(W X D X H)
5. On Board USB/Serial/Ethernet
6. Equipped with data buffer (receives print data even while printing)
7. Can print a range of barcodes
8. Range of printing density selectable
(controlled with virtual memory switch management)
It is advisable to read the contents of this manual carefully before using the printer for the first
time.
※ Use only authorized supplies that can be trusted!
- We are not responsible for quality and service for damage caused by the use of
unauthorized products (or recycled ones).
Page 3
Ver. 1.00
- 3 -
SRP-E300/E302
Safety Information
Warning: Warnings must be heeded carefully in order to prevent serious
physical harm.
Caution: Cautions must be heeded in order to prevent minor injuries, equipment
damage, or data loss.
Symbol Information
DC (Direct current)
Error, Warning
Paper Feeding
Stand-By
USB
Ethernet
Page 4

Ver. 1.00
- 4 -
SRP-E300/E302
Table of Contents
1. Installing Printer and Getting Started ................................................................................. 5
1-1 Unpacking ......................................................................................................................... 5
1-2 Interface ............................................................................................................................ 6
1-2-1 USB Interface ........................................................................................................ 6
1-2-2 Ethernet Interface.................................................................................................. 7
1-2-3 Serial Interface ...................................................................................................... 8
1-3 Drawer Port ....................................................................................................................... 9
1-4 Connecting Power Supply ............................................................................................... 10
1-5 Reconfiguration of Printer................................................................................................ 12
1-6 Installing & Replacing Paper ........................................................................................... 13
1-7 Recommended Papers ................................................................................................... 16
1-8 Removing Paper Jam ...................................................................................................... 16
1-9 Using Printer Functions ................................................................................................... 17
2. Self-Test .............................................................................................................................. 18
3. Hexadecimal Dumping ....................................................................................................... 20
4. Specifications ..................................................................................................................... 21
5. Appendix ............................................................................................................................. 22
5-1 Cleaning Printer .............................................................................................................. 22
Page 5
Ver. 1.00
- 5 -
SRP-E300/E302
1. Installing Printer and Getting Started
1-1 Unpacking
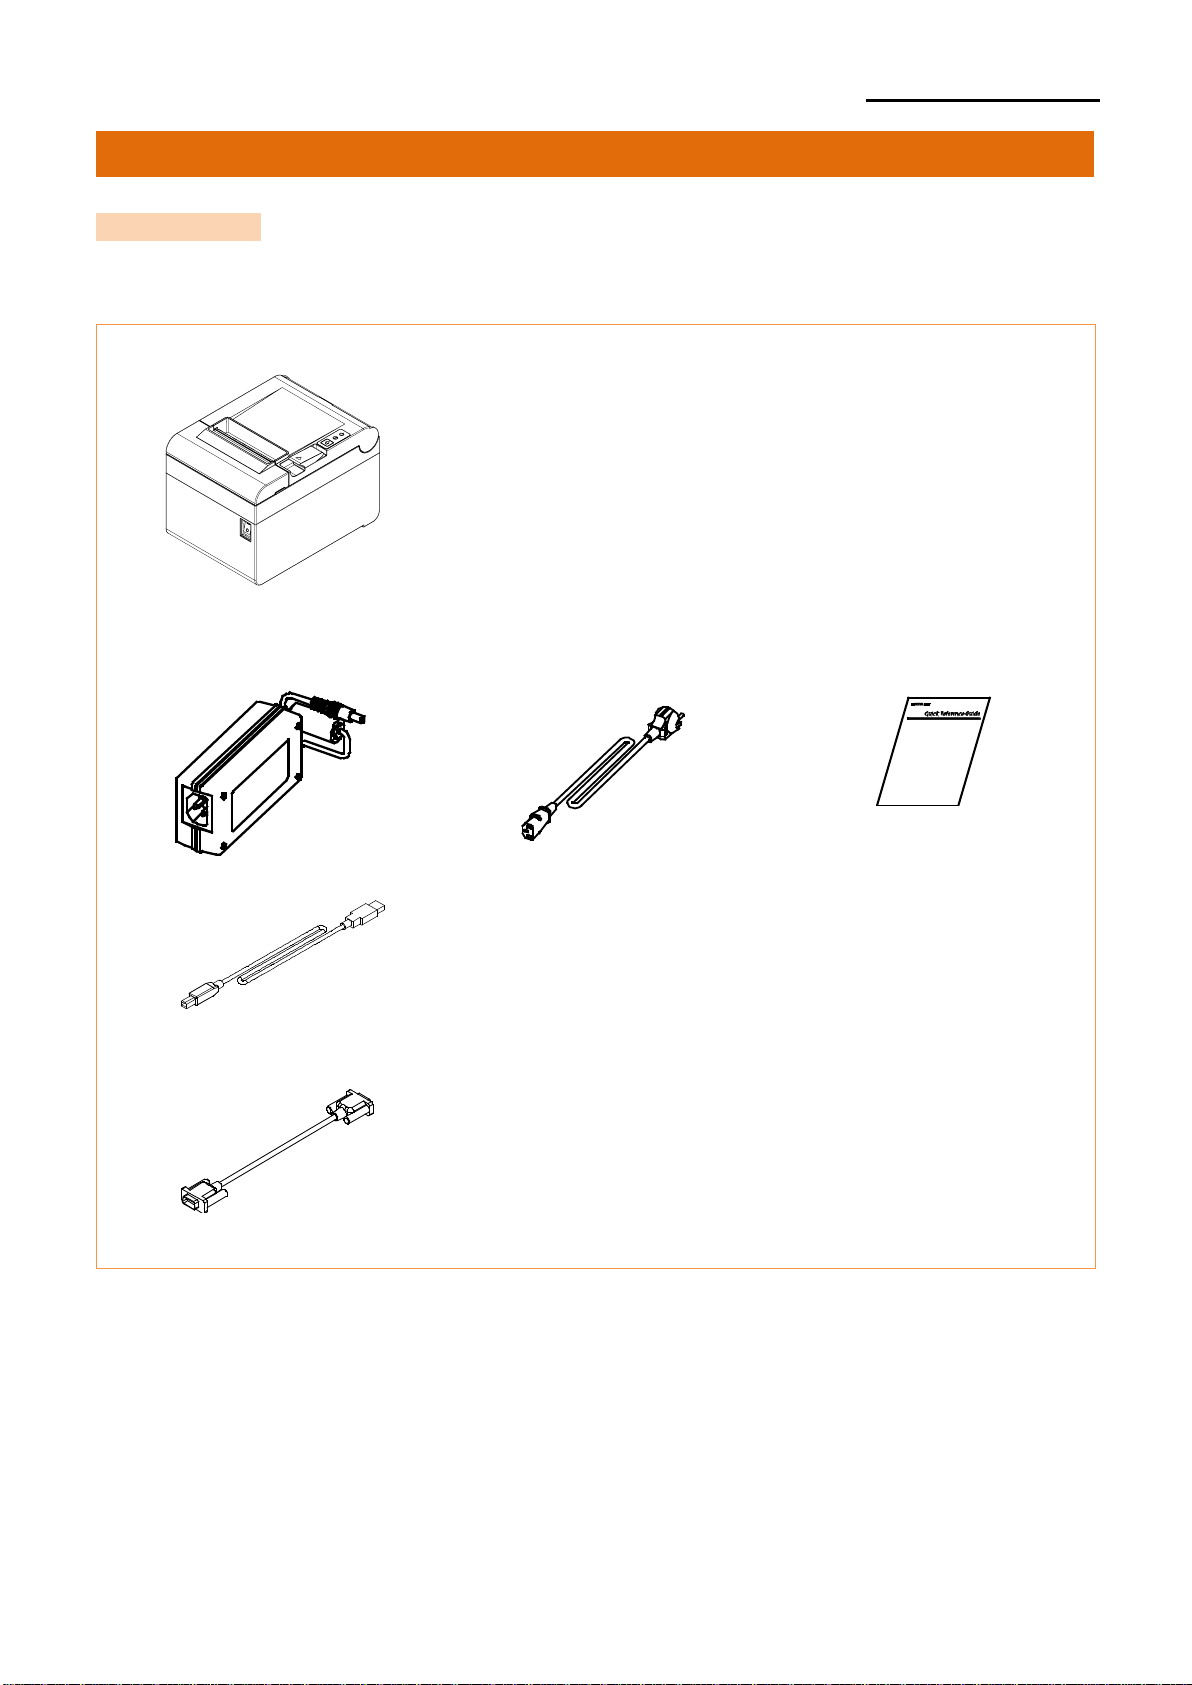
• Check the following contents list, and contact your dealer for assistance if any item is
missing or incorrect.
- Product
SRP-E300/E302
- Standard Components
AC/DC Adaptor
Power Cord
Installation Guide
USB A-B Cable
- Optional Components (SRP-E300ES/SRP-E302ES)
Serial Cable (9pin - 9pin)
Page 6
Ver. 1.00
- 6 -
SRP-E300/E302
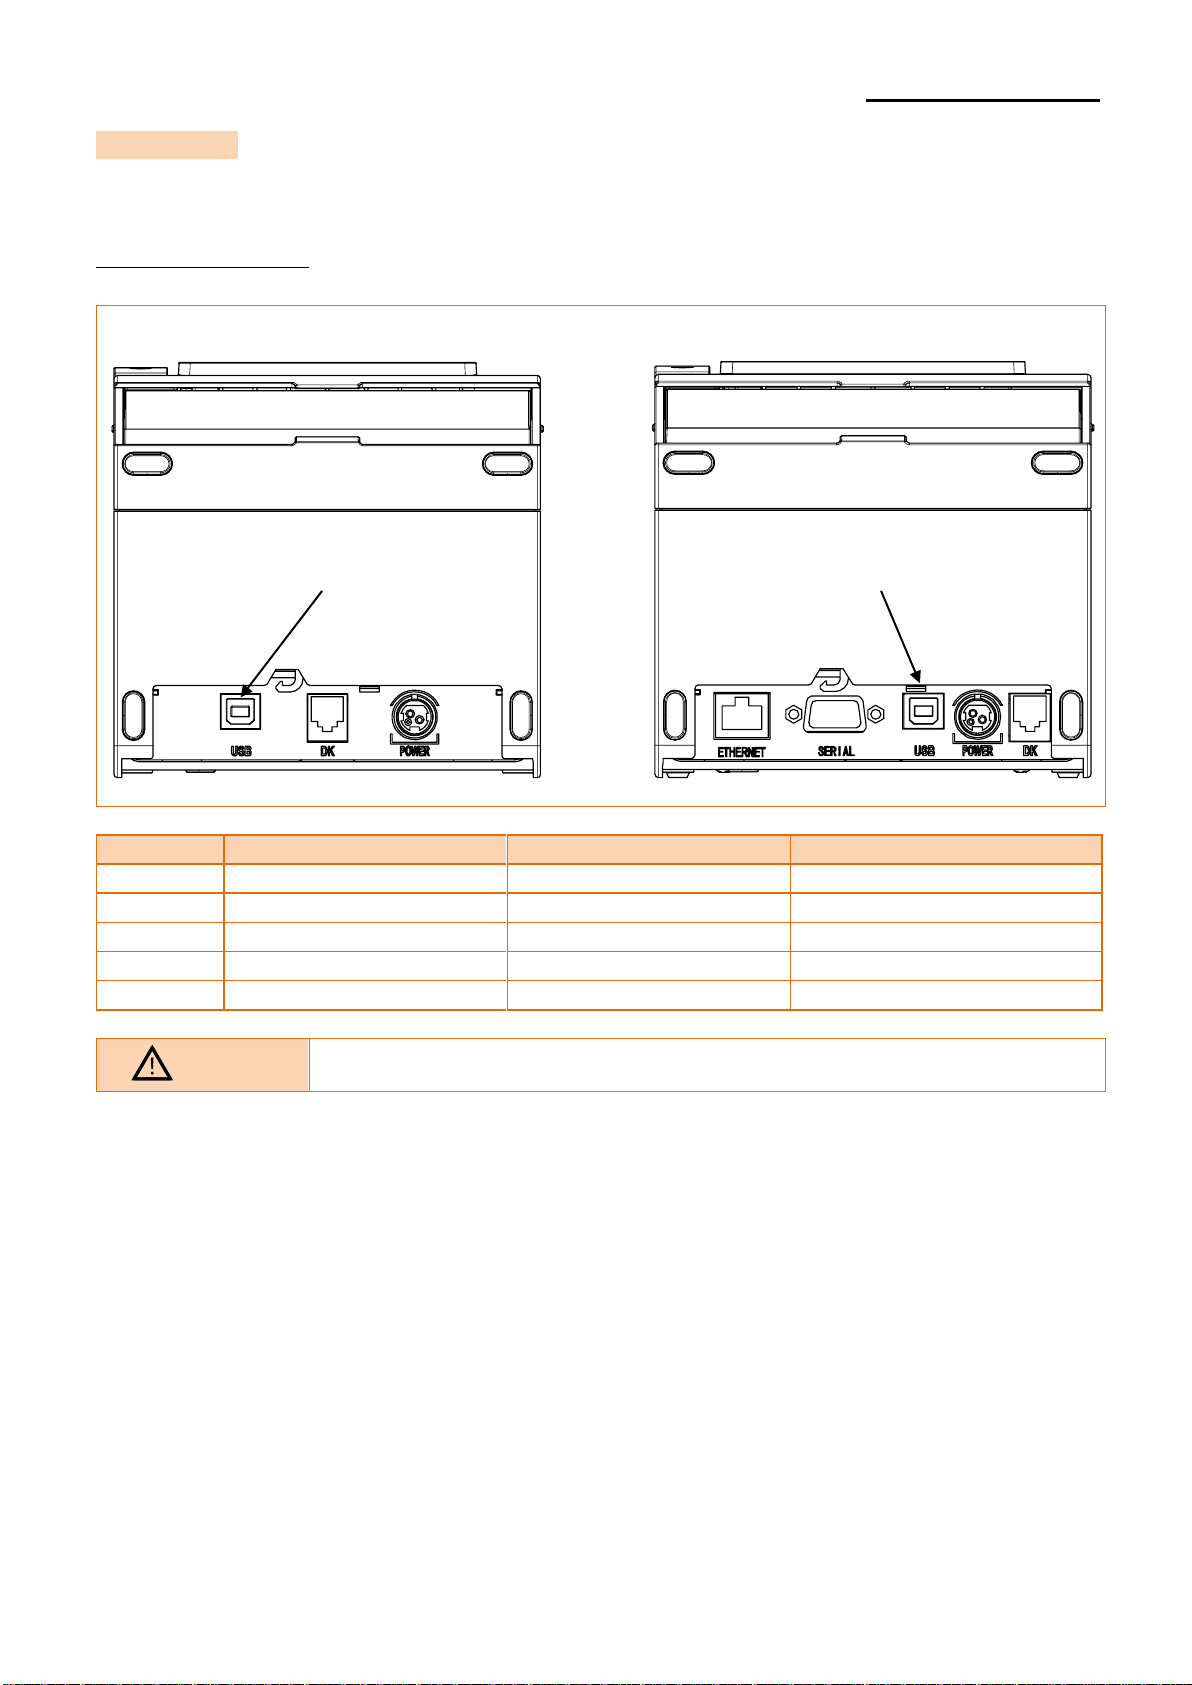
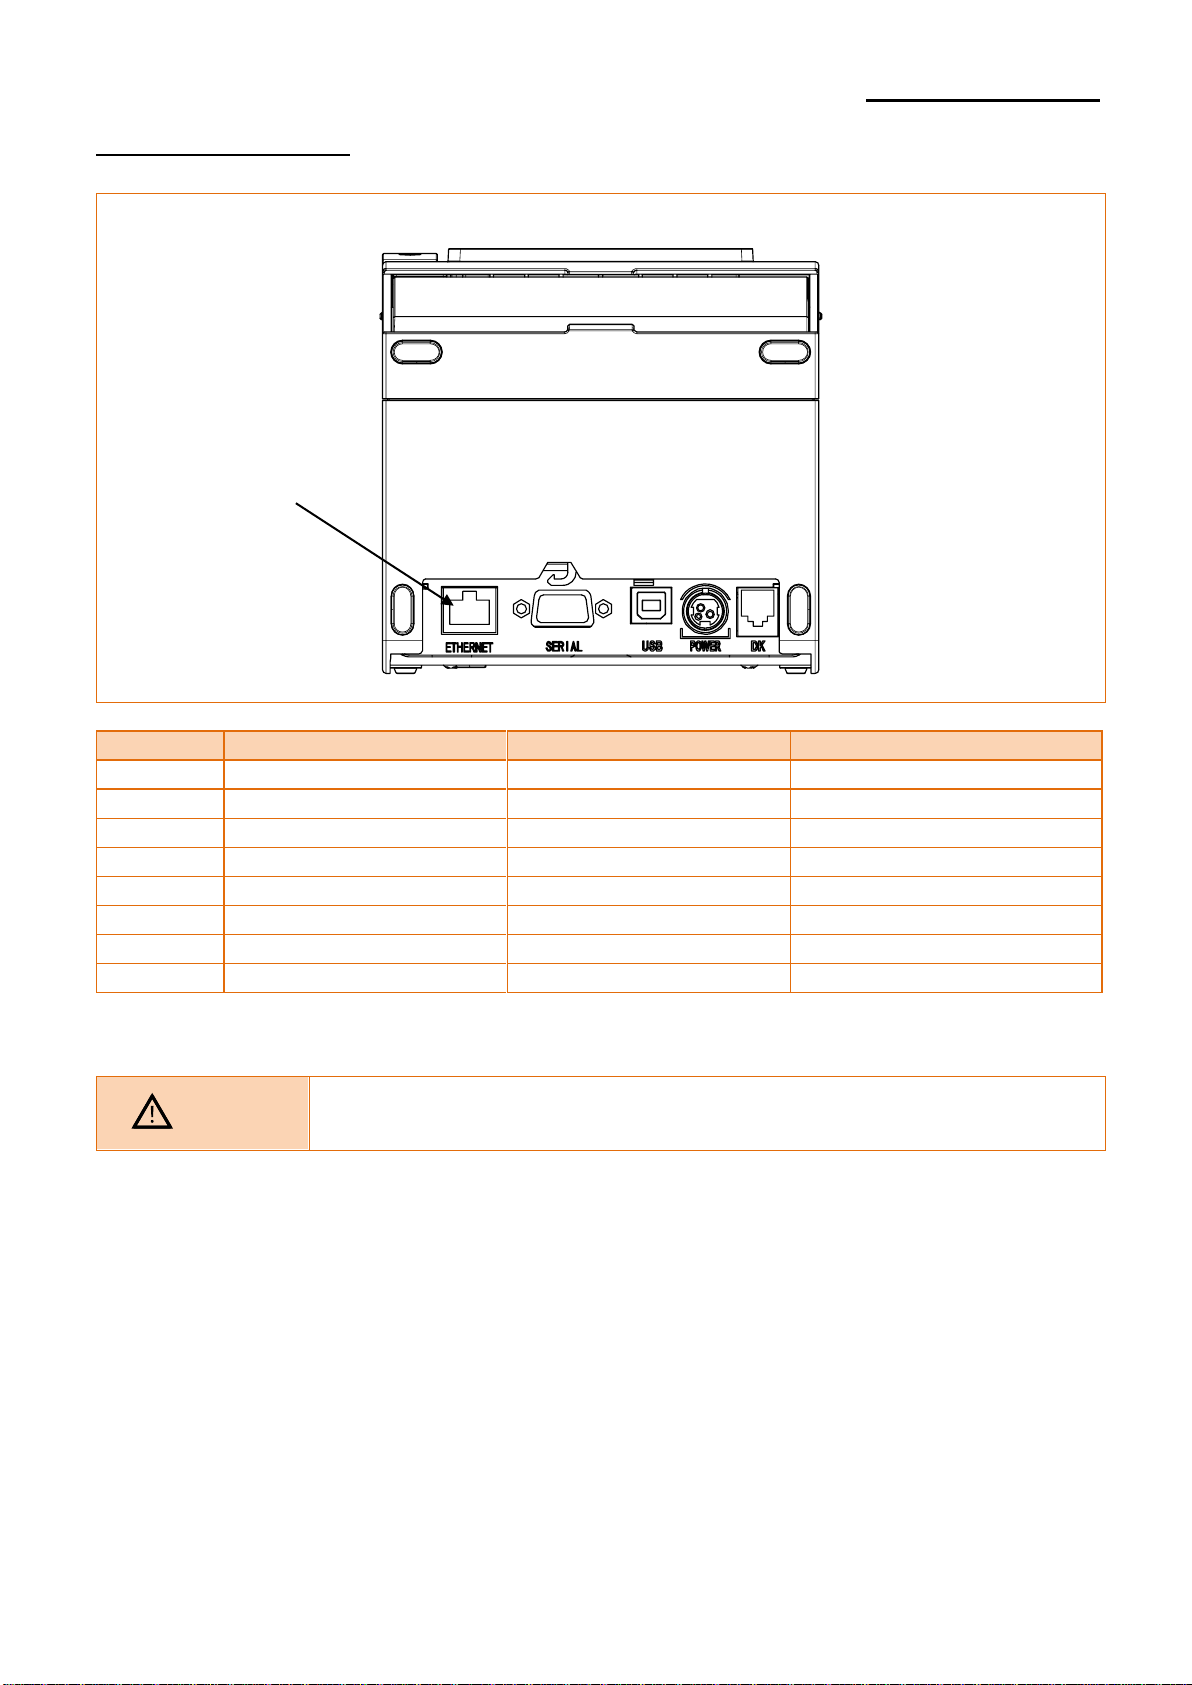
1-2 Interface
• Connect the printer to the host computer using the right interface cable that complies with
the specifications of the interface
1-2-1 USB Interface
- SRP-E300/E302 - SRP-E300ES/E302ES
Pin No.
Signal Name
Designation (Color)
Function
Shell
Shield
Drain Cable
Frame Ground
1
VBUS
RED
Host Power
2
D-
WHITE
Data Line (D-)
3
D+
GREEN
Data Line (D+)
4
GND
BLACK
Signal Ground
Caution
All cables must be connected while the product is turned off.
USB Port
USB Port
Page 7
Ver. 1.00
- 7 -
SRP-E300/E302
1-2-2 Ethernet Interface
- SRP-E300ES/E302ES
Pin No.
Signal Name
Designation (Color)
Function
1
TD+
WHITE ORANGE
Transmit +
2
TD-
ORANGE
Transmit -
3
TCT
WHITE GREEN
Receive +
4
NC
BLUE
-
5
NC
WHITE BLUE
-
6
RCT
GREEN
Receive -
7
RD+
WHITE BROWN
-
8
RD-
BROWN
-
* Refer to the Ethernet User’s Manual that is available from the BIXOLON website for more
detailed information.
Caution
All cables must be connected while the product is turned off.
Ethernet Port
Page 8
Ver. 1.00
- 8 -
SRP-E300/E302
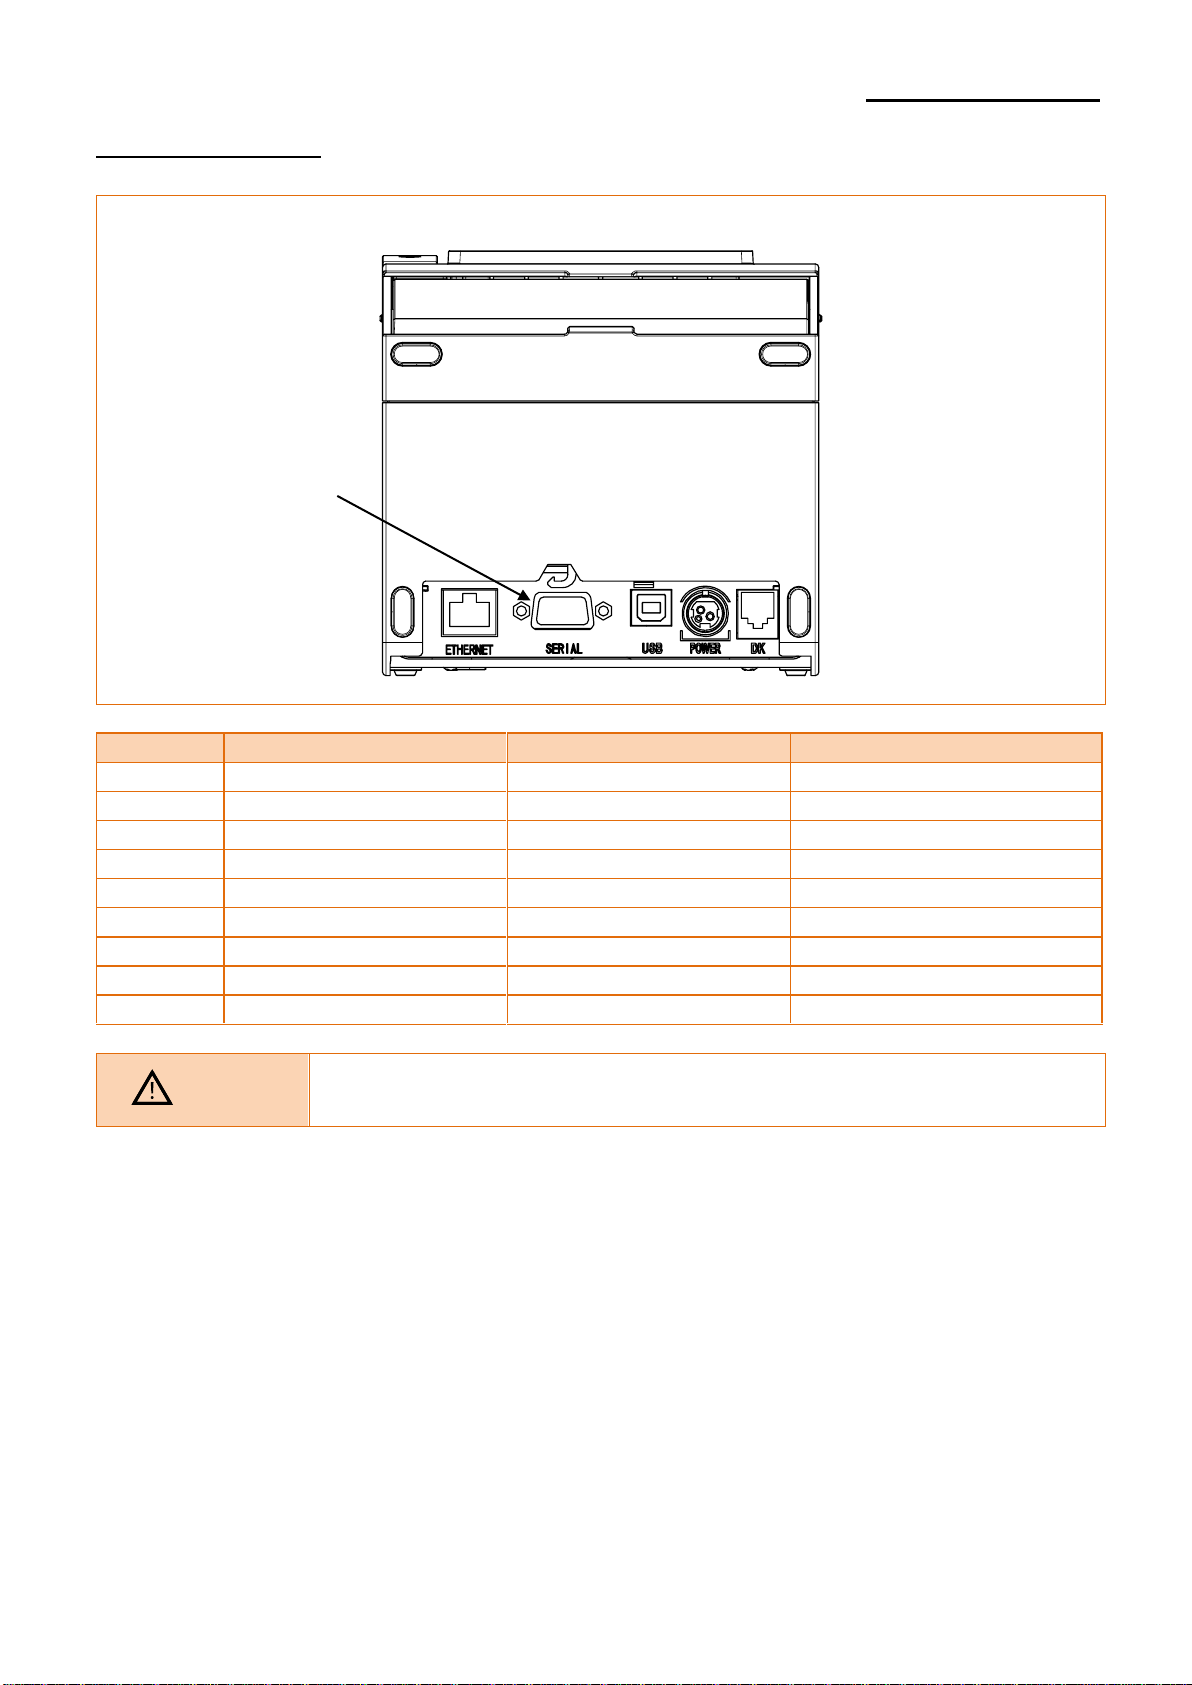
1-2-3 Serial Interface
- SRP-E300ES/E302ES
Pin No.
Signal Name
Direction
Function
1
NC - -
2
TxD
OUTPUT
Transmit Data
3
RxD
INPUT
Receive Data
4
DSR
INPUT
Data Set Ready
5
GND - -
6
DTR
OUTPUT
Data Terminal Ready
7
CTS
INPUT
Clear To Send
8
RTS
OUTPUT
Ready To Send
9
NC - -
Caution
All cables must be connected while the product is turned off.
Serial Port
Page 9

Ver. 1.00
- 9 -
SRP-E300/E302
1-3 Drawer Port
• Connect the cash drawer connection cable to the drawer kick-out connector on the rear side
of the printer.
- SRP-E300/E302 - SRP-E300ES/E302ES
Pin No.
Signal Name
Direction
1
Frame Ground
-
2
Drawer Kick-out Drive Signal 1
Output
3
Drawer Open/Close Signal
Input 4 +24V
-
5
Drawer Kick-out Drive Signal 2
Output 6 Signal Ground
-
Caution
- Use a cash drawer that meets the printer specifications.
Using a cash drawer that is inappropriate to the specs or using
it as a power supply for a separate device may result in
damage to the product
- Do not connect a telephone line to the drawer kick-out
connector. Otherwise, the telephone line and the computer
may be damaged.
- Do not allow a foreign object such as a conductor to touch
the cash drawer port. This may result in damage to the product
- Make sure to use a cash drawer with an internal coil resistance of
24 Ω or higher. (The maximum current is 1A.)
- The open signal time for the cash drawer should not exceed 0.8
seconds. After opening the cash drawer, make sure to idle for at
least 3.2 seconds (at least 4 times that of the open signal time)
before operating it.
Drawer(DK) Port
Drawer(DK) Port
Page 10

Ver. 1.00
- 10 -
SRP-E300/E302
1-4 Connecting Power Supply
1) Make sure the product is turned off before connecting the power supply.
2) Connect the power cable with the flat side pointing to the outside of the printer, as shown
in the diagram below.
- SRP-E300/E302
- SRP-E300ES/E302ES
Power Cable
Power Connector
Power Connector
Power Cable
Page 11

Ver. 1.00
- 11 -
SRP-E300/E302
Caution
- Only use a power supply provided by Bixolon. Bixolon shall
bear noresponsibility for damage caused by using a third-party
power supply.
- Check the power supply’s label to check its electronic specs.
- When removing the power supply, make sure you have a firm
grasp of the plug terminal of the power cable and the printer
and pull horizontally.
- When connecting or disconnecting power, make sure to remove
the power supply from the power outlet before removing.
- Pay attention to the direction in which you insert the power
cable.
- SRP-E300/E302
- SRP-E300ES/302ES
Warning
Do not connect a voltage out of the specifications of the power
supply. It can cause damage to the product or a fire.
O
X
Page 12

Ver. 1.00
- 12 -
SRP-E300/E302
1-5 Reconfiguration of Printer
• This product does not support Dip Switch. In order to change the product’s configuration,
use either the virtual memory switch utility or the virtual memory switch management
function when performing a self-diagnosis.
• Please refer to the Utility and Service Manual for more information.
Caution
Make sure to turn the printer off and on again after using
the virtual memory switch utility to adjust the settings of the
product.
Page 13

Ver. 1.00
- 13 -
SRP-E300/E302
1-6 Installing & Replacing Paper
1) Open the paper roll cover by raise the cover-open lever.
Caution
Do not open the print cover while the printer is operating,
otherwise the printer may be damaged.
Page 14

Ver. 1.00
- 14 -
SRP-E300/E302
2) Remove the empty paper roll and replace with a new one as shown in the image.
Caution
Check the orientation of the roll paper when inserting it into
the printer.
Page 15

Ver. 1.00
- 15 -
SRP-E300/E302
3) Pull out a small amount of paper as shown in the picture, and close the cover.
Caution
When closing the cover, hold down the center of printer cover
firmly so that paper roll is loaded correctly.
4) Cut the paper as shown in the following picture.
Caution
- Make sure to use the specified paper only.
- To prevent data loss, replace paper only when the printer is
not receiving any data.
Page 16

Ver. 1.00
- 16 -
SRP-E300/E302
1-7 Recommended Papers
- TF50KS-E (Paper Thickness: 65μm): Nippon Paper Industries Co., Ltd.
- PD 150R (Paper Thickness: 75μm): New Oji Paper Mfg. Co., Ltd.
- PD 160R (Paper Thickness: 75μm): New Oji Paper Mfg. Co., Ltd.
- P350 (Paper Thickness: 62μm): Kansaki Specialty Paper, Inc. (USA)
- P220AG (Paper Thickness: 65μm): Mitsubishi Paper Mills Limited
- P220A (Paper Thickness: 65μm): Mitsubishi Paper Mills Limited
- F5041 (Paper Thickness: 65μm): Mitsubishi HitecPaper Flensburg Gmbh
- P5047 (Paper Thickness: 60μm): Mitsubishi Paper Mills Limited
Caution
- Use of papers other than those recommended above may
damage TPH or degrade the printing quality and our company
Is not responsible for the damage caused by non-recommended
papers.
- If you have to use other products, we recommend that you use
papers with a similar level of quality to the recommended ones.
1-8 Removing Paper Jam
• Open the cover and remove the jammed paper.
Caution
- Placing your hand above the printer outlet may cause a paper
jam.
- If the cover will not open due to a minor paper jam, turning
the power OFF → ON will automatically return the blade to its
original position.
Warning
If the cover does not open, do not use tools such as screw
drivers, and call the customer center. Forcing the cover
open may result in faulty paper cutting or damage to the product.
Page 17

Ver. 1.00
- 17 -
SRP-E300/E302
1-9 Using Printer Functions
Caution
If the printer does not power on, check that the adapter LED
indicates “ON”
• Power (Button)
- The POWER light is on whenever the printer is on.
• Error (Indicator Lamp)
- Red light will be on in various error conditions such as out of paper, cover open, etc.
• Feed (Button)
- Press this button to feed the paper out. Hold down this button to feed out the paper
continuously.
Page 18

Ver. 1.00
- 18 -
SRP-E300/E302
2. Self-Test
• The self-test checks whether the printer has any problems. If the printer does not function
properly, contact your dealer. The self-test procedure is as follows:
1) Make sure paper roll has been installed properly.
2) Turn on the power while holding down the FEED button and the self-test begins.
3) The self-test prints the current status of the printer including control ROM version.
4) After printing the current printer status, the printer wait for the next step after printing the
following lines. (The paper signal light keeps blinking.)
SELF-TEST PRINTING.
Select a button to run the following.
Continue test printing : Press the button briefly
Memory switch configuration mode : Press and hold down button
5) Press the Feed button to resume printing or hold down the button for at least one
second to change the VMSM settings.
• If “Continuous SELF-TEST” is selected
(1) Press the Feed button for less than one second to print the preset page.
(2) The self test ends automatically as it prints the following line and cuts the paper
*** COMPLETED ***
(3) The printer goes into normal print mode upon completion of the self test.
Page 19

Ver. 1.00
- 19 -
SRP-E300/E302
• If “VMSM Selection” is selected
(1) The following lines will be printed when the VMSM opens.
** VMSM Selection **
0 : Exit and reboot printer
(*) 1 : None
2 : Set Print Density
3 : None
4 : Set Cutting mode
5 : Set External Buzzer after cutting
6 : None
7 : None
8 : Print current settings
9 or more : None
(*) SRP-E300ES/E302ES
1: Ethernet Information Setting
(2) Press the Feed button to run the above function.
- Step 1(Select Options): press the button a number of times as shown by each menu.
- Step 2(Enter Options): hold down the button for at least one second to apply each
item selected.
Note
If you select any items not listed above, the list of “VMSM Selection”
will be printed again.
Setting the mode will be canceled if no item is selected in Step 1.
(3) Hold down the Feed button for at least 1 second to save the changes.
The following line will be printed before cutting the paper.
If “0: Exit and reboot printer” is not executed, the new settings will not be saved.
*** COMPLETED ***
6) The new settings will be automatically applied when printer resets.
Caution
Contact the customer center if the setting changes are
not saved.
Page 20

Ver. 1.00
- 20 -
SRP-E300/E302
3. Hexadecimal Dumping
• This function allows experienced users to see exactly what data is coming to the printer.
This can be useful in finding software problems. When you turn on the hexadecimal dump
function, the printer prints all commands and data in hexadecimal format along with a guide
section to help you find specific commands.
• To use the hexadecimal dump function, follow these steps.
1) After making sure that the printer is off, open the cover.
2) Turn the printer on, while holding down the FEED button.
3) Close the cover, and then the printer enters the hexadecimal dump mode.
4) Select the hexadecimal printing function in the mode selection menu to move to the
hexadecimal printing mode.
5) Run any software program that sends data to the printer.
The printer will print all the codes it receives in a two-column format.
The first column contains the hexadecimal codes and the second column gives the ASCII
characters that correspond to the codes.
1B 21 00 1B 26 02 40 40 40 40
. ! . . & . @ @ @ @
02 0D 1B 44 0A 14 1E 28 28 28
. . . D . . . . ( ( (
00 01 0A 41 0D 42 0A 43 43 43
. . . A . B . C C C
- A period (.) is printed for each code that has no ASCII equivalent.
- During the hex dump, all commands are disabled.
6) When the printing finishes, turn off the printer.
7) Turn on the printer and then the hexadecimal mode is off.
Caution
Contact the customer center if the printer does not
enter hexadecimal printing mode.
Page 21

Ver. 1.00
- 21 -
SRP-E300/E302
4. Specifications
Printing Method
Thermal printing
Dot Density
SRP-E300/E300ES: 180 dpi (7dots/mm)
SRP-E302/E302ES: 203 dpi (8dots/mm)
Printing Width
3 inches
72 mm
Roll Width
3 inches
79.5±0.5 mm
No. of Characters per Line
(Default Value)
SRP-E300/E300ES:
42 (Font A) ,56 (Font B), 56 (Font C)
SRP-E302/E302ES:
48 (Font A) ,64 (Font B), 64 (Font C)
Printing Speed
Max. 220 mm/sec
Receiving Buffer Size
4K bytes
Interface
SRP-E300/E302: USB
SRP-E300ES/E302ES: USB, Ethernet, Serial
Cash Drawer
2ports with Y-type cable
Supply Voltage
SMPS
Input Voltage
100~240 VAC
Frequency
50/60 Hz
SMPS
Output Voltage
24 VDC
Environment
Condition
Temperature
Operating: 0 ~ 40 ℃
Storage: -20 ~ 60 ℃
Humidity
Operating: 10 ~ 80 % RH
Storage: 10 ~ 90 % RH
Paper excluded
Life Span
Printer Head *)
150 Km
Auto Cutter
1,500,000 cuts
*) The specifications were determined based on operation at normal temperature using
designated paper on default settings. They are subject to change depending on
temperature or printing level.
Caution
Printing speed may become slightly slower depending on
the data transmission speed and the combination of commands.
Page 22

Ver. 1.00
- 22 -
SRP-E300/E302
5. Appendix
5-1 Cleaning Printer
• Paper dust inside the printer may lower the print quality.
In this case clean the printer as follows:
1) Open the printer cover and remove the paper currently in use.
2) Residue or contamination of printer head should be wiped out by ethanol or IPA.
3) Clean the paper sensor and paper roller with a cotton swab or a dry cloth.
4) Insert a paper roll and close the printer cover.
Caution
When cleaning the printer head, make sure that cleaning
solutions such as ethanol or IPA do not penetrate the printer.
Warning
Do not touch the printer head immediately after printing,
as it could burn the skin.
Cotton swab
Page 23

Ver. 1.00
- 23 -
SRP-E300/E302
Copyright
© BIXOLON Co., Ltd. All rights reserved.
This user manual and all property of the product are protected under copyright law.
It is strictly prohibited to copy, store, and transmit the whole or any part of the manual
and any property of the product without the prior written approval of BIXOLON Co., Ltd.
The information contained herein is designed only for use with this BIXOLON product.
BIXOLON is not responsible for any direct or indirect damages, arising from or related to use
of this information.
• The BIXOLON logo is the registered trademark of BIXOLON Co., Ltd.
• All other brand or product names are trademarks of their respective companies or
organizations.
BIXOLON maintains ongoing efforts to enhance and upgrade the functions and quality of all
our products.
In the following, product specifications and/or user manual content may be changed without
prior notice.
Warning - U.S.A
This equipment has been tested and found to comply with the limits for a Class A digital
device pursuant to Part 15 of the FCC Rules. These limits are designed to provide reasonable
protection against harmful interference when the equipment is operated in a commercial
environment. This equipment generates uses, and can radiate radio frequency energy and, if
not installed and used in accordance with the instruction manual, may cause harmful
interference to radio communications. Operation of this equipment in a residential area is
likely to cause harmful interference in which case the user will be required to correct the
interference at his own expense.
ii) Changes or modifications not expressly approved by the manufacturer could void the user's
authority to operate the equipment.
iii) Caution: Exposure to Radio Frequency Radiation.
To comply with FCC RF exposure compliance requirements, a separation distance of at least
20 cm must be maintained between the antenna of this device and all persons.
Notice - Canada
i) Class A Digital Device : Wired Device
This Apparatus complies with class “A” limits for radio interference as specified in the
Canadian department of communications radio interference regulations.
Get appareil est conforme aux normes class “A” d’interference radio tel que specifier par
ministre canadien des communications dans les reglements d’interference radio.
Page 24

Ver. 1.00
- 24 -
SRP-E300/E302
Caution
Some semiconductor devices are easily damaged by static electricity. You should turn the
printer “OFF”, before you connect or remove the cables on the rear side, in order to guard the
printer against the static electricity. If the printer is damaged by the static electricity, you
should turn the printer “OFF”.
Waste Electrical and Electric Equipment (WEEE)
This marking shown on the product or its literature, indicates that is should not be
disposed with other household wastes at the end of its working life, To prevent
possible harm to the environment or human health from uncontrolled waste
disposal, please separate this from other types of wastes and recycle it
responsibly to promote the sustainable reuse of material resources. Household
users should contact either the retailer where they purchased this product, or their local
government office, for details of where and how they can take this item for environmentally
safe recycling. Business users should contact their supplier and check the terms and
conditions of the purchase contract. This product should not be mixed with other commercial
wastes for disposal.
Page 25

Ver. 1.00
- 25 -
SRP-E300/E302
Revision history
Rev.
Date
Page
Description
1.00
04.05.18
-
New
1.01
27.07.18
5
16
Modified components (USB Cable, Serial Cable)
Add paper spec
 Loading...