

Binatone Babysebse 5 User Manual
Breathing & Movement Monitor
5
Medically approved
Sensor | Do not use | Sensor
Slot
Illustration 6
Sensor | Do not use | Sensor
Hanging hook
Blue breathing
movement
indicator light
Red alert
alarm light
Low battery
warning light
On/Off
button
I
llustration 8
Speaker
Control
Unit
Cable Cable
Bed/Crib
base
Control unit holder
Illustration 5
1
3
2
Ensure you read this user guide before installing and
using the product.
Babysense is a high quality, high sensitivity electronic
device which must be handled with care:
• Do not handle roughly, drop or throw.
• Follow the installation in structions carefully to
ensure that it is installed se curely and correctly.
• Babysense is not a toy. Do not allow children of any
age to play with it.
• Do not put any additional baby or pet in the bed.
Babysense cannot be used for two infants in one bed.
• You must undertake the performance test daily of
the Babysense monitor (as set out on page 3).
• Do not operate a vaporiser or ventilator directly
towards the bed.
• To avoid possible danger from sensor cords,
ensure that excess cords are pulled back under
the mattress, secured with the i ncluded cable tie
and are not visible or reachable .
• Install 4 new and identical size AA 1.5 volt batteries,
preferably alkaline.
• IMPORTANT: It is strongly advised that ever y
caregiver learn how to give first aid.
"Babysense" monitors and alerts, but cannot prevent
cessation of breathing. The responsibility for applying first
aid rests on caretakers. The "Babysense" senses breathing
movement s and motio n only, and c annot monito r
other occurrences. The purpose of the device is to alert
when stopping or slowing of breathing and
movement occur.
"Babysense" is a unique safety system which has helped
save infants, giving parents (or caretaker) assurance,
by enabling intervention in the event of irregular
breathing movement or distress, before it becomes
critical. There are a number of cautionary steps
which are internationally recommended for SAFE
SLEEPING:
* Always lay your baby to sleep on his or her back.
* Refrain from smoking near or around your baby.
* Avoid over-heating the baby's surroundings.
* Do not leave any objects near your baby that can
cause suffocation.
Babysense is an addition to these precautions.
"Babysense" is a home breathing movement monitor
for basically healthy infants up to one year of age,
and is not to be relied on for use with high-risk infants
requiring constant medical supervision.
"Babysense" continually detects the baby's motion and
breathing movements, and will set off a sound and
visual alarm if movement stops for 20 seconds or if the
breathing rate slows to below 10 breaths per minute if
the baby's breathing. The system's non-touch sensor
pads under the mattress monitor baby's movement
without restraining him.
1. Insert, in accordance with the markings, 4 new and
identical size AA 1.5 volt batteries, preferable alkaline.
Close the battery cover.
Note: Do not mix old and new batteries.
Note: For replacing the batteries, remove the battery
cover by inserting a flat screwdriver into the opening
recess (see illustration 7).
Note: Please dispose of used batteries in accordance
with local waste regulations.
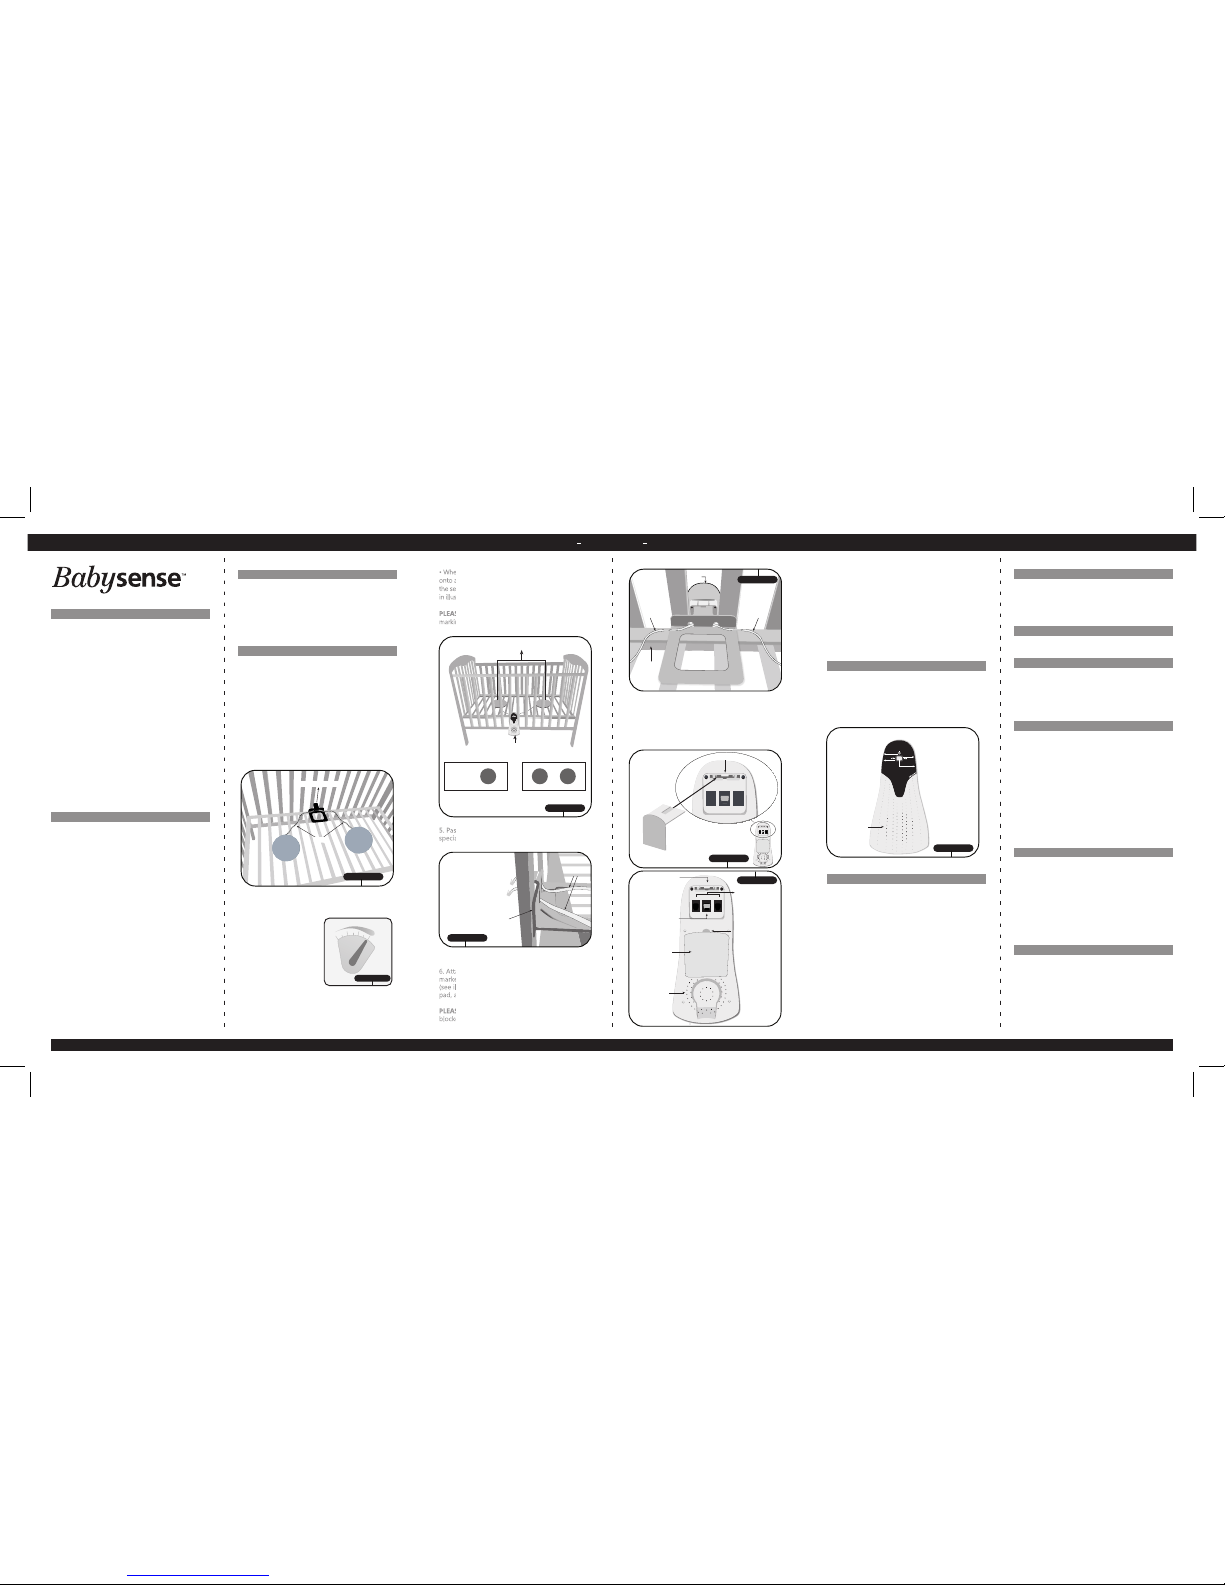
2. Place control unit holder on the base of the crib
or bed and in between two bars as shown in
illustration 1.
3. Make sure the sensitivity adjustor, located on the back
of the sensor pads, is positioned on level 3
(see illustration 2).
4. Sensor pad installation:
• When using for an infant not yet able to crawl, place
one sensor pad as shown in illustration 3. Make sure the
sensor is placed underneath the baby's position in the crib.
Warnings
Principal Of Operation
Installation
Please note
9. Place mattress firmly on top of sensor pads. If the
mattress cannot be in contact with the sensor pads,
or if the bed base is soft, padded or contains
springs, place extra plywood on the bed base, place
the sensor pads on the plywood and place the
mattress firmly on top.
IMPORTANT: To avoid possible danger from sensor
cords, ensure that exce ss cords are pulled back
under the mattress, secured with the included cable
tie and are not visible or reachable.
See illustration 8 for layout of control unit featuring:
• On/Off button.
• Blue breathing movement indic ator light.
• Acoustic and visual red alarm light.
• Low battery red warning li ght.
"Babysense" is ready for operation and use once
the installation is complete. To operate, follow the
below instructions:
• Place your baby in the crib/b ed.
• Turn control unit on by pressing On/Off but ton.
• Red control lights switch on briefl y and a double
click sound is heard.
• When breathing and movement i s sensed, the
blue light flashes.
• Acoustic any visual red ligh t alarms are activated
if the baby's breathing stops or slo ws significantly.
• If the red low-battery wa rning light flashes,
replace all batteries as soon as possible. If in
addition clicking is heard, all batteries must be
replaced immediately.
• Turn off by pressing On/Off button before taki ng
your baby out of the crib/bed.
User Guide
0
1
2
3
Illustration 2
• When the baby begins to crawl, and is able to move
onto areas not "covered" by a single sensor pad, attach
the second sensor and place the two sensors as shown
in illustration 3.
PLEASE NOTE: The sensors shall be placed with the
marking “THIS SIDE UP” facing upfront.
5. Pass the cord(s) of the sensor pad(s) through
special openings in the holder. (see illustration 4)
6. Attach end(s) of the cord(s) to the outlets
marked "SENSOR" on the back of control unit
(see illustration 5 and 6). When using one sensor
pad, attach to either “SENSOR” outlet.
PLEASE NOTE: Do not attach any cable to the
blocked socket, marked "DO NOT USE"
7. Should the design of the crib/bed not allow proper
installation with the control unit holder, please use the
optional hanging hook (see illustration 6) and hang the
control unit from the bottom edge of the crib.
8. Press control unit holder or hanging hook firmly
into slot in back of control unit (see illustration 5 and 6).
"Babysense" is a highly sensitive device which
monitors baby's breathing movements through the
mattress during sleep. There are two main causes of
malfunction - technical malfunctions and
malfunctions due to environmental factors.
In or der to mini mise t echnic al pro blems, foll ow
installa tion and op eration ins tructions c arefully.
Due to the high sensitivity of "Babysense", it can
be influenced by fans, wind, air condit ioning, and
so forth . Such enviro nmental effec ts could be
picked up by the sensors on a similar level to that of
breathing moveme nts, thus preventing or delaying
alarm ac tivation.
Do not conduct performance test by picking up
baby out of bed and waiting for the alarm to sound
• The pe rformance test should be conducte d
while th e baby is no t in bed.
• Turn device on and take two steps back from bed.
• Ensure the alarm g oes off wit hin 20 seco nds
(due to a bsence of b reathing mov ements).
• The al arm may sou nd with or without
prelimina ry tickin g.
• Check the alarm c an be heard in all loca tions
throughou t the home or place o f care.
• In cas e the alarm does not s ound within 20
seconds refer to trou bleshooting at page 5.
• The pe rformance test must be conducted daily.
Isolated cases of false alarms are possible. Check if caused
by faulty connection of the sensor pad(s) to the control
unit, connection of only one sensor pad when the baby
can move off the immediate area, connection of two
sensor pads far apart from each other when the baby is
not crawling yet, or failure of the sensor pads to be
directly against the mattress.
In case of false alarms, kindly refer to troubleshooting
guide. If the problem cannot be solved, please
contact your nearest BABYSENSE representative.
Act imme diately acc ording to th e following :
1. Approach the bed and check that baby is breathing.
Note pallor (color of skin), muscle tone and movement.
2. If baby doe s not seem normal, pinc h baby's heel
and chec k that there is no caus e for choki ng,
such as an obje ct lod ged i n baby ’s thro at.
When brea thing resum es, consult a doctor.
3. If breathing does not resume, apply first aid and seek
medical assistance immediately.
Sensor | Do not use | Sensor
Slot
Battery
cover
Blocked socket
DO NOT USE
“Sensor”
socket
Illustration 7
Opening
recess
Speaker
Layout of control unit
Operation
Testing Operation
Technical malfunction
Environmentally caused malfunction
Conduct this performance test daily
False alarms
In the event of alarm
Cables
Illustration 4
Control unit
holder
Illustration 1
Control unit holder
Cables
Sensor
Sensor
Sensor pads
(Under mattress)
Control unit
Illustration 3
Top crib/bed view
For babies not
yet able to crawl
For crawling babies
Top crib/bed view
Breathing & Movement Monitor
5
Medically approved
User Guide
English
4
V.BS5(B) .1.EN. 7.13
• Batteries are not inserted
correctly or may be flat.
• Check batteries are inserted i n the Control Unit
observing the correct pola rity.
• Control Unit requires 4 X AA 1.5V Alkaline batteries (not supplied).
• Batteries low. • Replace all 4 batteries.
• Sensor pad is out of order.
• Cable is connected to
monitor’s blocked socket.
• Connect one sensor pad lay the baby on the bed for 1 mi nute.
If the alarm does not activate, th e sensor pad is in order. If the
alarm activates, disconnect and pl ace the sensor pad aside.
• Connect the other sensor pad and repeat steps above.
• Do not connect any cables to the blocked socket (only to
“SENSOR” socket).
• The mattress is not
touching the sensor pads.
• Make sure that the mattress and the sensor pads
are touching.
• The mattress is raised
(there is an object near the
sensor pads).
• Make sure that there are no objects n ext to the sensor pads
• Placing two sensors next to
each other (or using one
sensor) when the baby is of
crawling age or using two
sensor pads far apart from
each other when baby is
young and is not crawling yet.
• Connect according to instructions.
• It is important to use only one sensor pad when the baby is young
and is not crawling yet.
• It is important to make sure that two sensor pads are used when the baby
is moving around.
• Make sure the sensors are placed underneath baby’s location in bed/crib.
• The mattress does not
enable transfer of baby
movements. (a rigid mattress,
a mattress with springs or a
mattress with air pockets).
• Place extra plywood under th e sensor pad so that the
sensor pad and the mattress will b e tightly pressed together.
• Performance test is not
correct.
• Do not conduct performance test by picking up the
baby out of bed and waiting for th e alarm to sound.
Kindly conduct performance test according to guidance in page 3.
• Environmental influences
detected by the sensor
pads, such as wind, fan, air
conditioner, mobile,
vibrations.
• Perform a test which will detect the source of the movement
that the device detects. For example, sources of wind such as: air
conditioner, an open window or a fan; movements of a baby
mobile (which can vibrate even if it's not turned on) walking
around the bed area or an intercom placed near the bed with
intense transmission levels. Solutions: Eliminate sources of wind,
remove the mobile etc. After neutralising all environmental
influences, perform the test again. If even after neutralising all of
the environmental influences, the alarm does not go off within
20 seconds, perform the following:
1. In the back of the sensor pads (see illustration 1)
reduce the sensitivity level to position 2 (on both sensor pads) and
perform again the Performance Test. If the alarm sounds within 20
seconds, than keep this sensitivity level.
2. If the alarm does not go off in time, than reduce the sensitivity
level to position 1 and perform again the Performance Test. If the
alarm sounds within 20 seconds, than keep this sensitivity level.
3. If the alarm does not go off in time at this level, than it is
suggested using only one sensor pad with the sensitivity level
adjusted on position 1.
4. PAY ATTENTION: Should false alarms sound as a result of
reduced sensitivity, than increase the level of sensitivity and
perform the Performance Test.
Solution
Possible Cause
Symptom
Lights on Control
Unit don’t illuminate
when turned ON
Low battery voltage
warning (red light)
on the Control Unit
False alarm up to
1/2 minute from
activating
False alarm after 1/2
minute from
activating
Delayed alarms
while taking the
baby out of the bed
The alarm does
not go off within
20 seconds when
performing the
correct
performance test
Troubleshooting Guide
5
Made by Hisense Ltd.
ISO 9001:2008 and ISO 13485:2003 certified
23, Becker St. Rishon le Zion 7535929, Israel
www.hisense.co.il
European Authorized Representative
OBELIS s.a email@obelis.net
Boulevard Général Wahis 531030 Brussels, Belgium
Tel +(32) 2.732.59.54 Fax +(32) 2.732.60.03
Powered by 4 size AA, 1.5 volt bat teries.
Power consumption approx. 1mA.
Battery life approx. 6 months using alkaline batteries.
Alarm volume typically 85dB S PL at distance of
one meter.
Size of sensor pad is 216 mm .
Technical Specifications
Contents
• Control Unit
• Control Unit Holder
• Optional hanging hook
• 2 Sensor pads
• 2 Cable Ties
• User guide
Please note that the batteries are not supplied.
"Babysense" requires no special treatment beyond
replacing batteries when the battery indicator light
goes on. The sensor pads and control unit may be
wiped with a damp cloth.
Batteries should be removed and the device stored in
a dry shaded place when not in use.
For additional information, please visit our website :
Website: www.binatoneonline.com
Customer Care Helpline Tel. No.:
UK : 0845 345 9677
Republic of Ireland : 08187 62092
Caring for your babysense
DISPOSAL OF THE DEVICE (ENVIRONMENT)
At the end of the product lifecycle, you should not dispose of this product with normal household waste. Take this
product to a collection point for the recycling of electrical and electronic equipment. The symbol on the product,
user’s guide and/or box indicates this. Some of the product materials can be re-used if you take them to a recycling
point. By reusing some parts or raw materials from used products you make an important contribution to the
protection of the environment. Please contact your local authorities in case you need more information on the
collection points in your area. Dispose of the battery pack in an enviormentally-friendly manner according to your
local regulations.
 Loading...