

Page 1
User Guide for
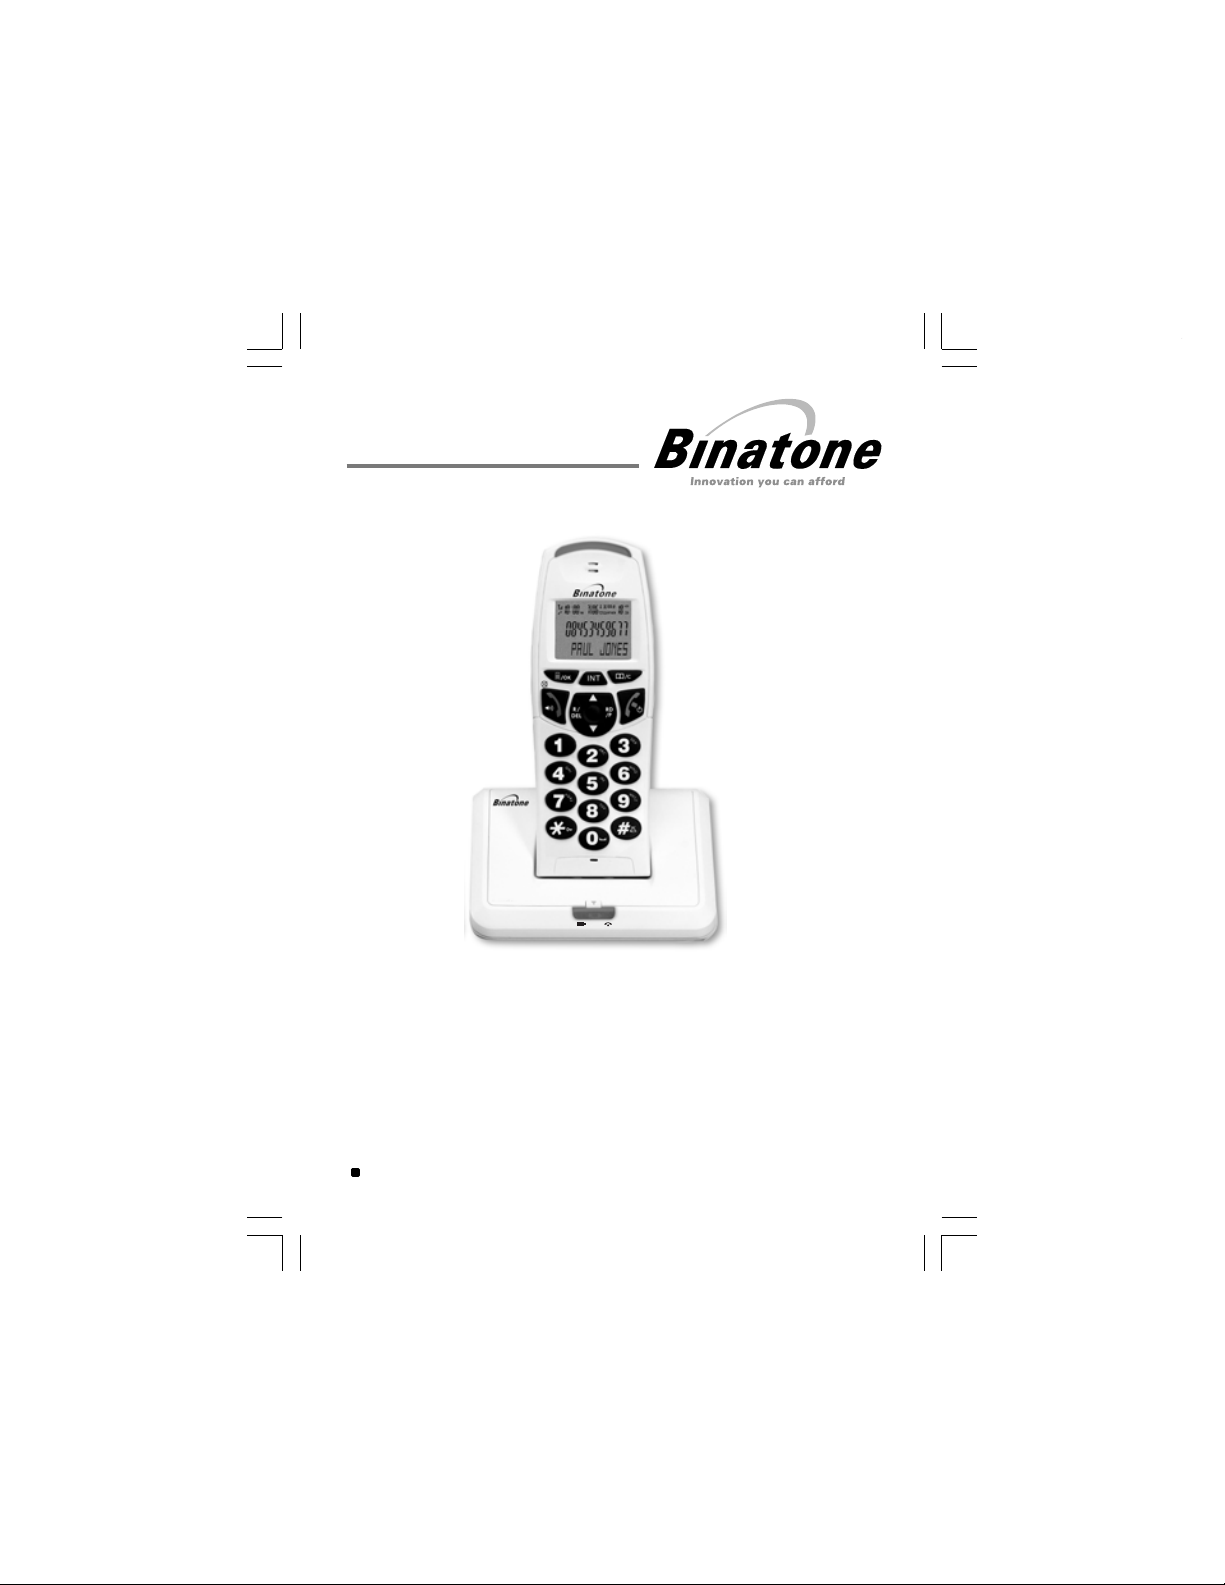
BB3200 Digital Cordless Telephone with Caller Display
Unpacking your BB3200 system
In the box, you will find:
Ƶ the base unit telephone
Ƶ a telephone line cable for the base unit
Ƶ a
mains power adapter
Ƶ the cordless handset (up to five, depending on
this user guide
Ƶ
Ƶ up to five charger pods, each with a mains power
Keep the packaging materials in a safe place in case
Keep your sales (till) receipt, which is your
Charging batteries
.
Before you start to use your telephone make sure that all batteries are fully
charged for 15 hours.
for the base unit
for the first time
:
which BB3200 system you’ve bought)
supply for multi handset systems
you later need to transport the unit.
guarantee.
Page 2

Important note — emergency calls
The BB3200 cordless handset is not designed for making emergency calls
when the mains power fails.
For Emergency calls you should have a basic phone that does not need
a mains power, connected to your line so that you can make calls during
a power failure.
*** Before operating this set, please read these
instructions carefully.
If you need help …..
Binatone Helpline (for UK only)
Monday to Friday from 9:00am to 5:00pm
Tel: 0845 345 9677
**Please note that all calls are charged at local rate
Or visit our website:
http://www.binatoneonline.com
Page 3

Phone Function Keys
LCD Display
Intercom
•
Press to call other handsets
•
During talk mode, press to
transfer call to another handset
Menu/OK/Mute
•
Press to enter menu functions from
idle mode & to confirm selections
Press to mute the microphone
•
during a call
TALK/Handsfree
•
Press to make or answer phon e
calls in the earpiece
•
During talk mode, press to turn
on/off speakerphone
STAR/Lock
Press
•
switch the key lock on/off
•
Press when setting
up conference call
•
Press when
to change to Tone dialling
mode
for the rest of that call.
Recall/Delete button
•
Press to delete memory while
memory being checked
•
Press to erase a digit or letter while
editing a number or name
•
You may need the Recall (Flash) function if
your phone is connected to a PBX,
or if you use BT Calling Features.
and hold for 1.5seconds to
in Pulse dialling
PAGE
•
Press to make all registered
handsets ring (this is useful if you've
forgotten where you put a handset).
HANDSET CHARGING light
•
Turns on red when the handset is put
on charge
OK
OK
RD
/P
MOUTH PIECE
PIECE
EAR
Phonebook/Exit
•
Press to access phonebook records
Press to exit present menu
•
HANG UP
•
During talk mode, press to end
the call and go back to idle mode
•
Pr
ess and hold for 3 seconds to
switch handset power on/off
Redial/Pause
•
During talk mode, press to redial
the last dialled number
•
Press while dialling a number
to insert a pause(3s)
•
to review last number redial list
Press
Ring on/ off
•
Press and hold to switch
the handset external call ringer on/off
UP/CID
Press to scroll up through the
•
lists and menu options
•
During talk mode, press to
increase volume in the earpiece /
loudspeaker
•
Press to review the Caller ID list
RD
/P
DOWN/ CID
•
Press to scroll down through the
lists and menu options
During talk mode, press to decrease
•
volume
in the earpiece / loudspeaker
•
Press to review the Caller ID list
/Power on/off /C
RD
/P
IN USE light
•
Turns on yellow when you have a
connection to the telephone line,
and flashes when you have new
Caller Display* records or the base
is paging or in registration mode.
Page 4

What's on the display?
The display of your telephone contains one line of icons
and the time/date at the top, one line of text ,and one line of numbers.
Display in standby mode
1. Current time and date
2. Antenna signal level
3. Battery level
4. Handset name
5. Status of phone
Icons and time/date
Character field : shows the
Menu, names and status of a call
Number field : shows the telephone
numbers and the call timer
Page 5
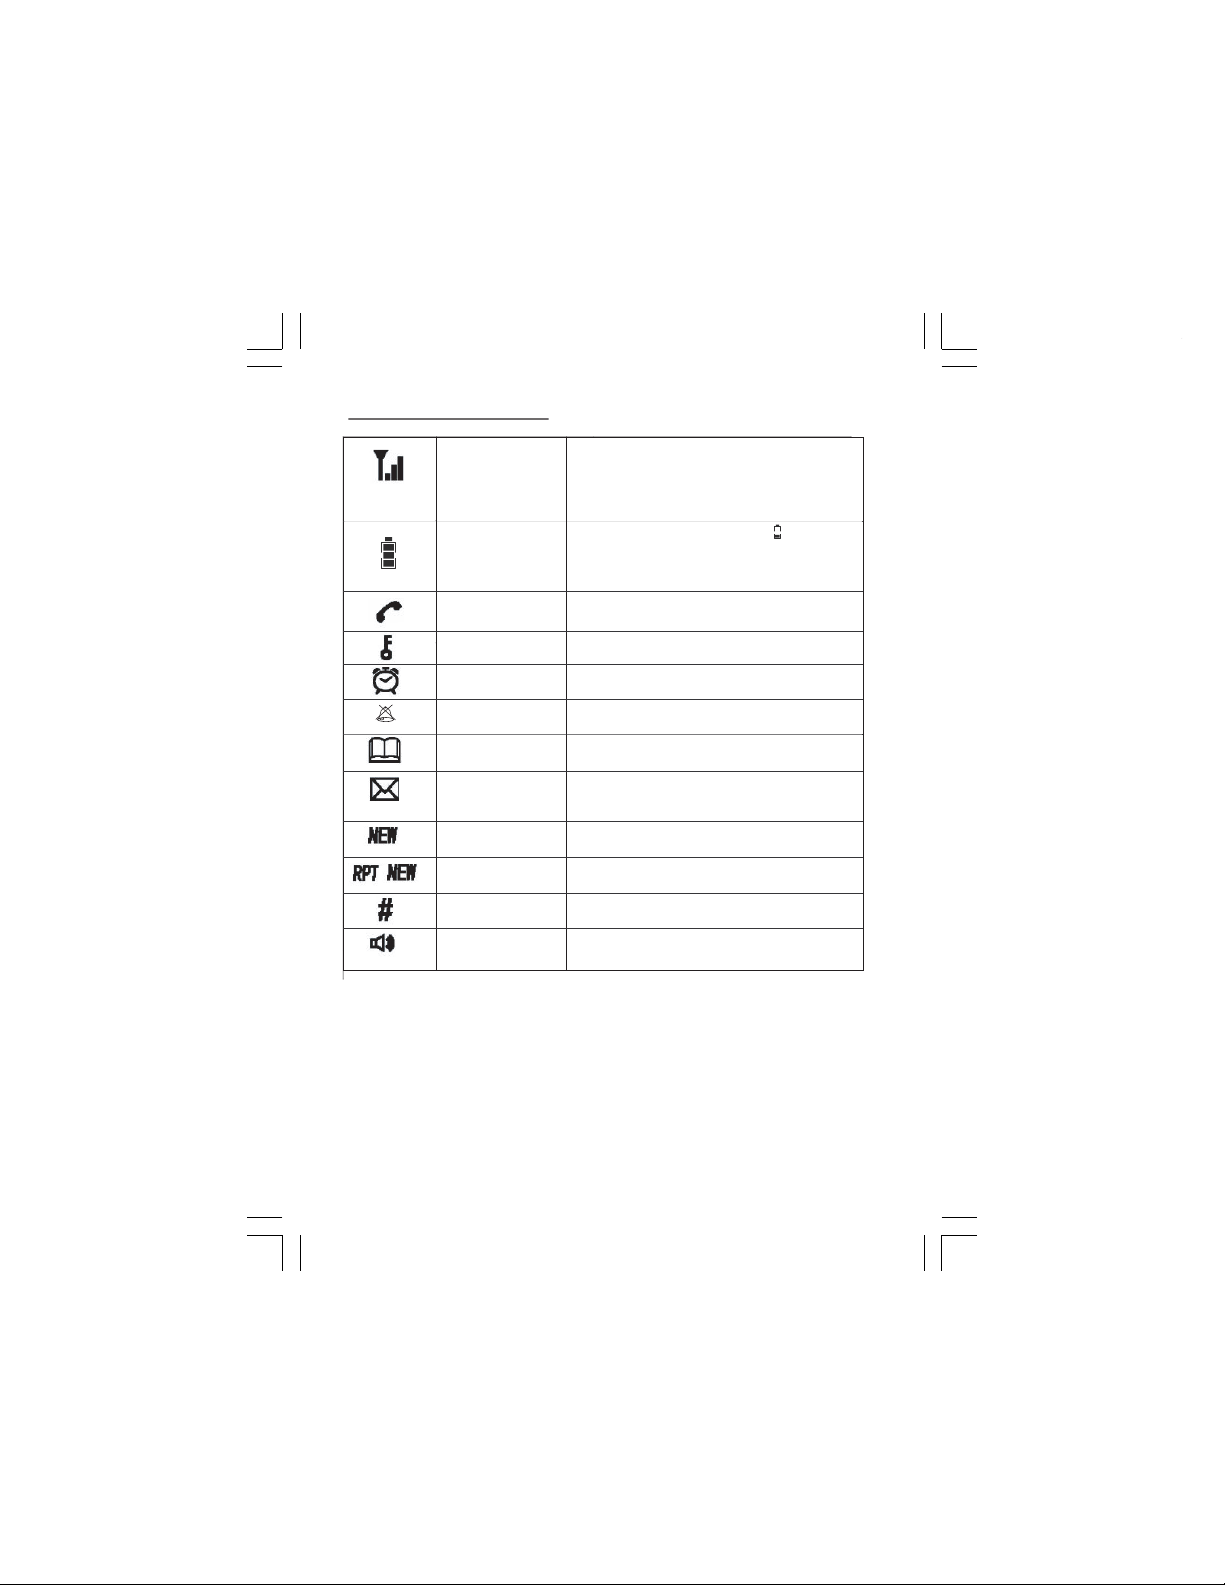
What the symbols mean?
Antenna-signal level
Battery level
Talk
Key lock
Alarm
Ring Off
Phonebook
Voicemail
New CID
Repeated
NEW CID
Sequence
Hands free
•
Shows the strength of the signal between the handset
and base unit, and flashes when you are out of range
of the base unit (the display will also flash "BASE 1")
•
If the level is low, or the symbol is flashing,
move closer to the base unit.
•
Whenever this shows nearly 'empty'( ) put the
handset on the charge cradle to charge the batteries.
•
While the battery is being charged,the level
shown will keep changing.
•
This will display when you are on a call with
the handset
•
Keypad locked
•
This will display when you have set an alarm
•
This will flash when the alarm is triggered
•
This will display when the handset ringer
set OFF
is
•
This will display when you are in the phonebook
menu or are reviewing the phonebook memory
•
This will display when you have a new Voice Mail
message. (This is a caller id service and is
not usually available from UK network providers.)
•
This will display when there is a new CID entry or
if one is being viewed
•
This will display when the same caller has
called more than once and not been read yet.
•
Indicates
the sequence number of the CID or
Redial record being displayed.
•
This will display when the speakerphone is in
use
Page 6

1. Contents
Your Phone Function Keys
’
s on the
What
What the symbols mean?
•
display?
Battery installation
•
Fit the batteries
•
Charge the batteries
Read First beforeUse
•
Choosing a site for the base unit and
charger pod
Mains power connection
•
•
If you have a Broadband line
•
Radio signals handset and base set
•
Interference
•
‘ Out of range warning’
•
Battery safety
Handset basic settings
• To switch on/off
•
To lock/unlock
•
To set time and date
•
To set alarm
Making and answering calls
•
Making calls
•
Answering calls
•
Making calls from redial list
•
Making calls from CID list
•
Muting the mouthpiece
•
Find the Handset
Phone Book/(Memory dialing)
•
Review phonebook memory
•
Add to phonebook memory
•
Modify phonebook memories 11
Delete a contact in phonebook
•
•
Delete all contacts in phonebook
•
Review phonebook memory status 12
•
Store last number redial in phonebook
10
11
12
12
1
Caller Display (CID)
• New CID list 1
•
Review CID list 1
•
2
2
2
3
3
3
3
4
4
4
4
6
6
6
7
8
8
8
9
9
9
9
9
9
Delete a CID 1
•
Delete all CID list 1
• Store a CID in phonebook 1
Handset tones and volume setting
•
Adjust the earpiece volume
•
Adjust handset ringing melodies
Adjust handset ringer volume
•
•
Set handset TONES
Using multi handset
•
Making intercom call
•
Transfer a call
•
Making a three way conference ca
Handset Registration
Registering a handset to base
•
•
Select base
•
De-registering a handset
Customising your phone
•
Change the handset name
HandsetAuto answer
•
•
Select handset display language
Select handset call barring function
•
•
Reset handset to default settings
Base basic setting
•
Set dial mode (tone or pulse)
Set flash time
•
•
Modify pin code
•
Reset base to default settings
Troubleshooting
Cleaning and Care
Declaration of Conformity
3
Guarantee and Service
Technical Details
list
1
3
3
4
4
4
5
16
6
1
6
1
7
1
7
1
9
1
9
1
9
1
ll
20
20
20
21
21
22
22
2
2
2
2
2
3
2
3
23
2
4
2
4
2
5
2
5
26
28
29
30
3
1
1
Binatone Help Line - 0845 345 9677
Page 7
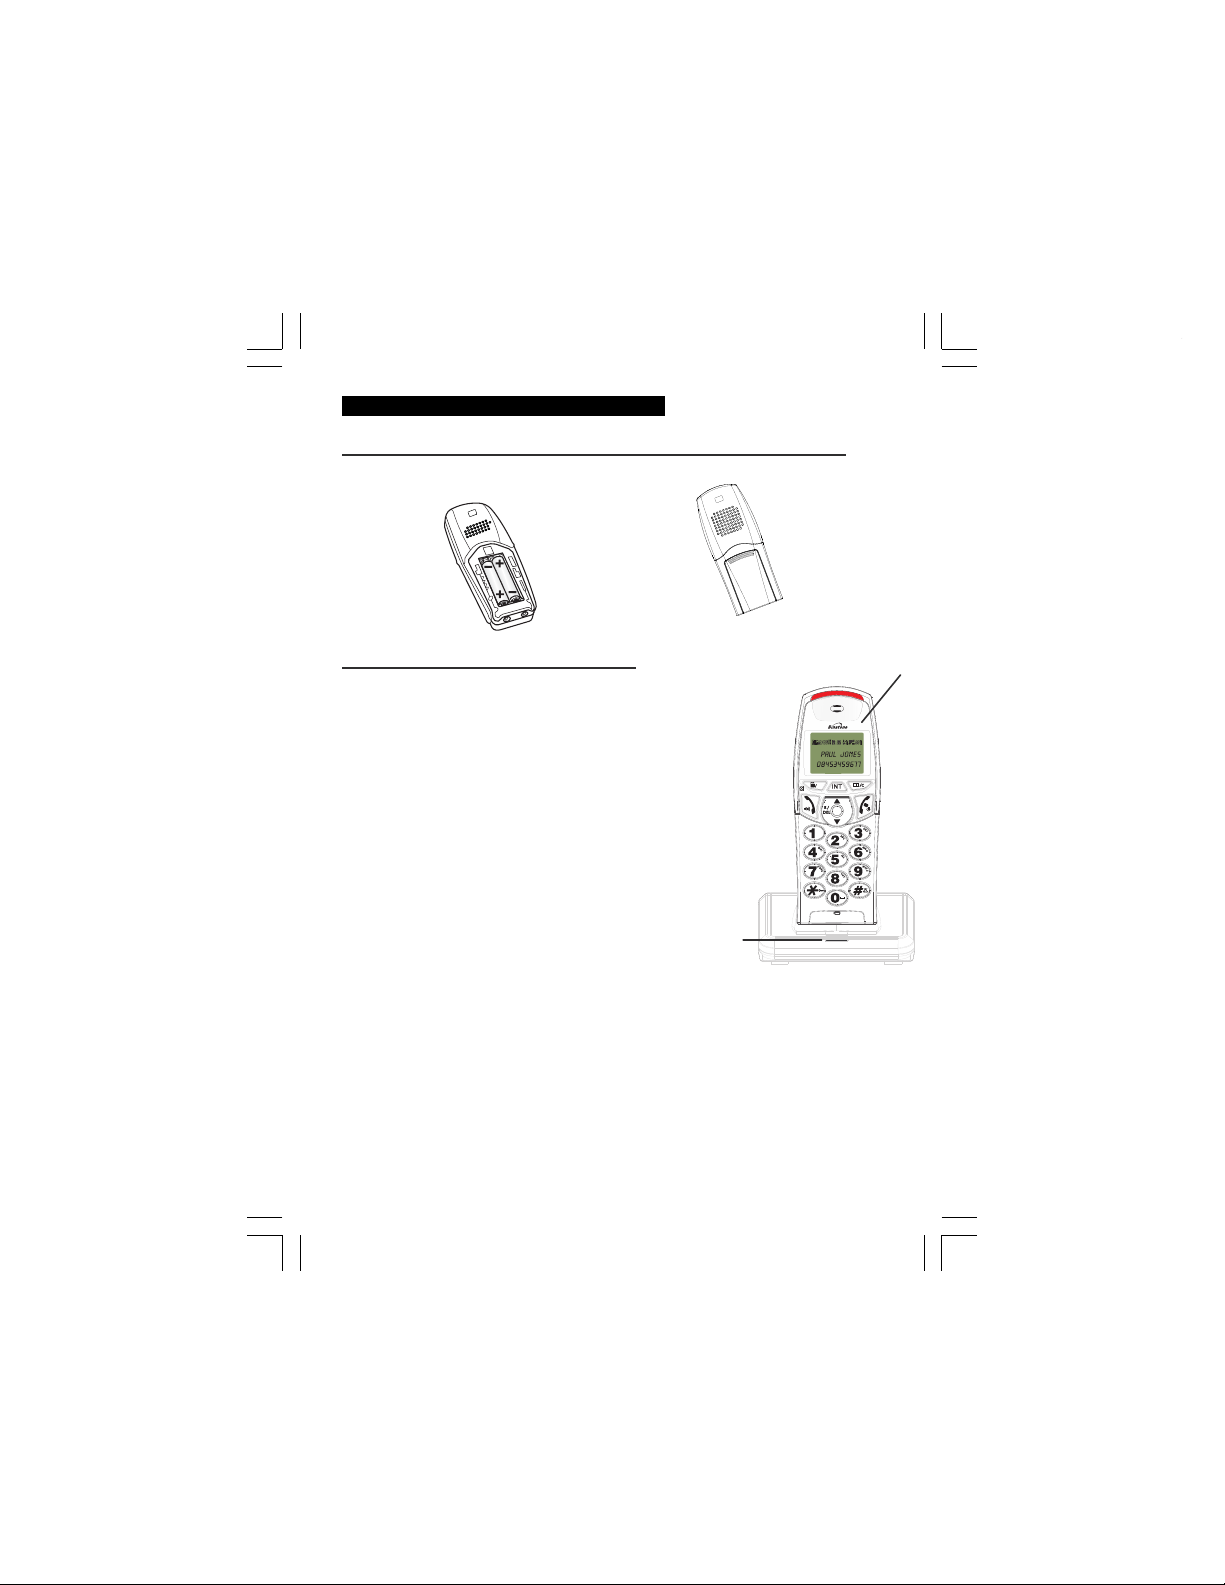
2. Battery installation
hss
eldrocehtniseirettabehttiF
Insert the two
rechargeable
batteries as
shown
hC
Before you use the cordless handset(s) for the
first time, it's important to charge the batteries
fully.
You hear a 'beep' when the handset is correctly in
position on the base unit or charging cradle.
Leave the handset(s) on charge for
Drop in the battery
compartment cover,
then slide it forward
until it clicks firmly
into place
1rofseirettabehtegra
sruoh5
15 hours.
To keep the batteries charged, whenever you
don' t need to use the handset (such as overnight
or when you go out ), leave it on the base unit or
charger pod.
The CHARGE light
comes on
)s(tesdna
The bars on the battery
level symbol continuously
change as the batteries
are being cahrged
OK
RD
/P
2
Page 8

3. Read First Before Use
Choosing a site for the base unit and charger pod
The base unit and charger pod(s) should be placed on a level surface, in a position where:
x
the mains adapter plug will reach an easily accessible 230-VAC switched mains
supply socket - never try to lengthen the mains power cable
x
the base unit's telephone line cable will reach your telephone line socket or
extension socket
x
it is not close to a sink, bath or shower, or anywhere else where it might get wet
x it is not close to other electrical equipment - fridges, washing machines,
microwave ovens, fluorescent lights, televisions etc.
x
if the base comes into contact with liquids, disconnect it promptly and use a soft
cloth to dry it; if you believe that the liquid has seeped into the unit, do not
reconnect the base station. Contact the Binatone helpline.
x
it is away from hot, humid conditions and strong sunlight
Mains power connection
IMPORTANT - The BB3200 base unit must be used with the mains adapter supplied
with the unit.
Using any other adapter will result in non-compliance with EN60950, and will
invalidate any approval given to this apparatus.
If you have a Broadband line
If you connect your telephone to a line with a broadband connection, you will need to
insert a micro-filter between the telephone and the telephone line; otherwise you may
get interference between the telephone and the broadband, which could cause
problems.
In a home with broadband, every telephone must have a micro-filter connected, not
just the one at the telephone point that your modem is connected to. If you need more
broadband micro-filters, contact your broadband supplier.
3
Binatone Help Line - 0845 345 9677
Page 9

Radio signals between handset and base unit
To use your cordless handset and base unit together, you must be able to establish a radio
link between them.
The signal range between the handset and the base station is in accordance with the
approved standard for Binatone phones:
•
Maximum range: 300 metres outdoors
•
Maximum range: 50 metres indoor
The signal range could become lower during normal use. Any large metal object, like a
refrigerator, a mirror, a filing cabinet, metallic doors or reinforced concrete, between the
handset and the base unit may block the radio signal. The signal strength may also be reduced
by other solid structures, like walls, or by other radio or electrical interference.
For the best radio signal, it is recommended that your telephone is at the highest possible
position.
If there is no radio signal reception, Base 1 message and the
on the display.
Interference
If the sound quality gets worse as you move around while on a call, this is probably caused by
interference between the handset and the base unit, perhaps because you are too near to
another phone or other electrical equipment.
Move to a different position to clear the interference. If you do not move, it might cause a short
break or your call may be cut off.
"Out of range" warning
signal level
icon will flash
If you hear a warning tone during a call, or the sound in the earpiece becomes faint or distorted,
you may be going out of range of the base unit.
Move nearer to the base unit within 20 seconds, until the earpiece sound improves. Otherwise,
your call may be cut off.
Battery safety
use the rechargeable batteries supplied with the handset.
ONLY
DO NOT use non-
rechargeable batteries - they may burst and cause damage to your telephone.
4
Page 10
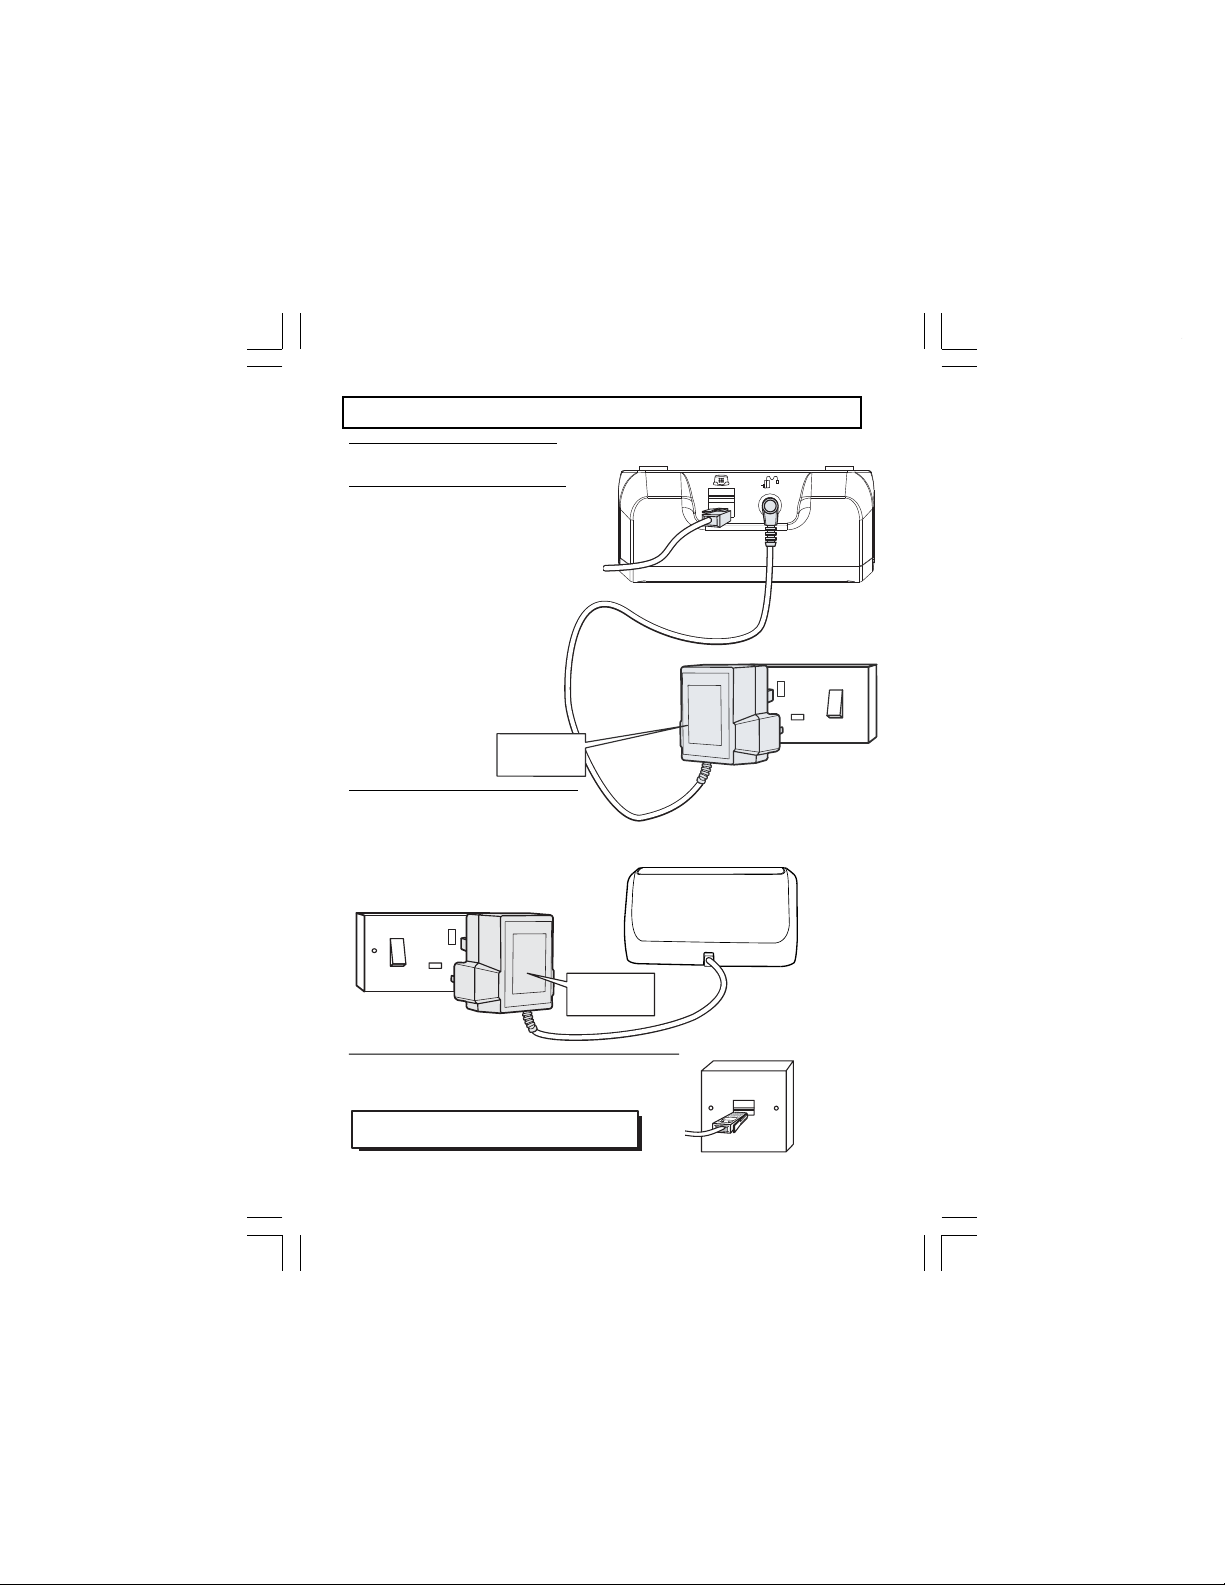
Installation and Set-up
1/ Choose a suitable site for the
base unit (see page 3)
2/ Connect the mains power lead
and the telephone line cord into the
base unit
Plug one end of the telephone line
cord into the jack on the back of the
base (the other end will plug into the
telephone wall socket later)
See the note
on page 3
3/ Plug the mains adaptor into your
wall socket. If you have one or more
charger pods, plug the mains
adaptors accordingly
Make sure that the 230VAC, 50hz mains
socket is switched OFF when you plug
the mains adapter into the socket.
See the note
on page 3
4/ Connect the base unit to the telephone line
Insert the telephone line plug into the socket then switch
mains power back ON.
Make sure the mains socket is switched on
the phone won’t work without electrical power
—
5
Binatone Help Line - 0845 345 9677
Page 11

4. Handset basic settings
Switching handset power on and off
1).
To switch the handset off
Press the "Power on/off "
The handset display will go blank.
2).
To switch the handset back on:
Press the
the base unit or charge pod.
while the handset
"Power on/off "
searches for the base. When the handset links with the base, there will
(in case you need save battery power):
button and hold it for 3 seconds
button and hold it for 3 seconds or replace the handset on
The handset display will turn back on. "BASE 1" will flash briefly,
be a musical chime, and the handset display will go to dle mode.
Notes
n
When the handset is switched off, it can’t be used for making calls including
emergency calls.
n
When the handset is switched off, it won’t ring for incoming calls.
answer a call when the handset is switched off , you need to switch it back on.
To
Remember that it may take a few moments for the handset to re-establish a radio
link with the base unit.
If the batteries have become completely run down (or if handset is switched off)
Notes:
and you place the handset in the base unit or charge cradle it may take about 5
minutes to link with the base unit. If you lift the handset during this time, it will try
to link to the base unit.
Make sure mains power to the base unit stays
!
switched on. The BB3200 cordless handset
needs the mains power for the base unit to be turned on to be able to make or
receive calls.
To lock the keypad:
Press and hold the button for
You will hear a beep tone , the icon
flash briefly. While the keypad is locked, if you press any buttons, the handset will give you
a double warning tone, and "HS LOCKED" will flash briefly on the display.
about 2 seconds.
will appear on the top of display,
"HS LOCKED"will
To unlock the keypad:
Press and hold the button for
You will hear a beep tone , the icon
about 2 seconds.
will disappear from the display and it will go back to
idle mode.
6
Page 12

To set time and date
In idle mode,you can set the time and date by the following menu operation :
1.
2.
3.
4.
5.
OK
Press
Press
OK
Press
Press
OK
Press
Press the
or to set the year.
Press the to confirm.
à
à
3 times
à
7 times
à
The display shows the DATE & TIME screen, with the year flashing.
OK
"PHONEBOOK"
"HS SETTINGS"
"ALARM"
"DATE & TIME"
The 'month' will be flashing
Press the or to set the month.
Press the to confirm.
OK
The 'date' will be flashing.
Press the
Press the
The 'hour' will be flashing.
Press the or to set the hour, in 24 hour clock mode.
Press the to confirm.
The 'minutes' will be flashing.
Press the
6.
Press , after you have finished time and date setting, the display will return
or
OK
OK
OK
to set the date.
to confirm.
or to set the minutes.
to the previous menu.
Press
*
The format on the display for time is: HH:MM (24hr clock)
and date is: MM/DD.
Notes:
to go back to idle mode
1). If you subscribe to Caller Display your
automatically updated by the network when you receive an incoming call.
2).The Caller Display service only sends the month and date, not the year, so
you may still need to set the year to keep the date correct during leap years
and non-leap years.
BB3200 time and date settings will be
7
Binatone Help Line - 0845 345 9677
Page 13
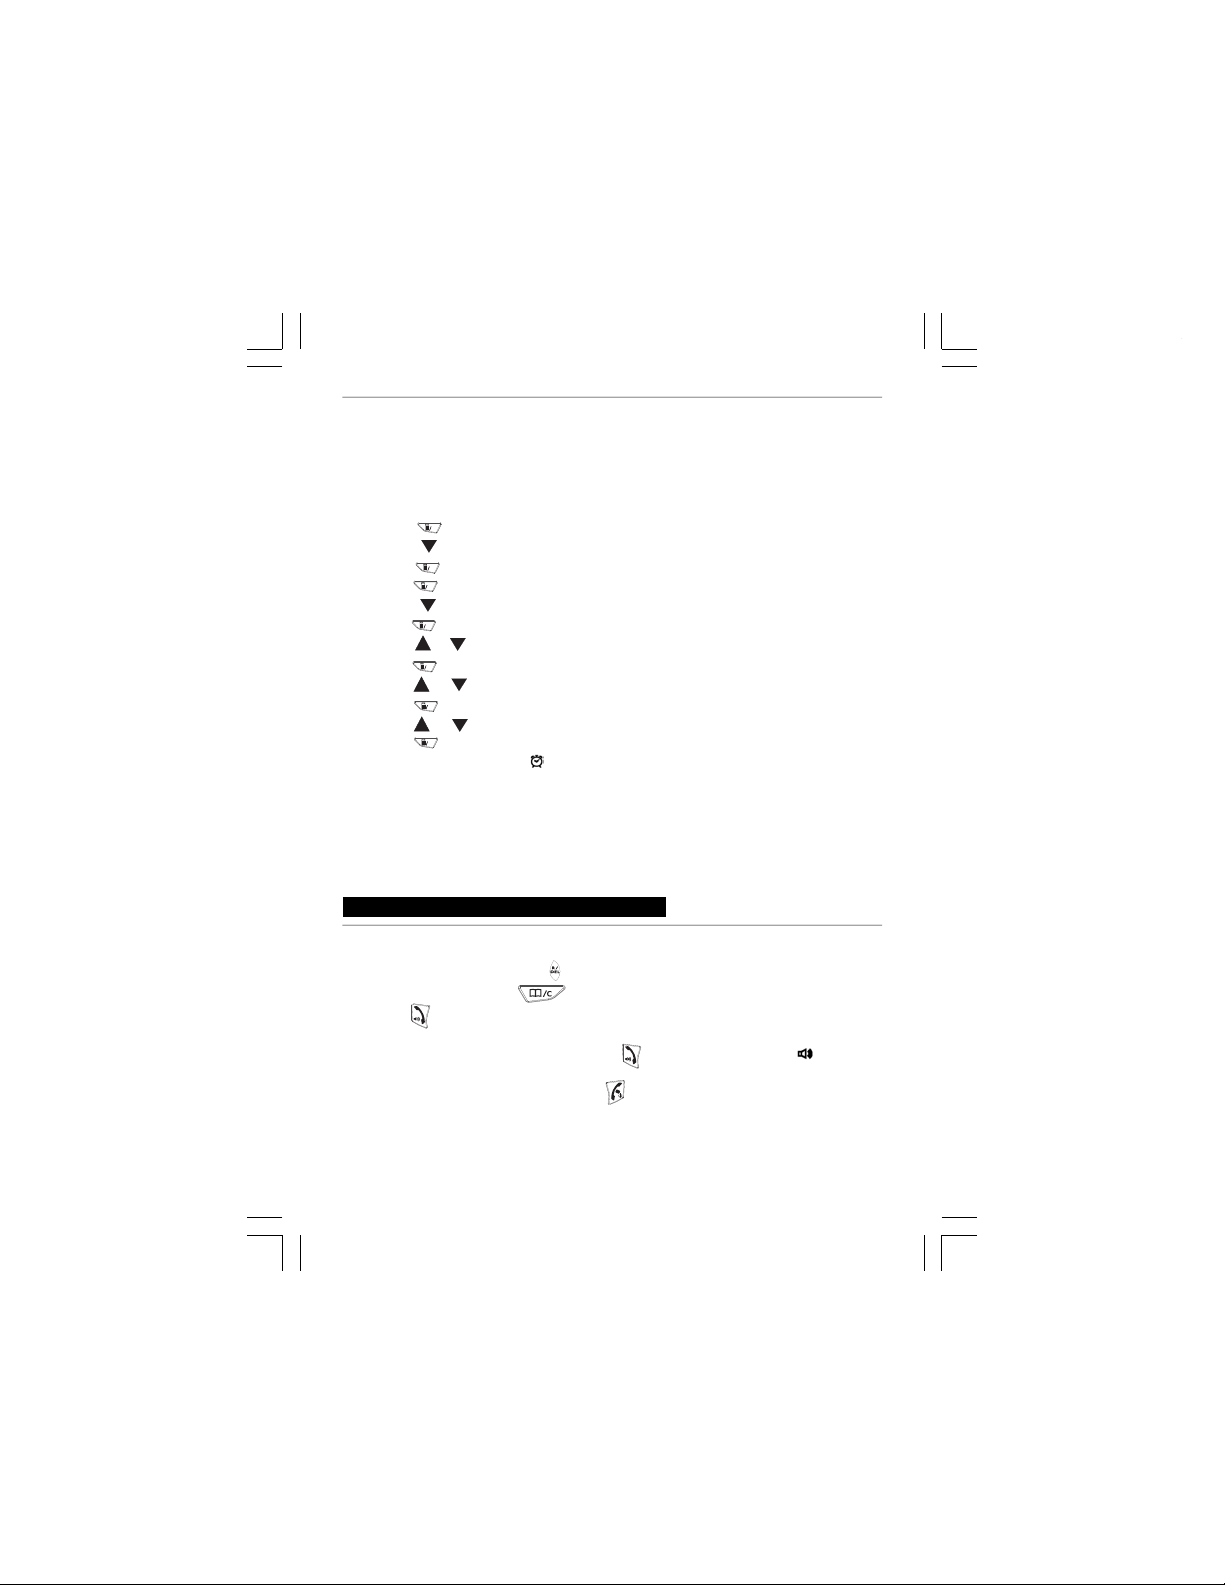
To set alarm
You can set an alarm function on the handset, to give an alert at a programmed time of
every day.
The alarm gives repeated beeps for 45 seconds, or until any handset button is pressed.
If the Snooze is set ON, this will be repeated about every 5 minutes for an hour, with the
alarm icon continuing to flash.
If the Snooze is set OFF, the alarm will sound for the 45 seconds only once.
OK
Press
1.
Press
2.
Press
3.
4.
Press
Press
5.
6.
Press
.
7
Press or once to change the hours.
Press
Press or to change the minutes.
Press to confirm, and the display will show "SNOOZE ON".
Press or to change between SNOOZE ON or OFF.
Press
3 times,
OK
OK
OK
OK
to confirm, and the minutes will flash.
OK
OK
to confirm, and the display will return to the previous menu.
8. When the alarm is set, the
à
"PHONEBOOK"
à
"HS SETTINGS"
à
"ALARM"
"OFF" (if no alarm is already set)
à
"ON"
à
à
"12-00" (for example) with the hours flashing.
icon will appear on the top of display
Note: If you have set an alarm, it will ring on the time you have set
When it rings, you can switch it off by pressing any button of the handset, or you can place
the handset back down on the charge pod. If you don't switch it off the alarm tone will
continue for about 45 seconds.
If you want to disable the Alarm function, you have to re-enter the Alarm menu option and
select OFF.
5. Making and answering calls
To make calls
1. Key in the phone number
If you make a mistake, press" " to clear digits one by one
To clear all digits, press .
2.
3. If you wish to use the speakerphone press
4. When
or place the handset back on the base unit or charge pod.
, and the display shows "LINE IN USE", the number will dial out, and then the
Press
display will show the call timer.
appear in the right top corner of the display.
you have finished the call, press
in the idle mode,
again at any time and the icon will
briefly.
8
Page 14
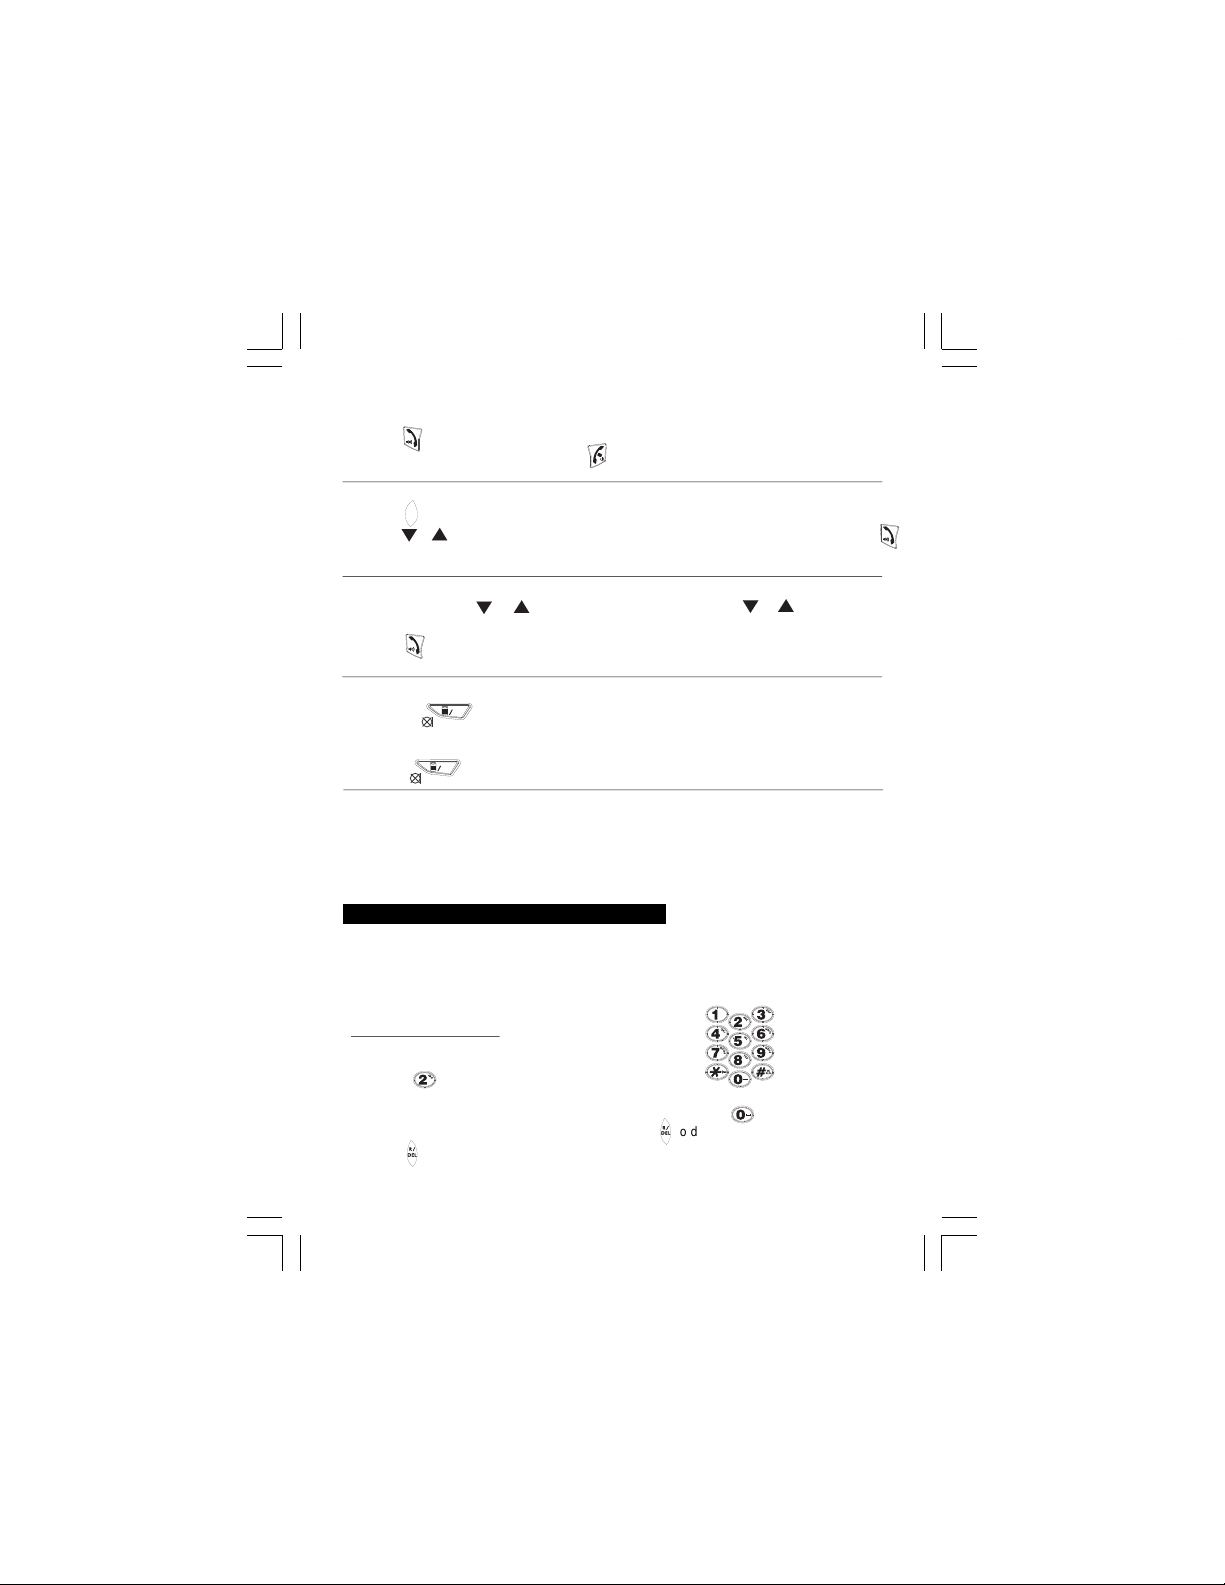
To answer a call
1. When the handset rings:
Press
2. When
unit or charge pod
Making calls from the redial list
1. Press
2. Scroll
the number which you have selected
"LINE IN USE"
Making calls from CID list
1.
In idle mode, press or to enter the CID list, and then scroll or until you see
and display shows "LINE IN USE"
you have finished the call, press
RD
.
/P
to view the redial list
or
until you see the name and /or number of the person you want to call, then press
.
briefly or place the handset back on the base
automatically dials out and the display shows
the name and/or number of the person you want to call.
2. Press
display
, the number which you have selected automatically dials out and the
shows "LINE IN USE".
Muting the mouthpiece
1. Press " " to mute the mouthpiece
While the mouthpiece is muted the person on the other end of the call can not hear you and
the display will show "MUTE" .
2. Press " " again to un-mute the mouthpiece,and the handset shows "LINE IN USE"
Find the Handset
You can locate the handset by pressing <PAGE> on the base station. All the handsets
registered to the base will produce the paging tone and show
can stop the paging by pressing <TALKON>/
on the base again.
Note: If there is an incoming call during paging, the phone will ring with the
incoming call instead of paging.
OK
OK
<TALK OFF> /<C> on any handset or <PAGE>
"PAGING" on the display. You
6. Phone Book/(Memory dialing)
You can store up to 150 numbers in each handset’s Phone Book (memory). Each number
can have up to 20 digits, and you can store a name of up to 12 characters with the number.
(If you try to store more, the handset will give a brief warning tone and the extra letter/
number will not be saved in memory.)
Also, you can select a different ringer melody for each entry
subscribe to CID (see page 14).
How to enter characters ?
To enter characters you press the button where you
see the character e.g. if you want to insert the letter
you press
twice and for
for the first
, if you want to insert the letter
once
, three times etc. If you want to insert,
"C"
"A"
flashing then insert the second
to stop
the key pad table overleaf for other characters. Press
and hold
to delete the
whole text.
9
but this will only work if you
’
‘
A
’
‘
B
‘ AA ’ then you
"A". Press
will have to wait
for a space, or see
to delete single characters and press
Binatone Help Line - 0845 345 9677
Page 15
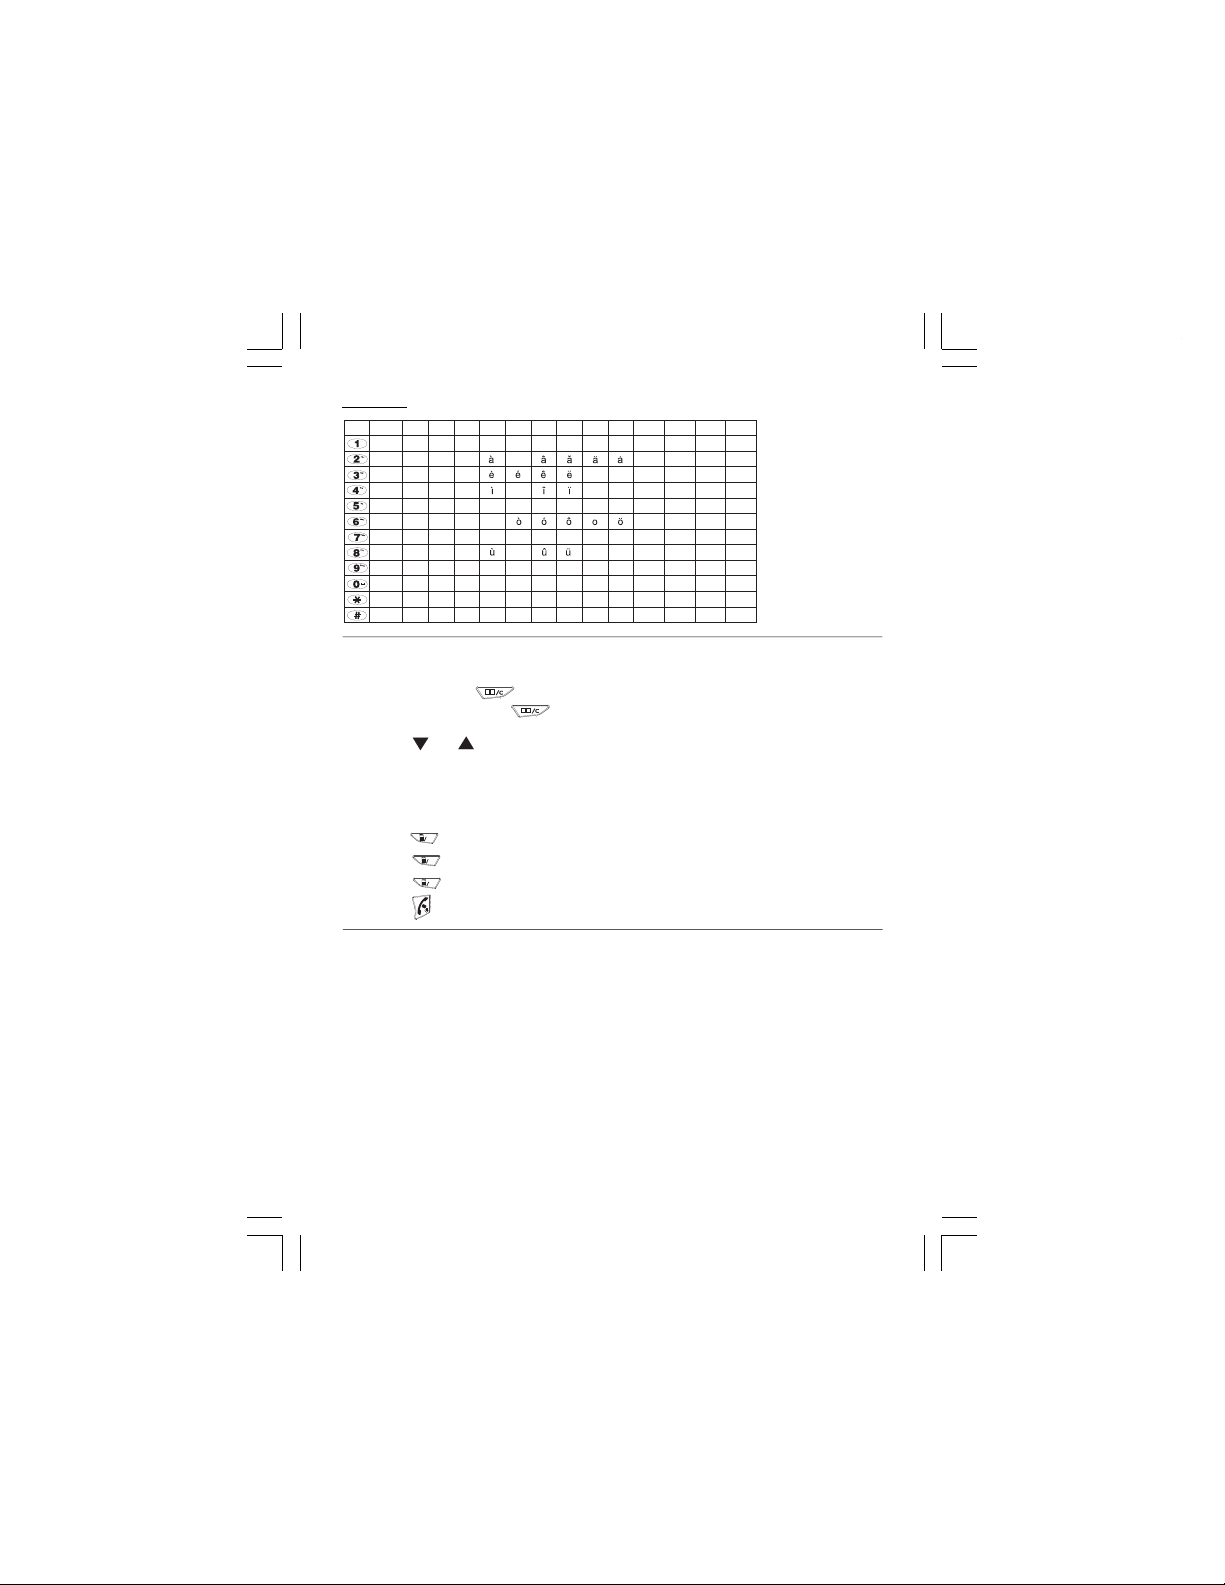
Key pad table
1st 2nd 3rd 4th 5th 6th
_ , ?
1
A B C 2
D E F 3
G H I 4
J K L 5
M N O 6
P Q R S 7
T U V 8
W X Y Z 9
space 0 + - @ = / \ [ ]
*
#
7th 8th 9th 10th 11th 12th 13th 14th
? !
!
á
í
~
N
ú
( ) : ; .
”
’
~
To review phonebook memory(name and number):
There are two ways to review the phonebook memory,Note:
(1). The shortcut key
In the idle mode, press
phonebook memory
Press or to scroll through the phonebook memory one by one, or
and the handset display will show the first entry in the
press digit
buttons to jump straight to the first entry beginning with the corresponding letters, and
then scroll up or down.
(2). The Phonebook menu:
Press
*
Press
Press
Press
à
OK
OK
OK
"PHONEBOOK"
"LIST"
à
display the first entry in the phonebook memory, and then search as above.
to go back to idle mode at any time.
Phonebook submenu structure:
The cordless handset has a phonebook submenu, to help you to use the phonebook memory
easily.
"LIST"----shows all of phonebook memories one by one
"NEW ENTRY"---add a new phonebook entry
"EDIT RECORD"--- modify an existing phonebook memory
"DEL RECORD"--- delete a phonebook memory
"DELETE ALL"--- delete all phonebook memories
"MEM STATUS"---shows the number of entries programmed in the phonebook
10
Page 16

To Add a phonebook memory:
1. Press
2. Press
3. Press
4. Press
OK
OK
OK
once
à
"PHONEBOOK"
à
"LIST"
"NEW ENTRY"
à
and the display shows a flashing cursor at the start of the name line.
5. Key in the name (maximum 12 characters).
If you enter any wrong character, press
6. When you have entered the name , press
to delete one letter
OK
to confirm, and the cursor will jump to
the start of the number line. Key in the telephone number (maximum 20 digits).
7. When you have entered the number, press
"MELODY 1",
8. Press or to scroll through the ring melodies.
with the melody playing.
OK
to confirm and the display shows
(Note: the melody you select will only play if you subscribe to CID (see page 14) and
the phonebook number matches the one received from the Caller Display.)
9. Press
*
OK
The display will return to the previous menu.
Press
to confirm the melody, and the new entry is saved in the phonebook.
to go back to idle mode at any time.
To modify phonebook memories
1. Press
2. Press
3. Press
4. Press
5. Press
6. Press
7. Press
8. Press
OK
OK
twice ,
OK
to display the first entry in the phonebook.
or
OK
and the cursor will flash at the end of the current name.
à
"PHONEBOOK"
"LIST"
à
"EDIT RECORD"
à
to scroll to the entry you want to modify.
to delete letters one by one, and then add characters to enter the new name.
OK
number.
to confirm the name, and the cursor will flash at the end of the current
Press to delete numbers one by one, and then add any new numbers.
9. Press
or to scroll through the ring melodies.
10. Press
11. Press
Press
*
to confirm the number, and the display will show "MELODY 1"
OK
OK
to confirm the melody, and the modified entry is saved in the phonebook.
to go back to idle mode at any time.
11
Binatone Help Line - 0845 345 9677
Page 17
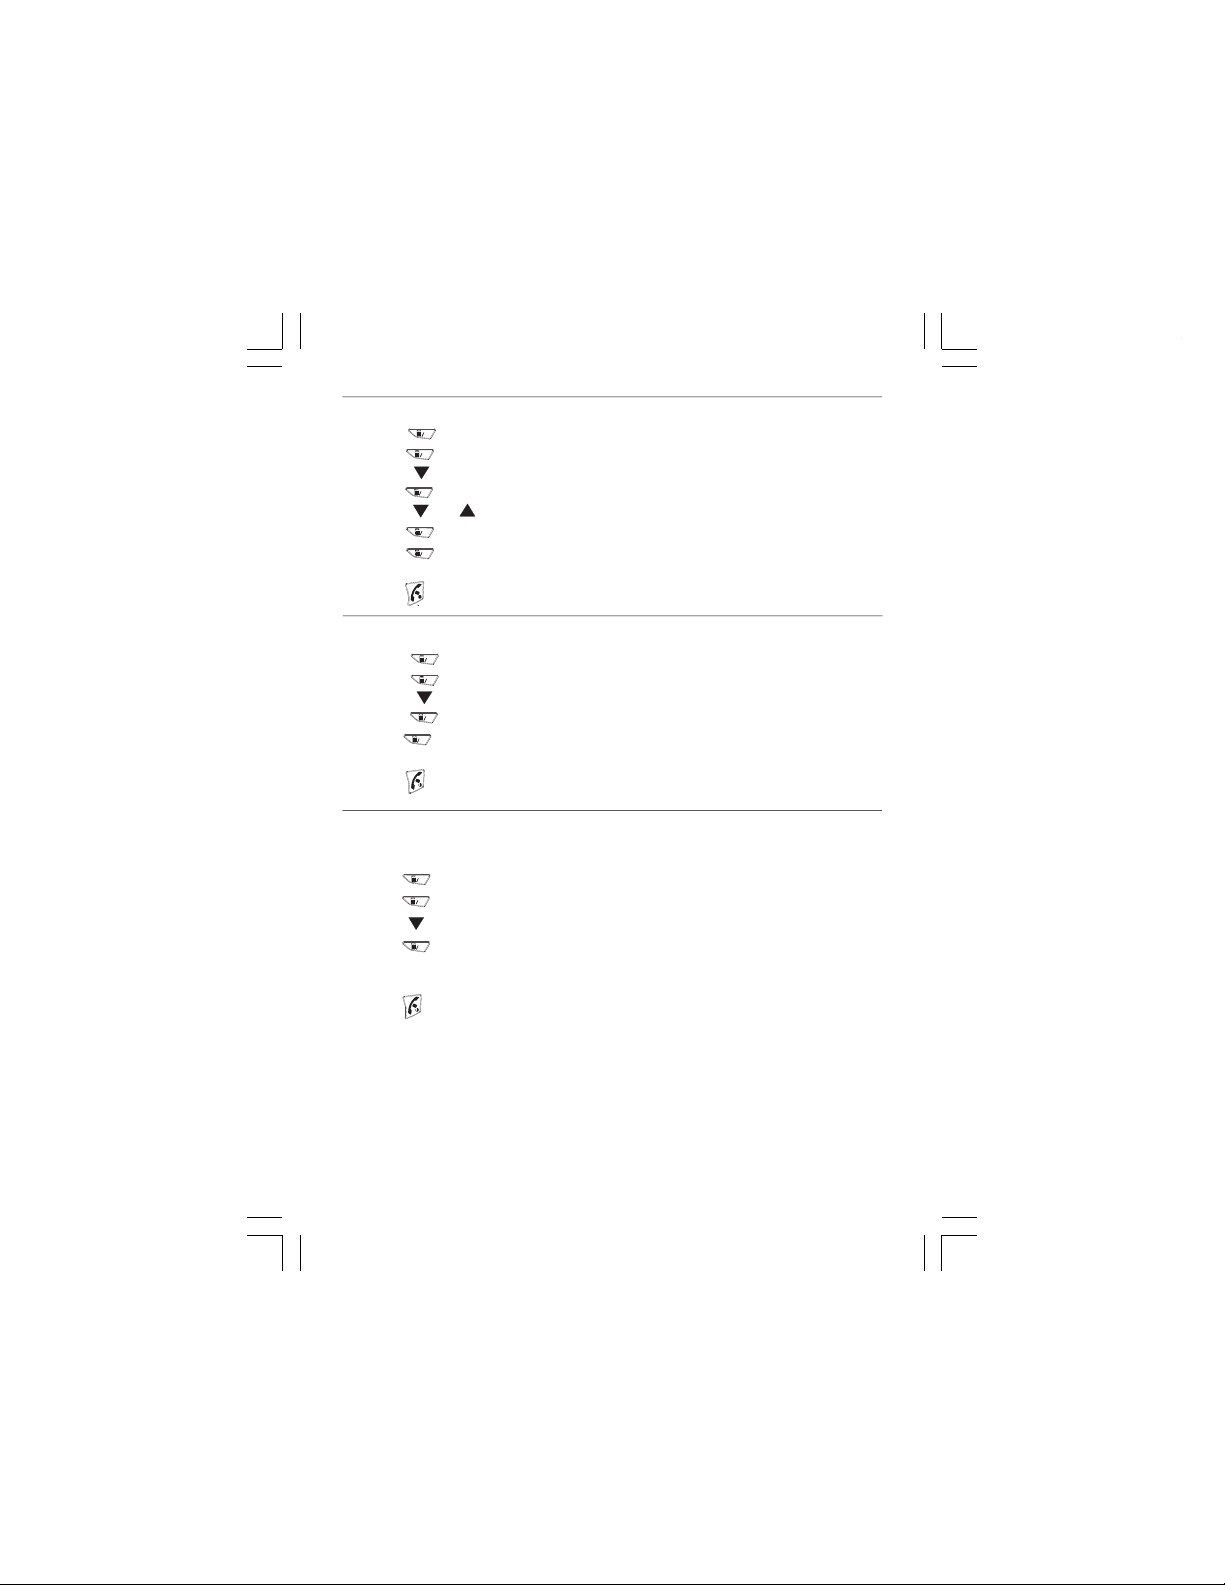
To delete a contact in your phonebook
Press
Press
Press
OK
OK
OK
or
OK
OK
à
"PHONEBOOK"
"LIST"
3 times,
à
"DEL RECORD"
à
to display the first entry in the phonebook.
to scroll to the entry you want to delete.
à
"CONFIRM ?"
to confirm the delete.
1.
2.
3. Press
4.
Press
5.
Press
6.
7.
Press
The display will show "DEL RECORD".
Press
*
To delete all contacts in your phonebook
1.
Press
Press
2.
3.
Press
4. Press
5.
Press
to go back to idle mode at any time.
OK
OK
4 times,
OK
OK
to confirm the delete.
"PHONEBOOK"
à
"LIST"
à
à
"DELETE ALL"
"CONFIRM?"
à
The handset will give a confirmation beep, and the display will return to "DELETE ALL".
*
Press
to go back to idle mode at any time.
Reviewing phonebook memory status(total quantity)
This allows you to check how many entries you have in the phonebook.
The phone book allows up to 150 names and numbers.
1.
2.
3.
4.
*
OK
Press
OK
Press
Press
Press
e.g "05"/"150" :
OK
5 times
means the handset can have a maximum of 150 entries in total.
Press
to go back to idle mode at any time.
"PHONEBOOK"
à
"LIST"
à
"MEM STATUS"
à
the phonebook memory status will be shown
à
"05" means the handset has 5 entries saved in the phonebook, /"150"
12
Page 18

To store a last number redial in your phonebook
RD
1. Press in the idle mode, and the display will show the first entry in the dialled call list.
/P
to select the dialled call number you want to save.
2.
Scroll
3.
Press
4.
Press
Key in the name.
Press to confirm the name, and the cursor will jump to the end of
5.
the current number to allow you to modify the number, if necessary.
Press
6.
or
OK
OK
OK
OK
à
"ADD TO PB"
and the display shows a flashing cursor at the start of the name line.
to confirm the number, and the display will show "MELODY 1".
à
Press or to go through the ring melodies.
Press
OK
to confirm the melody and store the redial number in your phonebook.
to go back to idle mode at any time.
7. Press
*
7. Caller Display(CID)
To subscribe to this feature you need to contact your service provider, and there may be a
charge for this service.
Caller Display lets you see the phone numbers of your callers on the display before you answer.
Each handset will store its own CID list independently.
Both answered and unanswered calls are stored, up to a maximum of 29 calls. When the caller
display list is full, any new caller display entry will replace the oldest record.
The caller display information includes:
•
the caller's number (up to 20 digits)
•
the date and time of the call
•
the caller's name (up to 12 characters) if the incoming number matches an entry
in the phonebook
Note: it will also display the caller's name if the network sends it, but this is not normally
available in the UK.
The display may also show the following:
UNAVAILABLE - if the number of the caller is unavailable, e.g. from an international call. (This
may also appear with a number, as certain networks can send a "name unavailable" message
with the caller's number.)
WITHHELD - if the call is from someone who has withheld their number, e.g. by dialling 141.
New CID list : CALLER ID information on display
(1) If you have new calls in the calls list, the display will show the NEW icon and a number in
the top right corner to indicate how many new calls there are.
(2) If you receive the same new caller id more than once, the display will show
NEW icons while the handset is ringing, but after the ringing stops the total new CID
number will not increase.
Also, the RPT and NEW icons will be shown when the call is first viewed in the calls list.
the RPT and
1
3
Binatone Help Line - 0845 345 9677
Page 19
To review the CID list
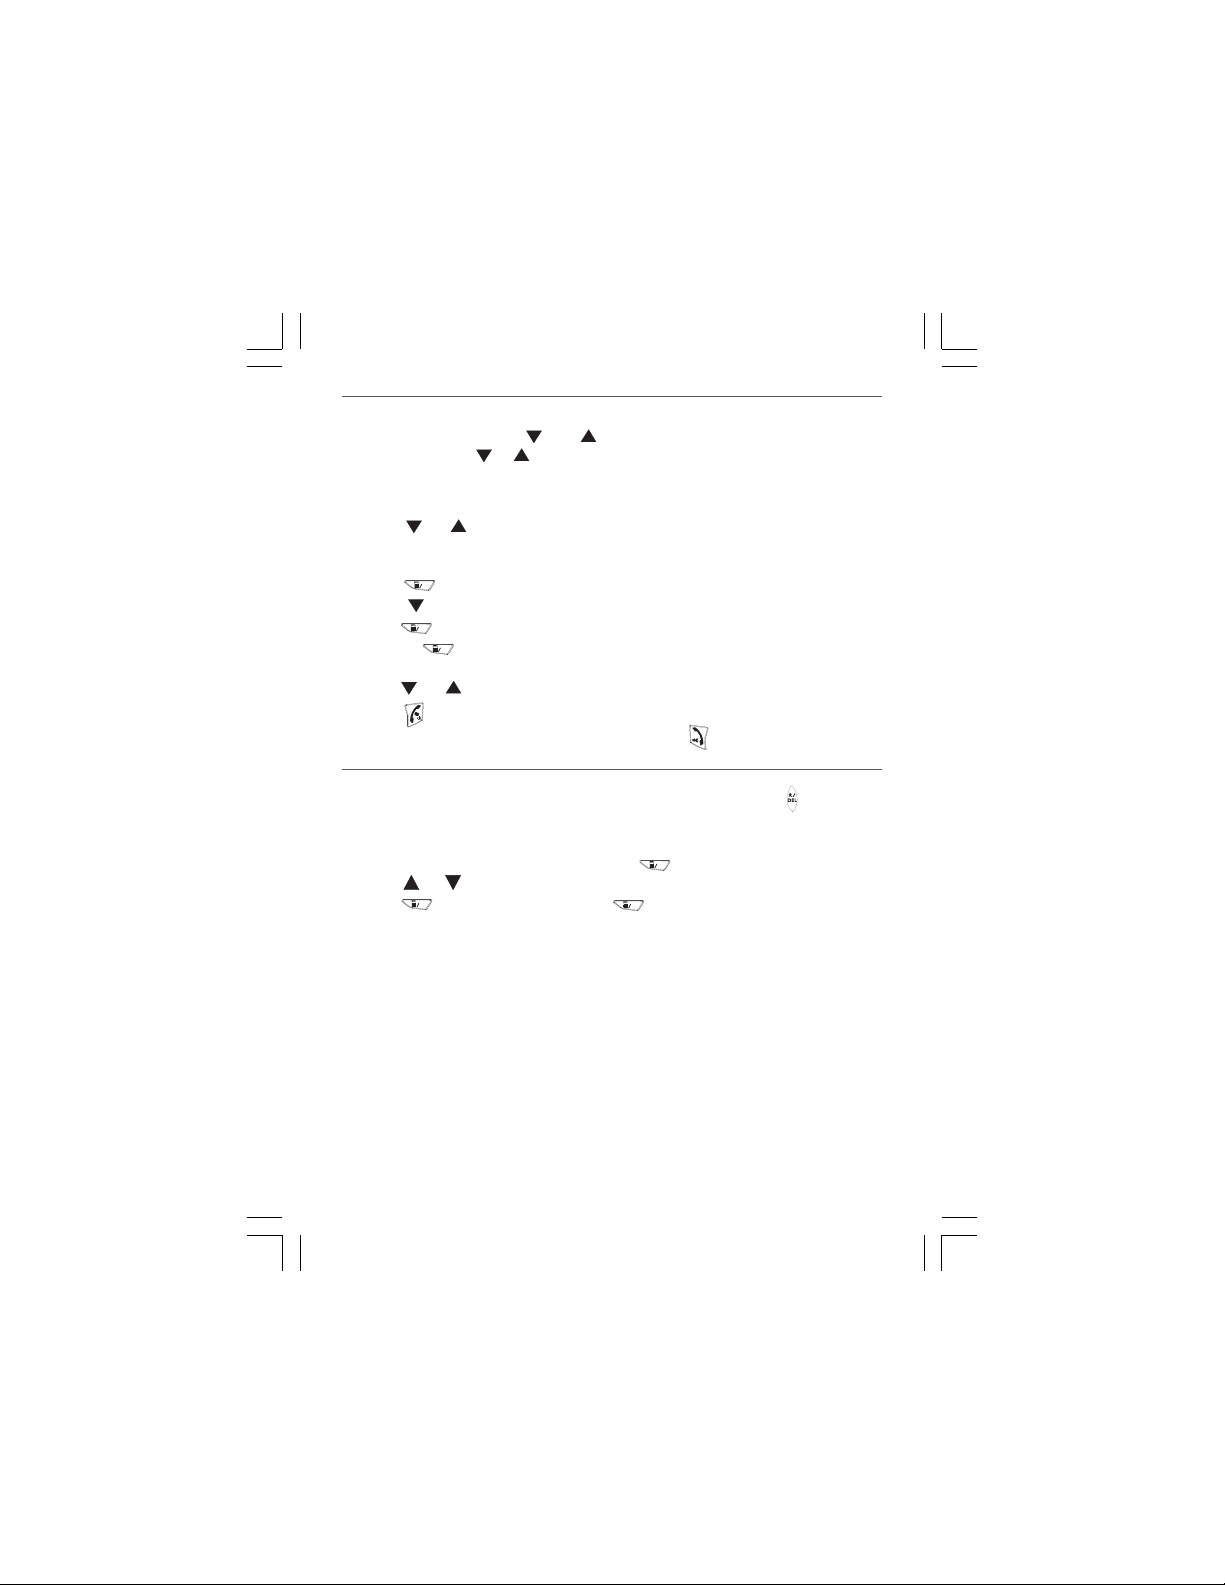
1.
Using the short-cut keys:
In idle mode
If the viewed call is a new call, the display will show
with #
of the call will also be shown on the top line.
(
and )
press
or
, and the display will show details of the most recent call received.
on the top right corner along
"NEW"
and a number to indicate the position of the entry in the calls list. The time and date
Press or to scroll through the rest of the CID list.
2. Using the Call Log menu:
In idle mode
OK
Press
Press
Press
Press the
call received (as above).
Press or to scroll through the rest of the CID list.
Press
*
If you wish to call directly from the CID list, simply press while the number you want to
*
call is shown on the display.
"PHONEBOOK"
à
à
"CALL LOG"
OK
à
"RECEIVED"
OK
and the display will show details of the most recent
to go back to idle mode at any time.
To delete a Caller ID
While the entry you want to delete is shown on the display, simply press the
The entry will be deleted immediately and the display will show the next entry in the calls list.
To delete all caller id records from the list:
*
While you are reviewing the calls list, press the
Press
or
Press to show "CONFIRM ?". Press to confirm.
until you see "DELETE ALL ?"
OK
OK
to display "ADD TO PB".
OK
All entries will be deleted and the display will show "EMPTY", before returning to idle.
14
Page 20

To store a Caller ID record in phonebook
While the entry you want to store is shown on the display:
OK
OK
"ADD TO PB"
à
and the display shows a flashing cursor at the start of the name line.
à
1). Press
2). Press
Key in the name.
OK
Press to confirm the name, and the cursor will jump to the end of the current
à
number to allow you to modify the number, if necessary.
Press
OK
OK
to confirm the number, and the display will show "MELODY 1".
à
à
or to go through the ring melodies.
to confirm the melody and store the CID number in your phonebook.
à
to go back to idle mode at any time.
à
3). Press
4). Press
Press
*
15
Binatone Help Line - 0845 345 9677
Page 21
8. Handset tones and volume setting
To adjust the earpiece or speakerphone volume during a call
While making or answering a call with the handset:
1.
Press
to increase the earpiece or loudspeaker volume ,
the earpiece or loudspeaker volume.
.
2
The display will show the volume level as you adjust it. The earpiece can be adjusted
from 1 to 5, and the loudspeaker can be adjusted from 1 to 6.
You will hear an error tone if you try to adjust beyond these limits.
To adjust Handset ringing melodies
Note:
There are 10 different melodies to choose from. Melodies 1 and 2 are mono- tone rings,
and melodies 3 to 10 are polyphonic melodies.
To adjust the ringing melody for
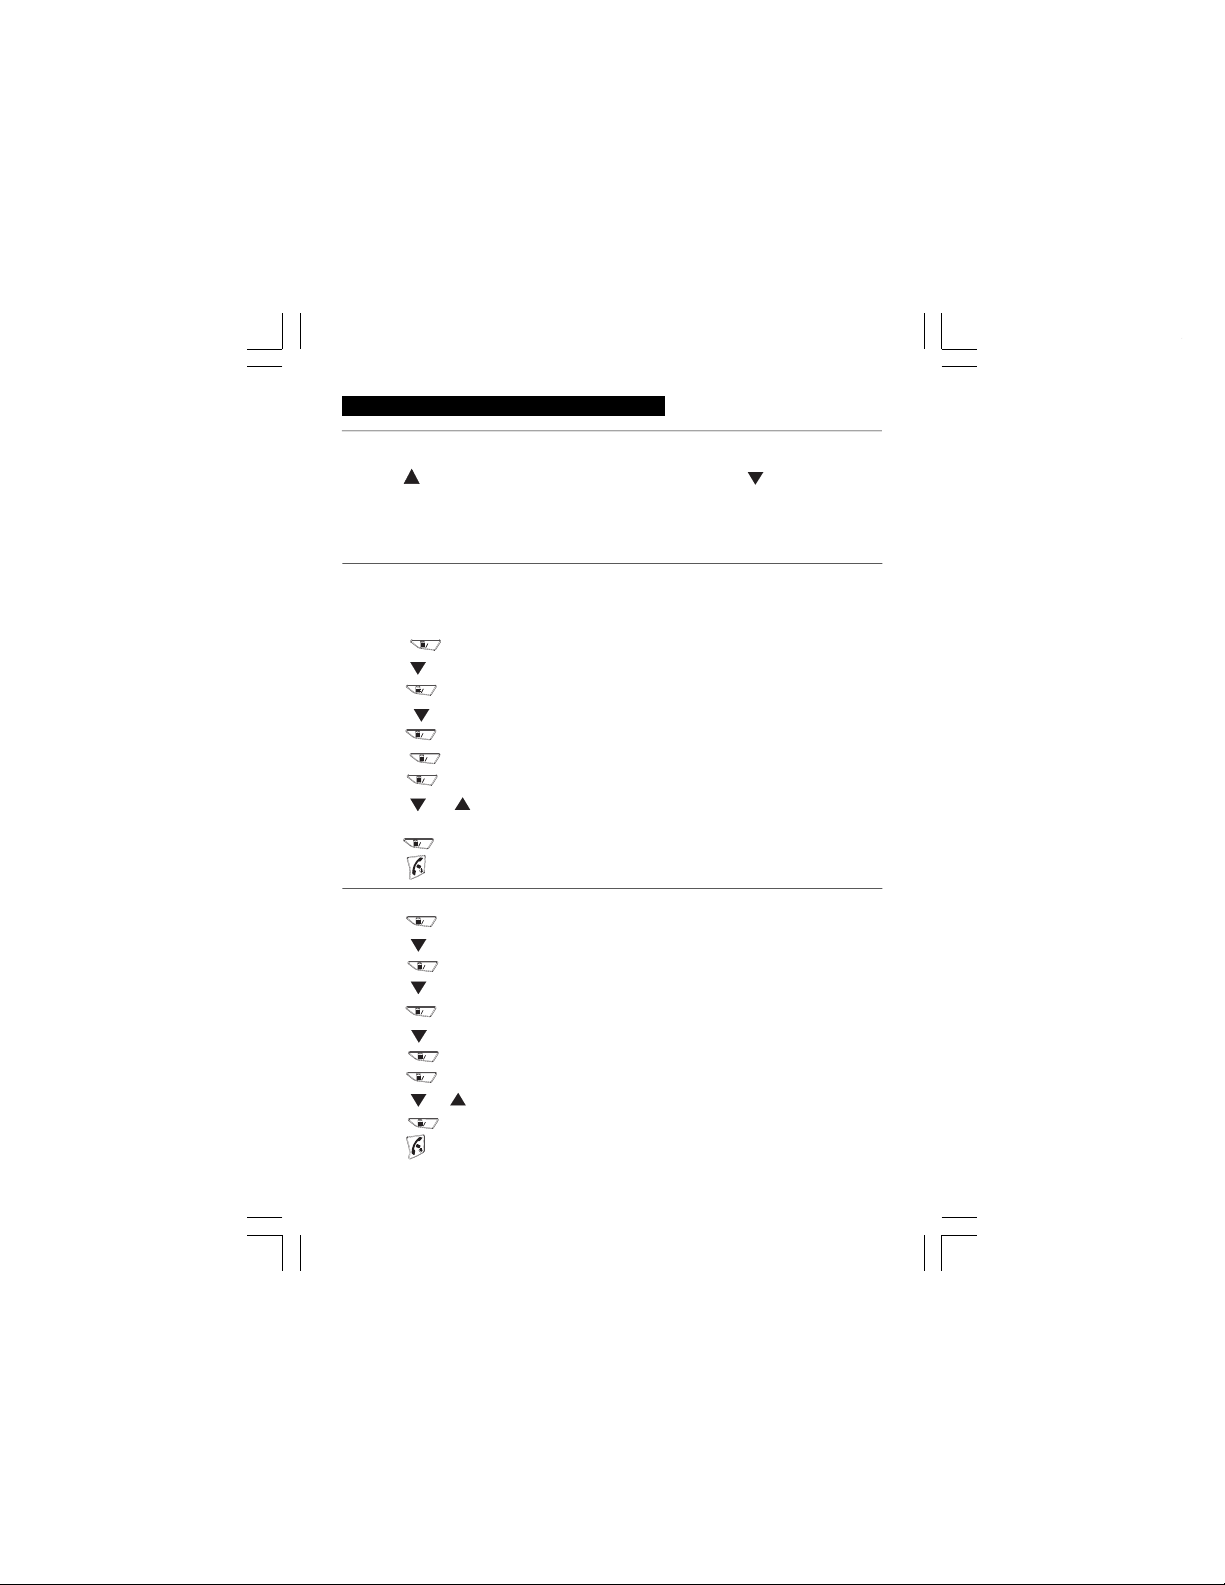
1. Press
2. Press
3. Press
4. Press
5. Press
6. Press
7. Press
8. Press
Each one will play as its number is shown.
9. Press
Press
*
To adjust the ringing melody for incoming external call
1). Press
2). Press
3). Press
4). Press
5). Press
6). Press
7). Press
8). Press
9). Press
10). Press
Press
*
OK
à
"PHONEBOOK"
à
three times
OK
à
once
OK
à
"INT RING"
OK
"MELODY"
à
OK
à
or
OK
to confirm the selected melody
"HS SETTINGS"
"ALARM"
à
"RING SETUP"
"MELODY 1"(or 2.3..9, 10)
to scroll through the 10 ring melodies.
to go back to idle mode at any time.
OK
à
"PHONEBOOK"
three times "HS SETTINGS"
OK
à
once
OK
à
à
OK
OK
or
OK
à
à
"ALARM"
"RING SETUP"
à
"INT RING"
"EXT RING"
"MELODY"
à
"MELODY 1"(or 2.3..9, 10)
à
to scroll through the 10 ring melodies.Each one will play as its number is shown.
to confirm the selected melody.
to go back to idle mode at any time .
intercom call,
press to decrease
16
Page 22

To adjust handset ringer volume
The handset has a choice of
*
If you’ve set the ringer volume to OFF, you won’t hear any melody at this point.
five volume levels
or of turning the ringer off.
(1). To adjust ringing volume for incoming external calls
1. Press
2. Press
3. Press
4. Press
5. Press
6. Press
7. Press
8. Press
9. Press Menu/OK then
10. Press
Press
*
OK
à
"PHONEBOOK"
à
"ALARM"
à
"HS SETTINGS"
"RING SETUP"
or
three times
à
OK
once
OK
à
"INT RING"
"EXT RING"
à
OK
"MELODY"
à
"VOLUME"
à
to confirm the selected volume level.
OK
to go back to idle mode at any time.
à
"VOLUME1, 2, 3, 4,5 or OFF"
(2). To adjust ringing volume for intercom calls
1. Press
2. Press
3. Press
4. Press
5. Press
6. Press
7. Press
8.
9. Press
*
To set handet TONES"
There are three handset tones that can be turned on or off via the handset menu.
All of these tones are ON by default.
OK
"PHONEBOOK"
à
three times
OK
"ALARM"
à
one time,
"INT RING"
à
OK
OK
"MELODY"
à
"VOLUME"
à
Press Menu/OK then
OK
to confirm the selected volume level.
Press
to go back to idle mode at any time.
"HS SETTINGS"
à
à
"RING SETUP"
or
à
"VOLUME1, 2, 3, 4,5 or OFF"
(1). Key tone on/off
Each time you press a key, you hear a tone. You can turn this off if you prefer.
OK
three times
OK
à
"PHONEBOOK"
à
"ALARM"
à
"HS SETTINGS"
1. Press
2. Press
3. Press
17
Binatone Help Line - 0845 345 9677
Page 23
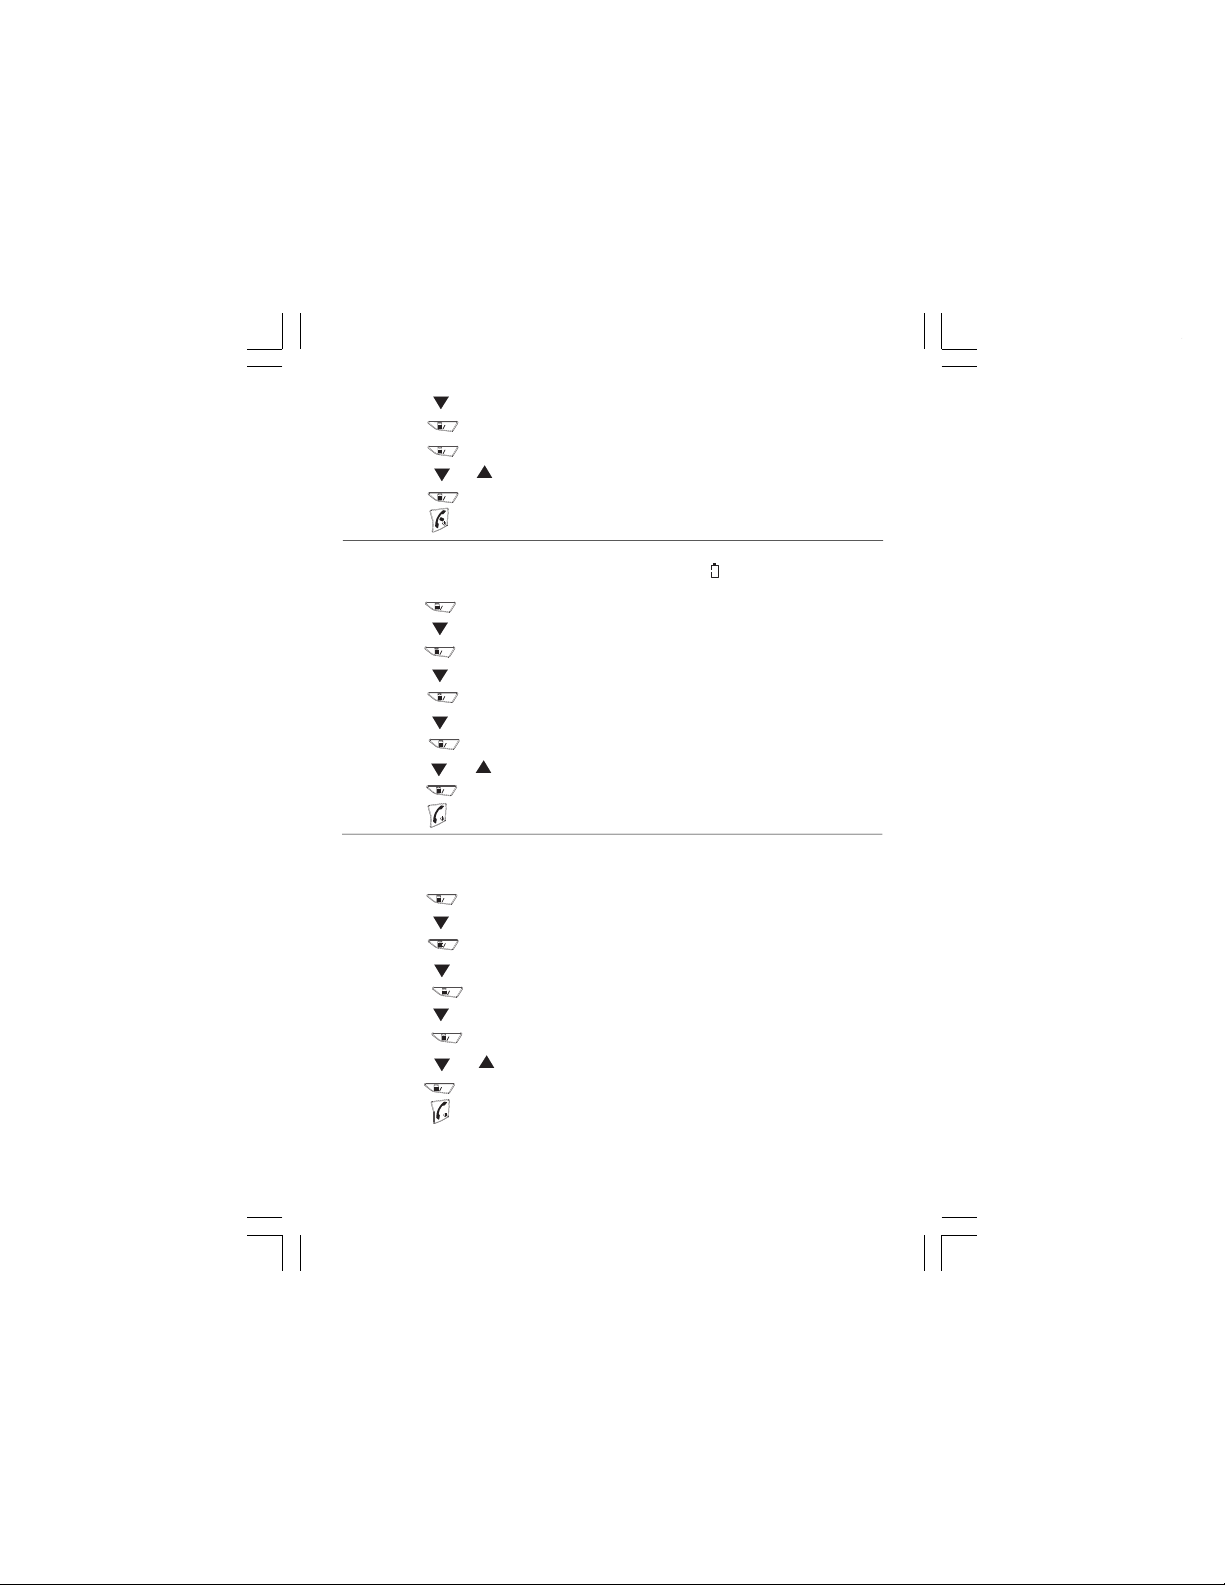
4. Press
5. Press
6. Press
7. Press
8. Press
Press
*
(2). To turn battery low warning tone on/off
When the battery level is low, as well as seeing the symbol( )
display you also hear a tone. You can turn the tone off if you prefer.
1. Press
2. Press
3. Press
4. Press
5. Press
6.
Press
7. Press
8. Scroll
9. Press
Press
*
à
twice
OK
OK
or
OK
"TONE SETUP"
"KEY TONE"
à
"ON"
à
to select on or off
to confirm your selection
to go back to idle mode at any time.
OK
à
"PHONEBOOK"
three times
OK
à
twice
OK
once
OK
or
OK
to confirm your selection
à
"ALARM"
"TONE SETUP"
à
"KEY TONE"
à
"BATTERY LOW"
à
"ON"
à
to select "on" or "off "
"HS SETTINGS"
to go back to idle mode at any time.
(3). To turn out of range warning tone on/off:
When the handset goes out of range of the base unit, you will hear a tone,
you can turn the out of range warning tone off if you prefer.
1. Press
2. Press
3. Press
4. Press
5. Press
6. Press
7. Press
8. Scroll
9. Press
*
Press
OK
"PHONEBOOK"
à
"HS SETTINGS"
three times
OK
à
Twice
OK
à
Twice
OK
or
OK
to confirm your selection
à
"ALARM"
"TONE SETUP"
à
"KEY TONE"
"RANGE ALARM"
à
"ON"
à
to select "on" or "off
to go back to idle mode at any time.
"
on the
18
Page 24

9. Using a multi-handset system
If you have a
three or four handsets.
You can have
With more than one handset registered to your base unit, you can
>
>
>
>
*
BB3200 Twin, Triple
up to 5 handsets
make intercom calls
intercom call
make an
transfer
an outside call from one handset to another
three-way conference call between yourself, an outside call and another handset
set up a
Each handset has its own number —1, 2, 3, 4 or 5
handset name, e.g. "HS 1"
from one handset to another handset
Please note —
Among the handsets registered to the base, only one outside call and two
intercom calls can take place at the same time
When a cordless handset is using the outside line, the other handset displays will show
" " ,
"LINE BUSY"
pressing
When your handset shows "LINE BUSY" you can still make an intercom call to another
handset , provided they are not the one on the outside line.
and you will get a warning tone
Making intercom calls
1).
Press
INTERCOM You hear a constant tone in the earpiece and
will show "HS ?"
2).
Key in the number of other handset
The other handset will ring and the display will say which handset is calling.
The other handset answers the call by pressing the or
start talking.
Note: If there is only one other handset registered to the base, you will not need to select
the handset you want to call, it will ring automatically after step 1.
with the numbers of the other handsets you can call.
To transfer a call
When you've made or answered an outside call, to transfer it to another handset .
1).Press
"INTERCOM"
call to.
The outside call is put on hold. When the other handset answers, you can
speak to the user. If the other handset does not answer, you can get back to the outside
call pressing
outside call after 30 seconds.
2).
When the other handset answers your intercom, press
outside call to the other handset, and to hang up your handset.
3).
You can also transfer the call without waiting for the other handset to answer.
Press followed by the number of the handset you want to transfer the
call to, and then press The other handset will then ring, but if it is not
answered within 1 minute, all handsets will ring for a further minute, and if none
answer by then the outside call will be disconnected.
"INTERCOM"
"INTERCOM"
or
system, you already have two,
Quad
registered to the base unit, as numbers 1, 2, 3, 4 or 5.
while you are on an outside call
— which is shown to the right of the
if you try to make an outside call by
à
" 0,1, 2,3,4 or using the
, key in the number of the handset (1-5) you want to transfer the
again, or you will automatically be reconnected to the
"HANG UP"
5"
handset digit keys
"INTERCOM"
"HANG UP" to transfer the
the handset
, and can then
19
Binatone Help Line - 0845 345 9677
Page 25

Set up a three-way conference call
To set up a three-way conference between two handsets and an outside call:
1). Either make or answer an outside call with one handset(e.g HS1),
"INTERCOM"
2).
Press
call will be
3). When the other handset answers the call, press the STAR (*) button on
(HS1) to
4). To end the conference call either handset can press "HANG UP" ,and the other
handset will be left connected to the outside call.
put on hold.
connect the three parties together.
,then key in the number of another handset , and the outside
the handset
10.Handset registration
To register a handset to a new base:
The handset(s) supplied with your BB3200 system are already registered
!
— the first one as handset number 1, the second as number 2...etc
You don’t need to re-register them, unless you have a problem.
To check whether a handset is registered, make sure mains power to the base unit is
switched on and the handset is within range. The handset’s display should show its number,
and the 'signal level' symbol on the display should show three bars. If the display
shows"UNREGISTERED " , you need to re-register the handset using the following process:
You need to operate the base and handset together:
à
à
"PIN ?"
OK
à
"PHONEBOOK"
"REGISTRATION"
"BASE 1"
display will flash "SEARCHING 1" (or 2,3,4)
1. On the handset, press
2. Press twice
3. Press
If the handset already has a registration to a base there is a "+" on the right side of the
display, and you should choose another base number if you don't want to lose that one.
4. Press
5. Press
6. Press to confirm, and the
OK
to select a base number (BASE 1, 2,3 or 4)
OK
(Key in the 4 digit PIN code for the base -the BB3200 default PIN code is 0000.)
à
OK
7. At the same time, on the base, press and hold page button until the On-Line LED
Flashes.
After a short delay, if the registration is successful, there will be a confirmation beep, and
the handset display will go back to idle mode with the new handset number shown
(e.g. HS1, HS2). The base will also go back to idle mode and the LED turns off.
20
Page 26
To select a base:
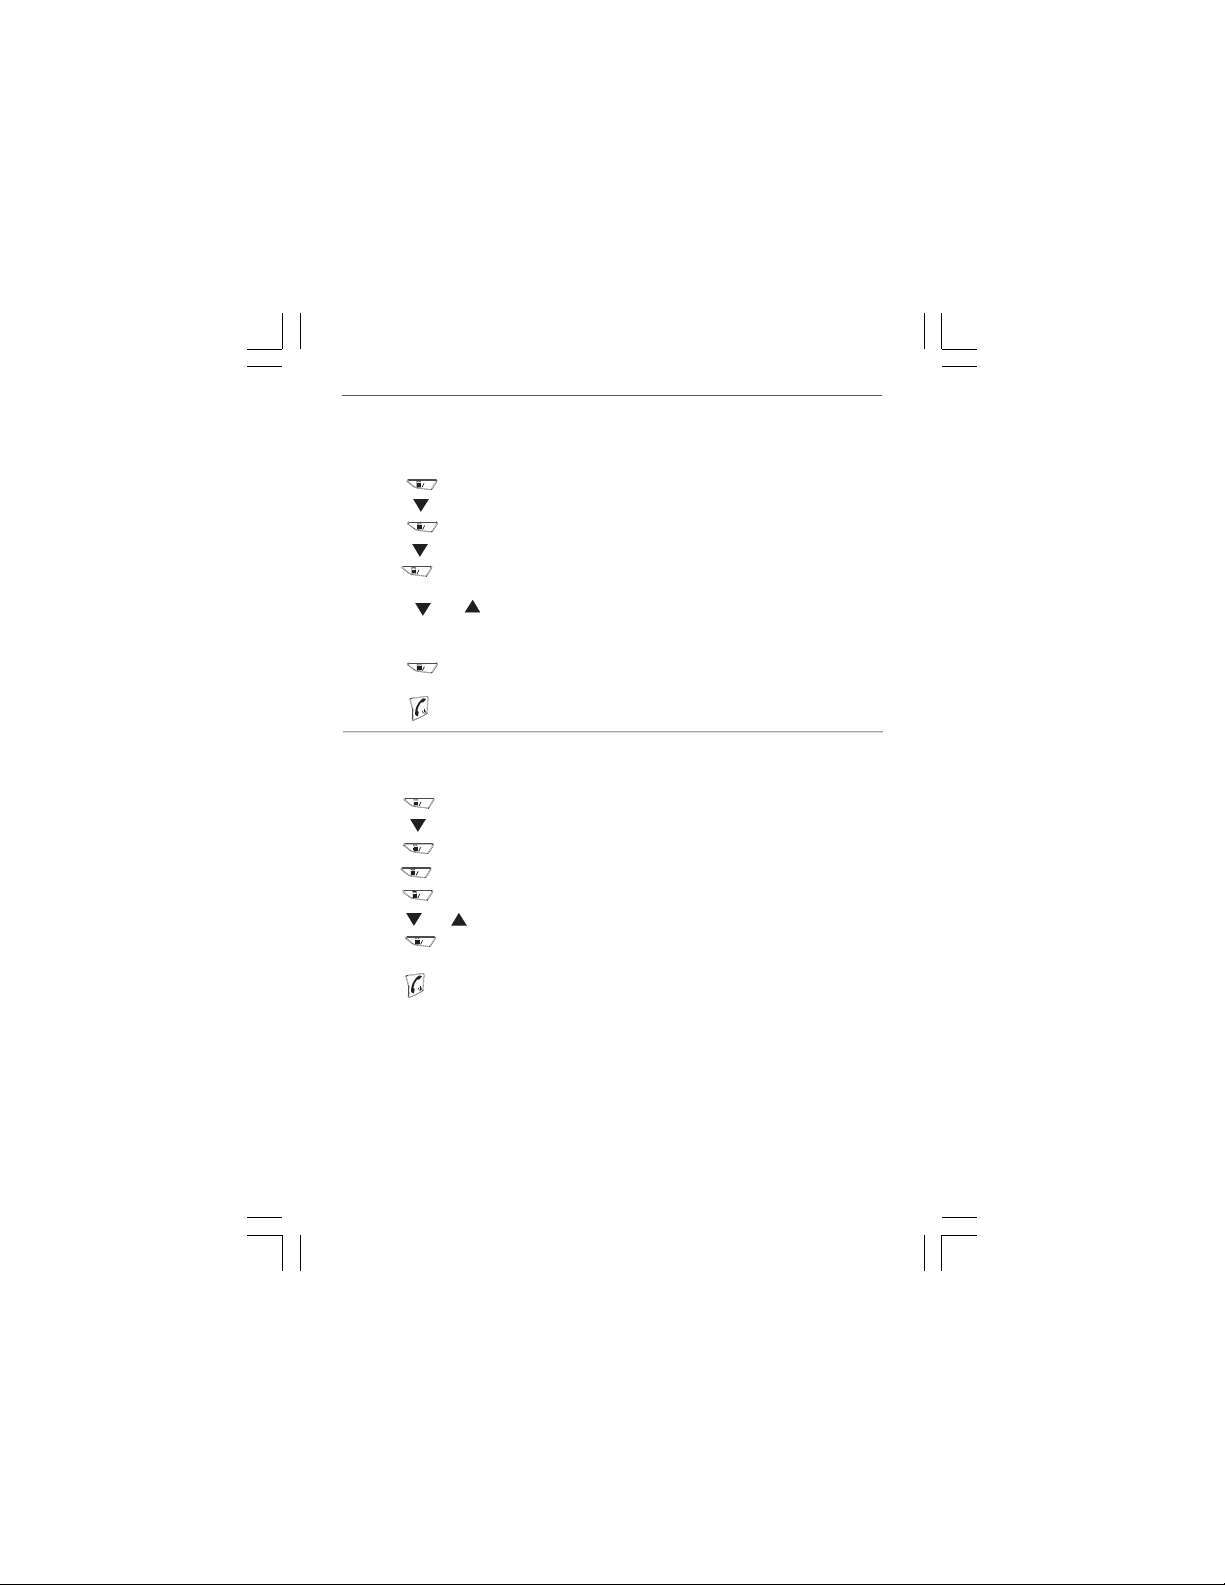
The handset can be registered to more than one base (up to a maximum of 4), and you can
select which base you want the handset to operate with.
If you select "AUTO" the handset will link with the first of the registered bases that it finds.
1. P
ress
2. Press
3. P
ress
4. Press
5. Press
OK
3 times
OK
8 times
OK
à
to confirm, and the display shows the present linked base number,
"PHONEBOOK"
à
"HS SETTINGS"
à
"ALARM"
à
"SELECT BASE"
à
e.g "BASE 1 +"
6. Press or to select which base you want the handset to link
à
with (BASE 1,2,3,4 or AUTO).
Note: the handset will only link with base numbers followed by a "+".
7. Press
OK
to confirm the base. The display will show "SEARCHING 1" (or 2,3,4) and
à
there will be a short delay until the handset finds the base and the display returns to idle.
*
Press
to go back to idle mode at any time.
à
To de-register a handset
You may need to do this if you need to replace a faulty handset. Call the Binatone help line if
you need more advice.
1. Press
2. Press
3. Press
4. Press
5. Press
6. Press
7. Press
OK
"PHONEBOOK"
à
"BS SETTINGS"
twice
à
OK
"DELETE HS"
à
OK
"PIN ?"
à
OK
à
or
OK
to confirm, and the selected handset will be de-registered.
Key in the PIN code (default value is 0000).
" HS 1 +"
to select the handset you want to de-register.
(The display on the handset that has been deleted will show "UNREGISTERED")
Press
*
When de-registering this way, the handset cannot delete itself, only other handsets.
*
to go back to idle mode at any time
21
Binatone Help Line - 0845 345 9677
Page 27
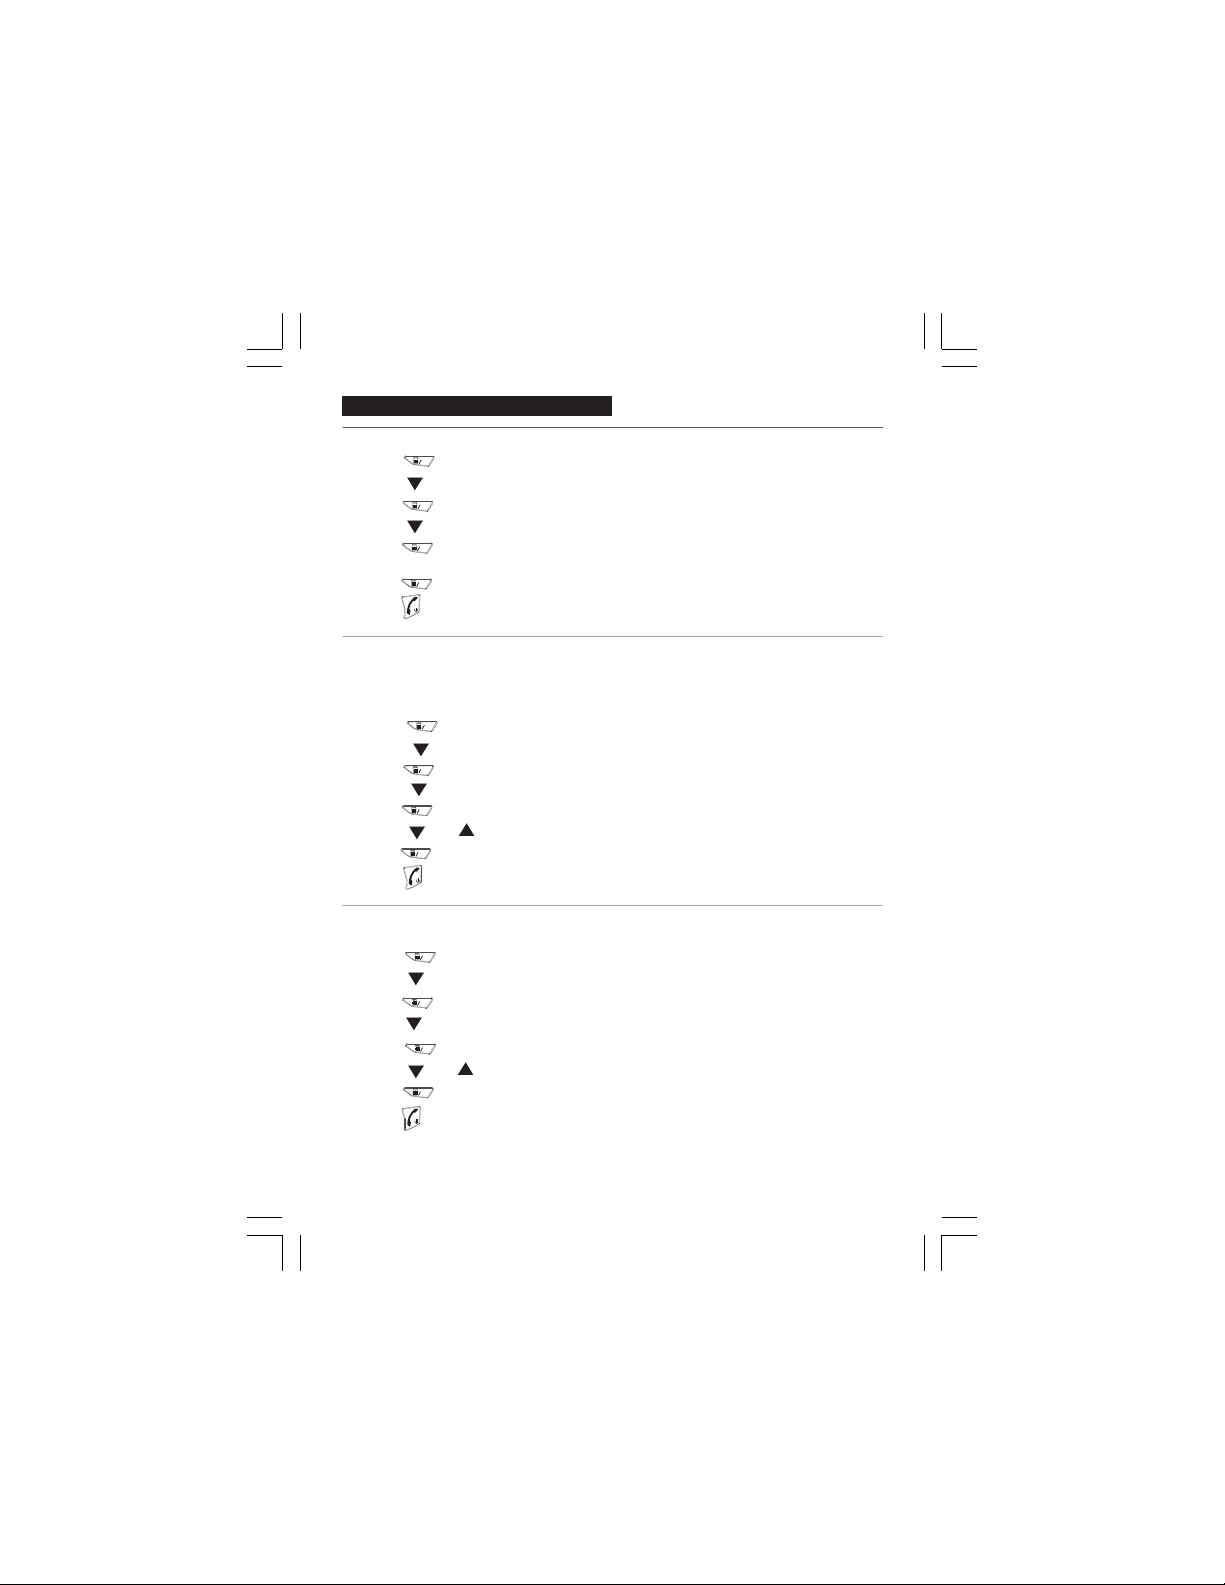
11 Customising your phone
To change the handset name
1. Press
2. Press
3. Press
4. Press
5. Press
6. Press
Press
*
To turn on/off handset Auto answer
This allows you to answer an incoming call automatically by simply picking the handset up off
the charging cradle.
OK
three times
OK
4 times
OK
Key in the required name, up to a maximum of 10 characters.
and the display will show a flashing cursor on the name line.
OK
to go back to idle mode at any time.
"PHONEBOOK"
à
"HS SETTINGS"
à
à
"ALARM"
" HS NAME"
à
to confirm the name setting
You can switch this function ON or OFF. The default is ON.
OK
1. Press
2. Press
3. Press
4. Press
5. Press
6. Press
7. Press
Press
*
"PHONEBOOK"
à
three times
OK
à
5 times
OK
à
or
OK
to confirm your selection
à
"HS SETTINGS"
"ALARM"
" AUTO ANSWER"
à
"ON" or "OFF"
to select "ON" or "OFF"
to go back to idle mode at any time.
To select handset display language
You can select between 6 different languages for the handset display.
1. Press
2. Press
3. Press
4. Press
5. Press
6. Press
7. Press
Press
*
OK
"PHONEBOOK"
à
three times
OK
"ALARM"
à
3 times
OK
à
or
OK
to confirm your selection
"HS SETTINGS"
à
"LANGUAGE"
à
"ENGLISH"(default language)
to select the language you want.
to go back to idle mode at any time.
22
Page 28

To set handset call barring function
You can set 4 numbers (up to 4 digits each) for call barring.
When the call barring is "ON", any numbers beginning with the programmed digits will not be
able to be dialled out, and the display will show "CALLS BARRED".
1. Press
2. Press
3. Press
4. Press
5. Press
6. Press
7. Press
8. Press
(Note: if a number is already in that location it will be shown also on the bottom line.)
If you want to program (or change) the number to be barred in this location,
Key in the digits you want to program, using R/DEL if you want to delete digits, and then
press to confirm the number. The display will show the programmed entry.
If you want to program another location, press or to scroll to NUMBER
Press to select another location and program the number as described
OK
"PHONEBOOK"
à
three times
OK
à
six times
OK
à
OK
à
or
to select "OFF" or "ON".
OK
to confirm your selection. If you
and the cursor will flash on the bottom number line.
OK
OK
"HS SETTINGS"
à
"ALARM"
"BARRING"
à
"PIN ?". Key in the PIN code (default 0000)
(default setting : OFF)
"OFF"
select "ON", the display will show
"NUMBER 1".
OK
press
1,2,3, or 4.
above.
Press to go back to idle mode at any time.
To set handset default settings
This allows you to restore the handset to its default settings. The handset menu settings will
be returned to their initial default settings, and the CID and redial lists will be cleared.
The phonebook will not be changed.
1. Press
2. Press
3. Press
4. Press
5. Press
6. Press
OK
"PHONEBOOK"
à
three times
OK
à
once
OK
à
OK
to confirm the default, and the handset display will reset, search for the base
"HS SETTINGS"
à
"ALARM"
"HS DEFAULT"
à
"PIN ?" and key in the PIN code (default 0000)
and then return to idle mode.
,
23
Binatone Help Line - 0845 345 9677
Page 29
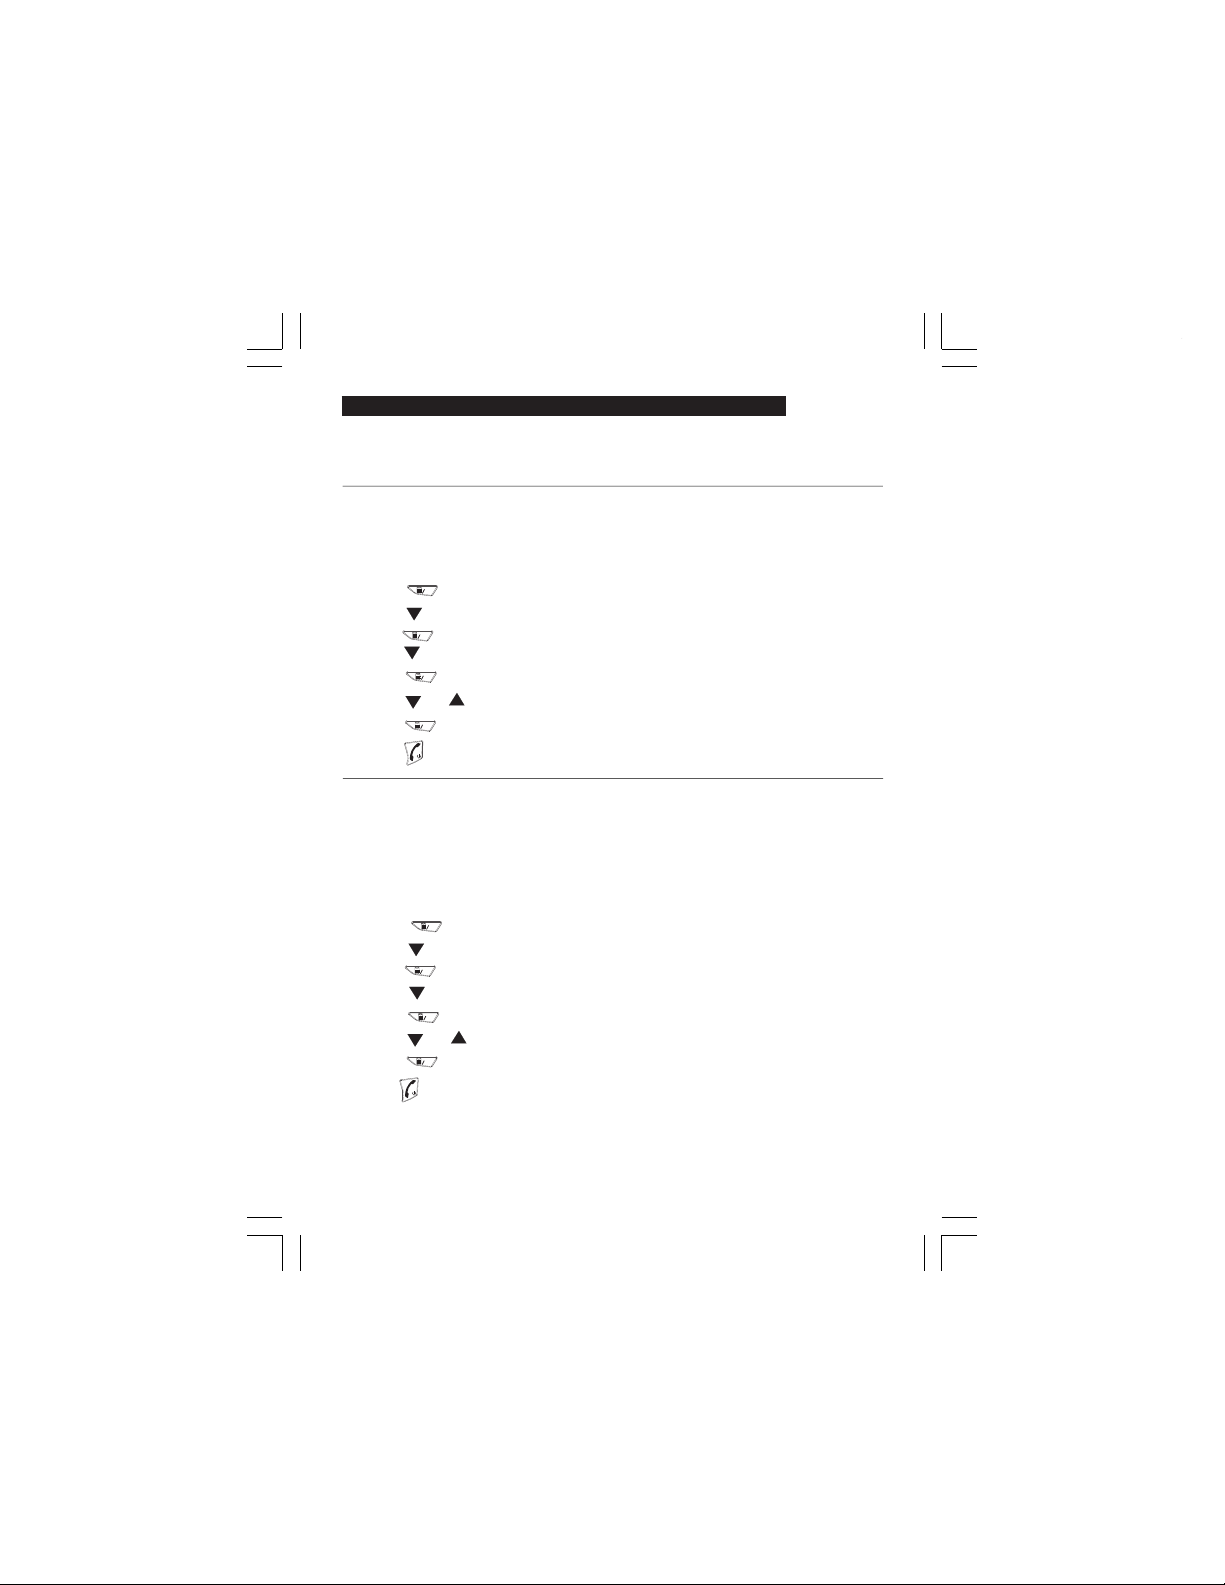
12. BASE BASIC SETTING FROM THE HANDSET
You can set some of the basic base functions from the cordless handset.
The base must be powered up and in idle mode, otherwise you will hear an error tone when
you try to access the "BS SETTING" menu.
To set dial mode (Only for models with a TONE /PULSE option)
The default setting of this BB3200
and normally this will be correct for the changed.
However, for some old telephone lines or PABX systems you may need to change the dialling
mode from Tone to Pulse.
1. Press
2. Press
3. Press
4. Press
5. Press
6. Press
7. Press
Press
*
OK
"PHONEBOOK"
à
twice
à
OK
"DELETE HS"
à
once
OK
OK
à
"TONE" (this is the default setting)
à
or
to select TONE or PULSE
to confirm your selection
to go back to idle mode at any time
telephone is TONE (also called Touch Tone,MF or DTMF),
"BS SETTINGS"
"DIAL MODE"
To set flash time
The Recall (also called Flash) may be needed if you use BT calling functions or are
connected to a PABX.
The default setting of this BB3200 telephone is 100ms, and normally this will be correct
for the UK.
However, if necessary, you can select from 3 flash times: 100ms, 300ms and 600ms
(options may vary) to meet your telephone line or PABX requirement.
1. Press
2. Press
3. Press
4. Press
5. Press
6. Press
7. Press
Press
*
OK
"PHONEBOOK"
à
"BS SETTINGS"
Twice
à
OK
"DELETE HS"
à
à
Twice
"FLASH TIME"
OK
to show the current setting of the Flash time.
to display the flash time you want .
or
OK
to confirm your selection
to go back to idle mode at any time
UK so will not need to be
24
Page 30

To modify pin code
A PIN code is required to access some functions on the handset and base.
The default PIN is 0000, but you can change it to your personal 4-digit PIN.
1. Press
2. Press
3. Press
4. Press
5. Press
6. Press
7. Press
8. Press
OK
OK
OK
OK
OK
OK
Twice
3 times
à
"PHONEBOOK"
à
à
"BS SETTINGS"
"DELETE HS"
à
à
"MODIFY PIN"
"PIN ?" and key in the current PIN code (default 0000)
à
"NEW PIN" and key in your new 4-digit PIN
à
"REPEAT" and key in your new 4-digit PIN again
à
to confirm the new PIN code. (Make a note of this number,
or don't forget it, otherwise you will not be able to access some of
the BB3200 functions.)
*
Press
to go back to idle mode at any time
To reset base to default settings
This allows you to restore the base to its default settings.
The base menu settings will be returned to their initial default settings
The phonebook , CID and redial lists will not be changed.
OK
1. Press
2. Press
3. Press
4. Press
5. Press
6. Press
"PHONEBOOK"
à
Twice
OK
OK
OK
"BS SETTINGS"
à
"DELETE HS"
à
four times
à
"BS DEFAULT"
à
"PIN ?" and key in the PIN code (default 0000)
to confirm,the base unit will reset, and the handset
will go back to idle mode.
.
25
Binatone Help Line - 0845 345 9677
Page 31

Troubleshooting
ALWAYS check
first that:
"The handset does
not switch on"
"The handset
switches on but
cannot be
connected
to the base station"
I cannot make or
"
answer calls"
"I cannot make a
call"
"When I press keys,
nothing happens"
"When I key in a
number, it appears
on the display, but I
can not make an
outside call.
The phone does not
ring"
•
You have followed all the steps listed in pages 3-5 to install and set up
your BB3200.
• All connectors are firmly inserted in their sockets
•
Mains power to the base unit is switched on at the socket
•
The handset's batteries are correctly and securely installed and are not run
down
Everyday use
•
Check the connection of the batteries, they may be flat or not
and charge the handset on the base or charger pod.
•
Check the connection of the power supply unit of the base unit.
•
Verify that the network socket where the power supply unit is plugged in
is supplying the correct voltage.
•
Repeat the handset registration procedure as described on page 20/21
•
If the handset's display is blank. It may be switched off. Press the
HANG UP/C button for a few seconds to switch it back on.
•
Check that the base unit’ s mains power adapter is plugged in and power is
switched on. The base unit needs mains power for normal operation of
the phone
• Make sure you are using the telephone line cable supplied with your BB3200
Other telephone line cables might not work.
•
Move the handset closer to the base unit
•
Check the battery Level symbol on the display. If it is low, replace the handset
on the base or charger pod to recharge the batteries.
•
Switch off power at the mains socket, wait for 30 seconds and then switch .
back on. This may solve the problem.
• The handset 's keypad may be locked. Unlock it before you make a call.
•
Only one handset can be connected to the outside line at
once. If another handset is already using the line, you need to wait until it's
finished its call.
•
Make sure the batteries are fitted in your handset. If the Battery Level symbol
on the display shows ‘ low , put your handset back on the cradle for it to charge.
• Try a different position for the base unit – somewhere higher if possible, or
further from other electrical equipment.
• Try moving the handset
•
Check that the base unit ’ s mains power adapter is plugged in and power is
switched on.
The base unit needs mains power for normal operation of the phone
• Make sure you are using the telephone line cable that was supplied with your
BB3200. Other telephone line cables might not work
to the base unit.
closer
’
inserted properly
26
Page 32

"My call was cut off
when I went out of
range. Now I can't
use my handset.
"There is
interference and
noise on the line"
"I hear ‘ beeps from
my handset while
I’ m on a call"
"The Caller Display
feature isn't
working"
"When I try to
make a call, I hear
Busy tone."
"The volume in the
earpiece is low
when I' m on a call"
"I can' t transfer a
call"
•
•
•
• You ' ll get the best sound if you place the base unit
‘
•
• Check the
•
•
• If you' re using a BB3200 multi handset system, check that other handset are
• Make sure you're holding the earpiece correctly over your ear.
•
Intercom and transfer
•
• Make sure you are dialling the correct number for the other handset.
Batteries
"The handset is not
functioning even
after charging for
15 hours"
"The handset's
battery pack is
running low within
an hour or two"
"I try to recharge
the batteries but I
still get a warning
that they are low"
•
•
• You may need to replace the batteries
•
•
• Dispose of used batteries safely – never burn them, or put them where they
•
If the fault persists…
•
Move the handset closer to the base unit before you try again to make a call.
Move the handset closer to the base unit, or to a different position."
Try moving the base unit so that it’ s not near other electrical equipment such
as a television or a computer.
For example, in a two-storey house, the first -floor landing is an ideal place.
You may be going out of range of the base unit. Move closer or your
call may be cut off.
Battery Level
batteries.
You need to subscribe to the Caller Display feature from your network service
provider. You should find contact details on your phone bill.
The caller may have withheld their number by dialling 141.
Or they may be calling from a network that does not transmit the caller's
number (e.g. it may be an international call.)
symbol on the display. If it’s low, recharge the
as high as possible
.
not already on a call.
Adjust the volume using the UP/DOWN button.
Make sure the other handset is in range of the base unit.
Remove the batteries from the handset and wait for a few seconds before
replacing them. If the problem persists, replace the batteries.
Before you first use the handset, you should have left it on the base unit or
charger pod for 15 hours to charge the batteries fully.
Check the base and/or charger pod power is ok, and the handset beeps and
the handset beeps and the charge LED lights when the handset is put on charge.
You need to replace the batteries. To find out how to obtain replacements call
the Binatone helpline on 0845 345 9677 from 9:00am to 5:00pm,
Monday to Friday (UK only).
could get punctured.
Do not use non-rechargeable batteries in your BB3200 – they may burst,
causing damage.
Disconnect all other instruments connected to the same line as the
BB3200 and try to make a call
27
Binatone Help Line - 0845 345 9677
Page 33

•
Disconnect the base unit from the telephone line and plug a different phone
into the master telephone socket. Try making a call. If this works, the line is
OK.
•
If the call does not work, and you are using a two-way socket adapter,remove
it and plug a telephone directly into the socket. If the call now works,the
adapter may be faulty.
•
If you cannot make a call, the fault may be on the exchange line. Contact the
service provider (the BT engineers on 151 for UK only, or your cable company).
•
If you still cannot identify the cause of the problem, contact the Binatone on
0845 345 9677 (UK only).
Cleaning and care
§ Do not clean
chemicals – this may cause permanent damage which is not covered by
the Guarantee.
When necessary, clean it with a damp cloth.
§ Keep your BB3200 away from or strong sunlight, and don't let it
get wet.
§
Every effort has been made to ensure high standards of reliability for your BB3200
However, if something does go wrong, please do not try to repair it yourself – consult
your supplier or the Binatone Helpline
any part of your BB3200 with benzene, thinners or other solvent
hot, humid conditions
.
28
Page 34

Declaration of conformity
We the manufacturer / Importer : Binatone Telecom Plc
1 Apsley Way London
Declare under our sole responsibility that the following product
Type of equipment: Digital cordless telephone
Model Name: BB3200 Series
Country of Origin: China
Brand: Binatone
complies with the essential protection requirements of R&TTE Directive 1999/5/EC on the
approximation of the laws of the Member States relating to Radio Spectrum Matters, the
Council Directive 2004/108/EC on the approximation of the laws of the Member States
relating to electromagnetic compatibility (EMC) and the European Community Directive
2006/95/EC relating to Electrical Safety.
Assessment of compliance of the product with the requirements relating to the essential
requirements according to Article 3 R&TTE was based on Annex III of the Directive
1999/5/EC and the following standard:
Radio Spectrum: EN 301406: V1.5.1:2003-07;
EMC: EN 301489-1:V1.6.1:2005-09;
EN 301489-6:V1.2.1;2002-08;
Electrical Safety: EN 60950-1:2006
The product is labelled with the European Approval Marking CE as show. Any Unauthorized
modification of the product voids this Declaration.
EC Declaration of Conformity
NW2 7HF, United Kingdom.
Manufacturer / Importer
(signature of authorized person)
London,
Signature: (K.H.Mueller, CT0) Place & Date: 1 Feb 2009
29
Binatone Help Line - 0845 345 9677
Page 35

Guarantee and service
The BB3200 is guaranteed for 12 months from the date of purchase shown on your
sales receipt.
This guarantee does not cover any faults or defects caused by accidents, misuse, fair
wear and tear, neglect, faults on the telephone line, lightning, tampering with the
equipment, or any attempt at adjustment or repair other than through approved agents.
Please keep your sales (till) receipt – this is your guarantee
You should also keep the original packaging material.
In the unlikely event that you need to return your BB3200 to our Repair Centre while it
is under guarantee, there may be ahandling charge.
While the unit is under Guarantee
1.
Disconnect the base unit from the telephone line and the mains electricity supply
Pack up all parts of your BB3200, using the original packaging. Remember to
2.
include the mains adapter
Return the unit to the shop where you bought it, making sure you take your sales
3.
receipt.
After the Guarantee has expired
If the unit is no longer under Guarantee, first follow
Guarantee.
Then…
4. Call the Binatone Helpline on 0845 345 9677 (for UK only) and ask for a quotation
of the repair charge and details of where to send your BB3200 for repair.
Make sure you include with your BB3200:
5.
§ Your name and address
A cheque or postal order for the value of the repair charge
§
> A brief description of the fault.
Return your BB3200 to the address given by the Service Department.
6.
* This does not affect your statutory rights.
1 and 2 as for repair under
steps
30
Page 36

Technical details
Standard Digital Enhanced Cordless Telecommunication (DECT)
Frequency range 1.88 to 1.9 GHz (bandwidth = 20 MHz)
Channel bandwidth 1.728 MHz
Operating range Up to 300m outdoors; up to 50m indoors
Operating time
Temperature range Ope rating 0 º C to 40
Electrical power
HANDSET
Base Unit - SIL BD060020J
Input 230VAC, 50Hz, 30mA, Output 6VDC, 200mA
Charger Pod - SIL BD060020J
Input 230VAC, 50Hz, 30mA, Output 6VDC, 200mA
Port specification
–
SELV port with respect to EN41003.
The
port (connected to the telephone line) is a TNV port with respect to
EN41003.
Dialling type: Tone (DTMF, dual tone multi-frequency) or Pulse (loop disconnect).
Network connection: This equipment is intended to be used in the UK only.
Operation on other countries' PSTN termination points cannot be guaranteed.
Binatone Telecom plc operates a policy of continuous improvement, and so reserves the
right to make changes to the products and functions without notice.
*CAUTION:
RISK OF EXPLOSION IF BATTERY IS REPLACED BY AN INCORRECT TYPE.
DISPOSE OF USED BATTERIES ACCORDING TO THE INSTRUCTIONS
Standby: 100 hours
Talking: 10 hours
st
1
time battery charge time: 15 hours
Storage -20 º C to 60
two pcs of AAA- size 600mAH NiMH 1.2V rechargeable batteries
The
º C
º C
(connect to the mains power supply) is a
1
3
UK (BTP) Ver 8
6, Dec 200
 Loading...