

Binatone ADVENTURER 450 User Manual
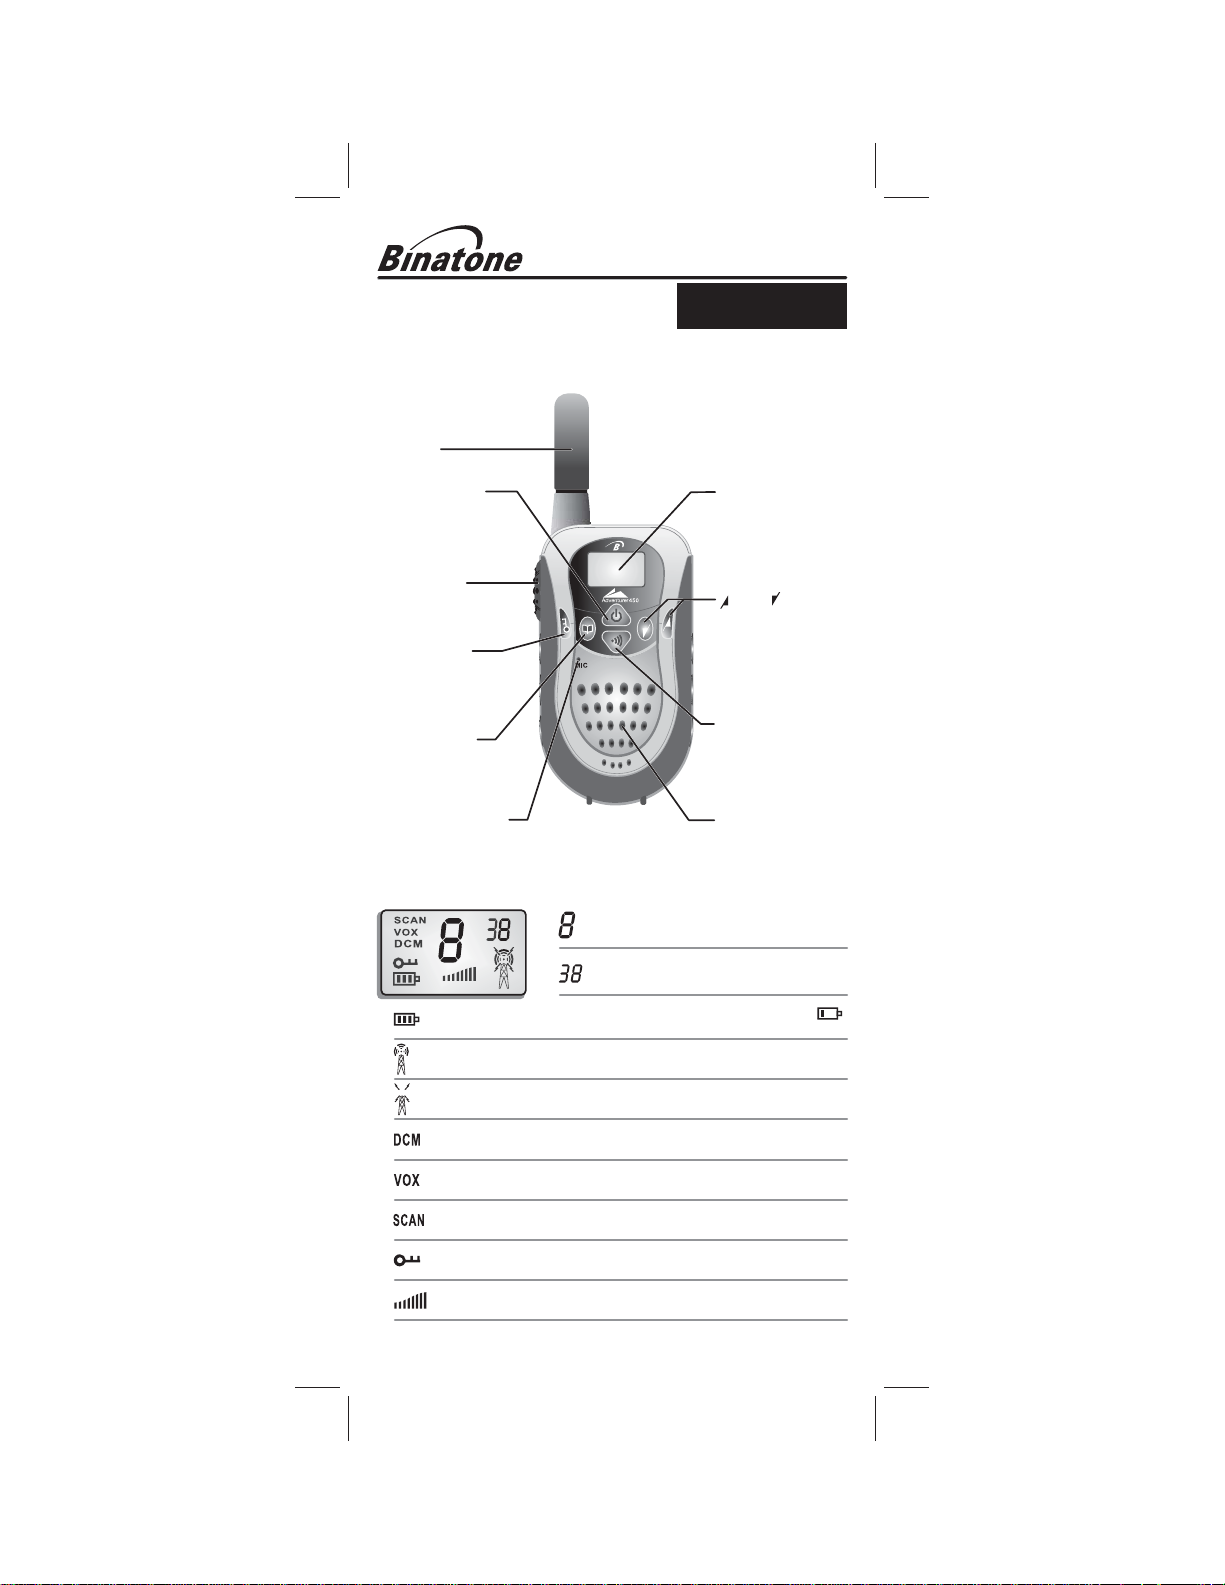
Antenna
ADVENTURER 450
Private mobile radio with twin charger
USER GUIDE
POWER button
- Press and hold to
turn the PMR unit
ON or OFF.
PTT button
- Press and
hold to transmit.
LOCK button
- Press and hold to
lock and unlock the
buttons.
MENU Button
-Press to program
the PMR settings.
MIC (Microphone)
LCD Screen
-Displays the
current channel
selection and other
radio symbols.
buttons - Press to
change the speaker
volume. Press after
the button to
change channels.
CALL button
-
tone to other PMR
units.
Speaker
1. LCD Screen
Channel Number. Changes from 1 to 8
as selected by the user.
CTCSS Code. Changes from 0 to 38
as selected by the user.
Displays the current Battery charge level. When this shows “ “
(low), recharge the battery.
Displayed when transmitting a signal.
(UP)/ (DOWN)
MENU
Press to send ring
Displayed when receiving a signal.
Displayed when the Dual Watch function is turned ON.
Displayed when the Vox feature is enabled.
Displayed when the Scan feature is turned ON.
Displayed when the Key lock function is activated.
Displays the current Speaker volume level.
Binatone Help Line - 0845 345 9677
2. Installation
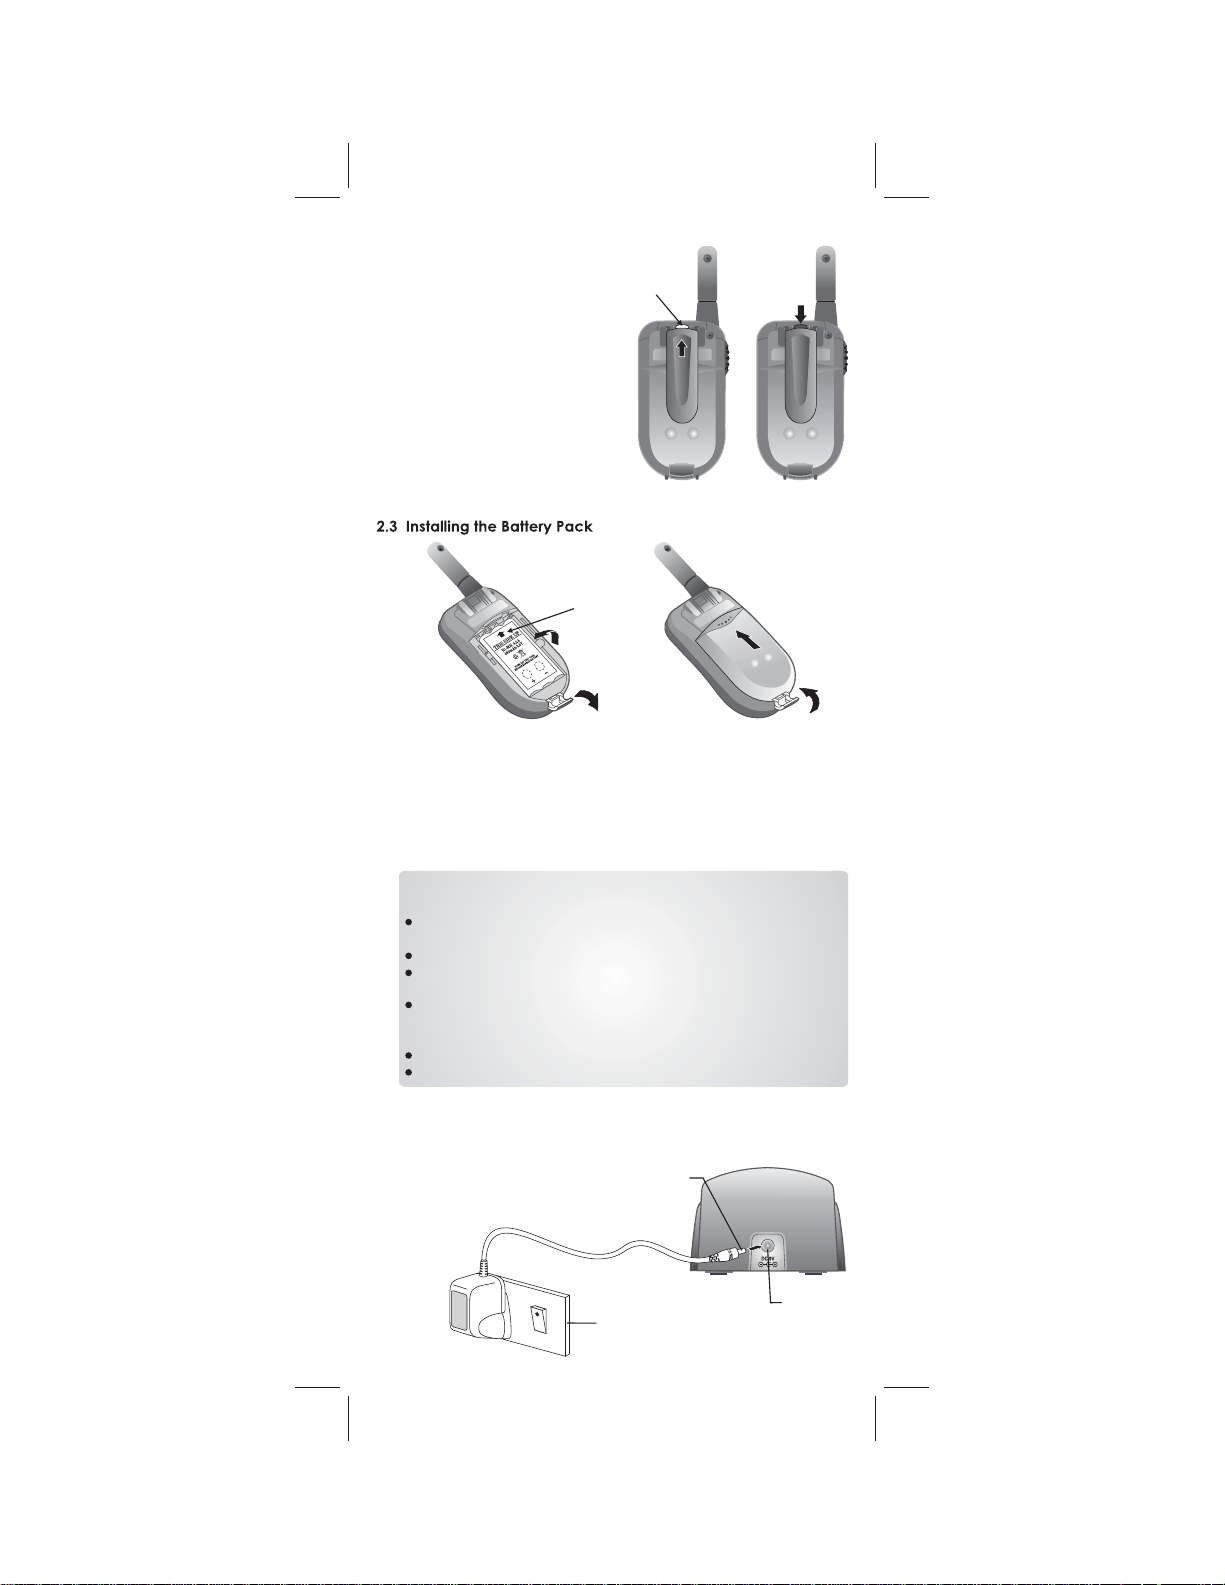
2.1 Removing the Belt Clip
a. Insert your finger nail behind
the Belt clip tab then pull it
forward (away from the PMR).
While pulling the Belt clip tab,
b.
push up the Belt Clip as
shown in Figure 1.
2.2 Installing the Belt Clip
a. Slide the Belt Clip down
into the slot as shown
in Figure 2.
A “click” indicates the Belt
b.
Clip is locked into position.
When inserting the
battery pack, make sure
the arrow is showing
and pointing upward.
Belt clip
tab
Figure 1
Figure 2
b
c
d
Figure 3
a
Figure 4
a. Release the Battery Compartment Cover Latch located on the rear
side of the PMR then remove the Battery Compartment Cover from
the Battery Compartment. See Figure 3.
Install the Battery pack with the battery contact plate facing out.
b.
See Figure 3.
Replace the Battery Compartment Cover.
c.
Lock the Battery Compartment Cover Latch into position.
d.
Important: Read these Safety Warnings before charging the
battery pack.
Use only the Ni-MH rechargeable battery pack supplied with this
product.
Do not try to charge the non-rechargeable batteries.
Make sure the battery compartment cover is securely locked in place
when you are charging the battery pack.
Disposed of used batteries safely and in a way that will not harm the
environment - never try to burn or put them anywhere they could get
burnt or punctured.
Don't leave dead batteries in your PMR .
Do not expose the unit to rain or moisture.
2.4 Charging the Battery pack
a. Insert the small plug on the end of the mains adaptor into the Power-in
Connection Jack at the back of the desktop charger.
Plug the mains adaptor into a
b.
230V AC, 50 Hz main socket with
the switch on the socket set to OFF.
Switch ON
c.
Mains
adaptor
plug
the main
socket.
Main
Socket
Power-in
Connection
Jack
The PMR must be charged using the mains adaptor provided. Using
any other adaptor will result in non-compliance with EN60065 and
will invalidate any approvals & warranty.
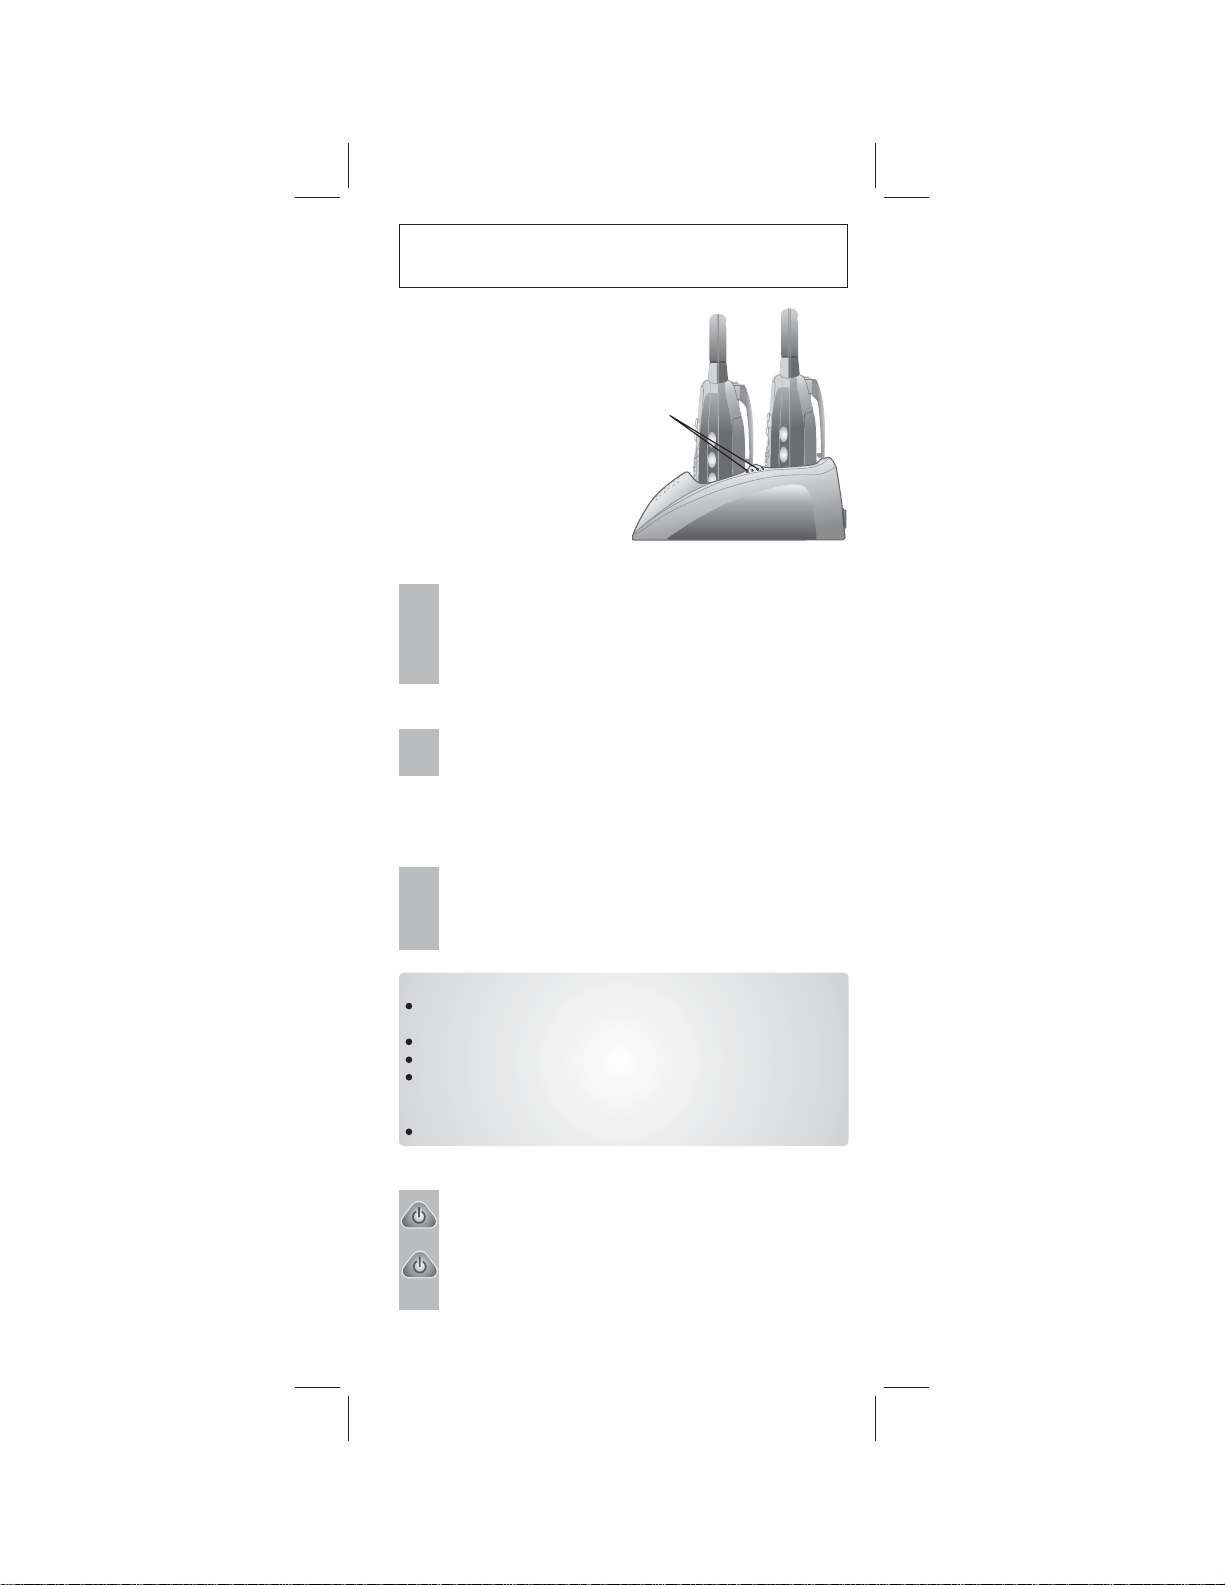
d.e.Place the PMR unit/s in the
desktop charge cradle in an
upright position and facing
outward. The Charge LED
indicator/s will light up.
It takes about 6 hours to
recharge a battery pack
that has completely run down.
New battery pack takes up to
14 hours to fully charge.
The Charge
light comes
on when the
PMR is in
the charge
cradle.
Important: Always turn OFF the
PMR units when charging. This
will shorten the charging time.
Battery Meter
The battery meter is located in the left corner of the LCD panel.
It appears like a battery with three bars inside. The bars
indicate the amount of battery charge power available. As the
power is used up, the bars will disappear. When the battery
charge level has reach it’s minimum power condition, the unit
will emit two ‘beep’ tones and automatically turns OFF.
Battery Life
The Adventurer 450 has a built in power saver feature to make
the batteries last longer. But when you are not using the unit,
switch it off to conserve the battery power.
3. Operation
3.1 Transmitting Range
The talk range depends on the environment and terrain. It will
be greatest (up to about 3km, or 1 3/4 miles) in wide open
spaces, without obstructions such as hills or buildings. Do not
try to operate two PMR units that are less than 2m (6.5 feet)
apart. Doing so might cause interference.
Important Safety Warnings
Wh
en using your PMR, hold the unit at least 5cms. (2inches) away
from your face to reduce the exposure to radio frequency.
Never use your PMR outdoors in a thunderstorm.
Do not use the PMR in the rain.
If your PMR ever gets wet, turn it off and remove the batteries. Dry
the battery compartment and leave the cover off for few hours. Do
not operate the unit until it is completely dry..
Keep the PMR out of the reach of babies and young children.
3.2 Turning the Unit ON/OFF
To Turn ON;
a.
Press and hold the button until the LCD Screen
turns ON and displays the current channel.
To switch OFF;
b.
Press and hold the button until the LCD screen
turns blank.
You can hear a musical tone each time to confirm.
POWER
POWER
Binatone Help Line - 0845 345 9677
 Loading...