

Page 1

LICUADORA
FRULLATORE
KOMPERNASS GMBH · BURGSTRASSE 21 · D-44867 BOCHUM
www.kompernass.com
ID-Nr.: KH527-12/08-V3
KH 527
LICUADORA
Instrucciones de uso
FRULLATORE
Istruzioni per l'uso
BLENDER
Operating instructions
STANDMIXER
Bedienungsanleitung
Page 2

KH 527
q
w
e
o
r
t
y
u
i
Page 3

ÍNDICE PÁGINA
Indicaciones de seguridad 2
Uso conforme al previsto 2
Características técnicas 3
Desembalar 3
Volumen de suministro 3
Descripción de aparatos 3
Emplazamiento 3
Manejo 4
Llenado y montaje del suplemento mezclador 4
Seleccionar velocidad 4
Llenado durante el funcionamiento 4
Retirar el suplemento mezclador 5
Indicaciones útiles 5
Limpieza 5
Limpieza del suplemento mezclador 5
Limpieza del bloque motor 6
Después de la limpieza 6
Almacenamiento 6
Evacuación 7
Garantía y servicio 7
Importador 7
¡Guardar estas instrucciones para preguntas posteriores – e, igualmente entregar éstas, en caso de dar el
aparato a terceras personas!
- 1 -
Page 4

Indicaciones de seguridad
Para evitar peligro de muerte por
descarga eléctrica:
• Asegúrese de que el bloque motor, el cable de
red o la clavija de red no se sumerjan nunca en
agua o en cualquier otro líquido.
• Utilice el aparato sólo en lugares secos y cerrados,
nunca al aire libre o en ambientes húmedos.
• Preste atención de que el cable de red no se
moje o entre en contacto con humedad durante
el servicio. Tiéndalo de modo que no pueda ser
aplastado o dañado de forma alguna.
• En caso de una clavija de red dañada o cable
de red dañado, encomiende su sustitución a personal técnico autorizado o al servicio de posventa con el fin de evitar riesgos.
• Retire después del uso siempre la clavija de la
base de enchufe. No es suficiente con desconectarlo, ya que mientras esté insertada la clavija
de red en la base de enchufe sigue llegando
tensión de red al aparato.
• Antes de cada uso compruebe que el aparato
se encuentre en perfecto estado. El aparato no
debe ser utilizado cuando presente daños visibles,
especialmente en el bloque motor o en el suplemento mezclador de vidrio.
• Retire inmediatamente la clavija de red de la base
de enchufe si percibe un ruido o un olor inusual,
o si se produce un error en el funcionamiento.
Para evitar el sobrecalentamiento
y el riesgo de incendio:
• No utilice el aparato bajo la luz directa del sol
ni en lugares donde pueda verse afectado por
otros aparatos que generen calor.
• ¡No introduzca nunca líquidos hirviendo en el
suplemento mezclador! Deje que éstos se enfríen
primero hasta una temperatura media. De otro
modo el aparato podría sobrecalentarse e incluso
reventar el vidrio del suplemento mezclador!
Para evitar el riesgo de accidentes
y de lesiones:
• No sujete nunca el suplemento mezclador, especialmente durante el funcionamiento. ¡Las cuchillas
están muy afiladas!
• No abra la tapa cuando esté el aparato en funcionamiento. ¡De otro modo pueden salir despedidos a gran velocidad trozos de alimentos!
• No introduzca nunca cubiertos u objetos para
batir en el suplemento mezclador mientras el
aparato esté en funcionamiento. ¡Si éstos entran
en contacto con las cuchillas giratorias, que giran a
alta velocidad, existe un serio peligro de lesiones!
• Para poder reaccionar rápidamente en caso de
peligro, no deje el aparato en funcionamiento
sin vigilancia.
• No permita utilizar el aparato a personas (incluidos
los niños) cuyas facultades físicas, sensoriales o
mentales, así como su falta de conocimientos o
de experiencia, les impida hacer un uso seguro
del mismo si no están bajo vigilancia o han sido
instruidos correctamente.
• Vigile a los niños para asegurarse de que no
juegan con el aparato.
Uso conforme al previsto
Este aparato ha sido diseñado para...
– mezclar, pasar puré y batir alimentos, así como
para trocear cubitos de hielo (picar),
– sólo con cantidades normales en el hogar y
para el uso privado doméstico en espacios
secos.
Este aparato no ha sido diseñado para...
– trocear alimentos duros como p. ej. nueces,
cereales, granos grandes o tallos,
– preparar materiales que no sean alimentos,
- 2 -
Page 5

– el uso comercial o industrial,
– el funcionamiento en ambientes húmedos o al
aire libre.
Utilice sólo accesorios y piezas de recambio adecuadas para este aparato. ¡Otras piezas pueden
no ser lo suficientemente adecuadas o seguras!
Características técnicas
Tensión nominal: 220 - 240 V~50 Hz
Potencia nominal: 550 vatios
Cantidad de llenado máx.: 1,75 l
Clase de protección: II
Tiempo KB: 3 minutos
Con el periodo KB (funcionamiento por un corto
periodo de tiempo) se indica durante cuánto tiempo
puede funcionar un aparato sin que el motor se sobrecaliente ni se dañe. Tras el periodo KB indicado deberá apagarse el aparato hasta que el motor se
haya enfriado a temperatura ambiente.
Volumen de suministro
Después del desembalado compruebe si el envío
está completo. El volumen de suministro comprende:
1 x bloque motor, con cable de alimentación y
clavija de red
1 x suplemento mezclador con cuchilla de corte
fija
1 x tapa
1 x tapa de llenado
1 x manual de instrucciones
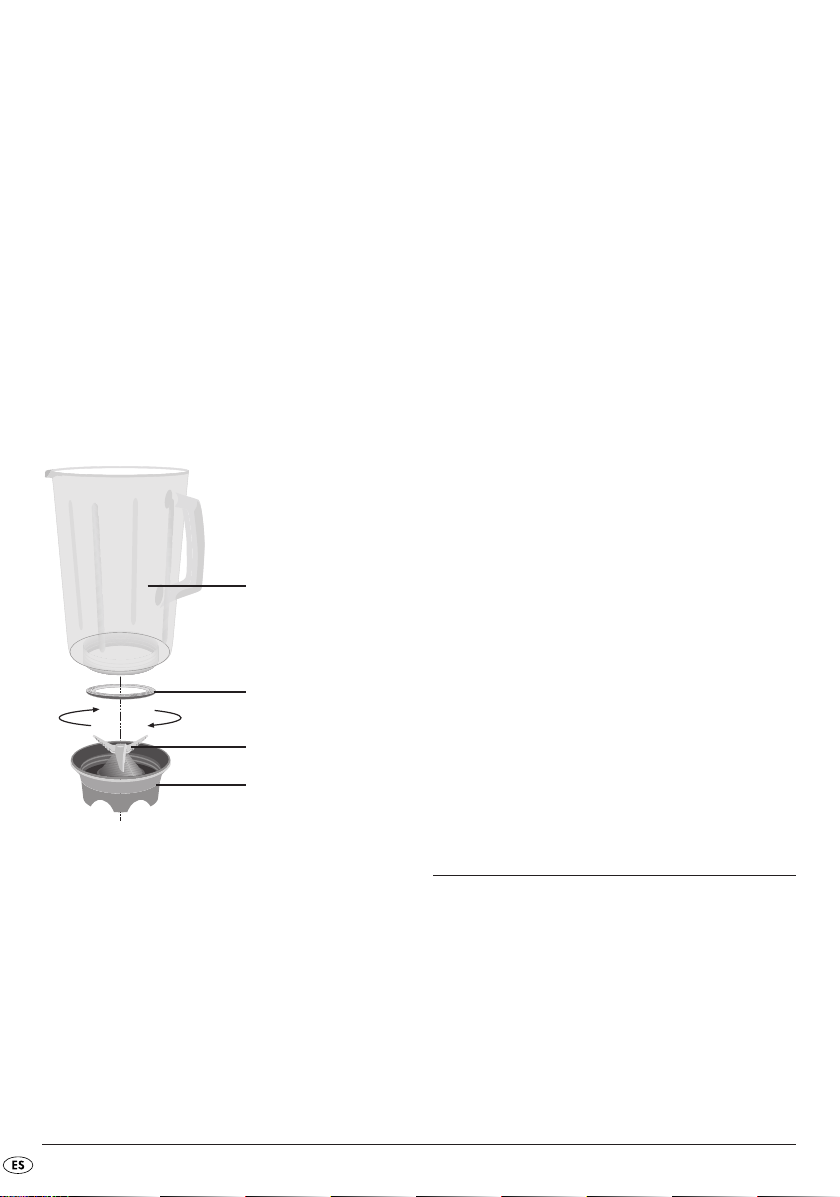
Descripción de aparatos
Tapa de llenado
q
Tapa
w
Suplemento mezclador
e
Cuchilla de corte
r
Interruptor
t
Cable de alimentación
y
Bloque motor
u
Rebobinador del cable
i
Escala
o
Desembalar
Antes de poner el aparato en servicio, cerciórese
de que ...
– no esté dañado el aparato, el cable de alimenta-
ción con clavija de red, ni ninguno de los accesorios y componentes,
– se hayan retirado todos los materiales de emba-
laje del aparato. Conserve el embalaje para poder guardar el aparato con la adecuada protección en caso de almacenamiento o envío, p. ej.
en caso de reparación.
• Limpie con precaución todos las piezas antes de
utilizar la mezcladora de pie por primera vez
(véase “Limpieza”).
Emplazamiento
Después de que haya limpiado todas las piezas
como se indica en el apartado “Limpieza”:
Emplace el aparato de manera que ...
➩
– la clavija de red sea fácilmente accesible, para
poder extraerla de la base de enchufe en caso
de peligro.
– repose de forma estable y sin deslizamientos,
para que no vuelque en caso de vibraciones.
– el cable
y al tirar de él por descuido el aparato pueda
volcar.
- 3 -
no sobresalga en la zona de trabajo
y
Page 6

Manejo
¡Advertencia!
El motor se apaga al separar el suplemento mezclador
del bloque motor u. Por este motivo podría olvi-
e
darse de que la máquina todavía está conectada. El
motor arrancará repentinamente en cuanto monte el
suplemento mezclador
Por consiguiente:
• No introduzca la clavija de red en la base de
enchufe hasta haber llenado totalmente el suplemento mezclador
tamente.
• Asegúrese siempre antes del montaje de que el
aparato está desconectado o de que la clavija
de red no está introducida en la base de enchufe.
• Apague el aparato, retire la clavija de red y
espere hasta que el motor se pare antes de
extraer el suplemento mezclador
Llenado y montaje del suplemento
mezclador
Llene el suplemento mezclador esólo después
➩
de extraerlo del aparato.
A continuación presione la tapa wfirmemente so-
➩
bre el suplemento mezclador
que también esté cerrado el pico de vertido del
suplemento mezclador
Introduzca la tapa de llenado qen la apertura
➩
de la tapa y gírela en el sentido de las agujas
del reloj.
Coloque el suplemento mezclador elleno y cer-
➩
rado sobre el bloque motor
mento mezclador
da presionarlo hacia abajo. Sólo cuando el
suplemento mezclador
colocado podrá encenderse el motor.
:
e
y haberlo montado correc-
e
.
e
. Compruebe
e
.
e
. Gire el suple-
u
ligeramente, hasta que pue-
e
esté correctamente
e
Seleccionar velocidad
Cuando haya terminado de llenar el suplemento
mezclador
sobre el bloque motor
rato.
Ponga el interruptor ten el ...
➩
– nivel 1-3
para alimentos líquidos o de consistencia media,
para mezclar, pasar puré y batir
– nivel 3-5
para alimentos de mayor consistencia o para trocear
– Nivel Ice Crush/Clean
para funcionamiento en impulsos breves y potentes,
p. ej. para picar cubitos de hielo o para la limpieza.
El interruptor
para no sobrecargar el motor. Por este motivo, mantenga el interruptor
y lo haya colocado correctamente
e
, puede encender el apa-
u
no se queda fijo en esta posición
t
brevemente en esta posición.
t
Llenado durante el funcionamiento
¡Advertencia!
Si durante el funcionamiento desea introducir algún
alimento, sólo podrá abrir la tapa de llenado
vista para ello.
• No abra la tapa
lir despedidos a gran velocidad trozos de alimentos!
• No introduzca nunca cubiertos u objetos para
mezclar en el suplemento mezclador
tras el aparato esté en funcionamiento. ¡Si éstos
entran en contacto con las cuchillas giratorias, que
giran a alta velocidad, existe un serio peligro de lesiones!
Para introducir alimentos durante el funcionamiento ...
gire la tapa de llenado qen sentido contrario
➩
a las agujas del reloj y retírela.
A continuación introduzca de nuevo la tapa de
➩
llenado
el sentido de las agujas del reloj.
en la apertura de la tapa y gírela en
q
en ningún caso. ¡Pueden sa-
w
e
q
mien-
pro-
- 4 -
Page 7

Retirar el suplemento mezclador
Una vez finalizada la elaboración de los alimentos
introducidos:
Ponga siempre en primer lugar el interruptor
➩
en la posición de apagado ("0") y extraiga la clavija de red.
Espere hasta que el motor se detenga antes de
➩
levantar el suplemento mezclador
mento mezclador
posición.
no se ha de girar en esta
e
e
t
. El suple-
Indicaciones útiles
– Para lograr los mejores resultados al hacer purés
de ingredientes sólidos, vaya añadiendo poco a
poco porciones pequeñas dentro del suplemento
mezclador
una vez.
– Si prepara ingredientes sólidos, córtelos en trocitos
pequeños (2-3 cm).
– Al mezclar ingredientes líquidos comience primero
con una pequeña cantidad de líquido. Vaya añadiendo poco a poco más líquidos a través del
hueco de la tapa.
– Puede estabilizar fácilmente el aparato colocando
su mano sobre la mezcladora de pie cerrada
durante el funcionamiento.
– Al batir alimentos sólidos o espesos puede ser
útil el uso del funcionamiento a impulsos, para
evitar que la cuchilla de corte
en vez de cantidades grandes de
e
se incruste.
r
Limpieza
¡Precaución!
Antes de limpiar la mezcladora de pie y sus piezas:
• Asegúrese de que el aparato se encuentra desconectado y la clavija de red extraída.
En ningún caso debe sumergir el bloque motor
en agua o en cualquier otro líquido.
u
Esto puede provocar peligro de muerte por descarga eléctrica y se puede dañar el aparato.
• No abra la carcasa del aparato bajo ninguna
circunstancia. De lo contrario, puede existir peligro
de muerte por descarga eléctrica.
• No desmonte nunca la cuchilla
co nunca el interior del suplemento mezclador
. ¡Las cuchillas restán muy afiladas!
e
• No aplique disolventes ni productos abrasivos
sobre las superficies de plástico, ya que podrían
dañarse.
Limpieza del suplemento mezclador
Limpie el suplemento mezclador esólo con un
➩
cepillo de mango largo, de manera que usted
no se pueda dañar con las cuchillas
En caso de suciedad persistente puede lavar el
➩
suplemento mezclador
las. Retire para ello siempre el suplemente mezclador
conforme a lo descrito más adelante.
e
Limpie la tapa wy la tapa de llenado qen el
➩
lava-vajillas o lávela con normalidad.
e
, ni toque tampo-
r
.
r
también en el lavavajil-
- 5 -
Page 8
Si limpia la mezcladora de pie justo después de su
uso, conseguirá en la mayoría de los casos una limpieza higiénica con las siguientes alternativas:
Llene el suplemento mezclador econ agua,
➩
cierre la tapa
dor
sobre el bloque motor u.
e
Introduzca la clavija de red en la base de enchufe
y accione un par de veces el funcionamiento en
modo Ice Crush/Clean, para que la cuchilla
se limpie con el agua a velocidad máxima.
Si la suciedad no se desprendiese, puede separar
la pieza inferior de plástico del suplemento mezclador
, donde está la cuchilla r, de la pieza de vidrio
e
del mismo:
y coloque el suplemento mezcla-
w
r
Limpie bien ambas piezas con agua jabonosa
➩
o en el lavavajillas.
Coloque la pieza de plástico del suplemento
➩
mezclador
del mismo. Compruebe que la anilla de junta
esté colocada.
de nuevo sobre la pieza de vidrio
e
Limpieza del bloque motor
Para limpiar las superficies de plástico utilice
➩
un paño seco o ligeramente humedecido como
máximo.
En cada limpieza compruebe que el interruptor de
➩
contacto del alojamiento del suplemento mezclador
ciedad. Si no puede eliminar los posibles bloqueos con la esquina de una hoja de papel,
póngase en contacto con el servicio de atención
al cliente. No utilice en ningún caso un objeto
duro, ya que de este modo el interruptor de contacto podría dañarse.
Retire la posible suciedad de la parte inferior
➩
del bloque motor
un cepillo suave para el polvo. Tenga cuidado
de que no penetre nada en el interior del aparato a través de las aperturas de ventilación.
no está bloqueado con restos de su-
e
sólo con un paño seco o
u
Después de la limpieza
Deje que todas las piezas se sequen completamente
antes de volver a montar la mezcladora de pie o
utilizar el aparato.
Saque el suplemento mezclador edel bloque mo-
➩
tor
.
u
Gire la parte de plástico del suplemento
➩
mezclador
de la pieza de vidrio del suplemento mezclador
e
Atención!
Tenga cuidado con las cuchillas . Están muy afiladas. ¡Peligro de lesiones!
, de manera que se pueda separar
e
.
Almacenamiento
Si no va a utilizar la mezcladora de pie durante
➩
mucho tiempo, límpiela completamente (véase
capítulo "Limpieza").
Enrosque el cable de red yen el rebobinador
➩
del cable
Guarde la mezcladora de pie en un lugar fresco
➩
y seco.
- 6 -
en el fondo del bloque motor u.
i
Page 9
Evacuación
En ningún caso deberá tirar el aparato
a la basura doméstica. Este producto
está sometido a la directiva europea
2002/96/EC.
Elimine el aparato a través de una empresa de
evacuación de basuras autorizada o por medio del
centro de evacuación de basuras municipal.
Tenga en cuenta las normativas actuales en vigor.
En caso de duda póngase en contacto con el
centro de evacuación de basuras.
El material de embalaje debe desecharse
de forma respetuosa con el medio
ambiente.
Garantía y servicio
Con este aparato recibe usted 3 años de garantía
desde la fecha de compra. El aparato ha sido fabricado cuidadosamente y ha sido probado antes de
su entrega. Guarde el comprobante de caja como
justificante de compra. Si necesitara hacer uso de
la garantía, póngase en contacto por teléfono con
su punto de servicio habitual. Éste es el único
modo de garantizar un envío gratuito.
Kompernass Service España
C/Invención 7
Polígono Industrial Los Olivos
28906 Getafe – Madrid
Tel.: 902/884663
Fax: 91/6652551
e-mail: support.es@kompernass.com
Importador
KOMPERNASS GMBH
BURGSTRASSE 21
44867 BOCHUM, GERMANY
www.kompernass.com
La garantía cubre los defectos de fabricación o del
material, pero no las piezas sujetas a desgaste y
los daños sufridos por las piezas frágiles. Este producto ha sido diseñado exclusivamente para el uso
particular y no para el uso industrial.
En caso de manipulación indebida e incorrecta, uso
de la fuerza y en caso de abrir el aparato personas
extrañas a nuestros centros de asistencia técnica
autorizados, la garantía pierde su validez. Esta garantía no reduce en forma alguna sus derechos
legales.
- 7 -
Page 10

- 8 -
Page 11

INDICE PAGINA
Indicazioni di sicurezza 10
Uso conforme 10
Dati tecnici 11
Disimballaggio 11
Fornitura 11
Descrizione dell'apparecchio 11
Montaggio 11
Funzionamento 12
Riempimento e montaggio del bicchiere del frullatore 12
Selezione della velocità 12
Riempimento durante il funzionamento 12
Rimozione del bicchiere 13
Indicazioni utili 13
Pulizia 13
Pulizia del bicchiere del frullatore 13
Pulizia del blocco motorino 14
Operazioni successive alla pulizia 14
Conservazione 14
Smaltimento 15
Garanzia & assistenza 15
Importatore 15
Conservare le presenti istruzioni per consultarle in futuro; in caso di cessione dell'apparecchio a terzi,
consegnare anche le istruzioni!
- 9 -
Page 12

Indicazioni di sicurezza
Per evitare il pericolo di morte a
causa di scossa elettrica:
• Accertarsi che il blocco motore, il cavo di allacciamento alla rete o la spina non vengano immersi
in acqua o altri liquidi.
• Utilizzare l'apparecchio esclusivamente in ambienti asciutti, mai all'aperto o in ambiente umido.
• Impedire che il cavo di rete si bagni o inumidisca
durante l'uso. Disporlo in modo tale che non si
incastri o si danneggi in altro modo.
• Fare sostituire immediatamente la spina o il cavo
di rete danneggiato da personale specializzato
autorizzato o dal centro di assistenza ai clienti,
per evitare possibili danni.
• Dopo l'uso estrarre sempre la spina dalla presa.
Non è sufficiente spegnere l'apparecchio poiché
esso è ancora sotto tensione fino a quando la
spina è inserita nella presa.
• Prima dell'uso, controllare sempre che il prodotto
sia in condizioni perfette. Non si può utilizzare
l'apparecchio nel caso in cui siano riconoscibili
dei danni, in particolare al blocco motore o al
bicchiere in vetro del mixer.
• Staccare subito la spina di rete dalla presa se si
sente un odore o un rumore insolito o in caso di
guasto visibile.
Per evitare surriscaldamento e
pericolo di incendio:
• non esporre l'apparecchio all'irradiazione solare
o al calore proveniente da altri apparecchi
• non introdurre mai liquidi bollenti nel bicchiere
del frullatore! Lasciarli dapprima raffreddare a
temperatura ambiente. In caso contrario l'apparecchio può surriscaldarsi e il bicchiere può saltare!
Per evitare incidenti e infortuni:
• Non introdurre mai le mani nel bicchiere del frullatore, in particolar modo con l'apparecchio in
funzione. Le lame sono estremamente affilate!
• Non aprire il coperchio durante il funzionamento
dell'apparecchio. In caso contrario alcuni pezzi
di alimenti potrebbero schizzare fuori ad alta
velocità!
• Non introdurre mai posate o oggetti per mescolare nel bicchiere del frullatore mentre quest'ultimo
è in funzione. Sussiste notevole pericolo di lesioni
in caso di contatto con lame che ruotano a velocità molto elevata!
• Tenere sempre l'apparecchio sotto controllo quando
è in funzione, per poter reagire immediatamente
in caso di pericolo
• Questo apparecchio non è indicato per l'uso da
parte di persone (inclusi bambini) con limitate
capacità fisiche, sensoriali o mentali o prive dell'esperienza e/o della conoscenza necessaria, a
meno che tali persone non vengano sorvegliate
da un responsabile per la sicurezza o abbiano
ricevuto indicazioni sull'impiego dell'apparecchio.
• Sorvegliare i bambini per assicurarsi che non
giochino con l'apparecchio.
Uso conforme
Questo apparecchio è progettato per ...
– miscelare, frullare e agitare alimenti nonché tritu-
rare cubetti di ghiaccio (cosiddetto “crushen”),
– quantità esclusivamente ad uso domestico e sol-
tanto per l'impiego domestico privato in ambienti
asciutti.
Questo apparecchio non è progettato per ...
– la triturazione di ingredienti duri, ad esempio
noci, semi, grani grossi o steli,
– la lavorazione di materiali diversi dai generi
alimentari,
- 10 -
Page 13

– l'impiego a scopo commerciale o industriale,
– l'utilizzo in ambiente umido o all'aperto.
Impiegare soltanto accessori e ricambi specifici per
questo apparecchio. Altri componenti potrebbero
non essere sufficientemente idonei o sicuri!
Dati tecnici
Tensione nominale: 220 - 240 V ~50 Hz
Potenza nominale: 550 Watt
Capacità max. di
riempimento: 1,75 l
Classe di protezione: II
Funzionamento continuato:3 minuti
Il tempo di funzionamento abbreviato indica il tempo
di funzionamento dell'apparecchio senza pericolo
di surriscaldamento e di guasti al motore. In base al
tempo di funzionamento abbreviato, l'apparecchio
dev'essere spento fino al completo raffreddamento
del motore a temperatura ambiente.
Fornitura
Dopo aver aperto la confezione, verificare la completezza della fornitura. Della dotazione standard
fanno parte:
1 x blocco motorino, con cavo di rete e spina di
rete
1 x bicchiere frullatore, con lame fisse
1 x coperchio
1 x coperchio di riempimento
1 x manuale di istruzioni
Descrizione dell'apparecchio
Coperchio di riempimento
q
Coperchio
w
Bicchiere frullatore
e
Lame
r
Interruttore
t
Cavo di rete
y
Blocco motorino
u
Avvolgicavo
i
Bicchiere graduato
o
Disimballaggio
Prima di utilizzare l'apparecchio, accertarsi che ...
– l'apparecchio, il cavo di rete, la spina e tutti gli
accessori e componenti dell'apparecchio non
siano danneggiati,
– siano stati rimossi tutti i materiali di imballaggio
dall'apparecchio. Conservare l'imballaggio per
conservare l'apparecchio protetto o per la spedizione, ad es. in caso di riparazione.
• Pulire accuratamente tutti gli elementi prima del
primo impiego del frullatore (vedere sezione
“Pulizia”).
Montaggio
Una volta puliti tutti i pezzi, procedere come descritto
al paragrafo “Pulizia”:
Montare l'apparecchio in modo tale che ...
➩
– la spina di rete sia subito raggiungibile, per
consentirne l'estrazione dalla presa in caso di
pericolo;
– sia posizionato in modo stabile e non possa sci-
volare, per evitarne il ribaltamento in caso di
vibrazioni;
– il cavo
e si possa far ribaltare l'apparecchio qualora
venisse tirato inavvertitamente.
- 11 -
non interferisca con la zona di lavoro
y
Page 14

Funzionamento
Avvertenza!
Il motore si spegne non appena il bicchiere del frullatore
Non si noterà probabilmente che l'apparecchio è
ancora acceso. Il motore si avvia in modo imprevisto non appena viene montato il bicchiere
Per questo motivo:
• Inserire la spina di rete nella presa soltanto
• Prima del montaggio accertarsi che l'apparecchio
• Disinserire dapprima l'apparecchio, estrarre la
Riempimento e montaggio del
bicchiere del frullatore
➩
➩
➩
➩
viene rimosso dal blocco motorino u.
e
:
e
dopo aver montato il bicchiere
chiuso.
sia disinserito o che la spina di rete sia estratta.
spina e attendere l'arresto del motore prima di
rimuovere il bicchiere
Riempire il bicchiere esoltanto se lo stesso è
stato rimosso.
Premere infine il coperchio wsul bicchiere e. Accertarsi che anche il becco salvagoccia del bicchiere
Inserire il coperchio di riempimento qnell'apertura del coperchio e chiuderlo ruotando in senso
orario.
Posizionare il bicchiere epieno e chiuso sul blocco motore. Ruotare leggermente il bicchiere
del frullatore finché è possibile premerlo verso il
basso. Soltanto quando il bicchiere
tamente posizionato, il motorino può avviarsi.
sia chiuso.
e
e
.
e
pieno e
è corret-
e
e
Selezione della velocità
Non appena il bicchiere eè del tutto pieno, completamente chiuso e ben posizionato sul blocco motorino
, è possibile accendere l'apparecchio.
u
Posizionare l'interruttore tsu ...
➩
– velocità 1-3
per alimenti liquidi o di media solidità, per miscelare,
frullare e agitare
– velocità 3-5
per alimenti più solidi o per triturare
– Ice Crush/Clean
per un funzionamento a impulsi breve e deciso, ad
es. per triturare cubetti di ghiaccio o per la pulizia.
L'interruttore
non sovraccaricare il motorino. Tenere pertanto
solo brevemente l'interruttore
ne.
non scatta in questa posizione per
t
in questa posizio-
t
Riempimento durante il
funzionamento
Attenzione!
Qualora si voglia riempire l'apparecchio mentre è
in funzione, aprire esclusivamente il coperchio di
riempimento
• Non aprire in nessun caso il coperchio
caso contrario alcuni alimenti potrebbero schizzare fuori ad alta velocità!
• Non introdurre mai posate o oggetti per mescolare nel bicchiere
mo è in funzione. Sussiste notevole pericolo di lesioni in caso di contatto con lame
velocità molto elevata!
Per introdurre qualcosa con l'apparecchio in
funzione, ...
aprire il coperchio di riempimento qin senso
➩
antiorario ed estrarlo.
Inserire infine di nuovo il coperchio di riempi-
➩
mento
lo ruotando in senso orario.
appositamente previsto.
q
del frullatore mentre quest'ulti-
e
che ruotano a
r
nell'apertura del coperchio e chiuder-
q
w
. In
- 12 -
Page 15

Rimozione del bicchiere
Se la lavorazione degli alimenti introdotti è terminata:
Posizionare sempre l'interruttore tsu Off ("0“) pri-
➩
ma di estrarre la spina.
Attendere prima l'arresto del motorino prima di
➩
rimuovere il bicchiere
so l'alto. Per staccare il bicchiere
cessario ruotarlo.
estraendolo diritto ver-
e
, non è ne-
e
Indicazioni utili
– Per ottenere i migliori risultati di frullatura di in-
gredienti solidi, aggiungere gli alimenti nel bicchiere
to il quantitativo in un'unica soluzione.
– In caso di elaborazione di ingredienti solidi,
tagliarli in piccoli pezzi (2-3 cm).
– Nel mescolare ingredienti solidi, partire inizial-
mente da una piccola quantità di liquido. Continuare quindi a versare progressivamente il liquido
tramite l'apertura situata nel coperchio.
– Poggiando la mano sopra il frullatore chiuso du-
rante il funzionamento, lo si stabilizza in modo
appropriato.
– Per agitare ingredienti solidi o molto densi, può
essere utile impiegare la funzione "pulse" al fine
di impedire un bloccaggio della lama
un po' alla volta, invece di versare tut-
e
r
.
Pulizia
Attenzione!
Prima di pulire il frullatore e i suoi componenti:
• Assicurarsi che l'apparecchio sia spento e la spina
sia staccata.
Non immergere assolutamente il blocco motorino
dell'apparecchio in acqua o altri liquidi.
u
Ciò può comportare pericolo di morte a causa di una scossa elettrica e l'apparecchio può
essere danneggiato.
• Non aprite mai l'involucro dell'apparecchio.
Altrimenti si corre pericolo di morte per scossa
elettrica.
• Non smontare mai le lame
mai le mani nel bicchiere del frullatore
lame
• Non utilizzare solventi o sostanze abrasive per
le superfici in plastica, che altrimenti potrebbero
esserne danneggiate.
sono estremamente affilate!
r
Pulizia del bicchiere del frullatore
Pulire il bicchiere del frullatore esoltanto con
➩
uno scovolino con manico lungo in modo tale
da non potersi ferire con le lame
In caso di sporco ostinato è possibile lavare il
➩
bicchiere del frullatore
glie. Smontare sempre l'inserto di miscelazione
come descritto di seguito.
e
Pulire il coperchio we il coperchio di riempi-
➩
mento
lavaggio delle stoviglie.
nella lavastoviglie o durante il normale
q
e non introdurre
r
e
.
r
anche nella lavastovi-
e
. Le
- 13 -
Page 16

In caso di pulizia del frullatore subito dopo l'impiego,
si raggiunge un grado di igiene sufficiente nella
maggior parte dei casi attraverso le seguenti
alternative:
Riempire il bicchiere econ acqua, chiudere il
➩
coperchio
blocco motorino
Inserire la spina nella presa e azionare ripetutamente il funzionamento Ice Crush/Clean, in modo
tale che le lame
me massimo.
Nel caso in cui lo sporco non si staccasse, è possibile
staccare la parte inferiore in plastica del bicchiere
con le lame rdalla parte in vetro del bicchiere
e
:
e
e posizionare il bicchiere esul
w
.
u
attraversano l'acqua al regi-
r
Attenzione!
Procedere con cautela con le lame . Sono molto
affilate. Pericolo di lesioni!
Pulire a fondo entrambi i componenti in una deli-
➩
cata lisciva di sapone o nella lavastoviglie.
Posizionare di nuovo la parte in plastica del
➩
bicchiere
. Accertarsi che l'anello di tenuta sia
e
correttamente posizionato.
sulla parte in vetro del bicchiere
e
Pulizia del blocco motorino
Utilizzare un panno asciutto o al massimo legger-
➩
mente inumidito per pulire le superfici di plastica.
Ad ogni operazione di pulizia, controllare che
➩
l'interruttore di contatto nell'alloggiamento del
bicchiere
co. Nel caso in cui non si riescano a rimuovere
eventuali blocchi con l'angolo di un foglio di carta,
rivolgersi al Servizio assistenza. Non utilizzare
in nessun caso un oggetto duro, l'interruttore di
contatto potrebbe subire un danno.
Rimuovere eventuali tracce di sporco sulla parte
➩
inferiore del blocco motorino
con un panno asciutto o con un pennello per la
polvere. Accertarsi che non possa penetrare nulla nell'apparecchio attraverso le aperture di
ventilazione.
non sia bloccato da tracce di spor-
e
esclusivamente
u
Operazioni successive alla pulizia
Far asciugare di nuovo tutti i componenti prima di
montare di nuovo e utilizzare il frullatore.
Rimuovere il bicchiere del frullatore edal bloc-
➩
co motorino
Girare la parte in plastica del bicchiere ein
➩
modo tale che si possa staccare dalla parte in
vetro del bicchiere
u
.
.
e
Conservazione
In caso di prolungato inutilizzo del frullatore,
➩
pulirlo accuratamente (v. capitolo "Pulizia“).
Avvolgere il cavo yintorno all'avvolgicavo
➩
alla base del blocco motorino u.
Conservare il frullatore in un luogo fresco e
➩
asciutto.
- 14 -
i
Page 17

Smaltimento
Importatore
Non gettare per alcun motivo l’apparecchio insieme ai normali rifiuti
domestici. Questo prodotto sottostà
alla direttiva europea 2002/96/EC.
Smaltire l’apparecchio presso un’azienda autorizzata o presso l’ente comunale di smaltimento.
Rispettare le norme attualmente in vigore. In caso di
dubbi, contattare l’azienda di smaltimento
competente.
Smaltire tutti i materiali d’imballo in conformità alle norme per il rispetto dell’ambiente.
Garanzia & assistenza
Questo apparecchio è garantito per tre anni a partire dalla data di acquisto. L'apparecchio è stato
prodotto con cura e debitamente collaudato prima
della consegna. Conservare lo scontrino come prova d'acquisto. Nei casi contemplati dalla garanzia,
mettersi in comunicazione telefonicamente con il
centro di assis-tenza più vicino. Solo in questo
modo è possibile garantire una spedizione gratuita
della merce.
La prestazione della garanzia vale solo per difetti
del materiale o di fabbricazione. Il prodotto è destinato esclusivamente all'uso domestico e non a quello commerciale.
La garanzia decade in caso di impiego improprio o
manomissione, uso della forza e interventi non eseguiti dalla nostra filiale di assistenza autorizzata.
KOMPERNASS GMBH
BURGSTRASSE 21
44867 BOCHUM, GERMANY
www.kompernass.com
Kompernass Service Italia
Corso Lino Zanussi 11
33080 Porcia (PN)
Tel.: 0434/1851001
Fax: 0434/1851001
e-mail: support.it@kompernass.com
- 15 -
Page 18

- 16 -
Page 19

CONTENT PAGE
Safety Notices 18
Intended Use 18
Technical data 19
Unpacking 19
Items supplied 19
Appliance description 19
Preparing for use 19
Operation 20
Filling and mounting the mixer jug 20
Selecting operating speeds 20
Filling when in use 20
Removing the mixer 21
Useful tips 21
Cleaning 21
Cleaning the mixer 21
Cleaning the motor block 22
After cleaning 22
Storage 22
Disposal 23
Warranty & Service 23
Importer 23
Read the operating instructions carefully before using the appliance for the first time and preserve this
booklet for later reference. Pass the manual on to whomsoever might acquire the scale at a later date.
- 17 -
Page 20

Safety Notices
To avoid the risk of a potentially
fatal electric shock:
• Ensure that the motor block, the power cable and
the power plug are never submersed in water or
other fluids.
• Only use the appliance in dry rooms, never use
it outdoors or in moist environments.
• Make sure that the power cable never becomes
wet or damp during operation. Lay the cable
such that it does not get clamped or otherwise
damaged.
• Arrange for defective power plugs and/or cables
to be replaced at once by qualified technicians
or our Customer Service Department.
• Always remove the plug from the power socket
after use. Switching off the appliance is not sufficient because the appliance receives power as
long as the power plug is connected to the socket.
• Check to ensure that the appliance is in a serviceable condition before taking it into use. The appliance may not be used if there is recognisable
damage on it, especially to the motor block and
the glass mixing jug.
• Immediately remove the plug from the socket
should you hear or smell anything unexpected
from the appliance when it is in use or there is
an evident malfunction.
To avoid overheating and the
risk of fire:
• Do not use the appliance in locations with direct
sunlight or in the vicinity of heat generating appliances.
• NEVER fill the mixing jug with boiling fluids!
Allow these to cool to a handwarm temperature.
Otherwise, the appliance could overheat and/
or the glass of the mixing jug could crack!
To reduce the risk of fire or injury:
• NEVER insert your hand or fingers in the mixing
jug, especially when it is in use. The cutters are
extremely sharp!
• DO NOT open the cover when the appliance is
in operation. Should you do so, pieces of the
foodstuff could be thrown out at high speeds!
• Do not insert cutlery items or mixing tools into
the mixing jug when the appliance is in use.
There is a considerable risk of injury should these
make contact with the swiftly rotating cutters!
• In order to be able to react immediately in the
event of danger, always have the appliance
under supervision when it is in use.
• This appliance is not intended for use by individuals (including children) with restricted physical,
physiological or intellectual abilities or deficiences
in experience and/or knowledge unless they are
supervised by a person responsible for their safety
or receive from this person instruction in how the
appliance is to be used.
• Children should be supervised to ensure that
they do not play with the appliance.
Intended Use
This appliance is intended for ...
– the mixing, blending and stirring of foodstuffs
as well as the crushing of ice cubes,
– exclusively for normal domestic amounts and
only for private use in a domestic environment
in dry rooms.
This appliance is not intended for ...
– the hacking of hard foodstuffs, such as nuts,
seeds, large kernels or stalks,
– the processing of materials that are not foodstuffs,
– utilisation for commercial or industrial purposes,
– for use in moist environments or outdoors.
Use only the accessories and spare parts that are
specified for this appliance. Other parts are possibly
not sufficiently suitable or safe!
- 18 -
Page 21

Technical data
Appliance description
Nominal voltage: 220 - 240 V~50 Hz
Nominal power
consumption: 550 Watt
Max. capacity: 1.75 l
Protection class: II
CO time: 3 Minutes
The C.O. Time (Continuous Operation) details how
long an appliance may be used without the motor
overheating and being damaged. When the specified
C.O. Time has been reached, the appliance must be
switched off until the motor has cooled itself down.
Unpacking
Before taking the appliance into use check to ensure
that ...
– the appliance is free of visible damage, including
also the power cable and plug, all accessories
and all appliance parts,
– all packaging materials are removed from the
appliance. Preserve the packaging so as to be
able to store the appliance under protection or
to transmit it through the post, e.g. for repairs.
• Carefully clean all components before using the
liquidiser for the first time (see “Cleaning”).
Filling cap
q
Cover
w
Mixer jug
e
Cutter
r
Switch
t
Power cable
y
Motor block
u
Cable storage
i
Scale
o
Preparing for use
When all components have been cleaned as described
under “Cleaning”:
Position the appliance such that, ...
➩
– the power plug is immediately accessible, so that
it can be quickly withdrawn in the event of
danger.
– the appliance stands firmly and without risk of
slipping or tipping when under vibration.
– that the power cable
area and thus not presenting a risk of being inadvertently snagged and tipping the appliance
over.
is not in the working
y
Items supplied
After unpacking, check to ensure all items are
avail-able. Being supplied are:
1 x Motor block, with power cable and plug
1 x Mixer jug, with permanently assembled cutters
1 x Lid
1 x Filling cap
1 x Operating instruction
- 19 -
Page 22

Operation
Warning!
The motor switches itself off as soon as the mixing
jug
is removed from the motor block u. It could
e
then be overlooked that the appliance is still switched on. The motor will thus start of its own accord
as soon as the mixing jug
Therefore:
• First insert the power plug into the wall socket
when the mixer jug
its lid fitted and closed.
• Before mounting the mixing jug always check to
see that the appliance is switched off or that the
power plug has been removed.
• Before removing the mixer jug
pliance off, remove the power plug and wait for
the motor to stop revolving.
Filling and mounting the mixer jug
Only fill the mixer jug ewhen it is removed
➩
from the motor unit.
Afterwards, firmly press the lid wonto the mixer
➩
jug
. Ensure that the pourer on the mixer jug
e
is also securely closed.
e
Insert the filling cap qinto the lid opening and
➩
secure it by turning it clockwise.
Place the ready filled and sealed mixer jug
➩
onto the motor block u. Lightly turn the mixer
jug
until you can press it down. The motor
e
can start only when the mixer jug
positioned.
is replaced on it:
e
is filled and mounted with
e
, switch the ap-
e
is securely
e
e
Selecting operating speeds
When the mixer jug eis filled, completely sealed
and securely fitted to the motor block
then switch the appliance on.
Place the switch ton ...
➩
– Level 1-3
for fluid or soft foodstuffs, for mixing, blending
and stirring
– Level 3-5
for firmer foodstuffs or for hacking
– Level Ice Crush/Clean
for a short, powerful impulse operation, e.g. for
crushing ice cubes or for cleaning. To avoid
overburdening the motor the switch
lock into this position. Therefore, hold the switch
in this position for a short period.
t
, you can
u
does not
t
Filling when in use
Warning!
Should you wish to insert further foodstuffs during
operation, you may ONLY open the filling cap
provided for this purpose.
• Under no circumstance should you open the lid
. Pieces of the foodstuff could be thrown out at
w
high speeds!
• Do not insert cutlery items or mixing tools into
the mixing jug
There is a considerable risk of injury should these
make contact with the swiftly rotating cutters
To insert something when the appliance is in
operation, ...
turn the filling cap qanti-clockwise and remo-
➩
ve it.
Afterwards, replace the filling cap qinto the
➩
lid and secure it by turning it clockwise.
when the appliance is in use.
e
q
r
!
- 20 -
Page 23

Removing the mixer
When the processing of the foodstuffs is complete:
Always first place the switch tinto the OFF
➩
position ("0") and remove the power plug.
Wait until the motor has come to a complete
➩
standstill before lifting the mixer jug
up. It does not need to be turned.
e
straight
Cleaning
Caution!
Before starting to clean the liquidiser and its
components:
• Ensure that the motor is switched off and the
power plug removed from the socket.
Useful tips
– The best results when blending firm ingredients
are achieved by placing small portions one after
the other into the mixer jug
ting a single large portion.
– When processing firm ingredients, cut them into
small pieces (2-3 cm).
– When mixing liquid ingredients begin first of all
with a small measure of fluids. Gradually add
more fluids to the mixture through the filling cap.
– The appliance can be stabilised by placing your
hand on top of the closed liquidiser during operation.
– For the stirring of firm or very viscous foodstuffs
it can be beneficial to use the impulse-operation,
which helps avoid a blocking of the cutters
instead of inser-
e
r
.
Under no circumstance may the motor block
be submersed in water or other fluids.This
u
could result in you receiving a fatal electric
shock and the appliance could be damaged.
• Never open the housing of the appliance. This
brings with it the risk of receiving a fatal electric
shock.
• Never disassemble the cutters
ach into the mixer jug
tremely sharp!
• Do not use solvents or abrasive cleaners on the
plastic surfaces, they could be damaged by them.
. The cutters rare ex-
e
and never re-
r
Cleaning the mixer
So that you do not injure yourself on the cutters
➩
, clean the mixer jug eonly with a long
r
handled dishwasher brush.
In a case of stubborn soiling, the mixer jug
➩
can also be cleaned in a dishwasher. For this,
always take the mixing jug
described later.
Clean the lid wand the filling cap qin a dish-
➩
washer or with the normal washing up.
apart, as
e
e
If you clean the liquidiser directly after use, you can
often achieve a satisfactory and hygienic level of
cleaning with the following alternative:
Fill the mixer jug ewith water, close the lid
➩
and place the mixer jug eon the motor block
.
u
Insert the power plug into the wall socket and
activate the Ice Crush/Clean switch, causing the
cutters
revolutions.
- 21 -
to rotate in the water with maximum
r
w
Page 24

Should this not dislodge the soiling, you can separate
the lower plastic part of the mixer jug
ters
) from the the glass part:
r
(with the cut-
e
Cleaning the motor block
Use a dry cloth or, at the most, a lightly moistened
➩
one for cleaning the plastic surfaces.
At every cleaning check that the contact switch
➩
in the receptor for the mixer jug
ked by soiling residues. If you cannot dislodge
any blockages with the corner of a piece of pa-
per, make contact with Customer Services. Un-
der no circumstances should you use a hard ob-
ject, this could damage the contact switch.
Remove any possible residues on the underside
➩
of the motor block
stiff bristled brush. Ensure that nothing can enter
through the ventilation opening of the appliance.
only with a dry cloth or a
u
is not blok-
e
Remove the mixer jug efrom the motor block
➩
.
u
Turn the plastic part of the mixer jug eso
➩
that it separates itself from the glass part .
Attention!
Take care with the cutters . They are very sharp.
Risk of injury!
Clean both parts thoroughly in a mild soapy
➩
solution or in a dishwasher.
Replace the plastic part of the mixer jug
➩
back onto the glass part . Ensure that the sealing ring is correctly fitted.
e
After cleaning
Allow all parts to dry well before re-assembling and
re-using the liquidiser.
Storage
If you do not intend to use the liquidiser for an
➩
extended period, clean it thoroughly (see chapter
"Cleaning").
Wrap the power cable yaround the cable sto-
➩
rage
Store the liquidiser at a cool and dry location.
➩
on the base of the motor block u.
i
- 22 -
Page 25

Disposal
Do not dispose of the appliance in your
normal domestic waste. This product is
subject to the European guideline
2002/96/EC.
Dispose of the appliance through an approved disposal centre or at your community waste facility.
Observe the currently applicable regulations.
In case of doubt, please contact your waste disposal
centre.
Dispose of all packaging materials in an
environmentally responsible manner.
Warranty & Service
DES Ltd
Units 14-15
Bilston Industrial Estate
Oxford Street
Bilston
WV14 7EG
Tel.: 0870/787-6177
Fax: 0870/787-6168
e-mail: support.uk@kompernass.com
Irish Connection
Harbour view
Howth
Co. Dublin
Tel: 00353 (0) 87 99 62 077
Fax: 00353 18398056
e-mail: support.ie@kompernass.com
The warranty for this appliance is for 3 years from
the date of purchase. This appliance has been
manufactured with care and meticulously examined
before delivery. Please retain your receipt as proof
of purchase date. Should a claim need to be made
under the warranty, please make contact by telephone with our service department. Only in this
way can a post-free despatch for your goods be assured.
The warranty covers ONLY claims for material and
maufacturing defects, not for wearing or consumable or for damage to fragile components. This product is for private use only and is not intended for
commercial applications.
The warranty will become void in the event of abusive and improper handling, use of force and internal
tampering not carried or approved by our authorized service branch. Your statutory rights are not
restricted in any way by this warranty.
Importer
KOMPERNASS GMBH
BURGSTRASSE 21
44867 BOCHUM, GERMANY
www.kompernass.com
- 23 -
Page 26

- 24 -
Page 27

INHALTSVERZEICHNIS SEITE
Sicherheitshinweise 26
Bestimmungsgemäßer Gebrauch 26
Technische Daten 27
Auspacken 27
Lieferumfang 27
Gerätebeschreibung 27
Aufstellen 27
Bedienen 28
Mixaufsatz befüllen und montieren 28
Geschwindigkeitsstufe wählen 28
Einfüllen im Betrieb 28
Mixaufsatz abnehmen 29
Nützliche Hinweise 29
Reinigen 29
Mixaufsatz reinigen 29
Motorblock reinigen 30
Nach dem Reinigen 30
Aufbewahren 30
Entsorgen 31
Garantie und Service 31
Importeur 31
Lesen Sie die Bedienungsanleitung vor der ersten Verwendung aufmerksam durch und heben Sie diese für
den späteren Gebrauch auf. Händigen Sie bei Weitergabe des Gerätes an Dritte auch die Anleitung aus.
- 25 -
Page 28

Sicherheitshinweise
Um Lebensgefahr durch elektrischen Schlag zu vermeiden:
• Stellen Sie sicher, dass der Motorblock, das
Netzkabel oder der Netzstecker niemals in Wasser oder andere Flüssigkeiten getaucht wird.
• Verwenden Sie das Gerät ausschließlich in
trockenen Räumen, niemals im Freien oder in
feuchter Umgebung.
• Achten Sie darauf, dass im Betrieb das Netzkabel niemals nass oder feucht wird. Führen Sie
es so, dass es nicht eingeklemmt oder anderweitig beschädigt werden kann.
• Lassen Sie beschädigte Netzstecker oder Netzkabel sofort von autorisiertem Fachpersonal
oder dem Kundenservice austauschen, um
Gefährdungen zu vermeiden.
• Ziehen Sie nach Gebrauch immer den Stecker
aus der Steckdose. Ausschalten alleine genügt
nicht, weil noch immer Netzspannung im Gerät
anliegt, solange der Netzstecker in der
Steckdose steckt.
• Kontrollieren Sie vor jedem Gebrauch das Gerät
auf seinen einwandfreien Zustand. Das Gerät
darf nicht verwendet werden, wenn Schäden erkennbar sind, insbesondere an dem Motorblock
oder gläsernen Mixaufsatz.
• Ziehen Sie sofort den Netzstecker aus der
Steckdose, wenn Sie eine ungewöhnliche Geräusch- oder Geruchsentwicklung wahrnehmen
oder bei erkennbarer Fehlfunktion.
Um Überhitzung und Brandgefahr
zu vermeiden:
• Verwenden Sie das Gerät nicht im Bereich direkter Sonneneinstrahlung oder Wärmeeinwirkung
hitzeerzeugender Geräte.
• Füllen Sie niemals kochende Flüssigkeiten in den
Mixaufsatz! Lassen Sie diese erst auf handwarme Temperatur abkühlen. Andernfalls kann das
Gerät überhitzen und auch das Glas vom
Mixaufsatz springen!
Um Unfall- und Verletzungsgefahr
zu vermeiden:
• Greifen Sie niemals in den Mixaufsatz, insbesondere nicht im Betrieb. Die Messer sind extrem
scharf!
• Öffnen Sie nicht den Deckel, wenn das Gerät in
Betrieb ist. Andernfalls können Lebensmittelteile
mit hoher Geschwindigkeit herausfliegen!
• Führen Sie niemals Besteckteile oder Rührgegenstände in den Mixaufsatz, solange das Gerät in
Betrieb ist. Es besteht erhebliche Verletzungsgefahr, wenn diese das sich sehr schnell drehende
Messer berühren!
• Lassen Sie das Gerät nicht unbeaufsichtigt arbeiten, um bei Gefahr sofort reagieren zu können.
• Dieses Gerät ist nicht dafür bestimmt, durch Personen (einschließlich Kinder) mit eingeschränkten physischen, sensorischen oder geistigen
Fähigkeiten oder mangels Erfahrung und/oder
mangels Wissen benutzt zu werden, es sei denn,
sie werden durch eine für ihre Sicherheit zuständige Person beaufsichtigt oder erhielten von ihr
Anweisungen, wie das Gerät zu benutzen ist.
• Kinder sollten beaufsichtigt werden, um sicherzustellen, dass sie nicht mit dem Gerät spielen.
Bestimmungsgemäßer
Gebrauch
Dieses Gerät ist bestimmt für ...
– das Mischen, Pürieren und Rühren von Lebens-
mitteln sowie Zerkleinern von Eiswürfeln (sog.
“Crushen”),
– ausschließlich haushaltsübliche Mengen und nur
für den privaten Hausgebrauch in trockenen
Räumen.
Dieses Gerät ist nicht bestimmt für ...
– das Zerkleinern von harten Lebensmittelanteilen
wie z.B. Nüsse, Kerne, große Körner oder Stiele,
– das Verarbeiten von Materialien, die nicht
Lebensmittel sind,
- 26 -
Page 29

– den Einsatz für gewerbliche oder industrielle
Zwecke,
– die Verwendung in feuchter Umgebung oder im
Freien.
Verwenden Sie nur Zubehör- und Ersatzteile, die für
dieses Gerät bestimmt sind. Andere Teile sind möglicherweise nicht ausreichend geeignet oder sicher!
Technische Daten
Lieferumfang
Kontrollieren Sie nach dem Auspacken die Lieferung auf Vollständigkeit. Im Lieferumfang enthalten
ist:
1 x Motorblock, mit Netzkabel und Netzstecker
1 x Mixaufsatz, mit fest montiertem Schneidmesser
1 x Deckel
1 x Einfüllkappe
1 x Bedienungsanleitung
Nennspannung: 220 - 240 V~50 Hz
Nennleistung: 550 Watt
Max. Einfüllmenge: 1,75 l
Schutzklasse: II
KB-Zeit: 3 Minuten
Die KB-Zeit (Kurzzeitbetrieb) gibt an, wie lange
man ein Gerät betreiben kann, ohne dass der
Motor überhitzt und Schaden nimmt. Nach der
angegebenen KB-Zeit muss das Gerät solange
ausgeschaltet werden, bis sich der Motor auf
Raumtemperatur abgekühlt hat.
Auspacken
Bevor Sie das Gerät verwenden, überzeugen Sie
sich davon, dass ...
– das Gerät unbeschädigt ist, ebenso das Netzka-
bel mit Netzstecker und alle Zubehör- und
Geräteteile,
– alle Verpackungsteile vom Gerät entfernt sind.
Bewahren Sie die Verpackung auf, um das Gerät geschützt lagern oder einsenden zu können,
z.B. im Reparaturfall.
• Reinigen Sie sorgfältig alle Bestandteile vor dem
ersten Gebrauch des Standmixers
(siehe “Reinigen”).
Gerätebeschreibung
Einfüllkappe
q
Deckel
w
Mixaufsatz
e
Schneidmesser
r
Schalter
t
Netzkabel
y
Motorblock
u
Kabelaufwicklung
i
Skala
o
Aufstellen
Wenn Sie alle Teile gereinigt haben, wie unter
“Reinigen” beschrieben:
Stellen Sie das Gerät so auf, ...
➩
– dass der Netzstecker sofort erreichbar ist, um
diesen bei Gefahr aus der Steckdose ziehen zu
können.
– dass das Gerät stabil und rutschfest steht, um bei
Vibrationen nicht umzukippen.
– dass das Netzkabel
bereich ragt und durch versehentliches Ziehen
daran das Gerät umkippen kann.
nicht in den Arbeits-
y
- 27 -
Page 30

Bedienen
Warnung!
Der Motor schaltet sich aus, sobald der Mixaufsatz
vom Motorblock uentfernt wird. Es wird dann
e
vielleicht übersehen, dass die Maschine noch eingeschaltet ist. Der Motor startet dann unvermutet,
sobald der Mixaufsatz
Deshalb:
• Stecken Sie den Netzstecker erst dann in die
Steckdose, sobald der Mixaufsatz
füllt und verschlossen montiert ist.
• Vergewissern Sie sich vor dem Montieren stets,
dass das Gerät ausgeschaltet oder der Netzstecker gezogen ist.
• Schalten Sie erst aus, ziehen Sie den Netzstecker und warten Sie den Stillstand des Motors
ab, bevor Sie den Mixaufsatz
Mixaufsatz befüllen und montieren
Befüllen Sie den Mixaufsatz enur in abgenom-
➩
menem Zustand.
Anschließend drücken Sie den Deckel wfest auf
➩
den Mixaufsatz
auch die Ausgießnase am Mixaufsatz
schlossen ist.
Stecken Sie die Einfüllkappe qin die Deckelöff-
➩
nung und drehen Sie diese im Uhrzeigersinn zu.
Setzen Sie den fertig befüllten und verschlosse-
➩
nen Mixaufsatz
hen Sie den Mixaufsatz
herunter drücken können. Nur wenn der Mixaufsatz
bündig aufgesetzt ist, kann der Motor
e
starten.
montiert wird:
e
fertig be-
e
abnehmen.
e
. Achten Sie darauf, dass
e
e
auf den Motorblock u. Dre-
e
leicht, bis Sie diesen
e
ver-
Geschwindigkeitsstufe wählen
Wenn der Mixaufsatz efertig befüllt und vollständig verschlossen auf dem Motorblock
nen Sie das Gerät einschalten.
Stellen Sie den Schalter tauf ...
➩
– Stufe 1-3
für flüssige oder mittelfeste Lebensmittel, zum
Mischen, Pürieren und Rühren
– Stufe 3-5
für festere Lebensmittel oder zum Zerkleinern
– Stufe Ice Crush/Clean
für kurzen, kraftvollen Impulsbetrieb, z.B. zum
Crushen von Eiswürfeln oder zur Reinigung. Der
Schalter
den Motor nicht zu überlasten. Halten Sie den
Schalter
rastet in dieser Stellung nicht ein, um
t
deshalb nur kurz in dieser Stellung.
t
steht, kön-
u
Einfüllen im Betrieb
Warnung!
Wenn Sie bei laufendem Betrieb etwas einfüllen
möchten, dürfen Sie ausschließlich nur die dafür
eigens vorgesehene Einfüllkappe
• Öffnen Sie keinesfalls den Deckel
Lebensmittelteile mit hoher Geschwindigkeit
herausfliegen!
• Führen Sie niemals Besteckteile oder Rührgegenstände in den Mixaufsatz
in Betrieb ist. Es besteht erhebliche
Verletzungsgefahr, wenn diese das sich sehr
schnell drehende Schneidmesser
Um bei laufendem Betrieb etwas einfüllen zu
können, ...
drehen Sie die Einfüllkappe qentgegen dem
➩
Uhrzeigersinn auf und nehmen diese heraus.
Anschließend stecken Sie die Einfüllkappe
➩
wieder in die Deckelöffnung und drehen Sie diese im Uhrzeigersinn zu.
öffnen.
q
. Es können
w
, solange das Gerät
e
berühren!
r
q
- 28 -
Page 31

Mixaufsatz abnehmen
Wenn die Bearbeitung der eingefüllten Lebensmittel
beendet ist:
Stellen Sie immer erst den Schalter tin Aus-
➩
Stellung („0“) und ziehen Sie den Netzstecker.
Warten Sie erst den Stillstand des Motors ab,
➩
bevor Sie den Mixaufsatz
herausheben. Der Mixaufsatz
nicht gedreht zu werden.
gerade nach oben
e
braucht dabei
e
Nützliche Hinweise
– Um beim Pürieren fester Zutaten beste Ergeb-
nisse zu erzielen, geben Sie nach und nach nur
kleine Portionen in den Mixaufsatz
eine große Menge auf einmal einzufüllen.
– Wenn Sie feste Zutaten verarbeiten, schneiden
Sie diese in kleine Stücke (2-3 cm).
– Beim Mixen flüssiger Zutaten beginnen Sie zu-
nächst mit einer geringen Menge Flüssigkeit. Geben Sie dann nach und nach mehr Flüssigkeit
durch die Deckelöffnung hinzu.
– Wenn Sie bei laufendem Betrieb Ihre Hand
oben auf den verschlossenen Standmixer legen,
können Sie das Gerät damit gut stabilisieren.
– Für das Rühren von festen oder sehr dickflüssi-
gen Lebensmitteln kann es nützlich sein, den PulsBetrieb zu verwenden, um ein Festsetzen des
Schneidmessers
zu verhindern.
r
, anstatt
e
Reinigen
Vorsicht!
Bevor Sie den Standmixer und seine Teile reinigen:
• Stellen Sie sicher, dass das Gerät ausgeschaltet
und der Netzstecker gezogen ist.
Auf keinen Fall darf der Motorblock
Wasser oder andere Flüssigkeiten getaucht
werden. Hierdurch kann Lebensgefahr entstehen durch elektrischen Schlag und das Gerät
kann beschädigt werden.
• Öffnen Sie niemals das Gehäuse des Gerätes.
Andernfalls kann Lebensgefahr bestehen durch
elektrischen Schlag.
• Demontieren Sie niemals das Schneidmesser
und greifen Sie auch niemals in den Mixaufsatz
. Das Schneidmesser rist extrem scharf!
e
• Verwenden Sie keine Lösungs- oder Scheuermittel für die Kunststoffflächen, diese können
andernfalls beschädigt werden.
Mixaufsatz reinigen
Reinigen Sie den Mixaufsatz enur mit einer
➩
langstieligen Spülbürste, so dass Sie sich nicht
am Schneidmesser
Bei hartnäckiger Verschmutzung können Sie den
➩
Mixaufsatz
gen lassen. Demontieren Sie dafür immer den
Mixaufsatz
Reinigen Sie den Deckel wund die Einfüllkappe
➩
in der Spülmaschine oder beim normalen Ge-
q
schirrspülen.
e
e
verletzen können.
r
auch in der Spülmaschine reini-
, wie später beschrieben.
u
in
r
Wenn Sie direkt nach der Benutzung den Standmixer reinigen, erzielen Sie eine in den meisten
Fällen ausreichende hygienische Reinigung durch
folgende Alternative:
Füllen Sie den Mixaufsatz emit Wasser, schlie-
➩
- 29 -
ßen den Deckel
auf den Motorblock u.
e
und setzen den Mixaufsatz
w
Page 32

Stecken Sie den Netzstecker in die Steckdose
und betätigen Sie ein paar Mal den Ice
Crush/Clean-Betrieb, so dass das Schneidmesser
mit maximaler Drehzahl durch das Was-
r
ser pflügt.
Sollte sich der Schmutz nicht lösen, können Sie den
unteren Plastikteil des Mixaufsatzes
Schneidmesser
lösen:
e
vom Glasteil des Mixaufsatzes
r
e
mit dem
Nehmen Sie den Mixaufsatz evom Motorblock
➩
.
u
Drehen Sie den Plastikteil des Mixaufsatzes
➩
, so dass er sich vom Glasteil des Mixauf-
e
satzes
Gehen Sie vorsichtig mit den Messern um. Sie
sind sehr scharf. Verletzungsgefahr!
lösen lässt.
e
Achtung!
Motorblock reinigen
Verwenden Sie ein trockenes oder höchstens
➩
leicht angefeuchtetes Tuch, um die Kunststoffflächen zu reinigen.
Kontrollieren Sie bei jeder Reinigung, dass der
➩
Kontaktschalter in der Aufnahme für den Mixaufsatz
nicht durch Schmutzreste blockiert ist.
e
Wenn Sie eventuelle Blockierungen nicht mit der
Ecke von einem Blatt Papier lösen können, wenden Sie sich an den Kundendienst. Verwenden
Sie auf keinen Fall einen harten Gegenstand,
der Kontaktschalter könnte dadurch beschädigt
werden.
Entfernen Sie eventuelle Verschmutzungen an
➩
der Unterseite des Motorblocks
lich mit einem trockenen Tuch oder einem Staubpinsel. Achten Sie darauf, dass nichts durch die
Lüftungsöffnungen in das Gerät gelangt.
ausschließ-
u
Nach dem Reinigen
Lassen Sie alle Teile wieder gut trocknen, bevor Sie
den Standmixer wieder zusammensetzen und
verwenden.
Aufbewahren
Wenn Sie den Standmixer längere Zeit nicht ver-
➩
wenden, reinigen Sie ihn gründlich (siehe Kapitel
„Reinigen“).
Wickeln Sie das Netzkabel yum die Kabelauf-
➩
wicklung
Bewahren Sie den Standmixer an einem kühlen,
➩
trockenen Ort auf.
am Boden des Motorblocks u.
i
Reinigen Sie beide Teile gründlich in milder Sei-
➩
fenlauge oder in der Spülmaschine.
Setzen Sie den Plastikteil des Mixaufsatzes
➩
wieder auf den Glasteil des Mixaufsatzes
e
. Achten Sie darauf, dass der Dichtungsring
e
eingesetzt ist.
- 30 -
Page 33

Entsorgen
Werfen Sie das Gerät keinesfalls in den
normalen Hausmüll. Dieses Produkt
unterliegt der europäischen Richtlinie
2002/96/EC.
Entsorgen Sie das Gerät über einen zugelassenen
Entsorgungsbetrieb oder über Ihre kommunale
Entsorgungseinrichtung.
Beachten Sie die aktuell geltenden Vorschriften.
Setzen Sie sich im Zweifelsfall mit Ihrer Entsorgungseinrichtung in Verbindung.
Führen Sie alle Verpackungsmaterialien
einer umweltgerechten Entsorgung zu.
Schraven
Service- und Dienstleistungs GmbH
Gewerbering 14
47623 Kevelaer, Germany
Tel.: +49 (0) 180 5 008107
(14 Ct/Min. aus dem dt. Festnetz ggf. abweichende Preise
aus dem Mobilfunknetz)
Fax: +49 (0) 2832 3532
e-mail: support.de@kompernass.com
Kompernaß Service Österreich
Rittenschober KG
Gmundner Strasse 10
A-4816 Gschwandt
Tel.: +43 (0) 7612 6260516
Fax: +43 (0) 7612 626056
e-mail: support.at@kompernass.com
Garantie und Service
Sie erhalten auf dieses Gerät 3 Jahre Garantie ab
Kaufdatum. Das Gerät wurde sorgfältig produziert
und vor Anlieferung gewissenhaft geprüft. Bitte bewahren Sie den Kassenbon als Nachweis für den
Kauf auf. Bitte setzen Sie sich im Garantiefall mit
Ihrer Servicestelle telefonisch in Verbindung. Nur so
kann eine kostenlose Einsendung Ihrer Ware
gewährleistet werden.
Die Garantieleistung gilt nur für Material- oder Fabrikationsfehler, nicht aber für Verschleißteile oder
für Beschädigungen an zerbrechlichen Teilen, z. B.
Schalter oder Akkus. Das Produkt ist lediglich für
den privaten und nicht für den gewerblichen
Gebrauch bestimmt.
Bei missbräuchlicher und unsachgemäßer Behandlung, Gewaltanwendung und bei Eingriffen, die
nicht von unserer autorisierten Service-Niederlassung vorgenommen wurden, erlischt die Garantie.
Ihre gesetzlichen Rechte werden durch diese Garantie nicht eingeschränkt.
Kompernaß Service Schweiz
Tel.: +49 (0) 2327 301850
Importeur
KOMPERNASS GMBH
BURGSTRASSE 21
44867 BOCHUM, GERMANY
www.kompernass.com
- 31 -
 Loading...